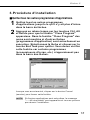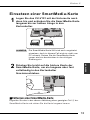
1
for Windows® 95 (IBM PC/AT Compatibles)
DEUTSCH
FRANSIAS
VU-V101
ENGLISH
FLOPPY DISK ADAPTER
ADAPTATEUR DE DISQUE
DISKETTENADAPTER
This manual explains how to use your Floppy Disk Adapter correctly.
Please follow the instructions carefully.
Ce mode d'emploi explique comment utiliser votre Floppy Disk Adapter correctement.
Veuillez suivre soigneusement ces précautions.
Dieses Dokument erklärt den richtigen Gebrauch des Floppy Disk Adapter.
Befolgen Sie bitte sorgfältig die hier gegebenen Anweisungen.
INSTRUCTIONS
MODE D'EMPLOI
BEDIENUNGSANLEITUNG
BB08280-200
LYT0235-005B
FLOPPY DISK ADAPTER VU-V101
IMPORTANT
Read the following carefully.
ENGLISH
Notes on This Software and Owner's Manual
(1)
Unauthorized transfer or duplication of all or any part of the
enclosed software or Owner's Manual is forbidden.
(2)
The enclosed software and Owner's Manual can only be
used with one VU-V101 Floppy Disk Adapter (referred to
hereafter as the VU-V101).
(3)
JVC accepts no liability whatsoever for any loss incurred by
the customer or by any third party while using the VU-V101
with the enclosed software and Owner's Manual.
(4)
Every effort has been made to ensure that this product is
flawless. If any defect is found that is due to a fault on the
part of the manufacturer, the product will be replaced free of
charge. No responsibility is accepted for defects not caused
by the manufacturer.
(5)
The contents of the enclosed software and Owner's Manual
are subject to change without notice.
Battery consumption will vary between diffrent brands.
Based on our tests, Sanyo and Maxell batteries provide the most
consistent performance with the VU-V101.
The VU-V101 may not work properly on some models of PC.
2
Windows95
Safety Notes (to be observed at all times)
● Before using this product, read this Owner's Manual carefully,
particularly the Safety Notes and the notes pertaining to button
cells.
● After reading this manual, keep it handy at all times for easy
reference.
About the Icons
ENGLISH
A number of icons are displayed both in this Owner's Manual and on
the product. These icons are intended to facilitate safe and correct use
of the product, to prevent injury to yourself or anyone else, and to
prevent material damage. These icons and their meanings are
explained below. Ensure that you fully understand these warnings
before you read this manual.
a DANGER
Indicates that, if this warning is ignored, improper handling of the
product is likely to result in death or serious injury.
a WARNING
Indicates that, if this warning is ignored, improper handling of the
product may cause death or serious injury.
a CAUTION
Indicates that, if this warning is ignored, improper handling of the
product may cause personal injury or material damage.
Examples of Icons
k
e
g
Triangular icons notify the user of information requiring
attention. Specific details of the information are indicated
graphically inside the icon. (The icon at left indicates that the
user must beware of electric shocks.)
Circular icons with a diagonal bar notify the user that the action
indicated is prohibited. Specific details of the prohibited action
are indicated graphically in or beside the icon. (The icon at left
indicates that the device must not be disassembled.)
Filled circles notify the user that an action must be performed. Specific
details of the required action are indicated graphically in the icon. (The
icon at left indicates that the device must be unplugged from the power
socket.) Always observe these instructions.
3
FLOPPY DISK ADAPTER VU-V101
Specific Exemptions
• JVC accepts no liability whatsoever for any injury or damage incurred while using this
product due to fires, earthquakes, the actions of third parties, intentional or accidental
misuse by the owner, or any other abnormal circumstance.
• JVC accepts no liability whatsoever for any incidental damage or loss (including lost
income, interrupted work, corruption or loss of stored data, etc.) arising from the use of
this product or the inability to use this product.
• JVC accepts no liability whatsoever for damage or loss arising from the use of this
product in ways not described in this Owner's Manual.
• JVC accepts no liability whatsoever for damage or loss arising from malfunctions
occurring when this device is connected to any other device.
ENGLISH
a DANGER
● Observe the following when handling the button cells:
• Do not attempt to disassemble or modify the button cells.
• Do not allow metal objects such as staples to touch the poles
(+ and -) of the button cells.
Also, do not carry or store the button cells with metal objects such as
necklaces or hairpins.
• Do not heat the button cells or place them in a flame.
• Do not pierce, hammer or stamp on the button cells.
• Do not attempt to charge the button cells.
Failure to observe the above warnings could result in battery fluid
leakage, heat discharge, combustion, rupturing, burns or injury.
a WARNING
● Do not store or use the button cell within reach of small
children.
If swallowed, it could cause poisoning or suffocation.
If a button cell is swallowed, seek immediate medical treatment.
● Observe the following when using button cells:
• Do not use new and used button cells together.
• Ensure that the poles (+ and -) are properly aligned when you insert
the cells.
• Do not leave cells that have run flat loaded in the device.
Failure to observe the above warnings could result in battery fluid
leakage, heat discharge, rupturing, burns or injury.
● When fitting or replacing the button-cell batteries, use
only CR2016 batteries.
The use of other types of button cell could result in battery fluid
leakage, heat discharge, rupturing, burns or injury.
4
Windows95
a WARNING
● If fluid leaks from inside a button cell, do not touch the
fluid as this could cause burns.
• If the fluid comes in contact with your skin or clothing, wash the
affected area immediately with clean water.
If the fluid gets into your eye, flush the eye with clean water and then
seek medical treatment.
Do not touch
a CAUTION
ENGLISH
● Do not use this product close to a heating appliance or
fire as this could cause smoke emissions or a fire.
● Do not immerse this product in water, chemicals or oil
as this could cause a short-circuit, electric shock or
fire.
● If you bend, drop or subject this product strong
impacts, contact your JVC dealer or authorized JVC
service facility and ask them to check it.
Continuing to use the product without checking could result in smoke
emissions or a fire.
● Do not attempt to repair, disassemble or modify this
product yourself as this could result in a fire, electric
shock or injury.
Do not disassemble
● Do not insert foreign objects into the SmartMedia slot
on the VU-V101 as this could cause smoke emissions
or a fire.
● If the VU-V101 produces an unusual odor, sound or
smoke during use, switch off your personal computer
immediately and unplug the plug from the power outlet.
Continuing to use the VU-V101 could result in a fire or other damage.
Contact your JVC dealer or authorized JVC service facility to request
repairs.
● Do not affix labels or stickers to the outside of the
VU-V101 as these could fall off inside the floppy disk
drive and damage the disk drive.
● Close the battery cover firmly after you replace the
VU-V101 batteries.
If the cover is not firmly closed, the batteries could fall out inside the
floppy disk drive and cause fluid leakage, heat discharge or rupturing.
5
FLOPPY DISK ADAPTER VU-V101
Accessories
FLOPPY DISK ADAPTER
ADAPTATEUR DE DISQUE
DISKETTENADAPTER
VU-V101
INSTRUCTIONS
MODE D'EMPLOI
BEDIENUNGSANLEITUNG
BB08280-200
LYT0235-005A
CR2016 (lithium) button cells
(2)
ENGLISH
VU-V101 Owner's Manual
(this document)
(1)
VU-V101 Setup Disk (for Windows ® 95)
(1)
■ Trademark Information
● Microsoft Windows is a registered trademark of Microsoft in the
U.S. and other countries.
Microsoft Windows is an abbreviated term referring to the
Microsoft Windows Operating System.
● FlashPath is a trademark of Fischer International Systems
Corporation, inc.
● The other company names and product names are the trademarks
or the registered trademarks of the various companies.
6
Windows95
Contents
ENGLISH
IMPORTANT ......................................................... 2
Safety Notes ......................................................... 3
Accessories .......................................................... 6
Contents ............................................................... 7
Using the VU-V101 Correctly.................................. 8
Loading the Button Cells ...................................... 10
Installing the Software ......................................... 12
1. VU-V101 Overview ...................................... 12
2. Minimum System Requirements.................... 12
3. Installation Procedure .................................. 13
4. Uninstalling the Software ............................. 16
Loading a SmartMedia ......................................... 17
Loading the VU-V101 (FlashPath)......................... 18
Using the FlashPath Status Monitor Program......... 20
Specifications ..................................................... 24
7
FLOPPY DISK ADAPTER VU-V101
Using the Floppy Disk Adapter
Correctly
■ Data Retention
ENGLISH
● In the circumstances described below, data recorded on a SmartMedia card may
be lost (corrupted). JVC accepts no liability whatsoever for the loss (corruption) of
recorded data.
1. If the owner or a third party uses the SmartMedia or VU-V101 incorrectly
2. If the SmartMedia or VU-V101 is affected by static electricity or electrical noise
3. If the VU-V101 is removed or the PC is switched off during VU-V101 access
(recording, erasing or playback)
● Users are advised to back up important data onto another medium (MO disk,
floppy disk, hard disk, etc.).
■ Notes on Using the VU-V101
● Never remove the VU-V101 or switch off your PC during VU-V101 access
(recording, erasing or playback) as this can damage the SmartMedia.
● The VU-V101 is a precision electronic device. Do not bend or drop the VU-V101 or
subject it to strong impacts.
● To protect the VU-V101 and the floppy disk drive mechanism, remove the VUV101 from the floppy disk drive after use and store it in a safe place.
● To avoid soiling the contact surfaces in the floppy disk drive heads, incorrect
functioning of the operation switch or other damage, store the VU-V101 in its case
when it is not being used.
● Always keep the VU-V101 in its special storage case when you are carrying or
storing the adapter. Do not carry it in places such as your trouser pocket as this
can subject the adapter to excessive force and damage it when you sit down.
● Avoid using or storing the VU-V101 in locations subject to strong static electricity
or electrical noise.
● Do not use or store the VU-V101 in locations subject to high temperatures and
humidity or in corrosive environments.
● Do not switch your personal computer off or touch the disk eject button on your
floppy disk drive while the floppy disk drive is operating.
This could result in the loss or corruption of the data stored on the SmartMedia.
● Do not allow dirt or foreign objects to get into the SmartMedia slot.
● Do not directly touch or allow metal objects to touch the SmartMedia terminals
(contact surfaces) as this could result in a discharge of static electricity and the
loss or corruption of the data stored on the SmartMedia.
● Do not switch off your personal computer while data is being written to or read
from a SmartMedia card as this could result in the loss or corruption of the data
stored on the SmartMedia.
● Do not subject the device to vibration or shock or attempt to remove the adapter
while data is being written to or read from a SmartMedia card as this could result
in the loss or corruption of the data stored on the SmartMedia.
8
Windows95
ENGLISH
● If you are formatting a SmartMedia that has already been used, first check the
data stored on the SmartMedia. Formatting erases all the data stored on the
SmartMedia.
● The VU-V101 does not have a write-protection mode. Even if the SmartMedia card
has a write-protect sticker affixed to it, the VU-V101 will not recognize it.
Ensure that existing data is not inadvertently erased or overwritten as a result.
● Always consult the Owner's Manuals for both the SmartMedia and the device
used.
● Wipe off any soiling with a soft, dry cloth.
● Always backup the data on a SmartMedia to another medium at regular intervals
in case of faults, damage or data loss.
JVC accepts no liability whatsoever for the loss of data stored on other media.
● Before you initialize (format) a SmartMedia, check that there is no important
information (files) stored on the SmartMedia. Any data on the SmartMedia will be
erased when the card is initialized.
● When using the VU-V101, ensure that there is no soiling of the contact areas for
the floppy disk drive heads. The contact areas are the rectangles in the top-center
of the adapter (the black area on the front and the cavity on the back). Soiling of
the contact areas can not only impair the data writing performance of the floppy
disk drive heads, but can also contaminate the floppy disk recording surface when
a floppy disk is used and lead to data loss. To avoid this, check that there is no
grease or dust on the contact areas before you insert the VU-V101 into the floppy
disk drive. If the contact areas are soiled, wipe them with a clean cloth.
You should also use a commercially available head cleaning disk to clean the
floppy disk drive heads.
● If you eject the VU-V101 from the floppy disk drive while it is being accessed, or if
the VU-V101 batteries run low while data is being written, the file structure on the
SmartMedia may be corrupted.
Continuing to use a SmartMedia in this condition can result in lost files and
corrupted data.
Use the procedure below to repair the SmartMedia.
Select Start → Programs → Accessories → System Tools → ScanDisk to start up
the ScanDisk utility.
Select the floppy disk drive in which the VU-V101 is loaded, select Standard in the
Type of Test box, and click on Start. Then follow the on-screen instructions until
the repair is completed.
Another method is to format the SmartMedia by selecting Start → Programs →
FlashPath → FlashPath Format.
If you have a digital camera, you can also format the SmartMedia in the camera.
Note however that formatting the SmartMedia erases all the data recorded on the
SmartMedia.
9
FLOPPY DISK ADAPTER VU-V101
Loading the Button Cells
The VU-V101 uses 2 CR2016 lithium button cell batteries.
The table below is a guide to the time for which the lithium batteries can be
used (at normal temperatures).
SmartMedia Used
Continuous Read
Continuous Write
5V
Approx. 2.4 hours
Approx. 1.4 hours
3.3V
Approx. 10 hours
Approx. 5 hours
ENGLISH
Battery consumptionl varies between different brands.
Based on our tests, Sanyo and Maxell batteries provide the most consistent
performance with the VU-V101. The above figures are for Sanyo and Maxell
batteries.
1
Rotate the battery cover in the direction of the
arrows to open it.
Place the VU-V101 on a level surface and rotate the battery
cover counter-clockwise until it clicks while pressing on the
indentations in the cover with your fingertips.
2
Insert the CR2016 button cells with the + side
upwards.
Check that surfaces of the cells are touching the contacts on the
inside of the cover.
Contact
NOTE Ensure that the contacts are not pinned under the batteries.
10
Windows95
3
Replace the battery cover and rotate the battery
cover clockwise while pressing on the
indentations in the cover with your fingertips.
ENGLISH
Rotate the cover until the markings on the battery cover are
aligned with the
mark on the VU-V101.
Battery cover markings
NOTE
• When replacing the batteries, always replace both cells.
• The effective life of the batteries varies significantly
depending on the battery manufacturer. When fitting or
replacing the button-cell batteries, use the batteries
supplied with the VU-V101 or CR2016 batteries
manufactured by Sanyo or Maxell.
■ Notes on Button-Type Lithium Batteries
• The performance of the batteries varies depending on operating
temperatures.
• To ensure that the contact surfaces of the battery are clean, wipe
the battery with a dry cloth before fitting it in the camera.
• Do not attempt to disassemble, heat above +100°C, recharge or
short-circuit the battery, or place the battery in a fire, as this could
cause the battery to split. When disposing of the battery, do so
responsibly and ensure that it is not burnt.
a CAUTIONS
• Dispose of used battery promptly.
• Keep the lithium battery out of the reach of children. Should the battery be
swallowed, consult a doctor immediately.
• Wipe the battery with a dry cloth to assure good contact.
• Be sure to install the battery with the correct polarity.
• Do not hold the battery with metallic tweezers, as a short-circuit may occur.
j WARNING
The battery may explode if mistreated. Do not recharge, disassemble or
dispose of in fire.
11
FLOPPY DISK ADAPTER VU-V101
Installing the Software
1. VU-V101 Overview
ENGLISH
The VU-V101 is intended as a SmartMedia adapter that can be
loaded into a floppy disk drive and used on a PC.
The VU-V101 is the same size as a 3.5-inch floppy disk and allows
data to be written to and read from a SmartMedia card via a floppy
disk drive.
You can exchange data with a SmartMedia simply by loading the
SmartMedia into the VU-V101 and inserting the VU-V101 into your
floppy disk drive.
The VU-V101 software runs on IBM PC/AT-compatible PCs running
Microsoft Windows ® 95.
The floppy disk drive must support 1.44 MB floppy disks.
The VU-V101 will not run on high-capacity floppy disk drives with a
capacity greater than 1.44 MB.
2. Minimum System Requirements
12
Computer
IBM PC/AT compatible
CPU
Intel 486 or better, or Pentium
OS
Windows ® 95
Windows95
3.Installation Procedure
■ Quit all other application programs.
Press down the Ctrl, Alt and Delete keys at the
same time so that the Close Program window
appears. Inside the Close Program window, it
shows names if any other tasks (application
programs) are currently running. Select the task
and click on the End Task button to quit. You
must check this window because some programs
(screen savers, etc.) are not shown on the
taskbar.
ENGLISH
1
2
Quit all other application programs until no
program icons are shown in the taskbar.
When you are finished, click on the Cancel button to close this
window.
NOTE
If any other applications are running, the "----.dll not
found" message may appear and installation will not be
successful.
13
FLOPPY DISK ADAPTER VU-V101
■ Install the software.
1
2
3
Insert the VU-V101 Setup disk into the floppy
disk drive.
4
The FlashPath setup window appears. When you
click on the Next button, the Software Licence
Agreement window appears. Click on the Yes
button. The dialog box for choosing the
installation destination then appears.
Click on the Start button.
Select Run, type in "a:\setup" and click on the
OK button.
ENGLISH
14
5
If you click on the Next button, the setup
program starts copying the required files to the
default directory (c:\Fisc\Flash). The setup
program builds a group called FlashPath and
creates 3 icons in the group window. The three
icons are the FlashPath Format icon, the
FlashPath Status icon and the FlashPath
Uninstall icon.
6
When installation ends, the window shown below
appears.
7
To validate the software, eject the setup disk,
click on the OK button and then restart your PC.
ENGLISH
Windows95
15
FLOPPY DISK ADAPTER VU-V101
4. Uninstalling the Software
■ Before you begin uninstalling the software
Follow the steps below to shut down the FlashPath status monitoring
program. The FlashPath files will not be removed correctly unless this
program is shut down.
ENGLISH
1
Click on the FlashPath Status icon in the taskbar.
(See P.20 for a description of the FlashPath
Status icon.)
2
When the FlashPath Status Monitor window
opens, click on the icon in the top left corner and
then click on Close.
■ Uninstallation procedure
Follow the steps below to remove the files installed on your PC.
1
2
Click on Start → Programs→ FlashPath →
FlashPath Uninstall.
Follow the instructions shown at the top of the
screen to remove the software.
The window below appears when the software removal is
complete.
3
Click on the OK button and restart your PC.
NOTE
16
You must restart your PC to erase all of the software,
which was uninstalled with the above operations, from
the PC’s memory.
Windows95
Loading a SmartMedia
1
Place the VU-V101 bottom-up as shown below
and slowly push the SmartMedia halfway into the
card holder.
(5V card)
NOTE
2
ENGLISH
A
(3.3V card)
Though it is possible to insert the SmartMedia the other
way up or the other way round, your PC will not be able
to recognize the card. Always insert the SmartMedia in
the correct orientation described here.
Press gently on the back edge of the SmartMedia
to slide it slowly but firmly the rest of the way
into the card holder.
■ Removing a SmartMedia
Grip the portion of the SmartMedia shown at A in the top figure above
and slowly pull the SmartMedia out.
17
FLOPPY DISK ADAPTER VU-V101
Loading the VU-V101 (FlashPath)
Inserting the VU-V101
Before inserting the VU-V101 into the floppy disk drive, thoroughly
wipe off any soiling of the rectangles in the top-center of the adapter
(the black area on the front and the cavity on the back).
Then insert the VU-V101 into the floppy disk drive. The VU-V101 is
now ready to be accessed by the floppy disk drive.
ENGLISH
NOTE To maximise the life of the batteries, always take the VU-V101
out of the floppy disk drive when the SmartMedia is not being
accessed.
Ejecting the VU-V101
After the VU-V101 has been ejected from the floppy disk drive,
thoroughly wipe off any dust or soiling that has collected in the
rectangular cavity in the top-center of the back of the adapter.
After cleaning the VU-V101, always remove the SmartMedia from the
VU-V101 and store the VU-V101 in its hard case.
NOTE 1. The VU-V101 does not have a write-protection mode. Even
if the SmartMedia card has a write-protect sticker affixed to
it, the VU-V101 will not recognize it.
Ensure that existing data is not inadvertently erased or
overwritten as a result.
2. Do not leave the VU-V101 in the floppy disk drive as this
could result in damage to the drive.
18
Windows95
Using the Formatting Utility to
Format a SmartMedia
Insert the VU-V101 into the floppy disk drive.
Click on Start → Programs → FlashPath →
FlashPath Format.
ENGLISH
1
2
3
4
5
Load the SmartMedia to be formatted into the
VU-V101.
When you are ready to start formatting the
SmartMedia, press the Y key on the keyboard.
When the "SmartMedia formatted successfully"
message appears, click on the ✕ button in the
corner of the window.
NOTE
• Never remove that VU-V101 while formatting is in
progress as this could render the SmartMedia
useless.
• This procedure formats the SmartMedia as a "highdensity floppy disk".
If you want to use the SmartMedia in a camera, you
must initialize (format) the SmartMedia in the
camera.
• After formatting the SmartMedia, remove the VUV101 once before using it.
Power-save Function
To maximize the life of the batteries, the VU-V101 automatically
powers down if it is not accessed for 5 minutes after being inserted
into a floppy disk drive.
To resume power for the VU-V101 eject the adapter from the floppy
disk drive and then re-insert it.
19
FLOPPY DISK ADAPTER VU-V101
Using the FlashPath Status
Monitor Program
This section describes how to use the FlashPath status monitoring
program (flashstat.exe) and explains the messages that are displayed
by the program.
Starting Up flashstat.exe
ENGLISH
■ To start up flashstat.exe:
1
2
Click on Start → Programs → FlashPath →
FlashPath Status.
Once the program has started up, the icon shown
below appears on the end of the taskbar icons.
Flashstat.exe
3
To open the Status window, click on the icon in
the taskbar.
■ Flashstat.exe standard status window:
r Caption
q Status icons
t Floppy disk icon
20
e Version information
w Status messages
Windows95
Always access FlashPath after the status window opens. The
status icons are refreshed when FlashPath is accessed.
The status window is divided into the following sections:
q Status Icons
• The status icons change from a green light to a red light when an
error is detected in the corresponding area.
The three status icons show the battery status, the FlashPath
power supply status, and the SmartMedia status.
ENGLISH
● Battery Condition .........Shows the remaining charge in the
battery
Green: Normal
Yellow: Low (read-only)
Red:
Battery exhausted
(Note: The battery-exhausted signal only
appears if the VU-V101 has been
accessd and the madia has been
recognized.)
●Power On/Off ................Shows whether the VU-V101 is ready or
in power-save mode.
Green: Ready (power on)
Red:
Power-save mode (power off)
(Note: The power off signal only appears
if the VU-V101 has been accessed and
the madia has been recognized.)
●SmartMedia Status .......Shows whether a SmartMedia is loaded
Green: Normal
Red:
Error (no media or a media error)
(Note: Media errors are only recognized
when the battery status is Green.)
w Status Messages
This area shows a detailed description of the status.
e Version Information
This shows the version information for flashstat.exe.
r Caption
This changes depending on the current program status.
[Normally]
"FlashPath Status Monitor"
[After a status change is detected]
"FlashPath User Intervention Required"
21
FLOPPY DISK ADAPTER VU-V101
t Floppy Disk Icon
This shows the overall result of the status icons shown at q.
Gray (colorless): No media recognized
Green: All green
Yellow: Battery status yellow (actually, battery status yellow, all
others green)
Red:
One of the status monitor icons is red.
• A similar indicator is shown in the taskbar icon.
ENGLISH
Messages are shown in the Status Messages field in the
following circumstances:
[When the VU-V101 has not been detected]
"No FlashPath has been detected in any drive."
/Access the VU-V101 once.
[During normal operation]
"The FlashPath is functioning normally."
[When the batteries are running low]
"FlashPath Battery Low"
[When the VU-V101 contains no SmartMedia or the SmartMedia
is loaded incorrectly]
"The SmartMedia is inaccessible."
[When the VU-V101 has shut down to conserve battery power]
"Eject and re-insert the FlashPath."
[When the internal SmartMedia format is incompatible]
"Invalid SmartMedia."
■ Error window shown when a VU-V101 error is detected:
22
Windows95
The message shown in the error window varies depending
on the circumstances.
ENGLISH
[When the batteries are running low]
"Battery low condition detected. The SmartMedia is now read only."
[When the VU-V101 contains no SmartMedia or the SmartMedia
is loaded incorrectly]
"The SmartMedia cannot be accessed. Please eject the FlashPath
and be sure that the SmartMedia has been inserted properly."
[When the VU-V101 has shut down to conserve battery power]
"The FlashPath has powered off to save its batteries.
Please eject the FlashPath from your floppy drive and re-insert it to
turn it back on."
[When the internal SmartMedia format is incompatible]
"The logical filing system on the SmartMedia is unrecognized.
This SmartMedia cannot be used with FlashPath."
23
FLOPPY DISK ADAPTER VU-V101
Specifications
✽ The specifications and performance data given here are subject to
change without notice.
JVC accepts no liability for any errors in these Operating
Instructions.
ENGLISH
24
Model
Floppy Disk Adapter for SmartMedia
Allows SmartMedia to be used as
floppy disks.
Compatible SmartMedia
2 MB (5 V, 3.3 V), 4 MB (5 V, 3.3 V),
8 MB (5 V, 3.3 V),16 MB (5 V, 3.3 V)
Operating Conditions
Temperature: 10°C to 40°C; Humidity:
20% to 80% RH (no condensation)
Dimensions
90 × 3.3 × 94 mm
Mass
Approx. 35 g
MEMO
ADAPTATEUR DE DISQUE VU-V101
IMPORTANT
Lisez attentivement les points suivants :
FRANSIAS
Notes sur ce logiciel et le mode d'emploi
(1)
Le transfert ou la duplication non autorisée du logiciel ou du
mode d'emploi ou d'une partie du logiciel ou du mode
d'emploi joint est interdite.
(2)
Le logiciel ou le mode d'emploi joint ne peut servir qu'avec
l'adaptateur de disquette VU-V101 (appelé ci-après le
VU-V101).
(3)
JVC décline toute responsabilité de quelque sorte que ce
soit pour toute perte supportée par le client ou une tierce
personne pendant l'utilisation de cet VU-V101 et de son
mode d'emploi.
(4)
Tous les efforts ont été faits pour que ce produit soit sans
défaut. Si vous trouviez un défaut engageant la
responsabilité du fabricant, le produit serait remplacé
gracieusement. Cependant, le fabricant décline toute
responsabilité pour les défauts ne dépendant pas de lui.
(5)
Le contenu du logiciel ou du mode d'emploi joint est sujet à
des changements sans notice préalable.
Lors de l’installation ou du remplacement des piles bouton, utilisez
seulement les piles fournies avec le VU-V101 ou des piles CR2016
des marques Sanyo ou Maxell.
Le VU-V101 peut ne pas fonctionner correctement sur certain modèles de
PC.
2
Windows 95
Notes sur la sécurité (à observer en permanence)
● Avant d'utiliser ce produit, veuillez lire attentivement ce mode d'emploi,
notamment en ce qui concerne les Notes sur la sécurité et les notes
concernant les piles bouton.
● Une fois que vous avez lu ce mode d'emploi, gardez-le accessible en toutes
circonstances pour vous y référer facilement.
A propos des icônes
Un certain nombre d'icônes est affiché dans ce mode d'emploi comme sur le
produit. Ces icônes ont pour but de premettre une utilisation sure et correcte de
ce produit, d'éviter qu'une personne ne se blesse et d'éviter les dommages
matériels. Ces icônes et leur signification sont expliquées ci-dessous. Assurezvous de bien comprendre ces avertissements avant de lire ce mode d'emploi.
a DANGER
FRANSIAS
Indique que, si vous ignorez cet avertissement, la manipulation incorrecte
du produit a de grandes probabilités d'entraîner la mort ou des blessures
graves.
a AVERTISSEMENT
Indique que, si vous ignorez cet avertissement, la manipulation incorrecte
du produit risque éventuellement d'entraîner la mort ou des blessures
graves.
a PRECAUTION
Indique que, si vous ignorez cet avertissement, la manipulation incorrecte
du produit risque d'entraîner des blessures corporelles ou un
endommagement du matériel.
Exemples d'icônes
k
e
g
Les icônes triangulaires signalent à l'utilisateur une information
nécessitant de l'attention. Les détails spécifiques de l'information sont
indiqués graphiquement dans l'icône. (L'icône de gauche indique que
l'utilisateur doit faire attention à l'électrocution).
Les icônes circulaires avec une barre diagonale signalent à l'utilisateur
que l'action indiquée est interdite. Des détails spécifiques sur l'action
interdite sont indiqués graphiquement à côté de l'icône. (L'icône de
gauche indique que le périphérique ne doit pas être démonté.)
Les ronds pleins signalent à l'utilisateur qu'une action doit être
exécutée. Des détails spécifiques sur l'action requise sont indiquées
graphiquement dans l'icône. (L'icône de gauche indique que le
périphérique doit être débranché à la prise secteur). Observez toujours
ces instructions.
3
ADAPTATEUR DE DISQUE VU-V101
Exemptions spécifiques
• JVC décline toute responsabilité de quelque sorte que ce soit pour les blessures ou
dommages qui pourraient survenir pendant l'utilisation du produit du fait d'un incendie,
d'un tremblement de terre, d'actions de tierces parties, de mauvais emploi intentionnel
ou accidentel par l'utilisateur ou du fait de circonstances anormales.
• JVC décline toute responsabilité de quelque sorte que ce soit pour les dommages
fortuits ou pertes (y compris les pertes de revenus, les interruptions de travail,
l'altération ou la perte des données mémorisées, etc.), résultant de l'utilisation de ce
produit ou de l'incapacité à utiliser ce produit.
• JVC décline toute responsabilité de quelque sorte que ce soit pour les dommages ou
pertes résultant de l'utilisation de ce produit de manières non décrites dans ce mode
d'emploi.
• JVC décline toute responsabilité de quelque sorte que ce soit pour les dommages ou
les pertes résultant des mauvais fonctionnements lorsque ce périphérique est raccordé
à un autre appareil.
FRANSIAS
a DANGER
● Observez les points suivants quand vous manipulez les
piles bouton :
• N'essayez pas de démonter ou de modifier des piles bouton.
• Ne laissez pas des objets métalliques tels que des agrafes, toucher
les pôles (faces + et -) des piles bouton.
De même, ne transportez pas ou ne rangez pas les piles bouton avec
des objets métalliques tels que des colliers ou des épingles à
cheveux.
• Ne faites pas chauffer les piles bouton ou ne les placez pas près
d'une flamme.
• Ne percez pas, ne martelez pas et n'emboutissez pas les piles
bouton.
• N'essayez pas de recharger des piles bouton.
Le fait de ne pas observer les avertissements mentionnés ci-dessus
peut entraîner une fuite du liquide, une décharge thermique, une
combustion, une rupture, des brûlures ou des blessures.
4
Windows 95
a AVERTISSEMENT
● Ne rangez pas les piles bouton à la portée des enfants
ou ne les utilisez pas près d'eux.
Une pile avalée peut provoquer un empoisonnement ou une
suffocation.
En cas d'ingestion, consultez immédiatement un médecin.
● Observez les points suivants avec les piles bouton :
• Ne mélangez pas de piles neuves et de piles usagées ensemble.
• Lorsque vous insérez les piles, vérifiez que les pôles (+ et -) sont
correctement alignés.
• Ne laissez pas des piles épuisées en place dans l'appareil.
Le fait de ne pas observer les avertissements mentionnés ci-dessus
peut entraîner une fuite du liquide, une décharge thermique, une
rupture, des brûlures ou des blessures.
● Remplacez les piles bouton usées par des piles bouton
CR2016.
FRANSIAS
L'utilisation de piles autres que celles mentionnées peut entraîner une
fuite du liquide, une décharge thermique, une rupture, des brûlures ou
des blessures.
● Ne touchez pas le liquide qui fuit de la pile bouton, car
il peut provoquer des brûlures.
• Si le liquide touche votre peau ou vos vêtements, lavez
immédiatement l'endroit affecté à l'eau claire.
Si le liquide pénétrait dans vos yeux, rincez votre oeil à l'eau claire et
consultez un médecin.
Ne touchez
pas
● Nous vous conseillons d’utiliser la carte SMARTMEDIA
de 3.3 Volts, plutôt que la carte SMARTMEDIA de 5
Volts, afin de limiter la consommation de courant de
l’adaptateur VU-V101.
5
ADAPTATEUR DE DISQUE VU-V101
a PRECAUTION
● N'utilisez pas ce produit près d'un appareil de chauffage
ou d'un feu car il pourrait se produire de la fumée ou un
incendie.
● N'immergez pas ce produit dans de l'eau, des produits
chimiques ou du feu car cela pourrait provoquer un
court-circuit, une électrocution ou un incendie.
● Si vous courbez, faites tomber ou soumettez ce produit
à des impacts forts, prenez contact avec votre
revendeur JVC ou un centre S.A.V. JVC et demandezleur de le vérifier.
Le fait de continuer à utiliser ce produit sans le faire vérifier peut
provoquer une émission de fumée ou un incendie.
FRANSIAS
● N'essayez pas de réparer, démonter ou modifier ce
produit vous-même car il pourrait se produire un
incendie, une électrocution ou une blessure.
Ne démontez pas
6
Windows 95
a PRECAUTION
● N'insérez pas d'objets étrangers dans la prise
SmartMedia sur le VU-V101 car cela pourrait provoquer
de la fumée ou un incendie.
● Si le VU-V101 produit une odeur, un son inhabituels ou
de la fumée pendant son utilisation, éteignez
immédiatement votre ordinateur personnel et
débranchez la fiche à la prise murale.
Prenez contact avec votre revendeur JVC ou le service S.A.V. JVC pour
leur demander de réparer.
● Ne fixez pas d'étiquette ou d'autocollant à l'extérieur du
VU-V101 car ils pourraient tomber dans le lecteur de
disquette et l'endommager.
FRANSIAS
● Fermez fermement le couvercle du logement une fois
que vous avez remplacé les piles du VU-V101.
Si le couvercle n'est pas fermé fermement, les piles pourraient tomber
dans le du lecteur de disquette et provoquer une fuite de liquide, une
décharge de chaleur ou une rupture.
7
ADAPTATEUR DE DISQUE VU-V101
Accessoires
FLOPPY DISK ADAPTER
ADAPTATEUR DE DISQUE
DISKETTENADAPTER
VU-V101
INSTRUCTIONS
MODE D'EMPLOI
BEDIENUNGSANLEITUNG
BB08280-200
LYT0235-005A
Piles bouton CR2016 (lithium)
(2) Mode d'emploi du VU-V101
(ce document)
(1)
FRANSIAS
Dique d'installation VU-V101 (pour Windows ® 95)
(1)
■ Informations sur les marques
● Microsoft Windows est une marque de Microsoft Corporation des
Etats-Unis, enregistrée aux Etats-Unis et autres pays.
Windows est une abréviation faisant référence à Microsoft
Windows Operating System.
● FlashPath est une marque de Fischer International Corporation of
des Etats-Unis.
● Tous les autres noms de sociétés ou de produits sont les marques
ou marques déposées de leurs sociétés respectives.
8
Windows 95
Table des matières
FRANSIAS
IMPORTANT ..........................................................2
Notes sur la sécurité...............................................3
Accessoires ...........................................................8
Table des matières .................................................9
Utilisation correcte du VU-V101.............................10
Mise en place des piles bouton ..............................12
Installation du logiciel ...........................................14
1. Vue d'ensemble du VU-V101 .........................14
2. Configuration minimum du système ...............14
3. Procédure d'installation ................................15
4. Désinstallation du logiciel .............................18
Chargement d'une SmartMedia .............................19
Chargement du VU-V101 (FlashPath) ....................20
Utilisation du programme moniteur de statut
FlashPath ............................................................22
Fiche technique....................................................26
9
ADAPTATEUR DE DISQUE VU-V101
Utilisation correcte du VU-V101
■ Rétention des données
● Dans les circonstances décrites ci-dessous, les données enregistrées sur une carte
SmartMedia peuvent être perdues (altérées). Fuji JVC décline toute responsabilité
de quelque sorte que ce soit pour la perte (l'altération) de données enregistrées.
1. Si le propriétaire ou une tierce partie utilise les SmartMedia ou VU-V101 de
manière incorrecte.
2. Si les SmartMedia ou VU-V101 sont affectés par l'électricité statique ou des
parasites électriques.
3. Si vous retirez le VU-V101 ou si vous éteignez le PC pendant l'accès au
VU-V101 (enregistrement, effacement ou lecture)
● Nous recommandons aux utilisateurs de faire une sauvegarde de secours des
données importantes sur un autre média (disque MO, disquette ou disque dur, etc.).
■ Notes sur l'utilisation du VU-V101
FRANSIAS
● Ne retirez jamais le VU-V101 ou n'éteignez pas votre PC pendant l'accès au
VU-V101 (enregistrement, effacement ou lecture) car vous pourriez endommager la
SmartMedia.
● Le VU-V101 est un périphérique électronique de précision. Ne courbez pas le
VU-V101 et ne le faites pas tomber ou ne le soumettez par à des impacts forts.
● Pour protéger le VU-V101 et le mécanisme du lecteur de disquette, retirez le
VU-V101 du lecteur de disquette après utilisation et rangez-le dans un endroit sûr.
● Pour éviter la souillure des surfaces de contact des têtes de lecteur de disquette,
un fonctionnement incorrect du sélecteur d'opération ou d'autres dommages,
rangez le VU-V101 dans son boîtier quand vous ne l'utilisez pas.
● Conservez toujours le VU-V101 dans un boîtier de rangement spécial quand vous
transportez ou rangez l'adaptateur. Ne le transportez pas dans une poche de votre
pantalon par exemple, car l'adaptateur pourrait subir une pression excessive et être
endommagé lorsque vous vous asseyez.
● Evitez d'utiliser ou de ranger le VU-V101 dans des endroits sujets à des champs
magnétiques forts ou a des bruits électriques.
● N'utilisez pas ou ne rangez pas le VU-V101 dans des endroits où la température et
l'humidité sont élevées ou dans un environnement corrosif.
● N'éteignez pas votre ordinateur personnel ou ne touchez pas la touche d'éjection
de disquette de votre lecteur de disquette pendant que le lecteur fonctionne.
Vous pourriez perdre ou altérer les données sauvegardées sur la SmartMedia.
● Ne laissez pas pénétrer de la poussière ou des matières étrangères dans la prise
SmartMedia.
● Ne touchez pas directement les bornes SmartMedia (les surfaces de contact) ou ne
laissez pas des objets étrangers entrer en contact avec car il pourrait se produire
une décharge d'électricité statique et une perte ou une altération des données
sauvegardées sur la SmartMedia.
● N'éteignez pas votre ordinateur personnel pendant l'écriture des données sur
SmartMedia ou la lecture des données de SmartMedia, car il pourrait se produire
une décharge d'électricité statique et une perte ou une altération des données
sauvegardées sur la SmartMedia.
10
Windows 95
FRANSIAS
● Ne soumettez pas le périphérique à des vibrations ou à des chocs et n'essayez pas
de retirer l'adaptateur pendant l'écriture des données sur SmartMedia ou la lecture
des données de SmartMedia, car il pourrait se produire une décharge d'électricité
statique et une perte ou une altération des données sauvegardées sur la
SmartMedia.
● Si vous formatez une carte SmartMedia qui a déjà été utilisée, vérifiez d'abord les
données sauvegardées sur SmartMedia. Le formatage efface toutes les données
sauvegardées sur SmartMedia.
● Le VU-V101 ne comprend pas de mode de protection contre l'écriture. Bien qu'une
étiquette de protection contre l'écriture soit apposée sur la carte SmartMedia, elle
n'est pas reconnue par le VU-V101.
En résultat, vérifiez que les données existantes ne sont pas effacées par
inadvertence ou bien écrites par-dessus.
● Reportez-vous toujours aux modes d'emploi SmartMedia et du périphérique utilisé.
● Essuyez toute trace de souillure avec un chiffon sec et doux.
● Faites toujours une sauvegarde des données sur SmartMedia et sur un autre média
à des intervalles réguliers en cas de défaut, de dommage ou de perte des données.
JVC décline toute responsabilité de quelque sorte que ce soit pour la perte des
données sauvegardées sur les autres média.
● Avant d'initialiser (de formater) une SmartMedia, vérifiez qu'il n'y a pas de données
(fichiers) importants sauvegardés sur SmartMedia. Lorsque vous initialisez la carte
SmartMedia, toutes les données sauvegardées dessus sont effacées.
● Quand vous utilisez le VU-V101, vérifiez que les zones de contact des têtes du
lecteur de disquette ne sont pas souillées. Les zones de contact sont les rectangles
au milieu du haut de l'adaptateur (la partie noire à l'avant et la cavité à l'arrière). La
souillure des zones de contact peut non seulement endommager la performance
d'écriture des données des têtes de lecteur de disquette, mais peut également
contaminer la surface d'enregistrement du disquette quand vous utilisez une
disquette ou conduire à la perte des données. Pour éviter ceci, vérifiez qu'il n'y a
pas de graisse ou de poussière sur les zones de contact avant d'insérer le VU-V101
dans un lecteur de disquette. Si les surfaces de contact sont souillées, utilisez une
disquette nettoyante de tête disponible dans le commerce pour nettoyer les têtes
du lecteur de disquette.
● Si vous éjectez le VU-V101 du lecteur de disquette pendant qu'il est accédé, ou si
les piles du VU-V101 se déchargent complètement pendant l'écriture des données,
la structure du fichier sur SmartMedia peut être altérée.
Si vous continuez à utiliser SmartMedia dans ces conditions, vous pouvez perdre
vos fichiers ou altérer les données.
Utilisez la procédure ci-dessous pour réparer la carte SmartMedia.
Sélectionnez Démarrer → Programmes → Accessories → System Tools →
Scandisk (balayer la disquette) pour démarrer l'utilitaire Scandisk.
Sélectionnez le lecteur de disquette dans lequel vous avez chargé le VU-V101,
sélectionnez Standard dans Type de la fenêtre de Test et cliquez sur démarrer.
Puis, suivez les instructions en ligne sur l'écran jusqu'à ce que la réparation soit
terminée.
Une autre méthode consiste à formater la SmartMedia en sélectionnant Démarrer
→ Programmes → FlashPath → FlashPath format (formater FlashPath).
Si vous êtes en possession d'un appareil photo numérique, vous pouvez aussi
formater la carte dans l'appareil. Notez cependant que le formatage de la
SmartMedia efface toutes les données enregistrées sur la carte SmartMedia.
11
ADAPTATEUR DE DISQUE VU-V101
Mise en place des piles bouton
Le VU-V101 utilise 2 piles bouton CR2016 au lithium.
Le tableau ci-dessous est un guide de la durée pendant laquelle vous
pouvez utiliser les piles au lithium (à une température normale).
SmartMedia utilisée
Lecture continue
Ecriture continue
5V
2.4 heure env.
1.4 heure env.
3.3V
10 heure env.
5 heure env.
1
Tournez le couvercle de la pile dans le sens
indiqué par la flèche pour l'ouvrir.
Placez le VU-V101 sur une surface à niveau et tournez le
couvercle de la pile dans le sens contraire des aiguilles d'une
montre jusqu'au déclic pendant que vous appuyez sur les dents
du couvercle du bout des doigts.
FRANSIAS
2
Insérez les piles bouton CR2016 avec le côté +
orienté vers le haut.
Vérifiez que les surfaces des piles touchent les contacts à
l'intérieur du couvercle.
Contact
NOTE Faites attention à ce que les contacts ne soient pas bloqués
sous les piles.
12
Windows 95
3
Remettez le couvercle des piles et faites-le
tourner dans le sens des aiguilles d'une montre
tout en appuyant sur les dents du couvercle du
bout des doigts.
Faites tourner le couvercle jusqu'à ce que les repères sur le
couvercle de pile soient alignés avec le repère (
) du VU-V101.
NOTE
FRANSIAS
Repères du couvercle de piles
• Quand vous remplacez les piles, remplacez toujours les
deux ensemble.
■ Remarques sur les Piles au Lithium du Type Bouton
• Utilisez une pile au lithium Sanyo CR2016, ou Maxell CR2016
pour remplacer la pile usagée. L’utilisation de tout autre type de
pile risque de provoquer un incendie ou une explosion.
• Essuyez la pile avec un chiffon sec avant de la mettre en place
dans l’appareil photo pour que les surfaces de contact de la pile
soient bien propres.
• Ne tentez pas de démonter, chauffer, recharger ou court-circuiter
la pile, et ne la placez pas dans un feu car ceci pourrait la faire
éclater. Pour mettre la pile au rebut, agir conformément aux
réglementations et assurez-vous qu’elle n’est pas incinérée.
a ATTENTION
• Conservez la pile au lithium hors de la portée des enfants. Si la pile est avalée,
consultez immédiatement un médecin.
• Essuyez la pile avec un chiffon sec pour assurer un bon contact.
• Mettez la pile en place en respectant les polarités.
• Ne tenez pas la pile avec des pinces métalliques car un court-circuit risque de
se produire.
j AVERTISSENMENT
La pile peut exploser si elle n’est pas manipulée correctement. Ne pas la
recharger, la démonter ni l’incinérer.
13
ADAPTATEUR DE DISQUE VU-V101
Installation du logiciel
1. Vue d'ensemble du VU-V101
FRANSIAS
L'adaptateur VU-V101 est conçu comme adaptateur SmartMedia qui
peut être chargé dans un lecteur de disquette et peut être utilisé sur
un PC.
Le VU-V101 est de la même taille qu'une disquette de 3,5 pouces et
permet d'écrire et de lire les données d'une carte SmartMedia via le
lecteur de disquette.
Vous pouvez échanger les données avec une SmartMedia
simplement en chargeant la SmartMedia dans le VU-V101 et en
insérant le VU-V101 dans votre lecteur de disquette.
Le logiciel du VU-V101 est exécuté sur les ordinateurs compatibles
IBM PC/AT sous Microsoft Windows ® 95.
Le lecteur de disquette doit accepter des disquettes de 1,44 Mo. Le
VU-V101 ne fonctionnera pas sur des lecteurs de disquette haute
densité supérieurs à 1,44 Mo.
2. Configuration minimum du système
14
Ordinateur
Compatible IBM PC/AT
UC
Intel 486 ou supérieur ou Pentium
Système d'exploitation
Windows ® 95
Windows 95
3.Procédure d'installation
1
Quittez tous les autres programmes
d'applications jusqu'à ce qu'il n'y ait plus d'icône
dans la barre de tâches.
2
Appuyez en même temps sur les touches Ctrl, Alt
et Delete pour que la fenêtre "Close Program"
apparaisse. Dans la fenêtre "Close Program" des
noms sont montrés si d'autres tâches
(programmes d'application) sont actuellement en
exécution. Sélectionnez la tâche et cliquez sur la
touche End Task pour quitter. Vous devez vérifier
cette fenêtre car certains programmes
(économiseurs d'écran, etc.) n'apparaissent pas
dans la barre des tâches.
FRANSIAS
■ Quittez tous les autres programmes d'applications.
Lorsque vous avez terminé, cliquez sur le bouton Cancel
(annuler) pour fermer cette fenêtre.
NOTE
Si d'autres applications sont exécutées, le message
"----.dll introuvable" peut apparaître et vous ne pourrez
pas réussir l'installation.
15
ADAPTATEUR DE DISQUE VU-V101
■ Installez le logiciel
1
2
3
Insérez la disquette d'installation du VU-V101
dans le lecteur de disquette.
4
La fenêtre d'installation du FlashPath apparaît.
Quand vous appuyez sur le bouton Next
(suivant), la fenêtre Software Licence Agreement
(Accord de licence utilisateur) apparaît. Cliquez
sur le bouton Yes (oui). La boîte de dialogue pour
sélectionner la destination de l'installation
apparaît alors.
Cliquez sur le bouton Start (Démarrer).
Sélectionnez Run (Exécuter), tapez "a: \setup" et
cliquez sur le bouton OK.
FRANSIAS
16
Windows 95
Si vous cliquez sur le bouton Next (suivant), le
programme d'installation démarre en copiant les
fichiers requis sur le répertoire par défaut (c:
\Fisc\Flash). Le programme d'installation
construit un groupe appelé FlashPath et crée 3
icônes dans la fenêtre de groupe. Les trois
icônes sont l'icône de FlashPath Format, l'icône
de FlashPath Status et l'icône de FlashPath
Uninstall.
6
Quand l'installation se termine, la fenêtre
indiquée ci-dessous apparaît.
7
Pour valider l'installation du logiciel, éjectez la
disquette d'installation, cliquez sur le bouton
OK, puis redémarrez votre PC.
FRANSIAS
5
17
ADAPTATEUR DE DISQUE VU-V101
4. Désinstallation du logiciel
■ Avant de commencer à désinstaller le logiciel
Suivez les étapes ci-dessous pour fermer le programme de contrôle
d'état FlashPath. Les titres FlashPath ne seront pas retirés
correctement à moins que vous ne sortiez de ce programme.
sur l'icône de FlashPath Status dans la
barre des tâches (voir page 22 pour une
1 Cliquez
description détaillée de l'icône de FlashPath
Status).
la fenêtre de contrôle de FlashPath
Status Monitor s'ouvre, cliquez sur l'icône dans
2 Lorsque
le coin supérieur gauche de l'écran, puis cliquez
sur Close (fermer).
FRANSIAS
■ Procédure de désinstallation
Suivez les étapes mentionnées ci-dessous pour retirer les fichiers
installés dans votre PC.
1
2
Cliquez sur Démarrer → Programmes →
FlashPath → FlashPath Uninstall.
Suivez les instructions mentionnées en haut de
l'écran pour retirer le logiciel.
La fenêtre ci-dessous apparaît quand le retrait du logiciel est
terminé.
3
Cliquez sur le bouton OK et redémarrez votre PC.
NOTE
18
Redémarrez votre PC pour effacer de la mémoire du PC
toutes les parties du logiciel qui ont été désinstallées
lors des opérations mentionnées ci-dessus.
Windows 95
Chargement d'une SmartMedia
1
Placez le VU-V101 avec le dessous-visible comme
illustré ci-dessous et poussez doucement la
SmartMedia contact doré visible sur le dessus à
mi-chemin dans le support de carte.
A
NOTE
2
(Carte 3,3 V)
FRANSIAS
(Carte 5 V)
Bien qu'il soit possible d'insérer la carte SmartMedia
avec le contacteur sur le dessus ou le dessous, votre
PC ne sera pas capable de reconnaître la carte
SmartMedia sielle est insérée dansle mauvais sens.
Insérez toujours la carte SmartMedia de la manière
correcte décrite précédemment.
Appuyez doucement sur le bord arrière de la
carte SmartMedia pour faire glisser doucement
mais fermement le reste de la carte dans le
support de carte.
■ Retrait de la carte
Saisissez la partie de la SmartMedia indiquée à A dans la figure
supérieure ci-dessus et sortez doucement la SmartMedia.
19
ADAPTATEUR DE DISQUE VU-V101
Chargement du VU-V101
(FlashPath)
Insertion du VU-V101
Avant d'insérer le VU-V101 dans un lecteur de disquette, essuyez
complètement les souillures des rectangles du centre supérieur de
l'adaptateur (la zone noire à l'avant et la cavité à l'arrière).
Puis, insérez le VU-V101 dans le lecteur de disquette. Le VU-V101 est
maintenant près à être utilisé par le lecteur de disquette.
NOTE Pour maximaliser la longévité des piles, sortez toujours le
VU-V101 de son lecteur de disquette quand vous n'accédez
plus à la SmartMedia.
FRANSIAS
Ejection du VU-V101
Une fois que le VU-V101 a été éjecté du lecteur de disquette, essuyez
soigneusement la poussière et les souillures rassemblées dans la
cavité rectangulaire du centre supérieur de l'arrière de l'adaptateur.
Après avoir nettoyé le VU-V101, retirez toujours la carte SmartMedia
du VU-V101 et rangez le VU-V101 dans son boîtier.
NOTE 1. Le VU-V101 ne comprend pas de mode de protection contre
l'écriture. Bien qu'une étiquette de protection contre
l'écriture soit apposée sur la carte SmartMedia, elle n'est
pas reconnue par le VU-V101.
En résultat, vérifiez que les données existantes ne sont pas
effacées par inadvertence ou bien écrites par-dessus.
2. Ne laissez pas le VU-V101 dans le lecteur de disquette car
le lecteur pourrait être endommagé.
20
Windows 95
Utilisation de l'utilitaire de
formatage pour formater une
SmartMedia
5
Chargez la SmartMedia à formater dans le
VU-V101.
Insérez le VU-V101 dans le lecteur de disquette.
Cliquez sur Démarrer → Programmes →
FlashPath → FlashPath Format.
Quand vous êtes prêt à démarrer le formatage de
la SmartMedia, appuyez sur la touche Y (oui) du
clavier.
FRANSIAS
1
2
3
4
Quand le message "SmartMedia formatted
successfully" apparaît, cliquez sur le bouton ✕
dans le coin de la fenêtre.
NOTE
• N'essayez jamais ce VU-V101 pendant que le
formatage est en cours car cela pourrait rendre la
SmartMedia inutilisable.
• Cette procédure formate la SmartMedia comme une
"disquette haute densité".
Si vous voulez utiliser la SmartMedia dans un
appareil photo, vous devez initialiser (formater) la
SmartMedia dans l'appareil photo.
• Après avoir formaté la carte SmartMedia, retirez
VU-V101 avant de l'utiliser.
Fonction de veille
Pour maximiser la longévité des piles, le VU-V101 se met
automatiquement en état de veille si vous n'y accédez pas pendant 5
minutes après l'avoir inséré dans un lecteur de disquette.
Pour réactiver l'alimentation du VU-V101, éjectez l'adaptateur du
lecteur de disquette et réinsérez-le.
21
ADAPTATEUR DE DISQUE VU-V101
Utilisation du programme moniteur
de statut FlashPath
Cette section décrit la manière d'utiliser le programme de contrôle de
statut FlashPath (Flashstat.exe) et explique les messages qui sont
appliqués par le programme.
Pour démarrer flashstat.exe
■ Pour démarrer flashstat.exe :
FRANSIAS
1
2
Cliquez sur Démarrer → Programmes →
FlashPath → FlashPath Status.
Une fois que le programme a démarré, l'icône
illustrée ci-dessous apparaît à la fin des icônes
de la barre des tâches.
Flashstat.exe
3
Pour ouvrir la fenêtre Statut, cliquez sur l'icône
dans la barre des tâches.
■ Fenêtre de statut standard flashstat.exe :
r Titre
q Icônes de statut
t Icône de disquette
22
e Informations de version
w Messages de statut
Windows 95
Accédez toujours au FlashPath une fois que la fenêtre de statut
s'ouvre. Les icônes de statut sont rafraîchies (remises à jour)
quand vous accédez au FlashPath.
La fenêtre de statut est divisée dans les sections qui suivent :
q Icônes de statut
• Les icônes de statut passent de la lumière verte à la lumière
rouge quand une erreur est détectée dans la zone
correspondante.
Les trois icônes de statut indiquent le statut des piles, le statut
d'alimentation de FlashPath et le statut de SmartMedia.
● Battery Condition ..........Indique la charge restante dans la pile
Vert : Normal
Jaune : Faible (Lecture seulement)
Rouge : Pile épuisée
FRANSIAS
(Note : Le signal de pile épuisée apparaît
seulement quand vous accédez au
VU-V101 et que le média a été reconnu.)
● Power On/Off ...............Indique si le VU-V101 est prêt ou s'il est
en mode de veille.
Vert : Mode de veille (sous tension)
Rouge : Veille (hors tension)
(Note : Le signal hors tension apparaît
seulement quand vous accédez au
VU-V101 et que le média a été reconnu.)
● SmartMedia Status .......Indique si une SmartMedia est chargée
ou non.
Vert : Normal
Rouge : Erreur (Pas de média ou erreur
de média).
(Note : Les erreurs de média ne sont
reconnues que lorsque la condition de la
pile est verte.)
w Messages de statut
Cette zone montre une description détaillée du statut.
e Informations de version
Montre les informations de version pour flashstat.exe.
r Titre
Change en fonction du statut de programme actuel.
[Normalement]
"FlashPath Status Monitor"
[Une fois qu'un changement de statut est détecté]
"FlashPath User Intervention Required"
23
ADAPTATEUR DE DISQUE VU-V101
t Icône de disquette
Indique le résultat d'ensemble des icônes de statut indiquées en q.
Grisé (incolore) : Aucun média reconnu
Vert :
Tous verts
Jaune :
Statut de pile jaune (dans la réalité, l'état de la
pile est jaune, tous les autres sont verts)
Rouge :
L'une des icônes du moniteur de statut est
rouge.
• Un indicateur similaire est indiqué dans l'icône de la barre des
tâches.
Les messages sont montrés dans le champ de message de
statut dans les circonstances suivantes :
FRANSIAS
[Quand aucun VU-V101 n’a été détecté]
"No FlashPath has been detected in any drive."
/Accédez VU-V101.
[Pendant le fonctionnement]
"The FlashPath is functioning normally."
[Quand les piles sont déchargées]
"FlashPath Batteriy Low"
[Quand VU-V101 ne contient aucune SmartMedia ou que la
SmartMedia n'est pas chargée correctement.]
"The SmartMedia is inaccessible."
[Quand VU-V101 est en veille pour conserver la charge de la
pile]
"Eject and re-insert the FlashPath."
[Quand le format SmartMedia interne est incompatible]
"Invalid SmartMedia."
■ Fenêtre d'erreur indiquée quand une erreur de VU-V101
est détectée.
24
Windows 95
Le message indiqué dans la fenêtre d'erreur varie selon les
circonstances.
FRANSIAS
[Quand les piles sont faibles]
"Battery low condition detected. The SmartMedia is now read only."
[Quand VU-V101 ne contient pas de SmartMedia ou quand la
SmartMedia est chargée de manière incorrecte]
"The SmartMedia cannot be accessed. Please eject the FlashPath
and be sure that the SmartMedia has been inserted properly."
[Quand VU-V101 est en état de veille pour conserver la charge
de pile]
"The FlashPath has powered off to save its batteries.
Please eject the FlashPath from your floppy drive and re-insert it to
turn it back on."
[Quand le format SmartMedia interne est incompatible]
"The logical filling system on the SmartMedia is unrecognized.
This SmartMedia cannot be used with FlashPath."
25
ADAPTATEUR DE DISQUE VU-V101
Fiche technique
✽ Les spécifications et les données de performance mentionnées ici
sont sujettes à des changements sans notice préalable.
JVC décline toute responsabilité pour les erreurs qui pourraient se
glisser dans ces instructions d'exploitation.
FRANSIAS
26
Modèle :
Adaptateur de Disquette pour
SmartMedia
Permet aux SmartMedia d'être utilisées
comme des disquettes.
Compatible SmartMedia.
2 Mo (5 V, 3,3 V), 4 Mo (5 V, 3,3 V),
8 Mo (5 V, 3,3 V),16 Mo (5 V, 3,3 V)
Conditions de service :
Température : De 10 ˚C à 40˚ C;
Humidité : De 20 à 80 % d'humidité
relative (sans condensation)
Dimensions
90 × 3,3 × 94 mm
Poids
35 g env.
MEMO
DISKETTENADAPTER VU-V101
WICHTIG
Lesen Sie bitte die folgenden Hinweise.
DEUTSCH
Hinweise zur Software und Bedienungsanleitung
(1)
Übertragung oder Vervielfältigung der beiliegenden Software
oder dieser Bedienungsanleitung, als Ganzes oder von
Teilen davon, ohne Genehmigung ist untersagt.
(2)
Die beiliegende Software und diese Bedienungsanleitung
dürfen nur für einen Diskettenadapter VU-V101 (nachfolgend
als VU-V101 bezeichnet) benutzt werden.
(3)
JVC übernimmt keine Haftung für etwaige Verluste, die dem
Kunden oder dritten Personen durch die Benutzung des VUV101 mit der beiliegenden Software oder der
Bedienungsanleitung entstehen.
(4)
Dieses Produkt wurde mit der größten Sorgfalt hergestellt.
Sollte trotzdem ein Defekt festgestellt werden, der auf einen
Produktionsfehler zurückzuführen ist, wird das Produkt
kostenlos ersetzt. Für Defekte, die nicht durch den Hersteller
verursacht wurden, wird keine Haftung übernommen.
(5)
Änderungen des Inhalts der beiliegenden Software und der
Bedienungsanleitung sind ohne Vorankündigung
vorbehalten.
Benutzen Sie beim Einsetzen oder Auswechseln der KnopfzellenBatterien die mit dem VU-V101 gelieferten Batterien oder CR2016
Batterien von Sanyo oder Maxell.
Bei einigen PC Modellen kann die Verwendung des VU-V101 zu
Problemen führen.
2
Windows 95
Sicherheitshinweise (bitte immer beachten)
● Lesen Sie bitte vor Inbetriebnahme dieses Produkts gründlich diese
Bedienungsanleitung durch, insbesondere die Sicherheitshinweise sowie die
Hinweise zu den Knopfzellen.
● Bewahren Sie diese Bedienungsanleitung gut auf, damit Sie jederzeit
nachschlagen können.
Über die Symbole
In dieser Bedienungsanleitung und auf dem Produkt selbst wird eine Anzahl
von Symbolen gezeigt. Diese Symbole sollen sicheren und korrekten Gebrauch
des Produkts gewährleisten und Verletzungen des Benutzers oder anderer
Personen sowie Sachschäden verhindern. Nachfolgend werden diese Symbole
und ihre Bedeutung erklärt. Machen Sie sich bitte mit der Bedeutung dieser
Warnungen vertraut, bevor Sie die Bedienungsanleitung lesen.
a GEFAHR
Zeigt an, daß bei Nichtbeachtung dieser Warnung unsachgemäße
Handhabung des Produkts zu schweren oder tödlichen Verletzungen führen
kann.
a WARNUNG
DEUTSCH
Zeigt an, daß bei Nichtbeachtung dieser Warnung unsachgemäße
Handhabung des Produkts zu schweren oder tödlichen Verletzungen führen
kann.
a VORSICHT
Zeigt an, daß bei Nichtbeachtung dieser Warnung unsachgemäße
Handhabung des Produkts zu Verletzungen oder Sachschäden führen kann.
Beispiele für Symbole
k
e
g
Dreieckige Symbole weisen den Benutzer auf eine Information hin, die
beachtet werden muß. Die Einzelheiten der Information sind graphisch
in dem Symbol angegeben. (Das Symbol links zeigt an, daß sich der
Benutzer vor elektrischen Schlägen hüten muß.)
Kreisförmige Symbole mit einem diagonalen Strich weisen den
Benutzer darauf hin, daß die angegebene Aktion verboten ist. Die
Einzelheiten der verbotenen Aktion sind graphisch in oder neben dem
Symbol angezeigt. (Das Symbol links zeigt an, daß das Gerät nicht
zerlegt werden darf.)
Gefüllte Kreise weisen den Benutzer darauf hin, daß eine Aktion
durchgeführt werden muß. Die Einzelheiten der erforderlichen Aktion
sind graphisch in dem Symbol angezeigt. (Das Symbol links zeigt an,
daß das Gerät von der Netzsteckdose abgetrennt werden muß.)
Befolgen Sie bitte immer diese Anweisungen.
3
DISKETTENADAPTER VU-V101
Haftungsausschlüsse
• JVC übernimmt keine Haftung für Verletzungen oder Sachschäden, die beim Betrieb
dieses Produkts durch Brand, Erdbeben, Aktionen Dritter, vorsätzlichen oder
unbeabsichtigten Mißbrauchs oder durch andere anomale Umstände entstehen.
• JVC übernimmt keine Haftung für beiläufige Schäden oder Verluste jeglicher Art
(einschließlich Einkommensverlust, Arbeitsunterbrechung, Korrumpierung oder Verlust
gespeicherter Daten usw.), die durch die Benutzung oder nicht mögliche Benutzung
dieses Produkts entstehen.
• JVC übernimmt keine Haftung für Schäden oder Verluste, die durch nicht in dieser
Bedienungsanleitung beschriebenen Gebrauch dieses Produkts entstehen.
• JVC übernimmt keine Haftung für Schäden oder Verluste, die durch
Funktionsstörungen entstehen, wenn dieses Gerät an einem anderen Gerät
angeschlossen ist.
a GEFAHR
● Beachten Sie bitte beim Umgang mit den Knopfzellen
die folgenden Punkte:
DEUTSCH
• Niemals versuchen, die Knopfzellen zu zerlegen oder zu
modifizieren.
• Darauf achten, daß keine Metallgegenstände wie etwa Heftklammern
die Pole (+ und -) der Knopfzellen berühren.
Die Knopfzellen sollten auch nicht zusammen mit
Metallgegenständen wie Ketten oder Haarnadeln getragen oder
gelagert werden.
• Die Knopfzellen nicht erhitzen und nicht in eine Flamme halten.
• Knopfzellen nicht durchbohren und nicht einem Hammer darauf
schlagen.
• Niemals versuchen, die Knopfzellen aufzuladen.
Nichtbeachtung dieser Warnungen kann zum Auslaufen von
Batterieflüssigkeit, zu Hitzeentladung und zum Platzen der Zellen
führen und Hautverbrennungen oder andere Verletzungen
verursachen.
4
Windows 95
a WARNUNG
● Bewahren Sie Knopfzellen nicht in Reichweite kleiner
Kinder auf.
Verschlucken einer Knopfzelle könnte eine Vergiftung oder Ersticken
verursachen.
Sollte einmal eine Knopfzelle verschluckt werden, suchen Sie sofort
einen Arzt auf.
● Beachten Sie bitte bei der Benutzung von Knopfzellen
die folgenden Punkte:
• Keine neuen und gebrauchten Knopfzellen zusammen benutzen.
• Beim Einsetzen der Zellen auf die richtige Positionierung der Pole (+
und -) achten.
• Keine verbrauchten Zellen in dem Gerät belassen.
Nichtbeachtung dieser Warnungen kann zum Auslaufen von
Batterieflüssigkeit, zu Hitzeentladung und zum Platzen der Zellen
führen und Hautverbrennungen oder andere Verletzungen
verursachen.
● Benutzen Sie beim Einsetzen oder Auswechseln der
Knopfzellen-Batterien nur CR2016 Batterien.
Bei Verwendung anderer Typen von Knopfzellen kann es zum
Auslaufen von Batterieflüssigkeit, zu Hitzeentladung und zum Platzen
der Zellen kommen, wodurch Hautverbrennungen oder andere
Verletzungen verursacht werden könnten.
• Sollte Batterieflüssigkeit auf Ihre Haut oder Kleidung geraten, den
betroffenen Bereich sofort mit sauberem Wasser abwaschen.
Wenn Batterieflüssigkeit in Ihre Augen kommt, spülen Sie die Augen
sofort aus und suchen Sie dann einen Arzt auf.
DEUTSCH
● Berühren Sie bitte nicht aus einer Knopfzelle
auslaufende Batterieflüssigkeit; das könnte
Hautverbrennungen verursachen.
Nicht
berühren
● Bei der Verwendung von 5 Volt SmartMedia
Speicherkarten verringert sich deutlich die
Lebensdauer der Batterie. Dies gilt besonders beim
schreiben von Daten auf die 5V SmartMedia.
Bei Verwendung von der neuen Generation von
SmartMedia Speicherkarten (3,3 V) gilt diese
Einschränkung nicht.
5
DISKETTENADAPTER VU-V101
a VORSICHT
● Benutzen Sie dieses Produkt nicht in unmittelbarer Nähe
einer Heizung oder eines offenen Feuers; das könnte zu
Rauchentwicklung oder zu einem Brand führen.
● Tauchen Sie dieses Produkt nicht in Wasser,
Chemikalien oder Öl ein; das könnte zu einem
Kurzschluß führen oder einen Stromschlag oder Brand
verursachen.
● Wenn dieses Produkt gebogen, fallen gelassen oder
starken Erschütterungen ausgesetzt wird, lassen Sie es
bei Ihrem JVC Fachhändler oder einem JVC
Kundendienst überprüfen.
Wird das Produkt ohne Überprüfung weiter benutzt, kann es zu
Rauchentwicklung oder einem Brand kommen.
● Versuchen Sie nicht, dieses Produkt selbst zu
reparieren, zu zerlegen oder zu modifizieren; das könnte
zu einem Brand, Stromschlag oder Verletzungen führen.
Nicht zerlegen
DEUTSCH
6
Windows 95
a VORSICHT
● Führen Sie keine Gegenstände in den SmartMediaSteckplatz des VU-V101 ein; das könnte
Rauchentwicklung oder einen Brand verursachen.
● Falls während des Betriebs aus dem VU-V101
ungewöhnlicher Geruch, Geräusch oder Rauch austritt,
sollten Sie den PC sofort ausschalten und den
Netzstecker abziehen.
Geben Sie das Gerät zu Ihrem JVC Fachhändler oder einem JVC
Kundendienst zur Reparatur.
● Bringen Sie keine Etiketten oder Aufkleber am VU-V101
an; solche Aufkleber könnten ins Innere des
Diskettenlaufwerks fallen und dieses beschädigen.
● Schließen Sie nach dem Auswechseln der Batterien des
VU-V101 fest den Batteriedeckel.
DEUTSCH
Anderenfalls könnten die Batterien in das Diskettenlaufwerk fallen; das
könnte zum Auslaufen von Batterieflüssigkeit, zu Hitzeentwicklung oder
zum Platzen der Batterien führen.
7
DISKETTENADAPTER VU-V101
Zubehör
FLOPPY DISK ADAPTER
ADAPTATEUR DE DISQUE
DISKETTENADAPTER
VU-V101
INSTRUCTIONS
MODE D'EMPLOI
BEDIENUNGSANLEITUNG
BB08280-200
LYT0235-005A
CR2016 (Lithium) Knopfzellen
(2)
VU-V101
Bedienungsanleitung
(dieses Dokument)
VU-V101 Installationsdiskette (für Windows ® 95)
(1)
(1)
DEUTSCH
■ Warenzeichen
● Microsoft Windows ist ein in den Vereinigten Staaten und anderen
Ländern eingetragenes Warenzeichen der Microsoft Corporation,
USA.
Windows ist eine Kurzbezeichnung für das Microsoft Windows
Betriebssystem.
● FlashPath ist ein Warenzeichen der Fischer International
Corporation, USA.
● Alle anderen Firmen oder Produktnamen sind Warenzeichen oder
eingetragene Warenzeichen der jeweiligen Firmen.
8
Windows 95
Inhaltsverzeichnis
DEUTSCH
WICHTIG ...............................................................2
Sicherheitshinweise ...............................................3
Zubehör.................................................................8
Inhaltsverzeichnis ..................................................9
Richtiger Gebrauch des VU-V101 ..........................10
Einsetzen der Knopfzellen ....................................12
Installieren der Software .......................................14
1. VU-V101 Überblick .......................................14
2. Mindest-Systemvoraussetzungen ..................14
3. Installationsverfahren ...................................15
4. Deinstallieren der Software ...........................18
Einsetzen einer SmartMedia-Karte ........................19
Einsetzen des VU-V101(FlashPath) ......................20
Verwendung des FlashPath
Status-Monitorprogramms.....................................22
Technische Daten .................................................26
9
DISKETTENADAPTER VU-V101
Richtiger Gebrauch des VU-V101
■ Datenerhaltung
● n den nachfolgend beschriebenen Fällen können auf einer SmartMedia-Karte
aufgezeichnete Daten verlorengehen (korrumpiert werden). JVC übernimmt keine
Haftung für den Verlust (die Korrumpierung) aufgezeichneter Daten.
1. Bei unsachgemäßem Gebrauch der SmartMedia-Karte oder des VU-V101 durch
den Benutzer oder eine dritte Person.
2. Wenn die SmartMedia-Karte oder der VU-V101 statischer Elektrizität oder
elektrischem Rauschen ausgesetzt wird.
3. Wenn der VU-V101 aus dem Diskettenlaufwerk herausgenommen oder der PC
ausgeschaltet wird, während auf den VU-V101 zugegriffen wird (Aufzeichnung,
Löschen oder Wiedergabe).
● Es ist ratsam, von allen wichtigen Daten Sicherungskopien auf einem anderen
Datenträger anzufertigen (MO-Platte, Diskette, Festplatte usw.).
■ Hinweise zum Gebrauch des VU-V101
DEUTSCH
● Niemals den VU-V101 entfernen oder den PC ausschalten, während auf den
Adapter zugegriffen wird (Aufzeichnung, Löschen oder Wiedergabe); dadurch kann
die SmartMedia-Karte beschädigt werden.
● Der VU-V101 ist ein elektronisches Präzisionsgerät. Er darf nicht gebogen, fallen
gelassen oder starken Erschütterungen ausgesetzt werden.
● Zum Schutz des VU-V101 und des Diskettenlaufwerks sollte der VU-V101 nach
dem Gebrauch immer aus dem Diskettenlaufwerk herausgenommen und an einem
sicheren Ort aufbewahrt werden.
● Um Verschmutzung der Kontaktflächen in den Köpfen des Diskettenlaufwerks,
Fehlfunktionen des Betriebsschalters oder andere Beschädigungen zu vermeiden,
sollte der VU-V101 bei Nichtgebrauch in seiner Box aufbewahrt werden.
● Legen Sie den VU-V101 zum Tragen oder Lagern immer in seine Box. Stecken Sie
den Adapter niemals in Ihre Hosentasche; wenn Sie sich hinsetzen, könnte er
übermäßiger Krafteinwirkung ausgesetzt und beschädigt werden.
● Benutzen oder lagern Sie den VU-V101 nicht an Orten, die starker statischer
Elektrizität oder elektrischem Rauschen ausgesetzt sind.
● Benutzen oder lagern Sie den VU-V101 nicht an sehr warmen oder feuchten Orten
oder in einer korrodierenden Umgebung.
● Schalten Sie Ihren PC nicht aus und berühren Sie nicht die Disketten-Auswurftaste
des Diskettenlaufwerks, während dieses in Betrieb ist.
Dadurch könnten die auf der SmartMedia-Karte gespeicherten Daten
verlorengehen oder korrumpiert werden.
● Passen Sie auf, daß kein Schmutz und keine Fremdkörper in den SmartMediaSteckplatz geraten.
● Berühren Sie die Anschlüsse (Kontaktflächen) der SmartMedia-Karte nicht mit den
Fingern und achten Sie darauf, daß sie nicht mit Metallgegenständen in Berührung
kommen; das könnte zu einer Entladung statischer Elektrizität und zum Verlust
oder zur Korrumpierung der auf der SmartMedia-Karte gespeicherten Daten führen.
● Schalten Sie Ihren Computer nicht aus, während Daten auf eine SmartMedia-Karte
geschrieben oder von einer SmartMedia-Karte gelesen werden; das könnte zum
Verlust oder zur Korrumpierung der auf der SmartMedia-Karte gespeicherten Daten
führen.
10
Windows 95
DEUTSCH
● Setzen Sie das Gerät keinen Vibrationen oder Erschütterungen aus und
versuchen Sie nicht, den Adapter aus dem Diskettenlaufwerk herauszunehmen,
während Daten auf eine SmartMedia-Karte geschrieben oder von einer
SmartMedia-Karte gelesen werden; das könnte zum Verlust oder zur
Korrumpierung der auf der SmartMedia-Karte gespeicherten Daten führen.
● Wenn Sie eine bereits benutzte SmartMedia-Karte formatieren, prüfen Sie bitte
zuerst die auf dieser Karte gespeicherten Daten. Bei der Formatierung werden
alle auf der SmartMedia-Karte gespeicherten Daten gelöscht.
● Der VU-V101 hat keinen Schreibschutzmodus. Er kann daher einen an der
SmartMedia-Karte eventuell angebrachten Schreibschutzstreifen nicht erkennen.
Stellen Sie daher sicher, daß bestehende Daten nicht versehentlich gelöscht oder
überschrieben werden.
● Lesen Sie immer die Gebrauchsanleitung der SmartMedia-Karte und die
Bedienungsanleitung des benutzten Geräts.
● Wischen Sie Schmutz mit einem weichen, trockenen Tuch ab.
● Sichern Sie für den Fall von Fehlern, Beschädigungen oder Datenverlust in
regelmäßigen Abständen die auf einer SmartMedia-Karte gespeicherten Daten
auf einem anderen Datenträger.
JVC übernimmt keine Haftung für den Verlust von Daten, die auf einem anderen
Datenträger gespeichert sind.
● Vergewissern Sie sich vor dem Initialisieren (Formatieren) einer SmartMediaKarte, daß keine wichtigen Informationen (Dateien) auf der Karte gespeichert
sind. Bei der Initialisierung werden alle Daten auf der SmartMedia-Karte gelöscht.
● Stellen Sie bei Gebrauch des VU-V101 sicher, daß die Kontaktbereiche für die
Köpfe des Diskettenlaufwerks nicht verschmutzt sind. Die Kontaktbereiche sind
die Rechtecke oben in der Mitte des Adapters (der schwarze Bereich auf der
Vorderseite und die Vertiefung auf der Rückseite). Verschmutzungen der
Kontaktbereiche können nicht nur die Schreibleistung des Diskettenlaufwerks
beeinträchtigen, sondern bei Verwendung einer Diskette die Aufzeichnungsfläche
der Diskette verschmutzen und Datenverlust verursachen. Überprüfen Sie daher
vor dem Einsetzen des VU-V101 in das Diskettenlaufwerk, daß sich kein Fett oder
Staub auf den Kontaktbereichen befindet. Verschmutzte Kontaktbereiche sind mit
einem sauberen Tuch abzuwischen.
Darüber hinaus sollten auch die Köpfe des Diskettenlaufwerks regelmäßig mit
einer handelsüblichen Kopfreinigungsdiskette gereinigt werden.
● Wird der VU-V101 aus dem Diskettenlaufwerk ausgeworfen, während darauf
zugegriffen wird, oder wenn während des Schreibens von Daten die Batterien leer
werden, kann die Dateistruktur auf der SmartMedia-Karte korrumpiert werden.
Weitere Verwendung einer SmartMedia-Karte in diesem Zustand kann zum
Verlust von Dateien und zur Korrumpierung von Daten führen.
Reparieren Sie die SmartMedia-Karte nach dem folgenden Verfahren.
Wählen Sie Start → Programs → Accessories → System Tool → ScanDisk, um
das ScanDisk-Dienstprogramm zu starten.
Wählen Sie das Diskettenlaufwerk aus, in dem der VU-V101 eingesetzt ist, und
klicken Sie auf Starten. Folgen Sie dann den Anweisungen auf dem Bildschirm,
bis die Reparatur abgeschlossen ist.
Eine andere Möglichkeit ist, die SmartMedia-Karte zu formatieren. Wählen Sie
dazu Start → Programs → FlashPath → FlashPath Format.
Wenn Sie eine Digitalkamera besitzen, können Sie die SmartMedia-Karte auch in
der Kamera formatieren. Beachten Sie jedoch bitte, daß bei der Formatierung alle
auf der SmartMedia-Karte gespeicherten Daten gelöscht werden.
11
DISKETTENADAPTER VU-V101
Einsetzen der Knopfzellen
Der VU-V101 verwendet 2 CR2016 Lithium-Batterien (Knopfzellen).
Die nachfolgende Tabelle gibt eine Übersicht über die Betriebszeit der
Lithium-Batterien (bei normalen Temperaturen).
Verwendete SmartMedia-Karte
Lesen (Dauerbetrieb)
Schreiben (Dauerbetrieb)
5V
Ca. 2,4 Stunden
Ca. 1,4 Stunden
3,3 V
Ca. 10 Stunden
Ca. 5 Stunden
1
Drehen Sie den Batteriedeckel zum Öffnen in
Richtung der Pfeile.
Legen Sie den VU-V101 auf eine ebene Fläche, drücken Sie mit
den Fingerspitzen auf die Vertiefungen in dem Batteriedeckel
und drehen Sie den Deckel dabei im Gegenuhrzeigersinn, bis
Sie ein Klicken hören.
DEUTSCH
2
Setzen Sie die CR2016 Knopfzellen mit der +
Seite nach oben weisend ein.
Überprüfen Sie, daß die Oberfläche der Zellen die Kontakte auf
der Innenseite des Deckels berühren.
Kontakt
HINWEIS
12
Stellen Sie sicher, daß die Kontakte nicht unter den
Batterien festgeklemmt sind.
Windows 95
3
Setzen Sie den Batteriedeckel wieder auf, drücken
Sie mit den Fingerspitzen auf seine Vertiefungen
und drehen Sie ihn dabei im Uhrzeigersinn.
Drehen Sie den Batteriedeckel, bis seine Markierungen auf die
(
) Markierung auf dem VU-V101 ausgerichtet sind.
Markierungen auf Batteriedeckel
HINWEIS
• Wechseln Sie immer beide Zellen aus.
■ Hinweis zur Lithiumbatterie
DEUTSCH
• Ersetzen Sie die Batterie durch eine Sanyo CR2016, oder Maxell
CR2016 Lithiumbatterie. Bei Verwendung anderer Batterien
besteht Brand- oder Explosionsgefahr.
• Wischen Sie die Batterie vor dem Einsetzen in die Kamera mit
einem trockenen Tuch ab, um sicherzustellen, daß die
Kontaktflächen sauber sind.
• Versuchen Sie nicht, die Batterie auseinanderzunehmen, zu
erhitzen, aufzuladen oder kurzzuschließen und werfen Sie sie nicht
ins Feuer, da die Batterie dabei platzen kann. Gehen Sie bei der
Entsorgung der Batterie verantwortungsvoll um und stellen Sie
sicher, daß sie nicht brennt.
a VORSICHT
• alten Sie die Lithiumbatterie außerhalb der Reichweite von kleinen Kindern.
Sollte einmal eine Batterie verschluckt werden, suchen Sie sofort einen Arzt auf.
• Wischen Sie die Batterie mit einem trockenen Tuch ab, um guten Kontakt
sicherzustellen.
• Achten Sie beim Einsetzen der Batterie unbedingt auf die richtige Polarität.
• Halten Sie die Batterie nicht mit einer Metallpinzette, da dadurch ein Kurzschluß
auftreten kann.
j WARNUNG
Bei unsachgemäßer Behandlung kann die Batterie explodieren. Die Batterie darf
nicht aufgeladen, auseinandergenommen oder ins Feuer geworfen werden.
13
DISKETTENADAPTER VU-V101
Installieren der Software
1. VU-V101 Überblick
Der VU-V101 dient als SmartMedia-Adapter. Er kann in ein
Diskettenlaufwerk eingesetzt und auf einem PC benutzt werden.
Der VU-V101 ist so groß wie eine 3,5-Zoll-Diskette und ermöglicht
es, Daten über ein Diskettenlaufwerk auf eine SmartMedia-Karte zu
schreiben und von einer SmartMedia-Karte zu lesen.
So brauchen Sie zum Austauschen von Daten mit einer SmartMediaKarte lediglich die Karte in den VU-V101 und den VU-V101 in das
Diskettenlaufwerk Ihres PCs einzusetzen.
Die VU-V101 Software läuft auf IBM PC/AT-kompatiblen PCs unter
Microsoft Windows ® 95.
Das Diskettenlaufwerk muß 1,44-MB-Disketten unterstützen.
Der VU-V101 läuft nicht in Hochkapazitäts-Diskettenlaufwerken mit
einer Kapazität von mehr als 1,44 MB.
2. Mindest-Systemvoraussetzungen
DEUTSCH
14
Computer
IBM PC/AT-kompatibel
Prozessor
Intel 486 oder besser oder Pentium
Betriebssystem
Windows ® 95
Windows 95
3. Installationsverfahren
■ Beenden Sie alle anderen Anwendungsprogramme.
2
Drücken Sie gleichzeitig die Tasten Ctrl, Alt und
Delete, so daß das Fenster "Anwendung
schließen" erscheint. Im Fenster "Anwendung
schließen" werden die Namen der zu diesem
Zeitpunkt geölfneten Anwendungen aufgelistet.
Wählen Sie die Anwendung aus und klicken Sie
dann auf die Schaltfläche "Task beenden".
Dieses Fenster muß geprüft werden, weil einige
Programme (Bildschirmschoner etc.) nicht in der
Task-Leiste gezeigt werden.
DEUTSCH
1
Beenden Sie alle anderen
Anwendungsprogramme, bis in der Task-Leiste
keine Programmsymbole mehr angezeigt werden.
Wenn Sie fertig sind, klicken Sie zum Schließen dieses Fensters
auf Abbrechen.
HINWEIS
Sollten noch andere Anwendungen laufen,
erscheint möglicherweise die Meldung "----.dll nicht
gefunden"; in diesem Fall wird die Installation nicht
erfolgreich durchgeführt.
15
DISKETTENADAPTER VU-V101
■ Installieren Sie die Software.
DEUTSCH
16
1
2
3
Legen Sie die VU-V101 Installationsdiskette in
das Diskettenlaufwerk ein.
4
Das FlashPath Setup-Fenster erscheint. Wenn
Sie auf die Schaltfläche Weiter klicken, erscheint
das Fenster Endbenutzer-Lizenzvertrag. Klicken
Sie auf die Schaltfläche Ja. Das Dialogfeld zur
Auswahl des Zielverzeichnisses für die
Installation erscheint.
Klicken Sie auf die Schaltfläche Start.
Wählen Sie Ausführen, geben Sie "a:\setup" ein
und klicken Sie auf die Schaltfläche OK.
5
Wenn Sie auf die Schaltfläche Weiter klicken,
werden die erforderlichen Dateien in das
Standardverzeichnis (c:\Fisc\Flash] kopiert. Das
Installationsprogramm legt eine Gruppe mit dem
Namen FlashPath an und erstellt 3 Symbole im
Gruppenfenster. Die drei Symbole sind:
FlashPath Format, FlashPath Status und
FlashPath Uninstall.
6
Nach Abschluß der Installation erscheint das
folgende Fenster.
7
Um die Software benutzen zu können, müssen
Sie die Installationsdiskette auswerfen, auf die
Schaltfläche OK klicken und dann Ihren PC neu
starten.
DEUTSCH
Windows 95
17
DISKETTENADAPTER VU-V101
4. Deinstallieren der Software
■ Vor dem Deinstallieren der Software
Beenden Sie nach dem folgenden Verfahren das FlashPath StatusMonitorprogramm. Die FlashPath-Dateien werden nicht einwandfrei
entfernt, wenn dieses Programm läuft.
1
Klicken Sie auf das Symbol FlashPath Status in
der Task-Leiste. (Eine Beschreibung des
Symbols FlashPath Status finden Sie auf Seite
22.)
2
Wenn sich das FlashPath Status-Monitorfenster
öffnet, klicken Sie auf das Symbol in der Ecke
oben links und dann auf Schließen.
■ Deinstallationsverfahren
So entfernen Sie die auf Ihrem PC installierten Dateien:
DEUTSCH
1
2
Klicken Sie auf Start → Programme → FlashPath
→ FlashPath Uninstall.
Folgen Sie zum Entfernen der Software den
Anweisungen auf dem Bildschirm.
Nach Abschluß der Deinstallation erscheint das folgende
Fenster.
3
Klicken Sie auf die Schaltfläche OK und starten
Sie Ihren PC neu.
HINWEIS
18
Der PC muß unbedingt neu gestartet werden, um
die wie oben beschrieben deinstallierte Software
völlig aus dem PC-Speicher zu löschen.
Windows 95
Einsetzen einer SmartMedia-Karte
1
Legen Sie das VU-V101 mit der Unterseite nach
oben hin und schieben Sie die SmartMedia-Karte
langsam bis zur halben Länge in den
Kartenhalter.
A
(5-V-Karte)
2
Die SmartMedia-Karte läßt sich auch umgekehrt
einsetzen, doch in diesem Fall wird sie nicht vom
PC erkannt. Setzen Sie die SmartMedia-Karte
immer wie hier beschrieben in der richtigen
Richtung ein.
DEUTSCH
HINWEIS
(3,3-V-Karte)
Drücken Sie leicht auf die hintere Kante der
SmartMedia-Karte, um sie langsam aber fest
vollständig in den Kartenhalter
hineinzuschieben.
■ Entfernen einer SmartMedia-Karte
Ergreifen Sie den in der oberen Abbildung oben gezeigten Teil A der
SmartMedia-Karte und ziehen Sie die Karte langsam heraus.
19
DISKETTENADAPTER VU-V101
Einsetzen des VU-V101 (FlashPath)
Installieren des VU-V101
Wischen Sie vor dem Einsetzen des VU-V101 in das Diskettenlaufwerk
gründlich allen Schmutz von den Rechtecken oben in der Mitte des
Adapters ab (der schwarze Bereich auf der Vorderseite und die
Vertiefung auf der Rückseite).
Dann setzen Sie den VU-V101 in das Diskettenlaufwerk ein. Jetzt kann
über das Diskettenlaufwerk auf den VU-V101 zugegriffen werden.
HINWEIS
Um die Lebensdauer der Batterien zu maximieren, sollte
der VU-V101 bei Nichtgebrauch der SmartMedia-Karte
immer aus dem Diskettenlaufwerk herausgenommen
werden.
DEUTSCH
Herausnehmen des VU-V101
Wischen Sie nach dem Herausnehmen des VU-V101 aus dem
Diskettenlaufwerk gründlich Staub und andere Verschmutzungen in
der rechteckigen Vertiefung oben in der Mitte auf der Rückseite des
Adapters ab.
Nach dem Reinigen des VU-V101 nicht vergessen, die SmartMediaKarte aus dem VU-V101 herauszunehmen und den VU-V101 im
Festgehäuse verstauen.
HINWEIS
20
1. Der VU-V101 hat keinen Schreibschutzmodus. Er kann
daher einen an der SmartMedia-Karte eventuell
angebrachten Schreibschutzstreifen nicht erkennen.
Stellen Sie daher sicher, daß bestehende Daten nicht
versehentlich gelöscht oder überschrieben werden.
2. Lassen Sie den VU-V101 nicht im Diskettenlaufwerk,
da dadurch das Laufwerk beschädigt werden könnte.
Windows 95
Formatieren einer SmartMediaKarte mit dem
Formatierungsprogramm
Legen Sie die zu formatierende SmartMediaKarte in den VU-V101 ein.
Setzen Sie den VU-V101 in das Diskettenlaufwerk
ein.
Klicken Sie auf Start → Programme → FlashPath
→ FlashPath Format.
Drücken Sie dann zum Formatieren der
SmartMedia-Karte die Taste J der Tastatur.
Wenn die Meldung "SmartMedia formatted
successfully" erscheint, klicken Sie auf die
Schaltfläche ✕ in der Ecke des Fensters.
HINWEIS
• Nehmen Sie niemals den VU-V101 aus dem
Diskettenlaufwerk heraus, während die
SmartMedia-Karte formatiert wird; dadurch
könnte die Karte unbrauchbar werden.
• Dieses Verfahren formatiert die SmartMediaKarte als "High-Density-Diskette".
Soll die SmartMedia-Karte in einer Kamera
verwendet werden, muß Sie in der Kamera
initialisiert (formatiert) werden.
• Nehmen Sie nach dem Formatieren der
SmartMedia-Karte das VU-V101 vor dem
Gebrauch einmal heraus.
DEUTSCH
1
2
3
4
5
Stromsparfunktion
Um die Lebensdauer der Batterien zu maximieren, wird der VU-V101
automatisch heruntergefahren, wenn nach dem Einsetzen in das
Diskettenlaufwerk fünf Minuten lang nicht auf die SmartMedia-Karte
zugegriffen wird.
Um die Stromversorgung zum VU-V101 wieder zu aktivieren, müssen
Sie den Adapter aus dem Diskettenlaufwerk auswerfen lassen und
dann wieder einstecken.
21
DISKETTENADAPTER VU-V101
Verwendung des FlashPath StatusMonitorprogramms
Dieser Abschnitt beschreibt die Verwendung des FlashPathMonitorprogramms (flashstat.exe) und erklärt die von dem Programm
angezeigten Meldungen.
Starten von flashstat.exe
■ So starten Sie flashstat.exe:
1
2
Klicken Sie auf Start → Programme → FlashPath
→ FlashPath Status.
Sobald das Programm gestartet ist, erscheint
das unten abgebildete Symbol am Ende der TaskLeiste.
Flashstat.exe
DEUTSCH
3
Klicken Sie zum Öffnen des Fensters Status auf
das Symbol in der Task-Leiste.
■ Das Standard-Statusfenster von flashstat.exe:
r Beschriftung
q Statussymbole
t Diskettensymbol
22
e Versionsinformation
w Statusmeldungen
Windows 95
Greifen Sie nach dem Öffnen des Statusfensters immer auf
FlashPath zu. Die Statusanzeigesymbole werden erneuert, sobald
man auf FlashPath zugreift.
Das Statusfenster ist in die folgenden Abschnitte unterteilt:
q Statussymbole
• Die Farbe der Statussymbole wechselt von Grün zu Rot, wenn in
dem entsprechenden Bereich ein Fehler entdeckt wird.
Die drei Statussymbole zeigen den Batteriestatus, den FlashPathStromversorgungsstatus und den SmartMedia-Status.
● Battery Condition ..........Zeigt die Restladung der Batterie
Grün: Normal
Gelb: Niedrig (nur Lesen)
Rot:
Erschöpfte Batterie
(Hinweis: Das Signal für erschöpfte
Batterie erscheint nur dann, wenn auf
den VU-V101 zugegriffen und das
Speichermedium erkannt wurde.)
● Power On/Off ...............Zeigt an, ob der VU-V101 im
Bereitschafts- oder im Stromsparbetrieb
ist.
Grün: Bereit (Strom ein)
Rot:
Stromsparbetrieb (Strom aus)
DEUTSCH
(Hinweis: Das Signal für Strom aus
erscheint nur dann, wenn auf den
VU-V101 zugegriffen und das
Speichermedium erkannt wurde.)
● SmartMedia Status .......Zeigt, ob eine SmartMedia-Karte
eingesetzt ist
Grün: Normal
Rot:
Fehler (kein Datenträger oder
Datenträgerfehler)
(Hinweis: Speichermedienfehler werden
nur dann erkannt, wenn die
Batteriezustandsanzeige auf Grün steht.)
w Statusmeldungen
In diesem Bereich wird eine detaillierte Beschreibung des Status
angezeigt.
e Versionsinformation
Zeigt die Versionsinformation für flashstat.exe.
r Beschriftung
Ändert sich entsprechend dem aktuellen Programmstatus.
[Im Normalfall]
"FlashPath Status Monitor"
[Nach Erkennung einer Statusänderung]
23
DISKETTENADAPTER VU-V101
t Diskettensymbol
Gibt das Gesamtergebnis der in q gezeigten Statussymbole an.
Grau (farblos):
Kein Datenträger erkannt
Grün:
Alle grün
Gelb:
Batteriestatus gelb (Batteriestatus gelb, alle
anderen grün)
Rot:
Eines der Statussymbole ist rot.
• Eine ähnliche Anzeige wird in der Task-Leiste gezeigt.
Die unten gezeigten Meldungen im Feld Statusmeldungen
erscheinen in den folgenden Fällen:
DEUTSCH
[Wenn VU-V101 nicht erkannt worden ist]
"No FlashPath has been detected in any drive."
/Greifen Sie einmal auf das VU-V101 zu.
[Bei normalem Betrieb]
"The FlashPath is functioning normally."
[Wenn die Batterieladung niedrig ist]
"FlashPath Batteriy Low"
[Wenn VU-V101 keine SmartMedia-Karte enthält oder die
SmartMedia-Karte falsch eingesetzt ist]
"The SmartMedia is inaccessible."
[Wenn VU-V101 heruntergefahren worden ist, um
Batterieenergie zu sparen]
"Eject and re-insert the FlashPath."
[Wenn das interne SmartMedia-Format nicht kompatibel ist]
"Invalid SmartMedia."
■ Wenn ein VU-V101-Fehler entdeckt wird, erscheint das
folgende Fehlerfenster:
24
Windows 95
Die im Fehlerfenster angezeigte Meldung hängt von den
Umständen ab.
DEUTSCH
[Wenn die Batterieladung niedrig ist]
"Battery low condition detected. The SmartMedia is now read only."
[Wenn VU-V101 keine SmartMedia-Karte enthält oder die
SmartMedia-Karte falsch eingesetzt ist]
"The SmartMedia cannot be accessed. Please eject the FlashPath
and be sure that the SmartMedia has been inserted properly."
[Wenn VU-V101 heruntergefahren worden ist, um
Batterieenergie zu sparen]
"The FlashPath has powered off to save its batteries.
Please eject the FlashPath from your floppy drive and re-insert it to
turn it back on."
[Wenn das interne SmartMedia-Format nicht kompatibel ist]
"The logical filling system on the SmartMedia is unrecognized.
This SmartMedia cannot be used with FlashPath."
25
DISKETTENADAPTER VU-V101
Technische Daten
✽ Technische Änderungen sind ohne Vorankündigung vorbehalten.
JVC übernimmt keine Haftung für Fehler in dieser
Bedienungsanleitung.
DEUTSCH
26
Modell
Diskettenadapter für SmartMedia-Karten
Ermöglicht die Verwendung von
SmartMedia-Karten als Disketten.
Verwendbare
SmartMedia-Karten
2 MB (5 V, 3,3 V), 4 MB (5 V, 3,3 V),
8 MB (5 V, 3,3 V),16 MB (5 V, 3,3 V)
Betriebsbedingungen
Temperatur: 10°C bis 40°C; Rel.
Luftfeuchtigkeit: 20% bis 80% (keine
Kondensation)
Abmessungen
90 × 3,3 × 94 mm
Gewicht
Ca. 35 g
MEMO
MEMO
MEMO
VU-V101
VICTOR COMPANY OF JAPAN, LIMITED
COPYRIGHT© 1998 VICTOR COMPANY OF JAPAN, LTD.
E/EK
Printed in Japan
0998MNV UN SW
* *