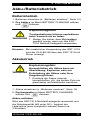
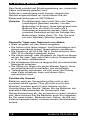
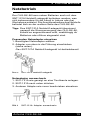
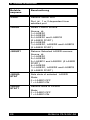
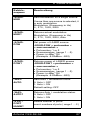
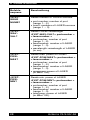
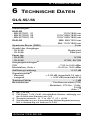
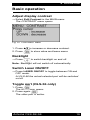
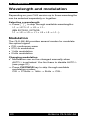
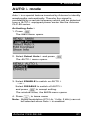
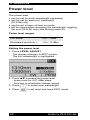
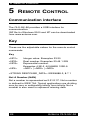
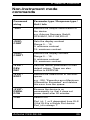
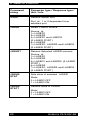
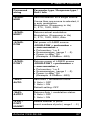
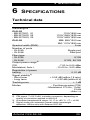
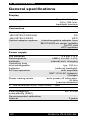
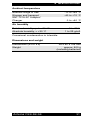
1
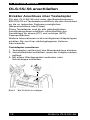
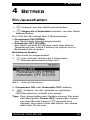
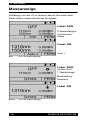
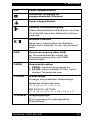
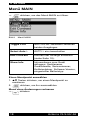
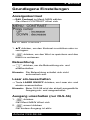
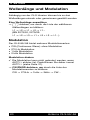
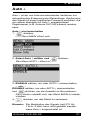
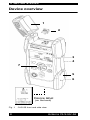
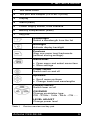
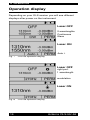
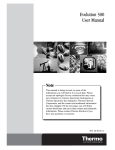
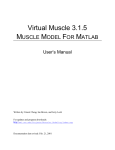
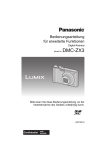
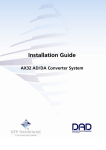
OLS-55, OLS-56
Optical Light Sources
Operating Manual
Bedienungsanleitung
Enabling Broadband & Optical Innovation
Acterna Test and Measurement Solutions
Enabling Broadband & Optical Innovation
Acterna Test and Measurement Solutions
OLS-55, OLS-56
Optical Laser Sources
Bedienungsanleitung
BN 2279/01
BN 2279/21
BN 2279/02
BN 2279/22
BN 2279/03
BN 2279/23
BN 2279/05
BN 2279/98.11
06.02
Deutsch
Wenn Sie Fragen haben, wenden Sie sich
bitte an die zuständige Acterna-Vertriebsgesellschaft. Die Adressen finden Sie am
Schluss dieses Handbuchs.
Copyrights
Dieses Produkt oder Teile davon basieren auf Empfehlungen und/oder Standards des Standardisierungssektors der
Internationalen Fernmeldeunion - ITU-T und/oder des
Europäischen Instituts für Telekommunikationsnormen ETSI. Diese Empfehlungen und Standards unterliegen
Schutzrechten dieser Organisationen. Ohne schriftliche
Zustimmung von ITU-T und/oder ETSI ist es nicht gestattet,
ITU-T-Empfehlungen oder ETSI-Standards ganz oder in
Teilen zu kopieren und/oder Dritten zugänglich zu
machen.
Acterna Germany GmbH
Mühleweg 5, 72800 Eningen u. A.
Order no.: BN 2279/98.11
Version: 06.02
Previous version: 05.06
Hinweis: Änderungen technischer Daten, Bezeichnungen
und Lieferangaben vorbehalten.
© Copyright 2006 Acterna, LLC. Alle Rechte vorbehalten.
“Acterna”, “Communications Test and Management
Solutions” und das Logo sind eingetragene Warenzeichen
der Acterna, LLC. Alle anderen Warenzeichen und
eingetragenen Warenzeichen sind das Eigentum ihrer
jeweiligen Inhaber.
Printed in Germanyl
Inhaltsverzeichnis
Inhaltsverzeichnis
1
Einführung
1
OLS-55/-56 Optical Laser Sources
Verwendete Symbole
1
2
2
Sicherheitshinweise
4
3
Vor dem Betrieb
7
4
5
6
7
Gerät auspacken
Geräteübersicht
Spannungsversorgung
Akku-/Batteriebetrieb
Netzbetrieb
OLS-55/-56 anschließen
7
8
10
11
13
14
Betrieb
15
Ein-/ausschalten
Messanzeige
Menü MAIN
Grundlegene Einstellungen
Wellenlänge und Modulation
Auto λ
Ausgangspegel
Wartung und Pflege
15
16
18
19
20
21
22
23
Fernsteuerung
24
Schnittstelle
Schlüssel
Befehle
24
24
25
Technische Daten
29
OLS-55/-56
Allgemeine technische Daten
29
30
Bestelldaten
32
Index
33
Acterna OLS-55/-56
i
Inhaltsverzeichnis
ii
Acterna OLS-55/-56
1 EINFÜHRUNG
1
EINFÜHRUNG
OLS-55/-56 Optical Laser
Sources
Besondere Merkmale
Die optischen Quellen OLS-55/-56 wurden entwickelt für
höchste Anforderungen beim Test optischer Signale und
Systeme, wie z.B. Breitband, PONs und Gigabit
Ethernet. Batteriebetrieb mit vier Zellen vom Typ AA
sowie das robuste, stoß- und spritzwassergeschützte
Gehäuse ermöglichen lange Messzeiten selbst unter
schwierigsten Bedingungen im Feld. Netzbetrieb über
ein separates Netzteil und die USB-Schnittstelle zur
Fernsteuerung gestatten aber auch den komfortablen
Einsatz des OLS-55/-56 im Labor und im
Produktionsumfeld.
Modellunterschiede
Die OLS-55/-56 Modellreihe erfüllt alle Anforderungen
hinsichtlich Moden (SM/MM), Wellenlängen und
Fasertypen. Folgende Liste stellt die Unterschiede dar:
Typ/
BN
Mode Wellenlänge
Fasertyp
OLS-55 2279/01
SM
1310/1550 nm
PC
2279/21
SM
1310/1550 nm
APC
2279/02
SM
1310/1550/1625 nm PC
2297/22
SM
1310/1550/1625 nm APC
2297/03
SM
1310/1490/1550 nm PC
2297/23
SM
1310/1490/1550 nm APC
OLS-56 2279/05
MM
850/1300 nm
SM
1310/1550 nm
Acterna OLS-55/-56
PC
1
1 EINFÜHRUNG
Testadapter
Der OLS-55/-56 wird über Adapter ins Testfeld
eingebunden, die für alle gängigen Anschlusssysteme
verfügbar sind (z.B. DIN, FC, ST). Die Adapter sind
sowohl für PC- als auch APC-Stecker passend.
Spannungversorgung und Schnittstelle
Der OLS-55/-56 kann entweder über Batterien/Akkus
(4 x AA/Mignon) oder über das separate erhältliche
Netzteil/Ladegerät SNT-121A betrieben werden. Akkus
werden beim Einsatz des Netzteils automatisch im
Gehäuse geladen; bei eingelegten Batterien erfolgt die
Stromversorgung über das Netzteil.
Die USB-Schnittstelle ermöglicht es, den OLS-55/-56
übe einen PC fernzusteuern. Das benötigte INF-File für
Windows XP wird mitgeliefert.
Verwendete Symbole
Folgende Symbole, Begriffe und Kennzeichnungen
werden in dieser Bedienungsanleitung verwendet:
Achtung
VORSICHT
Befolgen Sie die Hinweise, um eine
Beschädigung des Gerätes zu
vermeiden!
Warnung
WARNUNG
Befolgen Sie die Hinweise, um eine
Beschädigung des Gerätes oder
eine Verletzung zu vermeiden!
Gefahr
GEFAHR
2
Befolgen Sie die Hinweise, um eine
Beschädigung des Gerätes oder
schwere Verletzungen zu
vermeiden!
Acterna OLS-55/-56
1 EINFÜHRUNG
Gefährliche Spannung
GEFAHR
Befolgen Sie die Hinweise, um eine
Beschädigung des Gerätes oder
schwere Verletzungen durch
gefährliche elektrische
Spannungen zu vermeiden!
Laser-Strahlung
WARNUNG
!
Befolgen Sie die Hinweise, um eine
Beschädigung des Gerätes oder
eine Verletzung durch gefährliche
Laser-Strahlung zu vermeiden!
Wichtige Anleitung
Zum Beispiel
! Schützen Sie sich und andere vor
gefährlicher Strahlung.
✓
Voraussetzung
Klären Sie, ob diese Voraussetzung
zutrifft, z.B.
✓ Das Gerät ist eingeschaltet.
⇒
1.
2.
Handlungsschritt
kursive
Schrift
Ergebnis
fette Schrift
Tasten und Display-Elemente
Führen Sie die beschriebene
Handlung aus (Ziffern bei mehreren
Schritten), z.B.:
⇒ Modus wählen
Ergebnis nach einer Handlung, z.B.
Die Seite wird geöffnet.
Tasten und Displayelemente sind fett
geschrieben.
Acterna OLS-55/-56
3
2 SICHERHEITSHINWEISE
2
SICHERHEITSHINWEISE
Bestimmungsgemäßer Gebrauch
Unsachgemäßer Gebrauch
Unsachgemäßer Gebrauch kann
gefährlich für den Benutzer sein und
VORSICHT das Gerät beschädigen.
! Benützen Sie diese Gerät nur unter den
in dieser Anleitung angegebenen
Bedingungen und für den Zweck, für
den es entwickelt wurde.
! Beachten Sie die zulässigen
Umgebungsbedingungen und die
vorgeschriebenen Messgrenzen.
! Stellen Sie vor dem Einschalten sicher,
dass das Gerät in funktionsfähigem
Zustand ist.
Lasersicherheit
Unsichtbare LED- und Laserstrahlung!
WARNUNG
4
Dieses Gerät verfügt über einen Laser
der Klasse 1 nach DIN EN 60825-1.
Beachten Sie beim Umgang mit dem
Gerät und Lasersystemen folgende
Anweisungen:
! Blicken Sie niemals direkt in einen
Laserausgang oder in eine
angeschlossene Faser, wenn das
Gerät oder das System in Betrieb ist.
! Beachten Sie die üblichen
Sicherheitsstandards beim Umgang
mit Laserstrahlung.
Acterna OLS-55/-56
2 SICHERHEITSHINWEISE
Batterie-/Akkubetrieb
Explosionsgefahr
Trockenbatterien können explodieren
beim Versuch sie zu laden.
WARNUNG ! Stellen Sie sicher, dass Dry battery
gewählt wurde, wenn sie das SNT121A Netzteil/Ladegerät verwenden.
Kurzschließen der Akkus kann zur
Überhitzung, Explosion oder zur
Entzündung der Akkus oder ihrer
Umgebung führen.
! Kontakte der Akkus niemals
kurzschließen, d.h. die beiden Pole nie
gleichzeitig mit Metallteilen berühren.
SNT-121A Netzteil/Ladegerät
Schutzklasse
Das SNT-121A Netzteil/Ladegerät ist schutzisoliert
gemäß IEC 60950.
Umwelteinflüsse
Umgebungstemperatur zu hoch/
zu niedrig!
Temperaturen außerhalb des BetriebsVORSICHT bereichs von 0 bis +40 °C können das
SNT-121A Netzteil/Ladegerät
beschädigen oder dessen Funktion
und Sicherheit beeinträchtigen.
! Das SNT-121A Netzteil/Ladegerät nur
in Innenräumen verwenden.
! Das SNT-121A Netzteil/Ladegerät nur
bei Umgebungstemperaturen zwischen
0 und +40 °C betreiben.
Acterna OLS-55/-56
5
2 SICHERHEITSHINWEISE
Unzureichende Belüftung!
Eine unzureichende Belüftung kann
das SNT-121A Netzteil/Ladegerät
VORSICHT beschädigen oder dessen Funktion
und Sicherheit beeinträchtigen.
! Während des Betriebs des Netzteils für
ausreichende Belüftung sorgen.
Betauung!
Ein Betrieb bei Betauung kann das
SNT-121A Netzteil/Ladegerät
VORSICHT beschädigen oder dessen Funktion
und Sicherheit beeinträchtigen.
! Das SNT-121A Netzteil/Ladegerät nicht
bei Betauung betreiben.
! Lässt sich eine Betauung nicht
vermeiden, z. B. wenn das SNT-121A
Netzteil/Ladegerät kalt ist und in einen
warmen Raum gebracht wird, vor dem
Einstecken warten, bis das SNT-121A
Netzteil/Ladegerät trocken ist.
6
Acterna OLS-55/-56
3 VOR DEM BETRIEB
3
VOR DEM BETRIEB
Gerät auspacken
Verpackungsmaterial
Bitte bewahren Sie die Originalverpackung auf. Im Falle
einer Einsendung des Gerätes garantiert die
Verpackung einen sicheren Transport.
Überprüfen des Lieferumfangs
Ihr Gerät wurde mit folgendem Zubehör ausgeliefert:
• 1 Adapter (OLS-56: 2), (BN 2150/00.xx)
• 4 Batterien, Typ Mignon/AA
• Tasche mit Tragriemen MT-1S
• Bedienungsanleitung
Überprüfen auf Beschädigung
Überprüfen Sie das Geräte nach dem Auspacken bitte
auf Transportschäden. Insbesondere wenn an der
Verpackung deutliche Beschädigungen sichtbar sind. Im
Falle einer Beschädigung setzen Sie sich bitte mit Ihrer
nächstgelegenen Acterna Servicestelle in Verbindung;
Kontaktadressen finden Sie am Ende dieser Anleitung.
Maßnahme nach Lagerung und
Transport
Kondensfeuchtigkeit kann entstehen, wenn das Gerät
bei geringen Temperaturen gelagert oder transportiert
wurde und dann in ein wärmeres Umfeld gebracht wird.
Um Beschädigungen zu vermeiden nehmen Sie das
Gerät erst in Betrieb, wenn keine Kondensfeuchtigkeit
mehr an der Geräteoberfläche zu sehen ist. Betreiben
Sie das Gerät nur im spezifizierten Temperaturbereich
(siehe „Umgebungstemperatur”, Seite 31). Dies gilt
auch, wenn das Gerät bei sehr hohen Temperaturen
gelagert wurde.
Acterna OLS-55/-56
7
3 VOR DEM BETRIEB
Geräteübersicht
1
2
3
-----
4
7
5
----
6
Gerätedaten
(auf der Rückseite)
Bild 1
8
OLS-55 Front- und Seitenansicht.
Acterna OLS-55/-56
3 VOR DEM BETRIEB
1
Schutzkappe
2
Testadapter
3
Anzeige
4
Aufstellbügel (Rückseite)
5
Externe Spannungsversorgung, USB-Interface
6
Batteriefach (Rückseite)
7
Tastenfeld
Wellenlänge
Auswahl einer Wellenlänge aus der
Liste
Anzeigenbeleuchtung
Beleuchtung ein-/ausschalten
Vorheriges Menü
Im Menu einen Schritt zurück (ohne
Änderung von Einstellungen)
Menü/Eingabe
• Menü öffnen, Eintrag auswählen
• Einstellungen speichern
Ein-/Aus-Schalter
Gerät ein-/ausschalten
Auf/Ab
• Im Menü auf-/abspringen
• Ändern von Pegel und Wellenlänge
in den Menüs
LASER ON/OFF
Laser ein-/ausschalten
CW/FMOD
Modulation ändern:
CW - 270Hz - 1kHz - 2kHz - CW -...
LEVEL ADJUST
Ausgangspegel ändern
Tab. 1
Geräteübersicht und Bedienfeld.
Acterna OLS-55/-56
9
3 VOR DEM BETRIEB
Spannungsversorgung
Der OLS-55/-56 kann mit folgenden Spannungsquellen
betrieben werden:
• Vier 1,5 V Batterien (Typ Mignon/AA, empfohlener
Typ: Alkaline)
• Vier 1,2 V NiMH Akkus (Typ Mignon/AA)
• SNT-121A Netzteil/Ladegerät.
• Über USB-Schnittstelle im Fernsteuerbetrieb .
Batterien ersetzen
Das Batteriefach befindet sich auf der Rückseite des
Gerätes.
1. Deckel nach unten abziehen, um Batteriefach zu
öffnen.
2. Neue Batterien einlegen oder alte ersetzen.
Achtung: Beachten Sie die korrekte Polung der
Batterien. Die Polung ist am Boden des
Batteriefachs markiert.
3. Batteriefach schließen.
4. Zum Einschalten
drücken.
Nach dem Einschalten werden Sie aufgefordert, den
verwendeten Batterietyp zu wählen:
Bild 2
!
Menü zur Batteriewahl.
Beachten Sie unbedingt nachfolgende Anweisungen
zur Auswahl des richtigen Batterietyps.
10
Acterna OLS-55/-56
3 VOR DEM BETRIEB
Akku-/Batteriebetrieb
Batteriebetrieb
1. Batterien einsetzen (s. „Batterien ersetzen”, Seite 10)
2. Dry battery im Menü BATTERY CHANGED wählen
und
drücken.
Explosionsgefahr
Trockenbatterien können explodieren
beim Versuch sie zu laden.
WARNUNG ! Stellen Sie sicher, dass Dry battery
gewählt wurde, wenn sie das SNT121A Netzteil/Ladegerät verwenden.
Hinweis: Bei zusätzlicher Verwendung des SNT-121A
wird der OLS-55/-56 über den SNT-121A mit
Strom versorgt.
Akkubetrieb
Explosionsgefahr
Kurzschließen der Akkus kann zur
Überhitzung, Explosion oder zur
WARNUNG Entzündung der Akkus oder ihrer
Umgebung führen.
! Kontakte der Akkus niemals
kurzschließen, d.h. die beiden Pole nie
gleichzeitig mit Metallteilen berühren.
1. Akkus einsetzen (s. „Batterien ersetzen”, Seite 10)
2. Rechargeable im Menü BATTERY CHANGED
wählen und
drücken.
Akkus aufladen
Wird das SNT-121A Netzteil/Ladegerät verwendet und
die Akkukapazität fällt unter 90%, beginnt der
Ladezyklus (eine komplette Ladezeit dauert ca.
3 Stunden).
Acterna OLS-55/-56
11
3 VOR DEM BETRIEB
Das Gerät schaltet auf Erhaltungsladung um, sobald die
Akkus vollständig geladen sind.
Sollte der Ladevorgang nicht starten, obwohl das
Netzteil angeschlossen ist, kontrollieren Sie die
Batterieeinstellungen im INFO Menü.
Hinweis: Der Batterietyp kann nicht über die Tastatur
nachträglich geändert werden. Um den
Batterietyp zu ändern, muss wenigstens eine
Batterie bzw. ein Akku für mehr als 5
Sekunden entnommen werden. Nach dem
erneuten Einsetzen erfolgt die Abfrage des
Batterietyps (siehe Seite 10). Der Typ wird
bis zum nächsten Wechsel gespeichert.
Generelle Tipps zum Gebrauch von Akkus
• Stets sorgsam mit den Akkus umgehen.
• Die Akkus nicht fallen lassen, nicht beschädigen und
keinen unzulässig hohen Temperaturen aussetzen.
• Die Akkus nur im OLS-55/-56 in Verbindung mit dem
SNT-121A Netzteil/Ladegerät laden.
• Die Akkus einzeln oder eingebaut im Gerät nie länger
als ein bis zwei Tage unter sehr hohen Temperaturen
(z. B. im Auto) aufbewahren.
• Die entladenen Akkus nie längere Zeit im unbenutzten
Messgerät belassen.
• Die Akkus nie länger als sechs Monate lagern, ohne
sie zwischendurch zu entladen und aufzuladen.
• Tiefentladung vermeiden, da sich sonst die Polung
einer Zelle umkehren kann und dieser Akku
unbrauchbar wird.
Schütze die Umwelt
Batterien nach der Verwendung bitte nicht in den
normalen Abfall werfen. Dies gilt nicht nur für den
Wechsel, sondern auch für den Ausbau vor der
Verschrottung des Geräts. Geben Sie die Batterien bei
speziellen Sammelstellen für Sondermüll oder
Rohstoffverwertung ab, die es bereits in vielen Ländern
gibt. Meist können Sie die Batterien auch dort abgeben,
wo Sie neue kaufen. Batterien bzw. Akkus, die Sie von
Acterna bezogen haben, nehmen unsere Servicestellen
zurück.
12
Acterna OLS-55/-56
3 VOR DEM BETRIEB
Netzbetrieb
Der OLS-55/-56 kann neben Batterien auch mit dem
SNT-121A Netzteil/Ladegerät betrieben werden, was
sich insbesondere für die Arbeit in Labors oder bei
Workshops anbietet. Die Anschlussbuchse des Netzteils
befindet sich an der rechten Seite des OLS-55/-56.
Tipp: Das SNT-121A Netzteil/Ladegerät übernimmt
generell die Stromversorgung des OLS-55/-56,
sobald es angeschlossen wird, unabhängig ob
Batterien oder Akkus eingesetzt sind.
Passenden Netzadapter einsetzen
1. Benötigten Netzadapter wählen.
2. Adapter von oben in die Führung einschieben
(siehe unten).
Das SNT-121A Netzteil/Ladegerät ist betriebsbereit.
Bild 3
SNT-121A Netzteil/Ladegerät
Netzadapter auswechseln
1. SNT-121A wie gezeigt an eine Tischkante anlegen.
2. SNT-121A nach unten drücken.
3. Anderen Adapter wie zuvor beschrieben einsetzen.
Bild 4
SNT-121A: Adapter auswechseln.
Acterna OLS-55/-56
13
3 VOR DEM BETRIEB
OLS-55/-56 anschließen
Direkter Anschluss über Testadapter
Für den OLS-55/-56 sind unter den Bestellnummern
BN 2150/00.xx Testadapter erhältlich, die den Anschluss
an die zu testenden Systeme ermöglichen
(Messanschlüsse oder Faser).
Diese Testadapter sind für alle gebräuchlichen
Anschlusssysteme erhältlich; einschließlich der
Anschlüsse für ebene (PC) und schräge (APC)
Faserendflächen.
Weitere Informationen zu den verfügbaren Adaptertypen
erhalten Sie von Ihrer nächstgelegenen Acterna
Servicestelle.
Testadapter montieren
1. Testadapter vertikal auf den Messanschluss stecken.
2. Verschlusshebel schließen, wenn der Adapter sauber
aufliegt.
3. Mit einem Glasfaserkabel verbinden oder
Schutzkappe schließen.
2
1
Bild 5
14
BN 2150/00.xx adapter.
Acterna OLS-55/-56
4 BETRIEB
4
BETRIEB
Ein-/ausschalten
⇒
drücken, um das Gerät einzuschalten.
⇒
länger als 2 Sekunden drücken, um das Gerät
auszuschalten.
Der OLS-55/-56 verfügt über 2 Betriebsarten:
• Permanent ON (PERM):
das Gerät bleibt ständig eingeschaltet.
• Automatic OFF (ECON):
das Gerät schaltet 20 Minuten nach dem letzten
Tastendruck aus. Diese Funktion ist jedoch nur im
Batteriebetrieb wirksam.
Betriebsart ändern
✓ Das Gerät ist eingeschaltet.
1.
kurz drücken (kürzer als 2 Sekunden).
Das Betriebsartenmenü öffnet sich.
Bild 6
Wahl der Betriebsart.
2. Permanent ON oder Automatic OFF wählen.
3.
drücken, um die Auswahl zu speichern.
Das Menüfenster schließt sich wieder.
Tipp: Zum Ausschalten des Gerätes können Sie auch
den Menüpunkt Power OFF verwenden: hierzu
aus dem Betrieb heraus
zweimal kurz
drücken (der erste öffnet das Menü, der zweite
wählt den Punkt aus).
Acterna OLS-55/-56
15
4 BETRIEB
Messanzeige
Abhängig von der OLS-Version sehen Sie nach dem
Einschalten unterschiedliche Anzeigen:
Laser AUS
2 Wellenlängen
Continuous
Wave
Laser AN
Auto λ
Bild 7
OLS-55 Messanzeige
Laser AUS
rechter Port
1 Wellenlänge
Modulationsfrequenz
Laser AN
Bild 8
16
OLS-56 Messanzeige
Acterna OLS-55/-56
4 BETRIEB
OFF
Laser ausgeschaltet
Gewählter Ausgang im
ausgeschalteten Zustand
Laser eingeschaltet
Externe Stromversorgung
Wenn dieses Symbol sichtbar ist, wird der
OLS-55/-56 über das Netzteil mit Strom
versorgt.
Batterie-Zustand
Zeigt den Ladezustand der Batterie.
Wenn nicht sichtbar, ist nur das Netzteil
aktiv.
USB
Stromversorgung über USB
Im Fernsteuerbetrieb erfolgt die
Stromversorgung über die USBSchnittstelle.
PERM
Ausschaltfunktion
• PERM: Gerät ist permanent an
• ECON: Gerät schaltet 20 Min. nach
letztem Tastendruck aus.
1310nm
Wellenlänge
Anzeige der gewählten Wellenlänge.
Mögliche Kombinationen:
λ1 -> λ2 -> λ1 + λ2 -> λ1...
BN 2279/02, 2279/22:
λ1 -> λ2 -> λ3 -> λ1 + λ2 + λ3 -> λ1...
-3.00dBm
Ausgangspegel
Wird angezeigt für jede gewählte
Wellenlänge.
Acterna OLS-55/-56
17
4 BETRIEB
Menü MAIN
⇒
Bild 9
drücken, um das Menü MAIN zu öffnen.
Menü MAIN
Toggle Port
Nur OLS-56: Wechseln zwischen
beiden Ausgängen
Select Auto λ
AUTO λ ein-/ausschalten
Edit Contrast
Kontrast der Anzeige einstellen
(siehe Seite 19).
Show Info
Informationen zum Gerät
abfragen: Gerätename,
Gerätefamilie, Seriennummer,
Kalibrierdatum, Software-Version,
eingestellter Batterietyp.
Einen Menüpunkt auswählen
1. ▲▼ Tasten drücken, um einen Menüpunkt zu
markieren
2.
drücken, um ihn auszuwählen.
Menü ohne Änderungen verlassen
⇒
drücken
18
Acterna OLS-55/-56
4 BETRIEB
Grundlegene Einstellungen
Anzeigenkontrast
⇒ Edit Contrast im Menü MAIN wählen
Das Menü CONTRAST öffnet sich.
Bild 10 Menü CONTRAST
1. ▲▼ drücken, um den Kontrast zu erhöhen oder zu
verringern.
2.
drücken, um den Wert zu speichern und das
Menü zu verlassen.
Beleuchtung
⇒
drücken, um die Beleuchtung ein- und
auszuschalten
Hinweis: Die Beleuchtung schaltet sich nicht
automatisch aus.
Laser ein-/ausschalten
⇒ Taste LASER ON/OFF drücken, um Laser ein- und
wieder auszuschalten
Hinweis: Beim OLS-56 wird der aktuell ausgewählte
Ausgang ein- und ausgeschaltet.
Ausgang umschalten (nur OLS-56)
1.
drücken
Das Menü MAIN öffnet sich
2.
erneut drücken
Der andere Ausgang ist aktiv.
Acterna OLS-55/-56
19
4 BETRIEB
Wellenlänge und Modulation
Abhängig von der OLS-Version können bis zu drei
Wellenlängen einzeln oder gemeinsam gewählt werden.
Eine Wellenlänge auswählen
⇒
drücken, um durch die Liste der wählbaren
Wellenlängen zu blättern:
λ1 -> λ2 -> λ1 + λ2 -> λ1...
(BN 2279/02, 2279/22:
λ1 -> λ2 -> λ3 -> λ1 + λ2 + λ3 -> λ1...)
Modulation
Der OLS-55/-56 bietet mehrere Modulationsarten:
• CW (Continuous Wave): ohne Modulation
• 270 Hz Modulation
• 1 kHz Modulation
• 2 kHz Modulation
Modulation ändern
✓ Die Modulation kann nicht geändert werden, wenn
AUTO λ aktiviert ist. Deaktivieren Sie daher zuerst
AUTO λ (siehe Seite 21).
⇒ CW/FMOD drücken, um durch die Liste der
Modulationsarten zu blättern:
CW -> 270Hz -> 1kHz -> 2kHz -> CW...
20
Acterna OLS-55/-56
4 BETRIEB
Auto λ
Auto λ ist ein von Acterna entwickeltes Verfahren zur
automatischen Erkennung der Wellenlänge. Hierbei wird
das Signal mit einer bestimmten Frequenz moduliert, die
von einem ebenfalls mit Auto λ ausgestatteten
Pegelmesser (z.B. Acterna OLP-55) erkannt werden
kann.
Auto λ ein-/ausschalten
1.
drücken
Das Menü MAIN öffnet sich.
2. Select Auto λ wählen und
Das Menü AUTO λ öffnet sich.
drücken.
3. ENABLE wählen, um oder AUTO λ einzuschalten
– oder –
DISABLE wählen, um oder AUTO λ auszuschalten
drücken, um die Auswahl zu übernehmen.
und
Das Fenster schließt sich, das Menü MAIN ist wieder
sichtbar.
4.
drücken, um das Menü zu verlassen.
Hinweis: Die Modulation des Signals (mit 270 Hz,
1 kHz, 2 kHz) kann nicht gewählt werden,
wenn Auto λ eingeschaltet ist.
Acterna OLS-55/-56
21
4 BETRIEB
Ausgangspegel
Der Ausgangspegel
• kann für jede Wellenlänge separat eingestellt werden,
• kann für jeden Ausgang separat eingestellt werden
(nur OLS-56),
• kann bei ein- oder ausgeschaltetem Laser eingestellt
werden,
• wird beim Wechsel der Wellenlänge oder des
Ausgangs (nur OLS-56) sowie beim Ausschalten
gespeichert.
Pegelbereich
CW Modus:
0 bis -7 dBm
Moduliert und Auto λ:
-3 bis -10 dBm
Ausgangspegel verändern
1. Taste LEVEL ADJUST drücken
Das Display wechselt in den EDIT Modus.
Die erste Wellenlänge ist markiert.
2. ▲▼ drücken, um den Wert zu erhöhen/verringern
- einmalig drücken für schrittweises Ändern
- bei gehaltener Taste beschleunigt die Änderung.
3.
drücken, um die nächste Wellenlänge zu
wählen.
4.
drücken, um die Einstellungen zu übernehmen
und den EDIT Modus zu verlassen.
22
Acterna OLS-55/-56
4 BETRIEB
Wartung und Pflege
Es ist empfehlenwert, die optischen Stecker auf
Verschmutzungen zu überprüfen und sie im Bedarfsfall
zu säubern. Selbst kleinste Staubpartikel an den
Steckerendflächen oder in den Testadaptern können
sich nachteilig auf das Messergebnis auswirken.
1. Gerät ausschalten.
2. Entfernen Sie den Messadapter vom Testanschluss
(siehe Seite 14).
Die Steckerendfläche ist nun zugängig.
3. Wischen Sie die Steckerendfläche mit einem in
Isopropanol getränkten Baumwolltuch ab.
4. Blasen Sie den Testadapter mit Pressluft aus.
Tipp: Schließen Sie stets die Schutzkappe, wenn das
Gerät nicht benützt wird. Sie vermeiden dadurch
eine Verschmutzung.
Das Instrument reinigen
Sollte das Instrument durch den Gebrauch schmutzig
geworden sein, können Sie es mit einem weichen,
feuchten Tuch und einer milden Reinigungsflüssigkeit
säubern.
Beschädigung des Instruments
VORSICHT
Wasser oder Reinigungslösung, die in
das Innere gelangen, können das
Gerät beschädigen oder zerstören.
! Vermeiden Sie unbedingt, dass
Wasser oder Reinigungslösung in das
Innere des Instruments gelangt.
⇒ Einzelne Teile des Gerätes können im Falle einer
Verschmutzung auch vorsichtig mit Alkohol gereinigt
werden.
Acterna OLS-55/-56
23
5 FERNSTEUERUNG
5
FERNSTEUERUNG
Schnittstelle
Der OLS-55/-56 verfügt über eine USB-Schnittstelle zur
Kommunikation.
Eine INF-Datei für Windows 2000 und XP steht unter der
Internet-Adresse www.acterna.com zum Download
bereit.
Schlüssel
Nachfolgend finden Sie eine Liste der über die
Fernsteuerung einstellbaren Parameter.
Schlüssel
<NR1>
<NR2>
<NR3>
<NRf>
Ganzzahliger Wert: Bsp. 23 90
Fließkommazahl: Bsp. 23.45, 1.225
Exponentialzahl:
Bsp. 4.3E-3, -8.9456E8, 123E-5
<NR1> | <NR2> | <NR3>
<STRING RESPONSE_DATA>: IEEE4888.2, 8.7.1
Not A Number (NAN)
„Not a number“ wird repräsentiert durch 9.91E37 und ist
definiert in IEEE 754. Typische Applikationen teilen null
durch null oder subtrahieren unendlich von unendlich.
„Not a number“ wird auch benutzt, um fehlende Daten
darzustellen.
24
Acterna OLS-55/-56
5 FERNSTEUERUNG
Befehle
Befehlssequenz
Beschreibung
*IDN?
Returns the unique identification of
the device.
e.g. Acterna Germany GmbH,
OLS-55/01,XX-0106,V00.01
:DISP:
CONT
Sets the display contrast
:DISP:
CONT?
Returns the display contrast
:SYST:
DEV:
DEF
Sets the device parameters to their
default values. These are also
written to EEPROM.
:SYST:
ERR?
Returns the oldest error in the error
queue
Range 0 ... 15
0: minimum contrast
15: maximum contrast
Range 0 ... 15
0: minimum contrast
15: maximum contrast
e.g. -200, "Execution error;Maximum
Attenuation Exceeded" and deletes
this error from the queue.
:SYST:
PERM:
POW
Ensures the device is on
permanently i.e. that it does not
power down after 20 minutes
:Port
Select Port
Port_id: 1 or 2 dependent from OLS
If the OLS is a Single Port device
Port_id is always 1.
Acterna OLS-55/-56
25
5 FERNSTEUERUNG
Befehlssequenz
Beschreibung
:Port?
Returns Select Port
Port_id: 1 or 2 dependent from
selected port
:SOUR
Select LASER source
Source_id:
1= LASER1
2= LASER2
3= LASER1 and LASER2
(2 LASER PORT )
4= LASER3
7= LASER1, LASER2 and LASER3
(3 LASER PORT )
:SOUR?
Returns Selected LASER sources
Source_id:
1= LASER1
2= LASER2
3= LASER1 and LASER2 (2 LASER
PORT )
4= LASER3
7= LASER1, LASER2 and LASER3
(3 LASER PORT )
:SOUR:
STAT
Sets state of selected LASER
:SOUR:
STAT?
Returns state of LASER
26
State:
0 = LASER OFF
1 = LASER ON
State:
0 = LASER OFF
1 = LASER ON
Acterna OLS-55/-56
5 FERNSTEUERUNG
Befehlssequenz
Beschreibung
:SOUR:
MOD
Sets modulation for a single source.
:SOUR:
MOD?
Returns actual modulation.
:SOUR:
POW
Set power of LASER source
:SOUR:POW < portnumber >
< sourcenumber >
• Portnumber: 1 or 2
• Sourcenumber: (range 1 …3)
• Power: in dBm*100
(Example -5.22dBm= -522)
:SOUR:
POW?
Returns power of LASER source
:SOUR:POW? < portnumber >
< sourcenumber >
• Portnumber: 1 or 2
• Sourcenumber: (range 1 …3)
• Power: in dBm*100
(Example -5.22dBm= -522)
:WAV:
AUTO
Sets Auto λ modulation on/off.
0: Auto λ OFF
1: Auto λ ON
Default setting: OFF
:WAV:
AUTO?
Returns Auto λ modulation status.
0: Auto λ OFF
1: Auto λ ON
:SYST:
PORT
NUMB?
If more than one source is selected, it
is auto modulation.
Modulation: (Frequency in Hz)
0 , 270 , 1000, 2000
Modulation: (Frequency in Hz)
0 , 270 , 1000, 2000, Auto
Reads number of ports.
count: numbers of ports ( range 1 ... 2 )
Acterna OLS-55/-56
27
5 FERNSTEUERUNG
Befehlssequenz
Beschreibung
:SYST:
SOUR
NUMB?
Reads number of LASER sources.
:SYST:
WAV:
VAL?
Reads LASER wavelength
:SYST:WAV:VAL?< portnumber >
< lasernumber >
• portnumber: number of port
(range 1…2)
• lasernumber: number of LASER
(range 1…3)
• wavelength: wavelength of LASER
(in nm).
:SYST:
POW:
MAX?
Reads max. power of LASER
:SYST:POW:MAX?< portnumber >
< lasernumber >
• portnumber: number of port
(range 1…2 )
• lasernumber: number of LASER
(range 1…3)
• maxpower: power of LASER
(in dBm*100).
:SYST:
POW:
MIN?
Reads min. power of LASER
:SYST:POW:MIN?< portnumber >
< lasernumber >
• portnumber: number of port
(range 1…2 )
• lasernumber: number of LASER
(range 1…3)
• minpower: power of LASER
(in dBm*100).
28
• port number: number of port
(range 1…2 )
• count: numbers of LASER sources
(range 1 ... 3)
Acterna OLS-55/-56
6 TECHNISCHE DATEN
6
TECHNISCHE DATEN
OLS-55/-56
Wellenlängen1)
OLS-55
- BN 2279/01, 21
- BN 2279/02, 22
- BN 2279/03, 23
OLS-56
Spektrale Breite (RMS)
Anzahl der Ausgänge
- OLS-55
- OLS-56
Faser typ
- OLS-55
- OLS-56
Ausgangsleistungen2)
CW
Modulation, Auto λ
Auflösung Leistung
Signalstabilität3)
- Kurzzeit
- Langzeit
Tracking-Fehler
Betriebsarten
1310/1550 nm
1310/1550/1625 nm
1310/1490/1550 nm
MM: 850/1300 nm
SM: 1310/1550 nm
5 nm
Single port
Dual port
9/125
9/125, 50/125
-7.00 to 0.00 dBm
-10.00 to -3.00 dBm
0.01 dB
± 0.02 dB (innerhalb 15 min.)
± 0.20 dB (innerhalb 8 h)
± 1 dB
- Continuous wave (CW)
- Moduliert: 270 Hz, 1 kHz,
2 kHz
- Auto λ4)
1) typ. ± 20 nm
2) CW-Signal, T=23°C±3K, einschließlich Stecker, abhängig von
der Qualität des Steckers am OLS
3) Temperaturbereich -10 °C to +55 °C, ΔT = ±0.3K
4) Signalkodierung zur automatischen Wellenlängenerkennung.
Nur in Verbindung mit Acterna OLP-55.
Acterna OLS-55/-56
29
6 TECHNISCHE DATEN
Allgemeine technische Daten
Display
Display-Typ
Grafisches Display,
64 x 128, s/w.
mit Beleuchtung
Anschlüsse
Anschlusstyp
- BN 2279/01/02/03/05
- BN 2279/21/22/23
Optisches
Adaptersystem
PC
APC
Austauschbare Adapter
(BN 2150/00.xx),
passend für PC und
APC Systeme
Spannungsversorgung
Batterien
Akkus
Betriebsdauer mit
Batterien/Akkus
Netzbetrieb
Stromsparschaltung
4 x AA, 1.5 V
NiMH, 4 x AA, 1.2 V,
internes Aufladen
typ. 100 Std.1)
(ohne Beleuchtung)
mit separatem SNT-121A
Netzteil/Ladegerät
automatische Abschaltung
nach ca. 20 min
(abschaltbar)
1) Bei einer aktiven Wellenlänge, Ausgangsleistung -7 dBm
Elektromagnetische
Kompatibilität (EMC)
Empfohlene
Kalibrierintervalle
30
IEC 61326
3 Jahre
Acterna OLS-55/-56
6 TECHNISCHE DATEN
Umgebungstemperatur
-10 to +55 °C
-40 to +70 °C
Arbeitsbereich
Lagerung und Transport
SNT-121A Netzteil/
Ladegerät
0 to +40 °C
Luftfeuchtigkeit
Relative Feuchte bis +30 °C
Absolute Feuchte > +30 °C
5 bis 95%
1 to 29 g/m3
Gelegentliche Kondensation ist zulässig
(nur OLS-55/-56).
Abmessungen und Gewicht
Abmessungen (B x H x T)
Gewicht
Acterna OLS-55/-56
95 x 60 x 195 mm
ca. 500 g
(inkl. Batterien)
31
7 BESTELLDATEN
7
BESTELLDATEN
OLS-55 Optical Light Source
2 Wellenlängen 1310/1550 nm, PC
2 Wellenlängen 1310/1550 nm, APC
3 Wellenlängen 1310/1550/1626 nm, PC
3 Wellenlängen 1310/1550/1626 nm, APC
3 Wellenlängen 1310/1490/1550 nm, PC
3 Wellenlängen 1310/1490/1550 nm, APC
BN 2279/01
BN 2279/21
BN 2279/02
BN 2279/22
BN 2279/03
BN 2279/23
OLS-56 Optical Light Source
4 Wellenlängen, MM + SM
BN 2279/05
Kalibrierbericht
BN 2279/90.01
Zubehör
Optische Adapter
OCK-10 Optisches
Reinigungsset
Reinigungsband für optische
Anschlüsse
Ersatzband für optisches
Reinigungsband
NiMH Akkus (AA Typ, 1,2 V)
SNT-121A Netzteil/Ladegerät
(weltweit kompatibel)
Tasche mit Riemen
MT-1S
Soft case für 2 Instrumente
MT-2S
Soft case für 3 Instrumente
MT-3S
Hard case für 3 Instrumente
MK-3S
32
BN 2150/00.xx
BN 2229/90.21
BN 2229/90.07
BN 2229/90.08
BN 2237/90.02
BN 2277/90.01
BN 2277/90.02
BN 2126/03
BN 2126/04
BN 2093/31
Acterna OLS-55/-56
Index
A
Kontrast 19
Akkubetrieb 11
Akkus
aufladen 11
Generelle Tipps 12
Typ 10
Anzeigenkontrast 19
Ausgang umschalten (nur OLS56) 19
Ausgangspegel 22
Auto Lambda 21
L
B
Batterie-/Akkubetrieb 5
Batteriebetrieb 11
Batterien
ersetzen 10
Typ 10
Beleuchtung 19
Beschädigung 7
Bestimmungsgemäßer Gebrauch 4
Betriebsart ändern 15
C
Contrast Menü 19
E
ECON 15
Ein-/ausschalten 15
G
Lagerung und Transport
Maßnahme nach 7
Laser ein-/ausschalten 19
Lasersicherheit 4
Lieferumfang 7
M
Main Menu 18
Menü
Contrast 19
Main 18
Messanzeige 16
Modellunterschiede 1
Modulation 20
N
Netzadapter 13
Netzadapter einsetzen/auswechseln 13
Netzbetrieb 13
P
PERM 15
S
Schutzklasse 5
Spannungsversorgung 10
T
Geräteübersicht 8
Testadapter 2
montieren 14
H
U
Highlights 1
Umwelteinflüsse 5
I
V
Instrument reinigen 23
Verpackungsmaterial 7
K
W
Kondensation 7
Wartung und Pflege 23
Acterna OLS-55/-56
Acterna hat ein proaktives
Umweltmanagementsystem
Auf dem Gebiet der Messtechnik für die Daten- und Telekommunikation überzeugen wir seit Jahrzehnten mit Qualität und Leistung. Mit unserem Umweltmanagementsystem wollen wir an
diese Tradition anknüpfen.
Ein Baustein in unserem Gesamtmanagementsystem ist das
zukunftsorientierte, proaktive Umweltmanagementsystem.
Gemeint ist damit: Umweltschutz empfinden wir nicht als Last,
sondern vielmehr als Chance und lohnenswerte Aufgabe für
unser Unternehmen. Eine positive Einstellung zur Umwelt hilft,
den Geschäftserfolg zu sichern. Dieses gehört zum Selbstverständnis von Acterna.
Das Umweltmanagementsystem ist integraler Bestandteil der
Acterna-Unternehmenspolitik und der Unternehmensziele. Unter
Umweltmanagement verstehen wir die Entwicklung von langfristig
tragfähigen Lösungen im Spannungsfeld von Ökonomie, Technologie und Ökologie.
Die Grundlage des systematischen Umweltmanagements von
Acterna ist seine transparente Struktur und eine nachvollziehbar
organisierte Dokumentation. Diese Transparenz des umweltrelevanten Tuns ermöglicht uns und unseren Geschäftspartnern eine
optimale Zusammenarbeit. Mit der Kenntnis unseres Systems
können Anforderungen klar formuliert werden; wir können mit kürzesten Reaktionszeiten auf spezielle Bedürfnisse eingehen.
Unser proaktives Umweltmanagementsystem
unterstützt Sie:
Beim Einsatz der Acterna-Produkte
Bei der Planung, Entwicklung/Konstruktion und Herstellung von
Acterna-Produkten werden umweltbezogene Belange und Restriktionen besonders berücksichtigt. Dieses erstreckt sich von der
Auswahl der verwendeten Rohstoffe/Halbzeuge und der zur
Anwendung kommenden Herstellprozesse, über den Energieverbrauch im Betrieb, bis zur Schlussphase des Produktlebens in
Form einer demontagefreundlichen Baustruktur.
Bei der Deklarierung gefährlicher Stoffe in Produkten
Die Vermeidung bzw. ein sorgsamer Umgang mit Gefahrstoffen in
der Produktion und in den Produkten hat bei Acterna höchste Priorität. Eine Gefahrstoffliste beinhaltet alle zu vermeidenden
Stoffe; ist dieses technisch nicht möglich, erfolgt eine Kennzeichnung in der produktspezifischen Dokumentation bzw. im/am Produkt.
Bei der Wiederverpackung von Acterna-Produkten
Zum Einsatz kommen wiederverwendbare Transportverpackungen. Bevorzugt werden überall dort, wo es transporttechnisch
möglich ist, unkritische Einstoffverpackungen.
Beim Aufbau eines eigenen Managementsystems
Nur durch umweltkompetente Partner wird die geforderte Sorgfaltspflicht erfüllt. Dieses schützt vor kritischen Fragen Dritter.
Bei der Entsorgung von Produkten
Dieses Produkt entspricht der europäischen Richtlinie 2002/96/
EC zur Entsorgung elektrischer und elektronischer Altgeräte
(WEEE, Waste Electrical and Electronic Equipment).
Entsorgen Sie diese Produkt nicht ungetrennt mit Ihrem
Hausmüll, sondern führen Sie es einer getrennten Entsorgung
gemäß Ihren nationalen Bestimmungen zu.
In der Europäischen Union können alle von
Acterna nach dem 13. August 2005
gekauften elektronischen Messsysteme
nach Ablauf ihrer Nutzungsdauer
zurückgegeben werden. Die hiervon
betroffenen Messsysteme erkennen Sie an
dem rechts abgebildeten Symbol einer
durchgestrichenen Mülltone mit schwarzem
Balken, das am Gerät selbst oder in
begleitenden Unterlagen zu finden ist.
Weitere Informationen zum Umweltmanagementprogramm von
Acterna erhalten Sie unter folgenden Adressen:
Deutschland
Umweltmanagement:
Tel. +49-(0)7121 86 1470
Fax +49-(0)7121 86 1502
Großbritannien
Design Office:
Tel. +44-1752 772 773
Fax +44-1752 709 897
Amerika
Environmental Management:
Tel. +1-919 941 5730
Fax +1-919 941 5751
Frankreich
Environmental Management:
Tel. +33-(0)2 99 84 70 40
Fax +33-(0)2 99 84 70 44
Internationaler Firmensitz
One Milestone Center Court
Germantown, Maryland
20876-7100
USA
Acterna ist in mehr als 80 Ländern vertreten. Um Ihre örtliche Verkaufsniederlassung zu
finden, besuchen Sie:
www.acterna.com
Regionale Vertriebszentren
Europa,
Naher Osten und Afrika
Muehleweg 5
72800 Eningen u.A.
Deutschland
Tel.: +49 7121 86 2222
Fax: +49 7121 86 1222
Schweiz
Acterna Schweiz AG
Morgenstrasse 83
Postfach 779
CH-3018 Bern
Schweiz
Tel.: +43 996 44 11
Fax: +41 996 44 22
Österreich
Acterna Austria GmbH
Aredstrasse 16-18
A-2544 Leobersdorf
Österreich
Tel.: +43 2256 65610
Fax: +43 2256 65610-22
OLS-55, OLS-56
Optical Laser Source
Operating Manual
BN 2279/01
BN 2279/21
BN 2279/02
BN 2279/22
BN 2279/03
BN 2279/23
BN 2279/05
BN 2279/98.11
06.02
English
Please contact your local Acterna Sales
Company if you have any questions
regarding this product. The addresses are
listed at the end of this manual.
Copyrights
This product or parts of this product are based on the
Recommendations and/or Standards issued by the
Standardization Sector of the International
Telecommunications Union - ITU-T and/or the European
Telecommunications Standards Institute - ETSI. These
Recommendations and Standards are copyright to these
organizations. ITU-T Recommendations or ETSI Standards
may not be copied and/or made available to third parties in
whole or in part without the written agreement of ITU-T
and/or ETSI.
Acterna Germany GmbH
Mühleweg 5, 72800 Eningen u. A.
Order no.: BN 2279/98.11
Version: 06.02
Previous version: 05.06
Note: Changes may be made to specifications,
descriptions and delivery information.
© Copyright 2006 Acterna, LLC. All rights reserverd.
“Acterna”, “Communications Test and Management
Solutions” and the Acterna logo are registered trademarks
of Acterna, LLC. All other trademarks and registered
trademarks are the properties of their respective owners.
Printed in Germany
Contents
Contents
1
Introduction
1
The OLS-55/-56 Optical Laser Sources
Symbols used in this operating manual
1
2
2
Safety Information
4
3
Getting Started
7
4
5
6
7
Unpacking the device
Device overview
Power Supply
Battery operation
Operation from AC power
Connecting the OLS-55/-56
7
8
10
11
13
14
Operation
15
Power ON/OFF
Operation display
Main Menu
Basic operation
Wavelength and modulation
AUTO λ mode
Power level
Maintenance
15
16
18
19
20
21
22
23
Remote Control
24
Communication interface
Key
Non-Instrument mode commands
24
24
25
Specifications
29
Technical data
General specifications
29
30
Ordering Information
32
Index
33
Acterna OLS-55/-56
i
Contents
ii
Acterna OLS-55/-56
1 INTRODUCTION
1
INTRODUCTION
The OLS-55/-56 Optical Laser
Sources
Highlights
The OLS-55/-56 Optical Laser Sources are designed for
highest performing testing of all optical signals and
systems, i.e. broadband, PONs, and Gigabit Ethernet.
Battery operation with four AA batteries and the robust,
shock-proof and splash-proof design allow a long
operation time in the field even under tough conditions.
AC line operation via a separate AC adapter and the
USB interface for remote control allow also comfortable
use in labs or production environments.
Differences between devices
The OLS-55/-56 family covers the complete range of
needed modes, wavelengths and fibertypes. Following
table list the differences between the devices:
Type/
BN
Mode Wavelengths
Fibertype
OLS-55 2279/01
SM
1310/1550 nm
PC
2279/21
SM
1310/1550 nm
APC
2279/02
SM
1310/1550/1625 nm PC
2279/22
SM
1310/1550/1625 nm APC
2279/03
SM
1310/1490/1550 nm PC
2279/23
SM
1310/1490/1550 nm APC
OLS-56 2279/05
MM
850/1300 nm
SM
1310/1550 nm
Acterna OLS-55/-56
PC
1
1 INTRODUCTION
Test adapters
The OLS-55/-56 is looped into the test configuration
using test adapters which are available for all common
connector systems (e.g. DIN, FC, ST). These adapters
are suitable both for PC and APC connectors.
Power supply and interface
The OLS-55/-56 can be powered either by batteries (4 x
AA dry or rechargeable) or by the AC Adapter/Charger.
When using rechargeable batteries and the AC Adapter/
Charger, the batteries are recharged automatically.
Together with dry batteries, the instrument is supplied
from the AC Adapter/Charger.
A USB interface allows remote control via a PC.
A software driver for Windows XP is included.
Symbols used in this operating
manual
Following symbols are used in this operating manual:
Caution
Follow the instructions carefully to
avoid damage!
CAUTION
Warning
WARNING
Follow the instructions carefully to
avoid damage or injury!
Danger
DANGER
2
Follow the instructions carefully to
avoid damage or severe injury!
Acterna OLS-55/-56
1 INTRODUCTION
High Voltage
DANGER
Follow the instructions carefully to
avoid damage or severe injury!
This safety instruction is given when
high voltage causes the danger
Laser
WARNING
Follow the instructions carefully to
avoid damage or injury!
This safety instruction is given when
laser radiation causes the danger.
Additional information is given to
specify the laser class.
!
Very important instruction
Follow carefully the advice, e.g.
! Make sure that you protect yourself
and others from exposure to laser
light.
✓
Requirement
This requirement has to be checked
first, e.g.
✓ The system is switched on
⇒
Instruction
Here is your input requested, e.g.:
⇒ Select mode
italics type
face
Result
Result following an action, e.g.
The page opens.
bold type
face
Keys and display elements
Keys and display elements are
marked in bold type face.
Acterna OLS-55/-56
3
2 SAFETY INFORMATION
2
SAFETY INFORMATION
Proper usage
Non-compliant usage
CAUTION
Non-compliant usage can be
hazardous to the user or damage the
device itself.
! Please make sure the allowable
ambient conditions are not violated!
! Also note the specified measurement
range!
! Before powering up the device, always
make sure that it is in proper working
order.
Laser safety
Invisible LED and Laser radiation!
WARNING
4
This device contains a Class 1 Laser
product according to DIN EN 60825-1.
Please take notice of following
instructions:
! When the system or test generator is
switched on, never look directly into the
output or into a connected optical fiber.
! Please heed the normal precautions
for working with lasers and consider
local regulations.
Acterna OLS-55/-56
2 SAFETY INFORMATION
Battery Operation
Explosion danger
WARNING
Dry batteries can explode if you
attempt to recharge them.
! Make sure to select Dry battery as
battery type when using dry batteries
and the SNT-121A AC Adapter/
Charger.
Short-circuit of batteries can result in
overheating, explosion or ignition of
the batteries and their surroundings.
! Never short-circuit the battery contacts
by touching both contacts
simultaneously with a metal object.
SNT-121A AC Adapter/Charger
Safety class
The SNT-121A AC Adapter/Charger Unit is protectively
isolated in conformance with IEC 60950.
Environmental conditions
Ambient temperature too high/low
CAUTION
Temperatures outside the operating
range of 0 to +40 °C can damage the
SNT-121A AC Adapter/Charger Unit or
adversely affect its function and safety.
! The SNT-121A AC Adapter/Charger
Unit must only be operated indoors.
! The SNT-121A AC Adapter/Charger
Unit must only be operated at ambient
temperatures between 0 and +40 °C.
Acterna OLS-55/-56
5
2 SAFETY INFORMATION
Insufficient ventilation
CAUTION
Insufficient ventilation can damage the
SNT-121A AC Adapter/Charger Unit or
adversely affect its function and safety.
! Ensure adequate ventilation when
operating the SNT-121A AC Adapter/
Charger Unit.
Condensation
CAUTION
6
Operation in the presence of
condensation can damage the
SNT-121A AC Adapter/Charger Unit or
adversely affect its function and safety.
! Do not operate the SNT-121A AC
Adapter/Charger Unit if condensation
has formed.
! If condensation cannot be avoided,
such as when the SNT-121A AC
Adapter/Charger Unit is cold and is
moved to a warm room, wait until the
SNT-121A AC Adapter/Charger Unit is
dry before plugging it into the AC power
line.
Acterna OLS-55/-56
3 GETTING STARTED
3
GETTING STARTED
Unpacking the device
Packing material
We suggest that you keep the original packing material.
It is designed for reuse (unless it is damaged in transit).
Using the original packing material is your guarantee of
protecting the device during transit.
Checking the package contents
Your level meter is shipped with the following
accessories:
• 1 adapter (OLS-56: 2), (BN 2150/00.xx)
• 4 dry batteries AA
• Belt bag MT-1S
• Operating manual
Checking for damages in transit
After you unpack the device, check to see whether it was
damaged in transit. This is particularly likely if the
packaging is clearly damaged. If there is damage, do not
attempt to operate the device. Doing so can cause
further damage. In case of a damage, please contact
your local Acterna Sales Company. The addresses are
listed at the end of this manual.
Recovery following storage/transport
Condensation can occur if a device that is stored or
transported at a low temperature is brought into a warm
room. To avoid damages, wait until no more
condensation is visible on the surface before powering
up the device. Do not operate the device until it has
reached its guaranteed temperature range (see
“Ambient temperature”, page 31). This also applies if the
device is stored at a high temperature .
Acterna OLS-55/-56
7
3 GETTING STARTED
Device overview
1
2
3
-----
4
7
5
----
6
Device label
(on the back)
Fig. 1
8
OLS-55 front and side view.
Acterna OLS-55/-56
3 GETTING STARTED
1
Test head cover
2
Test port and adapter (OLS-56: 2 ports)
3
Display
4
Stand (back)
5
Power Supply socket, USB interface
6
Battery compartment (back)
7
Key pad
Wavelength
Select a wavelength from the list
Backlight
Activate display backlight
Previous
Step one menu level backwards
(without storing settings)
Menu/Enter
• Open menu and select menu item
• Store settings
Power On/Off
Switch unit on and off
Up/Down
• Scroll menu up/down
• Change levels and wavelengths
LASER ON/OFF
Switch laser on/off
CW/FMOD
Change modulation type:
CW - 270Hz - 1kHz - 2kHz - CW - ...
LEVEL ADJUST
Change power level
Table 1
Device overview and key pad.
Acterna OLS-55/-56
9
3 GETTING STARTED
Power Supply
The following power sources can be used to operate the
OLS-55/-56:
• Four 1.5 V dry batteries (Mignon/AA size, Alkaline type
recommended)
• Four 1.2 V NiMH rechargeable batteries
(Mignon/AA size)
• The SNT-121A AC Adapter/Charger.
• Via USB interface in remote operation.
Replacing batteries
The battery compartment is on the back of the
instrument.
1. Pull down lid to open the battery compartment.
2. Place in new batteries or remove the used batteries
with fresh ones.
Notice: Take care of the correct polarity of the
batteries. It is indicated by a diagram on the
floor of the battery compartment.
3. Close the battery compartment.
4. Press
to switch on.
After powering on the device you are asked in the
BATTERY CHANGED menu to specify whether dry
batteries or rechargeable batteries are used.
Fig. 2
!
Setup menu for battery type.
Please note the following advice to select the proper
battery type.
10
Acterna OLS-55/-56
3 GETTING STARTED
Battery operation
Operation with dry batteries
1. Insert batteries (see "Replacing batteries", page 10)
2. Select Dry battery in the BATTERY CHANGED menu
and press
.
Explosion danger
Dry batteries can explode if you
attempt to recharge them.
WARNING ! Make sure to select Dry battery as
battery type when using dry batteries
and the SNT-121A AC Adapter/
Charger.
Note: When using the SNT-121A additionally the OLS55/-56 is supplied from the SNT-121A.
Operation with rechargeable batteries
Explosion danger
Short-circuit the batteries can result in
overheating, explosion or ignition of
WARNING the batteries and their surroundings.
! Never short-circuit the battery contacts
by touching both contacts
simultaneously with a metal object.
1. Insert batteries (see "Replacing batteries", page 10)
2. Select Rechargeable in the BATTERY CHANGED
menu and press
.
Recharging the batteries
When using the SNT-121A, and the battery capacity is
lower 90%, the batteries are recharged (complete
recharging takes about 3 hours). The instrument
switches to trickle charging automatically as soon as the
batteries are fully charged.
Acterna OLS-55/-56
11
3 GETTING STARTED
If the charge cycle does not start although the Adapter/
Charger is connected, please check the battery setup in
the INFO menu.
Note: The battery type can not be selected by the
instrument keys. To change the battery type the
battery compartment must be opened and at least
one battery must be removed for more than five
seconds. After replacing the battery the
OLS-55/-56 asks for the battery type (see
page 10). The battery type you choose then will
be stored until you change the batteries again.
General tips on using rechargeable batteries
• Always handle rechargeable batts. with care.
• Do not drop or damage the rechargeable batteries or
expose them to excessively high temperatures.
• Only recharge the batteries while they are fitted in the
OLS-55/-56 and only use the SNT-121A for this
purpose.
• Do not store the batteries for more than one or two
days at very high temperatures (e.g. in a vehicle),
either separately or fitted in the instrument.
• Do not leave discharged batteries in the instrument for
a long time if it is not being used.
• Do not store rechargeable batteries for more than 6
months without discharging and recharging them at
intervals.
• Avoid deep discharging the batteries as this can cause
the cell polarity to reverse and make the battery
useless.
Protect the environment
Please dispose of any unwanted dry batteries or
rechargeable batteries carefully. They should therefore
also be removed from the instrument if it is to be
scrapped. If facilities in your country exist for collecting
waste or for recycling, please make use of them rather
than throwing the batteries in the normal trash. You will
often be able to return used batteries to the place where
you purchase new ones. Any dry or rechargeable
batteries that you purchased from Acterna can be
returned to one of our Service Centers for disposal.
12
Acterna OLS-55/-56
3 GETTING STARTED
Operation from AC power
The OLS-55/-56 can also be powered from the
SNT-121A AC Adapter/Charger only if it is mainly to be
used in one place, such as in a laboratory or test
workshop. There is a socket on the side of the
OLS-55/-56 for plugging in the cable of the SNT-121A.
Tip: The SNT-121A provides power even if dry or
rechargeable batteries are fitted in the instrument.
Fitting the AC line plug adapter
1. Select the appropriate AC line plug adapter.
2. Slide the AC line plug adapter into the slot.
The SNT-121A AC Adapter/Charger is ready for use.
Fig. 3
SNT-121A AC Adapter/Charger
Changing the AC line plug adapter
1. Place the SNT-121A against the edge of a table or
bench as shown.
2. Push the SNT-121A downwards.
3. Slide another AC line plug adapter into the slot.
Fig. 4
SNT-121A: Changing the AC line plug adapter
Acterna OLS-55/-56
13
3 GETTING STARTED
Connecting the OLS-55/-56
Direct connection via test adapters
The BN 2150/00.xx range of accessories includes a
number of test adapters for connecting the OLS-55/-56
to the interface to be tested (connector or bare fiber).
Using these adapters, you can connect all standard
optical connector types to the instrument. The test
adapters are suitable for connectors with planar (PC)
and angled (APC) end surfaces .
For available adapter types contact your local Acterna
service office.
Mounting the adapters
1. Place the test adapter vertically on the optical
connector.
2. Close the locking lever when the test adapter is firmly
seated. You will hear the locking mechanism lock.
3. Fit the fiber optic cable to the test adapter or close the
dust cap.
2
1
Fig. 5
14
BN 2150/00.xx adapter.
Acterna OLS-55/-56
4 OPERATION
4
OPERATION
Power ON/OFF
⇒ Press
to power on the device.
⇒ Press
for more than 2 sec. to power off the
device.
The OLS-55/-56 provides two power modes:
• Permanent ON:
the device remains powered on
• Automatic OFF:
the device powers off 20 min. after last key press. This
function is available only in battery mode.
To change power mode
✓ The device is powered on.
1. Press
shortly (for less than 2 sec.).
The power mode EDIT menu opens:
Fig. 6
Power mode EDIT menu
2. Select Permanent ON or Automatic OFF.
3. Press
to set power mode.
The menu window closes.
Tip: To power off the device, you also can use the Power
OFF item in this menu: Just press
button twice
(first press opens the menue, the second selects the
item).
Acterna OLS-55/-56
15
4 OPERATION
Operation display
Depending on your OLS version you will see different
displays after power on the instrument:
Laser OFF
2 wavelengths
Continuous
Wave
Laser ON
Auto λ
Fig. 7
OLS-55 operation display
Laser OFF
right port
1 wavelength
modulation
Laser ON
Fig. 8
16
OLS-56 operation display
Acterna OLS-55/-56
4 OPERATION
OFF
Laser switched OFF
Selected port in OFF mode
Laser switched ON
External power supply
When symbol is shown the OLS-55/-56 is
powered by the external AC adapter
Battery status
Shows actual battery status. If not shown
just the AC adapter is in use.
USB
PERM
Power supply via USB
In remote operation the device is powered
via the USB interface.
Power OFF mode
• PERM: device remains powered on
• ECON: device powers off 20 min. after
last key press.
1310nm
Wavelength
Selected wavelength.
Possible combinations:
λ1 -> λ2 -> λ1 + λ2 -> λ1...
BN 2279/02, 2279/22:
λ1 -> λ2 -> λ3 -> λ1 + λ2 + λ3 -> λ1...
-3.00dBm
Power level
Displayed for each selected wavelength
Acterna OLS-55/-56
17
4 OPERATION
Main Menu
⇒ Press
Fig. 9
to open the MAIN menu.
MAIN menu
Toggle Port
OLS-56 only: Toggle between
the two ports
Select Auto λ
Switch ON/OFF AUTO λ
Edit Contrast
Adjust display contrast (see
page 19).
Show Info
View device information: device
name, family, serial number,
calibration date, software
version, battery type.
Selecting an item
1. Press ▲▼ keys to mark the desired item.
to select it.
2. Press
Leaving the menu without changes
⇒ Press
18
Acterna OLS-55/-56
4 OPERATION
Basic operation
Adjust display contrast
⇒ Select Edit Contrast in the MAIN menu
The CONTRAST menu opens.
Fig. 10 CONTRAST menu
1. Press ▲▼ to increase or decrease contrast.
2. Press
to store value and leave menu.
Backlight
⇒ Press
to switch backlight on and off.
Note: Backlight will not switch off automatically.
Switch Laser ON/OFF
⇒ Press LASER ON/OFF to toggle between ON and
OFF mode.
At OLS-56 the actual selected port will be switched
on/off.
Toggle port (OLS-56 only)
1. Press
The Main menu opens.
2. Press again
The other port is active.
Acterna OLS-55/-56
19
4 OPERATION
Wavelength and modulation
Depending on your OLS version up to three wavelengths
can be selected separately or together.
Selecting a wavelength
⇒ Press
to skip through available wavelengths:
λ1 -> λ2 -> λ1 + λ2 -> λ1...
(BN 2279/02, 2279/22:
λ1 -> λ2 -> λ3 -> λ1 + λ2 + λ3 -> λ1...)
Modulation
The OLS-55/-56 provides several modes for modulate
the optical signal:
• CW: continuous wave
• 270 Hz modulation
• 1 kHz modulation
• 2 kHz modulation
Changing modulation
✓ Modulation can not be changed manually when
AUTO λ is activated. You first have to disable AUTO λ
(see page 21).
⇒ Press CW/FMOD key to skip through available
modulation modes:
CW -> 270kHz -> 1kHz -> 2kHz -> CW...
20
Acterna OLS-55/-56
4 OPERATION
AUTO λ mode
Auto λ is a special feature invented by Acterna to identify
wavelengths automatically. Therefor the signal is
modulated by a certain frequency which can be detected
from a AUTO λ equipped power meter like the Acterna
OLP-55 series.
Activating Auto λ
1. Press
The Main menu opens
2. Select Select Auto λ and press
The AUTO λ menu opens.
3. Select ENABLE to switch on AUTO λ
– or –
Select DISABLE to switch off AUTO λ
and press
to accept setting.
The window close, the MAIN menu opens.
4. Press
to leave menu
Note: Signal modulation (270 Hz, 1 kHz, 2 kHz) can not
be selected when Auto λ is enabled.
Acterna OLS-55/-56
21
4 OPERATION
Power level
The power level
• can be set for each wavelength separately
• can be set for each port separately
(OLS-56 only)
• can be set in laser off and on mode
• will be stored when changing the wavelength, toggling
the port (OLS-56 only) and during power off.
Power level ranges
CW mode:
0 to -7 dBm
Modulated and Auto λ:
-3 to -10 dBm
Setting the power level
1. Press LEVEL ADJUST
The display changes to EDIT modus
The first wavelength is highlighted
2. Press ▲▼ increase/decrease level
- press once for 0.01 dBm steps
- hold key to accelerate change speed
3. Press
to select next wavelength.
4. Press
22
to set level and leave EDIT mode.
Acterna OLS-55/-56
4 OPERATION
Maintenance
It is a good idea to check that the optical connections are
clean and to clean them if necessary before starting
measurements. Even very small dust particles on the
end surfaces of the plugs or in the test adapters can
adversely affect the accuracy of the measurement.
1. Power off the device.
2. Remove the test adapter from the optical connection
(see page 14).
The plug end surface is now accessible.
3. Wipe off the plug end surface using a cotton bud
soaked in isopropanol. This is a particularly effective
way of cleaning which leaves no residues.
4. Blow out the test adapter with clean compressed air
(available in spray cans, e.g. Anti Dust Spray).
Tip: Cover the optical connections with the dust cap
whenever they are not in use. This prevents them
from getting dirty.
Cleaning the instrument
If the instrument has become dirty through use, it can be
cleaned using a soft cloth moistened with a mild solution
of detergent.
Damage of device
CAUTION
Cleaning solution getting inside the
instrument can damage or destroy the
device.
! Make sure that the cleaning solution
does not get inside the instrument.
⇒ Parts which have become very dirty may also be
cleaned carefully using alcohol.
Acterna OLS-55/-56
23
5 REMOTE CONTROL
5
REMOTE CONTROL
Communication interface
The OLS-55/-56 provides a USB interface for
communication.
INF file for Windows 2000 and XP can be downloaded
from www.acterna.com.
Key
These are the adjustable values for the remote control
commands.
Key
<NR1>
<NR2>
<NR3>
<NRf>
Integer value. Examples 23 90
Real number. Examples 23.45 1.225
Exponential number.
Examples 4.3E-3 -8.9456E8 123E-5
<NR1> | <NR2> | <NR3>
<STRING RESPONSE_DATA>: IEEE4888.2, 8.7.1
Not A Number (NAN)
Not a number is represented as 9.91 E 37. Not a number
is defined in IEEE 754. Typical applications are dividing
zero by zero or subtracting infinity from infinity. Not a
number is also used to represent missing data.
24
Acterna OLS-55/-56
5 REMOTE CONTROL
Non-Instrument mode
commands
Command
string
Parameter type / Response type /
Unit / Info
*IDN?
Returns the unique identification of
the device.
e.g. Acterna Germany GmbH,
OLS-55/01,XX-0106,V00.01
:DISP:
CONT
Sets the display contrast
:DISP:
CONT?
Returns the display contrast
:SYST:
DEV:
DEF
Sets the device parameters to their
default values. These are also
written to EEPROM.
:SYST:
ERR?
Returns the oldest error in the error
queue
Range 0 ... 15
0: minimum contrast
15: maximum contrast
Range 0 ... 15
0: minimum contrast
15: maximum contrast
e.g. -200, "Execution error;Maximum
Attenuation Exceeded" and deletes
this error from the queue.
:SYST:
PERM:
POW
Ensures the device is on
permanently i.e. that it does not
power down after 20 minutes
:Port
Select Port
Port_id: 1 or 2 dependent from OLS
If the OLS is a Single Port device
Port_id is always 1.
Acterna OLS-55/-56
25
5 REMOTE CONTROL
Command
string
Parameter type / Response type /
Unit / Info
:Port?
Returns Select Port
Port_id: 1 or 2 dependent from
selected port
:SOUR
Select LASER source
Source_id:
1= LASER1
2= LASER2
3= LASER1 and LASER2
(2 LASER PORT )
4= LASER3
7= LASER1, LASER2 and LASER3
(3 LASER PORT )
:SOUR?
Returns Selected LASER sources
Source_id:
1= LASER1
2= LASER2
3= LASER1 and LASER2 (2 LASER
PORT )
4= LASER3
7= LASER1, LASER2 and LASER3
(3 LASER PORT )
:SOUR:
STAT
Sets state of selected LASER
:SOUR:
STAT?
Returns state of LASER
26
State:
0 = LASER OFF
1 = LASER ON
State:
0 = LASER OFF
1 = LASER ON
Acterna OLS-55/-56
5 REMOTE CONTROL
Command
string
Parameter type / Response type /
Unit / Info
:SOUR:
MOD
Sets modulation for a single source.
:SOUR:
MOD?
Returns actual modulation.
:SOUR:
POW
Set power of LASER source
:SOUR:POW < portnumber >
< sourcenumber >
• Portnumber: 1 or 2
• Sourcenumber: (range 1 …3)
• Power: in dBm*100
(Example -5.22dBm= -522)
:SOUR:
POW?
Returns power of LASER source
:SOUR:POW? < portnumber >
< sourcenumber >
• Portnumber: 1 or 2
• Sourcenumber: (range 1 …3)
• Power: in dBm*100
(Example -5.22dBm= -522)
:WAV:
AUTO
Sets Auto λ modulation on/off.
0: Auto λ OFF
1: Auto λ ON
Default setting: OFF
:WAV:
AUTO?
Returns Auto λ modulation status.
0: Auto λ OFF
1: Auto λ ON
:SYST:
PORT
NUMB?
If more than one source is selected, it
is auto modulation.
Modulation: (Frequency in Hz)
0 , 270 , 1000, 2000
Modulation: (Frequency in Hz)
0 , 270 , 1000, 2000, Auto
Reads number of ports.
count: numbers of ports ( range 1 ... 2 )
Acterna OLS-55/-56
27
5 REMOTE CONTROL
Command
string
Parameter type / Response type /
Unit / Info
:SYST:
SOUR
NUMB?
Reads number of LASER sources.
:SYST:
WAV:
VAL?
Reads LASER wavelength
:SYST:WAV:VAL?< portnumber >
< lasernumber >
• portnumber: number of port
(range 1…2)
• lasernumber: number of LASER
(range 1…3)
• wavelength: wavelength of LASER
(in nm).
:SYST:
POW:
MAX?
Reads max. power of LASER
:SYST:POW:MAX?< portnumber >
< lasernumber >
• portnumber: number of port
(range 1…2 )
• lasernumber: number of LASER
(range 1…3)
• maxpower: power of LASER
(in dBm*100).
:SYST:
POW:
MIN?
Reads min. power of LASER
:SYST:POW:MIN?< portnumber >
< lasernumber >
• portnumber: number of port
(range 1…2 )
• lasernumber: number of LASER
(range 1…3)
• minpower: power of LASER
(in dBm*100).
28
• port number: number of port
(range 1…2 )
• count: numbers of LASER sources
(range 1 ... 3)
Acterna OLS-55/-56
6 SPECIFICATIONS
6
SPECIFICATIONS
Technical data
Wavelengths1)
OLS-55
- BN 2279/01, 21
- BN 2279/02, 22
- BN 2279/03, 23
OLS-56
Spectral width (RMS)
Number of ports
- OLS-55
- OLS-56
Fiber type
- OLS-55
- OLS-56
Output power range2)
CW
Modulated, Auto λ
Resolution of power
setting
Signal stability3)
- Short term
- Long term
Tracking error
Modes
1310/1550 nm
1310/1550/1625 nm
1310/1490/1550 nm
MM: 850/1300 nm
SM: 1310/1550 nm
5 nm
Single port
Dual port
9/125
9/125, 50/125
-7.00 to 0.00 dBm
-10.00 to -3.00 dBm
0.01 dB
± 0.02 dB (within 15 min.)
± 0.20 dB (within 8 h)
± 1 dB
- Continuous wave (CW)
- Modulated: 270 Hz, 1 kHz,
2 kHz
- Auto λ4)
1) typ. ± 20 nm
2) CW signal, T=23°C±3K, including connector, depending on
quality of connector applied to the OLS
3) At ambient temperature range -10 °C to +55 °C, ΔT = ±0.3K
4) Signal coding for automatic power meter wavelength
detection. Works only with Acterna OLP-55.
Acterna OLS-55/-56
29
6 SPECIFICATIONS
General specifications
Display
Display type
Graphical display,
64 x 128, b/w.
backlight function
Connectors
Connector type
- BN 2279/01/02/03/05
- BN 2279/21/22/23
Optical adapter system
PC
APC
Interchangeable adapter from
BN 2150/00.xx range, suitable
for PC and
APC systems
Power supply
Dry batteries
Rechargeable
batteries
Operating time
dry/rechargeable
batteries
AC line operation
Power saving mode
4 x AA, 1.5 V
NiMH, 4 x AA, 1.2 V,
internal batt. charging
typ. 100 h1)
(without backlight)
with separate
SNT-121A AC Adapter/
Charger
auto power-off after appr.
20 min
(can be disabled)
1) One wavelength active, output power -7 dBm
Electromagnetic
compatibility (EMC)
Recommended calibration
interval
30
IEC 61326
3 years
Acterna OLS-55/-56
6 SPECIFICATIONS
Ambient temperature
-10 to +55 °C
-40 to +70 °C
Nominal range of use
Storage and transport
SNT-121A AC Adapter/
Charger
0 to +40 °C
Air humidity
Relative humidity up to +30 °C
Absolute humidity, > +30 °C
5 to 95%
1 to 29 g/m3
Occasional condensation is tolerable.
Dimensions and weight
Dimensions (w x h x d)
Weight
Acterna OLS-55/-56
95 x 60 x 195 mm
approx. 500 g
(including batteries)
31
7 ORDERING INFORMATION
7
ORDERING
INFORMATION
OLS-55 Optical Light Source
2 wavelengths 1310/1550 nm, PC
2 wavelengths 1310/1550 nm, APC
3 wavelengths 1310/1550/1626 nm, PC
3 wavelengths 1310/1550/1626 nm, APC
3 wavelengths 1310/1490/1550 nm, PC
3 wavelengths 1310/1490/1550 nm, APC
BN 2279/01
BN 2279/21
BN 2279/02
BN 2279/22
BN 2279/03
BN 2279/23
OLS-56 Optical Light Source
4 wavelengths, MM + SM
BN 2279/05
Calibration report
BN 2279/90.01
Accessories
Optical adapter
OCK-10 Optical cleaning kit
Cleaning tape for optical
connectors
Spare tape for optical cleaning
tape
BN 2150/00.xx
BN 2229/90.21
BN 2229/90.07
BN 2229/90.08
NiMH cells (AA size, 1.2 V)
SNT-121A AC Adapter/Charger
(worldwide compatible)
BN 2237/90.02
BN 2277/90.01
Belt bag MT-1S
Soft case 2 instruments MT-2S
Soft case 3 instruments MT-3S
Hard case 3 instruments MK-3S
BN 2277/90.02
BN 2126/03
BN 2126/04
BN 2093/31
32
Acterna OLS-55/-56
Index
Index
A
M
AC line plug adapter 13
Adapter
mounting 14
Auto Lambda 21
Main Menu 18
Menu
Auto Lambda 21
Contrast 19
Main 18
Mounting the adapters 14
B
Backlight 19
Batteries
recharging 11
replacing 10
Battery operation 11
C
O
Operation from AC power 13
Overview 8
P
Cleaning
optical connections 23
the instrument 23
Condensation 7
Connection 14
Contrast Menu 19
Package contents 7
Packing material 7
Power
change mode 15
ON/OFF 15
Power Supply 10
Proper usage 4
D
R
Device overview 8
Rechargeable batteries 10
Differences between devices 1
handling 12
Display 16
Recharging batteries 11
Display contrast 19
Recovery 7
Dry batteries 10
Recycling 12
Replacing batteries 10
E
Environmental protection 12
S
F
Functional characteristics 2
SNT-121A AC Adapter/Charger
Unit 13
Switch Laser on/off 19
L
T
Laser on/off 19
Laser safety 4
Acterna OLA-54/-55
Test adapter 14
Toggle port (OLS-56 only) 19
Acterna Environmental Management Program
Superb performance and high quality have always characterized
Acterna datacom and telecom measurement technology
products. In this same world-class tradition, Acterna has an
established, proactive program of environmental management.
Environmental management is an integral part of Acterna’s
business philosophy and strategy requiring the development of
long-term, productive solutions to problems in the key areas of
economics, technology, and ecology.
A systematic environmental management program at Acterna is
essential in regard to environmental policy and enhances
cooperation between ourselves and our business partners.
The Acterna Environmental Management
Program considers:
Product design and manufacture
Environmental restrictions and requirements are taken into
account during planning and manufacture of Acterna products.
This attention ranges form the raw materials and finished
components selected for use and the manufacturing processes
employed, through to the use of energy in the factory, and right on
up to the final stages in the life of a product, including dismantling.
Hazardous materials
Acterna avoids or uses with care any hazardous or dangerous
material in themanufacturing process or the end product. If the
use of a dangerous material cannot be avoided, it is identified in
product documentation and clearly labeled on the product itself.
Packaging materials
Preference is given to reusable or biodegradable singlesubstance packaging materials whenever possible.
Environmental management partnerships
Acterna encourages our customers and suppliers who take this
responsibility seriously to join Acterna in establishing their own
environmental management programs.
Recycling used products
This product complies with the European Union Waste Electrical
and Electronic Equipment directive (WEEE), 2002/96/EC. This
product should not be disposed of as unsorted municipal waste
and should be collected separately and disposed according to
your national regulations.
In the European Union, all equipment
purchased from Acterna after 2005-08-13
can be returned for disposal at the end of
its useful life.
Contact your local Technical Assistance
Center (TAC) for return and collection
services available to you.If you would like
specific information about the Acterna
Environmental Management Program,
please contact us at:
If you would like specific information about the Acterna
Environmental Management Program, please contact us at:
Germany
Environmental Management:
Tel. +49-(0)7121 86 1470
Fax +49-(0)7121 86 1502
United Kingdom
Design Office:
Tel. +44-1752 772 773
Fax +44-1752 709 897
United States
Environmental Management:
Tel. +1-919 941 5730
Fax +1-919 941 5751
France
Environmental Management:
Tel. +33-(0)2 99 84 70 40
Fax +33-(0)2 99 84 70 44
Worldwide Headquarters
One Milestone Center Court
Germantown, Maryland
20876-7100
USA
Acterna is present in more
than 80 countries. To find your
local sales office go to:
www.acterna.com
Regional Sales Headquarters
North America
One Milestone Center Court
Germantown, Maryland
20876-7100
USA
Toll Free +1 866 ACTERNA
Toll Free +1 866 228 3762
Tel.: +1 301 353 1560x2850
Fax: +1 301 353 9216
Latin America
Acterna do Brasil Ltda.
Av. Eng. Luis Carlos Berrini
936 9th Floor
04571-000 São Paulo
SP-Brazil
Tel.: +55 11 5503 3800
Fax: +55 11 5505 1598
Asia Pacific
Acterna Hong Kong Ltd.
Suite 4010, 40th Floor
China Resources Building
26 Harbour Road, Wanchai
Hong Kong
Tel.: +852 2892 0990
Fax: +852 2892 0770
Europe,
Middle East and Africa
Acterna Germany GmbH
Muehleweg 5
72800 Eningen u.A.
Germany
Tel.: +49 7121 86 2222
Fax: +49 7121 86 1222
OLS-55, OLS-56
Optical Light Sources
Operating Manual
Bedienungsanleitung
Enabling Broadband & Optical Innovation
Acterna Test and Measurement Solutions
Enabling Broadband & Optical Innovation
Acterna Test and Measurement Solutions