1
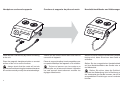
OPERATION INSTRUCTIONS
MODE D'EMPLOI
BEDIENUNGSANLEITUNG
INSTRUCCIONES DE EMPLEO
ISTRUZIONI PER L'USO
BRUKSANVISNING
12
13
14
®
PIEZON MASTER 700
26
25
24
23
®
PIEZON
MASTER
700
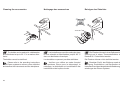
Cleaning
STANDARD
ENDO
Max
Min
Power
11
15
10
7
5
8
16
9
17
18
6
19
4
20
3
2
Caution! Federal (USA) law restricts this device
to sale by or on the order of a dentist.
1
21
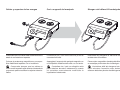
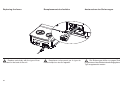
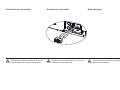
Fold out the cover pages to view technical drawings
Technische Zeichnungen auf der Innenseite der Deckblätter
Abra las tapas del manual para ver las ilustraciones
Spiegare le copertine per visualizzare i disegni tecnici
Vik upp omslaget för att se tekniska ritningar
TECHNICAL MODIFICATIONS
MODIFICATIONS TECHNIQUES
22
TECHNISCHE ÄNDERUNGEN
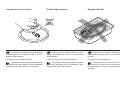
PIEZ
Cleani
ng
Min
Power
Max
Standa
rd
Endo
ON ®M
ASTE
R
700
EMS reserves the right to modify the technique, " EMS behält sich vor, im Zusammenhang mit
accessories, operating instructions or contents of # technischen oder wissenschaftlichen Weiterent
$$ wicklungen Änderungen an der Technik, dem
Zubehör, der Bedienungsanleitung sowie am
Inhalt der Originalverpackung vorzunehmen.
MODIFICACIONES TÉCNICAS
MODIFICHE TECNICHE
TEKNISKA ÄNDRINGAR
los accesorios, las instrucciones de empleo o el
tecnica, agli accessori, alle istruzioni operative o
al contenuto del set in seguito a miglioramenti
EMS förbehåller sig rätten att ändra teknik,
tillbehör, bruksanvisning eller innehåll i satsen
på grund av tekniska eller vetenskapliga förbättringar.
13
12
11
PIEZO
Cleani
ng
N ®MA
STER
700
Min
Power
1
2
Max
3
Standa
rd
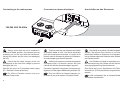
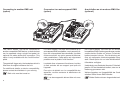
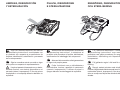
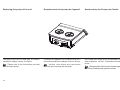
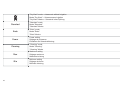
COMPONENTS
COMPOSANTS
BESTANDTEILE
1
2
3
4
5
6
7
8
9
10
11
12
13
14
15
16
17
18
19
20
21
22
23
24
1
2
3
4
5
6
7
8
9
10
11
12
13
14
15
16
17
18
19
20
21
22
23
24
1
2
3
4
5
6
7
8
9
10
11
12
13
14
15
16
17
18
19
20
21
22
23
24
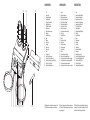
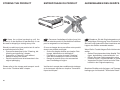
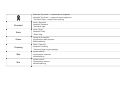
Unit
Power setting
Working mode selection
Left bottle selection
"Cleaning" mode selection
Right bottle selection
"Dry Work" control lamp
Handpiece cord
Magnetic handpiece support
Handpiece
SystemBox Piezon®
Bottle
Bottle cap
Power cable
Foot pedal
Power switch
Power socket
Fuses
Unit pump cover
Screw of the unit pump cover
Connector for right handpiece cord
Connector for connecting a second EMS unit
Connector for the foot pedal
Connector for left handpiece cord
Appareil
&$$
$
'*$'
Voyant lumineux "Dry Work"
*+"
+"$
/+"
SystemBox Piezon®
Bouteille
Bouchon de la bouteille
Cable secteur
/
:$
Prise de secteur
Fusibles
Cache de la pompe de l'appareil
Vis du cache de la pompe de l'appareil
*+"
Connecteur pour brancher un second appareil EMS
*
*+"$
Gerät
Einstellen der Ultraschallleistung
Auswählen des Arbeitsmodus
Auswählen der linken Flasche
Auswählen des Reinigungsmodus
Auswählen der rechten Flasche
"Dry Work"-Kontrolllampe
Handstückschlauch
Magnetische Handstückhalterung
Handstück
SystemBox Piezon®
Flasche
Flaschendeckel
Netzkabel
Fußschalter
Hauptschalter
Anschluss für Netzkabel
Sicherungen
Abdeckung Pumpeneinheit
Schraube für Abdeckung Pumpeneinheit
Anschluss Handstückschlauch rechts
Anschluss zweites EMS-Gerät
Anschluss Fußschalter
Anschluss Handstückschlauch links
Endo
4
5
6
7
8
9
10
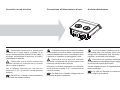
EMS supplies this unit with various accessories. The
"Packing list" shows exactly what your unit includes.
EMS fourn
<<
='/>$'#
avec votre appareil.
EMS bietet Geräte in unterschiedlichen Ausstattungsvarianten an. Für die genaue Ausstattung Ihres Geräts
beachten Sie bitte die beiliegende Packliste.
COMPONENTES
COMPONENTI
KOMPONENTER
1
2
3
4
5
6
7
8
9
10
11
12
13
14
15
16
17
18
19
20
21
22
23
24
1
2
3
4
5
6
7
8
9
10
11
12
13
14
15
16
17
18
19
20
21
22
23
24
1
2
3
4
5
6
7
8
9
10
11
12
13
14
15
16
17
18
19
20
21
22
23
24
Aparato
Ajuste de la potencia
Selección del modo de trabajo
Selección del bote izquierdo
Selección del modo "Cleaning"
Selección del bote derecho
Piloto indicador "Dry Work"
Cable del mango
*
Mango
SystemBox Piezon®
Bote
Tapa del bote
Cable de alimentación
Pedal
Interruptor de alimentación
Toma de corriente
Fusibles
Tapa de la bomba del aparato
Tornillo de la tapa de la bomba del aparato
Conector para el cable del mango derecho
Conector para conectar un segundo aparato de EMS
Conector para el pedal
Conector para el cable del mango izquierdo
EMS suministra este aparato con diversos accesorios. La
"Lista de contenido" indica exactamente lo que incluye
su aparato.
Impostazione della potenza
Luce di controllo "Dry Work"
Cavo del manipolo
Supporto del manipolo magnetico
Manipolo
SystemBox Piezon®
Flacone
Cavo di alimentazione
Pedaliera
Interruttore di alimentazione
Presa di alimentazione
Fusibili
!#
!#
Connettore per il cavo del manipolo di destra
##$%
Connettore per pedaliera
Connettore per il cavo del manipolo di sinistra
$%&'##()
"distinta di spedizione" sono elencati esattamente tutti gli
#!#(
Enhet
Effektinställning
Driftsläge
Rengöringsläge
"Dry Work"-indikering
Slang till handstycke
Magnetisk handstyckehållare
Handstycke
SystemBox Piezon®
Flaska
Flasklock
Nätkabel
Fotpedal
Huvudströmbrytare
Uttag för nätkabel
Säkringar
Skydd för pumpenhet
Skruv till pumpenhetens skydd
Anslutning för högra handstyckets slang
Anslutning för ytterligare en EMS-enhet
Anslutning för fotpedal
Anslutning för vänstra handstyckets slang
EMS utrustar enheten med olika tillbehör. Packlistan visar
exakt vad som medföljer denna enhet.
DEAR CUSTOMERS,
CHERS CLIENTS,
SEHR GEEHRTER KUNDEN,
Thank you for buying a new EMS product. It meets
the highest quality and safety standards.
)##&*!'###
#$%(/*#;##;
<'#**#*(
Wir gratulieren Ihnen zum Kauf Ihres neuen
EMS-Produkts. Es erfüllt höchste Ansprüche an
Qualität und Sicherheit.
#*=#*
##$%>
pour les applications suivantes:
Das Ultraschallgerät ist für den zahnmedizinischen
Einsatz mit EMS-Piezon-Ultraschallinstrumenten
für die folgenden Einsatzgebiete bestimmt:
+ Elimination du tartre supra-gingival
+ Elimination des taches
+ Entfernen von supragingivalen
Konkrementen
+ Entfernen von Flecken
This product is designed for use in dentistry
with EMS Piezon ultrasound instruments for the
following indications:
+ Removal of supragingival calculus
+ Removal of stains
+ Preparation, cleaning and irrigation of root
canals
+ Retrograde preparation of root canals
+ Condensing gutta-percha
+ Removal of crowns, bridges and restorations
Restorative
+ Preparation of cavities
+ Cementation of restorations
+ Condensing of amalgams
Perio
+ Scaling and root planing
+ Periodontal treatments
For further details on the various instruments and their scopes of application, please refer
to the operating instructions supplied with your
Piezon system or available from the distributor in
your country.
+ >*?@
canaux radiculaires
+ >**#;
radiculaires
+ Condensation de la gutta-percha
+ Descellement de couronnes, bridges et
restaurations
+ Präparation, reinigen und spülen von
Wurzelkanälen
+ Retrograde Präparation von Wurzelkanälen
+ Guttapercha-Kondensation
+ Entfernen von Kronen, Brücken, Inlays und
Rekonstruktionen
+ JO*
+ Scellement de restaurations
+ Condensation d'amalgame
+ Kavitätenpräparation
+ Zementieren von Rekonstruktionen
+ Kondensation von Amalgamen
+ X*#&O#
+ Traitements parodontaux
+ Scaling und Wurzelglättung
+ Parodontaltherapie
>##&*
&&*##
Y?##*&*#
Y&#@<>
ou auprès du distributeur de votre pays.
Nähere Informationen zu den verschiedenen Instrumenten und ihren Einsatzgebieten
entnehmen Sie bitte der Bedienungsanleitung,
die Ihrem Piezon-System beiliegt, oder wenden
Sie sich an Ihren EMS-Händler.
ESTIMADOS CLIENTES,
GENTILE CLIENTE,
BÄSTA KUND,
Le agradecemos que haya adquirido un nuevo
producto de EMS. Éste satisface las exigencias
más altas de calidad y seguridad.
Grazie di aver acquistato un nuovo prodotto EMS
&'##
più elevati.
Tack för att du har köpt en EMS-produkt. Den
uppfyller högt ställda kvalitets- och säkerhetskrav.
Este producto se ha diseñado para utilizar en
odontología con los instrumentos de ultrasonidos
Piezon de EMS para las siguientes indicaciones:
Questo prodotto è destinato all'uso in odontoiatria
con strumentazioni agli ultrasuoni EMS Piezon per
le seguenti indicazioni:
+ Eliminación del cálculo supragingival
+ Eliminación de manchas
+ Rimozione di calcoli sopragengivali
+ Rimozione di macchie
+ Preparación, limpieza e irrigación de
conductos radiculares
+ Preparación retrógrada de conductos
radiculares
+ Condensación de gutapercha
+ Descementado de coronas, puentes y restauraciones
+ Preparazione, pulizia e irrigazione di canali
radicolari
+ Preparazione retrograda di canali radicolari
+ Condensazione della guttaperca
+ Rimozione di corone, ponti e restaurazione
!
+ Preparación de cavidades
+ Cementación de restauraciones
+ Condensación de amalgamas
+ Raspado y pulido radicular
+ Tratamientos periodontales
Si desea información más detallada de los
distintos instrumentos y sus aplicaciones, consulte
las instrucciones de empleo que se proporcionan
#>#_*_#
de su país.
+ >
+ Cementazione di restaurazione
+ Condensa di amalgame
Perio
+ Ablazione e levigatura di radici
+ Trattamenti periodontali
Per ulteriori dettagli sui vari strumenti e la
loro applicazione, consultare le istruzioni operative
in dotazione con il sistema Piezon o disponibili
presso il distributore autorizzato del proprio paese.
Denna produkt är avsedd att användas för tandläkarvård med EMS Piezon-ultraljudsinstrument
för följande indikationer:
+ Borttagning av supragingival tandsten
+ [
+ Förberedelse, rengöring och spolning av
rotkanaler
+ Retrograd förberedelse av rotkanaler
+ Kondensering av guttaperka
+ Avlägsna kronor, broar och inlägg
+ Förberedelse av kaviteter
+ Fastsättning av inlägg
+ Kondensering av amalgam
+ Scaling och rotplaning
+ Periodontal behandling
Ytterligare information om de olika instru]^
i bruksanvisningarna som medföljer Piezonsystemet. Dessa kan även beställas från distributören i det aktuella landet.
ABOUT THIS MANUAL
A PROPOS DE CE MANUEL
ZU DIESEM HANDBUCH
These operating instructions are to ensure the
correct installation and use of this product.
Y*Y
Y##(
Please read these operating instructions carefully
as they explain all the most important details and
procedures. Please pay special attention to the
safety precautions.
#Y
#*#@
*(|#
'#*#*(
Die Bediendungsanleitung soll Ihnen bei der
korrekten Installation und Bedienung des Produkts
helfen.
Always keep this document close at hand.
###}#*
de main.
Instructions concerning the components of the system are provided separately in
the respective instructions for use. Read the
instruction manuals originally delivered with each
of the components before using this product. Do
not hesitate to contact your local EMS dealer for
further information.
This product needs special precautions
regarding electromagnetic compatibility and needs
to be installed and put into service according to
the "Electromagnetic compatibility" manual.
Les instructions concernant les compo # @< &# **
#Y#(
##Y#*
#Y##(
)Y*_##$%
##Y&(
#**##<_***'#(/=*
manuel "Electromagnetic compatibility".
Lesen Sie sie somit aufmerksam durch, da
die wesentlichen Einzelheiten und Handgriffe
anschaulich erklärt werden. Beachten Sie dabei
besonders die Sicherheitshinweise.
Bewahren Sie diese Unterlagen immer griffbereit
auf.
Anweisungen zur Bedienung der einzelnen
Systembestandteile sind in den jeweiligen Bedie###^(`#
des Geräts sind die Bedienungsanleitungen, die
im Lieferumfang der einzelnen Systembestandteile enthalten waren, zu lesen. Weitere Informationen erhalten Sie bei Ihrem EMS-Händler.
Für das Gerät sind besondere Vorsichtsmaßnahmen hinsichtlich der elektromagnetischen
Kompatibilität zu beachten. Die Installation und
Inbetriebnahme des Geräts muss die Anforderungen des Handbuchs für die "Electromagnetic
compatibility" erfüllen.
PRESENTACIÓN DEL MANUAL
INFORMAZIONI SU QUESTO
MANUALE
OM DENNA HANDBOK
Estas instrucciones de empleo sirven para garantizar una instalación y uso correctos de este
producto.
Le presenti istruzioni operative consentono la
corretta installazione e utilizzo di questo prodotto.
Syftet med denna bruksanvisning är att säkerställa
att produkten installeras och används på rätt sätt.
Leggere attentamente queste istruzioni operative
poichè spiegano tutti i dettagli e le procedure
più importanti. Porre un'attenzione speciale alle
precauzioni di sicurezza.
Läs bruksanvisningen noga – här beskrivs alla
viktiga detaljer och procedurer. Var särskilt
uppmärksam på säkerhetsföreskrifterna.
Lea estas instrucciones de empleo atentamente ya
que explican todos los detalles y procedimientos
más importantes. Preste especial atención a las
precauciones de seguridad.
Tenga siempre a mano este documento.
Las instrucciones referentes a los componentes del sistema se facilitan por separado en las
instrucciones de uso correspondientes. Antes de
utilizar este producto, lea los manuales de instrucciones suministrados originalmente con cada uno
de los componentes. No dude en ponerse en
contacto con su distribuidor local de EMS si desea
información adicional.
Este producto requiere precauciones
especiales referentes a compatibilidad electro*?@_@&#namiento conforme al manual de "Electromagnetic
compatibility".
Tenere questo documento sempre a portata di
mano.
Istruzioni relative ai componenti del sistema
vengono fornite separatamente nelle rispettive
istruzioni per l'uso. Prima di usare questo prodotto
leggere i manuali di istruzioni spediti originalmente
con ciascun componente. Per ulteriori informazioni rivolgersi al rivenditore locale EMS.
Questo prodotto richiede precauzioni
_magnetica e va installato e messo in servizio in
&#$~
"Electromagnetic compatibility".
Ha alltid detta dokument nära till hands.
Anvisningar som rör systemets beståndsdelar ges separat i respektive beståndsdels bruksanvisning. Läs de bruksanvisningar som levererades tillsammans med varje beståndsdel innan
du använder produkten. Tveka inte att kontakta
din lokala EMS-återförsäljare om du vill ha mer
information.
Denna produkt kräver särskilda försiktighetsåtgärder vad gäller elektromagnetisk kompatibilitet och måste installeras och driftsättas i
enlighet med anvisningarna i handboken "Electromagnetic compatibility".
To prevent possible patient or user injury or
damage to the Piezon Master 700, please note
the corresponding directives:
>#*_
ou dommages au Piezon Master 700, merci de
tenir compte des directives suivantes:
Risk of patient or user injury
Risque de blessure pour le patient ou
l'utilisateur
(
Risk of damage to the device or environmental harm
|'#!#
Y
Useful additional information and hints
'
/&*#
tours de main
Note that the English version of this manual is the
master from which translations derive. In case
of any discrepancy, the binding version is the
English text.
We would be pleased to answer your questions
or listen to your suggestions. We do, of course,
provide support in case of technical problems.
Please contact your approved EMS repair center
or your dealer.
We wish you lots of success!
EMS
##_*#
sa version anglaise. Ainsi le texte en anglais fera
*&*(
Zur Vermeidung von Personenschäden oder
Sachschäden am Piezon Master 700 beachten
Sie bitte die folgenden Hinweise:
"
#
Bei Gefahr von Personenschäden
Bei drohenden Sach- und Umweltschäden
$%
Bei nützlichen Zusatzinformationen und
Anwendungstipps
&
Es wird darauf hingewiesen, dass das englische
Original der Bedienungsanleitung als Vorlage für
alle Übersetzungen gilt. Bei eventuellen Abweichungen ist der englische Text bindend.
)#<#
* '# # Y*# *# #(
Naturellement, nous vous proposons un soutien
technique en cas de problèmes. Veuillez contacter
**$%#
distributeur.
Wir stehen Ihnen gerne für Fragen zur Verfügung.
Bei Problemen bieten wir Ihnen selbstverständlich
technische Unterstützung an. Wenden Sie sich
bitte an ein EMS-genehmigtes Reparaturzentrum
oder Ihren Händler.
Avec nos meilleurs vœux de succès!
Ihre EMS
EMS
Wir wünschen Ihnen viel Erfolg!
Para evitar posibles lesiones en el paciente o
usuario, o daños al Piezon Master 700, nótense
las directrices correspondientes:
Per impedire possibili lesioni al paziente o all'utilizzatore o danni al Piezon Master 700 attenersi
alle relative direttive:
Riesgo de lesiones en el paciente o
usuario
Pericolo
Rischio di lesioni al paziente o all'utilizzatore
Fara
Risk för skada på patient eller användare
!
Riesgo de daños en el dispositivo o
medioambientales
Rischio di danni al dispositivo o all'ambiente
&
Risk för skada på enheten eller miljön
)
!
Información y consejos útiles adicionales
*
#
a ulteriori informazioni e consigli
Estaremos encantados de contestar a sus
preguntas o escuchar sus sugerencias. Por
supuesto, proporcionamos asistencia en caso
_*(>
con su centro de reparaciones autorizado o distribuidor de EMS.
#*;
*+-
Tillåtet
)'#*#
es la original de la que parten las traducciones.
En caso de discrepancias, la versión vinculante
es la inglesa.
)
Ytterligare praktisk information och tips
Vietato
EMS
För att förhindra patientskador eller skador på
Piezon Master 700 ska följande varningar observeras:
La versione inglese di questo manuale è la
versione master da cui deriva la traduzione. In
caso di discrepanze fa fede il testo in inglese.
Observera att den engelska versionen av
handboken är originalet som övriga språk har
översatts från. Vid eventuella avvikelser gäller
den engelska texten.
#
sono ben accetti. Ovviamente forniamo assistenza
in caso di problemi tecnici. Rivolgersi direttamente al centro di assistenza EMS autorizzato o
al proprio rivenditore.
Vi svarar gärna på frågor och tar emot förslag.
Vi ger självklart support vid tekniska problem.
Kontakta ditt godkända EMS-reparationscenter
eller din återförsäljare.
Lycka till!
Auguriamo successo a tutti!
EMS
EMS
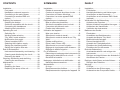
CONTENTS
SOMMAIRE
INHALT
Installation ........................................................ 2
Foot pedal .................................................... 2
Handpiece cords and supports .................... 4
Connecting to the mains power .................. 6
Connecting to another EMS unit
(option).......................................................... 8
Preparing for treatment .................................. 10
Installing the bottles ................................... 10
Solutions compatible with the circuit ......... 12
Connecting the handpieces ....................... 14
Attaching the instruments .......................... 16
Operating the unit .......................................... 18
Switching On .............................................. 18
Working mode selection............................. 20
"Dry Work" mode selection ........................ 24
Multifunction foot pedal .............................. 26
Piezon handpiece LED............................... 28
Selecting the irrigation supply.................... 30
Setting the ultrasound power ..................... 32
Setting the irrigation flow rate .................... 34
End of the treatment ...................................... 36
Instruments disassembly and cleaning ..... 36
Cleaning and disinfecting the circuit .......... 38
Removing the bottle ................................... 44
Cleaning, disinfecting and sterilizing ............. 46
Cleaning the accessories........................... 48
Maintenance................................................... 50
O-rings ....................................................... 50
Replacing the fuses.................................... 52
Replacing the pump of the unit .................. 54
Installation ........................................................ 2
>* .................................. 2
#< ........ 4
;#*#*'# .................. 6
;##$%
(option).......................................................... 8
>*# ....................... 10
Mise en place des bouteilles ...................... 10
Solutions compatibles avec le circuit ........ 12
;< .................... 14
Fixation des instruments ............................ 16
Y ................................... 18
Mise sous tension ...................................... 18
*#...................... 20
*#X@
Work" .......................................................... 24
>*#& ................................. 26
><>$X .......................... 28
*#! ............. 30
|*## ..... 32
|*#*_! ...................... 34
Fin du traitement ............................................ 36
X*@# . 36
)@*&##........... 38
Retrait de la bouteille ................................. 44
)@?*&* .......... 46
Nettoyage des accessoires........................ 48
Maintenance................................................... 50
O-rings ....................................................... 50
Remplacement des fusibles ....................... 52
Remplacement de la pompe de l'appareil . 54
Installation ........................................................ 2
Fußschalter .................................................. 2
Handstückschläuche und Halterungen ........ 4
Anschließen an das Stromnetz ................... 6
Anschließen an ein anderes EMS-Gerät
(optional)....................................................... 8
Vorbereiten für die Behandlung ..................... 10
Aufsetzen der Flaschen ............................. 10
Mit dem Kreislauf kompatible Lösungen.... 12
Aufstecken der Handstücke ....................... 14
Verbinden der Instrumente ........................ 16
Bedienen des Geräts ..................................... 18
Einschalten ................................................. 18
Auswählen des Betriebsmodus ................. 20
Auswahl des Modus "Dry Work" ................ 24
Multifunktionsfußschalter ........................... 26
Piezon-Handstück-LED ............................. 28
Auswahl der Flüssigkeitszufuhr ................. 30
Einstellen der Ultraschallleistung............... 32
Einstellen der Durchflussrate .................... 34
Ende der Behandlung .................................... 36
Auseinandernehmen und reinigen der
Instrumente ................................................ 36
Reinigen und desinfizieren des Kreislaufs 38
Abnehmen der Flasche .............................. 44
|?^#........ 46
Reinigen des Zubehörs .............................. 48
Wartung .......................................................... 50
O-Ringe ...................................................... 50
Austauschen der Sicherungen................... 52
Austauschen der Pumpe des Geräts ......... 54
INDICE
INDICE
INNEHÅLL
Instalación ........................................................ 3
Pedal ............................................................ 3
Cables y soportes de los mangos ............... 5
;* ......................... 7
Conexión a otro aparato de EMS
(opción) ......................................................... 9
Preparación para el tratamiento .................... 11
Instalación de los botes ............................. 11
Soluciones compatibles con el circuito...... 13
Conexión de los mangos ........................... 15
Acoplamiento de los instrumentos ............. 17
Utilización del aparato ................................... 19
Encendido .................................................. 19
Selección del modo de funcionamiento..... 21
Selección del modo "Dry Work"................. 25
Multifonction pedal ..................................... 27
Multifonction pedal ..................................... 27
El mango Piezon LED ................................ 29
Selección de la fuente de irrigación .......... 31
Ajuste de la potencia de los ultrasonidos .. 33
Ajuste del flujo de irrigación....................... 35
Fin del tratamiento ......................................... 37
Desmontaje y limpieza
de los instrumentos .................................... 37
Limpieza y desinfección del circuito .......... 39
Retirada del bote ........................................ 45
Limpieza, desinfección y esterilización ......... 47
Limpieza de los accesorios........................ 49
Mantenimiento................................................ 51
Juntas tóricas ............................................. 51
Sustitución de los fusibles ......................... 53
Sustitución de la bomba del aparato ......... 55
Installazione ..................................................... 3
Pedaliera ...................................................... 3
Cavi e supporti del manipolo ....................... 5
Connessione all'alimentazione di rete ......... 7
#!#$%
(opzionale) .................................................... 9
Preparazione per il trattamento ..................... 11
Installazione dei flaconi.............................. 11
Soluzioni compatibili con il circuito. ........... 13
Connessione dei manipoli .......................... 15
Applicazione degli strumenti ...................... 17
!#.................................................. 19
Accensione................................................. 19

X@ ......... 25
Pedale multifunzione ................................. 27
El manipolo Piezon LED ............................ 29
Selezione della fonte di irrigazione ............ 31
Impostazione della potenza
degli ultrasuoni ........................................... 33
Impostazione della portata del flusso di
irrigazione................................................... 35
Fine del trattamento ....................................... 37
Smontaggio e pulizia degli strumenti ......... 37
Pulizia e disinfezione del circuito ............... 39
Rimozione del flacone................................ 45
Pulizia, disinfezione e sterilizzazione ............ 47
Pulizia degli accessori ............................... 49
Manutenzione................................................. 51
Anelli di tenuta ............................................ 51
Sostituzione dei fusibili .............................. 53
#!# ........... 55
Installation ........................................................ 3
Fotpedal ....................................................... 3
Slangar och hållare till handstycke .............. 5
Ansluta nätströmmen .................................. 7
Ansluta ytterligare en EMS-enhet
(tillval) ........................................................... 9
Förberedelser inför behandling...................... 11
Installera flaskorna ..................................... 11
Lösningar som är kompatibla med slingan 13
Ansluta handstyckena ................................ 15
Fästa instrumenten .................................... 17
Använda enheten ........................................... 19
Slå på enheten ........................................... 19
Välja driftsläge............................................ 21
Välja "Dry Work"-läget ............................... 25
Piezon-handstyckets LED .......................... 29
Välja spolningskälla.................................... 31
Ställa in ultraljudseffekten .......................... 33
Ställa in flödeshastigheten ......................... 35
Avsluta behandlingen..................................... 37
Demontera och rengöra instrument ........... 37
Rengöra och desinficera slingan ............... 39
Ta bort flaskan............................................ 45
Rengöring, desinfektion och sterilisering ...... 47
Rengöra tillbehör ........................................ 49
Underhåll ........................................................ 51
O-ringar ...................................................... 51
Byta säkringar ............................................ 53
Byta ut enhetens pump .............................. 55
Safety precautions ......................................... 56
Storing the product ........................................ 60
Product disposal ............................................ 62
Warranty......................................................... 62
Accessories.................................................... 62
EMS Service .................................................. 64
Symbols ......................................................... 66
Technical data ................................................ 74
Troubleshooting ............................................. 78
|'#*#*................ 56
Entreposage du produit ................................. 60
Recyclage ...................................................... 62
Garantie ......................................................... 62
Accessoires.................................................... 62
Service EMS .................................................. 64
Symboles ....................................................... 66
*'#'# .......................... 74
X*..................................................... 79
Sicherheitshinweise ....................................... 56
Aufbewahren des Geräts ............................... 60
Entsorgen des Produkts ................................ 62
Garantie ......................................................... 62
Zubehör .......................................................... 62
EMS-Service .................................................. 64
Symbole ......................................................... 66
Technische Daten .......................................... 75
Fehlerbehebung ............................................. 80
Precauciones sobre seguridad ...................... 57
Almacenamiento del producto ....................... 61
Eliminación del producto................................ 63
Garantía ......................................................... 63
Accesorios ..................................................... 63
*$%................................ 65
Símbolos ........................................................ 67
X* ............................................... 75
Solución de problemas .................................. 81
Precauzioni di sicurezza ................................ 57
Stoccaggio del prodotto ................................. 61
Smaltimento del prodotto ............................... 63
Garanzia......................................................... 63
Accessori ....................................................... 63
Servizio assistenza EMS ............................... 65
Simboli ........................................................... 67
Dati tecnici...................................................... 76
Individuazione e risoluzione dei problemi ..... 82
Säkerhetsföreskrifter ..................................... 57
Förvara produkten ......................................... 61
Kassering av produkten ................................. 63
Garanti ........................................................... 63
Tillbehör ......................................................... 63
EMS-service .................................................. 65
Symboler ........................................................ 67
Tekniska data ................................................. 76
Felsökning ...................................................... 83
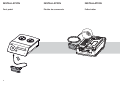
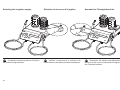
INSTALLATION
INSTALLATION
INSTALLATION
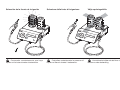
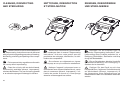
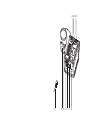
Foot pedal
*.
%NGCP
KPI
/KP
2QYG
T
2
/CZ
5VCPFC
TF
'PFQ
INSTALACIÓN
INSTALLAZIONE
INSTALLATION
Pedal
Pedaliera
Fotpedal
%NGCP
KPI
/KP
2QYG
T
/CZ
5VCPFC
TF
'PFQ
3
$
(
1
2
$/0
$
%NGCP
KPI
%NGCP
KPI
/KP
/KP
2QYG
T
2QYG
T
/CZ
5VCPFC
TF
'PFQ
Check that the cords are fully dry before connecting
to the unit.
*^'#_
;!(
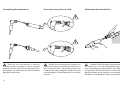
Place the magnetic handpiece holder on a metal
surface of the unit or on the furniture.
>#<*'##
#*'#!##_(
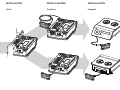
Always check that the cords will not rub
against the front face during the treatment because
this could eventually modify the selected settings.
Toujours s'assurer que les cordons ne
passent pas sur la face avant durant l'utilisation
#*#&
***(
4
/CZ
5VCPFC
TF
'PFQ
Stellen Sie sicher, dass die Schläuche vollständig
trocken sind, bevor Sie sie an das Gerät anschließen.
Stellen Sie den magnetischen Handstückhalter
#&%_
#&
ein Möbelstück.
Stellen Sie sicher, dass die Schläuche
während der Behandlung nicht in Berührung mit
der Vorderseite des Geräts kommen, da sich die
ausgewählten Einstellungen sonst verändern
könnten.
(
4
(
3
4
%NGCP
KPI
%NGCP
KPI
/KP
/KP
2QYG
T
/CZ
2QYG
5VCPFC
TF
'PFQ
T
/CZ
5VCPFC
TF
'PFQ
#_'#_*
antes de conectarlos al aparato.
Controllare che i cavi siano asciutti prima di
!#(
Kontrollera att slangarna är helt torra innan du
ansluter dem till enheten.
'#*##^_(
Appoggiare il supporto del manipolo magnetico su
##^!###(
Placera den magnetiska handstyckehållaren på
en metallyta på enheten eller inredningen.
Compruebe siempre que los cables no
rocen contra la parte frontal durante el tratamiento
@'#^}#nados.
Controllare che i cavi non sfreghino sulla
parte anteriore durante il trattamento in quanto
ciò potrebbe eventualmente modificare le
impostazioni selezionate.
Kontrollera alltid att slangarna inte ligger
emot enhetens framsida under behandling
eftersom detta kan påverka inställningarna.
5
(
%
(
<
'
.
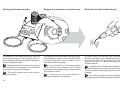
Always check that the unit is installed in
a safe and stable position. An eventual fall may
suddenly pull on the cord and the handpiece,
hurting the patient and the user, and damaging
the unit.
Toujours s!#'#!*
_(#*#
pourrait brusquement entraîner le cordon et la
<_!##?
et endommager gravement l'appareil.
Das Gerät muss sicher und stabil aufgestellt
werden. Bei einem Sturz könnte es zu einem
plötzlichen Reißen an Schlauch und Handstück
und zu Verletzungen des Patienten oder Schäden
am Gerät kommen.
Check that the rated voltage of the unit
corresponds to the local line voltage to prevent
damaging the unit.
*^'#!
_#
_^!*!!(
Um Schäden am Gerät zu vermeiden, muss
die Nennspannung des Geräts mit der örtlichen
Versorgungsspannung übereinstimmen.
Use the unit only in a FI protected mains supply
(FI = Residual current protection).
Y#'##**###&&*J/(
For USA or Canada: connect only to an
Hospital Grade outlet
Pour les USA ou le Canada: brancher uni'###(
Das Gerät darf nur an Steckdosen mit Fehlerstromschutz (FI-Schutzschalter) angeschlossen
werden.
5667896&(:67;6$
6
USA und Kanada: Nur an Hospital-GradeSteckdosen anschließen
(
<!
(
=
0+
Compruebe siempre '#*
instalado en un lugar seguro y estable. Si se
cayera accidentalmente podría tirar del cable y
el mango, lesionándose al paciente y al usuario,
y dañándose el aparato.
Controllare sempre che!#
in una posizione sicura e stabile. Una eventuale
caduta potrebbe tirare il cavo e il manipolo e ferire
!!#(
Se till att enheten installeras på en säker
och stadig plats. Om enheten faller ned rycks
slangen och handstycket med, vilket kan skada
patienten, användaren eller enheten.
Controllare che la tensione nominale
!#
!#(
Kontrollera att enhetens märkspänning
överensstämmer med nätspänningen i byggnaden
för att förhindra skada på enheten.
!##zione elettrica protetta FI (FI = protezione da
corrente residua).
Använd enheten endast i FI-skyddade elnät (FI =
restströmsskydd).
Compruebe que la tensión nominal del
aparato coincide con la tensión de la red local
para no dañar el aparato.
Use el aparato solamente en una red con
protección FI (FI = protección contra corriente
residual).
Para EE.UU. o Canadá: conectar solamente
a una toma de calidad sanitaria.
Per Stati Uniti o Canada: collegare solo ad
una presa di grado ospedaliero
För USA och Kanada: får endast anslutas
till ett uttag för sjukhusbruk.
7
(
>
?@
(
<2
>
?@
.
>7"
0
?@
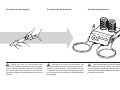
The Piezon Master 700 can be connected to
another compatible EMS device, so both devices
can be operated using a single foot pedal. An
optional link cable allows this connection. This
option is only available with the "multi-function"
pedal.
>%#=*#
#$%_?'#Y###'#*(_
!Y&&#
cette combinaison. Cette option est uniquement
_*#~&#(
The pedal will trigger only the handpiece which is
lifted from its support whatever the unit.
*&#'#&<
*#'#'#
l'appareil.
Der Piezon Master 700 kann an ein anderes
kompatibles EMS-Gerät angeschlossen werden,
sodass beide Geräte mit einem Fußschalter
bedient werden können. Die Verbindung wird
über ein optionales Verbindungskabel hergestellt. Diese Option ist nur beim Multifunktionsfußschalter verfügbar.
For additional details on device compatibility,
please contact the distributor in your country.
Both units must be turned on.
8
># # * # _* appareils, veuillez contacter le distributeur de
votre pays.
#;=#
tension.
Unabhängig vom Gerät wird über den Fußschalter
jeweils nur das Handstück bedient, das aus der
Halterung genommen wird.
Weitere Angaben zur Kompatibilität der Geräte
erhalten Sie bei Ihrem EMS-Händler.
Beide Geräte müssen eingeschaltet sein.
(
<!
>
?!@
(
=2>
?
@
4
>7
?@
El Piezon Master 700 se puede conectar a otro
dispositivo EMS compatible, de modo que puedan
utilizarse ambos aparatos con un solo pedal. Un
cable de conexión opcional permite realizar esta
conexión. Esta opción sólo está disponible con el
pedal "multifuncional".
Il Piezon Master 700 può essere collegato ad un
altro dispositivo EMS compatibile di modo che
entrambi i dispositivi possano essere azionati
con una singola pedaliera. Un cavo opzionale
consente tale connessione. Questa opzione è
disponibile solo con il pedale "multi-funzione".
Piezon Master 700 kan anslutas till en annan
kompatibel EMS-enhet, så att båda enheterna
kan användas med samma fotpedal. Anslutningen görs med en länkkabel (tillval). Detta tillval
&#
&#(
$'#*
levantado de su soporte, cualquiera que sea el
aparato.
/ sollevato dal suo supporto, indipendentemente
!#(
Si desea más detalles sobre la compatibilidad
de los aparatos, póngase en contacto con su
distribuidor.
>#&#_
dispositivo, rivolgersi al distributore nel proprio
paese.
Ambos aparatos deben estar encendidos.
$_#(
Pedalen aktiverar endast det handstycke som har
tagits ur sin hållare, oavsett enhet.
Ytterligare information om kompatibla enheter kan
fås från våra återförsäljare.
Båda enheterna måste vara påslagna.
9
PREPARING FOR TREATMENT
PRÉPARATION POUR
LE TRAITEMENT
VORBEREITEN FÜR
DIE BEHANDLUNG
>
#
*
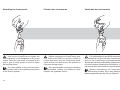
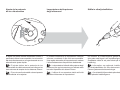
Always check the condition of the bottle cap
O-ring before installing the bottle. Please refer to
the chapter "Maintenance".
Toujours !*#}~#
bouchon avant la mise en place de la bouteille.
##*&*#%(
Kontrollieren Sie vor jedem Aufsetzen der
Flasche den O-Ring im Flaschendeckel. Beachten
Sie dazu die Hinweise im Abschnitt zur Wartung.
Use the graduations provided on the
bottles to adjust the quantity of the solution for
the treatment.
Utiliser les graduations sur les bouteilles
#}#'#*#*#
traitement.
Die erforderliche Menge der für die
Behandlung verwendeten Lösung kann mithilfe
der Teilstriche auf der Flasche abgemessen
werden.
Install one or two bottle(s) using a rotating
movement until it reaches the stop.
Mettre en place une ou deux bouteille(s) en effec###}#'#Y_#*(
Setzen Sie eine oder zwei Flaschen mit einer
drehenden Bewegung bis zum Anschlag der
Flaschenaufnahme auf.
10
PREPARACIÓN PARA
EL TRATAMIENTO
PREPARAZIONE PER
IL TRATTAMENTO
FÖRBEREDELSER INFÖR
BEHANDLING
!
J
J
%NGCP
KPI
/KP
2QYG
T
/CZ
5VCPFC
TF
'PFQ
%NGCP
KPI
/KP
2QYG
T
/CZ
5VCPFC
TF
'PFQ
Compruebe siempre el estado de la junta
tórica de la tapa del bote antes de instalarlo.
Consulte el capítulo "Mantenimiento".
Use las graduaciones provistas en los botes
para ajustar la cantidad de solución para el tratamiento.
Instale uno o los dos botes girándolos hasta que
lleguen al tope.
Prima dell'installazione del flacone,
controllare sempre la condizione dell'anello di
#
(#
"Manutenzione".
##
'##
trattamento.
Kontrollera alltid att flasklockets O-ring
är hel innan flaskan installeras. Se kapitlet
”Underhåll”.
]&
justera vätskemängden för behandlingen.
/]
#&
dem tills de når stoppläget.
/##
#
^'#&(
11
%
>
W
#
+
Please read the instructions for use of the
disinfecting products.
##*&*#;Y
#*&(
Please refer to standards applicable in your
country regarding the purchase and use of these
products.
##*&*#;##
dans votre pays pour l'acquisition et l'utilisation de
ces produits.
Bitte lesen Sie zunächst die Bedienungsanleitungen der einzelnen Desinfektionslösungen
durch.
#
#
+ #@)
+ ;(
+ >@`)(
+ Hydrogen peroxide (H2O2
+ Carbanilides
+ Povidone iodine
+ Quaternary ammonium compounds
+ Cetylpyridin chloride
+ Citric acid
+ Aromatic essence
+ Ethanol
#
+ @#)
+ ;?
+ $#@'#)(
+ Peroxide d'hydrogène (H2O2¡
+ Carbanilides
+ >*
+ Composants ammonium quaternaires
+ Chlorure de cetylpyridine
+ Acide citrique
+ Essence aromatique
+ Ethanol
<
#
BacterX® pro / Triclosan / Betadine® / Listerine®
/ Alodont® / Meridol® / BreathRx® / CloSYS™ /
Dakin's solution / Scope® / Cepacol® /...
<
Bitte halten Sie beim Kauf und beim
Gebrauch solcher Produkte die in Ihrem Land
geltenden Normen ein.
#
+
#/
X
+
+
+
+
+
+
+
+
+
+
+
)#@)
;?
|#)?
Wasserstoffperoxid (H2O2
Carbanilide
Polyvidon-Jod
Quaternäre Ammoniumverbindungen
Cetylpyridinchlorid
Zitronensäure
Essenzielle Öle
Ethanol
BacterX® pro / Triclosan / Betadine® / Listerine®
/ Alodont® / Meridol® / BreathRx® / CloSYS™ /
Dakin's solution / Scope® / Cepacol® /...
X
0Y
%
BacterX® pro / Triclosan / Betadine® / Listerine® /
Alodont® / Meridol® / BreathRx® / CloSYS™ /
Dakin-Lösung / Scope® / Cepacol® /...
#
#%
+ EMS Ultra Clean (H2O2
+ Hydrogen peroxide (H2O2¡
+ Sterilox (hypochlorous acid)
#
+ EMS Ultra Clean (H2O2
+ Peroxide d'hydrogène (H2O2¡
+ Sterilox (acide hypochlorique)
#
+
"
0
<
>
Different disinfecting solutions can be used
during treatment. Chemical reactions might occur
between these solutions and damage the unit.
Wash the liquid circuit before using a different
solution (please refer to the "Cleaning mode" in
the "End of treatment" chapter).
X&&*#*&#
=#*#(X*
chimiques pourraient se produire entre ces
'#Y(#
'#!###*&&&*##*&*#
mode" dans le chapitre "Fin de traitement").
12
+
+
+
EMS Ultra Clean (H2O2
Wasserstoffperoxid (H2O2¡
Sterilox (unterchlorige Säure)
&
+
Eventuell werden während der Behandlung
verschiedene Desinfektionslösungen verwendet,
zwischen denen es zu chemischen Reaktionen
kommen kann, die das Gerät beschädigen. Spülen
Sie das Gerät somit vor jedem Wechsel der Desinfektionslösung aus (siehe Abschnitt zum "Cleaning
mode" im Kapitel zum Ende der Behandlung).
[
+0
Lea las instrucciones de uso de los
productos desinfectantes.
Leggere attentamente le istruzioni per l'uso
dei prodotti disinfettanti.
Läs desinfektionsmedlens bruksanvisningar.
Consulte la normativa vigente en su país
con respecto a la adquisición y uso de estos
productos.
Fare riferimento agli standard applicabili
nel proprio paese sull'acquisto e utilizzo di questi
prodotti.
Kontrollera de standarder som gäller i ditt
land för köp och användning av dessa produkter.
#
+ )
+ ;?
+ #^)?
+ Agua oxigenada (H2O2
+ Carbanilidas
+ Povidona yodada
+ Compuestos de amonio cuaternario
+ Cloruro de cetilpiridina
+ Ácido cítrico
+ Esencia aromática
+ Etanol
#
[
+ /)
+ ;?
+ #^)?
+ Perossido di idrogeno (H2O2
+ Carbanilidi
+ Iodio povidone
+ Composti di ammonio quaternario
+ Cloruro cetilpiridina
+ Acido citrico
+ Essenza aromatica
+ Etanolo
#
+#+
+ )#@)
+ ¢;?
+ ¢)?
+ Väteperoxid (H2O2
+ Karbanilider
+ Povidonjod
+ Kvartära ammoniumföreningar
+ Cetylpyridinklorid
+ Citronsyra
+ Aromatisk essens
+ Etanol
BacterX® pro / Triclosan / Betadine® / Listerine® /
Alodont® / Meridol® / BreathRx® / CloSYS™ /
soluzione di Dakin/ Scope® / Cepacol® /...
<
3
BacterX® pro / Triclosan / Betadine® / Listerine® /
Alodont® / Meridol® / BreathRx® / CloSYS™ /
Dakins lösning / Scope® / Cepacol® /...
#
+ EMS Ultra Clean (H2O2
+ Perossido di idrogeno (H2O2¡
+ Sterilox (acido ipocloroso)
#
+#+0
+ EMS Ultra Clean (H2O2
+ Väteperoxid (H2O2¡
+ Sterilox (hypoklorsyra)
>
Durante il trattamento possono essere
utilizzate diverse soluzioni disinfettanti. Fra queste
soluzioni si possono verificare delle reazioni
!#(
il circuito dei liquidi prima di usare una diversa
soluzione disinfettante (consultare "Cleaning
mode" nel capitolo "Fine trattamento").
Olika desinfektionslösingar kan användas
under behandling. Kemiska reaktioner kan uppstå
mellan dessa lösningar som kan skada enheten.
Tvätta vätskeslingan innan en annan desinfektionslösning används (se "Cleaning mode" i
kapitlet "Avsluta behandlingen").
-
BacterX® pro / Triclosan / Betadine® / Listerine®
/ Alodont® / Meridol® / BreathRx® / CloSYS™ /
solución de Dakin / Scope® / Cepacol® /...
#
+ EMS Ultra Clean (H2O2
+ Agua oxigenada (H2O2¡
+ Sterilox (ácido hipocloroso)
>
Durante el tratamiento se pueden usar
distintas soluciones desinfectantes. Podrían
producirse reacciones químicas entre estas
soluciones y dañar el aparato. Lave el circuito de
líquido antes de utilizar otra solución (consulte
"Cleaning mode" en el capítulo "Fin del tratamiento").
13
(
(
<
1
2
#
$/
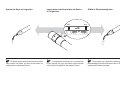
Blow dry the connections to remove
eventual presence of liquid to ensure a proper
electrical contact. Never blow compressed air in
the irrigation connections as this will irremediably
damage internal parts.
#&
###
**#'#^!##
_*'#()}@!
*!
**_ <
internes.
Trocknen Sie die einzelnen Komponenten
mit einem Fön, um eine einwandfreie elektronische Verbindung zu gewährleisten. Die Verbindungsstücke dürfen keinesfalls mit Druckluft
gereinigt werden, da es hierdurch zu irreparablen
Schäden an innenliegenden Teilen kommen kann.
14
(
<!
(
4
%NGCP
KPI
/KP
2QYG
T
Seque con aire las conexiones para
eliminar la posible existencia de líquido y garan#*#()'#
aire comprimido en las conexiones de irrigación
ya que esto dañará irremediablemente las partes
internas.
Asciugare con aria le connessioni per
eliminare eventuali liquidi presenti e garantire un
()&^
*
le parti interne ne rimarrebbero irrimediabilmente
danneggiate.
/CZ
5VCPFC
TF
'PFQ
Torka anslutningarna med en blåstork för
att avlägsna eventuell vätska och säkerställa
korrekt elektrisk kontakt. Blås aldrig med tryckluft i
spolningsanslutningarna eftersom detta kan skada
inre delar permanent.
15
*<
&
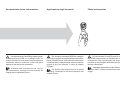
Use only the CombiTorque to tighten the
EMS instrument on the handpiece to the correct
torque. Once the instrument is screwed all the
way in, give an extra quarter of a turn to obtain
the required torque.
Utiliser uniquement la CombiTorque pour
&;!#$%#<#
#*(&!#*?
Y#'##^!_
couple de serrage requis.
For further details on the use of the instruments, please refer to the operating instructions
of the Piezon systems.
>##*Y#
#?##*&*#
Y@<>(
Für die Befestigung des EMS-Instruments
am Handstück mit dem korrekten Drehmoment
darf nur der CombiTorque verwendet werden.
Sobald das Instrument vollständig aufgeschraubt
ist, ist eine weitere Vierteldrehung erforderlich, um
das erforderliche Drehmoment zu gewährleisten.
16
Weitere Informationen zur Verwendung
der Instrumente erhalten Sie in den jeweiligen
Bedienungsanleitungen der Piezon-Systeme.
*0
Use solamente el CombiTorque para ajustar
el instrumento de EMS en el mango al par de
('##*
enroscado, dele un cuarto de vuelta más para
obtener el par de torsión necesario.
Per serrare lo strumento EMS sul manipolo
con il valore corretto di coppia utilizzare esclusivamente il CombiTorque. Una volta che lo strumento
è stato avvitato completamente, dare un ulteriore
quarto di giro per ottenere il valore di coppia
richiesto.
Använd endast CombiTorque för att dra
fast EMS-instrumentet på handstycket till rätt
vridmoment. När instrumentet har skruvats in
helt drar du åt ytterligare ett kvarts varv för att få
korrekt vridmoment.
Si desea más información del uso de
los instrumentos, consulte las instrucciones de
empleo de los sistemas Piezon.
>#&#Y#'#
strumenti, consultare le istruzioni operative dei
sistemi Piezon.
Ytterligare information om hur instrumenten
^>~@_#ningar.
17
OPERATING THE UNIT
UTILISATION DE L’APPAREIL
BEDIENEN DES GERÄTS
%)
>
%NGC
ON
/KP
2QYG
T
%NGCP
KPI
/CZ
5VCPF
CTF
'PFQ
%NGCP
KPI
/KP
/KP
2QYG
T
/CZ
2QYG
5VCPFC
TF
'PFQ
T
/CZ
5VCPFC
TF
'PFQ
When the unit is turned on, the control lamps
light up and then the unit returns to its previous
^#(
#Y?
@##;Y##!
#^#**(
Beim Einschalten des Geräts leuchten die
Kontrolllampen auf und das Gerät wird auf die
¢^#(
After 15 min. of inactivity, the unit goes in
_@(>^
zone wakes the unit from standby mode. The unit
##^#(
<£¡(!*?!
en mode stand-by. Placer le doigt sur la zone
_*!#~_@(
!#^#**dente.
Wird das Gerät nicht innerhalb von 15 Min.
in Betrieb genommen, schaltet es in den StandbyModus. Durch ein Berühren des Bedienfeldes wird
das Gerät wieder in den aktiven Modus geschaltet
#¢^#(
18
UTILIZACIÓN DEL APARATO
USO DELL'UNITÀ
ANVÄNDA ENHETEN
33
%NGCP
/KP
2QYG
T
/CZ
5VCPF
CTF
'PFQ
Al encender el aparato, los pilotos indicadores
#@###^guración previa.
¤#!#?
#!#^#
cui si trovava prima dello spegnimento.
Tras 15 min. de inactividad, el aparato
pasa a modo standby. Al poner un dedo sobre la
zona sensible, el aparato sale del modo standby
@##^#(
X£¡#?!#
_@(>
_!#?!#
_@(!##^gurazione precedente.
%NGCP
KPI
/KP
2QYG
T
/CZ
5VCPFC
TF
'PFQ
När enheten slås på tänds kontrollampan och
]]&]^#(
Efter 15 minuters inaktivitet går enheten
över i vänteläge. Om du pekar i den tryckkänsliga
zonen blir enheten aktiv igen. Enheten återgår då
^#(
19
]
YGT
%NGCP
KPI
/CZ
5VCPF
CTF
'PFQ
%0
X
YGT
/CZ
5VCPF
CTF
'PFQ
/KP
2QYG
T
/CZ
5VCPFC
TF
'PFQ
The unit includes two modes to optimize the ultrasound power range depending on the application.
The power setting allows to adjust the power within
the selected range.
For each working mode, the unit saves the
settings of the last power setting and the last
bottle selection.
20
!#;^Y
la plage de puissance des ultrasons en fonction
Y(*#
*#**(
>#'#?!*
*#<
*_#(
Das Gerät verfügt über zwei Modi zur Optimierung
der Ultraschallleistung je nach Anwendung. Die
Ultraschallleistung kann innerhalb eines ausgewählten Bereichs reguliert werden.
Für jeden Arbeitsmodus wird die letzte Einstellung
der Ultraschallleistung und Flaschenauswahl
gespeichert.
!
#
2#
&0-#0
El aparato incluye dos modos para optimizar el
intervalo de la potencia de los ultrasonidos dependiendo de la aplicación. El ajuste de la potencia
permite regular la potencia dentro del intervalo
seleccionado.
!##
la gamma di potenza ad ultrasuoni in base all'applicazione. L'impostazione consente di regolare
la potenza nell'intervallo selezionato.
Enheten har två driftslägen för att optimera ultraljudseffekten efter användningsområdet. Med
effektinställningen justerar du effekten inom det
valda intervallet.
> ? !# impostazioni della precedente impostazione di
!#
(
För varje driftsläge sparar enheten den senaste
&&
(
Para cada modo de trabajo, el aparato guarda la
^#¥}#@
del último bote seleccionado.
21
22
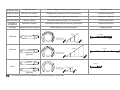
Working mode
Handpiece used
Power settings according to the instuments
Available power
Mode de travail
><#*
|*##
Puissance disponible
Arbeitsmodus
Verwendetes Handstück
Leistungseinstellung je nach Instrument
Verfügbare Leistung
Modo de trabajo
Mango utilizado
Ajustes de potencia según los instrumentos
Potencia disponible
%
lavorazione
Manipolo utilizzato
Impostazioni della potenza secondo gli strumenti
Potenza disponibile
Driftsläge
Handstycke som används
Effektinställning enligt instrumenten
Tillgänglig effekt
Power
Standard
Power
Piezon LED
MIN
Power
MAX
MAX
MIN
Power
Standard
Power
Piezon Power LED
MIN
MAX
(optional)
Power
MAX
MIN
Piezon LED
Power
Endo
Power
Piezon Power LED
(optional)
Power
MIN
MIN
MAX
MAX
The Piezon Power LED handpiece may not be available in all markets.
23
^4]^
2
^4]^
%
>^4]^
Press the foot pedal on the corresponding symbol
to activate the "Dry work" mode.
>*#@_
pour activer le mode "Dry work".
Betätigen Sie den Fußschalter (Symbol für "Dry
Work"-Modus).
Never work dry to avoid heat damage on the
###^cally for this purpose. The tip of the instrument
immediately heats up when used without irrigation.
)}^Y*
*'####&
#*O##(
Y#Y*#&&*
en travaillant sans irrigation.
Zur Vermeidung von möglichen Hitzeschäden am Gewebe arbeiten Sie niemals
trocken, es sei denn, es werden die speziell
dafür vorgesehenen Instrumente verwendet. Die
Arbeitsspitze der Instrumente erwärmt sich bei
Arbeiten ohne Flüssigkeit sehr schnell.
Please refer to the operating instructions
of the Piezon systems for further information
concerning instruments usable in "Dry work"
mode.
24
##*&*#Y
des systèmes Piezon pour des informations plus
**##_
en mode "Dry work".
Weitere Informationen zu Instrumenten, die
im "Dry Work"-Modus verwendet werden können,
finden Sie in den Bedienungsanleitungen der
Piezon-Systeme.
!
^4]^
2^4]^
&0-^4]^70
%NGCP
KPI
/KP
2QYG
T
/CZ
5VCPFC
TF
'PFQ
Pise el pedal sobre el símbolo correspondiente
para activar el modo de "Dry work".
Premere la pedaliera sul simbolo corrispondente
X@(
Tryck på "Dry Work"-symbolen på fotpedalen för
att aktivera Dry Work-läget.
No trabaje nunca en seco para que el calor
¦}?'##*
^^(#
del instrumento se calienta enseguida cuando se
usa sin irrigación.
Non lavorare mai a secco per evitare danni
da calore sui tessuti, a meno che lo strumento non
^'#(/
puntale dello strumento si riscalda immediatamente se usato senza irrigazione.
Arbeta aldrig torrt för att undvika värmeskador på vävnaderna om inte instrumentet är
särskilt avsett för torranvändning. Instrumentets
spets värms omedelbart upp när det används utan
spolning.
Para más información sobre los instrumentos que pueden utilizarse en modo de "Dry
work", consulte las instrucciones de empleo de
los sistemas Piezon.
Per informazioni ulteriori sugli strumenti
#Dry
work" consultare le istruzioni operative dei sistemi
Piezon.
Ytterligare information om vilka instrument
som kan användas i "Dry work"-läge finns i
Piezon-systemens bruksanvisningar.
25
>##
#
>##.
4
3
1
2
26
>#
#
>#
EN
FR
DE
ES
IT
SV
1
Irrigation + light
Irrigation + lumière
Flüssigkeit + Licht
Irrigación + luz
Irrigazione +
illuminazione
Spolning + belysning
2
Ultrasounds +
irrigation + light
Ultrasons + irrigation
+ lumière
Ultraschall +
Flüssigkeit + Licht
Ultrasonidos +
irrigación + luz
Ultrasounds + light
Ultrasons + lumière
Ultraschall + Licht
Ultrasonidos + luz
Ultrasuoni +
illuminazione
Ultraljud + belysning
(Dry work mode)
(mode "Dry work")
(Modus "Dry Work")
(modo "Dry Work")
%X@
("Dry Work"-läge)
Funzione boost*
+ illuminazione
Effektökning*
+ belysning
3
Ultrasuoni + irriga- Ultraljud + spolning
+ belysning
zione + illuminazione
Boost function*
+ light
Fonction Boost*
+ lumière
Boost-Funktion*
+ Licht
Función de
^©
+ luz
1 2 3
Same as
Standard mode
Identique au mode
Standard
Identisch mit
Standard-Modus
Igual que el
modo Standard
Standard
Samma som
Standard-läge
4
Inactive
Inactif
Inaktiv
Inactivo
Inattivo
Inaktivt
4 (+
2
)
©@`&#£
©#£
©#*#}#'#!£
©#^£
©ª_$###_#£
©&&&#£
27
1
2
7$/7
The Piezon handpiece LED lights up when
the foot pedal is activated. The light stays on for
about 20 seconds after the foot pedal is released.
< > $X !*
'# * *(
$#*###*!«
<'#**(
Das Piezon-LED-Handstück leuchtet auf,
sobald der Fußschalter aktiviert wird. Nach dem
Loslassen des Fußschalters leuchtet die LED
noch etwa 20 Sekunden weiter.
28
74
86
El mango Piezon LED se ilumina cuando
se activa el pedal. Esta luz permanece encendida
unos 20 segundos tras soltar el pedal.
Il manipolo Piezon LED si illumina quando si
attiva la pedaliera. Rimane acceso per una durata
di 20 sec. dopo che la pedaliera viene rilasciata.
Piezon-handstyckets LED tänds när fotpedalen aktiveras. Lampan lyser i cirka 20 sekunder
efter det att fotpedalen har släppts upp.
29
4
=
PKPI
%
*/
#
'4
%NGCP
%NGCP
KPI
KPI
/KP
/KP
2QYG
T
/CZ
5VCPFC
TF
'PFQ
Constantly check the presence of liquid in
the bottles during treatment.
30
2QYG
T
*& * liquide dans les bouteilles pendant le traitement.
/CZ
5VCPFC
TF
'PFQ
Überprüfen Sie während der Behandlung
laufend, ob sich noch ausreichend Flüssigkeit in
J_^(
!
#
!
#
&0-0
%NGCP
%NGCP
KPI
/KP
KPI
/KP
2QYG
T
/CZ
5VCPFC
TF
'PFQ
Compruebe constantemente que haya
líquido en los botes durante el tratamiento.
2QYG
T
/CZ
Controllare costantemente la presenza di
'#
#.
5VCPFC
TF
'PFQ
¢^
#_.
31
%
g
%NGCP
KPI
/KP
2QYG
T
/CZ
5VCPFC
TF
'PFQ
/KP
2QYG
T
5
/CZ
'PF
The settings can be obtained either by sliding or
_@^(
^@
a quick setting alternative.
*#=_#?
soit en plaçant le doigt sur la zone sensible. Placer
!**#
*(
Die gewünschte Einstellung kann entweder
stufenlos oder direkt durch Antippen des Drehreglers bei der gewünschten Einstellung vorgenommen werden (zur Beschleunigung des
Einstellvorgangs).
Optimal setting of the ultrasound power for
each instrument are indicated in the operating
instructions for the Piezon systems.
&#*
de la puissance des ultrasons pour chaque
#'#*Y
des systèmes Piezon.
Beachten Sie für die optimale Einstellung
der Ultraschallleistung für die einzelnen Instrumente die Bedienungsanleitungen der PiezonSysteme.
!# !# # * #
!#&&*(
Bei Verwendung einer sterilen Schutzabdeckung können sich die Einstellungen verändern.
The use of a sterile cover on the unit may
affect the settings.
32
-
0-
##
El ajuste se puede realizar deslizando el dedo o
*__(
del dedo directamente en el lugar deseado es una
alternativa de ajuste rápida.
È possibile effettuare le impostazioni facendo
scorrere o mettendo il dito sulla zona sensibile.
Una rapida alternativa di impostazione è mettere
il dito direttamente sulla posizione desiderata.
Du kommer till inställningarna genom att dra
^@(
Snabbaste sättet är att peka direkt på önskad
inställning.
El ajuste óptimo de la potencia de los
ultrasonidos de cada instrumento se indica en las
instrucciones de empleo de los sistemas Piezon.
Le impostazioni ottimali della potenza degli
ultrasuoni per ogni strumento sono indicate nelle
istruzioni operative dei sistemi Piezon.
Information om optimala inställningar
#}#&&&#^
Piezon-systemens bruksanvisningar.
$##&#*_
puede afectar a los ajustes.
!####!#
__
#(
Om ett sterilt hölje används på enheten kan
detta påverka inställningarna.
/KP
2QYG
T
5VC
/CZ
'PFQ
33
J%
=
J
max.
&'#
`&
each instrument are indicated in the operating
instructions of the Piezon systems
34
&#*
# *_ '# # '# #
_Y
systèmes Piezon.
Beachten Sie für die optimale Einstellung
der Flüssigkeitsmenge die Bedienungsanleitungen der einzelnen Piezon-Systeme.
-
J-
!
J
MIN
$}#
#}'#
instrumento se indica en las instrucciones de
empleo de los sistemas Piezon.
Le impostazioni ottimali per la portata del
#'##
nelle istruzioni operative dei sistemi Piezon.
0J+
MAX
Information om optimala inställningar av
&#^>~
systemens bruksanvisningar.
35
END OF THE TREATMENT
FIN DU TRAITEMENT
ENDE DER BEHANDLUNG
4
4
Clean the instrument with running water
before disinfection.
)@ # Y#
#*&(
Spülen Sie das Instrument vor der Desin&#
¬_(
Please conform to the recommendations of
the "Reprocessing Instructions" manual delivered
with your product regarding the procedures of
cleaning, disinfecting and sterilizing of the components.
Veuillez vous conformer aux recommandations contenues dans le manuel "Reprocessing
/#*##
*#@?*&*sation des composants.
Beachten Sie die Empfehlungen des
Handbuchs "Reprocessing Instructions", das im
Lieferumfang Ihres Produkts enthalten ist, zur
Reinigung, Desinfektion und Sterilisation der
Bestandteile.
36
FIN DEL TRATAMIENTO
FINE DEL TRATTAMENTO
AVSLUTA BEHANDLINGEN
-
4
+
Limpie los instrumentos con agua corriente
antes de desinfectarlos.
Pulire lo strumento con acqua corrente
prima della disinfezione.
Rengör instrumentet under rinnande
vatten före desinfektion.
Siga las recomendaciones del manual
"Reprocessing Instructions" suministrado con
su producto con respecto a los procedimientos
de limpieza, desinfección y esterilización de los
componentes.
Attenersi alle raccomandazioni del manuale
"Istruzioni per la rigenerazione" in dotazione al
prodotto sulle procedure di pulizia, disinfezione e
sterilizzazione dei componenti.
Följ rekommendationerna i handboken
"Reprocessing Instructions" som medföljer
produkten vad gäller procedurer för rengöring,
desinfektion och sterilisering av komponenter.
37
(
#
h
4
#
Y
W
#
^(
^
>
^(
^
^(
^7>
It is recommended to proceed daily to the
washing and the disinfecting of the liquid circuit
of the unit.
/**'##*&##
'#Y(
Eine tägliche Spülung und Desinfektion des
Flüssigkeitskreislaufs des Geräts wird empfohlen.
The "Cleaning" mode allows for the washing
and the disinfecting of the liquid circuit in order to
reduce the crystalline deposits and the number
of bacteria in the liquid circuit. A rinsing of the
circuit is then required to avoid a possible reaction
caused by the ageing of the solution or by an
unwanted mixture of liquids.
Le mode "Cleaning" permet le lavage et la
*&##'#^*#
*__*
circuit de liquide. Un rinçage du circuit est ensuite
'#^!*#_*##
#*&##
*'#(
All the bottles and handpiece cords used
during treatment must be present during the
washing and the disinfecting of the liquid circuit
because the process is simultaneous for all these
elements. Remove the handpieces.
#_##*
= *
*&##
'#**#*##
**($<(
Circuit washing cycle:
+ Prepare the bottle(s) with distilled or demineralized water,
+ Press the "Cleaning" mode selector,
+ Select the bottle(s) to use,
+ Lift the connector(s) and put it (them) above
a sink,
+ Press the foot pedal to start the program.
Three "beeps" and the blinking of the con&^
the end of the cycle.
Cycle de lavage du circuit:
+ >*#_#
!#*#***?
+ >*##?
+ *#_##?
+ Soulever le(s) connecteur(s) et le(s) placer
##!#*?
+ >*#*gramme. Trois "bips" et le clignotement de
la lampe de contrôle du "Cleaning" mode
^#@(
Disinfecting cycle:
+ Prepare the bottle(s) with a compatible
disinfecting solution (refer to the list of compatible disinfectants at the beginning of this
manual),
+ Select the bottle(s) to use,
Cycle de*&
+ >*arer la (ou les) bouteilles avec une
#*&_
*&_#*_#
ce manuel),
+ *#_##?
+ Soulever le(s) connecteur(s) et le(s) placer
##!#*?
38
Der "Cleaning" -Modus erlaubt das Reinigen und
X^Jª#&?
kristalline Ablagerungen und Bakterien ansammeln
können. Anschließend muss der Kreislauf gespült
werden, um mögliche Reaktionen durch überalterte
Lösungen oder eine unerwünschte Vermischung von
Flüssigkeiten zu vermeiden.
Jª|#X^Jªkeitskreislaufs müssen alle Flaschen und Handstückschläuche angeschlossen sein, da auf diese Weise alle
Elemente gleichzeitig gereinigt werden. Entfernen Sie
die Handstücke.
Reinigungszyklus für den Flüssigkeitskreislauf:
+
+
+
+
+
Bereiten Sie die Flaschen mit destilliertem oder
demineralisiertem Wasser vor.
Wählen Sie den "Cleaning"-Modus aus.
Wählen Sie die zu verwendenden Flaschen
aus.
Heben Sie das Anschlussstück (bzw. die Anschlussstücke) an und halten Sie es (sie) über
ein Waschbecken.
Betätigen Sie den Fußschalter, um das Programm zu starten. Durch drei Pieptöne und
ein Blinken der Kontrolllampe des Reinigungsmodus wird das Ende des Reinigungszyklus
angezeigt.
Desinfektionszyklus:
+
+
Bereiten Sie die Flaschen mit einer kompatiblen
Desinfektionslösung vor. (Eine Liste solcher Lö#^&_#(
Wählen Sie die zu verwendenden Flaschen
aus.
4
#
!
#
+
Y
>^(
^
>2^(
^
+0
Se recomienda lavar y desinfectar a diario
el circuito de líquido del aparato.
Si consiglia di procedere giornalmente al
lavaggio e alla disinfezione del circuito dei liquidi
!#(
Vi rekommenderar att du tvättar och desin^(
El modo "Cleaning" permite el lavado y
&#'#^#
los depósitos cristalinos y el número de bacterias
en el circuito de líquido. A continuación hace
falta aclarar el circuito para prevenir una posible
reacción causada por el deterioro de la solución
o por una mezcla no deseada de líquidos.
Todos los botes y cables de los mangos que
se hayan utilizado en el tratamiento deben estar
presentes durante el lavado y desinfección del
circuito de líquido ya que el proceso debe realizarse simultáneamente en todos estos elementos.
Retire los mangos.
Ciclo de lavado del circuito:
+ Prepare el o los botes con agua destilada o
desmineralizada.
+ Pulse el selector del modo "Cleaning".
+ Seleccione el bote o botes a usar.
+ Levante el o los conectores y póngalo(s)
encima de un fregadero.
+ Pise el pedal para que empiece el programa. Tres "pitidos" y el parpadeo del piloto
^
^(
Ciclo de desinfección:
+ Prepare el o los botes con una solución
desinfectante compatible (consulte la lista
de desinfectantes compatibles al principio
del manual).
+ Seleccione el bote o botes a usar.
e la disinfezione del circuito dei liquidi per ridurre i
depositi di cristalli e di batteri nel circuito dei liquidi.
Viene quindi richiesto il risciacquo del circuito per
evitare possibili reazioni causate dall'invecchiamento della soluzione o da una miscela non voluta
di liquidi.
#
#
nel trattamento devono essere presenti durante
il lavaggio e la disinfezione del circuito dei liquidi
*#'#<#taneo. Rimuovere i manipoli.
Ciclo di lavaggio del circuito:
+ >¯
¯'#
demineralizzata.
+ >(
+ ¯
¯#(
+ Sollevare il connettore e collocarlo sul lavandino.
+ Premere la pedaliera per avviare il program(^&
tre segnalazioni acustiche "bip" e dalla luce
intermittente della spia di controllo della mo(
Ciclo di disinfezione:
+ Prepa¯
¯##
disinfettante compatibile (fare riferimento
all'elenco delle soluzioni disinfettanti riportato all'inizio di questo manuale),
I rengöringsläget ”Cleaning” kan vätske^&
kristallavlagringarna och mängden bakterier i
vätskeslingan. Slingan måste sedan sköljas för
att undvika eventuella reaktioner som orsakas
av gammal vätska eller en oönskad blandning av
vätskor.
@
har använts under behandling måste tvättas
^
eftersom processen utförs samtidigt för alla dessa
beståndsdelar. Ta bort handstyckena.
Tvättcykel för slingan:
+ J_
saltat vatten.
+ Tryck på "Cleaning"-knappen.
+ }¯
(
+ Lyft handstyckena och håll dem över en
vask.
+ Tryck på fotpedalen för att starta programmet. Tre pip och en blinkande kontrollampa
bekräftar att cykeln är klar.
Desinfektionscykel:
+ J_
_infektionslösning (se listan över kompatibla
desinfektionslösningar i början av handboken).
+ }¯
(
+ Lyft handstyckena och håll dem över en
vask.
39
+
+
+
Lift the connector(s) and put it (them) above
a sink,
Press the foot pedal to start the program.
Three "beeps" signal and the blinking of the
control lamp of the "Cleaning" mode con^&@,
Then allow the disinfecting solution to act
for 5 minutes without intervene with the unit.
+
+
>*#*gramme. Trois "bips" et le clignotement de
la lampe de contrôle du "Cleaning" mode
^?
##*&tante pendant 5 minutes sans intervenir sur
l'appareil.
Rinsing cycle:
+ Prepare the bottle(s) with the sterile distilled
water,
+ Select the bottle(s) to use,
+ Lift the connector(s) and put it (them) above
a sink,
+ Press the foot pedal to start the program.
Three "beeps" signal and the blinking of the
control lamp of the "Cleaning" mode con^&@,
Press the "Cleaning" mode selector to exit this
mode (this cycle must be then restarted).
Cycle de rinçage:
+ >*arer la (ou les) bouteilles avec de l'eau
**?
+ *#_##?
+ Soulever le(s) connecteur(s) et le(s) placer
##!#*?
+ >*#*gramme. Trois "bips" et le clignotement de
la lampe de contrôle du "Cleaning" mode
^?
>*###
s@=mencer ensuite).
(Note: it is possible at any time to press the foot
pedal to stop the program in progress.)
)_#Y#@#
*#=#(
The informative durations of the "Cleaning" mode
cycles ^&`)sponds to 10 seconds):
#*&@#
*^#)#
£
40
1 bottle
2 bottles
1 cord
30 seconds
50 ml
1 minute
2 x 50 ml
2 cords
1 minute
100 ml
2 minutes
2 x 100 ml
1 bouteille
2 bouteilles
1 cordon
30 secondes
50 ml
1 minute
2 x 50 ml
2 cordons
1 minute
100 ml
2 minutes
2 x 100 ml
+
+
+
Heben Sie das Anschlussstück (bzw. die Anschlussstücke) an und halten Sie es (sie) über
ein Waschbecken.
Betätigen Sie den Fußschalter, um das Programm zu starten. Durch drei Pieptöne und ein
Blinken der Kontrolllampe des "Cleaning" Modus wird das Ende des Zyklus angezeigt.
Lassen Sie die Desinfektionslösung anschließend fünf Minuten lang wirken, ohne weitere
Einstellungen am Gerät vorzunehmen oder das
Gerät zu verwenden.
Spülzyklus:
+
+
+
+
Bereiten Sie die Flaschen mit sterilem, destilliertem Wasser vor.
Wählen Sie die zu verwendenden Flaschen
aus.
Heben Sie das Anschlussstück (bzw. die Anschlussstücke) an und halten Sie es (sie) über
ein Waschbecken.
Betätigen Sie den Fußschalter, um das Programm zu starten. Durch drei Pieptöne und ein
Blinken der Kontrolllampe des "Cleaning" Modus wird das Ende des Zyklus angezeigt.
Betätigen sie noch einmal die Auswahltaste für den
Reinigungsmodus, um den Modus zu beenden. (Der
Zyklus muss dann erneut gestartet werden.)
(Hinweis: Das laufende Programm kann jederzeit
mithilfe des Fußschalters unterbrochen werden.)
Die Dauer der einzelnen Zyklen des Reinigungsmodus ist wie folgt: (Hinweis: eine LED entspricht
10 Sekunden.)
1 Flasche
2 Flaschen
1 Schlauch
30 Sekunden
50 ml
1 Minute
2 x 50 ml
2 Schläuche
1 Minute
100 ml
2 Minuten
2 x 100 ml
+
+
+
Levante el o los conectores y póngalo(s)
encima de un fregadero.
Pise el pedal para que empiece el programa. Tres "pitidos" y el parpadeo del piloto
^
^.
A continuación deje actuar la solución desinfectante durante 5 minutos sin tocar el
aparato.
Ciclo de aclarado:
+ Prepare el o los botes con agua destilada
*(
+ Seleccione el bote o botes a usar.
+ Levante el o los conectores y póngalo(s)
encima de un fregadero.
+ Pise el pedal para que empiece el programa. Tres "pitidos" y el parpadeo del piloto
^
^.
Pulse el selector del modo "Cleaning" para salir
de este modo (este ciclo deberá entonces reiniciarse).
(Nota: es posible pisar el pedal en cualquier
momento para detener el programa en curso.)
A continuación se indican las duraciones informativas de los ciclos del modo "Cleaning" (Nota: un
led corresponde a 10 segundos):
1 bote
2 botes
1 cable
30 segundos
50 ml
1 minuto
2 x 50 ml
2 cables
1 minuto
100 ml
2 minutos
2 x 100 ml
+
+
+
+
¯
¯#(
Sollevare il connettore e collocarlo sul lavandino.
Premere la pedaliera per avviare il program(^&
tre segnalazioni acustiche (bip) e dalla luce
intermittente della spia di controllo della mo(
Lasciare agire la soluzione disinfettante per
5 ##!#(
Ciclo di risciacquo:
+ Preparare¯
¯'#
sterile.
+ ¯
¯#(
+ Sollevare il connettore e collocarlo sul lavandino.
+ Premere la pedaliera per avviare il program(^&
tre segnalazioni acustiche (bip) e dalla luce
intermittente della spia di controllo della mo(
>
#'# (riavviare questo ciclo).
+
+
Tryck på fotpedalen för att starta programmet. Tre pip och en blinkande kontrollampa
bekräftar att cykeln är klar.
Låt sedan desinfektionslösningen verka i
fem minuter utan att röra enheten.
Sköljningscykel:
+ J_
vatten.
+ }¯
(
+ Lyft handstyckena och håll dem över en
vask.
+ Tryck på fotpedalen för att starta programmet. Tre pip och en blinkande kontrollampa
bekräftar att cykeln är klar.
Tryck på "Cleaning"-knappen för att gå ut ur rengöringsläget (cykeln måste då startas om).
(Obs! Du kan när som helst trycka på fotpedalen
och avbryta det pågående programmet.)
Informationen om "Cleaning" lägets cykler visas
på följande sätt (obs! varje lampa lyser i 10
sekunder):
(Nota: in qualsiasi momento è possibile premere la
pedaliera per interrompere il programma in corso.)
#
^#(nota: un led corrisponde a
10 secondi):
£
«
1 cavo
30 secondi
50 ml
1 minuto
2 x 50 ml
2 cavi
1 minuto
100 ml
2 minuti
2 x 100 ml
£
«
1 slang
30 sekunder
50 ml
1 minut
2 x 50 ml
2 slangar
1 minut
100 ml
2 minuter
2 x 100 ml
41
#^(
^
4
=4
^(
^
4
1
2
Clean
ing
3
Clean
4
ing
%NGCP
KPI
%NGCP
KPI
/KP
2QYG
T
/CZ
5VCPFC
TF
'PFQ
/KP
2QYG
T
/CZ
5VCPFC
TF
'PFQ
max.
4
/KP
2QYGT
42
/CZ
!
^(
^
5
2
^(
^
6
4
^(
^70
7
8
j<
2+'<1
%NGCP
KPI
0
&
43
*
%NGCP
KPI
/KP
2QYG
T
/CZ
5VCPFC
TF
'PFQ
At the end of each treatment a purge is
necessary to remove the liquid inside the cords.
Before a prolonged stop of the unit, it is important
to conduct a complete cleaning and disinfecting
of the circuit.
^'##O
*#'#Y*#
(#=*!?
*#@
*&<##(
Remove the bottle with a rotating movement.
Retirer la bouteille en effectuant un mouvement
de rotation.
44
Nach jeder Behandlung muss der Kreislauf
gespült werden, um die Flüssigkeit aus den
Schläuchen zu entfernen. Wenn das Gerät
längere Zeit nicht verwendet werden soll, muss
eine vollständige Reinigung und Desinfektion des
Kreislaufs durchgeführt werden.
Entfernen Sie die Flasche mit einer Drehbewegung.
J
kJ
OFF
%NGCP
KPI
/KP
2QYG
T
^
el líquido del interior de los cables. Antes de una
parada prolongada del aparato, es importante
realizar una limpieza y desinfección completa del
circuito.
^<
uno spurgo per eliminare i liquidi all'interno dei
(>##!#<
importante condurre una completa pulizia e disinfezione del circuito.
Retire el bote girándolo.
|#
#(
/CZ
5VCPFC
TF
'PFQ
I slutet av varje behandling måste slangarna
tömmas på all vätska. Innan enheten står oanvänd
en längre tid är det viktigt att man utför en total
^(
_
#(
45
CLEANING, DISINFECTING
AND STERILIZING
NETTOYAGE, DÉSINFECTION
ET STÉRILISATION
REINIGEN, DESINFIZIEREN
UND STERILISIEREN
%NGCPKP
%NGCPKP
I
/KP
I
/KP
2QYGT
/CZ
5VCPFCTF
'PFQ
2QYGT
/CZ
5VCPFCTF
'PFQ
Please conform to the recommendations of
the Reprocessing Instructions manual delivered
with your product regarding procedure of cleaning,
disinfecting, sterilizing and packing of the components.
Veuillez vous conformer aux recommandations contenues dans le manuel "Reprocessing
/#*##
*#@?*&?*lisation des composants.
Beachten Sie die Empfehlungen des
Handbuchs "Reprocessing Instructions", das im
Lieferumfang Ihres Produkts enthalten ist, zur
Reinigung, Desinfektion, Sterilisation und Verpackung der Bestandteile.
Follow present-day regulations enforced in
the country about reprocessing.
Se conformer aux règlements en vigueur
dans le pays en ce qui concerne le retraitement.
Die vor Ort geltenden, aktuellen Vorschriften
zur Wiederverwendung und Versorgung von
Geräten sind zu beachten.
Clean the unit only with an alcohol-based,
commercially available (ethanol, isopropanol),
colorless disinfectant. The use of scouring powder
or an abrasive sponge will damage its surface.
)@Y#'##
*&_!?#
*?(Y##*##Y#*
abrasive endommagerait sa surface.
Reinigen Sie das Gerät nur mit einem
handelsüblichen, farblosen Desinfektionsmittel
auf Alkoholbasis (Ethanol, Isopropanol). Bei
der Verwendung eines Scheuerpulvers oder
`_
_
werden.
46
LIMPIEZA, DESINFECCIÓN
Y ESTERILIZACIÓN
PULIZIA, DISINFEZIONE
E STERILIZZAZIONE
RENGÖRING, DESINFEKTION
OCH STERILISERING
%NGCPKP
I
/KP
22QYGT
Siga las recomendaciones del manual
"Reprocessing Instructions" suministrado con
su producto con respecto al procedimiento de
limpieza, desinfección, esterilización y envasado
de los componentes.
#'#*
en su país con respecto al reprocesamiento.
Limpie el aparato únicamente con un desinfectante incoloro con alcohol disponible en el
mercado (etanol, isopropanol). El uso de polvos
limpiadores o una esponja abrasiva dañarán su
#^(
Attenersi alle raccomandazioni del manuale
"Reprocessing Instructions" in dotazione al
prodotto sulle procedure di pulizia, disinfezione,
sterilizzazione e imballaggio dei componenti.
Attenersi alle normative sulla rigenerazione
in vigore nel proprio paese.
>#!##&
base alcolica, incolore, reperibile in commercio
(etanolo, isopropanolo). L'utilizzo di polveri o
#_#^(
/CZ
5VCPFCTF
'PFQ
Följ rekommendationerna i handboken
”Reprocessing Instructions” som medföljer
produkten vad gäller procedurer för rengöring,
desinfektion, sterilisering och förpackning av
komponenter.
Följ gällande regler i ditt land för upparbetning.
Rengör endast enheten med ett alkohol_?&&^]
marknaden (etanol, isopropanol). Om skurpulver
eller en svamp med slipverkan används kan ytan
skadas.
47
(
q
+
h
4
135°C
The bottles can be washed in a dishwasher
and disinfected at up to 95 °C in a washer disinfector.
_##=@*
~*&*}#'#Y¡°
#*&#'#(
Die Flaschen können in einer Spülmaschine
gereinigt und in einem Thermodesinfektor bei
;¡°^`(
The bottles cannot be sterilized.
_##=**(
Die Flaschen können nicht sterilisiert werden.
Please refer to the operating instructions
of the Piezon systems to remove, clean, disinfect
and sterilize the instruments and the handpiece.
##*&*#Y
@< > # *? @?*&*
#<(
Beachten Sie für das Entfernen sowie die
Reinigung, Desinfektion und Sterilisation der
Instrumente und des Handstücks die Bedienungsanleitungen der Piezon-Systeme.
48
+
+
135°C
Los botes se pueden lavar en un lavavajillas
y desinfectarse a un máximo de 95 °C en una
lavadora desinfectante.
/
&^¡°#
disinfettatrice.
Flaskorna kan tvättas i diskmaskin och
^#¡°¯^(
Los botes no se pueden esterilizar.
/
(
Flaskorna kan inte steriliseras.
Consulte las instrucciones de empleo de los
sistemas Piezon para retirar, limpiar, desinfectar
y esterilizar los instrumentos y los mangos.
Consultare le istruzioni operative dei sistemi
Piezon per eliminare, pulire, disinfettare e sterilizzare gli strumenti e il manipolo.
Information om hur man tar bort, rengör,
desinficerar och steriliserar instrumenten och
@^>~@_#visningar.
49
MAINTENANCE
MAINTENANCE
WARTUNG
)7
)7
)7
A damaged or worn out O-ring must be
replaced immediately.
}~*##*=
**(
Beschädigte oder verschlissene O-Ringe
müssen umgehend ausgetauscht werden.
Please refer to the instructions provided
with the maintenance set.
# # *&* #; Y#
&#Y(
Bitte beachten Sie hierzu die Anweisungen,
die mit dem Wartungssatz geliefert werden.
Always use EMS original parts. Using non
original instruments may damage the unit, and
practitioner or patient may be injured.
Utiliser exclusivement des pièces originales
EMS. L'utilisation d'instruments non originaux
#²!
blessures au praticien ou au patient.
Verwenden Sie nur Originalteile von EMS.
Bei Verwendung anderer als der Originalinstrumente kann das Gerät beschädigt werden, und
es besteht Verletzungsgefahr für den Arzt oder
Patienten.
50
MANTENIMIENTO
MANUTENZIONE
UNDERHÅLL
w!
)7
Una junta tórica dañada o gastada debe
cambiarse de inmediato.
Sostituire immediatamente un anello di
tenuta danneggiato o usurato.
En skadad eller sliten O-ring måste genast
bytas ut.
Consulte las instrucciones facilitadas con
el equipo de mantenimiento.
Consultare le istruzioni fornite con il set di
manutenzione.
Se anvisningarna som medföljer underhållssatsen.
Use siempre piezas originales de EMS. Si
se utilizan instrumentos que no sean originales
podría dañarse el aparato y lesionarse el dentista
o el paciente.
Usare sempre parti di ricambio originali
EMS. L'utilizzo di strumentazione non originale
#³ !#? # #
lesioni al medico o al paziente.
Använd alltid originaldelar från EMS. Om
instrument som inte är originalinstrument används
kan enheten, tandläkaren eller patienten skadas.
51
#
#
Replace exclusively with the type of fuse
indicated on the back of the unit.
Remplacer uniquement par le type de
&#_'#*#!(
Die Sicherungen dürfen nur gegen Sicherungen des auf der Geräterückseite angegebenen
Typs ausgetauscht werden.
52
!
#
#
X40
Sustitúyalos exclusivamente por el tipo de
fusible que se indica en la trasera del aparato.
Sostituire esclusivamente con il tipo di
&#_#!#(
Använd endast den typ av säkringar som
anges på enhetens baksida.
53
#
=
"
0
The pump of the unit is a wear part. It is recommended to replace it every 18 months.
!#**!##(/
*#£´(
Please refer to the instructions provided
with the spare pump.
# # *&* #; #
fournies avec la pompe de rechange.
Die Pumpe des Geräts ist ein Verschleißteil. Es
wird empfohlen, sie alle 18 Monate auszutauschen.
54
Bitte beachten Sie hierzu die Anweisungen,
die mit der Ersatzpumpe geliefert werden.
!
=2
X4
La bomba del aparato es una pieza de desgaste.
Se recomienda sustituirla cada 18 meses.
!#<#
usura. Si consiglia di sostituirla ogni 18 mesi.
Enhetens pump är en förbrukningsartikel. Den bör
bytas var 18:e månad.
Consulte las instrucciones facilitadas con
la bomba de repuesto.
Consultare le istruzioni fornite con la pompa
di ricambio.
Se anvisningarna som medföljer reservdelspumpen.
55
SAFETY PRECAUTIONS
REMARQUES CONCERNANT
LA SÉCURITÉ
SICHERHEITSHINWEISE
EMS and the distributor of this product accept no
liability for direct or consequential injury or damage
resulting from improper use, arising in particular
through non-observance of the operating instructions, or improper preparation and maintenance.
EMS et le distributeur de ce produit ne peuvent
=#_Y*#*}#
*#Y#*'#
#Y#?#'#
YY***#'#
*YY**&&#*(
EMS und der Vertreiber des Produkts haften
nicht für direkte und Folgeschäden, die durch
eine unsachgemäße Verwendung des Produkts
auftreten, insbesondere durch Nichtbeachtung
der Bedienungsanleitung oder unsachgemäße
Vorbereitung oder Wartung.
Contraindication: ultrasonic oscillations
@^_lators from functioning properly. Therefore, we
recommend that patients with a cardiac pace
^_#_`
this product.
Use for the intended purpose only. Before
using the product, make sure the operating
instructions have been carefully studied. This also
applies to any equipment used with this product.
Failure to observe the operating instructions may
result in the patient or user suffering serious injury
or the product being damaged.
Risk of explosion: do not use this product
&
_
gases.
This product must be used only by trained
'#^(
Check before each treatment the contents
of the bottle as well as the liquid present in the
circuit.
56
Contre-indication: le fonctionnement correct
##'#*^_#
#=#_*#'#
#&*'#()##
pas traiter les patients porteurs de stimulateurs
'##*^_##(
)Y##'## *#( Y =
#*#*Y#(
*_##*'#
#=#*_
#(#*'#_#
Y#(
Risque d'explosion: ne pas utiliser ce
#*Y*'##
_(
#=#*'##
'#^*&*(
*^'##
_#'#*#(
Kontraindikationen: Herzschrittmacher und
X^_#`gungen in ihrer Funktion gestört werden. Daher
empfehlen wir, Patienten mit Herzschrittmachern
X^_>##
behandeln.
Nur für den vorgesehenen Verwendungszweck einsetzen. Die Bedienungsanleitung ist
vor dem Einsatz des Geräts sorgfältig zu lesen
und zu verstehen. Dies gilt gleichermaßen für
alle in Kombination mit dem Gerät eingesetzten
Produkte. Eine Nichtbeachtung der Bedienungsanleitung kann zu ernsthaften Verletzungen des
Patienten oder Bedieners oder zu Schäden am
Produkt führen.
Explosionsgefahr: Verwenden Sie das
Produkt nicht in der Nähe von entzündlichen
Anästhetika oder Gasen.
Das Produkt darf nur von ausgebildetem
#'#^>``(
Prüfen Sie vor jeder Behandlung den
Inhalt der Flasche und die im Kreislauf enthaltene
Flüssigkeit.
PRECAUCIONES SOBRE
SEGURIDAD
PRECAUZIONI DI SICUREZZA
SÄKERHETSFÖRESKRIFTER
EMS y el distribuidor de este producto no aceptan
ninguna responsabilidad por daños o lesiones
directos o emergentes derivados de un uso
incorrecto, en especial los que se produzcan por la
no adherencia a las instrucciones de empleo, o de
una preparación y mantenimiento inadecuados.
L'EMS e il distributore di questo prodotto non
##_
lesioni diretti o conseguenti derivati da un uso
?^vanza delle istruzioni operative o da una preparazione e manutenzione non corrette.
EMS och produktens distributör påtar sig inget
ansvar för direkta skador eller följdskador som
uppstår på grund av felaktig användning, särskilt
om de beror på att användaren inte följt bruksanvisningen eller inte utfört korrekta förberedelser
eller korrekt underhåll.
Contraindicación: las vibraciones ultrasónicas pueden hacer que los marcapasos y
^_&#mente. Por tanto, se recomienda no tratar con este
producto a pacientes portadores de un marca#^_(
Controindicazioni: le oscillazioni ad
ultrasuoni possono impedire il funzionamento
^_latori. Pertanto consigliamo di non trattare con
questo prodotto i pazienti portatori di stimolatori
^_(
Kontraindikation: ultraljudssvängningar
^_
fungerar korrekt. Därför rekommenderar vi att
man inte behandlar patienter med pacemaker
^_#(
^;#(
Antes de usar el producto, cerciórese de haber
leído atentamente las instrucciones de empleo.
$_*'#'#
usen con este producto. Si no se observaran las
instrucciones de empleo, el paciente o el usuario
podrían sufrir una lesión grave o podría dañarse
el producto.
Utilizzo solo allo scopo previsto: prima di
#?^tamente studiate le istruzioni operative. Questo
vale anche per qualsiasi apparecchiatura utilizzata
con questo prodotto. La mancata osservanza delle
istruzioni operative potrebbe comportare lesioni
gravi per il paziente o l'operatore oppure il prodotto
potrebbe subire danni.
Riesgo de explosión: no use este producto
*
_(
Rischio di esplosione: non usare questo
^mabili.
Este producto sólo debe ser utilizado por
@#^(
Compruebe antes de cada tratamiento el
contenido del bote, así como el líquido existente
en el circuito.
Questo prodotto deve essere usato solo da
'#^(
Får endast användas för avsett ändamål.
Läs bruksanvisningen noggrant innan produkten
används. Detta gäller all utrustning som används
tillsammans med produkten. Om bruksanvisningen inte följs kan detta leda till att patienten
eller användaren skadas allvarligt, eller att utrustningen går sönder.
Explosionsrisk: använd inte produkten i
närheten av lättantändliga anestetika eller andra
gaser.
Produkten får endast användas av utbildad
och behörig personal.
¢
]
slingan före varje behandling.
Prima di ogni trattamento controllare il
#
'#
circuito.
57
Clean, disinfect and sterilize the different
pieces and accessories of this product before each
use. Please refer to the information provided in
the operating instructions. Non-sterile pieces and
accessories may cause bacterial or viral infections.
)@?*&*&&*rentes pièces et accessoires de ce produit avant
chaque utilisation. Respecter pour cela les indica#Y(X
<*#=
YY&_*#(
Die einzelnen Bestandteile des Geräts
ª}`#?^ziert und sterilisiert werden. Weitere Informationen
siehe Bedienungsanleitung. Nicht sterile Geräteteile und Zubehör können bakterielle oder virale
Infektionen auslösen.
Always examine the product for damage
before starting the treatment. Damaged accessories or a damaged unit must not be used and
must be replaced. Use original EMS spare parts
and accessories only.
*&'#'#
#**&#(
##*#=#*
=*()Y#'#<
$%Y(
Have this product exclusively repaired by
an approved EMS repair center.
J*#;#
#***$%(
Überprüfen Sie Ihr Produkt vor jeder
Behandlung auf Schäden. Beschädigtes Zubehör
oder ein beschädigtes Gerät dürfen nicht
mehr verwendet und müssen ersetzt werden.
Verwenden Sie ausschließlich Original-EMSErsatzteile und -Zubehör.
This product has been investigated with
regard to safety from electrical shock and fire
hazard. CSA (Canadian Standard Association)
has not investigated physiological effects.
#&Y_}Y#*#'#
#;'#*'#Y(
Y
*#*&&@'#(
Certain types of mobile telecommunication
equipment could potentially interfere with this
product. The separation distances recommended
in the note "Electromagnetic compatibility" manual
must be taken into account.
@ Y _ **##_Y&*
#(*
*#_*
µ*'#=*(
58
Lassen Sie das Produkt ausschließlich in
einem von EMS genehmigten Reparaturzentrum
reparieren.
Das Produkt war Gegenstand einer Studie
zur Brand- und Stromschlaggefahr. Die physiologischen Auswirkungen wurden nicht von der CSA
(Canadian Standard Association) untersucht.
Bestimmte Arten mobiler Telekommunikationsgeräte können die Funktion des Produkts
beeinträchtigen. Die im Kapitel zur elektromagnetischen Verträglichkeit empfohlenen räumlichen
Entfernungen müssen eingehalten werden.
Limpie, desinfecte y esterilice las distintas
piezas y accesorios de este producto antes de
cada uso. Consulte la información facilitada en las
instrucciones de empleo. Las piezas y accesorios
*#&_rianas o víricas.
Examine siempre el producto para
^'#*¦
el tratamiento. Si un accesorio o el aparato está
dañado no debe utilizarse y debe sustituirse. Use
solamente piezas de repuesto y accesorios originales de EMS.
Repare este producto exclusivamente en
un centro de reparación autorizado de EMS.
Este producto ha sido investigado con
respecto a su seguridad frente a descargas
*@(
Standard Association) no ha investigado los
&^(
Ciertos tipos de equipos de telecomunicaciones móviles podrían interferir con este
producto. Deben tenerse en cuenta las distancias
de separación recomendadas en el manual de
"Electromagnetic compatibility".
Prima dell'uso pulire, disinfettare e sterilizzare le varie parti e gli accessori del prodotto.
Consultare le informazioni fornite nelle istruzioni
operative. Parti e accessori non sterili possono
causare infezioni batteriche o virali.
Rengör, desinficera och sterilisera
produktens olika delar och tillbehör före varje
användningstillfälle. Se informationen i respektive
bruksanvisning. Icke-sterila delar och tillbehör kan
orsaka bakterie- eller virusinfektioner.
Esaminare sempre il prodotto in relazione
alla presenza di eventuali danni prima di iniziare
(#!#
danneggiata non devono essere utilizzati e
devono essere sostituiti. Usare esclusivamente
parti di ricambio e accessori EMS originali.
Kontrollera alltid att produkten inte är
skadad innan behandling påbörjas. Skadade
tillbehör eller en skadad enhet får inte användas
utan måste bytas ut. Använd endast originalreservdelar och tillbehör från EMS.
Fare riparare questo prodotto esclusivamente in un centro di assistenza EMS approvato.
Questo prodotto è stato analizzato in
relazione alla sicurezza rispetto a scosse elettriche
e rischio di incendi. La CSA (Canadian Standard
&&^(
Certi tipi di apparecchiature di telecomunicazione mobile potrebbero potenzialmente
interferire con questo prodotto. Tenere in considerazione le distanze di separazione consigliate
nel manuale "Electromagnetic compatibility".
Låt endast godkända EMS-reparationscentra reparera produkten.
Denna produkt har testats med avseende
på säkerhet mot elektriska stötar och brandrisk.
CSA (Canadian Standard Association) har inte
undersökt enhetens fysiologiska verkan.
Vissa typer av mobil kommunikationsutrustning kan störa produkten. Följ rekommendationerna om avstånd som anges i handboken
"Electromagnetic compatibility".
59
STORING THE PRODUCT
ENTREPOSAGE DU PRODUIT
COND
ITION
TRAN
S
DE
TRANSPOR
TRAN
Temp
SPORT AND SPOR
eratur
T
UND STOR T ET
e
LAGEAGE
-10°C
+40°
C
Humid R
ity
10
%
DE
STOC
COND
BEDIN
KAGE
ITION
GUNG
S
EN
Press
ure
95
%
500
hpa
1060
hpa
.CH
ITY
UAL
ISSQ
W
S
EMS
Keep the original packaging until the
product is to be disposed of permanently. It can
be used for shipping or storing at any time.
Y_Y}#'#Y
#_###(/#=*#
pour le rangement ou le transport.
Should you wish to put your product out of use for
an extended period of time:
+ Proceed as described in the "Cleaning, disinfecting and sterilizing" chapter,
+ Proceed to a "Cleaning" cycle without
bottles to empty the circuits,
+ Pack the product and all accessories in the
original packaging.
Si vous envisagez de ne pas utiliser votre produit
##**
+ #**#)@?*&*?
+ >*#@#
sans les bouteilles pour vider les circuits,
+ Ranger le produit et tous les accessoires
Y_Y(
Please refer to the storage and transport conditions in the "Technical data" chapter.
Veuillez tenir compte des conditions de stockage
*#*tiques techniques".
60
AUFBEWAHREN DES GERÄTS
Bewahren Sie die Originalverpackung bis
zur endgültigen Entsorgung Ihres Produkts auf.
Sie kann somit jederzeit für das Verschicken oder
Lagern des Geräts verwendet werden.
Wenn Sie Ihr Produkt längere Zeit nicht benutzen
wollen:
+ Gehen Sie entsprechend dem Kapitel "Rei?^#(
+ Führen Sie einen Reinigungszyklus ohne
Flaschen durch, um den Kreislauf zu leeren.
+ Verpacken Sie das Produkt und alle Zubehörteile in der Originalverpackung.
Beachten Sie bitte auch die Lager- und Transportbedingungen im Abschnitt "Technische Daten".
ALMACENAMIENTO
DEL PRODUCTO
STOCCAGGIO DEL PRODOTTO
FÖRVARA PRODUKTEN
Guarde el embalaje original hasta que vaya
a desechar el producto de forma permanente.
Puede servir para su transporte o almacenamiento
en cualquier momento.
Conservare l'imballo originale fino allo
^(>
utilizzato per la spedizione o per lo stoccaggio.
Behåll originalförpackningen tills produkten
kasseras permanent. Den kan återanvändas för
frakt eller förvaring.
Se si intende non utilizzare il prodotto per un
periodo di tempo prolungato:
+ Procedere come descritto nel capitolo "Pulizia, disinfezione e sterilizzazione".
+ >#
per vuotare i circuiti.
+ Confezionare il prodotto e tutti gli accessori
nell'imballo originale.
Gör så här om du vill ställa undan produkten under
en längre tid:
+ Följ anvisningarna i kapitlet ”Rengöring,
desinfektion och sterilisering”.
+ &@#
&
tömma slingorna.
+ Packa ned produkten och alla tillbehör i originalförpackningarna.
Consultare le condizioni di stoccaggio e di
trasporto nel capitolo "Dati tecnici".
Information om förvarings- och transportförhål^(
Si deseara dejar de utilizar el producto durante
un período de tiempo prolongado:
+ Proceda como se describe en el capítulo
"Limpieza, desinfección y esterilización".
+ Realice un ciclo de limpieza sin botes para
vaciar los circuitos.
+ Guarde el producto y todos los accesorios
en el embalaje original.
Consulte las condiciones de almacenamiento y
#X*(
61
PRODUCT DISPOSAL
RECYCLAGE
ENTSORGEN DES PRODUKTS
The product must not be discarded in domestic
household waste.
#=}*#_
domestique.
Das Produkt darf nicht mit dem normalen
Haushaltsmüll entsorgt werden.
Should you wish to definitively dispose of the
product, please comply with the regulations which
apply in your country.
##*^#_#
#?*^'###@(
Wollen Sie Ihr Produkt endgültig entsorgen,
beachten Sie bitte die jeweils in Ihrem Land
geltenden Bestimmungen.
Waste Electrical and Electronic Equipment
belonging to customers located in the European
Union may be shipped to EMS for recycling in
accordance to the WEEE regulations. The costs of
recycling, exclusive of shipping fees, are covered
by EMS.
*'#*'#*'#
^#;*
!$#*#=@*$%
#=@*
$$$(#@?!;#
frais de transports, sont couverts par EMS.
Abfall aus elektrischen und elektronischen
Geräten im Besitz von Kunden in der Europäischen Union können gemäß der WEEE-Richtlinie
für die Wiederverwertung an EMS zurückgegeben
werden. Die Kosten für das Recycling, exklusive
der Kosten für die Anlieferung, werden von EMS
übernommen.
WARRANTY
GARANTIE
GARANTIE
Damages due to non-adherence to the operating
instructions or wear out of parts are excluded
from warranty.
X**#~#Y
#Y##<;#(
Durch Nichtbeachtung der Bedienungsanleitung
und Abnutzung entstandene Schäden an Gerätebestandteilen sind von der Garantie ausgenommen.
The warranty of your product will be
cancelled if you try to open it.
##*
#@Y#(
Die Garantie des Produkts verfällt, wenn
Sie versuchen, das Gerät zu öffnen.
ACCESSORIES
ACCESSOIRES
ZUBEHÖR
Accessories are available from EMS or any authorized dealers. Please contact your customer
service directly.
Vous trouverez les accessoires auprès d'EMS
#!#_###*(#
contacter votre service clientèle directement.
Zubehör erhalten Sie bei EMS oder einem autorisierten Händler. Wenden Sie sich bitte direkt an
Ihren zuständigen Kundenservice.
62
ELIMINACIÓN DEL PRODUCTO
SMALTIMENTO DEL PRODOTTO
KASSERING AV PRODUKTEN
El producto no debe tirarse con los residuos
*(
)'#^#(
Produkten får inte kastas i hushållssoporna.
Per smaltire definitivamente questo prodotto,
attenersi alla normativa in vigore nel proprio
paese.
Följ gällande regler i ditt land om du vill kassera
produkten permanent.
Si deseara deshacerse definitivamente del
producto, cumpla la normativa correspondiente
de su país.
|#$*@$nicos (RAEE) que pertenezcan a clientes que se
encuentren en la Unión Europea pueden enviarse
a EMS para su reciclaje de conformidad con la
normativa sobre RAEE. El coste del reciclaje,
excluidos los gastos de envío, lo cubre EMS.
L'apparecchiatura elettronica ed elettrica fuori
uso appartenente a clienti residenti nella UE
$%
&|$$(/
??
carico di EMS.
Avfall som utgörs av eller innehåller elektriska eller
elektroniska produkter (WEEE – Waste Electrical
and Electronic Equipment) som tillhör kunder inom
EU kan skickas till EMS för återvinning i enlighet
med WEEE-direktivet. EMS står för återvinningskostnaden, men inte för fraktkostnaden.
GARANTÍA
GARANZIA
GARANTI
Los daños debidos a la no adherencia a las
instrucciones de empleo o al desgaste de piezas
están excluidos de la garantía.
I danni causati dall'inosservanza delle istruzioni
operative o ad usura delle parti sono esclusi dalla
garanzia.
Skador som beror på att användaren inte följt
bruksanvisningen eller på slitage omfattas inte
av garantin.
La garantía de su producto quedará
anulada si intenta abrirlo.
#
caso di tentativo di apertura del prodotto.
Garantin upphör att gälla om du själv
försöker öppna produkten.
ACCESORIOS
ACCESSORI
TILLBEHÖR
Podrá obtener los accesorios de EMS o de sus
distribuidores autorizados. Contacte con Atención
al Cliente directamente.
Gli accessori sono disponibili presso EMS o i
rivenditori autorizzati. Rivolgersi direttamente al
servizio di assistenza clienti.
Tillbehör kan beställas från EMS eller våra auktoriserade återförsäljare. Kontakta kundtjänst direkt.
63
EMS SERVICE
SERVICE EMS
EMS-SERVICE
Should your product need additional servicing
or repairs, please send it to your dealer or to an
authorized EMS Repair Center.
Pour toute autre intervention de maintenance ou
*?@#_####*
**$%(
Bitte schicken Sie Ihr Produkt für alle Wartungsoder Reparaturarbeiten an Ihren Händler oder ein
von EMS autorisiertes Reparaturzentrum.
In the case of non-authorized repairs or damages
due to non-adherence to the operating instructions, EMS accepts no liability whatsoever. This
will also void the warranty.
X * # # ~#Y*$%
#_*#(
Nicht genehmigte Reparaturen oder Schäden
durch Nichtbeachtung der Bedienungsanleitung
entbinden EMS von jeglicher Haftung. Der Garantieanspruch erlischt.
It is best to ship the product in the original
packaging. It protects the product against damage
during shipment.
*&*Y_Y#
Y;*(##;**
les incidents de transport.
Verwenden Sie für den Transport am besten
die Originalverpackung. Dadurch ist Ihr Produkt
während des Transports geschützt.
Please clean, disinfect and sterilize the
product and all accessories as described in the
operating instructions before dispatching them.
)@?*&*#
Y_&*
#Y;*(
Vor dem Versand müssen das Gerät und
alle Zubehörteile gemäß der Bedienungsanleitung
?^#`(
When sending the product directly to the approved
EMS repair center, please include the name of
@#(^(
$Y;*###
***$%?'#
_##(^
le traitement.
Bei Direktversand des Produkts an das von EMS
autorisierte Reparaturzentrum geben Sie bitte
den Namen Ihres Händlers an. Dies erleichtert
die Abwicklung.
64
SERVICIO TÉCNICO DE EMS
SERVIZIO ASSISTENZA EMS
EMS-SERVICE
Si su producto necesitara una revisión o reparaciones adicionales, envíelo a su distribuidor o a un
centro de reparación autorizado de EMS.
Se il prodotto ha bisogno di un'ulteriore assistenza
o di riparazioni, spedirlo al rivenditore o a un
centro di assistenza EMS autorizzato.
Om produkten behöver ytterligare service eller
reparation skickar du den till din återförsäljare eller
ett godkänt EMS-reparationscenter.
En el caso de reparaciones no autorizadas o daños
debidos a la no adherencia a las instrucciones de
empleo, EMS no aceptará ninguna responsabilidad. Además, esto anulará la garantía.
In caso di riparazioni non autorizzate o di danni
derivanti dalla mancata osservanza delle istruzioni
?$%#_#(
EMS påtar sig inget som helst ansvar vid oauktoriserade reparationer eller skador som beror att
bruksanvisningen inte har följts. Då upphör även
garantin att gälla.
Lo mejor es enviar el producto en su embalaje
original, que lo protege de daños durante el transporte.
Si consiglia di spedire il prodotto nel suo imballo
(/'#
durante la spedizione.
Produkten transporteras bäst i originalförpackningen. Den skyddar produkten mot skador under
transporten.
Limpie, desinfecte y esterilice el producto
y todos los accesorios como se describe en las
instrucciones de empleo antes de mandarlos.
Pulire, disinfettare e sterilizzare il prodotto
e tutti gli accessori come descritto nel istruzioni
operative prima della spedizione.
Rengör, desinficera och sterilisera
produkten och alla tillbehör enligt beskrivningarna
i bruksanvisningen innan du skickar iväg dem.
Cuando envíe el producto directamente al centro
de reparación autorizado de EMS, incluya el
_#_#($^
proceso.
Quando si spedisce il prodotto direttamente ad un
centro di assistenza EMS approvato, includere il
(³^
il processo.
Ange återförsäljarens namn om du skickar
produkten direkt till ett godkänt EMS-reparationscenter. Detta underlättar hanteringen.
65
SYMBOLS
SYMBOLES
SYMBOLE
%#&#Y
Logo du fabricant
Herstellerlogo
Caution! Read the operation instructions
#Y
Achtung! Siehe Bedienungsanleitung
Year of manufacture
*&_
Herstellungsjahr
Applied part, type BF
>'#*#@[J
Anwendungsteil Typ BF
Degree of protection against water permeability
X***Y#
Schutzgrad gegen Wasserdurchlässigkeit
CE marking: refers to directive 93/42 EEC, including EN 60601-1 and EN 60601-1-2
%'#&*$¯·«$$?@$) £~£$) £~£~«
CE-Kennzeichen: Bezieht sich auf die Richtlinie 93/42 EWG, einschließlich EN 60601-1 und EN 60601-1-2
Disposal of old electrical & electronic equipment (applicable in the European Union and other European countries with
separate collection systems)
*'#*'#^_@Y$#*
#;#@#*@<*
Entsorgung von Abfall aus elektrischen und elektronischen Geräten (für die Europäische Union und andere
europäische Länder ohne separates Entsorgungssystem)
66
SÍMBOLOS
SIMBOLI
SYMBOLER
Logo del fabricante
Logo del produttore.
Tillverkarens logotyp
¡Precaución! Lea las instrucciones de empleo
Attenzione! Leggere le istruzioni operative
Varning! Läs bruksanvisningen
Año de fabricación
Anno di fabbricazione
Tillverkningsår
Componente aplicado de tipo BF
Parte applicata, tipo BF
Patientansluten del, typ BF
Grado de protección frente a la penetración de agua
Grado di protezione contro penetrazione di acqua
Skydd mot vattengenomtränglighet
%$^¯·«$$?#$) £~£@$) £~£~«
Marcatura CE: si riferisce alla direttiva 93/42 CEE, incluse EN 60601-1 e EN 60601-1-2
CE-märkning: hänvisar till direktiv 93/42 EEG, inklusive SS-EN 60601-1 och SS-EN 60601-1-2
$*@#_$#@#
con sistemas de recogida independiente)
Smaltimento di apparecchiature elettriche ed elettroniche in disuso (applicabile all'Unione Europea e ad altri paesi
europei con sistemi di raccolta differenziati)
Kassering av gammal elektrisk och elektronisk utrustning (gäller i EU och andra europeiska länder med system för
separat avfallsinsamling)
67
Power switch "ON"
/##**)
Hauptschalter „EIN“
Power switch "OFF"
/##**JJ
Hauptschalter „AUS“
Input
$*
Eingang
Output
Sortie
Ausgang
Fuse
Fusible
Sicherung
`^&#&`&#
conformance with US standards
%'#^##&#;##
conforme US
¢#/^#&ª>#&#&ª>#
konform mit US-Normen
Foot pedal connection
;*
Anschluss Fußschalter
"Irrigation" mode – irrigation without ultrasounds
Mode "Irrigation" – irrigation sans ultrasons
"Irrigations"-Modus – Spülung ohne Ultraschall
68
Interruptor de alimentación encendido (ON)
Interruttore di accensione
På-knapp
Interruptor de alimentación apagado (OFF)
Interruttore di spegnimento
Av-knapp
Entrada
Ingresso
Ingång
Salida
Uscita
Utgång
Fusible
Fusibile
Säkring
%^#&@#
conformes con las estadounidenses
%^&&
standard statunitensi.
CSA-märkning med koden "C" för produkter som överensstämmer med kanadensisk standard och "US" för produkter
som överensstämmer med USA-standard
Conexión pedal
Connessione pedaliera
Uttag för fotpedal
Modo de "irrigación" – irrigación sin ultrasonidos
%¼##
Spolningsläge – spolning utan ultraljud
69
"Dry Work" mode – ultrasounds without irrigation
Mode "Dry Work" – Ultrasons sans irrigation
"Dry Work"-Modus – Ultraschall ohne Spülung
Standard
Endo
Power
70
"Standard" mode
Mode "Standard"
"Standard"-Modus
"Endo" mode
Mode "Endo"
"Endo"-Modus
Power setting
|*#
Einstellen der Ultraschallleistung
Cleaning
"Cleaning" mode
Mode "Cleaning"
"Cleaning" Modus
Max
Maximum setting
|*;#
Maximale Leistung
Min
Minimum setting
|*#
Minimale Leistung
Modo de "Dry Work" – ultrasonidos sin irrigación
%X@¼##
"Dry Work"-läge – ultraljud utan spolning
Standard
Endo
Power
Cleaning
Modo "Standard"
%
"Standard"-läge
Modo "Endo"
%Endo"
"Endo"-läge
Ajuste de la potencia
Impostazione della potenza
Effektinställning
Modo "Cleaning"
%
"Cleaning"-läge (rengöringsläge)
Max
Ajuste máximo
Impostazione massima
Maxinställning
Min
Ajuste mínimo
Impostazione minima
Minimiinställning
71
Liquid supplied from left bottle
Liquide fourni par la bouteille de gauche
Flüssigkeitszufuhr aus linker Flasche
Liquid supplied from right bottle
Liquide fourni par la bouteille de droite
Flüssigkeitszufuhr aus rechter Flasche
Connection for a second EMS unit
Connexion pour un second appareil EMS
Anschluss für zweites EMS-Gerät
Pump
Pompe
Pumpe
Serial number
)#**
Seriennummer
72
Líquido suministrado por el bote izquierdo
'#
&]
Líquido suministrado por el bote derecho
'#
&]
Conexión para un segundo aparato de EMS
##$%
Anslutning för ytterligare en EMS-enhet
Bomba
Pompa
Pump
Número de serie
Numero di serie
Serienummer
73
TECHNICAL DATA
CARACTÉRISTIQUES TECHNIQUES
DESCRIPTION
DESCRIPTION
Manufacturer
EMS ELECTRO MEDICAL SYSTEMS SA,
CH-1260 Nyon, Switzerland
Fabricant
EMS ELECTRO MEDICAL SYSTEMS SA,
CH-1260 Nyon, Suisse
Model
Piezon® Master 700
Modèle
Piezon® Master 700
^$) £~£
- Class I
- Applied part, Type BF
- IP 20, unit
- IP X1, foot pedal
^$) £~£
- Classe I
~>'#*#@[J
- IP 20, appareil
~/>½£?*
^¯·«$
Class IIa
^¯·«$$
Classe IIa
Mode
with irrigation:
without irrigation:
Continuous operation
X#@@£#
10 min. maximum
Mode de fonctionnement
avec irrigation:
sans irrigation:
Service continu
#;Y#£
10 minutes maximum
Supply voltage
100 - 240 VAC / 50-60 Hz
Y
100 - 240 VAC / 50-60 Hz
Power consumption
80 VA
Puissance nominale
80 VA
Fuses
T 1.6 A 250 VAC
(Ø 5 X 20mm, time lag)
Fusibles
T 1,6 A 250 VAC
¾¡;«?*
#^
Maximum output:
Frequency range:
12 Watts
24-32 kHz
*^Y#
Puissance maximum:
>&*'#
12 Watts
24-32 kHz
Weight
Approx. 2.4 kg
Poids
Approx. 2,4 kg
Dimensions in mm
(H x W x D)
225 x 280 x 295
Dimensions en mm
(H x L x P)
225 x 280 x 295
Operating conditions
+10 °C to +40 °C
¡#@
Conditions de fonctionnement
¿£°¿·°
¡Y#*
Storage and
transport conditions
-10 °C to +40 °C
£¡#@
500 hPa to 1060 hPa air pressure
Conditions de stockage
et de transport
~£°¿·°
£¡Y#*
(¡>£ >
74
TECHNISCHE DATEN
DATOS TÉCNICOS
BESCHREIBUNG
DESCRIPCIÓN
Hersteller
EMS ELECTRO MEDICAL SYSTEMS SA,
CH-1260 Nyon, Schweiz
Fabricante
EMS ELECTRO MEDICAL SYSTEMS SA,
CH-1260 Nyon, Suiza
Modell
Piezon® Master 700
Modelo
Piezon® Master 700
¢^$) £~£
- Klasse I
- Anwendungsteil Typ BF
- IP 20 für das Gerät
- IP X1 für den Fußschalter
^$) £~£
- Clase I
- Componente aplicado de tipo BF
- IP 20, aparato
- IP X1, pedal
¢^¯·«$
Klasse IIa
^¯·«$
Clase IIa
Modus
Mit Flüssigkeit:
Ohne Flüssigkeit:
Dauerbetrieb
_@#£`
max. 10 Min.
Modo
Con irrigación:
Sin irrigación:
Funcionamiento continuo
_}£#
10 min. máximo
Versorgungsspannung
100 - 240 VAC / 50-60 Hz
Tensión de red
100 - 240 Vca / 50-60 Hz
Leistungsaufnahme
80 VA
Consumo de corriente
80 VA
Sicherungen
T 1,6 A 250 V AC (Ø 5 X 20 mm, träge)
Fusibles
T 1,6 A 250 Vca (Ø 5 X 20 mm, con retardo)
~^
Maximale Ausgangsleistung:
Frequenzbereich:
12 Watt
24-32 kHz
$^#
Potencia máxima:
Intervalo de frecuencias:
12 vatios
24-32 kHz
Gewicht
ca. 2,4 kg
Peso
Aprox. 2,4 kg
Abmessungen in mm
(H x B x T)
225 x 280 x 295
Dimensiones en mm
(Al x An x P)
225 x 280 x 295
Betriebsbedingungen
+10 °C bis +40 °C
_¡(J#
Condiciones de funcionamiento
+10 °C a +40 °C
¡#
Lager- und
Transportbedingungen
-10 °C bis +40 °C
£_¡(J#
Luftdruck 500 hPa bis 1060 hPa
Condiciones de
almacenamiento y transporte
-10 °C a +40 °C
£¡#
¡>£ >&*
75
DATI TECNICI
TEKNISKA DATA
DESCRIZIONE
BESKRIVNING
Produttore
EMS ELECTRO MEDICAL SYSTEMS SA,
CH-1260 Nyon, Svizzera
Tillverkare
EMS ELECTRO MEDICAL SYSTEMS SA,
CH-1260 Nyon, Schweiz
Modello
Piezon® Master 700
Modell
Piezon® Master 700
^$) £~£
- Classe I
- Parte applicata, tipo BF
~/>«?#
- IP X1, pedaliera
¢^$) £~£
- Klass I
- Patientansluten del, typ BF
- IP 20, enhet
- IP X1, fotpedal
^¯·«$
Classe IIa
¢^¯·«$$
Klass IIa
%
Con irrigazione
Senza irrigazione
Funzionamento continuato
£#
10 min. massimo
Driftsläge
med spolning:
utan spolning:
Kontinuerlig drift
X&@£#
högst 10 minuter
Tensione di alimentazione
100-240 V a.c. / 50-60 Hz
Matningsspänning
100–240 V AC/50–60 Hz
Consumo corrente
80 VA
Strömförbrukning
80 VA
Fusibili
T 1,6 A 250 VAC
(Ø 5 X 20 mm, ritardo temporale)
Säkringar
T 1,6 A 250 V AC
(Ø 5 X 20 mm, tidsfördröjning)
^##
Uscita max.:
Intervallo di frequenza:
12 Watt
24(32) kHz
}#^
Maximal uteffekt:
Frekvensområde:
12 W
24–32 kHz
Peso
2,4 kg circa
Vikt
Cirka 2,4 kg
Dimensioni in mm
(A x L x P)
225 x 280 x 295
Mått i mm
(H x B x D)
225 x 280 x 295
Condizioni operative
da +10 °C a +40 °C
¡#
Driftsförhållanden
+10 °C till +40 °C
¡#&&#
Condizioni di stoccaggio
e di trasporto
Da -10 °C a +40 °C
£¡#
da 500 hPa a1060 hPa di pressione dell'aria
Förvarings- och
transportförhållanden
-10 °C till +40 °C
£¡#&&#
500 hPa till 1 060 hPa lufttryck
76
77
TROUBLESHOOTING
Symptom
Control lamps do not turn on when
the unit is switched on
+
+
+
+
Check the connections of the power cable of the unit
`#@&&^
Check the fuses and replace them only by the type of fuse indicated on the back of the unit
Send the unit to an approved EMS repair center
)'#
``&
activated
+
+
+
+
+
#'#
`;#
Make sure that the bottle is properly installed
Check the connections between the unit, the handpiece cord and the handpiece
Check the connection of the foot pedal
Activate the "Cleaning" mode, disconnect the handpiece from the handpiece cord and check that liquid exits
the cord; if it is the case, the handpiece is plugged, send the handpiece to an approved EMS repair center
Unscrew the pump cover and check that the pump functions
Send the unit to an approved EMS repair center
+
+
No ultrasound oscillations or
#&^`
+
+
+
Make sure that the instrument is correctly tight
Check the wear of the instrument and replace it if necessary
Check the connections between the unit, the handpiece cord and the handpiece
Dry the connectors of the handpiece cord and of the handpiece
Check the connection of the foot pedal
Check the settings and the working mode
Check that when the handpiece is lifted from its support, the control lamps of the bottle holder are turned on; if
it is not the case, send the handpiece to an approved EMS repair center
Replace the handpiece cord and/or the handpiece
When one of the two handpieces is used, check that the other one is correctly seated on its support
Send the unit to an approved EMS repair center
Water leak between the handpiece
cord and the handpiece
+
+
+
Check the O-ring of the handpiece cord and replace if necessary
Send the handpiece cord to an approved EMS repair center
Send the unit to an approved EMS repair center
Water leak at the bottle
+
+
+
Check the O-ring of the bottle cap and replace if necessary
Replace the bottle
Send the unit to an approved EMS repair center
/#&^&
+
+
Replace the light guide
Test with another handpiece
78
+
+
+
+
+
+
+
DÉPANNAGE
4#
@##;Y#
pas lors de la mise en marche de
Y
+
+
+
+
;##Y
Y*'##_
&#_#'#@&#_'#*#Y
$@!#***$%
>Y'#*
*
+
+
+
+
+
#_#*#*_'##;#
Contrôler la mise en place de la bouteille
;Y?<<
;*
>?*<#<*^'#Y#
#Â!?<_#*?@<#*
**$%
X**^'#&
$@!#***$%
+
+
Pas de vibrations ultrasoniques ou
##&^
+
+
+
+
+
+
+
+
+
+
'#Y#*
Y##Y#*
;Y?<<
*##<<
;*
*&
*^'#'#<#*#?@##;##_#
#*ÂY?@<#***$%
|<¯#<
'#!##;<#*?*^'#Y#_##
$@Y#***$%
J#Y#
<<
+
+
+
}~#<*
$@<#***$%
$@Y#***$%
J#Y#_#
+
+
+
Contrôler le joint O-ring du bouchon de la bouteille *
Remplacer la bouteille
$@!#***$%
$<
#&^
+
+
Remplacer le guide lumière
##<
79
FEHLERBEHEBUNG
*
+
Kontrollleuchten gehen nicht an,
wenn Gerät eingeschaltet wird
+
+
+
+
Keine Spülung beim Betätigen
des Fußschalters
+
+
+
+
+
+
+
Keine Ultraschallschwingung
bzw. unzureichende Ultraschallleistung
Stellen Sie den Drehregler für die Flüssigkeitsmenge auf das Maximum ein
Prüfen Sie die korrekte Installation der Flasche
Prüfen Sie die Verbindungen zwischen dem Gerät, dem Handstückschlauch und dem Handstück
Überprüfen Sie die Verbindung zum Fußschalter
Aktivieren Sie den Reinigungsmodus, trennen Sie das Handstück vom Handstückschlauch und prüfen Sie, ob
Flüssigkeit aus dem Schlauch austritt. Wenn dies der Fall ist, ist das Handstück blockiert und muss an ein von
EMS autorisiertes Reparaturzentrum gesendet werden
Entfernen Sie den Deckel der Pumpe und prüfen Sie die Funktion der Pumpe
Senden Sie das Gerät an ein von EMS autorisiertes Reparaturzentrum
+
+
+
Stellen Sie sicher, dass das Instrument fest angeschlossen ist
Prüfen Sie den Verschleiß des Instruments und ersetzen Sie es gegebenenfalls
Prüfen Sie die Verbindungen zwischen dem Gerät, dem Handstückschlauch und dem Handstück
Trocknen Sie die Anschlussstücke des Handstückschlauchs und des Handstücks
Überprüfen Sie die Verbindung zum Fußschalter
Prüfen Sie die Einstellungen und den Arbeitsmodus
Ã_ª&?_¢J#
#?`ª##
genommen wird. Wenn dies nicht der Fall ist, senden Sie das Handstück an ein von EMS autorisiertes Reparaturzentrum
Ersetzen Sie den Handstückschlauch und/oder das Handstück
Überprüfen Sie, ob bei der Verwendung eines von zwei Handstücken das andere Handstück korrekt in der Halterung sitzt
Senden Sie das Gerät an ein von EMS autorisiertes Reparaturzentrum
Wasseraustritt zwischen
Handstückschlauch und
Handstück
+
+
+
Prüfen Sie den O-Ring des Handstückschlauchs und ersetzen Sie ihn gegebenenfalls
Senden Sie das Handstück an ein von EMS autorisiertes Reparaturzentrum
Senden Sie das Gerät an ein von EMS autorisiertes Reparaturzentrum
Wasseraustritt an der Flasche
+
+
+
Prüfen Sie den O-Ring im Flaschendeckel und ersetzen Sie ihn gegebenenfalls
Ersetzen Sie die Flasche
Senden Sie das Gerät an ein von EMS autorisiertes Reparaturzentrum
Unzureichende Beleuchtung des
Handstücks
+
+
Ersetzen Sie den Lichtleiter
Prüfen Sie die Beleuchtung mit einem anderen Handstück
80
+
+
+
+
+
+
+
Überprüfen Sie den Anschluss des Netzkabels des Geräts
Überprüfen Sie die Praxisstromversorgung
Überprüfen Sie die Sicherungen und ersetzen Sie sie gegebenenfalls ausschließlich durch den auf der
Geräterückseite angegebenen Sicherungstyp
Senden Sie das Gerät an ein von EMS autorisiertes Reparaturzentrum
SOLUCIÓN DE PROBLEMAS
!
Los pilotos indicadores no se iluminan
al encender el aparato
+
+
+
+
Compruebe las conexiones del cable de alimentación del aparato
Compruebe la electricidad de la consulta dental
Compruebe los fusibles y sustitúyalos solamente por el tipo de fusible que se indica en la trasera del aparato
Envíe el aparato a un centro de reparación autorizado de EMS
)
#@'#
+
+
+
+
+
#}'#;
¥'#_*_
Compruebe las conexiones entre el aparato, el cable del mango y el mango
Compruebe la conexión del pedal
?#_@#_'#'#*Â
así, el mango estará atascado; envíe el mango a un centro de reparación autorizado de EMS
Desenrosque la tapa de la bomba y compruebe que la bomba funciona
Envíe el aparato a un centro de reparación autorizado de EMS
+
+
No hay vibraciones ultrasónicas o la
#^
+
+
+
+
+
+
+
+
+
+
¥'##*_}#
Compruebe el desgaste del instrumento y cámbielo si es necesario
Compruebe las conexiones entre el aparato, el cable del mango y el mango
Seque los conectores del cable del mango y del propio mango
Compruebe la conexión del pedal
Compruebe los ajustes y el modo de funcionamiento
Compruebe que al levantar el mango del soporte se encienden los pilotos indicadores del receptáculo del
bote; si no es así, envíe el mango a un centro de reparación autorizado de EMS
Sustituya el cable del mango y/o el mango
###?#_'#*_#
Envíe el aparato a un centro de reparación autorizado de EMS
Fuga de agua entre el cable del mango
y el mango
+
+
+
Compruebe la junta tórica del cable del mango y sustitúyala si es necesario
Envíe el cable del mango a un centro de reparación autorizado de EMS
Envíe el aparato a un centro de reparación autorizado de EMS
Fuga de agua en el bote
+
+
+
Compruebe la junta tórica de la tapa del bote y sustitúyala si es necesario
Sustituya el bote
Envíe el aparato a un centro de reparación autorizado de EMS
/##^
+
+
Sustituya la guía de luz
Pruebe con otro mango
81
INDIVIDUAZIONE E RISOLUZIONE DEI PROBLEMI
Le luci di controllo non si illuminano
quando il dispositivo è acceso
+
+
+
+
!#
Controllare l'alimentazione elettrica dello studio dentistico
&#_##&#_#!#
/!##$%
Quando la pedaliera è attivata non vi
<
#'#
+
+
+
+
+
#
#
&!#?
Controllare la connessione della pedaliera
?'#&#
cavo; in tal caso il manipolo è intasato. Inviare il manipolo ad un centro assistenza EMS approvato
Svitare il coperchio della pompa e controllare che la pompa funzioni
/!##$%
+
+
Mancanza di oscillazioni degli
ultrasuoni o alimentazione
#&^
+
+
+
Controllare che lo strumento sia correttamente a tenuta
Controllare l'usura dello strumento e sostituirlo se necessario
&!#?
Asciugare i connettori del cavo del manipolo e il manipolo
Controllare la connessione della pedaliera
'#<###
accese; in caso contrario inviare il manipolo ad un centro di assistenza EMS approvato
Sostituire il cavo del manipolo e/o il manipolo
Quando viene utilizzato uno dei due manipoli, controllare che l'altro sia adeguatamente alloggiato nel suo supporto
/!##$%
Perdita di acqua fra il cavo del
manipolo e il manipolo
+
+
+
Controllare l'anello di tenuta del cavo del manipolo e sostituirlo se necessario
Inviare il cavo del manipolo ad un centro di assistenza EMS approvato
/!##$%
>!'#
+
+
+
Controllare l'anello di tenuta del tappo del falcone e sostituirlo se necessario
#
/!##$%
/#&^#
manipolo
+
+
Sostituire la guida della luce
Testare con un altro manipolo
82
+
+
+
+
+
+
+
FELSÖKNING
Symtom
+
Kontrollamporna tänds inte när
enheten slås på
+
+
+
+
Kontrollera att enhetens nätkontakt sitter i.
Kontrollera tandläkarmottagningens strömförsörjning.
Kontrollera säkringarna och byt ut dem med den säkringstyp som anges på enhetens baksida.
Skicka enheten till ett godkänt EMS-reparationscenter.
/
&
aktiveras
+
+
+
+
+
#
;(
¢
(
Kontrollera anslutningarna mellan enheten, handstyckets slang och handstycket.
Kontrollera fotpedalens anslutning.
Aktivera rengöringsläget, ta bort handstycket från slangen och kontrollera att det kommer ut vätska ur
slangen. Om det gör det är handstycket igensatt. Skicka handstycket till ett godkänt EMS-reparationscenter.
Skruva bort pumpskyddet och kontrollera att pumpen fungerar.
Skicka enheten till ett godkänt EMS-reparationscenter.
+
+
Inga ultraljudssvängningar eller
otillräcklig effekt
+
+
+
+
+
+
+
+
+
+
Kontrollera att instrumentet är tätt.
Kontrollera om instrumentet är slitet och byt vid behov ut det.
Kontrollera anslutningarna mellan enheten, handstyckets slang och handstycket.
Torka anslutningarna på handstycket och dess slang.
Kontrollera fotpedalens anslutning.
Kontrollera inställningarna och driftsläget.
¢]
]#@&]](
annars handstycket till ett godkänt EMS-reparationscenter.
Byt ut handstycket och/eller slangen.
Om bara ett av de två handstyckena används kontrollerar du att det andra sitter ordentligt i hållaren.
Skicka enheten till ett godkänt EMS-reparationscenter.
Vattenläckage mellan slangen och
handstycket
+
+
+
Kontrollera O-ringen på slangen och byt ut den vid behov.
Skicka slangen till ett godkänt EMS-reparationscenter.
Skicka enheten till ett godkänt EMS-reparationscenter.
+
+
+
¢~]
_@#_(
[@#
(
Skicka enheten till ett godkänt EMS-reparationscenter.
Otillräckligt ljus i handstycket
+
+
Byt ut ljusledaren.
Testa med ett annat handstycke.
83
84
24
14
15
16
17
18
19
20
23 22
21
CANADA
EMS Canada Inc.
QXYXY[X
\]^_^^*
Tel. +1 514 736 5066
Fax +1 514 736 5065
e-mail: [email protected]
FRANCE
EMS France Sarl
Y^j
={$
Immeuble Santos Dumont, Bâtiment D
|}~[
^^^X[^[
Fax +33 1 34 58 03 90
e-mail: [email protected]
GERMANY
EMS Electro Medical Systems GmbH
Schatzbogen 86
D-81829 München
Tel. +49 89 42 71 61 0
Fax +49 89 42 71 61 60
e-mail: [email protected]
ITALY
EMS Italia S.p.a
Via Faravelli 5
I-20149 Milano
Tel. +39 02 3453 8111
Fax +39 02 3453 2778
e-mail: [email protected]
SPAIN
EMS Electro Medical Systems España SL
Bernardino Obregón 14 bis
E-28012 Madrid
Tlf. +34 91 528 99 89
Fax +34 91 539 34 89
e-mail: [email protected]
USA
EMS Corporation
11886 Greenville Avenue #120
Dallas, TX 75243, USA
Tel. +1 972 690 83 82
Fax +1 972 690 89 81
e-mail: [email protected]
WWW.EMS-SWISSQUALITY.CH
ed. 2010/01
Ch. de la Vuarpillière 31
1260 Nyon
SWITZERLAND
Tel. +41 22 99 44 700
Fax +41 22 99 44 701
e-mail: [email protected]
FB-430/3
© Copyright EMS SA
EMS Electro Medical Systems SA