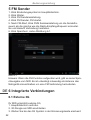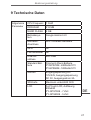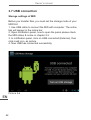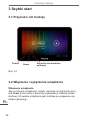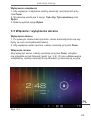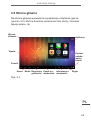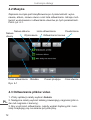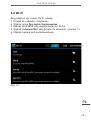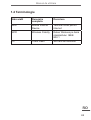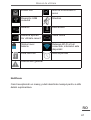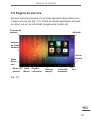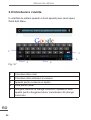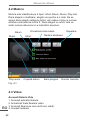
1
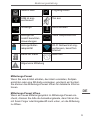
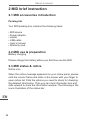
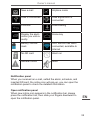
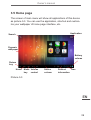
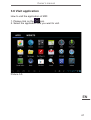
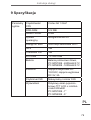
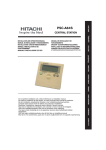
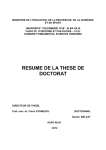
GPS Peiying Exclusive
PY-GPS7008
PY-GPS5008
Bedienungsanleitung (1 - 28) DE
Owner’s manual (29 - 54) EN
Instrukcja obsługi (55 - 80) PL
Manual de utilizare (81 - 106) RO
Bedienungsanleitung
Inhalt
1 Einleitung
1.1 Bestätigung
1.2 Wartung
1.3 Sicherheitshinweise
1.4 Akronyme / Terminologie
2 MID Kurze Einleitung
2.1 MID Zubehör Einleitung
2.2 MID Benutzung & Vorbereitung
2.3 MID Status & Benachrichtigungen 3 Schnellstart
3.1 Tastenfunktionen
3.2 Ein-/Ausschalten
3.3 Bildschirm Ein-/Ausschalten
3.4 Benutzung des Touch Panel
3.5 Startseite
3.6 Anwendungen aufrufen
3.7 USB-Anschluss
3.8 Speicherkarte
3.9 Worteingabe
4 Multimedia
4.1 Unterstützte Dateiformate
4.2 Musik
4.3 Video
4.4 Bildergalerie
5 FM Sender
6
5
5
6
7
8
8
8
8
10
10
10
11
12
13
15
16
17
18
19
19
20
20
21
DE
22
3
Bedienungsanleitung
6 Integrierte Verbindungen
6.1 Externe 3G
6.2 Wi-Fi Verbindung 7 GPS Navigation
DE
4
22
22
23
24
7.1 Installation
7.2 Aktualisieren
7.3 Deinstallieren
24
24
24
8 Fehlerbehebung
25
9 Technische Daten 27
Bedienungsanleitung
1 Einleitung
1.1 Bestätigung
Vielen Dank für den Kauf unseres Produktes. Das Produkt ist
ein MID (Mobile Internet Device), ein High-End Gerät mit einem
Touchscreen, von 800x480 Pixel Auflösung. Es ist mit 1 GHz Hochgeschwindigkeits-Prozessor ausgestattet. Das Betriebssystem
ist Android 4.0.
Diese Bedienungsanleitung stellt systemisch die Funktionen,
benutzen der Techniken und Ankündigungen vor, lesen Sie bitte
diese Bedienungsanleitung sorgfältig vor der Bedienung.
1.2 Wartung
• Bitte bewahren Sie das Gerät, Akku oder Ladegerät fern von
Wasser und Dampf, das Gerät oder das Ladegerät nicht mit nassen Händen benutzen, um das Gerät nicht zu Beschädigen, oder
Elektroschock durch Kurzschluss oder Korrosion zu vermeiden.
• Bitte vermeiden Sie starke mechanische Schocks oder Vibrationen um das Gerät, Akku und Ladegerät nicht zu Beschädigen.
• Bitte setzen Sie nicht das Gerät, Akku und Ladegerät einer zu
hohen oder niedrigen Temperatur aus um Beschädigungen zu
vermeiden.
• Bitte nicht stoßen, werfen oder löchern das MID und vermeiden
Sie herunterfallen, zusammendrücken, biegen das MID.
• Bitte Gerät und Zubehör nicht zerlegen, da sonst unserer
Gesellschaft keine Garantie mehr für das Gerät und Zubehör
übernimmt.
DE
5
Bedienungsanleitung
1.3 Sicherheitshinweise
Bitte lesen Sie und lassen Sie Ihre Kinder, die Angaben in diesem
Abschnitt wissen, bevor Sie das MID verwenden. Weitere detaillierte Informationen entnehmen Sie bitte den Sicherheitshinweisen
und Anmerkungen.
• Bitte das MID nicht während der Fahrt benutzen, um Ablenkung
zu vermeiden.
• Bitte beachten Sie die einschlägigen Bestimmungen und
Vorschriften in medizinischen Örtlichkeiten. Bitte schalten Sie Ihr
MID aus, wenn Sie in der Nähe medizinischer Geräte sind.
• Bitte das MID ausschalten oder in Flugzeugmodus schalten
bim einsteigen in ein Flugzeug um Interferenzen zwischen dem
Radiosignalen und den Flugzeugsignalen zu vermeiden.
• Bitte schalten Sie das MID aus in der Nähe hochpräziser elektronischen Geräten, sonst kann es zum Ausfall der elektronischen
Geräte führen.
• Bitte das MID und Zubehör nicht selbst auseinandernehmen,
nur autorisierte Fachwerkstätte können das MID reparieren.
• Bitte das MID fern von magnetischen Geräten halten, die
Strahlung des MID löscht die gespeicherte Information auf den
magnetischen Geräten.
• Bitte das MID nicht an Orten mit hohen Temperaturen, ent-
DE flammbaren Gasen (wie z.B. Tankstellen) benutzen.
• Bitte bewahren Sie das MID und Zubehör außerhalb der Reichweite von Kindern auf, lassen Sie die Kinder nicht unbeaufsichtigt
das MID benutzen.
6
Bedienungsanleitung
• Wenn Sie das MID benutzen, beachten Sie bitte die relevanten
Gesetze und Vorschriften sowie die Achtung der Privatsphäre und
die gesetzlichen Rechte.
• Bitte unbedingt die entsprechenden Spezifikation dieser Anleitung befolgen, wenn Sie das USB-Kabel verwenden, sonst kann
Ihr MID oder PC beschädigt werden.
• Bitte benutzen Sie das MID nicht in feuchter Umgebung (z. B.
Badezimmer) und vermeiden Sie den Kontakt des MID mit Flüssigkeiten.
1.4 Akronyme / Terminologie
Abkürzungen/
Terminologie
Voller Name
Beschreibung
MID
Mobile Internet
Device
Mobiles Internetgerät
WI-FI
Wireless Fidelity
Schnurloses lokales
Netzwerk auf Basis des
Standard IEEE 802.11b
TF
Trans Flash
SD Speicherkarte
DE
7
Bedienungsanleitung
2 MID Kurze Einleitung
2.1 MID Zubehör Einleitung
Packungsliste
Ihre MID Packung enthält folgende Teile:
• MID Hauptgerät
• KFZ-Ladegerät
• KFZ-Halterung
• USB Kabel
• Bedienungsanleitung
• Garantiekarte
2.2 MID Benutzung & Vorbereitung
Batterieladung
Bitte Batterien aufladen vor der ersten Benutzung des MID.
2.3 MID Status & Benachrichtigungen
Benachrichtigungs-Symbole
When the notice message appeared on your notice panel, please
click the column frame and slide on the screen with your finger to
open notice list. Click the options you need to check for checking
the detailed information. Then you can click information box and
slide upward to close the information window. The following is the
iconic illustration of the status bar:
DE
8
Bedienungsanleitung
Neue E-Mail
Flugzeugmodus
USB ist angeschlossen
Ton aus
Vorherige
Herunterladen
Anzeige der
zuletzt benutzten
Anwendungen
Taste Hauptbildschirm
Anzeige Batteriekapazität
WI-FI Netzwerk ist angeschlossen, bereit fürs
Internet
Keine SD Karte
Alarm ein
Allgemeine Mitteilung
Mitteilungs-Paneel
Wenn Sie eine E-Mail erhalten, den Alarm einstellen, Zeitplan
einrichten oder eine SD-Karte einstecken, erscheint ein Symbol,
Sie können das Mitteilungs-Paneel öffnen für detailierte Informationen.
Mitteilungs-Paneel öffnen
Wenn ein neues Mitteilungssymbol im Mitteilungs-Paneel erscheint, drücken Sie bitte die Anmeldungsleiste, dann fahren Sie
mit Ihrem Finger oder Eingabestift nach unten, um die Mitteilung
zu öffnen.
DE
9
Bedienungsanleitung
3 Schnellstart
3.1 Tastenfunktionen
Tastenfunktionen Einleitung:
Taste
Vorherige
Abb. 3-1
Taste
Hauptbildschirm
Anzeige der zuletzt benutzten Anwendungen
3.2 Ein-/Ausschalten
DE
Einschalten
Langes drücken der Taste für 2 Sekunden erscheint der Startbildschirm. Sie können das Gerät bedienen nach aufruf der Hauptseite System einschalten.
Ausschalten
1. Langes drücken der Taste erscheinen die Ausschaltoptionen.
2. Optionsliste des Gerätes Stummmodus aufheben und Gerät
ausschalten.
10
Bedienungsanleitung
3. Klicken auf das Symbol Ausschalten um das Gerät auszuschalten.
3.3 Bildschirm Ein-/Ausschalten
Der Bildschirm schaltet sich automatisch aus wenn das
Gerät im Ruhezustand ist.
1. Wenn das Gerät im Ruhezustand ist schaltet sich der Bildschirm automatisch aus um die Batterie zu schonen.
2. Um den Bildschirm auszuschalten drücken Sie kurz die Taste
Ein-/Ausschalten, der Bildschirm wird sogleich ausgeschaltet.
Ausgeschalteten Bildschirm wieder einschalten
Sie können die Netztaste drücken um den ausgeschalteten Bildschirm wieder einzuschalten, der Bildschirm ist verriegelt, siehe
Abbildung 3-2. Drücken Sie das Schlosssymbol und schieben es
mit dem Finger nach oben um den Bildschirm zu entriegeln.
DE
Abb. 3-2
11
Bedienungsanleitung
3.4 Benutzung des Touch Panel
Bedienung des MID
Es gibt mehrere wege um die Startseite, Menüs und Anwendungsprogramme des MID zu betrachten.
Klick
Wenn Sie, die Bildschirm-Tastatur als Eingabe verwenden
möchten, oder das Element auf der Startseite der Anwendung
auswählen, die Sie gerade benötigen, benutzen Sie Ihre Finger
oder Eingabestift, um auf den Bildschirm klicken.
Halten
Wenn Sie die verfügbare Option einiger Projekt (wie z. B. das
Textfeld oder Link der Web-Seite), oder die Hauptseite öffnen
möchten, oder im Hauptmenü des Programms bewegen wollen,
brauchen Sie nur dieses Element zu halten.
Gleiten
Gleitene bedeutet, mit dem Finger oder Eingabestift, um vertikal
oder in der Ebene schnell auf das Bild ziehen.
Ziehen
Bevor Sie ziehen, müssen Sie einen Finger oder Eingabestift
benutzen um das Element zu halten und einen gewissen Druck
auszuüben, den Finger oder Eingabestift nicht loslassen, bis Sie
das Ziel erreichen.
DE
12
Drehen
Für die meisten der Bilder, müssen Sie nur das MID seitlich
drehen, dann wird der Bildschirm von der horizontalen in gerader
Richtung automatisch gedreht. Zum Beispiel, die Eingabe eines
Wortes oder betrachten von Filmen usw.
Bedienungsanleitung
3.5 Startseite
Der Bildschirm des Hauptmenüs zeigt alle Anwendungen dieses
Gerätes, siehe Abbildung 3-3. Sie können die Anwendungen
benutzen, Verknüpfungen und Hintergrundbild einstellen, usw.
SuchSpalte
Anwendungen
Dynamisches Hintergrundbild
BatterieKapazität
Taste
Vorherige
Hauptbildschirm
Lautstärke- Mitteilung- Erinnerungs- Uhrzeit
sleiste
Informationen
regelung
Taste Menü
Abb. 3-3
DE
13
Bedienungsanleitung
Erweiterbare Startseite
Die Startseite kann außerhalb des Bildschirms erweitert werden,
um viel mehr Platz anzubieten, für neue Verknüpfungen, kleine
Werkzeuge usw. Drücken Sie eine leere Stelle der Startseite, um
dann mit Eingabestift schnell vertikal zu gleiten, wird sie auf die
rechte oder linke Seite des Bildschirms erweitert. Die Startseite
hat zwei oder mehr Erweiterungsbilder, siehe Abbildung 3-4.
Abb. 3-4
DE
14
Bedienungsanleitung
3.6 Anwendungen aufrufen
Wie die Anwendungen des MID aufgerufen werden:
1. Auf das Symbol
klicken.
2. Die gewünschte Anwendung auswählen.
Abb. 3-5
DE
15
Bedienungsanleitung
3.7 USB-Anschluss
Speichereinstellungen des MID
Vor dem Dateientransfer muss zuerst die Speichereinstellung des
MID eingestellt werden:
1. Mit einem USB-Kabel MID und PC verbinden. Die Informationstipps erscheinen im Mitteilungs-Paneel.
2. Öffnen Sie das Mitteilungs-Paneel, siehe MID Status & Benachrichtigungen Kapitel 2.3.
3. Im Mitteilungs-Paneel, Klick auf USB-Anschluss (Extern), danach Klick auf das Symbol Load (Laden), siehe Abbildung 3-6
4. USB-Anschluss erfolgreich durchgeführt
DE
16
Abb. 3-6
Bedienungsanleitung
3.8 Speicherkarte
Kopieren der Dateien auf die Speicherkarte
1. Benutzen Sie ein USB-Kabel um das MID mit dem PC zu
verbinden.
2. Nach drücken des Symbols Speichereinstellungen, Anschluss
erfolgreich durchgeführt.
3. Öffnen Sie den Ordner Mein Computer um den Inhalt des USBSpeichers anzusehen.
4. Suchen Sie die gewünschte Datei und kopieren sie auf den
USB-Speicher.
5. Nach beenden des Kopiervorgangs, klicken Sie auf das Symbol Hardware sicher entfernen in der Taskleiste ihres Computers
zur Speicherentfernung.
Hinweis: Wenn Sie USB-Speicher aktivieren, wenn Ihr MID mit
dem USB-Kabel angeschlossen ist, werden Sie nicht mehr in der
Lage sein die Speicherkarte des MID zuzugreifen, wenn Sie auf
die Speicherkarte des MID zugreifen müssen, trennen Sie das
USB-Kabel vom MID.
DE
17
Bedienungsanleitung
3.9 Worteingabe
Benutzen des Bildschirm-Tastenfeldes
Wenn Sie Programme starten, oder die Texteditier-Box wählen,
um Wörter oder Zahlen einzugeben, erscheint das BildschirmTastenfeld.
Abb. 3-7
DE
18
1
Shift Caps Eingabemethode
2
Umschalten Worteingabe mit Symbol und Zahleneingabemethode
3
Drücken für Leerzeichen einfügen
4
Klick für Enter
5
Löschen des Charakter links vom Cursor. Klick und halten
um alle Charakter links vom Cursor zu löschen
Bedienungsanleitung
4 Multimedia
4.1 Unterstützte Dateiformate
Ihr MID kann folgende Formate abspielen:
Musik-Dateiformate
• MP3
• AAC
• OGG
• WMA
• WAV
• APE
• FLAC
• AMR
Video Dateiformate
• AVI
• MPG
• VOB
• MKV
• FLV
• TS/TP
• H264
• MPRC-4
• RMVB
• DIVX
• MPEG-2
Bild Dateiformate
• JPEG
• GIF
• PNG
• BMP
DE
19
Bedienungsanleitung
4.2 Musik
Ihre Musik wird in vier Kategorien eingeteilt werden: Künstler,
Album, Musik, Abspielliste. Wählen Sie eine Kategorie die Sie
gerne anhören möchten. Zum Beispiel, wenn Sie Künstler Kategorie wählen, sehen Sie die Namen der Interpreten Aufgelistet
von A bis Z. Wenn Sie einen Künstler auswählen, zeigt die Liste
das Album und die Lieder des Künstlers.
Album Name
Musik
Künstler
Anzeigen der Musikliste
Zufallswiedergabe
Vergangene Zeit
Fortschritts-Anzeige
Albumdeckblatt
Abb. 4-1
DE 4.3 Video
Besuchen der Video Galerie
1. Klick Galerieanwendung.
2. MID aktualisiert alle Videodateien.
3. Klick auf die gewünschte Datei zur Wiedergabe.
4. Wiedergabe starten.
20
Wiederholung
Titellänge Bedienungsanleitung
4.4 Bildergalerie
Das Bildergalerie Programm kann Bilder- und Video-Dateien
suchen, die in der SD-Karte automatisch gespeichert werden.
Darüber hinaus wird sie die Bilder- und Video-Dateien klassifizieren und sie in den verschiedenen Ordnern speichern. Sie können
das Bildergalerie-Programm zum Betrachten, Bearbeiten der
Bilder benutzen, das Bild als Hintergrund setzen und das Video
ansehen.
Bilder betrachten
1. Klick auf den Ordner um die Bilder zu betrachten.
2. Klick auf das Bild, das System wird das Bild im Vollbildmodus
anzeigen.
3. Leicht den Bildschirm benutzen, ein Pfeil erscheint an der
rechten und linken Seite des Bildes, Klick auf den Pfeil um das
vorherige oder nächste Bild zu betrachten.
DE
21
Bedienungsanleitung
5 FM Sender
1. Klick Einstellungssymbol im Hauptbildschirm.
2. Klick Weiter.
3. Klick FM Sendereinstellung.
4. Klick FM Sender, FM startet.
5. Nach FM-Start, Klick FMS Sendeeinstellung um die Sendefrequenz als die gleiche wie die Radio-Empfangsfrequenz einzustellen und danach Verbindung herstellen.
6. Klick Speichern, siehe Abbildung 6-1.
Abb.5-1
Hinweis: Wenn die FM-Funktion aufgerufen wird, gibt es keine Sprachausgabe vom MID. Es ist unbedingt notwendig als Antenne das
Netzgerät anzuschließen um eine FM-Verbindung herzustellen.
DE 6 Integrierte Verbindungen
6.1 Externe 3G
Ihr MID unterstütz externe 3G,
1. Hauptbildschirm aufrufen.
2. 3G Dongle am MID anschließen
3. Warten Sie bis das 3G Symbol in der Erinnerungsleiste erscheint.
22
Bedienungsanleitung
6.2 Wi-Fi Verbindung
Ihr MID kann eine Verbindung zu einem Wi-Fi Netzwerk
aufbauen, siehe Verbindungsanleitung:
1. Klick auf die Taste Menü zum Aufruf des Einstellungsmenüs
auf der Startseite.
2. Klick auf das Symbol Setting (Einstellungen).
3. Klick auf das Symbol Wireless and Network (Schnurlos und
Netzwerk).
4. Klick auf das Symbol Wi-Fi startet des Wi-Fi Netzwerk.
5. Klick auf das Symbol Wi-Fi Setting (Wi-Fi Einstellungen), das
MID untersucht das vorhandene Wi-Fi schnurlose Netzwerk
automatisch, siehe Abbildung 7-1.
6. Wählen Sie das gewünschte Wi-Fi Netzwerk zum Anschließen,
wenn das Netzwerk verschlüsselt ist, erscheint ein Anschlussfenster für Eingabe Benutzernamen und Passwort. (Hinweis: Einige
Router benötigen eine statische IP, siehe Abbildung 7-1, drücken
der Taste Menü und wählen Sie das Symbol Senior (Fortgeschritten) zum Einstellen der statischen IP und anderer fortgeschrittene
Optionen.
7. Klick auf das Symbol Connection (Verbindung) zum Aufbau der
Verbindung.
DE
Abb. 6-1
23
Bedienungsanleitung
7 GPS Navigation
7.1 Installation
1. Besorgen Sie die Navigationskarte vom Betreiber.
2. Mit dem Dateimanager suchen und installieren Sie das Programmpaket APK.
7.2 Aktualisieren
Besorgen Sie die aktualisierte Navigationskarte vom Betreiber.
7.3 Deinstallieren
1. Klick auf das Symbol Setting (Einstellung) in der Hauptseite.
2. Klick auf die Option Application (Anwendung).
3. Klick auf die Option Application Management (AnwendungManager), Sie können die Deinstallation beenden durch Klick auf
die Datei die Sie deinstallieren möchten..
Hinweis: 1. Alle Karten die vom Betreiber bereitgestellt werden
müssen im APK Format sein
2. Bitte beachten Sie streng beim Fahren die Verkehrsregeln und
Sicherheits- Warnungen vom Karten-Betreiber.
DE
24
Bedienungsanleitung
8 Fehlerbehebung
1. MID Langsamer Start beim ersten mal
Nach Systemaktualisierung, braucht das MID 2-3 Minuten beim
erstyen Einschalten, um die vorinstallierten Anwendungen zu
aktualisieren, die Geschwindigkeit wird nach dem ersten Einschalten erhöht.
2. MID fühlt sich heiß an
Das Gerät fühlt sich heiß an wenn Sie mehrere Anwendungen
zugleich benutzen, den Bildschirm sehr hell machen, oder das
Gerät aufladen, das ist alles normal.
3. MID kann keine WI-FI Verbindung herstellen
• Achten Sie darauf dass der Router, welcher die Internetverbindung zur Verfügung stellt, normal funktioniert.
• Achten Sie darauf einen gewissen Abstand von 50 bis 100 m
zwischen MID und wireless Router zu lassen und es sollten sich
keine Hindernisse, wie z.B. Mauern, dazwischen befinden.
• Achten Sie auf korrekte Benutzername- und Passwort-Eingabe.
4. Webseite kann nicht geöffnet werden
• Bitte halten Sie eine effektive Distanz zwischen Router und MID.
• WI-FI erneut starten und nochmals versuchen.
5. System abnormal, MID funktioniert nicht normal
Das System kann abnormal funktionieren bei der Installation
einiger Anwendungen von anderen Anbietern, drücken Sie die
Taste Reset (neben dem Netzanschluss) um das System neu zu
starten.
6. Kann E-Mail nicht installieren oder Anwendung registrieren
• Achten Sie darauf dass das Netzwerk normal funktioniert und
einen Internetanschluss herstellen kann.
• Achten Sie auf korrekte E-Mail Einstellungen.
DE
25
Bedienungsanleitung
7. TF-Karte kann nicht gelesen werden
• Achten Sie auf korrekte Einsteckung der TF-Karte.
• Bitte warten Sie auf den Aktivitäts-Ton, wenn er nicht ertönt,
Karte erneut einstecken.
8. MID keine Sprachausgabe
• Bitte überprüfen Sie ob die Lautstärke nicht ausgeschaltet ist
(Stummschaltung).
• Bitte überprüfen Sie ob FM eingeschaltet ist, wen Ja, dann
Funktion bitte ausschalten.
9. MID hat keine Reaktion manchmal für eine längeren
Zeitraum
• Bitte drücken Sie die Taste Reset (neben dem Netzanschluss)
um das System neu zu starten.
10. Das MID kann nicht eingeschaltet werden bei angeschlossenem Netzteil nachdem der Akku leer ist
• Dies ist ein normaler Vorgang. Bitte schalten Sie Ihr Gerät ein
nachdem Sie es für mehr als 10 Minuten aufgeladen haben, um
Ihr MID zu schützen und in einen in einer viel stetigen Zustand zu
Arbeiten.
DE
26
Bedienungsanleitung
9 Technische Daten
Allgemeine
Parameter
CPU Frequenz
1 GHZ
DDR-RAM
512 MB
NAND FLASH
4 GB
Betriebssystem
Google Android 4.0
NetzwerkAnschluss
Wi-Fi Wireless Netzwerk
GPS
Ja
FM transmitter
Ja
USB-Anschluss
Mini USB
Standard Batterie
Polymer Lithium Batterie,
PY-GPS7008 - 2400mAh/3.7V
PY-GPS5008 - 1200mAh/3.7V
Netzteil
Eingangsspannung DC
12V/24V, Ausgangsspannung
DC 5V, Ausgangsstrom 2A
SD-Karte
Maximum unterstützt 32G
LCD
Full Touch LCD, Auflösung
800x480
PY-GPS7008 - 7 Zoll
PY-GPS5008 - 5 Zoll
DE
27
Bedienungsanleitung
Anwendungen
Video-Wiedergabe
Unterstützt AVI, MKF, FLV
Video Format, unterstützt 720P
1080P Player
Musik-Wiedergabe
Integrierter Music Player, Unterstützt MP3, MIDI, WAV Audio
Format
Spiele
Unterstützt Programme anderer
Anbieter
Photo Browser
Unterstützt JPG, BMP, PNG,
GIF Photo Format
Office software
Unterstützt Office-Software
(Word, Excel lesen und bearbeiten), Unterstützt PDF Browser
Die Spezifikationen können ohne Ankündigung geändert werden.
Hiermit erklär die Firma Lechpol dass sich das Gerät PY-GPS7008
PY-GPS5008 im Einklang mit den grundlegenden Anforderungen
und anderen relevanten Bestimmungen der Richtlinie 1999/5/EG
befindet. Konformitätserklärung zum Download auf www.lechpol.
eu
DE
28
Owner’s manual
Contents
1 Introduction
31
1.1 Acknowledgement
1.2 Maintenance
1.3 Safety instruction
1.4 Acronym / terminology
31
31
32
33
2 MID brief instruction
34
2.1 MID accessories introduction
2.2 MID use & preparation
2.3 MID status & notice 3 Quick starts
3.1 Button function
3.2 Power On/Off
3.3 Screen turn On/Off
3.4 Usage of touch panel
3.5 Home page
3.6 Visit application
3.7 USB connection
3.8 Storage card
3.9 Input word
4 Multi-Media
4.1 File format support
4.2 Music
4.3 Video
4.4 Photo gallery
5 FM transmitter
34
34
34
36
36
36
37
38
39
41
42
43
44
45
45
46
46
47
EN
48
29
Owner’s manual
6 Connection establishment
6.1 External 3G
6.2 Wi-Fi connection 7 GPS navigation
7.1 Install
7.2 Update
7.3 Uninstall
EN
30
48
48
49
50
50
50
50
8 Trouble shooting
51
9 Product spec 53
Owner’s manual
1 Introduction
1.1 Acknowledgement
Thanks for your purchase of our product. The product is MID
(Mobile Internet Device), it is a high end product, with a touch
screen which resolution of 800x480 pixel. It is designed with 1 GHz
high speed processor. The operating system is Android 4.0.
The manual systemically introduces the functions, use techniques and announcements, please read this manual carefully
before your operation.
1.2 Maintenance
• Please keep the device, battery or charger away from water,
steam, do not use the wet hands to operate the device or adapter,
so as not to cause the device breakdown or people be electronic
shocked because of device short-circuit, corrosion.
• Please do not make the device, battery and charger be strongly
impacted or vibrated, so as not to cause the device, battery and
charger breakdown.
• Please do not put the equipment, battery and charger in too high
or low temperature area, otherwise it may cause the device, battery and charger breakdown.
• Please do not bump, throw or acupuncture the MID and avoid
falling, extrusion, bending the MID
• Please do not disassemble the device and accessories, otherwise the device and accessories will no longer within the warranty
scope of our company
EN
31
Owner’s manual
1.3 Safety instruction
Please read and let your children know the information of this
section before you use the MID. Other more detailed information,
please refer to the safety instructions and remarks
• Please do not use the MID when you are driving to avoid interfering with safe driving.
• Please comply with the relevant provisions or regulations in
medical place. Please turn off your MID when you are nearby
medical equipment area.
• Please turn off the MID or open plane mode when you are
boarding to avoid radio signals interfering the aircraft control
signal.
• Please turn off the MID in the vicinity of using high-precision
electronic equipment, otherwise, it may lead to the breakdown of
the electronic equipment.
• Please do not disassemble the MID and accessories by yourself, only the authorization institution can repair the MID.
• Please keep the MID far away from magnetic equipment, the
radiation of MID will erase the stored messages of magnetic
equipment.
• Please do not use the MID at the place of high temperature,
inflammable gas existed area (such as gas station).
• Please put the MID and accessories out of the touch scope of
EN children, do not let them to use the MID in unsupervised condition.
• When you use the MID, please comply with relevant laws and
regulations, and respect for others’ privacy and legal rights when
you are using the MID.
32
Owner’s manual
• Please strictly comply with the relevant specification of this
manual when you are using the USB cable , otherwise it might
damage your MID or personal computer
• Please do not use the MID under wet environment (such as
bathroom) and avoid the MID be soaked or irrigated by liquid.
1.4 Acronym / terminology
Abbreviations/
terminologies
Full name
Introductions
MID
Mobile Internet
Device
Internet mobile terminal
WIFI
Wireless Fidelity
Wireless LAN based on
the standard of IEEE
802.1
TF
Trans Flash
SD card
EN
33
Owner’s manual
2 MID brief instruction
2.1 MID accessories introduction
Packing list
Your MID packing box contains the following items:
• MID device
• Power adapter
• Holder
• USB cable
• User’s manual
• Warranty card
2.2 MID use & preparation
Battery charging
Please charge the battery before you first time use the MID.
2.3 MID status & notice
Notice icon
When the notice message appeared on your notice panel, please
click the column frame and slide on the screen with your finger to
open notice list. Click the options you need to check for checking
the detailed information. Then you can click information box and
slide upward to close the information window. The following is the
iconic illustration of the status bar:
EN
34
Owner’s manual
New e-mail
Airplane mode
USB is connected
USB adjustment is
connected
Previous
Downloading
Display the application you use recently
Home key
Battery volume
mark
WIFI service has been
connected, available to
internet
No SD card
Alarm on
General notice
Mute
Notification panel
When you received an e-mail, setted the alarm, schedule, and
inserted SD card, the notice icon will pop-up, you can open the
notification panel to check the detailed information.
Open notification panel
When new notice icon appears in the notification bar, please
press the notification bar, then slide your fingers downward to
open the notification panel.
EN
35
Owner’s manual
3 Quick starts
3.1 Button function
Button function introduction:
Return
key
Home key
Display the application
you use recently
Picture 3-1
3.2 Power On/Off
Power on
press the power button for 2 seconds, you will see the
EN Long
start-up screen. You can operate the device after entering into the
main page under the system open state.
36
Owner’s manual
Power Off
1. Long press the Power button, the power off options will popsup.
2. Device options list out silent mode and power off mode.
3. Click the Power Off icon to turn off the device.
3.3 Screen turn On/Off
The screen will turn off automatically when it is in idle status.
1. After the screen is in idle state for a while, the screen will turn
off automatically for saving the battery power
2. Under the screen turn on state, press power button, the screen
will turn off immediately.
Turn on the screen under off state
You can press power button to turn on the screen under screen
off state,it will enter into lock state, refer to picture 3-2. Press the
Lock icon and slide upward with your finger to unlock.
EN
Picture 3-2
37
Owner’s manual
3.4 Usage of touch panel
The operation mode of MID
There are several ways to view the main screen, menu and application programs of your MID.
Click
If you would like to use the screen keyboard input or choose the
item on the home page of the application, you just need to use
your finger to click on the screen.
Hold
If you want to open the available option of some project (such
as the text box or link of web page), or open the shortcut of main
page, or move the main program menu, you just need to hold this
item.
Slide
Slide means using your finger to vertical or level drag fastly on
the image.
Drag
Before drag, you must use a finger to hold and put some pressure
on the item , don’t release your finger until you reach the destination.
Rotate
For most of the image, you just need to make the MID rotate
laterally, then the screen will rotate from horizontal to straight
direction automatically. Such as when you are inputting the word
or watching movies, etc.
EN
38
Owner’s manual
3.5 Home page
The screen of main menu will show all applications of this device
as picture 3-3. You can use the application, shortcut and customize your wallpaper of home page interface, etc.
Application
Search
Dynamic
wallpaper
Battery
volume
Return
key
Home
Menu Volume
key
control
Notice
column
Remind
Time
information
Picture 3-3
EN
39
Owner’s manual
Extensible home page Interface
Home page interface can be extended to the outside screen to
provide much more space, which allow you to put new shortcut,
small tools etc. Press the blank space of home page interface
then use finger slide vertically around quickly, it will extend outside to the right or left of the screen. Home page interface have
two or more extension images as picture 3-4.
Picture 3-4
EN
40
Owner’s manual
3.6 Visit application
How to visit the application of MID:
1. Please click on the
icon.
2. Select the application that you want to visit.
Picture 3-5
EN
41
Owner’s manual
3.7 USB connection
Storage settings of MID
Before you transfer files, you must set the storage mode of your
MID first:
1. Use USB cable to connect the MID with computer. The notice
tips will appear in the notice bar.
2. Open notification panel, how to open the panel please check
the MID status & notice in chapter 2-3.
3. In notification panel, click on USB connected (External), then
click Load icon, as picture.
4. Now USB has connected successfully.
EN
42
Picture 3-6
Owner’s manual
3.8 Storage card
Copy files into the storage card
1. Use USB cable to connect the MID with computer.
2. After press the Storage Settings of MID icon, connected with
computer successfully.
3. Open My Computer file folder in your computer, view the content of Removable Disk.
4. Find out the file that you want to copy, and then copy it to the
“Removable disk”.
5. After finished copy, click the Safely Remove Hardware icon in
the task bar of your computer to uninstall it.
Notes: If you enabled the USB Storage Device when your MID
is connected with your USB cable, you would not be able to visit
storage card of MID, if you need to visit the storage card of MID,
please disconnect the USB cable with the MID.
EN
43
Owner’s manual
3.9 Input word
Use screen buttonboard
When you start the programme or choose the text edit box for
inputting word or number, the screen buttonboard will pop-up.
Picture 3-7
EN
44
1
Shift Caps input method
2
Shift word input method with symbol and number input
method
3
Tap to insert a space
4
Click to enter
5
Delete the left character of the cursor. Click and hold to
delete all the characters on the left side of the cursor
Owner’s manual
4 Multi-Media
4.1 File format support
Your MID can play the following format:
Music file format
• MP3
• AAC
• OGG
• WMA
• WAV
• APE
• FLAC
• AMR
Video file format
• AVI
• MPG
• VOB
• MKV
• FLV
• TS/TP
• H264
• MPRC-4
• RMVB
• DIVX
• MPEG-2
Picture file format
• JPEG
• GIF
• PNG
• BMP
EN
45
Owner’s manual
4.2 Music
Your music will be classified in four kinds: Artist, Album, Music,
Play List. If you choose one classify, choose the one you would
like to play. For example, if you choose Artist category, you will
see the artist name list from A to Z. If you choose one artist, the
list will show the album and the song list of the artist.
View the Playing List
Album name
Music
Elipsed time
Artist
Album cover
Picture 4-1
4.3 Video
EN Visit Video Gallery
1. Click gallery application.
2. MID refresh all video files.
3. Click the file you want play.
4. Enter into play picture to play.
46
Repeat
Random Opened
Progress bar
Music time
Owner’s manual
4.4 Photo gallery
Photo gallery application can be search into SD card memory
card and video file, and photo gallery will device the photos and
video photo, you can use the photo gallery application to view
and edit photo, and set the desktop and view photo.
View photos
1. Click photo gallery application in main interface.
2. Enter into photo gallery, click the file you want to view and.
3. Click the photo you want to view, system will view the photo in
full screen.
4. When you view photos, you can zoom in and out, touch the
screen with two finders, and pull the fingers and separate the fingers to decrease and increase the photo or double touch screen.
EN
47
Owner’s manual
5 FM transmitter
1. Click setting icon in main interface.
2. Click more.
3. Click FM transmitter configuration.
4. Click FM transmitter, start FM.
5. After starting FM, click FMS Trans Setting to set the frequency,
and keep it same with radio receiving frequency, then connect.
6. Click Save, as Picture 6-1.
Picture 5-1
Note: When FM function is opened, there is no voice output from
MID. It is a must condition to connect the charger as antenna
when building FM connection.
6 Connection establishment
EN 6.1 External 3G
Your MID can support external 3G,
1. Enter into main interface.
2. MID connect 3G dongle.
3. Wait the 3G icon. shows in remind column.
48
Owner’s manual
6.2 Wi-Fi connection
Your MID can link to Wi-Fi network, see link instruction:
1. Click the Menu button to pop-up setting menu list on the home
page.
2. Click Setting icon.
3. Click Wireless and Network icon.
4. Click Wi-Fi icon to start Wi-Fi network.
5. Click Wi-Fi Setting icon, the MID will scan the available Wi-Fi
wireless network automatically, see picture 7-1.
6. Choose the Wi-Fi network you would like to link, if the network
is encrypted, it will pop-up a window requires you to input the
password, please input the correct password. (Notes: some of the
router requires to use the static IP, see picture 7-1, press Menu
button to choose Senior icon to set static IP and other senior
options.
7. Click Connection icon to link.
EN
Picture 6-1
49
Owner’s manual
7 GPS navigation
7.1 Install
1. To obtain the navigation map from map operators
2. Select the intall program package of APK in the file browser to
install.
7.2 Update
To obtain the updated navigation map from map operators to
update.
7.3 Uninstall
1. Click on the Setting bitmap on the main interface.
2. Click on the Application icon.
3. Click on Application Management icon, you can finish the uninstallation by click on the file what you want to uninstall.
Notes : 1. All the map be provided by the operators must be the
APK file package.
2. Please comply with the traffic regulations and safety warning
from the map operator strictly when driving.
EN
50
Owner’s manual
8 Trouble shooting
1. MID Slow Start For the First Time
After the system upgrade, MID will need 2-3 mins to power on for
the first time because of upgrading the pre-installed application,
and the speed will become much faster after first time start.
2. MID feels hot
You will feel the device hot when you are operating several applications at the same time, making the screen the brightness, or
the device being charged, it’s all normal.
3. MID can not connect Wi-Fi
• Make sure the wireless router which provide the internet service
work normally.
• Make sure to leave a certain distance of 50 to 100 miles between MID and wireless Router, and they should not be separated by any wall or other obstacles
• Make sure to input the right user name and password.
4. Website can not be opened
• Please keep the distance within remain distance effectively
between routing and MID
• Please restart WIFI to try again
5. System abnormal, MID can not run normally
It may make the system can not run normally when you are
installing some third party application, you can press the reset
button (beside the power interface) to reset the system.
6. Can not set up E-mail or register application
• Make sure your Network work normally and can connect to the
internet.
• Make sure to set the E-mail correctly.
EN
51
Owner’s manual
7. TF card can not read data
• Please make sure to insert the TF card in place
• Please wait for the remindation tone, if it not appears, Please
re-insert the TF card
8. MID no voice output
• Please check whether the main volume is in silence mode
• Please check the if FM is on, if yes, please turn off the FM function.
9. MID have no response for a long time sometimes
• Please press reset key (beside the power interface) to reset the
system.
10. The MID can not be turned on even when the charger
connected after the power was fully run out.
• This is a normal phenomenon. Please turn on your device after
charged for more than 10 minutes in order to protect your MID to
work in a much more steady condition.
EN
52
Owner’s manual
9 Product spec
CPU Frequency
1 GHZ
DDR-RAM
512 MB
NAND FLASH
4 GB
Operating System
Google Android 4.0
Network Access
WiFi Wireless Network
GPS
Built-in
FM transmitter
Built-in
USB Interface
Mini USB
Standard Battery
Polymer lithium battery,
PY-GPS7008 - 2400mAh/3.7V
PY-GPS5008 - 1200mAh/3.7V
Power Adapter
Input Voltage DC
12V/24V,Output Voltage DC
5V,Current 2A
SD Card
Maximum support 32G
LCD
TFT LCD with capacitive
touch panel, resolution
800x480
PY-GPS7008 - 7 inch
PY-GPS5008 - 5 inch
EN
53
Owner’s manual
Applications
Video play
Support AVI, MKF, FLV
Video Format, Support
720P 1080P play
Audio play
Built-in video player which
support MP3, MIDI, WAV
etc.
Games
Support third party software
Photo viewer
Support JPEG, BMP, PNG,
GIF etc.
Office software
Support office (word, excel
read and edit ), support
PDF view
Specifications are subject to change without notice.
The Lechpol company declares that product PY-GPS7008,
PY-GPS5008 is consistent with the essential requirements and
other relevant provisions of directive 1999/5/EC. The proper
declaration for download from www.lechpol.eu
EN
54
Instrukcja obsługi
Spis treści
1 Wprowadzenie
1.1 Wstęp
1.2 Warunki użytkowania
1.3 Zasady bezpieczeństwa
1.4 Terminologia
2 Informacje podstawowe
2.1 Akcesoria
2.2 Ładowanie baterii
2.3 Status urządzenia
3 Szybki start
3.1 Przyciski i ich funkcje
3.2 Włączenie / wyłączenie urządzenia
3.3 Włącznie / wyłączenie ekranu
3.4 Ekran dotykowy
3.5 Strona główna
3.6 Aplikacje
3.7 Połączenie USB
3.8 Pamięć urządzenia
3.9 Wprowadzanie znaków
4 Multi-Media
4.1 Odtwarzane formaty plików
4.2 Muzyka
4.3 Odtwarzanie plików video
4.4 Przeglądanie zdjęć
5 Transmiter FM
57
57
57
58
59
60
60
60
60
62
62
62
63
64
65
67
68
69
70
71
71
72
72
73
74
PL
55
Instrukcja obsługi
6 Połączenia
PL
56
74
6.1 Połączenie 3G
6.2 Wi-Fi 74
75
7 Nawigacja GPS
76
7.1 Instalacja
7.2 Aktualizacja
7.3 Deinstalacja
76
76
76
8 Rozwiązywanie problemów
77
9 Specyfikacja 79
Instrukcja obsługi
1 Wprowadzenie
1.1 Wstęp
Dziękujemy za zakup naszego produktu. Urządzenie posiada
ekran dotykowy wysokiej rozdzielczości 800x480, wydajny procesor o częstotliwości 1 GHz oraz system operacyjny Android 4.0.
Niniejsza instrukcja zawiera informację o funkcjach urządzenia, jego działaniu oraz rozwiązywaniu powstałych problemów,
warto ją przeczytać przed pierwszym użyciem urządzenia.
1.2 Warunki użytkowania
• Zalanie urządzenia wodą lub działanie pary wodnej może spowodować zwarcie i w efekcie uszkodzenie urządzenia oraz porażenie prądem elektrycznym.
• Nie należy poddawać urządzenia silnym wstrząsom i uderzeniom. Może to spowodować uszkodzenie urządzenia.
• Nie należy używać urządzenia w miejscach o skrajnie niskiej
lub wysokiej temperaturze. Może to doprowadzić do uszkodzenia
urządzenia lub jego baterii.
• Próby samodzielnej naprawy lub rozkręcenia urządzenia powodują utratę gwarancji.
PL
57
Instrukcja obsługi
1.3 Zasady bezpieczeństwa
Przed pierwszym użyciem urządzenia należy przeczytać poniższe zasady bezpieczeństwa.
• Wprowadzanie ustawień do nawigacji podczas kierowania pojazdem powoduje znaczne zmniejszenie bezpieczeństwa podróżowania.
• Należy stosować się do przepisów i rozporządzeń zabraniających korzystanie z urządzenia w określonych miejscach (np. w
pobliżu urządzeń medycznych).
• Należy wyłączyć urządzenie przed wejściem do samolotu, aby
uniknąć ryzyka zakłócenia systemów sterowania.
• Należy wyłączyć urządzenie w pobliżu precyzyjnego sprzętu
elektronicznego.
• Naprawa urządzenia może być przeprowadzona wyłączenie poprzez wykwalifikowany serwis.
• Nie należy używać urządzenia w pobliżu urządzeń magnetycznych.
• Nie należy używać urządzenia w miejscach o skrajnie niskiej lub
wysokiej temperaturze.
• Należy zabezpieczyć urządzenie przed niekontrolowanym dostępem dzieci.
PL
58
• Podczas korzystania z urządzenia należy przestrzegać lokalnych przepisów prawnych, a także zachować poszanowanie prywatności innych osób.
Instrukcja obsługi
• Należy przestrzegać wszystkich zaleceń zawartych w niniejszej
instrukcji obsługi (szczególną uwagę należy zwrócić na podłączania urządzenia za pomocą kabla USB).
• Nie należy używać urządzenia w środowisku o dużej wilgotności powietrza.
1.4 Terminologia
Skrót
Pełna nazwa
Opis
MID
Mobile Internet
Device
Mobilne urządzenie do
korzystania z internetu
WIFI
Wireless Fidelity
Bezprzewodowa sieć lokalna
TF
Trans Flash
Karta SD
PL
59
Instrukcja obsługi
2 Informacje podstawowe
2.1 Akcesoria
Zawartość opakowania:
• nawigacja GPS
• ładowarka
• kabel USB
• instrukcja obsługi
• karta gwarancyjna
2.2 Ładowanie baterii
Przed pierwszym użyciem należy naładować baterię nawigacji.
2.3 Status urządzenia
Ikony
Aby wyświetlić zawartość powiadomienia, należy nacisnąć na
jego ikonę. W poniższej tabeli zostały przedstawione ikony powiadomienia:
PL
60
Instrukcja obsługi
Nowa wiadomość
e-mail
Tryb samolotowy
Podłączone urządzenie USB
Wyciszenie
Poprzedni
Pobieranie
Aktualnie uruchomione aplikacje
Powrót do ekranu głównego
Poziom naładowania baterii
Aktywne połączenie
Wi-Fi, dostęp do internetu
Brak karty SD
Włączony alarm
Uwaga ogólna
Panel powiadomień
Po odebraniu wiadomości email, ustawieniu zegara, kalendarza
oraz włożeniu karty SD, na ekranie pojawią się ikony powiadomienia. Aby zobaczyć szczegóły, należy otworzyć panel powiadomień.
Otwieranie panelu powiadomień
Gdy nowa ikona pojawi się na pasku, należy nacisnąć na pasek
powiadomień i przesunąć go w dół.
PL
61
Instrukcja obsługi
3 Szybki start
3.1 Przyciski i ich funkcje
Powrót
Home
Aktualnie uruchomione
aplikacje
Rys. 3-1
3.2 Włączenie / wyłączenie urządzenia
PL
Włączenie urządzenia
Aby uruchomić urządzenie, należy nacisnąć i przytrzymać przycisk Power przez około 2 sekundy, wyświetlony zostanie ekran
startowy. Używanie urządzenia jest możliwe po pojawieniu się
ekranu głównego.
62
Instrukcja obsługi
Wyłączenie urządzenia
1. Aby wyłączyć urządzenie należy nacisnąć i przytrzymać przycisk Power.
2. Na ekranie ukażą się 3 opcje: Tryb cichy, Tryb samolotowy oraz
Wyłącz.
3. Należy wybrać opcję Wyłącz.
3.3 Włącznie / wyłączenie ekranu
Wyłączanie ekranu
1. Po pewnym czasie bezczynności, ekran automatycznie się wyłączy (w celu oszczędzania baterii).
2. Aby wyłączyć ekran ręcznie, należy nacisnąć przycisk Power.
Włączenie ekranu
Aby wyłączyć ekran, należy nacisnąć przycisk Power, urządzenie przejdzie w tryb blokady (patrz rys. 3-2). W celu odblokowania
urządzenia, należy nacisnąć ikonę blokady i przesunąć ją w górę.
PL
Rys. 3-2
63
Instrukcja obsługi
3.4 Ekran dotykowy
Tryb pracy
Istnieje kilka sposobów wyświetlania ekranu głównego, menu i
zainstalowanych programów.
Kliknięcie
Aby skorzystać z klawiatury ekranu lub wybrać element na stronie
głównej, wystarczy kliknąć na ten element na ekranie.
Przytrzymanie
Aby otworzyć dostępną opcję jakiegoś programu (np. pola tekstowego lub link do strony internetowej), otworzyć skrót strony głównej lub przejść do menu głównego programu, wystarczy przytrzymać ten element.
Przesunięcie
Aby przesunąć element, należy go nacisnąć i przytrzymać a następnie przesunąć nim po ekranie.
Przesuń i upuść
Aby upuścić element w wybrane miejsce, należy go nacisnąć i
przytrzymać a następnie przesunąć nim po ekranie. Nie należy odrywać palca od ekranu do momentu upuszczenia elementu.
Aby upuścić element, należy oderwać palec od ekranu.
Obróć
W większości przypadków obraz obraca się wraz z obracaniem
urządzenia.
PL
64
Instrukcja obsługi
3.5 Strona główna
Na stronie głównej wyświetlone są aplikacje urządzenia (jak na
rysunku 3-2). Można dowolnie umieszczać tam skróty, zmieniać
tapetę ekranu, itp.
Wyszukiwanie
Aplikacje
Tapeta
Poziom
naładowania
baterii
Powrót
Home
Menu Regulacja Pasek po- Informacje o
głośności wiadomień urządzeniu
Zegar
Rys. 3-3
PL
65
Instrukcja obsługi
Rozszerzenie strony głównej
Stronę główną można rozszerzać o kolejne strony aby zapewnić
większą ilość miejsca dla skrótów, narzędzi itp. Aby to zrobić, należy nacisnąć puste miejsce na stronie głównej i przesunąć palcem do lewej lub prawej krawędzi ekranu. Patrz rys. 3-4.
Rys. 3-4
PL
66
Instrukcja obsługi
3.6 Aplikacje
Aby uruchomić aplikację należy:
1. Nacisnąć znajdujący się na ekranie głównym przycisk
2. Nacisnąć ikonę aplikacji, która ma zostać uruchomiona.
.
Rys. 3-5
PL
67
Instrukcja obsługi
3.7 Połączenie USB
1. Aby podłączyć urządzenie do komputera należy użyć kabla
USB.
2. Na ekranie nawigacji ukaże się informacja Połączenie przez USB.
3. Należy wybrać Włącz nośnik USB. Na ekranie wyświetlony zostanie komunikat Po włączeniu nośnika USB niektóre używane aplikacje zostaną zatrzymane i mogą być niedostępne do chwili wyłączenia nośnika
USB. Należy wybrać opcję OK.
4. Na ekranie ukaże się informacja Nośnik USB w użyciu oznaczająca prawidłowe podłączenie urządzenia do komputera. Aby odłączyć urządzenie należy nacisnąć przycisk Wyłącz nośnik USB a następnie odłączyć kabel USB.
Rys. 3-6
PL
68
Instrukcja obsługi
3.8 Pamięć urządzenia
Kopiowanie plików
1. Aby skopiować pliki, należy podłączyć nawigację do komputera
za pomocą kabla USB (jak opisano w poprzednim punkcie).
2. Przejść do katalogu Mój komputer.
3. Na liście urządzeń wyszukać podłączoną nawigację.
4. Skopiować żądane pliki.
5. Po zakończeniu kopiowania na nawigacji wybrać: Wyłącz nośnik USB.
PL
69
Instrukcja obsługi
3.9 Wprowadzanie znaków
Klawiatura dotykowa
Po uruchomieniu programu lub pola gdzie można wprowadzać
tekst, na ekranie nawigacji ukaże się klawiatura.
Rys. 3-7
PL
70
1
Typ wprowadzanych znaków (litery/cyfry)
2
Shift - zmiana wielkości wprowadzanych liter (duże/małe)
3
Spacja
4
Enter (nowa linia)
5
Usunięcie znaku po lewej stronie od kursora
Instrukcja obsługi
4 Multi-Media
4.1 Odtwarzane formaty plików
Formaty muzyki
• MP3
• AAC
• OGG
• WMA
• WAV
• APE
• FLAC
• AMR
Formaty video
• AVI
• MPG
• VOB
• MKV
• FLV
• TS/TP
• H264
• MPRC-4
• RMVB
• DIVX
• MPEG-2
Formaty obrazu
• JPEG
• GIF
• PNG
• BMP
PL
71
Instrukcja obsługi
4.2 Muzyka
Zapisana muzyka jest klasyfikowana po 4 parametrach: wykonawca, album, nazwa utworu oraz lista odtwarzania. Istnieje możliwość wyszukiwania i odtwarzania utworów po tych parametrach.
Patrz rys. 4-1.
Nazwa
utworu
Nazwa albumu
Powtarzanie
Lista odtwarzania
Wykonawca
Czas odtwarzania Okładka
Odtwarzanie losowe
Pasek postępu
Czas utworu
Rys. 4-1
4.3 Odtwarzanie plików video
PL
72
1. Z listy aplikacji należy wybrać Galeria.
2. Następnie należy wybrać katalog zawierający nagrania (pliki video lub nagrania z kamery).
3. Aby uruchomić odtwarzanie, należy wybrać żądany plik i nacisnąć znajdujący się na ekranie przycisk play.
Instrukcja obsługi
4.4 Przeglądanie zdjęć
Aplikacja automatycznie wyszukuje zapisane na karcie pamięci
obrazy i pliki video. Ponadto pliki będą pogrupowane w folderach,
tak jak zostały zapisane na karcie pamięci. Aplikacja umożliwia
przeglądanie i edytowanie obrazów, ustawienie obrazu jako tapetę ekranu głównego oraz odtwarzanie plików video.
Przeglądanie obrazów
1. Należy wybrać żądany folder.
2. Naciśnięcie wybranego obrazu spowoduje jego wyświetlenie
na pełnym ekranie.
3. Za pomocą przycisków symbolizujących lupę można powiększać lub pomniejszać wyświetlany obraz.
Wskazówka: Aplikacja umożliwia również obracanie wyświetlanego obrazu, naciśnij Menu a następnie Obróć w lewo lub Obróć w prawo.
PL
73
Instrukcja obsługi
5 Transmiter FM
Aby uruchomić transmiter, należy:
1. W ustawieniach urządzenia wybrać Więcej.
2. Następnie wybrać FM Transmitter configuration.
4. Nacisnąć FM Transmitter (transmiter zostanie włączony).
5. Aby ustawić częstotliwość, nacisnąć FM Transmitter freq setting i
potwierdzić ustawienia klikając przycisk Save (rys. 6-1).
Rys. 5-1
Uwaga: Przy włączonym transmiterze nawigacja nie emituje żadnych dźwięków. Do prawidłowego działania transmitera wymagane jest podłączenie ładowarki jako anteny.
6 Połączenia
6.1 Połączenie 3G
PL Istnieje możliwość podłączenia do urządzenia zewnętrznego modemu 3G. Po podłączeniu modemu na liście powiadomień ukaże
się odpowiednia informacja.
74
Instrukcja obsługi
6.2 Wi-Fi
Aby połączyć się z siecią Wi-Fi, należy:
1. Przejść do ustawień urządzenia.
2. Wybrać opcję Sieci zwykłe i bezprzewodowe.
3. Kliknąć ikonę Wi-Fi (aby włączyć/wyłączyć Wi-Fi).
5. Wybrać Ustawienia Wi-Fi (aby przejść do ustawień), rysunek 7-1.
6. Wybrać żądaną sieć bezprzewodową.
Rys. 6-1
PL
75
Instrukcja obsługi
7 Nawigacja GPS
7.1 Instalacja
Aby zainstalować mapę należy:
1. Pobrać mapę od dostawcy map.
2. Uruchomić program instalacyjny.
7.2 Aktualizacja
Aktualizację mapy należy pobrać od dostawcy map.
7.3 Deinstalacja
1. Należy nacisnąć przycisk Menu a następnie wybrać Zarządzaj
aplikacjami.
2. Następnie na zakładce Pobrane należy wybrać żądaną aplikację.
3. Aby odinstalować dany program, należy nacisnąć przycisk Odinstaluj.
PL
76
Instrukcja obsługi
8 Rozwiązywanie problemów
1. Powolny start urządzenia
Po aktualizacji systemu urządzenie potrzebuje około 2-3 minut
na start, aby zaktualizować wprowadzone zmiany. Przy kolejnym
starcie urządzenie powinno uruchomić się już normalnie.
2. Urządzenie jest gorące
Urządzenie staje się cieplejsze: podczas używania wielu aplikacji
jednocześnie, w sytuacji gdy ustawiona jest maksymalna jasność
lub podczas ładowania. Jest to sytuacja normalna.
3. Nie można się połączyć z siecią WIFI
• Należy się upewnić, że sieć jest dostępna (należy sprawdzić router/punkt dostępowy).
• Należy sprawdzić czy urządzenie jest w zasięgu sieci (nie ma
zbyt dużej odległości od routera/punktu dostępowego).
• Należy się upewnić, że wprowadzone zostały prawidłowe ustawienia dostępu do sieci.
4. Nie można wyświetlić strony internetowej
• Należy sprawdzić czy urządzenie jest w zasięgu sieci (nie ma
zbyt dużej odległości od routera/punktu dostępowego).
• Należy wyłączyć i ponownie włączyć sieć WIFI.
5. System nie działa prawidłowo
Istnieje możliwość, że po instalacji oprogramowania pochodzącego z nieznanego źródła urządzenie przestanie działać prawidłowo. Rozwiązaniem tego problemu może być reset urządzenia
(przycisk znajdujący się na tylnej obudowie urządzenia).
6. Nie działa poczta E-mail
• Należy się upewnić, że jest połączenie z Internetem.
• Należy się upewnić, że wprowadzony adres e-mail jest prawidłowy.
PL
77
Instrukcja obsługi
7. Nie można odczytać danych z karty pamięci
• Należy się upewnić, że karta jest prawidłowo włożona do gniazda.
• Należy wyjąć i ponownie włożyć kartę pamięci do gniazda.
8. Brak dźwięku
• Należy sprawdzić, czy poziom dźwięku nie jest ustawiony na minimum.
• Należy się upewnić, że tryb FM jest wyłączony (przy włączonym
trybie FM dźwięk w nawigacji jest wyciszony).
9. Urządzenie nie odpowiada od dłuższego czasu
• Jeżeli nie można włączyć/wyłączyć urządzenia, to należy nacisnąć przycisk RESET.
10. Urządzenie się nie uruchamia nawet po podłączeniu do
źródła zasilania.
• Jeżeli bateria urządzenia została całkowicie rozładowana to po
podłączeniu do źródła zasilania należy odczekać przynajmniej 10
minut przed ponownym włączeniem urządzenia (jest to zabezpieczenie chroniące urządzenie przed pracą przy zbyt niskim poziomie zasilania).
PL
78
Instrukcja obsługi
9 Specyfikacja
Parametry
ogólne
Częstotliwość
CPU
Cortex A8 1 GHZ
DDR-RAM
512 MB
NAND FLASH
4 GB
System
operacyjny
Google Android 4.0
Dostęp do sieci
Sieć bezprzewodowa Wi-Fi
GPS
Tak
Transmiter FM
Tak
Port USB
1 x mini USB
Bateria
Bateria polimerowo-litowa,
PY-GPS7008 - 2400mAh/3.7V
PY-GPS5008 - 1200mAh/3.7V
Zasilanie
Napięcie wejściowe DC
12V/24V, napięcie wyjściowe
DC 5V, 2A
Czytnik kart SD
Maksymalny rozmiar 32G
Wyświetlacz
Dotykowy ekran pojemnościowy TFT LCD o rozdzielczości 800x480
PY-GPS7008 - 7”
PY-GPS5008 - 5”
PL
79
Instrukcja obsługi
Aplikacje
Odtwarzacz video
Odtwarzane typy plików AVI,
MKF, FLV, 720P 1080P
Odtwarzacz audio
Odtwarzane typy plików
MP3, MIDI, WAV itp.
Gry
Wsparcie dla gier innych
producentów
Przeglądarka
zdjęć
Odtwarzane typy plików
JPEG, BMP, PNG, GIF itp.
Oprogramowanie
biurowe
Odczyt i edycja plików z
programów word i excel (po
zainstalowaniu dodatkowego
oprogramowania).
Przeglądarka plików PDF.
Specyfikacja urządzenia może ulec zmianie bez powiadomienia.
Niniejszym firma Lechpol oświadcza, że urządzenie
PY-GPS7008, PY-GPS5008 jest zgodne z zasadniczymi wymaganiami oraz innymi stosownymi postanowieniami dyrektywy
1999/5/WE. Właściwa deklaracja do pobrania na stronie www.
lechpol.eu
PL
80
Manual de utilizare
Curpins
1 Introducere
1.1 Multumiri
1.2 Instructiuni privind siguranta
1.3 Instructiuni privind siguranta
1.4 Terminologie
2 Inainte de utilizare
2.1 Accesorii
2.2 Pregatire de utilizare
2.3 Stare aparat si notificari 3 Pornire rapida
3.1 Functii butoane
3.2 Pornire/oprire
3.3 Pornire/oprire ecran
3.4 Utilizarea Panoului tactil
3.5 Pagina de pornire
3.6 Vizitare aplicatie
3.7 Conectare USB
3.8 Card de memorie
3.9 Introducere cuvinte
4 Multi-Media
4.1 Format fisiere suportate de aparat
4.2 Muzica
4.3 Video
4.4 Galerie imagini (Photo Gallery)
5 Transmitator FM
83
83
83
84
85
86
86
86
86
88
88
88
89
90
91
93
94
95
96
97
97
98
98
99
100
RO
81
Manual de utilizare
6 Conexiuni
6.1 Dispozitiv 3G Extern
6.2 Conectare la o retea Wi-Fi
7 Navigare GPS
7.1 Instalare
7.2 Update
7.3 Dezinstalare
RO
82
100
100
101
102
102
102
102
8 Depanare
103
9 Product spec 105
Manual de utilizare
1 Introducere
1.1 Multumiri
Va multumim pentru achizitionarea produsului nostru. Produsul
este un MID (Mobile Internet Device - dispozitiv mobil pentru internet), un dispozitiv high-end, cu ecran tactil, rezolutie de 800x480
pixeli. Acesta este echipat cu un procesor de mare viteza 1 GHz,
sistem de operare Android 4.0.
Va rugam sa cititi cu atentie instructiunile de utilizare si sa le respectati intocmai.
1.2 Instructiuni privind siguranta
• Va rugam sa feriti bateria dispozitivului sau incarcatorul de apa,
aburi, nu folositi mainile umede cand utilizati aparatul sau adaptorul, deoarece puteti deteriora aparatul si exista riscul aparitiei
unui soc electric.
• Va rugam sa feriti dispozitivul, bateria si incarcatorul de lovituri
puternice sau vibratii.
• Va rugam sa nu lasati echipamentul, bateria si incarcatorul in
zone cu temperaturi extreme, in caz contrar aceasta poate provoca defectarea aparatului, acumulatorului si incarcatorului.
• Nu deschideti aparatul sau accesoriile, in caz contrar garantia
acordata produsului e pierde.
RO
83
Manual de utilizare
1.3 Instructiuni privind siguranta
Va rugam cititi cu atentie instructiunile de utilizare si respectati
intocmai recomandarile de utilizare. Pastrati manualul pentru
consultari ulterioare. Nu lasati aparatul la indemana copiilor.
• Nu utilizati aparatul in timp ce conduceti!
• Nu utilizati produsul in apropierea echipamentelor medicale sau
a echipamentelor electronice sensibile deoarece este posibila
aparitia interferentelor.
• Pentru a evita aparitia interferentelor cu sistemele de navigatie
aeriana, opriti aparatul atunci cand calatoriti cu avionul.
• In caz de defectiune, nu desfaceti aparatul. Pentru reparatii
apelati la un service autorizat.
• Pastrati aparatul departe de campuri magnetice puternice deoarece acestea pot sterge mesajele electronice inregistrate pe
suport magnetic.
• Nu utilizati paaratul in locuri cu temperaturi extreme sau in medii
gazoase (statii de gaz).
• Nu lasati aparatul la indemana copiilor.
• Nu utilizati aparatul in medii umede (cum ar fi baia) pentru a
evita aparitia condensului sau patrunderea de lichide in interiorul
aparatului.
RO
84
Manual de utilizare
1.4 Terminologie
Abreviatii
Denumire
completa
Descriere
MID
Mobile Internet
Device
Terminal mobil pentru
internet
WIFI
Wireless Fidelity
Retea Wireless pe baza
standardului IEEE
802.1
TF
Trans Flash
SD card de memorie
RO
85
Manual de utilizare
2 Inainte de utilizare
2.1 Accesorii
Inainte de utilizare verificati continutul coletului:
• Dispozitiv MID
• Incarcator auto
• Suportul auto
• Cablu USB
• Manual utilizare
• Certificat garantie
2.2 Pregatire de utilizare
Incarcare baterie
Inainte de prima utilizare, trebuie sa incarcati bateria.
2.3 Stare aparat si notificari
Iconite pentru mesaje
Cand apare un mesaj de notificare pe ecran, utilizati creionul
touch-pen pentru a deschide lista de notificari. Apasati pe
optiunile pe care le doriti pentru detalii suplimentare. In figura
urmatoare se arata lista de mesaje.
RO
86
Manual de utilizare
E-Mail nou
Mod de functionare in
avion
Dispozitiv USB
conectat
Silentios
Anterior
Descarcare
Afisarea aplicatiilor utilizate recent
Tasta Home
Simbol nivel
baterie
Reteaua WI-FI a fost
conectata, internetul este
disponibil
Fara card SD
Alarma pornita
Avertisment general
Notificare
Cand receptionati un mesaj, puteti deschide mesajul pentru a afla
detalii suplimentare.
RO
87
Manual de utilizare
3 Pornire rapida
3.1 Functii butoane
Button function introduction:
Tasta
Revenire
Tasta de
pornire ecran
Afisarea aplicatiilor
utilizate recent
Fig. 3-1
3.2 Pornire/oprire
Pornire
RO
88
Apasati lung (2 sec.) pe acest buton pentru a porni aparatul, veti
vedea ecranul de pornire. Veti putea utiliza aparatul dupa ce
intrati in pagina principala.
Manual de utilizare
Oprire
1. Apasati lung butonul Power, pe ecran vor apare optiuni suplimentare: mod silentios si oprire
2. Apasati pe iconita Power Off pentru a opri aparatul.
3.3 Pornire/oprire ecran
Ecranul se opreste automat cand aparatul intra in starea idle
(economisire energie).
Cu aparatul pornit apasati butonul pentru a opri afisajul.
Pornirea ecranului
Puteti apasa butonul de pornire pentru a porni ecranul oprit,
ecranul va intra pe modul blocare, a se vedea figura 3-2.
Fig. 3-2
RO
89
Manual de utilizare
3.4 Utilizarea Panoului tactil
Utilizarea ecranului tactil
Sunt cateva metode pentru a vedea ecranul principal, meniul si
aplicatiile aparatului dvs.
Click
Daca doriti sa utilizati tastatura de pe ecran, apasati usor cu
degetul sau cu touch-pen-ul direct pe ecran.
Hold
Daca doriti sa deschideti o optiune a unui proiect (cum ar fi text
box sau un link spre o pagina de internet) sau doriti sa deschideti
un short-cut al paginii principale sau sa va plimbati prin meniul
principal, utilizati aceasta optiune Hold.
Slide
Aceasta inseamna a glisa rapid cu touch-pen-ul sau cu degetul
pe imaginea dorita.
Drag
Inainte de executa aceasta operatie trebuie sa apasati usor cu
touch-pen-ul sau cu degetul pe obiectul dorit, fara a-l ridica de pe
obiect pana cand ajungeti cu obiectul la destinatia dorita.
Rotate
Pentru cele mai multe imagini este suficient sa rotiti tableta si
imaginea se va roti automat de la orizontala la verticala si invers.
RO
90
Manual de utilizare
3.5 Pagina de pornire
Ecranul meniului principal va va arata aplicatiile disponibile ca si
in figura de mai jos (fig. 3.3). Puteti sa utilizati aplicatiile, sa faceti
noi short-cut-uri, sa schimbati imaginea de fundal, etc.
Coloana de
cautare
Aplicatii
Imagine
de fundal
dinamica
Volum
baterie
Tasta
Revenire
Ecran de Tasta Reglare
pornire
Meniu volumului
Bara de
mesaje
Informatiimemento
Ora
Fig. 3-3
RO
91
Manual de utilizare
Extinderea interfetei principale
Pagina interfetei principale poate fi extinsa pentru a furniza ai
mult spatiu, ceea ce va permite sa puneti un nou short-cut, noi
unelte de lucru, etc. Apasati pe spatiul gol al interfetei principale
apoi cu ajutorul touch-pen-ului glisati rapid in directie verticala,
ceea ce va face ca interfata principala sa se extinda ca in figura
de mai jos (fig. 3.4)
Fig. 3-4
RO
92
Manual de utilizare
3.6 Vizitare aplicatie
Cum sa accesati aplicatiile MID:
1. Apasati pictograma
.
2. Selectati aplicati dorita.
Fig. 3-5
RO
93
Manual de utilizare
3.7 Conectare USB
Setari
Inainte de transferul de fisiere, trebuiesc facute urmatoarele
setari:
1. Conectati cablul USB intre aparat si calculator. Va apare o
iconita de notificare pe ecran.
2. Deschideti iconita de notificare – vezi detalii la capitolul 2.3
3. In panoul de notificare faceti click pe USB connected (External), apoi faceti click pe iconita Load ca si in fig. 3.6.
4. Acum conectarea USB este realizata.
Fig. 3-6
RO
94
Manual de utilizare
3.8 Card de memorie
Copiere fisiere pe card
1. Conectati aparatul la calculator prin cablul USB.
2. Dupa ce apasati pe iconita Storage Settings, conectarea a fost
realizata cu succes.
3. Deschideti fisierul My Computer si vizualizati Removable Disk.
4. Alegeti fisierele care trebuiesc copiate apoi copiati-le pe “Removable disk”
5. Dupa ce ati copiat fisierele faceti click pe iconita Safely Remove Hardware pentru deconectare.
Nota: Daca activati USB Storage Device cand tableta este conectata prin cablul USB, s-ar putea sa nu puteti vedea cardul tabletei,
in acest caz deconectati cablul USB de la tableta.
RO
95
Manual de utilizare
3.9 Introducere cuvinte
In interfata de editare apasati si tineti apasat pana cand apare
Word Edit Menu.
Fig. 3-7
RO
96
1
Comutare litere mari
2
Comutare intre simboluri si numere
3
Apasati pentru a insera un spatiu
4
Click pentru enter
5
Stergere caracter la stanga cursorului. Apasati si tineti
apasat pentru stergerea tuturor caracterelor din stanga
cursorului.
Manual de utilizare
4 Multi-Media
4.1 Format fisiere suportate de aparat
Aparatul suporta urmatoarele tipuri de fisiere:
Formate pentru muzica
• MP3
• AAC
• OGG
• WMA
• WAV
• APE
• FLAC
• AMR
Formate video
• AVI
• MPG
• VOB
• MKV
• FLV
• TS/TP
• H264
• MPRC-4
• RMVB
• DIVX
• MPEG-2
Format fisiere imagine
• JPEG
• GIF
• PNG
• BMP
RO
97
Manual de utilizare
4.2 Muzica
Muzica este clasificata pe 4 tipuri: Artist, Album, Music, Play List.
Daca alegeti o clasificare, alegeti una pentru a o reda. De exemplu daca alegeti categoria Artist, veti vedea o lista cu numele
artistului ordonata de la A la Z. Daca alegeti un artist, lista va
arata numele albumului si a melodiilor acestuia.
Album
Music
Timp scurs
Artist
Coperta album
Redare aleatoare
Bara progres
Fig. 4-1
4.3 Video
RO
98
Repetare
Vizualizare lista redare
Accesati Galeria Vide
1. Accesati aplicatia Galerie.
2. Actualizati toate fisierele video.
3. Accesati fisierul pe care doriti sa-l redati.
4. Incepeti redarea.
Durata melodie
Manual de utilizare
4.4 Galerie imagini (Photo Gallery)
Programul pentru galeria de imagini poate cauta in mod automat
fisierele de tip imagine sau fisierele video de pe cardul SD. Mai
mult, va clasifica aceste fisiere si le va pune in fisiere separate.
Puteti utiliza programul pentru galeria de imagini pentru vizualizare, editare, setare imagine ca wallpaper (imagine de fond) sau
redare video.
Vizualizare imagini
1. Apasati pe fisierul dorit pentru a vizualiza pozele.
2. Faceti click pe poza, sistemul va afisa poza pe intreg ecranul.
3. Atingeti ecranul usor, o sageata va apare in stanga si una in
dreapta imaginii, faceti click pe sageti pentru a vizualiza poza
anterioara sau urmatoarea.
4. Atingeti usor ecranul, o zona de zoom va apare sub poza,
puteti astfel sa mariti sau sa micsorati poza.
OBS: Imaginile suporta optiunea de auto-rotire, cand rotiti
aparatul, poza se va alinia automat cu directia de rotatie.
RO
99
Manual de utilizare
5 Transmitator FM
1. Apasati pictograma pentru setare de pe interfata principala.
2. Apasati mai departe.
3. Accesati configurarea transmitatorului FM.
4. Accesati transmitatorul FM, porniti optiunea FM.
5. Dupa ce ati pornit transmitatorul, apasati optiunea de Setare pentru a seta frecventa FM si setati-o la fel cu frecventa de receptie radio.
6. Accesati optiunea Salvare, ca si in figura 6-1.
Fig. 5-1
Nota: In cazul in functia FM este pornita, dispozitivul MDI nu emite sunet. Este obligatoriu sa conectati alimentatorul care va fi utilizat ca antena, pentru a avea o conexiune FM.
6 Conexiuni
6.1 Dispozitiv 3G Extern
RO
100
Dispozitivul dumneavoastra MID suporta un dispozitiv 3G extern.
1. Accesati interfata principala.
2. Conectati un dispozitiv dongle 3G la dispozitivul MID.
3. Asteptati pana cand pictograma 3G apare in bara de lucru.
Manual de utilizare
6.2 Conectare la o retea Wi-Fi
Aparatul se poate conecta la o retea wireless Wi-Fi in modul
urmator:
1. Apasati pe butonul Menu, va apare o lista de meniuri pe pagina
principala.
2. Apasati pe Setting.
3. Apasati pe iconita Wireless and Network.
4. Apasati pe iconita Wi-Fi pentru a va conecta la reteaua wireless Wi-Fi.
5. Apasati pe iconita Wi-Fi Setting, aparatul va cauta retelele
wireless disponibile, vezi fig. 7.1.
6. Alegeti reteaua dorita, daca aceasta este protejata de o parola
va apare o casuta de dialog in care vi se va cere o parola, introduceti parola (unele routere necesita o adresa statica de IP, vezi
fig. 7.1, apasati pe butonul Menu si alegeti iconita Senior pentru
setarea adresei IP statice)
7. Apasati pe iconita Connection pentru conectare.
Fig. 6-1
RO
101
Manual de utilizare
7 Navigare GPS
7.1 Instalare
1. Trebuie sa obtineti o harta de la operatorii de harti GPS.
2. Selectati optiunea de instalare a hartii si instalati-o.
7.2 Update
Contactati operatorii de harti pentru a obtine cele mai noi versiuni
ale hartii instalate in sistemul dvs.
7.3 Dezinstalare
1. Apasati pe Setting in interfata principala.
2. Faceti click pe iconita Application.
3. Apasati pe iconita Application Management, alegeti aplicatia pe
care doriti sa o dezinstalati facand click pe ea.
Nota : 1. Toate hartile furnizate de operatorii de harti trebuie sa fie
fisiere de tip APK.
2. Respectati cu strictete regulile de circulatie in timp ce conduceti.
RO
102
Manual de utilizare
8 Depanare
1. Aparatul porneste greu pentru prima data
Dupa un upgrade de sistem, aparatului ii sunt necesare 2-3 min.
pentru a porni deoarece se face upgrade si la programele preinstalate, urmand ca dupa prima pornire aparatul sa porneasca
mult mai repede.
2. Aparatul se incalzeste MID feels hot
Daca aparatul se incalzeste cand rulati mai multe programe
simultan sau se incarca, este norma, nu va impacientati.
3. Aparatul nu se poate conecta la o retea Wi-Fi
• Verificati ca routerul wireless sa functioneze normal.
• Lasati o anumita distanta intre router si aparat si verificati ca
intre acestea sa nu fie un zid de beton sau alte obstacole care pot
intrerupe sau mininua distanta de receptie wireless.
• Verificati ca numele utilizator si parola sa fie corecte.
4. Pagina web nu se poate deschide
• Lasati o anumita distanta intre router si aparat si verificati ca
intre acestea sa nu fie un zid de beton sau alte obstacole care pot
intrerupe sau mininua distanta de receptie wireless.
• Restartati routerul wireless.
5. Aparatul nu functioneaza normal
Daca sistemul nu functionbeaza normal dupa instalarea unui
program, resetati sistemul prin apasarea butonului reset (langa
butonul de pornire).
6. Nu se pot citi datele de pe card
• Verificati ca cardul sa fie introdus corect in slot.
• Reintroduceti cardul din nou in slot.
RO
103
Manual de utilizare
7. Nu se aude sonorul
• Verificati ca sonorul sa n u fie la minim.
• Verificati daca radioul este pornit, daca da, opriti-l.
8. Aparatul nu raspunde la comenzi
• Apasati butonul de reset pentru resetarea sistemului.
9. Aparatul nu poate fi pornit cand incarcatorul este conectat
dupa ce s-a incarcat complet.
• Este un fenomen normal, asteptati 10 minute dupa ce s-a incarcat complet pentru a porni aparatul.
RO
104
Manual de utilizare
9 Product spec
Parametri
de baza
Frecventa CPU
Cortex A81 GHz
DDR-RAM
512 MB
NAND FLASH
4 GB
Operating System
Google Android 4.0
Network Access
WiFi Wireless Network
GPS
Built-in
FM transmitter
Built-in
USB Interface
Mini USB
Baterie standard
Baterie Litiu-Polymer,
PY-GPS7008 - 2400mAh/3.7V
PY-GPS5008 - 1200mAh/3.7V
Alimentator
Tensiune intrare 12V/24V
DC, Iesire DC 5V, 2A max
SD Card
Max. 32G
LCD
Full touch LCD,
rezolutie 800x480
PY-GPS7008 - 7 inch
PY-GPS5008 - 5 inch
RO
105
Manual de utilizare
Aplicatii
Video
Format AVI, MKF, FLV
Video Format, suporta 720P
1080P play
Muzica
Internal Music Player, Support MP3, MIDI&WAV Audio
Format
Jocuri
Third Party Program
Foto
Format JPG, BMP, PNG,
GIF
Programe Office
Compatibil cu programele
office (word, excell) , PDF
Browser
Specificatiile sunt supuse schimbarilor fara notificare prealabila.
Compania Lechpol declară că produsul PY-GPS7008,
PY-GPS5008 este în conformitate cu cerinţele esenţiale şi alte
prevederi relevante ale Directivei 1999/5/CE. Declaraţia pentru
descărcare este postata pe site-ul www.lechpol.eu
RO
106
www.peiying.eu