1
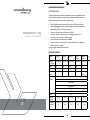
BEDIENUNGSANLEITUNG
BODENWAAGEN
USER MANUAL
PLATFORM SCALES
MANUEL D‘UTILISATION
BALANCES PLATEFORMES
ISTRUZIONI PER L`USO
BILANCE A PLATTAFORMA
MANUAL DE INSTRUCCIONES
BALANZAS CON PLATAFORMAS
INSTRUKCJA OBSŁUGI
WAGI PLATFORMOWE
DE | EN | FR | IT | ES | PL
SBS-BW-3T | SBS-BW-5T | SBS-BW-1T
SBS-BW-3T/1KG | SBS-BW-5T/2KG
INHALT | CONTENT |CONTENU |CONTENUTO | CONTENIDO | TREŚĆ
ALLGEMEINE INFORMATIONEN
WARNUNGEN UND HINWEISE
Elektronisches Wiegen ist ein präzises Messverfahren. Die Sicherheit sollte jedoch an
vorderster Stelle stehen. Bitte beachten Sie die folgenden Hinweise, um die Lebensdauer Ihrer Plattformwaage zu erhöhen und einen korrekten Betriebszustand zu
gewährleisten:
3
•
Plattformwaagen besitzen einen Überlastbereich. Meiden Sie den Überlastbereich,
um Beschädigungen am Sensor und an der Waage und den Garantieverlust zu
vermeiden. (die Waage gibt bis 135% Überlast Warnsignale aus)
• Achten Sie auf einen stabilen Halt der Lasten.
• Überprüfen Sie den Sitz aller Schrauben, Füße und der Haltestange.
• Vermeiden Sie das Messen bei zu höher Feuchtigkeit und unter Regen.
• Vermeiden Sie das Arbeiten bei hohen Umgebungstemperaturen.
• Laden Sie mindestens einmal alle 2 ~ 3 Monate die Batterie 24 h auf, um die max.
Kapazität und eine hohe Lebensdauer zu gewährleisten sowie Entladungen zu
vermeiden.
Lesen Sie bitte vor der Inbetriebnahme die Betriebsanleitung durch!
8
14
20
26
32
TECHNISCHE DETAILS
Modell
SBS-BW-3T
SBS-BW-5T
SBS-BW-1T
Messbereich
Einteilung
Eigengewicht
Fläche
bis 3000 kg
1 kg
119 kg
150 cm |
150 cm
bis 5000 kg
2 kg
151 kg
150 cm |
150 cm
bis 1000 kg
500 g
79 kg
100 cm |
100 cm
Halten
Tarieren
Nullieren
Funktionen
Display
Versandgewicht
Versandmaße
(LxBxH)
2
123 kg
152x152x
19 cm
SBS-BW3T/1KG
bis 3000 kg
1 kg
57 kg
100 cm |
100 cm
Stückzählung
Wechsel der Gewichtseinheiten (kg/lb)
PACK
LCD
156 kg
81,5 kg
58 kg
SBS-BW5T/2KG
bis 5000 kg
2 kg
82 kg
100 cm |
100 cm
83 kg
152 x 152 x 101 x 101 x 102 x 102 x 102 x 102 x
19 cm
9 cm
9 cm
9 cm
3
DE
FUNKTIONEN DES FRONTPANELS
WARN- UND ZUSTANDSIGNALE
Batteriezustand (lb)
Erscheint auf dem Display eine LB -Anzeige und gleichzeitig ertönt ein BEEP -Ton, so
bleiben Ihnen ungefähr ~ 1 h Restdauer. Schalten Sie die Waage an das Netz an. Ist die
Waage an das Netz angeschlossen, schaltet sich die Anzeige sowie das Warnsignal ab
und die AC -Diode leuchtet auf. Um die Batterie vollständig aufzuladen, sollten sie die
Waage 4 h aufladen.
X SICHERHEITSANZEIGE
Status „NO“
Wenn „NO“ auf dem Display erscheint, arbeitet der elektrische Stromkreis nicht.
Die Waage muss repariert werden.
BEDIENFELDER UND EINSTELLUNGEN
EIN-/AUSSCHALTEN (I/O)
DE
Mit der I/O - Hauptschalter auf der Rückseite wird die Waage angeschaltet und der
Selbsttest wird gestartet. Der Selbsttest beginnt mit dem Display- und Diodentest. Es
müssen die 0.0.0.0.0.0 -Anzeige auf dem Display sowie alle Dioden korrekt aufleuchten. Anschließend folgen Informationen über die aktuelle Kalibrierungseinstellung
(werkseitig 0150.05 -Anzeige ,d.h. 150 kg Messbereich in 0,5 kg Intervallabstand), die
Programmversion des Taschenrechners (Uer_3.2 -Anzeige, d.h.Ver. 3.2) und über den
Betriebsspannungszustand (z. B. dC_U5.0 für 5.0 V). Nach dem Test ist die Waage
betriebsbereit mit der 0.00 -Anzeige. Drücken Sie erneut den I/O - Hauptschalter um
die Waage auszuschalten.
Bei dem Modell SBS-BW-3T/1KG ist der Kopf mit der Plattform kabellos verbunden.
Die Kommunikation zwischen der Plattform und dem Kopf wird nach dem Einschalten des Kopfes und der Plattform aufgenommen. Die Plattform wurde mit 3 Kontrollleuchten ausgestattet:
leuchten, um einen korrekten Betriebszustand zu gewährleisten. Wenn die ZERO
-Diode nicht leuchtet oder die Anzeige sich nach der Entlastung nicht auf Null zurücksetzt, dann drücken Sie kurz die [ZERO/TARE] -Taste. Die Waage bestätigt die
Null-Nivellierung mit der 0.00 -Anzeige. Anschließend können Sie das Nettogewicht
messen.
FEHLERMELDUNGEN
“ Ad_Err ”
“Lo_bat”
---OL--- Overload.
SEtErr
Das Gewicht wird vom Sensor nicht gemessen. Reparaturfall.
Batterie ersetzen.
Zu viel Gewicht auf der Waage.
Die Daten sind nicht korrekt. Reparaturfall.
DRÜCKEN SIE NICHT DIE [ZERO/TARE]
-Taste, solange die Last nicht stabil hängt
(zu erkennen am unteren linken Rand des Displays an der STABLE -Diode, die nicht
leuchtet), um Messfehler zu vermeiden.
NULL-NIVELLIEREN (ZERO)
Vor dem Null-Nivellieren legen Sie den leeren Behälter auf die Plattform, wenn die
STABLE -Diode leuchtet. Drücken Sie anschließend kurz die [ZERO/TARE]-Taste,
damit die Waage das Leergewicht des Behälters ignoriert.
ACHTUNG
Nach der Null-Nivellierung reduziert sich die max. messbare Last um das entsprechende Leergewicht des Behälters! z. B. Behälter b = 90kg, max. Last l = 150kg, max.
noch messbare Last L: L = l – b = 60 kg.
Legen Sie die Last langsam auf die Plattform und entfernen Sie diese sofort bei Überlast (zu erkennen an der OL -Anzeige auf dem Display).
AC – bedeutet Aufladevorgang des Akkus (AC Versorgung ist angeschlossen)
HALTEN (HOLD)
Low Voltage – bedeutet, dass man den Akku der Plattform aufladen soll.
Bei einem Lastwert ≥0,05 kg im Wägemodus kann der Haltemodus aktiviert werden,
indem Sie die goldene [HOLD] -Taste drücken. Gleichzeitig leuchtet zur Bestätigung
die HOLD -Diode am rechten unteren Rand des Displays auf. Drücken Sie anschließend nochmal die [HOLD]-Taste, um den Haltemodus zu verlassen und in den Wägemodus zurückzukehren.
SIGNAL – nach einer korrekten Verbindung zwischen Plattform und Kopf wird die
Leuchte blinken.
Falls am Display folgende Meldung angezeigt wird: „Err24” bedeutet es, dass es ein
Fehler in der kabellosen Verbindung zwischen dem Kopf und der Plattform aufgetreten ist (die Plattform ist ausgeschaltet oder ihr Akku muss aufgeladen werden).
ZURÜCKSETZEN (TARE)
Bevor Sie die Last auflegen, vergewissern Sie sich, dass die ZERO -Diode, die STABLE
-Diode am linken Displayrand und die gewünschte Einheit am rechten Displayrand
4
EINHEITENWECHSEL (UNIT / KG / LB, LB / KG)
Mit der [UNIT] -Taste können Sie zwischen der kg- und lb -Einheit wechseln. Drücken Sie dafür kurz die [UNIT]-Taste, bis Sie die gewünschte Einheit ausgewählt
haben.
5
DE
PACK - FUNKTION:
Es gibt zwei Auswahlmöglichkeiten in der Funktion PACK: IN und OUT. In den
Standardeinstellungen sind die Funktionen PACK, sowie ALARM ausgeschaltet (die
Einstellung „NO“). Wenn „IN“ eingestellt ist, wird das Gerät mit Alarm signalisieren,
falls sich das Gewicht zwischen UPPER (OBEREM) und LOWER (UNTEREM) Limit
befindet; wenn „OUT“ eingestellt wird, schaltet der Alarm ein, im Moment, wenn das
obere oder untere Limit überschritten wird. Das Display zeigt HHHHHH, falls das
obere Limit überschritten wird, und LLLLLL, falls das untere Limit überschritten wird.
WIE STELLT MAN IN EIN
Die Waage mit dem Mustergewicht (z. B. 1000,0 kg) belasten, dann die Taste PACK
drücken, bis auf dem Display SET-AL erscheint; in diesem Moment gelangt die Waage
in den Funktionsauswahlmodus. Mit Hilfe der Tasten +/- IN wählen. [ZERO/TARE]
drücken, um zu bestätigen und in nächste Einstellung zu gelangen; auf dem Display
wird AL-UP angezeigt – in diesem Moment soll man LOWER das (UNTERE) Limit
einstellen (z. B. 995,0 kg eintragen). ZERO/TARE drücken, um zu bestätigen, und in
nächste Einstellung zu gelangen; das Display zeigt AL-DN und man soll UPPER das
(OBERE) Limit (z. B. 1005,0 kg) eintragen. [ZERO/TARE] drücken, um zu bestätigen,
das Display wird IN anzeigen. Das heißt, dass die Einstellungen beendet wurden.
DE
ACHTUNG: der Bereich [IN] zwischen 1000,0kg±5,0kg ist ein Beispiel.
WIE STELLT MAN UPPER/LOWER DAS (OBERE/UNTERE) LIMIT EIN
Mit Hilfe der Tasten [UNIT] und [HOLD] kann man das obere und untere Limit
einstellen, indem man die Ziffer 0-9 einträgt. Drücken Sie [UNIT], um den Wert zu
steigern und [HOLD], um den Wert zu mindern. Drücken Sie [ZERO/TARE], um zu
bestätigen und von den Einstellungen herauszukommen.
EINSTELLEN DES ALARMS
Überschreiten des unteren Limits (995,0kg), wird mit einem Ton und der Meldung
(LLLLLL), die auf dem Display angezeigt wird, signalisiert. Das Überschreiten des oberen Limits wird mit deinem Ton und der Meldung (HHHHHH), die auf dem Display
angezeigt wird, signalisiert.
STÜCKZÄHLUNG
Bestimmung des mittleren Gewichts eines Probestückes:
Schalten Sie die Waage ein, gehen Sie zum Wiegemodus, legen Sie die Probestücke auf
der Wiegefläche (die mögliche Anzahl: 10/20/50/100/200/500/1000), drücken Sie die
Taste [PCS] bis auf dem Display „P-XX“ erscheint, drücken Sie [UNIT] und [HOLD],
um die Anzahl der Probestücke, die sich auf der Plattform befinden, einzutragen.
Drücken Sie die Taste [PCS], das Display zeigt die Anzahl an, die sich auf der Plattform
befindet.
Zählung
Die Waren auf der Plattform legen, das Display zeigt ihre aktuelle Anzahl an.
KALIBRIERUNG
Drücken Sie [ZERO / TARE] und schalten Sie die Waage ein, in demselben Moment
wird „-------„ angezeigt, drücken Sie [PCS] + [UNIT] + [PCS] + [ZERO / TARE] – Sie
gelangen in den Kalibriermodus, tragen Sie jetzt den Wert des Gewichtes ein, das
Sie auf der Plattform legen werden, in dem Sie [PACK] und [PCS] drücken, um die
Ziffer zu wählen, drücken Sie die Taste [HOLD] / [UNIT] um den Wert der Ziffer zu
verändern (z.B. 001000, man kann auf der Waage 1000kg legen), und dann drücken
Sie [ZERO / TARE], legen Sie das Gewicht auf der Plattform, drücken Sie [ZERO /
TARE], auf dem Display wird der Wert des eingestellten Gewichtes angezeigt. Ende
der Kalibrierung.
Wenn das Display IN zeigt, wird Sie die Waage warnen, falls sich das Gewicht zwischen UPPER dem (OBEREN) und LOWER dem (UNTEREN) Limit befindet. Wenn
das Display OUT zeigt, wird Sie die Waage warnen, falls UPPER das (OBERE) Limit
überschritten wird, oder falls das Gewicht niedriger als LOWER das (UNTERE) Limit
ist. Drücken Sie [TARE/ZERO] um die aktuellen Einstellungen zu bestätigen.
WIE STELLT MAN OUT EIN
Die Waage mit dem Mustergewicht (z. B. 1000,0 kg), belasten, dann die Taste PACK
drücken, bis auf dem Display SET-AL erscheint; in diesem Moment gelangt die Waage in den Funktionsauswahlmodus. Mit Hilfe der Tasten +/- OUT wählen. [ZERO/
TARE] drücken, um zu bestätigen und in nächste Einstellung zu gelangen; auf dem
Display wird AL-UP angezeigt – in diesem Moment soll man UPPER das (OBERE)
Limit einstellen (z. B. 1005,0 kg eintragen). ZERO/TARE drücken, um zu bestätigen,
und in nächste Einstellung zu gelangen; das Display zeigt AL-DN, man soll LOWER das
(UNTERE) Limit (z. B. 995,0 kg) eintragen. [ZERO/TARE] drücken, um zu bestätigen,
das Display zeigt (1000,0kg) an. Das heißt, dass die Einstellungen beendet wurden.
6
7
DE
GENERAL INFORMATION
WARNINGS AND NOTES
Electronic weighing is a method of precise measurement. Security must remain at the
forefront, please follow the instructions in this manual to increase the longevity of
your device and ensure good long term results.
•
USER MANUAL
PLATFORM SCALES
platform scales have a zone of overload. It must be observed to avoid damages
of the sensor and to prevent a loss of warrantee (balance gives a warning signal
up to 135% overload)
• Ensure that the weight placed on the scales is stable.
• Check that all screws, rods and brackets are secure
• Do not weigh in case of extreme humidity and rain
• Avoid working at high ambient temperatures
• Allow the balance to recharge every 2-3 months for at least 24 hours to ensure
maximum capacity and longevity.
Please carefully read the instructions!
TECHNICAL DETAILS
EN
Model
SBS-BW-3T
Measuring
range
SBS-BW-5T
SBS-BW-1T
SBS-BW3T/1KG
SBS-BW5T/2KG
Up to 3000 kg Up to 5000 kg
Up to 1000 kg
Up to 3000 kg
Up to 5000
kg
Division
1 kg
2 kg
500 g
1 kg
2 kg
Dead weight
119 kg
151 kg
79 kg
57 kg
82 kg
Weighing
surface
150 cm | 150
cm
150 cm | 150
cm
100 cm | 100
cm
100 cm | 100
cm
100 cm |
100 cm
Functions
Hold
Tare
Zero
Parts counting
Change the weight units (kg/lb)
PACK
Display
EN
Shipping
weight
Package
Dimensions
(LxBxH)
LCD
123 kg
156 kg
81,5 kg
58 kg
83 kg
152x152x 19
cm
152 x 152 x
19 cm
101 x 101 x
9 cm
102 x 102 x
9 cm
102 x 102 x
9 cm
9
ERROR MESSAGES
KEY FUNCTIONS
WARNING SIGNALS AND STATE
Battery Level (lb)
If your balance shows LB and produces a beep at the same time , the battery reaches
for about 1 hour of work. Connect the scale on the sector. The LB display and the
beep tone stop, and the AC LED will turn on. To fully charge the battery, let the scaleload for 4h.
The weight cannot be measured by the sensor. Necessary
repairs.
“Lo_bat“
Charge the battery
--- --- OL Overload. Too much weight on the scale
Seterra
The internals data are not correct. Necessary repairs.
X DISPLAY SECURITY
DO NOT PRESS THE BUTTON (ZERO / TARE)
Status “NO“
When the scale displays “NO“, the circuit does not work.
The balance must be repaired.
until the weight is not stable, (ie until the LED STABLE is not lit) to avoid measurement errors.
TARE (ZERO)
BUTTONS AND OPTIONS
EN
“Ad_Err“
With the switch I / O on the back of the device, you can turn the scale on. A self-test
starts. It begins with a test of the screen and the diodes. The screen should display
0.0.0.0.0.0. and all the LEDs should light. Then the information on the current calibration values is displayed (from the factory: 0150.05: 0150 stands for 150kg and 0.5
for the measurement interval), as well as the programmation of the calculator (Uer_3,
2 for ver3,2) and the state of the battery (eg. dC_U5, 0 for 5.0 V) After the test, the
scale is ready to use when it displays 0.00. Press the button I / O again to turn off the
scale.
For the SBS-BW-3T/1KG scale model, the connection between the scale head and
the scale platform is wireless. The communication between the head and the platform
is being established right after switching on the scale head and the scale platform. The
scale platform is equipped with three control lights:
AC – means that the storage battery of the platform is charging (AC power is connected)
Low Voltage – means that the platform storage battery needs to be charged
SIGNAL – after proper wireless connection between the scale head and the scale
platform this light will be blinking.
If the scale display will show „Err24”, it means that there is wireless connection error
(the platform is off or the platform storage battery needs to be charged).
TARE (ZERO)
Before weighing, make sure that ZERO and STABLE indicators are on the left and the
desired unit is on the right. This means the optimum state of operation of the device.
If the ZERO indicator is not turned on or the display is not showing zero after taking
off the load from the scale, then the key [ZERO/TARE] must be pressed. The scale will
confirm the tare showing 0.00. The weight window will display the net weight value.
10
To tare, place an empty container on the platform when the STABLE LED is lit. Then
press (ZERO / TARE) for the scale to ignore the weight of the container.
CAUTION
After the tare, the maximum capacity is reduced by the weight of the container!
Eg container b = 90kg, normal max weigh s= 150kg Max. capacity Left: s-b = 60kg.
Immediately remove the weight in case of overload! OL ---- (----)
HOLD (HOLD)
If the weight is superior to 0.05 kg in weighing mode, the save mode can be activated by pressing the HOLD button. At the same time, the HOLD LED lights up as a
confirmation. Press the HOLD key again to exit the hold mode and to return to the
weighing mode.
UNIT CHANGE (UNIT / KG / LB, LB / KG)
With the (UNIT) key, you can change units between lb and kg. Press the button
(UNIT) to choose the right unit.
PACK FUNCTION
There are 2 selections under PACK function: IN & OUT. The default setting is “NO”,
which means ALARM and PACK functions in non-work status; When it is under IN,
it will alert between UPPER and LOWER limit; When it is under OUT setting, it
will alarm that the weight exceeds the upper limit or below LOWER limit. It shows
HHHHHH when exceeding UPPER limit and LLLLLL when below LOWER limit.
11
EN
HOW TO SET IN
put the preset weight (e.g. 1000.0g), keep pressing [PACK] and the indicator shows
SET-AL; then the scale enter into choosing function mode. Press +/- for enter into
mode IN. Press [ZERO/TARE] to confirm and then enter into next setting; The indicator shows AL-UP, then enter into LOWER limit set(e.g. input 995.0g). Press [ZERO/
TARE] to confirm and go for next step;
The indicator shows AL-DN, then enter into UPPER limit (e.g. input 1005.0g). Press
[ZERO/TARE] for confirmation and the indicator shows IN. It means the setting is
finished when the indicator keeps alarming.
Note: [IN] range between 1000.0g±5.0g is an example for customer’s references.
HOW TO SET UPPER/LOWER LIMIT
[UNIT] and [HOLD] could be used to set upper & lower limit by inputting the numbers 0-9 into the setting. Press [UNIT] to increase and [HOLD] to decrease. Press
[ZERO/TARE] to confirm and quit setting.
the platform. Press [PCS] and the display will show the number of the pieces which
are currently on the platform.
Counting
Put the parts on the platform and the scale will show the actual amount of these
parts.
CALIBRATION
Simultaneously switch on the scale and press [ZERO/TARE], the display will show
the “------“. Press the [PCS] + [UNIT] + [PCS] + [ZERO / TARE] – this will allow
for entering the calibration. Now enter the value of the weight which is going to be
placed on the platform by pressing the [PACK] / [PCS] for choosing the digit, press
the [HOLD] / [UNIT] for changing the value of the digits (for example: for 001000
the weight 1000kg can be placed on the platform), then press [ZERO/TARE], put the
entered weight on the platform, press [ZERO/TARE], the display will show the value
of the set weight. End of calibration.
SETTING OF ALARM
EN
When indicator shows IN, it will alert the weight is between UPPER and LOWER
limit. When window shows OUT, it will alert the load exceeds the UPPER limit or
below LOWER limit. When window shows NO, it means it will not alarm without any
load. Press [TARE/ZERO] to confirm the current selection.
EN
HOW TO SET OUT
Put the preset weight (e.g. 1000.0g), keep pressing [PACK] and the indicator shows
SET-AL; then the scale enter into choosing function mode. Press +/- for enter into
mode OUT. Press [ZERO/TARE] to confirm and then enter into next setting; The
indicator shows AL-UP, then enter into UPPER limit set(e.g. input 1005.0g). Press
[ZERO/TARE] to confirm and go for next step. The display will show AL-DN and the
LOWER limit should be set (e.g. input 995.0 kg). Press [ZERO/TARE] to confirm and
then the display will show the 1000.0 kg. This means that settings are finished. Exceeding the lower limit (995.0 kg) is indicated by a beep and displaying (LLLLLL) on the
display. Exceeding the upper limit is indicated by a beep and displaying (HHHHHH) on
the display.
PARTS COUNTING
Setting the average weight of the sample
Turn on the scale and wait for weighing mode. Put the samples on the platform number of the samples must be 10/20/50/100/200/500/1000. Hold the [PCS] for a
while until the display will show the “P-XX”, then press [UNIT] or [HOLD] in order
to set the number of samples – number must be the same as the amount of pieces on
12
13
INFORMATIONS GÉNÉRALES
AVERTISSEMENTS ET REMARQUES
Le pesage électronique est un procédé de mesure précis. La sécurité devant rester à
premier rang, nous vous prions de respecter les consignes de ce mode d´emploi afin
d´augmenter la durée de vie de votre appareil et de garantir des bons résultats à long
terme.
•
MANUEL D‘UTILISATION
BALANCES PLATEFORMES
les balances plateformes possèdent une zone de surcharge. Celle-ci doit être respecté pour éviter un endommagement du capteur et éviter une perte de garantie
(La balance donne un signal d´avertissement jusqu´à 135% de surcharge)
•
Veillez à ce que les poids placés sur la balance soient stables.
• Contrôlez que toutes les visses, tiges et supports soient bien fixés
• Évitez de peser en cas d´humidité extrême et sous la pluie
• Évitez de travailler à de hautes températures ambiantes
• Laissez la balance se recharger tous les 2-3 mois pendant au moins 24h afin de
garantir une capacité maximum et une grande longévité.
Veuillez lire attentivement le mode d´emploi !
DÉTAILS TECHNIQUES
Modèle
SBS-BW-3T
SBS-BW-5T
SBS-BW-1T
Plage de
mesure
Jusqu‘à 3000
kg
Jusqu‘à 5000
kg
Jusqu‘à1000 kg Jusqu‘à 3000
kg
Jusqu‘à 5000
kg
Précision de
mesure
1 kg
2 kg
500 g
1 kg
2 kg
Poids net
119 kg
151 kg
79 kg
57 kg
82 kg
Surface de
pesée
150 cm | 150
cm
150 cm | 150
cm
100 cm | 100
cm
100 cm | 100
cm
100 cm |
100 cm
Fonctions
SBS-BW3T/1KG
SBS-BW5T/2KG
Maintenir
tarer
Mettre à zéro
Mesure par unité
Changement des unités de poids (kg/lb)
PACK
Écran
d‘affichage
FR
LCD
Poids
d‘expédition
123 kg
156 kg
81,5 kg
58 kg
83 kg
Dimensions
d‘envoi
(LxlxH)
152x152x 19
cm
152 x 152 x
19 cm
101 x 101 x
9 cm
102 x 102 x
9 cm
102 x 102 x
9 cm
15
FR
MESSAGES D´ERREUR
FONCTIONS DES TOUCHES
SIGNAUX D´AVERTISSEMENT ET D´ÉTAT
Niveau de batterie (lb)
Si votre balance affiche LB et produit en même temps un BIIP, l´accu suffit encore
pour environ 1h de travail. Branchez la balance sur le secteur. L´affichage LB et le BIIP
s´arrêteront, et la diode AC s´allumera. Pour charger complètement l´accu, laissez la
balance charger pendant 4h
X AFFICHAGE DE SÉCURITÉ
Statut „NO“
Lorsque la balance affiche „NO“, le circuit électrique ne fonctionne pas.
La balance doit être réparée.
TOUCHES ET OPTIONS
FR
Avec l´interrupteur principal I/O à l´arrière de l´appareil, vous pouvez allumer la
balance. Un auto-test démarre. Il commence par un test de l´écran et des diodes.
L´écran doit afficher 0.0.0.0.0.0. et toutes les diodes doivent s´allumer. Puis les informations sur la calibration actuelle sont affichées (à sortie d´usine: 0150,05 : 0150 pour
150kg et 0,5 pour l´intervalle de mesure.), la programmation du calculateur (Uer_3,2
pour VER3,2) et l état de l´accu (par ex. dC_U5,0 pour 5,0V) Après le test, la balance
est prête à l´emploi lorsqu´elle affiche 0,00. Pressez à nouveau le bouton I/O pour
éteindre la balance.
Sur le modèle SBS-BW-3T/1KG, l‘écran est relié sans fil à la plate-forme. La communication entre la plate-forme et l‘écran commence après mise sous tension de l‘appareil.
La plate-forme est équipée de 3 lumières de contrôle:
AC - le chargement de la batterie est en cours (l‘appareil est branché)
Low Voltage - la batterie doit être rechargée.
SIGNAL - le signal apparaît lorsque l‘écran est correctement relié à la plate-forme.
Si l‘écran affiche le message suivant: „Err24” s‘affiche sur l‘écran, cela signifie qu‘il y
a un défaut dans la connexion entre la tête de la balance et la plate-forme (la plateforme est hors circuit ou sa batterie doit être rechargée).
RÉINITIALISATION (TARE)
Avant de peser quoi que ce soit, assurez-vous que les messages ZERO et DIODE
soient affichées à gauche de l‘écran et que l‘indicateur de l‘unité voulue (en poids)
soit affiché à droite, et ce, dans le but de garantir une utilisation optimale de l‘appareil.
Si le message ZERO n‘est pas affiché ou si le montant du poids ne se réinitialise pas
à zéro après avoir mis du poids sur la balance, alors appuyez sur la touche [ZERO/
TARE]. La balance confirme la remise à zéro avec le message « 0.00 ». Désormais,
vous pouvez peser les poids nets.
16
“ Ad_Err ”
“Lo_bat”
---OL--- Overload.
SEtErr
Le poids ne peut être mesuré par le capteur. Réparation
nécessaire.
Charger l´accu
Poids trop important sur la balance
Les données internes ne sont pas correctes. Réparation
nécessaire.
ZERO
Avant de placer un poids sur la balance, assurez-vous que la diode ZERO, la diode
STABLE (au bord gauche) et l´unité désirée sont allumées. Si la diode ZERO n´est
pas allumée, ou si l´affichage ne retourne pas à zéro après décharge de la balance,
pressez brièvement la touche (ZERO/TARE). La balance retourne à zéro et vous
pouvez peser le poids net.
NE PAS PRESSEZ LA TOUCHE (ZERO/TARE)
tant que le poids n´est pas stable, c´est à dire tant que la diode STABLE n´est pas
allumée, afin d´éviter des erreurs de mesure.
TARE (ZERO)
Pour tarer, placez un récipient vide sur la plateforme lorsque la diode STABLE est
allumée. Pressez ensuite sur (ZERO/TARE) pour que la balance ignore le poids du
récipient.
ATTENTION
Après la tare, la capacité maximale de la balance se réduit du poids du récipient !
Par ex: Récipient b=90kg, poids max normal l =150kg Poids max. restant : l-b=60kg.
Retirez tout de suite le poids en cas de surcharge! (----OL----)
MAINTIEN (HOLD)
En cas de poids supérieur à 0,05 kg en mode pesage, le mode maintien peut être
activé en appuyant sur la touche HOLD. En même temps, la diode HOLD s´allume
en confirmation. Pressez de nouveau la touche HOLD pour quitter le mode maintien
et retourner en mode pesage.
CHANGEMENT D´UNITÉ (UNIT / KG / LB, LB/KG)
Avec la touche (UNIT), vous pouvez changer d´unité entre lb et kg. Pressez pour cela
la touche (UNIT) jusqu´à avoir choisi la bonne unité.
FONCTION PACK:
Il y a deux options dans la fonction PACK: IN et OUT. Dans les réglages par défaut,
17
FR
les fonctions PACK et ALARME sont désactivées (paramètre « no »). Si « IN » est
activé, l‘alarme de l‘appareil émettra une alarme sonore dans le cas où le poids se
situe entre les limites UPPER (SUPÉRIEURE) et LOWER (INFÉRIEURE). Si « OUT »
est activé, l‘alarme émettra un signal sonore si la limite supérieure ou inférieure est
dépassée. L‘affichage montre HHHHHH, si la limite supérieure est dépassée, et LLLLLL, si la limite inférieure est dépassée.
COMMENT ACTIVER LA FONCTION IN
Mettez un poids-test (p.ex. de 1000,0 Kg). Sur la balance puis appuyer sur PACK et
l‘écran affichera, alors, SET-AL. Dès lors, la balance vous présentera son menu de
choix de fonction. À l‘aide des touches +/-, choisissez IN. Appuyer sur [ZERO/TARE],
pour confirmer et passer à l‘étape suivante. Le message AL-UP va s‘afficher sur
l‘écran et à ce moment, vous pourrez régler la limite LOWER (INFÉRIEURE) (p.ex.
inscrivez 995,0 Kg). Appuyez sur ZERO/TARE pour confirmer et passer à l‘étape
suivante. L‘écran affiche alors AL-DN et à ce moment, vous pourrez régler la limite
UPPER(SUPÉRIEURE) (P.ex. inscrivez 1005,0 Kg). Appuyer sur [ZERO/TARE] pour
confirmer et l‘écran affichera IN. Cela signifie que les réglages sont terminés.
ATTENTION: Les mesures effectuées avec la fonction [IN] entre 1000,0 kg ± 5,0
kg ne sont qu‘un exemple.
FR
COMMENT PARAMÉTRER LES LIMITES UPPER/LOWER (SUPÉRIEURE/INFÉRIEURE)
À l‘aide des touches [UNIT] et [HOLD], vous pouvez régler la limite supérieure et inférieure en modifiant chaque chiffre entre 0 et 9. Appuyez sur [UNIT] pour augmenter la valeur et sur [HOLD] pour réduire la valeur. Appuyez sur [ZERO/TARE], pour
confirmer et sortir des réglages.
RÉGLAGE DE L‘ALARME
Si l‘écran affiche IN, la balance vous préviendra si le poids, posé sur la balance, se situe
entre la limite UPPER (SUPÉRIEURE) et LOWER (INFÉRIEURE). Si l‘écran affiche
OUT, la balance vous préviendra si la limite UPPER (SUPÉRIEURE) est dépassée, ou
si le poids est plus faible que la limite LOWER (INFÉRIEURE). Appuyez sur [TARE/
ZERO] pour confirmer les réglages actuels.
Comment activer la fonction OUT
Mettez un poids-test (p.ex. de 1000,0 Kg) ex. sur la balance puis appuyer sur PACK,
et l‘écran affichera alors SET-AL; dès lors, la balance vous présentera son menu de
choix de fonction. À l‘aide des touches +/-, choisissez OUT. Appuyer sur [ZERO/
TARE], pour confirmer et passer à l‘étape suivante. Le message AL-UP va s‘afficher
sur l‘écran et à ce moment, vous pourrez régler la limite LOWER (INFÉRIEURE) (p.
ex. inscrivez 1005,0 Kg). Appuyez sur ZERO/TARE pour confirmer et passer à l‘étape
suivante; l‘écran affiche alors AL-DN et à ce moment, vous pourrez régler la limite
LOWER(INFÉRIEURE) (P. ex. entrez 995,0 Kg). Appuyer sur [ZERO/TARE] pour con-
18
firmer. L‘écran indique alors (1000,0kg). Cela signifie que les réglages sont terminés.
Franchir la limite inférieure (995,0kg) sera signalé par un signal sonore et l‘écran le
signalera en affichant (LLLLLL). Franchir la limite supérieure sera signalé également
par un signal sonore et l‘écran le signalera en affichant (HHHHHH).
MESURE PAR UNITÉ
Application du poids moyen d‘un poids-test:
Allumez la balance, allez dans le menu de pesée, posez les poids-test sur la surface
de la balance (les intervalles possibles : 10/20/50/100/200/500/1000), appuyez sur
la touche [PCS] jusqu‘à l‘affichage de „P-XX“ sur l‘écran, appuyez ensuite [UNIT]
et [HOLD] afin d‘inscrire le nombre de poids-test qui se trouvent sur la balance.
Appuyez sur la touche [PCS], l‘écran affiche alors le nombre de pièces présentes sur
le plateau.
Comptage
Posez les objets sur le plateau et l‘écran affichera le nombre actuel.
CALIBRAGE
Appuyez sur [ZERO / TARE] et allumez la balance, au même moment l‘écran affichera
„-------“. Appuyez sur [PCS] + [UNIT] + [PCS] + [ZERO / TARE] - vous arrivez alors
dans le mode de calibrage, enregistrez la valeur du poids présent sur le plateau en
appuyant sur [PACK] et [PCS] afin de choisir le bon nombre: Appuyez ensuite sur les
touches [HOLD] / [UNIT] pour modifier la valeur du nombre (p. ex. 001000 = on
peut mettre 1000kg sur la balance),puis appuyez sur [ZERO/TARE] placez le poids
sur la plate-forme, appuyez de nouveau sur [ZERO/TARE], l‘écran indiquera la valeur
du poids en prenant en compte les réglages effectués au préalable. Le calibrage est
terminé.
Koniec kalibracji.
19
FR
INFORMAZIONI GENERALI
AVVERTENZE E NOTE
La pesatura elettronica è un metodo di misurazione preciso. La sicurezza deve rimanere in prima linea: seguire le istruzioni di questo manuale per aumentare la durata
del dispositivo e garantire buoni risultati a lungo termine.
•
ISTRUZIONI PER L`USO
BILANCE A PLATTAFORMA
Bilance a piattaforma hanno una zona di sovraccarico. Si deve osservare per
evitare di danneggiare il sensore e prevenire la perdita di sicurezza (saldo dà un
segnale di allarme fino a 135% di sovraccarico)
• Assicurarsi che il peso posto sulla bilancia sia stabile.
• assicurarsi che tutti i componenti e le viti di fissaggio siano ben fissati
• Non pesare in caso di eccessiva umidità e pioggia
• Evitare di lavorare ad alte temperature ambientali
• Lasciare la bilancia ricaricare ogni 2-3 mesi per almeno 24 ore per garantire la
massima capacità e longevità.
Si prega di leggere attentamente le istruzioni!
DETTAGLI TECNICI
Modello
SBS-BW-3T
SBS-BW-5T
SBS-BW-1T
SBS-BW3T/1KG
SBS-BW5T/2KG
Campo di
misurazione
hasta 3000 kg
hasta 5000 kg
hasta 1000 kg
hasta 3000 kg
hasta5000
kg
lettura
1 kg
2 kg
500 g
1 kg
2 kg
Peso propio
119 kg
151 kg
79 kg
57 kg
82 kg
150 cm | 150
cm
100 cm | 100
cm
100 cm | 100
cm
100 cm |
100 cm
Superficie del 150 cm | 150
piatto
cm
Peso della
spedizione
Arresto
Tara
Azzeramento
Conteggio pezzi
Cambio unita‘ peso (kg/lb)
PACK
Display
IT
LCD
peso della
spedizione
123 kg
156 kg
81,5 kg
58 kg
83 kg
Dimensioni
della spedizione
152x152x 19
cm
152 x 152 x
19 cm
101 x 101 x
9 cm
102 x 102 x
9 cm
102 x 102 x
9 cm
21
IT
FUNZIONI DEI TASTI
ZERO
SEGNALI D‘ALLARME E DI STATO
Prima di immettere un peso sulla bilancia, assicurarsi che il diodo ZERO, il diodo STABILE (bordo sinistro) e l‘unità desiderata siano accesi. se il diodo ZERO non è acceso,
o se il display non si ritorna a zero dopo la dimissione dalla bilancia, premere brevemente il tasto (ZERO / TARE). La bilancia torna a zero e si può pesare il peso netto.
Livello della batteria (lb)
Se la bilancia mostra LB e prodotto al tempo stesso un segnale acustico, la batteria è
ancora sufficiente per circa 1 ora di lavoro.
Collegare la bilancia con il settore. Il schermo mostra LB e il Beep cessa, e il diodo
AC si accende . Per ricaricare completamente la batteria, lasciare la bilancia ricaricare
per 4h.
X MOSTRA DI SICUREZZA
Status „NO“
Quando viene visualizzata la parola „NO“, il circuito non funziona. La bilancia deve
essere riparata.
IT
MESSAGGI DI ERRORE
„Ad_Err“
„Lo_bat“
--- OL--SetErr
Il peso non può essere misurato dal sensore. Riparazioni sono
necessarie.
Ricargare la batteria
Sovraccarico. Troppo peso sulla bilancia
Gli informazioni interni non sono corretti. Riparazioni sono
necessarie.
PULSANTI E OPZIONI
NON PREMERE IL TASTO (ZERO / TARE)
Con l‘interruttore I / O sul retro della bilancia, è possibile attivare la bilancia. Un autotest viene avviato. Si inizia con un test dello schremo e di diodi. Lo schermo dovrebbe
visualizzare 0.0.0.0.0.0. e tutti li diodi devono luccicare. Le informazioni sulla calibrazione corrente vengono visualizzate (dalla fabbrica: 0.150,05: 0150 per 150 kg e 0,5
il passo di misurazione.) Programmazione del computer (Uer_3, 2 per ver3, 2) e lo
stato della batteria (es. dC_U5,o per 5,0 V) Dopo il test, la bilancia è pronta per l‘uso
quando mostra 0,00. Premere nuovamente il pulsante I / O per spegnere la bilancia.
finché il peso non è stabile, cioè fino a quando il diodo STABLE non è acceso, per
evitare errori di misura.
Collegamento wireless tra testa e piattaforma della bilancia modello SBS-BW-3T/1KG.
La comunicazione fra la piattaforma e la testa avviene dopo aver messo in funzione la
testa della bilancia e averla collegata con la piattaforma. La piattaforma è dotata di 3
luci di controllo:
ATTENZIONE
CA - significa procedura di caricamento batteria (CA attiva)
Low Voltage - significa che bisogna ricaricare la batteria della piattaforma.
SIGNAL - dopo aver collegato correttamente la piattaforma con la testa della bilancia,
si accendera‘ l`apposita spia di indicazione.
Nel caso sul display compaia la seguente scritta: „Err24„ significa che si e‘ verificato
un errore nel collegamento wireless tra la testa della bilancia e la piattaforma. (La
piattaforma e‘ spenta oppure la batteria deve essere ricaricata).
22
IT
TARE (ZERO)
Per tarare, posizionare un contenitore vuoto sulla piattaforma quando il diodo
STABLE è acceso. Quindi premere (ZERO / TARE) per la bilancia ignora il peso del
contenitore.
Dopo la tara, la capacità massima è ridotta del peso del contenitore!
Ad esempio, peso del contenitore b =90kg, peso massimo normale s= 150 kg peso
massimo rimanente : s-b = 60kg. Rimuovere subito il peso in caso di sovraccarico!
(----OL----)
Hold
Se il peso è superiore a 0,05 kg in modo di peso, il modo di hold può essere attivato
premendo il tasto HOLD. Allo stesso tempo, il diodo HOLD è accesso per conferma. Premere il tasto HOLD nuovamente per uscire del modo e tornare al modo di
pesatura.
23
CAMBIAMENTO DI UNITÀ (UNIT/ KG / LB, LB / KG)
Con (UNIT), è possibile modificare le unità tra libbre e chilogrammi. Premere il pulsante (UNIT) per scegliere la giusta unità.
FUNZIONE - PACK (CONTA PEZZI):
La funzione PACK contempla due possibilita‘ : IN e OUT. Nelle impostazioni standard
le funzioni PACK e ALARM sono spente. Se è impostata la funzione „IN“, tramite
un segnale d`allarme, l‘apparecchio indica se il peso e‘ superiore (UPPER) oppure
inferiore (LOWER) al limite previsto; Anche nel caso in cui sia impostata la funzione
„OUT“, l‘allarme segnalera‘ il superamento del limite previsto o il non raggiungimento
del peso minimo consentito. Il display mostrera‘ HHHHHH in caso di sovraccarico e
LLLLLL in caso di peso insufficiente.
IT
COME IMPOSTARE LA FUNZIONE IN
Appoggiare il campione peso (Es . un carico da 1000.0 Kg) sul piatto di pesata e premere il tasto PACK finche‘ sul display non compare la scritta SET-AL ; in questo modo
la bilancia attivera‘ la funzione. Aiutandovi con i tasti +/- selezionare IN. Premere i
tasti [ ZERO/TARE] per confermare e impostare gli altri campi; sul display comparira‘ la scritta AL-UP. In questo momento bisognerebbe impostare LOWER, (limite peso
INFERIORE). Digitare quindi il peso ad esempio: 995,0 kg). Premere il tasto ZERO/
TARE per confermare e impostare il campo successivo; il display mostrera‘ la scritta
AL-DN e a quel punto, digitare il limite di peso massimo UPPER ( ad esempio 1005,0
kg). Premere il tasto [ZERO/TARE] per confermare e il display mostrera‘ IN. Impostazione terminata.
ATTENZIONE: i campi fra 1000,0kg±5,0kg sono un esempio.
COME IMPOSTARE IL LIMITE PESO SUPERIORE E INFERIORE UPPER/LOWER .
Aiutandovi coi tasti [UNIT] e [HOLD], potrete impostare il limite peso superiore e
inferiore digitando le cifre da 0 a 9 sulla tastiera. Premere [UNIT], per aumentare e
[HOLD] per ridurre il valore. Premere [ZERO/TARE], per confermare e uscire dalle
impostazioni.
ALLARME
Se il display mostra IN la bilancia segnala che e‘ in sovraccarico o che il limite minimo
di peso non e‘ stato raggiunto. Quando il display mostra OUT la bilancia segnala
che il limite superiore e‘ stato superato che il peso minimo non e‘ statao raggiunto.
Premere il tasto [TARE/ZERO] per confermare le impostazioni attuali.
Come impostare la funzione OUT
Appoggiare il campione peso (es . un carico da 1000.0 Kg) sul piatto di pesata e
24
premere il tasto PACK finche‘ non compare la scritta SET-AL su display; in questo
modo la bilancia attivera‘ la funzione. Aiutandovi con i tasti +/- selezionare OUT.
Premere i tasti [ZERO/TARE] per confermare e impostare gli altri campi; sul display
comparira‘ la scritta AL-UP. Quindi impostare UPPER, limite peso SUPERIORE. Ad
esempio 1005,0 kg). Premere il tasto ZERO/TARE per confermare e impostare il
campo successivo; il display mostrera‘ la scritta AL-DN e a quel punto, digitare il limite di peso minimo LOWER . Digitare il peso, ad esempio: 995,0 kg. Premere [ZERO/
TARE] per confermare. Il display indichera‘ (1000,0kg). Impostazione terminata. Un
segnale d`allarme indichera‘ che il peso minimo non e‘ stato raggiunto (es: 995,0kg)
e sul display comparira‘ l`indicazione (LLLLLL). Un segnale d`allarme indichera‘ che
il peso massimo consentito e‘ stato superato e sul display comparira‘ l`indicazione
(HHHHHH).
CONTEGGIO PEZZI
Stabilire il peso medio di un campione:
Accendere la bilancia, andare nel campo modalita‘ peso e porre il campione sul piatto
di pesata (cifre possibili: 10/20/50/100/200/500/1000). Premere il tasto [PCS] finche‘
sul display non compare l`indicazione „P-XX“. Premere [UNIT] e [HOLD], per inserire la quantita‘ di pezzi/campioni che si trovano sulla piattaforma di pesata. Premere
il tasto [PCS], in modo che il display vi indichi il numero dei pezzi che si trovano sulla
piattafoma.
Conto pezzi
Porre gli articoli da pesare sulla piattaforma. Il display indichera‘ il numero attuale
degli articoli.
CALIBRATURA
Premere il tasto [ZERO / TARE] e accendere la bilancia. Al contempo il display indichera‘ „-------„. Premere quindi i tasti [PCS] + [UNIT] + [PCS] + [ZERO / TARE] per
calibrare e premendo i tasti [PACK] e [PCS], digitare il valore peso dell`articolo che
appoggerete sulla piattaforma. Per cambiare il valore digitato, premere i tasti [HOLD]
/ [UNIT] (es: 001000 sulla bilancia: 1000 kg) e infine premere il tasto [ZERO / TARE].
Appoggiare l`articolo sulla piattaforma e il display indichera‘ il valore del peso impostato. Fine calibratura.
25
IT
INFORMACIÓN GENERAL
AVISOS Y ADVERTENCIAS
MANUAL DE INSTRUCCIONES
BALANZAS CON PLATAFORMAS
El pesaje electrónico es un método de medición precisa. Sin embargo, la seguridad
debe mantenerse como máxima prioridad. Por ello, le rogamos siga las instrucciones
de este manual para garantizar la durabilidad de su dispositivo, así como unos precisos
resultados de medición.
• Las balanzas de plataformas tienen un cuadro de sobrecarga. Es preciso señalar
que se deben evitar los daños del sensor por sobrecarga y una pérdida de la
garantía (la balanza da una señal de alarma hasta de 135% de sobrecarga)
• Garantizar que el peso en la báscula sea estable.
• Comprobar que todos los tornillos, barras y soportes estén fjiados
• No pesar en caso de extrema humedad y la lluvia
• Evite trabajar en ambientes con altas temperaturas
• Deje que se recarga la balanza cada 2-3 meses durante al menos 24 horas para
garantizar una capacidad máxima y una gran longevidad.
Por favor lea cuidadosamente las instrucciones!
DETALLES TÉCNICOS
ES
Modello
SBS-BW-3T
SBS-BW-5T
SBS-BW-1T
SBS-BW3T/1KG
SBS-BW5T/2KG
Rango de
medida
fino a 3000 kg
fino a 5000 kg
fino a 1000 kg
fino a 3000 kg
fino a 5000
kg
Unidad
1 kg
2 kg
500 g
1 kg
2 kg
Peso propio
119 kg
151 kg
79 kg
57 kg
82 kg
Superficie
150 cm | 150
cm
150 cm | 150
cm
100 cm | 100
cm
100 cm | 100
cm
100 cm |
100 cm
Funciones
Mantener
Tara
Cero
Cómputo de piezas
Cambio de unidad (kg/lb)
PACK
Display
ES
Peso del
envío
Dimensiones
del envío
(LxAxA)
LCD
123 kg
156 kg
81,5 kg
58 kg
83 kg
152x152x 19
cm
152 x 152 x
19 cm
101 x 101 x
9 cm
102 x 102 x
9 cm
102 x 102 x
9 cm
27
FUNCIONES DE LAS TECLAS
CERO
SEÑALES DE ADVERTENCIA Y ESTADO
Antes de colocar un peso en la báscula, asegúrese de que el diodo ZERO, el diodo
STABLE (margen izquierdo) y la unidad deseada se encienden. si el diodo ZERO no se
ilumina, o si la pantalla no vuelve a cero después de retirar el peso de la balanza, pulse
brevemente la tecla (ZERO / TARE). La balanza vuelve a cero y puede pesar el peso
neto.
Nivel de la batería (lb)
Si la balanza muestra LB y produce un sonido al mismo tiempo, el nivel de la batería
es suficiente para trabajar durante aproximadamente 1 hora. Conecte La escala al
sector. La pantalla no muestra mas LB el tono de alerta deja, y la LED CA se enchufa.
Para totalmente cargar la batería, necesita 4h.
X MUESTRA DE SEGURIDAD
Indicacion „NO“
Cuando aparezca la indicacion „NO“, el circuito no funciona. La balanza debe ser
reparada.
BOTONES Y OPCIONES
ES
Con el interruptor I / O en la parte posterior del dispositivo, puede enchufar la
balanza. Se inicia una prueba automática. Comienza con la prueba de la pantalla y de
los diodos. La pantalla debe muestrar „0.0.0.0.0.0. Todos los indicadores LED deben
brillar. A continuación, la información sobre la calibración actual se muestra (de la
fábrica: 0150.05: 0150 por 150 kg y 0,5 como el intervalo de medición.), asi como
la programación de la computadora (Uer_3, 2 para Ver3, 2) y el estado de la batería
(por ejemplo, dC_U5,0 para 5,0 V) Después de la prueba, la escala está lista para el
uso y muestra 0.00. Pulse el botón I / O para apagar la balanza.
El modelo SBS-BW-3T/1KG dispone de conexión inalámbrica entre el display y el plato. La conexión entre display y plataforma se lleva a cabo tras el encendido de ambos
elementos. La plataforma está equipada con 3 indicadores luminosos.
AC (CA) - significa la batería (el suministro de corriente alterna está conectado) se
carga correctamente Low Voltage - significa que se debe cargar la batería de la plataforma. SIGNAL - este piloto se encenderá de manera intermitente cuando la conexión entre el display y la plataforma sea correcta.
Si el display mostrase el siguiente aviso: „Err24” significa que hay un error en la conexión inalámbrica entre el display y la plataforma (la plataforma está apagada o ha que
cargar la batería).
MENSAJES DE ERROR
„Ad_Err“
El peso no puede ser medido por el sensor. Reparaciones
necesarias.
„Lo_bat“
Cargar la batería
--- --- Sobrecarga OL. Demasiado peso en la escala
SetErr
Los internos datos no son correctas. Reparaciones necesarias.
NO PRESIONE EL BOTÓN (ZERO / TARE)
hasta de que el peso no es estable, es decir, hasta que el LED STABLE no está iluminado, para evitar errores de medición.
ES
TARA (ZERO)
Para la tara, coloque un recipiente vacío en la plataforma cuando el diodo STABLE
no esta iluminado . A continuación, pulse (ZERO / TARE) para que la balanza pasa por
alto el peso del recipiente.
ATENCIÓN
Después de tarar, la capacidad máxima se reduce por el peso del contenedor! Por
ejemplo, Peso del contenedore b = 90 kg , Peso máximo normal = 150 kg Peso Max.
restante: s-b = 60 kg. Retirar de inmediato el peso en caso de sobrecarga! (---OL---)
MANTENER (HOLD)
Si el peso es mas de 0,05 kg en modo de pesaje, el modo de retención puede ser
activado pulsando el botón HOLD. Al mismo tiempo, la LED HOLD se enchufa como
confirmación. Pulse HOLD de nuevo para salir del modo de retencion y volver al
modo de pesaje.
CAMBIAR LA UNIDAD (UNIDAD / KG / LB, LB / KG)
Con el botón (UNIT), puede cambiar las unidades entre lb y kilogramos. Pulse el
28
29
botón (UNIT) para elegir la unidad correcta.
FUNCIÓN - PACK:
Existen 2 opciones en la función PACK: IN y OUT. En la configuración estándar están
las funciones PACK y ALARMA apagadas. Si se selecciona la función „IN“, la alarma
señalará si el peso del objeto está entre el límite superior (UPPER) o inferior (LOWER) del dispositivo; Si selecciona „OUT“, la alarma indicará si el objeto supera
el límite superior o inferior. La pantalla señalará „HHHHHH“ si se rebasa el límite
superior y „LLLLLL“ si no llega al limite inferior.
ES
COMO AJUSTAR LA FUNCIÓN „IN“
Coloque un peso de prueba sobre la balanza (p. Ej. 1000,0 kg) y pulse la tecla PACK
hasta que el display muestre SET-AL; con lo que podrá seleccionar la función correspondiente. Con ayuda de las teclas +/- seleccione IN y pulse, ZERO / TARE para
confirmar acceder al siguiente paso. La pantalla mostrará AL-UP - En este momento
podrá configurar el límite inferior LOWER (p. Ej.: 995,0). Pulse de nuevo ZERO/
TARE para confirmar y acceder al siguiente paso; el display señalará AL-DN y con ello
podrá seleccionar el limite superior UPPER (p. Ej. . 1005.0 Kg.). Pulse ZERO / TARE
para confirmar el valor y la pantalla indicará IN , lo que significará que el ajuste está
realizado.
ATENCIÓN: El rango “IN” de 1000,0kg ± 5,0 kg representado arriba es solo un
ejemplo.
COMO CONFIGURAR EL LIMITE SUPERIOR UPPER Y EL INFERIOR LOWER
Con los botones de UNIT y HOLD se puede configurar el límite superior e inferior,
introduciendo el valor manualmente con las teclas del 0-9. Pulse UNIT, para aumentar
el valor y HOLD para reducirlo. Presione ZERO/ TARE para confirmar el valor y salir
de los ajustes.
spondiente. Con ayuda de las teclas +/- seleccione OUT y pulse ZERO / TARE para
confirmar y acceder al siguiente paso. La pantalla mostrará AL-UP - En este momento
podrá configurar el límite superior UPPER (p. Ej.: 1005,0). Pulse de nuevo ZERO/
TARE para confirmar el valor y acceder al siguiente paso; el display señalará AL-DN y
con ello podrá seleccionar el limite inferior LOWER (p. Ej. 995,0 Kg.). ZERO / TARE/],
para confirmar, la pantalla mostrará (1000,0 Kg.). Es decir, que la configuración ha sido
realizada satisfactoriamente. Si no llega al límite inferior (995,0kg), la balanza emitirá
un sonido y la pantalla mostrará (LLLLLL). Si se supera el límite superior el display
indicará (HHHHHH), acompañado de una señal de alarma.
FUNCIÓN DE CÓMPUTO DE PIEZAS
Determinación del peso medio de la muestra:
Encienda la balanza, acceda al modo de pesaje y coloque los objetos de muestra (cantidades posibles: 10/20/50/100/200/500/1000). A continuación, pulse la tecla PCS hasta
que el display muestre „P-XX“ y utilice las teclas UNIT y HOLD para seleccionar la
cantidad de piezas sobre el plato. Pulse PCS y el display mostrará la cantidad de piezas
sobre el plato.
Cómputo
Coloque los objetos sobre el plato y el display indicará la cantidad.
CALIBRADO
Pulse la tecla ZERO / TARE y encienda la balanza; la pantalla mostrará „--------“. Mantenga pulsados PCS + UNIT + PCS + ZERO / TARE para acceder al modo de calibrado e introduzca el peso de muestra que va a colocar sobre el plato de pesaje. Para
ello, pulse PACK y PCS y podrá seleccionar el valor, aumentándolo o disminuyéndolo
con las teclas HOLD / UNIT (p.Ej. con 001000, usted podrá colocar en la balanza
1000 kg) y pulse ZERO / TARE, y coloque el peso sobre el plato. La pantalla mostrará
el valor del peso seleccionado. Fin del calibrado.
COMO CONFIGURAR LA ALARMA
Si el display muestra „IN“, la balanza le avisará si el peso está entre el rango del límite
superior UPPER e inferior LOWER. Si la pantalla muestra „OUT“ la balanza le avisará
si rebasa el límite superior UPPER o inferior LOWER. Presione ZERO/ TARE, para
confirmar la configuración actual.
COMO AJUSTAR LA FUNCIÓN „OUT“
Coloque un peso de prueba sobre la balanza (p. Ej. 1000,0 kg) y pulse la tecla PACK
hasta que el display muestre SET-AL; con lo que podrá seleccionar la función corre-
30
31
ES
INFORMACJE OGÓLNE
WSKAZÓWKI I OSTRZEŻENIA
Ważenie elektroniczne jest precyzyjną metodą pomiaru ciężaru. Bezpieczeństwo
jednak ma tu również ogromne znaczenie. W celu przedłużenia żywotności wagi oraz
zapewnienia odpowiednich warunków pracy należy przestrzegać poniższych wskazówek:
•
INSTRUKCJA OBSŁUGI
WAGI PLATFORMOWE
•
•
•
•
•
Wagi podłogowe wyposażono w zakres przeciążenia. Należy unikać obciążania
wagi w zakresie przeciążenia ze względu na możliwość uszkodzenia czujników,
wagi oraz utraty gwarancji (waga sygnalizuje przeciążenie do 135%).
Należy zapewnić stabilne położenie obciążenia.
Należy sprawdzić osadzenie sworzni, stopek oraz elementów mocujących.
Należy unikać pomiarów przy zbyt wysokiej wilgotności oraz podczas deszczu.
Należy unikać prac w wysokiej temperaturze otoczenia.
W celu zapewnienia maks. pojemności, długiej żywotności oraz uniknięcia
całkowitego wyładowania akumulatorów należy je ładować przynajmniej raz na
2 -3 miesiące przez 24 godziny.
PARAMETRY TECHNICZNE WAGI
Model
SBS-BW-3T
SBS-BW-5T
SBS-BW-1T
Zakres ważenia
Podziałka
Ciężar własny
Powierzchnia
Do 3000 kg
1 kg
119 kg
150 cm |
150 cm
Do 5000 kg
2 kg
151 kg
150 cm |
150 cm
Do 1000 kg
500 g
79 kg
100 cm |
100 cm
Zatrzymanie
Tarowanie
Zerowanie
Funkcje
PL
Wyświetlacz
Ciężar
wysyłkowy
Wymiary
wysyłkowe
(DxSxW)
123 kg
152x152x
19 cm
SBS-BW3T/1KG
Do 3000 kg
1 kg
57 kg
100 cm |
100 cm
Zliczanie sztuk
Zmiana jednostek ważenia (kg/lb)
PACK
LCD
156 kg
81,5 kg
58 kg
SBS-BWPL
5T/2KG
Do 5000 kg
2 kg
82 kg
100 cm |
100 cm
83 kg
152 x 152 x 101 x 101 x 102 x 102 x 102 x 102 x
19 cm
9 cm
9 cm
9 cm
33
FUNKCJE PANELU STERUJĄCEGO
ZEROWANIE (ZERO)
SYGNAŁY OSTRZEGAWCZE I STANU URZĄDZENIA
Przed obciążeniem wagi należy upewnić się, czy po lewej stronie świeci się dioda
ZERO oraz dioda STABLE a wymagana jednostka po prawej stronie. Oznacza to optymalny stan eksploatacji urządzenia. Jeżeli dioda ZERO nie zaświeci się lub wyświetlacz
nie wyzeruje się po odciążeniu, to należy wcisnąć przycisk [ZERO/TARE]. Waga potwierdzi tarowanie komunikatem 0.00. Następnie można zmierzyć ciężar.
Stan akumulatorów (lb)
Jeżeli na wyświetlaczu mruga wskaźnik poziomu naładowania akumulatorów
(Batterie), to pozostała jeszcze około jedna godzina zasilania. Wagę należy podłączyć
do sieci elektrycznej. Po podłączeniu wagi do sieci elektrycznej wskaźnik
poziomu akumulatorów przestaje mrugać a zapala się dioda AC. W celu całkowitego
naładowania akumulatorów należy je ładować przynajmniej 4 godziny.
KOMUNIKAT BEZPIECZEŃSTWA X
Status „NO“
Jeżeli na wyświetlaczu pojawi się komunikat „NO“, to oznacza to, że obwód elektryczny nie funkcjonuje. Wagę należy oddać do naprawy.
“ Ad_Err ”
“Lo_bat”
---OL--- Overload.
SEtErr
ciężar nie jest mierzony przez czujnik. Konieczna naprawa.
wymienić baterie.
Overload – za duże obciążenie na wadze.
dane nie są poprawne. Konieczna naprawa.
NIE NACISKAĆ PRZYCISKU [ZERO/TARE]
POLA OBSŁUGI I USTAWIENIA
Tak długo jak obciążenie nie wisi stabilnie (informuje o tym dioda STABLE przy lewej,
dolnej krawędzi ekranu, która nie świeci) nie wolno naciskać przycisku [ZERO/TARE].
WŁĄCZANIE I WYŁĄCZANIE (I/O)
PL
KOMUNIKATY BŁĘDÓW
Urządzenie włączamy za pomocą włącznika głównego I/O, który znajduje się na tylnej
ścianie urządzenia. Urządzenie uruchomi test sprzętowy. Test urządzenia testuje
najpierw wyświetlacz a następnie diody. Wyświetlacz musi wyświetlić prawidłowo
komunikat 0.0.0.0.0.0 a wszystkie diody muszą zaświecić się prawidłowo. Następnie
pojawiają się informacje dotyczące aktualnych ustawień kalibracji (ustawienie producenta 0150.05, tzn. zakres pomiaru 150 kg w odstępach co 0,5 kg), wersji programu
kalkulatora (komunikat Uer_3.2, tzn. wersja 3.2) oraz stanu napięcia eksploatacji
(np. dC_U5.0 dla 5.0V). Po wykonanym teście waga jest gotowa do eksploatacji i na
wyświetlaczu pojawia się komunikat 0.0. Ponowne naciśnięcie włącznika głównego I/O
spowoduje wyłącznie urządzenia.
Dla modelu wagi SBS-BW-3T/1KG połączenie głowicy wagi oraz platformy jest
realizowane bezprzewodowo. Komunikacja pomiędzy platformą oraz głowicą zostaje
nawiązana po włączeniu platformy i głowicy. Platforma jest wyposażona w trzy lampki
kontrolne:
AC – oznacza, że akumulator platformy jest w trakcie ładowania (podłączone zasilanie
AC)
Low Voltage – oznacza, że akumulator platformy należy podłączyć do ładowania
SIGNAL – po prawidłowym nawiązaniu połączenia między platformą oraz głowicą
lampka będzie migać.
W przypadku gdy na wyświetlaczu głowicy pokaże się komunikat „Err24” oznacza to,
że nastąpił błąd w połączeniu bezprzewodowym pomiędzy głowicą a platformą (platforma jest wyłączona lub jej akumulator wymaga naładowania).
34
TAROWANIE (TARE)
Przed tarowaniem na wagę należy położyć pusty pojemnik, jeżeli dioda STABLE świeci
się. Następnie naciskamy przycisk [ZERO/TARE], żeby waga zignorowała ciężar
pojemnika.
UWAGA
Po zerowaniu redukuje się maks. mierzalne obciążenie o ciężar pojemnika!
Np. pojemnik b = 90kg, maks. obciążenie l = 150kg, maks. mierzone obciążenie L: L =
l – b = 60 kg.
Obciążenie należy położyć powoli na platformę i zdjąć ją natychmiast w przypadku
przeciążenia (informuje o tym komunikat OL na wyświetlaczu).
PRZYTRZYMANIE (HOLD)
Dla ciężarów powyżej ≥ 0,05 kg w trybie ważenia można uaktywnić tryb przytrzymania naciskając przycisk [HOLD]. Równocześnie zapala się dioda HOLD przy prawej
dolnej krawędzi wyświetlacza, która potwierdza wykonanie funkcji. W celu wyjścia
z trybu przytrzymania należy ponownie nacisnąć przycisk [HOLD]. Spowoduje to
powrót do trybu ważenia.
ZMIANA JEDNOSTKI (UNIT / KG / LB, LB / KG)
35
PL
Przycisk [UNIT] umożliwia wybór jednostki wagi kg lub lb. W tym celu należy
naciskać przycisk [UNIT], aż do wyboru wymaganej jednostki.
FUNKCJA PACK
Dostępne są dwie pozycje w ramach funkcji PACK: IN oraz OUT. Domyślnie funkcje PACK oraz ALARM są wyłączone (ustawienie „NO”). W momencie ustawienia
na „IN”, urządzenie powiadomi alarmem, gdy ciężar znajdzie się pomiędzy UPPER
(GÓRNYM) i LOWER (DOLNYM) limitem; W momencie ustawienia na „OUT”
alarm nastąpi, gdy ciężar przekroczy górny limit lub dolny limit. Wyświetlacz wskaże
HHHHHH w momencie przekroczenia górnego limitu oraz LLLLLL w momencie
przekroczenia dolnego limitu.
PL
JAK USTAWIĆ IN
Obciążyć wagę ciężarem zadanym (np. 1000,0 kg), następnie wciskać przycisk PACK
do momentu, w którym wyświetlacz wskaże SET-AL; w tym momencie waga wchodzi
w tryb wyboru funkcji. Przyciskami +/- wybrać IN. Nacisnąć [ZERO/TARE] celem potwierdzenia i przejścia w następne ustawienie; wyświetlacz wskaże AL-UP – w tym momencie należy ustawić LOWER (DOLNY) limit (np. wprowadzić 995,0 kg). Nacisnąć
ZERO/TARE celem potwierdzenia i przejścia w następne ustawienie; Wyświetlacz
wskaże AL-DN i należy wprowadzić UPPER (GÓRNY) limit (np. wprowadzić 1005,0
kg). Nacisnąć [ZERO/TARE] celem potwierdzenia a wyświetlacz wskaże IN. Oznacza
to że ustawienia zostały ukończone.
UWAGA: zakres [IN] pomiędzy 1000,0kg±5,0kg jest przykładowy.
JAK USTAWIĆ UPPER/LOWER LIMIT (GÓRNY/DOLNY)
Przyciski [UNIT] oraz [HOLD] mogą być wykorzystane do ustawiania górnego i
dolnego limitu poprzez wprowadzanie cyfr 0-9. Nacisnąć [UNIT] w celu zwiększenia
oraz [HOLD] celem zmniejszenia wartości. Nacisnąć [ZERO/TARE] aby potwierdzić i
wyjść z ustawień.
celem potwierdzenia i przejścia w następne ustawienie; wyświetlacz wskaże AL-UP
– w tym momencie należy ustawić UPPER (GÓRNY) limit (np. wprowadzić 1005,0
kg). Nacisnąć ZERO/TARE celem potwierdzenia i przejścia w następne ustawienie; Wyświetlacz wskaże AL-DN i należy wprowadzić LOWER(DOLNY) limit (np.
wprowadzić 995,0 kg). Nacisnąć [ZERO/TARE] celem potwierdzenia a wyświetlacz
wskaże (1000,0kg). Oznacza to, że ustawienia zostały ukończone. Przekroczenie limitu
dolnego (995,0kg) sygnalizowane jest przez sygnał dźwiękowy i wyświetlenie (LLLLLL) na wyświetlaczu. Przekroczenie limitu górnego jest sygnalizowane przez sygnał
dźwiękowy i wyświetlenie na wyświetlaczu (HHHHHH).
ustawień.
ZLICZANIE SZTUK
Wyznaczenie średniego ciężaru próbki:
Włączyć wagę i przejść do trybu ważenia, położyć na platformie próbki (ilość może
wynosić 10/20/50/100/200/500/1000) nacisnąć przycisk [PCS] przez dłuższy okres
czasu do momentu gdy wyświetlacz pokaże „P-XX“, nacisnąć [UNIT] oraz [HOLD]
w celu ustawienia ilości takiej samej jak na platformie. Nacisnąć przycisk [PCS]
wyświetlacz pokaże ilość która znajduje się na platformie.
Zliczanie
Położyć towary na platformie a wyświetlacz wyświetli ich aktualną ilość.
KALIBRACJA
Nacisnąć [ZERO / TARE] i włączyć wagę w tym samym czasie, wyświetli się
„------„ nacisnąć [PCS] + [UNIT] + [PCS] + [ZERO / TARE] – wejście do kalibracji,
teraz wpisać masę, która będzie umieszczona na platformie, naciskając [PACK] i
[PCS] aby wybrać zmienianą cyfrę, nacisnąć klawisz [HOLD] / [UNIT], aby zmienić
wartość cyfry. (np. 001000 można umieścić na wadze 1000kg), a następnie nacisnąć
[ZERO / TARE], umieścić ustawiony ciężar na platformie, nacisnąć [ZERO / TARE], na
wyświetlaczu pojawi się wartość ustawionego ciężaru. Koniec kalibracji.
USTAWIENIE ALARMU
W momencie gdy wyświetlacz wskazuje IN, waga będzie ostrzegać w momencie gdy
ciężar znajduje się pomiędzy limitami: UPPER (GÓRNY) oraz LOWER (DOLNY). W
momencie gdy wyświetlacz wskazuje OUT, waga będzie ostrzegać w momencie gdy
ciężar przekroczy limit UPPER (GÓRNY) lub gdy ciężar będzie się znajdował poniżej
limitu LOWER (DOLNY). Nacisnąć [TARE/ZERO] celem potwierdzenia aktualnych
JAK USTAWIĆ OUT
Obciążyć wagę ciężarem zadanym (np. 1000,0 kg), następnie wciskać przycisk PACK
do momentu w którym wyświetlacz wskaże SET-AL; w tym momencie waga wchodzi w tryb wyboru funkcji. Przyciskami +/- wybrać OUT. Nacisnąć [ZERO/TARE]
36
37
PL
Instrukcja bezpiecznego usunięcia akumulatorów i baterii.
Instrukcja opracowana zgodnie z ustawą z dnia 24 kwietnia 2009 r. o bateriach i akumulatorach (Dz. U. 2009
nr 79 poz. 666) rozdz. 2 art. 11, nakładającą na producentów urządzeń elektronicznych obowiązek dołączenia
instrukcji demontażu baterii i akumulatorów.
1. W wagach platformowych:
3015 SBS-BW-3T Bodenwaage / waga platformowa 3T
3016 SBS-BW-5T Bodenwaage / waga platformowa 5T
3085 SBS-BW-1T Bodenwaage / waga platformowa 1T
3120 SBS-BW-3T/1KG wireless / Bodenwaage / Waga platformowa
3121 SBS-BW-5T/2KG Bodenwaage / Waga platformowa
zamontowane są:
• Akumulatory kwasowo – ołowiowe 4V 4Ah (dla modeli 3120 SBS-BW-3T/1KG oraz 3121 SBS-BW5T/2KG) oraz 6V 4Ah (dla pozostałych modeli).
2. Przed przystąpieniem do demontażu należy bezwzględnie wyłączyć wagę oraz odłączyć zasilanie wagi z
zasilacza sieciowego.
3. Demontaż akumulatorów kwasowo – ołowiowych znajdujących się w głowicach wag:
• Odkręcić wkręty mocujące obudowę z tyłu urządzenia.
• Zdjąć obudowę.
• Odpiąć / odlutować końcówki przewodów akumulatora.
• Odkręcić śruby mocujące akumulator.
• Wyjąć akumulator.
4. Demontaż akumulatorów kwasowo – ołowiowych znajdujących się w platformie wagi (dotyczy modelu
3120 SBS-BW-3T/1KG):
• Odkręcić wkręty mocujące obudowę akumulatora platformy wagi. Obudowa znajduje się pod spodem
platformy.
• Wyjąć obudowę i odkręcić wkręty mocujące pokrywę obudowy.
• Odpiąć / odlutować przewody końcówek akumulatora.
• Wyjąć akumulator.
5. Akumulator przekazać komórce odpowiedzialnej za utylizację tych materiałów.
6. Usuwanie zużytych urządzeń
Po zakończeniu okresu użytkowania nie wolno usuwać niniejszego produktu poprzez normalne odpady komunalne, lecz należy go oddać do punktu zbiórki i recyklingu urządzeń elektrycznych i elektronicznych.
Informuje o tym symbol, umieszczony na produkcie, instrukcji obsługi lub opakowaniu.
Zastosowane w urządzeniu tworzywa nadają się do powtórnego użycia zgodnie z ich oznaczeniem. Dzięki
powtórnemu użyciu, wykorzystaniu materiałów lub innym formom wykorzystania zużytych urządzeń wnoszą
Państwo istotny wkład w ochronę naszego środowiska.
Informacji o właściwym punkcie usuwania zużytych urządzeń udzieli Państwu administracja gminna.
DE
Hiermit bestätigen wir, dass die hier in dieser Anleitung aufgeführten Geräte CE-konform sind.
EN
We hereby certify that the appliances listed in this manual are CE compliant.
FR
Par la présente, nous confirmons que les appareils présentés dans ce mode d´emploi
sont conformes aux normes Ce.
PL
Niniejszym potwierdzamy, że urządzenia opisane w tej instrukcji są zgodne z
deklaracją CE.
IT
Con la presente documentazione si certifica che i dispositivi descritti all´interno del
manuale sono conformi alle vigenti norme CE.
ES
Por la presente confirmamos que los dispositivos detallados en este manual son
conformes con las normativas de la CE.
38
39
Umwelt- und Entsorgungshinweise
Hersteller an Verbraucher
Sehr geehrte Damen und Herren,
gebrauchte Elektro- und Elektronikgeräte dürfen gemäß europäischer Vorgaben [1] nicht zum unsortierten Siedlungsabfall
gegeben werden, sondern müssen getrennt erfasst werden. Das Symbol der Abfalltonne auf Rädern weist auf die Notwendigkeit
der getrennten Sammlung hin. Helfen auch Sie mit beim Umweltschutz. Sorgen Sie dafür, dieses Gerät, wenn Sie es nicht mehr
weiter nutzen wollen, in die hierfür vorgesehenen Systeme der Getrenntsammlung zu geben.
In Deutschland sind Sie gesetzlich [2] verpflichtet, ein Altgerät einer vom unsortierten Siedlungsabfall getrennten Erfassung
zuzuführen. Die öffentlich - rechtlichen Entsorgungsträger (Kommunen) haben hierzu Sammelstellen eingerichtet, an denen
Altgeräte aus privaten Haushalten ihres Gebietes für Sie kostenfrei entgegengenommen werden. Möglicherweise holen die
rechtlichen Entsorgungsträger die Altgeräte auch bei den privaten Haushalten ab.
Bitte informieren Sie sich über Ihren lokalen Abfallkalender oder bei Ihrer Stadt- oder Gemeindeverwaltung über die in Ihrem
Gebiet zur Verfügung stehenden Möglichkeiten der Rückgabe oder Sammlung von Altgeräten.
[1]
RICHTLINIE 2002/96/EG DES EUROPÄISCHEN PARLAMENTS UND DES RATES
ÜBER ELEKTRO- UND ELEKTRONIK - ALTGERÄTE
[2]
Gesetz über das Inverkehrbringen, die Rücknahme und die umweltverträgliche Entsorgung
von Elektro- und Elektronikgeräten (Elektro- und Elektronikgerätegesetz - ElektroG).
Po zakończeniu okresu użytkowania nie wolno usuwać niniejszego produktu poprzez normalne odpady komunalne, lecz należy
go oddać do punktu zbiórki i recyklingu urządzeń elektrycznych i elektronicznych. Informuje o tym symbol, umieszczony na
produkcie, instrukcji obsługi lub opakowaniu.
Zastosowane w urządzeniu tworzywa nadają się do powtórnego użycia zgodnie z ich oznaczeniem. Dzięki powtórnemu użyciu,
wykorzystaniu materiałów lub innym formom wykorzystania zużytych urządzeń wnoszą Państwo istotny wkład w ochronę
naszego środowiska.
Informacji o właściwym punkcie usuwania zużytych urządzeń udzieli Państwu administracja gminna.
For the disposal of the device please consider and act according to the national and local rules and regulations.
CONTACT
emaks spółka z ograniczoną
odpowiedzialnością sp.k.
Ul. Dekoracyjna 3
65-155 Zielona Góra
Nr. kom.: +48 506 06 05 74
E-mail: [email protected]
w w w. e x p o n d o . d e
www.steinbergsystems.de