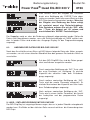
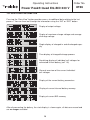
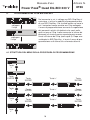
1
Bedienungsanleitung
Operating instructions
Notice d’utilisation
Manuale d‘uso
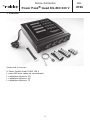
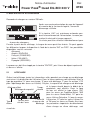
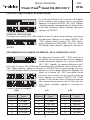
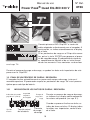
Power Peak® Quad EQ-BID 230 V
No. 8196
Bedienungsanleitung
Bestell Nr.
Power Peak® Quad EQ-BID 230 V
8196
Sehr geehrter Kunde,
wir freuen uns, dass Sie sich für das Automatik-Ladegerät Power Peak® Quad EQ-BID
230 V aus dem robbe Sortiment entschieden haben. Damit besitzen Sie ein kompaktes
4 fach-Ladegerät mit Akkumanagement und Equalizer für den Anschluss an 230 V AC.
Trotz der einfachen Handhabung dieses Laders verlangt die Bedienung eines so hochwertigen, automatischen Ladegerätes wie dem Power Peak® Quad EQ-BID 230 V vom
Anwender einige Kenntnisse. Durch diese Anleitung wird es Ihnen schnell gelingen, sich
mit dem Gerät vertraut zu machen.
Um dieses Ziel sicher zu erreichen, sollten Sie die Be
die
nungs
anleitung, und die
Sicherheitshinweise aufmerksam lesen, bevor Sie Ihr neues Automatik-Ladegerät in
Betrieb nehmen.
Wir wünschen Ihnen viel Erfolg und Freude mit Ihrem neuen Ladegerät!
Die Anleitung bezieht sich nur auf einen von vier Ladeausgängen, da alle nach dem
selben Prinzip funktionieren!
Sicherheitshinweise
!
Am Ende der Bedienungsanleitung sind ausführliche Sicherheitshinweise zum
Umgang mit Ladegeräten und den unterschiedlichen Akkutypen aufgeführt.
Lesen Sie UNBEDINGT VOR Inbetriebnahme des Gerätes diese Anweisungen und
Sicherheitshinweise durch.
Falscher Umgang mit Akkus und Ladegeräten kann zur Explosion und Feuer der
Akkus führen.
Haftungsausschluss
Dieses Ladegerät ist ausschließlich für das Laden von den in der Anleitung genannten Akkus konzipiert und zugelassen. robbe Modellsport übernimmt keinerlei
Haftung bei anderweitiger Verwendung.
Sowohl die Einhaltung der Betriebsanleitung als auch die Bedingungen und Methoden
beim Betrieb, Verwendung und Wartung des Ladegeräts können von robbe-Modellsport
nicht überwacht werden.
Daher übernehmen wir keinerlei Haftung für Verluste, Schäden oder Kosten, die sich aus
fehlerhafter Verwendung und Betrieb ergeben oder in irgendeiner Weise damit zusammenhängen.
Soweit gesetzlich zulässig ist die Verpflichtung zur Schadenersatzleistung, gleich aus
welchen Rechtsgründen, auf den Rechnungswert der an dem schadensstiftenden Ereignis
unmittelbar beteiligten robbe-Produkt begrenzt. Dies gilt nicht, soweit nach zwingenden
gesetzlichen Vorschriften wegen Vorsatzes oder grober Fahrlässigkeit unbeschränkt
gehaftet werden muss.
2
Bedienungsanleitung
Bestell Nr.
Power Peak® Quad EQ-BID 230 V
8196
Inhaltsverzeichnis
Kapitel
Seite
Sicherheitshinweise2
1.Lieferumfang 4
2. Allgemeine Beschreibung
5
3.Bedienelemente 6
3.1 Funktion der Bedienelemente
6
4.Technische Daten
7
5. Inbetriebnahme des Ladegerätes
8
5.1Arbeitsdisplay 8
5.2 Anschluss der Akkus
9
6. Automatik Modus
9
6.1 Menüstruktur des Automatik Modus
10
6.2 Einstellungen im Automatik Modus
10
7. Manueller Modus
11
7.1 Menüstruktur des manuellen Modus
11
7.2Einstelldisplay 12
7.3 Einstellungen im manuellen Modus
12
7.4 Start eines Lade- / Entladevorganges
15
8. Programmierung eines BID-Chips/Key`s
16
8.1 Menüstruktur des Programmiervorganges
16
8.2Programmiervorgang 17
8.3 Auslesen der Daten eines BID-Chips/Key`s18
9. Lade- / Entladevorgänge mit BID-Chip/Key`s
18
10. Ende eines Lade- / Entladevorganges
19
10.1 Anzeige der Lade- / Entladedaten
19
10.2 Zusatzinformationen (Data-View-Taste)
20
11.Fehlermeldungen 21
12. Allgemeine Sicherheitshinweise
22
13.Gewährleistung 22
14. Empfohlenes Zubehör
23
15.Konformitätserklärung 24
Altgeräteentsorgung 24
16. Service Adressen
24
3
Bedienungsanleitung
Bestell Nr.
Power Peak® Quad EQ-BID 230 V
8196
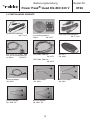
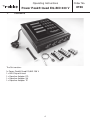
1. Lieferumfang
Der Lieferumfang enthält:
1x Power Peak® Quad EQ-BID 230 V
1 x BID-CHIP mit Anschluss-Kabel
1 x Equalizer Adapter PQ
1 x Equalizer Adapter XH
1 x Equalizer Adapter TP
4
Bedienungsanleitung
Power Peak® Quad EQ-BID 230 V
2.
Bestell Nr.
8196
Allgemeine beschreibung
Der Power Peak® Quad EQ-BID 230 V ist ein intelligentes Ladegerät mit komfortablem
Akkumanagement, zum Laden und Entladen von NC-, NiMH-, Blei und Lithium-Akkus.
Darüber hinaus verfügt er über einen eingebauten Equalizer.
Mit dem Power Peak® Quad EQ-BID 230 V können NC oder NiMH Akkus von 1 bis 14
Zellen sowohl im Automatikmodus mit automatischer Stromeinstellung als auch im manuellen Modus geladen bzw. entladen werden. Die Abschaltung erfolgt bei vollgeladenem
Akku nach der Delta-Peak-Methode.
Ebenso können bis zu 6 in Reihe geschaltete Lithium Zellen mit einem maximalen Strom
von bis zu 5 Ampere geladen werden. Die Abschaltung erfolgt spannungsabhängig automatisch bei voll geladenem Akku. Das automatische Laden von Bleiakkus von 2 bis 12
Volt ist ebenfalls möglich.
10 interne Speicherplätze des Gerätes erlauben im manuellen Modus das Abspeichern
akkuspezifischer Daten für den Lade- und Entladevorgang von zehn verschiedenen
Akkus. Das Haupt-Feature des Power Peak® Quad EQ-BID 230 V ist das
zukunftsweisende Batterie-Identifikations System (BID). Die Vielfalt der
verschiedenen Akkutypen wird immer größer, wobei jeder Akkutyp sein
“eigenes” Ladeverfahren benötigt. Schnell kann es passieren, dass man am
Ladegerät eine falsche Einstellung vornimmt und schon hat der wertvolle
Akku Schaden genommen.
Das revolutionäre BID-System von robbe bietet eine geniale
Lösung für dieses Problem. Jedem Akku wird ein kleiner,
leichter BID-Chip zugeordnet. Er speichert alle relevanten
Daten zum optimalen Laden und Entladen des Akkus. Zum
Laden bzw. Entladen wird der auf dem Akku angebrachte
BID-Chip mit dem Power Peak® Quad EQ-BID 230 V verbunden, er gibt dem Lader die Parameter vor.
Es muss nur noch die ‘Start’-Taste betätigt werden und der
Lade- bzw. Entladevorgang beginnt. Kein lästiges Suchen
der Einstell-Parameter im Menü, maximaler Schutz vor
Fehlbedienung und Speicherung der relevanten Akkudaten
im BID-Chip/KEY sind die besonderen Vorteile des BIDSystems.
Durch die Speicherung der wichtigsten Daten im BID-Chip/
Key trägt man die Akkudaten immer bei sich, diese können
somit am Ladegerät leicht angezeigt werden. Diese Funktion
ersetzt weitgehend die Notwendigkeit einer PC-Software sowie
Computertechnik, um sich einen aktuellen Überblick über den
Akkuzustand zu verschaffen.
5
Bedienungsanleitung
Bestell Nr.
Power Peak® Quad EQ-BID 230 V
8196
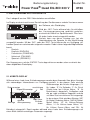
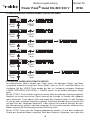
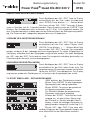
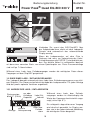
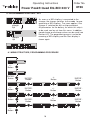
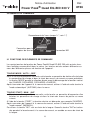
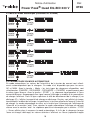
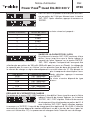
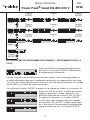
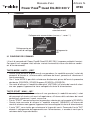
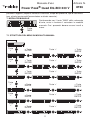
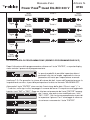
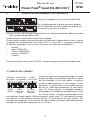
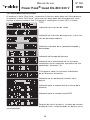
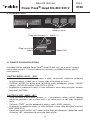
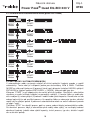
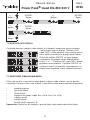
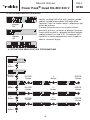
3. bedienelemente
Tasten zur
Menüsteuerung
Display
Akkuanschluss (rot = „+“, schwarz=“-“)
Anschluss für
Voltage Sensor
BID-Anschluss
3.1 Funktion der Bedienelemente
Die 4 Bedienungstasten des Power Peak® Quad EQ-BID 230 V sind, wie von der
Beschriftung dargestellt, mehrfach belegt. Bei verschiedenen Betriebszuständen werden
mit den Tasten unterschiedliche Aktionen ausgelöst.
MODE / AUTO / „DEC“ -Taste
• Mit dieser Taste werden bei manuellem Betrieb, im Einstellmodus die Werte der
Ladeparameter um einen Schritt verringert und bei der Menüauswahl das jeweils vorherige Menü ausgewählt.
• Mit der ‘MODE’-Taste kann direkt vor dem Start der gewünschte Vorgang (LADEN,
ENTLADEN oder ENTL->LADEN) ausgewählt werden.
• Nach dem Verbinden mit der Versorgungsspannung wird mit dieser Taste im AuswahlMenü der “automatische Modus” (AUTOMA.) aktiviert.
Start / Man / „INC“ -Taste
• Mit dieser Taste werden bei manuellem Betrieb, im Einstellmodus die Werte der
Ladeparameter um einen Schritt vergrößert und bei der Menüauswahl das jeweils folgende Menü ausgewählt.
• Mit der ‘START’-Taste wird der ausgewählte Vorgang, z.B. LADEN gestartet.
• Nach dem Verbinden mit der Versorgungsspannung wird mit dieser Taste im Auswahl
Menü der “manuelle Modus” (MANUELL) aktiviert.
• Außerdem dient die ‘INC’-Taste zur Sprachauswahl. Wenn “INC” während des
Anschließen der Versorgungsspannung gedrückt wird, gelangt man in das Menü zur
Sprachauswahl.
6
Bedienungsanleitung
Bestell Nr.
Power Peak® Quad EQ-BID 230 V
8196
Stop / Enter-Taste
• Mit der ‘STOP’-Taste kann ein laufender Vorgang, z.B. LADEN gestoppt werden.
• Mit der ‘ENTER’-Taste erfolgt die Bestätigung einer Auswahl, z.B. die Aktivierung eines
ausgewählten Menüs.
DATA-TASTE
• Anzeige der Daten des Laders z.B. Eingangsspannung. Ausserdem kann man mit dieser Taste alle Einzelzellenspannungen eines angeschlossenen LiPo-Akkus anzeigen.
Alle Tasten besitzen eine Autorepeat-Funktion, ein Halten der Taste bewirkt ein
wiederholendes Tasten.
Integrierter Tongeber
• Der Piezosummer quittiert jede Tastenbetätigung und zeigt das Lade- bzw. Entladeende,
sowie einen aufgetretenen Fehler akustisch an.
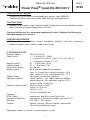
4. Technische Daten
Betriebsspannung:
Zellenzahl:
Ladestrom:
Entladestrom:
Equalizingstrom:
Ladeleistung:
Entladeleistung:
Erhaltungsladung:
Entladeschlussspan.:
Abschaltung:
NC / NiMH:
Blei- und Lithium:
Abmessungen:
Funktionen:
230 V AC/ 50 Hz
1 ... 14 Zellen NC / NiMH,
1 ... 6 Zellen LiIo (3,6 V), LiPo (3,7 V), LiFe (3,3 V)
1 ... 6 Zellen (2...12 V) Bleiakku
0,1 ... 5 A bei max. 50 W
0,1 ... 1 A bei max. 5 W
ca. 250 mA
50 W, Strom wird entsprechend geregelt
z.B. 24 V Akkuspannung, Ladestrom ca. 2,0 A
z.B. 28 V Akkuspannung, Ladestrom ca. 1,7 A
5 W, Strom wird entsprechend geregelt
eingeladene Kapazität <1 Ah: keine Erhaltungsladung
eingeladene Kapazität >1 Ah: Erhaltungsladung mit C/20
(nur bei NC und NiMH)
0,8 V pro Zelle bei NC und NiMH,
3,0 V pro Zelle bei LiPo, LiIo
2,5 V pro Zelle bei LiFe
1,8 V pro Zelle bei Bleiakkus
automatisch, digitales-Delta-Peak-System
automatisch, spannungsabhängig, CC-CV Verfahren
ges. 225 x 170 x 40 mm
Laden, Entladen, Entladen-Laden, Balancieren
10 interne Speicherplätze
Hinweis: Angaben beziehen sich auf einen Ladeausgang!
7
Bedienungsanleitung
Bestell Nr.
Power Peak® Quad EQ-BID 230 V
8196
5. inbetriebnahme des Ladegerätes
Das Ladegerät an eine 230 V Netzsteckdose anschließen.
Im Display erscheint nach kurzer Darstellung des Gerätenamens und der Versionsnummer
der Software, das Startdisplay.
Wird die „INC“-Taste während des Anschließens
der Versorgungsspannung gedrückt gehalten,
erscheint das Menü zur Sprachauswahl. Dies kann
für jeden Lader einzeln eingestellt werden.
Danach kann von dieser Anzeige aus, bei der
Inbetriebnahme die Sprache für die Menüführung
ausgewählt werden. Mit der ‘INC’- oder der ‘DEC’-Taste können die zur Verfügung stehenden Sprachen nacheinander aufgerufen werden. Dabei stehen folgende Möglichkeiten
bereit:
•
Deutsch
•
Englisch (ENGLISH)
•
Französisch (FRANCAIS)
•
Italienisch (ITALIANO)
•
Spanisch (ESPANOL)
Der Vorgang muss mit der ‘ENTER’-Taste abgeschlossen werden, dann erscheint das
oben abgebildete Startdisplay.
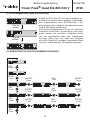
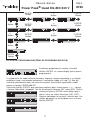
5.1 Arbeits-display
Während eines Lade- bzw. Entladevorganges werden dem Anwender über diese Anzeige
alle notwendigen Informationen zur Verfügung gestellt. In der oberen Zeile wird die
Statusanzeige, die Art des Vorganges, (‘L’
für Laden, ‘E’ für Entladen, ‘F‘ für Finish
Statusanzeige
verstrichene
(Ende) bzw. bei Lithium Akkus, `B` für
Zeit
Kapazitätsanzeige
Balancieren) dargestellt. Außerdem wird
die ge- oder entladene Kapazität und die
seit dem Start verstrichene Zeit angezeigt.
In der unteren Zeile wird der Akkutyp (‘NC’
Lade- bzw.
für Nickel-Cadmium Akkus, ‘NM’ für Nickelaktuelle
EntladeMetall Akkus, ‘LP’ für Lithium-Polymer
Akkutyp Akkuspannung
strom
Akkus, ‘Li‘ für Lithium Ionen Akkus, ‘LF‘
für Lithium Ferum Akkus und ‘Pb’- für
Bleiakkus) dargestellt. Damit werden während eines Lade- bzw. Entladevorganges auf
einen Blick sämtliche wichtigen Parameter angezeigt.
8
Bedienungsanleitung
Bestell Nr.
Power Peak® Quad EQ-BID 230 V
8196
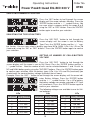
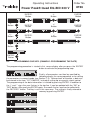
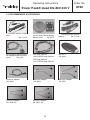
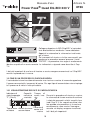
5.2 Anschluss der Akkus
Wichtig!!! Vor dem Anschluss eines Akkus unbedingt die eingestellten Parameter noch
einmal genau überprüfen. Bei falscher Einstellung kann der Akku Schaden nehmen,
explodieren oder zu brennen beginnen. Um einen Kurzschluss mit den Bananensteckern
zu vermeiden, die Ladekabel immer zuerst am Ladegerät anschließen, dann am Akku.
Beim Abklemmen in umgekehrter Reihenfolge vorgehen. Auf Polung achten!
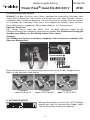
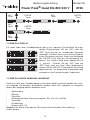
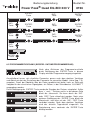
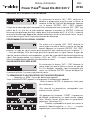
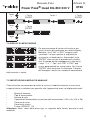
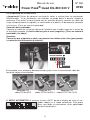
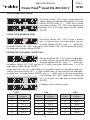
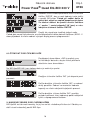
Equalizer Anschluss:
Das Voltage Sensor Kabel des Akkus, muss mit dem schwarzen Kabel an die
Pfeilkennzeichnung am Ladegerät angeschlossen werden. Die Pfeilkennzeichnung gibt
den Massepol (Minus) an. Auf Polung achten! Siehe Unten!
Achtung:
Um Schäden am Gerät zu verhindern, Ausgänge nicht miteinander verbinden (z.B.
über eine Akkuweiche)!
VOLTAGE SENSOR
+
+
+S1
+S2
-
+S3
Dieses Beispiel dient nur zur Anschauung und soll den Anschluss des Voltage Sensor
Kabels an den Equalizer verdeutlichen.
EQ-Adapter
robbe-PQ No.8213
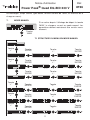
6. Automatik Modus
EQ-Adapter
robbe-JSTXH No.8214
EQ-Adapter
robbe-TP/FP No.8215
Wird vom Startdisplay aus die Taste ‘AUTO’ betätigt,
arbeitet der Lader im automatischen Modus, dabei
sind alle Parameter automatisch optimiert.
9
Bedienungsanleitung
Bestell Nr.
Power Peak® Quad EQ-BID 230 V
8196
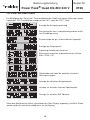
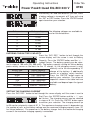
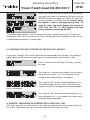
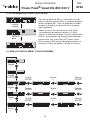
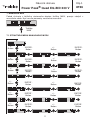
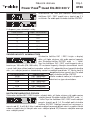
6.1 Menüstruktur des Automatik Modus (nur NC und NiMH)
‘MODE’Taste
‘START’Taste
‘MODE’Taste
‘START’Taste
‘MODE’Taste
‘START’Taste
‘MODE’Taste
‘START’Taste
‘MODE’Taste
‘START’Taste
‘MODE’Taste
‘START’Taste
6.2 Einstellungen im Automatik Modus
Im automatischen Modus werden vom Lader jeweils die optimalen Strom- und Span
nungswerte automatisch eingestellt. Dieser Modus steht nur für NC- und NiMH-Akkus zur
Verfügung. Mit der ‘MODE’-Taste werden die drei zur Verfügung stehenden Vorgänge
(LADEN; ENTLADEN; ENTLADEN -> LADEN) jeweils für die beiden Akkutypen ausgewählt.
Mit der ‘START’-Taste wird bei angeschlossenem Akku der jeweilige Vorgang eingeleitet.
Begleitet von einem akustischen Signal wechselt die Anzeige, es werden die Ladepara
meter dargestellt. In der oberen Zeile wird neben dem Vorgang Laden (L) oder Entladen
(E) die ge- oder entladene Kapazität angezeigt. Außerdem wird dort die verstrichene Zeit
seit dem Start des Vorganges dargestellt. In der unteren Zeile wird der Akkutyp, die aktuelle Akkuspannung und der Ladestrom angezeigt. Zur Kennzeichnung des automatischen
Modus wechselt die Stromanzeige mit dem Schriftzug ‘auto’.
Mit der ‘STOP’-Taste kann der Vorgang abgebrochen werden, es wird dann wieder das
Display des Automatik-Modus angezeigt. Nach dem Ende des Vorganges, wenn der Akku
10
Bedienungsanleitung
Bestell Nr.
Power Peak® Quad EQ-BID 230 V
8196
voll ge- oder entladen ist, werden im Display die erreichten Werte (ge- oder entladene
Kapazität, Vorgangszeit, Akkutyp, aktuelle Akkuspannung und der aktuelle Strom) angezeigt.
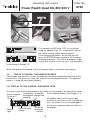
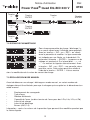
7. Manueller Modus
Wird vom Startdisplay aus die Taste ‘MAN’ betätigt,
arbeitet der Lader im manuellen Modus. Nun müssen Sie die Parameter von Hand eingeben.
‘MAN’Taste
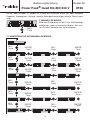
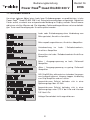
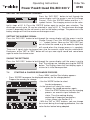
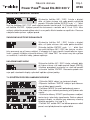
7.1 Menüstruktur des manuellen Modus
INC/Taste
INC/Taste
INC/Taste
INC/Taste
INC/Taste
INC/Taste
‘ENTER’Taste
INC/Taste
‘ENTER’Taste
‘ENTER’Taste
INC/Taste
‘ENTER’Taste
‘ENTER’Taste
INC/Taste
‘ENTER’Taste
‘ENTER’Taste
INC/Taste
‘ENTER’Taste
‘ENTER’Taste
INC/Taste
‘ENTER’Taste
‘ENTER’Taste
INC/Taste
‘ENTER’Taste
11
INC/Taste
INC/Taste
Bedienungsanleitung
Bestell Nr.
Power Peak® Quad EQ-BID 230 V
8196
INC/Taste
‘ENTER’Taste
‘ENTER’Taste
‘ENTER’Taste
INC/Taste
7.2 Einstell-display
Für jeden Lade- bzw. Entladeparameter gibt es ein separates Einstell-Menü mit zugehöriger Display
anzeige. Mit der ‘INC’- oder der
‘DEC’-Taste wird der zu verändernde Parameter
angewählt. Die obere Zeile ist am rechten Rand mit
einem Pfeil gekennzeichnet. Durch eine Betätigung
der ‘ENTER’-Taste wird der Einstellvorgang eingeleitet. Am rechten Rand blinkt abwechselt ein
‘+’- und ein ‘-’-Zeichen. Mit der ‘INC’- oder der
‘DEC’-Taste kann ein neuer Wert programmiert
werden. Mit der ‘ENTER’-Taste wird die Einstellung
abgeschlossen. Die dargestellte Displayfolge zeigt
exemplarisch die Veränderung des Ladestroms.
7.3 Einstellungen im manuellen Modus
Bevor ein Lade- bzw. Entladevorgang im manuellen Modus gestartet werden kann, müssen folgende Einstellungen durchgeführt werden, damit das Ladegerät im manuellen
Modus den Vorgang optimal abarbeiten kann:
•
Speicherplatz
•
Akkutyp
•
Zellenzahl
•
Akkukapazität (bzw. Akkuspannung bei LiPo, LiIo, LiFe und Pb)
•
Ladestrom
•
Entladestrom
•
Piepser (AUS,1-5)
Hinweis: Nur Werte in der oberen Zeile können bei blinkendem Pfeilsymbol ge-
ändert werden.
12
Bedienungsanleitung
Bestell Nr.
Power Peak® Quad EQ-BID 230 V
8196
Auswahl des Speicherplatzes
Durch Betätigung der ‘INC’ Taste im Display weiterblättern bis der Pfeil neben Speicherplatz steht.
‘ENTER’-Taste drücken, ’+ / -’ -Zeichen blinkt. Nun
kann mit der ‘INC / DEC’-Taste der Speicherplatz
zwischen 0 und 9 gewählt werden. Nach Auswahl
erneut ‘ENTER’-Taste drücken.
Auswahl des Akkutyps
Durch Betätigung der INC / DEC Taste im Display
weiterblättern bis der Pfeil neben Akkutyp steht.
‘ENTER’-Taste drücken, ’+ / -’ -Zeichen blinkt.
Mit der ‘INC / DEC’-Taste aus der Auswahl NiCd,
NiMH, LiPo, LiIo, LiFe oder PB (Blei) den Akkutyp wählen. Nach Auswahl erneut ‘ENTER’Taste drücken.
Zellenzahl / Akkuspannung festlegen
Durch Betätigung der INC / DEC Taste im Display
weiterblättern bis der Pfeil neben Zellenzahl steht.
‘ENTER’-Taste drücken, ’+ / -’ -Zeichen blinkt. Nun
kann für NC- und NiMH-Akkus mit der ‘INC / DEC’-Taste die Zellenzahl zwischen 1 und 14
gewählt werden. Nach Auswahl erneut ‘ENTER’-Taste drücken.
Bei den Akkutypen LiPo, LiIo, LiFe und Pb (Blei) wird statt der Zellenzahl die
Akkunennspannung festgelegt.
Beispiel: Durch Betätigung der INC / - Taste im Display weiterblättern bis der Pfeil neben
Akku-Spannung steht. ‘ENTER’-Taste drücken, ’+ /
-’ -Zeichen blinkt. Nun kann für LiPo-Akkus mit der
‘INC / DEC’-Taste die Akkuspannung in Schritten
von 3,7 V pro Zelle gewählt werden. Nach Auswahl
erneut ‘ENTER’-Taste drücken.
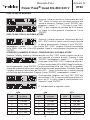
Folgende Auswahl steht zur Verfügung:
LiPo
Zellenzahl Akkuspannung
1
3,7 Volt
2
7,4 Volt
3
11,1 Volt
4
14,8 Volt
5
18,5 Volt
6
22,2 Volt
LiIo
Zellenzahl Akkuspannung
1
3,6 Volt
2
7,2 Volt
3
10,8 Volt
4
14,4 Volt
5
18,0 Volt
6
21,6 Volt
13
LiFe
Zellenzahl Akkuspannung
1
3,3 Volt
2
6,6 Volt
3
9,9 Volt
4
13,2 Volt
5
16,5 Volt
6
19,8 Volt
Bedienungsanleitung
Bestell Nr.
Power Peak® Quad EQ-BID 230 V
8196
Alternativ kann für Blei-Akkus mit der ‘INC / DEC’Taste die Akkuspannung in Schritten von 2 V
pro Zelle gewählt werden. Nach Auswahl erneut
‘ENTER’-Taste drücken.
Folgende Auswahl steht zur Verfügung:
Zellenzahl
Akkuspannung
1
2 Volt
2
4 Volt
3
6 Volt
4
8 Volt
5
10 Volt
6
12 Volt
Eingabe der Akkukapazität
Durch Betätigung der INC / DEC Taste im Display
weiterblättern bis der Pfeil neben Akku-Kapazität
steht. ‘ENTER’-Taste drücken, ’+ / -’ -Zeichen
blinkt. Nun kann mit der ‘INC / DEC’-Taste die
Akkukapazität in Schritten von 100 mAh (PB; 500 mAh) gewählt werden. Die Einstellung
der Akkukapazität bei Lithium Akkus, dient in erster Linie als Basis der 1C Ladung des
Akkus, d.h. der Ladestrom stellt sich automatisch auf die entsprechende 1C Ladung des
Akkus ein. Darüber hinaus dient sie
zur Sicherheitsabschaltung des Akkus.
Akkutyp
Akku Kapazität
Nach Auswahl erneut ‘ENTER’-Taste
NiCd
100 - 9900 mAh
drücken.
NiMH
100 - 9900 mAh
Nebenstehende Auswahl steht in
LiPo
100 - 9900 mAh
Abhängigkeit vom Akkutyp zur VerfüLiIo
100 - 9900 mAh
gung.
LiFe
100 - 9900 mAh
Pb (Blei)
0,50 Ah - 20,00 Ah
Einstellung des Ladestromes
Durch Betätigung der INC / DEC Taste im Display weiterblättern bis der Pfeil neben Ladestrom steht. ‘ENTER’-Taste drücken, ’+ / -’ -Zeichen blinkt. Nun kann mit der ‘INC / DEC’-Taste der
Ladestrom in Schritten von 0,1 A gewählt werden.
Nach Auswahl erneut ‘ENTER’-Taste drücken. Der
Ladestrom kann von 0,1 A bis 5,0 A eingestellt werden. Die max. Ladestromstärke ist
dabei aber von der Zellenzahl bzw. der Akkuspannung abhängig (bei Lithium Akkus max.
2C). Der Prozessor des Ladegerätes begrenzt den max. Ladestrom.
14
Bedienungsanleitung
Bestell Nr.
Power Peak® Quad EQ-BID 230 V
8196
Einstellung des entLadestromes
Durch Betätigung der INC / DEC Taste im Display
weiterblättern bis der Pfeil neben Entladestrom
steht. ‘ENTER’-Taste drücken, ’+ / -’ -Zeichen blinkt.
Nun kann mit der ‘INC / DEC’-Taste der Entladestrom in Schritten von 0,1 A gewählt werden. Nach Auswahl erneut die ‘ENTER’-Taste
drücken. Der Entladestrom kann im Bereich von 0,1 A bis 1,0 A eingestellt werden. Die
max. Entladestromstärke ist dabei aber von der Zellenzahl bzw. der Akkuspannung abhängig. Der Prozessor des Ladegerätes begrenzt den max. Entladestrom.
Vorgabe des akustischen Signals
Durch Betätigung der INC / DEC Taste im Display
weiterblättern bis der Pfeil neben Piepser steht.
‘ENTER’-Taste drücken, ’+ / -’ -Zeichen blinkt. Nun
kann mit der ‘INC / DEC’-Taste der Ton ausgewählt
werden, mit dem z.B. das Ladeende akustisch angezeigt wird. Es stehen 5 Signalarten zur
Verfügung, außerdem kann der Signalgeber ausgeschaltet werden. Bei jeder Betätigung
der ‘INC’- oder der ‘DEC’-Taste wird ein neuer Ton eingestellt und dabei gleichzeitig, zur
Erleichterung der Auswahl, einmal wiedergegeben.
Speichern der Einstellungen
Durch Betätigung der INC / DEC Taste im Display
weiterblättern bis der Pfeil neben Ende steht. Die
vorgenommenen Einstellungen werden durch Betätigung der ‘ENTER’-Taste gespeichert. Das Display
zeigt danach wieder das Startdisplay an, es springt in die Ausgangsposition zurück.
7.4 Start eines Lade- / Entladevorgangs
•
‘MAN’ drücken, das Startdisplay erscheint
•
Mit der Taste ‘ENTER’ für den angezeigten
Speicherplatz die Ladung vorbereiten.
•
Mit der ‘MODE’-Taste kann der gewünsch
te Vorgang ausgewählt werden.
•
Zur Sicherheit werden die gespeicherten
Parameter noch einmal angezeigt.
•
Drücken der ‘START’- Taste löst den Lade
vorgang aus, ein akustisches Signal zeigt
den Zustand an. Danach wird das Arbeits
display, in dem alle wichtigen Parameter an
gezeigt werden, dargestellt (siehe Kap. 5.1).
•
Mit der ‘INC’- oder ‘DEC’-Taste kann während des Vorgangs der Strom geändert werden, der
neue Wert blinkt vor der Übernahme zunächst.
15
Bedienungsanleitung
Bestell Nr.
Power Peak® Quad EQ-BID 230 V
8196
8. Programmierung eines BID-Chips/KEY
Sobald ein BID-Chip/ KEY mit dem Ladegerät verbunden wird, wechselt das Ladegerät in den Modus
zum Programmieren eines BID-Chips/Key`s. Das
gilt auch wenn das Ladegerät mit angeschlossenem
Chip in Betrieb genommen wird.
Von diesem Ausgangsmenü lassen sich sämtliche
Parameter für den Akku, an dem dieser Chip angebracht werden soll, einstellen. Außerdem lassen
sich evtl. gespeicherte Lade- bzw. Entladewerte
auslesen (siehe Kap. 8.3). Nach dem Abziehen
eines BID-Chips/Key`s wird das Programmier-Menü
verlassen und wieder das Startdisplay angezeigt.
Chip anstecken
Chip abziehen
8.1 Menüstruktur des Programmiervorganges
INC/Taste
‘ENTER’Taste
INC/Taste
INC/Taste
‘ENTER’Taste
INC/Taste
‘ENTER’Taste
‘ENTER’Taste
INC/Taste
‘ENTER’Taste
‘ENTER’Taste
INC/Taste
‘ENTER’Taste
INC/Taste
16
INC/Taste
INC/Taste
Bedienungsanleitung
Bestell Nr.
Power Peak® Quad EQ-BID 230 V
8196
‘ENTER’Taste
INC/Taste
‘ENTER’Taste
‘ENTER’Taste
INC/Taste
‘ENTER’Taste
‘ENTER’Taste
INC/Taste
‘ENTER’Taste
INC/Taste
‘ENTER’Taste
8.2 Programmiervorgang (Beispiel Datumsprogrammierung)
Nach dem Aktivieren der Programmierschleife
durch Betätigung der ‘ENTER’-Taste in diesem
Display wird der Programmiervorgang eingeleitet.
Anschließend lassen sich sämtliche Parameter, genau nach dem gleichen Verfahren
und Ablauf wie bei der Einstellung der Parameter im manuellen Modus (siehe Kap. 7.3),
vorgeben. Damit der Überblick über die Daten gewährleistet bleibt, kann an Stelle der
Vorgabe für den akustischen Signalgeber, ein Datum, in der Schreibweise ‘JJJJ-MM-TT’
vorgegeben werden.
Durch Betätigung der ‘ENTER’-Taste wurde die Eingabe des Datums eingeleitet. Außer
dem ‘+’ und ‘-’- Zeichen rechts in der oberen Zeile
blinkt die Jahreszahl. Sie kann durch die ‘INC’oder ‘DEC’-Taste aktualisiert werden. Nach einer
weiteren Betätigung der ‘ENTER’-Taste blinkt die
Monatszahl, und kann mit der ‘INC / DEC’-Taste
verändert werden. Nach dem gleichen Verfahren
wird das aktuelle Tagesdatum eingestellt. Zur
Speicherung muss nochmals die ‘ENTER’-Taste
betätigt werden.
17
Bedienungsanleitung
Bestell Nr.
Power Peak® Quad EQ-BID 230 V
8196
Zum Schluss muss die Eingabe der Parameter
durch eine Betätigung der ‘ENTER’-Taste abgeschlossen werden, damit die neuen Werte auf dem
BID-Chip dauerhaft gespeichert werden. Wenn bei
der Eingabe eine Änderung der Daten erfolgt
ist, erscheint zuerst eine Sicherheitsabfrage.
Zum Speichern müssen Sie mit der ‘INC’- oder
der ‘-’-Taste, die Antwort auf ‘JA’ setzen, und
anschließend die ‘ENTER’-Taste betätigen.
Der Doppelton zeigt an, dass die Änderung erfolgreich abgespeichert wurde. Sollen die
Daten nicht übernommen werden, muss die Sicherheitsabfrage mit ‘NEIN’ quittiert werden. In beiden Fällen wird wieder das Ausgangs-Display für den Programmiervorgang
angezeigt.
8.3
Ansehen der Daten des BID-Chip/ BID-Key
Nach dem Anschließen eines Akkus mit BID können folgende Daten des Akkus ausgelesen werden, um sich einen aktuellen Überblick über den genauen Zustand des Akkus zu
verschaffen.
Auf dem BID-Chip/BID-Key sind die Daten gespeichert und können ausgelesen werden.
Durch zweimalige Betätigung der ‘INC’-Taste steht
der erste Parameter zur Verfügung. Es wird die
Kapazität des aktuellen Lade- bzw. Entlade
vorgangs angezeigt.
Durch weitere zweimalige Betätigung der ‘INC’Taste wird der zweite Parameter dargestellt. Es
wird der Maximalwert der Kapazität aus allen Ladebzw. Entladevorgängen angezeigt.
Nach weiterer zweimaliger Betätigung der ‘INC’Taste wird in einem letzten Parameter, die Anzahl
der Ladezyklen und das programmierte Datum
angezeigt.
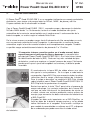
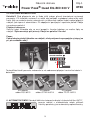
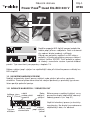
9. Lade- / Entladevorgänge mit BID-Chip/KEY
Der BID-Chip/Key hat so geringe Abmessungen, dass er in jedem Zubehör untergebracht
werden kann. Die Bilder auf der nächsten Seite veranschaulichen die Verwendung eines
BID-Chips.
18
Bedienungsanleitung
Bestell Nr.
Power Peak® Quad EQ-BID 230 V
8196
Verbinden Sie zuerst den BID-Chip/KEY über
das Adapterkabel bzw. direkt mit dem Ladegerät.
Danach wird automatisch das nebenstehende
Display anzeigt.
Wenn die Ladeparameter auf dem Chip in
Ordnung sind, muss zur Vorbereitung des Lade /
Entladevorganges die ‘ENTER’-Taste gedrückt werden. Der weitere Ablauf ist vollkommen identisch
mit dem eines normalen Starts, von einem Speicherplatz aus. Diese Zusammenhänge
sind im Kap. 7.4 beschrieben.
Während eines Lade- bzw. Entladevorganges werden die wichtigsten Daten dieses
Vorganges auf dem Chip/KEY gespeichert.
10. Ende eines Lade- / Entladevorganges
Das Ladegerät beendet automatisch einen Lade- bzw. Entladevorgang genau zum richtigen Zeitpunkt. Der Prozessor berücksichtigt dabei die Ladeparameter. Für jeden Akkutyp
wird das jeweils optimale Verfahren angewandt.
10.1 Anzeige der Lade- / Entladedaten
Statusanzeige
blinkt ‘F’ (Finish)
Akkutyp
ge- oder
entladene
Kapazität
aktuelle
Akkuspannung
Während eines Lade- bzw. Entlade
vorganges werden im Arbeitsdisplay die
Werte des Vorganges kontinuierlich angezeigt (siehe Kap. 5.1).
Lade-/Entladezeit
Ein erfolgreich abgeschlossener Vorgang
wird akustisch gemeldet. Im Display werden, wie in der nebenstehende Abbildung,
die wichtigsten Daten dargestellt.
Lade- bzw.
Entladestrom
19
Bedienungsanleitung
Bestell Nr.
Power Peak® Quad EQ-BID 230 V
8196
10.2 Zusatzinformationen
Die Betätigung der “Data View” Taste ermöglicht den Zugriff auf weitere Daten des letzten
Vorganges. Das Durchblättern erfolgt mit der ‘INC’- oder der ‘DEC’-Taste.
Anzeige der Ausgangsspannung
Darstellung der max. Ladespannung und der mittleren Entladespannung
Einzelanzeige der ge- und entladenen Kapazität
Anzeige der Vorgangszeit
Equalizing Anzeige der einzelnen
Zellenspannungen bei angeschlossenem Lithium
Akku ( Zelle 1-6 ).
Gesamtübersicht über die aktuellen einzelnen
Zellenspannungen.
Anzeige der aktuellen Akkuparameter.
Anzeige für aktuellen internen Speicherplatz.
Anzeige für aktuellen BID Speicher.
Nach dem Abziehen des Akkus wird wieder das Start-Display angezeigt, sämtliche Daten
werden gelöscht und stehen nicht mehr zur Verfügung!
20
Bedienungsanleitung
Bestell Nr.
Power Peak® Quad EQ-BID 230 V
8196
11. Fehlermeldungen
Um einen sicheren Ablauf eines Lade- bzw. Entladevorganges zu gewährleisten, ist das
Power Peak® Quad EQ-BID 230 V mit Sicherheitsvorrichtungen ausgestattet. Sobald ein
Fehler auftritt, erscheint eine entsprechende Meldung im Display und der Piezo-Summer
gibt einen schrillen Warnton ab. Die folgenden Fehlermeldungen können mit einer beliebigen Taste nach Beseitigung der Ursache quittiert werden.
Lade- oder Entladevorgang ohne Verbindung zum
Akku gestartet, Anschluss herstellen
Akku verpolt angeschlossen, Anschluss überprüfen
Unterbrechung im LadeAnschluss überprüfen
/ Entladestromkreis,
Kurzschluss im Lade- / Entladestromkreis Anschlüsse
überprüfen
Akku- / Ausgangsspannung zu hoch, Zellenzahl
überprüfen
Akku- / Ausgangsspannung zu gering, Zellenzahl
überprüfen
BID-Chip/BID-Key während eines laufenden Vorganges
vom Ladegerät getrennt, Vorgang stoppen, Verbindung
zum Chip überprüfen und neu starten.
Angeschlossene Zelle(n) befinden sich in einer
Spannungslage über 4,3 Volt.
Angeschlossene Zelle(n) befinden sich in einer
Spannungslage unter 2,75 V bei LiPo und LiIo oder
2,0 V bei LiFe.
Voltage-Sensorkabel nicht angeschlossen.
21
Bedienungsanleitung
Bestell Nr.
Power Peak® Quad EQ-BID 230 V
8196
12.Sicherheitshinweise
!
• Ladegerät und angeschlossene Akkus niemals auf brennbare Unterlagen legen. Nie in der Nähe
von brennbarem Material oder Gasen betreiben.
• Gerät nicht unter Spannung öffnen!
• Lassen Sie es während des Betriebs nicht unbeaufsichtigt. Das Gerät kann sich während des
normalen Betriebs stark erwärmen.
• Vorsicht im Umgang mit Akkupacks mit hohen Zellenzahlen. Unbedingt auf gute Isolierung achten,
sonst besteht die Gefahr eines Stromschlags.
• Der Power Peak® Quad EQ-BID 230 V ist nur zum Laden, Entladen und Equalizen von wiederaufladbaren NC- / NiMH- / Blei- und Lithium-Akkus geeignet. Keine Trockenbatterien laden, dabei
besteht Explosionsgefahr.
• Das Ladegerät ist für den Betrieb an 230 V / 50 Hz AC ausgelegt, betreiben Sie es nie mit einer
anderen Spannung.
• Beim Aufstellen auf freie Kühlöffnungen zur Luftzirkulation achten.
• Achten Sie auch auf Beschädigungen am Gehäuse und an den Kabeln.
• Schützen Sie das Ladegerät unbedingt vor Staub, Schmutz und Feuchtigkeit.
• Setzen Sie das Gerät keiner übermäßigen Kälte oder Hitze und keiner direkter Sonneneinstrahlung aus.
• Vermeiden Sie Stoß- und Druckbelastungen und setzen Sie das Ladegerät keinen starken Vibrationen aus.
• Bei längerem Nichtgebrauch das Gerät von der Stromquelle trennen und eventuell angeschlossene Akkus abnehmen.
• Keine Akkus kurz hintereinander ein zweites Mal laden.
• Keine Akkus laden, die stark erwärmt sind. Akkus auf Umgebungstemperatur abkühlen lassen.
• Es dürfen nur Zellen gleicher Kapazität und gleichen Fabrikats im Verbund geladen werden.
• Nicht zwei Akkus an einem Ausgang beim Laden parallel laden, nur einen Akkupack anschließen.
• Achten Sie unbedingt auf richtige Polung der Akkus und vermeiden Sie Kurzschlüsse.
• Überprüfen Sie die Einstellungen am Power Peak® Quad EQ-BID 230 V stets genau. Akkus
können durch unpassende Einstellungen zerstört werden.
• Achten Sie auf die Akku Anleitung des jeweiligen Herstellers.
13. Gewährleistung
Unsere Artikel sind selbstverständlich mit den gesetzlich vorgeschriebenen 24 Monaten Gewährleistung ausgestattet. Sollten Sie einen berechtigten Gewährleistungsanspruch geltend machen wollen, so wenden Sie sich immer an Ihren Händler, der Gewährleistungsgeber und für die Abwicklung
zuständig ist. Während dieser Zeit werden evtl. auftretende Funktionsmängel sowie Fabrikationsoder Materialfehler kostenlos von uns behoben. Weitergehende Ansprüche z. B. bei Folgeschäden,
sind ausgeschlossen.
Der Transport zu uns muss frei erfolgen, der Rücktransport zu Ihnen erfolgt ebenfalls frei. Unfreie
Sendungen können nicht angenommen werden.
Für Transportschäden und Verlust Ihrer Sendung können wir keine Haftung übernehmen. Wir empfehlen eine entsprechende Versicherung.
Senden Sie Ihre Geräte an die für das jeweilige Land zuständige Servicestelle.
Zur Bearbeitung Ihrer Gewährleistungsansprüche müssen folgende Voraussetzungen erfüllt werden:
• Legen Sie Ihrer Sendung den Kaufbeleg (Kassenzettel) bei.
• Die Geräte wurden gemäß der Bedienungsanleitung betrieben.
• Es wurden ausschließlich empfohlene Stromquellen und original robbe-Zubehör verwendet.
• Feuchtigkeitsschäden, Fremdeingriffe, Verpolung, Überlastungen und mechanische Beschädigungen liegen nicht vor.
• Fügen Sie sachdienliche Hinweise zur Auffindung des Fehlers oder des Defektes bei.
22
Bedienungsanleitung
Bestell Nr.
Power Peak® Quad EQ-BID 230 V
8196
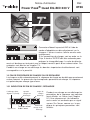
14. Empfohlenes Zubehör
Senderakkuladekabel
No. F 1415
BID-Chip ohne Kabel, zur
Ausstattung weiterer
Akkus.
No. 8472
Empfängerakkuladekabel No. F 1416
BID-Chip mit Kabel 300
mm, zur Ausstattung weiterer Akkus
No. 8473
BID-Kabel, 300 mm
No. 8474
BID-KEY
No. 8888
BID-Kabel, 500 mm
No. 8475
Balanceradapter
No. 4029
Balanceradapter
No. 4023 XH
Balanceradapter
No. 4023
Balanceradapter
No. 4031 XH
23
Balanceradapter
No. 4031
15. Konformitätserklärung
Hiermit erklärt die robbe Modellsport
GmbH & Co. KG, dass sich dieses Gerät
in Übereinstimmung mit den grundlegenden Anforderungen und anderen relevanten
Vorschriften der entsprechenden CE Richtlinien
befindet. Die Original-Konformitätserklärung finden Sie im Internet unter www.robbe.com, bei
der jeweiligen Gerätebeschreibung durch Aufruf
des Logo-Buttons „Conform“.
Dieses Symbol bedeutet, dass elektrische und elektronische Kleingeräte am
Ende ihrer Nutzungsdauer, vom Hausmüll getrennt, entsorgt werden müssen.
Entsorgen Sie das Gerät bei Ihrer örtlichen
kommunalen Sammelstelle oder Recycling-Zentrum. Dies gilt für alle Länder der Europäischen
Union sowie anderen Europäischen Ländern mit
separatem Sammelsystem.
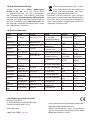
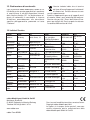
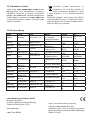
16.Service Adressen
Land
Andorra
Dänemark
Deutschland
England
Frankreich
Griechenland
Italien
Niederlande/
Belg.
Norwegen
Österreich
Schweden
Schweiz
Slowakische
Rep.
Spanien
Tschech.
Rep.
Firma
Strasse
Stadt
AND-00130
Sorteney
Santa Anna, 13
Les escaldesPrINCip.D‘Andorre
Nordic Hobby
DK-8940 Randers
Bogensevej 13
A/S
SV
D-36355
robbe-Service Metzloser Str. 38
Grebenhain
robbe-Schlüter
GB-LE10 3DS
LE10-UB
UK
Leicestershire
6, Rue Usson du
S.A.V Messe
F-57730 Folschviller
Poitou, BP 12
TAG Models
GR-14341 New
18,Vriullon Str.
Hellas
Philadelfia/Athen
I-36010 Cavazzale
Via del Progresso,
MC-Electronic
di Monticello C.Otto
25
(Vi)
Jan van
Slot de Houvelaan
NL-3155 Maasland
Mouwerik
30
Norwegian
Box 2140
N-3103 Toensberg
Modellers
robbe-Service Puchgasse 1
A-1220 Wien
Minicars
Bergsbrunnagatan
S-75323 Uppsala
Hobby A.B.
18
robbe Futaba
Baselstrasse 67 A CH-4203 Grellingen
Service
Ivo Marhoun Horova 9
CZ-35201 AS
D-36355
robbe-Service Metzloser Str. 38
Grebenhain
Ivo Marhoun Horova 9
CZ-35201 AS
robbe Modellsport GmbH & Co.KG
Metzloser Straße 38
D-36355 Grebenhain Metzlos/Gehaag
Telefon INC49 (0) 6644 / 87-0
www.robbe.com
robbe Form BBBB 40-xxxx
Telefon
Fax
00376-825
00376-862 865
476
0045-86-43
0045-86-43
61 00
77 44
0049-6644-87- 0049-6644-87777
779
0044-14550044-1455637151
635151
0033 3 87 94 0033-3-87 94
62 58
62 58
0030-20030-2102584380
102533533
0039 0444
0039 0444
945992
945991
0031-10-59 13 0031-10-59 13
594
594
0047-333 78
0047-333 78
000
001
0043-12590043-125866-52
11-79
0046-186 06
0046-186 06
571
579
0041-61-741
0041-61 741
23 22
23 34
00420 351 120
162
0049-6644-87- 0049-6644-87777
779
00420 351 120
162
Irrtum und technische Änderungen vorbehalten
Copyright robbe-Modellsport 2011
Kopie und Nachdruck, auch auszugsweise,
nur mit schriftlicher Genehmigung der robbeModellsport GmbH & Co.KG
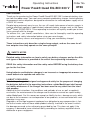
Operating Instructions
Operating Instructions
Notice d’utilisation
Manuale d‘uso
Power Peak® Quad EQ-BID 230 V
No. 8196
Operating Instructions
Order No.
Power Peak® Quad EQ-BID 230 V
8196
Dear customer,
Thank you for purchasing the Power Peak® Quad EQ-BID 230 V automatic battery charger from the robbe range. You now have a compact quad battery charger, featuring battery
management and an equalizer, designed for connection to switched power supply unit or
a 230 V AC source.
Despite being extremely easy to use, the use still needs to be aware of certain aspects in
order to effectively operate a sophisticated, automatic battery charger such as the Power
Peak® Quad EQ-BID 230 V. These operating instructions will quickly enable you to familiarise yourself with the charger.
To achieve this, you should, nevertheless, take care to thoroughly read the operating
instructions and safety information before using your new charger.
We wish you every success and enjoyment in using your new battery charger!
These instructions only describe a single charge output, and are the same for all
four outputs since they operate on the same principle!
!
Safety
Notes
Detailed safety information on how to safely use battery chargers and on the different types of batteries is provided at the end of these operating instructions.
READ this safety information and the safety notes BEFORE using the battery charger for the first time.
Using batteries and batteries chargers in an incorrect or inappropriate manner can
cause batteries to explode and catch fire.
Liability exclusion
This battery charger is designed and approved solely for the purpose of charging
the batteries defined in the operating instructions. robbe Modellsport shall accept
no liability whatsoever if the charger has been used for any other than the intended purpose.
Adhering to the instructions, the conditions and methods of use, as well as application chosen, the maintenance of the charger and the batteries cannot be supervised by
robbe Modellsport. For this reason we accept no liability for loss, damage or costs which
are due to the erroneous use and operation of our products, or are connected with such
operation in any way.
Regardless of the legal argument employed, our obligation to pay compensation is limited to the invoice value of those robbe products directly involved in the event in which
the damage occurred, unless otherwise prescribed by law. This does not apply if the
company is deemed to have unlimited liability according to statutory regulation due to
deliberate or gross negligence.
2
Operating Instructions
Order No.
Power Peak® Quad EQ-BID 230 V
8196
Table of contents
ChapterPage
Safety Notes
2
1. Delivery Specification
4
2. General Description
5
3.Controls 6
3.1 Description of Controls
6
4. Specification
7
5. Using the charger for the first time
8
5.1 Working Display
8
5.2 Connecting the Battery
9
6.Automatic mode
9
6.1 Menu structure in automatic mode
10
6.2 Settings in Automatic Mode
10
7. Manual Mode
11
7.1 Menu Structure for Manual Mode
11
7.2 Set-up display
12
7.3 Settings in Manual Mode
12
7.4. Starting a charge/discharge process
15
8. Programming a BID chip / key
16
8.1 Menu structure, programming procedure
16
8.2 Programming procedure
17
8.3 Reading the Data on a BID Chip/Key
18
9.Charge / discharge processes with a BID chip / key 18
10. End of a charge / discharge process
19
10.1 Display of the charge / discharge data
19
10.2 Additional Information (Data View Button)
20
11. Error messages
21
12. General safety notes
22
13.Guarantee 22
14. Recommended accessories
23
15.Conformity Declaration
24
End of life disposal of used equipment
24
16. Service Centre Addresses
24
3
Operating Instructions
Order No.
Power Peak® Quad EQ-BID 230 V
8196
1.Contents
The Set contains:
1x Power Peak® Quad EQ-BID 230 V
1 x BID-Chip with lead
1 x Equalizer Adapter PQ
1 x Equalizer Adapter XH
1 x Equalizer Adapter TP
4
2.
Operating Instructions
Order No.
Power Peak® Quad EQ-BID 230 V
8196
General Description
The Power Peak® Quad EQ-BID 230 V is an intelligent battery charger with convenient
battery management for charging and discharging NC, NiMH, lead and lithium rechargeable battery packs.
Additionally, it features a built-in equalizer.
The Power Peak® Triple 230 W EQ-BID 230 V is used to charge or discharge 1 to 14
cell NC or NiMH battery packs both in automatic mode with automatic current adjustment as well as in manual mode. The Delta-Peak method is used to switch off the
device when the battery is fully charged.
Likewise, up to 6-series connected lithium cells can be charged with a maximum current
of up to 5 amps. The Cut-Off is made automatically when the battery reaches its fullycharged voltage. It is also possible to automatically charge lead batteries from 2 to 12
Volt.
10 internal memory storage locations allow you to store battery-specific
data for charging and discharging up to ten different batteries in manual
mode. The main feature of the Power Peak® Quad EQ-BID 230 V is the
future-proof battery identification system (BID). As the variety of different
batteries is becoming ever more diverse, each type of battery requires its
"own individual" charging process. It is easy to set up the charger incorrectly for a specific type of battery, resulting in costly damage to the battery.
The revolutionary BID-System from robbe offers a brilliant
solution for this problem. Each battery will be fitted with a
small, light BID chip/key. This stores all the relevant data to
charge and discharge the battery to the optimum. The BID
chip assigned to the battery connects to the Power Peak®
Quad EQ-BID 230 V and transfers the parameters to the
charger. Simply press the ‘Start’ button, and the charge or
discharge process begins. No tiresome searching through
menus for the set-up parameters, maximum protection from
mishandling, and storing of the relevant battery data in the
BID chip - those are the unique advantages of the BID system. By storing the most important data in the BID chip/key, all
the data required for safe, optimum charging and discharging
is always “on board” the battery, which can be easily displayed
on the charger itself. This function means that PC software
and computer technology are no longer required to obtain an
overview of the current battery status.
To provide the battery condition.
5
Operating Instructions
Order No.
Power Peak® Quad EQ-BID 230 V
8196
3.Controls
Menu control
buttons
Display
Battery connection (red=„+“, black=“-“)
Voltage sensor
connection
3.1
BIDconnection:
Description of Controls
As indicated by the labelling, the 4 operating buttons on the Power Peak® Quad EQ-BID
230V have several functions. The buttons trigger different actions in different operating
situations.
‘DEC’ / MODE / AUTO BUTTON
• In manual mode this button is used to reduce the values of the charging parameters by
one during set-up and select the previous menu in the menu selection.
• The required operation (CHARGE, DISCHARGE or DISCHARGE->CHARGE) can be
pre-selected with the MODE button.
• After connecting to the supply voltage, this button is used to activate "automatic mode"
(AUTO.) in the selection menu.
‘INC’ / START / MAN BUTTON
• In Manual Mode- during set-up, this button is used to increase the value of the charge
parameter by one and select the next menu in the menu selection.
• The START button is pressed to start the selected operation, e.g. CHARGE.
• After connecting to the supply voltage, this button is used to select "manual mode"
(MANUAL) in the start screen selection menu.
• The 'INC' button is also used to select the required language. The language selection
menu is accessed by pressing the 'INC' while connecting the supply voltage.
6
Operating Instructions
Order No.
Power Peak® Quad EQ-BID 230 V
8196
STOP / ENTER BUTTON
• A current operation, e.g. CHARGE, can be terminated by pressing the STOP button.
• The ENTER button confirms a selection, e.g. activation or deactivation of a selected
menu.
DATA VIEW BUTTON
• Shows the charger data, e.g. input voltage. Pressing this button also shows all individual cell voltages of a connected LiPo battery pack.
All buttons have an Autorepeat function so that the respective function is repeatedly switched when the button is held pressed.
INTEGRATED SOUND GENERATOR
• The piezo buzzer confirms each time a button is pressed and acoustically signals the end
of charging/discharging as well as any faults.
4.
Technical Specification
Operating Voltage:
230 V AC/ 50 Hz
Cell count:
1 ... 14 cells NC/NiMH,
1 ... 6 cells LiIo (3.6 V), LiPo (3.7 V), LiFe (3.3 V)
1 ... 6 cells (2...12 V) lead-acid battery
Charging current:
0.1 ... 5 A at max. 50 W
Discharging current:
0.1 ... 1 A at max. 5 W
Equalizing current:
max. 250 mA
Charging power:
50 W, current is controlled to suit
e.g. 24 V battery voltage, charging current approx. 2.0 A
e.g. 28 V battery voltage, charging current approx. 1.7 A
Discharging power:
5 W, current is controlled to suit
Trickle charge:
Charged capacity <1 Ah: No trickle charge
Charged capacity >1 Ah: Trickle charge at C/20
(only with NC and NiMH)
Cut-off voltage:
0.8 V per cell for NC and NiMH,
3.0 V per cell for LiPo, Lilo
2.5 V per cell for LiFe
1.8 V per cell for lead batteries
Charge Cut-Off:
NC/NiMH:
automatic, digital Delta-Peak system
Lead and lithium:
automatic, voltage-dependent, CC-CV method
Dimensions:
est. 225 x 170 x 40 mm
Functions:
Charge, discharge, discharge-charge, balance
10 internal memory locations
Note:stated values refer to a single charge output port!
7
5.
Operating Instructions
Order No.
Power Peak® Quad EQ-BID 230 V
8196
Using the charger for the first time
Connect the charger to a 230 V 50 Hz mains socket.
The language selection menu appears if the '+' button is pressed and held while connecting the supply
voltage. This can be
The language selection menu appears if the 'INC'
button is pressed and held while connecting the supply voltage.
set separately for each charger.
The menu language can now be selected from this display. The available languages can
be selected one after the other with the 'INC' or 'DEC-' buttons. In doing so, there are the
following options available:
•
German
•
English
•
French
•
Italian
•
Spanish
Language selection must be concluded by pressing the ENTER button. The start display
shown above will then appear.
5.1
WORKING DISPLAY
This display provides the user with all the necessary information during a charging or
discharging operation. The upper line of the status display shows the type of operation
(C for charging, D for discharging, F for
Status indicator
Time
finish and alternately C/B for balancing
elapsed
lithium batteries). The charged or discharCapacity indicator
ged capacity and the time elapsed since
the start are also shown on the top line.
The type of battery (NC for nickel-cadmium
battery, NM for nickel-metal battery, LP for
Charge or
lithium-polymer battery, Li for lithium-ion
Current battery
Battery
discharge
voltage
battery, LF for lithium-ferum battery and
type
current
Pb for lead battery) is shown on the bottom
line. The display therefore shows all important parameters at a glance during a charging or discharging operation.
8
Operating Instructions
Order No.
Power Peak® Quad EQ-BID 230 V
8196
5.2Connecting the Battery
Important!!! Before connecting a battery pack, make one last check that all the set parameters are correct! The battery may be damaged, explode or catch fire if the settings are
incorrect. To avoid a short-circuit with the banana plugs, always connect the charging
leads to the battery charger first and then to the battery. Follow the reverse procedure
when disconnecting. Ensure correct polarity!
Equalizer connection:
The black wire of the voltage sensor lead from the battery must be connected to the
charger at the arrow marking. The arrow marking indicates the earth pole (negative).
Ensure correct polarity! See below!!
Caution:
To avoid damage to the unit, never connect outputs together (e.g via a battery
backer)!
VOLTAGE SENSOR
+
+
+S1
+S2
-
+S3
This example only serves as a reference and is intended to demonstrate the connection
of the voltage sensor lead to the equalizer.
EQ-Adapter
robbe-PQ No.8213
6.Automatic mode
EQ-Adapter
robbe-JSTXH No.8214
EQ-Adapter
robbe-TP/FP No.8215
When the "AUTO" button is pressed from the start
display, the charger operates in automatic mode,
whereupon, all the parameters are set automatically.
9
6.1
Operating Instructions
Order No.
Power Peak® Quad EQ-BID 230 V
8196
Menu Structure for Automatic Mode (only NC and NiMH)
‘MODE’Button
‘START’button
‘MODE’Button
‘START’Button
‘MODE’Button
‘START’Button
‘MODE’Button
‘START’Button
‘MODE’Button
‘START’Button
‘MODE’Button
‘START’Button
6.2
Settings in Automatic Mode
The battery charger automatically sets the charging/discharging current and the number of
cells in automatic mode. This mode is only available for NC and NiMH battery packs. The
three operations (CHARGE; DISCHARGE; DISCHARGE->CHARGE) available for the two
types of battery are selected with the MODE button.
With the battery connected, the required operation is initiated by pressing the START button. Accompanied by an acoustic signal, the display changes over to the working display
(see Section 5.2, Page 8). The top line shows the process - Charge (C) or Discharge (D)
- and the charged-in or discharged capacity. Also, the time elapsed since the start of the
process is displayed. The bottom line shows the battery type, the current battery voltage
and the charge current. The current display alternates with the word ‘auto’ to indicate that
the charger is in automatic mode.
The process can be terminated by pressing the STOP button; the display for automatic
mode is then shown again. When the process is complete, the achieved final values are
10
Operating Instructions
Order No.
Power Peak® Quad EQ-BID 230 V
8196
shown in the display (charge/discharge capacity, process time, battery type, battery voltage and current).
7.
Manual Mode
The charger operates in manual mode when the
"MAN" button is pressed from the start display. In
this case, you have to enter the parameters manually.
Tlačítko
‘MAN’
7.1
+/Button
+/Button
+/Button
+/Button
+/Button
+/Button
Menu Structure for Manual Mode
‘ENTER’Button
+/Button
‘ENTER’Button
‘ENTER’Button
+/Button
‘ENTER’Button
‘ENTER’Button
+/Button
‘ENTER’Button
‘ENTER’Button
+/Button
‘ENTER’Button
‘ENTER’Button
+/Button
‘ENTER’Button
‘ENTER’Button
+/Button
‘ENTER’Button
11
+/Button
+/Button
Operating Instructions
Order No.
Power Peak® Quad EQ-BID 230 V
8196
+/Button
‘ENTER’Button
‘ENTER’Button
‘ENTER’Button
+/Button
7.2 SET-UP DISPLAY
There is a separate Set-up menu with a corresponding screen display for each charge or
discharge parameter. The parameter to be changed is selected with the 'INC' or the 'DEC' button.
The corresponding line is indicated by an arrow
on the right-hand display margin. The set-up procedure is initiated by pressing ENTER. A '+' and
a '-' sign flash alternately on the right-hand screen
margin. A new value can be entered with the 'INC'
or the 'DEC' button. Press ENTER to confirm the
new setting. The illustrated display sequence
shows a typical example of how the charging current is changed.
7.3
Settings in Manual Mode
The following settings have to be entered manually before a charge or discharge process can be started in manual mode; this ensures that the charger is able to work
through the process efficiently when in this mode:
•
Battery memory
•
Battery type
•
Cell count
•
Battery capacity (or battery voltage for LiPo, LiIo, LiFe and Pb)
•
Charge current
•
Discharge current
•
Buzzer (OFF, 1-5)
Note: Only values in the first line can be changed when the arrow symbol is flashing.
12
Operating Instructions
Order No.
Power Peak® Quad EQ-BID 230 V
8196
SELECTING A MEMORY LOCATION
Press the ‘INC’ button to leaf through the screen
display until the arrow indicates Memory. Press the
‘ENTER’ button and the ‘+ / -’ symbol flashes. You
can now select a memory within the range 0 to 9
using the ‘INC’ or ‘DEC’ button. Press the ‘ENTER’
button again to confirm your selection.
SELECTING THE TYPE OF BATTERY
Press the ‘INC/ DEC ’ button to leaf through the
screen display until the arrow is next to Battery
Type. Press the ‘ENTER’ button and the ‘+ / -’ symbol flashes. You can now select a battery type from NiCd, NiMH, LiPo, LiIo, LiFe or Pb
(lead-acid) using the ‘INC’ or ‘DEC’ buttons. Press the ‘ENTER’ button again to confirm
your selection.
SETTING UP NUMBER OF CELLS/BATTERY
VOLTAGE
Press the ‘INC/ DEC ’ button to leaf through the
screen display until the arrow is next to Cell Count. Press the ‘ENTER’ button and the ‘+
/ -’ symbol flashes. Now the number of cells can be selected between 1 and 14 cells for
NC and NiMH battery packs using the "INC/DEC" buttons. Press the ‘ENTER’ button again
to confirm your selection. With the battery types LiPo, LiIo, LiFe and Pb (lead-acid) you
should enter the nominal battery voltage instead of the cell count.
Example: Press the ‘INC/ - ’ button to leaf through the screen display until the arrow indicates Battery Voltage. Press the ‘ENTER’ button
and the ‘+ / -’ symbol flashes. For a LiPo battery,
the battery voltage can now be selected in 3.7 V per
cell increments. Press the ‘ENTER’ button again to
confirm your selection.
The following voltages are available to use for lithium batteries:
LiPo
LiIo
LiFe
Cell count Battery voltage
Cell count Battery voltage
Cell count Battery voltage
1
3,6 Volt
1
3,7 Volt
1
3,3 Volt
2
7,2 Volt
2
7.4 Volt
2
6.6 Volt
3
10,8 Volt
3
11.1 Volt
3
9,9 Volt
4
14,4 Volt
4
14,8 Volt
4
13,2 Volt
5
18,0 Volt
5
18,5 Volt
5
16,5 Volt
6
21,6 Volt
6
22,2 Volt
6
19.8 Volt
13
Operating Instructions
Order No.
Power Peak® Quad EQ-BID 230 V
8196
Alternatively, for lead-acid batteries you can select
a battery voltage in increments of 2 V per cell using
the ‘INC’ or ‘DEC’ button. Press the ‘ENTER’ button
again to confirm your selection.
Cell count
Battery voltage
1
2 Volt
2
4 Volt
3
6 Volt
4
8 Volt
5
10 Volt
6
12 Volt
The following voltages are available to
use for lithium batteries:
ENTERING THE BATTERY CAPACITY
Press the ‘INC/ DEC ’ button to leaf through the
screen display until the arrow is next to Battery
Capacity. Press the ‘ENTER’ button and the ‘+ / -’
symbol flashes. The battery capacity can be selected in steps of 100 mAh (PB, 500 mAh). The battery capacity setting for lithium battery
packs mainly serves as the basis for the 1C charge, i.e. the charging current is automatically set to the corresponding 1C
Battery type
Battery capacity
charge of the battery. It additionally
NiCd
100 - 9900 mAh
serves as a battery safety function.
NiMH
100 - 9900 mAh
Press the ‘ENTER’ button again to
LiPo
100 - 9900 mAh
confirm your selection. The range of
capacities shown in the table here are
LiIo
100 - 9900 mAh
available and depend upon the type of
LiFe
100 - 9900 mAh
battery:
Pb (lead)
0,50 Ah - 20,00 Ah
SETTING THE CHARGING CURRENT
Press the ‘INC/ DEC ’ button to leaf through the screen display until the arrow is next to
End. Press the ‘ENTER’ button and the ‘+ / -’ symbol flashes. The charging current can be selected
in steps of 0.1 A. Press the ‘ENTER’ button again
to confirm your selection. The charging current up
to 5A can be selected in steps of 0.1 A. The maximum charging current is dependent on
the number of cells or the battery voltage and the maximum charging capacity (max. 2C
for lithium batteries). The processor in the battery charger limits the maximum charging
current if the maximum charging capacity is exceeded.
14
Operating Instructions
Order No.
Power Peak® Quad EQ-BID 230 V
8196
SETTING THE DISCHARGE CURRENT
Press the ‘INC/ DEC ’ button to leaf through the
screen display until the arrow is next to Discharge
Current . Press the ‘ENTER’ button and the ‘+ / -’
symbol flashes. The charging current can be selected in steps of 0.1 A. Press the ‘ENTER’ button again to confirm your selection. The
discharge current up to 1A can be selected in steps of 0.1 A. The maximum discharge
current is dependent on the cell count as well as the battery voltage. The processor in the
battery charger will limit the maximum discharge current.
SETTING THE AUDIBLE SIGNAL
Press the ‘INC/ DEC ’ button to leaf through the screen display until the arrow is next to
Charge Current. Press the ‘ENTER’ button and the
‘+ / -’ symbol flashes. Now use the "INC/ DEC" buttons to select the sound, e.g. the acoustic signal that
will sound when the charge process is complete.
There are 5 signal styles to choose from, also the acoustic signal may be switched off.
Each press of the "INC" or "DEC" button will set up a new signal sound and sound once
again to make the choice easier.
SAVING THE SETTINGS
Press the ‘INC/ DEC ’ button to leaf through the screen display until the arrow is next to
End. The settings are saved by pressing the ENTER
button. The Display shows the start display again, it
returns to its initial home position.
7.4
STARTING A CHARGE/DISCHARGE PROCESS
• Press ‘MAN’, and the Start display appears.
• Press ‘ENTER’ to prepare the displayed memory for the charge process.
Prepare the memory for storage.
• Use the ‘MODE’ button to select
the desired process
• In the interests of safety, the screen
displays the stored parameters again.
•
Press the START button to start the charging
process, an acoustic signal indicates the
status. Then the working display,
containing all important parameters,
is then shown (see Section 5.1).
• With the 'INC' or 'DEC' buttons, you can change
the current during the charging procedure, the new
value flashes before being adopted. 15
Operating Instructions
Order No.
Power Peak® Quad EQ-BID 230 V
8196
8. Programming a BID chip / key
As soon as a BID chip/key is connected to the
charger, the charger switches to the mode for programming a BID chip/key. The same applies if the
charger is switched on with a chip connected.
All parameters for the battery, for which this chip is
to be used, can be set from this menu. In addition,
stored charge or discharge values can be read (see
Section 8.3). The programming menu is exited on
removing a BID chip/key and the Start display is
shown again.
připojte
čip
odpojte
čip
8.1 Menu structure, programming procedure
+/Button
‘ENTER’Button
+/Button
+/Button
‘ENTER’Button
+/Button
‘ENTER’Button
‘ENTER’Button
+/Button
‘ENTER’Button
‘ENTER’Button
+/Button
‘ENTER’Button
+/Button
16
+/Button
+/Button
Operating Instructions
Order No.
Power Peak® Quad EQ-BID 230 V
8196
‘ENTER’Button
+/Button
‘ENTER’Button
‘ENTER’Button
+/Button
‘ENTER’Button
‘ENTER’Button
+/Button
‘ENTER’Button
+/Button
‘ENTER’Button
8.2
PROGRAMMING CHIP/KEY (EXAMPLE: PROGRAMMING THE DATE)
The programming procedure is started in this screen display after you press the ‘ENTER’
button to activate the programming loop.
Finally, all parameters can then be specified by
following exactly the same procedure as for setting
the parameters in manual mode (see Section 7.3). To keep track of the data, a date can
be entered in the form 'YYYY-MM-DD', instead of setting up an acoustic signal control.
The programming of the date information is initiated by pressing ENTER. In addition to
the '+' and '-' signs the year flashes in the top line. It can be updated with the 'INC' or
'DEC' button. After pressing ENTER again, the month flashes and can be edited with
the 'INC'/DEC-' button. The day is set in the same way. The setting is finally entered to
memory by pressing ENTER.
17
Operating Instructions
Order No.
Power Peak® Quad EQ-BID 230 V
8196
When you have finished entering the parameters,
you must conclude the procedure by pressing the
‘ENTER’ button once more; this stores the new values permanently in the BID chip. A security query
will appear if data is changed during entry. To
save the data, you must change the answer to
'YES' with the 'INC' or 'DEC' button and then
finally confirm by pressing ENTER.
The double beep indicates that the change has been stored successfully. Answer the
safety query with 'NO' if you do not wish the changed data to be adopted. In both cases,
the programming display is shown again.
8.3 Reading the data stored on the BID CHIP / BID KEY
If you have a battery with a BID chip and once connected to the charger, the following
battery data can be read out to give you an accurate display of the battery state.
Data is stored on the BID chip / BID key, and can
be read.
Pressing the ‘+’ button twice displays the first parameter on the screen. This is the capacity of the
charge or discharge process in progress.
tions is displayed.
Pressing the ‘INC’ button twice more displays the
second parameter on the screen. The maximum
capacity value of all charging or discharging opera-
Pressing the ‘INC’ button twice more displays the
final parameter: this is the number of charge cycles
and the programmed date.
9. CHARGE / DISCHARGE PROCESSES WITH A BID CHIP / KEY
BID chip / keys are so small that you can slip them into whatever other accessories you
are using. The pictures on the next page show how BID chips are used.
18
Operating Instructions
Order No.
Power Peak® Quad EQ-BID 230 V
8196
is described in Section 7.4.
First connect the BID chip / KEY to the charger
using the adaptor lead. This automatically causes
the screen display shown here to appear.
If the charging parameters on the chip are OK,
press the ENTER button to prepare the charging/
discharging process. The further procedure is identical to that used for a manual start. This procedure
While charging or discharging, the most important data is stored on the chip/key.
10. End of a charge / discharge process
The charger automatically finishes a charging or discharging operation precisely at the
correct time. The processor takes into account the charging parameters. The optimum
process is used for each type of battery.
10.1 Display of the charge / discharge data
During a charge or discharge process, the values for that process are constantly shown
Charged or Charge/dis- in the working display (see Chapter 5.1).
Status indicator
discharged charge time
Flashing ‘F’
capacity
(Finish)
An audible signal will be heard upon
successful conclusion of the charging process. As shown in the illustration opposite, the most important data are shown in
the display.
Charge or
Current battery
Battery
discharge
voltage
type
current
19
Operating Instructions
Order No.
Power Peak® Quad EQ-BID 230 V
8196
10.2 Additional Information
Pressing the ‘Data View” button provides access to additional data relating to the last
process. You can then leaf through the information using the ‘INC’ or ‘DEC’ button.
Display of output voltage
Display of maximum charge voltage and average
discharge voltage
Single display of charged-in and discharged capacity
Time display of charge/discharge process
Equalizing display of individual cell voltages for
connected lithium battery (cell 1-6)
General overview of the current individual
cell voltages
Display of the current battery parameters
Display of current internal battery memory
Display of current BID memory
After disconnecting the battery, the start display is shown again, all data are erased and
are no longer available!
20
Operating Instructions
Order No.
Power Peak® Quad EQ-BID 230 V
8196
11. Error messages
Power Peak® Quad EQ-BID 230V is equipped with special safety features to ensure
safe and reliable charging and discharging operation. As soon as a fault occurs, a corresponding message appears in the display and the piezo buzzer emits a shrill warning
tone. After eliminating the cause, the following error messages can be acknowledged by
pressing any button.
Charging or discharging started without connection
to battery, make connection
Battery connected with polarity reversed, check
connection
Break in charging/discharging current circuit, check
connection
Short-circuit in charging/discharging current circuit,
check connections
Battery/output voltage too high, check number of
cells
Battery/output voltage too low, check number of
cells
BID chip/key separated from charger during active operation, stop procedure, check connection to chip and
restart.
Voltage level of connected cell(s) has risen above
4.3 Volt.
Voltage level of connected cell(s) has fallen below
2.75 Volt for LiPo and LiIo or 2.0 Volt for LiFe.
Voltage sensor lead is not connected
21
12.
!
Operating Instructions
Order No.
Power Peak® Quad EQ-BID 230 V
8196
Safety Notes
• Never place the charger and connected batteries on combustible surfaces. Never use the charger
close to combustible materials or gases.
• Never open the device when connected to a live power source!
• Do not leave the charger unattended during operation. The charger can heat up considerably
during normal operation.
• Take particular care when handling battery packs with a large number of cells. Ensure good insulation to prevent the risk of electric shock.
• The Power Peak® Quad EQ-BID 230V is designed only for charging, discharging and equalizing
rechargeable NC/NiMH/lead and lithium batteries. Due to the risk of explosion, do not use the charger to charge dry batteries.
• The charger is designed for operation only for 230 V /50 Hertz AC operation, therefore, never operate the charger with a different voltage supply.
• Ensure the cooling vents are always clear to allow air to freely circulate.
• Check for damage to the casing and leads. • Protect the charger from dust, dirt and moisture
• Do not expose the charger to excessively low or high temperatures as well as direct sunlight.
• Make sure the charger is not exposed to impact, pressure or excessive vibration load.
• When not used for a long periods of time, unplug the charger from the power source and disconnect any batteries.
• Do not charge rechargeable batteries twice in quick succession.
• Do not charge batteries that are at a high temperature. Allow batteries to cool down to ambient
temperature.
• Only cells of the same capacity and of the same make may be charged together.
• Never charge two batteries connected in parallel to one output, connect only one rechargeable
battery pack at a time.
• Ensure correct polarity of the battery and avoid short-circuits
• • Always take great care to check the settings on the Power Peak® Quad EQ-BID 230V.
Incorrect or unsuitable settings can irreparably damage the batteries.
• Read the battery manufacturer’s instructions and adhere to them strictly.
13. Guarantee
Naturally all our products are guaranteed for 24 months as required by law. If you wish to make a
justified claim under guarantee, please contact your dealer in the first instance, as he is responsible
for the guarantee and for processing guarantee claims. During the guarantee period we will rectify any
functional defects, production faults or material flaws at no cost to you. We will not accept any further
claims, e.g. for consequential damage.
Goods must be sent to us with carriage pre-paid; we will pay return carriage costs. We will not accept
any packages sent without pre-paid postage.
We accept no liability for transport damage, nor for the loss of your shipment. We recommend that you
take out appropriate insurance.
Send your device to the approved Service Centre in your country.
The following requirements must be fulfilled before we can process your guarantee claim:
• You must include proof of purchase (till receipt) with the returned product.
• You must have operated the product in accordance with the operating instructions.
• You must have used only the recommended power sources and genuine robbe accessories.
• There must be no damage present caused by moisture, unauthorised intervention, polarity reversal, overloading and mechanical stress.
• Please include a concise, accurate description of the fault to help us locate the problem.
22
Operating Instructions
Order No.
Power Peak® Quad EQ-BID 230 V
8196
14. Recommended accessories
Transmitter battery charge
lead
No. F 1415
BID-Chip without cable to
convert other Rechargeable
battery packs.
No. 8472
Charge lead for receiver
battery No. F 1416
BID chip with 300 mm lead,
for equipping other battery
packs
No. 8473
BID lead, 300 mm
No. 8474BID lead, 500 mm
BID-KEY
No. 8888
BID lead, 500 mm
No. 8475BID lead, 500 mm
Balancer adapter
No. 4029
Balancer adapter
No. 4023 XH
Balancer adapter
No. 4023
Balancer adapter
No. 4031 XH
23
Balancer adapter
No. 4031
15. Conformity declaration
robbe Modellsport GmbH & Co. KG hereby declares that this device conforms to the fundamental
requirements and other relevant regulations of
the corresponding EC Directive. Under www.
robbe.com, you will find the original Conformity
Declaration by clicking on the Logo button
"Conform" shown together with the respective
device description.
This symbol means that you should dispose of electrical and electronic equipment separately from the household
waste when it reaches the end of its useful life.
Take your unwanted equipment to your local
council collection point or recycling centre. This
requirement applies to member countries of the
European Union as well as other non-European
countries with a separate waste collection system.
16.Service Addresses
Country
Company
Street-name
City
AND-00130 Les
Andorra
Sorteney
Santa Anna, 13
escaldes-Princip.
D‘Andorre
Nordic Hobby
DK-8940 Randers
Denmark
Bogensevej 13
A/S
SV
D-36355
Germany
robbe-Service Metzloser Str. 38
Grebenhain
robbe-Schlüter Newton Road,
GB-LE10 3DS
England
UK
Hinckley
Leicestershire
6, Rue Usson du
France
S.A.V Messe
F-57730 Folschviller
Poitou, BP 12
TAG Models
GR-14341 New
Greece
18,Vriullon Street
Hellas
Philadelfia/Athens
I-36010 Cavazzale
Via del Progresso,
Italy
MC-Electronic
di Monticello C.Otto
25
(Vi)
Netherlands / Jan van
Slot de Houvelaan
NL-3155 Maasland
Belgium.
Mouwerik
30
Norwegian
Norway
Box 2140
N-3103 Toensberg
Modellers
Österreich
robbe-Service Puchgasse 1
A-1220 Vienna
Minicars
Bergsbrunnagatan
Sweden
S-75323 Uppsala
Hobby A.B.
18
robbe Futaba
Baselstrasse 67 A CH-4203 Grellingen
Switzerland
Service
Slovakian
Ivo Marhoun Horova 9
CZ-35201 AS
Rep.
D-36355
Spain
robbe-Service Metzloser Str. 38
Grebenhain
Czech
Ivo Marhoun Horova 9
CZ-35201 AS
Republic
robbe Modellsport GmbH & Co.KG
Metzloser Straße 38
D-36355 Grebenhain Metzlos/Gehaag
Telephone +49 (0) 6644 / 87-0
www.robbe.com
robbe Form BBBB
Telephone
Fax
00376-825
00376-862 865
476
0045-86-43
0045-86-43
61 00
77 44
0049-6644-87- 0049-6644-87777
779
0044-14550044-1455637151
635151
0033 3 87 94 0033-3-87 94
62 58
62 58
0030-20030-2102584380
102533533
0039 0444
0039 0444
945992
945991
0031-10-59 13 0031-10-59 13
594
594
0047-333 78
0047-333 78
000
001
0043-12590043-125866-52
11-79
0046-186 06
0046-186 06
571
579
0041-61-741
0041-61 741
23 22
23 34
00420 351 120
162
0049-6644-87- 0049-6644-87777
779
00420 351 120
162
Errors and omissions excepted. Technical
modifications reserved.
Copyright robbe-Modellsport 2011
Duplication and copying of the text, in whole or in
part, is only permitted with the prior written approval
of robbe-Modellsport GmbH & Co. KG
Notice d'utilisation
Operating instructions
Notice d’utilisation
Manuale d‘uso
Power Peak® Quad EQ-BID 230 V
Réf. 8196
Notice d'utilisation
Réf.
Power Peak® Quad EQ-BID 230 V
8196
Cher client,
Nous sommes heureux que vous ayez opté pour le chargeur automatique Power Peak®
Quad EQ-BID 230 V issu de la gamme robbe. Vous disposez ainsi d'un quadruple chargeur compact avec gestion et équilibrage des accus pour connexion en 230 volts CA.
Malgré une prise en main facile de ce chargeur, l'utilisation d'un tel chargeur automatique
haut de gamme Power Peak® Quad EQ-BID 230 V nécessite quelques connaissances de
la part de l'utilisateur. Ces quelques instructions vont vous permettre de vous familiariser
rapidement avec cet appareil.
Pour satisaire à cet objectif, il vous faut lire attentivement les instructions d'utilisation et
consignes de sécurité avant de mettre votre nouveau chargeur automatique en service.
Nous vous souhaitons beaucoup de plaisir et de réussite avec votre nouveau chargeur.
Les instructions ne concernent qu'une seule des quatre sorties de charge; toutes
fonctionnent sur le mêm principe!
!
Consignes
de sécurité
La notice d'utilisation se termine par des instructions de sécurité détaillées concernant l'utilisation des chargeurs et des différents types d'accus.
LISEZ IMPERATIVEMENT les instructions et consignes de sécurité AVANT mise
en service de l'appareil.
Un mésusage des accus ou du chargeur peut entrainer une explosion ou un
incendie de l'accu.
Exclusion de responsabilité
Cet appareil de charge est exclusivement conçu et habilité à la charge des accus
mentionnés dans cette notice. Robbe Modellsport dégage toute responsabilté pour
d'autres usages.
La société robbe Modellsport n'est pas en mesure de contrôler le respect des indications
et des méthodes fournies par la notice de maintenance et d'exploitation, de mise en
œuvre, d'utilisation et de maintenance.
Nous ne pouvons donc être tenus pour responsables d'aucune perte, d'aucun dommage
ni coût coséquents à une utilisation ou une mise en œuvre inadéquates ou de quelque
conséquence que ce soit.
Dans les limites du Droit et quels qu'en soient les motifs les produits robbe directement
à l'origine de dommages ne peuvent être mis en cause ni donner droit au versement de
dommages et intérêts. Ceci ne vaut pas dans le cas de directives contraignantes lorsque
les intentions sont malveillantes ou en présence de négligences grossières.
2
Notice d'utilisation
Réf.
Power Peak® Quad EQ-BID 230 V
8196
Sommaire
ChapitrePage
Consignes de sécurité
1. Contenu de la livraison 2. Description générale
3. Eléments de commande
3.1 Fonction des éléments de commande
4. Caractéristiques techniques
5. Mise en fonction du chargeur
5.1 Écran de travail
5.2 Connexion des accus
6. Mode automatique
6.1 Structure du menu en mode automatique
6.2 Paramétrage en mode automatique
7. Mode manuel
7.1 Structure du menu en mode manuel 7.2 Écran de mise au point
7.3 Mises au point en mode manuel
7.4 Démarrage d'une séquence de charge / décharge
8. Programmation d'une puce/clé BID
8.1 Menu du déroulement d'un programme
8.2 Procédure de programmation
8.3 Lecture des données d'une puce/clé BID
9. Déroulement d'une charge / décharge avec puce/clé BID
10. Fin de séquence de charge / décharge
10.1 Indication des paramètres de charge / décharge
10.2 Informations complémentaires (touche Data-View)
11. Messages de dérangement
12. Consignes générales de sécurité 13.Garantie
14. Accessoires recommandés
15. Déclaration de conformité
Mise au rebut des appareils usagés
16. Adresses SAV
3
2
4
5
6
6
7
8
8
9
9
10
10
11
11
12
12
15
16
16
17
20
18
19
19
20
21
22
22
23
24
24
24
Notice d'utilisation
Réf.
Power Peak® Quad EQ-BID 230 V
8196
1. Contenu
Contenu de la livraison :
1x Power Peak® Quad EQ-BID 230 V
1 x puce BID avec cordon de raccordement
1 x adaptateur égaliseur PQ
1 x adaptateur égaliseur XH
1 x adaptateur égaliseur TP
4
2.
Notice d'utilisation
Réf.
Power Peak® Quad EQ-BID 230 V
8196
Description générale
Le chargeur Power Peak® Quad EQ-BID 230 V est un chargeur intelligent permettant
une gestion confortable de la charge / décharge d'accus NC, NiMH, au Plomb ou au
Lithium. De plus, il dispose d'un équilibreur intégré.
Avec le Power Peak® Quad EQ-BID 230 V, des accus NC ou NiMH de 1 à 14 éléments
peuvent être chargés en mode automatique avec réglage automatique de l'intensité ou
en mode manuel. La coupure a lieu en fin de charge sur le principe du Delta-Peak.
Ainsi, jusqu'à 6 éléments Lithium connectés en série peuvent être chargés sous une
intensité de 5 Ampères. La coupure s'effectue automatiquement, indépendamment de
la tension, lorsque l'accu est complètement chargé. La charge automatique d'accus au
plomb de 2 à 12 Volt est également possible.
Les 10 emplacements mémoire de l'appareil permettent la sauvegarde en mode manuel des données spécifiques de 10 accus différents pour la charge et la
décharge. L'équipement important du Power Peak® Quad EQ-BID 230 V
est le système avant-gardiste d'identification des accus (BID). La multiplicité des différents types d’accus ne cesse de croître, chaque type d’accu
exigeant sa "propre" procédure de charge. Une erreur de paramétrage du
chargeur peut ainsi survenir facilement et le précieux accu être endommagé.
Le système révolutionnaire BID de robbe propose une solution géniale à ce problème. A chaque accu est affecté une
petite puce BID. Elle mémorise toutes les caractéristiques
essentielles de l’accu pour une charge/décharge optimale.
Pour la charge ou la décharge le Power Peak® Quad EQBID 230 V est connecté avec le BID-Chip adapté à l'accu. Il
indique au chargeur les paramètres.
Il suffit d'appuyer sur la touche 'Start' et la charge ou la
décharge commence. Plus de recherches fastidieuses des
paramètres dans le menu, protection maximale contre les
manipulations intempestives et sauvegarde des caractéristiques essentielles de l'accu dans la puce/clé BID, tels sont
les principaux avantages du système BID.
Par sauvegarde des données les plus importantes sur le BIDChip/Key les paramètres de l'accu sont toujours disponibles et
peuvent ainsi facilement être utilisables par le chargeur. Cette
fonction évite l'utilisation d'un PC ou d'informatique pour connaitre les paramètres de l'accu.
5
Notice d'utilisation
Réf.
Power Peak® Quad EQ-BID 230 V
8196
3.Éléments de commande
Touche de
menu
Écran
Raccordement de l’accu (rouge="+", noir="-")
Connection pour le
capteur de tension
Connection BID
3.1 Fonctions des éléments de commande
Les quatre touches de fonction du Power Peak® Quad EQ-BID 230 volts ont des fonctions multiples comme décrit dans la notice. Les touches ont des actions différentes au
cours des différentes phases de fonction de l'appareil.
Touche MODE / AUTO / „DEC“
Dans le cas d'une procédure manuelle, cette touche va permettre de réduire d'un échelon
les paramètres de charge et dans le choix des menus, de revenir au menu précédent.
• La touche ‘MODE’ permet la sélection directe avant le démarrage de la fonction souhaitée (CHARGE, DECHARGE, DECHARGE->CHARGE).
Après connexion de l'appareil à la source de courant, activer à l'aide de cette touche le
"mode automatique" (AUTOMA.) dans le menu.
Touche Start / Man / „INC“
• Dans le cas d'une procédure manuelle, cette touche va permettre d'augmenter d'un
échelon les paramètres de charge et dans le choix des menus de passer au menu
suivant.
A l'aide de la touche ‘START’, la fonction choisie est démarrée, par exemple CHARGER.
Après connexion de l'appareil à la source de courant, activer à l'aide de cette touche le
"mode manuel" (MANUELL).
Par ailleurs la touche "INC" sert au choix de la langue. Quand la touche "INC"est actionnée pendant le branchement à la source de courant, on accède au menu du choix de
la langue.
6
Notice d'utilisation
Réf.
Power Peak® Quad EQ-BID 230 V
8196
Touche Stop / Enter
Avec la touche ‘STOP’ une fonction en cours, par exemple CHARGE peut être
interrompue. La touche ‘ENTER’ permet la validation d'une fonction, par exemple
l'activation ou la désactivation d'un menu sélectionné.
Touche DATA
Cette touche permet d'afficher les caractéristiques du chargeur comme, par exemple, la
tension d'alimentation. En outre, on peut afficher grâce à cette touche la tension de
chaque élément d'un accu LiPo connecté.
Toutes les touches possèdent une fonction Autorepeat; le maintien de la touche
entraine une répétition de l'action sur cette dernière.
Buzzer inégré
• Le buzzer piezo accompagne chaque action sur une touche et indique par un signal
sonore la charge ou la décharge ainsi qu'une éventuelle erreur.
4. Caractéristiques techniques
Tension de service :
230 volts CA/ 50 Hz
Nombre d'éléments:
1 ... 14 éléments NC / NiMH,
1 à 6 éléments LiIo (3,6 V), LiPo (3,7 V), LiFe (3,3 V)
1 à 6 éléments (2 à 12 volts) accu au plomb
Courant de charge :
0,1 à 5 A avec max. 50 W
Intensité de décharge 5 A avec max. 120 W
Intensité d'équilibre:
env. 250 mA
Puissance de charge:
50 W, le courant est ajusté en conséquence.
Par exemple : tension de l'accu 24 volts, courant approx. 2,0 A
Par exemple : tension de l'accu 28 volts, courant approx. 1,7 A
Performance en décharge : 5 W, le courant est ajusté en conséquence
Charge d'entretien: Capacité de charge <1 Ah, pas de charge d'entretien
Capacité chargée > 1Ah : charge d'entretien de C/20
(seulement pour NC et NiMH)
Tension de fin de décharge:0,8 V par élément Cd-Ni ou NiMH
3,0 volts par élément LiPo, LiIo
2,5V par élément LiFe
1,8V par élément accus au Plomb.
Coupure en fin de procédure :
Cd-Ni / NiMH : automatique, système numérique Delta-Peak.
Plomb et Lithium:
automatique, dépend de la tension, pprocédure CC-CV
Encombrement :
225 x 170 x 40 mm
Fonctions: charge, décharge, décharge-charge, équilbrage.
10 emplacements mémoire internes
Mise en garde : les informations concernent une sortie de charge !
7
Notice d'utilisation
Réf.
Power Peak® Quad EQ-BID 230 V
8196
5. Mise en route du chargeur
Raccordez le chargeur au secteur 230 volts.
Après une courte présentation du nom de l'appareil
du numéro de la version du logiciel, l'écran de
démarrage s'affiche.
Si la touche „INC“ est maintenue enfoncée pendant le branchement de l'alimentation, le menu permettant le choix de la langue apparait.
Ce choix peut être effectué individuellement pour
chacun des chargeurs.
Ensuite à partir de cet affichage, la langue du menu peut être choisie. On peut appeler
les différentes langues à disposition à l'aide de la touche 'INC' ou 'DEC'. Les possibilités
disponibles sont les suivantes :
•
Allemand
•
Anglais (ENGLISH)
•
Français (FRANCAIS)
•
Italien (ITALIANO)
•
Espagnol (ESPANOL)
Le processus doit être stoppé par la touche "ENTER", puis l'écran de départ représenté
ci-dessus s'affiche.
5.1Affichage
Grâce à cet affichage, toutes les informations utiles pendant une charge ou une décharge
sont mises à la disposition de l'utilisateur. Dans la ligne supérieure sont affichées l'état, le
type de procédure ('L' pour une charge, 'E' pour une décharge, 'F' pour fin ou bien 'L'/'B'
pour l'équilibrage des accus au Lithium). De plus, la capacité de charge ou de décharge
et le temps écoulé depuis le début de la
Affichage d'état
Temps
procédure, sont affichés. Dans la ligne
écoulé
Affichage de capacité
du bas est affiché le type d'accu ('NC'
pour les accus ou Cadmium-Nickel, 'NM'
pour les accus Nickel-Métal, 'LP' pour les
accus Lithium-Polymère, 'Li' pour les accus
Intensité Lithium-ion, 'LF' pour les accus Lithium-Fer
Tension actuType
charge ou de et 'Pb' pour les accus au Plomb. Ainsi tous
elle de l'accu
d'accu
décharge les paramètres importants du déroulement
d'une charge ou d'une décharge, sont
visualisés.
8
Notice d'utilisation
Réf.
Power Peak® Quad EQ-BID 230 V
8196
5.2 Branchement des accus Important!!! Avant de connecter les accus, il faut absolument vérifier encore une fois
scrupuleusement les paramètres sélectionnés. L’accu peut être endommagé, exploser
ou prendre feu, en cas branchement erroné. Afin d’éviter tout court-circuit avec les fiches
banane, toujours commencer par brancher les cordons de charge au chargeur, puis à
l’accu. Veillez à respecter les polarités! Attention au respect des polarités !
Connexion de l’équilibreur :
Le cordon capteur de tension de l’accu doit être connecté avec le câble noir au repère
fléché du chargeur. Le repère fléché indique la masse (pôle moins). Attention au respect des polarités ! Voir plus bas !
Attention :
Pour ne pas endommager l'appareil éviter de relier les sorties entre elles (par ex. en
croisant les accus).
VOLTAGE SENSOR
+
+
+S1
+S2
-
+S3
L’exemple qui suit montre le concept d’ensemble et est destiné à expliquer le branchement du cable capteur de tension.
Adaptateur EQ
robbe-PQ réf. 8213
Adaptateur EQ
robbe-JSTXH réf. 8214
Adaptateur EQ
robbe-TP/FP réf. 8215
6. Mode automatique Si depuis l’affichage de départ on actionne la touche 'AUTO',
le chargeur se met en mode automatique et dans
ce cas les paramètres sont optimisés automatiquement.
9
Notice d'utilisation
Réf.
Power Peak® Quad EQ-BID 230 V
8196
6.1 Menu en mode automatique (seulement NC et NiMH)
Touche
‘MODE’
Touche
‘START’
Touche
‘MODE’
Touche
‘START’
Touche
‘MODE’
Touche
‘START’
Touche
‘MODE’
Touche
‘START’
Touche
‘MODE’
Touche
‘START’
Touche
‘MODE’
Touche
‘START’
6.2 Paramètrage en mode automatique
En mode automatique, les valeurs de l'intensité et de la tension du courant sont sélectionnés automatiquement par le chargeur. Ce mode n’est disponible que pour les accus
NC et NiMH. Avec la touche « Mode » les trois types de séquences disponibles sont
sélectionnées (CHARGE ; DECHARGE ; DECHARGE -> CHARGE) respectivement pour
les deux types d’accus. Avec la touche « START », la séquence correspondant à l’accu
connecté démarre. Accompagné d’un signal sonore l’affichage se modifie et les paramètres
de charge s'affichent. Dans la ligne supérieure à côté du déroulement de la charge (L) ou
décharge (E), s'affiche la capacité de charge ou décharge. De plus sont affichés,le temps
écoulé depuis le début de la charge, le type d'accu, la tension actuelle de l'accu et l'intensité
de charge. Le mode automatique en cours est visualisé par l'alternance de l'affichage de
l'intensité et la mention 'auto'. Pour signaler le mode automatique l'affichage du courant
alterne avec la mention 'auto'. La séquence peut être interrompue par la touche « STOP
», l’écran affiche alors à nouveau le mode automatique. A la fin de la séquence lorsque
l’accu est chargé / déchargé, les valeurs atteintes s’affichent sur l’écran (capacité chargée
10
Notice d'utilisation
Réf.
Power Peak® Quad EQ-BID 230 V
8196
ou déchargée, temps écoulé, type d'accu, tension actuelle de l'accu, et intensité de la
charge en cours).
7. Mode manuel
Si on active depuis l’affichage de départ la touche
“MAN”, le chargeur se met en mode manuel. Les
paramètres doivent maintenant être rentrés manuellement.
Touche
‘MAN’
7.1 Structure du menu en mode manuel
Touche
‘+’‘
Touche
‘+’‘
Touche
‘+’‘
Touche
‘+’‘
Touche
‘+’‘
Touche
‘ENTER’
Touche
‘+’‘
Touche
‘ENTER’
Touche
‘ENTER’
Touche
‘+’‘
Touche
‘ENTER’
Touche
‘ENTER’
Touche
‘+’‘
Touche
‘ENTER’
Touche
‘ENTER’
Touche
‘+’‘
Touche
‘ENTER’
Touche
‘ENTER’
Touche
‘+’‘
Touche
‘ENTER’
Touche
‘ENTER’
Touche
‘+’‘
Touche
‘ENTER’
11
Touche
‘+’‘
Touche
‘+’‘
Notice d'utilisation
Réf.
Power Peak® Quad EQ-BID 230 V
8196
Touche
‘+’‘
Touche
‘ENTER’
Touche
‘ENTER’
Touche
‘ENTER’
Touche
‘+’‘
7.2 Ecran de paramétrage
Pour chaque paramètre de charge / décharge il y
a un menu séparé avec l’affichage correspondant.
Avec les touches « INC » ou « DEC » on sélectionne le paramètre à modifier. La ligne concernée
est indiquée par une flèche sur le bord droit. En
actionnant la touche « ENTER », le processus de
réglage est enclenché. Sur le bord droit , « + » et
« - » se mettent à clignoter alternativement. Avec
la touche « INC » ou « DEC » une nouvelle valeur
peut être saisie. Cette valeur peut être validée à
l’aide de la touche « ENTER ». L’écran montre
alors la modification de la valeur du courant de charge.
7.3 Réglages en mode manuel
Avant de démarrer une charge / décharge en mode manuel, un certain nombre de
réglages doivent être effectués pour que le chargeur puisse optimiser le déroulement en
mode manuel.
•
Emplacement de sauvegarde
•
Type d'accu
•
Nombre d'éléments
•
Capacité de l'accu (ou bien tension de l’accu pour des LiPo, Lilo, LiFe, et Pb)
•
Intensité de charge
•
Intensité de décharge
•
Buzzer (AUS,1-5)
Information : seules les valeurs de la première ligne peuvent être modifiées pendant que
la flèche clignote.
12
Notice d'utilisation
Réf.
Power Peak® Quad EQ-BID 230 V
8196
Choix de l'emplacement de sauvegarde
En actionnant la touche 'INC' continuer à faire défiler
l'écran jusqu'à ce que la flèche soit sur sauvegarde.
Appuyer sur la touche 'ENTER', ‘INC / DEC’ clignote.
L'emplacement de sauvegarde (de 0 à 9) peut maintenant être sélectionné. Après sélection, appuyer à
nouveau sur 'ENTER'.
Choix du type d'accus
Par action sur la touche ‘INC / DEC’ dérouler le menu jusqu'à ce que la flèche se trouve en
face de buzzer. Appuyer sur la touche 'ENTER', ‘INC
/ DEC’ clignote. Avec la touche ‘INC / DEC' sélectionner le type d'accu, NiCd, NiMH, LiPo, LiIo, LiFe ou
PB (Plomb). Après sélection, appuyer à nouveau sur
'ENTER'.
Détermination du nombre d'éléments / de la tension de l'accu
En actionnant la touche 'INC' / 'DEC' continuer à
faire défiler l'écran jusqu'à ce que la flèche indique le
nombre d'éléments. Appuyer sur la touche 'ENTER',
‘INC / DEC’ clignote. Le nombre d'éléments (de 1
à 14) pour les accus NC et NiMH peut maintenant être sélectionné avec la touche 'INC' /
'DEC'. Après sélection, appuyer à nouveau sur 'ENTER'.Pour les accus de type LiPo, Lilo,
LiFe et Pb (Plomb), définir la tension nominale au lieu du nombre d’éléments.Exemple: Par
action sur la touche INC / DEC faire défiler l'écran
jusqu'à ce que la flèche soit en face de tension de
l'accu. Appuyer sur la touche 'ENTER', 'INC' / 'DEC'
clignote. La tension des accus LiPo peut maintenant
être sélectionnée par paliers de 3,7 Volts par élément. Après sélection, appuyer à nouveau sur
'ENTER'.
Le choix suivant est proposé :
LiPoLiIoLiFe
Nombre
d'éléments
1
2
3
4
5
6
Tension de
l'accu
3,7 volts
7,4 volts
11,1 volts
14,8 volts
18,5 volts
22,2 volts
Nombre
d'éléments
1
2
3
4
5
6
Tension de
l'accu
3,6 volts
7,2 volts
10,8 volts
14,4 volts
18,0 volts
21,6 volts
13
Nombre
d'éléments
1
2
3
4
5
6
Tension de
l'accu
3,3 volts
6,6 volts
9,9 volts
13,2 volts
16,5 volts
19,8 volts
Notice d'utilisation
Réf.
Power Peak® Quad EQ-BID 230 V
8196
Pour les accus au plomb la tension peut être définie par palier de 2 Volt par élément avec la touche
‘INC / DEC’. Après sélection, appuyer à nouveau sur
'ENTER'.
Nombre d'éléments
Tension de l'accu
1
2 volts
2
4 volts
3
6 volts
4
8 volts
5
10 volts
6
12 volts
Le choix suivant est proposé :
Saisie de la capacité de l'accu
En actionnant la touche ‘INC / DEC’ continuer à faire
défiler l'écran jusqu'à ce que la flèche indique la
capacité de l'accu. Appuyer sur la touche 'ENTER',
‘INC / DEC’ clignote. La capacité de l'accu peut être
sélectionnée par paliers de 100 mAh (500 mAh pour les accus au Plomb). Le réglage de
la capacité pour les accus au Lithium, sert en première ligne de base de charge de 1C,
le courant de charge se règle automatiquement sur cette valeur de 1C. Elle permet en
plus la coupure de sécurité pour l'accu.
Après sélection, appuyer à nouveau
Type d'accu
Capacité de l'accu
sur 'ENTER'.
NiCd
100 - 9900 mAh
Le choix ci-contre dépend du type
NiMH
100 - 9900 mAh
d’accu :
LiPo
100 - 9900 mAh
LiIo
100 - 9900 mAh
LiFe
100 - 9900 mAh
Pb (plomb)
0,50 Ah - 20,00 Ah
Réglage de l'intensité de charge
En actionnant la touche ‘INC / DEC’continuer à faire défiler l'écran jusqu'à ce que la flèche
indique l'intensité de charge. Appuyer sur la touche
'ENTER', ‘INC / DEC’ clignote. L'intensité du courant
de charge peut être sélectionnée par paliers de 0,1 A
avec la touche ‘INC / DEC’. Après sélection, appuyer
à nouveau sur 'ENTER'. L'intensité de charge peut être réglée de 0,1A à 5,0A. L'intensité
maximale de charge dépend du nombre d'éléments ou de la tension de l'accu (pour les
accus au Lithium max. 2C). Le processeur du chargeur limite l'intensité max. de charge.
14
Notice d'utilisation
Réf.
Power Peak® Quad EQ-BID 230 V
8196
Réglage de l'intensité de décharge
En actionnant la touche ‘INC / DEC’ continuer à
dérouler le programme jusqu'à ce que la flèche se
retrouve à côté de l'intensité de décharge. Appuyer
sur la touche 'ENTER', ‘INC / DEC’ clignote.
L'intensité de décharge peut maintenant être sélectionnée avec la touche 'INC / DEC’' par
paliers de 0,1 A. Une fois le choix effectué, appuyer à nouveau sur 'ENTER'. L'Intensité
du courant de décharge peut être réglée dans une fourchette de 0,1 A à 10 A. L'intensité
maximale de décharge dépend du nombre d'éléments ou de la tension de l'accu. Le processeur du chargeur limite l'intensité maximale de décharge.
Programmation du signal sonore
Par action sur la touche ‘INC / DEC’ dérouler le
menu jusqu'à ce que la flèche se trouve en face de
buzzer. Appuyer sur la touche 'ENTER', ‘INC / DEC’
clignote. Le type de signal sonore peut maintenant être sélectionné avec la touche '+' /
'-', ainsi par exemple la fin de charge peut être signalée par un signal sonore. 5 types de
signaux sonores d’alerte sont disponibles, en plus de la possibilité de désactivation de ce
signal. Pour chaque action sur la touche « INC » ou « DEC » un signal sonore différent est
émis et immédiatement reproduit afin de faciliter le choix.
Sauvegarde des réglages
En actionnant la touche 'INC' / 'DEC' dérouler le
menu jusqu'à ce que la flèche se trouve en face de
fin. Les réglages souhaités sont sauvegardés par
action sur la touche 'ENTER'. L'écran de départ est
à nouveau affiché, il se met en position de sortie.
7.4 Démarrage d'un processus de charge/décharge
•
Appuyez sur 'MAN', l'écran de démarrage apparaît
•Avec la touche‘ENTER’ péparer la charge pour la mémoriastion adaptée.
•Avec la touche 'MODE', le processus choisi peut
être selectionné.
•Par sécurité les paramètres sauvegardés sont
encore une fois affichés.
•En appuyant sur la touche « START » le processus
de charge se déclenche, un signal sonore indique
l’état. Ensuite l’écran affiche tous les paramètres
importants (Voir chap. 5.1)
•
Pendant la procédure on peut faire varier le
courant à l’aide de la touche « + » ou « - » ; la valeur
clignote alors, avant d’être prise en compte.
15
Notice d'utilisation
Réf.
Power Peak® Quad EQ-BID 230 V
8196
8. Programmation d'une puce/clé BID
Dès qu'une puce/clé BID est connectée au chargeur, ce dernier bascule dans le mode de programmation clé/puce BID. Ceci est également valable
lorsque le chargeur est branché avec une puce
déjà connectée.
Depuis ce menu de sortie peuvent être réglés
l'ensemble des paramètres destinés à l'accu,
auquel se reporte cette puce. De plus d'éventuelles
valeurs sauvegardées de charge ou de décharge
peuvent être lues (voir chap. 8.3). Après retrait
d'une puce/clé BID le menu de programmation se
referme et l'écran de départ s'affiche à nouveau.
Installer
la puce
Retirer la
puce
8.1 Menu du déroulement d'un programme
Touche
‘+’‘
Touche
‘ENTER’
Touche
‘+’‘
Touche
‘+’‘
Touche
‘ENTER’
Touche
‘+’‘
Touche
‘ENTER’
Touche
‘ENTER’
Touche
‘+’‘
Touche
‘ENTER’
Touche
‘ENTER’
Touche
‘+’‘
Touche
‘ENTER’
Touche
‘+’‘
16
Touche
‘+’‘
Touche
‘+’‘
Notice d'utilisation
Réf.
Power Peak® Quad EQ-BID 230 V
8196
Touche
‘ENTER’
Touche
‘+’‘
Touche
‘ENTER’
Touche
‘ENTER’
Touche
‘+’‘
Touche
‘ENTER’
Touche
‘ENTER’
Touche
‘+’‘
Touche
‘ENTER’
Touche
‘+’‘
Touche
‘ENTER’
8.2 Procédure de programmation (Exemple : programmation de la
date)
Après activation de la boucle de programmation
par action sur la touche 'ENTER' le déroulement
du programme est déclenché.
Ensuite l'ensemble des paramètres peuvent être affectés avec la même procédure et
le même déroulement que pour le réglage des paramètres en mode manuel (voir chap
7.3). Pour que l'aperçu des données soit assuré, une date peut être affectée sur le mode
'AAAA-MM-JJ', à la place du signal accoustique.
En actionnant la touche 'ENTER', le processus de réglage de la date est enclenché. En
dehors du 'INC' ou du 'DEC' le chiffre des années
clignote à droite dans la ligne supérieure. Elle
peut être actualisée par la touche 'INC' ou 'DEC'.
En appuyant à nouveau sur la touche 'ENTER'
le chiffre des mois clignote et peut être modidié
par la touche 'INC' ou 'DEC'. La date du jour peut
ainsi être rentrée. Pour permettre la mémorisation,
appuyer encore une fois sur la touche 'ENTER'.
17
Notice d'utilisation
Réf.
Power Peak® Quad EQ-BID 230 V
8196
Pour terminer, l'entrée des paramètres doit être
validée en actionnant la touche 'ENTER' pour que
les données puissent être durablement enregistrées
sur le BID-Chip. Si une modification est survenue
au moment de l'entrée des données, une validation est demandée. Pour valider il faut placer la
réponse sur 'OUI' à l'aide de la touche 'INC' ou '-'
et pour finir actionner la touche 'ENTER'
La double tonalité indique que la modification a été enregistrée avec succès. Si on ne
souhaite pas enregistrer les paramètres, répondre 'NON' à la demande de validation.
Dans les deux cas, l'écran de sortie de programmtion s'affiche à nouveau.
8.3 Visualisation des paramètres de la puce BID / clé BID
Après la connection d'un accu avec un BIP les données suivantes peuvent être affichées
afin d'avoir une vision globale actuelle de l'état exact de l' accu.
Sur le BID Chip/Key les données sont sauvegardées et peuvent être lues.
Par une double action sur la touche '+', le premier paramètre est proposé. La capacité
de charge ou décharge du processus actuel est
indiquée.
est indiquée.
Par une nouvelle double action sur la touche '+' le
second paramètre est proposé. La valeur maximale
de la capacité de toutes les charges ou décharges
Après double action sur la touche 'INC', un dernier
paramètre indique le nombre de cycles de charge
et la date programmée.
9. Déroulement d'une charge/décharge avec BID-Chip/KEY
Le BID-CHIP/Key a des dimensions si réduites qu'il peut aisément trouver sa place
parmi les accessoires d'un chargeur. Les images sur la page suivante montrent
l'utilisation d'un BIP-Chip.
18
Notice d'utilisation
Réf.
Power Peak® Quad EQ-BID 230 V
8196
Connecter d'abord la puce/clé BID à l'aide du
cordon d'adaptation ou bien directement sur le
chargeur. L'écran ci-contre s'affiche ensuite automatiquement.
Si les paramètres de charges sont en ordre sur le
Chip, la touche 'ENTER' doit être actionnée pour
préparer la charge/décharge. La suite du déroulement est identique en tout point avec un départ normal à partir d'une mémorisation. Ces
analogies sont décrites au chapitre 7.4.
Pendant une charge ou une décharge les données importantes du déroulement sont
sauvegardées sur la puce/clé.
10. Fin de procédure de charge ou de décharge
Le chargeur arrête automatiquement la séquence de charge ou de décharge exactement
au bon moment. Le processeur tient compte des paramètres de charge. La séquence
est optimisée pour chaque type d’accu.
10.1 Indication de fin de charge / décharge
L’affichage d’état
clignote ‘F’ (Finish)
Type d‘accu
capacité
chargée ou
déchargée
Tension actuelle de l‘accu
temps de
charge/
décharge
Pendant une charge ou une décharge les
paramètres de la séquence sont constamment affichés sur l’écran (voir Chapitre
5.1).Une séquence qui s’est déroulée
avec succès est annoncée par un signal
sonore. Sur l’écran, comme sur le graphique les principaux paramètres sont
affichés.
Courant de
charge ou de
décharge
19
Notice d'utilisation
Réf.
Power Peak® Quad EQ-BID 230 V
8196
10.2 Informations complémentaires
L’activation de la touche "Data view " : permet l’accès à d’autres paramètres de la dernière séquence.
Le défilement se fait à l’aide de la touche "INC" ou
"DEC".
Indication de la tension de sortie
Indication de la tension maximale de charge ou de
la tension moyenne de décharge
Indication de la capacité chargée et déchargée
Affichage de l’avancement dans le temps
Affichage de l’équilibrage pour chaque élément
pour une connexion d’un accu au Lithium (Elément
1-6)
Aperçu de la tension actuelle de chaque élément.
Tensions des éléments
Indication des paramètres actuels de l’accu
Indication sur l’état actuel de la mémoire interne
Indication sur l’état actuel de la mémoire BID
Après le retrait de l’accu, l’écran de départ est à nouveau affiché, les données complètes sont effacées et ne sont plus disponibles !
20
Notice d'utilisation
Réf.
Power Peak® Quad EQ-BID 230 V
8196
11. Messages de dérangement
Pour garantir un déroulement en toute sécurité d’une charge / décharge, le Power Peak
Quad EQ-BID 230 volts est équipé de dispositifs de sécurité. Dès qu’apparait une erreur,
elle est annoncée sur l’écran et le buzzer piezzo émet un signal d’alerte strident. Les
annonces d’erreurs suivantes peuvent être acquittées par une touche quelconque, après
résolution de la cause.
Démarrage d’une séquence de charge / décharge
sans liaison avec l’accu. Etablir la connexion.
Inversion de polarité de l’accu. Contrôler la connexion. Interruption de la séquence de charge / décharge.
Contrôler la connexion.
Court-circuit au cours de la séquence de charge /
décharge. Contrôler la connexion. Tension de sortie de l’accu trop élevée. Contrôler
le nombre d’éléments.
Tension de sortie de l’accu trop faible. Contrôler le
nombre d’éléments.
Üuce/clé BID déconnectée pendant une séquence de
charge. Stopper le processus, vérifier la connexion
entre la puce/clé et redémarrer.
Le(s) élément(s) connectés sont à une tension
supérieure à 4,3 Volt.
Le(s) élément(s) connectés sont à une tension
inférieure à 2,75 Volt pour des accus LiPo et Lilo
ou 2,0 V pour des Life.
Le cordon capteur de tension n’est pas connecté.
21
12.
!
Notice d'utilisation
Réf.
Power Peak® Quad EQ-BID 230 V
8196
Consignes de sécurité
N'installez jamais le chargeur avec des accus connectés sur une surface inflammable. N'utilisez
jamais le chargeur au voisinage de matériaux inflammables.
• Ne pas ouvrir le chargeur sous tension !
• Ne laissez jamais le chargeur sans surveillance pendant son fonctionnement. Pendant le fonctionnement normal, l'appareil peut fortement s'échauffer.
• La manipulation d'accus composés de nombreux éléments demande une certaine prudence. ;
veiller absolument à leur bonne isolation, sinon il y a risque de décharge électrique.
• Le Power Peak® Quad EQ-BID 230 V est adapté uniquement à la charge / décharge et équilibrage
d’accus rechargeables NC- / NiMH- / au Plomb ou au Lithium. Ne chargez jamais de pile, risque
d’explosion.
• Le chargeur n'est conçu que pour une utilisation avec une alimentation de 230 volts / 50 Hz CA, ne
l'utilisez jamais en oeuvre avec d'autres tensions.
• Veillez au bon refroidissement et à une bonne circulation d’air au cours du fonctionnement. • Veillez à ne pas endommager le boîtier ou les cordons.
• Préserver le chargeur de la poussière, des salissures, et de l’humidité.
• Ne pas soumettre l’appareil à des températures trop élevées ou trop basses et éviter les expositions directes au soleil.
• Eviter les chocs et fortes pressions et ne pas soumettre l’appareil à des vibrations trop importantes.
• En cas de non utilisation prolongée de l’appareil, le déconnecter de la source de courant et le cas
échéant, déconnecter les accus.
• Ne pas recharger une seconde fois un accu immédiatement après une charge.
• Ne pas charger des accus fortement échauffés. Laisser se refroidir les accus à la température
ambiante.
• Ne charger que des accus constitués d'éléments de même capacité et de même marque.
• Ne pas charger deux accus en parallèle sur une même sortie ; ne connecter qu’un seul groupement d'élements.
• Veiller absolument à la polarité correcte des accus et éviter les courts-circuits.
• Contrôler avec soin les paramétrages sur le Power Peak® Quad EQ-BID 230 V. Des accus
peuvent être détruits par des réglages inadéquats.
Respecter les indications du fabricant de l'accu.
13. Garantie
Nos articles sont naturellement couverts par la garantie légale de 24 mois. Si vous souhaitez faire
valoir une requête justifiée avec recours à la garantie, adressez-vous toujours d’abord à votre vendeur
qui vous assure la garantie et qui est responsable du suivi de votre requête. Nous prenons en charge
gratuitement pendant cette durée d’éventuels disfonctionnements ainsi que des défauts de fabrication
ou de matériel. Toutes autres prétentions, p. ex. en cas de dommages consécutifs, sont exclues.
Le transport doit être assuré jusqu’à nous, le retour se ferra jusqu'à chez vous sans frais. Nous
n’acceptons pas d’envoi en port dû. Nous ne sommes pas responsables des dommages dus au transport ou de la perte de votre envoi. Nous recommandons une assurance adaptée.
Expédier l'appareil au service après-vente du pays concerné.
Pour le traitement de vos droits à la garantie, les conditions suivantes doivent être remplies :
• Joindre la facture (ticket de caisse) à l'envoi Les appareils ont été utilisés conformément aux
prescriptions de la notice.
• Seul des sources d'alimentation recommandées ont été utilisées , seul des accessoires d'origine
robbe ont été utilisés.
• Les dégâts dus à l'humidité, à des interventions de personnes non autorisées, d'inversions de
la polarité, de surtensions, de surcharges et de détériorations mécaniques ne sont apas pris en
compte.
• Joignez toute indication technique susceptible de faciliter la recherche de panne ou du défaut.
22
Notice d'utilisation
Réf.
Power Peak® Quad EQ-BID 230 V
8196
14. Accessoires recommandés
Cordon de charge d’accu
d’émission
Réf. F 1415
Puce BID sans cordon pour
équipement d’accus supplémen taires. Accus.
réf. 8472
Puce BID avec cordon
300 mm, pour équipement
d’accus supplémentaires
réf. 8473
Cordon BID 300 mm
Réf. 8474
Adaptateur équilibreur
(Balancer)
Réf. 4029
Adaptateur équilibreur
(Balancer)
Réf. 4023
Adaptateur équilibreur
(Balancer)
Réf. 4023 XH
Cordon de charge pour
accu récepteur Réf. F
1416
BID-KEY
Réf. 8888
Cordon BID 500 mm
Réf. 8475
Adaptateur équilibreur
(Balancer)
Réf. 4031 XH
23
Adaptateur équilibreur
(Balancer)
Réf. 4031
15. Déclaration de conformité
Par la présente, la société robbe Modellsport
GmbH & Co. KG déclare que cet appareil est
conforme avec les exigences fondamentales
et les autres prescriptions de la directive CE
correspondante. Vous trouverez l'original de la
déclaration de conformité sur Internet à l'adresse
wwww.robbe.com, à la description de l'appareil
en question en cliquant sur le bouton portant le
logo « Conform ».
Ce symbole signifie que les petits
appareils électriques et électroniques
en fin de vie doivent être mis au rebut
séparément des ordures ménagères.
Portez-les dans les collecteurs communaux
appropriés ou un centre de recyclage spécialisé. Cette remarque s’applique aux pays de la
Communauté européenne et aux autres pays
européens pourvus d’un système de collecte
spécifique.
16.Adresses SAV
Pays
Andorre
Sté
Sorteney
Rue
Santa Anna, 13
Nordic Hobby
Bogensevej 13
A/S
Allemagne
robbe-Service Metzloser Str. 38
robbe-Schlüter
Angleterre
LE10-UB
UK
6, Rue Usson du
France
S.A.V Messe
Poitou, BP 12
TAG Models
Grèce
18,Vriullon Str.
Hellas
Via del Progresso,
Italie
MC-Electronic
25
Niederlande/ Jan van
Slot de Houvelaan
Belg.
Mouwerik
30
Norwegian
Norvège
Box 2140
Modellers
Autriche
robbe-Service Puchgasse 1
Minicars
Bergsbrunnagatan
Suède
Hobby A.B.
18
robbe Futaba
Baselstrasse 67 A
Suisse
Service
Slowakische
Ivo Marhoun Horova 9
Rep.
Espagne
robbe-Service Metzloser Str. 38
Dänemark
Rép. tchèque. Ivo Marhoun
Horova 9
robbe Modellsport GmbH & Co.KG
Metzloser Straße 38
D-36355 Grebenhain Metzlos/Gehaag
Téléphone +49 (0) 6644 / 87-0
www.robbe.com
robbe Form BBBB
Ville
Téléphone
AND-00130
Les escaldes00376-862 865
Princip.D‘Andorre
DK-8940 Randers 0045-86-43
SV
61 00
D-36355 Grebenhain 0049-6644-87(Allemagne)
777
GB-LE10 3DS
0044-1455Leicestershire
637151
0033 3 87 94
F-57730 Folschviller
62 58
GR-14341 New
0030-2Philadelfia/Athen
102584380
I-36010 Cavazzale
0039 0444
di Monticello C.Otto
945992
(Vi)
0031-10-59 13
NL-3155 Maasland
594
0047-333 78
N-3103 Toensberg
000
0043-1259A-1220 Wien
66-52
0046-186 06
S-75323 Uppsala
571
0041-61-741
CH-4203 Grellingen
23 22
00420 351 120
CZ-35201 AS
162
D-36355 Grebenhain 0049-6644-87(Allemagne)
777
00420 351 120
CZ-35201 AS
162
Télécopie
00376-825
476
0045-86-43
77 44
0049-6644-87779
0044-1455635151
0033-3-87 94
62 58
0030-2102533533
0039 0444
945991
0031-10-59 13
594
0047-333 78
001
0043-125811-79
0046-186 06
579
0041-61 741
23 34
0049-6644-87779
Sous réserve d'erreur d'impression et de modification technique
Copyright robbe-Modellsport 2011
La copie et la reproduction, même partielles, sont
soumises à l'autorisation écrite de la Sté robbeModellsport GmbH & Co.KG
Manuale d'uso
Operating instructions
Notice d’utilisation
Manuale d‘uso
Power Peak® Quad EQ-BID 230 V
N. 8196
Manuale d'uso
Articolo N.
Power Peak® Quad EQ-BID 230 V
8196
Gentili clienti,
ci congratuliamo per l'acquisto del caricabatterie automatico ·Power·Peak®·Quad·EQ-BID
230 V della gamma dei prodotti robbe. Siete ora in possesso di un caricabatterie compatto
con sistema di gestione dell'accumulatore batteria ed equalizzatore, per il collegamento
a 230 V AC.Nonostante l'utilizzo si dimostri particolarmente semplice, questo sistema di
ricarica ·Power·Peak®·Quad·EQ-BID·230 V tecnologicamente avanzato richiede alcune
conoscenze di base da parte dell'utente finale. Queste istruzioni per l'uso vi permetteranno
di familiarizzare in breve tempo con il funzionamento di questo apparecchio.
Per raggiungere tale obiettivo, vi invitiamo a leggere attentamente le seguenti istruzioni
per l'uso e le norme riguardanti la sicurezza, prima di iniziare ad utilizzare il vostro nuovo
apparecchio. Vi auguriamo un buon divertimento con il vostro nuovo caricabatterie!
Le istruzioni per l'uso si riferiscono ad una soltanto delle quattro uscite di carica,
dato che tutte funzionano secondo lo stesso principio!
Norme
di sicurezza
!
Alla fine del manuale d'istruzione sono riportate dettagliatamente le indicazioni di
sicurezza per un corretto utilizzo dell'apparecchio e sono inoltre elencati i diversi
tipi di accumulatori.
ASSOLUTAMENTE PRIMA della messa in funzione dell'apparecchio, leggere
attentamente tutte le istruzioni e le norme per la sicurezza.
Un utilizzo sbagliato degli accumulatori e del caricabatterie può causarne
l'incendio e l'esplosione.
Esclusione della responsabilità
Questo apparecchio è concepito e rilasciato esclusivamente per la ricarica degli
accumulatori indicati nelle istruzioni. robbe Modellsport non si assume alcuna
responsabilità per usi che differiscano da quelli menzionati in questo manuale.
robbe-Modellsport non può sorvegliare nè il rispetto delle istruzioni, nè tantomeno i
metodi usati durante l'utilizzo, il funzionamento o la manutenzione della stazione di ricarica.
La ditta, pertanto, non si assume alcuna responsabilità per perdite, danni o costi derivanti da un utilizzo e un funzionamento errati o in qualche modo ad essi correlati.
Per quanto ammesso dalla legge, l'obbligo per l'adempimento del risarcimento dei danni,
indipendentemente dal motivo giuridico, è limitato al valore direttamente fatturato dei
prodotti robbe interessati all'evento che ha causato il danno. Ciò non è valido nel caso in
cui, in base a norme giuridiche vincolanti, si debba rispondere di dolo o grave negligenza.
2
Manuale d'uso
Articolo N.
Power Peak® Quad EQ-BID 230 V
8196
Indice
CapitoloPagina
Norme di sicurezza
2
1.Contenuto della confezione
4
2. Descrizione generale
5
3.Comandi 6
3.1 Funzione dei comandi
6
4. Dati tecnici
7
5.Accensione e utilizzo del caricabatterie
8
5.1 Display
8
5.2 Collegamento degli accumulatori
9
6. Modalità automatica
9
6.1 Struttura del menù in modalità automatica 10
6.2 Impostazione in modalità automatica
10
7. Modalità manuale
11
7.1 Struttura del menù in modalità manuale
11
7.2 Display di impostazione
12
7.3 Impostazioni in modalità manuale
12
7.4 Avvio di una procedura di carica/scarica
15
8.Struttura del menù di un BID-Chip/Key
16
8.1 Struttura del menù della procedura di programmazione 16
8.2 Procedura di programmazione
17
8.3 Lettura dati di una BID-Chip Key
18
9. Procedure di carica/scarica con BID Chip/Key
18
10. Fine procedura di carica/scarica
19
10.1 Visualizzazione dei dati di carica/scarica
19
10.2 Informazioni aggiuntive (Tasto Data-View)
20
11.Segnalazione errori
21
12. Norme generali di sicurezza
22
13.Garanzia 22
14.Accessori consigliati
23
15.Certificato di conformità
24
Smaltimento apparecchiature obsolete
24
16. Indirizzi Service
24
3
Manuale d'uso
Articolo N.
Power Peak® Quad EQ-BID 230 V
8196
1.Contenuto della confezione
La confezione contiene:
1x Power Peak® Quad EQ-BID 230 V
1 x BID-CHIP con cavo di collegamento
1 x Adattatore Equalizer PQ
1 x Adattatore Equalizer XH
1 x Adattatore Equalizer TP
4
2.
Manuale d'uso
Articolo N.
Power Peak® Quad EQ-BID 230 V
8196
Descrizione generale
Il Power Peak® Quad EQ-BID 230 V è un caricabatterie intelligente con una comoda
gestione dell'accumulatore per le operazioni di carica e scarica di accumulatori NC,
NiMH, al piombo e al litio.
Inoltre dispone anche di un equalizzatore integrato.
Con Power Peak® Quad EQ-BID 230 V possono essere caricati e scaricati accumulatori
NC o NiMH da 1 a 14 celle sia in modalità automatica, mediante regolazione automatica
di corrente, che in modalità manuale. Lo spegnimento avviene quando l'accumulatore ha
raggiunto il massimo della carica, secondo il metodo Delta-Peak.
Allo stesso modo possono essere caricate fino a 6 celle al litio collegate in serie, con
una corrente massimale fino a 5 Ampere. Lo spegnimento avviene automaticamente, in
base alla tensione, quando l'accumulatore è completamente carico. Allo stesso modo è
possibile caricare accumulatori al piombo da 2 a 12Volt.
La presenza di 10 memorie interne consente, in modalità manuale, di
memorizzare i parametri di carica e scarica di dieci differenti accumulatori. La caratteristica distintiva del Power Peak® Quad EQ-BID 230 V è
l'adozione dell'innovativo sistema di identificazione della batteria (BID). La
molteplicità dei tipi di accumulatori è in costante aumento e ciascuna tipologia richiede la propria procedura di ricarica. Basta poco per impostare il
caricabatterie in maniera errata e danneggiare così il prezioso accumulatore.
Il sistema rivoluzionario BID offre la soluzione geniale al problema, rendendo contemporaneamente facile e sicuro l’utilizzo
del caricabatterie. Ad ogni accumulatore viene assegnato
un piccolo, leggero BID-Chip. Esso memorizza tutti i parametri fondamentali per eseguire ricarica / scarica ottimale
dell'accumulatore. Per la carica o scarica, sarà quindi sufficiente collegare il BID-Chip al Power ·Peak®·Quad EQ-BID
·230·W, che fornisce i parametri al caricabatterie. Deve essere azionato ancora una volta
il tasto "Start" e ha inizio il processo di carica o scarica. Non
sarà più necessario cercare i parametri nel Menu di regolazione; il sistema BID ha il vantaggio di dare la massima sicurezza in fase di impostazione e di memorizzare all’interno del
BID Chip/Key tutti i dati rilevanti. Attraverso la memorizzazione dei dati più importanti nel BID-Chip/Key, questi possono
essere facilmente visualizzati sul display del caricabatterie.
Grazie a questa funzione, non è più necessario l'utilizzo del
computer e dei relativi software per avere sotto controllo
tutti i dati riguardanti lo stato dell'accumulatore.
5
Manuale d'uso
Articolo N.
Power Peak® Quad EQ-BID 230 V
8196
3.Comandi
Tasti per
comando menù
Display
Collegamento accumulatore (rosso=„+“, nero=“-“)
Collegamento per il
sensore di voltaggio
Collegamento
BID
3.1 Funzione dei comandi
I 4 tasti di comando del Power Peak® Quad EQ-BID 230 V ricoprono molteplici funzioni.
Con questi tasti vengono infatti attivate svariate funzionalità,in base alle diverse condizioni di funzionamento.
Tasto MODE / AUTO / „DEC“
• Questo tasto permette di diminuire di una grandezza (in modalità manuale) i valori dei
parametri di ricarica e, all'interno della selezione dei menù, permette di selezionare il
menù precedente.
• Con il tasto MODE è possibile selezionare direttamente prima dell'avvio la procedura
desiderata (RICARICA, SCARICA oppure SCARICA->RICARICA).
• Consente di attivare la "modalità automatica" (AUTOMA.) all'interno del menù di selezione non appena l'apparecchio viene collegato alla fonte di alimentazione.
Tasto Start / Man / „INC“
• Questo tasto permette di aumentare di una grandezza (in modalità manuale) i valori
dei parametri di ricarica nel menù di regolazione; all'interno della selezione dei menù
permette di selezionare il menù successivo.
• Il tasto "START" consente di avviare la procedura selezionata, ad esempio la RICARICA.
• Questo tasto consente di attivare la "modalità manuale" (MANUELL) all'interno del
menù di selezione non appena l'apparecchio viene collegato alla fonte di alimentazione.
• Il tasto "INC" serve inoltre per selezionare la lingua del menù. Premendo il tasto "INC"
durante il collegamento dell'apparecchio con l'alimentazione, si accede al menù per la
selezione della lingua desiderata.
6
Manuale d'uso
Articolo N.
Power Peak® Quad EQ-BID 230 V
8196
Tasto Stop / Enter
• Con il tasto "STOP" si può terminare un processo in corso, ad esempio RICARICA.
• Con il tasto "ENTER" si conferma la scelta effettuata, per esempio l'attivazione o la
disattivazione di un menù selezionato.
TASTO DATA
• Consente la visualizzazione dei parametri del caricabatterie, ad esempio la tensione
d'ingresso. Questo tasto permette inoltre di visualizzare la tensione di ogni singola di un
accumulatore LiPo collegato.
Tutti i tasti possiedono una funzione di Autorepeat, il mantenimento di un tasto,
provoca una ripetizione dello stesso.
Dispositivo acustico integrato
• A ogni pressione dei tasti segue un segnale acustico, esso inoltre segnala la fine del
processo sia di carica che di scarica e avverte anche in caso di errori.
4. Dati tecnici
Tensione di alimentazione:230 V AC/ 50 Hz
Numero celle: 1 ... 14 celle NC /NiMH
1 ... 6 celle LiIo (3,6 V), LiPo (3,7 V), LiFe (3,3 V)
1 ... 6 celle (2...12 V) accumulatore al piombo
Corrente di carica:
0,1 ... 5 A a max. 50 W
Corrente di scarica:
0,1 ... 1 A a max. 5 W
Corrente di bilanciamento:ca. 250 mA
Potenza di carica: 50 W, corrente regolata di conseguenza ad esempio tensione accumulatore 24 V, corrente di carica ca. 2,0 A ad esempio tensione di accumulatore 28 V,
Corrente di carica ca. 1,7 A
Potenza di scarica: 5 W, corrente regolata di conseguenza
Carica di mantenimento: Capacità immessa < 1 Ah: nessuna carica di mantenimento
Capacità immessa >1 Ah: carica di mantenimento C/20
(solo NC e NiMH)
Tensione finale di scarica: 0,8 V a cella con NC e NiMH,
3,0 V a cella con LiPo, Lilo
2,5V a cella con LiFe
1,8V a cella con accumulatori al piombo
Spegnimento:
NC / NiMH: sistema digitale di spegnimento automatico Delta-Peak.
Batterie al piombo e al litio: spegnimento automatico, in funzione della tensione, con
procedura CC-CV
Dimensioni:
di legge 225 x 170 x 40 mm
Funzioni: Ricarica, scarica, scarica-ricarica, bilanciamento
10 memorie interne
Attenzione: I dati si riferiscono a un'uscita di carica!
7
Manuale d'uso
Articolo N.
Power Peak® Quad EQ-BID 230 V
8196
5. Accensione e utilizzo del caricabatterie
Collegare il caricabatterie a una presa da 230 V.
Sul display apparirà, dopo la schermata con il
nome dell'apparecchio e la versione del software,
la schermata d'avvio.
Durante il collegamento all'alimentazione, mantenendo premuto il tasto "INC", appare il menù per la
scelta della lingua. Questo può
essere impostato singolarmente per ogni caricatore.
Da questa schermata può essere sclelta la lingua per la gestione del menù. Con i tasti
"INC" o "DEC" si può scorrere l'elenco delle lingue disponibili. In questo caso sono disponibili le seguenti possibilità:
•
Tedesco
•
Inglese (ENGLISH)
•
Francese (FRANCAIS)
•
Italiano (ITALIANO)
•
Spagnolo (ESPANOL)
Il processo deve essere concluso con il tasto "ENTER", dopodiché apparirà la schermata d'avvio del display descritta sopra.
5.1 Display di lavoro
Durante le procedure di carica e di scarica vengono visualizzate su questo display tutte le
informazioni necessarie. Sulla schermata più in alto si possono visualizzare: l'indicatore
di stato,che indica il tipo di processo in
Indicatore di stato
Tempo trasatto ("L" ricarica, "E" scarica, "F" Fine, o
corso
per le batterie al litio, cambia in "L"/"B"
Indicatore di capacità
bilanciamento). Inoltre viene visualizzata
la capacità caricata o scaricata e il tempo
trascorso dall'avvio. Sulla riga più in basso
viene indicato il tipo di batteria ("NC"per
Corrente di
batteria al Nickel-Cadmio, "NM"per batteria
Attuale tensioTipo di
carica o di
Nickel- metallo, "LP" per batteria ai polimeri
accumula- ne accumulascarica
tore
di litio, "Li" per batteria agli ioni di litio, "LF"
tore
per batteria Litio-Ferro, e "Pb" per batteria
al piombo). In tal modo vengono visualizzati tutti i parametri importanti durante un processo di carica o scarica.
8
Manuale d'uso
Articolo N.
Power Peak® Quad EQ-BID 230 V
8196
5.2 Collegamento degli accumulatori
Importante!!! Prima di effettuare il collegamento di un accumulatore, controllare ancora una volta con attenzione tutti i parametri. Una scorretta impostazione può causare
danneggiamenti, esplosioni e incendi dell'accumulatore. Per evitare cortocircuiti del
connettore a banana, collegare sempre per primo il cavo di ricarica all'apparecchio, poi
all'accumulatore. Per scollegare, seguire l'ordine inverso. Prestare attenzione alla polarità!
Collegamento dell'equalizzatore
Il cavo del sensore di voltaggio dell'accumulatore deve essere collegato al caricabatterie
mediante il cavo nero, nella posizione indicata dalla freccia. La freccia indica anche il
polo (negativo). Prestare attenzione alla polarità! Vedi sotto!
Attenzione:
Per evitare danni all'apparecchio, non collegare tra loro le uscite (ad esempio attraverso un interruttore batterie)!
VOLTAGE SENSOR
+
+
+S1
+S2
-
+S3
Questo esempio illustra il collegamento del cavo del sensore di voltaggio all'equalizzatore
e ha solo scopo dimostrativo.
Adattatore EQ
robbe-PQ N. 8213
6.
Adattatore EQ
robbe-JSTXH N.8214
Adattatore EQ
robbe-TP/FP N.8215
Modalità automatica
Azionando il tasto AUTO dal menù d'avvio, il
caricabatterie viene impostato per lavorare in modalità automatica, di conseguenza i parametri vengono
ottimizzati automaticamente.
9
Manuale d'uso
Articolo N.
Power Peak® Quad EQ-BID 230 V
8196
6.1 Struttura del menù in modalità automatica (solo NC e NiMH)
Tasto
‘MODE’
Tasto
‘START’
Tasto
‘MODE’
Tasto
‘START’
Tasto
‘MODE’
Tasto
‘START’
Tasto
‘MODE’
Tasto
‘START’
Tasto
‘MODE’
Tasto
‘START’
Tasto
‘MODE’
Tasto
‘START’
6.2 Impostazione in modalità automatica
In modalità automatica la corrente ottimale e i valori della tensione vengono installati
automaticamente. Questa modalità è disponibile solamente per accumulatori NC e NiMH.
Con il tasto "MODE" è possibile scegliere la procedura desiderata (CARICA, SCARICA e
SCARICA > CARICA) ognuna per entrambi i tipi di accumulatori.
Il tasto "START" consente di avviare il processo della batteria collegata. Il cambio di visualizzazione è accompagnato da un segnale acustico; vengono rappresentati i parametri di
carica. Nella riga superiore viene visualizzata, oltre al processo Carica (L) o Scarica (E),
la capacità caricata e scaricata. Inoltre viene visualizzato il tempo trascorso dall'inizio del
processo. Nella riga inferiore vengono visualizzati il tipo di accumulatore, l'attuale tensione
dell'accumulatore e la corrente di carica. Per la caratterizzazione della modalità automatica,
si modifica la visualizzazione della corrente con la scritta "auto".
Il tasto "STOP" consente di interrompere il processo in atto; questo viene nuovamente segnalato sul display della modalità automatica. Alla fine di ogni procedura, quando
l'accumulatore è completamente carico o scarico, sul display sarà possibile visualizzare i
10
Manuale d'uso
Articolo N.
Power Peak® Quad EQ-BID 230 V
8196
parametri raggiunti (capacità caricata o scaricata, tempo del processo, tipo di accumulatore, attuale tensione dell'accumulatore e attuale corrente).
7. Modalità manuale
Confermando con il tasto "MAN" dalla schermata
d'avvio, entra in funzione il caricatore in modalità
manuale. Ora i parametri devono essere inseriti a
mano.
Tasto
‘MAN’
7.1 Struttura del menù in modalità manual
Tasto
‘+’
Tasto
‘+’
Tasto
‘+’
Tasto
‘+’
Tasto
‘+’
= Tasto
‘ENTER’
Tasto ‘+’
= Tasto
‘ENTER’
= Tasto
‘ENTER’
Tasto ‘+’
= Tasto
‘ENTER’
= Tasto
‘ENTER’
Tasto ‘+’
= Tasto
‘ENTER’
= Tasto
‘ENTER’
Tasto ‘+’
= Tasto
‘ENTER’
= Tasto
‘ENTER’
Tasto ‘+’
= Tasto
‘ENTER’
= Tasto
‘ENTER’
Tasto ‘+’
= Tasto
‘ENTER’
11
Tasto
‘+’
Tasto
‘+’
Manuale d'uso
Articolo N.
Power Peak® Quad EQ-BID 230 V
8196
Tasto ‘+’
= Tasto
‘ENTER’
= Tasto
‘ENTER’
= Tasto
‘ENTER’
Tasto
‘+’
7.2 Display di impostazione
della corrente si carica.
Per ogni parametro di carica o di scarica è presente un menu d'installazione con relativo display.
Mediante i tasti "INC" o "DEC" vengono scelti
i parametri. La riga superiore è segnalata da
una freccia sul bordo destro. Azionando il tasto
"ENTER" viene avviata la procedura di installazione. Sul bordo destro lampeggiano in alternanza
i segni "+" e "-". Con i tasti "INC" o "DEC" può
essere programmato un nuovo valore. Con il tasto
"ENTER" verrà terminata l'installazione. Il display
dell'immagine, mostra un esempio di impostazione
7.3 Impostazioni in modalità manuale
Prima di iniziare una procedura di carica o scarica in modalità manuale, è necessario
eseguire alcune installazioni per garantire che l'apparecchio lavori nel migliore dei modi:
•
Spazio di memoria
•
Tipo di accumulatore
•
Numero di celle
•
Capacità dell'accumulatore (e tensione dell'accumulatore LiPo, LiIo, LiFe e Pb)
•
Corrente di carica
•
Corrente di scarica
•
Fischio (SPENTO, 1-5)
Attenzione: Solo i valori della prima riga, se segnalati dalla freccia, possono essere
modificati.
12
Manuale d'uso
Articolo N.
Power Peak® Quad EQ-BID 230 V
8196
Scelta delle memorie
Scorrere il display attraverso l'attivazione dei tasti
"INC" finché la freccia non di troverà accanto allo
spazio di memoria. Premere il tasto "ENTER", lampeggiano i simboli "+" / "-". Ora con il tasto "INC /
DEC" si può scegliere di utilizzare da 0 a 9 memorie. Dopo la scelta premere nuovamente il tasto
"ENTER".
Scelta del tipo di accumulatore
Scorrere il display attraverso l'attivazione dei tasti
INC / DEC finché la freccia non di troverà accanto
al tipo di accumulatore. Premere il tasto "ENTER",
lampeggiano i simboli "+" / "-". Con il tasto "INC / DEC" scegliere il tipo di accumulatore
NiCd, NiMH, LiPo, LiIo, LiFe o PB (piombo). Dopo la scelta premere nuovamente il tasto
"ENTER".
Stabilire il numero di celle / tensione dell'accumulatore
Scorrere il display attraverso l'attivazione dei tasti INC / DEC finché la freccia non di troverà accanto al numero di celle. Premere il tasto
"ENTER", lampeggiano i simboli "+" / "-". Qui viene
scelto con il tasto "INC / DEC" il numero di celle da 1
a 14 per accumulatori NC e NiMH. Dopo la scelta premere nuovamente il tasto "ENTER". Per gli accumulatori LiPo, Lilo, LiFe e Pb (al piombo),
invece del numero di celle viene stabilita la tensione dell'accumulatore. Esempio: Scorrere
il display attraverso l'attivazione dei tasti INC / - finché la freccia non si troverà accanto
alla tensione dell'accumulatore. Premere il tasto "ENTER", lampeggiano i simboli "+" / "-".
Ora è possibile scegliere con i tasti "INC / DEC" per
accumulatori LiPo la tensione dell'accumulatore in
passi da 3,7 V a cella. Dopo la scelta premere nuovamente il tasto "ENTER".
E' a disposizione la seguente scelta:
LiPo
Numero di Tensione accucelle
mulatore
1
3,7 Volt
2
7,4 Volt
3
11,1 Volt
4
14,8 Volt
5
18,5 Volt
6
22,2 Volt
LiIo
Numero di Tensione accucelle
mulatore
1
3,6 Volt
2
7,2 Volt
3
10,8 Volt
4
14,4 Volt
5
18,0 Volt
6
21,6 Volt
13
LiFe
Numero di Tensione accucelle
mulatore
1
3,3 Volt
2
6,6 Volt
3
9,9 Volt
4
13,2 Volt
5
16,5 Volt
6
19,8 Volt
Manuale d'uso
Articolo N.
Power Peak® Quad EQ-BID 230 V
8196
In alternativa, per accumulatori al piombo, si possono scegliere passi da 2 V a cella con il tasto "INC
/ DEC". Dopo la scelta premere nuovamente il tasto
"ENTER".
Numero di celle
1
Tensione accumulatore
2 Volt
2
4 Volt
3
6 Volt
4
8 Volt
5
10 Volt
6
12 Volt
E' a disposizione la seguente scelta:
Immissione della capacità dell'accumulatore
Scorrere il display attraverso l'attivazione dei tasti
INC / DEC finché la freccia non di troverà accanto
alla capacità dell'accumulatore. Premere il tasto
"ENTER", lampeggiano i simboli "+" / "-". La capacità dell'accumulatore può ora essere scelta in passi da 100 mAh (piombo 500 mAh).
L'impostazione della capacità nell'accumulatore al litio, serve in primo luogo come base di
carica da 1C, ciò significa che la corrente di carica si imposta automaticamente sulla rispettiva carica da 1C dell'accumulatore.
Tipo di accumulatore Capacità accumulatore Questo serve inoltre a incrementare
NiCd
100 - 9900 mAh
la sicurezza dell'accumulatore. Dopo
NiMH
100 - 9900 mAh
la scelta premere nuovamente il tasto
LiPo
100 - 9900 mAh
"ENTER".
La scelta sottostante è a disposizione
LiIo
100 - 9900 mAh
in base al tipo di accumulatore.
LiFe
100 - 9900 mAh
Pb (piombo)
0,50 Ah - 20,00 Ah
Impostazione della corrente di carica
Scorrere il display attraverso l'attivazione dei tasti
INC / DEC finché la freccia non di troverà accanto
alla corrente di carica. Premere il tasto "ENTER",
lampeggiano i simboli "+" / "-". La corrente di carica
può ora essere scelta in passi da 0,1 A. con i tasti "INC /DEC". Dopo la scelta premere
nuovamente il tasto "ENTER". La corrente di carica può essere impostata in un ampio
intervallo, da 0,1 A a 5,0 A. Il valore massimo della corrente di carica dipende però dal
numero di celle, dalla tensione dell'accumulatore e dalla potenza di carica (per le litio è
14
Manuale d'uso
Articolo N.
Power Peak® Quad EQ-BID 230 V
8196
max. 2C). Il processore del caricatore limita la corrente di carica massima.
Impostazione della corrente di scarica
Scorrere il display attraverso l'attivazione dei tasti
INC / DEC finché la freccia non di troverà accanto
alla corrente di scarica. Premere il tasto "ENTER",
lampeggiano i simboli "+" / "-". La corrente di scarica può ora essere scelta in passi da
0,1 A con il tasto "INC / DEC". Dopo la scelta premere nuovamente il tasto "ENTER". La
corrente di scarica può essere scelta in passi da 0,1 A a 1,0 A. Il valore massimo della
corrente di scarica dipende però dal numero di celle o dalla tensione dell'accumulatore. Il
processore dell'apparecchio di carica limita la corrente massima di carica.
Impostazione del segnale acustico
Scorrere il display attraverso l'attivazione dei tasti
INC / DEC finché la freccia non di troverà accanto
al pigolio. Premere il tasto "ENTER", lampeggiano i
simboli "+" / "-". In questo menù è possibile scegliere
tramite il tasto "INC / DEC" il suono attraverso cui, ad esempio, viene segnalato il termine
della carica. Sono a disposizione 5 tipologie di segnale, oltre alla possibilità di disattivare il
segnale acustico. Premendo i tasti "INC" e "DEC" è possibile impostare un nuovo tono, che
al tempo stesso viene riprodotto, per facilitare la scelta.
Memorizzazione delle impostazioni
Scorrere il display attraverso l'attivazione dei tasti INC / DEC finché la freccia non di troverà
accanto alla fine. Le impostazioni effettuate vengono
memorizzate confermando con il tasto "ENTER". Il
display mostra ancora la pagina di avvio e torna alla
posizione di partenza.
7.4 Inizio procedura di carica / scarica
•Premere ‘MAN’, appare la schermata iniziale
•Con il tasto ‘ENTER’ preparare la carica
per lo spazio di memoria visualizzato.
•Con il tasto ‘MODE’ è possibile
scegliere il processo desiderato.
•Per sicurezza vengono visualizzati
ancora una volta i parametri.
•Premendo il tasto "START" viene azionata la procedura di ricarica, un segnale acustico segnalerà
lo stato. Dopodiché viene visualizzato il display di
lavoro, in cui appaiono tutti i parametri importanti
(vedi Cap. 5.1).
•
Con i tasti "INC" e "DEC" si può cambiare
l'intensità di corrente con procedura in corso,
il nuovo valore lampeggia prima di essere registrato.
15
8.
Manuale d'uso
Articolo N.
Power Peak® Quad EQ-BID 230 V
8196
Programmazione di un BID-Chip/KEY
Nel momento in cui si collega una BID-Chip/Key al
caricatore, si attiva la modalità di programmazione
di una BID-Chip/Key. Ciò è valido anche nel caso in
cui il caricatore venga avviato con Chip collegato.
Il menu di programmazione consente la regolazione
dei parametri relativi alla batteria che verrà collegata insiame al Chip. Inoltre consente la lettura dei
parametri di ricarica/scarica eventualmente memorizzati all'interno del Chip (vedi cap.8.3). Dopo aver
scollegato la BID/Chip Key, si lascia il menu di programmazione e di ritorna alla schermata d'avvio.
collegare
il chip
scollegare
il chip
8.1 Struttura del menù della procedura di programmazione
Tasto
‘+’
Tasto
‘ENTER’
Tasto
‘+’
Tasto
‘+’
Tasto
‘ENTER’
Tasto ‘+’
Tasto
‘ENTER’
Tasto
‘ENTER’
Tasto ‘+’
Tasto
‘ENTER’
Tasto
‘ENTER’
Tasto ‘+’
Tasto
‘ENTER’
Tasto
‘+’
16
Tasto
‘+’
Tasto
‘+’
Manuale d'uso
Articolo N.
Power Peak® Quad EQ-BID 230 V
8196
Tasto
‘ENTER’
Tasto ‘+’
Tasto
‘ENTER’
Tasto
‘ENTER’
Tasto ‘+’
Tasto
‘ENTER’
Tasto
‘ENTER’
Tasto ‘+’
Tasto
‘ENTER’
Tasto
‘+’
Tasto
‘ENTER’
8.2 Procedura di programmazione (esempio programmazione dati)
Dopo l'attivazione della programmazione attraverso il tasto "ENTER", su questo display
viene avviato il processo di programmazione.
In questa modalità è possibile impostare diversi
parametri allo stesso modo, seguendo la stessa
procedura utilizzata per l'impostazione manuale
(vedi cap.7.3). Per garantire la visione d'insieme dei dati, invece dell'impostazione per la
segnalazione acustica, è possibile preimpostare la data nel formato "AAAA-MM-GG".
Azionando il tasto "ENTER" viene avviata l'immissione della data. Oltre ai segni "+" e
"-"a destra, nella riga in alto, lampeggia il numero dell'anno. Esso può essere aggiornato
tramite i tasti "INC" o "DEC". Dopo un ulteriore azionamento del tasto "ENTER" lampeggia il mese, che può essere modificato con i tasti
"INC / DEC". Con lo stesso procedimento è possibile impostare il giorno. Per il salvataggio è necessario azionare nuovamente il tasto "ENTER".
17
Manuale d'uso
Articolo N.
Power Peak® Quad EQ-BID 230 V
8196
Infine l'immissione dei parametri viene terminata
con l'attivazione del tasto ‘ENTER’, affinché i nuovi
valori vengano definitivamente salvati sul BID-Chip.
Se durante l'immissione si verifica una modifica
dei dati, appare una domanda di sicurezza. Per
memorizzare è necessario posizionarsi con il
tasto "INC" o "-" su "JA" (SI) e azionare il tasto
‘ENTER’.
Il doppio segnale acustico conferma l'avvenuta memorizzazione del cambiamento. Se
invece non si desidera modificare i dati, premere "NEIN" (NO). In entrambi i casi viene
visualizzata la schermata di uscita per la procedura di programmazione.
8.3
Visione dei dati della BID-Chip/ BID-Key
Dopo aver collegato un'accumulatore con BID è possibile leggere i seguenti dati per
ottenere le informazioni sull'esatto stato dell'accumulatore.
I dati sono memorizzati sulla BID-Chip/BID-Key e
possono essere letti.
Attraverso il doppio azionamento del tasto "INC"
è a disposizione il primo parametro. Viene visualizzata la capacità dell'attuale processo di carica o
scarica.
Attraverso l'ulteriore doppio azionamento del tasto
"INC" viene visualizzato il secondo parametro.
Viene visualizzato il valore massimo di capacità in
tutti i processi di carica e scarica.
Dopo ulteriore doppio azionamento del tasto "INC",
in un ultimo parametro viene visualizzato il numero
di cicli di ricarica e della data programmata.
9. Procedure di carica/scarica con BID-Chip/KEY
Le dimensioni così ridotte di una BID-Chip/Key ne consentono l'utilizzo con qualsiasi
accessorio. Le immagini della pagina successiva mostrano l'uso di un BID-Chip.
18
Manuale d'uso
Articolo N.
Power Peak® Quad EQ-BID 230 V
8196
Collegare dapprima la BID-Chip/KEY al caricabatterie direttamente o mediante il cavo adattatore.
Apparirà in automatico la schermata visualizzata
qui a fianco.
Se i parametri di ricarica sul chip sono corretti, per
preparare la procedura occorre premere il tasto
"ENTER". La procedura che segue è esattamente
identica a quella di un avvio normale. Le indicazioni a riguardo sono descritte al Cap.
7.4.
I dati più importanti di una fase di ricarica o scarica vengono memorizzati sul Chip/KEY
mentre la procedura è in corso.
10. Fine di un processo di carica/scarica
Il caricabatterie termina automaticamente una ricarica o scarica al momento opportuno.
Il processore controlla i parametri di carica. Per ogni tipo di accumulatore viene impiegato il processo di volta in volta più adatto.
10.1 Visualizzazione dei dati di carica/scarica
Tempo di
carica / sca- Durante la procedura di ricarica e scarica,
rica
la schermata di lavoro mostra di continuo
i valori dei parametri relativi a quella fase
(vedi Cap. 5.1).Un segnale acustico informa quando una procedura si è conclusa
correttamente. ome mostra l'immagine
Corrente di
Tipo di accu- Attuale tensione
accanto sul display vengono visualizzati
carica o di
accumulatore
mulatore
tutti i dati più importanti.
scarica
Indicatore di
stato lampeggia
"F" (Finish)
Capacità
caricata o
scaricata
19
Manuale d'uso
Articolo N.
Power Peak® Quad EQ-BID 230 V
8196
10.2 Informazioni aggiuntive
Premando il tasto "Data View"è possibile visualizzrae sul display altri parametri relativi
all'ultima procedura eseguita. I tasti "INC " o "DEC" consentono di scorrere da un parametro all'altro.
Visualizzazione della tensione in uscita.
Rappresentazione della tensione di ricarica massima e della tensione di scarica media.
Visualizzazione della singola capacità caricata o
scaricata.
Visualizzazione del tempo trascorso.
Visualizzazione delle tensioni di ciascuna cella
dell'accumulatore Litio collegato (celle 1-6 ).
Visualizzazione generale delle tensioni attuali su
ogni singola cella.
Mostra i parametri attuali della batteria.
Mostra la memoria interna attuale.
Mostra la memoria BID attuale.
Dopo aver scollegato la batteria, viene nuovamente visualizzata la schermata di partenza, tutti i dati verranno cancellati e non saranno più disponibili.
20
Manuale d'uso
Articolo N.
Power Peak® Quad EQ-BID 230 V
8196
11. Notifiche d'errore
Al fine di garantire uno svolgimento sicuro delle fasi di carica / scarica il Power Peak®
Quad EQ-BID 230 V è stato equipaggiato con alcuni dispositivi di sicurezza. Non appena
si verifica un errore compare un avviso sul display e viene emesso un segnale acustico
acuto. Le seguenti notifiche di errore possono essere rimosse premendo un tasto qualsiasi non appena è stato risolto l'inconveniente.
Avvio della procedura di carica/scarica effettuato
senza il collegamento all'accumulatore, collegare la
batteria all'apparecchio.
Accumulatore collegato con polarità invertita, verificare i collegamenti.
Interruzione nel circuito di carica /scarica, controllare i collegamenti.
Cortocircuito nel circuito di ricarica /scarica, controllare i collegamenti.
Tensione in uscita dell'accumulatore troppo alta;
controllare il numero di celle.
Tensione in uscita dell'accumulatore troppo bassa;
controllare il numero di celle.
BID/Chip Key disconnessa dall'apparecchio mentre
la procedura è in corso; interrompere la procedura e
controllare il collegamento con il Chip. Riavviare la
procedura dall'inizio.
La/e cella/e collegata/e presenta/no una tensione
maggiore di 4,3 Volt.
La/e cella/e collegata/e presenta/no una tensione
minore di 2,75 Volt per batterie LiPo e Lilo, oppure
inferiore a 2,0V per batterie LiFe.
Cavo sensore di voltaggio non collegato.
21
Manuale d'uso
Articolo N.
Power Peak® Quad EQ-BID 230 V
8196
12.Consigli
di sicurezza
!
• Non poggiare mai il caricatore insieme alla batteria su superfici infiammabili. Non utilizzarlo in
prossimità di materiali o gas infiammabili.
• Non aprire mai il caricabatterie sotto tensione!
• Non lasciare l'apparecchio incustodito mentre lo si utilizza, poichè durante il normale funzionamento può raggiungere temperature elevate. L'apparecchio durante il normale funzionamento può
raggiungere temperature elevate.
• Prestare attenzione quando si maneggiano batterie con alto numero di celle. Verificarne il corretto
isolamento, altrimenti esiste il rischio di scosse.
• Il Power Peak® Quad EQ-BID 230 V è da utilizzare esclusivamente per la carica, scarica, equalizzazione di accumulatori ricaricabili NC/ NiMH/ al piombo/ e al litio. Non utlizzarlo con batterie a
secco, poiché vi è rischio di esplosione.
• Il caricabatterie è predisposto per il funzionamento con una tensione di 230V / 50 Hz AC. Non
utilizzarlo con altre tensioni.
• Assicurare un'adeguata ventilazione intorno all'apparecchio, facendo in modo che l'aria circoli
liberamente.
• Controllare che non siano presenti danni sulla cassa del caricabatterie e sui cavi.
• Proteggere l'apparecchio da polvere, sporco e umidità.
• Evitare di esporre l'apparecchio a caldo o freddo eccessivi e ai raggi solari.
• Evitare carichi o pressione eccessivi e non sottoporre il caricabatterie a vibrazioni di forte intensità.
• Qualora l'apparecchio non fosse utilizzato per un lungo periodo di tempo, scollegarlo dalla fonte di
alimentazione e scollegare gli accumulatori ad esso eventualmente collegati.
• Non ricaricare gli accumulatori a intervalli troppo brevi.
• Non ricaricare gli accumulatori troppo riscaldati. Lasciarle raffreddare a temperatura ambiente.
• Possono essere ricaricate insieme soltanto celle di uguale capacità e dello stesso tipo.
• Non collegare due pacchi accumulatori in parallelo ad una uscita. Collegare sempre solo un pacco.
• Prestare attenzione alla corretta polarità ed evitare cortocircuiti.
• Verificare sempre attentamente le impostazioni del Power Peak® Quad EQ-BID 230 V. Gli
accumulatori possono subire danni a seguito di impostazioni errate.
• Prestare attenzione alla guida dell'accumulatore del rispettivo produttore.
13. Garanzia
I nostri prodotti sono garantiti per un periodo di 24 mesi dalla data di acquisto. Qualsiasi richiesta di
intervento in garanzia deve essere avanzata al rivenditore presso il quale è stato effettuato l 'acquisto
del prodotto. Ci impegniamo a riparare gratuitamente eventuali malfunzionamenti, difetti di fabbricazione o di materiale sorti durante questo periodo. Sono escluse altre richieste, per esempio danni
verificatisi successivamente.
Il trasporto verso la nostra sede e il ritorno al cliente non avviene a nostre spese. Non accettiamo
spedizioni non affrancate.
Non ci assumiamo alcuna responsabilità per danni dovuti al trasporto o per perdita della merce. Consigliamo a tale proposito di assicurare la merce da voi spedita.
Spedire l'apparecchio difettoso al centro di assistenza responsabile per il rispettivo Paese.
Per poter far valere i diritti a garanzia devono essere soddisfatti i seguenti requisiti:
• Allegare alla spedizione lo scontrino fiscale.
• Gli apparecchi sono stati utilizzati seguendo le istruzioni per l'uso.
• Si sono utilizzate esclusivamente le fonti di energia elettrica raccomandate e gli accessori robbe
originali.
• I guasti non sono dovuti ad umidità, manomissioni da parte di terzi, inversione di polarità, sovraccarichi e danni meccanici.
• Allegare indicazioni dettagliate relative al difetto o al malfunzionamento riscontrato.
22
Manuale d'uso
Articolo N.
Power Peak® Quad EQ-BID 230 V
8196
14. Accessori raccomandati
Cavo per ricarica batteria
trasmittente
N. F 1415
Chip-BID senza cavo per
equipaggiare ulteriori
Accumulatori.
N. 8472
Chip-BID con cavo da
300 mm per equipaggiare
anche altri accumulatori
N. 8473.
Cavo BID 300 mm
Adattatore di bilanciamento
N. 4029
Adattatore di bilanciamento
N. 4023 XH
Cavo BID 500 mm
N. 8474
Chiave BID
N. 8888
N. 8475
Adattatore di bilanciamento
N. 4023
Adattatore di bilanciamento
N. 4031 XH
23
Cavo per ricarica batteria
ricevente No. F 1416
Adattatore di bilanciamento
N. 4031
15. Dichiarazione di conformità
Con la presente robbe Modellsport GmbH & Co.
KG dichiara che questo apparecchio è conforme
ai requisiti base e ad altre disposizioni rilevanti
della relativa direttiva CE. La dichiarazione originale di conformità è consultabile in Internet
all'indirizzo www.robbe.com alla descrizione
specifica dell'apparecchio, premendo sul tasto
"Conform".
Questo simbolo indica che al termine
del loro utilizzo gli apparecchi elettronici
di dimensioni limitate devono essere
smaltiti separatamente.
Smaltire l'apparecchio presso gli appositi punti
di raccolta, come i punti autorizzati dal comune.
Questo vale per tutti i Paesi dell'Unione Europea e per tutti gli altri Paesi europei che attuano
la raccolta differenziata dei rifiuti.
16.Indirizzi Service
Paese
Ditta
Via
Città
AND-00130
Andorra
Sorteney
Santa Anna, 13
Les escaldesPrINCip.D‘Andorre
Nordic Hobby
DK-8940 Randers
Danimarca
Bogensevej 13
A/S
SV
D-36355
Germania
robbe-Service Metzloser Str. 38
Grebenhain
robbe-Schlüter
GB-LE10 3DS
Inghilterra
LE10-UB
UK
Leicestershire
6, Rue Usson du
Francia
S.A.V Messe
F-57730 Folschviller
Poitou, BP 12
TAG Models
GR-14341 New
Grecia
18,Vriullon Str.
Hellas
Philadelfia/Athen
I-36010 Cavazzale
Via del Progresso,
Italia
MC-Electronic
di Monticello C.Otto
25
(Vi)
Paesi Bassi/ Jan van
Slot de Houvelaan
NL-3155 Maasland
Belg.
Mouwerik
30
Norwegian
Norvegia
Box 2140
N-3103 Toensberg
Modellers
Austria
robbe-Service Puchgasse 1
A-1220 Vienna
Minicars
Bergsbrunnagatan
Svezia
S-75323 Uppsala
Hobby A.B.
18
robbe Futaba
Baselstrasse 67 A CH-4203 Grellingen
Svizzera
Service
Repubblica
Ivo Marhoun Horova 9
CZ-35201 AS
Slovacca
D-36355
Spagna
robbe-Service Metzloser Str. 38
Grebenhain
Repubblica
Ivo Marhoun Horova 9
CZ-35201 AS
Ceca
robbe Modellsport GmbH & Co.KG
Metzloser Straße 38
D-36355 Grebenhain Metzlos/Gehaag
Telefono INC49 (0) 6644 / 87-0
www.robbe.com
robbe Form BBBB
Telefono
Fax
00376-825
00376-862 865
476
0045-86-43
0045-86-43
61 00
77 44
0049-6644-87- 0049-6644-87777
779
0044-14550044-1455637151
635151
0033 3 87 94 0033-3-87 94
62 58
62 58
0030-20030-2102584380
102533533
0039 0444
0039 0444
945992
945991
0031-10-59 13 0031-10-59 13
594
594
0047-333 78
0047-333 78
000
001
0043-12590043-125866-52
11-79
0046-186 06
0046-186 06
571
579
0041-61-741
0041-61 741
23 22
23 34
00420 351 120
162
0049-6644-87- 0049-6644-87777
779
00420 351 120
162
Con riserva di modifiche tecniche o eventuali errori.
Copyright robbe-Modellsport 2011
La copia e la ristampa, anche parziali, sono consentite solamente previa autorizzazione della
robbe Modellsport GmbH & Co.KG
Manual de uso
Operating instructions
Notice d’utilisation
Manuale d‘uso
Power Peak® Quad EQ-BID 230 V
Nº 8196
Manual de uso
Nº Ref.
Power Peak® Quad EQ-BID 230 V
8196
Apreciado cliente:
Nos alegra que se haya decidido por el cargador automático Power Peak Quad EQ-BID
230 V de la gama de productos robbe. Ahora posee un cargador compacto para manejar
4 baterías y ecualizador para la conexión a 230 V AC.
Aunque sea fácil manejar este cargador, el uso de un cargador automático de tal calidad
como el Power Peak® Quad-EQ-BID 230 V, requiere que el usuario tenga algunos conocimientos. Estas instrucciones le permitirán familiarizarse rápidamente con el cargador.
Para conseguirlo de forma segura, debería leer con atención el manual de uso y los
consejos de seguridad antes de poner en funcionamiento su nuevo cargador automático.
¡Le deseamos mucho éxito y que disfrute de su nuevo cargador!
¡El manual se refiere solamente a una de las cuatro salidas de carga, porque
todas las salidas funcionan según el mismo principio!
! Indicaciones de seguridad
Al final de este manual figuran los consejos de seguridad detallados para el uso de
los cargadores con los diferentes tipos de baterías.
ES IMPRESCINDIBLE leer los consejos de seguridad y el manual de uso antes de
poner el aparato en funcionamiento.
El uso erróneo de las baterías y de los cargadores puede causar la explosión o la
quema las baterías.
Exclusión de garantía
Este cargador está concebido y autorizado únicamente para cargar las baterías
indicadas en las instrucciones. robbe Modellsport no se hace responsabale de
ningún uso ajeno.
robbe Modellsport no puede supervisar el mantenimiento del manual de uso y de las
condiciones y métodos durante el uso, la aplicación y el mantenimiento del cargador.
Por este motivo, no asumimos ninguna responsabilidad relacionada con pérdidas, daños
o costes atribuíbles de algún modo a un uso o funcionamiento indebido.
Siempre que la ley lo permita se restringe la obligación a indemnización, independientemente del motivo legal que la motive, al valor de la factura del producto de robbe implicado directamente en el suceso causante del daño. Esta norma no se aplicará cuando
en virtud de precepto legal imperativo se deba responder ilimitadamente por dolo o por
negligencia grave.
2
Manual de uso
Nº Ref.
Power Peak® Quad EQ-BID 230 V
8196
Índice
CapítuloPágina
Indicaciones de seguridad
2
1.Contenido 4
2. Descripción General
5
3. Elementos de mando
6
3.1 Función de los elementos de mando
6
4.Características técnicas
7
5. Puesta en funcionamiento del cargador
8
5.1 Display de trabajo
8
5.2 Conexión de la batería 9
6. MODO AUTOMÁTICO 9
6.1 Estructura del menú del modo automático
10
6.2 AJUSTES EN EL MODO AUTOMÁTICO 10
7. MODO MANUAL 11
7.1 ESTRUCTURA DEL MENÚ DEL MODO MANUAL 11
7.2 Pantalla de ajuste
12
7.3 AJUSTES EN EL MODO MANUAL 12
7.4 Inicio de un proceso de carga / descarga
15
8. Programación de un BID-Chip/Key
16
8.1 Estructura del menú del proceso de programación
16
8.2 Proceso de programación
17
8.3 Leer los datos de un BID-Chips/Key18
9. Procesos de carga o descarga con BID-Chip/Key
18
10. Fin de un proceso de carga / descarga
19
10.1 Indicación de los datos de carga / descarga
19
10.2 Información adicional (tecla Data-View)
20
11. Avisos de errores
21
12. Indicaciones Generales de Seguridad
22
13.Garantía 22
14. Accesorios recomendados
23
15. Declaración de conformidad
24
Eliminación de aparatos viejos
24
16. Domicilios del servicio técnico
24
3
Manual de uso
Nº Ref.
Power Peak® Quad EQ-BID 230 V
8196
1.Contenido
El contenido es el siguiente:
1x Power Peak® Quad EQ-BID 230 V
1 x BID CHIP con cable de conexión
1 x adaptador para el ecualizador PQ
1 x adaptador para el ecualizador XH
1 x adaptador para el ecualizador TP
4
2.
Manual de uso
Nº Ref.
Power Peak® Quad EQ-BID 230 V
8196
Descripción general
El Power Peak® Quad EQ-BID 230 V es un cargador inteligente con manejo confortable
de baterías, para cargar y descargar baterías NiCad-, NiMH-, de plomo y de litio.
Dispone además de un ecualizador instalado.
Con el Power Peak® Quad EQ-BID 230 V, se pueden cargar y descargar las baterías
NiCad o NiMH desde 1 a 14 elementos, tanto en el modo automático con ajuste
automático de la corriente, como también en el modo manual. La desconexión de la
batería cargada, se realiza según el método Delta-Peak.
De la misma manera se pueden cargar hasta 6 elementos de litio, conectados en serie,
con una corriente máxima de hasta 5 amperios. La desconexión se realiza de forma
automática según la tensión cuando la batería está completamente cargada. También
es posible cargar automáticamente baterías de plomo de 2 a 12 voltios.
10 memorias internas, permiten grabar en el modo manual, datos
específicos para el proceso de carga y descarga. La característica
principal del Power Peak® Quad EQ-BID 230 V, es el futurístico sistema
de identificación de batería (BID). Cada vez hay más variedad de tipos
de baterías y cada uno requiere su “propio” proceso de carga. Fácilmente
puede ocurrir que el ajuste del cargador sea erróneo y la batería quede
inservible.
de la batería.
El revolucionario sistema BID de robbe ofrece una solución genial a este problema . Se le asigna a cada batería
un pequeño y ligero BID-Chip, que memoriza todos los datos
relevantes para la carga y descarga óptima de la batería.
Para la carga o descarga, se conecta el BID-Chip situado
sobre la batería con el Power Peak® Quad EQ-BID 230 V. El
BID-Chip le da los parámetros al cargador.
Bastará con pulsar la tecla "Start" para iniciar el proceso de
carga o descarga. Las ventajas especiales del sistema BID
son que no hace falta buscar los parámetros de ajuste en
el menú, ofrece una máxima protección contra errores de
manejo y que memoriza los datos relevantes de la batería en
el BID-Chip/KEY.
Al grabar los datos más importantes en el BID-Chip/Key, se
lleva los datos de la batería siempre encima y se les puede
indicar fácilmente en el cargador. Esta función sustituye en
gran medida la necesidad de un software en el PC, o disponer
de un ordenador para poder consultar el estado actual
5
Manual de uso
Nº Ref.
Power Peak® Quad EQ-BID 230 V
8196
3. Elementos de uso
Teclas para la
guía por el menú
Pantalla
Conexión de la batería (rojo=„+“, negro=“-“)
Conexión para el
sensor de voltaje
Entrada para
BID
3.1 Función de los elementos de uso
Tal como se puede deducir de la rotulación, las 4 teclas de uso del Power Peak® Quad
EQ-BID 230 V tienen diferentes ocupaciones.En diferentes estados de uso, se realizan
acciones diferentes con las teclas.
Tecla ‘DEC’ / MODE / AUTO
• Con esta tecla, se reducen los valores de los parámetros de carga en el modo de ajuste por un paso en el uso manual y en la selección del menú, se selecciona el menú
anterior.
• Con la tecla ‘MODE’, se puede seleccionar directamente antes del inicio el proceso deseado (CARGAR, DESCARGAR o DESC->CARGAR)
• Después de conectar con la tensión de alimentación, se activa con esta tecla el “modo
automático” (AUTOMA.)en el menú de selección.
Tecla ‘INC’ / Start / Man
• Con esta tecla, aumentan en el uso manual en el modo de ajuste, los valores de los
parámetros de carga por un paso y al seleccionar el menú, se selecciona siempre el
menú siguiente.
• Con la tecla ‘START’, se inicia el proceso seleccionado, por ejemplo CARGAR.
• Después de conectar con la tensión de alimentación, se activa con esta tecla el “modo
manual” (MANUELL) en el menú de selección.
• La tecla‘INC’ sirve además para seleccionar el idioma. Pulsando “INC” durante la conexión de la tensión de alimentación, se llega al menú de selección del idioma.
6
Manual de uso
Nº Ref.
Power Peak® Quad EQ-BID 230 V
8196
TECLA STOP / ENTER
• Con la tecla ‘STOP’, se puede parar un proceso en marcha, por ejemplo CARGAR.
• Con la tecla ‘ENTER’, se confirma una selección, por ejemplo la activación o desactivación de un menú seleccionado.
TECLA DATA
• Indicación de los datos del cargador , por ejemplo tensión de entrada. Con esta tecla
se pueden indicar además todas las tensiones individuales de los elementos de una
batería LiPo conectada.
Todas las teclas disponen de una función autorepeat. Es decir, cuando se mantiene la tecla pulsada, se produce una repetición de pulsaciones.
ZUMBADOR INTEGRADO
• EL zumbador piezo confirma cada pulsación de la tecla e indica de forma acústica el
final de carga y descarga, así como un error que haya aparecido.
4. CARACTERÍSTICAS TÉCNICAS
Tensión de servicio:
230 V AC/ 50 Hz
Cantidad de elementos: 1 ... 14 elementos NiCad / NiMH,
1 ... 6 elementos LiIo (3,6 V), LiPo (3,7 V), LiFe (3,3 V)
1 ... 6 elementos (2...12 V) batería de plomo
Corriente de carga:
0,1 ... 5A con máx. 50W
Corriente de descarga: 0,1 ... 1A con máx. 5W
Corriente de ecualización:aprox. 250 mA
Potencia de carga:
50W, la corriente se regula de forma correspondiente
p.ej. tensión de la batería 24 V, corriente de carga aprox. 2,0
A
p.ej. tensión de la batería 28 V, corriente de carga aprox. 1,7 A
Potencia de descarga:
5W, con regulación paralela de la corriente
Carga de mantenimiento: capacidad cargada <1Ah: sin carga de mantenimiento
capacidad cargada >1Ah: carga de mantenimiento con C/20
(solamente con NiCad y NiMH)
Tensión de final de carga:0,8V por elemento con NiCad y NiMH,
3,0V por elemento con LiPo, LiIo
2,5V por elemento con LiFe
1,8V por elemento con baterías de plomo
Desconexión:
NiCad / NiMH:
automático, sistema digital Delta-Peak
plomo y litio:
automático, depende de la tensión, procedimiento CC-CV
Dimensiones:
total 225 x 170 x 40 mm
Funciones:
Cargar, descargar, descargar-cargar, balancear
10 memorias internas
Nota: ¡Las indicaciones se refieren a una salida de carga!
7
5.
Manual de uso
Nº Ref.
Power Peak® Quad EQ-BID 230 V
8196
Puesta en funcionamiento del cargador
Conectar el cargador a un enchufe de red de 230V.
En el display aparece el display de inicio, después
de una indicación corta del nombre del aparato y el
número de la versión del software.
Al pulsar la tecla „INC“ durante la conexión de la tensión de alimentación, aparece el menú
para la selección del idioma. Esto
puede ajustarse individualmente para cada cargador.
A continuación, puede seleccionar desde esta indicación el idioma para el menú, al poner
el aparato en funcionamiento. Con la tecla 'INC' y la tecla 'DEC', se pueden seleccionar
los idiomas disponibles una tras otra. Se ofrecen las siguientes posibilidades:
•
Alemán
•
Inglés (ENGLISH)
•
Francés (FRANCAIS)
•
Italiano (ITALIANO)
•
Español
Finalizar el proceso con la tecla ‘ENTER’, entonces aparece el display indicado arriba.
5.1 Display del trabajo
Durante un proceso de carga o descarga, el usuario
dispone de toda la información necesaria a través
de esta indicación. En la línea superior, se indica el
estado, el tipo de proceso, (‘L’ para cargar, ‘E’ para
descargar, ‘F‘ para finalizar y en el caso de baterías
de litio, se indica alternativamente „B“ para balantipo de
tensión
Corriente
cear). Se indica además la capacidad cargada o
batería actual de la
de carga y
descargada y el tiempo transcurrido desde el inicio.
batería
descarga
En la línea inferior, se indica el tipo de batería(‘NC’
para baterías níquel-cadmio, ‘NM’ para baterías níquel-metal, ‘LP’ para baterías de polímero de litio, ‘Li‘ para baterías de iones de litio, ‘LF‘ para baterías de litio y hierro y ‘Pb’
para baterías de plomo). De esta forma, se indican durante un proceso de carga o descarga todos los parámetros importantes en un vistazo.
Indicación Indicación de
del estado la capacidad
tiempo
transcurrido
8
Manual de uso
Nº Ref.
Power Peak® Quad EQ-BID 230 V
8196
5.2 Conexión de la batería
¡¡¡Importante!!! Antes de conectar una batería, volver a verificar bien los parámetros
seleccionados. Si los parámetros son erróneos se puede dañar la batería, explotar o
quemarse. Para evitar un corto circuito con los enchufes banana, conectar los cables de
carga siempre primero al cargador y a continuación a la batería. Al desconectar, proceder
a la inversa. ¡Tener en cuenta la polaridad!
Conexión del ecualizador:
Conectar el cable del sensor de voltaje de la batería con el cable negro en la marca de
la flecha del cargador. La flecha indica el polo a masa (negativo). ¡Tener en cuenta la
polaridad! ¡Ver abajo!
Atención:
Para evitar que el aparato se dañe, no conectar las salidas entre ellas (¡por ejemplo,
a través de una bifurcación de batería!).
VOLTAGE SENSOR
+
+
+S1
+S2
-
+S3
Este ejemplo sirve solamente de demostración, para ilustrar la conexión del cable del
sensor de voltaje al ecualizador.
Adaptador EQ
robbe-PQ No.8213
Adaptador EQ
robbe-JSTXH No.8214
Adaptador EQ
robbe-TP/FP Ref. 8215
6. Modo automático Al accionar la tecla ‘AUTO’ desde el display de inicio, el cargador trabaja en el modo automático. Esto quiere
decir, que todos los parámetros están optimizados
de forma automática.
9
6.1
Manual de uso
Nº Ref.
Power Peak® Quad EQ-BID 230 V
8196
Estructura del menú del modo automático (solamente NC y NiMH)
tecla
‘MODE’
tecla
‘START’
tecla
‘MODE’
tecla
‘START’
tecla
‘MODE’
tecla
‘START’
tecla
‘MODE’
tecla
‘START’
tecla
‘MODE’
tecla
‘START’
tecla
‘MODE’
tecla
‘START’
6.2
AJUSTES EN EL MODO AUTOMÁTICO
En el modo automático, el cargador ajusta automáticamente los valores óptimos de corriente y tensión. Este modo está disponible solamente para baterías NC y NiMH. Con la
tecla ‘MODE’, se seleccionan los tres procesos disponibles (CARGAR, DESCARGAR;
DESCARGAR -> CARGAR) para los dos tipos de baterías.
Con la tecla ‘START’, se inicia el proceso correspondiente con la batería conectada. La
indicación cambia acompañada de una señal acústica, se indican los parámetros de carga.
En la línea superior, se indica al lado del proceso cargar (L) o descargar (E), la capacidad
cargada o descargada. Se indica además el tiempo transcurrido desde el inicio del proceso. En la línea inferior, se indica el tipo de batería, la tensión actual de la batería y la
corriente de carga. Para indicar el modo automático, la indicación de la corriente, cambia
con las letras 'auto'.
Con la tecla ‘STOP’, se puede interrumpir el proceso. Entonces, se vuelve a indicar el
modo automático. Después de finalizar el proceso, cuando la batería está completamente
cargada o descargada, se indican los valores alcanzados en el display (capacidad carga10
Manual de uso
Nº Ref.
Power Peak® Quad EQ-BID 230 V
8196
da o descargada, duración del proceso, tipo de batería, tensión actual de la batería y la
corriente actual).
7. Modo manual
Al accionar la tecla ‘MAN’ desde el display de inicio,
el cargador trabaja en el modo manual. Ahora debe
entrar los parámetros manualmente.
tecla
‘START’
7.1 Estructura del menú del modo manual
tecla
‘+’
tecla
‘ENTER’
tecla
‘+’
tecla
‘ENTER’
tecla
‘+’
tecla
‘ENTER’
tecla
‘+’
tecla
‘ENTER’
tecla
‘+’
tecla
‘ENTER’
tecla
‘+’
tecla
‘ENTER’
tecla
‘+’
tecla
‘ENTER’
tecla
‘+’
tecla
‘ENTER’
tecla
‘+’
tecla
‘ENTER’
tecla
‘+’
tecla
‘ENTER’
tecla
‘+’
tecla
‘ENTER’
tecla
‘+’
tecla
‘ENTER’
11
Manual de uso
Nº Ref.
Power Peak® Quad EQ-BID 230 V
8196
tecla
‘+’
tecla
‘ENTER’
tecla
‘+’
tecla
‘ENTER’
tecla
‘+’
tecla
‘ENTER’
tecla
‘+’
7.2 Display de ajuste
Para cada parámetro de carga y descarga, existe un menú de ajuste separado con la
indicación correspondiente en el display. Se selecciona el parámetro a modificar con la
tecla ‘INC’ o la tecla ‘DEC’. La línea correspondiente está marcada con una flecha en el
borde de la derecha. Pulsando la tecla ‘ENTER’,
se inicia el proceso de ajuste. En el borde de la
derecha, parpadea de forma intermitente una
señal ‘+’ y ‘-’-. Con la tecla ‘INC’o la tecla ‘DEC’,
se puede ajustar un nuevo valor. El ajuste se
confirma con la tecla ‘ENTER’. La secuencia del
display indicada, muestra un ejemplo del cambio
de la corriente de carga.
7.3 Ajustes en el modo manual
Antes de poder iniciar un proceso de carga-descarga en el modo manual, es necesario
configurar los siguientes parámetros para que el cargador trabaje de forma óptima en el
modo manual:
•
Espacio de memoria
•
Tipo de batería
•
cantidad de elementos
•
Cantidad de la batería (y tensión de la batería con LiPo, LiIo, LiFe y Pb)
•
Corriente de carga
•
Corriente de descarga
•
Zumbador (PARO,1-5)
Nota: Se pueden cambiar solamente los valores en la primera línea cuando parpadea
el símbolo de la flecha.
12
Manual de uso
Nº Ref.
Power Peak® Quad EQ-BID 230 V
8196
Selección del espacio de memoria
Pulsar la tecla ‘INC’ en el display hasta que la flecha
esté al lado del espacio de memoria.. Pulsar la tecla
‘ENTER’, el símbolo ’+ / -’ parpadea. Ahora puede
seleccionar mediante la tecla ‘INC / DEC’ el espacio
de memoria entre 0 y 9. Después de la selección, volver a pulsar la tecla ‘ENTER’.
Selección del tipo de batería
Pulsar la tecla INC / DEC en el display hasta que la
flecha esté al lado de tipo de batería. Pulsar la tecla
‘ENTER’, el símbolo ’+ / -’ parpadea. Seleccionar
mediante la tecla ‘INC / DEC’ el tipo de batería entre NiCad, NiMH, LiPo, LiIo, LiFe o PB
(plomo). Después de la selección, volver a pulsar la tecla ‘ENTER’.
Fijar la cantidad de elementos / tensión de la batería
Pulsar la tecla INC / DEC en el display hasta que la
flecha esté al lado de cantidad de elementos. Pulsar
la tecla ‘ENTER’, el símbolo ’+ / -’ parpadea. Seleccionar mediante la tecla 'INC / DEC' la cantidad de
elementos entre el 1 y el 14. En los tipos de batería LiPo, LiIo, LiFe y Pb (plomo), se fija la
tensión nominal de la batería en vez de la cantidad de elementos. Ejemplo: Pulsar la tecla
INC / en el display hasta que la flecha esté al lado de
tensión de la batería. Pulsar la tecla ‘ENTER’, el símbolo ’+ / -’ parpadea. Seleccionar mediante la tecla
‘INC / DEC’ la tensión de la batería para baterías
LiPo en pasos de 3,7 V por elemento. Después de la
selección, volver a pulsar la tecla ‘ENTER’. Dispone
de la siguiente selección:
LiPo
Cantidad
de elementos
1
2
3
4
5
6
Tensión de la
batería
3,7 voltios
7,4 voltios
11,1 voltios
14,8 voltios
18,5 voltios
22,2 voltios
LiIo
Cantidad
de elementos
1
2
3
4
5
6
Tensión de la
batería
3,6 voltios
7,2 voltios
10,8 voltios
14,4 voltios
18,0 voltios
21,6 voltios
13
LiFe
Cantidad
de elementos
1
2
3
4
5
6
Tensión de la
batería
3,3 voltios
6,6 voltios
9,9 voltios
13,2 voltios
16,5 voltios
19,8 voltios
Manual de uso
Nº Ref.
Power Peak® Quad EQ-BID 230 V
8196
Puede seleccionar de forma alternativa la tensión
para baterías de plomo con la tecla ‘INC / DEC' en
pasos de 2 V por elemento. Después de la selección,
volver a pulsar la tecla ‘ENTER’.
Cantidad de elementos Tensión de la batería Dispone de la siguiente selección:
1
2 voltios
2
4 voltios
3
6 voltios
4
8 voltios
5
10 voltios
6
12 voltios
Entrada de la capacidad de la batería
Pulsar la tecla INC / DEC en el display hasta que la
flecha esté al lado de capacidad de la batería. Pulsar la tecla ‘ENTER’,la señal ’+ / -’ parpadea. Ahora
puede seleccionar mediante la tecla ‘INC / DEC’ la capacidad de la batería en pasos de
100 mAh (PB; 500 mAh). El ajuste de la capacidad de la batería en el caso de baterías de
litio, sirve en primera línea como base para la carga 1C de la batería, es decir, la corriente
de carga se ajusta automáticamente a la carga 1C correspondiente de la batería. Además,
sirve de desconexión por seguridad de
Tipo de batería
Capacidad de la batería
la batería. Después de la selección,
NiCad
100 - 9900 mAh
volver a pulsar la tecla 'ENTER'.
NiMH
100 - 9900 mAh
La selección indicada al lado, está disLiPo
100 - 9900 mAh
ponible según el tipo de batería:
LiIo
100 - 9900 mAh
LiFe
100 - 9900 mAh
Pb (plomo)
0,50 Ah - 20,00 Ah
AJUSTE DE LA CORRIENTE DE CARGA
Pulsar la tecla INC / DEC en el display hasta que la flecha esté al lado de corriente de
carga. Pulsar la tecla ‘ENTER’, la señal ’+ / -’ parpadea. Ahora puede seleccionar mediante la tecla ‘INC / DEC’ la corriente de carga en pasos de 0,1 A. Después de la selección,
pulsar de nuevo la tecla ‘ENTER’. Se puede ajustar la corriente de carga desde 0,1 A hasta 5,0 A.
No obstante, la potencia máxima de la corriente de
carga depende de la cantidad de elementos y de la
tensión de la batería (con baterías de litio, max. 2C). El procesador del cargador limita la
corriente de carga máxima.
14
Manual de uso
Nº Ref.
Power Peak® Quad EQ-BID 230 V
8196
AJUSTE DE LA CORRIENTE DE DESCARGA
Pulsar la tecla INC / DEC en el display hasta que
la flecha esté al lado de corriente de descarga. Pulsar la tecla ‘ENTER’,la señal ’+ / -’ parpadea. Ahora
puede seleccionar mediante la tecla ‘INC / DEC’ la
corriente de descarga en pasos de 0,1 A. Después de la selección, volver a pulsar la tecla
‘ENTER’. Se puede ajustar la corriente de descarga en un rango de 0,1 A a 1,0 A. La
corriente de descarga máxima depende de la cantidad de elementos y de la tensión de la
batería. El procesador del cargador limita la corriente de descarga máxima.
ENTRADA DE LA SEÑAL ACÚSTICA
Pulsar la tecla INC / DEC en el display hasta que
la flecha esté al lado del zumbador. Pulsar la tecla
‘ENTER’, el símbolo ’+ / -’ parpadea. Ahora puede
seleccionar mediante la tecla ‘INC / DEC’ el tono, con el cual se indica de forma acústica
por ejemplo el final de carga. Dispone de 5 tipos de señales. Además, se puede apagar el
emisor de señales. Con cada pulsación de la tecla ‘INC’ o ‘DEC’, se ajusta un nuevo tono,
reproduciéndolo al mismo tiempo una vez para facilitar la selección.
MEMORIZAR LOS AJUSTES
Pulsar la tecla INC / DEC en el display hasta que la flecha esté al lado de final. Pulsando
la tecla ‘ENTER’, se memorizan los ajustes. A continuación, el display vuelve a mostrar el display de
inicio, es decir, salta a la posición inicial.
7.4
•
INICIO DE UN PROCESO DE CARGA / DESCARGA
Al pulsar MAN’, aparece el display de inicio
•Preparar con la tecla ‘ENTER’ la carga para
para el espacio de memoria indicado.
•Con la ayuda de la tecla ‘MODE’, se puede
seleccionar el proceso deseado.
•Por razones de seguridad, se indican de nuevo los parámetros memorizados.
•Al pulsar la tecla ‘START’, se inicia el proceso de
carga. Una señal acústica muestra el estado. A continuación, se indica el display de trabajo, que indica
todos los parámetros importantes (ver cap. 5.1).
•
Con la tecla ‘INC’ o ‘DEC’, se puede modificar la corriente durante el proceso, el nuevo valor
parpadea primero antes de la aceptación.
15
8.
Manual de uso
Nº Ref.
Power Peak® Quad EQ-BID 230 V
8196
Programación de un BID-Chip/Key
Cuando se conecta un BID-Chip/ KEY con el cargador desde el display de inicio o desde cualquier
otro menú, el cargador cambia al modo cargardescargar una batería con el BID Chip/ Key o a
programar un BID-Chips/Key. Esto vale también
para cuando de usa el cargador con Chip/Key
conectado.
Desde este menú de salida, se pueden ajustar
todos los parámetros para la batería, a la cual
desea fijar este chip. Además, es posible leer los
posibles valores de carga y descarga memorizados
(ver capítulo 8.3). Después de desconectar un BIDChip/Key, se sale del menú de programación y se
indica de nuevo el display de inicio.
Enchufar
chip
Desenchufar
chip
8.1
Estructura del menú del proceso de programación
tecla
‘+’
tecla
‘ENTER’
tecla
‘ENTER’
tecla
‘+’
tecla
‘ENTER’
tecla
‘+’
tecla
‘ENTER’
tecla
‘+’
tecla
‘ENTER’
tecla
‘+’
tecla
‘ENTER’
tecla
‘+’
tecla
‘ENTER’
16
Manual de uso
Nº Ref.
Power Peak® Quad EQ-BID 230 V
8196
tecla
‘ENTER’
tecla
‘+’
tecla
‘+’
tecla
‘ENTER’
tecla
‘+’
tecla
‘ENTER’
tecla
‘ENTER’
tecla
‘+’
tecla
‘ENTER’
tecla
‘ENTER’
tecla
‘+’
8.2 PROCESO DE PROGRAMACIÓN CHIP/KEY (EJEMPLO, PROGRAMACIÓN DE
LA FECHA)
Después de activar el lazo sin fin de programación,
pulsando la tecla 'ENTER', se inicia el proceso de
programación en el display.
A continuación puede entrar todos los parámetros, siguiendo exactamente el mismo proceso y transcurso que para los ajustes de los parametros en el modo manual (ver cap.
7.3). Para garantizar una vista general de los datos, se puede entrar una fecha ‘AAAAMM-DD’ en vez del emisor acústico.
Pulsando la tecla ‘‘ENTER“, se inicia la entrada de
la fecha. A parte de la señal ‘+’ y ‘-’a la derecha,
en la línea superior, parpadea la cifra del año. Se
puede actualizar esta cifra mediante las teclas
‘INC’ o ‘DEC’. Después de volver a pulsar la
tecla ‘ENTER’, parpadea la cifra del mes. Puede
modificarla con las teclas ‘INC /DEC’. De la misma
manera se ajusta la fecha del día. Para memorizar,
volver a pulsar la tecla 'ENTER'.
17
Manual de uso
Nº Ref.
Power Peak® Quad EQ-BID 230 V
8196
Hay que finalizar la entrada de los parámetros
pulsando la tecla 'ENTER', para que los nuevos
valores queden memorizados permanentemente
en el BID-Chip. Si ha hecho una modificación de
los datos durante la entrada, aparecen primero
unas preguntas de seguridad. Para memorizar
los datos, debe indicar la respuesta 'JA' con la
tecla ‘INC’ o la tecla ‘DEC’ y pulsar a continuación la tecla‘ENTER’.
El doble tono indica que la modificación ha quedado registrada correctamente. Si no quiere guardar
los datos, confirmar las preguntas de seguridad con ‘NEIN’. En ambos casos vuelve a
indicarse el display de salida para la programación.
8.3
Leer los datos del BID-Chip/ BID-Key
Después de conectar una batería con BID, se pueden leer los siguientes datos de la
batería, para tener una vista general sobre el estado exacto de una batería.
Los datos están grabados en un BID-Chip/BID-Key
y pueden leerse.
Con una doble pulsación de la tecla ‘INC’, dispone
del primer parámetro. Se indica la capacidad del
proceso actual de carga o descarga.
Con otra doble pulsación de la tecla ‘INC’, dispone
del segundo parámetro. Se indica el valor máximo
de la capacidad de todos los procesos de carga o
descarga.
Después de otra doble pulsación de la tecla 'INC',
se indica en un último parámetro, la cantidad de
ciclos de carga y la fecha programada.
9.
Procesos de carga o descarga con BID-Chip/Key
EL BID-Chip/Key es tan pequeño, que puede instalarse cómodamente en cada accesorio de un cargador. Las fotos en la página siguiente, representan el uso de un BIDChip.
18
Manual de uso
Nº Ref.
Power Peak® Quad EQ-BID 230 V
8196
Conecte primero el BID-Chip/KEY a través del
cable adaptador o directamente con el cargador. A
continuación, se indica automáticamente el display
de al lado.
Si los parámetros de carga en el Chip están correctos, pulsar la tecla ‘ENTER’ para preparar el proceso de carga/descarga. El procedimiento siguiente
es completamente idéntico al de un inicio normal
desde una memoria. Estos contextos se describen
en el cap. 7.4.
Durante el proceso de carga o descarga, se graban los datos más importantes de este
proceso en el Chip/KEY.
10. Final de un proceso de carga / descarga
El cargador finaliza automáticamente un proceso de carga o descarga, justo en el
momento oportuno. El procesador respeta los parámetros de carga. Se usa el proceso
óptimo para cada tipo de batería.
10.1
Indicación de los datos de carga / descarga
Indicación del estado
parpadea ‘F’ (Finish)
Tipo de
batería
Capacidad
cargada o
descargada
Tensión actual
de la batería
Durante un proceso de carga o descarga,
se indican en el display continuadamente
los valores del proceso (ver cap. 5.1).
Tiempo de
carga/ descarga
Cuando un proceso finaliza con éxito, se
indica de forma acústica. El display indica
los datos mas importantes, como la foto
de al lado.
Corriente
de carga /
descarga
19
Manual de uso
Nº Ref.
Power Peak® Quad EQ-BID 230 V
8196
10.2 INFORMACIÓN ADICIONAL
Al accionar la tecla “Data View”, se permite el acceso a otros datos del último proceso.
Al accionar la tecla “Data View”, tiene acceso a otros datos del último proceso, tanto
durante el proceso como al final. Se realiza el scrolling con la tecla ‘INC’ o la tecla
'DEC’. Indicación de la tensión de salida
Indicación de la tensión de carga max. y de la tensión de descarga mediana.
Indicación individual de la capacidad cargada y
descargada.
Indicación del tiempo del proceso
Indicación de la ecualización de las tensiones
individuales de los elementos con batería de litio
conectada ( elemento 1-6 ).
Vista general sobre las tensiones individuales
de los diferentes elementos.
Indicación de los parámetros actuales de la
batería.
Indicación para el espacio actual e interno de la
memoria.
Indicación para la memoria actual BID.
son disponibles!
Después de retirar la batería, se indica de nuevo el
display de inicio, se borran todos los datos y ya no
20
Manual de uso
Nº Ref.
Power Peak® Quad EQ-BID 230 V
8196
11. Avisos de errores
Para asegurar el desarrollo del proceso de carga o de descarga, el Power Peak® Quad
EQ-BID está equipado con dispositivos de seguridad. Cuando se produce un error, aparece enseguida un aviso correspondiente en el display y el zumbador piezo da un chillido. Los siguientes mensajes de error pueden ser confirmados y borrados con cualquier
tecla después de subsanar el error.
Se inició el proceso de carga o descarga sin conexión con la batería, realizar la conexión
La batería está conectada con la polaridad inversa,
verificar la conexión
Interrupción en el circuito de corriente de carga /
descarga, verificar la conexión
Corto circuito en el circuito de corriente de carga /
descarga, verificar las conexiones
La tensión de la batería / de la salida es demasiado alta, verificar la cantidad de elementos
La tensión de la batería / de la salida es demasiado
baja, verificar la cantidad de elementos
El BID-Chip/BID-Key se ha separado del cargador
durante un proceso, parar el proceso, verificar la conexión con el chip y reiniciar.
El (los) elemento(s) conectados tienen una tensión
superior a 4,3 voltios.
LiFe.
El (los) elemento(s) conectados, tienen una tensión
por debajo de 2,75V con LiPo y LiIo o 2,0V con
El cable del sensor de voltaje no está conectado.
21
12.
!
Manual de uso
Nº Ref.
Power Peak® Quad EQ-BID 230 V
8196
Indicaciones de seguridad
• No use nunca el cargador con baterías conectadas sobre bases inflamables. No usar nunca cerca
de materiales inflamables o gases.
• ¡No abrir el aparato bajo tensión!
• No dejar el cargador sin vigilancia durante el uso. El aparato puede calentarse fuertemente durante
el uso normal.
• Cuidado al manejar packs de baterías con muchos elementos. Tener en cuenta que el aislamiento
sea bueno, de lo contrario puede producirse un golpe de corriente.
• El Power Peak® Quad EQ-BID 230 V es apto para cargar, descargar y ecualizar baterías recargables NC- / NiMH- / de plomo y de litio. No cargar pilas secas, pueden explotar.
• El cargador está diseñado para funcionar con 230 V / 50 Hz AC, no lo utilice nunca con otra tensión.
• Al colocarlo procure no tapar las rejillas de circulación del aire de refrigeración.
• Preste atención también al deterioro en la carcasa y los cables.
• Es muy importante proteger el cargador contra el polvo, la suciedad y la humedad.
• No exponga el cargador a calor o frío excesivos, ni tampoco a la radiación solar directa.
• Evite golpes o presiones y no exponga el cargador a vibraciones fuertes.
• Cuando no vaya a utilizar el aparato durante un tiempo prolongado, desenchúfelo de la red y retire
las baterías conectadas si es el caso.
• No cargue las baterías dos veces seguidas.
• No cargar baterías que estén muy calientes. Dejar que se enfríen a temperatura ambiente.
• Sólo se pueden cargar juntos elementos de la misma capacidad y de la misma marca.
• No cargar paralelamente dos baterías en una salida; conecte únicamente un pack de baterías.
• Vigilar que la polaridad de la batería sea correcta y evitar cortocircuitos.
• Compruebe con exactitud los ajustes del Power Peak® Quad EQ-BID 230 V.Ajustes inadecuados pueden destruir las baterías.
• Respete las instrucciones para las baterías de cada fabricante.
13. Garantía
Nuestros artículos ofrecen naturalmente la garantía legal de 24 meses. Si quiere reclamar su derecho
de garantía, diríjase siempre a su comercio, el cual es responsable para su tramitación. Durante este
tiempo, arreglamos de forma gratuita defectos de funcionamiento así como defectos de fabricación o
defectos materiales. Otras exigencias, como por ejemplo daños por falla, quedan excluidas.
El transporte hasta nosotros deberá ser efectuado a portes pagados; el transporte de vuelta hasta
Usted también será efectuado a portes pagados. No se aceptarán los envíos con portes debidos.
No se asume ninguna resposabilidad por los daños de transporte o pérdida de su envío. Recomendamos hacer un seguro. Enviar los aparatos al servicio de atención al cliente de su país.
Envíe sus aparatos al centro de servicio técnico competente para su país.
Para la tramitación de sus solicitudes de garantía deben cumplirse los siguientes requisitos:
• Adjunte a su envío el comprobante de compra (ticket de caja).
• Los aparatos tienen que haber sido utilizados conforme a las instrucciones de uso.
• Sólo ha aplicado las fuentes de corriente recomendadas y los accesorios originales de robbe.
• No hay daños por humedad, ni intervenciones ajenas, ni sobretensiones, ni sobrecargas, ni daños
mecánicos..
• Incluya la información conveniente para la localización del fallo o del defecto.
22
Manual de uso
Nº Ref.
Power Peak® Quad EQ-BID 230 V
8196
14. Accesorios recomendados
Cable de carga para la
batería de la emisora
No. F 1415
Chip BID sin cable, para
equipar otras
baterías.
No. 8472
Cable de carga para la
batería de la emisora
Ref. F 1416
Chip BID con cable de 300
mm, para equipar otras
baterías
Ref. 8473
Cable BID, 300 mm
No. 8474
KEY BID
Nº 8888
Cable Bid 500 mm
No. 8475
Adaptador del balanceador
Nº 4029
Adaptador del balanceador
Nº 4023 XH
Adaptador del balanceador
Nº 4023
Adaptador del balanceador
Nº 4031 XH
23
Adaptador del balanceador
Nº 4031
15. Declaración de conformidad
robbe Modellsport GmbH & Co.KG declara por
la presente, que este producto cumple con los
requisitos básicos y demás preceptos relevantes de las directivas CE correspondientes. La
declaración de conformidad original figura en las
descripciones respectivas de los aparatos dentro
de la página de Internet www.robbe.com.
Este símbolo significa que los pequeños
aparatos eléctricos o electrónicos no
pueden tirarse a la basura doméstica al
final de su uso.
Lleve el aparato a su centro de recogida municipal o a un centro de reciclaje. Esto vale para
todos los países de la C.C.E.E., así como para
otros países europeos con sistema de recogida
separado.
16.Direcciones del servicio técnico
País
Empresa
Calle
Localidad
AND-00130
Andorra
Sorteny
Santa Anna, 13
Les escaldesPrINCip.D‘Andorre
Nordic Hobby
DK-8940 Randers
Dinamarca
Bogensevej 13
A/S
SV
D-36355
Alemania
robbe-Service Metzloser Str. 38
Grebenhain
robbe-Schlüter
GB-LE10 3DS
Inglaterra
LE10-UB
UK
Leicestershire
6, Rue Usson du
Francia
S.A.V Messe
F-57730 Folschviller
Poitou, BP 12
TAG Models
GR-14341 New
Grecia
18,Vriullon Str.
Hellas
Philadelfia/Athen
I-36010 Cavazzale
Via del Progresso,
Italia
MC-Electronic
di Monticello C.Otto
25
(Vi)
Países Bajos/ Jan van
Slot de Houvelaan
NL-3155 Maasland
Belg.
Mouwerik
30
Norwegian
Noruega
Box 2140
N-3103 Toensberg
Modellers
Austria
robbe-Service Puchgasse 1
A-1220 Wien
Minicars
Bergsbrunnagatan
Suecia
S-75323 Uppsala
Hobby A.B.
18
robbe Futaba
Baselstrasse 67 A CH-4203 Grellingen
Suiza
Service
Rep. de
Ivo Marhoun Horova 9
CZ-35201 AS
Eslovaquia
D-36355
España
robbe-Service Metzloser Str. 38
Grebenhain
República
Ivo Marhoun Horova 9
CZ-35201 AS
Checa
robbe Modellsport GmbH & Co.KG
Metzloser Straße 38
D-36355 Grebenhain Metzlos/Gehaag
Teléfono +49 (0) 6644 / 87-0
www.robbe.com
robbe Form BBBB
Teléfono
Fax
00376-825
00376-862 865
476
0045-86-43
0045-86-43
61 00
77 44
0049-6644-87- 0049-6644-87777
779
0044-14550044-1455637151
635151
0033 3 87 94 0033-3-87 94
62 58
62 58
0030-20030-2102584380
102533533
0039 0444
0039 0444
945992
945991
0031-10-59 13 0031-10-59 13
594
594
0047-333 78
0047-333 78
000
001
0043-12590043-125866-52
11-79
0046-186 06
0046-186 06
571
579
0041-61-741
0041-61 741
23 22
23 34
00420 351 120
162
0049-6644-87- 0049-6644-87777
779
00420 351 120
162
No nos responsabilizamos de modificaciones
técnicas y errores.
Copyright robbe-Modellsport 2011
Queda prohibida la reproducción total o parcial de
este documento sin el consentimiento por escrito de
robbe Modellsport GmbH & Co. KG.
Návod k obsluze
Operating instructions
Notice d’utilisation
Manuale d‘uso
Power Peak® Quad EQ-BID 230 V
č. 8196
Návod k obsluze
Obj.č.
Power Peak® Quad EQ-BID 230 V
8196
Vážený zákazníku,
těší nás, že jste se rozhodl pro automatický nabíječ Power Peak® Quad EQ-BID 230 V
ze sortimentu robbe. Stávate se takto majitelem kompaktního 4-násobného nabíječe s
managementem akumulátorů a balancerem pro připojení na napětí 230V AC.
Přestože je zacházení s tímto nabíječem jednoduché, vyžaduje obsluha tak vysoce
kvalitního přístroje, jako je Power Peak® Quad EQ-BID 230 V, určité znalosti.ze strany
uživatele. Díky tomuto návodu se s nabíječem poměrně rychle seznámíte.
Proto byste si měli před uvedením Vašeho nového automatického nabíječe do provozu
pozorně přečíst Návod k obsluze a věnovat zvláštní pozornost i bezpečnostním pokynům.
Přejeme Vám s Vaším novým nabíječem mnoho úspěchů a radosti!
Návod se vztahuje pouze na jeden ze čtyř nabíjecích výstupů, poněvadž všechny
pracují na základě stejného principu!
Bezpečnostní
pokyny
!
Na konci návodu k obsluze jsou uvedeny podrobné bezpečnostní pokyny k zacházení s nabíječem a různými typy akumulátorů.
Před uvedením přístroje do provozu si bezpodmínečně pročtěte tento návod a
bezpečnostní pokyny.
Chybné zacházení s akumulátory a nabíječem může vést i k explozi a požáru
akumulátorů.
Vyloučení záruky
Tento nabíječ je koncipován a povolen výhradně k nabíjení akumulátorů uvedených v návodu k obsluze . robbe Modellsport v žádném případě nemůže poskytovat záruku při jiném použití.
Na dodržení postupů v Návodu k obsluze, jakož i podmínek a metod při provozu, použití
a údržbě nabíječe nemůže robbe-Modellsport dohlížet.
Proto nepřebírá v žádném případě ručení za ztráty, škody a náklady, které souvisí
jakýmkoli způsobem s chybnou obsluhou a provozem.
Pokud to zákon připouští, omezuje se závazek firmy robbe Modellsport k plnění náhrady
škody, bez ohledu na právní důvody, na hodnotu faktury za množství zboží firmy robbe
Modellsport, které se bezprostředně podílelo na poškozující události. Toto neplatí, pokud
firma robbe Modellsport podle závazných zákonných předpisů ručí neomezeně z důvodu
záměru nebo hrubé nedbalosti.
2
Návod k obsluze
Obj.č.
Power Peak® Quad EQ-BID 230 V
8196
Obsah
KapitolaStrana
Bezpečnostní pokyny
1. Obsah setu
2. Všeobecné popis
3. Ovládací prvky
3.1 Funkce ovládacích prvků
4.Technická data
5.Uvedení nabíječe do provozu
5.1 Pracovní displej
5.2 Připojení akumulátorů
6. Automatický mód
6.1 Struktura menu automatického módu
6.2 Nastaveováví v automatickém módu
7. Manuální mód
7.1 Struktura menu manuálního módu
7.2 Displej nastavení
7.3 Nastavování v manuálním módu
7.4 Spuštění procesu nabíjení / vybíjení
8. Programování BID-čipu/klíče
8.1 Struktura menu postupu programování
8.2 Postup programování
8.3 Čtení dat BID čipu/klíče 9. Nabíjecí / vybíjecí pochody s BID-chip/klíčem
10.Ukončení nabíjení/vybíjení
10.1 Zobrazení dat nabíjení/vybíjení
10.2 Doplňkové informace (tlačítko Data-View
11. Chybová hlášení
12. Všeobecné bezpečnostní pokyny
13.Záruční podmínky
14. Doporučené příslušenství 15. Prohlášení o shodě
Likvidace použitých přístrojů
16.Servisní adresy
3
2
4
5
6
6
7
8
8
9
9
10
10
11
11
12
12
15
16
16
17
18
18
19
19
20
21
22
22
23
24
24
24
1.
Návod k obsluze
Obj.č.
Power Peak® Quad EQ-BID 230 V
8196
Obsah setu
Set obsahuje:
1x Power Peak® Quad EQ-BID 230 V
1x BID-čip s připojovacím kabelem
1 x adaptér equalizéru PQ
1 x adaptér equalizéru XH
1 x adaptér equalizéru TP
4
2.
Návod k obsluze
Obj.č.
Power Peak® Quad EQ-BID 230 V
8196
Všeobecný popis
Power Peak® Quad EQ-BID 230 V je inteligentní nabíječ s pohodlným akumanagementem k nabíjení a vybíjení NiCd, NiMH, olověných a litiových aku.
Kromě toho nabíječ disponuje zabudovaným balancerem.
Nabíječem Power Peak® Quad EQ-BID 230 V lze nabíjet anebo vybíjet 1-14 NC nebo
NiMH článků jak v automatickém módu s automatickým nastavením proudu, tak i v
manuálním módu. Odpojení probíhá metodou Delta Peak při plně nabitém akumulátoru..
Lze rovněž nabíjet až 6 do série zapojených litiových článků maximálním proudem do 5
ampér. Vypínání je automatické v závislosti na napětí při plně nabitém aku. Automatické
nabíjení olověných aku od 2 do 12 volt je rovněž možné.
10 interních paměťových pozic nabíječe umožňuje v manuálním módu uložit specifická
data akumulátorů pro nabíjení a vybíjení až 10 různých akumulátorů. Nejdůležitější vlastností nabíječe Power Peak® Quad EQ-BID 230 V je moderní identifikační
systém baterií (BID). Na trhu je stále více různých typů akumulátorů,
přičemž každý typ vyžaduje svůj „vlastní“ nabíjecí proces. Tak se může
lehce stát, že na nabíječi provedete chybné nastavení a akumulátor tím
poškodíte.
Revoluční systém BID firmy robbe poskytuje geniální řešení těchto problémů.
Každému aku se přiřadí malý a lehký BID-čip. Ten ukládá do paměti všechna relevantní
data pro optimální nabíjení a vybíjení aku. Pro nabíjení anebo
vybíjení se propojí nabíječ Power Peak® Quad EQ-BID 230 V
s akumulátorem s BID čipem a zadá nabíječi parametry.
Je pouze zapotřebí stisknout startovací tlačítko a proces
nabíjení nebo vybíjení se spustí. Odpadá zdlouhavé hledání
parametrů nastavení v menu, zvláštní výhodou systému BID
je maximální ochrana před chybnou obsluhou a ukládání
relevantních dat aku v BID-chipu/klíči.
Díky uložení nejdůležitějších dat na BID čipu/klíči mají články
vlastně svá data neustále u sebe a lze je kdykoli zobrazit.
Tato funkce nahrazuje z velké části použití PC softwaru a
počítačové techniky, chcete-li si udělat přehled o aktuálním
o stavu aku.
5
Návod k obsluze
Obj.č.
Power Peak® Quad EQ-BID 230 V
8196
3. Ovládací prvky
tlačítka k
ovládání menu
Displej
Přípoj aku (červený=„+“, černý=“-“)
Přípoj servisního
kabelu
Připojení BID
3.1 Funkce ovládacích prvků
4 ovládací tlačítka nabíječe Power Peak® Quad EQ-BID mají, jak je patrné z popisu,
vícenásobné osazení. V různých provozních režimech se ovládacími prvky spouští
různé procesy.
Tlačítko MODE / AUTO / „DEC“
• Tímto tlačítkem v manuálním provozu v módu nastavování nabíjecích parametrů
snižujete hodnoty o jeden krok a v menu volby volíte předchozí menu.
• Tlačítkem ‘MODE’ lze přímo před spuštěním zvolit požadovaný proces (LADENnabíjení, ENTLADEN-vybíjení nebo ENTL->LADEN).
• Po připojení k napájecímu napětí se tímto tlačítkem v menu volby aktivujete "automatický mód" (AUTOMA..
Tlačítko Start / Man / „INC“
• Tímto tlačítkem v manuálním provozu se v nastavovacím módu zvětšují hodnoty
nabíjecích parametrů vždy o jeden krokv a při volbě menu se volí vždy následující
menu.
• Tlačítkem ‘START’ spustíte požadovaný proces, např. LADEN (nabíjení).
• Po připojení k napájecímu napětí se tímto tlačítkem v menu volby aktivujete "manuální
mód" (MANUELL).
• Kromě toho slouží tlačítko ‘INC’k volbě jazyka. Když při připojování napájecího napětí
stiskneme “INC”, dospějeme do menu pro volbu jazyka.
6
Návod k obsluze
Obj.č.
Power Peak® Quad EQ-BID 230 V
8196
Tlačítko Stop / Enter
• Tlačítkem STOP je možné zastavit probíhající proces, např. NABÍJENÍ
• Tlačítkem ENTER se potvrzuje volba, např. aktivace zvoleného menu.
Tlačítko DATA
• Zobrazení dat nabíječe, např. vstupního napětí. Kromě toho lze tímto tlačítkem zobrazit
napětí jednotlivých článků připojeného Li-Po aku.
Všechna tlačítka mají tzv. autorepeat (opakovací) funkci. Podržení tlačítka má za
následek opakované stisknutí.
Integrovaný bzučák
• Piezo-bzučák potvrdí každé stisknutí kteréhokoli tlačítka a akusticky signalizuje
ukončení nabíjení, popř. vybíjení nebo výskyt chyby.
4. Technická data
Provozní napětí:
230 V AC/ 50 Hz
Počet článků:
1 ... 14 článků NC / NiMH,
1 ... 6 článků LiIo (3,6 V), LiPo (3,7 V), LiFe (3,3 V)
1 ... 6 olověných článků (2..12 V)
Nabíjecí proud:
0,1 ... 5 A při max. 50 W
Vybíjecí proud:
0,1 ... 1 A při max. 5 W
Vyrovnávací proud:
ca. 250 mA
Nabíjecí výkon:
50 W, proud je adekvátně regulován
např. 24 V napětí aku, nabíjecí proud ca. 2,0 A
např. napětí aku 28 V, nabíjecí proud ca. 1,7 A
Vybíjecí výkon:
5W, proud je adekvátně regulován
Udržovací nabíjení:
nabitá kapacita <1Ah: žádné udržovací nabíjení nabitá kapacita >1Ah: udržovací nabíjení C/20
(pouze u NiCd a NiMH aku)
Koncové vybíjecí napětí 0,8V/čl. u NiCd a NiMH,
3,0V/čl. u LiPo, LiIo
2,5V/čl. u LiFe
1,8V/čl. u olověných aku
Odpojení:
NiCd / NiMH:
automaticky, digitální systém Delta-Peak
Olověné a litiové aku:
automaticky, v závislosti na napětí, postup CC-CV
Rozměry :
celk. 225 x 170 x 40 mm
Funkce:
nabíjení, vybíjení, vybíjení-nabíjení, balancování
10 interních paměťových pozic
Upozornění: Údaje se vztahují na jeden nabíjecí výstup!
7
Návod k obsluze
Obj.č.
Power Peak® Quad EQ-BID 230 V
8196
5. Uvedení nabíječe do provozu
Připojte nabíječ k síťové zásuvce 230V 50Hz.
Po krátkém zobrazení názvu nabíječe a čísla verze
softwaru se na displeji objeví startovací displej.
Pokud během připojování zdroje napětí podržíte
tlačítko „INC“, objeví se menu volby jazyka. Toto lze
pro každý nabíječ nastavit jednotlivě.
Poté lze z tohoto zobrazení při uvedení do provozu
zvolit jazyk pro vedení menu. Klávesou ‘INC’ nebo
‘DEC’ lze postupně vyvolat po sobě jednotlivé jazyky, které jsou k dispozici. Můžete zvolit
z následujících možností:
•
němčina
•
angličtina (ENGLISH)
•
francouzština (FRANCAIS)
•
italština (ITALIANO)
•
španělština (ESPANOL)
Tento postup musíte uzavřít tlačítkem ‘ENTER, poté se objeví zobrazený startovací displej.
5.1 Pracovní displej
Během procesu nabíjení/vybíjení jsou uživateli přes toto zobrazení zprostředkovávány
všechny nezbytné informace. V horním řádku se zobrazí údaj o stavu, typu procesu
(„L“ pro nabíjení, „E“ pro vybíjení, „F“ pro
Indikace stavu
uplynulá
Finish (konec), popř. u lithiových aku „B“
doba
zobrazení kapacity
pro balancování). Kromě toho se zobrazuje
nabitá nebo vybitá kapacita a čas, který
uplynul od startu. Ve spodním řádku se
zobrazuje typ aku (‘NC’ pro nikl-kadmiové
nabíjecí, aku, ‘NM’ pro nikl-metalhydridové aku, ‘LP’
Typ aku- aktuální napětí popř. vybíjecí pro lithium-polymerové aku, ‘Li‘ pro lithiummulátoru akumulátoru
proud ionové aku, ‘LF‘ pro Lithium Ferrum aku
a ‘Pb’ pro olověné aku). Tak jsou vždy na
okamžik zobrazovány během procesu nabíjení nebo vybíjení veškeré důležité parametry.
8
Návod k obsluze
Obj.č.
Power Peak® Quad EQ-BID 230 V
8196
5.2 Připojení akumulátorů
Důležité!!! Před připojením aku je třeba ještě jednou přesně zkontrolovat nastavené
parametry. Při chybném nastavení se může aku poškodit, explodovat nebo může začít
hořet. Aby se zamezilo zkratu na banáncích, je třeba vždy nabíjecí kabel napřed připojit k
nabiječi, pak teprve k akumulátoru. Při odpojování postupujte v opačném pořadí. Dbejte
na správnou polaritu!
Připojení balanceru:
Servisní kabel lithiového aku se musí propojit s černým kabelem na značce šipky na
nabíječi. Šipka označuje pól (minus). Dbejte na polaritu! Viz níže!
Pozor:
Pokud chcete předejít škodám na nabíječi, nikdy vzájemně nepropojujte výstupy (na
př. přes odbočku aku)!
VOLTAGE SENSOR
+
+
+S1
+S2
-
+S3
Tento příklad slouží pouze ke znázornění a má zobrazovat připojení servisního kabelu k
balanceru.
EQ-adaptér
robbe-PQ č.8213
EQ-adaptér
robbe-JSTXH č.8214
EQ-adaptér
robbe-TP/FP č.8215
6. Automatický mód Pokud při běžicím startovacím displeji stisknete tlačítko ‘AUTO’’,
pracuje nabíječ v automatickém módu, přičemž
všechny parametry jsou automaticky optimalizovány.
9
Návod k obsluze
Obj.č.
Power Peak® Quad EQ-BID 230 V
8196
6.1 Struktura menu automatického módu (pouze NC a NiMH)
‘MODE’Button
‘START’button
‘MODE’Button
‘START’Button
‘MODE’Button
‘START’Button
‘MODE’Button
‘START’Button
‘MODE’Button
‘START’Button
‘MODE’Button
‘START’Button
6.2 Nastavení v automatickém módu
V automatickém módu nastavuje nabíječ příslušné optimální hodnoty proudu a napětí
automaticky. Tento mód je k dispozici pouze pro akumulátory NiCd a NiMH. Tlačítkem
‘MODE’lze vždy zvolit jeden ze tří procesů, které jsou k dispozici (nabíjení/LADEN, vybíjení/
ENTLADEN a vybíjení-nabíjení/ENTLADEN -> LADEN), vždy pro oba typy aku.
Klávesou ‘START’ se při zapojených aku zahájí příslušný proces. Současně s akustickým
signálem se změní náhled a zobrazí se parametry nabíjení. V horním řádku se vedle procesu nabíjení(L) nebo vybíjení (E)zobrazí i nabitá nebo vybitá kapacita. Kromě toho se zde
zobrazí uplynulý čas od spuštění procesu. Ve spodním řádku se zobrazuje typ aku, aktuální
napětí aku a nabíjecí proud. K potvrzení automatického módu se změní zobrazení proudu
na nápis "auto".
Tlačítkem ‘STOP’ lze ukončit proces, poté se znovu zobrazí displej automatického módu.
Po ukončení procesu, když je akumulátor plně nabitý nebo vybitý, se na displeji zobrazí
dosažené hodnoty (nabité nebo vybité kapacity, trvání procesu, typ aku, aktuální napětí
aku a aktuální proud).
10
Návod k obsluze
Obj.č.
Power Peak® Quad EQ-BID 230 V
8196
7. Manuální mód
Pokud stisknete z běžicího startovacího displeje tlačítko ‘MAN’, pracuje nabíječ v
manuálním módu. Nyní musíte parametry nastavovat manuálně.
Tlačítko
‘MAN’
7.1 Struktura menu manuálního módu
+/Button
+/Button
+/Button
+/Button
+/Button
+/Button
‘ENTER’Button
+/Button
‘ENTER’Button
‘ENTER’Button
+/Button
‘ENTER’Button
‘ENTER’Button
+/Button
‘ENTER’Button
‘ENTER’Button
+/Button
‘ENTER’Button
‘ENTER’Button
+/Button
‘ENTER’Button
‘ENTER’Button
+/Button
‘ENTER’Button
11
+/Button
+/Button
Návod k obsluze
Obj.č.
Power Peak® Quad EQ-BID 230 V
8196
+/Button
‘ENTER’Button
‘ENTER’Button
‘ENTER’Button
+/Button
7.2 Nastavovací displej
Pro každý parametr nabíjení nebo vybíjení je k dispozici samostatné menu nastavení
s příslušnými údaji na displeji. Tlačítkem "NC"
nebo "DEC" zvolíte parametr, který chcete změnit.
Horní řádek je označen na pravém okraji šipkou.
Stisknutím tlačítka ‘ENTER’ se spustí proces
nastavování. Na pravém okraji střídavě blikají
znaky "+" a "-". Tlačítkem 'NC' nebo 'DEC' lze programovat novou hodnotu. Tlačítkem 'ENTER' se
nastavení ukončí. Znázorněný sled zobrazení na
displeji ukazuje příklad změny nabíjecího proudu.
7.3 Nastavení v manuálním módu
Dříve než spustíte v manuálním módu proces nabíjení nebo vybíjení, musíte provést
následující nastavení menu, aby nabíječ v manuálním módu proces optimálně zpracoval.
•
paměťová pozice
•
typ akumulátoru
•
Počet článků
•
Kapacita aku (popř. napětí aku u LiPo, LiIo, LiFe a Pb)
•
nabíjecí proud
•
vybíjecí proud
•
bzučák (AUS=vypnuto,1-5)
Upozornění: Změnit lze jen hodnoty v prvním řádku, když vedle nápisu bliká šipka.
12
Návod k obsluze
Obj.č.
Power Peak® Quad EQ-BID 230 V
8196
Volba paměťové pozice
Stisknutím tlačítka 'INC' listujte v displeji dále, až
šipka zůstane stát vedle paměťové pozice. Stiskněte
tlačítko ‘ENTER’, znak ’+ / -’ bliká. Nyní můžete
volit pomoci tlačítka 'INC / DEC' mezi paměťovými
pozicemi 0 až 9. Po volbě opět stiskněte tlačítko
'ENTER'.
Volba typu akumulátoru
Stisknutím tlačítka INC / DEC listujte v displeji
dále, až šipka zůstane stát vedle pozice typ aku.
Stiskněte tlačítko ‘ENTER’, znak ’+ / -’ bliká. Nyní
lze pomocí tlačítka ‘INC / DEC’ zvolit typ aku NiCd, NiMH, LiPo, LiIo, LiFe anebo PB (olovo).
Po volbě opět stiskněte tlačítko ‘ENTER’.
Určení počtu článků / napětí aku
Stisknutím tlačítka INC / DEC listujte v displeji dále,
až šipka zůstane stát vedle pozice počtu článků.
Stiskněte tlačítko ‘ENTER’, znak ’+ / -’ bliká. Nyní
lze pomocí tlačítka ‘INC / DEC’ pro aku NC a NiMH zvolit počet článků mezi 1 a 14. Po
volbě opět stiskněte tlačítko ‘ENTER’.
U typu aku LiPo, LiIo, LiFe a Pb (olovo) se místo počtu článků určí jmenovité napětí aku.
Příklad: Stisknutím tlačítka ‘INC’ / - listujte v displeji dále, až šipka zůstane stát vedle pozice napětí aku. Stiskněte tlačítko ‘ENTER’, znak ’+ / -’ bliká. Nyní lze volit pro akumulátory
LiPo tlačítkem ‘INC / DEC’ napětí aku v krocích po
3,7 V na článek. Po volbě opět stiskněte tlačítko
‘ENTER’.
K dispozici jsou následující volby:
LiPo
Počet
Napětí akučlánků
mulátoru
1
3,7 V
2
7,4 V
3
11,1 V
4
14,8 V
5
18,5 V
6
22,2 V
Počet
článků
1
2
3
4
5
6
LiIo
Napětí akumulátoru
3,6 V
7,2 V
10,8 V
14,4 V
18,0 V
21,6 V
13
Počet
článků
1
2
3
4
5
6
LiFe
Napětí akumulátoru
3,3 V
6,6 V
9,9 V
13,2 V
16,5 V
19,8 V
Návod k obsluze
Obj.č.
Power Peak® Quad EQ-BID 230 V
8196
Alternativně lze volit pro olověné akumulátory
tlačítkem ‘INC / DEC’ napětí aku v krocích po 2 V
na článek. Po volbě opět stiskněte tlačítko ‘ENTER’.
K dispozici jsou následující volby:
Počet článků
Napětí akumulátoru
1
2V
2
4V
3
6V
4
8V
5
10 V
6
12 V
Zadání kapacity akumulátorů
Stisknutím tlačítka INC / DEC listujte v displeji
dále, až šipka zůstane stát vedle pozice kapacity
aku. Stiskněte tlačítko ‘ENTER’, znak ’+ / -’ bliká.
Nyní lze tlačítkem ‘INC / DEC’ zvolit kapacitu aku v
krocích po 100 mAh (PB; 500 mAh). Při nastavení kapacity litiových akumulátorů slouží
v prvé řadě jako základ nabíjení proudem velikost 1C, odpovídajícímu kapacitě daného
aku, t. zn. nabíjecí proud se automaticky nastaví na nabíjecí proud aku 1C. Navíc slouží k
bezpečnostnímu vypnutí aku. Po volbě
Typ akumulátoru
Kapacita aku
opět stiskněte tlačítko ‘ENTER’.
NiCd
100 - 9900 mAh
Vedle uvedená volba je k dispozici v
NiMH
100 - 9900 mAh
závislosti na typu akumluátoru.
LiPo
100 - 9900 mAh
LiIo
100 - 9900 mAh
LiFe
100 - 9900 mAh
Pb (olovo)
0,50 Ah - 20,00 Ah
Nastavení nabíjecího proudu
Stisknutím tlačítka INC / DEC listujte v displeji dále, až šipka zůstane stát vedle pozice
nabíjecí proud. Stiskněte tlačítko ‘ENTER’, znak ’+ /
-’ bliká. Nyní lze tlačítkem ‘INC / DEC’ zvolit nabíjecí
proud v krocích po 0,1 A. Po volbě opět stiskněte
tlačítko ‘ENTER’. Nabíjecí proud lze nastavovat v
rozsahu od 0,1 A až 5,0 A. Max. hodnota nabíjecího proudu přitom závisí na počtu článků
nebo na napětí aku (u litiových aku max. nabíjecí proud 2C).Procesor nabíječe omezuje
max. nabíjecí proud.
14
Návod k obsluze
Obj.č.
Power Peak® Quad EQ-BID 230 V
8196
Nastavení vybíjecího proudu
Stisknutím tlačítka INC / DEC listujte v displeji
dále, až šipka zůstane stát vedle pozice vybíjecího
proudu. Stiskněte tlačítko ‘ENTER’, znak ’+ / -’ bliká.
Nyní lze tlačítkem ‘INC / TEC’ zvolit vybíjecí proud v krocích po 0,1 A. Po volbě opět stisknout tlačítko ‘ENTER’.. Vybíjecí proud lze nastavovat v rozsahu od 0,1 A až 1,0 A. Max.
velikost vybíjecího proudu přitom závisí na na počtu článků anebo na napětí aku. Procesor
nabíječe omezuje max. vybíjecí proud.
Zadávání akustické signalizace
Stisknutím tlačítka INC / DEC listujte v displeji
dále, až šipka zůstane stát vedle pozice bzučáku.
Stiskněte tlačítko ‘ENTER’, znak ’+ / -’ bliká. Nyní
lze zvolit tlačítkem ‘INC / DEC’ tón, ketrým se akusticky oznamuje na př. konec nabíjení. K dispozici je 5 typů signálů, kromě toho lze signalizaci i vypnout. Každým stisknutím klávesy ‘INC’ nebo ‘DEC’ se nastaví nový tón a přitom
se současně, k ulehčení volby, jednou zopakuje.
Ukládání nastavení
Stisknutím tlačítka NC / DEC listujte v displeji dále,
až šipka zůstane stát vedle pozice Konec (ENDE).
Všechna provedená nastavení se uloží do paměti
stisknutím tlačítka 'ENTER'. Obrazovka potom ukazuje opět standardní displej a přeskočí zpět do výchozí polohy.
7.4 Spuštění procesu nabíjení/vybíjení
•‘Stiskněte ‘MAN’, objeví se startovací displej
•Připravte tlačítkem ‘ENTER’ nabíjení pro zobrazenou ukládací pozici paměti.
•Tlačítkem ‘MODE’ lze zvolit požadovaný proces.
•Pro jistotu jsou uložené parametry ještě jednou zobrazeny.
• Stisknutím klávesy ‘START’spustíte proces nabíjení,
tento stav je i akusticky signalizován. Poté se zobrazí
pracovní displej, na kterém jsou zobrazeny všechny
důležité parametry (viz. kap. 5.1).
•Tlačítke ‘INC’ anebo DEC’ lze během procesu měnit
proud, nová před převzetím napřed bliká.
15
Návod k obsluze
Obj.č.
Power Peak® Quad EQ-BID 230 V
8196
8. Programování BID-čipu/klíče
Jakmile se připojí BID-chip/ klíč k nabíječi, přejde
nabíječ na mód programování BID-chips/klíče.
Toto platí i když se uvede nabíječ s připojeným čip/
klíčem do provozu.
Z tohoto výchozího menu lze nastavit veškeré
parametry pro aku, na kterém je připojen tento čip.
Kromě toho lze přečíst i případně uložené hodnoty
nabíjení/vybíjení (viz kap. 8.3.). Po odpojení BIDčipu/klíče se zavře programovací menu a opět se
zobrazí startovací displej.
připojte
čip
odpojte
čip
8.1 Struktura menu postupu programování
+/Button
‘ENTER’Button
+/Button
+/Button
‘ENTER’Button
+/Button
‘ENTER’Button
‘ENTER’Button
+/Button
‘ENTER’Button
‘ENTER’Button
+/Button
‘ENTER’Button
+/Button
16
+/Button
+/Button
Návod k obsluze
Obj.č.
Power Peak® Quad EQ-BID 230 V
8196
‘ENTER’Button
+/Button
‘ENTER’Button
‘ENTER’Button
+/Button
‘ENTER’Button
‘ENTER’Button
+/Button
‘ENTER’Button
+/Button
‘ENTER’Button
8.2 Postup programování (příklad programování data)
Po aktivaci programovací smyčky stisknutím
tlačítka ‘ENTER’ se v tomto displeji spustí proces
programování.
V následujícím lze zadat veškeré parametry naprosto stejným způsobem a se stejným
průběhem, jako u nastavování parametrů v manuálním módu (viz. kap 7.3). Aby byl
zachován přehled přes data, lze namísto zavedení akustického signalizátoru zadat
datum ve formátu ‘RRRR-MM-DD’.
Stisknutím tlačítka ‘ENTER’ bylo zahájeno zadávání data. Kromě znaků ‘+’ a ‘-’ vpravo
v horním řádku bliká i letopočet. Ten lze aktualizovat klávesou ‘INC’ nebo ‘DEC’. Dalším
stisknutím klávesy ‘ENTER’ začne blikat údaj o
měsíci, který lze změnit klávesami ‘INC / DEC’.
Stejným způsobem lze nastavit i aktuální den. Pro
uložení do paměti se ještě jednou musí stisknout
tlačítko ‘ENTER’.
17
Návod k obsluze
Obj.č.
Power Peak® Quad EQ-BID 230 V
8196
Nakonec se musí zadání parametrů uzavřít stisknutím
tlačítka ‘ENTER’, aby se nové hodnoty trvale uložily
v paměti BID-chipu. Pokud při zadání došlo ke
změně dat, objeví se napřed bezpečnostní dotaz.
Za účelem uložení do paměti musíte tlačítkem
‘+’- anebo ‘-’ zavést odpověď ‘JA’ (ano) a v následujícím stisknout tlačítko ‘ENTER’.
Dvojitý tón signalizuje úspěšné uložení změn.
Pokud data nemají být převzata, musíte bezpečnostní dotaz potvrdit tlačítkem „NEIN“. V
obou případech se znovu zobrazí výstupní displej procesu programování.
8.3 Čtení dat z BID čipu/BID klíče
Po připojení akumulátoru s BID je možné vyvolat následující data aku, abyste získali přehled o
aktuálním stavu akumulátoru.
Na BID čipu/BID-klíči jsou uložena data a je možné je vyvolat.
parametr.
Dvojitým stisknutím tlačítka ‘INC’ je k dispozici první
Dalším dvojitým stisknutím tlačítka ‘INC’ se zobrazí
druhý parametr. Zobrazí se maximální hodnota
kapacity ze všech nabíjecích/vybíjecích procesů.
Dalším dvojitým stiskem tlačítka ‘INC’ vyvoláte
poslední parametr, který zobrazuje počet nabíjecích
cyklů a naprogramované datum.
9. Nabíjení/vybíjení s BID chipem/klíčem
BID čip/klíč má tak malé rozměry, že jej lze umístit v každém příslušenství. Obrázky na
další straně znázorňují použití BID čipu.
18
Návod k obsluze
Obj.č.
Power Peak® Quad EQ-BID 230 V
8196
Nejdříve propojte BID čip/klíč pomocí adapčního
kabelu popř. přímo s nabíječem. Poté se automaticky zobrazí displej uvedený v příkladu.
Pokud jsou parametry nabíjení na BID chipu v
pořádku, stiskněte pro přípravu procesu nabíjení/
vybíjení tlačítko ‘ENTER’. Další průběh je naprosto shodný s normálním startem z pozice ukládací
paměti. Tyto souvislosti jsou popsány v kapitole 7.4.
Během nabíjení popř. vybíjení se nejdůležitější data příslušeného procesu ukládají na
BID chip/klíč.
10. Ukončení nabíjení/vybíjení
Nabíječ automaticky ukončí proces nabíjení nebo vybíjení přesně ve správném
okamžiku. Procesor přitom bere ohled na nabíjecí parametry a pro každý typ akumulátoru použije optimální postup.
10.1 Indikace nabíjecích / vybíjecích dat
Indikace stavu nabitá
bliká ‘F’ (Finish) anebo vybitá
kapacita
Typ akumulátoru
Doba
nabíjení/
vybíjení
nabíjecí,
aktuální napětí
popř. vybíjecí
akumulátoru
proud
19
Během procesu nabíjení/vybíjení se na
pracovním displeji nepřetržitě zobrazují
hodnoty procesu (viz. kap 5.1).
Úspěšně ukončený proces je akusticky
signalizován. Na displeji jsou zobrazena
nejdůležitější data, viz. obrázek.
Návod k obsluze
Obj.č.
Power Peak® Quad EQ-BID 230 V
8196
10.2 Doplňkové informace
Stisknutím tlačítka “Data View” je umožněn přístup k dalším datům posledního průběhu.
Pomocí tlačítka ‘INC’ nebo ‘DEC’ můžete listovat.
Zobrazení výstupního napětí
Zobrazení maximálního nabíjecího napětí a
středního vybíjecího napětí
Jednotlivé zobrazení nabité a vybité kapacity
Zobrazení doby procesu
Zobrazení balancování napětí jednotlivých článků pokud jsou připojeny litiové články ( řádek 1-6 ).
Celkový přehled o aktuálních napětích jednotlivých článků
Zobrazení aktuálních parametrů akumulátorů.
Zobrazení aktuální interní paměťové pozice.
Zobrazení pro aktuální paměť BID.
Po odpojení akumulátoru se znovu zobrazí startovací displej, veškerá data jsou vymazána a nejsou dále k dispozici!
20
Návod k obsluze
Obj.č.
Power Peak® Quad EQ-BID 230 V
8196
11. Chybová hlášení
Aby byl zajištěn bezpečný průběh nabíjecího anebo vybíjecího pochodu. je nabíječ
Power Peak® Quad EQ-BID 230 V vybaven bezpečnostními zařízeními. Jakmile dojde
k chybě, objeví se na displeji odpovídající hlášení a bzučák vyšle ostrý výstražný tón.
Následující hlášení chyb lze po odstranění příčiny potvrdit libovolným tlačítkem.
Proces nabíjení nebo vybíjení bez připojení k aku je
spuštěn, připojte akumulátor
Akumulátor je připojen s opačnou polaritou,
překontrolujte připojení
Přerušení v obvodu nabíjecího / vybíjecího proudu,
překontrolujte připojení
Zkrat v obvodu nabíjecího / vybíjecího proudu,
překontrolujte připojení.
Příliš vysoké napětí akumulátoru / výstupního
napětí, překontrolujte počet článků
Příliš nízké napětí akumulátoru / výstupního napětí,
překontrolujte počet článků
BID chip/klíč byl odpojen během probíhajícího procesu
od nabíječe, přerušte proces. Překontrolujte propojení
s chipem a znovu spusťte.
Připojené články se nachází na úrovni napětí nad
4,3 V.
Připojené články se nachází na úrovni napětí
pod 2,75 V u Li-Poly a Lilo nebo 2,0 V u LiFe
akumulátorů.
Servisní napěťový kabel není připojen.
21
12.
!
Návod k obsluze
Obj.č.
Power Peak® Quad EQ-BID 230 V
8196
Bezpečnostní pokyny
• Nikdy neumísťujte nabíječ a připojené akumulátory na hořlavé podložky. Nikdy neprovozujte
nabíječ v blízkosti hořlavých materiálů nebo plynů.
• Neotevírejte nabíječ pod napětím!
• Pokud je nabíječ v provozu, nenechávejte jej nikdy bez dozoru. Přístroj se během normálního provozu může silně zahřát.
• Pozor při manipulaci s akumulátory s vysokými počty článků. Bezpodmínečně dbejte na dobrou
izolaci, hrozí nebezpečí úrazu proudem
• Nabíječ Power Peak® Quad EQ-BID 230 V je vhodný pouze pro nabíjení, vybíjení a ekvalizaci
nabíjitelných akumulátorů NiCd / NiMH / Pb a litiových aku. Nikdy se nepokoušejte nabíjet suché
články, hrozí nebezpečí exploze!
• Nabíječ je dimenzován pro provoz na střídavém napětí 230 V / 50 Hz. Nikdy jej neprovozujte na
jiném napětí.
• Dbejte na to, aby byly vždy volné otvory pro chlazení a cirkulaci vzduchu.
• Dávejte pozor, aby nebyly poškozeny kabely ani pouzdro nabíječe.
• Chraňte nabíječ před prachem, vlhkem a nečistotami.
• Nevystavujte nabíječ přímému slunci, extrémnímu teplu nebo chladu.
• Chraňte nabíječ před nárazy a zatížení tlakem a nevystavujte jej silným vibracím.
• Pokud nabíječ delší dobu nepoužíváte, odpojte jej od zdroje proudu, eventuelně odpojte i články.
• Nikdy nenabíjejte tytéž akumulátory zakrátko podruhé.
• Nenabíjejte zahřáté akumulátory. Akumulátory vždy nechejte ochladit na okolní teplotu.
• Současně se smí nabíjet jen akumulátory stejné kapacity a stejného výrobce.
• Nikdy nenabíjejte paralelně na jednom výstupu dvoje akumulátory, připojujte pouze 1 akupak.
• Dávejte pozor na správnou polaritu aku a vyvarujte se zkratů.
• Vždy velmi pečlivě zkontrolujte nastavení nabíječe Power Peak® Quad EQ-BID 230 V. Akumulátory se mohou nevhodným nsatavením zničit.
• Dbejte na návody k akumulátorům příslušných výrobců.
13. Záruční podmínky
Na naše výrobky se samozřejmě vztahuje zákonem předepsaná záruka v délce 24 měsíců. V případě
uplatňování oprávněných záručních nároků se vždy obraťte na svého obchodníka, který je nositelem
záruky a je odpovědný za její provedení. V záruční lhůtě Vám bezplatně opravíme vzniklé funkční,
výrobní a materiálové závady. Dále sáhající nároky, jako na př. následné škody, jsou vyloučeny.
Náklady spojené s odesláním do servisu hradí zákazník, zaslání zpět od nás je zdarma. Nevyplacené
zásilky nemůžeme přijmout.
Za škody vzniklé při dopravě nebo ztrátu nemůže firma Robbe převzít zodpovědnost. Doporučujeme
uzavřít patřičné pojištění.
Nabíječe zasílejte vždy příslušnému servisu ve Vaší zemi.
Pro zpracování Vašich záručních nároků musí být splněny následující předpoklady:
• Přiložte k Vaši zásilce doklad o koupi (pokladní lístek).
• Nabíječ byl provozován v souladu s návodem k obsluze.
• Byly použity jen doporučené zdroje napětí a originální příslušenství robbe.
• Nabíječ nebyl vystaven vlhku, nebyly zde zjištěny žádné cizí zásahy, přetěžování, přepólování nebo mechanická poškození.
• Pokuste se uvést možné důvody k vyhledání chyby nebo závady.
22
Návod k obsluze
Obj.č.
Power Peak® Quad EQ-BID 230 V
8196
14. Doporučené příslušenství
Nabíjecí kabel aku vysílače
č. F 1415
BID-čip bez kabelu k vybavení dalších
akumulátorů.
č. 8472
Nabíjecí kabel
přijímačových aku č. F
1416
BID-čip s 300 mm kabelem, k vybavení dalších
akumulátorů
č. 8473
BID-kabel, 300 mm
BID-klíč
č. 8888
BID-kabel, 500 mm
Adaptér balancéru
č. 4029
Adaptér balancéru
čís. 4023 XH
Adaptér balancéru
č. 4023
Adaptér balancéru
Čís. 4031 XH
23
č. 8474
č. 8475
Adaptér balancéru
č. 4031
15. Prohlášení o shodě
Tímto firma robbe Modellsport GmbH & Co.
KG prohlašuje, že je tento přístroj v souladu se
základními nařízeními a ostatními relevantními
předpisy dle směrnic CE. Originální prohlášení o
shodě najdete na internetu na www. robbe.com
u příslušného popisu výrobku stisknutím logotlačítka "Conform".
Uvedený symbol upozorňuje na
skutečnost, že musí být výrobek na
konci své životnosti zlikvidován v místě
k tomu určenému a ne v běžném domácím
odpadu.
Zlikvidujte výrobek v místní komunální sběrně
nebo recyklačním centru. To platí pro všechny
země Evropské unie a ostatní evropské země s
odlišným sběrným systémem.
16.Servisní adresy
Země
Andorra
Dánsko
Německo
Anglie
Francie
Řecko
Itálie
Nízozemí/
Belg.
Norsko
Rakousko
Švédsko
Švýcarsko
Slovenská
Rep.
Španělsko
Česká Rep.
Firma
Ulice
Město
AND-00130
Sorteney
Santa Anna, 13
Les escaldesPrINCip.D‘Andorre
Nordic Hobby
DK-8940 Randers
Bogensevej 13
A/S
SV
D-36355
robbe-Service Metzloser Str. 38
Grebenhain
robbe-Schlüter
GB-LE10 3DS
LE10-UB
UK
Leicestershire
6, Rue Usson du
S.A.V Messe
F-57730 Folschviller
Poitou, BP 12
TAG Models
GR-14341 New
18,Vriullon Str.
Hellas
Philadelfia/Athen
I-36010 Cavazzale
Via del Progresso,
MC-Electronic
di Monticello C.Otto
25
(Vi)
Jan van
Slot de Houvelaan
NL-3155 Maasland
Mouwerik
30
Norwegian
Box 2140
N-3103 Toensberg
Modellers
robbe-Service Puchgasse 1
A-1220 Wien
Minicars
Bergsbrunnagatan
S-75323 Uppsala
Hobby A.B.
18
robbe Futaba
Baselstrasse 67 A CH-4203 Grellingen
Service
Ivo Marhoun Horova 9
CZ-35201 Aš
D-36355
robbe-Service Metzloser Str. 38
Grebenhain
Ivo Marhoun Horova 9
CZ-35201 Aš
robbe Modellsport GmbH & Co.KG
Metzloser Straße 38
D-36355 Grebenhain Metzlos/Gehaag
Telefon INC49 (0) 6644 / 87-0
www.robbe.com
robbe Form BBBB
Telefon
Fax
00376-825
00376-862 865
476
0045-86-43
0045-86-43
61 00
77 44
0049-6644-87- 0049-6644-87777
779
0044-14550044-1455637151
635151
0033 3 87 94 0033-3-87 94
62 58
62 58
0030-20030-2102584380
102533533
0039 0444
0039 0444
945992
945991
0031-10-59 13 0031-10-59 13
594
594
0047-333 78
0047-333 78
000
001
0043-12590043-125866-52
11-79
0046-186 06
0046-186 06
571
579
0041-61-741
0041-61 741
23 22
23 34
00420 351 120
162
0049-6644-87- 0049-6644-87777
779
00420 351 120
162
Chyby a technické změny vyhrazeny
Copyright robbe-Modellsport 2011
Kopírování jakož i tisk ve výňatcích je povolen
pouze s písemným souhlasem robbe-Modellsport
GmbH & Co.KG