1
Overlander RC-6S AC/DC Pro User’s
Manual
A Digital Programmable Balancing Charger/Discharger/Cycler.
http://www.overlander.com
1
Contents.
Page No.
Introduction.
1
Specification.
1
Special Features.
1
Charger Control and Connection Lay-out.
4
LiPo Battery Connection to Charger with Balancing.
4
Warning and Safety notes.
5
Programming the RC-6S.
7
Charging NiCd and NiMH packs.
9
Discharging NiCd and NiMH packs.
10
Cyclic operation for NiCd and NiMH packs.
10
Charging Lithium packs – LiPo/LiIo/LiFe.
11
Discharging Lithium packs – LiPo/LiIo/LiFe.
11
Charging Pb batteries.
12
Discharging Pb batteries.
12
Storing and loading data.
12
Monitoring values during a procedure.
13
Error and Warning Signals.
14
Warranty and Service.
15
2
The Overlander RC-6S AC Pro Programmable Balancing Charger/Discharger.
Introduction.
This unit is designed to allow the modeller to charge, discharge, and maintain a wide range of
battery types and sizes. It has features which would normally be found only in much more
sophisticated (and expensive) units, and will enable the modeller to maintain his/her batteries
in optimum condition. Please read this entire operating manual completely and attentively
before using the unit as it covers the full range of safe procedures.
The charger is identical in many aspects to the RC6S Pro unit but has a major addition in the
form of accepting Mains AC supply and therefore not needing a DC supply when used in the
workshop. It can, however, be operated from a 12 volt lead acid battery if required, for
example when used in the field.
Specification.
Operating voltage range:
Circuit power
Charge current range:
Discharge current range:
Current drain for balancing Li-po:
NiCd \NiMH battery cell count:
li-ion\Polymer cell count:
Pb battery voltage:
Weight:
Dimensions:
AC 240 volts, DC 11.0-18.0 Volt
AC to DC adaptor (DC 11 -18V, 5A)
Max. charge power 50w
Max. discharge power 5w
0.1 -5.0A
0.1-1.0A
300mAh/cell
1 to 15 cells
1-6 series cells
2V to 20V
260g (Net Weight)
117 x 85.5 x 30mm
Special Features.
Optimized operating software.
The RC-6S features both a “manual” and an “auto” mode of charging/discharging. In the auto
mode the unit adjusts the current during the process so as to maintain an optimum battery
condition. With Lithium batteries especially, this can prevent overcharging due to user error
which might otherwise lead to destruction of the pack. It can disconnect the circuit
automatically and sound an alarm once any malfunction is detected. All of the programmed
operations of this product are controlled via two way communication between battery and
charger in order to achieve maximum safety and minimum problems. All the settings can be
configured by the user.
Internal Independent lithium battery balancer.
The RC-6S employs an individual-cell-voltage balancer. The use of an external balancer is
unnecessary.
Balancing individual cells during battery discharge.
During the process of discharging, RC-6S can monitor and balance each cell of the battery
individually. Error message will indicate if the voltage of any single cell is abnormal and the
process will be ended automatically.
3
Adaptable to various types of Lithium battery.
The RC-6S is able to handle various types of Lithium batteries, such as Liion, LiPo and the
new LiFe series of batteries.
Fastcharge and storage modes for lithium batteries.
This unit has two additional charge modes, a “fast” charge to reduce the duration of
charging, and a “store” charge which can control the final voltage of the battery at a level
which is ideal for long-term storage and hence extend the useful life of the battery.
Maximum safety.
The automatic charge program for NiCd and NiMH packs is based on the principle of deltapeak voltage detection. When the battery voltage change on charge exceeds the predetermined threshold, the charging process will be automatically terminated.
Automatic charge current limitation.
The maximum current upper limit can be preset for NiCd and NiMH packs. This is useful
when charging low impedance and capacity cells in the auto mode and avoids damaging the
batteries by over current charging.
Capacity limit.
The charging input capacity is calculated as the process progresses from the product of the
charging current multiplied by the elapsed time. If this value exceeds the pre-set limit, the
process will be terminated automatically to protect the pack.
Temperature threshold.
The battery’s internal chemical reaction will cause the temperature of the battery to rise during
the charging process. The use of the temperature probe and the pre-set temperature limit
allows the process to be terminated if this value is reached, again protecting the pack.
*This function is available by connecting an optional temperature probe.
Processing time limit.
You can also pre-set the maximum process time limit to avoid any possible defect leading to an
over-running procedure and the resultant pack damage...
Input power monitoring.
If the unit is used with a lead acid battery as the power source (and not a mains power supply), the
voltage of this supply battery is also monitored so that the operation of the RC-6S can be terminated
if the value reaches a lower cut-off level. This prevents long term damage to the lead acid battery.
Data store/load.
The RC-6S can store up to five sets of different operating programs. Each can be based upon
different batteries types of different sizes, and can cover charging, discharging, and cycling
procedures. Once stored, a program can be loaded back into the charger at the press of a few
buttons so that the most regularly used procedures can be loaded and re-loaded without
following the full programming process from scratch.
Cyclic charging/discharging.
1 to 5 continuous cycles of charge > discharge (or discharge > charge if preferred) are
available as a program for refreshing and balancing a battery. These processes are
intended to maintain/restore the battery’s performance.
4
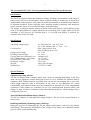
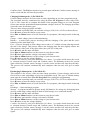
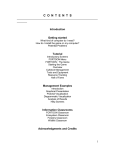
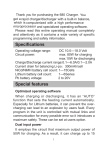
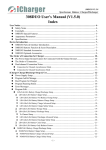
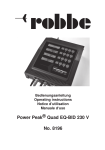
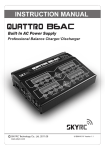
Charger Control and Connection Lay-out.
2 to 6 cell JSTXH balance
sockets
LCD Screen
Mains Input Power
240 volts AC
Input Power
Socket DC
11 – 18V DC
Temperature
Sensor Socket
Output Connections
Button " A" Stop any
process / Scroll through
Main Menu
Increase (right) and
decrease (left)
buttons ("Plus" and
"Minus") for
changing numerical
and other values.
Button "B" Start any process
and select parameters/advance
stage.
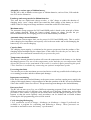
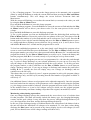
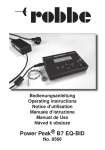
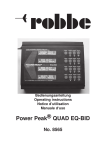
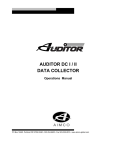
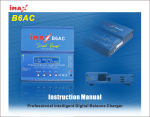
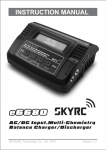
LiPo Battery Connection to Charger with Balancing
This photograph shows the correct way to connect the unit to a LiPo battery for any process
involving balancing. Both the main battery leads and the balancing lead must be connected.
WARNING!!! Failure to connect in the approved manner may cause damage to the
charger and/or the battery.
5
Warning and Safety notes.
These warnings and safety notes are particularly important. Please follow the instructions
carefully to obtain maximum safety. The charger and the battery can otherwise be
damaged (at worst it can cause a fire).
• Never leave the charger unattended when it is connected to its power supply. If any
malfunction is observed during operation, TERMINATE THE PROCESS AT ONCE
and refer to the operation manual.
• Keep the charger well away from dust, damp, rain, heat, direct sunshine and
vibration. Never drop it.
• Use either the 240 volt AC mains input or the 11-18V DC input. NEVER ATTEMPT
TO USE BOTH SUPPLIES SIMULTANEOUSLY.
• This charger and the battery being processed should be put on a heat-resistant,
noninflammable and nonconductive surface. Never place them on a car seat, carpet or
similar. Keep all inflammable or volatile materials away from the area of operation.
• Make sure you know the specifications of the battery to be charged or discharged to
ensure it fits the specification of this charger. If the program is set up incorrectly, the
battery and charger may be damaged. It can cause fire or explosion due to
overcharging. This warranty is not valid for any damage or any damage or subsequent
damage arising as a result of a misuse or failure to observe the procedures outlined in
this manual.
NiCd / NiMh
Voltage level: 1.2V/cell.
Allowable fast charge current: IC-2C (depends on the
cell performance).
Discharge voltage cut-off level: 0.85V\cell (NiCd), 1.0V\cell (NiMH).
Li-ion
Voltage level: 3.6V/cell.
Max. charge voltage: 4.1V\cell.
Allowable fast charge current: 1 C or less.
Min. discharge voltage cut-off level: 2.7V/cell or higher.
Lipo
Voltage level: 3.7V/cell.
Max. charge voltage: 4.2V/cell.
Allowable fast charge current: 1 C or less.
Min. discharge voltage cut-off level: 3.0V/cell or higher.
LiFe
Voltage level: 3.3v/cell.
Max. charge voltage: 3.6V/cell.
Allowable fast charge current: 4C or less.
Min discharge voltage cut-off level: 2.0V/cell or higher.
Pb Acid
Voltage level: 2.0V/cell.
Max. charge voltage: 2.46V/cell.
Allowable fast charge current: O.4C or less.
Min discharge voltage cut- off level: 1.75V/cell or higher.
6
To avoid short circuit between the battery charge leads, always connect the charge
cable to the charger first, then connect the battery. Reverse the sequence when
disconnecting. Do not connect more than one battery pack to this charger at any time.
Never attempt to charge or discharge battery packs which fit the following
classifications.
• A battery pack which consists of different types of cells (including cells from different
manufacturers).
•
A battery that is already fully charged or just slightly discharged.
•
Non-rechargeable batteries (Explosion hazard).
•
Batteries that require a different charge technique from NiCd, NiMH, Lipo or Gel cell
(Pb, Lead acid).
•
A faulty or damaged battery.
•
A battery fitted with an integral charge circuit or a protection circuit.
•
Batteries installed in a device or which are electrically linked to other components.
•
Batteries that are not expressly stated by the manufacturer to be suitable for the
currents this charger delivers during the charge process.
Please bear in mind the following points before commencing to charge any battery.
• Did you select the appropriate program suitable for the type of battery you are
charging?
• Did you set up adequate current for charging or discharging?
• Have you checked the battery voltage?
• Lithium battery packs can be wired in parallel, and in series, i.e. a 2 cell pack can be
3.7V (in parallel) or 7.4V (in series).
• Have you checked that all connections are firm and secure? Make sure there are no
intermittent contacts at any point in the circuit.
Charging
During the charge process, a specific quantity of electrical energy is fed into the battery.
The charge quantity is calculated by multiplying charge current by charge time. The
maximum permissible charge current varies depending on the battery type or its
performance, and can be found in the information by the battery manufacturer. Only
batteries that are expressly stated to be capable of quick-charge are allowed to be charged
at rates higher than the standard charge current.
Connect the battery to the terminal of the charger: red is positive and black is negative.
Due to the different resistance of cable and connector, the charger cannot detect resistance
of the battery pack, the essential requirement for the charger to work properly is that the
charge lead should be of adequate conductor cross-section, and high quality connectors
which are normally gold-plated should be fitted to both ends. Always refer to the battery
7
manufacturers’ advice regarding charging methods, recommended charging current, and
charging time. Especially so with Lithium batteries, which should only be charged
according to the instructions provided by the manufacturer.
Careful attention should be paid to the connection of Lithium batteries. It is essential to
remember that the cells in Lithium battery packs can be wired in parallel and in series. In
the parallel connection, the battery's capacity is calculated by multiplying a single cell's
capacity by the number of cells, and the pack voltage is the same as that of a single cell. In
series connection the capacity of the pack is the same as that of a single cell, but the pack
voltage is that of a single cell multiplied by the number of cells. Using any Lithium battery
with an excessive voltage imbalance between cells may cause damage to the pack with
possible fire or explosion. It is recommended that Lithium cells be charged in series packs.
Do not attempt to disassemble any battery pack arbitrarily
Discharging
The main purpose of discharging is to clean any residual capacity of the battery, or to
reduce the battery voltage to a defined level. The same attention should be paid to the
discharging process as to charging. The final discharge voltage should be set up correctly
to avoid deep-discharging. Lithium batteries cannot be discharged to lower than the
minimum voltage without causing a rapid loss of capacity or a total failure. In general use,
a Lithium battery does not need to be discharged. Please pay attention to the minimum
voltage of all cells in a Lithium battery to protect and maintain the battery.
Some rechargeable batteries have a memory effect. If they are partly discharged and then
recharged they can only accept a lower input capacity. They remember this value and will
only accept the same reduced input the next time they are charged, even if fully
discharged. This is a 'memory effect’. It is said that NiCd and NiMh batteries suffer from
memory effect .The effect is worse with NiCd than with NiMh.
It is recommended that Lithium batteries are only partially discharged (rather than fully
discharged) where possible. Frequent full discharging should be avoided as it increases the
possibility of damage due to over discharge. It is better to charge a battery more often or to
use a battery of larger capacity. The full capacity of any pack should not be used until the
pack has been subjected to 10 or more charge/discharge cycles. The cyclic process of
charge and discharge will optimize the capacity of battery pack.
Programming the RC-6S
General
The initial switch-on of the unit (by connection to a 12 volt battery or mains power supply)
will display the unit identification followed immediately by the Program Select screen. In
normal use this will indicate the program last in use when the unit was switched off.
Programming is achieved by a sequence of pushes on the four buttons with each push causing
an audio beep from the unit.
Repeated pressing of button A will scroll through the six basic program headings as follows
Lixx battery.
NiMH battery.
NiCd battery.
Pb battery.
Save Data.
Load Data.
User Set Program.
8
In each case the program is entered by pressing B which will move to the initial charge or
discharge screen for that type of battery, or to an initial screen for the process chosen. A press
of either the Plus or Minus buttons will scroll through the available options for that program.
These options are as follows:NiCd – charge to discharge to cycle.
NiMH – charge to discharge to cycle
LiPo – charge to balance charge to fast charge to storage to discharge
Pb batt. – charge to discharge
Save Data – save data only
Load Data – load data only
User Set Program – LiPo voltage type to Lithium check time to NiMH sensitivity to NiCd
sensitivity to USB/Temperature probe select to Cyclic Waste time (inter-cycling pause) to
Safety Timer to Capacity cut-off to Key beep/buzzer to Input power low voltage cut-off.
Other options exist within certain programs. In the charge programs for NiMH and NiCd
packs the choice can be made between Manual and Automatic charging. In the Manual case
the user sets a charge current and the unit will hold the charge at that value until the process is
complete. In the Automatic case the user sets an upper limit to the charge current but the unit
has the facility to charge the pack at a current lower than this limit if it assesses that the pack
would benefit from a lower value. If conditions improve, this change may be reversed. The
changes in charge current may continue automatically until the process is complete.
Once the required operational screen has been reached, the user can adjust the parameters to
suit his requirements. This process is generally by pressing button B which causes the
parameters to flash and then allowing the value to change by pressing the Plus or Minus
buttons. Once a particular parameter has been set, further presses on B will move through the
remaining parameters allowing each to be adjusted in turn. When the final value has been set
a last press of B will complete the process. At this stage the battery may be connected to the
unit and the button B pressed to start the procedure which will then continue automatically
until complete. The unit signals completion by a series of audio beeps.
In the case of the User Set program parameters the data needs more detailed explanation.
LiPo voltage type. There are three kinds of Lithium battery: LiFe (3.3V), Lilo (3.6V) or LiPo
(3.7V). This information is of critical importance such that you have to check the battery
carefully to make sure the value chosen is correct. If it is incorrect, the battery may be
damaged leading to a possible fire.
Lithium check time. To help the user avoid erroneous settings, the RC-6S detects the cell
count of Lithium packs automatically at the beginning of charge or discharge process. This
process is not infallible and the user is recommended to set the correct cell count manually.
An additional check is made by the unit during the process, normally 15 seconds after the
start. This period can be adjusted (e.g. increased for large capacity packs), but care should be
taken not to extend it for smaller packs.
NiMH and NiCd sensitivity. The automatic delta peak cut-off for these cells is set by default
to 7 mV per cell for NiMH and 12 mV per cell for NiCd. These values can be adjusted
between 5 and 20 mV per cell but setting the trigger voltage higher brings a danger of
overcharging; whereas setting it lower brings a possibility of premature termination. Please
refer to the technical specification of the battery.
USB or Temperature Probe. There is a 3-pin port on the left of the charger used for either a
USB interface or as a temperature sensor port. If the screen displays temperature, you can use
the optional temperature probe to connect to the surface of the battery. If it is set as the USB
9
port, you can connect the charger to your PC through the optional USB cable to monitor the
charging/discharging process. This requires optional software. The maximum temperature the
battery is allowed to reach can be set. The process will then be terminated automatically to
protect the battery if its temperature reaches this value.
Cyclic Waste Time. The use of a cyclic program can cause the pack to overheat as the each
stage follows the previous one. The program will minimize this effect by inserting a time
delay after each stage to allow the battery enough time to cool down before beginning the
next stage in the process. This value ranges from 1 to 60 minutes and can be adjusted to suit
different sizes of cells.
Safety Timer. The unit contains an integrated safety timer which starts simultaneously with
any charge process. If an error leads to a failure of the automatic fully charged cut-off this
timer will cut-off the charge at the time limit set and prevent battery damage. The calculation
of the time limit depends on the charging parameters set and an example is now given.
Safe timer calculation.
When charging NiCd or NiMH batteries, divide the capacity by the current, and then divide
the result by 11.9. Set this number of minutes as the value of the safety timer. If the charging
process is stopped at this time threshold, about 140% of the capacity has been fed into the
battery.
Example calculations
Capacity Current Safety Time
2000mAh 2.OA
(2000/2.0=1000)/11.9 = 84 minutes
3300mAh 3.OA
(3300/3.0=1100)/11.9 = 92 minutes
1000mAh 1.2A
(1000/1.2=833)/11.9 = 70 minutes
Capacity Cut-off. The feature provides a final level of protection against over-charging. If
the delta-peak voltage cannot be detected or the safety timer setting is excessive, this value
will automatically stop the charge process when the battery reaches the user-set maximum
charge capacity. This might normally be set at 130% of the manufacturers’ specified value.
Key Beep/Buzzer. The audio beep to confirm the user's operation sounds every time a button
is pressed. The buzzer or melody sounds at various times during operations to confirm a mode
change. These functions can be switched on or off.
Input Power Low Voltage Cut-off. This function monitors the voltage of the input battery
used to power the unit. If the voltage falls below the user-set value, the program will be ended
to protect the input battery.
Normal charge and discharge programs.
Charging NiCd and NiMH packs.
Connect charger and wait for first screen to settle (depending on previous programme used).
Press A button repeatedly until you reach the cell type (NiMH or NiCd).
Press B button to enter the charge set up screen.
Press B button again and amps will flash.
Press Plus or Minus buttons to set the current to your chosen value.
Press the Plus and Minus buttons simultaneously to select between Automatic (current limit)
and Manual (fixed current) modes.
Press B to stop current flashing.
Connect the battery and press button B for about 3 seconds until the charge process
commences. The process will continue automatically until complete when the unit will give
an audio signal.
10
Discharging NiCd and NiMH packs.
Connect charger and wait for first screen to settle (depending on previous programme used).
Press A button repeatedly until you reach the cell type (NiMH or NiCd).
Press B button to enter the charge set up screen.
Press Plus button to move to the Discharge screen.
Press B button and the amps will flash.
Press Plus or Minus buttons to set the current to your chosen value.
Press B button and the volts will flash.
Press Plus or Minus buttons to set the voltage to your chosen value.
Press Plus or Minus to set the cut-off voltage (e.g. 1 volt per cell =5 volts for a 5 cell pack.)
Press B button to stop voltage flashing.
Connect the battery and press button B for about 3 seconds until the discharge process
commences. The process will continue automatically until complete when the unit will give
an audio signal.
Cyclic operation for NiCd and NiMH packs.
Connect charger and wait for first screen to settle (depending on previous programme used).
Press A button repeatedly until you reach the cell type (NiMH or NiCd etc.).
Press B button to enter the charge set up screen.
Press B button again and amps will flash.
Press Plus or Minus buttons to set the current to your chosen value.
Press the Plus and Minus buttons simultaneously to select between Automatic (current limit)
and Manual (fixed current) modes.
Press B to stop current flashing.
Press Plus button to move to the Discharge screen.
Press B and the amps will flash.
Press Plus or Minus to set discharge current.
Press B and the volts will flash.
Press Plus or Minus to set the cut-off voltage (e.g. 1 volt per cell =5 volts for a 5 cell pack.)
Press B to stop voltage flashing.
Press Plus button to move to the cycling screen.
Press B to get Chg/Dchg flashing and then Plus or Minus to set the order you want
(Chg/Dchg or Dchg/Chg).
Press B to get cycle nos. flashing and Plus or Minus to set cycles you want (1 to 5).
Press B to stop cycle no. flashing.
Connect battery you want to cycle.
Press B and hold (around 3 secs) to begin cycle.
Process is then automatic until completion.
Lithium packs –LiPo/LiIo/LiFe.
These programs are only suitable for charging/discharging Lithium based batteries with a
nominal voltage of 3.3/3.6/3.7V/cell. Different batteries have different chemistries and
therefore need different charge techniques. The charge current varies according to battery
capacity and specification. The final voltage is very important; it should precisely match the
specified voltage of the battery: LiPo is 4.2V, LiIo is 4.1V, and LiFe is 3.6V. The current and
voltage of the battery should be correctly set.
As with all programs on the unit, to change the values of parameters, press B to make the
parameter flash, use Plus or Minus to change the value, then press B button again to store the
value. A particular difference for all Lithium procedures is that the start of the procedure
includes an option to cancel the process. When the B button is pressed for about 3 seconds the
process does not start immediately but the screen alternates between Cancel (stop) and
11
Confirm (enter). The B button needs to be pressed again whilst the Confirm (enter) message is
on the screen and this will start the procedure.
Charging Lithium packs – LiPo/LiIo/LiFe.
Connect charger and wait for first screen to settle (depending on previous programme used).
The procedure must be commenced by using the User Set Program to select either LiPo,
LiIo, or LiFe. Once this is complete the details of the program change to cover the Program
Select name and the nominal/maximum/minimum voltages involved. The charging procedure
is then the same for all three types.
There are three charge programs available.
Press A button repeatedly until you reach the cell type (LiPo, LiIo, or LiFe as chosen above).
Press B button to enter the charge set-up screen.
Press Plus or Minus button to scroll around the five programs, choosing from the following
three:Charge – a basic charge process without balancing.
Balance – a much better process involving both the charging of the pack and the active
balancing of the individual cells.
Fast – a process designed to allow charge rates at above 1C with the current reducing towards
the end of the charge. This process reduces the charging time but also slightly reduces the
final capacity of the pack. It may also reduce the cyclic life of the pack.
Press B button and the amps will flash.
Press Plus or Minus button to set the current to your chosen value.
Press B button again and the voltage (cell count) will flash.
Press Plus or Minus button to set the voltage to your chosen value.
Press B button to stop the voltage flashing.
Connect the battery and press B button for about 3 seconds which causes the screen
to alternate between Cancel (stop) and Confirm (enter). The B button needs to be pressed
again whilst the Confirm (enter) message is on the screen and this will start the procedure.
The process will continue automatically until complete when the unit will give an audio
signal.
Discharging Lithium packs – LiPo/LiIo/LiFe.
This program is the reverse of the previous charge procedure. Connect charger and wait for
first screen to settle (depending on previous programme used). The type of Lithium battery
must again be selected in the User Set Program before starting the programming.
Press A button repeatedly until you reach the cell type (LiPo, LiIo, or LiFe as chosen above).
Press B button to enter the charge set-up screen.
Press Plus or Minus button to scroll around the five programs, choosing from the following
two:Discharge – a basic discharge program.
Storage – a program intended to prepare nearly full batteries for storage by discharging them
down to a mid-range voltage which is ideal for shelf storage over weeks and months.
Press B button and the amps will flash.
Press Plus or Minus button to set the current to your chosen value.
Press B button again and the voltage (cell count) will flash.
Press Plus or Minus button to set the voltage to your chosen value.
Press B button to stop the voltage flashing.
Connect the battery and press B button for about 3 seconds which causes the screen
to alternate between Cancel (stop) and Confirm (enter). The B button needs to be pressed
again whilst the Confirm (enter) message is on the screen and this will start the procedure.
The process will continue automatically until complete when the unit will give an audio
signal.
12
Pb batteries (Lead Acid/Gel)
These programs are only suitable for lead based batteries with a nominal voltage of between 2
and 20V (based on 2v per cell). These batteries can only deliver low current in comparison to
their capacity, and a similar restriction applies to their charging rate where the optimum is
1/10th of their capacity. Please follow the instructions of the manufacturer.
Charging Pb batteries.
Connect charger and wait for first screen to settle (depending on previous programme used).
Press A button repeatedly until you reach the cell type (Pb Batt).
Press B button to enter the charge set up screen.
Press B button again and amps will flash.
Press Plus or Minus buttons to set the current to your chosen value.
Press B again and the volts will flash.
Press Plus or Minus buttons to set the voltage to match the correct number of cells in the
battery.
Connect the battery and press button B for about 3 seconds until the charge process
commences. The process will continue automatically until complete when the unit will give
an audio signal.
Discharging Pb batteries.
Connect charger and wait for first screen to settle (depending on previous programme used).
Press A button repeatedly until you reach the cell type (Pb Batt).
Press B button to enter the charge set up screen.
Press the Plus button which will enter the discharge screen.
Press B button again and amps will flash.
Press Plus or Minus buttons to set the current to your chosen value.
Press B again and the volts will flash.
Press Plus or Minus buttons to set the voltage to match the correct number of cells in the
battery.
Connect the battery and press button B for about 3 seconds until the discharge process
commences. The process will continue automatically until complete when the unit will give
an audio signal.
Storing and loading data.
This process allows you to set up the programs you use most often (up to 5 programs) for
particular packs and store the program data so that anytime you wish to use one of them you
simply load the program from the memory and don’t need to set it up from scratch.
Start in program select and press the A button repeatedly until you reach Save Data.
Press the B button and you reach the entry screen with Program number, and Cell type, pack
nominal voltage (e.g. 12.0 V for 10 NiMH cells), and cell capacity of the battery being
programmed .
Set each value in turn using the Plus or Minus buttons then moving to the next one by
pressing the B button.
When all your values are OK, press and hold the B button for 3 secs to move to the next
screen.
Set the type of program you want to save by using the Plus or Minus buttons to scroll
between charge/discharge/cycle and select your choice. Once you have chosen the type you
can enter the details as follows.
13
1) For a Charging program - You can set the charge process to be automatic (At) or manual
(Man) by using the B button to make the current flash and then pressing the Plus and Minus
buttons simultaneously. This will change the screen between At/current limit and
Man/current.
With the current still flashing you can alter the current limit (or current) to the value you wish
by using the Plus or Minus button.
Press and hold the B button to save this charge program.
2) For a Discharge program - Press the B button to cause the current to flash and then the Plus
or Minus buttons will set this to your chosen value. Use the same process for the cut-off
voltage.
Press and hold the B button to save this discharge program.
3) For a cyclic program you first use the B button to make the disch/chg flash, and then the
Plus or Minus buttons to choose the order of the two phases of the cycle. Next press of the B
button makes the number of cycles flash and this can be set between 1 to 5 cycles. Press the B
button again to leave only the asterisk flashing and press the Plus or Minus buttons to move
to a charge and then a discharge screen which are set up exactly as in 1) and 2) above. Press
and hold the B button for 3 seconds and the program will be saved.
To load an established programme on to the unit simply scroll through the program select
screen to reach Load Data then press the B button. Use the Plus or Minus buttons the reach
the program number you wish to use, then press and hold the B button for 3 seconds until the
program has loaded. Use the Plus or Minus buttons to scroll to cycle. Connect the battery and
start the program (hold B for 3 seconds) exactly as if you had just set it up from scratch.
In the case of a cyclic program you can use it as programmed (i.e. the take the pack through
say 5 cycles of charge-discharge at your selected parameters) or you can use it to carry out
only the charge or the discharge programs built into the cyclic pattern. To do this you enter
the program number as above and then use the Plus or Minus buttons to scroll between
charge, discharge and cycle. If you stop at charge or discharge and connect the pack before
holding B for 3 seconds, the unit will simply carry out a charge (or discharge) and not
continue on to the full cycle.
This shows that you can effectively store 3 separate programs in each cyclic program (charge
only, discharge only, and full cycle) meaning that the total number of programs available is
effectively 15.
One additional feature is that a saved program can be adjusted temporarily. Once the program
has been loaded into the unit any of the parameters can be changed before using the program
(e.g. the charge current could be reduced). After the program has been used it can be re-saved
in the modified form or it can be left without saving in which case the original program
remains in the memory and future loading will produce the original, un-modified, version.
Monitoring values during a procedure.
Once any charge/discharge process has commenced, the screen shows a set of real-time data
for that procedure. This data will usually include the battery type, the charging/discharging
current, and the pack voltage. It may also show the process (charge/discharge/balance/cycle
etc.), the elapsed time from start, and the discharged/charged capacity.
In the case of the discharge/storage of Lithium batteries the connection of the balance lead to
the unit will allow the individual cell voltages to be monitored. To view these values during
discharge the Plus button can be pressed at any time to display 6 active cell voltages (for a 6S
pack, for less than 6S some of the voltage readings will show 0.00).
14
Additional data can be obtained during any process by pressing the Minus button. This
changes the screen into the User Set screen and displays the various categories by scrolling
downwards with further presses of the Minus button. A press of the Plus button will return to
the normal on-going process screen.
Error and Warning Signals.
The following screen wordings indicate a problem as listed below:REVERSE POLARITY
Battery connection reversed.
CONNECTION BREAK
A break in the cables/connectors between pack
and unit
Short circuit on the output.
SHORT ERR
INPUT VOL ERR
VOL SELECT ERR
Incorrect voltage selection (cell count) for
Lithium pack.
Voltage of battery pack incorrect.
BREAK DOWN
The unit has a malfunction. Seek expert advice.
BATTERY CHECK
LOW VOLTAGE
The voltage is lower than the set value. Check
cell count.
BATTERY CHECK
HIGH VOLTAGE
The voltage is higher than the set value. Check
cell count.
BATTERY VOLTAGE
CELL LOW VOL
The voltage of one cell in the pack is too low.
Check all cells.
BATTERY VOLTAGE
CELL HIGH VOL
The voltage of one cell in the pack is too high.
Check all cells.
BATTERY VOL ERR
CELL CONNECT
Incorrect connection detected. Check whole
circuit.
TEMP OVER ERR
The unit internal temperature is too high. Allow
unit to cool.
The processor has detected a supply failure.
Check supply and circuit.
CONTROL FAILURE
15
Warranty and Service.
We guarantee this product to be free from manufacturing and assembly defects for a period of
one year from the date of purchase. This warranty only applies to material or operational
defects which were present at the time of purchase. During the period of the warranty we will
repair or replace free of charge components deemed defective as described.
You will be required to produce proof of purchase (invoice or receipt). This warranty is not
valid for any direct or indirect damage arising as a result of misuse, modification, or failure to
observe the procedures outlined in this manual.
Overlander Batteries
Tel: 01524 793328
Fax: 01524 793327
Website:http://www.overlander.co.uk
Unit 1, Jesmond Dene Trading Est.
School Lane
FORTON
Lancashire
PR3 0AT
UK