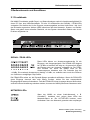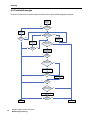
1
OWNER’S MANUAL
BEDIENUNGSANLEITUNG
Contents
Introduction . . . . . . . . . . . . . . . . . . . . . . . . . . . . . . . . . . . . . . . . . . . . . . . . . . . . . . . . . . . . . . . . . . . 6
Description of the system . . . . . . . . . . . . . . . . . . . . . . . . . . . . . . . . . . . . . . . . . . . . . . . . . . . . . . . . . 6
N8000 features . . . . . . . . . . . . . . . . . . . . . . . . . . . . . . . . . . . . . . . . . . . . . . . . . . . . . . . . . . . . . . . . . 7
Unpacking and warranty . . . . . . . . . . . . . . . . . . . . . . . . . . . . . . . . . . . . . . . . . . . . . . . . . . . . . . . . . . 8
Installation instruction . . . . . . . . . . . . . . . . . . . . . . . . . . . . . . . . . . . . . . . . . . . . . . . . . . . . . . . . . . . . 9
IRIS-Net . . . . . . . . . . . . . . . . . . . . . . . . . . . . . . . . . . . . . . . . . . . . . . . . . . . . . . . . . . . . . . . . . . . . . . 9
Browser Interface . . . . . . . . . . . . . . . . . . . . . . . . . . . . . . . . . . . . . . . . . . . . . . . . . . . . . . . . . . . . . . . 10
Control Elements and Connections . . . . . . . . . . . . . . . . . . . . . . . . . . . . . . . . . . . . . . . . . . . . . . . 11
Front Faceplate . . . . . . . . . . . . . . . . . . . . . . . . . . . . . . . . . . . . . . . . . . . . . . . . . . . . . . . . . . . . . . . . 11
SIGNAL / PEAK-LEDs . . . . . . . . . . . . . . . . . . . . . . . . . . . . . . . . . . . . . . . . . . . . . . . . . . . . . . . . . 11
NETWORK-LEDs . . . . . . . . . . . . . . . . . . . . . . . . . . . . . . . . . . . . . . . . . . . . . . . . . . . . . . . . . . . . . 11
SYSTEM STATUS-LEDs . . . . . . . . . . . . . . . . . . . . . . . . . . . . . . . . . . . . . . . . . . . . . . . . . . . . . . . 12
POWER-LED . . . . . . . . . . . . . . . . . . . . . . . . . . . . . . . . . . . . . . . . . . . . . . . . . . . . . . . . . . . . . . . . 12
USB Interface . . . . . . . . . . . . . . . . . . . . . . . . . . . . . . . . . . . . . . . . . . . . . . . . . . . . . . . . . . . . . . . . 12
Rear Panel . . . . . . . . . . . . . . . . . . . . . . . . . . . . . . . . . . . . . . . . . . . . . . . . . . . . . . . . . . . . . . . . . . . . 13
AUDIO SLOTs . . . . . . . . . . . . . . . . . . . . . . . . . . . . . . . . . . . . . . . . . . . . . . . . . . . . . . . . . . . . . . . 13
Network Module Slot . . . . . . . . . . . . . . . . . . . . . . . . . . . . . . . . . . . . . . . . . . . . . . . . . . . . . . . . . . 13
ETHERNET Interface . . . . . . . . . . . . . . . . . . . . . . . . . . . . . . . . . . . . . . . . . . . . . . . . . . . . . . . . . . 14
RS-232 Interfaces . . . . . . . . . . . . . . . . . . . . . . . . . . . . . . . . . . . . . . . . . . . . . . . . . . . . . . . . . . . . 14
REMOTE CAN BUS . . . . . . . . . . . . . . . . . . . . . . . . . . . . . . . . . . . . . . . . . . . . . . . . . . . . . . . . . . . 14
CONTROL PORT . . . . . . . . . . . . . . . . . . . . . . . . . . . . . . . . . . . . . . . . . . . . . . . . . . . . . . . . . . . . . 15
Mains Connector and Power Switch. . . . . . . . . . . . . . . . . . . . . . . . . . . . . . . . . . . . . . . . . . . . . . . 15
Preparations . . . . . . . . . . . . . . . . . . . . . . . . . . . . . . . . . . . . . . . . . . . . . . . . . . . . . . . . . . . . . . . . . . 16
Mounting . . . . . . . . . . . . . . . . . . . . . . . . . . . . . . . . . . . . . . . . . . . . . . . . . . . . . . . . . . . . . . . . . . . . . . 16
Installation of expansion cards . . . . . . . . . . . . . . . . . . . . . . . . . . . . . . . . . . . . . . . . . . . . . . . . . . . . . 16
System expansion with analog/digital inputs or outputs . . . . . . . . . . . . . . . . . . . . . . . . . . . . . . . . 17
System expansion with a network module . . . . . . . . . . . . . . . . . . . . . . . . . . . . . . . . . . . . . . . . . . 17
Expansion of the DSP performance of the system. . . . . . . . . . . . . . . . . . . . . . . . . . . . . . . . . . . . 17
Interface description . . . . . . . . . . . . . . . . . . . . . . . . . . . . . . . . . . . . . . . . . . . . . . . . . . . . . . . . . . . . . 18
Ethernet Interface . . . . . . . . . . . . . . . . . . . . . . . . . . . . . . . . . . . . . . . . . . . . . . . . . . . . . . . . . . . . . 18
CAN Interface . . . . . . . . . . . . . . . . . . . . . . . . . . . . . . . . . . . . . . . . . . . . . . . . . . . . . . . . . . . . . . . . 19
USB connection . . . . . . . . . . . . . . . . . . . . . . . . . . . . . . . . . . . . . . . . . . . . . . . . . . . . . . . . . . . . . . 21
RS-232 Interface . . . . . . . . . . . . . . . . . . . . . . . . . . . . . . . . . . . . . . . . . . . . . . . . . . . . . . . . . . . . . 21
CONTROL PORT . . . . . . . . . . . . . . . . . . . . . . . . . . . . . . . . . . . . . . . . . . . . . . . . . . . . . . . . . . . . . 22
Audio Interfaces . . . . . . . . . . . . . . . . . . . . . . . . . . . . . . . . . . . . . . . . . . . . . . . . . . . . . . . . . . . . . . 24
Network configuration . . . . . . . . . . . . . . . . . . . . . . . . . . . . . . . . . . . . . . . . . . . . . . . . . . . . . . . . . . 26
Introduction . . . . . . . . . . . . . . . . . . . . . . . . . . . . . . . . . . . . . . . . . . . . . . . . . . . . . . . . . . . . . . . . . . . . 26
Configuration . . . . . . . . . . . . . . . . . . . . . . . . . . . . . . . . . . . . . . . . . . . . . . . . . . . . . . . . . . . . . . . . . . 28
Configuration and testing of an Ethernet connection with N8000. . . . . . . . . . . . . . . . . . . . . . . . . 28
Appendix . . . . . . . . . . . . . . . . . . . . . . . . . . . . . . . . . . . . . . . . . . . . . . . . . . . . . . . . . . . . . . . . . . . . . 32
Application Example . . . . . . . . . . . . . . . . . . . . . . . . . . . . . . . . . . . . . . . . . . . . . . . . . . . . . . . . . . . . . 32
Installation in a multi-purpose hall . . . . . . . . . . . . . . . . . . . . . . . . . . . . . . . . . . . . . . . . . . . . . . . . 32
Troubleshootings . . . . . . . . . . . . . . . . . . . . . . . . . . . . . . . . . . . . . . . . . . . . . . . . . . . . . . . . . . . . . . . 33
Ethernet principles . . . . . . . . . . . . . . . . . . . . . . . . . . . . . . . . . . . . . . . . . . . . . . . . . . . . . . . . . . . . . . 34
IP addresses . . . . . . . . . . . . . . . . . . . . . . . . . . . . . . . . . . . . . . . . . . . . . . . . . . . . . . . . . . . . . . . . 35
Subnet mask . . . . . . . . . . . . . . . . . . . . . . . . . . . . . . . . . . . . . . . . . . . . . . . . . . . . . . . . . . . . . . . . 35
Automatic/Manual Allocation of IP Addresses . . . . . . . . . . . . . . . . . . . . . . . . . . . . . . . . . . . . . . . 36
CAN-Bus Principles . . . . . . . . . . . . . . . . . . . . . . . . . . . . . . . . . . . . . . . . . . . . . . . . . . . . . . . . . . . . . 37
System Examples. . . . . . . . . . . . . . . . . . . . . . . . . . . . . . . . . . . . . . . . . . . . . . . . . . . . . . . . . . . . . 39
Performance Specifications . . . . . . . . . . . . . . . . . . . . . . . . . . . . . . . . . . . . . . . . . . . . . . . . . . . . . 40
IP Address Table . . . . . . . . . . . . . . . . . . . . . . . . . . . . . . . . . . . . . . . . . . . . . . . . . . . . . . . . . . . . . . . 41
2
NetMax N8000 System Controller
Owner’s manual / Bedienungsanleitung
Inhalt
Einleitung . . . . . . . . . . . . . . . . . . . . . . . . . . . . . . . . . . . . . . . . . . . . . . . . . . . . . . . . . . . . . . . . . . . . 46
Systembeschreibung . . . . . . . . . . . . . . . . . . . . . . . . . . . . . . . . . . . . . . . . . . . . . . . . . . . . . . . . . . . . 46
N8000 Eigenschaften . . . . . . . . . . . . . . . . . . . . . . . . . . . . . . . . . . . . . . . . . . . . . . . . . . . . . . . . . . . . 47
Auspacken und Garantie . . . . . . . . . . . . . . . . . . . . . . . . . . . . . . . . . . . . . . . . . . . . . . . . . . . . . . . . . 48
Installationshinweise . . . . . . . . . . . . . . . . . . . . . . . . . . . . . . . . . . . . . . . . . . . . . . . . . . . . . . . . . . . . . 49
IRIS-Net . . . . . . . . . . . . . . . . . . . . . . . . . . . . . . . . . . . . . . . . . . . . . . . . . . . . . . . . . . . . . . . . . . . . . . 49
Browser Interface . . . . . . . . . . . . . . . . . . . . . . . . . . . . . . . . . . . . . . . . . . . . . . . . . . . . . . . . . . . . . . . 50
Bedienelemente und Anschlüsse . . . . . . . . . . . . . . . . . . . . . . . . . . . . . . . . . . . . . . . . . . . . . . . . . 51
Frontblende . . . . . . . . . . . . . . . . . . . . . . . . . . . . . . . . . . . . . . . . . . . . . . . . . . . . . . . . . . . . . . . . . . . 51
SIGNAL / PEAK-LEDs . . . . . . . . . . . . . . . . . . . . . . . . . . . . . . . . . . . . . . . . . . . . . . . . . . . . . . . . . 51
NETWORK-LEDs . . . . . . . . . . . . . . . . . . . . . . . . . . . . . . . . . . . . . . . . . . . . . . . . . . . . . . . . . . . . . 51
SYSTEM STATUS-LEDs . . . . . . . . . . . . . . . . . . . . . . . . . . . . . . . . . . . . . . . . . . . . . . . . . . . . . . . 52
POWER-LED . . . . . . . . . . . . . . . . . . . . . . . . . . . . . . . . . . . . . . . . . . . . . . . . . . . . . . . . . . . . . . . . 52
USB-Schnittstelle . . . . . . . . . . . . . . . . . . . . . . . . . . . . . . . . . . . . . . . . . . . . . . . . . . . . . . . . . . . . . 52
Rückseite . . . . . . . . . . . . . . . . . . . . . . . . . . . . . . . . . . . . . . . . . . . . . . . . . . . . . . . . . . . . . . . . . . . . . 53
AUDIO SLOTs . . . . . . . . . . . . . . . . . . . . . . . . . . . . . . . . . . . . . . . . . . . . . . . . . . . . . . . . . . . . . . . 53
Netzwerk-Modul-Slot . . . . . . . . . . . . . . . . . . . . . . . . . . . . . . . . . . . . . . . . . . . . . . . . . . . . . . . . . . 53
ETHERNET-Schnittstelle . . . . . . . . . . . . . . . . . . . . . . . . . . . . . . . . . . . . . . . . . . . . . . . . . . . . . . . 54
RS-232-Schnittstellen. . . . . . . . . . . . . . . . . . . . . . . . . . . . . . . . . . . . . . . . . . . . . . . . . . . . . . . . . . 54
REMOTE CAN BUS . . . . . . . . . . . . . . . . . . . . . . . . . . . . . . . . . . . . . . . . . . . . . . . . . . . . . . . . . . . 54
CONTROL PORT . . . . . . . . . . . . . . . . . . . . . . . . . . . . . . . . . . . . . . . . . . . . . . . . . . . . . . . . . . . . . 55
Netzbuchse und Netzschalter. . . . . . . . . . . . . . . . . . . . . . . . . . . . . . . . . . . . . . . . . . . . . . . . . . . . 55
Inbetriebnahme . . . . . . . . . . . . . . . . . . . . . . . . . . . . . . . . . . . . . . . . . . . . . . . . . . . . . . . . . . . . . . . . 56
Aufbauverfahren . . . . . . . . . . . . . . . . . . . . . . . . . . . . . . . . . . . . . . . . . . . . . . . . . . . . . . . . . . . . . . . . 56
Installation von Erweiterungskarten . . . . . . . . . . . . . . . . . . . . . . . . . . . . . . . . . . . . . . . . . . . . . . . . . 57
Systemerweiterung mit analogen/digitalen Audioein- bzw. Ausgängen . . . . . . . . . . . . . . . . . . . . 57
Systemerweiterung mit einem Netzwerk-Modul . . . . . . . . . . . . . . . . . . . . . . . . . . . . . . . . . . . . . . 57
Erweiterung der DSP-Leistung des Systems . . . . . . . . . . . . . . . . . . . . . . . . . . . . . . . . . . . . . . . . 58
Schnittstellenbeschreibung . . . . . . . . . . . . . . . . . . . . . . . . . . . . . . . . . . . . . . . . . . . . . . . . . . . . . . . . 58
Ethernet-Schnittstelle . . . . . . . . . . . . . . . . . . . . . . . . . . . . . . . . . . . . . . . . . . . . . . . . . . . . . . . . . . 58
CAN-Schnittstelle . . . . . . . . . . . . . . . . . . . . . . . . . . . . . . . . . . . . . . . . . . . . . . . . . . . . . . . . . . . . . 59
USB-Schnittstelle . . . . . . . . . . . . . . . . . . . . . . . . . . . . . . . . . . . . . . . . . . . . . . . . . . . . . . . . . . . . . 61
RS-232-Schnittstelle. . . . . . . . . . . . . . . . . . . . . . . . . . . . . . . . . . . . . . . . . . . . . . . . . . . . . . . . . . . 62
CONTROL PORT . . . . . . . . . . . . . . . . . . . . . . . . . . . . . . . . . . . . . . . . . . . . . . . . . . . . . . . . . . . . . 63
Audioschnittstellen . . . . . . . . . . . . . . . . . . . . . . . . . . . . . . . . . . . . . . . . . . . . . . . . . . . . . . . . . . . . 65
Netzwerk-Konfiguration . . . . . . . . . . . . . . . . . . . . . . . . . . . . . . . . . . . . . . . . . . . . . . . . . . . . . . . . . 67
Einführung . . . . . . . . . . . . . . . . . . . . . . . . . . . . . . . . . . . . . . . . . . . . . . . . . . . . . . . . . . . . . . . . . . . . 67
Konfiguration . . . . . . . . . . . . . . . . . . . . . . . . . . . . . . . . . . . . . . . . . . . . . . . . . . . . . . . . . . . . . . . . . . 69
Aufbau und Überprüfung einer Ethernet-Verbindung mit dem N8000 . . . . . . . . . . . . . . . . . . . . . 69
Anhang . . . . . . . . . . . . . . . . . . . . . . . . . . . . . . . . . . . . . . . . . . . . . . . . . . . . . . . . . . . . . . . . . . . . . . 73
Anwendungsbeispiel . . . . . . . . . . . . . . . . . . . . . . . . . . . . . . . . . . . . . . . . . . . . . . . . . . . . . . . . . . . . . 73
Installation in einer Mehrzweckhalle. . . . . . . . . . . . . . . . . . . . . . . . . . . . . . . . . . . . . . . . . . . . . . . 73
Problemlösungen . . . . . . . . . . . . . . . . . . . . . . . . . . . . . . . . . . . . . . . . . . . . . . . . . . . . . . . . . . . . . . . 74
Ethernet-Grundlagen . . . . . . . . . . . . . . . . . . . . . . . . . . . . . . . . . . . . . . . . . . . . . . . . . . . . . . . . . . . . 75
IP-Adressen . . . . . . . . . . . . . . . . . . . . . . . . . . . . . . . . . . . . . . . . . . . . . . . . . . . . . . . . . . . . . . . . . 76
Subnetzmaske . . . . . . . . . . . . . . . . . . . . . . . . . . . . . . . . . . . . . . . . . . . . . . . . . . . . . . . . . . . . . . . 77
Automatische/manuelle Vergabe von IP-Adressen . . . . . . . . . . . . . . . . . . . . . . . . . . . . . . . . . . . 77
CAN-Bus-Grundlagen . . . . . . . . . . . . . . . . . . . . . . . . . . . . . . . . . . . . . . . . . . . . . . . . . . . . . . . . . . . . 78
Systembeispiele . . . . . . . . . . . . . . . . . . . . . . . . . . . . . . . . . . . . . . . . . . . . . . . . . . . . . . . . . . . . . . 80
Leitungsspezifikation . . . . . . . . . . . . . . . . . . . . . . . . . . . . . . . . . . . . . . . . . . . . . . . . . . . . . . . . . . 81
Tabelle IP-Adressen . . . . . . . . . . . . . . . . . . . . . . . . . . . . . . . . . . . . . . . . . . . . . . . . . . . . . . . . . . . . . 83
Specifications/Technische Daten . . . . . . . . . . . . . . . . . . . . . . . . . . . . . . . . . . . . . . . . . . . . . . . . . . . 84
Block Diagram/Blockschaltbild . . . . . . . . . . . . . . . . . . . . . . . . . . . . . . . . . . . . . . . . . . . . . . . . . . . . . 86
Dimensions/Abmessungen . . . . . . . . . . . . . . . . . . . . . . . . . . . . . . . . . . . . . . . . . . . . . . . . . . . . . . . . 87
NetMax N8000 System Controller
Owner’s manual / Bedienungsanleitung
3
IMPORTANT SAFETY INSTRUCTIONS
The lightning flash with arrowhead symbol, within
an equilateral triangle is intended to alert the user
to the presence of uninsulated “dangerous
voltage“ within the product’s enclosure that may
be of sufficent magnitude to constitute a risk of
electric shock to persons.
The exclamation point within an equilateral triangle is intended to alert the user to the presence
of important operating and maintenance (servicing) instructions in the literature accompanying
the appliance.
1.
2.
3.
4.
5.
6.
7.
8.
9.
10.
11.
12.
13.
14.
15.
16.
17.
Read these instructions.
Keep these instructions.
Heed all warnings.
Follow all instructions.
Do not use this apparatus near water.
Clean only with a dry cloth.
Do not block any ventilation openings. Install in accordance with the manufacture’s instructions.
Do not install near heat sources such as radiators, heat registers, stoves, or other apparatus (including amplifiers) that produce heat.
Do not defeat the safety purpose of the polarized or the grounding-type plug. A polarized plug has two blades with one wider than the other.
A grounding type plug has two blades and a third grounding prong. The wide blade or the third prong are provided for your safety. If the
provided plug does not fit into your outlet, consult an electrician for replacement of the obsolete outlet.
Protect the power cord from being walked on or pinched particularly at plugs, convenience receptacles, and the point where they exit from
the apparatus.
Only use attachments/accessories specified by the manufacturer.
Use only with the cart, tripod, bracket, or table specified by the manufacturer, or sold with the apparatus. When a cart is used, use caution
when moving the cart/apparatus combination to avoid injury from tip-over.
Unplug this apparatus during lightning storms or when unused for a long period of time.
Refer all servicing to qualified service personnel. Servicing is required when the apparatus has been damaged in any way, such as powersupply cord or plug is damaged, liquid has been spilled or objects have fallen into the apparatus, the apparatus has been exposed to rain or
moisture, does not operate normally, or has been dropped.
Do not expose this equipment to dripping or splashing and ensure that no objects filled with liquids, such as vases, are placed on the
equipment.
To completely disconnect this equipment from the AC Mains, disconnect the power supply cord plug from the AC receptacle.
The mains plug of the power supply cord shall remain readily operable.
Management of WEEE (waste electrical and electronic equipment) (applicable in Member States of the European Union and other European countries with individual national policies on the management of WEEE) The
symbol on the product or on its packaging indicates that this product may not be treated as regular household
waste, but has to be disposed through returning it at a Telex dealer.
IMPORTANT SERVICE INSTRUCTIONS
CAUTION: These servicing instructions are for use by qualified personnel only. To reduce the risk of electric shock, do not
perform any servicing other than that contained in the Operating Instructions unless you are qualified to do so.
Refer all servicing to qualified service personnel.
1.
2.
3.
4.
5.
6.
7.
8.
Security regulations as stated in the EN 60065 (VDE 0860 / IEC 65) and the CSA E65 - 94 have to be obeyed when
servicing the appliance.
Use of a mains separator transformer is mandatory during maintenance while the appliance is opened, needs to be
operated and is connected to the mains.
Switch off the power before retrofitting any extensions, changing the mains voltage or the output voltage.
The minimum distance between parts carrying mains voltage and any accessible metal piece (metal enclosure),
respectively between the mains poles has to be 3 mm and needs to be minded at all times. The minimum distance between
parts carrying mains voltage and any switches or breakers that are not connected to the mains (secondary parts) has to be
6 mm and needs to be minded at all times.
Replacing special components that are marked in the circuit diagram using the security symbol (Note) is only permissible
when using original parts.
Altering the circuitry without prior consent or advice is not legitimate.
Any work security regulations that are applicable at the locations where the appliance is being serviced have to be strictly
obeyed. This applies also to any regulations about the work place itself.
All instructions concerning the handling of MOS-circuits have to be observed.
NOTE:
4
SAFETY COMPONENT (MUST BE REPLACED BY ORIGINAL PART)
NetMax N8000 System Controller
Owner’s manual
HF-Interference
This equipment has been tested and found to comply with the limits for a Class B digital device, pursuant
to Part 15 of the FCC Rules. These limits are designed to provide reasonable protection agains harmful
interference in a residential installation. This equipment generates, uses and can radiate radio frequency
energy and, if not installed and used in accordance with the instructions, may cause harmful interference
to radio communications. However, there is no guarantee that interference will not occur in a particular
installation. If this equipment does cause harmful interference to radio or televsion reception, which can be
determined by turning the equipment off and on, the user is encouraged to try to correct the interference by
one or more of the following measures:
•
Reorient or relocate the receiving antenna
•
Increase the separation between the equipment and receiver
•
Connect the equipment into an outlet on a circuit different from that to which the receiver is connected
•
Consult the dealer or an experienced radio/TV technician for help
D ECLARATION
OF
C ONFORMITY
Applicant:
Telex EVI Audio GmbH
Hirschberger Ring 45
94315 Straubing
Germany
Type of Equipment:
System Controller
Model Number:
N8000
Serial Number:
1703230424010021
Test Report Number:
Test Report Is On File At:
266.242
EMV Testhaus GmbH
Gustav-Hertz-Straße 35
94 315 Straubing
Germany
Registration number: TTI-P-G 101/95-20
This device complies with Part 15 of the FCC Rules for Class B Devices.
Regulation:
United States Code of Federal Regulations 47
Part 15-Digital Devices, Subpart B-Unintentional Radiators, Class B
Standard:
ANSI C63.4-2003 Methods of Measurement of Radio-Noise
Emissions from Low Voltage Electrical Equipment in the Range of 9
kHz to 40 GHz.
Limit:
DIN EN 55022:1999-05 Information Technology Equipment
Radio Disturbance Characteristics –
Limits and Methods of Measurement
Verified by:
Date: Straubing, May 2 nd, 2006
NetMax N8000 System Controller
Owner’s manual
5
Introduction
1 Introduction
First of all we want to express our thanks and offer our congratulations that you have selected the
NetMax N8000 System Controller from Electro-Voice. Before operating the NetMax N8000
please read this instruction manual attentively to ensure that this device provides optimal
performance and that damages due to improper use are avoided.
N8000 front view
1.1 Description of the system
NetMax is a modular, network-compatible and freely configurable audio system with which
complete system solutions can be constructed. These system solutions exactly meet the
customers' requirements. Applications are all kinds of professional audio installations, complex
building sound reinforcement systems as well as concert sound applications. NetMax integrates
all components ranging from the matrix to the speakers including system control and system
monitoring in a common audio platform. The configuration, operation and monitoring of a NetMax
system are effected by the PC Software IRIS-Net - Intelligent Remote & Integrated Supervision.
The central unit of NetMax is the N8000 system controller with up to 32 audio channels, mixer
and matrix functions, signal processing and extensive control and monitoring functions. Several
N8000 can be connected via a CobraNet™ audio and control network so that a large,
decentralized audio system can be assembled.
NetMax also manages the Electro-Voice P-series remote amplifiers including its speaker and
system monitoring functions. The connection is directly effected via CAN to the N8000.
A NetMax system meets all relevant safety requirements. All audio connections, interfaces and
processor systems are monitored and displayed in case of fault. By using CobraNet™ redundant
networks can be assembled.
6
NetMax N8000 System Controller
Owner’s manual
Introduction
1.2 N8000 features
NetMax N8000 is an all-purpose digital audio system controller with outstanding performance
features. A high quality system design provides excellent audio quality and clear sound, which is
achieved by the application of high-end 24 Bit A/D and D/A converters with 120 dB volume
range, high-quality input and output circuits in the analog domain and digital signal processing
with optimized 48 bit double-precision algorithms. Hence, the N8000 is even particularly suitable
for demanding applications in theatres, concert halls, big churches etc.
NetMax N8000 is highly flexible due to the modular hardware design which renders many other
applications possible. Four slots with 8-channel audio modules at the rear of the device offer up
to 32 local audio channels. Each slot can be equipped either with an audio input module or an
audio output module. So, various configurations (e.g. 8-in/8-out, 8-in/16-out, 8-in/24-out, 16-in/
16-out, 24-in/8-out) can be realized in only one single device. In addition, N8000 can be
equipped with a CobraNet™ network module. Therefore, several N8000 can be integrated in a
network and be connected to a large, sophisticated system.
The signal processing in the N8000 is effected on powerful audio signal processors where,
depending on the stage of expansion, up to 8 DSPs are available. The software contains a
multitude of freely programmable signal processing components. Among other things, these are
filters with all possible characteristics, parametric and graphic equalizer, crossover network,
matrix router and matrix mixer, delays, dynamic functions, etc. Diverse configurations can be
created by combining and connecting these DSP blocks. The programming is done via the PC
software IRIS-Net. With that, you choose the desired components from a signal processing
library, place them in a working area on the screen and wire them to a signal flow chart. Thus, the
resulting DSP configuration has only to be transferred to the N8000 and is ready for immediately
use.
The powerful signal processing allows complex configurations for the adjustment and control of
the sound system, depending on the application or type of event. Thus, the sonic quality of PA
speakers, monitor speakers, front fill systems as well as of the sound reinforcement of adjoining
rooms, lobbies, areas for the staff etc. can be optimized and tuned individually. In other words,
the N8000 copes with every application - even with large and complex systems - absolutely
exactly and reliably.
In addition to the audio processing, the NetMax N8000 is equipped with diverse control functions.
The scheduling with calendar function makes it possible to program one-time or recurring events.
The recurrence can occur annually, monthly, weekly, daily, hourly or even within smaller time
intervals. Furthermore, daily programs can be set up and can also be combined to weekly
operations. With the event control, reactions to certain events or system states can be
configured, e.g. in case of overstepping or undershooting of threshold values. Faults in the
device or in the complete NetMax system are detected automatically and can be displayed on
the PC screen or transmitted to external sites if necessary.
Faults and other events are recorded in an internal log file with date and time. Furthermore, it can
be defined which types of errors or events should be recorded. The log can be read out and
displayed on the screen at any time. In the NetMax N8000 individual functions can be integrated
into complex operations. For example, several parameters can be set with various values or
states in a scene and can be changed manually or automatically at any time.
NetMax N8000 System Controller
Owner’s manual
7
Introduction
The NetMax N8000 is equipped with all relevant interfaces by default in order to provide the
connection to the network and external components. The Ethernet port makes the connection to
existing building networks (intranet) and communication via the Internet possible. Ethernet is also
the common connection between one or more N8000s and a PC with IRIS-Net software for the
configuration, control and monitoring of a complete NetMax system. Two RS-232 serial ports can
be used in order to control the N8000 from external multi-media systems, e.g. Crestron™ or
AMX™. For that, an open interface protocol is available. The remote CAN-bus serves as
connection to Electro-Voice remote amplifiers. Up to 100 amplifiers can be attached via CAN to
one single N8000. Together with additional N8000s and amplifiers they can also be integrated in
a complex and powerful audio system. The NetMax N8000 also has a control port which offers
freely programmable control inputs and outputs. Switches, potentiometers or external control
voltages can be connected to the control inputs (GPIs). Any logic and analog functions can be
programmed. External elements which can be used to signal certain states can be attached to
the control outputs (GPOs). A PC can be connected to the USB port on the front faceplate if the
N8000 has been installed in a rack and the Ethernet port cannot be reached easily. Via the USB
interface the network parameters of the N8000 can be edited and files containing the entire
N8000 configuration can be transferred.
The highest standards regarding construction and mechanical working have been followed. The
chassis is extremely robust and, therefore, effectively protects the electronics against outside
influences. A temperature controlled fan provides thermal stability and also constant ambient
conditions inside the device. All audio interfaces are electronically balanced and have Phoenix
screw terminal connectors.
By reading this instruction manual you will get to know many additional features and functions of
the NetMax N8000. Please read on attentively and keep this manual in order to be able to
consult it at any time.
1.3 Unpacking and warranty
Please open the packaging and uncase the N8000. The following accessories are added to the
device:
•
N8000 owner’s manual (this document)
•
Power supply cord
•
2 CAN terminating impedances
•
2 Phoenix connectors (6-pin)
•
Warranty card
Please completely fill out the warranty card in the event that you need to make a warranty claim.
We also ask you to keep the sales slip and the packaging together with the warrenty card in case
the unit has to be returned.
8
NetMax N8000 System Controller
Owner’s manual
Introduction
1.4 Installation instruction
The N8000 has to be set up and installed so that both air supply and ventilation are ensured on
both sides of the device. The direction of ventilation is from left to right when you look at the front
faceplate. Devices with an opposing routing of air flow should not be installed in the same rack.
When installing the N8000 in a rack, a free air duct between the sides of the N8000 and the side
panel of the rack to the upper rack ventilation must be observed in order to ensure sufficient air
ventilation. There must be at least 100 mm free space for ventilation above the rack.
ATTENTION:
The maximum ambient air temperature of +40°C should not be exceeded in order to ensure failure-free operation.
Standard installation rails should be used when mounting an N8000 in transport racks in order to
prevent twisting of the front faceplate.
The N8000 must be protected against: dripping/splashing water, direct solar radiation, high
ambient air temperature or direct impact of heat sources, high moisture, heavy vibrations and
dust deposit.
If these conditions cannot be ensured permanently, maintenance is obligatory at regular intervals
in order to prevent any breakdowns which are mainly due to negative environmental influences.
If the N8000 is transported from a cold to a warm environment, moisture may condense at the
core. The device should not be started up before warming to the changed temperature (approx.
after 1 hour). If a solid or liquid is in the housing, cut the device off from the mains power at once
and have the device checked by an authorized service center before re-using it.
1.5 IRIS-Net
The IRIS-Net (Intelligent Remote & Integrated Supervision) PC software is used to configure and
operate the N8000 system controller. The configuration of the N8000 can be done offline (i.e.
without connection between the PC and the N8000) on the PC. After the connection between the
PC and the N8000 has been established via Ethernet, the configuration can be transmitted to it.
In addition to configurations, IRIS-Net can also be used for extensive supervision, control and
monitoring of N8000 system controllers (and Electro-Voice Precision Series Remote Amplifiers
which are connected to them).
Please see the short IRIS-Net instruction in the menu:
>
.
NetMax N8000 System Controller
Owner’s manual
9
Introduction
1.6 Browser Interface
Some of the configuration and operation options of the N8000 which are available in IRIS-Net are
also provided by the N8000 browser interface. Any standard Internet browser with activated
JavaScript and CSS can be utilized in order to use the browser interface. Please find the detailed
information on the N8000 browser interface in the file N8000 browser manual in the IRIS-Net
setup directory (\Documentation\NetMax).
IRIS-Net (Intelligent Remote & Integrated Supervision)
N8000 Browser Interface
10
NetMax N8000 System Controller
Owner’s manual
Control Elements and Connections
2 Control Elements and Connections
2.1 Front Faceplate
The front faceplate of the N8000 has level and status displays and it offers also the possibility to
connect a PC via a USB interface. SIGNAL / PEAK-LEDs exist for all 32 audio channels. The
channels are combined to groups of 8 and assigned to the audio-slots 1 to 4 at the rear.
Additional LEDs inform about the states of the network, system and device and give a quick
overview of whether the system is working faultlessly or if a problem has occurred.
NET MAX
®
AUDIO CHANNELS SLOT 1
1
2
3
N8000 SYSTEM CONTROLLER
NETWORKED MATRIX SYSTEM
4
5
6
7
8
AUDIO CHANNELS SLOT 2
AUDIO CHANNELS SLOT 3
AUDIO CHANNELS SLOT 4
NETWORK
SYSTEM STATUS
PEAK
PEAK
PEAK
ACTIVE
READY
SIGNAL
SIGNAL
SIGNAL
MASTER
FAULT
1
2
3
4
5
6
7
8
1
2
3
4
5
6
7
8
1
2
3
4
5
6
7
POWER
USB
ON
8
SIGNAL / PEAK-LEDs
These LEDs serve as level meter display for input and
output signals. The SIGNAL-LED begins to flash at -25 dBU
and indicates if a signal generally exists at the input or at the
output. The PEAK-LED flashes when the N8000 is operated
close to the level meter’s limit. The limit is approx. at
+18 dBU. The maximum level meters is +21 dBu so that
there is 3 dB of head room until the final clip limit is reached. The PEAK-LEDs should only flare
up sporadically in case of dynamic peaks. If the PEAK-LED of an input flashes constantly or very
often, you should reduce the corresponding input signal slightly. If the PEAK-LED of an output
flashes constantly, the internal gain should be reduced or else the connected device will be
permanently overdriven.
NETWORK-LEDs
If the N8000 is operated on an audio network, e.g.
CobraNet™, these LEDs show the status of the network.
The ACTIVE-LED flashes or twinkles when audio data is
sent or received via the network. If the LED is off, no
communication via the audio network is taking place. The
MASTER-LED is on when the N8000 serves as clock-master - in case of CobraNet™ it is also
named the conductor. There is always only one master in an audio network, i.e. the MASTERLED will only be illuminated on one N8000 within the network. If the unit currently functioning as
NetMax N8000 System Controller
Owner’s manual
11
Control Elements and Connections
clock master breaks down or is removed from the network, another N8000 will take over this
function automatically.
SYSTEM STATUS-LEDs
These LEDs indicate device or system states. The READYLED is on when the device has booted after switch-on and
when it is ready for operation. An illuminated FAULT-LED
indicates an internal error in the N8000 or an error in the
NetMax system. During the configuration of the N8000, it
can be specified which errors should be displayed. If the FAULT display is on, the error should be
identified promptly. This can be done using the detailed diagnostics within the IRIS-Net PC
software. The source of the fault has to be remedied immediately.
POWER-LED
This LED is permanently green when the N8000 is powered
on. If the ON indication is not illuminated, even though the
device is switched on, this device may not be connected to
the power supply system or the primary fuse may be faulty.
USB Interface
A PC can be connected at the front panel via the USB
interface. Thus, it is possible to connect the N8000 with a
PC even it is already installed - i.e. when the Ethernet
interface at the rear panel is perhaps no longer accessible.
Via the USB interface the network parameters of the N8000
can be edited and files containing the entire N8000
configuration can be transferred. You can find the necessary USB driver in the subdirectory
\Driver\USB in the IRIS-Net setup directory. Please see chapter Interface description for more
information on technical details concerning the USB interface and the other interfaces of the
N8000 which are described in the following section.
12
NetMax N8000 System Controller
Owner’s manual
Control Elements and Connections
2.2 Rear Panel
N8000
MODEL:
MADE IN GERMANY
AUDIO SLOT 3
AUDIO SLOT 1
AUDIO SLOT 4
AUDIO SLOT 2
BURNSVILLE, MN, U.S.A.
C
US
100-240 V~ 50-60 Hz/ 90 W
N378
SERIAL: 170323 03150 10001
CONTROL PORT
INPUTS
0-10V
REMOTE
RS-232
GND 1 2 3 4 10V REF
PORT 1
ETHERNET
STATUS
RELAY
OUTPUTS
2 3 4 5V/200mA
CAN BUS
PORT 2
There are all connections for analog and digital audio signals, control interfaces and the power
supply at the rear panel of the N8000.
AUDIO SLOTs
The AUDIO SLOTs 1 - 4 are module slots for the installation of
NetMax audio modules. There are both analog and digital
input and output modules available. Also, a module for
microphone input sensitivity is optionally available. Each slot
can accept any module so you can equip those inputs and
outputs which you need for your specific application. The
N8000 detects the type of the module automatically and offers
the corresponding configuration possibilities.
ATTENTION:
The N8000 has to be switched off if you want to change or install a module. You will find
detailed instructions in the data sheet of the corresponding module.
Network Module Slot
This slot is provided for the installation of a network module,
e.g. CM-1 CobraNet™ module. There are all 64 audio
channels - 32 inputs and 32 outputs - internally available at
this slot. The CM-1 allows up to 32 digital audio input signals
and 32 digital audio output signals to be transmitted via a
CobraNet™ network simultaneously. Thus, several N8000
NetMax system controllers can be connected to create a large, distributed audio system. The
NetMax N8000 System Controller
Owner’s manual
13
Control Elements and Connections
N8000 automatically detects an installed network module. The module can be configured in the
PC software IRIS-Net.
ATTENTION:
The N8000 has to be switched off if you want to change or install a module. You will find
detailed instructions in the data sheet of the corresponding module.
ETHERNET Interface
A computer and/or other N8000 devices can be connected
via the Ethernet interface for 100Base-TX / 10Base-T
Ethernet networks. Normally this connection is established
via a standard (straight throug) Ethernet cable and an
Ethernet hub or a switch. If the N8000 is to be connected
directly with a computer or another N8000, a crossed Ethernet cable (crossover cable) must be
used.
RS-232 Interfaces
The N8000 can be connected to external devices, such as
multimedia system (AMX™, Crestron™) or facility
management systems via the two RS-232 interfaces. All
N8000 functions and parameters can be controlled and
monitored via RS-232. Communication is done using an
ASCII parser which is easy to implement. Thus, a NetMax
system can be easily combined with media and touch panel
control systems. A PC can also be connected to the RS-232
port to access N8000 parameters using a terminal program
like Hyperterminal. A special instruction set is available in order to establish a connection to a
PROMATRIX/PROANNOUNCE system. The two RS-232 ports can be configured according to
their corresponding application via the IRIS-Net PC software.
REMOTE CAN BUS
Electro-Voice remote amplifiers and other devices with CAN
interfaces can be connected to the N8000 via the CAN
interface. Up to 100 remote amplifiers can be connected
with a single N8000. All connected components are linked to
the NetMax monitoring and control platform.
The STATUS-LED is provided to monitor the communication
on the CAN bus. If the CAN interface is not in use, the LED
is deactivated. In normal mode the LED flashes every 2
14
NetMax N8000 System Controller
Owner’s manual
Control Elements and Connections
seconds. The duration of the flashing within these 2 seconds depends on the bus load. The
higher the bus load is the longer the duration of the flashing within these two seconds will be.
CONTROL PORT
The CONTROL PORT contains four freely programmable
control inputs, three freely programmable control outputs,
one ready/fault output as well as reference connections for
ground, +5 V and +10 V.
The control inputs IN1 - IN4 are DC inputs, which internally
are connected to ground via pull-down resistors. From
external sources voltages between 0 V and +10 V are
possible. Either switch-mode functions or variable functions
can be programmed for the control input via the IRIS-Net PC
software. Examples of use are: power on/standby switching, preset switching or parameter
control.
The control outputs OUT2 - OUT4 are relay contacts, which are open circuits in off-state (off).
When the output is in on-state (on) the outputs are connected to ground. The outputs are able to
signal internal states and they can directly operate LEDs, indicator lights or relays. The +5 V
reference voltage is able to energize the externally connected elements with up to 200 mA.
Operating states (critical temperature, overstepping or falling below of defined limit values, faults,
etc.) can be relayed to central operation stations or other systems (fire alarm systems, life safety
systems) even without use of a PC via the control outputs. You will find detailed information
regarding configuration of the control ports in the IRIS-Net documentation.
Mains Connector and Power Switch
Please use the enclosed power cable in order to connect
NetMax N8000 to the mains power supply. The N8000 is
compatible with a supply voltage between 100 V AC and
240 V AC. Therefore, a supply voltage switch is not
necessary. Internally, there is a mains fuse which is normally
only blown in case of a fault. The fuse should only be
replaced with an equivalent fuse with identical values for
current, voltage and actuating characteristics by an
authorized service center.
The N8000 can be switched on and off with the power switch on the rear of the device. The ONLED on the front panel is immediately illuminated after switch-on. The N8000 boots and initializes
all parameters with those values that had been previously active. The initialization takes some
seconds. As soon as N8000 is ready for operation, the READY-LED is also illuminated.
NetMax N8000 System Controller
Owner’s manual
15
Preparations
3 Preparations
3.1 Mounting
1. Install the expansion cards.
If you have purchased expansion cards (AI-1, AO-1, CM-1, DSP-1, etc.) for your N8000
system controller, please install them. In this regard, please note the paragraph page 16 as
well as the installation instructions in the manuals which are enclosed to the expansion cards.
2. Connect the power cable.
Please pay attention that the power switch of the N8000 (above the mains connector) is off.
3. Install the program IRIS-Net (Intelligent Remote & Integrated Supervision) on your PC.
Please see the installation instruction for IRIS-Net in the file iris_readme.htm.
4. If you have installed expansion cards with inputs or outputs (AI-1, AO-1 or CM-1) in
step 1, connect the corresponding devices now.
Please note the instruction manual both of the expansion cards and the used devices.
5. Connect the Ethernet interface of the N8000 with the PC via an appropriate Ethernet
cable.
Please see the corresponding chapter Ethernet Interface on page 18.
6. If your application also utilizes Electro Voice P-series Remote Control amplifiers,
connect the CAN interface of the N8000 with the amplifiers.
Please see the corresponding chapter CAN Interface on page 19.
7. Switch on the N8000 (via the power switch at the rear), the computer and any
additional connected devices, if used.
In order to avoid any pops or thumps that may damage your speakers, please switch on the
connected devices (if used) in the following order: audio signal sources - mixer and/or
recorders - (power) amplifiers. These devices should be switched off in the reverse order.
8.
Now start the IRIS-Net program on your PC.
You will find a program introduction in the online help of IRIS-Net and the corresponding
quick start guide in the menu:
>
.
3.2 Installation of expansion cards
The options for expanding the N8000 controller through the use of expansion cards are
explained in this chapter. The N8000 can be equipped with expansion cards in different ways:
16
•
4 Slots (module slots) for the expansion of the system with analog/digital inputs (AI-1, MI-1,
DI-1) or outputs (AO-1)
•
1 network module slot for the installation of a network module, e.g. CM-1 CobraNet™ Module
NetMax N8000 System Controller
Owner’s manual
Preparations
•
1 DSP expansion module (DSP-1) for the expansion of the storage capacity and signal processing
ATTENTION:
It is essential to switch off the N8000 if you want to install or change a module. You will
find detailed instructions in the data sheet of the corresponding module.
System expansion with analog/digital inputs or outputs
There are four slots at the rear of the N8000 which are intended to expand the systems with
analogue or digital inputs or outputs. These slots have the marking AUDIO SLOT 1 to AUDIO
SLOT 4 (see the figure on page 13). Any combination of the following types of expansion cards
can be installed:
•
AI-1 with 8 analog inputs
•
MI-1 with 8 microphone inputs
•
DI-1 with 8 digital inputs
•
AO-1 with 8 analog outputs
You can choose any slot for the installation of the expansion cards as the slot is automatically
detected by the N8000 after the installation.
System expansion with a network module
An audio network interface for CobraNet™ can be installed in the network module slot on the
rear panel of the N8000. The CM-1 module that is used for this purpose has two Ethernet
connections (Primary and Secondary) so a redundant network can be established. Up to 32
digital audio input signals and 32 digital audio output signals can be transmitted simultaneously.
Expansion of the DSP performance of the system
The N8000 system controller has efficient DSP modules with a total computing power of
300 MIPS and a working memory for a maximum delay of 21.8 seconds. If this does not meet the
requirements of your application, the processing power as well as the working memory of the
N8000 can be increased by installing the DSP-1 NetMax DSP expansion module. This allows the
execution of more complex DSP programs and the use of longer delay times or additional delay
lines.
NetMax N8000 System Controller
Owner’s manual
17
Preparations
3.3 Interface description
Ethernet Interface
By connecting the N8000 system controller via the Ethernet interface, the
communication between the N8000 and one or several PC is possible. This allows
the configuration of N8000 via IRIS-Net software. Furthermore, the whole
connected system (consisting of N8000s and EV Precision Series Remote Control
Amplifiers) can be operated and monitored. By using appropriate network
hardware it is even possible to operate the N8000 via a wireless network (WLAN). The Ethernet
interface on the rear of N8000 is a RJ-45 connector (8P8C). Both 10Base-T and 100Base-TX
Ethernet standards are supported. The connections of the Ethernet interfaces can be seen in the
following figure and table.
Pin Assignment of Ethernet jack
Pin Name
Description
1
Tx+
Transmit+
2
Tx-
Transmit-
3
Rx+
Receive+
6
Rx-
Receive-
Pair
2
3
Colour
T568A
T568B
Green striped
Orange striped
Green
Orange
Orange striped
Green striped
Orange
Green
The pin assignment of the Ethernet connector is shown in the following figure. The connector is
viewed from the contact side.
Pin Assignment of Ethernet plug
18
NetMax N8000 System Controller
Owner’s manual
Preparations
The maximum length of a connected cable segment is 100 meters in both Ethernet standards, in
which two twisted pairs are used in one cable. Category 3 (unshielded CAT-3) can be used for
10Base-T communication. Category 5 (CAT-5) must be used for 100Base-TX. Cat-5 cable is
compatible with 10Base-T as well.
If the N8000 is connected via a patch cable to a hub/switch, the wiring of the cable at pin 1 of the
first connector has to be connected with Pin 1 of the other connector; this is the same regarding
the other pins as well. There are the T568A and T568B standards for the colors of the different
wires used. However, T568B standard is more widely-used.
If a crossover cable is used in order to connect a N8000 with a PC directly, pair 2 has to be
interchanged with pair 3 on one side of the crossover cable. Thus, the necessary swap of the
sending and receiving lines that is internally processed in a hub/switch takes place.
CAN Interface
The network for the Electro-Voice remote power amplifiers is based on the
CAN-bus standard, which has become widely accepted in the automotive,
industrial and security sector and which has proved itself for years. The
CAN-bus is a balanced serial interface to transmit commands and data. 100
power amplifiers or other devices up to a maximum cable length of
1000 meters can be connected per CAN-bus.
Each bus member has 2 RJ-45 connectors for the remote CAN-bus. The
connectors are connected in parallel and serve as input or output (for a
loop-through) of the remote network. The CAN-bus has to be terminated with a 120 Ω terminating
resistance at both ends. Therefore, two terminating connectors CAN-TERM 120 Ω are included
with the N8000. Please plug these terminating connectors in the free RJ-45 connectors of the
first and the last device at the CAN-bus.
In addition to the CAN-bus, a balanced audio monitor signal is carried in the network wiring in
order to monitor the input and output signals of all remote networks. This monitor bus makes it
possible to monitor the input and output signals of all power amplifiers existing in the remote
network via the software without the need for additional wiring work. At the N8000, the monitor
bus can be gripped at a CAN connector (pins 7 and 8), it can be connected with an audio input
and routed to a monitor box (e.g.) for monitoring purposes.
Pin Assignment of CAN jack
NetMax N8000 System Controller
Owner’s manual
19
Preparations
Assignment of CAN plug
Colour
Pin
Name
2
CAN_GND
4
CAN_H (+)
Blue
5
CAN_L (-)
Blue striped
7
MONITOR BUS +
Brown striped
8
MONITOR BUS -
Brown
T568A
T568B
Green
Orange
The CAN-bus makes it possible to use different data transmission rates, in which the boud rate is
indirectly proportional to the length of the bus. If the network is only slightly extended, higher
baud rates up to 500 kbit/s are possible. In case of larger extensions, the baud rate has to be
lowered (to a min. transmission rate of 10 kbit/s). The following table explains the relationship
between baud rate and length of the bus or extension of the network. In principle, bus lengths
over 1000 meters should only be realized with repeaters.
Transfer rate (in kbit/s)
Bus length (in m)
500
100
250
250
125
500
62,5
1000
20
2500
10
5000
Please see the CAN bus principles chapter on page 37 in the appendix of this document as well
as the instruction manuals of the connected devices for further information on CAN bus
(especially on system examples and performance specifications).
20
NetMax N8000 System Controller
Owner’s manual
Preparations
USB connection
The USB interface on the front panel of the N8000 uses the USB 1.1 standard.
Accordingly, the low speed (1,5 MBit/s) and full speed (12 MBit/s) transfer rates are
supported. According to USB specifications, the cable which is connected to this
interface must not be longer than 5 meters. The USB interface of the N8000 is a
USB-B (female) connector.
The standard pin configuration can be seen in the following figure and table.
Pin Assignment of USB jack
Pin
Name
Description
1
VCC
+5 V
2
D-
Data -
3
D+
Data +
4
GND
Ground
RS-232 Interface
With the RS-232 interface on the rear panel, communication with the
N8000 is possible via a simple ASCII communication protocol. Thus, the
N8000 can be operated and configured via external devices (examples are,
among other things, media control systems and PROMATRIX/
PROANNOUNCE DPM4000). In order to make data transfer between the
N8000 and the connected device possible, the interfaces on both sides of
the transmission route must be identically configured. The configuration of
the interface of the N8000 is given in the following table.
Parameter
Value
Data bit
8
Parity bit
-
Stop bit
1
Transfer rate
19200 bit/s
NetMax N8000 System Controller
Owner’s manual
21
Preparations
The pins of the RS-232 interface used in the N8000 are indicated in the following illustration and
table. Connections which are not given are internally connected in the N8000 so that the
communication between the N8000 and the connected device is possible via a software
handshake system. The cable which is used for the connection should not be longer than
15 meters.
Assignment of RS-232 jack
Pin Name
Description
Input/Output (view from N8000)
2
TxD
Transmit
Out
3
RxD
Receive
In
5
GND Signal Ground
-
CONTROL PORT
The control port on the rear of N8000 is divided into two parts.
Two Phoenix connectors (6-pin) are included in delivery in
order to be able to connect external components.
Control Inputs
The upper part, which is marked as INPUTS 0-10V on the device, provides four freely
programmable control inputs for voltages between 0 volt and 10 volts. The inputs are numbered
in order from 1 to 4. The N8000 provides its own voltage supply for externaly connected
monitoring elements, e.g. potentiometers or switches. The voltage supply is available at the
10V REF and GND connectors of the control port.
ATTENTION:
The maximum allowable current at the 10 V REF is 100 mA.
22
NetMax N8000 System Controller
Owner’s manual
Preparations
The following figure shows an example application for the "analogue circuit" on the control inputs
of the N8000. A voltage which can be changed via a potentiometer is connected at the control
input 1. The N8000 can be configured via IRIS-Net so that this voltage can be used to adjust a
variable parameter, for example, adjusting the volume of an audio input or output.
Control port with potentiometer
An example for a "digital circuit" on a control input of N8000 is shown in the following figure. The
control input 2 is connected to ground via a switch (normally open contact). In IRIS-Net the
N8000 can be so configured that, for example, an audio input or output channel can be muted by
operating a switch. The threshold voltage for high/low which are used for this purpose are freely
configurable for any input.
Control port with switch
Control Outputs
The lower part of the control port, which is marked as RELAY OUTPUTS on the N8000, provides
different outputs. There are three freely programmable control outputs which are numbered in
order from 2 to 4. These control outputs are designed as relays contacts (normally open), i.e.
they are open when they are inactive (off) and closed towards ground when they are active (on).
A voltage source at the 5V/200mA connection is available in order to operate the externally
connected elements.
NetMax N8000 System Controller
Owner’s manual
23
Preparations
ATTENTION:
The maximum allowable current at the 5 V output is 200 mA.
The two left connections of the RELAY OUTPUTS are the READY/FAULT output of the N8000.
This floating output is closed when the N8000 is ready for operation and no error has occurred. It
is possible in IRIS-Net to configure which kind of error causes the contact to be opened. Due to
this feature, this contact is especially suitable for the integration of the N8000 in life safety
systems (closed current principle). An example application for the circuit of a control output is
shown in the following figure. An operating state of the N8000 (e.g. the overstepping of a
temperature limit) is indicated via a pilot light.
Control port with pilot light
Audio Interfaces
Analog audio connecting cable
It is advisable to choose balanced cables (2 signal conductors + shield) with XLR connectors as
analog audio connections. Although all N8000 analog audio inputs and outputs can be used
unbalanced, balanced audio cable is the better choice. A balanced differential audio circuit can
prevent the injection of external noise into the audio path and is strongly recommended,
particularly for long cable runs.
N8000 Analog audio input cable, XLR (female) on Phoenix
24
NetMax N8000 System Controller
Owner’s manual
Preparations
N8000 Analog audio output cable, XLR (male) on Phoenix
Digital audio connecting cable
It is advisable to choose balanced cables (2 signal conductors + shield) with XLR connectors as
digital audio connections. Although all N8000 digital audio inputs can be used unbalanced,
balanced audio cable is the better choice.
N8000 Digital (balanced) audio input cable, XLR (female) on Phoenix
N8000 Digital (unbalanced) audio input cable, Cinch (male) on Phoenix
NetMax N8000 System Controller
Owner’s manual
25
Network configuration
4 Network configuration
4.1 Introduction
The N8000 system controller can be connected to a TCP/IP-network via the Ethernet interface at
its rear panel (see page 14). For further information on the principles of Ethernet and TCP/IP
please see the chapter Ethernet principles on page 34 in the appendix of this document.
The N8000 comes with the following network configurations from the factory:
Parameter
Value
IP address
192.168.1.100
Subnet mask 255.255.255.0
Gateway
192.168.1.1
DHCP
deactivated
An IP address must be unique, it must only be allocated to one single device (host) in a network.
In case a new Ethernet network is designed for the operation of the N8000, it is recommended to
retain the subnet mask and network ID which had been set at the factory. If the N8000 is
integrated in an existing Ethernet network, the network configuration of the N8000 must be
adapted.
The preset IP address of the N8000 can be retained if and only if
•
only a single N8000 with factory-set configuration is connected via Ethernet and
•
the network ID 192.168.1 can be retained and
•
no other devices have the Host-ID 100.
If at least one of these three conditions is not fulfilled, the preset IP address of the N8000 has to
be changed.
Example:
The following illustration shows an example application with four NetMax N8000 in a closed
network. These are networked with a PC via a central Ethernet switch. Thus, the factory preset
26
NetMax N8000 System Controller
Owner’s manual
Network configuration
IP address 192.168.1.100 would exist four times in the network. Because of this, the preset IP
address of three NetMax N8000s must be replaced with a unique address.
Example of an Ethernet network with four N8000
It is advantageous and strongly recommended to list all devices used in the Ethernet network and
IP addresses for changing the preset IP addresses of the N8000s. An example of such a list for
the example system shown in the above illustration is given in the following. You will find an
empty form in the appendix. Please enter the description of the device, an unambiguous
description and the IP address which has to be assigned to the device for every device used in
the network in this list. If the device is displayed in IRIS-Net, you can also use the description that
is used there.
Device
IRIS-Net Device Name
Location/Description
IP-Adresse
N8000
main office
main office
192.168.1.100
PC
-
main office
192.168.1.1
N8000
administration
administration building
192.168.1.101
N8000
production
production building
192.168.1.102
N8000
multi-purpose
mult-purpose hall
192.168.1.103
When the example system is put into operation, the IP addresses which are given in the overview
table, should be assigned to each device. The assignment of the IP address can be made via
IRIS-Net and via the N8000 browser interface. In IRIS-Net the assignment is possible both over
the USB interface and the Ethernet interface of the N8000. Information about the exact
proceedings are given in the IRIS-Net online-help. For the assignment of the IP address over the
N8000 browser interface open the browser interface using the current (preset) IP address of the
N8000. Information about the exact proceedings are given in the N8000 browser manual.
NetMax N8000 System Controller
Owner’s manual
27
Network configuration
4.2 Configuration
Configuration and testing of an Ethernet connection with N8000
The purpose of this procedure is to build a connection between a PC and a N8000 with factory
network settings (see page 26) via Ethernet and to check the proper function of this connection.
In the following it is assumed that neither the PC nor the N8000 are connected with an existing
network.
1. Click on Start > Control Panel > Network Connection.
The window Network Connections appears. Here, all available possibilities for the connection
of your PC with a network are given. The Ethernet connection that is used for the connection
with the N8000 is contained in the LAN or High-Speed Internet category.
2. Click on (with the right mouse button) that particular Ethernet connection in the
Network Connections window that should be used for the connection with the N8000.
The context menu of the chosen Ethernet connection appears.
28
NetMax N8000 System Controller
Owner’s manual
Network configuration
3. Click on Properties in the context menu.
The pop-up window Local Area Connection Properties appears.
4. Double click on Internet Protocol (TCP/IP).
The pop-up window Internet Protocol (TCP/IP) Properties appears.
5. Choose the option Use the following IP address in the window.
6. Type 192.168.1.1 in the IP address input field.
7. Type 255.255.255.0 in the Subnet mask input field.
NetMax N8000 System Controller
Owner’s manual
29
Network configuration
8. Close the window Internet Protocol (TCP/IP) Properties by clicking on the OK button.
The IP configuration of the PC is now complete. In the following steps the connection of the
PC with the N8000 will be established and checked.
9. Connect the network connection of your PC to the Ethernet interface of the N8000
directly with a crossover cable, or with a patch cable and a hub/switch.
Please see the Ethernet principles chapter on page 34 in the appendix of this document for
more information on the details of connecting devices via Ethernet.
10. Connect the N8000 to the power supply system and switch it on by operating the
power switch on the rear.
The green ON-LED (see page 12) on the front panel of the N8000 is illuminated. After some
seconds the green READY-LED (see page 12) is also illuminated and signals the successful
start activity of the N8000.
11. Click on Start > All Programs > Accessories > Command Prompt.
The window command prompt appears.
30
NetMax N8000 System Controller
Owner’s manual
Network configuration
12. Enter ping 192.168.1.100 and tap the return button.
The PC is now checking the connection with the N8000. For this four network packets are sent to
the N8000 via Ethernet then the N8000 has to confirm these packets. If the Ethernet connection
is successful, no packets get lost. Therefore, 0% loss is stated in the ping statistics.
NetMax N8000 System Controller
Owner’s manual
31
Appendix
5 Appendix
5.1 Application Example
Installation in a multi-purpose hall
The following figure shows an example for the application of a N8000 system controller in a multipurpose hall. Four microphones, one CD player and one tuner are the connected signal sources.
Both active and passive speakers are used for the sound reinforcement. The Electro-Voice
Precision Series Remote Amplifiers which are used for the operation of the passive speakers are
connected with the N8000 via the CAN Bus in addition to the audio connections.
Two different methods are designed in order to operate and control the system. The first
possibility is a conventional PC where the IRIS-Net (Intelligent Remote & Integrated Supervision)
software is used to operate the N8000 and the remote amplifiers. It is not only possible to operate
and control the system via IRIS-Net, but also to monitor the whole system. The N8000 and the
PC are connected via Ethernet. Connecting a touch panel (e.g. AMX™, Crestron™) to the RS232-interface of the N8000 is the second possibility for the operation of the system. The desired
functions of the system can be accessed via the special operating interface of the touch panel.
Installation in a multi-purpose hall
32
NetMax N8000 System Controller
Owner’s manual
Appendix
5.2 Troubleshootings
Problem: It is not possible to establish a connection with the N8000 via IRIS-Net.
Host not
reachable
(Timeout)
N8000
activated?
no
yes
Switch on
N8000
IP address in
IRIS correct?
no
N8000
online?
unknown
yes
no
yes
Correct IP
address
yes
N8000
online?
Find out IP
address
PING to IP address
successful?
yes
no
no
Check Networkconfiguration of PC
yes
N8000
online?
no
More than one
N8000 connected?
no
yes
Ruling Out Duplicate
IP addresses
yes
N8000
online?
no
Check Physical
Connectivity Problems
yes
N8000
online?
no
Using Hub/
Switch?
no
yes
Connect directly
yes
Problem
solved
N8000
online?
no
Call EV
support
NetMax N8000 System Controller
Owner’s manual
33
Appendix
Check Network Configuration of PC:
Check the network configuration of the used PC. Remember that the network part of the used IP
addresses that is used and the subnet mask of the PC and the N8000 have to be identical.
Ruling Out Duplicate IP-Adresses:
It is possible that the same IP address is allocated twice if there are more devices in an Ethernet
network and if the IP addresses are allocated manually. Switch off the N8000 and try to ping the
IP address of the off-state N8000 via a command line prompt (see page 31 of this manual). If the
ping is successful, another device has the address of the off-state N8000. In this case, change
the IP address of the device which is now answering or of the N8000 with the duplicate address
(then you also have to change the IP address of the N8000 in IRIS-Net).
Check Physical Connectivity Problems:
When the PC and the N8000 are connected physically via the Ethernet, the following points have
to be checked:
•
Is the network cable undamaged and plugged in correctly?
•
Is - if necessary - a crossover cable used?
•
Do the indicator lights of the network socket of the PC, the N8000 and (if available) of the network devices between the PC and the N8000 glow after the network cable(s) has/have been
plugged in?
•
Is a problem indicated on the used network interface in the system control devices of the
operating system?
Connect directly:
Establish a direct connection between the PC and the N8000 via a crossover cable in order to
rule out internal problems in the network devices between the PC and the N8000. If an IP
address had been set up automatically (DHCP) via a network device which is now no longer
connected, this address has to be set up manually again.
5.3 Ethernet principles
The N8000 system controller can be connected to an Ethernet network via the Ethernet interface
(RJ-45) on the rear panel. Ethernet is a computer networking technology for local networks. It is
possible to connect two devices (hosts) directly via a crossed Ethernet cable (crossover cable) if
this is necessary. If more than two devices have to be connected, they have to be connected via
normal Ethernet cables (straight through cables) and a central node (hub or switch). For this
purpose the central hub or switch has an extension (port) for every network member. The
Ethernet interface of the N8000 is compatible with the following Ethernet standards:
•
34
10Base-T (IEEE 802.3i): Four wires (two twisted pairs) of CAT-3 or CAT-5 cables are used
for this connection. The transfer rate is 10 MBit/s and the maximal length of a segment is
100 meters.
NetMax N8000 System Controller
Owner’s manual
Appendix
•
100Base-TX (IEEE 802.3u): Two twisted wire pairs are used for the connection (see above).
However, in this case, a CAT-5 cable has to be used. 100Base-TX has a transfer rate of
100 MBit/s and is the standard Ethernet implementation nowadays.
IP addresses
Diverse network protocols can be used for the communication of the devices connected to the
Ethernet network. The N8000 uses the TCP/IP protocol, thus, it is an IP network device. IP
addresses are used for the logical addressing of devices in an IP network. The N8000 uses
version IPv4 (Internet protocol version 4) for the addressing. Therefore, the length of an IP
address is 32 bit (= 4 Byte). 4.3 billion unique addresses are theoretically possibl with this
protocol. Normally IPv4 addresses are given in the dotted decimal notation, i.e. the four bytes are
written as four decimals separated by dots. Thus, the general notation of an IPv4 address is
AAA.BBB.CCC.DDD. An example of an IP address is 130.009.122.195. Zeros which stand in the
first place can be omitted. That is the reason why the exemplary address can also be written as:
130.9.122.195.
The following table shows address sequences that should be used in private networks.
Class
Adress space
Subnet mask
CIDR
Number of IP addresses
A
10.0.0.0 10.255.255.255
255.0.0.0
10.0.0.0/8
16777216
B
172.16.0.0 172.31.255.255
255.240.0.0
172.16.0.0/12
1048576
C
192.168.0.0 192.168.255.255
255.255.0.0
192.168.0.0/16
65536
Link local
169.254.0.0 169.254.255.255
255.255.0.0
169.254.0.0/16
65536
Private IP addresses are especially of interest in networks which are connected to the Internet.
Private IP addresses are not routed in the Internet. Thus, it is necessary to make an address
conversion with NAT (Network Address Translation) or PAT (Port Address Translation = NAT and
additional change of the port number) in order to be able to access the Internet. An benefit of this
is that it is possible to connect several devices via a router with the Internet even when your
Internet provider has only allocated one IP address. Additionally, the real IP address of the
devices can be hidden from hackers by NAT/PAT (Security through Obscurity).
Subnet mask
An IP address is always divided into a network part (network address/ID) and a host part (host
address/ID or device address). Devices are in the same network if, and only if, the network parts
of their addresses are identical. Devices can interact directly with each other if they are in the
same network. Ancillary equipment (e.g. a router) is necessary if devices in different networks
should interact. Within one network host addresses may not be allocated twice.
NetMax N8000 System Controller
Owner’s manual
35
Appendix
For example, a network could e.g. split the 4 Byte (32 bit) of an IP address in a 3 Byte long
network part and in 1 Byte long host part. The exact partitioning between network part and host
part is given in the form of subnet masks. In this case, the partitioning of the first 24 bits or the
last 8 bits would be made because of the subnet mask 255.255.255.0.
The CIDR notation which is designed to display a subnet mask is an alternative to the dotted
decimal notation. So called suffixes are used in the CIDR notation. The suffix indicates the
number of 1-bits in the subnet mask. Thus, the subnet mask 255.255.255.0 in dotted decimal
notation would correspond to the suffix /24 as the first 24 places (in binary description) of an IP
address are chosen as network address.
It is possible to impact the maximum number of the devices addressable within a network by
choosing the subnet mask which results in different partitioning of the IP address in network part
and in host part. For the exact number it has to be considered that the host part may neither be
completely zero nor completely 1 in the binary description.
Example: In case of the above-mentioned example IP address 130.9.122.195 the network part
would be 130.9.122.0 by using the subnet mask 255.255.255.0. So, each device (or interface) in
the considered network uses an address of the type 130.9.122.DDD. As the values 00000000
and 11111111 are excluded for the host part DDD in binary description, the corresponding
decimal values 1 to 254 for DDD are allowed. Thus, a maximum of 254 different devices can be
addressed in a network and the corresponding addresses are 130.9.122.1 to 130.9.122.254.
Automatic/Manual Allocation of IP Addresses
IP addresses can be allocated both automatically and manually to a device in a network. If the
address is allocated automatically via DHCP (Dynamic Host Configuration Protocol), the
operation of a DHCP server in the network is necessary. This server makes it possible to
dynamically allocate an IP address and additional configuration parameter to hosts in a network.
The use of a DHCP server is especially useful for networks in which devices are often connected
and removed.
If DHCP is used, certain incidents (e.g. the reboot of a device) can result in the change of the IP
address of this device. If this device is a N8000 system controller, its configuration in IRIS-Net
has to be modified to reflect the changed IP address. For that reason it is not advisable to use
DHCP for the dynamic configuration of N8000. Instead, of that the network configuration of the
N8000 should be done manually.
When a new Ethernet network which will not be connected to the Internet is established, any
network part of the IP addresses can be defined. By choosing the appropriate subnet mask it is
possible to adapt the number of the addressable devices to your requirements.
Please contact your network administrator regarding details on the correct network
configurations if one or several N8000 is/are integrated in an existing Ethernet network (with or
without DHCP server) or if the network is connected to the Internet.
36
NetMax N8000 System Controller
Owner’s manual
Appendix
5.4 CAN-Bus Principles
The network topology used by the CAN bus is based on the so-called “bus or line topology”, i.e.
all participants are connected via a single two-wire cable (Twisted-Pair cable, shielded or
unshielded) with the cabling running from one participant on the bus to the next, allowing
unlimited communication among all devices. In general, it does not matter if the bus member is a
power amplifier, a N8000 or a UCC1 USB-CAN converter. Thus, the N8000 can be connected at
any place of the CAN bus. In total, up to 100 devices can be connected to one CAN bus.
The CAN bus has to be terminated with a 120 Ω terminating resistor at both ends. If the
termination is missing or an improper resistor value is used, network errors can occur as a signal
is reflected on the bus at both bus ends. Because of the superposition of the reflection with the
original signal, the original signal is blurred. This may result in the loss of data. In order to prevent
or minimize reflections at the bus ends, terminators are used as they "absorb" the energy of the
signal.
Since the CAN interfaces of all EVI Audio appliances are galvanically separated from the rest of
the circuitry, network cabling also carries a common ground conductor (CAN_GND) ensuring that
all CAN-interfaces in the network are connected to a common ground potential.
Bus Topology of the CAN bus
By using a CAN bus repeater a connection between two independent and self-contained CAN
bus systems can be created. Thus, the following can be achieved:
•
Increase of the max. number of members
A maximum of 100 devices can be connected to one CAN bus. This number can be
increased up to 250 by connecting several CAN bus systems. This limitation of exactly 250
devices results from the addressing scheme used by the CAN bus. The addressing scheme
allows the allocation of a maximum of 250 different CAN device addresses.
•
Improvement of signal quality
With CAN bus systems, whose bus length exceeds 1000 meters, a CAN bus repeater should
be used. The CAN bus repeater accomplishes a signal processing and a reinforcement of the
NetMax N8000 System Controller
Owner’s manual
37
Appendix
bus signals. The internal running time of the repeaters of approx. 150 ns corresponds to an
extension of the bus over approx. 45 meters.
•
Creation of alternative network topologies
By using one or several repeaters, not only the above-mentioned bus topology, but the
creation of other network topologies are also possible. In the following figure a star topology
from three independent CAN bus systems is given as example. The three CAN buses are
connected via two repeaters.
38
NetMax N8000 System Controller
Owner’s manual
Appendix
System Examples
The following illustrations show examples of the data-bus wiring for different sizes of CAN-bus
networks..
System with 5 power amps and 1 N8000 at the beginning of the bus. Termination plugs at the N8000 (first unit on the bus) and at amp 5 (last unit on the bus).
.
System with 2 amp-racks and 1 N8000/PC in the middle. Termination plugs at
power amp 6 (first unit on the bus) and power amp 12 (last unit on the bus).
NetMax N8000 System Controller
Owner’s manual
39
Appendix
Performance Specifications
According to the ISO 11898-2 standard, CAN-bus data transfer cabling has to be carried out
using Twisted-Pair cables with or without shielding providing a characteristic impedance of 120
Ω. Both ends of a CAN-bus need to be terminated with 120 Ω termination-plugs. The maximum
bus-length depends on the actual data transfer rate, the kind of data transfer cable being used,
as well as the total number of participants on the bus. The following table shows the most
essential requirements for CAN-networks consisting of up to 64 participants.
Date Transmission Cable
Bus Length (in m)
Resistance per
Unit Length
(in mΩ/m)
Cable Diameter
Termination (in Ω)
Max. Data Transfer
Rate
0...40
< 70
0,25...0,34 mm²
AWG23, AWG22
124
1000 kbit/s at 40 m
40...300
< 60
0,34...0,6 mm²
AWG22, AWG20
127
500 kbit/s at 100 m
300 ... 600
< 40
0,5...0,6 mm²
AWG 20
150...300*
100 kbit/s at 500 m
600...1000
< 26
0,75...0,8 mm²
AWG 18
150...300*
62,5 kbit/s at 1000 m
* With longer cables and many participants on the CAN-bus, termination resistors with higher
impedance than the specified 120 Ω are recommended to reduce the ohmic load of the interface
drivers and therefore the voltage drop between the two cable-ends.
The following table is meant for first assessment of necessary cable diameters for different bus
lengths and bus-participant numbers.
Bus Length (in m)
Number of Units on the CAN-Bus
32
64
100
100
0,25 mm² bzw. AWG24
0,34 mm² bzw. AWG22
0,34 mm² bzw. AWG22
250
0,34 mm² bzw. AWG22
0,5 mm² bzw. AWG20
0,5 mm² bzw. AWG20
500
0,75 mm² bzw. AWG18
0,75 mm² bzw. AWG18
1,0 mm² bzw. AWG17
Additionally, the length of branch lines - for participants that are not directly connected to the
CAN-bus - is also of importance. For data transfer rates of up to 125 kbit/s, the maximum length
of a single stub cable should not exceed 2 meters. For higher bit rates a maximum length of only
0.3 meter is still permissible. The entire length of all branch lines should not exceed 30 meters.
General Note:
40
•
As long as only short distances (up to 10 meters) are concerned, common RJ-45 patch
cables with a characteristic impedance of 100 Ω (AWG 24 / AWG 26) can be used for the
cabling inside of a rack mounted system.
•
The previously outlined guidelines for network cabling are mandatory as far as the rack
mounted shelve interconnection or fixed installations are involved.
NetMax N8000 System Controller
Owner’s manual
Appendix
5.5 IP Address Table
Project: _________________________________
Subnet mask
Gateway
Device
IRIS-Net Device Name
Location / Description
IP Address
NetMax N8000 System Controller
Owner’s manual
41
Appendix
42
NetMax N8000 System Controller
Owner’s manual
BEDIENUNGSANLEITUNG
Inhalt
Einleitung . . . . . . . . . . . . . . . . . . . . . . . . . . . . . . . . . . . . . . . . . . . . . . . . . . . . . . . . . . . . . . . . . . . . 46
Systembeschreibung . . . . . . . . . . . . . . . . . . . . . . . . . . . . . . . . . . . . . . . . . . . . . . . . . . . . . . . . . . . . 46
N8000 Eigenschaften . . . . . . . . . . . . . . . . . . . . . . . . . . . . . . . . . . . . . . . . . . . . . . . . . . . . . . . . . . . . 47
Auspacken und Garantie . . . . . . . . . . . . . . . . . . . . . . . . . . . . . . . . . . . . . . . . . . . . . . . . . . . . . . . . . 48
Installationshinweise . . . . . . . . . . . . . . . . . . . . . . . . . . . . . . . . . . . . . . . . . . . . . . . . . . . . . . . . . . . . . 49
IRIS-Net . . . . . . . . . . . . . . . . . . . . . . . . . . . . . . . . . . . . . . . . . . . . . . . . . . . . . . . . . . . . . . . . . . . . . . 49
Browser Interface . . . . . . . . . . . . . . . . . . . . . . . . . . . . . . . . . . . . . . . . . . . . . . . . . . . . . . . . . . . . . . . 50
Bedienelemente und Anschlüsse . . . . . . . . . . . . . . . . . . . . . . . . . . . . . . . . . . . . . . . . . . . . . . . . . 51
Frontblende . . . . . . . . . . . . . . . . . . . . . . . . . . . . . . . . . . . . . . . . . . . . . . . . . . . . . . . . . . . . . . . . . . . 51
SIGNAL / PEAK-LEDs . . . . . . . . . . . . . . . . . . . . . . . . . . . . . . . . . . . . . . . . . . . . . . . . . . . . . . . . . 51
NETWORK-LEDs . . . . . . . . . . . . . . . . . . . . . . . . . . . . . . . . . . . . . . . . . . . . . . . . . . . . . . . . . . . . . 51
SYSTEM STATUS-LEDs . . . . . . . . . . . . . . . . . . . . . . . . . . . . . . . . . . . . . . . . . . . . . . . . . . . . . . . 52
POWER-LED . . . . . . . . . . . . . . . . . . . . . . . . . . . . . . . . . . . . . . . . . . . . . . . . . . . . . . . . . . . . . . . . 52
USB-Schnittstelle . . . . . . . . . . . . . . . . . . . . . . . . . . . . . . . . . . . . . . . . . . . . . . . . . . . . . . . . . . . . . 52
Rückseite . . . . . . . . . . . . . . . . . . . . . . . . . . . . . . . . . . . . . . . . . . . . . . . . . . . . . . . . . . . . . . . . . . . . . 53
AUDIO SLOTs . . . . . . . . . . . . . . . . . . . . . . . . . . . . . . . . . . . . . . . . . . . . . . . . . . . . . . . . . . . . . . . 53
Netzwerk-Modul-Slot . . . . . . . . . . . . . . . . . . . . . . . . . . . . . . . . . . . . . . . . . . . . . . . . . . . . . . . . . . 53
ETHERNET-Schnittstelle . . . . . . . . . . . . . . . . . . . . . . . . . . . . . . . . . . . . . . . . . . . . . . . . . . . . . . . 54
RS-232-Schnittstellen. . . . . . . . . . . . . . . . . . . . . . . . . . . . . . . . . . . . . . . . . . . . . . . . . . . . . . . . . . 54
REMOTE CAN BUS . . . . . . . . . . . . . . . . . . . . . . . . . . . . . . . . . . . . . . . . . . . . . . . . . . . . . . . . . . . 54
CONTROL PORT . . . . . . . . . . . . . . . . . . . . . . . . . . . . . . . . . . . . . . . . . . . . . . . . . . . . . . . . . . . . . 55
Netzbuchse und Netzschalter. . . . . . . . . . . . . . . . . . . . . . . . . . . . . . . . . . . . . . . . . . . . . . . . . . . . 55
Inbetriebnahme . . . . . . . . . . . . . . . . . . . . . . . . . . . . . . . . . . . . . . . . . . . . . . . . . . . . . . . . . . . . . . . . 56
Aufbauverfahren . . . . . . . . . . . . . . . . . . . . . . . . . . . . . . . . . . . . . . . . . . . . . . . . . . . . . . . . . . . . . . . . 56
Installation von Erweiterungskarten . . . . . . . . . . . . . . . . . . . . . . . . . . . . . . . . . . . . . . . . . . . . . . . . . 57
Systemerweiterung mit analogen/digitalen Audioein- bzw. Ausgängen . . . . . . . . . . . . . . . . . . . . 57
Systemerweiterung mit einem Netzwerk-Modul . . . . . . . . . . . . . . . . . . . . . . . . . . . . . . . . . . . . . . 57
Erweiterung der DSP-Leistung des Systems . . . . . . . . . . . . . . . . . . . . . . . . . . . . . . . . . . . . . . . . 58
Schnittstellenbeschreibung . . . . . . . . . . . . . . . . . . . . . . . . . . . . . . . . . . . . . . . . . . . . . . . . . . . . . . . . 58
Ethernet-Schnittstelle . . . . . . . . . . . . . . . . . . . . . . . . . . . . . . . . . . . . . . . . . . . . . . . . . . . . . . . . . . 58
CAN-Schnittstelle . . . . . . . . . . . . . . . . . . . . . . . . . . . . . . . . . . . . . . . . . . . . . . . . . . . . . . . . . . . . . 59
USB-Schnittstelle . . . . . . . . . . . . . . . . . . . . . . . . . . . . . . . . . . . . . . . . . . . . . . . . . . . . . . . . . . . . . 61
RS-232-Schnittstelle. . . . . . . . . . . . . . . . . . . . . . . . . . . . . . . . . . . . . . . . . . . . . . . . . . . . . . . . . . . 62
CONTROL PORT . . . . . . . . . . . . . . . . . . . . . . . . . . . . . . . . . . . . . . . . . . . . . . . . . . . . . . . . . . . . . 63
Audioschnittstellen . . . . . . . . . . . . . . . . . . . . . . . . . . . . . . . . . . . . . . . . . . . . . . . . . . . . . . . . . . . . 65
Netzwerk-Konfiguration . . . . . . . . . . . . . . . . . . . . . . . . . . . . . . . . . . . . . . . . . . . . . . . . . . . . . . . . . 67
Einführung . . . . . . . . . . . . . . . . . . . . . . . . . . . . . . . . . . . . . . . . . . . . . . . . . . . . . . . . . . . . . . . . . . . . 67
Konfiguration . . . . . . . . . . . . . . . . . . . . . . . . . . . . . . . . . . . . . . . . . . . . . . . . . . . . . . . . . . . . . . . . . . 69
Aufbau und Überprüfung einer Ethernet-Verbindung mit dem N8000 . . . . . . . . . . . . . . . . . . . . . 69
Anhang . . . . . . . . . . . . . . . . . . . . . . . . . . . . . . . . . . . . . . . . . . . . . . . . . . . . . . . . . . . . . . . . . . . . . . 73
Anwendungsbeispiel . . . . . . . . . . . . . . . . . . . . . . . . . . . . . . . . . . . . . . . . . . . . . . . . . . . . . . . . . . . . . 73
Installation in einer Mehrzweckhalle. . . . . . . . . . . . . . . . . . . . . . . . . . . . . . . . . . . . . . . . . . . . . . . 73
Problemlösungen . . . . . . . . . . . . . . . . . . . . . . . . . . . . . . . . . . . . . . . . . . . . . . . . . . . . . . . . . . . . . . . 74
Ethernet-Grundlagen . . . . . . . . . . . . . . . . . . . . . . . . . . . . . . . . . . . . . . . . . . . . . . . . . . . . . . . . . . . . 75
IP-Adressen . . . . . . . . . . . . . . . . . . . . . . . . . . . . . . . . . . . . . . . . . . . . . . . . . . . . . . . . . . . . . . . . . 76
Subnetzmaske . . . . . . . . . . . . . . . . . . . . . . . . . . . . . . . . . . . . . . . . . . . . . . . . . . . . . . . . . . . . . . . 77
Automatische/manuelle Vergabe von IP-Adressen . . . . . . . . . . . . . . . . . . . . . . . . . . . . . . . . . . . 77
CAN-Bus-Grundlagen . . . . . . . . . . . . . . . . . . . . . . . . . . . . . . . . . . . . . . . . . . . . . . . . . . . . . . . . . . . . 78
Systembeispiele . . . . . . . . . . . . . . . . . . . . . . . . . . . . . . . . . . . . . . . . . . . . . . . . . . . . . . . . . . . . . . 80
Leitungsspezifikation . . . . . . . . . . . . . . . . . . . . . . . . . . . . . . . . . . . . . . . . . . . . . . . . . . . . . . . . . . 81
Tabelle IP-Adressen . . . . . . . . . . . . . . . . . . . . . . . . . . . . . . . . . . . . . . . . . . . . . . . . . . . . . . . . . . . . . 83
Specifications/Technische Daten . . . . . . . . . . . . . . . . . . . . . . . . . . . . . . . . . . . . . . . . . . . . . . . . . . . 84
Block Diagram/Blockschaltbild . . . . . . . . . . . . . . . . . . . . . . . . . . . . . . . . . . . . . . . . . . . . . . . . . . . . . 86
Dimensions/Abmessungen
87
44
NetMax N8000 System Controller
Bedienungsanleitung
WICHTIGE SICHERHEITSHINWEISE
Das Blitzsymbol innerhalb eines gleichseitigen
Dreiecks soll den Anwender auf nicht isolierte
Leitungen und Kontakte im Geräteinneren hinweisen, an denen hohe Spannungen anliegen,
die im Fall einer Berührung zu lebensgefährlichen Stromschlägen führen können.
Das Ausrufezeichen innerhalb eines gleichseitigen Dreiecks soll den Anwender auf wichtige
Bedienungs- sowie Servicehinweise in der zum
Gerät gehörenden Literatur aufmerksam
machen.
1.
2.
3.
4.
5.
6.
7.
8.
9.
10.
11.
12.
13.
14.
15.
16.
Lesen Sie diese Hinweise.
Heben Sie diese Hinweise auf.
Beachten Sie alle Warnungen.
Richten Sie sich nach den Anweisungen.
Betreiben Sie das Gerät nicht in unmittelbarer Nähe von Wasser.
Verwenden Sie zum Reinigen des Gerätes ausschließlich ein trockenes Tuch.
Verdecken Sie keine Lüftungsschlitze. Beachten Sie bei der Installation des Gerätes stets die entsprechenden Hinweise
des Herstellers.
Vermeiden Sie die Installation des Gerätes in der Nähe von Heizkörpern, Wärmespeichern, Öfen oder anderer
Wärmequellen.
Achtung: Gerät nur an Netzsteckdose mit Schutzleiteranschluss betreiben. Setzen Sie die Funktion des Schutzleiteranschlusses des mitgelieferten Netzanschlusskabels nicht außer Kraft. Sollte der Stecker des mitgelieferten Kabels nicht in
Ihre Netzsteckdose passen, setzen Sie sich mit Ihrem Elektriker in Verbindung.
Sorgen Sie dafür, dass das Netzkabel nicht betreten wird. Schützen Sie das Netzkabel vor Quetschungen insbesondere am
Gerätestecker und am Netzstecker.
Verwenden Sie mit dem Gerät ausschließlich Zubehör/Erweiterungen, die vom Hersteller hierzu vorgesehen sind.
Ziehen Sie bei Blitzschlaggefahr oder bei längerem Nichtgebrauch den Netzstecker.
Überlassen Sie sämtliche Servicearbeiten und Reparaturen einem ausgebildeten Kundendiensttechniker. Servicearbeiten
sind notwendig, sobald das Gerät auf irgendeine Weise beschädigt wurde, wie z.B. eine Beschädigung des Netzkabels
oder des Netzsteckers, wenn eine Flüssigkeit in das Gerät geschüttet wurde oder ein Gegenstand in das Gerät gefallen ist,
wenn das Gerät Regen oder Feuchtigkeit ausgesetzt wurde, oder wenn es nicht normal arbeitet oder fallengelassen wurde.
Stellen Sie bitte sicher, dass kein Tropf- oder Spritzwasser ins Geräteinnere eindringen kann. Platzieren Sie keine mit
Flüssigkeiten gefüllten Objekte, wie Vasen oder Trinkgefäße, auf dem Gerät.
Um das Gerät komplett spannungsfrei zu schalten, muss der Netzstecker gezogen werden.
Beim Einbau des Gerätes ist zu beachten, dass der Netzstecker leicht zugänglich bleibt.
Entsorgung von gebrauchten elektrischen und elektronischen Geräten (Anzuwenden in den Ländern der
Europäischen Union und anderen europäischen Ländern mit einem separaten Sammelsystem für diese
Geräte) Das Symbol auf dem Produkt oder seiner Verpackung weist darauf hin, dass dieses Produkt nicht als
normaler Haushaltsabfall zu behandeln ist, sondern bei einem Telex Händler abgegeben werden muss.
WICHTIGE SERVICEHINWEISE
ACHTUNG: Diese Servicehinweise sind ausschließlich zur Verwendung durch qualifiziertes Servicepersonal. Um die
Gefahr eines elektrischen Schlages zu vermeiden, führen Sie keine Wartungsarbeiten durch, die nicht in der
Bedienungsanleitung beschrieben sind, außer Sie sind hierfür qualifiziert. Überlassen Sie sämtliche
Servicearbeiten und Reparaturen einem ausgebildeten Kundendiensttechniker.
1.
Bei Reparaturarbeiten im Gerät sind die Sicherheitsbestimmungen nach EN 60065 (VDE 0860) einzuhalten.
2.
Bei allen Arbeiten, bei denen das geöffnete Gerät mit Netzspannung verbunden ist und betrieben wird, ist ein NetzTrenntransformator zu verwenden.
3.
Vor einem Umbau mit Nachrüstsätzen, Umschaltung der Netzspannung oder sonstigen Modifikationen ist das Gerät
stromlos zu schalten.
4.
Die Mindestabstände zwischen netzspannungsführenden Teilen und berührbaren Metallteilen (Metallgehäuse) bzw.
zwischen den Netzpolen betragen 3 mm und sind unbedingt einzuhalten.
5.
Die Mindestabstände zwischen netzspannungsführenden Teilen und Schaltungsteilen, die nicht mit dem Netz verbunden
sind (sekundär), betragen 6 mm und sind unbedingt einzuhalten.
6.
Spezielle Bauteile, die im Stromlaufplan mit dem Sicherheitssymbol gekennzeichnet sind, (Note) dürfen nur durch
Originalteile ersetzt werden.
7.
Eigenmächtige Schaltungsänderungen dürfen nicht vorgenommen werden.
8.
Die am Reparaturort gültigen Schutzbestimmungen der Berufsgenossenschaften sind einzuhalten. Hierzu gehört auch die
Beschaffenheit des Arbeitsplatzes.
9.
Die Vorschriften im Umgang mit MOS-Bauteilen sind zu beachten.
NOTE:
SAFETY COMPONENT (MUST BE REPLACED BY ORIGINAL PART)
NetMax N8000 System Controller
Bedienungsanleitung
45
Einleitung
1 Einleitung
Wir möchten Ihnen zuallererst danken und Sie beglückwünschen, dass Sie sich für den NetMax
N8000 System Controller von Electro-Voice entschieden haben. Um optimale Leistung mit
diesem Gerät zu erzielen und um Schäden durch unsachgemäße Bedienung zu vermeiden,
lesen Sie bitte diese Bedienungsanleitung aufmerksam durch, bevor Sie den NetMax N8000
betreiben.
N8000 Frontansicht
1.1 Systembeschreibung
NetMax ist ein modulares, netzwerkfähiges und frei konfigurierbares Audiosystem, mit dem
komplette Systemlösungen erstellt werden können, die exakt den kundenspezifischen
Anforderungen entsprechen. Einsatzgebiete sind alle Arten von professionellen AudioInstallationen, komplexe Gebäude-Beschallungsanlagen sowie Concert Sound Applikationen.
NetMax integriert alle Komponenten von der Matrix bis zu den Lautsprechern einschließlich der
Systemsteuerung und -überwachung in ein gemeinsames Audio-Konzept. Die Konfiguration,
Bedienung und Überwachung eines NetMax Systems erfolgt durch die PC-Software IRIS-Net –
Intelligent Remote & Integrated Supervision.
Die Zentraleinheit von NetMax ist der N8000 System Controller mit bis zu 32 Audiokanälen,
Mixer- und Matrixfunktionen, Signal Processing und umfangreichen Steuerungs- und
Überwachungsfunktionen. Mehrere N8000 können über ein CobraNet™ Audio- und SteuerNetzwerk verbunden und so zu einem großen, dezentralen Audiosystem zusammengestellt
werden.
NetMax verwaltet auch die Electro-Voice Precision Series Remote Verstärker einschließlich ihrer
Lautsprecher- und Systemüberwachungsfunktionen. Die Anbindung erfolgt über CAN direkt an
den N8000.
Ein NetMax System erfüllt alle relevanten Sicherheitsforderungen. Sämtliche Audiowege,
Schnittstellen und Prozessorsysteme werden überwacht und im Fehlerfall zur Anzeige gebracht.
Durch die Verwendung von CobraNet™ können redundante Netzwerke aufgebaut werden.
46
NetMax N8000 System Controller
Bedienungsanleitung
Einleitung
1.2 N8000 Eigenschaften
Der NetMax N8000 ist ein universell einsetzbarer digitaler Audio System Controller mit
herausragenden Leistungsmerkmalen. Ein kompromissloses Schaltungsdesign sorgt für
exzellente Audioqualität und klaren Sound. Erreicht wird dies durch den Einsatz von High-End
24 Bit A/D- und D/A-Wandlern mit 120 dB Dynamikbereich, hochwertigen Eingangs- und
Ausgangsstufen im Analogbereich und digitaler Signalverarbeitung mit optimierten 48 Bit
Double-Precision Algorithmen. Damit ist der N8000 selbst für anspruchsvolle Anwendungen in
Theatern, Konzertsälen, Veranstaltungszentren, großen Kirchen, usw. bestens geeignet.
Das modulare Hardware-Design macht den NetMax N8000 äußerst flexibel und eröffnet viele
weitere Einsatzgebiete. Vier Steckplätze für 8-Kanal Audiomodule auf der Geräterückseite
ermöglichen bis zu 32 lokale Audiokanäle. Jeder Steckplatz kann entweder mit einem AudioEingangsmodul oder einem Audio-Ausgangsmodul bestückt werden. Damit lassen sich bereits in
einem einzelnen Gerät die verschiedensten Konfigurationen, z. B. 8-in/8-out, 8-in/16-out, 8-in/24out, 16-in/16-out, 24-in/8-out usw., realisieren. Darüber hinaus kann der N8000 mit einem
CobraNet™ Netzwerkmodul ausgestattet werden. Mehrere N8000 können somit in einem
Netzwerk integriert und zu einem großen weit verzweigten System verbunden werden.
Die Signalverarbeitung im N8000 erfolgt auf leistungsstarken Audio-Signalprozessoren, wobei je
nach Ausbaustufe bis zu 8 DSP’s zur Verfügung stehen. Die Software umfasst eine Vielzahl an
frei programmierbaren Signalverarbeitungs-Komponenten. Unter anderem sind dies Filter mit
allen möglichen Charakteristiken, Parametrische und Grafische Equalizer, Frequenzweichen,
Matrix-Router und Matrix-Mischer, Delays, Dynamik-Funktionen, usw. Durch völlig beliebige
Kombination und Verdrahtung dieser Komponenten können Konfigurationen für die
verschiedensten Anwendungen geschaffen werden. Die Programmierung geschieht mit Hilfe der
PC-Software IRIS-Net. Damit wählen Sie die gewünschten Komponenten aus einer
Signalverarbeitungs-Bibliothek, platzieren diese in einen Arbeitsbereich auf dem PC-Bildschirm,
und verdrahten sie zu einem Signalfluß-Diagramm. Die so erstellte Signal-Struktur muss nur
noch zum N8000 übertragen werden und ist sofort einsatzbereit.
Die leistungsfähige Signalverarbeitung erlaubt auch komplexe Konfigurationen für die
Feineinstellung des Sounds je nach Räumlichkeit oder Art der Veranstaltung. So kann die KlangCharakteristik für die PA-Lautsprecher, Monitor-Lautsprecher, Front Fill Systeme, sowie für die
Beschallung von Nebenräumen, Lobby, Angestellten-Bereichen usw. völlig individuell eingestellt
und optimiert werden. Anders gesagt, der N8000 meistert jede Anwendung, auch große und
komplexe Systeme, absolut exakt und zuverlässig.
Neben den reinen Audio-Funktionen ist der NetMax N8000 mit vielfältigen Kontroll-Funktionen
ausgestattet. Eine Zeitsteuerung mit Kalenderfunktion dient zur Programmierung von einmaligen
oder periodisch wiederkehrenden Ereignissen. Die Wiederholung kann jährlich, monatlich,
wöchentlich, täglich, stündlich oder sogar in noch kürzeren Zeiträumen stattfinden. Außerdem
können Tagesprogramme erstellt und diese zu Wochenabläufen kombiniert werden. Mit der
Ereignis-Steuerung können Reaktionen auf bestimmte Ereignisse oder Systemzustände
konfiguriert werden, z. B. beim Über- oder Unterschreiten von Schwellwerten. Fehler im Gerät
oder im gesamten NetMax System werden automatisch erkannt, und können je nach Bedarf auf
dem PC-Bildschirm angezeigt oder an externe Stellen gemeldet werden. Fehler und sonstige
Ereignisse werden in einer internen Protokoll-Datei mit Datum und Uhrzeit aufgezeichnet, wobei
bestimmt werden kann, welche Fehlerarten oder Ereignisse erfasst werden sollen. Das Protokoll
kann jederzeit ausgelesen und am PC-Bildschirm dargestellt werden. Im NetMax N8000 lassen
NetMax N8000 System Controller
Bedienungsanleitung
47
Einleitung
sich einzelne Funktionen zu komplexen Abläufen integrieren. So können z. B. mehrere
Parameter mit ihren jeweiligen Werten oder Zuständen in einer Szene abgelegt und zu einem
beliebigen Zeitpunkt manuell oder automatisch verändert werden.
Für die Anbindung an Netzwerke und externe Komponenten ist der NetMax N8000 mit allen
relevanten Schnittstellen standardmäßig bestückt. Der Ethernet Port erlaubt die Anbindung an
bestehende Gebäudenetzwerke (Intranet) und die Kommunikation über das Internet. Ethernet ist
auch die übliche Verbindung zwischen einem oder mehreren N8000 und einem PC mit IRIS-Net
Software. Darüber läuft die Konfiguration, Steuerung und Überwachung eines kompletten
NetMax Systems. Zwei serielle RS-232 Ports können benutzt werden, um den N8000 von
externen Multi-Media Systemen, z. B. Crestron™ oder AMX™, zu steuern. Hierfür steht ein
offenes Schnittstellen-Protokoll zur Verfügung. Der CAN-Bus dient als Verbindung zu ElectroVoice Remote Verstärkern. Bis zu 100 Verstärker können über CAN an einen einzelnen N8000
angeschlossen und zusammen mit weiteren N8000 und Verstärkern zu einem komplexen und
leistungsfähigen Audiosystem integriert werden. Weiterhin findet sich am NetMax N8000 ein
Control Port, der frei programmierbare Steuereingänge und Steuerausgänge bietet. An die
Steuereingänge (GPI’s) können entweder Schalter oder Potentiometer bzw. externe
Steuerspannungen angeschlossen werden und es lassen sich beliebige Logik- oder
Analogfunktionen programmieren. An den Steuerausgängen (GPO’s) können externe Elemente
angeschlossen werden, die etwa zur Signalisierung bestimmter Zustände verwendet werden
können. Der USB Port an der Frontblende des N8000 dient zum Anschluss eines PCs auch im
eingebauten Zustand, d.h. wenn der Ethernet-Port womöglich nur schlecht erreichbar ist. Der
USB Port kann zur Übertragung einer Datei mit der gesamten N8000-Konfiguration vom N8000
auf den PC bzw. vom PC zurück auf den N8000 verwendet werden. Auch die
Parameteränderung der Ethernet-Schnittstelle ist über den USB Port möglich.
Höchste Ansprüche wurden auch an die Konstruktion und mechanische Verarbeitung gestellt.
Das Chassis ist besonders robust und schützt so die Elektronik wirkungsvoll vor äußeren
Einflüssen. Ein temperaturgesteuerter Lüfter sorgt für thermische Stabilität und gleich bleibende
Umgebungsbedingungen innerhalb des Geräts. Alle Audioschnittstellen sind elektronisch
symmetrisch und mit verschraubbaren Phoenix-Steckverbindern ausgeführt.
In dieser Bedienungsanleitung werden Sie noch viele weitere Eigenschaften des NetMax N8000
kennen lernen. Lesen Sie deshalb bitte aufmerksam weiter und bewahren Sie diese gut auf, um
sie zum Nachschlagen jederzeit griffbereit zu haben.
1.3 Auspacken und Garantie
Öffnen Sie die Verpackung und entnehmen Sie den N8000. Dem Gerät liegt folgendes Zubehör
bei:
48
•
N8000 Benutzerhandbuch (dieses Dokument)
•
Netzkabel
•
2 Stück CAN-Abschlusswiderstände
•
2 Stück Phoenix-Stecker 6-polig
•
Garantiekarte
NetMax N8000 System Controller
Bedienungsanleitung
Einleitung
Überprüfen Sie bitte, ob die Garantiekarte vollständig ausgefüllt ist, denn nur so können Sie
etwaige Garantieansprüche geltend machen. Bewahren Sie zur Garantiekarte auch den
Kaufbeleg und ebenso die Verpackung für eventuelle Rücksendung gut auf.
1.4 Installationshinweise
Generell ist der N8000 so aufzustellen oder zu montieren, dass die Luftzufuhr und die Entlüftung
an beiden Geräteseiten nicht behindert werden. Die Belüftungsrichtung ist von links nach rechts,
wenn man das Gerät von der Frontseite betrachtet. Geräte mit umgekehrter Luftführung sollen
möglichst nicht im gleichen Rack/Schrank verbaut werden. Beim Einbau in Gehäuse und
Gestellschränke ist ein freier Luftkanal zwischen den N8000 Geräteseiten und der Schrank/
Rack-Seitenwand bis zur oberen Rack- oder Schrankentlüftung vorzusehen, um eine
ausreichende Belüftung der Geräte zu gewährleisten. Oberhalb des Schrankes soll ein freier
Raum von mindestens 100 mm für die Entlüftung zur Verfügung stehen.
ACHTUNG:
Die max. Umgebungstemperatur von +40°C soll für störungsfreien Betrieb nicht überschritten werden.
Beim Einbau in Gestellschränken oder Transport-Racks sollen in jedem Fall handelsübliche
Einbauschienen verwendet werden, um ein Verwinden der Frontblende zu verhindern.
Der N8000 ist zu schützen vor: Tropf- oder Spritzwasser, direkter Sonnenbestrahlung, hoher
Umgebungstemperatur oder unmittelbarer Einwirkung von Wärmequellen, hoher Luftfeuchtigkeit,
starken Staubablagerungen und starken Vibrationen.
Können die angeführten Forderungen nicht dauerhaft gewährleistet werden, so ist eine
regelmäßige Wartung des Geräts zwingend erforderlich, um etwaigen Ausfällen vorzubeugen,
die wesentlich durch negative Umwelteinflüsse entstehen können.
Wenn der N8000 direkt von einem kalten an einen warmen Ort gebracht wird, kann sich
Feuchtigkeit auf Innenteilen niederschlagen. Das Gerät darf erst in Betrieb genommen werden,
wenn es sich auf die geänderte Temperatur erwärmt hat (nach etwa einer Stunde). Sollte ein
fester Gegenstand oder Flüssigkeit in das Gehäuse gelangen, trennen Sie sofort das Gerät vom
Netz und lassen Sie das Gerät von einer autorisierten Servicestelle überprüfen, bevor Sie es
weiterverwenden.
1.5 IRIS-Net
Zur Konfiguration und Bedienung des N8000 System Controller wird die PC-Software IRIS-Net
(Intelligent Remote & Integrated Supervision) verwendet. Die gesamte Konfiguration des N8000
kann hierbei offline (d.h. ohne Verbindung zwischen PC und N8000) auf dem PC erstellt werden.
Nach Herstellung einer Verbindung zwischen PC und N8000 über Ethernet kann die
NetMax N8000 System Controller
Bedienungsanleitung
49
Einleitung
Konfiguration auf diesen übertragen werden. Neben der Erstellung von Konfigurationen kann
IRIS-Net auch für die umfassende Kontrolle und Überwachung von N8000 System Controllern
(und daran angeschlossenen Electro-Voice Precision Series Remote Amplifier) genutzt werden.
Hinweise für die Installation von IRIS-Net auf Ihrem PC finden Sie in der Datei „iris_readme.htm“.
Die Bedienungsanleitung von IRIS-Net wird während dessen Installation automatisch auf den
Computer kopiert.
Eine IRIS-Kurzeinführung finden Sie im Menü unter
>
.
IRIS-Net (Intelligent Remote & Integrated Supervision)
1.6 Browser Interface
Das N8000-Browser-Interface stellt einen Teil der in IRIS-Net vorhandenen Möglichkeiten zur
Konfiguration und Bedienung des N8000 zur Verfügung. Zur Nutzung des Browser-Interface ist
jeder herkömmlicher Internet Browser mit aktiviertem JavaScript und CSS verwendbar.
Detaillierte Informationen über das N8000-Browser-Interface finden Sie im N8000-BrowserManual. Sie finden dieses im Unterverzeichnis \Documentation\NetMax im IRISInstallationsverzeichnis.
NetMax N8000 Browser Interface
50
NetMax N8000 System Controller
Bedienungsanleitung
Bedienelemente und Anschlüsse
2 Bedienelemente und Anschlüsse
2.1 Frontblende
Die N8000 Frontblende enthält Pegel- und Status-Anzeigen sowie die Anschlussmöglichkeit für
einen PC über eine USB-Schnittstelle. Für alle 32 Audiokanäle sind SIGNAL / PEAK-LEDs
vorhanden. Die Kanäle sind in 8er Gruppen zusammengefasst und den Audio-Slots 1 bis 4 auf
der Rückseite zugeordnet. Weitere LEDs informieren über den Netzwerk-, System- und GeräteStatus und geben einen schnellen Überblick, ob das System einwandfrei arbeitet oder ob ein
Problem aufgetreten ist.
SIGNAL / PEAK-LEDs
Diese LEDs dienen zur Aussteuerungskontrolle für die
Eingangs- und Ausgangssignale. Die SIGNAL-LED beginnt
bei -25 dBu zu leuchten und zeigt an, ob generell ein Signal
am Eingang oder am Ausgang vorhanden ist. Die PEAKLED leuchtet auf, wenn der N8000 nahe an der
Aussteuergrenze betrieben wird. Die Schwelle liegt bei
+18 dBu. Die maximale Aussteuerung beträgt +21 dBu, es verbleibt somit noch eine Reserve
von 3 dB bis zur endgültigen Clip-Grenze.
Die PEAK-LEDs sollten nur bei Dynamik-Spitzen sporadisch aufflackern. Wenn die PEAK-LED
eines Eingangs dauernd oder sehr häufig leuchtet, sollten Sie das entsprechende
Eingangssignal etwas zurücknehmen. Falls die PEAK-LED eines Ausgangs dauernd aufleuchtet,
sollte die interne Verstärkung reduziert werden, da sonst der N8000 permanent übersteuert wird.
NETWORK-LEDs
Wenn der N8000 an einem Audio-Netzwerk, z. B.
CobraNet™, betrieben wird, zeigen diese LEDs den
Netzwerk-Status an. Die ACTIVE-LED leuchtet, wenn
Audiodaten über das Netzwerk gesendet oder empfangen
NetMax N8000 System Controller
Bedienungsanleitung
51
Bedienelemente und Anschlüsse
werden. Ist die LED aus, findet keine Kommunikation über das Audio-Netzwerk statt. Die
MASTER-LED leuchtet, wenn der N8000 als Clock-Master – bei CobraNet™ auch als Conductor
bezeichnet – fungiert. In einem Audio-Netzwerk gibt es immer nur einen Master, das heißt, die
MASTER-LED muss und darf nur an einem N8000 innerhalb des Netzwerk-Verbunds leuchten.
Falls der momentan als Clock-Master fungierende N8000 ausfällt oder aus dem Netzwerk
entfernt wird, wird diese Funktion automatisch von einem anderen N8000 übernommen.
SYSTEM STATUS-LEDs
Diese LEDs zeigen den Geräte- oder System-Status an. Die
READY-LED leuchtet grün, wenn das Gerät nach dem
Einschalten gebootet hat und betriebsbereit ist. Die FAULTLED zeigt durch ihr Aufleuchten einen internen Fehler des
N8000 oder einen Fehler im System an. Während der
Konfiguration des N8000 kann festgelegt werden, welche Fehler zu einer Anzeige führen sollen.
Wenn die FAULT-LED leuchtet, sollte umgehend überprüft werden, was die Ursache ist. Mit Hilfe
der PC-Software IRIS-Net ist eine detaillierte Diagnose möglich. Die Fehlerursache muss
umgehend beseitigt werden.
POWER-LED
Diese LED leuchtet grün, wenn der N8000 eingeschaltet ist.
Falls die ON-LED trotz eingeschaltetem Gerät nicht
leuchtet, ist das Gerät entweder nicht mit dem Stromnetz
verbunden oder die interne Primärsicherung ist defekt.
USB-Schnittstelle
Die USB-Schnittstelle dient zum frontseitigen Anschluss
eines PCs. Damit ist es möglich, den N8000 auch im
eingebauten Zustand – wenn die Ethernet-Schnittstelle an
der Rückseite womöglich nicht mehr zugänglich ist – mit
einem PC zu verbinden. Über die USB-Schnittstelle können
Netzwerkparameter eingestellt und Dateien mit der gesamten N8000-Konfiguration übertragen
werden. Die genauen Vorgehensweisen hierzu finden Sie in der Online-Hilfe von IRIS-Net. Den
benötigten Treiber finden Sie im Unterverzeichnis \Driver\USB NetMax Driver des IRISInstallationsverzeichnis. Für technische Eigenschaften der USB-Schnittstelle, wie auch der
nachfolgend beschriebenen übrigen Schnittstellen des N8000, sei auf den Abschnitt
Schnittstellenbeschreibung (Seite 58) verwiesen.
52
NetMax N8000 System Controller
Bedienungsanleitung
Bedienelemente und Anschlüsse
2.2 Rückseite
MODEL:
N8000
MADE IN GERMANY
AUDIO SLOT 3
AUDIO SLOT 1
AUDIO SLOT 4
AUDIO SLOT 2
BURNSVILLE, MN, U.S.A.
C
US
100-240 V~ 50-60 Hz/ 90 W
N378
SERIAL: 170323 03150 10001
CONTROL PORT
INPUTS
0-10V
REMOTE
RS-232
GND 1 2 3 4 10V REF
PORT 1
ETHERNET
STATUS
RELAY
OUTPUTS
2 3 4 5V/200mA
CAN BUS
PORT 2
Auf der Rückseite des N8000 befinden sich sämtliche Anschlüsse für analoge und digitale
Audiosignale, Steuer-Schnittstellen und für die Stromversorgung.
AUDIO SLOTs
Die AUDIO SLOTS 1 – 4 sind Modul-Steckplätze zur
Aufnahme von NetMax Audio-Modulen. Es stehen sowohl
analoge als auch digitale Eingangs- und Ausgangsmodule
zur
Verfügung.
Auch
ein
Eingangsmodul
mit
Mikrophonempfindlichkeit ist optional erhältlich. Jeder Slot
kann ein beliebiges Modul aufnehmen, dadurch können Sie
exakt die Ein- und Ausgänge bestücken, die Sie für Ihre
Anwendung benötigen. Der N8000 erkennt die Modul-Type
automatisch
und
bietet
die
entsprechenden
Konfigurationsmöglichkeiten an.
ACHTUNG:
Der N8000 muss unbedingt ausgeschaltet werden, wenn Sie ein Modul wechseln wollen.
Eine genaue Anleitung finden Sie in der Beschreibung des jeweiligen Moduls.
Netzwerk-Modul-Slot
Dieser Slot dient zur Bestückung mit einem NetzwerkModul, z. B. dem CM-1 CobraNet™ Modul. Intern stehen an
diesem Slot alle 64 Audiokanäle – 32 Eingänge und 32
Ausgänge – zur Verfügung. Mit dem CM-1 können
gleichzeitig bis zu 32 digitale Audio Input Signale und 32
digitale Audio Output Signale über ein CobraNet™
Netzwerk übertragen werden. Mehrere N8000 NetMax System Controller können so zu einem
weit verbreiteten, dezentralen Audiosystem verbunden werden. Ein bestücktes Netzwerk-Modul
NetMax N8000 System Controller
Bedienungsanleitung
53
Bedienelemente und Anschlüsse
wird vom N8000 automatisch erkannt. In der PC-Software IRIS-Net kann das Modul für die
jeweiligen Anforderungen konfiguriert werden.
ACHTUNG:
Der N8000 muss unbedingt ausgeschaltet werden, bevor Sie ein Modul einbauen. Eine
genaue Anleitung finden Sie in der Beschreibung des jeweiligen Moduls.
ETHERNET-Schnittstelle
Die Ethernet-Schnittstelle für 100Base-TX / 10Base-T
Ethernet-Netzwerke dient zur Verbindung des N8000 mit
einem PC und/oder anderen N8000. Normalerweise wird
diese Verbindung über ein Standard-Ethernet-Kabel (nicht
gekreuzt) und einen Ethernet-Hub oder Switch hergestellt.
Wenn ein N8000 direkt mit einem PC oder einem anderen N8000 verbunden werden soll, muss
ein gekreuztes Ethernet-Kabel (Crossover-Kabel) verwendet werden.
RS-232-Schnittstellen
Die beiden RS-232-Schnittstellen dienen zur Verbindung
des N8000 mit externen Geräten, z. B. Mediensteuerungssystemen (AMX™, Crestron™ u. a.) oder Gebäudemanagementsystemen. Über RS-232 können sämtliche
N8000 Funktionen und Parameter gesteuert und abgefragt
werden. Die Kommunikation erfolgt über ein einfach zu
implementierendes ASCII String-Protokoll. Auf diese Weise
kann ein NetMax System problemlos mit Medien- und
Touchpanel-Steuerungen kombiniert werden. An der RS232 Schnittstelle kann auch ein PC angeschlossen werden, der Parameterzugriff kann hierbei
über ein einfaches Terminalprogramm erfolgen. Für die Anbindung an ein PROMATRIX System
steht ein spezieller Befehlssatz zur Verfügung. Mit Hilfe der PC-Software IRIS-Net werden die
beiden RS-232-Schnittstellen für ihre jeweilige Anwendung konfiguriert.
REMOTE CAN BUS
Die CAN-Schnittstelle dient zum Anschluss von ElectroVoice Remote Verstärkern und anderen Geräten mit CANInterface. Hierbei können bis zu 100 Remote Verstärker mit
einem einzelnen N8000 verbunden werden. Alle
angeschlossenen Komponenten werden in das NetMax
Überwachungs- und Steuerungskonzept eingebunden. Die
STATUS-LED dient zur Kontrolle der Kommunikation am
CAN-Bus. Ist die CAN-Schnittstelle nicht in Betrieb, ist die
54
NetMax N8000 System Controller
Bedienungsanleitung
Bedienelemente und Anschlüsse
LED deaktiviert. Im Normalbetrieb blinkt die LED in einem 2-Sekunden-Takt. Die Dauer des
Aufleuchtends der LED innerhalb dieser 2 Sekunden entspricht hierbei der Busbelastung, d.h.
bei hoher Last leuchtet die LED innerhalb der 2 Sekunden für eine längere Zeitdauer als bei
niedriger Buslast.
CONTROL PORT
Der CONTROL PORT enthält vier frei programmierbare
Steuereingänge,
drei
frei
programmierbare
Steuerausgänge, einen Ready-/Fault-Ausgang sowie
Referenzspannungsanschlüsse für Masse, +5 V und +10 V.
Die Steuereingänge IN1 – IN4 sind Gleichspannungseingänge, die intern über Pull-Down Widerstände auf Masse
liegen. Extern kann eine Steuerspannung zwischen 0 V und
+10 V angelegt werden. Mit Hilfe der PC-Software IRIS-Net
können für die Steuereingänge entweder Schaltfunktionen oder Regler-Funktionen programmiert
werden. Anwendungsbeispiele sind z. B. Power On / Standby Umschaltung, Presetumschaltung
oder Parameterkontrolle.
Die Steuerausgänge OUT2 – OUT4 sind Relais-Kontakte, die im nichtaktiven Zustand offen sind
(Off). Im aktiven Zustand (On) sind die Ausgänge gegen Masse geschlossen. Die Ausgänge
dienen zur Signalisierung interner Zustände und können direkt LEDs, Kontrollleuchten oder
Relais ansteuern. Der +5 V Referenzanschluss dient zur Versorgung der extern
angeschlossenen Elemente mit einem Strom von bis zu 200 mA. Über die Steuerausgänge
können Betriebszustände (kritische Temperatur, Über- oder Unterschreitung definierter
Grenzwerte, Fehler, usw.) an zentrale Bedienplätze oder andere Systeme (Brandmeldeanlage,
Alarmierungsanlage) auch ohne Nutzung eines PC gemeldet werden. Nähere Hinweise zur
Konfiguration des Control Ports finden Sie in der IRIS-Net Dokumentation.
Netzbuchse und Netzschalter
Verwenden Sie das beiliegende Netzkabel zum Anschluss
des NetMax N8000 an das Stromnetz. Der N8000 ist für
Netzspannungen von 100 V AC bis 240 V AC ausgelegt, es
ist also keine Netzspannungsumschaltung erforderlich.
Intern befindet sich eine Netzsicherung, die normalerweise
nur im Fehlerfall auslöst. Die Sicherung darf nur von einer
autorisierten Servicestelle gegen eine gleichwertige
Sicherung mit identischen Daten für Strom, Spannung und
Auslösecharakteristik getauscht werden.
Mit dem Netzschalter auf der Geräterückseite wird der N8000 ein- und ausgeschaltet. Nach dem
Einschalten leuchtet sofort die ON-LED an der Frontseite. Der N8000 bootet und initialisiert alle
Parameter mit den zuletzt eingestellten Werten. Die Initialisierung dauert einige Sekunden.
Sobald der N8000 betriebsbereit ist, leuchtet auch die READY-LED.
NetMax N8000 System Controller
Bedienungsanleitung
55
Inbetriebnahme
3 Inbetriebnahme
3.1 Aufbauverfahren
1. Installieren Sie die Erweiterungskarten.
Falls Sie für Ihren N8000 System Controller Erweiterungskarten (AI-1, AO-1, CM-1 bzw.
DSP-1) erworben haben, bauen Sie diese ein. Beachten Sie hierzu den Abschnitt Installation
von Erweiterungskarten auf Seite 57 und die Einbauhinweise in den mitgelieferten
Bedienungsanleitungen der Erweiterungskarten.
2. Schließen Sie das Netzkabel an.
Achten Sie darauf, dass der Netzschalter des N8000 (über der Netzbuchse, siehe Seite 55)
ausgeschaltet ist.
3. Installieren Sie das Programm IRIS-Net (Intelligent Remote & Integrated Supervision)
auf dem PC.
Beachten Sie hierbei die Installationsanleitung von IRIS-Net in der Datei iris_readme.htm.
4. Falls in Schritt 1 Erweiterungskarten mit Ein- bzw. Ausgängen (AI-1, AO-1, MI-1, DI-1
oder CM-1) installiert wurden, schließen Sie dort die zu verwendenden Geräte an.
Beachten Sie hierzu die jeweils mitgelieferten Bedienungsanleitungen der
Erweiterungskarten und der verwendeten Geräte.
5. Verbinden Sie die Ethernet-Schnittstelle des N8000 mit dem PC über ein geeignetes
Ethernet-Kabel.
Beachten Sie hierzu den Abschnitt Ethernet-Schnittstelle auf Seite 58.
6. Falls Ihre Anwendung Electro Voice P-Series Verstärker umfasst, verbinden Sie die
CAN-Schnittstelle des N8000 mit den Verstärkern.
Beachten Sie hierzu den Abschnitt CAN-Schnittstelle auf Seite 59.
7. Schalten Sie den N8000 (über den Netzschalter an der Rückseite), den Computer, und,
falls vorhanden, die weiteren angeschlossenen Geräte ein.
Damit der Einschaltstrom keine Spannungsspitze im Audiosignal erzeugt und Ihre
Lautsprecher beschädigt, schalten Sie angeschlossene Geräte (falls vorhanden) in der
folgenden Reihenfolge ein: Audiosignalquellen - Mischpult und/oder Aufnahmegeräte Verstärker/Endstufen. Das Ausschalten der Geräte sollte in umgekehrter Reihenfolge
erfolgen.
8.
Starten Sie das Programm IRIS-Net auf dem PC.
Eine Einführung in das Programm finden Sie in der Online-Hilfe von IRIS-Net. Sie finden den
Quick Start Guide in IRIS-Net im Menü unter
56
NetMax N8000 System Controller
Bedienungsanleitung
>
.
Inbetriebnahme
3.2 Installation von Erweiterungskarten
In diesem Kapitel werden die Möglichkeiten zum Ausbau des N8000 System Controller mit
Erweiterungskarten beschrieben. Der N8000 kann auf verschiedene Weisen mit
Erweiterungskarten bestückt werden:
•
4 Slots (Modul-Steckplätze) für die Erweiterung des Systems mit analogen/digitalen Eingängen (AI-1, MI-1, DI-1) bzw. Ausgängen (AO-1)
•
1 Netzwerk Modul-Slot für den Einbau eines Audio-Netzwerk-Moduls, etwa dem CM-1
CobraNet™ Modul
•
1 DSP-Erweiterungsmodul (DSP-1) zur Erweiterung der maximalen Speicherkapazität und
Signalverarbeitungsleistung
ACHTUNG:
Der N8000 muss unbedingt ausgeschaltet werden, wenn Sie ein Modul einbauen möchten. Eine genaue Einbauanleitung finden Sie in der Beschreibung des jeweiligen Moduls.
Systemerweiterung mit analogen/digitalen Audioein- bzw. Ausgängen
Für die Erweiterung des Systems mit analogen oder digitalen Audioein- bzw. Ausgängen stehen
auf der Rückseite des N8000 vier Slots zur Verfügung, diese sind mit AUDIO SLOT 1 bis
AUDIO SLOT 4 beschriftet (siehe Seite 53). In diese Slots kann eine beliebige Kombination von
Erweiterungskarten folgender Typen eingebaut werden:
•
AI-1 mit 8 analogen Eingängen
•
MI-1 mit 8 Mikrofon-Eingängen
•
DI-1 mit 8 digitalen Eingängen
•
AO-1 mit 8 analogen Ausgängen
Die Wahl des Slots für den Einbau der Erweiterungskarten ist hierbei völlig frei, nach Einbau der
Karten werden diese vom N8000 automatisch erkannt.
Systemerweiterung mit einem Netzwerk-Modul
Über den Netzwerk Modul-Slot an der Rückseite des N8000 kann eine AudioNetzwerkschnittstelle zu einem CobraNet™ nachgerüstet werden. Das hierzu verwendete Modul
CM-1 besitzt zwei Ethernetanschlüsse zum Aufbau eines redundanten Netzwerks. Es können
gleichzeitig bis zu 32 digitale Audio Input Signale und 32 digitale Audio Output Signale
übertragen werden.
NetMax N8000 System Controller
Bedienungsanleitung
57
Inbetriebnahme
Erweiterung der DSP-Leistung des Systems
Der N8000 System Controller besitzt leistungsfähige DSP-Bausteine mit einer
Gesamtrechenleistung von 300 MIPS und Arbeitsspeicher für ein maximales Delay von
21,8 Sekunden. Sollte dies den Anforderungen ihrer Anwendung nicht genügen, kann durch den
Einbau des NetMax DSP Extension Moduls DSP-1 die Rechenleistung und Speicherkapazität
des N8000 erhöht werden. Hierdurch werden die Ausführung komplexerer DSP-Programme und
die Verwendung längerer Verzögerungszeiten oder zusätzliche Delay-Lines ermöglicht.
3.3 Schnittstellenbeschreibung
Ethernet-Schnittstelle
Durch den Anschluss des N8000 System Controller über die Ethernet-Schnittstelle
wird die Kommunikation eines oder mehrerer PCs mit dem N8000 ermöglicht.
Hierdurch kann nicht nur die komfortable Konfiguration des N8000 über die
mitgelieferte Software IRIS-Net erfolgen, es kann auch das gesamte
angeschlossene System (bestehend aus N8000 und EV Precision Series
Verstärker) bedient und überwacht werden.
Durch Verwendung geeigneter Netzwerk-Hardware kann der N8000 auch über ein Funknetzwerk
(WLAN) bedient werden. Die Ethernet-Schnittstelle ist als RJ-45-Buchse (8P8C) ausgeführt. Es
werden die beiden Ethernet-Standards 10Base-T und 100Base-TX unterstützt. Die Belegung der
Ethernet-Schnittstelle kann folgender Abbildung und Tabelle entnommen werden.
Belegung der Ethernet Schnittstelle
58
NetMax N8000 System Controller
Bedienungsanleitung
Inbetriebnahme
Pin Name
Beschreibung
1
Tx+
Transmit+
2
Tx-
Transmit-
3
Rx+
Receive+
6
Rx-
Receive-
Paar
2
3
Kabelfarbe nach
T568A
T568B
Green striped
Orange striped
Green
Orange
Orange striped
Green striped
Orange
Green
Die Belegung des Ethernet-Steckers ist in folgender Abbildung dargestellt. Die Betrachtung des
Steckers erfolgt hierbei von der Kontaktseite.
Belegung des Ethernet Steckers
Die maximale Länge eines angeschlossenen Kabels beträgt bei beiden Ethernet-Standards
100 Meter, wobei in einem Kabel jeweils zwei verdrillte Adernpaare verwendet werden. Für
10Base-T ist ein Kabel der Kategorie 3 (ungeschirmt, CAT-3), für 100Base-TX ein Kabel der
Kategorie 5 (geschirmt, CAT-5) zu verwenden.
Bei Anschluss des N8000 mittels eines Patch-Kabels in Verbindung mit einem Hub/Switch ist die
Verdrahtung des Kabels eins zu eins, d.h. die Ader des Kabels an Pin 1 des einen Steckers wird
mit Pin 1 des anderen Steckers verbunden, für die übrigen Pins wird analog vorgegangen. Für
die Farben der verwendeten Kabeladern existieren die beiden Standards T568A und T568B, der
Standard T568B ist allerdings weiter verbreitet.
Bei Verwendung eines Crossover-Kabels zur Direktverbindung eines N8000 mit einem PC ist auf
einer Seite des Crossover-Kabels das Adern-Paar 2 mit dem Adern-Paar 3 zu vertauschen.
Hierdurch wird der notwendige Tausch der Sende- und Empfangsleitungen durchgeführt, in
einem Hub/Switch wird dieser Tausch intern vorgenommen.
CAN-Schnittstelle
Das Netzwerk für die Electro-Voice Remote Endstufen basiert auf dem
CAN-Bus Standard, der sich im Automotive-, Industrie- und SicherheitsBereich durchgesetzt und über Jahre hinweg bewährt hat. Der CAN-Bus ist
eine symmetrische serielle Schnittstelle zur Übertragung von Kommandos
und Daten. Pro CAN-Bus lassen sich 100 Endstufen oder andere Geräte
bis zu einer maximalen Kabellänge von 1000 Meter anschließen.
Jeder Bus-Teilnehmer hat 2 Stück RJ-45 Buchsen fur den Remote CANBus. Die Buchsen sind parallel geschaltet und dienen als Eingang und
Ausgang (zum Weiterschleifen) des Remote-Netzwerkes. Der CAN-Bus
muss an beiden Enden mit einem 120 Ω-Abschlusswiderstand terminiert werden. Zu diesem
NetMax N8000 System Controller
Bedienungsanleitung
59
Inbetriebnahme
Zweck liegen dem N8000 zwei Abschluss-Stecker CAN-TERM 120 Ω bei. Stecken Sie diese
Abschluss-Stecker in die freien RJ-45 Buchsen des ersten und des letzten Gerätes am CANBus.
In der Netzwerk-Verkabelung ist neben dem CAN-Bus auch das symmetrische Audio-Monitor
Signal zum Abhören der Endstufeneingänge und -ausgänge mitgeführt. Dieser Monitorbus
ermöglicht das softwaregesteuerte Abhören der Eingangs- oder Ausgangssignale aller im
Remote-Netzwerk vorhandenen Endstufen ohne zusätzlichen Verdrahtungsaufwand. Am N8000
kann der Monitorbus an einer CAN-Buchse abgegriffen (Pins 7 und 8, siehe Abbildung auf
Seite 60), mit einem Audio-Eingang verbunden und zum Abhören beispielsweise auf eine
Monitorbox geroutet werden.
Der CAN-Bus erlaubt die Verwendung unterschiedlicher Datenraten, wobei die Datenrate indirekt
proportional zur Buslänge ist. Wenn das Netzwerk nur eine geringe Ausdehnung hat, sind
Datenraten bis zu 500 kbit/s möglich. Bei größeren Ausdehnungen muss die Datenrate
herabgesetzt werden (bis zur minimalen Datenrate von 10 kbit/s). Die folgende Tabelle erläutert
den Zusammenhang zwischen Bit Rate und Buslänge bzw. Netzwerkausdehnung. Buslängen
über 1000 Meter sollten grundsätzlich nur mit Repeatern realisiert werden.
Bit Rate (in kbit/s)
Bus Länge (in m)
500
100
250
250
125
500
62,5
1000
20
2500
10
5000
Belegung der CAN Buchse
Belegung des CAN Steckers
60
NetMax N8000 System Controller
Bedienungsanleitung
Inbetriebnahme
Kabelfarbe nach
Pin
Name
2
CAN_GND
4
CAN_H (+)
Blue
5
CAN_L (-)
Blue striped
7
MONITOR BUS +
Brown striped
8
MONITOR BUS -
Brown
T568A
T568B
Green
Orange
Für weitere Informationen über den CAN-Bus, insbesondere Systembeispiele und
Leitungsspezifikationen, sei auf den Abschnitt CAN-Bus-Grundlagen auf Seite 78 im Anhang
dieses Dokument und die Bedienungsanleitungen der angeschlossenen Geräte verwiesen.
USB-Schnittstelle
Die USB-Schnittstelle an der Frontseite des N8000 System Controller kann mit Hilfe
von IRIS-Net für verschiedene Zwecke verwendet werden. Einerseits kann die
Konfigurationsdatei des N8000 ausgelesen und zurückgeschrieben werden.
Andererseits können über die USB-Schnittstelle die Netzwerk-Einstellungen (IPAdresse, Subnetzmaske usw.) der Ethernet-Schnittstelle des N8000 konfiguriert
werden. Die USB-Schnittstelle entspricht dem Standard USB 1.1. Dementsprechend werden die
Übertragungsraten Low Speed (1,5 MBit/s) und Full Speed (12 MBit/s) unterstützt.
Das an dieser Schnittstelle angeschlossene Kabel darf laut USB-Spezifikation höchstens 5 Meter
lang sein. Bei der USB-Schnittstelle des N8000 handelt es sich um eine Buchse des USB-Typ B
(female), die standardgemäße Belegung kann folgender Abbildung und Tabelle entnommen
werden.
Belegung USB Buchse
Pin
Name
Beschreibung
1
VCC
+5 V
2
D-
Data -
3
D+
Data +
4
GND
Ground
NetMax N8000 System Controller
Bedienungsanleitung
61
Inbetriebnahme
RS-232-Schnittstelle
Die RS-232-Schnittstelle auf der Rückseite des N8000 dient zur
Kommunikation mit dem N8000 über ein einfaches ASCII-Protokoll.
Hierdurch kann der N8000 von externen Geräten (Beispiele hierfür sind z.B.
Mediensteuerungen und der PROMATRIX DPM4000) bedient und
überwacht werden. Für eine Datenübertragung zwischen dem N8000 und
dem angeschlossenen Gerät müssen die Schnittstellen auf beiden Seiten
der
Übertragungs-Strecke
identisch
konfiguriert
sein.
Die
Werkskonfiguration der beiden RS-232-Schnittstellen ist in folgender Tabelle
angegeben.
Parameter
Wert
Datenbits
8
Paritybit
-
Stoppbit
1
Geschwindigkeit
19200 bit/s
In folgender Abbildung und Tabelle sind die im N8000 verwendeten Pins der RS-232Schnittstelle angegeben. Das zur Verbindung des N8000 mit einem anderen Gerät verwendete
Verbindungskabel sollte eine Länge von 15 Meter nicht überschreiten.
Belegung RS-232
Pin Name Beschreibung Input/Output (von N8000 aus gesehen)
62
2
TxD
Transmit
Out
3
RxD
Receive
In
5
GND Signal Ground
NetMax N8000 System Controller
Bedienungsanleitung
-
Inbetriebnahme
CONTROL PORT
Der Control Port an der Rückseite des N8000 ist in zwei
Hälften unterteilt. Für den Anschluss externer Komponenten
sind zwei Phoenix-Stecker (6-polig) im Lieferumfang des
N8000 enthalten.
Steuereingänge
Die obere Hälfte, am N8000 mit INPUTS 0-10V beschriftet, stellt vier frei programmierbare
Steuereingänge für Spannungen zwischen 0 Volt und 10 Volt zur Verfügung. Die Eingänge sind
mit 1 bis 4 durchnummeriert. Der N8000 stellt eine eigene Spannungsversorgung für extern
angeschlossene Kontrollelemente, z. B. Potentiometer oder Schalter, zur Verfügung. Die
Spannungsversorgung ist an den Anschlüssen 10V REF und GND des Control Ports verfügbar.
ACHTUNG:
Der maximal zulässige Strom am Ausgang 10V REF beträgt 100 mA.
Analoge Beschaltung
In der folgenden Abbildung ist eine Beispielanwendung zur „analogen Beschaltung“ der
Steuereingänge des N8000 dargestellt. Hierbei ist eine über ein Potentiometer änderbare
Spannung am Steuereingang 1 angeschlossen. Über IRIS-Net kann der N8000 so konfiguriert
werden, dass diese Spannung etwa zur Regelung der Lautstärke eines Audio-Eingangs oder
Audio-Ausgangs verwendet wird.
Control Port mit Potentiometer
NetMax N8000 System Controller
Bedienungsanleitung
63
Inbetriebnahme
Digitale Beschaltung
In folgender Abbildung ist ein Beispiel für eine „digitale Beschaltung“ eines Steuereingangs des
N8000 dargestellt. Hierbei ist der Steuereingang 2 über einen Schalter (Schließer) mit GND
(Masse) verbunden. In IRIS-Net kann der N8000 so konfiguriert werden, dass bei Betätigung des
Schalters etwa ein Audio-Eingang oder Audio-Ausgang Kanal stumm geschaltet wird. Die dabei
verwendeten Logik-Schwellen für High / Low sind für jeden Eingang frei konfigurierbar.
Control Port mit Schalter
Steuerausgänge
Die untere Hälfte des Control Ports, am Gerät mit RELAY OUTPUTS beschriftet, stellt
verschiedene Ausgänge zur Verfügung. Es sind drei frei programmierbare Steuerausgänge
vorhanden, die mit 2 bis 4 durchnummeriert sind. Diese Steuerausgänge sind als RelaisKontakte (Schließer) ausgeführt, d.h. im nichtaktiven Zustand (Off) sind diese offen, im aktiven
Zustand (On) sind sie gegen Masse geschlossen. Für den Betrieb der extern angeschlossenen
Elemente steht eine Spannungsquelle am Anschluss 5V/200mA zur Verfügung.
ACHTUNG:
Der maximal zulässige Strom am 5 V-Ausgang beträgt 200 mA.
Die beiden linken Anschlüsse der RELAY OUTPUTS sind der READY/FAULT-Ausgang des
N8000. Dieser potentialfreie Ausgang ist geschlossen, wenn der N8000 betriebsbereit ist und
kein Fehler aufgetreten ist. Über IRIS-Net kann konfiguriert werden, bei welchen Fehlerarten der
Kontakt geöffnet werden soll. Durch dieses Funktionsprinzip eignet sich dieser Kontakt
besonders gut für die Integration des N8000 in Gefahrenmeldeanlagen (Ruhestromprinzip).
64
NetMax N8000 System Controller
Bedienungsanleitung
Inbetriebnahme
Eine Beispielanwendung zur Beschaltung eines Steuerausgangs ist in folgender Abbildung
dargestellt. Hierbei wird über eine Kontrollleuchte ein Betriebszustand des N8000, etwa die
Überschreitung eines Temperatur-Grenzwertes, angezeigt.
Control Port mit Kontrollleuchte
Audioschnittstellen
Analoge Audio-Verbindungskabel
Als analoge Audio-Verbindung wählen Sie am besten symmetrisch ausgelegte Kabel
(2 Signaladern + Schirmgeflecht) mit XLR-Stecker. Obwohl alle analogen Ein- und Ausgänge des
N8000 auch unsymmetrisch belegt werden können, stellt ein symmetrisch ausgeführtes AudioVerbindungskabel die bessere Alternative dar. Der Schirm im Kabel verbindet bei symmetrischer
Signalführung alle metallischen Gehäuse und verhindert dadurch lückenlos ein Einkoppeln von
externen Störsignalen, im wesentlichen Brummen, auf den Audiosignalpfad..
Analoges Audio-Ausgangskabel, XLR (male) auf Phoenix
Analoges Audio-Eingangskabel, XLR (female) auf Phoenix
NetMax N8000 System Controller
Bedienungsanleitung
65
Inbetriebnahme
Digitale Audio-Verbindungskabel
Als digitale Audio-Verbindung wählen Sie am besten symmetrisch ausgelegte Kabel (2
Signaladern + Schirmgeflecht) mit XLR-Stecker. Obwohl die digitalen Eingänge des N8000 auch
unsymmetrisch belegt werden können, stellt ein symmetrisch ausgeführtes AudioVerbindungskabel die bessere Alternative dar.
Digitales (symmetrisches) Audio-Eingangskabel, XLR (female) auf Phoenix
Digitales (unsymmetrisches) Audio-Eingangskabel, Cinch (male) auf Phoenix
66
NetMax N8000 System Controller
Bedienungsanleitung
Netzwerk-Konfiguration
4 Netzwerk-Konfiguration
4.1 Einführung
Der N8000 System Controller kann über die Ethernet-Schnittstelle an der Rückseite (siehe
Seite 54) an ein TCP/IP-Netzwerk angeschlossen werden. Für Informationen über die
Grundlagen von Ethernet und TCP/IP siehe Abschnitt Ethernet-Grundlagen ab Seite 75 im
Anhang dieses Dokumentes.
Ab Werk besitzt der N8000 folgende Netzwerk-Konfiguration:
Parameter
Wert
IP-Adresse
192.168.1.100
Subnetzmaske
255.255.255.0
Gateway
192.168.1.1
DHCP
deaktiviert
Eine IP-Adresse muss eindeutig sein, sie darf also jeweils nur einem einzigen Gerät (Host) in
einem Netzwerk zugewiesen werden. Wird für den Betrieb des N8000 ein neues Ethernet
aufgebaut, wird die Beibehaltung der werkseitig voreingestellten Netzwerk-ID und
Subnetzmaske empfohlen. Bei Integration des N8000 in ein bestehendes Ethernet muss die
Netzwerk-Konfiguration des N8000 angepasst werden.
Die voreingestellte IP-Adresse des N8000 kann genau dann beibehalten werden, wenn
•
nur ein einzelner N8000 mit werksseitiger Netzwerk-Konfiguration über Ethernet angeschlossen wird und
•
die Netzwerk-ID 192.168.1 beibehalten werden kann und
•
kein anderes Gerät die Host-ID 100 besitzt.
Ist mindestens eine dieser drei Bedingungen nicht erfüllt, muss die voreingestellte IP-Adresse
des N8000 geändert werden.
Beispiel:
In folgender Abbildung ist eine Beispielanwendung mit vier NetMax N8000 in einem
abgeschlossenen Ethernet dargestellt. Diese werden über einen zentralen Ethernet-Switch mit
einem PC verbunden. Die werkseitig eingestellte IP-Adresse 192.168.1.100 wäre hierdurch
viermal im Netzwerk vorhanden, durch die Änderung der voreingestellten IP-Adressen von
NetMax N8000 System Controller
Bedienungsanleitung
67
Netzwerk-Konfiguration
mindestens drei NetMax N8000 muss also eine eindeutige Adressierung der Geräte im Netzwerk
hergestellt werden.
Beispiel eines Ethernet mit vier N8000
Für die Änderung der voreingestellten IP-Adressen der N8000 ist die Erstellung einer Auflistung
aller im Ethernet verwendeten Geräte und IP-Adressen von Vorteil. Ein Beispiel einer solchen
Liste für das System in obiger Abbildung ist im Folgenden dargestellt. Einen leeren Vordruck
finden Sie im Anhang. Tragen Sie in die Liste für jedes der im Netzwerk verwendeten Geräte die
Bezeichnung des Gerätes, eine eindeutige Beschreibung und die ihm zuzuweisende IP-Adresse
ein. Falls das Gerät in IRIS-Net dargestellt wird, können Sie die dort verwendete Bezeichnung
ebenfalls in die Tabelle eintragen.
Gerät
IRIS-Bezeichnung
Standort/Beschreibung
IP-Adresse
N8000
Hauptzentrale
Hauptzentrale
192.168.1.100
PC
-
Hauptzentrale
192.168.1.1
N8000
Verwaltung
Verwaltungsgebäude
192.168.1.101
N8000
Produktion
Produktionsgebäude
192.168.1.102
N8000
Mehrzweck
Mehrzweckhalle
192.168.1.103
Bei der Inbetriebnahme dieses Beispielsystems müssten die in der Übersichtstabelle
angegebenen IP-Adressen an die einzelnen Geräte vergeben werden. Die Änderung der IPAdresse kann sowohl über IRIS-Net als auch über das N8000 Browser Interface erfolgen. In
IRIS-Net ist die Änderung sowohl über die USB-Schnittstelle als auch die Ethernet-Schnittstelle
des N8000 möglich. Informationen über die genauen Vorgehensweisen entnehmen Sie bitte der
Online-Hilfe von IRIS-Net. Zur Änderung der IP-Adresse über das Browser-Interface öffnen Sie
dieses unter Verwendung der aktuellen (voreingestellten) IP-Adresse des N8000. Beachten Sie
zur genauen Vorgehensweise das N8000-Browser-Manual.
68
NetMax N8000 System Controller
Bedienungsanleitung
Netzwerk-Konfiguration
4.2 Konfiguration
Aufbau und Überprüfung einer Ethernet-Verbindung mit dem N8000
Das Ziel dieses Vorgangs ist es, eine Verbindung zwischen einem PC und einem N8000 mit
werksseitiger Netzwerkeinstellung (siehe Seite 67) über Ethernet aufzubauen und die korrekte
Funktion der Verbindung zu überprüfen. Es wird im Folgenden davon ausgegangen, dass weder
der PC noch der N8000 mit einem bestehenden Ethernet verbunden sind, der N8000 ist vom
Stromnetz getrennt.
1. Klicken Sie Start > Einstellungen > Netzwerkverbindungen.
Das Fenster Netzwerkverbindungen erscheint, hier sind alle vorhandenen Möglichkeiten
ihres PC zur Verbindung mit einem Netzwerk aufgeführt. Der zur Verbindung mit dem N8000
verwendete Ethernet-Anschluss ist in der Kategorie LAN oder Hochgeschwindigkeitsinternet
enthalten.
2. Klicken Sie im Fenster Netzwerkverbindungen mit der rechten Maustaste auf den
Ethernet-Anschluss, der zur Verbindung mit dem N8000 verwendet werden soll.
Es erscheint das Kontextmenü des gewählten Ethernet-Anschlusses.
NetMax N8000 System Controller
Bedienungsanleitung
69
Netzwerk-Konfiguration
3. Klicken Sie im Kontextmenü auf Eigenschaften.
Es erscheint das Dialogfenster Eigenschaften von LAN-Verbindung.
4. Doppelklicken Sie auf Internetprotokoll (TCP/IP).
Es erscheint das Dialogfenster Eigenschaften von Internetprotokoll (TCP/IP)
5. Wählen Sie im Fenster die Option Folgende IP-Adresse verwenden.
6. Schreiben Sie in das Eingabefeld IP-Adresse: 192.168.1.1
7. Schreiben Sie in das Eingabefeld Subnetzmaske: 255.255.255.0
70
NetMax N8000 System Controller
Bedienungsanleitung
Netzwerk-Konfiguration
8. Schließen Sie das Fenster Eigenschaften von LAN-Verbindung durch klicken auf die
Schaltfläche OK.
Die Konfiguration des PC ist damit vollständig, in den folgenden Schritten wird die
Verbindung des PC mit den N8000 hergestellt und überprüft.
9. Verbinden Sie den Netzwerkanschluss Ihres PC mit dem Ethernet Interface des N8000
direkt über ein Crossover-Kabel oder über zwei Patchkabel und einen Hub/Switch.
Für Informationen über Möglichkeiten zur Verbindung von Geräten über Ethernet siehe auch
Abschnitt Ethernet-Grundlagen auf Seite 75 im Anhang dieses Dokumentes.
10. Schließen Sie den N8000 an das Stromnetz an und schalten Sie ihn mittels des
Netzschalters an der Rückseite ein.
Die grüne ON-LED (siehe Seite 52) an der Frontblende des N8000 leuchtet auf. Nach
einigen Sekunden signalisiert das zusätzliche Aufleuchten der grünen READY-LED (siehe
Seite 52) den erfolgreichen Startvorgang des N8000.
11. Klicken Sie Start > Programme > Zubehör > Eingabeaufforderung
Es erscheint das Fenster Eingabeaufforderung.
NetMax N8000 System Controller
Bedienungsanleitung
71
Netzwerk-Konfiguration
12. Geben Sie ping 192.168.1.100 ein und drücken Sie Return-Taste.
Der PC überprüft nun die Verbindung mit dem N8000. Hierzu werden vier Netzwerk-Pakete über
das Ethernet an den N8000 verschickt, die von diesem bestätigt werden müssen. Bei
erfolgreicher Ethernet-Verbindung werden keine Pakete verloren, in der Ping-Statistik ist daher
0% Verlust angegeben.
72
NetMax N8000 System Controller
Bedienungsanleitung
Anhang
5 Anhang
5.1 Anwendungsbeispiel
Installation in einer Mehrzweckhalle
In untenstehender Abbildung ist ein Beispiel für die Verwendung eines N8000 System Controller
in einer Mehrzweckhalle dargestellt. Hierbei sind als Signalquellen vier Mikrofone, ein CD-Spieler
und ein Tuner angeschlossen. Zur Beschallung werden sowohl aktive als auch passive
Lautsprecher verwendet. Die zum Betrieb der passiven Lautsprecher verwendeten Electro-Voice
Precision Series Remote Amplifier sind zusätzlich zu den Audio-Verbindungen über den CANBUS mit dem N8000 verbunden.
Für die Bedienung und Steuerung des Systems sind zwei verschiedene Wege vorgesehen. Die
erste Möglichkeit stellt ein herkömmlicher PC dar. Auf diesem wird die Software IRIS-Net
(Intelligent Remote & Integrated Supervision) zur Bedienung des N8000 und der Remote
Amplifier verwendet. Neben der Bedienung und Steuerung kann über IRIS-Net auch die
Überwachung des gesamten Systems erfolgen. Die Verbindung zwischen N8000 und PC erfolgt
über Ethernet. Als zweite Möglichkeit zur Bedienung des Systems ist ein Touch Panel (z.B.
AMX™, Crestron™) an die RS-232-Schnittstelle des N8000 angeschlossen. Das Touch Panel
macht über eine eigene Bedienoberfläche die gewünschten Funktionen des Systems zugänglich.
Installation in einer Mehrzweckhalle
NetMax N8000 System Controller
Bedienungsanleitung
73
Anhang
5.2 Problemlösungen
Problem: Es kann keine Verbindung über IRIS-Net mit dem N8000 aufgebaut werden.
Host not
reachable
(Timeout)
N8000
eingeschaltet?
nein
ja
N8000
einschalten
nein
N8000
online?
IP Adresse in
IRIS korrekt?
unbekannt
Bestimmung der
zugewiesenen IP
Adresse
ja
nein
ja
IP Adresse
korrigieren
ja
N8000
online?
PING an IP Adresse
erfolgreich?
ja
nein
nein
NetzwerkKonfiguration des
PCs überprüfen
ja
N8000
online?
nein
Mehr als ein N8000
am Ethernet?
nein
ja
Ausschließen doppelter
IP-Adressen
ja
ja
N8000
online?
nein
Ethernet-Verbindung
überprüfen
N8000
online?
nein
Wird ein Hub/
Switch verwendet?
nein
ja
Direktverbindung
herstellen
ja
Problem
gelöst
74
NetMax N8000 System Controller
Bedienungsanleitung
N8000
online?
nein
EV Support
Anhang
Netzwerk-Konfiguration des PCs überprüfen:
Überprüfen sie die Netzwerk-Konfiguration des verwendeten PCs. Insbesondere der
Netzwerkteil der verwendeten IP-Adressen und die Subnetzmaske von PC und N8000 müssen
identisch sein.
Ausschließen doppelter IP-Adressen:
Sind mehrere Geräte in einem Ethernet vorhanden und werden IP-Adressen manuell vergeben,
kann unter Umständen die selbe IP-Adresse doppelt vergeben sein. Um zu überprüfen, ob dies
der Fall ist, schalten Sie den N8000 aus und versuchen sie bei ausgeschaltetem N8000 dessen
IP-Adresse über ein ping zu erreichen. Falls der ping erfolgreich ist, besitzt ein anderes Gerät die
IP-Adresse des N8000. Ändern Sie in diesem Fall die IP-Adresse des nun antwortenden Gerätes
oder des N8000 (hierbei müssen Sie entsprechend die IP-Adresse des N8000 in IRIS-Net
anpassen).
Ethernet-Verbindung überprüfen:
Bei der physischen Verbindung zwischen PC und N8000 über Ethernet sind folgende Punkte zu
überprüfen:
•
Ist das Netzwerkkabel unbeschädigt und korrekt eingesteckt?
•
Wird, falls notwendig, ein Crossover-Kabel verwendet?
•
Leuchten nach Einstecken des/der Netzwerkkabel die indicator lights der Netzwerkbuchsen
von PC, N8000 und, falls vorhanden, der Netzwerkgeräte zwischen PC und N8000 auf?
•
Wird vom Betriebssystem ein Problem bei dem verwendeten Netzwerkinterface angezeigt?
Direktverbindung herstellen:
Um interne Probleme in verwendeten Netzwerkgeräten zwischen PC und N8000
auszuschließen, stellen Sie eine Direktverbindung zwischen PC und N8000 über ein CrossoverKabel (siehe Seite 58) her. Falls zuvor durch ein nun nicht mehr angeschlossenes Netzwerkgerät
eine automatische IP-Adressvergabe (DHCP) durchgeführt wurde, muss diese nun manuell
erfolgen.
5.3 Ethernet-Grundlagen
Der N8000 System Controller kann über die Ethernet-Schnittstelle (RJ-45) an der Rückseite an
ein Ethernet angeschlossen werden. Ethernet ist eine Computer-Vernetzungtechnologie für
lokale Netzwerke. Sollen zwei Geräte (Hosts) verbunden werden, kann dies direkt über ein
gekreuztes Ethernet-Kabel (Crossover-Kabel) erfolgen. Ist die Anzahl der zu verbindenden
Geräte größer als zwei, erfolgt die Verbindung über normale Ethernet-Kabel (Patchkabel) und
einen zentralen Knoten (Hub oder Switch). Der zentrale Knoten besitzt hierbei für jeden
Teilnehmer des Netzwerks einen Anschluss (Port). Das Ethernet-Interface des N8000 ist zu
folgenden Ethernet-Standards kompatibel:
NetMax N8000 System Controller
Bedienungsanleitung
75
Anhang
•
10Base-T (IEEE 802.3i): Bei diesem Standard werden vier Adern (zwei verdrillte Paare)
eines CAT-3 oder CAT-5-Kabels für die Verbindung verwendet. Die Übertragungsgeschwindigkeit ist 10 MBit/s und die maximale Länge eines Segments beträgt 100 Meter.
•
100Base-TX (IEEE 802.3u): Für die Verbindung werden wie bei 10Base-T zwei verdrillte
Adernpaare verwendet, es muss allerdings ein CAT-5-Kabel verwendet werden. Mit einer
Übertragungsgeschwindigkeit von 100 MBit/s ist 100Base-TX heute (2005) die Standard-Ethernet-Implementation.
IP-Adressen
Zur Kommunikation der an das Ethernet angeschlossenen Geräte können verschiedene
Netzwerkprotokolle verwendet werden. Der N8000 verwendet das Protokoll TCP/IP, es handelt
sich daher um ein IP-Netzwerk. In einem IP-Netzwerk werden IP-Adressen zur logischen
Adressierung von Geräten verwendet. Der N8000 verwendet die Version IPv4 (Internet Protocol
Version 4) zur Adressierung, eine IP-Adresse ist daher 32 Bit (= 4 Byte) lang. Hierdurch sind
theoretisch etwa 4,3 Milliarden eindeutige Adressen möglich. IPv4-Adressen werden gewöhnlich
in der dotted decimal notation dargestellt, d.h. die vier Bytes werden als vier durch Punkte
voneinander getrennte Dezimalzahlen geschrieben. Die allgemeine Form einer IPv4-Adresse
lautet somit AAA.BBB.CCC.DDD, ein Beispiel für eine IP-Adresse ist 130.009.122.195.
Führende Nullen können weggelassen werden, die Beispieladresse kann somit auch als
130.9.122.195 geschrieben werden.
Folgende Tabelle zeigt Adressbereiche, die in privaten Netzwerken verwendet werden sollen.
Klasse
Adressbereich
Subnetzmaske
CIDR-Schreibweise
Anzahl möglicher Adressen
A
10.0.0.0 10.255.255.255
255.0.0.0
10.0.0.0/8
16777216
B
172.16.0.0 172.31.255.255
255.240.0.0
172.16.0.0/12
1048576
C
192.168.0.0 192.168.255.255
255.255.0.0
192.168.0.0/16
65536
Link local
169.254.0.0 169.254.255.255
255.255.0.0
169.254.0.0/16
65536
Private IP-Adressen sind insbesondere in Netzwerken, die mit dem Internet verbunden sind, von
Interesse. Private IP-Adressen werden nicht im Internet geroutet, daher ist für den Zugriff auf das
Internet eine Adressumsetzung mit NAT (Network Adress Translation) oder PAT (Port Adress
Translation = NAT und zusätzliche Änderung der Port-Nummer) notwendig. Hierdurch können
einerseits mehrere Geräte über einen Router mit dem Internet verbunden werden, auch wenn
man von einem Internetprovider nur eine einzelne IP-Adresse zugeteilt bekommen hat.
Andererseits lassen sich die echten IP-Adressen der Geräte durch NAT/PAT vor Hackern
verbergen (Security through Obscurity).
76
NetMax N8000 System Controller
Bedienungsanleitung
Anhang
Subnetzmaske
Eine IP-Adresse wird stets in einen Netzwerkteil (Netzwerk-Adresse/ID) und einen Hostteil (HostAdresse/ID bzw. Geräteadresse) unterteilt. Geräte sind genau dann im selben IP-Netzwerk,
wenn die Netzwerkteile ihrer Adressen identisch sind. Sind Geräte im selben IP-Netzwerk,
können sie direkt miteinander kommunizieren. Für die Kommunikation von Geräten in
verschiedenen Netzwerken sind Zusatzgeräte (z.B. Router) notwendig. Innerhalb eines
Netzwerks darf keine Host-Adresse doppelt vergeben sein.
Ein Netzwerk könnte z.B. die Aufteilung der 4 Byte (32 Bit) einer IP-Adresse in einen 3 Byte
langen Netzwerkteil und einen 1 Byte langen Hostteil vornehmen. Die genaue Aufteilung
zwischen Netzwerkteil und Hostteil wird in Form der Subnetzmaske angegeben. In diesem Fall
würde durch die Subnetzmaske 255.255.255.0 die Aufteilung in die ersten 24 Bit bzw. die letzten
8 Bit vorgenommen.
Die CIDR-Schreibweise zur Darstellung einer Subnetzmaske stellte eine Alternative zur dotted
decimal notation dar. In der CIDR-Schreibweise werden sogenannte Suffixe verwendet. Das
Suffix gibt die Anzahl der 1-Bits in der Subnetzmaske an. Der Subnetzmaske 255.255.255.0 in
dotted decimal notation würde somit das Suffix /24 entsprechen, da durch die Subnetzmaske
255.255.255.0 die (in binärer Darstellung) ersten 24 Stellen einer IP-Adresse als
Netzwerkadresse gewählt werden.
Durch die Wahl der Subnetzmaske, und der daraus resultierenden unterschiedlichen Aufteilung
der IP-Adresse in Netzwerkteil und Hostteil, lässt sich die maximale Anzahl der innerhalb eines
Netzwerks adressierbaren Geräte beeinflussen. Für die genaue Anzahl ist jedoch die Festlegung
zu beachten, dass der Hostanteil in binärer Darstellung weder vollständig Null noch vollständig
Eins sein darf.
Beispiel: Bei oben genannter Beispiel-IP-Adresse 130.9.122.195 wäre bei Verwendung der
Subnetzmaske 255.255.255.0 der Netzwerkteil 130.9.122.0. Jedes Gerät (bzw. Schnittstelle) im
betrachteten Netzwerk verwendet also eine Adresse der Form 130.9.122.DDD. Da für den
Hostteil DDD in binärer Darstellung die beiden Werte 00000000 und 11111111 ausgenommen
sind, sind die entsprechenden dezimalen Werte 1 bis 254 für DDD zulässig. Es sind somit
höchstens 254 verschiedene Geräte in dem Netzwerk adressierbar, die möglichen Adressen
lauten entsprechend 130.9.122.1 bis 130.9.122.254.
Automatische/manuelle Vergabe von IP-Adressen
Die Zuweisung einer IP-Adresse an ein Gerät in einem Netzwerk kann sowohl manuell als auch
automatisch erfolgen. Bei automatischer Vergabe über DHCP (Dynamic Host Configuration
Protocol) ist der Betrieb eines DHCP-Servers im Netzwerk erforderlich. Dieser Server ermöglicht
die dynamische Zuweisung einer IP-Adresse und weiterer Konfigurationsparameter an Hosts in
einem Netzwerk. Diese Verwendung eines DHCP-Servers ist besonders in solchen Netzwerken
nützlich, in denen häufig Geräte neu angeschlossen oder wieder entfernt werden.
Bei Verwendung von DHCP kann es durch bestimmte Vorkommnisse, etwa dem Neustart eines
Geräts, zu einer Änderung der geräteeigenen IP-Adresse kommen. Handelt es sich bei dem
Gerät um einen N8000 System Controller, müsste hierbei dessen Konfiguration in IRIS-Net an
NetMax N8000 System Controller
Bedienungsanleitung
77
Anhang
die geänderte IP-Adresse angepasst werden. Aus diesem Grund wird von der Verwendung von
DHCP zur dynamischen Konfiguration des N8000 abgeraten. Stattdessen sollte die NetzwerkKonfiguration des N8000 manuell erfolgen.
Bei Aufbau eines neuen Ethernets, das nicht mit dem Internet verbunden werden wird, kann ein
beliebiger Netzwerkteil der IP-Adressen festgelegt werden. Durch die Wahl einer geeigneten
Subnetzmaske kann die Anzahl der adressierbaren Geräte den eigenen Ansprüchen angepasst
werden.
Wird ein oder mehrere N8000 in ein bestehendes Ethernet (mit oder ohne DHCP-Server)
integriert oder besteht eine Verbindung des Netzwerkes mit dem Internet, kontaktieren Sie bitte
ihren Netzwerkadministrator bezüglich Details zur korrekten Netzwerk-Konfiguration.
5.4 CAN-Bus-Grundlagen
Der CAN-Bus verwendet als Netzwerktopologie die so genannte „Bus- oder Linien-Topologie“.
Das heißt, alle Teilnehmer sind an einer einzigen Zweidrahtleitung (Twisted-Pair-Kabel,
geschirmt oder ungeschirmt) angeschlossen, wobei die Verkabelung von einem Busteilnehmer
zum nächsten verlaufen muss. Jedes Gerät kann hierbei uneingeschränkt mit jedem anderen
Gerät kommunizieren. Dabei ist es grundsätzlich egal, ob der Busteilnehmer eine Endstufe, ein
N8000 oder ein UCC1 USB-CAN Converter ist. Somit kann der N8000 an beliebiger Stelle am
CAN-Bus betrieben werden. Insgesamt können bis zu 100 Geräte an einem CAN-Bus
angeschlossen werden.
Der CAN-Bus muss an beiden Enden mit einem 120 Ω−Abschlusswiderstand terminiert werden.
Bei fehlender oder falscher Terminierung können Funktionsstörungen auftreten, da ein Signal auf
einem Bus an beiden Bus-Enden reflektiert wird. Durch Überlagerung der Reflexionen mit dem
ursprünglichen Signal wird dieses verzerrt, was zu Datenverlusten führen kann. Zur
Verhinderung oder Minimierung von Reflexionen an den Bus-Ende werden daher Terminatoren
verwendet, um die Energie des Signals dort zu "absorbieren".
Da die CAN-Schnittstelle in allen EVI Audio Geräten galvanisch getrennt von den übrigen
Schaltungsteilen aufgebaut ist, wird auch eine gemeinsame Masseleitung (CAN_GND) in der
Netzwerkverkabelung mitgeführt (siehe folgende Abbildung). Damit ist sichergestellt, dass alle
CAN-Schnittstellen im Netzwerk auf einem gemeinsamen Potential liegen.
CAN Bus mit Linien-Topologie
78
NetMax N8000 System Controller
Bedienungsanleitung
Anhang
Durch einen CAN-Bus-Repeater kann eine Verbindung zwischen zwei unabhängigen und in sich
abgeschlossenen CAN-Bus-Systemen hergestellt werden. Hierdurch lassen sich folgende Ziele
erreichen:
•
Erhöhung der maximalen Teilnehmerzahl am CAN-Bus
An einem einzelnen CAN-Bus können maximal 100 Geräte angeschlossen sein, durch die
Verbindung mehrerer CAN-Bus-Systeme durch CAN-Bus-Repeater lässt sich diese Zahl auf
bis zu 250 erhöhen. Die Beschränkung auf genau 250 Geräte folgt aus dem verwendeten
Adressierungsschema des CAN-Busses, dieses erlaubt die Vergabe von höchstens 250
unterschiedlichen CAN-Geräteadressen.
•
Verbesserung der Signalqualität auf dem CAN-BUS
Bei CAN-Bus-Systemen, deren Bus-Länge 1000 Meter überschreitet, sollte ein CAN-BusRepeater verwendet werden. Der CAN-Bus-Repeater führt eine Aufbereitung und
Verstärkung der Bussignale durch. Die dabei auftretende interne Laufzeit des Repeaters von
ca. 150 ns entspricht einer Verlängerung des Busses um ca. 45 Meter.
•
Bildung alternativer Netztopologien
Durch die Verwendung von einem oder mehreren Repeatern ist neben der oben
dargestellten Bus-Topologie auch der Aufbau anderer Netztopologien möglich. Als Beispiel
ist in folgender Abbildung eine Stern-Topologie aus drei unabhängigen CAN-Bus-Systemen
dargestellt. Die drei CAN-Busse werden hierbei durch zwei Repeater miteinander verbunden.
NetMax N8000 System Controller
Bedienungsanleitung
79
Anhang
Systembeispiele
Die folgenden beiden Abbildungen zeigen Beispiele von Systemverdrahtungen eines CAN-BUS.
System mit 5 Verstärkern und einem N8000 am Bus-Anfang. AbschlussStecker am N8000 (Bus-Anfang) und am Verstärker 5 (Bus-Ende).
.
System mit 2 Racks und einem N8000 in der Mitte. Abschluss-Stecker am
Verstärker 6 (Bus-Anfang) und Verstärker 12 (Bus-Ende)
80
NetMax N8000 System Controller
Bedienungsanleitung
Anhang
Leitungsspezifikation
Gemäß dem ISO 11898-2 Standard sollten für den CAN-Bus als Datenübertragungskabel
vorzugsweise Twisted-Pair-Leitungen, geschirmt oder ungeschirmt, mit einem Wellenwiderstand
von 120 Ω zum Einsatz kommen. Als Leitungsabschluss muss an beiden Enden ein
Abschlusswiderstand von 120 Ω vorgesehen werden. Die maximale Buslänge ist abhängig von
der Datenübertragungsrate, von der Art des Datenübertragungskabels sowie von der Anzahl der
Bus-Teilnehmer. Die folgende Tabelle zeigt die wesentlichen Zusammenhänge für CANNetzwerke mit bis zu 64 Teilnehmern.
Datenübertragungskabel
Abschlusswiderstand
Max.
Buslänge (in m) Widerstandsbelag Kabelquerschnitt
(in Ω)
Datenübertragungsrate
(in mΩ/m)
0...40
< 70
0,25...0,34 mm²
AWG23, AWG22
124
1000 kbit/s bei 40 m
40...300
< 60
0,34...0,6 mm²
AWG22, AWG20
127
500 kbit/s bei 100 m
300 ... 600
< 40
0,5...0,6 mm²
AWG 20
150...300*
100 kbit/s bei 500 m
600...1000
< 26
0,75...0,8 mm²
AWG 18
150...300*
62,5 kbit/s bei 1000 m
* Bei langen Leitungen und vielen Geräten am CAN-Bus werden hochohmigere
Abschlusswiderstande als die spezifizierten 120 Ω empfohlen, um die ohmsche Last für die
Schnittstellentreiber und damit den Spannungsabfall von einem zum anderen Leitungsende zu
verringern.
Die nächste Tabelle dient zur ersten Abschätzung des erforderlichen Kabelquerschnitts für
unterschiedliche Buslängen und verschiedene Anzahl der Bus-Teilnehmer.
Buslänge (in m)
Anzahl der Geräte am CAN-Bus
32
64
100
100
0,25 mm² bzw. AWG24
0,34 mm² bzw. AWG22
0,34 mm² bzw. AWG22
250
0,34 mm² bzw. AWG22
0,5 mm² bzw. AWG20
0,5 mm² bzw. AWG20
500
0,75 mm² bzw. AWG18
0,75 mm² bzw. AWG18
1,0 mm² bzw. AWG17
Wenn ein Teilnehmer nicht direkt am CAN-Bus angeschlossen werden kann, muss eine
Stichleitung (Abzweigleitung) verwendet werden. Da an einem CAN-Bus immer genau zwei
Abschlusswiderstände vorhanden sein müssen, kann eine Stichleitung nicht terminiert sein.
Dadurch entstehen wiederum Reflexionen, die den übrigen Bus beeinträchtigen. Zur
Begrenzung dieser Reflexionen sollten diese Stichleitungen bei Datenübertragungsraten bis zu
125 kbit/s eine Einzellänge von max. 2 Meter und bei höheren Bitraten von max. 0,3 Meter nicht
überschreiten. Die Gesamtlänge aller Abzweigleitungen sollte 30 Meter nicht übersteigen.
NetMax N8000 System Controller
Bedienungsanleitung
81
Anhang
Grundsätzlich gilt:
82
•
Für die Rack-Verdrahtung können handelsübliche RJ-45 Patchkabel mit 100 Ω Wellenwiderstand verwendet werden (AWG 24 / AWG 26), wenn es sich nur um kurze Strecken handelt
(bis zu 10 Meter).
•
Für die Verdrahtung der Racks untereinander und in der Gebäudeinstallation sind unbedingt
die oben genannten Richtlinien für die Netzwerkverkabelung einzuhalten.
NetMax N8000 System Controller
Bedienungsanleitung
Anhang
5.5 Tabelle IP-Adressen
Projekt: _________________________________
Subnetzmaske
Gateway
Gerät
IRIS-Bezeichnung
Standort/Beschreibung
IP-Adresse
NetMax N8000 System Controller
Bedienungsanleitung
83
6.1 Specifications/Technische Daten
GENERAL DESCRIPTION AND FEATURES
N8000 System Controller
Modular NetMax system manager including signal processing, routing, system control and supervision
Audio
32 Audio Channels
4 Audio Slots, modular
8-Channel Input and Output cards, analog or digital
Networking
Module Slot for optional CobraNet™ Interface
32 I/O Audio and Control
Safety / Redundancy
Internal Supervision, System Monitoring, Watchdog, Fault
Output, Redundant Audio Network possible
PC Configuration and Control Software
IRIS-Net - Intelligent Remote & Integrated Supervision
Integration of N8000, Remote Amplifiers, peripheral control
Configuration, Control and Supervision for complete Audio
Systems
Freely programmable User Control Panels and Access Levels
AUDIO SPECIFICATIONS
Audio Inputs - Analog Input Module AI-1
8 analog audio inputs per module, line level, electronically
balanced
Connectors
8 x 3-pole Euro block connectors
Input Level (nominal)
+6 dBu / 1.55 V
Input Level (max. before clip)
+21 dBu / 8.7 V
Input Impedance
20 kΩ
Common Mode Rejection
> 70 dB
A/D Conversion
24 Bit, Sigma-Delta, 128 times oversampling
Audio Outputs - Analog Output Module AO-1 8 analog audio outputs per module, line level, electronically
balanced
Connectors
8 x 3-pole Euro block connectors
Output Level (nominal)
+6 dBu / 1.55 V
Output Level (max. before clip)
+21 dBu / 8.7 V
Output Impedance
100 Ω
Min. Load Impedance
600 Ω
D/A Conversion
24 Bit, Sigma-Delta, 128 times oversampling
Frequency Response
20 Hz...20 kHz (-0.5 dB)
Signal to Noise Ratio (A-weighted)
AI-1: 117 dB typical
AO-1: 118 dB typical
N8000 analog In to analog Out: 115 dB typical
THD+N
< 0.005 %
Signal Delay
AI-1: 1.3958 ms
AO-1: 0.646 ms
N8000 analog In to analog Out: 2.2917 ms
Crosstalk
< -110 dB @ 1 kHz
84
NetMax N8000 System Controller
Owner’s manual / Bedienungsanleitung
SIGNAL PROCESSING
Sample Rate
Data Format
Signal Processing
INTERFACES
Ethernet
CAN
RS-232
USB
GPIO Control Port
N8000 GENERAL SPECIFICATIONS
Power Supply
Power Consumption
Safety Class
Cooling
Operating Temperature Range
Dimensions (W x H x D)
Weight
MODULES / OPTIONS
AI-1 Analog Input Module
AO-1 Analog Output Module
CM-1 CobraNet™ Module
DSP-1 DSP Extension Module
MI-1 Microphone Input Module
DI-1 Digital Input Module
48 kHz internal
32 kHz - 192 kHz external
24 Bit linear A/D and D/A conversion, 48 Bit processing
2 DSPs Standard (150 MHz, 300 MIPS)
1 DSP per Audio Module (100 MHz, 100 MIPS)
DSP-1 Extension Module optional (+300 MIPS)
10 / 100 MBit/s, RJ-45 (PC Control)
10... 500 kbit/s, 2 x RJ-45 (Remote Amp Control)
2 Ports, 9pin D-Sub female (Remote Control)
USB Type B on Front Panel (PC Control)
2 x 6-pole Euro block
4 Control Inputs (analog 0 - 10 V / logic control)
3 Control Outputs (Relay contact to ground)
1 Fault Output (NC Relay contact)
3 Reference Outputs (+5 V / +10 V / GND)
100 - 240 V AC, 50/60 Hz
90 W max. (incl. 2 x AI-1, 2 x AO-1, 1 x CM-1 modules)
I
Left-to-right, 3-stage fan
0 °C ... 40 °C
483 x 88.1 x 381 mm (19“, 2 HU)
N8000 (without optional modules): 7.35 kg
AI-1 Analog Input Module: 200 g
AO-1 Analog Output Module: 260 g
CM-1 CobraNet™ Module: 75 g
8 analog audio inputs, line level, electronically balanced
8 analog audio outputs, line level, electronically balanced
32 digital audio inputs and outputs, 2 CobraNet™ ports
(Primary / Secondary) for network redundancy
Internal DSP processing power and Delay-RAM extension,
300 MIPS, 256k x 24 SRAM
8 microphone inputs, programmable Gain and Phantom
Power, PAD for line level switching
8 digital audio inputs, AES/EBU, S/PDIF and Optical formats, sample rate converters for 32-192 kHz operation
NetMax N8000 System Controller
Owner’s manual / Bedienungsanleitung
85
6.2 Block Diagram/Blockschaltbild
AUDIO CARDS
AUDIO
CARDS
8 Channels
AUDIO
CARDS
8 Channels
Analog I/O
AUDIO
MODULES
8 Channels
Analog
DigitalI/O
I/O
DigitalI/O
I/O
8Analog
Channels
Digital
Analog
I/OI/O
AUDIO NETWORK
MODULES
32 Inputs / 32 Outputs
Digital I/O
AUDIO
SLOT 1
AUDIO
SLOT 2
AUDIO
SLOT 3
AUDIO
SLOT 4
AUDIO NETWORK
PORT
Audio Out (4x8 Channels)
Audio In (4x8 Channels)
12.288 MHz
CLOCK
CIRCUIT
DELAY
SRAM
AC
POWER
SUPPLY
Clocks (MCLK, WCLK)
24 Bit DSP Bus
SIGNAL
PROCESSING
REAL TIME
CLOCK &
Watchdog
SPI Bus
Remote CAN
Interface
2 x RJ-45
12-pin
Phoenix
86
Internal
Expansion
Slot
CAN
GPIO
4 Analog Inputs
3 Logic Outputs
1 Ready/Fault Out
SPI
Watchdog
HOST CPU
SYSTEM
FRAM
Host Bus
9-pin D-SUB
RS-232
Port 1
UART1
9-pin D-SUB
RS-232
Port 2
UART2
USB Port
(Typ B)
USB Device
Interface
USB-Controller
RJ-45
Ethernet
Transceiver
Ethernet-Controller
SDRAM
(16 MByte)
FLASH
(8 MByte)
NetMax N8000 System Controller
Owner’s manual / Bedienungsanleitung
FRONT PANEL
(LEDs)
100 - 240 V ~
6.3 Dimensions/Abmessungen
NetMax N8000 System Controller
Owner’s manual / Bedienungsanleitung
87
USA: Telex Communications Inc., 12000 Portland Ave. South, Burnsville, MN 55337, Phone: +1 952-884-4051, FAX: +1 952-884-0043
Germany: EVI Audio GmbH, Hirschberger Ring 45, D 94315, Straubing, Germany, Phone: +49 9421-706 0, FAX: +49 9421-706 265
France: EVI Audio France, Parc de Courcerin, Allée Lech Walesa, 77185 Lognes, France, Tél : +33 1 6480 0090, FAX: +33 1 6006 5103
Subject to change withou prior notice.
Printed in Germany
www.electro-voice.de
V1.2
5/18/06 / D 362 478