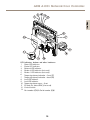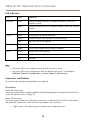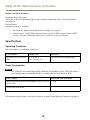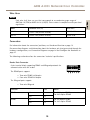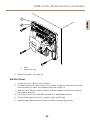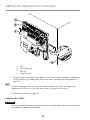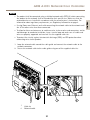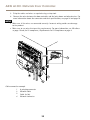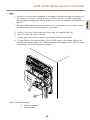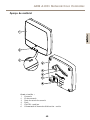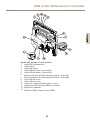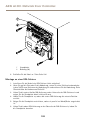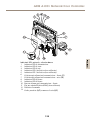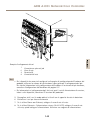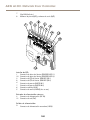
1
ENGLISH
FRANÇAIS
AXIS A1001 Network Door Controller
DEUTSCH
ITALIANO
ESPANÕL
ò ¨ ¾
Installation Guide
Liability
Every care has been taken in the preparation of this
document. Please inform your local Axis office of any
inaccuracies or omissions. Axis Communications AB cannot
be held responsible for any technical or typographical errors
and reserves the right to make changes to the product and
manuals without prior notice. Axis Communications AB
makes no warranty of any kind with regard to the material
contained within this document, including, but not limited
to, the implied warranties of merchantability and fitness for
a particular purpose. Axis Communications AB shall not
be liable nor responsible for incidental or consequential
damages in connection with the furnishing, performance
or use of this material. This product is only to be used for
its intended purpose.
Intellectual Property Rights
Axis AB has intellectual property rights relating to
technology embodied in the product described in this
document. In particular, and without limitation, these
intellectual property rights may include one or more of
the patents listed at www.axis.com/patent.htm and one or
more additional patents or pending patent applications in
the US and other countries.
This product contains source code copyright Apple Computer,
Inc., under the terms of Apple Public Source License 2.0
(see www.opensource.apple.com/apsl). The source code is
available from https://developer.apple.com/bonjour/
Equipment Modifications
This equipment must be installed and used in
strict accordance with the instructions given in the
user documentation. This equipment contains no
user-serviceable components. Unauthorized equipment
changes or modifications will invalidate all applicable
regulatory certifications and approvals.
Trademark Acknowledgments
AXIS COMMUNICATIONS, AXIS, ETRAX, ARTPEC and VAPIX
are registered trademarks or trademark applications of Axis
AB in various jurisdictions. All other company names and
products are trademarks or registered trademarks of their
respective companies.
Support
Should you require any technical assistance, please contact
your Axis reseller. If your questions cannot be answered
immediately, your reseller will forward your queries through
the appropriate channels to ensure a rapid response. If you
are connected to the Internet, you can:
• download user documentation and software updates
• find answers to resolved problems in the FAQ database.
Search by product, category, or phrase
• report problems to Axis support staff by logging in to
your private support area
• chat with Axis support staff (selected countries only)
• visit Axis Support at www.axis.com/techsup/
Learn More!
Visit Axis learning center www.axis.com/academy/ for
useful trainings, webinars, tutorials and guides.
Regulatory Information
Europe
This product complies with the applicable CE marking
directives and harmonized standards:
• Electromagnetic Compatibility (EMC) Directive
2004/108/EC. See Electromagnetic Compatibility (EMC)
on page 2.
•
Low Voltage (LVD) Directive 2006/95/EC. See Safety
on page 3.
• Restrictions of Hazardous Substances (RoHS) Directive
2011/65/EU. See Disposal and Recycling on page 3.
A copy of the original declaration of conformity may be
obtained from Axis Communications AB. See Contact
Information on page 3.
Electromagnetic Compatibility (EMC)
This equipment has been designed and tested to fulfill
applicable standards for:
• Radio frequency emission when installed according to
the instructions and used in its intended environment.
• Immunity to electrical and electromagnetic phenomena
when installed according to the instructions and used
in its intended environment.
USA
This equipment has been tested using a shielded network
cable (STP) and found to comply with the limits for a
Class B digital device, pursuant to part 15 of the FCC
Rules. These limits are designed to provide reasonable
protection against harmful interference in a residential
installation. This equipment generates, uses and can
radiate radio frequency energy and, if not installed and
used in accordance with the instructions, may cause
harmful interference to radio communications. However,
there is no guarantee that interference will not occur in
a particular installation. If this equipment does cause
harmful interference to radio or television reception, which
can be determined by turning the equipment off and on,
the user is encouraged to try to correct the interference by
one or more of the following measures:
• Reorient or relocate the receiving antenna.
• Increase the separation between the equipment and
receiver.
• Connect the equipment into an outlet on a circuit
different from that to which the receiver is connected.
• Consult the dealer or an experienced radio/TV
technician for help.
The product shall be connected using a shielded network
cable (STP) that is properly grounded.
Canada
This digital apparatus complies with CAN ICES-3 (Class B).
The product shall be connected using a shielded network
cable (STP) that is properly grounded.
Cet appareil numérique est conforme à la norme
CAN NMB-3 (classe B). Le produit doit être connecté à
l'aide d'un câble réseau blindé (STP) qui est correctement
mis à la terre.
Europe
This digital equipment fulfills the requirements for RF
emission according to the Class B limit of EN 55022. The
product shall be connected using a shielded network cable
(STP) that is properly grounded.
This product fulfills the requirements for immunity
according to EN 61000-6-1 residential, commercial and
light-industrial environments.
This product fulfills the requirements for immunity
according to EN 61000-6-2 industrial environments.
This product fulfills the requirements for immunity
according to EN 55024 office and commercial environments
This product fulfills the requirements for immunity
according to EN 50130-4 residential, commercial,
light-industrial and industrial environments.
Australia/New Zealand
This digital equipment fulfills the requirements for RF
emission according to the Class B limit of AS/NZS CISPR 22.
The product shall be connected using a shielded network
cable (STP) that is properly grounded.
Japan
この装置は、クラスB 情報技術装置です。この装置
は、家庭環境で使用することを目 的としています
が、この装置がラジオやテレビジョン受信機に近
接して使用されると、 受信障害を引き起こすこと
があります。 取扱説明書に従って正しい取り扱い
をして下さい。 本製品は、シールドネットワーク
ケーブル(STP)を使用して接続してください。また
適切に接地してください。
Safety
This product complies with IEC/EN/UL 60950-1, Safety of
Information Technology Equipment. If its connecting cables
are routed outdoors, the product shall be grounded either
through a shielded network cable (STP) or other appropriate
method.
The power supply used with this product shall fulfill
the requirements for Safety Extra Low Voltage
(SELV) and Limited Power Source (LPS) according to
IEC/EN/UL 60950-1.
Disposal and Recycling
When this product has reached the end of its useful life,
dispose of it according to local laws and regulations. For
information about your nearest designated collection point,
contact your local authority responsible for waste disposal.
In accordance with local legislation, penalties may be
applicable for incorrect disposal of this waste.
Europe
This symbol means that the product shall not be
disposed of together with household or commercial waste.
Directive 2012/19/EU on waste electrical and electronic
equipment (WEEE) is applicable in the European Union
member states. To prevent potential harm to human health
and the environment, the product must be disposed of in
an approved and environmentally safe recycling process.
For information about your nearest designated collection
point, contact your local authority responsible for waste
disposal. Businesses should contact the product supplier for
information about how to dispose of this product correctly.
This product complies with the requirements of
Directive 2011/65/EU on the restriction of the use of
certain hazardous substances in electrical and electronic
equipment (RoHS).
China
This product complies with the requirements of the
legislative act Administration on the Control of Pollution
Caused by Electronic Information Products (ACPEIP).
Contact Information
Axis Communications AB
Emdalavägen 14
223 69 Lund
Sweden
Tel: +46 46 272 18 00
Fax: +46 46 13 61 30
www.axis.com
Supported Readers
This list of supported readers is subject to change without
notice. Contact your Axis reseller for information about
supported readers.
This product is compatible with UL Listed Wiegand access
control readers
This product is compatible with the following RS485 access
control readers:
AXIS A4011-E Reader
HID iCLASS® RW100: 6101CG40000, 6101CGM0000,
6101CK40000, 6101CK40002, 6101CK40100,
6101CK403C0, 6101CKM0000, 6101CKM0002,
6101CKM0203; RW300: 6111CG40000, 6111CG400C0,
6111CGM0000, 6111CK40000, 6111CK4000Z,
6111CKM0000; RW400: 6121CG40000, 6121CGM0000,
6121CK40000, 6121CK40003, 6121CK40007-G3.0,
6121CK4000D-G3.0, 6121CKM0000; R40:
6122CKP00P0, 6122CKP05P0, 6122CKP06P0; RWK400:
6131CG4020000, 6131CK4000000, 6131CK4000014,
6131CK4000300, 6131CK4020000, 6131CKM000000,
6131CKM000214; RK40: 6132BKP00Q709-G3.0,
6132CKP000009, 6132CKP000011, 6132CKP000700-G3.0,
6132CKP000709-G3.0, 6132CKP001009, 6132CKP001011,
6132CKP00P000, 6132CKP00P009, 6132CKP00P709-G3.0,
6132CKP00Q709-G3.0, 6132CKP030014, 6132CKP060514,
6132CKP06P009, 6132CKP06P609, 6132CKP070209;
RW150: 6141CG40000, 6141CGM0000, 6141CK40000,
6141CKM0000; R15: 6142CKP000Z, 6142CKP00P0,
6142CKP0100; RWKL550: 6171BK4000000,
6171BK4000009, 6171BK4000014, 6171BK4000214,
6171BK4000500, 6171BK4040Z14, 6171BK4060000,
6171BK4060209, 6171BK4060Z09, 6171BK4061000,
6171BKM000000, 6171BKM000200, 6171BKM000300,
6171BKM040400; RWKLB575: 6181BK4000000,
6181BK4000009, 6181BK4000014, 6181BK4000022,
6181BK406C009;
HID Smartid®: 8031DSAP
HID pivClass® R10-H: 900LHRNAK00000,
900LHRTAK00000, 900NHRNAK00000, 900NHRTAK00000,
900PHRNAK00000, 900PHRTAK00000, 910LHRNAK00000,
910LHRTAK00000, 910NHRNAK00000, 910NHRTAK00000,
910PHRNAK00000, 910PHRTAK00000, 920LHRNAK00000,
920LHRTAK00000, 920NHRNAK00000, 920NHRTAK00000,
920PHRNAK00000, 920PHRTAK00000, 921LHRNAK00000,
921LHRTAK00000, 921NHRNAK00000, 921NHRTAK00000,
921PHRNAK00000, 921PHRTAK00000; RPKCL40-P:
923LPRNAK00000, 923LPRTAK00000, 923NPRTAK00000,
923PPRNAK00000, 923PPRTAK00000
AptiqTM: M11, MTK15, MTMSK15, MT15, MTMS15
For information about which compatible RS485 access
control readers have been verified by UL, see Requirements
for UL Compliance on page 4.
AXIS A1001 Network Door Controller
Requirements for UL Compliance
This section contains information and instructions required for UL compliance. To make sure the
installation is UL compliant, follow the instructions below in addition to the general information
and instructions provided throughout this document. In cases where pieces of information
contradict each other, the requirements for UL compliance always replace general information
and instructions.
Supported Readers
•
Compatibility with the following RS485 readers has been verified by UL: HID iClass RK40,
HID SmartID 8031 DSHM, and AptiqQ MTMSK15.
Safety Instructions
•
•
•
The Axis product shall be installed and serviced by a factory trained professional.
The Axis product shall be installed within the protected premises (secured area).
The Axis product shall be mounted indoors. Outdoor use has not been evaluated or
approved by UL.
• All interconnecting devices shall be UL Listed and Class 2 power limited.
• All wiring methods shall be performed in accordance with NFPA70, local codes and
authorities having jurisdiction.
• When the Axis product has reached the end of its useful life, dispose of it according
to local laws and regulations. The product should not be disposed of together with
household or commercial waste. See Disposal and Recycling on page 3.
• Battery
The 3.0 V lithium battery used by the Axis product is a UL Recognized
component. (Type: BR2032, diameter: 20 mm (0.78 in), Axis part number:
38118, manufacturers: Rayovac, Panasonic, Renata.)
Users shall not replace the battery. If the battery needs replacing,
a factory trained service professional shall contact Axis support
at www.axis.com/techsup for assistance.
Used batteries shall be disposed of according to local laws and regulations,
which may vary from state to state. Waste BR lithium cells are neither listed
nor exempted from the USEPA hazardous waste regulations. Waste BR lithium
batteries can be considered reactive hazardous waste if there is a significant
amount of unreacted, or unconsumed lithium remaining. For information
about how to dispose of used lithium batteries, contact your local authority
for waste disposal.
Specifications
•
•
Operating Conditions
Temperatures beyond 0 °C to 49 °C (32 °F to 120 °F) has not been verified
as part of UL 294.
Wire Area
4
AXIS A1001 Network Door Controller
-
•
•
•
•
5
ENGLISH
•
UL Listed or R/C AWM wires that have an conductor gauge range of
AWG 22–14 shall be used.
The minimum conductor gauge for connection between the power sourcing
equipment (PSE) or power injector and the powered device (PD) is 26 AWG.
Connectors
This product is not intended for outside wiring as covered by Article 800 in the
National Electrical Code, NFPA 70.
Power Connector – For UL security applications, the product shall be powered
by a UL 294 Listed or UL 603 Listed Class 2 low-voltage power limited power
supply that is capable of 4 hours of standby power.
Network Connector – Power over Ethernet (PoE) shall be supplied by a UL 294
Listed Class 2 power limited injector that provides 44–57 V DC, 15.4 W and 4
hours of standby power. Compliance with IEEE 802.3 (at or af) specifications
has not been verified as part of UL 294/B.
Tampering Alarm Pin Header – To comply with UL 294/7.2.1 (Enclosure), the
tampering alarm shall be connected to a sound alarm.
System Considerations
The Axis product, whether it is a standalone door controller or a system of
door controllers, shall not impair the intended operation of the panic hardware
used in conjunction with it.
Wall and Ceiling Mount
If using a junction box to mount the Axis product, the junction box shall be
UL Listed.
Assign an IP Address
The functionality of AXIS Camera Management, see page 36, has not been
evaluated by UL.
Maintenance Instructions
For maintenance instructions (some steps require access to the product’s
webpages), see page 40. For information about how to configure the Axis
product using the product’s webpages (AXIS Entry Manager), see the User
Manual.
6
AXIS A1001 Network Door Controller
Safety Information
Hazard Levels
DANGER
Indicates a hazardous situation which, if not avoided, will result in
death or serious injury.
WARNING
Indicates a hazardous situation which, if not avoided, could result
in death or serious injury.
CAUTION
Indicates a hazardous situation which, if not avoided, could result
in minor or moderate injury.
NOTICE
TICE
NO
Indicates a situation which, if not avoided, could result in damage
to property.
Other Message Levels
Important
Indicates significant information which is essential for the product
to function correctly.
Note
Indicates useful information which helps in getting the most out
of the product.
7
ENGLISH
Read through this Installation Guide carefully before installing the product. Keep the Installation
Guide for future reference.
AXIS A1001 Network Door Controller
Safety Instructions
WARNING
• The Axis product shall be installed by a trained professional.
NOTICE
TICE
NO
• The Axis product shall be used in compliance with local laws and regulations.
• To use the Axis product outdoors, or in similar environments, it shall be installed in an
approved outdoor housing.
• Store the Axis product in a dry and ventilated environment.
• Avoid exposing the Axis product to shocks or heavy pressure.
• Do not install the product on unstable brackets, surfaces or walls.
• Use only applicable tools when installing the Axis product. Excessive force could cause
damage to the product.
• Do not use chemicals, caustic agents, or aerosol cleaners.
• Use a clean cloth dampened with pure water for cleaning.
• Use only accessories that comply with technical specification of the product. These can be
provided by Axis or a third party.
• Use only spare parts provided by or recommended by Axis.
• Do not attempt to repair the product by yourself. Contact Axis support or your Axis
reseller for service matters.
Transportation
NOTICE
TICE
NO
• When transporting the Axis product, use the original packaging or equivalent to prevent
damage to the product.
Battery
The Axis product uses a 3.0 V BR/CR2032 lithium battery as the power supply for its internal
real-time clock (RTC). Under normal conditions this battery will last for a minimum of five years.
Low battery power affects the operation of the RTC, causing it to reset at every power-up. When
the battery needs replacing, a log message will appear in the product’s server report. For more
information about the server report, see the product´s setup pages or contact Axis support.
The battery should not be replaced unless required, but if the battery does need replacing, contact
Axis support at www.axis.com/techsup for assistance.
8
AXIS A1001 Network Door Controller
WARNING
• Risk of explosion if the battery is incorrectly replaced.
• Replace only with an identical battery or a battery which is recommended by Axis.
9
ENGLISH
• Dispose of used batteries according to local regulations or the battery manufacturer's
instructions.
10
AXIS A1001 Network Door Controller
Installation Guide
Installation Steps
1. Make sure the package contents, tools and other materials necessary for the installation
are in order. See page 11.
2. Study the hardware overview. See page 13.
3. Study the specifications. See page 18.
4. Install the hardware. See page 26.
5. Access the product. See page 34.
Package Contents
•
•
•
•
•
•
•
AXIS A1001 Network Door Controller
Cable tie (4x)
Cover screw
6-pin plug connector (5x) (plugged into terminal connectors)
Reader I/O (blue)
Reader I/O (red)
Reader data (white)
Reader data (yellow)
Power & Relay (orange)
4-pin plug connector (5x) (plugged into terminal connectors)
Audio (white)
Auxiliary (yellow)
Door in (blue)
Door in (red)
Power lock (orange)
2-pin plug connector (plugged into terminal connector)
Power (black)
Printed materials
Graphical Installation Guide
Extra serial number label (2x)
AVHS Authentication key
11
ENGLISH
This Installation Guide provides instructions for installing AXIS A1001 Network Door Controller
on your network. For other aspects of using the product, see the User Manual available at
www.axis.com
AXIS A1001 Network Door Controller
Recommended Tools
•
•
•
•
•
Drill – if mounting on wall or ceiling
Screwdriver – if mounting on wall or ceiling
Slotted screwdriver – for opening the cover
Torx screwdriver (T10) – for tightening the cover screw
Wire stripping tool
12
AXIS A1001 Network Door Controller
Hardware Overview
ENGLISH
1
2
3
4
5
6
7
8
Front and back:
1 Cover
2 Cover screw
3 Cover removal slot
4 Base
5 DIN clip – upper
6 Tampering alarm switch – back
7 DIN clip – lower
13
AXIS A1001 Network Door Controller
8
Part number (P/N) & Serial number (S/N)
1
4
2
6
3
5
8
7
9
10
11
12
I/O
1
10
3
8
4
7
6
5
interface:
Reader data connector (READER DATA 1)
Reader data connector (READER DATA 2)
Reader I/O connector (READER I/O 1)
Reader I/O connector (READER I/O 2)
Door connector (DOOR IN 1)
Door connector (DOOR IN 2)
Auxiliary connector (AUX)
Audio connector (AUDIO) (not used)
External power inputs:
2 Power connector (DC IN)
12 Network connector (PoE)
Power outputs:
9 Power lock connector (LOCK)
11 Power & Relay connector (PWR, RELAY)
14
AXIS A1001 Network Door Controller
2
1
3
4
5
ENGLISH
6
7
13
8
12
9
11
LED
1
2
3
4
5
6
7
8
9
10
11
12
13
10
indicators, buttons and other hardware:
Power LED indicator
Status LED indicator
Network LED indicator
Reader 2 LED indicator (not used)
Reader 1 LED indicator (not used)
Tampering alarm pin header – front (TF)
Tampering alarm pin header – back (TB)
Lock LED indicator
Lock LED indicator
Tampering alarm sensor – front
SD card slot (microSDHC) (not used)
Control button
Part number (P/N) & Serial number (S/N)
15
AXIS A1001 Network Door Controller
LED Indicators
LED
Color
Indication
Network
Green
Steady for connection to a 100 MBit/s network. Flashes for
network activity.
Amber
Steady for connection to a 10 MBit/s network. Flashes for network
activity.
Unlit
No network connection.
Green
Steady green for normal operation.
Amber
Steady during startup and when restoring settings.
Red
Slow flash for failed upgrade.
Green
Normal operation.
Amber
Flashes green/amber during firmware upgrade.
Green
Steady when not energized.
Red
Steady when energized.
Unlit
Floating.
Status
Power
Lock
Note
• The Status LED can be configured to flash while an event is active.
• The Status LED can be configured to flash for identifying the unit. Go to Setup >
Additional Controller Configuration > System Options > Maintenance .
Connectors and Buttons
For specifications and operating conditions, see page 18.
I/O Interface
Reader Data Connector
Two 6-pin terminal blocks supporting RS485 and Wiegand protocols for communication with the
reader. For specifications, see page 19.
Reader I/O Connector
Two 6-pin terminal blocks for reader input and output. In addition to the 0 V DC reference point
and power (DC output), the reader I/O connector provides the interface to:
•
Digital input – For connecting, for example, reader tampering alarms.
16
AXIS A1001 Network Door Controller
• Digital output – For connecting, for example, reader beepers and reader LEDs.
For specifications, see page 20.
Auxiliary Connector
4-pin configurable I/O terminal block. Use with external devices, in combination with, for example
tampering alarms, event triggering and alarm notifications. In addition to the 0 V DC reference
point and power (DC output), the auxiliary connector provides the interface to:
•
Digital input – An alarm input for connecting devices that can toggle between an open
and closed circuit, for example PIR sensors or glass break detectors.
• Digital output – For connecting external devices such as burglar alarms, sirens or lights.
Connected devices can be activated by the VAPIX® application programming interface or
by an action rule.
For specifications, see page 21.
External Power Inputs
NOTICE
TICE
NO
The product shall be connected using a shielded network cable (STP). All cables connecting
the product to the network shall be intended for their specific use. Make sure that the
network devices are installed in accordance with the manufacturer’s instructions. For
information about regulatory requirements, see Electromagnetic Compatibility (EMC) on
page 2.
Power Connector
2-pin terminal block for DC power input. Use a Safety Extra Low Voltage (SELV) compliant limited
power source (LPS) with either a rated output power limited to ≤100 W or a rated output current
limited to ≤5 A. For specifications, see page 22.
Network Connector
RJ45 Ethernet connector. Supports Power over Ethernet (PoE). For specifications, see page 22.
Power Outputs
Power Lock Connector
4-pin terminal block for connecting one or two locks. The lock connector can also be used to power
external devices. For specifications, see page 23.
Power & Relay Connector
6-pin terminal block for connecting power and the door controller’s relay to external devices such
as locks and sensors. For specifications, see page 23.
17
ENGLISH
Door Connector
Two 4-pin terminal blocks for connecting door monitoring devices and request to exit (REX) devices.
For specifications, see page 21.
AXIS A1001 Network Door Controller
Buttons and Other Hardware
Tampering Alarm Pin Header
Two 2-pin headers for disconnecting the front and back tampering alarms. For specifications,
see page 24.
Control Button
The control button is used for:
•
•
Resetting the product to factory default settings. See page 39.
Connecting to an AXIS Video Hosting System service or AXIS Internet Dynamic DNS
Service. For more information about these services, see the User Manual.
Specifications
Operating Conditions
The Axis product is intended for indoor use.
Classification
Temperature
Humidity
IEC 60721-4-3 Class 3K3,
3M3
0 °C to 50 °C
(32 °F to 122 °F)
20–85% RH (non-condensing)
Power Consumption
NOTICE
TICE
NO
Use a Safety Extra Low Voltage (SELV) compliant limited power source (LPS) with either a
rated output power limited to≤100 W or a rated output current limited to ≤5 A.
Power supply
Maximum load on outputs
Power over Ethernet IEEE 802.3af/802.3at Type 1 Class 3,
44–57 V DC
7.5 W
10–30 V DC, max 26 W
14 W
For connector specifications, see Power Connector on page 22 and Network Connector on page 22.
18
AXIS A1001 Network Door Controller
Wire Area
NOTICE
TICE
NO
AWG
Diameter mm (in)
Area mm2
28–16
0.321–1.29 (0.0126–0.0508)
0.0810–1.31
22–14
0.644–1.63 (0.0253–0.0641)
0.326–2.08
Connectors
For information about the connectors’ positions, see Hardware Overview on page 13.
For connection diagrams and information about the hardware pin chart generated through the
hardware configuration, see Connection Diagrams on page 24 and Configure the Hardware on
page 27.
The following section describes the connectors’ technical specifications.
Reader Data Connector
6-pin terminal block supporting RS485 and Wiegand protocols for
communication with the reader.
The RS485 ports support:
• Two-wire RS485 half duplex
• Four-wire RS485 full duplex
The Wiegand ports support:
• Two-wire Wiegand
Function
RS485
RS485
Pin
Notes
A-
1
B+
2
For full duplex RS485
For half duplex RS485
A-
3
B+
4
For full duplex RS485
For half duplex RS485
19
ENGLISH
Each wire shall have an area that corresponds to an conductor gauge range of
AWG 28–16 (CSA) or AWG 22–14 (cUL/UL). Select cables in compliance with your local
regulations.
AXIS A1001 Network Door Controller
Wiegand
D0 (Data 0)
5
D1 (Data 1)
6
For Wiegand
Important
The recommended maximum cable length is 30 m (98.4 ft).
Reader I/O Connector
6-pin terminal block for:
• Auxiliary power (DC output)
• Digital Input
• Digital Output
• 0 V DC (-)
Pin 3 on the reader I/O connectors can be supervised. If the connection
is interrupted, an event is activated. To use supervised inputs, install
end of line resistors. Use the connection diagram for supervised inputs.
See page 26.
Function
Pin
Notes
0 V DC (-)
1
DC output
2
For powering auxiliary equipment.
Note: This pin can only be used as
power out.
12 V DC
Max load = 300 mA
Configurable
(Input or
Output)
3–6
Digital input — Connect to pin 1 to
activate, or leave floating (unconnected)
to deactivate.
0 to max 40 V DC
Digital output — Connect to pin 1 to
activate, or leave floating (unconnected)
to deactivate. If used with an inductive
load, e.g. a relay, a diode must be
connected in parallel with the load, for
protection against voltage transients.
0 to max 40 V DC, open
drain, 100 mA
Specifications
0 V DC
20
AXIS A1001 Network Door Controller
Door Connector
Two 4-pin terminal blocks for door monitoring devices (digital input).
Function
Pin
0 V DC (-)
1, 3
Input
2, 4
Notes
ENGLISH
All door input pins can be supervised. If the connection is interrupted, an
alarm is triggered. To use supervised inputs, install end of line resistors.
Use the connection diagram for supervised inputs. See page 26.
Specifications
0 V DC
For communicating with door monitor.
Digital input — Connect to
pin 1 or 3 respectively to activate,
or leave floating (unconnected) to
deactivate.
Note: This pin can only be used for
input.
0 to max 40 V DC
Auxiliary Connector
4-pin configurable I/O terminal block for:
• Auxiliary power (DC output)
• Digital Input
• Digital Output
• 0 V DC (-)
For an example connection diagram, see Connection Diagrams on page
24.
Function
Pin
0 V DC (-)
1
DC output
2
Notes
Specifications
0 V DC
For powering auxiliary equipment.
Note: This pin can only be used as
power out.
21
3.3 V DC
Max load = 100 mA
AXIS A1001 Network Door Controller
Configurable
(Input or
Output)
3–4
Digital input — Connect to pin 1 to
activate, or leave floating (unconnected)
to deactivate.
0 to max 40 V DC
Digital output — Connect to pin 1 to
activate, or leave floating (unconnected)
to deactivate. If used with an inductive
load, e.g. a relay, a diode must be
connected in parallel with the load, for
protection against voltage transients.
0 to max 40 V DC, open
drain, 100 mA
Power Connector
2-pin terminal block for DC power input. Use a Safety Extra Low Voltage
(SELV) compliant limited power source (LPS) with either a rated output
power limited to ≤100 W or a rated output current limited to ≤5 A.
Function
Pin
0 V DC (-)
1
DC input
2
Notes
Specifications
0 V DC
For powering controller when not using
Power over Ethernet.
Note: This pin can only be used as
power in.
10–30 V DC, max 26 W
Max load on outputs =
14 W
Network Connector
RJ45 Ethernet connector. Supports Power over Ethernet (PoE). Use
Category 5e cables or higher.
Function
Specifications
Power and Ethernet
Power over Ethernet IEEE 802.3af/802.3at Type 1 Class 3,
44–57 V DC
Max load on outputs = 7.5 W
22
AXIS A1001 Network Door Controller
Power Lock Connector
4-pin terminal block for powering one or two locks (DC output). The
lock connector can also be used to power external devices.
ENGLISH
Connect locks and loads to the pins according to the hardware pin chart
generated through the hardware configuration.
Function
Pin
0 V DC (-)
1, 3
0 V DC,
floating, or
12 V DC
2, 4
Notes
Specifications
0 V DC
For controlling up to two 12 V locks. Use
the hardware pin chart. See Configure
the Hardware on page 27.
12 V DC
Max total load = 500 mA
Power & Relay Connector
6-pin terminal block with built-in relay for:
• External devices
• Auxiliary power (DC output)
• 0 V DC (-)
Connect locks and loads to the pins according to the hardware pin chart
generated through the hardware configuration.
Function
Pin
Notes
0 V DC (-)
1, 4
Relay
2–3
For connecting relay devices. Use the
hardware pin chart. See Configure the
Hardware on page 27.
The two relay pins are galvanically
separated from the rest of the circuitry.
Max current = 700 mA
Max voltage = +30 V DC
12 V DC
5
For powering auxiliary equipment.
Note: This pin can only be used as
power out.
Max voltage = +12 V DC
Max load = 500 mA
24 V DC
6
Not used
Specifications
0 V DC
23
AXIS A1001 Network Door Controller
Tampering Alarm Pin Header
Two 2-pin headers for bypassing:
• Back tampering alarm (TB)
• Front tampering alarm (TF)
Function
Pin
Notes
Back tampering alarm
1–2
Front tampering
alarm
1–2
To bypass the front and back tampering alarm
simultaneously, connect jumpers between TB 1, TB 2 and
TF 1, TF 2 respectively. Bypassing the tampering alarms
means that the system will not identify any tampering
attempts.
Note
Both the front and back tampering alarms are connected by default. The casing open
trigger can be configured to perform an action if the door controller is opened or if the
door controller is removed from the wall or ceiling. For information about how to configure
alarms and events, see the User Manual.
Connection Diagrams
Connect devices according to the hardware pin chart generated through the hardware
configuration. For more information about hardware configuration and the hardware pin chart, see
Configure the Hardware on page 27.
24
AXIS A1001 Network Door Controller
Auxiliary Connector
1
A
B
1
2
A
B
0 V DC (-)
DC output: 3.3 V, max 100 mA
I/O configured as input
I/O configured as output
25
ENGLISH
2
AXIS A1001 Network Door Controller
Supervised Inputs
i
22 kΩ
4.7 kΩ
ii
To use supervised inputs, install end of line resistors. This applies to all supervised inputs. For
information about limitations and updates, see the product’s release notes.
i
ii
Input
0 V DC (-)
Install the Hardware
CAUTION
Never mount the Axis product while power is applied to the product. Always apply power
at the end of the installation.
NOTICE
TICE
NO
To protect the circuits against electrostatic discharge (ESD), use ESD protection when
handling the product while the components and contacts are exposed.
Read all the instructions before installing the product.
•
•
•
•
To configure the hardware, see page 27.
To install the product on a wall (preferred) or ceiling, see page 28.
To install the product on a DIN rail, see page 29.
To connect the cables, see page 30.
System Considerations
The Axis product shall be installed within the secured area.
26
AXIS A1001 Network Door Controller
The Axis product, whether it is a standalone door controller or a system of door controllers, shall
not limit or weaken the intended use of the devices connected to it.
Configure the Hardware
Configure the hardware in the Hardware Configuration pages before installing the product.
Doors, locks and other devices can be connected to the Axis product before completing the
hardware configuration. However, the connection of devices will be easier if you complete the
hardware configuration first. This is because the hardware pin chart will be available when the
configuration is complete. The hardware pin chart is a guide on how to connect the pins and can be
used as a reference sheet for maintenance. For maintenance instructions, see page 40.
To configure the hardware, select one of the following methods:
•
•
Import a hardware configuration file. See page 27.
Create a new hardware configuration. See page 27.
Import a Hardware Configuration File
The hardware configuration of the Axis product can be completed faster by importing a hardware
configuration file.
For information about exporting hardware configuration files, see the User Manual.
To import a hardware configuration file:
1. Go to Setup > Hardware Configuration.
2. Click Import hardware configuration or, if there a hardware configuration already exists,
Reset and import hardware configuration.
3. In the file browser dialog that appears, locate and select the hardware configuration file
(*.json) on your computer.
4. Click OK.
Create a New Hardware Configuration
To create a new hardware configuration from the beginning:
1. If required, remove the cover screw, insert a slotted screwdriver into the cover removal
slot and remove the cover.
2. Connect the Axis product to the network and wait until the network connection has
been established and the product has powered up. If the product is not powered through
Power over Ethernet but will use Ethernet and external power instead, also connect the
27
ENGLISH
The Axis product should be installed on a wall (preferred) or a ceiling, with or without a junction
box. It can also be installed on a DIN rail.
AXIS A1001 Network Door Controller
product to a SELV compliant limited power source (LPS). For more information about the
power connector (DC input), see Specifications on page 18.
3. Access the product. See page 34.
4. Go to Setup > Hardware Configuration and click Start new hardware configuration.
If the product’s hardware has not been configured before or has been deleted, Hardware
Configuration will be available in the notification panel in the Overview page.
5. Select a door option depending on the number of doors, one (1) or two (2), that will be
connected to the Axis product.
6. Enter a descriptive name for each door and click Next. It is recommended to provide
the doors with unique descriptive names so that they easily can be identifed by anyone
who will administrate the system.
You can also edit the name of the Axis product. The default name includes the serial
number for easy identification.
7. Select the door monitor and lock options that match the requirements and the type of
lock connections that will be used and click Next. For more information about available
options, see the User Manual.
8. Select the types of readers that will be used and click Finish. For more information about
available options, see the User Manual.
9. In the dialog that appears after completing the configuration, click OK or click the link
to view the hardware pin chart.
To print the hardware pin chart, click Print Hardware Pin Chart on the Hardware Pin
Chart page.
10. Disconnect the product from the network. If not powering the product through Power
over Ethernet, also disconnect the product from its power source.
To cancel the hardware configuration, click Cancel. This can be done in any of the hardware
configuration pages.
Wall and Ceiling Mount
NOTICE
TICE
NO
If installing the door controller on a wall, make sure the cut-out for the cables is facing
downward.
1. If using a junction box, install the junction box before installing the network door
controller. For UL compliance, the junction box shall be UL Listed.
2. If required, remove the cover screw, insert a slotted screwdriver into the cover removal
slot and remove the cover. See Hardware Overview on page 13.
3. Make marks for the screw holes in the ceiling/wall, using the base as a template.
4. If required, drill holes for the screws.
5. Mount the base on the wall or ceiling. Make sure that the screws and plugs are
appropriate for the material (e.g. wood, metal, sheet rock, stone).
28
AXIS A1001 Network Door Controller
1
ENGLISH
2
1
2
Base
Screw hole (4x)
6. Connect the cables. See page 30.
DIN Rail Mount
1. If required, install a DIN rail (not included).
2. If required, remove the cover screw, insert a slotted screwdriver into the cover removal
slot and remove the cover. See Hardware Overview on page 13.
3. Hook the lower DIN clip, which is flexible, onto the bottom of the DIN rail, tilting the
base slightly forwards.
4. Lift the base so that the lower DIN clip reaches its bottommost position.
5. Tilt the base backwards so that it is parallel to the wall/ceiling.
6. Hook the upper DIN clip onto the top of the DIN rail by lowering the base.
29
AXIS A1001 Network Door Controller
1
2
3
4
1
2
3
4
Base
Screw hole (4x)
DIN rail
Lower Din clip
7. Secure the base using four screws. Make sure that the screws and plugs are appropriate
for the material (e.g. wood, metal, sheet rock, stone). See Wall and Ceiling Mount on
page 28.
Note
To prevent bending of the base, be careful not to tighten the screws too tight. Leave
approximately 2.5 mm (0.1 in). If the base is bent, the cover will not close.
8. Connect the cables. See page 30.
Connect the Cables
CAUTION
Disconnect power before connecting any wires to the Axis product. Never make connections
while power is applied to the product.
30
AXIS A1001 Network Door Controller
• If using Power over Ethernet, wait with connecting the network cable to the network until
the all the other wires have been connected.
• To allow for future maintenance, to avoid excessive strain on wires and connectors, and to
avoid damage to conductor insulation, leave a service loop and make sure all cables and
wires are properly supported and secured. Use the supplied cable ties.
• To protect the circuits against electrostatic discharge (ESD), use ESD protection when
connecting wires to the product.
1. Loop the network cable around the cable guide and connect the network cable to the
network connector.
2. Secure the network cable to the cable guide using one of the supplied cable ties.
1
1
2
Cable tie
Network cable
31
2
ENGLISH
NOTICE
TICE
NO
• The product shall be connected using a shielded network cable (STP). All cables connecting
the product to the network shall be intended for their specific use. Make sure that the
network devices are installed in accordance with the manufacturer’s instructions. For
information about regulatory requirements, see Regulatory Information on page 2.
AXIS A1001 Network Door Controller
3. Strip the cables and wires as required using a crimp tool.
4. Connect the wires between the door controller and the locks, doors and other devices. For
more information about the connectors and their specifications, see page 16 and page 19.
NOTICE
TICE
NO
• Make sure all the wires are connected correctly. Incorrect wiring could cause damage
to the product.
• Make sure to use wires that meet the requirements. For more information, see Wire Area
on page 19 and, for UL compliance, Requirements for UL Compliance on page 4.
1
4
2
3
Cable connection example
1
2
3
4
6-pin plug connector
Network cable
Cable tie (4x)
Network connector
32
AXIS A1001 Network Door Controller
Note
• For information about how to connect other wires, such as power wires to locks, readers
and other devices, see the manufacturers’ instructions.
5.
6.
7.
8.
Collect all the wires neatly and secure them using the supplied cable ties.
Label the cables for future reference.
If using Power over Ethernet, connect the network cable to the network.
If using Ethernet and external power (10–30 V DC), connect the network cable to the
network and connect power. Use a SELV compliant limited power source (LPS). For more
information, see Power Connector on page 22.
1
2
Cable connection example
1
2
Network connector
Network cable
33
ENGLISH
• For devices that have been configured in the product’s hardware configuration pages, use
the hardware pin chart as a guide on how to connect the pins. For more information
about hardware configuration and the hardware pin chart, see Configure the Hardware on
page 27.
AXIS A1001 Network Door Controller
9. Make sure that the LEDs indicate the correct conditions. See LED Indicators on page 16.
10. Attach the cover to the base and tighten the cover screw.
1
2
1
2
Cover
Cover screw (T10)
Access the Product
The product can be used with most operating systems and browsers. The recommended browsers are
Internet Explorer with Windows, Safari with Macintosh and Firefox with other operating systems.
When you access the product for the first time, you must assign an IP address and set the password
for the default administrator user root.
•
•
To assign an IP address, see page 35.
To set the root password, see page 38.
34
AXIS A1001 Network Door Controller
Access from a Browser
Access from the Internet
Once connected, the Axis product is accessible on your local network (LAN). To access the product
from the Internet you must configure your network router to allow incoming data traffic to the
product. To do this, enable the NAT-traversal feature, which will attempt to automatically configure
the router to allow access to the product. This is enabled from Setup > Additional Controller
Configuration > System Options > Network > TCP/IP > Advanced.
For more information about NAT trasversal for IPv4, see the product’s User Manual. See also AXIS
Internet Dynamic DNS Service at www.axiscam.net
For Technical notes on this and other topics, visit the Axis Support web at www.axis.com/techsup
Assign an IP Address
Default IP Address
The Axis product is designed for use on an Ethernet network and requires an IP address for access.
Most networks have a DHCP server that automatically assigns IP addresses to connected devices.
If your network does not have a DHCP server the Axis product will use 192.168.0.90-95 as
the default IP address.
Recommended Methods in Windows®
AXIS IP Utility and AXIS Camera Management are recommended methods for finding Axis
products on the network and assigning them IP addresses in Windows®. Both applications are free
and can be downloaded from www.axis.com/techsup
35
ENGLISH
1. Start a browser (Internet Explorer, Firefox, Safari).
2. Enter the IP address or host name of the Axis product in the browser’s Location/Address
field. To access the product from a Macintosh computer (Mac OS X), click on the Bonjour
tab and select the product from the drop-down list.
If you do not know the IP address, use AXIS IP Utility to locate the product on the network.
For information about how to discover and assign an IP address, see Assign an IP Address.
This information is also available from the support pages on www.axis.com/techsup
3. Enter your user name and password. If this is the first time the product is accessed, the
root password must first be configured. For instructions, see Set the Root Password on
page 38.
4. AXIS Entry Manager opens in your browser. The start page is called the Overview page.
AXIS A1001 Network Door Controller
AXIS IP Utility – Small Installations
AXIS IP Utility automatically discovers and displays Axis products on your network. The application
can also be used to manually assign a static IP address.
Note that the computer running AXIS IP Utility must be on the same network segment (physical
subnet) as the Axis product.
Automatic Discovery
1.
2.
3.
4.
Check that the Axis product is connected to the network and has powered up.
Start AXIS IP Utility.
When the Axis product appears in the window, double-click to open its web pages.
For information about how to set the password, see page 38.
Assign the IP Address Manually (optional)
1. Acquire an available IP address on the same network segment as your computer.
2. Select the Axis product in the list.
3.
4.
5.
6.
and enter the IP address.
Click Assign new IP address to selected device
Click Assign and continue according to the instructions.
When the Axis product appears in the window, double-click to open its web pages.
For information about how to set the password, see page 38.
AXIS Camera Management – Large Installations
AXIS Camera Management is a powerful installation and management tool for Axis network
products. The tool can automatically search the network for devices, assign IP addresses, set
passwords, show connection status, manage firmware upgrades and configure product parameters.
It can perform batch operations on multiple products at once.
Automatic Discovery
1. Check that the Axis product is connected to the network and has powered up.
2. Start AXIS Camera Management.
3. Connect to a server.
To connect to a server on the network, select Remote server and select a server from the
drop-down list or enter the IP or DNS address in the field.
To connect to a server running locally on your computer, select This computer.
4. Click Log On to log on as the current computer user, or de-select Log on as current user
and enter the user name and password to log on with.
36
AXIS A1001 Network Door Controller
Assign IP Addresses in Multiple Devices
AXIS Camera Management speeds up the process of assigning IP addresses to multiple devices by
suggesting IP addresses from a specified range.
1. Select the devices you wish to configure (different models can be selected) and click
Assign IP address to selected devices
.
2. Click Yes in the Device Maintenance dialog.
3. Select Assign the following IP address range and enter the IP address range, subnet
mask and default router the devices will use. Click Next.
4. Suggested IP addresses are listed under New IP Addresses and can be edited by selecting
a device and clicking Edit IP.
5. Click Finish.
Other Operating Systems and Methods
The list below shows the other methods available for assigning or discovering the IP address. All
methods are enabled by default, and all can be disabled.
•
•
•
•
•
•
AVHS Service Connection (all operating systems). To connect to an AVHS service, refer
to the service provider’s Installation guide. For information and help in finding a local
AVHS Service Provider, go to www.axis.com/hosting
UPnP™ (Windows®). When enabled on your computer, the Axis network product is
automatically detected and added to Network/My Network Places.
Bonjour (Mac OS X® 10.4 or later). Applicable to browsers with support for Bonjour.
Navigate to the Bonjour bookmark in your browser (for example Safari) and click on
the link to access the web pages.
AXIS Dynamic DNS Service (all operating systems). A free service from Axis that allows
you to quickly and simply install your Axis network product. Requires an Internet
connection without an HTTP proxy. For more information, see www.axiscam.net
ARP/Ping (all operating systems). See Assign IP Address Using ARP/Ping. The command
must be issued within 2 minutes of connecting power.
DHCP server (all operating systems). To view the admin pages for the network DHCP
server, see the server’s user documentation.
37
ENGLISH
5. The first time AXIS Camera Management runs it automatically searches for Axis products
on the network. To manually search for products, select Configuration > Add Devices.
The software displays a list of the products found.
Select the products to add and click Next and then click Finish.
6. In the list of devices, click on the address to open the product’s web pages.
7. For information about how to set the password, see page 38.
AXIS A1001 Network Door Controller
Assign IP Address Using ARP/Ping
The product's IP address can be assigned using ARP/Ping. The command must be issued within 2
minutes of connecting power.
1. Acquire a free static IP address on the same network segment as the computer.
2. Locate the serial number (S/N) on the product label.
3. Open a command prompt and enter the following commands:
Linux/Unix syntax
arp -s <IP address> <serial number> temp
ping -s 408 <IP address>
Linux/Unix example
arp -s 192.168.0.125 00:40:8c:18:10:00 temp
ping -s 408 192.168.0.125
Windows syntax (this may require that you run the command prompt as an
administrator)
arp -s <IP address> <serial number>
ping -l 408 -t <IP address>
Windows example (this may require that you run the command prompt as an
administrator)
arp -s 192.168.0.125 00-40-8c-18-10-00
ping -l 408 -t 192.168.0.125
4. Check that the network cable is connected and then restart the product by disconnecting
and reconnecting power.
5. Close the command prompt when the product responds with Reply from
192.168.0.125:... or similar.
6. Open a browser and type http://<IP address> in the Location/Address field.
Note
• To open a command prompt in Windows, open the Start menu and type cmd in the
Run/Search field.
• To use the ARP command in Windows 8/Windows 7/Windows Vista, right-click the
command prompt icon and select Run as administrator.
• To open a command prompt in Mac OS X, open the Terminal utility from Application >
Utilities.
Set the Root Password
To access the Axis product, you must set the password for the default administrator user root.
This is done in the Configure Root Password dialog, which opens when the product is accessed
for the first time.
38
AXIS A1001 Network Door Controller
To prevent network eavesdropping, the root password can be set via an encrypted HTTPS connection,
which requires an HTTPS certificate. HTTPS (Hypertext Transfer Protocol over SSL) is a protocol
used to encrypt traffic between web browsers and servers. The HTTPS certificate ensures encrypted
exchange of information.
To set the password via a standard HTTP connection, enter it directly in the dialog.
To set the password via an encrypted HTTPS connection, follow these steps:
1. Click Use HTTPS.
A temporary certificate (valid for one year) is created, enabling encryption of all traffic to
and from the product, and the password can now be set securely.
2. Enter a password and then re-enter it to confirm the spelling.
3. Click OK. The password has now been configured.
Reset to Factory Default Settings
Important
Reset to factory default should be used with caution. A reset to factory default will reset
all settings, including the IP address, to the factory default values.
Note
The installation and management software tools are available from the support pages
on www.axis.com/techsup
To reset the product to the factory default settings:
1. Disconnect power from the product.
2. Press and hold the control button and reconnect power. See Hardware Overview on
page 13.
3. Keep the control button pressed for about 25 seconds until the status LED indicator
turns amber for the second time.
4. Release the control button. The process is complete when the status LED indicator turns
green. The product has been reset to the factory default settings. If no DHCP server is
available on the network, the default IP address is 192.168.0.90
5. Using the installation and management software tools, assign an IP address, set the
password, and access the product.
It is also possible to reset parameters to factory default via the web interface. Go to Setup >
Additional Controller Configuration > Setup > System Options > Maintenance.
39
ENGLISH
The default administrator user name root is permanent and cannot be deleted. If the password for
root is lost, the product must be reset to the factory default settings. For information about how to
reset the product to factory default, see the product’s User Manual.
AXIS A1001 Network Door Controller
Maintenance Instructions
To keep the access control system running smoothly, Axis recommends regular maintenance of the
access control system, including door controllers and connected devices.
Do maintenance at least once a year. The suggested maintenance procedure includes, but is not
limited to, the following steps:
•
Make sure all the connections between the door controller and the external devices
are secure.
• Verify all the hardware connections. This requires access to the product’s webpages. For
more information, see the User Manual.
• Verify that the system, including the connected external devices, functions correctly.
Swipe a card and test the readers, doors, and locks.
If the system includes REX devices, sensors or other devices, test them as well.
If activated, test the tampering alarms.
If the results from any of the steps above indicate faults or unexpected behavior:
-
Test the signals of the wires using appropriate equipment and check if the
wires or cables are damaged in any way.
Replace all damaged or faulty cables and wires.
Once the cables and wires have been replaced, verify all the hardware
connections again. This requires access to the product’s webpages. For more
information, see the User Manual.
• Make sure all access schedules, doors, groups, and users are up to date. This requires
access to the product’s webpages. For more information, see the User Manual.
• If the door controller is not behaving as expected, see the User manual for information
about troubleshooting and the product’s built-in maintenance functions.
For information about maintenance of the battery, see Requirements for UL Compliance on page 4
and Battery on page 8.
Further Information
The User Manual is available at www.axis.com
Visit www.axis.com/techsup to check if there is updated firmware available for your network
product. To see the currently installed firmware version, go to Setup > About.
Visit Axis learning center www.axis.com/academy for useful trainings, webinars, tutorials and
guides.
40
AXIS A1001 Network Door Controller
Warranty Information
For information about Axis’ product warranty and thereto related information, see
www.axis.com/warranty/
ENGLISH
41
42
AXIS A1001 Network Door Controller
Informations sur la sécurité
Lisez attentivement ce guide d'installation avant d'installer l'appareil. Conservez le guide
d'installation pour toute référence ultérieure.
Niveaux de risques
Indique une situation dangereuse qui, si elle n'est pas évitée,
entraînera le décès ou des blessures graves.
AVERTISSEMENT
Indique une situation dangereuse qui, si elle n'est pas évitée,
pourrait entraîner le décès ou des blessures graves.
ATTENTION
Indique une situation dangereuse qui, si elle n'est pas évitée,
pourrait entraîner des blessures légères ou modérées.
A VIS
Indique une situation qui, si elle n'est pas évitée, pourrait
endommager l'appareil.
Autres niveaux de message
Important
Indique les informations importantes, nécessaires pour assurer le
bon fonctionnement de l'appareil.
Note
Indique les informations utiles qui permettront d'obtenir le
fonctionnement optimal de l'appareil.
43
FRANÇAIS
DANGER
AXIS A1001 Network Door Controller
Consignes de sécurité
AVERTISSEMENT
• Le produit Axis doit être installé par un professionnel habilité.
A VIS
• Le produit Axis doit être utilisé conformément aux lois et règlementations locales en
vigueur.
• Pour pouvoir utiliser le produit Axis à l'extérieur, ou dans des environnements similaires, il
doit être installé dans un boîtier d'extérieur homologué.
• Conserver le produit Axis dans un environnement sec et ventilé.
• Ne pas exposer le produit Axis aux chocs ou aux fortes pressions.
• Ne pas installer ce produit sur des supports, surfaces ou murs instables.
• Utiliser uniquement des outils recommandés pour l'installation de le produit Axis. Une
force excessive appliquée sur le produit pourrait l'endommager.
• Ne pas utiliser de produits chimiques, de substances caustiques ou de nettoyants
pressurisés. Utiliser un chiffon propre et humide pour le nettoyage.
• Utiliser uniquement des accessoires conformes aux caractéristiques techniques du produit.
Ceux-ci peuvent être fournis par Axis ou un tiers.
• Utiliser uniquement les pièces de rechange fournies ou recommandées par Axis.
• Ne pas essayer de réparer ce produit vous-même. Contacter l'assistance technique d'Axis
ou votre revendeur Axis pour des problèmes liés à l'entretien.
Transport
A VIS
• Lors du transport du produit Axis, utilisez l'emballage d'origine ou un équivalent pour
éviter d'endommager le produit.
Batterie
Le produit Axis utilise une batterie au lithium BR/CR2032 3,0 V comme alimentation de son
horloge en temps réel interne (RTC). Dans des conditions normales, cette batterie a une durée de
vie minimale de cinq ans.
Si la batterie est faible, le fonctionnement de l'horloge en temps réel peut être affecté et entraîner
sa réinitialisation à chaque mise sous tension. Un message enregistré apparaît dans le rapport de
serveur du produit lorsque la batterie doit être remplacée. Pour tout complément d'information
concernant le rapport de serveur, reportez-vous aux pages de Configuration du produit ou contactez
l'assistance technique d'Axis.
44
AXIS A1001 Network Door Controller
La batterie doit être remplacée uniquement en cas de besoin, et pour ce faire, contactez l'assistance
technique d'Axis à l'adresse www.axis.com/techsup pour obtenir de l'aide.
AVERTISSEMENT
• Risque d'explosion si la batterie est remplacée de façon incorrecte.
• Remplacez-la uniquement par une batterie identique ou une batterie recommandée par
Axis.
• Mettez au rebut les batteries usagées conformément aux réglementations locales ou
aux instructions du fabricant de la batterie.
FRANÇAIS
45
46
AXIS A1001 Network Door Controller
Guide d'installation
Ce guide d'installation explique comment installer le contrôleur de porte réseau AXIS A1001 sur
votre réseau. Pour toute autre information relative à l'utilisation du produit, reportez-vous au
manuel de l'utilisateur disponible sur le site www.axis.com
Procédures d’installation
Contenu de l'emballage
•
•
•
•
•
•
•
Contrôleur de porte réseau AXIS A1001
Frette de câbles (x4)
Vis du couvercle
Connecteur à 6 broches (x 5) (branché dans les connecteurs du terminal)
E/S du lecteur (bleu)
E/S du lecteur (rouge)
Données du lecteur (blanc)
Données du lecteur (jaune)
Alimentation et relais (orange)
Connecteur à 4 broches (x 5) (branché dans les connecteurs du terminal)
Audio (blanc)
Auxiliaire (jaune)
Porte d'entrée (bleu)
Porte d'entrée (rouge)
Verrou alimentation (orange)
Connecteur à 2 broches (branché dans le connecteur du terminal)
Câble d'alimentation (noir)
Documents imprimés
Guide d'installation graphique
Étiquette supplémentaire reprenant le numéro de série (x2)
Clé d’authentification AVHS
47
FRANÇAIS
1. Assurez-vous que les outils et autres matériels nécessaires à l'installation sont inclus
dans l'emballage. Cf. page 47.
2. Consultez la description du matériel. Cf. page 49.
3. Étudiez les caractéristiques. Cf. page 54.
4. Installez le matériel. Cf. page 62.
5. Utilisez le produit. Cf. page 71.
AXIS A1001 Network Door Controller
Outils recommandés
•
•
•
•
•
Perceuse - en cas de fixation au mur ou au plafond
Tournevis - en cas de fixation au mur ou au plafond
Tournevis à fente – pour l'ouverture du couvercle
Tournevis Torx (T10) – pour serrer la vis du couvercle
Outil de dénudage de câble
48
AXIS A1001 Network Door Controller
Aperçu du matériel
1
FRANÇAIS
2
3
4
5
6
7
8
Avant et arrière :
1 Couvercle
2 Vis du couvercle
3 Fente de retrait du couvercle
4 Socle
5 Clip DIN - supérieur
6 Commutateur d'alarme de détérioration – arrière
49
AXIS A1001 Network Door Controller
7
8
Clip DIN – inférieur
Référence (P/N) et numéro de série (S/N).
1
4
2
6
3
5
8
7
9
10
11
12
Interface E/S :
1 Connecteur de données du lecteur (READER DATA 1)
10 Connecteur de données du lecteur (READER DATA 2)
3 Connecteur E/S du lecteur (READER I/O 1)
8 Connecteur E/S du lecteur (READER I/O 2)
4 Connecteur de porte (DOOR IN 1)
7 Connecteur de porte (DOOR IN 2)
6 Connecteur auxiliaire (AUX)
5 Connecteur audio (AUDIO) (non utilisé)
Entrées d'alimentation externes :
2 Connecteur d'alimentation (DC IN)
12 Connecteur réseau (PoE)
Sorties d'alimentation :
9 Connecteur du verrou d’alimentation (LOCK)
11 Connecteur d'alimentation et du relais (PWR, RELAY)
50
AXIS A1001 Network Door Controller
2
1
3
4
5
FRANÇAIS
6
7
13
8
12
9
11
10
Voyants DEL, boutons et autre matériel :
1 Voyant DEL d’alimentation
2 Voyant d’état
3 Voyant DEL réseau
4 Voyant DEL du lecteur 2 (non utilisé)
5 Voyant DEL du lecteur 1 (non utilisé)
6 Bloc de connexion de l'alarme de détérioration – avant (TF)
7 Bloc de connexion de l'alarme de détérioration – arrière (TB)
8 Voyant DEL du verrou
9 Voyant DEL du verrou
10 Capteur de l'alarme de détérioration – avant
11 Logement de carte SD (microSDHC) (non utilisé)
12 Bouton de commande
13 Référence (P/N) et numéro de série (S/N).
51
AXIS A1001 Network Door Controller
Voyants
Voyant
Couleur
Indication
Réseau
Vert
Fixe en cas de connexion à un réseau de 100 Mbit/s. Clignote en
cas d’activité réseau.
Orange
Fixe en cas de connexion à un réseau de 10 Mbit/s. Clignote en
cas d’activité réseau.
Éteint
Pas de connexion réseau.
Vert
Vert fixe en cas de fonctionnement normal.
Orange
Fixe pendant le démarrage et lors de la restauration des paramètres.
Rouge
Clignote lentement en cas d’échec de la mise à niveau.
Alimentation
Vert
Fonctionnement normal.
Orange
Le voyant vert/orange clignote pendant la mise à niveau du
microprogramme.
Verrou
Vert
Fixe en l'absence d'alimentation.
Rouge
Fixe en cours d'alimentation.
Éteint
Flottant.
État
Note
• Le voyant d'état peut clignoter lorsqu'un événement est actif.
• Le voyant d'état peut clignoter pendant l'identification de l'appareil. Accédez à Setup >
Additional Controller Configuration > System Options > Maintenance (Configuration >
Configuration du contrôleur supplémentaire > Options du système > Maintenance).
Connecteurs et boutons
Pour les caractéristiques et les conditions d'utilisation, consultez page 54.
Interface E/S
Connecteur des données du lecteur
Deux blocs terminaux à 6 broches prenant en charge les protocoles RS485 et Wiegand pour la
communication avec le lecteur. Pour les caractéristiques, consultez page 56.
Connecteur E/S du lecteur
Deux blocs terminaux à 6 broches prenant en charge l'entrée et la sortie du lecteur. En plus du
52
AXIS A1001 Network Door Controller
point de référence 0 V CC et de l'alimentation (sortie CC), le connecteur E/S du lecteur fournit
une interface aux éléments suivants :
•
Entrée numérique – Permet de connecter des alarmes de détérioration du lecteur par
exemple.
• Sortie numérique – Permet de connecter des beepers et des voyants du lecteur par
exemple
Pour les caractéristiques, consultez page 56.
Connecteur auxiliaire
Bloc terminal E/S configurable à 4 broches. Utilisez-le avec des périphériques externes associés aux
applications telles que les alarmes de détérioration, la détection de mouvement, le déclenchement
d'événements et les notifications d'alarme. En plus du point de référence 0 V CC et de l'alimentation
(sortie CC), le connecteur auxiliaire fournit une interface aux éléments suivants :
•
Entrée numérique – Entrée d'alarme utilisée pour connecter des dispositifs pouvant
passer d'un circuit ouvert à un circuit fermé, par exemple capteurs infrarouge passifs
ou détecteurs de bris de verre.
• Sortie numérique – Permet de connecter des dispositifs externes, comme des alarmes
anti-vol, des sirènes ou des éclairages. Les appareils connectés peuvent être activés par
l'®interface de programmation VAPIX® ou par une règle d'action.
Pour les caractéristiques, consultez page 58.
Entrées d'alimentation externes
A VIS
Le produit doit être connecté à l'aide d'un câble réseau blindé (STP). Tous les câbles
reliant le produit au commutateur réseau doivent être destinés à leur usage spécifique.
Assurez-vous que les périphériques réseau sont installés conformément aux instructions
du fabricant. Pour plus d’informations sur les exigences réglementaires, consultez
Electromagnetic Compatibility (EMC) on page 2.
Connecteur d’alimentation
Bloc terminal à deux broches utilisé pour l'entrée d'alimentation. Utilisez une source d'alimentation
limitée (LPS) conforme aux exigences de Très basse tension de sécurité (TBTS) dont la puissance
de sortie nominale est limitée à ≤100 W ou dont le courant de sortie nominal est limité à ≤5 A.
Pour les caractéristiques, consultez page 58.
Connecteur réseau
Connecteur Ethernet RJ45. Prend en charge l'alimentation par Ethernet (PoE). Pour les
caractéristiques, consultez page 59.
53
FRANÇAIS
Connecteur de porte
Deux blocs terminaux à 4 broches pour le branchement des périphérique de contrôle des portes et
les périphériques de demande de sortie (REX). Pour les caractéristiques, consultez page 57.
AXIS A1001 Network Door Controller
Sorties d'alimentation
Connecteur du verrou d'alimentation
Bloc terminal à 4 broches pour brancher un ou deux verrous. Le connecteur de verrou peut
également être utilisé pour alimenter des périphériques externes. Pour les caractéristiques,
consultez page 59.
Connecteur d'alimentation et du relais
Bloc terminal à 6 broches pour brancher l'alimentation et le relais du contrôleur de porte à des
périphériques externes comme des verrous et des capteurs. Pour les caractéristiques, consultez
page 60.
Boutons et autres matériels
Bloc de connexion de l'alarme de détérioration
Deux blocs de connexion permettant de débrancher les alarmes de détérioration avant et arrière.
Pour les caractéristiques, consultez page 60.
Bouton de commande
Le bouton de commande permet de réaliser les opérations suivantes :
•
•
Réinitialisation du produit aux paramètres d’usine par défaut. Cf. page 76.
Connexion au service du Système d'hébergement vidéo AXIS ou au service AXIS Internet
Dynamic DNS. Pour plus d'informations sur ces services, reportez-vous au Manuel de
l'utilisateur.
Caractéristiques techniques
Conditions d'utilisation
L'appareil Axis est uniquement destiné à une utilisation en intérieur.
Classification
Température
Humidité
IEC 60721-4-3 Classe 3K3,
3M3
0 °C à 50 °C
(32 °F à 122 °F)
Humidité relative de 20 à 85 % (sans
condensation)
Consommation électrique
A VIS
Utilisez une source d'alimentation limitée (LPS) conforme aux exigences de Très basse
tension de sécurité (TBTS) dont la puissance de sortie nominale est limitée à ≤100 W ou
dont le courant de sortie nominal est limité à ≤5 A.
54
AXIS A1001 Network Door Controller
Alimentation
Charge maximale en sortie
Alimentation par Ethernet IEEE 802.3af/
802.3at Type 1 Classe 3, 44 à 57 V CC
7,5 W
10 à 30 V CC, max. 26 W
14 W
Zone des câbles
A VIS
Chaque câble doit comporter une zone correspondant à un calibre de conducteur de
28 à 16 AWG (CSA) ou 22 à 14 AWG (cUL/UL). Sélectionnez des câbles conformes à la
législation locale.
AWG
Diamètre mm (po)
Zone mm2
28–16
0.321–1.29 (0.0126–0.0508)
0.0810–1.31
22–14
0.644–1.63 (0.0253–0.0641)
0.326–2.08
Connecteurs
Pour en savoir plus sur les positions des connecteurs, reportez-vous à Aperçu du matériel page 49.
Pour consulter les schémas de connexion et pour plus d'informations sur le schéma des broches
du matériel généré via la configuration matérielle, reportez-vous àSchémas de connexion page
61 et Configurer le matériel page 63.
La section suivante décrit les caractéristiques techniques des connecteurs.
55
FRANÇAIS
Concernant les caractéristiques des connecteurs, reportez-vous à Connecteur d’alimentation page
58 et Connecteur réseau page 59.
AXIS A1001 Network Door Controller
Connecteur de données du lecteur
Bloc terminal à 6 broches prenant en charge les protocoles RS485 et
Wiegand pour la communication avec le lecteur.
Les ports RS485 prennent en charge :
• RS485 semi-duplex sur deux fils
• RS485 duplex intégral sur quatre fils
Les ports Wiegand prennent en charge :
• Wiegand sur deux fils
Fonction
RS485
RS485
Wiegand
Broche
Notes
A-
1
B+
2
Pour duplex intégral RS485
Pour semi-duplex RS485
A-
3
B+
4
D0 (Donnée 0)
5
D1 (Donnée 1)
6
Pour duplex intégral RS485
Pour semi-duplex RS485
Pour Wiegand
Important
La longueur maximale de câble recommandée est de 30 mètres (98,4 pieds).
Connecteur E/S du lecteur
Bloc terminal à 6 broches pour :
• Alimentation auxiliaire (sortie CC)
• Entrée numérique
• Sortie numérique
• 0 V CC (-)
La broche 3 des connecteurs E/S du lecteur peut être supervisée. Si la
connexion est interrompue, un événement est activé. Pour utiliser des
entrées supervisées, installez des résistances de fin de ligne. Utilisez le
schéma de connexion pour les entrées supervisées. Cf. page 62.
Fonction
Broche
0 V CC (-)
1
Notes
Caractéristiques
0 V CC
56
AXIS A1001 Network Door Controller
2
Alimentation du matériel auxiliaire.
Remarque : cette broche ne peut
être utilisée que comme sortie
d’alimentation.
12 V CC
Charge maximale = 300 mA
Configurable
(entrée ou
sortie)
3–6
Entrée numérique — Connectez-la à la
broche 1 pour l’activer ou laissez-la
flotter (déconnectée) pour la désactiver.
0 à 40 V CC max.
Sortie numérique — Connectez-la à la
broche 1 pour l’activer ou laissez-la
flotter (déconnectée) pour la désactiver.
Si vous l’utilisez avec une charge
inductive, par exemple un relais, une
diode doit être connectée en parallèle
avec la charge, en guise de protection
contre les tensions transitoires.
0 à 40 V CC max., drain
ouvert, 100 mA
FRANÇAIS
Sortie CC
Connecteur de porte
Deux blocs terminaux à 4 broches pour les périphérique de contrôle des
portes (entrée numérique).
Toutes les broches d'entrée des portes peuvent être supervisées. Si la
connexion est interrompue, une alarme est déclenchée. Pour utiliser des
entrées supervisées, installez des résistances de fin de ligne. Utilisez le
schéma de connexion pour les entrées supervisées. Cf. page 62.
Fonction
Broche
0 V CC (-)
1, 3
Entrée
2, 4
Notes
Caractéristiques
0 V CC
Pour la communication avec le moniteur
de porte.
Entrée numérique — Raccordez-la à
la broche 1 ou 3 respectivement pour
activer ou laisser flotter (déconnectée)
pour désactiver.
Remarque : Cette broche ne peut être
utilisée que pour l'entrée.
57
0 à 40 V CC max.
AXIS A1001 Network Door Controller
Connecteur auxiliaire
Bloc terminal E/S configurable à 4 broches pour :
• Alimentation auxiliaire (sortie CC)
• Entrée numérique
• Sortie numérique
• 0 V CC (-)
Pour un exemple de schéma de connexion, consultez Schémas de
connexion page 61.
Fonction
Broche
Notes
0 V CC (-)
1
Sortie CC
2
Alimentation du matériel auxiliaire.
Remarque : cette broche ne peut
être utilisée que comme sortie
d’alimentation.
3,3 V CC
Charge maximale = 100 mA
Configurable
(entrée ou
sortie)
3–4
Entrée numérique — Connectez-la à la
broche 1 pour l’activer ou laissez-la
flotter (déconnectée) pour la désactiver.
0 à 40 V CC max.
Sortie numérique — Connectez-la à la
broche 1 pour l’activer ou laissez-la
flotter (déconnectée) pour la désactiver.
Si vous l’utilisez avec une charge
inductive, par exemple un relais, une
diode doit être connectée en parallèle
avec la charge, en guise de protection
contre les tensions transitoires.
0 à 40 V CC max., drain
ouvert, 100 mA
Caractéristiques
0 V CC
Connecteur d’alimentation
Bloc terminal à 2 broches pour l'alimentation CC. Utilisez une source
d'alimentation limitée (LPS) conforme aux exigences de Très basse
tension de sécurité (TBTS) dont la puissance de sortie nominale est
limitée à ≤100 W ou dont le courant de sortie nominal est limité à ≤5 A.
58
AXIS A1001 Network Door Controller
Fonction
Broche
0 V CC (-)
1
Entrée CC
2
Notes
Caractéristiques
0 V CC
Pour le contrôleur d'alimentation si
l'alimentation par Ethernet n'est pas
utilisée.
Remarque : Cette broche ne peut
être utilisée que comme entrée
d’alimentation.
10 à 30 V CC, max. 26 W
Charge maximale en
sortie = 14 W
FRANÇAIS
Connecteur réseau
Connecteur Ethernet RJ45. Prend en charge l'alimentation par Ethernet
(PoE). Utilisez des câbles blindés de catégorie 5 ou supérieure.
Fonction
Caractéristiques
Alimentation et Ethernet
Alimentation par Ethernet IEEE 802.3af/802.3at Type 1 Classe 3,
44 à 57 V CC
Charge maximale en sortie = 7,5 W
Connecteur du verrou d’alimentation
Blocs terminaux à 4 broches pour l'alimentation d'un ou deux verrous
(sortie CC). Le connecteur de verrou peut également être utilisé pour
alimenter des périphériques externes.
Raccordez les verrous et charges aux broches conformément au schéma
des broches généré via la configuration matérielle.
Fonction
Broche
0 V CC (-)
1, 3
0 V CC,
flottante ou
12 V CC
2, 4
Notes
Caractéristiques
0 V CC
Pour contrôler jusqu'à deux verrous
12 V. Utilisez le schéma des broches
du matériel. Cf. Configurer le matériel
page 63.
59
12 V CC
Charge totale
maximale = 500 mA
AXIS A1001 Network Door Controller
Connecteur d'alimentation et du relais
Bloc terminal à 6 broches avec relais intégré pour :
• Périphériques externes
• Alimentation auxiliaire (sortie CC)
• 0 V CC (-)
Raccordez les verrous et charges aux broches conformément au schéma
des broches généré via la configuration matérielle.
Fonction
Broche
Notes
0 V CC (-)
1, 4
Relais
2–3
Permet de connecter des périphériques
relais. Utilisez le schéma des broches du
matériel. Reportez-vous à Configurer le
matériel page 63.
Les deux broches du relais sont
galvaniquement séparées du reste du
circuit.
Courant maximale
= 700 mA
Tension maximale
= +30 V CC
12 V CC
5
Alimentation du matériel auxiliaire.
Remarque : cette broche ne peut
être utilisée que comme sortie
d’alimentation.
Tension max. = +12 V CC
Charge max. = 500 mA
24 V CC
6
Non utilisé
Caractéristiques
0 V CC
Bloc de connexion de l'alarme de détérioration
Deux blocs de connexion pour court-circuiter :
• l'alarme de détérioration arrière (TB)
• l'alarme de détérioration avant (TB)
Fonction
Broche
Notes
Alarme de
détérioration arrière
1–2
Alarme de
détérioration avant
1–2
Pour court-circuiter simultanément les alarmes de
détérioration avant et arrière, branchez les cavaliers entre
TB 1, TB 2 et TF 1, TF 2 respectivement. Court-circuiter
les alarmes de détérioration signifie que le système
n'identifiera aucune tentative de détérioration.
60
AXIS A1001 Network Door Controller
Note
Les alarmes de détection avant et arrière sont raccordées par défaut. Le déclenchement
de l'ouverture du boîtier peut être configuré pour exécuter une action si le contrôleur
de porte est ouvert ou si le contrôleur de porte est retiré du mur ou du plafond. Pour
plus d'informations sur la configuration des alarmes et des événements, reportez-vous
au manuel de l’utilisateur.
Schémas de connexion
Connecteur auxiliaire
1
2
A
B
1
2
A
B
0 V CC (-)
Sortie CC : 3,3 V, max. 100 mA
Entrée/sortie configurée comme entrée
Entrée/sortie configurée comme sortie
61
FRANÇAIS
Raccordez les périphériques conformément au schéma des broches généré via la configuration
matérielle. Pour plus d'informations sur la configuration matérielle et le schéma des broches,
reportez-vous à Configurer le matériel page 63.
AXIS A1001 Network Door Controller
Entrées supervisées
i
22 kΩ
4.7 kΩ
ii
Pour utiliser des entrées supervisées, installez des résistances de fin de ligne. Cela s'applique à
toutes les entrées supervisées. Pour plus d'informations sur les limites et mises à jour, consultez les
notes de version du produit.
i
ii
Entrée
0 V CC (-)
Installation du matériel
ATTENTION
N'installez jamais le produit Axis lorsque le produit est sous tension. Mettez sous tension
une fois l'installation terminée.
A VIS
Pour protéger les circuits contre les décharges électrostatiques (ESD), utilisez une protection
électrostatique lorsque vous manipulez le produit alors que ses composants ou contacts
sont exposés.
Lisez toutes les instructions avant l'installation de l'appareil.
•
•
•
•
Pour configurer le matériel, reportez-vous à page 63.
Pour installer l'appareil au mur (de préférence) ou au plafond, reportez-vous à page 64.
Pour installer le produit sur un rail DIN, reportez-vous à page 65.
Pour brancher les câbles, consultez page 67.
Considérations système
Le produit Axis doit être installé dans une zone sécurisée.
62
AXIS A1001 Network Door Controller
Le produit Axis, qu'il s'agisse d'un contrôleur de porte indépendant ou d'un système de contrôleurs
de portes, ne doit pas limiter ou avoir un impact négatif sur l'utilisation à laquelle les périphériques
qui lui sont raccordés sont destinés.
Le produit Axis doit être installé sur un mur (de préférence) ou un plafond avec ou sans boîte de
jonction. Il peut également être installé sur un rail DIN.
Configurer le matériel
Les portes, verrous et autres périphériques peuvent être connectés au produit Axis avant de
terminer la configuration matérielle. Toutefois, la connexion des périphériques sera plus facile si
vous commencez par configurer d'abord le matériel. En effet, le schéma des broches du matériel
sera disponible lorsque la configuration est terminée. Le schéma des broches du matériel explique
comment connecter les broches et peut être utilisé comme fiche de référence pour la maintenance.
Pour les instructions de maintenance, reportez-vous à page 77.
Pour configurer le matériel, sélectionnez l’une des méthodes suivantes :
•
•
Importation d'un fichier de configuration matérielle. Cf. page 63.
Créer un fichier de configuration matérielle. Cf. page 63.
Importation d'un fichier de configuration matérielle
La configuration matérielle du produit Axis peut être plus rapide si vous importez un fichier
de configuration matérielle.
Pour plus d'informations sur l'exportation des fichiers de configuration matérielle, reportez-vous
au Manuel de l'utilisateur.
Pour importer un fichier de configuration matérielle :
1. Accédez à Setup > Hardware Configuration (Configuration > Configuration matérielle).
2. Cliquez sur Import hardware configuration (Importer la configuration matérielle) ou
s'il existe déjà une configuration matérielle, Reset and import hardware configuration
(Réinitialiser et importer la configuration matérielle).
3. Dans la boîte de dialogue du navigateur du fichier qui apparaît, recherchez et
sélectionnez le fichier de configuration matérielle (*.json) sur votre ordinateur.
4. Cliquez sur OK.
Créer une nouvelle configuration matérielle
Pour créer une nouvelle configuration matérielle depuis le début :
63
FRANÇAIS
Configurez le matériel dans les pages Hardware Configuration (Configuration matérielle) avant
d'installer le produit.
AXIS A1001 Network Door Controller
1. Si nécessaire, retirez la vis du couvercle, insérez un tournevis à fente dans la fente
permettant le retrait du couvercle et retirez ce dernier.
2. Raccordez le produit Axis au réseau et attendez que la connexion réseau soit établie
et que le produit soit sous tension. Si le produit n'est pas alimenté par Ethernet mais
utilise une alimentation Ethernet et externe, raccordez-le également à une source
d'alimentation limitée (LPS) conforme aux exigences de Très basse tension de sécurité
(TBTS). Pour plus d’informations concernant le connecteur d'alimentation (entrée CC),
reportez-vous aux Caractéristiques techniques page 54
3. Accédez au produit. Cf. page 71.
4. Accédez à Setup > Hardware Configuration (Configuration > Configuration matérielle)
et cliquez sur Créer une nouvelle configuration matérielle.
Si le matériel du produit n'a pas été configuré avant ou a été supprimé, Hardware
Configuration (Configuration matérielle) sera disponible dans le panneau de notification
de la page Overview (Présentation).
5. Sélectionnez une option de porte selon le nombre de portes, une (1) ou deux (2) qui
seront raccordées au produit Axis.
6. Attribuez un nom descriptif à chaque porte et cliquez sur Next (Suivant). Il est
recommandé de donner aux portes des noms descriptifs uniques de sorte à permettre
leur identification par toute personne qui administrera le système.
Vous pouvez également modifier le nom du produit Axis. Le nom par défaut inclut le
numéro de série pour une identification facile.
7. Sélectionnez le moniteur de porte et les options des verrous conformes aux exigences
ainsi que le type de raccordement aux verrous qui sera utilisé, puis cliquez sur Next
(Suivant). Pour plus d'informations sur les options disponibles, reportez-vous au manuel
de l'utilisateur.
8. Sélectionnez les types de lecture qui seront utilisés, puis cliquez sur Finish (Terminer).
Pour plus d'informations sur les options disponibles, reportez-vous au manuel de
l'utilisateur.
9. Dans la boîte de dialogue qui apparaît une fois la configuration terminée, cliquez sur OK
ou cliquez sur le lien pour afficher le schéma des broches du matériel.
Pour imprimer le schéma des broches du matériel, cliquez sur Print Hardware Pin Chart
(Imprimer le schéma des broches du matériel) sur la page Hardware Pin Chart (Schéma
des broches du matériel).
10. Déconnectez le produit du réseau. Si le produit n'est pas alimenté par Ethernet,
débranchez également le produit de sa source d'alimentation.
Pour annuler la configuration matérielle, cliquez sur Cancel (Annuler). Cela peut être effectué dans
n'importe laquelle des pages de configuration matérielle.
Fixation murale et au plafond
A VIS
Si vous installez le contrôleur de porte sur un mur, veillez à ce que la découpe destinée
aux câble soit orientée vers le bas.
64
AXIS A1001 Network Door Controller
1. Si vous utilisez une boîte de jonction, installez-la avant d'installer le contrôleur de porte
réseau. Pour garantir une conformité UL, la boîte de jonction doit être homologuée UL.
2. Si nécessaire, retirez la vis du couvercle, insérez un tournevis à fente dans la fente
permettant le retrait du couvercle et retirez ce dernier. Cf. Aperçu du matériel page 49.
3. Marquez les orifices de vis dans le plafond/mur, en utilisant la base comme gabarit.
4. Percez les orifice pour les vis, si nécessaire.
5. Installez la base sur le mur ou au plafond. Assurez-vous que les vis et les chevilles sont
adaptées au matériau (bois, métal, placoplâtre, pierre).
FRANÇAIS
1
2
1
2
Socle
Trou de vis (x 4)
6. Branchez les câbles. Cf. page 67.
Rail DIN
1. Si nécessaire, installez un rail DIN (non fourni).
65
AXIS A1001 Network Door Controller
2. Si nécessaire, retirez la vis du couvercle, insérez un tournevis à fente dans la fente
permettant le retrait du couvercle et retirez ce dernier. Cf. Aperçu du matériel page 49.
3. Fixez le clip DIN inférieur, flexible, au bas du rail DIN, en inclinant légèrement la base
vers l'avant.
4. Soulevez la base afin que le clip DIN inférieur se trouve dans la position la plus basse.
5. Inclinez la base vers l'arrière afin qu'elle soit parallèle au mur/plafond.
6. Fixez le clip DIN supérieur en haut du rail DIN en baissant la base.
1
2
3
4
1
2
3
4
Socle
Trou de vis (x 4)
Rail DIN
Clip DIN inférieur
7. Fixez la base à l'aide de quatre vis. Assurez-vous que les vis et les chevilles sont adaptées
au matériau (bois, métal, placoplâtre, pierre). Cf. Fixation murale et au plafond page 64.
Note
Pour éviter de tordre la base, veillez à ne pas trop serrer les vis. Laissez environ 2,5 mm
(0,1 pouce). Si la base est tordue, le couvercle ne se fermera pas.
66
AXIS A1001 Network Door Controller
8. Branchez les câbles. Cf. page 67.
Branchement des câbles
ATTENTION
Coupez l'alimentation avant de brancher tous les câbles au produit Axis. Ne procédez
jamais aux branchements si le produit est sous tension.
A VIS
• Si vous utilisez l'alimentation par Ethernet, attendez avant de raccorder le câble réseau au
réseau que tous les autres câbles soient branchés.
• Pour permettre une maintenance future, éviter une pression excessive sur les câbles et
les connecteurs et éviter d'endommager l'isolation des conducteurs, laissez un espace
d'entretien et assurez-vous que tous les câbles et fils sont correctement soutenus et
sécurisés. Utilisez les frettes de câble fournies.
• Pour protéger les circuits contre les décharges électrostatiques (ESD), utilisez une
protection électrostatique lorsque vous raccordez les câbles au produit.
1. Entourez le câble réseau autour du guide des câbles et raccordez le câble réseau au
connecteur réseau.
2. Fixez le câble réseau au guide des câbles à l'aide de l'une des frettes de câble fournies.
67
FRANÇAIS
• Le produit doit être connecté à l'aide d'un câble réseau blindé (STP). Tous les câbles
reliant le produit au commutateur réseau doivent être destinés à leur usage spécifique.
Assurez-vous que les périphériques réseau sont installés conformément aux instructions
du fabricant. Pour plus d’informations sur les exigences réglementaires, consultez
Regulatory Information on page 2.
AXIS A1001 Network Door Controller
1
1
2
2
Frette de câbles
Câble réseau
3. Dénudez les câbles et fils si nécessaire à l'aide d'une pince à sertir.
4. Raccordez les câbles entre les contrôleurs de porte et les verrous, les portes et les autres
périphériques. Pour plus d'informations sur les connecteurs et leurs caractéristiques,
reportez-vous à page 52 et page 55.
A VIS
• Assurez-vous que tous les câbles sont correctement raccordés. Un câblage incorrect
pourrait endommager le produit.
• Veillez à utiliser des câbles conformes aux exigences. Pour plus d’informations,
reportez-vous à Zone des câbles page 55 et, concernant la conformité UL, à Requirements
for UL Compliance on page 4.
68
AXIS A1001 Network Door Controller
4
2
3
Exemple de raccordement de câbles
1
2
3
4
Connecteur à 6 broches
Câble réseau
Frette de câbles (x4)
Connecteur réseau
Note
• Pour les périphériques qui ont été configurés dans les pages de configuration matérielle du
produit, utilisez le schéma des broches du matériel pour vous guider dans le raccordement
des broches. Pour plus d'informations sur la configuration matérielle et le schéma des
broches, reportez-vous à Configurer le matériel page 63.
• Pour plus d'informations sur le raccordement des autres câbles comme les câbles de
raccordement aux verrous, lecteurs et autres périphériques, reportez-vous aux instructions
du fabricant.
5. Regroupez tous les câbles correctement et fixez-les à l'aide des frettes de câble fournies.
6. Étiquetez les câbles pour vous y référer ultérieurement.
7. Si vous utilisez l'alimentation par Ethernet, raccordez le câble réseau au réseau.
69
FRANÇAIS
1
AXIS A1001 Network Door Controller
8. Si vous utilisez une alimentation Ethernet et externe (10 à 30 V CC), raccordez le câble
réseau au réseau, puis procédez au raccordement à l'alimentation. Utilisez une source
d'alimentation limitée (LPS) conforme aux exigences de Très basse tension de sécurité
(TBTS). Pour en savoir plus, consultez Connecteur d’alimentation page 58.
1
2
Exemple de raccordement de câbles
1
2
Connecteur réseau
Câble réseau
9. Vérifiez que les voyants indiquent les conditions correctes. Cf. Voyants page 52.
10. Fixez le couvercle à la base et serrez la vis du couvercle.
70
AXIS A1001 Network Door Controller
FRANÇAIS
1
2
1
2
Couvercle
Vis du couvercle (T10)
Accès au produit
Le produit peut être utilisé avec la plupart des systèmes d'exploitation et des navigateurs. Les
navigateurs recommandés sont Internet Explorer sous Windows, Safari sous Macintosh et Firefox
sous les autres systèmes d’exploitation.
Lors de la première utilisation du produit, vous devez lui attribuer une adresse IP et définir le mot
de passe de l’utilisateur administrateur par défaut (root).
•
•
Pour attribuer une adresse IP, consultez page 72.
Pour définir le mot de passe root, consultez page 38.
Accès par un navigateur
1. Démarrez un navigateur Web, par exemple Internet Explorer, Firefox ou Safari.
71
AXIS A1001 Network Door Controller
2. Saisissez l'adresse IP ou le nom d'hôte du produit Axis dans le champ Location/Address
(Emplacement/Adresse) du navigateur. Pour accéder au produit depuis un ordinateur
Macintosh (Mac OS X), cliquez sur l'onglet Bonjour et sélectionnez le produit dans la
liste déroulante.
Si vous ne connaissez pas l'adresse IP, utilisez AXIS IP Utility pour trouver le produit sur
le réseau. Pour plus d'informations sur la détection et l'attribution d'une adresse IP,
reportez-vous à Attribution d'une adresse IP. Ces informations sont également disponibles
sur les pages d'assistance technique du site www.axis.com/techsup
3. Saisissez votre nom d’utilisateur et mot de passe. Lors du premier accès au produit, le
mot de passe root doit être configuré. Concernant les instructions, consultez Définir le
mot de passe Root page 76.
4. AXIS Entry Manager s'ouvre dans votre navigateur. La page d'accueil est appelée page
Overview (Présentation).
Accès à partir d'Internet
Une fois connecté, le produit Axis est accessible sur votre réseau local (LAN). Pour accéder au
produit sur Internet, vous devez configurer votre routeur réseau pour autoriser le trafic entrant de
données vers le produit. Pour ce faire, activez la fonction NAT traversal qui essaiera de configurer
automatiquement le routeur afin d'autoriser l'accès au produit. L'activation s'effectue à partir de
(Configuration > Options du système > Réseau > TCP/IP avancés)Setup > Additional Controller
Configuration > System Options > Network > TCP/IP > Advanced (Configuration > Configuration
du contrôleur supplémentaire > Options du système > Réseau > TCP/IP > Avancés).
Pour en savoir plus sur NAT trasversal pour IPv4, reportez-vous au manuel de l’utilisateur du produit.
Consultez aussi le service AXIS Internet Dynamic DNS sur www.axiscam.net
Pour consulter des notes techniques à ce sujet ou pour toute autre question, consultez la page
d’assistance technique d’Axis à l’adresse suivante www.axis.com/techsup
Attribution d'une adresse IP
Adresse IP par défaut
Le produit Axis est destiné à être utilisé sur un réseau Ethernet. Une adresse IP est donc nécessaire
pour accéder au réseau. La plupart des réseaux sont équipés d'un serveur DHCP qui attribue
automatiquement une adresse IP aux appareils connectés. Si votre réseau en est dépourvu, le
produit Axis utilisera 192.168.0.90 comme adresse IP par défaut.
Méthodes recommandées sous Windows®
Il est recommandé d'utiliser AXIS IP Utility ou AXIS Camera Management pour rechercher des
produits Axis sur le réseau et leur attribuer une adresse IP sous Windows®. Ces deux applications
sont gratuites et peuvent être téléchargées sur www.axis.com/techsup.
72
AXIS A1001 Network Door Controller
AXIS IP Utility : petites installations
AXIS IP Utility recherche et affiche automatiquement les produits Axis présents sur votre réseau
local. Cette application sert également à attribuer manuellement une adresse IP fixe.
Notez que l'ordinateur exécutant l'application AXIS IP Utility doit se trouver sur le même segment
de réseau (sous-réseau physique) que le produit Axis.
Détection automatique
Attribution manuelle de l’adresse IP (facultatif)
1. Trouvez une adresse IP disponible sur le même segment de réseau que celui de votre
ordinateur.
2. Sélectionnez le produit Axis dans la liste.
3. Cliquez sur Assign new IP address to selected device (Attribuer une nouvelle adresse
IP au périphérique sélectionné)
puis saisissez l'adresse IP.
4. Cliquez sur Assign (Attribuer) et poursuivez conformément aux instructions.
5. Lorsque le produit Axis apparaît dans la fenêtre, double-cliquez dessus pour ouvrir les
pages Web correspondantes.
6. Pour en savoir plus sur la configuration du mot de passe, reportez-vous à page 76.
AXIS Camera Management : installations importantes
Le logiciel AXIS Camera Management est un puissant outil d'installation et de gestion, spécialement
conçu pour les produits réseau Axis. Cet outil peut automatiquement rechercher des appareils sur
le réseau, attribuer des adresses IP, définir des mots de passe, afficher le statut de connexion, gérer
les mises à niveau du microprogramme et configurer les paramètres du produit. Il peut réaliser des
opérations par lots sur plusieurs produits à la fois.
Détection automatique
1. Vérifiez que le produit Axis est connecté au réseau et sous tension.
2. Lancez AXIS Camera Management.
3. Connectez-vous à un serveur.
73
FRANÇAIS
1. Vérifiez que le produit Axis est connecté au réseau et sous tension.
2. Lancez AXIS IP Utility.
3. Lorsque le produit Axis apparaît dans la fenêtre, double-cliquez dessus pour ouvrir les
pages Web correspondantes.
4. Pour en savoir plus sur la configuration du mot de passe, reportez-vous à page 76.
AXIS A1001 Network Door Controller
4.
5.
6.
7.
Pour vous connecter à un serveur du réseau, sélectionnez Remote server (Serveur
distant), puis sélectionnez un serveur dans la liste déroulante ou saisissez l'adresse IP
ou DNS dans le champ.
Pour vous connecter à un serveur fonctionnant en local sur votre ordinateur, sélectionnez
This computer (Cet ordinateur).
Cliquez sur Log On (Se connecter) pour vous connecter en tant qu'utilisateur actuel de
l'ordinateur ou décochez Log on as current user (Se connecter en tant qu'utilisateur
actuel) et saisissez votre nom d'utilisateur et votre mot de passe pour vous connecter.
Lorsque AXIS Camera Management démarre pour la première fois, il recherche
automatiquement les produits Axis du réseau. Pour rechercher manuellement des
produits, sélectionnez Configuration > Add Devices (Configuration > Ajouter des
périphériques). Le logiciel affiche une liste de produits trouvés.
Sélectionnez les produits à ajouter et cliquez sur Next (Suivant), puis sur Finish
(Terminer).
Dans la liste des périphériques, cliquez sur l'adresse pour ouvrir les pages Web du produit.
Pour en savoir plus sur la configuration du mot de passe, reportez-vous à page 76.
Attribution d'adresse IP à plusieurs appareils
AXIS Camera Management accélère le processus d'attribution d'adresse IP à plusieurs appareils en
suggérant des adresses IP parmi une plage spécifiée.
1. Sélectionnez les appareils à configurer (il peut s'agir de plusieurs modèles différents),
puis cliquez sur le bouton Assign IP address to selected devices (Attribuer une adresse
IP aux appareils sélectionnés)
.
2. Cliquez sur Yes (Oui) dans la boîte de dialogue Device Maintenance (Maintenance de
l'appareil).
3. Sélectionnez Assign the following IP address range (Attribuer la plage d'adresses IP
suivante), puis saisissez la plage d'adresses IP, le masque de sous-réseau et le routeur par
défaut que les appareils utiliseront. Cliquez sur Next (Suivant).
4. Les adresses IP suggérées sont énumérées sous le champ New IP Addresses (Nouvelles
adresses IP) et peuvent être modifiées en sélectionnant un appareil et en cliquant sur
Edit IP (Modifier IP).
5. Cliquez sur Finish (Terminer).
Autres systèmes d'exploitations et méthodes
La liste ci-dessous indique les autres méthodes permettant d'attribuer ou de détecter l’adresse IP.
Toutes les méthodes sont activées par défaut et peuvent être désactivées.
•
Connexion au service du Système d'hébergement vidéo AVHS (tous les systèmes
d'exploitation). Pour procéder au raccordement à un serveur AVHS, consultez le guide
d'installation du fournisseur de serveur. Pour obtenir des renseignements et trouver un
fournisseur de service AVHS, rendez-vous sur www.axis.com/hosting
74
AXIS A1001 Network Door Controller
•
•
•
•
Attribuer une adresse IP à l’aide d’ARP/Ping
L'adresse IP du produit peut être attribuée à l’aide d’ARP/Ping. La commande doit être saisie
dans les 2 minutes suivant la mise sous tension.
1. Trouvez une adresse IP statique disponible sur le même segment réseau que celui de
votre ordinateur.
2. Repérez le numéro de série (S/N) sur l’étiquette du produit.
3. Ouvrez une invite de commandes et saisissez les commandes suivantes :
Syntaxe pour Linux/Unix
arp -s <Adresse IP > <numéro de série > temp
ping -s 408 <Adresse IP >
Exemple pour Linux/Unix
arp -s 192.168.0.125 00:40:8c:18:10:00 temp
ping -s 408 192.168.0.125
Syntaxe Windows (peut nécessiter que vous exécutiez l'invite de commande en tant
qu'administrateur)
arp -s <Adresse IP > <numéro de série >
ping -l 408 -t <Adresse IP >
Exemple Windows (peut nécessiter que vous exécutiez l'invite de commande en tant
qu'administrateur)
arp -s 192.168.0.125 00-40-8c-18-10-00
ping -l 408 -t 192.168.0.125
4. Vérifiez que le câble réseau est connecté, puis redémarrez le produit en débranchant puis
en rebranchant l’alimentation.
5. Fermez l’invite de commande lorsque le produit répond par Réponse de
192.168.0.125 :... ou similaire.
75
FRANÇAIS
•
UPnP™ (Windows®). Lorsque le produit réseau Axis est activé sur votre ordinateur, il est
détecté automatiquement et vient s’ajouter au dossier Réseau/Favoris réseau.
Bonjour (Mac OS X® 10.4 ou une version ultérieure). Applicables aux navigateurs
prenant en charge Bonjour. Accédez au signet Bonjour dans votre navigateur (par
exemple, Safari), puis cliquez sur le lien pour accéder aux pages Web.
AXIS Dynamic DNS Service (tous les systèmes d'exploitation). Service Axis gratuit vous
permettant d’installer rapidement et facilement votre produit réseau Axis. Nécessite
une connexion Internet sans proxy HTTP. Pour plus d’informations, rendez-vous sur
www.axiscam.net
ARP/Ping (tous les systèmes d'exploitation). Cf. Attribuer une adresse IP à l’aide
d’ARP/Ping. La commande doit être saisie dans les 2 minutes suivant la mise sous tension.
serveur DHCP (tous les systèmes d'exploitation). Pour consulter les pages administratives
du serveur DHCP réseau, reportez-vous à la documentation de l'utilisateur du serveur.
AXIS A1001 Network Door Controller
6. Ouvrez un navigateur et saisissez http://<Adresse IP > dans le champ
Lieu/Adresse.
Note
• Pour ouvrir une invite de commande sous Windows, ouvrez le menu Démarrer puis
saisissez cmd dans le champ Exécuter/Rechercher.
• Pour utiliser la commande ARP sous Windows 8/Windows 7/Windows Vista, cliquez avec
le bouton droit sur l’icône d’invite de commande et sélectionnez Run as administrator
(Exécuter en tant qu’administrateur).
• Pour ouvrir une invite de commande dans Mac OS X, ouvrez l’utilitaire Terminal dans
Application > Utilities (Application > Utilitaires).
Définir le mot de passe Root
Pour accéder au produit Axis, vous devez définir le mot de passe de l’administrateur par défaut root.
Vous pouvez le faire depuis la boîte de dialogue Configure Root Password (Configurer le mot de
passe Root) qui s’ouvre lors du premier accès au produit.
Pour éviter les écoutes électroniques, la configuration du mot de passe root peut être effectuée via
une connexion HTTPS cryptée requérant un certificat HTTPS. Le protocole HTTPS (Hypertext Transfer
Protocol over Secure Socket Layer) est utilisé pour crypter le trafic entre les navigateurs Web et les
serveurs. Le certificat HTTPS garantit l’échange crypté des informations.
Le nom d’utilisateur par défaut de l’administrateur root est permanent et ne peut pas être
supprimé. Si vous perdez le mot de passe du nom d'utilisateur root, les paramètres d'usine par
défaut du produit devront être rétablis. Pour plus d'informations sur la réinitialisation du produit
aux paramètres d’usine par défaut, reportez-vous au manuel de l’utilisateur.
Pour configurer le mot de passe via une connexion HTTP standard, saisissez-le directement dans
la boîte de dialogue.
Pour configurer le mot de passe avec une connexion HTTPS cryptée, procédez comme suit :
1. Cliquez sur Use HTTPS (Utiliser le protocole HTTPS).
Un certificat temporaire (valide un an) est créé, il permet le cryptage de tout le trafic vers
et depuis le produit et le mot de passe peut ainsi être défini en toute sécurité.
2. Saisissez un mot de passe, puis saisissez-le à nouveau pour le confirmer.
3. Cliquez sur OK. Le mot de passe est à présent configuré.
Réinitialisation aux paramètres d'usine par défaut
Important
La réinitialisation aux paramètres d'usine par défaut doit être utilisée avec prudence. Cette
opération reconfigure tous les paramètres, y compris l'adresse IP, aux valeurs d'usine par
défaut.
76
AXIS A1001 Network Door Controller
Note
Les logiciels d'installation et de gestion sont disponibles sur les pages d'assistance du
site www.axis.com/techsup
Pour réinitialiser l'appareil aux paramètres d'usine par défaut :
Instructions de maintenance
Afin que le système du contrôle d'accès continue de fonctionner sans problème, Axis recommande
sa maintenance régulière, y compris celle des contrôleurs de porte et les périphériques branchés.
Procédez à une maintenance une fois par an. La procédure de maintenance suggérée inclut, sans s'y
limiter, les étapes suivantes :
•
Vérifiez que tous les branchement entre le contrôleur de porte et les périphériques
externes sont corrects.
• Vérifiez tous les branchements matériels. Ceci requiert d'accéder aux pages Web du
produit. Pour plus d’informations, reportez-vous au manuel de l’utilisateur.
• Vérifiez que le système, y compris les périphériques externes branchés, fonctionnent
correctement.
Lisez une carte et testez les lecteurs, portes et verrous.
Si le système inclut des périphériques REX, des capteurs et d'autres
périphériques, testez-les également.
Testez les alarmes de détérioration si elles sont activées.
Si les résultats de l'une des étapes ci-dessus révèlent des erreurs ou un comportement anormal :
-
Testez les signaux des câbles à l'aide de l'équipement adéquat et vérifiez si les
câbles sont endommagés d'une quelconque façon.
77
FRANÇAIS
1. Déconnectez l'alimentation de l'appareil.
2. Maintenez le bouton de commande enfoncé et remettez l'appareil sous tension.
Consultez Aperçu du matériel page 49.
3. Appuyez sur le bouton de commande pendant environ 25 secondes jusqu’à ce que le
voyant d'état passe à l’orange une seconde fois.
4. Relâchez le bouton de commande. Le processus est terminé lorsque le voyant d'état passe
au vert. Les paramètres d’usine par défaut de l'appareil ont été rétablis. En l'absence d'un
serveur DHCP sur le réseau, l'adresse IP par défaut est 192.168.0.90.
5. Utilisez les outils d'installation et de gestion pour attribuer une adresse IP, configurer le
mot de passe et accéder au flux de données vidéo.
Il est également possible de rétablir les paramètres d’usine à partir de l’interface Web. Accédez à
(Configuration > Options du système > Maintenance)Setup > Additional Controller Configuration
> Setup > System Options > Maintenance (Configuration > Configuration du contrôleur
supplémentaire > Configuration > Options du système > Maintenance).
AXIS A1001 Network Door Controller
-
Remplacez tous les câbles endommagés ou défaillants.
Une fois les câbles remplacés, vérifiez à nouveau tous les branchements
matériels. Ceci requiert d'accéder aux pages Web du produit. Pour plus
d’informations, reportez-vous au manuel de l’utilisateur.
• Vérifiez que toutes les programmations accès, les portes, les groupes et les utilisateurs
sont à jour. Ceci requiert d'accéder aux pages Web du produit. Pour plus d’informations,
reportez-vous au manuel de l’utilisateur.
• Si le contrôleur de porte se comporte de façon anormale, reportez-vous au manuel
de l'utilisateur pour en savoir plus sur le dépannage et les fonctions de maintenance
intégrées du produit.
Pour plus d'informations sur la maintenance de la batterie, consultez et Batterie page 44.
Pour obtenir plus de renseignements
Le Manuel de l'utilisateur est disponible à l'adresse suivante : www.axis.com
Consultez le site www.axis.com/techsup pour vérifier si des mises à jour des logiciels sont
disponibles pour votre appareil réseau. Pour connaître la version du micrologiciel actuellement
installée, reportez-vous à la page Setup > About (Configuration > À propos de).
Visitez le centre d'apprentissage en ligne Axis sur le site www.axis.com/academy pour en savoir
plus sur les formations, les webinaires, les tutoriels et les guides.
Informations sur la garantie
Pour obtenir plus d'amples informations sur la garantie du produit AXIS et des renseignements
connexes, allez sur le site www.axis.com/warranty/
78
AXIS A1001 Network Door Controller
Sicherheitsinformation
Lesen Sie das Installationshandbuch sorgfältig durch bevor sie das Produkt installieren. Bewahren
Sie das Installationshandbuch für zukünftige Zwecke auf.
Gefährdungsstufen
GEFAHR
Weist auf eine gefährliche Situation hin, welche, falls nicht
verhindert, zu Tod oder schweren Verletzungen führt.
WARNUNG
Weist auf eine gefährliche Situation hin, welche, falls nicht
verhindert, zu Tod oder schweren Verletzungen führen kann.
VORSICHT
Weist auf eine gefährliche Situation hin, welche, falls nicht
verhindert, zu geringfügiger oder mäßiger Verletzung führen kann.
Weist auf eine gefährliche Situation hin, welche, falls nicht
verhindert, zu Sachschäden führen kann.
Weitere Nachrichtenstufen
Wichtig
Weist auf wichtige Informationen hin, die den richtigen Betrieb
des Produkts gewährleisten.
Beachten
Weist auf nützliche Informationen hin, die die optimale
Verwendung des Produkts unterstützen.
79
DEUTSCH
HINWEIS
AXIS A1001 Network Door Controller
Sicherheitsanweisungen
WARNUNG
• Das Axis Produkt muss von fachmännischem Personal installiert werden.
HINWEIS
• Die Anwendung des Axis Produkts muss unter Beachtung der örtlich geltenden rechtlichen
Bestimmungen erfolgen.
• Bei der Anwendung von Axis Produkten im Außenbereich oder ähnlichen Umgebungen,
müssen diese in zugelassenen Außengehäusen installiert werden.
• Lagern Sie das Axis Produkt in einer trockenen und belüfteten Umgebung.
• Achten Sie darauf, dass das Axis Produkt weder Stößen noch starkem Druck ausgesetzt ist.
• Installieren Sie das Produkt nicht an instabilen Halterungen, Oberflächen oder Wänden.
• Verwenden Sie bei der Installation des Axis Produkts ausschließlich passende Werkzeuge.
Ein zu großer Kraftaufwand kann das Produkt beschädigen.
• Verwenden Sie keine chemischen, ätzenden oder aerosolhaltigen Reinigungsmittel.
Verwenden Sie zum Reinigen ein sauberes, mit lauwarmem Wasser angefeuchtetes Tuch.
• Verwenden Sie nur Zubehör, das den technischen Daten des Produkts entspricht. Dieses
ist von Axis oder Drittanbietern erhältlich.
• Verwenden Sie ausschließlich Ersatzteile die von Axis bereitgestellt oder empfohlen
werden.
• Versuchen Sie nicht, das Produkt selbstständig zu reparieren. Wenden Sie sich bezüglich
Reparatur und Wartung an den Axis Support oder Ihren Axis Händler.
Transport
HINWEIS
• Bei Bedarf transportieren Sie das Axis Produkt in der Originalverpackung oder einer
entsprechenden Verpackung, so dass Schäden vermieden werden.
Batterie
Das Axis-Produkt ist mit einer 3,0 V-BR/CR2032-Lithium-Batterie ausgestattet, mit der die interne
Echtzeituhr (RTC) versorgt wird. Unter normalen Bedingungen hat die Batterie eine Lebensdauer
von mindestens fünf Jahren.
Bei entladener Batterie ist der Betrieb der Echtzeituhr nicht mehr gewährleistet, sodass die Uhr bei
jedem Systemstart zurückgesetzt wird. Sie erhalten eine Protokollnachricht im Serverbericht des
Produkts, wenn ein Batteriewechsel erforderlich ist. Weitere Informationen über den Serverbericht
finden Sie auf den Setup-Seiten des Produkts, oder wenden Sie sich an den Axis Support.
80
AXIS A1001 Network Door Controller
Die Batterie sollte nur bei Bedarf ersetzt werden. Wenden Sie sich in diesem Fall an den Axis
Support unter www.axis.com/techsup.
WARNUNG
• Explosionsgefahr bei fehlerhaftem Batteriewechsel.
• Die Batterie darf nur durch eine identische Batterie oder eine von Axis empfohlene
Batterie ersetzt werden.
• Verbrauchte Batterien sind gemäß den örtlichen Vorschriften oder den Anweisungen des
Herstellers zu entsorgen.
DEUTSCH
81
82
AXIS A1001 Network Door Controller
Installationsanleitung
In dieser Anleitung wird die Installation des AXIS A1001 Netzwerk-Tür-Controllers in Ihrem
Netzwerk beschrieben. Weitere Informationen zur Verwendung dieses Produktes finden Sie im
Benutzerhandbuch unter www.axis.com.
Installationsschritte
1. Stellen Sie sicher, dass die Packungsinhalte, Werkzeuge und andere notwendige
Materialien für die Installation in Ordnung sind. Siehe Seite 83.
2. Machen Sie sich mit der Hardware-Übersicht vertraut. Siehe Seite 85.
3. Machen Sie sich mit den technischen Daten vertraut. Siehe Seite 90.
4. Installieren Sie die Hardware. Siehe Seite 98.
5. Zugriff auf das Produkt. Siehe Seite 108.
•
•
•
•
•
•
•
AXIS A1001 Netzwerk-Tür-Controller
Kabelbinder (4x)
Schraube für Abdeckung
6-poliger Anschlussstecker (5x) (eingesteckt)
Leser-E/A (blau)
Leser-E/A (rot)
Leser-Daten (weiß)
Leser-Daten (gelb)
Strom und Relais (orange)
4-poliger Anschlussstecker (5x) (eingesteckt)
Audio (weiß)
Zusatzanschluss (gelb)
Tür-Eingang (blau)
Tür-Eingang (rot)
Stromversorgung Verriegelung (orange)
2-poliger Anschlussstecker (eingesteckt)
Stromversorgung (schwarz)
Dokumente
Bebilderte Installationsanleitung
Zusätzliche Etiketten mit der Seriennummer (2x)
AVHS-Authentifizierungsschlüssel
83
DEUTSCH
Lieferumfang
AXIS A1001 Network Door Controller
Empfohlene Werkzeuge
•
•
•
•
•
Bohrmaschine (für Wand- oder Deckenmontage)
Schraubendreher (für Wand- oder Deckenmontage)
Schlitzschraubendreher (zum Öffnen der Abdeckung)
Torx-Schraubendreher (T10) (zum Festziehen der Abdeckungsschraube)
Abisoliergerät
84
AXIS A1001 Network Door Controller
Übersicht über die Hardware
1
DEUTSCH
2
3
4
5
6
7
8
Vorder- und Rückseite:
1 Abdeckung
2 Schraube für Abdeckung
3 Schlitz zum Entfernen der Abdeckung
4 Grundplatte
5 DIN-Halterung – obere
6 Manipulationsalarmschalter – Rückseite
85
AXIS A1001 Network Door Controller
7
8
DIN-Halterung – untere
Bestellnummer (P/N) und Seriennummer (S/N)
1
4
2
6
3
5
8
7
9
10
11
12
E/A-Schnittstelle:
1 Leser-Daten-Anschluss (READER DATA 1)
10 Leser-Daten-Anschluss (READER DATA 2)
3 Leser-E/A-Anschluss (READER I/O 1)
8 Leser-E/A-Anschluss (READER I/O 2)
4 Türanschluss (DOOR IN 1)
7 Türanschluss (DOOR IN 2)
6 Zusatzanschluss (AUX)
5 Audioanschluss (AUDIO) (nicht verwendet)
Externe Stromanschlüsse:
2 Netzanschluss (DC IN)
12 Netzwerkanschluss (PoE)
Stromausgänge:
9 Stromanschluss für Schloss (LOCK)
11 Netz- und Relaisanschluss (PWR, RELAY)
86
AXIS A1001 Network Door Controller
2
1
3
4
5
6
7
13
9
11
10
LED-Anzeigen, Tasten und andere Hardware:
1 LED-Betriebsanzeige
2 LED-Statusanzeige
3 LED-Netzwerkanzeige
4 LED-Anzeige für Leser 2 (nicht verwendet)
5 LED-Anzeige für Leser 1 (nicht verwendet)
6 Stiftleiste für Manipulationsalarm – Vorderseite (TF)
7 Stiftleiste für Manipulationsalarm – Rückseite (TB)
8 LED-Anzeige für Schloss
9 LED-Anzeige für Schloss
10 Manipulationsalarmsensor – Vorderseite
11 SD-Speicherkarteneinschub (microSDHC) (nicht verwendet)
12 Steuertaste
13 Bestellnummer (P/N) und Seriennummer (S/N)
87
DEUTSCH
8
12
AXIS A1001 Network Door Controller
LEDs
LED
Farbe
Bedeutung
Netzwerk
Grün
Leuchtet bei Verbindung mit einem 100 MBit/s-Netzwerk. Blinkt
bei Netzwerkaktivität.
Gelb
Leuchtet bei Verbindung mit einem 10 MBit/s-Netzwerk. Blinkt bei
Netzwerkaktivität.
Leuchtet
nicht
Keine Netzwerkverbindung vorhanden.
Grün
Leuchtet bei Normalbetrieb grün.
Gelb
Leuchtet beim Start und beim Wiederherstellen der Einstellungen.
Rot
Blinkt langsam bei einem Aktualisierungsfehler.
Stromversorgung
Grün
Normaler Betrieb.
Gelb
Blinkt grün/gelb bei der Firmware-Aktualisierung.
Schloss
Grün
Konstant im spannungslosen Zustand.
Rot
Konstant bei anliegender Spannung.
Leuchtet
nicht
Potentialfrei.
Status
Beachten
• Die Status-LED kann so eingestellt werden, dass sie blinkt, wenn ein Ereignis aktiv ist.
• Die Status-LED kann so eingestellt werden, dass sie blinkt, wenn die Einheit erkannt
wird. Rufen Sie Setup > Additional Controller Configuration > System Options >
Maintenance (Setup > Grundeinstellungen des Controllers > Systemoptionen >
Wartung) auf.
Anschlüsse und Tasten
Für die technischen Daten und Betriebsbedingungen siehe Seite 90.
E/A-Schnittstelle
Leser-Daten-Anschluss
Zwei 6-polige Anschlussblöcke mit Unterstützung für RS485- und Wiegand-Protokoll zur
Kommunikation mit dem Leser. Technische Daten finden Sie auf Seite 92.
88
AXIS A1001 Network Door Controller
Leser-E/A-Anschluss
Zwei 6-polige Anschlussblöcke für Lesereingang und -ausgang. Abgesehen vom 0 V DC-Bezugspunkt
und Strom (Gleichstromausgang) verfügt der Leser-E/A-Anschluss über eine Schnittstelle zum:
• Digitaleingang – z. B. zum Anschließen eines Leser-Manipulationsalarms.
• Digitalausgang – z. B. zum Anschließen von Leser-Signaltongebern und Leser-LEDs.
Technische Daten finden Sie auf Seite 92.
Türanschluss
Zwei 4-polige Anschlussblöcke zum Anschließen von Türüberwachungsgeräten und REX-Geräten
(Request to Exit). Technische Daten finden Sie auf Seite 93.
•
Digitaleingang – Alarmeingang für den Anschluss von Geräten, die zwischen
geöffnetem und geschlossenem Schaltkreis wechseln können, z. B. PIR-Sensoren oder
Glasbruchmelder.
• Digitalausgang – zum Anschluss externer Geräte wie Einbruchalarme, Sirenen
oder Leuchten. Angeschlossene Geräte können über die VAPIX®-API (Application
Programming Interface) oder über eine Aktionsregel aktiviert werden.
Technische Daten finden Sie auf Seite 94.
Externe Stromanschlüsse
HINWEIS
Das Produkt muss mit einem abgeschirmten Netzwerkkabel (STP) angeschlossen werden.
Alle Kabel, die das Produkt mit dem Netzwerkswitch verbinden, müssen hierfür ausgelegt
sein. Stellen Sie sicher, dass die Netzwerkgeräte gemäß den Anweisungen des Herstellers
installiert wurden. Informationen zu gesetzlichen Bestimmungen finden Sie unter
Electromagnetic Compatibility (EMC) on page 2.
Netzanschluss
2-poliger Anschlussblock für die Gleichstromversorgung. Verwenden Sie eine mit den
Anforderungen für Schutzkleinspannung (SELV) kompatible Stromquelle mit begrenzter Leistung
(LPS), entweder mit einer Nennausgangsleistung von ≤100 W oder einem dauerhaft auf
≤5 A begrenzten Nennausgangsstrom. Technische Daten finden Sie auf Seite 94.
Netzwerkanschluss
RJ-45-Ethernetanschluss. Unterstützt Power over Ethernet (PoE). Technische Daten finden Sie
auf Seite 95.
89
DEUTSCH
Zusatzanschluss
4-poliger konfigurierbarer E/A-Anschlussblock. Zur Verwendung mit externen Geräten in
Verbindung mit Manipulationsalarmen, Ereignisauslösung, Alarmbenachrichtigungen usw.
Abgesehen vom 0 V DC-Bezugspunkt und Strom (Gleichstromausgang) verfügt der Zusatzanschluss
über eine Schnittstelle zum:
AXIS A1001 Network Door Controller
Stromausgänge
Stromanschluss
4-poliger Anschlussblock für ein oder zwei Schlösser. Dieser Anschluss kann auch zur
Stromversorgung externer Geräte verwendet werden. Technische Daten finden Sie auf Seite 95.
Netz- und Relaisanschluss
6-poliger Anschlussblock für den Netzanschluss und das Relais des Tür-Controllers für externe
Geräte wie Schlösser und Sensoren. Technische Daten finden Sie auf Seite 96.
Tasten und andere Hardware
Stiftleiste für Manipulationsalarm
Zwei 2-polige Stiftleisten zum Trennen des vorderen und rückseitigen Manipulationsalarms.
Technische Daten finden Sie auf Seite 96.
Steuertaste
Die Steuertaste hat folgende Funktionen:
•
•
Zurücksetzen des Produkts auf die Werkseinstellungen. Siehe Seite 114.
Verbinden mit einem AXIS Video Hosting System-Service oder einem AXIS Internet
Dynamic DNS-Service. Weitere Informationen zu diesen Diensten finden Sie in der
Bedienungsanleitung.
Technische Daten
Betriebsbedingungen
Das Axis Produkt ist für die Verwendung in Innenräumen ausgelegt.
Klassifikation
Temperatur
Luftfeuchtigkeit
IEC 60721-4-3 Klasse 3K3,
3M3
0 °C bis 50 °C
20 bis 85 % rF (nicht kondensierend)
Stromverbrauch
HINWEIS
Verwenden Sie eine mit den Anforderungen für Schutzkleinspannung (SELV) kompatible
Stromquelle mit begrenzter Leistung (LPS), entweder mit einer Nennausgangsleistung von
≤100 W oder einem dauerhaft auf ≤5 A begrenzten Nennausgangsstrom.
90
AXIS A1001 Network Door Controller
Netzteil
Max. Last an Ausgängen
Power over Ethernet IEEE 802.3af/802.3at Typ 1 Klasse 3,
44–57 V DC
7,5 W
10–30 V DC, max. 26 W
14 W
Für technische Daten der Anschlüsse siehe Stromanschluss auf Seite 94 und Netzwerkanschluss
auf Seite 95.
Aderquerschnitt
AWG
Durchmesser mm
Querschnitt mm2
28–16
0.321–1.29 (0.0126–0.0508)
0.0810–1.31
22–14
0.644–1.63 (0.0253–0.0641)
0.326–2.08
Anschlüsse
Für Informationen zur Lage der Anschlüsse siehe Übersicht über die Hardware auf Seite 85.
Für Anschlussschaltbilder und Informationen zu dem bei der Hardwarekonfiguration erstellten Pin
Chart siehe Anschlussschaltbilder auf Seite 97 und Konfigurieren der Hardware auf Seite 99.
Im folgenden Abschnitt finden Sie die technischen Daten der Anschlüsse.
91
DEUTSCH
HINWEIS
Jeder Draht muss einen Querschnitt aufweisen, der einem Bereich von AWG 28–16 (CSA)
bzw. AWG 22–14 (cUL/UL) entspricht. Verwenden Sie Kabel, die den örtlichen Vorschriften
entsprechen.
AXIS A1001 Network Door Controller
Leser-Daten-Anschluss
6-poliger Anschlussblock für die Kommunikation mit dem Leser
(unterstützt RS485- und Wiegand-Protokoll).
Die RS485-Ports unterstützen:
• Zweiadrig RS485 Halbduplex
• Vieradrig RS485 Vollduplex
Die Wiegand-Ports unterstützen:
• Zweiadrig Wiegand
Funktion
RS485
RS485
Wiegand
Kontakt
Hinweise
A-
1
B+
2
RS485 für Vollduplex
RS485 für Halbduplex
A-
3
B+
4
D0 (Daten 0)
5
D1 (Daten 1)
6
RS485 für Vollduplex
RS485 für Halbduplex
Für Wiegand
Wichtig
Die empfohlene maximale Kabellänge beträgt 30 m.
Leser-E/A-Anschluss
6-poliger Anschlussblock für:
• Zusatzstromversorgung (Gleichstromausgang)
• Digitaleingang
• Digitalausgang
• 0 V DC (-)
Kontakt 3 an den Leser-E/A-Anschlüssen kann überwacht werden. Bei
Unterbrechung der Verbindung wird ein Ereignis ausgelöst. Bringen
Sie zur Verwendung überwachter Eingänge Abschlusswiderstände an.
Beachten Sie das Anschlussschaltbild für überwachte Eingänge. Siehe
Seite 98.
92
AXIS A1001 Network Door Controller
Funktion
Kontakt
Hinweise
Technische Daten
0 V DC (-)
1
Gleichstromausgang
2
Zur Stromversorgung von
Zusatzgeräten.
Hinweis: Dieser Kontakt kann nur für
den Stromausgang verwendet werden.
12 V DC
Max. Stromstärke
= 300 mA
Konfigurierbar
(Ein- oder
Ausgang)
3–6
Digitaleingang – Zum Aktivieren mit
Kontakt 1 verbinden; zum Deaktivieren
nicht anschließen.
0 bis max. 40 V DC
Digitalausgang – Zum Aktivieren mit
Kontakt 1 verbinden; zum Deaktivieren
nicht anschließen. Bei Verwendung
mit einer induktiven Last, z. B. einem
Relais, muss parallel zur Last zum
Schutz vor Spannungsspitzen eine
Diode zwischengeschaltet werden.
0 bis max. 40 V DC,
Open Drain, 100 mA
0 V DC
DEUTSCH
Türanschluss
Zwei 4-polige Anschlussblöcke für Türüberwachungsgeräte
(Digitaleingang).
Alle Türeingangskontakte können überwacht werden. Bei Unterbrechung
der Verbindung wird ein Alarm ausgelöst. Bringen Sie zur Verwendung
überwachter Eingänge Abschlusswiderstände an. Beachten Sie das
Anschlussschaltbild für überwachte Eingänge. Siehe Seite 98.
Funktion
Kontakt
0 V DC (-)
1, 3
Eingang
2, 4
Hinweise
Technische Daten
0 V DC
Zur Kommunikation mit dem Türmonitor.
Digitaleingang – Zum Aktivieren mit
Kontakt 1 bzw. 3 verbinden; zum
Deaktivieren nicht anschließen.
Hinweis: Dieser Kontakt kann nur für
den Eingang verwendet werden.
93
0 bis max 40 V DC
AXIS A1001 Network Door Controller
Zusatzanschluss
4-poliger konfigurierbarer E/A-Anschlussblock für:
• Zusatzstromversorgung (Gleichstromausgang)
• Digitaleingang
• Digitalausgang
• 0 V DC (-)
Ein Anschlussschaltbild als Beispiel finden Sie unter
Anschlussschaltbilder auf Seite 97.
Funktion
Kontakt
Hinweise
Technische Daten
0 V DC (-)
1
Gleichstromausgang
2
Zur Stromversorgung von
Zusatzgeräten.
Hinweis: Dieser Kontakt kann nur für
den Stromausgang verwendet werden.
3,3 V DC
Max. Stromstärke
= 100 mA
Konfigurierbar (Einoder Ausgang)
3–4
Digitaleingang – Zum Aktivieren mit
Kontakt 1 verbinden; zum Deaktivieren
nicht anschließen.
0 bis max. 40 V DC
Digitalausgang – Zum Aktivieren mit
Kontakt 1 verbinden; zum Deaktivieren
nicht anschließen. Bei Verwendung
mit einer induktiven Last, z. B.
einem Relais, muss zum Schutz vor
Spannungsspitzen eine Diode parallel
zur Last zwischengeschaltet werden.
0 bis max. 40 V DC,
Open Drain, 100 mA
0 V DC
Stromanschluss
2-poliger Anschlussblock für die Gleichstromversorgung. Verwenden
Sie eine mit den Anforderungen für Schutzkleinspannung (SELV)
kompatible Stromquelle mit begrenzter Leistung (LPS), entweder mit
einer Nennausgangsleistung von ≤100 W oder einem dauerhaft auf
≤5 A begrenzten Nennausgangsstrom.
94
AXIS A1001 Network Door Controller
Funktion
Kontakt
0 V DC (-)
1
Gleichstromeingang
2
Hinweise
Technische Daten
0 V DC
Stromversorgung des Controllers ohne
Power over Ethernet.
Hinweis: Dieser Kontakt kann nur für
den Stromeingang verwendet werden.
10–30 V DC, max. 26 W
Max. Last an
Ausgängen = 14 W
Netzwerkanschluss
RJ45-Ethernetanschluss. Unterstützt Power over Ethernet (PoE).
Verwenden Sie Kabel der Kategorie 5e oder höher.
Technische Daten
Stromversorgung und
Ethernet
Power over Ethernet IEEE 802.3af/802.3at Typ 1 Klasse 3,
44 bis 57 V DC
Max. Last an Ausgängen = 7,5 W
Stromanschluss (Schloss)
4-poliger Anschlussblock für ein oder zwei Schlösser
(Gleichstromausgang). Dieser Anschluss kann auch zur Stromversorgung
externer Geräte verwendet werden.
Schließen Sie Schlösser und andere Geräte gemäß dem während der
Hardwarekonfiguration erstellten Pin Chart an.
Funktion
Kontakt
0 V DC (-)
1, 3
0 V DC, frei
oder 12 V DC
2, 4
Hinweise
Technische Daten
0 V DC
Zur Steuerung von bis zu zwei
12-V-Schlössern. Verwenden Sie
das Pin Chart. Siehe Konfigurieren
der Hardware auf Seite 99.
95
12 V DC
Max. Gesamtlast = 500 mA
DEUTSCH
Funktion
AXIS A1001 Network Door Controller
Netz- und Relaisanschluss
6-poliger Anschlussblock mit integriertem Relais für:
• Externe Geräte
• Zusatzstromversorgung (Gleichstromausgang)
• 0 V DC (-)
Schließen Sie Schlösser und andere Geräte gemäß dem während der
Hardwarekonfiguration erstellten Pin Chart an.
Funktion
Kontakt
Hinweise
Technische Daten
0 V DC (-)
1, 4
Relais
2–3
Zum Anschluss von Relaisgeräten.
Verwenden Sie das Pin Chart. Siehe
Konfigurieren der Hardware auf
Seite 99.
Die beiden Relaisanschlüsse sind
galvanisch von den anderen
Schaltkreisen getrennt.
Max. Stromstärke = 700 mA
Max. Spannung = +30 V DC
12 V DC
5
Zur Stromversorgung von
Zusatzgeräten.
Hinweis: Dieser Kontakt kann nur
für den Stromausgang verwendet
werden.
Max. Spannung = +12 V DC
Max. Last = 500 mA
24 V DC
6
Nicht verwendet
0 V DC
Manipulationsalarm-Stiftleiste
Zwei 2-polige Leisten zur Überbrückung des:
• Hinteren Manipulationsalarms (TB)
• Vorderen Manipulationsalarms (TF)
Funktion
Kontakt
Hinweise
Hinterer
Manipulationsalarm
1–2
Vorderer
Manipulationsalarm
1–2
Setzen Sie die Drahtbrücken zwischen TB 1, TB 2 bzw.
TF 1, TF 2, um den vorderen bzw. hinteren
Manipulationsalarm zu überbrücken. Bei einer
Überbrückung des Manipulationsalarms erkennt das
System keine Manipulationsversuche.
96
AXIS A1001 Network Door Controller
Beachten
Der vordere und der hintere Manipulationsalarm sind standardmäßig aktiviert. Der Auslöser
für die Öffnung des Gehäuses kann so konfiguriert werden, dass eine Aktion ausgeführt
wird, wenn der Tür-Controller geöffnet bzw. von der Wand oder der Decke entfernt wird.
Weitere Informationen zur Konfiguration von Alarmen und Ereignissen finden Sie im
Benutzerhandbuch.
Anschlussschaltbilder
Schließen Sie Geräte gemäß dem während der Hardwarekonfiguration erstellten Pin Chart an.
Weitere Informationen zu Hardwarekonfiguration und Pin Chart finden Sie unter Konfigurieren
der Hardware auf Seite 99.
Zusatzanschluss
2
A
B
1
2
A
B
0 V (-) DC
Gleichstromausgang: 3,3 V, max. 100 mA
E/A als Eingang konfiguriert
E/A als Ausgang konfiguriert
97
DEUTSCH
1
AXIS A1001 Network Door Controller
Überwachte Eingänge
i
22 kΩ
4.7 kΩ
ii
Bringen Sie zur Verwendung überwachter Eingänge Abschlusswiderstände an. Dies gilt für alle
überwachten Eingänge. Informationen zu Einschränkungen und Aktualisierungen sind in den
Release-Notes des Produkts enthalten.
i
ii
Eingang
0 V DC (-)
Installieren der Hardware
VORSICHT
Das Axis Produkt darf nicht montiert werden, während es mit Strom versorgt wird. Schalten
Sie die Stromversorgung immer erst am Ende der Installation ein.
HINWEIS
Um die Stromkreise vor elektrostatischer Entladung (ESD) zu schützen, ist bei der
Handhabung des Produkts ein ESD-Schutz zu verwenden, wenn Komponenten und Kontakte
freiliegen.
Lesen Sie die Anleitung, bevor Sie das Produkt installieren.
•
•
•
•
Informationen zum Konfigurieren der Hardware finden Sie auf Seite 99.
Weitere Informationen zur Installation des Produkts an einer Wand (empfohlen) oder an
der Decke finden Sie auf Seite 101.
Weitere Informationen zur Installation des Produkts auf einer DIN-Schiene finden Sie
auf Seite 102.
Informationen zum Anschließen der Kabel finden Sie auf Seite 104.
98
AXIS A1001 Network Door Controller
Systembedingungen
Das Axis Produkt muss in einem sicheren Bereich installiert werden.
Das Axis Produkt, entweder ein eigenständiger Tür-Controller oder ein System von Tür-Controllern,
darf die bestimmungsgemäße Verwendung der daran angeschlossenen Geräte nicht einschränken
oder beeinträchtigen.
Das Axis Produkt sollte an einer Wand (empfohlen) oder einer Decke mit oder ohne Anschlussdose
installiert werden. Die Installation auf einer DIN-Schiene ist ebenfalls möglich.
Konfigurieren der Hardware
Konfigurieren Sie die Hardware auf den Seiten der Hardware Configuration
(Hardwarekonfiguration), bevor Sie das Produkt installieren.
Konfigurieren Sie die Hardware mithilfe einer der folgenden Methoden:
•
•
Importieren einer Hardwarekonfigurationsdatei. Siehe Seite 99.
Erstellen einer neuen Hardwarekonfiguration. Siehe Seite 100.
Importieren einer Hardware-Konfigurationsdatei
Die Hardwarekonfiguration des Axis Produkts kann schneller abgeschlossen werden, indem eine
Hardware-Konfigurationsdatei importiert wird.
Informationen zum Exportieren von Hardware-Konfigurationsdateien finden Sie im
Benutzerhandbuch.
So importieren Sie eine Hardware-Konfigurationsdatei:
1. Rufen Sie Setup > Hardware Configuration (Setup > Hardwarekonfiguration) auf.
2. Klicken Sie auf Import hardware configuration (Hardwarekonfiguration importieren)
oder, wenn bereits eine Hardwarekonfiguration vorhanden ist, auf Reset and import
hardware configuration (Zurücksetzen und Hardwarekonfiguration importieren.).
3. Wählen Sie im angezeigten Dateibrowser die Hardware-Konfigurationsdatei (*.json)
auf dem Computer aus.
4. Klicken Sie auf OK.
99
DEUTSCH
Türen, Schlösser und andere Geräte können vor Abschluss der Hardwarekonfiguration an das Axis
Produkt angeschlossen werden. Das Anschließen von Geräten ist jedoch einfacher, wenn Sie zuerst
die Hardwarekonfiguration abschließen, da Ihnen somit das Pin Chart zur Verfügung steht. Das
Pin Chart dient als Leitfaden für den Anschluss der Kontakte sowie als Referenz bei der Wartung.
Anweisungen zur Wartung finden Sie auf Seite 114.
AXIS A1001 Network Door Controller
Erstellen einer neuen Hardwarekonfiguration
So erstellen Sie eine komplett neue Hardwarekonfiguration:
1. Lösen Sie ggf. die Schraube für die Abdeckung, setzen Sie einen Schlitzschraubendreher
in den Schlitz zum Entfernen der Abdeckung ein und entfernen Sie die Abdeckung.
2. Verbinden Sie das Axis Produkt mit dem Netzwerk und warten Sie, bis die
Netzwerkverbindung hergestellt und das Produkt gestartet wurde. Wenn das Produkt
nicht per Power over Ethernet versorgt wird und stattdessen Ethernet sowie eine
externe Stromquelle verwendet werden, muss das Produkt außerdem an eine mit den
Anforderungen für Schutzkleinspannung (SELV) kompatible Stromquelle mit begrenzter
Leistung (LPS) angeschlossen werden. Weitere Informationen zum Netzanschluss
(Gleichstromeingang) finden Sie unter Technische Daten auf Seite 90.
3. Greifen Sie auf das Produkt zu. Siehe Seite 108.
4. Rufen Sie Setup > Hardware Configuration (Setup > Hardwarekonfiguration) auf
und klicken Sie auf Start new hardware configuration (Neue Hardwarekonfiguration
starten).
Wenn die Hardware des Produkts zuvor nicht konfiguriert wurde oder gelöscht
wurde, ist die Option Hardware Configuration (Hardwarekonfiguration) im
Benachrichtigungsbereich der Übersichtsseite verfügbar.
5. Wählen Sie eine Türoption entsprechend der Anzahl von Türen, eine (1) oder zwei (2), die
mit dem Axis Produkt verbunden werden.
6. Verwenden Sie eine deskriptive Namensgebung für jede Tür und klicken Sie auf Next
(Weiter). Es wird empfohlen, die Türen mit eindeutigen Namen zu beschreiben, damit
diese von allen Personen, die für die Verwaltung des Systems verantwortlich sind,
identifiziert werden können.
Sie können auch den Namen des Axis Produkts bearbeiten. Der Standardname umfasst
zur leichteren Identifizierung die Seriennummer.
7. Wählen Sie die Optionen für Türüberwachung und -schloss aus, die den Anforderungen
und dem Typ der verwendeten Schlossverbindungen entsprechen, und klicken Sie auf
Next (Weiter). Weitere Informationen zu den verfügbaren Optionen finden Sie im
Benutzerhandbuch.
8. Wählen Sie die Typen der zu verwendenden Leser aus und klicken Sie auf Finish
(Beenden). Weitere Informationen zu den verfügbaren Optionen finden Sie im
Benutzerhandbuch.
9. Klicken Sie im Dialogfeld, das nach Abschluss der Konfiguration angezeigt wird, auf OK
oder klicken Sie auf den Link, um das Pin Chart anzuzeigen.
Klicken Sie zum Ausdrucken des Pin Charts auf Print Hardware Pin Chart (Pin Chart
drucken).
10. Trennen Sie das Produkt vom Netzwerk. Trennen Sie das Produkt außerdem von der
Stromversorgung, wenn es nicht per Power over Ethernet versorgt wird.
Klicken Sie zum Abbrechen der Hardwarekonfiguration auf Cancel (Abbrechen). Dies ist auf jeder
der Hardware-Konfigurationsseiten möglich.
100
AXIS A1001 Network Door Controller
Wand- und Deckenmontage
HINWEIS
Wenn der Tür-Controller an einer Wand installiert wird, muss die Aussparung für die Kabel
nach unten zeigen.
101
DEUTSCH
1. Bei Verwendung einer Anschlussdose muss diese vor der Installation des
Netzwerk-Tür-Controllers angebracht werden. UL-Konformität muss mit einer
UL-gelisteten Anschlussdose gewährleistet werden.
2. Lösen Sie ggf. die Schraube für die Abdeckung, setzen Sie einen Schlitzschraubendreher
in den Schlitz zum Entfernen der Abdeckung ein und entfernen Sie die Abdeckung. Siehe
Übersicht über die Hardware auf Seite 85.
3. Markieren Sie vor dem Bohren die Bohrlöcher an der Wand/Decke, indem Sie die
Grundplatte als Schablone verwenden.
4. Bohren Sie ggf. Löcher für die Schrauben.
5. Bringen Sie die Grundplatte an der Wand bzw. Decke an. Die Schrauben und Dübel
müssen für das entsprechende Material (beispielsweise Holz, Metall, Rigips, Beton)
geeignet sein.
AXIS A1001 Network Door Controller
1
2
1
2
Grundplatte
Bohrung (4x)
6. Schließen Sie die Kabel an. Siehe Seite 104.
Montage an einer DIN-Schiene
1. Installieren Sie bei Bedarf eine DIN-Schiene (nicht enthalten).
2. Lösen Sie ggf. die Schraube für die Abdeckung, setzen Sie einen Schlitzschraubendreher
in den Schlitz zum Entfernen der Abdeckung ein und entfernen Sie die Abdeckung. Siehe
Übersicht über die Hardware auf Seite 85.
3. Haken Sie die untere flexible DIN-Halterung an der Unterseite der DIN-Schiene ein und
neigen Sie die Grundplatte dabei leicht nach vorn.
4. Heben Sie die Grundplatte an, sodass die untere DIN-Halterung die unterste Position
erreicht.
5. Neigen Sie die Grundplatte nach hinten, sodass sie parallel zur Wand/Decke ausgerichtet
ist.
6. Haken Sie die obere DIN-Halterung an der Oberseite der DIN-Schiene ein, indem Sie
die Grundplatte absenken.
102
AXIS A1001 Network Door Controller
1
2
3
DEUTSCH
4
1
2
3
4
Grundplatte
Bohrung (4x)
DIN-Schiene
Untere DIN-Halterung
7. Sichern Sie die Grundplatte mit vier Schrauben. Die Schrauben und Dübel müssen für das
entsprechende Material (beispielsweise Holz, Metall, Rigips, Beton) geeignet sein. Siehe
Wand- und Deckenmontage auf Seite 101.
Beachten
Ziehen Sie die Schrauben nicht zu fest an, um ein Verbiegen der Grundplatte zu vermeiden.
Lassen Sie ca. 2,5 mm Abstand. Wenn die Grundplatte verbogen ist, lässt sich die
Abdeckung nicht schließen.
8. Schließen Sie die Kabel an. Siehe Seite 104.
103
AXIS A1001 Network Door Controller
Anschließen der Kabel
VORSICHT
Trennen Sie das Gerät vom Stromnetz, bevor Sie Kabel an das Axis Produkt anschließen.
Stellen Sie niemals Verbindungen her, während das Produkt mit Strom versorgt wird.
HINWEIS
• Das Produkt muss mit einem abgeschirmten Netzwerkkabel (STP) angeschlossen werden.
Alle Kabel, die das Produkt mit dem Netzwerkswitch verbinden, müssen hierfür ausgelegt
sein. Stellen Sie sicher, dass die Netzwerkgeräte gemäß den Anweisungen des Herstellers
installiert wurden. Informationen zu gesetzlichen Bestimmungen finden Sie unter
Regulatory Information on page 2.
• Wenn Sie Power over Ethernet verwenden, darf das Netzwerkkabel erst an das Netzwerk
angeschlossen werden, nachdem alle anderen Kabel angeschlossen wurden.
• Fügen Sie eine Kabelschleife ein, um zukünftige Wartungsarbeiten zu erleichtern, um
übermäßige Zugkraft an Kabeln und Steckverbindungen zu verhindern und um Schäden an
der Aderisolierung zu vermeiden. Stellen Sie sicher, dass Kabel und Drähte ordnungsgemäß
gestützt und gesichert werden. Verwenden Sie die mitgelieferten Kabelbinder.
• Um die Stromkreise vor elektrostatischer Entladung (ESD) zu schützen, ist beim
Anschließen von Drähten an das Produkt ein ESD-Schutz zu verwenden.
1. Legen Sie das Netzwerkkabel um die Kabelführung und schließen Sie es an den
entsprechenden Anschluss an.
2. Sichern Sie das Netzwerkkabel mit einem der beiliegenden Kabelbinder an der
Kabelführung.
104
AXIS A1001 Network Door Controller
DEUTSCH
1
1
2
2
Kabelbinder
Netzwerkkabel
3. Manteln Sie die Kabel und Drähte je nach Bedarf mit einem Crimpzange ab.
4. Verbinden Sie die Drähte zwischen dem Tür-Controller und den Schlössern, Türen sowie
anderen Geräten. Weitere Informationen zu Anschlüssen und deren Spezifikationen
finden Sie auf Seite 88 und Seite 91.
HINWEIS
• Stellen Sie sicher, dass alle Drähte ordnungsgemäß angeschlossen sind. Eine fehlerhafte
Verdrahtung kann das Produkt beschädigen.
• Stellen Sie sicher, dass Sie Drähte verwenden, die die Anforderungen erfüllen. Weitere
Informationen finden Sie unter Aderquerschnitt auf Seite 91 sowie, für UL-Konformität,
unter Requirements for UL Compliance on page 4.
105
AXIS A1001 Network Door Controller
1
4
2
3
Beispiel für Verkabelung
1
2
3
4
6-poliger Anschlussstecker
Netzwerkkabel
Kabelbinder (4x)
Netzwerkanschluss
Beachten
• Verwenden Sie für Geräte, die auf den Hardware-Konfigurationsseiten des Produkts
konfiguriert wurden, das Pin Chart als Leitfaden zum Verbinden der Kontakte. Weitere
Informationen zu Hardwarekonfiguration und Pin Chart finden Sie unter Konfigurieren
der Hardware auf Seite 99.
• Informationen über das Anschließen weiterer Kabel, wie z. B. Stromkabel für Schlösser,
Leser und andere Geräte, finden Sie in den Anweisungen des Herstellers.
5. Bündeln Sie die Leitungen und sichern Sie sie mit den beiliegenden Kabelbindern.
6. Kennzeichnen Sie die Kabel.
7. Verbinden Sie das Netzwerkkabel mit dem Netzwerk, wenn Sie Power over Ethernet
verwenden.
106
AXIS A1001 Network Door Controller
8. Wenn Sie Ethernet sowie eine externe Stromquelle (10–30 V DC) verwenden, verbinden
Sie das Netzwerkkabel mit dem Netzwerk, und schließen Sie die Stromversorgung
an. Verwenden Sie eine mit den Anforderungen für Schutzkleinspannung (SELV)
kompatible Stromquelle mit begrenzter Leistung (LPS). Für weitere Informationen siehe
Stromanschluss auf Seite 94
DEUTSCH
1
2
Beispiel für Verkabelung
1
2
Netzwerkanschluss
Netzwerkkabel
9. Vergewissern Sie sich, dass die LEDs die richtigen Zustände anzeigen. Siehe LEDs auf
Seite 88.
10. Bringen Sie die Abdeckung an der Grundplatte an und ziehen Sie die Schrauben fest.
107
AXIS A1001 Network Door Controller
1
2
1
2
Abdeckung
Schraube für Abdeckung (T10)
Zugriff auf das Produkt
Das Produkt ist mit den meisten Standard-Betriebssystemen und Browsern kompatibel. Empfohlen
werden die Browser Internet Explorer für Windows, Safari für Macintosh und Firefox für andere
Betriebssysteme.
Wenn Sie zum ersten Mal auf das Produkt zugreifen, müssen Sie eine IP-Adresse zuweisen und das
Kennwort für den Standard-Administrator auf root festlegen.
•
•
Wie Sie eine IP-Adresse zuweisen, finden Sie auf Seite 109.
Informationen zum Festlegen des Root-Kennworts finden Sie auf Seite 113
Zugriff über einen Browser
1. Starten Sie einen Browser (Internet Explorer, Firefox, Safari).
2. Geben Sie in die Adresszeile des Browsers die IP-Adresse oder den Host-Namen des Axis
Produkts ein. Wenn Sie von einem Macintosh-Computer (Mac OS X) auf das Produkt
108
AXIS A1001 Network Door Controller
zugreifen möchten, klicken Sie auf den Bonjour-Tab, und wählen Sie ein Produkt aus
der Dropdownliste aus.
Wenn Sie die IP-Adresse nicht kennen, können Sie das Produkt mithilfe von AXIS IP
Utility im Netzwerk identifizieren. Weitere Informationen zum Ermitteln und Zuweisen
von IP-Adressen finden Sie unter Zuweisen einer IP-Adresse. Diese Information finden Sie
ebenso auf den Support-Seiten unter www.axis.com/techsup
3. Geben Sie Ihren Benutzernamen und Ihr Kennwort ein. Wenn dies der erste Zugriff auf
das Produkt ist, muss das Root-Kennwort konfiguriert werden. Anweisungen finden Sie
unter Festlegen des Root-Kennworts auf Seite 113.
4. AXIS Entry Manager wird im Browser geöffnet. Die Startseite wird als Übersichtsseite
bezeichnet.
Zugriff über das Internet
Weitere Informationen zu NAT-Traversal für IPv4 finden Sie im Benutzerhandbuch des Produkts.
Beachten Sie auch den AXIS Internet Dynamic DNS-Service unter www.axiscam.net.
Technische Hinweise zu diesem und anderen Themen finden Sie auf der Axis Support-Website
unter www.axis.com/techsup.
Zuweisen einer IP-Adresse
Standard-IP-Adresse
Das Axis-Produkt ist für die Nutzung innerhalb eines Ethernet-Netzwerkes ausgelegt und erfordert
daher für den Zugang eine IP-Adresse. In den meisten Netzwerken befindet sich ein DHCP-Server,
der angeschlossenen Geräten automatisch IP-Adressen zuweist. Falls Ihr Netzwerk über keinen
DHCP-Server verfügt, verwendet das Axis-Produkt als Standard-IP-Adresse 192.168.0.90.
Empfohlene Methoden für Windows®
Die für Windows® empfohlenen Methoden für das Finden von Axis-Produkten im Netzwerk und
das Zuweisen von IP-Adressen sind AXIS IP Utility und AXIS Camera Management. Beide
Anwendungen sind kostenfrei und können von www.axis.com/techsup heruntergeladen werden.
109
DEUTSCH
Nach dem Anschließen können Sie über Ihr lokales Netzwerk (LAN) auf das Axis Produkt zugreifen.
Um über das Internet auf das Produkt zugreifen zu können, muss der Netzwerk-Router so
konfiguriert werden, dass eingehender Datenverkehr zum Produkt zugelassen wird. Aktivieren Sie
dazu die NAT-Traversal-Funktion, bei der versucht wird, den Router automatisch für den Zugriff
auf das Produkt zu konfigurieren. Rufen Sie dazu Setup > System Options > Network > TCP/IP
Advanced (Grundeinstellungen > Systemoptionen > Netzwerk > TCP/IP Erweitert) auf.
AXIS A1001 Network Door Controller
AXIS IP Utility - Kleine Installationen
AXIS IP Utility erkennt automatisch in Ihrem Netzwerk vorhandene Axis-Produkte und zeigt
diese an. Die Anwendung kann außerdem zur manuellen Zuweisung einer statischen IP-Adresse
verwendet werden.
Beachten Sie, dass sich das Axis-Produkt und der Computer, auf dem AXIS IP Utility ausgeführt
wird, im gleichen Netzwerksegment (d. h. physischen Subnetz) befinden müssen.
Automatische Erkennung
1. Stellen Sie sicher, dass das Axis Produkt an das Netzwerk angeschlossen ist und
eingeschaltet wurde.
2. Starten Sie AXIS IP Utility.
3. Doppelklicken Sie auf das Axis Produkt, das im Fenster angezeigt wird, um die zugehörige
Weboberfläche zu öffnen.
4. Informationen zum Festlegen des Kennworts finden Sie auf Seite 113.
Manuelles Zuweisen der IP-Adresse (optional)
1. Wählen Sie eine verfügbare IP-Adresse im selben Netzwerksegment, in dem sich Ihr
Computer befindet.
2. Wählen Sie das Axis Produkt in der Liste aus.
3. Klicken Sie auf Assign new IP address to selected device (Ausgewähltem Gerät neue
und geben Sie die IP-Adresse ein.
IP-Adresse zuweisen)
4. Klicken Sie auf Assign (Zuweisen) und befolgen Sie die Anweisungen.
5. Doppelklicken Sie auf das Axis Produkt, das im Fenster angezeigt wird, um die zugehörige
Weboberfläche zu öffnen.
6. Informationen zum Festlegen des Kennworts finden Sie auf Seite 113.
AXIS Camera Management - Umfangreiche Installationen
AXIS Camera Management ist ein leistungsstarkes Installations- und Verwaltungstool
für Axis-Netzwerkprodukte. Das Tool kann automatisch das Netzwerk nach Geräten
durchsuchen, IP-Adressen zuweisen, Kennwörter vergeben, den Verbindungsstatus anzeigen,
Firmware-Aktualisierungen verwalten und Produktparameter konfigurieren. Es kann
Batch-Operationen für mehrere Produkte gleichzeitig ausführen.
Automatische Erkennung
1. Stellen Sie sicher, dass das Axis Produkt an das Netzwerk angeschlossen ist und
eingeschaltet wurde.
2. Starten Sie AXIS Camera Management.
110
AXIS A1001 Network Door Controller
Zuweisen von IP-Adressen in mehreren Geräten
AXIS Camera Management beschleunigt die Zuweisung von IP-Adressen für mehrere Geräte, indem
IP-Adressen aus einem angegebenen Bereich vorgeschlagen werden.
1. Wählen Sie die Geräte, die Sie konfigurieren möchten (es können unterschiedliche
Modelle ausgewählt werden) und klicken Sie auf Assign IP address to selected devices
(IP-Adresse ausgewählten Geräten zuweisen).
2. Klicken Sie auf Yes (Ja) im Dialogfeld Device Maintenance (Gerätewartung).
3. Wählen Sie Assign the following IP address range (Folgenden IP-Adressbereich
zuweisen) und geben Sie den IP-Adressbereich, die Subnetzmaske und den Standardrouter
für die Geräte ein. Klicken Sie auf Next (Weiter).
4. Die vorgeschlagenen IP-Adressen werden in der Liste New IP Addresses (Neue
IP-Adressen) aufgeführt. Wenn Sie eine IP-Adresse ändern möchten, wählen Sie das
betreffende Gerät aus und klicken Sie auf Edit IP (IP bearbeiten).
5. Klicken Sie auf Finish (Fertig).
Weitere Betriebssysteme und Methoden
Die Liste bietet einen Überblick über weitere Methoden zum Zuweisen oder Ermitteln der
IP-Adresse. Alle Methoden sind standardmäßig aktiviert und können deaktiviert werden.
•
Verbindung zum AVHS-Dienst (alle Betriebssysteme). Informationen zur Verbindung
mit einem AVHS-Dienst finden Sie in der Installationsanleitung des Dienstanbieters.
111
DEUTSCH
3. Stellen Sie eine Verbindung mit einem Server her.
Um eine Verbindung mit einem Server im Netzwerk herzustellen, wählen Sie
Remote-Server aus. Wählen Sie dann einen Server in der Dropdown-Liste aus oder geben
Sie die IP- bzw. DNS-Adresse in das Feld ein.
Um eine Verbindung zu einem Server herzustellen, der lokal auf Ihrem Computer
ausgeführt wird, wählen Sie This computer (Dieser Computer) aus.
4. Klicken Sie auf Log On (Anmelden), um sich als aktueller Computerbenutzer anzumelden,
oder deaktivieren Sie Log on as current user (Als aktueller Benutzer anmelden) und
geben Sie den Benutzernamen und das Kennwort für die Anmeldung ein.
5. Beim ersten Ausführen von AXIS Camera Management wird automatisch nach Axis
Produkten im Netzwerk gesucht. Um manuell nach Produkten zu suchen, wählen
Sie Configuration > Add Devices (Konfiguration > Geräte hinzufügen) aus. In der
Software wird eine Liste der gefundenen Produkte angezeigt.
Wählen Sie die hinzuzufügenden Produkte aus und klicken Sie auf Next (Weiter) und
dann auf Finish (Fertig stellen).
6. Klicken Sie in der Liste der Geräte auf die Adresse, um die Weboberfläche des Produkts
zu öffnen.
7. Informationen zum Festlegen des Kennworts finden Sie auf Seite 113.
AXIS A1001 Network Door Controller
•
•
•
•
•
Informationen und Hilfe bei der Suche nach einem lokalen AVHS-Dienstanbieter finden
Sie unter www.axis.com/hosting.
UPnP™ (Windows®). Wenn die Funktion auf dem Computer aktiviert ist, wird das Axis
Netzwerkprodukt automatisch erkannt und unter „Netzwerk“ bzw. „Netzwerkumgebung“
hinzugefügt.
Bonjour (Mac OS X® 10.4 oder höher). Gilt für Browser mit Unterstützung für Bonjour.
Navigieren Sie zum Bonjour-Lesezeichen Ihres Browsers (z. B. Safari) und klicken Sie auf
den Link, um die Weboberfläche aufzurufen.
AXIS Dynamic DNS Service (alle Betriebssysteme). Ein kostenloser Service von Axis, mit
dem Sie Ihr Axis Netzwerkprodukt schnell und einfach installieren können. Erfordert eine
Internetverbindung ohne HTTP-Proxyserver. Weitere Informationen hierzu finden Sie
unter www.axiscam.net.
ARP/Ping (alle Betriebssysteme). Siehe Zuweisen der IP-Adresse mit ARP/Ping. Der Befehl
muss innerhalb von 2 Minuten nach dem Anschließen der Stromversorgung erfolgen.
DHCP-Server (alle Betriebssysteme). Hinweise zum Anzeigen der Administrationsseiten
des DHCP-Servers im Netzwerk finden Sie in der Benutzerdokumentation.
Zuweisen der IP-Adresse mit ARP/Ping
Die IP-Adresse des Produkts kann mit ARP/Ping zugewiesen werden. Der Befehl muss innerhalb von
2 Minuten nach dem Anschließen der Stromversorgung erfolgen.
1. Wählen Sie eine nicht zugewiesene statische IP-Adresse im selben Netzwerksegment, in
dem sich der Computer befindet.
2. Suchen Sie nach der Seriennummer (S/N) auf dem Produktaufkleber.
3. Öffnen Sie eine Eingabeaufforderung, und geben Sie die folgenden Befehle ein:
Linux/Unix-Syntax
arp -s <IP-Adresse> <Seriennummer> temp
ping -s 408 <IP-Adresse>
Linux/Unix-Beispiel
arp -s 192.168.0.125 00:40:8c:18:10:00 temp
ping -s 408 192.168.0.125
Windows-Syntax (Sie müssen die Eingabeaufforderung möglicherweise als Administrator
ausführen.)
arp -s <IP-Adresse> <Seriennummer>
ping -l 408 -t <IP-Adresse>
Windows-Beispiel (Sie müssen die Eingabeaufforderung möglicherweise als
Administrator ausführen.)
arp -s 192.168.0.125 00-40-8c-18-10-00
ping -l 408 -t 192.168.0.125
4. Stellen Sie sicher, dass das Netzwerkkabel angeschlossen ist, und starten Sie das Produkt
neu, indem Sie die Stromversorgung unterbrechen und wiederherstellen.
112
AXIS A1001 Network Door Controller
5. Schließen Sie die Eingabeaufforderung, wenn das Produkt mit Reply from
192.168.0.125:... oder einer ähnlichen Meldung antwortet.
6. Öffnen Sie einen Browser und geben Sie http://<IP-Adresse> im Adressfeld ein.
Beachten
• Um eine Eingabeaufforderung in Windows zu öffnen, rufen Sie das Startmenü auf und
geben Sie cmd im Feld Ausführen/Suchen ein.
• Klicken Sie zum Verwenden des Befehls „ARP“ unter Windows 8/Windows 7/Windows
Vista mit der rechten Maustaste auf das Befehlszeilensymbol, und wählen Sie Als
Administrator ausführen aus.
• Um eine Eingabeaufforderung in Mac OS X zu öffnen, rufen Sie das Dienstprogramm
„Terminal“ unter Programme > Dienstprogramme auf.
Festlegen des Root-Kennworts
Um ein Abhören der Netzwerkkommunikation zu verhindern, können Sie das Root-Kennwort über
eine verschlüsselte HTTPS-Verbindung festlegen, die ein HTTPS-Zertifikat erfordert. Das Protokoll
HTTPS (Hypertext Transfer Protocol over SSL) wird verwendet, um den Datenverkehr zwischen
Webbrowsern und Servern zu verschlüsseln. Das HTTPS-Zertifikat gewährleistet den verschlüsselten
Informationsaustausch.
Der standardmäßige Administrator-Benutzername root kann nicht geändert bzw. gelöscht werden.
Wenn Sie das entsprechende Kennwort vergessen haben, muss das Gerät auf die Werkseinstellungen
zurückgesetzt werden. Informationen zum Zurücksetzen des Produkts auf die Werkseinstellungen
finden Sie im Benutzerhandbuch.
Zum Festlegen des Kennworts über eine standardmäßige HTTP-Verbindung geben Sie dieses direkt
in das Dialogfeld ein.
Um das Kennwort über eine verschlüsselte HTTPS-Verbindung festzulegen, führen Sie die folgenden
Schritte aus:
1. Klicken Sie auf Use HTTPS (HTTPS verwenden).
Ein befristetes Zertifikat (gültig für ein Jahr) wird erstellt. Dieses gewährleistet die
sichere Datenübertragung zum und vom Produkt. Das Kennwort kann jetzt sicher
festgelegt werden.
2. Geben Sie ein Kennwort ein und wiederholen Sie die Eingabe, um die korrekte
Schreibweise zu bestätigen.
3. Klicken Sie auf OK. Damit ist das Kennwort konfiguriert.
113
DEUTSCH
Für den Zugriff auf das Produkt muss das Kennwort für den standardmäßigen
Administrator-Benutzer root festgelegt werden. Bei der erstmaligen Verwendung des Produkts
wird das Dialogfeld Configure Root Password (Root-Kennwort konfigurieren) angezeigt. Dort
kann das Kennwort festgelegt werden.
AXIS A1001 Network Door Controller
Zurücksetzen auf Werkseinstellungen
Wichtig
Das Zurücksetzen auf die Werkseinstellungen sollte mit Vorsicht verwendet werden. Beim
Zurücksetzen auf die Werkseinstellungen werden alle Einstellungen einschließlich der
IP-Adresse auf die Werkseinstellungen zurückgesetzt.
Beachten
Die Software-Tools für Installation und Verwaltung sind über die Supportseiten unter
www.axis.com/techsup verfügbar.
So wird das Produkt auf die Werkseinstellungen zurückgesetzt:
1. Trennen Sie das Produkt von der Stromversorgung.
2. Halten Sie die Steuertaste gedrückt und stecken Sie den Netzstecker wieder ein. Siehe
Übersicht über die Hardware auf Seite 85.
3. Halten Sie die Steuertaste etwa 25 Sekunden gedrückt, bis die LED-Statusanzeige zum
zweiten Mal gelb leuchtet.
4. Lassen Sie die Steuertaste los. Der Vorgang ist abgeschlossen, wenn die
LED-Statusanzeige grün leuchtet. Das Produkt wurde auf die Werkseinstellungen
zurückgesetzt. Wenn kein DHCP-Server im Netzwerk verfügbar ist, lautet die
Standard-IP-Adresse 192.168.0.90.
5. Verwenden Sie die Software-Tools für Installation und Verwaltung, um eine IP-Adresse
zuzuweisen, ein Kennwort einzurichten und auf den Videostream zuzugreifen.
Die Parameter können auch über die Weboberfläche auf die Werkseinstellungen zurückgesetzt
werden. Rufen Sie Setup > Additional Controller Configuration > Setup > System Options
> Maintenance (Setup > Grundeinstellungen des Controllers > Setup > Systemoptionen >
Wartung) auf.
Wartungsanweisungen
Für einen reibungslosen Betrieb des Zugangskontrollsystems empfiehlt Axis eine regelmäßige
Wartung des Systems, einschließlich Tür-Controller und angeschlossener Geräte.
Die Wartung sollte mindestens einmal pro Jahr erfolgen. Die empfohlene Wartungsprozedur
umfasst unter anderem die folgenden Schritte:
•
•
•
Stellen Sie sicher, dass alle Verbindungen zwischen dem Tür-Controller und den externen
Geräten sicher sind.
Überprüfen Sie alle Hardware-Anschlüsse. Dafür ist der Zugriff auf die Weboberfläche
des Produkts erforderlich. Weitere Informationen hierzu finden Sie im Benutzerhandbuch.
Stellen Sie sicher, dass das System, einschließlich der angeschlossenen externen Geräte,
ordnungsgemäß funktioniert.
114
AXIS A1001 Network Door Controller
-
Ziehen Sie eine Karte durch und testen Sie Leser, Türen und Schlösser.
Wenn das System REX-Geräte, Sensoren oder andere Geräte umfasst, müssen
diese ebenfalls getestet werden.
Testen Sie ggf. Manipulationsalarme.
Wenn die Ergebnisse von einem der oben genannten Schritte auf Fehler oder unerwartetes
Verhalten hindeuten:
-
Weitere Informationen
Das Benutzerhandbuch finden Sie unter www.axis.com.
Unter www.axis.com/techsup finden Sie Firmware-Aktualisierungen für Ihre Netzwerkprodukte. Um
die aktuell installierte Firmware-Version zu sehen, gehen Sie auf Setup > About (Einrichten >
Über).
Besuchen Sie das Axis-Schulungszentrum www.axis.com/academy für anregende Schulungen,
Webinare, Lernprogramme und Anleitungen.
Garantieinformationen
Informationen zur Garantie der Axis Produkte und hierzu verbundene Informationen, finden Sie
unter www.axis.com/warranty/
115
DEUTSCH
Testen Sie die Signale der Drähte mit entsprechender Ausrüstung und
überprüfen Sie, ob die Drähte oder Kabel beschädigt sind.
Ersetzen Sie alle beschädigten oder fehlerhaften Kabel und Drähte.
Überprüfen Sie nach dem Austauschen der Kabel und Drähte alle
Hardware-Anschlüsse erneut. Dafür ist der Zugriff auf die Weboberfläche
des Produkts erforderlich. Weitere Informationen hierzu finden Sie im
Benutzerhandbuch.
• Stellen Sie sicher, dass alle Zugangszeitpläne, Türen, Gruppen und Benutzer aktuell
sind. Dafür ist der Zugriff auf die Weboberfläche des Produkts erforderlich. Weitere
Informationen hierzu finden Sie im Benutzerhandbuch.
• Wenn der Tür-Controller nicht wie erwartet funktioniert, finden Sie im Benutzerhandbuch
Informationen zur Fehlerbehebung sowie zu den integrierten Wartungsfunktionen des
Produkts.
Weitere Informationen zur Wartung der Batterie finden Sie unter Requirements for UL Compliance
on page 4 und Batterie auf Seite 80.
116
AXIS A1001 Network Door Controller
Informazioni di Sicurezza
Leggere questa Guida all'Installazione prima di installare il prodotto. Conservare la Guida
all'Installazione per usi futuri.
Livelli di pericolo
PERICOLO
Indica una situazione pericolosa che, se non evitata, provoca morte
o lesioni gravi.
AVVERTENZA
Indica una situazione pericolosa che, se non evitata, può provocare
la morte o lesioni gravi.
ATTENZIONE
Indica una situazione pericolosa che, se non evitata, può provocare
lesioni medie o minori.
A VVISO
Indica una situazione che, se non evitata, può danneggiare la
proprietà.
Altri livelli d'informazione
Indica informazioni importanti, essenziali per il corretto
funzionamento del prodotto.
Nota
Indica informazioni utili che aiutano a ottenere il massimo dal
prodotto.
117
ITALIANO
Importante
AXIS A1001 Network Door Controller
Istruzioni di sicurezza
AVVERTENZA
• Il prodotto Axis deve essere installato da un professionista qualificato.
A VVISO
• Il prodotto Axis deve essere utilizzato in conformità alle leggi e alle disposizioni locali.
• Per utilizzare il prodotto Axis in ambienti esterni, o in ambienti simili, è necessario
installarlo in una custodia per esterni approvata.
• Conservare il prodotto Axis in un ambiente asciutto e ventilato.
• Evitare di esporre il prodotto Axis a urti o pressioni eccessive.
• Non installare il prodotto su supporti, superfici o pareti instabili.
• Per l'installazione del prodotto Axis utilizzare solo strumenti adeguati. Una forza eccessiva
può causare danni al prodotto.
• Non utilizzare sostanze chimiche, agenti caustici o detergenti spray. Per la pulizia
utilizzare un panno pulito inumidito con acqua pura.
• Utilizzare solo accessori conformi alle specifiche tecniche del prodotto. Questi possono
essere forniti da Axis o da terze parti.
• Utilizzare solo parti di ricambio fornite o consigliate da Axis.
• Non tentare di riparare il prodotto da soli. Per le questioni relative alla manutenzione,
contattare l'assistenza o il rivenditore Axis.
Trasporti
A VVISO
• Durante il trasporto del prodotto Axis, utilizzare l'imballaggio originale o equivalente per
evitare danni al prodotto.
Batteria
Il prodotto Axis utilizza una batteria al litio da 3,0 V BR/CR2032 come alimentazione per il suo
real-time clock (RTC) interno. In condizioni normali questa batteria avrà una durata minima
di cinque anni.
Una bassa carica della batteria influisce sul funzionamento del RTC, facendolo resettare a ogni
accensione. Quando la batteria deve essere sostituita, un messaggio di registro viene visualizzato
nel report server del prodotto. Per ulteriori informazioni sul report server, consultare le pagine di
configurazione del prodotto o contattare l'assistenza Axis.
118
AXIS A1001 Network Door Controller
La batteria non deve essere sostituita se non richiesto, ma nel caso in cui questo fosse necessario,
contattare l'assistenza Axis all'indirizzo www.axis.com/techsup per ottenere le indicazioni del caso.
AVVERTENZA
• Rischio di esplosione se la batteria viene sostituita in modo errato.
• Sostituire solo con una batteria identica o una batteria consigliata da Axis.
• Smaltire le batterie usate in base alle normative locali o alle istruzioni del produttore
della batteria.
ITALIANO
119
120
AXIS A1001 Network Door Controller
Guida all'installazione
La presente Guida all'installazione fornisce le istruzioni necessarie per installare AXIS A1001
Network Door Controller nella rete in uso. Per ulteriori informazioni sull’utilizzo del prodotto,
consultare il Manuale Utente disponibile all'indirizzo www.axis.com
Procedure di installazione
1. Assicurarsi che il contenuto della confezione, gli strumenti e altri materiali necessari per
l'installazione siano in ordine. Consultare pagina 121.
2. Studiare la descrizione dell'hardware. Consultare pagina 123.
3. Studiare le specifiche. Consultare pagina 128.
4. Installazione dell’hardware. Consultare pagina 136.
5. Accedere al prodotto. Consultare pagina 145.
Contenuto della Confezione
•
•
•
AXIS A1001 Network Door Controller
Fascetta (4)
Vite del coperchio
Connettore a spina a 6 pin (5, inseriti nei connettori per morsetti)
I/O lettore (blu)
I/O lettore (rosso)
Dati lettore (bianco)
Dati lettore (giallo)
Alimentazione e relè (arancione)
Connettore a spina a 4 pin (5, inseriti nei connettori per morsetti)
Audio (bianco)
Ausiliario (giallo)
Ingresso porta (blu)
Ingresso porta (rosso)
Blocco alimentazione (arancione)
Connettore a spina a 2 pin (inserito nel connettore per morsetti)
Alimentazione (nero)
Materiali stampati
Guida grafica all'installazione
Etichetta aggiuntiva con numero di serie (2)
Chiave di autenticazione AVHS
121
ITALIANO
•
•
•
•
AXIS A1001 Network Door Controller
Strumenti raccomandati
•
•
•
•
•
Trapano: in caso di montaggio a parete o a soffitto
Cacciavite: in caso di montaggio a parete o a soffitto
Cacciavite scanalato: per l'apertura del coperchio
Cacciavite Torx (T10): per il serraggio della vite del coperchio
Spellacavi
122
AXIS A1001 Network Door Controller
Panoramica dell'hardware
1
2
ITALIANO
3
4
5
6
7
8
Vista anteriore e posteriore:
1 Coperchio
2 Vite del coperchio
3 Slot di rimozione coperchio
4 Base
5 Clip DIN superiore
6 Interruttore allarme anti-manomissione - retro
123
AXIS A1001 Network Door Controller
7
8
Clip DIN inferiore
Codice prodotto (N/P) e numero di serie (N/S)
1
4
2
6
3
5
8
7
9
10
11
12
Interfaccia I/O:
1 Connettore dati lettore (READER DATA 1)
10 Connettore dati lettore (READER DATA 2)
3 Connettore I/O lettore (READER I/O 1)
8 Connettore I/O lettore (READER I/O 2)
4 Connettore porta (DOOR IN 1)
7 Connettore porta (DOOR IN 2)
6 Connettore ausiliario (AUX)
5 Connettore audio (AUDIO) (non utilizzato)
Ingressi alimentazione esterni:
2 Connettore di alimentazione (DC IN)
12 Connettore di rete (PoE)
Uscite alimentazione:
9 Connettore blocco di alimentazione (LOCK)
11 Connettore di alimentazione e relè (PWR, RELAY)
124
AXIS A1001 Network Door Controller
2
1
3
4
5
6
7
13
8
12
9
11
10
125
ITALIANO
Indicatori LED, pulsanti e altro hardware:
1 Indicatore LED di alimentazione
2 Indicatore LED di stato
3 Indicatore LED di rete
4 Indicatore LED 2 del lettore (non utilizzato)
5 Indicatore LED 1 del lettore (non utilizzato)
6 Collettore pin allarmi anti-manomissione - fronte (TF)
7 Collettore pin allarmi anti-manomissione - retro (TB)
8 Indicatore LED di blocco
9 Indicatore LED di blocco
10 Sensore allarme anti-manomissione - fronte
11 Slot per scheda SD (microSDHC) (non utilizzato)
12 Pulsante di comando
13 Codice prodotto (N/P) e numero di serie (N/S)
AXIS A1001 Network Door Controller
Indicatori LED
LED
Colore
Indicazione
Rete
Verde
Luce fissa per connessione di rete a 100 MBit/s. Luce lampeggiante:
attività di rete.
Giallo
Luce fissa per connessione di rete a 10 MBit/s. Luce lampeggiante:
attività di rete.
Spento
Assenza di connessione.
Verde
Luce verde fissa: condizioni di normale utilizzo.
Giallo
Fissa durante l'avvio e quando si ripristinano le impostazioni.
Rosso
Luce lampeggiante lenta: aggiornamento non riuscito.
Alimentazione
Verde
Normale funzionamento.
Giallo
Luce lampeggiante verde/gialla: aggiornamento firmware.
Blocco
Verde
Luce fissa: non in tensione.
Rosso
Luce fissa: in tensione.
Spento
Isolato.
Stato
Nota
• Il LED di stato può essere configurato per lampeggiare quando un evento è attivo.
• Il LED di stato può essere configurato per lampeggiare al fine di identificare l'unità. Andare
suSetup > Additional Controller Configuration > System Options > Maintenance
(Configurazione > Configurazione controller aggiuntivo > Opzioni di sistema >
Manutenzione).
Connettori e pulsanti
Per le specifiche e le condizioni di funzionamento, consultare pagina 128.
Interfaccia I/O
Connettore dati lettore
Due morsettiere a 6 pin che supportano i protocolli RS485 e Wiegand per la comunicazione con il
lettore. Per le specifiche, consultare pagina 129.
Connettore I/O lettore
Due morsettiere a 6 pin per l'ingresso e l'uscita del lettore. Oltre al punto di riferimento 0 V CC e
all'alimentazione (uscita CC), il connettore I/O lettore fornisce l'interfaccia per:
126
AXIS A1001 Network Door Controller
•
Ingresso digitale: ad esempio per il collegamento degli allarmi anti-manomissione del
lettore.
• Uscita digitale: ad esempio per il collegamento dei segnalatori acustici e dei LED del
lettore.
Per le specifiche, consultare pagina 130.
Connettore porta
Due morsettiere a 4 pin utilizzate per collegare i dispositivi di monitoraggio porte e i dispositivi
REX (request to exit). Per le specifiche, consultare pagina 131.
Connettore ausiliario
Morsettiera I/O a 4 pin configurabile. Utilizzare con dispositivi esterni in combinazione con, ad
esempio, allarmi antimanomissione, attivazione di eventi e notifiche di allarme. Oltre al punto di
riferimento 0 V CC e all'alimentazione (uscita CC), il connettore ausiliario fornisce l'interfaccia per:
•
Ingresso digitale: ingresso allarme utilizzabile per collegare i dispositivi, che può passare
dal circuito chiuso al circuito aperto, ad esempio i sensori PIR o rilevatori di rottura.
• Uscita digitale: per collegare dispositivi esterni come allarmi antifurto, sirene o
luci. I dispositivi collegati possono essere attivati tramite l'API (interfaccia per la
programmazione di applicazioni) VAPIX® oppure tramite una regola di azione.
Per le specifiche, consultare pagina 131.
A VVISO
Il prodotto deve essere collegato con un cavo di rete schermato (STP). Tutti i cavi che
collegano il prodotto alla rete sono destinati al loro uso specifico. Verificare che i dispositivi
di rete siano installati secondo le istruzioni del produttore. Per maggiori informazioni sui
requisiti normativi, consultare Electromagnetic Compatibility (EMC) on page 2.
Connettore di alimentazione
Morsettiera a 2 pin utilizzata per l'ingresso dell'alimentazione CC. Utilizzare una sorgente di
alimentazione limitata (LPS) compatibile con una bassissima tensione di sicurezza (SELV) con
una potenza di uscita nominale limitata a ≤100 W o una corrente nominale di uscita limitata a
≤5 A. Per le specifiche, consultare pagina 132.
Connettore di rete
Connettore Ethernet RJ45. Supporta Power over Ethernet (PoE). Per le specifiche, consultare
pagina 132.
Uscite alimentazione
Connettore di blocco alimentazione
Morsettiera a 4 pin utilizzata per il collegamento di uno o due blocchi. Il connettore di blocco può
127
ITALIANO
Ingressi alimentazione esterni
AXIS A1001 Network Door Controller
essere usato anche per fornire alimentazione ai dispositivi esterni. Per le specifiche, consultare
pagina 133.
Connettore di alimentazione e relè
Morsettiera a 6 pin utilizzata per collegare l'alimentazione e il relè del door controller a dispositivi
esterni quali serrature e sensori. Per le specifiche, consultare pagina 133.
Pulsanti e altro hardware
Collettore pin allarmi anti-manomissione
Due collettori a due pin per scollegare gli allarmi anti-manomissione anteriore e posteriore. Per le
specifiche, consultare pagina 134.
Pulsante di comando
Il pulsante di comando viene utilizzato per:
•
•
Ripristinare il prodotto alle impostazioni predefinite di fabbrica. Consultare pagina 150.
Collegare a un servizio AXIS Video Hosting System o AXIS Internet Dynamic DNS Service.
Per ulteriori informazioni su questi servizi, consultare il Manuale Utente.
Dati tecnici
Condizioni di funzionamento
Il prodotto Axis è destinato all'uso interno.
Classificazione
Temperatura
Umidità
IEC 60721-4-3 Classe 3K3,
3M3
Da 0 °C a 50 °C
(da 32 °F a 122 °F)
20 - 85% (umidità relativa senza
condensa)
Consumo energetico
A VVISO
Utilizzare una sorgente di alimentazione limitata (LPS) compatibile con una bassissima
tensione di sicurezza (SELV) con una potenza di uscita nominale limitata a ≤100 W o una
corrente nominale di uscita limitata a ≤5 A.
Alimentatore
Carico massimo in uscita
Power over Ethernet IEEE 802.3af/802.3at Tipo 1 Classe 3,
44-57 V CC
7,5 W
10-30 V CC, max 26 W
14 W
128
AXIS A1001 Network Door Controller
Per le specifiche dei connettori, consultare Connettore di alimentazione alla pagina 132 e
Connettore di rete alla pagina 132.
Area di cablaggio
A VVISO
Per ogni cavo deve essere disponibile un'area corrispondente all'intervallo dei calibri dei
conduttori 28-16 AWG (CSA) o 22-14 AWG (cUL/UL). Selezionare i cavi nel rispetto delle
normative locali.
AWG
Diametro mm (pollici)
Area mm2
28–16
0.321–1.29 (0.0126–0.0508)
0.0810–1.31
22–14
0.644–1.63 (0.0253–0.0641)
0.326–2.08
Connettori
Per informazioni sulle posizioni dei connettori, consultare Panoramica dell'hardware alla pagina 123.
Nella sezione seguente vengono descritte le specifiche tecniche dei connettori.
Connettore dati lettore
Morsettiera a 6 pin che supporta i protocolli RS485 e Wiegand per
la comunicazione con il lettore.
Le porte RS485 supportano:
• RS485 a due fili, half-duplex
• RS485 a quattro fili, full-duplex
Le porte Wiegand supportano:
• Wiegand a due fili
Funzione
Pin
Note
RS485
A-
1
B+
2
Per RS485 full duplex
Per RS485 half duplex
129
ITALIANO
Per gli schemi di connessione e le informazioni sullo schema dei pin hardware generato tramite la
configurazione dell'hardware, consultare Schemi delle connessioni alla pagina 134 e Configurazione
dell'hardware alla pagina 137.
AXIS A1001 Network Door Controller
RS485
Wiegand
A-
3
B+
4
D0 (Data 0)
5
D1 (Data 1)
6
Per RS485 full duplex
Per RS485 half duplex
Per Wiegand
Importante
La lunghezza cavo massima consigliata è 30 m (98,4 piedi).
Connettore I/O lettore
Morsettiera a 6 pin per:
• Alimentazione ausiliaria (uscita CC)
• Ingresso digitale
• Uscita digitale
• 0 V CC (-)
Il pin 3 sui connettori I/O lettore può essere supervisionato. Se il
collegamento viene interrotto, viene attivato un evento. Per utilizzare
ingressi supervisionati, installare resistori terminali. Per gli ingressi
supervisionati utilizzare lo schema delle connessioni. Consultare pagina
136.
Funzione
Pin
Note
0 V CC (-)
1
Uscita CC
2
Per alimentare periferiche ausiliarie.
Nota: questo pin può essere usato solo
come uscita alimentazione.
12 V CC
Carico massimo = 300 mA
Configurabile
(ingresso o
uscita)
3–6
Ingresso digitale: collegare al pin 1 per
attivare oppure lasciare isolato
(scollegato) per disattivare.
Da 0 a max 40 V CC
Uscita digitale: collegare al pin 1 per
attivare oppure lasciare isolato
(scollegato) per disattivare. Se utilizzata
con un carico induttivo, ad esempio un
relè, collegare un diodo in parallelo al
carico per proteggere il dispositivo da
ritorni di tensione.
Da 0 a max 40 V CC,
open-drain, 100 mA
Specifiche
0 V CC
130
AXIS A1001 Network Door Controller
Connettore porta
Due morsettiere a 4 pin utilizzate per i dispositivi di monitoraggio porte
(ingresso digitale).
Tutti i pin di ingresso porte possono essere supervisionati. Se il
collegamento viene interrotto, viene attivato un allarme. Per utilizzare
ingressi supervisionati, installare resistori terminali. Per gli ingressi
supervisionati utilizzare lo schema delle connessioni. Consultare pagina
136.
Funzione
Pin
0 V CC (-)
1, 3
Ingresso
2, 4
Note
Specifiche
0 V CC
Per la comunicazione con il monitor
porte.
Ingresso digitale: collegare al
pin 1 o 3 rispettivamente per attivarlo
o lasciare isolato (scollegato) per
disattivarlo.
Nota: questo pin può essere usato solo
per l'ingresso.
Da 0 a max 40 V CC
ITALIANO
Connettore ausiliario
Morsettiera I/O a 4 pin configurabile per:
• Alimentazione ausiliaria (uscita CC)
• Ingresso digitale
• Uscita digitale
• 0 V CC (-)
Per un esempio di schema delle connessioni, consultare Schemi delle
connessioni alla pagina 134.
Funzione
Pin
0 V CC (-)
1
Uscita CC
2
Note
Specifiche
0 V CC
Per alimentare periferiche ausiliarie.
Nota: questo pin può essere usato solo
come uscita alimentazione.
131
3,3 V CC
Carico massimo = 100 mA
AXIS A1001 Network Door Controller
Configurabile (ingresso
o uscita)
3–4
Ingresso digitale: collegare al pin 1 per
attivare oppure lasciare isolato
(scollegato) per disattivare.
Da 0 a max 40 V CC
Uscita digitale: collegare al pin 1 per
attivare oppure lasciare isolato
(scollegato) per disattivare. Se utilizzata
con un carico induttivo, ad esempio un
relè, collegare un diodo in parallelo al
carico per proteggere il dispositivo da
ritorni di tensione.
Da 0 a max 40 V CC,
open-drain, 100 mA
Connettore di alimentazione
Morsettiera a 2 pin per ingresso alimentazione CC. Utilizzare una
sorgente di alimentazione limitata (LPS) compatibile con una bassissima
tensione di sicurezza (SELV) con una potenza di uscita nominale limitata
a ≤100 W o una corrente nominale di uscita limitata a ≤5 A.
Funzione
Pin
0 V CC (-)
1
Ingresso CC
2
Note
Specifiche
0 V CC
Per l'alimentazione del controller
quando non si usa Power over Ethernet.
Nota: questo pin può essere usato solo
come ingresso alimentazione.
10-30 V CC, max 26 W
Carico massimo in
uscita = 14 W
Connettore di rete
Connettore Ethernet RJ45. Supporta Power over Ethernet (PoE). Usare
cavi di Categoria 5e o superiore.
Funzione
Specifiche
Alimentazione attraverso
cavo di rete
Power over Ethernet IEEE 802.3af/802.3at Tipo 1 Classe 3,
44–57 V CC
Carico massimo in uscita = 7,5 W
132
AXIS A1001 Network Door Controller
Connettore blocco di alimentazione
Morsettiera a 4 pin per l'alimentazione di uno o due blocchi (uscita CC).
Il connettore di blocco può essere usato anche per fornire alimentazione
a dispositivi esterni.
Collegare blocchi e carichi ai pin in base allo schema dei pin hardware
generato tramite la configurazione dell'hardware.
Funzione
Pin
0 V CC (-)
1, 3
0 V CC, isolato
o 12 V CC
2, 4
Note
Specifiche
0 V CC
Per controllare fino a due blocchi
da 12 V. Usare lo schema dei pin
hardware. Consultare Configurazione
dell'hardware alla pagina 137.
12 V CC
Carico massimo totale
= 500 mA
Connettore di alimentazione e relè
Morsettiera a 6 pin con relè integrato per:
Note
ITALIANO
• Dispositivi esterni
• Alimentazione ausiliaria (uscita CC)
• 0 V CC (-)
Collegare blocchi e carichi ai pin in base allo schema dei pin hardware
generato tramite la configurazione dell'hardware.
Funzione
Pin
0 V CC (-)
1, 4
Relè
2–3
Per il collegamento di relè. Usare lo
schema dei pin hardware. Consultare
Configurazione dell'hardware alla
pagina 137.
I due pin relè sono separati con
isolamento galvanico dal resto dei
circuiti.
Corrente max = 700 mA
Tensione max = +30 V CC
12 V CC
5
Per alimentare periferiche ausiliarie.
Nota: questo pin può essere usato solo
come uscita alimentazione.
Tensione max = +12 V CC
Carico massimo = 500 mA
24 V CC
6
Non utilizzato
Specifiche
0 V CC
133
AXIS A1001 Network Door Controller
Collettore pin allarmi anti-manomissione
Due collettori a due pin per escludere:
• Allarme anti-manomissione posteriore (TB)
• Allarme anti-manomissione anteriore (TF)
Funzione
Pin
Note
Allarme antimanomissione
posteriore
1–2
Allarme antimanomissione
anteriore
1–2
Per escludere contemporaneamente l'allarme
anti-manomissione anteriore e posteriore, collegare i
ponticelli tra TB 1, TB 2 e TF 1, TF 2, rispettivamente.
L'esclusione degli allarmi anti-manomissione significa
che il sistema non identificherà alcun tentativo di
manomissione.
Nota
Gli allarmi anti-manomissione anteriore e posteriore sono collegati per impostazione
predefinita. È possibile configurare l'attivazione di apertura della struttura in modo che
esegua un'azione se il door controller viene aperto o rimosso dalla parete o dal soffitto. Per
informazioni sulla configurazione di allarmi ed eventi, consultare il Manuale Utente.
Schemi delle connessioni
Collegare i dispositivi in base allo schema dei pin hardware generato tramite la configurazione
dell'hardware. Per ulteriori informazioni sulla configurazione dell'hardware e lo schema dei pin
hardware, consultare Configurazione dell'hardware alla pagina 137.
134
AXIS A1001 Network Door Controller
Connettore ausiliario
1
2
A
B
0 V CC (-)
Uscita CC: 3,3 V max 100 mA
I/O configurato come ingresso
I/O configurato come uscita
135
ITALIANO
1
2
A
B
AXIS A1001 Network Door Controller
Ingressi supervisionati
i
22 kΩ
4.7 kΩ
ii
Per utilizzare ingressi supervisionati, installare resistori terminali. Ciò vale per tutti gli ingressi
supervisionati. Per informazioni sulle limitazioni e gli aggiornamenti, consultare le note di rilascio del
prodotto.
i
ii
Ingresso
0 V CC (-)
Installazione dell'Hardware
ATTENZIONE
Non montare mai il prodotto Axis mentre viene alimentato. Collegare l'alimentazione
sempre al termine dell'installazione.
A VVISO
Per proteggere i circuiti dalle scariche elettrostatiche (ESD), utilizzare appropriate protezioni
ESD per maneggiare il prodotto quando componenti e contatti sono esposti.
Leggere attentamente tutte le istruzioni prima di installare il prodotto.
•
•
•
•
Per configurare l'hardware, consultare pagina 137.
Per montare il prodotto a parete (metodo consigliato) o a soffitto, consultare pagina 138.
Per montare il prodotto su una guida DIN, consultare pagina 140.
Per collegare i cavi, consultare pagina 141.
Considerazioni sul sistema
Il prodotto Axis deve essere installato all'interno dell'area protetta.
136
AXIS A1001 Network Door Controller
Il prodotto Axis, sia nella forma di door controller indipendente che di sistema di door controller,
non deve limitare o ridurre la destinazione d'uso dei dispositivi collegati.
Il prodotto Axis deve essere installato a parete (metodo consigliato) o a soffitto, con o senza una
scatola di derivazione. Può essere installato anche su una guida DIN.
Configurazione dell'hardware
Prima di installare il prodotto, configurare l'hardware nelle pagine Hardware Configuration
(Configurazione hardware).
Porte, serrature e altri dispositivi possono essere collegati al prodotto Axis prima di completare la
configurazione dell'hardware. Tuttavia, tale collegamento risulta più semplice se viene effettuato
dopo aver completato la configurazione dell'hardware. Ciò è dovuto al fatto che al termine della
configurazione è disponibile uno schema dei pin hardware, che funge da guida per connettere i
pin e può essere utilizzato come scheda di riferimento per la manutenzione. Per le istruzioni di
manutenzione, consultare pagina 151.
Per configurare l'hardware, selezionare uno dei seguenti metodi:
•
•
Importare un file di configurazione dell'hardware. Consultare pagina 137.
Creare una nuova configurazione dell'hardware. Consultare pagina 137.
La configurazione dell'hardware del prodotto Axis può essere completata più rapidamente
importando un file di configurazione dell'hardware.
Per informazioni sull'esportazione dei file di configurazione dell'hardware, consultare il Manuale
Utente.
Per importare un file di configurazione dell'hardware:
1. Andare suSetup > Hardware Configuration (Configurazione > Configurazione
hardware).
2. Fare clic su Import hardware configuration (Importa configurazione hardware) o, se
esiste già una configurazione, Reset and import hardware configuration (Reimposta e
importa configurazione hardware).
3. Nella finestra di dialogo di selezione file, individuare e selezionare il file di configurazione
dell'hardware (*.json) sul computer.
4. Fare clic su OK.
Creazione di una nuova configurazione dell'hardware
Per creare una configurazione dell'hardware completamente nuova:
137
ITALIANO
Importazione di un file di configurazione dell'hardware
AXIS A1001 Network Door Controller
1. Se necessario, rimuovere la vite del coperchio, inserire un cacciavite scanalato nello slot
di rimozione del coperchio e rimuovere il coperchio.
2. Collegare il prodotto Axis alla rete e attendere l'attivazione del collegamento di rete e
l'accensione del prodotto. Se il prodotto non riceve alimentazione tramite Power over
Ethernet ma utilizza invece Ethernet e una sorgente di alimentazione esterna, collegare
il prodotto anche a una sorgente di alimentazione limitata (LPS) compatibile con una
bassissima tensione di sicurezza (SELV). Per ulteriori informazioni sulla morsettiera di
alimentazione (ingresso CC), consultare Dati tecnici alla pagina 128.
3. Accedere al prodotto. Consultare pagina 145.
4. Andare su Setup > Hardware Configuration (Configurazione > Configurazione
hardware) e selezionare Start new hardware configuration (Avvia nuova configurazione
hardware).
Se l'hardware del prodotto non è stato configurato in precedenza o la configurazione è
stata eliminata, Hardware Configuration (Configurazione hardware) sarà disponibile
nel pannello di notifica della pagina Overview (Panoramica).
5. Selezionare l'opzione indicante il numero di porte, una (1) o due (2), che verranno
collegate al prodotto Axis.
6. Immettere un nome descrittivo per ciascuna porta e fare clic su Next (Avanti). Si
consiglia di assegnare alle porte nomi descrittivi univoci, in modo da facilitarne
l'identificazione da parte di chi amministrerà il sistema.
È inoltre possibile modificare il nome del prodotto Axis. Il nome predefinito include il
numero di serie per semplificare l'identificazione.
7. Selezionare le opzioni di monitoraggio e di blocco delle porte che rispondono ai requisiti e
al tipo di collegamenti di blocco che verranno utilizzati, quindi fare clic su Next (Avanti).
Per ulteriori informazioni sulle opzioni disponibili, consultare il Manuale Utente.
8. Selezionare i tipi di lettori che verranno utilizzati e fare clic su Finish (Fine). Per ulteriori
informazioni sulle opzioni disponibili, consultare il Manuale Utente.
9. Nella finestra di dialogo che viene visualizzata al termine della configurazione, fare clic
su OK oppure sul collegamento per visualizzare lo schema dei pin hardware.
Per stampare lo schema dei pin hardware, fare clic su Print Hardware Pin Chart (Stampa
schema pin hardware) nella relativa pagina.
10. Scollegare il prodotto dalla rete. Se il prodotto non è alimentato tramite Power over
Ethernet, scollegarlo anche dalla sorgente di alimentazione.
Per annullare la configurazione dell'hardware fare clic su Cancel (Annulla). Questa operazione
può essere effettuata in qualsiasi pagina della configurazione.
Montaggio a parete e a soffitto
A VVISO
Quando si installa il door controller a parete, assicurarsi che la foratura per i cavi sia rivolta
verso il basso.
138
AXIS A1001 Network Door Controller
1. Se viene utilizzata una scatola di derivazione, installarla prima del network door
controller. Per la conformità UL, la scatola di derivazione deve essere classificata "UL
Listed".
2. Se necessario, rimuovere la vite del coperchio, inserire un cacciavite scanalato nello
slot di rimozione del coperchio e rimuovere il coperchio. Consultare Panoramica
dell'hardware alla pagina 123.
3. Contrassegnare i punti per i fori per le viti sulla parete/sul soffitto, utilizzando la base
come modello.
4. Se necessario, praticare i fori per le viti con un trapano.
5. Montare la base sulla parete o sul soffitto. Verificare che le viti e i tasselli siano adatti al
materiale (ad esempio legno, metallo, cartongesso, pietra).
1
2
ITALIANO
1
2
Base
Foro per vite (4)
6. Collegare i cavi. Consultare pagina 141.
139
AXIS A1001 Network Door Controller
Montaggio su guida DIN
1. Se necessario, installare una guida DIN (non inclusa).
2. Se necessario, rimuovere la vite del coperchio, inserire un cacciavite scanalato nello
slot di rimozione del coperchio e rimuovere il coperchio. Consultare Panoramica
dell'hardware alla pagina 123.
3. Agganciare la clip DIN inferiore, che è flessibile, alla parte inferiore della guida DIN,
inclinando la base leggermente in avanti.
4. Sollevare la base in modo che la clip DIN inferiore raggiunga la posizione più bassa.
5. Inclinare la base all'indietro in modo che sia parallela alla parete e al soffitto.
6. Agganciare la clip DIN superiore alla parte superiore della guida DIN abbassando la base.
1
2
3
4
1
2
3
4
Base
Foro per vite (4)
Guida DIN
Clip DIN inferiore
140
AXIS A1001 Network Door Controller
7. Fissare la base utilizzando quattro viti. Verificare che le viti e i tasselli siano adatti al
materiale (ad esempio legno, metallo, cartongesso, pietra). Consultare Montaggio a
parete e a soffitto alla pagina 138.
Nota
Per evitare la curvatura della base, non serrare eccessivamente le viti. Lasciare circa 2,5 mm
(0,1 pollici). La curvatura della base impedirebbe la chiusura del coperchio.
8. Collegare i cavi. Consultare pagina 141.
Collegamento dei cavi
ATTENZIONE
Scollegare l'alimentazione prima di collegare qualsiasi cavo al prodotto Axis. Non effettuare
mai collegamenti mentre il prodotto viene alimentato.
A VVISO
• Il prodotto deve essere collegato con un cavo di rete schermato (STP). Tutti i cavi che
collegano il prodotto alla rete sono destinati al loro uso specifico. Verificare che i
dispositivi di rete siano installati secondo le istruzioni del produttore. Per maggiori
informazioni sui requisiti normativi, consultare Regulatory Information on page 2.
• Per consentire la manutenzione futura, per evitare di sottoporre cavi e connettori a
eccessiva tensione e per evitare danni all'isolamento dei conduttori, lasciare un tratto dei
cavi disponibile alle ispezioni e verificare che non vi siano cavi pendenti o non fissati
saldamente. Utilizzare le apposite fascette in dotazione.
• Per proteggere i circuiti dalle scariche elettrostatiche (ESD), utilizzare appropriate
protezioni ESD durante il collegamento dei cavi al prodotto.
1. Far passare il cavo di rete intorno al guidacavo e collegarlo al connettore di rete.
2. Fissare il cavo di rete al guidacavo con una delle fascette in dotazione.
141
ITALIANO
• Se si utilizza Power over Ethernet, collegare il cavo di rete alla rete solo dopo aver
collegato tutti gli altri cavi.
AXIS A1001 Network Door Controller
1
1
2
2
Fascetta
Cavo di rete
3. Spellare i cavi come richiesto utilizzando una crimpatrice.
4. Collegare i cavi tra il door controller e le serrature, le porte e gli altri dispositivi. Per
ulteriori informazioni sui connettori e le relative specifiche, consultare pagina 126
e pagina 129.
A VVISO
• Verificare che tutti i cavi siano collegati correttamente. Un collegamento non corretto
può causare danni al prodotto.
• Assicurarsi di utilizzare cavi conformi ai requisiti. Per ulteriori informazioni, consultare
Area di cablaggio alla pagina 129 e, per la conformità UL, Requirements for UL Compliance
on page 4.
142
AXIS A1001 Network Door Controller
1
4
2
Esempio di collegamento di cavi
1
2
3
4
Connettore a spina a 6 pin
Cavo di rete
Fascetta (4)
Connettore di rete
Nota
• Per i dispositivi che sono stati configurati nelle pagine di configurazione dell'hardware del
prodotto, utilizzare lo schema dei pin hardware come guida per il collegamento dei pin.
Per ulteriori informazioni sulla configurazione dell'hardware e lo schema dei pin hardware,
consultare Configurazione dell'hardware alla pagina 137.
• Per informazioni sul collegamento degli altri cavi, quali i cavi di alimentazione di serrature,
lettori e altri dispositivi, consultare le istruzioni dei produttori.
5.
6.
7.
8.
Raccogliere tutti i cavi in modo ordinati e fissarli con le apposite fascette in dotazione.
Etichettare i cavi per futuro riferimento.
Se si utilizza Power over Ethernet, collegare il cavo di rete alla rete.
Se si utilizza Ethernet e l'alimentazione esterna (10–30 V CC), collegare il cavo di rete
alla rete, quindi collegare l'alimentazione. Utilizzare una sorgente di alimentazione
143
ITALIANO
3
AXIS A1001 Network Door Controller
limitata (LPS) compatibile con una bassissima tensione di sicurezza (SELV). Per ulteriori
informazioni, consultare Connettore di alimentazione alla pagina 132.
1
2
Esempio di collegamento di cavi
1
2
Connettore di rete
Cavo di rete
9. Verificare che i LED indichino le corrette condizioni. Consultare Indicatori LED alla pagina
126.
10. Fissare il coperchio alla base e serrare la vite del coperchio.
144
AXIS A1001 Network Door Controller
1
2
ITALIANO
1
2
Coperchio
Vite del coperchio (T10)
Accedere al Prodotto
Il prodotto può essere utilizzato con la maggior parte dei sistemi operativi e dei browser. I browser
consigliati sono Internet Explorer con Windows, Safari con Macintosh e Firefox con gli altri sistemi
operativi.
Quando si accede al prodotto per la prima volta, è necessario assegnare un indirizzo IP e impostare
la password root predefinita per l'utente amministratore.
•
•
Per assegnare un indirizzo IP, consultare pagina 146.
Per impostare la password root, consultare page 38.
Accesso da un browser
1. Avviare un browser (Internet Explorer, Firefox, Safari).
145
AXIS A1001 Network Door Controller
2. Nel campo del percorso/indirizzo del browser immettere l'indirizzo IP o il nome host del
prodotto Axis. Per accedere al prodotto da un computer Macintosh (Mac OS X), fare clic
sulla scheda Bonjour e selezionare il prodotto dall'elenco a discesa.
Se non si conosce l'indirizzo IP, individuare il prodotto sulla rete tramite AXIS IP
Utility. Per informazioni su come individuare e assegnare un indirizzo IP, consultare
Assegnazione di un indirizzo IP. Queste informazioni sono disponibili anche sulle pagine
dedicate all'assistenza sul sito www.axis.com/techsup
3. Immettere il nome utente e la password. Se si accede al prodotto per la prima volta, è
necessario prima configurare la password root. Per le istruzioni, consultare Impostazione
della password root alla pagina 150.
4. AXIS Entry Manager si apre nel browser. La pagina iniziale è chiamata pagina Overview
(Panoramica).
Accesso da Internet
Dopo la connessione, il prodotto Axis è accessibile dalla rete locale (LAN). Per accedere al prodotto
da Internet, è necessario configurare il router di rete per consentire al prodotto di ricevere il
traffico di dati in entrata. A tale scopo, abilitare la funzione di attraversamento NAT per tentare
la configurazione automatica del router in modo da rendere possibile l'accesso al prodotto. Per
abilitare la funzione, andare a Setup > Additional Controller Configuration > System Options
> Network > TCP/IP > Advanced (Configurazione > Configurazione controller aggiuntivo >
Opzioni di sistema > Rete > TCP/IP > Avanzate).
Per ulteriori informazioni sulla funzione di attraversamento NAT per IPv4, consultare il
Manuale Utente del prodotto. Vedere anche l'AXIS Internet Dynamic DNS Service all'indirizzo
www.axiscam.net
Per le note tecniche su questo e altri argomenti, visitare il sito Web dell'assistenza Axis all’indirizzo
www.axis.com/techsup
Assegnazione di un indirizzo IP
Indirizzo IP predefinito
Il prodotto Axis è progettato per l'uso su rete Ethernet e richiede un indirizzo IP per l'accesso. La
maggior parte delle reti dispone di un server DHCP che assegna automaticamente gli indirizzi IP alle
periferiche connesse. Se la rete non dispone di un server DHCP, il prodotto Axis userà l'indirizzo IP
predefinito 192.168.0.90.
Metodi consigliati in Windows®
AXIS IP Utility e AXIS Camera Management sono i metodi consigliati per la ricerca di prodotti Axis
nella rete e l'assegnazione di indirizzi IP in Windows®. Entrambe le applicazioni sono gratuite e
scaricabili all'indirizzo www.axis.com/techsup
146
AXIS A1001 Network Door Controller
AXIS IP Utility – Piccole installazioni
AXIS IP Utility rileva e visualizza automaticamente i prodotti Axis nella rete locale. L'applicazione
può anche essere utilizzata per assegnare manualmente un indirizzo IP statico.
Si tenga presente che il computer sul quale è in esecuzione AXIS IP Utility deve essere sullo stesso
segmento di rete (subnet fisica) del prodotto Axis.
Rilevamento automatico
1. Verificare che il prodotto Axis sia collegato alla rete e acceso.
2. Avviare AXIS IP Utility.
3. Quando il prodotto Axis viene visualizzato nella finestra, fare doppio clic per aprire
le relative pagine Web.
4. Per informazioni su come impostare la password, consultare pagina 150.
Assegnazione manuale dell’indirizzo IP (opzionale)
1. Acquisire un indirizzo IP disponibile sullo stesso segmento di rete del computer.
2. Selezionare il prodotto Axis dall’elenco.
3. Fare clic su Assign new IP address to selected device (Assegna nuovo indirizzo IP al
AXIS Camera Management – Grandi installazioni
AXIS Camera Management è un potente strumento di installazione e gestione per i prodotti
di rete Axis. Lo strumento può automaticamente cercare periferiche in rete, assegnare indirizzi
IP, impostare password, visualizzare lo stato della connessione, gestire aggiornamenti firmware
e configurare i parametri del prodotto. Permette di eseguire operazioni su più prodotti
contemporaneamente.
Rilevamento automatico
1. Verificare che il prodotto Axis sia collegato alla rete e acceso.
2. Avviare AXIS Camera Management.
3. Effettuare il collegamento a un server.
Per effettuare il collegamento a un server sulla rete, selezionare Remote server (Server
remoto), quindi selezionare un server dall'elenco a discesa o immettere un indirizzo IP
o DNS nel campo.
147
ITALIANO
dispositivo selezionato)
e immettere l'indirizzo IP.
4. Fare clic su Assign (Assegna) e proseguire seguendo le istruzioni visualizzate.
5. Quando il prodotto Axis viene visualizzato nella finestra, fare doppio clic per aprire
le relative pagine Web.
6. Per informazioni su come impostare la password, consultare pagina 150.
AXIS A1001 Network Door Controller
4.
5.
6.
7.
Per il collegamento a un server in esecuzione sul computer locale, selezionare This
computer (Questo computer).
Fare clic su Log On (Accedi) per accedere come utente corrente del computer oppure
deselezionare Log on as current user (Accedi come utente corrente) e immettere il
nome utente e la password con cui effettuare l'accesso.
Alla prima esecuzione, AXIS Camera Management cerca automaticamente i prodotti Axis
sulla rete. Per effettuare la ricerca manuale dei prodotti, selezionare Configuration >
Add Devices (Configurazione > Aggiungi dispositivi). Viene visualizzato un elenco
dei prodotti trovati.
Selezionare i prodotti da aggiungere e fare clic su Next (Avanti), quindi su Finish (Fine).
Nell'elenco di dispositivi, fare clic sull'indirizzo per aprire le pagine Web del prodotto.
Per informazioni su come impostare la password, consultare pagina 150.
Assegnazione di indirizzi IP su più periferiche
AXIS Camera Management velocizza il processo di assegnazione degli indirizzi IP di più periferiche,
suggerendo gli indirizzi IP in base a un intervallo specifico.
1. Selezionare le periferiche da configurare (è possibile selezionare diversi modelli) e fare
2.
3.
4.
5.
clic su Assign IP address to selected devices
(Assegna indirizzi IP alle periferiche
selezionate).
Fare clic su Yes (Sì) nella finestra di dialogo Device Maintenance (Manutenzione
periferica).
Selezionare Assign the following IP address range (Assegna il seguente intervallo di
indirizzi IP) e immettere l'intervallo di indirizzi IP, la subnet mask e il router predefinito
da usare per le periferiche. Fare clic su Next (Avanti).
Gli indirizzi IP suggeriti sono elencati sotto New IP Addresses (Nuovi indirizzi IP) e
possono essere modificati selezionando una periferica e facendo clic su Edit IP (Modifica
IP).
Fare clic su Finish (Fine).
Altri sistemi operativi e metodi
L'elenco seguente descrive gli altri metodi disponibili per assegnare o individuare l’indirizzo IP. Tutti
i metodi sono abilitati per impostazione predefinita e tutti possono essere disabilitati.
•
•
Connessione al servizio AVHS (tutti i sistemi operativi). Per la connessione a un
servizio AVHS, fare riferimento alla Guida all'installazione del fornitore del servizio. Per
informazioni e assistenza sulla ricerca di un fornitore di servizi AVHS nella propria zona,
accedere alla pagina www.axis.com/hosting
UPnP™ (Windows®). Quando questo metodo è abilitato sul computer, il prodotto di rete
Axis viene automaticamente individuato e aggiunto a Rete/Risorse di rete.
148
AXIS A1001 Network Door Controller
•
•
•
•
Bonjour (Mac OS X® 10.4 o versioni successive). Utilizzabile con i browser con supporto
Bonjour. Selezionare il segnalibro Bonjour nel browser (ad esempio Safari) e fare clic sul
collegamento per accedere alle pagine Web.
AXIS Dynamic DNS Service (tutti i sistemi operativi). Servizio gratuito fornito da Axis
che consente di installare il prodotto di rete Axis in modo facile e veloce. È necessaria
una connessione a Internet senza proxy HTTP. Per ulteriori informazioni, accedere alla
pagina www.axiscam.net
ARP/Ping (tutti i sistemi operativi). Consultare Assegnazione dell'indirizzo IP tramite
ARP/Ping. È necessario eseguire il comando entro 2 minuti dal collegamento
all'alimentazione.
Server DHCP (tutti i sistemi operativi). Per visualizzare le pagine di amministrazione del
server DHCP di rete, consultare la relativa documentazione per l'utente.
Assegnazione dell'indirizzo IP tramite ARP/Ping
È possibile assegnare l'indirizzo IP del prodotto tramite ARP/Ping. È necessario eseguire il comando
entro 2 minuti dal collegamento all'alimentazione.
149
ITALIANO
1. Acquisire un indirizzo IP statico libero sullo stesso segmento di rete del computer.
2. Individuare il numero di serie indicato sull'etichetta del prodotto.
3. Aprire un prompt dei comandi e immettere i seguenti comandi:
Sintassi per Linux/Unix
arp -s <indirizzo IP> <numero di serie> temp
ping -s 408 <indirizzo IP>
Esempio per Linux/Unix
arp -s 192.168.0.125 00:40:8c:18:10:00 temp
ping -s 408 192.168.0.125
Sintassi per Windows (potrebbe essere necessario eseguire il prompt dei comandi come
amministratore)
arp -s <indirizzo IP> <numero di serie>
ping -l 408 -t <indirizzo IP>
Esempio per Windows (potrebbe essere necessario eseguire il prompt dei comandi come
amministratore)
arp -s 192.168.0.125 00-40-8c-18-10-00
ping -l 408 -t 192.168.0.125
4. Verificare che il cavo di rete sia collegato, quindi riavviare il prodotto scollegando
e ricollegando l'alimentazione.
5. Chiudere il prompt dei comandi una volta ricevuta la risposta del prodotto Reply
from 192.168.0.125... o un altro messaggio simile.
6. Aprire un browser e digitare http://<indirizzo IP> nel campo del
percorso/indirizzo.
AXIS A1001 Network Door Controller
Nota
• Per aprire un prompt dei comandi in Windows, aprire il menu Start e digitare cmd nel
campo Cerca/Esegui.
• Per usare il comando ARP in Windows 8/Windows 7/Windows Vista, fare clic con il
pulsante destro del mouse sull'icona del prompt dei comandi e selezionare Esegui come
amministratore.
• Per aprire un prompt dei comandi in Mac OS X, aprire l'utility Terminal in Applicazione
> Utilità.
Impostazione della password root
Per accedere al prodotto Axis, è necessario impostare la password dell’utente amministratore
predefinito root. Questa operazione viene effettuata nella finestra di dialogo Configure Root
Password (Configura password root), visualizzata quando si accede al prodotto per la prima volta.
Per evitare intercettazioni sulla rete, la password root può essere impostata tramite una connessione
HTTPS crittografata, con un certificato HTTPS. HTTPS (Hypertext Transfer Protocol over SSL) è un
protocollo utilizzato per crittografare il traffico tra i browser e i server Web. Il certificato HTTPS
assicura lo scambio crittografato di informazioni.
Il nome utente amministratore predefinito root è permanente e non può essere eliminato. Se si
smarrisce la password di root, il prodotto deve essere ripristinato alle impostazioni predefinite di
fabbrica. Per informazioni su come ripristinare il prodotto alle impostazioni predefinite di fabbrica,
consultare il Manuale Utente del prodotto.
Per impostare la password tramite una connessione HTTP standard, inserirla direttamente nella
finestra di dialogo.
Per impostare la password tramite una connessione HTTPS crittografata, attenersi alla seguente
procedura.
1. Fare clic su Use HTTPS (Usa HTTPS).
Viene creato un certificato temporaneo (valido per un anno), che consente la crittografia
di tutto il traffico in arrivo e in uscita dal prodotto e quindi anche l'impostazione
protetta della password.
2. Immettere una password e reimmetterla per confermarla.
3. Fare clic su OK. La password è stata configurata.
Ripristino dei valori predefiniti di fabbrica
Importante
Il ripristino delle impostazioni di fabbrica deve essere usato con cautela. Un ripristino delle
impostazioni di fabbrica consentirà di ripristinare le impostazioni di fabbrica per tutti i
parametri, incluso l'indirizzo IP.
150
AXIS A1001 Network Door Controller
Nota
Gli strumenti software per la gestione e l'installazione del prodotto sono disponibili sulle
pagine dedicate all'assistenza sul sito Web www.axis.com/techsup.
Per ripristinare il prodotto alle impostazioni predefinite di fabbrica:
1. Scollegare l'alimentazione dal prodotto.
2. Tenere premuto il pulsante di comando e ricollegare l'alimentazione. Vedere Panoramica
dell'hardware alla pagina 123.
3. Tenere premuto il pulsante di comando per 25 secondi circa fino a quando l'indicatore
LED di stato non diventa nuovamente di colore giallo.
4. Rilasciare il pulsante di comando. Il processo è completo quando il LED di stato diventerà
verde. Il prodotto è stato reimpostato alle impostazioni di fabbrica predefinite. Se nessun
server DHCP è disponibile in rete, l'indirizzo IP predefinito è 192.168.0.90.
5. Mediante gli strumenti per l'installazione e la gestione del software, assegnare un
indirizzo IP, impostare la password e accedere al flusso video.
È anche possibile reimpostare i parametri alle impostazioni predefinite di fabbrica mediante
l’interfaccia web. Andare su Setup > Additional Controller Configuration > Setup >
System Options > Maintenance (Configurazione > Configurazione controllo aggiuntivo >
Configurazione > Opzioni di sistema > Manutenzione).
Per tenere il sistema di controllo degli accessi in buono stato di funzionamento, Axis ne consiglia la
regolare manutenzione, che deve includere door controller e dispositivi collegati.
Effettuare la manutenzione almeno una volta all'anno. Le procedure di manutenzione consigliate,
includono, a titolo esemplificativo, i passaggi seguenti:
•
Verificare che tutti i collegamenti tra il door controller e i dispositivi esterni siano ben
saldi.
• Verificare tutti i collegamenti hardware. A tale scopo è necessario accedere alle pagine
Web del prodotto. Per ulteriori informazioni, consultare il Manuale Utente.
• Verificare che il sistema, inclusi i dispositivi esterni collegati, funzioni correttamente.
Passare una tessera e testare i lettori, le porte e le serrature.
Se nel sistema sono inclusi dispositivi REX, sensori o altri dispositivi, testare
anche quelli.
Se attivati, testare gli allarmi anti-manomissione.
Se i risultati di qualsiasi passaggio precedente indicano problemi o comportamenti imprevisti:
-
Testare i segnali dei cavi con attrezzatura appropriata e controllare se i cavi
sono in qualche modo danneggiati.
Sostituire tutti i cavi danneggiati o difettosi.
151
ITALIANO
Istruzioni di manutenzione
AXIS A1001 Network Door Controller
-
Dopo aver sostituito i cavi, verificare nuovamente tutti i collegamenti
hardware. A tale scopo è necessario accedere alle pagine Web del prodotto.
Per ulteriori informazioni, consultare il Manuale Utente.
• Verificare che tutte le pianificazioni accessi, le porte, i gruppi e gli utenti siano
aggiornati. A tale scopo è necessario accedere alle pagine Web del prodotto. Per ulteriori
informazioni, consultare il Manuale Utente.
• Se il door controller funziona in modo non previsto, consultare il Manuale Utente per
informazioni sulla risoluzione dei problemi e sulle funzioni di manutenzione integrate
nel prodotto.
Per informazioni sulla manutenzione della batteria, consultare e Batteria alla pagina 118.
Ulteriori Informazioni
Il Manuale per l'Utente è disponibile all'indirizzo www.axis.com
Visitare il sito all’indirizzo www.axis.com/techsup per verificare se sono stati pubblicati
aggiornamenti del firmware per il proprio prodotto di rete. Per conoscere la versione del firmware
installata, andare su Setup (Impostazioni) > About (Informazioni su).
Visitare il Centro di apprendimento Axis alla pagina www.axis.com/academy per servizi di
formazione utili, webinar, tutorial e guide.
Informazioni sulla garanzia
Per informazioni sulla garanzia del prodotto Axis e informazioni ad esso relative, consultare
la pagina www.axis.com/warranty/
152
AXIS A1001 Network Door Controller
Información de seguridad
Lea esta Guía de instalación con atención antes de instalar el producto. Guarde la Guía de
instalación para poder consultarla en otro momento.
Niveles de peligro
PELIGRO
Indica una situación peligrosa que, si no se evita, provocará
lesiones graves o la muerte.
ADVERTENCIA
Indica una situación peligrosa que, si no se evita, puede provocar
lesiones graves o la muerte.
ATENCIÓN
Indica una situación peligrosa que, si no se evita, puede provocar
lesiones moderadas o leves.
A VISO
Indica una situación peligrosa que, si no se evita, puede provocar
daños materiales.
Otros niveles de mensaje
Importante
Indica información importante que es fundamental para que el
producto funcione correctamente.
Nota
Indica información útil que ayuda a aprovechar el producto al
máximo.
ESPANÕL
153
AXIS A1001 Network Door Controller
Instrucciones de seguridad
ADVERTENCIA
• El encargado de instalar el producto de Axis debe ser un profesional con experiencia.
A VISO
• El producto de Axis debe utilizarse de acuerdo con la legislación y la normativa locales.
• Para usar el producto de Axis en exteriores, o en entornos similares, debe instalarse en
una carcasa exterior aprobada.
• Almacene el producto de Axis en un entorno seco y ventilado.
• Evite la exposición del producto de Axis a choques o a una fuerte presión.
• No instale el producto en soportes, superficies o paredes inestables.
• Utilice solo las herramientas correspondientes cuando instale el producto de Axis. La
aplicación de una fuerza excesiva puede provocar daños en el producto.
• No utilice limpiadores en aerosol, agentes cáusticos ni productos químicos. Limpie con un
paño limpio humedecido con agua pura.
• Utilice solo accesorios que cumplan con las especificaciones técnicas del producto. Estos
accesorios los puede proporcionar Axis o un tercero.
• Utilice solo piezas de repuesto proporcionadas o recomendadas por Axis.
• No intente reparar el producto usted mismo. Póngase en contacto con el servicio de
asistencia técnica de Axis o con su distribuidor de Axis para tratar asuntos de reparación.
Transporte
A VISO
• Cuando transporte el producto de Axis, utilice el embalaje original o un equivalente para
evitar daños en el producto.
Batería
Este producto de Axis utiliza una batería de litio BR/CR2032 de 3,0 V como fuente de alimentación
del reloj interno en tiempo real. En condiciones normales, esta batería durará un mínimo de cinco
años.
Un nivel bajo de batería afectará al funcionamiento del reloj en tiempo real, lo que provocará el
restablecimiento de este cada vez que se encienda el producto. Cuando sea necesario sustituir la
batería, aparecerá un mensaje de registro en el informe del servidor del producto. Para obtener más
información sobre el informe del servidor, consulte las páginas de configuración del producto o
póngase en contacto con el servicio de asistencia técnica de Axis.
154
AXIS A1001 Network Door Controller
La batería no debe sustituirse a menos que sea necesario; no obstante, si precisa hacerlo, póngase en
contacto con el servicio de asistencia técnica de Axis en www.axis.com/techsup para solicitar ayuda.
ADVERTENCIA
• La sustitución incorrecta de la batería implica riesgo de explosión.
• Sustituya la batería por una batería idéntica u otra batería recomendada por Axis.
• Deseche las baterías usadas de conformidad con la normativa local o las instrucciones
del fabricante.
ESPANÕL
155
156
AXIS A1001 Network Door Controller
Guía de instalación
Esta Guía de instalación incluye las instrucciones necesarias para instalar el controlador de accesos
en red AXIS A1001 en su red. Para conocer otros aspectos de uso del producto, consulte el Manual
del usuario disponible en www.axis.com.
Pasos de la instalación
1. Asegúrese de que dispone del contenido del paquete, las herramientas y los demás
materiales necesarios para la instalación. Vea página 157.
2. Estudie la información general del hardware. Vea página 159.
3. Estudie las especificaciones. Vea página 164.
4. Instale el hardware. Vea página 172.
5. Acceda al producto. Vea página 181.
Contenido del paquete
•
•
•
•
•
•
157
ESPANÕL
•
Controlador de accesos en red AXIS A1001
Abrazadera de cable (4x)
Tornillo de la cubierta
Conector con enchufe de 6 pines (5x) (enchufado en los conectores del terminal)
Lector de E/S (azul)
Lector de E/S (rojo)
Datos del lector (blanco)
Datos del lector (amarillo)
Alimentación y relé (naranja)
Conector con enchufe de 4 pines (5x) (enchufado en los conectores del terminal)
Audio (blanco)
Auxiliar (amarillo)
Entrada de puerta (azul)
Entrada de puerta (rojo)
Alimentación cerradura (naranja)
Conector con enchufe de 2 pines (enchufado en el conector del terminal)
Alimentación (negro)
Materiales impresos
Guía de instalación gráfica
Etiquetas adicionales con el número de serie (2x)
Clave de autenticación AVHS
AXIS A1001 Network Door Controller
Herramientas recomendadas
•
•
•
•
•
Taladro: para realizar el montaje en pared o techo
Destornillador: para realizar el montaje en pared o techo
Destornillador plano: para abrir la cubierta
Destornillador Torx (T10): para apretar el tornillo de la cubierta
Pelacables
158
AXIS A1001 Network Door Controller
Información general del hardware
1
2
3
4
5
ESPANÕL
6
7
8
Parte delantera y trasera:
1 Cubierta
2 Tornillo de la cubierta
3 Ranura de desmontaje de la cubierta
4 Base
5 Clip DIN (superior)
6 Interruptor de alarma antimanipulación (posterior)
159
AXIS A1001 Network Door Controller
7
8
Clip DIN (inferior)
Número de pieza (N/P) y número de serie (N/S)
1
4
2
6
3
5
8
7
9
10
11
12
Interfaz de E/S:
1 Conector de datos del lector (READER DATA 1)
10 Conector de datos del lector (READER DATA 2)
3 Conector de E/S del lector (READER I/O 1)
8 Conector de E/S del lector (READER I/O 2)
4 Conector de puerta (DOOR IN 1)
7 Conector de puerta (DOOR IN 2)
6 Conector auxiliar (AUX)
5 Conector de audio (AUDIO) (no se usa)
Entradas de alimentación externa:
2 Conector de alimentación (DC IN)
12 Conector de red (PoE)
Salidas de alimentación:
9 Conector de alimentación cerradura (LOCK)
160
AXIS A1001 Network Door Controller
11
Conector de alimentación y relé (PWR, RELAY)
2
1
3
4
5
6
7
13
8
12
9
11
10
161
ESPANÕL
Indicadores LED, botones y otro hardware:
1 Indicador LED de alimentación
2 Indicador LED de estado
3 Indicador LED de red
4 Indicador LED 2 del lector (no se usa)
5 Indicador LED 1 del lector (no se usa)
6 Cabezal con pines de la alarma antimanipulación (delantero) (TF)
7 Cabezal con pines de la alarma antimanipulación (trasero) (TB)
8 Indicador LED de cerradura
9 Indicador LED de cerradura
10 Sensor de la alarma antimanipulación (delantero)
11 Ranura para tarjetas SD (microSDHC) (no se usa)
12 Botón de control
13 Número de pieza (N/P) y número de serie (N/S)
AXIS A1001 Network Door Controller
Indicadores LED
LED
Color
Indicación
Red
Verde
Fijo para indicar una conexión a una red de 100 MBits/s. Parpadea
cuando hay actividad de red.
Ámbar
Fijo para indicar una conexión a una red de 10 MBits/s. Parpadea
cuando hay actividad de red.
Apagado
No hay conexión a la red.
Verde
Verde fijo para indicar un funcionamiento normal.
Ámbar
Fijo durante el inicio y al restaurar valores de configuración.
Rojo
Parpadea despacio si se ha producido un error en una actualización.
Alimentación
Verde
Funcionamiento normal.
Ámbar
Parpadea en verde/ámbar durante la actualización del firmware.
Cerradura
Verde
Luz fija cuando no hay alimentación.
Rojo
Luz fija cuando hay alimentación.
Apagado
Suelta.
Estado
Nota
• Se puede configurar el LED de estado para que parpadee mientras haya un evento activo.
• Se puede configurar el LED de estado para que parpadee e identifique la unidad. Acceda
a Setup > Additional Controller Configuration > System Options > Maintenance
(Configuración > Configuración del controlador adicional > Opciones del sistema
> Mantenimiento).
Conectores y botones
Para conocer las especificaciones y las condiciones de funcionamiento, vea página 164.
Interfaz de E/S
Conector de datos del lector
Dos bloques de terminales de 6 pines compatibles con los protocolos RS485 y Wiegand para la
comunicación con el lector. Para conocer las especificaciones, consulte página 166.
Conector de E/S del lector
Dos bloques de terminales de 6 pines para entrada y salida del lector. Además del punto de
162
AXIS A1001 Network Door Controller
referencia de 0 V CC y la alimentación (salida de CC), el conector de E/S del lector ofrece la interfaz
para:
• Entrada digital: para conectar, por ejemplo, alarmas antimanipulación del lector.
• Salida digital: para conectar, por ejemplo, avisadores y LED del lector.
Para conocer las especificaciones, consulte página 166.
Conector de puerta
Dos bloques terminales de 4 pines para conectar dispositivos de monitor de puerta y solicitud para
dispositivos de salida (REX). Para conocer las especificaciones, consulte página 167.
Conector auxiliar
Bloque de terminales de E/S configurable de 4 pines. Se utiliza con dispositivos externos
combinados, por ejemplo, con alarmas antimanipulación, activación de eventos y notificaciones de
alarma. Además del punto de referencia de 0 V CC y la alimentación (salida de CC), el conector
auxiliar ofrece la interfaz para:
•
Entrada digital: una entrada de alarma para conectar dispositivos que puedan alternar
entre circuitos cerrados y abiertos, por ejemplo, sensores PIR o detectores de cristales
rotos.
• Salida digital: para conectar dispositivos externos como luces, sirenas o alarmas
antirrobo. Los dispositivos conectados se pueden activar mediante la interfaz de
programación de aplicaciones VAPIX® o mediante una regla de acción.
Para conocer las especificaciones, consulte página 168.
Entradas de alimentación externa
A VISO
Conector de alimentación
Bloque de terminales de 2 pines para la entrada de alimentación de CC. Use una fuente de
alimentación limitada (LPS) que cumpla los requisitos de tensión muy baja de seguridad (SELV) con
una potencia nominal de salida limitada a ≤100 W o una corriente nominal de salida limitada a
≤5 A. Para conocer las especificaciones, consulte página 168.
Conector de red
Conector Ethernet RJ45. Admite alimentación a través de Ethernet (PoE). Para conocer las
especificaciones, consulte página 169.
163
ESPANÕL
El producto se conectará mediante un cable de red blindado (STP). Todos los cables que
conecten el producto a la red deberán estar blindados para su uso específico. Asegúrese
de que los dispositivos de red estén instalados de conformidad con las instrucciones
del fabricante. Para obtener información sobre los requisitos normativos, consulte
Electromagnetic Compatibility (EMC) on page 2.
AXIS A1001 Network Door Controller
Salidas de alimentación
Conector de alimentación cerradura
Bloque de terminales de 4 pines para conectar una o dos cerraduras. Este conector de cerradura
también podría usarse para proporcionar alimentación a dispositivos externos. Para conocer las
especificaciones, consulte página 169.
Conector de alimentación y relé
Bloque de terminales de 6 pines para conectar el relé del controlador de puerta y de alimentación
a dispositivos externos como cerraduras y sensores. Para conocer las especificaciones, consulte
página 170.
Botones y otro hardware
Cabezal con pines de la alarma antimanipulación
Dos cabezales de dos pines para desconectar las alarmas antimanipulación delantera y trasera. Para
conocer las especificaciones, consulte página 170.
Botón de control
El botón de control se utiliza para lo siguiente:
•
•
Restablecer el producto a la configuración predeterminada de fábrica. Consulte página
186.
Conectarse a un servicio AXIS Video Hosting System o al Servicio de DNS dinámico
de Internet de AXIS. Para obtener más información sobre estos servicios, consulte el
Manual del usuario.
Especificaciones
Condiciones de funcionamiento
El producto de Axis se ha creado para su uso en interiores.
Clasificación
Temperatura
Humedad
IEC 60721-4-3 Clase 3K3,
3M3
Desde 0 °C hasta 50 °C
(desde 32 °F hasta 122 °F)
Humedad relativa del 20 al 85 % (sin
condensación)
Consumo
A VISO
Use una fuente de alimentación limitada (LPS) que cumpla los requisitos de tensión muy
baja de seguridad (SELV) con una potencia nominal de salida limitada a≤100 W o una
corriente nominal de salida limitada a ≤5 A.
164
AXIS A1001 Network Door Controller
Fuente de alimentación
Carga máxima en las salidas
Alimentación a través de Ethernet IEEE 802.3af/802.3at Tipo 17,5 W
Clase 3, 44–57 V CC
14 W
10–30 V CC, máx. 26 W
Para conocer las especificaciones del conector, consulte Conector de alimentación en la página 168
y Conector de red en la página 169.
Área de los cables
A VISO
Cada cable debe tener un área que se corresponda con un rango de calibre de conductor
de AWG 28–16 (CSA) o AWG 22–14 (cUL/UL). Elija cables que cumplan la normativa local
aplicable.
AWG
Diámetro mm (pulg.)
Área mm2
28–16
0.321–1.29 (0.0126–0.0508)
0.0810–1.31
22–14
0.644–1.63 (0.0253–0.0641)
0.326–2.08
Conectores
Para ver los diagramas de conexión y obtener información sobre el gráfico de pines de hardware
generado mediante la configuración de hardware, consulte Diagramas de conexión en la página 171
y Configuración del hardware en la página 173.
En la siguiente sección se describen las especificaciones técnicas de los conectores.
165
ESPANÕL
Para obtener más información sobre las posiciones de los conectores, consulte Información general
del hardware en la página 159.
AXIS A1001 Network Door Controller
Conector de datos del lector
Bloque de terminales de 6 pines compatibles con los protocolos RS485
y Wiegand para la comunicación con el lector.
Los puertos RS485 admiten:
• Semidúplex RS485 de dos cables
• Dúplex completo RS485 de cuatro cables
Los puertos Wiegand admiten:
• Wiegand de dos cables
Pin
Notas
A-
1
B+
2
Para dúplex completo RS485
Para semidúplex RS485
A-
3
B+
4
D0 (datos 0)
5
D1 (datos 1)
6
Función
RS485
RS485
Wiegand
Para dúplex completo RS485
Para semidúplex RS485
Para Wiegand
Importante
La longitud de cable máxima recomendada es 30 m (98,4 pies).
Conector de E/S del lector
Bloque de terminales de 6 pines para:
• Alimentación auxiliar (salida de CC)
• Entrada digital
• Salida digital
• 0 V CC (-)
Los 3 pines de los conectores de E/S del lector se pueden supervisar. Si
se interrumpe la conexión, se activa un evento. Para usar entradas
supervisadas, instale las resistencias de final de línea. Use el diagrama
de conexión para las entradas supervisadas. Consulte página 172.
Función
Pin
0 V CC (-)
1
Notas
Especificaciones
0 V CC
166
AXIS A1001 Network Door Controller
Salida de CC
2
Para alimentar el equipo auxiliar.
Nota: Este pin solo se puede utilizar
como salida.
12 V CC
Carga máx. = 300 mA
Configurable
(entrada o
salida)
3–6
Entrada digital: conéctela al pin 1 para
activarla o bien déjela suelta
(desconectada) para desactivarla.
0 a 40 V CC máx.
Salida digital: conéctela al pin 1 para
activarla o bien déjela suelta
(desconectada) para desactivarla. Si
se utiliza con una carga inductiva (por
ejemplo, un relé), debe conectarse un
diodo en paralelo a la carga como
protección ante transitorios de tensión.
De 0 a 40 V CC máx.,
drenaje abierto, 100 mA
Conector de puerta
Dos bloques de terminales de 4 pines para dispositivos de monitor de
puerta (entrada digital).
Todos los pines de entrada de las puertas se pueden supervisar. Si
se interrumpe la conexión, se activa una alarma. Para usar entradas
supervisadas, instale las resistencias de final de línea. Use el diagrama
de conexión para las entradas supervisadas. Consulte página 172.
Pin
0 V CC (-)
1, 3
Entrada
2, 4
Notas
Especificaciones
0 V CC
Para comunicarse con el monitor de
puerta.
Entrada digital: conecte con el
pin 1 o 3 respectivamente para activar
o dejar suelta (desconectada) para
desactivar.
Nota: Este pin solo se puede utilizar
como entrada.
167
0 a 40 V CC máx.
ESPANÕL
Función
AXIS A1001 Network Door Controller
Conector auxiliar
Bloque de terminales de E/S configurable de 4 pines para:
• Alimentación auxiliar (salida de CC)
• Entrada digital
• Salida digital
• 0 V CC (-)
Para ver un ejemplo del diagrama de conexiones, consulte Diagramas de
conexión en la página 171.
Función
Pin
Notas
0 V CC (-)
1
Salida de CC
2
Para conectar el equipo auxiliar.
Nota: Este pin solo se puede utilizar
como salida.
3,3 V CC
Carga máx. = 100 mA
Configurable
(entrada o
salida)
3–4
Entrada digital: conéctela al pin 1 para
activarla o bien déjela suelta
(desconectada) para desactivarla.
0 a 40 V CC máx.
Salida digital: conéctela al pin 1 para
activarla o bien déjela suelta
(desconectada) para desactivarla. Si
se utiliza con una carga inductiva (por
ejemplo, un relé), debe conectarse un
diodo en paralelo a la carga como
protección ante transitorios de tensión.
De 0 a 40 V CC máx.,
drenaje abierto, 100 mA
Especificaciones
0 V CC
Conector de alimentación
Bloque de terminales de 2 pines para la entrada de alimentación de
CC. Use una fuente de alimentación limitada (LPS) que cumpla los
requisitos de tensión muy baja de seguridad (SELV) con una potencia
nominal de salida limitada a ≤100 W o una corriente nominal de salida
limitada a ≤5 A.
168
AXIS A1001 Network Door Controller
Función
Pin
0 V CC (-)
1
Entrada de CC
2
Notas
Especificaciones
0 V CC
Para alimentar el controlador cuando
no se use la alimentación a través de
Ethernet.
Nota: Este pin solo se puede utilizar
como entrada.
10–30 V CC, máx. 26 W
Carga máxima en las
salidas = 14 W
Conector de red
Conector Ethernet RJ45. Admite alimentación a través de Ethernet
(PoE). Use cables de categoría 5 o superior.
Función
Especificaciones
Alimentación y Ethernet
Alimentación a través de Ethernet IEEE 802.3af/802.3at Tipo 1 Clase 3,
44–57 V CC
Carga máx. en las salidas = 7,5 W
Conector de alimentación cerradura
Bloque de terminales de 4 pines para proporcionar alimentación a una
o dos cerraduras (salida de CC). Este conector de cerradura también
podría usarse para proporcionar alimentación a dispositivos externos.
Función
Pin
0 V CC (-)
1, 3
0 V CC,
suelto o
12 V CC
2, 4
Notas
Especificaciones
0 V CC
Para controlar hasta dos cerraduras
de 12 V. Uso del gráfico de pines del
hardware. Consulte Configuración del
hardware en la página 173.
169
12 V CC
Carga máx. total = 500 mA
ESPANÕL
Conecte las cerraduras y las cargas a los pines según el gráfico de pines
del hardware generado mediante la configuración de hardware.
AXIS A1001 Network Door Controller
Conector de alimentación y relé
Bloque de terminales de 6 pines con relé integrado para:
• Dispositivos externos
• Alimentación auxiliar (salida de CC)
• 0 V CC (-)
Conecte las cerradurasy las cargas a los pines según el gráfico de pines
del hardware generado mediante la configuración de hardware.
Función
Pin
Notas
0 V CC (-)
1, 4
Relé
2–3
Para conectar dispositivos de relés.
Uso del gráfico de pines del hardware.
Consulte Configuración del hardware en
la página 173.
Los dos pines de relé están separados de
forma galvanizada del resto del circuito.
Corriente máxima = 700 mA
Tensión máxima = +30 V CC
12 V CC
5
Para alimentar el equipo auxiliar.
Nota: Este pin solo se puede utilizar
como salida.
Tensión máxima = +12 V CC
Carga máxima = 500 mA
24 V CC
6
No se utiliza
Especificaciones
0 V CC
Cabezal con pines de la alarma antimanipulación
Dos cabezales con dos pines para funciones de bypass:
• Alarma antimanipulación posterior (TB)
• Alarma antimanipulación delantera (TF)
Función
Pin
Notas
Alarma
antimanipulación
posterior
1–2
Alarma
antimanipulación
delantera
1–2
Para hacer el bypass simultáneamente a las alarmas
antimanipulación delantera y trasera, coloque puentes
entre TB 1, TB 2 y TF 1, TF 2, respectivamente. Al aplicar
un bypass a las alarmas antimanipulación, el sistema no
identificará ningún intento de manipulación.
170
AXIS A1001 Network Door Controller
Nota
Las alarmas antimanipulación delantera y la trasera están conectadas de forma
predeterminada. El activador de carcasa abierta se puede configurar para que realice
una acción si el controlador de puerta está abierto o si se ha retirado de la pared o el
techo. Para obtener más información sobre cómo configurar alarmas y eventos, consulte el
manual del usuario.
Diagramas de conexión
Conecte los dispositivos según el gráfico de pines del hardware generado mediante la configuración
de hardware. Para obtener más información sobre la configuración del hardware y el gráfico de
pines del hardware, consulte Configuración del hardware en la página 173.
Conector auxiliar
1
2
A
1
2
A
B
0 V CC (-)
Salida de CC: 3,3 V, máx 100 mA
E/S configurada como entrada
E/S configurada como salida
171
ESPANÕL
B
AXIS A1001 Network Door Controller
Entradas supervisadas
i
22 kΩ
4.7 kΩ
ii
Para usar entradas supervisadas, instale las resistencias de final de línea. Esto se aplica a todas las
entradas supervisadas. Para obtener información sobre limitaciones y actualizaciones, consulte las
notas de versión del producto.
i
ii
Entrada
0 V CC (-)
Instalación del hardware
ATENCIÓN
No monte nunca el producto de Axis mientras el dispositivo esté conectado a la
alimentación. Conecte siempre la alimentación al final de la instalación.
A VISO
Para proteger los circuitos frente a descargas electrostáticas (ESD), use protección ESD al
manipular el producto mientras los componentes y contactos estén expuestos.
Lea todas las instrucciones antes de instalar el producto.
•
•
•
•
Para configurar el hardware, consulte página 173.
Para instalar el producto en una pared (opción preferida) o en el techo, consulte página
175.
Para instalar el producto en un raíl DIN, consulte página 176.
Para conectar los cables, consulte página 177.
Consideraciones sobre el sistema
El producto de Axis debe instalarse en un área segura.
172
AXIS A1001 Network Door Controller
El producto de Axis, tanto si es un controlador de puerta independiente o un sistema de
controladores de puerta, no debería limitar ni debilitar el funcionamiento previsto de los sistemas
con los que se conecta.
El producto de Axis debe instalarse en una pared (opción recomendada) o en el techo (con o sin
caja de conexiones). También se puede instalar en un raíl DIN.
Configuración del hardware
Configure el hardware en las páginas Hardware Configuration (Configuración del hardware)
antes de instalar el producto.
Puertas, cerraduras y otros dispositivos se pueden conectar al producto de Axis antes de completar
la configuración de hardware. Sin embargo, la conexión de dispositivos será más fácil si completa
la configuración de hardware primero. Esto se debe a que el gráfico de pines del hardware
estará disponible cuando la configuración esté completa. El gráfico de pines del hardware es
una guía sobre cómo conectar los pines. Se puede usar como hoja de referencia para tareas de
mantenimiento. Para conocer las instrucciones de mantenimiento, consulte página 187.
Para configurar el hardware, seleccione uno de los siguientes métodos:
•
•
Importación de un archivo de configuración de hardware. Consulte página 173.
Creación de una nueva configuración de hardware. Consulte página 173.
Importación de un archivo de configuración de hardware
La configuración del hardware del producto de Axis se puede completar más rápidamente mediante
la importación de un archivo de configuración de hardware.
Para importar un archivo de configuración de hardware:
1. Acceda a Setup > Hardware Configuration (Configuración > Configuración de
hardware).
2. Haga clic en Import hardware configuration (Importar configuración de hardware).
Si ya existe una configuración de hardware, haga clic en Reset and import hardware
configuration (Restablecer e importar una configuración de hardware).
3. En el cuadro de diálogo del navegador de archivos que aparece, localice y seleccione el
archivo de configuración de hardware (*.json) en su equipo.
4. Haga clic en OK (Aceptar).
Creación de una nueva configuración de hardware
Para crear una nueva configuración de hardware desde cero:
173
ESPANÕL
Para obtener más información sobre la exportación de archivos de configuración de hardware,
consulte el Manual del usuario.
AXIS A1001 Network Door Controller
1. Si procede, quite el tornillo de la cubierta, inserte un destornillador plano en la ranura de
extracción de la cubierta y retire la cubierta.
2. Conecte el producto de Axis a la red y espere hasta que la conexión de red se haya
establecido y el producto tenga alimentación. Si el producto no cuenta con alimentación
a través de Ethernet, sino que usa Ethernet y alimentación externa en su lugar, también
deberá conectar el producto a una fuente de alimentación limitada (LPS) compatible con
SELV. Para obtener más información sobre el conector de alimentación (entrada CC),
consulte Especificaciones en la página 164.
3. Acceda al producto. Consulte página 181.
4. Acceda a Setup > Hardware Configuration (Configuración > Configuración
de hardware) y haga clic en Start new hardware configuration (Iniciar nueva
configuración de hardware).
Si el hardware del producto no se han configurado antes o se ha eliminado, Hardware
Configuration (Configuración de hardware) estará disponible en el panel de notificación
de la página Descripción general.
5. Seleccione una opción de puerta en función del número de puertas, una (1) o dos (2), que
se conectarán al producto de Axis.
6. Especifique un nombre descriptivo para cada puerta y haga clic en Next (Siguiente). Se
recomienda especificar nombres descriptivos exclusivos para las puertas de forma que
puedan identificarlas fácilmente aquellos que administren el sistema.
También puede editar el nombre del producto de Axis. El nombre predeterminado incluye
el número de serie para facilitar la identificación.
7. Seleccione las opciones de cerradura y de monitor de puerta que se ajusten a los
requisitos y el tipo de conexiones de cerradura que se usarán. A continuación, haga clic
en Next (Siguiente). Para obtener más información sobre las opciones disponibles,
consulte el Manual del usuario.
8. Seleccione los tipos de lectores que se utilizarán y haga clic en Finish (Finalizar). Para
obtener más información sobre las opciones disponibles, consulte el Manual del usuario.
9. En el cuadro de diálogo que aparece una vez finalizada la configuración, haga clic en OK
(Aceptar) o haga clic en el enlace para ver el gráfico de pines del hardware.
Para imprimir el gráfico de pines del hardware, haga clic en Print Hardware Pin Chart
(Imprimir gráfico de pines del hardware) en la página Hardware Pin Chart (Gráfico
de pines del hardware).
10. Desconecte el producto de la red. Si el producto no está conectado mediante
alimentación a través de Ethernet, desconecte también el producto de la fuente de
alimentación.
Para cancelar la configuración de hardware, haga clic en el botón Cancel (Cancelar). Puede hacer
esta acción desde cualquiera de las páginas de configuración de hardware.
174
AXIS A1001 Network Door Controller
Montaje en pared y techo
A VISO
Si está instalando el controlador de puerta en una pared, asegúrese de que la pieza de
corte de los cables esté mirando hacia abajo.
1. Si se usa una caja de conexiones, instálela antes de instalar el controlador de accesos en
red. Por motivos de conformidad con UL, la caja de conexiones debe figurar en la lista UL.
2. Si procede, quite el tornillo de la cubierta, inserte un destornillador plano en la ranura
de extracción de la cubierta y retire la cubierta. Consulte Información general del
hardware en la página 159.
3. Haga marcas para los orificios para los tornillos en el techo o la pared usando la base
como plantilla.
4. Si es necesario, taladre los orificios para los tornillos.
5. Monte la base en la pared o el techo. Asegúrese de que los tornillos y tacos sean
adecuados para el material (por ejemplo, madera, metal, placas de yeso, piedra, etc.).
1
2
ESPANÕL
1
Base
175
AXIS A1001 Network Door Controller
2
Orificio para tornillo (4x)
6. Conecte los cables. Consulte página 177.
Montaje en raíl DIN
1. Si procede, se puede instalar un raíl DIN (no incluido).
2. Si procede, quite el tornillo de la cubierta, inserte un destornillador plano en la ranura
de extracción de la cubierta y retire la cubierta. Consulte Información general del
hardware en la página 159.
3. Enganche el clip DIN inferior (que es flexible) en el raíl DIN inferior inclinando la base
levemente hacia adelante.
4. Levante la base de forma que el clip DIN inferior alcance la posición más baja.
5. Incline la base hacia atrás de forma que quede paralela con la pared o el techo.
6. Enganche el clip DIN superior (que es flexible) en el raíl DIN superior bajando la base.
1
2
3
4
1
2
Base
Orificio para tornillo (4x)
176
AXIS A1001 Network Door Controller
3
4
Raíl DIN
Clip DIN inferior
7. Fije la base utilizando los cuatro tornillos. Asegúrese de que los tornillos y tacos sean
adecuados para el material (por ejemplo, madera, metal, placas de yeso, piedra, etc.).
Consulte Montaje en pared y techo en la página 175.
Nota
Para evitar que la base se curve, procure no apretar los tornillos demasiado. Deje
aproximadamente 2,5 mm (0,1 pulg.). Si la base se queda doblada, la cubierta no cerrará.
8. Conecte los cables. Consulte página 177.
Conexión de los cables
ATENCIÓN
Desconecte la alimentación antes de conectar cualquier cable al producto de Axis. Nunca
efectúe conexiones mientras el dispositivo esté conectado a la alimentación.
A VISO
• El producto se conectará mediante un cable de red blindado (STP). Todos los cables que
conecten el producto a la red deberán estar blindados para su uso específico. Asegúrese
de que los dispositivos de red estén instalados de conformidad con las instrucciones del
fabricante. Para obtener información sobre los requisitos normativos, consulte Regulatory
Information on page 2.
• Si utiliza alimentación a través de Ethernet, no conecte el cable de red a la red hasta
que los demás cables se hayan conectado.
• Para proteger los circuitos frente a descargas electrostáticas (ESD), use la protección ESD
al conectar cables al producto.
1. Haga un bucle con el cable de red alrededor de la guía de cables y conecte el cable
de red al conector de red.
2. Ajuste el cable de red a la guía de cables usando una de las abrazaderas de cables
proporcionadas.
177
ESPANÕL
• Para facilitar el mantenimiento futuro, evitar excesiva tensión en los cables y conectores
y evitar daños en el aislamiento del conductor, deje un bucle de servicio y asegúrese de
que todos los cables estén correctamente fijados y seguros. Utilice las abrazaderas para
cables suministradas.
AXIS A1001 Network Door Controller
1
1
2
2
Abrazadera de cable
Cable de red
3. Pele los cables según se requiera con un engarzador.
4. Conecte los cables entre el controlador de puerta y las cerraduras, las puertas y otros
dispositivos. Para obtener más información sobre los conectores y sus especificaciones,
consulte página 162 y página 165.
A VISO
• Asegúrese de que todos los cables estén correctamente conectados. Un cableado
incorrecto podría causar daños en el producto.
• Asegúrese de usar cables que se ajusten a los requisitos. Para obtener más información,
consulte Área de los cables en la página 165 y, para la conformidad con UL, Requirements
for UL Compliance on page 4.
178
AXIS A1001 Network Door Controller
1
4
2
3
Ejemplo de conexión de cables
Conector con enchufe de 6 pines
Cable de red
Abrazadera de cable (4x)
Conector de red
Nota
• Para los dispositivos que se hayan configurado mediante las páginas de configuración de
hardware del producto, use el gráfico de pines del hardware como guía para saber cómo
debe conectar los pines. Para obtener más información sobre la configuración del hardware
y el gráfico de pines del hardware, consulte Configuración del hardware en la página 173.
• Para obtener información acerca de cómo conectar otros cables, por ejemplo, los cables de
alimentación a las cerraduras, los lectores y otros dispositivos, consulte las instrucciones
de los fabricantes.
5. Recoja todos los cables y asegúrelos con las abrazaderas para cables suministradas.
6. Etiquete los cables para usarlos en otro momento.
7. Si utiliza alimentación a través de Ethernet, conecte el cable de red a la red.
179
ESPANÕL
1
2
3
4
AXIS A1001 Network Door Controller
8. Si utiliza Ethernet y alimentación externa (10–30 V CC), conecte el cable de red a la red y
conecte la alimentación. Use una fuente de alimentación limitada (LPS) compatible con
SELV. Para obtener más información, consulte Conector de alimentación en la página 168.
1
2
Ejemplo de conexión de cables
1
2
Conector de red
Cable de red
9. Asegúrese de que los indicadores LED indiquen las condiciones correctas. Consulte
Indicadores LED en la página 162.
10. Fije la cubierta a la base y apriete los tornillos de la cubierta.
180
AXIS A1001 Network Door Controller
1
2
1
2
Cubierta
Tornillo de la cubierta (T10)
El producto se puede utilizar con la mayoría de los sistemas operativos y exploradores. Los
exploradores recomendados son Internet Explorer con Windows, Safari con Macintosh y Firefox con
otros sistemas operativos.
La primera vez que acceda al producto, debe asignar una dirección IP y establecer la contraseña
para el usuario administrador predeterminado root.
•
•
Para asignar una dirección IP, vea página 182.
Para establecer la contraseña de root, vea page 38.
Acceso desde un navegador
1. Inicie un navegador (Internet Explorer, Firefox o Safari).
181
ESPANÕL
Acceso al producto
AXIS A1001 Network Door Controller
2. Especifique la dirección IP o el nombre del host del producto de Axis en el campo
Ubicación/Dirección del navegador. Para acceder al producto desde un equipo Macintosh
(Mac OS X), haga clic en la ficha Bonjour y seleccione el producto en la lista desplegable.
Si no conoce la dirección IP, use la utilidad AXIS IP Utility para localizar el producto en la
red. Para obtener información sobre cómo detectar y asignar direcciones IP, consulte
Asignación de una dirección IP. Esta información también está disponible en las páginas
de asistencia técnica en www.axis.com/techsup
3. Especifique el nombre de usuario y la contraseña. Si esta es la primera vez que se accede
al producto, habrá que configurar en primer lugar la contraseña de root. Para ver las
instrucciones, consulte Definición de la contraseña de root en la página 186.
4. AXIS Entry Manager se abre en el navegador. La página de inicio se denomina Descripción
general.
Acceso desde Internet
Una vez conectado, el producto de Axis estará accesible en su red local (LAN). Para acceder al
producto desde Internet, debe configurar el router de red para permitir el tráfico de datos entrantes
hasta el producto. Para ello, active la función de NAT transversal, que intentará configurar
automáticamente el router para permitir el acceso al producto. Esta función se activa desde Setup
> Additional Controller Configuration > System Options > Network > TCP/IP > Advanced
(Configuración > Configuración del controlador adicional > Opciones del sistema > Red >
TCP/IP > Avanzado).
Para obtener más información acerca de NAT transversal para IPv4, consulte el manual del usuario
del producto. Consulte también la información sobre el servicio de DNS dinámico de Internet de
AXIS, en www.axiscam.net.
Para consultar las notas técnicas sobre este y otros temas, consulte el sitio web de soporte de Axis,
en www.axis.com/techsup.
Asignación de una dirección IP
Dirección IP predeterminada
El producto Axis está diseñado para su uso en una red Ethernet y requiere una dirección IP para
acceder. La mayoría de redes disponen de un servidor DHCP que asigna direcciones IP a dispositivos
conectados de forma automática. Si su red no dispone de un servidor DHCP, el producto Axis
utilizará 192.168.0.90 como dirección IP predeterminada.
Métodos recomendados en Windows®
Se recomienda utilizar AXIS IP Utility y AXIS Camera Management como métodos para encontrar
productos Axis en la red y asignarles direcciones IP en Windows®. Ambas aplicaciones son gratuitas
y pueden descargarse desde www.axis.com/techsup
182
AXIS A1001 Network Door Controller
AXIS IP Utility: instalaciones pequeñas
AXIS IP Utility encuentra y muestra automáticamente los productos Axis existentes en su red.
Además, puede utilizarse para asignar manualmente una dirección IP estática.
Recuerde que el equipo que ejecute AXIS IP Utility debe encontrarse en el mismo segmento de red
(subred física) que el producto Axis.
Detección automática
1. Asegúrese de que el producto de Axis esté conectado a la red y encendido.
2. Inicie la utilidad AXIS IP Utility.
3. Cuando el producto de Axis aparezca en la ventana, haga doble clic para abrir sus
páginas web.
4. Para obtener más información sobre cómo configurar la contraseña, consulte página 186.
Asignación de la dirección IP manualmente (opcional)
1. Adquiera una dirección IP disponible en el mismo segmento de red que su equipo.
2. Seleccione el producto de Axis en la lista.
3. Haga clic en Assign new IP address to selected device (Asignar nueva dirección IP al
dispositivo seleccionado)
y escriba la dirección IP.
4. Haga clic en Assign (Asignar) y continúe según las instrucciones.
5. Cuando el producto de Axis aparezca en la ventana, haga doble clic para abrir sus
páginas web.
6. Para obtener más información sobre cómo configurar la contraseña, consulte página 186.
AXIS Camera Management es una potente herramienta de instalación y gestión de productos de red
Axis. La herramienta puede buscar dispositivos automáticamente en la red, asignar direcciones
IP, establecer contraseñas, mostrar estados de conexión, gestionar actualizaciones de firmware y
configurar parámetros de productos. Puede ejecutar operaciones por lotes en varios productos a
la vez.
Detección automática
1. Asegúrese de que el producto de Axis esté conectado a la red y encendido.
2. Inicie AXIS Camera Management.
3. Conéctese a un servidor.
Para conectarse a un servidor de la red, seleccione Remote server (Servidor remoto)
y seleccione un servidor en la lista desplegable, o bien escriba la dirección IP o DNS
en el campo.
183
ESPANÕL
AXIS Camera Management: instrucciones detalladas
AXIS A1001 Network Door Controller
4.
5.
6.
7.
Para conectarse a un servidor que se ejecute localmente en su equipo, seleccione This
computer (Este equipo).
Haga clic en Log On (Iniciar sesión) para iniciar sesión como el usuario actual del
equipo. Si lo desea, también puede anular la selección de Log on as current user (Iniciar
sesión como el usuario actual) y especifique el nombre de usuario y la contraseña
para iniciar sesión.
La primera vez que se ejecuta AXIS Camera Management, busca automáticamente
productos de Axis en la red. Para buscar manualmente los productos, seleccione
Configuration > Add Devices (Configuración > Agregar dispositivos). El software
muestra una lista de los productos encontrados.
Seleccione los productos que desee agregar. Haga clic en Next (Siguiente) y, a
continuación, en Finish (Finalizar).
En la lista de dispositivos, haga clic en la dirección para abrir las páginas web del
producto.
Para obtener más información sobre cómo configurar la contraseña, consulte página 186.
Asignar direcciones IP en varios dispositivos
AXIS Camera Management acelera el proceso de asignación de direcciones IP en varios dispositivos
indicando las direcciones IP disponibles dentro de un intervalo especificado.
1. Seleccione los dispositivos que desee configurar (pueden seleccionarse varios modelos) y
haga clic en Assign IP address to selected devices (Asignar dirección IP a los dispositivos
seleccionados)
.
2. Haga clic en Yes (Sí) en el cuadro de diálogo Device Maintenance (Mantenimiento
de dispositivos).
3. Seleccione Assign the following IP address range (Asignar el rango de direcciones
IP siguiente) y escriba el intervalo de direcciones IP, la máscara de subred y el router
predeterminado que utilizarán los dispositivos. Haga clic en Next (Siguiente).
4. Las direcciones IP sugeridas aparecerán listadas en New IP Addresses (Nuevas direcciones
IP) y podrán editarse seleccionando un dispositivo y haciendo clic Edit IP (Editar IP).
5. Haga clic en Finish (Finalizar).
Otros métodos y sistemas operativos
La siguiente lista muestra otros métodos disponibles para asignar o detectar direcciones IP. Todos
los métodos están activados de forma predeterminada, y se pueden desactivar.
•
•
Conexión de un servicio AVHS (todos los sistemas operativos). Para conectarse a
un servicio AVHS, consulte la guía de instalación del proveedor del servicio. Para
obtener información y ayuda para encontrar un proveedor de servicios AVHS, acceda a
www.axis.com/hosting.
UPnP™ (Windows®). Cuando está activado en un equipo, el producto de red de Axis se
detecta automáticamente y se agrega a Redes/Mis sitios de red.
184
AXIS A1001 Network Door Controller
•
•
•
•
Bonjour (Mac OS X® 10.4 o versiones posteriores). Aplicable a todos los navegadores
compatibles con Bonjour. Acceda a los marcadores de Bonjour en el navegador (por
ejemplo, Safari) y haga clic en el enlace para acceder a las páginas web.
Servicio DNS dinámico de AXIS (todos los sistemas operativos). Un servicio gratuito
de Axis que permite instalar de forma rápida y sencilla el producto de red de Axis.
Requiere una conexión a Internet sin proxy HTTP. Para obtener más información, consulte
www.axiscam.net.
ARP/Ping (todos los sistemas operativos). Consulte Asignación de una dirección IP
usando ARP/Ping. El comando se debe emitir en un plazo de 2 minutos a partir de la
conexión de la fuente de alimentación.
Servidor DHCP (todos los sistemas operativos). Para ver las páginas de administración
del servidor DHCP de red, consulte la documentación de usuario del servidor.
Asignación de una dirección IP usando ARP/Ping
La dirección IP del producto se puede asignar usando ARP/Ping. El comando se debe emitir en un
plazo de 2 minutos a partir de la conexión de la fuente de alimentación.
185
ESPANÕL
1. Adquiera una dirección IP estática gratis en el mismo segmento de red que el equipo.
2. Localice el número de serie (S/N) en la etiqueta del producto.
3. Abra el símbolo del sistema y especifique los siguientes comandos:
Sintaxis Linux/Unix
arp -s <dirección IP> <número de serie> temp
ping -s 408 <dirección IP>
Ejemplo de Linux/Unix
arp -s 192.168.0.125 00:40:8c:18:10:00 temp
ping -s 408 192.168.0.125
Sintaxis de Windows (es posible que deba ejecutar el símbolo del sistema como
administrador)
arp -s <dirección IP> <número de serie>
ping -l 408 -t <dirección IP>
Ejemplo de Windows (es posible que deba ejecutar el símbolo del sistema como
administrador)
arp -s 192.168.0.125 00-40-8c-18-10-00
ping -l 408 -t 192.168.0.125
4. Compruebe que el cable de red esté conectado y, a continuación, reinicie el producto.
Para ello, debe desconectar la alimentación y volver a conectarla.
5. Abra el símbolo del sistema cuando el producto responda con: Reply from
192.168.0.125:... o similar.
6. Abra un navegador y escriba http://<dirección IP> en el campo de
Ubicación/Dirección.
AXIS A1001 Network Door Controller
Nota
• Para abrir el símbolo del sistema en Windows, acceda al menú Inicio y escriba cmd en el
campo Ejecutar/Buscar.
• Para usar el comando ARP en Windows 8/Windows 7/Windows Vista, haga clic con el botón
secundario en el icono del símbolo del sistema y seleccione Ejecutar como administrador.
• Para abrir el símbolo del sistema en Mac OS X, abra la utilidad Terminal desde Aplicación
> Utilidades.
Definición de la contraseña de root
Para acceder al producto de Axis, debe definir la contraseña para el usuario administrador
predeterminado root. Esta acción se lleva a cabo en el cuadro de diálogo Configure Root Password
(Configurar contraseña de root), que se abre cuando se accede al producto por primera vez.
Para evitar escuchas ilegales en la red, la contraseña de root se puede definir mediante una
conexión HTTPS cifrada, que requiere un certificado HTTPS. HTTPS (protocolo de transferencia de
hipertexto sobre SSL) es un protocolo que se usa para cifrar el tráfico entre los navegadores web y
los servidores. El certificado HTTPS garantiza un intercambio cifrado de información.
El nombre de usuario del administrador predeterminado root es permanente y no se puede
eliminar. Si pierde la contraseña de root, habrá que restablecer el producto a su configuración
predeterminada de fábrica. Para obtener información acerca de cómo se restablecen los valores
predeterminados de fábrica, consulte el manual del usuario.
Para definir la contraseña mediante una conexión HTTP estándar, escríbala directamente en
el cuadro de diálogo.
Para definir la contraseña mediante una conexión HTTPS cifrada, siga estos pasos:
1. Haga clic en Use HTTPS (Usar HTTPS).
Se crea un certificado temporal (válido durante un año) que permite el cifrado de todo el
tráfico (tanto el que llega al producto como el que sale de él). La contraseña se puede
establecer ahora con seguridad.
2. Escriba una contraseña y vuelva a escribirla para confirmar su grafía.
3. Haga clic en OK (Aceptar). La contraseña se ha configurado.
Restablecimiento a la configuración predeterminada de fábrica
Importante
Hay que tener cuidado al restablecer la configuración predeterminada de fábrica. Todos
los valores, incluida la dirección IP, se restablecerán a la configuración predeterminada
de fábrica.
186
AXIS A1001 Network Door Controller
Nota
Las herramientas del software de instalación y gestión están disponibles en las páginas de
asistencia técnica en www.axis.com/techsup.
Para restablecer el producto a la configuración predeterminada de fábrica:
1. Desconecte la alimentación del producto.
2. Mantenga pulsado el botón de control y vuelva a conectar la alimentación. Vea
Información general del hardware en la página 159.
3. Mantenga pulsado el botón de control durante 25 segundos hasta que el indicador LED
de estado se ponga en ámbar por segunda vez.
4. Suelte el botón de control. El proceso finaliza cuando el indicador LED de estado se pone
verde. El producto se ha restablecido a la configuración predeterminada de fábrica. Si
no hay ningún servidor DHCP disponible en la red, la dirección IP predeterminada es
192.168.0.90.
5. Utilice las herramientas del software de instalación y gestión para asignar una dirección
IP, establecer la contraseña y acceder a la transmisión de vídeo.
También es posible restablecer los parámetros a los valores predeterminados de fábrica mediante
la interfaz web. Para ello, vaya a Setup > Additional Controller Configuration > Setup >
System Options > Maintenance (Configuración > Configuración del controlador adicional >
Configuración > Opciones del sistema > Mantenimiento).
Instrucciones de mantenimiento
Efectúe tareas de mantenimiento al menos una vez al año. El procedimiento de mantenimiento
sugerido incluye, aunque sin limitarse a ellos, los siguientes pasos:
•
Compruebe que todas las conexiones entre el controlador de puerta y los dispositivos
externos sean seguras.
• Verifique todas las conexiones de hardware. Se requiere acceso a las páginas web del
producto. Para obtener más información, consulte el manual de usuario.
• Compruebe que el sistema funcione correctamente, incluidos los dispositivos externos
conectados.
Pase una tarjeta y pruebe los lectores, las puertas y las cerraduras.
Si el sistema incluye dispositivos REX, sensores u otros dispositivos, pruébelos
también.
Si están activadas, pruebe también las alarmas antimanipulación.
Si los resultados de cualquiera de los pasos anteriores indican que hay fallos o comportamientos
inesperados:
187
ESPANÕL
Para mantener el sistema de control de acceso funcionando correctamente, Axis recomienda
efectuarle un mantenimiento periódico, incluidos los controladores de puerta y los dispositivos
conectados.
AXIS A1001 Network Door Controller
-
Pruebe las señales de los cables usando los equipos adecuados y compruebe si
los cables están dañados en algún sentido.
Sustituya todos los cables defectuosos.
Una vez que se hayan sustituido los cables, compruebe de nuevo las conexiones
de hardware. Se requiere acceso a las páginas web del producto. Para obtener
más información, consulte el manual de usuario.
• Asegúrese de que estén actualizados todos usuarios y los grupos, así como las puertas y
las programaciones de acceso. Se requiere acceso a las páginas web del producto. Para
obtener más información, consulte el manual de usuario.
• Si el controlador de puerta no actúa del modo previsto, consulte el manual del
usuario para obtener información sobre la resolución de problemas y las funciones de
mantenimiento integradas del producto.
Para obtener información sobre el mantenimiento de la batería, consulte y Batería en la página 154.
Más información
El Manual de usuario se encuentra disponible en www.axis.com.
Visite www.axis.com/techsup para comprobar si existe un firmware actualizado disponible para su
producto de red. Para ver la versión del firmware instalado actualmente, vaya a Setup > About
(Configuración > Acerca de).
Visite el centro de aprendizaje de www.axis.com/academy para consultar guías, tutoriales,
seminarios web y cursos que pueden resultarle útiles.
Información de la garantía
Para obtener más información acerca de la garantía del producto Axis e información relacionada,
visite www.axis.com/warranty/
188
189
Installation Guide
AXIS A1001 Network Door Controller
© Axis Communications AB, 2013 - 2014
Ver. M1.10
Date: October 2014
Part No. 59870