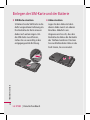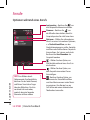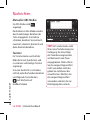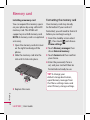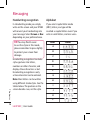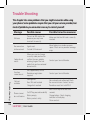
1
KP502 Benutzerhandbuch
Allgemeine Anfragen
<LG Informationscenter für Kunden>
01805-4737-84
General Inquiries
<LG Customer Information Center>
01805-4737-84
P/N : MMBB0318319 (1.0) H
ELECTRONICS INC.
www.lgmobile.com
KP502 Benutzerhandbuch
DEUTSCH
ENGLISH
Bluetooth QD ID B014534
Der Inhalt dieses Handbuchs kann
je nach Modell oder Software
des Mobiltelefons oder nach
Dienstanbieter variieren.
KP502 Benutzerhandbuch
Herzlichen Glückwunsch zum Kauf des hoch
entwickelten und kompakten Mobiltelefons
KP502 von LG, mit dem Sie modernste digitale
Mobilkommunikationstechnologie nutzen
können.
Entsorgung von Altgeräten
1 Wenn dieses Symbol eines durchgestrichenen Abfalleimers auf
einem Produkt angebracht ist, unterliegt dieses Produkt der
europäischen Richtlinie 2002/96/EC.
2 Alle Elektro- und Elektronik-Altgeräte müssen getrennt vom
Hausmüll entsprechend den geltenden Vorschriften entsorgt
werden.
3 Durch korrekte Entsorgung des Altgeräts können negative
Konsequenzen für die Umwelt und Personen vermieden
werden.
4 Genauere Informationen zur Entsorgung des alten
Geräts erhalten Sie bei den lokalen Behörden, der
Entsorgungseinrichtung oder dem Fachhändler, bei dem Sie
das Produkt erworben haben.
Einführung
01
Standby-Bildschirm
02
Erste Schritte
03
Werden Sie kreativ
04
Organizer
05
Browser
06
Einstellungen
07
Zubehör
08
Inhalt
Einführung
Ihr neues Mobiltelefon��������������������������� 8
Ansicht des geöffneten Telefons������10
Einlegen der SIM-Karte und der
Batterie�������������������������������������������������������11
Speicherkarte�������������������������������������������14
Menü-Übersicht��������������������������������������16
Standby-Bildschirm
Touchscreen-Tipps���������������������������������17
ERSTE SCHRITTE
Anrufe���������������������������������������������������������22
Anrufen�������������������������������������������������������22
Mithilfe des Kontaktverzeichnisses
anrufen��������������������������������������������������������23
Annehmen oder Abweisen eines
Sprachanrufs���������������������������������������������23
Optionen während eines Anrufs�������24
Lautstärke anpassen������������������������������25
Kurzwahl�����������������������������������������������������25
Neuer Anruf�����������������������������������������������25
Abschalten von MFV-Tönen����������������26
Anruflisten anzeigen������������������������������26
Rufumleitung��������������������������������������������27
Anrufsperre������������������������������������������������28
Kontakte����������������������������������������������������30
Kontakte suchen��������������������������������������30
LG KP502 | Benutzerhandbuch
Neuen Kontakt hinzufügen�����������������30
Kontaktoptionen�������������������������������������31
Eine Gruppe erstellen����������������������������32
Kontakteinstellungen ändern�������������33
Informationen anzeigen�����������������������35
Nachrichten����������������������������������������������36
Nachrichten�����������������������������������������������36
Senden von Nachrichten����������������������36
Text eingeben�������������������������������������������37
T9-Modus���������������������������������������������������37
Manueller ABC-Modus��������������������������38
Tastatur�������������������������������������������������������38
Handschrifterkennung��������������������������39
E-Mail einrichten��������������������������������������41
E-Mail abrufen������������������������������������������44
E-Mail vom neuen Konto senden������44
E-Mail-Einstellungen ändern���������������44
Nachrichtenordner���������������������������������46
Nachrichten verwalten��������������������������47
Vorlagen�����������������������������������������������������48
Emoticons��������������������������������������������������48
Einstellungen für Textnachrichten
ändern���������������������������������������������������������48
Einstellungen für MultimediaNachrichten ändern�������������������������������50
Andere Einstellungen ändern�������������51
Werden Sie kreativ
Kamera�������������������������������������������������������52
Ein Foto machen �������������������������������������52
Nach der Aufnahme�������������������������������52
Der Sucher�������������������������������������������������53
Bildeinstellung wählen��������������������������54
Belichtung einstellen�����������������������������54
Serienaufnahme��������������������������������������55
Erweiterte Einstellungen����������������������55
Bildgröße verändern������������������������������57
Farbton wählen����������������������������������������58
Gespeicherte Fotos ansehen���������������58
Videokamera��������������������������������������������59
Ein Video aufnehmen����������������������������59
Nach der Aufnahme�������������������������������59
Der Sucher�������������������������������������������������61
Belichtung einstellen�����������������������������62
Erweiterte Einstellungen����������������������62
Video-Bildgröße verändern�����������������64
Farbton wählen����������������������������������������64
Gespeicherte Videos ansehen������������65
Ihre Fotos und Videos���������������������������66
Fotos und Videos ansehen������������������66
Fotos und Videos mit der ZoomFunktion ansehen�����������������������������������66
Lautstärke einstellen, wenn Sie ein
Video ansehen������������������������������������������66
Standbild aus Videoaufnahmen��������67
Fotos als Diashow ansehen�����������������67
Foto als Hintergrund������������������������������68
Fotos bearbeiten�������������������������������������69
Text zu Fotos hinzufügen���������������������70
Effekt zu Fotos hinzufügen������������������71
Morphing von Fotos�������������������������������72
Farbakzent zu Fotos hinzufügen�������72
Farbe der Fotos verändern������������������73
Länge des Videos zuschneiden����������74
Zwei Videos mischen�����������������������������74
Mischen von Fotos und Videos����������75
Text zu Video hinzufügen���������������������76
Foto-Überlagerung���������������������������������76
Sprachaufzeichnung hinzufügen������77
Soundtrack zum Video hinzufügen��78
Videogeschwindigkeit verändern�����79
Multimedia�����������������������������������������������80
Bilder �����������������������������������������������������������80
Optionenmenü „Meine Bilder“�����������80
Fotos senden��������������������������������������������81
Ein Bild auswählen����������������������������������82
Bilder drucken������������������������������������������82
Bilder kopieren und verschieben������83
Eine Diashow erstellen��������������������������83
Töne�������������������������������������������������������������83
Mit Ton arbeiten��������������������������������������84
Inhalt
Videos ���������������������������������������������������������84
Optionen während das Video
angehalten ist�������������������������������������������84
Videoclip senden�������������������������������������85
Menü Video-Optionen��������������������������85
Unterhaltung �������������������������������������������86
Ein Spiel oder eine Anwendung
lokal installieren���������������������������������������86
Ein Spiel spielen���������������������������������������86
Menü „Spiele-Optionen“����������������������87
Dokumente������������������������������������������������87
Datei auf das Mobiltelefon
übertragen�������������������������������������������������87
Dateien ansehen��������������������������������������88
Andere���������������������������������������������������������88
Einen Film erstellen��������������������������������89
Musik������������������������������������������������������������90
Übertragen von Musik auf das
Mobiltelefon����������������������������������������������90
Musiktitel abspielen�������������������������������91
Optionen während des Abspielens
von Musiktiteln����������������������������������������91
Eine Playlist erstellen�����������������������������92
Playlist bearbeiten����������������������������������92
Playlist löschen�����������������������������������������93
Radio �����������������������������������������������������������93
Radiostationen suchen�������������������������94
LG KP502 | Benutzerhandbuch
Kanäle zurücksetzen������������������������������94
Radio hören�����������������������������������������������95
ORGANIZER
Organizer���������������������������������������������������96
Hinzufügen eines neuen Termins�����96
Standard-Kalenderansicht ändern����97
Aufgaben hinzufügen���������������������������97
Anderen Zugriff zu Aufgaben
gewähren���������������������������������������������������98
Notiz hinzufügen�������������������������������������98
Datumrechner������������������������������������������99
Wecker einstellen������������������������������������99
Eine Notiz mit Skizze hinzufügen��� 100
Sprachmemo����������������������������������������� 101
Ton- und Sprachaufnahme��������������� 101
Sprachaufnahme senden������������������ 102
Rechner���������������������������������������������������� 102
Umrechnen von Einheiten���������������� 103
Stoppuhr verwenden�������������������������� 103
Ort zur Weltzeit hinzufügen������������� 104
PC-Synchronisation���������������������������� 105
LG PC Suite auf Ihrem PC
installieren���������������������������������������������� 105
Mobiltelefon mit PC verbinden������� 105
Telefoninformationen sichern und
wiederherstellen����������������������������������� 106
Telefondaten auf dem PC ansehen106
Kontakte synchronisieren����������������� 107
Nachrichten synchronisieren����������� 108
Ihr Mobiltelefon als
Massenspeichergerät�������������������������� 108
Ihr Mobiltelefon als
Musiksynchronisationsgerät������������ 109
BROWSER
Browser ��������������������������������������������������� 110
Zugriff zum Internet ��������������������������� 110
Lesezeichen hinzufügen und
darauf zugreifen����������������������������������� 110
RSS-Reader verwenden���������������������� 111
Seite speichern�������������������������������������� 112
Auf gespeicherte Seite zugreifen��� 112
Browserverlauf ansehen�������������������� 112
Browsereinstellungen ändern��������� 113
Verwenden des Telefons als
Modem����������������������������������������������������� 113
Dateien über Bluetooth��������������������� 120
Koppeln mit anderen BluetoothGeräten.��������������������������������������������������� 122
Verwenden von BluetoothKopfhörern��������������������������������������������� 123
Zubehör���������������������������������������124
Netzdienste��������������������������������125
Technische Daten���������������������125
Richtlinien
Richtlinien für sichere und effiziente
Handhabung����������������������������������������� 127
Fehlerbehebung���������������������������������� 133
Einstellungen
Profil anpassen�������������������������������������� 115
Bildschirmeinstellungen ändern���� 115
Telefoneinstellungen ändern���������� 116
Verbindungseinstellungen
ändern������������������������������������������������������ 117
Speicherverwaltung���������������������������� 119
Senden und Empfangen von
Ihr neues Mobiltelefon
Gesprächsende/Aus-Taste
Beendet einen Anruf oder lehnt
ihn ab.
Schaltet das Telefon ein/aus.
Drücken Sie einmal, um auf
den Standby-Bildschirm
zurückzukehren.
Multitasking-Taste
Anruf-Taste
Wählt eine Telefonnummer
und beantwortet
eingehende Anrufe.
Einführung
WARNUNG: Das LCD-Display und der Touchscreen können
beschädigt werden, wenn Sie schwere Gegenstände auf das Telefon
legen oder wenn sich beim Hinsetzen das Telefon in Ihrer Hosentasche
befindet.
LG KP502 | Benutzerhandbuch
01
Anschluss für Ladegerät/
Kabel/Freisprechanlage
TIPP: Warten Sie, bis
das Telefon eingeschaltet
und im Netz angemeldet
ist, bevor Sie das USBKabel anschließen.
Seitliche Tasten
• Im Ruhezustand:
Lautstärke des Tastentons
• Während eines Anrufs:
Hörerlautstärke
• Während des Abspielens
eines BGM-Titels
- Kurzer Tastendruck:
Steuert die Lautstärke
02
03
Steckplatz für
microSD-Speicherkarte
04
Tasten „Sperren/
Entsperren“
06
Aufnahmetaste
08
05
07
Eingabestift
Einführung
Ansicht des geöffneten Telefons
Akkuabdeckung
Akku
Kameralinse
Einführung
10
LG KP502 | Benutzerhandbuch
Halterung für SIMKarte
Einlegen der SIM-Karte und der Batterie
1 Akkuabdeckung abnehmen
Schieben Sie die Akkuabdeckung
nach unten und weg vom
Telefon.
01
02
03
04
2 Akku entnehmen
Nehmen Sie den Akku mithilfe
der Aussparung auf der
Unterseite aus dem Akkufach
heraus.
WARNUNG: Benutzen Sie
zum Entfernen des Akkus nicht
Ihre Fingernägel.
05
WARNUNG: Entfernen Sie
den Akku nicht, während das
Telefon eingeschaltet ist. Dies
könnte Schäden am Telefon zur
Folge haben.
08
06
07
Einführung
11
Einlegen der SIM-Karte und der Batterie
3 S IM-Karte einsetzen
Schieben Sie die SIM-Karte in die
dafür vorgesehene Halterung ein.
Die Kontakte der Karte müssen
dabei nach unten zeigen. Um
die SIM-Karte zu entfernen,
ziehen Sie sie vorsichtig in die
entgegengesetzte Richtung.
Einführung
12
LG KP502 | Benutzerhandbuch
4 Akku einsetzen
Legen Sie den Akku mit dem
oberen Ende zuerst am oberen
Rand des Akkufachs ein.
Vergewissern Sie sich, dass die
Kontakte des Akkus die Kontakte
des Telefons berühren. Drücken
Sie anschließend den Akku in das
Fach hinein, bis er einrastet.
5 Telefon laden
Öffnen Sie die Abdeckung der
Buchse für das Ladegerät an
der Seite des KP502, indem
Sie sie anheben und drehen.
Stecken Sie das Ladegerät ein,
und schließen sie es dann an
eine Netzsteckdose an. Sobald
die Anzeige „Akku geladen“ auf
dem Bildschirm erscheint, ist das
KP502 aufgeladen.
01
02
03
04
05
06
07
08
Einführung
13
Speicherkarte
Speicherkarte einsetzen
Sie können den Speicherplatz des
Telefons mittels einer microSDSpeicherkarte erweitern. Das KP502
unterstützt Speicherkarten mit bis
zu 8 GB.
HINWEIS: Die Speicherkarte ist als
optionales Zubehör erhältlich.
1 Ö
ffnen Sie die Klappe über dem
Speicherkartensteckplatz an der
rechten Seite des Telefons.
2 Schieben Sie die Speicherkarte in
den Steckplatz, bis sie einrastet.
Einführung
14
3 Setzen Sie die Abdeckung ein.
LG KP502 | Benutzerhandbuch
Speicherkarte formatieren
Möglicherweise ist Ihre
Speicherkarte bereits formatiert. Ist
dies nicht der Fall, müssen Sie die
Speicherkarte formatieren, bevor
Sie sie nutzen können.
1 Wählen Sie auf dem StandbyBildschirm zuerst
, dann
,
und wählen Sie dann „Telefon“.
2 Speicherverwaltung berühren
und Speicherkarte wählen.
3 Format berühren und Ihre Wahl
bestätigen.
4 Falls ein Kennwort festgesetzt
wurde, geben Sie es jetzt ein. Die
Karte wird formatiert und kann
dann verwendet werden.
TIPP! Um das StandardSpeicherziel zu ändern, im
Menü Telefoneinstellungen
die Speicherverwaltung öffnen
und Hauptspeichereinstellung
wählen.
HINWEIS: Alle schon auf der
Speicherkarte gespeicherten
Daten werden automatisch im
entsprechenden Ordner abgelegt –
Videos werden z. B. unter „Meine
Videos“ gespeichert.
01
02
03
04
Kontakte übertragen
05
So übertragen Sie Kontakte von
Ihrer SIM auf das Mobiltelefon:
1 Wählen Sie in der Registerkarte
„Telefon“ die Option
und
dann „Einstellungen“.
2 Berühren Sie „Kopieren“.
3 Wählen Sie „Telefon auf SIM“,
und berühren Sie dann „Fertig“.
4 Wählen Sie „Alle auswählen“,
oder wählen Sie die Namen
einzeln aus, und berühren Sie
dann Kopieren.
06
07
08
Einführung
15
Menü-Übersicht
Berühren Sie
im Standby-Bildschirm, um ein Hauptmenü zu öffnen.
Von dort können Sie auf weitere Menüs zugreifen: Kommunikation,
Unterhaltung, Anwendungen und Einstellungen.
Einführung
16
Kommunikation
Unterhaltung
Anrufen
Kurzwahl
Kontakte
Anrufliste
Neue Nachricht
Neue E-Mail
Nachrichten
Galerie
Eigene Dateien
Kamera
Videokamera
Muvee-Studio
Musik
Radio
Unterhaltung
Anwendungen
Einstellungen
Browser
Organizer
Wecker
Sprachmemo
Skizzen
Extras
SIM-Dienste
Profile
Anzeige
Telefon
Anrufe
Touchscreen
Bluetooth
Verbindungen
LG KP502 | Benutzerhandbuch
Standby-Bildschirm
Wird das KP502 nicht genutzt,
kehrt es automatisch zum StandbyBildschirm zurück. Von hier haben
Sie Zugang zu allen Menüoptionen,
können schnell Anrufe tätigen, den
Status Ihres Mobiltelefons einsehen
und vieles mehr.
Touchscreen-Tipps
01
02
03
04
05
06
07
08
Standby-Bildschirm
Die Startseite ist der ideale Ort, um
sich mit dem Touchscreen vertraut
zu machen.
Tippen Sie genau auf ein Symbol,
um es auszuwählen. Nach jedem
Berühren einer Option reagiert das
KP502 mit einer leichten Vibration.
Zum Durchblättern der Listen
berühren Sie das letzte sichtbare
Element und fahren mit dem
Finger leicht über das Display.
Die Liste verschiebt sich nach
oben, wodurch darunter liegende
Elemente sichtbar werden.
• Bitte nur leicht berühren, da
der Touchscreen schon auf die
leichteste Berührung reagiert.
• Berühren Sie mit der Fingerspitze
leicht das gewünschte Objekt.
Achten Sie dabei darauf, dass Sie
nicht die Optionen für andere
Funktionen berühren.
• Wenn die Beleuchtung
ausgeschaltet ist, drücken Sie
rechts die Taste „Entsperren/
Sperren“, um wieder zur Startseite
zurückzukommen.
• Bedecken Sie das Telefon nicht.
Der Touchscreen funktioniert
nicht, wenn er abgedeckt ist.
• Es gibt zwei verschiedene Arten
von Standby-Bildschirmen.
Blättern Sie nach links oder rechts,
um Ihren Standby-Bildschirm zu
ändern.
17
Standby-Bildschirm
1 W
idget-Standby: Wenn Sie
berühren, wird das MobiltelefonWidget angezeigt.
2 Kurzwahl-Standby: Wenn Sie
berühren, wird die Kurzwahlliste
angezeigt. Sie können in beiden
Standby-Arten die gewünschte
Funktion direkt ziehen und
anklicken.
Standby-Bildschirm
18
LG KP502 | Benutzerhandbuch
Die Schnelltasten
Einmaliges Berühren der Schnelltasten ermöglicht den schnellen Zugriff
auf die am häufigsten benutzten Funktionen.
01
02
03
Berühren öffnet Ihr
Adressbuch. Um nach der
Nummer zu suchen, die Sie
wählen möchten, geben Sie
den Namen des Kontakts über
das Touchpad oben auf dem
Bildschirm ein. Sie können
auch neue Kontakte erstellen
und vorhandene bearbeiten.
Berühren zur Anzeige des
Menüs „Nachrichten“. Hier
können Sie neue SMS oder
MMS erstellen oder Ihren
Nachrichtenordner ansehen.
Berühren Sie dieses Symbol,
um das Hauptmenü zu
öffnen, das in vier vertikale
Untermenüs eingeteilt
ist. Durch Berühren
der Registerkarten der
Untermenüs gelangen Sie zu
weiteren Optionen.
04
05
06
07
08
Standby-Bildschirm
Berühren zeigt die Softtastatur
um Anrufe zu tätigen. Geben
Sie die Nummer wie über
jedes andere Tastenfeld ein,
und berühren Sie Anrufen,
oder drücken Sie die Taste
.
19
Standby-Bildschirm
Statusleiste
Mittels verschiedener Symbole
zeigt die Statusleiste unter
anderem die Signalstärke, neue
Nachrichten, die Akkulebensdauer
oder die Bluetooth- bzw. GPRSAktivität an.
In der nachstehenden Tabelle
werden die gängigen Symbole der
Statusleiste erklärt.
Symbol Beschreibung
Multitasking-Funktion
Anzeige der Netzstärke
(Anzahl der Balken kann
variieren)
Standby-Bildschirm
20
Kein Netz
Verbleibende
Akkulebensdauer
Akku leer
Neue SMS
Neue Sprachmitteilung
NachrichtenEingangsbox ist voll
LG KP502 | Benutzerhandbuch
Symbol Beschreibung
Senden der Nachricht
fehlgeschlagen
Alarm ist eingestellt
Profil “Benutzerdef. “
wird verwendet
Profil „Normal“ wird
verwendet
Profil „Outdoor“ wird
verwendet
Profil „Lautlos“ wird
verwendet
Headset-Profil wird
verwendet
Rufumleitung
EDGE wird verwendet
Roaming
Flugmodus ist aktiviert
Bluetooth ist aktiv
BGM aktiv
BGM pausiert
Profil ändern in der
Statusleiste
Berühren Sie die Statusleiste,
um den Statusbericht zu öffnen.
Angezeigt werden die aktuelle
Uhrzeit, das Netz, die SVC-ID
sowie Akku-, Telefonspeicher-,
Speicherkarten-, Profil-, MP3- und
Bluetooth-Status. Hier können
Sie den Profiltyp einstellen, den
MP3-Player starten oder anhalten
und Bluetooth aktivieren oder
deaktivieren.
Multitasking-Funktion
Drücken Sie die Multitasking-Taste
, um das Multitasking-Menü zu
öffnen. Hier sehen Sie alle derzeit
aktiven Anwendungen und können
durch kurzes Berühren darauf
zugreifen.
Im Hintergrund laufende
Anwendungen (z. B. ein Spiel oder
UKW-Radio) werden durch
in
der Statusleiste angezeigt.
01
02
03
04
05
06
07
08
Standby-Bildschirm
21
Anrufe
Anrufen
1 B erühren Sie , um das
Tastenfeld zu öffnen.
2 Geben Sie die Nummer auf dem
Tastenfeld ein. Berühren Sie
zum Löschen einer Ziffer die
Löschtaste.
3 Drücken Sie die Taste
, um
den Anruf einzuleiten.
4 Berühren Sie die Taste
, um
den Anruf zu beenden.
TIPP! Zur Eingabe von
„+“ für die Tätigung eines
internationalen Anrufs drücken
und halten Sie
.
ERSTE SCHRITTE
22
TIPP! Drücken Sie die
Taste „Sperren/Entsperren“
,
um die Sperre des Touchscreens
zu aktivieren.
LG KP502 | Benutzerhandbuch
TIPP! Zur Anzeige des
Tastenfelds während des
Gesprächs drücken Sie die Taste
.
TIPP! Zum Entsperren berühren.
Sie können entsperren, indem
Sie die Taste so lange berühren,
bis der Bildschirm betriebsbereit
ist, oder indem Sie die Taste
„Entsperren“
drücken.
TIPP! Sie können eine
Nachricht senden und Kontakte
durchsuchen, indem Sie
wählen.
Mithilfe des
Kontaktverzeichnisses
anrufen
1 Öffnen Sie die Kontakte durch
Berühren von
auf dem
Standby-Bildschirm.
2 Geben Sie die ersten Buchstaben
des Kontakts ein, den Sie anrufen
möchten.
3 Wählen Sie aus der gefilterten
Liste den Kontakt, den Sie
anrufen möchten. Bei mehreren
Nummern können Sie die
gewünschte durch Berühren
auswählen.
4 Berühren Sie .
Wenn das Mobiltelefon klingelt,
drücken Sie die Taste
, oder
berühren , um den Anruf
entgegenzunehmen.
Drücken Sie
, um das Klingeln
stumm zu schalten. Das ist
besonders hilfreich, wenn Sie
vergessen haben, Ihr Profil vor
einem Meeting auf „Lautlos“ zu
schalten.
Drücken Sie die Taste
oder berühren Sie , um ein
eingehenden Anruf abzulehnen.
01
02
03
04
05
06
07
08
ERSTE SCHRITTE
TIPP! Sie können die
Kontaktlisten auf dem
Anrufbildschirm durchsuchen.
Berühren Sie
und wählen
Sie Kontakte öffnen. Blättern
Sie durch Ihre Kontakte, oder
geben Sie zur Begrenzung der
Auswahl die ersten Ziffern der
Nummer ein.
Annehmen oder Abweisen
eines Sprachanrufs
23
Anrufe
Optionen während eines Anrufs
ERSTE SCHRITTE
24
TIPP! Zum Blättern durch
Optionen oder Ihre Kontaktliste
berühren Sie das letzte Element,
und fahren Sie mit dem Finger
über den Bildschirm. Die Liste
verschiebt sich nach oben,
wodurch darunter liegende
Elemente sichtbar werden.
LG KP502 | Benutzerhandbuch
Lautsprecher – Berühren Sie
, um
die Freisprechfunktion einzuschalten.
Stummer – Berühren Sie
, um
das Mikrofon abzuschalten, damit ihr
Gesprächspartner Sie nicht hören kann.
Optionen – Wählen Sie während eines
Anrufs aus einer Liste weiterer Optionen,
u. a. Nachrichten öffnen, um den
Nachrichteneingang zu prüfen, Kontakte
zu öffnen oder während eines Gesprächs
hinzuzufügen. Sie können auch durch
Berühren von Anruf beenden das
Gespräch beenden.
– Wählen Sie diese Option, um
Ihre Kontakte während eines Anrufs zu
durchsuchen.
– Wählen Sie diese Option, um
dem Gespräch eine weitere Person
hinzuzufügen.
– Berühren Sie diese Option, um
das numerische Tastenfeld zu öffnen
und über Menünummern in den Menüs
zu navigieren. Zum Beispiel, um ein
Call-Center oder einen automatischen
Telefondienst anzurufen.
Lautstärke anpassen
Verwenden Sie die Auf- und
Abwärtstasten an der linken Seite
des Telefons, um die Lautstärke
während des Anrufs einzustellen.
Kurzwahl
Sie können häufig angerufenen
Kontakten eine Kurzwahltaste
zuweisen.
1 Berühren Sie auf dem StandbyBildschirm
und , und
wählen Sie dann .
2 Taste 1 ist fest eingestellt für
die Mobilbox und kann nicht
geändert werden. Durch
Berühren kann jede Nummer
einer Kurzwahl zugeordnet
werden.
3 Ihr Adressbuch öffnet sich. Durch
einmaliges Berühren wählen
Sie den Kontakt, dem Sie eine
Kurzwahl zuordnen wollen. Sie
können einen Kontakt suchen,
indem Sie das Suchfeld berühren
und den ersten Buchstaben
vom Namen des gewünschten
Kontakts eingeben.
01
02
03
04
05
06
07
1 B erühren Sie während Ihres
ersten Anrufs , und wählen Sie
die zweite Nummer aus, die Sie
anrufen möchten.
2 Wählen Sie die Nummer, oder
durchsuchen Sie Ihre Kontakte.
3 Drücken Sie die Taste , um
den Anruf zu tätigen.
4 Beide Anrufe werden auf dem
Bildschirm angezeigt. Ihr erster
Anruf wird auf Halten gesetzt.
08
ERSTE SCHRITTE
Neuer Anruf
25
Anrufe
5 U
m zwischen den Anrufen
umzuschalten, berühren Sie
und wählen Anruf wechseln,
oder drücken Sie die Nummer
des gehaltenen Anrufs.
6 Um einen oder beide Anrufe
zu beenden, drücken Sie
und wählen Beenden und
anschließend entweder Alle,
Gehaltener oder Aktiver.
TIPP! Sie können Ihre Anrufe
zusammenführen, indem
Sie zuerst Annehmen und
dann Verbinden auswählen.
Prüfen Sie, ob Ihr Netzanbieter
Konferenzschaltungen
unterstützt.
HINWEIS: Jeder getätigte Anruf ist
kostenpflichtig.
ERSTE SCHRITTE
26
LG KP502 | Benutzerhandbuch
Abschalten von MFV-Tönen
MFV-Töne bieten die Möglichkeit,
durch numerische Befehle in den
Menüs von automatischen Anrufen
zu navigieren. MFV-Töne sind
standardmäßig aktiviert.
Berühren Sie
, und wählen Sie
MFV aus, um die MFV-Töne während
eines Gesprächs zu deaktivieren (um
z. B. eine Nummer zu notieren).
Anruflisten anzeigen
TIPP! Zum Durchblättern der
Listen berühren Sie das letzte
Element, und fahren Sie mit
dem Finger leicht über das
Display. Die Liste verschiebt sich
nach oben, wodurch darunter
liegende Elemente sichtbar
werden.
TIPP! Berühren Sie in
einer beliebigen Anrufliste
und Alle löschen, um alle
Aufnahmen zu löschen.
TIPP! Berühren einzelner
Anrufprotokolle zeigt Datum,
Zeit und Dauer des Anrufes an.
Rufumleitung
1 B erühren Sie
, wählen Sie
,
und wählen Sie
.
2 Berühren Sie Rufumleitung.
3 Wählen Sie, ob alle Anrufe
weitergeleitet werden sollen,
ob weitergeleitet werden soll,
wenn besetzt ist oder niemand
antwortet, oder für den Fall, dass
Sie nicht erreichbar sind.
4 Geben Sie die Telefonnummer
für die Rufumleitung ein.
5 Berühren Sie zur Aktivierung
Anford..
HINWEIS: Rufumleitungen
sind gebührenpflichtig. Nähere
Informationen erhalten Sie von
Ihrem Mobilfunkanbieter.
01
TIPP! Wählen Sie Alle
deaktivieren im Menü
Rufumleitung, um alle
Rufumleitungen zu deaktivieren.
ERSTE SCHRITTE
Berühren Sie
, wählen Sie ,
und berühren Sie .
Wählen Sie aus diesen Optionen:
Alle – Zeigt die vollständige
Liste aller gewählten,
empfangenen und entgangenen
Anrufe an.
Ausgehende – Liste aller
gewählten Anrufe einsehen.
Eingehende – Liste aller
empfangenen Anrufe einsehen.
Entgangene – Liste aller
entgangenen Anrufe einsehen.
02
03
04
05
06
07
08
27
Anrufe
Anrufsperre
1 B erühren Sie
, wählen Sie
,
und wählen Sie
.
2 Berühren Sie Anrufsperre.
3 Wählen Sie eine oder alle dieser
sechs Optionen:
Alle ausgehenden
Ausgehende international
Ausgehende international,
ausgen.Heimatland
Alle eingehenden
Eingehende,wenn im Ausland
Alle deaktivieren
4 Sperrkennwort eingeben
Informieren Sie sich bitte bei
Ihrem Netzanbieter über diesen
Service.
ERSTE SCHRITTE
28
LG KP502 | Benutzerhandbuch
TIPP! Wählen Sie
Festwahlnummer, um
eine Liste von Nummern
einzuschalten und zu erstellen,
die von Ihrem Mobiltelefon aus
angerufen werden können. Sie
brauchen dazu einen PIN2-Code
von Ihrem Netzanbieter. Von
diesem Mobiltelefon können nur
Nummern aus der Festwahlliste
angerufen werden.
Ändern der Rufeinstellung
1 B erühren Sie
, wählen Sie
Einstellungen, und wählen Sie
.
2 Berühren Sie Allgemein Hier
können Sie die Einstellungen
ändern für:
Minutenton – Schieben Sie den
Schalter nach links auf „ON“,
damit während eines Anrufs jede
Minute ein Signalton ertönt.
BT-Antwortmodus – Zum
Entgegennehmen eines
Anrufs beim Benutzen des
Bluetooth-Kopfhörers wählen Sie
„Freisprecheinr.“, oder wählen
Sie „Telefon“, um eingehende
Anrufe durch Drücken einer
Taste am Mobiltelefon
anzunehmen.
Neue Nummer speich. – Wählen
Sie „Ja“, um eine neue Nummer
zu speichern.
TIPP! Zum Durchblättern
der Listen berühren Sie das
letzte Element, und fahren Sie
mit dem Finger leicht über das
Display. Die Liste verschiebt sich
nach oben, wodurch darunter
liegende Elemente sichtbar
werden.
01
02
03
04
05
06
07
08
ERSTE SCHRITTE
Anruf ablehnen – Verschieben
Sie den Schalter auf „ON“, um
die Ablehnliste zu markieren. Sie
können das Textfeld berühren,
um zwischen Alle Anrufe,
bestimmten Kontakte oder
Gruppen oder Nicht registriert
Unbekannt Nummern (die nicht
in Ihren Kontakten gespeichert
sind) zu wählen. Berühren Sie
„Speichern“, um die Einstellung
zu ändern.
Eigene Nr. senden – Wählen
Sie, ob Ihre Nummer angezeigt
werden soll, wenn Sie anrufen.
Autom. Wahlwdh. – Schieben
Sie den Schalter nach links für
„ON“ und nach rechts für „OFF“.
Rufannahme – Wählen Sie, ob
ein Anruf mit der Sendetaste
oder jeder beliebigen Taste
angenommen wird.
29
Kontakte
Kontakte suchen
Sie können Kontakte auf zwei
verschiedene Arten suchen:
Vom Standby-Bildschirm
1 Öffnen Sie die Kontakte durch
Berühren von
auf dem
Standby-Bildschirm. Wählen Sie
den Kontakt aus der Liste, den Sie
anrufen möchten.
2W
ählen Sie Anrufe oder drücken
Sie die Taste
, um den
gewählten Kontakt anzurufen.
ERSTE SCHRITTE
30
Im Hauptmenü
1 Berühren Sie
, und wählen
Sie .
2 Berühren Sie
,und wählen
Sie Suche.
3 Sobald eine Liste mit Kontakten
angezeigt wird, geben Sie den
ersten Buchstaben des Namens
des gewünschten Kontakts ein,
worauf das Menü zu diesem
Buchstabenbereich in der Liste
springt.
LG KP502 | Benutzerhandbuch
TIPP! Das alphabetische
Tastenfeld wird angezeigt,
sobald Sie das leere Quadrat
berühren.
TIPP! Zum Durchblättern der
Listen das letzte sichtbare
Element berühren und mit dem
Finger leicht über das Display
fahren. Die Liste verschiebt sich
nach oben, wodurch darunter
liegende Elemente sichtbar
werden.
Neuen Kontakt hinzufügen
1 B erühren Sie auf dem StandbyBildschirm , und berühren Sie
Kontakt hinzufügen.
2 Legen Sie fest, ob Sie den
Kontakt im Telefon oder SIM
speichern wollen.
3 Geben Sie Vorname und
Nachname des neuen Kontakts
ein. Sie müssen nicht beide, aber
mindestens einen eingeben.
TIPP! Sie können auch
von Ihnen selbst definierte
Kontaktgruppen erstellen.
Informationen dazu finden Sie
unter Eine Gruppe erstellen.
Kontaktoptionen
Sie haben viele Möglichkeiten,
wenn Sie einen Kontakt anzeigen.
So greifen Sie auf das Menü
„Optionen“ zu:
1 Öffnen Sie den gewünschten
Kontakt.
2 Von hier aus können Sie direkt
Anrufe tätigen oder Nachrichten
senden.
3 Drücken Sie auf
, um die
Optionenliste zu öffnen.
Bearbeiten – Kontaktdaten
ändern.
01
02
03
04
05
06
07
08
ERSTE SCHRITTE
4 S ie können bis zu fünf
verschiedene Nummern
pro Kontakt eingeben.
Für jeden Eintrag gibt es
einen voreingestellten Typ:
Mobiltelefon, Privat, Büro,
Pager, Fax und Allgemein.
Wenn Sie fertig sind, berühren
Sie Zurück.
5 Fügen Sie eine E-Mail-Adresse
hinzu.
6 Weisen Sie den Kontakt einer
oder mehreren Gruppen zu. Zur
Auswahl stehen: Keine Gruppe,
Familie, Freunde, Kollegen,
Schule oder VIP.
7 Außerdem können Sie Rufton,
Geburtstag, Jahrestag,
Startseite, Privatadresse,
Firmenname, Position,
Firmenadresse und Notiz
hinzufügen.
8 Berühren Sie zum Speichern des
Kontakts Speichern.
31
Kontakte
Löschen – Den Kontakt löschen.
Berühren Sie Ja, wenn Sie sich
sicher sind.
Auf SIM/Telefon kopieren oder
verschieben – Wählen Sie diese
Option, um Inhalte auf die SIMKarte oder das Mobiltelefon zu
verschieben (je nachdem, wo
der Kontakt zuerst gespeichert
wurde).
Kontakt senden – Senden Sie
die Kontaktdaten als Visitenkarte
an eine andere Person. Wählen
Sie SMS-MMS, E-Mail oder Über
Bluetooth.
ERSTE SCHRITTE
32
TIPP! Nachr. senden –
eine Nachricht an den Kontakt
senden. Falls der Kontakt eine
E-Mail-Adresse hat, wählen Sie
E-Mail oder SMS/MMS.
LG KP502 | Benutzerhandbuch
Eine Gruppe erstellen
1 B erühren Sie
, und wählen
Sie .
2 Berühren Sie Kontakte, und
dann Gruppen.
3 Berühren Sie
.
4 Wählen Sie Neue Gruppe.
5 Geben Sie einen Namen für die
neue Gruppe ein. Sie können
der Gruppe auch einen Rufton
zuweisen
6 Berühren Sie Speichern.
HINWEIS: Wenn Sie eine
Gruppe löschen, bleiben die
einzelnen Kontakte dieser Gruppe
erhalten. Sie verbleiben in Ihrem
Adressbuch.
TIPP! Sie können jede
vorhandene Gruppe bearbeiten,
indem Sie sie markieren und
dann
berühren. Wählen
Sie, ob Sie der Gruppe ein
Mitglied hinzufügen oder
ihr einen Gruppen-Rufton
zuweisen möchten, oder ob Sie
die Gruppe umbenennen oder
löschen wollen.
Kontakteinstellungen
ändern
Sie können die
Kontakteinstellungen so anpassen,
dass das Adressbuch Ihren
Anforderungen entspricht.
01
02
03
04
05
06
07
08
ERSTE SCHRITTE
TIPP! Zum Durchblättern der
Listen berühren Sie das letzte
Element, und fahren Sie mit
dem Finger leicht über das
Display. Die Liste verschiebt sich
nach oben, wodurch darunter
liegende Elemente sichtbar
werden.
1B
erühren Sie auf dem StandbyBildschirm
, und wählen
Sie .
2 Berühren Sie Kontakte, und
wählen Sie dann Einstellungen.
3 Wählen Sie Einstellungen.
Hier können Sie folgende
Einstellungen anpassen:
Einst.Kontaktlists – Wählen Sie,
ob Sie Kontakte anzeigen wollen,
die auf Telefon und SIM, Telefon
oder nur SIM gespeichert sind.
Sie können auch festlegen,
ob erst der Vorname oder der
Nachname eines Kontakts
angezeigt wird.
33
Kontakte
Kopieren – Kopieren Sie Ihre
Kontakte von der SIM auf Ihr
Mobiltelefon oder umgekehrt.
Sie können Kontakte zusammen
oder einzeln kopieren. Wenn
Sie das Kopieren einzelner
Kontakte wählen, müssen Sie
jeden einzelnen Kontakt separat
kopieren.
Verschieben - Funktioniert
ebenso wie das Kopieren. Der
Kontakt wird jedoch nur an
dem Ort gespeichert, an den er
verschoben wird. Wenn Sie einen
Kontakt von der SIM-Karte auf
das Mobiltelefon verschieben,
wird er von der SIM-Karte
gelöscht.
ERSTE SCHRITTE
34
LG KP502 | Benutzerhandbuch
Alle Kontakte über Bluetooth
senden – Senden Sie alle
Kontaktinformationen über
Bluetooth an ein anderes
Telefon. Wenn Sie diese
Option auswählen, werden
Sie aufgefordert, Bluetooth
einzuschalten.
Kontakte sichern –
Informationen dazu finden Sie
unter „Telefoninformationen
sichern und wiederherstellen“.
Kontakte wiederherstellen –
Informationen dazu finden Sie
unter „Telefoninformationen
sichern und wiederherstellen“.
Kontakte löschen – Alle
Kontakte löschen. Ja berühren,
wenn Sie sicher sind, dass Sie alle
Kontakte löschen wollen.
Informationen anzeigen
1 B erühren Sie auf dem StandbyBildschirm
, und wählen Sie
.
2 Berühren Sie Kontakte, und
wählen Sie dann Information.
3 Hier werden Ihre
Servicerufnummern,
Ihre Eigene Nummer, Ihr
Speicherstatus (freier
Speicherplatz) und die Option
Meine Visitenkarte angezeigt.
02
03
04
05
06
07
08
ERSTE SCHRITTE
TIPP! Wenn Sie Ihre
Visitenkarte erst speichern
müssen, wählen Sie Meine
Visitenkarte, und geben Sie alle
Daten auf dieselbe Weise wie für
andere Kontakte ein. Berühren
Sie zum Abschluss Speichern.
01
35
Nachrichten
Nachrichten
Ihr KP502 vereint SMS, MMS und
E-Mail in einem intuitiven und
einfachen Menü.
Sie können das Nachrichten-Center
auf zwei verschiedenen Arten
aufrufen:
1 Berühren Sie auf dem StandbyBildschirm
.
2 Berühren Sie auf dem StandbyBildschirm
, wählen Sie
und dann .
Senden von Nachrichten
ERSTE SCHRITTE
36
1 B erühren Sie
, um eine leere
Nachricht zu öffnen.
2 Von hier können Sie eine SMS
oder MMS schicken. Um eine
E-Mail zu senden, berühren Sie
auf dem Standby-Bildschirm
,
wählen Sie und dann .
LG KP502 | Benutzerhandbuch
3 B erühren Sie Einfügen, um ein
Bild, ein Video, einen Ton oder
eine Vorlage einzufügen.
4 Berühren Sie An1 am oberen
Bildschirmrand, um die Nummer
des Empfängers einzugeben,
oder berühren Sie das
Suchsymbol, um das Adressbuch
zu öffnen. Sie können mehrere
Kontakte hinzufügen. Berühren
Sie Senden, wenn Sie fertig sind.
WARNUNG:
Verschickte Nachrichten werden
pro Seite für jede Person
berechnet, der Sie die Nachricht
senden.
WARNUNG: Wenn
einer SMS ein Bild, Video
oder Ton hinzugefügt wird,
wird diese automatisch in
eine MMS umgewandelt und
dementsprechend berechnet.
TIPP! Schnellantwort –
Senden Sie mit einer Vorlage
sofort eine Antwort auf die
ausgewählte Nachricht.
Text eingeben
Es gibt fünf Möglichkeiten, um Text
einzugeben:
Tastenfeld, Tastatur, Handschrift,
Handschrift-Feld, HandschriftDoppelfeld.
Sie können die Eingabemethode
wählen, indem Sie auf
und
Eingabemethode tippen.
Berühren Sie den Bildschirm
einmal, um die Tastatur aufzurufen.
T9-Modus
Im T9-Modus wird
angezeigt.
Der T9-Modus verwendet ein
integriertes Wörterbuch, das
auf die Tastensequenz der
von Ihnen angetippten Wörter
reagiert. Berühren Sie einfach die
Zahlentaste für den gewünschten
Buchstaben, und das Wörterbuch
erkennt das Wort, das Sie eingeben
möchten.
Für „Telefon“ drücken Sie z. B. 8, 3,
5, 3, 3, 6, 6.
01
02
03
04
05
06
07
08
ERSTE SCHRITTE
Berühren Sie diese Option, um
den T9-Modus zu aktivieren.
Sie können die Sprache
auswählen.
Tippen Sie auf dieses Symbol,
um zwischen den Tastenfeldern
für Nummern, Symbole und Text
umzuschalten.
Blättern Sie mit
durch die
verschiedenen Tastaturen im
jeweiligen Texteingabemodus
(z. B. Großbuchstaben oder
Kleinbuchstaben).
37
Nachrichten
Manueller ABC-Modus
Im ABC-Modus wird
angezeigt.
Buchstaben im Abc-Modus werden
durch mehrmaliges Berühren der
Taste eingegeben. Um Hallo zu
schreiben, berühren Sie zweimal 4,
zweimal 3, dreimal 5, dreimal 5 und
dann dreimal 6 berühren.
Tastatur
ERSTE SCHRITTE
38
Im Tastaturmodus wechselt der
Bildschirm zum Querformat, und
es wird eine vollständige Tastatur
angezeigt.
Um eine Nachricht zu schreiben,
einfach jeden Buchstaben berühren
und folgende Taste drücken:
zum Wechseln auf
Großbuchstaben
LG KP502 | Benutzerhandbuch
TIPP! Im Tastaturmodus steht
Ihnen eine Texterkennung zur
Verfügung. Die Vorschläge
der Texterkennung beruhen
auf den bereits von Ihnen
eingegebenen Sätzen. Wenn
Sie das vorgeschlagene Wort
nicht verwenden möchten,
geben Sie stattdessen das
neue Wort ein. Möchten Sie
das vorgeschlagene Wort
verwenden, drücken Sie zur
Bestätigung die Leertaste.
Handschrifterkennung
Im Handschriftenmodus können
Sie einfach auf dem Bildschirm
schreiben, und Ihr KP502
konvertiert Ihre Handschrift
automatisch in eine Nachricht.
Je nach bevorzugter Ansicht
entweder Feld oder Doppelfeld
wählen.
TIPP! Für diesen Modus ist
der Eingabestift besser geeignet.
Drücken Sie dabei bitte nur
leicht auf, um den Bildschirm
nicht zu beschädigen.
01
02
03
04
05
06
07
08
ERSTE SCHRITTE
Die Handschrifterkennung
überträgt die Strichbewegungen
des Eingabestifts in Buchstaben,
Zahlen oder andere Zeichen und
zeigt diese Zeichen als Text an.
Die Handschrifterkennung ist nur
verfügbar, wenn die Eingabe von
Text möglich ist.
Hinweis: Die meisten
Buchstaben können mit
verschiedenen Strichbewegungen
geschrieben werden, wie in
den untenstehenden Tabellen
dargestellt. Durch die Position auf
dem Bildschirm wird festgelegt,
ob ein Buchstabe groß oder klein
geschrieben wird.
39
Nachrichten
Alphabet
Buchstabe
Wenn Sie den Modus für
Großbuchstaben (ABC) auswählen,
werden eingegebene Buchstaben
als Großbuchstaben angezeigt,
auch wenn Sie Kleinbuchstaben
schreiben, und umgekehrt.
Buchstabe
Strichbewegung
A
B
C
D
E
F
G
ERSTE SCHRITTE
40
H
I
J
K
LG KP502 | Benutzerhandbuch
L
M
N
O
P
Q
R
S
T
U
V
W
X
Y
Z
ß
Strichbewegung
Zahlen
E-Mail einrichten
Zahlen werden über dem Pfeil
geschrieben.
Mit der E-Mail-Funktion Ihres KP502
bleiben Sie auch unterwegs immer
in Verbindung. Die Einrichtung
eines POP3- oder IMAP4-E-MailKontos geht schnell und einfach.
01
TIPP! Zum Durchblättern der
Listen berühren Sie das letzte
Element, und fahren Sie mit
dem Finger leicht über das
Display. Die Liste verschiebt sich
nach oben, wodurch darunter
liegende Elemente sichtbar
werden.
05
Zahl
0
1
2
3
4
5
6
7
8
9
Strichbewegung
1 B erühren Sie
dann auf .
02
03
04
06
07
08
, und tippen Sie
ERSTE SCHRITTE
2W
ählen Sie
, und blättern Sie
anschließend zu Einstellungen.
Tippen Sie dann auf
Einstellungen.
3 Berühren Sie E-Mail und dann
E-Mail-Konto.
4 Berühren Sie Neues Profil.
41
Nachrichten
ERSTE SCHRITTE
42
5 D
er Einrichtungsassistent hilft
Ihnen beim Einrichten der EMail-Einstellungen.
E-Mail-Adresse – Geben Sie Ihre
E-Mail-Adresse ein.
Kennwort - Geben Sie das
Passwort für das Konto ein.
Benutzername – Geben Sie die
Benutzer-ID für Ihr Konto ein, die
Ihnen Ihr E-Mail-Dienstanbieter
bereitgestellt hat.
Mailboxtyp – Wählen Sie
das Internetprotokoll für die
Übertragung von E-Mails, IMAP4
oder POP3.
Eingehend. Server – Geben Sie
den Namen des eingehenden
Servers (POP3 oder IMAP4) oder
die IP-Adresse ein.
Ausgehend. Server – Geben Sie
den Namen des ausgehenden
Servers (SMTP) oder die IPAdresse ein. Dies kann derselbe
Server wie für eingehende EMails sein.
LG KP502 | Benutzerhandbuch
SMTP-Authentifiz. – Aktivieren
Sie die SMTP-Authentifizierung,
wenn zum Senden von E-Mail
ein Benutzername und Kennwort
für den ausgehenden Server
erforderlich sind.
Kontoname – Geben Sie den
Mailbox-Namen ein, der als
Kontoname für die Mailbox
angezeigt werden soll.
Jetzt ist Ihr Konto eingerichtet, und
erscheint in der Kontenliste Ihres
E-Mail-Ordners.
6 Sie können die Einstellungen
prüfen und bearbeiten, indem
Sie das Konto aus der Liste
auswählen. Sie können auch
die zusätzlichen Einstellungen
prüfen, die beim Erstellen des
Kontos automatisch erstellt
werden.
Antwort-E-Mail-Adresse –
Geben Sie die Antwort-E-MailAdresse für das Konto ein.
Ausgehend TLS/SSL – Wählen
Sie, ob SSL für den ausgehenden
Server verwendet werden soll.
Empfangsport – Normalerweise
110 für POP3-Konten und 143 für
IMAP4-Konten.
Eingehend TLS/SSL – Wählen
Sie, ob SSL für den eingehenden
Server verwendet werden soll.
SMTP-Benutzer – Geben Sie den
SMTP-Benutzernamen ein.
SMTP-Kennwort – Geben Sie
das SMTP-Kennwort ein.
APOP-Anmeldung – Wenn Sie
für Ihr POP3-Konto die sichere
APOP-Anmeldung aktivieren
wollen. IMAP4-Konten sind
immer deaktiviert.
7 Sie können Ihr standardmäßiges
E-Mail-Konto ändern, indem Sie
Aktivieren berühren.
01
02
03
04
05
06
07
08
ERSTE SCHRITTE
Max. Empfangsgröße – Legen
Sie die Größenbegrenzung für
Ihre Nachrichten fest, Maximum
1 MB.
Gesendete E-Mail speichern
in – Wählen Sie, ob gesendete
E-Mails gespeichert werden
sollen (wenn der Mailbox-Typ
auf IMAP4 eingestellt ist). Bei
Mailbox-Typ POP3 werden
gesendete E-Mails immer auf
dem Telefon gespeichert.
Zugangspunkte – Legen Sie
Ihren Internet-Zugriffspunkt fest.
Autom. Abrufen – Wählen
Sie, ob Sie Ihre neuen E-Mails
automatisch abrufen wollen.
Erweiterte
Einstellungen – Wenn Sie
erweiterte Einstellungen
benutzen möchten.
Sendport – Normalerweise 25.
43
Nachrichten
E-Mail abrufen
Sie können den E-Mail-Eingang
auf Ihr Konto automatisch oder
manuell prüfen.
Für manuelle Abfrage:
1 Berühren Sie
, wählen Sie
und dann
.
2 Berühren Sie E-Mail.
3 Berühren Sie das gewünschte
Konto und dann
.
4 Wählen Sie Abrufen, woraufhin
Ihr KP502 eine Verbindung zum
E-Mail-Konto herstellt und neue
Nachrichten abruft.
1W
ählen Sie Neue E-Mail im
Menü Kommunikation, um eine
neue E-Mail zu öffnen.
2 Geben Sie die Adresse des
Empfängers ein, und schreiben
Sie Ihre Nachricht. Außerdem
können Sie Bilder, Videos,
Töne oder andere Dateitypen
anhängen.
3 Berühren Sie Senden, um Ihre
E-Mail zu senden.
TIPP! Sie können Word-,
Excel-, PowerPoint- und PDFDokumente auf Ihr KP502 laden
und unterwegs anzeigen.
E-Mail-Einstellungen ändern
ERSTE SCHRITTE
44
E-Mail vom neuen Konto
senden
Sie können Ihre E-MailEinstellungen nach Bedarf
anpassen.
LG KP502 | Benutzerhandbuch
TIPP! Zum Durchblättern der
Listen berühren Sie das letzte
Element, und fahren Sie mit
dem Finger leicht über das
Display. Die Liste verschiebt sich
nach oben, wodurch darunter
liegende Elemente sichtbar
werden.
TIPP! Die Kosten für das
Abrufen von E-Mails können
beim Roaming steigen.
Informieren Sie sich bitte bei
Ihrem Netzanbieter.
01
02
03
04
05
06
07
08
ERSTE SCHRITTE
1 B erühren Sie
, wählen Sie
und dann Nachrichten.
2 Berühren Sie Einstellungen
und E-Mail. Dann können
Sie folgende Einstellungen
anpassen:
Lesebest.zulassen – Wählen
Sie, ob Sie das Senden von
Lesebestätigungen zulassen
möchten.
Lesebest. anfordern – Wählen
Sie, ob Sie Lesebestätigungen
anfordern möchten.
Abrufintervall – Legt fest, wie
oft das KP502 überprüft, ob neue
Nachrichten vorhanden sind.
Abrufmenge – Wählen Sie
die Anzahl der E-Mails, die
gleichzeitig abgerufen werden.
Originaltext in neue Nachricht
einfügen – Wählen Sie, ob Sie
die ursprüngliche Nachricht in
Ihre Antwort einfügen wollen.
Originalanhang mitsenden –
Wählen Sie diese Option, um
den Originalanhang bei jeder
Antwort mitzusenden.
Autom. Abruf bei Roaming –
Wählen Sie, ob Ihre Nachrichten
im Ausland automatisch
abgerufen werden sollen
(Roaming).
45
Nachrichten
Benachrichtigung über neue
E-Mail – Wählen Sie, ob Sie bei
neuen E-Mails benachrichtigt
werden möchten.
Signatur – Erstellen Sie eine EMail-Signatur, und schalten Sie
diese ein.
Priorität – Wählen Sie eine
Prioritätsstufe für Ihre E-Mails.
Nachrichtenordner
ERSTE SCHRITTE
46
Die Ordnerstruktur Ihres KP502 ist
in wenigen Worten erklärt.
Eingang – Alle Nachrichten, die
Sie erhalten, werden im Eingang
abgelegt, wo Sie sie anzeigen,
löschen und weitere Funktionen
ausführen können. Informationen
dazu finden Sie auch unter
Nachrichten verwalten.
E-Mail – Alle E-Mails, die Sie auf
Ihrem KP502 erhalten, werden in
Ihrer E-Mail abgelegt.
LG KP502 | Benutzerhandbuch
Entwürfe – Sie können
Nachrichten speichern, die Sie
aus Zeitmangel nicht fertig stellen
konnten.
Ausgang – Hier werden
Nachrichten während der
Übertragung vorübergehend
gespeichert.
Gesendet – Alle gesendeten
Nachrichten werden in diesem
Ordner abgelegt.
Archiv – Sie können Ordner
erstellen, um Ihre Nachrichten zu
speichern.
Nachrichten verwalten
Sie können Ihre Nachrichten im
Eingang verwalten.
TIPP! Zum Durchblättern der
Listen berühren Sie das letzte
Element, und fahren Sie mit
dem Finger leicht über das
Display. Die Liste verschiebt sich
nach oben, wodurch darunter
liegende Elemente sichtbar
werden.
01
02
03
04
05
06
07
08
ERSTE SCHRITTE
1 B erühren Sie
, wählen Sie
und dann Nachrichten.
2 Wählen Sie Eingang.
3 Berühren Sie
, und wählen
Sie dann eine der folgenden
Optionen:
Löschen – Löscht ausgewählte
Nachrichten.
Nachricht erstellen – Öffnen Sie
eine neue leere Nachricht oder
E-Mail.
Archivieren – Verschieben Sie
die Nachricht in Ihr Archiv.
Filter – Nachrichten nach Typ
anzeigen Filter – Nachrichten
nach Typ anzeigen.
Alle löschen – Alle Nachrichten
löschen.
Wenn die Nachricht Kein Platz für
Nachricht angezeigt wird, sollten
Sie einige Nachrichten auf der SIMKarte löschen.
Wenn die Nachricht Kein Platz für
SIM-Nachricht angezeigt wird,
sollten Sie einige Nachrichten
löschen, um wieder freien
Speicherplatz zu erhalten.
47
Nachrichten
ERSTE SCHRITTE
48
Vorlagen
Emoticons
Erstellen Sie Vorlagen für die am
häufigsten versendeten SMS- und
MMS-Nachrichten. Sie finden
bereits einige Vorlagen auf Ihrem
Mobiltelefon und können diese
nach Wunsch bearbeiten.
1 Berühren Sie
, wählen Sie
dann im Menü Kommunikation
die Option Vorlagen.
2 Wählen Sie SMS-Vorlagen oder
MMS-Vorlagen. Berühren Sie
dann
, um eine der folgenden
Optionen auszuwählen: Neu
hinzufügen, Löschen oder Alle
löschen.
3 Berühren Sie Neue Vorlage, um
eine neue Vorlage zu erstellen.
4 Sie können die Vorlage anzeigen,
indem Sie sie aus der Liste
auswählen und auf der Anzeige
berühren.
Peppen Sie Ihre Nachrichten
mit Emoticons auf. Auf Ihrem
Mobiltelefon finden Sie bereits
einige der gängigsten Emoticons.
1 Berühren Sie
, und
wählen Sie dann im Menü
Kommunikation die Option
Emoticon.
2 Drücken Sie
, um die
Optionen Neu hinzufügen,
Löschen und Alle löschen für
Emoticons zu verwenden.
LG KP502 | Benutzerhandbuch
Einstellungen für
Textnachrichten ändern
Die Nachrichteneinstellungen des
KP502 sind vordefiniert, damit Sie
sofort Nachrichten senden können.
Diese Einstellungen können Sie
entsprechend Ihren Wünschen
ändern.
TIPP! Zum Durchblättern der
Listen berühren Sie das letzte
Element, und fahren Sie mit
dem Finger leicht über das
Display. Die Liste verschiebt sich
nach oben, wodurch darunter
liegende Elemente sichtbar
werden.
01
02
03
04
05
06
07
08
ERSTE SCHRITTE
Berühren Sie
, und wählen Sie
dann im Menü Kommunikation
die Option Einstellungen. Wählen
Sie SMS. Sie können folgende
Änderungen vornehmen:
SMS-Zentrale – Geben Sie die
Detailinformationen der SMSZentrale ein.
Übertragungsbericht – Schieben
Sie den Schalter nach links, um
eine Sendebestätigung für Ihre
Nachricht zu erhalten.
Gültigkeit – Legen Sie fest,
wie lange Nachrichten in der
Nachrichtenzentrale gespeichert
werden.
Nachrichtentyp – Sie können Text
in Sprache, Fax, X.400 oder E-Mail
umwandeln.
Zeichenkodierung – Wählen
Sie die Codierung Ihrer Zeichen
aus. Dies wirkt sich auf die
Größe der Nachrichten und
demzufolge auf die Kosten für die
Datenübertragung aus.
Langen Text senden als – Wählen
Sie, ob langer Text als „Mehrere
SMS“ oder als „MMS“ gesendet
werden soll.
49
Nachrichten
Einstellungen für
Multimedia-Nachrichten
ändern
ERSTE SCHRITTE
50
Die Nachrichteneinstellungen des
KP502 sind vordefiniert, damit Sie
sofort Nachrichten senden können.
Diese Einstellungen können Sie
entsprechend Ihren Wünschen
ändern.
Berühren Sie
, wählen Sie
und dann
. Wählen Sie
Einstellungen und MMS. Sie
können folgende Änderungen
vornehmen:
Abrufmodus – Wählen Sie
Übertragungsbericht – Wählen
Sie, ob Sie einen Bericht anfordern/
Antwort zulassen.
Lesebestätigung – Wählen Sie,
ob Sie einen Bericht anfordern/
Antwort zulassen.
LG KP502 | Benutzerhandbuch
Priorität – Legen Sie die
Prioritätsstufe für Ihre MMS fest.
Gültigkeit – Wählen Sie, wie
lange Nachrichten in der
Nachrichtenzentrale gespeichert
bleiben.
Seitendauer – Legen Sie fest, wie
lange Ihre Dias auf dem Bildschirm
angezeigt werden.
Erstellmodus – Legen Sie den
Nachrichten-Modus fest.
Sendezeitpunkt – Wählen Sie den
Zeitraum bis zum Versand einer
Nachricht.
MMS Profil – Geben Sie die
Detailinformationen für die
Nachrichtenzentrale ein.
Andere Einstellungen ändern
Berühren Sie
, und wählen Sie
dann im Menü Kommunikation
die Option Einstellungen.
Mobilbox – Berühren Sie
, um
einen neuen Mobilbox-Service
hinzuzufügen. Fragen Sie Ihren
Netzbetreiber nach weiteren
Informationen zu diesem Service.
Push-Nachrichten – Wählen
Sie, ob Sie Service-Nachrichten
empfangen oder sperren möchten.
Sie können durch Erstellen
einer Liste sicherer oder nicht
sicherer Absender auch die
Sicherheitseinstellungen festlegen.
Info-Dienste – Wählen Sie den
Empfangsstatus, die Sprache oder
andere Einstellungen.
01
02
03
04
05
06
07
08
ERSTE SCHRITTE
51
Kamera
Ein Foto machen
Werden Sie kreativ
52
1 D
rücken Sie kurz die Taste
auf der rechten Seite des Telefons.
2 Der Sucher der Kamera wird auf
dem Bildschirm angezeigt.
3 Halten Sie das Mobiltelefon
horizontal, und richten Sie die
Linse auf den Fotogegenstand.
4 Halten Sie das Mobiltelefon so,
dass Sie das Fotomotiv in der
Anzeige sehen.
5 Sobald die Kamera Ihr Motiv
fokussiert hat, drücken Sie
entweder fest
an der Seite
des Telefons, oder drücken Sie
auf das roten Feld rechts unten
auf dem Bildschirm, um ein Foto
aufzunehmen.
Nach der Aufnahme
Ihr aufgenommenes Foto erscheint
auf dem Bildschirm. Der Bildname
erscheint zusammen mit fünf
Symbolen unten im Bildschirm
entlang der rechten Seite.
LG KP502 | Benutzerhandbuch
Berühren Sie, um zur Galerie zu
wechseln.
Durch Berühren dieser Option
können Sie das Foto als Nachricht,
E-Mail oder über Bluetooth senden.
Weitere Informationen finden Sie im
Abschnitt Senden von „Nachrichten“
und im Abschnitt „Senden und
Empfangen von Dateien über
Bluetooth“.
Berühren um das Video zu
bearbeiten.
Durch Berühren können Sie
das Bild als Hintergrund festlegen.
Durch Berühren können Sie
das gerade aufgenommene Foto
löschen. Bestätigen Sie das Löschen
durch Berühren von Ja. Der Sucher
erscheint wieder.
Durch Berühren dieser Option können Sie gleich ein weiteres Foto
aufnehmen. Ihr aktuelles Foto wird gespeichert.
01
02
Der Sucher
03
Einstellungen – Dieses Symbol berühren,
um das Menü „Einstellungen“ zu öffnen.
Weitere Informationen finden Sie unter
„Erweiterte Einstellungen“.
Kamera-Modus – Kamera-Modus
ausgewählt.
Videokamera-Modus – Berühren Sie
dieses Symbol, um in den Videomodus zu
wechseln.
04
05
06
07
08
Zurück – Hier berühren, um zum StandbyBildschirm zurückzukehren.
Galerie
Belichtung – Weitere Informationen
finden Sie unter „Belichtung einstellen“.
Bild aufnehmen
TIPP! Sie können die
Optionen aufrufen, indem Sie auf den
Bildschirm tippen. Sie erlöschen nach
einigen Sekunden automatisch.
Werden Sie kreativ
Aufnahmemodus – Siehe
„Aufnahmemodus wählen“.
53
Kamera
Bildeinstellung wählen
Belichtung einstellen
1 B erühren Sie , um die
verfügbaren Bildeinstellungen
zu öffnen.
2 Wählen Sie eine der beiden
Optionen:
Normales Bild – Die StandardBildeinstellung, das Foto wird im
normalen Modus aufgenommen,
wie unter „Ein Foto machen“
beschrieben.
Serienaufnahme – Hier können
Sie rasch hintereinander 3, 6 oder
9 Bilder aufnehmen.
Die Belichtung bestimmt den
Unterschied zwischen hellen und
dunklen Bereichen (Kontrast) in
einem Bild. Ein niedriger Kontrast
lässt ein Bild unscharf wirken,
während ein hoher Kontrast das
Bild schärfer erscheinen lässt.
1 Berühren Sie
.
2 Schieben Sie den
Kontrastanzeiger entlang des
Balkens hin und her, nach links
für ein verschwommeneres Bild
mit niedrigem Kontrast oder
nach rechts für ein schärferes
Bild mit höherem Kontrast.
Werden Sie kreativ
54
LG KP502 | Benutzerhandbuch
Serienaufnahme
Erweiterte Einstellungen
Der Serienaufnahme-Modus
ist ideal, um Fotos von sich
schnell bewegenden Motiven
oder Sportveranstaltungen
aufzunehmen.
1 Berühren Sie , um die
verfügbaren Bildeinstellungen
zu öffnen, und wählen Sie
anschließend Serienaufnahme.
2 Wählen Sie die Anzahl der Bilder,
die Sie in Serie aufnehmen
möchten.
3 Positionieren Sie den
Fotogegenstand im Sucher, und
drücken Sie die Aufnahmetaste,
als würden Sie ein normales Foto
machen.
4 Die Kamera nimmt 3, 6 oder
9 Bilder in kurzer Folge auf.
Berühren Sie im Sucher
, um die Optionen für „Erweiterte
Einstellungen“ zu öffnen.
01
02
03
04
05
06
07
08
Vorschaueinstellungen
Farbeffekt – Wählen Sie einen
Farbton für das Foto, das Sie
gerade aufnehmen. Weitere
Informationen finden Sie unter
„Farbeffekt wählen“.
Werden Sie kreativ
Größe – Ändern Sie die Fotogröße,
um Speicherplatz zu sparen, oder
nehmen Sie ein Bild eines Kontakts
mittels einer der Voreinstellungen
in der richtigen Größe auf. Siehe
„Bildgröße verändern“.
55
Kamera
Weißabgleich – Wählen Sie
zwischen „Automatisch“,
„Kunstlicht“, „Sonnig“, „Leuchtstoff“
oder „Bewölkt“.
Anzeigemodus – Wählen Sie
„Vollbild“ oder „Bildgröße“. In
der Vollbildansicht werden u. U.
Bildteile abgeschnitten.
Nachtmodus - Wenn Sie „Ein“
wählen, können Sie nachts bessere
Bilder aufnehmen.
Andere Einstellungen
Speicher - Wählen Sie, ob Sie die
Fotos im Telefonspeicher oder
auf der Speicherkarte speichern
möchten.
Selbstauslöser – Mit dem
Selbstauslöser können Sie eine
Zeitverzögerung festlegen,
die nach dem Drücken der
Aufnahmetaste verstreicht, ehe die
Kamera das Bild aufnimmt. Wählen
Aus, 3 Sekunden, 5 Sekunden,10
Sekunden das Gruppenfoto, auf
dem Sie auch drauf sein wollen.
Werden Sie kreativ
56
Qualität – Wählen Sie zwischen
„Superfein“, „Fein“ und „Normal“. Je
feiner die Qualität, desto schärfer
ist das Foto, aber dadurch erhöht
sich auch die Dateigröße. Das
bedeutet, dass Sie so weniger
Fotos speichern können.
LG KP502 | Benutzerhandbuch
Auslösegeräusch – Wählen Sie
eines der drei Auslösegeräusche.
Rasteransicht – Wählen Sie „Aus“,
„Fadenkreuz“ oder „Gitterlinien“.
Einst.zurücksetzen – Setzen Sie
alle Kameraeinstellungen auf die
Werkseinstellung zurück.
TIPP! Wenn Sie den
Kameramodus verlassen,
werden alle Einstellungen außer
Bildgröße und Bildqualität auf
die Standardeinstellungen
zurückgesetzt. Alle benutzten,
nicht standardmäßigen
Einstellungen, z. B. Farbton,
müssen zurückgesetzt werden.
Bitte überprüfen Sie diese,
bevor Sie Ihr nächstes Foto
aufnehmen.
Je mehr Pixel, desto höher die
Dateigröße und desto mehr
Speicherkapazität wird benötigt.
Falls Sie mehr Bilder auf Ihrem
Mobiltelefon speichern möchten,
ändern Sie die Pixelanzahl, um die
Dateien zu verkleinern.
1 B erühren Sie im Sucher in der
linken oberen Ecke .
2 Wählen Sie Größe im Menü
„Vorschau“.
3 Wählen Sie einen Pixelwert
aus den sechs numerischen
Optionen (3 M: 2048x1536,
2 M: 1600x1200, 1 M:
1280x960, 640x480,
400x240(W), 320x240) oder die
Voreinstellung:
Kontakte – Mit dieser KameraEinstellung machen Sie ein
Foto in der perfekten Größe,
um es einem Telefonkontakt
zuzuweisen.
01
02
03
04
05
06
07
08
Werden Sie kreativ
TIPP! Das Menü „Einstellungen“
überlagert den Sucher. Wenn
Sie also Elemente der Bildfarbe
oder Bildqualität ändern,
sehen Sie hinter dem Menü
„Einstellungen“ in der Vorschau,
wie sich das Bild verändert.
Bildgröße verändern
57
Kamera
Werden Sie kreativ
58
Farbton wählen
Gespeicherte Fotos ansehen
1 B erühren Sie im Sucher in der
linken oberen Ecke .
2 Wählen Sie Farbeffekt im Menü
„Vorschau“.
3 Es gibt fünf Farbtonoptionen:
Aus, Schwarzweiß, Negativ
oder Sepia.
4 Danach wird das Farbton-Menü
automatisch geschlossen, und
Sie können Ihr Bild aufnehmen.
1 S ie können aus dem
Kameramodus heraus auf
gespeicherte Fotos zugreifen.
Berühren Sie einfach
,
und Ihre Galerie wird auf dem
Bildschirm angezeigt.
TIPP! Sie können ein
Farbfoto in ein Schwarzweißoder ein Sepia-Foto umwandeln,
aber Sie können kein
Schwarzweiß- oder Sepia-Foto
in ein Farbfoto umwandeln.
LG KP502 | Benutzerhandbuch
Videokamera
Ein Video aufnehmen
5 O
ben im Sucher wird Rec
angezeigt, und ein Timer unten
gibt die Länge des Videos an.
6 Um das Video anzuhalten,
berühren Sie
, und wählen Sie
zum Fortfahren
.
7 Berühren Sie auf dem Bildschirm
, oder drücken Sie die
Aufnahmetaste ein zweites Mal,
um die Aufnahme anzuhalten.
Nach der Aufnahme
Ein Standbild, das Ihr
aufgenommenes Video darstellt,
erscheint auf dem Bildschirm.
Der Bildname läuft am unteren
Bildschirmrand entlang, und an der
rechten Seite werden fünf Symbole
angezeigt.
01
02
03
04
05
06
07
08
Werden Sie kreativ
1 D
rücken Sie die Kamera-Taste
auf der rechten Seite des
Telefons.
2 Berühren Sie in der
Kameravorschau im Sucher
das Kamerasymbol
, um in
den Videomodus zu wechseln.
Die Kamera wechselt in den
Videomodus.
3 Halten Sie das Mobiltelefon
horizontal und richten Sie die
Linse auf das Motiv.
4 Drücken Sie die Aufnahmetaste
einmal, um die Aufnahme zu
starten. Oder drücken Sie den
roten Punkt unten rechts auf
dem Bildschirm.
59
Videokamera
V120108_06.37.3gp
Werden Sie kreativ
60
Berühren Sie diese Option, um
das Video wiederzugeben
Berühren Sie diese Option, um
das Video als Nachricht, per E-Mail
oder per Bluetooth zu versenden.
Weitere Informationen finden Sie
unter Nachrichten senden und
unter Dateien über Bluetooth
senden und empfangen.
Berühren um den Video- Editor
zu öffnen.
LG KP502 | Benutzerhandbuch
Berühren Sie diese Option,
um eine Galerie der gespeicherten
Videos anzuzeigen.
Berühren Sie diese Option, um
das gerade aufgenommene Video
zu löschen, und bestätigen Sie
durch Berühren von Ja. Der Sucher
erscheint wieder.
Berühren Sie diese Option,
um sofort ein weiteres Video
aufzuzeichnen. Ihr aktuelles Video
wird gespeichert.
Der Sucher
01
Einstellungen – Dieses Symbol berühren,
um das Menü „Einstellungen“ zu öffnen.
Weitere Informationen finden Sie unter
„Erweiterte Einstellungen“.
02
03
Videomodus – Videomodus ausgewählt.
04
Videogröße
05
Speichern in Telefonspeicher/
Speicherkarte
06
Zurück – Hier berühren, um zum StandbyBildschirm zurückzukehren.
07
Galerie
08
Belichtung – Weitere Informationen
finden unter „Belichtung einstellen“.
Videogröße
Aufnahme beenden
Aufnahme starten
TIPP!
Wenn Sie alle Shortcut-Optionen
schließen, erhalten Sie einen
übersichtlicheren Sucher-Bildschirm.
Berühren Sie dazu einfach kurz die
Mitte des Suchers. Um die Optionen
wieder aufzurufen, berühren Sie den
Bildschirm erneut.
Kamera-Modus – Berühren Sie dieses
Symbol, um in den Kameramodus zu
wechseln.
Werden Sie kreativ
zum Vergrößern
Zoom – Berühren Sie
bzw. zum Verkleinern.
61
Videokamera
Belichtung einstellen
Erweiterte Einstellungen
Die Belichtung bestimmt den
Unterschied zwischen hellen und
dunklen Bereichen (Kontrast) in
einem Bild. Ein niedriger Kontrast
lässt ein Bild unscharf wirken,
während ein hoher Kontrast das
Bild schärfer erscheinen lässt.
1 Berühren Sie
.
2 Schieben Sie den
Kontrastanzeiger auf der Leiste
hin und her, nach links für ein
verschwommeneres Bild mit
niedrigem Kontrast oder nach
rechts für ein schärferes Bild mit
höherem Kontrast.
Berühren Sie im Sucher
Einstellungen, um die Optionen
für „Erweiterte Einst.“ zu öffnen.
Werden Sie kreativ
62
LG KP502 | Benutzerhandbuch
Vorschaueinstellungen
Videogröße – Ändern Sie die
Videogröße, um Speicherplatz
einzusparen.
Farbeffekt – Legt den Farbton
für das Video fest, das gerade
aufgezeichnet wird.
Anzeigemodus - Wählen Sie
„Vollbild“ oder „Bildgröße“. In der
Vollbildansicht werden u. U. Bildteile
abgeschnitten.
TIPP! Wenn Sie MMSLänge wählen, nehmen Sie
am Besten eine geringere
Bildqualität, um ein längeres
Video aufnehmen zu können.
Andere Einstellungen
Speicher – Wählen Sie, ob Sie die
Videos im Telefonspeicher oder
auf der Speicherkarte speichern
wollen.
Sprache – Wählen Sie „Ton ein,
Stumm aufzunehmen.
Einst.zurücksetzen – Alle
Videokameraeinstellungen auf die
Werkseinstellung zurücksetzen.
01
02
03
04
05
06
07
08
Werden Sie kreativ
Weißabgleich - Der Weißabgleich
stellt sicher, dass alle Weißtöne in
den Fotos realistisch sind. Damit
die Kamera den Weißabgleich
korrekt vornehmen kann, müssen
Sie eventuell die Lichtverhältnisse
einstellen. Wählen Sie unter
Automatisch, Kunstlicht, Sonnig,
Leuchtstoff oder Bewölkt.
Qualität – Wählen Sie zwischen
„Superfein“, „Fein“ und „Normal“.
Je feiner die Qualität, desto
schärfer ist das Video, aber es führt
zu einer höheren Dateigröße, und
Sie können so weniger Videos auf
Ihrem Mobiltelefon speichern.
Zeit einstellen – Legen Sie eine
Längenbeschränkung für das Video
fest. Wählen Sie Unbegrenzt oder
MMS-Aufnahme, um die Größe
zu beschränken und das Video als
MMS senden zu können.
63
Videokamera
Video-Bildgröße verändern
Werden Sie kreativ
64
Je mehr Pixel, desto höher die
Dateigröße und desto mehr
Speicherkapazität wird benötigt.
Falls Sie mehr Videos auf Ihrem
Mobiltelefon speichern möchten,
ändern Sie die Pixelanzahl, um die
Dateien zu verkleinern.
1 Berühren Sie im Sucher in der
linken oberen Ecke
.
2 Wählen Sie Videogröße im
Menü „Vorschau“.
3 Wählen Sie einen der zwei
Pixelwerte:
320 x 240 – Kleinere
Bildgröße, daher kleinere
Dateigröße.
176 x 144 – Kleinste
Bildgröße, daher kleinste
Dateigröße.
4 Wählen Sie die gewünschte
Größenoption.
LG KP502 | Benutzerhandbuch
TIPP! Konvertierungssoftware
für Videoformate finden Sie auf
der CD, die Sie mit Ihrem KP502
erhalten haben.
Farbton wählen
1 B erühren Sie im Sucher in der
linken oberen Ecke
.
2 Wählen Sie Farbeffekt im Menü
„Einstellungen“.
3 Es gibt fünf Farbtonoptionen:
Aus (Normal), Schwarzweiß,
Negativ oder Sepia.
4 Berühren Sie den Farbton, den
Sie verwenden möchten.
TIPP! Das Menü
„Einstellungen“ überlagert den
Sucher. Wenn Sie also Elemente
der Bildfarbe oder Bildqualität
ändern, sehen Sie hinter dem
Menü „Einstellungen“ in der
Vorschau, wie sich das Bild
verändert.
Gespeicherte Videos
ansehen
1 B erühren Sie im Sucher
.
2 Die Galerie erscheint auf dem
Bildschirm.
3 Das gewünschte Video
einmal kurz berühren und zur
Vorderseite der Galerie bringen.
4 Das Video ein zweites Mal
berühren, um es ganz zu öffnen.
01
02
03
04
05
06
07
08
Werden Sie kreativ
65
Ihre Fotos und Videos
Fotos und Videos ansehen
1 B erühren Sie
in der Vorschau
Ihrer Kamera.
2 Die Galerie erscheint auf dem
Bildschirm.
3 Berühren Sie das Video oder das
Foto zweimal, um es vollständig
zu öffnen.
4 Berühren Sie diese Option
, um das Video wiederzugeben.
Um die Wiedergabe zu
unterbrechen, berühren Sie .
TIPP! Um ein Foto oder
Video zu löschen, öffnen Sie
dieses, und wählen Sie .
Berühren Sie zur Bestätigung Ja.
Fotos und Videos mit der
Zoom-Funktion ansehen
Mehrmals drücken, um die
Präsentation zu vergrößern. Drücken
Sie , um die Präsentation zu
verkleinern. Benutzen Sie das
Miniaturbild in der rechten unteren
Ecke, um den Fokusbereich zu
verschieben.
Lautstärke einstellen, wenn
Sie ein Video ansehen
Werden Sie kreativ
66
TIPP! Blättern Sie nach
links oder rechts, um andere
Fotos oder Videos anzuzeigen.
LG KP502 | Benutzerhandbuch
Zum Einstellen der Lautstärke beim
Abspielen des Videos schieben Sie
den Marker der Lautstärkeregelung
auf der linken Seite des Bildschirms
auf und ab.
Standbild aus
Videoaufnahmen
Fotos als Diashow ansehen
Im Modus Diashow können Sie alle
Fotos in der Galerie auf einmal als
Diashow ansehen. Videos können
nicht als Diashow angesehen
werden.
1 Berühren Sie das Foto, mit
dem Sie die Diashow beginnen
wollen, zweimal.
2 Wählen Sie
.
3 Die Diashow beginnt.
01
02
03
04
05
06
07
08
Werden Sie kreativ
1W
ählen Sie das Video, von dem
Sie ein Einzelbild aufnehmen
wollen.
2 Berühren Sie , um das Video bei
dem Rahmen anzuhalten, von
dem Sie ein Einzelbild machen
wollen.
3 Wählen Sie im Menü „Optionen“
.
4 Auf dem Bildschirm erscheint
das Bild mit dem zugewiesenen
Bildnamen.
5 Berühren Sie das Bild und
dann
, um zur Galerie
zurückzukehren.
6 Das Bild wird in Ihrem
Medienalbum gespeichert und
in der Galerie angezeigt. Dazu
müssen Sie allerdings zunächst
die Galerie schließen und erneut
öffnen.
WARNUNG: Manche
Funktionen werden u. U. nicht
korrekt ausgeführt, wenn die
MMS-Datei nicht mit dem
Telefon aufgenommen wurde.
67
Ihre Fotos und Videos
Foto als Hintergrund
Werden Sie kreativ
68
In Diashows stehen
unterschiedliche Optionen zur
Verfügung:
Berühren Sie die Taste, um eine
zufällige Reihenfolge anzuzeigen.
Berühren Sie diese Option, um
die Diashow an einem bestimmten
Foto anzuhalten.
Durch erneutes Berühren
wird die Wiedergabe wieder
aufgenommen.
Berühren, um die Diashow
schneller oder langsamer laufen zu
lassen.
LG KP502 | Benutzerhandbuch
1 B erühren Sie das Foto, das sie als
Hintergrund einstellen möchten,
zweimal. Stellen Sie beim
Telefon das Querformat ein.
2 Zum Öffnen des Menüs
Optionen, die rechte Seite des
Bildschirms berühren.
3 Berühren Sie .
4 Der Bildschirm wechselt zum
Hochformat. Sie können nun die
Bildgröße ändern.
5 Wenn Sie mit der Größe
zufrieden sind, berühren Sie
Fertig.
Fotos bearbeiten
Sie können viele interessante
Dinge mit Ihren Fotos machen, sie
ändern, etwas hinzufügen oder sie
etwas lebendiger gestalten.
1 Öffnen Sie das zu bearbeitende
Foto, und berühren Sie
, um
die Optionen aufzurufen.
2 Berühren Sie die Symbole, um
Ihr Foto anzupassen:
Schneiden Sie Ihr Foto zu.
Wählen Sie einen quadratischen
oder runden Bereich zum
Zuschneiden, und schieben Sie
Ihren Finder über den Bildschirm,
um den Bereich zu wählen.
Dekorieren Sie Ihr Foto
mit Stempeln. Wählen Sie aus
verschiedenen Stempeln, und
berühren Sie Ihr Foto dort, wo Sie
den Stempel gerne hätten.
Löscht die gezeichnete Linie.
Speichern Sie die
Änderungen der Fotos. Wählen
Sie, ob die Änderungen in der
Originaldatei oder als Neue
Datei gespeichert werden sollen.
Wenn Sie Neue Datei wählen,
geben Sie einen Dateinamen ein.
Machen Sie die letzten mit
Effekt oder „Bearbeiten“ am Foto
vorgenommenen Änderungen
rückgängig.
01
02
03
04
05
06
07
08
Werden Sie kreativ
Zeichnen Sie freihändig in
Ihrem Foto. Wählen Sie die Dicke
der Linie aus den vier Optionen
aus, und wählen Sie die Farbe, die
Sie verwenden möchten.
Beschriften Sie Ihr Bild.
Informationen dazu finden Sie
unter Text zu Fotos hinzufügen.
69
Ihre Fotos und Videos
Berühren Sie diese Option,
um weitere Effekt-Optionen
zu öffnen, z. B. Drehen. Es
gibt noch mehr erweiterte
Bearbeitungsoptionen.
Siehe Spiegeln, Größe
ändern, Rahmen, Morphing,
Farbakzent, Farbtausch, Bilder
hinzufügen, Rote-AugenReduzierung usw.
Berühren, um einen Effekt
zu einem Foto hinzuzufügen.
Weitere Informationen
finden Sie unter Effekt zu Fotos
hinzufügen.
Werden Sie kreativ
70
Berühren Sie diese Option,
um zur Galerie zurückzukehren.
LG KP502 | Benutzerhandbuch
Text zu Fotos hinzufügen
1 B erühren Sie auf dem Bildschirm
„Bearbeiten“ .
2 Wählen Sie Signatur, um Text
ohne Rahmen hinzuzufügen,
oder wählen Sie eine der
Sprechblasen.
3 Geben Sie den Text über das
Tastenfeld ein, und wählen Sie
Speich.
4 Verschieben Sie den Text durch
Berühren und Schieben in die
gewünschte Position.
Effekt zu Fotos hinzufügen
Mosaik – Berühren Sie diese
Option, um dem Foto den
Effekt „Unscharfes Mosaik“
hinzuzufügen.
Ölgemälde – Ölgemälde-Effekt.
Skizze – Effekte hinzufügen, um
dem Bild einen Skizzeneffekt zu
verleihen.
Relief – Reliefeffekt.
Solarisieren – Belichtungseffekt
ändern.
Lebendig – Klarer und
strahlender Effekt.
Mondlicht – Licht in
Mondlichteffekt umwandeln.
Antik – Verleiht dem Bild einen
Antikeffekt.
Leuchtend – Lichtstrahleffekt.
Cartoon – Cartooneffekt.
Wasserfarben –
Wasserfarbeneffekt.
01
02
03
04
05
06
07
08
Werden Sie kreativ
1 B erühren Sie auf dem Bildschirm
„Bearbeiten“
.
2 Wählen Sie eine der sechs
Optionen:
Gesicht retuschieren –
Automatische
Gesichtserkennung und
Aufhellung in einem Foto.
Tunneleffekt – Lomografischer
Kameraeffekt.
Farbnegativ – Farbnegativeffekt.
Schwarzweiß – SchwarzweißFarbeffekt.
Sepia – Sepia-Effekt.
Unscharf – Anwenden eines
Unscharf-Effekts.
Schärfe – Zum Scharfzeichnen
der Fotos den Marker auf der
Leiste in- und herschieben.
Wählen Sie OK, um die
Änderungen anzuwenden oder
, um sie zu verwerfen.
71
Ihre Fotos und Videos
3 B erühren Sie einfach Rückg.,
um einen Effekt rückgängig zu
machen.
TIPP! Sie können, unter
Ausnahme des Farbeffekts,
mehr als einen Effekt pro Foto
hinzufügen.
Morphing von Fotos
Werden Sie kreativ
72
Morphing von Fotos ist ideal,
um den Gesichtsausdruck Ihrer
Freunde zu verändern, oder als
Spezialeffekt zur Verzerrung eines
Fotos.
1 Berühren Sie auf dem Bildschirm
„Bearbeiten“
.
2 Morphing wählen, und auf dem
Foto erscheinen vier Kreuze.
LG KP502 | Benutzerhandbuch
3V
erschieben Sie die Kreuze
auf den Teil des Fotos, den
Sie morphen möchten. Wenn
Sie zum Beispiel ein Gesicht
morphen, platzieren Sie ein
Kreuz am Rand der beiden
Augen und auf jeder Seite der
Lippen.
4 Wählen Sie ein Gesicht als
Vorlage für das zu morphenden
Foto aus.
5 Wählen Sie „OK“, um die
Änderungen zu speichern.
Farbakzent zu Fotos
hinzufügen
1 B erühren Sie auf dem Bildschirm
„Bearbeiten“
.
2 Wählen Sie Farbakzent.
Farbe der Fotos verändern
1 B erühren Sie auf dem Bildschirm
„Bearbeiten“
.
2 Farbtausch wählen.
3 Wählen Sie den Bereich auf
dem Foto. Um alle Bereiche mit
derselben oder einer ähnlichen
Farbe erscheint eine gebrochene
Linie.
Zum Beispiel um das Haar einer
Person oder die Farbe des
Pullovers.
4 Wählen Sie eine Farbe.
5 Drücken Sie OK.
6 Der für Farbakzent gewählte
Bereich des Fotos wechselt zur
gewählten Farbe.
7 Wählen Sie Speichern, um die
Änderungen zu speichern.
01
02
03
04
05
06
07
08
Werden Sie kreativ
3W
ählen Sie den Bereich auf
dem Foto. Um alle Bereiche mit
derselben oder einer ähnlichen
Farbe erscheint eine gebrochene
Linie. Zum Beispiel um das Haar
einer Person oder die Farbe des
Pullovers.
4 Berühren Sie OK.
5 Aus dem Foto werden alle
Farben entfernt, außer in dem
Bereich, den Sie für Farbakzent
markiert haben.
6 Ändern Sie die FarbakzentIntensität, indem Sie den Marker
auf der Intensitätsleiste auf- und
abschieben.
7 Wählen Sie Speichern, um die
Änderungen zu speichern.
73
Ihre Fotos und Videos
Länge des Videos
zuschneiden
Werden Sie kreativ
74
1 Öffnen Sie das zu bearbeitende
Video, wählen Sie , und
berühren Sie den Bildschirm, um
die Optionen anzuzeigen.
2 Zuerst
wählen und dann
Zuschneiden.
3 Berühren Sie , und markieren
Sie die neuen Anfangs- und
Endpunkte mit
.
4 Berühren Sie Geschnitten
wiedergeben, um festzustellen,
ob Sie mit der neuen Version
zufrieden sind.
5 Berühren Sie Speichern
oder , um zur Galerie
zurückzukehren und die
Änderungen zu verwerfen.
LG KP502 | Benutzerhandbuch
Zwei Videos mischen
1 Öffnen Sie das zu bearbeitende
Video, wählen Sie , und
berühren Sie den Bildschirm, um
die Optionen anzuzeigen.
2 Zuerst
wählen und dann
Mit Video mischen.
3 Der Ordner Eigene Dateien wird
geöffnet. Wählen Sie entweder
Meine Videos oder Meine
Speicherkarte (falls vorhanden).
Wählen Sie das Video, das Sie
mischen möchten, und berühren
Sie Wählen.
4 B erühren und Foto verschieben,
um es an das Ende oder den
Anfang des Videos zu mischen.
5 Berühren Sie Effekt zur Auswahl
der Videoübergänge: Aus,
Zoom, Oval, Aufdecken,
Balken, Schachbrett, Auflösen,
Geteilt oder Diamantenform.
6 Speichern drücken und
danach Ja, um das gemischte
Video zu speichern. Entweder
Originaldatei überschreiben oder
als neue Datei speichern.
7 Wiederholen Sie diese Schritte,
um weitere Videos zu mischen.
1 Öffnen Sie das zu bearbeitende
Video, wählen Sie , und
berühren Sie den Bildschirm, um
die Optionen anzuzeigen.
2 Wählen Sie und dann Mit
Bild mischen.
01
02
03
04
05
06
07
08
Werden Sie kreativ
Mischen von Fotos und
Videos
3 D
er Ordner Eigene Dateien wird
geöffnet. Wählen Sie entweder
Meine Bilder oder Meine
Speicherkarte (falls vorhanden).
Wählen Sie ein Foto, das Sie in
das Video mischen möchten,
und berühren Sie Wählen.
4 Berühren und Foto verschieben,
um es an das Ende oder den
Anfang des Videos zu mischen.
5 Berühren Sie Effekt zur Auswahl
der Übergänge zwischen
Foto und Video: Aus, Zoom,
Oval, Aufdecken, Balken,
Schachbrett, Auflösen, Geteilt
oder Diamantenform.
6 Speichern drücken und danach
Ja. Entweder Originaldatei
überschreiben oder als neue
Datei speichern.
7 Wiederholen Sie diese Schritte,
um weitere Fotos zu mischen.
75
Ihre Fotos und Videos
Text zu Video hinzufügen
1 Öffnen Sie das zu bearbeitende
Video, wählen Sie , und
berühren Sie den Bildschirm, um
die Optionen anzuzeigen.
2 Zuerst
wählen und dann
Text einblenden.
3 Geben Sie den Text mit dem
Tastenfeld ein, und wählen Sie
Speich.
4 berühren und mit
markieren, wo der Text
erscheinen soll.
5 Berühren Sie den BildschirmBereich, in dem der Text
erschienen soll.
Werden Sie kreativ
76
Bereich auswählen
LG KP502 | Benutzerhandbuch
6 B erühren, und mit markieren, wo der Text entfernt
werden soll.
7 Vorschau berühren, um
sicherzustellen, dass Sie mit der
Textüberlappung zufrieden sind.
8 Speichern drücken, und danach
Ja. Entweder Originaldatei
überschreiben oder als neue
Datei speichern.
9 Wiederholen Sie diese Schritte,
um weiteren Text hinzuzufügen.
Foto-Überlagerung
1 Öffnen Sie das zu bearbeitende
Video, wählen Sie , und
berühren Sie den Bildschirm, um
die Optionen anzuzeigen.
2 wählen und dann Bild
einblenden wählen.
8 Speichern drücken, und danach
Ja. Entweder Originaldatei
überschreiben oder als neue
Datei speichern.
9 Wiederholen Sie diese Schritte,
um weitere Fotos hinzuzufügen.
01
02
03
04
Sprachaufzeichnung
hinzufügen
05
1 Öffnen Sie das zu bearbeitende
Video, wählen Sie , und
berühren Sie den Bildschirm, um
die Optionen anzuzeigen.
2 wählen und danach
Sprachmemo wählen.
3 Die Qualität der AudioOriginaldatei wird
durch Hinzufügen der
Sprachaufzeichnung
beeinträchtigt. Ja berühren zum
Fortfahren.
07
06
08
Werden Sie kreativ
3 D
er Ordner Eigene Dateien
wird geöffnet. Wählen Sie
entweder Meine Bilder oder
Meine Speicherkarte (falls
vorhanden). Wählen Sie ein Foto
zur Bildüberlappung des Videos,
und berühren Sie Wählen.
4 Berühren Sie , und markieren
Sie die Stelle, an der das Foto
erscheinen soll, mit
.
5 Berühren Sie den BildschirmBereich, in dem das Foto
erschienen soll. Wenn Ihr Foto
zu groß ist, wird der ganze
Bildschirm überlappt, nicht nur
der gewählte Bereich.
6 Berühren, und mit markieren, wo das Foto entfernt
werden soll.
7 Vorschau berühren, um
sicherzustellen, dass Sie mit der
Bildüberlappung zufrieden sind.
77
Ihre Fotos und Videos
4 berühren, um das Video
anzusehen. Drücken Sie
an der Stelle, an der Sie den
Begleitkommentar aufnehmen
möchten.
7 Speichern berühren, und
danach Ja zum Speichern.
Entweder Originaldatei
überschreiben oder als neue
Datei speichern.
8 Wiederholen Sie diese
Schritte, um weitere
Sprachaufzeichnungen zum
Video hinzuzufügen.
Soundtrack zum Video
hinzufügen
Werden Sie kreativ
78
5 D
rücken Sie
oder
, um die
Aufzeichnung zu beenden und
wiederzugeben.
6 Vorschau berühren, um
sicherzustellen, dass Sie mit der
Sprachaufzeichnung zufrieden
sind.
LG KP502 | Benutzerhandbuch
1 Öffnen Sie das zu bearbeitende
Video, wählen Sie , und
berühren Sie den Bildschirm, um
die Optionen anzuzeigen.
2 wählen und dann
Synchronisieren wählen.
3 D
er Ordner Eigene Dateien wird
geöffnet. Wählen Sie entweder
Meine Sounds oder Meine
Speicherkarte (falls vorhanden).
Wählen Sie einen Track, den Sie
zum Video mischen möchten,
und berühren Sie Wählen.
4 Die Audio-Originaldatei des
Videos wird gelöscht. Ja
berühren zum Fortfahren.
5 Wenn die Audiodatei kürzer ist
als das Video, wählen Sie Einmal
oder Wiederholen.
6 Entweder Originaldatei
überschreiben oder als neue
Datei speichern.
Videogeschwindigkeit
verändern
1 Öffnen Sie das zu bearbeitende
Video, wählen Sie , und
berühren Sie den Bildschirm, um
die Optionen anzuzeigen.
2 Wählen Sie , und dann
Geschwindigkeit.
3 Wählen Sie eine der vier
Geschwindigkeiten: x4, x2, x1/4,
x1/2.
4 Entweder Originaldatei
überschreiben oder als neue
Datei speichern.
HINWEIS: Es können nur 3GPDateien bearbeitet werden.
01
02
03
04
05
06
07
08
Werden Sie kreativ
79
Multimedia
Im Telefonspeicher können Sie
jegliche Art von Multimediadatei
speichern und haben so einfachen
Zugriff auf all Ihre Bilder, Töne,
Videos und Spiele. Sie können
Ihre Dateien auch auf einer
Speicherkarte speichern. Der
Vorteil einer Speicherkarte ist, dass
Sie mehr Speicherplatz in Ihrem
Telefonspeicher haben.
Berühren Sie zum Zugriff auf das
Multimedia-Menü zuerst
, und
dann . Berühren Sie , um
auf eine Liste der Ordner mit Ihren
Multimedia-Dateien zuzugreifen.
Bilder
Werden Sie kreativ
80
Meine Bilder enthält eine Liste mit
Bilddateien, u. a. Standardbilder,
die auf Ihrem Mobiltelefon
vorgespeichert sind, Bilder, die
Sie heruntergeladen haben, und
Bilder, die mit der Kamera Ihres
Mobiltelefons aufgenommen
wurden.
LG KP502 | Benutzerhandbuch
Berühren Sie
, um von der
Ansicht „Miniaturbild“ zur Liste zu
wechseln.
Optionenmenü „Meine
Bilder“
Die verfügbaren Optionen in
Meine Bilder hängen davon ab,
welchen Bildtyp Sie wählen. Für
die Bilder, die Sie mit der Kamera
Ihres Mobiltelefons aufgenommen
haben, sind alle Optionen
verfügbar, aber für Standardbilder
sind nur die Optionen Sortieren
nach, Listenansicht, OrdnerInfo und Speicherverwaltung
verfügbar.
Senden – Senden Sie das Bild an
einen Freund.
Verschieben – Verschieben Sie
ein Bild vom Telefonspeicher auf
Meine Speichrkart oder umgekehrt.
Speicherverwaltung – Speicherstatus anzeigen.
Alle löschen – Löschen Sie alle
Bilder.
Fotos senden
1 B erühren Sie
und dann .
2 Berühren Sie , und wählen Sie
dann Meine Bilder.
3 Berühren Sie
Senden, und
wählen Sie Nachricht, E-Mail
oder Bluetooth.
4 Wenn Sie Nachricht oder E-Mail
wählen, wird Ihr Foto an eine
Nachricht angehängt, und Sie
können Ihre Nachricht ganz
normal schreiben und senden.
Wenn Sie Bluetooth wählen,
werden Sie dazu aufgefordert,
Bluetooth zu aktivieren. Ihr
Telefon sucht dann nach dem
Gerät, an das das Bild gesendet
werden soll.
01
02
03
04
05
06
07
08
Werden Sie kreativ
Kopieren – Kopieren Sie ein Bild
vom Telefonspeicher auf eine
Speicherkarte oder umgekehrt.
Löschen – Ein Bild löschen.
Umbenennen - Ein Bild
umbenennen.
Drucken – Drucken Sie das
ausgewählte Bild mit einem
Drucker aus.
Neuer Ordner – Erstellen Sie einen
neuen Ordner im Ordner „Meine
Bilder“.
Diashow – Eine Diashow starten.
Sortieren nach – Zum Ordnen der
Dateien nach Datum, Dateityp,
oder Name.
Listen-/Rasteransicht – Wechseln
Sie von der Raster- zur
Listenansicht und umgekehrt.
Ordner-Info – Zeigen Sie den
Name, Größe, Datum, Dat., Ordner.
81
Multimedia
Ein Bild auswählen
Werden Sie kreativ
82
Wählen Sie Bilder als Hintergrund
und Bildschirmschoner oder
identifizieren Sie sogar einen
Anrufer.
1 Berühren Sie
und dann .
2 Berühren Sie und dann Meine
Bilder.
3 Wählen Sie ein Bild, und
berühren Sie
.
4 Berühren Sie Verwenden als,
und wählen Sie zwischen:
Hintergrund – Legen Sie ein Bild
als Hintergrund für den StandbyBildschirm fest.
Kontaktfoto – Weisen Sie einer
bestimmten Person in Ihrer
Kontaktliste ein bestimmtes Bild
zu, das erscheint, wenn diese
Person Sie anruft.
LG KP502 | Benutzerhandbuch
Einschaltbild – Legen Sie ein
Bild fest, das beim Einschalten
des Mobiltelefons erscheint.
Ausschaltbild – Legen Sie ein
Bild fest, das beim Ausschalten
des Mobiltelefons angezeigt
wird.
Bilder drucken
1 B erühren Sie
und dann .
2 Berühren Sie und dann Meine
Bilder.
3 Wählen Sie ein Bild, und
berühren Sie
.
4 Berühren Sie Drucken, und
wählen Sie dann Bluetooth oder
PictBridge.
TIPP! Sie können über
Bluetooth drucken oder
indem Sie eine Verbindung zu
einem Drucker mit PictBridgeUnterstützung herstellen.
Bilder kopieren und
verschieben
Wenn Sie die im Telefon
gespeicherten Bilder anzeigen
möchten, können Sie eine Diashow
erstellen, sodass Sie nicht jedes
einzelne Bild öffnen und schließen
müssen.
1 Berühren Sie
und dann .
2 Berühren Sie und dann Meine
Bilder.
3 Wählen Sie ein Startbild für Ihre
Diashow.
4 Berühren Sie
und dann
Diashow.
01
02
03
04
05
06
07
08
Töne
Der Ordner Meine Sounds enthält
„Heruntergeladene Sounds“,
Standardtöne und Sprachmemos.
Hier können Sie Sounds verwalten,
versenden oder als Ruftöne
festlegen.
Werden Sie kreativ
Sie können ein Bild zwischen
dem Telefonspeicher und der
Speicherkarte verschieben oder
kopieren. Dies empfiehlt sich, um
neue Speicherkapazität in einer der
Speicherbänke zu schaffen oder
Ihre Bilder vor dem Verlorengehen
zu bewahren.
1 Berühren Sie
und dann .
2 Berühren Sie und dann Meine
Bilder.
3 Berühren Sie
, und wählen Sie
Verschieben oder Kopieren.
4 Sie können Bilder markieren oder
die Markierung aufheben, indem
Sie nacheinander darauf tippen.
Markieren Sie das Bild, das Sie
verschieben oder kopieren
möchten, und berühren Sie
Kopieren/Verschieben.
Eine Diashow erstellen
83
Multimedia
Mit Ton arbeiten
1 B erühren Sie
und dann .
2 Berühren Sie und dann Meine
Sounds.
3 Wählen Sie Standardtöne oder
Sprachmemo.
4 Wählen Sie einen Ton, um ihn
abzuspielen.
5 Berühren Sie
, und wählen Sie
Verwenden als.
6 Wählen Sie entweder Rufton,
Nachrichtenton, Einschalten
oder Ausschalten.
Videos
Werden Sie kreativ
84
Der Ordner Meine Videos enthält
eine Liste von heruntergeladenen
Videos und Videos, die Sie mit
Ihrem Mobiltelefon aufgenommen
haben.
LG KP502 | Benutzerhandbuch
Videos ansehen
1 Berühren Sie
und dann .
2 Wählen Sie und dann Meine
Videos.
3 Wählen Sie ein Video zur
Wiedergabe aus.
Optionen während das Video
angehalten ist
Berühren Sie im Pause-Modus
,
und wählen Sie zwischen:
Aufnehmen – angehaltenen Frame
als Bild aufnehmen
Bearbeiten – Videoclip bearbeiten.
Senden – Das Video per Nachricht,
E-Mail oder Bluetooth versenden.
Löschen – Video löschen
– Sprachrufton oder Videorufton.
Dateiinfo – Titel, Größe, Datum,
Typ, Dauer, Schutz, Weiterleiten.
Menü Video-Optionen
1W
ählen Sie ein Video, und
berühren Sie dann
.
2 Senden berühren und
Nachricht, E-Mail oder
Bluetooth wählen.
3 Wenn Sie Nachricht oder EMail wählen, wird Ihr Videoclip
einer Nachricht angehängt,
und Sie können Ihre Nachricht
ganz normal schreiben und
senden. Wenn Sie Bluetooth
wählen, werden Sie aufgefordert,
Bluetooth einzuschalten, und Ihr
Mobiltelefon sucht nach einem
Gerät, an das das Video gesendet
werden kann.
Im Ordner Meine Videos können
Sie aus folgenden Optionen
wählen:
Senden – Video an einen Freund
senden.
Verschieben – Videoclip vom
Telefonspeicher auf Meine
Speicherkarte verschieben oder
umgekehrt.
Kopieren – Videoclip vom
Telefonspeicher auf Meine
Speicherkarte kopieren oder
umgekehrt.
Löschen – Video löschen.
Umbenennen –Ein Video
umbenennen.
Neuer Ordner – Einen neuen
Ordner im Ordner Meine Videos
erstellen.
Sortieren nach – Sortieren Sie
Bilder nach Datum, Zeit oder Name.
01
02
03
04
05
06
07
08
Werden Sie kreativ
Videoclip senden
85
Multimedia
Listen-/Rasteransicht – Wechseln
Sie von der Raster- zur
Listenansicht und umgekehrt.
Ordner-Info – Zeigen Sie den
Name, Größe, Datum, Dat., Ordner.
Speicherverwaltung – Speicherstatus anzeigen.
Alle löschen – Löschen Sie alle
Videos.
Unterhaltung
Sie können neue Spiele und
Anwendungen auf Ihrem
Mobiltelefon installieren, um sich
die Zeit zu vertreiben.
Ein Spiel oder eine
Anwendung lokal installieren
1 B erühren Sie
und dann .
2 Berühren Sie und Andere
oder Meine Speicherkarte,
wenn eine Speicherkarte
vorhanden ist.
3 Wählen Sie die Datei (*.jad
oder *.jar), die Sie installieren
möchten, und drücken Sie den
Befehl Installieren. Die jeweilige
Anwendung wird installiert.
HINWEIS: Die JAD-Datei müsste
eine eigene JAR-Datei enthalten.
Ein Spiel spielen
Werden Sie kreativ
1 B erühren Sie
und dann .
2 Wählen Sie
und Meine
Spiele & mehr.
3 Öffnen Sie den Ordner „Spiele“,
und wählen und berühren Sie
das gewünschte Spiel, um es zu
starten.
86
LG KP502 | Benutzerhandbuch
Dokumente
Im Ordner „Spiele“ stehen unter
die folgenden Optionen zur
Verfügung:
Löschen – Datei löschen.
Neuer Ordner – Erstellen eines
Ordners in Meine Spiele & Mehr.
Umbenennen – Datei
umbenennen.
Verschieben – Verschieben Sie
eine Datei vom Telefonspeicher
auf Meine Speicherkarte oder
umgekehrt.
Dateiinfo – Zeigen Sie Name,
Name, Anbieter, Version, Größe,
Domäne, Signatur.
Sortieren – Sortieren Sie Spiele
und Anwendungen nach Datum,
Größe oder Name.
Speicherverwaltung – Speicherstatus anzeigen.
Alle löschen – Löschen Sie alle
Dateien.
Im Menü Dokumente werden alle
Dokument-Dateien angezeigt.
Hier können Sie Excel, Powerpoint,
Word, Text und
PDF- Dateien anzeigen.
Datei auf das Mobiltelefon
übertragen
Bluetooth ist wahrscheinlich der
einfachste Weg, um eine Datei vom
Computer auf Ihr Mobiltelefon zu
übertragen. Sie können die LG PC
Suite auch über ein Sync-Kabel
benutzen.
Zur Übertragung über Bluetooth:
1 Stellen Sie sicher, dass
Mobiltelefon und Computer
Bluetooth aktiviert sind und sich
gegenseitig erkannt haben.
2 Senden Sie von Ihrem Computer
die Datei über Bluetooth.
01
02
03
04
05
06
07
08
Werden Sie kreativ
Menü „Spiele-Optionen“
87
Multimedia
3 Nach dem Senden der Datei
müssen Sie den Empfang auf
Ihrem Mobiltelefon bestätigen,
indem Sie Ja berühren.
4 Die Datei sollte im Ordner
Dokumente oder Andere
angezeigt werden.
Dateien ansehen
1 B erühren Sie
und dann .
2 Berühren Sie und dann
Dokumente.
3 Wählen Sie ein Dokument, und
berühren Sie Ansicht.
Werden Sie kreativ
88
LG KP502 | Benutzerhandbuch
Andere
Im Ordner Andere werden
Dateien gespeichert, die nicht
Bilder, Sounds, Videos, Spiele oder
Anwendungen sind. Er wird wie der
Ordner Dokumente verwendet.
Manchmal werden Dateien, die
von Ihrem Computer auf Ihr
Mobiltelefon übertragen wurden,
im Ordner Andere statt im Ordner
Dokumente angezeigt.
Wenn das geschieht, können
Sie die Dokumente einfach
verschieben.
So verschieben Sie Dateien von
Andere nach Dokumente:
1 Berühren Sie
und dann .
2 Berühren Sie und dann
Andere.
3 Wählen Sie eine Datei, und
berühren Sie
.
4 B erühren Sie Verschieben,
und wählen Sie den Zielordner
aus der Liste, indem Sie das
Pfeilsymbol berühren. Auf dem
Bildschirm wird Verschoben
angezeigt, sobald die
Übertragung abgeschlossen ist.
Einen Film erstellen
01
02
03
04
05
06
07
08
Werden Sie kreativ
1 B erühren Sie
und dann .
2 Berühren Sie (Muvee-Studio).
3 berühren, um ein Bild
hinzuzufügen. Aktivieren Sie
die Kontrollkästchen der Bilder,
die Sie anhängen möchten, und
wählen Sie dann Einfügen.
4 Berühren Sie die Registerkarte
„Stil“, und wählen Sie einen
„Muvee Style“.
5 Berühren Sie
, um den Ton
wie gespeicherte Sprachmemos
zu speichern.
6 Durch das Berühren von
sehen Sie, was Sie erstellt haben.
7 B erühren Sie
und dann
Nacheinander, um eine
Reihenfolge zu erstellen.
8 Berühren Sie
und
dann Speicherort, um
den Speicherort des Films
auszuwählen, und berühren Sie
Dauer, um zwischen „Lang“ und
„Kurz“ zu wählen.
89
Multimedia
Musik
Werden Sie kreativ
90
Ihr LG KP502 verfügt über
einen integrierten Musik
Player zur Wiedergabe von
Musikdateien. Zum Zugriff auf das
Wiedergabeprogramm berühren
Sie zuerst , dann und zum
Schluss . Von hier haben Sie
Zugang auf verschiedene Ordner:
Zuletzt gespielt – Anzeigen aller
zuletzt gespielten Titel.
Alle Titel – Enthält alle Titel auf
dem Mobiltelefon.
Künstler - Blättern Sie durch Ihr
Musiksammlung nach Interpreten
sortiert.
Alben - Blättern Sie durch Ihre
Musiksammlung nach Alben
sortiert.
Genres - Blättern Sie durch Ihre
Musiksammlung nach Genres.
Playlists – Enthält alle von Ihnen
erstellten Playlists.
LG KP502 | Benutzerhandbuch
Zufällig – Geben Sie Ihre Titel in
zufälliger Reihenfolge wieder.
Übertragen von Musik auf
das Mobiltelefon
Der einfachste Weg, um Musik auf
Ihr Mobiltelefon zu übertragen, ist
über Bluetooth oder Sync-Kabel.
Sie können auch die LG PC Suite
benutzen. Zur Übertragung über
Bluetooth:
1 Stellen Sie sicher, dass bei
beiden Geräten Bluetooth
aktiviert ist und sie sichtbar sind.
2 Wählen Sie die Musikdatei im
anderen Gerät und, wählen Sie
das Senden über Bluetooth.
3 Nach dem Senden der Datei
müssen Sie den Empfang auf
Ihrem Mobiltelefon bestätigen.
Berühren Sie dazu Ja.
4 D
ie Datei wird in Musik > Alle
Titel angezeigt.
01
Musiktitel abspielen
02
1 B erühren Sie
und dann .
2 Berühren Sie zunächst und
dann Alle Titel.
3 Wählen Sie den gewünschten
Titel.
4 berühren, um den Titel
anzuhalten.
5 berühren, um zum nächsten
Titel zu wechseln.
6 berühren, um zum
vorherigen Titel zu wechseln.
7 Berühren Sie
, um zum
Menü Musik zurückzukehren.
03
04
05
06
07
08
Optionen während des
Abspielens von Musiktiteln
Werden Sie kreativ
Berühren Sie
, und wählen Sie
eine der folgenden Optionen aus:
Minimieren – Music PlayerBildschirm ausblenden, um Ihr
Mobiltelefon normal weiter zu
benutzen
91
Multimedia
Werden Sie kreativ
92
Dateiinfo – Sie können
Name,Größe, Datum, Zeit, Typ,
Titel, Künstler, Genre, Track Nummer, Album, Kommentar,
Dauer, Autor, Jahr, Copyright,
Schutz.
Senden – Titel mit einer Nachricht,
E-Mail, Bluetooth.
Verwenden als – Sie können den
Titel als Rufton, Nachrichtenton,
Einschalten, Ausschalten
Ausschaltton verwenden.
4 Im Ordner Alle Titel werden
alle Titel auf Ihrem Telefon
angezeigt. Wenn Sie die Titel
berühren, die in Ihre Playlist
aufgenommen werden sollen,
werden die jeweiligen Namen
mit einem Häkchen markiert.
5 Fertig berühren.
Zur Wiedergabe einer Playlist
wählen Sie sie und berühren
Wiedergabe.
Eine Playlist erstellen
Von Zeit zu Zeit werden Sie neue
Titel zu Ihrer Playlist hinzufügen
oder löschen. In diesem Fall
können Sie die Playlist so
bearbeiten:
1 Berühren Sie
und dann .
2 Berühren Sie , und dann
Playlists.
3 Wählen Sie die Playlist.
Wählen Sie Titel aus Ihrem Ordner
Alle Titel, um eigene Playlists zu
erstellen.
1 Berühren Sie
und dann .
2 Berühren Sie , und dann
Playlists.
3 Berühren Sie Neue Playlist,
geben Sie den Namen für die
Playlist ein, und berühren Sie
Speichern.
LG KP502 | Benutzerhandbuch
Playlist bearbeiten
4 berühren und wählen:
Neue Titel hinzufügen – Fügen
Sie weitere Titel zu Ihrer
Playlist hinzu. Markieren Sie die
gewünschten Titel, und berühren
Sie Fertig.
Reihenfolge ändern – Ändern
Sie die Wiedergabereihenfolge
der Playlist.
Entfernen – Titel aus der Playlist
entfernen Berühren Sie „Ja“ zur
Bestätigung.
Speicherstatus – Zeigen Sie den
Speicherstatus an.
Alle entfernen – Entfernen Sie
alle Titel aus der Playlist.
Playlist löschen
1 B erühren Sie
und dann
Unterhaltung.
2 Zuerst Musik berühren, dann
Playlists.
3 Berühren Sie zunächst
und dann Entfernen oder Alle
entfernen, um alle Playlists zu
löschen.
Radio
02
03
04
05
06
07
08
Werden Sie kreativ
Ihr LG KP502 enthält ein
integriertes UKW-Radio. So können
Sie jederzeit Ihren Lieblingssender
hören, wenn Sie unterwegs sind.
HINWEIS: Zum Radiohören
benötigen Sie Kopfhörer. Stecken
Sie die Kopfhörer in die KopfhörerBuchse ein (dieselbe Buchse, in die
Sie auch Ihr Ladegerät einstecken).
01
93
Multimedia
Radiostationen suchen
Werden Sie kreativ
94
Sie können die Radiosender auf
Ihrem Mobiltelefon entweder
manuell oder automatisch
einstellen. Sie werden dann unter
einer bestimmten Kanalnummer
gespeichert, damit Sie nicht jedes
Mal aufs Neue suchen müssen. Sie
können bis zu 50 Kanäle auf Ihrem
Mobiltelefon speichern. Befestigen
Sie die Kopfhörer zuerst am
Telefon, da sie als Antenne dienen.
Automatisch einstellen:
1 Berühren Sie
und dann .
2 Berühren Sie
und dann
.
3 Berühren Sie zuerst „Autom.
Suche“. Die Stationen werden
dann automatisch gesucht und
einem Kanal auf Ihrem Telefon
zugewiesen.
LG KP502 | Benutzerhandbuch
HINWEIS: Sie können die Sender
auch manuell mit den Zeichen
und neben der
Radiofrequenz suchen.
Wenn Sie und länger
drücken, werden die Stationen
automatisch gesucht.
Kanäle zurücksetzen
1 B erühren Sie
und dann .
2 Berühren Sie
und dann
.
3 Wählen Sie Zurücksetzen,
um den aktuellen Kanal
zurückzusetzen, oder Alle
Zurücksetzen, um alle Kanäle
zurückzusetzen. Jeder Kanal wird
auf die Anfangsfrequenz von
87,5 MHz zurückgesetzt.
Radio hören
1 B erühren Sie
und dann .
2 Berühren Sie zunächst
und dann die Kanalnummer
des Senders, den Sie hören
möchten..
TIPP! Um den Empfang zu
verbessern, verlängern Sie das
Headsetkabel, das als UKWAntenne dient.
Um Radio im Hintergrund zu
hören berühren Sie bitte .
01
02
03
04
05
06
07
08
Werden Sie kreativ
95
Organizer
Hinzufügen eines neuen
Termins
ORGANIZER
96
1W
ählen Sie auf dem StandbyBildschirm zuerst
, dann ,
und wählen Sie danach .
Kalender wählen.
2 Wählen Sie das Datum, dem Sie
ein neues Ereignis hinzufügen
möchten.
3 Berühren Sie
und dann
Neues Ereignis.
4 Berühren Sie Kategorie und
dann Termin, Jahrestag oder
Geburtstag.
Prüfen Sie das Datum, und
geben Sie die Uhrzeit des
Ereignisses ein.
5 Bei Terminen und Jahrestagen
geben Sie in den unteren beiden
Zeit- und Datumsfeldern die
Uhrzeit und das Datum ein, an
dem Ihr Ereignis beendet ist.
LG KP502 | Benutzerhandbuch
6W
enn Sie Ihrem Ereignis einen
Betreff oder einen Hinweis
hinzufügen möchten, berühren
Sie Notizen, geben Sie Ihren
Hinweis ein, und wählen Sie
dann Speichern.
7 Stellen Sie den Wecker und
Wiederholen ein.
8 Wählen Sie Speichern, um
Ihr Ereignis im Kalender zu
speichern. Ein quadratischer
Cursor markiert den jeweiligen
Tag, für den Sie Ereignisse
gespeichert haben, und zu
Beginn des Ereignisses ertönt ein
Alarmton, damit Sie immer auf
dem Laufenden sind.
TIPP! Sie können auch Ihren
Urlaub in den Kalender
eingeben. Berühren Sie zuerst
nacheinander alle Urlaubstage,
danach
, und wählen Sie
dann Als Feiertag einstellen.
Standard-Kalenderansicht
ändern
1W
ählen Sie auf dem StandbyBildschirm zuerst
, dann ,
und wählen Sie danach .
Wählen Sie Einstellungen.
2 Berühren Sie Kalender,
und wählen Sie entweder
Monatsansicht oder
Wochenansicht.
3 Legen Sie den Wochenbeginn
fest.
4 Drücken Sie zur Bestätigung
Speichern.
3 L egen Sie das Datum für Ihre
Aufgabe fest, fügen Sie Notizen
hinzu, und wählen Sie die
Prioritätsstufe: Hoch, Mittel oder
Niedrig.
4 Speichern Sie Ihre Aufgabe mit
Speichern.
TIPP! Sie können ein Element
bearbeiten, indem Sie es
auswählen, die Registerkarte
berühren und Ihre Änderungen
eingeben. Bestätigen Sie Ihre
Eingabe mit Speichern.
01
02
03
04
05
06
07
08
Aufgaben hinzufügen
ORGANIZER
1W
ählen Sie auf dem StandbyBildschirm zuerst
, dann ,
und wählen Sie danach .
2 Wählen Sie Aufgaben, und
berühren Sie Aufgabe hinzuf.
97
Organizer
Anderen Zugriff zu Aufgaben Notiz hinzufügen
gewähren
1 Wählen Sie auf dem Standby1 Wählen Sie auf dem StandbyBildschirm zuerst
, dann
, und wählen Sie danach .
Wählen Sie Aufgaben.
2 Wählen Sie die Aufgaben, die Sie
mit anderen teilen möchten, und
berühren Sie
.
3 Wählen Sie Senden. Sie können
die gemeinsame Nutzung
Ihrer Aufgaben entweder per
SMS, MMS, E-Mail, Bluetooth
ermöglichen.
TIPP! Sie können Ihren Kalender
sowohl mit Ihrem Computer
synchronisieren, als auch dort
sichern.
ORGANIZER
98
LG KP502 | Benutzerhandbuch
Bildschirm zuerst
, dann
, und wählen Sie danach .
Wählen Sie Notizen.
2 Berühren Sie Notiz hinzuf.
3 Schreiben Sie Ihre Notiz, und
berühren Sie dann Speichern.
4 Ihre Notiz wird auf dem
Bildschirm angezeigt, wenn Sie
das nächste Mal die Anwendung
Notizen öffnen.
TIPP! Sie können eine
vorhandene Notiz bearbeiten.
Wählen Sie die gewünschte
Notiz aus, und geben Sie Ihre
Änderungen ein.
Datumrechner
Wecker einstellen
Datumssuche ist ein praktisches
Hilfsmittel, mit dem Sie das
Datum nach einer bestimmten
Zeitspanne ausrechnen können.
Zum Beispiel 60 Tage nach 10.10.07
ist 09.12.2007.
Dies ist ideal, um wichtige Fristen
im Auge zu behalten.
1 Wählen Sie auf dem StandbyBildschirm zuerst
, dann ,
und wählen Sie danach .
2 Wählen Sie Datumrechner.
3 Geben Sie das gewünschte
Datum in der Registerkarte Von
ein.
4 In der Registerkarte Nach geben
Sie die Anzahl der Tage ein.
5 Unten erscheint dann das
Zieldatum.
1W
ählen Sie auf dem StandbyBildschirm zuerst
, dann ,
und wählen Sie danach .
2 Berühren Sie Neuer Weckruf.
3 Geben Sie die gewünschte
Alarmzeit ein, und berühren Sie
Speichern.
4 Wählen Sie, wann der Alarm
wiederholt werden soll: Nicht
wiederholen, Täglich, Mo - Fr,
Mo - Sa, Sa - So, Außer Feiertag,
Wochentag wählen.
Die Symbole zeigen die
Wochentage an, die Sie
auswählen.
5 Wählen Sie Alarmtyp, um einen
Alarmtyp auszuwählen.
01
02
03
04
05
06
07
08
ORGANIZER
99
Organizer
6 B erühren Sie Alarmton, wählen
Sie dann Standardtöne oder
den Ordner Sprachmemo,
um einen Ton zu suchen. Zum
Anhören der Töne berühren Sie
den jeweiligen Ton und dann
.
7 Dem Alarm eine Notiz
hinzufügen. Berühren Sie
Speichern, wenn Sie mit Ihrer
Notiz fertig sind.
8 Sie können die Snooze-Intervalle
auf 5, 10, 20, 30 Minuten,
1 Stunde oder „Aus“ einstellen.
9 Berühren Sie Speichern, wenn
Sie Ihren Alarm eingegeben
haben.
HINWEIS: Sie können bis zu
5 Alarme eingeben.
ORGANIZER
100
TIPP! Berühren Sie das Ein/Aus-Symbol rechts neben dem
einzustellenden Alarm.
LG KP502 | Benutzerhandbuch
Eine Notiz mit Skizze
hinzufügen
1W
ählen Sie auf dem StandbyBildschirm zuerst
, dann ,
und wählen Sie danach .
2 Berühren Sie Skizze hinzufügen.
3 Zeichnen Sie Ihre Notiz auf den
LCD-Touchscreen, und berühren
Sie dann
.
4 Ihre Notiz wird auf dem
Bildschirm angezeigt, wenn Sie
das nächste Mal Ihre Skizzen
öffnen.
Sprachmemo
Ton- und Sprachaufnahme
Mit der Sprachaufnahme können
Sie Sprachnotizen oder andere
Sounds aufnehmen.
1 Berühren Sie
und dann .
2 Berühren Sie
, dann
und
anschließend die gewünschten
Einstellungen:
Dauer – Legen Sie die
Aufnahmedauer fest. Wählen
Unbegrenzt, MMS-Größe,1 Min.
Qualität – Wählen der
Soundqualität. Wählen Sie für
den zu verwendenden Speicher
die Option „Superfein“, „Fein“
oder „Normal“.
Speicherort – Wählen Sie, wo
die Sprachaufnahme gespeichert
werden soll.
1 B erühren Sie
und dann
2 Berühren Sie
.
3 berühren, um mit der
Aufzeichnung zu beginnen.
4 berühren, um die
Aufzeichnung zu beenden.
5 berühren, um Ihre
Aufzeichnung zu hören.
.
01
02
03
04
05
06
07
08
ORGANIZER
101
Organizer
ORGANIZER
102
Sprachaufnahme senden
Rechner
1W
enn Sie die Aufnahme beendet
haben, berühren Sie
.
2 Berühren Sie Senden, und
wählen Sie Nachricht, E-Mail
oder Bluetooth. Wenn Sie
Nachricht oder E-Mail wählen,
wird Ihre Aufzeichnung einer
Nachricht angehängt, und Sie
können Ihre Nachricht ganz
normal schreiben und senden.
Wenn Sie Bluetooth wählen,
werden Sie aufgefordert,
Bluetooth zu aktivieren.
HINWEIS: Wenn Sie die
Aufnahme beendet haben,
berühren Sie
, und wählen
Sie „Senden“, „Datei“, „Löschen“,
„Verwenden als“ (um die
Aufzeichnung als Rufton zu
verwenden), „Einstellungen“ oder
„Meine Sprachmemos“.
1W
ählen Sie auf dem StandbyBildschirm zuerst
, dann ,
und wählen Sie danach .
2 Wählen Sie Rechner.
3 Berühren Sie die Zifferntasten,
um Zahlen einzugeben.
4 Für einfache Berechnungen,
berühren Sie die gewünschte
Funktion (+, –, *, /), gefolgt von
=.
5 Für kompliziertere
Berechnungen berühren Sie
und wählen sin, cos, tan, log, ln,
exp, sqrt, deg oder rad usw.
LG KP502 | Benutzerhandbuch
Umrechnen von Einheiten
Stoppuhr verwenden
1W
ählen Sie auf dem StandbyBildschirm zuerst
, dann ,
und wählen Sie danach .
2 Wählen Sie Umrechner.
3 Wählen Sie, was Sie umrechnen
möchten: Währung,
Fläche, Masse, Länge,
Temperatur, Volumen oder
Geschwindigkeit.
4 Wählen Sie die Einheit, und
geben Sie erst den Wert zur
Umrechnung und dann die
Einheit ein, in die Sie umrechnen
möchten.
5 Der entsprechende Wert wird
auf dem Bildschirm angezeigt.
1W
ählen Sie auf dem StandbyBildschirm zuerst
, dann ,
und wählen Sie danach .
2 Wählen Sie Stoppuhr.
3 Wählen Sie Start, um den Timer
zu starten.
4 Wählen Sie Runde, wenn
Sie eine Rundenzeit messen
möchten.
5 Mit Stopp wird die Zeitmessung
beendet.
6 Berühren Sie Weiter, um die
Stoppuhr an dem Zeitpunkt,
zu dem sie angehalten wurde,
wieder zu starten, oder berühren
Sie Zurücksetzen, um die
Zeitmessung neu zu starten.
01
02
03
04
05
06
07
08
ORGANIZER
103
Organizer
Ort zur Weltzeit hinzufügen
1W
ählen Sie auf dem StandbyBildschirm zuerst
, dann ,
und wählen Sie danach .
2 Wählen Sie Weltzeit.
3 Berühren Sie
und dann
Stadt hinzufügen. Sobald
Sie anfangen, den Namen der
gewünschten Stadt zu schreiben,
erscheint dieser oben am
Bildschirm.
ORGANIZER
104
LG KP502 | Benutzerhandbuch
PC-Synchronisation
Sie können Ihren PC auch
mit Ihrem Mobiltelefon
synchronisieren, um Ihre Daten zu
sichern und zu gewährleisten, dass
Ihre wichtigen Informationen und
Daten übereinstimmen.
LG PC Suite auf Ihrem PC
installieren
Mobiltelefon mit PC
verbinden
01
02
03
04
05
06
07
08
1V
erbinden Sie ein USB-Kabel mit
Ihrem Mobiltelefon und PC.
2 Doppelklicken Sie auf das LG
PC Suite-Symbol auf Ihrem
Desktop.
3 Klicken Sie auf den
Verbindungsassistent, danach
USB.
ORGANIZER
1 D
rücken Sie auf dem StandbyBildschirm
und
, und
wählen Sie dann
2 Wählen und bestätigen Sie USBVerbindung.
PC Internet
USB-Speicher
PC suite
Musik-Synchr.
Immer fragen
3 Legen Sie die Installations-CD in
Ihren PC. Klicken Sie auf den LG
PC Suite Installer, der auf dem
Bildschirm angezeigt wird.
4W
ählen Sie die gewünschte
Sprache, und klicken Sie auf OK.
5 Befolgen Sie die Anweisungen
auf dem Bildschirm, um den
LG PC Suite Installer Assistent
abzuschließen.
6 Wenn die Installation beendet
ist, wird das LG PC Suite-Symbol
auf Ihrem Desktop angezeigt.
105
PC-Synchronisation
4 K licken Sie auf Weiter, und
nochmals auf Weiter, dann auf
Fertig. Ihr Mobiltelefon und PC
sind nun verbunden.
4 Ihre Informationen werden
gesichert oder wiederhergestellt.
Telefondaten auf dem PC
ansehen
Telefoninformationen
1 Verbinden Sie Ihr Mobiltelefon
sichern und wiederherstellen
mit dem PC wie zuvor
ORGANIZER
106
1V
erbinden Sie Ihr Mobiltelefon
mit dem PC wie oben
beschrieben.
2 Klicken Sie auf das Sichern
Symbol, und wählen Sichern
oder Starten.
3 Markieren Sie den Inhalt, den Sie
sichern oder wiederherstellen
möchten. Wählen Sie den
Speicherort wo Sie Ihre
Informationen sichern möchten,
oder von wo Sie Informationen
wiederherstellen möchten.
Klicken Sie auf OK.
LG KP502 | Benutzerhandbuch
beschrieben.
2 K licken Sie auf das Symbol
Dateien.
3 Ihre auf dem Mobiltelefon
gespeicherten Dokumente,
Flash-Inhalte, Bilder, Töne
und Videos werden auf dem
Bildschirm im Ordner „LG
Mobiltelefon“ angezeigt.
TIPP! Durch Anzeigen der
auf Ihrem Mobiltelefon
gespeicherten Daten auf
dem PC behalten Sie den
Überblick, können Dateien und
Dokumente verwalten und
Daten löschen, die Sie nicht
mehr benötigen.
Kontakte synchronisieren
1 S chließen Sie das Mobiltelefon
am PC an.
2 Klicken Sie auf das Symbol
Kontakte.
3 Ihre auf der SIM-Card und dem
Telefon gespeicherten Kontakte
werden nun vom PC importiert
und angezeigt.
4 K licken Sie auf Datei, und
wählen Sie Speichern. Sie
können nun wählen, wo Sie Ihre
Kontakte speichern möchten.
HINWEIS: Um Kontakte zu
sichern, die auf Ihrer SIM-Karte
gespeichert sind, klicken Sie auf
den Ordner „SIM-Karte“ links auf
Ihrem PC-Bildschirm. Wählen Sie
oben im Bildschirm Bearbeiten,
dann Alle auswählen.
Klicken Sie mit der rechten
Maustaste auf Ihre Kontakte und
wählen Sie In Kontakte kopieren.
Klicken Sie nun auf den Ordner
Mobiltelefon links am Bildschirm
und Ihre Nummern werden
angezeigt.
01
02
03
04
05
06
07
08
ORGANIZER
107
PC-Synchronisation
Nachrichten synchronisieren
1 S chließen Sie das Mobiltelefon
am PC an.
2 Klicken Sie auf das Symbol
Nachrichten.
3 Alle Nachrichten auf Ihrem PC
und Mobiltelefon werden auf
dem Bildschirm in Ordnern
angezeigt.
4 Mit der Symbolleiste oben
am Bildschirm können Sie
Nachrichten bearbeiten und neu
ordnen.
ORGANIZER
108
LG KP502 | Benutzerhandbuch
Ihr Mobiltelefon als
Massenspeichergerät
Ihr Telefon kann als
Massenspeichergerät verwendet
werden.
1 Trennen Sie die Verbindung
zwischen Mobiltelefon und PC.
2 Wählen Sie auf dem StandbyBildschirm zuerst
, und
berühren Sie dann
.
3 Wählen Sie
und dann USBVerbindungsmodus.
4 Berühren Sie USB-Speicher.
5 Schließen Sie das Mobiltelefon
am PC an. Ihr Mobiltelefon
zeigt an: Verbinden als
Massenspeicher. Während
Übertragung nicht entfernen.
6 A
lle auf Ihrem Mobiltelefon
gespeicherten Dateien werden
automatisch auf der PC
Festplatte gespeichert.
HINWEIS: Zur Initialisierung
der Massenspeicherung darf Ihr
Mobiltelefon nicht mit dem PC
verbunden sein.
Ihr Mobiltelefon als
Musiksynchronisationsgerät
01
02
03
04
05
06
07
08
ORGANIZER
Ihr Telefon kann nur bei
Musiksynchronisationsdateien
als Musiksynchronisationsgerät
verwendet werden.
Die Synchronisierung von
Musikdateien kann mithilfe von
Windows Media Player 10/11
erfolgen und wird sowohl für
Telefonspeicher als auch für
Speicherkarten unterstützt.
1 Trennen Sie die Verbindung
zwischen Mobiltelefon vom PC.
2 Wählen Sie auf dem StandbyBildschirm zuerst
, und
berühren Sie dann
.
3 Wählen Sie
und dann USBVerbindungsmodus.
4 Berühren Sie Musik-Synchr.
5 Schließen Sie das Mobiltelefon
am PC an. Ihr Mobiltelefon zeigt
an: Im Music Sync-Modus
verbinden … und danach Kabel
trennen, um Musik-Synchr. zu
beenden.
109
Browser
Browser
Mit dem Browser haben Sie
direkt von Ihrem Mobiltelefon
Zugriff auf eine große Auswahl
an Spielen, Musik, Nachrichten,
Sportmeldungen und vielem
mehr, gleich, wo Sie sich gerade
aufhalten. Für jeden Geschmack ist
etwas dabei!
Zugriff zum Internet
1W
ählen Sie auf dem StandbyBildschirm zuerst
, dann ,
und wählen Sie danach .
2 Wählen Sie Startseite, um direkt
auf die Zur Startseite des
Adresse eingeben. Oder wählen
Sie Adresse eingeben, und
geben Sie die gewünschte URL
ein, gefolgt von Verbinden.
BROWSER
110
LG KP502 | Benutzerhandbuch
HINWEIS: Für die Verbindung
zu diesem Dienst und das
Herunterladen von Inhalten fallen
zusätzliche Kosten an. Erkundigen
Sie sich bei Ihrem Netzbetreiber
nach eventuellen Zusatzkosten.
Lesezeichen hinzufügen und
darauf zugreifen
Um schnell und einfach auf
Ihre Lieblingswebseiten zu
gelangen, können Sie Lesezeichen
hinzufügen und Webseiten
speichern.
1 Wählen Sie auf dem StandbyBildschirm zuerst
, dann ,
und wählen Sie danach .
2 Wählen Sie Lesezeichen. Eine
Liste Ihrer Lesezeichen wird auf
dem Bildschirm angezeigt.
3U
m ein neues Lesezeichen
hinzuzufügen, wählen Sie
, und berühren Sie dann
„Lesezeichen hinzufügen“.
Geben Sie einen Namen
für Ihr Lesezeichen und die
entsprechende URL ein.
4 Drücken Sie auf Speichern. Ihr
Lesezeichen erscheint nun in der
Liste der Lesezeichen.
5 Um auf das Lesezeichen
zuzugreifen, berühren Sie
das Lesezeichen und dann
„Verbinden“. Sie werden nun mit
Ihrem Lesezeichen verbunden.
RSS-Reader verwenden
01
02
03
04
05
06
07
08
BROWSER
RSS (Really Simple Syndication)
ist eine Familie von
Veröffentlichungsformaten
für das Internet, die für häufig
aktualisierte Inhalte, z. B.
Blogeinträge, Nachrichten oder
Podcasts, verwendet wird. Ein RSSDokument, das Feed, Web-Feed
oder Kanal genannt wird, enthält
entweder eine Zusammenfassung
des Inhalts der entsprechenden
Webseite oder den gesamten
Text. Durch RSS ist es möglich,
automatisch Informationen über
Aktualisierungen von Websites
zu erhalten, sodass ein manuelles
Prüfen auf Aktualisierungen nicht
erforderlich ist.
Der Benutzer abonniert einen Feed
durch Eingeben der Feed-Adresse
im Reader oder durch Klicken
auf ein RSS-Symbol im Browser,
durch das das Abonnement
gestartet wird. Der Reader prüft die
abonnierten Feeds regelmäßig auf
neue Inhalte und lädt gefundene
Aktualisierungen herunter.
111
Browser
Seite speichern
1G
reifen Sie wie oben
beschrieben auf die gewünschte
Webseite zu.
2 Berühren Sie
, und wählen Sie
„Seite speichern“.
3 Zum raschen Wiederfinden
geben Sie einen Namen für die
Webseite ein.
4 Drücken Sie auf Speichern.
TIPP! In diesem Menü können
Sie Titel gespeicherter Seiten
bearbeiten, Screen Memo
schützen und den Schutz
aufheben, und gespeicherte
Seiten löschen.
BROWSER
112
LG KP502 | Benutzerhandbuch
Auf gespeicherte Seite
zugreifen
1W
ählen Sie auf dem StandbyBildschirm zuerst
, dann ,
und wählen Sie danach .
2 Wählen Sie Gespeicherte
Seiten.
3 Wählen Sie die gewünschte
Seite, um sie zu öffnen.
Browserverlauf ansehen
1W
ählen Sie auf dem StandbyBildschirm zuerst
, dann ,
und wählen Sie danach .
Verlauf wählen.
2 Eine Liste von Webseiten, die
Sie kürzlich angesehen haben,
wird angezeigt. Zum Zugreifen
auf eine dieser Seiten wählen
Sie einfach die gewünschte
Seite, und berühren Sie dann
Verbinden.
Verwenden des Telefons als
Modem
1W
ählen Sie auf dem StandbyBildschirm zuerst
, dann ,
und wählen Sie danach .
Wählen Sie Einstellungen.
2 Sie können Profile,
Anzeigeeinstellungen,
Caches, Cookies oder
Sicherheit bearbeiten oder
über „Werkseinstellung“ alle
Einstellungen zurücksetzen.
3 Sie können diese Funktion
aktivieren oder deaktivieren,
indem Sie einfach das
entsprechende Symbol
berühren.
Sie können Ihr KP502 ebenfalls
als Modem für Ihren PC
verwenden, um somit auch ohne
Kabelverbindung jederzeit über
E-Mail und Internetzugriff zu
verfügen. Sie können entweder
das USB-Kabel oder Bluetooth
verwenden.
Mit dem USB-Kabel:
1 Vergewissern Sie sich, dass
die LG PC Suite auf Ihrem PC
installiert ist.
2 Verbinden Sie das KP502 mittels
USB-Kabel mit Ihrem PC, und
starten Sie die LG PC Suite
Software.
3 Klicken Sie auf das Internet-Kit
auf Ihrem PC. Klicken Sie dann
auf die Schaltfläche „Neu“ und
wählen Sie „Modem“.
01
02
03
04
05
06
07
08
BROWSER
Browsereinstellungen
ändern
113
Browser
BROWSER
114
4W
ählen Sie LG Mobile USB
Modem und dann OK. Es
wird nun auf dem Bildschirm
angezeigt.
5 Geben Sie das Profil ein, das
mit dem Internet verbunden
werden kann, und speichern Sie
die Werte.
6 Das Profil, das Sie erstellen,
wird auf Ihrem PC-Bildschirm
angezeigt. Wählen Sie es aus,
und klicken Sie auf „Verbinden“.
Ihr PC stellt eine Verbindung mit
dem KP502 her.
Mit Bluetooth:
1 Stellen Sie sicher, dass Bluetooth
aktiviert und sowohl für den PC
als auch für Ihr KP502 sichtbar
ist.
2 Koppeln Sie PC und KP502
so, dass ein Kennwort für die
Verbindung benötigt wird.
LG KP502 | Benutzerhandbuch
3 E rstellen Sie eine aktive
Bluetooth-Verbindung mithilfe
des Verbindungsassistent der
LG PC Suite.
4 Klicken Sie auf das Internet-Kit
auf Ihrem PC. Klicken Sie dann
auf die Schaltfläche „Neu“.
5 Wählen Sie LG Mobile USB
Modem und dann OK. Es
wird nun auf dem Bildschirm
angezeigt.
6 Geben Sie das Profil ein, das
mit dem Internet verbunden
werden kann, und speichern Sie
die Werte.
7 Das Profil, das Sie erstellen,
wird auf Ihrem PC-Bildschirm
angezeigt. Wählen Sie es aus,
und klicken Sie auf „Verbinden“.
Ihr PC stellt eine Verbindung mit
dem KP502 her.
EINSTELLUNGEN
In diesem Ordner können Sie Ihre
Einstellungen anpassen, um Ihr
KP502 zu personalisieren.
Profil anpassen
Sie können Ihr Profil rasch
auf dem Standby-Bildschirm
ändern. Berühren Sie einfach
die Statusanzeige am oberen
Bildschirmrand, und berühren Sie
dann die Registerkarte „Profil“.
Mit dem Menü „Einstellungen“
können Sie jede Profileinstellung
personalisieren.
1 Drücken Sie
, und wählen Sie
dann .
2 Berühren Sie Profile, und wählen
Sie dann das zu bearbeitende
Profil.
3 S ie können daraufhin alle Töne
und Warnoptionen in dieser
Liste ändern, einschließlich
Sprachrufton und Lautstärke,
Einstellungen für das
Nachrichtenton und mehr.
Bildschirmeinstellungen
ändern
02
03
04
05
06
07
08
EINSTELLUNGEN
1 B erühren Sie zuerst
und
dann
2 Berühren Sie , und wählen Sie
dann zwischen:
Hintergrund – Wählen Sie
ein Thema für den StandbyBildschirm.
Hauptmenü – Wählen Sie den
Stil zur Anzeige des Menüs.
Wählen – Wählen Sie
Zifferngröße und Farbe.
Schriftart – Legen Sie
Schriftgröße und Schriftart fest.
01
115
EINSTELLUNGEN
EINSTELLUNGEN
116
Beleuchtung – Wählen
Sie, wie lange die
Hintergrundbeleuchtung aktiv
bleibt.
HINWEIS:
Hintergrundbeleuchtung im
Akkubetrieb verringert die
Akkulaufzeit beträchtlich, und
Sie müssen Ihr Mobiltelefon
möglicherweise häufiger
aufladen.
Helligkeit – Passen Sie die
Helligkeit des Bildschirms an.
Telefonschema – Verändern
Sie rasch das Aussehen Ihres
Bildschirms.
Grußnachricht – Aktivieren
oder deaktivieren Sie die
Grußnachricht, und geben Sie
eine Nachricht ein.
Einschalten/Ausschalten –
Wählen Sie ein Thema
für den Einschalt- und
Ausschaltbildschirm.
LG KP502 | Benutzerhandbuch
2 B erühren Sie Speichern, um Ihre
Einstellungen zu speichern.
Telefoneinstellungen ändern
Sie können die Funktionen Ihres
KP502 an Ihre eigenen Wünsche
und Vorlieben anpassen.
TIPP! Zum Durchblättern der
Listen berühren Sie das letzte
Element, und fahren Sie mit
dem Finger leicht über das
Display. Die Liste verschiebt sich
nach oben, wodurch darunter
liegende Elemente sichtbar
werden.
1 Berühren Sie zuerst
und dann
.
2 Berühren Sie
, und wählen Sie
dann aus folgender Liste:
Werkseinstellung – Setzen
Sie alle Einstellungen auf die
Werkseinstellungen zurück.
Telefon-Info – Zeigen Sie die
technischen Informationen für
Ihr KP502 an.
01
02
03
04
Verbindungseinstellungen
ändern
05
Die Verbindungseinstellungen
wurden schon von Ihrem
Netzbetreiber eingestellt, so
dass Sie Ihr Mobiltelefon sofort
in Gebrauch nehmen können.
Verwenden Sie dieses Menü zum
Ändern von Einstellungen.
Berühren Sie
und dann
.
Wählen Sie
.
07
06
08
EINSTELLUNGEN
Datum & Zeit - Einstellungen für
Datum und Uhrzeit anpassen,
oder wählen Sie Auto Update zur
automatischen Zeitanpassung
auf Reisen oder Sommerzeit.
Energiesparmodus – Wählen
Aus, Nur nachts, Immer ein, um
die Werkseinstellungen für den
Energiesparmodus zu aktivieren/
deaktivieren.
Sprachen – Ändern Sie die
Sprache der Anzeige des KP502.
Autom.Tastensperre – Das
Tastenfeld wird im StandbyModus automatisch gesperrt.
Sicherheit – Passen Sie
Sicherheitseinstellungen wie PINCodes oder Telefonsperre an.
Speicherverwaltung – Weitere
Informationen finden Sie unter
„Speicherverwaltung“.
117
EINSTELLUNGEN
Netzwerkeinstellungen
Netz wählen – Mit der Funktion
„Automatisch“ wird automatisch
nach einem Netz gesucht und
das Telefon im Netz registriert.
Diese Einstellungen werden für
bestmögliche Service-Leistungen
und Qualität empfohlen.
Wenn Sie „Manuell“ festlegen,
werden alle derzeit verfügbaren
Netze angezeigt, und Sie
können eines davon für die
Registrierung auswählen. Wenn
die Registrierung des Netzes
fehlgeschlagen ist, werden alle
derzeit verfügbaren Netze erneut
aufgelistet, und Sie können ein
anderes für die Registrierung
auswählen.
EINSTELLUNGEN
118
LG KP502 | Benutzerhandbuch
HINWEIS: Wenn das Telefon im
manuellen Modus kein Netz
findet, wird die Popup-Meldung
zur Auswahl des verfügbaren
Netze auf dem StandbyBildschirm angezeigt.
Favoritenliste – Bei
automatischer Netzsuche
können Sie Netze hinzufügen,
mit denen eine Verbindung
hergestellt werden soll. Die
folgenden Optionen stehen zur
Verfügung:
Internetprofile – Dieses Menü
zeigt Internetprofile an. Mit dem
Menü “Optionen” können Sie
neue Profile erstellen, bearbeiten
und löschen. Für ein bestimmtes
Land standardmäßig konfigurierte
Einstellungen können jedoch
weder bearbeitet noch gelöscht
werden.
Streaming – Ihr Netzbetreiber
hat diese Informationen bereits
gespeichert. Sie können diese
gerne bearbeiten, wenn Sie wollen.
Speicherverwaltung
Ihr KP502 verfügt über drei
Speicherarten: Mobiltelefon, SIMKarte und externe Speicherkarte
(die Speicherkarte müssen Sie ggf.
separat erwerben).
Mit der Speicherverwaltung
können Sie festlegen, wie viel
Speicher verwendet wird und
feststellen, wie viel Speicher
verfügbar ist.
01
02
03
04
05
06
07
08
EINSTELLUNGEN
Zugangspunkte – Ihr
Netzbetreiber hat diese
Informationen schon gespeichert.
Mit diesem Menü können Sie einen
neuen Zugriffspunkt hinzufügen.
Datenverbindung herstellen
- Wählen Sie diese Option, wenn
eine GPRS-Verbindung zwischen
dem Netz und Ihrem Gerät
hergestellt werden soll.
USB-Verbindung – Wählen
Sie „Datendienste“, und
synchronisieren Sie Ihr KP502
mit der LG PC Suite Software, um
Dateien von Ihrem Mobiltelefon zu
kopieren.
Wenn Sie Ihre Musik mit
dem Windows Media Player
synchronisieren möchten, wählen
Sie in diesem Menü die Option
„Musik-Synchr.“ aus. Diese Option
steht nur zur Synchronisation von
Musik zur Verfügung.
119
EINSTELLUNGEN
EINSTELLUNGEN
120
Berühren Sie erst
und dann
und dann Speicherverwaltung.
Telefonspeicher – Hier können
Sie den verfügbaren Speicher für
Bilder, Töne, Videos, Flash, MMS,
E-Mails, Java-Anwendungen und
anderes auf Ihrem KP502 anzeigen.
Datenbankspeicher – Hier
sehen Sie, wie viel Speicher auf
Ihrem Telefon für SMS, Kontakte,
Kalender, Aufgabenliste, Notiz,
Weckrufe, Anrufliste, Lesezeichen
und Diverses verfügbar ist.
SIM-Speicher – Zeigt den auf der
SIM-Karte verfügbaren Speicher an.
Speicherkarte – Zeigt den auf
der Speicherkarte verfügbaren
Speicher an (die Speicherkarte
können Sie separat erwerben).
Standardspeicher - Wählen
Sie den von Ihnen bevorzugten
Speicherort für Ihre Elemente aus.
LG KP502 | Benutzerhandbuch
Senden und Empfangen von
Dateien über Bluetooth
Bluetooth ist ideal zum Senden
und Empfangen von Dateien,
da kein Kabel notwendig ist
und die Verbindung schnell und
einfach ist. Die Verbindung mit
Bluetooth-Kopfhörern ermöglicht
Ihnen, Anrufe zu tätigen und zu
empfangen.
Eine Datei senden:
1 Öffnen Sie die Datei, die Sie
senden möchten (meistens
ein Foto, ein Video oder eine
Musikdatei).
2 Wählen Sie Senden.
Wählen Sie Bluetooth.
3W
enn Sie bereits ein BluetoothGerät mit Ihrem Telefon
gekoppelt haben, sucht das
KP502 nicht automatisch nach
anderen Bluetooth-Geräten.
Wenn nicht, sucht Ihr KP502
automatisch nach anderen
Bluetooth-fähigen Geräten in
Reichweite.
4 Wählen Sie das Gerät, an das Sie
Ihre Datei senden möchten, und
berühren Sie Auswählen.
5 Ihre Datei wird gesendet.
TIPP! Behalten Sie die
Statusleiste im Auge, um
sicherzugehen, dass Ihre Datei
gesendet wird.
01
02
03
04
05
06
07
08
EINSTELLUNGEN
Eine Datei empfangen:
1 Um Dateien zu empfangen,
muss Ihr Bluetooth auf Ein
geschaltet und Sichtbar sein.
Weitere Informationen finden
Sie im Abschnitt „BluetoothEinstellungen ändern“ auf der
rechten Seite.
2 Mit einer Nachricht werden
Sie aufgefordert, den Empfang
der Datei zu akzeptieren.
Berühren Sie Ja, um die Datei zu
empfangen.
3 Es wird angezeigt, wo Ihre
Datei gespeichert wurde, und
Sie können wählen zwischen
Anzeigen oder Als Hintergrund
verwenden. In der Regel werden
die Dateien im entsprechenden
Ordner im Medienalbum
gespeichert.
121
EINSTELLUNGEN
EINSTELLUNGEN
122
Bluetooth-Einstellungen ändern.
1 Berühren Sie
, und wählen
Sie .
2 Wählen Sie , berühren Sie
, und wählen Sie dann
Einstellungen.
Ändern Sie:
Mein Telefonstatus – Wählen
Sie zwischen „Sichtbar“,
„Sichtbar für 1 Min.“ oder
„Unsichtbar“.
Mein Gerätename – Geben Sie
einen Namen für Ihr KP502 ein.
Unterst. Dienste – Wählen Sie,
wie Sie Bluetooth in Verbindung
mit verschiedenen Services
benutzen.
Remote-SIM-Modus – Ein- und
Ausschalten.
Eigene Adresse – Anzeigen der
Bluetooth-Adresse.
LG KP502 | Benutzerhandbuch
Koppeln mit anderen
Bluetooth-Geräten.
Durch Koppeln des KP502 mit
einem anderen Gerät können
Sie eine passwortgeschützte
Verbindung herstellen. Das
bedeutet, dass Ihre Koppelung
sicherer ist.
1 Prüfen Sie, ob Ihr Bluetooth ON
und Sichtbar ist. Sie können
die Sichtbarkeit im Menü
Einstellungen verändern.
2 Berühren Sie Suchen.
3 Ihr KP502 sucht nach Geräten.
Wenn die Suche beendet ist,
wird Suchen auf dem Bildschirm
angezeigt.
4 Wählen Sie das Gerät, mit dem
Sie koppeln möchten, geben Sie
das Passwort ein, und berühren
Sie OK.
5 Ihr Mobiltelefon wird jetzt mit
dem anderen Gerät verbunden,
dort geben Sie dasselbe
Passwort ein.
6 Ihre passwortgeschützte
Bluetooth-Verbindung ist jetzt
hergestellt.
Verwenden von BluetoothKopfhörern
02
03
04
05
06
07
08
EINSTELLUNGEN
1 P rüfen Sie ob, Ihr Bluetooth ON
und Sichtbar ist.
2 Befolgen Sie die Anweisungen
zu Ihrem Headset, versetzen
Sie Ihr Headset in den
Koppelungsmodus, und koppeln
Sie die Geräte.
3 Berühren Sie Immer erlauben,
Immer fragen und dann Ja,
um sofort eine Verbindung
herzustellen. Ihr KP502 wechselt
automatisch ins Headset-Profil.
01
123
Zubehör
Das KP502 wird mit folgendem optionalem Zubehör geliefert.
Ladegerät
Akku
StereoKopfhörer
Zubehör
124
Datenkabel und
CD
Verbinden und
synchronisieren
Sie Ihr KP502 mit
dem PC.
Benutzerhandbuch
Erfahren Sie mehr
über Ihr KP502.
KP502 Benutzerhandbuch
HINWEIS:
• Verwenden Sie ausschließlich
Displayfolie
Originalzubehör von LG.
• Die Missachtung dieses Hinweises
kann zum Erlöschen Ihrer Garantie
führen.
• Da das Zubehör je nach Land
WARNUNG: Wenn die
oder Region unterschiedlich sein
Displayfolie auf dem Touchscreen
kann, wenden Sie sich bei Fragen
befestigt wird, kann die
an einen unserer regionalen
Berührungsempfindlichkeit
Dienstanbieter oder Fachhändler.
beeinträchtigt werden.
LG KP502 | Benutzerhandbuch
Netzdienste
Technische Daten
Das in diesem Benutzerhandbuch
beschriebene Mobiltelefon ist für
die Verwendung mit dem
GSM 900-, DCS 1800, GSM 850 und
PCS 1900-Netz zugelassen.
Zahlreiche Funktionen in diesem
Handbuch werden als Netzdienste
bezeichnet. Dies sind spezielle
Dienste, die Sie über Ihren Anbieter
für Funkdienste aktivieren. Sie
können diese Netzdienste erst
nutzen, wenn Sie sie über Ihren
Dienstanbieter abonniert und
Anweisungen zur Verwendung
erhalten haben.
Allgemein
Produktname: KP502
System : GSM 900 / DCS 1800 /
GSM 850 / PCS 1900
Umgebungstemperatur
Max. + 55 °C (entladen)
+ 45 °C (laden)
Min: -10 °C
01
02
03
04
05
06
07
08
Netzdienste
125
EN 301 489-01 v1.6.1 / EN 301 489-07 v1.3.1 / EN 301 489-17 v1.2.1
EN 60950-1 : 2001
EN 50360 / EN62209-1:2006
EN 301 511 V9.0.2
EN 300 328 V1.7.1
18, March, 2009
Richtlinien für eine sichere und effiziente Handhabung
Lesen Sie diese einfachen Richtlinien
sorgfältig durch. Die Nichtbeachtung
dieser Richtlinien kann gefährlich
oder gesetzeswidrig sein. Weitere
ausführliche Informationen dazu
finden Sie in diesem Handbuch.
Sicherheitshinweis über die
Einwirkung elektromagnetischer
Energie im Radiofrequenzbereich
Informationen zur Einwirkung
elektromagnetischer Felder und zur
Spezifischen Absorptionsrate (SAR).
•Auch wenn Unterschiede zwischen
den SAR-Werten verschiedener
LGTelefonmodelle bestehen,
entsprechen Sie in jedem Fall den
geltenden Richtlinien hinsichtlich
der Einwirkung elektromagnetischer
Felder.
•Der von der Internationalen
Kommission für den Schutz vor
nichtionisierenden Strahlen
(International Commission on Nonlonizing Radiation Protection, ICNIRP)
empfohlene SAR-Grenzwert liegt
bei 2 W/Kg gemittelt über zehn (10)
Gramm Gewebe.
127
RICHTLINIEN
Das Mobiltelefon KP502
entspricht den geltenden
Sicherheitsbestimmungen hinsichtlich
der Einwirkung elektromagnetischer
Felder. Diese Bestimmungen basieren
auf wissenschaftlichen Richtlinien, die
auch Sicherheitsabstände definieren,
um eine gesundheitliche Gefährdung
von Personen (unabhängig
von Alter und allgemeinem
Gesundheitszustand) auszuschließen.
•In den Richtlinien hinsichtlich der
Einwirkung elektromagnetischer
Felder wird eine Maßeinheit
verwendet, die als Spezifische
Absorptionsrate bzw. SAR bezeichnet
wird. Der SAR-Wert wird mit
standardisierten Testmethoden
ermittelt, bei denen das Telefon in
allen getesteten Frequenzbändern
mit der höchsten zulässigen
Sendeleistung betrieben wird.
Richtlinien für eine sichere und effiziente Handhabung
•Der höchste für dieses Telefonmodell
mit DASY4 ermittelte SAR-Wert bei
Verwendung am Ohr liegt bei 0.827
W/Kg (10 g) und bei 1.40 W/Kg (10g),
wenn das Gerät am Körper getragen
wird.
•Einige Länder/Regionen haben
den vom Institute of Electrical
and Electronics Engineers (IEEE)
empfohlenen SAR-Grenzwert
übernommen. Dieser liegt bei 1.6
W/Kg gemittelt über ein (1) Gramm
Gewebe.
Pflege und Wartung des
Mobiltelefons
RICHTLINIEN
128
WARNUNG
Verwenden Sie ausschließlich Akkus,
Ladegeräte und Zubehörteile, die
für die Verwendung mit diesem
Mobiltelefon zugelassen sind. Die
Verwendung anderer Teile kann zum
Erlöschen der Zulassungen oder
Garantien für dieses Mobiltelefon
führen und kann gefährlich sein.
LG KP502 | Benutzerhandbuch
•Öffnen Sie dieses Mobiltelefon
nicht. Sollten Reparaturen
erforderlich sein, wenden Sie
sich an einen qualifizierten
Kundendienstmitarbeiter.
•Bewahren Sie dieses Mobiltelefon
nicht in der Nähe elektrischer Geräte
auf (z.B. Fernsehgeräte, Radios, PCs).
•Halten Sie das Mobiltelefon von
Wärmequellen wie Heizungen oder
Herdplatten fern.
•Lassen Sie das Mobiltelefon nicht
fallen.
•Setzen Sie das Mobiltelefon keinen
starken Erschütterungen oder Stößen
aus.
•Schalten Sie das Telefon aus,
wenn dies aufgrund von jeweils
geltenden Bestimmungen
erforderlich ist. Verwenden Sie
Ihr Telefon beispielsweise nicht in
Krankenhäusern, da andernfalls
die Funktionalität empfindlicher
medizinischer Geräte beeinträchtigt
werden kann.
•Die Beschichtung des Mobiltelefons
kann durch Folien, Klebestreifen u. Ä.
beschädigt werden.
•Setzen Sie das Mobiltelefon keiner
Feuchtigkeit, Luftfeuchtigkeit oder
Nässe aus.
•Reinigen Sie die Außenseite des
Geräts nur mit einem trockenen
Tuch. Verwenden Sie keine
lösungsmittelhaltigen Reiniger oder
Lösungsmittel wie Benzin, Verdünner
oder Alkohol.
•Verwenden Sie Zubehörteile (wie z.
B. einen Kopfhörer) immer mit der
erforderlichen Sorgfalt. Berühren Sie
die Antenne nicht unnötig.
•Bewahren Sie das Mobiltelefon nicht
in stark verrauchten oder staubigen
Umgebungen auf.
•Bewahren Sie das Mobiltelefon nicht
in der Nähe von Gegenständen
mit Magnetstreifen (Kreditkarten,
Flugscheine usw.) auf, da andernfalls
die auf dem Magnetstreifen
gespeicherten Informationen
beschädigt werden könnten.
Effiziente Verwendung des
Mobiltelefons
Elektronische Geräte
Bei Mobiltelefonen kann es zu
Interferenzen kommen, die die
Leistung beeinträchtigen können.
•Verwenden Sie das Mobiltelefon
nicht unerlaubt in der Nähe
medizinischer Geräte. Wenn Sie einen
RICHTLINIEN
•Berühren Sie das Display nicht mit
spitzen oder scharfen Gegenständen;
andernfalls kann das Mobiltelefon
beschädigt werden.
•Verwenden Sie Gerät und
Zubehör nicht an Orten mit hoher
Luftfeuchtigkeit wie z.B. SwimmingPools, Gewächshäusern, Solarien
oder tropischer Umgebung,
andernfalls kann dies zu
Beschädigung des Telefons und zum
Erlöschen der Garantie führen.
129
Richtlinien für eine sichere und effiziente Handhabung
Herzschrittmacher tragen, bewahren
Sie das Telefon nicht in der Nähe
des Herzschrittmachers (z.B. in der
Brusttasche) auf.
•Einige Hörhilfen können durch
Mobiltelefone beeinträchtigt werden.
•Bei Fernsehgeräten, Radios, PCs
usw. können ebenfalls leichte
Interferenzen auftreten.
Sicherheit im Straßenverkehr
Erkundigen Sie sich über die
jeweils geltenden Gesetze und
Bestimmungen über die Verwendung
von Mobiltelefonen in Fahrzeugen.
•Benutzen Sie während der Fahrt kein
Handtelefon.
•Richten Sie Ihre ganze
Aufmerksamkeit auf den
Straßenverkehr.
RICHTLINIEN
130
•Verwenden Sie, sofern verfügbar,
eine Freisprecheinrichtung.
•Parken Sie ggf. zuerst das Fahrzeug,
bevor Sie Anrufe tätigen oder
entgegennehmen.
LG KP502 | Benutzerhandbuch
•Elektromagnetische Strahlen
können u.U. elektronische Systeme
in Ihrem Fahrzeug stören, wie
beispielsweise das Autoradio oder
Sicherheitssysteme.
Wenn Sie Musik hören, während Sie
unterwegs sind, stellen Sie sicher, dass
die Lautstärke auf ein angemessenes
Maß eingestellt ist, sodass Sie Ihre
Umgebung wahrnehmen. Dies ist vor
allem dann wichtig, wenn Sie eine
Straße überqueren.
Vermeiden von Hörschäden
Wenn Sie längere Zeit einem hohen
Geräuschpegel ausgesetzt sind,
können Hörschäden auftreten. Wir
empfehlen deshalb, dass Sie das
Telefon beim Ein- und Ausschalten
nicht ans Ohr halten. Es empfiehlt sich
außerdem, die Lautstärke von Musik
und Anrufen auf ein angemessenes
Maß einzustellen.
Sprenggebiete
Kinder
Benutzen Sie das Telefon nicht in
Sprenggebieten. Beachten Sie die
Einschränkungen, und befolgen
Sie alle geltenden Vorschriften und
Regeln
Bewahren Sie das Mobiltelefon an
einem sicheren Ort außerhalb der
Reichweite von Kleinkindern auf. Es
enthält Kleinteile, die verschluckt oder
eingeatmet werden könnten.
Explosionsgefährdete Orte
•Transportieren und lagern Sie keine
brennbaren Flüssigkeiten, Gase
oder Explosivstoffe im gleichen
Raum eines Fahrzeugs, in dem
sich auch das Mobiltelefon oder
Mobiltelefonzubehör befindet.
In Flugzeugen
In einem Flugzeug können
Mobiltelefone zu Interferenzen führen.
•Schalten Sie daher Ihr Mobiltelefon
aus, bevor Sie in ein Flugzeug
steigen.
Notrufe sind möglicherweise nicht
in allen Mobilfunknetzen möglich.
Verlassen Sie sich daher bei Notrufen
nie ausschließlich auf ein Mobiltelefon.
Weitere Informationen dazu erhalten
Sie von Ihrem Dienstanbieter.
Hinweise zum Akku und zur
Pflege des Akkus
•Es ist nicht erforderlich, den Akku vor
dem Laden vollständig zu entladen.
Anders als bei herkömmlichen
Akkus tritt bei diesem Akku kein
Memory-Effekt auf, der die Leistung
vermindert.
RICHTLINIEN
•Verwenden Sie es auch nicht
während des Aufenthalts auf dem
Flughafengelände, sofern dies nicht
ausdrücklich vom Personal erlaubt
wurde.
Notrufe
131
Richtlinien für eine sichere und effiziente Handhabung
RICHTLINIEN
132
•Verwenden Sie ausschließlich Akkus
und Ladegeräte von LG. Ladegeräte
von LG sind so ausgelegt, dass die
Lebensdauer des Akkus optimiert
wird.
•Öffnen Sie den Akku nicht und
schließen Sie ihn nicht kurz.
•Achten Sie darauf, dass die Kontakte
des Akkus sauber sind.
•Tauschen Sie den Akku aus, wenn
die Leistung nicht mehr zufrieden
stellend ist. Ein Akku kann mehrere
Hundert Mal aufgeladen werden,
bevor er ausgetauscht werden muss.
•Wenn Sie den Akku längere Zeit
nicht verwendet haben, laden Sie ihn
erneut auf, um maximale Leistung
zu erzielen.
•Setzen Sie das Ladegerät keiner
direkten Sonneneinstrahlung oder
hoher Luftfeuchtigkeit (wie z. B. in
einem Badezimmer) aus.
•Bewahren Sie den Akku nicht in sehr
heißen oder sehr kalten Räumen auf,
da dies die Leistung beeinträchtigen
kann.
LG KP502 | Benutzerhandbuch
•Entsorgen Sie unbrauchbar
gewordene Akkus gemäß den
Anweisungen des Herstellers. Nutzen
Sie Recycling, wenn dies möglich ist.
Geben Sie Akkus nicht einfach in den
Hausmüll.
•Entsorgen Sie unbrauchbar
gewordene Akkus gemäß den
Anweisungen des Herstellers.
•Wenn Sie den Akku ersetzen
müssen, wenden Sie sich an einen
LG Electronics Service Point oder
Händler in Ihrer Nähe.
•Entfernen Sie das Ladegerät immer
aus der Steckdose, wenn das Telefon
voll aufgeladen ist. So vermeiden Sie,
dass das Ladegerät unnötig Strom
verbraucht.
•Die tatsächliche Lebensdauer
des Akkus ist abhängig von der
Netzwerkkonfiguration, den
Produkteinstellungen, dem Gebrauch
und den Umgebungsbedingungen.
Fehlerbehebung
In diesem Kapitel werden Probleme aufgelistet, die bei der Verwendung des
Mobiltelefons auftreten können. Bei einigen Problemen müssen Sie sich an Ihren
Dienstanbieter wenden, die meisten aufgetretenen Probleme können Sie jedoch
selbst einfach beheben.
Mögliche Ursachen
Mögliche Abhilfemaßnahmen
SIM-Fehler
Im Mobiltelefon befindet
sich keine SIM-Karte, oder sie
wurde möglicherweise falsch
eingesetzt.
Achten Sie darauf, dass die SIM-Karte
korrekt eingesetzt ist.
Keine
Verbindung
zum Netz
Signal schwach Außerhalb
der Reichweite des GSMNetzes
Gehen Sie zu einem Fenster oder
offenen Platz. Überprüfen Sie die
Netzwerkabdeckungskarte des
Dienstanbieters.
Codes nicht
ident.
Wenn Sie einen
Sicherheitscode ändern
möchten, müssen Sie den
neuen Code durch erneute
Eingabe bestätigen. Die
zwei eingegebenen Codes
stimmen nicht überein.
Wenden Sie sich an Ihren
Dienstanbieter.
Funktion kann
nicht eingestellt
werden
Diese Funktion wird
nicht vom Dienstanbieter
unterstützt oder muss
registriert werden.
Wenden Sie sich an Ihren
Dienstanbieter.
Anrufe nicht
möglich
Fehler beim Wählvorgang
Neue SIM-Karte eingesetzt
Maximale Anrufkosten
erreicht
Das neue Netz ist nicht autorisiert.
Überprüfen Sie, ob neue
Beschränkungen vorliegen. Wenden
Sie sich an Ihren Dienstanbieter, oder
setzen Sie Höchstwerte mit PIN2
zurück.
LG KP502 | Benutzerhandbuch
Fehlerbehebung
Mitteilung
133
Fehlerbehebung
Mitteilung
Mögliche Ursachen
Mögliche Abhilfemaßnahmen
Mobiltelefon
kann nicht
eingeschaltet
werden
Ein-/Aus-Taste wurde zu kurz
gedrückt
Akku leer
Akkukontakte verschmutzt
Drücken Sie die Ein-/Aus-Taste
mindestens zwei Sekunden lang.
Laden Sie den Akku auf. Überprüfen Sie
die Ladeanzeige auf dem Display.
Reinigen Sie die Kontakte.
Akku vollständig leer
Temperatur liegt außerhalb
des zulässigen Bereichs
Kontaktprobleme
Ladefehler
Keine Netzspannung
Ladegerät defekt
Falsches Ladegerät
Fehlerbehebung
134
Akku defekt
Laden Sie den Akku auf.
Achten Sie darauf, dass die
Umgebungstemperatur richtig ist,
warten Sie eine Weile, und laden Sie
den Akku dann erneut auf.
Überprüfen Sie die Stromversorgung
und die Anschlüsse des Mobiltelefons.
Überprüfen Sie die Akkukontakte, und
reinigen Sie sie gegebenenfalls.
Verwenden Sie eine andere
Steckdose, oder überprüfen Sie die
Stromspannung.
Wenn sich das Ladegerät nicht
erwärmt, tauschen Sie es aus.
Verwenden Sie nur Original-Zubehör
von LG.
Tauschen Sie den Akku aus.
Mobiltelefon
verliert
Netzsignal
Signal zu schwach
Die Verbindung zu einem anderen
Dienstanbieter wird automatisch
hergestellt.
Nummer nicht
zulässig
Die Funktion „Feste
Rufnummer“ wurde aktiviert.
Überprüfen Sie die Einstellungen.
LG KP502 | Benutzerhandbuch
Some of the contents in this
manual may differ from your phone
depending on the software of the
phone or your service provider.
KP502 User Guide
Congratulations on your purchase of the
advanced and compact KP502 phone by LG,
designed to operate with the latest digital mobile
communication technology.
Disposal of your old appliance
1 When this crossed-out wheeled bin symbol is attached to
a product it means the product is covered by the European
Directive 2002/96/EC.
2 All electrical and electronic products should be disposed of
separately from the municipal waste stream via designated
collection facilities appointed by the government or the local
authorities.
3 The correct disposal of your old appliance will help prevent
potential negative consequences for the environment and
human health.
4 For more detailed information about disposal of your old
appliance, please contact your city office, waste disposal service
or the shop where you purchased the product.
Set up
01
Your standby screen
02
The basics
03
Get creative
04
Get organised
05
The web
06
Settings
07
Accessories
08
Contents
Set up
Getting to know your phone��������������� 8
Open view�������������������������������������������������10
Installing the USIM and battery��������11
Memory card��������������������������������������������14
Menu map�������������������������������������������������16
Your standby screen
Touch screen tips�������������������������������������17
The basics
Calls�������������������������������������������������������������20
Making a call���������������������������������������������20
Making a call from your contacts������20
Answering and rejecting a call�����������20
In-call options�������������������������������������������22
Adjusting the call volume��������������������23
Speed dialling�������������������������������������������23
Making a second call������������������������������23
Turning off DTMF�������������������������������������24
Viewing your call logs����������������������������24
Using call divert���������������������������������������25
Using call barring������������������������������������25
Changing the common call setting��26
Contacts�����������������������������������������������������28
Searching for a contact�������������������������28
Adding a new contact���������������������������28
Contact options���������������������������������������29
Creating a group��������������������������������������30
LG KP502 | User Guide
Changing your contact settings��������31
Viewing information������������������������������32
Messaging�������������������������������������������������33
Messaging��������������������������������������������������33
Sending a message���������������������������������33
Entering text���������������������������������������������34
T9 predictive���������������������������������������������34
Abc manual�����������������������������������������������35
Keyboard����������������������������������������������������35
Handwriting recognition����������������������36
Setting up your email����������������������������38
Retrieving your email�����������������������������41
Sending an email using your new
account�������������������������������������������������������41
Changing your email settings�������������42
Message folders���������������������������������������43
Managing your messages��������������������44
Using templates���������������������������������������45
Using emoticons��������������������������������������45
Changing your text message
settings��������������������������������������������������������46
Changing your multimedia message
settings��������������������������������������������������������47
Changing your other settings�������������48
Get creative
Camera�������������������������������������������������������49
Taking a quick photo �����������������������������49
After you’ve taken your photo������������49
Getting to know the viewfinder���������50
Choosing a shot type�����������������������������51
Adjusting the exposure�������������������������51
Using continuous shot mode�������������52
Using the advanced settings���������������52
Changing the image size����������������������54
Choosing a colour effect�����������������������54
Viewing your saved photos�����������������55
Video camera�������������������������������������������56
Shooting a quick video�������������������������56
After you’ve shot your video���������������57
Getting to know the viewfinder���������58
Adjusting the Exposure�������������������������59
Using the advanced settings���������������59
Changing the video image size����������61
Choosing a colour tone�������������������������61
Watching your saved videos���������������62
Your photos and videos�����������������������63
Viewing your photos and videos�������63
Using zoom when viewing a photo��63
Adjusting the volume when
viewing a video����������������������������������������63
Capturing an image from a video�����64
Viewing your photos as a slide
show�������������������������������������������������������������64
Setting a photo as wallpaper��������������65
Editing your photos��������������������������������66
Adding text to a photo��������������������������67
Adding an effect to a photo����������������68
Morphing a photo�����������������������������������69
Adding a colour accent to a photo���70
Swapping the colours in a photo������70
Trimming the length of your video���71
Merging two videos together�������������71
Merging a photo with a video������������72
Adding text to a video���������������������������73
Overlaying a photo���������������������������������74
Adding a voice recording���������������������74
Adding a soundtrack to your video��75
Changing the speed of your video���76
Multimedia�����������������������������������������������77
Pictures�������������������������������������������������������77
My images option menus���������������������77
Sending a photo��������������������������������������78
Using an image����������������������������������������79
Printing an image������������������������������������79
Moving or copying an image��������������80
Creating a slide show�����������������������������80
Sounds��������������������������������������������������������80
Using a sound�������������������������������������������81
Videos����������������������������������������������������������81
Using options while video is
paused���������������������������������������������������������81
Editing a video clip���������������������������������82
Sending a video clip�������������������������������82
Contents
Using the video options menu�����������83
Games and Applications ����������������������83
Installing a game/application via
local install�������������������������������������������������84
Playing a game�����������������������������������������84
Using the games options menu���������84
Documents������������������������������������������������85
Transferring a file to your phone�������85
Viewing a file���������������������������������������������85
Others����������������������������������������������������������86
Creating a movie�������������������������������������86
Music������������������������������������������������������������87
Transferring music onto your
phone����������������������������������������������������������88
Playing a song������������������������������������������88
Using options while playing music���89
Creating a playlist������������������������������������89
Editing a playlist���������������������������������������90
Deleting a playlist������������������������������������90
Using the radio�����������������������������������������90
Searching for stations����������������������������91
Resetting channels���������������������������������91
Listening to the radio�����������������������������91
LG KP502 | User Guide
Get organised
Organiser���������������������������������������������������92
Adding an event to your calendar����92
Changing your default calendar
view��������������������������������������������������������������93
Adding an item to your to do list�������93
Sharing a to do item�������������������������������94
Adding a memo���������������������������������������94
Using date finder�������������������������������������95
Setting your alarm����������������������������������95
Adding a memo with drawing
panel������������������������������������������������������������96
Voice recorder�������������������������������������������96
Recording a sound or voice�����������������97
Sending the voice recording���������������97
Using your calculator�����������������������������98
Converting a unit������������������������������������98
Using the stopwatch������������������������������99
Adding a city to your world time�������99
PC Sync���������������������������������������������������� 100
Installing LG PC Suite on your
computer������������������������������������������������� 100
Connecting your phone and PC����� 100
Backing up and restoring your
phone’s information���������������������������� 101
Viewing your phone files on
your PC����������������������������������������������������� 101
Synchronising your contacts������������ 102
Synchronising your messages��������� 102
Using your phone as a mass
storage device��������������������������������������� 103
Using your phone as Music
Sync device��������������������������������������������� 103
The web
Browser���������������������������������������������������� 104
Accessing the web������������������������������� 104
Adding and accessing your
bookmarks���������������������������������������������� 104
Using RSS reader����������������������������������� 105
Saving a page���������������������������������������� 105
Accessing a saved page��������������������� 106
Viewing your browser history���������� 106
Changing the web browser
settings����������������������������������������������������� 106
Using your phone as a modem������� 107
Pairing with another Bluetooth
device������������������������������������������������������� 115
Using a Bluetooth headset��������������� 116
Accessories���������������������������������117
Network service������������������������118
Technical data����������������������������118
Guidelines
Guidelines for safe and efficient
use������������������������������������������������������������� 120
Trouble Shooting��������������������������������� 126
Settings
Personalising your profiles���������������� 109
Changing your screen settings�������� 109
Changing your phone settings������� 110
Changing your connectivity
settings����������������������������������������������������� 111
Using memory manager�������������������� 113
Sending and receiving your
files using Bluetooth��������������������������� 114
Getting to know your phone
End/Power key
Ends or rejects a call.
Turns the phone on/off.
Press once to return to
the standby screen.
Multitasking key
Call key
Dials a phone number and
answers incoming calls.
Set up
WARNING: Placing a heavy object on the phone or
sitting on it while it is in your pocket can damage the
phone’s LCD and touch screen functionality.
LG KP502 | User Guide
01
Charger, Cable, Handsfree
connector
TIP: To connect the
USB cable, wait until the
phone has powered up
and has registered to
the network.
Side keys
• When the screen is idle:
volume of key tone.
• During a call: volume of
the earpiece.
• When playing a BGM track
- Short press: controls the
volume.
02
03
Micro SD memory card
socket
04
Lock/Unlock key
06
Capture button
07
Stylus
05
08
Set up
Open view
Battery cover
Battery
Camera lens
Set up
10
LG KP502 | User Guide
USIM Card Socket
Installing the USIM and battery
1 Remove the battery cover
Slide the battery cover towards
the bottom of the phone and
away from it.
01
02
03
04
2 Remove the battery
Using the cut-out at the
bottom lift it from the battery
compartment.
WARNING: Do not use your
fingernail when removing the
battery.
05
WARNING: Do not remove
the battery when the phone
is switched on, as this may
damage the phone.
08
06
07
Set up
11
Installing the USIM and battery
3 I nstall the USIM card
Slide the USIM card into the USIM
card holder making sure that the
gold contact area on the card is
facing downwards. To remove the
USIM card, pull it gently in the
opposite direction.
Set up
12
LG KP502 | User Guide
4 Install the battery
Insert the top of the battery first
into the top edge of the battery
compartment. Ensure that the
battery contacts align with the
terminals on the phone. Press
down the bottom of the battery
until it clicks into place.
5 Charging your phone
Lift and twist the charger socket
cover of the on the side of your
KP502. Insert the charger and
plug it into a mains electricity
socket. Your KP502 needs to
be charged until “Battery full”
appears on screen.
01
02
03
04
05
06
07
08
Set up
13
Memory card
Installing a memory card
You can expand the memory space
on your phone by using a MicroSD
memory card. The KP502 will
support up to a 8GB memory card.
NOTE: A memory card is an optional
accessory.
1O
pen the memory card slot cover
on the right hand edge of the
phone.
2 Slide the memory card into the
slot until it clicks into place.
Formatting the memory card
Your memory card may already
be formatted. If your card isn’t
formatted, you will need to format it
before you can begin using it.
1 From the standby screen select
, then touch
and choose
Phone settings.
2 Touch Memory manager then
chose External memory.
3 Touch Format and then confirm
your choice.
4 Enter the password, if one is
set, and your card will then be
formatted and ready to use.
TIP! To change your
default storage destination,
open Memory manager from
the Phone settings menu and
select Primary storage settings.
3 Replace the cover.
Set up
14
LG KP502 | User Guide
NOTE: If your memory card already
has content, it will automatically
be filed in the correct folder; for
example, videos will be stored in the
My Videos folder.
Transferring your contacts
To transfer your contacts from your
USIM to your phone:
1 From the Communicate tab,
select
and choose Settings.
2 Touch Copy.
3 Choose Handset to SIM.
4 Choose all or choose names one
by one and touch Copy.
01
02
03
04
05
06
07
08
Set up
15
Menu map
Touch
in the standby screen to open a Top menu. From here you
can access further menus: Communicate, Entertainment, Utilities and
Settings.
Set up
16
Communicate
Entertainment
Dialling
Speed dials
Contacts
Call history
New message
New Email
Messaging
Gallery
My stuff
Camera
Video camera
Muvee studio
Music
FM radio
Games & Apps
Utilities
Settings
Browser
Organiser
Alarms
Voice recorder
Drawing Panel
Tools
STK
Profiles
Screen settings
Phone settings
Call settings
Touch settings
Bluetooth
Connectivity
LG KP502 | User Guide
Your standby screen
Whenever your KP502 is not in use
it will return to your home screen.
From here you can access all the
menu options, make a quick call and
view the status of your phone as
well as many other things.
Touch screen tips
01
02
03
04
05
06
07
08
Your standby screen
The home screen is also a great
place to get accustomed to the
touch screen.
To select an item, touch the icon
accurately. Your KP502 will vibrate
slightly when it recognises you’ve
touched an option.
To scroll through lists, touch the last
item visible and slide your finger up
the screen. The list will move up so
more items are visible.
• There’s no need to press too
hard, the touchscreen is sensitive
enough to pick up on a light, yet
firm, touch.
• Use the tip of your finger to touch
the option you want. Be careful
not to touch any other options
around it.
• When the screen back light is off,
press the Unlock/Lock key on the
right hand side to bring back the
home screen.
• Don’t cover the phone with a case
or cover. The touchscreen won’t
work with any material covering it.
• There are two types of idle screen.
Flick left or right to change your
idle screen types on the standby
screen.
1 Widget idle - When you touch ,
the mobile widget panel appears.
2 Speed dial idle - When you touch
, the speed dial list appears. You
can drag and click what you need
right away in both idle types.
17
Your standby screen
The quick keys
The quick keys provide easy, one-touch access to your most used functions.
Your standby screen
18
Touch to bring up the touch
dialling pad to make a call.
Input the number as you would
using a normal key pad and
touch Calls or press the
hard key.
Touch to open your address
book. To search for the
number you want to call, enter
the name of the contact at the
top of the screen using the
touchpad. You can also create
new contacts and edit existing
ones. See page 28 for details.
Touch to access the Messaging
options menu. From here you
can create a new SMS or MMS,
or view your message folder.
See page 33 for details.
Touch to open the full Top
menu which is divided into
four vertical sub-menus. Touch
each sub-menu’s tab to view
further options.
LG KP502 | User Guide
The status bar
The status bar uses various icons to
indicate things like signal strength,
new messages and battery life, as
well as telling you whether your
Bluetooth or GPRS is active.
Below is a table which explains the
meaning of the icons you’re most
likely to see in the status bar.
Icon Description
Icon Description
02
An alarm is set
03
Customised Profile in use
04
Normal profile in use
05
Outdoor profile in use
06
Silent profile in use
07
Headset profile in use
Multitasking
Calls are diverted
Network signal strength
(number of bars will vary)
EDGE in use
No network signal
Battery empty
New text message
New voice message
Message inbox is full
08
Roaming
Flight mode is on
Bluetooth is active
BGM play
BGM pause
Your standby screen
Remaining battery life
01
Message sending failed
19
Your standby screen
Changing your Status from
the status bar
Using the Multitasking
function
Touch the status bar to open the
Status Summary. It shows the
current Time, Network, SVC ID,
Battery, Handset memory, External
Memory, Profile, MP3 and Bluetooth
status. Here you can set Profile
type, play/pause MP3 and activate/
deactivate Bluetooth.
Press the multitasking hard key
to open the Multitasking menu.
From here you can view all the
applications you have running and
access them with one touch.
When you have an application
running in the background (e.g.
a game or the FM radio),
will
appear in the status bar.
Your standby screen
20
LG KP502 | User Guide
Calls
Making a call
1 T ouch
to open the keypad.
2 Key in the number using the
keypad. To delete a digit touch
the clear key.
3 Press the
hard key to initiate
the call.
4 To end the call press the
hard key.
TIP! To enter + for making
an international call, press and
hold
.
TIP! Press the lock/unlock
hard key
to lock the
touchscreen to prevent calls
being made by mistake.
TIP! To bring up the keypad
during a call, press the .
01
02
Making a call from your
contacts
03
1 From the standby screen touch
to open the address book.
2 Enter the first few letters of the
contact you would like to call.
3 From the filtered list, touch the
contact you’d like to call and
select the number to use if you
have more than one saved.
4 Touch
.
05
04
06
07
08
Answering and rejecting a
call
When your phone rings press the
hard key or touch
to
answer the call.
Tap
to mute the ringing. This is
great if you’ve forgotten to change
your profile to Silent for a meeting.
Press the
hard
or touch to
reject an incoming call.
The basics
TIP! Touch to unlock. You can
unlock by touching the button
for a while until the screen is
able to work or press the Unlock
hard key
.
TIP! You can send a message
and search contacts by tapping
.
21
Calls
In-call options
The basics
22
TIP! To scroll through a
list of options or your list
of contacts, touch the last
item visible and slide your
finger up the screen. The list
will move up so more items
become visible.
LG KP502 | User Guide
Speaker - Touch
to turn on the
speaker phone.
Mute - Touch
to turn off the
microphone so the person you are
talking to cannot hear you.
Options - Choose from a list of
further in-call options, including
Go to messages, so you can check
your messages, Go to contacts to
add or search contacts during a
call. You can also end the call from
here by touching End call.
- Choose to search your
contacts during a call.
- Choose to add another
person to the call.
- Chose to open a numerical
keypad for navigating menus with
numbered options. For example,
when dialling call centres or other
automated telephone services.
Adjusting the call volume
Making a second call
To adjust the volume during a call,
use the up and down button on the
left edge of the phone.
1D
uring your initial call, touch
and select the number you want
to call.
2 Dial the number or search your
contacts (see Making a call on
page 20 for details).
3 Press
to connect the call.
4 Both calls will be displayed on the
call screen. Your initial call will be
locked and the caller put on hold.
5 To change between the calls,
touch
and choose Swap call
or press the number of the held
call.
6 To end one or both calls press
and select End followed by All,
Held or Active.
Speed dialling
02
03
04
05
06
07
08
The basics
You can assign a frequently-called
contact to a speed dial number.
1 From the standby screen touch
and select and tap .
2 Your Voicemail is already set to
speed dial 1. You cannot change
this. Touch any other number to
assign it a speed dial contact.
3 Your address book will open.
Select the contact you’d like
to assign to that number by
touching their phone number
once. To find a contact tap the
search field box and enter the first
letter of the name of the contact
required.
01
23
Calls
TIP! You can combine your
calls by selecting Accept then
Join. Check that your network
provider supports conference
calling.
NOTE: You will be charged for each
call you make.
Turning off DTMF
DTMF allows you to use numerical
commands to navigate menus
within automated calls. DTMF is
switched on as default.
To turn it off during a call (to make
a note of a number for example)
touch
and select DTMF off.
The basics
24
LG KP502 | User Guide
Viewing your call logs
TIP! To scroll through a list of
options, touch the last item
visible and slide your finger up
the screen. The list will move up
so more items are visible.
Touch
and select and tap
.
Choose to view:
All - View a complete list of all your
dialled, received and missed calls.
Dialled - View a list of all the
numbers you have called.
Received - View a list of all the
numbers that have called you.
Missed - View a list of all the
calls you have missed.
TIP! From any call log
touch
and Delete all to
delete all the recorded items.
TIP! Touch any single call
log entry to view the date, time
and duration of the call.
Using call divert
Using call barring
1 Touch
, select and choose
.
2 Touch Call barring.
3 Choose any or all of the six
options:
All outgoing
Outgoing international
Outgoing international calls
except home country
All incoming
Incoming when abroad
Deactivate all
01
02
03
04
05
06
07
08
The basics
1 Touch
, select and choose
.
2 Touch Call divert.
3 Choose whether to divert all calls,
when the line is busy, when there
is no answer or when you are not
reachable.
4 Input the number you’d like to
divert to.
5 Touch Request to activate.
NOTE: Charges are incurred for
diverting calls. Please contact your
network provider for details.
TIP! To turn off all call
diverts, choose Deactivate all
from the Call divert menu.
25
Calls
4 E nter the call barring password.
Please check with your network
operator for this service.
TIP! Select Fixed dial
number to turn on and compile
a list of numbers which can be
called from your phone. You’ll
need your PIN2 code from
your operator. Only numbers
included in the fixed dial list can
be called from your phone.
Changing the common call
setting
1 Touch
, select and choose
.
2 Touch Common settings. From
here you can amend the settings
for:
The basics
26
LG KP502 | User Guide
Call reject - Slide the switch to
On to highlight the Reject list.
You can touch the text box to
choose from all calls, specific
contacts or groups, or those from
unregistered numbers (those not
in your contacts). Touch Save to
change the setting.
Send my number - Choose
whether your number will be
displayed when you call someone.
Auto redial - Slide the switch left
for On or right for Off.
Answer mode - Choose whether
to answer the phone using the
send key or any key.
Minute minder - Slide the switch
left to On to hear a tone every
minute during a call.
BT answer mode - Select Handsfree to be able to answer a call
using a Bluetooth headset, or
select Handset to press a key on
the handset to answer a call.
Save new number - Select Yes to
save a new number.
TIP! To scroll through a list
of options, touch the last item
visible and slide your finger up
the screen. The list will move up
so more items are visible.
01
02
03
04
05
06
07
08
The basics
27
Contacts
Searching for a contact
There are two ways to search for a
contact:
From the standby screen
1 From the standby screen touch
to open the address book. Select
the contact from the list that you
want to make a call.
2 T ouch
or press the
key to initiate the call.
hard
From the main menu
1 Touch
, select .
2 Touch
and select Search.
3 You see a list of contacts, typing
in the first letter of a contact’s
name will jump the menu to that
alphabetical area of the list.
The basics
28
TIP! The alphabetical keypad
is displayed once you tap the
blank square.
LG KP502 | User Guide
TIP! To scroll through your list
of contacts, touch the last item
visible and slide your finger up
the screen. The list will move up
so more items are visible.
Adding a new contact
1 From the standby screen touch
and touch Add contact.
2 Choose whether to save the
contact to your Handset or SIM.
3 Enter the first and last name of
your new contact. You do not
have to enter both, but you must
enter one or the other.
4 Y ou can enter up to five different
numbers per contact. Each entry
has a preset type Mobile, Home,
Office, Pager, Fax, and General.
When you have finished, touch
Close.
5 Add an email address.
6 Assign the contact to one or more
groups. Choose from No group,
Family, Friends, Colleagues,
School or VIP.
7 You can also add a Ringtone,
Birthday, Anniversary,
Homepage, Home address,
Company name, Job title,
Company address and a Memo.
8 Touch Save to save the contact.
There are many things you can do
when viewing a contact. Here’s how
to access and use the options menu:
1 Open the contact you’d like to
use. See Searching for a contact
on page 28.
2 You can call or send a message
directly from here.
3 Press
to open the list of
options.
Edit - Change any of the contact’s
details.
Delete - Delete the contact.
Touch Yes if you are sure.
Copy or Move to USIM/Handset
- Choose to move or copy to the
USIM card or handset (depending
on where you originally saved the
contact).
01
02
03
04
05
06
07
08
The basics
TIP! You can create
customised groups for your
contacts, see Creating a group
on page 30.
Contact options
29
Contacts
Send business card - Send
the contact’s details to another
person as a business card. Choose
to send as a Text message,
Multimedia message, Email or
via Bluetooth.
TIP! Send message - Send
a message to the contact. If the
contact has an email address,
select whether you’d like to send
an email or SMS/MMS. See page
33 for details on how to send
messages.
Creating a group
1
2
3
4
5
T ouch
and select .
Touch
then Groups.
Touch
.
Select Add group.
Enter a name for your new group.
You can also assign a ringtone to
the group.
6 Touch Save.
NOTE: If you delete a group, the
contacts which were assigned to
that group will not be lost. They will
remain in your address book.
TIP! You can edit an
existing group by highlighting it
and touching
. Choose Add
members to the group from
your contacts, assign a Group
ringtone, Rename the group or
Delete a group.
The basics
30
LG KP502 | User Guide
Changing your contact
settings
You can adapt your contact settings
so that your address book suits your
own preferences.
TIP! To scroll through a list
of options, touch the last item
visible and slide your finger up
the screen. The list will move up
so more items are visible.
01
02
03
04
05
06
07
08
The basics
1 From the standby screen touch
and select .
2 Touch
and select Settings.
3 From here you can adjust the
following settings:
Contact list settings - Choose
whether to view contacts saved
to both your Handset & USIM,
Handset only or USIM only
You can also choose to show
the first name or last name of a
contact first.
Copy - Copy your contacts from
your USIM to your handset or
from your handset to your USIM.
Choose to do this one at a time,
or all at once. If you select one at
a time, you’ll need to select each
contact to copy one by one.
Move - This works in the same
way as Copy, but the contact will
only be saved to the location
you’ve moved it to. So if you
move a contact from the USIM
to the handset it will be deleted
from the USIM memory.
31
Contacts
Send all contacts via Bluetooth
- Send all of your contacts to
another device using Bluetooth.
You will be prompted to turn on
Bluetooth if you select this option.
Backup and Restore contacts
- Backup and restore contacts to
the Memory Card.
Clear contacts - Delete all your
contacts. Touch Yes if you are sure
you want to wipe your address
book.
The basics
32
LG KP502 | User Guide
Viewing information
1 From the standby screen touch
and select .
2 Touch
and select
Information.
3 From here you can view your
Service dial numbers, your Own
number, your Memory info.
(how much memory space you’ve
got left) and My business card.
TIP! If you’ve yet to add a
business card for yourself, select
My business card and enter all
your details as you would for any
contact. Touch Save to finish.
Messaging
Messaging
Your KP502 combines SMS, MMS
and email into one intuitive and
easy to use menu.
There are two ways to enter the
messaging centre:
1 Touch
from the standby
screen.
2 Touch
from the standby
screen, then select and choose
.
Sending a message
WARNING: You will
be charged per per 1 page text
message for each person that
you send the message to.
WARNING: If an
image, video or sound is
added to an SMS it will be
automatically convert to an
MMS and you will be charged
accordingly.
01
02
03
04
05
06
07
08
TIP! Quick reply - Send a
reply promptly to the selected
message using a template.
The basics
1 T ouch
to open a blank
message.
2 From here you can send an SMS
or MMS. To send an email, touch
from the standby screen,
them select and . See page
38 for details.
3 Touch Insert, to add an image,
video, sound or template.
5 T ouch T(1) at the top of the
screen to enter the recipient’s
number, or touch the search icon
to open your address book. You
can add multiple contacts. Touch
Send when ready.
33
Messaging
Entering text
T9 predictive
There are five ways to enter text:
Keypad, Keyboard, HandwritingScreen, Handwriting-Box,
Handwriting-Double Box.
You can chose your input method
by tapping
and Input method.
Tap the screen once, the keyboard
appears.
In T9 mode you will see
.
T9 mode uses a built-in dictionary
to recognise words you’re writing
based on the key sequences you
touch. Simply touch the number key
associated with the letter you want
to enter, and the dictionary will
predict the word you want to use.
For example, press 8, 3, 5, 3, 7, 4, 6,
6, 3 to write ‘telephone’.
Touch to turn on T9 predictive
text.
You can choose writing
languages.
Tap to change numbers,
symbols and text keypad.
Use
to scroll through the
different keyboard types in each
text entry mode (for example,
capitals or lowercase).
The basics
34
LG KP502 | User Guide
Abc manual
In Abc mode you will see
.
In Abc mode you must touch the
key repeatedly to enter a letter. For
example, to write ‘hello’, touch 4
twice, 3 twice, 5 three times, 5 three
times again, then 6 three times.
Keyboard
In Keyboard mode the screen flips
to landscape and a full keyboard
appears on screen.
Simply touch each letter to write
your message and press:
to switch to upper case
TIP! Keyboard mode predicts
and shows what you will type in
next. These words are predicted
based on the sentences you
have typed in so far. If you do
not wish to use the suggested
words, keep typing in new
words. If you wish to use the
suggested words, press the
space bar to confirm them.
01
02
03
04
05
06
07
08
The basics
35
Messaging
Handwriting recognition
Alphabet
In Handwriting mode you simply
write on the screen and your KP502
will convert your handwriting into
your message. Select Screen or Box
depending on your preferred view.
If you select capital letter mode
(ABC), letters you type will be
inserted as capital letters even if you
write in small letters, and vice versa.
TIP! You may find it easier
to use the stylus in this mode,
please remember to press lightly
to protect your screen from
damage.
The basics
36
Handwriting recognition translates
stylus gestures into letters,
numbers or other character, and
displays these characters as text.
Handwriting recognition is only
active where text can be entered.
Note: Most letters can be written
using different stroke styles. See the
tables below. The position on the
screen decides case, not the style.
Letter
A
B
C
D
E
F
G
H
I
J
K
L
LG KP502 | User Guide
Strokes
Letter
M
Strokes
Numbers
Numbers are written above the arrow.
N
Number
O
0
P
1
Q
2
R
3
S
4
T
5
U
6
V
7
W
8
X
9
Strokes
01
02
03
04
05
06
07
08
Y
Z
The basics
ß
37
Messaging
Setting up your email
You can stay in touch on the move
using email on your KP502. It’s quick
and simple to set up a POP3 or
IMAP4 email account.
TIP! To scroll through a list
of options, touch the last item
visible and slide your finger up
the screen. The list will move up
so more items are visible.
1 Touch
then tap
.
2 S elect
then scroll menu to
Settings.
3 Touch Email then Email
accounts.
4 Touch Add Account.
5 Setup Wizard will help you set up
your email settings.
The basics
38
LG KP502 | User Guide
Email address - Enter your email
address.
Password - Enter the account
password.
Username - Enter your account
user ID as supplied by your email
provider.
Mailbox type - Select the internet
protocol type used to transfer
your email, IMAP4 or POP3.
Incoming server - Enter your
incoming (POP3 or IMAP4) mail
server name or IP address.
Outgoing server - Enter your
outgoing(SMTP) mail server name
or IP address. This may be the
same server as for incoming mail.
SMTP authentication - Turn
on SMTP authentication if the
outgoing server requires user
name and password to send
email.
Account name - Enter the
mailbox name that you wish to
appear as the account name for
the Mailbox.
Now your account is set up, it will
appear in the list of accounts in your
Email folder.
6 Y ou can check and edit settings
by selecting the account in
the list. You can also check the
additional settings that were
filled in automatically when you
created the account.
Reply email address - Enter the
‘reply to’ email address.
Maximum receive size - Choose
the size limit of your emails, the
maximum is 1MB.
Save sent mail into - Select
whether to save sent emails (an
option when the mailbox type is
set to IMAP4). When the mailbox
type is POP3, sent mails are
always saved into handset.
01
02
03
04
05
06
07
08
The basics
39
Messaging
Access points - Choose your
Internet access point.
Auto retrieve - Choose whether
to retrieve your new emails
automatically.
Advanced settings - Choose
whether to use the advanced
settings.
SMTP port number - Normally,
this will be 25.
SMTP TLS/SSL - Choose whether
to use SSL for outgoing server.
Incoming server port - Normally,
this is 110 for POP3 accounts and
143 for IMAP4 accounts.
The basics
40
LG KP502 | User Guide
Incoming TLS/SSL - Choose
whether to use SSL for incoming
server.
SMTP Username - Enter the
SMTP username.
SMTP Password - Enter the SMTP
password.
APOP secure login - Choose to
activate APOP secure login for a
POP3 account. IMAP4 accounts
are always set to off.
7 You can change your default
email account by touching
Activate.
Retrieving your email
You can automatically or manually
check your account for new emails.
See ‘Changing your email settings’
on page 42 to check automatically.
To check manually:
1 Touch
then select and
.
2 Touch Mailbox.
3 Touch the account you want to
use then
.
4 Choose Retrieve and your
KP502 will connect to your email
account and retrieve your new
messages.
Sending an email using your
new account
1 T ouch New Email in the
Communicate menu and a new
email will open.
2 You can enter the recipient’s
address and write your message.
You can also attach images,
videos, sounds or other file types.
3 Touch Send and your email will
be sent.
01
02
03
04
05
06
07
08
TIP! You can upload Word,
Excel, PowerPoint and PDF
documents to your KP502 so you
can review them on the move.
The basics
41
Messaging
Changing your email settings
You can change your email settings
according to your own preferences.
TIP! To scroll through a list
of options, touch the last item
visible and slide your finger up
the screen. The list will move up
so more items are visible.
1 Touch
then select and
.
2 Touch Settings and Email and
then you can adapt the following
settings:
Allow reply Email - Choose
to allow the sending of ‘read,
confirmation’ messages.
Request reply Email - Choose
whether to request read
confirmation messages.
The basics
42
LG KP502 | User Guide
Retrieve interval - Choose how
often your KP502 checks for new
email messages.
Retrieve amount - Choose the
number of emails to be retrieved
at any one time.
Include message in Fwd & Reply
- Choose to include the original
message in your reply.
Include attachment - Choose to
include the original attachment in
any reply.
Auto Retrieval in Roaming Choose whether to retrieve your
messages automatically when
abroad (roaming).
TIP! Costs for retrieving
email may be higher when
roaming. Check with your
network supplier.
New email notification - Choose
whether to be alerted to new
emails.
Signature - Create an email
signature and switch this feature
on.
Priority - Choose the priority level
of your email messages.
Message folders
01
02
03
04
05
06
07
08
The basics
You’ll recognise the folder structure
used on your KP502, which is fairly
self-explanatory.
Inbox - All the messsages you
receive are placed into your inbox
From here you can view, delete
and more, see Managing your
messages below for details.
Mailbox - All the emails you receive
on your KP502 will be placed in your
mailbox.
Drafts - If you don’t have time to
finish writing a message, you can
save what you’ve done so far here.
Outbox - This is a temporary
storage folder while messages are
being sent.
Sent items - All the messages you
have sent are placed in this folder.
My Folders - Create folders to store
your messages.
43
Messaging
Managing your messages
You can use your Inbox to manage
your messages.
TIP! To scroll through a list
of options, touch the last item
visible and slide your finger up
the screen. The list will move up
so more items are visible.
1 Touch
then select and
.
2 Select Inbox.
3 Touch
and then choose to:
Delete - Delete marked messages.
Create new message - Open a
new blank message or email.
Move to My folders - Move the
marked messages to My folders.
The basics
44
LG KP502 | User Guide
Filter - View your message
by type. This will group SMS
separately from MMS.
Delete all - Delete all of the
messages.
If you see the message No space for
USIM messages you should delete
some messages on the USIM.
If you see the message No space for
messages you should delete some
messages to free up memory space.
Using templates
Using emoticons
Create templates for the SMS
and MMS messages you send
most frequently. You’ll find some
templates already on your phone,
you can edit these if you wish.
1 Touch
then choose
Templates on the Communicate
menu.
2 Choose Text templates or
Multimedia templates. You
can then touch
to Add new,
Delete or Delete all templates.
3 Touch Add template to create a
new template.
4 You can view the template by
selecting it on the list and edit it
by touching on the view screen.
Liven up your messages using
emoticons. You’ll find some
commonly used emoticons already
on your phone.
1 Touch
then choose
Emoticons on the Communicate
menu.
2 Touch
to Add new, Delete or
Delete all emoticons.
01
02
03
04
05
06
07
08
The basics
45
Messaging
Changing your text message
settings
Your KP502 message settings are
pre-defined so that you can send
messages immediately. These
settings can be changed according
to your preferences.
TIP! To scroll through a list
of options, touch the last item
visible and slide your finger up
the screen. The list will move up
so more items are visible.
The basics
46
Touch
then choose Settings
on the Communicate menu. Select
Text message. You can make
changes to:
Text message centre - Enter the
details of your message centre.
Delivery report - Slide the switch
left to receive confirmation that
your messages have been delivered.
LG KP502 | User Guide
Validity period - Choose how long
your messages are stored at the
message centre.
Message types - Convert your
text into Text, Voice, Fax, X.400 or
Email.
Character encoding - Choose how
your characters are encoded. This
impacts the size of your messages
and therefore data charges.
Send long text as - Choose to send
long messages as Multiple SMS or
as MMS.
Changing your multimedia
message settings
Your KP502 message settings are
pre-defined so that you can send
messages immediately. These
settings can be changed according
to your preferences.
Touch
, select then
.
Chose Settings and Multimedia
message. You can make changes to:
Retrieval mode - Choose Home
or Roaming network. If you then
choose Manual you will receive only
notifications of MMS and you can
then decide whether to download
them in full.
Delivery report - Choose to allow
and/or request a delivery report.
Read reply - Choose to allow and/
or request a reply report.
Priority - Choose the priority level
of your MMS.
Validity period - Choose how
long your message is stored at the
message centre.
Slide duration - Choose how long
your slides appear on screen.
Creation mode - Choose your
message mode.
Delivery time - Choose how long
before a message is delivered.
Multi msg centre - Enter the details
of your message centre.
01
02
03
04
05
06
07
08
The basics
47
Messaging
Changing your other settings
Touch
, choose Settings on the
Communicate menu then:
Voicemail - Touch
to add a
new Voicemail service. Contact
your network operator for more
information on the service they
provide.
Service message - Choose to
receive or block service messages.
You can also set your message
security by creating trusted and
untrusted lists of senders.
Info service - Choose your
reception status, language and
other settings.
The basics
48
LG KP502 | User Guide
Camera
Taking a quick photo
1 P ress the
key on the right
side of the phone briefly.
2 The viewfinder will appear on
screen.
3 Holding the phone horizontally,
point the lens towards the subject
of the photo.
4 Position the phone so you can
see the subject of your photo in
the preview screen.
5 When the camera has focused on
your subject, either press the
on the side of the phone firmly
or press the red box on the lower
right of the screen to take the
photo.
01
02
03
P210208_00.13.jgp
05
06
07
08
Get creative
Touch to move to your gallery.
Touch to send the photo as a
message, e-mail or Bluetooth. See
page 33 for Sending a message, and
page 114 for Sending and receiving
your files using Bluetooth.
Touch to edit the photo.
Touch to set the picture you
have taken as Wallpaper.
Touch to delete the photo
you have just taken and confirm by
After you’ve taken your photo touching Yes. The viewfinder will
reappear.
Your captured photo will appear
on screen. The name of the image
Touch to take another photo
runs along the bottom of the screen straightaway. Your current photo
together with five icons down the
will be saved.
right side.
04
51
Camera
Getting to know the viewfinder
Settings - Touch this icon to open the
settings menu. See Using the advanced
settings on page 52 for details.
Camera mode - Camera mode is selected.
Video camera mode - Touch this icon to
switch to video mode.
Back - Touch here to return to the standby
screen.
Gallery
Exposure - See Adjusting the Exposure
on page 51.
Shot mode - See Choosing a shot type
on page 51.
Take a picture
Get creative
50
TIP! You can bring up the options by
tapping the screen. They auto turn off
after a few seconds.
LG KP502 | User Guide
Choosing a shot type
Adjusting the exposure
1 T ouch
to open the available
shot types.
2 Choose from two options:
Normal shot -This is the default
shot type, the photo will be taken
in the normal way, as outlined in
taking a quick photo.
Burst shot - This enables you to
take 3/6/9 shots automatically in
very quick succession.
Exposure defines the difference
between light and dark (contrast)
in an image. A low contrast image
will appear foggy, whereas a high
contrast image will appear much
sharper.
1 Touch
.
2 Slide the contrast indicator along
the bar - left for a lower exposure,
hazier image or right for a higher
exposure, sharper image.
01
02
03
04
05
06
07
08
Get creative
51
Camera
Using continuous shot mode
Using the advanced settings
Continuous shot mode is great for
taking photos of moving objects or
at sporting events.
1 Touch
to open the available
shot types and select Burst shot.
2 Select the shot count that you
would like to take continuously.
3 Position the subject in the
viewfinder and press the capture
button as you would to take a
normal photo.
4 The camera will take 3/6/9
pictures in quick sequence.
From the viewfinder touch
to open all the advanced settings
options.
Size - Change the size of the photo
to save on memory space or take a
picture preset to the correct size for
contact. See Changing the image
size on page 54.
Colour Effect - Choose a colour
tone to apply to the photo you’re
taking. See Choosing a colour effect
on page 54.
Get creative
52
Preview settings
LG KP502 | User Guide
White balance - Choose from Auto,
Incandescent, Sunny, Fluorescent
or Cloudy.
Night mode - Useful to use at dark
place.
Self-timer - The self-timer allows
you to set a delay after the capture
button is pressed before the camera
takes the picture. Choose from 3
seconds, 5 seconds or 10 seconds.
Great for that group photo you want
to be part of.
Quality - Choose between Super
fine, Fine and Normal. The finer the
quality the sharper a photo will be,
but the file size will increase. This
means you’ll be able to store fewer
photos in your memory.
Shutter sound - Select one of the
three shutter sounds.
01
02
03
04
Grid screen - Choose from Off,
Simple cross or Trisection
05
Reset settings - Reset all the
camera settings.
07
06
08
TIP! When you exit the camera
all your settings will return to
default, except image size and
image quality. Any non-default
settings you require will need
to be reset, for example colour
tone. Check them before you
shoot your next photo.
Get creative
View mode - Choose from Full
screen or Full image. In Full screen
some clipping of the image may
occur.
Other settings
Memory - Choose whether to
save your photos to the Handset
memory or to the External memory.
53
Camera
TIP! The settings menu
is superimposed over the
viewfinder, so when you change
elements of the image colour
or quality you’ll be able to see
the image change in preview
behind the settings menu.
Changing the image size
The more pixels, the larger the
file size, which in turn means they
take up more of your memory. If
you want to fit more pictures on to
your phone you can alter the pixel
number to make the file size smaller.
1 F rom the viewfinder touch
in
the top left corner.
2 Select Size from the Preview
menu.
Get creative
54
LG KP502 | User Guide
3 S elect a pixel value from the
five numerical options (3M:
2048x1536, 2M: 1600x1200,
1M: 1280x960, 640x480,
400*240(W), 320x240) or
choose the preset:
Contacts - This sets the camera
to take a photo the perfect
size to be added to a phone
contact.
Choosing a colour effect
1 F rom the viewfinder touch
in
the top left corner.
2 Select Colour Effect from the
Preview menu.
3 There are five colour tone options:
Off, Black & White, Negative or,
Sepia.
4 When you’ve made your selection
the colour tone menu will
automatically close, ready for you
to take your picture.
TIP! You can change a
photo taken in colour to black
and white or sepia after it’s
taken, but you cannot change a
picture taken in black and white
or sepia back to colour.
Viewing your saved photos
1 Y ou can access your saved photo’s
from within the camera mode.
Simply touch
and your
gallery will appear on screen.
01
02
03
04
05
06
07
08
Get creative
55
Video camera
Shooting a quick video
1 P ress the camera key on the right
side of the phone.
2 On the Camera preview mode
touch the camera icon
in
the view finder to switch to
video mode. The video camera’s
viewfinder will appear on screen.
3 Holding the phone horizontally,
point the lens towards the subject
of the video.
4 Press the capture button once to
start recording. Or press the red
dot at the bottom right of the
screen.
Get creative
56
LG KP502 | User Guide
5 Rec will appear at the top of the
viewfinder and a timer at the
bottom showing the length of
your video.
6 To pause the video touch
and
resume by selecting
.
7 Touch
on screen or press the
capture button a second time to
stop recording.
After you’ve shot your video
A still image representing your
captured video will appear on
screen. The name of the video runs
along the bottom of the screen
together with five icons down the
right side .
Touch to view a gallery of
saved videos .
Touch to delete the video you
have just made and confirm by
touching Yes. The viewfinder will
reappear.
Touch to shoot another video
straight away. Your current video
will be saved.
01
02
03
04
05
06
07
08
V120108_06.37.3gp
Get creative
Touch to play the video.
Touch to send the video as an
Message or Email or by Bluetooth.
See page 33 for Sending messages,
or page 114 for Sending and
receiving your files using
Bluetooth.
Touch to edit the video.
57
Video camera
Getting to know the viewfinder
Settings - Touch this icon to open the
settings menu. See Using the advanced
settings on page 59 for details.
Video mode - Video mode is selected.
Image size
Saving to handset memory/external
memory
Back - Touch here to return to the standby
screen.
Gallery
Exposure - See Adjusting the exposure
on page 59.
Video size
Recording stop
Recording start
Zoom - Touch
zoom out.
Get creative
58
TIP! You can close all the
shortcut options for a clearer
viewfinder screen. Simply touch the
centre of the viewfinder once. To recall
the options touch the screen again.
LG KP502 | User Guide
to zoom in or
to
Camera mode - Touch this icon to switch to
camera mode.
Adjusting the Exposure
Using the advanced settings
Exposure defines the difference
From the viewfinder touch Settings
between light and dark (contrast)
to open all the advanced settings
in an image. A low contrast image
options.
will appear foggy, whereas a high
contrast image will appear much
sharper.
1 Touch
.
2 Slide the exposure indicator along
the bar, left for a lower exposure,
hazier image, or right for a higher
contrast, sharper image.
Preview settings
02
03
04
05
06
07
08
Get creative
Video size - Change the size of the
video to save on memory space. See
Changing the video image size on
page 61.
Colour Effect - Choose a colour
tone to apply to the video you’re
taking. See Choosing a colour tone
on page 61.
01
59
Video camera
Get creative
60
White balance - The white balance
ensures that any white in your
videos is realistic. In order for your
camera to correctly adjust the white
balance you may need to determine
the light conditions. Choose from
Auto, Incandescent, Sunny,
Fluorescent or Cloudy.
Quality - Choose between Super
fine, Fine and Normal. The finer
the quality the sharper a video will
be, but the file size will increase as
a result, which means you’ll be able
to store fewer videos in the phone’s
memory.
Set time - Set a duration limit for
your video. Choose from No limit,
or MMS to limit the size so that you
can send the video as an MMS.
View mode - Choose from Full
screen or Full image. In Full screen
some clipping of the image may
occur.
LG KP502 | User Guide
TIP! If you choose MMS
duration, try choosing a lower
image quality to enable you to
shoot a longer video.
Other settings
Memory - Choose whether to
save your videos to the Handset
memory or to the External
memory.
Voice - Choose Mute to record a
video without sound.
Reset settings - Reset all the video
camera settings.
Changing the video image
size
TIP! For video format conversion
software, see the CD you
received with your KP502.
01
02
03
04
Choosing a colour tone
05
1 F rom the viewfinder touch
in
the top left corner.
2 Select Colour Effect from the
settings menu.
3 There are five colour tone options,
Off (Normal), Black & White,
Negative, Sepia.
4 Touch the colour tone you’d like
to use.
06
TIP! You can change a
video shot in colour to black and
white or sepia after it’s taken,
but you cannot change a video
shot in black and white or sepia
back to colour.
07
08
Get creative
The more pixels, the larger the file
size, which in turn means they take
up more memory. If you want to fit
more videos on to your phone you
can alter the pixel number to make
the file size smaller.
1 From the viewfinder touch
in
the top left corner.
2 Select Video size from the
Preview menu.
3 Select a pixel value from the two
options:
320x240 - Large image size,
therefore larger file size. Up to 24
fps are available for video play
back, up to 12 fps are available for
video recording.
176x144 - Small image size
and therefore smaller file size. Up
to 15 fps are available for video
play back.
4 S elect the size option you’d like
to use.
61
Video camera
Watching your saved videos
1 In the viewfinder touch
.
2 Your gallery will appear on screen.
3 Touch the video you want to view
once to bring it to the front of the
gallery.
4 Touch the video a second time to
open it fully.
Get creative
62
LG KP502 | User Guide
Your photos and videos
Viewing your photos and
videos
1 T ouch
on your camera
preview screen.
2 Your gallery will appear on screen.
3 Touch the video or photo twice to
open it fully.
4 To play the video touch
. To
pause playback touch .
TIP! To delete a photo or
video, open it and select
Touch Yes to confirm.
.
Using zoom when viewing a
photo
To zoom in press
repeatedly.
To zoom out press
. Use the
thumbnail in the bottom right
corner to move the focus area.
Adjusting the volume when
viewing a video
TIP! Flick left or right to
view other photos or videos.
01
02
03
04
05
06
07
08
To adjust the volume of the audio
on a video whilst it is playing,
slide the marker up and down the
volume bar on the left side of the
screen.
Get creative
63
Your photos and videos
Capturing an image from a
video
1 S elect the video you would like to
capture an image from.
2 Touch to pause the video on
the frame you’d like to convert to
an image and touch the right side
of the screen to open the options
menu.
3 From the options menu select
.
4 The image will appear on screen,
with its assigned image name.
5 Touch the image then
to
return to the gallery.
6 The image will be saved in your
Media Album folder and appear
in the gallery. You need to exit
the gallery and then re-open it for
this to appear.
Get creative
64
LG KP502 | User Guide
WARNING: Some
functions will not work properly
if the multimedia file has not
been recorded on the phone.
Viewing your photos as a
slide show
Slideshow mode will show all the
photos in your gallery one at a time
as a slideshow. Videos can not be
viewed as a slideshow.
1 Touch the photo you would like
to begin the slideshow twice to
open it.
2 Select
.
3 The slideshow will begin.
There are options within slideshows:
Touch to show random.
Touch to pause the slideshow
on a particular photo.
Touch again to resume
playback.
Touch to increase or decrease
the speed of the slideshow.
Setting a photo as wallpaper
1 T ouch the photo you would like
to set as wallpaper twice to open
it. Turn the phone to landscape.
2 Touch the right side of the screen
to open the options menu.
3 Touch .
4 The screen will switch to portrait
mode. You can then change the
size of the picture.
5 When you are happy with the
picture touch Set.
01
02
03
04
05
06
07
08
Get creative
65
Your photos and videos
Editing your photos
There are loads of great things you
can do to your photos to change
them, add to them or liven them
up a little.
1 Open the photo you’d like to edit
and touch
to bring up the
options.
2 Touch the icons to adapt your
photo:
Crop your photo. Choose
a square or circular crop area
and move your finger across the
screen to select the area.
Draw something on your
photo freehand. Select the
thickness of the line from the four
options and the colour you would
like use.
Get creative
66
LG KP502 | User Guide
Put writing on the picture.
See Adding text to a photo on
page 67.
Decorate your photo with
stamps. Choose from the different
stamps available and touch your
photo wherever you’d like them
to be.
Erase line that you draw.
Save the changes you
have made to the photos. Select
to save the changes over the
Original file, or as a New file. If
you select New file enter a file
name.
Undo the last Effect or edit
you made to the photo.
Touch to open further effect
options including Rotate. There
are also more advanced editing
options. See Resize, Morphing,
Colour Accent, Add images etc.
Touch to add an effect to a
photo.
See Adding an effect to a
photo on page 68.
Adding text to a photo
1 From the editing screen, touch
.
2 Select Signature to add
unframed text or choose one of
the speech bubble shapes.
3 Enter your text using the keypad
and touch Save.
4 Move the text by touching it and
sliding it to the place you’d like
it to be.
01
02
03
04
05
06
07
08
Touch to return to the
gallery.
Get creative
67
Your photos and videos
Adding an effect to a photo
Get creative
68
1 From the editing screen, touch
.
2 Choose to apply any of the six
options to the photo:
Face beautify - Automatically
detect a face in the image and
brighten it up.
Tunnel effect - Lomo camera
effect.
Colour negative - Colour
negative effect.
Black and white - Black and
white colour effect.
Sepia - Sepia effect.
Blur - Apply a blurred effect.
Sharpen - Move the marker along
the bar to sharpen the focus
of the photo. Select OK icon to
apply the changes or choose
to cancel.
LG KP502 | User Guide
Mosaic blur - Touch to apply
a blurred mosaic effect to the
photo.
Oil painting - Oil painting effect.
Sketch - Apply an effect to make
the picture look like a sketch.
Emboss - Emboss effect.
Solarize - Change the effect of
exposure to the light
Vivid - An effect of clearness and
brilliance.
Moonlight - Change the light to
look like moonlight.
Antique - An old image effect.
Glow - A light beam effect.
Cartoon - A cartoon effect.
Water color - A water color effect.
3 T o undo an effect simply touch
Undo.
TIP! You can add more
than one effect to a photo,
except for a colour effect.
Morphing a photo
Morphing a photo is great for
changing the facial expressions of
friends, or just for distorting a photo
for artistic effect.
1 From the editing screen touch
.
2 Choose Morphing and four
crosses will appear on the photo.
3M
ove the crosses around the
photo so they are on the part
you’d like to morph. For example,
if you are morphing a face, place
a cross on the outside corner of
each eye and one each side of
the lips.
4 Select a face to represent how
you’d like to morph the photo.
5 Select OK to save the changes.
01
02
03
04
05
06
07
08
Get creative
69
Your photos and videos
Adding a colour accent to a
photo
Swapping the colours in a
photo
1 From the editing screen, touch
.
2 Choose Colour Accent.
3 Select part of the photo. A
traced line will appear around
everything in that area which is of
the same or similar colour.
For example, someone’s hair or
the colour of their jumper.
4 Touch OK.
5 All colour will be removed from
the photo, apart from the section
marked for colour accenting.
6 Alter the intensity of the
accenting by sliding the marker
up or down the intensity bar.
7 Select Save to save the changes.
1 From the editing screen, touch
.
2 Choose Colour swapping.
3 Select part of the photo. A
traced line will appear around
everything in that area which is of
the same or similar colour.
For example, someone’s hair or
the colour of their jumper.
4 Select a colour.
5 Press OK.
6 The part of the photo selected for
colour accenting will change to
the selected colour.
7 Select Save to save the changes.
Get creative
70
LG KP502 | User Guide
Trimming the length of your
video
1O
pen the video you’d like to edit,
select and touch the screen to
bring up the options.
2 Select
and choose Trim.
3 Touch and mark the new start
and end points using
.
4 Touch Play cropped to ensure
you are happy with the new cut.
5 Touch Save or, alternatively,
touch
to return to the
gallery and discard the changes.
Merging two videos together
1O
pen the video you’d like to edit,
select and touch the screen to
bring up the options.
2 Select
and choose Video
merge.
3 The My stuff folder will open,
select either My Videos or My
memory card (if fitted). Choose
the video you would like to
merge and touch Select.
4 Touch and slide the photo
to merge it to the end or the
beginning of the video.
5 Touch Effect to choose how the
videos merge together: None,
Pan zoom, Oval, Uncover, Blind,
Checker board, Dissolve, Split or
Shape diamond.
01
02
03
04
05
06
07
08
Get creative
71
Your photos and videos
6 P ress Save followed by Yes to
save the new merged video.
Choose to save over the original
file or as a new file.
7 Repeat these steps to merge
more videos.
Merging a photo with a video
Get creative
72
1O
pen the video you’d like to edit,
select and touch the screen to
bring up the options.
2 Select
and choose Image
merge.
3 The My stuff folder will open
select either My Images or My
memory card (if fitted). Choose
the photo you would like to
merge into your video and touch
Select.
4 Touch and slide the photo
to merge it to the end or the
beginning of the video.
LG KP502 | User Guide
5 T ouch Effect to choose how the
photo and video merge together:
None, Pan zoom, Oval, Uncover,
Blind, Checker board, Dissolve,
Split or Shape diamon.
6 Press Save followed by Yes.
Choose to save over the original
file or as a new file.
7 Repeat these steps to merge
more photos.
Adding text to a video
1O
pen the video you’d like to edit,
select and touch the screen to
bring up the options.
2 Select
and choose Text
overlay.
3 Enter your text using the keypad
and select Done.
4 Touch and mark when you’d
like the text to appear using
.
5 Touch the area of the screen you’d
like the text to appear in.
6 T ouch
to mark when you’d
like the text to disappear.
7 Touch Preview to ensure you are
happy with the text overlay.
8 Touch Save followed by Yes.
Choose to save over the original
file or as a new file.
9 Repeat these steps to add more
text.
01
02
03
04
05
06
07
08
Get creative
73
Your photos and videos
Overlaying a photo
1O
pen the video you’d like to edit,
select and touch the screen to
bring up the options.
2 Select
and choose Image
overlay.
3 The My stuff folder will open
select either My images or My
memory card (if fitted). Choose
the photo you would like to
overlay your video and touch
Select.
4 Touch and mark when you’d
like the photo to appear using
.
5 Touch the area of the screen you’d
like the photo to appear in. If the
photo is too big it will overlay the
whole screen, not just the area
selected.
Get creative
74
LG KP502 | User Guide
6 T ouch
to mark when you’d
like the photo to disappear.
7 Touch Preview to ensure you are
happy with the photo overlay.
8 Touch Save followed by Yes.
Choose to save over the original
file or as a new file.
9 Repeat these steps to add more
photos.
Adding a voice recording
1O
pen the video you’d like to edit,
select and touch the screen to
bring up the options.
2 Select
and choose Voice
recording.
3 The quality of the original audio
will be affected by adding a voice
recording. Touch Yes to continue.
4 T ouch to view your video.
When you get to the part you’d
like to record your voice over,
press
.
1O
pen the video you’d like to edit,
select and touch the screen to
bring up the options.
2 Select
and choose Audio
dubbing.
3 The My stuff folder will open
select either My sounds or My
memory card (if fitted). Choose
the track you would like to add to
your video and touch Select.
4 The original audio of your video
will be erased. Touch Yes to
continue.
5 If the audio is shorter than the
video choose whether to play
Once or to Repeat it.
6 Choose to save over the original
file or as a new file.
01
02
03
04
05
06
07
08
Get creative
5 P ress
or
to stop recording
and playback.
6 Touch Preview to ensure you are
happy with the voice recording.
7 Touch Save followed by Yes to
save. Choose to save over the
original file or as a new file.
8 Repeat these steps to add more
voice recordings to the video.
Adding a soundtrack to your
video
75
Your photos and videos
Changing the speed of your
video
1O
pen the video you’d like to edit,
select and touch the screen to
bring up the options.
2 Select
and choose Time
scaling.
3 Select one of the four speed
options: x4, x2, x1/4, x1/2.
4 Choose to save over the original
file or as a new file.
NOTE: Only 3gp Video file can be
edited.
Get creative
76
LG KP502 | User Guide
Multimedia
You can store any multimedia files
into your phone’s memory so that
you have easy access to all of your
pictures, sounds, videos and games.
You can also save your files to a
memory card. The advantage of
using a memory card is that you
can free up space on your phone’s
memory.
To access the Multimedia menu,
touch
then . Touch to
open a list of folders storing all of
your multimedia files.
Pictures
My images contains a list of
pictures including default images
pre-loaded onto your phone,
images downloaded by you and
images taken on your phone’s
camera.
Touch
to change the view from
thumbnail image to list.
My images option menus
The options which are available to
you in My images depend on what
type of image you have selected.
All of the options will be available
for pictures you have taken on the
phone’s camera, but only the Sort
by, List View, Folder info. and
Memory info. options are available
for default images.
01
02
03
04
05
06
07
08
Get creative
77
Multimedia
Get creative
78
Send - Send the image to a friend.
Move - Move an image from the
phone memory to a memory card
or vice versa.
Copy - Copy an image from the
phone memory to a memory card
or vice versa.
Delete - Delete an image.
Rename - Rename an image.
Print - Print the selected image
using a printer.
Create new folder - Create a new
folder within the My images folder.
Sort by - Sort images into order by
Date, Type or Name.
Slide show - Start a slide show.
List/Grid view - Grid view to List
view or vice versa.
Folder info. - View the Name,
Size, Date details of the folder and
number of files and sub-folders
inside the folder.
LG KP502 | User Guide
Memory info. - View the memory
status.
Delete all - Delete all of your
images.
Sending a photo
1 T ouch
then .
2 Touch then choose My
images .
3 Touch
Send and choose from
Message, Email or Bluetooth.
4 If you choose Message or Email,
your photo will be attached to a
message and you can write and
send the message as normal. If
you choose Bluetooth, you will
be prompted to turn Bluetooth
on and your phone will search for
a device to send the picture to.
Printing an image
You can choose images to use as
wallpapers and screensavers or even
to identify a caller.
1 Touch
then .
2 Touch then My images.
3 Select an image and touch
.
4 Touch Use as and choose from:
Wallpaper - Set a wallpaper for
the standby screen.
Contacts image - Allocate an
image to a particular person in
your contacts list so that their
picture shows when they call you.
Start-up image - Set an image
to appear when you switch the
phone on.
Power off image - Set an image
to appear when you switch the
phone off.
1
2
3
4
T ouch
then .
Touch then My images.
Select an image and touch
.
Touch Print then choose between
Bluetooth and PictBridge.
TIP! You can to print via
bluetooth or by connecting to a
PictBridge compatible printer.
01
02
03
04
05
06
07
08
Get creative
Using an image
79
Multimedia
Moving or copying an image
Creating a slide show
You can move or copy an image
between the phone memory and
the memory card. You might want
to do this to either free up some
space in one of the memory banks
or to safeguard your images from
being lost.
1 Touch
then .
2 Touch then My images.
3 Touch
and select Move or
Copy.
4 You can mark/unmark the images
by tapping it sequentially. Mark
the image that you want to move
or copy and touch Copy/Move.
If you want to look at all of the
images on your phone, you can
create a slide show to save you
from having to open and close each
individual image.
1 Touch
then .
2 Touch then My images.
3 Choose a start image for your
slide show.
4 Touch
then Slide show.
Get creative
80
LG KP502 | User Guide
Sounds
The My sounds folder contains
the Downloaded sounds, Default
sounds and Voice recordings.
From here you can manage, send or
set sounds as ringtones.
Using a sound
1 T ouch
then .
2 Touch then My sounds.
3 Select Default sounds or Voice
recordings.
4 Select a sound and and it will
begin to play.
5 Touch
and select Use as.
6 Choose from Ringtone, Message
tone, Start-up or Shut down.
Videos
The My videos folder shows a list of
downloaded videos and videos you
have recorded on your phone.
Watching a video
1 Touch
then .
2 Touch then My videos.
3 Select a video to play.
Using options while video is
paused
Touch
while in pause mode and
choose from:
Capture - Capture the frozen frame
as a picture.
Send - Send the video in a message
or via Bluetooth.
Delete - Delete the video.
Edit - Edit the video.
File info. - View the Name, Size,
Date, Time, Type, Duration,
Dimension, Protection and
Copyright details.
01
02
03
04
05
06
07
08
Get creative
81
Multimedia
Editing a video clip
Get creative
82
While your video is being played
and is in pause mode you can
choose from a number of options to
edit the video clip.
1 Select a video and touch Play.
2 Touch then
.
3 Touch Video editor and choose
from:
Trim - Cut the video down to only
the part you want.
Video merge - Merge the video
with another video clip.
Image merge - Merge the video
with an image from your Images
folder.
Text overlay - Add text to the
video.
Image overlay - Add an image to
the video.
LG KP502 | User Guide
Audio dubbing - Choose to
add sound from the Defaults
folder or from your own Voice
recordings.
Sending a video clip
1 S elect a video and touch
.
2 Touch Send and choose from
Message, Email or Bluetooth.
3 If you choose Message or Email,
your video clip will be attached
to the message and you can write
and send the message as normal.
If you choose Bluetooth, you will
be prompted to turn Bluetooth
on and your phone will search for
a device to send the video to.
Using the video options
menu
From the My videos folder, you can
choose from the following options:
Send - Send a video to a friend.
Move - Move a video clip from the
phone memory to a memory card
or vice versa.
Copy - Copy a video clip from the
phone memory to a memory card
or vice versa.
Delete - Delete a video.
Rename - Rename a video.
Create new folder - Create a new
folder within the My videos folder.
Sort by - Sort videos into order by
Date, Type or Name.
List/Grid view - Grid view to List
view or vice versa.
Folder info - View the Name, Size,
Date details of the folder and
number of files and sub-folders
inside the folder.
Memory manager - View the
memory status.
Delete all - Delete all videos.
01
02
03
04
05
Games and Applications
06
You can install new games and
applications to your phone to keep
you amused when you have time
to spare.
07
08
Get creative
83
Multimedia
Installing a game/application
via local install
Using the games options
menu
1 T ouch
then .
2 Touch and Others or My
memory card if external memory
is inserted.
3 Select the file(*.jad or *.jar)
to install and press Install
command. An application will be
installed.
NOTE: The jad should contain its
own jar.
From the Games folder, the
following options are available
when you touch
:
Delete – Delete a file.
Create new folder – Create a folder
within My games & Apps.
Rename – Rename a file.
Move – Move a file from the phone
memory to a memory card or vice
versa.
File info. – View the Name,
Size, Date, Time, Type, Duration,
Dimension, Protection and
Copyright details.
Playing a game
1 T ouch
then .
2 Touch
My games & apps.
3 Open the Games folder and
choose and touch a game to
launch.
Get creative
84
LG KP502 | User Guide
Sort by - Sort the games and
applications by Date, Size or Name.
Memory manager - View the
memory status.
Delete all - Delete all files.
Documents
From the Documents menu, you
can view all of your document
files. From here you can view Excel,
Powerpoint, Word, Text and
pdf files.
Transferring a file to your
phone
Bluetooth is probably the easiest
way to transfer a file from your
computer to your phone. You can
also use LG PC Suite via your sync
cable, see page 100 for details.
To transfer using Bluetooth:
1 Make sure your phone and
computer have Bluetooth
switched on and are visible to
one another.
2 Use your computer to send the
file via Bluetooth.
3 When the file is sent you will have
to accept it on your phone by
touching Yes.
4 The file should appear in your
Documents or Others folder.
01
02
03
04
05
06
07
08
Viewing a file
1 T ouch
then .
2 Touch then Documents.
3 Select a document and touch
View.
Get creative
85
Multimedia
Get creative
86
Others
Creating a movie
The Others folder is used to store
files which are not pictures, sounds,
videos, games or applications. It
is used in the same way as the
Documents folder. You may find
that when you transfer files from
your computer to your phone that
they appear in the Others folder
rather than the Documents folder.
If this happens you can move them.
To move a file from Others to
Documents:
1 Touch
then .
2 Touch then Others.
3 Select a file and touch
.
4 Touch Move, choose the
destination folder from the list
by touching the arrow icon. The
screen wil display Moved when
the transfer is complete.
1 T ouch
then .
2 Touch (Muvee studio).
3 Touch
to add an image.
Checkbox images you want to
include then select Insert .
4 Touch style tab to choose a
Muvee style.
5 Touch
to change the sound.
6 Touch
to see what you’ve
created.
7 Touch
then Order to make
an order.
LG KP502 | User Guide
8 T ouch
then Save Location to
choose where to save the movie.
Music
01
02
03
04
05
06
07
08
Get creative
Your LG KP502 has a built-in music
player so you can play all your
favourite tracks. To access the music
player, touch
then then .
From here you can access a number
of folders:
Recently played - View all of the
songs you have played recently.
All tracks - Contains all of the songs
you have on your phone.
Artists - Browse through your music
collection by artist.
Albums - Browse through your
music collection by album.
Genres - Browse through your
music collection by genre.
Playlists - Contains any playlists you
have created.
Shuffle tracks - Play your tracks in a
random order.
87
Multimedia
Transferring music onto your
phone
The easiest way to transfer music
onto your phone is via Bluetooth or
your sync cable.
You can also use LG PC Suite, see
page 100 for details. To transfer
using Bluetooth:
1 Make sure both devices have
Bluetooth switched on and are
visible to one another.
2 Select the music file on the other
device and choose to send it via
Bluetooth.
3 When the file is ready to be sent
you should accept it on your
phone by touching Yes.
4 The file should appear in Music >
All tracks.
Get creative
88
LG KP502 | User Guide
Playing a song
1
2
3
4
5
T ouch
then .
Touch , then All tracks.
Select the song you want to play.
Touch
to pause the song.
Touch
to skip to the next
song.
6 Touch
to skip to the previous
song.
7 Touch
to return to the Music
menu.
Using options while playing
music
Touch
and choose from:
Minimise - Make the music player
screen disappear so that you can
continue using your phone as
normal.
File info. - View information
including the Name, Size, Date,
Time, Type, Duration, Protection and
Copyright of the song.
Send - Send the song as a message
or via Bluetooth.
Use as - Use the song as Ringtone,
Message tone, Start-up or Shut
down.
Creating a playlist
You can create your own playlists by
choosing a selection of songs from
the All tracks folder.
1 Touch
then .
2 Touch , then Playlists.
3 Touch Add new playlist, enter
the playlist name and touch Save.
4 The All tracks folder will show all
the songs in your phone. Touch all
of the songs that you would like
to include in your playlist; a tick
will show next to the track names.
5 Touch Done.
01
02
03
04
05
06
07
08
Get creative
89
Multimedia
Editing a playlist
Deleting a playlist
From time to time, you may want to
add new songs or delete songs from
a playlist. When you want to do this,
you can edit the playlist.
1 Touch
then .
2 Touch , then Playlists.
3 Select the playlist.
4 Touch
and select:
Add new songs – To add more
songs to the playlist. Mark the
ones you want and touch Done.
Remove – Remove a song from
the playlist. Touch Yes to confirm.
Memory staus - View the
memory status.
Remove all - Remove all tracks
from the playlist.
1 T ouch
then Entertainment.
2 Touch Music, then Playlists.
3 Touch
then Delete or Delete
all to delete all of the playlists.
Get creative
90
LG KP502 | User Guide
Using the radio
Your LG KP502 has an FM radio
feature so you can tune into your
favourite stations to listen to on the
move.
NOTE: You will need to insert your
headphones in order to listen to
the radio. Insert them into the
headphone socket (this is the same
socket that you plug your charger
into).
Searching for stations
Resetting channels
You can tune radio stations into
your phone by searching for them
either manually or automatically.
They will then be saved to specific
channel numbers so you don’t have
to keep re-tuning. You can save up
to 50 channels in your phone. You
must first attach the headset to the
phone as this acts as the antenna.
To auto tune:
1 Touch
then .
2 Touch
then
.
3 Touch Auto scan. Then the
stations will be automatically
found and allocated to a channel
in your phone.
NOTE: You can also manually
tune into a station by using
and displayed next to the
radio frequency. If you press and
hold and , the stations will
be automatically found.
1 T ouch
then .
2 Touch
then
.
3 Choose Reset to reset the current
channel or choose Reset all to
reset all of the channels. Each
channel will return to the starting
87.5Mhz frequency.
01
Listening to the radio
07
1 T ouch
then .
2 Touch
then touch the channel
number of the station you would
like to listen to.
02
03
04
05
06
08
TIP! To improve the radio
reception, extend the headset
cord, which functions as the
radio antenna.
Get creative
You can minimize the screen and
listen the BGM Radio by tapping
.
91
Organiser
Adding an event to your
calendar
1 From the standby screen select
, then touch and choose
.
Select Calendar.
2 Select the date you would like to
add an event to.
3 Touch
then Add event.
4 Touch Category then choose
from Appointment, Anniversary
or Birthday.
Check the date and enter the
time you would like your event
to begin.
5 For appointments and
anniversaries enter the time and
date your event finishes in the
lower two time and date boxes.
Get organised
92
LG KP502 | User Guide
6 If you would like to add a subject
or a note to your event, touch
Note and type in your note,
followed by Save.
7 Set Alarm and Repeat.
8 Select Save and your event will
be saved in the calendar. A square
cursor will mark the day that any
events have been saved to and a
bell will ring at the start time of
your event, so that you can stay
organised.
TIP! You can set a holiday in
your calendar. Touch each day
you are on holiday one at time,
then touch
and select Set
holiday.
Changing your default
calendar view
Adding an item to your to
do list
1 From the standby screen select
, then touch and choose
.
Select Settings.
2 Touch Calendar and choose
either Monthly view or Week
view.
3 Set week starts on.
4 Touch Save to confirm your
choice.
1 From the standby screen select
, then touch and choose
.
2 Select To do and touch Add to
do.
3 Set the date for the to do item,
add notes and select a priority
level: High, Medium or Low.
4 Save your to do list item by
selecting Save.
01
02
03
04
05
06
07
08
TIP! You can edit a item by
selecting it, and touch the tab
and input. Confirm your amends
by selecting Save.
Get organised
93
Organiser
Sharing a to do item
Adding a memo
1 From the standby screen select
, then and choose .
Select To do.
2 Select the to do item you would
like to share, then touch
.
3 Select Send. You can choose to
share your to do item by Text
message, Multimedia msg.,
Email or Bluetooth.
1 From the standby screen select
, then touch and choose
. Select Memo.
2 Touch Add memo.
3 Type your memo, followed by
Save.
4 Your memo will appear on screen
next time you open the Memo
application.
TIP! You can back up and
synchronise your calendar with
your computer. See PC Sync on
page 100.
TIP! You can edit an existing
memo. Select the one you want
to edit and type your changes.
Get organised
94
LG KP502 | User Guide
Setting your alarm
Date finder is a handy tool to help
you calculate what the date will be
after a certain amount of days has
passed. For example, 60 days from
10.10.07 will be 09.12.2007.
This is great for keeping tabs on
deadlines.
1 From the standby screen select
, then touch and choose
.
2 Select Date finder.
3 In the From tab set your required
date.
4 In the After tab set the number
of days.
5 The Target date will be shown
below.
1 From the standby screen select
, then touch and choose
.
2 Touch Add alarm.
3 Set the time you would like the
alarm to sound and touch Save.
4 Choose whether you would
like your alarm to repeat Once,
Daily, Mon - Fri, Mon - Sat, Sat
- Sun, Except holiday or Choose
weekday.
The icons indicate the weekday
you select.
5 Select Alarm type to select a
type for your alarm.
6 Touch Alarm tone then choose
Default sounds or Voice
recordings folder to find sounds.
To listen to sounds touch the
sound, followed by
.
01
02
03
04
05
06
07
08
Get organised
Using date finder
95
Organiser
7A
dd a memo for the alarm. Touch
Save when you have finished
typing the memo.
8 Finally you can set the snooze
interval at 5, 10, 20, 30 minutes,
1hour or off.
9 Once you have set your alarm,
touch Save.
NOTE: You can set up to 5 alarms.
TIP! Touch on/off icon on the
right hand side of the alarm
to set.
1 From the standby screen select
, then touch and choose
.
2 Touch Add drawing.
3 Draw your memo on the touch
screen LCD followed by
.
4 Your memo will appear on screen
next time you open the Drawing
Panel application.
Voice recorder
Use your voice recorder to record
voice memos or other sounds.
1 Touch
then .
2 Touch
then
and Settings
choose from:
Duration – Set the recording
duration. Choose from No limit,
MMS msg. size or 1 minute.
Quality – Select the sound
quality. Choose from Super Fine,
Fine or Normal.
Get organised
96
Adding a memo with drawing
panel
LG KP502 | User Guide
Recording a sound or voice
Sending the voice recording
1
2
3
4
5
1O
nce you have finished recording,
touch
.
2 Touch Send via and choose from
Message, Email or Bluetooth. If
you choose Message or Email,
the recording will be added to the
message and you can write and
send it as normal. If you choose
Bluetooth, you will be prompted
to turn Bluetooth on.
NOTE: After you have finished
recording, touch
and choose
Send via, File, Delete, Use as
(to use the recording as your
ringtone) Settings or Go to my
sounds.
T ouch
then .
Touch
.
Touch
to begin recording.
Touch
to end recording.
Touch
to listen to your
recording.
01
02
03
04
05
06
07
08
Get organised
97
Organiser
Using your calculator
Converting a unit
1 From the standby screen select
, then touch and choose
.
2 Select Calculator.
3 Touch the numeric keys to input
numbers.
4 For simple calculations, touch the
function you require (+, –, *, /),
followed by =.
5 For more complex calculations,
touch
and choose from sin,
cos, tan, log, ln, exp, sqrt, deg
or rad etc..
1 From the standby screen select
, then touch and choose
.
2 Select Converter.
3 Choose whether you would like
to convert Currency, Surface,
Weight, Length, Temperature,
Volume or Velocity.
4 You can then select the unit, and
enter the value you would like to
convert from, followed by the unit
you would like to convert to.
5 The corresponding value will
appear on the screen.
Get organised
98
LG KP502 | User Guide
Using the stopwatch
1 From the standby screen select
, then touch and choose
.
2 Select Stopwatch.
3 Touch Start to begin the timer.
4 Touch Lap if you want to record
a lap time.
5 Touch Stop to end the timer.
6 Touch Resume to restart the
stopwatch at the time you
stopped it at, or touch Reset to
begin the time again.
Adding a city to your world
time
1 From the standby screen select
, then touch and choose
.
2 Select World time.
3 Touch the
, followed by Add
city. Start typing the name of the
city you require and it will show at
the top of the screen.
01
02
03
04
05
06
07
08
Get organised
99
PC Sync
You can synchronise your PC with
your phone to make sure all your
important details and dates match,
and also to backup your files to put
your mind at ease.
Installing LG PC Suite on your
computer
Get organised
100
1 From the standby screen press
and select
and choose
.
2 Select USB connection mode
and choose.
PC internet
Mass storage
PC suite
Music sync
Always ask
3 Insert the supplied CD into your
PC. Click on the LG PC Suite
Installer which will appear on
your screen.
LG KP502 | User Guide
4 S elect the language you would
like the installer to run in and
click OK.
5 Follow the instructions on the
screen to complete the LG PC
Suite Installer wizard.
6 Once installation is complete, the
LG PC Suite icon will appear on
your desktop.
Connecting your phone and
PC
1C
onnect the USB cable to your
phone and your PC.
2 Double click on the LG PC Suite
icon on your desktop.
3 Click on Connection Wizard,
then USB.
4 Click on Next, then Next again,
then Finish.
Your phone and PC are now
connected.
Backing up and restoring
your phone’s information
Viewing your phone files on
your PC
1C
onnect your phone to your PC
as outlined above.
2 Click on the Backup icon, and
select Backup or Restore.
3 Mark the contents you would
like to back up or restore. Select
the location you would like to
backup information to, or restore
information from. Click OK.
4 Your information will be backed
up or restored.
1C
onnect your phone to your PC
as outlined previously.
2 Click on the Contents icon.
3 All of the documents, flash
contents, images, sounds and
videos you have saved onto your
phone will be displayed on the
screen in the LG Phone folder.
TIP! Viewing the contents of
your phone on your PC helps
you to arrange files, organise
documents and remove
contents you no longer need.
01
02
03
04
05
06
07
08
Get organised
101
PC Sync
Synchronising your contacts
Synchronising your messages
1C
onnect your phone to your PC.
2 Click on the Contacts icon.
3 Your PC will now import and
display all contacts saved to your
USIM card and handset.
4 Click on File and select Save. You
can now select where you would
like to save your contacts to.
NOTE: To backup contacts saved
to your USIM card, click on the
SIM card folder on the left side of
your PC screen. Select Edit at the
top of the screen, then Select all.
Right-click your contacts and
select Copy to contact. Now click
on the Handset folder on the
left of your screen and all your
numbers will be displayed.
1C
onnect your phone to your PC.
2 Click on the Messages icon.
3 All of your PC and phone
messages will be displayed in
folders on your screen.
4 Use the tool bar at the top of
your screen to edit and rearrange
messages.
Get organised
102
LG KP502 | User Guide
Using your phone as Music
Sync device
Your phone can be used as a mass
storage device.
1 Disconnect your phone from
your PC.
2 From the standby screen select
, then touch
.
3 Select
, then USB connection
mode.
4 Touch Mass storage.
5 Connect your phone to your PC.
Your phone will read: Connected.
6 All of your phone files will
automatically be stored onto your
PC hard drive.
NOTE: Your phone must be
unplugged from your PC to
initiate Mass Storage.
Your Phone can be used as Music
Sync device to Sync Music Files only.
Music Sync can be done using
Windows Media Player 10 / 11 and
supports both Handset Memory
and External Memory Card.
1 Disconnect your phone from
your PC.
2 From the standby screen select
, then touch
.
3 Select
and then USB
connection mode.
4 Touch Music sync.
5 Connect your phone to your PC.
Your phone will read: Connecting
as Music Sync … followed by
Disconnect Cable to Stop Music
Sync.
01
02
03
04
05
06
07
08
Get organised
Using your phone as a mass
storage device
103
The web
Browser
Browser gives you a fast, full colour
world of games, music, news, sport,
entertainment and loads more,
straight to your mobile phone.
Wherever you are and whatever
you’re into.
Accessing the web
1 From the standby screen select
, then touch and choose
.
2 To access the browser homepage
directly, select Home. Alternately
select Enter address and type
in your desired URL, followed by
Connect.
NOTE: An additional cost is incurred
when connecting to this service and
downloading content. Check your
data charges with your network
provider.
The web
104
LG KP502 | User Guide
Adding and accessing your
bookmarks
For easy and fast access to your
favourite websites, you can add
bookmarks and save web pages.
1 From the standby screen select
, then touch and choose
.
2 Select Bookmarks. A list of your
Bookmarks will appear on the
screen.
3 To add a new bookmark, select
and touch Add bookmark.
Enter a name for your bookmark
followed by the URL.
4 Touch Save. Your Bookmark
will now appear in the list of
bookmarks.
5 To access the bookmark simply
touch the bookmark and then
touch Connect. You will be
connected to your bookmark.
Using RSS reader
Saving a page
RSS (Really Simple Syndication) is a
family of web feed formats used to
publish frequently updated content
such as blog entries, news headlines
or podcasts. An RSS document,
which is called a feed, web feed, or
channel, contains either a summary
of content from an associated web
site or the full text. RSS makes it
possible for people to keep up
with their favourite web sites in an
automated manner that is easier
than checking them manually.
The user subscribes to a feed by
entering the feed’s link into the
reader or by clicking an RSS icon
in a browser that initiates the
subscription process. The reader
checks the user’s subscribed
feeds regularly for new content,
downloading any updates that it
finds.
1A
ccess your required webpage as
described above.
2 Touch
and select Save this
page.
3 Enter a name for the webpage so
you can easily recognise it.
4 Touch Save.
01
TIP! This menu will also allow
you to edit titles of saved pages,
protect or unprotect the screen
memo, and delete saved pages.
07
02
03
04
05
06
08
The web
105
The web
Accessing a saved page
1 From the standby screen select
, then touch and choose
.
2 Select Saved pages.
3 Select the required page and it
wil open.
Viewing your browser history
1 From the standby screen select
, then touch and choose
.
Select History.
2 A list of web page titles you
have accessed recently will be
displayed. To access one of these
pages, simply select the required
page.
The web
106
LG KP502 | User Guide
Changing the web browser
settings
1 From the standby screen select
, then touch and choose
.
Select Settings.
2 You can choose to edit Profiles,
Appearance settings, Cache,
Cookies, Security, or to reset all
settings, select Reset Settings.
Using your phone as a
modem
Your KP502 can double as a modem
for your PC, giving you email and
internet access even when you can’t
connect using wires. You can use
either the USB cable or Bluetooth.
Using the USB cable:
1 Ensure you have the LG PC Suite
installed on your PC.
2 Connect your KP502 and your PC
using the USB cable and launch
the LG PC Suite software.
3 Click Internet Kit on your PC.
Then click New button and select
Modem.
4 Choose LG Mobile USB Modem
and select OK. It will now appear
on screen.
01
02
03
04
05
06
07
08
The web
5W
rite the Profile that can connect
to the Internet and save the
values.
6 The profile that you create will
appear on your PC screen. Select
it and click Connect.
Your PC will connect through
your KP502.
NOTE: For more information on
synchronising using the LG PC
Suite see page 101.
Using Bluetooth:
1 Ensure Bluetooth is switched On
and Visible for both your PC and
KP502.
2 Pair your PC and KP502 so
that a passcode is required for
connection.
3 Use the Connection wizard on
your LG PC Suite to create an
active Bluetooth connection.
4 Click Internet Kit on your PC.
Then click New button.
107
The web
5C
hoose LG Mobile USB Modem
and select OK. It will now appear
on screen.
6 Write the Profile that can connect
to the Internet and save the
values.
7 The profile that you create will
appear on your PC screen. Select
it and click Connect.
Your PC will connect through
your KP502.
NOTE: For more information on
Bluetooth see page 114.
The web
108
LG KP502 | User Guide
Settings
Within this folder you can adapt
your settings to make your KP502
personal to you.
NOTE: For information on call
settings see page 26.
Personalising your profiles
You can quickly change your profile
on the standby screen. Simply touch
the status summary bar on the top
and touch the profile tab.
Using the settings menu you can
personalise each profile setting.
1 Press
and then choose
.
2 Touch Profiles and then choose
the profile you want to edit.
3 You can then change all of the
sounds and alert options available
in the list, including your Voice
Ring tone and Volume, Message
alerts settings and more.
Changing your screen
settings
1 T ouch
then choose
.
2 Touch and then choose from:
Wallpaper - Choose the theme
for your standby screen.
Top Menu - Choose the style of
the top menu.
Dialing - Adjust the number size
and colour.
Font - Adjust the font style and
size.
Backlight - Choose how long the
backlight remains on for.
NOTE: The longer the backlight is
on for, the more battery power is
used and you may need to charge
your phone more often.
01
02
03
04
05
06
07
08
Settings
109
Settings
Brightness - Adjust the screen
brightness.
Greeting message - Choose
on or off and fill in the greeting
message.
Start-up/Shut down - Choose
the theme for your start-up/shut
down screen.
2 Touch Save to save your settings.
Changing your phone
settings
Enjoy the freedom of adapting how
your KP502 works to your own style.
TIP! To scroll through a list of
options, touch the last item
visible and slide your finger up
the screen. The list will move up
so more items are visible.
Settings
110
LG KP502 | User Guide
1 T ouch
then choose
.
2 Touch
then choose from the
list below.
Date & Time - Adjust your date
and time settings or choose to
auto update the time when you
travel or for daylight saving.
Power save - Choose to switch
the factory set power saving
settings Off, Night only and
Always on.
Languages - Change the
language of your KP502’s display.
Auto key lock - Lock the keypad
automatically in standby screen.
Security - Adjust your security
settings, including PIN codes and
handset lock.
Memory manager - See Using
memory manager on page 113
for more information.
Reset settings - Reset all
the settings to their factory
definitions.
Handset information - View the
technical information for your
KP502.
Changing your connectivity
settings
Your connectivity settings have
already been set up by your
network operator, so you can enjoy
your new phone from the off. If you
want to change any settings, use
this menu.
Touch
then
.
Select .
Network settings
Select Network - If you set to
Automatic, KP502 automatically
searches for the network and
registers the handset to the
network. This is recommended for
best service and quality.
If you set to Manual all the
currently available networks are
shown and you can select one
of them for registration. If the
registration of the network has
failed, the network lists are listed
again and you can select any
other one for registration.
NOTE: When your handset loses
the network in manual mode,
the popup message to select the
available network will be shown
on the Idle screen.
01
02
03
04
05
06
07
08
Settings
111
Settings
Preferred lists - If the network
is searching automatically, you
can add a prefer red network to
be connected to. The following
options are available.
Internet profiles - This menu shows
the Internet profiles. You can create
new profiles, delete or edit them by
using the Option Menu. However,
you cannot delete or edit default
configurations depending on
country variant.
Access points - Your network
operator has already saved this
information. You can add new
access points using this menu.
Packet data conn. - Choose when
your device should be connected to
network for packet data.
Settings
112
LG KP502 | User Guide
USB connection mode - Choose
Data service and synchronise
your KP502 using the LG PC Suite
software to copy files from your
phone. See page 100 for more
information on synchronisation.
If you use Music sync with Windows
Media Player, select Music sync
in this menu. Music sync is only
available for music content.
Streaming settings - Your network
operator has already saved this
information. You may edit it if you’d
like to make changes.
Using memory manager
Your KP502 has three memories
available: the phone, the USIM Card
and an external memory card (you
may need to purchase the memory
card separately).
You can use memory manager to
determine how each memory is
used and see how much space is
available.
Touch
followed by
. Select
then Memory Manager.
Handset common memory - View
the memory available on your
KP502 for Pictures, Sounds, Video,
Flash, MMS, Email, Java applications
and others.
Handset reserved memory - View
the memory available on your
handset for SMS, Contacts, Calendar,
To do list, Memo, Alarm, Call history,
Bookmarks and Miscellaneous
items.
SIM memory - View the memory
available on your SIM Card.
External memory - View the
memory available on your external
memory card (you may need
to purchase the memory card
separately).
Primary storage settings - Choose
the location you prefer items to be
saved to.
01
02
03
04
05
06
07
08
TIP! See page 14 for information
on Inserting a memory card.
Settings
113
Settings
Sending and receiving your
files using Bluetooth
Settings
114
Bluetooth is a great way to send and
receive files as no wires are needed
and connection is quick and easy.
You can also connect to a Bluetooth
headset to make and receive calls.
To send a file:
1 Open the file you want to send,
typically this will be a photo,
video or music file.
2 Choose Send.
Choose Bluetooth.
3 If you have already paired the
Bluetooth device, your KP502
will not automatically search for
other Bluetooth devices. If not,
your KP502 will search for other
Bluetooth enabled devices within
range.
4 Choose the device you want to
send the file to and touch Select.
LG KP502 | User Guide
5 Your file will be sent.
TIP! Keep an eye on the
progress bar to make sure your
file is sent.
To receive a file:
1 To receive files your Bluetooth
must be both On and Visible. See
Changing your Bluetooth settings
on the right for more information.
2 A message will prompt you to
accept the file from the sender.
Touch Yes to receive the file.
3 You will see where the file has
been saved and you can choose
to View the file or Use as
wallpaper. Files will usually be
saved to the appropriate folder in
your Media Album.
Changing your bluebooth
settings:
1 Touch
and choose
.
2 Choose then touch
and
choose Settings.
Make your changes to:
My device visibility - Choose to
be Visible or Hidden or Visible
for 1 min.
My device name - Enter a name
for your KP502.
Supported services - Choose
how to use Bluetooth in
association with different services.
See Using your phone as a
modem on page 107 or Using a
Bluetooth headset on page 116.
Remote SIM Mode - Turn on
or off.
My address - Show your
Bluetooth address.
Pairing with another
Bluetooth device
02
03
04
05
06
07
08
Settings
By pairing your KP502 and another
device, you can set up a passcode
protected connection. This means
your pairing is more secure.
1 Check your Bluetooth is On and
Visible. You can change your
visibility in the Settings menu.
2 Touch Search.
3 Your KP502 will search for devices.
When the search is completed
Refresh will appear on screen.
4 Choose the device you want to
pair with and enter the passcode,
then touch OK.
5 Your phone will then connect to
the other device, on which you
should enter the same passcode.
6 You passcode protected
Bluetooth connection is now
ready.
01
115
Settings
Using a Bluetooth headset
1C
heck your Bluetooth is On and
Visible.
2 Follow the instructions that came
with your headset to place your
headset in pairing mode and pair
your devices.
3 Touch Ask before connect or
Always connect and touch Yes
to Connect now. Your KP502 will
automatically switch to Headset
profile.
TIP! See page 27 for details on
BT answer mode so that you
can control how you answer
calls when your Bluetooth
headset is connected.
Settings
116
LG KP502 | User Guide
Accessories
These accessories were supplied with KP502.
Charger
Battery
01
Data cable
and CD
Connect and
synchronise
your KP502
and PC.
02
03
04
05
06
07
Stereo
headset
User Guide
Learn more
about your
KP502.
08
KP502 User Guide
Protection Film
WARNING:
When the
protection film is
attached on touch
window, touch
sensitivity might
be decreased.
Accessories
NOTE:
• Always use genuine LG accessories.
• Failure to do this may invalidate your
warranty.
• Accessories may be different in
different regions; please check with
our regional service company or
agent for further inquires.
117
Network service
Technical data
The wireless phone described in this
guide is approved for use on the
GSM 900, DCS 1800, GSM 850 and,
PCS 1900 network.
A number of features included
in this guide are called Network
Services. These are special services
that you arrange through your
wireless service provider. Before
you can take advantage of any
of these Network Services, you
must subscribe to them through
your service provider and obtain
instructions for their use from your
service provider.
General
Product name : KP502
System : GSM 900 / DCS 1800 / GSM
850 / PCS 1900
Network service
118
LG KP502 | User Guide
Ambient Temperatures
Max : +55°C (discharging),
+45°C (charging)
Min : -10°C
EN 301 489-01 v1.6.1 / EN 301 489-07 v1.3.1 / EN 301 489-17 v1.2.1
EN 60950-1 : 2001
EN 50360 / EN62209-1:2006
EN 301 511 V9.0.2
EN 300 328 V1.7.1
18, March, 2009
Guidelines for safe and efficient use
Please read these simple guidelines.
Not following these guidelines may
be dangerous or illegal.
Exposure to radio frequency
energy
Guidelines
Radio wave exposure and Specific
Absorption Rate (SAR) information
This mobile phone model KP502
has been designed to comply with
applicable safety requirements for
exposure to radio waves. These
requirements are based on scientific
guidelines that include safety
margins designed to assure the
safety of all persons, regardless of
age and health.
• The radio wave exposure
guidelines employ a unit of
measurement known as the
Specific Absorption Rate, or SAR.
Tests for SAR are conducted using
standardised methods with the
phone transmitting at its highest
certified power level in all used
frequency bands.
120
LG KP502 | User Guide
• While there may be differences
between the SAR levels of various
LG phone models, they are all
designed to meet the relevant
guidelines for exposure to radio
waves.
• The SAR limit recommended by
the International Commission on
Non-Ionizing Radiation Protection
(ICNIRP) is 2W/kg averaged over
10g of tissue.
• The highest SAR value for this
model phone tested by DASY4 for
use at the ear is 0.827 W/kg (10g)
and when worn on the body is
1.40 W/Kg(10g).
• SAR data information for
residents in countries/regions
that have adopted the SAR limit
recommended by the Institute of
Electrical and Electronics Engineers
(IEEE), which is 1.6 W/kg averaged
over 1g of tissue.
Product care and
maintenance
WARNING
Only use batteries, chargers
and accessories approved for
use with this particular phone
model. The use of any other
types may invalidate any
approval or warranty applying
to the phone, and may be
dangerous.
Guidelines
• Do not disassemble this unit. Take
it to a qualified service technician
when repair work is required.
• Keep away from electrical
appliances such as TVs, radios, and
personal computers.
• The unit should be kept away from
heat sources such as radiators or
cookers.
• Do not drop.
• Do not subject this unit to
mechanical vibration or shock.
• Switch off the phone in any area
where you are required by special
regulations. For example, do not
use your phone in hospitals as
it may affect sensitive medical
equipment.
• Do not handle the phone with wet
hands while it is being charged. It
may cause an electric shock and
can seriously damage your phone.
• Do not to charge a handset near
flammable material as the handset
can become hot and create a fire
hazard.
• Use a dry cloth to clean the
exterior of the unit (do not use
solvents such as benzene, thinner
or alcohol).
• Do not charge the phone when it
is on soft furnishings.
• The phone should be charged in a
well ventilated area.
121
Guidelines for safe and efficient use
• Do not subject this unit to
excessive smoke or dust.
• Do not keep the phone next to
credit cards or transport tickets; it
can affect the information on the
magnetic strips.
• Do not tap the screen with a
sharp object as it may damage the
phone.
• Do not expose the phone to liquid
or moisture.
• Use the accessories like earphones
cautiously. Do not touch the
antenna unnecessarily.
Efficient phone operation
Electronics devices
All mobile phones may get
interference, which could affect
performance.
• Do not use your mobile phone
near medical equipment
without requesting permission.
Avoid placing the phone over
pacemakers, for example, in your
breast pocket.
• Some hearing aids might be
disturbed by mobile phones.
• Minor interference may affect TVs,
radios, PCs, etc.
Road safety
Guidelines
Check the laws and regulations on
the use of mobile phones in the
area when you drive.
• Do not use a hand-held phone
while driving.
• Give full attention to driving.
122
LG KP502 | User Guide
• Use a hands-free kit, if available.
• Pull off the road and park before
making or answering a call if
driving conditions so require.
• RF energy may affect some
electronic systems in your vehicle
such as car stereos and safety
equipment.
• When your vehicle is equipped
with an air bag, do not obstruct
with installed or portable wireless
equipment. It can cause the air bag
to fail or cause serious injury due
to improper performance.
• If you are listening to music whilst
out and about, please ensure that
the volume is at a reasonable
level so that you are aware of your
surroundings. This is particularly
imperative when near roads.
Avoid damage to your
hearing
Damage to your hearing can occur
if you are exposed to loud sound for
long periods of time. We therefore
recommend that you do not turn on
or off the handset close to your ear.
We also recommend that music and
call volumes are set to a reasonable
level.
Glass Parts
Guidelines
Some parts of your mobile device
are made of glass. This glass
could break if your mobile device
is dropped on a hard surface or
receives a substantial impact. If
the glass breaks, do not touch or
attempt to remove. Stop using your
mobile device until the glass is
replaced by an authorized service
provider.
123
Guidelines for safe and efficient use
Blasting area
Children
Do not use the phone where
blasting is in progress. Observe
restrictions, and follow any
regulations or rules.
Keep the phone in a safe place
out of the reach of small children.
It includes small parts which may
cause a choking hazard if detached.
Potentially explosive
atmospheres
Emergency calls
• Do not use the phone at a
refueling point.
• Do not use near fuel or chemicals.
• Do not transport or store
flammable gas, liquid, or explosives
in the same compartment of your
vehicle as your mobile phone and
accessories.
In aircraft
Guidelines
124
Wireless devices can cause
interference in aircraft.
• Turn your mobile phone off before
boarding any aircraft.
• Do not use it on the ground
without permission from the crew.
LG KP502 | User Guide
Emergency calls may not be
available under all mobile networks.
Therefore, you should never depend
solely on the phone for emergency
calls. Check with your local service
provider.
Battery information and care
• You do not need to completely
discharge the battery before
recharging. Unlike other battery
systems, there is no memory
effect that could compromise the
battery’s performance.
• Use only LG batteries and chargers.
LG chargers are designed to
maximize the battery life.
• Do not disassemble or short-circuit
the battery pack.
• Keep the metal contacts of the
battery pack clean.
• Replace the battery when it
no longer provides acceptable
performance. The battery pack
maybe recharged hundreds of
times until it needs replacing.
• Recharge the battery if it has
not been used for a long time to
maximize usability.
• Do not expose the battery charger
to direct sunlight or use it in high
humidity, such as in the bathroom.
• Do not leave the battery in hot or
cold places, this may deteriorate
the battery performance.
• There is risk of explosion if the
battery is replaced by an incorrect
type.
• Dispose of used batteries
according to the manufacturer’s
instructions. Please recycle when
possible. Do not dispose as
household waste.
• If you need to replace the battery,
take it to the nearest authorized LG
Electronics service point or dealer
for assistance.
• Always unplug the charger from
the wall socket after the phone is
fully charged to save unnecessary
power consumption of the charger.
• Actual battery life will depend on
network configuration, product
settings, usage patterns, battery
and environmental conditions.
Guidelines
125
Trouble Shooting
This chapter lists some problems that you might encounter while using
your phone. Some problems require that you call your service provider, but
most of problems you encounter are easy to correct yourself.
Trouble shooting
126
Message
Possible causes
Possible Corrective measures
SIM error
There is no SIM card in the
phone or you may have
inserted it incorrectly.
Make sure that the SIM card is correctly
inserted.
No connection
to the network
Signal weak
Outside GSM network
Move higher to a window or open
space. Check service provider coverage
map.
Codes do not
match
When you want to change
a security code you have to
confirm the new code by
entering it again. The two
codes that you have entered
do not match.
Contact your Service Provider.
Function
cannot be set
Not supported by Service
Provider or registration
required
Contact your Service Provider.
Calls not
available
Dialling error
New SIM card inserted
Charge limit reached
New network not authorised. Check
for new restrictions. Contact Service
Provider or reset limit with PIN 2.
Phone cannot
be switched on
On/Off key pressed too briefly
Battery empty
Battery contacts dirty
Press On/Off key for at least two
seconds.
Charge battery. Check charging
indicator in the display.
Clean contacts.
LG KP502 | User Guide
Message
Possible causes
Battery totally empty
Temperature out of range
Contact problem
Charging error
No mains voltage
Charger defective
Wrong charger
Battery defective
Possible Corrective measures
Charge battery.
Make sure the ambient temperature is
right, wait for a while, and then charge
again.
Check power supply and connection to
the phone. Check the battery contacts,
clean them if necessary.
Plug in to a different socket or check
voltage.
If the charger does not warm up,
replace it.
Only use original LG accessories.
Replace battery.
Phone loses
network
Signal too weak
Reconnection to another service
provider is automatic.
Number not
permitted
The Fixed dial number
function is on.
Check settings.
Trouble shooting
127