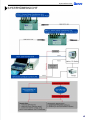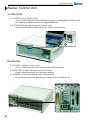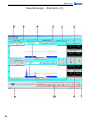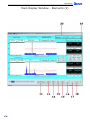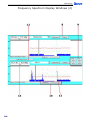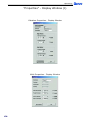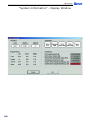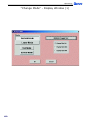
1
Copyright © 2002. IES GmbH. Alle Rechte vorbehalten Benutzerhandbuch für Onyx3000 Erste Ausgabe: Januar 2002 Autoren: Stefan Scheuermann Herbert Scheuermann Wilfried Zenker Gabriel Nistor Printed in Austria Gelegentliche Änderungen der Informationen in dieser Veröffentlichung behalten wir uns ohne Ankündigung vor. Diese Änderungen werden jeweils in die folgenden Ausgaben dieses Handbuches, zusätzlicher Dokumente oder Veröffentlichungen übernommen. Diese Firma übernimmt keine Garantie, weder ausdrücklich noch implizit, bezüglich des Inhalts dieses Handbuchs. Notieren Sie nachfolgend die Modellnummer, Seriennummer sowie Kaufdatum. Wenn Sie sich bezüglich Ihres Gerätes an IES GmbH. wenden, müssen Sie diese Daten immer mit angeben. Kein Teil dieser Veröffentlichung darf ohne vorherige schriftliche Zustimmung von IES GmbH. reproduziert, in einem Datenabrufsystem gespeichert oder in anderer Form oder durch andere Verfahren (elektronisch, mechanisch, durch Fotokopieren, Aufnahme, etc.) verbreitet werden. Online Machine Condition Analysing Expert System Onyx3000 Modell:______________________________ Seriennummern: LCU3000: __________________________________ ALCU3000: _________________________________ PDCU3000: _________________________________ CIOU3000: _________________________________ ECCU3000: _________________________________ SSCU3000 (1): ______________________________ SSCU3000 (2): ______________________________ Kaufdatum:_________________________________ Produktnamen und Warenzeichen anderer Unternehmen werden in diesem Handbuch nur zu Identikationszwecken verwendet und sind das Eigentum der jeweiligen Unternehmen. 2 3 4 I N H A LT Konformitätserklärung . . . . . . . . . . . . . . . . . . . . . . . . . . . . . . . . . . . . . . . . . . . . . . . . . . . . . . . . . . . . . . . . . . . . . . . . . . . . . . . . 8 Hilfestellungen und Support . . . . . . . . . . . . . . . . . . . . . . . . . . . . . . . . . . . . . . . . . . . . . . . . . . . . . . . . . . . . . . . . . . . . . . . . . . . 9 Vorwort . . . . . . . . . . . . . . . . . . . . . . . . . . . . . . . . . . . . . . . . . . . . . . . . . . . . . . . . . . . . . . . . . . . . . . . . . . . . . . . . . . . . . . . . . . . . . . 10 1. Systemübersicht Onyx3000 Systemübersicht . . . . . . . . . . . . . . . . . . . . . . . . . . . . . . . . . . . . . . . 13 Funktionsprinzipien Onyx3000 . . . . . . . . . . . . . . . . . . . . . . . . . . 14 Mess-Prinzip . . . . . . . . . . . . . . . . . . . . . . . . . . . . . . . . . . . . . . . . . . . . . . . . . . . . 14 Systemkonzept . . . . . . . . . . . . . . . . . . . . . . . . . . . . . . . . . . . . . . . . . . . . . . . . . 15 Interpretation von Messwertenund Einstellung von Schwellwerten . . . . . . . . . . . . . . . . . . . . . . . . . . . . . . . 16 Vibrationswerte . . . . . . . . . . . . . . . . . . . . . . . . . . . . . . . . . . . . . . . . . . . . . . . . . 17 4/20 mA-Kanäle (Temperatur-, Strom-, Wind-, Aux-Werte) . . . . . . . . 18 Master Control Unit . . . . . . . . . . . . . . . . . . . . . . . . . . . . . . . . . . . . 20 Vorder-/Rückseite . . . . . . . . . . . . . . . . . . . . . . . . . . . . . . . . . . . . . . . . . . . . . . 20 LCU3000 . . . . . . . . . . . . . . . . . . . . . . . . . . . . . . . . . . . . . . . . . . . . . . . . . . . . . . . 21 ECCU3000 . . . . . . . . . . . . . . . . . . . . . . . . . . . . . . . . . . . . . . . . . . . . . . . . . . . . . . 21 ALCU3000 . . . . . . . . . . . . . . . . . . . . . . . . . . . . . . . . . . . . . . . . . . . . . . . . . . . . . . . 22 Externe Leistungs-Relais . . . . . . . . . . . . . . . . . . . . . . . . . . . . . . . . . . . 22 Pin-Belegung des 50 Pin Steckers . . . . . . . . . . . . . . . . . . . . . . . . . . . 22 Stecker für externe Verkabelung . . . . . . . . . . . . . . . . . . . . . . . . . . . . 23 CIOU3000 . . . . . . . . . . . . . . . . . . . . . . . . . . . . . . . . . . . . . . . . . . . . . . . . . . . . 23 “to Pc” Stecker . . . . . . . . . . . . . . . . . . . . . . . . . . . . . . . . . . . . . . . . . . . . 23 “to frontend” Stecker . . . . . . . . . . . . . . . . . . . . . . . . . . . . . . . . . . . . . . 24 “options” Stecker . . . . . . . . . . . . . . . . . . . . . . . . . . . . . . . . . . . . . . . . . 24 Reset Taster . . . . . . . . . . . . . . . . . . . . . . . . . . . . . . . . . . . . . . . . . . . . . . 25 PDCU3000 . . . . . . . . . . . . . . . . . . . . . . . . . . . . . . . . . . . . . . . . . . . . . . . . . . . . . . 26 Der Haupt - AC/DC (DC/DC) - Converter . . . . . . . . . . . . . . . . . . . . . . . . . . 26 Tauschen von einzelnen Funktionsmodulen . . . . . . . . . . . . . . . . . . . . . . . 27 SSCU3000 . . . . . . . . . . . . . . . . . . . . . . . . . . . . . . . . . . . . . . . . . . . . . 28 Steckverbindungen . . . . . . . . . . . . . . . . . . . . . . . . . . . . . . . . . . . . . . . . . . . . . . 29 Von SSCU unterstützte Sensoren . . . . . . . . . . . . . . . . . . . . . . . . . . . . . . . . . 29 Bedeutung der Leds . . . . . . . . . . . . . . . . . . . . . . . . . . . . . . . . . . . . . . . . . . . . . 29 Einstellmöglichkeiten und Reset . . . . . . . . . . . . . . . . . . . . . . . . . . . . . . . . . . 30 5 2. Bedienung Onyx3000 Software Übersicht . . . . . . . . . . . . . . . . . . . . . . . . . . . . . . . . . . . . . 33 OnyxView . . . . . . . . . . . . . . . . . . . . . . . . . . . . . . . . . . . . . . . . . . . . . . 34 “Splash” - Screen und Startup . . . . . . . . . . . . . . . . . . . . . . . . . . . . . . . . . . . 36 Hauptanzeige - Elemente . . . . . . . . . . . . . . . . . . . . . . . . . . . . . . . . . . . . . . . 38 Onyx - Viewer Modus . . . . . . . . . . . . . . . . . . . . . . . . . . . . . . . . . . . . . . . . . . . . 42 “Drop-down” - Auswahlfelder . . . . . . . . . . . . . . . . . . . . . . . . . . . . . . . . . . . . 44 Auswahl - File . . . . . . . . . . . . . . . . . . . . . . . . . . . . . . . . . . . . . . . . . . . . 44 Auswahl - Actions . . . . . . . . . . . . . . . . . . . . . . . . . . . . . . . . . . . . . . . . . 44 Auswahl - View . . . . . . . . . . . . . . . . . . . . . . . . . . . . . . . . . . . . . . . . . . . 46 Auswahl - Help . . . . . . . . . . . . . . . . . . . . . . . . . . . . . . . . . . . . . . . . . . . 46 Frequenzspektrum - Anzeigen . . . . . . . . . . . . . . . . . . . . . . . . . . . . . . . . . . . 48 Multifunktions - Anzeigen . . . . . . . . . . . . . . . . . . . . . . . . . . . . . . . . . . . . . . . . 52 “Settings” - Anzeigefenster (“Onyx-Parameters”) . . . . . . . . . . . . . . . . . 54 “Settings” - Anzeigefenster (“User-Settings”) . . . . . . . . . . . . . . . . . . . . . 56 “Settings” - Anzeigefenster (“Learn-Settings”) . . . . . . . . . . . . . . . . . . . . 58 “Properties” - Anzeigefenster (1) . . . . . . . . . . . . . . . . . . . . . . . . . . . . . . . . . 60 “Properties” - Anzeigefenster (2) . . . . . . . . . . . . . . . . . . . . . . . . . . . . . . . . . 62 “System-Information” - Anzeigefenster . . . . . . . . . . . . . . . . . . . . . . . . . . . 64 “Change Mode” - Anzeigefenster . . . . . . . . . . . . . . . . . . . . . . . . . . . . . . . . . 66 “Calculate Trend” - Anzeigefenster . . . . . . . . . . . . . . . . . . . . . . . . . . . . . . . 70 Excel-Beschreibung . . . . . . . . . . . . . . . . . . . . . . . . . . . . . . . . . . . . . 72 Pc-Anywhere - Funktionsbeschreibung . . . . . . . . . . . . . . . . . . . 74 Standardmäßig eingerichtete Benutzer . . . . . . . . . . . . . . . . . . . . . . . . . . . 74 Verbindungsaufbau . . . . . . . . . . . . . . . . . . . . . . . . . . . . . . . . . . . . . . . . . . . . . . 74 Pc-Anywhere über Internet . . . . . . . . . . . . . . . . . . . . . . . . . . . . . . . . . . . . . . 74 Sicherheitsaspekte . . . . . . . . . . . . . . . . . . . . . . . . . . . . . . . . . . . . . . . . . . . . . . 75 LCU3000 - Navigationsüberblick und Funktionen . . . . . . . . . . 76 Navigationsinterface und Menüführung . . . . . . . . . . . . . . . . . . . . . . . . . . . 77 “Show values” - Menü . . . . . . . . . . . . . . . . . . . . . . . . . . . . . . . . . . . . . . . . . . 77 “Show Alarms” - Menü . . . . . . . . . . . . . . . . . . . . . . . . . . . . . . . . . . . . . . . . . 77 “Set Mode” - Menü . . . . . . . . . . . . . . . . . . . . . . . . . . . . . . . . . . . . . . . . . . . . 78 Mail Informer . . . . . . . . . . . . . . . . . . . . . . . . . . . . . . . . . . . . . . . . . . . 79 6 3. LCX3000 (Option) Montage des LCX3000 . . . . . . . . . . . . . . . . . . . . . . . . . . . . . . . . . . . . . . . . . . . . . . . 85 Stromversorgung, Batterie - und Relaistest . . . . . . . . . . . . . . . . . . . . . . . . . . . . 85 Batteriewechsel . . . . . . . . . . . . . . . . . . . . . . . . . . . . . . . . . . . . . . . . . . . . . . . . . . . . . . 86 Elektrische Verbindungen . . . . . . . . . . . . . . . . . . . . . . . . . . . . . . . . . . . . . . . . . . . . 86 Technische Daten . . . . . . . . . . . . . . . . . . . . . . . . . . . . . . . . . . . . . . . . . . . . . . . . . . . . 86 4. Technische Daten Sensoren - Technische Daten . . . . . . . . . . . . . . . . . . . . . . . . . . . 89 Vibration - Accelerometer . . . . . . . . . . . . . . . . . . . . . . . . . . . . . . . . . . . . . . . 89 Temperatur - Pt 100 . . . . . . . . . . . . . . . . . . . . . . . . . . . . . . . . . . . . . . . . . . . . 89 Current - AC, 50 - 60 Hz . . . . . . . . . . . . . . . . . . . . . . . . . . . . . . . . . . . . . . . . 89 Wind Velocity . . . . . . . . . . . . . . . . . . . . . . . . . . . . . . . . . . . . . . . . . . . . . . . . . . . 89 Proximity Switch - North Pulse . . . . . . . . . . . . . . . . . . . . . . . . . . . . . . . . . . . 90 SSCU3000 - Technische Daten . . . . . . . . . . . . . . . . . . . . . . . . . . 90 Vibration . . . . . . . . . . . . . . . . . . . . . . . . . . . . . . . . . . . . . . . . . . . . . . . . . . . . . . . . 90 4 - 20 mA Sensor Interface (up to 32/Sensors/channels) . . . . . . . . . . . 91 Proximity Switch Interface (2 channels) . . . . . . . . . . . . . . . . . . . . . . . . . . . 91 General . . . . . . . . . . . . . . . . . . . . . . . . . . . . . . . . . . . . . . . . . . . . . . . . . . . . . . . . . 91 Master Control Unit . . . . . . . . . . . . . . . . . . . . . . . . . . . . . . . . . . . . . 92 7 Konformitätserklärung Wir IES Ges.m.b.H. mit der Anschrift Weidholzstrasse 1 A-3021 Pressbaum Austria erklären in alleiniger Verantwortung, dass das Produkt Bezeichnung: System zur Messwert-Erfassung, Überwachung und Auswertung Typ, Modell, Artikel-Nr., Größe: Onyx 3000 mit den Anforderungen der Normen und Richtlinien 73/23/EWG DIN EN 61010 89/336/EWG DIN EN 50081 DIN EN 50082 Niederspannungsrichtlinie Sicherheitsbestimmungen für elektrische Mess-, Steuer-, Regel und Laborgeräte Elektromagnetische Verträglichkeit EMV Fachgrundnorm Störaussendung Fachgrundnorm Störfestigkeit und den angezogenen Prüfberichten übereinstimmt und damit den Bestimmungen entspricht. Ort und Datum der Ausstellung 8 Name und Unterschrift des Befugten Hilfestellungen und Support Kontaktinformation Industrial Electronic Systems IES Gesellschaft m. b. H. Weidholzstrasse 1 A-3021 Pressbaum Tel.: (+432233) 53 910 Mobil: (+43 664) 2002002 Fax: (+43 2233) 53 910-16 email: [email protected] homepage: www.ies.co.at Schulungen - technische Einweisungen Auf Anfrage bieten wir individuelle Schulungen und Einarbeitungskurse zu den Themen, Pc-Anywhere, und Bedienung des Onyx3000 Systems. Tausch und Lieferung von Ersatzmodulen Auf Anfrage liefern wir Ersatzmodule die vom Anwender selbst getauscht werden können. Gewährleistung Grundsätzlich bieten wir auf das System Onyx3000 eine Gewährleistung von 24 Monaten. Auf Anfrage bieten wir auch eine verlängerte Gewährleistung und Wartungsverträge. Wenn das Pc-Anywhere “Remote Control” System funktionsfähig auf der Anlage installiert ist und ein Zugang über Telefonleitung existiert, werden alle Softwareund Firmware- updates ohne zusätzliche Kosten innerhalb der ersten 12 Monate nachinstalliert. Online Support Dieses Handbuch und weitere Dokumente sind zusätzlich auf unserer Hompage zum Download bereitgestellt. (www.ies.co.at) 9 Vorwort Dieses Handbuch beschreibt die Funktionen und den Gebrauch des Online Machine Condition Analysing Expert Systems Onyx 3000. Onyx wurde für die Langzeitüberwachung von rotierenden Maschinen und anderen Anlagen, die über Jahre hinweg immer in derselben Art und Weise arbeiten entwickelt. Das System “merkt” sich den Zustand einer Anlage an einem sehr frühen Zeitpunkt und vergleicht dann diese “gelernten” Daten mit all den zukünftig gemessenen. Die hauptsächlich benutzten physikalischen Eigenschaften die hierzu herangezogen werden sind: 1. mechanische Vibration 2. Stromverbrauch 3. Temperatur Konsequenterweise analysiert Onyx die Vibrationssignale im Frequenzbereich von 0,24 Hz bis 12,5kHz mit einer sehr hohen Auösung von 2% CPB (Constant Percentage Bandwith), mit 256 Spectrallinien, von denen jede eine dymaische Auösung von über 100 dB hat. Dadurch ist Onyx imstande die geringsten Anzeichen einer Beschädigung schon Wochen oder Monate bevor ein Fehler auftritt zu erkennen. Man kann bis zu 32 Vibrationssenoren an die verschiedenen Vibrationsquellen anbringen. So kann man auch alle Warnungen und Alarme von Onyx einem bestimmten Teil der Anlage zuordnen, z.B. das Geräusch von Zahnrädern, oder die Rotation von Kugeln in Kugellagern. Die Überwachung von Stromverbrauch und Temperatur (jeweils 16 Sensoren anschließbar), vervollständigen die Überwachung. Das alles ist untergebracht in einem vollständig geschirmten Metallgehäuse, welches nahe oder innerhalb der Anlage montiert wird. Es enthält Vorverstärker und eine Signalaufbereitung in einen seriellen Datenstrom, der über ein Glasfaserkabel, welches alle elektromagnetischen Störungen eliminiert, weitergeschickt wird. Zum Anzeigen der Daten, Zustände, und Alarme, welche von der Anlage geschickt werden, wird ein 4HU 19” großes Gerät verwendet, welches auch einen Laptop beinhaltet auf dem die OnyxView Software läuft. Mit Hilfe dieser Software ist es möglich, alle Messdaten auf Harddisk und/oder CDROM zu speichern, anwenderfreundlich anzuzeigen, automatisch Protokolle auszudrucken, Trendanalysen zu erstellen, welche die Wahrscheinlichkeit eines Fehlers in der Zukunft anzeigen, und eine Verbindung zu einem anderen Computersystem herzustellen, um z.B. das System fernzusteuern oder fern-abzufragen. 10 1. Systemübersicht Onyx3000 In diesem Kapitel erhalten Sie einen Überblick über die im System enthaltenen Komponenten und deren Funktionen. Systemübersicht - SYSTEMÜBERSICHT 13 Systemübersicht - Funktionsprinzipien Onyx 3000 Mess-Prinzip ONYX3000 ist ein Meß-und Überwachungssystem für die Zustandskontrolle rotierender Maschinen bzw. Anlagen. Es ist für “Online”-Einsatz konzipiert - d.h. die Anlage wird ständig rund um die Uhr überwacht. Das System ist selbst-lernend - d.h. der Zustand der Anlage wird nach erfolgter Installation automatisch “gelernt”. Der Anwender kann jedoch auch später einen momentanen Zustand seiner Anlage als Referenz denieren indem er ONYX einen neuen “Learn” ausführen lässt. Es sind 5 verschiedene “Learn” -bezüge speicherbar, auf die manuell oder automatisch (durch Denition bestimmter Parameter) umgeschaltet werden kann. ONYX vergleicht alle aktuellen Messwerte mit den gelernten und gibt Alarme wenn die aktuellen Messwerte bestimmte Schwellwerte über- oder unterschreiten. Diese Schwellwerte sind vom Anwender frei denierbar. Das Messkonzept zielt auf zwei grundsätzlich verschiedene Überwachungsstrategien ab: 1. akute, plötzlich auftretende Veränderungen werden rasch (3x pro Sekunde) erfasst und sollen auch zu entsprechenden (Notfalls-)Reaktionen führen (z.B. Abschalten). 2. langsam auftretende Veränderungen werden getrennt im Rhythmus mehrerer Stunden erfasst und dienen einer Langzeit-Vorhersage von notwendigen Wartungsmaßnahmen in einem Zeitraum von Wochen bis Monaten. Das Messkonzept sieht weiters eine völlige Unabhängigkeit von angeschlossenen Visualisierungsgeräten (wie Laptop oder PC) vor. ONYX misst und gibt Alarme (über seine Alarm-Kontakte) also auch, wenn angeschlossene PCs abgeschaltet oder ausgefallen sind. Auch alle 5 Lern-Bezüge sind in ONYX und nicht auf PCs nichtüchtig gespeichert. Die angeschlossenen(maximal 3) PCs dienen der bequemen Anzeige aller Daten (sowohl aktueller als auch vergangener), der bequemen Eingabe von Befehlen und Parametern, der Speicherung aller Daten auf Festplatte und CDROM, der Berechnung einer Trendanalyse und der Kommunikation mit einem ev. vorhandenen übergeordneten Kontrollrechner sowie über Telefonleitung mit einer Fernabfragestation. Weiters werden über Telefonleitung Alarme auf Wunsch in Form von emails und/oder SMS an beliebige Adressen bzw. Mobiltelefone versandt. 14 Systemübersicht - Die wichtigsten Einstellungen und Anzeigen können auch direkt an der lokalen Bedieneinheit von ONYX ohne PC vorgenommen bzw. abgelesen werden. Eine dritte Möglichkeit zur Einstellung bzw. Ablesung der Betriebsart (z.B. “Service-Mode”) ist über digitale I/Os vorgesehen. Damit kann ONYX per Kontakt ferngesteuert werden. Weiters ist der Anschluß von (maximal 4) LCX3000 (Blitzschlag-Monitor) an ebendiese I/Os vorgesehen, um auch Blitzschläge in die Überwachung miteinzubeziehen. Systemkonzept Die Hardware von ONYX gliedert sich in zwei Einheiten: 1. Messteil (Sensor Signal Conditioning Unit SSCU) mit allen angeschlossenen Sensoren in einem separaten HF- und klimadichten Gehäuse und 2. Auswerteteil (Local Control Unit LCU, Alarm Control Unit ALCU, Power Distribution & Control Unit ALCU, Communication & I/O Unit CIOU und integrierter Laptop Enhanced Computer Control Unit ECCU) in einem 4HE 19”-Gehäuse. Beide Teile enthalten jeweils einen 16-Bit-Microcontroller mit umfangreicher Firmware. Die Datenübertragung zwischen den beiden erfolgt mittels mehrfach gesicherter Telegramme über Lichtwellenleiter um vollständige Potentialtrennung und Störimmunität zu gewährleisten. An einen Messteil können maximal 16 Sensoren zweier Grundtypen angeschlossen werden: Vibrationssensoren und 4/20mA-Sensoren, wobei von jeder SensorGrundtype immer 4 gleiche mit einer modular einsteckbaren Karte verarbeitet werden. Die Grundtype 4/20mA kann mit einer Vielzahl von Sensoren beschaltet werden: Temperatur, Strom, Windgeschwindigkeit und Aux (=Anwender-denierbar). Die Vibrationssensoren benötigen die Industrie-Standard-Schnittstelle (Konstantstromspeisung mit Spannungsausgang und optional TEDS = “Transducer Electronic Data Sheet” - womit die werkseitig kalibrierte Empndlichkeit des Sensors [mV/g] von ONYX ausgelesen werden kann). Bei Vibrationssensoren kann noch zusätzlich die Option “Nur RMS” oder “RMS und Spektrum” gewählt werden. Weiters kann ein “Nord-Puls”-Sensor an einen Messteil angeschlossen werden - er ermittelt die tatsächliche Umdrehungsgeschwindigkeit der Anlage. Damit kann diese angezeigt und die Messungen mit dieser synchronisiert werden. Die Erfüllung aller EMV-Richtlinien und Sicherheitsstandards ist gewährleistet. 15 Systemübersicht - Der Auswerteteil ist grundsätzlich immer gleich ausgeführt und enthält die o.a. Einheiten. Er wird in einem 19”-Gestell montiert oder kann optional als Tischgerät ausgeführt sein. Seine mechanische und elektrische Konstruktion gewährleistet ebenfalls die Erfüllung aller EMV-Richtlinien und Sicherheitsstandards. Interpretation von Messwerten und Einstellung von Schwellwerten Allen Messungen gemeinsam ist eine Mittelung aufeinander folgender Messwerte mit einem gleitenden Mittelwert-Algoritmus. Die Anzahl der zu mittelnden Werte kann vom Anwender in “Settings/Average Values” zwischen 1 und 16 eingestellt werden. Es gilt hierbei abzuwägen zwischen einer möglichst stabilen Anzeige einerseits und einer raschen Reaktion andererseits. Empfohlen wird eine Einstellung von 5. Weiters werden einmalige “Ausreißer” durch einen weiteren Algoritmus unterdrückt. Zu beachten ist auch, dass im “Learn” grundsätzlich Maxima gelernt (gespeichert) werden. Die Standard-Lernzeit beträgt 24 Stunden, kann jedoch vom Anwender in einem weiten Bereich vorgegeben werden. ONYX besitzt einen eingebauten Kalibrator mit einer absoluten Genauigkeit von 0,01% und einem Temperaturkoefzienten von 0,5ppm/K, der alle Messkanäle einmal nach Reset und dann regelmäßig jeden Tag um 12:00 kalibriert. Bei Bedarf kann eine Kalibration noch zusätzlich durch einen Befehl im “Actions-Drop-DownMenü” ausgeführt werden. Jedenfalls wird eine gleichbleibende Messgenauigkeit ohne händische Justierungen oder Einstellungen gewährleistet. Eine Kontrolle aller Messkanäle kann ebenfalls mittels des eingebauten Kalibrators durchgeführt werden. Im Menü “Change Mode” kann man unter “Activate Channel Test” entweder Channel Test MIN oder -MAX auswählen. Anstelle der normalen Sensorsignale werden nun die Kalibrator Minima/Maxima an die Messeingänge gelegt. Entsprechende Anzeigen gestatten die Kontrolle jedes Kanals. Allen Alarmgaben gemeinsam ist, dass ein Alarm erst ausgelöst wird, wenn der Messwert n mal hintereinander eine Schwelle über- oder unterschritten hat. Diese Zahl n kann ebenfalls vom Anwender in “Settings/Report Alarms” im Bereich 3..16 eingestellt werden. Dieselbe Zahl n gilt auch für das Verschwinden von Alarmen: erst wenn die Alarmursache n mal hintereinander nicht mehr wahr ist und der Alarm vom Anwender quittiert wurde, wird ein Alarm gelöscht (und der entsprechende Alarmkontakt zurückgesetzt). Das Quittieren alleine setzt lediglich die optisch/ akustische Alarmmeldung zurück! Empfehlung für die Einstellung von Report Alarms: 3 16 Systemübersicht - Vibrationswerte Die Sensoren liefern eine Spannung proportional zur Beschleunigung mit einer Empndlichkeit von nominell 100mV/g oder 500mV/g in einem Frequenzbereich 0,2Hz bis 12,5 kHz. Dieses Signal wird von ONYX in ein Spektrum ebendieses Umfanges mit einer sehr feinen Unterteilung in 256 diskrete Linien umgewandelt. Der Abstand zwischen den einzelnen Linien weist größtenteils einen konstanten Faktor von etwa 2% auf und folgt demnach einer logarithmischen Skala. Jede Linie wird mit 24 Bit Auösung digitalisiert und weist unter Berücksichtigung aller Rausch- und Fehlerquellen eine Dynamik von etwa 100 dB auf. Die Messung aller 256 Spektrallinien dauert ca. 3,5 h, wobei die tiefsten Frequenzen den größten Anteil an der Messzeit haben. Schränkt man das Messband z.B. auf 5Hz bis 12,5kHz ein beträgt die Dauer eines Messdurchganges nur mehr etwa 1h. Nach Ablauf eines solchen Durchganges werden grundsätzlich alle Daten für Dokumentation und spätere Vergleiche auf Festplatte gespeichert. Die Beschleunigungswerte werden noch in Leistung [pW] umgerechnet, da eine Vibrations-Leistung physikalisch besser dem Verständnis von Vibration entspricht. Diese Leistung wird nun pro Spektrallinie noch in dB (0dB = 1pW) umgerechnet und die Spektrallinie im Vibrationsfenster des PC mit entsprechender Höhe angezeigt. Steht der Cursor auf einer Linie, werden die entsprechenden Zahlenwerte in dB und pW ebenfalls angezeigt. Dieser Teil der Messung dient der Langzeitanalyse und -Vorhersage von notwendigen Wartungsarbeiten am mechanischen System der Anlage. Es wird daher empfohlen, diesen Alarmtyp nicht zum Abschalten der Anlage heranzuziehen, sondern vielmehr eine präventive Wartung durchzuführen. Die Alarm-Schwellwerte für diese Spektralmessung sind in dB relativ zum gelernten Wert jeder einzelnen Linie deniert. Sie werden außerdem als grüne (Pre-High) und rote (Main-High) Linien im Vibrationsfenster am Bildschirm dargestellt. Weiters werden für die Berechnung der Alarmgabe immer 4 benachbarte Linien gemeinsam herangezogen: Ihr Mittelwert muss den Mittelwert derselben 4 gelernten Linien überschreiten. Damit werden mögliche Alarme aufgrund von leichten Schwankungen der Umdrehungszahl der Anlage vermieden. Empfehlung für die Einstellung der Alarm-Schwellwerte für Spektrallinien: Die Alarmschwellen werden im “Property”-Fenster des jeweiligen Sensors eingestellt. Pre-High 20dB, Main-High 36dB, Low-Alarme disablen. 17 Systemübersicht - Gleichzeitig mit der (langsamen) Spektrallinien-messung wird das Sensorsignal einer (schnellen, 3x pro Sekunde) TRUE-RMS-Messung zugeführt. Diese begrenzt einerseits das gemessene Frequenzband auf 10Hz...1kHz und bildet außerdem aus der Beschleunigung eine Geschwindigkeit [mm/s]. Damit steht ein Messwert zur Verfügung, der mit genormten Empfehlungen für zulässige Vibrationspegel kompatibel ist. Diese VDI-Norm 2056 gibt vor: Für Antriebe bis 15 kW: Gut:<=0,7; Brauchbar:<=1,8; Für Antriebe bis 75 kW: Gut:<=1,1; Brauchbar:<=2,8; Zulässig:<=4,5 mm/s Zulässig:<=7,1 mm/s Empfehlung für die Einstellung der Alarm-Schwellwerte für RMS: Die Alarmschwellen werden im “Property”-Fenster des jeweiligen Sensors eingestellt. Beobachtung der einzelnen Messwerte plus “Brauchbar”-Wert für Pre-High-Alarm sowie plus “Zulässig”-Wert für Main-High-Alarm. Low-Alarme disablen. Diese Alarmschwellen stellen absolute Grenzen dar und beziehen sich nicht auf gelernte Werte! 4/20mA-Kanäle (Temperatur-, Strom-, Wind-, Aux-Werte) Ein kleiner Drehschalter mit 16 Stellungen (“HexSwitch”) an der SSCU legt pro Kanal fest, wie der 4/20mA-Wert dieses Kanals zu interpretieren ist. Dementsprechend erfolgt dann die Anzeige in der jeweiligen Einheit. Da die Alarm-Schwellen davon abhängen, was und wo gemessen wird, können hier keine konkreten Empfehlungen abgegeben werden. Alle Alarmschwellen stellen jedenfalls absolute Grenzen dar und beziehen sich nicht auf gelernte Werte! 18 Systemübersicht - 19 Systemübersicht - Master Control Unit Vorderseite 1. LCU3000 (Local Control Unit) ist ein Funktionsmodul zur Notfallsteuerung der wichtigsten Funktion fals der Laptop ausfallen sollte oder abgeschaltet ist. 2. ECCU3000(Enhanced Computer Control Unit) ist eine ausziehbare Lade auf der ein Laptop montiert ist. 2 1 Rückseite 3. ALCU3000 (Alarm Control Unit) ist ein Funktionsmodul zum Steuern der Alarmkontakte 4. PDCU 3000 (Power Distribution Control Unit) ist ein Funktionsmodul zur Stromversogung 5. CIOU3000 (Communications Input Output Unit) ist ein Funktionsmodul das für den Datenverkehr zuständig ist 3 20 4 5 Systemübersicht - LCU3000 (Local Control Unit) Dieses Modul enthält den Mikrokontroller für die Steuerung aller Gerätefunktionen, sowie einen Beeper mit Lautstärkenregelung, 2 Displays mit Kontrastreglern zur Anzeige der wichtigsten Funktionen und Daten, und ein Navigationsinterface um die wichtigsten Funktionen auch ohne Hilfe des Laptops zu steuern. Im Falle irgendeiner Fehlfunktion des Laptops, bleibt das System selbst voll funktionsfähig, und die LCU3000 bietet eine adequate Lösung für: • Anzeige aller analogen Messwerte der Sensoren (“show values” menu) • Anzeigen und Bestätigen aller Alarme (“show alarms” menu) • Anzeige des derzeitigen Betriebsmodus und Umschalten in einen anderen Modus (“set mode” menu) Eine genauere Beschreibung der Navigationsmöglichkeiten folgt in Kapitel 2. ECCU3000 (Enhanced Computer Control Unit) Dieses Modul besteht aus einer ausziehbaren Lade auf der ein Laptop montiert ist. Unter dem Laptop bendet sich eine ausziehbare Mausauage und eine weitere Lade die als Stauraum gedacht ist. Mit Hilfe der OnyxVIEW Software kann man alle Funktionen von Onyx3000 steuern und ablesen. Darüberhinaus bietet die Software noch weitere Funktionen wie Fernabfrage und Fernkontrolle des Onyx3000 Systems über Modem oder Netzwerk, Backupfunktionen mit Hilfe des eingebauten CD-Brenners, Konvertierung aller Daten in Microsoft Excel, etc. Alle Kabel die an der Rückseite des Laptop angeschlossen werden können (siehe Benutzerhandbuch Acer Travelmate 600 Series) können über eine Umlenkschiene an der Rückseite der Master Control Unit hinausgeführt werden, sodaß keine Beeinträchtigung der Ladenfunktion entsteht. Außerdem wurde auf eine HF-dichte Ausführung dieser Kabeldurchführung geachtet. Eine genauere Beschreibung der Software nden Sie in Kapitel 2. 21 Systemübersicht - ALCU3000 (Alarm Control Unit) Die Alarm Control Unit ist ein Einschubmodul auf der Rückseite der Master Control Unit. Sie enthält einen 50-pin Stecker, für die Ausgabe der 16 verschiedenen Alarm-Umschaltekontakte. Die 16 internen Relais sind Ausgelegt für eine maximale Belastung von 100V/1A. Externe Leistungs-Relais Externe Relais oder Schütze können hinzugefügt werden, indem man die interne 24V DC Versorgungsspannung die an Pin 50 (+) und Pin 17 (-) des 50 Pin DSUB Steckers anliegt, nützt. Die 24V DC können mit einer maximalen Stromstärke von 200mA entnommen werden. Pin-belegung des 50 Pin Steckers Von den 16 Relais ist jeweils ein Umschaltekontakt an den Stecker geführt. Wenn das unten/rechts beschriebene Ereignis eintritt, wird der no-(normally open)-pin mit dem co-(change-over)-pin verbunden. Im Ruhezustand ist der nc-(normally closed)-pin mit dem co-pin verbunden. Alle Kontakte sind trockene Kontakte mit einem RC-Schutz (47n/47R), gänzlich potentialfrei, und voneinander isoliert (100 V). “Alarm Contacts” (Pin-Belegung des Steckers beachten): 1 2 3 4 5 6 7 8 9 10 11 12 13 14 15 16 17 22 no1 no2 no3 no4 no5 no6 no7 no8 no9 no10 no11 no12 no13 no14 no15 no16 0V DC@ 200mA 18 co1 19 co2 20 co3 21 co4 22 co5 23 co6 24 co7 25 co8 26 co9 27 co10 28 co11 29 co12 30 co13 31 co14 32 co15 33 co16 34 nc1 35 nc2 36 nc3 37 nc4 38 nc5 39 nc6 40 nc7 41 nc8 42 nc9 43 nc10 44 nc11 45 nc12 46 nc13 47 nc14 48 nc15 49 nc16 50 +24V DC @ 200mA General sum alarm General main high alarm General high alarm General low alarm General main low alarm General VIB RMS alarm General temperature alarm General current alarm General wind alarm General auxiliary alarm General VIB spectrum alarm user alarm 1 - future use user alarm 2 - future use system alarm sensor line alarm no alarm power for external use Systemübersicht - Stecker für externe Verkabelung Eine unbeschaltete 50-pin Buchse wird mitgeliefert um dem Benutzer die Möglichkeit zu geben nach seinen Vorstellungen logische Verknüpfungen der verschiedenen Alarmzustände selbst vorzunehmen. Es können Verbindungen der Kontakte parallel oder seriell hergestellt werden, womit man AND oder/und OR Funktionen bildet, welche von externen Überwachungsgeräten passiv gelesen werden können. Zu beachten ist auch Relais 16 (“no alarm”) welches ohne Alarm immer angezogen ist und somit invers zu allen anderen Alarmgaben reagiert und auch einen Spannungsausfall signalisiert. CIOU 3000 (Communication Input Output Unit) Diese Einheit ist das Kommunikationszentrum für ein- und ausgehende Verbindungen. Sie enthält nicht nur serielle Kommunikationsinterfaces sondern auch parallele Anschlüsse, über welche das System mittels Kontaktbefehlen kontrolliert bzw. ferngesteuert werden kann. Die CIOU 3000 hat 16 parallele I/O- Kanäle und 4 serielle Interfaces, von denen zwei für Kontrollzwecke benutzt werden können, und 2 für den Anschluss externer PCs. Diese haben das selbe Softwareprotokoll wie der Laptop und können gleichzeitig von 3 verschiedenen Benutzern verwendet werden (wenn 2 weitere externe Computer angeschlossen werden). Bei einer solchen Konguration ist zu beachten dass bestimmte Befehle von einem der 3 verwendeten Computer auch Auswirkungen auf die anderen 2 haben. Da alle 3 User mit ein und demselben Onyx3000 arbeiten, führen wiedersprüchliche Befehle dazu, dass nur der zuletzt gesendete ausgeführt wird. “to Pc” Stecker Dieser Stecker ist eine Rs-232C Schnittstelle, für den Anschluss eines externen PCs Nur die 2 3 5 folgenden Pins sind benutzt: RxD (vom Pc) TxD (zum Pc) Ground Das Softwareprotokoll für diesen Kanal ist das gleiche wie das des seriellen Anschlusses für den eingebauten Laptop. 23 Systemübersicht - “to frontend” Stecker Dieser Stecker besitzt 2 optische Anschlüsse für die Signalübertragung zur und von der Sensor Signal Conditioning Unit (Frontend), und einen 24V Stromversorgungsanschluß für die SSCU. “options” Stecker Dieser ist eine 37-pin D-Sub Buchse der 3 serielle und 16 parallele I/O Anschlüsse bietet. Pin-belegung “options”- Stecker: 1 2 3 4 5 6 7 8 9 10 11 12 13 14 15 16 17 18 19 +24V aux-supply +5V aux-supply Signal Ground TxD (“Opto”)-Ch C RxD (“Opto”)-Ch C TxD0 # (µC) RxD0 # (µC) NMOD out SMOD out LCX1 out LCX3 out NMOD in LMOD in SMOD in TMOD in LCX1 in LCX2 in LCX3 in LCX4 in 20 21 22 23 24 25 26 27 28 29 30 31 32 33 34 35 36 37 Return (0V) TxD - Ch D (To Aux-PC) RxD - Ch D (From Aux-PC) Signal Ground BOOTSTR # (µC) BSLRST # (µC) Signal Ground LMOD out TMOD out LCX2 out LCX4 out Return (0V) Return (0V) Return (0V) Return (0V) Return (0V) Return (0V) Return (0V) Pins 1,2,3 sind Hilfsversorgungsspannungen welche extern genutzt werden können. Diese sind internen auf ca. 100mA limitiert. Pins 4,5 sind das elektrische Equivalent zu den über das optische Kabel übertragenen Signalen, und sind nur für Kontrollzwecke gedacht. Pins 6,7,24,25 stellen ein Serviceinterface für den Mikrokontroller dar und werden nur für Wartungsarbeiten benötigt. Pins 21, 22 sind das serielle Interface Nr. 3, für einen weiteren externen PC. 24 Systemübersicht - Die folgenden Pins bilden Paare, die folgende Funktionen ausführen: Durch aktivierung eines der oben angeführten “in” Signale wird die entsprechende Funktion angefordert. Sobald das System die Funktion angenommen hat, wird das entsprechende “out” - Signal aktiviert. 12 NMOD in (request normal mode) 13 LMOD in (request learn mode) 14 SMOD in (request service mode) 15 TMOD in (request test mode) 8 NMOD out (conrm system is in normal mode) 27 LMOD out (conrm system is in learn mode) 9 SMOD out (conrm system is in service mode) 28 TMOD out (conrm system is in test mode) Folgende “in” Signale sind für den Anschluss des Blitzmonitors LCX 3000 gedacht. Sie speichern den kurzen LCX Impuls und geben diese Information über die entsprechenden “out” - Signale konstant (gespeichert) aus. 16 LCX1 in 10 LCX1 out 17 LCX2 in 29 LCX2 out 18 LCX3 in 11 LCX3 out 19 LCX4 in 30 LCX4 out Zu beachten: Alle “out” - Signale sind “open collector” und können auf 2 Arten verwendet werden. 1. zwischen einem “out” - Signal und einer Hilfsversorgung (Pins 1 oder 2) kann eine Last direkt angespeist werden. 2. zwischen einem “out” - Signal und einem der “return”- Pins kann ein Schaltsignal abgenommen werden (für das dann eine externe Versorgung erforderlich ist). Alle “in” - Signale werden intern über Wiederstände auf 24 V gezogen und werden aktiviert indem man sie mit einem der “return” - Pins verbindet. Reset Taster Falls erforderlich kann der interne Mikrokontroller damit zurückgesetzt werden. Der eingebaute Laptop ist davon nicht betroffen. 25 Systemübersicht - PDCU 3000 (Power Distribution Control Unit) Die Power Distribution Control Unit stellt die Stromversorgung innerhalb des Onyx3000 Systems her. Alle Funktionen außer dem primären - AC/DC (DC/DC) - Converter sind in diesem Modul enthalten. Dieser primäre - AC/DC (DC/DC) - Converter ist von der Vorderseite nach entfernen der Local Control Unit zugänglich. Das Modul kann standarmäßig Versorgungsspannungen von 88 bis 372V DC oder von 85V bis 264 V AC bei 47 bis 440 Hz verarbeiten. Die maximale Leistungsaufnahme beträgt 100W. Von außen sind folgende Elemente zugänglich: • • • • Hauptschalter (On/Off) 2 Sicherungen 5x20 mm 4A träge 2 grüne Leds: Laptop Versorgung OK und +5 V OK 2 2mm Stecker und ein Einstellregler (normalerweise vom Benutzer nicht benötigt, für die Messung und Feinregulierung der Stromversorgung des Laptop: typ. 19V) Pinbelegung des “Power In” Steckers 1 P(-) phase (if AC) 2 N(+) neutral (if AC) PE Protective Ground negative (if DC) positive (if DC) Der Haupt - AC/DC (DC/DC) - Converter Dieser Converter kann für nicht standard Eingangsspannungsbereiche ausgetauscht werden. Er besitzt 3 Leds. Die grüne Led ist die OK Anzeige und leuchtet normalerweise immer. Die rote “i” - Led signalisiert Unterspannung, die rote “Iol” - Led Überstrom. Diese Leds sind ebenfals nur nach Ausbau der Local Control Unit sichtbar. Er ist erst nach entfernen der Local Control Unit sichtbar. 26 Systemübersicht - Tauschen von einzelnen Funktionsmodulen Fals einmal ein Modul (LCU, ALCU, PDCU, CIOU) getauscht werden muss ist dies kein Problem. Einfach, ohne das System abzuschalten, die Schrauben des gewünschten Moduls lockern und es herausziehen. Anschliesend das neue Modul einsetzen, die Schrauben wieder festziehen und die eventuell zuvor Abgezogenen Stecker wieder montieren. Alle Module sind “hot-plugable”. Das Ausbauen des Laptops ist nach herausziehen der Lade und abschrauben der Bodenplatte von unten möglich. Zur Bedienung und Fehlerbehebung in Bezug auf den Laptop verweisen wir hier auf das mitgelieferte Benutzerhandbuch des Laptops. 27 Systemübersicht - SSCU 3000 (Sensor Signal Conditioning Unit) Die SSCU 3000 (auch Frontend genannt) ist ein ausgelagertes Modul des Onyx3000 Systems, das in der Nähe der Anlage montiert wird und mit der Master Control Unit über ein Lichtleiterkabel verbunden ist. An ihr werden die Sensoren angeschlossen. Es können zwei solcher Module in Serie über Lichtleiterkabel angeschlossen werden um die maximale Anzahl von 32 Sensoren plus 2 x North Pulse zu erreichen Die Sensoren werden über 3 fach geschirmte Kabel mit dem Frontend verbunden, wo die Daten digitalisiert, und zur Master Control Unit übertragen werden. 28 Systemübersicht - Steckverbindungen 1 Sensor wird jeweils an einen Kanal, d.h. an einen 3 poligen Stecker (CH1...CH16) angeschlossen, wobei die Nummerierung folgendes bedeutet: • 1 = Sensor + (hell) • 2 = Sensor - (dunkel) • 3 = Protective Ground An die Kanäle 1 - 16 können alle vom System unterstützten Sensoren angeschlossen werden. Es ist jedoch nötig die “Mode”- Schalter auf die jeweilige Art des Sensors einzustellen. An die Steckverbindung rechts unten, beschriftet mit NP kann nur ein North Pulse Sensor angeschlossen werden. Die Belegung für NP ist: • 1 = Sensor + -Versogung (+17V) • 2 = Sensor - pnp-Schaltausgang • 3 = Sensor - -Versogung (-5V) Die Debug und Download Steckerleisten werden nur für Wartungsarbeiten, die von IES durchgeführt werden, benötigt. Von SSCU unterstützte Sensoren • • • • • • Vibrationssensor (VIB rms, VIB spec) Temperatursensor (TEMP) Stromverbrauchssensor (CUR) Windgeschwindigkeitssensor (WIND) North Pulse - Sensor (NP) Hilfssensoren (vom Anwender denierbar) (AUX) Weitere Details nden Sie in Kapitel 3 - Technische Daten. Bedeutung der Leds Wenn ein Sensor an einen Kanal angeschlossen wird, leuchtet die Led des jeweiligen Kanals, und zeigt damit einen korrekt angesteckten Sensor an. Die Leuchtstärke ist proportional zum Strom in der Sensorleitung. Damit kann optisch erkannt werden, wenn eine Unterbrechung oder ein Kurzschluß in der Sensorleitung vorliegt. Die 4 Leds in der rechten oberen Ecke bedeuten Folgendes: • NP: blinkt jedes mal wenn der North Puls Senor den Kontakt schließt • TxD, RxD: blinken wenn mit der Master Control Unit kommuniziert wird • ALIVE: blinkt wenn die Software auf dem Mikrokontroller der SSCU korrekt ausgeführt wird 29 Systemübersicht - Einstellmöglichkeiten und Reset Jeder der Kanäle hat einen drehbaren Schalter der “HexSwitch” genannt wird, und dessen Position von der Software ausgelesen wird um zu erkennen, welche Art von Sensor an diesem Kanal angeschlossen ist. Die Bedeutung der Schalterstellungen ist: 0 kein Sensor oder Kanal ausgeschaltet 1 VIB, nur RMS, Alarm enabled 2 VIB, nur RMS, Alarm disabled 3 VIB, RMS + SPEC, Alarm enabled 4 VIB, RMS + Spec, Alarm disabled 5 TEMP, Alarm enabled 6 TEMP, Alarm disabled 7 CUR, Alarm enabled 8 CUR, Alarm disabled 9 WIND, Alarm enabled A WIND, Alarm disabled B AUX, Alarm enabled C AUX, Alarm disabled D reserved E reserved F reserved Die Bedeutung der Einstellungen des “HexSwitch” mit der Beschriftung MASTER MODE ist folgende: 0 SSCU OFF, Frontend misst nicht, IDLE-Mode 1 SSCU ON, diese ist die erste oder einzige SSCU 2 SSCU ON, diese ist die zweite SSCU 3...F verwendet für interne Testfunktionen, nicht für die Anwender gedacht ! Der RESET Taster wird normalerweise nicht benötigt, falls jedoch einmal ein Reset erforderlich wird, kann man diesen hier mit einem spitzen Gegenstand auslösen. 30 2 Bedienung Onyx3000 In diesem Kapitel erhalten Sie Informationen über die auf dem Laptop installierte Software, im besonderen über das Programm OnyxVIEW, welches alle Daten die Onyx liefert Anzeigt, und auch alle Funktionen die Onyx besitzt steuern kann. Bedienung - Software Übersicht Firmware Für die Messwerterfassung und - verarbeitung, sowie -Alarmbildung und alle daraus resultierenden Aktionen ist alleinig die Microkontroller Firmware verantwortlich. Diese liegt in den jeweiligen “Flash - Speichern” der beteiligten Mikrokontroller und kann bei Bedarf von Ferne ausgetauscht werden. OnyxView Für die Anzeige aller aktuellen und vergangenen Messwerte ist das MS-Visual-Basic Programm OnyxVIEW verantwortlich. OnyxVIEW ist standardmäßig auf dem Laptop installiert, kann jedoch auch zusätzlich auf bis zu 2 weiteren PC´s installiert werden, die dann über weitere vorhandene Schnittstellen mit der Firmware kommunizieren. OnyxView bietet darüberhinaus die Möglichkeit einen übergeordneten Kontrollrechner an eine weitere serielle Schnittstelle anzuschließen. Ein entsprechendes Treiberprogramm wird von IES auf Anfrage erstellt. Mail-Informer Weiters kann auf Wunsch ein email/SMS Programm auf dem Laptop installiert werden. Dieses versendet in wählbaren Intervallen oder bei Auftreten von Alarmen entsprechende e-mails und/oder SMS-Nachrichten an beliebige e-mail Adressen bzw. Mobil-Telefon-Nummern. Pc-Anywhere Für die Fernkontrolle des gesamten Onyx3000 Systems ist auf dem Laptop standardmäßig die praxisbewärte Software PC-Anywhere (von Symantec) installiert. Damit kann der Anwender von jedem beliebigen Pc mit Modem und Telefonanschluss (weltweit) den Laptop vor Ort vollständig kontrollieren. Vorraussetzung ist, dass auch der Laptop mit einem Telefonanschluss verbunden werden kann. Die Standardbedienung von Pc-Anywhere ist den beiliegenden Handbüchern zu entnehmen. Der Austausch oder ein Update von Firmware, OnyxView oder Mail_Informer kann ebenfalls von Ferne über Pc-Anywhere erfolgen. Betriebssystem - Win2000/Laptop Standardmäßig ist Win2000 auf dem Laptop vorinstalliert. Es gibt einige Systemeinstellungen in Win2000 die für das Onyx System relevant sind. Diese sind die “Energieoptionen” und “Benutzer und Kennwörter”. Die Standardbedienung des Betriebssystems und des Laptops ist den beiliegenden Handbüchern zu entnehmen. 33 Bedienung - OnyxView OnyxView ist ein MS-Visual Basic-Programm und läuft unter Windows ® NT/95 und höher. Benötigt wird ein Festplattenspeicher und ein RAM-Ausbau von mindestens 1Gbyte/128 MB. Das Programm ist in erster Linie ein Anzeige- und Aufzeichnungsprogramm für die Messwerte, die von den an die SSCU 3000 angeschlossenen Sensoren erfasst und von der LCU 3000 ausgewertet werden (derzeit max. 32). Das bedeutet, dass alle Überwachungsfunktionen des Onyx Systems unabhängig von der Software OnyxVIEW funktionieren. Das OnyxView-Programm zeichnet diese Messwerte auf Festplattenspeicher auf, damit auch auf die historischen Werte zu einem späteren Zeitpunkt zugegriffen werden kann. Über eine zweite serielle Schnittstelle kann ausserdem ein übergeordneter Kontrollrechner angeschlossen werden, der Onyx-Daten über ein angepasstes Treiberprogramm erhält. Alle wichtigen Einstellungsänderungen und sonstigen Aktionen, sowie Alarme werden in einem Logle aufgezeichnet. Für das Versenden von Alarm-e-mails/SMS werden eigene Alarmles generiert. OnyxView kann auf 5 Messwertdatensätze (Learn1-Learn5) als Referenz bzw. Vergleichswerte für einen späteren Zeitpunkt zurückgreifen bzw. auf einen davon umschalten. OnyxVIEW kann eine Trendvoraussage berechnen, wobei die zu berücksichtigende Anzahl von Tagen in der Vergangenheit für eine Vorraussage über eine Anzahl von Tagen in der Zukunft eingestellt werden kann. Alle Echtzeitanzeigen von OnyxVIEW werden alle 100 ms aktualisiert. Alle 24 Stunden werden das Logle und das Alarmle geschlossen und neue angelegt. Das Logle und Alarmle sind normale ascii-Textles in einem Unterordner “log” bzw. “alarms” und können bei Bedarf per Betriebssystem ausgedruckt oder angesehen bzw. automatisch als email oder SMS versendet werden. Jeder Drucker, den das Betriebssystem unterstützt, kann verwendet werden. Die Alarmles werden im Unterordner “email” abgespeichert. Die ExcelFiles werden im Unterordner “excel” abgespeichert. 34 Bedienung - 35 Bedienung - “Splash” - Screen und Startup (+ Com-Port Denitionen) 36 Bedienung - Software-Version zeigt die aktuelle Software-Version an. Diese benötigen Sie für Rückfragen. Statusanzeigen, serielle Schnittstellen Com1 ist standardmäßig die Schnittstelle zur Firmware (d.h. Verbindung zwischen Laptop und Onyx System). Com2 ist standardmäßig die Verbindung zum übergeordneten Kontrollrechner. Beim Laptop sind diese Einstellungen standardmäßig richtig eingestellt und müssen nur noch durch OK bestätigt werden. Wird OnyxView auf anderen Rechnern installiert, muss auf die richtige Auswahl der tatsächlich verwendeten Schnittstellen geachtet werden. Nach Bestätigung oder Auswahl der Schnittstellen gelangt man zur Hauptanzeige. 37 Bedienung - Hauptanzeige - Elemente (1) 38 Bedienung - 1. Frequenzspektrum - Anzeigen Diese enthalten hauptsächlich die Frequenzspektren der Vibrationen und einiges Zubehör. Diese werden auf den nächsten Seiten ausführlich beschrieben. Alle Amplituden der Linien werden in dBp (0dBp = 1pW) und pW angezeigt. 2. Multifunktions - Anzeigen zeigen die Werte der ausgewählten Sensoren an. Schwarzes Anzeigefeld, “Learned” Button, “Properties” Button und Sensorauswahl “drop-down” Menü bilden eine logische Einheit. 3. Modus - Anzeige zeigt an in welchem Modus sich das System derzeit bendet. Die Beschreibung der Modi benden sich unter Kapitel “change Mode”. 4. Versions - Anzeige zeigt die aktuelle Softwareversion an, mit der das System betrieben wird. 5. Stationsnamen - Anzeige zeigt den Namen der Anlage an in der Onyx zur Zeit betrieben wird. Dieser Name kann vom User im “Settings” Menü mit maximal 16 Zeichen frei gewählt werden. 6. Meßverlaufs - Aktivitätsanzeige zeigt an in welchem Meßdurchgang welche Linie gerade vom jeweiligen Frontend gemessen wird. 7. Daten Telegramm Fehler - Anzeige zeigt Übertragungsfehler an, wenn diese n-mal, wie im “Settings / Maintenance” Menü eingestellt, auftreten. (bei Fehler wechselt die Farbe zu rot). Wird auch rot, wenn Onyx längere Zeit mit Flash-Speicher-Operationen beschäftigt ist. 8. “Drop-down” - Auswahlfelder - File, Actions, View, Help Einige Funktionen sind nur über diese Menüs erreichbar, andere sind redundant vorhanden. Manche sind auch nur verfügbar , wenn das System in einem bestimmten “Mode” ist. 9. Statusbar - Anzeige Links wird angezeigt was die Software zur Zeit macht. Rechts wird das Systemdatum und die Systemzeit angezeigt. 10. Aktions - Buttons Am unteren Bildschirmrand benden sich eine Reihe von Steuerelementen deren Funktionen im folgenden noch beschrieben werden. 39 Bedienung - Hauptanzeige - Elemente (2) 40 Bedienung - 11. “Start/End ONYX-Viewer” - Auswahl hier wechselt man zwischen den 2 grundsätzlich verschiedenen Betriebsarten dieser Software: 1. Echtzeitmodus: In diesem Modus wird mit der Hardware des Systems kommuniziert, und alle Daten in Echtzeit angezeigt. Dies ist der Betriebsmodus der die meiste Zeit aktiv sein wird. 2. Onyx-Viewer Modus: In diesem Modus werden keine aktuell gemessenen Daten angezeigt, sondern man kann sich einen beliebigen Datensatz aus der Vergangenheit aussuchen und diesen dann genauer untersuchen. Die Bedienoberäche und die Anzeigen bleiben im großen und ganzen die selben bis auf ein paar veränderte und zusätzliche Funktionen, siehe nächste Seite. 12. “System Information” - Auswahl Das Anzeigefenster “System Information” erscheint. 13. “change Mode” - Auswahl Das Auswahlfenster - in welche Betriebsart des Echtzeitmodus man wechseln will - erscheint. 14. “Show Trend” - Auswahl Das Anzeigefenster zur Trendberechnung erscheint. 15. “Clear Alarms” - Auswahl Diese Funktion setzt die optische und akustische Alarmgabe von Onyx auf AUS “silent Mode” . Die optische Anzeige von Alarmen in OnyxView und die gesetzten Relais-Alarme bleiben aber solange bestehen, bis die Alarmursache beseitigt ist. LCX-Alarme (vom Blitzschlag-Monitor) werden gleich zurückgesetzt. 16. “Logout” -Auswahl Der aktuell eingeloggte User wird abgemeldet. Ein neuer User muß sich erneut mit Passwort anmelden. 17. “Exit” - Auswahl Diese Funktion beendet die OnyxView Software. Diese Funktion ist Passwortgeschützt. 18. “Settings” - Auswahl Das Anzeigefenster “Settings” erscheint. 19. LCX-Anzeigen Sie geben den gespeicherten Status der vier möglichen LCX-Inputs wieder. 20. Nord-Pulse-Anzeigen Sie zeigen die aktuelle Umdrehungszeit in ms an. Ein Blinken der zugeordneten “LED” zeigt, daß der Nord-Puls-Sensor regelmäßig Impulse liefert. 41 Bedienung - Onyx - Viewer Modus 42 Bedienung - Allgemein Die Bedienung des Onyx-Viewer ist genau dieselbe wie im Echtzeitmodus, ausser dass man sich archivierte Daten ansieht, und daher einige Funktionen und Einstellmöglichkeiten wie z.B. Settings und Properties nur angezeigt werden und nicht nachträglich verändert werden können. Die Kommunikation mit der Hardware bleibt jedoch im Hintergrund erhalten. 1. “End ONYX-Viewer” - Auswahl Diese Funktion wechselt zurück in den Echtzeitmodus der Software. 2. “Date” - Scrollfeld Hier wählt man einen Datensatz des entsprechenden Datums aus. Die Anzeige rechts oben gibt dabei Auskunft ob die Daten des ausgewählten Zeitpunktes auch verfügbar sind. Erst nach drücken des Buttons “Show saved Values” werden diese Daten dann in allen entsprechenden Fenstern angezeigt. 3. “Record Nr.” - Scrollfeld Hier wählt man die Nummer des “Records” aus den man angezeigt haben will. Pro Tag wird eine bestimmte Anzahl von “records” gemacht. Onyx speichert jeweils einen neuen “Record” nach beendigung eines Messdurchgangs (Messung aller gewählten Linien). 4. Daten Informationsfeld Hier wird das Datum und die Uhrzeit des gerade betrachteten Datensatzes angezeigt. Ist kein Datensatz zu den in “Date” und “Record” eingestellten Werten verfügbar wird hier “No Data availabe!” angezeigt. 5. Alarm - Anzeige Diese Alarmanzeige erscheint, während man sich im Onyx-Viewer Modus bendet und vergangene Daten betrachtet und im Echtzeitsystem ein Alarm ausgelöst wird. 6. “Hide saved data”, “show saved data” - Auswahl Dieser Button wechselt zwischen “Show saved Data” und “Hide saved Data”. Hiermit kann man die Anzeige der ausgewählten Daten ein- und ausschalten. Dies ist Sinnvoll um schneller zu einem weiter zurückliegenden Datensatz zu gelangen, da bei jedem wechsel des Datums alle Messdaten eingelesen werden und somit eine Verzögerung entsteht. 7. “Onyx-Settings” - Auswahl Das Anzeigefenster “Onyx-Settings” erscheint. Hier hat man jedoch natürlich nicht die möglichkeit Einstellungen zu ändern, da man sich ja nur die eingestellten “Settings” des damaligen Zeitpunktes ansieht. 43 Bedienung - “Drop-down” - Auswahlfelder “Drop-down” Auswahl - FILE “Save to HD” Diese Funktion speichert allle momentan anliegenden Werte, d.h alle gerade aktuellen Messdaten als einen “record” auf die Harddisk. Diese Daten sind dann zu einem späteren Zeitpunkt mithilfe von “Onyx - Viewer” auslesbar und betrachtbar. Dies ist die selbe Aktion die das Onyx - System automatisch nach jedem “Pass” ausführt. “Save to Excel” Diese Funktion speichert alle momentan anliegenden Werte, d.h alle gerade aktuellen Messdaten in die nächste freie Zeile des Excel Files. Achtung: das Excel - File darf nicht geöffnet sein. “Exit” redundante Funktion - beendet die OnyxView Software. Diese Funktion ist Passwortgeschützt. “Drop-down” Auswahl - ACTIONS “clear - Alarms” redundante Funktion - optische und akustische Alarme werden quittiert. “interrupt Learn” Diese Funktion ist nur dann anwählbar, wenn gerade ein “Learn” durchgeführt wird. Sie unterbricht den gerade laufenden “Learn” und schaltet in den “Normal Mode” zurück. Da die gelernten Daten immer erst nach dem Ende eines “Learn” gespeichert werden, gehen alle aktuell gelernten Daten verloren. “change Password” Das “Login” - Anzeigefenster wird eingeblendet, da dieses die “change Password” Funktion beinhaltet. “activate Calibration” automatische Selbstkalibration zur Kompensation aller temperatur -und zeitbedingten Veränderungen in der Hardware aller Messkanäle. Dieser Mode wird automatisch täglich um 12.00 1 x ausgeführt, kann jedoch vom Anwender zusätzlich manuell ausgelöst werden. Die Selbstkalibration nimmt in etwa 1 Minute Zeit in Anspruch, danach wird automatisch der vorherige Mode fortgesetzt, der Calibration-Mode wird im ModeAnzeigefenster angezeigt, die Hintergrundfarbe wechselt zu blau. 44 Bedienung - “change Learn Parameters” Diese Funktion ist nur dann aktiv, wenn gerade ein “Learn” durchgeführt wird. Ein neues Anzeigefenster erscheint in dem man während eines “Learns” die noch verbleibende “Learn” - Zeit in Stunden und den zu verwendenden Speicherplatz(1-5) ändern kann. “change Mode” redundante Funktion - auch mit der Taste F2 direkt ansteuerbar. “reset LCU”, “reset SSCU1”, “reset SSCU2” führen ebenso einen Reset durch wie er mit den Drucktastern auf den beiden Geräten ausgelöst werden kann. “update” Das Firmware Updatefenster erscheint. Hier kann man die Firmware (d.h. die Software der Mikrokontroller) aktualisieren. Die entsprechenden “Intel-Hex-Files” müssen im Unterordner “uCUpdates” stehen. Dieser Vorgang dauert einige Minuten. 45 Bedienung - “Drop-down” Auswahl - VIEW “Settings” redundante Funktion - Diese Funktion ist auch mit der Taste F1 direkt ansteuerbar. “System Info” redundante Funktion - das “System Information” - Anzeigefenster erscheint. “remaining Learn Time” Diese Funktion ist nur dann aktiv, wenn gerade ein “Learn” durchgeführt wird. Das Anzeigefenster “Remaining Learn Time” erscheint. Es zeigt die noch verbleibende Zeit bis zum Ende eines aktuellen “Learns” an. “Statusbar” Hier kann man die Informationsleiste am unteren Bildschirmrand ein - und ausblenden. “Drop-down” Auswahl - HELP “User Manual” Dieses Benutzerhanbuch wird mit Adobe Acrobat Reader angezeigt. “About OnyxView...” Das Informationsfenter der Software OnyxView erscheint. 46 Bedienung - 47 Bedienung - Frequenzspektrum -Anzeigen (1) 48 Bedienung - 1. “Main-High-Alarm” - Schwelle Eine rote Linie zeigt diese Schwelle an, ihre Lage entspricht den Pegeln der gelernten Daten + dem “Main-Alarm-Threshold” aus dem “Property” Menü des jeweiligen Sensors. 2. “Pre-High-Alarm” - Schwelle Eine grüne Linie zeigt diese Schwelle an. Ihre Lage entspricht den Pegeln der gelernten Daten + dem “Pre-Alarm-Threshold” aus dem “Property” Menü des jeweiligen Sensors. 3. Vibration- Cursor - Anzeigen Die Werte die in diesen Feldern angezeigt werden beziehen sich immer auf die Position des Vibration- Cursors und geben das numerisch wieder, was man in den Frequenzspektrum Anzeigen sieht. 3.1. numerische Frequenzanzeige In diesem Feld wird die Frequenz auf der sich der Vibration- Cursor gerade bendet numerisch angezeigt. (Wert ändert sich bei horizontaler Verschiebung des Cursors) Bei Linien die noch nicht gemessen wurden, wird anstelle der Frequenz eine Liniennummer angezeigt. 3.2. Cursor Wert (vertikal) (Amplitude in [dBpW] 0 dBp entspricht 1 pW) 3.3. Cursor Wert (vertikal) (Amplitude in [pW]) Diese Leistung wird aus der beschleunigungsproportionalen Spannung des Vibrationssensors bezogen auf den Eingangswiderstand des Verstärkers (75 kOhm) berechnet. 4. Anzeige - Datum/Uhrzeit zeigt das Datum und die Uhrzeit des momentan mit dem Vibration- Cursor angezeigten Messwertes an. 5. Cursorposition Die horizontale Cursorposition kann durch Mausklick bzw. Pfeil rechts/links Tasten verändert werden. 6. Sensorauswahl ist ein “drop-down-menü” in dem man aus den angeschlossenen Sensoren einen auswählen kann. Alle hier angezeigten Sensoren sind Vibrationssensoren. 7. Auswahl - aktueller/gelernter Wert Hier wechselt man die Anzeige zwischen aktuellem und zur Zeit verwendetem gelerntem Wert. Der gelernte Wert wird zwecks deutlicher Unterscheidung mit gelbem Hintergrund dargestellt. 49 Bedienung - Frequenzspektrum -Anzeigen (2) 50 Bedienung - 8. Anzeige Menü - “Properties” “Properties” - Anzeigefenster des jeweils Ausgewählten Vibrationssensors erscheint. 9. Offset/Zoom - Schieberegler diese beiden Regler gestatten es die vertikale Lage und Dehnung der Vibrationsanzeige individuell zu gestalten. 10. Auswahl - “Disable/Enable Line”, “Send Disabled/Enabled Lines” In der default Einstellung sind alle Linien enabled - d.h. alle Linien nehmen an der Alarmbildung teil. Möchte man bestimmte Linien von der Alarmbildung ausschließen (oder wiederrum aktivieren) markiert man diese mit dem Cursor und dem entsprechenden Button. Ist die Auswahl abgeschlossen sendet man diese durch drücken des Send Buttons an das Onyx-System. 11. Meßverlaufs - Aktivitätsanzeigen - Cursor Ein hellblauer Aktivitätscursor zeigt an welche Frequenz gerade gemessen wird. 12. Vibrations-Cursor-Kopplung Die Position der Cursor in beiden Frequenzspektrum-Anzeigen wird synchronisiert oder separiert. (Umschaltknopf) 13. Frequenzbandbeschränkung - Anzeige Die Vibrationsanzeigen stellen grundsätzlich das gesamte Frequenzband dar. Hat man jedoch im “Settings” - Anzeigefenster unter “Onyx Parameters” eine Frequenzbandeinschränkung vorgenommen, wird dies hier optisch durch diese beiden Balken dargestellt. 51 Bedienung - Multifunktions - Anzeigen 52 Bedienung - Allgemein In der Hauptanzeige stehen einem 8 Multifunktionsanzeigen (“Multis”) zur verfügung. Sie zeigen die Werte der ausgewählten Sensoren an. Folgende GrundSensortypen können gewählt werden: • VIB RMS • Temperatur • Strom • Wind • Hilfssensoren (Aux) 1. Sensorauswahl -Feld ist ein “drop-down-menü” in dem man aus den angeschlossenen Sensoren einen auswählen kann. 2. Anzeige Menü - “Properties” “Properties” - Anzeigefenster des jeweils ausgewählten Sensors erscheint. 3. Anzeige - gelernter Wert Anzeige des gelernten Wertes wird anstatt des Echtzeitwertes (des gespeicherten, vergangenen Wertes im Onyx-Viewer Modus) angezeigt. 4. Anzeige - Wert, Zeit, Datum Wert des jeweils ausgewählten Sensors. Uhrzeit und Datums Anzeige des angezeigten Messwertes. 53 Bedienung - “Settings” - Anzeigefenster (Onyx-Parameters) 54 Bedienung - 1. Onyx - Parameter - Einstelloptionen In dieser logischen Unterteilungseinheit des “Settings” Fensters können Sie all die folgenden Anderungen vornehmen. Ausgeführt werden diese Änderungen erst, wenn Sie den “Change ONYX-Parameters” Knopf drücken. 1.1. Stationsname - Eintragfeld Hier können Sie 16 beliebige Zeichen eingeben. Vorgesehen ist hier, dass Sie den Namen der Anlage eingeben in der Sie das Onyx System verwenden. Dieser Name erscheint dann in dem Feld “Stationsnamen - Anzeige” der Hauptanzeige und in den Log- ,Alarm- und Excelles. 1.2. “Wordrate”, und “Rotation-Period” - Eintragfelder Diese Felder sind nicht vom Benutzer editierbar und sind für zukünftige Funktionen vorgesehen. 1.3. “Report Alarms” - Eintragfeld Hier tragen Sie ein wie oft Schwellwerte hintereinander über/unterschritten werden müssen, bis ein Alarm ausgelöst oder zurückgenommen wird. (3...16) 1.4. “Average-Values” - Eintragfeld Hier tragen Sie die Anzahl der Messwerte ein die gemittelt werden. Allen Messungen gemeinsam ist eine Mittelung aufeinander folgender Messwerte mit einem gleitenden Mittelwert-Algoritmus. Es gilt hierbei abzuwägen zwischen einer möglichst stabilen Anzeige einerseits und einer raschen Reaktion andererseits. Empfohlen wird eine Einstellung von 5. Weiters werden einmalige “Ausreißer” durch einen weiteren Algoritmus unterdrückt. 1.5. “Frequency Band Selection” - Eintragfeld zeigt die aktuelle Frequenzbandauswahl und die, in die sie geändert werden soll an. Mit den beiden Schiebereglern stellen Sie die neue Frequenzbandauswahl ein. 2. Maintenance Only - Einstelloptionen für diese Einstellmöglichkeiten ist ein eigenes Passwort erforderlich. Sie sind nur für Wartungsarbeiten und Tests von IES gedacht. 55 Bedienung - “Settings” - Anzeigefenster (User Settings) 56 Bedienung - 3. “User Settings” - Einstelloptionen In dieser logischen Unterteilungseinheit des “Settings” Fensters können Sie die folgenden Änderungen vornehmen. Ausgeführt werden diese Änderungen erst, wenn Sie den “Save User-Settings” Knopf drücken. 3.1. “MaxRows in Excel” - Eintragfeld Nach Erreichung des eingetragenen Wertes in Zeilen wird in MS-Excel der älteste Wert wieder überschrieben und die Eintragungen in das MS-Excel File beginnen von vorne. Anmerkung: MS-Excel ist nicht im Lieferumfang von Onyx enthalten, kann jedoch vom User selbst installiert werden. Auf Anfrage liefern wir eine Excel-Formatvorlage. 3.2. “Automatic Transfer of Data to Excel” - Markierungsfeld Wenn Sie dieses Feld markieren, werden alle gemessenen Daten am Ende des Meßdurchgangs zusätzlich in ein MS-Excel Tabelle konvertiert, soferne MS-Excel installiert ist und das Excel-le Onyx.xls nicht gerade vom User benutzt wird. In diesem Falle erfolgen die Einträge nachträglich, sobald der User das Excel-le geschlossen hat. 3.3 “Region Nr.” In diesem Eintragfeld legt man den Parameter für die Kommunikation mit einem übergeordneten Kontrollrechner fest. 57 Bedienung - “Settings” - Anzeigefenster (Learn-Settings) 58 Bedienung - 4. “Learn-Settings” - Einstelloptionen In dieser Software stehen 5 verschiedene “gelernte” Datensätze zur Verfügung, auf die sich die Messungen beziehen können. Es kann aber immer nur einer der aktuell verwendete sein. In dieser logischen Unterteilungseinheit des “Settings” Fensters sind diese 5 möglichen Datensätze und ihre Eigenschaften aufgelistet. Die Eigenschaften eines “Learns” werden innerhalb einer Zeile dargestellt, wobei jede Spalte eine Eigenschaft beschreibt. 4.1. “Learn-Info” - Eintrag- Anzeige Feld Spalte Spalte Spalte Spalte Spalte 1: vordenierter Platz um einen Learn abzuspeichern (durchnummeriert) 2: Datum des Zeitpunktes wann “gelernt” wurde 3: Anzeige - welcher “Learn” zur Zeit aktiv ist 4: Anzeige - ob dieser Platz von einem “Learn” belegt ist oder nicht” 5: Eintragfeld - In diesem Feld ist Raum für eine Beschreibung des “Learns” 4.2. “Automatic Learn Switch” - Auswahlfeld Wenn die Anlage 2 Motoren besitzt die sich die Arbeit teilen, d.h. z.B. der erste Motor treibt die Anlage 24 Stunden an dann übernimmt Motor 2 die nächsten 24 Stunden, dann wieder Motor 1, u.s.w., ist es nötig den “Learn” auf den sich die Messdaten dieser Motoren beziehen mit zu wechseln. Dies ist nötig, weil jeder Antrieb seine eigene Geräusch-Charakteristik besitzt und ONYX eine so hohe Meßauösung besitzt, daß schon die kleinsten Unterschiede zu Alarmen führen würden. Der Zeitpunkt wann der “Learn” gewechselt wird, wird mit Hilfe der Stromverbrauchssensoren bestimmt, welche in Spalte 6 (“Automatic Learn-Switch”) ausgewählt werden können. Wenn Sie nun die Taste “Activate automatic Learn-Switch” aktivieren, setzen Sie damit folgende logische Verbindung: Sobald der Meßwert von einem in Spalte 6 eingetragenen Stromverbrauchssensor 1 Ampere unterschreitet, und der Meßwert von dem anderen in Spalte 6 eingetragenen Stromverbrauchssensor 6 A überschreitet, wird der “Learn” des “kommenden” aktiviert. Mit der Taste “Deactivate automatic Learn-Switch” wird dieser Automatismus aufgehoben. 4.3. “Manual Learn Switch” - Auswahlfeld In dieser Spalte kann man sich einen “Learn”, den man verwenden möchte aussuchen, und sobald man den Knopf “Switch Learn” drückt manuell in diesen umschalten. 4.4. “Save Learn” - Eingabefeld In diesem Feld können Sie einen “Learn” von einem (Speicher-)Platz auf einen anderen kopiert. Achtung: bereits vorhandene “Learns” (und damit auch alle mit diesem “Learn” gesammelten Daten) auf dem Ziel- (Speicher-)Platz werden gelöscht. 59 Bedienung - “Properties” - Anzeigefenster (1) Vibration-Properties - Anzeigefenster Multi-Properties - Anzeigefenster 60 Bedienung - 1. Anzeige Menü - “Properties” Die Maßeinheit die hier angezeigt wird hängt vom angewählten Sensor ab. Hier z.B. ein Vibrationssensor mit der Maßeinheit dBp. Alarmschwellen werden bei VIBspecProperties relativ zum gelernten Wet deniert - bei allen anderen in absoluten Werten. 1.1. “Sensor - Number” - Anzeigefeld zeigt an, an welchem Kanal der Sensor Angeschlossen ist. 1.2 “SensorName” - Eintragfeld Standardmäßig ist der Name “Sensor x” eingetragen, wobei x die Kanalnummer ist. 1.3 “Sensitivity” - Anzeigefeld Ist nur bei Vib-Spec und Vib-RMS-Sensoren vorhanden. Es zeigt die von Onyx elektronisch ausgelesene TEDS-Information des jeweiligen Vibrationssensors an. Besitzt der Sensor kein TEDS, wird die nominelle Empndlichkeit (100 oder 500 mV/g) angezeigt. 2. High-Alarms-Settings 2.1. Pre-Alarm- Thresholds - Eintragfeld ist das Eintragfeld für den Pre-Alarm-Threshold der High-Alarm-Settings 2.2. Main-Alarm- Thresholds - Eintragfeld ist das Eintragfeld für den Main-Alarm-Threshold der High-Alarm-Settings 3. Low-Alarms-Settings 3.1. Pre-Alarm- Thresholds - Eintragfeld ist das Eintragfeld für den Pre-Alarm-Threshold der Low-Alarm-Settings 3.2. Main-Alarm- Thresholds - Eintragfeld ist das Eintragfeld für den Main-Alarm-Threshold der Low-Alarm-Settings 4. Enable Alarms Standardmäßig sind alle Alarme markiert und damit enabled. Entfernen der Markierungen deaktiviert diesen Sensor für die Alarmbildung des entsprechenden Alarmtyps. 61 Bedienung - “Properties” - Anzeigefenster (2) Aux-Properties - Anzeigefenster 62 Bedienung - Zusätzlich zu den genannten Properties sind bei einem Aux-Sensor noch folgende vier Einstellungen enthalten: 5. Start-Value Dieser Wert gibt den Anfangswert des Wertebereichs an, indem ein Aux-Sensor arbeiten soll. 6. End-Value Dieser Wert gibt den Endwert des Wertebereichs an, indem ein Aux-Sensor arbeiten soll. 7. Resolution Dieser Wert gibt die Auösung an, indem ein Aux-Sensor arbeitet. (“1000”...0,001 ; “100”...0,01 ; “10”...0,1 ; “1”...1) Er wird je nachdem wie Start- und Endwert eingestellt wurden automatisch gebildet. 8. Unit Hier wird die Bezeichnung der Einheit die verwendet werden soll eingegeben. (z.B. “bar” für Luftdruck, “V” für elektrische Spannung) 63 Bedienung - “System-Information” - Anzeigefenster 64 Bedienung - 1. Temperatures Hier werden Betriebs-(innen-) Temperaturen der Geräte LCU und SSCU angezeigt. Übersteigt diese den oberen Grenzwert (+70°C für SSCU bzw. +45°C für LCU) wird diese Anzeige rot gefärbt. Unterschreitet die Temperatur den unteren Grenzwert (-25°C für SSCU bzw. -5°C für LCU) wird die Anzeige blau gefärbt. 2. Programmversions Hier werden die Programmversionen der aktuell in verwendung bendlichen Firmware Programme angezeigt. 3. Serial - Numbers zeigt die Seriennummern der entsprechenden Hardware an. Geänderte Seriennummern werden rot eingefärbt. 4. System-Alarms Neben den o.a. Temperaturen werden noch weitere kritische Systemzustände laufend überwacht: Selftesterror LCU - "kommt" z.B. wenn Flash-Aktionen fehlschlagen. Nur mehr eingeschränkter Betrieb möglich. Emergency-Mode - "kommt", wenn kein gültiges Application-Programm in LCU oder SSCU erkannt wird. Notbetrieb mit altem “StartUp-Programm” bleibt aufrecht, neues Applikationsprogramm muß dringend nachgeladen werden. Power-Fail SSCU1/2 - "kommt", wenn die Betriebsspannungen Grenzwerte unterschreiten. Betrieb bleibt weiter aufrecht, jedoch Service notwendig. Sensor-Error - "kommt", wenn in einer Sensorzuleitung ein unzulässig hoher oder niedriger Widerstand festgestellt wird. Betrieb bleibt weiter aufrecht, Messwerte dieses Sensors wahrscheinlich falsch, Service notwendig. 65 Bedienung - “Change Mode” - Anzeigefenster (1) 66 Bedienung - Onyx3000 kann sich in einem von 4 Hauptmodi benden : 1. Normal Mode Alle aktuellen Messwerte werden laufend mit den gelernten verglichen und Alarme generiert wenn die denierten Schwellen über/unterschritten werden und alles sonstigen Alarmbedingungen erfüllt sind. Diese Alarmbedingungen sind: • Sensoren Alarm-enable ein • Vibrationsfenster: Linie(n) enabled • Settings: Alarm repeat n-mal. 2. Learn-Mode In einem denierbaren Zeitraum wird das Maximum aller aktuellen Messwerte gebildet und am Ende diese Zeitraums als gelernter Datensatz im Mikrokontroller nicht üchtig gespeichert. Durch Angabe einer “Learn Number” von 1 bis 5 wird der Speicherort festgelegt. Onyx schaltet am Ende des Learn automatisch in den Normal Mode um und verwendet diesen neuen Learn als Referenz. Aus dem Learn Mode kann jederzeit in andere Modes umgeschaltet werden wobei die Learn-Daten in diesem Fall nicht gespeichert werden. Ebenso kann während eines laufenden Learn die Learn-Number und die Lern-Zeit geändert werden ohne den Learn zu unterbrechen: siehe Drop-Down-Menü Actions/Change Learn Parameters. Optisch wird der Learn-Modus durch gelbe Hintergrundfarbe angezeigt. Die restliche Learn-Zeit kann durch Auswahl im Drop-Down-Menü VIEW/Remaining Learn Time abgefragt werden. Die gerade aktuelle Learn-Number sieht man in der Statusleiste ganz unten und in Settings/Learn-Settings. Im Learn-Modus werden grundsätzlich keine Alarme erzeugt. 3. Test Mode Er dient der Kontrolle aller Alarmfunktionen von Soft und Hardware. es werden alle Alarmschwellen künstlich so verändert, daß alle Alarme kommen müssen. Die Ausgabe dieser Testalarme erfolgt jedoch nur optisch und Akkustisch und nicht über die Alarmkontakte. Der Testmode wird durch rote Hintergrundfarbe angezeigt. 4. Service Mode: Er dient zum vorübergehenden ausschalten jeglicher Alarmgabe (falls zum Beispiel Wartungsarbeiten durchgeführt werden). Es werden alle Alarmschwellen künstlich so verändert, daß keine Alarme kommen können. Der Service-Mode wird durch tiefblaue Hintergrundfarbe angezeigt und es ndet ausserdem keine Kommunikation mit den Frontends statt (d.h. es werden keine aktuellen Messwerte angezeigt) 67 Bedienung - “Change Mode” - Anzeigefenster (2) 68 Bedienung - Neben den 4 Hauptmodi kann außerdem noch auf folgende Sondermodi umgeschaltet werden (durch Anklicken von Activate channel test): 1. Channel Test max: Mit Hilfe der in die Frontends eingebauten Kalibrierfunktion werden anstelle der Sensorsignale genau denierte Maxima an die Messeingänge gelegt. Die entsprechenden Anzeigen können kontrolliert werden und zeigen somit das einwandfreie Funktionieren der Hardware an. Optische und akustische Alarme sind aktiv, Alarmkontakte inaktiv. Der Modus wird im Mode-Anzeigefenster angezeigt und die Hintergrundfarbe wechselt zu blau. 2. Channel Test min Wie oben, jedoch werden genau denierte Minima an die Messeingänge gelegt. 69 Bedienung - “Calculate Trend” - Anzeigefenster 70 Bedienung - Allgemein Das Trendfenster ermöglicht am rechten Rand die Auswahl der Anzahl von Tagen in der Vergangenheit um auf dieser Basis eine Vorhersage der Entwicklung für eine ebenfals wählbare Anzahl von Tagen in der Zukunft zu berechnen. Der Rechenalgorithmus umfasst alle Sensor- und Liniendaten und erlaubt außerdem die Aussage über eine bestimmte Wahrscheinlichkeit des Eintreffens der Vorhersage. Die Vorhersagen werden in Textform ausgegeben, z.B.: Linie 17,3 Hz von Sensor Drehkopplung wird die Pre-High Schwelle am 21.3.2002 erreichen. Wahrscheinlichkeit: 43%. Die Trendberechnung wird manuell gestartet (“Calculate New Trend”), und dauert etwa 1 Minute. Sie setzt vorraus, daß die Daten aus dem ausgewählten Zeitraum der Vergangenheit verfügbar sind. Diese Funktion wird zu Zeit noch überarbeitet und wird erst in späteren Programmversionen (ab 6.0) verfügbar sein. 71 Bedienung - Excel-Beschreibung Bei einem Excel -Eintrag werden die momentanen Werte der Sensoren in ein ExcelSheet geschrieben. Diese Exceldatei mit dem Namen “OnyxNew.XLS” bendet sich nach der Installation der ONYXVIEW-Software im Programmunterordner \Excel. Das Eintragen der Werte erfolgt immer in diese, für diesen Zweck bearbeitete Datei. Der Inhalt der Datei kann bei Bedarf beliebig bearbeitet werden. (Kopieren, Löschen,...) WICHTIG: Die Datei selber darf nicht gelöscht, umbenannt oder verschoben werden. Gliederung der Excel-Datei: Die Datei besteht aus 12 Tabellen. VIB1A, VIB2A, VIB3A, VIB4A: In diesen vier Tabellen werden die aktuellen Vibrationsspektren der ersten vier Vibrationssensoren eingetragen. (aber nur wenn gerade kein Learn aufgezeichnet wird) In der Kopfzeile jeder Tabelle werden die Frequenzen eingetragen und in den darunterliegenden Zeilen jeweils ein Satz Vibrationswerte. VIB1L, VIB2L, VIB3L, VIB4L: Während der Erstellung eines Learn-Speichers werden die aktuellen Vibrationsdaten in diese Tabellen gespeichert und nicht in die oben genannten. RMSA: In dieser Tabelle werden die Mittelwerte von vier Temperatursensoren, zwei Stromsensoren, und vier Vibrationssensoren eingetragen. RMSL: Während der Erstellung eines Learn-Speichers werden die genannten aktuellen Mittelwerte in dieser Tabelle statt in die obere eingetragen. ALARM: Hier werden alle auftretenden Alarme eingetragen. Der Eintrag umfasst Name des Sensors, Art des Alarms, Zeitpunkt des Alarms (Datum, Uhrzeit), Wert des Sensors als Alarm aktiv wurde, und Werte der anderen Mittelwertsensoren als Alarm aktiv wurde. 72 Bedienung - Beschreibung der Excel-Datei Die Beschreibung eines Excel-Files kann auf zwei verschiedene Arten erfolgen. 1. Wenn die Option “Automatic Transfer of Data to Excel” im Settings-Fenster ausgewählt wurde, wird nach jedem Pass (Messdurchlauf des Spektrums) ein Eintrag in die Excel-Datei durchgeführt. Wenn ein Alarm auftritt, wird dieser ebenfalls eingetragen. 2. Wenn man im Dropdown-Menu “File” die Taste mit der Aufschrift “Save to Excel” betätigt, wird ein einmaliger Eintrag durchgeführt. Ein Alarmeintrag ndet bei dieser Beschreibung nicht statt. 73 Bedienung - Pc-Anywhere - Funktionsbeschreibung Standardmäßig ist die Software Pc-Anywhere auf dem Laptop installiert. Die Funktion dieses Programmes ist es, einen beliebigen Benutzer, der über den Benutzernamen und das dazugehörige Passwort verfügt, via Telefonleitung und Telefonanschluss die Kontrolle über den Laptop übernehmen zu lassen. Die Bedienoberäche und alle Funktionen sind genau so als würde man direkt an der Anlage vor dem Laptop sitzen. Weiters ist es möglich Dateien vom und zum Laptop zu transferieren. Standardmäßig eingerichtete Benutzer Folgende Benutzer dürfen sich standardmäßig (vorinstalliert) über eine Pc-Anywhere Verbindung am Laptop (Host) anmelden: • PCA Administrator Dieses Benutzerkonto besitzt spezielle Administratorrechte, und ist mit voreingestellten Passwörtern geschützt. Über dieses Konto kann man auch von Ferne die gewünschten Benutzer hinzufügen. • PCA Maintenance Dieses Benutzerkonto ist für Wartungsarbeiten, Softwareupdates, und Firmwareupdates, die die Firma IES auch von Ferne durchführen kann, gedacht. Diese Einrichtung zusammen mit einem Telefonanschluß ist Voraussetzung für die kostenlose Programmwartung durch IES innerhalb der Gewährleistungsfrist. Verbindungsaufbau Auf dem Laptop wird Pc-Anywhere im Host-Modus ausgeführt und wartet auf eine Verbindung am eingebauten Modem des Laptops. Sobald ein ankommender Anruf registriert wird hebt das Modem ab und Pc-Anywhere fragt nach Benutzernamen und Kennwort der ankommenden Pc-Anywhere Remote Anfrage. Sind diese richtig wird eine Verbindung aufgebaut. Wird die Verbindung wieder getrennt schaltet Pc-Anywhere in den Host-Modus zurück und wartet auf die nächste Verbindung. Um sich nun von einem beliebigen anderen Computer an diesem Host anmelden zu können, benötigt man einen Pc mit Modem, einen Telefonanschluss, und die Software Pc-Anywhere sowie die Benutzernamen und Passwörter. Pc-Anywhere über Internet Grundsätzlich ist es möglich, Pc-Anywhere auch über eine Internetverbindung zu benutzen. Eine Grundvoraussetzung hierfür ist jedoch, dass der Host-PC einen Internetzugang mit einer xen IP-Adresse besitzt, oder man die dynamisch zugeordnete IP -Adresse kennt. 74 Bedienung - Sicherheitsaspekte Für die Datenübermittlung während und beim Aufbauen der Verbindung wird ein Pc-Anywhere-Verschlüsselungsverfahren benutzt, das die Daten vor zugriffen Dritter schützt. Um sich an dem Host (Onyx - Laptop) anmelden zu können benötigt man die Telefonnummer des Anschlusses den der Host benutzt, Benutzernamen und Passwort. Wenn die Verbindung einmal aufgebaut ist, wird ein weiteres Passwort benötigt um die Einstellungen der auf dem Host registrierten Remote Benutzer, und damit auch ihre Passwörter und Rechte zu verändern. Ein drittes Passwort wird benötigt um die Einstellungen des Host selber zu verändern. Mehr zu diesem Thema und eine detailiertere Beschreibung aller in Pc-Anywhere möglichen Sicherheitseinstellungen ndet man im Handbuch zu Pc-Anywhere. (auch als Download von der Homepage www.symantec.com erhältlich). IES bietet auch Schulungen zu diesem Thema an. Eine Voll-lizenzierte Version von PC-Anywhere ist im Standard-Lieferumfang enthalten und auf dem Laptop installiert. Eine Demo-Version von PC-Anywhere für das Installieren auf einem entfernten Rechner zum Kennenlernen der Fernbedienung ist im Lieferumfang von Onyx ebenfalls enthalten. 75 Bedienung - LCU - Navigationsüberblick und Funktionen 76 Bedienung - LCU - Navigation und Menüführung Das Navigationsinterface besteht aus 2 Displays, oberes Display mit 1 x 8 Zeichen, unteres Display mit 2 x 16 Zeichen, 1 “Up” und 1 “Down” Drucktaster, 1 x Jog-Rad mit Druckfunktion, und einem Schlüsselschalter um Befehle zu bestätigen. Die Menüführung ist als “tree” organisiert und besteht in der obersten Ebene aus 3 “main menues” und einer automatisch wechselnden Statusanzeige. Um eines dieser Menues auszuwählen, dreht man am “jog wheel” nach links oder rechts. Dann wählt man das gewünschte Menü aus indem man entweder auf das “jog wheel” drückt oder alternativ den “Down” Drucktaster betätigt. “Show values” - Menü In diesem Menü kann man sich ganz einfach alle analogen Messwerte ansehen, die die Sensoren liefern: Durch drücken des “jog wheel”, wenn die Anzeige “show values” erscheint gelangt man in Ebene 2 der Hierarchie. Dort kann man durch drehen des “jog wheels” den gewünschten Sensor aussuchen. Die Messwerte des jeweiligen Sensors werden im oberen Display angezeigt. “Show Alarms” - Menü Wenn man das “jog wheel” drückt, während “show alarms” angezeigt wird, gelangt man in Ebene 2 dieser Hierarchie, wo man die Alarme aller Sensoren ansehen und ggf. auch bestätigen kann. Für jeden Sensor werden die Alarm-typen “main-high”, “pre-high”, “pre-low” und “main-low” angezeigt (unteres Display), und im oberen Display erscheint entweder “ALARM” oder “----”. Alarme können wie folgt bestätigt werden: Um einen Alarm zu quittieren, drückt man das “jog wheel” um in Ebene 3 dieser Hierarchie zu gelangen. Dort bestätigt man den Alarm durch Drehung des Schlüsselschalters. Eine Kurzform der Alarm-Quittierung ohne vorher in die Untermenüs zu gehen besteht einfach in einer Betätigung des Schlüsselschalters. Die Quittierung eines Alarms löst nur den “Silent-Mode” aus. Es gilt dasselbe wie schon vorher bei OnyxView/Conrm Alarms beschrieben wurde. 77 Bedienung - “Set Mode” - Menü In diesem Menü kann man sehen in welchem Mode sich das System bendet und kann diesen auch wechseln. Drückt man das “jog wheel”, wenn “set Mode” auf dem Display zu lesen ist gelangt man in Ebene 2 dieser Hierarchie, welche mit “Set: Normal L1” beginnt. Durch drehen des “jog wheels” durchläuft man alle Modes in die das System versetzt werden kann. Der aktuell ausgeführte Mode wird immer im oberen Display angezeigt. Jede Änderung des Modes verlangt dass (1) der Mode durch drücken des “jog wheels” im entsprechenden Menü angefordert wird, (2) die Änderung durch drehen des Schlüsselschalters bestätigt wird, wenn das System danach verlangt und (3) dass das System in der Lage ist den Mode zu ändern, was einige Zeit dauern kann. Wenn das System nicht sofort reagiert nachdem ein Mode - Wechsel vorgenommen wurde, sollte man etwas Geduld haben, da vom System vieles zu tun ist bevor eine Änderung aktiv wird. Die verschiedenen Modi sind: (1) Normal Mode mit Verwendung der “Learns” L1, L2, L3, L4, oder L5 als Vergleichswerte mit den aktuellen Daten. (2) Learn mode L1, L2, L3, L4, oder L5, was bedeutet, dass das System zu “lernen” beginnt und die Daten in den ausgewählten “Learn” Buffer schreibt, sobald der Learn beendet ist um diese Daten dann zu einem späteren Zeitpunkt als Referenz heranzuziehen. Dieser dauert standardmäßig 24 Stunden. (3) No Alarms Er dient zum vorübergehenden Ausschalten jeglicher Alarmgabe (falls zum Beispiel Wartungsarbeiten durchgeführt werden). Es werden alle Alarmschwellen künstlich so verändert, daß keine Alarme kommen können. Es ndet ausserdem keine Kommunikation mit den Frontends statt (d.h. es werden keine aktuellen Messwerte angezeigt). (4) Alarm Test Er dient der Kontrolle aller Alarmfunktionen von Soft und Hardware. es werden alle Alarmschwellen künstlich so verändert, daß alle Alarme kommen müssen. Die Ausgabe dieser Testalarme erfolgt jedoch nur optisch und akustisch und nicht über die Alarmkontakte. (5) FE-CTMIN Mithilfe der in die Frontends eingebauten Kalibrierfunktion werden anstelle der Sensorsignale genau denierte Minima an die Messeingänge gelegt. Die entsprechenden Anzeigen können kontrolliert werden und zeigen somit das einwandfreie Funktionieren der Hardware an. Optische und Akkustische Alarme sind aktiv, Alarmkontakte inaktiv. (6) FE-CTMAX wie FE-CTMIN jedoch werden genau denierte Maxima an die Messeingänge gelegt. 78 Bedienung - Mail Informer (ab v 3.0) Allgemeine Informationen Mail Informer wurde entwickelt um Alarme und/oder regelmäßige Informationen via E-Mail zu versenden. Es funktioniert in Verbindung mit einem Onyx 3000 System und überwacht dessen Alarmierungssystem, aber es können auch andere Dateien überwacht und bei Bedarf versendet werden. Funktionsweise Das Programm hat zwei unabhängige Betriebsmodi: • Alarmgesteuert • Zeitgesteuert Alarmgesteuerter Betriebsmodus In diesem Betriebsmodus überwacht das Programm die Existenz einer Alarmdatei alle 30 Sekunden, wenn die Funktion “Enable check alarm” aktiviert ist. Diese Datei kann einen beliebigen Namen haben, oder das Programm sucht automatisch nach der richtige Datei, wenn die Funktion “Autotrace of the right le name” aktiviert ist. Ist diese Funktion ausgeschaltet (nicht empfehlenswert) wird der Knopf “Change alarm le” aktiviert und man kann eine andere Alarmdatei auswählen. Wird die Alarmdatei vorgefunden, wird automatisch eine Internetverbindung aufgebaut und eine Alarmmail versendet. Das Mail beinhaltet die Alarmdatei und kann zusätzlich noch folgendes beinhalten: • Zusätzlicher Text: Einzugeben ins Feld “Additional message”. Ist die Option “Clear message after send” aktiviert, so wird der zusätzlicher Text nach erfolgreicher Mailversand gelöscht und beim nächsten Mailversand wird kein zusätzlicher Text mehr mitgeschickt. • Andere Dateien: Man kann sie in der große Dateiliste aus dem Bereich “Alarm le” eintragen und dort einzeln aktivieren oder deaktivieren. Die Dateien werden durch einen Mausklick auf einen der folgenden Knöpfe, in der Liste eingetragen: “Attachments”, “Add log”, “Add onx”. Mit “Attachments” kann man beliebige Dateien in der Liste aufnehmen, mit “Add log” Dateien mit log-Erweiterung, und mit “Add onx” Dateien mit onx-Erweiterung. Bei der Aufnahme in der Liste werden alle Dateien mit einem Hacken aktiviert was bedeutet, dass sie beim nächsten Emailversand berücksichtigt werden. Die Dateien können durch einen Mauseklick deaktiviert werden. Durch einen Doppelklick wird die Datei aus der Liste gelöscht. Auch hier ndet die Funktion “Autotrace of the right le name” Verwendung. Alle Log- und Onx-Dateien werden bei aktivierter Funktion aktualisiert, und so wird immer die richtige Datei versendet. 79 Bedienung - Die Funktion “Allow deleting le after send” löscht die betreffende Dateien nach erfolgreicher Emailversand. Für das Alarmle selbst sollte diese Funktion immer aktiviert bleiben, da sonst alle 30 Sekunden “neue” Alarme vorgefunden werden, obwohl es sich um einen “alten” Alarm handelt. Unter “Onxy Path” steht der Pfad für das Onyxprogramm. Sollte beim Start von “Mail Informer” der hier eingetragenen Pfad, oder eines der Standardunterverzeichnisse (Excel, Data und Log) nicht gefunden werden, müssen diese händisch gesucht oder vom Programm automatisch erstellt werden. Das Programm kann ohne diese Standardverzeichnisstruktur nicht funktionieren. Zeitgesteuerter Betriebsmodus Dieser Betriebsmodus wird verwendet um regelmäßige Informationen über die Anlage zu versenden, unabhängig von dem Alarmstatus. Die Eintragung der Dateien erfolgt wie bei dem alarmgesteuerter Betriebsmodus und wird in dem Bereich “Automatic e-mails - time controlled” durchgeführt. Die “Autotrace” Funktion hat dieselbe Wirkung wie oben beschrieben. Auch hier hat man die Möglichkeit die versendeten Dateien, nach erfolgreichem Versand, mittels “Allow deleting le after send” automatisch zu löschen . Dieser Betriebsmodus wird durch das Anklicken der Funktion “Enable automailing” aktiviert. Der Intervall kann zwischen 1 Minute und 49 Tagen gewählt werden. E-Mail Einstellungen Um E-Mails senden zu können muss man über ein gültiges und aktives Internet und E-Mail Konto verfügen. Das Konto kann bei einem beliebigen Internet Provider sein. A1.net bietet ein kostenloses Internet und E-Mail Konto an, man bezahlt lediglich die Onlinegebühren. A1.net bietet auch einen SMS-Service mit dem man das Konto überwachen kann. Man kann eine Handytelefonnummer angeben und wird so bei Eintreffen neuer Mails über SMS darüber informiert. So wird man ständig am laufenden gehalten und kann bei Alarmen von Onyx 3000 schnell reagieren ohne ständig die E-Mail abzufragen zu müssen. Über aktuelle Tarife kann man sich auf der Homepage von A1.net informieren (www.a1.net). Folgende Einstellungen muss man vornehmen um “Mail Informer” richtig zu kongurieren: • Receiver e-mail address - hier werden die E-Mails gesendet. • Sender e-mail address - hier kann man eine Antwort E-Mail Adresse eingeben. Der Empfänger (receiver e-mail address) von Alarm/Info-Mails kann somit darauf antworten wenn notwendig. • SMTP Server - das ist der Sendeserver des Internetproviders (voreingestellt für A1.net Provider - smtp.a1.net) 80 Bedienung - • User name - wird normalerweise nicht benötigt, aber manche Server verlangen es trotzdem. A1.net braucht diese Einstellung nicht und ist somit standardmäßig deaktiviert. • Unter dem Reiter “Connection” muss man eine DFÜ-Verbindung auswählen. Existiert beim Start von “Mail Informer” keine DFÜ-Verbindung, so wird eine Fehlermeldung angezeigt und das Programm kann nicht ordnungsgemäß funktionieren. Das Passwort muss in der DFÜ-Verbindung gespeichert sein. Während eines E-Mailversandes wird der “DialUp Status” angezeigt. Hier werden alle Schritte der Kommunikation zwischen lokalem PC und Server angezeigt und protokolliert. “Miscellaneous” Reiter Hier kann man folgende Funktionen aktivieren oder deaktivieren: • Allow to change settings - wenn diese Funktion aktiviert ist kann man alle Einstellungen verändern. Um unabsichtliche Veränderung der Einstellungen vorzubeugen wird empfohlen diese Funktion zu deaktivieren. • Protect changing of settings with password - ist diese Funktion aktiviert, kann man die “Allow to change settings” Funktion nur mehr mittels Passwort aktivieren oder deaktivieren. Das standardmäßige Passwort lautet: Onyx3000. Das Passwort ist case sensitive (es wird zwischen Groß- und Kleinschreibweise unterschieden). Einmal aktiviert, kann diese Funktion nur mehr mittels Passwort deaktiviert werden. Beim deaktivieren erscheint ein Passwortfenster. Hier wird entweder das Passwort eingegeben und mit OK bestätigt oder man kann mittels “New Password” ein neues Passwort festlegen (das alte Passwort muss bekannt sein). Mit “Cancel” wird der Vorgang abgebrochen. • Enable check alarm - startet oder stoppt die Alarmüberwachung • Protect application against shut down - wenn diese Funktion aktiviert ist kann man den “Mail Informer” nicht mehr schließen. Mittels Task Manager ist dies jedoch möglich (nur Windows 2000). “Statistics” Reiter Hier wird eine Statistik angezeigt: • Insgesamt - alle erfolgreich versendeten E-Mails, alle Alarme und alle fehlgeschlagenen Verbindungen zum Server seit Aktivierung des “Mail Informers” • Die letzten 24 Stunden - alle erfolgreich versendete E-Mails, alle Alarme und alle fehlgeschlagenen Verbindungen zum Server seit 0 Uhr am selben Tag. Diese Zähler werden immer um 0 Uhr zurückgesetzt. 81 Bedienung - Station name Man kann hier die Stationskennung eingeben um so bei der Überwachung mehrerer Stationen, diese zu unterscheiden. Der Stationsname wird in der E-Mail-betreffzeile übernommen. IES Logo Sollte das IES Logo angeklickt werden, so wird der standardmäßige Internet Browser gestartet und die Homepage der Firma IES Ges.m.b.H. aufgerufen. Protokollierung Alle Aktionen die das Programm oder der User durchführt werden in einer Log-Datei eingetragen in: C:\Onyxverzeichnis\Log\Log-datei. Die Log-Datei wird jeden Tag neu erzeugt und kann z.B. so benannt werden: Ox020123 für den 23. Jan. 2002. Wenn die Einstellungen geändert werden, werden sie gespeichert und automatisch beim Neustart des “Mail Informers” wiederhergestellt. 82 3 LCX 3000 (Option) In diesem Kapitel wird der Lightning Control Monitor, LCX 3000, welcher als ein Sensor an das Onyx 3000 System angeschlossen werden kann beschrieben. Sensor Option LCX3000 - LCX 3000 (Lightning Control Monitor) Der Lightning Control Monitor reagiert elektronisch auf Blitze, die mindestens 10kA oder mehr stark sind. Im Falle eines Blitzeinschlages (Himmel-Erde und umgekehrt) wird ein Relaiskontakt für 1 Sekunde aktiviert. Der im LCX 3000 eingebaute 4-Pin-Connector erlaubt ein sehr simples Interface zur Hardware des Benutzers. Es hat potentialfreie trockene Kontakte (“normally open” und “normally closed” ist möglich). Montage des LCX 3000 Um den Lightning Control Monitor betreiben zu können, sollte er vertikal am Blitzableiter so nah wie möglich am Boden montiert werden. (Es sollte beachtet werden, dass ein Blitz mit einer theoretischen maximalen Stärke von 1 MA einen Spannungsabfall von ungefähr 1000V/m entlang des Blitzableiters bewirkt.) Die Schrauben bzw. Schellen auf der Rückseite des LCX öffnen, LCX vertikal entlang des Blitzableiters positionieren und die Schrauben wieder festziehen. Die Schrauben gut festziehen, damit der Lightning Control Monitor nicht rutscht und guter elektrischer Kontakt gewährleistet wird. Nachdem das Kabel durch den Panzerschlauch geführt wurde und dieser an der gewünschten Seite an das Gehäuse geschraubt wurde, nimmt man die Verkabelung vor. Danach schließt man das Gehäuse und den unbenützten Eingang mit der Schraubenkappe. Der Anschluß an Onyx erfolgt an dem “Options”-Stecker der CIOU zwischen einem der maximal 4 LCXin-Pins und einem “Return”-Pin. Stromversorgung Batterie - und Relaistest Der LCX 3000 wird mit einer 9V Lithium Blockbatterie (Größe:U9VL.J) versorgt. Eine neue Batterie versorgt den Lightning Control Monitor 10 Jahre lang mit ausreichend Strom. Ein Batterietest kann zu jeder Zeit sehr leicht durchgeführt werden. Batterietest: Den Druckknopf drücken und länger als 0,3 Sekunden gedrückt halten. Eine gute Batterie sollte ein monotones Beep-Geräusch erzeugen, welches so lange anhält, solange man den Knopf gedrückt hält. Die im Druckknopf eingebaute Led sollte ebenfals solange leuchten. Eine verbrauchte Batterie erzeugt eine Serie von kurzen Beep-Geräuschen, und eine blinkende Led, solange der Druckknopf gedrückt wird. In einem solchen Fall sollte die Batterie ausgetauscht werden. 85 Sensor Option LCX3000 - Relais-Test: Den Druckknopf drücken und kürzer als 0,3 Sekunden gedrückt halten. Wenn man den Drückknopf kürzer als 0,3 Sekunden drückt, kann man die Funktionstüchtigkeit der gesamten Elektronik Testen. Das Relais wird aktiviert und der Benutzer sollte 2 kleine “clicks” innerhalb einer Sekunde hören, oder die angeschlossene Hardware(Onyx) reagiert auf die 1s - Relais Aktion. Batteriewechsel Die Schrauben an der Vorderseite lösen und die alte Blockbatterie durch eine neue ersetzen. TYPE: 9V Lithium cell, Größe - U9VL-J. Elektrische Verbindungen Der 4 polige Stecker ist nach öffnen es Gehäuses zugänglich. Er verschafft Zugang zu den potentialfreien trockenen Relais Kontakten: 1...ERDE (es wird empfohlen diesen Kontakt offen zu lassen, da im Falle eines Blitzeinschlages dieses Potential signikant über “Ground” steigt ! Wenn Sie das Verbindungskabel schirmen wollen, sollten Sie das Erdpotential von der anderen Seite des Verbindungskabels nutzen - “Return”-Pin von Onyx CIOU) 2...CO (“Change Over” - der gemeinsame Kontakt für NO, NC) - an “Return”-Pin CIOU von Onyx 3...NC (“Normally Closed” - dieser öffnet im Falle eines Blitzeinschlages für 1 Sekunde) - bleibt frei 4...NO (“Normally Open” - dieser schließt im Falle eines Blitzeinschlages für 1 Sekunde) - an “LCXin”-Pin von CIOU von Onyx Technische Daten • Der LCX 3000 reagiert auf Blitzeinschläge mit einer mindeststärke von 10kA in beide Richtungen (Himmel-Erde oder Erde-Himmel). • Schutz gegen Blitzeinschlagströme bis zu_____________________10.000kA • Kontakt Spezikationen: Schaltleistung_______________max 100V/1A Isolation______________________1500Veff • Batterie Standby Zeit (9V Lithium Block)______________________10 Jahre • Arbeitstemperatur_________________________________-40°C - +85°C • Schutz gegen Wasser und Staub________________________IP67 Standard • Hochfrequenzgeschütztes Metallgehäuse • EMC-Geschützt • dreifach geschirmter, hochfrequenz geschützter exibler Metallschlauch zum Schutz und zur Abschirmung des Verbindungskabels ( Länge auf Anfrage) 86 4 Technische Daten In diesem Kapitel sind alle Geräte des Onyx3000 Systems nocheinmal aufgelistet und deren genauen technischen Daten angegeben. Technische Daten - Sensoren - Technische Daten Vibration - Accelerometer • Sensitivity___________________________500 mV/g (51 mv/ms-2) +- 20% The exact value of sensitivity is factory-calibrated and written into a non-volatile memory inside the sensor. This value is read by Onyx after Reset via the standard TEDS (Transducer Electronic Data Sheet, IEEE 1451.4) • Measurement range______________________________+- 10g (+- 98 ms-2) • • • • Frequency Range (+- 3 dB)_________________________0,167 Hz .. 12,5 kHz Mounted Resonant Frequency__________________________________16 kHz Amplitude Linearity__________________________________________+- 1% Shock Limit________________________________________________5000 g • Temperature Range_________________________________-54°C .. + 121°C • Spectral Noise__________________________________1,6 mg/ Hz @ 10Hz 0,5 mg/ Hz @ 1 kHz 30 mg @ 10 Hz .. 1 kHz • Sealing______________________EMI-Proof, Welded Stainless Steel Hermetic Temperature - Pt 100 • Measurement Range________________________________- 40°C .. + 120 °C • Integrated 4 - 20 mA Transmitter • Absolute Accuracy_________________________________________+- 0,5 K • Different Types for Air/Surface/Inside-Oil - Temperature • Sealing____________________________________________EMI-Proof, IP 67 Current - AC, 50 - 60 Hz • Measurement Range____________________________________0 - 20 A RMS • Integrated 4 - 20 mA Transmitter • Absolute Accuracy_____________________________________+- 0,2 A RMS • 3 Current Sensors combined in one 3-Phase Measurement Box • Sealing____________________________________________EMI-Proof, IP 67 Wind Velocity • Measurement Range____________________________________0 - 200 km/h • Integrated 4 - 20 mA Transmitter • Operating Temperature Range__________________________-55 °C .. + 70°C 120/50 mm F x 280 mm H • Sealing____________________________________________EMI-Proof, IP 67 89 Technische Daten - Proximity Switch - North Pulse • Measurement Principle: Capacitive • Adjustable Detection Distance________________________________0 - 8 mm • Operating Temperature Range_________________________- 25 °C… + 70 °C M18 x 55 mm • Sealing____________________________________________EMI-Proof, IP67 SSCU - Teschnische Daten 1. Vibration Sensor Calibration Data are read via the standard TEDS-interface The signal from each Vibration Sensor is processed in two different ways: 1.1 Spectral Analysis (for longterm surveillance) • • • • • • • • 256 different spectral lines from 0,24 Hz to 12,5 kHz logarithmic frequency scale (CPB Constant Percentage Bandwidth of approx. 2%) Extremely high dynamic:______________________________________0 to 5 g ADC Resolution:______________________________________________24 Bits SNRRMS (including Sensor-, Thermal, OpAmp- and ADC Noise)____ dB @ 1 kHz SNRPk (including all noise sources)_________________________99 dB @ 1 kHz Resulting Noise Free Resolution_____________76,3 mg / 7,77 mm/s-2 / 16 Bits Elimination of all Offset-, Aging- and Full Scale-Errors by Continuous System Calibration with onboard extremely high precision DC- and AC-References: • Absolute DC- and AC-Reference Error___________________________+- 0,04% • DC- and AC-Reference Temperature Coefcient________________+- 0,5 ppm/K • Duration of complete Measurement Cycle (256 Spectral Lines)_________2 hours 1.2 TRMS - Sum-level Analysis (for quick reaction) • Measurement Frequency Range, True RMS___________________10 Hz to 1 kHz • Measurement Unit:_____________________________________Velocity: mm/s • Measurement Range____________________________________0 to 780 mm/s • ADC-Resolution______________________________________________24 Bits • Noise-Free Resolution_________________________________12 mm/s / 16 Bits • Elimination of all Offset-, Aging-,and Full scale Errors by Continuous System Calibration with extremely high precision onboard DC-Reference: • Absolute DC Reference Error / Temp. Co.______________0,04% / +- 0,5 ppm/K • Measurements per second (adjustable)_____________________5..(3 nom)..0,3 90 Technische Daten - 2. 4 - 20 mA Sensor Interface (up to 32/Sensors/channels) each channel is individually congurable for: • Temperature Measurement_____________________________-40°C … + 120 °C • Current Measurement____________________________________0 … 20 A RMS • Wind-Velocity Measurement_______________________________0 … 200 km/h according to the previousley described Sensors; • User dened 4 - 20 mA - Auxiliary Sensor with user-denable Units / Offsets / Spans and AlarmThresholds • Elimination of all Offset-, Aging- and Full Scale-Errors by continuous System Calibration with extremely high precision onboard DC-Reference-Currents (4,000 / 20,000 mA) • Absolute DC-Reference-Currents Error / Temp.Co._____+- 0,05% / +-0,5 ppm/K • ADC Resolution_______________________________________________24 Bits • Noise-Free Resolution_________________________________15x10-6 / 16 Bits • Measurements per second (adjustable)_____________________5..(3 nom)..0,3 3. Proximity Switch Interface (2 channels) Measurement of time interval between subsequent pulses for synchronisation of all other measurements • Measurement Range________________________________1000ms to 16s • Resolution____________________________________________________50us 4. General • • • • • • • 16-Bit Microcontroller 80C165 / 40 MHz 4 x 8 channels / 24-Bit ADCs 8 x tunable BP-Filters, 8 x TRMS / DC-Converters 8 x tunable Antialiasing / Smoothing - Filters 8 x Peak Detectors Interface for reading TEDS-Data from Vib.-Sensors Complete System-Calibration for all channels with high precision reference 0,5 ppm/K • Active Input Protection for all channels • Power Supply (14..36V/10W) over DC/DC-Converter and serial data transmission • • • • over Plastic Optical Fibres provide completely oating operation and immunity against EMI Optional Optical Repeater - built-in extension for up to 4 Data Acquisition Units as described above - or external for optical data transmission length greater than 60 m. Electronic Serial Number readable by microcontroller Inside case temperature measurement by microcontroller Working temperature range -35 °C … +60 °C 91 Technische Daten - • Prepared for Remote-Service (including Remote-Download of Firmware) • Mechanical Dimensions 260 x 160 x 90 mm • Sealing EMI-Proof, IP67 Master Control Unit 19”, 4HU rack-mountable or table-case EMI-shielded, special ventilation local illuminated display for one selected channel • Local illuminated display for operating mode • Complete user-interface by one jogwheel/2 pushbuttons • Key-Switch for conrmation of user-inputs • Alarm-Buzzer with volume-control • Optional built-in state-of-the-art Laptop sliding-leaf-extendible for: • Convenient graphical user-interface/display • Mass-storage of all measured data over the years • CD/ROM-Writer for archiving of measured data • Remote Alarm-notication by email/SMS • Remote maintenance for user-software/rmware • Extremely versatile Power-supply: 8...385VDC/85...264VAC(47..440Hz)/ 100W Hot-plugable/changeable modules for: • Master-Controller 16-Bit 80C165 / 40 MHz o User-interface/display • 16 Alarm-relays/contacts - completely user-congurable • 4Channel-Communication-interface to Frontend(s) via optical bre, Laptop and/or external PC(s) via RS232, general purpose l/0s(8 digital IN, 8 digital OUT) • Power Supply • Electronic Serial Numbers of all modules readable by microcontroller • Inside case temperature measurement by microcontroller • Input/Output-protection of all l/0-lines • Heavy duty industrial connectors EMI-shielded for all In/outgoing signals/lines • Working ambient temperature range -15 °C ... +35 °C 92 93 94 USER´S HANDBOOK 95 Copyright © 2002 by IES GmbH. All rights reserved. Onyx3000 User Manual First Edition: January 2002 Authors: Stefan Scheuermann Herbert Scheuermann Wilfried Zenker Gabriel Nistor Printed in Austria We reserve the right to make modest changes in text at any time. Such changes may be applied to future editions of this manual, supplementary documents and other publications. This rm does not take any warranty, neither explicitly nor implicitly, for the contents of this manual. Please record the model number, serial numbers and the date of purchase in the following space. In case you adress IES GmbH. concerning any issue you will be asked for the data. This publication must not, neither as a whole nor in part, be reproduced, stored in a data retrieval system or be distributed in any other form or way (electronically, mechanically, by copying, photographing or equivalent) without prior written consent of IES GmbH. Online Machine Condition Analysing Expert System Onyx3000 Model:______________________________ Serial Numbers: LCU3000: __________________________________ ALCU3000: _________________________________ PDCU3000: _________________________________ CIOU3000: _________________________________ ECCU3000: _________________________________ SSCU3000 (1): ______________________________ SSCU3000 (2): ______________________________ Date of purchase:_____________________________ Product names and trademarks of other enterprises contained in this publication are used for reference only and remain the property of their respective owners. 96 97 98 TA B L E O F C O N T E N T S Declaration of Conformity . . . . . . . . . . . . . . . . . . . . . . . . . . . . . . . . . . . . . . . . . . . . . . . . . . . . . . . . . . . . . . . . . . . . . . . . . . . . 102 Assistance and Support . . . . . . . . . . . . . . . . . . . . . . . . . . . . . . . . . . . . . . . . . . . . . . . . . . . . . . . . . . . . . . . . . . . . . . . . . . . . . . 103 Foreword . . . . . . . . . . . . . . . . . . . . . . . . . . . . . . . . . . . . . . . . . . . . . . . . . . . . . . . . . . . . . . . . . . . . . . . . . . . . . . . . . . . . . . . . . . . 104 1. System overview Onyx3000 System overview . . . . . . . . . . . . . . . . . . . . . . . . . . . . . . . . . . . . . . 107 Operational concepts Onyx3000 . . . . . . . . . . . . . . . . . . . . . . . . 108 Measurement concept . . . . . . . . . . . . . . . . . . . . . . . . . . . . . . . . . . . . . . . . . . 108 System concept . . . . . . . . . . . . . . . . . . . . . . . . . . . . . . . . . . . . . . . . . . . . . . . 109 Interpretation of measured valuesand adjustment of threshold values . . . . . . . . . . . . . . . . . . . . . . . . . . . . . 110 Vibration . . . . . . . . . . . . . . . . . . . . . . . . . . . . . . . . . . . . . . . . . . . . . . . . . . . . . . 111 4/20 mA-channels (Temperature-, Current-, Wind-, Aux-values) . . . 112 Master Control Unit . . . . . . . . . . . . . . . . . . . . . . . . . . . . . . . . . . . . 114 Front- /Rear view . . . . . . . . . . . . . . . . . . . . . . . . . . . . . . . . . . . . . . . . . . . . . . 114 LCU3000 . . . . . . . . . . . . . . . . . . . . . . . . . . . . . . . . . . . . . . . . . . . . . . . . . . . . . . 115 ECCU3000 . . . . . . . . . . . . . . . . . . . . . . . . . . . . . . . . . . . . . . . . . . . . . . . . . . . . . 115 ALCU3000 . . . . . . . . . . . . . . . . . . . . . . . . . . . . . . . . . . . . . . . . . . . . . . . . . . . . . 116 Externe Hi-Power-Relays . . . . . . . . . . . . . . . . . . . . . . . . . . . . . . . . . . 116 Pin-out of the 50-pin male connector . . . . . . . . . . . . . . . . . . . . . . . 116 Connector for external cabling . . . . . . . . . . . . . . . . . . . . . . . . . . . . 117 CIOU3000 . . . . . . . . . . . . . . . . . . . . . . . . . . . . . . . . . . . . . . . . . . . . . . . . . . . 117 “to Pc” Connector . . . . . . . . . . . . . . . . . . . . . . . . . . . . . . . . . . . . . . . . 117 “to frontend” Connector . . . . . . . . . . . . . . . . . . . . . . . . . . . . . . . . . . . 118 “options” Connector . . . . . . . . . . . . . . . . . . . . . . . . . . . . . . . . . . . . . . 118 Reset Button . . . . . . . . . . . . . . . . . . . . . . . . . . . . . . . . . . . . . . . . . . . . 119 PDCU3000 . . . . . . . . . . . . . . . . . . . . . . . . . . . . . . . . . . . . . . . . . . . . . . . . . . . . . 120 The Primary AC/DC (DC/DC) - Converter . . . . . . . . . . . . . . . . . . . . . . . . 120 Changing Function Modules . . . . . . . . . . . . . . . . . . . . . . . . . . . . . . . . . . . . . 121 SSCU3000 . . . . . . . . . . . . . . . . . . . . . . . . . . . . . . . . . . . . . . . . . . . . 122 Block Connectors . . . . . . . . . . . . . . . . . . . . . . . . . . . . . . . . . . . . . . . . . . . . . . 123 Sensors supported by the SSCU . . . . . . . . . . . . . . . . . . . . . . . . . . . . . . . . . 123 Meaning of the LEDs . . . . . . . . . . . . . . . . . . . . . . . . . . . . . . . . . . . . . . . . . . . . 123 Hexswitch settings and Reset . . . . . . . . . . . . . . . . . . . . . . . . . . . . . . . . . . . 124 99 2. Operating Onyx3000 Software Overview . . . . . . . . . . . . . . . . . . . . . . . . . . . . . . . . . . . . 127 OnyxView . . . . . . . . . . . . . . . . . . . . . . . . . . . . . . . . . . . . . . . . . . . . . 128 “Splash” - Screen and Startup . . . . . . . . . . . . . . . . . . . . . . . . . . . . . . . . . . 130 Main Display Window - Elements . . . . . . . . . . . . . . . . . . . . . . . . . . . . . . . 132 Onyx - Viewer Mode . . . . . . . . . . . . . . . . . . . . . . . . . . . . . . . . . . . . . . . . . . . . 136 “Drop-down” - Fields . . . . . . . . . . . . . . . . . . . . . . . . . . . . . . . . . . . . . . . . . . . 138 Selection - File . . . . . . . . . . . . . . . . . . . . . . . . . . . . . . . . . . . . . . . . . . 138 Selection - Actions . . . . . . . . . . . . . . . . . . . . . . . . . . . . . . . . . . . . . . . 138 Selection - View . . . . . . . . . . . . . . . . . . . . . . . . . . . . . . . . . . . . . . . . . 140 Selection - Help . . . . . . . . . . . . . . . . . . . . . . . . . . . . . . . . . . . . . . . . . 140 Frequency Spectrum Disply Windows . . . . . . . . . . . . . . . . . . . . . . . . . . . 142 Multifunction Display . . . . . . . . . . . . . . . . . . . . . . . . . . . . . . . . . . . . . . . . . . . 146 “Settings” - Display Window (“Onyx-Parameters”) . . . . . . . . . . . . . . . . 148 “Settings” - Display Window (“User-Settings”) . . . . . . . . . . . . . . . . . . . 150 “Settings” - Display Window (“Learn-Settings”) . . . . . . . . . . . . . . . . . . 152 “Properties” - Display Window (1) . . . . . . . . . . . . . . . . . . . . . . . . . . . . . . . 154 “Properties” - Display Window (2) . . . . . . . . . . . . . . . . . . . . . . . . . . . . . . . 156 “System-Information” - Display Window . . . . . . . . . . . . . . . . . . . . . . . . . 158 “Change Mode” - Display Window . . . . . . . . . . . . . . . . . . . . . . . . . . . . . . . 160 “Calculate Trend” - Display Window . . . . . . . . . . . . . . . . . . . . . . . . . . . . . 164 Writing into Excel . . . . . . . . . . . . . . . . . . . . . . . . . . . . . . . . . . . . . . 166 Pc-Anywhere - Operation details . . . . . . . . . . . . . . . . . . . . . . . 168 Default User(s) . . . . . . . . . . . . . . . . . . . . . . . . . . . . . . . . . . . . . . . . . . . . . . . . 168 Connection establishment . . . . . . . . . . . . . . . . . . . . . . . . . . . . . . . . . . . . . . 168 Pc-Anywhere over Internet . . . . . . . . . . . . . . . . . . . . . . . . . . . . . . . . . . . . . 168 Security aspects . . . . . . . . . . . . . . . . . . . . . . . . . . . . . . . . . . . . . . . . . . . . . . . 169 LCU3000 - Navigationsüberblick und Funktionen . . . . . . . . 170 LCU - Navigation and Operation . . . . . . . . . . . . . . . . . . . . . . . . . . . . . . . . . 171 “Show values” - Menu . . . . . . . . . . . . . . . . . . . . . . . . . . . . . . . . . . . . . . . . . . 171 “Show Alarms” - Menu . . . . . . . . . . . . . . . . . . . . . . . . . . . . . . . . . . . . . . . . . . 171 “Set Mode” - Menu . . . . . . . . . . . . . . . . . . . . . . . . . . . . . . . . . . . . . . . . . . . . . 172 Mail Informer . . . . . . . . . . . . . . . . . . . . . . . . . . . . . . . . . . . . . . . . . . 173 100 3. LCX3000 (Option) Mounting the LCX3000 . . . . . . . . . . . . . . . . . . . . . . . . . . . . . . . . . . . . . . . . . . . . . . 179 Power supply and battery check . . . . . . . . . . . . . . . . . . . . . . . . . . . . . . . . . . . . . 179 Replacing the battery . . . . . . . . . . . . . . . . . . . . . . . . . . . . . . . . . . . . . . . . . . . . . . . 180 Electrical connections . . . . . . . . . . . . . . . . . . . . . . . . . . . . . . . . . . . . . . . . . . . . . . . 180 Technical specications . . . . . . . . . . . . . . . . . . . . . . . . . . . . . . . . . . . . . . . . . . . . . 181 4. Technische Daten Sensors - Technical Data . . . . . . . . . . . . . . . . . . . . . . . . . . . . . . . 185 Vibration - Accelerometer . . . . . . . . . . . . . . . . . . . . . . . . . . . . . . . . . . . . . . 185 Temperatur - Pt 100 . . . . . . . . . . . . . . . . . . . . . . . . . . . . . . . . . . . . . . . . . . . 185 Current - AC, 50 - 60 Hz . . . . . . . . . . . . . . . . . . . . . . . . . . . . . . . . . . . . . . . 185 Wind Velocity . . . . . . . . . . . . . . . . . . . . . . . . . . . . . . . . . . . . . . . . . . . . . . . . . . 185 Proximity Switch - North Pulse . . . . . . . . . . . . . . . . . . . . . . . . . . . . . . . . . . 186 SSCU3000 - Technical Data . . . . . . . . . . . . . . . . . . . . . . . . . . . . 186 Vibration . . . . . . . . . . . . . . . . . . . . . . . . . . . . . . . . . . . . . . . . . . . . . . . . . . . . . . 186 4 - 20 mA Sensor Interface (up to 32/Sensors/channels) . . . . . . . . . . 187 Proximity Switch Interface (2 channels) . . . . . . . . . . . . . . . . . . . . . . . . . 187 General . . . . . . . . . . . . . . . . . . . . . . . . . . . . . . . . . . . . . . . . . . . . . . . . . . . . . . . 187 Master Control Unit . . . . . . . . . . . . . . . . . . . . . . . . . . . . . . . . . . . . 188 101 Declaration of Conformity We IES Ges.m.b.H. with the address Weidholzstrasse 1 A-3021 Pressbaum Austria declare under our sole responsibility that the product Name: System for capturing, supervision and processing of measurement values Type, Model, Article No. Onyx 3000 conforms to the standards and 73/23/EWG DIN EN 61010 89/336/EWG DIN EN 50081 DIN EN 50082 Niederspannungsrichtlinie Sicherheitsbestimmungen für elektrische Mess-, Steuer-, Regel und Laborgeräte Elektromagnetische Verträglichkeit EMV Fachgrundnorm Störaussendung Fachgrundnorm Störfestigkeit the taken test reports and therefore corresponds to the regulations of the Directive. Place and date of issue 102 Name and signature of authorized person Assistance and Support Contact Industrial Electronic Systems IES Gesellschaft m. b. H. Weidholzstrasse 1 A-3021 Pressbaum Tel.: (+432233) 53 910 Mobil: (+43 664) 2002002 Fax: (+43 2233) 53 910-16 email: [email protected] homepage: www.ies.co.at Training and technical assistance for beginners We offer individual training courses and technical assistance classes on demand. Subjects are PC-Anywhere and Mastering the Onyx3000 System. Module replacement - delivery of replacement modules On demand, we deliver replacement modules which can easily be replaced by the user. Guarantee The guarantee (basic warranty from law) period is 24 months. On request we offer prolongation of the warranty period and service contracts. If the PC-Anywhere “Remote Control” System is installed and works correctly and if the access over the telephone line functions satisfactorily, all software- and rmware-updates will be installed over the telephone line without additional cost within the rst 12 moths. Online Support This manual and other technical documents may be downloaded from our homepage www.ies.co.at. 103 Foreword This manual describes the functions and the use of the Online Machine Condition Anaylysing Expert Systems Onyx 3000. ONYX was developed for longterm surveillance of rotating machines and other equipment, that work many years in a regular and steady way. ONYX evaluates the condition of a facility at an early point of time and compares these “learned data” with all the following measured data. The physical characteristics which are mainly used are: 1. mechanical vibration 2. current consumption 3. temperature Consequently ONYX analyses the vibration signal(s) in the frequency domain with a very tight resolution of 2% CPB (Constant Percentage Bandwidth) in the range from 0,24 Hz to 12,5 kHz, featuring a bundle of 256 discrete spectral lines, each of which shows a dynamic resolution of over 100 dB. This extraordinary accuracy enables ONYX to detect the slightest changes weeks or months before damage becomes obvious. Up to 32 vibration sensors can be attached to various sources of vibration. This way all warnings and alarms can be assigned to discrete parts of the plant, e.g. the noise of gear wheels or the rotation of balls in ball bearings. Surveillance of power(current)-consumption (up to 16 sensors) and temperatures (up to 16 sensors) completes the MCM - all in one rugged housing, designed to be mounted near or inside the facility. It contains preampliers and signal conditioning to a serial data stream for transmission over a bre optic link, which eliminates all kinds of electromagnetic interferences. For the display of data, status information and alarms which are sent from the plant a 4HU (height units) 19” wide device is used which also contains a laptop computer on which the OnyxView runs. With the help of this software all measured data can be stored on disk or even CDROM (burner inside the laptop), and can be displayed in a user friendly way. Protocols may be printed automatically, time series can be created in order to analyse the probability of a failure in the future, for instance, and connections to other computer systems may be made in order to tele-control or tele-monitor the system. 104 1 System overview Onyx3000 In this section you receive an overview of the components contained in the system and their functions. System overview - System overview 107 System overview - Operational concepts Onyx 3000 Measurement concept ONYX3000 is a measuring and monitoring system for the supervision of the error status of rotating machines or industrial plants. It has been designed for full time service - which means that the machine or plant will be monitored all the time without interruption. The system is self-learning - this means that the orderly state of the machine or plant to be monitored will be learned by the system after installation. Yet the user can dene a current status for reference at a later time by letting the system “do” a “Learn” i.e. lling one of ve learn buffers with reference data. The measurement strategy supports two different monitoring principles: 1. spontaneous changes are recorded quickly (3 times per second) and should normally lead to appropriate emergency action (e.g. shutdown). 2. slowly-occurring changes are recorded separately in a time series that takes several hours and are used for a long term prediction of maintenance necessities within a time span from weeks to months. Thanks to the measurement strategy the system is completely independent from any visualisation equipment (as are as laptop or desktop computers) and its possible errors. This means, Onyx remains operative even if connected computers are shut off or fail. This also holds for the 5 “learns” the data of which are stored on Onyx in a non-volatile memory. A maximum of three (3) computers can be connected to Onyx in order to do the following: rst, comfortably display data which may be current data as well as recorded data from the past; second, enter commands and set parameters; third, store all data on disk or CDROM; fourth, calculate a trends analysis; fth, communicate with a superordinate controlling computer; sixth, communicate with a remote control station. Further, alarms can be dispatched when desired as emails or SMS to any addresses or mobile phones, respectively. Provision has been made in order to do most important settings and displays directly from the local control unit without the help of a personal computer. An additional possibility to read or set the mode of operation (for instance, “service mode”) works with digital I/Os. This way Onyx can b e controlled via relay contacts. Further, some of the mentioned I/Os are dedicated for connecting an maximum of 4 lightning detectors type LCX3000 to them in order to integrate lightning strike into the supervision. 108 System overview - System concept The hardware of ONYX consists of two units: 1. Measuring Unit (“Sensor Signal Conditioning Unit”, “SSCU”) with all connected sensors, in separated RF- and watertight housing and 2. Data Processing Unit (comprising Local Control Unit LCU, Alarm Control Unit ALCU, Power Distribution & Control Unit ALCU, Communication & I/O Unit CIOU and the Enhanced Computer Control Unit ECCU with an integrated laptop computer) built into a 4 height units (HU), 19” wide housing. Both parts contain a 16-bit microcontroller each with extensive rmware. The data transmission between the microcomputers uses datagrams which are multiply secured against statistical errors, and bre optic as transmission media in order to achieve complete potential separation and noise immunity. A maximum of 16 sensors of two different types can be connected to one Measuring Unit: vibration sensors and 4/20mA current sensors, in groups of 4 of the same type, one group connected to a pluggable modular printed circuit board. The printed circuit board for the basic 4/20mA sensor type is not restricted to current sensors but can be equipped with a wide variety of sensors: temperature sensor, current sensor, wind velocity and any other user-deneable type (using the “AUX” keyword). The vibration sensors use the well-known industry standard interface which is a constant current supply with voltage output and optional TEDS = “Transducer Electronic Data Sheet” - a protocol invented to read the manufacturer’s calibration data (in this case, the sensor’s sensitivity in [mV/g]) from the sensor itself - used by ONYX to read the sensor data upon startup. When speaking of vibration sensors, the option “only RMS” signal processing or “RMS and spectrum” signal processing can be selected. Additionally, a “North Pulse”-Sensor can be connected to one of the Measuring Units. This is a proximity switch which closes once per turn and in this way enables Onyx to calculate the rotational speed of the turntable or industrial plant. Thus the rotational speed can be displayed and the measurement data can be synchronised with it. Of course Onyx meets the Council Directive concerning the “Electromagnetic Compatibility” as well as the current safety standards. The Data Processing Unit, as a general rule, consists of all the parts or modules listed above, in a 4 HU 19” housing. It is normally mounted in a 19” rack but may as well be used on desk top. Its mechanic and electrical construction meets all required standards, as does the Measuring Unit. 109 System overview - Interpretation of measured values and adjustment of threshold values An averaging of sequentially measured values with a sliding average value algorithm is common to all measurements. The number of values which can be averaged can be set by the user in “Settings/Average values” to any value between 1 and 16. It applies here to weigh between on the one hand as stable a display as possible and a rapid reaction on the other hand. We recommend setting it to 5. Further, outliers are suppressed by an intelligent algorithm. Please note that, when speaking of the “Learning” process in Onyx, as a general rule the maximum values are stored (“learned”). The learning-time is 24 hours by default but can be set to a value in a much larger range by the user. Onyx features a built-in calibrator with an absolute accurity of 0.01% and a temperature coefcient of 0.5ppm/K which calibrates all measurement channels once - after reset - and thence periodically every day at 12:00 noon. If required, a calibration action can be triggered by a command in the “Actions-Drop-Down” menu. In any case a stable measuring accuracy without adjustments requiring user action is granted. With the help of the built-in calibrator, an inspection of all measurement channels can be carried out. In the menu “Change Mode”, channel test “MIN” (minimal values) or “MAX” (maximal values) can be chosen which causes the appropriate calibrator values to be switched to the measuring inputs. Corresponding display values provide for inspection of all the channels. It is common to all alarm processing that an alarm is issued no earlier than when the measured value has exceeded the dened threshold n times in series without interruption. This number n can be dened by the user in the menu “Settings/Report Alarms” within a range of 3 to 16. The same magic number and algorithm are applied when alarms disappear: if the measured value falls below the (upper) threshold it has to be n times for the alarm condition to disappear. Before disappearing, it is also required that the alarm be acknowledged by the user. Attention: Acknowledging an alarm while the alarm condition is (still) active only resets the optical and acoustic alarm circuitry. We recommend setting “Report Alarms” to 3. 110 System overview - Vibration The sensors give a voltage proportional to the acceleration with a sensitivity of (nominal) 100mV/g (g..acceleration due to gravity) or 500mV/g in a frequency range from 0.2 Hz to 12.5 kHz. This signal is converted into a Spectrum of equal range and 256 spectral lines which is a very ne resolution. The distance between the spectral lines is a constant factor of about 2% and thus follows a logarithmic scale. Each of the spectral lines is quantised with 24 bit resolution and features a dynamic of about 100 dB, possible source(s) of noise and error(s) included! The measurement of all spectral lines requires 3.5 hours where the low frequencies require the most time. Restriction of the band to frequencies between 5 Hz and 12.5 kHz (as an example) reduces the duration of a cycle to about 1 hour. In any case all data are recorded to magnetic disk for documentation and further reference. The vibration values are converted to power measured in picowatts since the power of a vibration supports the understanding of the phenomenon vibration better. These power values are then transformed to dB where 0dB = 1 pW, and displayed with the appropriate height in the vibration window of the attached laptop computer. When the crosshair cursor points to a spectral line, its height is displayed as numerals both in dB and pW. This part of the measurement serves for long term supervision and prediction of maintenance for the mechanical systems of the plant which may become necessary. We therefore recommend not to use this type of alarm for closing the plant down but instead to carry out a preventative maintenance. The alarm thresholds for this spectrum anlysis are in dB, relative to the learned value per spectral line. Moreover, they are displayed as green (pre-high) and red (main-high) lines in the vibration window of the screen. Further, for the alarm calculation 4 neighbouring spectral lines are considered. Their average values have to exceed the 4 learned values of the lines for an alarm to occur. This way, potential alarms caused by slight variation of the rotational speed are suppressed. Recommendation for the setting of the alarm thresholds of spectral lines: The alarm thresholds may be set in the “Property”-Window of the respective sensor. Pre-High 20dB, Main-High 36dB, disable Low-alarms. 111 System overview - At the time when the (slow) spectral line processing is done, the sensor signal is fed into a (fast, 3-times per second) true-RMS calculation machine. This on the one hand, limits the frequency band to between 10 Hz and 1 kHz and, on the other hand, calculates a speed [mm/s] from the acceleration value(s). This way a calculated value is derived which matches standardised recommendations for the vibration level. The VDI standard 2056 denes: For motor drives up to 15 kW: Good:<=0,7; Fair:<=1,8; For motor drives up to 75 kW: Good:<=1,1; Fair:<=2,8; Max. allowed:<=4,5 mm/s Max. allowed:<=7,1 mm/s Recommendation for the setting of RMS alarm thresholds: The alarm threshold can be set in the “Property”-Window of the appropriate sensor. Actual Value plus “Fair”-value for Pre-High-Alarm and Actual value plus “Fair”-value plus “Max. allowed”-value for Main-High-Alarm. Disable Low-Alarms. Attention: These alarm thresholds represent absolute limits and do not relate to learned values! 4/20mA-channels (Temperature-, Current-, Wind-, Aux-values) A small rotational switch with 16 Positions (“HexSwitch”) on the SSCU decides how to interpret the 4/20mA-value of the channel, on a per-channel basis. Following this setting, the unit will be displayed appropriately. Since the alarm thresholds vary from plant to plant, no further special recommendations can be given at this point. The alarm thresholds are absolute limits and do not relate to learned values. Beware: “absolute limits” = for the decision to issue an alarm or not, not maximum ratings for the sensors! 112 System overview - 113 System overview - Master Control Unit Front view 1. LCU3000 (Local Control Unit) is a function module for emergency control of the most important system functions in case the laptop computer fails. 2. ECCU3000 (Enhanced Computer Control Unit) is a laptop computer mounted on an exensible drawer. 2 1 Rear view 3. ALCU3000 (Alarm Control Unit) is a function module for controlling the alarm contacts 4. PDCU 3000 (Power Distribution Control Unit) is a function module for distribution of the different supply voltages 5. CIOU3000 (Communications Input Output Unit) is a function module for data communication 3 114 4 5 System overview - LCU3000 (Local Control Unit) This module contains a microcontroller controlling its functions, a beeper with volume control, 2displays with contrast regulators for diplaying the most important functions and data and a navigation interface in order to control the most important system functions without the help of the laptop computer. Thus in case of a failure of the laptop computer the system remains operative and the LCU3000 offers an adequate solution to: • Display the measured values of all sensors (“show values” menu) • Display and conrm all alarms (“show alarms” menu) • Display the mode of operation and switch to another mode (“set mode” menu) An exact explanation of the navigation follows. ECCU3000 (Enhanced Computer Control Unit) This module consists of a laptop computer mounted on an extensible drawer. Under the laptop computer you can nd an extensible mousepad and a second drawer meant for free room e.g. for storage of small things and the like. The OnyxVIEW software which is suited for comfortably reading all the measured values and reading and controlling the alarm thresholds in Onyx is installed on the laptop computer. Furthermore, the software features more functions like remote access and remote control of the Onyx system via modem or network, backup functions with the help of the built-in CDROM burner and export of all data to Microsoft Excel. All the cabling which may be connected to the back of the laptop computer (see description in the User Manual Acer Travelmate 600 Series) can be led out through the back side of the Master Control Unit so that no deterioration of the drawer function can arise. Apart from that the lead-out has been made RF-tight. An exact description of the software follows in chapter 2. 115 System overview - ALCU3000 (Alarm Control Unit) The Alarm Control Unit is a module plugged from the rear of the Master Control Unit. It contains a 50-pin male connector bearing the contacts of 16 alarm relay contacts. These built-in relay contacts can stand a maximum of 100V/1A. External Hi-Power-Relays External relay circuitry can be added more easily when making use of the built-in 24 V CD power supply accessible through pins 50 (+) and 17 (-) of the 50-pin connector. The 24V DC can be loaded with a maximum current of 200mA. Pin-out of the 50-pin male connector Originating from the relays, an alternating switch contact is led to the connector (see table below). When the event (rightmost column of the table) happens, the normally open (no) pin will be connected with the changeover (co) contact. Otherwise, in the quiescent state, the changeover pin is connected with the normally closed (nc) contact. All contacts are dry contacts with snubber protection (R-C 47R/47nF), potential free and isolated from one another (100V). “Alarm Contacts” (please watch out for the pin numbering): 1 2 3 4 5 6 7 8 9 10 11 12 13 14 15 16 17 116 no1 no2 no3 no4 no5 no6 no7 no8 no9 no10 no11 no12 no13 no14 no15 no16 0V DC@ 200mA 18 co1 19 co2 20 co3 21 co4 22 co5 23 co6 24 co7 25 co8 26 co9 27 co10 28 co11 29 co12 30 co13 31 co14 32 co15 33 co16 34 nc1 35 nc2 36 nc3 37 nc4 38 nc5 39 nc6 40 nc7 41 nc8 42 nc9 43 nc10 44 nc11 45 nc12 46 nc13 47 nc14 48 nc15 49 nc16 50 +24V DC @ 200mA General sum alarm General main high alarm General high alarm General low alarm General main low alarm General VIB RMS alarm General temperature alarm General current alarm General wind alarm General auxiliary alarm General VIB spectrum alarm user alarm 1 - future use user alarm 2 - future use system alarm sensor line alarm no alarm power for external use System overview - Connector for external cabling A 50-pin female connector matching the 50-pin male connector is supplied with each Onyx in order to enable the user to add circuitry to logically connect different alarms himself or herself. It is possible to make wired OR or wired AND functions by connecting the alarm contacts in parallel (OR contacts) or in series (AND contacts) or any combination, which can be read in by external equipment in a passive way, i.e. without having to supply power to the contacts. Please note that Relay no. 16 is the “no alarm” relay which is active whenever there is no alarm and thus operates in the opposite way to the other relays. It is also suited for signalling a power fail. CIOU 3000 (Communication Input Output Unit) This module is the communication centre for incoming and outgoing connections. not only does it contain serial interfaces but also parallel I/O which enables the system to be controlled by the I/O port command interface, locally and from remote. The CIOU 3000 features 16 parallel I/O channels and 4 serial ports, two of which are occupied for control purposes. The other two serial ports can be used for connecting external computers. They support the same software protocol as the built-in laptop computer and support 3 simultaneous sessions (i.e. 3 simultaneous users, one at the laptop and 2 more on external computers connected to the CIOU 3000). When running in such a conguration please note that commands given by one user also may have an impact on the work of the other two users. Since all three users work with the same Onyx, when giving contradictory commands Onyx will, for safety, only execute the last command given. “to Pc” Connector This connector is a 3-wire serial port for connecting an external PC. Only the following pins are connected: 2 RxD (from Pc) 3 TxD (to Pc) 5 Ground The software protocol of this port is the same as the one of the serial port for the built-in laptop computer. 117 System overview - “to frontend” Connector This connector bears two optical plugs for the transmission of data to and from the Sensor Signal Conditioning Unit (SSCU), and a 24V power supply output for the SSCU. “options” Connector This is a female 37-pin D-Sub connector carrying 3 serial and 16 parallel I/O pins. Pin-out “options”- connector (female): 1 2 3 4 5 6 7 8 9 10 11 12 13 14 15 16 17 18 19 +24V aux-supply +5V aux-supply Signal Ground TxD (“Opto”)-Ch C RxD (“Opto”)-Ch C TxD0 # (µC) RxD0 # (µC) NMOD out SMOD out LCX1 out LCX3 out NMOD in LMOD in SMOD in TMOD in LCX1 in LCX2 in LCX3 in LCX4 in 20 21 22 23 24 25 26 27 28 29 30 31 32 33 34 35 36 37 Return (0V) TxD - Ch D (To Aux-PC) RxD - Ch D (From Aux-PC) Signal Ground BOOTSTR # (µC) BSLRST # (µC) Signal Ground LMOD out TMOD out LCX2 out LCX4 out Return (0V) Return (0V) Return (0V) Return (0V) Return (0V) Return (0V) Return (0V) Pins 1,2,3 are auxiliary power supply which can be used externally. They are limited to about 100 mA intrernally. Pins 4,5 carry the electrical equivalent of the signal running over the bre optic cable and are meant for maintenance purposes only. Pins 6,7,24,25 form a service interface for the microcontroller and are reserved for maintenance use. Pins 21, 22 carry serial interface number 3 for yet another external PC. 118 System overview - The following pins form pairs which execute the following functions: Activation of one of the above mentioned signal input pair (“in”) requests the corresponding function. As soon as the system has executed the requested function or entered the desired state, the corresponding “out” signal is activated by the system. 12 NMOD in (request normal mode) 13 LMOD in (request learn mode) 14 SMOD in (request service mode) 15 TMOD in (request test mode) 8 NMOD out (conrm system is in normal mode) 27 LMOD out (conrm system is in learn mode) 9 SMOD out (conrm system is in service mode) 28 TMOD out (conrm system is in test mode) The following signal inputs “in” are meant for connecting the lightning strike monitor LCX 3000 to them. They will store the short LCX pulse and output this stored information via the “out” pin. 16 17 18 19 LCX1 in LCX2 in LCX3 in LCX4 in 10 LCX1 out 29 LCX2 out 11 LCX3 out 30 LCX4 out Please note: All “out”-pins are open collector which means that they can be used in two ways: 1. a load can be put directly between an “out” - pin and an auxiliary power supply (pins 1 or 2) 2. an “out” pin and a “return”- pin together can be used as a switch which then requires an external power supply All “in” - signal pins are pulled to +24V and activated by connecting them to one of the “return” - pins. Reset Button When required the internal microcontroller can be reset by pushing the reset button. The built-in laptop computer is not affected. 119 System overview - PDCU 3000 (Power Distribution Control Unit) The Power Distribution Control Unit provides for power for all modules in the system. All circuitry except the primary power conversion (AC or DC to DC) are contained in this module. The primary power conversion is done by a converter and can be accessed from the front after removal of the Local Control Unit LCU. The module works with any input voltage between 88 and 372V DC or from 85V bis 264 V AC at 47 to 440 Hz. The maximum power consumption is 100W. Accessible from outside are: • • • • the mains switch (On/Off) 2 fuses 5x20 mm 4A slow blow 2 green LEDs: Laptop Power OK and +5 V OK 2 2mm BUXXEN and a trimmer (normally not serviceable by the user, for measurement and ne tuning of the power supply for the laptop computer, typically 19V). Pin-out of the “Power In” Connector 1 P(-) phase (if AC) 2 N(+) neutral (if AC) PE Protective Ground negative (if DC) positive (if DC) The Primary AC/DC to DC - Converter This Converter can be exchanged for non-standard input voltage ranges. Its front panel carries 3 LEDs. The green LED is the OK sign and is normally on. The red “i” - LED is lit in case of undervoltage, the red “Io”-LED in case of overcurrent. The front panel and its LEDS is only visible when the Local Control Unit (LCU 3000) is removed. 120 System overview - Changing Function Modules Changing a module (LCU, ALCU, PDCU, CIOU) is no problem in case it should be required. Simply unfasten the screws of the module - without switching the system off - and pull it out. Then insert the replacement module and tighten the screws again. Don’t forget to reconnect any cables you may have removed before. Don’t worry about the power supply of the modules, all modules are hot pluggable. For removal of the laptop computer pull out the drawer, unscrew the base plate and then the laptop. For troubleshooting of the notebook computer please refer to the handbook of the laptop which comes with the system. 121 System overview - SSCU 3000 (Sensor Signal Conditioning Unit) The SSCU 3000 (also known as Frontend) is a detached module which normally is mounted in the vicinity of the plant and is connected with the Master Control Unit via bre optic cable. This is the unit the sensors are connected to. Two such modules can be connected to one Onyx system in series using bre optic cable to make a total of 32 plus two North pulse sensors. The sensors are connected to the box via triple screened cable. In the box, the analogue sensor signals are converted to digital and transmitted to the Master Control Unit. 122 System overview - Block Connectors The sensors each connect to a 3-pin block connector. These are the inputs of the measuring channels (CH1...CH16). The pin-out is • 1 = Sensor + • 2 = Sensor • 3 = Protective Ground Any sensor supported by the system can be connected to any channel (1 to 16), only the “Mode”-switch must be set to the sensor type correctly. The block connector bottom right marked “NP” is dedicated for the North Pulse sensor. The pin-out for NP is • 1 = Sensor + Power Supply (+17V) • 2 = Sensor - pnp Switching Output • 3 = Sensor - Power Supply (-5V) There are two more connectors without a plastic body and with female contacts which are provided for maintenance, namely download and debug, but they are reserved for use by the manufacturer. Sensors supported by the SSCU • • • • • • Vibration sensors (VIB rms, VIB spec) Temperature sensors (TEMP) Current sensors (CUR) Wind velocity sensors (WIND) North Pulse sensors (NP) Auxiliary sensors (user deneable) (AUX) More details are contatined in chapter 3 - Technical Data Meaning of the LEDs Whenever a sensor is connected to the input of a channel correctly the LED is lit, this way indicating a correct connection. The brightness is proportionate to the current in the sensor cable. So a short circuit or an open in the sensor line is easily recogniseable by watching the LED of the sensor. The four LEDs in the top right hand corner have the following meaning: • NP: blinks every time when the North Puls Sensor contact closes • TxD, RxD: blink when data is transmitted to or received from the Master Control Unit • ALIVE: blinks when the SSCU software is exectued correctly by the SSCU microcontroller. 123 System overview - Hexswitch settings and Reset Each of the channels has got a rotary switch called “HexSwitch” the position of which is read out by software to see what type of sensor is connected to it. The switch positions have the following meaning: 0 no Sensor or channel disabled 1 VIB, RMS only, Alarm enabled 2 VIB, RMS only, Alarm disabled 3 VIB, RMS + Spectrum Analysis, Alarm enabled 4 VIB, RMS + Spectrum Analysis, Alarm disabled 5 TEMP, Alarm enabled 6 TEMP, Alarm disabled 7 CUR, Alarm enabled 8 CUR, Alarm disabled 9 WIND, Alarm enabled A WIND, Alarm disabled B AUX, Alarm enabled C AUX, Alarm disabled D reserved E reserved F reserved The meaning of the settings of the “HexSwitch” labelled MASTER MODE is as follows: 0 SSCU OFF, Frontend does not operate, IDLE-Mode 1 SSCU ON, this is the rst (or the only) SSCU 2 SSCU ON, this is the second SSCU 3...F Used for internal test functions, reserved for the manufacturer! The RESET Button is normally not needed. In case a Reset should be required, this can be done with any pen or pencil. 124 2 Operating Onyx3000 This chapter contains information about the software installed on the laptop computer, in particular about OnyxVIEW which displays all data which Onyx delivers and can control all the functions of Onyx. Operating - Software Overview Firmware Capturing and processing of the measured values which includes the generation of alarms and all resulting action reside in the microcontroller rmware. The storage used is ash EPROM and can be modied from remote if required. OnyxVIEW The display of all actual and historic values is managed by OnyxVIEW, a MS-VisualBasic programme. Onyxview normally resides on the laptop computer but can be installed on two more computers which then can communicate with the rmware via the before-mentioned extra serial ports. Moreover, Onyx offers the possibility to connect a superordinate controlling computer to Onyx via another serial port. A suitable driver will be created by IES on demand. Mail Informer If desired, an email and SMS managing programme can be installed on the laptop computer. This software creates and expedites emails and SMS messages, either in user selectable time intervals or event triggered on recognition of an alarm situation. The emails and SMS messages can be sent to any email address or mobile phone number world wide. PC-Anywhere For remote control of all the Onyx 3000 system functions, Symantec’s PC-Anywhere is installed on the laptop computer. With the help of PC-Anywhere the user can control the built-in laptop computer from any PC world wide, provided the laptop computer can be connected to the telephone network. For the operation of PC-Anywhere please refer to the manuals which came with Onyx. A replacement or upgrade of the Onyx rmware can also be done from remote via PC-Anywhere. Operating system Windows 2000 As a standard, MS Windows 2000 is installed on the laptop computer. Some of the system settings are relevant for the operation in connection with Onyx, namely “Energy Options” and “User and Passwords”. For the standard oepration of Windows 2000 please refer to the manuals which came with Onyx. Please note: All software components come ready to use! 127 Operating - OnyxView OnyxView has been written in MS Visual Basic and runs on top of Windows NT/Windows 95 or higher. A hard disk of 1 GB minimum capacity and a memory of at least 128 MB size are required. The programme serves, in the rst place, for displaying and recording of the measured values which are sensed by the sensors connected to the SSCU 3000 and processed by the LCU 3000. Currently 32 channels are available. Due to the processing in the LCU, the supervisory functions of Onyx do not depend on the good behaviour of OnyxVIEW. Yet Onyxview records these measured values on the before-mentioned disk so that the data can be acessed as historical values at a later point in time. Via a second serial port, a superordinate monitoring computer can be connected, which commuicates Onyx data over a special software interface. All important changes in the settings as well as any other action, including alarms, are recorded into a log le. For the expedition of alarm email or alarm SMS, special alarm les are generated. OnyxVIEW can use 5 data sets (learn 1 to learn 5) as a reference or as values for comparison, at a later time, or switch to one of them. OnyxVIEW can calculate a trend analysis whereby the days to take into account can be set by the user. Onyx refrehes all real-time displays every 100ms. The logle and the alarm le are closed every 24 hours, and new versions of the les are created. Logle and alarm le are normal ASCII Textles and reside in a subdirectory called “log”. Of course, any le can be printed via the operating system at any time. For the printout, any printer supported by Windows (R) 2000 can be used. 128 Operating - 129 Operating - “Splash” - Screen and Startup + Com-Port Denitions 130 Operating - Software Version displays the current software version. This number will be asked from you when you ask for software support. Status displays of the serial lines Com1 is, per default, the line connecting the laptop computer and the Onyx system microcontroller. Com2 is, per default, the serial port connecting to the superordinate monitoring computer. On the laptop computer, these settings are correctly set on delivery of the Onyx system and only need conrmation by the user. When OnyxVIEW is installed on other computers, please make sure that the serial port to work together with Onyx has the correct settings. Having conrmed the serial port data, the splash screen changes over to the main display screen. 131 Operating - Main Display Window - Elements (1) 132 Operating - 1. Frequency spectrum display windows These contain mainly the frequency spectrum of the vibration sensor and some things more and will be explained in detail on the following pages. The amplitudes of all lines are displayed in dBp (0 dBp = 1pW) and pW. 2. Multifunction Displays show the value of the selected sensor. Display window with dark background, “learned”- button, “properties”-button and sensor selection drop down menu build a logical set. 3. Mode Display shows in which mode the system is currently running. For the description see chapter “change mode”. 4. Version Display shows the actual version of the system software 5. Station Name Display shows the name of the plant currently monitored by Onyx. This name can be altered from the “settings” menu (max. 16 characters). 6. Measurement Activity Display shows which spectral line is measured by the frontend(s) 7. Data Telegram Error Display shows transmission errors when they occur at least n-times as set in the “settinsg/ maintenance”-menu. (On error the colour changes to red). Also changes to red when Onyx is busy doing ash memory operations for a longer time. 8. “Drop-down” - Selection menu Some of the functions are only accessible via these menus, others are redundant. Some are only available when the system is in a special “mode”. 9. Status bar display On the left side is displayed what the system currently does. On the right side there are the system date and the system time. 10. Action buttons Near the lower border of the screen there is a row of control elements the function of which is explained in the following. 133 Operating - Main Display Window - Elements (2) 134 Operating - 11. “Start/End ONYX-Viewer” - Button switches between the two basically different running modes of this software: 1. Real time mode: In this mode there is communication with the system hardware and all data are displayed in real time. This is the mode which will be active most of the time. 2: Onyx-Viewer Mode: In this mode not the real time data are displayed but one can select a historical data record and analyse it in more detail. The command interface and the displays in it remain the same with a few exceptions, see next page. 12. “System Information” - Button The display window “system information” appears. 13. “change Mode” - Button The selection window - where the type of the real time mode to switch to next - appears. 14. “Show Trend” - Button The display window for the trend display appears. 15. “Clear Alarms” - Button This function sets the optical and acoustic alarm generation of Onyx to OFF (silent mode). The optical display of alarms in OnyxView and the relay contacts in OnyxView remain set until the reason for the alarm is removed. LCX (lighning strike detectors) are immediately reset. 16. “Logout” - Button The user currently logged in is logged off. A new user may log in giving name and password. 17. “Exit” - Button This function terminates the OnyxView Software. THis function is password protected. 18. “Settings” - Button The display window “settings” appears. 19. LCX-displays show the stored status of the 4 LCX (lightning detector) inputs. 20. North Pulse Display Displays the revolution time in milliseconds. A ashing LED indicates that pulses keep coming from the sensor regularly. 135 Operating - Onyx - Viewer Mode 136 Operating - General The operation of the Onyx-Viewer is the same as in the real time mode except that the data are from the archive and thus some functions like settings and properties can only be displayed and not altered a posteriori (afterwards, which is now). “End ONYX-Viewer” - Button This function switches back to the real time mode of the software. “Date” - Scroll Field Here one selects a data record from the selected date. The top right hand corner display tells the availability of the data of the specied point in time. After clicking the button “Show saved Values” these data are displayed in all corresponding windows. “Record Nr.” - Scroll Field Here one selects the number of the record to display. A number of records are created every day. Data Information Field Here data and time of the displayed data record are displayed. When there is no data matching the selected “Date” und “Record” values, “No Data availabe!” will be displayed in this eld. Alarm Display This alarm display appears when executing in the the Onyx-Viewer Modus and a real-time alarm is triggered. “Hide saved data”, “show saved data” - Button This button switches between “Show saved Data” and “Hide saved Data”. This is useful in order to get to historical data more quickly because otherwise, at any change of the calender date, all mesasured values are read in creating an avoidable delay. “Onyx-Settings” - Button The display window “Onyx-Settings” appears. Here there is no possiblity to change the settings because this is only the picture of the settings formerly recorded. 137 Operating - “Drop-down” - Fields “Drop-down” Selection - FILE “Save to HD” This function transfers all data which is currently available, i.e. all measured values as a record to the hard disk. These data are those which can be read and looked at with the help of “Onyx-Viewer” at a later time. This is the function which Onyx automatically does after each “Pass” (scan of all values). “Save to Excel” This function stores all data available at the moment into the next free line of hte Excel le. Attention: the Excel-le must be closed. “Exit” redundant function - this too ends the OnyxView Software. The function is password-protected. “Drop-down” Selection - ACTIONS “clear - Alarms” redundant function “interrupt Learn” This function is only active when a Learn is currently being executed. It interrupts the currently running Learn and switches back to “Normal Mode”. Since all data are stored at the end of a Learn, this ends the current Learn without saving the data. “change Password” The login display window is displayed because this one contains the “change password” function. “activate Calibration” Automatic self calibration to compensate for all temperature and time dependent drifting effects in the hardware of all measuring channels. This mode is executed automatically at 12:00 noon every day, but can be triggered by the user manually as well. The self calibration takes about one minute, then Onyx returns to the mode in which it was running before. The Calibration Mode is displayed in the Mode Display Window, and the background colour changes to blue. 138 Operating - “change Learn Parameters” This function is only active if a Learn is currently being executed. A new display window appears in which, during a learn, it is possible to alter the remaining learn time in hours and the amount of storage (1-5). “change Mode” redundant function - can also be done by pressing the F2 key on the keyboard “reset LCU”, “reset SSCU1”, “reset SSCU2” initiate a reset in the same way as the pushbuttons on the devices do. “update” The rmware update window appears. Here the rmware (this is the software for the microcontrollers) can be updated. The “Intel-Hex-Files” have to be located in the Subfolder “uCUpdates”. 139 Operating - “Drop-down” Selection - VIEW “Settings” redundant function - this function can also be done with the F1 key from the keyboard. “System Info” redundant function “remaining Learn Time” This function is active only when a “Learn” is currently executed. The display window “Remaining Learn Time” appears. It displays the remaining time to the end of the acual “Learn”. “Status bar” With this button the information bar at the lower border of the screen can be switched on or off. “Drop-down” Selection - HELP “User Manual” Display this user manual with Adobe Acrobat Reader. “About OnyxView...” The information window of the Onyx software appears. 140 Operating - 141 Operating - Frequency Spectrum Display Windows (1) 142 Operating - 1. “Main-High-Alarm” - Threshold A red line indicates this threshold. Its position corresponds with the levels of the learned data plus the “Main Alarm Threshold” from the “Property” menu of the respective sensor. 2. “Pre-High-Alarm” - Threshold A green line indicates this threshold. Its position corresponds with the levels of the learned data plus the “Pre-Alarm-Threshold” from the “Property” menu of the respective sensor. 3. Vibration- Cursor - Displays The values displayed in these elds always relate to the position of the vibration cursor and represent numerically what is displayed in the frequency spectrum display windows. 3.1. Numerical frequency display In this eld the frequency on which the vibration cursor is positioned is displayed. The value changes with any horizontal shift of cursor). With spectral lines that have not yet been measured a line number is displayed instead of a frequency. 3.2. Cursor Value (vertical) Amplitude in dBpW. 0 dBp corresponds to 1 pW 3.3. Cursor value (vertical) Amplitude in pW. This power is taken from the vibration sensor voltage which is proportionate to the acceleration, and calculated to the input impedance of the amplier (75 kOhms). 4. Date and Time display shows date and time of the measured value the vibration cursor points to. 5. Cursor position The horizontal cursor position can be altered by mouseclick or by pressing the left arrow or right arrow key. 6. Sensor selection is a drop down menu from which one of the connected sensors can be selected. All sensors displayed here are of the vibration type. 7. Selection - actual (real time) value Here is the switch between actual (real time) values and the learned value(s) which is currently being used. The learned value is displayed with a yellow background for facilitating recognition. 143 Operating - Frequency Spectrum Display Windows (2) 144 Operating - 8. “Properties” Display Menu The “Properties” - display window of the currently selected vibration sensor appears. 9. Offset/Zoom These scrollbars permit the vertical positioning of the window and the resizing of the window horizontally according to user taste. 10. Selection - “Disable/Enable Line”, “Send Disabled/Enabled Lines” In the default setting all lines are enabled which means all lines participate in the alarm generation process. In order to exclude (or re-include) specic lines it is required to mark the desired line(s) with the cursor and the appropriate button. When the selection is done, clicking the send button sends it to the Onyx system. 11. Current Measurement Activity Cursor A cursor in light blue colour highlights what frequency is being measured. 12. Vibration Cursor Coupling The position of the cursors in both frquency spectrum displays is synchronised or re-separated. (Toggle button) 13. Frequency Band Limitation The vibration displays normally show the whole frequency range unless the frequency band has been limited with the “Settings” display window under “Onyx Parameters”. In this case the limitation is marked with two vertical bars (see picture). 145 Operating - Multifunction Display 146 Operating - General The Main Display Window contains 8 multifunction displays (the so-called “multis”). They can display the values from selected sensors. The following basic sensor-types are available: • Vibration RMS • Temperature • Current • Wind speed • Auxiliary sensors (Aux) 1. Sensor Selection Field This is a drop-down menu from which one of the connected sensors can be selected. 2. Display Menu “Properties” The “Properties” display of the selected sensor appears. 3. Display learned value The learned value will be displayed instead of the current real time value OR instead of the stored historical value when in Onyx-Viewer mode. 4. Value, Time, Date Display Relate to the selected sensor and it´s value. 147 Operating - “Settings” - Display Window (Onyx Parameters) 148 Operating - 1. Onyx -Parameter Settings In this subeld of the “Settings” window the following settings can be made. They are executed upon klicking the “Change ONYX-Parameters” button. 1.1. Station Name Input Field Here the software accepts 16 different characters which will appear in the “station name display” of the main display and in log- and alarm les. It is recommended that you enter the name of the site, plant or machine which Onyx monitors. 1.2. “Wordrate”, “Rotation-Period” Input Fields These elds cannot be changed by the user. They are provided for future expansion. 1.3. “Report Alarms” Input Field The value entered here controls how often the threshold values must be above or below a give value before an alarm is generated (3...16) or cancelled. 1.4. “Average-Values” Input Field The value entered here controls the number of samples taken to calculate a measured value. (1...16) The algorithm applied is sliding average. 1.5. “Frequency Band Selection” Input Field Shows the current frequency range selection and the new values to enter. The scrolling bars are for setting the borders of the frequency range to new values. 2. Maintenance Only Setup The operation of these settings is reserved for the maintenance personnel of IES. Therefore they require a special password. 149 Operating - “Settings” - Display Window (User Settings) 150 Operating - 3. “User Settings” - Optional Settings In this subeld of the “Settings” window the following optinal settings can be made. Changes are executed when the “Save User-Settings” button is klicked. 3.1. “MaxRows in Excel” - Input eld This sets the number of lines to ll before Excel returns to line 1, from there starting to overwrite the oldest values. Remark: MS-Excel is not contained in the Onyx package as delivered but can be installed by the user himself or herself. We deliver an MS-Excel format template on demand. 3.2. “Automatic Transfer of Data to Excel” - tick box If you tick this box all measured data will be converted and entered in an MS-Excel spreadsheet if MS-Excel is installed and if the Excel-le Onyx.xls is not being used by the user. In this case the entries will be carried out at a later time, as soon as the user has closed the Excel-le Onyx.xls. 3.3 “Regins Nr.” - Input eld Spezies this parameter for the communication with a host computer. 151 Operating - “Settings” - Display window (Learn Settings) 152 Operating - 4. “Learn-Settings” - Settable Options In this software version 5 data sets for stored (“learned”) data are available which can be taken as a reference for new measured values. There can, however, be only one in use at a time. In this logical subset of the “Settings” window the 5 possible data sets and their properties are listed. The properties of a “Learn” (data set) is shown in a row, the table has 5 rows (corresponding to the number of possible “Learns”) and every column describes a property of the learn. 4.1. “Learn-Info” - Input / Display Field Column 1: predened place to store a learn (numbered) Column 2: Creation Date of the learn Column 3: Display which Learn is currently active Column 4: Display if this place is occupied by a learn (or not) Column 5: Input eld - here is space for a description of the learn, for instance “summer”, “winter” ... 4.2. “Automatic Learn Switch” - Selection Field When a plant uses two motors which share the load, i.e. if, for instance, the rst motor drives the turntable for 24 hours, then the second motor takes over for the next 24 hours, then again motor 1 etc., it is necessary to switch the learn the measured data relates to at the same time as the motor. This is necessary because each motor drive has its own acoustic characteristics and the measurement resolution of Onyx is so high that minimal differences would trigger an alarm. The point in time when the learn is switched exactly is determined with the help of the electrical current sensors which can be selected in column 6 (“Automatic learn switch”). Now, by activating the key “Activate automatic Learn-Switch” you set the following logical connection: If [=as soon as] the measured value of an electrical current sensor has fallen below 1 Ampere and if the value of the other electrical current sensor contained in column 6 exceeds 6 Amperes then the learn of the newly started motor is activated. This automatic programme can be cancelled with the “Deactivate automatic LearnSwitch” key. 4.3. “Manual Learn Switch” - Selection Field In this column you can select a learn you want to use and, as soon you klick the button “Switch Learn”, initiate the learn switch manually. 4.4. “Save Learn” - Input Field With the help of this eld you can move the contents of one learn from its storage to another storage. Attention: if there is a learn already present in the destination storage it will be deleted and with it all collected data. 153 Operating - “Properties” - Display Window (1) Vibration-Properties - Display Window Multi-Properties - Display Window 154 Operating - 1. Display Window - “Properties” The measure unit which is displayed here depends on the selected sensor type. Here for instance is a vibration sensor with unit dBp. With VIBspec properties, alarm thresholds are dened relative to the learned value - with the others, in absolute values. 1.1. “Sensor - Number” - Display eld shows which channel the sensor is connected to. 1.2 “SensorName” - Input Field As a standard, the name “Sensor x” is entered where x is the channel number. 1.3 “Sensitivity” - Display Field It exists only with Vib-Spec and Vib-RMS-Sensors. It shows the TEDS-information of the corresponding vibration sensor as electronically read out by Onyx. If the sensor has no TEDS the nominal sensitivity (100 oder 500 mV/g) is displayed here. 2. High Alarms Settings 2.1. Pre-Alarm-Thresholds Input Field is the input eld for the Pre-Alarm-Threshold of the High-Alarm-Settings 2.2. Main-Alarm-Thresholds Input Field is the input eld for the Main-Alarm-Threshold of the High-Alarm-Settings 3. Low-Alarms-Settings 3.1. Pre-Alarm- Thresholds Input Field is the input eld for the Pre-Alarm-Threshold of the Low-Alarm-Settings 3.2. Main-Alarm- Thresholds Input Field is the input eld for the Main-Alarm-Threshold of the Low-Alarm-Settings 4. Enable Alarms As a standard, all alarms are marked and therefore enabled. Removing the mark deactivates the sensor for the alarm generation of the corresponding alarm type. 155 Operating - “Properties” - Display Window (2) Aux-Properties - Display Window 156 Operating - In addition to the properties mentioned for an Aux sensor the following 4 settings are also available: 5. Start value This value indicates the beginning of the measuring range in which the Aux sensor is to operate. 6. End value This value indicates the end of the measuring range in which the Aux sensor is to operate. 7. Resolution This value indicates the resolution in which the Aux sensor is operating. (“1000”…0.001 ; “100”…0,01 ; “10”…0.1 ; “1”…1)It is calculated automatically from the start- and the end value. 8. Unit Here the name of the unit to be used is entered. e.g. “bar” for air pressure, “V” for electrical voltage; 157 Operating - “System-Information” - Display Window 158 Operating - 1. Temperatures Here the operating temperature (inner side) of the devices LCU and SSCU are displayed. If the operating temperature exceeds the upper limit (+70°C for SSCU and +45°C for LCU) this display is switched to red. If the temperature falls below the lower limit (-25°C for the SSCU and -5°C for the LCU) the display is switched to blue. 2. Programme versions Here the programme versions of all the rmware programmes in use are displayed. 3. Serial Numbers Here the serial numbers of the corresponding hardware are displayed. Changes in the serial numbers will be marked in red. 4. System Alarms Besides the above mentioned temperatures the following critical system statuses are permanently monitored: Selftesterror LCU - this is displayed when ash actions fail. This restricts the oeprations possible. Emergency-Mode - this message appears when there is no valid Application Programme in LCU or SSCU. Emergency-Mode remains operable with the old startup program, yet the new application program must be uploaded without delay. Power-Fail SSCU1/2 - this message appears when the voltages drop below pre-dened values. The system remains operative, but a service is mandatory. Sensor-Error - this message appears when in any sensor line a resistance is detected which is unreasonably high or low. The system remains operational, but the values coming from this sensor are almost certainly wrong. A service is required. 159 Operating - “Change Mode” - Display Window (1) 160 Operating - Onyx3000 can be running in one of 4 main modes of operation: 1. Normal Mode all actual measured values are compared with the lerned values regularly and alarms are generated when the dened thresholds are exceed by higher or by lower values and if all other alarm conditions are met: these are sensor alarms enable, vibration window: line enabled, settings: alarm repeat n-times. 2. Learn Mode In a pre-dened time span the maximum of all actual measured values is calculated and, at the ende of the time span, stored in the microcomputer system as learned data set in a non-volatile memory. The storage location is determined by the predened learn number from 1 to 5. At the end of the learn time Onyx switches to Normal Mode, using the newly learned data as reference. From the learn mode any other mode can be chosen at any time, but the learned data will not be saved in such a case. Likewise, during a running learn the learn number and the learn time may both be changed without interrupting the learn: see drop-down menu Actions/Change Learn Parameters. Optically the Learn Mode is characterised through a yellow background colour. The remaining Learn Time can be displayed by selection in the drop-down menu VIEW/Remaining Learn Time. The number of the current learn is in the status bar at the bottom of the screen and in Settings/Learn-Settings. When in Learn Mode, no alarms are generated. 3. Test Mode The Test Mode serves for checking all alarm functions of both Soft-and Hardware. All alarm thresholds are varied articially so that all alarms must be generated. Yet the output of these test alarms is only optical and acoustic, the alarm contacts will remain unaffected. This Test Mode is displayed with a red background colour. 4. Service Mode: It serves as a temporary inhibitor of all alarms, for instance when service is going on. All alarm thresholds are temporarily modied so that no alarms are generated. The Service Mode is characterised with a deep blue background colour. Moreover, there is no communications with the frontends. Consequently, no measured values can be displayed. 161 Operating - “Change Mode” - Display Window (2) 162 Operating - Besides the 4 Main Modes the following special modes can be switched to (by clicking Activate channel test): 1. Channel Test max: With the help of the calibration function built into the frontends, exactly dened maxima are applied to the measuring inputs instead of the sensor signals. The values displayed can be compared with what they should be and in this way the correct operation of the hardware is veried. Optical and acoustic alarms are active, the alarm relays remain inactive. The mode is displayed in the Mode Display Window and the background colour changes to blue. 2. Channel Test min Like above, but works with exactly dened minima which are applied to the measuring inputs. 163 Operating - “Calculate Trend” - Display Window 164 Operating - General The Trends Windows enables to select the number of days reaching into the past in order to calculate the development (prediction) of the values for a selectable number of days into the future. The algorithm takes into account all sensor and spectrum line data and also permits an estimate for the probabilitiy of the prediction to occur. The predictions are output as a text, e.g.: (spectral) line 17.3 Hz from sensor Turntable will reach the pre-high alarm level on March 21st, 2002. Probability: 43%. The Trends calculation is started manually (“Calculate New Trend”) and takes about 1 minute. It requires that the data for the selected time interval are available. This function is currently reworked. It will be available in later programm versions (> 6.0). 165 Operating - Writing into Excel With this option the current measured values from the sensors are entered into an Excel sheet. This Excel sheet named “OnyxNew.xls” is located in the directory \Excel after installation of the OnyxVIEW Software. Values are always inserted into this le which has been optimised for this purpose.The contents of the le can be processed as needed. (copy, delete etc. ) Important: The le must not be deleted, renamed or moved. Structure of the Excel le: The le consists of 12 spreadsheets. VIB1A, VIB2A, VIB3A, VIB4A Into these four spreadsheets the current vibration spectra of the rst four vibration sensors are entered (but only if no learn is currently recorded). The frequencies are entered into the headings of each spreadsheet, and one record of measured values into each of the lines below. VIB1L, VIB2L, VIB3L, VIB4L During a Learn the current vibration data are stored into these spreadsheets and not in the ones mentioned above. RMSA The average values of four temperature sensors, two current sensors and four vibration sensors are entered into this spreadsheet. RMSL During a Learn the current average values are entered into this table instead of the ones mentioned above. ALARM Here, all generated alarms are entered. A record comprises the sensor name, type of the alarm, time and date of the alarm, the sensor’s current value, and the values of the other average sensors when the alarm was activated. 166 Operating - Exporting to the Excel File Writing the data to an Excel le can be done in two ways 1. When the option “Automatic transfer of data to Excel” in the “Settings” window is selected, there will be an entry into the Excel File after each data acquisition pass (one run through all frequencies). If an alarm is generated, it is also entered. 2. When clicking on the button “Save to Excel” in the Drop-down menu “File”, one record is made. There is no alarm information stored with the record when working in this way.- 167 Operating - Pc-Anywhere - Operation details As a standard, PC-Anywhere is installed on the laptop computer. The task of this software is to give control over the PC to any user knowing the matching Username and Password, via telephone line or telephone access point. The man machine interface and all functions are as if the user were sitting directly in front of the laptop. An additional function is transferring data to and from the remote laptop. Default User(s) The following user names are in advance known by the system and may log into the laptop via the PC-Anywhere connection: • PCA Administrator This account possesses special administrator rights and is protected with predened passwords. From this account, you can administrate users (add, give rights and so on) from remote. • PCA Maintenance This account is meant for maintenance, software updates and rmware updates which IES can do from remote. This account plus telephone access are require so that IES can do programme maintenance for free during the guarantee period or when the user has signed a maintenance agreement. Connection establishment On the Onyx laptop, PC-Anywhere is executed in Host Mode and waits for a connection listening to the built-in modem of the laptop. As soon as an incoming call is registered, the modem goes off-hook and Pc-Anywhere asks for username and password. If they are correct, a connection is established. If not, or if the connection is released again from the other side, PC-Anywhere goes on-hook, goes into the host mode and waits for the next connection request. To get connected to the laptop (host) a PC with a modem is required, a telephone, the software PC Anywhere and the knowledge of a username/password. PC-Anywhere over Internet Basically it is possible to use PC-Anywhere over an internet connection. There is one requirement, the host PC must have internet access with a xed IP address. 168 Operating - Security aspects For the transmission of data and in the connection establishment phase a PCAnywhere encryption algorithm is used which protects the data from access by a third party. To log into a host (Onyx - Laptop) the telephone number of the host is required, as well as username and password. Once the session is established, another password is needed to access and modify the remote users, their passwords and their rights. For modication of the settings of the host itself, yet another password is required. More about this subject and a more detailed description of all security settings in PC Anywhere can be found in the PC-Anywhere manual. The manual can be downloaded from the Symantec site, www.symantec.com. IES offers trainings about all the subjecs discussed here. A fully licensed version of PC-Anywhere is included in the standard delivery and installed on the notebook computer. There is also a demo licence for the remote PC for study of the remote control. 169 Operating - LCU - Navigation - Overview and Functions 170 Operating - LCU - Navigation and Operation The Navigation Interface consists of 2 Displays, uper display: 8 characters lower display: 2x16 characters, 1 “Up” and 1 “Down” push button, 1 jog wheel with push contact and a key switch for conrmation of commands. The navigation is organised as “tree” and, in the upper level, has 3 “main menus” [in the lower display] and an automatically changing status display [in the upper display]. To select one of the top level menus, turn the jog wheel left or right, watching the rst line of the lower display. Then, by hitting the “down” button or the jog wheel itself, you can select the desired menu. “Show values” Menu In this menu you can view all analogue values, just as the sensors deliver them. Turn the jog wheel until the upper line of the lower display reads “show values”, then press on the jog wheel. This way, you get into the second level of the measured values and the second line of the second display will read “Sensor 1” or the like. Then, by turning the jog wheel again, you can select the desired sensor. The value of the selected sensor is then displayed in the upper display. “Show Alarms” Menu Pressing on the jog wheel when “show alarms” is displayed leads to level 2 of this menu where the alarms of all sensors can be viewed and conrmed. For every sensor, the alarm types “main-high”, “pre-high”, “pre-low” and “main-low” are displayed (lower display); the upper display reads either “ALARM” or “----”. Alarms can be conrmed as follows: To conrm an alarm, press on the “jog wheel” and get into level 3 of the hierarchy. There, conrm the alarm by turning the key switch. A short form of alarm conrmation without identication of the alarm source can be achieved by simply turning the key switch. The conrmation of an alarm only starts the “silent mode”. The conditions described before with OnyxView/Conrm Alarms apply. 171 Operating - “Set Mode” Menu This menu shows which mode the system is in and allows the mode to be changed. By pressing on the jog wheel when “set Mode” is in the display you get into level 2 of the hierarchy which begins with “Set: Normal L1”. Then, by turning the jog wheel, you run through all the modes the system can run in. The current mode is always displayed in the upper display. Any mode switching requires that (1) the mode be selected by pressing the jog wheel in the corresponding menu, (2) the change be conrmed by turning the key switch when the system requests it and (3) that the system is capable of switching to the mode desired which by the way may take some time. When the system does not switch modes immediately after a mode change has been requested, don’t panic - please stand by, there are lots of things for the system to do before a change can become active. The different modes are: (1) Normal Mode, using Learns L1, L2, L3, L4, or L5 as reference for the current measuring values. (2) Learn mode L1, L2, L3, L4, or L5, which means that the system starts collecting data and entering data and writing the data into the selected learn buffer in order to use them at a later point in time as reference. (3) No Alarms Serves to temporarily switch off of all alarms (e.g.if there is maintenance work to do). All alarm levels are modied articially so that no alarms can be triggered. No communication with the frontend(s) and no actual values display is possible. (4) Alarm Test Serves to check all alarm functions of both hardware and software. All alarm thresholds are modied in a way so that all alarms must be generated. These alarms are signalled only optically and acoustically, the alarm contacts are not affected. (5) FE-CTMIN With the help of the calibration function built into the frontends, exactly dened minima are applied to the measuing channel inputs. The display of the reference values can be read out, this way verifying the correct operation of the hardware. Optical and acoustic alarms are active, alarm contacts are inactive. (6) FE-CTMAX like FE-CTMIN but exactly dened maxima are applied to the measuring inputs. 172 Operating - “Mail Informer” (version 3.0 and higher) General Information Mail Informer was developed to send either alarms or periodic information or both via email. It works in conjunction with the Onyx 3000 system and monitors the Onyx’ alarm generation and distribution system, but other les can also be monitored and sent by email, if desired. Operation The programme has two different modes of operation: Alarm triggered [event triggered] Time based Alarm triggered mode of operation In this mode of operation the programme monitors the existence of an alarm le every 30 seconds when the function “enable check alarm” is activated. This le may have any name, or the programme searches for the right le automatically, when the function “Autotrace to the right le name” is activated. When the function is deactivated (not recommended) the button “Change alarm le” is activated and a different alarm le can be chosen. When the alarm le is found, an internet connection is automatically created and an alarm mail is sent.The alarm mail contains the alarm le and additionally may contain the following: • Additional text. To be entered into the eld “Additional Message”. If the option “clear message after send” is activated, the additional text is cleared upon successful transmission of the mail, and no additional text is added to the next mailing. • Other les. They can be entered into the long list of les from the section “Alarm le” and, there, be activated or deactivated individually. The les are entered into the list by mouse click on one of the following buttons:”Attachments”, Add log”, “Add onx”. With “Attachments” any le can be added to the list, with “Add log” les with the .log extension, and “Add onx” les with the onx extension.Upon entry in the list all les are activated with a tick and this signies that they will be considered at the next e-mailing.The les can be deactivated with a mouseclick.On a double click, the le is removed from the list.The function “Autotrace of the right le name” is also used here.All .log and .onx-les are refreshed when the function is activated, and so always the right le is sent by email. 173 Operating - The function “Allow deleting after send” deletes the respective le after a successful e-mailing. For the alarm les this function should remain activated, because otherwise new alarms are found every 30 seconds although in reality they are “old” alarms.Under “Onyx Path” is the path for the Onyx program. If the path contained in here or one of the subdirectories (“Excel”, “Data” and “Log”) cannot be found when “Mail Informer” is started, they must be looked for manually or created automatically by the programme. The programme will not work without this standard directory structure. Time controlled mode of operation This mode of operation is used for sending information about the plant in regular time intervals, independently from the alarm status. The entry into the list works the same way as with the alarm-controlled mode of operation and it is done in the section “Automatic emails - time controlled”.The “Autotrace” function has the same effect as described above.The possibility to delete the les automatically after their successful expedition exists also in this mode, using the “Allow deleting le after send”.This mode of operation is activated by clicking the function “Enable automailing”. The interval can be selected from 1 minute to 49 days. Email settings To send emails you need a valid and active internet account and an email account. The account can be at any internet provider.A1.net offers internet access for free and an email account, the only charge is the online fees. A1.net also offers an SMS service to monitor the account.This means that you can specify a mobile telephone number and, on arrival of new mail, you will be informed of its arrival via SMS. So you are kept up-to-date and can react on alarms from Onyx 3000 fast without permanently calling up your email. Please nd everything about the current tariffs on the homepage of A1.net.(www.a1.net)To congure “Mail Informer” correctly, please use the following settings: • receiver email address - the address the emails are sent to • Sender email address - here you can enter an email address for response. The addressee (receiver email address) of alarm/info-mails can then answer if necessary. • SMPT server - this is the sending server of the internet provider involved (preset to A1.net Provider - smtp.a1.net) • User name - should normally not be needed, but some of the servers require it nevertheless. A1.net does not need this setting, so this is deactivated by default. 174 Operating - • under the tag “Connection” you have to select a data communication line. If at the start of “Mail Informer” the data communication does not exist, an error message is displayed and the program will NOT work properly.The password must be stored with the data communication’s data set. During an e-mailing the “DialUp Status” is displayed and all steps of the communication between the local PC and the server are displayed and registered. “Miscellaneous” tag Here the following functions can be activated or deactivated: • Allow to change settings - when this function is activated it is possible to change all settings.In order to prevent unintended changes in the settings we recommend deactivating this function. • Protect changing of settings with password - when this function is activated, the “Allow to change settings” function can only be activated or deactivated with a password. The default password is Onyx3000. The password is case sensitive (there is a difference between “a” and capital-”A”)Once activated, this function can only be deactivated with a password.On deactivation a password window appears.Here you can either enter the password and conrm with OK or you can select a new password using “New Password”. You must know the old password.You can cancel the operation with the cancel button.On successful change of the password a message is displayed and the window disappears automatically. • Enable check alarm - starts or stops the supervision and alarm generation • Protect application against shut down - when this function is activated you cannot close the “Mail Informer’s” window any more. However you can do this with the task manager (only in Windows 2000). “Statistics” tag Here limited statistical data are displayed· Total - sum of all successfully sent emails, all alarms and failed connections to the server since the activation of the “Mail Informer”. Last 24 hours - all successfully sent emails; all alarms and all failed connections to the server since midnight. At midnight, these counters are reset. Station name Here you can enter the station name and this way it is possible to differentiate between the stations when supervising more than one station. The station name is imported to the “subject” line of the email. 175 Operating - IES Logo On clicking the IES logo, the standard internet browser is started and the homepage of the rm IES Ges.m.b.H. is loaded. Action logging All actions of the program or the user are entered into a log le in C:\Onyxverzeichnis\Log\Log-datei.The log le is created every day anew and can be named following the algorithm Ox<date>, for instance Ox020123 for January 23rd, 2002. When the settings are changed they are automatically saved and will be restored on restarting the “Mail Informer”. 176 LCX 3000 Lightning Control Monitor In this user´s guide the lightning control monitor, LCX3000 is described. Sensor Option LCX3000 - LCX 3000 (Lightning Control Monitor) The LCX 3000 electronically responds to lightningashes with a mimimum of 10kA and hihger. In case of a lightning-stroke (sky-earth & vice versa) a relay-contact will be activated for about one second. The lightning monitor`s built in 4 - pin -connector allows a very simple interface to the user’s hardware, Potential-free dry contacts (normally open and normally closed) are provided. Mounting the LCX 3000 In order to o operate the Lihtning monitor, it should be mounted vertically along your lightning-conductor as near as possible to the grounding point. (It should be considered, that a lightning-stroke with a theoretical maximum current of 1MA will cause a voltage-drop of approximately 1000V/m along the lightning-conductor !) Open the screws, i.e. the shells on the back of the monitor, position the monitor vertically along your lightning-conductor and tighten the screws. Tighten srews well to prevent the monitor sliding down your lightning-conductor and to ensure good electrical connection. Connect your connection cable after sliding it through the protection-sleeve and after tightening the sleeve to the housing on the desired side. See “electrical connection” below. Close and seal the unused inlet with the supplied srew-cap. Power supply and battery check The LCX 3000 is supplied by a 9V lithium block-power cell, size U9VL-J. A fresh battery will stanby-operate the lightning monitor for 10 years. A batterycheck can be performed at any time very easily. 179 Sensor Option LCX3000 - Battery - test PRESS THE PUSH-BUTTON AND KEEP IT PRESSED LONGER THAN 0,3 SECONDS. A good battery should produce a monotonous beep, lasting as long as you keep the push-button pressed. The bult-in LED in the push-button will also light continously. A weak-voltage-battery will let you hear a series of short beeps for the duration of the button held down and the LED will also ash. A beeping LCX 3000-system needs a battery-replacement. Relay - Test: PRESS THE PUSH-BUTTON AND KEEP IT PRESSED LESS THAN 0,3 SECONDS. Pressing the button for less than 0,3 seconds gives you the chance to test the function of the whole electronics - a lightning stroke will be simulated by producing a voltage-spike of 1V and a few microseconds duration across the input. The relay will be activated and the user should be able to hear two little clicks within approximately one second,resp. your attached hardware will respond to the 1s - relay-action. Replacing the battery Die Schrauben an der Vorderseite lösen und die alte Blockbatterie durch eine neue ersetzen. TYPE: 9V Lithium cell, Größe - U9VL-J. Electrical connections The 4-pole connector is available after opening the housing. It provides access to the potential-free dry relay-contacts: 1......EARTH (it is recommended to leave this open, since in case of a lightning stroke this potential will be raised signicantly above ground! If you want to shield your connection cable use the earth-potential of the opposite end of the connection cable) 2......CO (Change Over - the common contact for NO, NC) 3......NC (Normally Closed - it will open for 1s in case of lightning stroke) 4......NO (Normally Open - it will close for 1s in case of lightning stroke) 180 Sensor Option LCX3000 - Technical specications The LCX 3000 responds to lightningashes with a current of min. 10kA in eather direction (sky-earth or earth-sky) • It is protected against ashlightning-currents up to____________10.000kA • Contact-ratings: switching_______________________________max 100V/1A Isolation___________________________________1500Veff • Battery standby-time (9v-lithium-block):____________________10 years • Operating temperatures :___________________________-40°C - +85°C • Anti- water and dust-protection according to_____________IP 67 standard. • High frequency protected full metal case. • EMC -protection • Triple-shielded, high frequency-protected exible metal sleeve for protection and shielding of the connection cable (length: on demand) All specications are subjected to changes without notice. 181 182 4 Technical Data In this chapter all devices belonging to the Onyx 3000 system are listed and the exact technical Data is given. Technical Data - Sensors - Technical Data Vibration - Accelerometer • Sensitivity___________________________500 mV/g (51 mv/ms-2) +- 20% The exact value of sensitivity is factory-calibrated and written into a non-volatile memory inside the sensor. This value is read by Onyx after Reset via the standard TEDS (Transducer Electronic Data Sheet, IEEE 1451.4) • Measurement range______________________________+- 10g (+- 98 ms-2) • Frequency Range (+- 3 dB)_________________________0,167 Hz .. 12,5 kHz • Mounted Resonant Frequency__________________________________16 kHz • Amplitude Linearity__________________________________________+- 1% • Shock Limit________________________________________________5000 g • Temperature Range_________________________________-54°C .. + 121°C • Spectral Noise__________________________________1,6 mg/ Hz @ 10Hz 0,5 mg/ Hz @ 1 kHz 30 mg @ 10 Hz .. 1 kHz • Sealing______________________EMI-Proof, Welded Stainless Steel Hermetic Temperature - Pt 100 • • • • • Measurement Range________________________________- 40°C .. + 120 °C Integrated 4 - 20 mA Transmitter Absolute Accuracy_________________________________________+- 0,5 K Different Types for Air/Surface/Inside-Oil - Temperature Sealing____________________________________________EMI-Proof, IP 67 Current - AC, 50 - 60 Hz • • • • • Measurement Range____________________________________0 - 20 A RMS Integrated 4 - 20 mA Transmitter Absolute Accuracy_____________________________________+- 0,2 A RMS 3 Current Sensors combined in one 3-Phase Measurement Box Sealing____________________________________________EMI-Proof, IP 67 Wind Speed • Measurement Range____________________________________0 - 200 km/h • Integrated 4 - 20 mA Transmitter • Operating Temperature Range__________________________-55 °C .. + 70°C 120/50 mm F x 280 mm H • Sealing____________________________________________EMI-Proof, IP 67 185 Technical Data - Proximity Switch - North Pulse • Measurement Principle: Capacitive • Adjustable Detection Distance________________________________0 - 8 mm • Operating Temperature Range_________________________- 25 °C… + 70 °C M18 x 55 mm • Sealing____________________________________________EMI-Proof, IP67 SSCU - Technical Data 1. Vibration Sensor Calibration Data are read via the standard TEDS-interface The signal from each Vibration Sensor is processed in two different ways: 1.1 Spectral Analysis (for longterm surveillance) • • • • • • • • 256 different spectral lines from 0,24 Hz to 12,5 kHz logarithmic frequency scale (CPB Constant Percentage Bandwidth of approx. 2%) Extremely high dynamic:______________________________________0 to 5 g ADC Resolution:______________________________________________24 Bits SNRRMS (including Sensor-, Thermal, OpAmp- and ADC Noise)____ dB @ 1 kHz SNRPk (including all noise sources)_________________________99 dB @ 1 kHz Resulting Noise Free Resolution_____________76,3 mg / 7,77 mm/s-2 / 16 Bits Elimination of all Offset-, Aging- and Full Scale-Errors by Continuous System Calibration with onboard extremely high precision DC- and AC-References: • Absolute DC- and AC-Reference Error___________________________+- 0,04% • DC- and AC-Reference Temperature Coefcient________________+- 0,5 ppm/K • Duration of complete Measurement Cycle (256 Spectral Lines)_________2 hours 1.2 TRMS - Sum-level Analysis (for quick reaction) • Measurement Frequency Range, True RMS___________________10 Hz to 1 kHz • Measurement Unit:_____________________________________Velocity: mm/s • Measurement Range____________________________________0 to 780 mm/s • ADC-Resolution______________________________________________24 Bits • Noise-Free Resolution_________________________________12 mm/s / 16 Bits • Elimination of all Offset-, Aging-,and Full scale Errors by Continuous System Calibration with extremely high precision onboard DC-Reference: • Absolute DC Reference Error / Temp. Co.______________0,04% / +- 0,5 ppm/K • Measurements per second (adjustable)_____________________5..(3 nom)..0,3 186 Technical Data - 2. 4 - 20 mA Sensor Interface (up to 32/Sensors/channels) each channel is individually congurable for: • Temperature Measurement_____________________________-40°C … + 120 °C • Current Measurement____________________________________0 … 20 A RMS • Wind-Velocity Measurement_______________________________0 … 200 km/h according to the previously described Sensors; • User dened 4 - 20 mA - Auxiliary Sensor with user-denable Units / Offsets / Spans and AlarmThresholds • Elimination of all Offset-, Aging- and Full Scale-Errors by continuous System Calibration with extremely high precision onboard DC-Reference-Currents (4,000 / 20,000 mA) • Absolute DC-Reference-Currents Error / Temp.Co._____+- 0,05% / +-0,5 ppm/K • ADC Resolution_______________________________________________24 Bits • Noise-Free Resolution_________________________________15x10-6 / 16 Bits • Measurements per second (adjustable)_____________________5..(3 nom)..0,3 3. Proximity Switch Interface (2 channels) Measurement of time interval between subsequent pulses for synchronisation of all other measurements • Measurement Range____________________________________1000ms to 16s • Resolution____________________________________________________50us 4. General • • • • • • • • • • • • • 16-Bit Microcontroller 80C165 / 40 MHz 4 x 8 channels / 24-Bit ADCs 8 x tunable BP-Filters, 8 x TRMS / DC-Converters 8 x tunable Antialiasing / Smoothing - Filters 8 x Peak Detectors Interface for reading TEDS-Data from Vib.-Sensors Complete System-Calibration for all channels with high precision reference 0,5 ppm/K Active Input Protection for all channels Power Supply (14..36V/10W) over DC/DC-Converter and serial data transmission over Plastic Optical Fibres provide completely oating operation and immunity against EMI Optional Optical Repeater - built-in extension for up to 4 Data Acquisition Units as described above - or external for optical data transmission length greater than 60 m. Electronic Serial Number readable by microcontroller Inside case temperature measurement by microcontroller Working temperature range -35 °C … +60 °C 187 Technical Data - • Prepared for Remote-Service (including Remote-Download of Firmware) • Mechanical Dimensions 260 x 160 x 90 mm • Sealing EMI-Proof, IP67 Master Control Unit 19”, 4HU rack-mountable or table-case EMI-shielded, special ventilation local illuminated display for one selected channel • Local illuminated display for operating mode • Complete user-interface by one jogwheel/2 pushbuttons • Key-Switch for conrmation of user-inputs • Alarm-Buzzer with volume-control • Optional built-in state-of-the-art Laptop sliding-leaf-extendible for: • Convenient graphical user-interface/display • Mass-storage of all measured data over the years • CD/ROM-Writer for archiving of measured data • Remote Alarm-notication by email/SMS • Remote maintenance for user-software/rmware • Extremely versatile Power-supply: 8...385VDC/85...264VAC(47..440Hz)/ 100W Hot-plugable/changeable modules for: • Master-Controller 16-Bit 80C165 / 40 MHz o User-interface/display • 16 Alarm-relays/contacts - completely user-congurable • 4Channel-Communication-interface to Frontend(s) via optical bre, Laptop and/or external PC(s) via RS232, general purpose l/0s(8 digital IN, 8 digital OUT) • Power Supply • Electronic Serial Numbers of all modules readable by microcontroller • Inside case temperature measurement by microcontroller • Input/Output-protection of all l/0-lines • Heavy duty industrial connectors EMI-shielded for all In/outgoing signals/lines • Working ambient temperature range -15 °C ... +35 °C 188 189 © IES Industrial Electronic Systems 3021 Pressbaum, Weidholzstrasse 1, Austria, [email protected], www.ies.co.at;