1
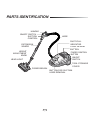
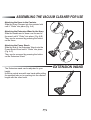
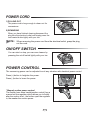
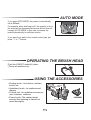
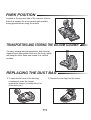
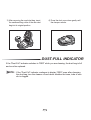
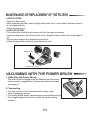
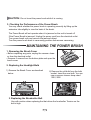
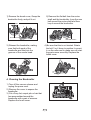
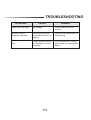
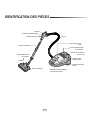
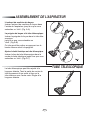
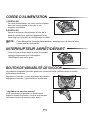
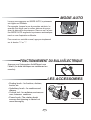
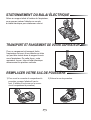
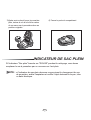
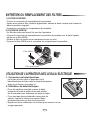
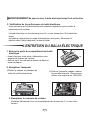
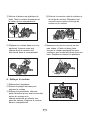
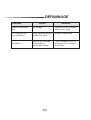
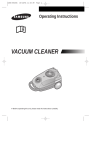
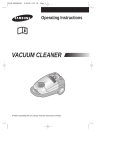
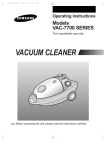
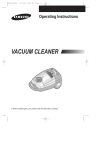
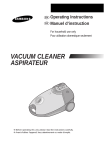
EN
FR
Operating instructions
Manuel d’instructions
For household use only
Pour utilisation domestique seulement
VACUUM CLEANER
ASPIRATEUR
❈ Before operating this unit, please read the instructions carefully.
❈ Avant d’utiliser l’appareil, lisez attentivement ce mode d’emploi.
EN
FR
Register your product at www.samsung.com/global/register
Enregistrez vos produits Samsung en vous connectant sur :
www.samsung.com/global/register
IMPORTANT SAFETY INSTRUCTIONS
When using an electrical appliance, basic precautions should always be followed,
including the following :
READ ALL INSTRUCTIONS BEFORE USING
THIS VACUUM CLEANER
WARNING
To reduce the risk of fire, electric shock, or injury.
1. Do not leave appliance when plugged in. Unplug from outlet when not in use and
before servicing.
2. Do not use outdoors or on wet surfaces.
3. Do not allow to be used as a toy. Close attention is necessary when used by or near
children.
4. Use only as described in this manual. Use only manufacturer’s recommended
attachments.
5. Do not use with damaged cord or plug. If appliance is not working as it should, has
been dropped, damaged, left outdoors, or dropped into water, take it to a service
center.
6. Do not pull or carry by cord, use cord as a handle, close a door on cord, or pull cord
around sharp edges or corners. Do not run appliance over cord. Keep cord away
from heated surfaces.
7. Do not unplug by pulling on cord. To unplug, grasp the plug, not the cord.
8. Do not handle plug or appliance with wet hands.
9. Do not put any object into openings. Do not use with any opening blocked : keep
free of dust, lint, hair, and anything that may reduce air flow.
10. Keep hair, loose clothing, fingers, and all other parts of the body away from openings and moving parts.
11. Do not vacuum anything that is burning or smoking, such as cigarettes, matches,
or hot ashes.
12. Do not use without dust bag and filters in place.
13. Turn off all controls before unplugging.
14. Use extra care when cleaning on stairs.
15. Do not use to vacuum flammable or combustible liquids such as gasoline or use in
areas where they may be present.
16. Store your vacuum cleaner indoors in a cool, dry area.
EN-1
17. Do not use extension cords or an outlet with inadequate current carrying capacity.
18. Hold plug when rewinding onto cord reel. Do not allow plug to whip when rewinding.
19. Unplug electrical appliances before vacuuming them.
20. The hose contains electrical wires. Do not use if damaged, cut, or punctured. Avoid
picking up sharp objects.
21. Always turn off this appliance before connecting or disconnecting either hose or
motorized nozzle.
SAVE THESE INSTRUCTIONS
To reduce the risk of electric shock, this appliance has a polarized plug(one blade is
wider than the other). This plug will fit in a polarized outlet only one way. If the plug does
not fit fully in the outlet, reverse the plug. If it still does not fit, contact a qualified electrician
to install the proper outlet. Do not change the plug in any way
EN-2
PARTS IDENTIFICATION
HANDLE
ON/OFF SWITCH
SUCTION
CONTROL
HOSE
DUST-FULL
INDICATOR
CORD REWIND
BUTTON
EXTENSION
WANDS
HEIGHT
ADJUSTMENT
KNOB
POWER CONTROL
BUTTON
ON/OFF
SWITCH
HEAD LIGHT
TOOL STORAGE
COVER
POWER BRUSH
EN-3
BUTTON FOR SUCTION
HOSE REMOVAL
ASSEMBLING THE VACUUM CLEANER FOR USE
Attaching the Hose to the Canister
Slide the Hose Clamper into the canister Inlet
until it “Clicks” into place.(Fig. A-A)
Attaching the Extension Wand to the Hose
Slide the handle end of hose over the end of
the wand until it “Clicks” into place. (Fig. A-B)
They can be removed by pressing the button
on the Hose.
Attaching the Power Brush
Slide the end of the Extension Wand onto the
Power Brush Wand unitl it “Clicks” into place.
(Fig. A-C)
They can be removed by pressing the button
on the Extension Wand.
The Extension wand can be adjusted to your
height.
Hold the central area with one hand while pulling
the smallest tube out or pushing into the desired
length with the other hand.
EN-4
EXTENSION WAND
POWER CORD
1) PULLING OUT
The power cord is long enough to drawn out for
convenience.
2) REWINDING
When you have finished cleaning,disconnect the
plug from the electrical outlet and simply press the
cord rewind button lightly with your toe.
NOTE : When removing the power cord from the electrical outlet, grasp the plug,
not the cord.
ON/OFF SWITCH
You can start or stop your vacuum cleaner by
pressing the on/off switch lightly with your toe.
POWER CONTROL
The vacuuming power can be adjusted to suit any situation with electrical power control.
Press (+)button to heighten the power.
Press (-)button to lower the power.
eh
* Manual suction power control
The flexible hose hose handle(suction control) has a
manual air flow regulator which allows you to briefly
alter the suction level : the further open the regulator
is, the weaker the suction power.
EN-5
AUTO MODE
If you press AUTO MODE, the power is automatically
set at 800watt.
For example, when dust bag is full, the quantity of air to
the motor will be decreased and power will be down followingly. AUTO MODE, in this case, increases the
power automatically for sufficient suction.
eh
If you want to go back to the normal control type, just
press "+" or "-" buttons.
OPERATING THE BRUSH HEAD
Push the ON/OFF switch(A) down.
(The brush switches on)
USING THE ACCESSORIES
• Dusting brush - for furniture, shelves,
books, etc.
• Upholstery brush - for cushions and
drapery.
• Crevice tool - for radiators,crevices,corners, between cushions.
• Power brush -The rotating brush
ensures that cleaning is carried out
more thoroughly.
EN-6
CREVICE
DUSTING
UPHOLSTERY
PARK POSITION
Located in the top rear side of the vacuum cleaner,
there is a support for a convenient park position
during pauses when using the nozzle.
TRANSPORTING AND STORING THE VACUUM CLEANER
For easy storage and transportation, this vacuum
cleaner has a clip system built onto the body, which
will keep the tube, hose and nozzle in a vertical
position.
REPLACING THE DUST BAG
1) To open the dust cover of the dust bag
compartment, press the clamper
upwards(the clamper is located at the front
of the dust cover).
2) Remove the dust bag from the cleaner
EN-7
3) After removing the used dust bag, insert
the cardboard bag collar of the new dust
bag into its original position.
4) Press the dust cover down gently until
the clamper relocks.
DUST-FULL INDICATOR
If the “Dust-Full” indicator switches to “RED” while you are cleaning, the dust bag is full
and must be replaced.
NOTE : If the “Dust-Full” indicator continues to display “RED” even after changing
the dust bag, turn the cleaner off and check whether the hose, tube or nozzle is clogged.
EN-8
MAINTENANCE OR REPLACEMENT OF THE FILTERS
1) INLET-FILTER.
• Open the dust cover.
• After detaching the filter, wash it lightly with water, dry it in the shade, and then insert it
in its original position.
• Close the dust cover.
2) OUTLET-FILTER.
• The outlet-filter which the air comes out from the vacuum-cleaner.
• Open the dust cover, and then pull the hook upward located at the front of the hepa filter.
• Remove and replace the exhausted outlet-filter.
• Close the hepa filter, and then close the dust cover.
Hepa Filter
Preliminary Filter
VACUUMING WITH THE POWER BRUSH
1. Attaching the Power Brush
The hose must be plugged into the canister and the power
brush must be plugged into the hose and extension wand
(see page 3).
2. Vacuuming
• For best results, move the power brush slowly using
short,overlapping strokes.
• For heavily soiled areas, repeat strokes in several directions.
• Turn height adjustment knob to match the surface being
cleaned.
EN-9
CAUTION: Do not invert the power brush while it is running
3. Checking the Performance of the Power Brush
You may check whether the power brush is operating correctly by lifting up the
extension tube slightly to view the back of the brush.
The Power Brush will not operate when it is jammed or the unit is turned off.
If the Power Brush is jammed, Unplug the power cord from the electrical outlet.
Turn power brush over and remove the jammed object.
Turn the power brush back to vacuuming position and resume vacuuming
MAINTAINING THE POWER BRUSH
1. Removing the Brush Cover
• Before replacing any parts, unplug the vacuum cleaner from the electrical outlet.
• Remove 6 screws from the bottom plate and open the
brush cover.
2. Replacing the Headlight Bulb
1) Remove the Brush Cover as described
below.
2) Remove the old bulb from the bulb
socket. Insert the new bulb. You can
use a vacuum cleaner lamp rated
120V, 20W.
3. Replacing the Brushroller Belt
Use with caution when replacing the that drives the brushroller. Tension on the
belt is high.
EN-10
1) Remove the brush cover, Grasp the
brushroller firmly, and pull it out.
BELT
2) Remove the flat belt from the motor
shaft and the brushroller, Loop the new
belt around the motor shaft and then
loop it around the brushroller.
BRUSHROLLER
MOTOR SHAFT
3) Reinsert the brushroller, making
sure that both ends of the
brushroller are fitted into the
grooves of the nozzle head.
4) Be sure that the is not twisted. Rotate
the belt 3 or 4 times to position it correctly on the roller and to make sure all rotating parts move smoothly. Replace the
brush cover.
4. Cleaning the Brushroller
1) Turn off the vacuum cleaner and
unplug the power cord.
2) Remove the cover to expose the
brushroller.
3) Cut off any lint, carpet pile or hair that
has accumulated around the
brushroller with a pair of scissors.
Replace the brush cover.
EN-11
TROUBLESHOOTING
PROBLEM
CAUSE
REMEDY
Motor does not start
No voltage
Check cable, plug and
socket.
Suction force is
gradually reduced
Filter,nozzle,suction
hose tube blocked, or
bag full.
Remove the obstruction or
replace bag.
Cord does not rewind
fully
Check that the cord is
not twisted or wound
unevenly
Pull the cord out 6~10ft &
push down the cord rewind
button
EN-12
DIRECTIVES DE SURETÉ IMPORTANTES
Lorsque vous utilisez un appareil électrique, certaines précautions doivent être
exercées, incluant les suivantes :
LIRE TOUTES LES INSTRUCTIONS AVANT D’UTILISER
L’APPAREIL.CONSERVER CES DIRECTIVES.
ATTENTION
Pour réduire le risque d’un feu, décharge électrique ou blessure:
1. Utiliser cet appareil tel que décrit dans le manuel.
2. Ne pas laisser votre aspirateur sans supervision lorsqu’il est branché ou en
fonction. Débrancher l’aspirateur après chaque usage et avant une réparation.
3. Mettre toutes les contrôles en position « off » avant d’arrêter l’aspirateur.
4. Débrancher l’appareil électrique avant de le nettoyer ou réparer.
5. ATTENTION : UNE DÉCHARGE ÉLECTRIQUE POURRAIT SE PRODUIRE
SI UTILISÉ DEHORS OU SUR UNE SURFACE HUMIDE.
6. Cet appareil n’est pas un jouet. Une surveillance est nécessaire lorsque l’appareil
est utilisé par ou près d’un enfant.
7. Ne pas utiliser si la corde ou fiche est endommagée. Si l’appareil ne fonctionne
pas à pleine capacité, a été échappé, endommagé, laissé dehors ou plongé
dans l’eau, apportez-le à un centre de service.
8. Ne pas tirer ou transporter l’aspirateur par la corde, utiliser la corde comme
une poignée, fermer une porte sur la corde, ou tirer la corde autour d’une bordure
tranchante ou coin aigü. Ne pas passer avec l’aspirateur sur la corde.
Garder la corde loin des sources de chaleur.
9. Ne pas tirer sur la corde pour débrancher. Pour débrancher, tenir la fiche fermement
et tirer.
10. Ne pas toucher la fiche ou l’aspirateur avec des mains humides.
11. Ne pas insérer aucun objet dans les ouvertures. Ne pas utiliser lorsqu’une
ouverture est bouchée.
12. Garder les cheveux, vêtements, doigts, et toute autre partie du corps loin des
ouvertures et pièces mobiles (brosse, poignée, etc.)
13. Ne jamais aspirer quelque chose qui est brûlant, ou qui dégage une fumée
telle une cigarette, allumette, ou des cendres chaudes.
14. Ne pas aspirer des liquides inflammables ou combustibles tel de l’essence; et
ne pas utiliser l’aspirateur près de ces liquides.
15. Ne pas utiliser l’aspirateur pour ramasser de l’eau ou aspirer une surface
humide.
FR-1
16. Ne pas utiliser l’appareil sans sac et filtres.
17. Soyez prudent lors du nettoyage des escaliers. Pour éviter des blessures
ou dommages, l’appareil doit demeurer au pied des escaliers.
18. Utiliser seulement que les accessoires recommandés par le manufacturier.
19. Assurez-vous que l’aspirateur n’est pas en fonction avant de débrancher.
20. Le flexible contient des fils électriques. Ne pas utiliser s’il est endommagé,
coupé ou perforé. Éviter d’aspirer des objets pointus.
21. Toujours arrêter cet appareil avant de relier ou débrancher l’un ou l’autre
tuyau, une baguette magique ou un bec motorisé.
CONSERVER CES DIRECTIVES
Pour réduire le risque d’une décharge électrique, cet appareil possède une
fiche avec des lames polarisées (une lame plus longue que l’autre). Cette
fiche s’insère d’une seule façon dans une prise polarisée. Essayez d’insérer la
fiche d’un côté et si cela ne fonctionne pas, essayez du côté opposé. Si
cela ne fonctionne toujours pas, demander à un électricien qualifié d’installer la
prise appropriée. Ne pas défier le but de la prise polarisée.
FR-2
IDENTIFICATION DES PIÈCES
POIGNÉE
INTERRUPTEUR ARRÊT/ DÉPART
RÉGULATEUR D’AIR
BOYAU
INDICATEUR DE SAC
PLEIN
TUBE TÉLESCOPIQUE
BOUTON D’ENROULEUR
AUTOMATIQUE
BOUTON DE VARIABILITÉ
DE SUCCION
BOUTON D’ÉLÉVATION
DU ROULEAU
INTERRUPTEUR
ARRÊT/DÉPART
LUMIÈRE
COUVERCLE DE BOITE A
OUTILS
BALAI ÉLECTRIQUE
BOUTON POUR DETACHEMENT
DU TUYAU DE SUCCION
FR-3
ASSEMBLEMENT DE L’ASPIRATEUR
L’embout de machine du boyau
Insérer l’embout de machine du boyau dans
l’entrée de l’aspirateur jusqu’à ce que vous
entendiez un ‘click’. (Fig. A-A)
La poignée du boyau et le tube télescopique
Insérer la poignée du boyau dans le tube télescopique
jusqu’à ce que vous entendiez un
‘click’. (Fig A-B)
Ce tube peut-être retirer en appuyant sur le
bouton barrure situé à la poignée.
Ajuster le balai électrique au tube télescopique
Insérer le bas du tube télescopique dans le
coude du balai électrique jusqu’à ce que vous
entendiez un ‘click’. (Fig A-C)
TUBE TÉLESCOPIQUE
Le tube télescopique peut-être ajusté à la
longueur désirée. Tenir la partie du centre du
tube fermement d’une main et tirer sur le
tube inférieur avec l’autre main. Régler à la
longueur désirée.
FR-4
CORDE D’ALIMENTATION
1) DÉROULER
La corde d’alimentation est d’une bonne longueur
pour que vous puissiez la dérouler à une
longueur confortable.
2) ENROULER
Après le nettoyage, déconnectez la fiche de la
prise de courant puis appuyez légèrement avec
votre doigt sur le bouton de rembobinage du câble.
NOTE : Pour débrancher la corde d’alimentation, assurez-vous de tenir la fiche
et non pas la corde seule..
INTERRUPTEUR ARRÊT/DÉPART
Avec la fiche insérée dans la prise de courant,
appuyer légèrement sur l’interrupteur
Arrêt/Départ avec votre pied.
BOUTON DE VARIABILITÉ DE SUCCION
La puissance d’aspiration peut être ajusté pour convenir à toutes conditions avec le contrôle
d’alimentation électrique.
Appuyez sur le bouton (+) pour augmenter la puissance.
Appuyez sur le bouton (-) pour diminuer la puissance.
eh
* régulateur de succion manuel
Vous trouverez à la poignée un bouton pour
régler le niveau de succion. Le plus vous fermez
l’ouverture le plus de succion vous aurez.
FR-5
MODE AUTO
Lorsque vous appuyez sur MODE AUTO, la puissance
est réglée sur 800watts.
Par exemple, lorsque le sac à poussière est plein, la
quantité d’air dirigé vers le moteur diminue en provoquant la diminution de puissance. Dans ce cas, la fonction MODE AUTO augmente la puissance automatiquement en vue d’aspiration suffisante.
eh
Pour revenir au contrôle normal, appuyez simplement
sur le bouton "+" ou "-".
FONCTIONNEMENT DU BALAI ÉLECTRIQUE
Appuyez sur l’interrupteur Arrêt/Départ vers
l’avant. (Le balai électrique en maintenant en
marche)
LES ACCESSOIRES
• Dusting brush - for furniture, shelves,
books, etc.
• Upholstery brush - for cushions and
drapery.
• Crevice tool - for radiators,crevices,corners, between cushions.
• Power brush -The rotating brush
ensures that cleaning is carried out
more thoroughly.
FR-6
SUCEUR PLAT
BROSSE À
MEUBLES
BALAI ÉLECTRIQUE
Garniture
STATIONNEMENT DU BALAI ÉLECTRIQUE
Grâce au support situé à l’arrière de l’aspirateur,
vous pouvez insérer l’attache au coude
du balai électrique pour stationner celui-ci.
TRANSPORT ET RANGEMENT DE VOTRE ASPIRATEUR
Pour un rangement et transport facile,
l’aspirateur est muni d’une attache au tube
qui peut être inséré dans le support trouvé
sous l’aspirateur. De cette façon, votre
aspirateur, boyau, tube et balai électrique
demeureront en position verticale.
REMPLACER VOTRE SAC DE POUSSIÈRE
1) Pour ouvrir le couvercle du compartiment à
poussière, poussez l’attache-fil vers le
haut. (L’attache-fil se trouve sur le couvercle du compartiment à poussière.)
2) Enlever le sac de poussière.
FR-7
3)Après avoir enlevé le sac à poussière
plein, insérez le col de la boîte en carton
du nouveau sac à poussière dans sa
position originale.
4) Fermer la porte du compartiment
INDICATEUR DE SAC PLEIN
Si l’indicateur "Sac plein" bascule sur "ROUGE" pendant le nettoyage, vous devez
remplacer le sac à poussière par un nouveau car il est plein.
NOTE : si l’indicateur de sac plein demeure rouge suivant le changement du sac
de poussière, arrêter l’aspirateur et verifier l’objet obstruant le boyau, tube
ou balai électrique.
FR-8
ENTRETIEN OU REMPLACEMENT DES FILTRES
1) FILTRE D’ENTREE.
• Ouvrez le couvercle du compartiment à poussière.
• Après avoir retiré le filtre, lavez-le légèrement, séchez-le dans l’ombre puis insérez-le
dans sa position originale.
• Fermez le couvercle du compartiment à poussière.
2) FILTRE DE SORTIE.
• Le filtre de sortie par lequel l’air sort de l’aspirateur.
• Ouvrez le couvercle du compartiment à poussière et poussez vers le haut l’agrafe
située sur le filtre HEPA.
• Retirez le filtre de sortie usé et remplacez-le par un neuf.
• Fermez le filtre HEPA puis le couvercle du compartiment à poussière.
Filtre HEPA
Filtre préliminaire
UTILISATION DE L’ASPIRATEUR AVEC LE BALAI ÉLECTRIQUE
1. Connexion du balai électrique
Le boyau doit être relié à l’aspirateur et le
balai électrique doit être relié au tube télescopique
ainsi que le boyau (voir page 3)
2. Utilisation du balai électrique
• Pour de meilleurs résultats, passer le balai
lentement d’avant à arrière et ne pas oublier
de chevaucher pour redresser les poils du tapis.
• Pour des tapis plus achalandés (avec plus de
saleté), répéter le même mouvement dans
plusieurs directions au lieu de chevaucher.
• Ajuster le bouton d’élévation du rouleau pour assurer un net
toyage approprié
FR-9
AVERTISSEMENT:Ne pas renverser le balai électrique lorsqu’il est en fonction.
3. Vérification de la performance du balai électrique.
Vous pouvez lever le balai électrique du plancher légèrement pour vérifier la
performance du rouleau.
Le balai électrique ne fonctionnera pas si il y a une obstruction. Si le balai électrique
est obstrué, débrancher la corde d’alimentation de la prise. Renverser le
balai et retirer l’objet obstruant l’entrée du balai.
L’ENTRETIEN DU BALAI ÉLECTRIQUE
1. Enlever la porte du compartiment du balai
électrique
• Avant d’enlever toute pièce, débrancher votre
appareil de la prise de courant.
• Enlever les 6 vis retenant la plaque de base et
retirer la plaque.
2. Remplacer l’ampoule
1)Retirer le dessus en plastique du
balai tel qu’illustré plus bas..
2) Enlever l’ampoule usagée. Insérer
la nouvelle ampoule. Vous pouvez
utiliser une ampoule de 120v,20W.
3. Remplacer la courroie du rouleau
Procéder délicatement lors du remplacement de la courroie. Il y a une forte
tension.
FR-10
1) Enlever le dessus en plastique du
balai. Tenir le rouleau fermement et
le retirer de son compartiment.
BELT
2) Enlever la courroie usée du rouleau et
de la tige du moteur. Réinsérer une
courroie neuve autour de la tige du
moteur et du rouleau.
BRUSHROLLER
MOTOR SHAFT
3) Replacer le rouleau dans son com
partiment. Assurez-vous que
chaque bout du rouleau soit
bien ancré dans le compartiment.
4) Assurez-vous que la courroie ne soit
pas tordue. A l’aide du doigt, faire
tourner le rouleau quelques fois pour
confirmer que toutes les pièces foncnent
bien. Replacer le dessus en plastique.
4. Nettoyer le rouleau
1) Débrancher l’aspirateur.
2) Enlever la plaque de base pour
exposer le rouleau.
3) Enlever les poussières, cheveux,
poils d’animaux qui se sont accumulés
autour du rouleau et à
chaque extrémité en utilisant une
paire de ciseaux. Replacer le rouleau
dans le compartiment.
FR-11
DÉPANNAGE
Problème
Cause
Solution
Moteur ne démarre
pas
No voltage
Vérifier la corde d’alimentation, prise, fiche
Le niveau de succion est Réduit
Filtre, balai électrique,
boyau, Sac plein
Enlever l’obstruction
Le niveau de succion
est Réduit
Vérifier que la corde
d’alimentation
ne soit pas tordue
Tirer la longueur de 6-10’
et appuyer sur le bouton
d’enrouleur
FR-12
DJ68-00093V REV(0.0)