1
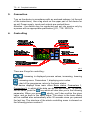
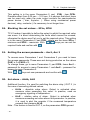
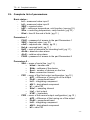
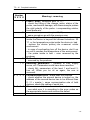
Measuring and regulating technique
Regulating and displaying unit
TC -41
Complete instruction
MRK s.r.o.
Mierové námestie 30/24
Nová Dubnica
018 51
tel./fax. +421 42 44 31 345
www.mrk.eu
[email protected]
-2-
-2-
TC - 41 Complete instruction
TC - 41 Complete instruction
-3-
Contents
Regulating and displaying unit ................................................................. 1
Contents ................................................................................................... 3
Introduction .............................................................................................. 4
1.
Description and function............................................................... 5
2.
Mechanical installation ................................................................. 6
3.
Connection ................................................................................... 7
4.
Controlling .................................................................................... 7
5.
Putting into practice ..................................................................... 9
6.
Launching and stopping the process of regulation ....................... 9
7.
Changing the set value - SEtP ................................................... 10
8.
Ramp function - rAmP ................................................................ 10
9.
HoLd function - HoLd, HdiF........................................................ 10
10.
Setting communication with the PC – SerL, bAud, SAdr, Scnt... 11
11.
Configuration of the regulation output – PID1, 2, 3 .................... 12
12.
Type of the input probe .............................................................. 14
13.
Number of the input probes........................................................ 14
14.
Shifting the measured value – CAL1, CAL2 ............................... 15
15.
Setting the cold temperature – rEF1, rEF2................................. 15
16.
Displaying decimal places - dcPt ............................................... 15
17.
Maximum rate of input reactions - OPEr .................................... 15
18.
Blocking the set values – SPLo, SPHi........................................ 16
19.
Setting the access passwords – Acc1, Acc 2 ............................. 16
20.
Set alarm – ALAb, AlrE .............................................................. 16
21.
Complete list of parameters ....................................................... 17
22.
Error reports ............................................................................... 18
23.
Parameters set by the producer ................................................. 20
24.
Warranty card ............................................................................ 22
25.
Notes.......................................................................................... 25
-3-
TC - 41 Complete instruction
-4-
Introduction
Thank you for buying our product. For its faultless usage, read these
instructions so that it works correctly to your complete satisfaction.
TC – 41 is an intelligent microprocessor unit, enabling regulation of
measured process values according to required parameters. It can be
entirely adjusted to your demands, however, that requires detailed
knowledge of its system. Every user will not apply all the available
functions, that’s why this instruction consists of two parts
-
Quick user’s manual
Complete instructions for the TC – 41 system
Quick manual contains basic information about TC – 41, survey and
setting of the most important parameters, simple launch, stopping of the
regulating process. The complete instruction will introduce you all the
TC – 41 functions, enabling setting of the regulation parameters,
displays, possibilities of connecting inputs and outputs, technical
parameters.
Instructions were written for the usage of TC – 41 as a controller of
temperature, stated principles and settings are applicable also for other
possibilities of usage.
Attention : The device may be installed and operated only by
people who are acquainted with these instructions, safety rules,
and is authorized for installation of electrical devices in
accordance with valid legislation.
We hope you’ll be fully content with our product.
-4-
TC - 41 Complete instruction
1.
-5-
Description and function
TC-41 is a compact regulating and displaying unit, enabling regulation,
or displaying measured values of process values from the connected
input probes. The controlling unit of TC-41 is determined to measure
and display 1 or 2 input signals. Output controlling signal can be binary,
analog with the possibility of galvanic separation.
TC-41 can be connected into larger regulating wholes (multizonal
furnaces...) with the possibility of connection to the PC with a serial
interface RS232, RS485, MODBUS, IrDA
( infrared
communication ). Controllers of visualisation in systems CONTROL
WEB, CONTROL PANEL are available. Concerning the time reactions
of the regulated complex, cascade connection of the regulators is also
possible.
Both measured and required (set) value are showed on two LED
displays ( height of the segments is 14mm – good visibility even from
a larger distance ). On the front panel, there are also 4 keys that set
and control the device. Input, output and supply clamps are placed on
the back side of the unit. The electronics of the controller is placed in
a plastic box in panel making with standard covering of IP40, or more .
All parameters are protected by a password against an unauthorized
change. Basic parameters are available in the user’s menu of 1st level
( password 1 ) and more detailed setting is enabled by the user’s menu
of 2nd level ( password 2 ).
-5-
TC - 41 Complete instruction
-6-
2.
Mechanical installation
The device was constructed for the fitting into a panel and is equipped
with two holds with aretation. The procedure of the fitting is as follows:
-
-
Cut an oblong opening {92 x 44 mm} into the panel, the width
of the panel maximum 5 mm
Insert the device into the opening and put the holds on both
sides ( the head of the screw is heading back to the connector
of the device ). Press back and that will fix the holds, then
fasten the screws, which will fasten the whole device
Connect all necessary conductors onto the connector and
insert it into the back part of the controller
That will be the end of installation.
-6-
TC - 41 Complete instruction
3.
-7-
Connection
Turn on the device in accordance with an enclosed scheme ( at the end
of the instructions). Use a tag stuck on the upper part of the device for
an aid. Power supply, inputs and outputs are marked there.
Attention : the device may be connected and put into service only by
a person with an appropriate qualification § 22 , 718 / 2003 Z.z.
4.
Controlling
pic.1
There are 4 keys for controlling :
- browsing in displayed process values, increasing, lowering
the value.
- accesing menu Parameters 1, displaying error codes.
- start of the programme, return to the basic status.
The device displays three main offers Basic status, Parameters 1,
Parameters 2, in which all the data can be set and viewed. To confirm
the set value, push the
key which will also take you to the following
parameter. When you press
shortly, you’ll also confirm the given
value, and go back to the basic status. The return to the basic status
will be realized also automatically after 30 seconds since you pressed
the last key. The structure of the whole controlling menu is showed on
the following picture number 2.
-7-
-8-
-8-
TC - 41 Complete instruction
TC - 41 Complete instruction
-9-
pic.2
Transition to menu Parameters 1 :
key for 3 seconds, provide the
From the basic status: press the
access password 1
( default = 1 ) and confirm
.
Transition to menu Parameters 2 :
On the menu Parameters 1, provide the access password 2 on the item
PAS2 ( default = 2 ) and confirm with
. There is also a quicker way
to get from the basic status directly to the menu Parameters 2. Press
at the same time and let go. The device will go on
both keys
straight to PAS2 part, where you have to provide the access password
2 and confirm
. Menu Parameters 2 contains more levels. The
names of individual levels are standardly showed on the red display,
the green display shows inscription no or YES . These inscriptions
show whether to enter the appropriate level or not. If there is for
example the no inscription in the SErL part, the device will go on to the
next part out1, after you press the
key. If there’s YES, after
pressing
it enters the level SErL, and displays the first parameter,
in our case it’s bAud.
5.
Putting into practice
After you turn on the device, the version number will be shown for
a moment, and followingly it will go on to the basic status. The upper
red display will show measured value, the lower green one will show
the set value. The red display cyclically shows the value of the 1.input (
the number is displayed ) and the 2. input ( it flickers – if it is being
used ).
If the device had been active before ( green or yellow signalizing LED is
displayed), it continues with the programme in course. Otherwise it
waits for launching and the outputs are turned off.
6.
Launching and stopping the process of regulation
key for a little longer {3 seconds}, you will starts
When you hold the
the process of regulation. It can be stopped in the same way. With
standard settings, the controller tries to achieve the set value as fast as
possible {green display}. When that happens, it will stay regulating on
that value until you stop the regulation.
-9-
TC - 41 Complete instruction
- 10 -
7.
Changing the set value - SEtP
Set the value with the
keys in the Basic status.
There is an option to set the device so that anyone could so easily
change the set value. In this case, setting the set value moves to menu
Parameters 1, where the input is via password. This function enables
the manufacturer.
When you hold the
key for some longer time ( 3 sec ), it will take
you to the user’s menu of setting the parameters. Accessing this menu
is subject to awareness of the password. The password has been
number 1 since production. With the
key you‘ll set 1 on the green
display and confirm with
. The system will go on to the user’s menu
and it will show the title of the first parameter SEtP – set value on the
keys. Confirm
and that
red display. Set the value with the
will bring you back to basic status. The lower green display now shows
the required value which was set by you.
Attention : after 30 seconds since the last push, the device itself will
return to the basic status.
8.
Ramp function - rAmP
Technology often requires gradual growth of temperature so that the
products are not destroyed. That’s why TC – 41 enables setting the
maximum rate of increasement in temperature. Go through to the user’s
menu ( in the same way as you did when setting the required value ).
The
key will take you to the following parameter rAmP, again with
keys, set the rate of increasement within a minute. The oFF
value is set standardly, that means: ramp turned off = maximum rate.
9.
HoLd function - HoLd, HdiF
HoLd serves for automatic ending of the programme ( turning off the
outputs ) after a set time. In the user’s menu, go on to the HoLd
parameter, where you set the required hold in terms of minutes. When
the controller achieves the set value, it will starts counting down the
time remaining until regulation is turned off, meanwhile it still keeps teh
- 10 -
TC - 41 Complete instruction
- 11 -
achieved status in required tolerance. The red display cyclically shows
the inscription tEnd – time remaining till the end of the process, the
green display shows time in terms of minutes. When the time is over,
the device beeps and turns off the outputs. Standardly, the - - - value
is set, which means infinite time, i.e. the device will be still keeping the
achieved value until it is turned off manually with the
key. Setting
hold is related to the following parameter HdiF – difference for
launching hold. In fact it determines the tolerance zone, when the
counting down of the rate can be started.
Example : SEtP = 300 ° C
HoLd = 60 min
HdiF = 10,0 ° C
When turned on, the controller tries to reach 300 ° C. The
temperature increases until it reaches 290 ° C ( en trance to the
tolerance zone ), the device beeps and starts counting down the time
remaining until the end of hold. But still it tries to reach 300 ° C and it
will keep regulating on this value until the hold time is over. Then it
ends the programme and turns off the outputs.
10. Setting communication with the PC , RS485 – SerL,
bAud, SAdr, Scnt
TC – 41 can contain serial interface for communication with a superior
system, or even with other controllers TC – 41. Setting of the
communication rates, addresses and other parameters is transferred in
the menu Parameters 2, part SErL. According to the structure of the
menu ( pic.number 2 ) go to the menu Parameters 2 to the item SErL (
see pg. 7 – transition to menu Parameters 2 ).
Enter SErL and on the item bAud set the communication rate.
Standardly. The value of 57.6 kBaud is set. Another item is SAdr –
address of the device. Every device on the line has to have a unique
address, while address 0 is a label of the superior ( MASTER ) device.
Master has also following item Scnt which determines the number of
the subordinate ( SLAVE ) devices. This item is not displayed if the
controller has some other address than 0. What follows is Stou which is
maximum time for answering the question from other devices on the
line. If there is no answer within that time, TC – 41 reports error of the
line. Used communication protocol – MODBUS.
- 11 -
- 12 -
TC - 41 Complete instruction
11. Configuration of the regulation outputs – PID1, 2, 3
In a standard version, the device contains 3 outputs. Out 2 is usually
relay, Out 1, Out 3 differ according to individual models of TC - 41.
They are usually adapted for controlling the semiconductors, SSR, by
means of analog signals etc. Type of used outputs is stated on the tag
at the lower part of the device.
Each output can be assigned to different input. The controller allows
you to assign any of inputs (In1, In 2) to the any of output. This option
performed the manufacturer. The standard is as follows:
- The version with one input - all three outputs respond to In1
- The version with two inputs - Out 1 and Out 2 respond to the
input signal # 1 (In 1). Out 3 responds to input # 2 (In 2).
This can be different in accordance with requierements.
The controller also allows each output manage its own PID parameters.
These are marked on the menu PID1, PID2, PID3. Parameters can also
be allocated to different outputs. The default setting is:
- PID 1 controls the OUT 3 - terminals 8, 9
- PID 2 controls the OUT 2 - terminals 5, 6, 7
- PID 3 controls the OUT 1 - terminals 3, 4
Explaining in detail the control parameters is beyond the scope of this
manual. The controller complies with the international standards of The
International Association of Automation Standard (www.isa.org). This
provides for setting up of the regulatory process parameters P, I, D, B.
Briefly explain the importance of these and other parameters that are
directly linked together.
We’ll state only one example of setting for Out3, in the remaining two
the parameters and their function is identical.
According to the structure of the menu ( pic.no.2 ) go to menu
Parameters 2, item PID1 ( see pg. 9 – Transition to the Parameters 2 ).
Now there‘s PID1 on the red display and no on the green one. The
system offers us a possibility to go on to setting individual parameters
for Out 3. Therefore we choose YES (
or
) and confirm
.
- 12 -
TC - 41 Complete instruction
- 13 -
What follows is the list of parameters in PID1 :
•
diF1 – difference of the turning on of the output ( ° C )
It is in fact a shift of the set value
Example : required value is 300 °C, diF1 = 5.0
Out 1 will be turned on until the measured temperature
reaches 305 °C.
•
PbA1 – width of the proportional band ( ° C )
In this band, the controller controls the output so that it
reaches the required value. This „fine-tuning“ is
realized by shortening, or prolonging the time of turning
on the output, according to the magnitude of the
aberrance between the required and the measured
value and other parameters.
Setting the parameter on the off value means that the
output will behave as a two-status output. That means
that the measured value is lower than the required
value – still turned on, and the other way around.
Example : Required temperature = 300 °C, PbA1 = 10
Out 3 will be turned on until the measured temperature
reaches 290 °C, then it starts turning on and off
systematically, until it reaches the required
temperature.
•
Int1 – integrating time constant ( sec )
Determines the share of the integrating component of
the controller. It is in terms of seconds. Thise
parameter only makes sense if the PbA1 is set. i.e.
PbA1 is not off.
•
dEr1 – derivational time constant ( sec )
determines the share of the derivational component of
the controller. It is in terms of seconds. This parameter
only makes sens if the PbA1 is set, i. e. PbA1 is not
off.
b1 – default = 1.
Ratio regulation constants for the transition to the set
value and maintaining the set value.
•
- 13 -
TC - 41 Complete instruction
- 14 -
Note : setting the PID parameters is a complicated process which
requires deeper knowledge of the question of regulation. The aim of
this document is not to make a detailed description of the theory of
regulators, we recommend to read appropriate expert literature, or visit
http://www.mrk.eu/, where you’ll find simple method of determination of
the PID constants.
•
•
•
SAn1 – sampling interval ( sec )
It’s a frequency of calculating the action interference for
the PID regulator. It is about how often should the
particular PID regulator calculate its interference and
turn on/off the output accordingly.
Lin1 – limit output. Limiting temperature setpoint for the output.
In practice, this means that the controller to regulate
the output never above this value even when the
required value in the Basic state higher.
HYS1 – hysteresis ( ° C ) – only when PbA1 = off
It is the area around the required value, where the
controller does not react to change of the regulated
process value, so- called zone of insensitivity.
Example : Required temperature = 300 °C, PbA1 = off
, HYS1 = 10
Out 3 will be turned on until the measured temperature
reaches 300 °C, that’s when it turns off, then turn s on
again when the temperature goes below 290 °C.
Values of the parameters, set by the producer for each output, as well
as all the other parameters set by the producer, are stated in the back
part of these instructions.
12. Type of the input probe
Set by the producer, according to requirements.
13. Number of the input probes
Set by the producer, according to requirements.
- 14 -
TC - 41 Complete instruction
- 15 -
14. Shifting the measured value – CAL1, CAL2
TC – 41 enables to set „deception“ of the measured value. This function
is usable especially in case of measuring temperatures when it’s
impossible to place the probe where demanded. The difference of the
temperatures between the required and actually measured place can
be set in the items CAL1 and CAL2 for the first and second output.
These items are in the menu Parameters 2, part inPS. i
,
keys
.
will set the required shift and confirm with
15. Setting the cold temperature – rEF1, rEF2
This function is used in case of measuring temperatures by
a thermocouple probe. There is a difference between temperatures in
the place of measurement and the place where the measuring device is
placed, and it influences the exactness of measuring. This inaccuracy
can be eliminated when you use thermocouple cables, or cold junction
box. In case of using thermocouple cables ( of the same type as the
temperature probe ), the cold temperature is automatically measured by
TC – 41. When using thermocouple box, it is necessary to set the
temperature of the cold junction box on TC – 41. It can be set in the
items rEF1 and rEF2, for the first and the second input. These items
are in the menu Parameters 2, part inPS. Keys
,
will set the
temperature of the cold junction box, or you can set Aut for automatic
.
measuring ( decrease value to -1 ) and confirm with
16. Displaying decimal places - dcPt
To display the measured value more precisely you can allow displaying
of the decimal places. In the menu Parameters 2, part inpS, there is an
item dcPt, which determines the number of the displayed decimal
places. Choose the required number and confirm with
.
17. Maximum rate of input reactions - OPEr
According to the used outputs which are controled by the device, It is
possible to set the maximum rate of switching, by which you can
increase the quality of regulation.
- 15 -
- 16 -
TC - 41 Complete instruction
This setting is in the menu Parameters 2, part SYSt , item OPEr.
Possible extent from 0,05 sec. – 10,0 sec. It is obvious that short times
can be used only when the main output controls the semiconductor
power device ( triac, thyristor.. ). When using mechanical power
devices ( relay, contactor ) it’s necessary to set longer time .
18. Blocking the set values – SPLo, SPHi
TC-41 makes it possible to define the extent in which the required value
can move. Ii is about determining the limits which cannot be crossed,
otherwise the device won’t let you to set the required value. This setting
is in the menu Parameters 2, part SYSt , where are the items SPLo –
minimum and SPHi – maximum. With
,
keys you can set the
required limits and confirm with
.
19. Setting the access passwords – Acc1, Acc 2
To access menu Parameters 1 and Parameters 2 you need to know
the access passwords. These were set during production on the values
PAS1 = 1 a PAS2 = 2 .
To change these, go to menu Parameters 2, part SYSt, items Acc1 –
password for access to menu Parameters 1 and Acc2 – passowrd for
access to menu Parameters 2.
With
,
keys set new passwords and confirm with
.
20. Set alarm – ALAb, AlrE
Additional function. It is used for switching the alarm relay ( OUT 2 ) in
the case of exceeding defined values.
• ALAb – absolute value alarm. Output is activated when
measure value exceeding this value. In practice, used as
emergency signaling of temperature.
• ALrE – relative value of alarm. Output is activated when
measure exceeding set value above this parameter. In practice,
it is used to alert the operator if the measured temperature
exceeds the tolerance ALrE.
Note : This feature is fixed to OUT 2, so the parameters PID2 ignored.
- 16 -
TC - 41 Complete instruction
- 17 -
21. Complete list of parameters
Basic status :
tn1 – measured value input 1
- tn2 – measured value input 2
- SEtP – required value
- trEF – reference temperature, cold junction ( see pg.15 )
- SPin – controlling temperature, ramp function ( pg.10 )
- tEnd – time till the end of hold ( pg.11 )
Parameters 1 :
- PAS1 – password of access to the part Parameters 1
- SEtP – required value ( pg.10 )
- rAnP – required rate - ramp ( pg.10 )
- HoLd – required hold ( pg.11 )
- HdiF – zone of tolerance for launching hold ( pg.11 )
- ALAb – absolute value alarm
- ALrE – relative value alarm
- PAS2 – password of access to the part Parameters 2
Parameters 2 :
- SErL – menu of serial line ( pg.11 )
o bAud – transfer rate
o SAdr – address of the device
o Scnt – number of devices on the line
o Stou –connection timeout
- PID1 – menu of the third output configuration ( pg.12 )
o diF1 – difference of turning on of the output
o PbA1 – proportional band
o Int1 – integrating component
o dEr1 – derivational component
o b1 – ratio PID
o SAn1 – sampling interval
o Lin1 – limit output
o HYS1 – hysteresis
- PID2 – menu of the second output configuration ( pg.12 )
o diF2 – difference of the turning on of the output
o PbA2 – proportional band
o Int2 – integrating component
o dEr2 – derivational component
o b2 – ratio PID
- 17 -
TC - 41 Complete instruction
- 18 -
-
-
-
o SAn2 – sampling interval
o Lin2 – limit output
o HYS2 – hysteresis
PID3 – menu of the first output configuration ( pg.12 )
o diF3 – difference of the turning on of the output
o PbA3 – proportional band
o Int3 – integrating component
o dEr3 – derivational component
o b3 – ratio PID
o SAn3 – sampling interval
o Lin3 – limit output
o HYS3 – hysteresis
inPS – menu of inputs
o CAL1 – shift of the measure value of input 1 (pg.14)
o CAL2 –shift of the measure value of input 2 (pg.14)
o rEF1 – cold temperature of input 1 ( pg.15 )
o rEF2 – cold temperature of input 2 ( pg.15 )
o dcPt – number of decimal spaces ( pg.15 )
SYSt – menu of system settings
o OPEr – sampling time of outputs čas ( pg.15 )
o SPLo – minimum set value ( pg.16 )
o SPHi – maximum set value ( pg.16 )
o Acc1 – password of access to Parameters 1 ( pg.16 )
o Acc2 – password of access to Parameters 2 ( pg.16 )
o Acc3 – reserved for the producer
Some of the parameters does not necessarily have to be displayed
– it depends on the config. of the device and on the user’s setting.
22. Error reports
When there’s an error on the TC-41, it beeps and the LED diode on the
front panel flickers. Along with that, in the Basic status, part Erros, an
error codes is displayed. Accordingly to the code you can identify the
problem. This code is in form of a hexadecimal number.
Example : if ErrC = 1 – probe 1 error
if ErrC = 2 – probe 2 error
if Errc = 3 – both probe 1 and probe 2 error
The meanings of the codes, as well as way of removing them to solve
the errrors are stated in the following chart.
- 18 -
TC - 41 Complete instruction
Number
X X X X
1
2
4
8
1 0
4 0 0 0
8 0 0 0
- 19 -
Meaning + removing
Probe 1 error ( connector pins 16,17 )
- check the fitting of the clamps, wires, status of the
probe, mechanical damage, with thermocouple probes
the right polarity of the probe + compensating cables,
burnt probe etc.
Probe 2 error ( connector pins 14,15 )
- same procedure as with the previous error
Measuring the reference temperature – temperature
inside the device is beyond the allowed tolerance– 50
° C, or the temperature probe inside the device is bad
- replace the device prístroj into a warmer/ colder
environment
- in case of overheating turn off the device, don’t turn
on until it reaches the temperature of the environment
- the probe inside is bad – error removed by the
producer
Calibration error
- removed by the producer
Rewriting parameters – because of EMI, supply
errors, etc. Parameters could have been rewritten
- check ALL parameters of the level 1 and levell 2,
turn off. When you tur nit on again, the erro is
removed.
Communication error –slave does not respond
- check whether the second device is turned on, the
address of the second device has to be different than
0 ( 0 = master ), same communication rate of both
devices, check the cables of serial line
Slave erros – defect on the subordinate device
- see what error it is according to the error codes on
the appropriate device and remove the defect
- 19 -
TC - 41 Complete instruction
- 20 -
23. Parameters set by the producer
Level
Param. 1
Param. 2
SErL
out 1
out2
out3
- 20 -
Name of the parameter
SEtP
rAnP
HoLd
HdiF *
ALAb *
ALrE *
bAud
SAdr
Scnt *
Stou
diF1
PbA1
Int1 *
dEr1 *
b1
SAn1
Lin1
HYS1 *
diF2
PbA2
Int2 *
dEr2 *
b2
SAn2
Lin2
HYS2 *
diF3
PbA3
Int3 *
dEr3 *
b3
SAn3
Lin3
HYS3 *
Producer
User
TC - 41 Complete instruction
inPS
SYSt
CAL1 *
CAL2 *
rEF1 *
rEF2 *
dcPt
OPEr
SPLo
SPHi
Acc1
Acc2
Acc3
- 21 -
Reserved for the producer
- 21 -
TC - 41 Complete instruction
- 22 -
24. Warranty card
Product :
Temperature controller TC - 41
Type : TC- 41
Production number :
Warranty period : 24 months since the date of distribution
Date of distribution :
Date of installation :
Direct customer :
Final customer :
Probe :
Output:
Max.working temperature:
°C
Warranty conditions :
The producer provides 24 months of guarantee for this product
since the date of distribution, except the errors caused by
a mechanical or electrical wear of the outputs. The guarantee does
not apply to any defects caused by incorrect storing, transport,
incorrect connecting, damage caused by outer influence(
especially electrical voltage, unallowed temperature, chemicals,
mechanical damage ), electrical or mechanical overloading of the
inputs and outputs.
Service :
MRK s.r.o.
Mierové námestie 30 / 24
018 51 Nová Dubnica
tel. 00421 – 42 –443 1345
- 22 -
rev.01/2013
TC - 41 Complete instruction
- 23 -
- 23 -
- 24 -
- 24 -
TC - 41 Complete instruction
TC - 41 Complete instruction
- 25 -
25. Notes
- 25 -