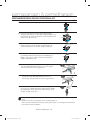
1
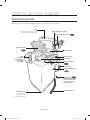
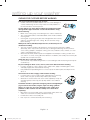
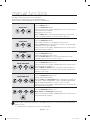
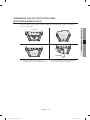
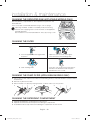
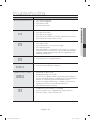
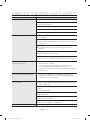
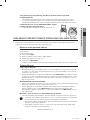
WA85H4000H Washing Machine user manual imagine the possibilities Thank you for purchasing a Samsung product. WA85H4000H_03218F_EN.indd 1 2014-07-18 2:29:04 contents SETTING UP YOUR WASHER 6 MANUAL FUNCTIONS 6 9 10 Description of part How to wash automatically depends on the laundry Control Panel 14 Manual functions 15 15 16 17 20 Environment Levelling Connecting the water supply hose Assembling the rat protection panel (applicable models only) How to connect the drain hose (applicable models only) Adding detergent Water supply connector filter Cleaning the Dedicated Sink (applicable models only) Cleaning the filter Cleaning the pump filter (applicable models only) Cleaning the detergent compartment 21 Troubleshooting 22 Washing machine won’t work? 24 Specification 14 INSTALLATION & MAINTENANCE 15 18 19 19 20 20 20 TROUBLESHOOTING 21 WASHING MACHINE WON’T WORK? 22 SPECIFICATION 24 English - 2 WA85H4000H_03218F_EN.indd Sec9:2 2014-07-18 2:29:13 safety instructions Please note that the following precautions for safety intend to prevent unpredictable danger and damage by helping the proper use in safety. When using hot water in washing, please make sure that the water should not exceed 50 °C. • Plastic parts may be deformed or damaged, and an electric shock or a fire may take place. IMPORTANT SAFETY PRECAUTIONS Do not let children (or pets) play in or on your washing machine. The washing machine door does not open easily from the inside and children may be seriously injured if trapped inside. This appliance is not to be used by persons (including children) with reduced physical, sensory or mental capabilities, or lack of experience and knowledge, unless they have been given supervision or instruction concerning use of the appliance by a person responsible for their safety. Children should be supervised to ensure that they do not play with the appliance. For use in Europe : This appliance can be used by children aged from 8 years and above and persons with reduced physical, sensory or mental capabilities or lack of experience and knowledge if they have been given supervision or instruction concerning use of the appliance in a safe way and understand the hazards involved. Children shall not play with the appliance. Cleaning and user maintenance shall not be made by children without supervision. If the supply cord is damaged, it must be replaced by the manufacturer, its service agent or similarly qualified persons in order to avoid a hazard. This appliance should be positioned so that the power plug, the water supply taps, and the drain pipes are accessible. English - 3 WA85H4000H_03218F_EN.indd Sec2:3 2014-07-18 2:29:13 01 SAFETY INSTRUCTIONS WARNING: To reduce the risk of fire, electric shock, or injury to persons when using your appliance, follow basic precautions, including the following: safety instructions For appliances with ventilation openings in the base, that a carpet must not obstruct the openings. The new hose-sets supplied with the appliance are to be used and that old hose-sets should not be reused. CAUTION: In order to avoid a hazard due to inadvertent resetting of the thermal cut-out, this appliance must not be supplied through an external switching device, such as a timer, or connected to a circuit that is regularly switched on and off by the utility. WARNING There might be serious injury or fatal accident when you violate this instruction. • Do not pull the cord off or touch it with moist hands. − An electric shock or a fire may take place. • Do not bend the power supply cord by force or press it with heavy things. − An electric shock or a fire may take place. • Do not install the washer nearby electric implement or don’t put a candle light or cigarette light on the washer. − A fire may take place. • During operation, do not put your hands or metal materials under the washer. − You may be hurt by spinning board beneath the washer. • Stay away from the washer when the bottom of the washer sinks into the water. − There might be an electric shock. Please wait until the water drains out completely. • Do not put laundry stained with gasoline, benzene, or alcohol in the washer, and keep the materials away from the washer. − An explosion or a fire may take place. • During spinning, don’t put your hand in the spinning tub. − It may hurt your hands. If it does not stop within 15 seconds after you open the lid, call service agent immediately. • This appliance has to be connected to the plug endurable to proper power consumption. • This appliance has to be positioned so that the plug is accessible after installation. • No user-serviceable parts inside. Refer any servicing to qualified service personnel. − Otherwise this may cause a mechanical error, electric shock, fire or physical damage. − The product warranty does not cover problems resulting from disassembling the product. • Do not use this product for business purposes. English - 4 WA85H4000H_03218F_EN.indd Sec2:4 2014-07-18 2:29:13 CAUTIONS English - 5 WA85H4000H_03218F_EN.indd Sec2:5 2014-07-18 2:29:13 01 SAFETY INSTRUCTIONS There might be a slight injury or damage when you violate this instruction. • Don’t install it in the area with moisture or outdoor where it has rain or snow. − An electric shock or a fire may take place. • Please unplug the power supply cord when you do not use it. − An electric shock or a fire may take place. • If there is dust or water on the power supply plug and its connected part, please remove it completely. − An electric shock or a fire may take place. • Do not make your kids look into the inside of the washer. − If your kid falls into the washer, his life could be in danger. • Ventilate immediately without touching the power plug if gas is leaking. − An electric shock or a fire may take place if it catches flame. • If the washer makes strange noise, smell or smoke, unplug it promptly and call service agent. − An electric shock or a fire may take place. • When cleaning, don’t spray water to the parts of the washer directly. − It may make its life span shorten. Also an electric shock or fire may take place. • Do not use the strong acid cleaning agent. • Don’t use several appliances together with an outlet. − A fire may take place due to unusual heat. • Don’t press the button with an awl or pin. − An electric shock or a fire may take place. • If the damage is found on the current cord in use, it should be replaced by manufacturer, service center or authorized person in order to avoid the risk. • Connect the grounding wire to the shell plate, and bury it under at least 25cm of earth:alternatively, connect the ground wire to the appropriate pin on a properly grounded power receptacle. Never connect the wire to a telephone line, lightning rod, or gas pipe. • The product you have purchased is designed for domestic use only. The use for business purposes qualifies as product misuse. In this case, the product will not be covered by the standard warranty provided by Samsung and no responsibility can be attributed to Samsung for malfunctions or damages resulting from such misuse. setting up your washer DESCRIPTION OF PART The User’s Manual is for common use. Make use of the User’s Manual depending upon your washing machine model. Lid Be sure to keep the lid closed during washing and spinning. Water supply hose (Cold) Water supply hose (Hot) Dedicated Sink Control panel Filter Lint will be collected in the filter during washing. Detergent box Spin basket Water-Jet Button Power cord Handle (Set Moving ) Ground lead When the water pipe is metal, make sure to cover the end of the ground wire. Water drain hose Adjustable legs Adjust the length of the legs when installing the washer. English - 6 WA85H4000H_03218F_EN.indd Sec3:6 2014-07-18 2:29:13 CHECKING BEFORE WASHING AND CARING FOR GARMENTS English - 7 WA85H4000H_03218F_EN.indd Sec3:7 2014-07-18 2:29:13 02 SETTING UP YOUR WASHER Must follow the checkpoints in order to avoid machine problems or damages on garments. • If the below problems are caused by customer’s faults, separate service fee will be charged. Checkpoints Before Starting Washing Check if the clothes are bleaching or not. • Add liquid detergent to a white towel and the garment where you can’t notice well. Then, rub together strongly. Check if the color transferred to the towel. • Be careful for scarves and imported clothes since they are easily discoloring. • Check for stains or partial dirt. • If stains are found, use the towel wet with detergents to rub on in a single direction. • Before washing, the sleeves, collar, dress hem and pockets are pre-treated by brushing with detergents. The wrinkle-processed clothes made of wool are specially treated by fixing them with threads before washing. The threads shall be removed after the clothes are dried. Not washable laundry Clothes those are easily transformable even by soaking in water. • Even by soaking in water, neckties, brassieres, jackets, suits and coats can be easily transformed like shrinking and discoloring on the garment surfaces because they are mostly made of rayon, polynosic, cuff and their blend fabrics. • The wrinkle-processed, embossed, or resin processed products are easy to transform even by soaking in water. • Easily discoloring products made of cotton and wool, wrinkled silk, leather products, leather accessory, leather ornamented clothes and its accessory. • Don’t wash those clothes without handling guideline or material indication tag. About Detergent • When detergents are not dissolving well, use warm water (about 40°C) to dissolve the detergent. • Use an appropriate amount. • Even if excess amount of detergent is used, there is not much difference in washing CAUTION result. It may cause damages to the garments because rinsing is not enough. • The bleaching agent may cause damages to garments since it is strong alkali. • Do sufficient rinsing because the powder detergent is easily remained on the garments causing bad odors. • If too much detergent is used or cold water is used, it doesn’t dissolve completely and remain on the garments, hose or spin basket, causing contamination on clothes. • In case of reserved washing, detergents must be put in the detergent box. If the powder detergents are spread on laundry directly, it may cause discoloration. setting up your washer CARING FOR CLOTHES BEFORE WASHING Take out personal belongings from pockets. • Caution, Check the pockets! Hairpins and coins cause damages to clothes and washing machine. They make noise and problems to the machine. Must check the pocket. If pants zippers are open while washing, the spin basket may be damaged. The zipper should be closed and fixed with a string before washing. • Metal on the clothing may cause damage to the clothes and the tub. • Turn clothing with buttons and embroidered clothes inside out before washing them. • Clothing with long strings may become entangled with other clothes, and may cause damage to the clothing. Be sure to fix the strings before washing. Waterproof clothes (Ski Wear, Diaper Covers, Footboards) are not allowed for washing. • This may cause the laundry to be ejected or cause the washing machine to vibrate abnormally, which may result in personal injury or damage the washing machine, the floor or the clothing. (Diapers, waterproof clothing, raincoats, umbrella covers, skiwear, car cover sheets, and sleeping bags, etc.). • When the tub rotates, water may become trapped in the waterproof clothing or fabric and can collect in a corner, causing abnormal vibrations. In addition, the laundry rises and may be ejected and cause personal injury. Shake the dirt or soils from clothes. • Soil and sands may rub delicate garments to cause damages and the washing result may be unsatisfactory. Do pre-washing for white socks, sleeves, and collars before the main washing. • For stains and dirt on collars, sleeves, hems, and pockets, apply some detergent to them and apply it lightly with a brush before washing. • Use powdered or liquid detergent. Do not use soap as the tub may become dirty from the dirt on it. Turn inside out for those nappy clothes before washing. • If clothes have too much foreign matter, separate them for washing. Other clothes may pick up those dirty matters (dirt, thread). • Wash black colored clothes and cotton towels separately. If they are washed together, towels may pick up dirty matters. Check before washing. Cashmilon and those garments having big volume and lightweight (eg. Lasedecorated clothes, lingerie, nylon stocking, synthetic fabrics etc.) may rise and cause damages to the clothes and problems to the machine. Use the laundry net or wash them separately. • Must put those long stringed clothes, lase-worked clothes, bed cover sheet, wool clothes into a laundry net before washing. • Put delicate clothes in the laundry net. • Use only those commercial laundry net for washing. English - 8 WA85H4000H_03218F_EN.indd Sec3:8 2014-07-18 2:29:13 Curtains, floating garments or blue jeans shall be pressed not to float on the water. • If they are floated on the water, press Start/Pause button to stop and press them to sock in the water. If the washing goes on with clothes floating on the water, it may cause damages to the clothes and the washing machine as well as unsatisfactory washing result. Put only washing cloths on EZ WASH TRAY. Heavy cloths & thing not to be kept. • Don’t put candle & Hot Things on washing machine. 02 SETTING UP YOUR WASHER HOW TO WASH AUTOMATICALLY DEPENDS ON THE LAUNDRY Before starting washing, check the following; • Connect the water supply hose to the water tap. Leave a tap open. Plug the power cord in. Make sure to lay down the drain hose. Washing for the first time Before washing clothes for the first time, you must run a complete cycle without clothes. To do this: 1. Press the Power button. 2. Open the detergent drawer and insert a little detergent. 3. Turn on the water supply to the washing machine. 4. Press the Start/Pause button. This will remove any water from the manufacturer’s test run remaining in the machine. Special notes! Automatic Sensing Function • According to the selected program, the amount of laundry is automatically sensed and then the appropriate water level, wash time, rinse cycle, and spinning time are automatically selected for the automatic wash. • After the power is on, a program is selected and Start/Pause button is pressed. Then, the washing board starts spinning without water. This action senses how much laundry is in the washing basket, not a machine problem. After this sensing process, water supplies automatically. Adding Detergent and Softener • It senses the amount of laundry and indicates the water level and amount of detergent. Then, it starts water supply right away. • During the water supply, it is possible to open the detergent box and add detergent. However, it is better to press Start/Pause button to stop water supply and add detergent. Close the lid and press Start/Pause button again. This way is much more convenient. Put the laundry into the washer and add detergent, too. • Be careful not to overload. Use right detergent for the fabrics you are washing. • • • If the lid is open while running, the washing machine is stopped automatically for safety. (Except, water supply continues while the lid is open.) When hot water is selected, both cold and hot water are supplied for the first 20 seconds in order to protect the clothes. Possible to control the washing time, rinsing cycle, and spinning time at every program during the washing. English - 9 WA85H4000H_03218F_EN.indd Sec3:9 2014-07-18 2:29:13 setting up your washer CONTROL PANEL For more details, see control panel of your washing machine. 1 2 3 4 5 7 6 8 9 1 Digital graphic display Displays the remaining wash time. Displays the error state if a problem occurs in the washing machine so that you can take action. 2 Water Level The water level is automatically adjusted. However, you can select the water level manually by pressing this button. 3 Activ Wash+ This is available only when you press the Power button and the washing machine enters Standby. The default is Water Save. Select Water Save > Drain Water Save: This option reduces water consumption. Drain: Drains the water used in the prewash. In this process, no other course is available for selection. However, the Power and the Activ Wash+ buttons are still available for selection. Use either button to stop draining the water. For built-in pump-drained models You cannot stop draining in the middle of the process. No other course is available for selection. After the draining is complete, the washing machine automatically switches to Water Save, and you can then select any courses. • General models also switch to Water Save automatically after the draining is complete, and then you can select any courses. 4 Wash Press this button to perform a wash only or to adjust the washing time. You can set the wash time from between 6 to 30 minutes. 5 Rinse Press this button to perform a rinse only or to adjust the rinse count. You can set the rinse count up to five times. 6 Power Spin Press this button to perform a spin cycle only or to adjust the spin time. You set the Spin time in this sequence: 1~9 min > 15 min > 30 min. When only a spin is selected, the spin time will be different from the total remaining time. This is because the total remaining time includes the actual spin time and the times for water draining and stopping. 7 Power Press this button once to operate. Press it again to turn the power off. English - 10 WA85H4000H_03218F_EN.indd Sec3:10 2014-07-18 2:29:13 8 Cycle Use to pause and restart the operation. To change the washing procedure during an operation, press this button to stop, and again to restart after changing the procedure. Fuzzy Selects the best washing program automatically. Quick If you want to wash those frequently used towels or less dirty laundry time. Because washing is speedy, it is good for light or less stained laundry. Soak Press this button to perform a soak wash. Soak time is set up as minutes. Can not change the soak time. Jeans For a more thorough wash. Blanket Big volume laundry like blanket and bed cover sheets Delicate Washable sweater, cardigan, delicate clothes etc. 02 SETTING UP YOUR WASHER 9 Start/Pause Hold down for 3 seconds to turn off the Eco Tub Clean. Use this program to clean the tub, it will keep the tub clean and sanitary. The TUB CHECK LED is turned on to notify the user that it is time to clean the tub. The powerful spinning force of the washing tub Eco Tub Clean (3 sec) pulsator removes the contaminations from the exterior of the washing tub to prevent odors or secondary contamination. The Eco Tub Clean indicator turns on in the following: • • If Eco Tub Clean is active. If the tub is diagnosed to be cleaned. English - 11 WA85H4000H_03218F_EN.indd Sec3:11 2014-07-18 2:29:14 setting up your washer CHILD LOCK This function is for protecting children, the elderly and the frail. 1. Press the Power button. 2. To activate the Child Lock function, press and hold both the Rinse and Power Spin buttons down simultaneously for 3 seconds. (If the Child Lock function is activated, the Child Lock icon blinks.) 3. Operations after activating the Child Lock function. • Even if the Child Lock function is activated, every button works until the door opens. • When you open the door during the Child Lock is being activated, the alarm sounds and an error message appears. In 30 seconds, draining begins automatically. However, if you close the door within 30 seconds, water will not be drained. (Displayed error message “CL”, “dE”). • To add laundry after activating the Child Lock function, you must deactivate the Child Lock function. • The Power button is disabled while the washing machine drains water in Child Lock mode. 4. To deactivate the Child Lock function, press and hold both the Rinse and Power Spin buttons simultaneously for 3 seconds again. (If the Child Lock function is deactivated, the Child Lock icon is turned off.) 5. To clear “CL” display, after draining is complete, close the door of the washing turn the main i/p power off and then on. - This function is for preventing injury and malfunction of the product because of inappropriate operations or actions by children, the elderly or the frail. CAUTION - If the door opens when the Child Lock function is activated, the water is drained by force to prevent children from drowning. - To add laundry after activating the Child Lock function, you must deactivate the Child Lock. - Even if the power is turned off and then on when the Child Lock is activated, the Child Lock remains activated. - Once Child Lock is activated, even when the power is turned off, if the door is opened, water is automatically drained in 30 seconds. - The Child Lock function cannot be deactivated when CL is displayed. (However, the Child Lock function can be deactivated when the dE error is displayed.) English - 12 WA85H4000H_03218F_EN.indd Sec3:12 2014-07-18 2:29:14 Water Jet (applicable models only) Water Jet helps do a hand-wash as part of prewash. Press the Water Jet button on the right side of the washing machine to activate Water Jet; press the button again to deactivate it. • • 02 SETTING UP YOUR WASHER Water Jet is not available in the following: If the door is closed (Water Jet will turn off if the door is closed while in operation) When the water level is set to the highest level Water Jet is available before the washing machine starts operation. If you want to do a hand-wash during the operation, first stop the operation by pressing the Start/Pause button, and then press the Water Jet button to do the hand-wash. To enable the Dedicated Sink (applicable models only) This tray is designed for the prewash, which looks like a washboard. Press the Water Jet button to apply water into the Dedicated Sink for the prewash. When the prewash is complete, you can use the water again for the next cycles, or simply drain it. To drain the water, select Drain in the Active Wash+ course. If reusing the water, the water level will be automatically set to 5, the highest level regardless of the course selected. English - 13 WA85H4000H_03218F_EN.indd Sec3:13 2014-07-18 2:29:14 manual functions Possible to select the function for each program. (Example) For a simple washing as the little dirt program : Power Select the little dirt program Wash Start/Pause WASH ONLY RINSE ONLY SPIN ONLY WASH AND RINSE RINSE AND SPIN WASH, RINSE AND SPIN Press the Power button. Press the Wash button. Press the Start/Pause button. Detects the amount of laundry, and determines wash and rinse time period automatically. (Option) Washing goes on for 1 time. When the Wash button is pressed during washing, the wash time can be changed to between 6 and 30 minutes in duration. Press the Rinse button. Press the Start/Pause button. The number of the Rinse cycles depends on the course. When the Rinse button is pressed, the rinse times can be changed to between 1 to 5 times in duration. Detects the amount of laundry, and determines wash and rinse time period automatically. (Option) Press the Power Spin button. Press the Start/Pause button. The dry time depends on the course. When the Power Spin button is pressed, the spin time can be changed to from 1~9 min > 15 min > 30 min. Press the Wash and Rinse button. Press the Start/Pause button once. Detects the amount of laundry, and determines wash and rinse time period automatically. (Option) When the Wash and Rinse button is pressed, wash time period is determined between 6 to 30 minutes, and rinse time is determined between 1 and 5 times. Press the Rinse and Power Spin button. Press the Start/Pause button once. Rinsing and spin drying follow. When the Rinse and Power Spin button is pressed, the number of rinse times is determined between 1 and 5, and spin time period for drying is determined between 1~9 min > 15 min > 30 min. Detects the amount of laundry, and determines wash and rinse time period automatically. (Option) Press the Wash, Rinse and Power Spin button. Press the Start/Pause button once. Wash, Rinse and Power Spin is performed. Detects the amount of laundry, and determines wash and rinse time period automatically. (Option) When turning on the washing machine, it remembers the last run course and automatically proceed with the course. • However, the Eco Tub Clean course is not remembered. English - 14 WA85H4000H_03218F_EN.indd 14 2014-07-18 2:29:14 installation & maintenance The User’s Manual is for common use. Make use of the User’s Manual depending upon your washing machine model. ENVIRONMENT 04 INSTALLATION & MAINTENANCE Leave some space Maintain at least 10 cm between the washer and the wall. Place the washer on a sturdy flat surface. If the washer is placed on an uneven or weak surface, noise or vibration occurs. (Allowable is 1˚) Adjust the legs for even placement. Never install the washer near water. Do not place the washer in steamy rooms or where the washer is directly exposed to rain. Moisture may destroy the electrical insulation causing an electrical shock hazard. Avoid direct sunlight or heaters. As plastic an electrical components are affected by direct heat, never place the washer near furnaces, boilers, etc. Do not place under direct sunlight. LEVELLING • If the washer is not leveled with the ground, it makes the machine tremble more or be out of order. So, make sure that the washer is leveled properly. Water SEE IF THE MACHINE IS PLACED LEVEL BY CHECKING THE POSITION OF THE WASHING TUB. • Open the lid of the machine, pour water into the tub up to the level just below the pulsator, and adjust the legs so that the pulsator is positioned at the center of the water as shown in the figure. LOOSEN LOCK • Place the machine more than 10 cm away from the wall. • Adjust the legs on feet for levelling. • Do not use stand, trolley and bricks for Washing Machine Installation English - 15 WA85H4000H_03218F_EN.indd Sec10:15 2014-07-18 2:29:15 installation & maintenance CONNECTING THE WATER SUPPLY HOSE 1. Remove the adaptor from the water supply hose. 2. First, using a “+” type screw driver, loosen the four screws on the adaptor. Next, take the adaptor and turn part (b) following the arrow for gap about 5 mm between them. 5 mm 3. Connect adaptor to the water tap by tightening the screws firmly. Then, turn part (b) following the arrow and put (a) and (b) together. a b 4. Connect the water supply hose to the adaptor. Pull down the part (c) of the water supply hose. When the part (c) is released, the hose is automatically connected to the adaptor making a ‘click’ sound. c 5. Connect the other end of the water supply hose to the inlet water valve at the back of the washer. Screw the hose clockwise all the way in. 5-1. Connect the other end of the water supply hose to the inlet water valve at the back side of the washer. Screw the hose clockwise all the way in. • If the water tap is a screw type, assemble a water supply hose that fits to the tap as shown. After completing connection, if water leaks from the hose, then repeat the same steps. After completing connection, if water leaks from the hose, then repeat the same steps. Use the most conventional type of faucet for water supply. In case the faucet is square or too big, remove the spacing ring before inserting the faucet into the adaptor. English - 16 WA85H4000H_03218F_EN.indd Sec5:16 2014-07-18 2:29:15 ASSEMBLING THE RAT PROTECTION PANEL (APPLICABLE MODELS ONLY) Tilt the washer a little, insert the shutter and finally fix the shutter with screw to the base as shown in the picture. 04 INSTALLATION & MAINTENANCE Rear Side 1. Insert the rat protection panel to the assembling hole on back side to the end. 2. If you have difficulty inserting the panel lift up the washer a little and insert it. English - 17 WA85H4000H_03218F_EN.indd Sec5:17 2014-07-18 2:29:15 installation & maintenance HOW TO CONNECT THE DRAIN HOSE (APPLICABLE MODELS ONLY) IN CASE OF PUMP-DRAINED WASHER cap-hose Take out the cap-hose and connect the outlet-hose. (option) Be sure to join tightly the drain hose into the drainoutlet on the back of the machine. 90~100 cm Drain hose Hose guide Be sure to join tightly the drain hose into the drain-outlet on the side of the machine. Install the drain hose in the position of about 90~100 cm above the ground. The end of the drain hose can not be sinked under water. IN CASE OF GENERAL WASHER (APPLICABLE MODELS ONLY) 1. After pressing the joint ring, insert to the drain hose. 2. After directing the drain hose to a drain, join to the drainoutlet of the washing machine. drain-outlet 3. Be sure to join them tightly by pressing the joint ring and pushing it into the drain-outlet. • The length of drain hose is adjustable so that you can extend the length appropriately. HOW TO CHANGE THE DRAIN HOSE DIRECTION (APPLICABLE MODELS ONLY) • The handle of joint ring is pressed to pull out the drain hose. Change the direction of the drain hose and follow the above guideline again. English - 18 WA85H4000H_03218F_EN.indd Sec6:18 2014-07-18 2:29:16 CAUTIONS WHEN INSERTING THE DRAIN HOSE Less than 3 m 04 INSTALLATION & MAINTENANCE 1. Don’t exceed more than 3 m when the drain hose is used by connecting with other hoses. 2. Be careful to drain water out at the end of the drain hose. Less than 3 m Less than 5 cm 3. The doorsill shoudn’t be more than 5cm. 4. Don’t install the drain hose underneath the wash machine. Test run Make sure that you install your washing machine correctly by running the Rinse+Power Spin cycle after the installation is complete. ADDING DETERGENT 1. Open the detergent box by pulling in the direction of the arrow as shown in the figure and then put the powder detergent in the detergent box. 2. Put in one-time amount of detergent evenly so the detergent may not brim over the box. WATER SUPPLY CONNECTOR FILTER 1. Pull out the filter and wash well. 2. Pull in the filter and connect the hose to the inlet water valve tightly. 3. Check if there is a leakage. Note to tighten up the connector. English - 19 WA85H4000H_03218F_EN.indd Sec6:19 2014-07-18 2:29:17 installation & maintenance CLEANING THE DEDICATED SINK (APPLICABLE MODELS ONLY) After the prewash, soap residues or other impurities may remain in the Dedicated Sink. In this case, wipe out the Dedicated Sink using a cloth or sponge. If pressing the Water Jet button in Standby mode, the washing machine starts supplying water so that the water can be applied to the Dedicated Sink. Use the water to rinse the Dedicated Sink. Then, dry it using a cloth. CLEANING THE FILTER Clean the filter net often to keep the washer clean. 1. Push the upper part of the Hygiene filter and pull in. 1. Open the cover as shown in the figure. 2. Then remove the lint from Magic filter. 3. Clean the Magic filter. 4. Close the cover and insert the lower part of the filter in the basket first and then push the filter with “click” sound. Note : After end of every cycle please clean the magic filter. CLEANING THE PUMP FILTER (APPLICABLE MODELS ONLY) 1. Place a rag or towel under the wash filter to avoid wetting the floor, and rotate the filter counterclockwise and pull it out. 2. Remove any dirt from the filter. 3. Return the filter to its place by rotating the filter clockwise until it locks into position. 1 2 3 CLEANING THE DETERGENT COMPARTMENT 1. Separate the detergent compartment from the washer. 2. Separate and clean the Rinse-Cap from the detergent compartment. 3. Assemble the Rinse-Cap and insert the detergent compartment into the washer. English - 20 WA85H4000H_03218F_EN.indd Sec6:20 2014-07-18 2:29:18 troubleshooting PROBLEM CHECK • • • • Is the water tap opened? Is the washer plugged in? Is the power cut off? Is there enough water? Water dose not drain • • • • Is the drain hose down? (No pump) Is the drain hose frozen? Is the drain hose clogged? If the water dose not drain in 30 minutes, a buzzer will sound, and the remaining time indicator will show “5E”. Water is not supplied • • • • • Is the water tap opened? Is the water cut off? Is the water supply hose or hose connection clogged? Is the water tap frozen? If the water supply is not finished in 1 hour or there is no change in the water level 4 min (10 minutes for some models) after the water supply has started, the buzzer rings and “4E” is displayed on the remaining time indicator. Spinning does not work • • Is the laundry spread out evenly in the washer? In the washer set on a sturdy flat surface? Water is overflowed • • Restart after spinning. If the error sign still indicates, call agency. Stains on clothes indicates that • a Child Lock error occurred • • • Water leakage error • • • 05 TROUBLESHOOTING Washing machine won’t work The error message blinks at a 0.5 sec interval and the water is drained with an alarm sound. (Displayed message: “CL” or “dE”) This function is to prevent children from drowning when falling into the wash tub. When draining is complete and you turn the power off and then on, the washing machine will operate normally. To clear “CL” display, after draining is complete, close the door of the washing machine, turn the power off and then on. Is the Start/Pause button pressed? Check if the end of the drain hose is placed on the floor. (The hose should be hung over the pump - hose guide.) Check if the drain hose is clogged by any foreign substances. If the error remains, call the customer care. English - 21 WA85H4000H_03218F_EN.indd 21 2014-07-18 2:29:18 washing machine won’t work? PROBLEM CHECK The power is cut off. Is the electric voltage normal? Is the washer plugged in? Plug in the electric cord. Water does not drain. Is the drain hose down? Put the drain hose down. Is the drain hose folded? Unfold the drain hose. Is the drain hose outlet clogged? Remove the waste cleanly. Washing machine won’t work. Is the washer lid open? Close the lid. Is the Pause button on? Press the Start/Pause button one more time and check if the washer starts. Is enough water filled to the water level? If the water pressure is low, it takes a long time to start washing. Is the faucet closed? Open the faucet to supply water. Did you open the door during the spinning cycle? Close the door, and press the Start/Pause button to resume. If the drain hose and spin basket are frozen, do as follows. • • • • Add hot water to the frozen water tap and remove the drain hose. Soak into hot water. Pour hot water into the spin basket for about 10 minutes. Put a hot water towel on the drain hose connector. If the drain hose defrosts, connect again and check for proper water draining. The water drains out immediately. • The drain is clogged with coins or pins. The drain hose is hung over the drain hose hook. Half fill the spin basket with water and try for spinning again. The water leaks at the water supply hose connector. If the faucet connecting part is loose, water may leak. Repeat the assembling steps again. (Refer to “Connecting the water supply hose”) Check if the rubber packing of water supply hose is in the right position. Screw tightly again. Is the water supply hose folded? Unfold the hose. If the water supply is too strong, water may leak. Close the faucet a little. Is water leaking from the faucet itself? Fix the faucet. Water is not supplied. Stains on clothes. Clean magic filter. English - 22 WA85H4000H_03218F_EN.indd Sec11:22 2014-07-18 2:29:18 PROBLEM CHECK The water leaks at the water supply hose connector. Did you press the Start/Pause button after selecting the water supply? If the Start/Pause button is not pressed, water is not supplied. Press the Start/Pause button. 06 WASHING MACHINE WON’T WORK? Is the faucet closed? Turn on the faucet. Is the filter net at the water supply hose connector clogged with dirty matters? Clean the filter net by brushing with a toothbrush. Is the water supply cut off? If the water supply is suspended, turn off the faucet and power off. Spinning makes loud noises and vibrations. Check if the laundry is spread evenly in the washer. Spread out the laundry evenly and start again. Check if the washing machine levels on a sturdy flat floor. Set the machine at level. Is the handle for leveling legs loose? Adjust the legs on the feet for leveling. Is around the washing machine filled with unnecessary stuffs? Remove those unnecessary things away from the wash machine. English - 23 WA85H4000H_03218F_EN.indd Sec11:23 2014-07-18 2:29:18 specification WA85H4000H MAX. MASS OF DRY CLOTH IN kg POWER CONSUMPTION DIMENSIONS (mm) WEIGHT WATER PRESSURE WASHING TYPE WA85H4000H 8.5 kg WASH 330 W SPIN 240 W W540 x D568 x H1002 (HIGH BASE) W540 x D568 x H982 (LOW BASE) 5 4 STANDARD WATER LEVEL 8.5 kg 60 ℓ 53 ℓ 3 40 ℓ 2 29 ℓ 1 22 ℓ 31 kg 0.05~0.78 Mpa (0.5~8.0 kg·f/cm2) Stirring Type WATER USAGE SPIN SPEED 160 ℓ 680 rpm English - 24 WA85H4000H_03218F_EN.indd 24 2014-07-18 2:29:19 memo WA85H4000H_03218F_EN.indd 25 2014-07-18 2:29:19 memo WA85H4000H_03218F_EN.indd 26 2014-07-18 2:29:19 memo WA85H4000H_03218F_EN.indd 27 2014-07-18 2:29:19 QUESTIONS OR COMMENTS? Country CALL OR VISIT US ONLINE AT INDONESIA 0800112888 021-56997777 www.samsung.com/id/support DC68-03218F WA85H4000H_03218F_EN.indd 28 2014-07-18 2:29:19 WA85H4000H Panduan Pengguna Mesin Cuci menghadirkan berbagai kemungkinan Terima kasih telah membeli produk Samsung. WA85H4000H_03218F_ID.indd 1 2014-07-18 2:28:33 daftar isi MEMASANG MESIN CUCI 6 FUNGSI MANUAL 6 9 10 Keterangan komponen Cara mencuci secara otomatis tergantung pada jenis cucian Panel Kontrol 14 Fungsi manual 15 15 16 17 20 Lingkungan Meratakan Menyambungkan selang pengisian air Memasang panel pelindung tikus (hanya model tertentu) Cara menyambung selang pembuangan (hanya model tertentu) Menambahkan deterjen Filter sambungan pengisian air Membersihkan Bak Cuci Khusus (hanya model tertentu) Membersihkan filter Membersihkan filter pompa (hanya model tertentu) Membersihkan kompartemen deterjen 21 Mengatasi masalah 22 Mesin cuci tidak berfungsi? 24 Spesifikasi 14 PEMASANGAN & PEMELIHARAAN 15 18 19 19 20 20 20 MENGATASI MASALAH 21 MESIN CUCI TIDAK BERFUNGSI? 22 SPESIFIKASI 24 Bahasa Indonesia - 2 WA85H4000H_03218F_ID.indd Sec9:2 2014-07-18 2:28:40 petunjuk keselamatan Perlu diketahui bahwa tindakan pencegahan untuk keselamatan berikut ditujukan untuk mencegah bahaya dan kerusakan yang tidak terduga dengan membantu penggunaan mesin cuci secara tepat dan aman. Bila menggunakan air panas untuk mencuci, pastikan suhu air tidak lebih dari 50 °C. • Komponen plastik dapat berubah bentuk atau rusak, dan dapat menyebabkan sengatan listrik atau kebakaran. 01 PETUNJUK KESELAMATAN TINDAKAN PENCEGAHAN UNTUK KESELAMATAN PENTING PERINGATAN: Untuk mengurangi risiko kebakaran, sengatan listrik, atau cedera saat menggunakan peralatan, ikuti tindakan pencegahan dasar berikut: Jangan biarkan anak-anak (atau hewan peliharaan) bermain di dalam atau di atas mesin cuci. Pintu mesin cuci tidak mudah dibuka dari dalam, sehingga anak-anak dapat mengalami cedera parah jika terjebak di dalamnya. Peralatan ini tidak untuk digunakan oleh orang (termasuk anak-anak) yang memiliki keterbatasan fisik, pancaindra, atau mental, maupun tidak memiliki pengalaman dan pengetahuan, kecuali jika mereka diawasi atau diberi petunjuk tentang cara menggunakan peralatan ini oleh orang yang bertanggung jawab atas keselamatan mereka. Anak-anak harus diawasi untuk memastikan mereka tidak bermain dengan peralatan ini. Untuk digunakan di Eropa: Peralatan ini dapat digunakan oleh anak berusia 8 tahun ke atas dan orang yang memiliki keterbatasan fisik, pancaindra, atau mental, maupun tidak memiliki pengalaman dan pengetahuan jika mereka diawasi atau diberi petunjuk tentang cara menggunakan peralatan ini secara aman dan memahami bahaya yang terkait. Anak-anak tidak boleh bermain dengan peralatan ini. Pembersihan dan pemeliharaan oleh pengguna tidak boleh dilakukan oleh anak-anak tanpa pengawasan. Jika rusak, kabel listrik harus diganti oleh produsen, teknisi servisnya, atau staf lain yang berpengalaman untuk menghindari timbulnya bahaya. Peralatan ini harus ditempatkan dengan benar agar konektor daya, Bahasa Indonesia - 3 WA85H4000H_03218F_ID.indd Sec2:3 2014-07-18 2:28:40 petunjuk keselamatan keran pengisian air, dan pipa pembuangan mudah dijangkau. Untuk peralatan dengan celah ventilasi di bagian alas, karpet tidak boleh menghalangi celah tersebut. Rangkaian selang baru yang diberikan bersama peralatan harus digunakan dan rangkaian selang lama tidak boleh digunakan kembali. PERHATIAN: Untuk menghindari bahaya karena pengaturan ulang pemutus termal yang tidak disengaja, peralatan ini tidak boleh dialiri listrik melalui perangkat pengalihan eksternal, seperti timer, atau tersambung ke sirkuit yang diaktifkan dan dinonaktifkan secara teratur sesuai penggunaan. PERINGATAN Kelalaian dalam mematuhi petunjuk ini dapat mengakibatkan cedera parah atau kecelakaan fatal. • Jangan tarik kabel untuk melepasnya atau jangan sentuh saat tangan basah. − Hal tersebut dapat mengakibatkan sengatan listrik atau kebakaran. • Jangan tekuk kabel listrik secara paksa atau jangan tekan dengan benda berat. − Hal tersebut dapat mengakibatkan sengatan listrik atau kebakaran. • Jangan pasang mesin cuci di dekat peralatan listrik atau jangan letakkan lilin maupun rokok yang menyala di atas mesin cuci. − Hal tersebut dapat mengakibatkan kebakaran. • Selama pengoperasian berlangsung, jangan letakkan tangan atau benda logam di bawah mesin cuci. − Papan yang berputar di bawah mesin cuci dapat melukai Anda. • Jauhi mesin cuci bila bagian bawahnya terendam air. − Sengatan listrik dapat terjadi. Tunggu hingga air benar-benar kering. • Jangan masukkan cucian yang terkena bensin, benzena, atau alkohol ke mesin cuci, dan jauhkan bahan tersebut dari mesin cuci. − Ledakan atau kebakaran dapat terjadi. • Selama pemerasan berlangsung, jangan masukkan tangan Anda ke tabung peras. − Tangan Anda dapat terluka. Jika tabung peras tidak berhenti berputar dalam waktu 15 detik setelah Anda membuka penutupnya, segera hubungi teknisi servis. • Peralatan ini harus tersambung ke konektor yang sesuai untuk pemakaian daya yang wajar. • Posisi peralatan ini harus diatur agar konektor mudah dijangkau setelah pemasangan. • Tidak ada komponen di bagian dalam yang dapat diperbaiki pengguna. Serahkan perbaikan kepada teknisi servis yang berpengalaman. − Jika tidak, kesalahan mekanis, sengatan listrik, kebakaran, atau kerusakan fisik dapat terjadi. − Jaminan produk tidak mencakup masalah yang ditimbulkan oleh pembongkaran produk. • Jangan gunakan produk ini untuk tujuan bisnis. Bahasa Indonesia - 4 WA85H4000H_03218F_ID.indd Sec2:4 2014-07-18 2:28:40 PERHATIAN • Produk yang telah Anda beli ini dirancang hanya untuk penggunaan rumah tangga. Penggunaan untuk tujuan bisnis merupakan penyalahgunaan produk. Dalam kasus ini, produk tidak akan tercakup dalam jaminan standar yang diberikan oleh Samsung, dan Samsung tidak bertanggung jawab atas kegagalan fungsi atau kerusakan apa pun yang diakibatkan oleh penyalahgunaan tersebut. Bahasa Indonesia - 5 WA85H4000H_03218F_ID.indd Sec2:5 2014-07-18 2:28:40 01 PETUNJUK KESELAMATAN Kelalaian dalam mematuhi petunjuk ini dapat mengakibatkan cedera atau kerusakan ringan. • Jangan pasang mesin cuci di tempat yang lembab maupun di luar ruangan dalam kondisi hujan atau bersalju. − Hal tersebut dapat mengakibatkan sengatan listrik atau kebakaran. • Lepas kabel listrik bila mesin cuci tidak digunakan. − Hal tersebut dapat mengakibatkan sengatan listrik atau kebakaran. • Jika terdapat debu atau air pada konektor listrik dan komponennya yang tersambung, bersihkan seluruhnya. − Hal tersebut dapat mengakibatkan sengatan listrik atau kebakaran. • Jangan biarkan anak Anda melihat bagian dalam mesin cuci. − Jika terjatuh ke dalam mesin cuci, keselamatan anak Anda dapat terancam. • Segera alirkan udara tanpa menyentuh konektor listrik jika terjadi kebocoran gas. − Sengatan listrik atau kebakaran dapat terjadi jika gas terkena api. • Jika mesin cuci mengeluarkan bunyi aneh, bau, atau asap, segera lepas konektor listrik dan hubungi teknisi servis. − Hal tersebut dapat mengakibatkan sengatan listrik atau kebakaran. • Saat membersihkan, jangan semprotkan air langsung ke komponen mesin cuci. − Tindakan tersebut dapat memperpendek masa pakainya. Selain itu, sengatan listrik atau kebakaran juga dapat terjadi. • Jangan gunakan bahan pembersih asam yang kuat. • Jangan gunakan beberapa peralatan pada stopkontak yang sama. − Panas yang ditimbulkan dapat menyebabkan kebakaran. • Jangan tekan tombol dengan penusuk atau peniti. − Hal tersebut dapat mengakibatkan sengatan listrik atau kebakaran. • Jika kabel listrik yang digunakan rusak, kabel tersebut harus diganti oleh produsen, pusat servis, atau teknisi resmi untuk menghindari risiko. • Sambungkan kabel arde ke pelat rangka, lalu benamkan minimal 25 cm di bawah tanah. Cara lain, sambungkan kawat arde ke pin yang sesuai pada stopkontak yang diarde dengan benar. Jangan sambungkan kabel tersebut ke saluran telepon, penangkal petir, atau pipa gas. memasang mesin cuci KETERANGAN KOMPONEN Panduan Pengguna ditujukan untuk penggunaan secara umum. Gunakan Panduan Pengguna sesuai model mesin cuci Anda. Tutup Pastikan untuk memasang kembali tutup ini saat mencuci dan memeras. Selang pengisian air (Dingin) Selang pengisian air (Panas) Bak Cuci Khusus Panel kontrol Filter Selama mencuci, kotoran akan terkumpul dalam filter. Kotak deterjen Keranjang peras Tombol Water Jet (Semprotan Air) Kabel daya Pegangan (Diatur untuk Perpindahan) Kabel arde Bila pipa air terbuat dari logam, pastikan untuk menutup ujung kabel arde. Selang pembuangan air Kaki yang dapat diatur Atur ketinggian kaki saat memasang mesin cuci. Bahasa Indonesia - 6 WA85H4000H_03218F_ID.indd Sec3:6 2014-07-18 2:28:40 MEMERIKSA SEBELUM MENCUCI DAN MERAWAT PAKAIAN Bahasa Indonesia - 7 WA85H4000H_03218F_ID.indd Sec3:7 2014-07-18 2:28:40 02 MEMASANG MESIN CUCI Poin pemeriksaan harus diikuti untuk menghindari masalah pada mesin cuci atau kerusakan pada pakaian. • Jika masalah di bawah ini disebabkan oleh kesalahan pelanggan, biaya servis terpisah akan dikenakan. Poin Pemeriksaan Sebelum Mulai Mencuci Periksa apakah pakaian luntur atau tidak. • Tambahkan deterjen cair pada handuk putih dan pakaian yang tidak Anda ketahui. Kemudian, kucek keduanya dengan kuat. Periksa apakah warnanya berpindah ke handuk. • Berhati-hatilah dengan scarf dan pakaian import karena cenderung mudah berubah warna. • Periksa apakah ada noda atau kotoran. • Jika terdapat noda, gunakan handuk basah dengan deterjen untuk menggosok pada satu arah. • Sebelum mencuci, persiapkan dahulu lengan, kerah dan saku dengan disikat menggunakan deterjen. Pakaian berbahan wol yang memiliki kerutan harus ditangani secara khusus dengan mengikatkan benang sebelum dicuci. Benang tersebut harus dilepas setelah pakaian kering. Pakaian yang tidak dapat dicuci Pakaian yang mudah berubah, meskipun hanya direndam air. • Meskipun hanya direndam air, dasi, BH, jaket, jas dan mantel dapat mudah berubah seperti mengerut dan perubahan warna pada permukaan pakaian karena hampir semuanya terbuat dari rayon, polynosic, cuff dan serat campurannya. • Produk yang diproses-kerut, diembos, atau diproses dengan resin akan mudah berubah meskipun hanya direndam air. • Produk yang mudah berubah warna dari bahan katun dan wool, sutra kerut, produk kulit, aksesori kulit, pakaian dengan hiasan kulit dan aksesorinya. • Jangan mencuci pakaian tersebut tanpa mengikuti petunjuk penanganan atau label keterangan bahan. Tentang Deterjen • Apabila deterjen tidak larut dengan baik, gunakan air hangat (kurang lebih 40 °C) untuk melarutkan deterjen. • Gunakan deterjen secukupnya. • Meskipun jumlah deterjen ditambah, hasil cucian tidak akan jauh berbeda. Deterjen PERHATIAN dapat merusak pakaian karena tidak cukup dibilas. • Bahan pemutih dapat merusak pakaian karena bersifat alkali kuat. • Bilas dengan baik karena deterjen bubuk mudah tertinggal pada pakaian dan menyebabkan bau tidak sedap. • Jika menggunakan terlalu banyak deterjen atau air dingin, deterjen tidak akan larut dengan sempurna dan menempel pada cucian, selang, atau keranjang peras, sehingga pakaian terkontaminasi. • Untuk pencucian yang ditunda, deterjen harus dimasukkan ke dalam kotak deterjen. Jika langsung ditaburkan pada cucian, deterjen bubuk dapat menyebabkan perubahan warna. memasang mesin cuci PERAWATAN PAKAIAN SEBELUM DICUCI Keluarkan barang dari saku. • Perhatian, Periksa semua saku! Jepit rambut dan uang logam dapat merusak pakaian dan mesin cuci. Benda-benda tersebut menimbulkan bunyi dan masalah pada mesin cuci. Saku harus diperiksa. Jika resleting celana terbuka sewaktu dicuci, keranjang peras dapat rusak. Resleting harus ditutup dan diikat dengan benang sebelum dicuci. • Benda logam pada pakaian dapat menyebabkan kerusakan pada pakaian dan tabung. • Balik pakaian dengan kancing dan sulaman dengan bagian dalam di luar sebelum dicuci. • Pakaian bertali panjang dapat saling membelit dengan pakaian lain, dan dapat menyebabkan kerusakan pada pakaian. Pastikan untuk mengikat tali tersebut sebelum mencuci. Pakaian kedap air (Pakaian Ski, Penutup Popok, Alas Kaki) tidak boleh dicuci dengan mesin. • Hal ini dapat menyebabkan pakaian dikeluarkan atau menyebabkan mesin cuci bergetar secara tidak normal, yang dapat mengakibatkan cedera tubuh atau kerusakan pada mesin, lantai atau pakaian. (Popok, pakaian kedap air, jas hujan, sarung payung, pakaian ski, penutup mobil, kantong tidur, dsb.). • Ketika tabung berputar, air mungkin terjebak di dalam pakaian atau serat tahan air dan dapat terkumpul di salah satu sudut, yang menyebabkan getaran tidak normal. Selain itu, cucian akan naik dan mungkin dikeluarkan serta menyebabkan cedera. Guncang kotoran atau tanah dari pakaian. • Tanah dan pasir dapat menggosok pakaian yang lembut dan menimbulkan kerusakan dan hasil cucian yang tidak memuaskan. Lakukan pencucian awal untuk kaus kaki berwarna putih, lengan, dan kerah sebelum pencucian sebenarnya. • Tabur atau tuangkan deterjen pada noda dan kotoran di kerah, lengan, lipatan, dan saku, lalu sikat dengan lembut sebelum mencuci. • Gunakan deterjen bubuk atau cair. Jangan gunakan sabun batangan karena kotoran dapat menempel pada tabung. Balik pakaian berbulu sebelum mencuci. • Jika terdapat banyak benda asing pada pakaian, pisahkan untuk dicuci terpisah. Pakaian lain dapat terkena kotoran tersebut (noda, benang). • Cuci pakaian berwarna hitam dan handuk katun secara terpisah. Jika dicuci bersama, kotoran dapat menempel pada handuk. Periksa sebelum mencuci. Cashmilon dan pakaian lain yang berukuran besar dan ringan (misalnya, pakaian berenda, pakaian dalam, stoking nilon, serat sintetis, dsb.) dapat mengambang dan menimbulkan kerusakan pada pakaian dan masalah pada mesin cuci. Gunakan jaring cucian atau cuci secara terpisah. • Pakaian bertali panjang, pakaian berenda, selimut tebal, pakaian wool harus dimasukkan ke jaring cucian sebelum dicuci. • Masukkan pakaian yang lembut ke dalam jaring cucian. • Gunakan hanya jaring cucian komersial untuk mencuci. Bahasa Indonesia - 8 WA85H4000H_03218F_ID.indd Sec3:8 2014-07-18 2:28:40 02 MEMASANG MESIN CUCI Tirai, pakaian yang mengambang, atau blue jeans harus ditekan agar tidak mengambang di air. • Jika pakaian mengambang di air, tekan tombol Mulai/Jeda untuk menghentikan mesin cuci, lalu tekan pakaian ke dalam air. Jika pakaian yang mengambang di air terus dicuci, kerusakan pada pakaian dan mesin cuci dapat terjadi serta hasil cucian tidak memuaskan. Letakkan hanya kain cucian di EZ WASH TRAY. Jangan letakkan kain berat & benda lainnya. • Jangan letakkan lilin & Benda Panas di atas mesin cuci. CARA MENCUCI SECARA OTOMATIS TERGANTUNG PADA JENIS CUCIAN Sebelum mulai mencuci, periksa hal berikut: • Sambungkan selang pengisian air ke keran air. Biarkan keran terbuka. Sambungkan kabel daya ke stopkontak. Pastikan selang pembuangan sudah terpasang. Mencuci untuk pertama kalinya Sebelum mencuci pakaian untuk pertama kali, Anda harus menjalankan mesin satu siklus penuh tanpa pakaian. Untuk melakukannya: 1. Tekan tombol Daya. 2. Buka laci deterjen, lalu masukkan sedikit deterjen. 3. Aktifkan pengisian air ke mesin cuci. 4. Tekan tombol Mulai/Jeda. Tindakan ini akan membuang semua air dari uji coba produsen yang masih tersisa di dalam mesin. Catatan khusus! Fungsi Sensor Otomatis • Berdasarkan program yang dipilih, jumlah cucian akan dideteksi secara otomatis, lalu level air, waktu cuci, siklus bilas, dan waktu pemerasan yang sesuai akan dipilih secara otomatis untuk pencucian otomatis. • Setelah daya diaktifkan, program akan dipilih dan tombol Mulai/Jeda akan ditekan. Setelah itu, tabung cuci akan mulai berputar tanpa air. Tindakan ini untuk mendeteksi jumlah cucian di dalam keranjang cuci, bukan kerusakan pada mesin. Setelah proses deteksi ini, air akan diisi secara otomatis. Menambahkan Deterjen dan Pelembut • Sensor akan mendeteksi jumlah cucian dan menunjukkan level air serta jumlah deterjen yang diperlukan. Setelah itu, air akan segera diisi ke mesin cuci. • Selama pengisian air, Anda dapat membuka kotak deterjen dan menambahkan deterjen. Namun, sebaiknya tekan tombol Mulai/Jeda untuk menghentikan pengisian air dan menambahkan deterjen. Tutup mesin cuci, lalu tekan kembali tombol Mulai/Jeda. Cara ini jauh lebih mudah. Masukkan cucian ke mesin cuci, lalu tambahkan juga deterjen. • Hati-hati agar beban tidak berlebihan. Gunakan deterjen yang tepat untuk kain yang dicuci. • • • Jika tutup mesin terbuka selama mencuci, mesin cuci akan dihentikan secara otomatis untuk keselamatan. (Kecuali air, yang terus diisi apabila tutup terbuka.) Bila air panas dipilih, air dingin dan air panas akan dialirkan bersamaan selama 20 detik pertama untuk melindungi pakaian. Anda dapat mengontrol waktu cuci, siklus bilas, dan waktu pemerasan pada setiap program selama pencucian berlangsung. Bahasa Indonesia - 9 WA85H4000H_03218F_ID.indd Sec3:9 2014-07-18 2:28:40 memasang mesin cuci PANEL KONTROL Untuk informasi lebih rinci, lihat panel kontrol mesin cuci Anda. 1 2 3 4 5 7 6 8 9 1 Tampilan grafis digital Menampilkan waktu cuci yang tersisa. Menampilkan status kesalahan jika terjadi masalah pada mesin cuci sehingga Anda dapat melakukan tindakan. 2 Level Air Level air akan diatur secara otomatis. Namun, Anda dapat mengatur level air secara manual dengan menekan tombol ini. Fungsi ini hanya tersedia bila tombol Daya ditekan dan mesin cuci beralih ke status Standby (Siaga). Nilai default adalah Hemat Air. Pilih Hemat Air > Pembuangan Hemat Air: Pilihan ini mengurangi pemakaian air. Pembuangan: Menguras air yang digunakan pada saat pencucian pertama. Selama proses ini berlangsung, tidak ada proses lain yang tersedia. Namun, tombol Daya dan Activ Wash+ tetap dapat dipilih. Gunakan salah satu tombol tersebut untuk menghentikan pengurasan air. 3 Activ Wash+ Untuk model dengan pompa kuras internal Anda tidak dapat menghentikan pengurasan saat proses sedang berlangsung. Tidak ada proses lain yang tersedia. Setelah pengurasan selesai, mesin cuci akan secara otomatis beralih ke Hemat Air dan Anda dapat memilih proses apapun. • Mesin cuci model biasa juga akan beralih ke Hemat Air secara otomatis setelah pengurasan selesai dan Anda dapat memilih proses apapun. 4 Cuci Tekan tombol ini untuk hanya mencuci atau mengatur waktu pencucian. Anda dapat mengatur waktu pencucian antara 6 hingga 30 menit. 5 Bilas Tekan tombol ini hanya untuk membilas atau mengatur waktu pembilasan. Anda dapat mengatur hingga lima kali pembilasan. Bahasa Indonesia - 10 WA85H4000H_03218F_ID.indd Sec3:10 2014-07-18 2:28:41 Putar Cepat 7 Daya Tekan tombol ini satu kali untuk mengoperasikan. Tekan kembali untuk menonaktifkan daya. Mulai/Jeda Gunakan untuk menjeda dan memulai kembali pengoperasian. Untuk mengubah prosedur pencucian selama mesin bekerja, tekan tombol ini untuk menghentikan, lalu tekan kembali untuk memulai ulang dari prosedur yang telah diubah. 8 9 Fuzzy Memilih program pencucian terbaik secara otomatis. Cepat Jika Anda ingin mencuci handuk yang sering digunakan atau mencuci secara cepat. Pencucian cepat cocok untuk cucian yang ringan atau hanya sedikit kotor. Rendam Tekan tombol ini untuk menjalankan perendaman cucian. Waktu rendam diatur dalam menit. Anda tidak dapat mengubah waktu rendam. Jeans Untuk pencucian yang lebih menyeluruh. Selimut Cucian besar seperti selimut dan bed cover Bahan Halus Sweater yang dapat dicuci, kardigan, pakaian lembut, dsb. Siklus Cuci Tabung (3 detik) 02 MEMASANG MESIN CUCI 6 Tekan tombol ini untuk hanya memeras atau mengatur waktu pemerasan. Anda dapat mengatur waktu Spin (Peras) dalam urutan berikut: 1~9 menit > 15 menit > 30 menit. Bila hanya pemerasan yang dipilih, waktu pemerasan akan berbeda dari waktu total yang tersisa. Hal ini karena waktu total yang tersisa mencakup waktu pemerasan yang sebenarnya serta waktu pengurasan dan penghentian. Tekan terus selama 3 detik untuk menonaktifkan Cuci Tabung. Gunakan program ini untuk membersihkan tabung, sehingga tabung tetap bersih. LED PERIKSA TABUNG akan menyala untuk memberi tahu pengguna sudah saatnya tabung dibersihkan. Gaya putar pulsator tabung cuci yang kuat akan menghilangkan kontaminasi dari bagian luar tabung cuci untuk mencegah bau atau kontaminasi sekunder. Indikator Cuci Tabung akan menyala dalam kondisi berikut: • • Jika Cuci Tabung aktif. Jika tabung didiagnosis untuk dibersihkan. Bahasa Indonesia - 11 WA85H4000H_03218F_ID.indd Sec3:11 2014-07-18 2:28:41 memasang mesin cuci KUNCI ANAK Fungsi ini untuk melindungi anak-anak, lansia, dan orang yang lemah. 1. Tekan tombol Daya. 2. Untuk mengaktifkan fungsi Kunci Anak, tekan tombol Bilas dan Putar Cepat bersamaan selama 3 detik. (Jika fungsi Kunci Anak diaktifkan, ikon Kunci Anak akan berkedip.) 3. Pengoperasian setelah mengaktifkan fungsi Kunci Anak. • Meskipun fungsi Kunci Anak diaktifkan, setiap tombol akan berfungsi hingga pintu terbuka. • Bila Anda membuka pintu selama Kunci Anak diaktifkan, alarm akan berbunyi dan pesan kesalahan akan ditampilkan. Dalam waktu 30 detik, pengurasan akan dimulai secara otomatis. Namun, jika Anda menutup pintu dalam waktu 30 detik, air tidak akan dikuras. (Pesan kesalahan yang ditampilkan "CL", "dE"). • Untuk menambahkan cucian setelah mengaktifkan fungsi Kunci Anak, Anda harus menonaktifkan fungsi Kunci Anak. • Tombol Daya dinonaktifkan saat mesin cuci menguras air dalam mode Kunci Anak. 4. Untuk menonaktifkan fungsi Kunci Anak, tekan terus tombol Bilas dan Putar Cepat secara bersamaan selama 3 detik. (Jika fungsi Kunci Anak dinonaktifkan, ikon Kunci Anak akan dinonaktifkan.) 5. Untuk menghapus tampilan "CL", setelah pembuangan selesai, tutup pintu mesin cuci, nonaktifkan daya i/p utama, lalu aktifkan. - Fungsi ini untuk mencegah cedera dan kegagalan fungsi pada produk karena pengoperasian yang tidak benar oleh anak-anak, lansia, atau orang yang lemah. PERHATIAN - Jika pintu terbuka saat fungsi Kunci Anak diaktifkan, air akan dikuras secara paksa agar anak-anak tidak tenggelam. - Untuk menambahkan cucian setelah mengaktifkan fungsi Kunci Anak, Anda harus menonaktifkan Kunci Anak. - Meskipun daya dinonaktifkan, lalu diaktifkan kembali saat Kunci Anak diaktifkan, Kunci Anak akan tetap aktif. - Setelah Kunci Anak diaktifkan, meskipun daya dinonaktifkan, jika pintu dibuka, air akan dikuras secara otomatis dalam waktu 30 detik. - Fungsi Kunci Anak tidak dapat dinonaktifkan bila CL ditampilkan. (Namun, fungsi Kunci Anak dapat dinonaktifkan bila kesalahan dE ditampilkan.) Bahasa Indonesia - 12 WA85H4000H_03218F_ID.indd Sec3:12 2014-07-18 2:28:41 Water Jet (Semprotan Air) (hanya untuk model tertentu) 02 MEMASANG MESIN CUCI Water Jet (Semprotan Air) akan membantu melakukan fungsi pencucian dengan tangan sebagai bagian dari fungsi pencucian awal. Tekan tombol Water Jet (Semprotan Air) di bagian kanan mesin cuci untuk mengaktifkan Water Jet (Semprotan Air); tekan tombol kembali untuk menonaktifkannya. Water Jet (Semprotan Air) tidak tersedia dalam kondisi berikut: • • Jika pintu ditutup (Water Jet (Semprotan Air) akan nonaktif jika pintu ditutup sewaktu pengoperasian) Bila tingkat air diatur ke tingkat tertinggi Water Jet (Semprotan Air) tersedia sebelum mesin cuci memulai pengoperasian. Jika Anda ingin melakukan fungsi pencucian dengan tangan selama pengoperasian, hentikan dulu pengoperasian dengan menekan tombol Mulai/Jeda, lalu tekan tombol Water Jet (Semprotan Air) untuk melakukan proses pencucian dengan tangan. Untuk mengaktifkan Bak Cuci Khusus (hanya model tertentu) Wadah yang tampak seperti papan cuci ini dirancang untuk pencucian pertama. Tekan tombol Water Jet (Semprotan Air) untuk mengalirkan air ke dalam Bak Cuci Khusus pada saat pencucian pertama. Setelah pencucian pertama selesai, Anda dapat menggunakan kembali air tersebut untuk siklus berikutnya atau cukup dengan mengurasnya. Untuk menguras air, pilih Kuras dalam proses Active Wash+. Jika Anda memilih menggunakan kembali air yang ada, level air akan secara otomatis diatur ke 5 yang merupakan tingkat tertinggi apapun proses yang dipilih. Bahasa Indonesia - 13 WA85H4000H_03218F_ID.indd Sec3:13 2014-07-18 2:28:41 fungsi manual Anda dapat memilih fungsi untuk setiap program. (Contoh) Untuk pencucian mudah seperti program sedikit kotoran: Daya Pilih program sedikit kotoran Cuci Mulai/Jeda HANYA CUCI HANYA BILAS HANYA PERAS CUCI DAN BILAS BILAS DAN PERAS CUCI, BILAS, DAN PERAS Tekan tombol Daya. Tekan tombol Cuci. Tekan tombol Mulai/Jeda. Mendeteksi jumlah cucian serta menentukan waktu pencucian dan pembilasan secara otomatis. (Opsional) Pencucian berlangsung 1 kali. Bila tombol Cuci ditekan selama mencuci, waktu pencucian dapat diubah menjadi antara 6 hingga 30 menit. Tekan tombol Bilas. Tekan tombol Mulai/Jeda. Frekuensi siklus Bilas tergantung pada prosesnya. Bila tombol Bilas ditekan, pembilasan dapat diubah menjadi antara 1 hingga 5 kali. Mendeteksi jumlah cucian serta menentukan waktu pencucian dan pembilasan secara otomatis. (Opsional) Tekan tombol Putar Cepat. Tekan tombol Mulai/Jeda. Waktu pengeringan tergantung pada prosesnya. Bila tombol Putar Cepat ditekan, waktu pemerasan dapat diubah mulai dari 1~9 menit > 15 menit > 30 menit. Tekan tombol Cuci dan Bilas. Tekan tombol Mulai/Jeda satu kali. Mendeteksi jumlah cucian serta menentukan waktu pencucian dan pembilasan secara otomatis. (Pilihan) Bila tombol Cuci dan Bilas ditekan, waktu pencucian akan ditentukan antara 6 hingga 30 menit, dan pembilasan antara 1 hingga 5 kali. Tekan tombol Bilas dan Putar Cepat. Tekan tombol Mulai/Jeda satu kali. Pembilasan dan pengeringan putar mulai dilakukan. Bila tombol Bilas dan Putar Cepat ditekan, frekuensi pembilasan akan ditentukan antara 1 hingga 5 kali dan durasi pemerasan untuk pengeringan ditentukan antara 1~9 menit > 15 menit > 30 menit. Mendeteksi jumlah cucian serta menentukan waktu pencucian dan pembilasan secara otomatis. (Opsional) Tekan tombol Cuci, Bilas, dan Putar Cepat. Tekan tombol Mulai/Jeda satu kali. Cuci, Bilas, dan Putar Cepat akan dijalankan. Mendeteksi jumlah cucian serta menentukan waktu pencucian dan pembilasan secara otomatis. (Opsional) Bila dihidupkan, mesin cuci akan mengingat proses yang terakhir dijalankan, lalu melanjutkannya secara otomatis. • Namun, proses Cuci Tabung tidak akan diingat. Bahasa Indonesia - 14 WA85H4000H_03218F_ID.indd 14 2014-07-18 2:28:41 pemasangan & pemeliharaan Panduan Pengguna ditujukan untuk penggunaan secara umum. Gunakan Panduan Pengguna sesuai model mesin cuci Anda. LINGKUNGAN MERATAKAN • Jika mesin cuci tidak rata dengan lantai, mesin cuci akan bergetar atau rusak. Oleh karena itu, pastikan mesin cuci dipasang dengan rata. PASTIKAN APAKAH MESIN CUCI SUDAH RATA DENGAN MEMERIKSA POSISI TABUNG CUCI. • Buka tutup mesin cuci, tuang air ke dalam tabung hingga levelnya tepat di bawah pulsator, lalu atur kaki mesin cuci sehingga pulsator terletak di bagian tengah air seperti ditunjukkan pada gambar. • Letakkan mesin cuci lebih dari 10 cm dari dinding. • Atur kaki mesin cuci untuk meratakan. • Jangan gunakan dudukan, troli, dan batu bata untuk Pemasangan Mesin Cuci Air LONGGARKAN KUNCI Bahasa Indonesia - 15 WA85H4000H_03218F_ID.indd Sec10:15 2014-07-18 2:28:42 04 PEMASANGAN & PEMELIHARAAN Sisakan ruang secukupnya Beri jarak minimal 10 cm antara mesin cuci dan dinding. Letakkan mesin cuci di permukaan yang kokoh dan rata. Jika mesin cuci diletakkan di permukaan yang tidak rata atau tidak kokoh, suara atau getaran dapat ditimbulkan. (1˚diperbolehkan) Atur ketinggian kaki untuk meratakan. Jangan pasang mesin cuci di dekat air. Jangan letakkan mesin cuci di ruangan beruap atau terkena hujan. Kelembaban dapat merusak isolasi listrik dan menyebabkan bahaya sengatan listrik. Hindari sinar matahari langsung atau pemanas. Karena komponen plastik dan listrik terpengaruh oleh panas langsung, jangan letakkan mesin cuci di dekat tungku, ketel, dsb. Jangan letakkan di bawah sinar matahari langsung. pemasangan & pemeliharaan MENYAMBUNGKAN SELANG PENGISIAN AIR 1. Lepas adaptor dari selang pengisian air. 2. Pertama, longgarkan keempat sekrup pada adaptor menggunakan obeng "+". Kemudian, pegang adaptor, lalu putar bagian (b) searah tanda panah untuk membuat celah sekitar 5 mm di antaranya. 3. Sambungkan adaptor ke keran air dengan mengencangkan sekrup. Setelah itu, putar bagian (b) searah tanda panah, lalu satukan bagian (a) dan (b). 5 mm a b 4. Sambungkan selang pengisian air ke adaptor. Tarik bagian (c) ke bawah pada selang pengisian air. Bila bagian (c) dilepas, selang akan secara otomatis tersambung ke adaptor dan berbunyi 'klik'. c 5. Sambungkan ujung selang pengisian air yang lain ke klep air masuk di bagian belakang mesin cuci. Kencangkan sekrup searah jarum jam hingga terkunci. 5-1. Sambungkan ujung selang pengisian air yang lain ke klep air masuk di bagian belakang mesin cuci. Kencangkan sekrup searah jarum jam hingga terkunci. • Jika keran air berjenis ulir, sambungkan selang pengisian air yang sesuai seperti ditunjukkan pada gambar. Setelah penyambungan selesai, jika air bocor dari selang, ulangi langkah-langkah yang sama. Setelah penyambungan selesai, jika air bocor dari selang, ulangi langkah-langkah yang sama. Gunakan jenis keran yang paling umum untuk pengisian air. Jika mulut keran berbentuk kotak atau terlalu besar, lepas cincin pengatur jarak sebelum memasukkan keran ke adaptor. Bahasa Indonesia - 16 WA85H4000H_03218F_ID.indd Sec5:16 2014-07-18 2:28:42 MEMASANG PANEL PELINDUNG TIKUS (HANYA MODEL TERTENTU) Miringkan sedikit mesin cuci, pasang penutup, lalu kencangkan penutup dengan sekrup di bagian alas seperti ditunjukkan pada gambar. 1. Masukkan seluruh panel pelindung tikus ke lubang pemasangan di sisi belakang. 04 INSTALLATION & MAINTENANCE Sisi Belakang 2. Jika panel sulit dimasukkan, angkat sedikit mesin cuci, lalu masukkan panel. Bahasa Indonesia - 17 WA85H4000H_03218F_ID.indd Sec5:17 2014-07-18 2:28:43 pemasangan & pemeliharaan CARA MENYAMBUNG SELANG PEMBUANGAN (HANYA MODEL TERTENTU) UNTUK MESIN CUCI POMPA KURAS tutup selang Lepas tutup selang, lalu sambungkan selang Pastikan untuk mengencangkan selang pembuangan. (opsional) pembuangan ke lubang pembuangan di bagian belakang mesin cuci. 90~100 cm Selang pembuangan Klem selang Pastikan untuk mengencangkan selang pembuangan ke lubang pembuangan di bagian samping mesin cuci. Pasang selang pembuangan di tempatnya, sekitar 90~100 cm di atas lantai. Ujung selang pembuangan tidak boleh terendam air. UNTUK MESIN CUCI BIASA (HANYA MODEL TERTENTU) 1. Setelah menekan cincin sambungan, masukkan ke selang pembuangan. 2. Setelah mengarahkan selang pembuangan ke saluran buang, sambungkan ke lubang kuras pada mesin cuci. lubang kuras 3. Pastikan untuk mengencangkannya dengan menekan cincin sambungan, lalu mendorongnya masuk ke lubang kuras. • Panjang selang pembuangan dapat diatur sehingga Anda dapat memanjangkannya sesuai kebutuhan. CARA MENGUBAH ARAH SELANG PEMBUANGAN (HANYA MODEL TERTENTU) • Tangkai cincin sambungan ditekan untuk menarik selang pembuangan keluar. Ubah arah selang pembuangan, lalu ikuti kembali panduan di atas. Bahasa Indonesia - 18 WA85H4000H_03218F_ID.indd Sec5:18 2014-07-18 2:28:43 PERHATIAN SEWAKTU MEMASUKKAN SELANG PEMBUANGAN Kurang dari 3 m 04 INSTALLATION & MAINTENANCE 1. Tidak boleh lebih dari 3 m bila selang pembuangan digunakan dengan menyambungkan ke selang lain. 2. Hati-hati saat menguras air di ujung selang pembuangan. Kurang dari 3 m Kurang dari 5 cm 3. Tinggi ambang pintu tidak boleh lebih dari 5 cm. 4. Jangan pasang selang pembuangan di bawah mesin cuci. Uji coba Pastikan pemasangan mesin cuci sudah benar dengan menjalankan siklus Bilas+Putar Cepat setelah pemasangan selesai. MENAMBAHKAN DETERJEN 1. Buka kotak deterjen dengan menariknya searah tanda panah seperti ditunjukkan pada gambar, lalu masukkan deterjen bubuk ke dalam kotak deterjen. 2. Masukkan jumlah deterjen sekali pakai secara merata sehingga deterjen tidak meluap dari kotak. FILTER SAMBUNGAN PENGISIAN AIR 1. Tarik keluar filter, lalu cuci hingga bersih. 2. Masukkan filter, lalu sambungkan selang ke klep air masuk dengan kuat. 3. Periksa apakah ada kebocoran. Ingat untuk mengencangkan sambungan. Bahasa Indonesia - 19 WA85H4000H_03218F_ID.indd Sec5:19 2014-07-18 2:28:44 pemasangan & pemeliharaan MEMBERSIHKAN BAK CUCI KHUSUS (HANYA MODEL TERTENTU) Setelah pencucian pertama selesai, sisa sabun atau kotoran lainnya dapat tertinggal dalam Bak Cuci Khusus. Dalam kondisi ini, seka Bak Cuci Khusus menggunakan kain atau spons. Menekan tombol Water Jet (Semprotan Air) dalam mode Standby (Siaga) akan membuat mesin cuci mulai mengalirkan air sehingga air dapat diisi ke Bak Cuci Khusus. Gunakan air untuk membilas Bak Cuci Khusus, lalu keringkan dengan kain. MEMBERSIHKAN FILTER Bersihkan jaring filter secara rutin agar mesin cuci selalu bersih. 1. Dorong bagian atas filter Higienis, lalu masukkan. 1. Buka tutup seperti ditunjukkan pada gambar. 2. Lepas kasa dari Magic filter (filter Magic). 3. Bersihkan Saringan ajaib. 4. Pasang tutup, lalu masukkan bagian bawah filter ke dalam keranjang terlebih dulu, lalu dorong filter hingga terdengar bunyi "klik". Catatan: Setelah setiap siklus selesai, bersihkan filter ajaib. MEMBERSIHKAN FILTER POMPA (HANYA MODEL TERTENTU) 1. Letakkan keset atau handuk di bawah filter cuci agar tidak membasahi lantai, dan putar filter berlawanan arah jarum jam, lalu tarik keluar. 2. Bersihkan semua kotoran dari filter. 3. Pasang kembali filter dengan memutarnya searah jarum jam hingga terkunci di tempatnya. 1 2 3 MEMBERSIHKAN KOMPARTEMEN DETERJEN 1. Pisahkan kompartemen deterjen dari mesin cuci. 2. Pisahkan dan bersihkan Tutup Bilas dari kompartemen deterjen. 3. Pasang Tutup Bilas, lalu masukkan kompartemen deterjen ke mesin cuci. Bahasa Indonesia - 20 WA85H4000H_03218F_ID.indd Sec5:20 2014-07-18 2:28:45 mengatasi masalah MASALAH PERIKSA • • • • Apakah keran air sudah dibuka? Apakah konektor telah tersambung ke stopkontak? Apakah listrik padam? Apakah air mencukupi? Air tidak habis terkuras • • • • Apakah selang pembuangan berada di bawah? (Tanpa pompa) Apakah selang pembuangan membeku? Apakah selang pembuangan tersumbat? Jika air tidak terkuras dalam waktu 30 menit, bel akan berbunyi, dan indikator waktu tersisa akan menampilkan "5E". Air tidak disalurkan • • • • • Apakah keran air sudah dibuka? Apakah aliran air terputus? Apakah selang pengisian air atau sambungan selang tersumbat? Apakah keran air membeku? Jika pengisian air tidak selesai dalam waktu 1 jam atau level air tidak berubah dalam waktu 4 menit (10 menit pada model tertentu) setelah air mulai diisi, bel akan berbunyi dan “4E” akan ditampilkan pada indikator waktu tersisa. Pemerasan tidak berfungsi • • Apakah cucian tersebar merata di dalam mesin cuci? Apakah mesin cuci dipasang di permukaan yang kokoh dan rata? Air meluap • • Hidupkan ulang setelah pemerasan. Jika tanda kesalahan masih menyala, hubungi pusat servis. Noda pada pakaian menunjukkan bahwa terjadi kesalahan pada Kunci Anak • Pesan kesalahan akan berkedip dengan interval 0,5 detik dan air akan dikuras seiring berbunyinya alarm. (Pesan yang ditampilkan: "CL" atau "dE") Fungsi ini untuk mencegah agar anak-anak tidak tenggelam bila terjatuh ke dalam tabung cuci. Setelah selesai dikuras dan daya dinonaktifkan, lalu diaktifkan kembali, mesin cuci akan berfungsi secara normal. Untuk menghapus tampilan "CL", setelah selesai dikuras, tutup pintu mesin cuci, nonaktifkan daya, lalu aktifkan kembali. Apakah tombol Mulai/Jeda ditekan? • • • Kesalahan kebocoran air • • • 05 MENGATASI MASALAH Mesin cuci tidak berfungsi Periksa apakah ujung selang pembuangan berada di lantai. (Selang harus tergantung di atas pompa - klem selang.) Periksa apakah ada benda asing yang menyumbat selang pembuangan. Jika kesalahan tidak teratasi, hubungi layanan pelanggan. Bahasa Indonesia - 21 WA85H4000H_03218F_ID.indd 21 2014-07-18 2:28:45 mesin cuci tidak berfungsi? MASALAH PERIKSA Aliran daya terputus. Apakah tegangan listrik normal? Apakah konektor telah tersambung ke stopkontak? Sambungkan kabel listrik. Air tidak terkuras. Apakah selang pembuangan berada di bawah? Turunkan selang pembuangan. Apakah selang pembuangan tertekuk? Luruskan selang pembuangan. Apakah lubang selang pembuangan tersumbat? Hilangkan kotoran hingga bersih. Mesin cuci tidak berfungsi. Apakah tutup mesin cuci terbuka? Pasang tutup mesin cuci. Apakah tombol Jeda aktif? Tekan kembali tombol Mulai/Jeda dan periksa apakah mesin cuci berfungsi. Apakah air terisi hingga mencapai batasnya? Jika tekanan air rendah, diperlukan waktu lama untuk mulai mencuci. Apakah keran tertutup? Buka keran air untuk mengisi air. Apakah Anda membuka pintu saat siklus pemerasan berlangsung? Tutup pintu, lalu tekan tombol Mulai/Jeda untuk melanjutkan. Jika selang pembuangan dan keranjang peras membeku, lakukan hal berikut. • • • • Tambahkan air panas ke keran air yang membeku dan lepaskan selang pembuangan. Rendam selang dalam air panas. Siramkan air panas ke dalam keranjang peras selama kurang lebih 10 menit. Tempelkan handuk yang dibasahi dengan air panas pada konektor selang pembuangan. Jika selang pembuangan tidak lagi membeku, sambungkan kembali selang, lalu pastikan pengurasan air berjalan dengan benar. Air langsung terkuras. • Pembuangan tersumbat uang logam atau peniti. Selang pembuangan digantung pada pengaitnya. Isi keranjang peras hingga separuhnya, lalu coba peras kembali. Kebocoran pada sambungan selang pengisian air. Jika sambungan ke keran longgar, air dapat bocor. Ulangi langkah-langkah pemasangan. (Lihat "Menyambungkan selang pengisian air") Periksa apakah cincin karet pada selang pengisian air terpasang dengan benar. Kencangkan kembali sekrupnya. Apakah selang pengisian air tertekuk? Luruskan selang yang tertekuk. Jika pengisian air terlalu kuat, air dapat bocor. Tutup sedikit keran air. Apakah keran air bocor? Perbaiki keran. Air tidak disalurkan. Noda pada pakaian. Bersihkan filter ajaib. Bahasa Indonesia - 22 WA85H4000H_03218F_ID.indd Sec11:22 2014-07-18 2:28:45 MASALAH PERIKSA Kebocoran pada sambungan selang pengisian air. Apakah Anda menekan tombol Mulai/Jeda setelah memilih pengisian air? Jika tombol Mulai/Jeda tidak ditekan, air tidak akan disalurkan. Tekan tombol Mulai/Jeda. 06 MESIN CUCI TIDAK BERFUNGSI? Apakah keran tertutup? Buka keran. Apakah jaring filter pada sambungan selang pengisian air tersumbat kotoran? Bersihkan jaring filter dengan sikat gigi. Apakah aliran air terputus? Jika aliran air terhenti, tutup keran, lalu nonaktifkan daya. Pemerasan menimbulkan suara dan getaran keras. Periksa apakah cucian tersebar merata dalam mesin cuci. Ratakan cucian, lalu jalankan kembali. Periksa apakah mesin cuci diletakkan pada lantai yang keras dan rata. Atur agar ketinggian mesin cuci sama. Apakah tangkai untuk meratakan kaki longgar? Atur ketinggian kaki agar mesin cuci seimbang. Apakah di sekeliling mesin cuci dipenuhi barang yang tidak perlu? Singkirkan barang yang tidak perlu dari mesin cuci. Bahasa Indonesia - 23 WA85H4000H_03218F_ID.indd Sec11:23 2014-07-18 2:28:46 spesifikasi WA85H4000H BERAT MAKS. PAKAIAN KERING DALAM KG KONSUMSI DAYA DIMENSI (mm) BERAT TEKANAN AIR JENIS PENCUCIAN WA85H4000H 8,5 kg CUCI 330 W PERAS 240 W 5 4 LEVEL AIR STANDAR P 540 x L 568 x T 1002 (ALAS TINGGI) P 540 x L 568 x T 982 (ALAS RENDAH) 31 kg 0,05~0,78 Mpa (0,5~8,0 kg·f/cm2) Jenis Putaran PENGGUNAAN AIR KECEPATAN PERAS 8,5 kg 60 ℓ 53 ℓ 3 40 ℓ 2 29 ℓ 1 22 ℓ 160 ℓ 680 rpm Bahasa Indonesia - 24 WA85H4000H_03218F_ID.indd 24 2014-07-18 2:28:46 memo WA85H4000H_03218F_ID.indd 25 2014-07-18 2:28:46 memo WA85H4000H_03218F_ID.indd 26 2014-07-18 2:28:46 memo WA85H4000H_03218F_ID.indd 27 2014-07-18 2:28:46 PERTANYAAN ATAU KOMENTAR? Negara HUBUNGI ATAU KUNJUNGI KAMI SECARA ONLINE DI INDONESIA 0800112888 021-56997777 www.samsung.com/id/support DC68-03218F WA85H4000H_03218F_ID.indd 28 2014-07-18 2:28:46