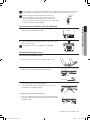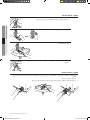
1
WA15PA WA14PA Washing Machine user manual imagine the possibilities Thank you for purchasing this Samsung product. To receive more complete service, please register your product at www.samsung.com/global/register WA15PALEP-02558G_EN.indd 1 2008-02-26 ¿ÀÀü 11:05:17 features of your new washer 1. The Silver Wash System The winning combination! Samsung’s silver technology combines the sanitizing effect of silver with state-of-the-art science for the ultimate clean wash! Two 99.9% pure silver plates are converted into silver ions via electrolysis. Even in cold, bleach-less water, the silver particles remove 99.9% of odor causing bacteria resulting in a “super clean” wash. Therefore, washing in cold water is energy efficient and beneficial to your laundry. 2. Air Turbo Drying System Air Turbo technology spins hard and fast so you can spend less time drying. Time Saving AIR TURBO saves your time, ensuring your clothes are dried 30%-40% faster than line drying alone. Especially during the rainy season and in high-humid weather, laundry that once took days to drip-dry, such as heavy jeans, bulky sweaters, and thick blankets are dried more rapidly. Easy-to-iron AIR TURBO is perfect for delicates and clothes made of synthetic fabrics. No more hanging and waiting. Simply iron straight-out-of-the washer, since AIR TURBO eliminates just enough moisture to keep clothes adequately damp for ironing. 3. Diamond Drum The diamond shaped drum creates a high water pressure, removing dirt from the laundry effectively. The diamond drum minimizes fabric damage extending the lifetime of the fabric. The glittering inner tube is both beautiful and powerful in the wash effect it creates. 4. Tempered Transparent Door Lets you observe while the washer is operating. Check on your laundry’s progress at any time. 5. Digital Control The digital control selects the optimal washing course by automatically sensing the washload using artificial intelligence. 6. Magic Filter The unique Magic Filter ensures that any and all lint inside the tub is captured for top quality filtering results that deliver a consistent and effective cleaning result. 7. Auto Restart The power is turned on automatically after a power failure and simply continues the previous cycle. This saves time and ensures your wash is completed every time without fail. 8. Child-Lock Function The Child-Lock function protects children from accidentally being hurt while playing with the washer. This manual contains important information on the installation, use, and care of your new Samsung washer. Refer to it for descriptions of the control panel, instructions on how to use the washer, and tips for making the most of its state-of-the-art features and functions. The ‘Troubleshooting and information codes’ section on page 26 tells you what to do if something goes wrong with your new washer. 2_ features WA15PALEP-02558G_EN.indd 2 2008-02-26 ¿ÀÀü 11:05:18 safety information Throughout this manual, you’ll see Warning and Caution notes. These warnings, cautions, and the important safety instructions that follow do not cover all possible conditions and situations that may occur. It’s your responsibility to use common sense, caution, and care when installing, maintaining, and operating your washer. Samsung is not liable for damages resulting from improper use. IMPORTANT SAFETY SYMBOLS AND PRECAUTIONS What the icons and signs in this user manual means: WARNING CAUTION CAUTION Hazards or unsafe practices that may result in severe personal injury or death. Hazards or unsafe practices that may result in minor personal injury or property damage. To reduce the risk of fire, explosion, electric shock, or personal injury when using your washer, follow these basic safety precautions: Do NOT attempt. Do NOT disassemble. Do NOT touch. Follow directions explicitly. Unplug the power plug from the wall socket. Make sure the machine is grounded to prevent electric shock. Call the service center for help. These warning signs are here to prevent injury to you and others. Please follow them explicitly. After reading this section, keep it in a safe place for future reference. Read all instructions before using the appliance. As with all any equipment using electricity and moving parts, potential hazards exist. To safely operate this appliance, become familiar with its operation and exercise care when using it. Install and store your washer inside, away from exposure to weather. Install and level your washer on a floor that can support its weight. Your washer must be properly grounded. Never plug it into an ungrounded outlet. Position the washer so that a wall plug is accessible after the installation is completed. safety information _3 WA15PALEP-02558G_EN.indd 3 2008-02-26 ¿ÀÀü 11:05:18 safety information To reduce the risk of fire or explosion: CAUTION • • • Do not wash items that have been washed, soaked, or treated with gasoline, dry cleaning solvents, or other flammable or explosive substances. They give off vapors that could ignite or explode. Rinse by hand any material that has been exposed to cleaning solvent or other flammable liquids or solids before putting in your washer. Be sure that all traces of such liquids, solids, and fumes have been removed. Dangerous substances include acetone, denatured alcohol, gasoline, kerosene, certain liquid household cleaners and spot removers, turpentine, waxes, and wax removers. Do not put gasoline, dry cleaning solvents, or other flammable or explosive substances into the washer. Under certain conditions, hydrogen gas may be produced in a hot water system – such as your hot water heater - that has not been used for two weeks or more. HYDROGEN GAS IS EXPLOSIVE. If your hot water system has not been used for two weeks or more, turn on all hot water faucets in your home, and let the water flow for several minutes before using your washer. This will release any hydrogen gas build–up. Since hydrogen gas is flammable, do not smoke or light an open flame during this time. Ventilate immediately without touching the power plug if there is a gas leak. Unplug the power cord before servicing your washer. Do not reach into the appliance when the tumbler is moving. Do not reach under the appliance with your hands or with an object as you may be injured by the spinning board beneath the washer. WARNING Do not let children play on or in your washer. The washer door does not open easily from the inside, and children may be seriously injured if trapped inside. WARNING Do not let children attempt to look into the washer as falling into the washer is extremely dangerous and may be fatal. WARNING This appliance is not intended for use by young children or infirm persons unless they have been adequately supervised by a responsible person to ensure that they can use the appliance safely. Young children should be supervised to ensure that they do not play with the appliance. Do not repair, replace, or service any part of your washer yourself unless you fully understand the recommended user–repair instructions and have the skills to carry them out. Work done by an unauthorized person may void your warranty. Store laundry detergents and other laundry supplies in a cool, dry place out of children’s reach. Disconnect the hoses and turn off the water when not using the washer. If the power cord is damaged, it must be replaced by the manufacturer, a service agent or similarly qualified person in order to avoid a hazard. Do not forcefully bend the power cable or place any heavy objects on the cable. Do not touch the power cord with wet hands. Do not overload the power outlet with too many appliances. 4_ safety information WA15PALEP-02558G_EN.indd 4 2008-02-26 ¿ÀÀü 11:05:18 Do not install the washer nearby electrical implements and do not place any candles or cigarettes on the washer. Do not go near the washer if it is flooded or under water, as there is a risk of electric shock. Unplug the washer and drain the water completely. CAUTION Do not combine chlorine bleach, ammonia, or acids (such as vinegar or rust remover) in the same wash. The fumes that can form when any of these items are combined are hazardous. Do not machine wash fiberglass materials. Small particles can stick to fabrics washed in subsequent loads and cause skin irritation. WARNING Before disposing of your washer, remove the door so that children or small animals cannot get trapped inside. Connect the washer to the main water supply using a new set of hoses. Do not reuse an old set of hoses. Water inlet hoses deteriorate over time. Check the hoses periodically for bulges, kinks, cuts, wear, and leaks, and replace them as needed and at least every five years. Before each wash, empty the pockets of your laundry. Small, irregularly shaped hard objects, such as coins, knives, pins, and paperclips could damage your washer. Do not wash clothing with large buckles, buttons, or other heavy metal objects. If the washer does not stop within 15 seconds after you open the lid, call a service agent immediately. Connect the grounding wire to the shell plate, and bury it under at least 10 in (25 cm) of earth: Alternatively, connect the ground wire to the appropriate pin on a properly grounded power receptacle. Never connect the wire to a telephone line, lightning rod, or gas pipe. For washers with ventilation openings in the base, that a carpet must not obstruct the openings. safety information _5 WA15PALEP-02558G_EN.indd 5 2008-02-26 ¿ÀÀü 11:05:18 contents SETTING UP YOUR WASHER 7 9 9 10 10 10 11 11 11 11 12 12 13 14 14 14 15 15 17 Checking the parts and the control panel Fuzzy course Blanket course Delicate course Memory course Clean Tub course Quick course Super Clean ECO+ course Delay Start Silver Wash Air Turbo Manual functions Installing your washer Selecting a location Connecting the water supply hose Assembling the Protection Panel (Optional) Connecting the drain hose Adjusting the height of the washer WASHING A LOAD OF LAUNDRY 18 18 20 21 21 Basic instructions Laundry guidelines Detergent and additives information Washing for the first time Automatic sensing function CLEANING AND MAINTAINING YOUR WASHER 22 22 23 23 Keeping the tub clean Cleaning the water supply connector filter Cleaning the filter net Cleaning the pump filter TROUBLESHOOTING AND INFORMATION CODES 24 26 Check these points if your washer... Information codes 7 18 22 24 27 SPECIFICATION 6_ contents WA15PALEP-02558G_EN.indd 6 2008-02-26 ¿ÀÀü 11:05:18 setting up your washer Be sure to have your installer follow these instructions closely so that your new washer works properly and so that you’re not at risk of injury when doing laundry. CHECKING THE PARTS AND THE CONTROL PANEL Lid Be sure to keep the lid closed during washing and spinning. Filter Silver wash (Selected models) Water supply hose (Hot) (Optional) Water supply hose (Cold) 01 SETTING UP YOUR WASHER Carefully unpack your washer, and make sure you’ve received all the parts shown below. If your washer was damaged during shipping, or if you do not have all the parts, contact Samsung Customer Service or your Samsung dealer. Drain hose (Pump) (Optional) Lint will be collected in the filter during washing. Detergent dispenser Fabric softener dispenser Spin basket (Optional) Power cord Pulsator Front control panel Adjustable legs Adjust the length of the legs when installing the washer. Ground wire (Optional) When the water pipe is metal, make sure to cover the end of the ground wire. Water drain hose (Optional) Protection panel (Optional) setting up your washer _7 DC68-02558B_EN.indd 7 2007-12-12 ¿ÀÈÄ 6:38:25 setting up your washer 14 13 12 1 POWER BUTTON 2 START/PAUSE BUTTON 3 11 10 COURSE SELECTION BUTTON 9 8 7 6 5 4 3 2 Press this button once to turn the power on. Press it again to turn the power off. Press to pause and restart courses. To change the washing procedure during an operation, press this button to stop the operation, and press it again to restart the washer after changing the washing procedure. Press this button repeatedly to cycle through the washing courses: [Fuzzy Blanket Delicate Memory Clean Tub Quick Super Clean ECO+] Press this button to perform only the rinse cycle or to adjust the amount of rinse cycles. Press this button to only perform a spin cycle or to adjust the spin time. When only a spin cycle is selected, the spin time will be different from the total remaining time. This is because the total remaining time includes the actual spin time, the time for the water to drain and the washer to stop. The child lock function allows you to lock the buttons so that the selected wash cycle can’t be changed. (This is a device that prevents children from playing with the washer.) Activating/Deactivating: Press both the Rinse and Spin buttons at the same time for 3 seconds. (Note: This function cannot be performed without the “Power” being on.) 4 RINSE BUTTON 5 SPIN BUTTON 6 CHILD-LOCK FUNCTION 7 WASH BUTTON Press this button to only perform a wash cycle or to adjust the wash time. REMAINING TIME, DELAY START TIME, ERROR DISPLAY The display shows the remaining wash time, the reserved delayed start time and error messages. 8 9 AIR-TURBO BUTTON 10 EASY BUTTON 11 DELAY START BUTTON 1 Press this button to fast-dry your laundry. Press this button to toggle between the Air-Turbo options: On Off On This function can only be selected if a spin cycle has been set. If you choose EASY, you will enjoy full access to all of Samsung Washing Machine’s userfriendly functions at your fingertips. When selecting this course, Air Turbo and Silver wash are selected automatically. Press this button to finish the wash at a specified time. Turn your washer off to cancel a previously delayed start time. You can set the delayed start time from between 3 to 18 hours. 8_ setting up your washer WA15PALEP-02558G_EN.indd 8 2008-02-26 ¿ÀÀü 11:05:19 SILVER WASH BUTTON This is available for all courses except for the Delicate course. 13 WATER LEVEL BUTTON 14 WATER SUPPLY BUTTON (Optional) The water level is automatically adjusted. However, you can select the water level manually by repeatedly pressing this button. Press this button repeatedly to cycle through the water options: Cold Hot Cold To change the water options, turn off the Silver Water function. 01 SETTING UP YOUR WASHER 12 This is a cycle where silver water is supplied during the wash cycle as well as during the last rinse, with additional sterilization and antibacterial coating. Silver Wash cannot be selected if only hot water is selected. Sanitization: Silver water is added to the water supply to perform an antibiotic sanitary wash. Bacteria Protection: Silver water is supplied during the last rinse after the wash to apply an antibacterial coating to the laundry. This is a sterilized rinse function that prevents the propagation of bacteria. Fuzzy course Use this course to automatically select the optimal washing course. 1. Press the Power button to turn the washer “On”. 2. Press the Start/Pause button. The water level is selected automatically. 3. The wash, rinse, and spin cycles follow. 4. To pause a course, press the Start/Pause button again. You can change the course when it is paused. 5. Close the lid. Blanket course Use this course for big volume laundry items such as blankets and bed cover sheets. 1. Press the Power button to turn the washer “On”. 2. Press the Course select button. 3. Press the Start/Pasue button. The water level is selected automatically. 4. The wash, rinse, and spin cycles follow. 5. To pause a course, press the Start/Pause button again. You can change the course when it is paused. 6. Close the lid. • Do not wash electric blankets and carpets. • Fold big volume laundry items (blankets and bed cover sheets) in the following way before adding them into the spin basket. • Purchase a laundry net for light and big volume laundry items (e.g. cashmere, blankets) as they may rise to the top of the washer and become damaged. setting up your washer _9 WA15PALEP-02558G_EN.indd 9 2008-02-26 ¿ÀÀü 11:05:20 setting up your washer Delicate course Use this course to wash delicate clothing items such as washable sweaters, cardigans, and other delicate items. 1. Press the Power button to turn the washer “On”. 2. Press the Course select button. 3. Press the Start/Pause button. The water level is automatically selected at the mid-level between Mid-low and Extra low. You can also adjust the water level manually. 4. The wash, rinse, and spin cycles follow. 5. To pause a course, press the Start/Pause button again. You can change the course when it is paused. 6. Close the lid. • You can select only Cold water. • The last spin cycle is a light cycle to prevent wrinkles. • Use only detergent indicated by the laundry. • Refer to the Care Label on the clothing for the appropriate wash information. • Make sure buttons are fastened and that clothing is turned inside out. • In the Delicate course, Air Turbo and Silver Wash functions cannot be selected as it may damage delicate items. Memory course Use this course to create your very own favorite or frequently used courses and store them in the washer so that you can select them at any time. 1. Press the Power button to turn the washer “On”. 2. Press the Course select button. 3. Select your frequently used functions. Select Wash, Rinse, Spin or Silver Wash according to your requirements. 4. Press the Start/Pause button to store them. Only stored when the Wash + Rinse + Spin steps are selected. 5. Add detergent and softener according to the water level and close the lid. • If you select the Memory course after turning the washer “On”, the stored settings are automatically retrieved. • To change the stored settings, select the Memory course, reconfigure the settings and then press the Start/Pause button. Then, the changes are stored. Clean Tub course Use this course to clean the tub. It will keep the tub clean and sanitary. 1. Press the Power button to turn the washer “On”. 2. Press the Course select button. 3. Press the Start/Hold button. 4. Add a delicated detergent and close the lid. • Never place laundry in the tub when cleaning inside the tub, as this can cause discoloration or damage to the laundry. • When doing the laundry after cleaning the tub, you may find some impurities. These are just detergent residues and impurities after the tub cleaning. Perform the rinse cycle two to three times. • The Soak function is set automatically. • The initial water level is selected at the mid-level between Maximum and Mid. 10_ setting up your washer WA15PALEP-02558G_EN.indd 10 2008-02-26 ¿ÀÀü 11:05:20 Quick course Super Clean Use this course to achieve the cleanest wash. This course provides you with the optimum in washing performance through the 5-step super clean system. 1. Press the Power button to turn the washer “On”. 2. Press the Course select button. 3. Press the Start/Pause button. The water level is selected at the mid-level between Mid and Mid-low. The water level is selected between Maximum and Mid or at the mid-level between Mid and Mid-low. 01 SETTING UP YOUR WASHER The Quick course is good for light or slightly stained laundry. 1. Press the Power button to turn the washer “On”. 2. Press the Course select button. 3. Press the Start/Pause button. The water level is selected automatically. 4. The wash, rinse, and spin cycles follow. 5. To pause a course, press the Start/Pause button again. You can change the course when it is paused. 6. Close the lid. 4. Close the lid. ECO+ course If you want to wash those frequently used towels or less dirty laundry time. Because washing is speedy, it is good for light or less stained laundry. 1. Press the Power button to turn the washer “On”. 2. Press the Course select button. 3. Press the Start/Pause button. 4. The wash, rinse, and spin cycles follow. 5. To pause a course, press the Start/Pause button again. You can change the course when it is paused. 6. Close the lid. Delay Start Use this to specify a time for the wash cycle to start, for example, when you need to go out and are unable to monitor the washer. 1. Press the Power button to turn the washer “On”. 2. Press the Delay Start button once. You may set the delay end time using the Delay Start button from between 3 to 18 hours. 3. Press the Start/Pause button and add the appropriate amount of detergent into the detergent drawer. 4. Close the lid. The wash will finish by the set time. Add detergent and softener according to the water level and close the lid. • Detergent must be added into the detergent drawer. • If detergent is added onto the laundry directly, some clothes may become discolored because the start has been delayed. • To cancel a Delay Start, press the Power button. setting up your washer _11 WA15PALEP-02558G_EN.indd 11 2008-02-26 ¿ÀÀü 11:05:20 setting up your washer Silver Wash This course kills bacteria in your laundry during the wash or rinse cycle protecting you and your family from harmful bacteria. 1. Press the Power button to turn the washer “On”. 2. Press the Silver Wash button. 3. Press the Start/Pause button. The water level is selected automatically. 4. The wash, rinse, and spin cycles follow. 5. To pause a course, press the Start/Pause button again. You can change the course when it is paused. 6. Close the lid. This can only be selected when the wash, einse and spin cycles are all selected. • When the Silver Wash course is selected, manually selecting the Water Supply button is not operated. • This is available as an option for all courses except for the Delicate course. Air Turbo This course saves you valuable time, ensuring that your clothes dry faster than from line drying. 1. Press the Power button to turn the washer “On”. 2. Press the Air Turbo button. Each time the Air Turbo button is pressed, the operations are performed in the following order: On OFF On 3. Close the lid. 4. Press the Start/Pause button. • This can be selected as an additional option for all courses except for Delicate and Clean Tub course. • The Air Turbo function is only available when spin cycle is selected. • Select this when you want to half-dry the laundry. 12_ setting up your washer WA15PALEP-02558G_EN.indd 12 2008-02-26 ¿ÀÀü 11:05:21 MANUAL FUNCTIONS It is possible to select cycles manually. (Example) A basic wash for lightly soiled laundry: Power Select the Quick course Wash Start/Pause WASH ONLY RINSE ONLY SPIN ONLY WASH AND RINSE RINSE AND SPIN WASH, RINSE AND SPIN INSTRUCTIONS Press the Power button. Press the Wash button. Press the Start/Pause button. When the Wash button is pressed while washing is in progress, the wash time can be changed to between 6 and 30 minutes. Press the Rinse button. Press the Start/Pause button. The rinse cycle is performed twice. When the Rinse button is pressed during the rinse cycle, the rinse time can be changed to between 2 to 5 times in duration. 01 SETTING UP YOUR WASHER COURSE Press the Spin button. Press the Start/Pause button. When the Spin button is pressed during the spin course, the spin time can be changed to 1 to 9 minutes. Press the Wash and Rinse buttons. Press the Start/Pause button once. The cycle detects the amount of laundry, and automatically determines the wash and rinse times. When the Wash and Rinse buttons are pressed while the washer is in progress, the wash time is determined between 6 and 30 minutes, and the rinse time is determined between 1 and 5 times. Press the Rinse and Spin buttons. Press the Start/Pause button once. The rinse and spin cycles are performed. When the Rinse and Spin buttons are pressed while the washer is operating, the number of rinse cycles is determined between 2 and 5 times, and the spin time is determined between 1 and 9 minutes. Press the Wash, Rinse and Spin buttons. Press the Start/Pause button once. The wash, rinse and spin cycles are performed. setting up your washer _13 WA15PALEP-02558G_EN.indd 13 2008-02-26 ¿ÀÀü 11:05:24 setting up your washer INSTALLING YOUR WASHER Selecting a location Before you install your washer, make sure the location: • Has a hard, level surface without carpeting or flooring that may obstruct ventilation and avoid vibrations • Allows at least 4 in (10 cm) between the washer and the wall • Is away from direct sunlight and not exposed to rain as moisture may destroy the electrical insulation causing an electrical shock hazard • Has adequate ventilation • Is not exposed to temperatures below freezing (below 32 ˚F and 0 ˚C) • Is away from heat sources such as oil and gas • Has enough space so that your washer doesn’t stand on its power cable Connecting the water supply hose Connecting the hose to the faucet 1. Remove the adaptor from the water supply hose. 2. Loosen the four screws on the adaptor using a “+” type screwdriver. Then take the adaptor and turn part (b) following the arrow until there is a gap of about 0.2 in (5 mm) between part a and b. 3. Connect the adaptor to the water tap by tightening the screws firmly. Then turn part (b) following the arrow, and push (a) and (b) together. 4. Connect the water supply hose to the adaptor. Pull part (c) (water supply hose) downwards. When part (c) is released, the hose is automatically connected to the adaptor and makes a ‘clicking’ sound. 5. Connect the other end of the water supply hose to the inlet water valve at the back of the washer. Screw the hose clockwise all the way in. OR Connect the other end of the water supply hose to the inlet water valve at the top of the washer. Screw the hose clockwise all the way in. 14_ setting up your washer WA15PALEP-02558G_EN.indd 14 2008-02-26 ¿ÀÀü 11:05:27 If the water tap is a screw type, assemble a water supply hose that fits to the tap as shown. After completing connection, if water leaks from the hose, then repeat the same steps. If after completing the connection water leaks from the hose, repeat the same steps again. Use the most conventional type of faucet for the water supply. If the faucet is square or too big, remove the spacing ring before inserting the faucet into the adaptor. 1. Push and insert the Protection panel towards the back through the insert hole from the front. 01 SETTING UP YOUR WASHER Assembling the Protection Panel (Optional) Front 2. If you have difficulty inserting the panel, lift the washer up a little and then insert it. The protection panel is not applied in some models Connecting the drain hose For non-pump drained washers 1. Press the joint ring and place it around the drain hose. 2. After placing the drain hose into a drain outlet, join the other end of the hose to the drain outlet of the washer. drain-outlet 3. Ensure that they are connected tightly by pressing the joint ring and pushing it into the drain-outlet. • The length of drain hose is adjustable so that it can be extended to the appropriate length. Changing the direction of the drain hose • Press the handle of the joint ring to pull out the drain hose. Change the direction of the drain hose and follow the above guidelines again. setting up your washer _15 WA15PALEP-02558G_EN.indd 15 2008-02-26 ¿ÀÀü 11:05:29 setting up your washer Caution when inserting the drain hose CAUTION 1. When extending the hose to another hose, the length should not exceed more than 118.1 in (3 m). Less than 118.1 in (3 m) 2. Ensure that the end of the drain hose is lower than the water level for the water to drain properly. 3. The drain hose should not have any obstacles higher than 2 in (5 cm) in their path. Less than 118.1 in (3 m) Less than 2 in (5 cm) 4. Don’t install the drain hose underneath the washer. For pump-drained washers 1. Remove the cap-hose and connect the outlet-hose. cap-hose 2. Ensure that the drain hose is connected tightly to the drainoutlet on the side of the washer. 35~39 in (90~100 cm) 3. Install the drain hose about 35~39 in (90~100 cm) above the ground. 16_ setting up your washer WA15PALEP-02558G_EN.indd 16 2008-02-26 ¿ÀÀü 11:05:31 Adjusting the height of the washer Make sure your washer is level by adjusting the leveling legs. CAUTION Beware of catching your hands under the legs. Waterdrop mark Cause The front of the washer is lower 01 SETTING UP YOUR WASHER 1. Pull the handles located at the right and left front of the washer and slide them off. 2. Adjust the height of the washer upwards or downwards. 3. When you have finished adjusting the height, push the handles back to fix the adjusting legs in place. How to level Level the washer by adjusting the legs. The back of the washer Adjust the height by using the props at the is lower back. The left of the washer is lower Adjust the left side by using the adjustable legs at the front and props at the back. The right of the washer is lower Adjust the left side by using the adjustable legs at the front and props at the back. Leveling your washer with the leveling screws (Optional) 1. Gently lift up the washer and turn the adjustable legs to the left to find the optimal balance. 2. When done, return the washer to its original position. 3. After adjusting the legs, do not forget to lock the nut for safety reasons. (Failing to do so may cause it to become loose and and move out of position.) setting up your washer _17 WA15PALEP-02558G_EN.indd 17 2008-02-26 ¿ÀÀü 11:05:35 washing a load of laundry With your new washer, the hardest part of doing laundry will be deciding which load to do first. BASIC INSTRUCTIONS 1. 2. 3. 4. Load your laundry into the washer. Close the door. Turn the power on. Add detergent and additives into the dispenser (see page 20). Select the appropriate course and options for the load (see pages 9-12). The Wash Indicator light will illuminate and the estimated course time will appear in the display. 5. Press the Start/Pause button. LAUNDRY GUIDELINES Follow these simple guidelines for the cleanest laundry and the most efficient wash. (It is important that the checkpoints below are followed in order to avoid machine problems or clothing damage.) If any problems arise due to the fault of the customer, a separate service fee will be charged to the customer. Always check the Care label on clothing before washing. • • • • • • • • • You can fill the tub with dry, unfolded clothes; but do NOT OVERLOAD the tub. Overloading may reduce washing efficiency, cause excess wear on your laundry and the washer, and possibly cause creasing or wrinkling of the load. When washing big, bulky items or a few smaller items that don’t fill the tub completely - a rug, a pillow, stuffed toys, or one or two sweaters, for example - add a few towels to improve the tumbling and spinning performance. Check if any clothing items may bleach. Add liquid detergent to a white towel and the garment if you are unsure whether it may bleach. Rub the two items together strongly. Check if the color is transferred to the towel. Be especially careful with scarves and imported clothes since they discolor easily. Check for stains or partial dirt. If stains are found, add some detergent to a cloth and rub the stain in a single direction. Soil and dirt may rub against delicate garments causing damage and the wash result may be unsatisfactory. If clothes are too soiled, remove them and wash them separately, as dirt may transfer to the other clothing. Before washing the following items, sleeves, collars, dress hems and pockets should be pre-treated by brushing them with detergent. Wrinkle-processed clothing made of wool should be specially treated by tying them together (using thread) before washing. The thread is removed after the clothes have dried. Metal on clothing may damage your clothing as well as the tub. Turn clothing with buttons and embroidered clothes inside out before washing them. If pants and jacket zips are open during the wash, the spin basket may be damaged. Zips should be closed before washing. Clothing with long strings may become entangled with other clothes and damage them. Be sure to fix the strings before starting the wash. Turn delicate clothing inside out before washing it. 18_ washing a load of laundry WA15PALEP-02558G_EN.indd 18 2008-02-26 ¿ÀÀü 11:05:36 • • CAUTION Check all pockets before washing! Hairpins and coins may damage your clothing as well as your washer. It is important that you check pockets for objects and remove them. Do NOT wash the following items • • • • • Clothing that is easily disfigured even when simply soaking in water. Neckties, brassieres, jackets, suits and coats that are made mostly of rayon and other kind of blended fabrics can be easily disfigured (e.g. shrinkage and discoloration). Wrinkle-processed, embossed, or resin processed products that are easily disfigured even when simply soaking in water. Easily discolored products made of cotton and wool, wrinkled silk, leather products, leather accessory, leather ornamented clothes and its accessories. Do not wash waterproof clothing (e.g. ski wear, diaper covers and matts/rugs). This may cause the laundry to be ejected or cause the washer to vibrate abnormally, which may result in personal injury or damage to the washer, the floor or the clothing. When the tub rotates, water may become trapped in the waterproof clothing or fabric and can collect in a corner, causing abnormal vibrations. In addition, the laundry rises and may be ejected and cause personal injury. 02 WASHING A LOAD OF LAUNDRY Wash black clothing and cotton towels separately. If these are washed together, the towels may become stained. Check before washing. Curtains, light garments or blue jeans should not float. If they are floating, stop the washer by pressing the Start/Pause button and press them them down until they are soaked in the water. If the wash continues with floating clothing, it may damage the laundry and the washer, as well as resulting in an unsatisfactory washing result. Use a laundry net to wash the following items • • • • Use only commercial laundry nets. Place delicate clothes in a laundry net. Cashmilon and garments with a big volume and lightweight (e.g. lace decorated clothing, lingerie, nylon stockings, synthetic fabrics, etc.) may rise to the top of the washer and damage clothing and the washer. Use a laundry net or wash these items separately. Place long stringed and lace decorated clothing, bed cover sheets, and woolen clothes into a laundry net before washing them. washing a load of laundry _19 WA15PALEP-02558G_EN.indd 19 2008-02-26 ¿ÀÀü 11:05:37 washing a load of laundry DETERGENT AND ADDITIVES INFORMATION Which detergent to use Use powdered or liquid detergent. Do not use soap as the tub may become dirty from dirt on it. • When the detergent does not dissolve properly, use warm water to dissolve the detergent. • Use the appropriate amount of detergent. CAUTION • • • • Even if an excessive amount of detergent is used, there is little difference in the washing result. However, It may damage the garments as there may be insufficient rinsing. Bleaching agents may cause damage to garments as they are a strong alkali. Perform sufficient rinsing as powdered detergent can easily remain on the garments causing bad odors. If too much detergent is used or cold water is used, the detergent doesn’t dissolve completely and remains on the garments, hose or spin basket, contaminating the laundry. For a delayed start, the detergent must be added into the detergent drawer. If powder detergent is spread directly onto the laundry, it may cause discoloration. Detergent drawer The detergent drawer is located inside the washer at the back. Adding detergent 1. Open the detergent drawer and then add the powder detergent into the detergent compartment. 2. Add detergent evenly so that it doesn’t brim over the edge of the drawer. • Use a reasonable amount of detergent. If you use more detergent than the standard CAUTION quantity or the water temperature is too low and the detergent does not dissolve in the water completely causing it to remain on the laundry and in the hose and tub, it may cause damage such as dirtying and discoloring the laundry. • If you use a powder detergent and it remains on the laundry, it may cause a bad odor. Rinse the laundry sufficiently in fresh water. • If you spread a powder detergent over the laundry directly, it may result in discoloration. Make sure to insert it into the detergent compartment. If the water pressure is low, the detergent may remain in the detergent compartment. Adding fabric softener 1. When the proper amount (one time dose) of fabric softener is stored in the softener inlet, it is automatically added during the last rinse cycle. 2. Do not add detergent, bleach or starch into the softener inlet. 3. Using too much softener may produce unsatisfactory results. 4. Do not open the lid during the Spin cycle. If added too early, its effectiveness will decrease. 5. Do not leave the softener in the softener dispenser for a long time as it may congeal. If the water pressure is low, the fabric softener may remain in the softener compartment. In this case, put the fabric softener into the tub directly. 20_ washing a load of laundry WA15PALEP-02558G_EN.indd 20 2008-02-26 ¿ÀÀü 11:05:38 WASHING FOR THE FIRST TIME Before performing a wash for the first time, you must run a complete cycle without adding any laundry. 1. Press the Power button. 2. Open the detergent drawer and insert a little detergent. 3. Turn on the water supply to the washer. 4. Press the Start/Pause button. This will remove any water remaining from the manufacturer’s test run. AUTOMATIC SENSING FUNCTION Your washer is equipped with an automatic sensing function which automatically senses the amount of laundry and the appropriate water level, wash time, rinse cycle, and spin time. This does not apply for the Delicate, Clean tub and Super clean courses. 02 WASHING A LOAD OF LAUNDRY Before starting to wash, check the following: 1. Connect the water supply hose to the water tap. Open the tap. Connect the power to the washer. Ensure that the drain hose is placed properly. 2. Make the drain hose in installed properly. After the power is on, a course is selected and the Start/Pause button is pressed, the washing board starts spinning without water. This action senses how much laundry is in the washing basket, and this is not a machine problem. After the sensing process has completed, water is supplied automatically. Place the laundry into the washer and add detergent. • • • • Be careful not to overload the washer. Use the appropriate detergent for the type of fabrics you are washing. If the lid is opened while the washer is running, the washer stops automatically for safety reasons. (However, the water supply continues while the lid is open.) When hot or warm water is selected, cold water is supplied for the first few seconds in order to protect the clothes. It is possible to control the wash time, rinse cycle, and spin time for every cycle during the wash course. washing a load of laundry _21 WA15PALEP-02558G_EN.indd 21 2008-02-26 ¿ÀÀü 11:05:38 cleaning and maintaining your washer Keeping your washer clean improves its performance, wards off unnecessary repairs, and lengthens its life. KEEPING THE TUB CLEAN When using the machine under humid conditions for an extended time, various airborne bacteria may stick to the tub and form mold, causing damage to the human body. To keep the tub clean and hygienic at all times, it is recommended reading the “Clean tub course” section on page 12 and using a dedicated or recommended detergent to clean the tub regularly at least once every one to three months. CLEANING THE WATER SUPPLY CONNECTOR FILTER 1. Remove the filter and wash it thoroughly. 2. Return the filter to its place and securely connect the hose to the inlet water valve. 3. Check if there is any water leakage. Ensure that the connector is connected tightly. 22_ cleaning and maintaining WA15PALEP-02558G_EN.indd 22 2008-02-26 ¿ÀÀü 11:05:39 CLEANING THE FILTER NET Clean the filter net regularly to keep the washer clean. 1. Push and pull the upper part of the Magic filter downwards at the same time. 03 CLEANING AND MAINTAINING 2. Open the cover as shown in the figure. 3. Clean the Magic filter. 4. Close the cover and first insert the lower part of the filter into the basket and then push the filter until you hear a “clicking” sound. CLEANING THE PUMP FILTER 1. Place a rag or towel under the wash filter to avoid wetting the floor, and rotate the filter counterclockwise and pull it out. 2. Remove any dirt from the filter. 3. Return the filter to its place by rotating the filter clockwise until it locks into position. 1 2 3 cleaning and maintaining _23 WA15PALEP-02558G_EN.indd 23 2008-02-26 ¿ÀÀü 11:05:42 troubleshooting and information codes CHECK THESE POINTS IF YOUR WASHER... PROBLEM CHECK & SOLUTION Has no power. Check if the electric voltage is normal. Check if the washer is plugged in. Make sure the electric cord is plugged in. Make sure that the drain hose is not twisted or folded. Make sure that the drain hose outlet is not clogged. Does Not Work Is the washer lid open? Close the lid. Is the Hold button on? Press the Start/Pause button again, and check if the washer starts. Has sufficient water filled up to the water level? If the water pressure is low, it takes along time for water to fill the washer. Is the faucet closed? Open the faucet to supply water. Has the drain hose and spin basket frozen. • • • • Add hot water to the frozen water tap and remove the drain hose. Soak it in hot water. Pour hot water into the spin basket for about 10 minutes. Place a hot water towel on the drain hose connector. When the drain hose has been defrosted, reconnect it and check if the water is draining properly. 24_ troubleshooting WA15PALEP-02558G_EN.indd 24 2008-02-26 ¿ÀÀü 11:05:43 CHECK & SOLUTION The water leaks at the water supply hose connector. If the faucet connecting part is loose, water may leak. Repeat the assembling steps again. (Refer to “Connecting the water supply hose”) Check if the rubber ring of the water supply hose is in the right position. Fit it tightly again. Is the water supply hose folded? Unfold the hose. 04 TROUBLESHOOTING PROBLEM If the water supply is too strong, water may leak. Close the faucet a little. Is water leaking from the faucet itself? Fix the faucet. Water is not supplied. Did you press the Start/Pause button after selecting the water supply? The Start/Pause button must be pressed for water, for water to be supplied. Press the Start/Pause button. Make sure that the faucet is on. Turn on the faucet. Check if the filter net at the water supply hose connector is clogged with dirt. Clean the filter net using a toothbrush. Make sure the water supply is on. If the water supply is suspended, turn both the faucet and power on. Spinning causes loud noises and vibrations. Check if the laundry is spread out evenly in the washer. Spread out the laundry evenly and start again. Check if the washer is balanced and level on a sturdy flat floor surface. Ensure that the washer is level. Check if the leveling legs are loose. Adjust the leveling legs so that the washer is even. Ensure that the washer is not surrounded with unnecessary items. Remove anything unnecessary away from the washer. troubleshooting _25 WA15PALEP-02558G_EN.indd 25 2008-02-26 ¿ÀÀü 11:05:43 troubleshooting and information codes INFORMATION CODES When your washer malfunctions, you may see an information code on the display. If that happens, please check this table and try the suggested solution before calling Customer Service. CODE SYMBOL PROBLEM CHECK Will not start. - Make sure the water source faucets are on. Make sure the washer is plugged in. Make sure the power is on. Make sure there is enough water. Does not drain. - Is the drain hose down?(No pump) Check if the drain hose is frozen. Check if the drain hose is clogged. If the water does not drain within 15 minutes, a buzzer will sound, and the remaining time indicator will show “5E”. Has no water. - Turn the faucets on fully. Has the water supply to the residence been cut off? Check if the water supply hose or hose connection is clogged. Check if the water faucet is frozen. If water supply is not finished within 1 hour or water level is not changed within 4 minutes, a buzzer will sound, and the remaining time indicator will show “4E”. - Does not spin. - Overflows(water). - Check that the laundry is spread out evenly in the washer. Check that the washer is balanced and on a sturdy flat surface. Restart after spinning. If the error sign is still displayed, call a customer service agent. 26_ troubleshooting WA15PALEP-02558G_EN.indd 26 2008-02-26 ¿ÀÀü 11:05:44 specification WASHING TYPE POWER CONSUMPTION Stirring Type WASH 600 W SPIN 330 W W630 x D675 x H1010 WEIGHT 45 kg MAXIMUM 88 ℓ MID 64 ℓ MID-LOW 45 ℓ EXTRA LOW 35 ℓ STANDARD WATER LEVEL 05 SPECIFICATION DIMENSIONS (mm) WATER PRESSURE 0.05MPa ~ 0.78 Mpa (0.5 ~ 8.0 kg∙f/cm2) WATER USAGE 230 ℓ SPIN SPEED 680 rpm specification _27 WA15PALEP-02558G_EN.indd 27 2008-02-26 ¿ÀÀü 11:05:44 QUESTIONS OR COMMENTS? Country U.A.E CALL 800-SAMSUNG (726-7864) 8000-4726 OR VISIT US ONLINE AT www.samsung.com/mea Code No. DC68-02558G_EN WA15PALEP-02558G_EN.indd 28 2008-02-26 ¿ÀÀü 11:05:44 WA15PA WA14PA الغسالة دليل املستخدم إمكانيات هائلة شكرا ً لشراء هذه الغسالة من .Samsung للحصول على خدمة أكثر تكامالً, الرجاء تسجيل املنتج على موقع www.samsung.com/global/register 2/26/2008 12:04:53 PM WA15PALEP-02558G_AR.indd 1 ميزات الغسالة اجلديدة .1نظام الغسيل الفضي عملية التجميع الناجحة! تعمل تقنية الغسيل الفضي من Samsungعلى دمج أثر التعقيم الناجت عن الغسيل الفضي باستخدام العلوم املتقدمة للحصول على أقصى درجة من الغسيل النظيف! يتم حتويل طبقني من الفضة النقية بنسبة %99.9 إلى أيونات فضية عن طريق التحليل بالكهرباء .تقوم اجلزيئات الفضية بإزالة %99.9من الرائحة التي تسبب البكتريا التي حتدث أثناء عملية الغسيل “نظافة قصوى” حتى وإن كانت في ماء بارد أو ماء بال مادة تبييض اللون .لذا يؤدي الغسيل في ماء بارد إلى حتسني الطاقة كما أنه مفيد للمالبس. .2نظام التجفيف بالهواء النفاث تعمل تقنية الهواء النفاث على الدوران بقوة وسرعة بحيث تتيح لك تقليل الوقت الالزم للتجفيف. توفير الوقت حيث يساعد الهواء النفاث على توفير الوقت وضمان جتفيف املالبس بنسبة %30إلى %40أسرع من التجفيف العادي. وحتى في املواسم املمطرة وفي األجواء الرطبة ،فإن املالبس التي حتتاج إلى وقت طويل كي جتف مثل اجلينز السميك واملعاطف الكبيرة والبطانيات السمكية يتم جتفيفها بسرعة أكثر. يعتبر الهواء النفاث مثاليا ً للمالبس الرقيقة واملالبس املصنوعة من األلياف الصناعية. ال مزيد من تعليق املالبس وانتظارها حتى جتف .ميكنك كي املالبس مبجرد خروجها من الغسالة حيث أن “الهواء النفاث” يقضى على نسبة كبيرة من الرطوبة مما يسهل عملية كيها. .3حاوية من املاس حتدث احلاوية املصنوعة من املاس ضغط عالي من املاء مما يعمل على إزالة األوساخ من الغسيل بشكل فعال .تقلل احلاوية املصنوعة من املاس من إحلاق ضرر باألقمشة مما يعمل على زيادة عمر األقمشة .تتميز األنبوبة الداخلية البراقة بأنها رائعة وقوية في امتصاص أثر الغسيل الذي حتدثه. .4باب شفاف مقوى يتيح لك رؤية ما يحدث أثناء تشغيل الغسالة .ميكنك التحقق من تقدم عملية الغسيل في أي وقت. .5حتكم رقمي تعمل ميزة التحكم الرقمي على حتديد أقصى دورة غسيل من خالل تقدير وزن الغسيل تلقائيا ً باستخدام الذكاء االصطناعي. .6املصفاة الفعالة تضمن لك املصفاة الفعالة الفريدة جتميع كافة النساالت املوجودة داخل حوض الغسيل مما يرفع كفاءة عملية التصفية للحصول على نتائج مناسبة وفعالة لعملية الغسيل. .7إعادة التشغيل التلقائي يتم تشغيل زر “الطاقة” تلقائيا ً بعد انقطاع التيارالكهربي ومواصلة الدورة السابقة بسهولة .يعمل هذا على توفير الوقت ويضمن لك استكمال الغسيل في كل وقت دون حدوث خلل. .8وظيفة التأمني ضد عبث األطفال تعمل وظيفة التأمني ضد عبث األطفال على حمايتهم من التعرض لألذى دون قصد أثناء اللعب بالغسالة. يحتوى هذا الدليل على معلومات هامة حول عملية التركيب ،واالستخدام ،وصيانة الغسالة اجلديدة من .Samsungميكنك الرجوع إليها للحصول على أوصاف لوحة التحكم ،والتعليمات التي تتعلق بكيفية استخدام الغسالة ،والتلميحات التي تتعلق باستغالل أحدث امليزات والوظائف املوجودة بها .يرشدك قسم “استكشاف املعلومات وإصالحها ورموز املعلومات” املوجود في صفحة 26إلى ما يجب عليك فعله في حالة حدوث شيء ما خطأ بالغسالة اجلديدة. ديدجلا ةلاسغلا تازيم _ 2/26/2008 12:04:53 PM WA15PALEP-02558G_AR.indd 2 معلومات متعلقة بالسالمة ستالحظ وجود عالمات حتذيرية وتنبيهية في هذا الدليل .ال تغطي هذه التحذيرات والتنبيهات وإرشادات األمان الهامة كافة الظروف واملواقف احملتمل وقوعها .لذا تقع على عاتقك مسؤولية التعامل بحذر وانتباه وعناية عند تركيب الغسالة وصيانتها وتشغيلها .ال تعد شركة Samsungمسؤولة عن األضرار الناجتة عن سوء االستخدام. الرموز واالحتياطات الهامة للسالمة تشير الرموز والعالمات في هذا الدليل إلى ما يلي: حتذير تنبيه تنبيه مخاطر أو إجراءات غير آمنة قد تؤدي إلى إصابات جسيمة أو الوفاة. مخاطر أو إجراءات غير آمنة قد تؤدي إلى إصابات طفيفة لألفراد أو تلف للممتلكات. لتقليل خطر حدوث حريق أو انفجار أو صدمة كهربائية أو إصابة لألفراد عند استخدام الغسالة ،اتبع احتياطات السالمة األساسية التالية: ال حتاول. ال تقم بفك. ال تلمس. اتبع اإلرشادات احملددة بوضوح. قم بفصل موصل الطاقة من مقبس احلائط. تأكد من أن الغسالة مثبته على األرض ملنع حدوث صدمة كهربائية. ميكنك االتصال مبركز الصيانة للحصول على املساعدة. تهدف عالمات التحذير املوجودة هنا إلى منع حدوث إصابات لك ولألخرين. الرجاء اتباع هذه اإلرشادات كما ينبغي. قم بحفظ هذا القسم في مكان آمن بعد قراءته لالحتفاظ به كمرجع في املستقبل. اقرأ كافة اإلرشادات أوال ً قبل استخدام اجلهاز. حيث يحتمل حدوث مخاطر مع أي جهاز عند استخدام الكهرباء واألجزاء املتنقلة .لتشغيل هذا اجلهاز بأمان ،يجب عليك التعرف على طريقة تشغيله وتوخي احلذر عند استخدامه. قم بتركيب الغسالة ووضعها بالداخل ،بعيدأ عن التعرض لعوامل الطقس. قم بتركيب الغسالة واجعلها مستوية على أرضية ميكن أن تناسب وزنها. يجب تثبيت الغسالة على األرض بشكل صحيح .ال تقم بتوصيلها بأحد املآخذ غير األرضية. ضع الغسالة حتى يتسنى الوصول إلى مقبس احلائط بعد استكمال عملية التركيب. _ مالسلاب ةقلعتم تامولعم 2/26/2008 12:04:54 PM WA15PALEP-02558G_AR.indd 3 معلومات متعلقة بالسالمة لتقليل مخاطر حدوث حريق أو انفجار: تنبيه • • • ال تقم بغسل املالبس التي قمت بغسلها أو غمسها أو التعامل معها باستخدام اجلازولني أو مذيبات التنظيف اجلاف ،أو املواد األخرى القابلة لالشتعال واالنفجار .ألنها حتدث أبخرة ميكن أن تشتعل أو تنفجر .قم بشطف أية مواد يدويا ً قد تعرضت ملذيب تنظيف أو أية سوائل أو مواد صلبة أخرى قابلة لالشتعال قبل وضعها في الغسالة .تأكد من التخلص من كافة آثار تلك املواد السائلة والصلبة واألبخرة .املواد اخلطرة التي تشتمل على األسيتون ،واملواد الكحولية ،واجلازولني ،والكيروسني، وبعض املنظفات املنزلية ،ومزيالت البقع ،والزيوت التربنتينة ،والشمع ،ومزيالت الشمع. ال تقم بوضع اجلازولني ،أو مذيبات التنظيف اجلاف ،أو أية مواد أخرى قابلة لالشتعال أو االنفجار في الغسالة. قد يصدر غاز الهيدروجني في نظام املاء الساخن في ظروف معينة ،كما هو احلال بالنسبة لسخان املاء الساخن اخلاص بك، الذي لم يستخدم ملدة أسبوعني أو أكثر .غاز الهيدروجني قابل لالنفجار .في حالة عدم استخدام نظام املاء الساخن ملدة أسبوعني أو أكثر ،قم بتشغيل كافة صنابير املياه الساخنة املوجودة في املنزل ،ودع املاء يتدفق لبضعة ثوان قبل استخدام الغسالة .سوف يعمل ذلك على تقليل نسبة تزايد غاز الهيدروجني .ال تقم بإشعال أي مصدر لهب مفتوح في ذلك الوقت. قم بتهوية القابس على الفور دون ملسه في حالة تسرب الغاز. قم بفصل سلك الطاقة قبل صيانة الغسالة. ال تقم باالقتراب من الغسالة أثناء حترك احلاوية. ال حتاول ملس أسفل اجلهاز بيديك أو باستخدام أداة حيث أن لوحة التنشيف املوجودة أسفل الغسالة قد تلحق بك ضرراً. حتذير حتذير حتذير ال تدع األطفال يقومون باللعب على الغسالة أو بداخلها .ال ميكن فتح باب الغسالة بسهولة من الداخل ،وقد يصاب األطفال بضرر شديد في حالة احتباسهم داخلها. ال تدع األطفال يقومون بالنظر داخل الغسالة حيث أن سقوطهم فيها يشكل خطرا ً كبيرًا وقد يؤدي إلى عواقب وخيمة. هذا اجلهاز غير مخصص الستخدام األطفال الصغار أو األشخاص ذوي االحتياجات اخلاصة ما لم يخضعوا إلشراف شخص بشكل آمن .يجب مراقبة األطفال الصغار لضمان عدم عبثهم بالغسالة. مسؤول للتأكد من إمكانية استخدامهم للجهاز ٍ ال تقم بإصالح أي جزء من الغسالة أو استبداله أو صيانته بنفسك مالم تكن على دراية كامة بإرشادات اإلصالح املوصى بها بالنسبة للمستخدم وتتوافر لديك مهارات كيفية تنفيذها .قد تؤدي عملية اإلصالح من قبل شخص غير معتمد إلى إلغاء الضمان. قم بتخزين منظفات الغسيل واملستلزمات األخرى للغسيل في مكان بارد وجاف بعيدا ً عن متناول أيدي األطفال. قم بفصل اخلراطيم وغلق املياه عند عدم استخدام الغسالة. في حالة تلف سلك التيار الكهربي ،يجب تغييره من قبل الشركة املصنعة أو وكيل الصيانة أو أي فني مؤهل لتجنب التعرض ألي خطر. ال تقم بثني كبل التيار الكهربي بقوة أو وضع أية أشياء ثقيلة عليه. ال تقم بلمس سلك التيار الكهربي ويديك مبتلة. ال تبالغ في حتميل منفذ التيار الكهربي بعدد كبير من األجهزة مالسلاب ةقلعتم تامولعم _ 2/26/2008 12:04:54 PM WA15PALEP-02558G_AR.indd 4 ال تقم بتركيب الغسالة بالقرب من املعدات الكهربائية كما ال تقم بوضع أية شموع أو سجائر على الغسالة. ال تقم باالقتراب من الغسالة في حالة فيضان املاء أو جريانه حيث يحتمل وقوع صدمة كهربية .قم بفصل الغسالة وتصريف املاء متاماً. تنبيه ال تقم بجمع مادة التبييض من الكلور ،أو األمونيا ،أو األحماض (مثل اخلل أو مزيل الصدأ) املوجود في نفس الغسيل .تتسم املواد القابلة لالشتعال التي ميكن أن تتكون من جراء جمع هذه املواد بأنها خطرة. ال تقم بغسل املواد املصنوعة من الفيبرجالس .ميكن أن تلتصق اجلزيئات الصغيرة باألقمشة في األحمال التالية وتسبب التهابات جلدية. حتذير قبل التخلص من الغسالة ،قم بإزالة الباب حتى ال يحتبس األطفال أو احليوانات الصغيرة داخل الغسالة. قم بتوصيل الغسالة مبصدر املياه الرئيسي باستخدام مجموعة جديدة من اخلراطيم .يحظر إعادة استخدام مجموعة خراطيم قدمية. تتأثر خراطيم صنبور املياه مبرور الوقت .قم بفحص اخلراطيم بشكل دوري ملعرفة االنتفاخات ،وااللتواءات ،ومناطق القطع ،والبلي، والتسرب ،واستبدالها حسبما تقتضي احلاجة كل خمس سنوات على األقل. قم بتفريغ جيوب املالبس قبل كل غسيل .ميكن أن تتسب األشياء الصغيرة ،والصلبة املشكلة بطريقة غير عادية مثل العمالت املعدنية ،والسكاكني ،والدبابيس ،وماسكات الورق في تلف الغسالة .ال تقم بغسل املالبس املزودة بإبزميات أو أزرار كبير احلجم أو أشياء معدنية أخرى ثقيلة الوزن. في حالة عدم توقف الغسالة عن العمل في غضون 15ثانية بعد قيامك بفتح الغطاء ،اتصل بوكيل الصيانة على الفور. قم بتوصيل السلك األرضي باللوحة األساسية وتخبئته حتت عمق 10بوصة ( 25سم) تقريبا ً حتت األرض :أو ميكنك كبديل لذلك توصيل سلك األرضي مبقبس طاقة لتصريف أرضي .يحظر توصيل السلك بسلك هاتف أو قضيب البرق أو أنبوب غاز. الغساالت التي حتتوي على فتحات تهوية بقاعدتها ،يجب جتنب سد السجاد لهذه الفتحات. _ مالسلاب ةقلعتم تامولعم 2/26/2008 12:04:54 PM WA15PALEP-02558G_AR.indd 5 احملتويات إعداد الغسالة 7 غسيل كمية من املالبس 18 7تأكد من أجزاء الغسالة ولوحة التحكم 9الدورة “رقمي” 9دورة “البطانية” 10دورة “املالبس الرقيقة” 10دورة الذاكرة 10دورة “تنظيف احلوض” 11الدورة “سريع” “11نظافة قصوى” 11دورة “اقتصادي”+ 11تأجيل التشغيل 12غسيل فضي 12هواء نفاث 13وظائف يدوية 14تركيب الغسالة 14اختيار مكان الغسالة 14توصيل خرطوم توريد املاء 15جتميع لوحة احلماية (اختياري) 15توصيل خرطوم التصريف 17ضبط ارتفاع الغسالة 18إرشادات أساسية 18تعليمات الغسيل 20مسحوق الغسيل ومعلومات حول املواد اإلضافية 21الغسيل للمرة األولى 21وظيفة التحسس التلقائي تنظيف الغسالة وصيانتها 22احتفظ باحلوض نظيفًا 22تنظيف مصفاة موصل تزويد املاء 23تنظيف شبكة املصفاة 23تنظيف مصفاة املضخة استكشاف املشاكل وحلها ورموز املعلومات 24حتقق مما يلي إذا كانت الغسالة... 26رموز املعلومات 22 24 املواصفات 27 يوتحملا _ 2/26/2008 12:04:54 PM WA15PALEP-02558G_AR.indd 6 إعداد الغسالة تأكد من التركيب وفقًا لهذه اإلرشادات بشكل دقيق حتى تعمل الغسالة بشكل صحيح وجتنب مخاطر حدوث إصابة عند القيام بالغسيل. أخرج الغسالة بعناية من الصندوق وتأكد من وجود كافة األجزاء املوضحة أدناه .في حالة تلف الغسالة أثناء عملية الشحن ،أو في حالة عدم استالمك لكافة األجزاء ،قم باالتصال بخدمة عمالء Samsungأو املوزع املعتمد لدى .Samsung ةلاسغلا دادعإ 01 تأكد من أجزاء الغسالة ولوحة التحكم الغطاء تأكد من غلق الغطاء أثناء عمليتي الغسيل والتنشيف. خرطوم تزويد املاء (الساخن) (اختياري) خرطوم التزود باملاء (البارد) غسيل فضي (موديالت محددة) املصفاة خرطوم التصريف (املضخة) (اختياري) ستتجمع النساالت في املصفاة أثناء الغسيل. موزع مسحوق الغسيل موزع ملني األقمشة سلة التنشيف (اختياري) سلك التيار الكهربي مضخة نابضة سلك أرضي (اختياري) إذا كانت ماسورة املاء مصنوعة من معدن ،تأكد من تغطية نهاية السلك األرضي. خرطوم تصريف املاء (اختياري) لوحة احلماية (اختياري) لوحة التحكم األمامية أرجل قابلة للضبط اضبط طول األرجل عند تثبيت الغسالة. _ ةلاسغلا دادعإ 2/26/2008 12:04:54 PM WA15PALEP-02558G_AR.indd 7 إعداد الغسالة 1 4 5 6 7 8 9 10 11 12 13 14 2 3 1 الزر “الطاقة” قم بالضغط على هذا الزر مرة واحدة لبدء التشغيل. اضغط هذا الزر مرة أخرى إليقاف التشغيل. 2 الزر “تشغيل/إيقاف مؤقت” اضغط إليقاف الدورات مؤقتا ً وإعادة تشغيلها. لتغيير أحد إجراءات الغسيل أثناء عملية التشغيل ،اضغط هذا الزر لإليقاف ،ومرة أخرى إلعادة تشغيل الغسالة بعد تغيير إجراء الغسيل. 3 زر حتديد الدورة [رقمي بطانية مالبس رقيقة ذاكرة تنظيف احلوض سريع نظافة قصوى اقتصادي]+ 4 الزر “شطف” اضغط على هذا الزر ألداء دورة الشطف فقط أو لضبط حجم دورات الشطف. 5 الزر “تنشيف” اضغط على هذا الزر إلجراء عملية التنشيف فقط أو لضبط وقت التنشيف. عند حتديد دورة التنشيف فقط ،سيختلف وقت التنشيف عن الوقت الكلي املتبقي .ويرجع ذلك إلى أن الوقت الكلي املتبقي يتضمن وقت التنشيف الفعلي ووقت تصريف املاء وإيقاف الغسالة. 6 وظيفة التأمني ضد عبث األطفال متكنك وظيفة التأمني ضد عبث األطفال من قفل األزرار حتى ال يكون هناك إمكانية لتغيير دورة الغسيل التي مت حتديدها( .يعمل هذا اجلهاز على منع األطفال من اللعب بالغسالة). التشغيل/عدم التشغيل :قم بالضغط على كل من زر الشطف و التنشيف في نفس الوقت ملدة 3ثوان. (مالحظة :ال ميكن أداء هذه الوظيفة دون تشغيل “الطاقة”). 7 الزر “غسيل” اضغط على هذا الزر للقيام بدورة الغسيل فقط أو لضبط وقت الغسيل. 8 الوقت املتبقي ووقت تأجيل التشغيل وشاشة األخطاء تقوم الشاشة بعرض وقت الغسيل املتبقي ،ووقت تأجيل التشغيل احملفوظ ورسائل األخطاء. 9 الزر “هواء نفاث” اضغط على هذا الزر للحصول على جتفيف سريع للغسيل. اضغط على هذا الزر للتبديل بني خيارات “الهواء النفاث”: تشغيل إيقاف تشغيل ميكن حتديد هذه الوظيفة فقط في حالة ضبط دورة التنشيف. 10 الزر “سهل” إذا قمت باختيار دورة “سهل” ،ستتمتع باستخدام جميع الوظائف السهلة املزودة بها غسالة سامسوجن بلمسة واحدة من أصابعك .عند حتديد هذه الدورة ،يتم حتديد دورة “هواء نفاث” و”غسيل فضي” تلقائ ًيا. 11 الزر “تأجيل التشغيل” اضغط على هذا الزر إلنهاء الغسيل في وقت محدد .قم بإيقاف تشغيل الغسالة إللغاء وقت التشغيل املؤجل مسبقاً. ميكنك ضبط وقت التشغيل املؤجل بني 3إلى 18ساعة. اضغط على هذا الزر مرارا ً وتكرارا ً لتدويرها خالل دورات الغسيل: ةلاسغلا دادعإ _ 2/26/2008 12:04:55 PM WA15PALEP-02558G_AR.indd 8 13 الزر “مستوى املاء” 14 الزر “تزويد املاء” (اختياري) يكون ذلك متاحا ً لكافة الدورات فيما عدا دورة املالبس الرقيقة. يتم ضبط مستوى املاء تلقائ ًيا .مع ذلك ،ميكنك حتديد مستوى املاء يدويًا بالضغط على هذا الزر بشكل متكرر. ةلاسغلا دادعإ 01 12 الزر “غسيل فضي” يتم في هذه دروة توفير املاء الفضي أثناء دورة الغسيل وأيضا ً أثناء عملية الشطف األخيرة ،مما يوفر تعقيما ً إضافيا ً وحماية من البكتريا. ال ميكن حتديد ماء الغسيل الفضي في حالة حتديد املاء الساخن فقط. التعقيم :يتم إضافة ماء الغسيل الفضي إلى تزويد املاء للقيام بغسل معقم ومكافحة للبكتريا. احلماية من البكتريا :يتم توريد ماء الغسيل الفضي أثناء دورة الشطف األخيرة بعد عملية الغسيل لوضع طبقة مكافحة للبكتريا على الغسيل .تعمل وظيفة الشطف املعقم على منع انتشارالبكتريا. اضغط على هذا الزر بشكل متكرر ألداء الدورة من خالل خيارات الغسيل: بارد ساخن بارد لتغيير خيارات املاء ،قم بإيقاف تشغيل وظيفة املاء الفضي. الدورة “رقمي” ميكنك استخدام هذه الدورة لتحديد أفضل دورة غسيل تلقائياً. .1اضغط على الزر الطاقة “لتشغيل” الغسالة. .2اضغط على الزر تشغيل/إيقاف مؤقت .يتم حتديد مستوى املاء تلقائ ًيا. .3تأتي بعد ذلك دورات الغسيل والشطف والتنشيف. .4إليقاف إحدى الدورات ،اضغط على الزر تشغيل/إيقاف مؤقت مرة أخرى .ميكنك تغيير الدورة أثناء التوقف املؤقت. .5أغلق الغطاء. دورة “البطانية” استخدم هذه الدورة لغسيل األشياء كبيرة احلجم مثل البطاطني ومالءات السرير. .1اضغط على الزر الطاقة “لتشغيل” الغسالة. .2اضغط على زر حتديد الدورة. .3اضغط على الزر تشغيل/إيقاف مؤقت .يتم حتديد مستوى املاء تلقائ ًيا. .4فيما يلي دورات الغسيل ،والشطف ،والتنشيف. .5إليقاف أحد الدورات مؤقتًا ،اضغط على الزر تشغيل/إيقاف مؤقت مرة أخرى .ميكنك تغيير الدورة أثناء التوقف املؤقت. .6أغلق الغطاء. • ال تغسل البطانية الكهربائية والسجاد. • قم بطي الغسيل ذا احلجم الكبير (البطاطني ومالءات السرير) بالطريقة التالية قبل وضعه بداخل سلة التنشيف. • قم بشراء شبكة للغسيل اخلفيف وكبير احلجم (مثل املالبس الصوفية والبطاطني) ألنها قد ترتفع إلى أعلى الغسالة مما قد يتسبب في الضرر. _ ةلاسغلا دادعإ 2/26/2008 12:04:55 PM WA15PALEP-02558G_AR.indd 9 إعداد الغسالة دورة “املالبس الرقيقة” ميكنك استخدام هذه الدورة لغسيل املالبس الرقيقة مثل اجلواكت القابلة للغسيل ،والسترات الصوفية ،واملالبس األخرى الرقيقة. .1اضغط على الزر الطاقة “لتشغيل” الغسالة. .2اضغط على زر حتديد الدورة. .3اضغط على الزر تشغيل/إيقاف مؤقت يتم حتديد مستوى املاء تلقائيا ً عند املستوى املتوسط بني منخفض-متوسط وحد أدنى .كما ميكنك ضبط مستوى املاء يدوياً. .4فيما يلي دورات الغسيل ،والشطف ،والتنشيف. .5إليقاف أحد الدورات مؤقتًا ،اضغط على الزر تشغيل/إيقاف مؤقت مرة أخرى .ميكنك تغيير الدورة أثناء التوقف املؤقت. .6أغلق الغطاء. • ميكنك حتديد ماء بارد فقط. • تتميز دورة التنشيف األخيرة بأنها دورة خفيفة ملنع التجاعيد. • ميكنك استخدم مسحوق الغسيل املوضح في الغسيل فقط. • ميكنك الرجوع إلى عالمة العناية املوجودة على املالبس للحصول على املعلومات الصحيحة لعملية الغسيل. • تأكد من أن األزرار مثبته وأن الغسيل يتم قلبه على ظهره داخل الغسالة. • بالنسبة لدورة املالبس الرقيقة ،ال ميكن حتديد وظائف “هواء نفاث” و”غسيل فضي” ألن ذلك رمبا يلحق ضررا ً باملالبس الرقيقة. دورة الذاكرة ميكنك استخدام هذه الدورة إلنشاء الدورات املفضلة أو املستخدمة بكثرة وتخزينها في الغسالة حتى ميكنك حتديدها في أي وقت. .1اضغط على الزر الطاقة “لتشغيل” الغسالة. .2اضغط على زر حتديد الدورة. .3ميكنك حتديد الوظائف املستخدمة بشكل بكثرة. حتديد الغسيل ،أو الشطف أو التنشيف أو الغسيل الفضي وفقا ً ملتطلباتك. .4اضغط على الزر تشغيل/إيقاف مؤقت لتخزينها. ميكن تخزينها فقط عند حتديد خطوات الغسيل+الشطف+التنشيف. .5قم بإضافة مسحوق وملني طبقا ً ملستوى املاء وأغلق الغطاء. • إذا قمت بتحديد الدورة «ذاكرة» بعد تشغيل الغسالة ،يتم استرداد اإلعدادات اخملزنة تلقائ ًيا. • لتغيير اإلعدادات اخملزنة ،حدد الدورة «ذاكرة» وقم بإعادة ضبط اإلعدادات ثم اضغط على الزر «تشغيل/إيقاف مؤقت» .يتم حفظ التغييرات. دورة “تنظيف احلوض” استخدم هذه الدورة لتنظيف احلوض .فهي تؤدي إلى إبقاء احلوض نظيفًا ومعق ًما. .1اضغط على الزر الطاقة “للتشغيل”. .2اضغط على زر حتديد الدورة. .3اضغط على الزر “تشغيل/إيقاف”. .4أضف املسحوق ثم أغلق الغطاء. • ال تقم أب ًدا بوضع الغسيل في احلوض عند القيام بتنظيفه ،فقد يؤدي ذلك إلى تلطخ ألوان الغسيل أو تلفه. • عند القيام بالغسيل بعد تنظيف احلوض ،قد جتد بعض الرواسب .التي ترجع إلى بقايا املادة املنظفة الناجتة عن عملية التنظيف .قم بإجراء دورة الشطف من مرتني إلى ثالث مرات. • سيتم ضبط وظيفة “تنقيع” تلقائ ًيا. •يتم حتديد مستوى املاء األولي عند املستوى املتوسط بني األقصى واملتوسط. ةلاسغلا دادعإ _10 2/26/2008 12:04:55 PM WA15PALEP-02558G_AR.indd 10 الدورة “سريع” “نظافة قصوى” استخدم هذه الدورة لتحقيق غسيل على أعلى درجة من النظافة. توفر هذه الدورة أعلى درجة في أداء الغسيل من خالل نظام النظافة القصوي املكون من 5خطوات. .1اضغط على الزر الطاقة “لتشغيل” الغسالة. .2اضغط على زر حتديد الدورة. .3اضغط على الزر تشغيل/إيقاف مؤقت .يتم حتديد مستوى املاء عند املستوى املتوسط بني متوسط ومنخفض-متوسط. ةلاسغلا دادعإ 01 تعد دورة “سريع” مناسبة للغسيل اخلفيف أو الغسيل املتسخ اتساخا ً خفيفاً. .1اضغط على الزر الطاقة “لتشغيل” الغسالة. .2اضغط على زر حتديد الدورة. .3اضغط على الزر تشغيل/إيقاف مؤقت .يتم حتديد مستوى املاء تلقائ ًيا. .4فيما يلي دورات الغسيل ،والشطف ،والتنشيف. .5إليقاف أحد الدورات مؤقتًا ،اضغط على الزر تشغيل/إيقاف مؤقت مرة أخرى .ميكنك تغيير الدورة أثناء التوقف املؤقت. .6أغلق الغطاء. يتم حتديد مستوى املاء بني األقصى واملتوسط أو عند املستوى املتوسط بني متوسط ومنخفض-متوسط. .4أغلق الغطاء. دورة “اقتصادي”+ تستخدم هذه الدورة عندما تريد غسل املناشف التي تستخدم بشكل متكرر أو الغسيل قليل االتساخ .مبا أن الغسيل يكون سريعاً، يفضل استخدام هذه الدورة للغسيل املتسخ اتساخا ً خفيفا ً أو أقل. .1اضغط على الزر الطاقة “لتشغيل” الغسالة. .2اضغط على زر حتديد الدورة. .3اضغط على الزر تشغيل/إيقاف مؤقت. .4فيما يلي دورات الغسيل ،والشطف ،والتنشيف. .5إليقاف أحد الدورات مؤقتًا ،اضغط على الزر تشغيل/إيقاف مؤقت مرة أخرى .ميكنك تغيير الدورة أثناء التوقف املؤقت. .6أغلق الغطاء. تأجيل التشغيل ميكنك استخدم هذه الدورة لتحديد وقت لبدء دورة الغسيل ،عندما تكون بحاجة للخروج وال ميكنك مراقبة الغسالة على سبيل املثال. .1اضغط على الزر الطاقة “لتشغيل” الغسالة. .2اضغط على الزر تأجيل التشغيل مرة واحدة لرمبا تقوم بضبط وقت التأجيل باستخدام الزر تأجيل التشغيل في فترة من 3إلى 18ساعة. .3اضغط على الزر تشغيل/إيقاف مؤقت ثم أضف كمية مناسبة من املسحوق في درج املسحوق. .4أغلق الغطاء. سوف ينتهي الغسيل بانتهاء الوقت احملدد. قم بإضافة مسحوق وملني طبقا ً ملستوى املاء وأغلق الغطاء. •يجب إضافة املسحوق في درج املسحوق. • في حالة إضافة املسحوق إلى الغسيل مباشرة ،قد تفقد بعض املالبس لونها بسبب تأجيل التشغيل. • إللغاء تأجيل التشغيل ،اضغط على الطاقة. _11ةلاسغلا دادعإ 2/26/2008 12:04:56 PM WA15PALEP-02558G_AR.indd 11 إعداد الغسالة غسيل فضي تعمل هذه الدورة على قتل البكتريا املوجودة في الغسيل أثناء دورة الغسيل أو الشطف مما يعمل على حمايتك أنت وأسرتك من البكتريا الضارة. .1اضغط على الزر الطاقة “لتشغيل” الغسالة. .2اضغط على الزر غسيل فضي. .3اضغط على الزر تشغيل/إيقاف مؤقت .يتم حتديد مستوى املاء تلقائ ًيا. .4فيما يلي دورات الغسيل ،والشطف ،والتنشيف. .5إليقاف أحد الدورات مؤقتًا ،اضغط على الزر تشغيل/إيقاف مؤقت مرة أخرى .ميكنك تغيير الدورة أثناء اإليقاف املؤقت. .6أغلق الغطاء. ميكن اختيار ذلك فقط في حالة حتديد دورات الغسيل والشطف والتنشيف. • عند حتديد دورة “غسيل فضي” ،وإيقاف تشغيل الزر “تزويد املاء” الذي يتم حتديده يدوياً. •يكون ذلك متاحا ً كخيار لكافة الدورات فيما عدا دورة املالبس الرقيقة. هواء نفاث تعمل هذه الدورة على توفير الوقت ،مما يضمن لك جتفيف مالبسك بشكل أسرع من التجفيف على حبل الغسيل. .1اضغط على الزر الطاقة “لتشغيل” الغسالة. .2اضغط على الزر “هواء نفاث”. يتم أداء العمليات بالترتيب التالي في كل وقت يتم فيه الضغط على الزر “هواء نفاث” :تشغيل إيقاف التشغيل تشغيل .3أغلق الغطاء. .4اضغط على الزر تشغيل/إيقاف مؤقت. • ميكن حتديد ذلك كخيار إضافي لكافة الدورات فيما عدا دورة “املالبس الرقيقة” ودورة “تنظيف احلوض”. • تكون وظيفة “هواء نفاث” متوفرة فقط عند حتديد دورة “التنشيف”. • حدد هذه الوظيفة إذا أردت جتفيف الغسيل في مرحلته املتوسطة. ةلاسغلا دادعإ _12 2/26/2008 12:04:56 PM WA15PALEP-02558G_AR.indd 12 وظائف يدوية الدورة الغسيل فقط الشطف فقط التنشيف فقط الغسيل والشطف الشطف والتنشيف غسيل وشطف وتنشيف إرشادات اضغط على الزر الطاقة. اضغط على الزر غسيل. اضغط على الزر تشغيل/إيقاف مؤقت. عند الضغط على الزر “غسيل” أثناء الغسيل ،ميكن تغيير مدة الغسيل ملدة تتراوح بني 6دقائق و 30دقيقة. ةلاسغلا دادعإ 01 من املمكن حتديد الدورات يدوياً. (مثال) غسيل أساسي للمالبس خفيفة االتساخ: الطاقة حتديد الدورة “سريع” غسيل تشغيل/إيقاف مؤقت اضغط على الزر شطف. اضغط على الزر تشغيل/إيقاف مؤقت. يتم أداء دورة الشطف مرتني. عند الضغط على الزر شطف أثناء الشطف ،ميكن تغيير عدد مرات الشطف لتتراوح من مرة واحدة إلى خمس مرات. اضغط على الزر “تنشيف”. اضغط على الزر تشغيل/إيقاف مؤقت. عند الضغط على الزر “تنشيف” أثناء دورة التنشيف ،ميكن تغيير مدة التنشيف من دقيقة إلى 9دقائق. اضغط على الزر غسيل وشطف. اضغط على الزر تشغيل/إيقاف مؤقت مرة واحدة. تتعرف الدورة على كمية الغسيل ،وحتديد وقت الغسيل والشطف تلقائياً. عند الضغط على الزر غسيل وشطف أثناء تشغيل الغسالة ،يتم حتديد وقت الغسيل إلى ما بني 6و 30دقائق ،وحتديد وقت الشطف إلى ما بني مرة واحدة أو خمس مرات. اضغط على الزر شطف وتنشيف. اضغط على الزر تشغيل/إيقاف مؤقت مرة واحدة. يتم تشغيل دورات الشطف والتنشيف. عند الضغط على الزر شطف وتنشيف أثناء تشغيل الغسالة ،يتم حتديد عدد دورات الشطف ما بني مرتني أو خمس مرات ،كما يتم حتيد وقت التنشيف ما بني دقيقة واحدة وتسع دقائق. اضغط على الزر غسيل وشطف وتنشيف. اضغط على الزر تشغيل/إيقاف مؤقت مرة واحدة. يتم تشغيل دورات “غسيل” و”شطف” و”تنشيف” _13ةلاسغلا دادعإ 2/26/2008 12:04:57 PM WA15PALEP-02558G_AR.indd 13 إعداد الغسالة تركيب الغسالة اختيار مكان الغسالة تأكد من اختيار مكان الغسالة قبل تركيبها. • ال بد من توافر سطح صلب ومستوي دون وجود سجاد أو بالط قد يعوق عملية التهوية وجتنب االهتزازات • اترك مسافة تقدر بـ 4بوصة ( 10سم) بني الغسالة واحلائط • تكون بعيدة عن ضوء الشمس املباشر وغير معرضة للمطر حيث أن الرطوبة قد تؤدي إلى تلف العزل الكهربي مما يتسبب في حدوث صدمة كهربية • يجب أن يتوافر بها تهوية كافية • ال تكون معرضة لدرجات حرارة حتت الصفر (أقل من ˚ ˚ 32فهرنايت و 0درجة مئوية • تكون بعيدة عن مصادر احلرارة مثل البترول والغاز • ال بد من توفر مساحة كافية حتى ال يتم وضع الغسالة على كبل الطاقة توصيل خرطوم توريد املاء توصيل اخلرطوم بالصنبور .1إزالة احملول من خرطوم تزويد املاء. .2إرخاء البراغي األربعة املوجودة باحملول باستخدام مفك البراغي من نوع “ .”+ثم إخراج احملول ولف اجلزء (ب) باجتاه السهم إلحداث فجوة تقدر بنحو 2.0بوصة ( 5مم) بني اجلزء (أ) واجلزء (ب). .3قم بتوصيل احملول بصنبور املاء بربط البراغي بإحكام .ثم لف اجلزء (ب) باجتاه السهم وادفع اجلزءين (أ) و (ب) معاً. .4صل خرطوم تزويد املاء باحملول .قم بسحب اجلزء (ج) (خرطوم تزويد املاء) ألسفل .عند إرخاء اجلزء (ج) ،يتم توصيل اخلرطوم باحملول تلقائيا ً محدثا ً صوت “إغالق”. .5صل الطرف اآلخر من خرطوم تزويد املاء بصمام دخول املاء املوجود في أعلى الغسالة .لف خرطوم تزويد املاء في اجتاه عقارب الساعة. أو صل الطرف اآلخر من خرطوم تزويد املاء بصمام دخول املاء املوجود في أعلى الغسالة .لف خرطوم توريد املاء في اجتاه عقارب الساعة. ةلاسغلا دادعإ _14 2/26/2008 12:04:58 PM WA15PALEP-02558G_AR.indd 14 إذا كان صنبور املاء من نوع برغي ،ركب خرطوم توريد للماء يالئم الصنبور كما هو موضح .بعد اكتمال التوصيل ،إذا تسرب املاء من اخلرطوم ،كرر نفس اخلطوات. بعد اكتمال التوصيل ،إذا تسرب املاء من اخلرطوم ،كرر نفس اخلطوات .استخدم صنبور من النوع العادي للتزويد باملاء .إذا كان الصنبور مربعا ً أو كبيرا ً جداً ،أزل احللقة الفاصلة قبل إدخال الصنبور إلى احمل ّول. .1قم بدفع لوحة احلماية وإدراجها نحو اخللف من خالل فتحة اإلدخال من األمام. واجهة الغسالة ةلاسغلا دادعإ 01 جتميع لوحة احلماية (اختياري) .2إذا واجهتك صعوبات في إدخال اللوحة ،ارفع الغسالة قليالً ثم قم بإدخالها. ال يتم استخدام لوحة احلماية في بعض املوديالت توصيل خرطوم التصريف بالنسبة للغسالت غير املزودة مبضخات تصريف .1قم بالضغط على حلقة الوصل وضعها حول خرطوم التصريف. .2بعد وضع خرطوم التصريف في مخرج التصريف ،قم بوصل الطرف األخر للخرطوم مبخرج الصرف اخلاص بالغسالة. مخرج التصريف .3تأكد من توصيله بإحكام عن طريق الضغط على حلقة الوصل ودفعها في مخرج التصريف. • ميكن التحكم في ضبط طول خرطوم التصريف بحيث ميكنك إطالته ليصل إلى الطول املالئم. تغيير اجتاه خرطوم التصريف • اضغط على مقبض حلقة الوصل لدفع خرطوم تصريف املاء .قم بتغيير اجتاه خرطوم التصريف واتبع اإلرشادات املوضحة أعاله مرة أخرى. _15ةلاسغلا دادعإ 2/26/2008 12:05:00 PM WA15PALEP-02558G_AR.indd 15 إعداد الغسالة تنبيه حول إدخال خرطوم تصريف املاء تنبيه .1عند توصيل خرطوم بآخر ،ينبغي أال يزيد الطول عن 118.1بوصة (3م). أقل من 118.1بوصة ( 3م) .2تأكد أن طرف خرطوم التصريف منخفض عن مستوى املاء لصمان تصريف املاء بصورة مالئمة. .3يجب أال تكون هناك أية عوائق في طريق خرطوم التصريف أعلى من 2بوصة (5 سم). أقل من 2بوصة ( 5سم) أقل من 118.1بوصة ( 3م) .4ال تقم بتثبيت خرطوم تصريف املاء أسفل الغسالة. بالنسبة للغسالت املزودة مبضخات تصريف .1انزع غطاء اخلرطوم وصل خرطوم الصرف. غطاء اخلرطوم .2تأكد من توصيل خرطوم التصريف مبخرج التصريف بشكل محكم املوجود على جانب الغسالة. .3ثبت خرطوم تصريف املاء على بعد يقدر بنحو (100~90سم) فوق األرض. 39~35بوصة ( 100 ~ 90سم) ةلاسغلا دادعإ _16 2/26/2008 12:05:01 PM WA15PALEP-02558G_AR.indd 16 ضبط ارتفاع الغسالة تأكد من استواء الغسالة عن طريق ضبط أرجل االستواء. كن حذرا ً من وضع يديك حتت أرجل الغسالة. تنبيه مؤشر مستوى املاء السبب ةلاسغلا دادعإ 01 .1قم بسحب املقابض املوجودة على ميني ويسار اجلزء األمامي للغسالة وإزاحتها. .2قم بتعديل ارتفاع الغسالة ألعلى أو ألسفل. .3بعد االنتهاء من ضبط االرتفاع ،قم بدفع املقابض للخلف لتثبيت أرجل الضبط في مكانها. كيفية ضبط االستواء تكون مقدمة الغسالة منخفضة حدد مستوى الغسالة عن طريق ضبط األرجل. تكون خلفية الغسالة منخفضة تعديل االرتفاع باستخدام الدعامات املوجودة في اخللف. يكون اجلانب األيسر من الغسالة منخفض قم بتعديل اجلانب األيسر باستخدام األرجل القابلة للتعديل املوجودة في املقدمة والدعامات املوجود في اخللف. يكون اجلانب األمين من الغسالة منخفض قم بتعديل اجلانب األيسر باستخدام األرجل القابلة للتعديل املوجودة في املقدمة والدعامات املوجود في اخللف. ضبط استواء أرجل الغسالة باستخدام البراغي اخملصصة لالستواء(.اختياري) .1قم برفع الغسالة برفق ولف األرجل القابلة للضبط إلى اليسار لضبطها على وضع االتزان األمثل. .2عند االنتهاء ،أنزل الغسالة إلى موضعها األصلي. .3بعد ضبط األرجل ،احرص على ربط صمولة التأمني ألغراض السالمة. (قد يتسبب عدم القيام بذلك في عدم تثبيت الغسالة وحتريكها من مكانها). _17ةلاسغلا دادعإ 2/26/2008 12:05:03 PM WA15PALEP-02558G_AR.indd 17 غسيل كمية من املالبس مع الغسالة اجلديدة ،يقوم اجلزء األكثر صالبة بتحديد الكمية التي يجب غسلها أوال ً إرشادات أساسية .1 .2 .3 .4 .5 قم بوضع املالبس في الغسالة. أغلق الباب. قم بتشغيل الغسالة. قم بإضافة مسحوق ومواد إضافية في املوزع (راجع صفحة .)20 حدد الدورة واخليارات املناسبة للكمية (راجع الصفحات من 9إلى .)12سيضىء مؤشر الغسيل وسوف يظهر وقت الدورة الذي مت تقديره على الشاشة. اضغط على الزر تشغيل/إيقاف مؤقت. تعليمات الغسيل اتبع هذه التعليمات البسيطة للحصول على غسيل أكثر نظافة وأكثر فاعلية( .من الضروري اتباع تعليمات الفحص املوجودة أدناه لتجنب املشاكل التي قد يواجهها جهاز الغسالة أو التلفيات التي قد تلحق باملالبس). في حالة وجود أية مشاكل حتدث بسبب االستخدام اخلطأ من قبل العميل ،سيتم حتصيل مصاريف خدمة منفصلة من العميل. قم بفحص بطاقة العناية املوجودة على املالبس دوما ً قبل الغسيل. • • • • • • • • • ميكنك ملء احلوض مبالبس جافة وغير مثنية ،ولكن يحظر وضع مالبس زيادة عن اللزوم في احلوض .قد يقلل وضع مالبس زيادة عن اللزوم من كفاءة الغسيل ،ويسبب حدوث بلي للغسيل والغسالة ،وميكن أن يسبب ثني أو جتعيد لكمية الغسيل. عند القيام بغسل األشياء كبيرة احلجم أوالضخمة أو األشياء األصغر في احلجم ال تقم مبلء احلوض متاما ً -بطانية ،أو وسادة ،أو دمي محشوة ،أو جاكت واحد أو اثنني على سبيل املثال.-.قم بإضافة مناشف قليلة لتحسني أداء التجفيف بالتدوير والتنشيف. تأكد من وجود أية مالبس قد تبيض .أضف مسحوق سائل إلى أحد املناشف واملالبس ذات اللون األبيض إذا كنت غير متأكد من أنها قد تبيض .قم بدعك كال الثوبني معا ً بقوة .حتقق مما إذا كان اللون قد انتقل إلى املنشفة أم ال. تعامل بحذر مع الوشاحات واملالبس املستوردة حيث أنها تفقد لونها بسهولة .حتقق مما إذا كان يوجد أية بقع أو أوساخ باملالبس. في حالة وجود أية بقع ،قم بإضافة بعض املساحيق إلى املالبس وادعكها في اجتاه واحد .يؤدي دعك األوساخ واألتربة املتراكمة على املالبس الرقيقة إلى تعريضها للتلف واحلصول على نتائج غير مرضية بعد الغسيل. إذا كانت املالبس متسخة بدرجة عالية ،قم بإزالتها وغسلها بشكل منفصل،حيث أن األوساخ قد تنتقل إلى املالبس األخرى. قبل الغسيل ،تتم معاجلة األشياء التالية مسبقا ً مثل األساور ،والياقات ،وثنيات الفساتني واجليوب بالتنظيف بفرشاة عليها مسحوق .يجب التعامل مع هيئة األقمشة اجملدولة املصنوعة من الصوف خاصة عن طريق ربطها معا ً (باستخدام خيوط) قبل عملية الغسيل .يتم إزالة اخليوط بعد جتفيف املالبس. قد تتسبب املعادن املستخدمة في املالبس في تلفها وكذلك احلوض .اقلب املالبس املزينة باألزرار واملطرزة على ظهرها قبل غسلها .إذا تركت السراويل وسوست اجلاكت مفتوحة أثناء الغسيل، فإن هذا قد يتسبب في تلف سلة التنشيف .يجب قفل السوست قبل الغسيل. قد تتشابك املالبس ذات اخليوط الطويلة مع مالبس أخرى وقد يؤدي ذلك إلى تلف هذه املالبس. احرص على تثبيت اخليوط قبل بدء الغسيل. اقلب املالبس الرقيقة على ظهرها قبل غسلها. الملا نم ةيمك ليسغ _18 2/26/2008 12:05:03 PM WA15PALEP-02558G_AR.indd 18 • • تنبيه قم بفحص كافة اجليوب قبل الغسيل! قد تتسبب بنس الشعر والعمالت املعدنية في تلف املالبس والغسالة .من الضروري فحص اجليوب للتأكد من وجود أشياء بها وإزالتها. الملا نم ةيمك ليسغ 02 اغسل املالبس السوداء واملناشف القطنية كل على حدة .قد تتسخ املالبس في حالة غسلها مع املالبس السوداء .افحص املالبس قبل الغسيل. ال يجب طفو الستائر ،أواملالبس اخلفيفة أو اجلينز .في حالة تعوميها ،قم بإيقاف الغسالة بالضغط على الزر تشغيل/إيقاف مؤقت والضغط على املالبس ألسفل حتى يتم غمرهم في املاء .في حالة استمرار الغسيل مع املالبس العائمة ،قد يتسبب ذلك في تلف املالبس والغسالة ،كما ينتج عنه نتائج غسيل غير مرضية. ال تقم بغسل األشياء التالية • • • • • املالبس التي تفقد شكلها بسهولة عند نقعها في املاء. أربطة العنق والصدريات والسترات والبدل واملعاطف املصنوع معظمها من الرايون ونوع آخر من مشتقات األلياف اخمللطة والتي ميكن أن تفقد شكلها بسهولة (مثل االنكماش وتلطخ ألوان الغسيل). ميكن أن تتغير ألوان األقمشة املعاجلة أو املنقوشة أو الصناعية التي تفقد شكلها بسهولة حتى من خالل النقع في املاء. وتعتبر األقمشة املصنوعة من القطن والصوف واحلرير املعالج واملنتجات اجللدية واألدوات املصنوعة من اجللود واملالبس املزينة باجللد وملحقاتها من املنتجات التي تفقد لونها بسهولة. ال تقم بغسل املالبس املقاومة للماء (مثل مالبس التزحلق على اجلليد ،وحفاضات األطفال واملمسحات/البطاطني) .قد يؤدي ذلك إلى خروج الغسيل أو اهتزاز الغسالة بشكل غير طبيعي مما قد يؤدي إلى إصابة شخصية أو تلف الغسالة أو األرضية أو املالبس .عند دوران احلوض ،قد يبقى املاء داخل املالبس أو األقمشة املقاومة للماء وقد يتجميع في أحد األركان مما يؤدي إلى اهتزاز الغسالة بشكل غير طبيعي .وقد يرتفع الغسيل ويخرج من الغسالة مما يؤدي إلى اإلصابة. استخدم شبكة الغسيل لغسيل األشياء التالية • • • • استخدم فقط شبكات الغسيل التجارية. ضع املالبس اخلفيفة في شبكة غسيل. قد يتسبب غسيل املالبس ذات األحجام الكبيرة واألوزان اخلفيفة (على سبيل املثال املالبس املزينة بالدانتيل ،واملالبس النسائية ،واملنسوجات املصنوعة من النيلون ،إلى آخره) في ارتفاعها إلى أعلى الغسالة ويلحق ضررا ً باملالبس نفسها والغسالة .استخدم شبكة الغسيل أو اغسلها على حدة. ضع املالبس ذات اخليوط الطويلة واملزينة بالدانتيل ،ومالءات السرير واملالبس الصوفية في شبكة غسيل قبل غسلها. _19الملا نم ةيمك ليسغ 2/26/2008 12:05:04 PM WA15PALEP-02558G_AR.indd 19 غسيل كمية من املالبس مسحوق الغسيل ومعلومات حول املواد اإلضافية أي مسحوق تقوم باستخدامه ميكن استخدام املنظفات السائلة واملساحيق .ال تستخدم الصابون فقد يتسخ احلوض من األوساخ املوجودة عليه. • عندما ال يذوب املسحوق بالصورة املالئمة ،قم باستخدام ماء ساخن إلذابته. • استخدم كمية مناسبة من املسحوق. تنبيه • • • • حتى إذا مت اإلفراط في استخدام كمية مسحوق الغسيل ،فلن تختلف نتيجة الغسيل بدرجة كبيرة .ومع ذلك ،فقد يلحق ضررا ً باملالبس ألن عملية الشطف قد تكون غير كافية. قد تتسبب مواد التبييض في إتالف املالبس حيث أنها مواد شديدة القلوية. قم بشطف املالبس بشكل كاف حيث أن املساحيق املنظفة ميكن أن يظل لها أثر على املالبس مم يتسبب في إحداث ريحة كريهة. إذا مت اإلفراط في استخدام املسحوق أو املاء البارد ،فلن يذوب املسحوق بالكامل وسيظل في املالبس أو اخلرطوم أو سلة التنشيف مما يسبب تلوثها. لتأجيل التشغيل ،يجب إضافة املسحوق إلى درج املسحوق .قد يؤدي انتشار مساحيق البودرة في الغسيل بشكل مباشر إلى تلطخ ألوانها. درج مسحوق الغسيل يقع درج مسحوق الغسيل داخل الغسالة في اخللف. إضافة مسحوق .1افتح درج مسحوق الغسيل ثم قم بإضافة مسحوق البودر إلى حيز املسحوق. .2أضف املسحوق بالتساوي حتى ال يفيض على حافة الدرج. • استخدم كمية مناسبة من املسحوق. إذا قمت باستخدام .مسحوق زيادة عن الكمية القياسية أو كانت درجة تنبيه احلرارة شديدة االنخفاض ولم يتم إذابة املسحوق في املاء بشكل جيد فإن ذلك يتسبب في ترك أثر للمسحوق على الغسيل وفي اخلرطوم واحلوض ،وقد يتسبب في إحداث تلف مثل اتساخ املالبس وفقدان لونها. • إذا قمت باستخدام مسحوق بودر وظل له أثر على الغسيل ،فإن ذلك قد يسبب رائحة كريهة .قم بشطف الغسيل بشكل كاف في ماء نظيف. • إذا قمت بتوزيع مسحوق بودر على الغسيل مباشرة ،فإن ذلك قد ينتج عنه تلطخ ألوان الغسيل .تأكد من إدخال املسحوق في حجيرة املسحوق. قد يتبقى املسحوق في حجيرة املسحوق في حالة انخفاض ضغط املاء. إضافة ملني أقمشة .1 .2 .3 .4 .5 عند تخزين كمية مناسبة (مقدار مرة واحدة) من ملني األقمشة في مكان توريد امللينات ،يتم وضعها في الدورة األخيرة من الشطف. ال تستخدم املسحوق ،أو املبيض ،أو النشا في درج امللني. يؤدي اإلفراط في استخدام امللني إلى نتائج غير مرضية. ال تفتح الغطاء أثناء دورة التنشيف .إذا مت إضافة ملني األقمشة في وقت سابق ،فإن هذا سينقص من فعاليته. ال تترك امللني في موزرع امللني ملدة طويلة ألنه قد يتجمد. قد يتبقى ملني األقمشة في حجيرة امللني في حالة انخفاض ضغط املاء .في تلك احلالة ،قم بوضع ملني األقمشة في احلوض بشكل مباشر. الملا نم ةيمك ليسغ _20 2/26/2008 12:05:04 PM WA15PALEP-02558G_AR.indd 20 الغسيل للمرة األولى قبل غسيل املالبس للمرة األولى ،يجب تشغيل اجلهاز دورة كاملة دون وضع أية مالبس. .1اضغط على الزر الطاقة. .2افتح درج املسحوق وضع قليالً منه. .3قم بتشغيل تزويد املاء للغسالة. .4اضغط على الزر تشغيل/إيقاف مؤقت. يزيل ذلك أي ماء متبقي في الغسالة نتيجة للتشغيل االختباري الذي قامت به الشركة املصنعة . الملا نم ةيمك ليسغ 02 قبل بدء عملية الغسيل ،حتقق مما يلي: .1صل خرطوم تزويد املاء إلى بصنبور املاء .افتح الصنبور .قم بتوصيل الطاقة للغسالة .تأكد أن خرطوم التصريف مت وضعه بشكل صحيح. .2قم بتثبيت خرطوم التصريف بشكل صحيح. وظيفة التحسس التلقائي تتميز الغسالة بأنها مزودة بوظيفة التحسس التلقائي الذي يقوم بالتعرف على كمية الغسيل واملستوى املناسب للماء ،ووقت الغسيل ،ودورة الشطف ،ووقت التنشيف. ال ينطبق ذلك على املالبس الرقيقة ،وحوض التنظيف ،ودورات النظافة القصوى. بعد تشغيل الطاقة ،وحتديد دورة والضغط على الزر تشغيل/إيقاف مؤقت تبدأ لوحة الغسيل في التنشيف بدون ماء .يتعرف هذا اإلجراء على حجم الغسيل املوجود في سلة الغسيل ،وهذا ليس خلالً في أداء اجلهاز .بعد استكمال عملية التحسس ،يتم تزويد املاء تلقائياً. ضع الغسيل في الغسالة وأضف أيضاً املسحوق. • • • • ال تتجاوز حمل الغسيل في الغسالة .استخدم املسحوق املناسب لنوع األقمشة التي تقوم بغسلها. إذا كان الغطاء مفتوحا ً أثناء التشغيل ،تتوقف الغسالة عن العمل تلقائ ًيا ً ألسباب تتعلق بالسالمة( .فيما عدا ذلك ،يستمر تزويد املاء أثناء فتح الغطاء). عند حتديد املاء الساخن أو البارد ،يتم تزويد املاء البارد في الثوان األولى القليلة حلماية املالبس. من املمكن التحكم في وقت الغسيل ،ودورة الشطف ،ووقت التنشيف لكل دورة أثناء دورة الغسيل. _21الملا نم ةيمك ليسغ 2/26/2008 12:05:04 PM WA15PALEP-02558G_AR.indd 21 تنظيف الغسالة وصيانتها يعمل حفظ الغسالة نظيفة على حتسني أدائها ،وجتنب اإلصالحات غير الالزمة ،وزيادة عمر الغسالة. ً نظيفا احتفظ باحلوض عند استخدام الغسالة في األجواء الرطبة لفترة طويلة ،قد تلتصق البكتريا باحلوض وتكون رواسب مما قد يلحق الضرر بجسم اإلنسان .لالحتفاظ باحلوض نظيف وصحي دائ ًما ،ينصح بقراءة اجلزء اخلاص بـ “دورة تنظيف احلوض” املوجود في صفحة 12واستخدام املواد املطهرة أو املنظفة املوصى بها لتنظيف احلوض بانتظام مرة واحدة على األقل كل شهر إلى ثالثة شهور. تنظيف مصفاة موصل تزويد املاء .1إزالة املصفاة وغسلها بدقة. .2إعادة املصفاة إلى مكانها وتوصيل اخلرطوم بأمان بصمام دخول املاء. .3تأكد من وجود أي تسرب للماء. تأكد من توصيل املوصل بإحكام. اهتنايصو ةلاسغلا فيظنت _22 2/26/2008 12:05:05 PM WA15PALEP-02558G_AR.indd 22 تنظيف شبكة املصفاة نظف شبكة املصفاة بانتظام للمحافظة على نظافة الغسالة. .1قم بدقع اجلزء العلوي من املصفاة الفعالة ألسفل وجذبه في نفس الوقت. اهتنايصو ةلاسغلا فيظنت 03 .2افتح الغطاء كما هو مبني بالشكل. .3نظف املصفاة الفعالة. .4أغلق الغطاء وأدخل أوال ً اجلزء السفلي من املصفاة في السلة ثم ادفع املصفاة حتى تسمع صوت “تثبيتها”. تنظيف مصفاة املضخة .1ضع قطعة من القماش أو منشفة أسفل مصفاة الغسيل حتى ال تبتل األرض ،ولف املصفاة في عكس اجتاه حركة عقارب الساعة واسحبها للخارج. .2قم بإزالة أي أوساخ من املصفاة. .3قم بإعادة املصفاة إلى مكانها عن طريق لف املصفاة في اجتاه عقارب الساعة إلعادتها إلى مكانها. 1 2 3 _23اهتنايصو ةلاسغلا فيظنت 2/26/2008 12:05:06 PM WA15PALEP-02558G_AR.indd 23 استكشاف املشاكل وحلها ورموز املعلومات حتقق مما يلي إذا كانت الغسالة... املشكلة الفحص واحلل ال توجد طاقة. تأكد هل وحدة التيار الكهربي عادية. تأكد من توصيل الغسالة .تأكد من توصيل سلك التيار الكهربي. تأكد من عدم تعرض خرطوم التصريف لالنثناء أو الطي. تأكد من عدم انسداد فتحة خرطوم التصريف. ال تعمل هل غطاء الغسالة مفتوح؟ أغلق الغطاء. هل الزر “توقف” في وضع تشغيل؟ اضغط على الزر “تشغيل/إيقاف مؤقت” مرة أخرى وتأكد من بدء تشغيل الغسالة. هل مت ملء املاء حتى املستوى املطلوب؟ إذا كان ضغط املاء منخفضاً ،فستستغرق عملية ملء الغسالة باملاء وقتا ً طويالً. هل الصنبور مغلق؟ افتح الصنبور لتزويد املاء. هل خرطوم التصريف وسلة التنشيف متجمدين. • • • • أضف املاء الساخن إلى صنبور املاء اجملمد وأزل خرطوم التصريف .انقعها في املاء الساخن. اسكب املاء الساخن في سلة التنشيف ملدة 10دقائق. ضع منشفة مبللة باملاء الساخن على وصلة خرطوم التصريف. عند فك جتميد خرطوم التصريف ،قم بتوصيله مرة أخرى وحتقق مما إذا كان تصريف املاء يتم بالشكل املالئم. مولعملا زومرو اهلحو لكاشملا فاشكتسا _24 2/26/2008 12:05:06 PM WA15PALEP-02558G_AR.indd 24 يترسب املاء في وصلة خرطوم تزويد املاء. إذا كان اجلزء اخلاص بوصلة الصنبور غير محكم الربط ،قد يتسرب املاء. كرر خطوات التجميع مرة أخرى( .راجع “توصيل خرطوم تزويد املاء”) حتقق مما إذا كانت حلقة املطاط اخلاصة بخرطوم تزويد املاء في وضعها الصحيح. قم بوضعها في مكانها مرة أخرى بإحكام. هل خرطوم تزويد املاء مثني؟ فك الثنايا املوجودة في خرطوم التصريف. إذا كانت عملية تزويد املاء قوية جداً ،قد يحدث تسرب. أغلق الصنبور قليالً. مولعملا زومرو اهلحو لكاشملا فاشكتسا 04 املشكلة الفحص واحلل هل حدث تسرب للماء من الصنبور؟ أصلح الصنبور .ال يتم تزويد املاء. هل قمت بالضغط على الزر “تشغيل/إيقاف مؤقت” بعد حتديد تزويد املاء؟ يجب الضغط على الزر “تشغيل/إيقاف مؤقت” لتزويد املاء .اضغط على الزر “تشغيل/ إيقاف مؤقت”. تأكد من أن الصنبور في وضع التشغيل. افتح الصنبور. هل شبكة املصفاة املوجودة في خرطوم تزويد املاء مسدودة بأوساخ. نظف شبكة املصفاة باستخدام فرشاة أسنان. تأكد من أن تزويد املاء في وضع التشغيل. في حالة توقف تزويد املاء ،قم بتشغيل الصنبور والتيار الكهربي. حتدث عملية التنشيف ضجيجا ً واهتزازات عالية. حتقق مما إذا كان قد مت توزيع الغسيل بالتساوي في الغسالة. وزع الغسيل بالتساوي وابدأ تشغيل الغسالة مرة أخرى. حتقق مما إذا كانت الغسالة متوازنة ومستوية على أرض ثابتة ومسطحة. تأكد أن الغسالة مستوية. تأكد هل أرجل االستواء مربوطة بإحكام. قم بضبط أرجل االستواء حتى تكون الغسالة في وضع متوازن. تأكد من عدم إحاطة الغسالة بأشياء غير ضرورية. قم بإزالة أي شيء غير ضروري بعيدا ً على الغسالة. _25مولعملا زومرو اهلحو لكاشملا فاشكتسا 2/26/2008 12:05:06 PM WA15PALEP-02558G_AR.indd 25 استكشاف املشاكل وحلها ورموز املعلومات رموز املعلومات عندما تتعرض الغسالة للعطل ،قد تالحظ رمز املعلومات على الشاشة .في حالة حدوث ذلك ،الرجاء فحص هذا اجلدول وجتربة احللول املقترحة قبل االتصال بخدمة العمالء. رمز الكود املشكلة الفحص ال تعمل - - تأكد أن صنابير املياه في وضع التشغيل. تأكد من توصيل قابس الغسالة مبصدر التيار الكهربي. تأكد من تشغيل التيار الكهربي. تأكد من وجود ماء كافي. ال يتم التصريف. - - هل خرطوم التصريف موضوع ألسفل؟(بدون مضخة) هل خرطوم التصريف مجمد. هل خرطوم التصريف مسدود. إذا لم يتم تصريف املاء خالل 15دقيقة ،سيسمع طنني ،وسيعرض مؤشر الوقت املتبقي “.”5E ال توجد ماء. - - افتح الصنبور متاماً. هل مت فصل تزويد املاء عن املنزل؟ هل خرطوم تزويد املاء أو وصلة اخلرطوم مسدودة؟ هل صنبور املاء مجمد. في حالة عدم انتهاء مشكلة تزويد املاء في غضون ساعة أو عدم تغيير مستوى املاء في 4دقائق ،سيسمع طنني ،وسيعرض مؤشر الوقت املتبقي “.”4E ال يتم التنشيف. - - حتقق من توزيع الغسيل بالتساوي في الغسالة. حتقق أن الغسالة متوازنة وعلى أرض ثابتة ومسطحة. عمليات التدفق (املاء). - - إعادة التشغيل بعد التنشيف. في حالة استمرار ظهور عالمة اخلطأ ،قم باالتصال بوكيل خدمة العمالء. مولعملا زومرو اهلحو لكاشملا فاشكتسا _26 2/26/2008 12:05:07 PM WA15PALEP-02558G_AR.indd 26 املواصفات نوع الغسيل نوع احلركة استهالك الطاقة الغسيل 600وات التنشيف 330وات الوزن 45كجم مستوى املاء القياسي األقصى 88لتر متوسط 64لتر منخفض-متوسط 45لتر حد أدنى 35لتر افصاوملا 05 األبعاد (مم) العرض × 630العمق × 675االرتفاع 1010 ضغط املاء ~ MPa 0.05Mpa 0.78( 8.0 ~ 0.5كجم∙قدم/سم)2 استخدام املاء 230لتر سرعة التنشيف 680دورة في الدقيقة _27افصاوملا 2/26/2008 12:05:07 PM WA15PALEP-02558G_AR.indd 27 هل لديك أسئلة أو تعليقات؟ البلد اتصل بـ أو قم بزيارة موقعنا على اإلنترنت على U.A.E 800-SAMSUNG()726-7864 8000-4726 www.samsung.com/mea كود رقمDC68-02558G_AR . 2/26/2008 12:05:07 PM WA15PALEP-02558G_AR.indd 28