1
UNIVERSITY OF SAO PAULO
ICMC - INSTITUTE OF MATHEMATICS AND COMPUTER SCIENCE
DEPARTAMENT OF COMPUTER SCIENCE
P.O. Box 668 - 13560-970 – São Carlos, SP, Brazil
ReVis: User Manual
v0.3
Systematic Review
Supported by Visual Analytics
September / 2010
Summary
Introduction and Overview ................................................................................................... 3
Installation ............................................................................................................................ 3
Getting Started ...................................................................................................................... 2
Creating the Input File .......................................................................................................... 2
Creating a Project ................................................................................................................. 3
The ReVis Project’s Structure .............................................................................................. 5
Starting the Selection ............................................................................................................ 7
Visualizations ....................................................................................................................... 7
Edge Bundles .................................................................................................................... 7
Projection .......................................................................................................................... 9
Network Viewer ............................................................................................................. 11
Table View ..................................................................................................................... 12
Performing the Selection – Four Stages ............................................................................. 13
Stage 1: Pre-selection ..................................................................................................... 14
Stage 2: Selection ........................................................................................................... 14
Stage 3: Quality Evaluation ............................................................................................ 15
Stage 4: Review by Expert ............................................................................................. 16
Contact ................................................................................................................................ 16
Bibliography ....................................................................................................................... 17
-2-
User Manual
Introduction and Overview
Projection Explorer (PEx)1 is a flexible visualization tool that has several text handling facilities,
which allows for a VTM (Visual Text Mining) exploration of a collection of documents. It is an
open source tool that has been developed at the University of Sao Paulo.
ReVis (Systematic Review Supported by Visual Analytics) is an extension of PEx created to
support selection and quality evaluation of primary studies in systematic reviews. It offers visual
mappings of the set of primary studies to be reviewed, in order to help the user explore the data.
In ReVis the selection and quality evaluation are performed in four consecutive stages: (1) the
pre-selection, when the user includes or excludes studies based on their abstracts; (2) the
selection, when the user includes or excludes studies based on their full texts; (3) quality
evaluation, when the user applies a score to the selected papers based on the quality of their
content; and (4) review, when an expert has the chance to change the selection or quality
evaluation if needed.
It’s important to note that ReVis acts only on the selection and quality evaluation of the studies,
not on the initial search. To use the tool, the user must first create the queries and obtain the full
set of primary studies to be analyzed.
Installation
First you must download the program ReVis in:
•
http://ccsl.icmc.usp.br/redmine/projects/revis/files
After, you must decompress the file. The content will be:
1
http://infoserver.lcad.icmc.usp.br/infovis2/PEx
-3-
User´s Manual: PEx-RS
Next, open the folder “bin” and run the file:
Getting Started
In order to use ReVis to support the primary studies’ selection in your systematic review, it is
first necessary to prepare an input file, according to a few rules. This input file will include all
the primary studies that returned from your search; thus, the search is not made from within the
tool. After you prepared your input file, you can create a new project within ReVis to generate
the visualizations and perform the selection.
Detailed descriptions of the input file and the tool’s user interface are provided in the next
sections.
Creating the Input File
The BibTeX2 file format (.bib) is currently the only format accepted by ReVis. It is used to
describe and process lists of references, mostly in conjunction with LaTeX3 documents. For
details about the general structure of a BibTeX file, please refer to the site. We recommend using
the JabRef4 tool for the input file creation; it is free and open source and it is available online for
download.
ReVis treats a BibTeX input file as a collection of entries where each entry represents one
primary study returned by your search. From all possible fields available for BibTeX entries, the
following are the most important when using ReVis.
In this entry, the first line (a) contains the entry key. There is no special formatting for this field,
but if you’re using JabRef, we recommend using the tool’s automatic key generation feature. The
(b) item includes the names of the authors of the entry. They can be written as the last name
followed by the initials, separated by comma. Each author is separated from the others with an
“and” statement. Items (c) and (d) are, respectively, the title and the year of the entry. The
abstract (d) is not often included in BibTeX files, but in this case it is absolutely necessary;
without it, the visualizations can’t be generated. The remaining lines (e) are the references of the
2
http://www.bibtex.org/
http://www.latex-project.org/
4
http://jabref.sourceforge.net/
3
-2-
User´s Manual: PEx-RS
entry – each reference represented by its title, one per line. It is very important that titles are
written in the exact same way throughout the whole file or else the tool will not be able to
correlate entries.
@ARTICLE{Martins2010,
(a)
author = {Martins, R. and Felizardo, K.},
(b)
title = {ReVis: User Manual},
(c)
year = {2010},
(d)
abstract = {ReVis is a tool for ...},
(e)
references = {title1
title2
...
}
(f)
}
Figure 1 – Example of a ReVis entry on a BibTeX file
Creating a Project
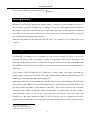
With the input file ready, start ReVis and you will see the tool’s main menu (Figure 2).
Figure 2 – ReVis main menu
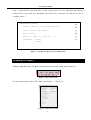
To start a new project, select “File” then “New Project…” (Figure 3).
Figure 3 – ReVis “File” menu
-3-
User´s Manual: PEx-RS
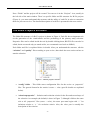
You will see the window on Figure 4; choose “ReVis Project” and press “Next”.
Figure 4 – “New Project”, initial window
Fill in your project’s name, the location where it will be stored and indicate where is your
BibTeX input file (Figure 5).
Figure 5 – “New Project”, second window
-4-
User´s Manual: PEx-RS
Press “Finish” and the project will be created. You can see it in the “Projects” view, usually in
the left side of the main window. There’s a specific folder and file structure for ReVis projects
(Figure 6); you must understand this structure and the utility of each file in order to customize
them for your own review. The detailed description of each file is presented in the next section.
The ReVis Project’s Structure
The folder/file structure of a ReVis project is shown in Figure 6. Each file has an important role
on the generation of the visualizations and the performing of the primary study selection.
Properties files can be edited inside the tool by double-clicking them; BibTeX files can also be
edited, but in text-mode only (as stated earlier, we recommend a tool such as JabRef).
Each folder and file is explained below in details. After you understand the structure, edit the
“selection” and “quality” files according to your review, then check the next section on how to
start the selection.
Figure 6 – A ReVis project’s structure
• “config” folder – This folder stores configuration files for the review as “properties”
files. The general format for the entries is name = value (specific details are explained
below).
• “selection.properties” – Inclusion and exclusion criteria for the first and second steps of
the selection. An example (the default) is show in Figure 7; although it follows the same
rule as all “properties” files (name = value), the name part must begin with “i.” for
inclusion criteria or “e.” for exclusion criteria. Also, the value part is actually the
description of the criterion.
-5-
User´s Manual: PEx-RS
Figure 7 – “selection.properties” file
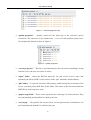
• “quality.properties” – Quality criteria for the third step of the selection (quality
evaluation). The entries are in the format name = score, for each possible quality score.
An example (the default) is show in Figure 8.
Figure 8 – “quality.properties”
• “review.properties” – This file is used internally by the tool; unless something’s wrong
with the review, the user won’t have to edit it.
• “input” folder – Stores the BibTeX input file for each of the review’s steps and,
optionally, the full text PDF’s of the entries (in the “pdf” subfolder, detailed below).
• “pdf” folder – To open the full texts of the primary studies during the second step of the
review, you must put the PDF files in this folder. The names of the files must match the
BibTeX key of the respective entry.
• “papers.stageN.bib” – These are the input files for each stage (N) of the selection. They
are used internally and shouldn’t be edited by the user.
• “review.pip” – The pipeline file for the review, used to generate the visualizations. It is
used internally and shouldn’t be edited by the user.
-6-
User´s Manual: PEx-RS
Starting the Selection
To start the selection, press the green “play” button on the tool’s main toolbar (Figure 9) while
focusing your project. Note: make sure you edited the “selection” and “quality” files as stated
in the previous section.
Figure 9 – Main toolbar
Visualizations
After a few messages of progress, both in dialogs and in the “output” view, four visualizations
are created and displayed. Of these, three are immediately visible; the “Network Viewer” is
initially behind “Projection”.
Edge Bundles
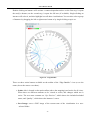
The first visualization on the left is called “Edge Bundles” (Figure 10). Each of the small circles
(instances) represents one primary study and the edges link studies that have cited each other.
The edge direction is represented by the color: the citing study is on the light blue end and the
cited study is on the dark blue end of the edge. The name of the visualization comes from the
fact that the edges that link primary studies are “bundled”, or grouped together by proximity [1].
Instances are hierarchically distributed along the three concentric circles of the radial layout of
the visualization. The hierarchy is based on the frequency of text topics that are automatically
extracted from the studies’ abstracts by the tool. You can check the topics by hovering the mouse
over the arcs on the outer circles. You can also see the instances’ keys (as defined on the BibTeX
input) by hovering the mouse over them.
Initially, all instances are grey, which means they haven’t been analyzed yet. According to the
color scale on the top left of the view, the colors vary from red – the study has been excluded –
to green – the study has been included (inclusion/exclusion is done on the Table view). In the
second step the scale changes; studies included/excluded in the first step are colored in “weak”
red and green, while studies included/excluded in the second step itself are colored in “strong”
red and green.
-7-
User´s Manual: PEx-RS
Double-clicking an instance will activate a context-dependent action: on the first step, it opens
the study’s abstract; on the second step, it opens the full text (if available). Single-clicking an
instance will select it, and also highlight it on all other visualizations. You can also select a group
of instances by dragging the left or right mouse button or by single-clicking a topic arc.
Figure 10 – Edge Bundles
There are three action buttons available on the toolbar of the “Edge Bundles” view (to see the
names, hover the mouse over them):
• Scalar: this is located on the main toolbar (above the mappings) and works for all views.
When there are different attributes to be viewed as colors, this changes which one is
active. The two most common are “Sys. Review”, which shows the included/excluded
status, and “Quality”, which shows the instances’ scores.
• Save Image: saves a PNG image of the current state of the visualization in a userselected folder.
-8-
User´s Manual: PEx-RS
• Instance Selection: default selection mode for instances; currently cannot be changed.
• Identity Coordination: default coordination mode; currently cannot be changed.
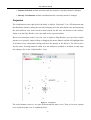
Projection
The visualization on the right (before the table) is called a “Projection”. It is a 2D document map
that distributes instances along the screen by bringing closer the most similar ones and separating
the most different ones, based on the textual content (in this case, the abstract of the studies).
Again, as in the Edge Bundles view, the small circles represent studies.
Direct user interaction on the Projection view is similar to Edge Bundles: you can select a single
instance or a group by single-clicking or dragging the mouse buttons (which will highlight them
in all other views), and double-clicking will show the abstract or the full text. The color scale is
also the same, showing instances which were not analyzed, excluded or included (second stage
also changes, like in the “Edge Bundles” view).
Figure 11 – Projection
The action buttons, however, are quite different than the other views. There a few more options
to be explored in this view, as explained below:
-9-
User´s Manual: PEx-RS
• Scalar: this is located on the main toolbar (above the mappings) and works for all views.
When there are different attributes to be viewed as colors, this changes which one is
active. The two most common are “Sys. Review”, which shows the included/excluded
status, and “Quality”, which shows the instances’ scores.
• Save Image: saves a PNG image of the current state of the visualization in a userselected folder.
• Search…: textual search on the studies’ abstracts. A new color scale will be created and
instances will be colored according to the frequency of the query in their abstracts.
• Enable/Disable Edges: initially there are no edges on the projection; you can, however,
enable them with this button. The undirected edges will then link nearest neighbors in the
projection. When edges are enabled, selecting an instance will also highlight the
connected instances.
• Instance Selection: default selection mode for instances; with this enabled, selecting will
only highlight them in all views.
• Topic Selection: alternate selection mode for instances; with this enabled, selecting will
also generate and display the most important topics for the selected group.
• Create Topic Clusters: this action will ask for a number N of clusters (with a reasonable
default) and divide the document set into N groups of nearest neighbors. It will also
generate and display the most important topics for each cluster (automatically enabling
Topic Selection).
• Show/Hide Labels: when Topic Selection is enabled, this will show or hide the labels
that display the generated topics.
• Highlight Label Clusters: when Topic Selection and this button are enabled, topic
clusters will be highlighted when you hover the mouse over them.
• Identity Coordination: default coordination mode; currently cannot be changed.
- 10 -
User´s Manual: PEx-RS
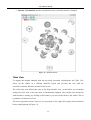
Network Viewer
In the same slot as the Projection visualization, but behind it (check the tabs), is the Network
Viewer. This visualization is created from the references information on the BibTeX input file
and shows all the primary studies with their respective referenced papers. It uses a force-based
layout, meaning that studies attract each other depending on how strong is their connection
(references to each other). Thus, studies that are far from the center are less cited and studies
grouped near the center are more cited (Figure 12).
Again, the direct user interaction and the colors are similar to the views already described (please
check the two previous sections). A simple selecting in this view, however, will also highlight
referenced items that are not on the review themselves (on a lighter gray). Selecting a study that
is not on the review (one that is only referenced) will also highlight its “main” study – the study
that is on the review and references the first. Since this view has edges automatically enabled,
selecting an instance will also select all the connected instances.
The action buttons available in this view are the following:
• Scalar: this is located on the main toolbar (above the mappings) and works for all views.
When there are different attributes to be viewed as colors, this changes which one is
active. The two most common are “Sys. Review”, which shows the included/excluded
status, and “Quality”, which shows the instances’ scores.
• Save Image: saves a PNG image of the current state of the visualization in a userselected folder.
• Enable/Disable Edges: initially the edges are automatically enabled; you can, however,
disable them with this button. This affects the Force button and the propagation of
instance selection.
• Start/Stop Force: as said earlier, the Network Viewer distribution of instances on the 2D
area of the screen is made with a force-based layout. You can control this process by
starting/stopping the force, if you find it necessary.
• Instance Selection: default selection mode for instances; currently cannot be changed.
- 11 -
User´s Manual: PEx-RS
• Identity Coordination: default coordination mode; currently cannot be changed.
Figura 12 – Network Viewer
Table View
To support the insights obtained with the previously presented visualizations, the Table View
shows all the studies in a familiar table-like layout and provides the user with the
selection/evaluation functions needed for the review.
The color scale used follows the same as the Edge Bundles view, so that when you eventually
change the color scale in one, the other is automatically updated. One possible user interaction
with the table is sorting; by clicking on the headers, you can sort the table by the studies’ IDs or
by number of citations received.
The most important actions, however, are presented in the right-click popup menu described
below (and displayed in Figure 13).
- 12 -
User´s Manual: PEx-RS
Figure 13 – The Table view
• Comments: it’s possible to leave review comments on each study by using this feature.
The tool will show a dialog with a text area filled with the (possible) current
commentaries, allowing for inserting and editing. This is especially useful if the review is
being done by more than one reviewer.
• Conflict: in case there has been a conflict with one or more studies - whether to
include/exclude them or not – this feature can be used to mark the study, so that it can be
decided later.
• Include:
this
submenu
shows
all
the
inclusion
criteria
specified
in
the
“selection.properties” file; to include the study in the review, just click on the criteria
used to decide. This will change the study color to green.
• Exclude:
this
submenu
shows
all
the
exclusion
criteria
specified
in
the
“selection.properties” file; to exclude the study from the review, just click on the criteria
used to decide. This will change the study color to red.
• Quality: this submenu is available in stages 3 and 4; it shows the scores specified in
“quality.properties” file. By selecting a score, you evaluate the selected study.
Performing the Selection – Four Stages
As stated earlier in the introduction, in ReVis the selection and quality evaluation actions are
organized in four main stages. After finishing one stage, you can start the next one by clicking on
- 13 -
User´s Manual: PEx-RS
the “Finish Current Stage” button on the main toolbar (Figure 14). You can also use the red
“Stop Review” button anytime to save the review’s current state and stop it.
Figure 14 – “Finish Current Stage” and “Stop Review” buttons
Remember that no matter which stage you’re in, all visual exploration features are available; use
them as you need.
Stage 1: Pre-selection
When you first start your review, this is the stage you’re in. The task is to pre-select your studies
by applying the inclusion/exclusion criteria after reading each of the abstracts.
Main actions:
• Double-click studies to read abstract (on Edge Bundles or Table View);
• Right-click the studies on Table View to display the selection menu;
• Include or exclude studies by setting the inclusion or exclusion criteria used;
• If you have any commentary about a study, worth keeping for future stages (or other
reviewers), use the “commentary” feature;
• If you are not sure whether to include or exclude a study, set it to “conflict” state.
Use the “Finish Current Stage” button when you’re finished pre-selecting your studies.
Stage 2: Selection
This stage is similar to the first, only now the task is to select your studies by applying the
inclusion/exclusion criteria after reading the full text of each pre-selected study. Studies that
were excluded on the first stage will appear in light red and included ones in light green.
Remember that, in order to be able to read the full text inside ReVis, you must have prepared the
“pdf” folder as described earlier.
Main actions:
- 14 -
User´s Manual: PEx-RS
• Double-click studies to read full text PDFs (on Edge Bundles or Table View);
• Right-click the studies on Table View to display the selection menu;
• Include or exclude studies by setting the inclusion or exclusion criteria used;
• If you have any commentary about a study, worth keeping for future stages (or other
reviewers), use the “commentary” feature;
• If you are not sure whether to include or exclude a study, set it to “conflict” state.
Use the “Finish Current Stage” button when you’re finished selecting your studies. Make sure
that, by the end of this stage, all studies were either included or excluded, even the ones in
“conflict” state. These will be reviewed in the 4th stage.
Stage 3: Quality Evaluation
Using the quality criteria you set on the “quality.properties”, evaluate each of the selected studies
based on the full text you read on the previous stage. This is an important part of the systematic
review, as it puts all different studies (from different sources) in one same evaluation platform,
allowing comparison between them.
Main actions:
• Double-click studies to read full text PDFs (on Edge Bundles or Table View);
• Right-click the studies on Table View to display the quality menu;
• Choose the score for each of the studies by clicking on the appropriate menu item;
• If you have any commentary about a study, worth keeping for the next stage, use the
“commentary” feature.
Use the “Finish Current Stage” button when you’re finished evaluating your studies. Make sure
that, by the end of this stage, all selected studies were evaluated.
- 15 -
User´s Manual: PEx-RS
Stage 4: Review by Expert
This stage offers both selection and evaluation features to the reviewer; it’s meant to be used by
an expert to evaluate – and possibly change – all the decisions that were made during the review.
Main actions:
• Double-click studies to read full text PDFs (on Edge Bundles or Table View);
• Right-click the studies on Table View to display the quality/selection menu;
• Review decisions of studies on “conflict” state;
• Include or exclude studies by setting the inclusion or exclusion criteria used;
• Change the score of the studies by clicking on the appropriate menu item;
If you have any commentary about a study, worth keeping for the next stage, use the
“commentary” feature.
Contact
For questions, suggestions or problems in the use of the tool, contact:
Rafael Messias Martins
[email protected]
Katia Romero Felizardo
[email protected]
- 16 -
User´s Manual: PEx-RS
Bibliography
[1] Danny Holten, "Hierarchical Edge Bundles: Visualization of Adjacency Relations in Hierarchical
Data", IEEE Transactions on Visualization and Computer Graphics (TVCG; Proceedings of
Vis/InfoVis 2006), Vol. 12, No. 5, Pages 741 - 748, 2006.
- 17 -