1
Text Editor
Version 1.4.7 and +3ST 1.0.0
User Manual
openWYSIWYG +3ST
This Manual presents instructions for installation and utilization of this Web Based Editor, customized
by 3ST based on the openWYSIWYG Editor developed by openWebware .
It is divided into three sessions
1. Installation
2. Resources Utilization
3. Trouble Shooting
Additional information can be accessed at 3ST Consulting and Services website at Downloading section
for this software.
ÍNDEX
1. Installation
1. Software Components
2. Adding software components in the website
3. Preparing processing environment – Configuration
4. Preparing processing environment – Installation
5. Uninstalling the software
2. Resources Utilization
1. Getting Editor and its resources knowledge
2. Formatting selected texts
3. Formatting paragraphs
4. Creating and editing tables
5. Creating and editing divisions
6. Adding and changing images
7. Adding and changing hyperlinks
8. Importing texts from other editors
9. Utilizing css style files
10. Editing HTML code
11. Raising Editor area
12. Salving edited document
13. Loading a document into the Editor
3. Trouble Shooting
1. Differences between browsers
2. Rows that cannot be deleted
3. Editor basic format does not have Save button
4. Sessions timeout
5. Divisions distortions in IE
6. Images Dialog Box does not show images navigator
7. Style combo box does not contains rules
8. Hyperlink errors
9. Styles are not applied to selected texts
10. Selecting objects on different browsers
© 2010 – 3ST Consulting and Services
Page 1 of 28
Installing – Software Components
The Editor openWYSIWYG +3ST is compound of html files and scripts in java language. When
unpacking the software there will be a folder named wysiwyg. This folder contains all necessary components
divided into other folders:
popups – contains html files that presents Dialog Boxes to accomplish specific tasks. The popups are
•
•
•
•
•
•
used to:
Tables and Divisions creation and maintenance
Add images
Hyperlinks creation
Text colors
Background colors
Users License
scripts – contains the Editor's java code. This files have the following utilization files:
•
•
•
•
•
•
•
wysiwyg-3stEnvironment.js – Implements this version configuration
wysiwyg-3stImplementacao.js – Contains this version main functions
wysiwyg-colors.js – Defines the color grid
wysiwyg-popup.js – Takes control of all Dialog Boxes
wysiwyg-settings – Contains the basic configuration
wysiwyg.css – This is the Editor's css style file
wysiwyg.js – This is the main java Editor code
wysiwyg_images – Contains the images used by the editor
In the Root of the main folder, wysiwyg, there are more files that belongs to the software
•
•
One file with the extension .pi – This is a downloading control file
Two other files with the extension .pdf – These are the Manual files. One in Portuguese the
other in English
Back
Installation – Adding software components in the website
The openWYSIWYG +3ST installation is pretty much simple. All you need is to copy the folder wysiwyg
to the root of your website and change some configuration variables in the configuration files.
See Preparing processing environment – Configuration
Back
Page 2 of 28
Installation – Preparing processing environment – Configuration
Editor Configuration
To make the Editor working correctly you must change some configuration items. The
following are the necessary changes.
In the file wysiwyg\wysiwyg-3stEnvironment.js the following variables must be changed to
reflect your processing environment:
var vsLogoImage
var cssLocation
var vsMainImageDirectory
var vsMainImagePath
= "../../#path to your logo image#";
= "#path to your cssFiles#";
= "../../#images directory path#";
= "#images directory name#";
vsLogoImage – Must contain the relative address to the file you will be using as your LOGO.
Ex. ../../App_Themes/3ST/images/3ST-Logo.gif
CssLocation – Must contain the relative address to the folder where your Style sheet files are located.
Ex. App_Themes/3ST/
vsMainImageDirectory – Must contain the relative address to the images folder. These are images you
will make available to your users.
Ex. ../../images
vsMainImagePath – Must contain the address to the same folder as the last item. However must poit to
the first level of the folder.
Ex. images
In this very configuration file there are other set of variables that must reflect your processing
environment. These points to the CSS Style Sheet Files you use in your website:
var
var
var
var
var
var
var
cssForIE
cssForIE8
cssForFirefox
cssForOpera
cssForSafari
cssForGoogle
cssDefault
=
=
=
=
=
=
=
"#css
"#css
"#css
"#css
"#css
"#css
"#css
file
file
file
file
file
file
file
name
name
name
name
name
name
name
for
for
for
for
for
for
for
IE#";
IE8#";
Firefox#";
Opera#";
Safari#";
Google Chrome#";
a Default css File#";
Each of these variables must contain the name of the CSS Style Sheet file to each different
browser, if you use different files.
To the cssDefault variable you should use the name of the CSS Style Sheet you will use to any
other browser. If you use only one Style Sheet file, repeat the name in all variables.
Back
Page 3 of 28
Installation – Preparing processing environment – Installation
Editor Installation
After configuring the software it is necessary to install it in the web page that will take control over
the openWYSIWYG +3ST Editor. This page must comply with the following characteristics:
Components
To work properly and provide communication between the Editor Java Script and the code of the
page you use to control the editor the following HTML controls must exist in the page:
1.
2.
3.
4.
5.
6.
7.
8.
TEXTAREA – Must have the name rConteudoTEXT. It is the component where the Editor will
be created
INPUT – Must have the name envLang and be invisible. It is the component that defines
the language it will be used. Initialize it with 'P' to take messages in Portuguese or 'E' to
take messages in English
INPUT – Must have the name textToSave and be invisible. It is the component where the
Editor will place the text to be edited and saved. It is from this component that your page
must retrieve the text when it is time to save it.
INPUT – Must have the name vsWorkingArea and be invisible. It is a working area that must
be loaded with the same content of textToSave
INPUT – Must have the name rulesList and be invisible. This component is where you must
provide the editor with the list of Style Sheet Rules you will make available to the editor.
It have to be a string containing rules names separated by semicolon.
INPUT – Must have the name btSavedUsed and be invisible. This component will be used by
the Editor to set TRUE or FALSE indicating if the user has used the Save Button. If TRUE
the component textToSave will contain the content to be saved. See item 3. above
INPUT – Must have the name imageList and be invisible. This component must be
initialized with the list of folders and image files that you want to make available to the
Editor.
INPUT – Must have the name idEditorStatus and be invisible. It is for Editor use
Installation of the Code Files
The web page that will host the Editor must indicate where the Java files are. The following code
lines must be added to the HTML page or to a ASPNET page:
<%-- ATTENTION - Maintain the Referencing Sequence Below --%>
<script type="text/javascript" src="wysiwyg/scripts/wysiwyg-3stImplementation.js"></script>
<script type="text/javascript" src="wysiwyg/scripts/wysiwyg-3stEnvironment.js"></script>
<script type="text/javascript" src="wysiwyg/scripts/wysiwyg.js"></script>
<script type="text/javascript" src="wysiwyg/scripts/wysiwyg-settings.js"></script>
<%-- ATTENTION - Replace 'ctl00_CPHMaster_rConteudoText' by your TextArea component name --%>
<script type="text/javascript">
WYSIWYG.attach('ctl00_CPHMaster_rConteudoTEXT', full);
</script>
NOTAS
•
•
The term ct100_CPHMaster_rConteudoTEXT refers to the TEXTAREA. ct100_CPHMaster_
is a prefix added by .NET and must be eliminated if your implementation is not .NET.
It it is .NET you must change it for the term your .NET installation gave to the
component rConteudoTEXT.
The term full refers to the operation mode. Full uses all Editor controls. Small uses
only basic components. See the software DEMO at the downloading area at 3ST site.
Back
Page 4 of 28
Installation – Uninstalling
The software does not require a process to uninstall. To eliminate it delete the folder wysiwyg from
the website where it is installed.
Back
Resources Utilization – Getting Editor and its resources knowledge
The openWYSIWYG +3ST Editor has enough resources allowing words, sentences or complete
paragraphs formatting as well as any professional text editor. These tools allow you to:
•
•
•
•
•
like:
Define the Font
Define Font characteristics like size, density, inclination, underline, color the Font and the
Background
Align and position paragraphs
Define numbered or marked lists
Apply styles
Other editing resources or tools allow you to create components to better organize the page content,
•
•
•
•
Create and edit Tables
Create and edit Divisions
Add images and define its properties for sizing and positioning
Add Hyperlinks
Additional tools help the editing process allowing:
•
•
•
•
•
•
•
Undo and Redo
Copy, Cut and Paste texts and components
Clear all formatting properties
Show and edit the HTML code
Preview the content in a browser
Raise the Editor window size
Print the content
Back
Page 5 of 28
Resources Utilization – Formatting selected texts
In the tool-bar
the first four buttons are to format Font properties like
Bold, Italic, Underlined e Stroked. The remaining two buttons allow you to color the Font and the Background.
When each of these two buttons are used the following Dialog Box opens:
The buttons
are to format the vertical position of the text on the line. The first one
position the text below the line and the other above.
In the case of the two tool-bars above, pressing it once and the properties are set. Pressing it twice
the properties are unset. You can combine properties by pressing several buttons turning several properties
on.
Using the choice-boxes
you can choose the
Font, its Size and Header Types. Notice that the Font and Size of the text where the cursor is positioned is
shown in the appropriate choice-box. If you move the cursor to a text with other properties the choice-boxes
will be updated.
Now with the tools
is possible to Cut, Copy and Paste texts. The last button
remove all formatting properties from the edited text. This button acts over the entire edited text.
What about UNDO and REDO
changes to the text.
? Using these two buttons you can UNDO and REDO the last 50
Back
Page 6 of 28
Resources Utilization – Formatting paragraphs
Basicamente existem dois conjuntos de ferramentas para a formatação de parágrafos.
To align the paragraphs the tool-bar
right aligned or centered.
allows the text to be justified, left aligned,
The second set or tools, just to the right,
allows:
The first two creates numbered or marked lists.
•
•
This is a marked list with two items
Second item
1. Now this is a numbered list also with two items
2. Second numbered item
The last two buttons allow paragraph indentation, forward and backward.
Indented line
Indentation reverted line
Back
Page 7 of 28
Resources Utilization – Creating and editing tables
The Dialog Box below allows the definition or Tables or Divisions. In this topic we will focus on Table
Creation and will describe only the upper side of the Dialog Box.
The fields in the Dialog Box allows the definition of:
• Number of rows. The default value is 2
• Number of columns. The default value is 2.
• Margins at R(ight), L(eft), B(ottom), T(op). The numbers, in pixels, must be separated by
colon and the four are required. The Margin define the external margin space. The default
value is 2,2,2,2
• Padding R(ight), L(eft), B(ottom), T(op).The numbers, in pixels, must be separated by colon
and the four are required. The Padding define the internal margin space. The default value is
2,2,2,2
• Border-size. Defined in a number of pixels. The 0 (zero) indicates that the border will not be
visible. The default value is 0 (zero)
• Border Style. A Choice-box presents values that defines the border style like solid (solid line),
double (double line), dotted (dotted line), dashed (dashed line), etc. The default value is
none
• Border Collapse. Forces the borders to be show together. No space between cells
• Border Color. Defines the border color. If Border Size equal ZERO or Border-Style equal NONE
the border color will not take any effect. The button at the right opens a Color Dialog Box
• Background Color. Defines the cells background color. The button at the right opens a Color
Dialog Box
• Vertical Alignment. Defines how the cells content will be aligned. Top, center or Base. The
default value is Top
• Horizontal Alignment. Defines how the cells content will be aligned. Left, right or center. The
default value is left
Page 8 of 28
•
Width. Defines the total table width. The default value is 300 pixels or percentage. The
Choice-box at right allows the definition of width in pixels or percentage
Important information about Tables:
• All cells will have the same properties and will be symmetric in terms of size in rows and
columns. These properties, if edited and changed, will be applied to all Table cells
• When the border is defined as invisible (size=0 and style=none) the Editor will make it dashed
to facilitate visualization and editing. However, when saved the borders will be eliminated and
not presented in the browser. In the Editor Tables will be presented like:
Without Border
With Border
•
To edit a Table it is necessary to select the table (see topic Trouble Shooting – Differences
between browsers). Once selected the Table properties will be presented in the Dialog Box.
Any changed property will be applied to the Table. To edit the selected table use the button
•
When typing texts the width of the cell will increase to accommodate the text. However the
total size of the Table will not change. As you type text in other cells the sizes will tend to be
proportional
As the cells width the cells height will increase will text is typed
To add an image in a Table Cell you need to select the cell and then utilize the Images Dialog
Box to choose and insert the picture
Any table can be copied and inserted in other part of the text. To copy a table you must select
it () and utilize Ctrl+C or press the button
copy
To paste the copied table position the cursor in the position you want to have the copied table
and utilize Ctrl+V or press the button
paste
Any other property can be applied to the text in the table cells. All you need is select the text
and apply the desired property. See Topic Formatting Texts or Formatting Paragraphs
•
•
•
•
•
Back
Page 9 of 28
Resources Utilization – Creating and editing divisions
The Dialog Box below allow the definition of Tables and Divisions. In this topic we will focus on
DIVISIONS and will describe all Dialog Box fields.
The fields in the Dialog Box allow you to define:
Upper
•
•
•
•
•
•
•
•
•
•
side of the Dialog Box
Number of rows. The default value is 2
Number of columns. The default value is 2.
Margins at R(ight), L(eft), B(ottom), T(op). The numbers, in pixels, must be separated by
colon and the four are required. The Margin define the external margin space. The default
value is 2,2,2,2
Padding R(ight), L(eft), B(ottom), T(op).The numbers, in pixels, must be separated by colon
and the four are required. The Padding define the internal margin space. The default value is
2,2,2,2
Border-size. Defined in a number of pixels. The 0 (zero) indicates that the border will not be
visible. The default value is 0 (zero)
Border Style. A Choice-box presents values that defines the line border style like solid, double,
dotted, dashed, etc. The default value is none
Border Collapse. Forces the borders to be show together. No space between cells
Border Color. Defines the border color. If Border Size equal ZERO or Border-Style equal NONE
the border color will not take any effect. The button at the right opens a Color Dialog Box
Background Color. Defines the cells background color. The button at the right opens a Color
Dialog Box
Vertical Alignment. Defines how the cells content will be aligned. Top, center or Base. The
default value is Top
Page 10 of 28
•
•
Horizontal Alignment. Defines how the cells content will be aligned. Left, right or center. The
default value is left
Width. Defines the total table width. The default value is 300 pixels or percentage. The
Choice-box at right allows the definition of width in pixels or percentage
The inferior part of the Dialog Box
• The small box Use Division. To create a Division instead of a Table check this box.
• Height per DIV. Defines the height of each Division. It is defined in pixels or in percentage
• Float at. Defines the positioning of the set of divisions being created. The possibilities are:
◦ Float at left
◦ Float at right
◦ Floating is none
• Formatted Text Allowed. If this option is checked the Editor will create a single Division using
the HTML control PRE. This control allows that the text inside keeps the characteristic the
user wants without HTML standard properties. Can be used to enter program code or any
other text with exclusive formatting
◦ All PRE Division is has the Font Courier New by default
• Allow Scroll. If checked this option forces the size of the division to fixed size and adds scroll
bars as needed
Important Information about Divisions:
• All cells are created with the same properties and will be symmetric in rows and columns.
Different from Tables though, each cell can be edited separately and the properties can be
changed differently to each cell
• All rows and columns will be created nested in a Main Division
• When the border is defined as invisible (size=0 and style=none) the Editor will make it dashed
to facilitate visualization and editing. However, when saved the borders will be eliminated and
not presented in the browser. In the Editor Tables will be presented like:
Without Border
•
•
•
•
•
With Borders
To edit a Table it is necessary to select the table (see topic Trouble Shooting – Differences
between browsers). Once selected the Table properties will be presented in the Dialog Box.
Any changed property will be applied to the Table. Select the table use the button
The with of each column will not raise will text is typed
The height of each cell will raise while the content expands the cell limit, except when the
Allow Scroll option has been checked
To add an image in a Table Cell you need to select the cell and then utilize the Images Dialog
Box to choose and insert the picture
A set of Divisions or a Division can be copied and inserted in other part of the text. To copy a
Division it is necessary to select it (see topic Trouble Shooting – Differences between browsers)
and utilize Ctrl+C or the Copy Button
Page 11 of 28
•
•
To paste the Division position the cursor in the insertion point on the text and use Ctrl+V or
press the button Paste
Any other property can be applied to the text in the table cells. All you need is select the text
and apply the desired property. See Topic Formatting Texts or Formatting Paragraphs
Back
Page 12 of 28
Resources Utilization – Adding and changing images
The following Dialog Box allows the choice of images or Flash components to insert them in the edited
text. Allows also you to select and edit an image already in the text.
The fields in the Dialog Box allow:
• Image URL. In this field you define the URL to the image. A URL must be any valid WEB
address, inside your website or outside in the WEB. It is possible to list images available in
your website in a image browser. To get this done you must provide a list of folders and images
you want to make available for editors. To provide this list, in the initialization of the page
where the editor resides as a string with each item separated by semi-colon:
• Example
• Folder Level 01
• Folder Level 02
• Folder Level 03
• File 1 Level 03
• File 2 Level 03
• File 1 Level 02
• File 2 Level 02
• File 1 Level 01
• File 2 Level 01
• File 1 Level 00
In this case the string must be like below:
Folder Level 01/; Folder Level 01/Folder Level02/;Folder Level 01/Folder Level
02/Folder Level 03/;Folder Level 01/Folder Level 02/Folder Level 03/File 1 Level
03;Folder Level 01/Folder Level 02/Folder Level 03/File 2 Level 03;Folder Level
01/Folder Level 02/File 1 Level 02;Folder Level 01/Folder Level 02/File 2 Level
02;Folder Level 01/File 1 Level 01;Folder Level 01/File 2 Level 01; File 1 Level 00
Page 13 of 28
To facilitate its visualization, see the string broken into lines:
Folder Level 01/;
Folder Level 01/Folder Level02/;
Folder Level 01/Folder Level 02/Folder Level 03/;
Folder Level 01/Folder Level 02/Folder Level 03/File 1 Level 03;
Folder Level 01/Folder Level 02/Folder Level 03/File 2 Level 03;
Folder Level 01/Folder Level 02/File 1 Level 02;
Folder Level 01/Folder Level 02/File 2 Level 02;
Folder Level 01/File 1 Level 01;
Folder Level 01/File 2 Level 01;
File 1 Level 00
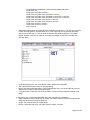
•
The Button Search opens the Images Browser Dialog Box (see below). In the left side you have
Folders and File Names in a hierarchical form. In the right side you can preview the image
selected in the left side. It works as much as the Microsoft Windows Explorer. The Search
Button, however, will only be visible if the string with images list has been provided (see
previous item)
•
•
•
In the above Dialog Box, the Select Button inserts defines the image URL
The Cancel Button simple returns to previous Dialog
Back to the main Image Dialog Box, in the field Alternate Text you can provide any text you
should want to show in case the image becomes
If the Box Flash is marked it will force the editor to insert a Flash component instead of an
image
•
In the inferior part of the Image Dialog Box there are the following information:
• Width. Defines to desired width for the image. The default value is AUTO indicating that the
image will be inserted with its original size
• Height. The same as above for image height
• Border. If different than zero, will make visible a margin in n pixels
Page 14 of 28
•
•
•
•
•
Alignment. It is a choice box with standard HTML options for image positioning:
• Not Set
• Left
• Right
• TexttTop
• AbsMiddle
• Baseline
• AbsBottom
• Bottom
• Middle
• Top
Horizontal Space. Defines the spacing from the left side of the text. It is defined in number of
pixels. The default value is zero
Vertical Space. Defines the spacing from the top of the text. The default value is zero
The Send Button inserts the image or Flash component in the text at the cursor position
The Cancel Button cancels the operation
Important Information about images utilization:
• The with the list of folders and files must be created in the page initialization and saved in
the variable imageList. See Preparing processing environment/Installation
• It this string is badly formatted the folders and files will not be presented correctly
• The image list must attain to the folders and images available within the website
environment, where the Editor is installed
• The Editor does not make any validation of the selected image regarding origin and size. It is
the implementer responsibility to provide any validation
Back
Page 15 of 28
Resources Utilization - Adding and changing hyperlinks
To define a Hyperlink it is necessary to select a text or image. With the selection you can use the
button to edit an hyperlink and the Dialog Box will open.
•
•
•
•
•
URL. Is where you must enter the destination URL. It can be an internal address pointing to
other page in your website, the address of a file for download or a WEB address.
Target. Defines how the link will be opened. The choice box, at right, offers the following
options:
• blank – A new window will open
• self – Will be opened in the active frameset
• parent – Will be opened in the first frameset above the active frameset
• top – Will be opened in the same window no matter what frameset
• no target – No specific target defined
• custom – Free to be used as per your requests
Style. Defines the formatting Style of the hyperlink. You can use any HTML formatting
properties
Class. A CSS Class name, if your website uses one
Name. Not used in this version
Important Information about hyperlink utilization
• The Editor does not make any validation of the selected image regarding origin and size. It is
the implementer responsibility to provide any validation
Back
Page 16 of 28
Resources Utilization - Importing texts from other editors
You can copy texts from other text editors and paste it in the Editor 3ST+ wysiwyg. However, the
pasted text will inherit formatting properties from the editor used, like Microsoft Word, OpenOffice, etc.
These properties are expressed in control characters not in the HTML standard.
The openWYSIWYG +3ST Editor offers a resource that eliminates all formatting controls from the
imported texts. To use it press the button
Important – The resource will eliminate all formatting controls including those added by the
openWYSIWYG +3ST. It will be necessary to re-format the text again.
Back
Resources Utilization – Utilizing css style files
Crating a list of Rules to be used
The openWYSIWYG +3ST Editor offers the possibility to utilize Style Rules existing in the active CSS
file being used by the website where the Editor is installed.
The rules will be available in the choice box
must be
defined by the ASP.NET program, or any other program, running in the server side of your website.
The field rulesList (see topic Preparing processing environment – Installing the editor) must contain a
list of the rules, each separated by semi-colon. Must be defined by the ASP.NET program, or any other
program, running in the server side of your website.
A Style Sheet file may have several rules, many of them not useful for the Editor. For this reason the
openWYSIWYG +3ST implementation asks that you prepare a list of those rules you think appropriate to make
available.
For instance, only those rules that are applicable to text and paragraph formatting, or those that
apply for lists.
The names of the rules must be listed exactly as they are in the Style Sheet File. The names can be
meaningful and the rules duplicated to have names in different languages.
Back
Page 17 of 28
Applying Rules in the Editor
The available rules can be applied to paragraphs or selected parts of the text. There are restrictions
in some browsers related to utilize rules to selected parts of the text. See topic Differences between
Browsers.
Select the text or position the cursor at the paragraph you want to apply a CSS Rule and then select
the rule from the choice box
The rule will be applied to the selection.
The applied style will be shown in the choice box allowing you to see what style is applied to any part
of the text.
OR
When a rule is applied to a paragraph any new paragraph created with the ENTER key will inherit the
rule from the previous paragraph.
Back
Page 18 of 28
Resources Utilization – Editing the HTML Code
To get access to the HTML code, generated by the openWYSIWYG +3ST Editor press the button
The Editor will enter in HTML mode and will show the HTML code. If you is a experienced user in HTML
code you can use this resource to fine-tune the formatting of the text or any object in the text.
When the button
the Text mode.
is pressed the Editor changes it by the button
that allows you to get back to
Important information about HTML mode utilization:
• Any changes to the HTML code may not be changed in the Text mode. Also, some properties
applied to Tables and Divisions may not be seen by the Dialog Boxes for these contents. In this
case you must edit your changes in the HTML mode
• While in HTML mode none of the Editor functions will be available. If you try to use them the
Editor will show you a warning message
Back
Resources Utilization – Raising the Editor Area
The Editor Window, in the complete mode, can be used in two different sizes. The button
or reduce the Editor Window.
raises
The two sizes option definition are in the file wysiwyg-settings.js located at folder wysiwyg/scripts in
the environment of the website utilizing the editor. These values can be changed using a common text editor.
The original values, for this distribution, are:
FULL option
full.Width = "690px";
full.Height = "380px";
full.MaxWidth = "690";
full.MaxHeight = "533px";
SMALL option
small.Width = "646px";
small.Height = "300px";
Max width and Max height are not used in the SMALL option
Back
Page 19 of 28
Resources Utilization – Saving Edited Document
The openWYSIWYG +3ST Editor presents the button
allowing you to request that the edited text is
saved.
Once the Editor is totally coded in Javascript there are no processes in the Editor to save its content.
The saving process though must be performed by the server side program that controls the page where the
Editor resides.
When the Save button is used the Editor uses two fields in the page (see topic Installation – Preparing
processing environment) are updated.
textToSave
btSavedUsed
- Will hold the edited text
– With TRUE indicates that the user pressed the Save button
Using these two fields your program that manages the page can save the content where it is
appropriate.
Back
Resources Utilization – Loading a document into the Editor
Once the openWYSIWYG +3ST Editor is developed in Javascript, to load content into the Editor you
must code it into the server side program that manages your web page.
As explained in the topic Instalation – Preparing processing environment, the fields below must be
updated with the content to be edited:
vsWorkingArea – Move to this field the HTML code to be Edited
rConteudoTEXT - Move to this field too the HTML code to be Edited
Back
Page 20 of 28
Trouble Shooting – Differences between browsers
There are behavior differences between tested browsers (IE, Safari, Firefox, Google Chrome and
Opera). In the list below you will find these differences description. It is recommended that you choose a
browser as your standard if use the Editor in a Content Management application. Some behavior differences
may difficult you to change some content created in a different browser.
All behavior differences are very small and can be corrected even editing text created in another
browser.
- When using Nested Divisions, this browser shows distortions in the way it renders the page. To fine
tune Divisions positions and sizes users can use the preview tool.
+ Images and Divisions can be selected and their sizes can be changed the mouse Drag and Drop. This
does no occur in other browsers.
- Objects, like Tables and Divisions, when selected have its margins highlighted what facilitates object
identification. Although it facilitates object size changes, this borders are placed in front of some
resources.
+ Allow CSS styles to be applied for selected texts and to entire paragraph.
- The objects embedded into divisions are not recognized by Popup tools, when selected (Tables and
Images). See in the Users Manual See specific procedures to overcome this downside.
- To access text or objects embedded into Divisions, it is necessary to double click over the division
+ Nested Divisions are presented properly without distortions.
+ Division's embedded objects are appropriately identified by Dialog Boxes.
- Allow Division selection. However, to change its size it is necessary to open the Dialog Box.
- Selected Divisions don't show highlighted borders and it is difficult to see what Division is selected.
However, the cursor blinks into the selected Division.
- CSS styles are applied only to entire paragraphs, the one that has the cursor position.
- Divisions content cannot be completely deleted. If so, the entire Division is also deleted. See
specific procedure in the Users Manual.
- Images cannot be moved by mouse drag and drop movements.
Page 21 of 28
- When using Nested Divisions, this browser shows small distortions in the way it renders the page.
- The objects embedded into divisions are not recognized by Popup tools, when selected. See in the
Users Manual See specific procedures to overcome this downside.
- Allow Division selection. However, to change its size it is necessary to open the Dialog Box.
- Selected Divisions don't show highlighted borders and it is difficult to see what Division is selected.
However, the cursor blinks into the selected Division.
- CSS styles are applied only to entire paragraphs, the one that has the cursor position.
- Divisions content cannot be completely deleted. If so, the entire Division is also deleted. See
specific procedure in the Users Manual.
- Tables may have some distortions when presented in other browsers.
Back
Trouble Shooting – Rows that cannot be deleted
Some paragraphs are created without any content and if the cursor remains outside the HTML TAGS
that defines the paragraph <P></P> it may be impossible to delete the paragraph and the row.
When it happens it is necessary to utilize the mode HTML and find the TAG <P></P> and deleted in
this Text mode.
If a CSS rule was applied to the paragraph the HTML TAG will appear as:
<P class=className></P>
Back
Page 22 of 28
Trouble Shooting – Editor basic format does not have Save button
In the Basic mode the Save button
is not available. The developer implementing the Editor to
operate in Basic mode must provide other ways to get the text saved.
In this case, the content to be saved will be in the field rConteudoTEXT.
Back
Trouble Shooting – Sessions timeout
The openWYSIWYG +3ST Editor does not change any standard of access sessions duration. When the
session timeout occurs the content cannot be saved. There will be an error message.
It is the user responsibility to save the content periodically avoiding sessions expiration.
Back
Page 23 of 28
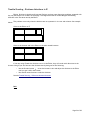
Trouble Shooting – Divisions distortions in IE
Editing Divisions in the Microsoft Internet Explorer can have some distortions problems compared with
the way the browser will renders the web page. This happens because IE renders Margins and Padding
different in the Text Area used by the Editor.
below.:
This problem occurs only when the divisions are not symmetric in its rows and columns. See example
Vision in the Editor on IE
Vision in the browser and in the Editor on the other tested browsers
If the user using IE make the divisions correct in the Editor, they will render with distortions in the
browser. Using IE you can fine-tune the divisions sizes by doing one of the following:
•
•
Use the Preview button
to see the browser's view and adjust the divisions in the Editor
until you get it OK in the browser
Use another tested browser to edit the divisions.
See also Trouble Shooting - Diferences between browsers
Back
Page 24 of 28
Trouble Shooting – Images Dialog Box does not show images in the navigator
The images navigator only shows images if the images paths were provided in the page initialization in
the field imageList that must exists in the web page.
See Resources Utilization – Adding and changing images
Back
Trouble Shooting – Style combo box does not contains rules
The Choice Box for style rules
only shows the rules list if the rules list
has been provided in the field rulesList in the page where the Editor resides.
See Resources Utilization – Utilizing css style files
Back
Page 25 of 28
Trouble Shooting – Hyperlink errors
A bad formatted hyperlink or pointing to an nonexistent URL will not work.
If the address is outside the website environment, an address in the WEB, check to ensure that the
link is appropriately written.
If the address is an intern one, inside your website, the relative address must be correct. Remember
to indicate higher levels in the hierarchy by providing ../
Examples.
The hyperlink is being written in a document that resides in the folder Clients and refers to a
document named tips.html that resides in the root of your website. The URL will be
../tips.html
The hyperlink is being written in a document that resides in the folder Clients and refers to a
document tips.html that resides in the folder systems. The URL will be ../systems/tips.html
The hyperlink is being written in a document that resides in the website root and refers to a
document tips.html that resides in the folder systems. The URL will be systems/Dicas.html
Back
Page 26 of 28
Trouble Shooting – Styles are not applied to selected texts
With this version of openWYSIWYG +3ST Editor only in Microsoft IE (7 or 8) is possible to apply styles
to a selected text. In all other tested browsers, Firefox, Safari, Google Chrome and Opera, styles can be
applied only to the current paragraph.
Back
Trouble Shooting – Selecting objects on different browsers
There are some difficulties to select objects like Tables and Images in the different browsers.
IE (7 e 8)
If an image is within a Division, the Dialog Box for images will not identify the image properties and
will open as to add a new image. When necessary the following procedure can be followed:
1. Select the image and Cut (Crtl+X) pasting it any where outside the Division
2. Select the image now outside the Division and edit it making all necessary changes
3. Select the image again and Cut (Ctrl+X) pasting it in the desired Division
Safari, Google Chrome and Opera
Selecting Images
To select an image it is necessary to Drag the mouse pointer, with left button pressed), over the
image. The image will change its colors if selected.
Page 27 of 28
Firefox, Safari, Google Chrome e Opera
Selecting Tables inside Divisions
If a table is inside a Division the Dialog Box for tables will not recognize its properties and opens as to
create a new table. When necessary the following procedure can be followed:
1. Select the table and Cut (Crtl+X) pasting it any where outside the Division
2. Select the table now outside the Division and edit it making all necessary changes
3. Select the table again and Cut (Ctrl+X) pasting it in the desired Division
Back
Page 28 of 28