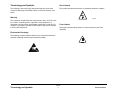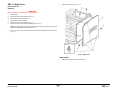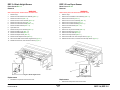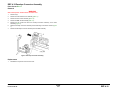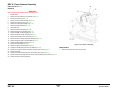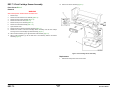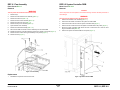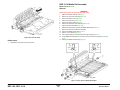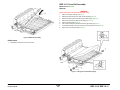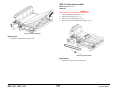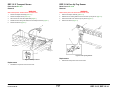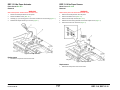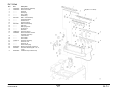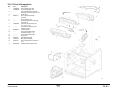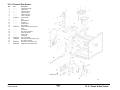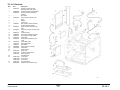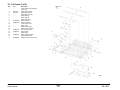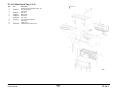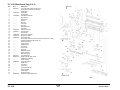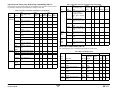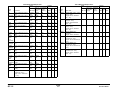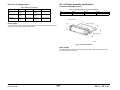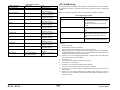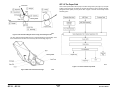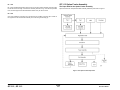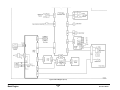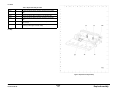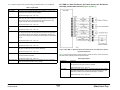
1
XEROX
Xerox DocuPrint N2125
Network Laser Printer Service Manual
CAUTION
721P52390
February 2000
These components are susceptible
to electrostatic discharge. Observe
all ESD procedures to avoid
damage.
This Service Manual contains information
that applies to the DocuPrint N2125 Laser
Printer.
Copyright 2000 by Xerox Corporation. Xerox and DocuPrint N2125 are
registered trademarks of Xerox Corporation.
Copyright
This Service Manual contains information that applies to the DocuPrint
N2125 Electronic Laser Printer.
Copyright 2000 Xerox Corporation. All rights reserved.
NOTICE
Copyright protection claimed includes all forms of matters of
copyrightable materials and information now allowed by statutory or
judicial law or hereinafter granted, including without limitation, material
generated from the software programs which are displayed on the
screen such as styles, templates, icons, screen displays, looks, etc.
This manual is for use by Xerox Technicians and Xerox trained
technicians only.
NOTICE
While every care has been taken in the preparation of this manual, no
liability will be accepted by Xerox arising out of any inaccuracies or
omissions.
Xerox, and all product names and product numbers mentioned in this
publication are trademarks.
All service documentation is supplied to Xerox external customers for
informational purposes only. Xerox service documentation is intended
for use by certified, product trained service personnel only. Xerox does
not warrant or represent that such documentation is complete. Nor does
Xerox represent or warrant that it will notify or provide to such customer
any future changes to this documentation. Customer’s service of
equipment, or modules, components, or parts of such equipment may
void any otherwise applicable Xerox warranties. If Customer services
such equipment, modules, components, or parts thereof, Customer
releases Xerox from any and all liability for Customer’s actions, and
Customer agrees to indemnify, defend, and hold Xerox harmless from
any third party claims which arise directly or indirectly from such
service.
Prepared by:
Maak 1
Adobe and PostScript are trademarks of Adobe Systems Incorporated.
PCL, HP LaserJet, and Intellifont are trademarks of Hewlett-Packard
Company. IBM is a trademark of International Business Machines
Corporation. Microsoft, Microsoft Windows, Microsoft Word, MS, and
MS-DOS are trademarks of Microsoft Corporation. Univers is a
trademark of Linotype AG or its subsidiaries. WordPerfect is a
trademark of WordPerfect Corporation. Centronics is a trademark of
Centronics Corporation. Macintosh and TrueType are trademarks of
Apple Computer, Incorporated. All other product names are trademarks/
tradenames of their respective owners.
PCL, PCL 5e, and PCL 6 are trademarks of Hewlett Packard Company.
This printer contains an emulation of the Hewlett Packard PCL 5e or
PCL 6 command language, recognizes HP PCL 5e or HP PCL 6
commands, and processes these commands in a manner compatible
with Hewlett Packard LaserJet printer products.
XL is a trademark of Xiontics.
105 Loudoun Street S.W.
Leesburg, VA. 20175-2910
Prepared for:
Network Printers Business Unit
Customer and Marketing Focus
701 South Aviation Blvd.
El Segundo, California 90245
Copyright
Warning
This equipment complies with the requirements in Part 15 of
FCC rules for a class A computing device. Operation of the
equipment in a residential area may cause unacceptable
interference to radio and TV reception, requiring the
operator to take whatever steps are necessary to correct the
interference.
02/2000
ii
Initial Issue
DocuPrint N2125
Electrostatic Discharge
Class 1 LASER Product
This caution indicates that there are components which are
sensitive to damage caused by electrostatic discharge.
The DocuPrint N2125 laser printer is certified to comply with
Laser Product Performance Standards set by the U.S.
Department of Health and Human Services as a Class 1 Laser
Product. This means that this is a class of laser product that does
not emit hazardous laser radiation; this is possible only because
the laser beam is totally enclosed during all modes of customer
operation.
CAUTION
These components are susceptible
to electrostatic discharge. Observe
all ESD procedures to avoid
damage.
The laser and output of the laser scanner unit produces a beam
that, if looked into, could cause eye damage. Service procedures
must be followed exactly as written without change.
When servicing the machine or laser module, follow the
procedures specified in the manual and there will be no hazards
from the laser.
Shock Hazard
This symbol indicates the presence of potentially hazardous
voltages.
FM_001
Fuser Hazard
Laser (FDA): Any laser label visible to service must be
reproduced in the service manual with location shown or
indicated. Safe working procedures and clear warnings
concerning precautions to avoid possible exposure must also be
included.
The Laser contained in the DocuPrint N2125 meets the following
standard: Laser class 3B, maximum 5mW, wavelength 780nm.
The following LASER symbol will be displayed at the start of any
procedure where possible exposure to the laser beam exists.
This symbol indicates the presence of extreme heat from the
Fuser Assembly.
LUOKAN 1 LASERLAITE
KLASS 1 LASER APPARAT
Initial Issue
DocuPrint N2125
02/2000
iii
Electrostatic Discharge
Table of Contents
Introduction
Title - - - - - - - - - - - - - - - - - - - - - - - - - - - - - - - - - - - - - Page
The DocuPrint N2125 Service Manual is the primary document used for
repairing and maintaining the DocuPrint N2125 Laser Printer.
Introduction - - - - - - - - - - - - - - - - - - - - - - - - - - - - - - - - - - iv
Organization - - - - - - - - - - - - - - - - - - - - - - - - - - - - - - - - - - v
This manual contains Service Call Procedures, Diagnostic Procedures,
General Information, Repair Analysis Procedures, Image Quality
Analysis Procedures, Wiring Data, and Parts Lists that will enable the
Service Representative to repair DocuPrint N2125 failures.
Revision Control List - - - - - - - - - - - - - - - - - - - - - - - - - - viii
Service Call Procedures - - - - - - - - - - - - - - - - - - - - - - - - 1-1
Section Contents - - - - - - - - - - - - - - - - - - - - - - - - - - - - - - - - - - - - - - - - 1-1
Repair Analysis Procedures - - - - - - - - - - - - - - - - - - - - - 2-1
Section Contents - - - - - - - - - - - - - - - - - - - - - - - - - - - - - - - - - - - - - - - - 2-1
Image Quality Repair Procedures - - - - - - - - - - - - - - - - - 3-1
Section Contents - - - - - - - - - - - - - - - - - - - - - - - - - - - - - - - - - - - - - - - - 3-1
Repair/Adjustments - - - - - - - - - - - - - - - - - - - - - - - - - - - 4-1
Section Contents - - - - - - - - - - - - - - - - - - - - - - - - - - - - - - - - - - - - - - - - 4-1
Parts List - - - - - - - - - - - - - - - - - - - - - - - - - - - - - - - - - - - 5-1
Section Contents - - - - - - - - - - - - - - - - - - - - - - - - - - - - - - - - - - - - - - - - 5-1
General Procedures - - - - - - - - - - - - - - - - - - - - - - - - - - - 6-1
Section Contents - - - - - - - - - - - - - - - - - - - - - - - - - - - - - - - - - - - - - - - - 6-1
Wiring Data - - - - - - - - - - - - - - - - - - - - - - - - - - - - - - - - - - 7-1
Section Contents - - - - - - - - - - - - - - - - - - - - - - - - - - - - - - - - - - - - - - - - 7-1
Table of Contents
02/2000
iv
Initial Issue
DocuPrint N2125
Organization
Section 7 - Wiring Data
This manual is divided into seven sections. The title and description of
each section of the manual is as follows:
This section contains sensor, connector, and PWB location drawings;
power distribution diagrams, interconect diagrams, interconnect
diagrams and pin assignment information. This information is not
specific to individual procedures but is provided for general reference.
Section 1 - Service Call Procedures
This section is used to identify a suspected problem. It contains
Machine Orientation, Call Flow, Initial Actions, Corrective Actions, and
Final Actions. This part of the service manual should always be used to
start the service call.
Section 2 - Repair Analysis Procedures
This section is used to isolate and identify problems to a faulty
component or subassembly. It contains the introduction, display
message table, error code tables and the Repair Analysis Procedures
(RAPs).
Section 3 - Image Quality
This section contains image quality repair procedures to assist in
correcting image quality defects. These procedures provide defect
samples and definitions to help identify the type of defect that exists,
the test pattern to use, and actions required to correct the defects.
Section 4 - Repair / Adjustment
This section contains the instructions for removal, replacement, and
adjustment of the spared parts within the machine.
Section 5 - Parts Lists
This section contains illustrations of disassembled subsystems and a
listing of the spared parts.
Part names are listed in this section of the manual even if the part itself
is not spared. All the parts that are spared will have the part number
listed. Parts that are not spared will not have a number listed.
Section 6 - General Procedures
This section includes the Operations Menu Map and the Service Mode
Menu Map. It includes all unique service operations, supplemental tools
and supplies.
Initial Issue
DocuPrint N2125
02/2000
v
Organization
Terminology and Symbols
Shock Hazard
The following is the terminology and symbols that are used in this
manual for Warnings, Electrostatic Device or General Cautions, and
Notes.
This symbol indicates the presence of potentially hazardous voltages.
Warning
FM_001
This equipment complies with the requirements in Part 15 of FCC rules
for a class A computing device. Operation of the equipment in a
residential area may cause unacceptable interference to radio and TV
reception, requiring the operator to take whatever steps are necessary
to correct the interference.
Fuser Hazard
This symbol indicates the presence of extreme heat from the Fuser
Assembly.
Electrostatic Discharge
The following symbols indicates that there are components which are
sensitive to damage caused by electrostatic discharge.
Terminology and Symbols
02/2000
vi
Initial Issue
DocuPrint N2125
Laser Product Certification
CAUTION
Use of controls or adjustments other than those specified in this manual
may result in an exposure to dangerous laser radiation.
The DocuPrint N2125 is certified to comply with Laser Product
Performance Standards set by the United States Department of Health
and Human Services as a Class 1 product. This means that it is a laser
product that does not emit dangerous laser radiation during any mode
of customer operation.
During servicing, the laser beam could cause eye damage if looked at
directly. Service procedures must be followed exactly as written without
change.
CAUTION
These components are susceptible
to electrostatic discharge. Observe
all ESD procedures to avoid
damage.
Initial Issue
DocuPrint N2125
02/2000
vii
Laser Product Certification
Product:
Title:
Part Number:
DocuPrint N2125 Laser Printer
Xerox DocuPrint N2125 Network Laser
Printer Service Manual
721P52390
Page
Page
Page
Revision
Page
Revision
Title - - - -2/2000
ii - - - - - - -2/2000
iii - - - - - -2/2000
iv - - - - - -2/2000
v - - - - - - -2/2000
vi - - - - - -2/2000
vii - - - - - -2/2000
viii- - - - - -2/2000
ix - - - - - -2/2000
x - - - - - - -2/2000
2-16
2-17
2-18
2-19
2-20
2-21
2-22
2-23
2-24
2-25
2-26
2-27
2-28
2-29
2-30
2-31
2-32
2-33
2-34
2-35
2-36
2-37
2-38
2-39
2-40
2-41
2-42
2-43
2-44
2-45
2-46
2-47
2-48
2-49
2-50
- - - - 2/2000
- - - - 2/2000
- - - - 2/2000
- - - - 2/2000
- - - - 2/2000
- - - - 2/2000
- - - - 2/2000
- - - - 2/2000
- - - - 2/2000
- - - - 2/2000
- - - - 2/2000
- - - - 2/2000
- - - - 2/2000
- - - - 2/2000
- - - - 2/2000
- - - - 2/2000
- - - - 2/2000
- - - - 2/2000
- - - - 2/2000
- - - - 2/2000
- - - - 2/2000
- - - - 2/2000
- - - - 2/2000
- - - - 2/2000
- - - - 2/2000
- - - - 2/2000
- - - - 2/2000
- - - - 2/2000
- - - - 2/2000
- - - - 2/2000
- - - - 2/2000
- - - - 2/2000
- - - - 2/2000
- - - - 2/2000
- - - - 2/2000
1-1
1-2
1-3
1-4
1-5
1-6
1-7
1-8
- - - - -2/2000
- - - - -2/2000
- - - - -2/2000
- - - - -2/2000
- - - - -2/2000
- - - - -2/2000
- - - - -2/2000
- - - - -2/2000
2-1 - - - - -2/2000
2-2 - - - - -2/2000
2-3 - - - - -2/2000
2-4 - - - - -2/2000
2-5 - - - - -2/2000
2-6 - - - - -2/2000
2-7 - - - - -2/2000
2-8 - - - - -2/2000
2-9 - - - - -2/2000
2-10 - - - -2/2000
2-11 - - - -2/2000
2-12 - - - -2/2000
2-13 - - - -2/2000
2-14 - - - -2/2000
2-15 - - - -2/2000
Initial Issue
DocuPrint N2125
Revision
Page
Revision
4-2- - - - 4-3- - - - 4-4- - - - 4-5- - - - 4-6- - - - 4-7- - - - 4-8- - - - 4-9- - - - 4-10 - - - 4-11 - - - 4-12 - - - 4-13 - - - 4-14 - - - 4-15 - - - 4-16 - - - 4-17 - - - 4-18 - - - 4-19 - - - 4-20 - - - 4-21 - - - 4-22 - - - 4-23 - - - 4-24 - - - 4-25 - - - 4-26 - - - 4-27 - - - 4-28 - - - 4-29 - - - 4-30 - - - 4-31 - - - 4-32 - - - 4-33 - - - 4-34 - - - 4-35 - - - 4-36 - - - -
2-51 - - - - 2/2000
2-52 - - - - 2/2000
2-53 - - - - 2/2000
2-54 - - - - 2/2000
2-55 - - - - 2/2000
2-56 - - - - 2/2000
3-1 - - - - - 2/2000
3-2 - - - - - 2/2000
3-3 - - - - - 2/2000
3-4 - - - - - 2/2000
3-5 - - - - - 2/2000
3-6 - - - - - 2/2000
3-7 - - - - - 2/2000
3-8 - - - - - 2/2000
3-9 - - - - - 2/2000
3-10 - - - - 2/2000
3-11 - - - - 2/2000
3-12 - - - - 2/2000
3-13 - - - - 2/2000
3-14 - - - - 2/2000
3-15 - - - - 2/2000
3-16 - - - - 2/2000
3-17 - - - - 2/2000
3-18 - - - - 2/2000
3-19 - - - - 2/2000
3-20 - - - - 2/2000
3-21 - - - - 2/2000
3-22 - - - - 2/2000
3-23 - - - - 2/2000
3-24 - - - - 2/2000
3-25 - - - - 2/2000
3-26 - - - - 2/2000
4-1 - - - - - 2/2000
02/2000
viii
2/2000
2/2000
2/2000
2/2000
2/2000
2/2000
2/2000
2/2000
2/2000
2/2000
2/2000
2/2000
2/2000
2/2000
2/2000
2/2000
2/2000
2/2000
2/2000
2/2000
2/2000
2/2000
2/2000
2/2000
2/2000
2/2000
2/2000
2/2000
2/2000
2/2000
2/2000
2/2000
2/2000
2/2000
2/2000
Revision
4-37- - - 4-38- - - 4-39- - - 4-40- - - 4-41- - - 4-42- - - 4-43- - - 4-44- - - 4-45- - - 4-46- - - 4-47- - - 4-48- - - 4-49- - - 4-50- - - 4-51- - - 4-52- - - 4-53- - - 4-54- - - 4-55- - - 4-56- - - 4-57- - - 4-58- - - 4-59- - - 4-60- - - 4-61- - - 4-62- - - 4-63- - - 4-64- - - 4-65- - - 4-66- - - 4-67- - - 4-68- - - 4-69- - - 4-70- - - 4-71- - - -
2/2000
2/2000
2/2000
2/2000
2/2000
2/2000
2/2000
2/2000
2/2000
2/2000
2/2000
2/2000
2/2000
2/2000
2/2000
2/2000
2/2000
2/2000
2/2000
2/2000
2/2000
2/2000
2/2000
2/2000
2/2000
2/2000
2/2000
2/2000
2/2000
2/2000
2/2000
2/2000
2/2000
2/2000
2/2000
Page
Revision
4-72 - - 4-73 - - 4-74 - - 4-75 - - 4-76 - - 4-77 - - 4-78 - - 4-79 - - 4-80 - - 4-81 - - 4-82 - - 4-83 - - 4-84 - - 4-85 - - 4-86 - - 4-87 - - 4-88 - - 4-89 - - 4-90 - - 4-91 - - 4-92 - - 4-93 - - 4-94 - - 4-95 - - 4-96 - - 4-97 - - 4-98 - - 4-99 - - 4-100 - 4-101 - 4-102 - 4-103 - 4-104 - 4-105 - 4-106 - -
2/2000
2/2000
2/2000
2/2000
2/2000
2/2000
2/2000
2/2000
2/2000
2/2000
2/2000
2/2000
2/2000
2/2000
2/2000
2/2000
2/2000
2/2000
2/2000
2/2000
2/2000
2/2000
2/2000
2/2000
2/2000
2/2000
2/2000
2/2000
2/2000
2/2000
2/2000
2/2000
2/2000
2/2000
2/2000
Revision Control List
Page
Revision
4-107 - - -2/2000
4-108 - - -2/2000
4-109 - - -2/2000
4-110 - - -2/2000
4-111- - - -2/2000
4-112 - - -2/2000
4-113 - - -2/2000
4-114 - - -2/2000
4-115 - - -2/2000
4-116 - - -2/2000
5-1 - - - - -2/2000
5-2 - - - - -2/2000
5-3 - - - - -2/2000
5-4 - - - - -2/2000
5-5 - - - - -2/2000
5-6 - - - - -2/2000
5-7 - - - - -2/2000
5-8 - - - - -2/2000
5-9 - - - - -2/2000
5-10 - - - -2/2000
5-11 - - - -2/2000
5-12 - - - -2/2000
5-13 - - - -2/2000
5-14 - - - -2/2000
5-15 - - - -2/2000
5-16 - - - -2/2000
5-17 - - - -2/2000
5-18 - - - -2/2000
5-19 - - - -2/2000
5-20 - - - -2/2000
5-21 - - - -2/2000
5-22 - - - -2/2000
5-23 - - - -2/2000
5-24 - - - -2/2000
6-1
6-2
6-3
6-4
- - - - -2/2000
- - - - -2/2000
- - - - -2/2000
- - - - -2/2000
Page
Revision
6-5 - - - - - 2/2000
6-6 - - - - - 2/2000
6-7 - - - - - 2/2000
6-8 - - - - - 2/2000
6-9 - - - - - 2/2000
6-10 - - - - 2/2000
6-11 - - - - 2/2000
6-12 - - - - 2/2000
6-13 - - - - 2/2000
6-14 - - - - 2/2000
6-15 - - - - 2/2000
6-16 - - - - 2/2000
6-17 - - - - 2/2000
6-18 - - - - 2/2000
6-19 - - - - 2/2000
6-20 - - - - 2/2000
6-21 - - - - 2/2000
6-22 - - - - 2/2000
6-23 - - - - 2/2000
6-24 - - - - 2/2000
6-25 - - - - 2/2000
6-26 - - - - 2/2000
6-27 - - - - 2/2000
6-28 - - - - 2/2000
6-29 - - - - 2/2000
6-30 - - - - 2/2000
6-31 - - - - 2/2000
6-32 - - - - 2/2000
6-33 - - - - 2/2000
6-34 - - - - 2/2000
6-35 - - - - 2/2000
6-36 - - - - 2/2000
6-37 - - - - 2/2000
6-38 - - - - 2/2000
6-39 - - - - 2/2000
6-40 - - - - 2/2000
6-41 - - - - 2/2000
6-42 - - - - 2/2000
6-43 - - - - 2/2000
6-44 - - - - 2/2000
Revision Control List
Page
Revision
Page
Revision
7-24 - - - 7-25 - - - 7-26 - - - 7-27 - - - 7-28 - - - 7-29 - - - 7-30 - - - 7-31 - - - 7-32 - - - 7-33 - - - 7-34 - - - 7-35 - - - 7-36 - - - -
6-45 - - - - 2/2000
6-46 - - - - 2/2000
6-47 - - - - 2/2000
6-48 - - - - 2/2000
6-49 - - - - 2/2000
6-50 - - - - 2/2000
6-51 - - - - 2/2000
6-52 - - - - 2/2000
6-53 - - - - 2/2000
6-54 - - - - 2/2000
6-55 - - - - 2/2000
6-56 - - - - 2/2000
6-57 - - - - 2/2000
6-58 - - - - 2/2000
6-59 - - - - 2/2000
6-60 - - - - 2/2000
Page
Revision
Page
Revision
2/2000
2/2000
2/2000
2/2000
2/2000
2/2000
2/2000
2/2000
2/2000
2/2000
2/2000
2/2000
2/2000
7-1 - - - - - 2/2000
7-2 - - - - - 2/2000
7-3 - - - - - 2/2000
7-4 - - - - - 2/2000
7-5 - - - - - 2/2000
7-6 - - - - - 2/2000
7-7 - - - - - 2/2000
7-8 - - - - - 2/2000
7-9 - - - - - 2/2000
7-10 - - - - 2/2000
7-11 - - - - 2/2000
7-12 - - - - 2/2000
7-13 - - - - 2/2000
7-14 - - - - 2/2000
7-15 - - - - 2/2000
7-16 - - - - 2/2000
7-17 - - - - 2/2000
7-18 - - - - 2/2000
7-19 - - - - 2/2000
7-20 - - - - 2/2000
7-21 - - - - 2/2000
7-22 - - - - 2/2000
7-23 - - - - 2/2000
02/2000
ix
Initial Issue
DocuPrint N2125
Page
Revision
Initial Issue
DocuPrint N2125
Page
Revision
Page
Revision
Page
02/2000
x
Revision
Page
Revision
Page
Revision
Revision Control List
1 Service Call Procedures
1.0 Introduction................................................................................................................
1.1 Machine Orientation ..................................................................................................
1.2 Call Flow....................................................................................................................
1.3 Initial Actions .............................................................................................................
1.4 Corrective Actions .....................................................................................................
1.5 Final Actions..............................................................................................................
Initial Issue
DocuPrint N2125
1-3
1-3
1-4
1-5
1-5
1-7
02/2000
1-1
Service Call Procedures
Service Call Procedures
02/2000
1-2
Initial Issue
DocuPrint N2125
1.0 Introduction
1.1 Machine Orientation
The Service Call Procedures section is used to identify a suspected problem. This section contains Call Flow, Initial Actions, Corrective Actions, and Final Actions.
For servicing the DocuPrint N2125, all references to machine orientation are as illustrated in
Figure 1.
Call Flow illustrates the normal activities and flow of a service call.
Initial Actions are used to gather information regarding the performance of the machine and
prepare the product for servicing.
Corrective Actions are used to verify the normal operation of the machine. In the Y/N (Yes/No)
steps of the corrective actions, a Yes response will lead you to the next step. A No response will
indicate the next step to perform or will direct you to a Repair Analysis Procedure (RAP).
RAPs will provide the instructions to isolate the faulty part or provide a list of suspect parts,
when isolation is not appropriate. Wire harnesses are not included in the repair actions and
problems with loose connections or damaged harnesses should be isolated using visual
inspection and the wiring data in section 7.
Final Actions are used to evaluate the total operation of the system and to identify the actions
required to complete the service call.
Figure 1 Machine Orientation
Initial Issue
DocuPrint N2125
02/2000
1-3
Service Call Procedures
1.0, 1.1
1.2 Call Flow
The call flow diagram shows the relationship of actions during a typical service call Figure 1.
The functions in Call Flow correspond to service manual sections as follows:
Section 1 - Initial Actions, Corrective Actions, and Final Actions
Section 2 - Status Indicator Repair Analysis Procedures (RAPs)
Section 3 - Image Quality Repair Analysis Procedures (IQ RAPs)
Section 4 - Repair / Adjustment (REPs)
Section 5 - Parts Lists (PLs)
Section 6 - General Procedures
Section 7 - Wiring
All service calls start with Initial Actions and all service calls end with Final Actions.
Figure 1 Call Flow Diagram
Service Call Procedures
1.2
02/2000
1-4
Initial Issue
DocuPrint N2125
1.3 Initial Actions
1.4 Corrective Actions
Initial Actions are used to gather information from the operator concerning problems at the
local machine. Make note of symptoms, error messages, error codes or other information concerning the problem that the operator may provide. This information may help identify an intermittent or unusual problem.
Procedure
Procedure
1.
Ensure that the power cord is connected to the wall outlet and to the machine.
2.
Check for paper or other objects in the paper path.
3.
Remove all paper from the output tray(s).
4.
The Rear Cover and Front Cover are closed.
Ensure that the Initial Actions have been completed. Switch the main power off, wait 10 seconds, then switch the main power on. The Fuser Fan runs.
Y
N
Perform RAP 2. If the DC power is correct, perform RAP 20.
The Main Drive Motor runs for approximately 6 seconds, then stops.
Y
N
Perform RAP 16.
The Fuser Fan runs.
Y
N
Perform RAP 20.
5.
The paper is within specification and is loaded correctly in the Paper Tray(s).
6.
Ask the operator to describe, or if possible, demonstrate the problem.
7.
If the problem is the result of incorrect operator action, refer the operator to the User documentation.
NOTE: The printer has the capability of displaying error messages while in the online
mode or in the diagnostic mode. The Fault History log will list the last 100 errors that have
occurred. The three codes may be different in format, but you can use any one of the
codes to access the Error Code Tables (Table 1 or Table 2) in section 2. The Error Code
Tables will list the corrective actions or direct you to a RAP.
8.
If an error message is displayed refer to the Error Code Tables (Table 1 or Table 2).
9.
If possible, print the “Configuration Sheet”. To print the Configuration Sheet, press and
release [1] or [5] until “Print Menu” is displayed. Then press and release [2] or [6] until
“Config Sheet” is displayed. Press Enter [4] to print the sheet. If the sheet is blank, go to
IQ RAP 2.
10. Have the customer determine that the configuration settings are correct.
11. If possible, print the “Fault History”. To print the “Fault History” press and release [1] or [5]
until “Print Menu” is displayed. Then press and release [2] or [6] until “Fault History” is displayed. Next, press Enter [4] to print the sheet. The Fault History will list the error codes
and the meter count when the event happened. Use the Fault History to determine the frequency of a problem. Access the Error Code Tables (Table 1 or Table 2) and perform the
corrective action as instructed.
12. If the Fault History can not be printed, the fault history can be displayed on the Control
Panel. To display the “Fault History” press and release [1] or [5] until “Print Menu” is displayed. Then press and release [2] or [6] until “Display Faults” is displayed. Next, press
press [3] to display the last fault that occurred. Continue to press and release [3] to display
the error codes in order from the newest to the oldest. Pressing and releasing the [4] key
will display the codes in order from the oldest to the newest. The Display Faults will display the error code and the meter count when the event happened. An example of the display “E9-2 #820”, where E9-2 is the error code and #820 is the meter count.
In approximately 30 seconds, the LCD Panel will display “Power On” and the Power On Diagnostic (POD) software “Version x.xxx”. The display is correct.
Y
N
Perform RAP 25
The Control Panel will display a number of different screens as the Power On Diagnostics
Completes Figure 1. The printer completes Power On Diagnostics and Ready is displayed.
Y
N
Perform RAP 25.
Press [1] twice to select “Print Menu”, then press and release [2] until “Menu Map” is displayed.
Press Enter [4] to print the “Menu Map”. “Processing Menu Map” is displayed, immediately followed by “Processing Tray #”. The display is correct.
Y
N
Perform RAP 25/RAP 26.
The Main Driver Motor runs.
Y
N
Perform RAP 29.
Paper is fed from the paper tray and is delivered to the output tray.
Y
N
Perform RAP as specified by the Error Code / Message listed in Table 1 of section 2.
The print contains readable text.
Y
N
If the print is black or blank perform IQ RAP 10 or IQ RAP 2.
If the text is garbled, Perform ()RAP A.
13. Proceed to Corrective Actions.
The print quality of the Menu Map is acceptable.
Y
N
Perform Image Quality Checkout.
A
Initial Issue
DocuPrint N2125
02/2000
1-5
Service Call Procedures
1.3, 1.4
A
Enter Diagnostics and select “Print Menu”. Scroll to “Test Print”. Feed at least 5 test prints from
all available trays to the Standard output tray (GP 2.5) for test print. Test prints were successfully delivered from each tray.
Y
N
Perform RAP as specified by the Error Code / Message listed in Table 1 of section 2.
If the Duplex Assembly is installed, run at least 5 duplexed prints (GP 2.5) for test print. If a
Duplex Assembly is not installed, follow the “Y” path. The prints were delivered successfully.
Y
N
Perform RAP as specified by the Error Code / Message listed in Table 1 of section 2.
If a Offset Catch Tray (OCT) is installed, run at least 5 prints to the OCT (GP 2.5) for test print.
If an OCT is not installed, follow the “Y” path. Prints were successfully delivered to the
OCT.
Y
N
Perform RAP as specified by the Error Code / Message listed in Table 1 of section 2.
Ensure that all normal printer conditions are set i.e. paper loaded, machine in Ready condition,
internet cable connected. Have the customer send a document to the printer. The print is
successful.
Y
N
Try a sending a document from a different application. The print was successful.
Y
N
There may be a problem with the print drivers. Have the customer contact Xerox
Customer Support.
There may be a problem with the application software. Have the customer contact Xerox
Customer Support.
Go to Final Actions.
Figure 1 Power On Diagnostic Sequence
Service Call Procedures
1.4
02/2000
1-6
Initial Issue
DocuPrint N2125
1.5 Final Actions
Procedure
1.
Switch the main power off.
2.
Update the tag matrix as required.
3.
Reinstall all the covers removed during the service call and complete all required administrative tasks.
4.
Clean the covers and ensure all labels are readable.
5.
Switch the printer power on. If any of the customer selections were changed return them
to the customer’s preferred settings.
6.
Run final prints and verify image quality. For Image Quality problems, go to section 3 Image Quality Checkout.
7.
Clean the general area.
8.
Communicate with the customer to inform them of actions taken and to ensure all problems have been solved.
Initial Issue
DocuPrint N2125
02/2000
1-7
Service Call Procedures
1.5
Service Call Procedures
1.5
02/2000
1-8
Initial Issue
DocuPrint N2125
2 Status Indicator Repair Analysis Procedures
Introduction......................................................................................................................
Measurements.................................................................................................................
2-3
2-3
Error Code Table
Error Code Tables ...........................................................................................................
2-5
Base Printer
RAP 1 AC Power.............................................................................................................
RAP 2 DC Power.............................................................................................................
RAP 3 DC Power Loading...............................................................................................
RAP 4 Tray # Failure Power Off/On (C3) ........................................................................
RAP 5 Tray # Empty (C5)................................................................................................
RAP 6 Remove Output From Std Bin (C5)......................................................................
RAP 7 MBF Misfeed (E2) ................................................................................................
RAP 8 Paper Jam / Misfeed (E2) ....................................................................................
RAP 9 System Controller PWB .......................................................................................
RAP 10 Paper Jam Open Front Cover (E3) ....................................................................
RAP 11 Paper Jam / Exit (E4).........................................................................................
RAP 12 Close Front Cvr/Close Rear Cvr (E5) ................................................................
RAP 13 Install Print Cartridge (J3) ..................................................................................
RAP 14 Toner Low (J5)...................................................................................................
RAP 15 P1: Fuser Pause ................................................................................................
RAP 16 Motor Failure Power Off/On (U1) .......................................................................
RAP 17 Laser Fail / Power Off/On (U2) ..........................................................................
RAP 18 Fuser Failure Power Off/On (U4) .......................................................................
RAP 19 IOT NVM Fail / Power Off/On (U6) ....................................................................
RAP 20 Fan Failure Power Off Now (U5)........................................................................
RAP 21 Low Paper Tray #...............................................................................................
RAP 22 Paper Size Error ................................................................................................
RAP 23 Low Toner Sensor Failure..................................................................................
RAP 24 Inoperative Printer..............................................................................................
RAP 25 Malfunctioning LCD/LED....................................................................................
RAP 26 Inoperative Keypad ............................................................................................
RAP 27 Erratic Printer Operation ....................................................................................
RAP 28 Power Supply.....................................................................................................
RAP 29 Main Motor Assembly ........................................................................................
RAP 30 Laser Assembly .................................................................................................
RAP 31 Fuser Assembly .................................................................................................
RAP 32 Registration Sensor ...........................................................................................
RAP 33 MBF No Paper Sensor.......................................................................................
RAP 34 Tray 1 No Paper Sensor ....................................................................................
RAP 35 Standard Bin Stack Full Sensor .........................................................................
RAP 36 Print Cartridge Sensor Assembly.......................................................................
RAP 37 Tray Motor Assembly Checkout Procedure .......................................................
RAP 38 Registration Clutch.............................................................................................
RAP 39 Turn Roll Clutch Assembly.................................................................................
RAP 40 Tray 1 Feed Clutch ............................................................................................
RAP 41 MBF Feed Solenoid ...........................................................................................
Initial Issue
DocuPrint N2125
2-11
2-12
2-13
2-14
2-15
2-16
2-16
2-17
2-18
2-18
2-19
2-20
2-21
2-21
2-22
2-22
2-23
2-24
2-24
2-25
2-25
2-26
2-26
2-27
2-28
2-29
2-29
2-30
2-31
2-32
2-32
2-33
2-34
2-34
2-35
2-35
2-36
2-36
2-37
2-37
2-38
RAP 42 System Controller Isolation ................................................................................
RAP 43 HVPS Assembly.................................................................................................
RAP 44 Electrical Noise ..................................................................................................
RAP 45 DIMM 1 (0101) ...................................................................................................
RAP 46 DIMM 2 (0102) ...................................................................................................
RAP 47 DIMM 3 (0103) ...................................................................................................
RAP 48 Exit Sensor.........................................................................................................
RAP 49 Exit Motor...........................................................................................................
RAP 50 Load MBF (C5) ..................................................................................................
RAP 51 Face Up Tray Open (E5)....................................................................................
2-38
2-39
2-39
2-40
2-41
2-41
2-42
2-42
2-43
2-43
500 Sheet Feeder
RAP 52 Low Paper Tray 2 (or Tray 3) 550 Sheet Feeder ...............................................
RAP 53 550 Sheet Feeder Feed Clutch..........................................................................
RAP 54 550 Sheet Feeder Assembly Not Recognized ...................................................
2-45
2-45
2-46
Duplex Unit
RAP 55 Duplex Unit Fail or Removed (E9-1) ..................................................................
RAP 56 Paper Jam Open Front Cover (E7) ....................................................................
2-47
2-47
Offsetting Catch Tray
RAP 57 Offset Jam Open Rear Cover (E6-X) .................................................................
RAP 58 OCT Assy Not Recognized ................................................................................
RAP 59 Remove Output From Offset Bin (C5)................................................................
RAP 60 OCT Stack Full Sensor ......................................................................................
RAP 61 OCT Offset Operation Not Performed................................................................
2-49
2-50
2-50
2-51
2-51
Envelope Feeder
RAP 62 Envelope Feeder Not Recognized .....................................................................
RAP 63 Envelope Feed Clutch........................................................................................
RAP 64 Envelope No Paper Sensor ...............................................................................
RAP 65 Load Envelope (C5) ...........................................................................................
RAP 66 Envelope Feeder Jam (E2) ................................................................................
02/2000
2-1
2-53
2-53
2-54
2-54
2-55
Status Indicator Repair Analysis Procedures
Status Indicator Repair Analysis Procedures
02/2000
2-2
Initial Issue
DocuPrint N2125
Introduction
Measurements
The Repair Analysis Procedures section is used to isolate and identify problems to a faulty
component or subassembly. It contains the Introduction, display message table, error code
table and the Repair Analysis Procedures (RAPs).
Power and signal grounds are connected to frame ground, therefore all circuit troubleshooting
can be performed using the metal frame (chassis) as the grounding point. If more information is
needed to locate connectors or test points, refer to section 7.
Use the Error Code Tables when messages or error codes are displayed or printed in a report.
Unless otherwise specified, the following voltage tolerances are used within this section: Table
1
The Repair Analysis Procedures (RAPs) are accessed from Section 1, system checks or additional checks. There are two types of RAPs: Status Indicator (SI) RAPs, contained in this section, and Image Quality (IQ) RAPs, located in Section 3.
RAPs will normally isolate a problem to a specific component or subassembly, excluding the
wire harnesses.
In the Y/N (Yes/No) steps of the RAPs, a Yes/No response will either lead you to the next step
or will indicate a corrective action. When the indicated corrective action has been completed,
go to Section 1 and restart the System Check to verify that the problem has been corrected.
Initial Issue
DocuPrint N2125
02/2000
2-3
Table 1 Voltage Measurements
Stated
Measured
+3.3 VDC
+3.0 to 3.6 VDC
+5.0 VDC
+4.8 to +5.2 VDC
+24.0 VDC
+21.6 to +26.4 VDC
0.0 VDC
Less than +0.5 VDC
Status Indicator Repair Analysis Procedures
Introduction, Measurements
Status Indicator Repair Analysis Procedures
Introduction, Measurements
02/2000
2-4
Initial Issue
DocuPrint N2125
Error Code Tables
Table 1 Error Code Table
General Info
Control Panel Message
Fault History Entry
Error Description
Action
Tray 1 Failure
Power Off/On
C3-1E
Tray 1 is not detected, motor failure,
Stack Height Sensor Failure.
Inspect and repair Tray 1
Go to RAP 4.
Tray 2 Failure
Power Off/On
C3-2E
Tray 2 is not detected, motor failure,
Stack Height Sensor Failure.
Inspect and repair Tray 2
Go to RAP 4.
Tray 3 Failure
Power Off/On
C3-3E
Tray 3 is not detected, motor failure,
Stack Height Sensor Failure.
Inspect and repair Tray 3
Go to RAP 4.
Load Envelope
No Fault Entry
C5: EBF Add Paper
Envelope is out of paper
Load Paper into Envelope
Go to RAP 65.
Load MBF
No Fault Entry
C5:MBF Add Paper
MBF is out of paper.
Load paper into MBF
Go to RAP 50.
Remove Output from Offset Bin
No Fault Entry
C5:OCT Tray Full
5 prints are delivered to the top tray
after the OCT Full Stack Sensor is
actuated.
Empty OCT Tray
Go to RAP 59.
Remove Output from Std. No Fault Entry
Bin
C5: Top Tray Full
Top Tray is declared full when 5 prints Empty Top Tray
are delivered to the top tray after the Go to RAP 6.
Full Stack Sensor is actuated.
Tray 1 Empty
No Fault Entry
C5:Tray 1 Add Pap
Tray 1 is out of paper
Load paper into Tray 1
Go to Rap 5.
Tray 2 Empty
No Fault Entry
C5:Tray 2 Add Pap
Tray 2 is out of paper
Load paper into Tray 2
Go to Rap 5.
Tray 3 Empty
No Fault Entry
C5:Tray 3 Add Pap
Tray 3 is out of paper
Load paper into Tray 3
Go to Rap 5.
Disk Error
Format Disk
D-1
N/A
Hard Drive error was detected.
Power Off/On
Format Hard Drive
Replace Hard Drive (PL 10.1)
Replace System Controller
PWB (REP 9.2).
Format Failed
Disk Locked
D-2
N/A
Cannot format disk, disk locked via
PJL or SNMP Command.
Customer Unlock Disk
Replace Hard Disk (PL 10.1).
Format Failed
Disk Locked
D-3
N/A
Cannot put disk in factory default
attempt to initialize disk after it is
locked.
Customer Unlock Disk
Replace Hard Disk (PL 10.1).
Tray 1 Feed Jam
Tray 1 Jam Open Tray 1
E2-01
E2-0: Feed Jam
Paper arrives at Registration Sensor
too early.
Open Tray 1
Open Front Cover
Clear Paper Path
Go to RAP 8.
Tray 2 Feed Jam
Tray 2 Jam Open Tray 2
E2-02
E2-0: Feed Jam
Paper arrives at Registration Sensor
too early.
Open Tray 2
Open Front Cover
Clear Paper Path
Go to RAP 8.
Initial Issue
DocuPrint N2125
Diagnostic Message
02/2000
2-5
Status Indicator Repair Analysis Procedures
Error Code Tables
Table 1 Error Code Table
General Info
Control Panel Message
Fault History Entry
Diagnostic Message
Error Description
Action
Tray 3 Feed Jam
Tray 3 Jam Open Tray 3
E2-03
E2-0: Feed Jam
Paper arrives at Registration Sensor
too early.
Open Tray 3
Open Front Cover
Clear Paper Path
Go to RAP 8.
Envelope Feed Jam Envelope Feeder Jam/
Remove all Envelopes
E2-0E
E2-0: Feed Jam
Paper arrives at Registration Sensor
too early.
Remove Envelope Feeder
Open Front Cover
Clear Paper Path
Go to RAP 66.
MBF Feed Jam
E2-0M
E2-0: Feed Jam
Paper arrives at Registration Sensor
too early.
Open Front Cover
Clear Paper Path
Go to RAP 7.
Envelope Feed Jam Envelope Feeder Jam/
Remove all Envelopes
E2-1E
E2-1: Feed Jam
Paper does not arrive at Registration
Sensor position within a specified
time.
Remove Envelope Feeder
Open Front Cover
Clear Paper Path
Go to RAP 66
MBF Misfeed
MBF Jam Remove All Paper
E2-1M
E2-1: Feed Jam
Paper does not arrive at Registration
Sensor position within a specified
time.
Open Front Cover or Feeder
Clear Paper Path
Close the Cover
Go to RAP 7.
Tray 1 Misfeed
Tray 1 Jam Open Tray 1
E2-11
E2-1: Feed Jam
Paper does not arrive at Registration
Sensor position within a specified
time.
Open Tray 1
Open Front Cover
Clear Paper Path
Go to RAP 8
Tray 2 Misfeed with Tray 2 Jam 550 Sheet Feeder Open Tray 2
installed as Tray 2
E2-12
E2-1: Feed Jam
Paper does not arrive at Registration
Sensor position within a specified
time.
Open Front Cover
Open Tray 2
Clear Paper Path
Go to RAP 8
Tray 3 Misfeed with Tray 3 Jam 550 Sheet Feeder Open Tray 3
installed as Tray 3
E2-13
E2-1: Feed Jam
Paper does not arrive at Registration
Sensor position within a specified
time.
Open Tray 1
Open Front Cover
Clear Paper Path
Go to RAP 8
Paper Jam Open Front Cover
E3-1
E3-1: Reg. Jam
Exit Sensor did not actuate within
time after the Registration clutch is
actuated.
Open Front Cover
Remove Print Cartridge
Clear Paper Path
Go to RAP 10
Paper Jam Open Front Cover
E3-2
E3-2: Reg. Jam
1. Registration Sensor did not deactuate within time after actuation of Registration sensor.
2. Registration Sensor is actuated at
power on.
Open Front Cover
Remove Print Cartridge
Clear Paper Path
Go to RAP 10
Exit Jam Open Rear Cover
E4-0
E4-0: Exit Jam
Paper leaves Exit Sensor early.
Open Rear Cover
Clear Paper Path
Go to RAP 11
Exit Jam Open Rear Cover
E4-2
E4-2: Exit Jam
1. Paper late off Exit Sensor.
2. Exit Sensor on at power up.
Open Rear Cover
Clear Paper Path
Go to RAP 11
Exit Jam 1
MBF Jam Remove All Paper
Status Indicator Repair Analysis Procedures
Error Code Tables
02/2000
2-6
Initial Issue
DocuPrint N2125
Table 1 Error Code Table
General Info
Control Panel Message
Fault History Entry
Diagnostic Message
Error Description
Exit Jam 2
Exit Jam Open Rear Cover
E4-3
E4-3: Exit Jam
Open Rear Cover
Custom Paper late off Exit Sensor
within a specified time from Registra- Clear Paper Path
Change Paper Setting in Custion Sensor.
tom Mode to correct size.
Go to RAP 11.
E5: FRNT/Rear Cover
1. Front cover interlock is open.
2. Rear cover interlock is open.
Close Front Cover
Close Rear Cover
Go to RAP 12.
E-5: Face Up Open
Face Up Tray is open.
Close Face Up Tray
Check Actuator
Check Sensor
Go to RAP 51.
Close Front Cvr
Close Rear Cvr
Action
Jam in the OCT
Offset Jam Open Rear Cover
E6-1
E6-1: OCT Jam
1. Paper late to OCT Sensor.
Open OCT Rear Door
Clear Paper Path
Open Printer Rear Cover
Clear Paper Path
Go to RAP 57
OCT Jam
Offset Jam Open Rear Cover
E6-2
E6-2: OCT Jam
Paper late off OCT Sensor.
OCT Sensor on at Power On
Open OCT Rear Door
Clear Paper Path
Go to RAP 57
Paper Jam Open Front Cover
E7-0
E7-0: Duplex Jam
Paper arrives at Registration Sensor
early from Duplex Sensor.
Open Front Cover
Clear Paper Path
Go to RAP 56.
Paper Jam Open Rear Cover
E7-1
E7-1: Duplex Jam
Paper late to Duplex Sensor
Open the Rear Cover
Remove Duplex Unit Clear
Paper Path
Go to RAP 56.
Duplex Jam 3
Paper Jam Open Rear Cover
E7-2
E7-2: Duplex Jam
1. Paper late off Duplex Sensor.
2. Duplex Sensor on at power up.
Open Rear Cover
Remove Duplex Unit
Clear Paper Path
Go to RAP 56.
Duplex Jam 4
Paper Jam Open Rear Cover
E7-3
E7-3: Duplex Jam
Paper late to Registration Sensor
from Duplex Sensor.
Open Rear Cover
Remove Duplex Unit
Clear Paper Path
Go to RAP 56.
Duplex Unit Fail or
Removed
E9-1
E9-1: Duplex Fail
Duplex module removed while power Reinstall Duplex Module
is on.
Go to RAP 55.
Offset Bin Fail
Power Off/On
E9-2
E9-2: OCT Fail
OCT removed while power is on.
Switch Power Off
Remove and Reinstall OCT
Switch Power On
Go to RAP 58.
Envelope Feeder Fail or
Removed
E9-E
E9: EBF Unit Fail
Envelope Feeder module removed
while power on.
Reinstall Envelope Feeder
Go to RAP 62.
Tray 2/3 Failure
Power Off/On
E11
E11: Tray 2/3 Fail
Trays 2/3 disconnected after power
on.
Reinstall Trays 2/3
Go to RAP 54.
Initial Issue
DocuPrint N2125
02/2000
2-7
Status Indicator Repair Analysis Procedures
Error Code Tables
Table 1 Error Code Table
General Info
Control Panel Message
Fault History Entry
Diagnostic Message
Error Description
Paper Size Jam
Open Rear Cover
PSE-1
C5: Paper Size Error
There is a conflict between the size of Correct the mismatch
the paper, which is detected by the
Open Rear Cover
Size Switches, and the length of
Go to RAP 22.
paper the printer detects by the length
of time the Registration Sensor is
actuated.
J3: EP Cartridge
1. Print Cartridge is not installed
2. The installed Print Cartridge is not
the correct one.
Install the Print Cartridge, or
replace with the correct Print
Cartridge
Go to RAP 13.
Replace Print Cartridge
Go to RAP 14.
Install
Print Cartridge
Toner Low
No Fault Entry
J5:Toner Low
Toner Low is detected after 10 prints
while Toner Sensor is on.
Memory Failure
Power Off/On
ESS-M
N/A
Controller memory has failed (32 meg Power Off/On
on board).
Go to RAP 9.
NV Memory Fail
Power Off/On
ESS-N
N/A
Controller NVM Failure.
Power Off/On
Go to RAP 9.
Flash Error
Format Flash
FMF-1
N/A
Flash Memory error found. Flash
memory format required.
Flash memory format
required
Go to RAP 9.
Motor Failure
Power Off/On
U1
U1: Motor Fail
Motor Fail signal is declared 1.3 seconds after start of Main Motor.
Power Off and On
Go to RAP 16.
Laser Failure
Power Off/On
U2
U2: ROS Fail
1.Laser Signal intervals are longer
Power Off and On
than the Ready time interval 20 sec- Go to RAP 17.
onds after the start of Laser warm up.
2. The laser power does not reach the
value in NVM when the laser diode is
switched on after the start of Laser
warm up.
3. Laser signal intervals become
longer than the Fail time interval after
Laser warm up is completed.
Fuser Failure
Power Off/On
U4
U4: Fuser Fail
1. Fuser temperature drops below the Power Off and On
set temperature after the Fuser warm Go to RAP 18.
up is complete.
2. Fuser warm up does not complete
within 110 seconds.
3. Thermistor circuit is detected to be
open.
4. Fuser temperature rises above the
set temperature.
5. Heat rod is on for 10 seconds when
the Main Drive Motor is stopped, after
the Fuser warm up is completed.
Fan Failure
Power Off Now
U5
U5: Fan Fail
Printer Pause
Main Fan has failed.
Status Indicator Repair Analysis Procedures
Error Code Tables
Action
02/2000
2-8
Check the Main Fan
Power Off and On
Go to RAP 20
Initial Issue
DocuPrint N2125
Table 1 Error Code Table
General Info
Control Panel Message
Fault History Entry
Diagnostic Message
Error Description
Action
IOT NVM Fail
Power Off/On
U6
U6: NVM Fail
1. A read error is detected during
power on.
2. A write error is detected during
write to the Nonvolatile Memory.
Power Off and On
Replace Print Engine Controller PWB (REP 9.3).
Table 2 System Controller Error Code Table
LED # blinks
Control Panel Message Followed by 1 sec. off
Initial Issue
DocuPrint N2125
Comment
0001 - System Controller 1
System Controller Board major failure. Go to RAP 42.
0001 - BASE RAM
System Controller Board RAM failure. Go to RAP 42.
1
0001 - BASE ROM
3
System Controller Board boot ROM. Go to RAP 42.
0001 - ASIC
4
System Controller Board ASIC failure. Go to RAP 42.
0001 - TIMER
4
System Controller Board Timer failure. Go to RAP 42.
0001 - PWPM
5
System Controller Board PWPM failure. Go to RAP 42.
0001 - DMA
5
System Controller DMA failure. Go to RAP 42.
0001 - COMM
6
System controller parallel port failure, USB port failure, ENet Port Failure.
Replace System Controller PWB (REP 9.2)
1000 - IOT
8
System Controller - IOT handshake failure.
Remove and reinstall the System Controller PWB (REP
9.2).
Replace the System Controller PWB (REP 9.2).
Replace the Print Engine Controller PWB (REP 9.3).
0010 - DISK
9
Hard disk failure.
Format Hard Disk (see Reset Menu - GP 4.1).
Replace the Hard Disk (PL 10.1).
Replace the System Controller PWB (REP 9.2).
0101 - DIMM1
10
DIMM board 1 failure. Go to RAP 45.
0102 - DIMM2
11
DIMM board 2 failure. Go to RAP 46.
0103 - DIMM3
12
DIMM board 3 failure. Go to RAP 47.
2000 - XIE RAM
15
System Controller Xerox Image Enhanced PWPM failure.
Replace the System Controller PWB (REP 9.2).
2010 - XIE PWPM
15
System Controller Xerox Image Enhanced PWPM failure.
Replace the System Controller PWB (REP 9.2).
2020 - XIE VDMA
15
System Controller Xerox Image Enhanced VDMA failure.
Replace the System Controller PWB (REP 9.2).
3000 - Token Ring
16
3000 - Serial
3000 - E-Net (10 Base 2)
Replace the appropriate network card (PL 10.1).
Replace System Controller PWB (REP 9.2).
5000 - Memory
Memory size not large enough to load the system software
Download Data.
Replace System Controller PWB (REP 9.2).
None
02/2000
2-9
Status Indicator Repair Analysis Procedures
Error Code Tables
Status Indicator Repair Analysis Procedures
Error Code Tables
02/2000
2-10
Initial Issue
DocuPrint N2125
RAP 1 AC Power
Initial Actions
Disconnect the AC power cord from the wall outlet.
WARNING
Improper connection of the grounding conductor can result in the risk of electrical
shock. The following must be observed:
•
Never use a ground adapter plug to connect the machine to a power source.
•
Never attempt any maintenance function which is not specifically called out in the
service procedures.
•
Never remove any covers which are fastened with screws, unless so instructed in
the service procedures.
CAUTION
If any of the voltage measurements are not as specified in the following steps, the cause must
be corrected. Caution the customer NOT to connect the machine to the wall outlet. Advise the
customer that a licensed electrician must correct the wiring. Do not attempt to correct the wiring yourself. If you later find the condition has not been corrected, inform your manager in writing of the improper wiring.
Figure 2 XL, UK, and AO (220 VAC) Outlet.
XL, Europe (220 VAC) Figure 3. Perform the following:
Measure the AC voltage between the supply pins, then between a supply pin and earth, then
between the other supply pin and earth. The voltage is 198 to 264 VAC between the supply
pins and between one of the supply pins and earth. Between the other supply pin and earth is
less than 3 VAC.
Procedure
Perform one of the following line voltage checks:
US, XCI, and AO (115 VAC) Figure 1. Perform the following:
Measure the AC voltage between AC Line and Neutral, between AC Line and Ground, and
between AC Neutral and Ground. The voltage between Line and Neutral and between Line and
Ground is 90 to 140 VAC and the voltage between Neutral and Ground less than 3 VAC.
Figure 3 XL, Europe (220 VAC) Outlet.
The voltage measured is correct.
Y
N
Inform the customer of insufficient voltage or improper wiring.
Check the continuity through all connections of the power cord. The measurement is less
than 10 ohms for each connection.
Y
N
Replace the power cord (PL 10.1), as applicable.
Perform RAP 2.
Figure 1 US, XCI, and AO (115 VAC) Outlet.
XL, UK and AO (220 VAC) Figure 2. Perform the following:
Measure the AC voltage between Line and Neutral, between Line and Earth/Ground, and
between Neutral and Earth/Ground. The voltage between Line and Neutral and between Line
and Earth/Ground is 198 to 264 VAC and between Neutral and Earth/Ground is less than 3
VAC.
Initial Issue
DocuPrint N2125
02/2000
2-11
Status Indicator Repair Analysis Procedures
RAP 1
A
Check the voltages listed in Table 1.
RAP 2 DC Power
This procedure is used to troubleshoot the Low Voltage Power Supply.
Table 1 Low Voltage Readings
Procedure
Red Lead
Black Lead
Voltage
Perform RAP 1 before starting this RAP. If RAP 1 results are correct, switch the printer power
off and disconnect the printer power. Remove the Left Interface Cover (REP 1.1), Left Cover
(REP 1.2), and the Left Plate Assembly (REP 1.11). Connect printer power. Switch the printer
power on. Measure the voltage on the LVPS between P/J285 pins 1 and 2. The
voltage
matches the line voltage.
Y
N
Repair/replace the AC Wire Assembly (PL 10.1).
P/J281 pin 7
Frame Ground
+5.0VDC
P/J281 pin 10
Frame Ground
+3.3VDC
P/J281 pin 1
Frame Ground
+24.0VDC
Measure the voltage between both sides of the Fuse F1 and frame ground. Both
readings
match the line voltage.
Y
N
Switch the printer power off. Replace fuse F1 (125V - 10A / 250V - 3A). Switch the printer
power on. Measure the voltage between both sides of the Fuse F1 and frame ground.
Both readings match the line voltage.
Y
N
Replace the LVPS (REP 9.5).
All voltages in Table 1 are correct.
Y
N
Go to RAP 3.
Return to Initial Actions or to the procedure that sent you here.
Problem Solved.
Measure the voltage between LVPS P/J281 pin 1 and frame ground. The voltage is +24VDC.
Y
N
On the LVPS, measure the voltage between P/J284 pin 2 and frame ground. The voltage
is +24VDC
Y
N
Switch the printer power off. Disconnect printer power. Disconnect P/J 281. Connect
printer power. Switch the printer power on. Measure the voltage between LVPS P/J
281 pin 1 and frame ground. The voltage is +24VDC.
Y
N
Replace the LVPS (REP 9.5).
Go to RAP 3.
Measure the voltage between P/J 284 pin 1 and frame ground. The voltage is +24VDC.
Y
N
Check the Front Cover. The Front Cover is closed and actuating the interlock
switch.
Y
N
Repair or replace the defective cover/interlock switch as necessary.
Check the continuity through the interlock switch. Replace if necessary.
Replace the LVPS (REP 9.5).
A
Status Indicator Repair Analysis Procedures
RAP 2
02/2000
2-12
Initial Issue
DocuPrint N2125
A
RAP 3 DC Power Loading
Switch the printer power on and measure the voltages listed in Table 1. All voltages are
correct.
Y
N
Replace the Print Engine Controller PWB (REP 9.3).
Initial Actions
Perform RAP 2 DC Power before starting this RAP.
WARNING
Switch the printer power off. Reconnect P/J23. Switch the printer power on. Measure the
voltages listed in Table 1. All the voltages are correct.
Y
N
Disconnect the following from the Connector PWB:
•
P/J43 (Registration Sensor, Registration Clutch)
AC input voltages can be lethal. Use extreme care while checking the voltages on the
LVPS.
Disconnect the power cord while checking the continuity of fuses and while removing or
reinstalling the components.
Procedure
Switch the printer power off. Remove the Left Interface Cover (REP 1.1), Left Cover (REP 1.2),
and the Left Plate Assembly (REP 1.11). Disconnect the following from the LVPS:
•
P/J281 (Print Engine Controller PWB)
•
P/J282 (System Controller PWB)
•
P/J283 (LVPS Fan)
•
Pn1 (5VDC Power Supply)
•
P/J42 (Toner Sensor)
•
P/J45 (Paper Set Sensor)
•
P/J44 (Pick Up Solenoid)
•
P/J41 (Envelope PWB)
Switch the printer power on. Measure the voltages listed in Table 1. All
ages are correct.
Y
N
Replace the Connector PWB.
the
volt-
Switch the printer power on and measure the voltages listed in Table 1 on the LVPS.
Switch the printer power off. Reconnect one of the disconnected plugs. Switch the
printer power on. Measure the voltages listed in Table 1. All the voltages are correct.
Y
N
Replace the component just connected to the Connector PWB.
Table 1 LVPS
Red Lead
Black Lead
Voltage
P/J281 pin 7
Frame Ground
+5.0VDC
P/J281 pin 10
Frame Ground
+3.3VDC
P/J281 pin 1
Frame Ground
+24.0VDC
Repeat the step with the next disconnected plug.
Switch the printer power off. Reconnect one of the disconnected plugs. Switch the printer
power on. Measure the voltages listed in Table 1. All the voltages are correct.
Y
N
Replace the component just connected to the Print Engine Controller PWB.
All voltages are correct.
Y
N
Replace the LVPS (REP 9.5).
Switch the printer power off. Reconnect P/J281 to the LVPS. Switch the printer power on and
measure the voltages listed in Table 1. All the voltages are correct
Y
N
Switch the printer power off. Reconnect all the P/Js to the LVPS. Disconnect the following
from the Print Engine Controller PWB:
•
P/J22 (Laser)
•
P/J21 (Laser, SOS)
•
P/J23 (Connector PWB)
•
P/J25 (Print Cartridge Sensor)
•
P/J32 (Exit Motor)
•
P29 (Main Motor)
•
P/J26 (HVPS PWB)
•
P/J27 (Exit Sensor)
•
P/J31 (Stack Full Sensor)
•
P/J33 (Size 1 PWB)
•
P/J34 (Duplex PWB)
•
P/J35 (OCT PWB)
A
Initial Issue
DocuPrint N2125
Repeat the step with the next disconnected plug.
Switch the printer power off. Reconnect one of the disconnected plugs. Switch the printer
power on. Measure the voltages listed in Table 1. All the voltages are correct.
Y
N
Replace the component just connected to the LVPS.
Repeat the step with the next disconnected plug.
02/2000
2-13
Status Indicator Repair Analysis Procedures
RAP 3
A
Remove and reinstall the Tray indicated. Press key “0”. The C3 error code still appears.
Y
N
Problem solved.
RAP 4 Tray # Failure Power Off/On (C3)
Tray Assembly (Tray 1, Tray 2, or Tray 3) are not in place.
Procedure
Enter Diagnostics, run a test print from every tray (see section 6). The Error Code specifies
Tray 2 or Tray 3.
Y
N
Remove and reinstall Tray 1. Press key “0”. The C3 error code still appears.
Y
N
Problem solved.
Measure the voltage from the lower contact of the Paper Feeder Socket (P/J672) and
frame ground. The voltage is +24VDC.
Y
N
Measure the voltage from P/J33 pin 6 on the Print Engine Controller PWB and frame
ground. The voltage is +24VDC.
Y
N
Go to RAP 2.
Exchange Tray 1 with the Tray generating the “C3” code. Run a test print from each tray. The
error code now indicates a Tray 1 failure.
Y
N
The error code indicates a Tray 2 failure.
Y
N
Remove the Tray 3 from the paper feeder. Check the voltage between the lower terminal on the Paper Feeder Connector and frame ground. The voltage is +24VDC
Y
N
Check the wiring harnesses between the Tray 2 Size PWB (P/J53) and the Tray
3 Size PWB (P/J54). Repair or replace if necessary. If the harnesses are in
good condition, replace the Tray 3 Size PWB (REP 11.19) then the Tray 3
Feeder PWB (REP 11.9).
Replace the following components, in order, until the problem is resolved:
•
Stack Height Sensor (REP 11.13)
Switch off the printer power. Remove the Size Sensor Housing (REP 3.11). Measure
continuity between the disconnected P/J33 pin 6 to P/J331 pin 12 on the Tray 1 Size
PWB. There is continuity between the two pins.
Y
N
Repair or replace Feeder Harness Assembly (PL 9.1).
Feeder PWB (REP 11.9)
•
Size PWB (REP 11.19)
•
Print Engine Controller PWB (REP 9.3).
Remove the Tray 2 from the paper feeder. Check the voltage between the lower terminal
on the Paper Feeder Connector and frame ground. The voltage is +24VDC
Y
N
Check the wiring harnesses between the Tray 1 Size PWB (P/J51) and the Tray 2
Size PWB (P/J52). Repair or replace if necessary. If the harnesses are in good condition, replace the Tray 2 Size PWB (REP 11.19) then the Tray 2 Feeder PWB (REP
11.9).
On the Tray 1 Size PWB, measure continuity between P/J331 pin 12 to P/J61 pin 1.
There is continuity between the two pins.
Y
N
Replace the Tray 1 Size PWB (REP 3.13).
Check the wiring between P/J67 pin 5 on the Tray 1 Feeder PWB and the bottom pin
on the Paper Feeder Socket (P/J672). If in good condition, replace the Tray 1 Feeder
PWB (REP 3.9).
On the paper tray, measure the resistance between the middle and bottom terminals on
the Paper Feeder Socket. The resistance is 75 to 105 ohms.
Y
N
Go to RAP 37
•
Replace the following components, in order, until the problem is resolved:
•
Stack Height Sensor (REP 11.13)
•
Feeder PWB (REP 11.9)
•
Size PWB (REP 11.19)
•
Print Engine Controller PWB (REP 9.3).
Remove the Tray now occupying the Tray 1 position and continue with RAP 37.
On the paper tray, measure the resistance between the top and bottom terminals on the
Paper Feeder Socket. There is continuity (0 ohms) between the two pins.
Y
N
Repair or replace the Paper Feeder Socket.
Replace the following parts one at a time until the problem is resolved:
•
Stack Height Sensor (3.4)
•
Feeder PWB (3.9)
•
Size 1 PWB (3.13)
•
Print Engine Controller PWB (9.3)
A
Status Indicator Repair Analysis Procedures
RAP 4
02/2000
2-14
Initial Issue
DocuPrint N2125
A
Enter diagnostics and select Component Test. Scroll to Sensor Input test and press Enter.
Manually actuate the Tray 2/3 No Paper Sensor. The number on the LCD increments each
time you press and release one of the actuators.
Y
N
Replace in order; the Feeder PWB (REP 11.9) then the Size PWB (REP 11.19) for the
problem feeder assembly.
RAP 5 Tray # Empty (C5)
Procedure
The problem appears when using Tray 2 or Tray 3.
Y
N
Check the paper level in Tray 1. There is paper in Tray 1.
Y
N
Load paper into Tray 1.
Replace the Print Engine Controller PWB (REP 9.3).
Enter diagnostics and select Test Print. Run a test print from the Tray 1. The
code reappears.
Y
N
Return to Initial Actions and restart.
C5
error
Remove Tray 1 from the printer. Remove all paper from the tray. Reinsert Tray 1 into the
printer. From the rear of the printer, watch the Tray 1 bottom plate. The Bottom Plate is
raised fully and evenly.
Y
N
Go to RAP 37.
Remove Tray 1. Manually actuate the Tray 1 No Paper sensor. The No Paper Actuator
moves smoothly.
Y
N
Replace the Tray 1 No Paper Actuator (REP 3.3).
Enter diagnostics and select Component Test. Scroll to Sensor Input test and press Enter.
Manually actuate the Tray 1 No Paper Sensor. The number on the LCD increments
each time you press and release the actuator.
Y
N
Go to RAP 34.
Replace the Print Engine Controller PWB (REP 9.3).
Check the paper level in Tray 2/3. There is paper in the Tray.
Y
N
Load paper into Tray 2/3.
Enter diagnostics and select Test Print. Run a test print from Tray 2/3. The
reappears.
Y
N
Return to Initial Actions and restart.
C5
error
code
Remove Tray 2/3 from the printer. Remove all paper from the tray. Reinsert the Tray into the
printer. From the rear of the printer, watch the tray bottom plate. The Bottom Plate is raised
fully and evenly.
Y
N
Go to RAP 37.
Remove Tray 2/3. Manually actuate the No Paper Sensor. The No Paper Actuator moves
smoothly.
Y
N
Replace the Tray 2/3 No Paper Actuator (REP 11.7).
A
Initial Issue
02/2000
DocuPrint N2125
2-15
Status Indicator Repair Analysis Procedures
RAP 5
RAP 6 Remove Output From Std Bin (C5)
RAP 7 MBF Misfeed (E2)
Error code indicates the output tray is full.
Paper arrives early or late to the Registration Sensor.
Procedure
Procedure
There is a paper stack in the standard bin actuating the stack full Sensor.
Y
N
The paper is curled.
Y
N
Lift and release the Stack Full Actuator a few times. The actuator moves freely.
Y
N
Replace Stack Full Actuator (REP 6.8) or Stack Full Sensor (REP 6.6), as necessary.
Switch the printer power off. Open the Front Cover. Check the MBF Chute for contamination or
obstructions. The MBF is free of contamination, paper, or other obstructions.
Y
N
Clean the MBF and remove the paper or obstruction.
Enter diagnostics and select Component Test. Scroll to Sensor Input test. Manually
actuate and deactuate the Stack Full Actuator. The number on the LCD increments each time you lift and release the actuator (the count may have a short
delay because of the sensor circuit).
Y
N
Go to RAP 35.
Replace Print Engine Controller PWB (REP 9.3).
Replace paper in paper tray with fresh dry paper. Run test prints. The error code reappears.
Y
N
Problem solved.
Enter diagnostics and select Component Test. Scroll to Sensor Input test. Manually actuate and deactuate the Stack Full Actuator. The number on the LCD increments each
time you lift and release the actuator (the count may have a short delay because of
the sensor circuit).
Y
N
Go to RAP 35.
Check the MBF Feed Roll for contamination and wear. The feed roll is clean and in good
condition.
Y
N
Replace the MBF Feed Roll (REP 4.3).
Enter Diagnostics and select Component Test. Scroll to Confirm MBF Feed Solenoid and press
Enter [4]. You can hear the solenoid energize.
Y
N
Go to RAP 41.
Open the Front Cover and cheat the Front Cover Interlock. Scroll to Main Motor Operation and
press Enter. The MBF drive gears rotate smoothly.
Y
N
Check, repair, or replace the Drive Gear (PL 5.1), Main Drive Gear Assembly (REP 8.2),
or Main Motor Assembly (REP 8.1) as necessary.
Scroll to Confirm MBF Feed Solenoid and press Enter [4]. The Feed Roll Shaft rotates, the
Pick-up Cams move and allow the Bottom Plate to contact the Feed Roll, and the Feed
Roll Shaft stops after one complete revolution.
Y
N
Remove the MBF Chute Assembly (REP 4.1) and repair of replace the components as
necessary.
Check the Registration Sensor (RAP 32). If the Registration Sensor is good, and the problem
persists, replace the Print Engine Controller PWB (REP 9.3).
Replace Print Engine Controller PWB (REP 9.3).
Remove the paper stack.
Status Indicator Repair Analysis Procedures
RAP 6 , RAP 7
02/2000
2-16
Initial Issue
DocuPrint N2125
RAP 8 Paper Jam / Misfeed (E2)
Y
Check the paper in all trays. Check for curled, damaged, or damp paper and for paper that is
out of specification. The paper is in good condition and meets specification.
Y
N
Replace with fresh dry paper that is within specifications.
N
Remove tray 2 and place the tray in feeder 1. Place tray 1 in feeder 2. Enter diagnostics
and select Test Print. Run 20 to 25 test prints from tray 2. All prints completed sucessfully.
Y
N
Remove the tray currently in feeder 2. Check the Nudger and Feed Rolls in feeder 2
for contamination and wear. The Feed Rolls are clean and in good condition.
Y
N
Replace the Feed Rolls (REP 11.11).
Check all paper paths for contamination, paper, or other obstructions. All paper paths are
clean and free of obstructions.
Y
N
Remove contamination or obstructions.
Check the Tray 2 Turn Roll Assembly. Check for obstructions, contamination, or
wear. The Turn Rolls are clean and in good condition.
Y
N
Remove the obstruction, clean, or replace the Turn Roll Assembly (REP 11.8).
Enter Diagnostics and select Test Print. Run five prints from every paper tray. The
problem
appears when printing from Tray 2 or 3.
Y
N
Remove Tray 1 from the printer. Check the Nudger Roll, Feed Roll, and Retard Roll for
contamination and wear. All rolls are clean and in good condition.
Y
N
Clean or replace the Nudger, Feed or Retard Roll as necessary (REP 3.8/REP 2.1).
Replace the Feeder PWB (REP 11.9). If the problem persists, replace the Size PWB
(REP 11.19) then the Print Engine Controller (REP 9.3).
Paper arrives early or late to the Registration Sensor or is on the sensor at power up.
Procedure
Reinsert Tray 1 into the printer. From the rear of the printer, watch the Tray 1 Bottom
Plate. The Bottom Plate is raised fully and evenly.
Y
N
Go to RAP 37.
From the rear of the printer, watch the paper feed as you run a test print from tray 1. The
Nudger Roll and Feed Roll rotate.
Y
N
Go to RAP 40.
Paper is fed from the tray to the Turn Roll Assembly.
Y
N
Replace the Nudger and Feed Rolls (REP 3.8).
The paper tray currently in feeder 1 appears to be defective. Perform RAP 37 to check the
tray motor. If RAP 37 checks out correctly, check the paper tray for contamination,
obstructions, broken or deformed parts. Replace the paper tray if necessary (PL 2.1).
Remove Tray 1 and Tray 2. Check the paper chute at the front of both trays (the chute guides
paper from Tray 3 to the Tray 2 turn rolls and from Tray 2 to the Tray 1 turn rolls). Check for contamination, paper, or other obstructions. The chute is clean and free of obstructions.
Y
N
Remove obstructions and clean chute. Replace paper tray if necessary (PL 2.1).
Replace Tray 2. Remove tray 3 and place the tray in feeder 1. Place tray 1 in feeder 3. Enter
diagnostics and select Test Print. Run 20 to 25 test prints from tray 3. All prints completed
successfully.
Y
N
Remove the tray currently in feeder 3. Check the Nudger and Feed Rolls in feeder 3 for
contamination and wear. The Feed Rolls are clean and in good condition.
Y
N
Replace the Feed Rolls (REP 11.11).
The Turn Roll Assembly moves the paper to the Registration Sensor.
Y
N
Go to RAP 39.
Check the Tray 3 Turn Roll Assembly. Check for obstructions, contamination, or wear.
The Turn Rolls are clean and in good condition.
Y
N
Remove the obstruction, clean, or replace the Turn Roll Assembly (REP 11.8).
Go to RAP 32.
Remove Tray 1. Check the paper chute at the front of the tray (the chute guides paper from Tray
2 to the Tray 1 turn rolls). Check for contamination, paper, or other obstructions. The chute is
clean and free of obstructions.
Y
N
Remove obstructions and clean chute. Replace paper tray if necessary (PL 2.1).
Replace the Feeder PWB (REP 11.9). If the problem persists, replace the Size PWB
(REP 11.19) then the Print Engine Controller (REP 9.3).
The paper tray currently in feeder 1 appears to be defective. Perform RAP 37 to check the tray
motor. If RAP 37 checks out correctly, check the paper tray for contamination, obstructions,
broken or deformed parts. Replace the paper tray if necessary (PL 2.1).
The jams occur when feeding from tray 3.
Initial Issue
DocuPrint N2125
02/2000
2-17
Status Indicator Repair Analysis Procedures
RAP 8
RAP 9 System Controller PWB
RAP 10 Paper Jam Open Front Cover (E3)
Procedure
Paper is late to the Exit Sensor, paper is late off the Registration Sensor or Registration Sensor
is actuated at power on.
Switch the printer power off. Remove the Left Interface Cover (REP 1.1). Remove all options
and host interface cables from the System Controller PWB. Switch the printer power on. The
error code reappears.
Y
N
Switch the printer power off. Reinstall one of the removed cables or options. Switch the
printer power on. The error code reappears.
Y
N
Repeat the step with the next option or cable.
Replace the option just installed.
Replace the System Controller PWB (REP 9.2).
Procedure
Switch the printer power off. Open the Front Cover and remove the Print Cartridge. Check the
printer for contamination, paper scraps, or other obstructions. The paper path is clean and
free of obstructions.
Y
N
Clean components and remove all obstructions.
Open the Rear Cover. Remove the Duplex unit if installed. Open the Fuser Access Cover.
Check for contamination, paper scraps, or other obstructions. The paper path is clean and
free of obstructions.
Y
N
Clean components and remove all obstructions.
Rotate the Fuser Idler Gear. The Fuser Idler Gear rotates smoothly.
Y
N
Replace the Fuser Assembly (REP 6.2).
Check the paper in all trays. The paper loaded in the paper trays is damp, wrinkled, or
damaged.
Y
N
The paper size used is within specifications.
Y
N
Replace with paper meeting size specifications.
Close the Rear Cover. Cheat the Front Cover Interlock. Enter diagnostics and select Component Test. Scroll to Confirm Reg Clutch and press Enter. You can hear the Registration Clutch energize.
Y
N
Go to RAP 38.
Scroll to Main Motor Operation and press Enter. The
Registration
Rolls
rotate
smoothly.
Y
N
Repair or replace as necessary: the Registration Rolls (REP 5.6), Registration
Clutch (REP 5.5), Main Drive Gear Assembly (REP 8.2), or Main Motor Assembly
(REP 8.1).
Perform RAP 32 to test the Registration Sensor. The Registration Sensor is working
correctly.
Y
N
Repair or replace the Registration Sensor as necessary (REP 5.4).
Perform RAP 48 to test the Exit Sensor. The Exit Sensor is working correctly.
Y
N
Replace the Fuser Assembly (REP 6.2).
A
Status Indicator Repair Analysis Procedures
RAP 9 , RAP 10
02/2000
2-18
B
Initial Issue
DocuPrint N2125
A
B
Select Test Print and Run test prints. When the error code appears, inspect the position of
lead edge of the paper. The lead edge of the paper passes between the BTR and the
Print Cartridge Drum.
Y
N
Check for contamination or obstructions between the Registration Rolls and the Print
Cartridge Drum.
The Detack Saw is clean and free of contamination.
Y
N
Clean the Detack Saw or Replace the Transport Chute Assembly (REP 6.1)
Inspect paper path between Transport Chute Assembly and the Fuser Assembly. The
paper passes through the Fuser Assembly.
Y
N
Replace the Fuser Assembly (REP 6.2).
RAP 11 Paper Jam / Exit (E4)
There is a paper jam at the Exit Sensor.
Procedure
Check the paper in the paper trays. Ensure the paper is installed correctly and the end guide
touches the rear of the paper stack. The paper is within specification. If Custom Mode is used,
ensure the settings are correct. All settings are correct and the paper is within specification.
Y
N
Install fresh paper that is within specification or correct settings.
Check the paper path for contamination, paper, or other obstructions. The
clean and free of obstructions.
Y
N
Remove obstructions and clean components as necessary.
paper
path
is
Replace the Print Engine Controller PWB (REP 9.3).
Replace with fresh, dry paper.
Enter Diagnostics and select Test Print. Run 25 prints from Tray 1. When the error code is
displayed, there is paper on the Exit Sensor.
Y
N
Open the Rear Cover and the Fuser Access Cover. Check the Exit Sensor Actuator. The
actuator moves freely and returns to the home position when released.
Y
N
Repair actuator or replace the Fuser Assembly (REP 6.2).
Enter diagnostics and select Component Test. Scroll to Sensor Input test and press Enter.
Open the Fuser Access Cover and use a piece of paper to block and unblock the Exit
Sensor. The number on the LCD increments each time you press and release the
actuator.
Y
N
Go to RAP 48.
Replace Print Engine Controller PWB (REP 9.3).
Open the Rear Cover and check the Face Up Chute Assembly for contamination or obstructions. The chute assembly is clean and free of obstructions.
Y
N
Clean of replace the Face Up Chute Assembly as necessary (PL 1.2).
Select Component Test. Scroll to Exit Motor FWD and press Enter. The Exit Motor rotates.
Y
N
Go to RAP 49.
The Exit Rollers and Pinch Rollers (on the Rear Cover) rotate smoothly.
Y
N
Replace the Exit Rollers or Gears as necessary (PL 7.1).
Check the Fuser Assembly for obstructions or contamination. The Fuser is clean and free of
obstructions.
Y
N
Clean or replace the Fuser Assembly (REP 6.2), as necessary.
A
Initial Issue
DocuPrint N2125
02/2000
2-19
Status Indicator Repair Analysis Procedures
RAP 10, RAP 11
A
Check the Transport Chute for contamination or obstructions. The Transport Chute is clean
and free of obstructions.
Y
N
Clean of replace the Transport Chute as necessary (REP 6.1).
Replace the Print Engine Controller PWB (REP 9.3).
RAP 12 Close Front Cvr/Close Rear Cvr (E5)
The Front Cover / Rear Cover (Interlock Switch) is open.
Procedure
Open and close the Front Cover. Inspect the movement of the Interlock Switch. The actuator
tab on the Front Cover presses down on the Interlock Switch lever.
Y
N
Replace the Front Cover Assembly (PL 1.1).
Open and close the Rear Cover. Inspect the movement of the Interlock Switch. The
tab on the Rear Cover presses down on the Interlock Switch lever.
Y
N
Replace the Rear Cover Assembly (PL 1.3).
actuator
Enter diagnostics and select Component Test. Scroll to Sensor Input test and press Enter [4].
Open and close the Rear Cover. The number on the LCD increments each time you open
and close the Rear Cover.
Y
N
Switch the printer power off. Remove the Left Interface Cover (REP 1.1), the Left Cover
(REP 1.2), and the Left Plate Assembly (REP 1.11). Disconnect P/J30 from the Print
Engine Controller PWB. Measure the resistance between pins 1 and 2 on the disconnected plug as you open and close the Rear Cover. There is continuity when the Rear
Cover is closed and infinity when the Rear Cover is open.
Y
N
Check the wiring between P/J30 and the Rear Cover Interlock Switch. Repair or
replace the wiring or interlock switch (REP 9.10) as required.
Replace the Print Engine Controller PWB (REP 9.3).
Open and close the Front Cover. The number on the LCD increments each time you open
and close the Front Cover.
Y
N
Switch the printer power off. Remove the Left Interface Cover (REP 1.1), the Left Cover
(REP 1.2), and the Left Plate Assembly (REP 1.11). Disconnect P/J284 from the LVPS
PWB. Measure the resistance between pins 1 and 2 on the disconnected plug as you
open and close the Front Cover. There is continuity when the Front Cover is closed
and infinity when the Front Cover is open.
Y
N
Check the wiring between P/J284 and the Front Cover Interlock Switch. Repair or
replace the wiring or interlock switch (REP 9.9) as required.
Connect P/J284 to the LVPS. Switch the printer power on. On the Print Engine Controller
PWB, check the voltage between P/J28 pin 1 and frame ground. The voltage is 24VDC.
Y
N
Replace the LVPS (REP 9.5).
Replace the Print Engine Controller PWB (REP 9.3).
Replace the Print Engine Controller PWB (REP 9.3).
Status Indicator Repair Analysis Procedures
RAP 11 , RAP 12
02/2000
2-20
Initial Issue
DocuPrint N2125
RAP 13 Install Print Cartridge (J3)
RAP 14 Toner Low (J5)
The Print Cartridge is not in place or is installed incorrectly.
The Print Cartridge is in a low toner condition.
Procedure
Procedure
Open the Front Cover and remove the Print Cartridge. Inspect the tab on the top left of the Print
Cartridge that actuates the Print Cartridge Sensor Assembly. The tab on the Print Cartridge
is intact.
Y
N
Replace the Print Cartridge (PL 8.1).
Install a new Print Cartridge. The J5 Error Code still appears.
Y
N
Problem solved.
Press and release the Print Cartridge Sensor Assembly Actuator. The Print Cartridge Sensor Assembly Actuator lever moves smoothly.
Y
N
Replace the Print Cartridge Sensor Assembly (REP 7.3).
Enter diagnostics and select Component Test. Scroll to Sensor Input test and press Enter.
Manually actuate the Print Cartridge Sensor Assembly Actuator. The number on the LCD
increments each time you press and release the actuator.
Y
N
Switch the printer power off. Remove the Left Interface Cover (REP 1.1), the Left Cover
(REP 1.2), and the Left Plate Assembly (REP 1.11). Install the Print Cartridge. Leave the
Front Cover open. Disconnect P/J25 from the Print Engine Controller PWB. Check for
continuity between J21-4 and J25-3, and J25-2 and J25-1 as you insert and remove the
Print Cartridge. There is continuity between J25-4 and J25-3, and J25-2 and J25-1
when you insert the cartridge and no continuity when you remove the cartridge.
Y
N
The Print Cartridge is a Xerox N2125 Print Cartridge.
Y
N
Replace Print Cartridge with a Xerox N2125 Print Cartridge (PL 8.1).
Remove the Front Cover (REP 1.6) and the Left Front Cover (REP 1.7). Cheat the Front Cover
Interlock Switch. On the Connector PWB, check the voltage between P/J42 pin 4 and frame
ground. The voltage is 0.0VDC with the print cartridge installed and 3.3VDC with the print
cartridge removed.
Y
N
Check the voltage between P/J42 pin 3 and pin 1. The voltage is 24VDC.
Y
N
On the Connector PWB, check the voltage between P/J231 pin 11 and pin 12. The
voltage is 24VDC.
Y
N
Check the Connector Harness Assembly. If OK, replace the Print Engine Controller PWB (REP 9.3).
Replace the Connector PWB (REP 9.7).
Replace the Toner Sensor (REP 5.2).
On the connector PWB, check the voltage between P/J231 pin 9 and frame ground. The voltage is 0.0VDC with the print cartridge installed and 3.3VDC with the print cartridge
removed.
Y
N
Replace the Connector PWB (REP 9.7).
Replace the Print Cartridge Sensor Assembly together with the harness (REP 7.4).
Replace the Print Engine Controller PWB (REP 9.3).
Check the Connector Harness Assembly. If OK, replace the Print Engine Controller PWB (REP
9.3).
Replace the Print Engine Controller PWB (REP 9.3).
Initial Issue
DocuPrint N2125
02/2000
2-21
Status Indicator Repair Analysis Procedures
RAP 13 , RAP 14
RAP 15 P1: Fuser Pause
RAP 16 Motor Failure Power Off/On (U1)
Receiving PAUSE command from the Controller.
There is a problem with the Main Motor.
Procedure
Procedure
Switch OFF the printer power. Remove the Fuser Assembly. Measure the resistance between
pins A4 & A5 of P272 on the Fuser Assembly (Figure 1). The resistance reads between 7K
ohms and 380K ohms (see NOTE).
Y
N
Replace the Fuser Top Cover (REP 6.9).
Remove the Left Interface Cover (REP 1.1), the Left Cover (REP 1.2), and the Left Plate
Assembly (REP 1.11). Open the Rear Cover and, if installed, remove the Duplex Assembly.
Manually rotate the rotor of the Main Motor clockwise (as viewed from the left side of the
printer). The rotor of the Motor rotates smoothly.
Y
N
Open the Front Cover and remove Print Cartridge. Manually rotate the rotor of motor
clockwise. The rotor of Main Motor rotates smoothly.
Y
N
Remove the Fuser Assembly (REP 6.2). Manually rotate the rotor of the Motor clockwise. The rotor of the Main Motor rotates smoothly.
Y
N
Remove the Main Motor (REP 8.1). Manually rotate the rotor of the Motor clockwise. The rotor of Main Motor rotates smoothly.
Y
N
Replace the Main Motor (REP 8.1).
Replace the Print Engine Controller PWB (REP 9.3).
NOTE: The resistance measured will be determined by the actual temperature of the Fuser
when the test is made. The acceptable range is between 7K ohms and 380K ohms.
Replace the Main Drive Gear Assembly (REP 8.2)
Replace the Fuser Assembly (REP 6.2).
Replace the Print Cartridge (PL 8.1).
Figure 1 Fuser Connector
Open the Front Cover and remove the Print Cartridge. Rotate the Metal Registration Roll manually. The Metal and Rubber Registration Rolls rotate smoothly.
Y
N
Replace the Registration Rolls (REP 5.6) or clutch (REP 5.5), as necessary.
With the Front Cover open, cheat the Front Cover Interlock. Enter diagnostics and select Component Test. Run the Main Motor Operation. Visually inspect the Main Motor and Main Drive
Gears. The Main Motor and drive gears run smoothly and all drive gears are in good
condition.
Y
N
Go to REP 8.1.
With the Main Motor still running, select MBF Feed Solenoid. The MBF Feed Roll Assembly
rotates smoothly.
Y
N
Replace the MBF Feed Roll components as necessary (REP 4.2/REP 4.3).
Scroll to Turn Roll Clutch and press Enter. All Turn Roll Shafts rotate smoothly.
Y
N
Repair or replace the appropriate Turn Roll Assembly (REP 3.2/REP 11.8).
Scroll to Reg Roll Clutch and press Enter. The Registration Roll rotate smoothly.
Y
N
Repair or replace the Registration Rolls (REP 5.6) as necessary.
A
Status Indicator Repair Analysis Procedures
RAP 15 , RAP 16
02/2000
2-22
Initial Issue
DocuPrint N2125
A
Remove the paper from all paper trays. Scroll to Tray 1 Feed Clutch and press Enter. The
Main Motor continues to rotate smoothly.
Y
N
Repair or replace the Tray 1 Feed Clutch or Feed Shaft (REP 3.6).
RAP 17 Laser Fail / Power Off/On (U2)
There is a problem with the Laser Assembly.
Procedure
Enter Diagnostics and select NVM Config (password 0734). Check the value for Print Resolution and for Laser Power. The value for Resolution is “02” and for Laser Power is “8”.
Y
N
Replace the Print Engine Controller PWB (REP 9.3).
The printer has a Tray 2.
Y
N
Replace the Main Motor Assembly (REP 8.1).
Scroll to Tray 2 Feed Clutch and press Enter. The Main Motor continues to rotate smoothly.
Y
N
Repair or replace the Tray 2 Feed Clutch or Feed Shaft (REP 11.10).
The printer has a Tray 3.
Y
N
Replace the Main Motor Assembly (REP 8.1).
Remove the paper from all paper trays. Scroll to Tray 3 Feed Clutch and press Enter. The
Main Motor continues to rotate smoothly.
Y
N
Repair or replace the Tray 3 Feed Clutch or Feed Shaft (REP 3.6).
Go to RAP 29.
Select Component Test then ROS Motor. You can hear the Scanner Motor spin up.
Y
N
Go to RAP 30.
Switch the printer power off. Remove the Left Interface Cover (REP 1.1), the Left Cover (REP
1.2), and the Left Plate Assembly (REP 1.11). Disconnect P/J21 from the Print Engine Controller PWB. Switch the printer power on. On the Print Engine Controller PWB, check the voltage
between P21-6 and frame ground. The voltage is +5.0 VDC.
Y
N
On the Print Engine Controller PWB, check the voltage between P25 pin 4 and frame
ground. The voltage is +5.0 VDC.
Y
N
On the Print Engine Controller PWB, check the voltage between P28 pin 7 and frame
ground. The voltage is +5.0 VDC.
Y
N
Replace the LVPS (REP 9.5).
Replace the Print Engine Controller PWB (REP 9.3).
On the Print Engine Controller PWB, check the voltage between P25 pin 3 and frame
ground. The voltage is +5.0 VDC.
Y
N
Go to RAP 13.
Replace the Print Engine Controller PWB (REP 9.3).
Go to RAP 30.
Initial Issue
DocuPrint N2125
02/2000
2-23
Status Indicator Repair Analysis Procedures
RAP 16 , RAP 17
RAP 18 Fuser Failure Power Off/On (U4)
RAP 19 IOT NVM Fail / Power Off/On (U6)
There is a problem with the Fuser Assembly.
There is problem with Non-Volatile RAM.
Procedure
Procedure
Switch the printer power off. Wait a few minutes, then switch the printer power on. The
Code reappears.
Y
N
Run 25 to 30 test prints. The Error code reappears.
Y
N
Problem solved
Error
Switch the printer power off then on. The U6 Error Code appears.
Y
N
To ensure that the problem is solved, switch the printer power off and on several times.
The U6 Error Code reappears.
Y
N
Problem Solved.
Go to RAP 31.
Enter Diagnostics and select NVM Config (password 0734). It is possible to enter into
the NVM Config.
Y
N
Replace the Print Engine Controller PWB (REP 9.3).
Go to RAP 31.
Check the NVM Data one by one referring to the NVM Table (Table 2) in section 6. The
data is set properly.
Y
N
The incorrect data is read only.
Y
N
Set the data to the default value.
Replace the Print Engine Controller PWB (REP 9.3).
Go to RAP 44.
Enter Diagnostics and select NVM Config (password 0734). It is possible to enter into the
NVM Config.
Y
N
Replace the Print Engine Controller PWB (REP 9.3).
Check the NVM Data one by one referring to the NVM Table (Table 2) in section 6. The data is
set properly.
Y
N
The incorrect data is read only.
Y
N
Set the data to the default value.
Replace the Print Engine Controller PWB (REP 9.3).
Go to RAP 44.
Status Indicator Repair Analysis Procedures
RAP 18 , RAP 19
02/2000
2-24
Initial Issue
DocuPrint N2125
RAP 20 Fan Failure Power Off Now (U5)
RAP 21 Low Paper Tray #
The printer is detecting incorrect fan rotation.
Paper stack in the Paper Tray Assembly is below 50 ±30 sheets.
Procedure
Procedure
Switch the printer power off, then on. The Fan rotates when the main power is switched on.
Y
N
Switch the printer power off. Remove the Left Interface Cover (REP 1.1), Left Cover (REP
1.2), and Left Plate Assembly (REP 1.11). Switch the printer power on. On the LVPS,
check the voltage between P/J283 pin 1 and frame ground. The voltage is +19VDC.
Y
N
Check the voltage between P/J281 pin 13 and frame ground. The
voltage
is
+0.8VDC.
Y
N
Replace the Print Engine Controller PWB (REP 9.3).
Insert a full Tray Assembly in the affected position. The Error Message reappears.
Y
N
Problem solved.
Replace the LVPS (REP 9.5).
Replace the Fan Assembly (REP 9.1).
Enter Diagnostics and select Component Test. Scroll to Fan Motor Hi and press Enter. The
Fan rotates at high speed.
Y
N
Switch the printer power off. Remove the Left Interface Cover (REP 1.1), Left Cover (REP
1.2), and Left Plate Assembly (REP 1.11). Switch the printer power on. Scroll to Fan
Motor Hi and press Enter. On the LVPS, check the voltage between P/J283 pin 1 and
frame ground. The voltage is +21.5VDC.
Y
N
Press the Online [0] key. Check the voltage between P/J281 pin 11 and frame
ground. Press the Enter key. The voltage changes from 0.8VDC to 0.0VDC when
you press the Enter key.
Y
N
Replace the Print Engine Controller PWB (REP 9.3).
Remove the affected tray Assembly. Push up the Low Paper Actuator manually and then
release. The Low Paper Actuator moves smoothly.
Y
N
Repair or replace the Low Paper Sensor Assembly (REP 3.5/REP 11.14).
Enter Diagnostics and select Component Test. Scroll to Sensor Input test and press Enter.
Press the Low Paper Actuator manually and then release. The LCD increments the counter
each time you press and release the Actuator.
Y
N
Check the wiring associated with the specific Low Paper Sensor. If ok, replace the Low
Paper Sensor (REP 3.5/REP 11.14).
Replace the Print Engine Controller PWB (REP 9.3).
Replace the LVPS (REP 9.5).
Replace the Fan Assembly (REP 9.1).
Switch the printer power off. Remove the Left Interface Cover (REP 1.1), Left Cover (REP 1.2),
and Left Plate Assembly (REP 1.11). Enter Diagnostics and select Component Test. On the
LVPS, check the voltage between P/J283 pin 2 and frame ground. The voltage is less than
1.0VDC.
Y
N
Replace the Fan Assembly (REP 9.1).
Replace the Print Engine Controller PWB (REP 9.3).
Initial Issue
DocuPrint N2125
02/2000
2-25
Status Indicator Repair Analysis Procedures
RAP 20 , RAP 21
RAP 22 Paper Size Error
RAP 23 Low Toner Sensor Failure
There is a conflict between the size of paper the printer senses and the size of paper that is
actually loaded.
Low Toner is not displayed when the Print Cartridge appears to be empty.
Procedure
Procedure
The problem appears when using Tray 1, 2, or 3.
Y
N
Verify the size of paper currently in the MBF Tray. Enter the User Menus, select Tray
Menu, then select MBF Size. The paper size displayed on the LCD matches the size
actually in the MBF.
Y
N
Set MBF size to the size of paper actually installed, then press Enter.
Replace the Print Engine Controller PWB (REP 9.3).
The paper size in the problem tray is within printer specifications.
Y
N
Replace with paper that meets specifications.
Check the side guides and the Paper Stack End Guide in the problem tray. All
properly set for the size of paper installed.
Y
N
Properly set the guides.
guides
are
Check the size cam on the left side of the paper tray (Table 1). The cams are in good condition (not broken) and move freely as the paper tray end guide is moved.
Y
N
Replace the paper tray (PL 2.1/PL 11.1).
Reinstall the paper tray. Enter Diagnostics and select Component Test. Scroll to Paper Tray
Size Reading and press Enter to display MBF size. Press Enter repeatedly to scroll through
each of the paper trays. The paper size displayed on the LCD matches the size of the
paper actually loaded.
Y
N
Replace the Tray Size PWB (REP 3.13/REP 11.19).
Run a Test Print. Inspect the print quality. The print is light.
Y
N
Return to Initial Actions.
Replace the Print Cartridge (PL 8.1). Run 5 test prints (Config Sheet or Demo Page) and
inspect the print quality. The print quality meets specifications.
Y
N
Go to IQ RAP 1.
Open the Front Cover and cheat the Front Cover Interlock. Enter Diagnostics and select Component Test. Scroll to Sensor Input and press Enter [4]. Hold the Print Cartridge in position
while you carefully push down then release the Toner Sensor. The number on the LCD increments each time you pull down and release the Toner Sensor.
Y
N
Switch the printer power off. Remove the Front Cover (REP 1.6) and the Left Front Cover
(REP 1.7). Cheat the Front Cover Interlock Switch. Switch the printer power on. On the
connector PWB, check the voltage between P/J42 pin 4 and frame ground. The voltage
is 0.0VDC with the print cartridge installed and 3.3VDC with the print cartridge
removed.
Y
N
Check the voltage between P/J42 pin 3 and pin 1. The voltage is 24VDC.
Y
N
On the Connector PWB, check the voltage between P/J231 pin 11 and pin 12.
The voltage is 24VDC.
Y
N
Check the Connector Harness Assembly. If OK, replace the Print Engine
Controller PWB (REP 9.3).
Replace the Connector PWB (REP 9.7).
Replace the Toner Sensor (REP 5.2).
Replace the Print Engine Controller PWB (REP 9.3).
On the connector PWB, check the voltage between P/J231 pin 9 and frame ground. The
voltage is 0.0VDC with the print cartridge installed and 3.3VDC with the print cartridge removed.
Y
N
Replace the Connector PWB (REP 9.7).
Table 1 Paper Size Actuators
Actuator Cam
Extended
B5
SEF
Top
X
A5
SEF
X
Bottom
8.5"
SEF
X
X
X
Status Indicator Repair Analysis Procedures
RAP 22 , RAP 23
14"
SEF
A4
SEF
X
Middle
Forward Cam
13"
SEF
Check the Connector Harness Assembly. If OK, replace the Print Engine Controller PWB
(REP 9.3).
X
X
X
Replace the Print Engine Controller PWB (REP 9.3).
02/2000
2-26
Initial Issue
DocuPrint N2125
A
RAP 24 Inoperative Printer
Y
The main power cannot be switched on.
Procedure
Ensure the power cord is properly connected to the wall outlet and to the Power Receptacle of
the printer. The problem still exists.
Y
N
Problem solved.
Replace the System Controller +5.0VDC Power Supply (REP 9.4).
Switch the printer power off. Remove any options connected to the System Controller
PWB. Reconnect P/J13 to the System Controller PWB. Switch the printer power on.
Check the voltage on P/J13 between pin 3 and frame ground (if there are no options
installed, follow the No path). The voltage is 5.0VDC.
Y
N
Replace the System Controller PWB (REP 9.2).
Perform RAP 1, then return here. RAP 1 indicated that correct AC voltage is being supplied to the printer.
Y
N
Notify customer that the power is out of specification.
Perform RAP 2, then return here. RAP 2 indicated that correct DC voltage is being supplied to the printer.
Y
N
Rap 2 instructed you to replace a component.
Y
N
Perform RAP 3.
Replace component as necessary.
On the System Controller PWB, check the voltage on P/J13 between pins 1 and 2. The voltage is 3.3VDC.
Y
N
Switch the printer power off. Disconnect P/J13 from the System Controller PWB. Switch
the printer power on. Check the voltage between pins 1 and 2 on the disconnected plug.
The voltage is 3.3VDC.
Y
N
Replace the LVPS (REP 9.5).
N
On the LVPS, check the voltage between P/J PN1 pin 1 and frame ground. The
voltage is +24.0VDC.
Y
N
Replace the LVPS (REP 9.5).
Switch the printer power off. Reinstall the removed options one at a time, switching on the
power and checking for 5.0VDC on P/J13 between pin 3 and frame ground after each one
is installed. Replace the option just installed when the voltage fails.
On the Print Engine Controller PWB, check the voltage between P/J28 pin 1 and frame ground,
P/J28 pin 7 and frame ground, and P/J28 pin 10 and frame ground. The voltage on pin 1 is
+24VDC, pin 7 is +5.0VDC, and pin 10 is 3.3VDC. All voltages are correct.
Y
N
Replace the LVPS (REP 9.5).
Replace the System Controller PWB (REP 9.2). If the problem persists, replace the Print
Engine Controller PWB (REP 9.3).
Switch the printer power off. Remove any options connected to the System Controller
PWB. Reconnect P/J13 to the System Controller PWB. Switch the printer power on.
Check the voltage on P/J13 between pins 1 and 2 (if there are no options installed, follow
the No path). The voltage is 3.3VDC.
Y
N
Replace the System Controller PWB (REP 9.2).
Switch the printer power off. Reinstall the removed options one at a time, switching on the
power and checking for 3.3VDC on P/J13 between pins 1 and 2 after each one is
installed. Replace the option just installed when the voltage fails.
On the System Controller PWB, check the voltage on P/J13 between pins 3 and 4. The voltage is 5.0VDC.
Y
N
Switch the printer power off. Disconnect P/J13 from the System Controller PWB. Switch
the printer power on. Check the voltage between pins 3 and 4 on the disconnected plug.
The voltage is 5.0VDC.
A
Initial Issue
DocuPrint N2125
02/2000
2-27
Status Indicator Repair Analysis Procedures
RAP 24
A
RAP 25 Malfunctioning LCD/LED
B
C
Y
There is an erratic display on LCD/LED.
N
Replace the LVPS (REP 9.5).
Replace the System Controller +5.0VDC Power Supply (REP 9.4).
Procedure
Switch the printer power off. Remove any options connected to the System Controller PWB.
Disconnect P/J18 from the System Controller PWB. Switch the printer power on. On the System Controller PWB, check the following voltages between P/J18 and frame ground.
Replace the System Controller PWB (REP 9.2).
Switch the printer power off. Reconnect P/J18 to the System Controller PWB. Switch the
printer power on. Check the voltages between the pins listed in Table 1 and frame
ground. All the voltages listed in the column “with P/J18 connected” are correct.
Y
N
Replace the Control Panel Assembly (PL 1.1).
Table 1
P18
With P/J18
Disconnected
With P/J18
Connected
Pin 1
3.3VDC
3.3VDC
Pin 2
0.0VDC
0.0VDC
Pin 3
1.4VDC
3.3VDC
Pin 4
0.0VDC
0.0VDC
Pin 5
3.3VDC
3.3VDC
Pin 6
1.4VDC
3.3VDC
Pin 7
3.3VDC
3.3VDC
Pin 8
0.0VDC
3.3VDC
Switch the printer power off. Reinstall the removed options one at a time, switching on the
power and checking the voltages between the pins listed in Table 1 and frame ground
after each component is installed. Replace the option just installed if the voltage fails.
After all the options are reinstalled, the LCD display is still erratic.
Y
N
Problem solved. Return to Initial Actions and restart.
Replace the Control Panel Assembly (PL 1.1). If the problem persists, replace the System
Controller PWB (REP 9.2).
All the voltages listed in the column “with P/J18 disconnected” are correct.
Y
N
On the System Controller PWB, check the voltage on P/J13 between pins 1 and 2. The
voltage is 3.3VDC.
Y
N
Switch the printer power off. Disconnect P/J13 from the System Controller PWB.
Switch the printer power on. Check the voltage between pins 1 and 2 on the disconnected plug. The voltage is 3.3VDC.
Y
N
On the LVPS, check the voltage on P/J282 between pins 1 and 2. The voltage
is 3.3VDC.
Y
N
Replace the LVPS (REP 9.5).
Repair or replace the harness between the LVPS and the System Controller
PWB (PL 10.1).
Switch the printer power off. Reconnect P/J18 to the System Controller PWB. Switch the
printer power on. Check the voltages between the pins listed in Table 1 and frame ground. All
the voltages listed in the column “with P/J18 connected” are correct.
Y
N
Replace the Control Panel Assembly (PL 1.1).
Switch the printer power off. Reinstall the removed options one at a time, switching on the
power and checking the voltages between the pins listed in Table 1 and frame ground after
each component is installed. Replace the option just installed if the voltage fails. After all the
options are reinstalled, the LCD display is still erratic.
Y
N
Problem solved. Return to Initial Actions and restart.
Replace the Control Panel Assembly (PL 1.1). If the problem persists, replace the System Controller PWB (REP 9.2).
Replace the System Controller PWB (REP 9.2).
On the System Controller PWB, check the voltage on P/J13 between pins 3 and 4. The
voltage is 5.0VDC.
Y
N
Switch the printer power off. Disconnect P/J13 from the System Controller PWB.
Switch the printer power on. Check the voltage between pins 3 and 4 on the disconnected plug. The voltage is 5.0VDC.
Y
N
On the LVPS, check the voltage between P/J PN1 pins 1 and 2. The voltage is
24.0VDC.
A
B
C
Status Indicator Repair Analysis Procedures
RAP 25
02/2000
2-28
Initial Issue
DocuPrint N2125
RAP 26 Inoperative Keypad
RAP 27 Erratic Printer Operation
Control Panel is not operative.
Procedure
Procedure
Enter Diagnostics and select the Component Test. Scroll to Sensor Input test and press Enter
[4]. The printer enters the Diagnostic Mode to the Sensor Input Level.
Y
N
Disconnect P/J18 on the System Controller PWB. Measure the voltages listed in Table 1
between P18 on the System Controller PWB and frame ground.
Disconnect all host cables. Enter diagnostics and select Test Print. Run 15 to 20 test prints.
The printer generates test prints.
Y
N
Switch the printer power off. Disconnect P/J PN1 from the LVPS Assembly. Switch the
printer power on. Check the voltage between P/J281 pin 7 and frame ground. The voltage is +5.0VDC.
Y
N
Switch the printer power off and reconnect PN1. Go to RAP 28.
Table 1 Keypad
Pin
Voltage
1
3.3 VDC
2
0 VDC
3
1.4 VDC
4
0 VDC
5
3.3 VDC
6
1.4 VDC
7
3.3 VDC
8
0 VDC
Replace the Print Engine Controller PWB (REP 9.3). The problem still appears.
Y
N
Problem solved.
Go to RAP 44.
The printer RESETS while generating test print.
Y
N
Replace the Print Engine Controller PWB (REP 9.3). The problem still appears.
Y
N
Problem solved
Notify customer the cause of the trouble seems to be a communication problem between
the host computer and the printer. The customer should contact Customer Support.
All the voltages are correct.
Y
N
Replace the System Controller PWB (REP 9.2).
Go to RAP 28.
Disconnect P/J412 from the Control Panel. Measure continuity on all wires between P/
J412 and P/J18. All checks are good.
Y
N
Replace the wiring harness (PL 1.1).
Replace the Control Panel Assembly (PL 1.1).
Keypad numbers (1-7) increment the counter. Keypad number [4] enters the test and (0)
exits the test.
Y
N
Replace the Control Panel Assembly (PL 1.1).
Replace the System Controller PWB (REP 9.2).
Initial Issue
DocuPrint N2125
02/2000
2-29
Status Indicator Repair Analysis Procedures
RAP 26 , RAP 27
A
RAP 28 Power Supply
Y
Procedure
Switch the printer power off. Disconnect the power cord. Remove the Left Interface Cover (REP
1.1), Left Cover (REP 1.2), and the Left Plate Assembly (REP 1.11). Disconnect the following
from the LVPS:
•
P/J281 (Print Engine Controller PWB) (REP 9.3)
•
P/J282 (System Controller PWB)(REP 9.2)
•
P/J11(Fuser)(REP 6.2)
•
P/J283 (Main Fan)(REP 9.1)
•
P/J284(Front Interlock Switch)(REP 9.9)
•
P/JPN1 (5VDC Power Supply)(REP 9.4)
N
Replace the Print Engine Controller PWB (REP 9.3).
Switch the printer power off. Reconnect one of the disconnected plugs. Switch the printer
power on. Measure the voltages listed in Table 1. All the voltages are correct.
Y
N
Replace the component just connected to the Print Engine Controller PWB.
Repeat the step with the next disconnected plug.
Connect the power cord. Switch the printer power on and measure the voltages listed in Table
1 on the LVPS.
Switch the printer power off. Reconnect one of the disconnected plugs. Switch the printer
power on. Measure the voltages listed in Table 1. All the voltages are correct.
Y
N
Replace the component just connected to the LVPS.
Repeat the step with the next disconnected plug.
Table 1 LVPS
Red Lead
Black Lead
Voltage
P/J281 pin 7
Frame Ground
+5.0VDC
P/J281 pin 10
Frame Ground
+3.3VDC
P/J281 pin 1
Frame Ground
+24.0VDC
All voltages are correct.
Y
N
Replace the LVPS (REP 9.5).
Switch the printer power off. Reconnect P/J281 to the LVPS. Switch the printer power on and
measure the voltages listed in Table 1. All the voltages are correct.
Y
N
Switch the printer power off. Reconnect all the P/Js to the LVPS. Disconnect the following
from the Print Engine Controller PWB:
•
P/J35 (OCT PWB) (REP 10.7)
•
P/J34 (Duplex PWB) (REP 12.4)
•
P/J33 (Size 1 PWB) (REP 3.13)
•
P/J22 (Laser) (REP 7.4)
•
P/J21 (Laser) (REP 7.4)
•
P/J23 (Connector PWB) (REP 9.7)
•
P/J31 (Stack Full Sensor) (REP 6.6)
•
P/J30 (Rear Interlock Switch) (REP 9.10)
•
P/J25 (Print Cartridge Sensor) (REP 7.3)
•
P/J32 (Exit Motor) (REP 6.5)
•
P/J29 (Main Motor) (REP 8.1)
•
P/J26 (HVPS PWB) (REP 9.6)
•
P/J27 (Fuser Sensors) (REP 6.2)
Switch the printer power on and measure the voltages listed in Table 1. All voltages are
correct.
A
Status Indicator Repair Analysis Procedures
RAP 28
02/2000
2-30
Initial Issue
DocuPrint N2125
A
RAP 29 Main Motor Assembly
Procedure
From
To
Voltage
CN101 - Pin 1
Frame Ground
+24.0 VDC
CN101 - Pin 2
Frame Ground
+24.0 VDC
CN101 - Pin 3
Frame Ground
+24.0 VDC
CN101 - Pin 7
Frame Ground
+5.0 VDC
CN101 - Pin 8
Frame Ground
+3.3 VDC
C
Replace the Print Engine Controller PWB (REP 9.3).
Enter Diagnostics and select the Component Test. Scroll to Main Motor Operation. On the
Print Engine Controller PWB, measure the voltage between P/J29 pin 7 and frame
ground. Press the Enter key. The voltage drops from 5.0 VDC to 0.0 VDC.
Y
N
Replace the Print Engine Controller PWB (REP 9.3).
Enter Diagnostics and select the Component Test. Scroll to Main Motor Operation and press
Enter. The Main Motor rotates.
Y
N
Switch the printer power off. Remove the Left Interface Cover (1.1), Left Cover (1.2), and
Left Plate Assembly (1.11). Ensure the Rear Cover is closed. Switch the printer power on.
Measure the voltages listed in Table 1 on the Main Motor Assembly.
Table 1 Main Motor Harness
B
Replace the Main Motor Assembly (REP 8.1).
Problem solved, return to Initial Actions and continue.
All voltages are correct.
Y
N
The voltages on pins 1, 2, and 3 are correct.
Y
N
On the Print Engine Controller PWB, check the voltage between P/J28 pins 1,
2, and 3 and frame ground. All three readings are +24.0 VDC.
Y
N
Replace the LVPS (REP 9.5).
On the Print Engine Controller PWB, check the voltage between P/J30 pin 2
and frame ground. The voltage is 24VDC.
Y
N
Check the wiring between the Print Engine Controller PWB and the Rear
Interlock. Repair or replace the wiring or replace the Rear Interlock Switch
(REP 9.10).
Replace the Print Engine Controller PWB (REP 9.3).
The voltage on pin 7 is correct.
Y
N
On the Print Engine Controller PWB, check the voltage between P/J28 pin 7
and frame ground. The voltage is +5.0 VDC.
Y
N
Replace the LVPS (REP 9.5).
Replace the Print Engine Controller PWB (REP 9.3).
On the Print Engine Controller PWB, check the voltage between P/J28 pin 10 and
frame ground. The voltage is 3.3 VDC.
Y
N
Replace the LVPS (REP 9.5).
A
B
C
Initial Issue
DocuPrint N2125
02/2000
2-31
Status Indicator Repair Analysis Procedures
RAP 29
RAP 30 Laser Assembly
RAP 31 Fuser Assembly
Procedure
Procedure
Enter Diagnostics and select Component Test. Scroll to ROS Motor and press Enter. You can
hear the ROS Motor spin up.
Y
N
Switch the printer power off. Remove the Left Interface Cover (REP 1.1) Left Cover (REP
1.2), and the Left Plate Assembly (REP 1.11). Switch the printer power on. Check the voltage between P/J21 pin 10 on the Print Engine Controller PWB and frame ground. The
voltage is 24.0 VDC.
Y
N
Check the voltage between P/J28 pin 1 on the Print Engine Controller PWB and
frame ground. The voltage is 24.0 VDC.
Y
N
Replace the LVPS (REP 9.5).
Replace the Print Engine Controller PWB (REP 9.3).
Enter Diagnostics and select Component Test. Scroll to ROS Motor Operation. Check the
voltage between P/J21 pin 12 and frame ground. Press the Enter key. The
voltage
drops from 5.0 VDC to 0.0 VDC.
Y
N
Replace the Print Engine Controller PWB (REP 9.3).
WARNING
If the printer has been switched on, the fuser may be hot.
Switch the printer power off. Remove the Fuser Assembly (REP 6.2). Measure the resistance
between pins A4 and A5 of P272 (Figure 1). The resistance is between 7K and 380K ohms
(depending on the temperature of the fuser).
Y
N
Replace the Fuser Top Cover (REP 6.9).
Measure the resistance between pins 3 and 4 of P272 on the Fuser Assembly (Figure 1). The
resistance is less than 5 ohms.
Y
N
Remove the Fuser Heat Rod (REP 6.9). Measure the resistance of the Heat Rod. The
resistance is less than 5 ohms.
Y
N
Replace the Heat Rod (REP 6.9).
Replace the Fuser Top Cover (REP 6.9).
Replace the Laser Assembly (REP 7.4).
Switch the printer power off. Remove the Left Interface Cover (REP 1.1) Left Cover (REP 1.2),
and the Left Plate Assembly (REP 1.11). Switch the printer power on. Check the voltage
between P21 pin 6 and frame ground. The voltage is +5.0VDC.
Y
N
Check the voltage between P/J28 pin 7 and frame ground. The voltage is +5.0VDC.
Y
N
Replace the LVPS (REP 9.5).
Check the voltage between P/J25 pin 3 and frame ground. The voltage is +5.0VDC.
Y
N
Go to RAP 36.
Replace the Print Engine Controller PWB (REP 9.3).
Measure the voltage between P/J21 pin 9 and frame ground. The voltage is +5.0VDC.
Y
N
Replace the Print Engine Controller PWB (REP 9.3).
Replace the Laser Assembly (REP 7.4).
Figure 1 Fuser Connector (P272)
Reinstall the Fuser Assembly. Remove the Left Interface Cover (REP 1.1), Left Cover (REP
1.2), and the Left Plate Assembly (REP 1.11). Disconnect P/J11 from the LVPS PWB. Check
the resistance between P11 pin 1 and pin 2. There is less than 5 ohms resistance.
Y
N
Repair or replace the Fuser Harness Assembly (REP 6.3).
Reconnect P/J11 and disconnect P/J27. Measure the resistance between P/J27 pins 1 and 2
(Figure 1). The resistance is between 7K and 380K ohms (depending on the temperature
of the fuser).
Y
N
Repair or replace the Fuser Harness Assembly (REP 6.3).
A
Status Indicator Repair Analysis Procedures
RAP 30 , RAP 31
02/2000
2-32
Initial Issue
DocuPrint N2125
A
Reconnect P/J27. Measure the voltage on the LVPS between P/J281 pin 12 and frame ground
as you switch the printer power on. The voltage is 0.0VDC during fuser warm up, then
changes to 2.8VDC.
Y
N
Replace the Print Engine Controller PWB (REP 9.3).
Replace the LVPS (REP 9.5).
RAP 32 Registration Sensor
Procedure
Enter Diagnostics and select Component Test. Scroll to Sensor Input test and press Enter.
Actuate and deactuate the Registration Sensor. The number on the LCD increments each
time you press and release the actuator.
Y
N
The actuator moves freely and is in good condition (not broken or damaged).
Y
N
Replace the Registration Actuator (REP 4.2).
Switch the printer power off. Remove the Left Interface Cover (REP 1.1), Left Cover (REP
1.2), and the Left Plate Assembly (REP 1.11). Switch the printer power on. On the Print
Engine Controller PWB, measure the voltage between P/J23 pin 11 and frame ground.
The voltage is +3.3VDC with the Registration Sensor deactuated and 0.0VDC with
the Registration Sensor actuated.
Y
N
Switch the printer power off. Remove the Left Front Cover (REP 1.7). Switch the
printer power on. On the Connector PWB, measure the voltage between P/J43 pin 5
and frame ground. The voltage is +3.3VDC with the Registration Sensor deactuated and 0.0VDC with the Registration Sensor actuated.
Y
N
Check the voltage between P/J43 pin 3 and frame ground. The voltage is
1.2VDC.
Y
N
Replace the Print Engine Controller PWB (REP 9.3).
Replace the Registration Sensor (REP 5.4).
Replace the Connector PWB (REP 9.7).
Replace the Print Engine Controller PWB (REP 9.3).
It appears that the Registration Sensor is working correctly. If a problem persists, replace the
Print Engine Controller PWB (REP 9.3).
Initial Issue
DocuPrint N2125
02/2000
2-33
Status Indicator Repair Analysis Procedures
RAP 31 , RAP 32
RAP 33 MBF No Paper Sensor
RAP 34 Tray 1 No Paper Sensor
Procedure
Procedure
Enter Diagnostics and select Component Test. Scroll to Sensor Input test and press Enter.
Actuate and deactuate the MBF No Paper Sensor. The number on the LCD increments
each time you press and release the actuator.
Y
N
The actuator moves freely and is in good condition (not broken or damaged).
Y
N
Replace the MBF No Paper Sensor Actuator (REP 4.5).
Remove Tray 1. Enter Diagnostics and select Component Test. Scroll to Sensor Input test and
press Enter. Actuate and deactuate the Tray 1 No Paper Sensor Actuator. The number on the
LCD increments each time you press and release the actuator.
Y
N
Visually inspect the Tray 1 No Paper Sensor Actuator. The actuator moves freely and is
in good condition (not broken or damaged).
Y
N
Replace the Tray 1 No Paper Sensor Actuator (REP 3.3).
Switch the printer power off. Remove the Left Interface Cover (REP 1.1), Left Cover (REP
1.2), and the Left Plate Assembly (REP 1.11). Switch the printer power on. On the Print
Engine Controller PWB, measure the voltage between P/J23 pin 14 and frame ground.
The voltage is +3.3VDC with the MBF No Paper Sensor deactuated and 0.0VDC with
the Sensor actuated.
Y
N
Switch the printer power off. Remove the Left Front Cover (REP 1.7). Switch the
printer power on. On the Connector PWB, measure the voltage between P/J45 pin 3
and frame ground. The voltage is +3.3VDC with the MBF No Paper Sensor deactuated and 0.0VDC with the Sensor actuated.
Y
N
Check the voltage between P/J45 pin 1 and frame ground. The voltage is
1.2VDC.
Y
N
Replace the Print Engine Controller PWB (REP 9.3).
Switch the printer power off. Remove the Left Interface Cover (REP 1.1), Left Cover (REP
1.2), and the Left Plate Assembly (REP 1.11). Switch the printer power on. On the Print
Engine Controller PWB, measure the voltage between P/J33 pin 2 and frame ground as
you actuate and deactuate the No paper Sensor. The voltage is 3.3VDC with the sensor deactuated and 0.0VDC with the sensor actuated.
Y
N
Check the voltage between P/J33 pin 8 and frame ground. The voltage 3.3VDC.
Y
N
Replace the Print Engine Controller PWB (REP 9.3).
Replace the Tray 1 Feeder PWB (REP 3.9).
Replace the Print Engine Controller PWB (REP 9.3).
It appears that the Tray 1 No Paper Sensor is working correctly. If a problem persists, replace
the Print Engine Controller PWB (REP 9.3).
Replace the MBF No Paper Sensor (REP 4.8).
Replace the Connector PWB (REP 9.7).
Replace the Print Engine Controller PWB (REP 9.3).
It appears that the MBF No Paper Sensor is working correctly. If a problem persists, replace the
Print Engine Controller PWB (REP 9.3).
Status Indicator Repair Analysis Procedures
RAP 33 , RAP 34
02/2000
2-34
Initial Issue
DocuPrint N2125
RAP 35 Standard Bin Stack Full Sensor
RAP 36 Print Cartridge Sensor Assembly
Procedure
Procedure
Enter Diagnostics and select Component Test. Scroll to Sensor Input test and press Enter.
Actuate and deactuate the Stack Full Sensor Actuator. The number on the LCD increments
each time you press and release the actuator.
Y
N
Visually inspect the Stack Full Sensor Actuator. The actuator moves freely and is in
good condition (not broken or damaged).
Y
N
Replace the Stack Full Actuator (REP 6.8).
Open the Front Cover and remove the Print Cartridge. Inspect the tab on the top of the Print
Cartridge that actuates the Print Cartridge Sensor Assembly. The tab on the Print Cartridge
is intact.
Y
N
Replace the Print Cartridge (PL 8.1).
Switch the printer power off. Remove the Left Interface Cover (REP 1.1), Left Cover (REP
1.2), and Left Plate (REP 1.11). Disconnect P/J31 from the Print Engine Controller PWB.
Switch the printer power on. On the Print Engine Controller PWB, measure the voltage
between P31 pin 1 and frame ground. The voltage is +3.3VDC.
Y
N
On the Print Engine Controller PWB, measure the voltage between P/J28 pin 10 and
frame ground. The voltage is +3.3VDC.
Y
N
Replace the LVPS (REP 9.5).
Replace the Print Engine Controller PWB (REP 9.3).
Press and release the Print Cartridge Sensor Assembly Actuator. The Print Cartridge Sensor Assembly Actuator lever moves smoothly.
Y
N
Replace the Print Cartridge Sensor Assembly (REP 7.3).
Enter diagnostics and select Component Test. Scroll to Sensor Input test and press Enter.
Manually actuate the Print Cartridge Sensor Assembly Actuator. The number on the LCD
increments each time you press and release the actuator.
Y
N
Switch the printer power off. Remove the Left Interface Cover (REP 1.1), Left Cover (REP
1.2), and Left Plate Assembly (REP 1.11). Switch the printer power on. On the print
Engine Controller PWB, check the voltage between P/J25 pin 4 and frame ground. The
voltage is +5.0VDC.
Y
N
Replace the Print Engine Controller PWB (REP 9.3).
Switch the printer power off. Reconnect P/J31 to the Print Engine Controller PWB. Switch
the printer power on. On the Print Engine Controller PWB, measure the voltage between
P/J31 pin 3 and frame ground. There is +3.3VDC between P/J31 pin 3 and frame
ground when the Stack Full Sensor is deactuated and 0.0VDC when actuated.
Y
N
Replace the Stack Full Sensor (REP 6.6).
Check the voltage between P/J25 pin 3 and frame ground. Manually actuate and deactuate the Print Cartridge Sensor Assembly. The voltage is 0.0VDC with the Print Cartridge Sensor Assembly deactuated and +5.0VDC with the sensor actuated.
Y
N
Replace the Print Cartridge Sensor Assembly together with the harness (REP 7.3).
Replace the Print Engine Controller PWB (REP 9.3).
Check the voltage between P/J25 pin 2 and frame ground. Manually actuate and deactuate the Print Cartridge Sensor Assembly. The voltage is 3.3VDC with the Print Cartridge Sensor Assembly deactuated and 0.0VDC with the sensor actuated.
Y
N
Replace the Print Cartridge Sensor Assembly together with the harness (REP 7.3).
Replace the Print Engine Controller PWB (REP 9.3).
Replace the Print Engine Controller PWB (REP 9.3).
Replace the Print Engine Controller PWB (REP 9.3).
Initial Issue
DocuPrint N2125
02/2000
2-35
Status Indicator Repair Analysis Procedures
RAP 35 , RAP 36
RAP 37 Tray Motor Assembly Checkout Procedure
RAP 38 Registration Clutch
Procedure
Procedure
NOTE: Tray 1 interlocks the 24VDC supply to the Tray 1 Size PWB, Tray 1 Feeder PWB, Tray 2
and Tray 3. Tray 2 interlocks the 24VDC supply to the Tray 2 Size PWB, Tray 2 Feeder PWB,
and Tray 3. Tray 3 interlocks the 24VDC supply to the Tray 3 Size PWB and the Tray 3 Feeder
PWB.
Enter Diagnostics and select Component Test. Scroll to Confirm Reg. Clutch and press Enter.
You can hear the Registration Clutch energize.
Y
N
Switch the printer power off. Remove the Left Interface Cover (REP 1.1), Left Cover (REP
1.2), and the Left Plate Assembly (REP 1.11). Disconnect P/J23 on the Print Engine Controller PWB. Measure the resistance between pins 6 and 9 on the disconnected plug.
The resistance is approximately 145 to 165 ohms.
Y
N
Remove the Front Cover (REP 1.6) and the Left Front Cover (REP 1.7). Disconnect
P/J43 from the Connector PWB. Measure the resistance between pins 1 and 2 on
the disconnected plug. The resistance is approximately 145 to 165 ohms.
Y
N
Replace the Registration Clutch (REP 5.5).
Switch the printer power off. Remove the Paper Tray to be tested. Switch the printer power on.
Measure the voltage from the lower contact of the Paper Feeder Socket to frame ground. The
voltage is +24 VDC.
Y
N
Go to RAP 2.
On the left side of the paper tray, measure the motor winding resistance from the middle contact to the lower contact of the Paper Feeder Connector. The resistance reading is between
110 - 130 ohms.
Y
N
Disconnect J673 from the 3 pin Paper Feeder Connector. Measure resistance between
pins 1 and 4. The resistance reading is between 110 - 130 ohms.
Y
N
Replace the Motor Assembly (REP 2.4).
Replace the Connector PWB (REP 9.7).
Reconnect P/J23. Switch the printer power on. Check the voltage between P/J23 pin 6
and frame ground. The voltage is +24VDC.
Y
N
Replace the Print Engine Controller PWB (REP 9.3).
Replace Paper Feeder Connector (PL 2.2).
Check the Paper Tray for damage, contamination, binding, misalignment or obstruction. All
components are clean, connected properly, aligned properly and without damage.
Y
N
Repair/replace as necessary.
Enter Diagnostics and select Component Test. Scroll to Confirm Reg. Clutch. Check the
voltage between P/J23 pin 9 and frame ground. Press Enter. The voltage drops from
+24VDC to 0.0VDC.
Y
N
Replace the Print Engine Controller PWB (REP 9.3).
Replace the Motor Assembly (REP 2.4).
Replace the Registration Clutch (REP 5.5)
Switch the printer power off. Open the Front Cover and remove the Print Cartridge. With the
Front Cover open, cheat the Front Cover Interlock. Enter Diagnostics and select Component
Test. Scroll to Main Motor and press Enter. Scroll to Confirm Reg. Clutch and press Enter.
The Registration Rolls rotate smoothly without stalling or jerking.
Y
N
Replace the Registration Clutch (REP 5.5) or Registration Rolls (REP 5.6).
Problem Solved.
Status Indicator Repair Analysis Procedures
RAP 37 , RAP 38
02/2000
2-36
Initial Issue
DocuPrint N2125
RAP 39 Turn Roll Clutch Assembly
RAP 40 Tray 1 Feed Clutch
Procedure
Procedure
Enter Diagnostics and select Component Test. Scroll to Turn Roll Clutch and press Enter. You
can hear the Turn Roll Clutch energize.
Y
N
Remove Tray 1. Check the voltage between the lower contact of the Paper Feeder Connector and frame ground The voltage is +24VDC.
Y
N
Switch the printer power off. Remove the Left Interface Cover (REP 1.1), Left Cover
(REP 1.2), and the Left Plate Assembly (REP 1.11). Switch the printer power on. On
the Print Engine Controller PWB, check the voltage between P/J33 pin 6 and frame
ground. The voltage is +24VDC.
Y
N
Replace the Print Engine Controller PWB (REP 9.3).
NOTE: Tray 1 interlocks the 24VDC supply to the Tray 1 Size PWB, Tray 1 Feeder PWB, Tray 2
and Tray 3. Tray 2 interlocks the 24VDC supply to the Tray 2 Size PWB, Tray 2 Feeder PWB,
and Tray 3. Tray 3 interlocks the 24VDC supply to the Tray 3 Size PWB and the Tray 3 Feeder
PWB.
Replace the Feeder PWB (REP 3.9).
On the left side of the Paper Tray, measure the resistance between the upper and lower
contacts on the Paper Feeder Connector. Their is continuity between the two contacts.
Y
N
Replace the Paper Feeder Connector (REP 2.5).
Enter Diagnostics and select Component Test. Scroll to Confirm Tray 1 Feed Clutch and press
Enter. You can hear the Tray 1 Feed Clutch energize.
Y
N
Remove Tray 1. Check the voltage between the lower contact of the Paper Feeder Connector and frame ground The voltage is +24VDC.
Y
N
Switch the printer power off. Remove the Left Interface Cover (REP 1.1), Left Cover
(REP 1.2), and the Left Plate Assembly (REP 1.11). Switch the printer power on. On
the Print Engine Controller PWB, check the voltage between P/J33 pin 6 and frame
ground. The voltage is +24VDC.
Y
N
Replace the Print Engine Controller PWB (REP 9.3).
Replace the Feeder PWB (REP 3.9).
On the left side of the Paper Tray, measure the resistance between the upper and lower
contacts on the Paper Feeder Connector. Their is continuity between the two contacts.
Y
N
Replace the Paper Feeder Connector (REP 2.5).
Switch the printer power off. Remove the Paper Feeder Assembly (REP 3.1). Disconnect
P/J64 from the Feeder PWB. Measure the resistance between pins 1 and 2 on the disconnected plug. Their is continuity between the two pins.
Y
N
Replace the Turn Clutch Assembly (PL 3.1).
Switch the printer power off. Remove the Paper Feeder Assembly (REP 3.1). Disconnect
P/J65 from the Feeder PWB. Measure the resistance between pins 1 and 4 on the disconnected plug. Their is continuity between the two pins.
Y
N
Replace the Tray 1 Feed Clutch (REP 3.6).
Replace the Feeder PWB (REP 3.9). If the problem persists, replace the Size PWB (REP
3.13).
Switch the printer power off. Remove the Front Cover (REP 1.6). Cheat the Front Cover Interlock Switch. Enter diagnostics and select Component Test. Scroll to Main Motor and press
Enter. Scroll to Turn Roll Clutch and press Enter. The Turn Rolls rotate smoothly without
stalling or jerking.
Y
N
Replace the Turn Roll Assembly (REP 3.2).
Replace the Feeder PWB (REP 3.9). If the problem persists, replace the Size PWB (REP
3.13).
Replace the Tray 1 Feed Clutch (REP 3.6). If the problem persists, replace the Print Engine
Controller PWB (REP 9.3).
Replace the Turn Roll Clutch (REP 3.2). If the problem persists, replace the Print Engine Controller PWB (REP 9.3).
Initial Issue
DocuPrint N2125
02/2000
2-37
Status Indicator Repair Analysis Procedures
RAP 39 , RAP 40
RAP 41 MBF Feed Solenoid
RAP 42 System Controller Isolation
Procedure
Procedure
Enter Diagnostics and select Component Test. Scroll to Confirm MBF Feed Solenoid and press
Enter. You can hear the MBF Feed Solenoid energize.
Y
N
Switch the printer power off. Remove the Left Interface Cover (REP 1.1), Left Cover (REP
1.2), and the Left Plate Assembly (REP 1.11). Disconnect P/J23 on the Print Engine Controller PWB. Measure the resistance between pins 6 and 12 on the disconnected plug.
The resistance is approximately 75 to 95 ohms.
Y
N
Remove the Front Cover (REP 1.6) and the Left Front Cover (REP 1.7). Disconnect
P/J44 from the Connector PWB. Measure the resistance between pins 1 and 2 on
the disconnected plug. The resistance is approximately 75 to 95 ohms.
Y
N
Replace the MBF Feed Solenoid (REP 4.9).
Switch the printer power off. Disconnect all cables connected to the rear of the System Controller PWB. Remove the Left Interface Cover (REP 1.1). Remove all options from the System
Controller PWB. Switch the printer power on. The printer boots up correctly and Ready is
displayed on the Control Panel (if no options are installed, follow the No path).
Y
N
Switch the printer power off. Remove then reinstall the System Controller PWB (REP 9.2)
to reseat the connection with the Print Engine Controller PWB. Switch the printer power
on. The printer boots up correctly and Ready is displayed on the Control Panel.
Y
N
Replace the System Controller PWB (REP 9.2).
Replace the Connector PWB (REP 9.7).
Reconnect P/J23. Switch the printer power on. Check the voltage between P/J23 pin 6
and frame ground. The voltage is +24VDC.
Y
N
Replace the Print Engine Controller PWB (REP 9.3).
Problem Solved.
Switch the printer power off. Reinstall one of the removed options or cables. Switch the printer
power on. The printer boots up correctly and Ready is displayed on the Control Panel.
Y
N
Replace the option or cable just installed.
Repeat the last step with the next option or cable until the problem is found.
Enter Diagnostics and select Component Test. Scroll to Confirm MBF Feed Solenoid.
Check the voltage between P/J23 pin 12 and frame ground. Press Enter. The
voltage
drops from +24VDC to 0.0VDC when you press Enter.
Y
N
Replace the Print Engine Controller PWB (REP 9.3).
Replace the MBF Feed Solenoid (REP 4.9)
Switch the printer power off. Open the Front Cover and remove the Print Cartridge. With the
Front Cover open, cheat the Front Cover Interlock. Enter Diagnostics and select Component
Test. Scroll to Main Motor and press Enter. Scroll to Confirm MBF Feed Solenoid and press
Enter. The MBF Feed Rolls make one complete revolution then stop.
Y
N
Replace the MBF Feed Solenoid (REP 4.9).
The MBF Feed Solenoid appears to operate correctly. If the problem persists, replace the Print
Engine Controller PWB (REP 9.3).
Status Indicator Repair Analysis Procedures
RAP 41 , RAP 42
02/2000
2-38
Initial Issue
DocuPrint N2125
RAP 43 HVPS Assembly
RAP 44 Electrical Noise
Procedure
Procedure
Open the Front Cover. Remove the Print Cartridge. Inspect all contacts on the Transport Chute
Assembly and the terminals on the Print Cartridge. The terminals are in good condition and
contacting properly when the cartridge is installed.
Y
N
Replace the Transport Chute Assembly (REP 6.1) or the Print Cartridge (PL 8.1) as necessary.
Check if there is other electrical equipment, such as electrical generators, radio transmitters, or
devices using electrical motors, within ten feet of the printer. Shut off the other electrical equipment, or relocate the printer at least twenty feet away from other devices. The
Electrical
Noise problem is still present.
Y
N
Problem solved.
Cheat the Front Cover Interlock Switch. Enter Diagnostics and select Component Test. Scroll to
each of the high voltage tests (Table 1). Measure the voltage between the contact listed and
frame ground. Press the Enter Key.
Check the AC wall outlet and power cord (see RAP 1). The AC wall outlet is correctly wired
and grounded.
Y
N
Inform the customer of insufficient voltage or improper wiring. A licensed electrician must
correct the wiring.
Table 1 High Voltage Power Supply Readings
High Voltage Test
Contact
Charge Roll DC
Rear Transport Chute Pin Contact -425 ±40 VDC
Reading
Charge Roll AC
Rear Transport Chute Pin Contact 1000 ± 100 VAC
Dev Bias DC
Front Transport Chute Pin Contact +7.3 ± 3 VDC
Dev Bias AC
Front Transport Chute Pin Contact 555 ± 55 VAC
BTR -
BTR Roll Bushing
-81 ± 8 VDC
BTR +
BTR Roll Bushing
0 VDC
Detack Saw
Detack Saw
-930 ± 100 VDC
Open the Front Cover. Remove the Print Cartridge. Inspect all contacts on the Transport Chute
Assembly and the terminals on the Print Cartridge. The terminals are in good condition and
contacting properly when the cartridge is installed.
Y
N
Replace the Transport Chute Assembly (REP 6.1) or the Print Cartridge (PL 8.1) as necessary.
At least one of the voltages is correct.
Y
N
Switch the printer power off. Remove the Left Interface Cover (REP 1.1), Left Cover (REP
1.2), and the Left Plate Assembly (REP 1.11). Switch the printer power on. On the Print
Engine Controller PWB, check the voltage between P/J26 pin 2 and frame ground. The
voltage is +24VDC.
Y
N
Replace the Print Engine Controller PWB (REP 9.3).
Replace the HVPS (REP 9.6).
All the voltages are correct.
Y
N
Replace the Print Engine Controller PWB (REP 9.3). Cheat the Front Cover Interlock
Switch. Enter Diagnostics and select Component Test. Scroll to each of the high voltage
tests (Table 1). Measure the voltage between the contact listed and frame ground. Press
the Enter Key. All the voltages are correct.
Y
N
Check the Transport Chute Assembly for proper installation. Check the HVPS harness for proper connection and for damage. If everything is OK, Replace the HVPS
(REP 9.6)
Remove the Left Interface Cover (REP 1.1). Inspect the grounding screw and wire connected
to the Main Power Connector. The cable is grounded properly.
Y
N
Attach the grounding screw properly.
Replace the Print Cartridge (PL 8.1). The Electrical Noise problem is still present.
Y
N
Problem solved.
Remove the Fuser Assembly (REP 6.2). Remove the end covers (see REP 6.9). Inspect the
cables of the Heater Rod. The cables are attached properly.
Y
N
Attach the cables properly or replace the Fuser Assembly (REP 6.2).
Disconnect the HVPS (P/J26) from the Print Engine Controller PWB. Run 20 Test Prints (the
prints will be blank). The Test Prints run normally.
Y
N
Replace the Print Engine Controller PWB (REP 9.3). The problem is still present.
Y
N
Problem solved.
Inspect all of the grounds in the printer. All the grounds are securely connected.
Y
N
Repair the bad grounds.
Replace the following components one at a time until the cause of the problem is found.
•
HVPS PWB Assembly (REP 9.6).
Problem Solved.
•
Problem solved.
Print Engine Controller PWB (REP 9.3).
A
Initial Issue
DocuPrint N2125
02/2000
2-39
Status Indicator Repair Analysis Procedures
RAP 43 , RAP 44
A
•
Print Cartridge (PL 8.1).
RAP 45 DIMM 1 (0101)
•
Fuser Assembly (REP 6.2).
Procedure
Replace the HVPS PWB Assembly (REP 9.6).
Switch the printer power off. Remove the Left Interface Cover (REP 1.1). Remove the DIMM
installed in Slot 1 (slot 1 is the middle DIMM slot). Switch the printer power on. The
error
code reappears.
Y
N
Switch the printer power off. Install the removed DIMM in Slot 2 (bottom DIMM slot).
Switch the printer power on. The error code reappears.
Y
N
Switch the printer power off. Remove DIMM from Slot 2 (bottom DIMM slot) and
install the DIMM in slot 1 (middle DIMM slot). Switch the printer power on. The error
code reappears.
Y
N
Attribute the problem to a poor connection between the DIMM and the System
Controller PWB. Go to Initial Actions.
Replace the System Controller PWB (REP 9.2).
Replace the DIMM installed in slot 2 with a new DIMM (PL 10.1).
Replace the System Controller PWB (REP 9.2).
Status Indicator Repair Analysis Procedures
RAP 44 , RAP 45
02/2000
2-40
Initial Issue
DocuPrint N2125
RAP 46 DIMM 2 (0102)
RAP 47 DIMM 3 (0103)
Procedure
Procedure
Switch the printer power off. Remove the Left Interface Cover (REP 1.1). Remove the DIMM
installed in Slot 2 (slot 2 is the bottom DIMM slot). Switch the printer power on. The
error
code reappears.
Y
N
Switch the printer power off. Install the removed DIMM in Slot 3 (top DIMM slot). Switch
the printer power on. The error code reappears.
Y
N
Switch the printer power off. Remove DIMM from Slot 3 (top DIMM slot) and install
the DIMM in slot 2 (bottom DIMM slot). Switch the printer power on. The error code
reappears.
Y
N
Attribute the problem to a poor connection between the DIMM and the System
Controller PWB. Go to Initial Actions.
Switch the printer power off. Remove the Left Interface Cover (REP 1.1). Remove the DIMM
installed in Slot 3 (slot 3 is the top DIMM slot). Switch the printer power on. The error code
reappears.
Y
N
Switch the printer power off. Install the removed DIMM in Slot 2 (bottom DIMM slot).
Switch the printer power on. The error code reappears.
Y
N
Switch the printer power off. Remove DIMM from Slot 2 (bottom DIMM slot) and
install the DIMM in slot 3 (top DIMM slot). Switch the printer power on. The
error
code reappears.
Y
N
Attribute the problem to a poor connection between the DIMM and the System
Controller PWB. Go to Initial Actions.
Replace the System Controller PWB (REP 9.2).
Replace the System Controller PWB (REP 9.2).
Replace the DIMM installed in slot 3 with a new DIMM (PL 10.1).
Replace the System Controller PWB (REP 9.2).
Initial Issue
DocuPrint N2125
Replace the DIMM installed in slot 2 with a new DIMM (PL 10.1).
Replace the System Controller PWB (REP 9.2).
02/2000
2-41
Status Indicator Repair Analysis Procedures
RAP 46, RAP 47
RAP 48 Exit Sensor
RAP 49 Exit Motor
Procedure
Procedure
Open the printer Rear Cover. Remove the Duplex Module, if installed. Open the Fuser Access
Cover and check the Exit Sensor Actuator. Check that the actuator moves smoothly and is not
broken. Make sure the actuator flag blocks the Exit Sensor when the access cover is closed.
The actuator is in good condition and moves smoothly.
Y
N
Replace the Fuser Assembly (REP 6.2).
Switch the printer power off. Open the Rear Cover and manually rotate the Exit Chute Assembly. The Exit Chute rotates without binding.
Y
N
Remove the Exit Chute Assembly (REP 6.4). Repair or replace components as necessary
(PL 7.1).
Enter Diagnostics and select Component Test. Scroll to Sensor Input test and press Enter [4].
Open the rear cover and open the Fuser Access Cover. Use a folded piece of paper to block
and unblock the Fuser Exit Sensor. The number on the LCD increments each time you
block and unblock the sensor.
Y
N
Switch the printer power off. Remove the Left Interface Cover (REP 1.1), Left Cover (REP
1.2), and the Left Plate Assembly (REP 1.11). Disconnect P/J27 from the Print Engine
Controller PWB. Switch the printer power on. Check the voltage between P/J27 pin 3 and
frame ground. The voltage is 3.3VDC.
Y
N
Check the voltage between P/J28 pin 10 and frame ground. The voltage is 3.3VDC.
Y
N
Replace the LVPS (REP 9.5).
Replace the Print Engine Controller PWB (REP 9.3).
Switch the printer power off. Reconnect P/J27 to the Print Engine Controller PWB. Switch
the printer power on. Measure the voltage between P/J27 pin 5 and frame ground as you
block and unblock the Fuser Exit Sensor. The voltage is 3.3VDC when the Fuser Exit
Sensor is blocked and 0.0VDC when unblocked.
Y
N
Replace the Fuser Assembly (REP 6.2).
Replace the Print Engine Controller PWB (REP 9.3).
Replace the Print Engine Controller PWB (REP 9.3).
Enter diagnostics and select Component Test. Scroll to Exit Motor Fwd Operation. Open the
Rear Cover and cheat the Rear Cover Interlock. Press the Enter Key. The Exit Motor rotates.
Y
N
Switch the printer power off. Remove the Left Interface Cover (REP 1.1), Left Cover (REP
1.2), and the Left Plate Assembly (REP 1.11). Disconnect P/J32 from the Print Engine
Controller PWB. On the disconnected plug, check the resistance between pins 1 and 2,
pins 1 and 3, pins 1 and 4, and between pins 1 and 5. All readings are 25 to 35 ohms.
Y
N
Replace the Exit Motor (REP 6.5).
Replace the Print Engine Controller PWB (REP 9.3).
Press the [0] key to stop the test. Scroll to Exit Motor Rev H and press Enter. The Exit Motor
runs in reverse at high speed.
Y
N
Switch the printer power off. Remove the Left Interface Cover (REP 1.1), Left Cover (REP
1.2), and the Left Plate Assembly (REP 1.11). Disconnect P/J32 from the Print Engine
Controller PWB. On the disconnected plug, check the resistance between pins 1 and 2,
pins 1 and 3, pins 1 and 4, and between pins 1 and 5. All readings are 25 to 35 ohms.
Y
N
Replace the Exit Motor (REP 6.5).
Replace the Print Engine Controller PWB (REP 9.3).
Press the [0] key to stop the test. Scroll to Exit Motor Rev L and press Enter. The Exit Motor
runs in reverse at low speed.
Y
N
Switch the printer power off. Remove the Left Interface Cover (REP 1.1), Left Cover (REP
1.2), and the Left Plate Assembly (REP 1.11). Disconnect P/J32 from the Print Engine
Controller PWB. On the disconnected plug, check the resistance between pins 1 and 2,
pins 1 and 3, pins 1 and 4, and between pins 1 and 5. All readings are 25 to 35 ohms.
Y
N
Replace the Exit Motor (REP 6.5).
Replace the Print Engine Controller PWB (REP 9.3).
Replace the Print Engine Controller PWB (REP 9.3).
Status Indicator Repair Analysis Procedures
RAP 48 , RAP 49
02/2000
2-42
Initial Issue
DocuPrint N2125
RAP 50 Load MBF (C5)
RAP 51 Face Up Tray Open (E5)
Procedure
Procedure
Enter Diagnostics and select Component Test. Scroll to Sensor Input test and press Enter.
Actuate and deactuate the MBF No Paper Sensor. The number on the LCD increments
each time you press and release the actuator.
Y
N
The actuator moves freely and is in good condition (not broken or damaged).
Y
N
Replace the MBF No Paper Sensor Actuator (REP 4.5).
Open the Rear Cover. The printer has a Duplex Unit installed.
Y
N
Replace the Print Engine Controller PWB (REP 9.3).
Switch the printer power off. Remove the Left Interface Cover (REP 1.1), Left Cover (REP
1.2), and the Left Plate Assembly (REP 1.11). Switch the printer power on. On the Print
Engine Controller PWB, measure the voltage between P/J23 pin 14 and frame ground.
The voltage is +3.3VDC with the MBF No Paper Sensor deactuated and 0.0VDC with
the Sensor actuated.
Y
N
Switch the printer power off. Remove the Left Front Cover (REP 1.7). Switch the
printer power on. On the Connector PWB, measure the voltage between P/J45 pin 3
and frame ground. The voltage is +3.3VDC with the MBF No Paper Sensor deactuated and 0.0VDC with the Sensor actuated.
Y
N
Check the voltage between P/J45 pin 1 and frame ground. The voltage is
1.2VDC.
Y
N
Replace the Print Engine Controller PWB (REP 9.3).
Replace the MBF No Paper Sensor (REP 4.8).
Check the Face Up Tray Sensor Actuator on the Rear Cover. The actuator is in good condition.
Y
N
Replace the Rear Cover (REP 1.8).
Cheat the Rear Cover Interlock. Enter diagnostics and select Component Test. Scroll to Sensor
Input Test and press Enter. Use a piece of paper to block and unblock the Face Up Tray Sensor. The number on the LCD increments each time you block and unblock the sensor.
Y
N
On the Face Up Tray Sensor, check the voltage between pin 1 (pin to the rear of the
printer) and frame ground. The voltage is 0.0VDC with the sensor unblocked and
3.3VDC with the sensor blocked.
Y
N
Check the voltage between pin 3 on the sensor and frame ground. The voltage is
1.2VDC.
Y
N
Switch the printer power off. Remove the Left Interface Cover (REP 1.1), Left
Cover (REP 1.2), and the Left Plate Assembly (REP 1.11). Switch the printer
power on. On the Print Engine Controller PWB, check the voltage between P/
J34 pin 11 and frame ground. The voltage is 1.2VDC.
Y
N
Replace the Print Engine Controller PWB (REP 9.3).
Replace the Connector PWB (REP 9.7).
Check the wiring harnesses. If the harnesses are in good condition, replace the
Duplex PWB (REP 12.4).
Replace the Print Engine Controller PWB (REP 9.3).
It appears that the MBF No Paper Sensor is working correctly. If a problem persists, replace the
Print Engine Controller PWB (REP 9.3).
Replace the Face Up Tray Sensor (REP 12.14).
Switch the printer power off. Remove the Left Interface Cover (REP 1.1), Left Cover (REP
1.2), and the Left Plate Assembly (REP 1.11). Switch the printer power on. On the Print
Engine Controller PWB, check the voltage between P/J34 pin 11 and frame ground. The
voltage is 0.0VDC with the sensor unblocked and 3.3VDC with the sensor blocked.
Y
N
Check the wiring harnesses. If the harnesses are in good condition, replace the
Duplex PWB (REP 12.4).
Replace the Print Engine Controller PWB (REP 9.3).
Replace the Print Engine Controller PWB (REP 9.3).
Initial Issue
DocuPrint N2125
02/2000
2-43
Status Indicator Repair Analysis Procedures
RAP 50 , RAP 51
Status Indicator Repair Analysis Procedures
RAP 50 , RAP 51
02/2000
2-44
Initial Issue
DocuPrint N2125
RAP 52 Low Paper Tray 2 (or Tray 3) 550 Sheet Feeder
RAP 53 550 Sheet Feeder Feed Clutch
Tray 2 and/or Tray 3 have low paper.
The 550 Sheet Feeder is not feeding paper or not feeding paper at the correct time.
Procedure
Procedure
Fill the affected paper tray with fresh paper. The Error Code is still displayed.
Y
N
Problem solved.
Enter Diagnostics and select Component Test. Scroll to Confirm Tray 2 Feed Clutch or Confirm
Tray 3 Feed Clutch and press Enter. You can hear the clutch energize.
Y
N
Switch the printer power off. Remove the Left Interface Cover (REP 1.1), Left Cover (REP
1.2), and the Left Plate Assembly (REP 1.11). Enter diagnostics and select Component
Test. Scroll to Confirm Tray 2 Feed Clutch or Confirm Tray 3 Feed Clutch. On the Print
Engine Controller PWB, for Tray 2, check the voltage between P/J33 pin 13 and frame
ground; for Tray 3, check the voltage between P/J33 pin 14 and frame ground. The voltage is +24VDC.
Y
N
Remove the Sheet Feeder Drive Assembly (REP 11.6) for the affected feeder. Disconnect P/J651 from the Feed Clutch. Measure the resistance between the two pins
on the feed clutch. The resistance is 140 to 170 ohms.
Y
N
Replace the Paper Feed Clutch (REP 11.10).
Remove the paper tray from affected Feeder Assembly. Manually push up and release the low
paper actuator. The low paper actuator moves smoothly up and down.
Y
N
Inspect the Low Paper Actuator. Repair or replace as required.
Enter Diagnostics and select Component Test. Scroll to Sensor Input test and press Enter.
Press and release the Low Paper Actuator. The number on the LCD increments each time
you press and release the actuator.
Y
N
Switch the printer power off. Remove the Left Interface Cover (REP 1.1), Left Cover (REP
1.2), and the Left Plate Assembly (REP 1.11). Switch the printer power on. On the Print
Engine Controller PWB, check the voltage between P/J33 pin 8 and frame ground. The
voltage is 3.3VDC.
Y
N
On the Print Engine Controller PWB, check the voltage between P/J28 pin 10 and
frame ground. The voltage is 3.3VDC.
Y
N
Replace the LVPS (REP 9.5).
Replace the Feeder PWB (REP 11.9). If the problem persists, replace the Size PWB
(REP 11.19).
Press the Enter key. The voltage drops from +24VDC to 0.0VDC.
Y
N
Replace the Print Engine Controller PWB (REP 9.3).
Replace the Print Engine Controller PWB (REP 9.3).
Replace the Paper Feed Clutch (REP 11.10).
Enter diagnostics and select Component Test. Scroll to Sensor Input test and press Enter.
On the Print Engine Controller PWB, for Tray 2, check the voltage between P/J33 pin 9
and frame ground; for Tray 3, check the voltage between P/J33 pin 10 and frame ground.
Check the voltage as you actuate the Low Paper Sensor. The voltage changes from
3.3VDC to 0.0VDC.
Y
N
Replace the Low Paper Sensor (REP 11.14) for the affected tray. If the problem persists, replace the Feeder PWB (REP 11.9) then the Size PWB (REP 11.19).
Replace the Print Engine Controller PWB (REP 9.3).
Replace the Print Engine Controller PWB (REP 9.3).
Initial Issue
DocuPrint N2125
Remove the Sheet Feeder Drive Assembly (REP 11.6) for the affected feeder. Check the Paper
Feed Rolls for contamination and wear. The Paper Feed Rolls are clean and in good condition.
Y
N
Replace the Paper Feed Rolls (REP 11.11).
Check the Paper Feed Assembly for binding, obstructions, or contamination. The feed assembly is clean and in good condition.
Y
N
Clean, repair, or replace as necessary (REP 11.12).
If the problem persists, replace the following in order until the problem is found:
•
Print Engine Controller PWB (REP 9.3).
•
Feeder PWB (REP 11.9).
•
Size PWB (REP 11.19)
•
Paper Feed Clutch (REP 11.10).
02/2000
2-45
Status Indicator Repair Analysis Procedures
RAP 52 , RAP 53
A
RAP 54 550 Sheet Feeder Assembly Not Recognized
Controller does not recognize the Feeder Assembly.
Procedure
Check the alignment of the printer to the 550 Sheet Feeder and the alignment of the top 550
Sheet Feeder to the second 550 Sheet Feeder, if installed. Ensure that the connectors are
properly aligned and properly connected. All connectors are properly aligned and connected.
Y
N
Reseat the feeders and printer to obtain proper alignment and connection.
Switch the printer power off. Remove the Left Interface Cover (REP 1.1), Left Cover (REP 1.2),
and the Left Plate Assembly (REP 1.11). Switch the printer power on. On the Print Engine Controller PWB, check the voltage between P/J33 pin 13 and frame ground. The
voltage
is
24VDC.
Y
N
On the Print Engine Controller PWB, check the voltage between P/J33 pin 6 and frame
ground. The voltage is 24.0VDC.
Y
N
Replace the Print Engine Controller PWB (REP 9.3).
Replace the Tray 2 Size PWB (REP 11.19). If the problem persists, replace the Tray 2
Feeder PWB (REP 11.9).
The printer has two optional 550 Sheet Feeders installed.
Y
N
Replace the Printer Engine Controller PWB (REP 9.3).
On the Print Engine Controller PWB, check the voltage between P/J33 pin 14 and frame
ground. The voltage is 24.0VDC.
Y
N
Remove Paper Tray 3. Check the voltage between the bottom terminal on the mating connector on the Tray 3 feeder and frame ground. The voltage is 24.0VDC.
Y
N
Replace the Tray 3 Size PWB (REP 11.19). If the problem persists, replace the Tray
3 Feeder PWB (REP 11.9).
Remove Paper Tray 2. Check the voltage between the bottom terminal on the mating connector on the Tray 2 feeder and frame ground. The voltage is 24.0VDC.
Y
N
Remove paper tray 1. Check the voltage between the bottom terminal on the mating
connector on the Tray 1 feeder and frame ground. The voltage is 24.0VDC.
Y
N
Replace the Tray 1 Size PWB (REP 3.13). If the problem persists, replace the
Tray 1 Feeder PWB (REP 3.9).
Check the resistance between the bottom and top terminals of the mating connector on
paper tray 3. There is continuity between the two pins.
Y
N
Replace the paper tray mating connector (PL 2.2).
Check that the paper tray mating connector and the feeder mating connector are properly
aligned when the tray is inserted into the feeder. The mating connectors are properly
connected when the paper tray is inserted.
Y
N
Repair or replace components as necessary.
Check the resistance between the bottom and top terminals of the mating connector
on paper tray 1. There is continuity between the two pins.
Y
N
Replace the paper tray mating connector (PL 2.2).
Check that the paper tray mating connector and the feeder mating connector are
properly aligned when the tray 1 is inserted into the feeder. The mating connectors
are properly connected when the paper tray is inserted.
Y
N
Repair or replace components as necessary.
B
Check that the paper tray mating connector and the feeder mating connector are properly
aligned when the tray is inserted into the feeder. The mating connectors are properly
connected when the paper tray is inserted.
Y
N
Repair or replace components as necessary.
Replace the Tray 3 Size PWB (REP 11.19). If the problem persists, replace the Tray 3
Feeder PWB (REP 11.9).
Replace the Print Engine Controller PWB (REP 9.3).
Replace the Tray 1 Size PWB (REP 3.13). If the problem persists, replace the Tray 1
Feeder PWB (REP 3.9).
Check the resistance between the bottom and top terminals of the mating connector on
the paper tray 2. There is continuity between the two pins.
Y
N
Replace the paper tray mating connector (PL 2.2).
A
B
Status Indicator Repair Analysis Procedures
RAP 54
02/2000
2-46
Initial Issue
DocuPrint N2125
RAP 55 Duplex Unit Fail or Removed (E9-1)
RAP 56 Paper Jam Open Front Cover (E7)
Duplex Unit was removed while power was on.
Paper is early to the Registration Sensor, paper is late to or late off the Registration Sensor, or
the Registration Sensor is actuated at power on.
Procedure
Switch the printer power off. Remove and reinstall the Duplex Unit. Switch the printer power on.
Run a Config Sheet. The Duplex Unit is listed on the Config Sheet.
Y
N
Switch the printer power off. Remove the Left Interface Cover (REP 1.1), Left Cover (REP
1.2), and the Left Plate Assembly (REP 1.11). Switch the printer power on. On the Print
Engine Controller PWB, check the voltage between P/J34 pin 9 and frame ground. The
voltage is 3.3VDC with the duplex Unit removed and 0.0VDC with the Duplex Unit
installed.
Y
N
Check the wiring harnesses. If in good condition, replace the Duplex PWB (REP
12.4). If the problem persists, replace the Print Engine Controller PWB (REP 9.3).
Replace the Print Engine Controller PWB (REP 9.3).
Problem Solved.
Procedure
Open the printer and check for paper or other obstructions in the paper path. Remove the
Duplex Assembly and check the rear entrance chute to the Paper Handler. The printer is free
of jammed paper, paper scraps, or other obstructions.
Y
N
Clear all jammed paper, paper scraps, and obstructions from the printer.
Check the Duplex Belt, Rollers, and gears. Check for contamination, wear, and obstructions.
The Duplex rollers, gears, and belt are clean and in good condition.
Y
N
Replace components or Duplex Assembly as necessary (REP 12.1).
Reinstall the Duplex Assembly. Enter diagnostics and select Test Print. Run 15 to 20 duplex
test prints. The error code reappears.
Y
N
Problem solved.
Select Component Test. Scroll to Duplex Motor Low and press Enter. Then scroll to Duplex
Motor Hi and press Enter. You can hear the Duplex Motor run at both speeds.
Y
N
Remove the Duplex Assembly then remove the Duplex Cover (REP 12.3). Disconnect P/
J38 from the Duplex PWB. Measure the resistance on the disconnected plug between pin
1 and pin 2; between pin 1 and pin 3; between pin 1 and pin 4; and between pin 1 and pin
5. All four readings are between 30 and 37 ohms.
Y
N
Replace the Duplex Motor Assembly (REP 12.8).
Replace the Duplex PWB (REP 12.4). If the problem persists, replace the Print Engine
Controller PWB (REP 9.3).
Press [0] for one second to stop all tests. Scroll to Sensor Input test and press Enter. Use a
small strip of paper to actuate and deactuate the Duplex Transport Sensor. The number on
the LCD increments each time you press and release the actuator.
Y
N
Replace the Duplex Sensor Assembly (REP 12.13). If the problem persists, replace the
Print Engine Controller PWB (REP 9.3).
Perform RAP 32 to test the Registration Sensor. The Registration Sensor is working correctly.
Y
N
Replace the Registration Sensor (REP 5.4).
Replace the Print Engine Controller PWB (REP 9.3).
Initial Issue
DocuPrint N2125
02/2000
2-47
Status Indicator Repair Analysis Procedures
RAP 55, RAP 56
Status Indicator Repair Analysis Procedures
RAP 55, RAP 56
02/2000
2-48
Initial Issue
DocuPrint N2125
A
Switch the printer power off. Remove the OCT (REP 10.1). Open the printer rear cover and
check the movement of the Exit Gate. The Exit Gate moves freely in both directions when
pressed and released.
Y
N
Repair or replace the Exit Gate as necessary (REP 6.4).
RAP 57 Offset Jam Open Rear Cover (E6-X)
Paper late to OCT sensor, paper late off OCT sensor, or paper on OCT sensor at power on.
Procedure
Open the printer Rear Cover and the OCT Rear Cover. Check for paper or other obstructions in
the paper path. The printer if free of jammed paper, paper scraps, or other obstructions.
Y
N
Clear all jammed paper, paper scraps, and obstructions from the printer and the OCT.
Run 15 to 20 test prints, output to OCT. The error code reappears.
Y
N
Problem Solved
Enter Diagnostics and select Component Test. Scroll to Sensor Input test and press Enter.
Open the OCT Rear Cover. Actuate and deactuate the OCT Exit Sensor Actuator. The number on the LCD increments each time you press and release the actuator.
Y
N
Switch the printer power off. Remove the Left Interface Cover (REP 1.1), Left Cover (REP
1.2), and the Left Plate Assembly (REP 1.11). On the Print Engine Controller PWB, check
the voltage between P/J35 pin 7 and frame ground as you actuate and deactuate the OCT
Exit Sensor Actuator. The voltage is 3.3VDC when deactuated and 0.0VDC when
actuated.
Y
N
Replace the OCT Exit Sensor (REP 10.11). If the problem persists, replace the OCT
PWB (REP 10.7).
Reinstall the OCT. Each time the printers’ rear cover or front cover is opened and closed with
power applied, the printer performs a reset. At the completion of the reset, the Exit Gate toggles between fully open and fully closed positions. Open the printer rear cover. Switch the
printer power on. Cheat the Rear Cover Interlock and watch the Exit Gate at the end of reset.
Remove then replace the Rear Cover Interlock cheater. The Exit Gate toggles at the completion of each reset.
Y
N
Replace the Direction Solenoid (REP 10.10). if the problem persists, Replace the OCT
PWB (REP 10.7).
Replace the OCT PWB (REP 10.7). If the problem persists, Replace the Print Engine Controller PWB (REP 9.3).
Replace the Print Engine Controller PWB (REP 9.3).
Exit Sensor Input test and scroll to OCT Motor Operation. Press Enter. The OCT Motor runs.
Y
N
Switch the printer power off. Remove the Left Interface Cover (REP 1.1), Left Cover (REP
1.2), and the Left Plate Assembly (REP 1.11). Enter diagnostics and select Component
Test. Scroll to OCT Motor Operation. On the Print Engine Controller PWB, check the voltage between P/J35 pin 6 and frame ground. Press Enter. The voltage drops from
3.3VDC to 0.5VDC when the Enter Key is pressed.
Y
N
Replace the Print Engine Controller PWB (REP 9.3).
Switch the printer power off. Remove the OCT from the printer (REP 10.1). Turn the OCT
up side down. Disconnect P/J210 from the OCT PWB. Check the resistance between pins
1 and 4, pins 1 and 6, pins 2 and 3, and pins 2 and 5 on the disconnected plug. All readings are 70 ± 10 ohms.
Y
N
Replace the OCT Motor (REP 10.8).
Replace the OCT PWB (REP 10.7).
Open the OCT Rear Cover. Check the OCT rollers. The OCT Rollers are rotating smoothly.
Y
N
Repair or replace the OCT Rollers as necessary (REP 10.14/REP 10.15).
A
Initial Issue
DocuPrint N2125
02/2000
2-49
Status Indicator Repair Analysis Procedures
RAP 57
RAP 58 OCT Assy Not Recognized
RAP 59 Remove Output From Offset Bin (C5)
Procedure
Error code indicates the output tray is full.
Switch the printer power off. Remove and reinstall the OCT. Switch the printer power on. Run a
Config Sheet. The OCT is listed on the Config Sheet.
Y
N
Switch the printer power off. Remove the Left Interface Cover (REP 1.1), Left Cover (REP
1.2), and the Left Plate Assembly (REP 1.11). Remove the OCT from the printer. Switch
the printer power on. On the Print Engine Controller PWB, check the voltage between P/
J35 pin 1 and frame ground. The voltage is 3.3VDC.
Y
N
Replace the Print Engine Controller PWB (REP 9.3).
Procedure
There is a paper stack in the offset bin actuating the Stack Full Sensor.
Y
N
The paper is curled.
Y
N
Lift and release the Stack Full Actuator a few times. The actuator moves freely.
Y
N
Replace Stack Full Actuator (REP 10.12) or Stack Full Sensor (REP 10.13), as
necessary.
Switch the printer power off. Properly install the OCT on the printer. Switch the printer
power on. On the Print Engine Controller PWB, check the voltage between P/J35 pin 1
and frame ground. The voltage is 0.0VDC.
Y
N
Replace the OCT PWB (REP 10.7).
Enter diagnostics and select Component Test. Scroll to Sensor Input test. Manually
actuate and deactuate the Stack Full Actuator. The number on the LCD increments each time you lift and release the actuator (the count may have a short
delay because of the sensor circuit).
Y
N
Go to RAP 60.
Replace the Print Engine Controller PWB (REP 9.3).
Problem Solved.
Replace Print Engine Controller PWB (REP 9.3).
Replace paper in paper tray with fresh dry paper. Run test prints. The error code reappears.
Y
N
Problem solved.
Enter diagnostics and select Component Test. Scroll to Sensor Input test. Manually actuate and deactuate the Stack Full Actuator. The number on the LCD increments each
time you lift and release the actuator (the count may have a short delay because of
the sensor circuit).
Y
N
Go to RAP 60.
Replace Print Engine Controller PWB (REP 9.3).
Remove the paper stack.
Status Indicator Repair Analysis Procedures
RAP 58 , RAP 59
02/2000
2-50
Initial Issue
DocuPrint N2125
RAP 60 OCT Stack Full Sensor
RAP 61 OCT Offset Operation Not Performed
Procedure
Procedure
Enter Diagnostics and select Component Test. Scroll to Sensor Input test and press Enter.
Actuate and deactuate the OCT Stack Full Sensor Actuator. The number on the LCD increments each time you press and release the actuator.
Y
N
Visually inspect the Stack Full Sensor Actuator. The actuator moves freely and is in
good condition (not broken or damaged).
Y
N
Replace the Stack Full Actuator (REP 10.12).
Manually move the Offset Assembly from one side to the other. The Offset Assembly moves
smoothly.
Y
N
Replace the Offset Assembly (REP 10.14).
Switch the printer power off. Remove the Left Interface Cover (REP 1.1), Left Cover (REP
1.2), and Left Plate (REP 1.11). Disconnect P/J35 from the Print Engine Controller PWB.
Switch the printer power on. On the Print Engine Controller PWB, measure the voltage
between P35 pin 2 and frame ground. The voltage is +3.3VDC.
Y
N
On the Print Engine Controller PWB, measure the voltage between P/J28 pin 10 and
frame ground. The voltage is +3.3VDC.
Y
N
Replace the LVPS (REP 9.5).
Enter Diagnostics and select Component Test. Scroll to OCT Offset Motor and press Enter [4].
The Offset Assembly shifts left then returns right.
Y
N
Switch the printer power off. Remove the Inner Exit Chute Assembly (REP 10.6). Disconnect P/J229 from the OCT PWB. On the disconnected plug, measure the resistance
between pins 1 and 3, pins 1 and 5, pins 2 and 4, and between pins 2 and 6. The resistance is 245 to 265 ohms.
Y
N
Replace the OCT Offset Motor (REP 10.17).
Replace the OCT PWB (REP 10.7). If the problem persists, replace the Print Engine Controller PWB (REP 9.3).
Replace the Print Engine Controller PWB (REP 9.3).
Replace the Print Engine Controller PWB (REP 9.3).
Switch the printer power off. Reconnect P/J35 to the Print Engine Controller PWB. Switch
the printer power on. On the Print Engine Controller PWB, measure the voltage between
P/J35 pin 2 and frame ground. There is +3.3VDC between P/J35 pin 2 and frame
ground when the Stack Full Sensor is deactuated and 0.0VDC when actuated.
Y
N
Replace the Stack Full Sensor (REP 10.13). If the problem persists, replace the OCT
PWB (REP 10.7).
Replace the Print Engine Controller PWB (REP 9.3).
Replace the Print Engine Controller PWB (REP 9.3).
Initial Issue
DocuPrint N2125
02/2000
2-51
Status Indicator Repair Analysis Procedures
RAP 60, RAP 61
Status Indicator Repair Analysis Procedures
RAP 60, RAP 61
02/2000
2-52
Initial Issue
DocuPrint N2125
RAP 62 Envelope Feeder Not Recognized
RAP 63 Envelope Feed Clutch
Procedure
Procedure
Switch the Printer power off. Remove and reinstall the envelope feeder. Switch the Printer
power on. Run a Config Sheet. The Envelope Feeder is listed on the Config Sheet.
Y
N
Switch the Printer power off. Remove the Left Interface Cover (REP 1.1), Left Cover (REP
1.2), and the Left Plate Assembly (REP 1.11). Switch the Printer power on. Check the
voltage on the Print Engine Controller PWB between P/J23 Pin 4 and frame ground. The
voltage is 0.0VDC.
Y
N
Switch the Printer power off. Remove the Envelope Feeder. Check for continuity
between J418 Pin 3 (Envelope Connector Assembly) and P/J23 Pin 4 on the Print
Engine Controller PWB. There is continuity between the two pins.
Y
N
Remove the Front Cover (REP 1.6) and the Left Front Cover (REP 1.7). Check
for continuity between P/J 41 Pin 6 on the Connector PWB and P/J 23 Pin 4.
There is continuity between the two pins.
Y
N
Check the Connector Harness Assembly for proper connection and for
defective wires. Repair or replace if necessary. If Harness is in good condition, replace the Connector PWB (REP 9.7).
Enter Diagnostics and select Component Test. Scroll to confirm EBF Clutch and press Enter.
You can hear the clutch energize.
Y
N
Switch Power Off. Remove the Left Interface Cover (REP 1.1), Left Cover (REP 1.2), and
the Left Plate Assembly (REP 1.11). Enter Diagnostics and select Component Test. Scroll
to confirm EBF Clutch. On the Print Engine Controller PWB, check voltage between P/J23
Pin 1 and frame ground. Press Enter. The voltage pulses from 0.0VDC to 3.3VDC then
returns to 0.0VDC.
Y
N
Check the voltage between P/J23 Pin 4 and frame ground. The voltage is 0.0VDC.
Y
N
Go to RAP 62.
Replace the Print Engine Controller PWB (REP 9.3).
Remove the Envelope Feeder from the Printer. Remove the Bottom Cover (REP 13.1) and
the Top Chute (REP 13.2). Disconnect P/J413 from the Envelope Feeder PWB. Measure
the resistance between Pins 1 and 2 on the disconnected plug. The resistance is 170 to
190 ohms.
Y
N
Replace the Envelope Feed Clutch (REP 13.12).
Replace the Envelope Connector Assembly (REP 4.10).
Replace the Envelope Feeder PWB (REP 13.3).
Replace the Envelope Feeder PWB (REP 13.3).
Problem solved.
Initial Issue
DocuPrint N2125
Replace the Envelope Feeder PWB (REP 13.3).
Check the Envelope Feed Belts for wear and contamination. Check for belts slipping. Repair or
replace as necessary. If Belts are in good condition and not slipping replace the Envelope Feed
Clutch (REP 13.12).
02/2000
2-53
Status Indicator Repair Analysis Procedures
RAP 62, RAP 63
RAP 64 Envelope No Paper Sensor
RAP 65 Load Envelope (C5)
Procedure
Procedure
Enter Diagnostics and select Component Test. Scroll to Sensor Input Test and press Enter.
Press and release the Envelope Feeder No Paper Sensor Actuator. The number on the LCD
increments each time you press and release the Actuator.
Y
N
Switch the Printer power off. Remove the Left Interface Cover (REP 1.1), Left Cover (REP
1.2), and the Left Plate Assembly (REP 1.11). Switch the Printer power on. On the Print
Engine Controller PWB check the voltage between P/J23 Pin 4 and the frame ground.
The voltage is 0.0VDC.
Y
N
Go to RAP RAP 62.
Check the voltage between P/J23 Pin 3 and frame ground. The voltage is 3.3 with the
Envelope Feeder No Paper Sensor de-actuated and 0.0VDC with the sensor actuated.
Y
N
Switch the Printer power off and remove the Envelope Feeder. Check for continuity
between J418 (Envelope Connector Assembly) and P/J23 Pin 3 on the Print Engine
Controller PWB. There is continuity between the pins.
Y
N
Remove the Front Cover (REP 1.6) and the Front Left Cover (REP 1.7). Check
for continuity between P/J41 Pin 5 on the Connector PWB and P/J23 Pin 3 on
the Print Engine Controller PWB. There is continuity between the two pins.
Y
N
Check the Connector Harness Assembly for proper connection and for
defective wires. Repair or replace if necessary. If Harness is in good condition, replace the Connector PWB (REP 9.7).
Replace the Envelope Connector Assembly (REP 4.10).
Replace the Envelope Connector Assembly (REP 4.10).
Replace the Envelope Feeder PWB (REP 13.3). If the problem persists, replace the
Envelope Feeder No Paper Sensor (REP 13.10).
Replace the Envelope Feeder PWB (REP 13.3). If the problem persists, replace the
Envelope Feeder No Paper Sensor (REP 13.10).
Replace the Print Engine Controller PWB (REP 9.3).
Replace the Print Engine Controller PWB (REP 9.3).
Status Indicator Repair Analysis Procedures
RAP 64, RAP 65
Replace the Print Engine Controller PWB (REP 9.3).
Replace the Print Engine Controller PWB (REP 9.3).
02/2000
2-54
Initial Issue
DocuPrint N2125
RAP 66 Envelope Feeder Jam (E2)
Envelopes early of late to the Registration Sensor.
Procedure
Remove all envelopes. Check the Envelope Feeder and Printer for contamination, paper
scraps, or other obstructions. The printer and Envelope Feeder is clean and free of
obstructions.
Y
N
Clean feeder and remove all obstructions.
Check the Feed Belts. Check for dirt or contamination on the top side and the under side of the
belt. Both sides of the belt are clean.
Y
N
Replace the Feed Belts (REP 13.17).
Enter Diagnostics and select Component Test. Scroll to Confirm EBF Clutch and press Enter.
You can hear the clutch energize.
Y
N
Go to RAP 63.
Scroll to Main Motor Operation and press Enter. Scroll to Confirm EBF Clutch. Watch the Feed
Belts and Feed Rollers and press Enter. The Feed Belts and Feed Rollers all rotate.
Y
N
Ensure the Envelope Feeder is installed properly and is contacting the printer drive gear.
The Envelope Feeder is installed correctly.
Y
N
Reinstall the Envelope Feeder correctly.
Remove the Envelope Feeder and check the feeder drive gears. All gears are in good
condition and operating properly.
Y
N
Replace the gears as necessary (PL 12.2).
Replace the Envelope Feed Clutch (REP 13.12). If the problem persists, Replace the
Envelope Feeder PWB (REP 13.3).
Perform RAP 32 to check the Registration Sensor. The Registration Sensor is operating
correctly.
Y
N
Replace the Registration Sensor (REP 5.4).
Replace the Print Engine Controller PWB (REP 9.3).
Initial Issue
DocuPrint N2125
02/2000
2-55
Status Indicator Repair Analysis Procedures
RAP 66
Status Indicator Repair Analysis Procedures
RAP 66
02/2000
2-56
Initial Issue
DocuPrint N2125
3 Image Quality Repair Analysis Procedures
Introduction......................................................................................................................
Measurements.................................................................................................................
Image Quality Defect Definitions .....................................................................................
Image Quality Checkout ..................................................................................................
Solid Area Density...........................................................................................................
Background .....................................................................................................................
Deletions (Line, Band, Spots)..........................................................................................
Fusing..............................................................................................................................
Resolution .......................................................................................................................
Registration (Side to Side) ..............................................................................................
Registration (Lead Edge to Trail Edge) ...........................................................................
Skew................................................................................................................................
Skips / Smears ................................................................................................................
Spots ...............................................................................................................................
Other Print Defects..........................................................................................................
IQ RAP 1 Light (Undertoned) Prints ................................................................................
IQ RAP 2 Blank Prints .....................................................................................................
IQ RAP 3 Spots ...............................................................................................................
IQ RAP 4 Horizontal Deletions ........................................................................................
IQ RAP 5 Vertical Deletions ............................................................................................
IQ RAP 6 Spot Deletions.................................................................................................
IQ RAP 7 Vertical Streaks ...............................................................................................
IQ RAP 8 Horizontal Streaks...........................................................................................
IQ RAP 9 Residual Image ...............................................................................................
IQ RAP 10 Black Prints ...................................................................................................
IQ RAP 11 Background ...................................................................................................
IQ RAP 12 Uneven Density.............................................................................................
IQ RAP 13 Skewed Image ..............................................................................................
IQ RAP 14 Damaged Print ..............................................................................................
IQ RAP 15 Registration ...................................................................................................
IQ RAP 16 Skips / Smears ..............................................................................................
IQ RAP 17 Unfused Image..............................................................................................
IQ RAP 18 Resolution .....................................................................................................
Initial Issue
DocuPrint N2125
3-3
3-3
3-4
3-5
3-6
3-6
3-7
3-7
3-8
3-8
3-9
3-9
3-10
3-10
3-11
3-11
3-12
3-13
3-14
3-15
3-16
3-17
3-18
3-19
3-20
3-21
3-21
3-22
3-23
3-24
3-25
3-25
3-26
02/2000
3-1
Image Quality Repair Analysis Procedures
Image Quality Repair Analysis Procedures
02/2000
3-2
Initial Issue
DocuPrint N2125
Introduction
Measurements
This section contains image quality repair procedures to assist in correcting image quality
defects. These procedures provide defect samples, definitions and specifications to help identify the type of defect that exists, the test pattern to use, and actions required to correct the
defects.
Power and signal grounds are connected to frame ground, therefore all circuit troubleshooting
can be performed using the metal frame (chassis) as the grounding point. If more information is
needed to locate connectors or test points, refer to section 7.
Unless specified otherwise, the following voltage tolerances are used within this section: Table
1
The voltage tolerances for this section are listed in Table 1 under the topic Measurements.
Throughout these procedures, the term “vertical” refers to the process direction (the direction
paper travels through the printer); the term “horizontal” refers to the scanning direction (the
direction the laser beam scans across the page).
Cleaning procedures should always be performed before beginning any Print Quality Repair
procedure.
Be sure that the paper meets printer specifications. Changing the paper, or using paper from a
previously unopened ream, will resolve many print quality issues.
Table 1 Voltage Measurements
Stated
Measured
+ 5.0 VDC
+ 4.8 VDC to + 5.2 VDC
+ 3.3 VDC
+ 3.0 VDC to + 3.6 VDC
+ 24.0 VDC
+ 21.6 VDC to + 26.4 VDC
0.0 VDC
less than + 0.5 VDC
After resolving an image quality problem, return to Image Quality Checkout to verify that no
other image quality defects exist.
Sample reproductions of the various image quality patterns are included under Image Quality
Specifications.
Use the Image Quality RAPS to further diagnose machine problems.
In the Y/N (Yes/No) steps of the RAPs, a Yes response will lead you to the next step. A No
response will indicate a corrective action, or will direct you to another step. When the indicated
corrective action has been completed, go to Section 1 and restart the Initial Actions to verify
that the problem has been corrected.
Initial Issue
DocuPrint N2125
02/2000
3-3
Image Quality Repair Analysis Procedures
Introduction, Measurements
Image Quality Defect Definitions
The System Controller Test Print (Figure 1) is used to evaluate each of the print quality parameters. Each area of the test pattern is used for a print quality parameter. The areas and the
print quality parameters are listed in Image Quality Checkout.
Table 1 Image Quality Defect Definitions
Defect Definitions
Go To:
LIGHT PRINTS: The overall image density is too light.
IQ RAP 1
BLANK PRINTS: Prints with no visible image.
IQ RAP 2
SPOTS: There are spots of toner on the page.
IQ RAP 3
HORIZONTAL DELETIONS: There are areas of the image that are extremely IQ RAP 4
light or missing entirely. These areas run horizontally across the page in the
direction of scanning.
VERTICAL DELETIONS: There are areas of the image that are extremely
light or missing entirely. These areas run vertically along the page in the
direction of paper movement.
IQ RAP 5
SPOT DELETIONS: Solid areas are marked with irregular white areas.
IQ RAP 6
VERTICAL STREAKS: Extraneous dark lines/bands in the process direction. IQ RAP 7
HORIZONTAL STREAKS: Extraneous dark lines/bands in the direction of
scan.
IQ RAP 8
RESIDUAL IMAGES: The image from a previous print, which was not
removed during the cleaning process, has been developed on the current
print.
IQ RAP 9
BLACK PRINTS: The print is completely covered with toner and has no visible image.
IQ RAP 10
BACKGROUND: Uniform toner contamination in non image areas. Refer to
the Background specification.
IQ RAP 11
UNEVEN DENSITY: The text/line darkness and solid area density image var- IQ RAP 12
ies across the print.
SKEWED IMAGE: Angular displacement of the image from its intended posi- IQ RAP 13
tion on the print. Refer to the specification.
DAMAGED PRINTS: Creases, wrinkles, excessive curl, cuts, folds or
embossed marks.
IQ RAP 14
REGISTRATION (lead edge to trail edge): Displacement of the image, in the IQ RAP 15
process direction, from its intended position on the print.
(inboard to outboard): Displacement of the image, in the direction of scan,
from its intended position on the print.
SKIPS / SMEARS: Skip-Loss or stretching of the image in bands across the IQ RAP 16
process direction.
Smear-The distortion of the image in bands across the process direction that
cause it to appear to be blurred or compressed.
UNFUSED IMAGE: Part of or all of the image is unfused. Refer to the specifi- IQ RAP 17
cation.
RESOLUTION: At 600 DPI, the two pixel lines and halftone patches cannot
be reproduced clearly on the print.
Image Quality Repair Analysis Procedures
Image Quality Defect Definitions
IQ RAP 18
02/2000
3-4
Initial Issue
DocuPrint N2125
Image Quality Checkout
The System Controller Test Print is used to evaluate and ensure that the printed image meets
the printer specifications.
Use new paper, whenever possible, to check the image quality of prints. Make five (5) prints of
the System Controller Test Print (Figure 1). Discard the first two prints and retain the remaining
prints for image quality analysis.
The Image quality Checkout is used to evaluate the following:
1.
Resolution (2 places) (Figure 1)
2.
Skips and Smears (4 places) (Figure 1)
3.
Registration (1 place) (Figure 1)
4.
Resolution and Uniformity (2 places) (Figure 1)
5.
Solid Area Density (3 places) (Figure 1)
6.
Half Tone Resolution (2 places). (Figure 1)
Go to Solid Area Density.
Figure 1 System Controller Test Print.
Initial Issue
DocuPrint N2125
02/2000
3-5
Image Quality Repair Analysis Procedures
Image Quality Checkout
Solid Area Density
Background
Procedure
Procedure
Ensure the printer is set for 600 dpi. Compare the solid areas on the System Controller Test
Patterns with the Output Reference document (82P520) (Figure 1). The solid areas on the
print are at the 1.20 density square on the scale or higher, and all the solid areas on any
print differ in density less than one density square.
Y
N
The solid area density is uniform.
Y
N
Go to IQ RAP 12 Uneven Density.
Compare the Test Prints with the Visual Scale (82P284). The worst background area on any
print should be at, or below, area 3 on the rating guide (Figure 1). The print is at the area 3 or
below.
Y
N
The background is uniform.
Y
N
Go to IQ RAP 12 Uneven Density.
Go to IQ RAP 11 Background.
The prints are too faint.
Y
N
The prints are black.
Y
N
Go to IQ RAP 11 Background.
The printed test patterns meet the Background specification. Go to Deletions.
Go to IQ RAP 10 Black Prints
Go to IQ RAP 1 Light Prints
The Solid Area Density is within specifications. Go to Background.
Figure 1 Rating Guide
Figure 1 Output Reference Document
Image Quality Repair Analysis Procedures
Solid Area Density, Background
02/2000
3-6
Initial Issue
DocuPrint N2125
Deletions (Line, Band, Spots)
Fusing
Procedure
Procedure
Inspect Test Prints for the presence of deletions (missing image). There should be no deletions
with a diameter larger than 0.5 mm visible on test prints (Figure 1). There are deletions on
the test prints.
Y
N
Go to Fusing.
NOTE: The operating environment of the printer is from 41° F (5° Celsius) at 15% relative
humidity to 95° F (35° Celsius) at 85% relative humidity. The fusing performance of the printer
will vary according to the environment.
There are vertical (in direction of paper movement) Line/Band deletions present.
Y
N
There are Horizontal (in direction of scanning) Line/Band Deletions present.
Y
N
There are Spot Deletions present.
Y
N
Go to Fusing.
Go to IQ RAP 6 Spot Deletions.
•
A cold environment will affect the warm-up time.
•
The weight (lb. / gsm) of the paper or transparency will affect the fusing of prints.
•
High humidity will have an adverse affect on the fusing of prints.
Check the fusing quality of the image of a System Controller Test Print (Figure 1). Rub the
image three times with a soft cloth or tissue. The image should not lift off of the surface of the
print. The fusing quality of the image meets the specification.
Y
N
Go to IQ RAP 17 Unfused Image.
Go to Resolution.
Go to IQ RAP 4 Horizontal Deletions.
Go to IQ RAP 5 Vertical Deletions.
Figure 1 Line, Band, or Spot Deletions.
Figure 1 Fusing Quality.
Initial Issue
DocuPrint N2125
02/2000
3-7
Image Quality Repair Analysis Procedures
Deletions , Fusing
Resolution
Registration (Side to Side)
Procedure
Procedure
Refer to Figure 1. Observe the three image areas on several System Controller Test Patterns.
Check the resolution of the images in each of the areas:
Arrow 1
The two pixel vertical, horizontal and diagonal lines should be clear and continuous. The diagonal lines might appear to be narrower than the others.
Arrow 2
The text paragraphs should be roughly equal in density.
Arrow 3
The half-tone patches adjacent to the solid blocks in the corners should be uniform in appearance. The three checks (arrows 1, 2, & 3) are within specification.
Y
N
Go to IQ RAP 18 Resolution.
Measure the registration on two consecutive System Controller Test Patterns. Fold the paper in
half (side edge to side edge). Observe the fold line of the paper with reference to the cross
hairs of the target, Figure 1. The fold is within +/- 2.0 mm of the target cross hairs (each
line on the target is 1 mm).
Y
N
Go to IQ RAP 15 Registration.
The test prints meet the side to side registration specification. Go to Registration (Lead Edge to
Trail Edge).
The printed test patterns meet the Resolution specification. Go to the Registration (Side to
Side).
Figure 1 Registration (Side to Side).
Figure 1 Resolution.
Image Quality Repair Analysis Procedures
Resolution, Registration
02/2000
3-8
Initial Issue
DocuPrint N2125
Registration (Lead Edge to Trail Edge)
Skew
Procedure
Procedure
Measure the registration on two consecutive System Controller Test Patterns. Fold the paper in
half (lead edge to Trail Edge). Observe the fold line of the paper with reference to the cross
hairs of the target. The fold is within +/- 2.0 mm of the target cross hairs (each line on the
target is 1 mm) (Figure 1).
Y
N
Go to IQ RAP 15 Registration.
Enter Diagnostics and select Test Print. Scroll to Print Pattern and press Enter [4]. Observe the
test pattern. Measure the dimensions ‘A’ and ‘B’ (Figure 1) on two consecutive test patterns.
The difference between ‘A’ and ‘B’ should be 1.5 mm or less. The skew on the test patterns
meets the specification.
Y
N
Go to IQ RAP 13 Skewed Image.
The printed test patterns meet the lead edge to trail edge registration specification. Go to
Skew.
The printed test patterns meet the Skew specification. Go to the Skips and Smears.
Figure 1 Registration (Lead Edge to Trail Edge).
Figure 1 Printer Engine Controller Test Pattern.
Initial Issue
DocuPrint N2125
02/2000
3-9
Image Quality Repair Analysis Procedures
Registration , Skew
Skips / Smears
Spots
Procedure
Procedure
Enter Diagnostics and select Test Print. Scroll to Print Pattern and press Enter [4]. Inspect the
ladder chart test pattern. The pattern should be free from skips and smears (Figure 1). The
test prints are free from skips and smears.
Y
N
Go to IQ RAP 16 Skips/Smears.
From the menu mode, run a Config Sheet. Inspect the print for spots (Figure 1). Within a 208 x
95 mm square:
•
There should be no spots larger than or equal to 0.5 mm visible on the prints.
Go to the Spots checkout
•
There should be no more than 1 spot measuring between 0.4 mm and 0.5 mm visible on
the print.
•
There should be no more than 16 spots measuring between 0.25 mm and 0.4 mm visible
on the print.
•
Any spot measuring less than 0.25 mm is acceptable.
The prints are free of spots or the spots that are visible fall within the acceptable range.
Y
N
Go to IQ RAP 3 Spots.
Go to Other Print Defects.
Figure 1 Spots.
Figure 1 Skips / Smears.
Image Quality Repair Analysis Procedures
Skips / Smears, Spots
02/2000
3-10
Initial Issue
DocuPrint N2125
Other Print Defects
IQ RAP 1 Light (Undertoned) Prints
Procedure
The overall image density is too light (Figure 1).
Inspect the Test Patterns for other Print Defects. Test Prints are free of defects.
Y
N
There are dark streaks present on the Test Prints.
Y
N
There is a residual image (ghosts) on the Test Prints.
Y
N
There is paper damage: wrinkles, creases, tears, etc.
Y
N
The printer meets specifications. Go to Initial Actions
Go to IQ RAP 14 Damaged Prints.
Go to IQ RAP 9 Residual Image.
Go to IQ RAP 7 / IQ RAP 8 Streaks.
Go to Final Actions
Figure 1 Light Prints
Initial Actions
•
Inspect the printer paper path for items such as staples, paper clips and paper scraps.
•
Check installation of the Print Cartridge.
•
Check that the Print Cartridge ground contact points are clean.
•
Ensure there are no obstructions in the Laser path.
Procedure
Load fresh, dry paper. Run a test print. The image density meets specifications.
Y
N
Install a new Print Cartridge. Run a test print. The image density meets specifications.
Y
N
Remove the Print Cartridge. Inspect the Metal Grounding Contacts on the Print Cartridge Side Guide. The Metal Grounding Contacts are intact and free of contamination.
Y
N
Reform or clean the Metal Grounding Contacts, so they make better contact
with the drum shaft, or replace the Print Cartridge Side Guide (REP 7.5).
Check for the continuity between the Metal Grounding Contacts and the printer body
frame. There is continuity between the Metal Grounding Contacts and the
printer frame.
Y
N
Replace the Print Cartridge Side Guide (REP 7.5).
Inspect Laser beam path between the Laser Assembly and the Drum for obstructions. The laser beam path is free of obstructions.
A
Initial Issue
DocuPrint N2125
02/2000
3-11
B
Image Quality Repair Analysis Procedures
Other Print Defects, IQ RAP 1
A
B
Y
N
Clean the Laser window and remove any obstructions from the laser beam
path.
IQ RAP 2 Blank Prints
No visible image anywhere on the output print (Figure 1).
The BTR is intact and is free of contamination.
Y
N
Replace the BTR (REP 7.1).
Generate a Test Print and switch OFF the printer power halfway through the print
cycle. Carefully remove the Print Cartridge and inspect the toner image on the drum
just before the transfer area (BTR). The image on the drum is completely developed with sharp, black, easily read areas.
Y
N
Go to (RAP 43)
Inspect the toner image on the drum immediately after the transfer area (BTR). The
toner image on the drum is transferred completely to the paper.
Y
N
Go to (RAP 43)
Replace in order until the problem is solved: BTR Assembly (REP 7.1), Fuser
Assembly (REP 6.2), HVPS PWB (REP 9.6), Laser Assembly (REP 7.4), LVPS
Assembly (REP 9.5), Print Cartridge Side Guide (REP 7.5), Print Engine Controller
PWB (REP 9.3), Chute Transport Assembly (REP 6.1).
Go to RAP 23.
Problem Solved.
Figure 1 Blank Prints
Initial Actions
•
Inspect the printer paper path for items such as staples, paper clips and paper scraps.
•
Check installation of the Print Cartridge.
•
Check that the Print Cartridge ground contact points are clean.
•
Ensure there are no obstructions in the Laser path.
•
Ensure the blank prints are not the result of multisheet feeds.
Procedure
Enter Diagnostics and select Test Print. Scroll to Print Pattern and press Enter [4]. Run five test
prints. The test prints are blank.
Y
N
Exit diagnostics and enter the Menu Mode. Print a Config Sheet. The prints are blank.
Y
N
The problem appears to be with the host computer or the cables. If the problems persist, replace the System Controller PWB (REP 9.2).
Remove and reseat the System Controller PWB. If the problems persist, replace the System Controller PWB (REP 9.2).
Install a new Print Cartridge. Run a test print. There is a normal image on the paper.
Y
N
Remove the Print Cartridge. Inspect the Metal Grounding Contacts on the Print Cartridge
Side Guide. The Metal Grounding Contacts are intact and is free of contamination.
Y
N
Reform or clean the Metal Grounding Contacts, so they make better contact with the
drum shaft, or replace the Print Cartridge Side Guide (REP 7.5).
A
Image Quality Repair Analysis Procedures
IQ RAP 1 , IQ RAP 2
02/2000
3-12
B
Initial Issue
DocuPrint N2125
A
B
Check for continuity between the Metal Grounding Contacts and the printer frame. There
is continuity between the Grounding Contacts and the printer frame.
Y
N
Replace the Print Cartridge Side Guide (REP 7.5).
IQ RAP 3 Spots
There are spots of toner randomly scattered on the page (Figure 1).
The BTR is intact and is free of contamination.
Y
N
Replace the BTR Assembly (REP 7.1).
Generate a Test Print and switch OFF the printer power halfway through the print cycle.
Carefully remove the Print Cartridge and inspect the toner image on the drum just before
the transfer area (BTR). The image on the drum is completely developed; with sharp,
black, easily read areas.
Y
N
Go to RAP 43.
Replace in order until the problem is solved: HVPS PWB (REP 9.6), Laser Assembly
(REP 7.4), BTR Assembly (REP 7.1), Print Engine Controller PWB (REP 9.3), LVPS PWB
(REP 9.5), Print Cartridge Side Guide (REP 7.5).
Problem solved.
Figure 1 Spots
Initial Actions
•
Check that the paper supply is clean, dry and fresh (recycled paper may have spots).
•
Ensure there are no obstructions in the Laser path.
•
Inspect the printer paper path for items such as staples, paper clips and paper scraps.
•
Check installation of the Print Cartridge.
•
Check that the Print Cartridge ground contact points are clean.
•
Check that rollers and other components in the paper path are clean and unobstructed.
Procedure
Install a new Print Cartridge. Run a Test Print. The spots are gone.
Y
N
Inspect the BTR Assembly for contamination and wear. The BTR is free of contamination and wear.
Y
N
Replace the BTR Assembly (REP 7.1).
Generate a Test Print and switch OFF the printer power halfway through the print cycle.
Carefully remove the Print Cartridge and inspect the toner image on the drum just before
the transfer area (BTR). The image on the drum is completely developed; with sharp,
black easily read areas and no spots.
Y
N
Go to RAP 43.
A
Initial Issue
DocuPrint N2125
02/2000
3-13
B
Image Quality Repair Analysis Procedures
IQ RAP 2 , IQ RAP 3
A
B
WARNING
IQ RAP 4 Horizontal Deletions
If the printer has been switched on, the Fuser will be hot.
Open the Rear Cover. Remove the Fuser Assembly. Rotate the fuser idler gear manually
and inspect the Heat Roll. Open fuser jam access cover. Rotate the fuser idler gear manually and inspect the Pressure Roll. The Heat Roll and the Pressure Roll are free of
scratches and contamination.
Y
N
Replace the Fuser Assembly (REP 6.2).
A deletion is an area of the print where the image is missing or extremely light. Horizontal deletions extend across the page (Figure 1).
Replace the following, in order, until the defective component is found: BTR Assembly
(REP 7.1), Fuser Assembly (REP 6.2), Chute Transport Assembly (REP 6.1), HVPS PWB
(REP 9.6), Laser Assembly (REP 7.4), Print Engine Controller PWB (REP 9.3)
Problem solved.
Figure 1 Horizontal Deletions
Initial Actions
•
Check that the paper supply is dry and fresh.
•
Inspect the printer paper path for items such as staples, paper clips and paper scraps.
•
Check installation of the Print Cartridge.
•
Check that the Print Cartridge ground contact points are clean.
•
Check that rollers and other components in the paper path are clean and unobstructed.
Procedure
Enter Diagnostics and select Test Print. Scroll to Print Pattern and press Enter [4]. Run five test
prints. The test prints have horizontal deletions.
Y
N
Exit diagnostics and enter the Menu Mode. Print a Config Sheet. The prints have horizontal deletions.
Y
N
The problem appears to be with the host computer or the cables. If the problems persist, replace the System Controller PWB (REP 9.2).
Remove and reseat the System Controller PWB. If the problems persist, replace the System Controller PWB (REP 9.2).
Load fresh, dry paper. Run a test print. The problem is still present.
Y
N
Problem solved.
Install a new Print Cartridge. The problem is still present.
Image Quality Repair Analysis Procedures
IQ RAP 3, IQ RAP 4
02/2000
3-14
Initial Issue
DocuPrint N2125
Y
IQ RAP 5 Vertical Deletions
N
Problem solved.
Inspect the BTR Assembly for contamination and wear. The BTR is free of contamination
and wear.
Y
N
Replace the BTR Assembly (REP 7.1).
A deletion is an area of the print where the image is missing or extremely light. Vertical band
deletions are deletions which extend down the page (Figure 1).
Generate a test print and switch OFF the printer power halfway through the print cycle. Carefully remove the Print Cartridge and inspect the toner image on the drum just before the transfer area (BTR). The image on the drum is completely developed, with sharp, black, easily
read areas and no horizontal deletions.
Y
N
Go to RAP 43.
Inspect the toner image on the drum immediately after the transfer area (BTR). The
image on the drum was transferred to the paper.
Y
N
Go to RAP 43.
toner
WARNING
If the printer has been switched on, the Fuser will be hot.
Warning: the Fuser may be hot. Open the Rear Cover and remove the Fuser Assembly. Rotate
the fuser idler gear manually and inspect the Heat Roll. Open the fuser jam access cover.
Rotate the fuser idler gear manually and inspect the Pressure Roll. The Heat Roll and the
Pressure Roll are free of scratches and contamination.
Y
N
Replace the Fuser Assembly (REP 6.2).
Replace in order until the problem is solved: HVPS PWB (REP 9.6), Print Cartridge Side Guide
(REP 7.5), BTR Assembly (REP 7.1), Chute Transport Assembly (REP 6.1), Laser Assembly
(REP 7.4), Print Engine Controller PWB (REP 9.3), Fuser Assembly (REP 6.2), MBF Chute
Assembly (REP 4.1), Registration Clutch (REP 5.5), Turn Roll Assembly (REP 11.8).
Figure 1 Vertical Deletions
Initial Actions
•
Check that the paper supply is dry and fresh.
•
Inspect the printer paper path for items such as staples, paper clips and paper scraps.
•
Check installation of the Print Cartridge.
•
Check that the Print Cartridge ground contact points are clean.
•
Ensure there are no obstructions in the Laser path.
•
Check that rollers and other components in the paper path are clean and unobstructed.
Procedure
Load fresh, dry paper. Run a test print. The problem is still present.
Y
N
Problem solved.
Install a new Print Cartridge. Run a test print. The problem is still present.
Y
N
Problem solved.
Inspect the laser beam path between the Laser Assembly and the Drum. The
path is free of obstructions.
Y
N
Remove any obstructions from the laser beam path.
laser
beam
Inspect the paper path, between feed and exit, for contamination or obstructions. The
path is free of obstructions.
Y
N
Remove obstructions or contamination from the paper path.
paper
A
Initial Issue
DocuPrint N2125
02/2000
3-15
Image Quality Repair Analysis Procedures
IQ RAP 4 , IQ RAP 5
A
Inspect the BTR Assembly for contamination and wear. The BTR is free of contamination
and wear.
Y
N
Replace the BTR Assembly (REP 7.1).
IQ RAP 6 Spot Deletions
Solid areas are marked with irregular white areas.
WARNING
If the printer has been switched on, the Fuser will be hot.
Open the Rear Cover and remove the Fuser Assembly. Rotate the fuser idler gear manually
and inspect the Heat Roll. Open the fuser jam access cover. Rotate the fuser idler gear manually and inspect the Pressure Roll. The Heat Roll and the Pressure Roll are free of
scratches and contamination.
Y
N
Replace the Fuser Assembly (REP 6.2).
Replace in order until the problem is solved: BTR Assembly (REP 7.1), Laser Assembly (REP
7.4), Fuser Assembly (REP 6.2), Print Engine Controller PWB (REP 9.3).
Figure 1 Spot Deletions
Initial Actions
•
Check that the paper supply is dry and fresh.
•
Inspect the printer paper path for items such as staples, paper clips and paper scraps.
•
Check installation of the Print Cartridge.
•
Check that the Print Cartridge ground contact points are clean.
Procedure
Load fresh, dry paper. Run a test print. The problem is still present.
Y
N
Problem solved.
Install a new Print Cartridge. Run a test print. The problem is still present.
Y
N
Problem solved.
Inspect the toner image on the drum immediately after the transfer area (BTR). The
image on the drum transferred to the paper.
Y
N
Replace the BTR Assembly (REP 7.1).
toner
WARNING
If the printer has been switched on, the Fuser will be hot.
Open the Rear Cover and remove the Fuser Assembly. Rotate the fuser idler gear manually
and inspect the Heat Roll. Open the fuser jam access cover. Rotate the fuser idler gear manually and inspect the Pressure Roll. The Heat Roll and the Pressure Roll are free of
scratches and contamination.
Image Quality Repair Analysis Procedures
IQ RAP 5 , IQ RAP 6
02/2000
3-16
Initial Issue
DocuPrint N2125
Y
IQ RAP 7 Vertical Streaks
N
Replace the Fuser Assembly (REP 6.2).
Replace the following, in order, until the defective component is found: BTR Assembly (REP
7.1), Chute Transport Assembly (REP 6.1).
Extraneous dark lines/bands in the process direction (in the direction of paper travel) (Figure
1).
Figure 1 Vertical Streaks
Initial Actions
•
Check that the paper supply is dry and fresh.
•
Inspect the printer paper path for items such as staples, paper clips and paper scraps.
•
Check installation of the Print Cartridge.
•
Check that the Print Cartridge ground contact points are clean.
•
Check that the paper is within specifications.
•
Inspect the paper path, between feed and exit, for contamination or obstructions.
Procedure
Enter Diagnostics and select Test Print. Scroll to Print Pattern and press Enter [4]. Run five test
prints. The test prints have vertical streaks.
Y
N
Exit diagnostics and enter the Menu Mode. Print a Config Sheet. The prints have vertical streaks.
Y
N
The problem appears to be with the host computer or the cables. If the problems persist, replace the System Controller PWB (REP 9.2).
Remove and reseat the System Controller PWB. If the problems persist, replace the System Controller PWB (REP 9.2).
Install a new Print Cartridge. Run a Test Print. The vertical streaks are gone.
Y
N
Inspect the laser beam path between the Laser Assembly and the Drum. The
beam path is free of obstructions.
laser
A
Initial Issue
DocuPrint N2125
02/2000
3-17
Image Quality Repair Analysis Procedures
IQ RAP 6 , IQ RAP 7
A
Y
IQ RAP 8 Horizontal Streaks
N
Remove any obstructions from the laser beam path.
Inspect the BTR Assembly for contamination and wear. The BTR is free of contamination and wear.
Y
N
Replace the BTR Assembly (REP 7.1).
There are black lines running horizontally across the page (at a right angle to the direction of
paper travel) (Figure 1).
WARNING
If the printer has been switched on, the Fuser will be hot.
Open the Rear Cover. Remove the Fuser Assembly. Rotate the fuser idler gear manually
and inspect the Heat Roll. Open the fuser jam access cover. Rotate the fuser idler gear
manually and inspect the Pressure Roll. The Heat Roll and the Pressure Roll are free
of scratches and contamination.
Y
N
Replace the Fuser Assembly (REP 6.2).
Go to RAP 44
Problem solved.
Figure 1 Horizontal Streaks
Initial Actions
•
Check that the paper supply is dry and fresh.
•
Inspect the printer paper path for items such as staples, paper clips and paper scraps.
•
Check installation of the Print Cartridge.
•
Check that the Print Cartridge ground contact points are clean.
Procedure
Enter Diagnostics and select Test Print. Scroll to Print Pattern and press Enter [4]. Run five test
prints. The test prints have horizontal streaks.
Y
N
Exit diagnostics and enter the Menu Mode. Print a Config Sheet. The prints have horizontal streaks.
Y
N
The problem appears to be with the host computer or the cables. If the problems persist, replace the System Controller PWB (REP 9.2).
Remove and reseat the System Controller PWB. If the problems persist, replace the System Controller PWB (REP 9.2).
Install a new Print Cartridge. Run a test print. The horizontal streaks are gone.
Y
N
Remove the Print Cartridge. Inspect the Metal Grounding Contacts on the Print Cartridge
Side Guide. The Metal Grounding Contacts are intact and is free of contamination.
Y
N
Reform or clean the Metal Grounding Contacts, so it makes better contact with the
drum shaft, or replace the Print Cartridge Side Guide (REP 7.5).
A
Image Quality Repair Analysis Procedures
IQ RAP 7 , IQ RAP 8
02/2000
3-18
B
Initial Issue
DocuPrint N2125
A
B
Check for the continuity between the Metal Grounding Contacts and the printer body
frame. There is continuity between the Grounding Contacts and the Printer Frame.
Y
N
Replace the Print Cartridge Side Guide (REP 7.5).
IQ RAP 9 Residual Image
The image from a previous print, which was not removed during the cleaning process, has
been developed on the current print.
Inspect the BTR Assembly for contamination and wear. The BTR is free of contamination and wear.
Y
N
Replace the BTR Assembly (REP 7.1).
Generate a Test Print and switch OFF the printer power halfway through print cycle. Carefully remove the Print Cartridge and inspect the toner image on the Drum just before the
transfer area (BTR). The image on the Drum is developed; with sharp, black, easily
read areas and no horizontal streaks.
Y
N
Go to RAP 43.
Inspect the toner image on the Drum immediately after the transfer area (BTR). The
toner image on the Drum was transferred to the paper along with any horizontal
streaks.
Y
N
Replace the BTR Assembly (REP 7.1).
Open the Rear Cover. Remove the Fuser Assembly. Rotate the fuser idler gear manually
and inspect the Heat Roll. Open the fuser jam access cover. Rotate the fuser idler gear
manually and inspect the Pressure Roll. The Heat Roll and the Pressure Roll are free
of scratches and contamination.
Y
N
Replace the Fuser Assembly (REP 6.2).
Go to RAP 44.
Problem solved.
Figure 1 Residual Image
Initial Actions
•
Inspect the printer paper path for items such as staples, paper clips and paper scraps.
•
Check installation of the Print Cartridge.
•
Check that the Print Cartridge ground contact points are clean.
•
Verify the fuser temperature (NVM).
Procedure
Replace paper with fresh, dry paper. Run a test print. Residual images still appear.
Y
N
Problem solved.
Install a new Print Cartridge. Run a test print. The residual images still appear.
Y
N
Problem solved.
Inspect the BTR Assembly for contamination and wear. The BTR is free of contamination
and wear.
Y
N
Replace the BTR Assembly (REP 7.1).
A
Initial Issue
DocuPrint N2125
02/2000
3-19
Image Quality Repair Analysis Procedures
IQ RAP 8, IQ RAP 9
A
WARNING
IQ RAP 10 Black Prints
If the printer has been switched on, the Fuser will be hot.
A totally black output print. There is toner on the paper with no visible image.
Open the Rear Cover. Remove the Fuser Assembly. Rotate the fuser idler gear manually and
inspect the Heat Roll. Open the fuser jam access cover. Rotate the fuser idler gear manually
and inspect the Pressure Roll. The Heat Roll and the Pressure Roll are free of scratches
and contamination.
Y
N
Clean or replace the Fuser Assembly (REP 6.2).
Replace the following, in order, until the defective component is found: BTR Assembly (REP
7.1), Fuser Assembly (REP 6.2), HVPS PWB (REP 9.6), Print Cartridge Side Guide (REP 7.5).
Figure 1 Black Prints
Initial Actions
•
Inspect the printer paper path for items such as staples, paper clips and paper scraps.
•
Check installation of the Print Cartridge.
•
Check that the Print Cartridge ground contact points are clean.
•
Ensure the machine covers are in place and fit well so no outside light can enter the
machine.
Procedure
Install a new Print Cartridge. Run a Test Print. The print is normal.
Y
N
Shield half of the window of the Laser Assembly. Run a Test Print. The
white and half black.
Y
N
Go to RAP 44.
print
is
half
Go to RAP 30.
Problem solved.
Image Quality Repair Analysis Procedures
IQ RAP 9, IQ RAP 10
02/2000
3-20
Initial Issue
DocuPrint N2125
IQ RAP 11 Background
IQ RAP 12 Uneven Density
There is toner contamination on all or part of the page. The contamination appears as a very
light gray dusting (Figure 1).
Image density varies within the page in either direction (Figure 1).
Figure 1 Uneven Density
Figure 1 Background
Initial Actions
Initial Actions
•
Inspect the printer paper path for items such as staples, paper clips and paper scraps.
•
Load fresh dry paper.
•
Check installation of the Print Cartridge.
•
Check that the correct Print Cartridge is properly installed and not empty.
•
Check that the Print Cartridge ground contact points are clean.
•
Ensure that the machine is reasonably level.
•
Ensure the machine covers are in place and fit well so no outside light can enter the
machine.
•
Check to make sure the Laser path is clean and unobstructed.
•
Remove the Print Cartridge and check the Left and Right Guides for ware, contamination,
obstructions, etc.
•
Clean the Laser window.
Procedure
Install a new Print Cartridge (PL 8.1). Run a Test Print. The background is gone.
Y
N
Generate a Test Print and switch OFF the printer power halfway through the print cycle.
Carefully remove the Print Cartridge and inspect the toner image on the drum just before
the transfer area (BTR). The undeveloped areas of the drum are clean and without
background.
Y
N
Go to RAP 43.
Clean or replace the Fuser Assembly (REP 6.2). The background is gone.
Y
N
Replace the following, in order, until the defective component is found: HVPS PWB
(REP 9.6), Fuser Assembly (REP 6.2), Chute Transport Assembly (REP 6.1), Laser
Assembly (REP 7.4), Print Cartridge Side Guide (REP 7.5), Print Engine Controller
PWB (REP 9.3).
Problem solved.
Procedure
Run a Test Print. The Test Print output image contains uneven print.
Y
N
Go to Final Actions.
Install a new Print Cartridge (PL 8.1). Run a Test Print. The Test Print output image contains uneven print.
Y
N
Problem solved. Go to Initial Actions.
Check the Bias Transfer Roll (BTR) for contamination, even spring pressure, and proper installation. The BTR is in good condition (not contaminated) and properly installed.
Y
N
Repair or replace the BTR Assembly (REP 7.1).
Check the Fuser Assembly for worn parts and for contamination on the Fuser Roll or Pressure
Roll. The Fuser Assembly is in good condition.
Problem solved.
Initial Issue
DocuPrint N2125
02/2000
3-21
Image Quality Repair Analysis Procedures
IQ RAP 11 , IQ RAP 12
Y
N
Replace the Fuser Assembly (REP 6.2).
IQ RAP 13 Skewed Image
The image is not parallel to the edges of the print sheet (Figure 1).
Panic stop the printer half way through the print cycle. Look at the image on the drum. The
image on the drum has even density.
Y
N
Replace the Laser Assembly (REP 7.4).
Look at the print on the paper before the Fuser. The print on the paper has even density.
Y
N
Replace the BTR (REP 7.1).
Replace the Fuser Assembly (REP 6.2).
Figure 1 Skewed Image
Initial Actions
•
Check the paper tray(s) installation and the paper in the tray(s).
•
Load fresh dry paper.
•
Paper meets specification.
•
Check the paper path for any obstructions or debris that might hamper the passage of the
paper.
•
Ensure the Print Cartridge is properly installed.
Procedure
Run 5 test prints, single sided, from each paper tray. If the printer has a Duplex Assembly, run
five duplexed prints from each tray. The skewed image appears only on duplexed prints.
Y
N
The skewed image occurs on prints fed from all trays.
Y
N
The skewed image occurs on prints fed from the MBF Tray.
Y
N
The skewed image occurs on prints fed from Tray 1.
Y
N
The skewed image occurs on prints fed from Tray 2.
Y
N
•
Check the Tray 3 Feed Rolls. Clean or replace if necessary.
A
Image Quality Repair Analysis Procedures
IQ RAP 12 , IQ RAP 13
02/2000
3-22
B
C
D
•
Check the Tray 3 Retard Roll. Clean or replace if necessary.
•
Check the Nudger Roll. Clean or replace if necessary.
•
Check the Tray 3 Transport Rolls. Check for obstructions or contamination. Clean as necessary.
•
Check the feed chute between Tray 3 and Tray 2. Check for
obstructions or contamination. Clean as necessary.
E
Initial Issue
DocuPrint N2125
A
B
•
C
D
E
•
Check the Tray 2 Feed Rolls. Clean or replace if necessary.
IQ RAP 14 Damaged Print
•
Check the Tray 2 Retard Pad/Retard Roll. Clean or replace if necessary.
The printed page comes out of the printer either wrinkled, creased, or torn (Figure 1).
•
Check the Tray 2 Nudger Roll. Clean or replace if necessary.
•
Check the Tray 2 Transport Rolls. Check for obstructions or contamination. Clean as necessary.
•
Check the feed chute between Tray 2 and Tray 1. Check for obstructions or contamination. Clean as necessary.
•
Check the Tray 1 Feed Rolls. Clean or replace if necessary.
•
Check the Tray 1 Nudger Roll. Clean or replace if necessary.
•
Check the Tray 1 Retard Roll. Clean or replace if necessary.
•
Check the feed chute between Tray 1 and the Registration Rolls. Check for
obstructions or contamination. Clean as necessary.
•
Check the MBF Feed Rolls. Clean or replace if necessary.
•
Check the MBF Retard Pad. Clean or replace if necessary.
•
Check the MBF Guide. Check for obstructions or contamination. Clean or
replace as necessary.
•
Check the Registration Sensor. Check actuation and for obstructions or contamination. Clean or replace as necessary.
Check the Registration Sensor. Check actuation and for obstructions or contamination. Clean or replace as necessary.
Figure 1 Damaged Print
Initial Actions
•
Check that the paper supply is dry and fresh.
Check the Registration Rolls. Clean or replace if necessary.
•
Check that rollers and other components in the paper path are clean and unobstructed.
Check the BTR Roll and bearings. Clean or replace if necessary.
•
Ensure that paper is within specification.
•
Check the Print Cartridge. Replace if necessary.
Procedure
•
Check the Chute Transport Assembly. Check for obstructions or contamination.
Clean or replace as necessary.
Observe paper feed as you run a test print. The paper fed crooked.
Y
N
Replace paper with fresh, dry standard paper. Run a Test Print. The paper is still damaged.
Y
N
Problem solved.
•
•
•
Check the Fuser Assembly. Check for worn parts or rolls. Check for obstructions or contamination. Clean or replace as necessary.
•
Check all rolls and drives in the Exit Assembly. Check for obstructions or contamination.
Clean or replace as necessary.
•
Check the Duplex assembly. Check for worn parts or rolls. Check for obstructions or contamination. Clean or replace as necessary.
•
Check the chute between the Duplex Assembly and the Registration Rolls. Check for
worn parts or rolls. Check for obstructions or contamination. Clean or replace as necessary.
Open the Rear Cover. Remove the Fuser Assembly. Rotate the fuser idler gear manually
and inspect the Heat Roll. Open the fuser jam access cover. Rotate the fuser idler gear
manually and inspect the Pressure Roll. The Heat Roll and the Pressure Roll are free
of scratches and contamination.
Y
N
Clean or replace the Fuser Assembly (REP 6.2).
Inspect the paper path between the feed tray and the exit tray for contamination or
obstructions. The paper path is free of obstructions.
Y
N
Remove obstructions or contamination from the paper path.
Inspect all of the rolls along the paper path, between the feed tray and the exit tray, for
contamination, wear or damage. The paper path rolls are free of contamination, wear,
or damage.
A
Initial Issue
DocuPrint N2125
02/2000
3-23
Image Quality Repair Analysis Procedures
IQ RAP 13 , IQ RAP 14
A
Y
IQ RAP 15 Registration
N
Replace the damaged or worn roll.
The image is not positioned correctly on the paper. It may be off in either the process direction
or in the scan direction (Figure 1).
Install a new Print Cartridge. Run a Test Print. The print is still damaged.
Y
N
Problem Solved.
Replace the following, in order, until the defective component is found: Fuser Assembly
(REP 6.2), Chute Transport Assembly (REP 6.1), BTR Assembly (REP 7.1), MBF Feed
Roll Assembly (REP 4.2), Retard Pad Assembly (REP 4.7), Turn Roll Assembly (REP
11.8), Paper Feed Rolls (REP 11.11), Tray Assembly /REP 4.4).
Go to IQ RAP 13.
Figure 1 Registration
Initial Actions
•
Check to ensure that the paper is within specification.
•
Check that the paper supply is dry and fresh and loaded correctly.
•
Check that the Paper Tray guides are set correctly.
•
Check that rollers and other components in the paper path are clean and unobstructed.
Procedure
Run a test print. The Test Print output image is properly registered.
Y
N
Perform the registration check (ADJ 1.1). The printer registration is set correctly.
Y
N
Perform the registration procedure (ADJ 1.1).
If misregistration occurs in the process direction, replace in sequence as necessary: Rubber Registration Rolls (REP 5.6), Registration Clutch (REP 5.5), Main Drive Gear Assembly (REP 8.2), Main Motor Assembly (REP 8.1), Registration Sensor (REP 5.4), Print
Engine Controller PWB (REP 9.3), or System Controller PWB (REP 9.2).
If misregistration occurs across the process direction, replace in sequence as necessary:
Laser (REP 7.4), System Controller PWB (REP 9.2).
Have the customer send another print job. The print image is properly registered.
Y
N
Have the customer contact the Xerox Customer Support.
Problem Solved.
Image Quality Repair Analysis Procedures
IQ RAP 14 , IQ RAP 15
02/2000
3-24
Initial Issue
DocuPrint N2125
IQ RAP 16 Skips / Smears
IQ RAP 17 Unfused Image
A disturbance of the image which lengthens or shortens the image in the process direction. A
darkening across the process direction or a repeat of the image in the process direction (Figure
1).
The printed image is not fully fused to the paper. The image rubs off easily (Figure 1).
Figure 1 Unfused Image
Figure 1 Skips / Smears
Initial Actions
•
Check that the paper supply is dry and fresh.
•
Check to ensure that the paper is within specification.
•
Check the paper path for any obstructions or debris.
Procedure
Run a test print. The image has skips or smears.
Y
N
Problem Solved.
Check, clean, or replace as necessary in the following sequence:
•
Transport Chute Assembly (REP 6.1).
•
The Main Drive Gear components (REP 8.2).
•
The Fuser Assembly (REP 6.2).
The defect still occurs.
Y
N
Problem Solved.
Replace the Print Cartridge (PL 8.1).
Initial Actions
•
Check to ensure that the paper is within specification.
Procedure
Replace the paper with fresh, dry paper from an unopened ream. Run a test print. The problem is still present.
Y
N
Problem solved.
Refer to Nonvolatile Memory Setup Mode and check the Fuser setting. The NV code is set to
the factory default value.
Y
N
Set NV code to the factory default value. Run 25 test prints. The
problem
is
still
present.
Y
N
Problem Solved.
Increase the fuser temperature by one increment.
The overall print density is within specification.
Y
N
Go to IQ RAP 1
Open the Rear Cover. Remove the Fuser Assembly. Rotate the fuser idler gear manually and
inspect the Heat Roll. Open the fuser jam access cover. Rotate the fuser idler gear manually
and inspect the Pressure Roll. The Heat Roll and the Pressure Roll are free of scratches
and contamination.
Initial Issue
DocuPrint N2125
02/2000
3-25
Image Quality Repair Analysis Procedures
IQ RAP 16 , IQ RAP 17
Y
IQ RAP 18 Resolution
N
Clean or replace the Fuser Assembly (REP 6.2).
The two pixel lines and halftone patches cannot be reproduced clearly on the print.
Open the fuser jam access cover. Rotate the fuser idler gear manually and inspect the contact
between the Heat Roll and the Pressure Roll along the rotation. The Heat Roll and the Pressure Roll are contacting each other uniformly.
Y
N
Replace the Fuser Assembly (REP 6.2).
Replace the following, in order, until the defective component is found: Fuser Assembly (REP
6.2), Print Engine Controller PWB (REP 9.3), LVPS PWB (REP 9.5).
Initial Actions
•
Ensure that the print density is set to the default value.
Procedure
Install a new Print Cartridge (PL 8.1). Run the image quality test print. The Test Print output
resolution is good.
Y
N
Replace the following, in order, until the defective component is found: Laser Assembly
(REP 7.4) then the HVPS PWB (REP 9.6).
Problem Solved.
Image Quality Repair Analysis Procedures
IQ RAP 17, IQ RAP 18
02/2000
3-26
Initial Issue
DocuPrint N2125
4 Repair-Adjustment
Introduction......................................................................................................................
4-3
REP 4.10 Envelope Connector Assembly.......................................................................
4-5
4-5
4-6
4-6
4-7
4-8
4-8
4-9
4-10
4-10
4-11
4-11
REP 5.1 Paper Handler Assembly ..................................................................................
REP 5.2 Toner Sensor ....................................................................................................
REP 5.3 Registration Actuator ........................................................................................
REP 5.4 Registration Sensor ..........................................................................................
REP 5.5 Registration Clutch............................................................................................
REP 5.6 Rubber Registration Roll...................................................................................
Covers and Trays
REP 1.1 Left Interface Cover Assembly..........................................................................
REP 1.2 Left Cover .........................................................................................................
REP 1.3 Option Cover.....................................................................................................
REP 1.4 Top Cover Assembly.........................................................................................
REP 1.5 Right Cover .......................................................................................................
REP 1.6 Front Cover Assembly ......................................................................................
REP 1.7 Left Front Cover ................................................................................................
REP 1.8 Rear Cover Assembly .......................................................................................
REP 1.9 Rear Face Up Cover Assembly ........................................................................
REP 1.10 Interlock Cover................................................................................................
REP 1.11 Left Plate Assembly ........................................................................................
REP 1.12 Plate Handle ...................................................................................................
Paper Transportation
Tray 1
REP 2.1 Retard Roll Assembly .......................................................................................
REP 2.2 Friction Clutch Assembly ..................................................................................
REP 2.3 Retard Spring....................................................................................................
REP 2.4 Motor Assembly ................................................................................................
REP 2.5 Connector and Socket Guide............................................................................
4-13
4-14
4-15
4-16
4-17
Paper Feed (Tray 1)
REP 3.1 Paper Feeder ....................................................................................................
REP 3.2 Turn Roll Assembly...........................................................................................
REP 3.3 Tray 1 No Paper Actuator .................................................................................
REP 3.4 Stack Height Sensor .........................................................................................
REP 3.5 Low Paper Sensor ............................................................................................
REP 3.6 Feed Clutch Assembly ......................................................................................
REP 3.7 Feeder Assembly ..............................................................................................
REP 3.8 Paper Feed Rolls ..............................................................................................
REP 3.9 Feeder PWB .....................................................................................................
REP 3.10 Feeder Socket.................................................................................................
REP 3.11 Size Sensor Housing ......................................................................................
REP 3.12 Size Sensor Actuators ....................................................................................
REP 3.13 Tray 1 Size PWB.............................................................................................
REP 3.14 Size Harness Assembly ..................................................................................
4-19
4-19
4-20
4-21
4-21
4-22
4-23
4-24
4-24
4-25
4-26
4-27
4-28
4-28
Paper Feed (MBF)
REP 4.1 MBF Chute Assembly .......................................................................................
REP 4.2 MBF Feed Roll Assembly .................................................................................
REP 4.3 MBF Feed Roll ..................................................................................................
REP 4.4 Tray Bottom Assembly......................................................................................
REP 4.5 MBF No Paper Actuator....................................................................................
REP 4.6 Tray Pick Up .....................................................................................................
REP 4.7 Retard Pad Assembly .......................................................................................
REP 4.8 MBF No Paper Sensor......................................................................................
REP 4.9 Pick Up Solenoid...............................................................................................
Initial Issue
DocuPrint N2125
4-35
4-29
4-29
4-30
4-31
4-32
4-32
4-33
4-33
4-34
4-37
4-38
4-39
4-40
4-40
4-41
Exit Assembly and Fuser
REP 6.1 Transport Chute Assembly ...............................................................................
REP 6.2 Fuser Assembly ................................................................................................
REP 6.3 Fuser Harness Assembly..................................................................................
REP 6.4 Exit Chute Assembly.........................................................................................
REP 6.5 Exit Motor Assembly .........................................................................................
REP 6.6 Stack Full Sensor..............................................................................................
REP 6.7 Mid 1 & Mid 2 Roll Assemblies .........................................................................
REP 6.8 Stack Full Actuator............................................................................................
REP 6.9 Fuser Upper Cover Assembly/ Heat Rod..........................................................
4-43
4-43
4-44
4-45
4-46
4-46
4-47
4-49
4-50
Xerographics
REP 7.1 BTR Assembly ..................................................................................................
REP 7.2 Print Cartridge Top Guide Assembly ................................................................
REP 7.3 Print Cartridge Sensor Assembly......................................................................
REP 7.4 Laser Assembly ................................................................................................
REP 7.5 Print Cartridge Side Guide ................................................................................
4-51
4-51
4-52
4-53
4-53
Main Drive
REP 8.1 Main Motor Assembly .......................................................................................
REP 8.2 Main Drive Gear Assembly ...............................................................................
4-55
4-55
Electrical
REP 9.1 Fan Assembly ...................................................................................................
REP 9.2 System Controller PWB ....................................................................................
REP 9.3 Print Engine Controller PWB.............................................................................
REP 9.4 5VDC PWB .......................................................................................................
REP 9.5 LVPS PWB........................................................................................................
REP 9.6 HVPS PWB .......................................................................................................
REP 9.7 Connector PWB ................................................................................................
REP 9.8 Main Switch.......................................................................................................
REP 9.9 Front Interlock Switch Assembly.......................................................................
REP 9.10 Rear Interlock Switch Assembly .....................................................................
REP 9.11 Offset Catch Tray Harness Assembly.............................................................
REP 9.12 Duplex Harness Assembly..............................................................................
4-57
4-57
4-58
4-59
4-60
4-60
4-61
4-62
4-63
4-63
4-64
4-64
Offsetting Catch Tray (OCT)
REP 10.1 Offset Catch Tray (OCT).................................................................................
REP 10.2 Exit Tray Extension .........................................................................................
REP 10.3 Exit Tray..........................................................................................................
02/2000
4-1
4-67
4-67
4-68
Repair-Adjustment
REP 10.4 Rear Cover Assembly .....................................................................................
REP 10.5 Lower Cover ...................................................................................................
REP 10.6 Inner Exit Chute Assembly .............................................................................
REP 10.7 Offset Catch Tray PWB ..................................................................................
REP 10.8 Motor Drive Assembly.....................................................................................
REP 10.9 Static Eliminator..............................................................................................
REP 10.10 Direction Solenoid.........................................................................................
REP 10.11 Exit Sensor Assembly ...................................................................................
REP 10.12 Stack Full Sensor Actuator ...........................................................................
REP 10.13 Stack Full Sensor..........................................................................................
REP 10.14 Offset Roll Assembly ....................................................................................
REP 10.15 Mid Roll Assembly ........................................................................................
REP 10.16 Offset Assembly............................................................................................
REP 10.17 Offset Motor Assembly .................................................................................
REP 10.18 Offset Assembly Home Sensor.....................................................................
4-69
4-69
4-70
4-70
4-71
4-71
4-72
4-72
4-73
4-73
4-74
4-75
4-76
4-76
4-77
Optional Paper Feeder
REP 11.1 Printer Removal ..............................................................................................
REP 11.2 550 Sheet Feeder Right Cover .......................................................................
REP 11.3 550 Sheet Feeder Left Cover .........................................................................
REP 11.4 550 Sheet Feeder Gear Bracket Assembly ....................................................
REP 11.5 Top Plate ........................................................................................................
REP 11.6 550 Sheet Feeder Drive Assembly .................................................................
REP 11.7 No Paper Actuator ..........................................................................................
REP 11.8 Turn Roll Assembly.........................................................................................
REP 11.9 Feeder PWB ...................................................................................................
REP 11.10 Feed Clutch Assembly..................................................................................
REP 11.11 Paper Feed Rolls ..........................................................................................
REP 11.12 Feeder Assembly..........................................................................................
REP 11.13 Stack Height Sensor .....................................................................................
REP 11.14 Low Paper Sensor ........................................................................................
REP 11.15 Feeder Socket ..............................................................................................
REP 11.16 550 Sheet Feeder Size Harness Assembly ..................................................
REP 11.17 Size Sensor Housing Assembly....................................................................
REP 11.18 Size Sensor Actuators ..................................................................................
REP 11.19 Size PWB......................................................................................................
REP 11.20 Size Harness Assembly................................................................................
4-79
4-79
4-80
4-80
4-81
4-81
4-82
4-82
4-83
4-84
4-85
4-86
4-87
4-87
4-88
4-88
4-89
4-90
4-91
4-91
REP 12.14 Face Up Tray Sensor....................................................................................
4-101
Envelope Feeder
REP 13.1 Bottom Cover ..................................................................................................
REP 13.2 Top Chute .......................................................................................................
REP 13.3 Envelope Feeder PWB ...................................................................................
REP 13.4 Retard Roll Assembly .....................................................................................
REP 13.5 Exit Pinch Roll.................................................................................................
REP 13.6 Exit Sensor Assembly .....................................................................................
REP 13.7 Weight Arm .....................................................................................................
REP 13.8 Tray Extension ................................................................................................
REP 13.9 No Paper Actuator ..........................................................................................
REP 13.10 No Paper Sensor ..........................................................................................
REP 13.11 Gear Cover ...................................................................................................
REP 13.12 Feed Clutch ..................................................................................................
REP 13.13 Transport Roll Assembly...............................................................................
REP 13.14 Bottom Roll Assembly...................................................................................
REP 13.15 Feed Roll Assembly 1 ...................................................................................
REP 13.16 Feed Roll Assembly 2 ...................................................................................
REP 13.17 Feed Belts.....................................................................................................
4-103
4-103
4-104
4-104
4-105
4-105
4-106
4-106
4-107
4-107
4-108
4-108
4-109
4-110
4-111
4-112
4-113
Adjustments
ADJ 1.1 Registration .......................................................................................................
4-115
Duplex Unit
REP 12.1 Duplex Assembly ............................................................................................
REP 12.2 Turn Chute Assembly .....................................................................................
REP 12.3 Duplex Cover ..................................................................................................
REP 12.4 Duplex PWB ...................................................................................................
REP 12.5 Drive Cover.....................................................................................................
REP 12.6 Connector Chute Assembly ............................................................................
REP 12.7 Upper Chute Assembly ...................................................................................
REP 12.8 Motor Assembly ..............................................................................................
REP 12.9 Rear Roll Assembly ........................................................................................
REP 12.10 Middle Roll Assembly ...................................................................................
REP 12.11 Front Roll Assembly......................................................................................
REP 12.12 Synchronous Belt..........................................................................................
REP 12.13 Transport Sensor ..........................................................................................
Repair-Adjustment
4-93
4-93
4-94
4-94
4-95
4-95
4-96
4-97
4-97
4-98
4-99
4-100
4-101
02/2000
4-2
Initial Issue
DocuPrint N2125
Introduction
Overview
The Repair / Adjustment section, Section 4 of the Service Manual, provides information that
enables the Service Representative to restore the product to within specification after fault isolation.
Section Contents
The Section Contents lists, in sequence, all the items of the section, with page references.
Each entry in the section contents appears exactly as it appears in the manual.
Repair Procedures
This repair subsection contains instructions for removal and replacement tasks. A removal and/
or replacement task is included when it is not obvious how components are removed and
replaced, or when special conditions (such as an adjustment) must be met during these tasks.
Step-by-step removal procedures for a specific component or assembly are provided. Numbers
in the illustrations refer to steps in the procedure. For example: if step 3 in a procedure
instructed you to remove a screw, the screw in the illustration would be labeled 3.
Illustrations are used to assist you with the procedures. You should refer to the specific Parts
List illustration (listed under the repair title) for locating most components within a procedure.
NOTE: Always reinstall the correct type and size screws. Using the wrong screw can damage
tapped holes.
NOTE: Do not use excessive force to either remove or install a part.
Locations, such as left, right, front, or rear, given in the repairs assume you are facing the
printer control panel.
The Print Cartridge should be removed and stored in a safe place when performing any procedure where screws or components may damage the cartridge.
Adjustment
Other than side-to-side and lead edge to trail edge registration, the N2125 printer does not
contain any field adjustable components.
WARNING
Use of controls or adjustments other than those specified in this manual may result in
an exposure to dangerous laser light.
Initial Issue
DocuPrint N2125
02/2000
4-3
Repair-Adjustment
Introduction
Repair-Adjustment
Introduction
02/2000
4-4
Initial Issue
DocuPrint N2125
REP 1.1 Left Interface Cover Assembly
REP 1.2 Left Cover
Parts List on PL 1.1
Removal
Parts List on PL 1.1
Removal
WARNING
WARNING
Switch off the power and disconnect the Power Cord.
Switch off the power and disconnect the Power Cord.
1.
Loosen the two thumb screws that secure the Left Interface Cover Assembly (Figure 1).
1.
Remove the Left Interface Cover Assembly (REP 1.1).
2.
Slide cover to the rear and remove (Figure 1).
2.
Remove the two screws securing the Left Cover to the printer (Figure 1).
3.
Remove the Left Cover (Figure 1).
Figure 1 Left Interface Cover
Replacement
1.
Figure 1 Left Cover
Reinstall the components in the reverse order.
Replacement
1.
Initial Issue
DocuPrint N2125
02/2000
4-5
Reinstall the components in the reverse order.
Repair-Adjustment
REP 1.1, REP 1.2
REP 1.3 Option Cover
REP 1.4 Top Cover Assembly
Parts List on PL 1.1
Removal
Parts List on PL 1.1
Removal
WARNING
WARNING
Switch off the power and disconnect the Power Cord.
1.
Squeeze the cover release and open the Rear Cover Assembly.
Switch off the power and disconnect the Power Cord.
2.
Push the two locking tabs at the rear of Option Cover (Figure 1).
1.
3.
Lift and slide the Option Cover to the rear and remove (Figure 1).
2.
Remove the Front Cover Assembly (REP 1.6).
3.
Remove the Left Front Cover (REP 1.7).
Remove Tray 1.
4.
Open the Rear Cover Assembly.
5.
Remove the four screws securing the Top Cover Assembly (Figure 1).
6.
Raising the Top Cover Assembly, disconnect P/J412 connector on the back side of the
Control Panel Assembly (Figure 1).
7.
Remove the Top Cover Assembly (Figure 1).
Figure 1 Option Cover
Replacement
1.
Reinstall the components in the reverse order.
Repair-Adjustment
REP 1.3, REP 1.4
Figure 1 Top Cover Assembly
Replacement
1.
02/2000
4-6
Reinstall the components in the reverse order.
Initial Issue
DocuPrint N2125
REP 1.5 Right Cover
8.
Remove the Right Cover (Figure 1).
Parts List on PL 1.1
Removal
WARNING
Switch off the power and disconnect the Power Cord.
1.
Remove Tray 1.
2.
Remove the Front Cover Assembly (REP 1.6).
3.
Remove the Left Front Cover (REP 1.7).
4.
Open the Rear Cover Assembly.
5.
Remove the Top Cover Assembly (REP 1.4).
6.
Remove the four screws securing the Right Cover (Figure 1).
NOTE: On printers without an optional feeder, slide the right edge of the printer over the
edge of the stand/table by approximately 1 inch.
7.
Lower the cover to disconnect the three hooks at the top and bottom of the Right Cover
(Figure 1).
Figure 1 Right Cover
Replacement
1.
Initial Issue
DocuPrint N2125
02/2000
4-7
Reinstall the components in the reverse order.
Repair-Adjustment
REP 1.5
REP 1.6 Front Cover Assembly
REP 1.7 Left Front Cover
Parts List on PL 1.1
Removal
Parts List on PL 1.1
Removal
WARNING
WARNING
Switch off the power and disconnect the Power Cord.
Switch off the power and disconnect the Power Cord.
1.
Open the Front Cover Assembly.
1.
2.
Slide the Cover Stopper to the left or right and remove from the right cover (Figure 1).
2.
Remove the Front Cover Assembly (REP 1.6).
3.
Remove the K clip that secures the Front Cover Assembly to the left stud of the printer
(Figure 1).
3.
Remove the three screws securing the Left Front Cover (Figure 1).
4.
Use a small screwdriver to press on the locking tab and the remove the cover (Figure 1).
4.
Slide the Front Cover to the right and remove (Figure 1).
Remove Tray 1.
Figure 1 Front Cover
Replacement
1.
Reinstall the components in the reverse order.
Figure 1 Left Front Cover
Replacement
1.
Repair-Adjustment
REP 1.6, REP 1.7
02/2000
4-8
Reinstall the components in the reverse order.
Initial Issue
DocuPrint N2125
REP 1.8 Rear Cover Assembly
Parts List on PL 1.3
Removal
WARNING
Switch off the power and disconnect the Power Cord.
1.
Open the Rear Cover Assembly by squeezing the clips.
2.
Lift the lead edge of the locking tab to release and remove the Stopper from the cover.
(Figure 1).
3.
Slide the Pivot Stopper that secures the left Rear Cover Assembly (Figure 2).
4.
Slide the Rear Cover Assembly to the right (as viewed from the rear) (Figure 2).
Figure 2 Rear Cover
Replacement
1.
Reinstall the components in the reverse order.
Figure 1 Stopper
Initial Issue
DocuPrint N2125
02/2000
4-9
Repair-Adjustment
REP 1.8
REP 1.9 Rear Face Up Cover Assembly
REP 1.10 Interlock Cover
Parts List on PL 1.3
Removal
Parts List on PL 7.1
Removal
WARNING
WARNING
Switch off the power and disconnect the Power Cord.
Switch off the power and disconnect the Power Cord.
1.
Open the Rear Cover Assembly (REP 1.8).
1.
Remove Rear Cover Assembly (REP 1.8).
2.
Release the Pivot Arm from the Rear Face Up Cover Assembly (Figure 1). (The art shows
the cover removed for clarity.)
2.
Remove the one screw that secures the Stopper to the printer (Figure 1).
3.
Remove the two screws that secure the Interlock Cover to the printer (Figure 1).
3.
Close the Rear Cover Assembly.
4.
Remove the Interlock Cover from the printer (Figure 1).
4.
Open the Rear Face Up Cover Assembly.
5.
Push the right hinge pin to the left (as viewed from the rear) until the hinge pin is free of
the Rear Cover.
6.
Remove the Rear Face Up Cover Assembly.
Figure 1 Rear Face Up Cover Assembly
Figure 1 Interlock Cover
Replacement
1.
Reinstall the components in the reverse order.
Replacement
1.
Repair-Adjustment
REP 1.9, REP 1.10
02/2000
4-10
Reinstall the components in the reverse order.
Initial Issue
DocuPrint N2125
REP 1.11 Left Plate Assembly
REP 1.12 Plate Handle
Parts List on PL 9.1
Removal
Parts List on PL 9.1
Removal
WARNING
WARNING
Switch off the power and disconnect the Power Cord.
Switch off the power and disconnect the Power Cord.
1.
Remove Tray 1.
1.
Remove Paper Tray 1.
2.
Remove the Left Interface Cover Assembly (REP 1.1).
2.
Remove the Left Interface Cover Assembly (REP 1.1).
3.
Remove the Left Cover (REP 1.2).
3.
Remove the Left Cover (REP 1.2).
4.
Remove the six screws that secure the Left Plate Assembly to the printer and remove
(Figure 1).
4.
Remove the Front Cover Assembly (REP 1.6).
5.
Remove the Left Front Cover (REP 1.7).
6.
Remove the Left Plate Assembly (REP 1.11).
7.
Remove the four screws that secure the Plate Handle to the printer and remove (Figure
1).
Figure 1 Plate Handle
Replacement
1.
Reinstall the components in the reverse order.
Figure 1 Left Plate
Replacement
1.
Reinstall the components in the reverse order.
Initial Issue
DocuPrint N2125
02/2000
4-11
Repair-Adjustment
REP 1.11, REP 1.12
Repair-Adjustment
REP 1.11, REP 1.12
02/2000
4-12
Initial Issue
DocuPrint N2125
REP 2.1 Retard Roll Assembly
Parts List on PL 12.1
Removal
WARNING
Switch off the power and disconnect the Power Cord.
1.
Remove Tray 1.
2.
Release the left and right latches of Tray 1 (Figure 1).
3.
Open the Retard Chute (Figure 1).
4.
Lift the locking tab and remove the Retard Roll Assembly (Figure 2).
Figure 2 Roll Assembly
Replacement
1.
Reinstall the components in the reverse order.
Figure 1 Retard Chute
Initial Issue
DocuPrint N2125
02/2000
4-13
Repair-Adjustment
REP 2.1
REP 2.2 Friction Clutch Assembly
Parts List on PL 2.2
Removal
WARNING
Switch off the power and disconnect the Power Cord.
1.
Remove Tray 1.
2.
Release the left and right latches of Tray 1 (Figure 1).
3.
Open the Retard Chute (Figure 1).
4.
Lift the locking tab and remove the Retard Roll Assembly (Figure 2).
5.
Remove the Friction Clutch Assembly from the shaft (Figure 3).
Replacement
1.
Reinstall the components in the reverse order.
Figure 2 MBF Feed Roll
Figure 1 Tray 1 Latches
Figure 3 Friction Clutch Assembly
Repair-Adjustment
REP 2.2
02/2000
4-14
Initial Issue
DocuPrint N2125
REP 2.3 Retard Spring
Parts List on PL 2.2
Removal
WARNING
Switch off the power and disconnect the Power Cord.
1.
Remove Tray 1.
2.
Release the left and right latches of Tray 1 (Figure 1).
3.
Open the Retard Chute (Figure 1).
4.
Release the two Locking Tabs and lift the Retard Assembly (Figure 2).
5.
Remove the Retard Spring from the Roll Assembly (Figure 2).
Figure 2 Retard Spring
Replacement
1.
Reinstall the components in the reverse order.
2.
Ensure that the tab on the clutch is positioned on the pin on the Retard Shaft.
Figure 1 Retard Chute
Initial Issue
DocuPrint N2125
02/2000
4-15
Repair-Adjustment
REP 2.3
REP 2.4 Motor Assembly
Parts List on PL 2.2
Removal
WARNING
Switch off the power and disconnect the Power Cord.
1.
Remove Tray 1.
2.
Remove the two screws that secure the Rear L Holder to Tray 1 (Figure 1).
3.
Remove the Motor Spring (Figure 1).
4.
Remove the bearing (Figure 1).
NOTE: It may be necessary to use a scribe or small screwdriver to lift the locking tabs to
disconnect P/J672
5.
Press the Socket Guide slightly and disconnect P/J672 (Figure 2).
6.
Remove the three screws securing the Motor to the Motor Assembly (Figure 2).
7.
Remove the Motor (Figure 2).
Figure 2 Motor Assembly
Replacement
1.
Reinstall the components in the reverse order.
Figure 1 Rear L Holder
Repair-Adjustment
REP 2.4
02/2000
4-16
Initial Issue
DocuPrint N2125
REP 2.5 Connector and Socket Guide
Parts List on PL 2.2
Removal
WARNING
Switch off the power and disconnect the Power Cord.
1.
Remove Tray 1.
2.
Remove the two screws that secure the Left Holder to the Tray 1 (Figure 1).
3.
Remove the Motor Spring (Figure 1).
4.
Remove the Bearing (Figure 1).
NOTE: It may be necessary to use a scribe or small screwdriver to lift the locking tabs to
disconnect P/J672
5.
Disconnect P/J672 from the Socket Guide (Figure 2).
6.
Remove the two screws that secure the Socket Guide (Figure 2).
7.
Remove the Socket Guide together with the Connector (Figure 2).
8.
Remove the Spring (Figure 2).
9.
Slide the Connector to disconnect it from the Socket Guide (Figure 2).
Figure 2 Connector and Socket Guide
Replacement
1.
Reinstall the components in the reverse order.
Figure 1 Rear L Holder
Initial Issue
DocuPrint N2125
02/2000
4-17
Repair-Adjustment
REP 2.5
Repair-Adjustment
REP 2.5
02/2000
4-18
Initial Issue
DocuPrint N2125
REP 3.1 Paper Feeder
REP 3.2 Turn Roll Assembly
Parts List on PL 3.1
Removal
Parts List on PL 3.1
Removal
WARNING
WARNING
Switch off the power and disconnect the Power Cord.
Switch off the power and disconnect the Power Cord.
1.
Remove Tray 1.
1.
Remove Tray 1.
NOTE: Remove all Optional 550 Sheet Feeders.
2.
Remove the Left Interface Cover Assembly (REP 1.1).
3.
Remove the Left Cover (REP 1.2)
2.
Remove the Left Interface Cover Assembly (REP 1.1).
3.
Remove the Left Cover (REP 1.2).
4.
Remove the Front Cover Assembly (REP 1.6).
5.
Remove the Left Front Cover (REP 1.7).
6.
Remove the Left Plate Assembly (REP 1.11).
7.
Remove the Plate Handle (REP 1.12).
8.
Open Rear Door.
9.
Remove the Top Cover Assembly (REP 1.4).
4.
Remove the Front Cover Assembly (REP 1.6).
5.
Remove the Left Front Cover (REP 1.7).
6.
Remove the Left Plate Assembly (REP 1.11).
7.
Remove the Plate Handle (REP 1.12).
8.
Open Rear Door.
9.
Remove the Top Cover Assembly (REP 1.4).
10. Remove the Right Cover (REP 1.5).
10. Remove the Right Cover (REP 1.5).
11. Remove the LVPS PWB (REP 9.5).
12. Remove the seven screws that secure the Paper Feeder to the printer (Figure 1).
13. Pull the Paper Feeder toward the front to remove (Figure 1).
11. Remove the LVPS PWB (REP 9.5).
12. Remove the Paper Feeder (REP 3.1).
13. Disconnect P/J64 on the Feeder PWB (Figure 1). Release cable from all cable clamps.
14. Remove the four screws that secure the Turn Roll Assembly to the Paper Feeder Assembly (Figure 1).
15. Remove the Turn Roll Assembly together with the Extension Spring and Chute Spring
(Figure 1).
Figure 1 Turn Clutch Assembly
Figure 1 Paper Feeder
Replacement
Replacement
1.
1.
Reinstall the components in the reverse order.
Initial Issue
DocuPrint N2125
02/2000
4-19
Reinstall the components in the reverse order.
Repair-Adjustment
REP 3.1, REP 3.2
REP 3.3 Tray 1 No Paper Actuator
Parts List on PL 3.1
Removal
13. Rotate the No Paper Actuator up until the left end of the actuator can be removed from the
support (Figure 1). Remove the actuator.
WARNING
Switch off the power and disconnect the Power Cord.
1.
Remove Tray 1.
2.
Remove the Left Interface Cover Assembly (REP 1.1).
3.
Remove the Left Cover (REP 1.2).
4.
Remove the Front Cover Assembly (REP 1.6).
5.
Remove the Left Front Cover (REP 1.7).
6.
Remove the Left Plate Assembly (REP 1.11).
7.
Remove the Plate Handle (REP 1.12).
8.
Open Rear Door.
9.
Remove the Top Cover Assembly (REP 1.4).
10. Remove the Right Cover (REP 1.5).
11. Remove the LVPS PWB (REP 9.5).
12. Remove the Paper Feeder (REP 3.1)
Figure 1 No Paper Actuator
Replacement
1.
Repair-Adjustment
REP 3.3
02/2000
4-20
Reinstall the components in the reverse order.
Initial Issue
DocuPrint N2125
REP 3.4 Stack Height Sensor
REP 3.5 Low Paper Sensor
Parts List on PL 3.1
Removal
Parts List on PL 3.1
Removal
WARNING
WARNING
Switch off the power and disconnect the Power Cord.
Switch off the power and disconnect the Power Cord.
1.
Remove Tray 1.
1.
Remove Tray 1.
2.
Remove the Left Interface Cover Assembly (REP 1.1).
2.
Remove the Left Interface Cover Assembly (REP 1.1).
3.
Remove the Left Cover (REP 1.2).
3.
Remove the Left Cover (REP 1.2).
4.
Remove the Front Cover Assembly (REP 1.6).
4.
Remove the Front Cover Assembly (REP 1.6).
5.
Remove the Left Front Cover (REP 1.7).
5.
Remove the Left Front Cover (REP 1.7).
6.
Remove the Left Plate Assembly (REP 1.11).
6.
Remove the Left Plate Assembly (REP 1.11).
7.
Remove the Plate Handle (REP 1.12).
7.
Remove the Plate Handle (REP 1.12).
8.
Open Rear Door.
8.
Open Rear Door.
9.
Remove the Top Cover Assembly (REP 1.4).
9.
Remove the Top Cover Assembly (REP 1.4).
10. Remove the Right Cover (REP 1.5).
10. Remove the Right Cover (REP 1.5).
11. Remove the LVPS PWB (REP 9.5).
11. Remove the LVPS PWB (REP 9.5).
12. Remove the Paper Feeder (REP 3.1)
12. Remove the Paper Feeder (REP 3.1)
13. Remove the No Paper Actuator (REP 3.3)
13. Disconnect P/J661 from the Low Paper Sensor (Figure 1).
14. Disconnect P/J662 from the Stack Height Sensor (Figure 1).
14. Release the five hooks, and remove the Low Paper Sensor (Figure 1).
15. Release the five hooks, and remove the Sensor (Figure 1).
Figure 1 Stack Height Sensor
Figure 1 Low Paper Sensor
Replacement
1.
Reinstall the components in the reverse order.
Replacement
1.
Initial Issue
DocuPrint N2125
02/2000
4-21
Reinstall the components in the reverse order.
Repair-Adjustment
REP 3.4, REP 3.5
REP 3.6 Feed Clutch Assembly
Parts List on PL 3.1
Removal
WARNING
Switch off the power and disconnect the Power Cord.
1.
Remove Tray 1.
2.
Remove the Left Interface Cover Assembly (REP 1.1).
3.
Remove the Left Cover (REP 1.2).
4.
Remove the Front Cover Assembly (REP 1.6).
5.
Remove the Left Front Cover (REP 1.7).
6.
Remove the Left Plate Assembly (REP 1.11).
7.
Remove the Plate Handle (REP 1.12).
8.
Open Rear Door.
9.
Remove the Top Cover Assembly (REP 1.4).
10. Remove the Right Cover (REP 1.5).
11. Remove the LVPS PWB (REP 9.5).
12. Remove the Paper Feeder (REP 3.1)
13. Remove the four screws that secure the bracket to the Paper Feeder and remove the
bracket (Figure 1).
Figure 1 Paper Feeder Bracket
14. Remove the Gear 3 and Gear 2 from the shaft of the Paper Feeder (Figure 1).
15. Remove the E-ring that secures the Feed Clutch Assembly to the Feeder (Figure 2).
16. Disconnect P/J651 from the clutch (Figure 2).
17. Remove the Feed Clutch Assembly (Figure 2).
Figure 2 Feed Clutch Assembly
Replacement
Repair-Adjustment
REP 3.6
1.
Reinstall the components in the reverse order.
2.
Ensure that all alignment pins are properly inserted in the bracket holes before replacing
the four screws.
02/2000
4-22
Initial Issue
DocuPrint N2125
REP 3.7 Feeder Assembly
Parts List on PL 3.1
Removal
WARNING
Switch off the power and disconnect the Power Cord.
1.
Remove Tray 1.
2.
Remove the Left Interface Cover Assembly (REP 1.1).
3.
Remove the Left Cover (REP 1.2).
4.
Remove the Front Cover Assembly (REP 1.6).
5.
Remove the Left Front Cover (REP 1.7).
6.
Remove the Left Plate Assembly (REP 1.11).
7.
Remove the Plate Handle (REP 1.12).
8.
Open Rear Door.
9.
Remove the Top Cover Assembly (REP 1.4).
10. Remove the Right Cover (REP 1.5).
Figure 2 Feeder Assembly
11. Remove the LVPS PWB (REP 9.5).
12. Remove the Paper Feeder (REP 3.1).
13. Remove the Feed Clutch Assembly (REP 3.6)
14. Remove the E-ring that secures the left shaft of the Feeder Assembly (Figure 1).
Replacement
1.
Reinstall the components in the reverse order.
15. Remove the left bearing from the left shaft of the Feeder Assembly (Figure 1).
16. Open the Front Chute Assembly (Figure 2).
NOTE: Caution: Don’t lose Bias Spring located under the Feeder Assembly (Figure 2).
17. Slide the Feeder Assembly to the right and remove (Figure 2).
Figure 1 Feeder Assembly Bearing
Initial Issue
DocuPrint N2125
02/2000
4-23
Repair-Adjustment
REP 3.7
REP 3.8 Paper Feed Rolls
REP 3.9 Feeder PWB
Parts List on PL 3.1
Removal
Parts List on PL 3.1
Removal
WARNING
CAUTION
These components are susceptible to electrostatic discharge. Observe all ESD procedures to
avoid damage.
Switch off the power and disconnect the Power Cord.
1.
Remove Tray 1.
2.
Open the Front Chute Assembly (Figure 1).
WARNING
3.
Release the locking tab on the Front Feed Roll and slide the roll to the right and remove
(Figure 1).
Switch off the power and disconnect the Power Cord.
1.
Remove Tray 1.
4.
Repeat with Rear Feed Roll (Figure 1).
2.
Remove the Left Interface Cover Assembly (REP 1.1).
3.
Remove the Left Cover (REP 1.2).
4.
Remove the Front Cover Assembly (REP 1.6).
5.
Remove the Left Front Cover (REP 1.7).
6.
Remove the Left Plate Assembly (REP 1.11).
7.
Remove the Plate Handle (REP 1.12).
8.
Open Rear Door.
9.
Remove the Top Cover Assembly (REP 1.4).
10. Remove the Right Cover (REP 1.5).
11. Remove the LVPS PWB (REP 9.5).
12. Remove the Paper Feeder (REP 3.1).
13. Disconnect P/J64, P/J65, P/J66, and P/J67 from the Feeder PWB.
14. Remove the No Paper Actuator (REP 3.3)
15. Remove the four screws that secure the Feeder PWB to the Paper Feeder (Figure 1).
16. Remove the PWB (Figure 1).
Figure 1 Paper Feed Rolls
Replacement
1.
Reinstall the components in the reverse order.
Repair-Adjustment
REP 3.8, REP 3.9
02/2000
4-24
Initial Issue
DocuPrint N2125
REP 3.10 Feeder Socket
Parts List on PL 3.1
Removal
WARNING
Switch off the power and disconnect the Power Cord.
1.
Remove Tray 1.
2.
Remove the Left Interface Cover Assembly (REP 1.1).
3.
Remove the Left Cover (REP 1.2).
4.
Remove the Front Cover Assembly (REP 1.6).
5.
Remove the Left Front Cover (REP 1.7).
6.
Remove the Left Plate Assembly (REP 1.11).
7.
Remove the Plate Handle (REP 1.12).
8.
Open Rear Door.
9.
Remove the Top Cover Assembly (REP 1.4).
10. Remove the Right Cover (REP 1.5).
11. Remove the LVPS PWB (REP 9.5).
12. Remove the Paper Feeder (REP 3.1).
13. Remove the two screws that secure the Feeder Socket in the printer (Figure 1).
NOTE: It may be necessary to use a scribe or small screwdriver to lift the locking tabs to
disconnect P/J671
14. Lift locking tabs and disconnect P/J671 from the Socket (Figure 1).
Figure 1 Feeder PWB
Replacement
1.
Reinstall the components in the reverse order.
Figure 1 Feeder Socket
Initial Issue
DocuPrint N2125
02/2000
4-25
Repair-Adjustment
REP 3.9, REP 3.10
Replacement
REP 3.11 Size Sensor Housing
1.
Parts List on PL 9.1
Removal
Reinstall the components in the reverse order.
WARNING
Switch off the power and disconnect the Power Cord.
1.
Remove Tray 1.
2.
Remove the Left Interface Cover (REP 1.1).
3.
Remove Left Cover (REP 1.2).
4.
Remove the Front Cover Assembly (REP 1.6).
5.
Remove the Left Front Cover Assembly (REP 1.7).
6.
Remove Top Cover Assembly (REP 1.4).
7.
Remove the Left Plate Assembly (REP 1.11).
8.
Remove the Plate Handle (REP 1.12).
9.
Disconnect P/J33 from the Print Engine Controller PWB and remove cable from all cable
clamps (Figure 1).
10. Press the locking pin and slide the housing to the rear of the printer and remove (Figure
1).
Figure 1 Size Sensor Housing
Replacement
1.
Repair-Adjustment
REP 3.10, REP 3.11
02/2000
4-26
Reinstall the components in the reverse order.
Initial Issue
DocuPrint N2125
REP 3.12 Size Sensor Actuators
Replacement
Parts List on PL 9.1
Removal
Refer to inset (A)
WARNING
Switch off the power and disconnect the Power Cord.
1.
Remove Tray 1.
2.
Remove the Left Interface Cover (REP 1.1).
3.
Remove Left Cover (REP 1.2).
4.
Remove the Front Cover Assembly (REP 1.6).
5.
Remove the Left Front Cover Assembly (REP 1.7).
6.
Remove Top Cover Assembly (REP 1.4).
7.
Remove the Left Plate Assembly (REP 1.11).
8.
Remove the Plate Handle (REP 1.12).
9.
Remove the Size Sensor Housing (REP 3.11).
1.
Position the Size Sensor Actuators below the Housing Assembly as shown.
2.
Press and hold (B) to allow the actuators (C) to fall into position.
3.
During reassembly ensure that locking tabs slide into position.
4.
Reinstall the components in the reverse order.
NOTE: Observe orientation of switch actuators before removal.
10. Remove the four screws that secure the Size Sensor Actuators to the Size Sensor Housing (Figure 1).
11. From the back side, disengage the two Locking Tabs that secure the Size Sensor Actuators to the Housing Assembly and remove (Figure 1).
Figure 1 Size Sensor Actuators
Initial Issue
DocuPrint N2125
02/2000
4-27
Repair-Adjustment
REP 3.12
REP 3.13 Tray 1 Size PWB
REP 3.14 Size Harness Assembly
Parts List on PL 9.1
Removal
Parts List on PL 9.1
Removal
CAUTION
These components are susceptible to electrostatic discharge. Observe all ESD procedures to
avoid damage.
WARNING
Switch off the power and disconnect the Power Cord.
WARNING
Switch off the power and disconnect the Power Cord.
1.
Remove Tray 1.
2.
Remove the Left Interface Cover (REP 1.1).
3.
Remove Left Cover (REP 1.2).
1.
Remove Tray 1.
4.
Remove the Front Cover Assembly (REP 1.6).
2.
Remove all optional feeders.
5.
Remove the Left Front Cover Assembly (REP 1.7).
3.
Remove the Left Interface Cover (REP 1.1).
6.
Remove Top Cover Assembly (REP 1.4).
4.
Remove Left Cover (REP 1.2).
7.
Remove the Left Plate Assembly (REP 1.11).
5.
Remove the Front Cover Assembly (REP 1.6).
8.
Remove the Plate Handle (REP 1.12).
6.
Remove the Left Front Cover Assembly (REP 1.7).
9.
Remove the Size Sensor Housing (REP 3.11).
7.
Remove Top Cover Assembly (REP 1.4).
10. Disconnect P/J51 from the Tray 1 Size PWB (Figure 1).
8.
Remove the Left Plate Assembly (REP 1.11).
11. Remove the two screws that secure the Size Harness Assembly to the Sensor (Figure 1).
9.
Remove the Plate Handle (REP 1.12).
12. Remove the Size Harness Assembly (Figure 1).
10. Remove the Size Sensor Housing (REP 3.11).
11. Remove the Size Sensor Actuators (REP 3.12)
12. Remove the two screws that secure the Tray 1 Size PWB to the Size Sensor Housing (Figure 1)
13. Lift the PWB and disconnect P/J51 and P/J331.
Figure 1 Tray 1 Size PWB
Replacement
1.
Reinstall the components in the reverse order.
Repair-Adjustment
REP 3.13, REP 3.14
Figure 1 Size M Harness Assembly
Replacement
1.
02/2000
4-28
Reinstall the components in the reverse order.
Initial Issue
DocuPrint N2125
REP 4.1 MBF Chute Assembly
REP 4.2 MBF Feed Roll Assembly
Parts List on PL 4.1
Removal
Parts List on PL 4.1
Removal
WARNING
WARNING
Switch off the power and disconnect the Power Cord.
Switch off the power and disconnect the Power Cord.
1.
Remove Tray 1.
1.
Remove Tray 1.
2.
Remove the Left Interface Cover Assembly (REP 1.1).
2.
Remove the Left Interface Cover Assembly (REP 1.1).
3.
Remove the Front Cover Assembly (REP 1.6).
3.
Remove the Front Cover Assembly (REP 1.6).
4.
Remove the Left Front Cover (REP 1.7).
4.
Remove the Left Front Cover (REP 1.7).
5.
Disconnect P/J41, P/J44, and P/J45 from the Connector PWB (Figure 1).
5.
Remove the MBF Chute Assembly (REP 4.1).
6.
Open the two clamps securing the harness of the MBF Chute Assembly to the printer
(Figure 1).
6.
Remove the MBF Pick Up Gear Spring (Figure 1).
7.
LIft the locking tab and remove the Pick Up Gear (Figure 1).
Remove the four screws that secure the MBF Chute Assembly. Remove the assembly
(Figure 1).
8.
Lift the locking tab and slide the left MBF Pick Up Cam to the right (Figure 2).
9.
Lift the locking tab and slide the right MBF Pick Up Cam to the left (Figure 2).
7.
10. Aligning the pin in the shaft with the slit in the assembly, slide the MBF Feed Roll Assembly to the left (Figure 3).
11. Lift the right end of the shaft and remove (Figure 3).
Figure 1 MBF Pick Up Gear Spring
Figure 1 MBF Chute Assembly
Replacement
1.
Reinstall the components in the reverse order.
Initial Issue
DocuPrint N2125
02/2000
4-29
Repair-Adjustment
REP 4.1, REP 4.2
REP 4.3 MBF Feed Roll
Parts List on PL 4.1
Removal
WARNING
Switch off the power and disconnect the Power Cord.
1.
Open the Front Cover.
2.
Lift the locking tab and slide the right core to the right (Figure 1).
3.
Slide the MBF Feed Roll to the right and remove (Figure 1).
Figure 2 MBF Pick Up Cam
Figure 1 MBF Feed Roll
Replacement
NOTE: Note the arrow on the side of the Feed Roll. Install with the arrow pointing in the direction of rotation.
1.
Reinstall the components in the reverse order.
Figure 3 MBF Roll Assembly
Replacement
1.
Reinstall the components in the reverse order.
Repair-Adjustment
REP 4.2, REP 4.3
02/2000
4-30
Initial Issue
DocuPrint N2125
REP 4.4 Tray Bottom Assembly
Parts List on PL 4.1
Removal
WARNING
Switch off the power and disconnect the Power Cord.
1.
Remove Tray 1.
2.
Remove the Left Interface Cover Assembly (REP 1.1).
3.
Remove the Front Cover Assembly (REP 1.6).
4.
Remove the Left Front Cover (REP 1.7).
5.
Remove the MBF Chute Assembly (REP 4.1).
6.
Remove the MBF Feed Roll Assembly (REP 4.2).
7.
Disconnect the hook that secures the Bottom Tray Assembly to the MBF Chute Assembly
(Figure 1).
8.
Use a small screwdriver to carefully lift the locking tab and remove the Bottom Tray
Assembly (Figure 2).
9.
Remove the right Exit Bearing (Figure 2).
Figure 2 Bottom Tray Assembly
Replacement
1.
Reinstall the components in the reverse order.
NOTE: After replacing the tray bottom, ensure that the sleeves on the Tray Bottom fit over
the two posts on the MBF frame (see A, Figure 1).
Figure 1 Bottom Tray Assembly Chute
Initial Issue
DocuPrint N2125
02/2000
4-31
Repair-Adjustment
REP 4.4
REP 4.5 MBF No Paper Actuator
REP 4.6 Tray Pick Up
Parts List on PL 4.1
Removal
Parts List on PL 4.1
Removal
WARNING
WARNING
Switch off the power and disconnect the Power Cord.
Switch off the power and disconnect the Power Cord.
1.
Remove Tray 1.
1.
Remove Tray 1.
2.
Remove the Left Interface Cover Assembly (REP 1.1).
2.
Remove the Left Interface Cover Assembly (REP 1.1).
3.
Remove the Front Cover Assembly (REP 1.6).
3.
Remove the Front Cover Assembly (REP 1.6).
4.
Remove the Left Front Cover (REP 1.7).
4.
Remove the Left Front Cover (REP 1.7).
5.
Remove the MBF Chute Assembly (REP 4.1).
5.
Remove the MBF Chute Assembly (REP 4.1).
6.
Remove the MBF Feed Roll Assembly (REP 4.2).
6.
Remove the MBF Feed Roll Assembly (REP 4.2).
7.
Remove the Bottom Tray Assembly (REP 4.4).
7.
Open the Bottom Tray Assembly.
8.
Lift the MBF No Paper Actuator from the back of the Bottom Tray and remove (Figure 1).
8.
Lift the Tray Pick Up from the Bottom Tray Assembly and remove (Figure 1).
Figure 1 MBF No Paper Actuator
Replacement
1.
Reinstall the components in the reverse order.
Figure 1 Tray Pick Up
Replacement
1.
Repair-Adjustment
REP 4.5, REP 4.6
02/2000
4-32
Reinstall the components in the reverse order.
Initial Issue
DocuPrint N2125
REP 4.7 Retard Pad Assembly
REP 4.8 MBF No Paper Sensor
Parts List on PL 4.1
Removal
Parts List on PL 4.1
Removal
WARNING
WARNING
Switch off the power and disconnect the Power Cord.
Switch off the power and disconnect the Power Cord.
1.
Remove Tray 1.
1.
Remove Tray 1.
2.
Remove the Left Interface Cover Assembly (REP 1.1).
2.
Remove the Left Interface Cover Assembly (REP 1.1).
3.
Remove the Front Cover Assembly (REP 1.6).
3.
Remove the Front Cover Assembly (REP 1.6).
4.
Remove the Left Front Cover (REP 1.7).
4.
Remove the Left Front Cover (REP 1.7).
5.
Remove the MBF Chute Assembly (REP 4.1).
5.
Remove the MBF Chute Assembly (REP 4.1).
6.
Remove the MBF Feed Roll Assembly (REP 4.2).
6.
Remove the MBF Feed Roll Assembly (REP 4.2).
7.
Open the Bottom Tray Assembly (REP 4.4).
7.
Open the Bottom Tray Pick Up (Figure 1).
8.
Carefully pry the left and right bracket arms of the Retard Pad Assembly from the MBF
Chute Assembly (Figure 1).
8.
Remove the MBF Bottom Tray Spring from the two studs on the MBF Chute Assembly
(Figure 1).
9.
Remove the assembly (Figure 1).
9.
Release the five hooks that secures the No Paper Sensor and remove (Figure 2).
10. Disconnect P/J451 from the No Paper Sensor (Figure 2).
Figure 1 Bottom Tray Pick Up
Figure 1 Retard Pad Assembly
Replacement
1.
Reinstall the components in the reverse order.
Initial Issue
DocuPrint N2125
02/2000
4-33
Repair-Adjustment
REP 4.7, REP 4.8
REP 4.9 Pick Up Solenoid
Parts List on PL 4.1
Removal
WARNING
Switch off the power and disconnect the Power Cord.
1.
Remove Tray 1.
2.
Remove the Left Interface Cover Assembly (REP 1.1).
3.
Remove the Front Cover Assembly (REP 1.6).
4.
Remove the Left Front Cover (REP 1.7).
5.
Remove the MBF Chute Assembly (REP 4.1).
6.
Remove the screw that secures the Pick Up Solenoid to the MBF Chute Assembly (Figure
1).
7.
Remove the solenoid (Figure 1).
Figure 2 MBF No Paper Sensor
Replacement
1.
Reinstall the components in the reverse order.
Figure 1 Pick Up Solenoid
Replacement
1.
Repair-Adjustment
REP 4.8, REP 4.9
02/2000
4-34
Reinstall the components in the reverse order.
Initial Issue
DocuPrint N2125
REP 4.10 Envelope Connector Assembly
Parts List on PL 4.1
Removal
WARNING
Switch off the power and disconnect the Power Cord.
1.
Remove Tray 1.
2.
Remove the Left Interface Cover Assembly (REP 1.1).
3.
Remove the Front Cover Assembly (REP 1.6).
4.
Remove the MBF Chute Assembly (REP 4.1).
5.
Remove the two screws that serve the Envelope Connector Assembly in the Chute
Assembly (Figure 1).
6.
Slide the Envelope Connector Assembly and the Mounting to the left and remove (Figure
1).
7.
Remove the Envelope connector Assembly from the MBF Assembly.
Figure 1 Envelope Connector Assembly
Replacement
1.
Reinstall the components in the reverse order.
Initial Issue
DocuPrint N2125
02/2000
4-35
Repair-Adjustment
REP 4.10
Repair-Adjustment
REP 4.10
02/2000
4-36
Initial Issue
DocuPrint N2125
REP 5.1 Paper Handler Assembly
Parts List on PL 5.1
Removal
WARNING
Switch off the power and disconnect the Power Cord.
1.
Remove Tray 1.
2.
Remove the Left Interface Cover Assembly (REP 1.1).
3.
Remove the Front Cover Assembly (REP 1.6).
4.
Remove the Left Front Cover (REP 1.7).
5.
Remove the MBF Chute Assembly (REP 4.1).
6.
Using long nose pliers remove Shaft 14 from the Printer (Figure 1).
7.
Remove Gear 14 (Figure 2).
8.
Disconnect P/J43 and P/J42 from the Connector PWB (Figure 3).
9.
Remove the five screws that secure the Paper Handler Assembly (Figure 3).
10. Lift the right end slightly and remove the Paper Handler (Figure 4).
Figure 2 Gear 14 Paper Handler Assembly
Figure 1 Shaft 14 Paper Handler Assembly
Figure 3 Paper Handler Assembly
Initial Issue
DocuPrint N2125
02/2000
4-37
Repair-Adjustment
REP 5.1
REP 5.2 Toner Sensor
Parts List on PL 5.1
Removal
WARNING
Switch off the power and disconnect the Power Cord.
1.
Remove Tray 1.
2.
Remove the Left Interface Cover Assembly (REP 1.1).
3.
Remove the Front Cover Assembly (REP 1.6).
4.
Remove the Left Front Cover (REP 1.7).
5.
Remove the MBF Chute Assembly (REP 4.1).
6.
Remove the Paper Handler Assembly (REP 5.1).
7.
Release the front locking tab and remove the Sensor (Figure 1).
8.
Disconnect P/J421 from the Toner Sensor (Figure 1).
Figure 4 Paper Handler Assembly Removal
Replacement
1.
Reinstall the components in the reverse order.
Figure 1 Toner Sensor Kit
Repair-Adjustment
REP 5.1, REP 5.2
02/2000
4-38
Initial Issue
DocuPrint N2125
Replacement
REP 5.3 Registration Actuator
1.
Parts List on PL 5.1
Removal
Reinstall the components in the reverse order.
WARNING
Switch off the power and disconnect the Power Cord.
1.
Remove Tray 1.
2.
Remove the Left Interface Cover Assembly (REP 1.1).
3.
Remove the Front Cover Assembly (REP 1.6).
4.
Remove the Left Front Cover (REP 1.7).
5.
Remove the MBF Chute Assembly (REP 4.1).
6.
Remove the Paper Handler Assembly (REP 5.1).
7.
Open the Upper Chute (Figure 1).
8.
Disconnect the right hook of the Registration Sensor Spring (Figure 1).
9.
Move the Actuator to the left until the right end is free (Figure 1).
10. Remove the Actuator.
Figure 1 Registration Actuator
Replacement
1.
Initial Issue
DocuPrint N2125
02/2000
4-39
Reinstall the components in the reverse order.
Repair-Adjustment
REP 5.2, REP 5.3
REP 5.4 Registration Sensor
REP 5.5 Registration Clutch
Parts List on PL 5.1
Removal
Parts List on PL 5.1
Removal
WARNING
WARNING
Switch off the power and disconnect the Power Cord.
Switch off the power and disconnect the Power Cord.
1.
Remove Tray 1.
1.
Remove Tray 1.
2.
Remove the Left Interface Cover Assembly (REP 1.1).
2.
Remove the Left Interface Cover Assembly (REP 1.1).
3.
Remove the Front Cover Assembly (REP 1.6).
3.
Remove the Front Cover Assembly (REP 1.6).
4.
Remove the Left Front Cover (REP 1.7).
4.
Remove the Left Front Cover (REP 1.7).
5.
Remove the MBF Chute Assembly (REP 4.1).
5.
Remove the MBF Chute Assembly (REP 4.1).
6.
Remove the Paper Handler Assembly (REP 5.1).
6.
Remove the Paper Handler Assembly (REP 5.1).
7.
Remove the Registration Actuator (REP 5.3).
7.
8.
Disengage the five hooks that secure the Sensor (Figure 1).
Remove the E-ring that secures the Registration Clutch to the Paper Handler Assembly
(Figure 1).
9.
Remove the Sensor out the back of the Paper Handler. (Figure 1).
8.
Slide the clutch out and Disconnect P/J453 from the Clutch (Figure 1).
9.
Remove the Clutch.
10. Disconnect P/J432 from the Registration Sensor.
Figure 1 Registration Sensor
Figure 1 Registration Clutch
Replacement
1.
Reinstall the components in the reverse order.
Replacement
1.
Repair-Adjustment
REP 5.4, REP 5.5
02/2000
4-40
Reinstall the components in the reverse order.
Initial Issue
DocuPrint N2125
REP 5.6 Rubber Registration Roll
Parts List on PL 5.1
Removal
WARNING
Switch off the power and disconnect the Power Cord.
1.
Remove Tray 1.
2.
Remove the Left Interface Cover Assembly (REP 1.1).
3.
Remove the Front Cover Assembly (REP 1.6).
4.
Remove the Left Front Cover (REP 1.7).
5.
Remove the MBF Chute Assembly (REP 4.1).
6.
Remove the Paper Handler Assembly (REP 5.1).
7.
Remove the Registration Clutch (REP 5.5).
8.
Remove the two E-rings that secure the two Registration Gears (Figure 1).
9.
Remove the E-ring from the left end of the Metal Registration Shaft (Figure 1).
10. Release the two registration springs from the Metal Registration Roll (Figure 2).
11. Squeeze and hold the Upper Chute and Inlet Chute together. Align the hole in the chute
with the Boss on the Left Bearing. Remove the Left Bearing from the Metal Registration
Roll (Figure 1).
12. Lift the Torsion Spring and slide the Right Bearing out. Squeeze and hold the Upper
Chute and Inlet Chute together and align the hole in the chute with the Boss on the Right
Bearing. Remove the Right Bearing (Figure 1).
Figure 1 Registration Roll
13. Slide the Metal Registration Shaft to the right and remove the assembly (Figure 1).
14. Remove the left and right bearings from the Rubber Registration Roll (Figure 3).
15. Lift the right end of the Rubber Registration Roll and remove (Figure 3).
Initial Issue
DocuPrint N2125
02/2000
4-41
Repair-Adjustment
REP 5.6
Figure 3 Rubber Registration Roll
Replacement
1.
Reinstall the components in the reverse order.
Figure 2 Registration Springs
Repair-Adjustment
REP 5.6
02/2000
4-42
Initial Issue
DocuPrint N2125
REP 6.1 Transport Chute Assembly
REP 6.2 Fuser Assembly
Parts List on PL 6.1
Removal
Parts List on PL 6.1
Removal
WARNING
WARNING
Switch off the power and disconnect the Power Cord.
Switch off the power and disconnect the Power Cord.
1.
Remove Tray 1.
The Fuser may be hot.
2.
Remove the Left Interface Cover Assembly (REP 1.1).
1.
Open the Rear Cover Assembly.
3.
Remove the Front Cover Assembly (REP 1.6).
2.
Remove Duplex Assembly (if installed).
4.
Remove the Left Front Cover (REP 1.7).
3.
5.
Remove the MBF Chute Assembly (REP 4.1).
Remove the two thumb screws that secure the Fuser Assembly to the printer and remove
the Fuser (Figure 1).
6.
Remove the Paper Handler Assembly (REP 5.1).
7.
Remove the BTR Assembly (REP 7.1).
8.
Remove the screw that secures the DTS Wire (white) to the Transport Chute Assembly
(Figure 1).
9.
Remove the screw that secures the TR Wire (red) to the Transport Chute Assembly (Figure 1).
10. Use care not to drop high voltage contact springs when chute is removed (Figure 1).
11. Remove the two screws that secure the Transport Chute Assembly to the printer (Figure
1). Remove Assembly.
Figure 1 Transport Chute Assembly
Figure 1 Fuser Assembly
Replacement
1.
Reinstall the components in the reverse order.
Replacement
1.
Initial Issue
DocuPrint N2125
02/2000
4-43
Reinstall the components in the reverse order.
Repair-Adjustment
REP 6.1, REP 6.2
REP 6.3 Fuser Harness Assembly
Parts List on PL 6.1
Removal
WARNING
Switch off the power and disconnect the Power Cord.
1.
Remove Tray 1.
2.
Remove the Left Interface Cover Assembly (REP 1.1).
3.
Remove the Left Cover (REP 1.2).
4.
Remove the Front Cover Assembly (REP 1.6).
5.
Remove the Left Front Cover (REP 1.7).
6.
Remove the Left Plate Assembly (REP 1.11).
7.
Remove the Plate Handle (REP 1.12).
8.
Open Rear Door.
9.
Remove the Fuser Assembly (REP 6.2).
10. Remove the Top Cover Assembly (REP 1.4).
11. Remove the MBF Chute Assembly (REP 4.1).
12. Remove the Paper Handler Assembly (REP 5.1)
13. Remove the Transport Chute Assembly (REP 6.1)
14. Remove the Print Cartridge Top Guide Assembly (REP 7.2).
15. Remove the Print Engine Controller PWB (REP 9.3)
16. Remove the Main Motor Assembly (REP 8.1)
17. Remove the LVPS PWB (REP 9.5)
Figure 1 Fuser Harness Assembly
18. Remove the Drive Gear Assembly (REP 8.2)
19. Unplug the P/JPRB (red) from the HVPS PWB (REP 10.6).
Replacement
20. Remove the screw that secures the HVPS Housing to the printer (Figure 1).
1.
Reinstall the components in the reverse order.
21. Remove the HVPS.
22. Pull the Fuser Harness Assembly from the left side of the printer (Figure 1).
23. Remove the two screws that secure the Fuser Harness Assembly to the printer (Figure 1).
24. Remove the Fuser Harness Assembly.
Repair-Adjustment
REP 6.3
02/2000
4-44
Initial Issue
DocuPrint N2125
REP 6.4 Exit Chute Assembly
Parts List on PL 7.1
Removal
WARNING
Switch off the power and disconnect the Power Cord.
1.
Remove Tray 1.
2.
Remove the Left Interface Cover Assembly (REP 1.1).
3.
Remove the Front Cover Assembly (REP 1.6).
4.
Remove the Left Front Cover (REP 1.7).
5.
Remove the Left Cover (REP 1.2).
6.
Remove the Left Plate Assembly (REP 1.11).
7.
Remove the Top Cover Assembly (REP 1.4).
8.
Remove the Rear Cover Assembly (REP 1.8)
9.
Remove the Interlock Cover (REP 1.10).
10. Disconnect P/J31 and P/J32 from the Print Engine Controller PWB (Figure 1).
11. Remove the four screws that secure the Exit Chute Assembly to the printer (Figure 2).
12. Remove the Exit Chute Assembly (Figure 2).
Figure 2 Exit Chute Assembly
Replacement
1.
Reinstall the components in the reverse order.
Figure 1 Exit Chute Harness Assembly
Initial Issue
DocuPrint N2125
02/2000
4-45
Repair-Adjustment
REP 6.4
REP 6.5 Exit Motor Assembly
REP 6.6 Stack Full Sensor
Parts List on PL 7.1
Removal
Parts List on PL 7.1
Removal
WARNING
WARNING
Switch off the power and disconnect the Power Cord.
Switch off the power and disconnect the Power Cord.
1.
Remove Tray 1.
1.
Remove Tray 1.
2.
Remove the Left Interface Cover Assembly (REP 1.1).
2.
Remove the Left Interface Cover Assembly (REP 1.1).
Front Cover Assembly (REP 1.6).
3.
Remove the Front Cover Assembly (REP 1.6).
3.
4.
Remove the Left Front Cover (REP 1.7).
4.
Remove the Left Front Cover (REP 1.7).
5.
Remove the Left Cover (REP 1.2).
5.
Remove the Top Cover Assembly (REP 1.4).
6.
Remove the Left Plate Assembly (REP 1.11).
6.
Open Rear Cover.
7.
Remove the Top Cover Assembly (REP 1.4).
7.
Remove the Static Eliminator Assembly (See REP 6.8 - step 6).
8.
Remove the Rear Cover Assembly (REP 1.8)
8.
Remove the Stack Full Actuator (REP 6.8).
9.
Remove the Interlock Cover (REP 1.10).
9.
Disconnect P/J311 from the Stack Full Sensor (Figure 1).
10. Remove the Exit Chute Assembly (REP 6.4).
11. Remove the two screws that secure the Exit Motor Assembly to the Exit Chute Assembly
(Figure 1).
10. Disengage the five hooks securing the Stack Full Sensor to the Exit Chute Assembly (Figure 1) Remove the Sensor (Figure 1)
12. Remove the Motor (Figure 1).
Figure 1 Exit Sensor
Figure 1 Exit Motor Assembly
Replacement
1.
Reinstall the components in the reverse order.
Replacement
1.
Reinstall the components in the reverse order.
Repair-Adjustment
REP 6.5, REP 6.6
02/2000
4-46
Initial Issue
DocuPrint N2125
REP 6.7 Mid 1 & Mid 2 Roll Assemblies
Parts List on PL 7.1
Removal
WARNING
Switch off the power and disconnect the Power Cord.
1.
Remove Tray 1.
2.
Remove the Left Interface Cover Assembly (REP 1.1).
3.
Remove the Left Cover (REP 1.2).
4.
Remove the Front Cover Assembly (REP 1.6).
5.
Remove the Left Front Cover (REP 1.7).
6.
Remove the Top Cover Assembly (REP 1.4).
7.
Remove the Rear Cover Assembly (REP 1.8).
8.
Remove the Interlock Cover (REP 1.10).
9.
Remove the Left Plate Assembly (REP 1.11).
10. Remove the Exit Chute Assembly (REP 6.4).
11. Lift the Static Eliminator Assembly and remove (Figure 1) (See REP 6.8 - step 6).
12. Remove the Stack Full Actuator (REP 6.8).
13. Release the locking tab and remove the Exit-17 Gear from the defective Roll Assembly
(Figure 1), (Figure 2), or (Figure 3).
14. Remove the Exit-32 Gear from the Exit Chute Assembly (Figure 1).
15. With a small screwdriver carefully release the locking tab that secures the Exit Bearings to
the Exit Chute Assembly (Figure 1), (Figure 2), or (Figure 3).
16. Remove the Roll Assembly together with the Exit Bearing from the Exit Chute Assembly
(Figure 1), (Figure 2), or (Figure 3).
17. Remove the left Exit Bearing from the Roll Assembly.
Figure 1 Exit 17 & Exit 32 Gears
Initial Issue
DocuPrint N2125
02/2000
4-47
Repair-Adjustment
REP 6.7
Figure 2 Mid 1 Roll Assembly
Figure 3 Mid 2 Roll Assembly
Replacement
1.
Repair-Adjustment
REP 6.7
02/2000
4-48
Reinstall the components in the reverse order.
Initial Issue
DocuPrint N2125
REP 6.8 Stack Full Actuator
Parts List on PL 7.1
Removal
WARNING
Switch off the power and disconnect the Power Cord.
1.
Remove Tray 1.
2.
Remove the Interface Cover Assembly (REP 1.1).
3.
Remove the Left Cover (REP 1.2).
4.
Remove the Top Cover Assembly (REP 1.4).
5.
Remove the Rear Cover Assembly (REP 1.8)
6.
Remove the Static Eliminator Assembly (Figure 1).
7.
Lift the right end of the Actuator free of the Exit Chute Assembly (Figure 2).
8.
Remove the Actuator.
Figure 2 Stack Full Actuator
Replacement
1.
Reinstall the components in the reverse order.
Figure 1 Static Eliminator Assembly
Initial Issue
DocuPrint N2125
02/2000
4-49
Repair-Adjustment
REP 6.8
REP 6.9 Fuser Upper Cover Assembly/ Heat Rod
Parts List on PL 6.1
Removal
WARNING
Switch off the power and disconnect the Power Cord.
1.
Remove Fuser Assembly (REP 6.2).
2.
Disconnect P/J274 from the left end of the Fuser Assembly (Figure 1).
3.
Remove the four screws securing the right and left end cover on the Fuser Assembly (Figure 1).
4.
Remove both covers while carefully disengaging the wiring harness on each end (Figure
1).
Figure 2 Fuser Heat Rod
NOTE: The Heat Rod must be removed before the Upper Cover Assembly to avoid breakage.
5.
Invert the Fuser Assembly to access the Fuser Heat Rod (Figure 2)
6.
Remove the three screws securing the Fuser Heat Rod and Harness (Figure 2).
NOTE: Avoid touching the glass rod with your fingers. Oil from your skin will contaminate
and shorten the life of the Heat Rod.
7.
Carefully remove the Heat Rod by lifting the right end sliding it out to the right side of the
Heat Roll (Figure 3).
8.
Return the Fuser Assembly to it’s right side up position (Figure 4).
9.
Remove the four screws and the Fuser Upper Cover (Figure 4).
Figure 3 Heat Rod
Figure 1 Fuser Assembly
Figure 4 Fuser Upper Cover
Replacement
1.
Repair-Adjustment
REP 6.9
02/2000
4-50
Reinstall the components in the reverse order.
Initial Issue
DocuPrint N2125
REP 7.1 BTR Assembly
REP 7.2 Print Cartridge Top Guide Assembly
Parts List on PL 6.1
Removal
Parts List on PL 8.1
Removal
WARNING
WARNING
Switch off the power and disconnect the Power Cord.
Switch off the power and disconnect the Power Cord.
Do not touch the surface of the BTR with your hands. Oil from your hands can cause
image quality problems.
1.
Remove Tray 1.
2.
Remove the Left Interface Cover Assembly (REP 1.2)
After removing the BRT Roll, store the Roll on clean paper and cover with another sheet
of paper.
3.
Remove the Option Cover (REP 1.3).
1.
Open the Front Cover Assembly and remove the Print Cartridge.
2.
Push down to release the left and right latches of the BTR Assembly (Figure 1).
3.
Holding the ends of the BTR Assembly, remove the assembly (Figure 1).
4.
Remove the Front Cover Assembly (REP 1.6).
5.
Remove the Left Front Cover (REP 1.7).
6.
Remove the Top Cover Assembly (REP 1.4).
7.
Remove the Left Plate Assembly (REP 1.11).
8.
Open the Rear Cover.
9.
Disconnect P/J 25 from the Print Engine Controller PWB (REP 9.3).
10. Remove the two screws that secure the Print Cartridge Top Guide Assembly to the printer
(Figure 1).
11. Remove the Print Cartridge Top Guide Assembly together with the Print Cartridge Sensor
Assembly from the printer (Figure 1).
Figure 1 BTR Assembly
Replacement
1.
Reinstall the components in the reverse order.
Figure 1 EP Cartridge Top Guide Assembly
Replacement
1.
Initial Issue
DocuPrint N2125
02/2000
4-51
Reinstall the components in the reverse order.
Repair-Adjustment
REP 7.1, REP 7.2
REP 7.3 Print Cartridge Sensor Assembly
12. Remove the Sensor Assembly (Figure 1).
Parts List on PL 8.1
Removal
WARNING
Switch off the power and disconnect the Power Cord.
1.
Remove Tray 1.
2.
Remove the Left Interface Cover Assembly (REP 1.2)
3.
Remove the Front Cover Assembly (REP 1.6).
4.
Remove the Left Front Cover (REP 1.7).
5.
Remove the Top Cover Assembly (REP 1.4).
6.
Remove the Left Plate Assembly (REP 1.11).
7.
Open the Rear Cover.
8.
Remove the Print Cartridge Top Guide Assembly (REP 7.3).
9.
Release the harness of the Print Cartridge Sensor Assembly from the three clamps
securing it to the Print Cartridge Top Guide Assembly (Figure 1).
10. With a small screwdriver pry the right shaft free of the assembly (Figure 1).
11. With a small screwdriver pry the left shaft free of the assembly. Remove the Sensor
Assembly (Figure 1).
Figure 1 Print Cartridge Sensor Assembly
Replacement
1.
Repair-Adjustment
REP 7.3
02/2000
4-52
Reinstall the components in the reverse order.
Initial Issue
DocuPrint N2125
REP 7.4 Laser Assembly
REP 7.5 Print Cartridge Side Guide
Parts List on PL 8.1
Removal
Parts List on PL 8.1
Removal
WARNING
WARNING
Switch off the power and disconnect the Power Cord.
Switch off the power and disconnect the Power Cord.
1.
Remove the Front Cover Assembly (REP 1.6).
1.
2.
Remove the Left Front Cover (REP 1.7).
2.
Remove the Left Interface Cover (REP 1.1).
3.
Open the Rear Cover.
3.
Remove Front Cover Assembly (REP 1.6).
4.
Remove the Top Cover Assembly (REP 1.4).
4.
Remove the Left Front Cover (REP 1.7).
5.
Remove the four screws securing the Laser Assembly to the printer (Figure 1).
5.
Remove MBF Chute Assembly (REP 4.1).
6.
Raising the Laser Assembly slightly disconnect P/J213 and P/J223 from the rear and two
connectors from the bottom of the Laser Assembly (Figure 1).
6.
Remove the Paper Handler Assembly (REP 5.1).
7.
Remove Top Cover Assembly (REP 1.4).
7.
Remove the Laser Assembly from the printer (Figure 1).
8.
Remove Right Cover (REP 1.5).
9.
Remove the two K-clips that secure the Print Cartridge Locking Arm.
Remove Tray 1.
10. Remove the five screws on the right side of the frame (Figure 1).
11. Remove the Print Cartridge Side Guide (Figure 1).
12. Remove the Spring Clip (Figure 1).
Figure 1 Laser Assembly
Replacement
1.
Figure 1 Print Cartridge Side Guide
Reinstall the components in the reverse order.
Replacement
1.
Initial Issue
DocuPrint N2125
02/2000
4-53
Reinstall the components in the reverse order.
Repair-Adjustment
REP 7.4, REP 7.5
Repair-Adjustment
REP 7.4, REP 7.5
02/2000
4-54
Initial Issue
DocuPrint N2125
REP 8.1 Main Motor Assembly
REP 8.2 Main Drive Gear Assembly
Parts List on PL 8.1
Removal
Parts List on PL 8.1
Removal
WARNING
WARNING
Switch off the power and disconnect the Power Cord.
Switch off the power and disconnect the Power Cord.
1.
Remove the Left Interface Cover (REP 1.1).
1.
Remove Tray 1.
2.
Remove the Left Cover (REP 1.2).
2.
Remove the Left Interface Cover Assembly (REP 1.1).
Remove the Left Cover (REP 1.2).
3.
Remove the Left Plate Assembly (REP 1.11).
3.
4.
Disconnect P/J29 from the Print Engine Controller PWB (Figure 1).
4.
Remove the Front Cover Assembly (REP 1.6).
5.
Release Motor Harness from all cable clamps.
5.
Remove the Left Front Cover (REP 1.7).
6.
Remove the four screws that secure the Main Motor Assembly to the printer and remove
the assembly (Figure 1).
6.
Remove the Left Plate Assembly (REP 1.11).
7.
Remove the Plate Handle (REP 1.12).
8.
Open Rear Door.
9.
Remove the Fuser Assembly (REP 6.2).
10. Remove the Top Cover Assembly (REP 1.4).
11. Remove the MBF Chute Assembly (REP 4.1).
12. Remove the Paper Handler Assembly (REP 5.1).
13. Remove the Chute Trans Assembly (REP 6.1).
14. Remove the Print Cartridge Top Guide Assembly (REP 7.2).
15. Remove the System Controller PWB (REP 9.2).
16. Remove the Print Engine Controller PWB (REP 9.3)
17. Remove the Main Motor Assembly (REP 8.1).
18. Remove the LVPS PWB (REP 9.5)
19. Remove the four screws that secure the Drive Gear Assembly from the left side of the
printer. (Screws are marked with a “D”) (Figure 1).
Figure 1 Main Motor Assembly
Replacement
1.
Reinstall the components in the reverse order.
Initial Issue
DocuPrint N2125
02/2000
4-55
Repair-Adjustment
REP 8.1, REP 8.2
20. Pull bottom of assembly out and lower the assembly to release the locking tab and
remove (Figure 1).
Figure 1 Drive Gear Assembly
Replacement
1.
Reinstall the components in the reverse order.
Repair-Adjustment
REP 8.2
02/2000
4-56
Initial Issue
DocuPrint N2125
REP 9.1 Fan Assembly
REP 9.2 System Controller PWB
Parts List on PL 9.1
Removal
Parts List on PL 10.1
Removal
WARNING
CAUTION
These components are susceptible to electrostatic discharge. Observe all ESD procedures to
avoid damage.
Turn the power off and disconnect the Power Cord.
1.
Remove Tray 1.
2.
Remove the Left Interface Cover Assembly (REP 1.1).
WARNING
3.
Remove the Left Cover (REP 1.2).
Turn the power off and disconnect the Power Cord.
4.
Remove the Front Cover Assembly (REP 1.6).
1.
Remove the Interface Cover Assembly (REP 1.1).
Remove the Left Front Cover (REP 1.7).
2.
Disconnect host cables connected to the System Controller PWB.
Remove the Top Cover Assembly (REP 1.4).
3.
Disconnect P/J18 and P/J13 from the System Controller PWB (Figure 1).
Open the Rear Cover Assembly.
4.
Remove the five screws that secure the System Controller PWB to the printer (Figure 1).
8.
Remove the Left Plate Assembly (REP 1.11).
5.
9.
Disconnect P/J283 connected to the Fan Assembly from the LVPS PWB.
Move the System Controller PWB toward the rear to disconnect P/J14 from the Print
Engine Controller PWB (REP 9.3).
6.
Remove the System Controller PWB from the printer (Figure 1).
5.
6.
7.
10. Release the harness of the Fan Assembly from the two clamps on the printer (Figure 1).
11. Remove the four screws securing the assembly to the printer (Figure 1).
12. Remove the Fan (Figure 1).
Figure 1 Fan Assembly
Replacement
1.
Figure 1 System Controller PWB
Reinstall the components in the reverse order.
Initial Issue
DocuPrint N2125
02/2000
4-57
Repair-Adjustment
REP 9.1, REP 9.2
Replacement
1.
Reinstall the components in the reverse order.
REP 9.3 Print Engine Controller PWB
Parts List on PL 10.1
Removal
CAUTION
These components are susceptible to electrostatic discharge. Observe all ESD procedures to
avoid damage.
WARNING
Switch off the power and disconnect the Power Cord.
1.
Remove the Left Interface Cover Assembly (REP 1.1).
2.
Remove the Left Cover (REP 1.2).
3.
Remove the Left Plate Assembly (REP 1.11).
4.
Disconnect P/J21, P/J22, P/J23, P/J25, P/J26, P/J27, P/J28, P/J29, P/J30, P/J31, P/J32,
P/J33, P/J34 and P/J35 from the Print Engine Controller PWB.
5.
Remove the four screws that secure the Print Engine Controller PWB to the printer.
Remove the Print Engine Controller PWB (Figure 1).
Figure 1 Print Engine Controller PWB
Repair-Adjustment
REP 9.2, REP 9.3
02/2000
4-58
Initial Issue
DocuPrint N2125
Replacement
1.
Reinstall the components in the reverse order.
REP 9.4 5VDC PWB
Parts List on PL 10.1
Removal
CAUTION
These components are susceptible to electrostatic discharge. Observe all ESD procedures to
avoid damage.
WARNING
Switch off the power and disconnect the Power Cord.
1.
Remove the Left Interface Cover Assembly (REP 1.1).
2.
Remove the Left Cover (REP 1.2).
3.
Remove the Left Plate Assembly (REP 1.11).
4.
Disconnect PN288 from the 5VDC PWB and PN1 from the LVPS PWB.
5.
Remove the two screws that secure the 5VDC PWB to the printer (Figure 1).
6.
Remove the 5VDC PWB (Figure 1).
Figure 1 5VDC PWB
Replacement
1.
Initial Issue
DocuPrint N2125
02/2000
4-59
Reinstall the components in the reverse order.
Repair-Adjustment
REP 9.3, REP 9.4
REP 9.5 LVPS PWB
REP 9.6 HVPS PWB
Parts List on PL 10.1
Removal
Parts List on PL 10.1
Removal
CAUTION
These components are susceptible to electrostatic discharge. Observe all ESD procedures to
avoid damage.
CAUTION
These components are susceptible to electrostatic discharge. Observe all ESD procedures to
avoid damage.
WARNING
WARNING
Switch off the power and disconnect the Power Cord.
Switch off the power and disconnect the Power Cord.
1.
Remove Tray 1.
1.
2.
Remove the Left Interface Cover Assembly (REP 1.1).
2.
Remove the Front Cover Assembly (REP 1.6).
3.
Remove the Left Cover (REP 1.2).
3.
Remove the Left Front Cover (REP 1.7).
Remove Tray 1.
4.
Remove the Front Cover Assembly (REP 1.6).
4.
Remove the MBF Chute Assembly (REP 4.1).
5.
Remove the Left Front Cover (REP 1.7).
5.
Remove the Paper Handler Assembly (REP 5.1).
6.
Remove the Left Plate Assembly (REP 1.11).
6.
Remove the BTR Assembly (REP 7.1).
7.
Remove Plate Handle (REP 1.12).
7.
Remove the Transport Chute Assembly (REP 6.1).
8.
Disconnect the Main Switch (Figure 1).
8.
Disconnect P/J261 from the HVPS PWB (Figure 1).
9.
Disconnect P/J11, PN1, P/J282, P/J283, P/J284, P/J285 and P/J281.
9.
Disconnect PRB (red) (Figure 1).
10. Remove the four screws that secure the LVPS PWB to the printer (Figure 1).
10. Remove the screw that secures the HVPS PWB housing to the printer (Figure 1).
11. Remove the LVPS PWB (Figure 1).
11. Remove the HVPS Assembly Housing from the printer (Figure 1).
12. Carefully disconnect the DTS (white) and TR (red) wires from the HVPS (Figure 2).
13. Releasing the two hooks that secure the HVPS PWB to the Housing, remove the HVPS
PWB (Figure 2).
Figure 1 LVPS PWB
Figure 1 Transport Chute Assembly
Replacement
1.
Reinstall the components in the reverse order.
Repair-Adjustment
REP 9.5, REP 9.6
02/2000
4-60
Initial Issue
DocuPrint N2125
REP 9.7 Connector PWB
Parts List on PL 10.1
Removal
CAUTION
These components are susceptible to electrostatic discharge. Observe all ESD procedures to
avoid damage.
WARNING
Switch off the power and disconnect the Power Cord.
1.
Remove Tray 1.
2.
Remove the Print Cartridge and store in safe place.
3.
Remove the Front Cover Assembly (REP 1.6).
4.
Remove the Left Front Cover (REP 1.7).
5.
Disconnect P/J41, P/J42, P/J43, P/J44, P/J45 and P/J231 from the Connector PWB (Figure 1).
6.
Remove the three screws that secure the Connector PWB to the printer (Figure 1).
7.
Remove the Connector PWB (Figure 1).
Figure 2 HVPS PWB
Replacement
1.
Reinstall the components in the reverse order.
Figure 1 Connector PWB
Replacement
1.
Initial Issue
DocuPrint N2125
02/2000
4-61
Reinstall the components in the reverse order.
Repair-Adjustment
REP 9.6, REP 9.7
Replacement
REP 9.8 Main Switch
1.
Parts List on PL 10.1
Removal
Reinstall the components in the reverse order.
WARNING
Switch off the power and disconnect the Power Cord.
1.
Remove Tray 1.
2.
Remove the Left Interface Cover Assembly (REP 1.1).
3.
Remove the Left Cover (REP 1.2).
4.
Remove the Front Cover Assembly (REP 1.6).
5.
Remove the Left Front Cover (REP 1.7).
6.
Remove the Left Plate Assembly (REP 1.11).
7.
Remove the Plate Handle (REP 1.12).
8.
Press the locking tabs and push the rear of the Main Switch so that it comes out of the
front of the printer (Figure 1).
9.
Disconnect the Harness from the Main Switch, and remove the Main Switch from the
printer (Figure 1).
Figure 1 Main Switch
Repair-Adjustment
REP 9.8
02/2000
4-62
Initial Issue
DocuPrint N2125
REP 9.9 Front Interlock Switch Assembly
REP 9.10 Rear Interlock Switch Assembly
Parts List on PL 10.1
Removal
Parts List on PL 10.1
Removal
WARNING
CAUTION
These components are susceptible to electrostatic discharge. Observe all ESD procedures to
avoid damage.
Switch off the power and disconnect the Power Cord.
1.
Remove Tray 1.
2.
Remove the Left Interface Cover Assembly (REP 1.1).
WARNING
3.
Remove the Left Cover (REP 1.2).
Switch off the power and disconnect the Power Cord.
4.
Remove the Front Cover Assembly (REP 1.6).
1.
Remove Tray 1.
5.
Remove the Left Front Cover (REP 1.7).
2.
Remove the Left Interface Cover Assembly (REP 1.1).
6.
Remove the Left Plate Assembly (REP 1.11).
3.
Remove the Left Cover (REP 1.2).
Disconnect P/J284 from the LVPS PWB (REP 9.5).
4.
Remove the Front Cover Assembly (REP 1.6).
8.
Release the switch harness from all cable clamps.
5.
Remove the Left Front Cover (REP 1.7).
9.
Remove the two screws that secure the Front Interlock Switch Assembly to the printer
(Figure 1).
6.
Remove the Top Cover Assembly (REP 1.4).
7.
Open the Rear Cover Assembly.
7.
10. Remove the Front Interlock Switch Assembly (Figure 1).
8.
Remove the Interlock Cover (REP 1.10).
9.
Remove the Left Plate Assembly (REP 1.11).
10. Remove the Exit Chute Assembly (REP 6.4).
11. Disconnect P/J30 from Print Engine Controller PWB.
12. Release the Harness from all cable clamps (Figure 1).
13. Remove the two screws that secure the Rear Interlock Switch Assembly to the printer
(Figure 1).
14. Remove the Rear Interlock Switch Assembly (Figure 1).
Figure 1 Rear Interlock Switch Assembly
Figure 1 Front Interlock Switch Assembly
Replacement
Replacement
1.
1.
Reinstall the components in the reverse order.
Initial Issue
DocuPrint N2125
02/2000
4-63
Reinstall the components in the reverse order.
Repair-Adjustment
REP 9.9, REP 9.10
REP 9.11 Offset Catch Tray Harness Assembly
REP 9.12 Duplex Harness Assembly
Parts List on PL 10.1
Removal
Parts List on PL 10.1
Removal
CAUTION
These components are susceptible to electrostatic discharge. Observe all ESD procedures to
avoid damage.
CAUTION
These components are susceptible to electrostatic discharge. Observe all ESD procedures to
avoid damage.
WARNING
WARNING
Switch off the power and disconnect the Power Cord.
Switch off the power and disconnect the Power Cord.
1.
Remove Tray 1.
1.
Remove Tray 1.
2.
Remove the Left Interface Cover Assembly (REP 1.1).
2.
Remove the Left Interface Cover Assembly (REP 1.1).
3.
Remove the Left Cover (REP 1.2).
3.
Remove the Left Cover (REP 1.2).
4.
Remove the Front Cover Assembly (REP 1.6).
4.
Remove the Front Cover Assembly (REP 1.6).
5.
Remove the Left Front Cover (REP 1.7).
5.
Remove the Left Front Cover (REP 1.7).
6.
Remove the Top Cover Assembly (REP 1.4).
6.
Remove the Top Cover Assembly (REP 1.4).
7.
Remove the Interlock Cover (REP 1.10).
7.
Remove the Rear Cover Assembly (REP 1.8).
8.
Remove the Left Plate Assembly (REP 1.11).
8.
Remove the Left Plate Assembly (REP 1.11).
9.
Remove the Exit Chute Assembly (REP 6.4).
9.
Remove the Plate Handle (REP 1.12).
10. Disconnect P/J35 from the Print Engine Controller PWB (REP 9.3).
10. Remove the MBF Chute Assembly (REP 4.1).
11. Release the Offset Catch Tray Harness from all cable clamps (Figure 1).
11. Remove the Paper Handler Assembly (REP 5.1).
12. Remove the two screws that secure the Offset Catch Tray Harness Assembly (Figure 1).
12. Remove the Transport Chute Assembly (REP 6.1).
13. Remove the Offset Catch Tray Harness Assembly from the printer (Figure 1).
13. Remove the Fuser Assembly (REP 6.2).
14. Remove the Print Cartridge Top Guide Assembly (REP 7.2).
15. Remove the Main Motor Assembly (REP 8.1).
16. Remove the Drive Gear Assembly (REP 8.2).
17. Remove the Print Engine Controller PWB (REP 9.3).
18. Remove the LVPS PWB (REP 9.5).
19. Remove the two screws that secure the Duplex Harness Assembly to the printer (Figure
1).
Figure 1 Offset Catch Tray Harness Assembly
Replacement
1.
Reinstall the components in the reverse order.
Repair-Adjustment
REP 9.11, REP 9.12
02/2000
4-64
Initial Issue
DocuPrint N2125
20. Remove the Duplex Harness Assembly (Figure 1).
Figure 1 Duplex Harness Assembly
Replacement
1.
Reinstall the components in the reverse order.
Initial Issue
DocuPrint N2125
02/2000
4-65
Repair-Adjustment
REP 9.12
Repair-Adjustment
REP 9.12
02/2000
4-66
Initial Issue
DocuPrint N2125
REP 10.1 Offset Catch Tray (OCT)
REP 10.2 Exit Tray Extension
Parts List on PL 14.1
Removal
Parts List on PL 14.1
Removal
WARNING
WARNING
Switch off the power and disconnect the Power Cord.
Switch off the power and disconnect the Power Cord.
1.
Open the printer Rear Cover.
1.
Open the Exit Tray Extension.
2.
Press the two locking tabs at the rear of the Offset Catch Tray (Figure 1).
2.
Slide the tray to the left.
3.
Lift the rear of the Offset Catch Tray approximately 1 inch (25mm).
3.
Carefully deflect the center of the tray until the right hinge pin is free (Figure 1).
4.
Slide the Offset Catch Tray toward the rear and remove (Figure 1).
4.
Slide the tray to the right and remove (Figure 1).
Figure 1 Exit Tray Extension
Replacement
1.
Reinstall the components in the reverse order.
Figure 1 Offset Catch Tray
Replacement
1.
Reinstall the components in the reverse order.
Initial Issue
DocuPrint N2125
02/2000
4-67
Repair-Adjustment
REP 10.1, REP 10.2
REP 10.3 Exit Tray
Parts List on PL 14.1
Removal
WARNING
Switch off the power and disconnect the Power Cord.
1.
Remove the Exit Tray Extension (REP 10.2).
2.
Squeeze the upper end of the Paper Weight and remove (Figure 1).
3.
Slide the tray to the left.
4.
Push the right hinge pin in until it is free of the Offset Catch Tray (Figure 2).
5.
Push the left hinge pin in until it is free of the Offset Catch Tray (Figure 2).
6.
Remove the Exit Tray.
Figure 2 Exit Tray
Replacement
1.
Reinstall the components in the reverse order.
Figure 1 Exit Tray Paper Weight
Repair-Adjustment
REP 10.3
02/2000
4-68
Initial Issue
DocuPrint N2125
REP 10.4 Rear Cover Assembly
REP 10.5 Lower Cover
Parts List on PL 14.1
Removal
Parts List on PL 14.1
Removal
WARNING
WARNING
Switch off the power and disconnect the Power Cord.
Switch off the power and disconnect the Power Cord.
1.
Remove the Offset Catch Tray (REP 10.1).
1.
2.
Remove the Exit Tray extension (REP 10.2).
2.
Carefully turn the Offset Catch Tray upside down.
3.
Remove the Exit Tray (REP 10.3).
3.
Remove the six screws that secure the lower cover (Figure 1).
4.
Turn the Offset Catch Tray upside down.
4.
Remove the Lower Cover (Figure 1).
5.
Remove the Lower Cover (REP 10.5).
6.
Remove the Inner Exit Chute Assembly (REP 10.6).
7.
Release and remove the two Rear Cover Springs (Figure 1).
8.
Remove the six screws that secure the Rear Cover (Figure 1).
9.
Remove the Rear Cover.
Remove the Offset Catch Tray (REP 10.1).
Figure 1 Lower Cover
Replacement
Figure 1 Rear Cover Assembly
1.
Hold the Stack Height Sensor Actuator out as you reinstall the lower cover.
2.
Reinstall the components in the reverse order
Replacement
1.
Reinstall the components in the reverse order.
Initial Issue
DocuPrint N2125
02/2000
4-69
Repair-Adjustment
REP 10.4, REP 10.5
REP 10.6 Inner Exit Chute Assembly
REP 10.7 Offset Catch Tray PWB
Parts List on PL 14.1
Removal
Parts List on PL 14.2
Removal
WARNING
Switch off the power and disconnect the Power Cord.
1.
Remove the Offset Catch Tray (REP 10.1).
2.
Remove the Exit Tray Extension (REP 10.2).
CAUTION
These components are susceptible to electrostatic discharge. Observe all ESD procedures to
avoid damage.
WARNING
3.
Remove the Exit Tray (REP 10.3).
Switch off the power and disconnect the Power Cord.
4.
Turn the Offset Catch Tray upside down.
1.
Remove the Offset Catch Tray (REP 10.1).
5.
Remove the Lower Cover (REP 10.5).
2.
Remove the Exit Tray Extension (REP 10.2).
6.
Remove the five screws that secure the Inner Exit Chute Assembly (Figure 1).
3.
Remove the Exit Tray (REP 10.3).
Hold open the Rear Cover.
4.
Turn the Offset Catch Tray upside down.
Remove the assembly (Figure 1).
5.
Remove the Lower Cover (REP 10.5).
7.
8.
6.
Hold open the Rear Cover.
7.
Remove the Inner Exit Chute Assembly (REP 10.6).
8.
Remove the screw that secures the PWB to the Inner Exit Chute Assembly (Figure 1).
9.
Disconnect P/J209, P/J224, P/J210, and P/J229 (Figure 1).
10. Remove the Offset Catch Tray PWB (Figure 1).
Figure 1 Inner Exit Chute Assembly
Figure 1 Offset Catch Tray PWB
Replacement
1.
Reinstall the components in the reverse order.
Replacement
1.
Repair-Adjustment
REP 10.6, REP 10.7
02/2000
4-70
Reinstall the components in the reverse order.
Initial Issue
DocuPrint N2125
REP 10.8 Motor Drive Assembly
REP 10.9 Static Eliminator
Parts List on PL 14.2
Removal
Parts List on PL 14.2
Removal
WARNING
WARNING
Switch off the power and disconnect the Power Cord.
Switch off the power and disconnect the Power Cord.
1.
Remove the Offset Catch Tray (REP 10.1).
1.
Remove the Offset Catch Tray (REP 10.1).
2.
Remove the Exit Tray Extension (REP 10.2).
2.
Remove the Exit Tray Extension (REP 10.2).
3.
Remove the Exit Tray (REP 10.3).
3.
Remove the Exit Tray (REP 10.3).
4.
Turn the Offset Catch Tray upside down.
4.
Turn the Offset Catch Tray upside down.
5.
Remove the Lower Cover (REP 10.5).
5.
Remove the Lower Cover (REP 10.5).
6.
Hold open the Rear Cover.
6.
Hold open the Rear Cover.
7.
Remove the Inner Exit Chute Assembly (REP 10.6).
7.
Remove the Inner Exit Chute Assembly (REP 10.6).
8.
Remove the two screws that secure the motor to the Inner Exit Chute Assembly (Figure
1).
8.
Remove the three screws that secure the Static Eliminator to the Inner Exit Chute (Figure
1).
9.
Disconnect P/J210 from the Offset Catch Tray PWB and remove the motor (Figure 1).
9.
Remove the Static Eliminator (Figure 1).
Figure 1 Static Eliminator
Figure 1 Motor Drive Assembly
Replacement
Replacement
1.
Install the motor with both tabs touching the plastic standoffs.
1.
2.
The ground wire on top and the earth plate at the bottom should be on the outside (Figure
1).
3.
Reinstall the components in the reverse order.
Initial Issue
DocuPrint N2125
02/2000
4-71
Reinstall the components in the reverse order.
Repair-Adjustment
REP 10.8, REP 10.9
REP 10.10 Direction Solenoid
REP 10.11 Exit Sensor Assembly
Parts List on PL 14.2
Removal
Parts List on PL 14.2
Removal
WARNING
WARNING
Switch off the power and disconnect the Power Cord.
Switch off the power and disconnect the Power Cord.
1.
Remove the Offset Catch Tray (REP 10.1).
1.
Remove the Offset Catch Tray (REP 10.1).
2.
Remove the Exit Tray Extension (REP 10.2).
2.
Remove the Exit Tray Extension (REP 10.2).
3.
Remove the Exit Tray (REP 10.3).
3.
Remove the Exit Tray (REP 10.3).
4.
Turn the Offset Catch Tray upside down.
4.
Turn the Offset Catch Tray upside down.
5.
Remove the Lower Cover (REP 10.5).
5.
Remove the Lower Cover (REP 10.5).
6.
Hold open the Rear Cover.
6.
Hold open the Rear Cover.
7.
Remove the Inner Exit Chute Assembly (REP 10.6).
7.
Remove the Inner Exit Chute Assembly (REP 10.6).
8.
Disconnect P/J228 from the Direction Solenoid (Figure 1).
8.
Release the four locking tabs and remove the sensor (Figure 1).
9.
Remove the two screws that secure the solenoid to the Inner Exit Chute Assembly (Figure
1). Remove the Solenoid.
9.
Disconnect P/J227 from the Exit Sensor Assembly (Figure 1).
Figure 1 Direction Solenoid
Replacement
1.
Reinstall the components in the reverse order.
Figure 1 Exit Sensor Assembly
Replacement
1.
Repair-Adjustment
REP 10.10, REP 10.11
02/2000
4-72
Reinstall the components in the reverse order.
Initial Issue
DocuPrint N2125
REP 10.12 Stack Full Sensor Actuator
REP 10.13 Stack Full Sensor
Parts List on PL 14.2
Removal
Parts List on PL 14.2
Removal
WARNING
WARNING
Switch off the power and disconnect the Power Cord.
Switch off the power and disconnect the Power Cord.
1.
Remove the Offset Catch Tray (REP 10.1).
1.
Remove the Offset Catch Tray (REP 10.1).
2.
Remove the Exit Tray Extension (REP 10.2).
2.
Remove the Exit Tray Extension (REP 10.2).
3.
Remove the Exit Tray (REP 10.3).
3.
Remove the Exit Tray (REP 10.3).
4.
Turn the Offset Catch Tray upside down.
4.
Turn the Offset Catch Tray upside down.
5.
Remove the Lower Cover (REP 10.5).
5.
Remove the Lower Cover (REP 10.5).
6.
Hold open the Rear Cover.
6.
Hold open the Rear Cover.
7.
Remove the Inner Exit Chute Assembly (REP 10.6).
7.
Remove the Inner Exit Chute Assembly (REP 10.6).
8.
Remove the Static Eliminator (REP 10.9).
8.
Remove the Offset Catch Tray PWB (REP 10.7).
9.
Remove the Stack Full Actuator from the two retaining clips (Figure 1).
9.
Disconnect P/J225 from the Stack Full Sensor (Figure 1).
10. Release the four locking tabs that secure the sensor (Figure 1). Remove the sensor.
Figure 1 Stack Full Sensor Actuator
Replacement
1.
Reinstall the components in the reverse order.
Figure 1 Stack Full Sensor
Replacement
1.
Initial Issue
DocuPrint N2125
02/2000
4-73
Reinstall the components in the reverse order.
Repair-Adjustment
REP 10.12, REP 10.13
REP 10.14 Offset Roll Assembly
15. Remove the Offset Roll Assembly (Figure 1).
Parts List on PL 14.2
Removal
WARNING
Switch off the power and disconnect the Power Cord.
1.
Remove the Offset Catch Tray (REP 10.1).
2.
Remove the Exit Tray Extension (REP 10.2).
3.
Remove the Exit Tray (REP 10.3).
4.
Turn the Offset Catch Tray upside down.
5.
Remove the Lower Cover (REP 10.5).
6.
Hold open the Rear Cover.
7.
Remove the Inner Exit Chute Assembly (REP 10.6).
8.
Remove the Offset Catch Tray PWB (REP 10.7).
9.
Remove the Static Eliminator (REP 10.9).
10. Remove the Stack Full Actuator (REP 10.12).
11. Release the locking tab and remove the Exit Gear (Figure 1).
12. Remove the Exit Gear Bearing (Figure 1).
13. Release the two locking tabs and remove the Offset Level from the Offset Roll Assembly
(Figure 1).
14. Remove the Exit Shaft (Figure 1).
Figure 1 Offset Roll Assembly
Replacement
1.
Repair-Adjustment
REP 10.14
02/2000
4-74
Reinstall the components in the reverse order.
Initial Issue
DocuPrint N2125
REP 10.15 Mid Roll Assembly
Parts List on PL 14.2
Removal
WARNING
Switch off the power and disconnect the Power Cord.
1.
Remove the Offset Catch Tray (REP 10.1).
2.
Remove the Exit Tray Extension (REP 10.2).
3.
Remove the Exit Tray (REP 10.3).
4.
Hold open the Rear Cover.
5.
Turn the Offset Catch Tray upside down.
6.
Remove the Lower Cover (REP 10.5).
7.
Remove the Inner Exit Chute Assembly (REP 10.6).
8.
Remove the Offset Catch Tray PWB (REP 10.7).
9.
Remove the screw that secures the ground plate to the bottom of the Motor Drive Assembly (Figure 1).
10. Remove the three screws that secure the PWB Holder to the Inner Exit Chute Assembly
(Figure 1). Remove the holder.
11. Release the locking tab and remove the Exit Gear and Bearing (Figure 2).
12. Remove the E-Ring and Bearing from the other end of the shaft (Figure 2).
13. Slide the shaft to the right and remove the left end of the Mid Roll Assembly. Remove the
assembly (Figure 3).
Figure 2 Locking Tab, Exit Gear, and Bearings
Figure 3 Mid Roll Assembly
Replacement
1.
Reinstall the components in the reverse order.
Figure 1 Ground Plate
Initial Issue
DocuPrint N2125
02/2000
4-75
Repair-Adjustment
REP 10.15
REP 10.16 Offset Assembly
REP 10.17 Offset Motor Assembly
Parts List on PL 14.2
Removal
Parts List on PL 14.2
Removal
WARNING
WARNING
Switch off the power and disconnect the Power Cord.
Switch off the power and disconnect the Power Cord.
1.
Remove the Offset Catch Tray (REP 10.1).
1.
Remove the Offset Catch Tray (REP 10.1).
2.
Remove the Exit Tray Extension (REP 10.2).
2.
Remove the Exit Tray Extension (REP 10.2).
3.
Remove the Exit Tray (REP 10.3).
3.
Remove the Exit Tray (REP 10.3).
4.
Turn the Offset Catch Tray upside down.
4.
Turn the Offset Catch Tray upside down.
5.
Remove the Lower Cover (REP 10.5).
5.
Remove the Lower Cover (REP 10.5).
6.
Hold open the Rear Cover.
6.
Hold open the Rear Cover.
7.
Remove the Inner Exit Chute Assembly (REP 10.6).
7.
Remove the Inner Exit Chute Assembly (REP 10.6).
8.
Release the two locking tabs and remove the Offset Lever from the Offset Assembly (Figure 1).
8.
Remove the Offset Assembly (REP 10.16).
9.
Remove the two screws that secure the Offset Motor (Figure 1).
Remove the two screws that secure the Offset Assembly to the Inner Exit Chute Assembly
(Figure 1).
10. Remove the Offset Motor Assembly (Figure 1).
9.
10. Disconnect P/J229 from the Offset Catch Tray PWB (Figure 1).
11. Disconnect P/J226 from the Offset Home Sensor (Figure 1).
12. Remove the harness from all harness clamps.
13. Remove the Offset Assembly (Figure 1).
Figure 1 Offset Motor Assembly
Replacement
1.
Reinstall the components in the reverse order.
Figure 1 Offset Assembly
Replacement
1.
Reinstall the components in the reverse order.
Repair-Adjustment
REP 10.16, REP 10.17
02/2000
4-76
Initial Issue
DocuPrint N2125
REP 10.18 Offset Assembly Home Sensor
Parts List on PL 14.2
Removal
WARNING
Switch off the power and disconnect the Power Cord.
1.
Remove the Offset Catch Tray (REP 10.1).
2.
Remove the Exit Tray Extension (REP 10.2).
3.
Remove the Exit Tray (REP 10.3).
4.
Turn the Offset Catch Tray upside down.
5.
Remove the Lower Cover (REP 10.5).
6.
Hold open the Rear Cover.
7.
Remove the Inner Exit Chute Assembly (REP 10.6).
8.
Remove the Offset Assembly (REP 10.16).
9.
Disconnect P/J226 from the Home Sensor (Figure 1).
10. Move the motor linkage until the flag is clear of the Sensor (Figure 1).
11. Release the locking tabs and remove the Offset Assembly Home Sensor (Figure 1).
Figure 1 Offset Assembly Home Sensor
Replacement
1.
Reinstall the components in the reverse order.
Initial Issue
DocuPrint N2125
02/2000
4-77
Repair-Adjustment
REP 10.18
Repair-Adjustment
REP 10.18
02/2000
4-78
Initial Issue
DocuPrint N2125
REP 11.1 Printer Removal
REP 11.2 550 Sheet Feeder Right Cover
Parts List on PL 11.1
Removal
Parts List on PL 11.1
Removal
WARNING
WARNING
Switch off the power and disconnect the Power Cord.
Switch off the power and disconnect the Power Cord.
1.
Remove Tray from the Feeder.
1.
2.
Remove the three screws that secure the printer to the 550 Sheet Feeder. Remove the
printer (Figure 1).
2.
Remove Tray from Feeder.
3.
Remove the four screws that secure the right cover (Figure 1).
Lift the printer & remove the 550 Sheet Feeder.
4.
Lift slightly to remove the cover (Figure 1).
3.
Remove the printer from the 550 Sheet Feeder (REP 11.1).
Figure 1 Right Cover
Replacement
1.
Reinstall the components in the reverse order.
Figure 1 Optional Feeder Assembly
Replacement
1.
Reinstall the components in the reverse order.
Initial Issue
DocuPrint N2125
02/2000
4-79
Repair-Adjustment
REP 11.1, REP 11.2
REP 11.3 550 Sheet Feeder Left Cover
REP 11.4 550 Sheet Feeder Gear Bracket Assembly
Parts List on PL 11.1
Removal
Parts List on PL 11.2
Removal
WARNING
WARNING
Switch off the power and disconnect the Power Cord.
Switch off the power and disconnect the Power Cord.
1.
Remove the printer from the 550 Sheet Feeder (REP 11.1).
1.
2.
Remove the Tray from the feeder.
2.
Remove the Tray from the Feeder.
3.
Remove the four screws that secure the Left Cover to the 550 Sheet Feeder (Figure 1).
3.
4.
Pull the top of the cover out and down to remove the cover (Figure 1).
Remove the five screws that secure the 550 Sheet Feeder Gear Bracket Assembly to the
550 Sheet Feeder (Figure 1).
4.
Remove the Gear Bracket Assembly.
Remove the printer from the 550 Sheet Feeder (REP 11.1).
Figure 1 Left Cover
Replacement
1.
Reinstall the components in the reverse order.
Figure 1 Gear Bracket Assembly
Replacement
1.
Repair-Adjustment
REP 11.3, REP 11.4
02/2000
4-80
Reinstall the components in the reverse order.
Initial Issue
DocuPrint N2125
REP 11.5 Top Plate
REP 11.6 550 Sheet Feeder Drive Assembly
Parts List on PL 11.1
Removal
Parts List on PL 11.1
Removal
WARNING
WARNING
Switch off the power and disconnect the Power Cord.
Switch off the power and disconnect the Power Cord.
1.
Remove the printer from the 550 Sheet Feeder (REP 11.1).
1.
Remove the printer from the 550 Sheet Feeder (REP 11.1).
2.
Remove the Tray from the Feeder.
2.
Remove the Tray from the Feeder.
3.
Remove the 550 Sheet Feeder Right Cover (REP 11.2).
3.
Remove the 550 Sheet Feeder Right Cover (REP 11.2).
4.
Remove the 550 Sheet Feeder Left Cover (REP 11.3).
4.
Remove the 550 Sheet Feeder Left Cover (REP 11.3).
5.
Remove 550 Sheet Feeder Gear Bracket Assembly (REP 11.4).
5.
Remove 550 Sheet Feeder Gear Bracket Assembly (REP 11.4).
6.
Remove the screw that secures the Top Plate to the Feeder (Figure 1)
6.
Remove the Top Plate (REP 11.5).
7.
Lift and remove the Top Plate from the Feeder (Figure 1).
7.
Remove the six screws that secure the 550 Sheet Feeder Drive Assembly to the 550
Sheet Feeder (Figure 1).
8.
Remove the Feeder Drive Assembly (Figure 1).
Figure 1 Feeder Drive Assembly
Figure 1 Top Plate
Replacement
1.
Replacement
1.
Reinstall the components in the reverse order.
Reinstall the components in the reverse order.
Initial Issue
DocuPrint N2125
02/2000
4-81
Repair-Adjustment
REP 11.5, REP 11.6
REP 11.7 No Paper Actuator
REP 11.8 Turn Roll Assembly
Parts List on PL 11.2
Removal
Parts List on PL 11.2
Removal
WARNING
WARNING
Switch off the power and disconnect the Power Cord.
Switch off the power and disconnect the Power Cord.
1.
Remove the printer from the 550 Sheet Feeder (REP 11.1).
1.
Remove the printer from the 550 Sheet Feeder (REP 11.1).
2.
Remove the Tray from the Feeder.
2.
Remove the Tray from the Feeder.
3.
Remove the 550 Sheet Feeder Right Cover (REP 11.2).
3.
Remove the 550 Sheet Feeder Right Cover (REP 11.2).
4.
Remove the 550 Sheet Feeder Left Cover (REP 11.3).
4.
Remove the 550 Sheet Feeder Left Cover (REP 11.3).
5.
Remove 550 Sheet Gear Bracket Assembly (REP 11.4).
5.
Remove 550 Sheet Feeder Gear Bracket Assembly (REP 11.4).
6.
Remove the Top Plate (REP 11.5).
6.
Remove the Top Plate (REP 11.5).
7.
Remove the 550 Sheet Feeder Drive Assembly (REP 11.6).
7.
Remove the 550 Sheet Paper Feeder Drive Assembly (REP 11.6).
8.
Rotate the No Paper Actuator up until the left end of the actuator can be removed from the
support (Figure 1). Remove the Actuator.
8.
Remove the No Paper Actuator (REP 11.7).
9.
Disconnect P/J64 on the Paper Feeder PWB (Figure 1).
10. Remove the four screws that secure the Turn Roll Assembly to the Feeder Assembly (Figure 1).
11. Remove the Turn Roll Assembly together with the Extension Springs and Chute Spring
(Figure 1).
12. Unhook the left and right Extension Springs from the two notches (Figure 3).
13. Remove the Chute Spring (Figure 2).
Figure 1 No Paper Actuator
Figure 1 Turn Roll Assembly
Replacement
1.
Reinstall the components in the reverse order.
Repair-Adjustment
REP 11.7, REP 11.8
02/2000
4-82
Initial Issue
DocuPrint N2125
REP 11.9 Feeder PWB
Parts List on PL 11.2
Removal
CAUTION
These components are susceptible to electrostatic discharge. Observe all ESD procedures to
avoid damage.
WARNING
Switch off the power and disconnect the Power Cord.
Figure 2 Chute Spring
1.
Remove the printer from the 550 Sheet Feeder (REP 11.1).
2.
Remove the Tray from the Feeder.
3.
Remove the 550 Sheet Feeder Right Cover (REP 11.2).
4.
Remove the 550 Sheet Feeder Left Cover (REP 11.3).
5.
Remove 550 Sheet Feeder Gear Bracket Assembly (REP 11.4).
6.
Remove the Top Plate (REP 11.5).
7.
Remove the 550 Sheet Feeder Drive Assembly (REP 11.6).
8.
Disconnect P/J64, P/J65, P/J66, and P/J67 on the Feeder PWB (Figure 1).
9.
Remove the four screws that secure the Feeder PWB and remove the PWB (Figure 1).
Figure 3 Extension Springs
Replacement
1.
Reinstall the components in the reverse order.
Figure 1 Feeder PWB
Initial Issue
DocuPrint N2125
02/2000
4-83
Repair-Adjustment
REP 11.8, REP 11.9
Replacement
REP 11.10 Feed Clutch Assembly
1.
Parts List on PL 11.2
Removal
Reinstall the components in the reverse order.
WARNING
Switch off the power and disconnect the Power Cord.
1.
Remove the printer from the 550 Sheet Feeder (REP 11.1).
2.
Remove Tray 2 from the Feeder.
3.
Remove the 550 Sheet Feeder Right Cover (REP 11.2).
4.
Remove the 550 Sheet Feeder Left Cover (REP 11.3).
5.
Remove 550 Sheet Feeder Gear Bracket Assembly (REP 11.4).
6.
Remove the Top Plate (REP 11.5).
7.
Remove the 550 Sheet Feeder Drive Assembly (REP 11.6).
8.
Remove the four screws that secure the bracket to the Paper Feeder (Figure 1).
9.
Remove the Gear 3 and 2 from the shaft of the Paper Feeder (Figure 1).
10. Remove the E-ring that secures the Feed Clutch Assembly to the feeder (Figure 2).
11. Remove the Feed Clutch (Figure 2).
12. Disconnect P/J651 From the Feed Clutch (Figure 2).
Figure 1 Bracket
Repair-Adjustment
REP 11.9, REP 11.10
02/2000
4-84
Initial Issue
DocuPrint N2125
REP 11.11 Paper Feed Rolls
Parts List on PL 11.2
Removal
WARNING
Switch off the power and disconnect the Power Cord.
1.
Remove the Tray.
2.
Open the Front Chute Assembly from the Feeder of the 550 Sheet Feeder (Figure 1).
3.
Release the locking tab on the front Feed Roll and slide the roll to the right and remove
(Figure 1).
4.
Repeat with rear Feed Roll (Figure 1).
Figure 2 Feed Clutch Assembly
Replacement
1.
Reinstall the components in the reverse order.
Figure 1 Paper Feed Rolls
Replacement
1.
Initial Issue
DocuPrint N2125
02/2000
4-85
Reinstall the components in the reverse order.
Repair-Adjustment
REP 11.10, REP 11.11
REP 11.12 Feeder Assembly
Parts List on PL 11.2
Removal
WARNING
Switch off the power and disconnect the Power Cord.
1.
Remove the printer from the 550 Sheet Feeder (REP 11.1).
2.
Remove the Tray from the Feeder.
3.
Remove the 550 Sheet Feeder Right Cover (REP 11.2).
4.
Remove the 550 Sheet Feeder Left Cover (REP 11.3).
5.
Remove 550 Sheet Feeder Gear Bracket Assembly (REP 11.4).
6.
Remove the Top Plate (REP 11.5).
7.
Remove the 550 Sheet Feeder Drive Assembly (REP 11.6).
8.
Remove the Feed Clutch Assembly (REP 11.10).
9.
Remove the E-ring that secures the left shaft of the Feeder Assembly (Figure 1).
10. Remove the left bearing from the left shaft of the Feeder Assembly (Figure 1).
11. Open the Front Chute Assembly (Figure 2).
Figure 2 Feeder Assembly
Replacement
1.
Reinstall the components in the reverse order.
NOTE: Caution: Don’t lose Bias Spring located under the Feeder Assembly.
12. Slide the Feeder Assembly to the right and remove (Figure 2).
Figure 1 E-Ring & Bearing
Repair-Adjustment
REP 11.12
02/2000
4-86
Initial Issue
DocuPrint N2125
REP 11.13 Stack Height Sensor
REP 11.14 Low Paper Sensor
Parts List on PL 3.1
Removal
Parts List on PL 11.2
Removal
WARNING
WARNING
Switch off the power and disconnect the Power Cord.
Switch off the power and disconnect the Power Cord.
1.
Remove the printer from the 550 Sheet Feeder (REP 11.1).
1.
Remove the printer from the 550 Sheet Feeder (REP 11.1).
2.
Remove the Tray from the Feeder.
2.
Remove the Tray from the Feeder.
3.
Remove the 550 Sheet Feeder Right Cover (REP 11.2).
3.
Remove the 550 Sheet Feeder Right Cover (REP 11.2).
4.
Remove the 550 Sheet Feeder Left Cover (REP 11.3).
4.
Remove the 550 Sheet Feeder Left Cover (REP 11.3).
5.
Remove 550 Sheet Feeder Gear Bracket Assembly (REP 11.4).
5.
Remove 550 Sheet Gear Bracket Assembly (REP 11.4).
6.
Remove the Top Plate (REP 11.5).
6.
Remove the Top Plate (REP 11.5).
7.
Remove the 550 Sheet Feeder Drive Assembly (REP 11.6).
7.
Remove the 550 Sheet Feeder Drive Assembly (REP 11.6).
8.
Disconnect P/J662 from the Stack Height Sensor (Figure 1).
8.
Disconnect P/J661 from the Low Paper Sensor (Figure 1).
9.
Release the five hooks and remove the Sensor (Figure 1).
9.
Release the five hooks and remove the Sensor (Figure 1).
Figure 1 Stack Height Sensor
Replacement
1.
Reinstall the components in the reverse order.
Figure 1 Low Paper Sensor
Replacement
1.
Initial Issue
DocuPrint N2125
02/2000
4-87
Reinstall the components in the reverse order.
Repair-Adjustment
REP 11.13, REP 11.14
REP 11.15 Feeder Socket
REP 11.16 550 Sheet Feeder Size Harness Assembly
Parts List on PL 3.1
Removal
Parts List on PL 11.1
Removal
WARNING
WARNING
Switch off the power and disconnect the Power Cord.
Switch off the power and disconnect the Power Cord.
1.
Remove the Tray.
1.
Remove the printer from the 550 Sheet Feeder (REP 11.1).
2.
Remove the two screws that secure the Socket to the Feeder in the printer (Figure 1).
2.
Remove the Tray from the Feeder.
3.
It may be necessary to use a scribe or small screwdriver to lift the locking tabs to disconnect P/J71.
3.
Remove the 550 Sheet Feeder Left Cover (REP 11.3).
4.
Remove the two screws that secure the 550 Sheet Feeder Size Harness Assembly to the
550 Sheet Feeder and remove from the wiring harness (Figure 1).
5.
Remove the Feeder Gear Bracket Assembly (REP 11.4).
4.
Disconnect P/J71 from the Socket and remove (Figure 1).
6.
Remove the Top Plate (REP 11.5).
7.
Remove the Feeder Drive Assembly (REP 11.6).
8.
Using a small screwdriver push the locking tab that secures the Size Sensor Housing to
the Feeder and remove (Figure 2).
9.
Disconnect P/J52 from the Size Option PWB and remove the Harness Assembly (Figure
3).
Figure 1 Feeder Socket
Replacement
1.
Figure 1 Removing Harness Assembly
Reinstall the components in the reverse order.
Repair-Adjustment
REP 11.15, REP 11.16
02/2000
4-88
Initial Issue
DocuPrint N2125
REP 11.17 Size Sensor Housing Assembly
Parts List on PL 9.1
Removal
WARNING
Switch off the power and disconnect the Power Cord.
1.
Remove the printer from the 550 Sheet Feeder (REP 11.1).
2.
Remove the Tray from the Feeder.
3.
Remove the 550 Sheet Feeder Left Cover (REP 11.3).
4.
Remove the two screws that secure the 550 Sheet Feeder Size Harness Assembly into
the hole in the 550 Sheet Feeder and remove from the wiring harness (Figure 1).
5.
Using a small screwdriver push the boss that secures the Size Sensor Housing from the
550 Sheet Feeder and remove (Figure 1).
Figure 2 Disconnecting Boss
Figure 1 Size Sensor Housing Assembly
Figure 3 Size Sensor Harness Assembly
Replacement
1.
Replacement
1.
Reinstall the components in the reverse order.
Reinstall the components in the reverse order.
Initial Issue
DocuPrint N2125
02/2000
4-89
Repair-Adjustment
REP 11.16, REP 11.17
REP 11.18 Size Sensor Actuators
4.
Reinstall the components in the reverse order.
Parts List on PL 11.1
Removal
WARNING
Switch off the power and disconnect the Power Cord.
1.
Remove the printer from the 550 Sheet Feeder (REP 11.1).
2.
Remove any lower feeders if installed.
3.
Remove the Tray from the Feeder.
4.
Remove the 550 Sheet Feeder Left Cover (REP 11.3).
5.
Remove the Size Sensor Housing Assembly (REP 11.17)
NOTE: Observe orientation of switch actuators before removal.
6.
Remove the four screws that secure the Size Sensor Actuators to the Size Sensor Housing (Figure 1).
7.
From the back side, disengage the two locking tabs that secure the Size Sensor Actuators
to the Housing Assembly and remove (Figure 1).
Figure 1 Size Sensor Housing
Replacement
Refer to inset (A)
1.
Position the Size Sensor Actuators below the Housing Assembly as shown.
2.
Press and hold (B) to allow the actuators (C) to fall into position.
3.
During reassembly ensure that locking tabs slide into position.
Repair-Adjustment
REP 11.18
02/2000
4-90
Initial Issue
DocuPrint N2125
REP 11.19 Size PWB
REP 11.20 Size Harness Assembly
Parts List on PL 9.1
Removal
Parts List on PL 9.1
Removal
CAUTION
These components are susceptible to electrostatic discharge. Observe all ESD procedures to
avoid damage.
WARNING
WARNING
Switch off the power and disconnect the Power Cord.
1.
Remove the printer from the 550 Sheet Feeder (REP 11.1).
2.
Remove the Tray from the Feeder.
Switch off the power and disconnect the Power Cord.
3.
Remove the 550 Sheet Feeder Left Cover (REP 11.3).
1.
Remove the printer from the 550 Sheet Feeder (REP 11.1).
4.
Remove the 550 Sheet Feeder Size Harness Assembly (REP 11.16).
2.
Remove the Tray from the Feeder.
5.
Remove the Size Sensor Harness Assembly (REP 11.17).
3.
Remove the 550 Sheet Feeder Left Cover (REP 11.3).
6.
Remove the Size Sensor Housing (REP 11.18).
4.
Remove the 550 Sheet Feeder Size Harness Assembly (REP 11.16).
7.
Disconnect P/J53 from the Tray 2 Size PWB (Figure 1).
5.
Remove the Size Sensor Harness Assembly (REP 11.17).
8.
Remove the two screws that secure the Size Harness Assembly (Figure 1).
6.
Remove the Size Sensor Housing (REP 11.18).
9.
Remove the Size Harness Assembly (Figure 1).
7.
Disconnect P/J53 from the Tray 2 Size PWB (Figure 1).
8.
Remove the two screws that secure the Size PWB to the Size Sensor Housing Assembly
(Figure 1).
9.
Remove the Tray 2 Size PWB (Figure 1).
Figure 1 Tray 2 Size PWB
Replacement
1.
Reinstall the components in the reverse order.
Figure 1 Size M Harness Assembly
Replacement
1.
Initial Issue
DocuPrint N2125
02/2000
4-91
Reinstall the components in the reverse order.
Repair-Adjustment
REP 11.19, REP 11.20
Repair-Adjustment
REP 11.19, REP 11.20
02/2000
4-92
Initial Issue
DocuPrint N2125
REP 12.1 Duplex Assembly
REP 12.2 Turn Chute Assembly
Parts List on PL 13.1
Removal
Parts List on PL 13.1
Removal
WARNING
WARNING
Switch off the power and disconnect the Power Cord.
Switch off the power and disconnect the Power Cord.
1.
Open the Printer Rear Cover.
1.
2.
Push the left and right latches in and pull the Duplex Assembly out and up to remove (Figure 1).
2.
Remove the two screws that secure the Turn Chute Assembly (Figure 1).
3.
Remove the Turn Chute Assembly (Figure 1).
Remove the Duplex Assembly (REP 12.1).
Figure 1 Turn Chute Assembly
Replacement
Figure 1 Duplex Assembly
1.
Reinstall the components in the reverse order.
Replacement
1.
Reinstall the components in the reverse order.
Initial Issue
DocuPrint N2125
02/2000
4-93
Repair-Adjustment
REP 12.1, REP 12.2
REP 12.3 Duplex Cover
REP 12.4 Duplex PWB
Parts List on PL 13.2
Removal
Parts List on PL 13.2
Removal
WARNING
Switch off the power and disconnect the Power Cord.
1.
Remove the Duplex Assembly (REP 12.1).
2.
Turn the Duplex Assembly upside down.
CAUTION
These components are susceptible to electostatic discharge. Observe all ESD procedures to
avoid damage.
WARNING
3.
Release the three locking tabs that secure the cover (Figure 1).
Switch off the power and disconnect the Power Cord.
4.
Remove the Duplex Cover (Figure 1).
1.
Remove the Duplex Assembly (REP 12.1).
2.
Remove the Duplex Cover (REP 12.3).
3.
Carefully release the locking tab and remove the PWB to access the connectors (Figure
1).
4.
Disconnect P/J392, P/J37, P/J38 and P/J39 (Figure 1).
5.
Remove the Duplex PWB (Figure 1).
Figure 1 Duplex PWB
Replacement
Figure 1 Duplex Cover
1.
Reinstall the components in the reverse order.
Replacement
1.
Reinstall the components in the reverse order.
Repair-Adjustment
REP 12.3, REP 12.4
02/2000
4-94
Initial Issue
DocuPrint N2125
REP 12.5 Drive Cover
REP 12.6 Connector Chute Assembly
Parts List on PL 13.1
Removal
Parts List on PL 13.1
Removal
WARNING
WARNING
Switch off the power and disconnect the Power Cord.
Switch off the power and disconnect the Power Cord.
1.
Remove the Duplex Assembly (REP 12.1).
1.
Remove the Duplex Assembly (REP 12.1).
2.
Remove the two screws that secure the cover (Figure 1).
2.
Remove the Duplex Cover (REP 12.3).
3.
Remove the Drive Cover (Figure 1).
3.
Remove the Drive Cover (REP 12.5).
4.
Remove the Duplex PWB (REP 12.4). Only disconnect P/J39 (Figure 1).
5.
Remove the connector harness from all cable clamps and pull connector through the hole
in the frame (Figure 1).
6.
Remove the two screws that secure the Connector Chute Assembly (Figure 1).
Figure 1 Drive Cover
Replacement
1.
Reinstall the components in the reverse order.
Figure 1 Connector Chute Assembly
Replacement
1.
Initial Issue
DocuPrint N2125
02/2000
4-95
Reinstall the components in the reverse order.
Repair-Adjustment
REP 12.5, REP 12.6
REP 12.7 Upper Chute Assembly
Parts List on PL 13.1
Removal
WARNING
Switch off the power and disconnect the Power Cord.
1.
Remove the Duplex Assembly (REP 12.1).
2.
Remove the Duplex Cover (REP 12.3).
3.
Remove the Drive Cover (REP 12.5).
4.
Remove the Connector Chute Assembly (REP 12.6).
5.
Push the two locking tabs out to release the Upper Chute Assembly (Figure 1).
6.
Lift the Upper Chute until it is straight up (Figure 2).
7.
Lift the right end to remove it from the right mounting (Figure 2).
8.
Move the Upper Chute Assembly to the right and remove.
Figure 2 Upper Chute Assembly
Replacement
1.
Reinstall the components in the reverse order.
Figure 1 Locking Tabs
Repair-Adjustment
REP 12.7
02/2000
4-96
Initial Issue
DocuPrint N2125
REP 12.8 Motor Assembly
REP 12.9 Rear Roll Assembly
Parts List on PL 13.2
Removal
Parts List on PL 13.2
Removal
WARNING
WARNING
Switch off the power and disconnect the Power Cord.
Switch off the power and disconnect the Power Cord.
1.
Remove the Duplex Assembly (REP 12.1).
1.
Remove the Duplex Assembly (REP 12.1).
2.
Remove the Duplex Cover (REP 12.3).
2.
Remove the Turn Chute Assembly (REP 12.2).
3.
Remove the Drive Cover (REP 12.5).
3.
Remove the Duplex Cover (REP 12.3).
4.
Disconnect P/J38 from the Duplex PWB (Figure 1).
4.
Remove the Drive Cover (REP 12.5).
5.
Remove the harness from all cable clamps (Figure 1).
5.
Remove the Motor Assembly (REP 12.8).
6.
Remove the two screws that secure the Motor Assembly (Figure 1).
6.
Release the locking tab and remove the Rear Belt Stopper (Figure 1).
7.
Remove the Motor Assembly (Figure 1).
7.
Remove the Duplex Gear (Figure 1).
8.
Remove Gears 17 and 18 (Figure 1).
9.
Release the locking tabs and remove both the left and right bearings (Figure 1).
10. Move the Rear Roll Assembly forward, then to the left until the right end is free (Figure 2).
11. Remove the Rear Roll Assembly (Figure 2).
Figure 1 Locking Tab and Rear Belt Stopper
Figure 1 Motor Assembly
Replacement
1.
Reinstall the components in the reverse order.
Initial Issue
DocuPrint N2125
02/2000
4-97
Repair-Adjustment
REP 12.8, REP 12.9
REP 12.10 Middle Roll Assembly
Parts List on PL 13.2
Removal
WARNING
Switch off the power and disconnect the Power Cord.
1.
Remove the Duplex Assembly (REP 12.1).
2.
Remove the Turn Chute Assembly (REP 12.2).
3.
Remove the Duplex Cover (REP 12.3).
4.
Remove the Drive Cover (REP 12.5).
5.
Remove the Duplex PWB (REP 12.4).
6.
Remove the Connector Chute Assembly (REP 12.6).
7.
Remove the Motor Assembly (REP 12.8).
8.
Release the locking tab and remove the Middle Belt Stopper (Figure 1).
9.
Remove the Synchronous Belt from the pulley.
10. Remove the Middle Duplex Gear (Figure 1).
11. Remove 17 and 18 Gear (Figure 1).
12. Use a small screwdriver to release the left and right bearings (Figure 1).
Figure 2 Rear Roll Assembly
Replacement
1.
13. Lift the Middle Roll Assembly then move the roller to the left until the right end is free (Figure 2).
14. Remove the Middle Roll Assembly (Figure 2).
Reinstall the components in the reverse order.
Figure 1 Locking Tab and Middle Belt Stopper
Repair-Adjustment
REP 12.9, REP 12.10
02/2000
4-98
Initial Issue
DocuPrint N2125
REP 12.11 Front Roll Assembly
Parts List on PL 13.2
Removal
WARNING
Switch off the power and disconnect the Power Cord.
1.
Remove the Duplex Assembly (REP 12.1).
2.
Release the tabs and open the Upper Chute Assembly (Figure 1).
3.
Release the locking tab and remove the Front Belt Stopper (Figure 1).
4.
Remove the Synchronous Belt from the Pulley (REP 12.12).
5.
Remove the Drive Gear (Figure 1).
6.
Use a small screwdriver to release the left and right bearings (Figure 1).
7.
Lift the Roll Assembly and move it to the left until the right end is free (Figure 2).
8.
Remove the Front Roll Assembly (Figure 2).
Figure 2 Middle Roll Assembly
Replacement
1.
Reinstall the components in the reverse order.
Figure 1 Locking Tab and Front Belt Stopper
Initial Issue
DocuPrint N2125
02/2000
4-99
Repair-Adjustment
REP 12.10, REP 12.11
REP 12.12 Synchronous Belt
Parts List on PL 13.2
Removal
WARNING
Switch off the power and disconnect the Power Cord.
1.
Remove the Duplex Assembly (REP 12.1).
2.
Remove the Drive Cover (REP 12.5).
3.
Remove the Front Belt Stopper (Figure 1).
4.
Remove the Synchronous Belt from the pulleys (Figure 1).
Figure 2 Front Roll Assembly
Replacement
1.
Reinstall the components in the reverse order.
Figure 1 Synchronous Belt
Replacement
1.
Repair-Adjustment
REP 12.11, REP 12.12
02/2000
4-100
Reinstall the components in the reverse order.
Initial Issue
DocuPrint N2125
REP 12.13 Transport Sensor
REP 12.14 Face Up Tray Sensor
Parts List on PL 13.2
Removal
Parts List on PL 13.2
Removal
WARNING
WARNING
Switch off the power and disconnect the Power Cord.
Switch off the power and disconnect the Power Cord.
1.
Remove the Duplex Assembly (REP 12.1).
1.
2.
Remove the Duplex Cover (REP 12.3).
2.
Release the four locking tabs that secure the Face Up Tray Sensor (Figure 1).
3.
Disconnect P/J37 from the Duplex PWB (Figure 1).
3.
Disconnect P/J361 from the Face Up Tray Sensor (Figure 1).
4.
Release the four locking tabs that secure the Transport Sensor (Figure 1).
4.
Remove the Sensor (Figure 1).
5.
Remove the Sensor (Figure 1).
Remove the Duplex Assembly (REP 12.1).
Figure 1 Face Up Tray Sensor
Figure 1 Transport Sensor
Replacement
1.
Reinstall the components in the reverse order.
Replacement
1.
Reinstall the components in the reverse order.
Initial Issue
DocuPrint N2125
02/2000
4-101
Repair-Adjustment
REP 12.13, REP 12.14
Repair-Adjustment
REP 12.13, REP 12.14
02/2000
4-102
Initial Issue
DocuPrint N2125
REP 13.1 Bottom Cover
REP 13.2 Top Chute
Parts List on PL 12.1
Removal
Parts List on PL 12.1
Removal
WARNING
WARNING
Switch off the power and disconnect the Power Cord.
Switch off the power and disconnect the Power Cord.
1.
Remove the Envelope Feeder from the printer.
1.
2.
Turn the Feeder upside down.
2.
Remove the Bottom Cover (REP 13.1).
3.
Remove the two screws that secure the front of the Bottom Cover (Figure 1).
3.
Remove the four screws that secure the Top Chute (Figure 1).
4.
Rotate the front of the Bottom Cover up until the two rear tabs can be removed from the
Feeder (Figure 1).
4.
Rotate the feeder unit up and disconnect P/J417 from the Exit Sensor (Figure 1).
5.
Slide the feeder unit to the right and remove it from the Top Chute (Figure 1).
Remove the Envelope Feeder from the printer.
NOTE: Make note of how the Harness Connector is inserted in the Bottom Cover.
5.
Lift the Bottom Cover and remove the harness connector from the cover (Figure 1).
Figure 1 Top Chute
Figure 1 Bottom Cover
Replacement
1.
Reinstall the components in the reverse order.
Initial Issue
DocuPrint N2125
Replacement
1.
02/2000
4-103
Reinstall the components in the reverse order.
Repair-Adjustment
REP 13.1, REP 13.2
REP 13.3 Envelope Feeder PWB
REP 13.4 Retard Roll Assembly
Parts List on PL 12.2
Removal
Parts List on PL 12.1
Removal
CAUTION
These components are susceptible to electrostatic discharge. Observe all ESD procedures to
avoid damage.
WARNING
Switch off the power and disconnect the Power Cord.
1.
Remove the Envelope Feeder from the printer.
2.
Remove the Bottom Cover (REP 13.1).
Switch off the power and disconnect the Power Cord.
3.
Remove the Top Chute (REP 13.2).
1.
Remove the Envelope Feeder from the printer.
4.
Carefully pry up on the two hinge pins and remove the Retard Roll Assembly (Figure 1).
2.
Remove the Bottom Cover (REP 13.1).
3.
Remove the Top Chute (REP 13.2).
WARNING
4.
Disconnect P/J411, P/J 412, P/J413, and P/J414 from the Feeder PWB (Figure 1).
5.
Remove the screw that secures the Feeder PWB to the frame (Figure 1).
Figure 1 Retard Roll Assembly
Replacement
1.
Reinstall the components in the reverse order.
Figure 1 Envelope Feeder PWB
Replacement
1.
Reinstall the components in the reverse order.
Repair-Adjustment
REP 13.3, REP 13.4
02/2000
4-104
Initial Issue
DocuPrint N2125
REP 13.5 Exit Pinch Roll
REP 13.6 Exit Sensor Assembly
Parts List on PL 12.1
Removal
Parts List on PL 12.1
Removal
WARNING
WARNING
Switch off the power and disconnect the Power Cord.
Switch off the power and disconnect the Power Cord.
1.
Remove the Envelope Feeder from the printer.
1.
Remove the Envelope Feeder from the printer.
2.
Remove the Bottom Cover (REP 13.1).
2.
Remove the Bottom Cover (REP 13.1).
3.
Remove the Top Chute (REP 13.2).
3.
Remove the Top Chute (REP 13.2).
4.
Carefully pry up on either end of the Pinch Roll until it is free of the mounting (Figure 1).
4.
Release the four locking tabs and remove the Exit Sensor (Figure 1).
5.
Remove the Exit Pinch Roll (Figure 1).
Figure 1 Exit Pinch Roll
Replacement
1.
Reinstall the components in the reverse order.
Initial Issue
DocuPrint N2125
Figure 1 Exit Sensor Assembly
Replacement
1.
02/2000
4-105
Reinstall the components in the reverse order.
Repair-Adjustment
REP 13.5, REP 13.6
REP 13.7 Weight Arm
REP 13.8 Tray Extension
Parts List on PL 12.1
Removal
Parts List on PL 12.1
Removal
WARNING
WARNING
Switch off the power and disconnect the Power Cord.
Switch off the power and disconnect the Power Cord.
1.
Remove the Envelope Feeder from the printer.
1.
Remove the Envelope Feeder from the printer.
2.
Deflect the center of the Weight Arm until the end of the arm is free of the hinge pin (Figure 1).
2.
Remove the Bottom Cover (REP 13.1).
3.
Pull the extension out at a 45° angle and remove (Figure 1).
3.
Remove the Weight Arm (Figure 1).
Figure 1 Tray Extension
Replacement
1.
Reinstall the components in the reverse order.
Figure 1 Weight Arm
Replacement
1.
Reinstall the components in the reverse order.
Repair-Adjustment
REP 13.7, REP 13.8
02/2000
4-106
Initial Issue
DocuPrint N2125
REP 13.9 No Paper Actuator
REP 13.10 No Paper Sensor
Parts List on PL 12.2
Removal
Parts List on PL 12.2
Removal
WARNING
WARNING
Switch off the power and disconnect the Power Cord.
Switch off the power and disconnect the Power Cord.
1.
Remove the Envelope Feeder from the printer.
1.
Remove the Envelope Feeder from the printer.
2.
Remove the Bottom Cover (REP 13.1).
2.
Remove the Bottom Cover (REP 13.1).
3.
Carefully pry up on the hinge pins to remove the actuator from the mounting (Figure 1).
3.
Remove the No Paper Actuator (REP 13.9).
4.
Rotate the No Paper Actuator up to remove (Figure 1).
4.
Release the three locking tabs that secure the No Paper Sensor (Figure 1).
5.
Disconnect P/J415 from the sensor (Figure 1).
Figure 1 No Paper Actuator
Replacement
1.
Reinstall the components in the reverse order.
Figure 1 No Paper Sensor
Replacement
1.
Initial Issue
DocuPrint N2125
02/2000
4-107
Reinstall the components in the reverse order.
Repair-Adjustment
REP 13.9, REP 13.10
REP 13.11 Gear Cover
REP 13.12 Feed Clutch
Parts List on PL 12.2
Removal
Parts List on PL 12.2
Removal
WARNING
WARNING
Switch off the power and disconnect the Power Cord.
Switch off the power and disconnect the Power Cord.
1.
Remove the Envelope Feeder from the printer.
1.
Remove the Envelope Feeder from the printer.
2.
Remove the Bottom Cover (REP 13.1).
2.
Remove the Bottom Cover (REP 13.1).
3.
Remove the Top Chute (REP 13.2).
3.
Remove the Top Chute (REP 13.2).
4.
Remove the Envelope Feeder PWB (REP 13.3).
4.
Remove the Envelope Feeder PWB (REP 13.3).
5.
Remove the two screws that secure the Gear Cover on the feeder (Figure 1).
5.
Remove the Gear Cover (REP 13.11).
6.
Disconnect P/J416 from the Feed Clutch (Figure 1).
6.
Remove the Torque Clutch (Figure 1).
7.
Remove the cover.
7.
Remove the Feed Clutch (Figure 2).
Figure 1 Torque Clutch
Figure 1 Gear Cover
Replacement
1.
Reinstall the components in the reverse order.
Figure 2 Feed Clutch
Replacement
1.
Repair-Adjustment
REP 13.11, REP 13.12
02/2000
4-108
Reinstall the components in the reverse order.
Initial Issue
DocuPrint N2125
REP 13.13 Transport Roll Assembly
Replacement
Parts List on PL 12.2
Removal
1.
Reinstall the components in the reverse order.
WARNING
Switch off the power and disconnect the Power Cord.
1.
Remove the Envelope Feeder from the printer.
2.
Remove the Bottom Cover (REP 13.1).
3.
Remove the Top Chute (REP 13.2).
4.
Remove the Envelope Feeder PWB (REP 13.3).
5.
Remove the Gear Cover (REP 13.11).
6.
Remove the Torque Clutch and Bearing from Transport Roll Assembly (Figure 1).
7.
Move the right bearing and Transport Roll Shaft to the left until it is free of the right support (Figure 2).
8.
Lift and remove the Transport Roll Assembly (Figure 2).
Figure 1 Torque Clutch
Figure 2 Transport Roll Assembly
Initial Issue
DocuPrint N2125
02/2000
4-109
Repair-Adjustment
REP 13.13
REP 13.14 Bottom Roll Assembly
Parts List on PL 12.2
Removal
WARNING
Switch off the power and disconnect the Power Cord.
1.
Remove the Envelope Feeder from the printer.
2.
Remove the Bottom Cover (REP 13.1).
3.
Remove the Top Chute (REP 13.2).
4.
Remove the Envelope Feeder PWB (REP 13.3).
5.
Remove the Gear Cover (REP 13.11).
6.
Remove the Torque Clutch (Figure 1).
7.
Remove the Feed Clutch (Figure 1).
8.
Remove the one way clutch and bearing from the Bottom Roll Assembly shaft (Figure 2).
9.
Slide the Bottom Roll Assembly and the right bearing to the left until free of the mounting
(Figure 2).
10. Raise the right end of the shaft and remove (Figure 3).
Figure 2 Clutch and Bearing
Figure 1 Torque Clutch
Figure 3 Bottom Roll Assembly
Replacement
1.
Repair-Adjustment
REP 13.14
02/2000
4-110
Reinstall the components in the reverse order.
Initial Issue
DocuPrint N2125
REP 13.15 Feed Roll Assembly 1
Parts List on PL 12.2
Removal
WARNING
Switch off the power and disconnect the Power Cord.
1.
Remove the Envelope Feeder from the printer.
2.
Remove the Bottom Cover (REP 13.1).
3.
Remove the Top Chute (REP 13.2).
4.
Remove the No Paper Actuator (REP 13.9).
5.
Remove the Envelope Feeder PWB (REP 13.3).
6.
Remove the Gear Cover (REP 13.11).
7.
Remove the Feed Clutch (REP 13.12).
8.
Remove the Torque Clutch, Gear, and Bearing from the Roll Feed shaft (Figure 1).
9.
Slide the Feed Roll Shaft and bearing to the left until it is free of the right mounting (Figure
2).
10. Lift the right end and remove assembly from the feed belts (Figure 2).
11. If replacing the feeder rolls, remove the rolls from the assembly (Figure 3).
Figure 2 Feed Roll Shaft
Figure 1 Bearing
Figure 3 Feed Roll Assembly 1
Replacement
1.
Initial Issue
DocuPrint N2125
02/2000
4-111
Reinstall the components in the reverse order.
Repair-Adjustment
REP 13.15
REP 13.16 Feed Roll Assembly 2
Parts List on PL 12.2
Removal
WARNING
Switch off the power and disconnect the Power Cord.
1.
Remove the Envelope Feeder from the printer.
2.
Remove the Bottom Cover (REP 13.1).
3.
Remove the Top Chute (REP 13.2).
4.
Remove the Envelope Feeder PWB (REP 13.3).
5.
Remove the Gear Cover (REP 13.11).
6.
Remove the Torque Clutch and Bearing from the Feed Roll Shaft (Figure 1).
7.
Slide the Feed Roll Shaft and Bearing to the left until it is free of the right mounting (Figure
2).
8.
Remove the Feed Roll Assembly 2 (Figure 2).
9.
If replacing the feeder rolls, remove the feeder rolls from the assembly (Figure 3).
Figure 2 Feed Roll Shaft
Figure 3 Feed Roll Assembly 2
Figure 1 Torque Clutch and Bearing
Replacement
1.
Repair-Adjustment
REP 13.16
02/2000
4-112
Reinstall the components in the reverse order.
Initial Issue
DocuPrint N2125
REP 13.17 Feed Belts
Parts List on PL 12.2
Removal
WARNING
Switch off the power and disconnect the Power Cord.
1.
Remove the Envelope Feeder from the printer.
2.
Remove the Bottom Cover (REP 13.1).
3.
Remove the Top Chute (REP 13.2).
4.
Remove the Envelope Feeder PWB (REP 13.3).
5.
Remove the Gear Cover (REP 13.11).
6.
Remove the Feed Clutch (REP 13.12).
7.
Remove the Bottom Roll Assembly (REP 13.14).
8.
Remove the Feed Roll Assembly 1 (REP 13.15).
9.
Remove the two pinch rolls from under the feed belts (Figure 1).
10. Rotate one side of the belt and slide it through the slot in the frame (Figure 2). Remove
the belts.
Figure 2 Feed Belts
Replacement
1.
Reinstall the components in the reverse order.
Figure 1 Pinch Roll
Initial Issue
DocuPrint N2125
02/2000
4-113
Repair-Adjustment
REP 13.17
Repair-Adjustment
REP 13.17
02/2000
4-114
Initial Issue
DocuPrint N2125
ADJ 1.1 Registration
6.
Press Enter to save the setting.
Purpose
7.
Scroll to Test Print. Select Print Pattern and press Enter.
8.
Measure the distance from the lead edge of the paper to the lead edge of the image (A)
and measure the distance from the trail edge of the paper to the trail edge of the image
(B) (Figure 1). These two measurements should be within 1mm.
9.
Measure the distance from the left edge of the paper to the left edge of the image (C) and
measure the distance from the right edge of the paper to the right edge of the image (D)
(Figure 1). These two measurements should be within 1mm.
To adjust the registration in the scan direction and the process direction.
To set Default Tray
1.
Enter Diagnostics and select Test Print.
2.
Scroll to Input Tray.
3.
Select the tray that you wish to feed from.
4.
Press “Enter”.
5.
Exit Diagnostics.
10. Repeat steps 1 through 9 until equal lead edge to trail edge (process direction) and sideto-side (scan direction) measurements are achieved.
Check
1.
Ensure that Edge to Edge Printing is set to off.
2.
Set the Default Tray.
3.
Enter diagnostics and select Test Print.
4.
Scroll to Print Pattern and press Enter to run a IOT Test Pattern.
5.
After at least two prints are completed (Figure 1), press and hold the [0] key for one second to stop printing.
6.
7.
The measurement should be made on two consecutive test patterns from each tray.
•
Measure the distance from the lead edge of the paper to the lead edge of the image
(A) and measure the distance from the trail edge of the paper to the trail edge of the
image (B) (Figure 1). These two measurements should be within 1mm.
•
Measure the distance from the left edge of the paper to the left edge of the image (C)
and measure the distance from the right edge of the paper to the right edge of the
image (D) (Figure 1). These two measurements should be within 1mm.
If either measurement does not meet specification perform the adjustment below.
8.
Repeat steps 2 through 7 for each paper tray.
9.
From the Test Print menu, set duplex to on and print a duplex test print. Check the adjustment (step 5) for the duplexed print.
NOTE: When checking the measurement for a duplexed print in the scan direction, you
must exit diagnostics and run a duplexed System Controller Test Print. Fold the test pattern in half, left edge to right edge. The target should be within 2mm of the fold line.
Adjustment
1.
Enter Diagnostics and select NVM Config.
2.
Enter the NVM Password (0734).
3.
Scroll to process (Tray X Proc Dir) or scan (Tray X Scan Dir) adjustment for the desired
tray.
4.
Press the Value Key (3 or 7) to display the current setting.
5.
Use the 3 or 7 keys to set the new value (Each increment of change equals 0.5mm).
NOTE: In the scan direction, increasing the value moves the image to the right and
decreasing the value moves the image to the left. In the process direction, increasing the
value moves the image toward the trail edge and decreasing the value moves the image
towards the lead edge.
Initial Issue
DocuPrint N2125
02/2000
4-115
Figure 1 IOT Test Pattern
Repair-Adjustment
ADJ 1.1
Repair-Adjustment
ADJ 1.1
02/2000
4-116
Initial Issue
DocuPrint N2125
5 Parts-list
Introduction......................................................................................................................
5-3
Covers (1 of 3)
PL 1.1 Covers (1 of 3) .....................................................................................................
5-4
5-5
PL 1.3 Covers (3 of 3) Options........................................................................................
5-6
PL 2.1 Tray 1 (1 of 2) ......................................................................................................
5-23
Offset Catch Tray 2
PL 14.2 Offset Catch Tray (2 of 2) ..................................................................................
Paper Cassette 1
5-22
Offset Catch Tray 1
PL 14.1 Offset Catch Tray (1 of 2) ..................................................................................
Covers (3 of 3)
5-21
Duplex 2
PL 13.2 Duplex (2 of 2) ...................................................................................................
Covers (2 of 3)
PL 1.2 Covers (2 of 3) .....................................................................................................
Duplex 1
PL 13.1 Duplex (1 of 2) ...................................................................................................
5-24
5-7
Paper Cassette 2
PL 2.2 Tray 1 (2 of 2) ......................................................................................................
5-8
Paper Feeder
PL 3.1 Paper Feeder .......................................................................................................
5-9
MBF Chute
PL 4.1 MBF Chute...........................................................................................................
5-10
Paper Transport
PL 5.1 Paper Handler Assembly .....................................................................................
5-11
Chute Transport & Fuser
PL 6.1 Chute Transport & Fuser .....................................................................................
5-12
Exit
PL 7.1 Exit .......................................................................................................................
5-13
Drive & Xerographics
PL 8.1 Drive & Xerographics ...........................................................................................
5-14
Frame & Size Sensor
PL 9.1 Frame & Size Sensor...........................................................................................
5-15
Electrical
PL 10.1 Electrical ............................................................................................................
5-16
Optional Feeder 1
PL 11.1 500 Sheet Feeder (1 of 2)..................................................................................
5-17
Optional Feeder 2
PL 11.2 500 Sheet Feeder (2 of 2)..................................................................................
5-18
Envelope Feeder 1
PL 12.1 Envelope Feeder (1 of 2) ...................................................................................
5-19
Envelope Feeder 2
PL 12.2 Envelope Feeder (2 of 2) ...................................................................................
Initial Issue
DocuPrint N2125
5-20
02/2000
5-1
Parts-list
Parts-list
02/2000
5-2
Initial Issue
DocuPrint N2125
Introduction
XE ------ European Parts Distribution System
Overview
AO ------ South America Parts Distribution System
The Parts List section provides exploded view illustrations of
all spared subsystem components and a listing of the
corresponding part numbers. The illustrations show the
relationships between parts.
Organization of this Section
The following elements make up the Parts List section:
Parts Lists (PL)
Each item number in the part numbers listing corresponds to
an item number in the illustration. All the parts in a given
subsystem of the machine will be located in the same
illustration or in a series of associated illustrations. The parts
which are not spared are indicated by “- -” in the Part column.
Exploded View Illustrations
An item that is called out on an illustration has a
corresponding listing within this section.
Components are given item numbers that correspond to the
part number listings.
Hardware items are lettered. All hardware dimensions are in
millimeters unless otherwise noted.
Assemblies and kits are a combination of several separate
components. A bracket is used on the illustration when an
assembly or kit is spared but is not shown. The item number
of the assembly or kit precedes the bracket; the item numbers
of the piece parts follow it.
XCL ------ Canada Parts Distribution System
P/J ------ Plug/Jack
P/O ------ Part of
W/ ------ With
W/O ------ Without
Tag
A Tag is used when a part or area of the system has been modified. The Change Tag Index, which is found in the General
Procedures/Information Section, lists the name and purpose of the Tag. In some cases, you will go to the parts lists and find a
part number listed as “with Tag.” Go to the Change Tag Index for a description of what the Tag is and what you need to install the
Tag. The Change Tag Index will either list a kit number or indicate “piece part.” If “piece part” is indicated, the parts lists
reference(s) will be given and all parts associated with the Tag will have to be individually located, ordered, and installed.
The notation “P/O Tag” after a part number indicates that the item is part of a Tag. The notation “Tag” after a part number will be
used only to indicate the entire Tag, whether that is a kit number or an individual part.
Whenever you install a Tag kit or all the piece parts that make up a Tag, mark the appropriate number on the Tag matrix.
Using the Parts List
1.
The numbers shown in each illustration correspond to the parts list number for that illustration.
2.
Throughout this manual, parts are identified by the prefix “PL”, followed by a number, a decimal point, and another number.
For example, PL3.1.12 means the part is item 12 of parts list 3.1.
3.
The capital letters “C”, “E”, and “S” shown in an illustration stand for C-ring, E-ring, and Screw, respectively.
4.
A shaded triangle t in an illustration indicates the item is part of an assembly.
5.
The notation “with X~Y” following an part name indicates an assembly that is made up of components X through Y. For
example, “1 (with 2~4)” means part 1 consists of part 2, part 3, and part 4.
Part Number Index
6.
The notation "RS" means that the part is a requested spare. Part numbers for these parts will be provided as soon as they
are available.
This index lists all the spared parts in the system in numerical
order. Each number is followed by a reference to the parts list
on which the part may be found.
7.
An asterisk * following a part name indicates the page contains a note about this part.
8.
The notation “J1<>J2 and P2” is attached to a wire harness. It indicates that connector jack 1 is attached to one end of the
wire harness and connector jack 2 is attached to the other end that is plugged into plug 2.
9.
A notation "(part of item 1.1)" indicates that the part is included with item 1.2.1 (PL1.2, line item 1).
Other Information
Abbreviations
Abbreviations which may be used in the parts lists text or
illustrations are as follows:
US ------ United States Parts Distribution System
Initial Issue
DocuPrint N2125
02/2000
5-3
Parts-list
Introduction
PL 1.1 Covers (1 of 3)
Item
Part
Description
1
2
3
4
5
6
7
8
48E64591
802K11330
48E64642
48K76454
802K09700
162K55281
48E64612
802K10800
9
10
11
12
13
14
15
16
17
18
19
------------3E48991
----3E43880
50K39130
48E64624
----891E95830
Left Cover
Left Interface Cover
Option Cover
Top Cover Assembly
Control Panel Assembly (with 6)
Control Panel Harness Assembly
Right Cover
Front Cover Assembly (with 10-13,
15-17, 20, 22)
Front Cover
Left Latch Assembly
Lever
Right Latch Assembly
Stopper Cover
Envelope Chute
Tray Stopper
MBF Tray Assembly
Left Front Cover
MBF Chute
Control Panel Overlay (English
110V)
Control Panel Overlay (Symbols
220V)
Control Panel Overlay (Spanish)
Control Panel Overlay (Portuguese)
Control Panel Overlay (French
Canadian)
Xerox Logo Badge
Hardware Kit (Includes Screw)
892E03010
892E15040
892E15050
892E15020
20
S
892E08500
600K79660
Initial Issue
DocuPrint N2125
02/2000
5-4
Parts-list
PL 1.1
PL 1.2 Covers (2 of 3)
Item
1
2
3
4
5
6
7
8
9
10
11
12
13
S
Part
Description
------------------------600K79530
54K14991
----3E46120
--------802K10010
600K79660
Latch Spring
Left Latch
Right Latch
Latch Cover
Rear Cover
Direction Arm
Cap Kit (quantity 2)
Face Up Chute Assembly
Right Pivot Stopper
Stopper
Duplex Guide Rail-Left
Duplex Guide Rail-Right
Rear Cover Assembly (with 1-9)
Hardware Kit (Includes Screw)
Initial Issue
DocuPrint N2125
02/2000
5-5
Parts-list
PL 1.2
PL 1.3 Covers (3 of 3) Options
Item
Part
Description
1
-----
2
3
4
5
6
7
8
9
10
11
12
13
14
15
16
17
S
--------------------------------------------54K14991
--------3E46120
600K79530
600K79660
Rear Face-up Cover Assembly
(with 2-15)
Latch Spring
Left Latch
Right Latch
Latch Cover
Rear Cover
Face-up Sub Tray
Face-up Main Tray
Eliminator
Pinch Spring
Pinch Roll
Direction Arm
Face-up Chute Assembly
Right Stopper Pivot
Face-up Ground Spring
Right Stopper
Cap Kit (quantity 2)
Hardware Kit (Includes Screw)
Initial Issue
DocuPrint N2125
02/2000
5-6
Parts-list
PL 1.3
PL 2.1 Tray 1 (1 of 2)
Item
Part
Description
1
109R00448
2
3
4
5
6
7
8
9
10
11
12
13
14
15
16
17
18
19
20
S
----------------------------------------------------------------------------600K79660
Cassette Assembly (with 2-20 and
PL 2.2)
Bottom Plate Assembly
Customer Size Knob
Custom Size Plate
End Guide Assembly
Extension Housing
Rack Slide
Extension Spring
Latch Spring
Size Plate
Base Extension
Left Side Guide Assembly
Right Side Guide Assembly
Link
Tray 1 Base
Rack
Pinion
Sub Cassette Assembly
Tray 1 Actuator
Actuator Cover
Hardware Kit (Includes Screw)
Initial Issue
DocuPrint N2125
02/2000
5-7
Parts-list
PL 2.1
PL 2.2 Tray 1 (2 of 2)
Item
Part
Description
1
-----
2
3
4
5
6
7
8
9
10
11
12
13
14
15
16
17
18
19
20
21
22
23
24
25
26
27
S
--------------------5K82890
600K79550
----809E11830
--------------------------------------------127K24682
--------114E11680
--------600K79660
Cassette Assembly (with 2-27) (P/
O PL 2.1 Item 1)
Retard Cap
Retard Chute Base - Left
Retard Chute
Retard Chute Base - Right
Retard Shaft Assembly
Friction Clutch Assembly
Roll Assembly Kit
Retard Bracket
Retard Spring
Tongue Plate
Tongue Shaft Assembly
Lift Up Shaft Holder
Bearing
Lift Up Ground Spring
Cassette Housing
Lever
Cassette Handle Assembly
Motor Spring
Right Holder
Left Holder
Motor Assembly
Bearing
Motor Holder Assembly
Connector
Spring
Socket Guide
Hardware Kit (Includes Screw)
Initial Issue
DocuPrint N2125
02/2000
5-8
Parts-list
PL 2.2
PL 3.1 Paper Feeder
Item
Part
Description
1
2
3
4
5
6
7
8
9
10
11
12
22K51531
121K20151
----809E11630
----120E16960
830E18131
---------------------
13
14
15
16
17
18
19
20
21
22
130E81970
162K47211
----------------600K79320
-------------
23
24
25
26
27
28
29
30
31
32
33
34
35
36
37
38
39
40
41
42
43
44
45
130E81970
--------------------809E11610
------------------------160K52781
121K19010
------------600K79640
600K79650
22K56900
600K79550
108R00330
46
600K79660
Turn Roll Assembly (with 2)
Turn Clutch Assembly
Extension Spring
Chute Spring
Feed CST Cover
No Paper Actuator
Support Actuator
Feeder Frame Assembly
Clamp
Left Latch Spring
Low Paper Actuator (P/O item 42)
Low Paper Actuator Support (P/O
item 42)
Low Paper Sensor
No Paper Sensor Harness Assy.
Front Chute Assembly
Turn Chute
Roll 7
Feeder Cover
Feed Head Assembly (with 20-28)
Feed Shaft (P/O item 19)
Bearing (P/O item 19)
Nudger Support Assembly (P/O
item 19)
Stack Height Sensor (P/O item 19)
Gear Clutch (P/O item 19)
O/W Clutch Assembly(P/O item 19)
Roll Assembly (P/O item 44)
Gear 25T (P/O item 19)
Gear 31T (P/O item 19)
Nudger Spring
Gear 4
Gear 2
Gear Cover
Bracket
Gear 3
Gear 1
Feeder PWB
Feed Clutch Assembly
Bearing
N/MOT Harness Assembly
Socket
Socket & Harness Kit (with 39, 40)
Actuator & Support Kit (with 11, 12)
Feeder Assembly 1 Kit (with 1-40)
Feed Roll Kit (item 26- quantity 3)
Feed Roll Usage Kit (item 44quantity 2)
Hardware Kit (includes screw)
Initial Issue
DocuPrint N2125
02/2000
5-9
Parts-list
PL 3.1
PL 4.1 MBF Chute
Item
Part
Description
1
2
3
4
5
6
7
8
9
10
11
12
54K13630
----------------22K50812
--------------------120E17120
13
14
15
16
17
18
19
20
21
22
23
24
25
--------19K94570
130E81970
--------121E85920
809E20170
7E54660
----113K82141
----162K47021
26
S
19K96830
600K79660
MBF Chute Assembly (with 2-30)
MBF Roll Assembly (with 3-6, 28)
MBF Shaft Assembly
MBF Pick-up CAM
Core
MBF Roll Assembly
Bearing
Tray Bottom Assembly (with 11, 12)
MBF Bottom Pad
Tray Pick-up
Tray Bottom (P/O item 8)
MBF No Paper Actuator (P/O item
8)
MBF Bottom Spring Tray
Exit Bearing
Retard Pad Assembly
Paper Set Sensor
MBF Ground Plate
MBF Chute Assembly
Pick Up Solenoid
MBF Spring
Gear Pick Up
Envelope Connector Plate
Envelope Connector Assembly
MBF (Left) Cam Pick-up
MBF No Paper Harness Assembly
(J45-J451)
Pick Up Pad Assembly (with 9, 10)
Hardware Kit (Includes Screw)
Initial Issue
DocuPrint N2125
02/2000
5-10
Parts-list
PL 4.1
PL 5.1 Paper Handler Assembly
Item
Part
Description
1
2
3
4
------------54K14980
5
6
7
8
9
10
11
12
13
14
15
16
17
18
19
20
21
22
23
24
25
26
27
28
--------59K11910
--------120E13331
809E19721
130E81970
----9E79120
7E54671
7E54681
--------121E85820
--------------------------------162K47011
29
30
31
32
-----------------
33
34
35
36
37
S
----6E60980
7E54650
809E19030
600K79380
600K79660
Toner Sensor
Toner Holder Sensor
Toner Spring Sensor
Paper Handler Assembly (with 2, 531)
Registration Roll - Metal
Upper Chute Assembly
Registration Roll - Rubber
Chute Inlet
Ground Spring - Bottom
Registration Actuator
Registration Sensor Spring
Registration Sensor
Metal Bearing
Registration Spring - Right
Registration Gear - Metal
Registration Gear - Rubber
Right Bearing - Rubber
Left Bearing - Rubber
Registration Clutch
Upper Chute Bottom
Ground Spring - Right
Ground Spring - Center
Ground Screw
Left Spring
Resist Baffle
Lower Chute Bottom
CST Chute
Registration Harness Assembly
(J43-J431, J432)
Torsion Spring
Lever Handle
Right Metal Bearing
Toner Sensor Harness Assembly
(J42-J421)
TNS Cushion
Shaft 14
Gear 14
Registration Spring Left
Toner Sensor Kit (with 1-3, 32 & 33)
Hardware Kit (Includes Screw)
Initial Issue
DocuPrint N2125
02/2000
5-11
Parts-list
PL 5.1
PL 6.1 Chute Transport & Fuser
Item
Part
Description
1
2
3
4
5
6
22K55010
54K15000
------------126K10132
7
8
9
126K10141
--------162K47191
BTR Assembly
Transfer Chute Assembly (with 3-5)
Bearing BTR SUP
Spring BTR
Transport Chute (reference only)
Fuser Assembly (120V) (with 10,
11)
Fuser Assembly (230V)
DTS Wire Assembly
TR Wire Assembly
Fuser Harness Assembly (120V)
(J271, J11, J27, J262)
Fuser Harness Assembly (230)
(J271, J11, J27, J262)
Fuser Upper Cover Assembly
Heat Rod (120V)
Heat Rod (230V)
Usage Kit (120V) (with Fuser, BTR,
3 Feed Rolls)
Usage Kit (230V) (with Fuser, BTR,
3 Feed Rolls)
Hardware Kit (Includes Screw)
162K51861
10
11
12
802K10000
126K08410
126K09710
108R00328
13
108R00329
S
600K79660
Initial Issue
DocuPrint N2125
02/2000
5-12
Parts-list
PL 6.1
PL 7.1 Exit
Item
Part
Description
1
2
3
4
5
6
7
8
9
10
11
12
13
14
15
16
17
105K14903
120E13350
----------------59K11950
------------59K11960
----------------130E81970
162K46981
18
19
20
21
22
23
24
25
26
------------127K24111
------------600K79540
54K15890
S
600K79660
Static Eliminator Assembly
Stack Full Actuator
Exit Gate
Exit Spring
Exit-17 Gear
Exit Bearing
MID-1-3 Roll Assembly
Out Exit Roll Pinch
Exit Roll Pinch
Exit Spring Pinch
MID-2 Roll Assembly
Roll Pinch
MID Spring Pinch
Spring Pinch
Exit Chute
Exit Photo Sensor
Stack Full Sensor Harness
Assembly (J30-J301)
Interlock Cover
Exit-23 Gear
Exit-33 Gear
Exit Motor Assembly
Exit Gear 17/47
Exit Gear -32
Exit Ground Spring
Bearing Kit (quantity 6 of item 6)
Exit Chute Assembly (with 1-16, 17,
19-24)
Hardware Kit (Includes Screw)
Initial Issue
DocuPrint N2125
02/2000
5-13
Parts-list
PL 7.1
PL 8.1 Drive & Xerographics
Item
Part
Description
2
113R00445
113R00446
-----
3
4
----32K94111
5
6
---------
7
162K46922
8
-----
9
10
62K09600
-----
11
12
13
14
15
--------7K85220
127K27791
32K94130
S
600K79660
Print Cartridge (XC 10K)
Print Cartridge (XC 15K)
Print Cartridge Sensor Harness
Assembly (J25-J251) (P/O item 15)
Arrow Label
Print Cartridge Top Guide
Assembly
Spring (P/O item 15)
Print Cartridge Sensor Assembly
(P/O item 15)
Laser Harness Assembly (J21J211, J212, J213)
VDO Harness Assembly (J22J223) (P/O item 7)
Laser Assembly
Print Cartridge Side Guide
Assembly-R (with 11, 12)
Print Cartridge Side Guide
Spring Clip
Drive Gear Assembly
Main Motor Assembly
Print Cartridge Sensor Kit (with 2,
5, 6)
Hardware Kit (Includes Screw)
1
Initial Issue
DocuPrint N2125
02/2000
5-14
Parts-list
PL 8.1
PL 9.1 Frame & Size Sensor
Item
Part
Description
1
2
3
4
5
6
7
8
9
10
11
12
13
------------------------127K24771
--------------------162K47001
14
15
16
17
18
19
20
21
22
S
--------------------160K52771
162K48420
----802K09970
600K79660
Left Plate Assembly
Clamp Press
Left Clamp Press
Interface Clamp
Lower B Elec Box
Lower A Elec Box
Fan Assembly
Duct
Edge Saddle H
AC Clamp
Insulator Plate
Plate Handle
Feeder Harness Assembly (J33J331)
CAM Shaft
Size Sensor Actuators
Cover Size Sensor
Spring CAM
Lever CAM
Tray 1 Size PWB
Size Harness Assembly (J51-J52)
Size Sensor Housing
Size Sensor 1 Kit (with 13-21)
Hardware Kit (Includes Screw)
Initial Issue
DocuPrint N2125
02/2000
5-15
Parts-list
PL 9.1 Frame & Size Sensor
PL 10.1 Electrical
Item
Part
Description
1
162K47201
2
160K65650
160K65940
3
4
----162K49271
5
6
7
8
9
--------110K08571
----162K46991
10
162K46941
11
12
13
14
15
160K52761
110K08561
160K52414
105K15401
162K46972
16
105K14931
105K15411
110E93711
162K46962
105K14954
----160K71520
160K71530
160K71540
System Controller Harness
Assembly (J287-J282, J288)
System Controller PWB (Network)
System Controller PWB (Nonnetwork)
Back Panel
OCT Harness Assembly (J35P351)
Adapter
Power Cord
Rear Interlock Switch Assembly
AC Wire Assembly (J285)
Duplex Harness Assembly (J34P341)
Connector Harness Assembly (J23J231)
Connector PWB
Front Interlock Switch Assembly
Print Engine Controller PWB
5VDC PWB
LVPS Harness Assembly (J28J218)
LVPS PWB (120V)
LVPS PWB (230V)
Main Switch
HVPS Harness Assembly
HVPS PWB
HVPS Housing
Serial Card
10 Base 2 Network Card
Token Ring Card
Hard Disk Drive
16 mb Dimm
32 mb Dimm
64 mb Dimm
8 mb Flash Dimm
Hardware Kit (Includes Screw)
17
18
19
20
21
22
23
24
S
733W14695
733W14696
733W14697
160K71940
600K79660
Initial Issue
DocuPrint N2125
02/2000
5-16
Parts-list
PL 10.1
PL 11.1 500 Sheet Feeder (1 of 2)
Item
Part
Description
1
-----
2
3
4
5
6
7
8
9
10
11
12
13
14
15
16
17
18
19
20
21
----7E54920
----162K48431
----160K53061
--------------------162K48420
--------802E04930
22K56910
109R00448
802E04920
600K79670
802K09980
S
600K79660
Option Feeder Assembly (with 220)
Gear OPT Bracket Assembly
Gear OPT I
Top Plate
Option Size Harness Assembly
Size Sensor Housing
Size Option PWB
CAM Spring
CAM Lever
CAM Shaft
CAM SW
Cover Size Sensor
Size Harness Assembly
Clamp
Main Frame Assembly
Right Side Cover
Feeder Assembly
Cassette Assembly
Left Side Cover
Screw (quantity 3)
Size Sensor Housing Assembly
(with 5-13)
Hardware Kit (Includes Screws)
Initial Issue
DocuPrint N2125
02/2000
5-17
Parts-list
PL 11.1
PL 11.2 500 Sheet Feeder (2 of 2)
Item
Part
Description
1
2
3
4
5
6
7
8
9
10
11
12
----22K55001
121K20151
----809E11630
120E16960
-------------------------
13
14
15
16
17
18
19
20
21
22
23
24
25
26
27
28
29
30
31
32
33
34
35
36
37
38
39
40
41
42
43
44
45
130E81970
162K47211
----------------600K79320
----------------------------------------------------------------160K52781
121K19010
------------600K79550
600K79640
600K79650
22K56900
108R00330
S
600K79660
Feeder Assembly (with 2-40)
Turn Roll Assembly (with 3)
Turn Clutch Assembly
Spring Extension
Spring Chute
No Paper Actuator
Actuator Support
Feeder Frame Assembly
Clamp
Left Latch Spring
Low Paper Actuator (P/O item 43)
Low Paper Support Actuator (P/O
item 43)
Low Paper Sensor
N/Sensor Harness Assembly
Front Chute Assembly
Turn Chute
Roll 7
Feeder Cover
Feeder Assembly (with 20-28)
Feed Shaft
Bearing
Nudger Support Assembly
Nudger Chute
Gear Clutch
O/W Clutch Assembly
Roll Assembly
Gear 25T
Gear 31T
Nudger Spring
Gear 4
Gear 2
Gear Cover
Bracket
Gear 3
OPT Gear
Feeder PWB
Feed Clutch Assembly
Bearing
N/Motor Harness Assembly
Socket
Feed Roll Kit (item 26- quantity 3)
Socket & Harness Kit (with 39, 40)
Actuator & Support Kit (with 11, 12)
Feeder Assembly 1 Kit (with 1-40)
Feed Roll Usage Kit (item 41quantity 2)
Hardware Kit (Includes Screw)
Initial Issue
DocuPrint N2125
02/2000
5-18
Parts-list
PL 11.2
PL 12.1 Envelope Feeder (1 of 2)
Item
Part
Description
1
-----
2
3
4
5
6
7
8
9
10
11
12
13
14
15
16
17
18
19
20
21
22
23
24
S
54E14452
----------------------------59E93940
31E93291
------------------------------------130K60390
--------600K79310
600K79660
Envelope Feeder Assembly (with 223)
Top Chute
Retard Spring
Retard Holder
Torque 29 Clutch Assembly
Retard Roll Assembly (with 7)
Retard Roll
Feeder Bearing
Pinch Spring
Exit Pinch Roll
Weight Arm
Weight Holder
Envelope Left Side Guide
Envelope Right Side Guide
Envelope Feeder Sub Assembly
Pinion Gear
Bottom Cover
Tray Extension
Envelope Pinch Roll
Sensor Harness Assembly
Exit Sensor Assembly
Weight Cover
Weight Plate
Retard Roll Kit Assembly
Hardware Kit (Includes Screw)
Initial Issue
DocuPrint N2125
02/2000
5-19
Parts-list
PL 12.1
PL 12.2 Envelope Feeder (2 of 2)
Item
Part
Description
1
-----
2
3
4
5
6
7
8
9
10
11
12
13
14
15
16
17
18
19
20
21
22
23
24
25
26
27
28
29
30
31
S
----7E27420
----7E36080
121K87180
----7E28780
121K87201
----121K87190
6E47120
121K87210
121K87220
----------------------------130E81970
------------------------------------600K79660
Envelope Feeder Sub Assembly
(with 2-31)
Gear Cover
Gear 29
Gear Drive 21
Gear 23
Torque 25 Clutch Assembly
Feeder Bearing
Idler 21 Gear
One Way 26 Clutch Assembly
Bearing Clutch Elec
Feed Clutch
Clutch Shaft 17
One Way Clutch Assembly
One Way Clutch Assembly
Transport Roll Assembly (with 16)
Transport Roll
Bottom Roll Assembly
Envelope Pinch Roll
Feed Belt
Main Chassis
No Paper Actuator
No Paper Sensor
Feed Roll Assembly 1 (with 24)
Feeder Roll
Feed Roll Assembly 2 (with 26)
Feeder Roll
Envelope Connector
Main Harness Assembly
Clutch Harness Assembly
Envelope PWB
No Paper Harness Assembly
Hardware Kit (Includes Screw)
Initial Issue
DocuPrint N2125
02/2000
5-20
Parts-list
PL 12.2
PL 13.1 Duplex (1 of 2)
Item
Part
Description
1
2
3
-------------
4
5
6
S
54K15061
--------600K79660
Duplex Assembly (with 2-6)
Turn Chute Assembly
Connector Chute Assembly
Connector
Upper Chute Assembly
Duplex Drive Cover
Lower Duplex Chute Assembly
Hardware Kit (Includes Screw)
Initial Issue
DocuPrint N2125
02/2000
5-21
Parts-list
PL 13.1
PL 13.2 Duplex (2 of 2)
Item
Part
Description
1
-----
2
3
4
5
6
7
8
9
10
11
12
13
14
15
16
17
18
S
59K12151
3E47580
----------------127K24800
423W15455
----------------130E81970
160K53051
----130K83310
----600K79660
Lower Duplex Chute Assembly
(with 2-18)
Duplex Roll Assembly
Duplex Stopper Belt
Duplex Gear 17/Pulley
Duplex Bearing
Duplex Gear 18
Duplex Gear 17/39
Motor Assembly
Synchronous Belt
Lower Duplex Chute
Duplex Latch
Duplex Latch Spring
Duplex Sensor Harness
Face Up Tray Sensor
Duplex PWB
Duplex Cover
Duplex Transport Sensor
Duplex Handle Label
Hardware Kit (Includes Screw)
Initial Issue
DocuPrint N2125
02/2000
5-22
Parts-list
PL 13.2
PL 14.1 Offset Catch Tray (1 of 2)
Item
1
2
3
4
5
6
7
8
9
10
S
Part
Description
----50K38631
----50E89160
12E09550
802E02773
802E02755
54K14842
--------600K79660
Offset Catch Tray Assembly (with 2-10)
Exit Tray Assembly
Tray Spring
Exit Tray
Weight Link
Rear Cover
OCT Cover
Inner Exit Chute Assembly
Hook Cover
Lower Cover
Hardware Kit (Includes Screw)
Initial Issue
DocuPrint N2125
02/2000
5-23
Parts-list
PL 14.1
PL 14.2 Offset Catch Tray (2 of 2)
Item
1
2
3
4
5
6
7
8
9
10
11
12
13
14
15
16
17
18
19
20
21
22
23
24
25
26
27
28
29
30
31
32
33
34
35
36
37
38
39
40
41
42
43
S
Part
Description
54K14842
--------160K47332
----127K28640
--------------------------------121K20551
11E09450
----130K84220
120E17191
130E81970
--------------------------------------------54E14431
802K05770
--------130E81970
----------------------------600K79660
Inner Exit Chute Assembly (with 2-43)
OCT Harness Assembly (J21-P202)
PWB Holder
OCT PWB
Ground Plate
Drive Motor Assembly
Gear Exit 20
Bearing Exit
Gear 27
Gear 26
Gear 47W
Gear Exit
Static Eliminator
HSG Gear
Direction Solenoid
Solenoid Lever
Solenoid Pin
Exit Sensor Assembly
Stack Full Actuator
Stack Full Sensor
OCT Sensor Harness Assembly (J224-225, J226, J227, J228)
Offset Roll Assembly (with 23-26, 43)
Exit Roll Assembly
Exit Roll Pinch
Offset Bearing
OCT Guide
OCT Holder
Exit Shaft
Mid Roll Assembly
OCT Pinch Roll
Mid Pinch Spring
Inner Exit Chute
Offset Assembly (with 35-39)
Offset Motor Assembly
Offset Housing
OCT Home Sensor
Offset Lever
Core Gear
Ferrite Core
OCT Wire Assembly
Sensor Bracket
Saddle Edge
Exit Pinch Spring
Hardware Kit (Includes Screw)
Parts-list
PL 14.2
02/2000
5-24
Initial Issue
DocuPrint N2125
6 General Procedures / Information
Introduction
Introduction......................................................................................................................
GP 5.1 Supplemental Tools, Supplies, and Hardware ....................................................
6-59
6-3
Printer Specifications
GP 1.1 General Specifications ........................................................................................
GP 1.2 Safety Standards.................................................................................................
GP 1.3 First Print Output Time (FPOT) ...........................................................................
GP 1.4 Continuous Printing Speed After The First Sheet Out ........................................
GP 1.5 Paper Specifications ...........................................................................................
GP 1.6 Printing Accuracy ................................................................................................
GP 1.7 CRU (Print Cartridge / Fuser Assembly) .............................................................
GP 1.8 Options................................................................................................................
GP 1.9 Optional Feeder Specifications ...........................................................................
GP 1.10 Duplex Assembly Specifications .......................................................................
GP 1.11 Offsetting Catch Tray Assembly Specifications ................................................
GP 1.12 Envelope Feeder Specifications........................................................................
6-5
6-6
6-6
6-7
6-7
6-11
6-11
6-12
6-12
6-13
6-14
6-14
Printer Diagnostics
GP 2.1 Power On Diagnostics.........................................................................................
GP 2.2 Controller / ESS Diagnostics...............................................................................
GP 2.3 Keys Pad & LED Layout......................................................................................
GP 2.4 IOT Diagnostics...................................................................................................
GP 2.5 Test Print.............................................................................................................
GP 2.6 NVM Config.........................................................................................................
GP 2.7 Component Test..................................................................................................
GP 2.8 Entering Download Mode....................................................................................
GP 2.9 To Reset Fuser ...................................................................................................
GP 2.10 Reset Menu.......................................................................................................
GP 2.11 System Controller Reset ...................................................................................
6-15
6-15
6-16
6-16
6-17
6-18
6-20
6-21
6-22
6-22
6-23
Principles of Operation
GP 3.1 Print Process Overview.......................................................................................
GP 3.2 The Paper Path ...................................................................................................
GP 3.3 Drive Flow ...........................................................................................................
GP 3.4 Print Engine Controller and Control Panel Functions..........................................
GP 3.5 Power Supplies ...................................................................................................
GP 3.6 Laser Control.......................................................................................................
GP 3.7 Fuser Control ......................................................................................................
GP 3.8 Erase Cycle.........................................................................................................
GP 3.9 Fan Control .........................................................................................................
GP 3.10 Duplex ...............................................................................................................
GP 3.11 Envelope Feeder...............................................................................................
GP 3.12 Offset Catch Tray (OCT) ...................................................................................
GP 3.13 Option Feeder Assembly...................................................................................
6-25
6-28
6-29
6-33
6-34
6-34
6-35
6-36
6-37
6-37
6-39
6-41
6-44
Menu Maps
GP 4.1 Menu Maps .........................................................................................................
6-47
Supplemental Tools, Supplies, & Hardware
Initial Issue
DocuPrint N2125
02/2000
6-1
General Procedures / Information
General Procedures / Information
02/2000
6-2
Initial Issue
DocuPrint N2125
Introduction
The following information is contained within this section:
General Procedures includes the Operations Menu Map and the Service Mode Menu Map. It
includes all unique service operations and the machine soft switch parameters and defaults.
When you suspect a machine is functioning outside the range of its specifications, refer to
product specifications. If the problem is a result of space, electrical, or environmental problems,
call for management or sales assistance as needed.
Tools and consumables contains a listing of the required tools and supplies needed to correctly
repair and maintain the machine.
Changes in configuration to the machine are assigned a Tag number. Information about a specific modification is found in the Tag Index within Tag Information. The firmware matrix lists the
launch firmware level and all subsequent issues.
Install provides the procedures required to install the machine and options.
The Principles of Operation have been added to provide additional machine operation theory
and information to help in resolving obscure machine faults.
Initial Issue
DocuPrint N2125
02/2000
6-3
General Procedures / Information
Introduction
General Procedures / Information
Introduction
02/2000
6-4
Initial Issue
DocuPrint N2125
GP 1.1 General Specifications
Table 1 General Specifications
Table 1 General Specifications
Category
Specification
Printing method
Electro-photographic system (roller charging, single component magnetic toner development)
Exposure method
Semiconductor Laser Beam Scanning
Laser specifications
Class 1 Laser Product
Class 3B Laser, rated at 5mW output @ 780nm
Resolution
600/1200 dots per inch (dpi), switchable at full engine
speed.
Fuser method
Heat and pressure
Warm-up time
From a cold start (22°C / 71.6°F ambient temperature) to
READY TO PRINT within 65 seconds.
Power supply
100/120VAC (90-140VAC) 50/60Hz (47Hz -63Hz)
220/240VAC (198-264VAC) 50/60Hz (47Hz -63Hz)
Power consumption
100/120VAC printer: Maximum consumption: 800W Running, 45 W Sleep, Maximum current: 8A (100VAC)/6.66A
(120VAC).
Category
Specification
Storage environment without a
packed Print Cartridge
Normal condition: 12 months maximum at -20 to -50°C / -4
to -58°F
@ 5-85% RH with no condensation present
Severe condition: 48 hours maximum at 50-60°C / 122 140 °F
@ 85-95% RH with no condensation present
Acoustic Noise
Standby mode: 35.0dB(A)
Sleep mode: Background noise only
Printing mode: 49.5dB(A) or 53.0dB(A)
Base Engine: Duplex Assembly, Tray 2, Tray 3, Envelope
Feeder, and OCT.
The paper is 20lb Letter SEF, at 600 dpi.
Dust generated
No more than 0.1mg/m3 of dust
Print Cartridge life (See GP 1.7)
*10,000/15,000 prints on A4/Letter paper, with 5% print
coverage
(*10,000 or 15,000 prints dependent on Print Cartridge
used)
Toner Sensor
After Toner Sensor detects a low level of toner in the CRU,
the printer makes ten additional prints before generating
an J5 error message.
240VAC printer: Maximum consumption: 800W Running,
45W Sleep. Maximum current: 3.33A (240VAC).
Note: No electrical current is supplied to the Fuser assembly in Sleep Mode.
Fuser control temperature
100/120VAC printer: T.B.D°C / °F
220/240VAC printer: T.B.D°C / °F
Size and weight (not including the Width 422mm X Depth 439mm X Height 413mm (16.5
Print Cartridge, System Controller inches x17.25 inches x 16.25 inches)
PWB or any options)
Weight = 26Kg (57lbs)
Space requirements
Overhead: Minimum T.B.D. mm
Front: Minimum 240mm (9.5 inches)
Back: Minimum 300mm (11.8 inches)
Sides: Minimum T.B.Dmm
Maximum paper size
Legal 14" (8.5"X14" = 355.6mm X 215.9mm)
Maximum printable area
Edge to edge printing capability. Within the 4mm border (4
sides) the printer will print any data 6 point Arial or larger.
Maximum paper load
550 sheets of RX 80 A4 paper, or Xerox 20lb Letter size
paper.
Operating environment
5 - 35°C / 41° - 95°F @ 15% to 85% RH (operating)
0 - 3100 meter (10171.1 ft.) above sea level
Horizontal bias within 5° of level
Storage environment with a
packed Print Cartridge
Normal condition:12 months maximum at 0-35°C/32-95°F
@ 15-80%RH with no condensation present
Severe condition: 1 month maximum at -20° to 0°C / -4° to
32°F or 35° to 40°C / 95 to104°F
@ 5-15 or 80-95%RH with no condensation present
Initial Issue
DocuPrint N2125
02/2000
6-5
General Procedures / Information
GP 1.1
GP 1.2 Safety Standards
GP 1.3 First Print Output Time (FPOT)
N2125 satisfies the following safety standards: Table 1
The First Print Output Time is the time from when the printer receives a START signal in the
READY state, until a single page is printed and delivered into the output tray Table 1.
Table 1 Safety Standards
Table 1 FPOT
Category
Standard Satisfied
Laser Safety
100V/120V type is submitted to FDA 21 CFR (Chapter
1, Subchapter J, Section 1010/1040).
220V/240V type is submitted to IEC 825 Class 1 laser
Product.
Paper
Size
Tray 1 (sec)
Tray 2 (sec)
Tray 3 (sec)
MBF (sec)
Simplex
Duplex
Simplex
Duplex
Simplex
Duplex
Simplex
Duplex
Letter
SEF
9.2
16.5
17.5
10.4
17.7
18.7
11.6
18.9
19.9
9.2
16.5
17.5
Ozone Density
Does not exceed 0.02 ppm of ozone density TWA
(Time Weight Average), measured according to ECMA
129 standard
A4 SEF
9.3
16.8
18.6
10.5
18.0
19.8
11.7
19.2
21.0
9.3
16.8
18.6
Other standards
100V/120V type satisfies;UL 1950 3rd Edition, CSA C22.2 no. 950-M95 or equivalent, NOM
NOTE:
1.
2.
200V/220V satisfies;IEC 950 including amendments 1,2,3 and 4, CE Directive 1, Nordic and other Agency Approval 2, CCIB
Note: 1. When the controller is installed, the OEM customer shall be responsible for the submittal of CE and
CCIB.
2. The OEM customer shall be responsible for the Nordic agency approvals including NEMKO, SEMKO, SETI
and DEMKO.
General Procedures / Information
GP 1.2 , GP 1.3
3.
4.
02/2000
6-6
The data is the theoretical values when the paper is fed from tray 1.
When Laser Motor OFF, the values are adjusted as follows:
•
FPOT = t + 4.0 seconds (600 dpi)
•
FPOT = t + 4.0 seconds (1200 dpi)
When the paper is fed from other tray, the values are adjusted as follows:
•
FPOT = t - 1.2 seconds (from MBF)
•
FPOT = t + 1.2 seconds (from tray 2)
•
FPOT = t + 2.4 seconds (from tray 3)
FPOT from the Sleep Mode add up to 65 seconds to each value.
Initial Issue
DocuPrint N2125
GP 1.4 Continuous Printing Speed After The First Sheet
Out
Table 1 Continuous Printing Speed After the First Sheet Out
Paper Type
Simplex Mode
(prints per minute)
Duplex Mode
(impressions per minute)
Letter SEF
21
15
Legal 13” SEF
17
12.5
Legal 14” SEF
17
12
Executive SEF
21
14
A4 SEF
20
14
B5 (JIS) SEF
21
15
Envelopes
14
N.A.
GP 1.5 Paper Specifications
The printer uses the following paper feed methods:
•
550 Universal Paper Tray
Standard feeder for the N2125 printer. Holds up to 550 sheets of the following papers
(Table 1).
Table 1 550 Universal Paper Tray
Type
Size (mm x mm) (inches x inches)
Letter SEF
215.9 x 279.4 (8.5" x 11")
Legal 13”
215.9 x 330.2 (8.5" x 13")
Legal 14”
215.9 x 355.6 (8.5" x 14")
Executive SEF
184.2 x 266.7 (7.25" x 10.5")
A4 SEF
210.0 x 297.0 (8.25" x 11.5")
B5 (JIS) SEF
182.0 x 257.0 (7" x 10")
A5 SEF
148.5 x 210.0 (5.8" x 8.25")
Custom
Width:
Length:
98.4 - 215.9 (3.5" - 8.5")
148.5 - 355.6 (5.8" - 14")
NOTE: Automatic size sensing is not effective for the custom size paper.
Available paper weight for Simplex Mode is 60gsm (16lb) - 216gsm (80lb) and for Duplex
Mode 60gsm (16lb) - 105gsm (28lb).
•
Multi-Bypass Feeder (MBF)
Standard feeder for the N2125 printer. The tables show available paper sizes and stack
capacity (Table 2) and (Table 3).
Table 2 MBF (1 of 2)
Width (mm)
Length (mm)
76.2 - 215.9 (3" - 8.5")
127.0 - 355.6 (5" - 14")
NOTE: Available weight of paper as follows:
Qualified paper:60gsm (16lb Xerographic) - 216gsm (80lb Cover Stock)
Japanese Official Postcard:190gsm
Card Stock:216gsm (80lb)
Table 3 MBF (2 of 2)
Initial Issue
DocuPrint N2125
Type
Paper Stack Capacity
Fuji Xerox P A4
120 sheets
Xerox 20lb Letter, RX 80 A4
100 sheets
Standard 20lb Paper
11.5 mm (.45") stacking height
Transparency, Label, Postcard
30 sheets
Envelope
10 sheets
02/2000
6-7
General Procedures / Information
GP 1.4 , GP 1.5
Special Purpose Paper supported for Paper Trays and MBF (Table 6)
Table 3 MBF (2 of 2)
Type
Paper Stack Capacity
Label sheet
30 sheets
Thicker Stock
30 sheets
•
Table 6 Special Purpose Paper Supported for Paper Trays and MBF
Envelope Feeder (optional)
Type
Size
Media recommended
Transparency
216 x 279mm (8.5" x 11")(Letter)
216 x 279mm (8.5" x 11")(Letter)
210 x 297mm (8.25" x 11.7")(A4)
(note 1)
210 x 297mm (8.25" x 11.7")(A4)
Xerox P/N 3R2780 (US)
3M P/N CG3300
Xerox 3R91334 (Europe)
Xerox P/N JE001 (Japan)
Label
216 x 279mm (8.5" x 11")(Letter)
216 x 279mm (8.5" x 11")(Letter)
210 x 297mm (8.25" x 11.7")(A4)
210 x 297mm (8.25" x 11.7")(A4)
Xerox 3R4469 (US)
Avery Laser Labels P/N 5160
Xerox P/N 3R97408 (Europe)
Xerox P/N V860 (Japan)
Envelope (note 2)
104.8 x 241.3mm (4" x 9.5")
98.4 x 190.5mm (3.87" x 7.5")
162 x 229mm (6.4" x 9")
110 x 220mm (4.3" x 8.7")
Columbian Brand Com #10
Monroe Brand Monarch
C5 (River series #02067/
Gummed)
DL (River series #01029/
Gummed)
Postcard (note 3)
105 x 148.5mm (4" x 5.8")
100 x 148mm (note 3) (3.9" x
5.8")
Postcard
Japanese Official Post Card
Cardstock
76.2 x 127mm - 210 x 297mm (3" 3"x5" Oxford index card (40801)
x 5") - (8.25" x 11.7")
(A4) or 215.9 x 279.4mm (Letter) Classic Crest Super Smooth
(8.5" x 11")
Cover (Long Grain)
Optional Envelope feeder for the N2125 printer, enables the feeding of envelopes. The
table shows available paper sizes and stack capacity (Table 4).
Table 4 Envelope Feeder
Paper Size
Stackable Capacity
Com #10 SEF
75 envelopes (Columbian brand)
Monarch SEF
75 envelopes (Monroe brand)
DL SEF
75 envelopes (River Series)
C5 SEF
50 envelopes (River Series)
Japanese Official postcard
100 sheets
Postcard
100 sheets
Other Media
24mm (1") maximum
NOTE: Supported paper weight is 60gsm (16lb) to 105gsm (28lb).
•
Duplex Assembly optional for the N2125 printer enables printing on both sides of the
paper. The table shows available paper sizes (Table 5).
Table 5 Duplex Assembly
Type
Size (mm x mm)
Letter SEF
215.9 x 279.4 (8.5" x 11")
Legal 13”
215.9 x 330.2 (8.5" x 13")
Legal 14”
215.9 x 355.6 (8.5" x 14")
Executive SEF
184.2 x 266.7 (7.25" x 10.5")
A4 SEF
210.0 x 297.0 (8.25" x 11.5")
B5 (JIS) SEF
182.0 x 257.0 (7" x 10")
Custom
Width:
Length:
182.0 - 215.9 (7" - 8.5")
257.0 - 355.6 (10" - 14")
NOTE: Supported paper weight is 60gsm (16lb) - 105gsm (28lb).
Custom size paper longer than JIS B5 is available only when Custom Size is selected.
General Procedures / Information
GP 1.5
02/2000
6-8
Initial Issue
DocuPrint N2125
Paper Size and Feeder Tray / Output Tray Compatibility (Table 7)
Table 7 Paper Size and Feeder Tray/Output Tray Compatibility
Paper sizes shown in the following table can be identified by the controller to improve processing. Otherwise, media will be processed as the maximum custom size.
Type
Table 7 Paper Size and Feeder Tray/Output Tray Compatibility
Size
Short Edge x Long
Edge
Paper
Face
Tray(STD
Duplex Up
OCT
/OPT)
MBF (Option) (Option) (Option)
Regular
Legal 14”
Cut Sheet
215.9 x 355.6 (8.5" x
14")
X
Legal 13”
215.9 x 330.2 (8.5" x
13")
X
X
X
X
X
A4
210.0 x 297.0 (8.25" x
11.7")
X
X
X
X
X
1/3 A4
99.0 x 210.0 (3.9" x
8.25")
X
X
Letter
215.9 x 279.4 (8.5" x
11")
X
X
X
X
X
X
X
X
B5(JIS)
182.0 x 257.0 (7" x 10") X
X
X
X
X
B5(ISO)
176.0 x 250.0 (6.9" x
9.8")
X
X
X
A5
149.0 x 210.0 (5.8" x
8.25")
X
X
X
State139.7 x 215.9 (5.5" x
ment (Half 8.5")
Letter)
X
X
C5
162.0 x 229.0 (6.4" x 9")
X
X
COM-10
104.8 x 241.3 (4" x 9.5")
X
X
DL
110.0 x 220.0 (4.3" x
8.7")
X
X
Monarch
98.4 x 190.5 (3.9" x
7.5")
X
X
Type
Name
Executive 184.2 x 266.7 (7.25" x
10.5")
Envelope
Postcard
X
X
X
X
X
X
Universal
size
X
X
Initial Issue
DocuPrint N2125
X
X
Transparency
Sheet
Label
Media
Sheet
Paper
Face
Tray(STD
Duplex Up
OCT
/OPT)
MBF (Option) (Option) (Option)
Cardstock 76.2 x 127.0 - 210 x 297 X
(3" x 5") - (8.25" x
11.7")(A4) or 215.9 x
279.4 (8.5" x 11")(Letter)
X
X
Universal
76.2 - 215.9 x 127 355.6 (3" - 8.5") x (5" x
14")
X
X
X
Custom
98.4 - 215.9 x 148.0 355.6
X
X
X
Custom
182.0 - 215.9 x 257.0 - X
355.6 (7" - 8.5") x (10" 14")X
X
Letter
215.9 x 279.4 (8.5" x
11")
X
X
X
X
A4
210.0 x 297.0 (8.25" x
11.7")
X
X
X
X
Letter
215.9 x 279.4 (8.5" x
11")
X
X
X
X
A4
210.0 x 297.0 (8.25" x
11.7")
X
X
X
X
X
X
X
Media Input / Output Chart (Table 8)
NS = Not Supported; CUS* = Supported when printer is in custom mode.
Japanese 100 x 148.0 (3.9" x 5.8")
Official
105.0 x 148.5 (4" x 5.8")
Others
Name
Size
Short Edge x Long
Edge
Table 8 Media Input/Output Chart
Inputs
Outputs
Paper Size
Tray 1, 2, 3 Envelope
(A4/Letter/ feeder
Face
MBF Tray Legal)
(option)
Main Up OCT
Letter
215.9 x 279.4 mm (8.5" x
11.0")
Duplex
SEF
Duplex
SEF
NS
Yes
Yes
Yes
Legal
215.9 x 355.6 mm (8.5" x
14.0")
Duplex
SEF
Duplex
SEF
NS
Yes
Yes
Yes
Legal 13" 215.9 x 330.2 mm (8.5" x
13.0")
Duplex
SEF
Duplex
SEF
NS
Yes
Yes
Yes
A4
210 x 297 mm (8.27" x
11.69")
Duplex
SEF
Duplex
SEF
NS
Yes
Yes
Yes
B5-JIS
182 x 257 mm (7.16" x
10.12")
Duplex
SEF
Duplex
SEF
NS
Yes
Yes
Yes
B5-ISO
176.0 x 250.0 mm (6.93" x
9.84")
Simplex
SEF
CUS*
NS
Yes
Yes
Yes
Paper
Style
02/2000
6-9
General Procedures / Information
GP 1.5
Table 8 Media Input/Output Chart
Table 8 Media Input/Output Chart
Inputs
Outputs
Inputs
Paper Size
Tray 1, 2, 3 Envelope
(A4/Letter/ feeder
Face
(option)
Main Up OCT
MBF Tray Legal)
148.0 x 210.0 mm (5.83" x
8.27")
Simplex
SEF
Simplex
SEF
NS
Yes
Yes
Yes
Executive 182.4 x 266.7 mm (7.25" x
10.5")
Duplex
SEF
Duplex
SEF
NS
Yes
Yes
Yes
1/3 A4
99.0 x 210.0 mm (3.9" x
8.27")
Simplex
CUS*
Simplex
CUS*
NS
Yes
Yes
Yes
Statement
139.7 x 215.9 mm (5.5" x
8.5")
Simplex
SEF
CUS*
NS
Yes
Yes
Yes
UP Post- 89.9 x 139.7 mm (3.5" x
card
5.5")
Simplex
SEF
NS
NS
Yes
Yes
Yes
Index
76.2 x 127.0 mm (3" x 5")
Simplex
SEF
NS
NS
Yes
Yes
Yes
A6 Postcard
105.0 x 148.0 mm (4.13" x
5.85")
Simplex
SEF
CUS*
Yes
Yes
Yes
Yes
100.0 x 148.0 mm (3.94" x
Hagaki
5.83")
(Japanese
Postcard)
Simplex
SEF
CUS*
Yes
Yes
Yes
Yes
Monarch 98.4 x 190.5 mm (3.88" x
Envelope 7.5")
Simplex
SEF
CUS*
Yes
Yes
Yes
Yes
COM10 104.8 x 241.3 mm (4.13" x
Envelope 9.5")
Simplex
SEF
CUS*
Yes
Yes
Yes
Yes
C5 Enve- 162.0 x 229.0 mm (6.38" x
lope
9.02")
Simplex
SEF
CUS*
Yes
Yes
Yes
Yes
DL Enve- 110.0 x 220.0 mm (4.33" x
lope
8.66")
Simplex
SEF
CUS*
Yes
Yes
Yes
Yes
Transpar- 215.9 x 279.4 mm (8.5" x
encies
11.0")
Letter
Simplex
SEF
Simplex
SEF
NS
Yes
Yes
Yes
Transpar- 210.0 x 297.0 mm (8.27" x
encies A4 11.69")
Simplex
SEF
Simplex
SEF
NS
Yes
Yes
Yes
Labels
Letter
215.9 x 279.4 mm (8.5" x
11.0")
Simplex
SEF
Simplex
SEF
NS
Yes
Yes
Yes
Labels
A4
210.0 x 297.0 mm (8.27" x
11.69")
Simplex
SEF
Simplex
SEF
NS
Yes
Yes
Yes
Custom
Simplex Width: 76.2215.9mm (3" - 8.5")
Length: 127.0 - 355.6 mm
(5" - 14")
X
Paper
Style
A5
General Procedures / Information
GP 1.5
Paper
Style
Paper Size
Outputs
Tray 1, 2, 3 Envelope
(A4/Letter/ feeder
Face
MBF Tray Legal)
(option)
Main Up OCT
Custom
Duplex Width: 182.0 - 215.9 X
mm (7"- 8.5")
Length: 257.0 - 355.6mm
(10" - 14")
Custom
Simplex Width: 98.4-215.9
mm (3.9" - 8.5")
Length: 148.0-355.6mm
(5.8" - 14")
X
Custom
Duplex Width: 182.0 - 215.9
mm (7" - 8.5")
Length: 257.0 - 355.6mm
(10" - 14")
X
Custom
Simplex Width: 98.4 178.0mm
Length: 148.5 - 254.0mm
Custom
Simplex Width: 76.2 215.9mm (3" - 8.5")
Length: 127.0 - 355.6mm (5"
- 14")
Custom
Simplex Width: 76.2 215.9mm (3" - 8.5")
Length: 127.0 - 355.6mm (5"
- 15")
Custom
Simplex Width: 98.4 215.9mm (3.9" - 8.5")
Length: 148.0 - 355.6mm
(5.8" - 14")
02/2000
6-10
X
X
X
X
Initial Issue
DocuPrint N2125
GP 1.6 Printing Accuracy
GP 1.7 CRU (Print Cartridge / Fuser Assembly)
•
Lead Edge Registration: +2.0mm maximum
Print Cartridges
•
Side Edge Registration: +2.5mm maximum
•
Skew: +1.2mm maximum (at the distance of 190mm)
Two Print Cartridges are available for the printer. The following figures represent the number of
impressions on an average 5% image coverage on Letter size paper in Simplex printing. The
Duplex printing is evaluated as two Simplex prints.
Table 1 Customer Replaceable Units
Initial Issue
DocuPrint N2125
CRU
Prints
Weight (toner)
10K Print Cartridge
10,000
420 grams (.9lbs)
15K Print Cartridge
15,000
620 grams (1.36lb)
Fuser Assembly (includes BTR)
200,000
n/a
02/2000
6-11
General Procedures / Information
GP 1.6 , GP 1.7
GP 1.8 Options
GP 1.9 Optional Feeder Specifications
There are several customer installed options available for the N2125 printer (Table 1).
The Optional Feeder Assembly consists of a 550 Sheet Paper Tray and a 550 sheet feeder.
The feeder contains the mechanism to feed paper out of the 550 Sheet Paper Tray.
Table 1 Options
The Optional Feeder Assembly can be used as the second and the third feeder on the printer.
If two Optional feeders are installed, the bottom feeder is designated Feeder 3, and the middle
feeder is designated Feeder 2 (Figure 1).
Option
Description
550 Sheet Paper Feeder
Customer Order Number:
97S02377
Provides 550 sheet continuous feed when used in conjunction with the 550 sheet Paper Tray.
You can install one or two 550 Sheet Paper Feeders.
550 Sheet Paper Tray
Customer Order Number:
109R00448
Used with the 550 Sheet Paper Feeder. The Tray holds
550 sheets of paper.
Cover Assembly Rear Face Up
Customer Order Number:
97S02406
The tray can hold 120 sheets of 20 lb. paper or 13mm
(.5") stack height.
Duplex Assembly
Customer Order Number:
97S02379
Provides duplex (two sided) printing capability.
Offset Catch Tray (OCT)
Customer Order Number:
97S02380
Offsets each set of printouts by 1.1 inches (2.8 cm).
The tray holds up to 500 sheets of paper, in four different
paper sizes.
Envelope Feeder
Customer Order Number:
97S02388
Provides continuous envelope feed.
Figure 1 Optional Feeders
General Procedures / Information
GP 1.8 , GP 1.9
02/2000
6-12
Initial Issue
DocuPrint N2125
Dimension and Weight (Table 1)
GP 1.10 Duplex Assembly Specifications
Dimension and Weight (Table 1)
Table 1 Dimension and Weight
Width
Depth
Height
Weight
Feeder + Paper
Tray
422 mm
(16.6")
433 mm (17")
175 mm
(6.9")
10.3 kg (22 lbs)
Feeder
422 mm
(16.6")
433 mm (17")
175 mm
(6.9")
7.6 kg (16.7 lbs)
Paper Tray
358 mm
(14")
432 mm (17")
136 mm
(5.3")
2.7 kg (5.9 lbs)
Table 1 Duplex Assembly Specifications and Weight
Width
Depth
Height
Weight
320 mm (12.6")
320 mm (12.6")
100 mm (3.9")
0.8 kg (1.5 lb.)
Power Supply
The +24VDC and +3.3VDC are supplied from the LVPS PWB through the Print Engine Controller PWB, to the Option Size PWB and Feeder PWB.
Figure 1 Duplex Specifications
Power Supply
The +24VDC and +3.3VDC are supplied from the LVPS PWB through the Print Engine Controller PWB to the Duplex Assembly.
Initial Issue
DocuPrint N2125
02/2000
6-13
General Procedures / Information
GP 1.9 , GP 1.10
GP 1.11 Offsetting Catch Tray Assembly Specifications
GP 1.12 Envelope Feeder Specifications
Dimension and Weight (Table 1)
Dimension and Weight (Table 1)
Table 1 Offsetting Catch Tray Assembly Specification Dimension and Weight
Table 1 Envelope Feeder Specifications Dimension and Weight
Width
Depth
Height
Weight
Width
Depth
Height
Weight
422 mm (16.6")
293 mm (11.5")
147 mm (5.8")
2.5 kg (5.5lbs)
272 mm (10.7")
260 mm (10.25")
117 mm (4.6")
1.5 kg (3.3lbs)
Figure 1 OCT Dimensions
Power Supply
Figure 1 Envelope Feeder Dimensions
The +24VDC and +3.3VDC are supplied from the LVPS PWB through the Print Engine Controller PWB to the OCT.
Power Supply
The +24VDC and +3.3VDC are supplied from the LVPS PWB through the Print Engine Controller PWB and Connector PWB.
General Procedures / Information
GP 1.11 , GP 1.12
02/2000
6-14
Initial Issue
DocuPrint N2125
GP 2.1 Power On Diagnostics
GP 2.2 Controller / ESS Diagnostics
The System Controller PWB has the following LEDs (Table 1) (Figure 1):
The System Controller PWB provides the following diagnostic capability:
•
Configuration Sheet includes System Controller Software Version and Print Engine Controller Software Version.
System Controller PWB Test Print for 81/2 x 11 and A4 paper sizes.
Table 1 Controller LEDs
LED
Description
•
Power
Indicates power to the controller board. Should stay on when power
is turned on.
•
Diagnostic Menu contains a sub menu containing the following:
–
Printing of Test Patterns from selectable input sources to selectable output destinations.
–
Input Sources: MBF, Tray 1, Tray 2, Tray 3, MBF Duplex, Tray 1 Duplex, Tray 2
Duplex, and Tray 3 Duplex.
Test
Indicates that a power on diagnostics failure has occurred when
flashing.
Speed
Off: 10 Mbit Ethernet.
Red: 100 Mbit Ethernet.
–
Output Sources: Top Tray, OCT, OCT with offset.
Link X
Off: Indicates no Ethernet link found.
Green: Indicates Ethernet link found.
–
Print quantity is 999 and can be terminated at anytime by pressing "0".
Off: Indicates no activity on Ethernet link.
Amber: Indicates activity on Ethernet link.
–
Hex dump
–
Error Log enablement and print capability
–
Active Faults
–
Fault History (list last 100 faults).
Activity
•
Smart Diagnostics (Sixth Sense), CenterWare Internet Services
This feature enables system administrator to be notified of various reactive events in the
printer via E-mail messages. The system administrator configures which events to be notified of through CentreWare Internet Service pages. System administrator may be notified
of the following REACTIVE events:
•
–
Periodic - specified time arrives (Fuser change, etc.)
–
Service - printer requires service (showing active fault)
–
Consumable - toner is low.
–
Paper - paper is low or out.
Smart Diagnostic will allow system administrator to:
–
Query printer for configuration sheet, and Fault history log to prescribed printer
address or E-mail address.
Figure 1 Power On Diagnostic LEDs
Initial Issue
DocuPrint N2125
02/2000
6-15
General Procedures / Information
GP 2.1 , GP 2.2
GP 2.3 Keys Pad & LED Layout
GP 2.4 IOT Diagnostics
Figure 1 illustrates the layout of the Control Panel
The IOT diagnostics provide the ability to:
•
Print IOT test page.
•
Read or Set IOT NVM configuration values. Access to NVM is password protected.
•
Monitor and verify operation of all input sensors for IOT and options.
•
Monitor and verify operation of all Output devices for IOT and options (motors, clutches,
etc.)
Table 1 summarizes the operation of the Control Panel Keys for entering IOT diagnostics.
Table 1 Entering IOT Diagnostics
Key Combination
-
Item Up + Item Down
Key Number Action
2+6
While turning on power press and hold until
message "*IOT*" is displayed on the LCD (it
takes approximately 30 seconds).
During this time the following occurs:
•
Switch printer power on
•
Enter
4
Squares (light)
•
Boot Code Version
•
IOT displayed
After *IOT* is displayed the ENTER key must
be pressed within 5 sec. to enter Diagnostics.
If the ENTER key is not pressed within 5 sec.,
printer will continue its normal power up
sequence.
The IOT diagnostic menu has the following selections:
•
Test Print
•
NVM Config
•
Component Test
Table 2 summarizes the operation of the Control Panel keys in IOT diagnostic main menu.
Table 2 IOT Diagnostic Mode Key Table
Key Combination
Figure 1 Keys Pad and LED Layout
-
Menu Up / Menu Down
On-line
(Press and hold for 1 second)
General Procedures / Information
GP 2.3 , GP 2.4
02/2000
6-16
Key Number Action
1 or 5
0
Scroll through the IOT diagnostic menu: Print
Menu, NVM Menu, Component Menu.
Stops routing in process and clears error messages from Control Panel.
Initial Issue
DocuPrint N2125
GP 2.5 Test Print
8.
The IOT pattern is stored in the Print Engine Controller PWB. The pattern will be used by service personnel to identify, repair, and validate the operability of printer xerographics and paper
handling from all paper sources, options, and output sources. Test Print diagnostics will allow
for the following routines:
Press key 2 or 6 to scroll through the items menu. When the LCD display "Input Tray,"
press key 3 or 7 to view the selected option. Press key 3 or 7 to cycle through all available
input trays. Press key 4 to select it. Selected tray has an * next to it.
9.
Repeat step 8 for output tray selection and duplex or simplex selection.
•
Print the Test Print
•
Input Tray selection (all supported paper sizes)
11. During printing, press key 0 for 1 second to stop printing. Wait for message "Ready" to
appear on the LCD. Press key 4 to resume printing, or key 0 to get back to the items
menu.
•
Output Tray selection
•
Duplex selection
•
Display error message/code when failure occurs (Table 2).
12. Press key 1 or 5 to get back to the Main Menu (selection of Component Test or NVM Config or Test Print).
Table 1 summarizes the operation of the Control Panel keys in Test Print mode.
Error and Jam Recovery
During Test Print, if printer encounters problem. . .
Table 1 Test Print Key Table
Key Numbers
10. When ready to print, press key 2 or 6 until "Print Pattern" is displayed. Then press key 4 to
start printing.
Actions
Item Up / Item Down
2 or 6
Scrolls through Print Menu containing: Print
Pattern, Input Tray, Output Tray, and Duplex
Value Up / Value Down
3 or 7
Scrolls all available selections of the Item
Menu selection.
* = selected item
Enter
4
Executes the Test Print up to 999 prints.
Enters selections of Input Tray, Output Tray
and Duplex selections.
On Line
0
Stop printing and clears error code.
•
Press and hold the "0" key for 1 second
1.
It will halt printing and displays the problem found on the LCD panel (Table 2). LED 3 will
start blinking. Follow the instruction display on LCD panel to troubleshoot the problem.
Press key 0 after fixing problem. LED 3 will stop blinking once the error is cleared.
2.
Printing will resume itself after problem has been fixed or printer will go back to step 1.
Table 2 IOT Fault Table
•
Used to stop printing in the Test Print
mode
•
If an error code appears, pressing "0"
clears the error code. Pressing "0" a second time returns to Print Pattern
Condition / Message
UI Error Code
Action
Paper Size Error-all inputs
C5
Put correct size paper in
Tray(s)
Early feed jam
E2-0
Open covers clear paper path
Misfeed jam
E2-1
Open covers clear paper path
Reg jam
E3-1, E3-2
Open covers clear paper path
Duplex jam
E7-0, E7-1, E7-2, E7-3 (refeed)
Open covers clear paper path
OCT jam
E6-1, E6-2
Open covers clear paper path
Exit jam
E4-0, E4-2, E4-3
Open covers clear paper path
EP Cart out
J3
Check Toner Cartridge; it may
need to be installed properly
Procedure:
1.
Power down printer.
Low Toner
J5
Replace EP Cartridge
2.
Simultaneously hold keys 2 and 6 down.
Output tray full
C5
Empty face down bin
3.
Power up printer, wait for message "IOT?" to appear on the LCD.
Optional output tray full (OCT) C5
Empty OCT bin
4.
Release both keys, then press key 4 to enter the IOT Diagnostics menu (message "Entering IOT Diagnostics Mode" appears. If key 4 is not pressed within 5 seconds of the "IOT?"
message, printer will go to the normal boot process.
Add Paper to MBF
C5
MBF is out of paper, add
paper
Add Paper to tray 1
C5
5.
Press key 1 or 5 to scroll through the Main Menu. "Component Test" and "NVM Config"
and "Test Print" are the choices available.
Main Tray is out of paper, add
paper
Add Paper to tray 2
C5
6.
With Test Print displayed, press key 2 or 6 to scroll through the items menu.
Aux Tray 1 is out of paper, add
paper
Add Paper to tray 3
C5
Aux Tray 2 is out of paper, add
paper
Add Paper EBF Tray
C5
Add envelopes to Envelope
Feeder
Top cover, Rear cover, open,
Face-up open
E5
Close Top cover, Close Rear
Cover, face-up
7.
Press key 3 or 7 to view the options selected under the item.
Test Print items menu offers the following selections:
•
Input Tray (Tray 1, Tray 2, Tray 3, MBF, EBF)
•
Output Tray (Standard, OCT)
•
Duplex (Off, On)
•
Print Pattern
Initial Issue
DocuPrint N2125
02/2000
6-17
General Procedures / Information
GP 2.5
GP 2.6 NVM Config
Table 2 IOT Fault Table
Condition / Message
UI Error Code
Action
Face up tray open
E5
Close Face-up tray
Tray 1 out install tray
C3
Main tray not installed properly, insert main tray
Tray 2 out install tray
C3
Aux tray 1 not installed properly, insert Tray properly
Tray 3 out install tray
C3
Aux tray 2 not installed properly, insert Tray properly
The IOT NVM values hold critical control parameters of the mechanical and electromagnetic
components of the printer. The following allows service personnel to status or change NVM
settings.
Table 1 summarizes the operation of the Control Panel keys in the NVM Config Menu.
Table 1 NVM Config Key Table
Key Numbers
Actions
Item Up / Item Down
2 or 6
First key press will request password.
Scroll through NVM locations after password
has been entered.
If location is READ ONLY, a (R) will be displayed.
(Main Drive) Motor Fail
U1
Power off & on if problem continues call for service
ROS Fail
U2
Power off & on if problem continues call for service
Fuser Fail
U4
Power off & on if problem continues call for service
Fan Fail
U5
Power off & on if problem continues call for service
(IOT) NVM Fail
U6
Power off & on problem continues call for service
Duplex Unit Fail
E9
Power off & on if problem continues call for service
Envelope Feeder unit fail
E9
Power off & on if problem continues call for service
OCT Unit fail
E9
Power off & on if problem continues call for service
Procedure
Optional Feeder Unit fail
E11
Power off & on if problem continues call for service
1.
Power down printer.
2.
Simultaneously hold keys 2 and 6 down.
Set pause command
P1
Printer received set pause
command
3.
Power up printer, wait for message "IOT?" to appear on the LCD.
4.
Release both keys, then press key 4 to enter the IOT Diagnostics menu (message "Entering IOT Diagnostics Mode" appears. If key 4 is not pressed within 5 seconds of the "IOT?"
message, printer will go to the normal boot process.
5.
Press key 1 or 5 to scroll through the Main Menu. "Component Test" and "NVM Config"
and "Test Print" are the choices available.
6.
Press key 2 or 6.
Fuser Warning
Fuser Unit Needs to be
replaced, Please Wait
Value Up / Value Down
3 or 7
Enter
4
0 -7 -3 -4
Replace fuser, clear fuser
warning
First key press will display current value.
Second key press changes NVM value up or
down.
Press Enter key to enter new value, message
"Wrote (value selected) to NVM" will be displayed. New value has been entered into
NVM.
Password to enter NVM (Password only has to
be entered once after entering diagnostics.)
7.
The message "Enter Password" will appear on the LCD.
8.
Press keys 0 7 3 4 in sequence.
9.
Press key 2 or 6 to scroll through the items menu (Table 2).
The value in the configuration NVM can be viewed and changed.
10. Press key 3 or 7 to view the content of the selected item. Item with an (R) next to it is a
read only item.
11. Press key 3 or 7 to change the NVM value to a different value. Press key 4 to store the
new value. If key 4 is pressed, a message "Wrote value to NVM" will appear for about 1
second on the LCD.
General Procedures / Information
GP 2.5 , GP 2.6
02/2000
6-18
Initial Issue
DocuPrint N2125
12. Press key 1 or 5 to get back to the Main Menu (selection of Component Test or NVM Config or Test Print).
Table 2 NVM Table
Menu Selection
Default Value
Read / Write
Print Res Setting
02
Read Only
Config 1 Setting
0E
Read Only
Config 2 Setting
00
Read Only
Laser Power Setting
08
Read Only
Fser Tmp Sby Setting
08 (Table 5)
Read Only
Fser Tmp Norm Adjustment
08 (Table 5)
Read/Write
Fser Tmp High Adjustment
08 (Table 5)
Read/Write
Table 3 MBF Paper Size Table
Value
Size
09
B5 (JIS)
0A
Executive
0B
Letter
0C
A4 210.0 x 297.0 (8.3" x 11.7")
0D
Legal 13"
0E
Legal 14"
0F
Universal
* Default
Table 4 EBF Paper Size Table
Fser Tmp OHP Adjustment
08 (Table 5)
Read/Write
Fser Tmp Env Adjustment
00 (Table 5)
Read/Write
Value
Size
Fser Tmp Dup Adjustment
00 (Table 5)
Read/Write
00
Index Card
MBF Paper Size Adjustment
Table 3
Read/Write
01
Post Card
EBF Paper Size Adjustment
Table 4
Read/Write
02
Monarch
Tray 1 Proc Dir Adjustment
08
Read/Write
N/A
A5 149.0 x 210.0 (5.8" x 8.2")
Tray 2 Proc Dir Adjustment
08
Read/Write
N/A
Statement
Tray 3 Proc Dir Adjustment
08
Read/Write
05
DL 110.0 x 220.0 (4.3" x 8.6")
EBF Proc Dir Adjustment
08
Read/Write
06
C5 162.0 x 229.0 (6.4" x 9")
MBF Proc Dir Adjustment
08
Read/Write
*07
COM 10
Tray 1 Scan Dir Adjustment
04
Read/Write
N/A
B5 (ISO)
Tray 2 Scan Dir Adjustment
04
Read/Write
N/A
B5 (JIS)
Tray 3 Scan Dir Adjustment
04
Read/Write
N/A
Executive
EBF Scan Dir Adjustment
04
Read/Write
N/A
Letter
MBF Scan Dir Adjustment
04
Read/Write
N/A
A4 210.0 x 297.0 (8.3" x 11.7")
Legal 13"
Proc Dir DUP Adjustment
08
Read/Write
N/A
Scan Dir DUP Adjustment
04
Read/Write
N/A
Legal 14"
Details U2 Errors
00
Read Only
N/A
Universal
Details U4 Errors
00
Read Only
Details U6 Errors
00
Read Only
* Default
Table 5 Fuser Temperature Equivalency
Table 3 MBF Paper Size Table
Value
Size
00
Index Card
01
Post Card
02
Monarch
03
04
05
06
*07
08
A5 149.0 x 210.0 (5.8" x 8.2")
Statement
DL 110.0 x 220.0 (4.3" x 8.6")
C5 162.0 x 229.0 (6.4" x 9")
COM 10
B5 (ISO)
Initial Issue
DocuPrint N2125
Nonvolatile Code 4
(NV4) Contents
Heat Roll Temperature (°C / °F)
00
148°C / 298° F
01
152°C / 306° F
02
156°C / 313° F
03
160°C / 320° F
04
164°C / 327° F
05
168°C / 334° F
06
172°C / 342° F
07
176°C / 349° F
02/2000
6-19
General Procedures / Information
GP 2.6
GP 2.7 Component Test
Table 5 Fuser Temperature Equivalency
Nonvolatile Code 4
(NV4) Contents
Heat Roll Temperature (°C / °F)
08
180°C / 356° F (Default Value)
This operation allows the user to test various electrical components of the printer. The actuation and deactuation of switches/sensors, and the energizing/de-energizing of motors, solenoids, and clutches (Table 2). The component Diagnostics will provide the following routines:
09
184°C / 363° F
0A
188°C / 370° F
•
Input actuation and state change of sensors and switches.
192°C / 377° F
•
Turning on and off of Output components (motors, clutches, solenoids, etc.)
196°C / 385° F
•
Input test-displays "Test Name" and increments counter. (01, 02, 03 etc.)
200°C / 392° F
•
Output test-displays "Test Name" and visual feedback of operation displayed.
0E
204°C / 399° F
Table 1 summarizes the operation of the Control Panel keys in "Component Test"
0F
208°C / 406° F
0B
0C
0D
Table 1 Test Print Key Table
If there is a U2 Failure the detail code will be displayed when you press the Value Keys
"3" or "7".
Table 6 U2
Key Numbers
Item Up / Item Down
Actions
2 or 6
Will scroll Component Menu (see Table 2)
Enter
4
Will turn on selected components.
On Line
0
Will turn off all components
Value
Description
1
ROS Fail at WarmUp
Procedure:
2
ROS Fail after WarmUp
1.
Power down printer.
2.
Simultaneously hold keys 2 and 6 down.
3.
Power up printer, wait for message "IOT?" to appear on the LCD.
4.
Release both keys, then press key 4 to enter the IOT Diagnostics menu (message "Entering IOT Diagnostics Mode" appears. If key 4 is not pressed within 5 seconds of the "IOT?"
message, printer will go to the normal boot process.
Press key 1 or 5 to scroll to "Component Test".
If there is a U4 Failure the detail code will be displayed when you press the Value Keys
"3" or "7".
Table 7 U4
Value
Description
5.
1
Low Trouble Temperature
6.
Press key 2 or 6 to select Component Test Item (Table 2).
2
WarmUp fail
7.
Press key 2 or 6 to scroll through the items menu.
3
STS disconnection fail
8.
Press key 4 to execute the test item appearing on the LCD.
4
High Trouble Temp
9.
Press and hold key 0 for 1 second to exit any Component test at any given time.
5
Continuous Heat ON
10. Press key 1 or 5 to get back to the Main Menu (selection of Component Test or NVM Config or Test Print).
If there is a U6 Failure the detail code will be displayed when you press the Value Keys
"3" or "7".
Table 8 U6
Table 2 Component Menu Table
Menu Item
Comment
Print Counter Reading
Print count displays for 5 seconds
Value
Description
Sensor Input Test
Press key 0 to exit
1
Task Over Flow
Read Fuser Set Temperature
Fuser set temperature displays for 5 seconds
2
Timer Table Over Flow
Read Fuser Temperature
5, 6, 7,
8, 9
Illegal interruption, NVM fail
Continuously updating temperature reading press key 0 to exit
Confirm MBF Feed Solenoid
Confirm Tray 1 Feed Clutch
Confirm Tray 2 Feed Clutch
Confirm Tray 3 Feed Clutch
Confirm EBF Clutch
Confirm OPT Dir Operation
General Procedures / Information
GP 2.6 , GP 2.7
02/2000
6-20
Initial Issue
DocuPrint N2125
GP 2.8 Entering Download Mode
Table 2 Component Menu Table
Menu Item
Comment
1.
Power down printer.
2.
Press and hold keys 1 and 5 as you switch printer power on.
3.
Wait for message "Entering Down Load Mode" to appear on the LCD.
4.
Release both keys.
5.
From the PC in DOS command mode. Change directory to where the program file
resides.
Dev Bias AC Operation
6.
Type: mode LPT1:,,p
BTR - Operation
7.
Type: C:\file_directory\.copy \b filename LPT1: then press "Enter".
BTR + Operation
8.
Data LED should light up, and LCD should display "Downloading. Please Wait."
Detack SAW
9.
Wait for message "Down Load Completed. Please reboot." to appear on the LCD. All
LEDs should be cycling for about 5 seconds then go off.
Confirm Trn Roll Clutch
Confirm Reg Clutch
Charge Roll DC Operation
Charge Roll AC Operation
Dev Bias DC Operation
Duplex Motor Hi Operation
Press "0" or "4" to stop motor
Duplex Motor Low Operation
Press "0" or "4" to stop motor
Exit Motor Fwd Operation
Press "0" or "4" to stop motor
Exit Motor Rev H Operation
Press "0" or "4" to stop motor
10. Task completed. Power off, power on.
Exit Motor Rev L Operation
Press "0" or "4" to stop motor
Main Motor Operation
Main motor remains on for 5 minutes, or Press
"0" or "4" to stop motor
Fan Motor Hi Operation
Press "0" or "4" to stop motor
ROS Motor Operation
Press "0" or "4" to stop motor
OCT Motor Operation
Press "0" or "4" to stop motor
OCT Offset Motor Operation
Stop All Tests Operation
Terminate all component tests
LASER Diode Operation
IOT ROM Checksum
Check sum displays for 5 seconds
Paper Tray Size Reading
Press key 4 to scroll through different tray press key 0 to exit
Initial Issue
DocuPrint N2125
02/2000
6-21
General Procedures / Information
GP 2.7 , GP 2.8
GP 2.9 To Reset Fuser
GP 2.10 Reset Menu
1.
Power down printer.
1.
Power down printer.
2.
Simultaneously hold keys 2 and 6 down.
2.
Simultaneously hold keys 0 and 4 down.
3.
Power up printer, wait for message "IOT?" to appear on the LCD.
3.
Power up printer, wait for first * to display on the LCD line 1 then release both keys.
4.
Release both keys, then simultaneously press keys 0 and 5 to activate the fuser reset
function. If keys 0 and 5 are not pressed within 5 seconds of the "IOT?" message, printer
will go to the normal boot process.
4.
Let printer go to Ready mode.
5.
Press 1 or 5 to scroll to Reset Menu.
6.
Press 2 or 6 to select Reset items (Table 1)
7.
Press 3 or 7 to change the values.
5.
Wait for message "Reset Completed. Please reboot" to appear on the LCD then release
both keys.
6.
Power off, power on.
NOTE: After execution all values except Demo Mode will return to "Default" value
8.
Press Enter to execute.
Table 1 Reset Menu
General Procedures / Information
GP 2.9 , GP 2.10
Reset Menu Item
Reset Menu Values
Factory Defaults
Yes (resets USB, System PCC, Tray, and Parallel menu).
No (default)
Network Defaults
Yes (resets Ethernet and Novell menu).
No (default)
Demo Mode
Yes
No (default)
Delete All Jobs
Yes (Hard drive installed)
No (default)
Disk Initialize
Yes (Hard drive installed)
No (default)
Disk Format
Yes (Hard drive installed)
No (default)
Flash Format
Yes (Flash DIMM installed)
No (default)
02/2000
6-22
Initial Issue
DocuPrint N2125
GP 2.11 System Controller Reset
Resets the System Controller to factory defaults.
NOTE: This will reset all network addresses to the factory default.
1.
Power down printer.
2.
Simultaneously hold keys 0 and 7 down.
3.
Power up printer, wait for message "NVM Erased!" to appear on the LCD then release
both keys.
Initial Issue
DocuPrint N2125
02/2000
6-23
General Procedures / Information
GP 2.11
General Procedures / Information
GP 2.11
02/2000
6-24
Initial Issue
DocuPrint N2125
GP 3.1 Print Process Overview
Print Process Overview (Figure 1) (Figure 2)
There are seven steps in the N2125 print process. This seven step cycle is repeated for each
sheet of paper that is sent through the printer.
The seven steps in the print process are:
1.
Charge
A bias charge roll places a uniform negative electric charge on the drum surface.
2.
Exposure
The laser scanner scans the drum surface with a very thin beam of laser light modulated
according to the signal from the Print Engine Controller to form an invisible electrostatic
latent image on the drum surface.
3.
Development
Attracts toner to the electrostatic latent image on the drum surface to form a visible toner
image.
4.
Transfer
Transfers the toner image from the drum surface to the paper.
5.
Discharge
Partially neutralizes the charge on the paper to allow the paper to peel off the drum surface.
6.
Fusing
Permanently fixes the toner image to the paper by heat and pressure.
7.
Cleaning
Cleans the drum surface of the remaining toner.
Figure 2 Side View Block Diagram of the Print Cycle
Print Process Description
1.
Charge (Figure 3)
The Bias Charge Roll (BCR) places a uniform negative electrostatic charge on the drum
surface. The drum surface is made of a photoconductive material that holds the electrical
charge as long as the drum remains in darkness. Light striking the drum discharges the
surface charge.
Figure 1 Block Diagram of the Print Cycle
Figure 1 illustrates the N2125 print cycle. It shows the sequence of events for the xerographic
process and the paper flow into and out of the printer.
Figure 2 is both a cut-away side view of the N2125 printer that shows the location of individual
components within the printer, and a side view block diagram that shows the major components that are directly related to the print cycle and to the paper path.
The BCR is a conductive roll that is positioned slightly above the surface of the drum. The
HVPS PWB supplies the BCR with two voltages; a negative DC charge voltage and an AC
discharge voltage The negative DC voltage creates a uniform negative charge across the
surface of the drum. The AC voltage removes any residual DC charge that was left from
the previous print cycle.
The pages following Figure 2 describe in detail each step of the print cycle.
Initial Issue
DocuPrint N2125
02/2000
6-25
General Procedures / Information
GP 3.1
The Magnetic Roll maintains an electrical potential relative to the charged surface of the
drum. Negative charged areas of the drum have a lower electrical potential, or higher relative negative value, than the Magnetic Roll. Discharged areas of the drum have a higher
electrical potential, or lower relative negative value, than the Magnetic Roll. A discharged
point on the surface of the drum now appears less negative, or positive, relative to the
negative charge on the Magnetic Roll.
The toner adhering to the Magnetic Roll is always in contact with the drum surface. When
a less negative point on the drum (a discharged area) comes in contact with the more
negative charged toner on the Magnetic Roll, toner transfers from the Magnetic Roll to
that point on the drum. At this point there is now a visible toner image on the drum surface.
Figure 3 Side View Block Diagram of the Drum Charge Process
2.
Exposure
The Raster Output Scanner (Laser) generates an invisible beam of cohesive light, called
a laser beam. Image data received from the print controller modulates this beam, turning
it on and off according to image information.
Through the use of a series of rotating and stationary mirrors within the Laser Assembly,
the beam scans the negative charged drum surface. Whenever the print controller sends
a command to print a black pixel, the laser switches on long enough to shine onto the
drum at a single pixel point. That point is now discharged and is less negative, relative to
the surrounding negative charge.
3.
Development (Figure 4)
Figure 4 Side View Block Diagram of the Development Process
The toner in the Print Cartridge has a magnetic property that causes it to adhere to the
Magnetic Roll. The Charge Metering Blade (CM Blade) spreads the toner into a very thin
layer on the Magnetic Roll. Friction between the Magnetic Roll and the CM Blade generates a small electrical charge that is transferred to the toner.
4.
The surface of the Magnetic Roll is made up of a thin sheet of conductive material. The
HVPS PWB supplies the Magnetic Roll with two voltages; a negative DC voltage and an
AC voltage. The DC voltage is the voltage that is used to transfer toner from the Magnetic
Roll to the surface of the drum. The AC voltage agitates the toner on the Magnetic Roll
and makes toner transfer easier.
General Procedures / Information
GP 3.1
02/2000
6-26
Transfer (Figure 5)
The Bias Transfer Roll (BTR) applies a positive charge to the back side of the printing
paper as the paper travels between the BTR and the drum surface. This positive charge
transfers the negative charged toner image from the drum surface to the front of the
paper. The toner image is now on the paper and the paper is now stuck to the drum surface due to the relative electrical differences.
Initial Issue
DocuPrint N2125
Figure 6 Side View Block Diagram of the Discharge Process
6.
The paper moves to the Fuser Assembly where it passes between the Heat Roll and the
Pressure Roll. The Heat Roll melts the toner image and bonds it permanently to the
paper. The paper then is transported to the output tray.
Figure 5 Side View Block Diagram of the Transfer Process
7.
5.
Discharge (Figure 6)
After the toner image has transferred to the surface of the paper, the Detack Saw (a thin
strip of metal that resembles a saw blade) applies a negative charge to the back side of
the paper to neutralize the positive voltage that was applied to it by the BTR. Once the
positive voltage is neutralized, the paper strips easily off of the drum surface.
Initial Issue
DocuPrint N2125
Fusing (Figure 7)
02/2000
6-27
Cleaning (Figure 7)
The Cleaning Blade removes any toner that remains on the drum after the transfer process. Immediately after passing the Cleaning Blade, the drum passes under the BCR.
The BCR applies an AC voltage to the surface of the drum to neutralize any electrical patterns remaining from the last print cycle.
General Procedures / Information
GP 3.1
GP 3.2 The Paper Path
There are three paths that a sheet of paper can follow during a feed cycle (Figure 1). One path
is taken if paper is fed from the Paper Tray. Another path is taken if paper is fed from the Multiple-Bypass Feeder (MBF). A third path is taken if paper is fed from the Envelope Feeder
Assembly option.
Figure 7 Side View Block Diagram of the Fusing and Cleaning Process
The toner that the Cleaning Blade removes is collected inside the Print Cartridge. Toner
that is reclaimed from the drum is not reused by the Print Cartridge (Figure 8).
Figure 1 The Three Possible Paper Paths
Figure 8 Side View of the Print Cartridge
General Procedures / Information
GP 3.1 , GP 3.2
02/2000
6-28
Initial Issue
DocuPrint N2125
Figure 2 is a cut-away side view of the N2125 printer that shows the major components that are
directly related to the paper path.
GP 3.3 Drive Flow
As shown in Figure 1, the Drive Gear Assembly takes the mechanical energy that is created by
the Main Motor Assembly and transmits it to four printer subsystems; the Turn Clutch Assembly, the drum gear, the Fuser Assembly and the Optional Envelope Feeder Assembly. The Exit
Motor Assembly provides the power needed by the exit component. The pages following this
figure show each drive section in greater detail.
Figure 2 Cut-away Side View of the Printer Showing the Paper Path
Figure 1 Drive Flow Through the Printer
Initial Issue
DocuPrint N2125
02/2000
6-29
General Procedures / Information
GP 3.1 , GP 3.2
Drive transmission to the MBF Roll Assembly
Drive transmission to the Turn Roll Assembly
As shown in Figure 2, the mechanical energy created by the Main Motor Assembly is transmitted through Gear 14 to the Pick Up Gear that drives the MBF Roll Assembly. When the Pick Up
Solenoid actuates, it transmits the energy from Gear 14 to the Pick Up Gear that is located on
the end of the MBF Shaft Assembly.
As shown in Figure 3, the mechanical energy created by the Main Motor Assembly is transmitted through the Drive Gear Assembly to the Turn Clutch Assembly. When the Turn Clutch
Assembly actuates it transmits the energy to the Turn Roll Assembly.
Figure 2 Drive transmission to the MBF Roll Assembly
Figure 3 Drive transmission to the Turn Roll Assembly
General Procedures / Information
GP 3.3
02/2000
6-30
Initial Issue
DocuPrint N2125
Drive transmission to the Feeder Assembly
Drive transmission to the Rubber Registration Roll Assembly
As shown in Figure 4, the mechanical energy created by the Main Motor Assembly is transmitted through the Drive Gear Assembly, Turn Clutch Assembly, and idle gears to the Feed Clutch
Assembly. When the Feed Clutch Assembly actuates, it transmits the energy to the Feed Roll
Assembly.
As shown Figure 5, the mechanical energy created by the Main Motor Assembly is transmitted
through the Drive Gear Assembly to the Registration Clutch that is located on the end of the
Rubber Registration Roll.
Figure 4 Drive transmission to the Feeder Assembly
Figure 5 Drive transmission to the Rubber Registration Roll
Initial Issue
DocuPrint N2125
02/2000
6-31
General Procedures / Information
GP 3.3
Drive transmission to the Drum and the BTR
Drive transmission to the Fuser Assembly
The Main Motor Assembly transmits drive through the Drive Gear Assembly to the Drum drive
gear that is located on the end of the Drum. The Drum Gear drives the BTR Gear that is
located on the end of the BTR Assembly (Figure 6).
As shown in Figure 7, the mechanical energy created by the Main Motor Assembly is transmitted through the Drive Gear Assembly to the Idler Gear of the Fuser Assembly. The Idler Gear
transmits energy to the Heat Roll Gear located on the Heat Roll.
Figure 7 Drive transmission to the Fuser Assembly
Figure 6 Drive transmission to the Drum and BTR
General Procedures / Information
GP 3.3
02/2000
6-32
Initial Issue
DocuPrint N2125
Drive transmission to the Exit Components
As shown in Figure 8, the mechanical energy created by the Exit Motor Assembly provides
drive to the gears located on the Roll Assembly.
GP 3.4 Print Engine Controller and Control Panel
Functions
The Print Engine Controller PWB performs eight main functions:
1.
Communicates with the System Controller.
2.
Controls the print sequence.
3.
Controls the Fuser Assembly, Laser Assembly, and Drive components.
4.
Distributes low DC voltages to various printer components.
5.
Monitors printer status.
6.
Maintains a running print count.
7.
Writes the NVRAM settings.
8.
Controls printer options.
The Print Engine Controller PWB uses a 32 bit microcomputer and ASICs (Application Specific
Integrated Circuits). The 32 bit microcomputer includes ROM, RAM, a 16 bit integrated timer, a
programmable timing pattern controller, a watch dog timer, serial communication interfaces, an
A/D converter, a D/A converter, I/O ports, a DMA controller, and a refresh controller.
The System Controller connects to the Print Engine Controller PWB directly. The Control Panel
is connected to the System Controller and signals pass through the Print Engine Controller
PWB via the System Controller.
Figure 8 Drive transmission to the Exit Components
Initial Issue
DocuPrint N2125
02/2000
6-33
General Procedures / Information
GP 3.3 , GP 3.4
GP 3.5 Power Supplies
GP 3.6 Laser Control
The LVPS (Low Voltage Power Supply) (Figure 1)
Warm-up
The LVPS uses a resonance-type switching regulator. The LVPS supplies +24VDC, +5VDC,
+3.3VDC.
The Laser completes warm-up when the SOS signal intervals are shorter than the READY reference value, during three consecutive samplings of the SOS signal interval, and when the
actual Laser Diode laser power reaches the value that was set in NVM Configuration. The
READY interval for the SOS signal is approximately 98% of the SOS interval when the Laser
Motor is rotating.
The LVPS has built-in over current protection. If an excessive current begins to flow the DC
supplies are shut down. Switch the power supply OFF for 5 minutes, then ON again to reset the
circuit after an over current shutdown.
Table 1 illustrates the Laser Motor and Laser Diode Control in Various Printer Modes
The LVPS also supplies AC power to the Heat Rod. A circuit, controlled by the Heat ON signal
from the Print Engine Controller PWB, switches power to the Heat Rod.
Table 1 Laser Motor and Laser Diode Control in Various Printer Modes
Printer Mode
Laser Motor and Laser Diode Control
On-line Mode
The Laser Motor and the Laser Diode are both controlled by
the Printer Controller.
Printing Test Mode
The Laser Motor and the Laser Diode are both controlled by
the Printer Controller.
Diagnostic Mode
The Laser Motor and the Laser Diode are always on.
Printable Area
NOTE: Edge to edge printing capability. Within the 4mm border (4 sides) the printer will print
any data 6 point Arial or larger.
Figure 1 LVPS Block Schematic Diagram
The HVPS (High Voltage Power Supply)
The HVPS supplies high voltages for the BCR, BTR, DB and DTS. The HVPS receives
+24VDC input from the LVPS, along with nine control signals from the Print Engine Controller
PWB.
The HVPS has built-in overcurrent protection. If an excessive current begins to flow in any of
the four power supplies, all of the supplies are shut down. Switch the power supply OFF, then
ON again to reset the circuit after an overcurrent shutdown.
Figure 1 Printable Area
Laser Trouble (U2 Error Code)
There are three major causes of U2 errors.
General Procedures / Information
GP 3.5 , GP 3.6
02/2000
6-34
Initial Issue
DocuPrint N2125
•
Warm-up failure - SOS signal intervals are longer than the READY reference value during
three consecutive samplings of the SOS. The actual laser power does not equal the value
set in NVRAM.
•
Laser speed too low (Down Failure) - SOS signal intervals are longer than the set Down
Failure interval after completion of warm-up. The set Down Failure is a time interval corresponding to 90% of the rated Laser Motor speed of rotation.
•
Laser speed too high (Overrun Failure) - SOS signal intervals are shorter than the set
Overrun Failure interval after completion of warm-up. The set Overrun Failure is a time
interval corresponding to 102% of the rated Laser Motor speed of rotation.
GP 3.7 Fuser Control
Fuser Temperature Control
The Thermistor monitors the temperature on the surface of the Heat Roll and compares that
temperature with the rated temperature that was set in NVRAM. The Print Engine Controller
switches the Heat Rod on or off depending on how the actual temperature differs from the rated
temperature.
Fuser Temperature Adjustment
You can adjust the rated Fuser temperature by changing the NVRAM Value. You can adjust the
setting in 16 increments, with each increment approximately 4°C.
The printer switches on the Heat Rod when the Fuser temperature lowers below the current
control temperature (approximately 178°C for the standard control temperature). The printer
switches off the Heat Rod when the Fuser temperature rises above the current control temperature (approximately 180°C for the standard control temperature).
Fuser Warm-up
Power to the Heat Rod is applied at the start of printer warm-up. Warm-up is complete when
the Heat Roll reaches the current control Temperature. If the Fuser Temperature is below
100°C at start of warm-up, then warm-up finishes when the Fuser temperature reaches
"standby temperature".
Fuser Trouble (U4 Error Code)
There are five major causes of a U4 error.
•
Warm-up failure - Fuser warm-up does not complete within specified seconds after starting.
•
Low Trouble temperature - The Fuser temperature drops to the Low Trouble temperature
(approximately current control temperature, minus approximately 25°C
•
High Trouble temperature -The Fuser temperature rises to the High Trouble temperature
(approximately current control temperature, plus approximately 35°C
•
The Thermistor circuit opened.
•
STS failure -The Heat Rod remains on for at least ten seconds after warm-up has completed.
AC Power Shutoff to the Fuser
There are eight reasons that the printer shuts off AC power to the Fuser.
Initial Issue
DocuPrint N2125
•
Fuser Failure (U4)
•
Paper jam
•
Open Front Cover Assembly
•
Laser failure (U2)
•
CPU or NVRAM problem (U6)
•
Main Motor Assembly problem (U1)
•
Fan problem (U5)
02/2000
6-35
General Procedures / Information
GP 3.6 , GP 3.7
•
GP 3.8 Erase Cycle
FUSER PAUSE command issued
Fuser Temperature Cycling (Table 1)
Table 1 Fuser Temperature Cycling
Temperature Name
Temperature Value
High Trouble Temperature
Approximately 215 °C (Standby temperature + approximately
35 °C)
Fuser Off Temperature
Fuser control temperature +/- 0 °C
Fuser Control Temperature
(NVRAM Code 09=08)
Running temperature (180 °C)
During an Erase Cycle, the printer switches on the Main Motor Assembly and the BCR (AC and
DC), BTR(-) and DB (DC) voltages. The Erase Cycle removes any developed image (toner) on
the drum, and any latent image (electrical) on the drum. When the Erase Cycle finishes, the
printer returns to normal mode and is ready to resume printing.
Standby temperature (180 °C)
Fuser On Temperature
Fuser control temperature - 2 °C
Low Trouble Temperature
Approximately 155 oC (Standby temperature - approximately
25 °C)
General Procedures / Information
GP 3.7 , GP 3.8
The printer immediately interrupts a print cycle whenever the Front or Rear Covers are opened,
there is a paper jam, Tray 1 is removed, or the printer power is switched off. When you remove
the cause of the print cycle interruption, such as closing the covers, clearing the paper jam,
reinstalling the Paper Tray, or switching on printer power, the printer runs an Erase Cycle before
continuing with the next print cycle.
02/2000
6-36
Initial Issue
DocuPrint N2125
GP 3.9 Fan Control
GP 3.10 Duplex
The printer switches between two Fan speeds.
The Paper Path for Duplex Printing (Figure 1) and (Figure 2)
•
High Speed, when the Main Motor Assembly is on.
•
Low Speed, when the Main Motor Assembly is off.
When printer power is switched on, or when an Interlock Switch is actuated (after being deactuated), the Fan runs at High Speed for one second, then switches to Low Speed.
During the duplex printing, the printer prints the first side of the paper. Then the Exit Assembly
reverses direction and re-feeds the paper to the Duplex Assembly. The paper is transferred
through the Duplex Assembly and fed again to the Paper Handler Assembly. When the paper
reaches the registration position, the second side of the paper is already face up. Then the
printer starts to print the second side of the paper, and transfers the completed duplex sheet to
the Output Tray.
During duplexing to ensure proper collation of the output documents, even sides are printed
first.
Figure 1 The Duplex Assembly Paper Path
Initial Issue
DocuPrint N2125
02/2000
6-37
General Procedures / Information
GP 3.9 , GP 3.10
Transmits the drive power generated by the Duplex Motor Assembly to the Duplex Roll Assembly.
Synchronous Belt Transmits the drive power from the Middle Roll Assembly to the Front Roll Assembly.
Duplex Sensor Assembly Detects paper entering and leaving the Duplex Assembly.
Home Position Sensor Detects the position of the Face Up Tray.
Duplex PWB Receives the control signals for the Duplex Motor Assembly from the Print Engine Controller
PWB, and provides the phase signals to operate the Duplex Motor Assembly.
Transmits the detection signals of the Duplex Sensor Assembly and the Duplex Sensor to the
Print Engine Controller PWB.
Figure 2 The Duplex Paper Path
Provides +24VDC and +3.3VDC for the Duplex Motor Assembly and Sensors.
Drive Flow
The Duplex Drive Assembly generates the mechanical energy needed to run the Duplex Unit
(Figure 3).
Figure 3 The Drive Flow of the Duplex Assembly
Function of Major Components (Figure 4)
Duplex Roll Assemblies (Rear, Middle, and Front) Figure 4 The Major Components of the Duplex Assembly
Transfers the paper through the Duplex Assembly.
Duplex Motor Assembly -
Duplex Printing Methods
Single Sheet Batch Printing -
Generates the drive to the Duplex Assembly.
Gears -
General Procedures / Information
GP 3.10
Involving a single sheet of paper. The first side of the page is printed, then the second side is
printed and the page is sent to the output tray.
02/2000
6-38
Initial Issue
DocuPrint N2125
The Duplex Assembly uses a Single-sheet Batch and a Multi-sheet Batch mode when duplexing a print job.
GP 3.11 Envelope Feeder
Single-sheet batch is used by the printer when a complex duplex job is received. For example,
if the printer received a job that contains complicated graphics, the printer will switch to singlebatch mode so it can process the job.
Paper that is fed from the optional Envelope Feeder follows the path (Figure 1).
The Paper Path for the Envelope Feeder
Multi Sheet Batch Printing 1.
The printer prints on one side of the first sheet of paper.
2.
The first sheet is returned to the Duplex Assembly and held.
3.
The printer prints on one side of a second sheet of paper.
4.
The Duplex Assembly returns the first sheet to the printer as the Exit Assembly returns
the second sheet to the Duplex Assembly
5.
The printer prints on the second side of the first sheet.
6.
The printer transports the first sheet to the Output Tray.
7.
A third sheet is fed and printed on one side.
8.
The Duplex Assembly returns the second sheet to the printer as the third sheet is
returned to the Duplex Assembly.
9.
The printer prints on the second side of the second sheet.
10. The printer transports the duplexed printed second sheet to the output tray.
11. This process repeats for additional prints.
Figure 1 The Envelope Feeder Paper Path
Initial Issue
DocuPrint N2125
02/2000
6-39
General Procedures / Information
GP 3.10 , GP 3.11
Figure 2 shows a cut-off view of the printer, to better illustrate the components involved in the
Envelope paper path.
Drive Flow
As shown in Figure 3, the mechanical power generated by the Main Motor Assembly is transmitted to the gears of the Envelope Feeder.
Figure 2 The Envelope Paper Path
Figure 3 Drive Flow
Function of Major Components
Figure 4 shows the major components of the Envelope Feeder.
Clutch 29
Controls the transmission of the drive power by the actuation of the clutch function.
Clutch Assembly One-way Torque
25, 26, 26A and 26B
Prevents the clockwise rotation.
Feed 1 Roll Assembly
Transfers the envelope by its counterclockwise rotation
Feed 2 Roll Assembly and Roll Assembly Bottom
General Procedures / Information
GP 3.10 , GP 3.11
02/2000
6-40
Initial Issue
DocuPrint N2125
Transfers the envelope by its counterclockwise rotation and transfers the drive power to the
Feed Belts at the same time.
GP 3.12 Offset Catch Tray (OCT)
Transfer Roll Assembly
Paper that is fed to the optional Offset Catch Tray follows the path shown in Figure 1.
The Paper Path for the Offset Catch Tray
Transfers the envelope to the registration paper path.
No Paper Sensor
Detects out of envelope condition.
Envelope Exit Sensor Assembly
Detects exit of the envelope.
Envelope PWB
Controls the Envelope Feeder and is the signal interface to the Print Engine Controller PWB.
Figure 1 The OCT Paper Path
Figure 4 Major Components of the Envelope Feeder
Initial Issue
DocuPrint N2125
02/2000
6-41
General Procedures / Information
GP 3.11 , GP 3.12
Figure 2 shows a cut-off view of the printer, to better illustrate the components involved in the
OCT paper path.
Drive Flow
As shown in Figure 3, the Motor Assembly Drive generates the mechanical power needed to
run the Mid OCT Roll Assembly and Exit Roll Assembly. The Offset Motor Assembly generates
the drive power to move the Offset Roll Assembly in alternating directions.
Figure 2 The OCT Paper Path
Figure 3 OCT Drive Flow
Function of Major Components
Figure 4 and Figure 5 show the major components of the Offset Catch Tray.
Motor Assembly Drive
Drives the Mid OCT Roll Assembly and the Exit Roll Assembly.
Offset Motor Assembly
Shifts the Offset Roll Assembly.
Full Stack Sensor and Actuator Full Stack
Detects when the stacking of the Tray Exit exceeds 500 sheets of paper.
OCT PWB
General Procedures / Information
GP 3.11 , GP 3.12
02/2000
6-42
Initial Issue
DocuPrint N2125
Controls OCT operations.
Offset Roll Assembly
Drives printed pages into the OCT Tray, offsetting each from the normal position.
OCT Exit Sensor Assembly
Located between the Mid OCT Roll Assembly and the Exit Roll Assembly, it detects when
paper passes into the Tray Exit.
Home Sensor
The OCT Home Sensor detects when the Offset Roll Assembly is in the home position. It is
turned On when the Gear Core is located at the sensing point of the OCT Home Sensor.
Direction Solenoid and Lever
Switches the paper path between the normal paper path and the OCT paper path.
Figure 5 Major Components of the OCT (2 of 2)
Offset Catch Tray Control
Offset Motor Control
When the end of a sheet of paper reaches the OCT Exit Sensor Assembly, the sensor signal
goes Low. The Offset Motor Assembly begins rotating clockwise for a specified time after the
signal goes Low. This clockwise rotation shifts the sheet of paper from the normal position. At
the specified time after the Sensor Assembly Exit goes Low, the Exit Motor Assembly begins
rotating in the counterclockwise direction, moving the Offset Roll Assembly back into home
position, until the Sensor OCT Home signal (/OCT HOME) goes Low. When the power is first
switched on, the Offset Motor Assembly performs this offset operation once, to make sure the
Offset Roll Assembly is in the home position.
When the printer is running in Duplex mode, paper partially feeds out into the Face Down Tray
(under the OCT Assembly), it then reverses direction and is printed on the second side, then
sent to the Exit Tray of the OCT.
Full Stack Detection
The Print Engine Controller PWB examines the state of the Full Stack Sensor after the Sensor
Assembly Exit signal goes Low. The Print Engine Controller PWB detects that the Tray Exit is
full when the Full Stack Sensor remains High for a set number of successive Sensor Assembly
Exit actuations (sheets of paper exiting in the OCT). The Full Stack condition stays in affect
until the Full Stack Sensor goes Low.
Paper Jam Detection
Figure 4 Major Components of the OCT (1 of 2)
Initial Issue
DocuPrint N2125
The base printer and the OCT are designed to move a sheet of paper between the detecting
points, i.e. sensors, on the paper path within specific periods of time. If a sheet of paper is
either early or late arriving at any point, the Print Engine Controller PWB interprets this deviation as a paper jam.
02/2000
6-43
General Procedures / Information
GP 3.12
GP 3.13 Option Feeder Assembly
E6-1 Jam
E6-1 is the specified time that the paper has to turn the OCT Sensor Assembly Low after it has
turned the Sensor Exit High. If the Sensor Assembly Exit does not go Low after the specified
time, the Print Engine Controller PWB detects that an OCT jam has occurred.
The Paper Path for the Option Feeder Assembly
Paper that is fed from the Optional Feeder Assembly follows the path shown in Figure 1.
E6-2 Jam
One of the conditions of the E6-2 jam is the same as the condition of the E6-1 jam. Another is
the signal of the OCT Exit Sensor Assembly turns Low during the warming-up.
Figure 1 The Option Feeder Paper Path
General Procedures / Information
GP 3.12 , GP 3.13
02/2000
6-44
Initial Issue
DocuPrint N2125
Figure 2 shows a cut-off view of the printer, to better illustrate the components involved in the
Option Feeder Assembly paper path.
Drive Flow
As shown in Figure 3, the mechanical power generated by the Main Motor Assembly is transmitted to the gears of the Option Feeder Assembly
Figure 2 The Option Feeder Paper Path
Figure 3 Option Feeder Drive Flow
Function of Major Components
Figure 4 shows the major components of the Option Feeder Assembly.
Turn Clutch Assembly
Consists of a gear and an electric clutch located on the end of the Turn Roll Assembly shaft.
This clutch controls the transmission of the drive power from Gear 4 of the Standard Feeder
Assembly to the Turn Roll Assembly by turning on and off the Turn Roll clutch. When this clutch
is activated, the drive power is transmitted to the Turn Roll Assembly through the Gear OPT to
the gear of the Clutch Assembly Feed.
Initial Issue
DocuPrint N2125
02/2000
6-45
General Procedures / Information
GP 3.12 , GP 3.13
Feed Clutch Assembly
Consists of a gear and a electric clutch located on the end of the Feeder Assembly shaft. This
clutch controls the transmission of the drive power from Gear 3 through the Turn Clutch
Assembly to the Roll Assembly of the Feeder Assembly by turning on and off the Feed clutch.
When this clutch is activated, the drive power is transmitted to the Feeder Assembly.
Feeder Assembly
Consists of the Nudger Support Assembly, Shaft Feed and Roll Assembly. The task of this
Assembly is to pick the paper from the Paper Tray Assembly and feed it to the Turn Roll Assembly. To ensure this task, the Nudger Support Assembly acts as the actuator for the Stack Height
Sensor Control by swivelling itself up and down synchronizing the height of the stacked paper.
Turn Roll Assembly
This Assembly feeds the paper to the Standard Feeder Assembly path. The mechanical activity
is same as the Turn Clutch Assembly.
Feeder PWB
Connective interface between the Sensors, Clutches and Motor, and the Size Option PWB.
This PWB also monitors the No Paper Sensor which detects the out of paper condition of the
Paper Tray.
Size Option PWB
Controls the Option Feeder Assembly, the interface function between the Size Option PWBs,
the Feeder PWB, and the Print Engine Controller PWB.
Figure 4 Major Components of the Option Feeder Assembly
No Paper Sensor
Detects the out of paper of the Paper Tray Assembly.
No Paper Actuator
Actuates the No Paper Sensor. When out of paper, this actuator will swivel down and shield the
No Paper Sensor.
Low Paper Sensor
Detects the state of low paper of the Paper Tray Assembly. Low paper detect is at approximately 50 +/- 30 sheets of paper.
Stack Height Sensor
Detects the state of the paper level (the position of the top sheet of paper). This sensor is actuated by the Nudger Support Assembly.
Size Switch
Mounted on the Feeder PWB and detects when the Paper Tray Assembly is out of paper.
General Procedures / Information
GP 3.13
02/2000
6-46
Initial Issue
DocuPrint N2125
GP 4.1 Menu Maps
This chapter shows the menu structure in graphical format. The names of menus, items and
values found in the menu maps contain the English language strings for reference only. The
order of menus, items, and values found in the menu maps is the order in which these strings
are displayed when scrolling through the menu items. The “first” menu, item or value is at the
top of the list and the “last” menu, item or value is at the bottom of the list. Selecting an “Up”
key causes scrolling from first to last. Pressing a “Down” key causes scrolling from last to first.
Some of the Menus and Items in the following maps are only displayed if an associated option
is installed. These options entries are flagged with the symbol “_” following the entry.
Figure 1 Job Menu/Print Menu/Reset Menu
Figure 2 Password Menu
Initial Issue
DocuPrint N2125
02/2000
6-47
General Procedures / Information
GP 4.1
General Procedures / Information
GP 4.1
02/2000
6-48
Initial Issue
DocuPrint N2125
Figure 3 Tray Menu
Initial Issue
DocuPrint N2125
02/2000
6-49
General Procedures / Information
GP 4.1
Figure 4 PCL Menu
General Procedures / Information
GP 4.1
02/2000
6-50
Initial Issue
DocuPrint N2125
Figure 5 System Menu
Initial Issue
DocuPrint N2125
02/2000
6-51
General Procedures / Information
GP 4.1
Figure 6 Parallel Menu
Figure 7 Serial Menu
General Procedures / Information
GP 4.1
02/2000
6-52
Initial Issue
DocuPrint N2125
Figure 8 USB Menu
Initial Issue
DocuPrint N2125
02/2000
6-53
General Procedures / Information
GP 4.1
Figure 9 Ethernet Menu
General Procedures / Information
GP 4.1
02/2000
6-54
Initial Issue
DocuPrint N2125
Figure 10 Token Ring Menu
Initial Issue
DocuPrint N2125
02/2000
6-55
General Procedures / Information
GP 4.1
Figure 11 Novell Menu
General Procedures / Information
GP 4.1
02/2000
6-56
Initial Issue
DocuPrint N2125
Figure 13 Reset Menu
Figure 12 Print Menu
Initial Issue
DocuPrint N2125
02/2000
6-57
General Procedures / Information
GP 4.1
General Procedures / Information
GP 4.1
02/2000
6-58
Initial Issue
DocuPrint N2125
GP 5.1 Supplemental Tools, Supplies, and Hardware
Table 1 Supplemental Tools, Supplies and Hardware
Description
Part Number
Cleaning Cloth (treated)
35P1538
Cleaning Pads
600S4372
Cotton Swabs
35P2162
Disposable Gloves
99P3082
Disposable Plastic Bags
99P30234
Drop Cloth
5P1737
Film Remover
43P45
Formula A Cleaner
43P48
Towel (heavy duty)
35P3191
RX Unique Cleaner
8R90175
Cleaning Pad Kit
600S4372
Fuser Cleaning Solvent Pads
43P83
General Cleaning Solvent
8R90176
Test Pattern, Output Performance
82P520
Test Pattern, Visual Scale
82P284
14" Magnetic Screwdriver
600T91798
Yellow Towels
35P1638
Initial Issue
DocuPrint N2125
02/2000
6-59
General Procedures / Information
GP 5.1
General Procedures / Information
GP 5.1
02/2000
6-60
Initial Issue
DocuPrint N2125
7 Wiring Data
Section Contents .............................................................................................................
Base Engine ....................................................................................................................
550 Sheet Paper Feeder .................................................................................................
Duplex Assembly.............................................................................................................
Offset Catch Tray ............................................................................................................
Envelope Feeder .............................................................................................................
Initial Issue
DocuPrint N2125
7-3
7-3
7-20
7-24
7-28
7-33
02/2000
7-1
Wiring Data
Wiring Data
02/2000
7-2
Initial Issue
DocuPrint N2125
Section Contents
Base Engine
Introduction
Wiring Diagrams and Signal Information for Engine
This section of the manual contains a Block Diagram for the N2125 printer. The Block Diagram
shows the interconnections of the major subsystems within the printer. The remainder of this
section divides the Block Diagram into nine individual block diagrams to better illustrate the
electrical relationships between components and assemblies within the printer. Each wire in
the block diagram is tagged with a signal name, and each wire is terminated at both ends with
a pin number.
Organization
1.
Wiring Diagram Notations (Figure 3)
2.
Block Diagram (Figure 4 & Figure 5)
3.
Print Engine Controller PWB <=> LVPS PWB and Fuser Assembly (Figure 7) (Table 2)
4.
LVPS PWB <=> Fan Assembly, Front Switch Interlock Assembly, 5VDC PWB and System
Controller PWB (Figure 8) (Table 3)
5.
Print Engine Controller PWB <=> HVPS PWB <=> BTR, Print Cartridge, and Fuser
Assembly (Figure 9) (Table 4) (Table 5)
6.
Print Engine Controller PWB <=> Fuser Assembly (Figure 10) (Table 6)
7.
Print Engine Controller PWB <=> Exit Sensor, and Rear Interlock Switch (Figure 11)
(Table 7)
8.
Print Engine Controller PWB <=> Size 1 PWB <=> Feeder PWB <=> Low Paper Sensor,
Stack Height Sensor, Feed Clutch Assembly, Turn Clutch Assembly and Motor Assembly
(Figure 12) (Table 8) (Table 9)
9.
Print Engine Controller PWB <=> Main Motor Assembly, Exit Motor Assembly and Print
Cartridge Sensor Assembly (Figure 13) (Table 10)
10. Print Engine Controller PWB <=> Connector PWB <=> Paper Set Sensor, Registration
Sensor, Registration Clutch, Toner Sensor, Pick Up Solenoid (Figure 14) (Table 11)
11. Print Engine Controller PWB <=> Laser Assembly (Figure 15) (Table 12)
12. System Controller PWB <=> Control Panel (Figure 16) (Table 13)
Location of P/J Connectors
Use the P/J table (Table 1) and the P/J Map (Figure 1) and (Figure 2) to locate a specific P/J
connector within the Base Engine.
•
Initial Issue
DocuPrint N2125
Locate the P/J connector number in the first column of the table.
•
Locate the corresponding coordinates in the second column, such as I7 or J7.
•
Go to the map.
•
Cross-reference the letter and number of the P/J coordinates with the letters and numbers
on the map.
•
The P/J connector is located within the area where the coordinates cross.
02/2000
7-3
Wiring Data
Section Contents, Base Engine
P/J Table
Table 1 Base Engine P/J Table
Table 1 Base Engine P/J Table
Connector
Coordinate
Description
P/J33
J35 (Figure 2)
Connects the Size 1 PWB to the Print Engine Controller
PWB
P/J34
J31 (Figure 2)
Connects the Duplex PWB to the Print Engine Controller
PWB
Connector
Coordinate
Description
TR
E20 (Figure 1)
Connects the BTR Roll to the HVPS
DTS
E29 (Figure 1)
Connects the Detack Saw to the HVPS
P/J51
J20 (Figure 1)
Connects the Print Engine Controller PWB to the 550 Sheet
Feeder PWB
P/J35
J31 (Figure 2)
Connects the OCT PWB to the Print Engine Controller
PWB
P/J61
G19 (Figure 1)
Connects the Feeder PWB to the Tray 1 Size PWB
P/J14
H36 (Figure 2)
P/J64
A18 (Figure 1)
Connects the Turn Clutch Assembly to the Feeder PWB
Connects the System Controller PWB to the Print Engine
Controller PWB
P/J65
C19 (Figure 1)
Connects the Feed Clutch Assembly to the Feeder PWB
P/J37
G33 (Figure 2)
Connects the Duplex Sensor to the Duplex PWB
K38 (Figure 2)
Connects the 5VDC PWB to the LVPS
P/J66
D18 (Figure 1)
Connects the Low Paper Sensor to the Feeder PWB
PN101
P/J67
B18 (Figure 1)
Connects the Paper Lift Motor to the Feeder PWB
P/J211
A37 (Figure 2)
P/J261
K25 (Figure 1)
Connects the HVPS to the Print Engine Controller PWB
Connects the SOS Sensor to the Print Engine Controller
PWB
PRB
K26 (Figure 1)
Connects the Fuser to the HVPS
P/J212
A39 (Figure 2)
P/J331
J17 (Figure 1)
Connects the Size PWB to the Print Engine Controller PWB
Connects the Laser Motor to the Print Engine Controller
PWB
P/J641
A25 (Figure 1)
Connects the Turn Clutch to the Feeder PWB
P/J213
A40 (Figure 2)
Connects the Laser PWB to the Print Engine Controller
PWB
P/J651
A26 (Figure 1)
Connects the Feed Clutch to the Feeder PWB
P/J223
A41 (Figure 2)
P/J661
G29 (Figure 1)
Connects the Low Paper Sensor to the Feeder PWB
Connects the Laser PWB to the Print Engine Controller
PWB
P/J662
D29 (Figure 1)
Connects the Stack Height Sensor to the Feeder PWB
P/J281
K41 (Figure 2)
Connects the LVPS to the Print Engine Controller PWB
P/J671
D20 (Figure 1)
Connects the Motor Harness Assembly to the Socket
P/J282
K39 (Figure 2)
Connects the System Controller PWB to the LVPS
P/J672
C20 (Figure 1)
Connects the Cassette Assembly to the Feeder Assembly
P/J283
K41 (Figure 2)
Connects the Fan Assembly to the LVPS
P/J673
B20 (Figure 1)
Connects the Motor Assembly to the Connector
P/J284
K40 (Figure 2)
Connects the Front Interlock Switch to the LVPS
P/J11
K43 (Figure 2)
Connects the Fuser Assembly to the LVPS
P/J285
K42 (Figure 2)
Connects the AC Input voltage to the LVPS
P/J21
H31 (Figure 2)
Connects the Laser Assembly to the Print Engine Controller
PWB
P/J13
I44 (Figure 2)
P/J288
K37 (Figure 2)
Connects the 5VDC PWB to the System Controller PWB
P/J22
G34 (Figure 2)
Connects the Connects the Laser Assembly to the Print
Engine Controller PWB
P/J291
K39 (Figure 2)
Connects the Main Motor to the Print Engine Controller
PWB
P/J23
K32 (Figure 2)
Connects the Connects the Connector PWB to the Print
Engine Controller PWB
P/J341
D44 (Figure 2)
Connects the Duplex PWB to the Print Engine Controller
PWB
P/J25
I31 (Figure 2)
Connects the Print Cartridge Sensor to the Print Engine
Controller PWB
P/J18
G36 (Figure 2)
Connects the Control Panel to the System Controller PWB
P/J511
G44 (Figure 2)
Connects the Tray1 Size PWB to the Tray 2 Size PWB
P/J26
H35 (Figure 2)
Connects the HVPS to the Print Engine Controller PWB
P/J27
I35 (Figure 2)
Connects the Fuser Exit Sensor to the Print Engine Controller PWB
P/J28
K35 (Figure 2)
Connects the LVPS to the Print Engine Controller PWB
P/J29
K33 (Figure 2)
Connects the Main Motor to the Print Engine Controller
PWB
P/J30
K35 (Figure 2)
Connects the Rear Interlock Switch to the Print Engine
Controller PWB
P/J31
G31 (Figure 2)
Connects the Stack Full Sensor to the Print Engine Controller PWB
P/J32
K33 (Figure 2)
Connects the Exit Motor Assembly to the Print Engine Controller PWB
Wiring Data
Base Engine
02/2000
7-4
Initial Issue
DocuPrint N2125
P/J Maps
Figure 2 Base Engine P/J Location Map (2 of 2)
Figure 1 Base Engine P/J Location Map (1 of 2)
Initial Issue
DocuPrint N2125
02/2000
7-5
Wiring Data
Base Engine
Wiring Diagram Notations
The wiring diagrams presented in this manual use the following circuit notations to describe
components and signal paths within the printer (Figure 3).
Figure 3 Wiring Diagram Notations
Wiring Data
Base Engine
02/2000
7-6
Initial Issue
DocuPrint N2125
Block Diagram
Figure 4 Block Diagram (1 of 2)
Initial Issue
DocuPrint N2125
02/2000
7-7
Wiring Data
Base Engine
Figure 5 Block Diagram (2 of 2)
Wiring Data
Base Engine
02/2000
7-8
Initial Issue
DocuPrint N2125
Block Diagram Tray 2 and Tray 3
Print Engine Controller PWB <=> LVPS PWB and Fuser Assembly (Figure 7) (Table 2)
Figure 7 Print Engine Controller <=> LVPS <=> Fuser
Print Engine Controller PWB <=> LVPS PWB and Fuser Assembly
Table 2 shows the signal names for the Print Engine Controller PWB <=> LVPS PWB path:
Table 2 Signal Names
Signal Name
Description
FAN ON
Fan drive power that drives the Fan Assembly with 2 voltages, 24V for High
speed and 15V for Low speed
/HEAT (TTL)
Fuser control signal to switch AC power to the Heat Rod on and off
Low: 0V (ON), High: 3.3V (OFF)
/FHIGH (24V) Fan speed switching signal that switches the speed of rotation of the Fan
Assembly between High and Low
Low: 0V (High speed), High: 24V (Low speed)
FAN ALARM
(TTL)
Fan monitor signal. Goes Low when the rotation of the Fan Assembly is abnormal
Low: 0V (Abnormal), High: 3.3V (Normal)
Figure 6 Block Diagram Tray 2 and Tray 3
Initial Issue
DocuPrint N2125
02/2000
7-9
Wiring Data
Base Engine
LVPS PWB <=> Fan Assembly, Front Switch Interlock Assembly, 5VDC
PWB and System Controller PWB (Figure 8) (Table 3)
Figure 8 LVPS <=> Fan Assembly <=> Front Switch Interlock <=> 5VDC PWB <=> System
Controller PWB
LVPS PWB <=> Fan Assembly, Front Switch Interlock Assembly, 5VDC PWB and System Controller PWB
Table 3 shows the signal names for the LVPS PWB <=> Fan Assembly path:
Table 3 Signal Names
Signal Name
Description
FAN ALARM
Actuates the Cassette 1 Feed Solenoid (Normally LOW (0V), and HIGH (3.3V)
when paper is fed)
Wiring Data
Base Engine
02/2000
7-10
Initial Issue
DocuPrint N2125
Print Engine Controller PWB <=> HVPS PWB <=> BTR, Print Cartridge,
and Fuser Assembly (Figure 9) (Table 4) (Table 5)
Figure 9 Print Engine Controller PWB <=> HVPS PWB <=> BTR <=> Print Cartridge <=>
Print Engine Controller PWB <=> HVPS PWB <=> BTR, Print Cartridge, and Fuser Assembly
Table 4 Signal Names
Signal Name Description
Table 4 shows the signal names for the Print Engine Controller PWB <=> HVPS PWB path:
Table 4 Signal Names
Signal Name Description
CR-DC
Control signal to switch the Charge Voltage for DC component of the CR and
the PBR on and off.
TR(-)
Transfer Voltage (-) to be applied onto BTR (Analog)
TR(+)
Transfer Voltage (+) to be applied onto BTR (Analog)
DB.DC
Control signal to select the Development Voltage for DC component (Analog)
DTS
Control signal to select the DTS Voltage (Analog)
TR-A/D
-
TR-D/A
Control signal to select the TR(+) voltage (0 to 3.3VDC) as determined by the
ATDVC (Analog)
Pressure Roll Bias to be applied on the Pressure Roll
Low: 0V (OFF), High: 3.3V (ON) (applied charge voltage)
CR-AC
Constant-frequency pulse signal that provides the source of oscillation for generating the AC component of the CR
PRB
CR-CH
-
Print Engine Controller PWB <=> HVPS PWB <=> BTR, Print Cartridge, and Fuser Assembly
DB-DA
Constant-frequency pulse signal that provides the source of oscillation for generating the AC component of the DB (Development Bias) in the HVPS
Initial Issue
DocuPrint N2125
02/2000
7-11
Wiring Data
Base Engine
Table 5 shows the signal names for the HVPS PWB <=> BTR, Print Cartridge, and Fuser
Assembly path:
Table 5 Signal Names
Signal Name
Description
CR
HVPS output to the Magnet Roll
DB
HVPS output to the BCR
TR
HVPS output to the BTR (+DC in Transfer operation, and -DC when
cleaning the BTR)
DTS
HVPS output to the Detack Saw
PRB
HVPS output to the Pressure Roll
Wiring Data
Base Engine
02/2000
7-12
Initial Issue
DocuPrint N2125
Print Engine Controller PWB <=> Fuser Assembly (Figure 10) (Table 6)
Figure 10 Print Engine Controller PWB <=> Fuser Assembly
Print Engine Controller PWB <=> Fuser Assembly
Table 6 shows the signal names for the Print Engine Controller PWB <=> Fuser Assembly path:
Table 6 Signal Names
Signal Name
Description
/EXIT
Signal from the Exit Sensor. This signal is Low (0V) when the Exit Sensor
is activated, and High (3.3V) when deactuated.
STS
Signal from the Temperature Sensor which monitors the Fuser Heat Roll
temperature. (Analog)
Initial Issue
DocuPrint N2125
02/2000
7-13
Wiring Data
Base Engine
Print Engine Controller PWB <=> Exit Sensor, and Rear Interlock
Switch (Figure 11) (Table 7)
Figure 11 Print Engine Controller PWB <=> Exit Sensor <=> Rear Interlock Switch
Print Engine Controller PWB <=> Exit Sensor, and Rear Interlock Switch Assembly
Table 7 shows the signal names for the Print Engine Controller PWB <=> Exit Sensor, and
Rear Interlock Switch Assembly path:
Table 7 Signal Names
Signal Name
Description
/FSTK
Signal from the Stack Full Sensor. This signal is Low (0V) when the Full
Stack Sensor is actuated, and High (3.3V) when deactuated
24V EXIT MOT
Signal from the Rear Interlock Switch Assembly. Goes Low (0V) when
the Cover Rear is open and breaks the 24VDC circuit for the Exit Motor
Assembly.
Wiring Data
Base Engine
02/2000
7-14
Initial Issue
DocuPrint N2125
Print Engine Controller PWB <=> Size 1 PWB <=> Feeder PWB <=>
Low Paper Sensor, Stack Height Sensor, Feed Clutch Assembly, Turn
Clutch Assembly and Motor Assembly (Figure 12) (Table 8) (Table 9)
Figure 12 Print Engine Controller PWB <=> Size 1 PWB <=> Feeder PWB <=> Low Paper Sensor, Stack Height Sensor, Feed Clutch Assembly, Turn Clutch Assembly, Motor Assembly
Print Engine Controller PWB <=> Size 1 PWB <=> Feeder PWB <=> Low Paper Sensor, Stack
Height Sensor, Feed Clutch Assembly, Turn Clutch Assembly and Motor Assembly
Initial Issue
DocuPrint N2125
02/2000
7-15
Wiring Data
Base Engine
Table 8 shows the signal names for the Print Engine Controller PWB <=> Size 1 PWB path:
Table 8 Signal Names
Table 8 Signal Names
Signal Name
Description
/LOW PAP 1
Signal Name
Description
Signal from the Low Paper Sensor (equipped on the Feeder). This signal
is Low when the Low Paper Sensor is activated.
/TG MCU
550 Sheet Feeder check signal which is transferred from the Print Engine
Controller PWB.
Signal Levels: High = 3.3V Low = 0V
Signal Levels: High = 3.3V Low = 0V
FD TXD
Print Engine Controller PWB <=> Size 1 PWB <=> Feeder PWB <=> Low Paper Sensor, Stack
Height Sensor, Feed Clutch Assembly, Turn Clutch Assembly and Motor Assembly
Control data which is transferred from the Print Engine Controller PWB
Table 9 shows the signal names for the Feeder PWB <=> Low Paper Sensor, Stack Height
Sensor, Feed Clutch Assembly, Turn Clutch Assembly and Motor Assembly path:
Signal Levels: High = 3.3V Low = 0V
FD RXD
Received data from the Feeder
Table 9 Signal Names
Signal Levels: High = 3.3V Low = 0V
/FEED 3
Feed control signal for the Feeder 3. The Feed Clutch Assembly and the
Turn Clutch Assembly are activated when this signal goes Low.
Signal Name
Description
LOW PAP 1
Signal from the Low Paper Sensor. This signal is Low when the Low
Paper Sensor is activated.
Signal Levels: High = 3.3V Low = 0V
/FEED 2
Feed control signal for the Feeder 2. The Feed Clutch Assembly and the
Turn Clutch Assembly are activated when this signal goes Low.
Signal Levels: High = 3.3V Low = 0V
FEED 1 ON
Control signal which actuates the Feed Clutch Assembly.
/TRNC (OUT)
Control signal which actuates the Turn Clutch Assembly. The Turn Clutch
Assembly is interlocked with the Feed Clutch Assembly.
Control signal which turns on the motor Assembly.
Signal Levels: High = 24V Low = 0V
Signal Levels: High = 3.3V Low = 0V
/NO PAP 3
Signal from the No Paper 3 Sensor (equipped on the 550 Sheet Feeder
3). This signal is Low when the No Paper 3 Sensor is activated.
/NO PAP 2
Signal from the No Paper 2 Sensor (equipped on the 550 Sheet Feeder
2). This signal is Low when the No Paper 2 Sensor is activated.
NUD MOTOR
Signal Levels: High = 3.3V Low = 0V
24V Interlock
Signal Levels: High = 24V Low = 0V
Signal Levels: High = 3.3V Low = 0V
Signal Levels: High = 3.3V Low = 0V
/LOW PAP 3
Signal from the Low Paper Sensor 3 (equipped on the 550 Sheet Feeder
3). This signal is Low when the Low Paper Sensor 3 is activated.
Interlock signal which related with the all clutches and motors equipped
on the Feeder PWB.
Signal Levels: High = 3.3V Low = 0V
/LOW PAP 2
Signal from the Low Paper Sensor 2 (equipped on the 550 Sheet Feeder
2). This signal is Low when the Low Paper Sensor 2 is activated.
Signal Levels: High = 3.3V Low = 0V
/FEED 1
Feed control signal for the Feeder 1. The Feed Clutch Assembly and the
Turn Clutch Assembly are activated when this signal goes Low.
/NO PAP 1
Signal from the No Paper 1 Sensor (equipped on the Feeder). This signal
is Low when the No Paper 1 Sensor is activated.
Signal Levels: High = 3.3V Low = 0V
Signal Levels: High = 3.3V Low = 0V
Wiring Data
Base Engine
02/2000
7-16
Initial Issue
DocuPrint N2125
Print Engine Controller PWB <=> Main Motor Assembly, Exit Motor
Assembly and Print Cartridge Sensor Assembly (Figure 13) (Table 10)
Table 10 Signal Names
Signal Name
Description
/EXIT XA
Phase XA drive signal for the stepping motor (LOW when driving, and
High when not driving)
Signal Levels: High = 24V Low = 0V
/EXIT B
Phase B drive signal for the stepping motor (LOW when driving, and High
when not driving)
Signal Levels: High = 24V Low = 0V
/EXIT A
Phase A drive signal for the stepping motor (LOW when driving, and High
when not driving)
Signal Levels: High = 24V Low = 0V
/M RSV
Signal Levels: High = 3.3V Low = 0V
/MALRM
Main motor monitor signal. Goes Low when the rotation of the Main
Motor Assembly is abnormal.
/MMOT ON
Main motor control signal to turn the Main Motor Assembly on and off.
Signal Levels: High = 3.3V Low = 0V
Signal Levels: High = 3.3V Low = 0V
Figure 13 Print Engine Controller PWB <=> Main Motor Assembly, Exit Motor Assembly,
Print Cartridge Sensor Assembly
Print Engine Controller PWB <=> Main Motor Assembly, Exit Motor Assembly and Print Cartridge Sensor Assembly
Table 10 shows the signal names for the Print Engine Controller PWB <=> Main Motor Assembly, Exit Motor Assembly and Print Cartridge Sensor Assembly path:
Table 10 Signal Names
Signal Name
Description
5VLD
+5V power source to the Laser Diode (0V when the Print Cartridge is not
in place)
/CRU
Signal which activates the 5VLD circuit (0V when the Print Cartridge is
not in place)
High: 5V Low: 0V
High: 5V Low: 0V
/EXIT XB
Phase XB drive signal for the stepping motor (LOW when driving, and
High when not driving)
Signal Levels: High = 24V Low = 0V
Initial Issue
DocuPrint N2125
02/2000
7-17
Wiring Data
Base Engine
Print Engine Controller PWB <=> Connector PWB <=> Paper Set Sensor, Registration Sensor, Registration Clutch, Toner Sensor, Pick Up
Solenoid (Figure 14) (Table 11)
Table 11 Signal Name
Signal Name
Description
/SOLM
Control signal which activates the Pick Up Solenoid
Signal Levels: High = 3.3V Low = 0V
/REG
Signal from the Registration Sensor. This signal is Low when the Registration Sensor is activated.
Signal Levels: High = 3.3V Low = 0V
/REG CL
Control signal which activates the Registration Clutch.
Signal Levels: High = 24V Low = 0V
/TONER
Signal from the Toner Sensor. This signal is Low when the Toner Sensor
is activated.
Signal Levels: High = 3.3V Low = 0V
/EPRS
Signal from the Envelope Exit Sensor Assembly equipped on the Envelope. This signal is Low when the Envelope Exit Sensor Assembly is activated.
Signal Levels: High = 3.3V Low = 0V
/NOPER
Signal from the No Paper Sensor equipped on the Envelope. This signal
is Low when the No Paper Sensor is activated.
SOLE
Control signal which activates the Clutch equipped on the Envelope
Signal Levels: High = 3.3V Low = 0V
Signal Levels: High = 24V Low = 0V
Figure 14 Print Engine Controller PWB <=> Connector PWB <=> Paper Set Sensor, Registration Sensor, Registration Clutch, Toner Sensor, Pick Up Solenoid
Print Engine Controller PWB <=> Connector PWB <=> Paper Set Sensor, Registration Sensor,
Registration Clutch, Toner Sensor, Pick Up Solenoid
Table 11 shows the signal names for the Print Engine Controller PWB <=> Connector PWB
path:
Table 11 Signal Name
Signal Name
Description
/NO PRM
Signal from the Paper Set Sensor. This signal is Low when the Paper Set
Sensor is activated.
Signal Levels: High = 3.3V Low = 0V
Wiring Data
Base Engine
02/2000
7-18
Initial Issue
DocuPrint N2125
Print Engine Controller PWB <=> Laser Assembly (Figure 15) (Table
12)
Table 12 Signal Names
Signal Name
Description
/nP.DATA
Print Image Data
Signal Levels: High = 3.3V Low = 0V
/LD
Control signal which determines the drive voltage for the Laser Diode.
Signal: Analog
/LDEN
Control signal which determines the drive voltage for the Laser Diode.
Signal: Analog
Vmf(D/A)
Control signal for the Laser Diode
Signal: Analog
/SOS(IN)
Synchronization signal generated by the SOS PWB which indicates the
start of each scan.
Signal: TTL
5VLD
+5V power source to the Laser Diode (0V when the Front Cover Assembly is open or the Print Cartridge is not in place).
/RMOT(OUT)
Scanner Motor Control signal which switches the Laser Motor on and off
Low: 0V (ON), HIgh: 3.3V (OFF)
/RCLK
Synchronization signal for the Laser Motor
High: 5V Low: 0V
Signal: Pulse
Figure 15 Print Engine Controller PWB <=> Laser Assembly
Table 12 shows the signal names for the Fuser Print Engine Controller PWB <=> Laser Assembly path:
Table 12 Signal Names
Signal Name
Description
P.DATA
Print Image Data
Signal Levels: High = 3.3V Low = 0V
Initial Issue
DocuPrint N2125
02/2000
7-19
Wiring Data
Base Engine
System Controller PWB <=> Control Panel (Figure 16) (Table 13)
550 Sheet Paper Feeder
Wiring Diagrams and Signal Information
This section of the manual contains a Block Diagram for the N2125 550 Sheet Paper Feeder
Assembly. The Block Diagram shows the interconnections of the major subsystems within the
printer. The remainder of this section divides the Block Diagram into individual block diagrams
to better illustrate the electrical relationships between components and assemblies within the
550 Sheet Paper Feeder Assembly. Each wire in the block diagram is tagged with a signal
name, and each wire is terminated at both ends with a pin number.
Block Diagram
1.
550 Sheet Feeder Block Diagram
2.
Size 1 PWB <=> Tray 2 PWB <=> Tray 3 PWB (Table 2)
3.
Feeder PWB <=> Low Paper Sensor, Stack Height Sensor, Feed Clutch Assembly, Turn
Clutch Assembly and Motor Assembly (Table 3)
Location of P/J Connectors
Figure 16 System Controller PWB <=> Control Panel
Use the P/J Table (Table 1) and the P/J Map (Figure 1) to locate a specific P/J connector within
the Feeder and Cassette.
To find the location of a P/J:
Table 13 Signal Names
1.
Locate the P/J connector number in the first column of the table.
Pin Number
Signal Name
In/Out
2.
Locate the corresponding coordinates in the second column, such as I7 or J7.
1
3.3V
-
3.
Go to the map.
2
GND
-
4.
3
/ACK
In
Cross-reference the letter and number of the P/J coordinates with the letters and numbers
on the map.
4
GND
-
5.
The P/J connector is located within the area where the coordinates cross.
5
DAT_OUT
Out
6
DAT_IN
In
7
/STB
Out
8
/RESET
Out
Wiring Data
Base Engine, 550 Sheet Paper Feeder
02/2000
7-20
Initial Issue
DocuPrint N2125
P/J Table
Table 1 550 Sheet Paper Feeder P/J Table
Connector
Coordinate Description
P/J 52
I4
Connects the Size 550 Sheet Harness Assembly to the Size 550
Sheet PWB.
P/J 53
I5
Connects the Harness Assembly to the Size 550 Sheet Feeder
PWB.
P/J 62
H5
Connects the Size Option PWB to the Feeder PWB.
P/J 64
B5
Connects the Turn Clutch Harness Assembly to the Feeder PWB.
P/J 65
B5
Connects the Feed Clutch Harness Assembly to the Feeder PWB.
P/J 66
C4
Connects the N/SNSR Harness Assembly to the Feeder PWB.
P/J 67
B4
Connects the N/MOT Harness Assembly to the Feeder PWB.
J 521
E8
Connects the Size Option Harness Assembly to the Printer Assembly. (Size 1 PWB)
P 531
E9
Connects the Harness Assembly to the Lower Feeder.
P/J 641
C9
Connects the Turn Clutch Harness Assembly to the Turn Clutch
Assembly.
P/J 651
C9
Connects the Feed Clutch Harness Assembly to the Feed Clutch
Assembly.
P/J 661
G10
Connects the N/SNSR Harness Assembly to the Low Paper Sensor
Paper.
P/J 662
E10
Connects the N/SNSR Harness Assembly to the Stack Height Sensor.
P/J 671
E9
Connects the N/MOT Harness Assembly to the Socket.
P/J 672
E9
Connects the Cassette Assembly to the Feeder Assembly.
P/J 673
D9
Connects the Motor Assembly to the Connector.
P/J Map
Figure 1 550 Sheet Paper Feeder P/J Map
Initial Issue
DocuPrint N2125
02/2000
7-21
Wiring Data
550 Sheet Paper Feeder
Block Diagram - 550 Sheet Feeder
Figure 2 550 Sheet Feeder Block Diagram
Wiring Data
550 Sheet Paper Feeder
02/2000
7-22
Initial Issue
DocuPrint N2125
Size 1 PWB <=> Tray 2 PWB <=> Tray 3 PWB (Table 2)
Table 3 Signal Names
Table 2 shows the signal names for the Print Engine Controller PWB <=> Size 1 PWB<=> PWB
Option path:
Signal Name
Description
FEED 1(/2/3) ON
Control signal which actuates the Feed Clutch Assembly.
Table 2 Signal Names
Signal Name
Description
FD TXD
Control data which is transferred from the Print Engine Controller PWB
Signal Levels: High = 24V Low = 0V
/TRNC (OUT)
Control signal which actuates the Turn Clutch Assembly. The Turn Clutch
Assembly is interlocked with the Feed Clutch Assembly.
NUD MOTOR
Control signal which turns on the Motor Assembly.
Signal Levels: High = 24V Low = 0V
Signal Levels: High = 3.3V Low = 0V
FD RXD
Received data from the Feeder
Signal Levels: High = 3.3V Low = 0V
Signal Levels: High = 3.3V Low = 0V
/FEED 3
Feed control signal for the Feeder 3. The Feed Clutch Assembly and the
Turn Clutch Assembly are activated when this signal goes Low.
24V Interlock
Interlock signal which related with the all clutches and motors equipped
on the Feeder PWB.
Signal Levels: High = 24V Low = 0V
Signal Levels: High = 3.3V Low = 0V
/FEED 2
Feed control signal for the Feeder 2. The Feed Clutch Assembly and the
Turn Clutch Assembly are activated when this signal goes Low.
/NO PAP 3
Signal from the No Paper 3 Sensor (equipped on the Option Feeder 3).
This signal is Low when the No Paper 3 Sensor is activated.
/NO PAP 2
Signal from the No Paper 2 Sensor (equipped on the Option Feeder 2).
This signal is Low when the No Paper 3 Sensor is activated.
Signal Levels: High = 3.3V Low = 0V
Signal Levels: High = 3.3V Low = 0V
Signal Levels: High = 3.3V Low = 0V
/LOW PAP 3
Signal from the Low Paper Sensor 3 (equipped on the Option Feeder 3).
This signal is Low when the Low Paper Sensor 3 is activated.
Signal Levels: High = 3.3V Low = 0V
/LOW PAP 2
Signal from the Low Paper Sensor 2 (equipped on the Option Feeder 2).
This signal is Low when the Low Paper Sensor 2 is activated.
Signal Levels: High = 3.3V Low = 0V
Feeder PWB <=> Low Paper Sensor, Stack Height Sensor, Feed Clutch
Assembly, Turn Clutch Assembly and Motor Assembly (Table 3)
The following table shows the signal names for the Feeder PWB <=> Low Paper Sensor, Stack
Height Sensor, Feed Clutch Assembly, Turn Clutch Assembly and Motor Assembly path:
Table 3 Signal Names
Signal Name
Description
LOW PAP 1(/2/3)
Signal from the Low Paper Sensor. This signal is Low when the Low
Paper Sensor is activated.
Signal Levels: High = 3.3V Low = 0V
Initial Issue
DocuPrint N2125
02/2000
7-23
Wiring Data
550 Sheet Paper Feeder
Duplex Assembly
Wiring Diagrams and Signal Information
This section of the manual contains a Block Diagram for the N2125 Duplex Feeder Assembly.
The Block Diagram shows the interconnections of the major subsystems within the printer. The
remainder of this section divides the Block Diagram into individual block diagrams to better
illustrate the electrical relationships between components and assemblies within the Duplex
Feeder Assembly. Each wire in the block diagram is tagged with a signal name, and each wire
is terminated at both ends with a pin number.
Block Diagram
1.
Duplex Assembly Block Diagram
2.
Print Engine Controller PWB <=> Duplex PWB (Figure 3) (Table 2)
3.
Duplex PWB <=> Sensor Photo IN-H(L), Duplex Sensor Assembly and Duplex Motor
Assembly (Figure 4)
Location of P/J Connectors
Use the P/J table (Table 1) and the P/J Map (Figure 1) to locate a specific P/J connector within
the Feeder and Cassette.
•
Locate the P/J connector number in the first column of the table.
•
Locate the corresponding coordinates in the second column, such as I7 or J7.
•
Go to the map.
•
Cross-reference the letter and number of the P/J coordinates with the letters and numbers
on the map.
•
The P/J connector is located within the area where the coordinates cross.
Wiring Data
Duplex Assembly
02/2000
7-24
Initial Issue
DocuPrint N2125
P/J Table
Table 1 Duplex Assembly P/J Table
Connector
Coordinate Description
P/J 36
H7
Connects the Duplex Sensor Harness Assembly to the Duplex
PWB.
P/J 37
H8
Connects the Duplex Sensor Assembly to the Duplex PWB.
P/J 38
G7
Connects the Duplex Motor Assembly to the Duplex PWB.
P/J 39
G7
Connects the Duplex Option Harness Assembly to the Duplex
PWB.
P/J 360
J7
Connects the Duplex Sensor Harness Assembly to the Sensor
Photo IN-H(L).
J 391
E8
Connects the Duplex Option Harness Assembly to the Printer
Assembly. (Print Engine Controller PWB)
P/J Map
Figure 1 Duplex Assembly P/J Map
Initial Issue
DocuPrint N2125
02/2000
7-25
Wiring Data
Duplex Assembly
Block Diagram
Print Engine Controller PWB <=> Duplex PWB (Figure 3) (Table 2)
Figure 3 Print Engine Controller PWB <=> Duplex PWB
Figure 2 Duplex Assembly Block Diagram
Wiring Data
Duplex Assembly
02/2000
7-26
Initial Issue
DocuPrint N2125
Duplex PWB <=> Sensor Photo IN-H(L), Duplex Sensor Assembly and
Duplex Motor Assembly (Figure 4)
Table 2 shows the signal names for the Print Engine Controller PWB <=> Duplex PWB path:
Table 2 Signal Names
Signal Name
Description
DUP A
Motor control signal
Signal: Pulse
DUP B
Motor control signal
Signal: Pulse
DUP XA
Motor control signal
Signal: Pulse
DUP XB
Motor control signal
/DPRS
Signal Levels: High = 3.3V Low = 0V
/NO PAPER DUP
Signal from the Duplex Sensor Assembly. This signal informs the paper
pass at the Duplex Assembly to the Print Engine Controller. This signal is
Low when the Duplex Sensor Assembly is actuated (when the paper
passes at the Duplex Sensor Assembly).
/DUP HOME
Signal from the Sensor Photo IN-H(L). This signal informs that the Duplex
Assembly is in the correct position (Home Position). This signal is Low
when the Duplex Assembly is in the correct position.
Signal: Pulse
Signal Levels: High = 3.3V Low = 0V
Signal Levels: High = 3.3V Low = 0V
Figure 4 Duplex PWB <=> Sensor Photo IN-H(L), Duplex Sensor Assembly and Duplex
Motor Assembly
Initial Issue
DocuPrint N2125
02/2000
7-27
Wiring Data
Duplex Assembly
Offset Catch Tray
Wiring Diagrams and Signal Information
This section of the manual contains a Block Diagram for the N2125 OCT. The Block Diagram
shows the interconnections of the major subsystems within the printer. The remainder of this
section divides the Block Diagram into individual block diagrams to better illustrate the electrical relationships between components and assemblies within the Offset Catch Tray. Each wire
in the block diagram is tagged with a signal name, and each wire is terminated at both ends
with a pin number.
Block Diagram
1.
OCT Block Diagram
2.
Print Engine Controller PWB <=> OCT PWB (Figure 3) (Table 2)
3.
OCT PWB <=> Stack Full Sensor, OCT Home Sensor, OCT Exit Sensor Assembly and
Direction Solenoid (Figure 4) (Table 3)
4.
OCT PWB <=> Drive Motor Assembly and Offset Motor Assembly (Figure 5) (Table 4)
Location of P/J Connectors
Use the P/J table (Table 1) and the P/J map (Figure 1) to locate a specific P/J connector within
the Feeder and Cassette.
1.
Locate the P/J connector number in the first column of the table.
2.
Locate the corresponding coordinates in the second column, such as I7 or J7.
3.
Go to the map.
4.
Cross-reference the letter and number of the P/J coordinates with the letters and numbers
on the map.
5.
The P/J connector is located within the area where the coordinates cross.
Wiring Data
Offset Catch Tray
02/2000
7-28
Initial Issue
DocuPrint N2125
P/J Table
Table 1 OCT P/J Table
Connector
Coordinate Description
P/J 202
E7
Connects the OCT Harness Assembly Unit to the Printer Assembly.
(Print Engine Controller PWB)
P/J 209
E7
Connects the OCT Harness Assembly Unit to the OCT PWB.
P/J 210
E6
Connects the Motor Drive Assembly to the OCT PWB.
P/J 223
E6
Connects the Offset Motor Assembly to the OCT PWB.
P/J 224
E7
Connects the OCT Harness Assembly SNR to the OCT PWB.
P/J 225
E6
Connects the OCT Harness Assembly SNR to the Stack Full Sensor.
P/J 226
G7
Connects the OCT Harness Assembly SNR to the OCT Home Sensor.
P/J 227
H7
Connects the OCT Harness Assembly SNR to the OCT Exit Sensor
Assembly.
P/J 228
H7
Connects the OCT Harness Assembly SNR to the Direction Solenoid.
P/J Map
Figure 1 OCT P/J Map
Initial Issue
DocuPrint N2125
02/2000
7-29
Wiring Data
Offset Catch Tray
Block Diagram
Print Engine Controller PWB <=> OCT PWB (Figure 3) (Table 2)
Figure 2 OCT Block Diagram
Figure 3 Print Engine Controller PWB <=> OCT PWB
Wiring Data
Offset Catch Tray
02/2000
7-30
Initial Issue
DocuPrint N2125
OCT PWB <=> Stack Full Sensor, OCT Home Sensor, OCT Exit Sensor
Assembly and Direction Solenoid (Figure 4) (Table 3)
Table 2 shows the signal names for the Print Engine Controller PWB <=> OCT PWB path:
Table 2 Signal Names
Signal Name
Description
/OCT PRES
Signal from the OCT PWB that detects the installation of the OCT. This
signal turns Low when the OCT is installed.
/NOT FSTK OCT
Signal from the OCT PWB generated after the receipt of the signal /NOT
FSTK from the Stack Full Sensor. This signal detects the full of paper on
the Exit Tray of the OCT. Turning High of this signal informs the Print
Engine Controller of the full stack of the Exit Tray.
Signal Levels: High = 3.3V Low = 0V
Signal Levels: High = 3.3V Low = 0V
/OFFSET MOT
ON
Motor control signal for the Offset Motor Assembly.
/OCT POWERD
Control signal for the OCT. The signal is used to switch on the OCT for
the reason that the OCT Harness Assembly-M includes the signal lines
for the Mail Box and is used commonly for the Mail Box. This signal is
sent from the Print Engine Controller to the OCT PWB when /OCT PRES
is Low.
/OCT MOT ON
Motor control signal for the Drive Motor Assembly.
Signal Levels: High = 3.3V Low = 0V
Signal Levels: High = 3.3V Low = 0V
Signal Levels: High = 3.3V Low = 0V
MBX IN/OCT EXIT Signal from the OCT Exit Sensor Assembly. This signal turns High when
the paper actuates the OCT Exit Sensor Assembly.
Signal Levels: High = 3.3V Low = 0V
DIRECT SOL ON
Control signal for the Direction Solenoid. This signal is High when the
Direction Solenoid is actuated.
/NOT FSTK OCT
Signal from the Stack Full Sensor. This signal turns High continuously
when the Exit Tray becomes to be full of paper.
Figure 4 OCT PWB <=> Stack Full Sensor, OCT Home Sensor, OCT Exit Sensor Assembly, Direction Solenoid
Table 3 shows the signal names for the OCT PWB <=> Stack Full Sensor, OCT Home Sensor,
OCT Exit Sensor Assembly and Direction Solenoid path:
Signal Levels: High = 3.3V Low = 0V
Table 3 Signal Names
Signal Name
Description
/NOT FSTK
Signal from the Stack Full Sensor that detects the installation of the OCT.
This signal turns Low when the OCT is installed.
/OCT HOME
Signal from the OCT Home Sensor. This signal detects the home position
of the Offset Roll Assembly. Turning Low of this signal informs the OCT
PWB that the initiation of the Offset Roll Assembly is completed.
Signal Levels: High = 3.3V Low = 0V
Signal Levels: High = 3.3V Low = 0V
Initial Issue
DocuPrint N2125
02/2000
7-31
Wiring Data
Offset Catch Tray
OCT PWB <=> Drive Motor Assembly and Offset Motor Assembly (Figure 5) (Table 4)
Table 3 Signal Names
Signal Name
Description
/OCT EXIT
Signal from the OCT Exit Sensor Assembly. This signal first turns High
when the paper is passing on this sensor and turns Low again when the
end of the paper passes over.
Signal Levels: High = 3.3V Low = 0V
/DIREXT SOL ON Control signal for the Direction Solenoid. The solenoid is actuated when
this signal is Low and holds the state of actuation until the signal/DIRECT
SOL OFF is issued by the OCT PWB.
Signal Levels: High = 3.3V Low = 0V
/DIRECT SOL
OFF
Control signal for the Direction Solenoid. This signal cuts off the power
circuit of the solenoid.
Signal Levels: High = 3.3V Low = 0V
Figure 5 OCT PWB <=> Drive Motor Assembly and Offset Motor Assembly
Table 4 shows the signal names for the OCT PWB <=> Drive Motor Assembly and Offset Motor
Assembly path:
Table 4 Signal Names
Signal Name
Description
A
Motor control signal
Signal: Pulse
B
Motor control signal
Signal: Pulse
/A
Motor control signal
Signal: Pulse
Wiring Data
Offset Catch Tray
02/2000
7-32
Initial Issue
DocuPrint N2125
Table 4 Signal Names
Signal Name
Description
/B
Motor control signal
Signal: Pulse
Envelope Feeder
Wiring Diagrams and Signal Information
This section of the manual contains a Block Diagram for the N2125 Envelope Feeder. The
Block Diagram shows the interconnections of the major subsystems within the printer. The
remainder of this section divides the Block Diagram into individual block diagrams to better
illustrate the electrical relationships between components and assemblies within the Envelope
Feeder. Each wire in the block diagram is tagged with a signal name, and each wire is terminated at both ends with a pin number.
Block Diagram
1.
Envelope Feeder Block Diagram
2.
Print Engine Controller PWB <=> Connector PWB <=> Envelope PWB (Figure 3) (Table
2)
3.
Envelope PWB <=> Envelope Exit Sensor Assembly, No Paper Sensor and Clutch (Figure
4)
Location of P/J Connectors
Use the P/J Table (Table 1) and the P/J map (Figure 1) to locate a specific P/J connector within
the Feeder and Cassette.
To find the location of a P/J:
Initial Issue
DocuPrint N2125
1.
Locate the P/J connector number in the first column of the table.
2.
Locate the corresponding coordinates in the second column, such as I7 or J7.
3.
Go to the map.
4.
Cross-reference the letter and number of the P/J coordinates with the letters and numbers
on the map.
5.
The P/J connector is located within the area where the coordinates cross.
02/2000
7-33
Wiring Data
Offset Catch Tray, Envelope Feeder
P/J Table
Table 1 Envelope Feeder P/J Table
Connector
Coordinate Description
P/J 411
D6
Connects the Main Harness Assembly to the Envelope PWB.
P/J 412
C7
Connects the Sensor Harness Assembly to the Envelope PWB.
P/J 413
C7
Connects the Clutch Harness Assembly to the Envelope PWB.
P/J 414
C7
Connects the No Paper Harness Assembly to the Envelope PWB.
P/J 415
H8
Connects the No Paper Harness Assembly to the No Paper Sensor.
P/J 416
D8
Connects the Clutch Harness Assembly to the Clutch.
P/J 417
G6
Connects the Sensor Harness Assembly to the Envelope Exit Sensor Assembly.
P/J 418
F7
Connects the Main Harness Assembly to the Envelope Connector.
P/J Map
Figure 1 Envelope Feeder P/J Map
Wiring Data
Envelope Feeder
02/2000
7-34
Initial Issue
DocuPrint N2125
Block Diagram
Print Engine Controller PWB <=> Connector PWB <=> Envelope PWB
(Figure 3) (Table 2)
Figure 2 Envelope Feeder Block Diagram
Figure 3 Print Engine Controller PWB <=> Connector PWB <=> Envelope PWB
Initial Issue
DocuPrint N2125
02/2000
7-35
Wiring Data
Envelope Feeder
Table 2 shows the signal names for the Print Engine Controller PWB <=> Connector PWB <=>
Envelope PWB path:
Envelope PWB <=> Envelope Exit Sensor Assembly, No Paper Sensor
and Clutch (Figure 4)
Table 2 Signal Names
Signal Name
Description
/EPRS
This signal is High when the Envelope Feeder is not installed.
Signal Levels: High = 3.3V Low = 0V
/NOPRE
Signal from the No Paper Sensor. This signal is High when all envelopes
are fed from the Envelope Feeder.
SOLE
Control signal for the Envelope Feeder PWB. This signal is High when the
Print Engine Controller makes the PWB active.
Signal Levels: High = 3.3V Low = 0V
Signal Levels: High = 3.3V Low = 0V
SOLE (out)
Control signal for the clutch. This signal is Low when the Envelope
Feeder PWB makes the clutch active.
Figure 4 Envelope PWB <=> Envelope Exit Sensor Assembly, No Paper Sensor and
Clutch
Wiring Data
Envelope Feeder
02/2000
7-36
Initial Issue
DocuPrint N2125