1
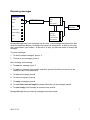
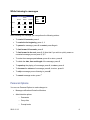
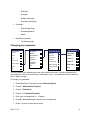
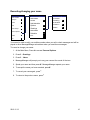
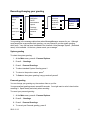
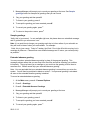
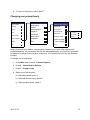
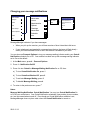
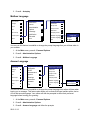
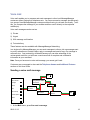
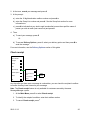
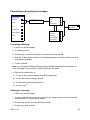
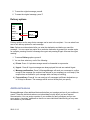
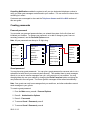
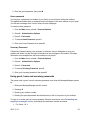
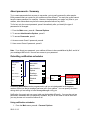
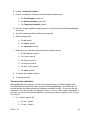
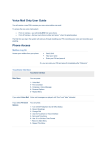
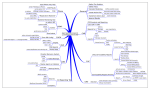
MessageManager™ Service
User Guide
for the Alcatel-Lucent Converged Messaging System
2010 12 13
1
Table of Contents
Welcome to MessageManager ………………………………………… 3
MessageManager at a glance …………………………………………. 3
Setting up MessageManager ………………………………………….. 4
Accessing MessageManager ………………………………………….. 4
Telephone Answer ……………………………………………………… 5
Main menu …………………………………………………………… 6
Reviewing messages …………………………………………………. 7
While listening to messages …………………………………………… 8
Personal Options ……………………………………………………… 8
Changing your password ……………………………………………… 9
Recording/changing your name ………………………………………… 10
Recording/changing your greeting ………………………………………. 11
Changing your prompt levels …………………………………………… 13
Changing your message notifications …………………………………… 13
Activating Date and Time playback ……………………………………… 15
Autoplay ……………………………………………………………… 15
Mailbox Language …………………………………………………….. 16
Answer Language …………………………………………………….. 16
Helpful hints …………………………………………………………. 17
Voice mail ……………………………………………………………….. 19
Sending a voice mail message …………………………………………. 19
Check receipt ………………………………………………………… 20
Group lists …………………………………………………………… 21
Forwarding and replying to messages ………………………………….. 22
Delivery options ………………………………………………………. 23
Additional features ……………………………………………………… 23
Creating passwords …………………………………………………… 24
Outcalling notification schedules ……………………………………….. 27
MessageManager service At-A-Glance …………………………….… 30
2010 12 13
2
Welcome to MessageManager
MessageManager is an advanced messaging capability that can significantly improve your
competitive position. MessageManager ensures that you never miss important calls, allows your
customers to leave you messages 24 hours a day, seven days a week and enables greater
mobility while still allowing you to stay in touch.
The best way to learn how to use MessageManager is to experiment with your new service.
Nothing you can do will break it.
Your MessageManager Access Number is the number you call to get your messages from your
own telephone: ________________________.
Your mailbox number is your 10 digit telephone number.
Your temporary password for first time access is _________________________
MessageManager at a glance
• Flashing visual message waiting lamp or short (intermittent) dial tones indicate that you
have messages. This will not prevent you from making or receiving calls.
• Your personal greeting can be up to 60 seconds in length
• Callers can leave you a message up to 5 minutes in length
• Your mailbox can hold up to 25 messages at a time. When your mailbox is full, callers will
hear a message that they cannot leave a message
• New messages will be stored for 21 days
• Telephone Answer, Voice Mail and the Additional Features are all included in the basic
monthly rental price
• MessageManager mailboxes include in the monthly rate either 220 or 150 minutes of
usage time per month depending on your requirements.
• A per minute charge applies for usage time in excess of the total aggregated usage time
provided for all MessageManager mailboxes associated with the same system .For
example, 10 MessageManager mailboxes in the same system with 220 minutes each of
usage time will only incur usage charges when the total usage for all mailboxes exceeds
2200 minutes in a month.
2010 12 13
3
Setting up MessageManager
You only have to set up your MessageManager once. Simply dial your MessageManager
Access Number. Then follow the voice prompts and the instructions in this guide to personalize
your service.
Before starting, locate the star * and pound # keys on your telephone. You will use them
frequently when you use MessageManager. You will use these keys when you need to cancel
what you are doing, go back to a previous menu, erase and re-record, complete a step, or skip
a message.
To set up MessageManager:
1. Dial the MessageManager Access Number. Voice prompts will guide you to complete the
following steps
2. If you are calling from a telephone other than your own, you will be prompted to enter your
mailbox number on your keypad – this is always your 10 digit telephone number
3. Using your keypad, enter your temporary password
4. Change your temporary password by entering a new password that is between 4 and 15
digits in length. For your security, your new password should be one that is easy for you
to remember but hard for others to guess
5. Record your name or telephone number as a personal identification
6. Record your personal greeting (maximum 60 seconds)
7. Exit by pressing the * key
Your service is now personalized and MessageManager is ready to answer your calls
automatically!
Accessing MessageManager
From your telephone number
1. Dial your MessageManager Access Number. Alternatively, If you have a message
waiting button and it is flashing (there is a message waiting), you can press the
message waiting button to access your mailbox.
2. Enter your password. MessageManager will tell you how many new and saved
messages you have waiting
3. You are now at the Main Menu
2010 12 13
4
From another telephone number
1. Call your own number and press “9” as soon as your greeting starts to play or
When calling from a phone that is long distance to your Centrex phone, call the new Toll
Free number 1-877-235 5777 (1 877 BELL 777) and follow the prompts.
2. Enter your password. MessageManager will tell you how many new and saved messages
you have waiting
3. You are now at the Main Menu
Note: You can also dial your MessageManager Access Number from another number
however, be aware that the initial system answering prompts will always be in English first
and French second. Press the # key when prompted and enter your mailbox number,
which is always your 10 digit telephone number – you will hear your recorded name or
identification.
Note: Long distance charges will apply if you are calling from outside your local calling area. To
avoid LD charges, you can use the toll-free access number 1-877-BELL777.
If you are calling to retrieve your messages from another MessageManager customer’s
telephone, call your own number and press “9” as soon as your greeting starts to play. Enter
your password.
Telephone Answer
The MessageManager service from Bell automatically answers your calls if you are not
available or if you are already on the line. This service offers the following features:
•
You can record a personalized greeting for your callers
•
Each caller can leave you a message up to 5 minutes in length
•
If you have the optional Message Waiting feature, you will hear a special, intermittent
dial tone when you lift your telephone receiver if there is a message waiting for you.
Certain telephone sets also have a message lamp that flashes if you have messages
•
You can pick up your messages at your convenience, day or night
•
No one else can listen to your messages since your mailbox is password protected
More information can be found in the Voice Mail and Additional
Features sections of this User Guide.
2010 12 13
5
Main menu
Main Menu
Check Unheard
Messages
1
Review
1
Send
2
Check Receipt
3
Personal Options
4
Restart
5
Exit
*
Menus list the options available to you when you use your mailbox. The first menu is the Main
menu, which includes options to review your messages and personalize the mailbox features.
Select the menu choice that you want and follow the easy voice instructions.
At the Main menu:
•
Press 1, 1 to hear new, unheard messages first or
•
Press 1 to listen to all your messages
•
Press 2 to send a message
•
Press 3 to check receipt of message
•
Press 4 - Personal Options to record or change your:
o
Message notifications/Outcall notifications
o
Administrative options
o
Greetings
o
Notification schedule
•
Press 5 to restart
•
Press * to disconnect/exit from the system.
2010 12 13
6
Reviewing messages
Main Menu
Check Unheard
Messages
1
Review
1
Send
2
Check Receipt
3
Personal Options
4
After Review
Delete
7
Reply
Save
8
9
More Options
0
Return to
Main Menu
Replay
4
Envelope
5
6
Restart
5
Send Copy
Exit
*
More Options
Cancel Review
*
*
0
MessageManager plays your messages one at a time – new messages are played first; then
saved messages are played. A message once saved, will be saved for 14 days from the day
that it was placed in your mailbox. At the end of 14 days, you have the option of resaving the
message.
To review messages:
1. To check unheard messages, press 1, 1
2. To listen to your messages, press 1
After reviewing each message:
3. To erase the message, press 7
4. To reply to a message from another subscriber, press 8. Note that you cannot use the
system to reply to non-subscribers
5. To save the message, press 9
6. To hear more options, press 0
7. To replay a message, press 4
8. To obtain date, time and length (envelope information),of the message, press 5
9. To send a copy of the message to someone else, press 6
MessageManager tells you when all messages have been played.
2010 12 13
7
While listening to messages
Playback Controls
Position
Speed
Volume
Skip
Rewind
Pause/
Restart
Forward
1
2
3
Slower
Envelope
Faster
4
5
6
Normal
Louder
8
9
7
Cancel
Review
#
*
While listening to a message, you can perform the following actions:
•
To rewind 10 seconds, press 1
•
To rewind to the beginning, press 1, 1
•
To pause the message, press 2; to restart, press 2 again
•
To fast forward 10 seconds, press 3
•
To fast forward to the end, press 3, 3. Note that if you wish to quickly erase an
unwanted message you can press 3, 3, 7.
•
To make the message speed slower, press 4; to return, press 6
•
To obtain the date, time and length of the message, press 5
•
To speed up the playing of a message, press 6; to return, press 4
•
To increase the volume of a message, press 9; to return, press 8
•
To skip a message you are listening to, press #
•
To cancel message review, press *
Personal Options
You can use Personal Options to make changes to:
•
Message notifications/Outcall notifications
•
Administrative options
o
Passwords
o
Group lists
o
Prompt levels
2010 12 13
8
o
Date/time
o
Autoplay
o
Mailbox Language
o
Answering Language
Greetings
•
o
Personal greetings
o
Extended absence
o
Name
Notification schedule
•
o
1st/2nd/temporary
Changing your password
Personal Options
Main Menu
Check Unheard
Messages
Review
1
1
Send
2
Check Receipt
3
Personal Options
4
Restart
5
Exit
*
Notification
On/Off
Administrative Options
Passwords
1
Passwords
1
Personal
1
Administrative
Options
Group Lists
2
2
Prompt Levels
3
Home
2
Greetings
3
Date/Time
4
Guest 1
3
Notification
Schedule
Exit
Autoplay On/Off
6
Guest 2
4
4
Mailbox Language 8
*
Secretary
Answer Language 9
5
Exit
*
Exit
*
You may change your password any time and as often as you like. Choose a password you
can remember, such as a number that is meaningful to you. Your password can be between 4
and 15 digits in length.
To change your password:
1. At the Main Menu, Press 4 to access Personal Options
2. Press 2 - Administrative Options
3. Press 1 - Passwords
4. Press 1 for Personal Password
5. Enter your new password (4 – 15 digits)
6. Press #. MessageManager repeats your new password
7. Press * to return to the previous menu
2010 12 13
9
Recording/changing your name
Personal Options
Main Menu
Check Unheard
Messages
1
Review
1
Send
Notification
On/Off
1
2
Administrative
Options
2
Check Receipt
3
Greetings
3
Personal Options
4
4
Restart
5
Notification
Schedule
Exit
Exit
*
Greetings
Personal
Greeting
1
Extended
Absence
2
Name
3
*
Your name is used to verify your mailbox number when you call to check messages and will be
played to other MessageManager subscribers when you send them messages.
To record or change your name:
1. At the Main Menu, Press 4 to access Personal Options
2. Press 3 - Greetings
3. Press 3 - Name
4. MessageManager will prompt you to say your name at the sound of the tone
5. Speak your name and then press #. MessageManager repeats your name.
6. To accept the name you have recorded, press #
7. To record your name again, press *
8. To return to the previous menu, press *
2010 12 13
10
Recording/changing your greeting
Personal Options
Main Menu
Check Unheard
Messages
1
Review
1
Send
2
Notification
On/Off
Greetings
1
Personal
Greeting
1
Administrative
Options
2
Extended
Absence
2
Greetings
3
Name
3
Check Receipt
3
Personal Options
4
Notification
Schedule
4
Restart
5
Exit
*
Exit
*
Personal
Greetings
System
1
Record
2
Your greeting is the message callers hear when MessageManager answers for you. Although
most people like to personalize their greeting, you may choose to use the system greeting,
which says, “Your call has been forwarded to an Automatic Voice Message System. (Recorded
name) is not available. At the tone, please record your message.”
System greeting
To select the system greeting:
1. At the Main menu, press 4 – Personal Options
2. Press 3 - Greetings
3. Press 1 - Personal Greetings
4. To select standard System Greeting press 1
5. To return to the previous menu, press *
6. To listen to the system greeting, hang up and call yourself
Personal greeting
You can change your greeting any time and as often as you like.
Your personalized greeting cannot exceed 60 seconds. You might want to write it down before
recording it. Speak clearly and slowly when recording.
To record your personal greeting:
1. At the Main menu, press 4 – Personal Options
2. Press 3 - Greetings
3. Press 1 - Personal Greetings
4. To record your Personal greeting, press 2
2010 12 13
11
5. MessageManager will prompt you to record your greeting at the tone. See Sample
greetings below for examples of greetings that you can record
6.
Say your greeting and then press #
7. To listen to your greeting, press 1
8. To accept the greeting you have recorded, press #
9. To record your greeting again, press *
10. To return to the previous menu, press *
Sample greetings
“Hello, this is (your name). I’m not available right now, but please leave me a detailed message
and I’ll get back to you as soon as I can.”
Note: It is a good idea to change your greeting each day to inform callers of your schedule so
they will have an idea of when you are available. For example:
“Hello, this is (your name). Today is Tuesday, April 2nd. I’ll be in the office this morning, but in
meetings all afternoon. Please leave me a detailed message and I’ll return your call as quickly
as possible.”
Extended absence greeting
You may record an extended absence greeting in place of the personal greeting. This
message advises callers that you are away from the office and will be checking your mailbox
infrequently. They may leave you a message or you could use the greeting to refer them to
someone else. Callers cannot skip your extended absence greeting.
Note: You are reminded that your extended absence greeting is on each time you enter the
system. You will then be prompted to delete or retain it. Your personal greeting is reinstated
as soon as the extended absence greeting is deleted.
To record an extended absence greeting:
1. At the Main menu, press 4 – Personal Options
2. Press 3 - Greetings
3. Press 2 - Extended Absence Greetings
4. MessageManager will prompt you to record your greeting at the tone
5.
Say your greeting and then press #
6. To listen to your greeting, press 1
7. To accept the greeting you have recorded, press #
8. To record your greeting again, press *
2010 12 13
12
9. To return to the previous menu, press *
Changing your prompt levels
=
Personal Options
Main Menu
Check Unheard
Messages
1
Review
1
Send
2
Check Receipt
3
Personal Options
Notification
On/Off
Administrative Options
1
Passwords
1
Administrative
Options
Group Lists
2
2
Prompt Levels
3
Greetings
3
Date/Time
4
Autoplay On/Off
6
4
Notification
Schedule
4
Mailbox Language 8
Restart
5
Exit
*
Answer Language 9
Exit
*
Exit
Prompt Levels
Standard
1
Extended
2
Rapid
3
*
When you access your mailbox, voice prompts will advise you of your menu choices and
provide assistance. As you become familiar with MessageManager, you may find it convenient
to change your prompt levels (lengthen or shorten). Your mailbox has been set with Standard
Prompts.
To change your prompt levels:
1. At the Main menu, press 4 – Personal Options
2. Press 2 - Administrative Options,
3. Press 3 - Prompt Levels
4. Select one of the following:
a) Standard prompts, press 1
b) Extended prompts (long), press 2
c) Rapid prompts (short), press 3
2010 12 13
13
Changing your message notifications
Personal Options
Main Menu
Check Unheard
Messages
1
1
Review
Notification
On/Off
1
Send
2
Administrative
Options
Check Receipt
3
Greetings
3
Personal Options
4
4
Restart
5
Notification
Schedule
Exit
Exit
*
2
On or Off
Exit
Outcall Notification/MWI
1
Outcall Notification On
1
*
Outcall Notification Off
2
MWI On
3
MWI Off
Exit
4
*
*
MessageManager indicates if you have messages:
•
When you pick up the receiver, you will hear a series of short intermittent dial tones
•
If your telephone is equipped with a message lamp feature, the lamp will flash slowly –
check your local Business Office to see if this feature is available in your area
You can also use Personal Options to turn your message waiting indicator and/or your Outcall
Notification schedule On or Off. Your mailbox has been set up with message waiting indicator
set to On as the default.
1. At the Main menu, press 4 – Personal Options
2. Press 1 – Notification On/Off
3. Press 1 to turn Outcall or Message Waiting Notification On or Off, then:
a) To turn Outcall Notification On, press 1
b) To turn Outcall notification Off, press 2
c) To activate Message Waiting, press 3
d) To disable Message Waiting, press 4
4. To return to the previous menu, press *
Notes:
Message Waiting Notification: Outcall Notification: You may turn Outcall Notification On
or Off at your convenience. Your Outcall Notification schedules (time periods, phone numbers,
etc.) are not erased when turned off. Even though an Outcall Notification schedule is set,
MessageManager does not place calls unless the Outcall Notification is turned on.
2010 12 13
14
Activating Date and Time playback
Personal Options
Main Menu
Check Unheard
Messages
1
Review
1
Send
2
Check Receipt
3
Personal Options
Notification
On/Off
Administrative Options
1
Passwords
1
Administrative
Options
Group Lists
2
2
Prompt Levels
3
Greetings
3
Date/Time
4
Autoplay On/Off
6
4
Notification
Schedule
4
Mailbox Language 8
Restart
5
Exit
*
Answer Language 9
Exit
*
Exit
Date/Time
1
2
On
Off
*
You can use this feature to hear the date and time when each message was received before
listening to the message.
1. At the Main menu, press 4 – Personal Options
2. Press 2 - Administrative Options
3. Press 4 - Date and Time Playback
4. To select On, press 1
5. To select Off, press 2
Autoplay
Personal Options
Main Menu
Check Unheard
Messages
1
Review
1
Send
2
Check Receipt
3
Personal Options
4
Restart
5
Exit
Notification
On/Off
Administrative Options
1
Passwords
1
Administrative
Options
Group Lists
2
2
Prompt Levels
3
Greetings
3
Date/Time
4
Autoplay On/Off
6
Notification
Schedule
Exit
4
Mailbox Language 8
*
Answer Language 9
Exit
*
Autoplay
Autoplay On
1
Autoplay Off
2
Exit
*
*
You can use this feature to set Autoplay on or off. When Autoplay is on, your unheard
messages will be automatically played as soon as you access your mailbox.
1. At the Main menu, press 4 – Personal Options
2. Press 2 - Administrative Options
2010 12 13
15
3. Press 6 – Autoplay
Mailbox Language
Personal Options
Main Menu
Check Unheard
Messages
1
Review
1
Send
2
Check Receipt
3
Personal Options
Notification
On/Off
Administrative Options
1
Administrative
Options
2
Greetings
3
4
Notification
Schedule
4
Restart
5
Exit
*
Exit
*
Passwords
1
Group Lists
2
Prompt Levels
3
Date/Time
4
Autoplay On/Off
6
Mailbox Language 8
Mailbox Prompt
Language
Answer Language 9
French
1
Exit
English
2
*
You can use this feature to establish or change the prompt language that you will hear when in
your mailbox.
1. At the Main menu, press 4 – Personal Options
2. Press 2 - Administrative Options
3. Press 8 – Mailbox Language
Answer Language
Personal Options
Main Menu
Check Unheard
Messages
1
Review
1
Send
Check Receipt
Personal Options
Notification
On/Off
1
2
Administrative
Options
2
3
Greetings
3
4
Notification
Schedule
4
Restart
5
Exit
*
Exit
*
Administrative Options
Passwords
1
Group Lists
2
Prompt Levels
3
Date/Time
4
Autoplay On/Off
6
Mailbox Language 8
Answer Language 9
Exit
*
Answer Language
First Language
1
Second Language 2
You can use this feature to establish or change the prompt language that callers will hear when
leaving you a message. This feature also allows you to create a bilingual mailbox with a choice
of first and second language. Your callers will then be prompted to select their preferred
language before hearing your greeting.
1. At the Main menu, press 4 – Personal Options
2. Press 2 - Administrative Options
3. Press 9 – Answer Language and follow the prompts
2010 12 13
16
Helpful hints
Hints for you
•
To disconnect, press * until MessageManager says “Good bye.” Do not just hang up.
•
The Star key is also used to cancel a command, to return to the previous menu, or to
exit. To return to the Main menu, continue pressing * until you hear the Main menu
options.
•
The Pound key # is used to skip a message or complete an option. Skipped messages
will be available for you to review later.
•
While you are in your mailbox:
o
•
For more information on the available options, press 0
To retrieve your messages from another MessageManager subscriber’s telephone:
o
Call your own number and press “9” as soon as your greeting starts to play
o
Enter your password
•
You can override most MessageManager prompts by pressing the correct key for the
option that you want before the prompt is completed. This will save you time once you
are familiar with the system.
•
Make sure your password is a number that is easy to remember. If you forget your
password, your mailbox will have to be re-established by Bell and all your messages
will be lost. No one can access your password.
•
If someone calls when you are not there or while you are on the telephone, calls will be
forwarded automatically to your MessageManager mailbox
•
If your telephone set is equipped with memory keys, you may store your
MessageManager Access Number on one of the memory keys for quick and easy
access to your MessageManager system. You may also store your password, if
appropriate.
Hints for your callers
•
If you have a bilingual mailbox, callers to your bilingual mailbox will be prompted to
select their preferred language before hearing your greeting. All subsequent prompts
will be in the language selected by the caller. Callers should make a selection or the
system will wait 6.5 seconds before assuming the caller does not have a touch tone
telephone and routing the caller to the first language.
•
Callers can skip your greeting by pressing the # key.
2010 12 13
17
•
Callers can also leave you an urgent message by pressing 1, 1, 2 after leaving you a
message and before they hang up. Urgent messages are always heard first and are
marked urgent.
•
During your greeting, callers may press 0 to reach a “live” person. Note that this feature
must be pre-programmed by Bell
•
Callers can delete messages they have recorded by pressing * before they hang up. A
voice prompt will ask them to re-record
•
Although you need a touch-tone telephone to access MessageManager, your callers do
not have to use a touch-tone telephone to call you or leave a message
•
Callers who reach your mailbox when it is full (maximum capacity of 25 messages) will
hear an advisory message that they cannot leave a message
•
Callers will hear one more ring than your chosen ring cycle
2010 12 13
18
Voice mail
Voice mail enables you to compose and send messages to other local MessageManager
customers without ringing their telephone sets. You can even send a message simultaneously
to a group of local MessageManager customers without having to call each one directly. To do
this, you compose the message in your mailbox and then send it directly to the recipients’
mailbox(es).
Voice mail messages can be sent as:
1) Private
2) Urgent
3) With message confirmation
4) Future delivery
These features are also available with MessageManager Networking.
In a single call to MessageManager you can send messages to others, pick up messages sent
to you by subscribers or outside callers, reply to messages and send a copy of a message to
someone else. Your productivity will benefit because you can take advantage of the
uninterrupted work time, yet still have a continuous flow of complete and confidential
information at your command.
Note: Once you have sent a voice mail message, you cannot get it back.
Customers are encouraged to also read the Telephone Answer and Additional Features
sections of this User Guide.
Sending a voice mail message
Send #
Main Menu
Check Unheard
Messages
1
Review
1
Send
2
Check Receipt
3
Personal Options
4
Restart
5
Exit
*
Enter Destination Number
Then Press #
To Hear More
Options Press
0
Record message
and press #
To Spell Subscriber's
Name Press #
Spell Name Then
Press #
Send #
1. At the Main menu, press 2 to send a message
2010 12 13
19
2. At the tone, record your message and press #.
3. At the prompt:
a) enter the 10 digit destination mailbox number and press # or
b) enter the Group List number and press #. See the Group lists section for more
information or
c) press # to indicate that you wish to spell a subscriber’s name then spell the name of
person you wish to reach (last name first) and press #
4. Then:
a) To send your message, press #
Or
b) To access Delivery Options, press 0, select your delivery option and then press # to
send the message
For more information, see the Delivery Options section of this guide
Check receipt
Main Menu
Check Unheard
Messages
1
Review
1
Send
2
Check Receipt
3
Personal Options
4
Restart
5
Exit
*
Enter Receipients
Mailbox Number
#
To Spell Subscriber's
Name
#
To Cancel Check
Receipt
*
Spell
Name
Any time after you have sent a message to a subscriber, you can check the recipient’s mailbox
to confirm that they have listened to your message.
Note: The Check receipt feature is only available for customers served by the same
MessageManager system.
1. At the Main Menu, press 3 to select Check receipt
2. To identify the recipient’s mailbox, enter their mailbox number
3. To cancel Check receipt, press *
2010 12 13
20
Group lists
Personal Options
Main Menu
Check Unheard
Messages
1
Review
1
Notification
On/Off
1
Administrative Options
Passwords
1
Group Lists
2
Prompt Levels
3
Date/Time
4
Autoplay On/Off
6
Send
2
Administrative
Options
Check Receipt
3
Greetings
3
Personal Options
4
Notification
Schedule
4
Mailbox Language 8
Restart
5
Exit
Answer Language 9
Exit
*
*
2
Exit
Group Lists
Create
1
Edit
2
Delete
3
List Names
4
*
Group lists are used to send the same message to a group of MessageManager subscribers
without having to enter each person’s mailbox separately.
You can have up to 15 group lists, and each list can contain up to 25 destinations. You can
add, change or delete your group lists at any time. Your group lists are numbered 11 through
25.
To create a group list:
1. From the Main menu, press 4 – Personal Options
2. Press 2 - Administrative Options
3. Press 2 - Group Lists
4. To create a list, press 1
5. At the prompt, enter the group list number (any number between 11 and 25)
6. At the prompt, record the name of the Group List and press #
7. At the prompt, enter the mailbox numbers (10 digit telephone numbers) of each person
included in the group list
8. To review all names on the list, press 1
9. To return to the Personal Options menu, press *
2010 12 13
21
Forwarding and replying to messages
Main Menu
Check Unheard
Messages
1
Review
1
Send
2
Check Receipt
3
Personal Options
4
After Review
Delete
7
Reply
Save
8
9
More Options
0
Return to
Main Menu
Replay
4
Envelope
5
6
Restart
5
Send Copy
Exit
*
More Options
Cancel Review
*
*
0
Forwarding a Message
1. Listen to the entire message
2. To forward, press 6
3. At the prompt, record your introductory comments and then press #
4. Enter the 10 digit mailbox number of the MessageManager subscriber to whom you wish
to forward the message
5. To send, press #
Note: you can select different delivery options before forwarding the message. For
more information, see the Delivery Options section of this guide
6. Enter the next destination, or:
a) To reply to the original message, press 8 when prompted
b) To save the original message, press 9
c) To erase the original message Press 7
d) To exit, press *
Replying to a message
1. Listen to the entire message
2. To reply, press 8 at the prompt; you cannot use the system to reply to a non-subscriber
(someone who is not on the same system)
3. At the prompt, record your reply and then press #
4. To send your reply, press #
2010 12 13
22
5. To save the original message, press 9
6. To erase the original message, press 7
Delivery options
Delivery Options
Private
1
Urgent
2
Message
Confirmation 3
Future
Delivery
4
Confirm
1
Notify of
Non-receipt 2
Delivery options are the ways that a message can be sent to the recipient. You can select from
one to four delivery options for each message.
Note: Options must be selected after you enter the destination and before you send the
message. You can cancel any option for a particular destination by pressing its number again;
for example, pressing 2 marks a message as urgent and pressing 2 again removes the urgent
marking.
1. To access Delivery options, press 0
2. You can then select any or all of the following:
a) Private: Press 1. A private message cannot be forwarded to anyone else
b) Urgent: Press 2. Urgent messages are always played first and are marked Urgent.
c) Message confirmation: Press 3. MessageManager will send you a message to confirm
receipt of the message (the recipient has listened to your message) or non-receipt (if the
recipient has not listened to your message within two days of sending)
d) Future delivery: Press 4. You can send up to 5 messages to different destinations up
to 30 days in advance. The message will be sent on the day that you specify.
Additional features
MessageManager offers additional features that allow you to assign portions of your mailbox to
guests. These are individuals who are not subscribers but with whom you have frequent
communication. You can assign a portion of your mailbox for family members; and you can
even assign a “secretary” password so that one or more individuals identified by you may scan
the contents of your mailbox.
2010 12 13
23
Outcalling Notification enables the system to call you at a designated telephone number to
notify you when new messages are delivered to your mailbox. You can control the hours when
outcalling is in effect.
Customers are encouraged to also read the Telephone Answer and Voice Mail sections of
this user guide.
Creating passwords
Personal password
You recorded your personal password when you entered the system for the first time and
initialized your mailbox. To change your password, or to add or change a guest, home or
secretary password, use the Personal Options menu.
Note: All your passwords can be up to 15 digits long.
Personal Options
Main Menu
Check Unheard
Messages
1
Review
1
Send
Administrative Options
Passwords
Notification
On/Off
1
Passwords
1
Personal
1
Group Lists
2
Home
2
2
Administrative
Options
2
Prompt Levels
3
3
Check Receipt
3
3
4
Guest 1
Greetings
Date/Time
Autoplay On/Off
6
Guest 2
4
Personal Options
4
Secretary
5
Restart
5
Exit
*
Exit
*
Notification
Schedule
4
Mailbox Language 8
Exit
*
Answer Language 9
Exit
*
Guest password
You may have two guest passwords. You can give a guest password to someone who is not a
subscriber but with whom you communicate frequently. This enables them to send messages
directly to you and to receive messages from you, using a portion of your mailbox. You may
change guests who use your mailbox by changing the Guest Password option and giving the
new password to the new guest. The former guest’s messages will be erased automatically.
Note: Your guests can only hear messages that you send them, and other subscribers cannot
send messages to your guests.
To create a guest password:
1. From the Main menu, press 4 – Personal Options
2. Press 2 - Administrative Options
3. Press 1 - Passwords
4. To access Guest 1 Password, press 3
5. To access Guest 2 Password, press 4
2010 12 13
24
6. Enter the guest password, then press #
Home password
You may give a password to members of your family (or use this as a third guest mailbox).
This password enables them to send and receive messages in the same manner as your guest.
You will hear messages from “Home” before all other messages.
To create a home password:
1. From the Main menu, press 4 – Personal Options
2. Press 2 - Administrative Options
3. Press 1 - Passwords
4. To access Home Password, press 2
5. Enter your Home Password, then press #
Secretary Password
A Secretary Password allows your secretary or someone else you designate to enter your
mailbox and obtain only the Envelope Information for the messages in the mailbox. Envelope
Information on messages from the home mailbox is not played.
1. From the Main menu, press 4 – Personal Options
2. Press 2 - Administrative Options
3. Press 1 - Passwords
4. To access Secretary Password, press 5
5. Enter your secretary password, then press #
Using guest, home and secretary passwords
The person with a guest, home or secretary password must enter the MessageManager system
by:
1. Dialing the MessageManager access number
2. Pressing #
3. Entering your mailbox number
4. Entering the special password which allows entry to his or her portion of your mailbox.
To reply to or create guest or home messages, follow the instructions in the Forwarding and
replying to messages section, and change the destination number as follows:
•
For Guest 1: 9 1
2010 12 13
25
•
For Guest 2: 9 2
•
For Home: 9 3
•
To exit, press #
Note: Guest 1 is mailbox 91, Guest 2 is mailbox 92, Home is mailbox 93. These mailboxes can
be destinations like any other mailbox, which means that you can include them in group lists,
etc.
2010 12 13
26
About passwords - Summary
Try to create passwords that are easy to remember, yet not easily guessed by other people.
Each password that you create for your mailbox must be different. You and your guests cannot
have the same password, for example. However, the passwords you assign only refer to your
mailbox; other subscribers may have the same password without any effect.
To find out only the current password, press 0 immediately after you identify the type of
password to be changed.
1. From the Main menu, press 4 – Personal Options
2. To access Administrative Options, press 2
3. To access Passwords, press 1
4. Access current Guest 2 password, press 4
5. Hear current Guest 2 password, press 0
Note: If you forget your password, your mailbox will have to be re-established by Bell, and all of
your messages will be lost. No one can access to your password.
Outcalling notification schedules
Personal Options
Main Menu
Check Unheard
Messages
1
Review
1
Send
Notification
On/Off
1
2
Administrative
Options
2
Check Receipt
3
Greetings
3
Personal Options
4
Restart
5
Notification
Schedule
4
Exit
*
Exit
Change
1
Exit
*
*
Notification Schedule
1st Schedule
1
2nd Schedule
2
Temporary
3
Outcalling Notification can be programmed to call you at a designated local telephone
number to alert you that a message has been left in your mailbox. You can specify the hours
during which you are willing to have MessageManager notify you.
Notification for urgent and non-urgent calls may be handled differently. You can also set two
permanent schedules and one temporary schedule, but you do not need to use all three and
you may choose not to use this feature at all.
Using notification schedules
1. From the Main menu, press 4 – Personal Options
2010 12 13
27
2. Press 4 - Notification options
3. Press 1 to establish or change outcall notification schedules then:
a. For First Schedule, press 1 or
b. For Second Schedule, press 2 or
c. For Temporary Schedule, press 3
4. Enter the 10 digit telephone number (must be a local number) where MessageManager
will call you
5. Enter the weekday/weekend notification time period.
6. Select message type:
a. For all, press 1
b. For urgent, press 2
c. For urgent list, press 3
7. Select when you should be called after a new message arrives:
a. For immediately, press 1
b. For 1 hour, press 2
c. For 2 hours, press 3
d. For 4 hours, press 4
e. For after 1 day, press 5
f.
For never, press 6
8. To confirm the schedule, press 1
9. To change, press 2
Time period for notification
MessageManager will prompt you to enter the time period when you will be accepting calls.
You separately enter a start time and a stop time for MessageManager’s notification call. You
indicate whether the schedule applies on weekdays, weekends or both. You can use the first
schedule for your office number; for example, for 9 a.m. to 5 p.m., with no calls on weekends. If
you want, you can use the second schedule for your home number; for example, from 7:00 p.m.
to 10:30 p.m.
1. For 7 o’clock, press 7 0 0
a. For a.m., press 1
b. For p.m., press 2
2010 12 13
28
2. For 10:30, press 1 0 3 0
a. For a.m., press 1
b. For p.m., press 2
Temporary schedule
If you set a temporary schedule, you must indicate the length of time it will be in effect. During
this period, it will override the other two schedules. Upon expiration of the temporary schedule,
the first and second schedules will automatically be reinstated.
1) From the Main menu, press 4 – Personal Options
2) For Notification options, press 4
3) For Temporary Schedule, press 3
4)
Enter number of days Temporary Schedule is required
5) Enter the telephone number where you want to be called
6) Enter the weekly/weekend notification time period
7) Select message type:
a) For all, press 1
b) For urgent, press 2
c) For urgent list, press 3
8) Select when you should be called after a new message arrives:
a) For 1 hour, press 1
b) For 2 hours, press 2
c) For 4 hours, press 3
d) For 1 day, press 4
e) For immediately, press 5
f)
For never, press 6
9. To confirm, press 1
2010 12 13
29
Playback Controls
MessageManager service At-A-Glance
Telephone Answer
Voice Mail & Extension
Additional Features
Pause/
Restart
Rewind
Position
During Review
Speed
Hear Message
Forward
1
2
3
Slower
Envelope
Faster
4
5
6
Normal
Louder
8
9
7
Volume
Skip
Cancel
Review
#
*
Delete
7
Reply
Save
9
More Options
0
8
Replay
4
Envelope
5
Send Copy
6
After Review
Main Menu
Call your MessageManager
Access Number
OR
Check Unheard
Messages
1
Review
1
Send
2
Check Receipt
3
Call Your Own Number
Personal Options
4
Press "9" As Soon As Your
Greeting Starts
Restart
5
Enter Your Password
Exit
Press the Message Waiting Button.
Enter Your Password
Enter System From Another
Telephone Number
#
To Spell Subscriber's
Name
#
To Cancel Check
Receipt
*
Personal Options
2
Greetings
3
4
*
1
Urgent
2
Message
Confirmation 3
Future
Delivery
4
0
Confirm
Notify of
Non-receipt 2
Return to
Spell Name Then
Press #
*
1
Exit
*
*
Personal
1
Home
2
Guest 1
3
Guest 2
Secretary
5
Exit
Create
1
*
Edit
2
Delete
3
List Names
4
Outcall Notification On
1
Outcall Notification Off
2
MWI On
3
Passwords
1
MWI Off
4
Exit
Group Lists
*
2
Prompt Levels
3
Prompt Levels
Date/Time
4
Standard
1
Autoplay On/Off
6
Extended
2
Rapid
3
Mailbox Language
8
Greetings
Change
Main Menu
Send #
Outcall Notification/MWI
1
Send #
1
Passwords
Personal
Greeting
1
Extended
Absence
2
Name
3
Notification Schedule
1st Schedule
1
2010 12 13
Private
Spell
Name
1
Administrative
Options
Notification
Schedule
Exit
To Spell Subscriber's
Name Press #
*
On or Off
Exit
Notification
On/Off
To Hear More
Options Press
Record message
and press #
Enter Recipients
Mailbox Number
Enter
Additional
Destination
Delivery Options
Enter Destination Number
Then Press #
*
Main Menu
0
Send #
Enter System From Your Mailbox
Return to
*
Cancel Review
More Options
2nd Schedule
2
Temporary
3
Administrative Options
Answer Language
9
Exit
*
Group Lists
4
Date/Time
On
Off
Autoplay
Autoplay On
1
Autoplay Off
2
Exit
*
Mailbox Prompt
Language
Answer Language
French
1
1
English
2
First Language
Second Language 2
30
1
2