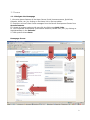
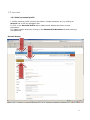
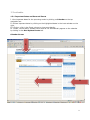
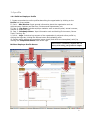
1
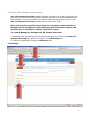
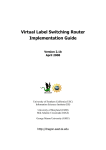
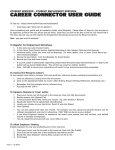
 Asper Career Portal Employer User Guide For Job Postings with Off‐Campus Interviews 1.1 home
1.1.1 Navigate the Homepage
I. View at-a-glance features of the Asper Career Portal (Announcements, Quicklinks,
Calendar, Alerts, etc.) by clicking on the Home link in the top toolbar.
II. Employers review Career Portal messages from the Career Development Center from
Announcements.
III. Access all system sections with one click by clicking on Quick Links.
IV. View important events dates (Information Sessions, Career Fairs, etc.) by clicking on
highlighted days in the Calendar.
V. View system-driven alerts.
Homepage Screen
III.
IV.
II.
V.
2 1.2 account 1.2.1 Build a personal profile
I. Build a personal profile (contact information, change password, etc.) by clicking on
Account link on the top navigation bar.
II. Click on the Personal Profile tab to update email address and other contact
information.
III. Update system access by clicking on the Password/Preferences tab and creating a
new password.
Account Screen
I.
III
II.
3 1.3 calendar
1.3.1 Important Dates and Personal Events
I. View important dates for the upcoming weeks by clicking on Calendar on the top
navigation bar.
II. Review important dates by clicking on the highlighted dates in the inset calendar on the
right.
III. Click on a link in the Event column to view event details.
IV. Create, review and/or update events that do not automatically appear on the calendar
by clicking on the Non-System Events tab.
Calendar Screen
I.
IV.
III.
II.
4 1.4 profile
1.4.1 Build an Employer Profile
I. Create comprehensive online profiles describing the organization by clicking on the
Profile link in top toolbar.
II. Part 1 - Who We Are: Input general information about the organization such as
Achievements, Products and Services, Divisions and Departments, etc.
III. Part 2 - Key Stats: Include employer statistics such as stock symbol, annual revenue,
number of employees, etc.
IV. Part 3 - Company Culture: Input information such as Working Environment, Career
Track, Training, etc.
V. Part 4 – Logo: Include a logo as part of the organization’s print and online profile by
clicking the Logo tab, clicking the Browse button and uploading a file.
VI. Review which sections are complete (green check) and which are incomplete (red X) by
utilizing the Completion Status inset on the right.
This section is viewable by students and will
assist you in raising your profile on campus.
Build an Employer Profile Screen
I.
II.
V.
VI.
III.
IV.
5 1.5 Jobs (off-campus interviews)
Jobs (off-campus interviews) enables employer contacts to view and post positions for
jobs that are not interviewing on campus. Contacts may also view student applications for
these positions. If you are conducting on-campus interviews please post your job in the
Jobs (on-campus interviews) tab and see our related user guide.
Note: Only post Co-op positions here if you are an employer located outside of
Winnipeg. All Co-op employers within Winnipeg must interview on-campus and
post their jobs in the Jobs (on-campus interviews) section.
1.5.1 Add & Manage Job Postings with Off Campus Interviews
I. View and/or edit job postings with off campus interviews by clicking on the Jobs (offcampus interviews) tab, and then clicking on the Job Postings tab.
II. Create a job posting by clicking the Add New button
Job Postings
I.
I.
II.
6 IV. Enter information about your new position. If you have a position already in the system
and you would like to copy the information use the Copy Existing drop down menu.
V. Choose your Position Type. Be sure to choose the type carefully so the correct students
can view and apply to your job posting.
Note: If this position is for Co-op students please select the Co-op session that
pertains to your position.
Job Postings
IV.
V.
7 VI. Enter the position Title.
VII. Enter the Job Description.
VIII. Select method in which resumes should be received (online or via email).
IX. Choose any Additional Documents that you would like applicants to include such as a
cover letter. After you choose an additional document you can make it required by checking
it off in the corresponding box below.
X. Select the date job postings beginning and ending dates to indicate when the job
posting will be open and closed.
XI. Press Submit at the bottom of the form.
VI.
VII.
VIII.
IX.
X.
Note: Your Job Posting will be viewable by students after an administrator
from the Asper Career Development Centre approves your posting. This
process should be done in 1 to 2 business days. If you have any questions
please contact the Career Development Centre.
8 1.5.2 Manage Job Posting Applicants (if collecting resumes online rather than via
email)
I. View a list of students who have applied for available positions by clicking on the Student
Resumes tab.
- View resumes by clicking on the document icon in the Resume column.
II. Communicate with applicants via email by checkmarking target individuals and then
clicking Mail to Checked, a web-based mail wizard.
- Send personalized emails to an unlimited number of recipients by inputting a
Subject, Message Body, etc.
- Utilize the mail merge fields in the Available Fields box.
- Initiate a mailing by clicking Next, and then clicking the Send Messages button.
III. Generate packet of student resumes by checkmarking desired applicants and clicking
generate book.
Student Resumes
I.
III
I.
II.
9 1.6 resume books
Resume Books enables employers to browse student resumes that have been sorted by
screening criteria.
1.6.1 View Resume Books
I. View resume books by clicking on RESUME BOOKS from the top navigation bar.
II. View a pre-packaged group of student resumes by clicking on the Resume Books tab,
and then clicking on a resume book link in the Name column.
Resume Books
I.
II.
10 Resume Books Continued
III. Refine the resume list by Major, Year in School and Applicant Type by utilizing the
dropdown menus at the top.
IV. View a resume by clicking on the document icon in the Resume column.
V. Refine the resume book list by clicking on the Advanced Search tab, selecting various
screening criteria (Work Authorization, Graduation Date, etc.), and then clicking the
Submit button.
Resume Books
V.
III.
IV.
Note: Only students who have opted in to include their resumes in a resume
book will have viewable documents. The number of students who are
displayed in a search are not representative of all Asper School of Business
candidates.
11 1.7 information sessions
1.7.1 Register for an Information Session
Information Session List
I. Create an information session by clicking Add New button.
- You will receive confirmation message when request is approved.
II. Once your Information Session is approved, click the link to view information session
details.
- If you enabled student rsvping, view students who rsvpd for the event.
Information Sessions Screen
I.
I.
12