1
OpenLabyrinth User Guide v2.4
User Guide
for OpenLabyrinth version 2.10
June 2009
This work is licensed under a Creative Commons
Attribution-Noncommercial-Share Alike 3.0 license
Page 1 of 57
OpenLabyrinth User Guide v2.4
Contents
1: Introduction ................................................................................................................................. 5
1.1: What’s new in version 2.10? ..................................................................................................................5
1.2: What is OpenLabyrinth? ........................................................................................................................5
1.3: Installing OpenLabyrinth ........................................................................................................................5
1.4: Labyrinths ..............................................................................................................................................5
1.5: Nodes.....................................................................................................................................................5
1.6: Links.......................................................................................................................................................6
1.7: Rules ......................................................................................................................................................6
1.8: Feedback ...............................................................................................................................................7
1.9: Data Elements and Clusters ..................................................................................................................7
1.10: Avatars .................................................................................................................................................8
1.11: OpenLabyrinth Remote Services .........................................................................................................8
2: Running a Labyrinth .................................................................................................................. 10
2.1: Permissions .........................................................................................................................................10
2.2: Keys .....................................................................................................................................................10
2.3: User Interface ......................................................................................................................................11
2.4: What happens next … .........................................................................................................................12
2.5: Tracking and Feedback .......................................................................................................................12
3: Creating a Labyrinth .................................................................................................................. 13
3.1: Creating a Labyrinth Manually .............................................................................................................13
3.2: Creating a OpenLabyrinth Map using Vue...........................................................................................13
3.3: Creating a OpenLabyrinth Map by Importing a MedBiquitous Virtual patient Package .......................14
3.4: Creating a Labyrinth by Duplicating an existing Labyrinth ...................................................................15
3.5: The New Labyrinth...............................................................................................................................15
4: Editing in OpenLabyrinth ........................................................................................................... 16
4.1: Visual Editor.........................................................................................................................................16
4.2: Inline Editing ........................................................................................................................................18
4.3: Editor Functions ...................................................................................................................................19
4.4: Global properties..................................................................................................................................20
4.5: Nodes...................................................................................................................................................21
4.6: Node sections ......................................................................................................................................22
4.7: Links.....................................................................................................................................................23
4.8: Feedback .............................................................................................................................................23
4.9: Session reports ....................................................................................................................................23
4.10: Preview ..............................................................................................................................................23
4.11: Authors...............................................................................................................................................23
4.12: Files ...................................................................................................................................................24
4.13: Counters ............................................................................................................................................25
Page 2 of 57
OpenLabyrinth User Guide v2.4
4.14: Data Elements ...................................................................................................................................26
4.15: Data Clusters .....................................................................................................................................27
4.16: Export MVP ........................................................................................................................................27
4.17: Duplicate ............................................................................................................................................27
4.18: Delete.................................................................................................................................................27
4.19: Avatars ...............................................................................................................................................28
4.20: Author Notes ......................................................................................................................................29
4.21: Key Feature Problems and Matching.................................................................................................29
5. Feedback and Reporting ........................................................................................................... 31
5.1: Session Reports...................................................................................................................................31
5.2: Feedback Report .................................................................................................................................32
5.3: Feedback Options................................................................................................................................32
6. Global Functions: Users, Presentations, Import and Export ..................................................... 34
6.1: User Management ...............................................................................................................................34
6.2: Language support ................................................................................................................................34
6.3: Presentations .......................................................................................................................................35
6.4: Export...................................................................................................................................................36
6.5: Import...................................................................................................................................................37
7. OpenLabyrinth Remote Services .............................................................................................. 38
7.1: Description ...........................................................................................................................................38
7.2: Setting up OpenLabyrinth Remote Services........................................................................................39
7.3: Remote Services Components and Messaging...................................................................................39
7.4: OpenLabyrinth Remote Services Transactions ...................................................................................40
7.4.1: Transaction: OpenLabyrinthservice ............................................................................. 40
7.4.2: Transaction: OpenLabyrinth......................................................................................... 41
7.4.4: Transaction: service ..................................................................................................... 42
7.5: Basic OpenLabyrinth Client Functions.................................................................................................43
7.6: OpenLabyrinth Client Enhancements ..................................................................................................43
8. Customization: Skins and Mashups .......................................................................................... 44
8.1: Skins ....................................................................................................................................................44
8.2: Code ....................................................................................................................................................45
8.3: Documentation.....................................................................................................................................46
8.4: Mashups ..............................................................................................................................................46
9. Development Techniques ......................................................................................................... 47
9.1: Using Vue ............................................................................................................................................47
9.2: Using Nodes ........................................................................................................................................48
9.3: Using Links ..........................................................................................................................................48
9.4: Using Counters ....................................................................................................................................48
9.5: Different Kinds of Labyrinth Designs....................................................................................................48
Page 3 of 57
OpenLabyrinth User Guide v2.4
10. Further Information and Resources ........................................................................................ 49
Appendix 1: Installation ................................................................................................................. 50
Appendix 2: Academic Free License ("AFL") v. 3.0 ...................................................................... 54
Page 4 of 57
OpenLabyrinth User Guide v2.4
1: Introduction
1.1: What’s new in version 2.10?
The following are the main changes in version 2.10:
•
Visual editor
•
Extended avatars
•
New front page layout
•
Bug and efficiency fixes
1.2: What is OpenLabyrinth?
OpenLabyrinth is an open source online activity modelling system that allows users to build
interactive ‘game-informed’ educational activities such as virtual patients, simulations, games,
mazes and algorithms. It has been designed to be adaptable and simple to use while retaining a
wealth of game-like features. OpenLabyrinth is licensed under the Academic Free License (AFL)
v. 3.0 – see appendix 2.
The original Labyrinth application was originally developed by the Learning Technology Section of
the College of Medicine and Veterinary Medicine at the University of Edinburgh. This latest
version includes work from the Northern Ontario School of Medicine and the University of
Edinburgh as well as input from St Georges University of London, England and the University of
New South Wales, Australia. This guide is intended to act both as user guide and technical
documentation for the system.
1.3: Installing OpenLabyrinth
OpenLabyrinth is a web application written using Active Server Page (ASP) code written in
VBScript. To run it needs to be running in Internet Information Services (IIS) which is part of
Microsoft server technologies (as well as Windows XP/Vista for single users). OpenLabyrinth also
requires a database joining the code and the database using an ODBC connector. The most
suitable database is MS SQL Server (the Express edition is available for free). See appendix 1 for
more details on how to install and configure OpenLabyrinth.
1.4: Labyrinths
A ‘labyrinth’ is the principal unit of organisation within OpenLabyrinth. Each labyrinth has a series
of global properties such as the type (game, maze, algorithm etc), its authors, timers, visual
appearance (skins), security, scores and counters etc. Within each labyrinth there are a series of
linked pages or ‘nodes’ that define the options available to the user, each of which can be
enhanced with a number of behaviours and services to further structure the user’s experience
and gameplay.
1.5: Nodes
A labyrinth’s nodes are the unit of presentation to the user, typically webpages, around which all
the other labyrinth components are organised. Although a labyrinth can have just the one node,
Page 5 of 57
OpenLabyrinth User Guide v2.4
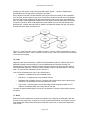
typically they will consist of many interconnected nodes. Figure 1.1 shows a diagrammatic
representation of a simple activity consisting of six nodes.
Every labyrinth node has a unique identifier (node ID) as well as a number of other properties
such as a title, textual content, a type (root or child) and a series of rule and function properties.
The rules and functions determine what is presented to the user at any given node depending
both on current node properties and what the user has done previously (particularly concerning
scores and counters). Other node properties include whether it is the root node (the labyrinth
starting point), whether the node must be visited or avoided and whether the user can end the
session and see a report of how they did.
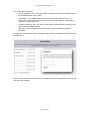
Figure 1.1: nodes and links: node 1 is linked to nodes 2, 3 and 4, node 2 is linked back to node 1,
node 3 is linked to node 4, node 4 is linked to nodes 5 and 6, node 5 is linked to node 3 and node
6 isn’t linked to anything.
1.6: Links
Labyrinth nodes are connected by a series of links expressed as pairs of node IDs with some
additional properties such as ordering, icons and alternative text. Because links are one
directional (from node A to node B) a link back requires a second link (from node B to node A)
with independent properties. There are 8 links indicated in figure 1 because there is a link from
node 1 to 2 and another separate one from node 2 to 1.
Links can be presented to the user in four different ways
•
Hypertext – clickable text link per available choice
•
Drop down – a dropdown list of the available choices
•
Dropdown with confidence interval – as above with a second drop down indicating how
confident (or unconfident) the user was about their choice
•
Type in text – the user types in the first few letters of their proposed answer and if it
matches an available option this is auto filled for the user.
The order of these available options can be set, randomized or randomly set to present just the
one option.
1.7: Rules
Rules are functions attached to nodes that change the way a labyrinth is presented to the user.
One set of rules might set or change one or more counters while another could require a user to
have visited other nodes before being able to load the current one. In a little more detail these
rules include:
Page 6 of 57
OpenLabyrinth User Guide v2.4
•
Counters: counters are similar to the score but while there is only one score there can be
many counters. Each counter has a name, description, starting value and a number of
functions. At any node the value for each and every counter can be changed using plus,
minus or equals operators along with an integer value; ‘+10’ adds ten, ‘=4’ sets the value
to 4 irrespective of its previous value. These values can then trigger rules based on the
current value of each counter.
•
Scores: in addition to counters labyrinths can use a score function that can be used to
control what the user sees and does. The start score and threshold score are set as
global numeric properties for the whole Map and can be changed at any node to any
integer value. OpenLabyrinth uses a 3-zone model (green, orange, red) with different
messages; if the score is above the threshold then the ‘green’ message is displayed, if
the score is below the threshold but above 0 then the ‘orange’ message is displayed, if
the score is 0 or lower then the ‘red’ message is displayed and the user is required to
restart the activity. At any node the score can be changed using plus, minus or equals
operators along with an integer value; ‘+10’ adds ten, ‘=4’ sets the score to 4 irrespective
of its previous value. Note however that there is only one score per activity and they are
deprecated in favour of using counters.
•
Conditionals: these control access to a node based on which nodes the user has visited
previously. For instance a rule that looks like “{15}OR{16}” would mean that a user
couldn’t enter node 17 without having visited nodes 15 or 16 first. Each rule is made up of
node IDs connected with standard Boolean operators.
•
Timers: these provide a real time countdown at the end of which the user needs to restart
the activity. A 300 second timer would mean that the user would need to complete the
activity in 5 minutes.
1.8: Feedback
The user can be given extensive feedback based on their choices in playing a labyrinth. This
includes a report of which choices were made, the counter values and whether nodes were
marked as ‘must visit’ or ‘must avoid’.
There are a number of author-configured feedback rules including:
•
Feedback per node visited
•
Feedback depending on the numbers of ‘must visit’ and ‘must avoid’ nodes visited
•
Feedback on the time taken to complete
•
Feedback on values of counters at the end of the session
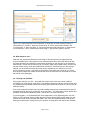
1.9: Data Elements and Clusters
OpenLabyrinth has been designed to import to and export from the MedBiquitous virtual patient
data standard, an emerging specification for the exchange and reuse of virtual patient activities
between different authoring and player systems. The MVP model is made up of five components:
•
VPD: virtual patient data – functioning as the electronic patient record, a VPD is a
collection of VPD elements. Although designed to support clinical data this could just as
easily be used to support any reusable data element such as a character name or unit of
measure. These are therefore called ‘data elements’ in OpenLabyrinth.
•
MR: media resources – this includes all supporting files including images and documents.
An MR Set is a collection of MR elements. Each MR element has properties of name,
path, mime type and arguments. Media resources are handled using the OpenLabyrinth
file manager.
Page 7 of 57
OpenLabyrinth User Guide v2.4
•
AM: activity model – this describes what the user can (and cannot) do. Activities are
described as a series of nodes containing narrative and educational content with links
between them. Both nodes and links have rules associated with them to enhance the
options for educational gameplay. This maps directly to the node and link aspects of
OpenLabyrinth.
•
DAM: data availability model – aggregations of VPD and MR elements. DAM contains at
least one VPD element or MR element, although more typically it contains many such
elements.
•
A standalone player – as OpenLabyrinth is an authoring and player system this is not
required for OpenLabyrinth.
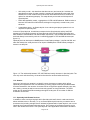
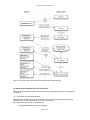
In terms of OpenLabyrinth, its activities correspond to the OpenLabyrinth activity itself, MR
equates to the file handling capacity of OpenLabyrinth while VPD and DAM functionality have
been added as ‘data elements’ and ‘data clusters’ respectively. VPD and MR data elements can
be linked directly into an activity node or via a DAM aggregate of VPD and MR elements (see
figure 1.2).
OpenLabyrinth can both export a MedBiquitous Virtual Patient package ( a zip file with XML and
other files inside) from a labyrinth and it can import a MedBiquitous Virtual Patient package to
create a new labyrinth.
Figure 1.2: The relationship between VPS, MR, DAM and activity elements in OpenLabyrinth. The
user only works with the activity; all elements are therefore surfaced within the activity.
1.10: Avatars
One way of enhancing a narrative is to identify human characters or agents within its flow.
OpenLabyrinth supports the use of characters by providing support for simple animated avatars
for these characters in the narrative. An avatar can be configured to appear differently (age, skin,
hair, clothing, context) as well as communicate using speech or thought bubbles. The same
avatar can be reused with different settings throughout a Labyrinth. Or a number of different
characters can be used.
1.11: OpenLabyrinth Remote Services
In addition to users running a labyrinth within OpenLabyrinth itself, there is a web-service that
allows activities to be run remotely. To run a remote OpenLabyrinth service you need to have a
remote service (including a single client IP address) registered within OpenLabyrinth, one or more
OpenLabyrinth maps associated with that service, and a means of presenting the activity to the
user in the remote environment. This OpenLabyrinth ‘client’ application would need to be able to
Page 8 of 57
OpenLabyrinth User Guide v2.4
consume the XML generated by the service and render it so that the user was given the links and
services required to run the labyrinth remotely and interact with the OpenLabyrinth server.
Page 9 of 57
OpenLabyrinth User Guide v2.4
2: Running a Labyrinth
This section describes the steps a user takes to start and work through a labyrinth– note that this
will be different for users of remote OpenLabyrinth services, which will depend on the way the
OpenLabyrinth client is instantiated and run as to how the interaction works.
2.1: Permissions
The only labyrinths a user can run without logging in are those whose security has been set to
‘open’. Labyrinths with a security setting of ‘closed’ can be viewed by anyone logged into
OpenLabyrinth while ‘private’ maps can only be viewed by their logged in editors. To start a
labyrinth just click on its title in the listing page. This loads the first node and displays it (see figure
2.1).
Figure 2.1: a typical labyrinth screen
2.2: Keys
In addition to making a Labyrinth more or less secure using Labyrinth security you can also
require your users to enter an arbitrary text key to activate a Labyrinth. To turn on the use of keys
set the labyrinth security type to “keys (a key is required to access this Labyrinth)” in the global
editor and use the ‘edit’ link by the security type select to create one or more keys. A key can be
any kind of text string including variations such as ‘6t4g45’ ‘green for go’ and ‘85A94W8BA9445’.
When a user tries to run a labyrinth they will be challenged to enter a valid key and they won’t be
able to start until they do so.
Page 10 of 57
OpenLabyrinth User Guide v2.4
2.3: User Interface
There may be a number of different elements on display (see figure 2.2) including:
•
Title: every node has a title, which is typically displayed at the top of the page.
•
Message: although not mandatory almost all labyrinth nodes will have some kind of
textual message for the user. Typically that will either describe the consequences of
having selected the current node. The message can change depending on what rules
have been tripped when you entered the current node. For instance if your score hit zero
you would be asked to restart the activity.
•
Linked options: the way to traverse a labyrinth is to click on one of the available options.
These will usually show the title of the node you are inking to although different text or an
image icon may be provided instead.
•
Review pathway taken: unless disabled in a particular skin a clickable track of the user’s
pathway through the labyrinth since you started is available. Click on a link to go back to
that point – note that this does not roll back the track of which nodes have been visited,
every action is recorded in a session.
•
Media elements: because OpenLabyrinth provides every node with containers for HTML
code any media element that can be displayed in a regular webpage can also be
displayed in OpenLabyrinth. This includes images, video, audio, or programmatic objects
and animations (such as Flash or Java).
•
Services: if a service has been instantiated globally (or at a particular node) an icon will
allow you to launch that service (typically in a pop-up window), these can include
information notes and DDX services.
•
Counters: for each counter that was set up globally a note of the item name and its
current value is displayed. If a counter function is encountered (which changes the value
for any given counter) this is also displayed. The counter text is clickable to launch a popup that gives more information about that counter.
•
Metadata and score: although not all skins show these, many do. This shows the current
labyrinth and node ID, and your current score (if used).
•
Reset link: this ends your present session and restarts you in a new session within the
same labyrinth.
•
A link to OpenLabyrinth home page: clicking the OpenLabyrinth icon returns you to the
home page.
•
Other graphics, links, tools and text may also bee displayed depending on the current
skin.
Page 11 of 57
OpenLabyrinth User Guide v2.4
Figure 2.2: a typical labyrinth screen’s elements: A: Node title; B: Node message/content; C:
Links/options; D: Counters – label plus current value; E: Link to review nodes viewed in the
current session; F: Open note taker; G: Current labyrinth and node information; H: Reset/restart
current labyrinth; I: link to OpenLabyrinth home page; J: Skin-specific graphics and text.
2.4: What happens next …
What the user experiences depends on the design of the labyrinth they are playing and the
choices available within it but typically a user makes decisions as to which path they shall take
and these decisions have different consequences depending on the rules set on the nodes they
pass through. Scores and counters may go up or down, paths may be dead ends or choices may
end the current activity, while other paths will be successful. Therefore when you are playing a
labyrinth you should think carefully about the options available to you, keep an eye on any
scores, counters or timers in the activity and follow the instructions and hints given you. Some
skins support multiple user modes where services such as information can be turned off to make
the activity more challenging.
2.5: Tracking and Feedback
Every option selection (or ‘click’ - along with the current score, timer and counter values) is
recorded as you work through a labyrinth. This tracking supports the pathway review function and
any conditional and feedback rules as well as being able to generate a report on how the user did
within the activity.
If the current labyrinth has been set to provide a feedback report then at some point the user will
be presented a link that says “end session and view report” – this will end the current session and
provide a comprehensive feedback report – see section 5 for more information.
If you are logged in, on the OpenLabyrinth home page there is a ‘My OpenLabyrinths’ link from
which you can view a list of every OpenLabyrinth you have started, behind which there is a user
session report that shows what path was taken, how much time elapsed between entering and
leaving the node and the varying level of any counters. A histogram of this data is also available.
Page 12 of 57
OpenLabyrinth User Guide v2.4
3: Creating a Labyrinth
There are four ways to create a labyrinth within OpenLabyrinth; stepwise manually, using a tool
called ‘Vue’, importing a MedBiquitous virtual patient package or duplicating an existing labyrinth.
3.1: Creating a Labyrinth Manually
This is where each node is entered manually, one at a time, along with the links, rules etc. The
steps for authoring and editing are very similar other than for authoring you need to create a
labyrinth first. To do this click the ‘add a new Labyrinth’ link (available to logged in users only) and
then fill in the form to set the new labyrinth’s global properties.
Once you have created the new labyrinth you can then start building it up by adding nodes, links
between nodes and counters, files, rules and other dynamic properties. A single root node will
have been created as part of the labyrinth but all other nodes, links, rules etc will need to be
added manually – see section 4 on editing a labyrinth for more details.
3.2: Creating a OpenLabyrinth Map using Vue
Vue is a Java-based visual concept-mapping tool from Tufts University that can be downloaded
(for free) from http://vue.uit.tufts.edu/ for both Windows and Mac. You can use it to create designs
for labyrinths by creating boxes to represent nodes and the links between them. Although Vue
supports many other features only the boxes (converted to nodes), text in the boxes/nodes and
the links (between nodes) will be imported, everything else will be ignored by the parser.
There are a number of issues to consider when using Vue to design for OpenLabyrinth:
•
Nodes and text: the colour, font, box shape and on-screen location are all ignored on
import to OpenLabyrinth but they can be used to help with the design process. For
instance different sections can have different colours.
•
Links: When you create a Vue map for upload to OpenLabyrinth ensure you make your
arrows between boxes point in the right direction as these are parsed in the upload
process - directionless arrows are interpreted as bidirectional (from A to B and from B to
A). Note also: this import process is currently only one-directional, once a Vue map has
been uploaded to OpenLabyrinth it cannot (as yet) be exported and reopened in Vue.
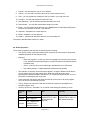
•
Arrow type
Import result
Non-directional
A link from A to B and a link from B to A
One way back
A link from B to A
One way forward
A link from A to B
Bidirectional
A link from A to B and a link from B to A
Pictures, hyperlinks and other Vue properties and objects are not imported to
OpenLabyrinth.
Page 13 of 57
OpenLabyrinth User Guide v2.4
When you import from Vue the text in each box is taken as both the new node’s title and content.
You can either specify the new labyrinth’s name on import or use the default of the globally
unique ID assigned to the new labyrinth, for example “VUE_upload_126162A6-2BEB-41988D5B-4B093D60579E”. Either way you can subsequently change this and set other properties
using the global editor.
You can chose whether or not to use verbose new node naming. With verbose naming turned on
e ach node is named with the node number allocated in Vue using square braces to indicate that
it hasn’t yet been edited, for example “ID=[2]]]] - see the patient”. Although this means that every
node needs to be edited this ensures that the content and setup of the node is done properly.
Alternatively you can turn verbose logging off and up to the first 50 characters of the Vue node
text will become the new node’s title.
For more information on using Vue see the authoring guide at
http://vue.uit.tufts.edu/userdoc/maps.cfm
Figure 3.1: a screen grab of a virtual patient activity created in Vue.
3.3: Creating a OpenLabyrinth Map by Importing a MedBiquitous Virtual patient Package
OpenLabyrinth can create new labyrinths by importing MedBiquitous Virtual Patient packages.
The package and the import process is described more fully in section 6.
Page 14 of 57
OpenLabyrinth User Guide v2.4
3.4: Creating a Labyrinth by Duplicating an existing Labyrinth
Any labyrinth you have edit access to can be duplicated as a template for a new labyrinth by
clicking its ‘duplicate’ link on the editor page. A basic copy of the original labyrinth is created
(called “Copy of …”) allowing you to change any aspect while keeping the original untouched.
Note that duplicating just takes the basic structure and does not import files, rules or other
additional properties.
3.5: The New Labyrinth
All four of these methods do the following:
•
Add the ID of the current user as an author of the new labyrinth
•
Set the new labyrinth security to ‘private’ – this means it is listed in the ‘Labyrinth’s I am
Authoring section on the home page
•
Set the labyrinth type to ‘maze’
•
Set section browsing to ‘off’
Page 15 of 57
OpenLabyrinth User Guide v2.4
4: Editing in OpenLabyrinth
All aspects of a labyrinth can be edited by anyone who is logged in with edit permissions for that
particular labyrinth. Simple content editing can be carried out within a node as the labyrinth is
being played while more advanced features are available through different labyrinth editors.
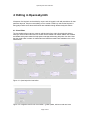
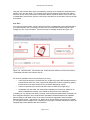
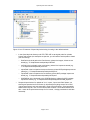
4.1: Visual Editor
The visual editor allows users to create or edit labyrinths from within OpenLabyrinth without
having to use an external tool like Vue. Nodes can be created and content added, links created
and edited and layouts created to help authors manage and develop labyrinths over time. Note
that the visual editor is written in Adobe Flash and therefore needs Flash enabled on the user’s
web browser.
Figure 4.1: OpenLabyrinth visual editor
Figure 4.2: navigation tools for the visual editor – global update, add new node and zoom
Page 16 of 57
OpenLabyrinth User Guide v2.4
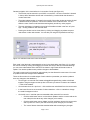
General navigation in the visual editor is via a number of tools (see figure 4.2):
•
The window can be zoomed in up to 300% or out to 50% - the zoom controller is located
in the top left of the editor window and is controlled by a vertical slider that shows the
current zoom level
•
The global update location is located in the top left of the editor window and when clicked
it refreshes all of the positions, colours and contents of the nodes and links. This is in
effect the ‘save’ function and should be used regularly as with any other program.
•
The new node button is located in the top left of the editor window in the form of a plus
sign – clicking creates a new unlinked node.
•
Panning the window can be done either by clicking and dragging anywhere except on
node boxes or other active areas. You can also pan using the keyboard’s arrow keys.
Figure 4.3: individual node tools in the visual editor
Each node in the labyrinth is represented by a box in the visual editor (see figure 4.3). A node’s
box can be moved by clicking and dragging on the bar at the top of the box. Note that although
you can move nodes above and to the left of the viewer’s origin these will be set to zero on
update. You need to update to save position changes to the database.
The node’s content can be changed by typing directly into the title and/or content text. You need
to update to save text changes to the database.
There are four tools on the outside edges of each node box (remember you need to update to
save any changes to the database.):
•
On the right is a cross hair tool creates a draggable target allowing nodes to be linked
together. Drag the target over the top bar o the node you want to connect to and release
– a link will be created.
•
On the bottom there is a ‘plus’ tool – click to add a new node linked from the current node
•
In the lower left corner are a number of colour swatches – click on a swatch to change
the node’s background colour
•
On the left is an ‘e’ tool that opens an extended editor pane with four controls:
o
Click the radio button next to ‘root’ and then update to set the current node as the
root node (this also saves any other changes you’ve made)
o
Click the radio button next to ‘delete’ and then update to remove the current node
and any links to or from it (this also saves any other changes you’ve made)
o
The ‘cancel’ button closes the extended editor without making any changes
Page 17 of 57
OpenLabyrinth User Guide v2.4
o
The ‘update’ button saves any changes you’ve made in this editor pane and in
the map as a whole
Figure 4.4: visual editor link edit tool
Links can also be edited by clicking on the arrow in the middle of the link path. This will open a
link editor (figure 4.4). There are six controls in this editor:
•
The topmost radio button sets the link as bidirectional, ie from A to B and from B to A
•
The left-hand radio button sets the link as going from B to A
•
The right-hand radio button sets the link as going from A to B
•
The lower radio button deletes the link
•
The ‘cancel’ button closes the link editor without making any changes
•
The ‘update’ button saves any changes you’ve made in this editor pane and in the map
as a whole
When using the visual editor do remember the following:
•
Use the update buttons to save changes – only this saves your work to the database
•
There is a top left zero point beyond which positions cannot be saved
•
Zoom and pan is not saved so the visual editor will open at 100% zoom and the top left
origin point every time you open the window
4.2: Inline Editing
The title and content of a node can be edited from within that node if the current user has
authoring rights to the current labyrinth. Click the link saying ‘turn editing on’ to switch into inline
editor mode. You will be able to change the current node’s title and content from here or click
directly to the more advanced editing tools (see figure 4.5).
Page 18 of 57
OpenLabyrinth User Guide v2.4
Figure 4.5: inline node editing: A is the link to turn editing on and off, B is the field to change the
title, C is the field to change the text, and D is a series of links to the main editor tools
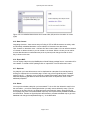
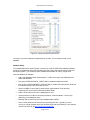
4.3: Editor Functions
When you click ‘edit’ you are taken to a screen (see figure 4.6) that allows you to access and
change any of the following properties:
Figure 4.6: the OpenLabyrinth map editor
There are 16 main editing functions for any given labyrinth:
1. Global properties - this is a duplicate of the form used to create a map manually
2. Nodes – you can add nodes or edit any existing nodes from here
3. Node sections – you can create arbitrary sections for grouping nodes together and assign
nodes to these sections from here.
4. Links – you can add links or edit links from here
5. Feedback – you can create and edit feedback rules from here
6. Session reports – all user sessions for the current map, see administration section on
reporting services
Page 19 of 57
OpenLabyrinth User Guide v2.4
7. Preview – this launches the map in a new window
8. Authors – you can add or remove authors to the current map from here
9. Files – you can upload and manage any files you need in your map from here
10. Counters – you can add and edit counters from here
11. Data Elements – you can add and edit data elements from here
12. Data Clusters – you can add and edit data clusters from here
13. Export – this exports the whole labyrinth in the MedBiquitous Virtual Patient (MVP) data
format or the Vue XML file format – see section 6
14. Duplicate – duplicates the current labyrinth
15. Delete – deletes the current labyrinth
16. Avatars - add and edit different avatars for the current labyrinth
This section describes these functions in depth.
4.4: Global properties
These are the properties that structure the whole labyrinth including:
•
Title, author credits, keywords and description: these are free text entries to set general
metadata properties for this particular map.
•
Map type:
o
Maze and Algorithm – these only use one message box so that the use of scores
is not advised for these labyrinth types, counters should be used instead. Maze is
the default type.
o
Game – uses scores to control messages –deprecated from v2.08 onward
o
Key feature problem – enables additional assessment functionality
•
Skin selection: a labyrinth can be skinned to appear in a range of different visual styles –
you can select from any of the existing skins. Note that some skins have some
OpenLabyrinth features disabled. See section 9 on customizing OpenLabyrinth for more
information on developing and using skins.
•
Score properties: the starting and threshold value for scores can be set here (integers
only), as can the units label for the score.
•
Timing: whether the map uses a real timer and the time delta (time available) set in
seconds (integers only).
•
Security: can be set – see table 1 for an outline of the settings and what they mean:
Security
type
View/run
Edit
Duplicate
Open
Yes
Closed
Only if logged in
Only if logged in and
registered as an editor for
the particular labyrinth
Private
Only if logged in as
an editor for the
particular labyrinth
Only if logged in and
registered as an editor
for the particular
labyrinth
Page 20 of 57
OpenLabyrinth User Guide v2.4
Key
•
Requires a textbased key to run
Section browsing: this controls how the node sections are shown to the user. The choices
are: don't show, visible, navigable (clickable).
4.5: Nodes
To view the nodes in the current map click the ‘nodes’ link in the main editor. This node edit
screen lists all of the nodes in the current map – first those allocated to a node section and then
all those that are unallocated. Clicking on the title of a node will preview it, clicking on ‘edit’ will
launch the node editor and clicking on ‘links’ will launch the link editor. There is a link at the top of
the node listing page to let you add a new node.
Whether you add or edit a node this will launch the node editor, which has the following features:
•
Toggle html and WYSIWYG editors: there are two editing modes. The first (and default)
mode is in HTML view where text and HTML code is entered directly into the title, content
and info fields, the alternative is a WYSIWYG (what you see is what you get) editor that
provides an interface somewhat akin to a word processor. In OpenLabyrinth this is
1
provided by the TinyMCE component . There are links at the top of the page that let you
toggle between these two modes. Click on the ‘?’ icon in the WYSIWYG editor for
information on how to use it (see figure 4.7).
Figure 4.7: the WYSIWYG tool bar
•
Node title: this is both the title displayed in the lists of nodes and at the top of the page
and the default text of any link to the node (although this can be overridden – see links
section).
•
Node content: This is what is shown to the user and is where narrative, images and
instructions are added. Depending on the global setting for map type there are different
editor boxes for node content. If the map is set to be a ‘Game’ this uses scores to control
display between three content boxes: green, orange and red. Content from the green box
is shown if the score is above the threshold (set in the global properties) and no other
rules have overridden it. Content from the orange box is shown if the score is at or below
the threshold (set in the global properties) and greater than zero and no other rules have
overridden it. Content from the red box is shown if the score zero or below. If the map is
set to ‘Maze’ or ‘Algorithm’ then there is only one content box. Note that to add a media
resource such as an image you need first to upload the file and then copy and paste its
wiki-style reference into the node content box where you want the file to appear (see
managing files section).
•
Info content: additional supporting content can be added in this field. If there is any
content in the info box for a node then an info button will render at runtime that launches
a popup window containing the information. This would typically be used to provide
1
TinyMCE is a platform independent web based Javascript HTML WYSIWYG editor control released as
Open Source under LGPL by Moxiecode Systems AB. Copyright © 2003-2006, Moxiecode Systems AB, All
rights reserved. For more information visit the TinyMCE website at http://tinymce.moxiecode.com/
Page 21 of 57
OpenLabyrinth User Guide v2.4
supporting factual information, commentary or advice from a character such as a tutor or
links to other materials and content outside OpenLabyrinth.
•
Node counter functions: for every counter created this is where they can be dynamically
changed. You can leave this blank or use one of ‘+’ or ‘-‘ or ‘=’ plus an integer. For
instance ‘+5’ adds 5 to the current counter while ‘=6’ sets it to 6 no matter what it was
before.
•
Exit node probability settings: this toggles on off whether just one of the linked nodes will
be presented at random or all of them presented at once.
•
Conditional rule settings: this allows you to set conditional rules for the current node.
These rules specify what nodes need to have been visited before the current one can be
accessed. When creating a conditional rule a message to the user is specified along with
a Boolean statement of which nodes are required. For instance {1}AND({2}OR{3})
requires the user to have visited node 1 and either nodes 2 or 3 before accessing the
current node. Editing a conditional rule deletes any previous rule requiring it to be reset.
•
Link function style: this changes how the linked options are displayed to the user:
o
text (default) – each choice is shown as a plain text hyperlink.
o
dropdown – each choice is an option in a drop down list.
o
dropdown + confidence – each choice is an option in a drop down list with a
second drop down to let the user select how confident they were at making the
selection.
o
type in text – user types in what they think the option should be and if (after the
first 3 letters are entered this matches one of the available choices then that
choice is selected.
•
Node priority: this flags whether the current node must be avoided or must be visited –
this is used in the session reporting and feedback.
•
Root node: this sets the current node as the root (starting point) node for the labyrinth.
•
Link to end and report from this node: this is off by default. If turned on a link is added to
end the current session and get feedback – see feedback section for more on this.
•
Node score function: this can be used to change the score. You can leave this blank or
use one of ‘+’ or ‘-‘ or ‘=’ plus an integer. For instance ‘+10’ adds 10 to the current score
while ‘=80’ sets it to 80 no matter what it was before.
•
Undo: this allows users to undo a node they have visited by removing it from the session
track. In any given node scroll down to “enable undo links” and select whether this
feature should be on or off for this node.
4.6: Node sections
Node sections are a way of organising nodes into logical groups. They can be used to help
authoring, particularly where there are a great many nodes or several nodes have the same title.
They can also be used to create a menu to help users browse through a labyrinth.
•
You can add and edit node sections and assign nodes to node sections from ‘List/edit
this labyrinth’s node sections’ link on the main editor page.
•
You can add a node section by typing a label into the form at the bottom of the node
sections page and clicking submit.
•
You can edit an existing node section by clicking on the ‘edit’ link next to its name on the
node sections page (which also lists the nodes assigned to each section). This provides a
list of the current nodes in the section that allows you to order them and remove them
Page 22 of 57
OpenLabyrinth User Guide v2.4
from the current section. You can also add any unassigned node to the current section.
Note that a node can only be assigned to one section at a time.
•
You can control how the node sections are shown to the user. The choices are: don't
show, visible, navigable (clickable). In the latter the section label becomes a hyperlink to
the first node in the section.
4.7: Links
The links editor in a map lists every node in the left hand column and every link from that node in
the right. Every left hand node entry allows you to edit its particular links or preview it. Every
linked node entry on the right allows you to go to that particular node’s entry in the left hand
column or preview it.
The editor for a specific node’s links allows you to:
•
Change the type of linking from the current node: there are three kinds of node linking
that can be set here:
o
Ordered: this allows you to specify the order that links will be shown. This
ordering is set in the current link editor using numeric dropdowns per link – they
evaluate low-high.
o
Random order: this means that the order of the available links from the current
node will be randomised every time the node is loaded.
o
Random select: this means that just one of the available links will be randomly
selected – note that this property can also be set in the node editor.
•
Edit current links from the current node: this allows you to order links (if linking type has
been set to ‘ordered’), delete links or edit them. If you are editing a link the form looks
very similar to that for adding new links – see next section.
•
Add a new link to the current node: this allows you to select a node to link to from a
dropdown list of every node in the current map not already linked from the current node.
You can also (optionally) set alternative text for the link (the default is the target node’s
title) or set a path for an image or icon to be used instead of a textual link.
4.8: Feedback
This lets you control how the feedback will be presented to the user at the end of their session.
See separate section on this topic.
4.9: Session reports
This lets you view all of the sessions run on the current labyrinth. See separate section on this
topic.
4.10: Preview
This starts the labyrinth running in a new window.
4.11: Authors
A map’s authors are the only ones who can edit it and if the map’s security is set to private they
are also the only ones who can see it. By default the user who created a map (by any of the three
creation methods) is an author on the new map. Additional authors can be added (or removed)
Page 23 of 57
OpenLabyrinth User Guide v2.4
using the map’s author editor which is accessed by clocking on the ‘list/edit this OpenLabyrinth's
authors’ link in the main editor. This provides a grid of all the registered OpenLabyrinth authors
with a tick box by each one that can be selected to add the user as an author of the current map
or deselected to remove them from the current map. Note that you cannot add or remove yourself
as an author.
4.12: Files
You may wish to add images, sounds, videos, documents, spreadsheets or other discrete files to
your OpenLabyrinth map. To manage your files click on the ‘list/edit this OpenLabyrinth's files
(images etc)’ link in the main editor. This launches the file manager window (see figure 4.8).
Figure 4.8: map files editor. The functions are: A=wiki-style file reference, B=resource preview;
C=metadata and editor and D=add a new file
For each file uploaded into the current labyrinth you have:
•
A wiki-style file reference: this takes the form of [[MR:xxx]] where MR indicates that this is
a media resource and xxx is the unique file ID assigned to the file on upload. By pasting
the reference into a node content box the file will be displayed at runtime.
•
A resource preview: this just shows what the resource looks like (images only).
•
A metadata view and editor: this shows basic metadata for the resource, allows you to
edit the metadata and it allows you to delete the file from the current labyrinth.
In addition you can upload a new file by choosing it and clicking the upload button (see table 2 for
list of supported file types). Once a file has been uploaded it should be edited for its metadata
(this will allow for both better control of the resource as well as registration within the Media
Resource MVP service – see section 5.2). Note that you should always ensure that any material
you use (both text and images) is not covered by any copyright or consent restrictions. Liability for
inappropriately used materials rests with the author.
Page 24 of 57
OpenLabyrinth User Guide v2.4
File Type
Display
Extension
Notes
JPEG image
Inline
.jpg
GIF image
Inline
.gif
JPEGs and GIFs are the only supported image
formats in OpenLabyrinth
Acrobat PDF
Link
.pdf
PDFs may be created from many applications
including Adobe Acrobat
Shockwave Flash
Embed
.swf
Runtime media files from Adobe Flash
Microsoft Word
Link
.doc
Standard Word format – OpenLabyrinth also
supports open RTF file type
Microsoft Excel
Link
.xls
Microsoft PowerPoint
Link
.ppt
Rich Text Format
Link
.rtf
QuickTime video
Embed
.mov
MPEG-4 video
Embed
.mp4
Windows Media
Embed
.wmv
Real Stream (RAM)
Embed
.ram
Real Stream (RPM)
Embed
.rpm
Flash video
Embed
.flv
MP3 audio
Embed
.mp3
WAV audio
Embed
.wav
AAC (m4a) audio
Embed
.m4a
Video formats
Audio formats
Table 2: file formats supported by OpenLabyrinth
4.13: Counters
Counters are comprised of a label and a dynamic integer value, which can be dynamically
changed as a user works through a labyrinth. There can be any number of counters and each of
these counters can have any number of rules that can be triggered by a counter’s value.
Counters need to be created globally for a map. To create a new counter or edit an existing one
click the ‘counters’ link. This opens the counters editor, which lists each existing counter with links
to edit, preview or delete it along with a link to create a new counter. Adding or editing a counter
opens the counter editor window (see figure 13).
The counter editor allows you to define/change:
•
Counter title: this is the label shown for the counter.
•
Counter description: an optional text description of what the counter is and what its
purpose is.
•
Path for a counter icon: an optional path for a graphical icon for this counter.
•
The starting value for the counter
Once created each counter will be displayed (except on some skins) to the user indicating its title
and current value. If the value is changed at a particular node that value change is also displayed.
Clicking on a counter link will launch a popup window with full details about that counter.
Page 25 of 57
OpenLabyrinth User Guide v2.4
Changing the value of a counter as a user moves through a map is set in the node editor which
has a function box per counter: you can leave this blank or use one of ‘+’ or ‘-‘ or ‘=’ plus an
integer. For instance ‘+5’ adds 5 to the current counter while ‘=6’ sets it to 6 no matter what it was
before.
Counter rules can be added from the editor for a particular counter. Each rule consists of the
following components:
•
An integer value
•
An operator: equal to, not equal to, less than or equal to, less than, greater than or equal
to, greater than
•
An action if the condition is met:
o
Go to one of the nodes in the current labyrinth Note that the counter value
should be reset at the target node or the program will loop
o
Show a message in place of the default node message
For example: if counter 3 is greater than or equal to 50 then show message “well done”.
4.14: Data Elements
OpenLabyrinth supports the MedBiquitous Virtual Patient (MVP) data specification, a key aspect
of which is the use of data elements. OpenLabyrinth supports the following MVP element types,
each of which has a different structure:
•
VPDText
•
PatientDemographics
•
AuthorDiagnoses
•
MedicationInterviewItem
•
PhysicalExam
•
DiagnosticTest
•
DifferentialDiagnosis
•
Intervention
To use OpenLabyrinth data elements:
1. Select ‘data elements’ from the editor menu. This will give a list of all the current data
elements and a link to create a new element
2. You can edit or delete any of the data elements
3. On the new element page select the type of element you want to create from the drop
down menu – this will load a form to be completed to create the element
Using a data element in a labyrinth involves pasting its tag into the content for any given node.
The tag has the format of ‘[[VPD:’ then the element’s ID and then ‘]]’, i.e. [[VPD:ER9M0MC]] – see
figure 4.9. You can also use data elements in data clusters.
Page 26 of 57
OpenLabyrinth User Guide v2.4
Figure 4.9: an embedded data element in the node editor (left) and how it renders on screen
(right)
4.15: Data Clusters
Integrating elements – there are two ways of linking in VPD or MR elements to an activity node:
as individually embedded elements or as a collection of elements via a data cluster.
Click ‘clusters’ on the editor menu – this lists all of the current clusters. You can edit the contents
of a cluster or delete a cluster or you can create a new cluster. Within a cluster you can add or
remove data elements or media elements (such as pictures) and change the order in which
they’re shown to the user.
4.16: Export MVP
You can export a labyrinth to the MedBiquitous Virtual Patient package format – see section 6 for
more details. To create an MVP package click on ‘export MVP’ from the editor main menu.
4.17: Duplicate
Any labyrinth you have edit access to can be duplicated as a template for a new labyrinth by
clicking its ‘duplicate’ link on the editor page. A basic copy of the original labyrinth is created
(called “Copy of …”) allowing you to change any aspect while keeping the original untouched.
Note that duplicating just takes the basic structure and does not import files, rules or other
additional properties.
4.18: Delete
You may wish to delete a labyrinth you have started. To do so click the ‘delete this map’ link on
the main editor – you will be challenged whether you really want to delete this map. If you are
sure that you do then click the ‘go ahead and remove this labyrinth’ button. Recognising that
some people may wish to resurrect deleted maps they are not permanently deleted but disabled
and held offline. Contact an OpenLabyrinth administrator to reinstate a deleted map or go to the
database and change the mapEnabled flag to ‘y’ in the MAP table.
Page 27 of 57
OpenLabyrinth User Guide v2.4
4.19: Avatars
2
Avatars are animated simple images of the characters you might want to include in your Labyrinth
either as passive representations of the characters in your narrative or taking part via speech or
thought bubbles. There can be any number of avatars per labyrinth – for instance the same
character in different settings and saying or thinking different things or perhaps many different
interacting characters.
Each avatar can be customized as follows: Sex, age, eyes open or closed, outfit, mouth shape,
the colour of their outfit (for some outfits only), their nose type, hair type and colour, three
different layers of accessories such as wounds, glasses, bandages etc, skin tone and colour,
background colour, background scenery, background weather and the kind of speech or thought
bubble used and what text should go in it.
Once created each avatar has a reference that looks like [[AV:123]]. Copying this tag and pasting
it into the contents of a node or info box and allows it to be incorporated and reused anywhere in
the current Labyrinth. You can duplicate an existing avatar for instance to create a series around
a single character, and you can edit them and delete them. See figure 4.10.
2
Thank you to Stewart Cromar at the University of Edinburgh for developing and sharing the code and
media to allow us to include this feature in OpenLabyrinth.
Page 28 of 57
OpenLabyrinth User Guide v2.4
Figure 4.10: the avatar editing screen
4.20: Author Notes
A simple note taker can be run for the authors of a labyrinth. Click on the pencil icon to load the
author notes editor. This can be viewed and changed by any of the editors of any given labyrinth.
4.21: Key Feature Problems and Matching
If the labyrinth type is set to Key Feature Problem then any node within that labyrinth can be set
to be a matching question rather than providing links. Turn matching on by going to any node in
the current KFP typed labyrinth and scroll down to “add text matching”, turn it on and submit the
page. Go back and re-enter the node edit page and there is now an ‘edit’ button next to the ‘add
text matching’ buttons. Click edit to start adding different strings to be matched (up to 12 per
question as well as the score for a match and whether the match is critical or not.
Page 29 of 57
OpenLabyrinth User Guide v2.4
You can also set the following:
•
counter controlled – this is the counter that is changed as a result of matching and adds
the associated score to this counter
•
strict [off][on] – this changes whether a string must be matched strictly or not – for
instance if the match term is “cardiac arrest” if the user enters “cardiac” they will get a
match only if strict is turned off.
•
number of options for user – this is the number of text boxes and therefore tries the user
has to submit candidate matches
•
next node – this is the node that the user is taken to after the matching has been
processed
In a matching-enabled node the user is presented with a series of text boxes and a submit button
– see figure 4.11.
Figure 4.11: the matching editor and the way a matching question is presented to the user (in this
case with three attempts)
Page 30 of 57
OpenLabyrinth User Guide v2.4
5. Feedback and Reporting
As with any educational program a labyrinth is at its most useful when it can inform a learner how
well, or how badly, they performed. It is even more useful when accompanied by suggestions
about how they might improve their performance in future.
5.1: Session Reports
As has already been mentioned each labyrinth user session is tracked and is available to its
authors as a report. A user session is started each time a user goes to a map’s root node. The
tracking involves recording each node selection along with the time and current score and
counter values at that point. The reports are available in one of two ways:
•
Users can see reports for every OpenLabyrinth they have run – this is in the ‘My
OpenLabyrinths’ section linked from the home page
•
Authors can see reports for every session within a particular map – this is in the ‘user
session report’ section linked from the main map editor.
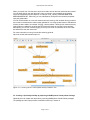
Each report consists of a list of nodes visited (representing the user’s path through the map)
along with the current score and how long they spent at the node (in seconds).
This allows a histogram to be drawn representing the session to be drawn up (see figure 5.1).
The value of each counter is also recorded and is available as a plot (see figure 5.2).
The data can be downloaded as a CSV file for further analysis.
Figure 5.1: a typical OpenLabyrinth report histogram. In this session the user spent 6 seconds on
nodes 21 and 52. Node 21 is a ‘must visit’ node (in green) and 52 is a ‘must avoid node’ (in red).
Page 31 of 57
OpenLabyrinth User Guide v2.4
Figure 5.2: a typical counter trace – there are two counters here ‘happiness’ which started at 10
and rose to 50 on the last node and ‘happiness’ which remained at 100 throughout
5.2: Feedback Report
The user can also be given a feedback report. To do this first enable the node property of ‘link to
end and report from this node’ for any node from which you want to allow the user to get their
report. When the user clicks the report link they get the following:
•
Metadata such as the user ID, the session ID and the labyrinth name.
•
The start time and the time taken to complete
•
The total number of nodes visited as well as the number of ‘must visit’ and ‘must avoid’
nodes visited
•
General feedback irrespective of what the user has done
•
Feedback in response to specific nodes visited
•
Feedback in response to the number of ‘must visit’ and ‘must avoid’ nodes visited
•
Feedback based on the time taken to complete
•
Feedback: on the final values of any of the current labyrinth’s counters
•
The list of nodes visited
•
The histogram of time spent per node
•
The graph of counter values through the session
5.3: Feedback Options
User feedback can be configured as follows:
1. Click on the ‘feedback’ option in the editor menu
Page 32 of 57
OpenLabyrinth User Guide v2.4
2. Set the general feedback to the user – for instance “That was a hard problem …”
3. Add feedback rules:
a. Feedback in response to specific nodes visited – for instance “You chose to get
an MRI, that was an expensive option given the circumstances …”
b. Feedback in response to the number of ‘must visit’ and ‘must avoid’ nodes visited
– for instance “You made 4 choices that should have been avoided …”
c.
Feedback based on the time taken to complete – for instance “You completed
the task in less than 2 minutes, were you really thinking about what you were
doing?”
d. Feedback: on the final values of any of the current labyrinth’s counters – for
instance “Your morale slipped below the critical point …”
Page 33 of 57
OpenLabyrinth User Guide v2.4
6. Global Functions: Users, Presentations, Import
and Export
In addition to the creation and running of OpenLabyrinth maps there are a number of
OpenLabyrinth administration services including user management, reporting and import/export:
6.1: User Management
All authors need to have a login to OpenLabyrinth. OpenLabyrinth super users have the ability to
create OpenLabyrinth accounts using the link from the home page. Each account requires a
username, password, full name and email address. This is where the user interface language is
set for a given user. A user may also be given super user access.
Figure 6.1: the add user screen
6.2: Language support
The user interface language is set in the user account creation or editing pages. If you change
your own user language then you must logout and log back in for the changes to take effect.
Currently there are just two supported languages – English and French. Note that the user guide
is currently available only in English although a French translation would be most welcome. Note
that the user interface phrases are stored in the “interface.xml” file sitting in the documents folder
at the OpenLabyrinth root.
At present the French translation is likely to be pretty poor limited as it is to the author’s memories
of school French and the quality of Google Translate. Corrections and improvements are invited.
Furthermore anyone willing to translate the 370 or so interface elements into a third or fourth
language are welcomed and encouraged. Simply add a language tag at the top of the XML file –
eg <language ID=”KN” name=”klingon” /> - and then add an additional element for each phrase –
eg <phraseKN>qapla</phraseKN>. Return to the author for inclusion in the next release.
Page 34 of 57
OpenLabyrinth User Guide v2.4
Figure 6.2: the interface.xml file that can be found in documents/interface.xml
6.3: Presentations
Groups of Labyrinths can be collected together as ‘presentations’ for instance as a course page
or a bank of assessment items. To create a presentation click on the ‘presentations’ link on the
home page, add the details for the presentation such as any text to be shown and user options
and then submit. Edit a presentation to add specific labyrinths to it. Note that you must be an
author on any labyrinth you want to include in a presentation – see figure 6.3.
Figure 6.3: the Presentations authoring screens
Page 35 of 57
OpenLabyrinth User Guide v2.4
6.4: Export
OpenLabyrinth currently exports to the MedBiquitous Virtual Patient XML format. To create a
package click the ‘export MVP’ link. This will run a script that creates a new folder, copies the
required files into it, writes XML files for the various required components and then creates a
zipped archive of the folder and its contents – the user is then presented with a link to the zip
archive.
The contents of a typical MVP export are shown in figure 6.4. The key elements are labelled as
follows:
A The Zipped package
B The IMS Manifest XML file that lists the contents of the archive
C The metadata XML file in LOM format
D Activity Model XML file
E Folder containing all of the media objects
F Virtual Patient Data XML file
G DAM XML file
The other files and folders are required objects for a SCORM package.
Figure 6.4: a typical MVP export from OpenLabyrinth
Page 36 of 57
OpenLabyrinth User Guide v2.4
6.5: Import
In a similar but reverse way to MVP export, OpenLabyrinth can create a new labyrinth by
importing and MVP package. Follow the ‘create’ link on the OpenLabyrinth home page and then
select ‘MVP import’ to upload an MVP package.
You select the zip archive, this is uploaded to a new temporary directory, unzipped, the XML files
parsed and the data written into the database, files copied to new directories and when all the
importing has been done the temporary directory deleted and a link to the new labyrinth
presented to the user.
Page 37 of 57
OpenLabyrinth User Guide v2.4
7. OpenLabyrinth Remote Services
7.1: Description
In addition to playing OpenLabyrinth activities within OpenLabyrinth itself you can also run them
in a remote system such as a virtual learning environment or e-assessment system by using
OpenLabyrinth Remote Services. These services use XML to send OpenLabyrinth node content
to the remote client that then communicates back using simple URLs (see figure 7.1).
Figure 7.1: OpenLabyrinth Remote Services Architecture. OpenLabyrinth is on the left and the
remote application is on the right hand side. The steps are:
1. The remote client calls REMOTE.ASP in OpenLabyrinth
2. If the user credentials are correct or the remote client’s IP is recognised then
REMOTE.ASP sends back an XML file listing the available Labyrinth Maps
3. The remote client parses the incoming XML into clickable links to start each Labyrinth
Map
4. When the user clicks on a link this sends a call to MNODE.ASP passing just the nodeID
5. If the call is authorised then MNODE.ASP returns the node XML package
6. The remote client parses the incoming XML so the user can work through the activity.
Each click cycles through steps 4-6
7. As this is happening additional communication can run within each application
Page 38 of 57
OpenLabyrinth User Guide v2.4
7.2: Setting up OpenLabyrinth Remote Services
There are two ways a remote service can be called:
1. by passing user credentials in the remote GET string. The user needs to be a remote
type user (i.e. not a superuser, author or learner account). To set this up:
•
create a remote user or reuse an existing one
•
add the remote user to any maps you want to be available in the remote service
•
call the remote service by adding hashed userID and password credentials
(uid=xxx&pwd=yyy) using the cookieHash function in UTILITIES.ASP . There is a
commented function in REMOTE.ASP that allows you to generate the hashed
credentials
2. by registering a remote service. To set this up:
•
click on ‘remote services’ on the home page and then ‘add a service’
•
give the service a name and enter the IP address or range of the remote server.
Leave box 4 or 3 and 4 blank to indicate a range of IP addresses, e.g. put 123 in box
1 and 45 in box 2 to accept any IP starting with 123.45.
•
once the service has been created then add Labyrinth Maps to the service by clicking
‘add/edit Labyrinths’ and adding them from the dropdown menu
7.3: Remote Services Components and Messaging
There are at least three discrete functions required at the client end:
1. Client list: this queries OpenLabyrinth for the OpenLabyrinth activities assigned to the
current remote service and then formats and displays the results of the query
2. Client player: this interacts with the MNODE.ASP script in OpenLabyrinth to run the
activity
3. Client remote services: these support additional OpenLabyrinth services like info boxes,
counters and DAM nodes
In addition there may be local services layered on top of the remote OpenLabyrinth application.
The components and their accompanying messaging flows are laid out in figure 7.2.
Page 39 of 57
OpenLabyrinth User Guide v2.4
Figure 7.2: remote components and their interactions with OpenLabyrinth
7.4: OpenLabyrinth Remote Services Transactions
There are three transaction types in the remote services: OpenLabyrinthservice, OpenLabyrinth
and service.
7.4.1: Transaction: OpenLabyrinthservice
This transaction is called by the client list function to get a list of the OpenLabyrinth activities
available for the current remote service. The URL for the call is:
http://OpenLabyrinth.mvm.ed.ac.uk/remote.asp
•
<OpenLabyrinthservice> is the root element
Page 40 of 57
OpenLabyrinth User Guide v2.4
•
<remoteIP> is the IP address as seen by OpenLabyrinth
•
<OpenLabyrinthmap> is the parent element per activity
•
<OpenLabyrinthmapid> is the current activity’s map ID (integer)
•
<OpenLabyrinthmapname> is the current activity’s title
•
<OpenLabyrinthmaproot> is the root mnode ID (integer) for the current activity
As an example:
<?xml version="1.0"?>
<OpenLabyrinthservice>
<remoteIP>129.215.133.15</remoteIP><OpenLabyrinthmap>
<OpenLabyrinthmapid>174</OpenLabyrinthmapid>
<OpenLabyrinthmapname>ESSQ+1</OpenLabyrinthmapname>
<OpenLabyrinthmaproot>2054</OpenLabyrinthmaproot>
</OpenLabyrinthmap>
<OpenLabyrinthmap>
<OpenLabyrinthmapid>178</OpenLabyrinthmapid>
<OpenLabyrinthmapname>ESSQ+Jaundice+1</OpenLabyrinthmapname>
<OpenLabyrinthmaproot>2129</OpenLabyrinthmaproot>
</OpenLabyrinthmap>
</OpenLabyrinthservice>
7.4.2: Transaction: OpenLabyrinth
This is the main transaction type with OpenLabyrinth which processes the activity as it plays out.
The URL for this is:
http://OpenLabyrinth.mvm.ed.ac.uk/mnode.asp?id=x&mode=remote&sessID=y
The value for sessID can be left blank for the root node transaction but is required thereafter to
maintain scores etc. As log as the node ID requested is in an activity that is allowed in the current
service an XML response is sent back with the following elements:
•
<OpenLabyrinth> is the root element
•
<mnodetitle> is the current node’s URL-encoded title
•
<mapname> is the current activity’s URL-encoded title
•
<mapid> is the current activity’s (integer)
•
<mnodeid> is the current node’s ID (integer)
•
<mapscore> is the current activity score (integer)
•
<message> is the current node’s URL-encoded body text
•
<colourbar> is the current node’s URL-encoded text indicating the use of colour bars for
zoned scores (in game mode only)
•
<linker> is the current node’s URL-encoded HTML links
•
<tracestring> is the current node’s URL-encoded HTML for the trace/track
•
<rootnode> is the node ID for the current activity’s root node (integer)
•
<infolink> is the current node’s ‘info’ button URL-encoded HTML
•
<usermode> is a toggle value between basic and expert
•
<dam> is a list of any associated MVP Data Availability Model nodes
•
<mysession> is the GUID for this particular user session
Page 41 of 57
OpenLabyrinth User Guide v2.4
•
<counterstring> is URL-encoded text of links for all the counters in this map
•
<timestring> and <javascripttime> are deprecated in the current version - disregard
As an example:
<?xml version="1.0"?>
<OpenLabyrinth>
<mnodetitle>Start</mnodetitle>
<javascripttime></javascripttime>
<mapname>ESSQ+Jaundice+1</mapname>
<mapid>178</mapid>
<mnodeid>2129</mnodeid>
<mapscore>100</mapscore>
<timestring></timestring>
<message>%3Cp%3Eyou+are+a+FY2+in+general+surgery+on+call++you+are+phoned+
by+a+GP+who+has+a+55yo+woman++in+his+surgery+who+appears+jaundiced++what+
do+you+do+now%3A%3C%2Fp%3E</message>
<colourbar>%3Ctable+border%3D%270%27+width%3D%27100%25%27+cellpadding%3D%
275%27%3E%3Ctr%3E%3Ctd+height%</colourbar>
<linker>%3Cp%3E%3DABBCE08B%2D1F75%2D4A0A%2D852B%2D21F0819A19A2%27%3EID%3D
%5B27%5D%5D%5D%5D+%2D+arrange+urgent+review++the+patient+comes+to+hospit%
3C%2Fa%3E%3C%2Fp%3E</linker>
<tracestring>%3Ca+href%3D%22%23%22+onclick%3D%22toggle%5Fvisibility%28%27
track%27%29%3B%22%3E%3Cp+class%3D%27style2%27%3E%3Cstrong%3EReview+your+p
athway%3C%</tracestring>
<rootnode>2129</rootnode>
<infolink></infolink>
<usermode></usermode>
<dam></dam>
<mysession>ABBCE08B-1F75-4A0A-852B-21F0819A19A2</mysession>
<counterstring></counterstring>
</OpenLabyrinth>
7.4.4: Transaction: service
This is a combined function that connects to three different OpenLabyrinth services:
•
Information: http://OpenLabyrinth.mvm.ed.ac.uk/info.asp?id=x&mode=remote&sessid=y
•
Counters:
http://OpenLabyrinth.mvm.ed.ac.uk/counter.asp?id=x&cid=y&mode=remote&sessid=z
•
DAM Nodes:
http://OpenLabyrinth.mvm.ed.ac.uk/counter.asp?id=x&did=y&mode=remote&sessid=z
Each of these scripts bundles their response as a single XML element:
•
<OpenLabyrinth> the root element
•
<service> a URL-encoded HTML text response
The following info button call is an example:
<?xml version="1.0" encoding="UTF-8"?>
<OpenLabyrinth>
<service>Your+role+in+this+clinic+is+to+review+patients+on+behalf+of+your
+Senior%2E+He+is+present+in+the+clinic%2C+and+will+call+in++to+see+if+you
+are+progressing+well+in+the+case%2E+++This+is+the+Virtual+Hospital+Envir
onment+%28VHE%29%2C+take+advantage+of+the+fact+there+is+no+time+pressure+
and+make+sure+you+understand+the+basic+sciences+you+are+applying%2E+++Bet
ter+than+getting+a+textbook+out+in+front+of+the+patient%2E</service>
</OpenLabyrinth>
Page 42 of 57
OpenLabyrinth User Guide v2.4
7.5: Basic OpenLabyrinth Client Functions
The OpenLabyrinth client is relatively thin in that it only needs to send out appropriate and wellformed requests and to parse, format and present the returned XML data. As any free-text
information is exchanged as hexadecimal data a converter from hex to plain text is required as is
some data cleaning, for instance:
•
Changing instances of "mnode.asp" to the local client URL.
•
Changing instances of "/files/" to http://OpenLabyrinth.mvm.ed.ac.uk/files/ in any
OpenLabyrinth resource URLs (such as images).
•
Changing certain links so that they open in a new window.
•
Changing instances of any HTML escaped characters back to their base format, for
instance instances of "'" should be turned back to an apostrophe.
7.6: OpenLabyrinth Client Enhancements
The previous few sections have outlined the underlying basics of creating a remote
OpenLabyrinth client service. It is possible however to build additional services on top of this as
meet the requirements of the system in which the client service is instantiated. These services
may be global to all surfaced OpenLabyrinth cases, they may be attached to specific activities
(identified by their unique map ID) or to specific nodes (identified by their unique node ID).
Examples from existing clients include:
•
The ability for users to make their own notes either at a particular node or throughout an
activity
•
The ability for users to record particular kinds/formats of data, for instance when working
with a virtual patient it is useful to be able to record several differential diagnoses, to rank
them and then to progressively whittle them down to a definite diagnosis as the activity
unfolds
•
Cross-integration (wiki knowledgebase)
Page 43 of 57
OpenLabyrinth User Guide v2.4
8. Customization: Skins and Mashups
8.1: Skins
The skins control how the labyrinth is presented to the user. The skin for a particular labyrinth can
be changed in the global editor. Standard installed skins include basic, PDA and NOSM, the latter
is presented as a development template for users to develop their own OpenLabyrinth skins.
Figure 8.1: an example OpenLabyrinth skin (for St Georges Medical School, London, UK)
There are a number of different presentation elements in an OpenLabyrinth skin (see figure 8.1):
A: title
B: message
C: options
D: counters
E: review session
F: notes
G: metadata
H: reset session
I: link to home page
J: skin-specific content
Effectively all that different skins do is to change the layout and visual presentation of these
elements – see figure 8.2
Figure 8.2: some example OpenLabyrinth skins
Page 44 of 57
OpenLabyrinth User Guide v2.4
To create a new skin:
•
Create a new skin folder in the skins folder, you could start by duplicating an existing one
•
Edit the ASP skin script and the accompanying CSS stylesheet to change the HTML
layout of the skin elements, adding new content as you require
•
Add the skin reference to the SKINS table in the database – this will allow it to be
presented as an option in the global editor
8.2: Code
OpenLabyrinth has been written in an open and largely modular way to allow for new
developments and changes to the code base. Moreover, OpenLabyrinth is provided as open
source, which means that users are free to reuse and adapt the code to meet their own needs.
You are strongly encouraged, although not required, to share any new code with the
OpenLabyrinth community. Examples of code changes could include:
•
New services such as tracking a differential diagnosis
•
New data elements such as those for a different professional discipline
•
Integration with other systems such as VLEs, assessment systems or
The homepage can also be customized, in particular there is a section below the
Figure 8.3: the OpenLabyrinth homepage
Page 45 of 57
OpenLabyrinth User Guide v2.4
8.3: Documentation
A copy of this user guide is also provided in PDF and Word DOC format. This can be amended
and reused as set out in the Creative Commons Attribution-Noncommercial-Share Alike 3.0
license (see http://creativecommons.org/licenses/by-nc-sa/3.0/). For instance you could add new
instructions, translate or adapt it for different contexts.
8.4: Mashups
OpenLabyrinth remote web services can be used to create mashups with other remote
applications. For instance:
•
a labyrinth could be used to link with a wiki by pairing its nodes with the wiki pages
•
a labyrinth could be used to link with other mashup applications such as Flickr, YouTube
or various Google services
See section 7 for more information on using the OpenLabyrinth remote services.
Page 46 of 57
OpenLabyrinth User Guide v2.4
9. Development Techniques
This section pulls together some advice and tips on creating and using OpenLabyrinth activities.
9.1: Using Vue
Vue is a free topic-mapping tool from Tufts University - see http://vue.uit.tufts.edu/ for both
Windows and Mac. You can use it to create designs for labyrinths by creating boxes to represent
nodes and the links between them. Although Vue supports many other features only the boxes
(converted to nodes) text in the boxes/nodes and the links (between nodes) will be imported but
everything else will be ignored.
Vue allows a whole design to be viewed at once, and to be built in whatever way the author(s)
wish (see figure 9.1 for some examples). For instance a Vue design could be data projected for a
group of authors to comment and build up a map collaboratively.
Figure 9.1: Some example labyrinth designs in preparation in Vue
As well as creating labyrinth designs in a stepwise manner parts of other designs can be copypasted into new designs. For instance a design for an interview or making a diagnosis can be
reused across a number of designs. Reusing these ‘design patterns’ can make development
faster and more effective.
Page 47 of 57
OpenLabyrinth User Guide v2.4
9.2: Using Nodes
A node consists of a container for HTML content plus a number of rules and functions. A node
may need to be duplicated if one or the other differs. Furthermore, a node may contain a media
object that presents an activity in its own right, for instance an assessment question, an animation
or an interactive object such as a puzzle or a mini game.
9.3: Using Links
The links represent the topology of the labyrinth activity. You can use these links creatively to
assemble different kinds of labyrinths:
•
A randomly selected link can be used to represent a dice throw – make six links each for
one of the dice values and then set the node to select just the one randomly. When the
labyrinth is played the dice throws will be randomly selected each time, use alternative
link text to hide what the value is.
•
You can use alternative text and icons to control how options are presented to the user.
For instance, you can allow users to select the image that best suits the question such as
interpreting an x-ray or a histology image
•
You can use different link types to create more specific designs. For instance, Key
Feature Problems (KFPs) can be designed using dropdown menus (Fischer et al 2005).
9.4: Using Counters
You can use counters to track different kinds of values during an activity:
•
Costs: a maximum financial budget can be set as the starting value and each choice that
involves expenditure can have that cost deducted from the budget.
•
Time: a time budget can be deducted from or arbitrary time added to based on the
choices made. For instance, selecting a blood pressure test may take 3 minutes while a
CT scan may take an hour.
•
Psychological factors such as morale, general health or satisfaction can be tracked
based on choices made.
•
Clinical specific factors such as blood pressure, heart rate or respiratory rate can also be
tracked against decisions made.
•
Artefacts such as tools, drugs, equipment or keys can be acquired (value increased) and
used (value decreased) using counters.
Remember that you can have any number of counters in any one labyrinth.
9.5: Different Kinds of Labyrinth Designs
There are lots of different kinds of designs you can build in Labyrinth:
•
Standard professional narratives such as history, examination, investigation, diagnosis
and treatment.
•
Narratives based on single cases or having to deal with multiple cases at once, each
intruding or interrupting the other
•
Algorithms such as clinical guidelines, diagnostic pathways for technical or user
documentation.
Page 48 of 57
OpenLabyrinth User Guide v2.4
10. Further Information and Resources
OpenLabyrinth is provided as open source code and as such the authors accept that there may
be some bugs and problems but make no guarantees and accept no liabilities for the same. If
bugs are found then either fix them and share the code back to the OpenLabyrinth community or
make a request for a fix to the community.
As for user support there ain’t none – ‘they’ are ‘us’. OpenLabyrinth community members will
generally help each other work through problems but only inasmuch as they have the ability and
time to do so. As with any community it takes all members to work together to make the system
stronger and better. Suggestions and ideas for new developments should also be circulated to
the community.
OpenLabyrinth is licensed under the Academic Free License (AFL) v. 3.0 – see appendix 2.
References
Begg, M., Dewhurst, D. and MacLeod, H. (2005). "Game Informed Learning: Applying computer
game processes to Higher Education." Innovate 1(6).
Begg, M., Ellaway, R., Dewhurst, D. and Macleod, H. (2007). "Transforming Professional
Healthcare Narratives into Structured Game-Informed-Learning Activities." Innovate 3(6).
Ellaway, R. (2004). "Modeling Virtual Patients and Virtual Cases." MELD.
http://meld.medbiq.org/primers/virtual_patients_cases_ellaway.htm
Ellaway, R. (2007). Discipline Based Designs for Learning: The Example of Professional and
Vocational Education. Design for Learning: rethinking pedagogy for the digital age. Beetham, H.
and Sharpe, R., Routledge: pp153-165.
Fischer M., Kopp V, Holzer M, Ruderich F, Jünger J (2005) “A modified electronic key feature
examination for undergraduate medical students: validation threats and opportunities” Medical
Teacher, Volume 27, Issue 5, 2005, Pages 450 – 4
Page 49 of 57
OpenLabyrinth User Guide v2.4
Appendix 1: Installation
OpenLabyrinth is a web application written using Active Server Page (ASP) code written in
VBScript. To run it needs to be running in Internet Information Services (IIS), which is part of
Microsoft server platform (as well as Windows XP/Vista for single users). OpenLabyrinth also
requires a database joining the code and the database using an ODBC connector. The most
suitable database is MS SQL Server (the Express edition is available for free). Note that the
setup requires a certain amount of technical experience in using server properties of Windows
platform.
Preparation
Provide one or more servers on which you will first need to install:
•
MSXML (latest version) - see
http://www.microsoft.com/downloads/results.aspx?productID=&freetext=msxml or
http://www.microsoft.com/downloads/details.aspx?FamilyID=3144b72b-b4f2-46da-b4b6c5d7485f2b42
•
Internet Information Server (IIS)
see http://www.microsoft.com/WindowsServer2003/iis/default.mspx
•
Microsoft .NET Framework v2.0 see
http://www.microsoft.com/downloads/details.aspx?FamilyID=0856eacb-4362-4b0d-8eddaab15c5e04f5&displaylang=en
•
SQL Express 2005 (with Advanced Services) or equivalent ODBC-compliant database
see http://www.microsoft.com/sql/editions/express/default.mspx
•
XZip see http://xstandard.com/en/downloads/?product=zip
Code and Directory
•
Downloadthe OpenLabyrinth package from http://sourceforge.net/projects/openlabyrinth/
and unzip its contents.
•
Copy the contents of the ‘code’ directory from the unzipped OpenLabyrinth package to a
new directory in the ‘wwwroot’ (or equivalent) directory. Depending on the setup of your
IIS instance this will either be a subdirectory of the default website or will need to be set
up as a new website:
o
If OpenLabyrinth is part of the default website (or other existing website) then
open IIS, right click the default (or other) website, select the ‘documents’ tab and
add ‘index.asp’ as a default document if it isn’t currently in the list.
o
If OpenLabyrinth is going to be a new website then follow the usual steps – see
http://technet2.microsoft.com/windowsserver/en/technologies/featured/iis/default.
mspx
Page 50 of 57
OpenLabyrinth User Guide v2.4
Figure A1: an IIS instance of OpenLabyrinth showing it running in the default website
•
•
In the OpenLabyrinth directory edit UTILITIES.ASP to set logical paths for uploads,
imports and exports (the examples are just that, you will need to set the paths to match
your local setup):
o
filesPath is the local path to the files directory (where the images, videos etc are
stored)e.g. "C:\Inetpub\wwwroot\openlabyrinth\files\"
o
vuePath is the local path to the vue directory (where Vue imports are stored) e.g.
"C:\Inetpub\wwwroot\openlabyrinth\vue\"
o
exportPath is the local path to the export directory (where MVP package exports are
placed) e.g. "C:\Inetpub\wwwroot\openlabyrinth\export\"
o
importPath is the local path to the vue directory (where MVP package imports are
stored) e.g. "C:\Inetpub\wwwroot\openlabyrinth\import\"
o
SCORMPath is the local path to the SCORM directory (objects for MVP package
exports are stored) e.g. "C:\Inetpub\wwwroot\openlabyrinth\SCORM_objects\"
Set special permissions for uploads to 'Vue', 'export', 'import' and 'files' folders: you
should grant permissions for all factors (in advanced) everything except ‘full control’,
‘change permissions’ and ‘take ownership’. Right click the directory, select properties,
select the security tab, click on the IUSR account to select it, click advanced and click
edit – check all the permissions except for ‘full control’, ‘change permissions’ and ‘take
ownership’.
Page 51 of 57
OpenLabyrinth User Guide v2.4
Figure A2: setting the directory permissions
You have now put the code part of OpenLabyrinth in place. The next step is to set up the
database.
Database Setup
You installed SQL Server 2005 Express or ensured you had an ODBC SQL database available
as part of the preparation step. Note that there are many factors that may change the nature of
the following tasks – you should consult a database administrator for help if you get stuck.
Once the database is available:
•
Add a new database called 'OpenLabyrinth'. In SQL Server right click Databases and
select add database.
•
Run query OPENLABYRINTH_TABLES.SQL to create the tables and views.
•
Run the query OPENLABYRINTH_SPROCS.SQL to create stored procedures. Note that
this needs to be done one procedure at a time.
•
Open the ODBC Control Panel (Control Panels, Administrative Tools) and add
‘OpenLabyrinth’ as a System Data Source Name (DSN).
•
Add the local IUSR account to the database as a user
•
Set permissions for IUSR for all stored procedures, views and tables – this will vary
depending on the database setup.
•
Manually add yourself as a user to the database table USERS.
•
Launch a web browser and browse to the OpenLabyrinth site – typically if you are
running on a local computer and have placed the OpenLabyrinth directory in the website
root then the URL will be http://localhost/openlabyrinth/.
Page 52 of 57
OpenLabyrinth User Guide v2.4
•
Log in using the account you manually added to the USERS table.
•
Run the script onetimesetup.asp to populate the database defaults.
Once you have completed these steps that should be OpenLabyrinth all ready to go!
Page 53 of 57
OpenLabyrinth User Guide v2.4
Appendix 2: Academic Free License ("AFL") v. 3.0
This Academic Free License (the "License") applies to any original work of authorship (the
"Original Work") whose owner (the "Licensor") has placed the following licensing notice adjacent
to the copyright notice for the Original Work:
Licensed under the Academic Free License version 3.0
Grant of Copyright License.
Licensor grants You a worldwide, royalty-free, non-exclusive, sublicensable license, for the
duration of the copyright, to do the following:
•
to reproduce the Original Work in copies, either alone or as part of a collective work;
•
to translate, adapt, alter, transform, modify, or arrange the Original Work, thereby
creating derivative works ("Derivative Works") based upon the Original Work;
•
to distribute or communicate copies of the Original Work and Derivative Works to the
public, under any license of your choice that does not contradict the terms and
conditions, including Licensor’s reserved rights and remedies, in this Academic Free
License;
•
to perform the Original Work publicly; and
•
to display the Original Work publicly.
Grant of Patent License.
Licensor grants You a worldwide, royalty-free, non-exclusive, sublicensable license, under patent
claims owned or controlled by the Licensor that are embodied in the Original Work as furnished
by the Licensor, for the duration of the patents, to make, use, sell, offer for sale, have made, and
import the Original Work and Derivative Works.
Grant of Source Code License.
The term "Source Code" means the preferred form of the Original Work for making modifications
to it and all available documentation describing how to modify the Original Work. Licensor agrees
to provide a machine-readable copy of the Source Code of the Original Work along with each
copy of the Original Work that Licensor distributes. Licensor reserves the right to satisfy this
obligation by placing a machine-readable copy of the Source Code in an information repository
reasonably calculated to permit inexpensive and convenient access by You for as long as
Licensor continues to distribute the Original Work.
Exclusions From License Grant.
Neither the names of Licensor, nor the names of any contributors to the Original Work, nor any of
their trademarks or service marks, may be used to endorse or promote products derived from this
Original Work without express prior permission of the Licensor. Except as expressly stated
herein, nothing in this License grants any license to Licensor’s trademarks, copyrights, patents,
trade secrets or any other intellectual property. No patent license is granted to make, use, sell,
offer for sale, have made, or import embodiments of any patent claims other than the licensed
claims defined in Section 2. No license is granted to the trademarks of Licensor even if such
Page 54 of 57
OpenLabyrinth User Guide v2.4
marks are included in the Original Work. Nothing in this License shall be interpreted to prohibit
Licensor from licensing under terms different from this License any Original Work that Licensor
otherwise would have a right to license.
External Deployment.
The term "External Deployment" means the use, distribution, or communication of the Original
Work or Derivative Works in any way such that the Original Work or Derivative Works may be
used by anyone other than You, whether those works are distributed or communicated to those
persons or made available as an application intended for use over a network. As an express
condition for the grants of license hereunder, You must treat any External Deployment by You of
the Original Work or a Derivative Work as a distribution under section 1(c).
Attribution Rights.
You must retain, in the Source Code of any Derivative Works that You create, all copyright,
patent, or trademark notices from the Source Code of the Original Work, as well as any notices of
licensing and any descriptive text identified therein as an "Attribution Notice." You must cause the
Source Code for any Derivative Works that You create to carry a prominent Attribution Notice
reasonably calculated to inform recipients that You have modified the Original Work.
Warranty of Provenance and Disclaimer of Warranty.
Licensor warrants that the copyright in and to the Original Work and the patent rights granted
herein by Licensor are owned by the Licensor or are sublicensed to You under the terms of this
License with the permission of the contributor(s) of those copyrights and patent rights. Except as
expressly stated in the immediately preceding sentence, the Original Work is provided under this
License on an "AS IS" BASIS and WITHOUT WARRANTY, either express or implied, including,
without limitation, the warranties of non-infringement, merchantability or fitness for a particular
purpose. THE ENTIRE RISK AS TO THE QUALITY OF THE ORIGINAL WORK IS WITH YOU.
This DISCLAIMER OF WARRANTY constitutes an essential part of this License. No license to
the Original Work is granted by this License except under this disclaimer.
Limitation of Liability.
Under no circumstances and under no legal theory, whether in tort (including negligence),
contract, or otherwise, shall the Licensor be liable to anyone for any indirect, special, incidental,
or consequential damages of any character arising as a result of this License or the use of the
Original Work including, without limitation, damages for loss of goodwill, work stoppage, computer
failure or malfunction, or any and all other commercial damages or losses. This limitation of
liability shall not apply to the extent applicable law prohibits such limitation.
Acceptance and Termination.
If, at any time, You expressly assented to this License, that assent indicates your clear and
irrevocable acceptance of this License and all of its terms and conditions. If You distribute or
communicate copies of the Original Work or a Derivative Work, You must make a reasonable
effort under the circumstances to obtain the express assent of recipients to the terms of this
License. This License conditions your rights to undertake the activities listed in Section 1,
including your right to create Derivative Works based upon the Original Work, and doing so
without honoring these terms and conditions is prohibited by copyright law and international
treaty. Nothing in this License is intended to affect copyright exceptions and limitations (including
“fair use” or “fair dealing”). This License shall terminate immediately and You may no longer
Page 55 of 57
OpenLabyrinth User Guide v2.4
exercise any of the rights granted to You by this License upon your failure to honor the conditions
in Section 1(c).
Termination for Patent Action.
This License shall terminate automatically and You may no longer exercise any of the rights
granted to You by this License as of the date You commence an action, including a cross-claim or
counterclaim, against Licensor or any licensee alleging that the Original Work infringes a patent.
This termination provision shall not apply for an action alleging patent infringement by
combinations of the Original Work with other software or hardware.
Jurisdiction, Venue and Governing Law.
Any action or suit relating to this License may be brought only in the courts of a jurisdiction
wherein the Licensor resides or in which Licensor conducts its primary business, and under the
laws of that jurisdiction excluding its conflict-of-law provisions. The application of the United
Nations Convention on Contracts for the International Sale of Goods is expressly excluded. Any
use of the Original Work outside the scope of this License or after its termination shall be subject
to the requirements and penalties of copyright or patent law in the appropriate jurisdiction. This
section shall survive the termination of this License.
Attorneys’ Fees.
In any action to enforce the terms of this License or seeking damages relating thereto, the
prevailing party shall be entitled to recover its costs and expenses, including, without limitation,
reasonable attorneys' fees and costs incurred in connection with such action, including any
appeal of such action. This section shall survive the termination of this License.
Miscellaneous.
If any provision of this License is held to be unenforceable, such provision shall be reformed only
to the extent necessary to make it enforceable.
Definition of "You" in This License.
"You" throughout this License, whether in upper or lower case, means an individual or a legal
entity exercising rights under, and complying with all of the terms of, this License. For legal
entities, "You" includes any entity that controls, is controlled by, or is under common control with
you. For purposes of this definition, "control" means (i) the power, direct or indirect, to cause the
direction or management of such entity, whether by contract or otherwise, or (ii) ownership of fifty
percent (50%) or more of the outstanding shares, or (iii) beneficial ownership of such entity.
Right to Use. You may use the Original Work in all ways not otherwise restricted or conditioned
by this License or by law, and Licensor promises not to interfere with or be responsible for such
uses by You.
Modification of This License.
This License is Copyright © 2005 Lawrence Rosen. Permission is granted to copy, distribute, or
communicate this License without modification. Nothing in this License permits You to modify this
Page 56 of 57
OpenLabyrinth User Guide v2.4
License as applied to the Original Work or to Derivative Works. However, You may modify the
text of this License and copy, distribute or communicate your modified version (the "Modified
License") and apply it to other original works of authorship subject to the following conditions:
(i)
You may not indicate in any way that your Modified License is the "Academic Free
License" or "AFL" and you may not use those names in the name of your Modified
License;
(ii)
You must replace the notice specified in the first paragraph above with the notice
"Licensed under <insert your license name here>" or with a notice of your own that is
not confusingly similar to the notice in this License; and
(iii)
You may not claim that your original works are open source software unless your
Modified License has been approved by Open Source Initiative (OSI) and You
comply with its license review and certification process.
Page 57 of 57