1
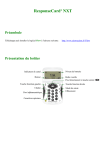
XR ResponseCard RF
User’s Guide
PRODUCT SPECIFICATIONS:
EDITING USER DATA:
Enclosure
• Lightweight, compact, card format
• Dimensions: 4.0”L x 2.5”W x 0.75”H
• Weight: 2.0 oz (with batteries)
• Angled LCD screen for optimum viewing
• Durable, rugged case ensures maximum
longevity under extreme conditions
1. Press MENU
2. Highlight “SETUP” (Use the YES button for down and the NO
button for up.)
3. Press ENTER
4. Highlight “User Data” from the sub-menu
5. Press ENTER
6. Select “2” to Edit User Data
7. Press “1” to edit your First Name
Your screen will display the following:
Enter First Name
FGHIJKLMNOPQRSTU
<
32 Left
7. To choose a letter use the 1/A button to scroll left and the 3/C
button to scroll right. While the cursor is on the letter you’d like to use press
the SEL button.
8. Your choice will appear on the next line in front of the < and the number left
will decrease by 1 each time.
9. Press ENTER when you are finished
Your screen will look like this:
First Name
User Input
• 20 Key (1(A) - 10(J)), Answer Mode, Go
To, Enter, Yes, No, Menu, Select, Clear,
+/-, .(decimal)
Display
• Easy to read LCD Display
• Dimensions: 50mm x 20mm viewable
area
• Display Features: Channel Number,
Battery Life Indicator, Answer Choice,
Response Confirmation
Power & Power Management
• Powered by two AAA batteries
• Average battery life is 6 to 12 months
10.
11.
12.
13.
14.
Send Now?
(Y/N)
Press the NO button on your ResponseCard
Select “2” to edit your Last Name
Repeat steps 7 through 9
Select “3” to edit your User ID
Repeat steps 7 through 9
SENDING USER DATA:
SENDING RESPONSES IN PRESENTATION MODE:
1.
2.
3.
4.
*To be used during a live presentation when the speaker wants immediate
feedback from the audience.
Press MENU
Highlight “SEND USER DATA”
Press ENTER
The next screen will show you which
channel the ResponseCard is programmed
to. If this is the correct channel press
ENTER. If you need to enter a different
channel number use the numeric keys to
enter your channel.
5. Press ENTER when the correct channel
number is entered.
6. Your screen will show
Channel Changed
1. Press MENU
2. Highlight “Presentation” (Use the YES button for down and the NO button
for up.)
3. Press ENTER
4. Your screen will display the following:
Presentation
Mode
Channel Number
5. Press the button on the ResponseCard that corresponds to your answer choice
6. Your answer can be verified on your screen after you make your selection.
Your Answer:
Receiver Found
7. After the ResponseCard finds
your channel the screen will
display:
User Data
Send Successful.
1/A
7. The checkmark will appear on the right-hand side of your screen confirming
your answer was received.
*If you receive a message stating:
Not accepting answers!
This means that polling was closed and you may not have answered the
question. If you sent a successful answer before polling closed, then
TurningPoint will accept the last successfully
transmitted answer.
CREATING A TEST/HOMEWORK ASSESSMENT:
EDITING A TEST/HOMEWORK ASSESSMENT:
1. Press MENU
2. Highlight “Test/Homework” (Use the YES button for down and
the NO button for up.)
3. Press ENTER
4. Press ‘1’ for New Session
5. You will now be prompted to enter your Control Number:
Enter Control #:
VWXYZ 0123456789
<
*You can not edit a test if the control number starts with “1.”
6. Press ENTER once you’ve entered the control number
7. The ResponseCard will prompt you to verify you’ve entered the
correct information.
Control Code:
012
Is This Correct?
(Y/N)
8. Select YES
9. You are now in the Test/Homework screen
Question: 001
10. Enter the corresponding answer to the test/homework
questions. You will receive confirmation that the answer is
being stored.
11. Repeat step 10 until all of the questions are answered. The
maximum number of answers that can be stored is 100.
12. Press MENU when you have completed the assessment.
13. You will be prompted to leave Test Mode. Choose YES or NO
14. You then have the following options
Save/Send Test?
1-Send
2-Save
3-Delete
15. Select 2 to save the assessment and transmit at a later time
1. Press MENU
2. Highlight “Test/Homework” (Use the YES button for
down and the NO button for up.)
3. Press ENTER
4. Press 2 for “Manage Session”
5. Use the YES button to scroll down to select your test
*You can not edit a test if the control number starts
with “1.”
6. Press ENTER when the test you want to edit is
highlighted
7. Press 3 to “Edit Session”
8. You can now use the YES and NO buttons to scroll
through your test. You could also use the “Go To” button
on the ResponseCard that looks like a pencil.
A. Press the “Go To” button
B. Enter the 3-digit question number
Ex. 004
9. To change the answer for the question you selected,
press a button on the ResponseCard that corresponds
to your new answer choice
10. Once all of your changes are made press MENU
11. You will be prompted to leave Test Mode. Choose
YES or NO
12. You then have the following options
Save/Send Test?
1-Send
2-Save
3-Delete
13. Select 2 to save the assessment and transmit at a
later time
*To submit the test immediately Press 1 to send to the host
computer.
*To submit the assessment immediately Press 1 to send to the host
computer.
SUBMITTING A SAVED TEST/HOMEWORK ASSESSMENT:
CHANGE CHANNEL:
1. Press MENU
2. Highlight “Test/Homework” (Use the YES button for
down and the NO button for up.)
3. Press ENTER
4. Press 2 for “Manage Session”
5. Use the YES button to scroll down to select your test
6. Press ENTER when the test you want to edit is
highlighted
7. Press 1 to Send Session
8. You will receive confirmation that your test has been
submitted
1. Press MENU
2. Highlight “Change Channel” (Use the YES button for
down and the NO button for up.)
3. Press ENTER
4. The next screen will show you which
channel the ResponseCard is programmed to. Use
the numeric keys to enter your channel.
5. Press ENTER when the correct channel number is
entered.
6. Your screen will show
Channel Changed
Receiver Found
7. You will then automatically be taken into Presentation
Mode
THE SETUP MENU:
Under the Setup Menu you have four options:
User Data
Contrast
Battery
Version
User Data—From this sub-menu you can View, Edit and
Send User Information.
Contrast—From this sub-menu you can adjust the
Contrast, using the YES button for a lighter screen and
the NO button to make your screen darker.
Battery—From this sub-menu you can see how much battery life remains.
Version—From this sub-menu you can see which version
of the XR ResponseCard Firmware you currently have
loaded.