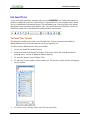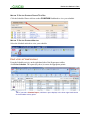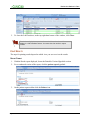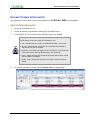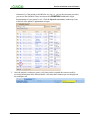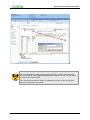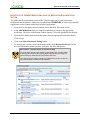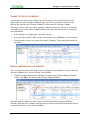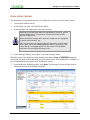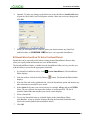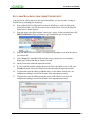
1
eCLINICIAN – EMR User Guide The contents of this User Guide reflect version 2012. Updated: 10 February 2015 Table of Contents WELCOME 12 A Message from Dr. Tim Graham ........................................................................ 12 INTRODUCTION 14 Using this Guide ............................................................................................ 14 Additional Resources ....................................................................................... 15 eCLINICIAN FUNDAMENTALS 16 Access eCLINICIAN .......................................................................................... 17 Log in to Citrix .......................................................................................... 17 Log in to Hyperspace .................................................................................. 18 Log out of Hyperspace ................................................................................. 19 Review Parts of Hyperspace .............................................................................. 20 The Dashboard .......................................................................................... 20 Title Bar .................................................................................................. 20 Epic Button .............................................................................................. 21 Hyperspace Toolbar .................................................................................... 21 Home Activity Mini-Tabs .............................................................................. 22 Workspaces .............................................................................................. 22 Activities ................................................................................................. 23 More Activities Menu ................................................................................... 23 Widescreen Feature .................................................................................... 24 Navigation Buttons ..................................................................................... 26 Navigators ............................................................................................... 26 Keyboard Navigation Reference ..................................................................... 28 Choose Values from Lists .............................................................................. 29 Use SmartTools ............................................................................................. 30 The SmartTool Toolbar ................................................................................ 30 Work with SmartLinks.................................................................................. 31 Work with SmartPhrases .............................................................................. 33 View a List of Available SmartLinks and SmartPhrases .......................................... 33 Work with SmartText .................................................................................. 36 Work with SmartLists .................................................................................. 37 Create Personal SmartPhrases ....................................................................... 38 Page 2 eCLINICIAN – Electronic Medical Record REVIEW THE PATIENT’S CHART 40 View Your Daily Schedule ................................................................................. 41 Access your Schedule .................................................................................. 42 Print a Copy of Your Schedule ....................................................................... 43 Review Chart Modes........................................................................................ 44 Open a Scheduled Patient’s Chart in Review Mode .............................................. 45 Open a Patient’s Chart When the Patient Is Not Scheduled .................................... 46 Break the Glass for Masked Patients .................................................................... 48 Break the Glass ......................................................................................... 48 Break the Glass Exceptions ........................................................................... 49 Review Basic Patient Information ....................................................................... 50 Review the Snapshot ................................................................................... 50 Review the Patient Header ........................................................................... 51 Review the Chart Review Activity ................................................................... 52 Clinical Data Available in eCLINICIAN.............................................................. 53 Clinical Data NOT Available in eCLINICIAN ....................................................... 55 View Past Visit Information ........................................................................... 56 View Lab Results in Report Format.................................................................. 58 View Lab Results in Flowsheet Format ............................................................. 58 Print Results ............................................................................................. 59 Filter Results ............................................................................................ 60 View Laboratory Results............................................................................... 61 Additional Information on Diagnostic Imaging Results ........................................... 62 View Lab Result using the Results Review Activity ............................................... 64 Review the Patient’s Medical Problems ............................................................ 65 Review the Medications Activity ..................................................................... 66 Review Information using the Flowsheet Activity ................................................ 66 REVIEW INFORMATION WITH THE PATIENT 69 Document Scheduled Encounters ........................................................................ 70 Open the Patient Encounter .......................................................................... 70 Review and Document Initial Details for the Visit .................................................... 73 Reason for Visit ......................................................................................... 73 Record Patient Vitals .................................................................................. 74 Review and Update Substance, Medical and Surgical History .................................. 75 Review and Update Family History .................................................................. 77 Review Allergies ........................................................................................ 82 Page 3 eCLINICIAN – Electronic Medical Record Update Allergies ........................................................................................ 83 Document that a Patient has no Allergies ......................................................... 84 Review and Update the Current Medication List...................................................... 86 Comparison of Functionality Between Medication Areas ........................................ 87 Review Current Medications using the Medication Documentation Section.................. 88 Update List of Current Medications using the Medication Documentation Section ......... 89 Review and Update Medication List from the Medications & Orders Section ................ 90 Update Medication Details for a Current or Expired Medication ............................... 92 Document Assessments .................................................................................... 93 Use Documentation Flowsheets ...................................................................... 93 Print a Documentation Flowsheet ................................................................... 94 Document Care Teams ..................................................................................... 95 Access the Care Teams Activity...................................................................... 96 Assign a PCP Member to the Patient Care Team .................................................. 97 Assign a Non-PCP Member to The Patient Care Team ........................................... 99 View Past Updates to Patient Care Team Members ............................................ 100 Assign a Member to the Visit Treatment Team ................................................. 100 WRITE NOTES 103 Review Options for Creating Progress Notes ......................................................... 104 NoteWriter ............................................................................................. 105 SmartTools ............................................................................................. 107 Voice Recognition .................................................................................... 107 Partial Dictation ...................................................................................... 107 Write Progress Notes ..................................................................................... 108 Begin Creation of your Note ........................................................................ 108 Create Note using NoteWriter ...................................................................... 109 Create Note using SmartBlock Macros ............................................................ 112 Create Note using SmartText....................................................................... 113 Create Note using Partial Dictation ............................................................... 115 Review Additional Note Features ...................................................................... 116 Add an Image to your Progress Note .............................................................. 116 Take Over Another’s Note .......................................................................... 118 Mark your Note as Sensitive ........................................................................ 119 Bookmark your Note ................................................................................. 120 View Bookmarked Notes ............................................................................. 120 Refresh SmartLinks in your Note ................................................................... 121 Page 4 eCLINICIAN – Electronic Medical Record View a Chart Review Report with Another Activity ............................................ 122 Write a Procedure Note ................................................................................. 123 Create a Procedure Note ............................................................................ 123 RECORD VISIT DIAGNOSES, PROBLEMS AND FYIS 126 Document Visit Diagnoses ............................................................................... 127 Record Visit Diagnoses ............................................................................... 127 Manage the Patient’s Problem List .................................................................... 129 Promote a Visit Diagnosis to the Problem List .................................................. 129 Promote a Problem from the Problem List to the Visit Diagnosis ........................... 130 Post a Problem to the Patient’s Problem List ................................................... 130 Edit the Patient’s Problem List .................................................................... 132 Changing Problems in the Problem List .......................................................... 132 View Resolved Problems ............................................................................ 134 Place an Alert Flag on the Patient’s Chart ........................................................... 135 Add an FYI Flag ....................................................................................... 135 ENTER ORDERS 138 General Steps for entering an order .................................................................. 139 Work with Procedure Orders ........................................................................... 141 Enter a Standing Order .............................................................................. 141 Enter an Order For an In Clinic Test .............................................................. 142 Enter an Order For an In Clinic Procedure ....................................................... 143 Enter an Order for an Immunization .............................................................. 143 Enter an Order for a Referral ...................................................................... 144 Enter a Billing Order (Drop a Billing Code) ...................................................... 145 Correct a billing code after it is submitted ...................................................... 147 Work with Medication Orders .......................................................................... 148 Introduction To Discrete Sigs ....................................................................... 148 Place a Medication Order ........................................................................... 149 Working with the Medications Order Composer ................................................. 150 Enter an Order for a Medication not Available in eCLINICIAN ................................ 153 Custom-Built Medications & Vitamins ............................................................. 154 Order Medications with Complex Dosing ......................................................... 155 Tapering Medications ................................................................................ 157 Order a Compound Medication ..................................................................... 159 Reorder a Medication ................................................................................ 160 Discontinue a Medication ........................................................................... 162 Page 5 eCLINICIAN – Electronic Medical Record Use Order Preference Lists during an encounter ................................................... 164 Save a Lab Order to Your Personal Preference List During an Encounter .................. 166 Save a Medication Order to your Personal Preference List During an Encounter ......... 168 Enter Orders Using a Personal Preference List .................................................. 170 Associate Orders with Diagnosis ....................................................................... 171 Sign your Orders .......................................................................................... 171 Warning Messages .................................................................................... 172 Cancel a Signed Order ............................................................................... 173 Reprint Requisitions and Prescriptions within eCLINICIAN ....................................... 174 Evaluate the Reprinting Options ................................................................... 174 Open the Original Encounter ....................................................................... 174 Reprint Using the Order Review Activity – Recommended .................................... 176 Print Using the Order Entry Activity .............................................................. 177 Place Orders and Other Visit Details using a SmartSet ............................................ 180 Document a Portion of your Visit Using a SmartSet ............................................ 180 Complete Post Order Activities ........................................................................ 182 Document the Result of an In Clinic test ......................................................... 182 Document an Immunization Administration ..................................................... 183 WRAP UP THE VISIT 184 Enter Follow-Up Details and Generate Handouts ................................................... 185 Document Patient Instructions ..................................................................... 185 Speed Buttons ......................................................................................... 186 Use Clinical References ............................................................................. 186 Enter Follow-Up Details ............................................................................. 187 Print an After Visit Summary Report .............................................................. 188 Write Letters .............................................................................................. 189 Close the Encounter ..................................................................................... 190 PERFORM POST VISIT ACTIVITIES 192 Find an Encounter to Complete Charting ............................................................ 193 Addend a Closed Encounter ............................................................................ 195 Locate an Encounter to Addend ................................................................... 195 Addend an Encounter ................................................................................ 196 Correct an Encounter Opened or Charted in Error ................................................. 198 Flag a Patient as Deceased ............................................................................. 199 MANAGE YOUR WORK USING THE IN BASKET Page 6 201 eCLINICIAN – Electronic Medical Record Review In Basket Basics ................................................................................. 202 View the Status of your In Basket ................................................................. 203 Open Your In Basket ................................................................................. 204 Sort and Refresh In Basket Messages .............................................................. 204 View an In Basket Message .......................................................................... 206 Change the Status of a Message ................................................................... 207 Remove a Message from your In Basket .......................................................... 207 Search Your In Basket ................................................................................ 208 Return a Message Marked as Done to your In Basket ........................................... 209 Send an In Basket Message .......................................................................... 209 Send a Message to a Pool ........................................................................... 211 Taking Ownership of a Pool Message .............................................................. 212 Cover your Messages / Share your In Basket ......................................................... 214 Arrange for Coverage of Messages While Away ................................................. 214 Modify a Previously Entered Unavailable Time Period ......................................... 215 Delete a Previously Entered Unavailable Time Period ......................................... 215 Grant Another User Ongoing Access to Your In Basket......................................... 215 Attach to Another User's In Basket ................................................................ 216 View Another User’s In Basket ..................................................................... 217 Work with Result-Related Messages ................................................................... 218 Review Results not Currently being Sent to your In Basket ................................... 220 Review a Result Message ............................................................................ 222 Respond to a Results Message ...................................................................... 223 Respond to a Result Notes Message ............................................................... 224 Book a Follow-Up Appointment from a Result Note ............................................ 226 Place Follow-Up Orders from a Result Note ..................................................... 226 View Result Notes in the Patient’s Chart ........................................................ 228 Work with Refill Requests............................................................................... 230 Review Rx Request Messages ....................................................................... 230 Approve an Rx Request Message without Edits .................................................. 231 Approve an Rx Request with Edits ................................................................. 231 Refuse an Rx Request ................................................................................ 232 Process an Rx Response Message .................................................................. 233 Work with Messages Related to Completing your Charts .......................................... 235 Close your Open Charts and Open Encounters .................................................. 235 Work with Telephone-Related In Basket Messages ................................................. 237 Respond to Pt Call Back Messages ................................................................. 237 Page 7 eCLINICIAN – Electronic Medical Record Respond to Patient Call Messages ................................................................. 237 Process Letter-Related In Basket Messages .......................................................... 239 Work with a Letter Queue Message – No Edits Required ...................................... 239 Work with a Letter Queue Message – Edits Required........................................... 242 Route Letter Back to Physician for Review - Optional ......................................... 244 In Basket Messages as Part of the Clinical Record .................................................. 246 DOCUMENT NON SCHEDULED ENCOUNTERS 247 Create an Orders Only Encounter ..................................................................... 248 Document an Orders Only Encounter ............................................................. 248 Document a Telephone Encounter .................................................................... 249 Open a Telephone Encounter ...................................................................... 249 Document a Telephone Encounter ................................................................ 250 Document a Refill Request ............................................................................. 251 Open a Refill Encounter ............................................................................. 251 Document a Refill Encounter ....................................................................... 252 PERSONALIZE eCLINICIAN 255 Personalize Navigation and The Appearance of Various Activities .............................. 256 Personalize the Epic button ........................................................................ 256 Personalize the Hyperspace toolbar .............................................................. 257 Add Additional Reports to the Schedule Activity ............................................... 258 Personalize Activity Tabs ........................................................................... 259 Arrange Topics and Sections in Navigators....................................................... 262 Change the Appearance of the Problem List .................................................... 263 Change the Appearance of the Medications & Orders Section ............................... 264 Build Patient Lists ........................................................................................ 266 Create a Patient List ................................................................................. 266 Add Patients to a Patient List from the patient list activity.................................. 267 Add A Patient to a patient list from the patient’s Chart ...................................... 268 Review which patient lists the patient is on .................................................... 269 Create a Custom Dictionary ............................................................................ 270 From the Epic Menu .................................................................................. 270 From a SmartTool-Enabled Toolbar ............................................................... 271 Personalize Features of the Visit Navigator ......................................................... 272 Create Reason for Visit Speed Buttons ........................................................... 272 Create Follow-up Speed Buttons................................................................... 273 Customize the Appearance of the SmartTools Toolbar ........................................ 274 Page 8 eCLINICIAN – Electronic Medical Record Setting Communications Preferences ............................................................. 275 Personalize Features of the Chart Review Activity ................................................. 276 Create a Personal Chart Review Filter............................................................ 276 Create a Personal Lab Flowsheet .................................................................. 277 Modify a Personal Data Filter/Lab Flowsheet ................................................... 279 Customize Chart Review Reports .................................................................. 282 Display Media Tab Thumbnails ..................................................................... 283 Manage Personal Preference Lists Outside of Encounters ......................................... 284 Plan the Structure of your Personal Preference Lists .......................................... 285 Add an Order to your Personal Preference List ................................................. 287 Edit an Item in your Personal Preference List ................................................... 288 Remove an Item from your Personal Preference List .......................................... 289 Manage Personal Preference Lists Created Using Browser and Composer.................. 290 Manage Personal SmartPhrases ........................................................................ 294 Create a Personal SmartPhrase – During an Encounter ........................................ 294 Edit a Personal SmartPhrase – During an Encounter ............................................ 295 Change a System SmartPhrase into a Personal SmartPhrase – During an Encounter ..... 296 Edit a Personal SmartPhrase - Outside of an Encounter ....................................... 296 Change a System SmartPhrase into a Personal SmartPhrase - Outside of an Encounter . 297 Add a Checkbox to a Personal SmartPhrase - Microsoft Office Word 2003 .............. 299 Add a Checkbox to a Personal SmartPhrase - Microsoft Office Word 2007 .............. 300 Determine Which SmartLink To Use in Your SmartPhrase..................................... 302 Create a Personal SmartPhrase - Outside of an Encounter ................................... 304 Manage SmartBlock Macros ............................................................................. 305 Create a SmartBlock Macro from Current Progress Note ...................................... 306 Edit a SmartBlock Macro from Current Progress Note ......................................... 308 Create SmartBlock Macros – Outside of an Encounter ......................................... 309 Edit an Existing SmartBlock Macro – Outside of an Encounter................................ 310 Manage your SmartBlock Macros ................................................................... 311 Personalize Your In Basket .............................................................................. 312 Personalize Message Columns ...................................................................... 312 Create QuickActions ................................................................................. 314 APPENDICES 316 Appendix A: Frequently asked Questions ............................................................ 316 Abstraction ............................................................................................ 316 Allergies ................................................................................................ 316 Page 9 eCLINICIAN – Electronic Medical Record Billing Codes / Fee for Service / ESL (Electronic Service Log) ............................... 317 Dictation ............................................................................................... 317 Doc Flowsheets / Review Flowsheets ............................................................. 318 Drug Coverage......................................................................................... 318 Home Care Orders / Patient Care Orders ........................................................ 318 In Basket ............................................................................................... 318 Labs ..................................................................................................... 319 Results .................................................................................................. 320 Letters / Referral Letters ........................................................................... 323 Medication Documentation / Meds and Orders.................................................. 324 Medical History ....................................................................................... 326 MPS (Multi Provider Schedule) / Joint Appointment ........................................... 326 Netcare ................................................................................................. 326 Passwords .............................................................................................. 326 Preference Lists ...................................................................................... 327 Pre-Work ............................................................................................... 327 Printing: Lab Requisitions / Patient Instructions / Progress Notes / Sick Note ........... 327 Printing Issues ......................................................................................... 330 Progress Notes ........................................................................................ 331 Scanning / Importing / Hardcopy Documentation .............................................. 331 System Issues .......................................................................................... 331 Telephone Encounter / MOA Role ................................................................. 332 ULI....................................................................................................... 332 Visit Diagnosis / Reason for Visit / Chief Complaint ........................................... 333 Workflows .............................................................................................. 333 Appendix B: System SmartPhrase Examples & Naming Conventions ............................ 335 Review of Systems SmartPhrases .................................................................. 335 Physical Exam SmartPhrases........................................................................ 336 Complete Visit SmartPhrases ....................................................................... 336 Other SmartPhrases .................................................................................. 336 Appendix C: Useful SmartLinks......................................................................... 337 Appendix D: Comparison of Medication-Related SmartLinks ..................................... 343 Screenshot Examples ................................................................................ 346 Appendix E: Keyboard Shortcuts for Windows Users ............................................... 349 Appendix F: Keyboard Shortcuts for Mac Users ..................................................... 352 Appendix G: Reporting Workbench .................................................................... 356 Confidentiality of Information within the Reporting Workbench ............................ 356 Page 10 eCLINICIAN – Electronic Medical Record Access the Reporting Workbench .................................................................. 357 Overview of the My Reports Activity .............................................................. 358 My Reports tab ........................................................................................ 358 Library tab ............................................................................................. 359 Create a New Report................................................................................. 360 Create a report ....................................................................................... 360 Criteria tab ............................................................................................ 361 Appearance Tab ...................................................................................... 363 Print Layout tab ...................................................................................... 364 General tab ............................................................................................ 366 Run a Report .......................................................................................... 368 Modify an Existing Report ........................................................................... 369 Work with Report Results ........................................................................... 370 Sort results ............................................................................................ 370 Filter Results .......................................................................................... 371 Create Patient Lists from Results.................................................................. 371 Use Results to Contact Patients ................................................................... 372 Export Results ......................................................................................... 372 Print results ........................................................................................... 373 Save results ............................................................................................ 374 This guide does not contain documentation pertaining to specialty specific workflows. Please refer to the eCLINICIAN-EMR Training Documents web page for this information. Page 11 eCLINICIAN – Electronic Medical Record Welcome WELCOME A MESSAGE FROM DR. TIM GRAHAM Welcome to the eCLINICIAN - EMR User Guide! eCLINICIAN is Alberta Health Services’ branding of Epic Systems’ Epicare Ambulatory Electronic Medical Record (EMR). As of September 2012, approximately 500 physicians, nurses, nurse practitioners, pharmacists, and over 2000 administrative users are contributing health information to the eCLINICIAN database in the Edmonton zone. Using an EMR for the first time, or transitioning from one EMR to another, can be a challenge. In addition to adopting eCLINICIAN, your clinic will also go through workflow changes that are intended to make things more efficient and patient-centric in the long run. In the early days some productivity loss is inevitable with such a big transition, and we would advise you to adjust your schedule, based on the recommendations of the eCLINICIAN project team. It can take several months to become proficient in using eCLINICIAN, and while it may initially seem complicated, we have found that users appreciate the depth of capability that the product provides, in the long run. Peer support is critical during these early phases, and if you find yourself struggling, do not be afraid to ask for help. Similarly, we encourage you to help your colleagues when you are able to do so. In order to meet its clinical and strategic goals, the Edmonton Zone has also chosen Epic’s software for inpatient facilities. This will allow patient-centric data such as medications, allergies, care plans etc., to be seamlessly shared between inpatient and ambulatory environments. Epic also has modules for mobile devices (iOS and Android), and to enable remote electronic communication and delivery of health information between patients and clinicians. There will be many opportunities to leverage these and other exciting modules in the Epic suite of products, to help provide and guide clinical care transformation in the future. There is ample opportunity for you to get more involved with eCLINICIAN if you are interested. There are a number of governance committees which are chaired and led by clinicians and guide the project rollout to new clinics, govern live clinics, prioritize new features and requests for extra functionality, and oversee things such as data stewardship and research. Each clinical program should also have a clinical lead who will try to troubleshoot your questions locally and help optimize the EMR for your clinic. Above all, try to keep a sense of humour as you go through training and go-live; a little humour will go a long way on this road to optimizing patient outcomes! DR. TIM GRAHAM, SENIOR MEDICAL DIRECTOR OF CLINICAL INFORMATICS, NORTH ALBERTA HEALTH SERVICES Page 12 eCLINICIAN – Electronic Medical Record Welcome Page 13 eCLINICIAN – Electronic Medical Record Introduction INTRODUCTION eCLINICIAN - Electronic Medical Record (EMR) is Alberta Health Services’ integrated clinical system providing a single patient electronic medical record for ambulatory care. This User Guide is a supplement to the eCLINICIAN - EMR classroom training programs. It includes steps for the tasks you perform frequently, such as entering orders and writing notes. Steps that you perform less frequently are also listed in this guide. The guide is also a valuable source of tips to help you optimize your use of eCLINICIAN. USING THIS GUIDE Each topic in the guide is constructed as an independent unit. You can read the guide from start to finish or seek out a topic of interest. Features of the guide include: • Organization based on the flow of a typical visit. • TIPS highlight important information and offer suggestions to help you optimize your use of eCLINICIAN. • Personalization topics present steps to help you customize eCLINICIAN to meet your needs. • Appendices include resources that you can print and keep at your desk for easy reference. In addition to the TIPS flagged throughout this guide, look for the following indicators: Indicates additional information about the item or topic Indicates Critical Information Indicates a time saving technique Indicates a best practice for using a shared EMR Page 14 eCLINICIAN – Electronic Medical Record Introduction ADDITIONAL RESOURCES Additional eCLINICIAN - EMR training documents and resources are available online. Click the Training Materials link in the eCLINICIAN Training information box on your eCLINICIAN Home workspace. You will be taken to the Alberta Health Services Insite Training Documents page with a link to EMR documents. Alternatively, when connected to the Alberta Health Services network, you can access the Insite page directly using this link: http://insite.albertahealthservices.ca/11520.asp TIP: Be sure to check this site regularly for new and updated documents. If you have questions, comments, or suggestions about our documentation, send us an e-mail at [email protected]. We appreciate your feedback! Page 15 eCLINICIAN – Electronic Medical Record eCLINICIAN Fundamentals eCLINICIAN FUNDAMENTALS This chapter describes the general look and feel of eCLINICIAN - EMR as well as basic navigation techniques. You’ll also be introduced to an important set of documentation tools called SmartTools. The following main topics are covered in this chapter: • Access eCLINICIAN • Review Parts of Hyperspace • Use SmartTools Page 16 eCLINICIAN – Electronic Medical Record eCLINICIAN Fundamentals ACCESS eCLINICIAN The following topics show you how to access eCLINICIAN and how to log in and out of eCLINICIAN. LOG IN TO CITRIX Think of the Citrix application as being the gateway to eCLINICIAN. 1. Log on to your computer. 2. Access Citrix in one of the following two ways: • For users on the Alberta Health Services network, select Start Menu > Clinical Applications > eCLINICIAN. • For users not on the Alberta Health Services network, access Citrix via the method set up for your clinic. 3. From the Citrix Web Interface screen, type your Alberta Health Services (AHS) user name and password. Various eCLINICIAN icons display based on your user role. 4. To launch eCLINICIAN, click the eCLINICIAN PRD icon. Page 17 eCLINICIAN – Electronic Medical Record eCLINICIAN Fundamentals LOG IN TO HYPERSPACE Hyperspace is the name given to the architecture that hosts all of Epic’s applications. Epic Systems is the software vendor for eCLINICIAN. Think of Hyperspace as the face of eCLINICIAN. 5. In the User ID field in the Hyperspace login window, type your Alberta Health Services user name. 6. In the Password field, type your Alberta Health Services password. 7. Click Log In or press ENTER. The Department selection screen displays. 8. To log in, do one of the following: A. If your clinic (department) displays by default, click OK or press ENTER. B. To select a clinic other than the one that displays by default, or if no clinic is displayed, click the Selection Tool (magnifying glass). The Record Select window displays. i. Select the name of the clinic from the Recent tab. ii. If no clinics display on the Recent tab (or if the clinic you wish to log into is not on this tab), select the Search tab. • Type the name of the department starting with the site or service abbreviation (i.e. UAH, UAH KEC, RAH, GRH, AMH, CHS, etc.). • To see a list of clinics that match your search criteria, click the Selection Tool again. • Select the appropriate clinic from the list and click Accept. The Department selection screen re-displays. iii. To log into the clinic (department), click OK or press ENTER. Your eCLINICIAN Dashboard (formerly known as the Homepage) displays. Page 18 eCLINICIAN – Electronic Medical Record eCLINICIAN Fundamentals LOG OUT OF HYPERSPACE To maintain patient confidentiality, you must log out or secure your computer when you are done working or have to leave the computer for any reason. To log out of eCLINICIAN, from the Hyperspace toolbar, click . To secure your workstation, from the Hyperspace toolbar either: • Click • Next the Log Out button, click the arrow and then click Secure. , if available, or The availability of the Secure button from the Hyperspace toolbar is dependent on your user permissions. When you secure a workstation, Hyperspace remembers where you are so that you, or the next user to log in with similar EMR security, sees the same thing. When a computer has been secured, a notification message displays on the login screen, as shown below. You can also Log Out and Secure from the Epic button menu options. Page 19 eCLINICIAN – Electronic Medical Record eCLINICIAN Fundamentals REVIEW PARTS OF HYPERSPACE This section provides you with a quick review of the main Hyperspace components. THE DASHBOARD When you first log in to eCLINICIAN the eCLINICIAN Dashboard displays. The Dashboard is your Home workspace. The Dashboard displays each time you log in and is the hub for all your activities. From here you can quickly check for In Basket messages, see if patients have arrived for their appointments and access a number of useful links and etools. TITLE BAR The Title bar displays the names of the following: • Application • Department you are logged in to • Environment • The logged on user. Your user name displays as your first name and the first initial of your last name. Page 20 eCLINICIAN – Electronic Medical Record eCLINICIAN Fundamentals EPIC BUTTON In order to provide you with more working space, many of the secondary features you need are available from the Epic button. To open the Epic menu, click the Epic button or press ALT. The most recent items accessed from the Epic menu appear in the Recent section. Click the star next to one of the Recent items to mark it as a favorite. Favorites display at the top of the Epic menu for convenient access. TIP: To quickly access a specific favorite, press ALT to launch the Epic menu, and then press the number that corresponds to your favorite. In the screenshot to the left, pressing ALT+1 opens the Patient Lookup window to search for a patient’s chart to addend. HYPERSPACE TOOLBAR The Hyperspace or Main toolbar provides you with quick access to commonly used features. With the click of a button you can start a Telephone Call encounter or create an Orders Only encounter. The buttons on your Hyperspace toolbar depend on your security/permissions in eCLINICIAN. Page 21 eCLINICIAN – Electronic Medical Record eCLINICIAN Fundamentals HOME ACTIVITY MINI-TABS Each Home activity is represented by a mini-tab (and a unique icon) so that you can access it with a single click. In the screenshot below, mini-tabs are shown for the eCLINICIAN Dashboard, the In Basket and the Schedule (Multiple Provider Schedule) activities. Access a Home activity by clicking the respective mini-tab, or use CTRL+ALT+1 to access the first mini-tab, CTRL+ALT+2 to access the second mini-tab, etc. WORKSPACES In addition to the mini-tabs, the workspace tabs area can include patient workspaces or reportbased workspaces. You can have up to four workspaces open at one time. Best Practice – Close Patient Workspaces Although you can have up to four workspaces open at one time, for patient confidentiality and to prevent charting errors, it is a best practice to exit patient workspaces when you are not actively charting. You can easily return to the patient’s workspaces to complete your charting later. Page 22 eCLINICIAN – Electronic Medical Record eCLINICIAN Fundamentals ACTIVITIES An activity is a window within a workspace, or in the case of a patient workspace, part of the patient’s chart. Common activities display on the left-hand side of the patient workspace as tabs. Clicking an activity tab takes you to that activity. You can work in different activities while in a single workspace. MORE ACTIVITIES MENU Activities not found immediately in the patient workspace are accessible from the More Activities menu, located at the bottom of the activity tab list. Page 23 eCLINICIAN – Electronic Medical Record eCLINICIAN Fundamentals The More Activities menu includes workspace-specific activities that a user might not regularly access, such as FYIs, Growth Charts, and Enter/Edit Results. From here you can also add activity tabs to the default view. TIP: To learn how to customize the list of activity tabs, refer to the Personalize eCLINICIAN section. You can also use the CTRL+D keyboard combination to open the More Activities menu. WIDESCREEN FEATURE The Widescreen feature allows physicians to navigate through an office visit with minimal scrolling and clicking, by grouping navigator sections together. Your screen resolution must be at least 1280 pixels in order to access this feature. 1. To access the Widescreen view, from the bottom of the Activity tab list, select More Activities > Try Widescreen View. In the Widescreen view, navigator sections are grouped into the following activities. • Rooming contains: − Visit Information, − Vitals, − History, − Allergies and − Medication Documentation sections. • Notes contain the Progress Notes section and the various note options. Page 24 eCLINICIAN – Electronic Medical Record eCLINICIAN Fundamentals • Plan contains: − Best Practice Advisories − the Problem List − Visit Diagnoses − SmartSets − Meds & Orders sections • Wrap Up contains: − Patient Instructions − Follow-Up − After Visit Summary • SnapShot, Chart Review, Communications and Sign Visit continue to display as activity tabs. A Sidebar Report is available to enable easy access to other sections of the chart. 2. Page 25 To return to the standard view, select More Activities > Turn Off Widescreen View. eCLINICIAN – Electronic Medical Record eCLINICIAN Fundamentals NAVIGATION BUTTONS Use the Back and Forward buttons at the top of the activity tab list to move back and forth between activities. These buttons support the shortcuts ALT+left arrow and ALT+right arrow. Use the drop down arrow to the right of the Back and Forward button to display a list of the ten most recently accessed activities visited for the current patient workspace. NAVIGATORS Another example of an activity is the Visit Navigator. Each workflow can have its own navigator to lay out a path for that workflow, whether it is a telephone encounter, refill encounter or the work that is done by various clinicians during a patient encounter. There are several features of the navigator with which you should familiarize yourself. Page 26 eCLINICIAN – Electronic Medical Record eCLINICIAN Fundamentals TABLE OF CONTENTS (LEFT-HAND PANE): The navigator table of contents contains sections (e.g. Visit Info and Vitals) that are grouped into topics (e.g. Review). These sections are where you do your documentation. You can move as needed between appropriate sections. The sections in a navigator can change depending on the user’s workflow. TIP: To learn how to customize the table of contents, refer to the Personalize eCLINICIAN section. RIGHT-HAND PANE: displays the information that was previously documented in a section or in a related activity. REVIEW MODE: This is default mode for the right-hand pane of the navigator. EDIT MODE: This is the mode used for documentation. To open a section in Edit mode: • From the navigator table of contents, click the corresponding section heading. • From the right-hand pane, next to corresponding section heading, click the paper and pencil icon. • From the right-hand pane, to the far right of the corresponding section heading, click click to open. BLUE ARROW: Each section in the table of contents has a downward-pointing blue arrow which takes you to the corresponding section in the right-hand pane, in review mode. Page 27 eCLINICIAN – Electronic Medical Record eCLINICIAN Fundamentals SCROLL BAR: You can also use the scroll bar to navigate through the right-hand pane of the navigator. CLOSE BUTTON: Closes an open section and reverts the navigator back to review mode. PREVIOUS BUTTON: Closes the current section and automatically opens the previous section in edit mode. NEXT BUTTON: Closes the current section and automatically opens the next section it in edit mode. YELLOW TRIANGLE: When all navigator sections are closed, in the navigator table of contents, a yellow triangle displays. This symbol indicates the most recently opened section. KEYBOARD NAVIGATION REFERENCE Instead of using the mouse, you might prefer to navigate the system using keyboard shortcuts. Learning shortcuts can save you time because you can keep your hands on the keyboard instead of switching between the keyboard and the mouse. TIP: For a complete list of Keyboard and Date shortcuts, refer to Appendix E: Keyboard Shortcuts for Windows Users & Appendix F: Keyboard Shortcuts for Mac Users. Page 28 eCLINICIAN – Electronic Medical Record eCLINICIAN Fundamentals CHOOSE VALUES FROM LISTS Throughout this guide you will see the term completion matching. Completion matching is a term we use to describe a quick way to search for information in a list of values or pick lists. Any time you see a field with a magnifying glass, which we call the Selection Tool, you can use completion matching. Note that you can also type the full word but completion matching is faster and can eliminate errors due to misspelling. 1. Start by typing the first few letters of a word and press ENTER. The system displays a list of all the choices starting with the letters you typed. 2. Make your selection from this filtered list and press ENTER or click Accept. Page 29 eCLINICIAN – Electronic Medical Record eCLINICIAN Fundamentals USE SMARTTOOLS As you write notes and letters and enter other text in eCLINICIAN, you’ll notice that many text fields are configured for the use of SmartTools. Using SmartTools, you can pull in entire blocks of text or information with minimal typing. This information can even be specific to the patient and pulled in from elsewhere in the chart or visit. You can tell that a text field allows the use of SmartTools when you see the SmartTool-enabled toolbar, shown below. THE SMARTTOOL TOOLBAR The SmartTool toolbar comes with a set of default tools. You can customize the toolbar by adding additional tools and removing ones you do not regularly use. To add or remove additional tools from your toolbar: 1. Access any SmartTool-enabled section. 2. From the top left of the SmartTool toolbar, click on the yellow star with the downward pointing arrow. A menu of additional buttons displays. 3. To see more options, click All Other Tools. 4. To add a tool to your toolbar, click the white star. The star turns yellow and the tool appears on your toolbar. 5. To remove a tool, click the yellow star. The star turns white. Page 30 eCLINICIAN – Electronic Medical Record eCLINICIAN Fundamentals There are four types of SmartTools: SmartTool Name Description SmartLinks Pulls in information that has been charted elsewhere in the chart. For example current medical problems, allergies, and lab data. SmartPhrases Expands into a word, phrase, or paragraph of text. Often called “dot phrases” because they are invoked by typing a period (dot) followed by the SmartPhrase name. SmartPhrases are often used to pull in a portion of a progress note. SmartLists Provides a set of pre-configured values from which you select. For example, you might have access to a SmartList with symptom onset values such as acute, chronic, gradual, and sudden. SmartTexts Provides templates or blocks of text used to reduce documentation time. A SmartText often includes embedded SmartLinks and SmartLists. For example, you might use a SmartText to pull an assessment template into your progress note. WORK WITH SMARTLINKS 1. From a SmartTool-enabled text box, type a period (.) followed by the SmartLink name. For example, type .med. A pop-up box displays a list of SmartLinks that match what you typed. 2. From the List, click the desired SmartLink and then to accept it, press either: • the SPACEBAR to continue typing on the same line, or • ENTER to jump to a new line. The linked information is added to your note. Page 31 eCLINICIAN – Electronic Medical Record eCLINICIAN Fundamentals TIP 1: The blue background indicates that the information was added via a SmartLink. TIP 2: Some SmartLinks are refreshable. This means that if you add new information to the source information, you can return to the area where you used the SmartLink and click Refresh to pull in the updated information. TIP 3: To see a listing of some of the SmartLinks available, refer to Appendix C: Useful SmartLinks. Page 32 eCLINICIAN – Electronic Medical Record eCLINICIAN Fundamentals WORK WITH SMARTPHRASES 1. From a SmartTool-enabled text box, type a period (.) followed by the SmartPhrase name. For example, type .neg. A pop-up box displays a list of SmartPhrases that match what you typed. 2. From the List, click the desired SmartPhrase and then to accept it, press either: • the SPACEBAR to continue typing on the same line, or • ENTER to jump to a new line. The phrase appears in your note. TIP 3: To see a listing of some of the System SmartPhrases available, refer to Appendix B: System SmartPhrase Examples & Naming Conventions. VIEW A LIST OF AVAILABLE SMARTLINKS AND SMARTPHRASES You can use the SmartLink/Phrase Butler to search for available SmartLinks and SmartPhrases. The SmartLink/Phrase Butler may need to be added to your toolbar. To add the SmartLink/Phrase Butler: 1. Access any SmartTool-enabled section. 2. From the top left of the SmartTool toolbar, click on the yellow star with the downward pointing arrow. 3. To access the SmartLink/Phrase Butler, click on All Other Tools. 4. To the right of the SmartLink/Phrase Butler ( ) click on the white star to the right. The star turns yellow and the SmartLink/Phrase Butler tool appears on your toolbar. Page 33 eCLINICIAN – Electronic Medical Record eCLINICIAN Fundamentals Launch the Butler from any SmartTool-enabled text box by clicking the button. (List Phrases) TIP 1: You can also type .? in any SmartTool-enabled text box. Page 34 eCLINICIAN – Electronic Medical Record eCLINICIAN Fundamentals Within the SmartLink/Phrase Butler, you can: • Insert SmartLinks and SmartPhrases into SmartTool-enabled fields, • Search for specific SmartLinks and SmartPhrases using the Search field, • Mark SmartLinks and SmartPhrases as favorites, • Edit your personal SmartPhrases, • Filter by favorites and type of SmartTool. For example, a user can choose to filter out SmartLinks but not SmartPhrases, and • Sort the list of SmartLinks and SmartPhrases alphabetically, by favorite or by usage. When sorted, the SmartTools used most frequently appear at the top of the list. TIP 2: To quickly identify the most useful SmartLinks or SmartPhrases, click the star to the left of the SmartLink to mark it as a favorite. The following table describes how to use some of the features of the SmartLink/Phrase Butler. Feature Description Abbrev column Shows the text to enter after a period to summon the SmartPhrase or SmartLink. Expansion column Shows the text each SmartPhrase or SmartLink pulls in. Search Field Type a SmartLink or SmartPhrase name in the Search field and press ENTER to begin the search. The search returns matching text found in the Abbrev and Expansion columns. Full text checkbox Select the Full text checkbox to perform a full text search. A full text search not only returns matching text found in the Abbrev and Expansion columns, but also text from the description of the SmartPhrase or SmartLink. Clear filters button Click Clear filters to remove any filters selected on the Filter tab and to remove any text entered in the Search field. Edit button Click Edit to open the currently highlighted SmartPhrase. This button is enabled only for SmartPhrases that you have security to edit. Preview button Not recommended - Due to potential formatting issues, the most reliable way to preview a SmartPhrase or SmartLink is usually to insert it in the SmartToolenabled field, then remove it if the results are not as desired. Add to Text button Click Add to Text to add the selected SmartLink or SmartPhrase to the text of the SmartTool-enabled field at the current cursor position. Note that a faster alternative to clicking Add to Text is double-clicking the SmartLink or SmartPhrase. Add and Close button Use to add the selected SmartLink or SmartPhrase to the text of the SmartToolenabled field and close the SmartLinks and SmartPhrases window. Favorites Column in the SmartLink/Phrase Table Click the star symbol to add the SmartLink or SmartPhrase to your favorites, and click it again to remove it from your favorites. SmartTool Type Page 35 = SmartLink eCLINICIAN – Electronic Medical Record eCLINICIAN Fundamentals Feature Description column in the SmartLink/Phrase Table = User SmartPhrases = System SmartPhrases Note that when you hover over the symbol with your cursor, a ToolTip identifies the type of SmartTool. SmartLink/Phrase Option Drawer Click the opening (<<) or closing (>>) chevrons to open or close the SmartLink/Phrase Option Drawer. The Option Drawer contains the Filter tab options and the Sort tab options. Note that the Option Drawer opens automatically when you first open the SmartLink/Phrase Butler. Whether it is closed or opened upon subsequent uses depends on how you last left it. Filter Tab Options • Select My SmartPhrases to include user-created SmartPhrases in the SmartLinks and SmartPhrases table. • Select System SmartPhrases to include system SmartPhrases in the SmartLinks and SmartPhrases • Select SmartLinks to include SmartLinks in the SmartLinks and SmartPhrases table. • Select Favorites Only to include only your favorite SmartPhrases or SmartLinks, based on which other checkboxes are selected, in the SmartLinks and SmartPhrases table. WORK WITH SMARTTEXT 1. From a SmartTool-enabled text box, click Selection window displays. (Open Selection Entry). The SmartText TIP: You can also type the name of the SmartText directly in the Insert Smart Text field. Note that the SmartText available to you varies depending on the area of the chart you are using. 2. Select the appropriate SmartText and click Accept. Page 36 eCLINICIAN – Electronic Medical Record eCLINICIAN Fundamentals The SmartText displays in the SmartTool-enabled text box. The SmartText may contain SmartLists that you have to manage. The next topic describes how to work with SmartLists. WORK WITH SMARTLISTS SmartLists are found within SmartPhrases and SmartText. They cannot be summoned on their own and users cannot create them. The following table describes how to work with SmartLists using the keyboard, mouse or both. Keyboard To open list Press F2. To make a selection: Single Response (yellow background) Navigate through list using: • Press the UP or Down arrows, or • Type the first letter of the item in the list, and then • Press ENTER to accept the selection and to move to the next SmartList. To make a selection: Multiple Response (blue background) Navigate through list using: • Press the UP or Down arrows, or • Type the first letter of the item in the list, • To select the item and move to next selection, press the SPACEBAR. • When all selections are complete, press ENTER to accept the selection and to move to the next SmartList. To accept the default selections Page 37 Press ENTER to accept the defaults and move to the next SmartList. eCLINICIAN – Electronic Medical Record eCLINICIAN Fundamentals Mouse To open list • Click in the note anywhere before the first list and then click Next Field (right pointing yellow arrow button), or • Right-click and select Next Field. To make selections: Singleand Multiple-Response “Left-click to pick, right-click to stick”: • Left-click the item(s) to select, then • Right-click to accept and continue. Accept default selections Right-click to accept default selections. Combination: Keyboard and Mouse Press F2 to open the list “Left-click to pick, right-click to stick” and move on. TIP: To ensure that you have completed all of the SmartLists in your note, press F2 one more time to locate any missing lists. Incomplete SmartLists The system cannot close encounters if SmartLists are left unfinished. You must make a selection for each SmartList within SmartText. CREATE PERSONAL SMARTPHRASES There are two types of SmartPhrases: • • System SmartPhrases are created by Epic or the eCLINICIAN - EMR project team to serve the needs of all users. User or personal SmartPhrases are created by end-users. Building your own personal SmartPhrases takes very little time and can drastically speed up your workflow. Refer to the Manage Personal SmartPhrases section. Page 38 eCLINICIAN – Electronic Medical Record eCLINICIAN Fundamentals Page 39 eCLINICIAN – Electronic Medical Record Review the Patient’s Chart REVIEW THE PATIENT’S CHART It might be your practice to review patient information shortly before seeing the patient in your office or at your clinic. This review of patient information might happen a day or two before you see the patient or even immediately before you see the patient in the exam room. Receiving new information about the patient may also require you to lookup patient information long after the patient’s appointment. This chapter details the various eCLINICIAN features that assist you with locating the patient’s chart and reviewing the pertinent information. The following main topics are covered in this chapter: • View your Daily Schedule • Review Chart Modes • Find a Patient’s Chart when the Patient is not Scheduled • Break the Glass for Masked Patients • Review Basic Patient Information Page 40 eCLINICIAN – Electronic Medical Record Review the Patient’s Chart VIEW YOUR DAILY SCHEDULE The Schedule activity is also known as the Multi Provider Schedule (MPS). From the Schedule activity, you can view daily appointment schedules for yourself and for any combination of providers and resources within your department. It is the hub that helps you manage both the patients and the health care providers that patients are scheduled to see during the course of a day. It also gives you quick access to a patient’s workspace where you can review the chart, document findings, place orders, and much more. Features of the Schedule activity include the following: CALENDAR: View appointments scheduled for past and future dates using the calendar. TIP 1: Use date shortcuts in the date field to navigate through the calendar, where t=today, w=week, m=month and y=year. E.g. an end date of 6 weeks from now can be entered as w+6. DEPT. FIELD: Select the department (clinic/specialty) you want to view. The first time you open the schedule, your login department displays automatically. PROVIDER SCHEDULES: With appropriate security access, you can choose to display the schedules of other providers within a particular department. Page 41 eCLINICIAN – Electronic Medical Record Review the Patient’s Chart DAILY SCHEDULE: Shows the appointments for a particular provider with various columns. Appointments may be sorted by time, patient name, visit type, etc. You can change the display of your schedule, create new views of your schedule and add additional reports to the Schedule activity. You can also create combined schedules, across multiple departments or providers TIP 2: For details on how to customize the Schedule activity, refer to the Personalize eCLINICIAN section. ACTIVITY TOOLBAR: Contains buttons that allow you to perform actions specific to the Schedule activity, and for whichever patient is selected in the schedule. REPORT TOOLBAR: You can view various reports from this toolbar, using the Report field, or available buttons. These reports display below the toolbar. The default report is the Snapshot. TIP 3: For details on how to add reports to the Report toolbar, refer to the Personalize eCLINICIAN section. ACCESS YOUR SCHEDULE If patients are scheduled to see you today, there are several methods you can use to view your schedule. METHOD 1: USE THE SCHEDULE GLANCE SECTION If you are the provider that patients have been scheduled to see, you can use the Schedule Glance section on the eCLINICIAN Dashboard to view your schedule. Page 42 eCLINICIAN – Electronic Medical Record Review the Patient’s Chart METHOD 2: USE THE SCHEDULE GLANCE TITLE BAR Click the Schedule Glance title bar on the eCLINICIAN Dashboard to view your schedule. METHOD 3: USE THE SCHEDULE MINI-TAB Select the Schedule mini-tab to view your schedule. PRINT A COPY OF YOUR SCHEDULE From the Schedule activity, on the right-hand side of the Hyperspace toolbar, click Print>Schedule. The report (day sheet) is sent to the appropriate printer. TIP: If you select Schedule Report, whichever report displays in the lower right-hand section of the Schedule activity prints. Page 43 eCLINICIAN – Electronic Medical Record Review the Patient’s Chart REVIEW CHART MODES You can open a patient’s record in eCLINICIAN in one of two ways: • Review mode (chart) mode – used to review information about the patient when the patient is not scheduled or prior to a scheduled appointment when the patient has not yet checked in. This mode is indicated by a chart icon. • Documentation (encounter) mode – used to document information about the patient. This mode is indicated by a stethoscope icon. Importance of Opening the Chart in the Correct Mode It is very important that you do not open a patient’s record in documentation mode until they have checked in for their appointment. Each time you open a patient’s record in documentation mode, eCLINICIAN - EMR creates an encounter report which can be seen on the Encounter tab in the Chart Review activity. If a patient does not show for their appointment and you opened their chart in documentation mode in advance of their appointment, a blank Encounter report is filed to the Chart Review activity. These blank Encounter reports take up system resources and can be confusing to other users. Page 44 eCLINICIAN – Electronic Medical Record Review the Patient’s Chart OPEN A SCHEDULED PATIENT’S CHART IN REVIEW MODE A patient’s chart can be opened in Review mode either from the Schedule activity or from the Schedule Glance section of the eCLINICIAN Dashboard. The latter method can be used only if the patient has been scheduled to see you. METHOD 1: FROM THE SCHEDULE ACTIVITY 1. Access the Schedule activity. 2. From the schedule (upper right-hand pane), select the patient whose history you want to review. From the Schedule activity toolbar, click Chart. The patient’s workspace displays. METHOD 2: FROM THE DASHBOARD SCHEDULE GLANCE 1. From the eCLINICIAN Dashboard, locate the Schedule Glance section. 2. Locate the appropriate appointment and click displays. Page 45 . The patient’s workspace (chart) eCLINICIAN – Electronic Medical Record Review the Patient’s Chart OPEN A PATIENT’S CHART WHEN THE PATIENT IS NOT SCHEDULED 1. From the Hyperspace (main) toolbar, click Chart. The Patient Lookup window opens displaying the AHS Lookup Tab. Search criteria entered on the AHS Lookup tab make it possible to search a database of all patients who have received medical treatment in Alberta and/or have Alberta Health Care. This database, the AHS Client Registry, has over sixteen million names and is used by other applications including Netcare, VAX and Tandem. 2. From the Patient Lookup window, search for the patient using one of following two methods: METHOD 1: RECOMMENDED PATIENT LOOKUP It is important to follow the recommended patient lookup in order to select the correct patient when reviewing or documenting in the chart. From the AHS Lookup Tab, enter the patient’s full last name, full first name and the date of birth to ensure the correct patient is being selected. a) Enter the patient’s full Last Name and full First Name in to the appropriate fields. b) In the DOB field, type the patient’s date of birth. c) Click Find Patient. The Patient Select window displays. e) Select your patient and click Accept. The patient’s workspace displays. Page 46 eCLINICIAN – Electronic Medical Record Review the Patient’s Chart Importance of Selecting the Correct Patient Record For Non-Hospital Clinics: Your search may return multiple records that all belong to the same patient. Select the correct record based on the ULI. For Hospital Clinics: Your search may return multiple records that all belong to the same patient. Select the correct record based on the MRN, if it exists. Failure to do this results in an additional MRN being created in your ADT system (VAX or Tandem) when an MRN for your facility may already be assigned to the patient, if you subsequently schedule an appointment. Note: When multiple records for the same patient exist, a Patient Data Inquiry In Basket message should be created. A Patient Data Inquiry message is sent to the appropriate team and partial or duplicate records are reconciled. METHOD 2: USE THE RECENT PATIENTS TAB. The Recent Patients tab displays the last 25 patients that you looked up. The patients display in order of selection, with the most recently selected patient first. a) Select the Recent Patients tab and locate your patient’s record. b) Click on the selected patient’s name. The patient’s workspace opens. Page 47 eCLINICIAN – Electronic Medical Record Review the Patient’s Chart BREAK THE GLASS FOR MASKED PATIENTS Masking is the process by which a cover or mask can be applied to the record of a patient who expresses significant concern about his or her data being in an electronic file. The role of the clinician is to counsel patients who seek this added confidentiality on their information, and to have the patient complete and sign the necessary forms, and to submit these forms to a central location. This process is further described in the Global Masking of a Patient’s Record in eCLINICIAN Self Learning document. Once a mask is applied, physicians and staff who need to access the record in order to provide care must lift the mask or break the glass. The mask is set in the AHS Client Registry (formerly called the Enterprise Master Person Index, or EMPI) and applies only to eCLINICIAN and to Alberta Netcare. BREAK THE GLASS Once a mask is set, eCLINICIAN users will see the following Break the Glass window when they try to access the record of a masked patient. To break the glass the user must select a reason and enter his or her eCLINICIAN password. Note that when a record is unmasked, the unmasking is logged electronically and is subject to daily audits. Page 48 eCLINICIAN – Electronic Medical Record Review the Patient’s Chart Once the record is unmasked the only visual indicator for the user that the record is masked appears on the Clinical Information tab of the Demographics activity. BREAK THE GLASS EXCEPTIONS Since break the glass can create inconvenience and delays when users must frequently access a record for appointment scheduling or managing a scheduled encounter, the following exceptions are built into the system. The user will not be required to break the glass when: • he/she has broken the glass in the last 7 days • he/she is the patient’s encounter provider and has an encounter scheduled with that patient in the next 15 day • he/she is the patient’s encounter provider and had an encounter scheduled with that patient in the last 15 days. Page 49 eCLINICIAN – Electronic Medical Record Review the Patient’s Chart REVIEW BASIC PATIENT INFORMATION Activities like Snapshot and Chart Review help you to quickly review significant history, current medications, allergies, documentation from past appointments as well as previous test results. REVIEW THE SNAPSHOT The Snapshot is a great way to get a quick summary of clinically relevant information about the patient. You can quickly be reminded of the patient’s basic demographics, medications, medical problems and allergies. When you think SnapShot, think hyperlinks. The data in each section is formatted as a hyperlink. Depending on what the hyperlink is for, you can click to open a report or to open a form that displays more information. The SnapShot is the default report in the lower right-hand pane of the Schedule activity. A section heading with a blue arrow after its name, such as Allergies, opens an activity where you can review additional information about that topic. The items listed in sections like Allergies or Medications are also hyperlinks. Click to view more information about each item. TIP: The SnapShot also displays as an activity in the patient’s chart as well as a report in the NoteWriter activity. Page 50 eCLINICIAN – Electronic Medical Record Review the Patient’s Chart REVIEW THE PATIENT HEADER The Patient Header displays at the top of the patient’s workspace and displays basic patient information such as name, alert flags (FYIs), MRN, date of birth, age, sex, allergies, and primary care provider (PCP). MRN, PHN/ULI: The MRN represents the active MRN for the patient based on the department you are logged to. For private family practice clinics, the patient’s PHN/ULI displays in this field ALLERGIES: For allergies, the Patient Header displays one of the following: • Unknown: Not on File (allergies have never been reviewed) • Unknown: No Active Allergies (previously documented allergies have been deleted) • No Known Allergies (patient reports no allergies) • Name of the allergies If there are more allergies than can be displayed in the allergy area of the patient header, three dots display at the end of the line. Click the link to see the complete list. FYI FLAGS: Patient FYI flags represent alert notes that are associated with a patient’s record. Page 51 eCLINICIAN – Electronic Medical Record Review the Patient’s Chart REVIEW THE CHART REVIEW ACTIVITY The Chart Review activity provides easy access to a large repository of information about the patient. TABS: This activity is made up of a series of tabs with each tab providing view-only access to specific information: • Encounters: displays past visit information • Lab: displays lab tests • Imaging: displays diagnostic imaging reports • Pt Instr/Notes: displays encounter progress notes and patient instruction notes. This tab also displays scanned Emergency Department Reports and transcriptions. To see the Progress notes, deselect Pt Instr checkbox. • Referrals: displays referral information. • Media: displays scanned documents. Keep in mind, if you scan, for example, an out of province lab report, the document is filed under the Media tab, not the Lab tab. ROWS: Each tab contains lines or rows of information. Double-click each row or line to view the details in a report. TIP: Refer to the personalization topic Customize Chart Review Reports to learn how to organize reports in a way that suits your needs. TAB TOOLBARS: Each tab in Chart Review has its own toolbar which supports viewing the information within that tab. You can access tabs that don’t fit in the toolbar by using the left/right arrows to view the far left/right tabs. PAPERCLIP ICON: If there is an attachment to an encounter, order or medication, a blue paperclip displays beside the record. To find out what the attachment is (is it a scan? a dictation?) without opening the report, right-click the paperclip and select Additional Info. Page 52 eCLINICIAN – Electronic Medical Record Review the Patient’s Chart FILTER: All Chart Review tab toolbars have a Filter button which allows you to quickly focus on only those records you wish to view. CLINICAL DATA AVAILABLE IN eCLINICIAN eCLINICIAN contains clinical data from a variety of sources primarily in the Edmonton zone. The information provided is a direct feed from the same source(s) populating Alberta NetCare. If you are seeing a patient from outside of the Edmonton zone, or you are not seeing expected results or reports for any patient in eCLINICIAN, you should refer to Netcare. The eCLINICIAN - EMR patient chart contains clinical data from the sources listed in the table below. Data Source Date Available Results Back To Name of Chart Review Activity Tab Lab Data AHS facilities • Edmonton area (All Facilities) 15 Apr 08 01 Jan 06 Lab • North zone (Northern Lights) 15 Apr 08 01 Jan 06 Lab • Provincial Lab (Edmonton zone) 01 May 08 01 May 08 Lab • Provincial Lab (Province Wide) 19 July 12 19 July 12 Lab • Newborn Metabolic Screening 01 June 08 01 June 06 Lab Cross Cancer Institute 28 Jun 10 28 Jun 10 Lab DynaLIFE (formerly DKML) collection sites Edmonton and area Central: Red Deer, Lloydminster, & Smith Clinic Camrose (where tests are performed at Dynalife Edmonton Main Lab) 15 Apr 08 01 Jan 06 Lab Feb 07 Lab Provincial Electrodiagnostics (ECG) All AHS Edmonton and area facilities 15 Apr 08 • ECG PDFs Page 53 eCLINICIAN – Electronic Medical Record Review the Patient’s Chart Data Source Date Available Results Back To Name of Chart Review Activity Tab 01 Jan 06 Notes Transcribed Reports All AHS Edmonton facilities 15 Apr 08 • Operative Report • Progress Report/Clinic Report • Discharge Summary • Home Care Summary • Consultation • History • Letter • Neurophysiology (EEGs) • Cardio diagnostic • Emergency Dept Reports (scanned) Diagnostic Imaging Text Reports All AHS Edmonton facilities (Text) 15 Apr 08 01 Jan 06 Imaging Medical Imaging Consultants (MIC) – Edmonton zone (PDF) Insight Medical Imaging (IMI) – Edmonton zone (Text) CML Healthcare – Edmonton zone (PDF) 15 Apr 08 15 Apr 08 Imaging 15 Apr 08 15 Apr 08 Imaging 15 Oct 08 15 Oct 08 Imaging 01 Jan 06 Procedures Endoworks Reports RAH and UAH sites Procedure Notes – “Colorectal Cancer Screening – CRC” exam procedure report 04 April 13 To view patient data prior to the listed dates you must to use Alberta Netcare or other paper sources. Results from sources not listed above, need to be viewed in Alberta Netcare. For information on data not available in eCLINICIAN, refer to the section: Clinical Data NOT Available in eCLINICIAN. Page 54 eCLINICIAN – Electronic Medical Record Review the Patient’s Chart CLINICAL DATA NOT AVAILABLE IN eCLINICIAN While eCLINICIAN - EMR is a shared EMR with access to clinical data from a variety of locations, it does not contain the entirety of a patient’s medical record. You must also use Alberta Netcare or paper charts to view this type of information. The eCLINICIAN - EMR patient chart DOES NOT contain clinical data from the sources listed in the table below. Lab Results • AHS -Calgary (All Facilities) • AHS - Cancer Tom Baker Centre Calgary • AHS - Central (All Facilities) • AHS - South (All Facilities) • Canadian Blood Services • HLA Lab Results Diagnostic Imaging • Amiha Diagnostic Imaging (St. Albert) • Breast Centre Radiology • Canada Diagnostic Centres (CDC) – Westgate X-Ray and Ultrasound • Cross Cancer Institute • Devon X-Ray Clinic • Dr. J.P. Mayo • Edmonton Cardiology Consultants at UAH and RAH - Echocardiograms • Glenwood Radiology • Pureform Diagnostic Imaging Clinic – includes Echocardiography (Sherwood Park) • The X-Ray Clinic at Northgate Centre • The X-Ray Clinic at 124th Street • The X-Ray Clinic at 142nd Street DI results from ALL facilities outside Edmonton and area are NOT found in eCLINICIAN. Electrodiagnostics • PDF Files: o o o Heart Diagram MAHI Stress and Holter Tests Paceart Other Results • AHS Edmonton - Tuberculin Skin Tests • Immunizations Community Clinic Page 55 eCLINICIAN – Electronic Medical Record Review the Patient’s Chart VIEW PAST VISIT INFORMATION 1. From the left-hand side of the patient’s workspace, select the Chart Review activity. 2. To review the patient’s past visits, select the Encounters tab. 3. Click the row for an encounter and view the report in the lower pane. Double-click the row to see the report in an expanded view. TIP 1: If the report does not display, right-click the selected row and select Preview. Another option is to right-click and select Display in Chart Sidebar. TIP 2: You can see Chart Review reports side-by-side. Click Side-by-Side on the tab toolbar. The Report Viewer window displays. Page 56 eCLINICIAN – Electronic Medical Record Review the Patient’s Chart Notice these features: Report History Pane Split Up/Down view Split Left/Right view (shown) Close button in the upper right corner of the window, which return you to the default view. The Default filter on the Encounters tab is set up to show you encounters related to patient interactions. These include Clinic, Office, Refill, Telephone, Orders Only and Letter encounters. Important Information about the Encounter Tab The Encounters tab also contains reports for data that does not actually involve a patient interacting with a provider. These types of reports are filtered out by the Default filter and include transcribed reports, DI Reports and Lab Reports. It is strongly recommended that you do not attempt to view this type of information by deselecting the Default filter and drilling down through reports. This type of information is best viewed by going directly to tabs such as the Lab and Notes which will be accurate and up-to-date. To view which Chart Review displays these data reports, refer to the topic Clinical Data Available in eCLINICIAN. Page 57 eCLINICIAN – Electronic Medical Record Review the Patient’s Chart VIEW LAB RESULTS IN REPORT FORMAT 1. From the left-hand side of the patient’s workspace, select the Chart Review activity. 2. Select the Lab tab. 3. Click the row for that result and view the report in the lower pane. Double-click the row to see the report in an expanded view. TIP: Abnormal results are highlighted in yellow on the Result Report. VIEW LAB RESULTS IN FLOWSHEET FORMAT 1. From the left-hand side of the patient’s workspace, select the Chart Review activity. 2. Select the Lab tab. 3. To view the lab result in flowsheet format, select the appropriate order. TIP 1: You can also select multiple orders by holding down the CTRL key as you make your selections. 4. From the toolbar, click Lab Flowsheet. The Laboratory Results window opens, displaying result components in a chart format. Page 58 eCLINICIAN – Electronic Medical Record Review the Patient’s Chart 5. To close the Lab Flowsheet, on the top right-hand corner of the window, click Close. Results that display in a narrative format should not be selected for display in a lab flowsheet format. You must view the results in report format. PRINT RESULTS The steps for printing results depend on which view you use to review the results. REPORT FORMAT 1. With the Result report displayed, locate the Printable Version Hyperlink section. 2. For a condensed version of the report, click the patient report hyperlink. 3. On the patient report toolbar click the Printer icon. Page 59 eCLINICIAN – Electronic Medical Record Review the Patient’s Chart FLOWSHEET FORMAT 1. With the Laboratory Results flowsheet displayed, click Print Flowsheet. FILTER RESULTS You can filter results to see the ones that are the most meaningful to you. 1. From the left-hand side of the patient’s workspace, select the Chart Review activity. 2. Select the Lab tab. 3. From the toolbar, click Filters. In the upper left-hand pane, a list of filter categories displays. In the right-hand pane, the results available for the patient display. 4. Select one of these categories (e.g. Test). In the lower left pane, a list of patient-specific entries belonging to that category display with checkboxes. Page 60 eCLINICIAN – Electronic Medical Record Review the Patient’s Chart 5. Select as many checkboxes as you need to refine your filter. As you make your selections, the listeof results in the right-hand pane gets smaller, displaying only those results matching your search criteria. TIP 1: You can create complex filters by selecting more than one category. For example, you can filter once on all of the tests for a particular provider and then filter again on all of their encounters where there was a particular diagnosis. Simply repeat steps 4 and 5 for each category you want to add to your filter. 6. To view the filtered lab results in report format, click Review Selected. 7. To view the filtered lab result in flowsheet format, click Lab Flowsheet. TIP 2: You can also filter using the From and To ‘date’ fields at the bottom of the Filter window. TIP 3: You can save filters for future use. Refer to the Personalize eCLINICIAN section. More on Filters • Filters display in the order that they were created. To change the order of the display you must delete the appropriate filters and recreate them in the appropriate display order. • Keep filter names short as this allows more filters to display on the filter bar. When you create more filters than can display on the bar you must click the >> button (at the end of the filter bar) to see any remaining filters. VIEW LABORATORY RESULTS One way to view laboratory results is to filter using the Procedure Category (e.g. Chemistry Orderables, Hematology Orderables, Serology Orderables). 1. From the left-hand side of the patient’s workspace, select the Chart Review activity. 2. Select the Lab tab. 3. From the toolbar, click Filters. In the upper left-hand pane, a list of filter categories displays. In the right-hand pane, the results available for the patient display. 4. Select Procedure Category. In the lower left pane, a list of entries belonging to that category display with checkboxes. 5. Select the procedure categories of interest. 6. The pane on the right-hand side displays the filtered list. Since laboratory results are sent as narrative reports they should be viewed using only the report format. 7. Select the appropriate order(s) and click Review Selected. Page 61 eCLINICIAN – Electronic Medical Record Review the Patient’s Chart ADDITIONAL INFORMATION ON DIAGNOSTIC IMAGING RESULTS ORDER CLASS: Diagnostic imaging results sent to eCLINICIAN are categorized by order class. ACCESSION # PREFIX: This is one way you can identify the diagnostic imaging source. STATUS: Diagnostic imaging results can have the following statuses: Ordered, Preliminary, Edited, Cancelled and Final Result. There may be times when the test you ordered and the test that is resulted do not have the same exam (test) name. In this case, the test you originally ordered remains listed with a status of Ordered. At the present time eCLINICIAN contains only narrative diagnostic imaging reports or PDF images of diagnostic imaging narrative reports. The diagnostic images themselves cannot be viewed. Use Alberta Netcare to review the images. Page 62 eCLINICIAN – Electronic Medical Record Review the Patient’s Chart Each order class contains results from the indicated sources: • Internal (Alberta Health Services – Edmonton zone) − RAHDI (Royal Alexandra) − UAHDI (University of Alberta) − QUADRIS − AGFA These results display as a result narrative. • External − IMI (Insight Medical Imaging) − MIC (Medical Imaging Consultants) − CML (CML Healthcare) IMI results also display as a result narrative. Results from MIC and CML are PDF images of a narrative report. To view the results click the View Image hyperlink. Page 63 eCLINICIAN – Electronic Medical Record Review the Patient’s Chart VIEW LAB RESULT USING THE RESULTS REVIEW ACTIVITY The Results Review activity is another place in eCLINICIAN - EMR where you can see a patient’s lab results. The benefit of using the Results Review activity is that you can isolate the patient’s lab results from the other information in Chart Review. 1. From the left-hand side of the patient’s workspace, select the Results Review activity. The Results Review - Date Range Wizard displays. 2. Select a date option. 3. Click Accept. The Results Review window displays showing all of the patient’s lab results since the timeframe you indicated on the Date Range Wizard. 4. To keep your Date Range Wizard selections as the default selection, click Set Default. Results Review Toolbar Ref Range button: Used to display reference ranges (the range of values considered normal for a test result) and the unit of measurement used when measuring that component. Click it again to hide this column. A different but quicker way to see a reference range is to hover your mouse over a result value. The reference range information and order number displays along the bottom of the activity. Time Mark button: Allows you to flag the results as being viewed by you at the current date and time. One of the Date Range Wizard options is to show New results since time mark last set. The next time you open the Results Review activity, eCLINICIAN - EMR will show you only the new results since the last time mark. Clicking this button also removes the italic formatting from the result values (and results are easier to read). Page 64 eCLINICIAN – Electronic Medical Record Review the Patient’s Chart REVIEW THE PATIENT’S MEDICAL PROBLEMS In eCLINICIAN - EMR, a problem is defined as a medical condition that is persistent across a number of encounters (i.e., not identified and resolved in a single ambulatory encounter). When the chart is in documentation mode, the problem list displays as a navigator section. In review mode, it displays as its own activity. The features of the activity and the section are the same. 1. Access the Problem List activity. 2. To view additional information about a problem, click the problem hyperlink. The Details and Create Overview subsections display. TIP: For information on how you can customize the display of the Problem List activity, refer to the Personalize eCLINICIAN section. Page 65 eCLINICIAN – Electronic Medical Record Review the Patient’s Chart REVIEW THE MEDICATIONS ACTIVITY When in chart mode, the Medications activity provides you with a comprehensive review of the patient’s medications. CURRENT TAB: This tab displays the medications that are prescribed as of right now. This includes medications that have a future end date as well as ones that have been marked as Long Term ( ). Medications that have been marked as Long Term remain on the Current tab even after the end date has passed. HISTORY TAB: This tab displays all of the patient’s past and current medications. FILTER: Found on the Medication activity toolbar, this button allows you to quickly narrow the search for a particular medication. LEGEND: Found on the Medication activity toolbar, this button helps you quickly determine the meaning of the various icons used in this activity. REVIEW INFORMATION USING THE FLOWSHEET ACTIVITY The Flowsheet activity can also be an important tool in helping you trend patient information. Flowsheets allow you to review data from different parts of the patient's record, such as vital signs and lab results for diseases such as diabetes. The eCLINICIAN team creates the flowsheets that display in this activity. They display as readonly information. To view a flowsheet: 1. From the left-hand side of the patient’s workspace, select the Flowsheets activity. The Flowsheet window displays a list of flowsheets applicable/designed for your speciality. TIP 1: Click the Selection tool next to the Search field to access all other available flowsheets. Page 66 eCLINICIAN – Electronic Medical Record Review the Patient’s Chart 2. Select the appropriate flowsheet form the list. 3. Click Accept. The Flowsheet report displays. 4. To add an additional flowsheet, in a blank cell under the Select Flowsheets to View area, click the Selection tool. A Record Select window displays all other available flowsheets. The additional flowsheet you choose displays below the current flowsheet. 5. To change the view to another flowsheet, in the cell currently displaying the flowsheet name, click the Selection tool. A Record Select window displays a list of flowsheets applicable/designed for your speciality. 6. To delete a flowsheet, click in the cell currently displaying the flowsheet name, and then press DELETE. TIP 2: You can print the flowsheet as well as graph the data. Page 67 eCLINICIAN – Electronic Medical Record Review the Patient’s Chart Page 68 eCLINICIAN – Electronic Medical Record Review Information with the Patient REVIEW INFORMATION WITH THE PATIENT This chapter provides information about the most common tasks completed during the initial portion of the patient’s visit. The following main topics are covered in this chapter: • Document Scheduled Encounters • Review and Document Initial Details for the Visit • Review and Update the Current Medication List • Document Assessments • Document Care Teams Page 69 eCLINICIAN – Electronic Medical Record Review Information with the Patient DOCUMENT SCHEDULED ENCOUNTERS Any interaction with or about a patient is documented in eCLINICIAN - EMR as an encounter. OPEN THE PATIENT ENCOUNTER 1. Access the Schedule activity. 2. Locate the patient’s appointment in the upper right-hand section. 3. Verify that the EC status column shows that the patient has Arrived. EC Status The EC Status conveys the stage of the patient’s visit. • Sch = Indicates that the patient is scheduled but hasn’t yet arrived. • Arrived = Indicates that the patient has arrived and has checked in. The patient can now be roomed. • Exam-Rm = A provider has logged into the workstation in the indicated exam room and has starting documenting in the encounter. • Comp = Patient has checked out but the encounter has not been closed (documentation incomplete). • Closed: Comp = Patient has checked out and the encounter has been closed. 4. To open the encounter to begin charting, double-click the appointment. Page 70 eCLINICIAN – Electronic Medical Record Review Information with the Patient Alternatively, if the patient is scheduled to see you (i.e., you are the encounter provider), you can use the Schedule Glance section on the eCLINICIAN Dashboard to begin documentation of your patient’s visit. Click the Open the encounter (stethoscope) icon to the left of the patient’s appointment to begin. 5. Once the patient’s workspace opens, verify that you have opened the correct record by reviewing information in the Patient Header. Also note that a stethoscope icon displays on the workspace tab. Page 71 eCLINICIAN – Electronic Medical Record Review Information with the Patient Secure the Workstation If you need to leave the exam room after you have opened the encounter, you must secure the workstation before you leave. You can secure the workstation by one of the following methods: • Click the Secure button on the Hyperspace toolbar • Select Epic button > Secure • Click the drop down arrow next to Log Out and select Secure This ensures that the patient’s information is kept confidential and also bookmarks your place in the chart. When you return to the room, log in as usual. Hyperspace opens to the place where you were last working. Page 72 eCLINICIAN – Electronic Medical Record Review Information with the Patient REVIEW AND DOCUMENT INITIAL DETAILS FOR THE VISIT The initial portion of the patient’s visit typically includes the documentation of the patient’s reasons for visit and vitals, as well as the review and update of allergies, current medications and histories (substance, medical, surgical, family). REASON FOR VISIT The Reason for Visit represents the reason a patient has presented as described by themselves or the referring physician. The documentation of Visit Information is not required to close a scheduled encounter. For quality improvement, correct triggering of smartsets, BPAs and later reporting, it is very important for this information to be complete and verified by the physician. 1. From the Visit Navigator table of contents, access the Visit Info section. The Visit Information section displays in edit mode. 2. In the Reason for Visit field, use completion matching to search for an appropriate reason. The Lookup window displays. 3. Select the appropriate complaint. 4. Click Accept. 5. If required, in the Comment field type additional information about the reason. 6. Repeat steps 2 -5 for each reason, if required. Users may click Database Lookup if the required reason is not located. Page 73 eCLINICIAN – Electronic Medical Record Review Information with the Patient RECORD PATIENT VITALS The patient vitals section of the visit navigator appears only within the context of scheduled encounters. This section does not appear in Orders Only, Refill Medication, or Telephone Call encounters. 1. From the Visit Navigator table of contents, access the Vitals section. The Vitals section displays in edit mode. 2. Record the vitals in the appropriate fields. For weight enter either the metric or imperial unit in the field. TIP: You can enter the height and weight in imperial units and eCLINICIAN - EMR converts the measurement to metric units. 3. Click Close when you are done. The navigator returns to read-only mode. When the Vitals section is in read-only mode (section is closed) you see a dual display of the imperial and metric values. Page 74 eCLINICIAN – Electronic Medical Record Review Information with the Patient More on Vitals – Features Available from the Read-Only mode You can record multiple readings of vitals within a single visit using the Doc Flowsheet hyperlink. The Doc Flowsheet activity displays. Alternatively, you can record multiple readings of vitals within a single visit by clicking the New Reading hyperlink. The Vitals navigator section reopens with a fresh set of fields in which you can document. To edit the existing vitals, click the date/time hyperlink. REVIEW AND UPDATE SUBSTANCE, MEDICAL AND SURGICAL HISTORY The Visit Navigator History section allows you to review or update the patient’s past history information, including: Substance, Medical, Surgical and Family. 1. From the Visit Navigator table of contents, access the History section. The History section displays in edit mode. 2. In the Substance History subsection, document the patient’s Tobacco, Alcohol and Drug Use. Alcohol/week Calculation The amount of alcohol contained in an alcoholic beverage may vary. The calculation is based on a standard drink, which in Canada contains 13.6 grams or 0.5 oz of alcohol. This is the amount in: • 341 ml or 12 oz of beer or coolers (5% alcohol content) • 142 ml or 5 oz glass of table wine (12% alcohol) • 85 ml or 3 oz of fortified wine such as sherry or port (18% alcohol) • 43 ml or 1.5 oz of spirits (40% alcohol) Higher strength beer (e.g. 6, 7, or 8% beer), higher strength coolers and over proof liquor will contain more than 1 standard drink. 3. In the Add an item field in the Medical History or Surgical History sub-sections, use completion matching to search for a condition. The Medical or Surgical History - Details window displays. Page 75 eCLINICIAN – Electronic Medical Record Review Information with the Patient Alternate way to add a Diagnosis/Procedure to Medical/Surgical History You can quickly select a diagnosis or procedure to add to a patient’s past medical or surgical history without using completion matching. 1. Without entering any text in the Add an item field, click the Add button. The Add Medical (or Surgical) History window displays. 2. From a list of folders that display on the left side of the window, select a category. 3. From the corresponding list on the right side of the window, select the appropriate diagnosis or procedure. 4. Click Accept. 4. If appropriate, document in the Date and Comment fields. If you have the appropriate security role you can also promote the medical condition to the patient’s Problem List. 5. When you are done, click Accept. If you’ve used the Add an item field, then the condition is displayed under the Other Medical or Other Surgical History section. 6. For each section that you reviewed, click the corresponding Mark as Reviewed button. If you have reviewed all History subsections, click the Mark as Reviewed button in the lower left-hand corner of the History section. Best Practice - Indicate Review of Current Findings You’ll see many places in the patient’s chart where you can mark items as having been reviewed. By clicking Mark as Reviewed you stamp the record with your name and the current date and time. This visual indicator makes it easier for subsequent providers to see the last time someone reviewed this information. Page 76 eCLINICIAN – Electronic Medical Record Review Information with the Patient REVIEW AND UPDATE FAMILY HISTORY The Visit Navigator Family History sub-section allows you to quickly document the patient’s family medical history, as well as the status of each family member. Four different views are available in the Family History subsection: Default View, Positives Only, Negatives Only, View All. The Default View displays 40 common diseases/problems relating to multiple specialties. Do NOT use View All view because eCLINICIAN attempts to load over 600 disease/problems into this sub-section and freezes Hyperspace for up to 60 seconds. The steps for adding a disease/problem that does not display in the Default View are described below. If the Family history is unknown, you can check the Family history unknown box. Page 77 eCLINICIAN – Electronic Medical Record Review Information with the Patient This topic is divided into two sections based on whether or not the disease/problem displays in the Default View. DISEASE/PROBLEM DISPLAYS IN THE FAMILY HISTORY SUBSECTION’S DEFAULT VIEW To document a disease/problem for a patient’s family member when the disease/problem displays in the Default View, perform the following: 1. From the Visit Navigator table of contents, access the History section. 2. Scroll down to the Family History subsection. 3. For the first family member, select the appropriate Relationship row. 4. If known, type the relation’s name and tab out of the field. 5. The Status field defaults to Alive. This field acts as a toggle allowing you to select other statuses. 6. In the Default View, find the column for the medical condition/disease, and click the corresponding cell in the Relationship row. A red checkmark displays. 7. If required, right-click and add the age of onset or a comment. 8. Click Accept. A blue and white paper icon indicates that a comment has been entered. Hover your mouse over the icon to see the comment. 9. To add additional relations to the grid, select the appropriate hyperlink in the Click to Add area at the bottom of the grid. 10. If documenting a negative history is required, find the column for the medical condition/disease, and click the corresponding cell in the Neg Hx row. 11. When you are done, click the corresponding Mark as Reviewed button. If you have reviewed all History subsections, click the Mark as Reviewed button in the lower left-hand corner of the History section. Page 78 eCLINICIAN – Electronic Medical Record Review Information with the Patient Best Practice - Indicate Review of Current Findings You’ll see many places in the patient’s chart where you can mark items as having been reviewed. By clicking Mark as Reviewed you stamp the record with your name and the current date and time. This visual indicator makes it easier for subsequent providers to see the last time someone reviewed this information. DISEASE/PROBLEM DOES NOT DISPLAY IN THE FAMILY HISTORY SUBSECTION’S DEFAULT VIEW To document a disease/problem for a patient’s family member when the disease/problem does not display in the Default View, you can add additional column(s) to the Family History grid. 1. From the Visit Navigator table of contents, access the History section. 2. Scroll down to the Family History subsection. 3. For the first family member, select the appropriate Relationship row. 4. If known, type the relation’s name and tab out of the field. 5. The Status field defaults to Alive. This field acts as a toggle allowing you to select other statuses. 6. In the Add problem column to view field, completion match on the medical problem 7. Click Add Problem to View. The column for the problem entered appears on the right-side of the grid, not alphabetically. 8. Under the new column, click the corresponding cell in the Relationship row. A red checkmark displays. 9. If required, right-click and add a comment and then click Accept. A blue and white paper icon indicates that a comment has been entered. Hover your mouse over the icon to see the comment. 10. To add additional relations to the grid, select the appropriate hyperlink in the Click to Add area at the bottom of the grid. 11. When you are done, click the corresponding Mark as Reviewed button. If you have reviewed all History subsections, click the Mark as Reviewed button in the lower left-hand corner of the History section. Page 79 eCLINICIAN – Electronic Medical Record Review Information with the Patient Best Practice - Indicate Review of Current Findings You’ll see many places in the patient’s chart where you can mark items as having been reviewed. By clicking Mark as Reviewed you stamp the record with your name and the current date and time. This visual indicator makes it easier for subsequent providers to see the last time someone reviewed this information. Page 80 eCLINICIAN – Electronic Medical Record Review Information with the Patient Impact of having Multiple Views in the Family History Visit Navigator Subsection Care must be taken when viewing Family History information from the Visit Navigator subsection. The read-only mode of the Family History subsection displays all of the noted positive and negative findings. When opened in edit mode, the initial display of this section does not show the full history if a disease/problem was added which was not part of the Default View. When in edit mode, you must always use the Positives Only and Negatives Only views to view the complete family history. Page 81 eCLINICIAN – Electronic Medical Record Review Information with the Patient REVIEW ALLERGIES You can review the patient’s allergies from one of the following locations: Patient Header Visit Navigator – Allergies section SnapShot activity/report Allergies/Contraindications activity (from the the More Activities menu). Best Practice - Indicate Review of Current Findings You’ll see many places in the patient’s chart where you can mark items as having been reviewed. By clicking Mark as Reviewed you stamp the record with your name and the current date and time. This visual indicator makes it easier for subsequent providers to see the last time someone reviewed this information. Page 82 eCLINICIAN – Electronic Medical Record Review Information with the Patient TIP 1: Allergies with a High severity display as bolded black text with a yellow background. TIP 2: While you can view allergy information on the Patient Header you cannot mark them as being reviewed from this location. Allergy Information in eCLINICIAN The allergies listed in eCLINICIAN - EMR are from First Data Bank (FDB) Canada and therefore only relate to drug ingredients or drug classes. To enter allergies not related to drugs, such as dust, hay fever or food allergies, use the Other category. The allergies database in eCLINICIAN is updated quarterly with new allergens after approval by the Clinical Design Team. Filtering of Allergy Alerts for Inactive Ingredients Inactive drug ingredients (e.g. latex, peanut oil) are often used as fillers in medications. These inactive ingredients are not screened by FDB Canada. The impact to eCLINICIAN is that if a patient has an allergy to an inactive ingredient, all subsequent medication orders would show an alert regardless of whether or not the medication contains the inactive ingredient. In order to reduce the number of false positives and reduce alert fatigue the filtering of inactive ingredients has been turned off in eCLINICIAN. UPDATE ALLERGIES 1. From the Visit Navigator table of contents, access the Allergies section. The Allergies/Contraindications section opens in edit mode. 2. In the Add a new agent field, use completion matching to search for the allergy. Allergy Information in eCLINICIAN The allergies listed in eCLINICIAN - EMR are from First Data Bank (FDB) Canada and therefore only relate to drug ingredients or drug classes. To enter allergies not related to drugs, such as dust, hay fever or food allergies, use the Other category. The allergies database in eCLINICIAN is updated quarterly with new allergens after approval by the Clinical Design Team. 3. Enter information about the allergy such as type, reactions, severity and date when noted. 4. When you are done, click Accept. 5. Click Mark As Reviewed. The last reviewed information updates to show your name, the date, and the time. Page 83 eCLINICIAN – Electronic Medical Record Review Information with the Patient Best Practice - Indicate Review of Current Findings You’ll see many places in the patient’s chart where you can mark items as having been reviewed. By clicking Mark as Reviewed you stamp the record with your name and the current date and time. This visual indicator makes it easier for subsequent providers to see the last time someone reviewed this information. DOCUMENT THAT A PATIENT HAS NO ALLERGIES 1. From the Visit Navigator table of contents, access the Allergies section. The Allergies/Contraindications section opens in edit mode. 2. Select the No Known Allergies checkbox. When you select this checkbox, a comment displays with your name and the current date and time. 3. When you are done, click Mark as Reviewed. The last reviewed information updates to show your name, the date, and the time. Page 84 eCLINICIAN – Electronic Medical Record Review Information with the Patient Best Practice - Indicate Review of Current Findings You’ll see many places in the patient’s chart where you can mark items as having been reviewed. By clicking Mark as Reviewed you stamp the record with your name and the current date and time. This visual indicator makes it easier for subsequent providers to see the last time someone reviewed this information. Notice that when this activity/section is in read-only mode, No Known Allergies displays in a label below the check box and in the patient header. TIP: When you add an allergy, the checkbox is automatically cleared and no longer displays. Page 85 eCLINICIAN – Electronic Medical Record Review Information with the Patient REVIEW AND UPDATE THE CURRENT MEDICATION LIST A review of a patient’s current medications includes the review of: • Medications prescribed from eCLINICIAN • Medications not prescribed from eCLINICIAN • Any clinically significant over-the-counter medications or herbal supplements The latter two items are automatically flagged as a Patient Reported medication when entered in eCLINICIAN. During a visit, clinical support staff may perform an initial review of the patient’s medications using the Medication Documentation section of the Visit Navigator. Clinical staff may prefer to do a more comprehensive review of the patient’s current and past medications. The Medications & Orders section of the Visit Navigator can be used for this review as well as to update current medication details and to order and reorder the listed medications. You can also see current medications on the Snapshot activity. You can see a full list of current and historical medications from the Medication activity. Page 86 eCLINICIAN – Electronic Medical Record Review Information with the Patient COMPARISON OF FUNCTIONALITY BETWEEN MEDICATION AREAS The following table compares the medication features available between the following activities/navigator sections: • Medication Documentation (Med. Document) navigator section • Medications & Orders (Meds & Orders) navigator section • Medications activity Med Document navigator section Meds & Orders navigator section Medications activity Document a patient reported med Mark a med as Taking View current medications View expired and discontinued meds Mark existing med as long-term Review Medications Adjust Medications Reorder or change a med Discontinue a current medication not ordered during today’s encounter Discontinue a current med ordered during today’s encounter Order Medications Order a new med Reorder a previous med Mark new med as long-term Page 87 eCLINICIAN – Electronic Medical Record Review Information with the Patient REVIEW CURRENT MEDICATIONS USING THE MEDICATION DOCUMENTATION SECTION 1. From the Visit Navigator table of contents, access the Med. Document section. 2. You can choose different list views of the patient’s medications by selecting the appropriate option in the Sort by: drop down menu. 3. For each medication that the patient is currently taking, click Taking. A red checkmark displays in the Taking column. TIP 1: To quickly mark a number of medications with the same status of Taking or Not Taking is the same for all of them, use the corresponding Mark Unselected Taking or Mark Unselected Not Taking button. If no additions to the medication list are required, proceed to the next step. If you need to add medications that were not prescribed from eCLINICIAN or any clinically significant over-the-counter medication or herbal supplement, proceed to the next topic. TIP 2: The Medication List Comments hyperlink at the top of this section allows you to document a comment for the entire medication list. For example, “uses blister pack”. 4. To indicate that you have reviewed the medications, click Mark as Reviewed. The last reviewed information updates to show your name, the date, and the time. Best Practice - Indicate Review of Current Findings You’ll see many places in the patient’s chart where you can mark items as having been reviewed. By clicking Mark as Reviewed you stamp the record with your name and the current date and time. This visual indicator makes it easier for subsequent providers to see the last time someone reviewed this information. Page 88 eCLINICIAN – Electronic Medical Record Review Information with the Patient UPDATE LIST OF CURRENT MEDICATIONS USING THE MEDICATION DOCUMENTATION SECTION The Medication Documentation section of the Visit Navigator can be used to document medications that the patient is taking not prescribed from eCLINICIAN, as well as any clinically significant over-the-counter medications or herbal supplements. 1. From the Visit Navigator table of contents, access the Med. Document section. 2. In the Add Medication field, use completion matching to search for the appropriate medication. The Select a Medication window displays. Select the appropriate medication. 3. From the New Medications section that opens, enter the appropriate medication details. Click Accept. 4. Click on the Mark Unselected Taking button. 5. To indicate that you have reviewed the medications, click Mark as Reviewed. The last reviewed information updates to show your name, the date, and the time. Best Practice - Indicate Review of Current Findings You’ll see many places in the patient’s chart where you can mark items as having been reviewed. By clicking Mark as Reviewed you stamp the record with your name and the current date and time. This visual indicator makes it easier for subsequent providers to see the last time someone reviewed this information. Page 89 eCLINICIAN – Electronic Medical Record Review Information with the Patient Additional Notes about Medication Symbols Patient Reported medication: Indicates that the patient is taking a medication that was not prescribed from eCLINICIAN or a clinically significant over-the-counter medication or herbal supplement. Medication prescribed from eCLINICIAN. Long term medication: Indicates a medication that the patient must take for a chronic condition. This medication might not be currently in the patient’s system at the time of the visit. For example, an asthma medication. Long term medications remain on the current medication list even after their end dates pass. Taking medication: Indicates that the patient is taking the medication as prescribed. To view a description of other icons, click the legend icon in the upper right-hand area of the section. REVIEW AND UPDATE MEDICATION LIST FROM THE MEDICATIONS & ORDERS SECTION 1. From the Visit Navigator table of contents, access the Meds & Orders section. 2. To change the presentation of the medications listed, click Options and then the appropriate List view option. 3. To have the medication list also show discontinued medications, check the Med History checkbox. 4. To see the details for each medication, click the medication name hyperlink. 5. To mark each medication as being taken, click the respective Taking checkbox or click the Mark All Taking button. TIP: If you check the Med History checkbox, the Taking checkbox is not available. Page 90 eCLINICIAN – Electronic Medical Record Review Information with the Patient 6. To see all the medication reorders, click the Med Dose History hyperlink. The Past Updates section displays showing the relevant details. 7. To indicate that you have reviewed the medications, click Mark as Reviewed. The last reviewed information updates to show your name, the date, and the time. Best Practice - Indicate Review of Current Findings You’ll see many places in the patient’s chart where you can mark items as having been reviewed. By clicking Mark as Reviewed you stamp the record with your name and the current date and time. This visual indicator makes it easier for subsequent providers to see the last time someone reviewed this information. Page 91 eCLINICIAN – Electronic Medical Record Review Information with the Patient UPDATE MEDICATION DETAILS FOR A CURRENT OR EXPIRED MEDICATION If, during a medication review, you discover that the details for a current medication need to be updated, or you need to extend the date for an expired medication, perform the following: 1. From the Visit Navigator table of contents, select Meds & Orders. 2. To have the medication list also show discontinued medications, in the Show area, select the Med History checkbox. 3. Click the medication name hyperlink. 4. Click Change. The Order Composer displays. 5. Update fields as required. 6. In the Change Reason field, use completion matching to select the appropriate reason for the medication change. 7. As a printed prescription is not required, click No Print. 8. Click Accept. 9. Sign or pend the order. TIP: You can also make these updates using the Medications activity. Page 92 eCLINICIAN – Electronic Medical Record Review Information with the Patient DOCUMENT ASSESSMENTS You may already use a number of forms or flowsheets as patient assessment tools. In eCLINICIAN-EMR, these assessment tools are typically built as documentation or doc flowsheets. Doc flowsheets are ideal for tracking large amounts of patient data over time. Remember that there is also a separate Flowsheets activity. The Flowsheets activity is different from the Doc Flowsheets activity in that it is a read-only tool and cannot be used to document patient findings. USE DOCUMENTATION FLOWSHEETS The Doc Flowsheets activity provides a place in an encounter where you assess the patient’s status or response to assessment questions over time. 1. To access Documentation Flowsheets, select the Doc Flowsheets activity tab. TIP: You can also access the Doc Flowsheets activity from the Go to Doc Flowsheets hyperlink in the Vitals section of the Visit Navigator. 2. In the Flowsheet name field, type the name of the flowsheet or use the Selection tool (magnifying glass) to select from the list. The screen shot below uses the Standardized Mini-Mental State Exam (SMMSE) flowsheet as an example. 3. To record information/answer flowsheet questions manually, in the left-hand pane in the cells under column to the right of the question, enter the response. 4. To record information/answer flowsheet questions more quickly, in the right -hand pane, click the appropriate response. The questionnaire advances you to the next question. Page 93 eCLINICIAN – Electronic Medical Record Review Information with the Patient More on Doc Flowsheets • Some doc flowsheets are designed to do calculations. In these types of flowsheets, the data you enter is used to calculate a total. • You can add a comment to any response by clicking on the paper icon to the left of the Selection tool. • You can flag an answer as significant by right-clicking it. The cell turns yellow. • If an entered response has been changed, a red flag indicator appears in the upper right of the cell. By clicking on the cell, you can see who changed the answer and what day and time. • When working with multiple flowsheets you can move between the flowsheets by clicking the tab for the appropriate flowsheet on the toolbar. PRINT A DOCUMENTATION FLOWSHEET 1. Access the Chart Review activity. 2. From the Encounters tab, click the row or the corresponding encounter. The Encounter report displays. 3. Scroll through the report to find the Additional Encounter Details heading. 4. Click the Flowsheets, Questionnaires, Images, and Forms hyperlink. 5. Under All Flowsheet Templates, click the name of your flowsheet. 6. From the toolbar, click the printer icon. Page 94 eCLINICIAN – Electronic Medical Record Review Information with the Patient DOCUMENT CARE TEAMS The Care Teams functionality provides you with a single list of providers and clinicians responsible for the patient’s long term care. Two types of patient care teams are supported: • The Patient Care Team identifies everyone involved with the long term care of the patient. The patient care team is made up of PCPs (Primary Care Providers) and non-PCP members. PCP members include the patient’s family practice physician as well as the specialists who also treat the patient (i.e., the patient’s cardiologist, neurologist, etc.). The non-PCP members include roles such as the patient’s physical therapist, social worker or outside agencies who are also involved in the patient’s care. • The Visit Treatment Team identifies all of the clinicians working with a patient during a scheduled encounter. The Care Teams activity provides a single access point for managing the patient’s various care providers. From the Care Teams activity you can perform the following: View and edit the patient’s PCP (Primary Care Provider) View and edit other members of the Patient Care team View and edit the Visit Treatment team, and Add and edit Patient Care Coordination notes: You can use the Patient Care Coordination note to record information about treatment the patient is receiving or about general care information. The note is viewable by all providers but only one Patient Care Coordination note can be created per patient. Previous versions of this note can be viewed by clicking on Past Versions when in edit mode. For users with the appropriate permissions, this functionality is also available from the patient’s problem list. Page 95 eCLINICIAN – Electronic Medical Record Review Information with the Patient Care Teams & Notes Report The Care Teams & Notes report displays information about the patient’s care team members, as well as your last outpatient progress note and the current Patient Care Coordination note (if there is one). The report can be accessed from the following locations: • The report pane on the Schedule activity. We recommend adding this report next to Snapshot report. • The Snapshot activity in the patient’s chart. For information on how to add this report, Refer to the Personalize eCLINICIAN section. ACCESS THE CARE TEAMS ACTIVITY Within the patient’s chart, the Care Teams activity is accessed from the More Activities menu in the Activity tab list. Page 96 eCLINICIAN – Electronic Medical Record Review Information with the Patient You can also access the Care Teams activity from the Schedule activity. Select the patient’s appointment and then right-click and select Open Care Teams. ASSIGN A PCP MEMBER TO THE PATIENT CARE TEAM Note: These steps are typically done by front desk staff. Setting up default PCPs for a patient can save time during the scheduling workflows such as booking appointments and checking in the patient for their appointment. A patient can have one or more PCPs defined as long as each PCP is of a different type or specialty. The PCP type of General is used to identify the patient’s Family Practice physician. Only the PCP-General displays in the header on the patient’s workspace. 1. Access the Care Teams activity. TIP 1: To access the Care Teams activity, refer to the previous topic. 2. The Care Teams activity displays. 3. To add a PCP to the patient’s record, in the Patient Care Team area, click Add (to the right of the Search for PCP field). 4. The New PCP details area displays. Page 97 eCLINICIAN – Electronic Medical Record Review Information with the Patient 5. In the Patient’s location field, use completion matching to select the name of the department. 6. In the PCP field, use completion matching to select the name of a primary care provider. 7. In the PCP type field, use completion matching to select the type of provider. TIP 2: Remember that each PCP type can be used only once and that the PCP-General type is used to represent the patient’s Family Practice physician. 8. In the Specialty field, use completion matching to select the PCP’s specialty. If appropriate, type a comment. 9. When you are done, click Accept. The names of the PCPs display in the PCPs area. In the screenshot below, a PCP-General was added to the Care Team. This information now displays in the Patient Header. TIP 3: You can use the End button to stamp an end date on the relationship with the PCP. TIP 4: To update details on the PCP member, click the member’s name. 10. To close the Care Teams activity, click Close. Page 98 eCLINICIAN – Electronic Medical Record Review Information with the Patient ASSIGN A NON-PCP MEMBER TO THE PATIENT CARE TEAM Non-PCP members on the patient’s care team represent roles such as the patient’s physical therapist, dieticians, social workers or an outside agency who might be involved with the patient’s care. As only one PCP can be defined per specialty, additional specialists in the same specialty need to be identified as non-PCP members. 1. Access the Care teams activity. 2. The Care Teams activity displays. 3. To add a non-PCP member, in the Patient Care team area, to the right of the Search for Team Member field, click Add. 4. The New Patient Care Team Member details area displays. 5. In the Provider field, use completion matching to select the name of the provider. TIP 2: To add a provider/agency that is not in the list, use the Free Text Provider button to populate details on this non-PCP care team member. 6. In the Relationship field, use completion matching to select the member’s role with the patient. 7. If required, in the Specialty field use completion matching to select the member’s specialty. 8. If appropriate, type a comment. 9. When you are done, click Accept. The name of the member displays in the Other Patient Care Team Members area. TIP 3: You can use the End button to stamp an end date on the relationship with the PCP. TIP 4: To update details on the non-PCP member, click the member’s name. Page 99 eCLINICIAN – Electronic Medical Record Review Information with the Patient 10. To close the Care Teams activity, click Close. VIEW PAST UPDATES TO PATIENT CARE TEAM MEMBERS You can view past updates (audits) to the PCP and non-PCP members of the Patient Care team. 1. From the Care Teams activity, locate the patient care member. 2. Click the date hyperlink located below the Updated column. 3. The Past Updates detail area displays for the indicated patient care team member. ASSIGN A MEMBER TO THE VISIT TREATMENT TEAM The Visit Treatment team can be used to identify all of the clinicians working with a patient during a scheduled encounter. For example, you may want to include the names of the resident who saw the patient during the visit. 1. Access the Care teams activity. 2. The Care Teams activity displays. 3. To add yourself to the visit treatment team, in the Visit Treatment Team area, click Add Me. TIP 2: You can also add yourself to the Visit Treatment team using the Schedule activity. Select the patient’s appointment and then right-click and select Add me to the Visit Treatment Team. 4. To add someone else to the Visit Treatment team, in the Visit Treatment Team area, click Add. 5. The New Provider details area displays. 6. In the Provider field, verify the information or use completion matching to select the name of the visit team member. 7. In the Relationship field, use completion matching to select the member’s role with the patient. 8. If required, in the Specialty field use completion matching to select the member’s specialty. 9. If appropriate, type a comment. Page 100 eCLINICIAN – Electronic Medical Record Review Information with the Patient 10. When you are done, click Accept. The name of the member displays in the Visit Treatment Team area. 11. To close the Care Teams activity, click Close. Page 101 eCLINICIAN – Electronic Medical Record Review Information with the Patient Page 102 eCLINICIAN – Electronic Medical Record Write Notes WRITE NOTES eCLINICIAN - EMR offers many tools to help you efficiently document your progress or procedure notes. The intention is not necessarily to change what you document in your progress note, but the way that the information is entered in the chart. It’s important to note some of these tools take some time and practice to master. In order to use charting tools effectively, it’s necessary to spend some time learning to use them and customizing them to fit your needs. This chapter helps you choose the most effective and efficient option for each situation and describes how to use these tools to compose your note. The following main topics are covered in this chapter: • Review Options for Creating Progress Notes • Write Progress Notes • Review Additional Progress Note Features • Write Procedure Notes Page 103 eCLINICIAN – Electronic Medical Record Write Notes REVIEW OPTIONS FOR CREATING PROGRESS NOTES You can create your progress note using any of the following ways: • Type it • Use SmartTools • Use the NoteWriter forms • Use partial dictation • Use voice recognition software such as Dragon In many cases, the most efficient way to write a note is to use a combination of these methods. One of the most common approaches involves using the NoteWriter tool to record the review of systems (ROS), physical exam (PE) along with SmartTools. You can use partial dictation or voice recognition software to record the history of present illness (HPI), assessment and plan for more complex patients. Page 104 eCLINICIAN – Electronic Medical Record Write Notes NOTEWRITER NoteWriter is a point-and-click documentation tool. It is effective for capturing a review of systems or a physical exam. As you make selections in NoteWriter, the system generates note text automatically, based on those selections. There are several distinct areas of the NoteWriter tool. HISTORY OF PRESENT ILLNESS (HPI) TAB: REVIEW OF SYSTEMS (ROS) FORM: Contains a series of tri-state buttons and checkboxes, organized by system type. PHYSICAL EXAM FORM: Contains a series of tabs representing the various systems. Within those tabs, there are tri-state buttons, checkboxes, and areas to document graphical information. The default tab is the Basic tab and contains a subset of selections found under the respective tab. NOTE FORM: Allows you to view the note that the system generates based on your selections in the HPI, ROS, and, PE forms. TRI-STATE BUTTON CONTROLS: By default, the buttons are in a neutral state, but can also have positive or negative orientations. Page 105 eCLINICIAN – Electronic Medical Record Write Notes Work with Tri-State Control Buttons To mark an item positive: • Click the plus sign on the button, or • Left-click the item name, or • Press the + (Plus) key on your keyboard. To mark an item as negative: • Click the minus sign on the button, or • Right-click the item name, or • Press the – (Minus) key on your keyboard. TAB NOTE BOX: Displays the note text the system generates based on your selections only for the form you are currently using. SNAPSHOT TAB: Displays by default to make patient information accessible without having to leave the NoteWriter activity. To close the Snapshot pane, to the right of the NoteWriter form, in the middle of the screen, click the double chevrons (>>). To reopen the pane, on the far right, click the double chevrons again. VISITS TAB: Allows you to view and access previous encounters. The Chart Review hyperlink takes you to that activity. Relevant Encounters (Last 2 years) will display with a date hyperlink. Click the hyperlink to view the encounter details in a Generic Report format. TIP: You can make documentation even easier with NoteWriter SmartBlock macros that automate your selections. To learn more about this, refer to the Personalize eCLINICIAN section. There are many benefits to using NoteWriter: • When you use NoteWriter, the data you enter is captured discretely, meaning that you can report on it later. • Using the NoteWriter is also effective for creating drawings and annotating images. • In addition to the review of systems and the physical exam, you can use NoteWriter to document a patient’s history of present illness. Depending on the patient’s complaints, you might find that other documentation tools are better suited for capturing HPI, especially when you’re dealing with a complex patient or a patient presenting for acute care. • You can easily fill out the point-and-click forms while you’re in the room with the patient, allowing you to maintain your focus on patient care without having to concentrate on typing. Page 106 eCLINICIAN – Electronic Medical Record Write Notes SMARTTOOLS SmartTools are discussed in detail in the topic eCLINICIAN Fundamentals. They are effective for documenting a visit that conforms to a specific template. For example, well-child visits, annual physicals or pre-op exams usually follow a set course. For these visits, you can pull in a SmartText or SmartPhrase to complete most of the documentation, and then fill in the blanks where specific patient information is needed. For patients with chronic problems, you can compose an initial note using SmartTools and copy that note forward each time the patient comes in for a follow-up visit. Any refreshable SmartLinks in the note are automatically updated to reflect information from the current visit, so you only need to adjust other note details, if required. VOICE RECOGNITION For your initial visit with a complex patient or an acute care visit, voice recognition is a good alternative to typing. You can use voice recognition to invoke SmartTools or other commands in Hyperspace. The use of voice recognition in eCLINICIAN - EMR requires installation of a thirdparty product, such as Dragon NaturallySpeaking. Remember that if you rely solely on voice recognition, you won’t be capturing discrete data in your note. PARTIAL DICTATION Partial Dictation is the term used to describe the process whereby the progress note is generated using a documentation method, such as NoteWriter, in conjunction with dictation. The workflow involves inserting a tag in the progress note where the transcription of the dictation will go. The tag uniquely identifies the dictation. The physician dictates the note into a third party device and references the tag number. The dictation is routed to the In Basket, eCLINICIAN-EMR’s electronic messaging system, to an administrative support pool. The transcription is then routed back to the dictating physician’s In Basket for approval. Avoid Duplication in your Progress Notes The Encounter Report (Chart Review activity) is the summary report for the complete visit. Because the encounter summary report already includes such things as vitals, diagnoses, and orders, consider that you may not need to duplicate this information in your note. Page 107 eCLINICIAN – Electronic Medical Record Write Notes WRITE PROGRESS NOTES During the visit, use the Progress Notes section of the Visit Navigator to create your notes. BEGIN CREATION OF YOUR NOTE 1. From the Visit Navigator table of contents, access the Progress Notes section. The Progress notes section displays with three button options for creating notes: • 2. Create Note in NoteWriter is used primarily by physicians, senior residents, and nurse practitioners to document findings. The Down Arrow allows users to choose between NoteWriter forms: − STANDARD NOTE: Opens with the standard NoteWriter forms. − PROCEDURE NOTE: Opens a procedure based NoteWriter template. − BLANK NOTE: Opens a blank NoteWriter form. • 3. Create Note opens a blank note and contains SmartText forms. Create Note is used primarily by Allied Health professionals to document findings. From the options listed above, you will select the appropriate option. To continue working through this section, click Create Note in Notewriter. TIP 1: If NoteWriter opens in full-screen mode, you can click Resize to fit it within the workspace. The system remembers how you viewed the NoteWriter the last time you accessed it and opens it in that mode again. Page 108 eCLINICIAN – Electronic Medical Record Write Notes CREATE NOTE USING NOTEWRITER The NoteWriter activity is divided into four forms: 1. The HPI, ROS and Physical Exam forms are designed to allow you to generate your note as discrete data. By simply clicking your mouse and adding comments and diagrams, the NoteWriter creates the text of your note. 2. The Note form is where your note takes shape whether you are using the other NoteWriter forms, partial dictation, SmartTools or directly typing your note. 3. To complete the documentation on the HPI, ROS and (PE) Physical Exam forms, click the appropriate check boxes or use the tri-state control buttons. Page 109 eCLINICIAN – Electronic Medical Record Write Notes Work with Tri-State Control Buttons To mark an item positive using tri-state control button: • Click the plus sign on the button, or • Left-click the item name, or • Press the + (Plus) key on your keyboard. To mark an item as negative using a tri-state control button: • Click the minus sign on the button, or • Right-click the item name, or • Press the – (Minus) key on your keyboard. Add Comments to NoteWriter Forms If you don’t see an option on the form, you can add a comment by clicking the paper icon in the appropriate section of the form. To add a comment for an item displayed as a tri-state control, hover your mouse over the button and just start typing. You can also doubleclick the center of the tri-state control. To accept your comment, click the green check mark on the Comment window or press Enter. The tristate control item then displays with the item name underlined. In the progress note, the comment will appear in parentheses. TIP 2: From the Physical Exam tab, click one of the icons to access the detailed tab for that system. TIP 3: To add a drawing to an image that appears, select one of the drawing tools, and then click and drag your mouse over the area of the image where you want to use the tool. For example, you might use one of the stencils available to you to indicate the location of a particular type of incision. Page 110 eCLINICIAN – Electronic Medical Record Write Notes TIP 4: To add text (an annotation) to your image, select , click the place on the image where you want to add the annotation, type your annotation text, and then click Accept. 4. Return to the Note form and review your note. The orange highlighting you see on the Note form indicates a SmartBlock. As you make selections on the HPI, ROS and Physical Exam tabs, the respective SmartBlock populates and contains the text that represents your selections. The highlighted text cannot be edited directly. You must return to the appropriate form in NoteWriter and alter your original selection in order to change the text displayed. 5. By default Progress Notes are signed when the encounter is closed. To make further modifications to a signed note, you would have to create an addendum to the note. If you want to save the note and return to it after the patient visit, change the option to Pend on saving note. Another option is to Sign on saving note. You cannot close a scheduled encounter without a signed progress note. Keep this in mind when deciding how to sign the note. Note the signing options available: • The default is: Sign at close encounter • Pend on saving note will prevent the encounter from being closed until your note is signed. You will also receive an In Basket reminder message that you have a pended note. • Sign on saving note: Lets others know this note is complete. In clinics where multiple providers are documenting in the patient’s chart, this can be helpful. Notes that are pended or signed, may still be edited or addended afterwards. Page 111 eCLINICIAN – Electronic Medical Record Write Notes TIP 5: You can also type free text and use SmartTools such as SmartPhrases and SmartLinks in conjunction with NoteWriter. Place your cursor under and outside of the appropriate SmartBlock and begin typing or accessing SmartTools. To learn more about documenting with SmartTools, refer to the Use SmartTools section. CREATE NOTE USING SMARTBLOCK MACROS The use of SmartBlock macros is one way that you can drastically reduce the time it takes to document progress notes for routine exams. SmartBlock macros are only accessible from the ROS and the Physical Exam forms in NoteWriter. For example, using a SmartBlock macro that was created for a pre-op physical quickly populates the most common findings. You can then update the selections for any abnormal findings. 1. From the Visit Navigator table of contents, access the Progress Notes section. 2. Click Create Note in NoteWriter. The NoteWriter activity opens, displaying a blank Note form. 3. Select either the ROS form or Physical Exam form. 4. On the far right of the toolbar, click the black down arrow. The Macro menu displays. 5. Select the appropriate macro to load. 6. To confirm the loading of the macro, click OK. The macro loads into NoteWriter, automatically generating selections on the form. Page 112 eCLINICIAN – Electronic Medical Record Write Notes 7. Review and edit the defaulted selections. Add new selections as required. 8. To review the completed note text, from the NoteWriter toolbar, click Note. TIP: You can also type free text and use SmartTools such as SmartPhrases and SmartLinks in conjunction with SmartBlock macros. Place your cursor under and outside of the appropriate SmartBlock and begin typing or accessing SmartTools. To learn more about documenting with SmartTools, refer to the Use SmartTools section. 9. Once you are finished with your note, confirm your note signing option, and click Accept to close NoteWriter. CREATE NOTE USING SMARTTEXT Most of the note templates developed for use by Allied Health professionals will be developed as SmartText. 1. From the Visit Navigator table of contents, access the Progress Notes section. 2. Click Create Note. A blank SmartTool-enabled Progress Note window displays. 3. From the SmartTool toolbar, click (Open Selection Entry). You can also type the name of the SmartText directly into the Insert Smart Text field. 4. From the SmartText Selection window, select the appropriate note template. 5. Click Accept. The SmartText is inserted into the documentation box. The SmartText may include SmartLists and SmartLinks. Page 113 eCLINICIAN – Electronic Medical Record Write Notes 6. Complete the note. TIP: You can also type free text and use other SmartTools such as SmartPhrases and SmartLinks in conjunction with SmartText. Place your cursor where you want the text to go and begin typing or summoning your SmartTools. To learn more about documenting with SmartTools, refer to the Use SmartTools section. 7. Note the signing options available: • The default is: Sign at close encounter • Pend on close will prevent the encounter from being closed until your note is signed. You will also receive an In Basket reminder message that you have a pended note (My Incomplete Notes). • Sign on close: Lets others know this note is complete. In clinics where multiple providers are documenting in the patient’s chart, this can be helpful. Notes that are pended or signed may still be edited or addended afterwards. You cannot close a scheduled encounter without a signed progress note. Keep this in mind when deciding how to sign the note. 8. Once you are finished with your note, confirm your note signing option and click Close. The Progress Notes section closes and the displays in read-only mode. Page 114 eCLINICIAN – Electronic Medical Record Write Notes CREATE NOTE USING PARTIAL DICTATION You can insert a tag in the progress note where the transcription of the dictation goes. The tag uniquely identifies the dictation using the patient’s medical record number (MRN) or personal health number (PHN) and if appropriate a dictation number (CSN). 1. Open a progress note using one of the options outlined above. 2. While creating the note, either in the Progress Note window or the Note form of the NoteWriter, position the cursor where the transcription of the dictation is to go. 3. From the SmartTool toolbar, click the Insert Partial Dictation (microphone) button. A Dictation tag is inserted into the note. 4. Once you are finished with your note, confirm your note signing option. By default Progress Notes are signed when the encounter is closed. To make further modifications to a signed note, you would have create an addendum to the note. If you want to save the note and return to it after the patient visit, change the option to Pend on saving note. Another option is to Sign on saving note. You cannot close a scheduled encounter without a signed progress note. Keep this in mind when deciding how to sign the note. 5. Click Accept to close NoteWriter. When you close your note, a dictation message is usually routed to your administrative support pool. When the transcription has been completed it is then routed back to your In Basket for approval. Page 115 eCLINICIAN – Electronic Medical Record Write Notes REVIEW ADDITIONAL NOTE FEATURES This section discusses additional progress note features such as: • Adding an image to your note • Taking over another’s note • Marking a note as sensitive • Bookmarking a note ADD AN IMAGE TO YOUR PROGRESS NOTE You have the ability to add an image or a photograph to your progress note. For example, you might want to add a photograph of a patient’s lesion to your physical exam findings. 1. Ensure that the image file is available on your computer (i.e. can be accessed from the computer’s hard drive or a jump drive/memory stick). 2. From the SmartTool-enabled toolbar in your progress note, click the Insert image button. The Image Selector window displays. If images have been attached to the patient’s record via the Media Manager, then a list of attached files displays. If no images have been attached to patient’s record using the Media Manager, then the message This patient has no attached images displays. 3. To attach an image to the current encounter’s progress note, click Browse. 4. Navigate to the image stored on the computer. TIP 1: Remember that you are accessing eCLINICIAN via Citrix. This means that when you initially open the window to navigate to your image, the Desktop directory that you see represents the directory on the Citrix desktop. Your local computer is represented as C$ on ‘Client’. 5. Select the image and then click Open. Page 116 eCLINICIAN – Electronic Medical Record Write Notes 6. The image displays in the Selected images area. 7. To adjust the image size, view the selections in the Insert size field. 8. To add the image to your progress note, click Insert. The image displays in your progress note. Page 117 eCLINICIAN – Electronic Medical Record Write Notes TAKE OVER ANOTHER’S NOTE A single encounter can have multiple progress notes. If clinical support staff or a resident starts the progress note for a visit, the physician has the option to do one of the following: • Create their own note • Edit the clinical support person’s or resident’s note, or • Take over the note and make themselves the author. When anyone refers to the encounter report afterwards, all of the relevant information is available regardless of the method used. 1. From the Visit Navigator, access the Progress Notes section in read-only mode (use the blue arrow). 2. Locate the note you wish to review and verify the author’s name. 3. To take ownership of the note and continue the documentation, click either the Edit in Notewriter or Edit button. The first opens the existing note in NoteWriter, the second opens it in a Progress Notes window. 4. Review, edit, and complete the note. 5. Above the toolbar on the top right, c lick Make Me Author. 6. Once you are finished with your note, confirm your note signing option. By default Progress Notes are signed when the encounter is closed. To make further modifications to a signed note, you would have create an addendum to the note. If you want to save the note and return to it after the patient visit, change the option to: • • Page 118 Pend on saving note (in the NoteWriter activity) Pend on close (in the Progress Notes window). eCLINICIAN – Electronic Medical Record Write Notes 7. Click Accept (in the NoteWriter Activity) or Close (in the Progress Notes window). MARK YOUR NOTE AS SENSITIVE You have the ability to mark a progress note as sensitive. The button is accessible above the Progress Notes or NoteWriter toolbar on the far right. Part of the build for your clinic involved determining how sensitive notes would be handled. Clinics can be set up to have one of the following options: • At the provider level: The provider who signs the progress note is the only person who can see the sensitive note. This option is not recommended; if that provider leaves the clinic, no other provider can view the note. • At the department level: Sensitive notes are viewable by all providers within the department. • At the specialty level: Sensitive notes are viewable by all providers within the specialty, regardless of the clinic. When progress notes are marked as sensitive they cannot be viewed by other users. This means that the note does NOT appear on the Notes tab in Chart Review. The Progress Notes section in the Encounter report displays as seen in the screenshot below. Page 119 eCLINICIAN – Electronic Medical Record Write Notes BOOKMARK YOUR NOTE You can tag your note with a bookmark so that you can easily find relevant information for later reference. VIEW BOOKMARKED NOTES To quickly identify which progress notes are bookmarked, a bookmark icon displays beside the corresponding item on the Encounters and Pt Instr/Notes tabs in the Chart Review activity. Page 120 eCLINICIAN – Electronic Medical Record Write Notes REFRESH SMARTLINKS IN YOUR NOTE After you’ve updated information elsewhere in the patient’s chart, you may need to return to your note and update the information in the SmartLink. For example, your note template uses the SmartLink .diag to pull the encounter diagnoses into your note. If you don’t update the diagnosis list until after you’ve written your note, you’ll need to return to the note to refresh the SmartLink. A refreshable SmartLink displays with a blue background. 1. To refresh all the SmartLinks in the note, click the Refresh button on the SmartToolenabled toolbar. 2. To refresh a selected SmartLink, right-click and select Refresh SmartLink. The updated information pulls into the note. Page 121 eCLINICIAN – Electronic Medical Record Write Notes VIEW A CHART REVIEW REPORT WITH ANOTHER ACTIVITY You can view Chart Review reports side by side with other activities such as NoteWriter. This allows you to keep pertinent information from the Chart Review activity open at all times while performing other workflows. 1. Access the Chart Review activity for the appropriate patient. 2. Select an item on a Chart Review tab. 3. To view the report in the sidebar, right-click the item and select Display in Chart Sidebar. 4. Open another activity, such as NoteWriter. The sidebar remains open and continues to display the added report. TIP: This feature works best at screen resolution of at least 1280x1024. Page 122 eCLINICIAN – Electronic Medical Record Write Notes WRITE A PROCEDURE NOTE Procedures are documented in a Progress Note within the Visit Navigator. All procedures must be documented by ordering in the Meds & Orders section. We encourage you to document the procedure in the appropriate area with the Progress Notes. This allows others using the patient’s chart to quickly locate your findings in the appropriate areas. CREATE A PROCEDURE NOTE 1. From the Visit Navigator table of contents, click Create Note in NoteWriter. Use the drop down arrow for the Procedure Note option. The Note Tab has free text for procedure documentation. A SmartPhrase could also be used. The Procedure Tab will indicate some of the most common office procedures to choose from. The specific procedure (example is Ear Syringe) provides a template to quickly do the documentation. If further detail is necessary there is a comment box. Page 123 eCLINICIAN – Electronic Medical Record Write Notes If the procedure was done by another clinical staff, Change Provider would document this. A procedure can also be Sensitive and or have a Bookmark. Select the appropriate option of Pend on saving note, Sign at close encounter or Sign on saving note. If the procedure is not associated with an existing diagnosis, there is the option to do so in the upper right-hand corner. The completed Procedure Note is displayed within the Progress Note Activity. Page 124 eCLINICIAN – Electronic Medical Record Write Notes Page 125 eCLINICIAN – Electronic Medical Record Record Visit Diagnoses, Problems and FYIs RECORD VISIT DIAGNOSES, PROBLEMS AND FYIS This chapter discusses the various ways that you can record the visit diagnoses as well as how to document and manage your patient’s problem list. Included is an overview on the various types of alerts that can be added to a patient’s chart. The following main topics are covered in this chapter: • Document Visit Diagnoses • Manage the Patient’s Problem List • Place an Alert Flag on the Patient’s Chart Page 126 eCLINICIAN – Electronic Medical Record Record Visit Diagnoses, Problems and FYIs DOCUMENT VISIT DIAGNOSES The diagnosis codes used in eCLINICIAN-EMR are ICD-9 codes (International Classification of Diseases, 9th Edition). IMO (Intelligent Medical Objects) is the name of the company who provides this data. RECORD VISIT DIAGNOSES 1. From the Visit Navigator table of contents, access the Visit Diagnoses section. 2. In the Add Diagnosis field, use completion matching to add the diagnosis and press ENTER. 3. From the Preference List Matches or Database Matches window, select the appropriate diagnosis and click Accept. 4. The diagnosis displays as a hyperlink. Click the diagnosis hyperlink (or the Pencil icon) to add a Diagnosis Qualifier to each of the patient’s diagnoses. Values include: active, acute, chronic, inactive, presumptive and resolved. 5. To add the diagnosis to the problem list, click the PL icon to the far right of the diagnosis. Page 127 eCLINICIAN – Electronic Medical Record Record Visit Diagnoses, Problems and FYIs More on Visit Diagnosis Symbols Indicates the primary diagnosis for this visit. By clicking on another row under the P column, the primary diagnosis can be changed. You can use the up and down arrows to the left of the diagnosis to arrange an order to the list. Click the X icon to the far right to delete the visit diagnosis. Right-click on a diagnosis to get a list of options: Change the diagnosis, add a diagnosis to a Routine or Common preference Dx list, or promote the diagnosis to the Problem List. Page 128 eCLINICIAN – Electronic Medical Record Record Visit Diagnoses, Problems and FYIs MANAGE THE PATIENT’S PROBLEM LIST A problem is defined as a medical condition that is persistent across a number of encounters (i.e., not identified and resolved in a single ambulatory encounter). For example, Myocardial Infarction (MI) is not a good candidate for the Problem List. However, the underlying condition, Atherosclerosis, which precipitated the MI, would be appropriate. The MI episode should be recorded in the Past Medical History section. To fully understand a patient’s medical history, users must review both the active problem list and the resolved problem list. Problems like diabetes may never be resolved. Others, like pregnancy will be resolved. The addition of items to a patient’s problem list is restricted by security role. Typically only physicians, nurse practitioners, senior residents and nurses with appropriate access are given these security roles. Sharing of a Patient’s Problem List by Multiple Users It is important that eCLINICIAN – EMR users understand the distinction between a problem list from a local EMR (maintained within a single clinic) and an enterprise wide list maintained by multiple users across multiple sites. The use of an enterprise wide problem list is only effective if users feel comfortable with modifications made to the list by other users. Note that there is a complete audit log of all changes made to a problem list. eCLINICIAN – EMR cannot replace open communication between users. If multiple users have differing opinions about a problem they should work together to directly resolve the difference. This leads to improved patient care. PROMOTE A VISIT DIAGNOSIS TO THE PROBLEM LIST From within an encounter you have the ability to promote the visit diagnosis to the problem list. 1. From the Visit Navigator table of contents, select Visit Diagnosis. 2. In the Add field, completion match and select the diagnosis from the Preference List Matches window and click Accept. 3. Click the Page 129 icon to the right of the problem. eCLINICIAN – Electronic Medical Record Record Visit Diagnoses, Problems and FYIs A green checkmark displays beside the problem to indicate that it has been added to the visit diagnosis list. PROMOTE A PROBLEM FROM THE PROBLEM LIST TO THE VISIT DIAGNOSIS From within an encounter you have the ability to promote the problem to the visit diagnosis list. 1. From the Visit Navigator table of contents, access the Problem List section. 2. Identify the problem you wish to add to the visit diagnosis list. 3. Click the 4. A green checkmark displays beside the problem to indicate that it has been added to the visit diagnosis list. icon to the right of the problem. POST A PROBLEM TO THE PATIENT’S PROBLEM LIST Diagnoses for problems that are ongoing should be placed on the patient’s Problem List. 1. From the Visit Navigator table of contents, access the Problem List section. 2. In the Search for a new item field, use completion matching to add the problem 3. In the Overview section, document any necessary information. TIP: You can use the Display field to add other pertinent information about the problem. The information that you record is viewable on the patient’s SnapShot. Also refer to the Best Practice note which follows. Page 130 eCLINICIAN – Electronic Medical Record Record Visit Diagnoses, Problems and FYIs Add a Comment to the Patient’s Problem List Use the Display field in the Problem window to add a comment to the problem which will display in reports such as SnapShot. For example, you might add Avoid Medications that prolong bleeding such as Coumadin and NSAIDS to problems associated with a bleeding disorder You can see the advisory on the patient’s SnapShot 4. If desired, assign a Priority. Assigning priority is not related to the seriousness of the illness. Rather, assigning priority allows you to sort the problem list so that the conditions ranked as high will always display first, medium second and so on, when you view the Problem List. Priorities set are specific to the user and do not affect the order set by other clinicians. Problems with a High priority display at the top of the list. 5. If appropriate, document a Patient Care Coordination Note. Patient Care Coordination Notes The Patient Care Coordination note can be used to record information about the treatment the patient is receiving and general information regarding the patient’s care. The note is viewable by all providers but only one Patient Care Coordination note can be created per patient. Previous versions of this note can be viewed using the audit trail by clicking on Past Versions when in edit mode. This functionality is also available from the Care Teams activity. 6. If appropriate, click File to History to add the problem to the patient’s medical history. Page 131 eCLINICIAN – Electronic Medical Record Record Visit Diagnoses, Problems and FYIs 7. When you are done, click Accept then click Mark as Reviewed. EDIT THE PATIENT’S PROBLEM LIST 1. From the Visit Navigator table of contents, access the Problem List section. 2. Click on the problem you wish to edit. • To edit details such as priority and noted date, click the Details hyperlink. • To edit the overview note details, click the Create Overview hyperlink. • To add a visit note, click the Create Current Assessment & Plan Note hyperlink. • To resolve a problem, click Resolve. CHANGING PROBLEMS IN THE PROBLEM LIST The Change Dx button allows users with the appropriate security to: Page 132 eCLINICIAN – Electronic Medical Record Record Visit Diagnoses, Problems and FYIs • Change an evolving problem without having to first resolve or delete it and then enter a new problem. Use Change Dx to access the Details form for a problem, without having to first open the problem by clicking the hyperlink. • Change Dx is not in the default view for existing users. To add the button: 1. Click Options. 2. Click Choose Columns. 3. Select Change Dx & Resolved and click Accept. Page 133 eCLINICIAN – Electronic Medical Record Record Visit Diagnoses, Problems and FYIs VIEW RESOLVED PROBLEMS Over time problems may be resolved. To fully understand a patient’s medical history it is important that you review both the active problem list and the resolved problem list. 1. Access either the Visit Navigator Problem List section (chart mode) or the Problem List activity (review mode) and click on the Options button on the upper right hand side. 2. From the upper right-hand area, in the Show area, select the Resolved checkbox. Resolved problems display as un-bold text. You can click the Details hyperlink to view details on the resolved problem. Page 134 eCLINICIAN – Electronic Medical Record Record Visit Diagnoses, Problems and FYIs PLACE AN ALERT FLAG ON THE PATIENT’S CHART Alert flags can be placed on a patient’s chart using the FYI activity. This activity can be found in the More Activities at the bottom of the Activity Tab list. FYI flags are categorized by flag type. Examples of FYI flag types include Disability, Communication Issue, and Latex Allergy. The ability to add, edit or see an FYI flag is controlled by user security role. When the patient has an FYI, the FYI activity is automatically added to the list of activities on the left-hand side of the patient’s workspace. On the patient header, the flag is represented as a red FYI hyperlink. If you have the appropriate security level, you can hover your mouse over this hyperlink to see the FYI category. Clicking the link opens the FYI activity and allows you to quickly view the relevant information and take the appropriate actions. This inconspicuous way to flag a patient’s record reduces the chances that a patient, or someone passing by the computer screen, might see the flag’s topic. ADD AN FYI FLAG 1. From the lower left-hand section of the patient workspace, click on the FYI activity tab. The FYI activity tab only displays if the patient already has an FYI. If the FYI activity tab does not display, go to More Activities, select the FYI Activity. 2. From the activity toolbar, click the New Flag button. The New Flag dialogue box displays. 3. In the Flag type field, click the Selection tool (magnifying glass) or use completion matching to search for the FYI flag you want to add. Page 135 eCLINICIAN – Electronic Medical Record Record Visit Diagnoses, Problems and FYIs 4. If required, add comments. 5. When you are done, click Accept. 6. To view the FYI flag on the patient’s header, exit and re-open the patient’s workspace. Page 136 eCLINICIAN – Electronic Medical Record Record Visit Diagnoses, Problems and FYIs Page 137 eCLINICIAN – Electronic Medical Record Enter Orders ENTER ORDERS eCLINICIAN - EMR is what is known as a physician order entry application. This means that the functionality has been designed to facilitate the efficient entry of orders by the physician during the patient’s visit. Clinical support staff and allied health professionals can also enter orders using eCLINICIAN when it is appropriate to do so. Orders in eCLINICIAN - EMR are divided into two categories: Medications and Procedures. To prescribe a medication in eCLINICIAN - EMR you must first order it. In order to generate a requisition for a lab test or procedure, the order must be entered into the system. The following main topics are covered in this chapter: • General Steps for Entering an Order • Work with Procedure Orders • Use Order Preference Lists • Work with Medication Orders • Associate Orders with Diagnosis • Sign your Orders • Place Orders and Other Visit Details using a SmartSet • Complete Post Order Activities Page 138 eCLINICIAN – Electronic Medical Record Enter Orders GENERAL STEPS FOR ENTERING AN ORDER Even though there are a variety of order types, the basic steps involved are the same for all types. The example below uses a medication order to demonstrate these steps. 1. From the navigator table of contents, access the Meds & Orders section. 2. Place an order using one of the following options: • In the Search for new order field, use completion matching to add the order. Either the Preference List Search window or Database Search window displays. Remember, the system always searches the Preference List first. If it can’t find any matches, it searches the system-wide Database. TIP 1: eCLINICIAN - EMR remembers your commonly placed orders and offers suggestions under the Search for new order field as you type. TIP 2: Even though the system may find matches on the Preference List, you can always manually click on the Database tab of the search window to see more matches. • Click New Order. The Preference List Browser displays. Learn more about the Preference List Browser in the topic Use Order Preference Lists during an encounter. Note: the default for the order is Orders and Prescriptions. If the order is administered in the clinic, you must manually select Clinic Administered Meds. Refer to the Self Learning Document: Medication Administration Record (MAR) available on the AHS website, insite. 3. Select the appropriate order. The order displays as an Unsigned Order. If there is required information missing from the order, the following symbol displays beside the order. TIP 3: If there are multiple with missing mandatory information, you can click the Next button to cycle through them and complete the orders. TIP 4: A yield 4. symbol indicates that recommended information is missing. To view and/or edit the order, under the order name, click the Summary Sentence hyperlink. Page 139 eCLINICIAN – Electronic Medical Record Enter Orders The Order Composer displays. The Order Composer is where you can make changes to any default values and complete additional information for the order. Depending on the type of order, different types of fields display. Also note that in some cases, a field contains both a list and buttons. The buttons represent the more common values in the list. Subsequent topics demonstrate how to work with the Order Composer for different order types. 5. Complete the order details and then click Accept. The Order Composer closes. 6. Sign or pend your order(s). Page 140 eCLINICIAN – Electronic Medical Record Enter Orders WORK WITH PROCEDURE ORDERS The following are examples of procedure orders: • lab test • diagnostic imaging • clinic performed test or procedure • immunization • referral to a specialist or to a service • outpatient procedure • request for service (allows other clinic staff to schedule their own appointments) and • billing code The subsequent topics demonstrate how to enter some of these orders. In order to generate a requisition you must place an order for the item. ENTER A STANDING ORDER Order Statuses In eCLINICIAN - EMR orders for lab tests have the following statuses: • Normal - used to represent an order for a test or procedure that will be performed in the clinic that day. • Standing –used to represent an order for a test that is placed today and repeated again at a defined interval(s). • Future – used to represent an order that will not be completed in the clinic. This is the default status for all labs. 1. From the Visit Navigator table of contents, access the Meds & Orders section. 2. In the Search for New Order field, use completion matching or click New Order. 3. Select your order and click Accept. The order displays as an Unsigned Order. 4. Click the Summary Sentence hyperlink for the Order Composer to display. 5. Using the drop down menu, change the status to Standing. Additional fields display to the right once you change the status to Standing 6. In the Release field, click Manual. 7. In the Interval field, type the period between repeats in weeks. 8. In the Count field, type the number of repeats. Page 141 eCLINICIAN – Electronic Medical Record Enter Orders 9. 10. In the example in the screen shot, the physician wants the patient to have a repeat TSH (only) test every 3 months for the next year. The standing order is entered with an Interval of every 12 weeks and a Count of 4.Complete the order details and then click Accept. When you are done, Pend or Sign the order(s). A single requisition prints for Standing Orders. The documentation of the repeat tests is handled by the receiving lab. ENTER AN ORDER FOR AN IN CLINIC TEST Tests that are performed in your clinic are referred to as In Clinic tests. 1. From the Visit Navigator table of contents, access the Meds & Orders section. 2. In the Search for New Order field, use completion matching on INCLINIC to access the lists of In Clinic tests. Continue your search for the specific the test you need. For example, Urine Dipstick. TIP: Searching for your test may require using the Database Lookup if it is not in your Preference List. 3. If required, click the Summary Sentence hyperlink to update order details. 4. When you are finished, sign or pend your order(s). Once the order is signed, a blue Schedule Activity flag displays beside the patient’s appointment on the Schedule activity. This flag indicates that there is an In Clinic test, procedure or injection to be performed. Page 142 eCLINICIAN – Electronic Medical Record Enter Orders ENTER AN ORDER FOR AN IN CLINIC PROCEDURE In order to document that you have performed an In Clinic procedure, you must first enter an order for that procedure. 1. From the Visit Navigator table of contents, access the Meds & Orders section. 2. In the Search for New Order field, use completion matching on INCLINIC to access the list of In Clinic procedures. Continue your search for the specific procedure you need. For example, Skin Biopsy. 3. If required, click the Summary Sentence hyperlink to update order details. 4. When you are finished, sign or pend your order(s). TIP: If appropriate to your security role, there is an option to Associate Diagnosis with the procedure. To enter a procedure note once you have performed the In Clinic procedure, refer to the topic Write a Procedure Note. ENTER AN ORDER FOR AN IMMUNIZATION In order to document the administration of an immunization, you first must order the immunization. 1. From the Visit Navigator table of contents, access the Meds & Orders Sections. 2. In the Search for New Order field, use completion matching to add an immunization. For example, Influenza Vaccine (Seasonal Flu). 3. If required, click the Summary Sentence hyperlink to update order details. 4. When you are finished, sign or pend your order(s). Once the order is signed, a blue Schedule Activity flag displays beside the patient’s appointment on the Schedule activity. This flag indicates that there is an In Clinic test, procedure or injection to be performed. Page 143 eCLINICIAN – Electronic Medical Record Enter Orders Refer to the Self Learning Document: Document an Immunization or Vaccine Administration Visit. ENTER AN ORDER FOR A REFERRAL 1. From the Visit Navigator table of contents, access the Meds & Orders section. 2. In the Search for New Order field, use completion matching to add a referral. For example, referral to endocrinology. 3. In the Unsigned Orders, click the Summary Sentence to open the order details. 4. If you know the name of the specialist that you want to refer the patient to, navigate to the To field. Use the Selection tool or type the name using lastname, firstname format. Otherwise leave the field blank. 5. Optional step: If referring to another clinical discipline, navigate to the Provider Specialty field and enter the speciality name. 6. Optional step: If referring to a department (clinic), navigate to the Department field and use the Selection tool or buttons to choose the appropriate department. This may already be selected for you based on the type of referral that you ordered. Or you can select the appropriate location for the speciality referral with available buttons. 7. Update the Ref Type Referral Reason, and Referral Priority fields with available buttons. Page 144 eCLINICIAN – Electronic Medical Record Enter Orders If the referral is to a department or clinic that is outside of eCLINICIAN the Department and Dept Specialty fields will have optional buttons available. The fields may be pre-populated or default to: • Department = NOT ON REFERRALS • Dept Specialty = MANUAL REFERRAL 8. From the Click to add text hyperlink you can record any additional information as comments. These comments display in the Notes/History section on the Referral record. 9. Click Accept. 10. Click Sign. A referral record is generated and becomes available in the eCLINICIAN Referral module where it can be tracked. ENTER A BILLING ORDER (DROP A BILLING CODE) When an appointment is made in eCLINICIAN–Scheduling the appointment details are sent to eCLINICIAN – Billing. Unscheduled encounters such as Orders Only encounters and Telephone encounters also send information to eCLINICIAN–Billing. Billing codes can also be entered directly in to eCLINICIAN-Billing. Billing codes are entered into eCLINICIAN-EMR through the Medications & Orders section. If billing and diagnostic codes are entered, the details are added to the patient’s record in eCLINICIAN – Billing and then be billed to the appropriate payer. Use completion matching or the preference list to select the appropriate billing codes. Billing codes include: • Alberta Health & Wellness Service (Fee) Codes Page 145 eCLINICIAN – Electronic Medical Record Enter Orders • Third party service codes including: Patient, WCB and Department of Defense • Patient/Direct Billing codes for services not covered by Alberta Health & Wellness Billing codes can also be entered directly in to eCLINICIAN-Billing. 1. From the Visit Navigator table of contents, access the Meds and Orders Section. 2. Click New Order and use the Browse tab to access the Billing section. 3. Option: Use completion matching with appropriate billing code(s) to search your Preference List. Billing codes within the eCLINICIAN are only the Alberta Health & Wellness Service (Benefit) Codes. 4. Select your billing code(s) and click Accept. The order displays as an Unsigned Order. 5. All billing orders are marked as Sensitive, so only you have access to this information. Further details on Mark your Note as Sensitive are on page 119. 6. Click the Summary Sentence hyperlink. The Order Composer displays. 7. Complete the appropriate details around Quantity and Modifiers. The encounter diagnosis displays as the Visit Diagnosis. 8. Supportive documentation to Alberta Health and Wellness is captured in the Questions fields and comments to billing staff can be added. 9. Click Accept. 10. Pend or sign your orders. Page 146 eCLINICIAN – Electronic Medical Record Enter Orders CORRECT A BILLING CODE AFTER IT IS SUBMITTED 1. From the schedule activity, locate the patient’s appointment where the incorrect billing code was ordered. 2. With the patient’s appointment highlighted, double-click. 3. The Encounter is Closed message should display. 4. Click Create Addendum. 5. Access the Meds and Orders section. 6. In the Search for New Order field, enter the correct billing code, or click New Order to search the preference list. 7. Select and accept the appropriate billing code. 8. Click Sign. 9. To associate the billing code to a single diagnosis, click Yes. 10. To choose from multiple visit diagnoses, click No and select the appropriate diagnosis. 11. From the Visit Navigator table of contents, select Sign Addendum. 12. Click Sign Addendum. 13. The new billing code has been sent to the billing team for processing. 14. Note: it is not possible to remove the original billing code from the patient’s chart and it will remain visible in Chart Review, under the Billing tab. It will be removed from the billing application. Page 147 eCLINICIAN – Electronic Medical Record Enter Orders WORK WITH MEDICATION ORDERS INTRODUCTION TO DISCRETE SIGS Prior to eCLINICIAN - EMR, when you handwrote a prescription, you wrote a sentence which described how much of the medication the patient should take, as well as how it should be taken and how often to take it. For example, Take 1 tablet twice a day. When ordering prescriptions in eCLINICIAN - EMR, you are now required to enter this information into specific fields such as Dose, Route, Frequency, and Dispense, using the Order Composer. When working with each of these fields, you’ll select from a list of predefined values. From the information entered into these fields, eCLINICIAN - EMR automatically combines this information and generates the prescribed sig. By entering this information as a discrete sig, you will see the following benefits: • Enhanced dose checking - Alerts display when the dose falls outside of allowed values for dose, frequency, duration of therapy, patient age, and weight. • More convenient weight-based dosing - You can easily order a weight- or BSA-based medication and change the calculation with minimal clicks in the Order Composer. About First Data Bank (FDB) Canada First Data Bank (FDB) Canada is the source for the allergy and medication information used in eCLINICIAN - EMR. A new source file is received from FBD weekly and uploaded into eCLINICIAN – EMR. Page 148 eCLINICIAN – Electronic Medical Record Enter Orders PLACE A MEDICATION ORDER Medications are ordered using the Medications & Orders section in a number of different navigators. 1. From the navigator table of contents, select Meds & Orders. 2. In the Search for new order field, use completion matching to search for the medication. Search for Medications Quickly You can search for medications by typing the first three letters of the name, a space, and then the dose. • For example, type pen 300 Optionally you can also type a space after the dose and then the form of the medication. • For example, type pen 300 t A search window displays with a list of records matching your search. 3. Select the appropriate record. 4. Click Accept. One of the following happens: • If the medication record is completely pre-built with all the mandatory information entered, the order displays under the Unsigned Orders section. If this is the case, follow the remaining steps. • If the medication record contains unpopulated mandatory fields, the Order Composer displays, highlighting the areas that require attention with red stop signs . To learn more about managing these fields, refer to the next topic Working with the Medications Order Composer. 5. Review the Summary Sentence. If you wish to modify the sig, click the Summary Sentence to launch the Order Composer. If not, proceed to step 7. 6. Update order details as required and click Accept. The Order Composer closes. Page 149 eCLINICIAN – Electronic Medical Record Enter Orders 7. Sign or pend your order(s). Add Medications to Personal Preference List If this is a medication you prescribe regularly, and with the same patient sig, before signing, consider adding this to your personal preference list. To learn more about this, refer to the topic Save a Medication Order to your Personal Preference List During an Encounter. WORKING WITH THE MEDICATIONS ORDER COMPOSER The Order Composer is where you can make changes to any default values and add additional or mandatory information for the order. It displays automatically after placing an order if mandatory information is missing (indicated by red stop signs ). You can also access it manually by clicking the Summary Sentence hyperlink below the order name. For some medication records, such as the amlodopine many of the required fields auto-populate because these values were built into the medication record. Compare this with penicillin where all of the fields are empty (see below). The Order Composer has several distinct areas with which you should become familiar: Page 150 eCLINICIAN – Electronic Medical Record Enter Orders SPECIFY DOSE, ROUTE, FREQUENCY BUTTON: This is the default display for the order composer and requires that dose, route, and frequency as well as the start date, end date, and dispense and refill values be entered as discrete date. USE FREE TEXT BUTTON: You can enter dose, route, and frequency as free text, using the Patient Sig field. Note: the start date, end date, and dispense and refill values must still be entered as discrete data. DOSE FIELDS: This information is automatically generated for you if the data was built into the medication record. Otherwise, there are two dose fields. The first is for entering the numeric value associated with the dose and the second is for the unit of measure (e.g. capsule, tablet, mg). If only one unit is allowed, the second field is not editable. You must complete the first field before you can complete the second. TIP 1: You can type both the number and unit in the first field and the system automatically separates them out. TIP 2: If you enter a dose that is not easily divisible based on the unit that was ordered (e.g. a dose of 7.5 mg using a 10 mg tablet), the system issues a warning and adjusts the sig, rounding the dose to better match the ordered product. It may be preferable to cancel the order and use a medication record with a dose value more conducive to dividing/multiplying, such as a 2.5 mg tablet, in this example. ROUTE FIELD: Indicates the method for taking the medication. FREQUENCY FIELD: Indicates how often the patient is to take the medication. FOR FIELD: Indicates the duration of the prescription in either doses or days. This field assists with auto-calculating both the ending date and dispense and refill values when the Dose data is built into the medication record. STARTING FIELD: This is a date field which auto-populates with the date at the time of the order. This field is editable if you want to change it. ENDING FIELD: This is a date field. Depending on the frequency you choose and how the medication record was built, the field behaves differently: • The data auto-calculates provided that the a) Frequency and For fields are complete, b) the Dose value was pre-built in the medication record and c) the frequency is not PRN or CONTINUOUS. • You must manually enter an ending date for prescriptions that have a frequency of PRN or CONTINUOUS. • An ending date is not required for medications that have a frequency of Once. TIP 3: You can use date shortcuts in this field where t=today, w=week, m=month and y=year. E.g. an end date of 6 months from now can be entered as m+6. DISPENSE FIELDS: There are two dose fields. The first indicates what portion of the prescription is to be initially assigned (versus the portion to be assigned as refills). The second Page 151 eCLINICIAN – Electronic Medical Record Enter Orders field is the unit of measure (e.g. capsule, tablet, mg). You must complete the first field before you can complete the second. TIP 4: You can type both the number and unit in the first field and the system automatically separates them out. DAYS/FILL BUTTONS: These buttons assist you with assigning dispense and refill values. They are only available if a) Frequency and For fields are complete, b) the Dose value was pre-built in the medication record and c) the frequency is not PRN or CONTINUOUS. You have three options available to you: • Full (# Days) button – reflects the day or dose count you specified and is assigned entirely to Dispense field. E.g. for a 180 day prescription: Dispense=180, Refill=0. • 30 Days – a default button which assigns 30 to the Dispense field and the rest to Refill, as refills of 30. E.g. for a 180 day prescription: Dispense=30, Refill=5. • 90 Days – a default button which assigns an initial dispense of 90 and the rest as refills of 90. E.g. for a 180 day prescription: Dispense=90, Refill=1. TIP 5: If there are details you want to add to the sig which cannot be added in discrete fields, you can enter this information as free text by clicking the Edit hyperlink in the Patient Sig area. Why Enter End Dates for Medications? Entering End Dates for medication orders is likely a new concept if you haven’t used an electronic medical record previously. The date itself is a soft date, meaning that you have no control over when the patient might actually fill the prescription and then start to take it. This date ensures that accurate medication lists are maintained on all patients in eCLINICIAN - EMR. When an End Date is reached, the medication is automatically removed from the patient’s current medications list, so the medication list is always current and no one has to manually clean it up. The only exception to this rule is for Long Term medications. Medications that are marked as Long Term remain on the current medications list even after the end date is reached. Page 152 eCLINICIAN – Electronic Medical Record Enter Orders ENTER AN ORDER FOR A MEDICATION NOT AVAILABLE IN eCLINICIAN As previously stated, First Data Bank (FDB) Canada is the medication source for eCLINICIAN EMR. The list of medications provided by FDB is not exhaustive. For example, it does not contain all brands and forms of multi-vitamins. You must order Medications not available from FDB Canada as an Other medication. Two Other categories you can use are: • Other, Medication. • Vitamin, Other for vitamins. Medications entered as an Other category are essentially free text entries. As a result, interaction checking with charted medications or allergies, and duplicate order checking do not take these entries into account. Free text entries also have limited value in terms of reportability. Because a new FDB source file is uploaded to eCLINICIAN - EMR weekly, you need to do periodic checks to see if any previously missing items, that were charted as an Other, are now available. The next topic Custom-Built Medications & Vitamins describes how you can manage medications and vitamins documented as Other. To enter a medication or vitamin not available from FDB Canada: 1. From the navigator table of contents, access the Meds & Orders section. 2. In the Search for new order field, use completion matching to search for Other Medication or Vitamins, Other. The Database Search window appears. 3. Select the appropriate record. 4. Click Accept. The Order Composer displays. 5. In the Medication Name field, type the name of the medication. This name rather than Other Medication or Other, Vitamin displays in the patient’s medication lists. 6. Complete the remaining order details as required. Page 153 eCLINICIAN – Electronic Medical Record Enter Orders 7. When you are finished, click Accept. The Order Composer closes. 8. Review the sig details in the Summary Sentence. 9. Sign or pend your order(s). When signing orders, a Medication Warnings window displays because the system cannot perform dose checking for you. You must confirm the dose manually. CUSTOM-BUILT MEDICATIONS & VITAMINS Every quarter the eCLINICIAN team and the Pharmacy team perform an analysis of the medications and vitamins entered as Other. The following criteria form the basis for selecting items to be built as a custom medication or vitamin: • New drugs on the market that are not yet available from FDB (First Data Bank Canada), • Commonly used medications that are not (or may never be) available from FDB (includes certain vitamins), and • Clinical trial medications. When medications or vitamins are custom-built, if a proxy medication exists, it is used so that Drug to Drug and Drug to Allergy interactions are available. Page 154 eCLINICIAN – Electronic Medical Record Enter Orders Custom-built medications that do not have a proxy, are created with an asterisk beside the medication made. This visual indicator means that there is no interaction checking when you sign these orders. When custom-built medications and vitamins are added to eCLINICIAN, you receive an In Basket message. The following actions may then be required: • If the custom-build medication/vitamin replaces one currently on your personal preference list, you need to delete the item from your list. For details on these steps, refer to the topic Remove an Item from your Personal Preference List. • If appropriate, add the custom built medication to your personal preference list. For details on these steps, refer to the topic Add an Order to your Personal Preference List. • If a proxy medication was not available for the newly built medication/vitamin, when placing future orders, you need to manually check interactions, as described in the previous topic. ORDER MEDICATIONS WITH COMPLEX DOSING Some prescriptions involve sigs that are too complex to order discretely, in this case, you have to enter the instructions as free text. There are three common reasons you would use free text: • There isn’t a specific dose for the prescription, which is often the case for topical creams and ointments. • The patient needs to take different doses at different times of the day. For example, s/he takes two tablets in the morning and one in the evening. • The patient needs to take different doses on different days. For example, you might taper a patient off of a medication (demonstrated below). To order a medication with complex dosing: 1. From the navigator table of contents, access the Meds & Orders section. 2. In the Search for new order field, use completion matching to search for the medication. A search window displays with a list of records matching your search. 3. Select the appropriate order. 4. Click Accept. The Order Composer displays with some fields pre-populated. Page 155 eCLINICIAN – Electronic Medical Record Enter Orders 5. Click Use Free Text. The Order Composer displays with fewer and different fields, including a Patient Sig field where you can enter free text. 6. In the Patient Sig field, type the instructions. 7. Complete the remaining details as required. 8. Click Accept. The Order Composer closes. 9. Review the sig details in the Summary Sentence. Add Medications with Complex Dosing to Personal Preference List If this is a medication you prescribe regularly, and with the same sig, consider adding this to your personal preference list. To learn more about this, refer to the topic Save a Medication Order to your Personal Preference List During an Encounter. 10. Sign or pend your order(s). Page 156 eCLINICIAN – Electronic Medical Record Enter Orders TAPERING MEDICATIONS To taper medications in eCLINICIAN, you can create multiple similar prescriptions simultaneously with gradually increasing or decreasing doses. 1. From the navigator table of contents, access the Meds & Orders section. 2. In the Search for new order field, use completion matching to search for the medication. A search window displays with a list of records matching your search. 3. Select the appropriate order. 4. Click Accept. The order displays as an Unsigned Order. 5. To the right of the medication name, click the gear icon. An order related action menu displays. 6. From the menu, select Create a Copy > Taper. Page 157 eCLINICIAN – Electronic Medical Record Enter Orders A duplicate order appears as an Unsigned Order with a stop sign beside it. 7. Click the medication hyperlink to launch the order composer. 8. Enter the tapered dose information. 9. Enter the frequency information. The remaining mandatory fields auto-populate. 10. Click Accept. The unsigned order redisplays. 11. Repeat steps 5-10 for to taper the medication further. 12. When you are done, sign or pend your order(s). Page 158 eCLINICIAN – Electronic Medical Record Enter Orders ORDER A COMPOUND MEDICATION 1. From the navigator table of contents, access the Meds & Orders section. 2. In the Search for new order field, completion match on compound. The Database Search window displays records matching your search. 3. Select the record that displays as COMPOUND. 4. Click Accept. The Order Composer displays. 5. In the Notes to Pharmacy field, enter all of the information regarding the ingredients for the compound. This is the area that prints on the prescription as instructions for the pharmacy. 6. In the Medication Name field, type the name of the compound. This name rather than Compound then displays in the patient’s medication lists. 7. Complete the remaining order details as required. Page 159 eCLINICIAN – Electronic Medical Record Enter Orders 8. Click Accept. The Order Composer closes. 9. Review the sig details in the Summary Sentence. Add Compounds to Personal Preference List Before you sign your order, click the star icon to the right of the compound name. This action saves the medication along with the newly entered details to your personal preference list. With a few clicks the compound can be quickly ordered for another patient. For details on these steps, refer to the topic Save a Medication Order to your Personal Preference List During an Encounter. 10. Sign or pend your order(s). REORDER A MEDICATION You can reorder medications from the Meds & Orders section of navigators. This workflow involves reordering the medication using the patient’s most recent medication details. 1. From the navigator table of contents, access the Meds & Orders section. 2. Under the Medications heading, click the medication order hyperlink. The details of the medication display. 3. Click Reorder. TIP 1:Refer to the Change Appearance of the Medications and Orders section to learn how you can personalize this navigator section to make these buttons more accessible. Page 160 eCLINICIAN – Electronic Medical Record Enter Orders The reordered medication displays in the Unsigned Orders subsection. 4. Review the Summary Sentence. If you wish to modify the sig, click the Summary Sentence to launch the Order Composer. If not, proceed to step 6. 5. Update order details as required and click Accept. The Order Composer closes. 6. Sign or pend your order(s). Best Practice – Reorder Medications When a patient requires a refill, reordering the medication using the corresponding Reorder button causes the original order (Rx) to be automatically discontinued. This avoids the creation of duplicate or overlapping medication records. Page 161 eCLINICIAN – Electronic Medical Record Enter Orders DISCONTINUE A MEDICATION The Medications area of the Meds & Orders navigator section lists the medications the patient is currently taking. These may be medications that were prescribed in eCLINICIAN or were patient-reported medications prescribed elsewhere. If you wish to cancel a prescribed medication or indicate that a patient is no longer taking a medication, you accomplish both in the Meds & Orders navigator section. 1. From the navigator table of contents, access the Meds & Orders section. 2. Under the Medications heading, click the medication order hyperlink. The details of the medication display. 3. Click Discontinue. TIP 1:Refer to the Change the Appearance of the Medications & Orders Section section to learn how to make these buttons more accessible. The Discontinue Prescription window displays. 4. In the Discontinue reason field, either use completion matching or click the Selection tool (magnifying glass) to add an appropriate reason. 5. Click Accept. The Meds & Orders section redisplays. Page 162 eCLINICIAN – Electronic Medical Record Enter Orders TIP 2: You can also use these steps to cancel a medication that you ordered in error and discovered immediately after signing the order. Page 163 eCLINICIAN – Electronic Medical Record Enter Orders USE ORDER PREFERENCE LISTS DURING AN ENCOUNTER Preference Lists are a great way to help you quickly place orders for medications and procedures that you most commonly use. There are two types of preference lists: • System preference lists are built by the eCLINICIAN project team to reflect ordering practices for a defined group of users such as for your specialty. • Personal preference lists are built by individual users. You can add orders to your personal preference lists so that they reflect your unique ordering practices. You can access these preference lists clicking the New Order button in the Meds & Orders navigator section. The window that displays has several distinct areas with which you should become familiar. Page 164 eCLINICIAN – Electronic Medical Record Enter Orders BROWSE TAB: This is where you can access the Preference List Browser which resembles a paper requisition form. It contains the order types and sub-types contained within your personal preference list and the system preference list. It comprises three panes: the left-hand pane, middle pane, and Selected Orders pane. PREFERENCE LIST BROWSER LEFT-HAND PANE: Lists the order types and sub-types you can order. Each heading is also a hyperlink that takes you to the respective section in the middle pane. PREFERENCE LIST BROWSER MIDDLE PANE: Displays the individual orders which you select by clicking the checkboxes to the left of the order name. PREFERENCE LIST BROWSER SELECTED ORDERS (RIGHT-HAND) PANE: Displays the orders you selected from the Preference List browser middle pane. ONLY FAVORITES CHECKBOX: This is a filter which, when selected, displays only those orders on your personal preference list. PREFERENCE LIST TAB: This is where you can search the system preference lists for orders, using completion matching. There are filters for refining your search to Medications, Procedures, and/or Order Panels. DATABASE LOOKUP TAB: This is where you can search the entire list of orders contained within the system, regardless of specialty. There are filters for refining your search to Medications, Procedures, and/or Order Panels. Page 165 eCLINICIAN – Electronic Medical Record Enter Orders SAVE A LAB ORDER TO YOUR PERSONAL PREFERENCE LIST DURING AN ENCOUNTER During an encounter you can add orders to your personal preference list. To demonstrate, the steps below involve adding a pre-op lab panel to your personal preference list. You can personalize specialized lab panels built for your specialty. For example, the specialtybuilt lab panel may contain more tests than you typically order. You can make your selections from the lab panel and then save these selections as a personal preference. 1. From the navigator, access the Meds & Orders section. 2. Place an order for a panel. The order displays under the Unsigned Orders section. Notice that panels are built without any of the tests pre-selected. You have to manually select them. 3. Click on the test names to build a subset of panel tests. The selections display with a checkmark to the left and a Summary Sentence to the right. 4. If you wish to add/change details of the order, click the Summary Sentence to launch the Order Composer and proceed to make the necessary changes. 5. To add the panel with the pre-selected values to your personal preference list, to the right of the panel order, click the Add order to preference list button (white star). The Add to Preference List window displays. Page 166 eCLINICIAN – Electronic Medical Record Enter Orders 6. In the Display name field, type a meaningful or shortened version of the order’s name. Notice that the system has a pre-populated section called, Existing. By default the system adds your personal preference list order to this section unless you create a new section. To create a new section to group orders of this kind: 7. Click New Section. The New Section window displays. 8. In the Display name field, type the section name. This could be a sub-category name or anything that sets the list apart, such as My Panels. 9. In the Sort alphabetically in order entry field, type y (for yes). 10. Click Accept. The Add to Preference List window redisplays. 11. Update any order-specific details as required by clicking on the Summary Sentences. 12. When you are done, click Accept. The order is now saved to your Preference List. Also, a Replace Order pop-up window displays. 13. If you made changes to your original sig order in the Add to Preference List window, and you want to replace it with the order from your personal preference list, click Replace Order. To keep your original order, click Keep Order. TIP: During an encounter you can add orders to your personal preference list up until you sign your order. Once you sign the order, the star icon no longer displays. Page 167 eCLINICIAN – Electronic Medical Record Enter Orders SAVE A MEDICATION ORDER TO YOUR PERSONAL PREFERENCE LIST DURING AN ENCOUNTER During an encounter you can add medication orders to your personal preference list. 1. From the navigator, access the Meds & Orders section. 2. Place an order for a medication and complete the details of the patient sig. 3. To the right of the medication, click the Add order to preference list button (white star). The Add to Preference List window displays. 4. In the Display name field, type a meaningful or shortened version of the order’s name. Notice that the system has a pre-populated section called, Existing. By default the system adds your personal preference list order to this section unless you create a new section. To create a new section to group orders of this kind: 5. Click New Section. The New Section window displays. 6. In the Display name field, type the section name. This could be a sub-category name or anything that sets the list apart, such as My Meds. 7. In the Sort alphabetically in order entry field, type y (for yes). 8. Click Accept. The Add to Preference List window redisplays. Notice that the system pulls in most of the information you specified in your order. The Starting and Ending dates as well as any free text information you added to the patient sig are not carried over from the original order. 9. 10. To pull in your patient instructions, in the Instructions area, click Copy From Order. In the Starting date field, type s. Page 168 eCLINICIAN – Electronic Medical Record Enter Orders TIP 1: Once you’ve entered a Starting date, the Ending date should auto-calculate so long as you entered information in the For field in the Frequency area. If the Ending date has not autocalculated, either complete the For field, or proceed to step 11. 11. In the Ending date field, type s + <duration of the therapy in days>. The For field autocalculates. TIP 2: The s in this formula stands for the starting date. For example, for a one month supply of a particular medication, type s+30. For a long term medication, type s+365.The start and end date pre-populate each time you place the order from your personal preference list. TIP 3: The Add to Preference List window is the only place where you can use this formula. 12. Update the remaining fields, as required. 13. When you are done, click Accept. The order is now saved to your Preference List. Also, a Replace Order pop-up window displays. 14. If you made changes to your original sig in the Add to Preference List window, and you want to replace it with the order from your preference list, click Replace Order. To keep your original order, click Keep Order. TIP 4: During an encounter you can add orders to your personal preference list up until you sign your order. Once you sign the order, the star icon no longer displays. 15. Click Accept. The order is now saved to your Preference List. Page 169 eCLINICIAN – Electronic Medical Record Enter Orders ENTER ORDERS USING A PERSONAL PREFERENCE LIST 1. From the navigator, access the Meds & Orders section. 2. Click New Order. The Preference List Browser displays. 3. To quickly locate items on your personal preference list, select the Only Favorites checkbox. In the middle pane, below the Orders heading, a list of your preference orders displays. TIP 1: You can also view your personal preference list by using the left-hand pane of the Preference List Browser window. From here, click the blue arrow beside the Orders heading to expand the menu. Then, click one of your newly created sections to view the personalized orders. 4. In the middle pane, select the appropriate order(s). TIP 2: You can place other orders while you have the Preference List Browser open. Deselect Only Favorites to see the full Browser, or go to the other tabs and use the Search field for completion matching. 5. In the Selected Orders pane, review your orders. 6. When you are done, click Accept. 7. Sign or pend your order(s). Page 170 eCLINICIAN – Electronic Medical Record Enter Orders ASSOCIATE ORDERS WITH DIAGNOSIS The association of orders to diagnoses is not a system-wide requirement and depends on your security role. You may however, encounter specific workflows where this is a required or optional task. The association of a billing code to the diagnoses and the association of a referral to anticoagulation monitoring (order) to the diagnoses are both examples of workflows where you must perform this association. 1. Place your orders but do not sign or pend them. 2. Under the Unsigned Orders heading, in the bottom left corner, click Associate. The Order -- Associate Diagnoses window displays. Here you will indicate the relationship between diagnosis and the order(s). 3. To the right of the desired order, click the column corresponding to appropriate diagnosis. A checkmark displays beside the order in the column. The interlocking red and blue rings also display beside the order indicating that the order is associated with a diagnosis. 4. A diagnosis can be added to the chart using the Diagnosis field. 5. When you are finished, click Accept. SIGN YOUR ORDERS Orders must be signed. Depending on your security level you will sign the order directly or sign the order as a delegate. Page 171 eCLINICIAN – Electronic Medical Record Enter Orders Several things happen when you sign your orders including the following: • Drug to Drug and Drug to Allergy interactions are checked. • Orders are checked for duplicates in the last 14 days. • Lab and Diagnostic Imaging tests – Requisitions print to the designated printer. • Medications – Prescriptions print to the designated printer. • In Clinic procedures – Drops to the Procedure Orders section of the navigator so procedure can be documented. • Requests for Service – Goes to the Schedulable Orders work list so that clinical staff can schedule their own appointments. • Outpatient Referral Services – Prints an Outpatient Rx form (may not meet the need for the service being referred to/requested so paper form may been to be filled out). • Referrals to a Specialty – If the ‘referred to’ clinic is using eCLINICIAN, the referral will fall onto their referral list. If the ‘referred to’ clinic is not using eCLINICIAN, then you will follow your current manual processes. Your administrative staff will also manually track the referral using a series of eCLINICIAN Referral reports. • Billing codes – Sent to eCLINICIAN-Billing. WARNING MESSAGES 1. In the current warning area, from the Override Reason menu, make a selection. TIP: If there multiple warnings, on the bottom left of the window, there are Immediately override all warnings buttons. Clicking these buttons automatically closes the Medications Warnings window. 2. Click Override and Accept. Page 172 eCLINICIAN – Electronic Medical Record Enter Orders CANCEL A SIGNED ORDER You can cancel an order as long as the order has not yet been resulted. If, after signing an order you discover that you need to cancel it, perform these steps: 1. From the Visit Navigator table of contents, access the Meds & Orders section. 2. Next to your order, click the summary sentence hyperlink. The Order Composer displays. 3. Click Cancel. The Cancel Order window displays. 4. In the Reason for cancelling field, use completion matching or the Selection Tool to enter an appropriate reason. 5. If appropriate, type a comment. 6. When you are done, click Accept. Page 173 eCLINICIAN – Electronic Medical Record Enter Orders REPRINT REQUISITIONS AND PRESCRIPTIONS WITHIN eCLINICIAN Occasions may arise where you need to reprint requisitions and/or prescriptions. There are two different ways to reprint in eCLINICIAN: • • The Order Review activity Order Entry activity EVALUATE THE REPRINTING OPTIONS The Order Review activity is recommended for reprinting orders when the following conditions apply: • The order(s) you want to reprint successfully printed the first time; i.e. there weren’t mapping/connection issues between the printer and workstation. • The order(s) was placed within 60 days of the current date. • You don’t mind that each order prints on a separate page. If your situation does not meet these conditions, you can cancel the original order(s) in the Order Entry activity, and then reorder them within the original encounter. The table below summarizes these two solutions: Order Review Original order printed? # of days order was signed prior to the current date Will print multiple orders on the same piece of paper? Yes No ≤ 60 days > 60 days Yes No Order Entry (Cancel Order) & Reorder Regardless of which option you choose, you must first open the encounter for the original order. OPEN THE ORIGINAL ENCOUNTER You can open an encounter using one of the following two ways: • Multi-Provider Schedule to find the patient appointment • Epic button to look up the patient and the open or closed encounter USE THE MULTI-PROVIDER SCHEDULE 1. Access the Schedule activity. 2. Use the calendar to navigate to the appropriate date. 3. Locate the patient’s appointment. Page 174 eCLINICIAN – Electronic Medical Record Enter Orders 4. To open the encounter, double-click the appointment row. If the encounter has been closed, create an addendum. USE THE EPIC BUTTON If you do not know the date of the scheduled encounter, or you are searching for an unscheduled encounter such as a Medication Refill or Orders Only, you can search from the Epic Menu. 1. Click the Epic button. 2. Select Patient Care. 3. To search for an open encounter, select Encounter. 4. Type the patient’s last name, first name, and date of birth in the corresponding fields. 5. Click Find Patient. 6. Click the appropriate patient and then click Accept. Encounters that have been closed do not display here. 7. If you do not see the applicable encounter in this list, click Cancel and complete steps 9 through 11 below, otherwise continue with step 8. 8. From the Encounter Selection window, select and open the appropriate encounter. 9. To search for a Closed Encounter, click the Epic button. 10. Select Patient Care. 11. Select Addendum. To reprint via the Order Review Activity, proceed to the next section Reprint Using the Order Review Activity. Page 175 eCLINICIAN – Electronic Medical Record Enter Orders To learn about cancelling orders and reordering, refer to the section Reprint Using the Order Entry Activity. REPRINT USING THE ORDER REVIEW ACTIVITY – RECOMMENDED The Order Review activity allows users to look up previous orders and reprint both requisitions and prescriptions. To access the Order Review activity: 1. Find and open the encounter in which the original orders were signed. If the encounter was previously closed, create an Addendum. 2. From the bottom of the Activity tab list, click More Activities. 3. From the menu, select Order Review. To view the orders which were placed during the encounter: 1. From the Activity toolbar, click Views. 2. Select the Encounter Orders option. Page 176 eCLINICIAN – Electronic Medical Record Enter Orders The orders are grouped into Labs, Medications, etc. 3. Click the orders you wish to reprint. To select multiple orders, hold the Ctrl key while you click the desired orders. 4. After you have selected your orders, from the activity toolbar, click Reprint. 5. Verify that the printer listed in the Printer name field is correct. If not, click the Selection tool to view a list of possible printers and choose the appropriate one. 6. After you select a printer, click Print. 7. When you are finished, exit the patient workspace or sign the Addendum, if appropriate. PRINT USING THE ORDER ENTRY ACTIVITY For situations in which Order Review won’t work, rather than reprinting the original orders, you can cancel/discontinue them and reorder them within the original encounter. The Order Entry activity allows you to cancel orders. To access the Order Entry activity: 1. Find and open the encounter in which the original orders were signed. If the encounter is closed, create an Addendum. 2. From the Activity tab list, select Order Entry. Page 177 eCLINICIAN – Electronic Medical Record Enter Orders To cancel/discontinue orders and reorder: 1. Expand the Previously Signed Orders section by clicking the heading. 2. Locate an order to be cancelled. You can only cancel one order at a time. 3. If it is a medication, click Discontinue. For other orders, click Cancel. Page 178 eCLINICIAN – Electronic Medical Record Enter Orders Even though there is a Reprint button beside medication orders, it only reprints orders that successfully printed the first time. 4. In the Reason for canceling field: • For medications, type Reorder. Additionally, in the Notes field, type for reprint. • For other orders, type Reprint. 5. Click Accept. 6. Repeat steps 3 through 5 for any remaining orders you wish to cancel. 7. When you are done, return to the Visit Navigator. 8. Open the Meds & Orders section and place the orders again. Once the order is signed, it will print to your assigned printer. Page 179 eCLINICIAN – Electronic Medical Record Enter Orders PLACE ORDERS AND OTHER VISIT DETAILS USING A SMARTSET SmartSets are another way to place orders quickly for your patients. The eCLINICIAN team typically builds SmartSets for encounters where there is a defined pattern to the orders that you place and the information that you chart. In addition to orders, SmartSets can also contain such things as the reason for visit and follow-up instructions. The Physical Exam SmartSet is an example of a current SmartSet. DOCUMENT A PORTION OF YOUR VISIT USING A SMARTSET A SmartSet can either be opened from the SmartSet section of the navigator, or it can be suggested based on a reason for visit that was entered for the current encounter. 1. From the navigator table of contents, access the SmartSets section. 2. You can select a SmartSet using the following methods: • In the Search field, use completion matching. • Click the Add button. • Click the checkbox beside the suggested SmartSet. TIP 1: You can preview the SmartSet to see if it is appropriate by clicking the paper and magnifying glass icon beside it. TIP 2: Right click the SmartSet name to add it as a favorite. The next time you access the SmartSet, it displays with a checkbox under the heading Favorites. 3. After making your selection, click Open SmartSets. The appropriate SmartSet displays. 4. Notice that some items are pre-selected. Select or deselect the corresponding checkboxes as required. Page 180 eCLINICIAN – Electronic Medical Record Enter Orders 5. If you need to change any details relating to a displayed item, click the related Summary Sentence hyperlink. 6. When you are done, click Sign or Pend. TIP 3: You can view all of the information populated in the SmartSet in the corresponding sections of the navigator. TIP 4: If the SmartSet does not contain the item you want to order/document, simply go to the respective section or activity and complete the rest of the orders/documentation for the visit there. Page 181 eCLINICIAN – Electronic Medical Record Enter Orders COMPLETE POST ORDER ACTIVITIES When an order is placed for an In Clinic test or procedure, additional activities may be generated for clinical staff. These actions may include the documentation of an In Clinic test or procedure and the administration of an immunization. For details on how to document an In Clinic procedure, refer to the topic Write a Procedure Note. DOCUMENT THE RESULT OF AN IN CLINIC TEST 1. From the lower left-hand section of the patient workspace, select More Activities > Enter/Edit Results. The Enter/Edit Results activity displays. 2. Double-click the test you want to result. 3. In the Specimen section, enter the appropriate information. 4. On the appropriate tab (Components, Sensitivities, Narrative or Impressions) enter the resulting components. 5. Result messages are returned to the ordering provider. To route the result to additional providers, in the Result Message section, complete the details. 6. In the Result section, enter the date and time of the result, indicate whether the procedure was abnormal, and change the status to Final. 7. Click Accept. Page 182 eCLINICIAN – Electronic Medical Record Enter Orders DOCUMENT AN IMMUNIZATION ADMINISTRATION For further details refer to the Self Learning Document: Document an Immunization or Vaccine Administration Visit. An Immunization must first be ordered within Meds & Orders before you can document the injection administration. 1. From the patient’s workspace, select the Immunizations activity. TIP: The Immunizations activity can also be found under the More Activities menu. 2. Immunizations that have been ordered, but not yet documented as administered, are listed in the Incomplete Administrations section. 3. Click Administer and enter any required details about the immunization, such as the site. will indicate the required fields. 4. From the toolbar, select from the Historical Admins menu to document previously administered immunizations. 5. Click Accept. Page 183 eCLINICIAN – Electronic Medical Record Wrap Up the Visit WRAP UP THE VISIT There are several tasks to consider when wrapping up the patient’s visit. These tasks can include writing a sick note for the patient, creating a letter to a referring provider or writing a consult letter back to the patient’s family physician. Other tasks include providing the patient with information to take away with them such as patient instruction handouts or visit summaries. When charting is complete, you must close the encounter. The following main topics are covered in this chapter: • Enter Follow-Up Details and Generate Handouts • Write Letters • Close the Encounter Page 184 eCLINICIAN – Electronic Medical Record Wrap Up the Visit ENTER FOLLOW-UP DETAILS AND GENERATE HANDOUTS Before you end the visit, you can generate handouts to give to your patient. The handouts can be in the form of patient instructions or a summary of what happened during the visit. The Follow-up section of the Visit Navigator provides you with an area where you can indicate when the patient should return for their next appointment, communicate instructions to the check-out staff and send a copy of the patient’s encounter report to a colleague for comment. DOCUMENT PATIENT INSTRUCTIONS The Patient Instructions section of the Visit Navigator allows you to enter information that you want the patient to read and take away with them. 1. From the Visit Navigator table of contents, access the Pt. Instructions section. The Patient Instructions section displays. 2. Enter patient instructions. You can add this information either by directly typing the information, copying and pasting the information from another source, using a SmartTool such as a personal SmartPhrase or using the Clinical Reference activity. For details on how to use Clinical References, refer to the topic Use Clinical References. 3. You can print Patient instructions directly by using the Print button on the Hyperspace (main) toolbar and then selecting Print Patient Instructions. TIP: Patient Instructions also display on the After Visit Summary report. Page 185 eCLINICIAN – Electronic Medical Record Wrap Up the Visit SPEED BUTTONS To increase efficiency in your workflow, speed buttons are now available in the Follow-up section. You have the ability to edit the default buttons and create new ones. 1. To edit or add a new Return in speed button, click the corresponding wrench icon. 2. To add a Reason for Return speed button, click the corresponding wrench icon. USE CLINICAL REFERENCES If you want to provide your patient with more information about a particular problem, diagnosis, or medication, you can search for related articles using the Clinical References activity. This activity allows you to print or copy text from McKesson, the clinical reference source used by eCLINICIAN. The copied text can be incorporated into the Patient Instructions section of the Visit Navigator. 1. From the Visit Navigator toolbar, click References. 2. From the Clinical Reference activity, select the Additional Search tab. 3. In the Search field, type the search parameter. Articles matching your search criteria display. Page 186 eCLINICIAN – Electronic Medical Record Wrap Up the Visit 4. Select the appropriate article. The article displays in the right-hand pane. 5. From the Document Preview tab you can click Print to print a copy of the article to give to the patient or you can add the content of the article to the Patient Instructions section. To add the contents of the article to the Patient Instructions sections, highlight the article and click Add To Patient Instructions. ENTER FOLLOW-UP DETAILS The Follow-up section allows you to route a check-out note to administrative support staff to complete any follow-up details for the patient. This is also the section where you can route a chart to another colleague or member of your support team. 1. From the Visit Navigator table of contents, select Follow-up. The Follow-up section displays. 2. In the Disposition area, indicate when the patient should return. The information entered here displays on the After Visit Summary report. 3. To communicate with the staff that checks the patient out of the clinic, type your instructions in the Smart-Tool enabled text box in the Check-out note field. 4. To send a copy of the encounter report to another user’s In Basket, enter the user’s name in the Recipient area. The recipient will receive a CC’d Chart In Basket message. 5. To enter a message for the recipient of the CC’d Chart, use the Smart-Tool enabled text box in the Comments field. 6. When you are done, close the section. Page 187 eCLINICIAN – Electronic Medical Record Wrap Up the Visit PRINT AN AFTER VISIT SUMMARY REPORT The After Visit Summary Report describes the visit in patient-friendly terms and includes information such as patient instructions, current medications and lab tests ordered. There are several locations from which you can access and print the After Visit Summary. One location is the Visit Navigator toolbar. Another location is within the Snapshot activity. From the Visit Navigator toolbar: 1. Click Print AVS or Preview AVS. From the Activity tabs on the left-side: 1. Select the Snapshot activity. 2. From the reports toolbar, click Visit Summary. 3. Review the details displayed. 4. To print the report, click Print from the Hyperspace (main) toolbar. The After Visit Summary report should be generated only within the context of the current encounter. The report should not be launched when the patient’s chart is in review mode. Page 188 eCLINICIAN – Electronic Medical Record Wrap Up the Visit WRITE LETTERS Letters can be created from both Scheduled and Non-Scheduled encounters. Non-Scheduled encounters include Telephone, Orders Only, Send Letters or Letters (Out) encounters. The steps to create letters to send to other health care providers and the steps to create letters for patients vary slightly in eCLINICIAN - EMR. There are several different workflows which you may use to create and send letters, depending on your clinic’s practices. Several of the basic workflows are outlined in detail in the Letter Workflows Self Learning document located on the eCLINICIAN Training Documents webpage (http://insite.albertahealthservices.ca/11520.asp). Page 189 eCLINICIAN – Electronic Medical Record Wrap Up the Visit CLOSE THE ENCOUNTER When you are done with all of your documentation, you must close the encounter to finalize your documentation. When you close an encounter, the system also performs checks to ensure that all the necessary information for a particular encounter types has been entered. Best Practice - Importance of Closing your Encounters Similar to the In Patient setting, charts in an enterprise ambulatory EMR must be closed in a timely manner. Encounters in a status of Open imply that the information in the encounter is incomplete. As a result clinicians looking at the encounter details may fail to act on this information. If you are the encounter provider and have not closed a chart, you will receive an automated In Basket notification 24 hours later. 1. From the Visit Navigator table of contents, select Close Encounter. 2. If the encounter is missing required information, the Close Encounter activity displays, listing the information you must complete. 3. To quickly jump to the section of the encounter that needs attention, click the appropriate hyperlink. 4. Once all information is complete, select Close Encounter again. You also have the option to Sign Visit or Sign Visit and Log Out. Page 190 eCLINICIAN – Electronic Medical Record Wrap Up the Visit Page 191 eCLINICIAN – Electronic Medical Record Perform Post Visit Activities PERFORM POST VISIT ACTIVITIES There are several activities that might be performed after the patient leaves your office. These activities include completing your charting or adding an addendum to an encounter after it has been closed and you discover missing or incorrect information. This chapter also deals with how to handle encounters that were opened or charted in error and how to indicate that a patient is deceased. The following main topics are covered in this chapter: • Find an Encounter to Complete Charting • Addend a Closed Encounter • Correct an Encounter Opened or Charted in Error • Flag Patient as Deceased Page 192 eCLINICIAN – Electronic Medical Record Perform Post Visit Activities FIND AN ENCOUNTER TO COMPLETE CHARTING You may not have time to complete your charting during the patient’s visit. METHOD 1: FROM THE IN BASKET ACTIVITY The easiest way to locate open charts is via the In Basket. A My Open Charts In Basket message will be automatically sent to you when a scheduled encounter (e.g. office visit) has not been closed after 24 hours. You can use this reminder to open and complete the chart. 1. To open your In Basket, select the In Basket mini-tab. The In Basket activity displays. 2. Select the My Open Charts In Basket folder. The messages in that folder display in a list to the right. 3. In the upper-right side of the In Basket activity, select the message for the chart you wish to complete. From the Bottom In Basket toolbar, click Enc (or double-click the selected message). The patient’s workspace displays. METHOD 2: FROM THE SCHEDULE ACTIVITY You can quickly locate your open charts using the EC Status column on the Schedule activity. The EC Status are explained below: EC Status Explanation Sch Appointment has been made but patient has not checked in Arrived Patient has arrived and checked in Exam-Rm (Sch) Someone has started documenting in the chart, but the patient has not been checked in Exam–Rm Patient is in the exam room and someone has logged into the workstation in the exam room and started charting Comp Patient has checked out but the encounter has not been closed (documentation incomplete) Closed: Comp Patient has checked out and the encounter has been closed Closed: Exam-Rm Encounter is closed, but the patient is not checked out 1. To open your schedule, select the Schedule mini-tab. The Schedule activity displays. 2. Use the calendar to select the date on which the encounter took place. 3. Locate the appointment in the upper right-hand pane. If the EC Status indicates Exam-Rm (Sch), Exam Rm, or Comp the chart is still open. Page 193 eCLINICIAN – Electronic Medical Record Perform Post Visit Activities 4. To re-open the chart and complete your charting, double-click the appointment. The patient’s workspace displays. TIP: Closed encounters display as Closed: Exam-Rm in the EC status column. Page 194 eCLINICIAN – Electronic Medical Record Perform Post Visit Activities ADDEND A CLOSED ENCOUNTER Once an encounter has been closed, you must create an Addendum in order to re-open the chart and update the previous details. LOCATE AN ENCOUNTER TO ADDEND METHOD 1: FOR SCHEDULED ENCOUNTERS ON KNOWN VISIT DATES To addend an encounter for a scheduled visit when the visit date is known, use the Schedule activity to re-open the encounter. The EC Status column can be used to help you find encounters that are still open and may need attention. Closed encounters display as Closed: Exam-Rm or Closed: Comp in the EC status column. 1. To open your schedule, select the Schedule mini-tab. The Schedule activity displays. 2. Use the calendar to select the date on which the encounter took place. 3. Locate the patient’s visit in the upper right-hand section. 4. Verify that the status of the encounter is Closed: Comp or Closed: Exam-Rm. 5. To open the encounter, double-click the appointment. The following message appears. 6. To create an addendum, click Create Addendum. The patient workspace opens showing an addendum watermark across the right-hand side of the navigator. METHOD 2: FOR SCHEDULED ENCOUNTERS WHEN VISIT DATES ARE NOT KNOWN AND FOR NONSCHEDULED ENCOUNTERS To addend an encounter for a scheduled visit when the visit date is not known, and for nonscheduled encounters, you will need to search for the patient’s encounter. 1. From the Epic button, select Patient Care > Addendum. The Patient Lookup window displays. 2. Search for the patient using the appropriate search criteria. Refer to the topic Find a Patient’s Chart when the Patient is not Scheduled. TIP: Consider marking this navigation path as a favorite so that in the future you can access it directly from the Epic button. 3. From the Encounter Selection window, select the closed encounter you want to addend. Page 195 eCLINICIAN – Electronic Medical Record Perform Post Visit Activities 4. Click Accept. The patient workspace opens showing an addendum watermark across the right-hand side of the navigator. ADDEND AN ENCOUNTER These steps follow from the previous topic Locate an Encounter to Addend. Once an encounter has been closed, you must create an Addendum in order to re-open the chart and update the previous details. 1. Verify that the re-opened encounter displays an Addendum watermark across the right-hand side of the navigator. 2. From the re-opened encounter, make the necessary changes. Page 196 eCLINICIAN – Electronic Medical Record Perform Post Visit Activities 3. 4. To close the addendum, select the Sign/Route Addendum section. • If you are the encounter provider, you do not need to route the addendum. • If you are not the encounter provider, the encounter provider’s name automatically displays in the Recipient field. An Addendum Notification In Basket message is automatically sent to their In Basket once you click Sign Addendum. Click Sign Addendum. Page 197 eCLINICIAN – Electronic Medical Record Perform Post Visit Activities CORRECT AN ENCOUNTER OPENED OR CHARTED IN ERROR When you have charted on the wrong patient, or you have charted a duplicate encounter for a patient, the following steps must be performed in eCLINICIAN-EMR: 1. Open the appropriate encounter or create an Addendum if the encounter has been closed. 2. Delete any Visit Information or Reason for Call and replace it with Error. 3. Remove any text you entered in the Progress Notes or in the Documentation section. Replace the text with Error. (Do not use the Delete button in the Progress Note) 4. Remove any diagnosis entered and replace it with a diagnosis of Erroneous Encounter – Disregard. 5. Any new information that was entered into the patient’s chart must be removed. This may include, but is not limited to, the following examples: 6. • Discontinue medications with a reason code of Error and Note of Ordered in Error and change the end date to be the same as the start date. • Cancel any orders. • Delete any information recorded in the Vitals, Allergy, History and FYI sections. Finally, if the patient was provided with printed information, such as prescriptions or lab requisitions, you will need to follow-up with the patient. TIP 1: If you’ve opened a Telephone or Refill Encounter by mistake, add Error to the Reason for Visit and close the encounter. TIP 2: Currently there is no way to indicate that you opened a Letter encounter in error. Page 198 eCLINICIAN – Electronic Medical Record Perform Post Visit Activities FLAG A PATIENT AS DECEASED When a patient is marked as deceased in the Alberta Client Registry, the information is automatically transferred to eCLINICIAN and can be viewed on the Demographics activity. To avoid the risk that there might be a delay in setting this flag in the Alberta Client Registry, the physician who signs the death certificate has the ability to mark that patient as Deceased in eCLINICIAN. To mark the patient as deceased, perform the following: 1. Access the patient’s workspace. 2. Select the Demographics activity. 3. In the Patient status field, change the value to Deceased and click Accept. 4. The following message displays: 5. Click Yes. When the patient is marked as deceased all future-dated appointments are automatically cancelled. Page 199 eCLINICIAN – Electronic Medical Record Perform Post Visit Activities Anyone who accesses the patient’s workspace in the future will receive the following warning message: Page 200 eCLINICIAN – Electronic Medical Record Manage your Work Using the In Basket MANAGE YOUR WORK USING THE IN BASKET The In Basket is eCLINICIAN - EMR’s internal communication tool. It is critical to understand that working in your In Basket throughout the day will keep your workflows and others’ workflows running smoothly. The key to understanding the In Basket is that it is task-based; i.e., it’s not just about messaging. The In Basket promotes work flow, and the delegation and completion of tasks through the use of messages. The use of the In Basket is also an important aspect of ensuring patient confidentiality. Users who have access to eCLINICIAN - EMR should communicate all patient information with one another via the In Basket rather than using email or fax. The following main topics are covered in this chapter: • Review In Basket Basics • Work with In Basket Messages • Cover your Messages / Share your In Basket • Work with Result-Related Messages • Work with Refill Requests • Work with Messages Related to Completing your Charts • Work with Telephone-Related In Basket Messages • Process Letter-Related In Basket Messages • In Basket as Part of the Clinical Record Page 201 eCLINICIAN – Electronic Medical Record Manage your Work Using the In Basket REVIEW IN BASKET BASICS There are several distinct areas of the In Basket workspace. FOLDER LIST PANE (LEFT-HAND PANE): The list of folders allows you access to the messages you’ve received. Folders display only if you have one or more messages of that type. The number of new messages in that folder is displayed in parentheses. Folders that contain new messages display in bold. NAVIGATION BUTTON LIST: These buttons allow you to switch between your In Basket and Out Basket (where you can view messages you’ve sent or replied to). If you are covering work for one of your colleagues, an Attached In Baskets button also displays. When you open a patient’s chart, a temporary folder called Opened Patients displays allowing you to view all messages pertaining to this patient. TOP IN BASKET TOOLBAR: This toolbar includes buttons for general In Basket actions and settings that aren’t specific to a given message type. BOTTOM IN BASKET TOOLBAR: This toolbar includes buttons for actions that are specific to the message type for the folder in which you are working. Page 202 eCLINICIAN – Electronic Medical Record Manage your Work Using the In Basket FOLDER TITLE BAR: This title bar indicates the name of the folder you have selected as well as the number of unread and total messages. You can select filter options for that folder and choose whether you want to automatically advance to the next message when you are finished with the currently selected message. MESSAGE LIST PANE (UPPER RIGHT-HAND PANE): This pane lists all of the messages you’ve received for a given folder. You can adjust the width of the columns, hide columns and sort messages by clicking the column header or using the controls on the Folder Title bar. MESSAGE REPORT TOOLBAR: This toolbar includes buttons specific to the message type for the folder in which you are working. You can access a Help report that tells you why you received the message and tips about processing it. It also contains different options for viewing message reports and QuickActions. MESSAGE DISPLAY PANE (LOWER RIGHT-HAND PANE): This pane displays the body of the selected message. For some message types, you might also be able to access additional reports using hyperlinks in the message text or the buttons on the available toolbars. VIEW THE STATUS OF YOUR IN BASKET Each time you log into eCLINICIAN, your eCLINICIAN Dashboard displays a list of your In Basket messages in the In Basket Glance section. Depending on your setup, you may also see a Status bar at the top (shown below) or bottom of the Hyperspace screen. • An In Basket icon displays whenever you have messages in your In Basket. • A red arrow on the envelope icon indicates that you have a high priority message. • A blue ball on the envelope icon represents all other priorities (shown above). Page 203 eCLINICIAN – Electronic Medical Record Manage your Work Using the In Basket OPEN YOUR IN BASKET There are several ways to open your In Basket. METHOD 1: FROM THE IN BASKET MINI - TAB Click the In Basket mini-tab. METHOD 2: FROM YOUR eCLINICIAN DASHBOARD Click the In Basket Glance heading or one of the indicated message types. METHOD 3: FROM THE STATUS BAR From the Status bar, click the envelope icon or one of the message types displayed. TIP: The In Basket status bar displays at the bottom of the Hyperspace window only if you’ve set your computer’s taskbar to the property of Auto-hide the taskbar. SORT AND REFRESH IN BASKET MESSAGES While working in your In Basket, you can easily sort your messages using the column headers that display. Sorting allows you to organize your messages in a way that makes sense to you and can help you quickly locate certain messages. For example, when working with Results messages, sorting by the Result Date column helps you easily find the oldest resulted tests. Refreshing your In Basket allows you to watch your list of messages get shorter as you complete messages and mark them as Done. Page 204 eCLINICIAN – Electronic Medical Record Manage your Work Using the In Basket SORT YOUR MESSAGES The order that messages initially display are pre-determined. However, you can sort the messages by any column, by clicking the column header. Click once to sort in ascending order. Click again to sort in descending order. You can also adjust the width of the columns and drag and drop them in a different order to match your preferences. REFRESH YOUR IN BASKET When you refresh your In Basket, eCLINICIAN checks for new messages, removes any messages that you marked as Done, and removes any folders that no longer contain messages. The system automatically refreshes your In Basket at regular intervals while you complete your work and each time you access the activity. To refresh your In Basket manually, from the Top In Basket toolbar, click Refresh. If you don’t have any folders selected when you refresh, you’ll see an updated Folder Summary in the upper right-hand pane. Page 205 eCLINICIAN – Electronic Medical Record Manage your Work Using the In Basket WORK WITH IN BASKET MESSAGES Most of the time spent in your In Basket involves working with messages you receive, but there are times when you'll need to send a message. For instance, you might send a message when you need to relay a phone message, have someone call a patient, or just ask a co-worker a question. The following topics show how to send and process some of these messages. VIEW AN IN BASKET MESSAGE 1. Access the In Basket activity. 2. In the Folder List pane, select the folder for the type of message you want to view (for example, Results). The messages in that folder display in the Message List (upper) pane. 3. To read the message contents, select the message. 4. The message displays in the Message Display (lower) pane. Page 206 eCLINICIAN – Electronic Medical Record Manage your Work Using the In Basket CHANGE THE STATUS OF A MESSAGE All messages start with a status of New. Once the message is selected in the Message List (upper) pane, the status changes to Read. In some cases, when you perform actions on the message, the message status changes to Pend. The final status of a message is Done. There may be times when you want to manually change the status of a message. For example, you might always use the status of Pend to identify messages about which you are waiting for more information. 1. In the Message List (upper) pane, select the message. 2. From the Top In Basket toolbar, click the down arrow next to Mark As. A menu displays. 3. From the menu, select a new status (for example, Pending). The message then remains in the folder. REMOVE A MESSAGE FROM YOUR IN BASKET Once you read a message and no longer want it to display in your In Basket, you must mark the message as Done to have it removed from your In Basket. 1. With the message selected in the Message List (upper) pane, from the Bottom In Basket toolbar, click Done. The Status of the message changes to Done. Messages marked as Done are removed from your In Basket the next time the In Basket refreshes. Note that some In Basket messages may have tasks associated with them that must be completed before they can be marked as Done. Page 207 eCLINICIAN – Electronic Medical Record Manage your Work Using the In Basket SEARCH YOUR IN BASKET The In Basket’s search functionality allows you to search for messages regarding any combination of the following criteria: a specific patient, attached In Baskets, message type, message status, priorities and date. 1. From the Top In Basket toolbar, click Search. The Message Search Report Settings window displays. 2. In the Patient field, use completion matching to search for messages pertaining to a specific patient. 3. In the Message Types section, select the appropriate message type(s). 4. To select the messages marked with a specific status, for example Done, in the Statuses section, deselect all of the statuses except for Done. TIP: You have the ability to retrieve messages marked as Done and return them to your In Basket within 60 days of marking the message with this status. 5. If appropriate, in the Date Message Received section, make the necessary selections to search by date or time period. 6. When you are done, click Search. The Ad Hoc (Search Results) window displays. Page 208 eCLINICIAN – Electronic Medical Record Manage your Work Using the In Basket 7. To view the search results, from the Folder Summary – Ad Hoc (Search Results) section, click the folder matching the message type(s) you identified in your search. RETURN A MESSAGE MARKED AS DONE TO YOUR IN BASKET If your In Basket has not refreshed, you can quickly change the status of a message from Done to another status, using the steps outlined in Change the Status of a Message. Once your In Basket refreshes, you still have the ability to retrieve messages marked as Done as long as you are within 60 days of the deletion. 1. Perform a search in your In Basket for the target message, as outlined in the previous topic. 2. Change the status of the message. SEND AN IN BASKET MESSAGE In eCLINICIAN, you can send or route messages to the following types of users: • Individual users • Classes – A class is a predefined group of users • Pools – A pool is also a predefined group of users. What is the difference between sending a message to a Class versus a Pool? When you send a message to a class, everyone in the group receives a separate message. Class messages are typically informational messages. When you send a message to a pool, everyone in the group sees the same message. Pool messages are typically task-based messages. Page 209 eCLINICIAN – Electronic Medical Record Manage your Work Using the In Basket To send an In Basket message: 1. Access the In Basket activity. 2. From the Top In Basket toolbar, next to New Msg, click the arrow. 3. Select a message type (e.g. Staff). A blank message displays in a new workspace. 4. In the To field, use completion matching to search for the name of the person you are sending the message to. Type the name in the format of lastname, firstname or type the five-digit ID number. TIP: You can also use completion matching to quickly enter the name of your recipient. For example, type smi,ale to locate Alexander Smith. When sending to multiple recipients, add a semi-colon between recipient names. 5. In the Subject field, type an appropriate message heading. 6. In the Notes field, type your message. Complete remaining fields as required. 7. To send the message, click Accept. Page 210 eCLINICIAN – Electronic Medical Record Manage your Work Using the In Basket If the recipient of the message has set him/herself as Out of Contact, an Out of Contact window displays to advise you. Options Tab To send the message at a later date, access the Options tab. In Basket enters today's date by default as the date on which this message should be sent, but you can override this and enter a future date. You can also enter an expiration date and add message flags, if applicable. After a message has expired, it is removed from any recipients' In Baskets. SEND A MESSAGE TO A POOL Page 211 eCLINICIAN – Electronic Medical Record Manage your Work Using the In Basket A pool is a predefined group of users set up by the eCLINICIAN team. When your clinic went live with eCLINICIAN, a list of your clinic’s pool names was created and distributed. If you are unsure of the pool names used by your clinic, contact your Clinic Manager. The steps for sending a message to a pool are the same as those for sending an In Basket message outlined in the previous topic. However, in the To field, type the name of the pool in the form of p <pool name>. TIP: If you don’t know the name of the pool, type p ? in the To field and press ENTER. The Record Select window displays a list of all available pools. You can scroll through the list or enter part of the pool name in the Search field and press ENTER. TAKING OWNERSHIP OF A POOL MESSAGE Whenever possible, all task-based messages should be sent to pools. This ensures that tasks continue to be actioned when staff are absent from the clinic. When you send a message to a pool, one recipient must -and only one can- take ownership of the task outlined in the message. To take ownership of a message: 1. Access the In Basket activity. 2. In the Folder List pane, select the folder for the type of message you want to view (for example, Result Notes). You can tell if a message is a pool message if there is an X under the PL column. 3. In the Message List (upper) pane, select the pool message. 4. In the Message Display (lower) pane, review the message details. 5. The status of the message changes to Read. This indicates to everyone else in the pool that you have taken ownership. It is important that no members of a pool take ownership of a message that already has a status of Read or Pend as this means that someone is already performing this task. If you are first to open the message and do not intend to take ownership, you must manually change the message status back to New. TIP: To make ownership more visible, with the message selected, on the Bottom In Basket toolbar, click the Comments button, and then type a message (or use a SmartPhrase) to indicate you have taken ownership. When the system refreshes, all pool recipients can then view the comments in the Message Report, under the Completion Message heading. 6. When you complete the task, return to the In Basket message and mark the message as Done. The message is removed from your and all other pool recipients’ In Baskets. Page 212 eCLINICIAN – Electronic Medical Record Manage your Work Using the In Basket Page 213 eCLINICIAN – Electronic Medical Record Manage your Work Using the In Basket COVER YOUR MESSAGES / SHARE YOUR IN BASKET Instead of letting your work accumulate in your In Basket while you're away from the office, you can use the Out of Contact activity to ensure that your work is completed in a timely manner. If one of your patients has abnormal results that need to be reviewed immediately while you are out, another designated provider can access your In Basket, review the results, and take the appropriate follow-up actions. There may also be times when you’re not actually unavailable, but you still need someone to help cover your work. You have the ability to grant other users access to your In Basket on an on-going basis. As part of their day to day work, support staff and physicians might also want to share their In Baskets with each other. ARRANGE FOR COVERAGE OF MESSAGES WHILE AWAY You can arrange for a colleague to cover for you while you’re out of the office or on vacation. The time-period when you are away is referred to as an out of contact occasion. While you are away, your In Basket can be attached to a delegate’s In Basket so that s/he can respond to your messages. To assign a delegate to your In Basket: 1. Access the In Basket activity. 2. From the Top In Basket toolbar, click Out. The Out of Contact activity opens. 3. To create an out of contact occasion, click New. The Out of Contact window displays. 4. In the Date fields, enter the dates you will be out of the office. 5. In the Delegates field, type the name of the user who will be covering for you. 6. When you are done, click Accept.Your In Basket appears as an Attached In Basket. Page 214 eCLINICIAN – Electronic Medical Record Manage your Work Using the In Basket In order to complete the coverage process your delegate must complete the steps in the topic Attach to Another User's In Basket. MODIFY A PREVIOUSLY ENTERED UNAVAILABLE TIME PERIOD 1. From the Top In Basket toolbar, click Out. The Out of Contact activity opens. 2. Select an occasion from the Out of Contact Occasions table. 3. Double-click the selected occasion or click Edit to open the Out of Contact window. 4. Edit information as required. 5. To close the Out of Contact window and save the Out of Contact occasion, click Accept. DELETE A PREVIOUSLY ENTERED UNAVAILABLE TIME PERIOD 1. From the Top In Basket toolbar, click Out. The Out of Contact activity opens. 2. Select the occasion you want to delete from the Out of Contact Occasions table. 3. Click Delete to remove the selected Out of Contact occasion. An Out of Contact confirmation prompt displays. 4. Click Yes. 5. Click Close to exit out of the Out of Contact workspace. GRANT ANOTHER USER ONGOING ACCESS TO YOUR IN BASKET Use these steps to grant a colleague ongoing access to your In Basket. 1. From the Top In Basket toolbar, click Attach to open the Attach Other In Baskets window. 2. Select the Grant Access tab. 3. In the User field, enter the names of the users to whom you want to grant permission. 4. Click Accept. Page 215 eCLINICIAN – Electronic Medical Record Manage your Work Using the In Basket The users to whom you grant access are now able to attach your In Basket using either the Persistent Attachment field or the Temporary Attachment field under the General tab in the Attach Other In Baskets window. TIP: To remove the permission after you have given it, simply remove the user's name from the Grant Access tab. ATTACH TO ANOTHER USER'S IN BASKET When a colleague has granted you access to his or her In Basket, as described in the topic Grant Another User Ongoing Access to Your In Basket, you must attach his or her In Basket before you can view it. 1. From the Top In Basket toolbar, click Attach to open the Attach Other In Baskets window. The General tab displays. 2. To attach to the user’s In Basket who granted you a persistent attachment, use completion matching to add the user’s name to the Persistent Attachment field. 3. To control whether or not you want the user’s In Basket to display at this time, select or deselect the Show checkbox. Show is the default setting. 4. Out of Contact and Temporary Attachments automatically display in the lower area of the window. 5. To control whether or not you want the user’s In Basket to display for the Out of Contact or Temporary Attachments, select or deselect the Show checkbox. Show is the default setting. Page 216 eCLINICIAN – Electronic Medical Record Manage your Work Using the In Basket VIEW ANOTHER USER’S IN BASKET In order to view another user’s In Basket, you must first have attached to that user’s In Basket. Refer to the topic Attach to Another User's In Basket to learn how to do this. 1. Access the In Basket activity. Starting on the first day that your coverage begins, on the lower left-hand area of the In Basket activity, you’ll see an Attached In Baskets button. 2. To view your colleague’s In Basket, click Attached In Baskets. Your In Basket folder is replaced with your colleague’s In Basket folder. 3. To return to your In Basket, click My In Basket. Note: For the dates that you cover a colleague’s In Basket, the Status bar at the bottom of the Hyperspace window displays the message types for both In Baskets. Page 217 eCLINICIAN – Electronic Medical Record Manage your Work Using the In Basket WORK WITH RESULT-RELATED MESSAGES This section describes the actions to take when processing two of the most common resultrelated In Basket message types: Results and Result Notes. Turn Off Delivery of In Patient Results Physicians can request that the delivery of In Patient results to their In Basket be turned off. When this is done, results still file to the patient chart and are available in Chart Review. When results are turned off, physicians continue to receive In Patient results from the following: • Lab and diagnostic imaging results that were copied (CC’d) to the physician • Provincial Laboratory results • Private vendor diagnostic imaging results For more information on results that come into eCLINICIAN refer to the sections: Clinical Data Available in eCLINICIAN and Clinical Data NOT Available in eCLINICIAN . To request that the delivery of In Patient results to In Basket be turned off, physicians should contact the eCLINICIAN project team by following the path below: Epic button > Help > Send a Non-Urgent Help Request to the eCLINICIAN Team. In the Help Desk window, select Turn Off In Patient Results for In Basket to auto-populate a request message. Once the change is made, the physician will receive a notification via an In Basket message. Page 218 eCLINICIAN – Electronic Medical Record Manage your Work Using the In Basket Discontinue the Delivery of Paper Results Paper laboratory results can be discontinued so that only electronic results are received. The clinic needs to have been live for a minimum of 90 days and have validated that they are receiving all electronic labs available in eCLINICIAN. To begin the process of discontinuing paper lab results, a clinic representative should call the Help Desk at 780 735 4357. The Help Desk will initiate a ticket and submit it to the LIS team. The LIS team will assist the clinic with the completion of the appropriate paper work, which will include the following required information: • Clinic Code • Discontinue request in writing from each physician in the clinic • Signature from all physicians or a clinic representative If a physician works in more than one clinic live on eCLINICIAN, they will continue to receive paper lab results for those clinics that have not completed this process. To request that “lab paper reports be discontinued” for an entire clinic, contact the Help Desk at 780 735 4357 to initiate the process. Page 219 eCLINICIAN – Electronic Medical Record Manage your Work Using the In Basket REVIEW RESULTS NOT CURRENTLY BEING SENT TO YOUR IN BASKET Business practices and workflows outside of the control of Information Systems impact the delivery of results to your In Basket. The reasons why a result may not appear in your eCLINICIAN In Basket include, but are not limited to, those listed in the following table. Reason Example The result was from a system not interfaced to eCLINICIAN Diagnostic Imaging and Laboratory results performed by an AHS facility outside of the Edmonton zone. Diagnostic Imaging text reports from Cross Cancer Institute. TB Clinic Example: Tuberculin Skin Test results. Canadian Blood Services Examples: Pre-natal, ABO & Rh, Antibody screen Alberta Cancer Board Results from the Tom Baker Centre. Examples: PSA, Ca 125, CEA. DI Text reports from any private community DI providers who do not appear on the eCLINICIAN Data Source listing. Examples: Breast Centre Radiology Mammography & Ultrasound (7121 109 St). APPROACH (Alberta Provincial Project for Outcome Assessment in Coronary Heart Disease). Examples: Coronary Angiography and Percutaneous Coronary Intervention reports. Service performed and resulted by AHS Edmonton facility but the device is not interfaced to a Laboratory Information System (LIS) or a Radiology Information System (RIS) or to eCLINICIAN. Examples: Pulmonary Function tests. The laboratory and ultrasound devices at the Fertility clinic at the Royal Alexandra hospital. The result was “third party” paid and sent from a private community diagnostic imaging provider Page 220 Third party (non-insured, private pay) diagnostic imaging results from private community diagnostic imaging providers Examples: Funds Administrative Service (for refugees or immigrants), Canadian Military, Federal Inmates, WCB, Patient Paid, and Corporate Paid. eCLINICIAN – Electronic Medical Record Manage your Work Using the In Basket Reason Example You responded “NO” to an applicable eCLINICIAN Order Entry question Your response to eCLINICIAN Order Entry questions drives the delivery of results to the In Basket. Examples: If you answer “YES” to the question “ECG to be read by DKML Panel?”, DynaLIFE results the ECG and the electronic result returned to you via your In Basket. If you answer “NO” to this question, you need to provide the name of the doctor who will interpret the ECG. In this case, DynaLIFE sends the ECG readings to the physician indicated on the order. The doctor who interprets the ECG sends the paper result directly to you. Your name was not added to receive the result Example 1: Workflow determines whether or not you receive the result. For a particular test, the process used by a site or department may be to CC the result to the family physician, if the family physician is mentioned in the dictated result. For the same test done at a different site or department, the process used may not CC the result to the family physician. Example 2: Registration interfaces and processes impact which results are sent to the In Basket. In the case of Dictaphone (regional transcription system), if the VAX or Tandem ADT system contains the name of the patient’s family physician, the transcription report is automatically CC’d to the family physician. When transcriptions are performed in other areas that do not use the Dictaphone, no provision of electronic results exists. This would include several specialists who use personal or private systems and staff for their transcription needs. Your name was incorrectly entered by the sending system Each clinic must have a formal process in place for the routing of paper results that are not sent electronically to the eCLINICIAN In Basket. Page 221 eCLINICIAN – Electronic Medical Record Manage your Work Using the In Basket REVIEW A RESULT MESSAGE The In Basket activity instantly provides you with results as they are entered in the system. 1. Access the In Basket activity. 2. In the Folder List pane, select the Results folder. 3. In the Message List (upper) pane, select the message. High-priority and abnormal results are indicated by a red arrow and a red exclamation point , respectively. All abnormal results are also marked as high priority. Within the Results message itself, abnormal components are highlighted in yellow and followed by "(A)". Also, lab results that are flagged as Normal, Abnormal or Critical appear with a green, yellow and red Message Report banner, respectively. Any results that are not flagged appear with the neutral coloured banner associated with the Hyperspace theme in use. 4. In the Message Display (lower) pane, review the message details. When the status of the Results message changes from New to Read, eCLINICIAN stamps the result with your name and the date that you reviewed the result. This information is viewable on the corresponding Result report in the Chart Review activity. 5. From the Bottom In Basket toolbar, click Done. This message is removed from your In Basket the next time the In Basket refreshes. Page 222 eCLINICIAN – Electronic Medical Record Manage your Work Using the In Basket RESPOND TO A RESULTS MESSAGE The results that you receive may require follow-up actions. To detail the actions required and to route the actions to the appropriate recipients, use a Result Notes message. Result Notes messages are filed in the patient’s chart along with the original result. Having the result as well as the follow-up actions all together in the patient’s chart is an important aspect of patient safety. 1. With the appropriate Results message selected, from the Bottom In Basket toolbar, click Rslt Note. The Result Note window displays. 2. In the Select Orders section, select the appropriate test(s) that relate to your note. 3. In the Result Note field, type your instructions for the selected test(s). TIP 1: Do not use the Also file as quick note checkbox when processing results. This feature creates an additional progress note that has no reference to the original result. 4. Under the Route Note To checkbox, in the Recipient field, type the name of the person(s) you wish to send the note to (e.g. your support pool or another physician). TIP 2: If you anticipate routinely routing Result Notes to the same recipient(s), select the Remember recipient(s) checkbox. The system automatically populates the Recipient field with this information in the future. Notice that on the bottom left of the Result Note window, there is a Save as QuickAction button. QuickActions allow you to complete workflows in fewer steps, saving you time. To learn about creating and managing QuickActions, refer to the Personalize eCLINICIAN section. 5. Click Accept. Page 223 eCLINICIAN – Electronic Medical Record Manage your Work Using the In Basket The In Basket window redisplays. Notice that the status of the message is now Pend. 6. To mark the message as complete, from the Bottom In Basket toolbar, click Done. When your In Basket refreshes, this message disappears from your Results folder. Your Result Note is routed to the indicated person(s) in the form of a Result Notes message. The person who receives the Result Note should enter their comments (e.g. “Pt. aware of test results” or “Pt. booked for follow-up”) as another Result Note, which is demonstrated in the next topic. The repeated use of the Result Note functionality is the best way to quickly view all communication about a result. RESPOND TO A RESULT NOTES MESSAGE 1. Access the In Basket activity. 2. Select the Result Notes folder. The messages in that folder display in the Message List (upper) pane. 3. Select a Result Notes message. 4. In the Message Report (lower) pane, view the message details and perform any assigned tasks. The Result Notes message basically serves as a springboard for the creation of additional notes and for any actions you might need to take, such as: • Contact the patient to pass along the result • Book a follow-up appointment for the patient • Place follow-up orders for the patient The steps for these last two items are documented in the two topics which follow. Page 224 eCLINICIAN – Electronic Medical Record Manage your Work Using the In Basket 5. Once you have completed the assigned task(s), on the Bottom In Basket toolbar, click Rslt Note. The Result Note window displays. 6. In the Select Orders section, select the appropriate order(s) that apply to the note. 7. In the Result Note box, type an appropriate note. 8. Result Note messages can be routed back to the sender as verification that action was taken. If you do not wish to route your message, deselect the Route Note to checkbox. 9. Click Accept. The In Basket activity redisplays, with the Result Notes message highlighted and opened. TIP: This and any subsequent Result Note messages remain attached to the order. Learn how to view Result Notes in the topic View Result Notes in the Patient’s Chart. 10. If no further action is required, click Done. Page 225 eCLINICIAN – Electronic Medical Record Manage your Work Using the In Basket BOOK A FOLLOW-UP APPOINTMENT FROM A RESULT NOTE If you have the appropriate security, you can schedule a follow-up appointment for the patient from the Result Note window. 1. With the Result Note window still displayed, from the Epic button select Scheduling > Appts. The Patient Lookup window displays showing the patient’s record in the ‘Shortcut to Open patients’ section. TIP: Depending on your security role, an Appts button may also be available to you from the Hyperspace (main) toolbar. 2. Select the patient record. The Appointment Desk activity displays. 3. From the Appointment Desk toolbar, click Make Appt. 4. Enter the required information in the Appt notes, Visit Type and Providers fields. 5. To use the Auto Scheduler to find the next available appointment, in the View Options section, select the Auto Search checkbox and click Search. The next available appointment displays in the Recommended Solution window. 6. To accept the displayed appointment, click Schedule. The Appointment Review window displays. 7. Click Accept to close the Appointment Review window. 8. Click Accept to close the Appointment Information activity. The Appointment Desk redisplays. 9. Close the patient’s workspace. The Result Note window redisplays. 10. In the Result Note section, type your note including the date of the future appointment. 11. If no further action is required, click Accept. 12. Click Yes at the prompt to indicate that you do not wish to route the message. The In Basket activity redisplays. 13. With the Result Note message highlighted, click Done. PLACE FOLLOW-UP ORDERS FROM A RESULT NOTE 1. With the Result Note message highlighted or with the Result Note window open, from the Hyperspace (main) toolbar, click Orders Only. The Patient Lookup window displays showing the patient’s record in the Shortcut to open patients section. 2. Select the patient record. The patient’s workspace opens showing the Orders Only Encounter navigator. 3. From the navigator table of contents, access the Meds & Orders section. 4. Using the Search for new order field or the New Order button, order the required tests or procedures. Page 226 eCLINICIAN – Electronic Medical Record Manage your Work Using the In Basket 5. Click Sign. A Providers window displays, prompting you to enter an authorizing provider. 6. Type the name in the format of lastname,firstname. 7. Click Accept. 8. Complete any other details in the encounter. 9. Close the encounter. The encounter and the patient’s workspace close. The Result Note message redisplays. 10. Create a Result Note as outlined in the topic Respond to a Result Notes Message in the Manage Your Work Using the In Basket. TIP: Keep the Result Note window open if you have multiple tasks to perform and document. 11. When finished, mark your message as Done. Page 227 eCLINICIAN – Electronic Medical Record Manage your Work Using the In Basket VIEW RESULT NOTES IN THE PATIENT’S CHART If the Result message is still in your In Basket, Result Notes can be viewed in the Message report (lower) pane. TIP: Depending on the timing, you may need to manually refresh the system before the result notes display in the Message Report. Page 228 eCLINICIAN – Electronic Medical Record Manage your Work Using the In Basket All Result Notes related to a result are attached to the result itself and can be seen in the Chart Review activity under the appropriate tab (i.e. Lab, Imaging). 1. Access the Chart Review activity for your patient. 2. Go to the appropriate tab. A list of result records displays. To the left of some records, there is a blue paper clip icon which denotes an attached note. 3. To view the Result (order) report, in the bottom pane, click the appropriate record. Alternately, double-click the record to see the report in an expanded form. 4. Scroll through the report until you see the Result Notes section. All associated result notes display below this heading. Page 229 eCLINICIAN – Electronic Medical Record Manage your Work Using the In Basket WORK WITH REFILL REQUESTS When a patient calls or when a fax is received at your clinic requesting a medication refill, the request is documented as a Refill encounter. The Refill encounter is routed to the physician for approval via an Rx Request In Basket message. The approved or denied medication refill request is then routed back to support staff as an Rx Response message. REVIEW RX REQUEST MESSAGES Rx Requests placed by your support staff are sent to you via your In Basket and appear in the Rx Request folder. 1. Access the In Basket activity. 2. Select the Rx Request folder. 3. In the Message List (upper) pane, select the message. 4. In the Message Display (lower) pane, review the message details. 5. Take note of any warning messages, which display with red font, included in the message. Page 230 eCLINICIAN – Electronic Medical Record Manage your Work Using the In Basket APPROVE AN RX REQUEST MESSAGE WITHOUT EDITS To approve the request with changes, proceed to the next topic Approve an Rx Request with Edits. To approve the request without making any changes, from the Bottom In Basket toolbar, click Approve Rx. This triggers the following actions: • The Refill encounter is automatically closed. • The status of the Rx Request message changes to Done. • The patient sig prints to the designated printer. • Your approval is automatically sent back to support staff as an Rx Response message. APPROVE AN RX REQUEST WITH EDITS To approve the request without changes, go to the previous topic Approve an Rx Request Message without Edits. To edit medication details before approving: 1. From the Bottom In Basket toolbar, click Edit Rx. The Rx Request window displays. 2. Click the medication hyperlink to open the Order Composer. Make the desired changes and click Accept. 3. Select the checkbox beside the medications you wish to approve. Alternately, if there is only one medication, or if you wish to approve all of them, click Approve All. 4. If you do not wish to route this message, skip to step 7. To route this message, to the right of the Recipients heading, click the pencil icon. 5. In the Recipient field, type a name in the format of lastname, firstname or enter a pool name. TIP 1: If the recipient is the same as the sender of the original request, click Add Sender which automatically populates the Recipient field for you. 6. In the Routing Comments box, type any follow-up instructions or comments for the recipient. 7. Click Sign (if not routing) or Sign and Route (if routing). Page 231 eCLINICIAN – Electronic Medical Record Manage your Work Using the In Basket The In Basket activity redisplays showing the message with a status of Done. Your approval is sent to the recipient(s) as an Rx Response message. TIP 2: You can return to the original Refill encounter by clicking Enc on the Bottom In Basket toolbar. REFUSE AN RX REQUEST 1. From the Bottom In Basket toolbar, click Refuse All/Rt. An Rx Request form displays. 2. In the Notes box, enter any information you want documented in the patient’s chart. 3. If no follow-up is required, Skip to step 5. To assign any follow-up actions, in the Recipient field, type a name in the format of lastname, firstname or enter a pool name TIP: If the recipient is the same as the sender of the original request, click Add Sender which automatically populates the Recipient field for you. 4. In the Routing Comments box, type any follow-up instructions comments for the recipient. 5. Click Sign (if not routing) or Sign and Route (if routing). A Refusal Reason window displays. 6. In the Refusal Reason field, click the Selection tool (magnifying glass) and choose an appropriate refusal reason. Page 232 eCLINICIAN – Electronic Medical Record Manage your Work Using the In Basket On the bottom right of the Refusal Reason pop-up window, you’ll see a button called My Quick Buttons. This feature allows you to configure your own buttons for common reasons for visit, which display next to the Refusal Reason field in the future. 7. Click Accept. The status of the Rx Request messages changes to Done. Your refusal is sent to the recipient(s) as an Rx Response message. PROCESS AN RX RESPONSE MESSAGE 1. Access your In Basket. 2. Select the Rx Response folder. 3. In the Message List (upper) pane, select the message and in the Message Display (lower) pane, read the message. 4. If the prescription has been approved, retrieve the signed form from the designated area. 5. To return to the Refill Encounter to complete documentation, from the Bottom In Basket toolbar, click Enc. The patient’s workspace displays for the current Refill encounter. Note: When Rx requests are approved without changes, the encounter is closed automatically. If you need to return to the encounter, you will need to create an addendum. Page 233 eCLINICIAN – Electronic Medical Record Manage your Work Using the In Basket 6. If contacting the patient about the approval or refusal of the prescription, select the Contacts section and record Outgoing contact details. 7. If appropriate, select the Documentation section and record any new details. TIP: SmartPhrases are a great benefit in this area. Create your own, or use a system SmartPhrase such as .RXFAXED to speed up documentation. 8. From the Refill Encounter Navigator table of contents, click either Close Encounter or Sign/Route Addendum. 9. Return to the In Basket activity and mark the Rx Response message as Done. Mark In Basket Messages as Done It is very important that you mark In Basket messages as Done only after you have completed the action associated with the message. If you mark the message as Done and are interrupted before you can complete the task, the task might not be completed could have significant impact to patient care. Page 234 eCLINICIAN – Electronic Medical Record Manage your Work Using the In Basket WORK WITH MESSAGES RELATED TO COMPLETING YOUR CHARTS You can use your In Basket to keep track of encounters that you haven’t yet completed. You can close these encounters from your In Basket with one click. Closing your encounters is necessary because it indicates that all the work pertaining to that particular visit is done. Best Practice - Importance of Closing your Open Charts and Open Encounters Similar to the In Patient setting, charts in an enterprise ambulatory EMR must be closed in a timely manner. Encounters with a status of Open imply that the information in the encounter is incomplete. As a result, clinicians looking at the encounter details may fail to act on this information. Users new to eCLINICIAN often mistakenly open various non-scheduled encounters when that is not their intention. These erroneously opened encounters can be confusing for others viewing the patient’s chart. For both of these reasons, it is critically important that you check your In Basket regularly for My Open Charts or My Open Encounters messages to verify that there is a clinical reason that the encounter is open. If you discover that an encounter was opened in error, refer the topic Correct an Encounter Opened or Charted in Error. CLOSE YOUR OPEN CHARTS AND OPEN ENCOUNTERS The My Open Charts and the My Open Encounters folders contain messages that serve as reminders. • My Open Charts: This type of message is sent to the In Basket of the scheduled provider, when a scheduled encounter has been open for longer than 24 hours. • My Open Encounters: This type of message is sent to the In Basket of the user who opened a non-scheduled encounter, as soon as s/he opens it. You cannot remove either of these message types from your In Basket. The system removes them once the associated encounter is closed. 1. Access the My Open Encounters or My Open Charts folder in your In Basket and select the message you want to review. 2. Review the contents of the message to determine whether the encounter should be closed or whether additional charting is needed. 3. The Message Report identifies any outstanding mandatory requirements and recommended actions using hyperlinks. Clicking these hyperlinks either takes you directly to the area that needs attention, or offers options for next steps. Page 235 eCLINICIAN – Electronic Medical Record Manage your Work Using the In Basket The Bottom In Basket toolbar contains buttons to help you complete your charting. 4. To add an additional progress note to the chart directly, click Quick Note. 5. To finish charting directly in the encounter, click Enc. 6. If no further charting is needed, click Close Enc to close the encounter and remove the message from your In Basket. Note: if there are still outstanding requirements you need to fulfill, the system takes you directly to the Close Encounter section of the encounter navigator, and displays warning messages to help you identify and action them. Page 236 eCLINICIAN – Electronic Medical Record Manage your Work Using the In Basket WORK WITH TELEPHONE-RELATED IN BASKET MESSAGES There are 3 telephone-related messages you are likely to see in your In Basket. Pt Call Back - Call Back messages are routed to clinical staff as Pt Call Back messages. Clinical staff document the return call to the patient using the Tel Call button (creates a Telephone Encounter) on the Bottom In Basket toolbar. A prompt to copy the text of the message into the encounter displays. Patient Call - You receive this message type when a Telephone encounter is routed to you for advice or for you to perform an action. Phone Calls - Use this message type to send messages to staff regarding a phone call from someone other than a patient. You should not use this message type to send information about patients as there is no way to attach a patient record to the message. RESPOND TO PT CALL BACK MESSAGES Call Back messages sent to you by support staff are routed to you as Pt Call Back messages. The receipt of this type of message is typically a prompt to create a Telephone encounter. For details on how to process the Pt Call Back message prior to creating a Telephone encounter, refer to the topic Open a Telephone Encounter(Method 3:From a Pt Call Back Message). RESPOND TO PATIENT CALL MESSAGES Telephone encounters are routed to you for follow-up in the form of Patient Call In Basket messages. 1. Access the In Basket activity. 2. Select the Patient Call folder. 3. In the Message List (upper) pane, select the message. 4. In the Message Display (lower) pane, review the message details. 5. To add your response directly to the encounter, from the Bottom In Basket toolbar, click QuickNote. The QuickNote window displays. TIP 1: Note that the Enc button on the Bottom In Basket toolbar still allows you to return to the Telephone encounter for the selected Patient Call message. 6. In the QuickNote window, type your response. 7. To route your response back to the sender, enter the name of the recipient or the pool. TIP 2: If you are routing this back to the person who sent it to you, beside the Recipient area, click Route to Sender. Page 237 eCLINICIAN – Electronic Medical Record Manage your Work Using the In Basket Notice that on the bottom left of the QuickNote window, there is a Save as QuickAction button. QuickActions allow you to complete workflows in fewer steps, saving you time. To learn about creating and managing QuickActions, refer to the Personalization section. 8. Click Sign (if not routing) or Sign and Route (if routing). Your response is saved to the patient’s chart and routed back to the sender. The Message Report redisplays. 9. With your message highlighted in the Message List pane, from the Bottom In Basket toolbar, click Complete. Page 238 eCLINICIAN – Electronic Medical Record Manage your Work Using the In Basket PROCESS LETTER-RELATED IN BASKET MESSAGES You can create letters from the Communications section of encounter navigators. Where you create letters affects what type of In Basket messages you get and how to manage them. When clinical staff route letters from an encounter to support staff for processing, the recipient receives a Letter Queue In Basket message, and the sender a Letter Queue Out Basket message. When clinical staff route letters from the Letters activity to support staff for processing, the recipient receives a Letters message, and the sender a Letters-Unsent message. Recommended Practice! Due to the robust functionality built into it, we strongly recommend that letter workflows begin in the Communications section of navigators and not the Letters activity. WORK WITH A LETTER QUEUE MESSAGE – NO EDITS REQUIRED Use the steps below to complete letter processing in eCLINICIAN when no additional editing of the letter is required by support staff. 1. Access the In Basket activity. 2. Select the Letter Queue message folder. 3. In the Message List (upper) pane, select the message. 4. In the Message Display (lower) pane, review the letter instructions. 5. From the Bottom In Basket toolbar, click Comm Mgt. The Communication window displays a list of the letter recipients. Page 239 eCLINICIAN – Electronic Medical Record Manage your Work Using the In Basket If the physician you are sending the letter to is live on eCLINICIAN AND has the ability to receive letters via their In Basket, the IB (In Basket) option is the default delivery method. Changing Communication Method Regardless of whether the recipient is live on eCLINICIAN or not, most clinics continue to send letters by mail or fax. This will continue until such time as we can ensure that all physicians are working in their In Baskets as expected. There are two ways to change the communication method: Click the recipient’s name and from the menu, select Mail. To the left of the recipient, click the blue arrow and under the Mail column, select the radio button. To collapse the grid, click the blue arrow again. 6. To print the letter and mark it as Sent in the patient’s chart, click Send. The In Basket activity redisplays with the Letter Queue message removed from your In Basket. Page 240 eCLINICIAN – Electronic Medical Record Manage your Work Using the In Basket When the letter is marked as Sent it is no longer available for editing. 7. Send the letter according to your clinic’s practice. Page 241 eCLINICIAN – Electronic Medical Record Manage your Work Using the In Basket WORK WITH A LETTER QUEUE MESSAGE – EDITS REQUIRED Physicians and support staff can use the steps below to complete letter processing in eCLINICIAN. 1. Access the In Basket activity. 2. Select the Letter Queue folder. 3. Select the appropriate message in the message list pane. 4. Review the letter instructions in the message report pane. 5. To edit or review the letter, click Comm Mgt from the Folder toolbar. The Communication window displays. 6. From the Communication window, the letter can be modified as necessary. Add or alter the recipient and click the blue arrow next to the recipient to change how the message is being sent (via mail or In Basket). Changing Communication Method Regardless of whether the recipient is live on eCLINICIAN or not, most clinics continue to send letters by mail or fax. This will continue until such time as we can ensure that all physicians are working in their In Recommended Practice! Baskets as expected. Due to the robust functionality built into it, we strongly recommend that There two ways to change communication method: letterare workflows begin in the the Communications section of navigators and not the activity. Click the Letters recipient’s name and from the menu, select Mail. To the left of the recipient, click the blue arrow and under the Mail column, select the radio button. To collapse the grid, click the blue arrow again. 7. Choose the letter template, if this has not already been selected. Page 242 eCLINICIAN – Electronic Medical Record Manage your Work Using the In Basket 8. Add or alter who the letter is From. 9. Add the body of the letter by typing and/or using SmartText or SmartPhrases. 10. Add a Reason for the letter to assist with sorting letters in Chart Review. If your process is to have the physician review the letter before sending, proceed to the next topic titled Route Letter Back to Physician for Review. 11. To preview the letter prior to sending, click Preview. From the Preview window, the letter can be printed for review on paper, if needed. Printing from the Preview Screen Printing from the Preview screen will not change the Letter status to Sent. To Print the finalized letter, it is important to click Send from the Communication window. 12. When edits are complete, click: • • 13. Pend to save the letter and allow future editing. Unsaved letters may be lost if the system secures after a period of inactivity. Send to print the letter or send via the In Basket. This action is irreversible and locks the letter from further editing.The status will be marked as Sent and the Letter Queue message is removed from the In Basket. The In Basket activity redisplays. Page 243 eCLINICIAN – Electronic Medical Record Manage your Work Using the In Basket ROUTE LETTER BACK TO PHYSICIAN FOR REVIEW - OPTIONAL If the physician’s preference is to review the edited letter before it is sent, support staff may route it to the physician’s In Basket. It is important to note that the physician must Forward the letter back to support staff in order for the letter to be edited, printed or sent. 1. From your In Basket, select the appropriate Letter Queue message. 2. From the Top In Basket toolbar, click Forward. The Enter Letter Queue window displays. 3. Enter the physician’s name in the last name, first name format. 4. Type your comments for the physician. 5. Click Accept. The In Basket activity redisplays and your Letter Queue message is no longer visible. Page 244 eCLINICIAN – Electronic Medical Record Manage your Work Using the In Basket When you return the letter for review, the physician receives a Letter Queue message. The physician must also follow the steps listed above to add their review comments and forward the Letter Queue message back. Page 245 eCLINICIAN – Electronic Medical Record Manage your Work Using the In Basket IN BASKET MESSAGES AS PART OF THE CLINICAL RECORD When responding to messages in your In Basket, you must consider whether or not the response should be part of the clinical record for that patient. The following diagram illustrates how some In Basket message types are designed to work with specific toolbar buttons that copy the information from the In Basket message to patient’s chart (clinical record). eCLINICIAN In Basket Patient Chart Phone (Calls) Message Do you wish to copy? Filed as a Progress Note Staff Message * Tel Enc (Pt) Call Back Message* Tel Enc Result Message Result Note Filed with the Result Result Note Message Result Note Filed with the Result Do you wish to copy? Filed as a Progress Note * Patient record must be attached to the In Basket message The following message types originate from an encounter and are already part of the patient’s chart. • Patient Call, created from a Telephone Encounter • Rx Request, created from a Refill Encounter • CC’d Chart, created from the Follow-up section of an encounter Use the QuickNote button on the Top In Basket toolbar to file the information to the patient’s chart. If you determine that information contained in another message type needs to become part of the patient’s clinical record, and QuickNote isn’t available, follow these steps: 1. Find the appropriate encounter or create a new encounter. 2. Manually copy the text of the In Basket message. 3. From the navigator table of contents, access either the Progress Notes or the Documentation section. 4. Paste the copied text in the text window. If no further action is required, from the navigator table of contents, click Close Encounter or Sign/Route Addendum. Page 246 eCLINICIAN – Electronic Medical Record Document Non Scheduled Encounters DOCUMENT NON SCHEDULED ENCOUNTERS Non scheduled encounters represent documentation that you create when the patient is not physically with you. Examples of non scheduled encounters include: Telephone, Refill, Letters and Orders Only. The following main topics are covered in this chapter: • • • Page 247 Create an Orders Only Encounter Document a Telephone Encounter Document a Refill Encounter eCLINICIAN – Electronic Medical Record Document Non Scheduled Encounters CREATE AN ORDERS ONLY ENCOUNTER Use an Orders Only encounter to document any of the following: • Additional patient information that is not related to a past encounter. • Orders placed prior to a patient visit. • Additional orders placed after a patient visit when the encounter is closed. Basically, an Orders Only encounter is used to document additional information about a patient who you are not scheduled to see. Think of it as a miscellaneous encounter. DOCUMENT AN ORDERS ONLY ENCOUNTER METHOD 1: FROM THE HYPERSPACE TOOLBAR 1. To open an Orders Only encounter, use one of the following methods: A. From the Hyperspace (main) toolbar, click Orders Only. B. From the Epic button, select Patient Care > Orders Only. 2. From the Patient Lookup window, search for the patient according to your clinic’s practice. The Orders Only Encounter navigator displays. Page 248 eCLINICIAN – Electronic Medical Record Document Non Scheduled Encounters My Open Encounters In Basket Folder eCLINICIAN sends a My Open Encounters In Basket message to your In Basket when you open an Orders Only encounter. My Open Encounters messages allow you to track which Orders Only encounters are still outstanding. You work with the sections of the Orders Only Encounter navigator the same way that you worked with the sections of the Visit Navigator for office or clinic visits. 3. Document the appropriate information in the corresponding navigator sections. The only requirement to close an Orders Only encounter is to sign any orders placed. 4. When you are done, close the encounter. DOCUMENT A TELEPHONE ENCOUNTER Use a Telephone encounter to document a phone call from a patient about a medical inquiry or medical advice. You will also use a Telephone encounter to document a call related to a clinical matter about a patient. OPEN A TELEPHONE ENCOUNTER METHOD 1: FROM THE HYPERSPACE TOOLBAR 1. From the Hyperspace (main) toolbar, click Telephone Call. The Patient Lookup window displays. 2. Look up the patient according to your clinic’s practice. The patient’s workspace displays. METHOD 2: FROM THE EPIC BUTTON 1. From the Epic button, select Patient Care > Telephone Call. The Patient Lookup window displays. 2. Look up the patient according to your clinic’s practice. The patient’s workspace displays. METHOD 3: FROM A PT CALL BACK MESSAGE When patients call with a medical inquiry, it may be your practice to have support staff create a Call Back In Basket message rather than directly opening a Telephone encounter to document the request. Call Back messages are routed to clinical staff as Pt Call Back messages. 1. Access your In Basket. 2. Select the Pt Call Back folder. 3. Highlight the message in the upper right-hand pane. 4. Review the letter instructions in the lower right-hand pane. Page 249 eCLINICIAN – Electronic Medical Record Document Non Scheduled Encounters 5. From the Bottom In Basket toolbar, click Tel Call. A message displays asking if you want to copy the text from the message to the encounter notes. 6. To copy the text of the message to the Telephone encounter (and be part of the clinical record), click Yes. DOCUMENT A TELEPHONE ENCOUNTER You work with the sections of the Telephone Call navigator the same way that you worked with the sections of the Visit Navigator for office or clinic visits. My Open Encounters In Basket Folder eCLINICIAN sends a My Open Encounters In Basket message to your In Basket when you open a Telephone encounter. My Open Encounters messages allow you to track which telephone calls are still outstanding. My Open Encounters messages are sent to the In Basket of the person who initiated the encounter. If your front desk staff initiates a telephone encounter instead of sending a Pt Call Back message to clinical staff, they will receive the My Open Encounters message. 1. From the Telephone Call navigator, select Incoming Call. The Telephone (Incoming) window displays in edit mode. 2. Indicate who is calling and their contact information. 3. Click Accept. The Contacts section closes. 4. Click on the Reason for Call section. The Reason for Call window appears. In the Reason for Call field, completion match on the appropriate reason. 5. From the navigator table of contents, select the Documentation section and record the details of your conversation with the patient. 6. Complete remaining documentation as required. 7. If you do not need to route the Telephone Encounter to someone for advice, proceed to step 8. To route the encounter, select the Routing section of the navigator. Page 250 eCLINICIAN – Electronic Medical Record Document Non Scheduled Encounters Notice that the Patient Call option is selected by default within Telephone encounters. A. In the Recipient field, completion match on the name of the recipient. B. Close the Routing section. C. Exit the patient’s workspace to route your message. Remember that exiting the patient’s workspace is not the same as closing the encounter. If you exit a workspace without closing the encounter, you can easily return to the workspace again. 8. If you do not need to route the message and your documentation of the call is complete, from the Navigator table of contents, select Close Encounter. The only requirement for closing a Telephone encounter is a Reason for Call. When to Close a Telephone Encounter The Telephone encounter should remain open as long as you are still dealing with the reason for the call. Since Telephone encounters may be routed back and forth between clinical staff, it is often difficult to know when the encounter is complete and may be closed. You can use the Last Accessed column in the In Basket to keep track of who has accessed the Telephone encounter. It is the responsibility of the person who created the encounter to close the encounter. DOCUMENT A REFILL REQUEST Use a Refill encounter to document a call from a patient requesting a medication refill. This encounter type is also used to document faxed medication refill requests from pharmacies. OPEN A REFILL ENCOUNTER Page 251 eCLINICIAN – Electronic Medical Record Document Non Scheduled Encounters METHOD 1: FROM THE HYPERSPACE TOOLBAR 1. From the Hyperspace (main) toolbar, click Refill Medication. The Patient Lookup window displays. 2. Look up the patient according to your clinic’s practice. The patient’s workspace displays. METHOD 2: FROM THE EPIC BUTTON 1. From the Epic button, select Patient Care > Refill Medication. The Patient Lookup window displays. 2. Look up the patient according to your clinic’s practice. The patient’s workspace displays. DOCUMENT A REFILL ENCOUNTER You work with the sections of the Refill Encounter navigator the same way that you worked with the sections of the Visit Navigator for office or clinic visits. My Open Encounters In Basket Folder eCLINICIAN sends a My Open Encounters In Basket message to your In Basket when you open a Refill encounter. My Open Encounters messages allow you to track which Refill encounters are still outstanding. 1. From the Refill Encounter Navigator table of contents, select Incoming Call for telephone requests. For fax or email requests, select Other and indicate Incoming. The Contacts section displays in edit mode. 2. For phoned request, indicate who is calling and their contact information. For fax/email requests indicate the following: A. In the Relation field, completion match on Pharmacy. B. In the Contact field, type the name of the pharmacy. C. In the Fax field, type the fax number of the pharmacy. D. Add any other pertinent pharmacy information to the Comments field. Page 252 eCLINICIAN – Electronic Medical Record Document Non Scheduled Encounters 3. Click Accept. The Reason for Call section has been pre-populated with Medications Refill. 4. From the table of contents, select Documentation and add information about the refill request. 5. From the table of contents, select Meds & Orders. 6. Click Reorder next to the appropriate medication(s). 7. Close the section. 8. From the table of contents, select Routing. The Rx Request option is selected by default because Medications Refill is the reason for call for this encounter. 9. In the Recipient field, type the name of the person who will receive the Rx Request In Basket message. 10. Close the section. Page 253 eCLINICIAN – Electronic Medical Record Document Non Scheduled Encounters TIP: Always verify the name of the intended recipient(s) when you close the Routing section. If you accidently select the wrong recipient or fail to add the recipient correctly, a message will be routed to the wrong recipient or never be routed. This could lead to a significant delay in patient care. 11. To route the message to the intended recipient, exit the patient’s workspace. Remember that exiting the patient’s workspace is not the same as closing the encounter. If you exit a workspace without closing the encounter, you can easily return to the workspace again. Page 254 eCLINICIAN – Electronic Medical Record Personalize eCLINICIAN PERSONALIZE eCLINICIAN eCLINICIAN - EMR provides you with many opportunities to customize or personalize the system to meet your needs and preferences. Taking the time to customize the application can save you time later by reducing the number of steps it takes to accomplish common tasks. The following main topics are covered in this chapter: • Personalize Navigation and Activities • Create Patient Lists • Create a Custom Dictionary • Personalize Features of the Visit Navigator • Personalize Features of the Chart Review Activity • Manage Personal Preference Lists Outside of an Encounter • Manage Personal SmartPhrases • Manage SmartBlock Macros • Customize the In Basket Page 255 eCLINICIAN – Electronic Medical Record Personalize eCLINICIAN PERSONALIZE NAVIGATION AND THE APPEARANCE OF VARIOUS ACTIVITIES eCLINICIAN - EMR provides you with the opportunity to create navigational shortcuts to activities that you access most frequently. You also have the ability to customize the appearance of your daily schedule and change the way that information displays in some activities and navigator sections. PERSONALIZE THE EPIC BUTTON The features that you access most commonly typically display as buttons on the Hyperspace (main) toolbar. Your security role determines these primary features. The secondary features that you can access are available from the Epic button menu. To provide you with quick navigation to these items in the future, you can mark them as being a favorite. If one of the Recent items you accessed from the Epic button represents an item that you access regularly, click the star next to the item to mark it as a favorite. Favorites display at the top of the Epic menu for convenient access. To quickly access a specific favorite, press ALT to launch the Epic menu, and then press the number that corresponds to your favorite. In the screenshot above, pressing ALT+2 opens the Patient Lookup window to search for a patient’s chart to addend. Page 256 eCLINICIAN – Electronic Medical Record Personalize eCLINICIAN PERSONALIZE THE HYPERSPACE TOOLBAR You can personalize your Hyperspace toolbar with activities you frequently use. The activities you can add are based on your security role. 1. From the Hyperspace toolbar, click the wrench. 2. Locate the button you wish to add (e.g. My SmartPhrases). 3. Click and drag the item to the My Toolbar section on the right. 4. Reorder items in the My Toolbar list by dragging them up or down to a new location. 5. Click Accept. The new button appears on the Hyperspace toolbar. 6. If you cannot see all the buttons you have added, click the double chevrons (>>) to see the additional buttons. Page 257 eCLINICIAN – Electronic Medical Record Personalize eCLINICIAN ADD ADDITIONAL REPORTS TO THE SCHEDULE ACTIVITY The SnapShot report is the default report on the Schedule activity. You can quickly personalize this area so that other reports are easily accessible. 1. In the Schedule activity, access the Reports toolbar. 2. Click Add or remove buttons from toolbar (the wrench). The Add or Remove Buttons from Toolbar window displays 3. Use completion matching or click the Selection tool (magnifying glass) to locate the report you want to add. 4. If appropriate, change the Display Name for each report. 5. If adding multiple reports, use the Up and Down arrows to change the order that the reports display on the Reports toolbar. 6. When you are done, click Accept. Page 258 eCLINICIAN – Electronic Medical Record Personalize eCLINICIAN The appropriate report displays on the Reports toolbar. Note that the Report field on the Report toolbar is used to temporarily display one of the available reports. TIP: We recommend adding the Care Teams & Notes report next to the Snapshot report. PERSONALIZE ACTIVITY TABS ADD ACTIVITY TABS TO THE ACTIVITY TAB LIST BY MARKING IT AS A FAVORITE You can customize your Activity tabs to include additional options and provide easy access to the activities you use most. 1. From the Visit Navigator, select More Activities. A menu displays a list of additional activities. 2. Next to the activity you wish to save as a favorite, click the white star. The white star turns to yellow and your selected activity appears on your list of activities. ADD ACTIVITY TABS TO THE ACTIVITY TAB LIST USING THE PERSONALIZATION ACTIVITY Additional options and the ability to re-order the list of activities are available from the Menu Personalization activity. 1. From the Visit Navigator, select More Activities. A menu displays a list of additional activities. 2. In More Activities, select Menu Personalization. Page 259 eCLINICIAN – Electronic Medical Record Personalize eCLINICIAN The Personalization Activity displays with two panes: Personalize This Workspace and Personalize This Toolbar. 3. From the Personalize This Workspace pane, in the Available Activities section, select an activity. 4. Drag it to the My Activities section. A green checkmark appears next to the activity you chose, showing it was added. 5. Click the black X to remove an activity that you have added. 6. Click Accept to save your changes. Page 260 eCLINICIAN – Electronic Medical Record Personalize eCLINICIAN CHANGE THE ORDER OF ACTIVITY TABS 1. From the Visit Navigator, select More Activities. A menu displays a list of additional activities. 2. In More Activities, select Menu Personalization. The Personalization Activity displays with two panes: Personalize This Workspace and Personalize This Toolbar. 3. From the Personalize This Workspace pane, in the My Activities section, select an activity. 4. Drag your selection to the desired position in the list. 5. Click Accept to save your changes. Page 261 eCLINICIAN – Electronic Medical Record Personalize eCLINICIAN Arrange Topics and Sections in Navigators To assist in making your workflows more efficient, you can now arrange a navigator’s table of contents in the order you prefer. You can re-arrange both topics and sections. For example, you could move the Charting topic to the top of the table of contents and the Progress Notes section to the top of the Charting topic. 1. From the bottom of the navigator table of contents, click the wrench. The Customize window displays. 2. Select your topic or sections and click and drag your selection to the desired position. Alternately, you can also use the blue arrows. 3. When you are finished, click Accept. Page 262 eCLINICIAN – Electronic Medical Record Personalize eCLINICIAN CHANGE THE APPEARANCE OF THE PROBLEM LIST You have the ability to control the way that information displays when you are viewing the Problem List activity. You can set the display so that the information that is the most important to you is saved as your default preference. 1. Access the patient’s workspace. 2. Depending on the chart mode you are using, select either the Problem List activity or the Problem List navigator section. 3. To sort the Problem List section by view, click Options. A List View area displays with radio buttons (blank circles). 4. Select the appropriate option. TIP 1: The Class List view option is not currently being used. 5. To add or remove data items available for display, click Choose Columns. Beneath the List View area, a series of checkboxes display. 6. Select or deselect the appropriate data items. View Changed and Resolved Problems We strongly recommend that your Problem List display include Change Dx & Resolved data item. The display of resolved problems is shown in the next section. 7. After you have finished customizing the display, click Accept. The data items that now display by default match your selections. Page 263 eCLINICIAN – Electronic Medical Record Personalize eCLINICIAN Sorting by Priority • Click the up and down arrow buttons under the Sort Priority column, to assign priorities of High, Medium or Low. • As you assign priority and move away from the arrows, the problems list re-sorts. • Hover your mouse over the arrow buttons. A ToolTip displays the priority that is assigned if you click the button. • Once you move the cursor, the problem is momentarily highlighted in green and is re-sorted. CHANGE THE APPEARANCE OF THE MEDICATIONS & ORDERS SECTION You can control the way that information displays when you are viewing the Medications and Orders Visit Navigator section. 1. From the Visit Navigator table of contents, access the Meds & Orders section. 2. To organize your orders into different groups, click Options. A List View area displays with radio buttons. 3. From the List view area, select the appropriate display option. In this example, medications and procedure orders are grouped separately. Pharm. Subclass Option The Pharm. Subclass option cannot be used as the source for medications in eCLINICIAN, First Databank (FDB) Canada, does not provide this information. 4. To reveal additional details about the items that have been ordered, select the Show: Summary checkbox. In this example, the Show: Summary option displays a one line summary of each order. 5. To choose the information to display beside each medication, click Choose Columns. A list of options display with checkboxes. 6. Select or deselect the appropriate options. 7. To save the options you selected, click Accept. The data items you selected display beside each medication as columns or buttons in your default display. Page 264 eCLINICIAN – Electronic Medical Record Personalize eCLINICIAN Page 265 eCLINICIAN – Electronic Medical Record Personalize eCLINICIAN BUILD PATIENT LISTS You can use the Patient Lists activity to create and maintain lists of patients. These lists provide you with easy access to patients that you are monitoring. CREATE A PATIENT LIST 1. From the Epic button, select Patient Care > Patient Lists. The Patient Lists activity displays in a new workspace. 2. To create a new list, on the activity toolbar, click Edit List > Create My List. The New List window displays with a General tab and an Advanced Tab. 3. From the General tab, in the Name field, type a name for the list. 4. From the Layout section, select a column of information to display in your report. For some columns, a brief description of information that will appear in the report displays. 5. Click Add. Your selections display in the Selected Columns section. 6. If required, use the Up and Down arrows to reorder the columns. TIP: Use the Advance tab to share your list with other providers. To indicate what the provider can do with the list, specify an Access Level, such as Modify Properties, Add/Remove Patients, or View Only. 7. When you are done, click Accept. Page 266 eCLINICIAN – Electronic Medical Record Personalize eCLINICIAN Patient List Access There are various levels of access: • View Only: The user can open the list but cannot modify it in any way. • Add/Remove Patients: The user can add or remove patients to the list. • Modify Properties: The user can modify the list, in addition to the previously mentioned abilities. • Change Accessibility: The user can change the accessibility of him/herself or other users, in addition to the previously mentioned abilities. • Delete Patient List: The user can delete the list, in addition to the previously mentioned abilities. ADD PATIENTS TO A PATIENT LIST FROM THE PATIENT LIST ACTIVITY 1. From the Epic button, select Patient Care > Patient Lists. The Patient Lists activity displays in a new workspace. 2. In the left pane, under My Lists, select the appropriate List. The name of the list displays in the upper right-hand pane. 3. On the activity toolbar, click Add Patient. The Patient Lookup window displays. 4. Search for and select the appropriate patient record. The information for that patient displays below the list name in the upper right-hand pane. Page 267 eCLINICIAN – Electronic Medical Record Personalize eCLINICIAN Additional Patient List features • Edit your list by selecting it under My Lists and clicking Properties on the activity toolbar. • Open a patient’s chart from your list by double-clicking the patient’s name. • In the patient’s chart, access the Demographics activity and go to the Clinical Information to view all of your patient lists that this patient belongs to. ADD A PATIENT TO A PATIENT LIST FROM THE PATIENT’S CHART 1. From the patient’s chart in review or documentation mode, click More Activities. 2. Select Patient List Membership. 3. Select the appropriate list from the My Lists or Shared Lists columns and click Accept. Page 268 eCLINICIAN – Electronic Medical Record Personalize eCLINICIAN REVIEW WHICH PATIENT LISTS THE PATIENT IS ON 1. From the patient’s chart in review or documentation mode, access the Demographics activity. 2. Select the Clinical Information tab. 3. Any lists to which the patient belongs are listed in the Patient Lists section. Page 269 eCLINICIAN – Electronic Medical Record Personalize eCLINICIAN CREATE A CUSTOM DICTIONARY You can create your own unique custom dictionary in eCLINICIAN - EMR. Your custom dictionary can be used wherever there is spell check functionality. Not all names and terms are available in the default dictionary (i.e. personal names and acronyms), therefore adding them to your custom dictionary will ensure that they are correctly spelled at all times and won’t continue to be flagged by Spell Checker. Note that your dictionary does not impact the current default American English Medical (AEM) dictionary. There are two ways you create your custom dictionary: FROM THE EPIC MENU 1. From the Epic button, select Tools > Spell Checker > User Dictionaries. The Spell Checker Dictionaries window displays. The name of the Dictionary file is automatically created using your name. Neither the file name nor the location can be changed. 2. In the Word to add field, type the new word. 3. Click Add Word.The word is saved in your custom dictionary. 4. To save your changes and close the dictionary, click Accept. Page 270 eCLINICIAN – Electronic Medical Record Personalize eCLINICIAN Additional Information The Import Text File and Export to Text File buttons are not supported functions. The remaining tabs and buttons are similar to the dictionary functionality in Microsoft Word®. FROM A SMARTTOOL-ENABLED TOOLBAR 1. From a SmartTool-enabled toolbar, click the Spell Check button or press F7. If the Spell Checker encounters a word that is not found in the default dictionary or in your custom dictionary, the Check Spelling window displays. 2. To add the new word, in the Check Spelling window, click Add to Dictionary. 3. Either finish cycling through the rest of the document using the Spell Checker, or click Close. A Spell Checker box displays the spell check results. 4. To return to your documentation, click OK. Page 271 eCLINICIAN – Electronic Medical Record Personalize eCLINICIAN PERSONALIZE FEATURES OF THE VISIT NAVIGATOR CREATE REASON FOR VISIT SPEED BUTTONS You can create speed buttons for common reasons for visit, such as Migraine and Gastrophageal Reflux, as shown in the example below. Speed Buttons allow you to select common reasons for visits with a single click. To create speed buttons: 1. From the Visit Navigator table of contents, access the Visit Info section. 2. In the Reason for Visit field, completion match on a reason for visit. 3. In that same field, right-click and select Add to speed buttons. The speed button appears immediately under the Reason for Visit column title. Speed buttons are accessible from any patient’s workspace. 4. To remove speed buttons, right-click on the existing reason for visit (with a corresponding speed button) and select Remove from speed buttons. Page 272 eCLINICIAN – Electronic Medical Record Personalize eCLINICIAN CREATE FOLLOW-UP SPEED BUTTONS To increase efficiency in your workflow, speed buttons are now available in the Follow-up section. You have the ability to edit the default buttons and create new ones. 1. From the Visit Navigator table of contents, access the Follow-up section. 2. To edit or add a new Return in speed button, in the Disposition area, click the wrench. 3. To add a Reason for Return speed button, click the corresponding wrench. Page 273 eCLINICIAN – Electronic Medical Record Personalize eCLINICIAN CUSTOMIZE THE APPEARANCE OF THE SMARTTOOLS TOOLBAR The SmartTools toolbar is available in several activities. You can customize the SmartTools toolbar and add the buttons you use most often. 1. From most SmartTool enabled text boxes, such as the Progress Notes or Pt. Instruction sections, on the far left of the toolbar, click the yellow star. A menu displays. 2. To expand the menu, click All Other Tools. Locate the button you want to add and to the right of it, and click the white star. The star turns yellow. 3. The new item displays on your toolbar. 4. To remove a button from the toolbar, click the yellow star. Page 274 eCLINICIAN – Electronic Medical Record Personalize eCLINICIAN SETTING COMMUNICATIONS PREFERENCES The Communications navigator section improves your efficiency by allowing you to personalize several features. 1. From the Visit Navigator table of contents, access the Communications section. 2. To begin personalizing this section, next to New Communication, click the wrench. The Communication Management User Preferences window displays. 3. From here you can set defaults for sending communications and routing to support staff or to the letter’s author. 4. To customize the display name for letter templates, In the Letter Templates area, in the Default letter template field, click the Selection tool (magnifying glass) and select a letter template. 5. In the Template display name field, enter the name you want to display on the button. 6. To add more letter templates, in a blank field under Additional Letter Templates, click the Selection tool to locate the letter template. 7. Enter a Display Name. 8. When you are finished customizing, click Accept. Page 275 eCLINICIAN – Electronic Medical Record Personalize eCLINICIAN PERSONALIZE FEATURES OF THE CHART REVIEW ACTIVITY The filter functionality in the Chart Review activity allows you to search patient data using predetermined criteria. For example, you can create a filter that shows only visits for which you were the physician. You can also filter on specific medications, orders, chief complaint, and more. Quick Filters take the functionality one step further by allowing you to save your most frequently used filters. By saving your personal (Quick) filter you can quickly sort data in the future. CREATE A PERSONAL CHART REVIEW FILTER 1. From the left-hand side of the patient’s workspace, select the Chart Review activity. 2. Access the appropriate tab on the Chart Review activity. 3. From the toolbar, click Filters. In the upper left-hand pane, a list of filter categories displays. In the right-hand pane, the report entries for the patient displays. 4. Select one of these categories. In the lower left pane, a list of patient-specific entries belonging to that category display with checkboxes. 5. Select as many checkboxes as you need to refine your filter. As you make your selections, the list in the right-hand pane gets smaller, displaying only those entries matching your filter criteria. TIP: You can create complex filters by selecting more than one category. For example, you can filter once on all of the tests for a particular provider and then filter again on all of their encounters where there was a particular diagnosis. Simply repeat steps 4 and 5 for each category you want to add to your filter. 6. To save the personal data filter, click Save. The Save Quick Filter window displays. 7. In the Caption field, type a name for the personal data filter. 8. To have the personal data filter automatically display each time you access the appropriate tab for any patient, select the Apply by Default checkbox. 9. Click Accept. The personal data filter displays on the Filter title bar. The personal filter is saved to your user settings. Regardless of the patient you select, the personal filter is available for your use each time you open the corresponding Chart Review tab. Page 276 eCLINICIAN – Electronic Medical Record Personalize eCLINICIAN CREATE A PERSONAL LAB FLOWSHEET On the Lab tab, the Quick Filter functionality can be combined with the Lab Flowsheet display to create personal lab flowsheets. For example, you can create a personal lab flowsheet that quickly shows you the screening tests that are most meaningful for your specialty. 1. From the left-hand side of the patient’s workspace, select the Chart Review activity. 2. Access the Lab tab on the Chart Review activity. 3. From the toolbar, click Filters. In the upper left-hand pane, a list of filter categories displays. In the right-hand pane, the results available for the patient display. 4. Select one of these categories (e.g. Order Name). In the lower left pane, a list of patient-specific results belonging to that category display with checkboxes. TIP 1: If the patient whose chart you are using to build the personal flowsheet has not had a particular test ordered, you are not able to add that test to the flowsheet. 5. Select as many checkboxes as you need to refine your filter. As you make your selections, the list in the right-hand pane gets smaller, displaying only those results matching your filter criteria. Page 277 eCLINICIAN – Electronic Medical Record Personalize eCLINICIAN TIP 2: You can create complex filters by selecting more than one category. For example, you can filter once on all of the tests for a particular provider and then filter again on all of their encounters where there was a particular diagnosis. Simply repeat steps 4 and 5 for each category you want to add to your filter. 6. To save the personal data filter, click Save. The Save Quick Filter window displays. 7. In the Caption field, type a name for the personal data filter. 8. To have the personal data filter automatically display each time you access the Lab tab for any patient, select the Apply by Default checkbox. 9. Click Accept. The personal data filter displays on the Filter title bar. The personal filter is saved to your user settings. Regardless of the patient you select, the personal filter is available for your use each time you open the Chart Review > Lab tab. Page 278 eCLINICIAN – Electronic Medical Record Personalize eCLINICIAN MODIFY A PERSONAL DATA FILTER/LAB FLOWSHEET The Quick Filter edit feature allows you to change only the name of your personal filter/flowsheet or to delete it. It does not allow you to add or remove selections from the filter/flowsheet. To add or remove selections, you must delete the filter/flowsheet and create the new version. CHANGE THE NAME OF YOUR PERSONAL FILTER 1. From the appropriate tab, click Filters 2. Apply the appropriate personal filter/flowsheet. 3. In the lower left-hand area, click Edit. The Edit Quick Filters window displays. 4. In the Caption field, type the new name of the filter. 5. Click Accept. The new name for your personal lab flowsheet filter displays on the Filter title bar. Page 279 eCLINICIAN – Electronic Medical Record Personalize eCLINICIAN DELETE YOUR PERSONAL FILTER 1. From the appropriate tab, click Filters 2. Apply the appropriate personal filter/flowsheet. 3. In the lower left-hand area, click Edit. The Edit Quick Filters window displays. 4. In the Caption field, type the new name of the filter. 5. Click Delete. 6. Click Accept. The personal filter/flowsheet is removed from the Filter title bar. ADD OR REMOVE SELECTIONS FROM YOUR PERSONAL FILTER 1. From the Lab tab, select the custom lab flowsheet filter. 2. Check or uncheck the appropriate filter selections. 3. Click Save. The Save Quick Filter window displays. 4. In the Caption field, enter a name for your updated filter. 5. To have the filter automatically display on the Filter title bar, select the Apply by Default field. 6. Click Accept. The newly updated filter displays on the Filter title bar each time you open the Chart Review > Lab tab. Page 280 eCLINICIAN – Electronic Medical Record Personalize eCLINICIAN 7. If required, follow the steps in the previous topic to delete the previous version of your custom filter. Page 281 eCLINICIAN – Electronic Medical Record Personalize eCLINICIAN CUSTOMIZE CHART REVIEW REPORTS To save time, you can customize the order of Chart Review reports to first display the information most important to you, and group related pieces of information together, limiting the amount of time you spend scrolling through the report. 1. In Chart Review, open a report you want to customize. 2. On the right-hand side of the Report Viewer toolbar, click the wrench. On the right, a Customize window displays. 3. Click and drag each item to the order you prefer or use the blue arrow. 4. Click Accept. Page 282 eCLINICIAN – Electronic Medical Record Personalize eCLINICIAN DISPLAY MEDIA TAB THUMBNAILS The new Thumbnail View in the Media tab of Chart Review makes it easier to see the type of file that has been scanned. 1. From the Media tab toolbar, click Thumbnail View. The listed reports change to thumbnails. 2. To return to the previous view, click Details View. Page 283 eCLINICIAN – Electronic Medical Record Personalize eCLINICIAN MANAGE PERSONAL PREFERENCE LISTS OUTSIDE OF ENCOUNTERS Preference Lists are a great way to help you quickly place orders for medications and procedures that you most commonly use. Each time you need to order one of these common medications or procedures, a simple technique can be used to place the order. As a reminder, there are two types of preference lists: • System preference lists are built by the eCLINICIAN - EMR project team to reflect ordering practices for a defined group of users such as your specialty. • Personal (user) preference lists are built by users. You can add orders to your personal preference list so that they reflect common orders or your unique ordering practices. The Enter Orders chapter of this guide describes how to add an item to your personal preference list while in a patient encounter. This section shows you how to add orders to your preference lists outside of a patient encounter as well as how to manage those orders once they are on your personal preference lists. Page 284 eCLINICIAN – Electronic Medical Record Personalize eCLINICIAN PLAN THE STRUCTURE OF YOUR PERSONAL PREFERENCE LISTS Outside of a patient encounter, you can add or modify items on your personal preference lists. Prior to building out your personal preference lists, we strongly recommend that you take some time to pre-plan the structure of your preference lists. This functionality is available to from the Epic button> Tools> Preference List Composer. When you first open the Preference List Composer, the Preference List Selector activity displays. The lists that display here were automatically created when your user account was set up in eCLINICIAN - EMR. Not all of these lists are active. When adding items to your personal preference list there is a correlation between these lists and where your personal items display on your specialty’s preference list. In other words, the preference list that you see when you place an order is a combination of the system preference list that was built for your speciality and the items that you add to personalize this list. Be sure to select the list for the type of facility you work in. Lists that end in IP are used when charting on In Patients. Lists that end in OP are used when charting on Out Patients. Page 285 eCLINICIAN – Electronic Medical Record Personalize eCLINICIAN In the example below, Dr. Pat Whistler adds a new Diabetes section to her Labs Preference list using the Preference List Composer. When placing orders during an encounter, Dr. Whistler sees this section added to the Preference List Browser under Labs. A yellow star (Favorites) beside the order indicates that it is from her personal preference list. Page 286 eCLINICIAN – Electronic Medical Record Personalize eCLINICIAN ADD AN ORDER TO YOUR PERSONAL PREFERENCE LIST You can add an order directly to your personal preference list following the steps below. 1. Select Epic button > Tools > Preference List Composer. The PrefList Selector activity displays in a new workspace. 2. In the Preference List Selector activity, double-click the appropriate preference list. The Choose Contact window displays. 3. Select the most recent record and click Accept. The PrefList Composer activity displays. 4. From the Preference List Sections area, select the appropriate section (or click New Section to create a new section). 5. From the activity toolbar, click New Item. The Preference List Composer window displays. 6. In the Orderable field, use completion matching to search for the item (order) to add. 7. In the Display name field, type the name to give the order. 8. Complete the remaining fields as required. Page 287 eCLINICIAN – Electronic Medical Record Personalize eCLINICIAN Procedure Orders - Fields to Leave Blank Notice that none of the default values display when you add orders to your personal preference list using this method. It is important to leave certain fields blank as the appropriate field automatically populates when you place your order if a default for that field was pre-built in the order record. • The Status field should be left blank unless you are setting up a Standing order or ordering an In Clinic procedure (Status = Normal). • The Expires field should be left blank for all orders. Personalizing Standing Orders For Standing orders, the Release field must be set to Manual in order to allow you to populate the Interval field. 9. Click Accept. The new order is added to your personal preference list. TIP: To change the order of items within a section, use the Move Items buttons in the lower portion of the activity. If you mistakenly add an item to the wrong section, simply drag and drop it to the correct section. EDIT AN ITEM IN YOUR PERSONAL PREFERENCE LIST 1. Select Epic button > Tools > Preference List Composer. The PrefList Selector activity displays in a new workspace. 2. In the Preference List Selector activity, double-click the preference list you want to edit. The Choose Contact window displays. Page 288 eCLINICIAN – Electronic Medical Record Personalize eCLINICIAN 3. Select the most recent record and click Accept. The PrefList Composer activity displays. 4. From the Preference List Sections area, select the section to edit. 5. From the right-hand area, double-click the item to edit (or select it and click Edit Details). The Preference List Defaults window displays. 6. Update the details as required. 7. When you are done, click Accept. The updated item is now available on your personal preference list. REMOVE AN ITEM FROM YOUR PERSONAL PREFERENCE LIST 1. Select Epic button > Tools > Preference List Composer. The PrefList Selector activity displays in a new workspace. 2. In the Preference List Selector activity, double-click the preference list you want to delete. The Choose Contact window displays. 3. Select the most recent record and click Accept. The PrefList Composer activity displays. 4. From the Preference List Sections area, select the appropriate section. 5. From the right-hand section, select the item. Page 289 eCLINICIAN – Electronic Medical Record Personalize eCLINICIAN 6. From the activity toolbar, click Remove Item. A confirmation window displays. 7. Click Yes. The item no longer displays on your personal preference list. MANAGE PERSONAL PREFERENCE LISTS CREATED USING BROWSER AND COMPOSER As previously discussed, the Preference List Browser displays a combination of orders built for your specialty as well as your personalized orders. There are several things you should note when personal preference lists are built using both the Preference List Composer and the Preference List Browser. During a patient encounter, you do not have the ability to directly add your personalized order to the appropriate specialty built or personalized sections of the Preference List Browser. When you mark an order as a favorite from a patient encounter, the order can be placed only in the Orders system preference list. In the Orders system preference list, the Existing section is automatically created for you. You have the option of creating a new section but this new section still resides on the Orders system preference list. Only create a New Section in the Orders system preference list if your intention is to keep all personalized orders in this area. Page 290 eCLINICIAN – Electronic Medical Record Personalize eCLINICIAN If your intention is to have all of your personalized orders display in the appropriate specialty-built or previously built personalized sections of the Preference List Browser, then you need to perform these additional steps. 1. From the navigator table of contents, access the Meds & Orders section. 2. Place an order and click the star beside it. The Add to Preference List window displays. 3. Leave the section name as Existing. 4. Complete the details for your personalized order. 5. When you are done, click Accept, to close the window. 6. Click Keep Order. The Meds & Orders section redisplays. 7. To view this order, in the Preference List Browser, click New Order. 8. Locate the order that you just placed under the Orders > Existing section. From the Preference List Browser you cannot directly move your personal order from one section to another. You can, however, copy the order from the Existing section to the appropriate specialty built or personalized section. 9. Right-click the personal order. 10. Select Add to Preference List. 11. Select the appropriate system preference list. Note that you cannot see the names of your specialty or personalized sections in this list at this time. Page 291 eCLINICIAN – Electronic Medical Record Personalize eCLINICIAN The Add to Preference List window redisplays giving you another opportunity to make any adjustments to the order details. Remember that you are now in the appropriate system preference list. 12. Perform either step 12a or 12b or 12c. A. To add your personalized order to an existing specialty built section, perform the following: i. Click New Section. The New Section window displays. ii. Type the name of the existing specialty section in the Display Name. (Note that when the system compiles the orders to display in the specialty section, it will create a list of the existing specialty orders and personalized orders). B. To add your personalized order to a new personalized section in the system preference list, perform the following: i. Click New Section. The New Section window displays. ii. Type the name of the new personalized section in the Display Name. C. To add your personalized order to an existing personalized section within the system preference list, perform the following: i. From the Section field, click the Selection Tool. The Item Select window displays. ii. Select the appropriate name of the personalized section and click Accept. iii. When you are done, click Accept. 13. You now need to delete the personalized order from the Orders > Existing section. Page 292 eCLINICIAN – Electronic Medical Record Personalize eCLINICIAN 14. From the Existing section, select the order that needs to be deleted. 15. Right-click and select Remove from Preference List Entry. A deletion confirmation window displays. To confirm the deletion, click Yes. The order is removed from the Existing section. Page 293 eCLINICIAN – Electronic Medical Record Personalize eCLINICIAN MANAGE PERSONAL SMARTPHRASES SmartTool is the name used to describe a series of tools that assist you with making the charting process faster. SmartTools include SmartLinks, SmartLists, SmartPhrases, SmartText and SmartSets. Of all the SmartTool types, users are able to create only personal SmartPhrases. To decide what text would make a useful SmartPhrase, watch for sentences, fragments, or even words that you commonly use. CREATE A PERSONAL SMARTPHRASE – DURING AN ENCOUNTER Building your own personal SmartPhrases takes very little time and can drastically speed up your workflow. 1. In a SmartTool-enabled text box, type the text of your SmartPhrase. 2. Highlight the text. 3. Click (Create SmartPhrase) on the SmartTool-enabled toolbar. (You can also right-click and select SmartPhrase > Create SmartPhrase from Selected Text). The SmartPhrase Editor window displays with the text you selected appearing in the SmartPhrase Text field. 4. In the Name field, type a name for your SmartPhrase. Page 294 eCLINICIAN – Electronic Medical Record Personalize eCLINICIAN TIP: We strongly recommend that you add your initials to the beginning of all the SmartPhrases that you create. This will help you to distinguish your SmartPhrases from others. 5. Make any necessary edits to your phrase. 6. To share your personal SmartPhrase with others, select the Owners/Users tab. Owners vs Users • Owners are users who can edit a SmartPhrase. To grant other users the ability to edit your SmartPhrase, add their name(s) to the SmartPhrase Owners area. • Users can use the SmartPhrase but are not able to edit it. To grant other users the ability to use your SmartPhrase, add their name(s) to the SmartPhrase Users area. 7. To enable look up of the SmartPhrase using alternate names, select the Synonym tab and add the new entries. 8. Click Accept. The SmartPhrase is now available for your use. EDIT A PERSONAL SMARTPHRASE – DURING AN ENCOUNTER Use the SmartLink/Phrase Butler to edit your personal SmartPhrases. 1. Access the SmartLink/Phrase Butler from a SmartTool-enabled text box. 2. From the SmartTool toolbar, click Butler displays. 3. Select the appropriate personal SmartPhrase (List my phrases). The SmartLink/Phrase TIP: If you add a synonym to your personal SmartPhrase, the SmartPhrase Butler displays the synonym as if it were another personal SmartPhrase. 4. Click Edit. The SmartPhrase Editor activity opens in a new workspace. 5. Edit your SmartPhrase as required and then click Accept. Page 295 eCLINICIAN – Electronic Medical Record Personalize eCLINICIAN CHANGE A SYSTEM SMARTPHRASE INTO A PERSONAL SMARTPHRASE – DURING AN ENCOUNTER During an encounter you have the ability to take a system SmartPhrase, modify it and then save it as a personal SmartPhrase. 1. Summon a system SmartPhrase. 2. With the system SmartPhrase displayed in a SmartTool-enabled text box, highlight the text and click (Create SmartPhrase). You can also right-click and select SmartPhrase > Create SmartPhrase from Selected Text. The SmartPhrase Editor window displays with the text you selected appearing in the SmartPhrase Text field. 3. Make any necessary edits to the phrase. 4. In the Name field, type a name for your personal SmartPhrase. 5. Click Accept. The SmartPhrase is now available for your use. EDIT A PERSONAL SMARTPHRASE - OUTSIDE OF AN ENCOUNTER Outside of an encounter you also have the ability to modify a system SmartPhrase and save it as a personal SmartPhrase. 1. Select Epic button > Tools > My SmartPhrases. The SmartPhrase List activity displays in a new workspace. 2. Select the phrase you want to edit. 3. From the SmartPhrase List activity toolbar, click Edit. The SmartPhrase Editor activity displays. 4. Edit your SmartPhrase as required. 5. When you are done, click Accept. Page 296 eCLINICIAN – Electronic Medical Record Personalize eCLINICIAN CHANGE A SYSTEM SMARTPHRASE INTO A PERSONAL SMARTPHRASE - OUTSIDE OF AN ENCOUNTER The SmartPhrase Selection window allows you to access the SmartPhrase Editor activity where you can view and edit user and system SmartPhrases. 1. Select Epic button > Tools > SmartPhrase Manager. The SmartPhrase Selection window displays. 2. Select the System Phrases tab. 3. To make the search for the system SmartPhrase easier, deselect the Filter choices based on context entered above option. 4. In the Phrase field, use completion matching or click the Selection tool to find the system SmartPhrase you want to work with. 5. To view the system SmartPhrase, click Go. The SmartPhrase Editor activity displays in a new workspace. Notice that the text window is greyed out. This indicates that you do not have the ability to edit a system SmartPhrase. You do, however, have the ability to copy it. 6. From the Content tab, highlight the text you want to bring over to your personal SmartPhrase. 7. Right-click and from the menu, select Copy. 8. From the bottom of the activity, click Open. Page 297 eCLINICIAN – Electronic Medical Record Personalize eCLINICIAN The SmartPhrase Selection window redisplays. 9. To create your new personal SmartPhrase, click New Phrase. The SmartPhrase Editor activity redisplays. 10. On the Content tab, in the blank SmartTool-enabled text box, right-click and select Paste to finish copying the text. 11. Make any necessary edits to your phrase. 12. In the Name field, type a name for your SmartPhrase. TIP: We strongly recommend that you add your initials to the beginning of all the SmartPhrases that you create. This will help you to distinguish your SmartPhrases from others. 13. Click Accept. The SmartPhrase is now available for your use. Page 298 eCLINICIAN – Electronic Medical Record Personalize eCLINICIAN ADD A CHECKBOX TO A PERSONAL SMARTPHRASE - MICROSOFT OFFICE WORD 2003 You can use personal SmartPhrases to create assessment tools that include clickable checkboxes. The key is to build your assessment tool in Microsoft Office Word first and then paste into any SmartTool-enabled area of eCLINICIAN - EMR and save it as a personal SmartPhrase. The following are instructions for Microsoft Office Word 2003. 1. Open a new document in Word. 2. Select View menu > Toolbars > Forms. The Forms displays. 3. Create your assessment tool. 4. In the document, click where you want to insert the checkbox. 5. Click the checkbox icon on the Forms toolbar. Page 299 eCLINICIAN – Electronic Medical Record Personalize eCLINICIAN A clickable checkbox displays in your document. 6. To change any of the properties of the checkbox, double-click the checkbox to open the Check Box Form Field Options window. 7. Make any necessary changes and click OK. 8. When you assessment tool is complete, paste your document into any SmartToolenabled textbox in eCLINICIAN - EMR and save it as a personal. ADD A CHECKBOX TO A PERSONAL SMARTPHRASE - MICROSOFT OFFICE WORD 2007 You can use personal SmartPhrases to create assessment tools that include clickable checkboxes. The key is to build your assessment tool in Microsoft Office Word first and then paste into any SmartTool-enabled area of eCLINICIAN - EMR and save it as a personal SmartPhrase. In order to add a checkbox to a Microsoft Office Word 2007 document, you must first ensure that you have the Developer option in the Ribbon toolbar. To setup the Developer option in the Ribbon toolbar, perform the following: • Click the Microsoft Office button, and then click Word Options. • Click Popular. • Select the Show Developer tab in the Ribbon check box, and then click OK. Page 300 eCLINICIAN – Electronic Medical Record Personalize eCLINICIAN The following are instructions for Microsoft Office Word 2007. 1. Open a new document in Word. 2. Create your assessment tool and place your cursor where you want to insert a checkbox. 3. Select Developer tab > Controls group> Legacy Tools. The Legacy Forms options display. 4. Optional step: If you do not want the checkboxes to be shaded, click the Form Field Shading button. 5. To insert the checkbox, click the Legacy Forms button; then click the Check Box Form Field button. A clickable checkbox displays in your document. Page 301 eCLINICIAN – Electronic Medical Record Personalize eCLINICIAN 6. Optional: To make any changes to the behaviour of the checkboxes, double-click them to open the Check Box Form Field Options window. Make any necessary changes and click OK. 7. When you assessment tool is complete, paste your document into any SmartToolenabled textbox in eCLINICIAN - EMR and save it as a personal SmartPhrase. DETERMINE WHICH SMARTLINK TO USE IN YOUR SMARTPHRASE SmartLinks can be especially useful when creating personal SmartPhrases because they allow you to pull patient information into your documentation. The SmartLink/Phrase Butler, available from the SmartPhrase Editor activity, provides you with the ability to search for the appropriate SmartLink. 1. In a SmartTool-enabled text box, click Editor displays. 2. From the toolbar, click the List My Phrases displays. 3. From the Filter tab on the right-hand side, select the SmartLinks option and deselect any other selections not needed for your search. 4. In the Search field, enter your search criteria, for example, allergy and press ENTER. (Note: The use of plurals can impact the number of results returned). The list of available SmartLinks that matched your search criteria displays. 5. Select a SmartLink. 6. To view the SmartLink name as it should display in the SmartPhrase Editor, click Preview. A pop-up window displays showing the formatted SmartLink name (Notice the arroba symbols that surround the name). 7. Click OK. Page 302 (Create SmartPhrase). The SmartPhrase button. The SmartLink/Phrase Butler eCLINICIAN – Electronic Medical Record Personalize eCLINICIAN 8. Once you have found the appropriate SmartLink, either click: • Add to Text and continue searching for additional SmartLinks, or • Add and Close, to return to your documentation. TIP 1: To quickly identify the SmartLinks most helpful to you, click the star to the left of the SmartLink to mark it as a favorite. TIP 2: For a list of commonly used SmartLinks, refer to Appendix C: Useful SmartLinks. Page 303 eCLINICIAN – Electronic Medical Record Personalize eCLINICIAN CREATE A PERSONAL SMARTPHRASE - OUTSIDE OF AN ENCOUNTER 1. Select Epic button > Tools > My SmartPhrases. The SmartPhrase List activity displays in a new workspace. 2. From the SmartPhrase List activity toolbar, click New. The SmartPhrase Editor activity displays. 3. On the Content tab, type your personal SmartPhrase. 4. In the Name field, type a name for your SmartPhrase. TIP: We strongly recommend that you add your initials to the beginning of all the SmartPhrases that you create. This will help you to distinguish your SmartPhrases from others. 5. When you are done, click Accept. The SmartPhrase is now available for your use. Page 304 eCLINICIAN – Electronic Medical Record Personalize eCLINICIAN MANAGE SMARTBLOCK MACROS The creation of SmartBlock macros is one way that you can drastically reduce the time it takes to document progress notes for routine exams. When you create a SmartBlock macro for a routine examination, the macro remembers the buttons and checkbox selections that you make. When you load the NoteWriter macro the next time you perform this type of exam, all of your defaulted selections automatically display. Any new findings that you have already noted are not overwritten when you load the macro. As a reminder, SmartBlock Macros are created using the down arrow on the far right of the NoteWriter toolbar. Macros are only available for ROS and the Physical Exam NoteWriter forms. The Macro menu has the following options: List of your macros or macros that others have shared with you. Create a new macro for the type of SmartBlock you are currently viewing. Create a macro for the type of SmartBlock you are currently viewing using the findings that are currently documented. Edit an existing macro for the type of SmartBlock you are currently viewing. Open the Macro Manager activity. Page 305 eCLINICIAN – Electronic Medical Record Personalize eCLINICIAN CREATE A SMARTBLOCK MACRO FROM CURRENT PROGRESS NOTE Once you have created a portion of your progress note using either the ROS form or the Physical Exam form, you have the option of saving the buttons and checkbox selections as a SmartBlock macro. The example below involves the Physical Exam form in NoteWriter. 1. From the Physical Exam form in NoteWriter, on the far right of the NoteWriter toolbar, click the down arrow. A menu displays. 2. From the menu, select Create macro from current data. The Macro Selection window displays. 3. In the Macro field, type a name for the macro. 4. Click Accept. The SmartBlock Macro Editor activity opens in a new workspace displaying a General tab and an Owners/Users tab. 5. On the General tab, revise selections as required. 6. If you want to grant other users the ability to use or to make changes to this macro, select the Owners/Users tab. Page 306 eCLINICIAN – Electronic Medical Record Personalize eCLINICIAN 7. To grant other users the ability to edit this macro, in the Macro Owners area, use completion matching to search for the name of the appropriate person(s). 8. To grant other users the ability to use this macro, in the Macro Users area, use completion matching to search for the name of the appropriate person(s). Sharing SmartBlock Macros The only restriction to sharing a SmartBlock macro is that the person you share the macro with must also have access to NoteWriter. You can share your macros with users in your own department and with users in other departments. TIP: When you use a SmartBlock macro that was changed by the SmartBlock macro owner, a message displays and allows you to accept or cancel out of loading the macro. 9. When you are done, click Accept. Additional Macro Features If you select the Set as primary macro option, this macro becomes the primary macro for this SmartBlock. The Save as button allows you to make a copy of the macro you just created. You can then open the copy and make the necessary changes. Note that you cannot edit the sex and age restrictions when you copy a macro. For example, if you copy an adult female physical exam macro, you cannot edit it to be an adult male physical exam macro. Page 307 eCLINICIAN – Electronic Medical Record Personalize eCLINICIAN EDIT A SMARTBLOCK MACRO FROM CURRENT PROGRESS NOTE You can edit an existing macro for the type of SmartBlock you are currently viewing in NoteWriter by performing the following: 10. From either the ROS or Physical Exam form in NoteWriter, on the far right of the NoteWriter toolbar, click the down arrow (the example below involves the Physical Exam form). A menu displays. 11. From the menu, select Edit existing <macro type> macro. In the screenshot below the PHYEXAMBYAGE (Physical Exam by Age) SmartBlock type is being used. 12. From the Macro Selection window, use completion matching to search for the macro you wish to edit. 13. Click Accept. The SmartBlock Macro Editor activity opens in a new workspace displaying a General tab and an Owners/Users tab. 14. On the General tab, make the required revisions. 15. If you would like to add or change the users who have the ability to use or edit your SmartBlock macro, select the Owners/Users tab and make the required revisions. 16. To grant other users the ability to edit this macro, in the Macro Owners area, use completion matching to search for the name of the appropriate person(s). 17. To grant other users the ability to use this macro, in the Macro Users area, use completion matching to search for the name of the appropriate person(s). Page 308 eCLINICIAN – Electronic Medical Record Personalize eCLINICIAN Sharing SmartBlock Macros The only restriction to sharing a SmartBlock macro is that the person you share the macro with must also have access to NoteWriter. You can share your macros with users in your own department and with users in other departments. TIP: When you use a SmartBlock macro that was changed by the SmartBlock macro owner, a message displays and allows you to accept or cancel out of loading the macro. 18. When you are done, click Accept. CREATE SMARTBLOCK MACROS – OUTSIDE OF AN ENCOUNTER SmartBlock Macros can also be created and managed outside of patient encounters. 19. Select Epic button > Tools > SmartBlock Macro. The Macro Selection window displays. 20. Select the Create Macro option. 21. In the Macro field, type a descriptive name for the macro (e.g. Adult Female Physical Exam). 22. To create a macro for the Physical Exam form, type PHYEXAMBYAGE in the SmartBlock field. To create a macro for the ROS form, type REVIEW_OF_SYSTEMS in the SmartBlock field. 23. If you selected the PHYEXAMBYAGE template, you must enter the appropriate information in the Age and Sex fields. 24. Click Accept. The Macro Editor activity opens in a new workspace. 25. The steps from this point forward are the same as in the topic Create a SmartBlock Macro from Current Progress Note. Page 309 eCLINICIAN – Electronic Medical Record Personalize eCLINICIAN EDIT AN EXISTING SMARTBLOCK MACRO – OUTSIDE OF AN ENCOUNTER Outside of a patient encounter, use the following steps to edit your macros. 1. Select Epic button > Tools > SmartBlock Macro. The Macro Selection window displays. 2. Choose Select macro and use completion matching to search for the macro you wish to edit. 3. Click Accept. The SmartBlock Macro Editor activity opens in a new workspace displaying a General tab and an Owners/Users tab. 4. On the General tab, make the required revisions. 5. If you would like to add or change the users who have the ability to use or edit your SmartBlock macro, select the Owners/Users tab and make the required revisions. 6. To grant other users the ability to edit this macro, in the Macro Owners area, use completion matching to search for the name of the appropriate person(s). 7. To grant other users the ability to use this macro, in the Macro Users area, use completion matching to search for the name of the appropriate person(s). Sharing SmartBlock Macros The only restriction to sharing a SmartBlock macro is that the person you share the macro with must also have access to NoteWriter. You can share your macros with users in your own department and with users in other departments. TIP: When you use a SmartBlock macro that was changed by the SmartBlock macro owner, a message displays and allows you to accept or cancel out of loading the macro. 8. When you are done, click Accept. Page 310 eCLINICIAN – Electronic Medical Record Personalize eCLINICIAN MANAGE YOUR SMARTBLOCK MACROS The Macro Manager activity is used to manage your SmartBlock macros. Access the Macro Manager activity the following ways: • Within an encounter - From NoteWriter, from the drop down menu on the far right of the NoteWriter toolbar. • Outside of an encounter - From Epic button > Tools > Macro Manager. You can perform the following actions from this activity: Hide a shared macro by selecting the checkbox in the appropriate row. This action prevents the macro from displaying in the drop down menu on the far right of the NoteWriter toolbar. Delete a macro (that you own) by clicking the X in the appropriate row. Deleted macros display in the lower portion of the screen. Bring a deleted macro back by clicking the Undelete icon in the appropriate row. Sort macros for each type of SmartBlock (ROS and Physical Exam) by order of importance. To sort, select the appropriate row and drag the macro to the new location. TIP: Once you name a SmartBlock macro you cannot rename it. You can change only the macros Display Name. To change the Display Name, double-click the Display Name field. Page 311 eCLINICIAN – Electronic Medical Record Personalize eCLINICIAN PERSONALIZE YOUR IN BASKET PERSONALIZE MESSAGE COLUMNS Users can now modify the columns that appear in individual message folders, so that the information displays in the order you prefer. 1. Select the folder for which you wish to configure your view. 2. On the far right of the Bottom toolbar, click the wrench icon. 3. Select a column to configure by clicking the column name. Page 312 eCLINICIAN – Electronic Medical Record Personalize eCLINICIAN 4. Customize the column view by using: • Move Up and Move Down buttons to change the order of the message columns. • The slider control to adjust column width. • Checkboxes under the Hide column to hide or unhide the column. 5. Repeat steps 3 and 4 for each column you wish to configure. 6. When you have finished your configuration, click Accept. TIP: To reveal hidden columns, you can click Show Hidden Columns on the Bottom In Basket toolbar Click the button again to re-hide columns. Page 313 eCLINICIAN – Electronic Medical Record Personalize eCLINICIAN CREATE QUICKACTIONS QuickActions are macros for your In Basket; they allow you automate the steps that you would take to deal with various message types. For example you can create a QuickAction that creates a result note containing the desired message and recipients. There are three different QuickActions that can be configured: • Result Note QuickAction • QuickNote QuickAction • Edit Note QuickAction The QuickActions Manager is where you can create, edit and delete QuickActions. You can access The QuickActions Manager from the In Basket in the following two ways: From the Bottom In Basket toolbar, select QuickActions > Manage QuickActions. From the Message Report toolbar, click Manage QuickActions. The following example demonstrates building a Result Note QuickAction for abnormal results. The basic steps for the other QuickAction types are similar. 7. From the In Basket, access the Results folder. 8. Access the QuickActions Manager. 9. To create a new Result Note Quick Action, select New > Result Note QuickAction. The Result Note QuickAction Editor displays. Page 314 eCLINICIAN – Electronic Medical Record Personalize eCLINICIAN The options available in the QuickAction Editor depend on the type of QuickAction you are creating. 10. In the Button name field, type a descriptive name for the QuickAction. For example, <your initials>Abnormal Results. 11. To have the system automatically mark the Result message as Done once you’ve sent your Result Note message, select the Mark In Basket message as complete after filing checkbox. 12. In the orders to select area, choose Abnormal. This choice ensures that if there are multiple results that are part of a single result message only the abnormal results are selected. 13. Enter an individual, class or pool to receive the message TIP: In the clinic you may want to use the pool that was created for admin staff. 14. In the SmartTool-enabled text field, type the message to the recipient(s). This message displays by default, every time you use this QuickAction. 15. To save the QuickAction, click Accept. Your new QuickAction appears with the name you assigned under the QuickActions menu in the Bottom In Basket toolbar and as a button on the Message Report toolbar. If you are in the middle of composing a QuickNote or Result Note and decide that you want to make it into a QuickAction, click the Save as QuickAction button on the bottom left of the Result Note or QuickNote window. The corresponding QuickAction Editor displays and you can make the necessary selections as described in the steps above. Page 315 eCLINICIAN – Electronic Medical Record Appendices APPENDICES APPENDIX A: FREQUENTLY ASKED QUESTIONS ABSTRACTION 1. Where is the pre-loaded information coming from? Existing clinical information in eCLINICIAN comes from one of three sources: • Investigations performed within the Edmonton Zone are interfaced from Netcare (Lab and Radiology). Netcare can be accessed from the desktop or from within eCLINICIAN. • For patients who have been seen in clinics already live with eCLINICIAN, patient information has been documented, reviewed and ordered electronically. • For patients who have not been seen in any live eCLINICIAN clinics, clinical information is abstracted from the patient’s paper chart and some referral / consult letters have been uploaded into the system and are viewable under the “Chart Review” activity, in the “Letters” or “Media” Tab. Because the clinical information is only accurate at the time of documentation (electronically or on paper), it is strongly recommended that the patient’s allergies, medications, and history are reviewed and confirmed (via “Mark as Reviewed”) at every visit. It is strongly recommended that Abstracts be reviewed for accuracy at first time of visit. ALLERGIES 1. The Allergy I want isn’t in the list. What do I do? Be sure the “Full Search” checkbox is selected. Use fewer letters when searching (i.e. enter “poll” for pollen, “rag” for ragweed). If you still can’t find what you’re looking for, search for and select Other. In the Comments field identify the allergy. The Comments field is reviewed quarterly and allergies re-occurring most often are added to the discrete list of allergies in the system. Page 316 eCLINICIAN – Electronic Medical Record Appendices BILLING CODES / FEE FOR SERVICE / ESL (ELECTRONIC SERVICE LOG) 1. How do I “drop a billing code” for a consult on another provider’s scheduled appointment? If a physician is consulted on another provider’s scheduled appointment and wants to drop a billing code, request him/her to open an “orders only” encounter. 2. Can a physician drop a billing code for a telephone call? Yes. Open a telephone encounter, enter diagnosis, enter documentation on advice given or asked, and order a telephone billing code in Meds & Orders. If the patient is from a non-EMR live area (i.e. IP / ER) then continue with paper billing for Tele/Advice. Note: Billers do not need the name of the physician they called or spoke to. 3. Electronic Service Log (ESL) ESL can be used for scheduled visits only. For non scheduled visits (telephone encounter, refill encounter, orders only encounter) use the paper service log as before or launch the ESL from a previously scheduled encounter. To launch the ESL from a previously scheduled encounter: • Click Chart. • Enter the patient identifiers. • Go to the “Encounters” tab of Chart Review. • Find the appropriate “Clinic Visit” to associate with the Service Log for this non scheduled visit (Only select encounters with a type of “Clinic Visit”). • Click on the “Launch Electronic Service Log” link. • Enter appropriate services. DICTATION 1. I want to dictate a consult letter instead of documenting a progress note. How do I do this? A progress note is required to close an encounter. Therefore, if you choose to dictate a consult letter without a progress note please indicate “see consult letter” in the progress note section so that you can close the encounter. Page 317 eCLINICIAN – Electronic Medical Record Appendices DOC FLOWSHEETS / REVIEW FLOWSHEETS 1. The Doc Flowsheet SmartLink isn’t working in my telephone encounter documentation section. What do I do? SmartLinks for Flowsheets do not work in a telephone encounter. If you need to use the Flowsheet SmartLinks, use the Orders Only or a telephone encounter. DRUG COVERAGE 1. Where do I document drug coverage for my patient? Use the Care Teams Activity to record the Insurance Information. Use the Free Text Provider field to enter the name of the Insurance and use “Other” as the relationship. Blue Cross drug authorization claim forms are completed and scanned into the EMR at the patient level. Note: You can add a link on your eCLINICIAN Dashboard to the Blue Cross forms for quick access. HOME CARE ORDERS / PATIENT CARE ORDERS 1. How do I place Home Care Orders? These are placed under PCO’s – Patient Care Orders. PCOs are printed and also filed automatically in Chart Review > Procedures tab. IN BASKET 1. How do I communicate with my Secretary or Admin Assistant regarding followups? Before utilizing eCLINICIAN for communication with your administration staff, discuss the expectations for monitoring the eCLINICIAN In Basket on a regular basis. In a Visit, you can utilize the CC’d Chart in the Follow Up section to provide direct communication to your administration staff regarding any follow-ups. They will receive this message in their In Basket under the CC’d Charts folder. If the patient is not present, a staff message can be utilized to request specific followup from your administration staff. In addition, staff messages can provide flags to separate out the different actions you are requesting of your administration staff and you can set due dates for the task. Be sure to check your In Basket for results and messages from your administration staff or other clinicians. Page 318 eCLINICIAN – Electronic Medical Record Appendices Also, remember to check for My Open Encounters in the In Basket, review the messages and close the encounter when all documentation has been completed. Note: Other workflows exist. The previous examples are the most common and straightforward workflows within eCLINICIAN - EMR. 2. I have My Open Encounters and My Open Charts folders. What is the difference? My Open Encounters refers to unscheduled visits (i.e. Telephone Call, Refill Medication and Orders Only encounters). The My Open Encounter message(s) show up in In Basket of the user that opened the unscheduled encounter immediately after opening the encounter. My Open Charts refers to scheduled visits and shows up in the In Basket of the scheduled provider one day after opening the chart if the chart is not closed. 3. Why is there a Letter Queue folder in my In Basket? A physician or other provider has routed a letter to you for processing. 4. How do I process a letter in my In Basket Letter Queue folder? Use the Comm Mgt button to edit the letter. If the letter is final, send the letter. The Letter Queue message will automatically disappear. If you want to save edits and send the letter to another user for review, Pend the letter and Forward the Letter Queue message to the reviewer. LABS 1. How do I communicate lab results with my patient’s Primary Care Provider (PCP)? You can copy the PCP, or any other provider, when ordering your lab. To do this: 2. • Order the lab in the Meds & Orders section. • Click on the blue hyperlink to open the lab details. • Complete the Questions section with the name and location of the provider for whom you would like to CC the lab results. • The lab will manually enter this CC information into their system and the lab results will be sent via hardcopy and/or to the CC provider’s In Basket results folder. What Lab requisitions printed from eCLINICIAN are not accepted? See Printing: 1d. eCLINICIAN requisitions not accepted. 3. I now get duplicate lab results in the eCLINICIAN In Basket Results folder as well as hardcopy paper results. How do I stop the hardcopy paper results? Contact your Subject Matter Expert (SME) on how to make this happen. 4. I can’t find the Lab I need in eCLINICIAN. What do I do? Page 319 eCLINICIAN – Electronic Medical Record Appendices Document that you’ve ordered this lab in the progress note. Complete a paper requisition for the patient. Contact the eCLINICIAN team. RESULTS 1. I can’t find my results in eCLINICIAN. Why? eCLINICIAN - EMR is a shared information tool where some data elements are shared in a similar fashion to Alberta Netcare. Privacy and security rules determine access to other data elements. The two tables below list: A. Clinical data found in eCLINICIAN - EMR. To view patient data prior to the listed dates, you must use Alberta Netcare or paper sources. B. Clinical data NOT found in eCLINICIAN – EMR. To review results from sources not listed, you must to use Alberta Netcare or paper sources. Importance of Checking Netcare for Results At this time, some results do not come into eCLINICIAN. It is important to check Netcare if you are expecting results and they are not appearing in eCLINICIAN. Table A Data Source Date Available Results Back To Name of Chart Review Activity Tab Lab Data AHS facilities • Edmonton area (All Facilities) 15 Apr 08 01 Jan 06 Lab • North zone (Northern Lights) 15 Apr 08 01 Jan 06 Lab • Provincial Lab (Edmonton zone) 01 May 08 01 May 08 Lab • Provincial Lab (Province Wide) 19 July 12 19 July 12 Lab • Newborn Metabolic Screening 01 June 08 01 June 06 Lab Cross Cancer Institute 28 Jun 10 28 Jun 10 Lab DynaLIFE (formerly DKML) collection sites Edmonton and area Central: Red Deer, Lloydminster, & Smith Clinic Camrose (where tests are performed at Dynalife Edmonton Main Lab) 15 Apr 08 01 Jan 06 Lab Provincial Electrodiagnostics (ECG) Page 320 eCLINICIAN – Electronic Medical Record Appendices Data Source Date Available All AHS Edmonton and area facilities 15 Apr 08 Results Back To Name of Chart Review Activity Tab Feb 07 Lab 01 Jan 06 Notes • ECG PDFs Transcribed Reports All AHS Edmonton facilities 15 Apr 08 • Operative Report • Progress Report/Clinic Report • Discharge Summary • Home Care Summary • Consultation • History • Letter • Neurophysiology (EEGs) • Cardio diagnostic • Emergency Dept Reports (scanned) Diagnostic Imaging Text Reports All AHS Edmonton facilities (Text) 15 Apr 08 01 Jan 06 Imaging Medical Imaging Consultants (MIC) – Edmonton zone (PDF) Insight Medical Imaging (IMI) – Edmonton zone (Text) CML Healthcare – Edmonton zone (PDF) 15 Apr 08 15 Apr 08 Imaging 15 Apr 08 15 Apr 08 Imaging 15 Oct 08 15 Oct 08 Imaging 01 Jan 06 Procedures Endoworks Reports RAH and UAH sites Procedure Notes – “Colorectal Cancer Screening – CRC” exam procedure report Page 321 04 April 13 eCLINICIAN – Electronic Medical Record Appendices Table B The eCLINICIAN - EMR patient chart DOES NOT contain clinical data from the sources listed in the table below: Lab Results • AHS -Calgary (All Facilities) • AHS - Cancer Tom Baker Centre Calgary • AHS - Central (All Facilities) • AHS - South (All Facilities) • Canadian Blood Services • HLA Lab Results Diagnostic Imaging • Amiha Diagnostic Imaging (St. Albert) • Breast Centre Radiology • Canada Diagnostic Centres (CDC) – Westgate X-Ray and Ultrasound • Cross Cancer Institute • Devon X-Ray Clinic • Dr. J.P. Mayo • Edmonton Cardiology Consultants at UAH and RAH - Echocardiograms • Glenwood Radiology • Pureform Diagnostic Imaging Clinic – includes Echocardiography (Sherwood Park) • The X-Ray Clinic at Northgate Centre • The X-Ray Clinic at 124th Street • The X-Ray Clinic at 142nd Street DI results from ALL facilities outside Edmonton and area are NOT found in eCLINICIAN. Electrodiagnostics • PDF Files: o o o Heart Diagram MAHI Stress and Holter Tests Paceart Other Results • AHS Edmonton - Tuberculin Skin Tests • Immunizations Community Clinic Page 322 eCLINICIAN – Electronic Medical Record Appendices LETTERS / REFERRAL LETTERS 1. What letter template should be utilized for windowed envelopes? Utilize the “blank letter 0.75” letter template in order for the letter to be processed with a windowed envelope. 2. How do I write a letter to a Provider Office, a Group of Providers, or a Community Program? For these letters, utilize the Other button in the Communications section to manually enter the name of the group being addressed. This window contains fields for adding the fax number and address as appropriate. 3. I’ve addressed a letter to my provider(s). How do I pull these names into my letter? SmartPhrase for pulling in the name of the first provider in the provider letter list: 4. • .cclistfirst - pulls in full name and address • .cclistfirstLname - pulls in only the last name • cclistrest - pulls in the name(s) of the remaining provider(s) in the provider letter list Why does the Referring Provider not display or populate when I am creating a consult letter? In order to pull the Referring Provider into letters or any of the clinical follow-up tools, the referring provider must be populated during patient registration. 5. I can’t find the referral letter for this patient. Where is it? All referrals are scanned or imported into eCLINICIAN and can be found in the Chart Review activity, Media tab. You can filter these documents by document type = referral to find all referrals for the patient. 6. I started my letter but have changed my mind and I don’t want to keep it. What do I do? You may choose to pend your letter so you can edit it and continue later. To do this, click the Pend button on the bottom right of the section. (Note: the encounter cannot be closed until all letters are marked as sent or routed to someone for follow-up). You may choose to cancel your letter. To do this, click the Cancel button on the bottom right of the section. Page 323 eCLINICIAN – Electronic Medical Record Appendices Medication Documentation / Meds and ORDERS 1. How do I add comments while documenting patient reported medications in the Medication Documentation section? 2. • To add comments for an individual medication, next to Instructions, select Click to Add Text. Enter the comments in the Instructions field. • To add a comment regarding the entire medication list, at the top of the Medication Documentation window, click Add Note. The medication I want to add is not available on the list. What do I do? If you’re in the Medication Documentation section: • Add Other Medication or Other Vitamin and enter a comment in Instructions identifying the name of the medication/vitamin. Select Click to Add Text. • For Insulin – do not change the dose in the dose field; rather document the dose change in Instructions. Select Click to Add Text. If you’re in the Meds & Orders section: • Be sure to check the Database Lookup Tab (F7) for a larger selection of medications to choose from. • Use fewer letters when searching i.e. Rather than entering Tylenol, enter the first three letters: Tyl • If you still can’t find what you’re looking for then order Other Medication and document the name of the medication in the Medication Name field of the questionnaire. Note: If this is a Patient Reported medication you must change Class to Historical Med so no prescription is printed and the medication is clearly identified as patient reported. Note: Medications entered as Other are reviewed quarterly and those medications reoccurring most often are added to the discrete list of medications in the system. 3. Why do I have duplicate orders? An order was previously placed in the last 14 days for the same item that you ordered. If the new order is still applicable, continue with signing of order. 4. How do I re-print my prescription? Go to the Order Entry Activity, open Previously Signed Orders, and click the Reprint button. Note: You can only reprint to the same printer as originally used. If you need to print at a different printer you will need to cancel the prescription and re-order it from the workstation mapped to the desired printer. 5. What is the quickest way to view the orders placed in an encounter? Page 324 eCLINICIAN – Electronic Medical Record Appendices Use the Rooming Report available from the Multi Provider Schedule. 6. What are all the boxes and checkmarks in the Med Documentation section? Medications in this section are intended to be reviewed in each encounter and documented by clicking the Taking, Not Taking or Unknown buttons. If medications have been abstracted and no medications have been reviewed (i.e. no one clicked the Taking, Not Taking or Unknown buttons in a previous encounter) then you would see Row D above, for each medication abstracted, when you open your first encounter following an abstract encounter. When you enter a new medication in this section, the is populated in the Taking? checkbox automatically. However, the grey box is left blank (Row A above). The grey box is populated only after clicking one of the Taking, Not Taking or Unknown buttons (Row B above). It is intended that one of these buttons will be clicked as each medication is reviewed with the patient in each encounter. The is cleared with the start of each new encounter to indicate that the medication has not yet been reviewed in the current encounter. Therefore, you would typically see Row C above, following an encounter where these medications had previously been reviewed, but not yet in this encounter. When you click the Not Taking or Unknown buttons the Taking? checkbox. Page 325 is cleared from the eCLINICIAN – Electronic Medical Record Appendices Medical History 1. How do I document Pertinent Negatives? AHS directive > pertinent negatives should be documented in the Progress Notes. MPS (MULTI PROVIDER SCHEDULE) / JOINT APPOINTMENT 1. How do I clearly identify that my patient is in a joint appointment with another provider? Add the Enc Provider and Joint columns to the MPS (Multi Provider Schedule). 2. How do I add a column to the MPS (Multiple Provider Schedule)? • While viewing the MPS, find My Schedule on the left hand side of your screen. • Highlight your name (your schedule) and right-click to select Properties. • You will be on the General tab. • Scroll down Available Columns on your left until you find the columns you want to add. • Highlight the column and click the Add button which is in the middle of your screen between Available Columns and Selected Columns. • Click Accept and return to the MPS. NETCARE 1. How do I see transcribed reports that have been CC’d to me from Netcare? These reports show up in the CC’d Charts messages folder in your In Basket. 2. How do I see letters dictated in Netcare? Letters dictated into Netcare are automatically posted to eCLINICIAN Chart Review > Notes Tab. PASSWORDS 1. My password isn’t working. Can you reset it? The eCLINICIAN team cannot reset passwords. For ALL password issues (AHS Login Accounts, AD Accounts, NT Login, Netcare Login, eCLINICIAN Login) for ALL staff (physicians or AHS staff), call the Help Desk at 780-735-4357 (HELP). Page 326 eCLINICIAN – Electronic Medical Record Appendices PREFERENCE LISTS 1. How do I copy a preference list? In the Preference List Composer (Epic button > Tools > Preference List Composer), click on the Copy User button on the bottom left-hand corner of the screen. PRE-WORK 1. I want to prepare my EMR chart prior to my scheduled visit. How do I do that? RN’s and Clerks should do pre-work in an Orders Only encounter. They should not perform pre-work on a physician’s scheduled visit. MDs can perform pre-work on their own scheduled visits. However, if the patient is a no show, the MD must address the open encounter by entering a Visit Diagnosis and Progress Note to close the encounter. If the Visit Diagnosis is unknown, use the Erroneous Encounter – Disregard (code 10000). For the Progress Note, you can type Patient did not show or Encounter opened in Error. PRINTING: LAB REQUISITIONS / PATIENT INSTRUCTIONS / PROGRESS NOTES / SICK NOTE 1. My Lab requisition isn’t printing. Why? Lab requisitions will not print if Status = Normal. • Orders which require the completion of a paper form or will be assigned to another provider in the clinic, have a status of Normal. To print, an order must have a Status of Future or Standing. • Ensure you have placed the correct order. • If necessary change the status. • Sign the order. Labs are printed after signing the order. If you’ve already signed the Lab order and it did not print you have two options: • You can give a hardcopy lab requisition to the patient • You can cancel the Lab order you just signed in eCLINICIAN and order the Lab again using Status = Future or Standing Note: eCLINICIAN requisitions NOT accepted include: Page 327 • All requisitions to the Mazankowski (i.e. Angiogram, Cardiac Ultrasound, ECHO, Stress Test, 24 Holter Monitor). • Blood Bank eCLINICIAN – Electronic Medical Record Appendices • Bone Marrow Aspiration • Bronchoscopy • ECG (not accepted at AHS or Mazankowski) • EEG orders – this is an internal referral to Neurology • EMG • Lithotripsy • Nuclear Medicine (i.e. NB Stress MIBI – Nuclear Medicine Cardiac Stress Test) • PFT • Referrals The provider should still order these requisitions in eCLINICIAN with Class = No Print, so we have an electronic record of these tests, in addition to completing the paper forms used before. EEG orders are an internal referral to Neurology and the paper referral form process must be followed. 2. How do I print multiple requisitions for the same test? Place the requisition Order in eCLINICIAN, sign and print, then select the Epic button > Tools > Printer Status and print additional copies. Do not photocopy the requisition. 3. My phone number isn’t printing on the requisition. Why not? The department phone and fax numbers are printed on Prescriptions and Lab requisitions, not individual user information. Physician information (primary provider’s phone & fax numbers) are printed on DI requisitions only. 4. 5. How do I print patient instructions? • From the Visit Navigator toolbar, click Print AVS. • While in the visit navigator – select down arrow beside printer icon on Hyperspace toolbar (very top right hand corner), select Print Patient Instructions. • If you do not have an open encounter, go to Chart Review activity, Notes tab, check the Pt Instr checkbox, click the printer icon (bottom half of screen, upper left hand side). How do I print progress notes? • Page 328 From the MPS (Multiple Provider Schedule) : select patient visit in schedule with single click, window will open up on bottom half of screen for patient reports, select the Rooming Report, right-click inside report itself and select Print. eCLINICIAN – Electronic Medical Record Appendices • 6. If you do not have an open encounter, go to Chart Review activity, Notes tab, deselect the Pt Instr checkbox, click printer icon (bottom half of screen, upper left hand side). How do I print a Sick Note? • Page 329 From within the encounter, go to Communications, In recipients, select Patient. From the other Templates, To Whom It May Concern Letter, enter info and print. eCLINICIAN – Electronic Medical Record Appendices PRINTING ISSUES A simple way to alleviate any Windows printing issues (i.e. Netcare) is to restart the PC. Some print jobs (PDF) are getting hung up in the print queue and users are unable to print from eCLINICIAN. When reporting printing issues you must supply the Room #, User, Computer ID, Citrix server & Printer ID and Order ID if you are having issues printing an order. To obtain the Computer ID (also called the Workstation ID) go to My Computer > Properties OR Epic button > Help > About Hyperspace. The name stickers on the monitors are not accurate computer IDs. If the issue is with printing an order, in the Meds & Orders section, click on the Order to expand, then click Report. Click on Order Details, the order information at the bottom will tell you the Order ID, which workstation it was ordered from, and Destination Workstation (Printer) it was printed on. If this is an immediate need for Windows Printing only, to add a printer from eCLINICIAN, follow these instructions: Page 330 • From the Start menu at the bottom left corner of screen, select settings. • Select Printers & Faxes. • Select Add Printer (double click). • From the Printer Wizard, select Next. • Select Network Printer. • Select Next. • Select Connect to this printer. • Select Next. • Type in your printer server. • From the dropdown list, select the appropriate printer for the exam room. Note that printer numbers are assigned by exam room number in the specific clinic area. eCLINICIAN – Electronic Medical Record Appendices PROGRESS NOTES 1. I want to pull my progress note into my letter. How do I do that? Use the SmartLink .pnotes to pull in the entire progress note into your letter. 2. I only want to pull a portion of my progress note into my letter. Can I do that? Yes. In your progress note use the two SmartLinks: .letterbegin and .letterend to identify the block you want to include in your letter. When you are in your letter use the SmartLink .lettertext to pull this block into your letter. SCANNING / IMPORTING / HARDCOPY DOCUMENTATION 1. My patient brought in his care log from home (Example: Food logs, glucose tests, BP readings). What do I do with that? Hardcopy documentation can be scanned into the patient’s encounter as a specific document type. Please see your Subject Matter Expert (SME) regarding what document type to use for various documents. Valid file types for Importing are: .jpg, .png, .tif, .tiff, .pdf 2. I scanned a document into eCLINICIAN and now I can’t find it. Where is it? All scanned documents are in Chart Review under the Media tab. You can filter on Document Type to select only those types of documents you’re looking for. 3. Scanning isn’t working for me. Why? See Systems Issues for details. SYSTEM ISSUES 1. I keep getting kicked out of eCLINICIAN. What can I do? When exiting eCLINICIAN and Citrix, be sure to Log Out of eCLINICIAN and Log Off of Citrix rather than using the X in the upper right hand corner of your screen. This will avoid a number of multiple server session related issues. If you’ve done this and still encounter problems, please call the Help Desk (780-735-4357). 2. Scanning isn’t working for me. Why? When you log in to Citrix for the first time you will get a Client Scanner Security pop up window with Question 1: Do you want to grant access? Select Yes, Full Access. Question 2: Do you want to be asked again? Select Never ask me again. This will allow scanning functionality and you will not get the pop up again. If you don’t get this pop up window, then select the Program Neighbourhood Connection Center (red ball icon on your desktop lower right corner) to open the popup window and answer the same questions appropriately. Page 331 eCLINICIAN – Electronic Medical Record Appendices If you keep getting this popup window, then Select Never ask me again. 3. My computer still doesn’t want to work. I need help. What should I do? For any technical issues with eCLINICIAN, please gather the following details to give to the Help Desk (780-735-4357) when you call: • User’s name (person logged into eCLINICIAN) • Citrix server name • Computer name • Patient name, ULI (see ULI section) • The encounter you were working in and what you were doing in that encounter when you ran into problems, i.e. type and date of encounter (telephone encounter, orders only encounter, visit encounter), task (letters, progress notes, history). TELEPHONE ENCOUNTER / MOA ROLE 1. The Doc Flowsheet SmartLink isn’t working in my telephone encounter documentation section. What do I do? Smart Links for Flowsheets do not work in a Telephone Encounter. If you need to use the Flowsheet Smart Links then use the Orders Only encounter. 2. Can I drop a physician billing code for a telephone encounter? Yes. See Billing Codes / Fee for Service / ESL (Electronic Service Log). 3. I have the MOA role and receive a patient message. Do I open a telephone encounter? Two methods exist depending on the situation: • To document directly on the patient’s chart, create a telephone encounter and route to the appropriate individuals. • To request guidance prior to any documentation on a patient’s chart, send an In Basket Call Back message to the appropriate individuals. ULI 1. How do I find the ULI for my patient? The ULI displays in the Patient Workspace Header. Page 332 eCLINICIAN – Electronic Medical Record Appendices VISIT DIAGNOSIS / REASON FOR VISIT / CHIEF COMPLAINT 1. I can’t find the Visit Diagnosis I want. What do I do? • Once you’re in the search screen, click Database Lookup (F5) button in the lower left hand corner of your screen for a larger selection of diagnoses to choose from. • Enter fewer letters to widen your search (e.g. enter ‘pulm’ rather than ‘pulmonary’) • If you still don’t find what you need please contact your Subject Matter Expert (SME) for advice on how to proceed. Note: If you find yourself using the same diagnosis frequently, add it to your preference list by right-clicking on the diagnosis and select Add to Common Dx Preference List. 2. I can’t find the Reason for Visit / Chief Complaint I want. What do I do? • Once you’re in the search screen, press the Database Lookup (F5) button in the lower left hand corner of your screen for a larger selection to choose from. • Enter fewer letters to widen your search (e.g. enter pain rather than back pain) • If you still don’t find what you need, you can select Other and indicate the details in the comment field. • Also, please contact your Subject Matter Expert (SME) for advice on how to request that your reason for visit be added to the list. Note: If you find yourself using the same reason for visit frequently, add it to your speed buttons by right-clicking on the reason for visit and selecting Add to Speed Buttons. WORKFLOWS CHECKOUT WORKFLOW 1. Orders are being missed. How do I ensure all orders placed during the visit are caught? When checking out the patients, the front desk should put in a process for all patients who have had orders placed during that visit. LETTER WORKFLOW 1. How do the physician and his/her administration staff coordinate completion of letters using In Basket? Page 333 eCLINICIAN – Electronic Medical Record Appendices The physician edits letters via the Comm Mgt button in his/her Letter Queue folder toolbar. S/he pends the letter. In the In Basket, s/he uses the Forward button to notify the administration staff that the letter is ready for final prep. Administrative staff use the Comm Mgt button in his/her Letter Queue folder toolbar to make final edits, review and Send (i.e. print) the letter. Once sent, the Letter Queue message automatically disappears. 2. How do I ensure accurate provider addresses for my letters? This requires coordination between the administration staff and physicians at the time of scheduling the appointment, check-in and creating the provider letter. At the time of scheduling the appointment: • The referring provider is selected from the list in the system. If this has been done correctly, the referring provider’s name and address can be pulled into the letter. • If the referring provider is not found in eCLINICIAN, administrative staff should send a Provider Record Request message to request the provider be added to the system. • Once the referring provider is available in the system, the front desk staff would update the appointment prior to or at check-in. PCP name and address is not required when scheduling an appointment. Administrative staff must use the Care Team activity to add this information in order for it to be pulled into the letter. At the time of Check In, front desk staff has the option to add or verify the PCP: • Click on the PCP stethoscope icon. • If the PCP exists, click on the Green Street icon to select the correct address. • If the PCP is missing, add the PCP and select the correct address. At the time of creating the provider letter, click the Referring Provider and/or PCP buttons and the correct information will pull into the letter. REFERRAL WORKFLOW 1. How do I order an outgoing referral? Order a referral in the Meds & Orders section to document the referral in the system. Page 334 • Complete your paper process as you would have done prior to using eCLINICIAN because the e-Referral system is not live yet. • If the physician you’re referring the patient to is live on eCLINICIAN you still must follow this same paper process. eCLINICIAN – Electronic Medical Record Appendices APPENDIX B: SYSTEM SMARTPHRASE EXAMPLES & NAMING CONVENTIONS System SmartPhrases cover many topics, including common words, medical terms, and phrases to document review of systems, physical exam, and complete visits. REVIEW OF SYSTEMS SMARTPHRASES • • For reviews of systems in which patients report positive symptoms, SmartPhrases begin with .pos. For reviews of systems in which patients report negative symptoms, SmartPhrases begin with .neg. Examples include: SmartPhrase Description .posdm Positive review of systems – diabetes mellitus .posgerd Positive review of systems – gastroesophageal reflux disease .negdm Negative review of systems – diabetes mellitus .neglbp Negative review of systems – lower back pain Page 335 eCLINICIAN – Electronic Medical Record Appendices PHYSICAL EXAM SMARTPHRASES • • Phrases for exams with positive findings will begin with .pex. Phrases for exams with negative findings will begin with .nex. Examples include: SmartPhrase Description .pexabd Positive findings – abdominal exam .pexdm Positive findings – diabetes mellitus .pexgen Positive findings – general exam .pexlbp Positive findings – lower back pain .nexabd Negative findings – abdominal exam .nexdm Negative findings – diabetes mellitus .nexlbp Negative findings – lower back pain .nexthy Negative findings – thyroid COMPLETE VISIT SMARTPHRASES All of the complete visit SmartPhrases begin with .cv. SmartPhrase Description .cvbronchitis Complete Visit – bronchitis .cvdm Complete Visit – diabetes mellitus .cvgerd Complete Visit – gastroesophageal reflux disease .cvlbp Complete Visit – lower back pain .cvwellchild Complete Visit – well child .cvww Complete Visit – well woman OTHER SMARTPHRASES The following other SmartPhrase naming conventions may also assist you in finding system SmartPhrases in eCLINICIAN. SmartPhrase Description .also Additional complaints. Examples include: .alsofatigue .drug Medication information. Examples include: .druginsulin and .drugfosamax .in Instructions for the patient. Examples include: .inchol and .insmoking .prob Problem-specific notes. Examples include: .probdiabetes and .probcopd .proc Procedure notes. Examples include: .procflexsig and .procskintag Page 336 eCLINICIAN – Electronic Medical Record Appendices APPENDIX C: USEFUL SMARTLINKS Following is a list of SmartLinks that can be especially useful while charting. Keep in mind that this isn't a complete list. However, it provides a starting point for the types of SmartLinks that are available. Area SmartLink Format Description Allergy .alg Prose Summary of patient's allergies .algenc Table Allergies as of the current encounter .algp Prose Patient's allergies .allergy Table Patient's allergies presented .fname Prose Patient's first name .lname Prose Patient's last name .name Prose Patient's full name .age Prose Patient's age as of today .sex Prose Patient's sex .add Prose Patient's address (all lines) .dob Prose Patient's date of birth .hmph Prose Patient's home phone number .ph Prose Patient's phone numbers .mob Table Patient's mobile/cell phone number .wkph Prose Patient's work phone number .pcp Prose Patient's primary care provider .mrn Prose Patient's medical record number .his Prose His or her in lower case .caphis Prose His or her in upper case .he Prose He or she in lower case .caphe Prose He or she in upper case .him Prose Him or her .me Prose User's name User-Related .logindept Prose Adds your login department to documentation Vitals .bsa Prose Patient's body surface area .lastbp Table Most recent blood pressure reading* .lasthc Table Most recent head circumference measurement* .lastht Table Most recent height reading* .lastpulse Table Most recent pulse reading* Demographics / Patient Page 337 eCLINICIAN – Electronic Medical Record Appendices Area SmartLink Format Description .lastresp Table Most recent respiration reading* .lasttemp Table Most recent temperature reading* .lastwt Table Most recent weight measurement* .multiplevitals .mvitals .vitalsmultiple .vitalsm Table Displays flowsheet data for a patient in tabular format and includes a row for each item of data that was recorded in the flowsheet. If the Multiple Vitals navigator section is not enabled, this SmartLink displays existing vitals stored in the patient record. .v Prose Visit vital signs on one line .vs Prose Visit vital signs separated by slash lines The asterisk * indicates that the number of readings to display is a parameter in the SmartLink. To use the SmartLink, enter the SmartLink (.lastbp, for example) followed by the number of readings you want to display. Enclose the number of readings in square brackets. Example: .lastbp[2] In this example, the SmartLink displays the two most recent blood pressure readings on record for the patient. By default, these SmartLinks look back from today's date to search for the vitals. Visit Info History Page 338 .cc Table Chief complaint .rfv Table Reason for visit .pnotes Prose Visit progress notes .alchx Table Patient's alcohol history .alchxp Prose Patient's alcohol history .drughx Table Patient's drug history .drughxp Prose Patient's drug history .famhx Table Patient's family history .famhxp Prose Patient's family history .hxped .ped Prose Patient's pediatric history. Displays such information as birth weight, birth length, head circumference, discharge weight, and delivery method. .hxpmh .medicalhx .pmh Table Past medical history .hxpsh .psh .surgicalhx Table Past surgical history eCLINICIAN – Electronic Medical Record Appendices Area Date/Time Diagnoses Medications Page 339 SmartLink Format Description .ob Table Status of the pregnancy history (not asked, never pregnant, or history of pregnancy) and the information from the pregnancy history fields .obhist Table The same information as .ob is displayed, along with the information entered in the Pregnancy Outcome table .prob Table Problem list with no comments listed .probl Table Extended problem list including comments .pshp Prose Patient's past surgical history .sacthx Table Patient’s sexual activity history .sexhxp Prose Patient's sexual activity history .soc Table Social history, including activities of daily living info and any text in the Social Documentation field .tobhx Table Patient's tobacco history .tobhxp Prose Patient's tobacco history .ed Prose Date of the current encounter .fdate Prose Formal date .smokeces Prose Pulls tobacco cessation information into progress notes .now Prose Current time .td Prose Today's date .afutappt Table Displays all future appointments. If no appointments exist, the text "No future appointments." displays. .diag Table Encounter diagnoses, along with the orders associated with each diagnosis .diagx Table Abbreviated encounter diagnoses .cmed Table A list of the patient's current medications .cmeds Prose Patient's current medications displayed on a single line .dcmed Table Medications discontinued in this encounter .cmedp Prose Displays medications in generic name format and is configurable as noted in the smart links below. .cmedp[1 Prose Displays medications in generic short name and brand short name format .cmedp[1,1 Prose Displays medications in generic and brand short name formats and displays the patient’s sig .cmedp[,1 Prose Displays medications in generic name format and displays the patient’s sig eCLINICIAN – Electronic Medical Record Appendices Area Results Page 340 SmartLink Format Description .cmedp[,,1 Prose Displays medications in generic and brand short name formats and displays medication dose and form .cmedp[,1,1 Prose Displays medications in generic and brand short name formats with patient’s sig .encmed Table Encounter medication list .encmedp Prose Patient's encounter medications .med Table All current medications that were ordered before the current encounter .medscurrent Prose Current medications .ltmed Table Long-term medications .refill Prose Requested medications .getlabs Table Lab results from previous visits and the current encounter. Use .getlabs to display all of the lab results information in one SmartLink. Example: GETLABS[6M,1 The "6M" instructs eCLINICIAN to search 6 months back from the day of the visit the user is presently in to find and display all lab component values in that time period. Entry for this parameter may be in the form #D, #W, #M, or #Y. The "#" indicates a number and the D, W, M, Y stand for days, weeks, months, or years respectively. If no entry is specified for this parameter (.GETLABS[,1), or if there are no results that fall within the time period indicated, then eCLINICIAN displays the last known result. The second parameter controls the display of the SmartLink. It accepts a blank entry, "1", or "2". A blank entry displays the component name, value, high and low ranges, status and any comments. An entry of "1" displays everything stated above except for the comments. An entry of "2" displays an abbreviated name and value for each component. eCLINICIAN – Electronic Medical Record Appendices Area Page 341 SmartLink Format Description .brieflab or .labbrief Table Component name, lab result, and date resulted for most recent labs. This is an abbreviated version of the lastlab SmartLink. The SmartLink accepts a list of result component base names separated by commas. The user can also request the number of results to display for each component. To indicate the number of results for each component, type the component name followed by a colon and then the number of results. For all results for that particular component, type an asterisk in place of the number. To obtain the last result for a particular component, type the component base name without the colon, number, or asterisk. Example: .brieflab[MCH:3,MCV:*,HCT This example would display a table for all components whose base name matches MCH, MCV, or HCT. The first would contain the last three results of each component that has a base name of MCH, the second would contain all the entered results for components with MCV as the base name, and the third would contain the last entered result for all components with a base name of HCT. .lastlabv .lablastv Table Lab results for previous visits in table format. It accepts two parameters separated by commas, which specify the duration and the format of the output. Example: .lastlabv[6M,1 The "6M" indicates to search six months back from the day of your open encounter to find and display all lab component values in that time period. Entry for this parameter may be in the form #D, #W, #M, or #Y. The "#" indicates a number and the D, W, M, Y stand for days, weeks, months, or years respectively. If no entry is specified for this parameter (.lastlabv[,1), or if there are no results that fall within the time period indicated, then the last known result displays. eCLINICIAN – Electronic Medical Record Appendices Area SmartLink Format Description .lastlab .lablast Table Most recent information on the requested components, including a table listing the date, result value, low and high reference range, and the result status for each result requested. The SmartLink accepts a list of result component base names separated by commas. The user can also request the number of results to display for each component. To indicate the number of results for each component, type the component name followed by a colon and then the number of results. For all results for that particular component, type an asterisk in place of the number. To obtain the last result for a particular component, type the component base name without the colon, number, or asterisk. Example: .lastlab[MCH:3,MCV:*,HCT This example would display tables for all components whose base name matches MCH, MCV, or HCT. The first would contain the last three results of each component that has a base name of MCH, the second would contain all the entered results for components with MCV as the base name, and the third would contain the last entered result for all components with a base name of HCT. My Sticky Note .mysticky Prose Pulls information from My Sticky Note into a Progress Note. Communication Management .fromaddr Prose Displays the From address. .ltrfrom Prose Displays the name of the letter author in the text of a letter. .followup Prose Pulls follow-up instructions into desired documentation. Follow Up Page 342 eCLINICIAN – Electronic Medical Record Appendices APPENDIX D: COMPARISON OF MEDICATION-RELATED SMARTLINKS Name Format Displays… Includes Patient Reported (PR) Meds? Reflects Meds Discontinued this encounter? Example / Notes .med table current med list before the start of the current encounter *see caution yes yes Caution: Consider using the encmedstart SmartLink instead as this SmartLink updates to also reflect changes made to the medications during the current encounter. .cmed table all current meds yes no .cmeds prose all current meds yes no “Current outpatient prescriptions:atorvastatin (LIPITOR) 10 mg Oral tablet, take 1 Tab (10 mg total) by mouth daily, Disp: 90 Tab, Rfl: 5” .cmedp prose all current meds yes no “has a current medication list which includes the following prescription(s): atorvastin” .cmedpwithsig prose all current meds yes no “has a current medication list which includes the following prescription(s): atorvastatin - take 1 Tab (10 mg total) by mouth daily” .cmedp[1 prose all current meds yes no “has a current medication list which includes the following prescription(s): atorvastatin (LIPITOR)” .cmedp[1,1 prose all current meds yes no “has a current medication list which includes the following prescription(s): atorvastatin (LIPITOR) - take 1 Tab (10 mg total) by mouth daily” .cmedp[,1 prose all current meds yes no “has a current medication list which includes the following prescription(s): atorvastatin - take 1 Tab (10 mg total) by mouth daily” .cmedp[,,1 prose all current meds yes no “has a current medication list which includes the following prescription(s): atorvastatin (LIPITOR) 10 mg Oral tablet” Page 343 eCLINICIAN – Electronic Medical Record Appendices Name Format Displays… Includes Patient Reported (PR) Meds? Reflects Meds Discontinued this encounter? Example / Notes .cmedp[,1,1 prose all current meds yes no “has a current medication list which includes the following prescription(s): atorvastatin (LIPITOR) 10 mg Oral tablet take 1 Tab (10 mg total) by mouth daily” .cmedsigonly table all current meds yes no Dispense and Refill columns are missing from the table .dcmed table only meds discontinued during current encounter yes yes .encmed table all current meds yes yes Displays the same medications as the .cmed SmartLink but it also lists any medications discontinued during the current encounter .encmedp prose all current meds yes yes “I have discontinued Mr. M's bisoprolol - take 1 Tab (10 mg total) by mouth daily. I am also having him maintain his amlodipine - take 1 Tab (10 mg) by mouth daily” .encmedstart table current med list before the start of the current encounter yes no This SmartLink does not reflect medication changes for the current encounter. .encmedsexclpr table meds ordered during current encounter no no .ltmed table only the current medications flagged as long term yes no .ltmedp prose only current yes no Page 344 “has a current medication list which includes the following eCLINICIAN – Electronic Medical Record Appendices Name Format Displays… Includes Patient Reported (PR) Meds? Reflects Meds Discontinued this encounter? medications flagged as long term Example / Notes long-term medication(s): ramipril, levothyroxine, and hydrochlorothiazide.” .medadmin table only meds administered in current encounter no no .medadminprose prose only meds administered in current encounter no no .avsmedlist table all current meds yes yes Provides a cleaner table of patient’s current medications intended for patient after visit summary. Additional brand or generic name and patient sig displays. .avscmedlist table all current meds yes no Provides a cleaner table of patient’s current medications intended for patient after visit summary. Additional brand or generic name and patient sig displays. .avscmedlistclinicalsig table all current meds yes no Provides a cleaner table of patient’s current medications with a clinical sig intended for letters to clinicians. Additional brand or generic name and patient sig displays. .actmed table only the current medications marked as Taking yes no Page 345 eCLINICIAN – Electronic Medical Record Appendices Additional Notes: • There is not a SmartLink that just displays Patient Reported (PR) medications. • There is not a version of the .med SmartLink that displays in Prose format. SCREENSHOT EXAMPLES SCREENSHOT 1 To see the patient current medication list prior to the start of the current encounter, use encmedstart. Page 346 eCLINICIAN – Electronic Medical Record Appendices SCREENSHOT 2 Lipitor is ordered during the encounter. To see just the ordered medications for this encounter (and exclude any patient reported medications), use encmedsexclpr. SCREENSHOT 3 To see the updated current medication list by the end of the encounter, consider using cmed. SCREENSHOT 4 If Claritin was also documented as a patient reported medication and Omeprazole discontinued during the encounter then Screenshot 1 & 2 would remain the same. Screenshot 3 is replaced by Screenshot 4 as the cmed SmartLink now pulls in the patient reported medication but not the discontinued medication. Page 347 eCLINICIAN – Electronic Medical Record Appendices SCREENSHOT 5 To see the updated current medication list by the end of the encounter in prose format and with the sig, consider using cmedpwithsig. SCREENSHOT 6 To display both the patient reported and the discontinued med at the end of the encounter, use encmed. Page 348 eCLINICIAN – Electronic Medical Record Appendices APPENDIX E: KEYBOARD SHORTCUTS FOR WINDOWS USERS Use the following keyboard shortcuts to save time. Use the following general keyboard shortcuts to speed up your work. F1 Open Help for the current activity TAB Move to the next field or button on the page SHIFT+TAB Move to the previous field or button on the page CTRL+UP ARROW Move up through activity tabs CTRL+DOWN ARROW Move down through activity tabs CTRL+TAB Move right through open workspaces and mini-tabs CTRL+SHIFT+TAB Move left through open workspaces and mini-tabs CTRL+W Close the selected workspace CTRL+D Open the More Activities menu CTRL+G Go to Diagnosis Entry in the Order Entry activity CTRL+N Go to the Visit Navigator CTRL+ALT+S Secure your session CTRL+ALT+L Log out of eCLINICIAN ALT+F4 Close eCLINICIAN You can also use the following standard Windows shortcuts: CTRL+A Select all text CTRL+C Copy selected text CTRL+X Cut selected text CTRL+V Paste selected text CTRL+Z Undo last action, such as restore a deleted block of text or undo your selection in a SmartList CTRL+Y Redo the last action you undid Use the following keyboard shortcuts to speed up your work when writing text: DOWN ARROW Move your cursor to the next line of text UP ARROW Move your cursor to the previous line of text CTRL+END Move your cursor to the end of the text CTRL+HOME Move your cursor to the beginning of the text END Move your cursor to the end of the current line of text Page 349 eCLINICIAN – Electronic Medical Record Appendices HOME Move your cursor to the beginning of the current line of text CTRL+RIGHT ARROW Move your cursor to the next word CTRL+LEFT ARROW Move your cursor to the previous word SHIFT+END Highlight from the cursor position to the end of the line SHIFT+HOME Highlight from the cursor position to the beginning of the line SHIFT+DOWN ARROW Highlight the line below the current line SHIFT+UP ARROW Highlight the line above the current line SHIFT+LEFT ARROW Highlight one character to the left of the cursor SHIFT+RIGHT ARROW Highlight one character to the right of the cursor CTRL+SHIFT+RIGHT ARROW Highlight from the cursor position to the end of the word CTRL+SHIFT+LEFT ARROW Highlight from the cursor position to the beginning of the word The following mouse-based methods work for selecting text or placing your cursor within a text field: Click and drag your cursor to select text. To select an entire line of text, click at the beginning of the line and move your cursor down Double-click a word to select it Click anywhere within a block of text to begin writing, editing, or deleting the information in that spot Use the following keyboard shortcuts to move through the Visit Navigator: F7 Open the previous navigator section F8 Open the next navigator section F9 Close the navigator section SHIFT+F7 Go to the previous navigator section without opening it SHIFT+F8 Go to the next navigator section without opening it ALT+UP ARROW Move up through the table of contents. The selected section opens when you release the ALT key ALT+DOWN ARROW Move down through the table of contents. The selected section opens when you release the ALT key Page 350 eCLINICIAN – Electronic Medical Record Appendices Use the following keyboard shortcuts to navigate your In Basket: ALT+UP ARROW Move up through the folder list ALT+DOWN ARROW Move down through the folder list CTRL+T Open the Out of Contact activity CTRL+F Forward In Basket Message Use the following techniques to select more than one option in a list. For example, in Chart Review, you might want to select four different encounters to review. SHIFT+click Select a continuous range of entries from the list. While holding down SHIFT on the keyboard, use your mouse to select an upper and lower bound. All entries between your two selections are highlighted. For example, use this technique to select rows 1 through 12 in a list. CTRL+click Select two or more individual entries from the list. While holding down CTRL on the keyboard, use your mouse to select each entry. For example, use this technique to select rows 1, 7, and 12 in a list. While still holding down the CTRL key, click an entry again to clear it. Use the following conventions to enter dates and times relative to today: t Today. Use this to indicate today’s date. You can also use this as a relative date. For example, to enter today’s date, type “t”. For tomorrow’s date, type “t+1”. w Week. Use this for relative dates. For example, to enter the date two weeks ago, type “w-2”. m Month. Use this for relative dates. For example, to enter the date five months from now, type “m+5”. y Year. Use this for relative dates. For example, to enter the date one year ago, type “y-1”. n Now. Use this to indicate the current time. You can also use this for relative times. For example, to enter the time 30 minutes from now, type “n+30”. Page 351 eCLINICIAN – Electronic Medical Record Appendices APPENDIX F: KEYBOARD SHORTCUTS FOR MAC USERS Additional Notes: 1. The Windows CTRL key usually performs the same function as the Mac Command and Control keys. Also note that sometimes both of the Mac keys work; sometimes only one of the two works. 2. The Windows ALT key usually performs the same function as the Mac Option or Alt key and sometimes the Mac Command key. Also note that sometimes both Mac keys work; sometimes only one of the two works. 3. If pressing any of the function keys (F1 to F12) does not cause the correct activity to occur, try pressing and holding the “fn” key when pressing the function key. For example, pressing the fn+F1 keys together should bring up the Help screen if pressing the F1 key alone did not bring it up. The Mac system preferences utility allows for changing from needing to press the “fn” key if desired. Use the following general keyboard shortcuts to speed up your work. f1 or fn+f1 (see note 3 above) Open Help for the current activity tab Move to the next field or button on the page shift+tab Move to the previous field or button on the page control+up arrow Move up through activity tabs control+down arrow Move down through activity tabs control+tab (command+tab will allow you to cycle through to other open programs, like Windows’ Alt+Tab does) Move right through open workspaces and mini-tabs control+shift+tab Move left through open workspaces and mini-tabs control or command+w Close the selected workspace control or command+d Open the More Activities menu control or command+g Go to Diagnosis Entry in the Order Entry activity control or command+n Go to the Visit Navigator command+f10 (release) then press s (see note 3) Secure your session command+f10 (release) then press o (see note 3) Log out of eCLINICIAN alt or option+f4 or command+f10 (release) then press x (see note 3) Close eCLINICIAN Page 352 eCLINICIAN – Electronic Medical Record Appendices You can also use the following standard Windows shortcuts: control or command+a Select all text control or command+c Copy selected text control or command+x Cut selected text control or command+v Paste selected text control or command+z Undo last action, such as restore a deleted block of text or undo your selection in a SmartList. control or command+y Redo the last action you undid Use the following keyboard shortcuts to speed up your work when writing text: down arrow Move your cursor to the next line of text up arrow Move your cursor to the previous line of text left arrow Move your cursor to the left one character right arrow Move your cursor to the right one character fn+control+right arrow Move your cursor to the end of all the text/page fn+control+left arrow Move your cursor to the beginning of all the text/page fn+right arrow Move your cursor to the end of the current line of text fn+left arrow Move your cursor to the beginning of the current line of text control+right arrow Move your cursor to the beginning of the next word to the right control+left arrow Move your cursor to the beginning of the previous word to the left fn+shift+right arrow Highlight from the cursor position to the end of the line fn+shift+left arrow Highlight from the cursor position to the beginning of the line shift+down arrow Highlight from the cursor position to the line below the current line at the same cursor position shift+up arrow Highlight from the cursor position to the line above the current line at the same cursor position shift+left arrow Highlight one character to the left of the cursor (or as many characters as the left arrow is pressed) shift+right arrow Highlight one character to the right of the cursor (or as many characters as the right arrow is pressed) control+shift+right arrow Highlight from the cursor position to the end of the word control+shift+left arrow Highlight from the cursor position to the beginning of the word Page 353 eCLINICIAN – Electronic Medical Record Appendices Use the following keyboard shortcuts to speed up your work when writing text: fn+down arrow Move upwards (if available) through the text fn+up arrow Move downwards (if available) through the text The following mouse-based methods work for selecting text or placing your cursor within a text field: Click and drag your cursor to select text. To select an entire line of text, click at the beginning of the line and move your cursor down Double-click a word to select it Click anywhere within a block of text to begin writing, editing, or deleting the information in that spot Use the following keyboard shortcuts to move through the Visit Navigator: F7 (see note 3) Open the previous navigator section F8 (see note 3) Open the next navigator section command+f9 (see note 3) Close the navigator section shift+f7 (see note 3) Go to the previous navigator section without opening it shift+f8 (see note 3) Go to the next navigator section without opening it alt+up arrow Move up through the table of contents. The selected section opens when you release the ALT key alt+down arrow Move down through the table of contents. The selected section opens when you release the ALT key Use the following keyboard shortcuts to navigate your In Basket: up arrow Move up through the folder list down arrow Move down through the folder list control or command+t Open the Out of Contact activity enter/return Refresh or load the selected message fn+delete Mark the message as Done Page 354 eCLINICIAN – Electronic Medical Record Appendices Use the following keyboard shortcuts to select screen options using the keyboard instead of the mouse: command+f10 (release) then press underlined letter (see note about F keys) Perform the action of the associated button. Often one letter of a particular button name appears underlined. If so, use that letter as the shortcut for the button. For example, in the Visit Navigator, the S in the SmartSets button is underlined. Press ALT+S to activate the button and search for SmartSets. Use the following techniques to select more than one option in a list. For example, in Chart Review, you might want to select four different encounters to review. shift+click Select a continuous range of entries from the list. While holding down SHIFT on the keyboard, use your mouse to select an upper and lower bound. All entries between your two selections are highlighted. For example, use this technique to select rows 1 through 12 in a list. control or command+click Select two or more individual entries from the list. While holding down CTRL on the keyboard, use your mouse to select each entry. For example, use this technique to select rows 1, 7, and 12 in a list. While still holding down the CTRL key, click an entry again to clear it. Use the following conventions to enter dates and times relative to today: t Today. Use this to indicate today’s date. You can also use this as a relative date. For example, to enter today’s date, type “t”. For tomorrow’s date, type “t+1”. w Week. Use this for relative dates. For example, to enter the date two weeks ago, type “w-2”. m Month. Use this for relative dates. For example, to enter the date five months from now, type “m+5”. y Year. Use this for relative dates. For example, to enter the date one year ago, type “y-1”. n Now. Use this to indicate the current time. You can also use this for relative times. For example, to enter the time 30 minutes from now, type “n+30”. Page 355 eCLINICIAN – Electronic Medical Record Appendices APPENDIX G: REPORTING WORKBENCH The Reporting Workbench component of eCLINICIAN – EMR provides you with the ability to meet disease management and preventative care goals for your patients by allowing you to quickly identify a list of patients with a specific set of criteria. Reporting Workbench functionality in this section is: • Accessing Reporting Workbench • Overview of My Reports Activity • Create and Run New Report • Modifying Existing Report • Working with Report Results CONFIDENTIALITY OF INFORMATION WITHIN THE REPORTING WORKBENCH It is the responsibility of the author of any report, regardless of the medium (printing, electronic export, etc.), to adhere to confidentiality requirements in accordance with their organization’s physical safeguard policies and procedures. Transmission of confidential report data must be conducted in a secure manner with recommended disclaimers stamped on fax cover sheets, email subject lines, etc. Report disclaimer as recommended by the ISO (Information Stewardship Office): The report and any associated files are confidential and may contain personal or privileged health information as defined by Alberta’s Health Information Act and is intended solely for the use of the requestor and only for the purpose stated at the time of the request. Any other use, dissemination, distribution or copy is strictly prohibited. If received in error please return to sender immediately or report to the Information Stewardship Office at 780-735-0662. Thank you for your cooperation and assistance. All custodians and affiliates remain obligated, and are expected, to comply with their organization’s overarching policy and procedure (i.e., Alberta Health Services or University of Alberta fax, email and encryption policies). Report extracts are considered “transitory” in nature and should be confidentially shredded or deleted when their usefulness has expired. There is no legislative requirement to archive, retain or scan reports back into the EMR or the permanent legal health record. Page 356 eCLINICIAN – Electronic Medical Record Appendices ACCESS THE REPORTING WORKBENCH 1. Log into eCLINICIAN using your Alberta Health Services User ID and Password. 2. From the Epic button, select Reports > My Reports. Page 357 eCLINICIAN – Electronic Medical Record Appendices OVERVIEW OF THE MY REPORTS ACTIVITY The My Reports activity is made up of two tabs: My Reports tab and Library tab. MY REPORTS TAB The My Reports tab is the primary screen you see when you access the My Reports activity. You can run and access your favorite reports as well as view any recent or saved report results. My Reports is made up of the following sections: • My Favorite Reports: Lists all reports you marked as your favorites or were published to you as a favorite. • Saved Results: When you view the results of a report, you have an option to save the results. When you save the results, they display in this section for future access. • Recent Results: When you run a report from the Library or from your Favorites section, the results of that report display in this area. Page 358 eCLINICIAN – Electronic Medical Record Appendices LIBRARY TAB Using the Library, you can locate and run any saved reports as well as create new reports. By default, all reports that you have access to will be shown. 1. Use the search field to find a specific report. 2. Apply filters to browse for reports that meet certain criteria. Page 359 • Reports I Own: Lists all reports that you have created or reports that you are listed as an owner on. • Reports I Ran: Lists all reports you ran recently. • Type: Filters reports by type. • Groups: Filters reports by user groups. • Template: Lists all the current report templates available for the report type. This filter will not be used much as there is currently only one report type, “Find Patients Generic Criteria”. Please note more templates may be added in the future. The “Find Patients Generic Criteria” template should meet all of your current requirements as it is general in nature and includes all selection criteria that are available. Templates determine what search criteria are available to use in a report as well as settings for formatting the report results. • Tags: Tags can be added to reports when they are created. The Tags filter will allow you to find all reports that contain a particular Tag. eCLINICIAN – Electronic Medical Record Appendices CREATE A NEW REPORT You can create your own reports to quickly find all your patients that meet certain criteria. Report results can be reviewed, printed or exported to a patient list. There are two types of reports that can be created: • Private reports: Only visible to the user who created them. • Public reports: Visible to everyone who has security to see the template used to generate the report. Public reports are created by Report Administrators and are used as a means to distribute reports across the enterprises that are deemed important for patient care. To create a report, you need to consider four items: • Search Criteria: Used to identify which patients to include on the report. Search criteria are defined by you. • Appearance: Controls how the report is displayed in eCLINICIAN. Appearance can be set by the report template or defined by you. • Print Layout: Controls how the report is printed. Print layout can be copied from the report template or defined by you. • General: General settings such as report name, description and tags. CREATE A REPORT 1. Select the Library tab. 2. Place your cursor over the heading Find Patients - Generic Criteria. 3. Click New Report. The Report Settings window displays. Page 360 eCLINICIAN – Electronic Medical Record Appendices CRITERIA TAB The criteria tab is where you set the search parameters that the report will use to find patients for the report. You can add multiple criteria separated by logical operators to build complex rules upon which to find clients. 1. Set the date range that you would like the report to search within. Date Range The date range specified here will be used only by a time-sensitive criterion. Time-sensitive criteria are identified on the criteria window by a clock icon. If there are no time-sensitive criteria included in the report, Reporting Workbench will evaluate the criteria without using the date range. 2. Choose criteria to search on. Notice that as you make your selections, the right-hand Enter Search Values changes allowing you to enter specific values for each criterion. If appropriate, change the default Patient Base selection. Patient Base The Patient Base section displays My Patients. My Patients are defined as patients where you are: • The Primary Care Provider • The Encounter Provider • The Supervising Provider • A member of the Care Team You can further categorize the patients that will display on your report by changing the Patient Base selection criteria to: • My Care Team Patients in Time Frame • My Current Care Team Patients • My Scheduled Patients 3. Add more criteria using Or, And, or Custom logic operators. Logic used between criteria You can use one of the following to change the logic used between multiple criteria in a report: And = The result must match all of the values for the criterion. This is the default option. Or = The result must match one of the values for the criterion. Custom = This option allows you to define your own logic among criteria values. Page 361 eCLINICIAN – Electronic Medical Record Appendices 4. In the Enter Search Values section, add the details about the criteria that you have chosen. For example, if you chose Current medications you need to choose a specific medication. 5. Add multiple items within one criterion by using Or, And, or logic. Logic used between criteria You can use one of the following to change the logic used between multiple criteria in a report: And = The result must match all of the values for the criterion. This is the default option. Or = The result must match one of the values for the criterion. Custom = This option allows you to define your own logic among criteria values. 6. The search that you have created is written at the bottom of the screen. Page 362 eCLINICIAN – Electronic Medical Record Appendices APPEARANCE TAB The default appearance of the report is set by the report template type. To change the appearance of a report: 1. Uncheck Use theme colors. 2. From the Property: drop down menu, select the property’s appearance to set. 3. Choose a font and size. 4. Click Set to set the color. Page 363 eCLINICIAN – Electronic Medical Record Appendices PRINT LAYOUT TAB You must set up the print layout of your report if you will need to print it. If you run the report without the Print Layout information you will not be able to print the report. There are two types of print layouts to choose from: Plain Text or Rich Text. • Plain Text will print as follows (no header; footer contains printed date/time and page number): Report records - Landscape: Footer: • Rich Text will print as follows (Recommended): This is how your report will print if you select the AHS header and footer and save a Report name on the General tab. Header + report records – Landscape: Footer: RICH TEXT FORMAT PRINTING (RECOMMENDED): 1. Click on the Landscape check box (this will include all of the seven columns on one line). 2. Click on the radio button next to Rich text layout. It is strongly recommended that you use the Rich Text format and include the AHS Header and Footer. This will automatically include the disclaimers and allow you to adhere to the confidentiality requirements. Page 364 eCLINICIAN – Electronic Medical Record Appendices 3. Click on the Default Layout button. All of the report fields are filled in automatically. Columns displayed on the report: • MRN = Patient MRN – The patient’s medical record number • Patient = Patient Name – The patient’s name • DOB = Patient DOB – The patient’s date of birth • Age = Patient Age – The patient’s age • Sex = Patient Sex – The patient’s sex • PCP = Patient PCP – The patient’s primary care provider • Phone = Phone Number – All of the patient’s phone numbers that are recorded in eCLINICIAN. 4. Click on the Header & Footer button. Page 365 eCLINICIAN – Electronic Medical Record Appendices 5. Click on the Selection Tool for Header and select the AHS Report Header [12401]. 6. Click on the Selection Tool for Footer and select the AHS Report Footer [12402]. 7. Click Accept. GENERAL TAB 1. Type a name for your new report. If you have set up the report to print and would like the name of the report to appear at the top of the printed report; you must enter a report name and click Save. 2. Type a description of the report. 3. Click one of the following buttons: Page 366 • Run: Run the report • Save: Save the report • Save As: Saves the reports (and any changes) under a new report name • Restore: Restore to the templates default settings • Close: Close the report without saving your changes eCLINICIAN – Electronic Medical Record Appendices You can quickly mark your saved report as a favorite. • Access the Library tab, select your report and click Add to Favorites. Page 367 eCLINICIAN – Electronic Medical Record Appendices RUN A REPORT 1. To run a report, perform one of the following: • Click New Report button and click Run from the Reports Setting window. • To run a saved report, access the Library section, search for the report, hover your mouse over the report and click Run. 2. To view the status of your submitted report, select the My Reports tab. 3. View your submitted report in the Recent Results section. The report has an initial status of Running. 4. As the report continues to run, you will see updates given in the Status field. 5. When the status of the report changes to Ready to view, select the report and click View or double-click the report. Limitations of the Reporting Workbench • To minimize any risks to the live system (PRD), the Reporting Workbench runs on an alternate server. If, for some reason, this server becomes unavailable, an In Basket message will be sent to all users advising that Reporting Workbench is currently unavailable. • Submitted reports are queued for processing. The Report queue will run only five reports at a time. A report status of “Waiting to Run” will display if there are more than five reports ahead of yours in the queue. • The maximum records that can be returned for a given report is 5,000. Care should be taken in planning the amount of data that any one request may return. Page 368 eCLINICIAN – Electronic Medical Record Appendices MODIFY AN EXISTING REPORT You can make changes to an existing report and save the changes. You can also make changes to an existing report and save the new version using a new name. In the latter case, the original report remains unchanged. 1. From the Library tab, select the appropriate report. 2. Click Edit. 3. Modify the appropriate report settings. 4. Perform one of the following: 5. • To save the changes to your existing report, click Save. • To save the changes as a new report, click Save As. At the prompt, type a new name for the report and click OK. Click Close. Page 369 eCLINICIAN – Electronic Medical Record Appendices WORK WITH REPORT RESULTS Each row of a report represents one patient that meets the report’s criteria. Each column displays one piece of information about that patient. When you open the report you may see that not all of the results have been loaded. You can load the rest of the records by either clicking the Load All button or by scrolling to view the remaining results. By clicking Load All, all of your records are loaded into the report at once. By scrolling down, 100 records are returned at a time as you scroll. SORT RESULTS 1. To do a simple sort of your report results, click the header of the column that you want to sort. Click the column header again to reverse the sorting of the results. 2. For a more complex sort, right-click one of the column headers to bring up the menu of sorting options. • Choose the Custom option to open the Custom Sort window. • Using this window, you can sort the report by up to three columns in either ascending or descending order. Sorted columns display a ^ symbol with associated number to show the order of the sort. These point in the direction of the sort. In the above screenshot, the report is sorted in ascending order by MRN. Page 370 eCLINICIAN – Electronic Medical Record Appendices FILTER RESULTS 1. To filter your results by information in a specific column or columns, click Filters on the toolbar. 2. Select one or multiple columns to filter and specify values for each. 3. Once you have specified your filter criteria, click Apply to filter your results. 4. To look at the full report again, click the Clear All button and the filters will be removed. 5. To remove the filters pane from the current view either click Filters at the top of the workspace or press Alt-F. CREATE PATIENT LISTS FROM RESULTS You can create a patient list from your report results. 1. To create a patient list, click Add to List from the Reports viewer toolbar. 2. From the Add Patients to a Patient List window, either add the information to one of your displayed patient lists or click the option to create a new list. 3. Click Add to Patient List. Page 371 eCLINICIAN – Electronic Medical Record Appendices USE RESULTS TO CONTACT PATIENTS You can take direct action from the results of a Reporting Workbench report. The actions you can take are determined by the combination of your general eCLINICIAN permissions as well as your Reporting Workbench permissions. For example, if you do not have permission to create Telephone encounters, you will not be able to perform this action from the Reporting Workbench. The actions that you can take on the patient records displayed in your report are shown on the report toolbar: To perform any of these actions, click on the patient record in the report and then click on the Action button on the toolbar. EXPORT RESULTS Results can be exported as a .csv (comma delimited) or .tsv (tab delimited) file and imported into Microsoft Excel or another tool to display the date in another program. 1. Run the report. 2. From the Report viewer, select Options > Export to File or Export and Open. Both selections export your results to a file. Export and Open opens the file after exporting so that you can quickly see the file you have created. 3. From the Save As pop-up window, select the location for the exported file. Page 372 eCLINICIAN – Electronic Medical Record Appendices 4. In the File name field, type the name of the file. 5. In the Save as type field, select the appropriate file type .csv (comma delimited) or .tsv (tab delimited). 6. Click Save. PRINT RESULTS 1. At the top right corner select Print > Print List The following screen displays. In the Destination field, you have the option of printing to a file. This option should not be used with RWB as the destination is inaccessible. 2. Click on the Record Select Button for Printer Name and select the printer you would like to print to from the list. The Type will be automatically filled in when you select your printer. 3. Click OK to print. Page 373 eCLINICIAN – Electronic Medical Record Appendices If you did not set up the Print Layout tab when you created the report; you will get the following message and will be unable to print the report. Refer to the Create a New Report > Print Layout Tab section on how to set up the report for printing. SAVE RESULTS By default when you run a report the results are saved for two hours. 1. To save the results for review at a later time, from the Report Viewer click Options. 2. Select Save Results. 3. From the Save Results pop-up window, if appropriate, type a new name for report and set an expiration date. When you choose to save the results of a report run you choose an expiration date. This is the date you potentially want to save the results until. When you open the My Reports tab, eCLINICIAN notifies you if there are saved results that are past their expiration date. It offers you the choice to either keep the saved results for longer or delete them. Page 374 eCLINICIAN – Electronic Medical Record Appendices 4. Click Accept. 5. Return to the My Reports tab. 6. View your saved results in the Saved Results section. 7. The expiration date for each saved report is shown. Saving results saves only the actual result data, not any formatting. If you want to save formatting, you can Save the report so that it can be run again. All of the changes that are discussed in the Create a New Report section would not be saved and you would have to redo all of your changes if you wanted to run the report again. Page 375 eCLINICIAN – Electronic Medical Record