1
User’s Guide
Intellex
Version 5.0
Part Number 8200-0051-02 A0
Notice
The information in this manual was current when published. The manufacturer reserves the right to revise and improve its products.
All specifications are therefore subject to change without notice.
Copyright
Under copyright laws, the contents of this manual may not be copied, photocopied, reproduced, translated or reduced to any
electronic medium or machine-readable form, in whole or in part, without prior written consent of Tyco International Ltd. © 2011 and
its Respective Companies. All Rights Reserved.
American Dynamics
6600 Congress Avenue
Boca Raton, FL 33487 U.S.A.
Customer Service
Thank you for using American Dynamics products. We support our products through an extensive worldwide network of dealers. The
dealer through whom you originally purchased this product is your point of contact if you need service or support. Our dealers are
empowered to provide the very best in customer service and support. Dealers should contact American Dynamics at (800) 507-6268
or (561) 912-6259 or on the Web at www.americandynamics.net.
Trademarks
Windows® is a registered trademark of Microsoft Corporation. PS/2® is a registered trademark of International Business Machines
Corporation.
The trademarks, logos, and service marks displayed on this document are registered in the United States [or other countries]. Any
misuse of the trademarks is strictly prohibited and Tyco International Ltd. will aggressively enforce its intellectual property rights to the
fullest extent of the law, including pursuit of criminal prosecution wherever necessary. All trademarks not owned by Tyco International
Ltd. are the property of their respective owners, and are used with permission or allowed under applicable laws.
Product offerings and specifications are subject to change without notice. Actual products may vary from photos. Not all products
include all features. Availability varies by region; contact your sales representative.
License Information
Your use of this product is governed by certain terms and conditions. Please see the detailed license information at the end of this
manual.
Disclaimers
MPEG-4 Disclaimer:
THIS PRODUCT IS LICENSED UNDER THE MPEG-4 VISUAL PATENT PORTFOLIO LICENSE FOR THE PERSONAL AND NONCOMMERCIAL USE OF A CONSUMER TO (i) ENCODING VIDEO IN COMPLIANCE WITH THE MPEG-4 VISUAL STANDARD
("MPEG-4 VIDEO") AND/OR (ii) DECODING MPEG-4 VIDEO THAT WAS ENCODED BY A CONSUMER ENGAGED IN A
PERSONAL AND NON-COMMERCIAL ACTIVITY AND/OR WAS OBTAINED FROM A VIDEO PROVIDER LICENSED BY MPEG LA
TO PROVIDE MPEG-4 VIDEO. NO LICENSE IS GRANTED OR SHALL BE IMPLIED FOR ANY OTHER USE. ADDITIONAL
INFORMATION INCLUDING THAT RELATING TO PROMOTIONAL, INTERNAL AND COMMERCIAL USES AND LICENSING MAY
BE OBTAINED FROM MPEG LA, LLC. SEE HTTP://WWW.MPEGLA.COM
H.264 Disclaimer:
THIS PRODUCT IS LICENSED UNDER THE AVC PATENT PORTFOLIO LICENSE FOR THE PERSONAL AND NONCOMMERCIAL USE OF A CONSUMER TO (i) ENCODE VIDEO IN COMPLIANCE WITH THE AVC STANDARD ("AVC VIDEO")
AND/OR (ii) DECODE AVC VIDEO THAT WAS ENCODED BY A CONSUMER ENGAGED IN A PERSONAL AND NONCOMMERCIAL ACTIVITY AND/OR WAS OBTAINED FROM A VIDEO PROVIDER LICENSED TO PROVIDE AVC VIDEO. NO
LICENSE IS GRANTED OR SHALL BE IMPLIED FOR ANY OTHER USE. ADDITIONAL INFORMATION MAY BE OBTAINED FROM
MPEG LA, L.L.C. SEE HTTP://WWW.MPEGLA.COM
ii
Warnings
To reduce risk of electric shock, do not remove cover. No user serviceable parts inside. Refer servicing to qualified service personnel.
Do not expose this appliance to rain or moisture.
Do not install this product in hazardous areas where highly combustible or explosive products are stored or used.
This equipment is a Class 1 laser product incorporating a Class 1 laser diode and it complies with FDA radiation performance standards, 21 CFR subchapter J and the Canadian Radiation Emitting Devices Act, REDRC1370.
The lightning flash/arrowhead symbol, within an equilateral triangle, alerts the user to the presence of a shock hazard
within the product’s enclosure.
Danger of explosion if battery is incorrectly replaced. Replace only with the same or equivalent type recommended by
the battery manufacturer. Dispose of used batteries according to the battery manufacturer’s instructions.
Zur vermeidung eines stromschlages darf das gehäuse nicht entfernt werden. es enthält keine vom benutzer zu
wartenden teile. überlassen sie die wartung nur qualifiziertem fachpersonal.
Es besteht die Gefahr einer Explosion, wenn die Batterie nicht ordnungsgemäß ausgetauscht wird.
FCC COMPLIANCE
This equipment has been tested and found to comply with the limits for a Class “A” digital device, pursuant to part 15 of
the FCC Rules. These limits are designed to provide reasonable protection against harmful interference when the equipment is operated in a commercial environment. This equipment generates, uses and can radiate radio frequency energy
and, if not installed and used in accordance with the instruction manual, may cause interference to radio communications. Operation of this equipment in a residential area is likely to cause harmful interference in which case the user will
be required to correct the interference at their own expense.
This product was FCC verified under test conditions that included the use of shielded I/O cables and connectors between system components. To be in compliance with FCC regulations, the user must use shielded cables and connectors for all except power.
EQUIPMENT MODIFICATION CAUTION
Changes or modifications not expressly approved by Sensormatic, the party responsible for FCC compliance, could void
the user’s authority to operate the equipment and could create a hazardous condition
This class A digital apparatus complies with Canadian ICES-003. Cet appareil numérique de la classe A est conforme
à la norme NMB-003 du Canada.
Rack Mounting
Consult with the supplier of your equipment rack for adequate rack mounting means, with proper consideration for the
weight of this product.
Consult with the manufacturer of your rack regarding the proper hardware and procedure of mounting this product in a
safe and useable fashion
Avoid uneven loading or mechanical instability when rack mounting units.
Make sure that units are installed to get enough air flow for safe operation.
The maximum temperature for rack-mounted units is 35° C.
Avoid uneven loading or mechanical instability when rack mounting units.
Check product label for power supply requirements to assure that no overloading of supply circuits or overcurrent protection occurs.
Mains grounding must be reliable and uncompromised by any connections.
iii
iv
Contents
The Intellex System
Managing Digital Video . . . . . . . . . . . . . . . . . . . . . . . . . . . . . . . . . . . . . . . . . . . . . . . . 1
Basic features . . . . . . . . . . . . . . . . . . . . . . . . . . . . . . . . . . . . . . . . . . . . . . . . . . . . . 1
Optional Features . . . . . . . . . . . . . . . . . . . . . . . . . . . . . . . . . . . . . . . . . . . . . . . . . . 2
Basic Features
Getting Started . . . . . . . . . . . . . . . . . . . . . . . . . . . . . . . . . . . . . . . . . . . . . . . . . . . . . . . 3
Logging In . . . . . . . . . . . . . . . . . . . . . . . . . . . . . . . . . . . . . . . . . . . . . . . . . . . . . . . . 3
Main Screen . . . . . . . . . . . . . . . . . . . . . . . . . . . . . . . . . . . . . . . . . . . . . . . . . . . . . . 3
Widescreen display . . . . . . . . . . . . . . . . . . . . . . . . . . . . . . . . . . . . . . . . . . . . . . . 4
Widescreen resolution selection . . . . . . . . . . . . . . . . . . . . . . . . . . . . . . . . . . . . . 4
Controls . . . . . . . . . . . . . . . . . . . . . . . . . . . . . . . . . . . . . . . . . . . . . . . . . . . . . . . . 6
Changing the Look of the Live Display . . . . . . . . . . . . . . . . . . . . . . . . . . . . . . . . 7
Zooming in . . . . . . . . . . . . . . . . . . . . . . . . . . . . . . . . . . . . . . . . . . . . . . . . . . . . . . 7
Setup Controls. . . . . . . . . . . . . . . . . . . . . . . . . . . . . . . . . . . . . . . . . . . . . . . . . . . . . 7
Setting the camera’s frame rate. . . . . . . . . . . . . . . . . . . . . . . . . . . . . . . . . . . . . . 7
Increasing display resolution . . . . . . . . . . . . . . . . . . . . . . . . . . . . . . . . . . . . . . . . 7
Utility Options . . . . . . . . . . . . . . . . . . . . . . . . . . . . . . . . . . . . . . . . . . . . . . . . . . . . . . . . 8
Checking Camera Status . . . . . . . . . . . . . . . . . . . . . . . . . . . . . . . . . . . . . . . . . . . . . . . 9
Finding Video Segments . . . . . . . . . . . . . . . . . . . . . . . . . . . . . . . . . . . . . . . . . . . . . . 10
Viewing Live Video. . . . . . . . . . . . . . . . . . . . . . . . . . . . . . . . . . . . . . . . . . . . . . . . . . . 11
Start Camera Sequencing . . . . . . . . . . . . . . . . . . . . . . . . . . . . . . . . . . . . . . . . . . . 11
Stop Camera Sequencing . . . . . . . . . . . . . . . . . . . . . . . . . . . . . . . . . . . . . . . . . . . 11
Controlling a Dome Camera. . . . . . . . . . . . . . . . . . . . . . . . . . . . . . . . . . . . . . . . . . . . 12
Quick Camera Controls . . . . . . . . . . . . . . . . . . . . . . . . . . . . . . . . . . . . . . . . . . . . . 13
Controlling the Pan-Tilt Control via Mouse . . . . . . . . . . . . . . . . . . . . . . . . . . . . 13
Zoom via Mouse Scroll Wheel . . . . . . . . . . . . . . . . . . . . . . . . . . . . . . . . . . . . . . 13
Pattern and Preset Camera Controls . . . . . . . . . . . . . . . . . . . . . . . . . . . . . . . . . . 13
Selecting a Pattern. . . . . . . . . . . . . . . . . . . . . . . . . . . . . . . . . . . . . . . . . . . . . . . 14
Defining a Pattern . . . . . . . . . . . . . . . . . . . . . . . . . . . . . . . . . . . . . . . . . . . . . . . 14
Selecting a Preset . . . . . . . . . . . . . . . . . . . . . . . . . . . . . . . . . . . . . . . . . . . . . . . 14
Defining a Preset . . . . . . . . . . . . . . . . . . . . . . . . . . . . . . . . . . . . . . . . . . . . . . . . 15
Configuring a Dome Camera. . . . . . . . . . . . . . . . . . . . . . . . . . . . . . . . . . . . . . . . . 15
Exporting Video . . . . . . . . . . . . . . . . . . . . . . . . . . . . . . . . . . . . . . . . . . . . . . . . . . . . . 16
Managing Alarms . . . . . . . . . . . . . . . . . . . . . . . . . . . . . . . . . . . . . . . . . . . . . . . . . . . . 19
Generating Alarms . . . . . . . . . . . . . . . . . . . . . . . . . . . . . . . . . . . . . . . . . . . . . . . . 19
Reviewing Alarms . . . . . . . . . . . . . . . . . . . . . . . . . . . . . . . . . . . . . . . . . . . . . . . . . 19
v
Contents
Playing Back Video Clips . . . . . . . . . . . . . . . . . . . . . . . . . . . . . . . . . . . . . . . . . . . . . . 21
Slider Control . . . . . . . . . . . . . . . . . . . . . . . . . . . . . . . . . . . . . . . . . . . . . . . . . . . 22
Jog Shuttle Control . . . . . . . . . . . . . . . . . . . . . . . . . . . . . . . . . . . . . . . . . . . . . . 22
Playback from External Sources . . . . . . . . . . . . . . . . . . . . . . . . . . . . . . . . . . . . . . 22
Archiving Video . . . . . . . . . . . . . . . . . . . . . . . . . . . . . . . . . . . . . . . . . . . . . . . . . . . . . 24
Recommended Maximum Archive Size . . . . . . . . . . . . . . . . . . . . . . . . . . . . . . . . 24
Archiving to a storage device . . . . . . . . . . . . . . . . . . . . . . . . . . . . . . . . . . . . . . . . 24
While Recording. . . . . . . . . . . . . . . . . . . . . . . . . . . . . . . . . . . . . . . . . . . . . . . . . 25
After Stopping Recording. . . . . . . . . . . . . . . . . . . . . . . . . . . . . . . . . . . . . . . . . . 27
Restoring Images from a storage device . . . . . . . . . . . . . . . . . . . . . . . . . . . . . . 28
Playing Restored Images. . . . . . . . . . . . . . . . . . . . . . . . . . . . . . . . . . . . . . . . . . 28
Resetting Archive Flags . . . . . . . . . . . . . . . . . . . . . . . . . . . . . . . . . . . . . . . . . . . 28
Updating License Information . . . . . . . . . . . . . . . . . . . . . . . . . . . . . . . . . . . . . . . . 30
Advanced Features
The Two Man Rule. . . . . . . . . . . . . . . . . . . . . . . . . . . . . . . . . . . . . . . . . . . . . . . . . . . 31
Logging In a Second User. . . . . . . . . . . . . . . . . . . . . . . . . . . . . . . . . . . . . . . . . . . 31
Logging Off a Second User . . . . . . . . . . . . . . . . . . . . . . . . . . . . . . . . . . . . . . . . . . 32
Searching for Video Segments . . . . . . . . . . . . . . . . . . . . . . . . . . . . . . . . . . . . . . . . . 33
Searching by Date/Time . . . . . . . . . . . . . . . . . . . . . . . . . . . . . . . . . . . . . . . . . . . . 33
Searching by Camera . . . . . . . . . . . . . . . . . . . . . . . . . . . . . . . . . . . . . . . . . . . . . . 34
Searching by Alarms . . . . . . . . . . . . . . . . . . . . . . . . . . . . . . . . . . . . . . . . . . . . . . . 34
Searching Using Filters . . . . . . . . . . . . . . . . . . . . . . . . . . . . . . . . . . . . . . . . . . . . . 34
Searching Using Text Associated with Cameras . . . . . . . . . . . . . . . . . . . . . . . . . 35
Searching by String . . . . . . . . . . . . . . . . . . . . . . . . . . . . . . . . . . . . . . . . . . . . . . 35
Advanced Searches. . . . . . . . . . . . . . . . . . . . . . . . . . . . . . . . . . . . . . . . . . . . . . 35
Text Options. . . . . . . . . . . . . . . . . . . . . . . . . . . . . . . . . . . . . . . . . . . . . . . . . . . . . . . . 36
Adding, Editing, or Deleting a Text Stream . . . . . . . . . . . . . . . . . . . . . . . . . . . . . . 36
Associating Text Streams with Cameras. . . . . . . . . . . . . . . . . . . . . . . . . . . . . . . . 39
Generating Receipt Definitions . . . . . . . . . . . . . . . . . . . . . . . . . . . . . . . . . . . . . . . 39
Adding, Editing, Deleting, or Importing Receipt Definitions . . . . . . . . . . . . . . . . 39
Generating Text Alarms . . . . . . . . . . . . . . . . . . . . . . . . . . . . . . . . . . . . . . . . . . . . 40
Using Advanced Text Exceptions . . . . . . . . . . . . . . . . . . . . . . . . . . . . . . . . . . . 40
Advanced Searching with Motion Exception . . . . . . . . . . . . . . . . . . . . . . . . . . . . . . . 41
Motion Exception vs. Motion Detection . . . . . . . . . . . . . . . . . . . . . . . . . . . . . . . . . 41
Searching by Motion Exception. . . . . . . . . . . . . . . . . . . . . . . . . . . . . . . . . . . . . . . 42
Setting Up the Target Area . . . . . . . . . . . . . . . . . . . . . . . . . . . . . . . . . . . . . . . . . . 43
Adjusting Target Area Settings . . . . . . . . . . . . . . . . . . . . . . . . . . . . . . . . . . . . . . . 43
Determining Minimum Object Size. . . . . . . . . . . . . . . . . . . . . . . . . . . . . . . . . . . 44
Specifying an Object’s Direction . . . . . . . . . . . . . . . . . . . . . . . . . . . . . . . . . . . . 44
Specifying an Object’s Minimum Speed . . . . . . . . . . . . . . . . . . . . . . . . . . . . . . 45
Environmental Factors . . . . . . . . . . . . . . . . . . . . . . . . . . . . . . . . . . . . . . . . . . . . . 45
vi
Intellex
Contents
Viewing an Activity Log . . . . . . . . . . . . . . . . . . . . . . . . . . . . . . . . . . . . . . . . . . . . . . . 47
Enabling Remote Access Authorization . . . . . . . . . . . . . . . . . . . . . . . . . . . . . . . . . . . 53
S.M.A.R.T. Hard Drive Support . . . . . . . . . . . . . . . . . . . . . . . . . . . . . . . . . . . . . . . . . 53
Exiting Intellex . . . . . . . . . . . . . . . . . . . . . . . . . . . . . . . . . . . . . . . . . . . . . . . . . . . . . . 54
Exiting to Windows . . . . . . . . . . . . . . . . . . . . . . . . . . . . . . . . . . . . . . . . . . . . . . . . 54
End User License Agreement (EULA)
55
User’s Guide
vii
Contents
viii
Intellex
The Intellex System
Managing Digital Video
The Intellex is an intelligent DVMS (Digital Video Management System) that combines video
multiplexing, recording, and viewing of up to 16 cameras, local and remote camera control,
alarm/event detection and notification, video and text analysis (IntelleCord and Smart Search) and
much more.
Depending on equipment configuration, the Intellex can display multi-channel live video and output
live audio; record multiple video channels, text streams and one audio channel; play back
recorded multi-channel video with associated audio and text; perform video analysis and text
exception monitoring; export data; archive data; perform comprehensive video and text searching;
and host multiple remote users. Depending on equipment configuration and remote connections,
you can perform these and other tasks simultaneously.
Intellex is offered in desktop, rack mounted chassis, and platforms configured with Classic,
Deluxe, or Premier packages, each containing pre-configured hardware and software features.
Basic features
• Simultaneous viewing, recording, playback, transmitting, database searching, exporting and
archiving
• Uses ACC (Active Content Compression), a proprietary patented highly efficient video
compression and decompression method
• Intelligent recording (IntelleCord). Recording based on alarms: preconfigured video and text
filters, mechanical inputs, local and remote generated alarms and video loss. Always recording
plus response to alarms and/or recording only in response to alarms
• Selective Image Recall (Smart Search). Database search based on video and text filters
configured after-the-fact, preconfigured video and text filters, mechanical inputs, local and
remote generated alarms and on video loss
• Regular and Custom Schedules, including Custom Weekends
• Dome control including, pan, tilt, zoom, focus and iris, as well as programming American
Dynamics domes
• User-defined camera handlers
• Export video, text and audio to external storage. May be CD, DVD, removable and network
drives
• E-mail notification of system events
• Hard disk drive monitoring
• Remote access and management through Network Client and Intellex API 3rd party programs
(limited to API functions programmed)
View live video
Retrieve and play back video, text and audio
Remotely configure Intellex settings
• Windows XP/Windows 7 operating system platform.
1
The Intellex System
Optional Features
• Archive Manager module allows for data archiving (video, text and audio) to network attached
storage devices and retrieval using Network Client.
• Policy Manager module integrates with Microsoft Windows security to provide Intellex with
Advanced Security for managing and restricting user and user group access to Intellex
resources and functions locally and remotely by Network Client and Intellex API 3rd party
applications.
2
Intellex
Basic Features
Getting Started
To configure security, see the Intellex Installation and Configuration Guide. The system
administrator must grant privileges to access, set, or change features.
Note
The Administrator account should only be used to perform Administrator level duties, and should
not be used for viewing video.
Logging In
1 Using the mouse, enter the 1- to 8-character PIN (Personal Identification Number) code the
system administrator assigned. Click
to erase an entry.
2 Click OK. The main screen appears.
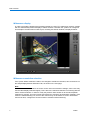
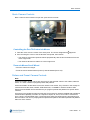
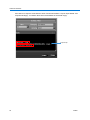
Main Screen
Displays video from 1–16 cameras. Here, the screen displays live images from 4×4 (16) cameras.
Each pane shows
live video from 1 of
the 16 cameras.
Image area
On-screen controls
3
Basic Features
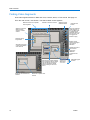
Widescreen display
In order to provide the highest picture quality possible on newer TFT widescreen monitors, Intellex
will now automatically resize its display to match whatever resolution the system has configured.
An example of a widescreen monitor layout, including text stream window, is displayed below:
Note
The controls perform the same functions as those shown for the standard resolution layout, the
only difference being their location on the screen.
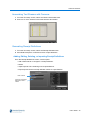
Widescreen resolution selection
If the system default resolution needs to be changed to a different resolution, this can be done on
the Setup/Display/Monitor Resolution Tab, as shown on the next page;
Note
Due to the various combinations of monitor screen sizes and resolution settings, some users may
see the video display stretched slightly. This is due to the selected resolution not matching with the
native monitor resolution. In order to rectify the problem users should run at the native/optimal
resolution for monitor. This can be done with reference to monitor’s documentation. Similarly, if the
monitor is switched during use, some of the controls may not be visible on screen. Should this
need to be done, configure the second monitor’s resolution before switching.
4
Intellex
Basic Features
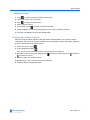
Select Monitor Resolution tab.
Select the desired Frequency rate from
this dropdown on the Monitor Resolution
tab.
Select the resolution from this drop
down.
Click on the Change Resolution button to
confirm your selection. You are prompted
to confirm if the new view is acceptable - if
a positive response is not given within a
preset timeframe then the system reverts
to the previous setting.
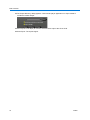
Note
If the GUI is resized to or from the 800x 600 setting the system will restart automatically for the
changes to take effect once you have confirmed your choice on the dialogue window shown below.
User’s Guide
5
Basic Features
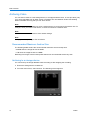
Controls
Play changes to Pause
when you click Pause
on Playback controls
Controls play/pause,
playback direction, and
speed
Selects the number of
cameras to display:
• 1x1 (1)
• 2x2 (4)
• 3x3 (9)
• 4x4 (16)
Searches the image database
for specific video images
Hides controls and
displays current images
full screen
Displays the list of alarms
Click to display a specific camera. In multicamera display, drag and drop a camera
button to any image pane.
Displays the
status screen
Opens Utility Options,
Setup Options
Opens Archive
Options, if available
Displays cameras sequentially
Playback Control Options
Jog/Shuttle Control
VCR Playback Control
Choose a playback option:
1 From Setup options, select Display.
2 From Playback Controls, choose Jog/Shuttle or VCR.
6
Intellex
Basic Features
Changing the Look of the Live Display
Right-click an image. This menu appears.
Switch to Full Screen / Switch to Menu
Displays live images on the full screen
and hides screen controls / Displays
screen controls
Display this camera in 1x1 format.
Generates an
alarm manually
for this camera.
Selects a camera to display in 1x1 mode.
Changes the
screen format.
Select:
Displays video from alarmed
cameras in sequence.
Displays video from a
specified camera.
View this camera’s live video signal on an
additional video monitor, if Call Monitor is
available.
Selects the current called
camera.
Zooming in
At any time, zoom in on an area of the live image to more closely observe activity from a camera.
1 Move the cursor over the image to display it in a single pane.
2 Click to fill the entire image area with this camera image. The cursor changes to
.
3 To return to the previous display mode:
• Click it again.
• Click the camera to full size.
4 Move the cursor over the image to enlarge.
5 Click and drag to define the area to enlarge.
Setup Controls
Setting the camera’s frame rate
Setting the frame rates higher will improve the picture quality. This can be done through the
Setup/Rate/Use Camera selectable rate dropdown menu.
Increasing display resolution
True 4CIF resolution can be achieved through the Setup facility. Through the Setup/Schedule and
Setup/Alarm menu option.
User’s Guide
7
Basic Features
Utility Options
From the main screen, click Utility.
Restarts the recording after
the image database is filled
(linear mode).
Generates an alarm event
manually for one or more
cameras.
Displays a user’s activities. See
35.
Clears alarm messages manually
from the live display if Latch
Messages is enabled.
Erases a CD-RW to re-use it for
exporting files.
Logs in/off the Two Man Rule
feature.
Shuts down the system.
Exits to Windows. See page 54.
Displays system version,
copyright, and hardware
information. See.
8
Intellex
Basic Features
Checking Camera Status
From the main screen, click Status.
Cameras by name in numerical
order
Super, Normal, or
Extended
Normal or
High
Disabled, Active,
or Alarmed
Pre-alarm setting for
each camera in
Alarmed mode
* = the camera is in covert mode
the
camera is
not connected or
there is no video
to record
the camera
is currently
unable to record
Current filter for each
camera in Active or
Alarmed mode
Rate in images per
second.
Auto rate only; not
applicable if the rate is
set per camera.
Circular or linear
Regular or custom
Time between
oldest and
newest images in
the database
Connected to network
Workstation’s network
identifier
Total number of images in the Estimate of remaining number of images
(linear mode only)
database
Note
On a DVMS or LT model the Auto Rate mode will not be an option. Users must manually set the
record rate.
User’s Guide
9
Basic Features
Finding Video Segments
Find video segments based on Date and Time, Camera, Alarm, or Text criteria. See page 24.
From the main screen, click Search. The Search Mode screen appears.
Defines a search for a specific
video segment
Selects a camera to search
Searches using
entered criteria
Interrupts the
search
Plays the selected
video segment. If
the Two Man Rule
is applied to the
selected camera a
second user must
be logged into
Intellex to play.
Searches using the
date and time,
camera, or alarm
criteria
Searches using
image filters
Clears current
criteria and begins
new search.
definition
Searches using text
content associated
with cameras
Selects the type of
filter used to
search the
database
Configures the
filter
After finding a video segment
that meets the search criteria,
sets the length of time that
search should skip ahead
before looking for the next
event
Searches all available text
streams
10
Selectable types
of filters
Searches a specific text
stream
Intellex
Basic Features
Viewing Live Video
Start Camera Sequencing
1 From the main screen, select a mode for the video display.
2 On the control tool bar, click Seq.
Display Mode
Stationary Live Images
Sequencing Images
Single
None.
Single pane displays the
sequencing cameras.
2×2
Panes 1–3 display stationary live
images from cameras 1–3.
Pane 4 sequences through live
images from cameras 4–16.
3×3
Panes 1–8 display stationary live
images from cameras 1–8.
Pane 9 sequences through lives
images from cameras
9–16.
4×4
Panes 1–16 display stationary live
images from cameras 1–16.
None.
Note
The example above illustrates basic mapping from cameras to panes. You can map cameras to
different panes (example: camera 1 to pane 16), and map the same camera to multiple panes
(example: camera 1 to all 16 panes). The sequencing pane sequences through all cameras not
currently displaying in a stationary pane.
Stop Camera Sequencing
• On the control toolbar, click Seq. Sequencing stops and cameras display in the previous
stationary display mode.
• Click any mode button. Cameras display in an appropriate display mode.
• Click any camera button. The selected camera displays in single-pane display mode.
User’s Guide 11
Basic Features
Controlling a Dome Camera
The dome symbol
appears with video from a camera with dome control.
Note
If another user is operating the dome, you may not be able to control it.
• Click
in the camera’s pane.
• Click the control item on the overlay.
.
Pan/Tilt control
Flips the camera 180°
Zoom
Closes the dome control overlay
(Exit)
Opens the dome configuration
menu
Opens the pattern menu
Iris
Focus
Opens the preset menu
Center buttons allow automatic control: auto iris, auto zoom, and auto focus. The center of the Pan/Tilt
Control stops camera movement.
Iris
Open
Auto Iris and Focus
Close
Zoom
In
(Future Version)
Out
Focus
Near
(Future Version)
Far
Pan/Tilt Movement
Pan / Tilt (outer rim)
Stop Camera Movement (middle)
These camera handlers enable access to these dome configuration menus:
12
• AD168/MP48
• AD1024 Matrix
• VM96RTT
• RS422 Dome
• VM16/ADTT16
• VM16E/ADTT16E
• Pelco Matrix Switch
• USB CCTV
Intellex
Basic Features
Quick Camera Controls
Start a camera control session to open the quick camera controls.
Controlling the Pan-Tilt Control via Mouse
1 Float the cursor over the center of the video pane. The Cursor Origin Mark
appears.
2 Click and drag the cursor to set the direction and speed, then release.
• The camera’s movement speed increases proportionally with the arrow’s distance from the
cursor origin mark.
• The camera’s direction is relative to cursor origin mark.
Zoom via Mouse Scroll Wheel
• Point the camera at a target.
• Scroll the mouse wheel forward (zoom in) and backwards (zoom out).
Pattern and Preset Camera Controls
Note
Preset and Pattern appear only if they are set up for the selected camera. Use Intellex, Network
Client, or a Touch Tracker to program presets and patterns.
Preset and Pattern enable dome control via camera scan modes. They function in the overlay for
cameras that use the VM16, VM16E, USB-Sensornet, or VM96RTT camera handlers. USBSensornet and VM16E camera handlers let you program presets and patterns for specific dome
cameras.
A Preset is a pre-positioned camera scene that you program for cameras installed with pan/tilt and
motorized lens capability. A Pattern is a sequence of pan, tilt, zoom, focus and iris movements
from a single, programmable dome. The dome learns these movements during programming for
later execution. You can run preprogrammed presets and patterns and define presets and patterns
without a Touch Tracker.
User’s Guide 13
Basic Features
Selecting a Pattern
1 Click
to open the Primary Camera Control menu.
2 Click Pattern
for the pattern menu:
3 Select a pattern number.
4 Click
to run the pattern.
5 Click Exit
6 Click
to close the Pattern menu.
to close the Primary Camera Control menu.
Defining a Pattern
1 Click
to open the Primary Camera Control.
2 Position the camera for the pattern’s start position.
3 Click
and select an index for pattern.
4 Click Define Pattern
. The Pattern Definition Menu appears.
It resembles the Primary Camera Control menu, except for Start and Stop.
5 Click Start
to begin programming the pattern. Use any displayed controls to define the
pattern’s behavior.
6 To end the pattern, click Stop
. The Replace Pattern message appears.
7 To keep the new pattern, click Yes.
8 Click
to close the pattern’s definition menu.
9 To test the new pattern, select the pattern number and click
10 Click
to close the Pattern menu.
11 Click
to close the Primary Camera Control menu.
.
Selecting a Preset
1 Click
to open the Primary Camera Control menu.
2 Click Preset
to display the preset menu.
3 Select a preset number.
4 Click
14
to move the camera to the preset position.
5 Click
to close the Preset menu.
6 Click
to close the Primary Camera Control menu.
Intellex
Basic Features
Defining a Preset
1 Click
to open the Primary Camera Control menu.
2 Position the camera for your preset.
3 Click
to display the preset menu.
4 Select a preset number.
5 Click Define Preset
to define a preset at this index.
6 When the Replace Preset? message appears, click Yes to program the preset.
The number of available presets is device-dependent.
Configuring a Dome Camera
Cameras using the VM16, VM16E, USB, and VM96 camera handlers can access the dome
configuration menu (see the Intellex Installation and Configuration Guide). Information appearing
in the menu depends on the dome camera.
1 Select the camera. Click
.
2 Click Configuration Menu
For Pan, Tilt, Focus, and Zoom primary camera controls, see page 12.
3 Navigate to items in the menu using Pan/Tilt
to modify the values.
. Select the items using Focus
. Use Zoom
4 Accept or reject the modified values.
5 Repeat steps 3 and 4 until the camera is configured.
6 Close the Dome Configuration Menu.
User’s Guide 15
Basic Features
Exporting Video
Note
You can only export video if your individual user privileges enable you to do so.
1 Insert blank CD or DVD media into the drive.
2 From the control bar, click Play to begin playback.
Note
If the Two Man Rule is applied to individual camera Playback and a second user has not logged
into Intellex a message opens:
Click OK. The Enter PIN dialog box opens. This message can be disabled by selecting the Do
not show this message again option button. If the warning message is disabled the Enter PIN
dialog box opens directly when you try to access camera Playback.
Enter the second user’s PIN and click OK. You cannot access camera Playback unless the
second user is different from the current user. The second user must have valid access rights
and privileges for camera Playback. For further information see The Two Man Rule on page 31.
Note
If the second user’s PIN is invalid, access to Playback for cameras without the Two Man Rule
applied is still permitted.
3 Move the slider to the location where the video clip
begins.
4 Click to define the beginning of a video clip.
5 Move the slider to the right to select the length of the video clip.
6 Click to define end of video clip.
7 Click Export.
Note
If the Two Man Rule is applied to the camera Export feature and a second user has not logged
into Intellex a message opens:
Click OK. The Enter PIN dialog box opens. This message can be disabled by selecting the Do
not show this message again option button. If the message is disabled the Enter PIN dialog box
opens directly when you try to access the camera Export feature.
Enter the second user’s PIN and click OK. You cannot access the camera Export feature
unless the second user is different from the current user. The second user must have valid
16
Intellex
Basic Features
access rights and privileges for camera Export. For further information see The Two Man Rule
on page 31.
A screen appears with exported video clips.
Available export cameras.
If the Two Man Rule is applied to the camera Export
feature, only cameras that both you and the second user
have Playback and Export privileges for are accessible.
You must have access
to all 16 cameras to
have access to the Fill
CD button.
Clips
available to
export.
8 Highlight the clip to export.
9 Click Edit to name the clip.
10 Enter a name. Click Update.
11 (Optional) click Play (default) or Pause to play or pause the video clip.
12 Check the Select box of any additional clips to include in the export.
13 Click Export to export to CD or DVD.
User’s Guide 17
Basic Features
14 The Export Directory dialog appears. Click Include player application on export media to
include the Intellex Player.
15 Click Export to CD-R(W) to write the selected video clips to the CD or DVD.
16 Click Export. The export begins.
18
Intellex
Basic Features
Managing Alarms
Generating Alarms
1 Move the cursor over the camera image where you want to generate an alarm.
2 Right-click. The Image Area menu appears.
3 Select Generate Alarm. The unit generates an alarm for the selected camera and processes it
according to your alarm settings.
Reviewing Alarms
1 From the control bar, click Alarms. The alarm review screen appears.
= video segments are
reviewed
Date, time, and camera name for
each video segment
Alarm input or alarm type (motion, text, generated,
etc.) for each video segment
Length of each video segment
(minutes: seconds)
2 Click Clear to clear all checked alarms, or Clear All to clear entire lists of alarms.
3 Click Play to play back a video segment containing a recorded alarm.
Note
If the Two Man Rule is applied to this camera’s Playback feature and a second user has not
logged into Intellex a message opens:
Click OK. The Enter PIN dialog box opens. This message can be disabled by selecting the Do
not show this message again option button. If the warning message is disabled the Enter PIN
dialog box opens directly when you try to access camera Playback. Enter the second user’s
PIN and click OK. You cannot access camera Playback unless the second user is different from
User’s Guide 19
Basic Features
the current user. The second user must have valid access rights and privileges for camera
Playback. For further information see The Two Man Rule on page 31.
Note
If the second user’s PIN is invalid, access to Playback for cameras without the Two Man Rule
applied is still permitted.
4 Click Play pre-alarm video if available to play alarm segments starting at the pre-alarm time, if
any.
20
Intellex
Basic Features
Playing Back Video Clips
1 Click the jog shuttle control or a VCR button to open playback mode.
Note
If the Two Man Rule is applied to camera Playback and a second user has not logged into
Intellex a warning message opens:
Click OK. The Enter PIN dialog box opens. This warning message can be disabled by selecting
the Do not show this message again option button. If the warning message is disabled the
Enter PIN dialog box opens directly when you try to access camera Playback.
Enter the second user’s PIN and click OK. You cannot access camera Playback unless the
second user is different from the current user. The second user must have valid access rights
and privileges for camera Playback. For further information see The Two Man Rule on page 31.
Note
If the second user’s PIN is invalid, access to Playback for cameras without the Two Man Rule
applied is still permitted.
2 Click a button to select a camera (its number) or cameras (1x1, 2x2, 3x3, 4x4).
3 Drag and drop the selected camera buttons to multi-screen panes.
4 Use the slider to approximate the player’s position.
5 Click the jog shuttle control or the VCR’s middle button to pause playback mode.
6 Click Close to exit playback mode.
User’s Guide 21
Basic Features
Slider Control
Play, pause, or move through the video stream using the slider
and Play/Pause button.
VCR Control
Step back or forward a single frame
Fast Reverse
• If you are fast forwarding, each click
decreases the speed up to 5 times
normal speed.
• If you are fast reversing, each click
increases the speed up to 5 times
normal speed.
Play
Play back
Fast Forward
• If you are fast forwarding, each click
increases the speed up to 5 times
normal speed.
• If you are fast reversing, each click
decreases the speed up to 5 times
normal speed.
Pause
Jog Shuttle Control
1 Click once to play back video.
2 Click again to pause video.
3 When playing, click and drag the arrow clockwise to increase playback speed or
counterclockwise to reduce or reverse playback speed. Click and drag the arrow horizontally to
the left or right to achieve the same results.
4 Continue dragging clockwise or counterclockwise to increase or decrease speed from 1–5
times normal speed. The speed increase or decrease appears.
5 When paused, click and drag the arrow clockwise to forward playback in slow motion or
counterclockwise to reverse playback in slow motion.
6 Continue dragging clockwise or counterclockwise to increase or decrease speed from 1–5
times slow motion speed. The speed increase or decrease appears.
Playback from External Sources
Intellex can play back clips downloaded to external sources such as CDs, DVDs, flash drives, and
network drives.
Note
External clips must be saved as .IMG files in order to play.
22
Intellex
Basic Features
1 Make sure the external source is available to Intellex:
•
If the clip is on a CD or DVD, place the disc in the disc drive.
•
If the clip is on a flash drive, connect it to the USB port.
•
If the clip is on a network drive, make sure the drive is mapped to the Intellex.
2 Press any VCR button from the main screen to open playback mode.
3 Press the External button.
4 A screen listing available external sources appears. Under each source, a list of available clips
displays. Click on the appropriate source and navigate to the desired clip.
Note
Drives that are configured as Intellex storage volumes will not display in the list of available
external drives.
5 Click Select.
6 The selected clip will play. Clips from external sources respond to the slider, vcr, and jog shuttle
controls (page 21). Please note that the Search and Export buttons are not available for clips
from external sources.
User’s Guide 23
Basic Features
Archiving Video
You can archive video to a usb storage device, to a mapped network drive, or to a tape drive (only
if you have upgraded from an older version of Intellex).The new Network Archive functionality
allows automatic archiving that you can store off-site.
Note
The Archive button is enabled only when a storage device is connected to the Intellex unit. For
example, when you insert a usb device, or when connected to a network drive.
Note
You can not use the network drive from Intellex storage.
Note
See page 16 for exporting to CDs and DVDs.
Recommended Maximum Archive Size
The following details outline the recommended maximum archive backup size:
• 205GB when the image file size is 20MB.
• 1TB when the image file size is 100MB.
Restoring from larger archive backup sizes than those recommended will be very slow.
Archiving to a storage device
You can back up the image database while recording or after stopping the recording.
1 Ensure the storage device is attached.
2 From the main screen, select Archive. The following screen appears.
24
Intellex
Basic Features
3 Select the archive drive you want to use and click Next. The Archive Options screen displays:
4 Click Back up images to (selected drive) to archive video. You are now prompted to choose an
archive mode.
If you select Back up while recording, refer to While Recording on page 25. Or, if you prefer to
Stop recording and back up now, refer to After Stopping Recording on page 27.
Note
Backing up images is disabled during combined storage device/network archiving.
While Recording
1 Select Back up while recording to archive in the background.
Note
If you are using a tape drive, you must wait until the tape drive’s lights stop blinking before
continuing to the next step.
User’s Guide 25
Basic Features
2 Click Next. The following screen displays:
3 Click Next to proceed. You are prompted with the following screen:
Note
The option to use a different drive is not available if you are using a tape drive.
4 Make your selection and click Next to continue, or select Cancel.
Whilst backing up and recording simutaneously, you can select to Stop image backup or Play
restored images from the database, as shown below:
26
Intellex
Basic Features
Otherwise, the backup commences until the storage device selected is full, as illustrated below:
5 Click Close to finish.
After Stopping Recording
1 Click Stop recording and back up now to stop recording and back up immediately, in the
foreground. The unit interrupts normal operation and does not record any images during the
backup.
Note
If you are using a tape drive, you must wait until the tape drive’s lights stop blinking before
continuing to the next step.
2 Click Next. The following screen displays:
User’s Guide 27
Basic Features
3 Click Finish to close once the backup is complete.
Restoring Images from a storage device
1 Click Restore images from (selected drive) to copy images from a storage device to the
system.
Name of Intellex unit that
archived these images
* = the segment containing
alarm images
Double-click to display cameras
included in the segment.
Video segments on the
archive
Double-click again to hide the cameras
2 Select a video segment to restore.
3 Press
to select the number of segments to restore.
4 Click OK. Follow the prompts.
Playing Restored Images
1 Click Play restored images to review images that were copied from a backup storage device to
the system.
2 Follow the prompts.
Resetting Archive Flags
1 Click Reset archive flags to make all files in the database available for archiving.
28
Intellex
Basic Features
2 Follow the prompts.
Note
Reset archive flags is disabled during combined storage device/network archiving.
User’s Guide 29
Basic Features
Updating License Information
To upgrade your license information:
1 From the Utility Options, click About Intellex, then System.
2 Click Upgrade, and the License Information screen appears.
3 From the Features box, you can select the product type:
• Ultra
• Intellex
• RMS
• LT
• IP
Depending on the product you select, you can then select the number of cameras (4, 8, or 16)
and features (Deluxe or Premier) associated with that product.
Provide this
number to Tech
Support
Tech Support will
give you new
license key
number
4 To get a new license key for the upgrade, call Tech Support, and supply the MAC Address.
They will provide you with the new license key number. Click Create File to create the upgrade.
30
Intellex
Advanced Features
To configure security, see the Intellex Installation and Configuration Guide. The system
administrator must grant privileges to access, set, or change features.
The Two Man Rule
The Two Man Rule feature provides enhanced security restrictions to:
• Playback (individual cameras)
• Export (individual cameras)
• Exit to System
• Security
When the Two Man Rule is applied to the above features, access to each one requires
authorization from a second user. Access to the feature is permitted only if there are two separate
users. Both users must have valid access rights and privileges for each feature. When the Two
Man Rule feature is enabled the second user must either:
• log in from the Utilities Options menu, or,
• enter their PIN.
Logging In a Second User
1 From the main screen click Utility and select the Two Man Log In option.
OR
Click OK in the message below. This message opens when you try to access a feature and the
Two Man Rule is applied, but the second user is not logged into Intellex.
Note
Select the Do not show this message again option button to disable this message.
31
Advanced Features
2 Enter the 1- to 8-character PIN (Personal Identification Number) code the system administrator
assigned. Click
to erase an entry.
Note
You cannot enter the PIN of the primary user’s account. If you try to enter the same PIN the
following warning message opens. Click OK to enter another PIN.
3 Click OK.
If a valid PIN is entered the second user is now logged into Intellex. All features protected by
the Two Man Rule that both users have privileges to can now be accessed by the primary user.
If a valid PIN is not entered a warning message opens:
Note
The second user remains active until you log off the second user or Intellex autolocks. When
Intellex autolocks and you (primary user) log back into Intellex you will still have access
complete your current task. However, to access another feature you will require a second
user’s PIN or a second user to log in again via the Utilities Options menu.
Logging Off a Second User
1 From the main screen click Utility.
2 Select the Two Man Log Off option.
The second user is logged off from the Intellex.
Note
The primary user will not have access to features with the Two Man Rule applied. When the
primary user tries to access these features they will be denied access and prompted for a
second user’s PIN.
32
Intellex
Advanced Features
Searching for Video Segments
Use criteria including Date/Time, Filters, and Text to search the image database and text streams.
From the main screen, click Search.
Creates a search using your criteria.
Any matches appear in a list.
Interrupts the search. The list
includes segments found before the
interruption.
Plays a segment that is highlighted
in the list of results.
Clears your criteria.
Searching by Date/Time
Click the Date/Time tab to search within a specific period.
Includes all segments regardless
of the time recorded.
Includes only segments recorded
during a time and date range.
Includes recently recorded
segments. Specify a time range
from 1 second–60 days.
Displays the days, hours, minutes,
seconds, and the calendar.
User’s Guide 33
Advanced Features
Searching by Camera
Click Cameras to search for segments by camera.
Include segments from all
cameras or a specific
camera in the search.
Searching by Alarms
Click Alarms to search for segments based on alarm information.
Includes segments
regardless of filter
criteria.
Includes segments
regardless of alarm input.
Includes segments
that were recorded
because a filter was
triggered.
Includes any segments
with an alarm input.
Includes segments with a
specific alarm input.
Includes all video loss
segments.
Includes all segments with
generated alarms.
Includes any
segments that were
recorded because a
specific filter was
triggered.
Searching Using Filters
1 From the Search Mode page, click With Image
Filters.
2 Click the Filters tab.
3 Select a camera.
4 Set the length of time that search should skip
ahead after a qualified video segment is found.
5 Select the type of filter to search for in the
database.
6 Click Setup to configure the filter.
34
Intellex
Advanced Features
7 To define the filter’s target area:
a
When the Activate button is
illuminated (default), move
the cursor over the image
area.
b Draw the filter boundaries by
clicking and moving the
mouse to each corner of the
target area and clicking
again.
c
After enclosing the target
area, click again to fill shape.
d Click the Deactivate button to
create a hole in the target
area.
8 Set the sensitivity level.
Note
Sensitivity is based on the size of the highlighted area. At higher sensitivity settings, smaller
changes trigger the filter. At lower settings, larger changes are required to trigger the filter.
Therefore, a large area may require a higher sensitivity for a small amount of movement.
9 Click Apply.
Searching Using Text Associated with Cameras
1 From the Search Mode page, click Text Streams. The search dialog displays criteria tabs:
Date/Time, Text Streams, and Text Criteria.
2 Select String Search or Advanced Search (does not apply to Intellex IP). The displayed tabs
depend on the text search selected. Advanced Search adds the Receipt Definitions tab.
Searching by String
You can search for any string associated with the Intellex or camera.
1 Select String Search.
2 Select the Date/Time tab.
3 Enter Date/Time criteria (optional).
4 Select the Text Streams tab to enter text stream criteria. You can:
• Select Any Text Stream to search all text streams on the Intellex unit
• Select Specific Text Stream. Select a stream from the list.
5 To define your search, click Text Criteria.
Advanced Searches
1 Select Advanced Search.
2 Select the Date/Time tab.
3 Enter Date/Time criteria (optional).
User’s Guide 35
Advanced Features
4 Select Text Criteria (optional). This screen displays text exceptions.
Text Options
Configure the Intellex unit to record text streams associated with cameras.
Adding, Editing, or Deleting a Text Stream
1 From the main screen, click Setup. The Setup Options screen appears.
2 Click Text. The Text setup screen appears.
3 Click Delete to eliminate a text stream. Click Add or Edit to define or modify a text stream, and
the Text Source screen appears.
4 In the Name box, enter a name for the text stream.
5 From the Type drop-down box, select a handler type.
6 To define a serial text stream:
a
36
From the Connection Type drop-down box, select COM Port.
Intellex
Advanced Features
b Click Setup next to the Connection Type box. The Setup Serial Text Stream Options screen
appears. Select an option from each list. Defaults are shown. Then click OK.
Rate of data
transmission
Word size
OR
7 To define an IP text stream:
a
From the Connection Type drop-down box, select IP Port.
b Click Setup next to the Connection Type box. The Setup TCP/IP Text Stream Options
screen appears.
User’s Guide 37
Advanced Features
OR
8 To define an AD IP Encoder text stream:
a
From the Connection Type drop-down box, select AD IP Encoder.
b Click Setup next to the Connection Type box. The Setup AD IP Encoder Text Stream
Options screen appears.
c
Highlight the IP address for the device which will be used for the text stream, then select the
the text channel from the drop down menu. The text channel is the serial port on the IP
Encoder that is receiving the incoming text stream.
d Select OK, the Text Source screen will be displayed.
9 Highlight a text formatter from the handler Type drop down menu.
10 Click Setup next to the handler type to access a printer interface.
11 For the General Text handler, enter an end-of-line delimiter to display text lines from a receipt.
• Click Default to reset the box definition to default 0D 0A. Click OK.
• For the American Dynamics handler, select one or both options to record and display entries.
Click OK.
Entries from printed customers’ receipts
Entries from printed retail journal receipts
38
Intellex
Advanced Features
Associating Text Streams with Cameras
1 From the Text setup screen, select the Camera Associations tab.
2 Click one or more cameras to associate with this text stream.
Generating Receipt Definitions
1 From the Text setup screen, select the Receipt Definitions tab.
2 Click Build Receipts to create and remove receipt definitions.
Adding, Editing, Deleting, or Importing Receipt Definitions
From the Receipt Definitions screen, click an option:
• Add or Edit selects or configures a receipt definition.
• Delete
• Import imports a file containing text receipt definitions.
• Export exports checked receipt definition entries to a specified file.
Enter a name
From the Transaction
Data pane, enter a
marker
User’s Guide 39
Advanced Features
Generating Text Alarms
1 From the Text setup screen, select the Alarms tab.
2 Click Apply selected exceptions as a group to
generate an alarm for a receipt. This operation
applies to text as Intellex receives it from some text
device. These conditions must be met:
• You selected at least two receipt definitions.
• A receipt definition marker is found in the current
receipt.
• All selected text exceptions report a match for
the current receipt.
Or deselect Apply selected exceptions as a group
to generate text alarms on individual text
exceptions.
3 Click Build Exceptions to generate advanced text exceptions. The Advanced Text Exceptions
screen appears.
Using Advanced Text Exceptions
1 From the Advanced Text Exceptions screen, click Add or Edit to create or modify a text
exception.
2 Enter an exception name.
3 Enter a match, or cut and paste from the Transaction Data pane.
4 From the Search Direction box, select Forward (default) or Backward.
5 From the Jump N Results box, select the number of words to skip, after a match is found, to
find the associated value. Default = 0.
OR
From the Jump N Results box, select To last entry of line to skip a variable number of entries
between the last match and the text value in a receipt.
40
Intellex
Advanced Features
6 From the And Value is box, select an option to return these results:
Option
Results
Less Than
< Value 1 setting
Greater Than
> Value 1 setting
Equal To
= Value 1 setting
Between
Values between Value 1 and Value 2 settings
Found
Any results found
A String
A series of characters in Value 1 box
7 Click Delete to remove the highlighted text exception.
8 Click Import to import a specific file containing text exceptions.
9 Click Export to export highlighted exceptions to a specified file.
Advanced Searching with Motion Exception
Motion exception searches for an event or activity by position, size, direction, and speed of a
moving object. Its parameters filter live video or search recorded video to find an event or activity.
After applying motion exception parameters, any object meeting your criteria in the target area
triggers an alarm.
• This feature applies to the Premier model only.
• On Intellex DVMS and LT, you can configure motion exception on up to 16 cameras. On Intellex
Ultra, you can only configure motion exception on up to 8 cameras.
• Motion exception cannot operate if the scheduled record rate is less than 7 ips.
• Motion exception requires a fixed camera or a dome in non-moving (fixed position) mode.
• You can configure one or more motion exception target areas at a time.
• Do not use Auto Rate Mode to configure recording rates when using motion exception filters for
alarm generation or search. Always use Camera Selectable Rate Mode and set the minimum
rate to 7.5 ips (6.25 for PAL) on cameras using motion exception filters.
Motion Exception vs. Motion Detection
Motion exception:
• Is more effective in performing what if searches.
• Performs detailed motion searches.
• Defines multiple regions of interest in various sizes.
• Specifies size, direction and speed of an object for detection.
Motion detection:
• Reacts to an image within the region of interest.
• Detects any motion that occurs.
User’s Guide 41
Advanced Features
Important differences in sensitivity:
Function
Motion Exception
Motion Detection
Reacting to images
Analyzes many images before
reacting
Reacts image to image
Best location
Outdoors
Indoors
Best position of the
camera
Far from the movement
Close to the movement
Alarms
Likelier to miss alarms, especially
in low light
Likelier to generate false alarms,
especially in low light
Finding motion while
searching
Likelier to find specific motion
Likelier to find any motion
Narrowing the filter or
search
Use specific tools
Use the Sensitivity adjustment
Effectiveness
Limited to specific camera views
Effective on most camera views
Neither is effective in low light.
For successful motion exception:
• A faster recording rate is better than a slower one.
• Draw one or more target areas to exclude extraneous activity.
• A target area near the center is better than one near the side.
• Do not increase the target object’s size or speed unless required.
• Good quality video feeds are essential.
Standard motion detection can generate many false alarms, as well as valid alarms. Motion
exception produces fewer, more detailed alarms than motion detection.
To assess motion filter effectiveness for a single camera:
1 Loop the camera’s signal to an unused input (make sure to set the termination properly).
2 Use motion detection on one input and motion exception on the other.
3 Observe the results of both methods and make changes as needed.
To perform a comprehensive search for all types of motion in recorded video, use both methods on
the same camera.
Searching by Motion Exception
1 From the main screen, click Search.
2 Select With Image Filters.
3 Click the Filters tab.
4 Select a camera from the Camera menu.
5 Select Motion Exception from the Filters menu. Select a duration (optional).
6 Click Setup.
Note
Alternately, access Motion Exception from the Setup menu to trigger an alarm during live video.
See the Intellex Installation and Configuration Guide.
42
Intellex
Advanced Features
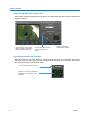
Setting Up the Target Area
1 Select the target area’s shape from the draw zone list.
2 Click and drag to form the target area. Custom shapes must form an enclosed boundary.
Active zones have scrolling borders.
Click a target area to activate it. Right-click
to deactivate it.
Inactive zones have static borders.
Draw Zone: Defines a target area for an
alarm or filter. You can draw multiple
areas. Areas can overlap, but not
completely.
Returns to the default setting for the
selected target area.
Select shape type:
rectangle, ellipse, or
custom.
Removes the selected target
area.
3 Configure additional target areas (optional).
To use the default settings for size, speed and direction:
1 Draw target area(s).
2 Click Test to try motion exception filters you configured. The Test Alarm radio button blinks
when an object meeting your configuration criteria moves through the target area.
3 Click Apply.
The default settings trigger an alarm for any motion in the target area.
Reduce the number of objects that trigger alarms by adjusting the target area settings.
Adjusting Target Area Settings
Your camera’s environment and placement can cause wide variations in recorded video. When
using motion exception, configure several filters for each camera. These filters account for the size
and speed of different objects, environmental variation, and unwanted object motion.
User’s Guide 43
Advanced Features
Determining Minimum Object Size
Click Size to change the default size of an object. An object larger than the selected or default size
triggers the alarm.
Target area with a sizing object.
Drag its handles to change the
object’s size and aspect ratio.
Changes the minimum size of
an object that triggers an
alarm.
Preserves the aspect
ratio as size is adjusted.
Specifying an Object’s Direction
Direction arrows are 45° apart. When you enable multiple directions, you expand the directions in
which you track the object. To account for variations when searching in one direction, select more
than one arrow within the directional range.
Click to activate direction arrows
Click one or more arrows to activate
(highlight) or deactivate (gray out)
a direction
44
Intellex
Advanced Features
Specifying an Object’s Minimum Speed
Click Speed to change an object’s default speed. Objects moving faster than the selected speed
trigger the alarm. The default direction is every direction.
When you click Speed, the
object moves in the active
direction and loops through
the zone at the selected
speed.
An object moves through the draw zone and target area in the specified direction
at the indicated speed.
Click the arrows to indicate
another direction. Grayed
out arrows indicate a
direction is disabled.
A dashed line indicates the direction
the object is moving. (Corresponds
with direction arrow.)
Apply speed adjustments
uniformly to all directions.
• > faster
• < slower
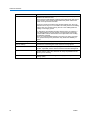
Environmental Factors
When using motion exception, consider:
Factor
Comment/Recommendation
Background motion
Select a location with no continual background motion. For example, do
not place the camera facing trees moving in the wind, a high traffic
roadway, a TV monitor, etc.
Lighting
Sudden lighting changes, such as turning lights on or off, may trigger
unwanted alarms.
Avoid low light and harsh shadows.
Too little contrast between an object and its background is usually due
to poor lighting.
Objects moving too fast
Because Intellex interprets changes in an object’s position over time, a
fast-moving object may not be tracked accurately.
Reflections
Reflections of objects in windows, mirrors, or other surfaces are
interpreted as other objects. If possible, place the camera so that there
are no reflective surfaces in the camera’s view.
User’s Guide 45
Advanced Features
Factor
Occlusions and obstructions
Comment/Recommendation
Set up the camera such that no objects totally block (occlude) objects of
interest in the camera’s view.
When someone walks behind something that totally blocks that person
in the camera’s view, Intellex predicts where the person will be next
based on his speed when last seen.
The more a person is blocked in the camera’s field of view, the more
prediction errors may occur. The Intellex can easily track a man walking
behind a tree at a constant velocity, but not a man walking behind a
building at a changing speed.
An obstruction may partially block the camera’s view; for example, a
man walking behind a car may appear to be missing his lower body,
and the Intellex notices that the size of the object that it was tracking
has suddenly changed.
When you configure alarms based on the size of an object, note that
even a partial or temporary obstruction may lessen the reliability of
alarms.
46
Camera’s recording rate
If the rate drops below 7 ips, the reliability of object tracking is reduced.
Moving objects in the camera
view on startup
Tracking quality is reduced until the Intellex unit can determine which
elements are in the background and which are moving objects.
Camera’s location
In a busy room, place the camera up high, with a 45–90° line of sight to
the floor. If possible, aim the camera toward a motionless background.
Camera is too close to objects
A moving object must fit within 25% of the screen. Large objects are
common indoors. Place the camera as far away as possible from the
objects you are tracking.
Excessive video noise
Poor video feed or excessive signal boosting significantly reduce
tracking quality.
Intellex
Advanced Features
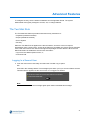
Viewing an Activity Log
1 From the main screen, click Utility. The Utility Options screen appears.
2 Click Activity Log to view activity a user performs on the Intellex after logging in.
3 From the Range box, select a time frame. If you select Specify, select start and end dates and
times for the filter.
4 Click Retrieve to see all activity meeting your criteria. Modify the results by defining User,
Category, and Activity.
User’s Guide 47
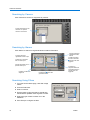
Advanced Features
Login name of the user
and time the action was
performed
Whether action was local to The action’s
category
Intellex or done through
Network Client or other
Action within
remote software
the category
Exports the
entire log to a Exports the
displayed log to
file
a file
48
Prints all the entries;
may print remotely
through third party
software (shows IP
address)
Describes the
activity
Prints only the
entries visible
on the screen
Intellex
Advanced Features
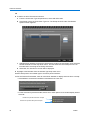
The Data section describes what a user has done, for example, accessing the Activity Log or
exporting clips. In the case of an export it lists the number of the clip in braces ({}), its date,
followed by its start time and duration, and then the camera names involved in the clip.
User’s Guide 49
Advanced Features
If the data is an export it will include two lines of textual information: “Export Clips Started” and
“Exported N Clip(s)”. In between these lines will be details of the actual clip(s).
Exported clip
50
Intellex
Advanced Features
If a clip involves more than eight cameras it will comprise two adjacent lines with the same date,
start time and duration. They will also have the same number inside the braces at the beginning of
the Data line.
Tells you there is only
one clip
Tells you there are
two clips
Tells you what number the clip is within the export. If clip 1 is exporting more than eight cameras then you
will see two lines of information, as displayed above, beginning with the number 1 in braces. Similarly, if clip
2 is exporting more than eight cameras, then you will also see two lines, beginning with the number 2 in
braces.
User’s Guide 51
Advanced Features
When you click on an exported clip the highlight will turn gray (as opposed to green), and the Audit
Bar will appear at the bottom of the screen.
Audit bar
Highlight
The font in this bar is smaller, and it is scrollable. It contains the same information as the
highlighted line.
First clip
contains eight
cameras (1-8)
Audit Bar, showing the user name and date and time they exported the clip in square brackets, followed by
the number of the clip in braces. Next information is the date, start time and duration of the clip, followed
by a list of the camera names (which are given by an administrator). You can see that line one of clip one
contains cameras 1 to 8.
Second clip also
contains eight
cameras (9-16)
Audit Bar, showing the user name and date and time they exported the clip in square brackets. Next information is
the date, start time and duration of the clip, followed by a list of camera names (given by an administrator). You can
see Cameras 9 to 16 on the second line.
52
Intellex
Advanced Features
5 You can export or print either the entire Activity Log or just what’s displayed on the screen using
the relevant buttons.
Enabling Remote Access Authorization
Enabling this feature provides Network Client password protection for this Intellex unit.
1 From the Setup Options screen, click Port Address.
2 Click to activate Remote Access Authorization. This enables secure access to video from the
Network Client so only those Network Client users accessing live video with the correct user
name and PIN are granted permission.
Note
You can only enable this feature when in Classic Security mode.
3 Click OK to confirm or Cancel.
S.M.A.R.T. Hard Drive Support
Intellex now offers a feature to monitor and anticipate whether a hard drive's health is failing, and if
so, notify the user. This feature is called S.M.A.R.T. (Self-Monitoring, Analysis and Reporting
Technology). The drive attributes that Intellex monitors are manufacturer-specific, so these vary for
each user’s system. Problems include reliability, temperature, and volume errors. If one of these
screens appear, click Storage Setup.
Solutions include:
• Replacing the affected hard drive as soon as possible.
• To correct a temperature problem, make sure that the ambient air temperature around the
Intellex case is less than 35oC (95oF), the internal cooling fans are operating properly, and
there is adequate air flow around the case.
Note
The system also alerts the user via E-mail notification when it has detected an unhealthy drive.
Refer to Setting Up E-mail Notification in the chapter on Configuring the Intellex in the Installation
and Configuration Guide.
User’s Guide 53
Advanced Features
Exiting Intellex
Since Intellex uses the Windows operating system, to configure the regional, mouse, time zone,
network, printer, and language settings, you must exit to Windows. In addition, you must exit from
Intellex to Windows to change PAL/NTSC settings.
Note
Windows screens appear in English, regardless of the language version of Intellex. Consult
Microsoft Windows Installation instructions for setting the operating system to another language.
Exiting to Windows is a protected feature. You must have the Exit to System privilege to access it.
Exiting to Windows
1 From the main screen, click Utility. The Utility Options screen appears.
2 Click Exit. A confirmation message appears.
3 Click Yes to exit to Windows. The Enter PIN Code screen appears.
4 Enter the system exit code. (Contact your dealer or system administrator for this code.)
5 Click OK to exit to the Windows operating system.
Note
If the Two Man Rule is applied to the Exit to System feature and a second user has not logged
into Intellex a message opens:
Click OK. The Enter PIN dialog box opens. This message can be disabled by selecting the Do
not show this message again option button. If the message is disabled the Enter PIN dialog box
opens directly when you try to exit Intellex.
Enter the second user’s PIN and click OK. You cannot exit Intellex unless the second user is
different than the current user. The second user must have valid access rights and privileges to
exit Intellex. For further information see The Two Man Rule on page 31.
54
Intellex
End User License Agreement (EULA)
IMPORTANT - READ THIS END-USER LICENSE AGREEMENT ("EULA") CAREFULLY
BEFORE OPENING THE DISK PACKAGE, DOWNLOADING THE SOFTWARE OR
INSTALLING, COPYING OR OTHERWISE USING THE SOFTWARE.
THIS EULA IS A LEGAL AGREEMENT BETWEEN YOU AND SENSORMATIC
ELECTRONICS, LLC., WHICH SOFTWARE INCLUDES COMPUTER SOFTWARE AND
MAY INCLUDE MEDIA, PRINTED MATERIALS, AND "ON-LINE" OR ELECTRONIC
DOCUMENTATION (COLLECTIVELY, THE "SOFTWARE"). BY BREAKING THE SEAL
ON THIS PACKAGE, DOWNLOADING THE SOFTWARE OR INSTALLING, COPYING OR
OTHERWISE USING THE SOFTWARE, YOU AGREE TO BE BOUND BY THE TERMS OF
THIS EULA. IF YOU DO NOT AGREE TO ALL OF THE TERMS AND CONDITIONS OF
THIS EULA, DO NOT OPEN, DOWNLOAD, INSTALL, COPY OR OTHERWISE USE THE
SOFTWARE.
1.
SCOPE OF LICENSE. The Software may include computer code, program files and any
associated media, hardware or software keys, printed material and electronic
documentation. The Software may be provided to you pre-installed on a storage device
(the media) as part of a computer system or other hardware or device (“System”). The
Software is protected by copyright laws and international copyright treaties, as well as
other intellectual property laws and treaties. All title and intellectual property rights in and
to the Software (including but not limited to any images, photographs, and text
incorporated into the Software), the accompanying printed materials, and any copies of the
Software, are owned by Tyco and/or its suppliers. The Software is licensed, not sold. All
rights not expressly granted under this EULA are reserved by Tyco and its suppliers.
2.
GRANT OF LICENSE. This EULA grants you the following rights on a non-exclusive
basis:
a.General. This EULA permits you to use the Software for which you have purchased this
EULA. Once you have purchased licenses for the number of copies of the Software that you
require, you may use the Software and accompanying material provided that you install and use
no more than the licensed number of copies at one time. The Software is only licensed for use
with specified Licensor-supplied Systems. If the Software is protected by a software or
hardware key or other device, the Software may be used on any computer on which the key is
installed. If the key locks the Software to a particular System, the Software may only be used
on that System.
b.Locally Stored Components. The Software may include a software code component that may
be stored and operated locally on one or more devices. Once you have paid the required license
fees for these devices (as determined by Tyco in its sole discretion), you may install and/or use
one copy of such component of the Software on each of the devices as licensed by Tyco. You
55
End User License Agreement (EULA)
may then use, access, display, run or otherwise interact with ("use") such component of the
Software in connection with operating the device on which it is installed solely in the manner
set forth in any accompanying documentation or, in the absence of such, solely in the manner
contemplated by the nature of the Software.
c.Remotely Stored Components. The Software may also include a software code component
for operating one or more devices remotely. You may install and/or use one copy of such
component of the Software on a remote storage device on an internal network with all of the
devices and may operate such component with each device over the internal network solely in
the manner set forth in any accompanying documentation or, in the absence of such, solely in
the manner contemplated by the nature of the Software; provided however, you must still
acquire the required number of licenses for each of the devices with which such component is
to be operated.
d.Embedded Software/Firmware. The Software may also include a software code component
that is resident in a device as provided by Tyco for operating that device. You may use such
component of the Software solely in connection with the use of that device, but may not
retrieve, copy or otherwise transfer that software component to any other media or device
without Tyco's express prior written authorization.
e.Backup Copy. You may make a back-up copy of the Software (other than embedded
software) solely for archival purposes, which copy may only be used to replace a component of
the Software for which you have current valid license. Except as expressly provided in this
EULA, you may not otherwise make copies of the Software, including the printed materials.
3.
56
OTHER RIGHTS AND LIMI TATIONS. Your use of the Software is subject to the
following additional limitations. Failure to comply with any of these restrictions will
result in automatic termination of this EULA and will make available to Tyco other legal
remedies.
a.
Limitations on Reverse Engineering and Derivative Works. You may not reverse
engineer, decompile, or disassemble the Software, and any attempt to do so shall
immediately terminate this EULA - except and only to the extent that such activity
may be expressly permitted by applicable law notwithstanding this limitation.
You may not make any changes or modifications to any portion of the Software,
or create any derivative works, without the written permission of an officer of
Tyco (except as provided in Section 3(f) of this EULA with respect to “open
source” software). You may not remove any proprietary notices, marks or labels
from the Software. You shall institute reasonable measures to ensure compliance
with the terms and conditions of this EULA by your personnel and agents.
b.
Copyright Notices. You must maintain all copyright notices on all copies of the
Software.
c.
Transfer. You may only transfer your rights under this EULA (i) as part of a
permanent sale or transfer of all of the devices for which the Software is licensed
User’s Guide
End User License Agreement (EULA)
as applicable; (ii) if you transfer all of the Software (including all component
parts, the media and printed materials, any upgrades and this EULA); (iii) if you
do not retain any copies of any portion of the Software; (iv) if the recipient agrees
to the terms of this EULA; and (v) if the Software is an upgrade, such transfer
must also include all prior versions of the Software. You agree that failure to
meet all of these conditions renders such transfer null and void.
d.
Termination.Without prejudice to any other rights, Tyco may terminate this
EULA if you fail to comply with the terms and conditions herein. In such event,
you must immediately destroy all copies of the Software and all of its component
parts. To the extent the Software is embedded in hardware or firmware, you will
provide prompt access to Tyco or its representative to remove or lock Software
features or functionality as Tyco determines.
e.
Subsequent EULA. Tyco may also supersede this EULA with a subsequent
EULA pursuant to providing you with any future component, release, upgrade or
other modification or addition to the Software. Similarly, to the extent that the
terms of this EULA conflict with any prior EULA or other agreement between
you and Tyco regarding the Software, the terms of this EULA shall prevail.
f.
Incorporation of “Open Source” and other Third Party Software. Portions of the
Software may be subject to certain thirty party license agreements governing the
use, copying, modification, redistribution and warranty of those portions of the
Software, including what is commonly known as “open source” software. A copy
of each applicable third party license can be found in the file README.TXT
accompanying the Software. By using the Software you are also agreeing to be
bound to the terms of such third party licenses. If provided for in the applicable
third party license, you have a right to receive source code for such software for
use and distribution in any program that you create, so long as you in turn agree to
be bound to the terms of the applicable third party license, and your programs are
distributed under the terms of that license. A copy of such source code may be
obtained free of charge by contacting your Tyco representative.
g.
Trademarks. This EULA does not grant you any rights in connection with any
trademarks or service marks of Tyco, its affiliates or its suppliers.
h.
Rental. You may not sublicense, rent, lease or lend the Software. You may not
make it available to others or post it on a server or web site or otherwise distribute
it.
i.
Software Keys. The hardware/software key, where applicable, is your proof of
license to exercise the rights granted herein and must be retained by you. Lost or
stolen keys will not be replaced.
57
End User License Agreement (EULA)
4.
58
j.
Demonstration and Evaluation Copies. A demonstration or evaluation copy of the
Software is covered by this EULA; provided that the licenses contained herein
shall expire at the end of the demonstration or evaluation period.
k.
Registration of Software. The Software may require registration with Tyco prior
to use. If you do not register the Software, this EULA is automatically terminated
and you may not use the Software.
l.
Additional Restrictions. The Software may be subject to additional restrictions
and conditions on use as specified in the documentation accompanying such
Software, which additional restrictions and conditions are hereby incorporated
into and made a part of this EULA.
m.
Upgrades and Updates. To the extent Tyco makes them available, Software
upgrades and updates may only be used to replace all or part of the original
Software that you are licensed to use. Software upgrades and updates do not
increase the number of copies licensed to you. If the Software is an upgrade of a
component of a package of Software programs that you licensed as a single
product, the Software may be used and transferred only as part of that single
product package and may not be separated for use on more than one computer or
System. Software upgrades and updates downloaded free of charge via a Tyco
authorized World Wide Web or FTP site may be used to upgrade multiple
Systems provided that you are licensed to use the original Software on those
Systems.
n.
Tools and Utilities. Software distributed via a Tyco-authorized World Wide Web
or FTP site (or similar Tyco-authorized distribution means) as a tool or utility may
be copied and installed without limitation provided that the Software is not
distributed or sold and the Software is only used for the intended purpose of the
tool or utility and in conjunction with Tyco products. All other terms and
conditions of this EULA continue to apply.
EXPORT RESTRICTIONS. You agree that you will not export or re-export any portion
of the Software, or any direct product thereof (the foregoing collectively referred to as the
"Restricted Components"), to any country, person or entity subject to U.S. or other
applicable export restrictions. You specifically agree not to export or re-export any of the
Restricted Components (i) to any country to which the U.S. or other applicable jurisdiction
has embargoed or restricted the export of goods or services, which currently include, but
are not necessarily limited to Cuba, Iran, Iraq, Libya, North Korea, Sudan and Syria, or to
any national of any such country, wherever located, who intends to transmit or transport
the Restricted Components back to such country; (ii) to any person or entity who you
know or have reason to know will utilize the Restricted Components in the design,
development or production of nuclear, chemical or biological weapons; or (iii) to any
person or entity who has been prohibited from participating in U.S. or other applicable
jurisdiction export transactions by any federal agency of the U.S. or other applicable
government. You warrant and represent that neither the U.S. Commerce Department,
User’s Guide
End User License Agreement (EULA)
Bureau of Export Administration nor any other U.S. federal agency has suspended,
revoked or denied your export privileges.
5.
U.S. GOVERNMENT RESTRICTED RIGHTS. The Software is Commercial
Computer Software provided with "restricted rights" under Federal Acquisition
Regulations and agency supplements to them. Any use, duplication or disclosure by the
U.S. Government is subject to restrictions as set forth in subparagraph (c)(1)(ii) of the
Rights in Technical Data and Computer Software clause at DFAR 255.227-7013 et. seq.
or 252.211-7015, or subparagraphs (a) through (d) of the Commercial Computer Software
Restricted Rights at FAR 52.227-19, as applicable, or similar clauses in the NASA FAR
Supplement. Contractor/manufacturer is Sensormatic Electronics, LLC, 6 Technology
Park Drive, Westford, MA 01886.
6.
LIMITED WARRANTY.
a.
Warranty. Tyco warrants that the recording medium on which the Software is
recorded, hardware key, and the documentation provided with it, will be free of
defects in materials and workmanship under normal use for a period of ninety (90)
days from the date of delivery to the first user. Tyco further warrants that for the
same period, the Software provided on the recording medium under this license
will substantially perform as described in the user documentation provided with
the product when used with specified hardware. THE FOREGOING EXPRESS
WARRANTY REPLACES AND IS IN LIEU OF ALL OTHER WARRANTIES
OR CONDITIONS, WHETHER EXPRESS, IMPLIED, OR STATUTORY,
INCLUDING BUT NOT LIMITED TO, ANY IMPLIED OR OTHER
WARRANTIES OF MERCHANTABILITY, FITNESS FOR A PARTICULAR
PURPOSE, TITLE, NON-INFRINGEMENT OR NON-MISAPPROPRIATION
OF INTELLECTUAL PROPERTY RIGHTS OF A THIRD PARTY, CUSTOM,
TRADE, QUIET ENJOYMENT, ACCURACY OF INFORMATIONAL
CONTENT, OR SYSTEM INTEGRATION. TYCO MAKES NO WARRANTY
THAT ANY PORTION OF THE SOFTWARE WILL OPERATE ERRORFREE, FREE OF ANY SECURITY DEFECTS OR IN AN UNINTERRUPTED
MANNER. TYCO SHALL NOT BE RESPONSIBLE FOR PROBLEMS
CAUSED BY CHANGES IN THE OPERATING CHARACTERISTICS OF
THE DEVICE(S) UPON WHICH THE SOFTWARE IS OPERATING, OR FOR
PROBLEMS IN THE INTERACTION OF THE SOFTWARE WITH NONTYCO SOFTWARE OR HARDWARE PRODUCTS. TYCO NEITHER
ASSUMES NOR AUTHORIZES ANY OTHER PERSON PURPORTING TO
ACT ON ITS BEHALF TO MODIFY OR TO CHANGE THIS WARRANTY,
NOR TO ASSUME FOR IT ANY OTHER WARRANTY OR LIABILITY
CONCERNING THIS SOFTWARE. THE WARRANTY MADE BY TYCO
MAY BE VOIDED BY ABUSE OR MISUSE. THIS LIMITED WARRANTY
GIVES YOU SPECIFIC LEGAL RIGHTS. YOU MAY HAVE OTHER
RIGHTS UNDER MANDATORY LAW THAT VARY FROM STATE TO
STATE AND COUNTRY TO COUNTRY.
59
End User License Agreement (EULA)
b.
8.
60
Exclusive Remedy. Tyco's entire liability and your exclusive remedy under the
warranty set forth in this Section will be, at Tyco's option, to (i) attempt to correct
Software errors with efforts Tyco believes suitable to the problem, (ii) replace at
no cost the recording medium, Software or documentation with functional
equivalents as applicable, or (iii) refund a pro-rated portion of the license fee paid
for such Software (less depreciation based on a five-year life expectancy) and
terminate this EULA, provided, in each case, that Tyco is notified in writing of all
warranty problems during the applicable warranty period. Any replacement item
will be warranted for the remainder of the original warranty period. No remedy is
provided for failure of the Software if such failure is the result of accident, abuse,
alteration or misapplication with respect to the Software or any hardware on
which it is loaded. Warranty service or assistance is provided at the original point
of purchase.
LIMITATION OF LIABILITY & EXCLUSION OF DAMAGES.
a.
LIMITATION OF LIABILITY. IN NO EVENT WILL TYCO’S AGGREGATE
LIABILITY (INCLUDING, BUT NOT LIMITED TO, LIABILITY FOR
NEGLIGENCE, STRICT LIABILITY, BREACH OF CONTRACT,
MISREPRESENTATION AND OTHER CONTRACT OR TORT CLAIMS)
ARISING FROM OR RELATED TO THIS EULA, OR THE USE OF THE
SOFTWARE, EXCEED THE AMOUNT OF FEES YOU PAID TO TYCO OR
ITS RESELLER FOR THE SOFTWARE THAT GIVES RISE TO SUCH
LIABILITY.
b.
EXCLUSION OF OTHER DAMAGES. UNDER NO CIRCUMSTANCES
SHALL TYCO OR ANY OF ITS RESELLERS OR LICENSORS BE LIABLE
FOR ANY OF THE FOLLOWING: (I) THIRD PARTY CLAIMS; (II) LOSS OR
DAMAGE TO ANY SYSTEMS, RECORDS OR DATA, OR LIABILITIES
RELATED TO A VIOLATION OF AN INDIVIDUAL'S PRIVACY RIGHTS;
OR (III) INDIRECT, INCIDENTAL, SPECIAL, CONSEQUENTIAL,
PUNITIVE, RELIANCE, OR COVER DAMAGES (INCLUDING LOST
PROFITS AND LOST SAVINGS), IN EACH CASE EVEN IF TYCO HAS
BEEN ADVISED OF THE POSSIBILITY OF SUCH DAMAGES. YOU ARE
SOLELY RESPONSIBLE AND LIABLE FOR VERIFYING THE SECURITY,
ACCURACY AND ADEQUACY OF ANY OUTPUT FROM THE
SOFTWARE, AND FOR ANY RELIANCE THEREON.
SOME
JURISDICTIONS DO NOT ALLOW THE EXCLUSION OF INCIDENTAL OR
CONSEQUENTIAL DAMAGES, OR THE LIMITATION ON HOW LONG AN
IMPLIED WARRANTY LASTS, SO SOME OF THE ABOVE LIMITATIONS
MAY APPLY TO YOU ONLY TO THE EXTENT PERMITTED BY THOSE
LAWS.
User’s Guide
End User License Agreement (EULA)
GENERAL. If any provision of this EULA is found to be unlawful, void, or for any reason
unenforceable, then that provision shall be severed from this EULA and shall not affect the validity and
enforceability of the remaining provisions. You should retain proof of the license fee paid, including model
number, serial number and date of payment, and present such proof of payment when seeking service or
assistance covered by the warranty set forth in this EULA. This EULA is governed by the laws of the State
of New York, without regards to its conflicts of law principles. The parties hereby irrevocably agree that
they submit themselves to the personal jurisdiction of the state and federal courts of New York for
purposes of resolving any and all disputes arising under or related to these terms and conditions. The
parties specifically exclude the application of the provisions of the United Nations Convention on
Contracts for the International Sale of Goods.
61
End User License Agreement (EULA)
62
User’s Guide
Index
A
E
Adjusting Target Area Settings 43
Advanced Search 35
Alarm Stage
Generating Alarms 19
Alarms
Clearing 19
managing 19
American Dynamics Handler 38
Apply selected exceptions as a group 40
Archiving to Tape 24
Archiving Video 24
Archive button enabled 24
Area
Image 7
Associating Text Streams with Cameras 39
Exiting to Windows 54
Export to CD-R(W) 18
F
Finding Video Segments 10
G
General Text Handler 38
Generating Receipt Definitions 39
Generating Text Alarms 40
I
B
Backing up images to tape after stopping
recording 27
Backing up images to tape while recording 25
Build Exceptions 40
C
Call Mode 7
Camera
Display 7
Camera handlers 12
Types 12
Camera Sequencing 11
Checking Camera Status 9
Controlling a Dome Camera 12
D
Display
Camera 7
Mode 7
Dome camera
Focus functions 12
Iris functions 12
Pan/Tilt Movement functions 12
Zoom functions 12
Dome Configuration Menu 15
Image
Area 7
Include player application on export media 18
J
Jog Shuttle Control 22
Jump N Results 40
L
Logging In 3
M
Main Screen Overview 3
Mode
Display 7
Motion Detection 41
Motion Exception 41
Environmental Factors 45
O
Overview, Intellex SDK 31
P
Pattern
63
Index
definition 13
Pattern and Preset Camera Controls 13
Personal Identification Number 3, 32
Playing Back Video Clips 21
Playing Restored Images 28
Preset
definition 13
Preset Overlay View 14
V
VCR Control 22
View
Single Pane 7
Viewing Live Video 11
Sequencing 11
Z
R
Resetting Archive Flags 28
Restoring Images from Tape 28
Reviewing Alarms 19
clearing all 19
Zoom
Image Area 7
Zooming in on an Image Area 7
S
Screen Format 7
SDK Overview, Intellex 31
Search
Alarms 34
Cameras 34
Date/Time 33
Filters 34
String 35
Text Streams 35
With Image Filters 42
Search Mode 10
Setting Up the Target Area 43
Speed 45
Setting up the Target Area
Direction 44
Size 44
Show customer entries 38
Show journal entries 38
Single Pane
View 7
Slider Control 22
Spot Mode 7
Start Camera Sequencing
Mapping 11
Status 9
T
Text Options 36
The 4
U
Utility Options 8
64
Intellex