1
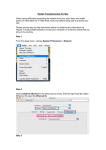
ResNet – Your Residence Internet Connection
Undergraduate Dorms
For assistance at any time, please email [email protected]
Your Internet connection at St. Paul’s is free through the University of Waterloo’s ResNet network service. Before you
connect, please do the following:
1. Make sure that your computer configuration is compatible;
2. Follow the outlined set-up instructions;
3. Read the “ResNet Use and Misuse” guidelines;
The Guidelines, along with detailed information on ResNet service, are available on the University of Waterloo’s Housing
website
Please note that at St. Paul’s:
•
We have our own student staff (called Residence Computer Consultants or RCCs) to assist you with ResNet
problems;
•
Alternative internet service providers and connections are not available.
Required Equipment
The majority of computers today meet the minimum requirements for connecting to ResNet. If you will be using our
wired connection, please make sure that you have an Ethernet card in your machine and bring your own Ethernet cable,
as we do not provide them at the College.
We also provide wireless connectivity in all residence rooms, as well as public areas, so please check to make sure that
your system has wireless capabilities.
Supported Operating Systems
ResNet officially supports Windows XP and Vista; however, limited support is available for users of older Windows
operating systems, as well as Mac OS and Linux users. Free copies of Windows XP and Vista are available to UWaterloo
students through the ResNet office and the CHIP (Computer Help Desk) on main campus.
ResNet Setup Instructions
Before you arrive:
1. Turn on your firewall – If you have Windows XP, turn on your firewall. If you have another version of Windows
or an alternate OS, download and install a third-party firewall;
2. Configure your TCP/IP settings – You may need to reconfigure your settings to automatically get an IP address.
These can usually be found under network settings or wireless options.
Upon arrival:
1. Connect your Ethernet cable from your computer to the Ethernet jack that is provided
2. Wait for your connection to become active. As many students are connecting to the network at the same time,
this step could take hours, so please be patient.
Using Windows Vista
1. Click on “Start” and then click on “Control Panel”
2. Select “View network status and tasks” from the “Network and Internet” group
3. In the “Network and Sharing Center” locate the connection “Local Area Connection” and select “View status”.
4. Select “Properties” from “Local Area Connection Status” and click “Properties”.
5. Select “Internet Protocol Version 4 (TCP/IPv4)” and click on “Properties”.
6. Ensure that “Obtain an IP address automatically” and “Obtain DNS server address automatically” are selected.
7. Close any windows that you have open.
Using windows XP
1. Turn on your Firewall
2. Click on the “start” button, then click the “Control Panel”
3. If you are in “Category View” switch to “Classic View” (Skip this step if you are already in “Classic View”).
4. From the “Network Connections” window, locate and right-click on “Local Area
5. Connection” then left click on “Properties”.
6. Select the “Internet Protocol TCP/IP” item and select the “Properties” button.
7. Ensure that “Obtain an IP address automatically” and “Obtain DNS server address automatically” are selected
then click “OK”.
8. Close any windows that you have open.
Using Mac OS X
1. Open your System Preferences window by clicking the Apple Logo on the menu bar, and choosing the System
Preferences shortcut.
2. Open the Network option by double clicking the Network Options icon from the System Properties window.
3. Make sure the 'location' drop down is set to Automatic, the 'show' drop down is set to Built-in Ethernet and you
are on the 'TCP/IP' tab.
4. Make sure the 'Lock' icon in the bottom left of the window is in the unlocked state. If it is not, then click it once
and enter your password in the prompt to unlock it.
5. Select 'Using DHCP' from the 'Configure IPv4' drop down and press the 'Renew DHCP Lease' button. You may
have to wait on this stage for up to 4 hours.
Using Linux PC
1. Select “System” then “Administration” and finally “Networking”.
2. Once the “Networking settings” screen opens click on the “Properties” button.
3. Verify that “Enable this connection” is checked and that configuration is set to DHCP. All ports should be closed
by default in Ubuntu however, the Firestarter Firewall is an excellent tool for better managing your system
firewall. Visit http://help.ubuntu.com or http://wiki.ubuntu.com for information about configuring Firestarter.
Using ResNet Wireless Connection:
1. Turn on the wireless detection/make sure you have enabled wireless capabilities on your laptop.
2. Search and detect wireless networks under “Network and Sharing Center” for Windows Vista or Windows 7,
“Network Connections” for Windows XP, “Network” for Mac OS X and “Network Settings” for Linux PC.
3. Select and Connect to wireless network “Eduroam”
4. Install “Xpressconnect Configuration Tool” click “allow.” Installation could take a couple minutes.
a. Visit XpressConnect if the option is not offered immediately.
5. Enter in your UWaterloo username and password in the required respective fields to verify your identity (Quest
login ID).
If you are unable to connect, search for additional wireless networks:
1. Select and connect to wireless network “uw-wireless.”
2. Enter in your UWaterloo username and password in the required respective fields to verify your identity (Quest
login ID).
3. If an “Unsecure connection” warning appears, select “Connect anyway.”
If after following these steps, you are still having problems connecting, please email [email protected] for
assistance. Please allow between 24-48 hours for a response.
Frequently Asked Questions
Q. How do I report problems with my ResNet connection?
A. If you are having problems connecting, please email [email protected] for assistance. Please allow for 24-48
hours for your request to be received and a case opened.
Q. Why is my connection so slow?
A. ResNet is used by thousands of students across campus so there could be a lot of traffic on the network, especially at
peak times. Other possible reasons are that:
•
your computer system may need to be upgraded or cleaned up, giving you a faster operating speed and/or more
RAM space;
•
uploading/downloading large files or programs that use up a lot of bandwidth.
Q. I just got a new computer and my connection is not working anymore.
A. The current ResNet system only allows one Mac address to be configured to your port. A Mac address is your
computer’s unique name, so when you plug in another computer, your port will need to be reset to register your new
Mac address. Please email [email protected] to have your ports reset.
Q. I did not change or touch anything, but my connection is not working.
A. There are a number of reasons that your connection may have been terminated. The most common reasons are:
•
you have exceeded your bandwidth limits (2GB/day for each resident);
•
peer-to-peer gaming, downloading movies, music, games and software that uses a lot of bandwidth and opens
the network up to viruses and hacking;
•
scanning the network for any reason, which includes the scanning caused by:
o
viruses trying to find other computers to infect,
o
hacking in any form,
o
setting up servers or routers of any kind without permission,
o
sharing of any material that could be deemed inappropriate or offensive.
Please note that these terminations are automated through the campus IT Security department, NOT by St. Paul’s
University College. Please also note that “sharing” of internet ports with other students (residents/otherwise) is strictly
forbidden and will result in immediate disconnection of your internet connection.
Problems arising from use for purposes other than those intended by the University in students’ role as members of the
UW community will be seen as misuse. This misuse may result in disconnection (without notice) and could ultimately
result in disciplinary action up to and including eviction from residence and/or referral for academic disciplinary action.
We at St. Paul’s are committed to assisting you with all of your ResNet issues effectively and efficiently. Some problems
may require external support, so we ask for your patience.