1
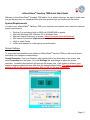
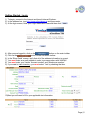
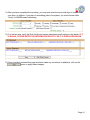
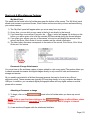
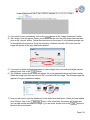
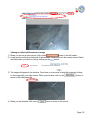
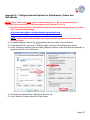
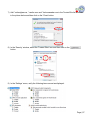
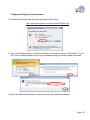
Quick Start User Guide
Page | 1
Table of Contents
System Requirements ........................................................................................................................... 3
Screen Settings ................................................................................................................................. 3
Text Size ........................................................................................................................................... 4
Security ............................................................................................................................................. 4
Getting Started - Login .......................................................................................................................... 5
User Management ................................................................................................................................ 7
Quick Quote .......................................................................................................................................... 8
Create a Quote and Work Order ......................................................................................................... 10
Create a Cash Quote ...................................................................................................................... 10
NAGS Based Quote: .................................................................................................................... 10
Special Feature: .............................................................................................................................. 12
Working with Work Orders ........................................................................................................... 13
Schedule a Job ............................................................................................................................ 13
Service Address ........................................................................................................................... 13
Print a Work Order ....................................................................................................................... 14
Complete a Work Order – Convert to Invoice .............................................................................. 15
Working with Invoices ......................................................................................................................... 15
How to Create a Quick Invoice .................................................................................................... 16
Adjustments and Credit Memos .......................................................................................................... 17
Adjustments..................................................................................................................................... 17
Credit Memo .................................................................................................................................... 18
Placing and Managing Vanfax Orders ................................................................................................ 20
Short-cuts & Miscellaneous Features ................................................................................................. 23
My Work Panel ................................................................................................................................ 23
Document & Image Attachments ..................................................................................................... 23
Attaching a Document or Image .................................................................................................. 23
Viewing an Attached Document or Image .................................................................................... 25
Appendix A - Configure Internet Explorer for Attachments, Orders and QuickBooks.......................... 26
Configure the Registry for Attachments ........................................................................................... 30
Appendix B – Installing Crystal Report Viewer .................................................................................... 31
Appendix C – Installing DBPIX Attachment Plug-in ............................................................................ 32
Install the Attachment Plug-in .......................................................................................................... 32
Appendix D – eDirectGlass© QuickBooks Setup ................................................................................. 33
Appendix E – eDirectGlass© Security & Privacy ................................................................................. 41
Page | 2
eDirectGlass© Vanshop TSM Quick Start Guide
©
Welcome to the eDirectGlass Vnashop TSM edition. As a valued customer, we want to make sure
you get the most from our system and this quick start guide will get you familiar with the basics.
System Requirements
©
In order to use eDirectGlass Vanshop TSM, your computer and network must meet the minimum
system requirements:
•
•
•
•
•
•
Pentium 3 or equivalent (Intel or AMD) with 256MB RAM or greater
Microsoft Windows 2000, Windows XP or Windows Vista
Microsoft Internet Explorer 6 or greater. (We only support Internet Explorer)
56k Internet Connection (High-speed broadband connection recommended)
Inkjet or Laser Printer
Valid e-mail address for order inquiry and confirmation
Screen Settings
©
To ensure the best possible screen display of eDirectGlass Vanshop TSM you will need to check
and adjust your computer screen settings.
Screen Resolution: From your Desktop, right mouse click on any blank area of the screen, and
select Properties from the menu. Go to the Settings tab, and change or adjust the screen
resolution. Increasing the resolution will improve the screen view. Each system is different; your
system’s maximum resolution may differ from the example shown below. The minimum resolution
setting is 800 by 600 but we recommend 1024 by 768 for the best experience.
Page | 3
Text Size
You should also double check the viewing text size for your Internet browser. With Internet Explorer
opened, go to the menu bar and select Page. From the Page sub menu, select Text Size, and then
select Medium.
*NOTE - THIS MAY DIFFER IN INTERNET EXPLORER 6 AND BELOW.
Security
In order to use certain features in our website, you must add/modify security settings in Internet
Explorer.
PLEASE FOLLOW THE INSTRUCTIONS FOUND
IN ‘APPENDIX’ A NOW BEFORE CONTINUING.
Page | 4
Getting Started - Login
1) To begin, connect to the Internet and launch Internet Explorer.
2) In the address bar, type http://www.edirectglass.ca and press enter.
3) At the login screen, enter your Login Name and Password then click
4)
5)
6)
7)
8)
9)
.
After you are logged in, click on the
button on the main toolbar.
button on the sub-menu toolbar.
Click on the
In the ‘Shop Detail’ screen, verify that all of the address information is correct.
You must enter an e-mail address in order to process orders with VANFAX.
You must enter your Vanfax ‘Account number’ and ‘Warehouse number’.
If you want to track inventory, you must select ‘Yes’ by checking that box.
10) Next you will need to fill in your applicable tax information.
Page | 5
11) After you have completed the tax setup, you must now enter the hours and days of operation for
your shop. In addition, if you plan on scheduling jobs in the system, you must choose either
‘Hourly’ or AM/PM based scheduling.
12) For the last step, verify the Work Order and Invoice statements match what you see below. IF IT
IS BLANK, PLEASE ENTER THE INFORMATION EXACTLY AS IT IS DISPLAYED BELOW.
13) Once you have reviewed this page and have made any corrections or additions, click on the
button to apply these changes.
Page | 6
User Management
If you wish to give access to other users or if you will be using the schedule system, you must add
these individuals to your account.
1) If you are not in the Administration section, click on the
tab located on the main
toolbar.
2) Next, click on the
found on the left toolbar.
3) Click on the
button found in the ‘Find User’ panel in the center of the screen.
4) Complete the ‘Add User’ panel with the individuals’ information.
5) If you are using the schedule system, you must assign user status to your technicians even if
they are not going to access the system. To do so, complete the step above and place a check
mark in the ‘Technician’ box. Select whether or not the technician performs ‘Mobile’, ‘In-House’
or both. Enter a number in the ‘Daily Job Capacity’ field.
6) When you are finished, click on the
button to save your changes.
7) If you want to allow the newly created user access to the program, you must give this user
rights to all or some parts of eDirectGlass. To do so, click on the ‘Show Rights’ text in the
middle of the saved ‘User Detail’ record.
Page | 7
8) On the ‘Rights’ screen, you must now add check marks in the ‘Permission’ column to allow this
user access to these areas of the program. If you do not place a check mark in the box, the
user cannot access that function.
9) Once you are finished with assigning or removing permissions, click on the
button to return to the ‘User Detail’ panel.
Quick Quote
Here are the steps if you want to provide a quick quote using any Catalogue or NAGS part pricing.
1) Click on the
button on the top main toolbar then click on the
button on the left side toolbar.
2) On the look up screen, you can either build the vehicle by manually selecting the Make, Model,
Year, Body Style and Sub-model or by entering the VIN Number. You can also find a vehicle
by entering a Glass Part # or OEM Part #. Once you have built the vehicle, click on the
button.
3) On the next screen, select the area of glass you wish to see; windshield, side, vent, back, etc.
Before you click on a part item, please make sure you have selected the catalogue you
wish to check pricing from. By default, your “Retail” catalogue is the default search
catalogue. Once you have selected your catalogue, simply click on the part item row you wish
to view.
Page | 8
4) Now you will see a list of parts that correspond to the main glass item you selected above. In
the ‘Price’ column, any price that is highlighted in blue indicates that the price is from the
catalogue you selected; otherwise, the system displays the current NAGS price. To build a
quick quote, simply check off the parts you will use and the system will provide a running total
at the bottom of the screen.
5) If you wish to save this quote, click on the
button.
Page | 9
Create a Quote and Work Order
In order to create a Work Order, you must first create a Quote and then convert it to a Work Order. If
you do not need to schedule a job or create a work order, you can skip to the section ‘Creating a
Quick Invoice’.
Create a Cash Quote
You can create a cash quote using either NAGS pricing or your own catalogue pricing.
NAGS Based Quote:
1) Click on the
button on the main toolbar and then the
button
on the left toolbar.
2) Now click on the
button.
3) You must first decide whether the job is for an ‘Owner’ or for a ‘Commercial’ account.
4) You must fill out all of the fields that have a solid red box. Any box that has a dashed red box
requires that one of them has data.
5) Next you must determine if the job will be billed to the ‘Owner’, ‘Insurance/Fleet Company’,
‘Broker’ or ‘Other’. When you have entered this information, click on the
continue.
button to
6) In our example, we have selected the ‘Bill to’ for the ‘Owner’. If you would have selected any
other ‘Bill to’, you would then look up the Insurance/Fleet or Broker company on the
tab screen and fill in the necessary information. Since we have selected to ‘Bill
to’ the ‘Owner’, the system will automatically take you to the
tab screen.
screen you can either enter a VIN number or manually build the vehicle.
7) On the
If you have the VIN number, enter it in the VIN field and click on the
button. Once you
are ready to build the vehicle, with or without the VIN number, click on the
button.
Page | 10
8) If you entered a valid VIN number, the system will automatically build the vehicle. If you did not
have a VIN number, you must build the vehicle by manually selecting the Make, Model, Year,
Body Style and Sub-model. You can also find a vehicle by entering a Glass Part # or OEM Part
#.
9) Once you have built the vehicle, you have a few choices to make.
a. If you are performing a replacement, click the
button.
b. If you are performing repairs or want to select a custom part from one of your
catalgoues, click the
button.
c. If you want to save the vehicle to work on the quote at a later time, click on the
button.
6) On the next screen, select the area of glass you wish to see; windshield, side, vent, back, etc.
Before you click on a part item, please make sure you have selected the catalogue you
wish to check pricing from. By default, the “NAGS” catalogue is the default search
catalogue. Once you have selected your catalogue, simply click on the part item row you wish
to view.
Page | 11
10) Now you will see a list of parts that correspond to the main glass item. Select the items you
wish to place on the quote from this list by placing a check (Click on the Check Box) in the
check box next to the part line item.
Special Feature:
Anytime you see a part line item that is highlighted in magenta, this indicates that the part is a valid
“interchange” part. You can also find out the detail of any part by moving your mouse over the ‘MFG
Part’ field and waiting a few seconds. The system will display a “hover” box with the part details, if
any.
11) Once you have selected the parts for the Quote, click on the
12) The system will now take you back to the
screen.
13) Now we will convert this Quote to a Work Order by clicking on the
found on the line item panel.
button.
button
Page | 12
Working with Work Orders
14) After you have clicked on the
button in the last step, the system will take you
to the
screen. You can Schedule the job, print the Work Order, or convert the
Work Order to an Invoice. NOTE: In order to work with the Schedule system, you must have
created Technicians in the User Management setup. Please refer to the ‘User Management’
section of this guide to create your technician accounts.
Schedule a Job
15) To schedule the job, select the ‘Mobile’ check box if the job will be out in the field then select
the date you wish to schedule the job for. The system will then display the availability grid for
the selected date.
16) Select a time space under any of the available technicians and the field will be highlighted in
yellow. Click on the
button to insert the job in the schedule.
Service Address
17) If the job will be performed in the field, you can enter a ‘Service Address’ where the job will
take place. To create a ‘Service Address’, click on the
button.
18) There are no mandatory fields in the ‘Service Address’ panel but it is a good idea to fill in as
much as you can and enter intuitive notes such as customer requests, cross streets, etc. Once
you are done entering this information, click on the
information will print on the printed Work Order.
button. The ‘Service Address’
Page | 13
Print a Work Order
button on the left toolbar.
19) To print a Work Order, click on the
NOTE: If this is your first time printing a report in eDirectGlass, please follow the
instructions in Appendix A in order to install the ‘Crystal Reports’ viewer in Internet
Explorer.
20) Next, the system will create a new browser window that will ask you if you want to include
pricing on the Work Order. This is a helpful tool if you do not want the customer to see pricing
button.
on the Work Order. Answer ‘Yes’ or “No’ and then click on the
21) The ‘Work Order’ will now display in the ‘Crystal Reports’ viewer window.
22) To print the Work Order to your printer, click on the
the viewer, simply close the browser screen.
button and select the printer. To close
Page | 14
Complete a Work Order – Convert to Invoice
When you have completed a Work Order, you can now complete the Work Order record by recording
various items such as Work Order Notes, Apply Customer Payments, adding additional line items and
so on. Once you have completed these optional items, you are ready to convert the Work Order to an
Invoice.
1) Open up the Work Order and select the
2) On the
screen, click on the
tab.
button.
Working with Invoices
After you have converted a Work Order to an Invoice you can now finalize the Invoice by adding
Invoice notes, adding additional line items applying payments and submitting the Invoice to a locked
status.
1) When you are ready to lock an Invoice so no changes can be made, click on the
button. The ‘Submit Invoice’ button will not be available if there is a balance on
the ‘Owner Invoice’ tab. Once the balance has reached $0, the ‘Submit Button’ will be active.
button on this
2) The ‘Submit Invoice to’ screen will now appear. Click on the
screen. By default, the ‘Print to local Printer’ is always selected.
3) A pop-up window will appear asking you if you want to “Print invoice
now?” At this point you can either print the Invoice or simply lock the
invoice and return to the Invoice record screen. If you click on ‘OK’ to
print, the Customer Invoice will appear in a new ‘Crystal Reports
Viewer’ window just as the Work Order print did.
Page | 15
4) When you are returned to the Invoice detail screen, you will now see that the screen is marked
with text that is circled in the graphic below. This indicates that the Invoice is locked.
How to Create a Quick Invoice
If you want to create an Invoice but do not want to go through the ‘Quote’, ‘Work Order’ and
‘Schedule’ process, you can directly create an Invoice without those steps.
1) Click on the
button on the main toolbar if you are not in the Quotes &
Invoice menu. Next, click on the
button on the left toolbar.
2) In the ‘Find Invoice’ box, click on the
button.
3) Follow the same instructions found in ‘Creating a Quote’ to complete the necessary information
such as Owner, Bill to, Insurance, Loss Info and the Vehicle information.
4) Once you have completed that information, you can then refer to the ‘Working with
Invoices’ section for completing and locking an Invoice.
Page | 16
Adjustments and Credit Memos
Adjustments
You can issue an ‘Adjustment’ in 2 places within the program. The first place you can issue an
‘Adjustment’ is while you are in an invoice with the ‘Vehicle’ tab open.
1) Click on the
button.
2) In the pop-up box, select the box next to ‘Make an Adjustment’ and click on next.
3) In the ‘Adjustment’ panel, enter:
a. the amount to be adjusted (tax will be calculated automatically),
b. Which invoice is to receive the adjustment, Insurance or Owner,
c. A reason for the adjustment.
4) When you have entered the information, click on the ‘Adjust Invoice’ button.
5) The invoice screen will now display and you will see the ‘Remittance’ box that will contain the
adjustment you just made along with an updated total for the invoice.
You may also create an Adjustment from the Accounting tab by selecting the
button in the Accounting sub-menu. Once you have clicked on this button, search for the invoice you
wish to issue an adjustment for and then follow the step 3 above.
Page | 17
Credit Memo
You can issue a Credit Memo in eDirectGlass for any Invoice that has been submitted. To issue a
Credit Memo, please follow these steps:
1) Click on the Accounting tab followed by the
button.
2) Find the invoice you wish to issue a Credit Memo for.
3) Once you click on the invoice you wish to work with, the Adjustment/Credit memo panel will
appear at the bottom of the screen.
4) Click on the box next to ‘Credit Memo’.
5) The screen will refresh and will now display the invoice details including the line items.
Page | 18
6) Select the items you wish to issue a Credit Memo for and enter a reason in the ‘Reason’ box
for the issue of the credit.
7) When you are finished, click on the
button.
8) A pop-up box will appear asking you if you want to issue the Credit Memo. Click on ‘OK’ to
issue the credit memo or click on ‘Cancel’ to go back.
9) The system will then launch a new window that will display the ‘Credit Invoice’ receipt. When
you are finished printing this receipt, close the window to return to the program.
10) The ‘Credit Memo’ information will now display in the ‘Remittance’ tab if you go and lookup the
invoice for review.
If you need to reference or re-print a ‘Credit Memo’ in the future, follow the instructions for issuing a
Credit Memo above. When you see the invoice details screen, it will contain the items that have
already had a Credit Memo issued against. At the bottom of the screen, click on the
button to print another copy of the ‘Credit Memo’.
Page | 19
Placing and Managing Vanfax Orders
At anytime you can electronically search for parts, place and manage orders with Vanfax from your
Vanshop TSM account using 2 methods:
Method 1 – Order Vanfax found on the
screen.
1) Click on the
button on the main toolbar.
button on the left toolbar.
2) Next, click on the
3) The Vanfax product search screen will appear after a short pause. From here, you can lookup
products, place orders and manage your VANFAX account.
4) If you get the following screen, you have not entered your Vanfax account number in the
Administration->System Admin panel.
Method 2 – Availability and Ordering Parts in Work Order or Invoice
When you are in a Work Order or Invoice, you can look up the availability and place orders for any of
the line items using your Vanfax account.
1) When you are on the
screen, you will see the
underneath
your line items.
button, the system will automatically connect to
2) When you click on the
Vanfax and check to see what parts are available.
3) If any of the parts in your line item list are available at Vanfax, the system will display them.
Page | 20
4) If you move your mouse over the empty box in the ‘Price’ column, the price will appear.
5) To place these items in your shopping cart, click on the
button.
6) The
button will display on the top of your screen near your name.
7) To place an order for the contents in your Cart, click on the
button.
8) In the Shopping Cart Contents screen, verify these are the items and quantity you wish to
button.
order. If you are ready to place your order, click on the
9) On the checkout panel, enter a purchase order number, choose your freight and shipping
methods and add any order notes you wish to have appear with the order. When you are ready
to place your order, click on the
button.
Page | 21
WARNING
*** IF YOU CLOSE YOUR BROWSER OR
LOG OUT AND YOU HAVE ITEMS IN YOUR
SHOPPING CART, THEY WILL BE
PERMENANTLY LOST ***
Page | 22
Short-cuts & Miscellaneous Features
My Work Panel
This panel can be found in the left toolbar area near the bottom of the screen. The ‘My Work’ panel
allows quick access to previous Quotes, Work Orders and Invoices that you have accessed during
your current session.
1) The ‘My Work’ panel will appear when you move away from any record.
2) At any time, you can click on any name in the list to go directly to that record.
3) If you have been in more than 5 records, the
button will appear. By clicking on this
button, you will be given a list of all the records you have visited during the current session.
4) If you place your mouse over any of the names, a hover box will display the amount of the
record, the Quote, Work Order or Invoice number and the vehicle information.
5) The letter before the name corresponds to the status of the record; Q for Quote, W for Work
Order and I for Invoice.
Document & Image Attachments
You never have to file and keep a piece of paper related to a job every again! The system allows you
to attach scanned documents and digital images directly to any record for safe and convenient
storage and access.
All you need to get started is a flat bed document scanner that can be found at any office or
electronics store. These scanners are typically $75 and plug directly in to any computer that has a
USB port. In addition, you can attach digital photographs taken with any digital camera or mobile
phone with a camera.
Attaching a Document or Image
found in the left toolbar when you have any record
1) To begin, click on the
open.
NOTE: If this is your first time clicking on the
button in eDirectGlass, please
follow the instructions in Appendix C in order to install the ‘DBPIX’ plug-in in Internet
Explorer.
2) A new window will appear with the attachment interface.
Page | 23
button in the ‘Image Attachment’ toolbar.
3) If you want to scan a document, click on the
4) The ‘Acquire’ box will appear. Select your scanner device from the drop-down menu and then
click on the ‘Acquire’ button. Follow the instructions on the screen if your scanner prompts you
for any additional information. Once the scanning is finished, click the ‘OK’ button and the
image will appear in the grey attachment window.
5) If you want to attach a digital photograph or other images from your hard drive/digital camera
memory card, click on the
button.
6) The Windows system driver folder will appear. Go to the appropriate drive and folder location.
Select the image you want and click on ‘OK’ or double-click the image. The selected image will
appear in the grey attachment window.
7) Now you will need to give the Attachment a title and a brief description. When you have added
both of these, click on the
button. After a brief wait, the screen will refresh and
button to
you can add another document or image. If you are done, simple click on the
return to the record screen.
Page | 24
Viewing an Attached Document or Image
1) When you are on an open record, click on the
button in the left toolbar.
2) A new window will pop-up listing all of the available Attachments for the current record. Select
the Attachment you want to view by clicking on the
button.
3) The image will appear in the window. From here you can email or print the image by clicking
button to
on the image with your right mouse. When you are done, click on the
return to the Attachment list.
4) When you are finished, click on the
button to return to the record.
Page | 25
Appendix A - Configure Internet Explorer for Attachments, Orders and
QuickBooks
NOTE: These instructions only apply to Internet Explorer 7.x. We recommend that you
upgrade to this new version if you are using Internet Explorer 5.x or 6.x.
1) Run the following links to automatically install the necessary settings for your ‘Trusted
Sites’ security level settings:
http://www.edirectglass.com/downloads/edgtrustedsite.reg
http://www.edirectglass.com/downloads/edgscripttimeout.reg
NOTE: If your machine has multiple user login accounts, you must run this file under
each user login.
button and then select ‘Internet Options’.
2) In Internet Explorer, click on the
3) In the ‘General Tab’, click on the ‘Settings’ button under the ‘Browsing history’ section.
4) In the ‘Temporary Internet Files and History Settings’ window, make sure that ‘Automatically’ is
selected and click on the OK button.
5) In the Internet Options Panel, Select the ‘Security’ tab.
6) In the ‘Security’ window, select the ‘Sites’ button.
Page | 26
7) Add *.edirectglass.ca, *.vanfax.com and *.belroncanada.com in the Trusted Site list as shown
in the picture below and then click on the ‘Close’ button:
8) In the ‘Security’ window, select the ‘Trusted Sites’ icon and then click on the
button.
9) In the ‘Settings’ menu, verify the following items are set as displayed:
Page | 27
Page | 28
10) When you have verified these settings, click on OK to return to the ‘Security’ window.
11) At the ‘Security’ menu, click the ‘OK’ button and then close all instances of Internet Explorer
before performing the last step.
Page | 29
Configure the Registry for Attachments
1) Download the following file and when prompted, choose ‘Run’:
http://www.edirectglass.com/downloads/eDGIEKey.reg
2) Your system may prompt you to allow the update to the registry to occur. Click ‘Allow’, ‘Yes’ or
‘OK’ to any of these prompts until you get a message telling you that the update took place.
3) Open up Internet Explorer and you can begin using the Attachments feature.
Page | 30
Appendix B – Installing Crystal Report Viewer
When you first click on any of the Print (Quote, Work Order, Invoice) buttons in eDirectGlass, it will
prompt you to install the ‘Crystal Smart Viewer for ActiveX’.
1) Click on the yellow highlighted area and a drop-down menu will appear.
2) Click on the ‘Install ActiveX Control in the drop-down.
3) A pop-up box may appear asking you to display the webpage again. Click on Retry to refresh
the page.
4) Another pop-up box will appear asking you if you want to install the viewer. Click on the Install
button to begin the installation process.
Page | 31
Appendix C – Installing DBPIX Attachment Plug-in
NOTE: Before you can use the Attachment feature in eDirectGlass, you must first configure
your computer and Internet Explorer.
Install the Attachment Plug-in
1) When you first click on the
button, a new browser window will appear asking
you to install the ‘dbpix20.ocx’ plug-in.
2) Click on the yellow highlighted area and a drop-down box will appear. Select ‘Install ActiveX
Control…’
3) A pop-up box will come up asking you if you want to install the software. Click on the Install
button to begin the installation process.
4) When the installation is complete, you will see the Image Attachment interface screen.
Page | 32
Appendix D – eDirectGlass© QuickBooks Setup
1. Download eDirectGlassQB.zip from
http://www.edirectglass.com/downloads/eDirectGlassQB.zip
2. NOTE: If you have QuickBooks open, please close it prior to running this file. Unzip the
files and first run QBXMLRP2Installer.exe. (NOTE: If you are upgrading to Internet Explorer 7
and/or QuickBooks 2006+, you must first uninstall the existing version of QBXMLRP2 under
Add/Remove Programs in the Windows Control Panel. Once you have removed the old
version, install the new version and reboot your PC.)
3. Click on ‘Next’ to begin the installation
4. Click on ‘Install’
Page | 33
5. The installation will begin.
6. When the application is finished installing, the following window will appear and now you must
click on the Finish button to complete the installation.
Page | 34
7. Note: You must have QuickBooks open before installing this DLL.
Next copy qbXMLRP2e.exe to C:\Program Files\Common Files\Intuit\QuickBooks\
Open QuickBooks and then Click Start, Programs, Accessories, Command Prompt and enter this
line at the prompt – cd C:\Program Files\Common Files\Intuit\QuickBooks\ then enter this on
the next blank line – qbXMLRP2e.exe /RegServer and hit enter. After the DLL installs, you will
receive a blank line with no messages.
8. Now open up Internet Explorer and go to Tools, Internet, Options, Security. Choose Custom
Level and then find the heading ‘Download Unsigned ActiveX Controls’. Change the setting for
this line to ‘Prompt’.
(Note: If you are using Internet Explorer 7, please refer to the Internet Explorer 7 Configuration
section of this guide to configure the settings for the correct operations of your QuickBooks
link.)
9. Login to your eDirectGlass account. Remember, QuickBooks must be open anytime that the
user wants to synchronize or work with eDirectGlass and QuickBooks.
10. Go to Administration, QuickBooks Setup.
Page | 35
11. Click on Browse and locate your QuickBooks company file. Typically this is found in
C:\Program Files\Intuit\QuickBooks Pro and the filename should be your company name with a
.QBW extension.
12. Once you have selected your file, click on Chart of Accounts. If you did not set your Internet
Explorer security settings properly, you will get an Internet Explorer ActiveX warning box, simply
click on Yes.
13. eDirectGlass will talk to your local installation of QuickBooks and may pop-up the follow dialog
box in QuickBooks. If the dialogue box does not come up, click on the QuickBooks program on
your toolbar:
14. Select “Yes,Always” to allow your eDirectGlass account access to your QuickBooks account.
15. You may also get a digital certificate warning screen. If you do, select “Yes”
Page | 36
16. Once you have completed this, your chart of accounts will be displayed:
You may get a warning message from Internet Explorer regarding the speed of waiting for the
Chart of Accounts. If you do, click ‘No’; otherwise, you may cause a setup issue.
17. Please go through all of our Chart of Account mappings and make sure that every Revenue
GL and COGS GL is setup for each PartID, Category, etc. As you make changes, they are
saved immediately.
Page | 37
18. Next, you must go in to QuickBooks, with your company file open and make the following
changes:
a. Go to Edit, Preferences and find the Purchases & Vendors icon. Click on this icon.
b. Next click on the Company Preferences. Make sure that the “Inventory and purchase
orders are active” check box is active. Close the Preferences window when you are
finished.
19. Now, click on the Item button on the main menu.
20. Click on the Item button at the bottom of the screen and choose New.
21. Choose ‘Inventory Part’ as the Type. Enter DW00000 in the Item Name/Number box.
22. In the ‘Income Account’ box, choose ‘Sales Glass:3000’and click on the OK button.
Page | 38
23. Now, click on Lists, then click on Tax Codes List.
24. Make sure you have the following in your list:
S – Standard (default) which should include GST & PST
(or HST total tax rate only in GST field*)
(and the piggyback
check box if PEI)
E – Exempt (no taxes)
G – GST Only
P – PST Only
*If you are in a Province where you use HST, you must make sure to modify your standard tax
code ‘S’ to show 13% under the GST listing. To change this, right mouse click on the Standard line in
the list and choose ‘Edit’. In the GST tax rate box, change the number to 13% and then click on the
OK button. You must also create a tax code ‘H’ for HST that also has 13% so that credit memos from
eDirectGlass post properly.
25. Next click on ‘Lists’ and select ‘Chart of Accounts’.
26. In the Chart of Accounts, make sure that Inventory Asset is not in a sub-account. If it is, create
a new Inventory Asset account.
Page | 39
27. Next, go back to ‘Lists’ and select ‘Item List’ to verify that you have an item called
“Deductible”.
28. If you do not have this item, add it as a ‘New’ discount item. You can choose the GL Account
as ‘Sales Other: Miscellaneous’. Make sure that the ‘Sales Tax Code’ is set to ‘E’ for exempt.
29. You must also make sure that you have the following as ‘Payment Types’ in QuickBooks and if
you do not, you must add them: Debit Card, VISA, MasterCard, American Express, Discover
and Other.
Page | 40
Appendix E – eDirectGlass© Security & Privacy
Summary
eDirectGlass exceeds the industry minimum standards for the safety and protection of your
company data on the Internet. While most companies lease computer equipment and services,
eDirectGlass owns 100% of its infrastructure thus enabling the highest level of privacy, safety and
data security.
3rd Party Monitoring
To ensure eDirectGlass is in compliance with industry standards and best practices for data
security and privacy, the company has contracted ControlScan (www.controlscan.com) to monitor our
network in real-time, 24 hours a day, seven days a week.
ControlScan is a market leader in e-commerce security, enabling businesses and consumers
to have confidence in a connected world. ControlScan helps its customers protect their infrastructure,
information, and interactions by delivering services that address risks to security and compliance.
Headquartered in Atlanta, Georgia, ControlScan has customers in over 20 countries.
Data Security
In order to protect your data with the strongest encryption possible, eDirectGlass utilizes 128bit and 1024-bit encryption services from the worldwide leader in digital security, VeriSign, Inc.
VeriSign is the leading secure sockets layer (SSL) Certificate Authority enabling secure e-commerce
and communications for Web sites, intranets, and extranets.
VeriSign, Inc. (NASDAQ: VRSN)
operates digital infrastructure that enables
and protects billions of interactions every
day across the world’s voice and data
networks. Every day, we process as many
as 31 billion Internet interactions. We offer
targeted solutions for carriers, consumer
product and retail companies, financial
services organizations, healthcare and life
sciences organizations, media and
entertainment companies, and the public
sector. VeriSign is a global enterprise with
offices throughout the Asia-Pacific region,
Europe, Latin America, and North America,
supported by a widespread international
network of data centers and operations centers.
Page | 41
Data Backup & Integrity
Your data is stored in redundancy on company owned/maintained equipment in owned/leased
data centers in 5 geographic areas around the world. Your data is backed up every second in this
redundancy. The data is stored in industry standard SQL data format on a Microsoft based platform
that includes Microsoft operating systems, .NET programming platform and related integrated
services & solutions.
Upon request, your data can be delivered to you should you choose to discontinue the use of
eDirectGlass. The data will be provided in the form of an ASCII delimited format that can be
universally imported in to most applications.
Privacy Policy
Your privacy is a primary concern to us at eDirectGlass. This Privacy Policy is intended to
explain what eDirectGlass does with information received via our Web site. eDirectGlass may update
this policy from time to time.
For each visitor to our web pages, our web server automatically recognizes the visitor's domain
name and email address (where possible). We collect the email addresses of those who post
messages to any bulletin board on our site and/or community, the email addresses of those who
communicate with us via email, aggregate information on what pages visitors’ access or visit and
information volunteered by the visitor, such as survey information and/or site registrations. The
information we collect is used for internal review, used to improve the content of our web site, used to
notify visitors about updates to our web site, and used by us to contact consumers for marketing
purposes. eDirectGlass does not share your personally identifiable information with other
organizations for commercial purposes, unless you have authorized us to do so in contractual
agreement. Data submitted through this web site may also be included for aggregating purposes to
generate general statistical information.
In the case of our eDirectGlass Claims Manager, Total Shop Manager or Mobile, any specific
information pertaining to insurance carrier, insured or claimant will be kept in strict
confidence.
If you do not want to receive email from us in the future, please let us know by sending email
to us at [email protected] with the subject line containing the word 'Remove'. If you supply
us with your postal address on-line you will receive the information that you requested when you
provided us your address. You may receive periodic mailings from us with information on new
products and services or upcoming events. If you do not wish to receive such mailings, please let us
know by sending email to us at the above address. Persons who supply us with their telephone
numbers on-line may receive telephone contact from us with information regarding orders they have
placed on-line or other business they have conducted on-line. If you post information, data, text, or
other content on publicly accessible areas of the Site or provide eDirectGlass with information,
including but not limited to, feed-back data, answers, questions, comments, suggestions, plans, ideas
or the like, such information or content shall be deemed to be non-confidential and eDirectGlass shall
be free to use, reproduce, disclose or distribute the information to others without restriction.
Page | 42