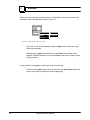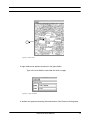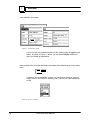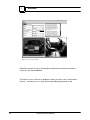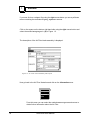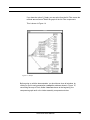
1
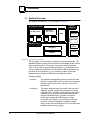
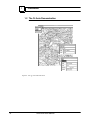
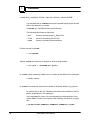
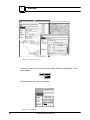
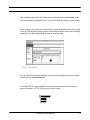
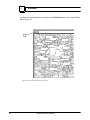
AUTO-DEMO
User Manual
Release 5.0 - April 1998
Information in this document is subject to change without notice
and should not be construed as a commitment by
O2 Technology.
The software described in this document is delivered under a
license or nondisclosure agreement.
The software can only be used or copied in accordance with the
terms of the agreement. It is against the law to copy this software
to magnetic tape, disk, or any other medium for any purpose
other than the purchaser’s own use.
Copyright 1992-1998 O2 Technology.
All rights reserved. No part of this publication can be
reproduced, stored in a retrieval system or transmitted in any
form or by any means, electronic, mechanical, photocopy without
prior written permission of O2 Technology.
O2, O2Engine API, O2C, O2DBAccess, O2Engine, O2Graph,
O2Kit, O2Look, O 2Store, O2Tools, and O2Web are registered
trademarks of O2 Technology.
SQL and AIX are registered trademarks of International
Business Machines Corporation.
Sun, SunOS, and SOLARIS are registered trademarks of Sun
Microsystems, Inc.
X Window System is a registered trademark of the
Massachusetts Institute of Technology.
Unix is a registered trademark of Unix System Laboratories, Inc.
HPUX is a registered trademark of Hewlett-Packard Company.
BOSX is a registered trademark of Bull S.A.
IRIX is a registered trademark of Siemens Nixdorf, A.G.
NeXTStep is a registered trademark of the NeXT Computer, Inc.
Purify, Quantify are registered trademarks of Pure Software Inc.
Windows is a registered trademark of Microsoft Corporation.
All other company or product names quoted are trademarks or
registered trademarks of their respective trademark holders.
Who should read this manual
When O2 is delivered, you receive a demonstration called auto with the
installation tape. This demonstration uses O2C, O2Look, O2Kit and
O2Graph.
This document explains how to install and use this demonstration.
See O2 Documentation set.
1
TABLE OF CONTENTS
This manual is divided into the following chapters:
• 1 - Introduction
• 2 - Installation - explains how to install and run the auto demonstration.
• 3 - Scenario - explains how to install and run the auto demonstration.
Auto-Demo User Manual
5
TABLE OF CONTENTS
1
Installation
7
1.1 System Overview........................................................................8
1.2 The O2 Auto Demonstration....................................................10
2
Installation
11
3
Scenario
17
6
Auto-Demo User Manual
1
I n s t al l at i o n
1
AUTO DEMONSTRATION
This chapter introduces the O2 System through a demonstration.
It contains the following sections:
• System Overview
• The O2 Auto demonstration
Auto-Demo User Manual
7
1
Installation
1.1 System Overview
The system architecture of O2 is illustrated in Figure 1.1.
External
Interfaces
Development Tools
Standard
Dev. Tools
O2 Dev. Tools
OQL
C
O2 C
C++
Java
Database Engine
O2Engine
O2Store
O2ODBC
O2Corba
O2DB
Access
O2Web
Fi gu r e 1 .1 : O2 Sy st em Ar ch i t ect u r e
The O2 system can be viewed as consisting of three components. The
Database Engine provides all the features of a Database system and an
object-oriented system. This engine is accessed with Development
Tools, such as various programming languages, O2 development tools
and any standard development tool. Numerous External Interfaces are
provided. All encompassing, O2 is a versatile, portable, distributed,
high-performance dynamic object-oriented database system.
Database Engine:
8
• O2Store
The database management system provides low level
facilities, through O2Store API, to access and manage a
database: disk volumes, files, records, indices and
transactions.
• O2Engine
The object database engine provides direct control of
schemas, classes, objects and transactions, through
O2Engine API. It provides full text indexing and search
capabilities with O2Search and spatial indexing and
retrieval capabilities with O2Spatial. It includes a
Notification manager for informing other clients
connected to the same O2 server that an event has
occurred, a Version manager for handling multiple
object versions and a Replication API for synchronizing
multiple copies of an O2 system.
Auto-Demo User Manual
System Overview
Programming Languages:
O2 objects may be created and managed using the following
programming languages, utilizing all the features available with O2
(persistence, collection management, transaction management, OQL
queries, etc.)
• C
O2 functions can be invoked by C programs.
• C++
ODMG compliant C++ binding.
• Java
ODMG compliant Java binding.
• O2C
A powerful and elegant object-oriented fourth
generation language specialized for easy development
of object database applications.
• OQL
ODMG standard, easy-to-use SQL-like object query
language with special features for dealing with complex
O2 objects and methods.
O2 Development Tools:
• O2Graph
Create, modify and edit any type of object graph.
• O2Look
Design and develop graphical user interfaces, provides
interactive manipulation of complex and multimedia
objects.
• O2Kit
Library of predefined classes and methods for faster
development of user applications.
• O2Tools
Complete graphical programming environment to
design and develop O2 database applications.
Standard Development Tools:
All standard programming languages can be used with standard
environments (e.g. Visual C++, Sun Sparcworks).
External Interfaces:
• O2Corba
Create an O2/Orbix server to access an O2 database
with CORBA.
• O2DBAccess Connect O2 applications to relational databases on
remote hosts and invoke SQL statements.
• O2ODBC
Connect remote ODBC client applications to O2
databases.
• O2Web
Create an O2 World Wide Web server to access an O2
database through the internet network.
Auto-Demo User Manual
9
1
Installation
1.2 The O2 Auto Demonstration
Fi gu r e 2 : T h e O2 Au t o d em on st r a t i on
10
Auto-Demo User Manual
2
2
I nst a ll a ti on
This chapter describes all the steps you need to carry out in order to
install and use the O2 demonstration auto. In most of the steps given
below, the explanation is followed by the actual command.
Auto-Demo User Manual
11
2
Installation
Unload the O2 installation Cd-Rom / tape into a directory called O2HOME.
It is assumed that an O2HOME environment variable specifying the access
path to this directory now exists.
In O2HOME, you find different files and directories.
The following directories are important:
• bin
directory containing the O2 binary files
• look
directory containing O2Look files
• demo
directory containing demonstrations
Position yourself in O2HOME:
> cd $O2HOME
Add the O2HOME/bin directory to the path in each working window:
> set path = ($O2HOME/bin $path)
In O2HOME, create a directory called o2vol to contain all the different O2 catalogues.
> mkdir o2vol
In O2HOME, now create the systems file needed to define the different O2 systems.
You should refer to the O2C Reference manual for more details on this file
and the organization of O2 catalogues.
In the systems file, insert a line corresponding to the description of the
system demo. Use the exact syntax of the following command on a single
line:
> echo demo:‘hostname‘:$O2HOME/o2vol::$O2HOME/o2vol::$O2HOME/o2vol::>>systems
12
Auto-Demo User Manual
Create the symbolic links that position the resource files of the demonstration for
O2Look:
> ln -s $O2HOME/demo/auto/resources/english/auto_demo look/english
> ln -s $O2HOME/demo/auto/resources/french/auto_demo look/french
Initialize the system demo:
> o2init -system demo
Launch an O2server. If you do this in another window, make sure that you add the
directory O2HOME/bin to the path.
> o2server -system demo
To specify which language you want the demonstration to be in, english or
french, position the environment variable O2RESOURCE to one of the following:
> setenv O2RESOURCE english
or
> setenv O2RESOURCE french
Position yourself in the directory demo and launch an O2 client:
> cd demo/auto
> o2 -system demo
Auto-Demo User Manual
13
2
Installation
In the client window, load the demonstration auto:
#”load”
^D
Note
If you are using SunOs, do not worry if you receive the following error
message:
ERROR 20048: Not available on this platform
Now you can launch the demonstration auto in the client window:
run application demo
^D
How to use the demonstration is described in Chapter 3 : Scenario.
To quit the demonstration, click (with left mouse button) on the “Quit” button of the O2
application icon shown in Figure 3 below.
Fi gu r e 3 : Ap p l i ca t i on i con
To now leave O2, type in the client window:
quit
^D
14
Auto-Demo User Manual
Finally kill the server.
o2shutdown -system demo
Auto-Demo User Manual
15
2
16
Installation
Auto-Demo User Manual
3
3
Sc ena ri o
This chapter goes through a scenario of the demonstration auto
step-by-step.
Note
When you read below to click on a particular part of the demonstration,
you should always use the left mouse button unless it is otherwise
stated in the text to use the right button.
Auto-Demo User Manual
17
3
Scenario
When you launch the demonstration auto, as explained in the previous section, an
application icon is displayed as shown in Figure 4.
Demo
Roots
I> Run
I> (shortcut)
Requests I>
Fi gu r e 4 : Ap p l i ca t i on i con a n d m en u s
Now click on the words O2 Demo using the right mouse button and a pull
down menu appears.
Maintaining the right mouse button over the Demo item another menu
appears. Release the button over the item Run of this menu in order to start
up this program.
A map of Paris now appears covered with various name tags.
Click using the right mouse button on the name tag John Denver (A) in the
center of the map and select the method Display.
18
Auto-Demo User Manual
A
Fi gu r e 5 : Pa r i s m a p
A login window now appears as shown in the figure below.
Type in the code field the code 7781 and click on Login.
Fi gu r e 6 : L ogi n w i n d ow
A window now appears containing information about John Denver including name,
Auto-Demo User Manual
19
3
Scenario
code, address, and orders.
Display
Fi gu r e 7 : I n f or m a t i on box es
If you now click in the address section of this window using the right mouse
button, as shown in Figure 7 above, you can select Display which then
gives you details of the address.
Now go back to the John Denver window and select the method Display in the menu
Cars.
Cars
Orders
Display
A selection box now appears in which you can choose the set of cars you
want to look at: All, France. Germany, USA. Click on your choice and then
on OK.
Fi gu r e 8 : Cou n t r y sel ect i on
20
Auto-Demo User Manual
Note
All data concerning French cars is in French and all other data is in
English.
All the cars corresponding to the country chosen are displayed - in this case
Germany.
Display
Fi gu r e 9 : Di sp l a y of Ger m a n ca r s
Click on one of the cars displayed using the right mouse button, and select the
method Display. The presentation corresponding to the car chosen is now
displayed.
Note
Complete information is only available for the Renault, Mercedes and
BMW cars. There is no section cut-out for the Corvette, Audi and Venturi.
This presentation contains technical data, text and two color photos and is
shown in Figure 10 below.
Click on the car manufacturer section and select the method Display you see all the cars produced by that manufacturer in a separate window.
Click on Quit to close this window.
Auto-Demo User Manual
21
3
Scenario
Display
Fi gu r e 1 0 : Ca r i n f or m a t i on
Reposition yourself in the car presentation window and now select the method
Display in the menu Schema.
The section cut-out of the car is displayed. When you click on one of the buttons
Engine, Transmission, or Body, the corresponding flags appear on the
22
Auto-Demo User Manual
diagram.
Fi gu r e 1 1 : Ca r cu t -ou t
Click on the button Engine. The various flags are now displayed. Now click on the Air
Filter flag using the right mouse button and chose the method Schema.
A diagram of the Air Filter is displayed and if you click on the Button Air
Filter you see the flags representing the various sub parts of the Filter.
Display
Update
Price
A
Fi gu r e 1 2 : Ai r f i l t er d i a gr a m
Auto-Demo User Manual
23
3
Scenario
If you now click on a subpart flag using the right mouse button you see a pull down
menu containing the methods Display, Update or Price.
Click on the square on the bottom right hand side using the right mouse button and
select the method Display as in (A) in Figure 12.
The description of the Air Filter intake assembly is displayed.
Fi gu r e 1 3 : Ai r f i l t er i n t a k e a ssem bl y d escr i p t i on
Now go back to the Air Filter illustration and click on the Information menu.
Information
Description
Structure
Price
From this menu you can select the methods Description and Price to
obtain further information about the Air Filter.
24
Auto-Demo User Manual
If you have the option O2Graph, you can select from the Air Filter screen the
method Structure to obtain the graph of the Air Filter components.
This is shown in Figure 14
Fi gu r e 1 4 : Gr a p h
Before going on with the demonstration, you should now close all windows, by
clicking on quit in each presentation, except the windows shown in Figure 15,
concerning the map of Paris, John Denver chosen at the beginning, the
components graph and/ or the intake assembly components window.
Auto-Demo User Manual
25
3
Scenario
Fi gu r e 1 5 : Wi n d ow s y ou n eed
If you now return to the John Denver presentation, select the method Add in the
menu Orders.
Cars
Orders
Add
The presentation of an order is displayed.
Insert
Fi gu r e 1 6 : Pr esen t a t i on
26
Auto-Demo User Manual
Click using the right button in the field parts, and select the method Insert. A new
tuple now appears in the parts field - you must enlarge the window to see it clearly.
Enter a quantity. To enter a part, simply select, using the middle mouse button, a flag
in the Air Filter Structure graph or a part in the intake assembly components and drag
and drop on the blackened square in order to copy the value.
Fi gu r e 1 7 : Pa r t s w i n d ow
You can renew this operation and then on the order presentation select the method
Price from the Information menu.
If you have LATEX on your machine click on the method Letter. You now see a
preview of a letter in LATEX. Type q in this window to exit.
Information
Price
Letter
Auto-Demo User Manual
27
3
Scenario
You leave the demonstration by clicking on the Terminate button on the map of Paris
(A ) in Figure 18.
A
Fi gu r e 1 8 : En d of d em on st r a t i on scen a r i o
28
Auto-Demo User Manual