1
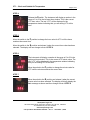
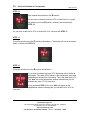
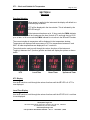
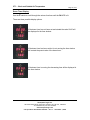
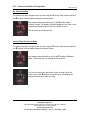
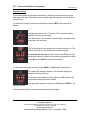
CT1 – Clock and Outside Air Temperature
Page 1 of 21
All specification subject to change
© 2005 Aerospace Logic Inc.
CT1 - Operations and Installation Manual
This manual is certified for use with
instrument serial number
ASL000000
Use of this manual with any other
instrument voids all warranties and may
result in damage to the instrument
This manual applies to both CT1-F and CT1-C instruments. For CT1-F use this manual
as published. For CT1-C instruments all references to ºF refer to ºC. Where necessary
values are provided in both units for accuracy.
Aerospace Logic Inc.
180 James Street South, Suite 205, Hamilton, ON, L8P 4V1, CANADA
Tel 416-628-0725 | Fax 416-352-5854
www.aerospacelogic.com
CT1 Operations & Installation Manual – Ver. 1.1 – November 1, 2005
CT1 – Clock and Outside Air Temperature
Page 2 of 21
THIS PAGE INTENTIONALLY LEFT BLANK
Aerospace Logic Inc.
180 James Street South, Suite 205, Hamilton, ON, L8P 4V1, CANADA
Tel 416-628-0725 | Fax 416-352-5854
www.aerospacelogic.com
CT1 Operations & Installation Manual – Ver. 1.1 – November 1, 2005
CT1 – Clock and Outside Air Temperature
Page 3 of 21
SECTION 1
Introduction
READING THIS MAUNAL IS THE FASTEST WAY TO INSTALL AND START USING
YOUR NEW INSTRUMENT!
This manual has been prepared in a logical sequence to facilitate the simplest and most
efficient method to install and start using your instrument. By following the instructions
on the following pages you can be assured of a successful install within the times
specified.
Installation times will vary depending on aircraft type and the current state of the aircraft.
It will generally take a little longer to install the instrument if this is the only task being
performed vs. in conjunction with other maintenance and / or repairs.
The general time estimate for the installation of this instrument, by licensed
maintenance personnel is one hour.
Technical support for any aspects of this instrument is available 24 hours a day 7 days a
week on our online support forum located at:
www.aerospacelogic.com/forum/
Telephone support is available, Monday through Friday from 9:00 a.m. to 5:00 p.m.
Eastern Standard Time at:
416-628-0725
Aerospace Logic Inc.
180 James Street South, Suite 205, Hamilton, ON, L8P 4V1, CANADA
Tel 416-628-0725 | Fax 416-352-5854
www.aerospacelogic.com
CT1 Operations & Installation Manual – Ver. 1.1 – November 1, 2005
CT1 – Clock and Outside Air Temperature
Page 4 of 21
NO NONSENSE WARRANTY
Our warranty policy is simple …. It is even written in plain English!
Please read it BEFORE DOING ANYTHING WITH YOUR NEW INSTRUMENT!
We will:
•
Repair or replace (at our discretion) any instrument which becomes defective
within a period of 12 (twelve) months of manufacture date. You will pay for the
shipping costs to return the instrument to us and we will pay for the shipping
costs to return the instrument to you;
•
Replace all instruments that fail out of warranty for a flat rate of 50% of the cost
of a new instrument, at the time of the failure.
We are not:
•
Liable for any costs associated with the installation or removal of any of our
instruments, irrespective of the cause;
•
Liable for any misuse or non-use of the instrument in whatever form.
We will not:
•
Repair or replace your instrument free of charge, under warranty, if it has not
been installed by an appropriately licensed person.
If you do not agree with ANY of the above statements, return
your new instrument to us immediately for a FULL refund LESS
shipping costs.
ALL RETURNS REQUIRE RETURN MATERIAL AUHORIZATIONS
(RMA). WE DO NOT ACCEPT RETURNS WITHOUT AN RMA
NUMBER. CALL 416-628-0725 FOR AUTHORIZATION.
Aerospace Logic Inc.
180 James Street South, Suite 205, Hamilton, ON, L8P 4V1, CANADA
Tel 416-628-0725 | Fax 416-352-5854
www.aerospacelogic.com
CT1 Operations & Installation Manual – Ver. 1.1 – November 1, 2005
CT1 – Clock and Outside Air Temperature
Page 5 of 21
SECTION 2
Installation
INSTALLATION STEP 1 – Instrument Physical
1. Choose an appropriate location on your aircraft panel for the installation of the
instrument. The CT1 will fit any standard 2 ¼” aircraft mounting hole. Ensure
easy and clear access to the instrument. This will allow easy operation of the
different functions.
2. Keep in mind wiring lengths.
a. The instrument is supplied with 4’ wiring for power and external functions
and 9’ of wiring for the temperature sender.
b. Any of these wires may be lengthened or shortened without effect on the
operation of the instrument.
3. Now install your instrument in your panel. Place the instrument in the hole from
the rear of the panel and then attach it with the four screws provided. If you need
to replace the screws, ensure that the threads do not penetrate the instrument
more than ½”. Screws that penetrate the instrument further will cause severe
damage to the instrument.
INSTALLATION STEP 2 – Outside Air Temperature Sensor
Select an appropriate location for the temperature sensor. Do not install it in the air path
of the engine exhaust, no matter how far from it.
We recommend either one of the following three locations:
1. On the underside of the fuselage on the side opposite the exhaust on aircraft with
a single exhaust, behind a straight line point of the trailing edge of the wing.
2. On the inboard bottom surface of either wing; on the opposite side to the exhaust
3. On the top of the fuselage
To install the sensor:
1. Drill a 5/16” hole in the chosen location
2. Insert the sensor into the hole ensuring that the metal washer is between the
sensor base and the aircraft body
3. Slide the nylon washer on the outer side of the sender
4. Attach the lock nut to the sender – do not over tighten
5. Route the sender wiring to the appropriate location to connect to the instrument.
Aerospace Logic Inc.
180 James Street South, Suite 205, Hamilton, ON, L8P 4V1, CANADA
Tel 416-628-0725 | Fax 416-352-5854
www.aerospacelogic.com
CT1 Operations & Installation Manual – Ver. 1.1 – November 1, 2005
CT1 – Clock and Outside Air Temperature
Page 6 of 21
INSTALLATION STEP 3
The CT1 is an electronic device. It has been designed to withstand normal static charges
both during installation and operation, installing it in the following sequence will reduce
the possibility of damage. Ensure power to the aircraft is turned off before continuing.
Now connect the primary wiring as follows:
1. Connect the BLACK wire from the instrument to an appropriate ground point.
2. Connect the RED wire to the switched supply point (i.e master switched bus or
similar). The instrument is internally fused for protection. However it should still
be connected through an appropriate circuit breaker to allow it to be disabled
should this be required for any reason.
3. Connect the YELLOW wire to a permanent supply point (14v or 28v). This line
must have supply at all times. Some possible connection points are: before the
master switch, supply line to the oil pressure switch that powers the hobbs meter
or direct battery connection.
4. If you wish to control the intensity of the instrument display using either the panel
rheostat or an external potentiometer connect EITHER the BLUE (28V) or the
WHITE (14V) wire to the variable output of this device. If you prefer to use the
internal intensity control then connection of either these wires is not required.
5. The instrument provides an external annunciator control output. This output is
capable of sinking a DC load of 150mA. An inductive load (such as a relay) may
be connected to this output without any further protective components (back EMF
protection is included in the instrument). Exceeding a 150mA sink current will
permanently damage your instrument. The supply voltage of your annunciator
device may not exceed the supply voltage of your aircraft DC system. Connect
the ORANGE wire to your external device if this is required.
Finally, connect the sender wires (the BLACK, RED and YELLOW twisted wire bundle)
to the sender in the following order:
1. BLACK
2. RED
3. YELLOW
Your instrument is now ready for operation. Turn on the power to the instrument and
confirm that the display is enabled. If the display does not turn on, check the wiring as
above and confirm that power is supplied to the instrument. If the instrument does turn
on proceed with the initial setup on the next page.
Aerospace Logic Inc.
180 James Street South, Suite 205, Hamilton, ON, L8P 4V1, CANADA
Tel 416-628-0725 | Fax 416-352-5854
www.aerospacelogic.com
CT1 Operations & Installation Manual – Ver. 1.1 – November 1, 2005
CT1 – Clock and Outside Air Temperature
Page 7 of 21
SECTION 3
Setup
Instrument setup is required when the time is to be reset or any parameters are to be
changed.
STEP 1
If this is the first time you are using the instrument or power has
been removed from the aircraft, such as replacing the battery, the
instrument will automatically enter the setup menu. The display will
be as shown to the left and then automatically advance to STEP 2.
In all other cases, to enter the Setup mode turn off the power to the
instrument. Next press and hold the switch in the F position and
turn on the power.
Release the F switch when you see the display on the instrument as shown here.
NOTE: the number following the “v” symbol is the software version and may differ
depending on the revision of your instrument.
STEP 2
The instrument will display the “Set-” message after the F switch is
released; indicating the setup menu has been successfully invoked.
Press the switch to the F position again and then release it. The
display will then change to that shown in STEP 3.
STEP 3
To set the primary instrument time and UTC time move and hold
the switch in the S position until the instrument resembles that in
STEP 4.
If you do not wish to set UTC but want to select another parameter
move the switch to the F position and release it. When the switch
is released the display will resemble that of STEP 9. Continue at
that point.
Aerospace Logic Inc.
180 James Street South, Suite 205, Hamilton, ON, L8P 4V1, CANADA
Tel 416-628-0725 | Fax 416-352-5854
www.aerospacelogic.com
CT1 Operations & Installation Manual – Ver. 1.1 – November 1, 2005
CT1 – Clock and Outside Air Temperature
Page 8 of 21
STEP 4
Release the S switch. The instrument will display a number in the
range of 0 to 23 in the left most time window. This is the current
UTC hour value. The text “UTC” will be displayed in the
temperature window indicating that you are setting UTC at this
time.
STEP 5
Move the switch to the F position to change the hour value for UTC until the hours
matches the correct time.
Move the switch to the S position and release it when the correct hour value has been
selected. The display will now change to that of STEP 6.
STEP 6
The instrument will display a number in the range of 0 to 59 in the
right most time window. This is the current UTC minute value. The
text “UTC” will be displayed in the temperature window indicating
that you are setting UTC at this time.
Move the switch to the F position to change the minute value for
UTC until the minutes matches the correct time.
STEP 7
Move the switch to the S position and release it when the correct
minute value has been selected. The display will briefly display the
Set- message as shown and then change to that of STEP 8.
Aerospace Logic Inc.
180 James Street South, Suite 205, Hamilton, ON, L8P 4V1, CANADA
Tel 416-628-0725 | Fax 416-352-5854
www.aerospacelogic.com
CT1 Operations & Installation Manual – Ver. 1.1 – November 1, 2005
CT1 – Clock and Outside Air Temperature
Page 9 of 21
STEP 8
The instrument display will now resemble one of the following displays:
← 12h if the instrument was
set in 12 hour mode
24h if the instrument was
set in 24 hour mode →
Press and release the F switch to toggle between 12 and 24 hour modes. Setting the
time display mode effects both UTC and local time.
Choose the time mode that you wish to set and press the switch to
the S position. The display will confirm the time mode setting by
displaying the Set- message as shown. When the switch is
released the display will change to that of STEP 9.
STEP 9
The “d Lt” menu allows the setting of the “delta local time” or local
time offset from UTC. This value must be set in order for the
instrument to display the correct local time.
If you do not wish to set the time offset at this point then press the
switch to the F position and release it. The display will now
resemble that of STEP 14.
If you do want to set the time offset then press and hold the switch in the S position until
the display resembles that of STEP 10.
Aerospace Logic Inc.
180 James Street South, Suite 205, Hamilton, ON, L8P 4V1, CANADA
Tel 416-628-0725 | Fax 416-352-5854
www.aerospacelogic.com
CT1 Operations & Installation Manual – Ver. 1.1 – November 1, 2005
CT1 – Clock and Outside Air Temperature
Page 10 of 21
STEP 10
Now release the switch from the S position.
Do you have to subtract time from UTC for local time? If so, press
the switch once to the S position, release it and continue with
STEP 12.
Do you have to add time to UTC for local time? If so, continue with STEP 11.
STEP 11
Press the switch once to the F position and release it. The display will now be as shown
below. Continue with STEP 12.
STEP 12
Press the switch once to the S position and release it.
If you need to subtract time from UTC the display will be similar to
that shown. The value (05:00) shown in the time window may differ
depending on the previous time setting. This is the offset from UTC.
The “Sub” text in the temperature window indicates that you will
subtract time from UTC for local time.
If you performed STEP 11 the text “Add” will appear in the
temperature window indicating that you will add time to UTC for
local time.
Aerospace Logic Inc.
180 James Street South, Suite 205, Hamilton, ON, L8P 4V1, CANADA
Tel 416-628-0725 | Fax 416-352-5854
www.aerospacelogic.com
CT1 Operations & Installation Manual – Ver. 1.1 – November 1, 2005
CT1 – Clock and Outside Air Temperature
Page 11 of 21
Now move the switch to the F position to select the appropriate amount of time to add or
subtract from UTC for local time. The time will increment in 30 minute values over the
range of 00:00 to 23:30 hours.
Once the correct amount of time has been selected press and hold the switch in the S
position until the display resembles that of STEP 13.
STEP 13
The local time offset has now been saved. Release the switch to
move to the next setup function as in STEP 14.
STEP 14
The “Int” menu allows the setting of the intensity control source.
If you do not wish to set the intensity source at this point then
press the switch to the F position and release it. The display will
now resemble that of STEP 18.
If you do want to set the intensity source then press and hold the switch in the S
position until the display resembles that of STEP 15.
STEP 15
Press and hold the switch in the S position until the display resembles one of the options
in STEP 16.
Aerospace Logic Inc.
180 James Street South, Suite 205, Hamilton, ON, L8P 4V1, CANADA
Tel 416-628-0725 | Fax 416-352-5854
www.aerospacelogic.com
CT1 Operations & Installation Manual – Ver. 1.1 – November 1, 2005
CT1 – Clock and Outside Air Temperature
Page 12 of 21
STEP 16
Release the switch. The instrument display will resemble of the following two displays;
depending on the prior setting retained in the instrument.
← Internal intensity control
is selected
External intensity control is
selected→
Toggle the switch to the F position to change the intensity source selection.
If you intend to control the intensity of the instrument using the S/F switch then select
the Internal option. For control using an external source, such as the panel rheostat or
and external potentiometer, select the External option.
When you have selected the appropriate option press and hold the switch in the S
position such that the display resembles that of STEP 17.
STEP 17
Now release the switch. The display will display the “Set” message
indicating that the intensity source selection has been saved.
The display will now resemble that of STEP 18.
Aerospace Logic Inc.
180 James Street South, Suite 205, Hamilton, ON, L8P 4V1, CANADA
Tel 416-628-0725 | Fax 416-352-5854
www.aerospacelogic.com
CT1 Operations & Installation Manual – Ver. 1.1 – November 1, 2005
CT1 – Clock and Outside Air Temperature
Page 13 of 21
STEP 18
At this point all setup options have been completed.
If you need to set some options again simply press the switch to
the F position and release it. Continue with STEP 3.
If you have completed all the setup options that you require press
and hold the switch in the S position until the display resembles
that of STEP 19.
STEP 19
Release the switch once the display is as shown.
All setup options have now been completed and the instrument is
ready for use.
It will restart is the normal operations mode.
Now review Section 4 – Operation.
Aerospace Logic Inc.
180 James Street South, Suite 205, Hamilton, ON, L8P 4V1, CANADA
Tel 416-628-0725 | Fax 416-352-5854
www.aerospacelogic.com
CT1 Operations & Installation Manual – Ver. 1.1 – November 1, 2005
CT1 – Clock and Outside Air Temperature
Page 14 of 21
SECTION 4
Operation
Function Selection
When power is applied to the instrument the display will default to a
similar display as shown.
UTC will be displayed in the time window. This is indicated by the
UT LED being lit.
If the instrument has been set in 12 hour mode the PM/Hr indicator
will be lit whenever the time (for both UTC and local time) is 12:00
p.m. or later. In 24 hour mode the PM/Hr indicator is not active in the UT and LT modes.
The current outside air temperature will be displayed in the temperature window.
Temperature will displayed with an accuracy of 0.5º for temperatures between 0º and
99.5º. All other temperatures are displayed to a 1º resolution.
The switch can be used to scroll through the various functions of the instrument.
Toggling it between the F (function) position and back will display the options as shown
below:
UTC
Local Time
Down Timer
Up/Interval Timer
UTC Display
Use the F switch to scroll through the various functions until the UT LED is lit. UTC is
now displayed.
Local Time Display
Use the F switch to scroll through the various functions until the LT LED is lit. Local time
is now displayed.
Aerospace Logic Inc.
180 James Street South, Suite 205, Hamilton, ON, L8P 4V1, CANADA
Tel 416-628-0725 | Fax 416-352-5854
www.aerospacelogic.com
CT1 Operations & Installation Manual – Ver. 1.1 – November 1, 2005
CT1 – Clock and Outside Air Temperature
Page 15 of 21
Down Timer Display
Use the F switch to scroll through the various functions until the DN LED is lit.
There are three possible display options:
If the down timer has not been set and started the value 00:00 will
be displayed in the time window.
If the down timer has been set but is not running the time window
will contain the preset value of the down timer.
If the down timer is running the decreasing time will be displayed in
the time window.
Aerospace Logic Inc.
180 James Street South, Suite 205, Hamilton, ON, L8P 4V1, CANADA
Tel 416-628-0725 | Fax 416-352-5854
www.aerospacelogic.com
CT1 Operations & Installation Manual – Ver. 1.1 – November 1, 2005
CT1 – Clock and Outside Air Temperature
Page 16 of 21
Down Timer Setting
The down timer must be preset to the desired value before it will run. The maximum
allowable down timer value is 99 minutes 59 seconds.
To preset the down timer use the F switch to select the DN function. Now hold the
switch in the S position until the display changes as shown below.
Release the switch. Move the switch to the F position the select the
number of minutes for the down timer. If the timer has not been run
since last being set it will retain the last preset value.
When the correct value is displayed move the switch to the S
position and release it. The display will now change to allow the
setting of the seconds portion of the timer.
Move the switch to the F position to select the number of seconds
for the down timer. If the timer has not been run since last being set
it will retain the last preset value.
When the correct value is displayed move the switch to the S
position and release it. The display will now display the “Set”
message indicating that the down timer has been preset.
The preset value of the down timer will be retained irrespective of other functions that
are selected. Each time you return to the DN function the preset value will be displayed
until the timer is either started or ended the down run.
The value may be reset at any time. If it is reset while to down timer is running the timer
will stop the current cycle and wait for a start command.
Aerospace Logic Inc.
180 James Street South, Suite 205, Hamilton, ON, L8P 4V1, CANADA
Tel 416-628-0725 | Fax 416-352-5854
www.aerospacelogic.com
CT1 Operations & Installation Manual – Ver. 1.1 – November 1, 2005
CT1 – Clock and Outside Air Temperature
Page 17 of 21
Down Timer – Running and Operation
To start the down timer it must be preset as outlined in the previous section. To start the
down timer, navigate to the DN function using the F switch. Confirm that the timer you
require is the time preset in the timer.
If it is correct press the switch to the S position and release it immediately. The display
will change as shown below.
As soon as the switch is released the message “run” will appear
briefly in the temperature window and the timer will start to count
down.
You have two options at this point: You can leave the instrument in
this mode and monitor the time progression or you can move to
another function.
Five seconds before the down timer expires the display will be forced to the DN mode
irrespective of the function being displayed. The last five seconds of the countdown will
be displayed. As soon as the down timer expires with DN LED will start to flash,
indicating that the down timer has expired. To clear the alarm press the switch once to
the F position and release it.
If you have an external annunciator device attached to the instrument it will be enabled
as long as the DN LED is flashing as part of the down timer expiration warning.
Up Timer and Interval Timer
The up timer will start timing as soon as power is applied to the instrument or whenever
it is manually reset. The UP LED will be lit whenever this counter is selected.
It will count up displaying minutes and seconds until 59 minutes and 59 seconds have
been reached. After this the PM/Hr indicator will be lit and the timer will display up time
as hours and minutes.
The interval timer works in conjunction with the up timer. It will provide an alarm output
for 5 seconds at each occurrence of the defined time interval. This alarm will also trigger
the external annunciator device, if connected.
NOTE: The up timer is reset each time a new interval value is loaded into the timer.
Aerospace Logic Inc.
180 James Street South, Suite 205, Hamilton, ON, L8P 4V1, CANADA
Tel 416-628-0725 | Fax 416-352-5854
www.aerospacelogic.com
CT1 Operations & Installation Manual – Ver. 1.1 – November 1, 2005
CT1 – Clock and Outside Air Temperature
Page 18 of 21
Up Timer Resetting
To reset the up timer navigate to the up timer using the F switch. Now hold the switch in
the S position until the display changes as shown below.
Now release the switch and move it to the S position again.
Release it again. The display will briefly display the text “run” in the
temperature window and the up timer will start to count.
The up timer has now been reset.
Interval Timer Preset and Start
To reset the up timer navigate to the up timer using the F switch. Now hold the switch in
the S position until the display changes as shown below.
Now release the switch and move it to the F position. Release it
again. The display will now change as shown below.
You are now able to set the interval of the up timer. Move the
switch once to the S position to load the timer. The display will
change to that shown in the next step.
Aerospace Logic Inc.
180 James Street South, Suite 205, Hamilton, ON, L8P 4V1, CANADA
Tel 416-628-0725 | Fax 416-352-5854
www.aerospacelogic.com
CT1 Operations & Installation Manual – Ver. 1.1 – November 1, 2005
CT1 – Clock and Outside Air Temperature
Page 19 of 21
Move the switch to the F position the change the minutes portion of
the interval timer. The range is 1 to 99 minutes.
Once the correct value is displayed move the switch once to the S
position and release it. This display will change to allow seconds
selection.
Move the switch to the F position the change the seconds portion
of the interval timer. The range is 0 to 59 seconds.
Once the correct value is displayed move the switch once to the S
position and release it.
The display will briefly display the “run” message in the temperature
window and the up timer will start counting.
At each occurrence of the interval the UP LED will flash for 5
seconds, irrespective of the function that is being used on the
instrument. After the 5 second period normal operation will
continue.
Aerospace Logic Inc.
180 James Street South, Suite 205, Hamilton, ON, L8P 4V1, CANADA
Tel 416-628-0725 | Fax 416-352-5854
www.aerospacelogic.com
CT1 Operations & Installation Manual – Ver. 1.1 – November 1, 2005
CT1 – Clock and Outside Air Temperature
Page 20 of 21
Intensity Control
If you have installed and setup the instrument to utilize the external intensity function
then ignore this topic. This option is only available when the intensity source has been
set to internal.
To control the intensity of the instrument display using the S/F switch proceed as
follows:
Navigate and choose the UTC display. The instrument display
should look similar to this image
Now hold switch in the S position until the display changes to that
displayed in the next step.
The “u” indicates the setting option to increase intensity (up). The
“Int” confirm that you are setting the instrument intensity.
To increase the intensity move the switch to the F position until
the desired intensity is reached. Now press and release the switch
to the S position TWICE to set the new intensity.
To decrease the intensity press the switch ONCE to the S position and release it.
The display will change indicating a “d” character signifying a
decrease in intensity (down).
To decrease the intensity move the switch to the F position until
the desired intensity has been reached.
Now press and release the switch to the S position TWICE to set
the new intensity.
The new intensity value is stored in the instrument until changed.
Aerospace Logic Inc.
180 James Street South, Suite 205, Hamilton, ON, L8P 4V1, CANADA
Tel 416-628-0725 | Fax 416-352-5854
www.aerospacelogic.com
CT1 Operations & Installation Manual – Ver. 1.1 – November 1, 2005
CT1 – Clock and Outside Air Temperature
Page 21 of 21
SECTION 5
CT1 Specifications
Dimensions
•
Fits standard 2.25” mounting hole
•
2.45” X 2.45” X 1.6”
•
2” viewing area
•
Weight: 8oz
Certifications Pending
•
DO-160(D)
•
DO-178(B)
•
TSO C43
•
STC for ~700 aircraft
Display
•
Sunlight visible
•
InGaAIPGaN LED technology
•
100,000 hours operating life
Programmable Options
•
All time settings
•
12 or 24 hour clock selection
•
Local time offset from UTC
•
Intensity source – internal or external
Operating Ranges
•
12/24 hour UTC clock
•
12/24 hour local time clock
•
+/- 23:30 hour local to UTC offset
•
Down timer: 99 minutes 59 seconds to 1
second
•
Flight timer: 1 second to 18 hours 12
minutes
•
Interval timer: 1 minute to 99 minutes, 59
seconds
•
-58ºF to + 302ºF OAT
•
-50ºC to +150ºC OAT
Accuracy
•
Clock within 2 minutes per month
•
OAT +/- 1% (Per TSO C43 requirement)
Operating Voltage
•
6V-40V DC continuous
•
40V-60V for < 5 seconds
Power Consumption
•
~30nA (not operating). When not in use the
instrument uses the aircraft battery to retain
date and time information.
•
275mA Max (daytime operation)
•
50mA Min (nighttime operation)
Sensor Technology
•
Monolithic solid state temperature sensor
•
Quartz crystal clock oscillator
Resolution
•
0 to 99.5º : 0.5º
•
All other ranges : 1º
Safety
•
•
•
•
Available Models
•
CT1-F for ºF operations
•
CT1-C for ºC operations
Up timer interval alarm
Down timer completion alarm
External alarm driver output
External processor watchdog
Operating Temperature ( Per DO-160(D) )
•
-15ºC to +55ºC
•
5ºF to 131ºF
All specifications subject to change.
© 2005 Aerospace Logic Inc.
Aerospace Logic Inc.
180 James Street South, Suite 205, Hamilton, ON, L8P 4V1, CANADA
Tel 416-628-0725 | Fax 416-352-5854
www.aerospacelogic.com
CT1 Operations & Installation Manual – Ver. 1.1 – November 1, 2005