1
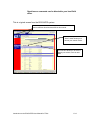
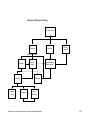
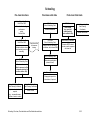
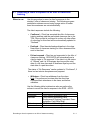
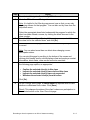
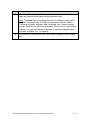
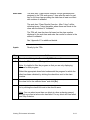
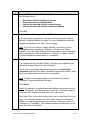
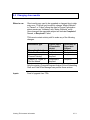
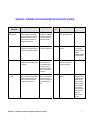
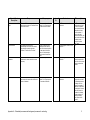
Ministry of Training, Colleges and Universities
Apprenticeship (APPR)
User Manual for Training Delivery Agents
Prepared by: EOIS-APPR Business Team
Date:
April 2013
Version:
Version 8.0
Table of Contents
CHAPTER 1
1.0
Introduction to the EOIS-APPR User Manual for TDAs .................... 1.0.1
CHAPTER 2
2.0
Schooling: Pre-class, Post-start date and Post-finish date activities 2.0.1
2.1
Recording a client’s response to an offer of classroom training........ 2.1.1
2.2
Enrolling a client in a class ............................................................... 2.2.1
2.3
Validating class participation and locking class enrolment ............... 2.3.1
2.4
Entering class results........................................................................ 2.4.1
2.5
Changing class results...................................................................... 2.5.1
2.6
Viewing TDA contract information .................................................... 2.6.1
2.7
Creating a class list .......................................................................... 2.7.1
CHAPTER 3
3.0
Viewing and completing TDA work items.......................................... 3.0.1
CHAPTER 4
4.0
Maintaining TDA information ............................................................ 4.0.1
4.1
Adding and updating TDA information .............................................. 4.1.1
4.2
Adding and updating campus information......................................... 4.2.1
CHAPTER 5
5.0
TDA Subscriber Information ............................................................. 5.0.1
Appendix A – Scheduled processes and background processes for schooling .... 1
CHAPTER 1
1.0 Introduction to the EOIS-APPR User Manual for TDAs
Purpose
The purpose of this User Manual for TDAs is to describe how
ministry apprenticeship business is performed using the
Employment Ontario Information System-Apprenticeship
(EOIS-APPR).
As system related procedures are updated, the version number
and the issue date will also be updated to reflect the current
version.
Scope
The following procedures are described in this manual:
•
•
•
How to use
this manual
Schooling: Pre-class, Post-start date and Post-finish date
activities:
o Recording a client’s response to an offer of
classroom training
o Enrolling a client in a class
o Validating class participation and locking class
enrolment
o Entering or changing class results
o Viewing TDA contract information
Maintaining TDA information (e.g., addresses, contact
information)
Maintaining your Work Queue
Each chapter has an Overview section that includes “When to
use” that describes the purpose of each procedure.
Each procedure includes:
•
•
•
•
If you need
help…
How to use the procedure, including information to
consider before proceeding further
Inputs to the procedure
Work items generated by the procedure (if applicable), and
Steps and page actions required to perform the procedure.
For help in using the EOIS-APPR system, you can refer to:
•
Online Help
On each page, you can click Help with this page?
Introduction to the EOIS-APPR User Manual for TDAs
1.0.1
Questions or comments can be directed to your local field
office.
This is a typical screen from the EOIS-APPR system:
Each of these five TABS will take you to a different screen, to
perform different functions described in this manual.
These are drop-down menu
“filters” which allows you to
narrow your search criteria.
This function allows you to sort the
data by one criteria, such as start
date.
Introduction to the EOIS-APPR User Manual for TDAs
1.0.2
CHAPTER 2
2.0 Schooling: Pre-class, Post-start date and Post-finish date
activities
When to use
these
procedures
Use these procedures when you are updating apprentices’
class participation status.
These activities take place following the application and
approval of a client in a program, and the set up of the training
agreement or contract.
•
Pre-class activities:
o Confirming a client’s response to an offer of classroom
training
o Decline an offer of classroom training
o Did not respond to an offer of classroom training
•
Post-class start date activities:
o Enrolling clients who are in class
•
Post-class finish date activities:
o Entering class results
Schooling: Pre-class, Post-start date and Post-finish date activities
2.0.1
Lifecycle of Classroom Training
Offer sent to client
Confirmed
Declined
Did not
respond
Date of intake or beyond
Enrolled
Validated
Ceased
Training
Did not
attend
Reconsidered for
future classes
Withdrawn
Completed
Marks
Withheld
Schooling: Pre-class, Post-start date and Post-finish date activities
2.0.2
Schooling
Pre-class functions
Post-class start date
School Scheduling Clerk
Field Office Staff
TDA Clerk
School Scheduling Clerk
Enter client's schooling
preferences
and/or
On Hold Date
Confirm enrollment
School Scheduling Clerk
Field Office Staff
Schedule clients to class
(via scheduled process or
manually)
Send client offer
of classroom
training
Post-class finish date
TDA Clerk
Enter results
(e.g., pass, fail,
ceased training,
marks withheld, etc.)
TDA Clerk
School Scheduling Clerk
Seat Planning Coordinator
Update class list if necessary
(i.e. withdraw, add, indicate DNA)
Generate HRDC extract
file, and reconcile response
with class list
School Scheduling Clerk
Seat Planning
Coordinator
Amend class results
School Scheduling Clerk
TDA Clerk
School Scheduling Clerk
Receive and record
client's response to offer
of classroom training (i.e.
confirm, decline, etc.)
Validate class participation
(class is locked)
Seat Planning Coordinator
Change participants in a
locked class, if required
School Scheduling Clerk
Seat Planning Coordinator
School Scheduling Clerk
Seat Planning Coordinator
Update class details, if
required
(e.g., increase/decrease
number of seats in a class)
Cancel a class
Schooling: Pre-class, Post-start date and Post-finish date activities
2.0.3
2.1 Recording a client’s response to an offer of classroom
training
When to use
Use this procedure to record a client’s response to the
ministry’s offer of classroom training. The following program
participation statuses are set using a page action or under
some circumstances are set automatically.
The client responses include the following:
•
Confirmed – Client has accepted the offer of classroom
training and has paid the associated classroom fee to the
TDA. Once a client is confirmed in a class, all other offers
of schooling for this client will be automatically updated to
“Declined”.
•
Declined – Client has declined participation in the class.
New offers of classroom training for future classes will be
sent to the client.
•
Did not respond –Client has not responded to the offer of
classroom training. EOIS-APPR will automatically set a
client’s status to “No response” if the client is in the status
of “Offered” and it is 20 business days beyond the start
date of a full time class and 40 business days beyond the
start date of a part time class.
The status of “No Response” can be updated to “Confirmed”, if
there is a last minute acceptance and payment.
•
Withdraw – Client has withdrawn from the class.
Note: This action can be done after the client has
confirmed their attendance in the class, and before
validation.
Use the following table to determine who can perform the
actions to record the client’s response in the EOIS - APPR:
Action
Confirmed
Declined
Did not respond
Withdraw
Role
TDA, School Scheduling Clerk
TDA, School Scheduling Clerk,
Employment &Training Consultant, Exam
Invigilator, Field Office Staff
TDA, School Scheduling Clerk
TDA, School Scheduling Clerk
Recording a client’s response to an offer of classroom training
2.1.1
Recording the client’s response can be done through the TDA’s
Course Offerings tab. This is used to look up the entire class list
when updating the client’s response to an offer of classroom
training. You can sort the list of classes by year, as well as by
campus, class number, delivery mode, start date and status.
The page action View Class List for the selected class is used
to display the apprentices scheduled and record their response.
Note: The View Class List page has a Show filter that allows
you to filter the clients in the class based on their Course
Participation status:
•
•
•
•
Work Item
Current statuses which include: Offered, Confirmed,
Enrolled, Validated, and Completed
Non-Current statuses which include: Declined, No
response, Withdrawn, Did Not Attend, and Ceased Training
All statuses
Show clients separately who have one of the following
statuses: Confirmed, Offered, Declined, Completed,
Enrolled and Validated.
The work item “Low confirmation warning” is generated and
displays in the TDA work queue if the following conditions are
met:
•
The number of “Confirmed” clients in the class is less than
the planned number of seats for the class and it is 45 days
prior to the class start date.
Only one “Low confirmation warning” work item will be created
per class that meets these conditions.
See “Appendix A” for additional details
Inputs
•
Telephone call, letter, email from the client
Recording a client’s response to an offer of classroom training
2.1.2
Step
1
2
Action
From the Left Navigation Bar, click My TDA Information.
Go to the TDA’s Course Offerings tab.
Note: It is helpful to first filter by program and year so that you are only
displaying classes for that program. You can also sort by class from the
drop-down menu.
3
4
Select the appropriate class listed underneath the program for which the
client has been offered a course, by clicking the check box next to the
class number.
From the What would you like to do? drop-down menu, select “View
the class list for the selected class” and click [Go].
On the View Class List page, select the client whose response you want
to record.
Note: You can select more than one client when changing course
participation status.
5
You can print this page by scrolling to the bottom of the screen and
clicking print-friendly version, which displays client and employer contact
information, client status, class results and notice sent date.
From the What would you like to do? drop-down menu, select one of
the following page options, as appropriate:
•
•
•
•
Confirm the selected client(s) in this class
Indicate the selected client(s) have declined this class
Indicate the selected client(s) have not responded
Withdraw the selected client(s) from this class
Click [Go].
6
On the Change Status page, a Status reason is required when a client
declines or withdraws from a class. Click [Save].
Result: This changes the status of the client’s classroom participation to
the selected action on the View Class List page.
Recording a client’s response to an offer of classroom training
2.1.3
Step
7
Action
Click View Class List on the Location bar to return to the View Class List
page and check that the status change has been made.
Note: The Show filter on this page allows you to display current and all
statuses. The default filter is Current statuses which include: Offered,
Confirmed, Enrolled, Validated, and Completed. Non-Current statuses
include: Declined, No response, Withdrawn, Did Not Attend, and Ceased
Training. You can also filter by All statuses or select the specific status
you want to display (e.g., Confirmed).
8
To return to the TDA record, click TDA Course Offerings on the Location
bar.
Recording a client’s response to an offer of classroom training
2.1.4
2.2 Enrolling a client in a class
When to use
Use this procedure to enrol a client in a class. Class enrolment
typically occurs up to 5 business days (for full time classes) or
up to 21 business days (for part time classes) following the start
date of a class. Class enrolment precedes validation.
TDAs, School Scheduling Clerks and Employment & Training
Consultants can perform this action.
Recording the enrolment is done through the TDA’s Course
Offerings tab.
Use the View Class List page to record the response.
Clients that were confirmed in a class may have withdrawn prior
to enrolment day. Clients not present in a class on the
enrolment day will be considered as “no show” and will be
entered in the EOIS - APPR as “Did not attend”.
Work Item
A work item “Enrolment Overdue First – 5 or 21 days” will be
generated and assigned to the TDA work queue via a
scheduled process;
•
•
on the 5th business day after the start date of a full time
class, and
on the 21st business day after the start of a part time class
when there are clients in the class with a status of “Confirmed”
and when there are no clients scheduled to a class.
The TDA will view the class list based on the class number
displayed in the work item and update the class participation
status for the clients confirmed.
Every 7 days thereafter, when there are still clients in the class
with a status of "Confirmed", the work item “Enrolment Overdue
After 7 days” will be sent to the TDA.
See “Appendix A” for additional details.
Enrolling a client in a class
2.2.1
Inputs
A printed class list is generally used to identify the clients that
are expected to attend on the first day of class. If additional
clients are accepted in the class, they are manually offered (by
ministry staff), then confirmed and then enrolled in EOIS-APPR.
After the client is enrolled, ministry staff can validate the client.
If it is determined that clients who have confirmed will not
attend, they should be withdrawn from the class before the
class is validated.
Step
1
2
Action
From the Left Navigation Bar, click My TDA Information.
Go to the TDA’s Course Offerings tab.
Select the appropriate class listed underneath the program for which the
client has been offered a course, by clicking the check box next to the
class number.
Note: It is helpful to filter the program so that you are only displaying
classes for that program.
3
From the What would you like to do? drop-down menu, select “View
the class list for the selected class” and click [Go].
4
On the View Class List page, select the client(s) which you want to enrol
by clicking the check box next to the client name.
5
From the What would you like to do? drop-down menu, select “Enrol
the selected client(s) in the class”, and click [Go].
6
On the Change Status screen, click [Save]. The message “Update
applied” is displayed at the top of the page.
7
Click on the View Class List link on the Location bar to return to the
TDA’s View Class List page. Use the Show filter to display the “Enrolled”
clients.
When viewing the class list, you can see the number of clients with the
Course Participation status of “Enrolled” beside the Clients enrolled
section at the top of the page. Once a client is changed from “Confirmed”
to “Enrolled”, the Clients confirmed count will be decreased by one and
the Clients enrolled count will be increased by 1.
Result: The client’s status has been changed to “Enrolled”.
8
To return to the TDA record, click TDA Course Offerings on the location
bar.
Enrolling a client in a class
2.2.2
2.3 Validating class participation and locking class enrolment
When to use
The ministry School Scheduling Clerk is required to validate a
class to confirm the enrolment reported by the TDA. If the
School Scheduling Clerk discovers that there are changes to
the class list after clients have been enrolled, she/he would
make these adjustments before validating clients.
Validation is usually done by the 5th business day after a fulltime class has started or the 21st business day after a part-time
class has started, providing the clients in the class have a
course participation of enrolled.
The ministry Financial/Program Analyst can also validate class
participation.
A class will become locked automatically when all clients in the
class have been validated. Once a class is locked, the TDA or
ministry staff cannot adjust the class. Only the
Financial/Program Analyst has the authority to make changes to
a locked class.
Note: A client that was previously entered as “Enrolled” can be
withdrawn from the class prior to validation. Clients who are not
present in the class at the time of validation will be considered
as “no show” and will be entered in EOIS-APPR as “Did not
Attend”.
Validating class participation and locking class enrolment
2.3.1
Work Item
A work item “Confirmation of Class validation” will display in the
TDA work queue once a class has been locked based on the
School Scheduling Clerk validating clients in a class.
The TDA will review the class list to ensure the accuracy of
clients validated. When the TDA user opens the linked work
items beside the date assigned, the class number will appear as
a link and when opened it will open the view class list page. If
the class is accurate, the TDA user can use the location bar to
return to the work item and complete it.
See Appendix A for additional details.
Inputs
Validation is based on the acceptance of the enrolment by the
TDA and will incorporate any changes after enrolment but
before class is locked.
At the time of class validation, clients who are not present will
be marked as “Did not attend”.
.
Validating class participation and locking class enrolment
2.3.2
2.4 Entering class results
When to use
Use this procedure to enter class results once a client has
completed their schooling. Results can only be added for clients
who have been validated in a class.
You can enter the class results as any of the following actions:
•
•
•
•
Passed
Failed
Ceased training
Marks withheld
The following table shows the results of the various actions on a
client’s Course Participation status (Status in Class) when
entering the client’s class results:
Action
Passed
Failed
Ceased training
Marks withheld
Course
Participation
Status
Completed
Completed
Ceased training
Remains
“Validated”
Class Result
Passed
Failed
None
Marks withheld
The Status in Class of "Completed" will display a class result of
Pass or Fail. “Completed” implies that the client attended and
finished the course.
The client can also have their status documented as “Ceased
Training” or “Marks Withheld”.
“Marks Withheld” implies that the client completed the course
and once other conditions are met, the class result will be
adjusted to Passed or Failed.
The Course Participation status must be “Completed” and the
class result must be “Passed” for the client to be scheduled for
the next required level. If the course result is “Failed” the client
will be scheduled to repeat the level.
Viewing TDA contract information
2.4.1
Work Item
The work item “Class results overdue” will be generated and
assigned to the TDA work queue 7 days after the end of a part
time or full time class providing the class has at least one client
with a status of validated.
The work item “Class Results Overdue - After 7 days” will be
refreshed every 7 days thereafter where there are clients in the
class with the status of “Validated”.
The TDA will view the class list based on the class number
displayed in the work item and enter the results for clients in the
status of validated.
See “Appendix A” for additional details.
Inputs
Step
1
2
Directly by the TDA
Action
From the Left Navigation Bar, click My TDA Information.
Go to the TDA’s Course Offerings tab.
Note: It is helpful to filter the program so that you are only displaying
classes for that program.
Select the appropriate class listed underneath the program for which the
client has been validated, by clicking the check box next to the class
number.
3
From the What would you like to do? drop-down menu, select “View
the class list for the selected class” and click [Go].
4
On the View Class List page, select the client you want to enter results
for by clicking the check box next to the client’s name.
Note: You can select more than one client at a time as having passed,
but only one client at a time who has failed. For any client who has failed,
see Step 6b below.
Viewing TDA contract information
2.4.2
Step
5
Action
From the What would you like to do? drop-down menu, select one of
the following actions:
•
•
•
•
Record the selected client(s) as passed
Record the selected client as failed
Indicate the selected client(s) ceased training
Indicate the selected client(s) marks are withheld
Click [Go].
6a
Passed, Ceased training, or Marks Withheld:
If the page action is selected to indicate a client has Passed, Ceased
training, or Marks Withheld, the client’s Course Participation status will
change immediately on the View Class List page.
Note: If you record a client as “Marks withheld”, the client’s Course
Participation status remains as “Validated”, with the result “Marks
withheld”. Once the client fulfills the TDA requirements, the course result
can be changed from “Marks withheld” to “Passed” or “Failed”, and the
Course Participation status reverts to “Completed”.
6b
Failed:
If you select that the client has “Failed”, the page action opens Record
Reportable Subject Results for that individual.
Check off the reportable subjects that the client has successfully
completed, and leave the “failed” reportable subject boxes blank – these
failed reportable subjects still need to be completed.
Note: At least one reportable subject must remain in the status of
“Required” if the client has failed the level.
Click [Save].
Result: All passed or completed reportable subjects are shown with the
status “Completed”, and there will be no check box. The failed subjects
are shown with “Required” status, and have a check box.
Click View Class List on the Location bar to return to the View Class List
page. The numbers displayed on View Class List will be recalculated
based on a client being changed from a Course Participation status of
“Validated” to “Completed”. The validated number will reduce by one for
each client that is completed.
Viewing TDA contract information
2.4.3
Step
Action
When the class is locked and all clients in the class are complete, you
can determine the number of clients that were validated in the class by
subtracting the Number of Seats Available from the Max seats (e.g., Max
seats 60 minus seats available 5 = 55).
Viewing TDA contract information
2.4.4
2.5 Changing class results
When to use
Client results may need to be upgraded or changed due to data
entry error. TDAs will only be able to change “Marks Withheld”
to “Passed” or “Failed” where the client’s Course Participation
status remains as “Validated” with “Marks Withheld” result.
Once changed, the reportable subject will indicate Complete if
Passed, or Required if Failed
TDAs must contact ministry staff to make any of the following
changes:
Amendment type
“Passed” to “Failed”
“Failed” to “Passed”
“Passed” or “Failed” to
“Ceased Training”
“Passed” or “Failed” to
“Did Not Attend”
Original status
of Reportable
Subject
Completed
Required
Completed or
Required
Completed or
Required
New status of
Reportable
Subject
Required
Completed
Required
Required
Only the ministry Financial/Program Analyst, School Scheduling
Clerk and Field Office Manager can perform these actions.
Inputs
Proof of upgrade from TDA
Viewing TDA contract information
2.5.1
To change the class results from “Marks Withheld to “Passed”
or “Failed”:
Step
1
2
Action
From the Left Navigation Bar, click My TDA Information.
Go to the Course Offerings tab. Select the appropriate class listed
underneath the program for which the client has been offered a course,
by clicking the check box next to the class number.
Note: It is helpful to use the Program filter so that you are only displaying
classes for that program.
3
From the What would you like to do? drop-down menu, select “View
the class list for the selected class” and click [Go].
4
On the View Class List page, select the client for which you want to
adjust the result, by clicking on the check box next to the client’s name.
5a
If the client has passed the class, from the What would you like to do?
drop-down menu, select “Record the selected client as passed” and click
[Go].
Result: You will automatically be returned to the View Class List page
and the client will display with a Course Participation status of “Complete”
and the result of “Passed”.
5b
If the client has failed the class, from the What would you like to do?
drop-down menu, select “Record the selected client as failed” and click
[Go].
This opens the client’s Reportable Subjects Results page. Check off the
subjects that the client has successfully completed, leave the others
blank, and click [Save].
Go back to the View Class List page. The client will display with a Course
Participation status of “Complete” and the result of “Failed”.
NOTE: The TDA will not be able to change results for a Pass or Fail result
once documented. The TDA will forward a request to adjust the results to the
School Scheduling Clerk.
Viewing TDA contract information
2.5.2
2.6 Viewing TDA contract information
When to use
Use this procedure to view your TDA contract information.
Note: Only the ministry Financial/Program Analyst can update
contracts, payments and deliverables information.
When a seat purchase contract has been received and signed
by the TDA, the value of the initial approved full time plan and
the initial approved full and the initial approved part time plan is
entered for your TDA by the ministry’s Financial/Program
Analyst. The contracted Seat Purchase Plan is the sum of both
these entries.
If the value of the contract needs to be increased later in the
year, this increased amount will appear as the amended total
contract value. The amended total contract value will default to
“None” unless a value other than this has been entered in the
“Amended total contract value” field. The contracted seat
purchase plan amount will not change although the contract
may be amended during the year because it reflects the
amount the original contract was signed for.
When classes are added as a result of creating a mirror image
or when created individually, the initial status of the class is
“Tentative”. The Seat Planning Contract displays the tentative
full time plan and tentative part time plan based on the class
type when creating the class. The EOIS - APPR calculates the
value of each part time and full time classed based on the
number of planned seats, fiscal duration and the per diem rate
for the class. The EOIS - APPR automatically moves the value
of the classes created in “Tentative” status to the seat planning
contract tab. The current value of “Tentative“ classes is the
sum of the tentative full time and part time plan.
Once a class is changed from “Tentative” to “Active” status, the
EOIS - APPR automatically transports the value of the class
from Current value of tentative classes to Current value of
Planned seats and Current value of max seats. As a part of
activating a class and updating active classes, the EOIS APPR does an edit check to determine if the Contracted seat
purchase plan value is less than the Current value of max
Viewing TDA contract information
2.6.1
seats.
Once clients have been validated in a class and the class has
been locked, the EOIS - APPR calculates the Current
commitment to plan and the Current payment commitment
based on the payment type, TDA type and class type.
The Total commitment to date is the sum of the Current
commitment to plan plus the Current payment
commitment.
The Uncommitted balance of contract is equal to the
Contracted seat purchase plan minus the Total
commitment to date.
The Total payments to date are equal to the sum of all
payments in the status of “Paid” recorded against this contract
number. To view the payment details, click the expansion box
beside the Deliverables and Payments section on the Seat
Planning Contracts page.
Step
1
Action
From the Left Navigation Bar, click My TDA Information.
2
Go to the Seat Planning Contracts tab and filter by program.
3
You will notice that the drop-down menu for “What would you like to
do?” displays “Sorry, no options available”.
You can use the Fiscal Ending Year filter to display the contracts by
year.
On this page you can view the following information:
•
•
•
Contract number, type
Financial information
Deliverables and payments information
Creating a class list
2.6.2
2.7 Creating a class list
When to use
Use this procedure to create a list of clients with the status of
“offered” scheduled to attend upcoming classes at your TDA.
The list will be created in excel format.
Note: If there is no class/client information to display based on
the timing of the request, a message will display that indicates
“No classes found with clients in the status of offered.”
If the client’s status changes from offered to confirmed or
declined etc. in EOIS-APPR after the report has been created,
the next time the report is run the client will not appear on the
list since only clients with the status of “offered” display.
.
Step
1
Action
From the Left Navigation Bar, click My TDA Information.
2
Go to the TDA’s Course Offerings tab.
3
From the What would you like to do? drop-down menu, select “Create
class list” and click [Go].
Note: Depending on the size of the file, this process can take a few
minutes to complete.
A pop-up window will appear entitled “File Download”. You have the
choice to Open or Save this file.
4
5
If you chose to save the file, you will be required to select a location to
save it in and click “SAVE”.
6
Once the file has been saved, a pop-up window will appear which
indicates “Download Complete”. You have the following three choices:
Open, Open folder, or Close.
Creating a class list
2.7.1
CHAPTER 3
3.0 Viewing and completing TDA work items
When to use
Work items are sent to TDAs as reminders that work is
outstanding.
There are work items associated with Low confirmation,
enrolment overdue first – 5-21 days, enrolment overdue after 7
and confirmation of class validation.
A description of the work item appears in the work item section
in each of the previous chapters.
.
See Appendix A – Scheduled processes and background
processes for schooling which includes service event
description, purpose, frequency, assignment, how to view,
responsibility for manual completion and completion of work
items via scheduled process.
Use these procedures to manually complete work items that
have been sent to the TDA work queue.
.
Step
1
Action
Log on to the EOIS - APPR.
2
On your Work Queues page, click the expansion box for the work that
needs to be done or “service event” to be completed.
3
Open the Work Item hyperlink associated with the service event.
4
Select the work item to be completed by clicking the check box next to the
event.
Go to the appropriate section in the EOIS - APPR to complete the work
(for example, enrol outstanding clients, as appropriate, who are marked
as “Confirmed”).
Once you have completed the work:
From the What would you like to do? drop-down menu, select
“Complete the selected work item” and click [Go].
5
6
7
Result: The status of the work item will change from “In progress” to
“Complete”.
Return to your work queue using the Location bar to continue with your
work.
Viewing and completing TDA work items
3.0.1
CHAPTER 4
4.0 Maintaining TDA information
When to use
these
procedures
Use these procedures to maintain your Training Delivery Agent
(TDA) record.
TDA staff can perform the following actions:
•
•
•
•
Add and update TDA contact information
Add and update campus contact information
Update TDA address
Update campus information / address
Maintaining TDA information
4.0.1
4.1 Adding and updating TDA information
When to use
Use this procedure to add or update the following TDA
information:
•
•
•
Add a new contact to the TDA
Update TDA contact information
Update TDA address information
Inputs
For all of the procedures:
Step
1
Action
Click Contact Information from the TDA Home Page which will take you
to the General tab.
To add a new contact to the TDA:
Step
Action
1
From the What would you like to do? drop-down menu, select “Add a
new contact to the vendor/TDA” and click [Go].
2
On the Add/Update Vendor/TDA Contact page, enter the contact
information and click [Save].
3
Go back to the TDA General page. Under the Administrative Office
section, you will see the new contact information.
Adding and updating TDA information
4.1.1
To update TDA contact information:
Step
Action
1
Select the appropriate contact name in the Administrative Contact section
by clicking the check box next to the name.
2
From the What would you like to do? drop-down menu, select “Update
the selected vendor/TDA contact” and click [Go].
3
On the Add/Update Vendor/TDA Contact page, update the appropriate
contact information. Click [Save].
4
Go back to the TDA General page. Under the Administrative Contact
section, you will see the new contact information.
To update the TDA address:
Note: A TDA’s address is entered when the TDA record is created.
Step
Action
1
From the What would you like to do? drop-down menu, select “Update
the vendor/TDA address” and click [Go].
2
On the Update Vendor/TDA Address page, you can update the TDA’s
main address and mailing address. For each address enter the
appropriate postal code and click [Look up Address]. This will open the
Postal Code Look-up application.
Click [Next] once you have added the information, to return to the Update
Vendor/TDA Address page.
3
Click [Save].
Go back to the TDA General page. Under the Administrative Office
section, you will see the updated TDA address.
Adding and updating TDA information
4.1.2
4.2 Adding and updating campus information
When to use
Use this procedure to add or update the following campus
information:
•
•
•
Update campus information (name, address, mailing
address)
Add a new contact to a campus
Update a campus contact
Inputs
For all of the procedures:
Step
1
Action
Click Contact Information from the TDA Home Page which will take you
to the General tab.
To update campus information:
Step
Action
1
Select the campus to which you want to update information by clicking on
the check box next to the campus name.
2
From the What would you like to do? drop-down menu, select “Update
the selected campus” and click [Go].
3
On the Add/Update Campus page update the campus name, address or
mailing address information.
For each address enter the appropriate postal code and click [Look up
Address]. This will open the Postal Code Look-up application.
Click [Next] once you have added the information, to return to the
Add/Update Campus page.
Click [Save].
4
Go back to the TDA General page. Under the Campuses section, you will
see the updated campus information.
Adding and updating campus information
4.2.1
To add a new contact to the campus:
Step
Action
1
Select the campus for which you want to add a new contact by clicking
on the check box next to the campus name.
2
From the What would you like to do? drop-down menu, select “Add a
new contact to the selected campus” and click [Go].
3
On the Add/Update Campus Contact page, add the appropriate contact
information. Click [Save].
4
Go back to the TDA General page. Under the Campuses section, you will
see the new campus contact information.
To update a campus contact:
Step
Action
1
Select the campus contact which you want to update by clicking on the
check box next to the campus contact name.
2
From the What would you like to do? drop-down menu, select “Update
the selected campus contact” and click [Go].
3
On the Add/Update Campus Contact page, update the contact
information, as applicable. Click [Save].
4
Go back to the TDA General page. Under the Campuses section, you will
see the updated campus contact information.
Adding and updating campus information
4.2.2
CHAPTER 5
5.0 TDA Subscriber Information
When to use
these
procedures
This view only screen provides details of the TDA
Subscriber(s), as well as the TDA Representative.
The TDA Subscriber is the individual(s) who has been granted
on-line access to the EOIS-APPR to report under the Seat
Purchase Agreement and the Terms and Conditions of Access.
The TDA Representative is the individual, who on behalf of
the TDA, requests EOIS-APPR on-line access for the TDA
Subscriber. The TDA assumes full responsibility for the
compliance of the TDA Subscriber with the Terms and
Conditions of Access and the Seat Purchase Agreement.
Updates to the subscriber or representative records are
maintained by the local service delivery office. While there can
be multiple subscribers, the TDA is allowed to have only one
representative.
Additional TDA Subscribers must complete an Application for
Access and provide identification to an Employment & Training
Consultant as confirmation of identity. Completion of the
application includes acceptance of Terms and Conditions of
Use of the EOIS-APPR. Non-compliance of these terms may
result in revocation of access.
TDA Subscribers are provided with an Enrolment number and
a Private Identification Number to access the system. These
authorization codes are to be maintained in a confidential and
secure manner.
The Authentication screen where the subscriber will enter their
PIN displays the “last logged in” date and time for the TDA
Subscriber. This additional security measure has been put in
place to easily identify when someone other than the
subscriber has accessed the EOIS-APPR.
TDA Subscriber Information
5.0.1
The Subscriber status will be set to inactive if the Subscriber
has not logged into the EOIS-APPR for 120 days, or if the
Subscriber has been issued their enrolment and PIN numbers
and has not yet enrolled and 120 days has passed. This
automated inactivation process also sends a warning email to
the subscriber at the 90 day mark to advise of the pending
inactivation. Logging into the EOIS-APPR halts the process.
TDA Subscriber Information
5.0.2
Appendix A – Scheduled processes and background processes for schooling
Service Event
Description
Purpose
Frequency
School scheduling
scheduled process
EOIS – APPR will automatically schedule
clients to an Active class providing the
clients schooling preferences match the
class being offered and the number of
clients confirmed in the class has not
exceeded the class maximum.
Weekly. The process will run
105 days prior to the start date
of a full time or part time class
and will stop 15 days prior to
the start date of the class.
N/A
In TDA record, via view class list
to see client scheduled to class
N/A
Low confirmation warning
To advise the user the number of
"confirmed" clients in a class is less than
the planned number of seats for the class.
45 days prior to the start date
of a full time or part time class
TDA
In TDA record, via the Work
items tab.
TDA. Note: if the work
item is not manually
completed, a scheduled
process will
automatically complete it
on the class start date.
No response from Client
Clients with the status of "offered" will be
changed to a course participation status of
"no response"
Will be run daily and will occur
if the current date is 20 or
more business days beyond
the start date of a full time
class or 40 or more business
days from the start date of a
part time class.
N/A
Client with a status of offered in
a class will be changed to no
response on the class list
N/A
Enrolment overdue first - 5
or 21 days
To remind TDA that there are classes
with no clients associated (empty classes)
or there are classes with clients in the
status of "Confirmed" that should be
enrolled or removed from class.
Will be run daily and will
appear if it is 5 business days
after the start date of a full
time class or 21 business days
after the start of a part time
class
TDA
In TDA record, via the Work
items tab.
The TDA can manually
complete the work item
or a Scheduled process
will change it from in
progress to complete 7
days after the date the
work item is assigned.
If clients in the class
remained as confirmed,
the class number will
display under
“Enrolment overdue
after 7 days”.
Appendix A – Scheduled processes and background processes for schooling
Assigned
to
How to view
Who completes
1
Service Event
Description
Purpose
Frequency
Assigned
to
How to view
Who completes
Enrolment overdue after 7
days
To remind TDA that there are classes
with clients in a status of "Confirmed" that
should be enrolled
Will be run daily and will
appear if it is 7 days beyond
the last enrolment reminder.
TDA
in TDA record, via the Work
items tab.
Class validation
This background process will
automatically lock a class if all clients in
the class have a status other than
"Offered", "Confirmed" or "Enrolled."
N/A
Class will appear locked on view
class list
Confirmation of Class
validation
To remind TDA that the class has been
locked and to review class list to ensure
accuracy
Will be run daily. Will lock
classes if the start date of
class is 5 business days after
the start date of a full time
class or 21 business days
after the start of a part time
class.
Will be run daily
TDA
Class will appear locked on view
class list
The TDA will need to
manually complete this
work item once the class
has been reviewed as
accurate.
Class results Overdue
To remind TDA that the schooling results
are overdue for classes with clients in the
status of validated.
Will be run daily and will
appear if it is 7 days beyond
the end date of the class.
TDA
In TDA record, via the Work
items tab.
The TDA can manually
complete this work item
or a Scheduled process
will change it from in
progress to complete 7
days after the work item
was assigned. If clients
in the class remain in
the status of validated,
the class number will
refresh and display
under “Class results
Overdue”.
Appendix A – Scheduled processes and background processes for schooling
The TDA can manually
complete the work item
or it will be completed
via a scheduled process
7 days after the work
item was created. If
clients in the class
remain as confirmed, the
class number will refresh
and display under
“Enrolment overdue
after 7 days”.
N/A
2