1
Printing System(2)
Print Controller
UG-1
PostScript3 Option
IB-1
Network Interface
Card Option
User’s Manual
Thank you very much for purchasing the Print Controller.
This User's Manual includes instructions for printing, handling the machine correctly, and safety precautions. Please read this manual before performing any printing operations or using the equipment in any
way.
In order to maintain satisfactory printing performance, Please read this manual before printing or using
the equipment in any way.
COPYRIGHT:
© 2002 by Kyoceramita Corporation
ACKNOWLEDGEMENT:
Microsoft, MS and MS-DOS are registered trademarks of Microsoft Corporation in the United States.
IBM is a registered trademark of International Business Machines, Inc. in the United States.
WindowsTM is a trademark of Microsoft Corporation.
HP and PCL are registered trademarks of Hewlett-Packard Company.
Agfa Microtype font is a registered trademark of Agfa Corporation.
PEERLESS is a registered trademark of PEERLESS SYSTEMS CORPORATION.
Apple, Macintosh and Mac are registered trademarks or trademarks of Apple Computer.Inc.
Adobe, Adobe Logo, Acrobat, Acrobat Logo, PostScript and PostScript Logo are registered trademarks or
trademarks of Adobe Systems, Inc.
Other company names and product names used in this manual are the registered trademarks or trademarks of their respective companies.
MAINTENANCE AGREEMENT:
The Print Controller will give you many years of trouble-free service. To ensure high quality performance
and to prevent premature wear and failure of precision parts and components, schedule regular cleaning
and routine adjustments.
We recommend that you contact your service center to discuss the benefits and advantages of Kyoceramita's Customer Service Maintenance Agreement and to be shown how a maintenance plan can be tailored to your individual needs.
NOTICE:
KYOCERA MITA AMERICA, INC. has made every effort to ensure that the information in this manual is
complete and accurate. However, constant efforts are also being made to improve and update the product. Therefore, KYOCERA MITA AMERICA, INC. shall not be liable for errors in this manual or for any
consequential damages resulting from the use of this manual. The information contained herein is subject
to change without notice.
FEDERAL OR STATE STATUTES MAY PROHIBIT THE COPYING OF CERTAIN DOCUMENTS OR
INFORMATION, RESULTING IN FINES OR IMPRISONMENT FOR VIOLATORS.
WEBSITE ADDRESS:
http://www.kyoceramita.com/home/index.cfm
CORRESPONDENCE:
Correspondence regarding this manual may be mailed to the address shown below.
KYOCERA MITA AMERICA, INC.
Headquarters. MARKETING DEPARTMENT
225 Sand Road, P.O. Box 40008
Fairfield, New Jersey 07004-0008
Introduction
The print controller is designed to be used as the built-in type server of the main body printer/copier. It enables
direct printing from Windows-compliant computers. It can also enable use of the copier as a network printer
when an optional network interface card is used.
FCC Regulation
Warning:
This equipment has been tested and found to comply with limits for a Class B digital device, pursuant to
part 15 of FCC rules. These limits are designed to provide reasonable protection against harmful interference in a residential area.
This equipment generates, uses and can radiate radio frequency energy and, if not installed and used in
accordance with the instructions, may cause harmful interference to radio communications. However,
there is no guarantee that interference will not occur in a particular installation. If this equipment does
cause harmful interference to radio or television reception, which can be determined by turning the
equipment off and on, the user is encouraged to try to correct the interference by one or more of the following measures:
• Reorient or relocate the receiving antenna.
• Increase the distance between the equipment and the receiver.
• Connect the equipment to an outlet on a circuit other than the circuit to which the receiver is connected.
• Consult your dealer or an experienced radio/TV technician for help.
Canadian Department of Communications Regulations
This Class B digital apparatus complies with Canadian ICES-003.
Patent Notice
The product includes an implementation of LZW licensed under U.S.Patent 4,558,302.
Built-in Fonts
The print controller includes support for PCL5e Language (HP PCL clone) and includes the 80 built-in
Agfa Microtype fonts. For a complete list, refer to "Appendix C Font".
Note
• A part or all of this User's Manual may not be used or copied without permission.
• Kyoceramita will have no liability for any influences caused by using the printing system and this
manual.
• Information written in this User's Manual is subject to change without notice.
• Kyoceramita Corporation maintains the copyright of this printer driver.
3
SOFTWARE LICENSE AGREEMENT
This package contains the following materials provided by Kyoceramita Corporation (Kyoceramita): software included as part of the printing system, the digitally-encoded machine-readable outline data encoded in the special format
and in the encrypted form ("Font Programs"), other software which runs on a computer system for use in conjunction
with the Printing Software ("Host Software"), and related explanatory written materials ("Documentation").
The term "Software" shall be used to describe Printing Software, Font Programs and/or Host Software and also include any upgrades, modified versions, additions, and copies of the Software.
The Software is being licensed to you under the terms of this Agreement.
Kyoceramita grants to you a non-exclusive sublicense to use the Software and Documentation, provided that you
agree to the following:
1.
You may use the Printing Software and accompanying Font Programs for imaging to the licensed output device(s), solely for your own internal business purposes.
2.
In addition to the license for Font Programs set forth in Section 1 ("Printing Software") above, you may use Roman Font Programs to reproduce weights, styles, and versions of letters, numerals, characters and symbols
("Typefaces") on the display or monitor for your own internal business purposes.
3.
You may make one backup copy of the Host Software, provided your backup copy is not installed or used on
any computer. Notwithstanding the above restrictions, you may install the on any number of computers solely
for use with one or more printing systems running the Printing Software.
4.
You may assign its rights under this Agreement to an assignee of all of Licensee's right and interest to such
Software and Documentation ("Assignee") provided you transfer to Assignee all copies of such Software and
Documentation Assignee agrees to be bound by all of the terms and conditions of this Agreement.
5.
You agree not to modify, adapt or translate the Software and Documentation.
6.
You agree that you will not attempt to alter, disassemble, decrypt, reverse engineer or decompile the Software.
7.
Title to and ownership of the Software and Documentation and any reproductions thereof shall remain with Kyoceramita.
8.
Trademarks shall be used in accordance with accepted trademark practice, including identification of the trademark owner's name. Trademarks can only be used to identify printed output produced by the Software. Such
use of any trademark does not give you any rights of ownership in that trademark.
9.
You may not rent, lease, sublicense, lend or transfer versions or copies of the Software Licensee does not use,
or Software contained on any unused media, except as part of the permanent transfer of all Software and Documentation as described above.
10. In no event will Kyoceramita be liable to you for any consequential, incidental or special damages, including any
lost profits or lost saving, even if Kyoceramita has been advised of the possibility of such damages, or for any
claim by any third party. Some states or jurisdictions do not allow the exclusion or limitation of incidental, consequential or special damages, so the above limitations may not apply to you.
11. Notice to Government End Users: The Software is a "commercial item," as that term is defined at 48 C.F.R.
2.101, consisting of "commercial computer software" and "commercial computer software documentation," as
such terms are used in 48 C.F.R. 12.212. Consistent with 48 C.F.R. 12.212 and 48 C.F.R. 227.7202-1 through
227.7202-4, all U.S. Government End Users acquire the Software with only those rights set forth herein.
4
NON-EXCLUSIVE LICENSE AGREEMENT
(Exclusive for PostScript3 Option)
READ THE TERMS AND CONDITIONS OF THIS
LICENSE AGREEMENT CAREFULLY
BY USING THE PRODUCTS DESCRIBED IN THIS USER MANUAL, BY OPENING A
SHRINK-WRAP PACKAGE CONTAINING SOFTWARE OR DOWNLOADING SOFTWARE OR PRINTER DRIVERS TO YOUR COMPUTER YOU AGREE TO BE BOUND BY
THE TERMS OF THIS LICENSE.
The computer programs embedded in the equipment and User Documentation are licensed (not sold) to You
by Kyoceramita Corporation (''Kyoceramita or LICENSOR''). The term ''Software'' shall be used to describe
accompanying Printer Drivers, software included as part of the printing system including PostScript software
and other Adobe software (''Printing Software''), digitally-encoded machine-readable outline data encoded in
the special format and in the encrypted form (''Font Programs''), and/or other software which runs on a computer system for use in conjunction with the Printing Software (''Host Software''), and related explanatory
written materials (''Documentation''), Upgrades, Modified Versions, Additions, and Copies of the Software
(the ''Software''). This license agreement represents the entire agreement concerning the Software between
You and Kyoceramita and it supersedes any prior proposal, representation, or understanding between the
parties. Kyoceramita reserves any rights not expressly granted to You. This package may contain third-party
software provided by Adobe Systems Incorporated (''Adobe'') or other suppliers in which case Kyoceramita
grants to you a non-exclusive sublicense to use the Software and Documentation, provided that you agree to
the following:
1.
LICENSE GRANT. You do not receive title to the Software or User Documentation. Licensor grants to
You, and You accept, a nonexclusive license to use the Software embedded in the Equipment in
machine-readable, object code form only (referred to as the ''Computer Program''), the accompanying
User Documentation, and Printer Drivers furnished to You, (collectively the ''Licensed Articles'') only as
authorized in this License Agreement. The Computer Program may be used only on the Equipment in
which it is embedded and may not be shared with or transferred to any other equipment or product.
The Printer Drivers shall be used only with printer products designed to work with the equipment containing the embedded Computer Program. You may make a single archive copy of the Printer Drivers
for back-up purposes, provided that it includes all copyright notices, markings and proprietary legends
on the original, including the markings of any other company contained therein. This archive copy may
not be in use at any time, may only be used for back-up purposes and must remain in Your possession
and control. You may not copy the drivers to a bulletin board or similar system.
a)
You may use the Printing Software and accompanying Font Programs for imaging to the licensed output device(s), solely for your own internal business purposes.
b)
In addition to the license for Font Programs set forth in (a), you may use Roman Font Programs to
reproduce weights, styles, and versions of letters, numerals, characters and symbols (''Typefaces'') on
the display or monitor for your own internal business purposes.
c)
Notwithstanding the restrictions in 1 above, you may install the Adobe Driver and/or other third-party's
Driver Software on any number of computers solely for use with one or more printing systems running
the Printing Software.
d)
You agree not to modify, adapt or translate the Software and Documentation.
e)
You agree that you will not attempt to alter, disassemble, decrypt, reverse engineer or decompile the
Software or use any other method to discover the printer driver's or Software's source code.
f)
You may not rent, lease, sublicense, modify, adapt, pledge, lend, share or transfer versions or copies
of the Software You do not use, or Software contained on any unused media, or any of Your rights
under this Agreement except as part of the permanent transfer of all Software and Documentation as
described in (g) below or to the extent expressly permitted by the laws of the country in which you use
the Software and Licensed Articles, You may not create derivative works based upon the Software or
any part thereof. You may not copy the Licensed Articles except as specifically provided in this License
Agreement.
5
g)
You may assign your rights under this Agreement to an assignee of all of Your rights and interest to
such Software and Documentation (''Assignee'') provided you transfer to Your Assignee all copies of
such Software and Documentation and the Assignee agrees to be bound by all of the terms and conditions of this Agreement.
2.
TITLE: Title to and ownership of the Software and Documentation and any reproductions thereof shall
remain with the owner of the third-party software and Kyoceramita.
3.
TRADEMARKS: Trademarks shall be used in accordance with accepted trademark practice, including
identification of the trademark owner's name. Trademarks can only be used to identify printed output
produced by the Software. Such use of any trademark does not give you any rights of ownership to
that trademark.
4.
LICENSOR'S RIGHTS. You acknowledge and agree that the Licensed Articles, including but not limited to the Software and the Documentation, are owned by Licensor and its suppliers, and its structure,
organization and code are proprietary and valuable trade secrets of Licensor or its suppliers. United
States Copyright Law and International Treaty Provisions also protect the Licensed Articles and Documentation, including but not limited to the Software and the Documentation. You further acknowledge
and agree that all right, title and interest in and to the Licensed Articles, including associated intellectual property rights, are and shall remain, with Licensor or its supplier. Licensor's suppliers may protect
their rights in the Licensed Articles in the event of a violation of this License Agreement. This License
Agreement does not convey to You an interest in or to the Licensed Articles, but only a limited right of
use revocable in accordance with the terms of this License Agreement.
5.
TERMINATION. This License Agreement is effective upon the purchase and acceptance of the Equipment by You or the downloading of any Software or Printer Driver from Kyoceramita'S Website or other
authorized electronic medium and shall continue until terminated. This License Agreement will terminate upon Your sale, transfer or disposal of the Equipment having the Software embedded therein.
Licensor may terminate this License Agreement upon the breach by You of any term hereof. Upon
such termination by Licensor, You agree to delete the Software and Printer Drivers from the hard drive
of the Product, destroy all copies of the Software and Printer Drivers from the hard drive of the Equipment and destroy all copies of the Software and Printer Drivers and User Documentation.
6.
LICENSE FEES. The license fees of $250.00 (included in the purchase price of the Equipment) paid
by You are paid in consideration of the license granted under this License Agreement.
7.
LIMITED WARRANTY. Licensor warrants, for Your benefit alone, for a period of 90 days from the date
of commencement of this License Agreement (referred to as the ''Warranty Period''), that the Software
and Printer Drivers shall operate substantially in accordance with the functional specifications in the
User Documentation. Kyoceramita specifically does not warrant that the Software or Printer Drivers will
operate uninterrupted or error-free. If during the Warranty Period, a defect in the Software or Printer
Drivers appears, You may contact the Licensor for either a replacement or, if so elected by Licensor,
refund of amounts paid by You under this License Agreement. You agree that the foregoing constitutes
Your sole and exclusive remedy for breach by Licensor of any warranties made under this Agreement.
EXCEPT FOR THE WARRANTIES SET FORTH ABOVE, THE LICENSED ARTICLES, AND THE
SOFTWARE CONTAINED THEREIN, ARE LICENSED ''AS IS,'' AND, TO THE MAXIMUM EXTENT
PERMITTED BY LAW, THE LICENSOR DISCLAIMS AND EXCLUDES ANY AND ALL OTHER WARRANTIES, WHETHER EXPRESS OR IMPLIED, INCLUDING, WITHOUT LIMITATION, ANY IMPLIED
WARRANTIES OF MERCHANTABILITY OR FITNESS FOR A PARTICULAR PURPOSE.
6
8.
LIMITATION OF LIABILITY.To the maximum extent permitted by law, and except for claims which
result in personal injury or death caused by Licensor's negligence or intentional acts, Licensor's, or any
of its affiliates or subsidiaries, cumulative liability to You or any other party for any loss or damages
resulting from any claims, demands, or actions arising out of or relating to this License Agreement shall
not exceed $250.00. In no event shall Licensor, or Adobe, the owner of other third party software or
any of their affiliates or subsidiaries be liable to you or any third party for any indirect, incidental, consequential, special, or exemplary damages or lost profits, even if Licensor has been advised of the possibility of such damages or for any claim by any third party. Some states do not allow the limitation or
exclusion of liability for incidental or consequential damages, so the above limitation or exclusion may
not apply to You.
9.
GOVERNING LAW. This License Agreement shall be construed and governed in accordance with the
laws of the State of Connecticut, United States of America. Should any court of competent jurisdiction
declare any term of this License Agreement void or unenforceable, such declaration shall have no
effect on the remaining terms hereof.
10. COSTS OF LITIGATION. If any action is brought by either party to this License Agreement against the
other party regarding the subject matter hereof, the prevailing party shall be entitled to recover, in addition to any other relief granted, reasonable attorneys' fees and expenses of litigation.
11. NO WAIVER. The failure of any party to enforce any rights granted hereunder or to take action against
the other party in the event of any breach hereunder shall not be deemed a waiver by that party as to
subsequent enforcement of rights or subsequent actions in the event of future breaches.
12. Notice to Government End Users: U.S. GOVERNMENT RESTRICTED RIGHTS: The Licensed Articles are provided with restricted rights. Use, duplication, or disclosure by the government is subject to
restrictions set forth in subparagraph (c)(1)(ii) of the Rights in Technical Data and Computer Software
clause at DFARS 252.277-7013, and paragraph (c)(1) and (2) of the Commercial Computer Software Restricted Rights clause at FAR 52.277-19. The Software is a ''commercial item,'' as that term is
defined at 48 C.F.R. 2.101, consisting of ''commercial computer software'' and ''commercial computer
software documentation,'' as such terms are used in 48 C.F.R. 12.212. Consistent with 48 C.F.R.
12.212 and C.F.R. 227.7202-1 through 227.7202-4, all U.S. Government End Users acquire the Software with only those rights set forth herein. The manufacturer is: Kyocera Mita America, Inc., 500 Day
Hill Road, Windsor, Connecticut 06095
13. THIRD PARTY BENEFICIARY: You are hereby notified that Adobe Systems Incorporated, a Delaware
corporation, located at 345 Park Avenue, San Jose, CA 95110-2704 is a third-party beneficiary to this
Agreement to the extent that this Agreement contains provisions which relate to Licensee's use of the
Software, Font Programs, Typefaces and the trademarks licensed hereby. Such provisions are made
expressly for the benefit of Adobe and are enforceable by Adobe in addition to Kyoceramita.
7
Contents
Introduction ...................................................................................................3
About this Product .....................................................................................18
Folder structure on the CD-ROM (Print Controller) .................................19
Folder structure on the CD-ROM (PS3 Option) ........................................20
About this Manual .......................................................................................21
Notation of each product ...........................................................................22
How to read this Manual ............................................................................23
Section 1 Before Using the Print Controller
Chapter 1 Overview of the Print Controller ................................25
Features of the Print Controller .................................................................25
The Print Controller Functions ..................................................................26
Print Controller Options .............................................................................28
Chapter 2 Connections of the Print Controller ..........................29
Parallel Connection ....................................................................................29
Ethernet Connection ..................................................................................30
Chapter 3 Overview of the Preparation Task .............................34
Using as a Printer .......................................................................................34
Printer Driver ...............................................................................................35
Using as a Network Scanner .....................................................................36
Section 2 How to Print
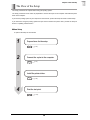
Chapter 4 How to Setup ...............................................................38
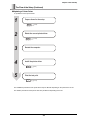
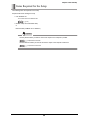
The Flow of the Setup ................................................................................38
Items Required for the Setup .....................................................................40
Connecting the copier ................................................................................41
Installing a Printer Driver ...........................................................................42
Installing to Windows 95/98/Me (PCL5e) ...............................................................................43
Installing to Windows 95/98/Me (PS3) .................................................................................... 49
Installing to Windows NT4.0 (PCL5e) .................................................................................... 55
8
Contents (Continued)
Installing to Windows NT4.0 (PS3) ......................................................................................... 63
Installing to Windows 2000 (PCL5e) ..................................................................................... 71
Installing to Windows 2000 (PS3) ........................................................................................... 81
Installing to Windows XP (PCL5e) ......................................................................................... 91
Installing to Windows XP (PS3) ............................................................................................ 101
Installing to Macintosh (PS3) ................................................................................................ 111
Test Page Print ..........................................................................................114
Setting Optional Devices (Windows) ......................................................115
Setting Optional Devices (Macintosh) ....................................................117
Updating a Printer Driver .........................................................................119
Updating the Printer Driver (Windows 95/98/Me) ................................................................ 120
Updating the Printer Driver (Windows NT4.0) .....................................................................121
Updating the Printer Driver (Windows 2000) .......................................................................124
Updating the Printer Driver (Windows XP) ..........................................................................126
Updating the Printer Driver (Macintosh) ..............................................................................128
Chapter 5 Printing from Windows .............................................129
Basic printing method ..............................................................................129
Printer [Properties] window .....................................................................130
[Properties] window of Windows 95/98/Me .........................................................................132
[Properties] window of Windows NT4.0 ..............................................................................135
[Properties] window displayed from Windows 2000 .......................................................... 139
[Properties] window of Windows XP ................................................................................... 145
To set the paper-related items .................................................................151
To set the orientation ............................................................................................................ 153
To print in rotation ................................................................................................................. 155
To set the size of the output paper ...................................................................................... 157
To set the type of manual-feed paper .................................................................................. 160
To enlarge or reduce by a specified ratio ............................................................................164
To set the printing position of the wide paper ....................................................................167
To set the margins ................................................................................................................. 169
To set the paper tray ................................................................................171
To set the Large Capacity Tray ............................................................................................ 173
To set the Bypass tray (Manual feed) .................................................................................. 176
To set the Finisher ................................................................................................................. 179
To set the Output tray ........................................................................................................... 182
To print multiple copies ...........................................................................185
To set the number of copies to be printed ..........................................................................187
9
Contents (Continued)
To print by sets ...................................................................................................................... 189
To print page by page collectively ....................................................................................... 191
To output offset copies ......................................................................................................... 194
To print multiple pages ............................................................................197
To set to print on both sides ................................................................................................ 199
To print the document of multiple pages on a single page ............................................... 202
To print 2 pages on a single paper twice as big ................................................................. 205
To print a twofold booklet ..................................................................................................... 209
To print a specific page on the front face ...........................................................................212
To print pages in reverse order ............................................................................................ 214
To set the Front & Back & Thick Cover / Insertion Sheet .....................216
To set a Front Cover .............................................................................................................. 218
To set a Back Cover .............................................................................................................. 222
To set an Insertion Sheet ...................................................................................................... 226
To set a Thick Cover ............................................................................................................. 229
To set for finishing ...................................................................................232
To set stapling ....................................................................................................................... 234
To set the Punch Unit ............................................................................................................ 238
To set punching ..................................................................................................................... 241
To adjust printing position inside the paper .......................................................................245
To set Fold, Stitch, Trim (Trimmer Unit) ..............................................................................248
To print a confidential document ............................................................253
To specify a user ................................................................................................................... 254
To print with protection by a password ...............................................................................256
To use an internal hard disk ....................................................................259
To save and print a print job .................................................................................................260
To re-set a Job ID .................................................................................................................. 263
To set a Watermark ...................................................................................265
To create a Overlay ............................................................................................................... 268
To print a Overlay .................................................................................................................. 270
To delete a Overlay ................................................................................................................ 272
To create a new Watermark .................................................................................................. 273
To print a Watermark ............................................................................................................. 277
To change a Watermark ........................................................................................................ 282
To delete a Watermark .......................................................................................................... 285
To set an image and shade ......................................................................287
To set Halftoning ................................................................................................................... 290
To set a printing density ....................................................................................................... 291
To save toner consumption by controlling print density .................................................. 292
10
Contents (Continued)
To set a resolution ................................................................................................................. 294
To print a curved section smoothly ..................................................................................... 296
To print an image by reversing white and black ................................................................. 298
To print an image by reversing image ................................................................................. 300
To print a text in gray or black more clearly .......................................................................301
To print an image in gray or black more clearly ................................................................. 302
To set font-related items ..........................................................................303
To print without using printer fonts ..................................................................................... 304
To replace TrueType with the printer font ...........................................................................306
To set a method for sending PostScript ..............................................................................308
To add the Euro currency mark to the font .........................................................................310
To download the font information ........................................................................................ 311
To adjust settings of PostScript output format .....................................312
To adjust basic settings of PostScript output format ........................................................ 313
To adjust detailed settings of PostScript output format .................................................... 316
Checking the Printer Driver Setting ........................................................318
To test printing to check the settings .................................................................................. 319
To check the current settings before printing ....................................................................323
To check the version of the printer driver ...........................................................................327
To set printer memory ..............................................................................329
To set printer memory configuration ......................................................330
Chapter 6 Printing from Macintosh ...........................................331
Basic printing method ..............................................................................331
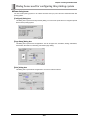
Dialog boxes used for configuring this printing system ......................333
Displaying the [Configure] dialog box ................................................................................. 334
Displaying the [Page Setup] dialog box ..............................................................................335
Displaying the [Print] dialog box .......................................................................................... 336
About descriptions in this chapter .........................................................338
To set the paper-related items .................................................................339
To set the orientation ............................................................................................................ 341
To set the size of the output paper ...................................................................................... 342
To set the type of manual-feed paper .................................................................................. 344
To enlarge or reduce by a specified ratio ............................................................................347
To set the printing position of the wide paper ....................................................................348
To set the margins ................................................................................................................. 349
To set a custom size paper ................................................................................................... 350
To set the paper tray ................................................................................351
11
Contents (Continued)
To set the Large Capacity Tray ............................................................................................ 353
To set the Manual Feed Tray ................................................................................................ 354
To set the Finisher ................................................................................................................. 356
To set the Output tray ........................................................................................................... 357
To print multiple copies ...........................................................................359
To set the number of copies to be printed ..........................................................................361
To print by sets ...................................................................................................................... 362
To print page by page collectively ....................................................................................... 363
To output offset copies ......................................................................................................... 364
To print multiple pages ............................................................................365
To set to print on both sides ................................................................................................ 367
To print the document of multiple pages on a single page ............................................... 368
To print 2 pages on a single paper twice as big ................................................................. 370
To print a twofold booklet ..................................................................................................... 372
To print pages in reverse order ............................................................................................ 374
To set the Front Cover / Back Cover / Thick Cover ...............................375
To set a Front Cover .............................................................................................................. 376
To set a Back Cover .............................................................................................................. 378
To set a Thick Cover ............................................................................................................. 380
To set for finishing ...................................................................................381
To set stapling ....................................................................................................................... 383
To set the Punch Unit ............................................................................................................ 386
To set punching ..................................................................................................................... 387
To adjust a printing position inside the paper ....................................................................389
To set center binding, folding and cutting (Trimmer Unit) ................................................ 390
To set a Watermark ...................................................................................392
To print a Watermark ............................................................................................................. 393
To create a new Watermark .................................................................................................. 395
To change a Watermark ........................................................................................................ 397
To set an image and shade ......................................................................399
To save toner consumption by controlling a print density ............................................... 401
To set a Resolution ............................................................................................................... 402
To print a curved section smoothly ..................................................................................... 403
To print an image by reversing white and black ................................................................. 404
To print an image by reversing image ................................................................................. 405
To print a bitmapped image more clearly ............................................................................406
To set font-related items ..........................................................................407
To print without using printer fonts ..................................................................................... 408
To restrict fonts that can be downloaded ...........................................................................409
12
Contents (Continued)
To check the printer driver setting ..........................................................410
To test print to check the settings ....................................................................................... 411
To check the current settings before printing ....................................................................413
To check the version of the printer driver ...........................................................................415
To set the memory installed in the printer .............................................416
Chapter 7 Tandem Print .............................................................417
To print with two copiers .........................................................................417
Chapter 8 Managing the Number of Prints ...............................421
Overview of the Printer ECM/EKC ...........................................................421
Setting of Printer ECM/EKC .....................................................................422
Printing with Printer ECM/EKC ................................................................423
ECM/EKC Limit ..........................................................................................424
Chapter 9 Troubleshooting ........................................................425
Basic Troubleshooting .............................................................................425
General Problems of Printing ..................................................................426
General Problems of PostScript ..............................................................429
Checking on non complete jobs .............................................................430
Section 3 How to Scan
Chapter 10 Overview of the Scanning Features ......................432
Available Scanning Features ...................................................................432
Process of the Settings and Operations ................................................434
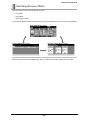
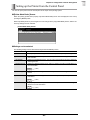
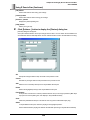
Scanning Screen of the Control Panel ...................................................435
Chapter 11 Configuring Destination/Storage Location Settings ..
436
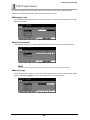
Scan to HDD ..............................................................................................436
Scan to Email ............................................................................................438
Setting of Destinations (FTP) ..................................................................441
13
Contents (Continued)
Chapter 12 Scanner Operation ..................................................444
Scanning ....................................................................................................444
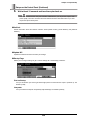
Scanner Basic screen ..............................................................................450
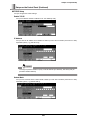
Special Original .........................................................................................454
Application ................................................................................................456
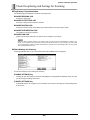
Check Deciphering and Settings for Scanning ......................................459
Chapter 13 Loading in the Scanned Image Data .....................460
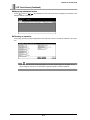
Reading In From HDD ...............................................................................460
Deleting images stored in the HDD .........................................................468
Images Scanned to FTP or E-mail ...........................................................469
Chapter 14 Troubles Concerning the Scanner ........................470
Cannot connect to the scanner ...............................................................470
When an Error Message Appears ...........................................................471
Scan ErrorList ...........................................................................................472
Section 4 Control Panel (for Administrator)
Chapter 15 Control Panel ...........................................................474
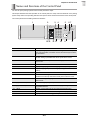
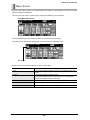
Names and Functions of the Control Panel ...........................................474
Switching Between Modes .......................................................................475
LCD Touch Screen ....................................................................................476
Basic Screen .............................................................................................478
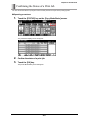
Confirming the Status of a Print Job ......................................................479
Chapter 16 Configuration of Printer Setting Menu ..................481
Setting up the Printer from the Control Panel .......................................481
Printing the Test Print ..............................................................................484
Setting the Banner Page ..........................................................................486
Setting the Banner Page Tray ..................................................................488
Setting the Job Time Out .........................................................................489
14
Contents (Continued)
Setting the Copier Time Out ....................................................................490
Setting the ScanDataAutoDel. .................................................................492
Setting the PDL .........................................................................................494
Setting the Default Paper size .................................................................496
Setting the Resolution ..............................................................................498
Setting the Default Value for the Duplex ................................................499
Setting the Default Orientation ................................................................501
Setting the Number of Pages to Copy ....................................................503
Setting the Override Paper ......................................................................504
Chapter 17 Print Job Control .....................................................505
Using the Forced Output Function .........................................................505
Reserving a Print Job ...............................................................................506
Canceling a Print Job ...............................................................................507
Confirming the Canceled Print Job .........................................................509
Deleting a Password Print Job ................................................................510
Section 5 Network Settings (for Administrator)
Chapter 18 Network Function Overview ...................................513
Network Function of Print Controller ......................................................513
Accompanied Utilities ..............................................................................514
Network setting procedures ....................................................................515
Chapter 19 Copier Setup ............................................................519
General Description of the Network Setup .............................................519
Outputing the Status Page .......................................................................524
Setups on the Control Panel ....................................................................525
Using MAP .................................................................................................540
Chapter 20 Printing by IP Peer-to-Peer from Windows 95/98/Me .
544
Using IP Peer-to-Peer ...............................................................................544
15
Contents (Continued)
Installation of Printer Driver ....................................................................550
Using IPX Peer-to-Peer .............................................................................552
Chapter 21 Printing by LPD/LPR from Windows NT 4.0/2000/XP
557
LPD/LPR Setup .........................................................................................557
Chapter 22 Printing by IPP from Windows 2000/XP ................564
Internet Printing ........................................................................................564
Chapter 23 NetWare Configuration ...........................................568
Setup for NetWare 3.x ..............................................................................568
Setup for NetWare 4.x ..............................................................................569
Chapter 24 UNIX Configuration .................................................571
UNIX Printing through TCP/IP .................................................................571
Chapter 25 Apple Talk Configuration .......................................581
Preparation to print from Macintosh .......................................................581
Chapter 26 Troubleshooting of Network ..................................582
Resetting the Network Interface Card to Factory Default .....................582
How to Diagnose Problems .....................................................................583
16
Contents (Continued)
Appendices
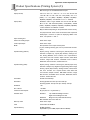
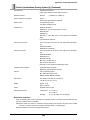
Appendix A Product Specifications ..........................................588
Product Specifications (Printing System (2)) .........................................588
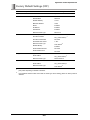
Product Specifications (Network Interface Card (NIC)) ........................592
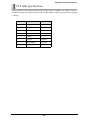
UTP cable specifications .........................................................................593
Factory Default Settings (NIC) .................................................................594
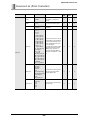
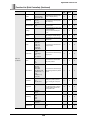
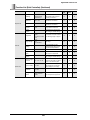
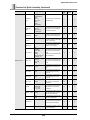
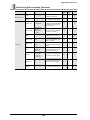
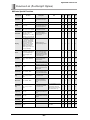
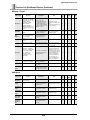
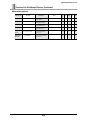
Appendix B Function List ..........................................................595
Function List (Print Controller) ...............................................................595
Function List (PostScript3 Option) .........................................................601
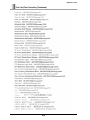
Appendix C Font .........................................................................604
Font List (Print Controller) .......................................................................604
Font List (PostScript3) .............................................................................607
Font Number List (Control Panel-PCL Setup) ........................................610
Screen Fonts .............................................................................................613
Downloading New Fonts ..........................................................................620
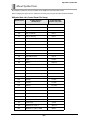
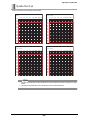
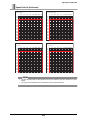
Appendix D Symbol Set .............................................................621
About Symbol Sets ...................................................................................621
Symbol Set List .........................................................................................623
Index ............................................................................................632
Index (Object) ............................................................................................632
Index (Item) ................................................................................................635
17
About this Product
● Package Contents
The following items are supplied with the Print Controller:
• Notice Sheet
• Interface Board
• User Software CD
(Windows)
• Printer Driver
• Scanner Driver
(compatible with TWAIN)
• Network Connection Utilities
•
•
•
•
•
•
BOOTP
IP-P2P
IPX-P2P
MAP
NW Setup
UNIX Utilities
• Adobe Acrobat Reader
• User's Manual
(this manual)
• Release Note
(describes the latest information as well as limits of the system and the user
software.)
• Screenfonts
• Web Utilities User's Reference Guide
(Macintosh)
• Adobe Acrobat Reader
• User's Manual
(this manual)
• Web Utilities User's Reference Guide
The following items are supplied with the PostScript3 Option:
• PS protection chip
• User Software CD
(Windows)
• Printer driver / PPD file
• Screen Fonts
• Adobe Acrobat Reader
• User’s Manual
(this manual)
• Web Utilities User’s Reference Guide
• Release Note
(describes the latest information as well as limits of the system and the users
software.)
(Macintosh)
• Printer driver / PPD file
• Screen Fonts
• Adobe Acrobat Reader
• User’s Manual
(this manual)
• Web Utilities User’s Reference Guide
• Release Note
(describes the latest information as well as limits of the system and the users
software.)
18
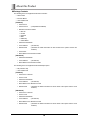
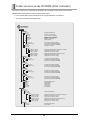
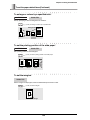
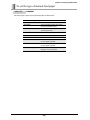
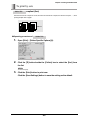
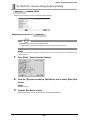
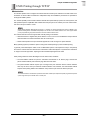
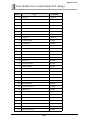
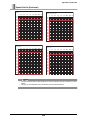
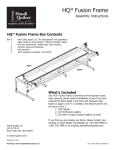
Folder structure on the CD-ROM (Print Controller)
The folders included on the accompanying CD-ROM for print controller are structured as shown below.
This illustration will be helpful for locating specific folders or files.
• In this manual, folder names and file names are not preceded by the root directory.
• You may use the files in the English folder.
User Software CD
Windows
English
Acroread
NetUtil
BOOTP
IP-P2P
IPX-P2P
MAP
NWSetup
Unix
Printer
Win9x_Me
WinNT_2000_Xp
Scanner
Screenfonts
UserGuide
Others
(Adobe Acrobat Reader 5.0)
(IP address assign program)
(IP base - Peer to Peer program)
(IPX base - Peer to Peer program)
(Management Access Program)
(NetWare Setup program)
(Utilities for Unix)
(Printer Driver for Windows 95/98/Me)
(Printer Driver for Windows NT/2000/XP)
(Scanner Driver (compatible with TWAIN))
(TrueType Screen Fonts)
iphigh_int_vxxx.pdf
webutil_e_vxxx.pdf
jobspl_e_vxxx.pdf
(Printing System(2)/UG-1/IB-1 User's Manual for non-USA)
(Web Utilities User's Reference Guide)
(JobSpooler User's Reference Guide)
iphigh_us_vxxx.pdf
webutil_e_vxxx.pdf
jobspl_e_vxxx.pdf
(Printing System(2)/UG-1/IB-1 User's Manual for USA)
(Web Utilities User's Reference Guide)
(JobSpooler User's Reference Guide)
USA
French
Printer
Win9x_Me
WinNT_2000_Xp
Scanner
(Printer Driver for Windows 95/98/Me)
(Printer Driver for Windows NT/2000/XP)
(Scanner Driver (compatible with TWAIN))
Italian
Printer
Win9x_Me
WinNT_2000_Xp
Scanner
(Printer Driver for Windows 95/98/Me)
(Printer Driver for Windows NT/2000/XP)
(Scanner Driver (compatible with TWAIN))
German
Printer
Win9x_Me
WinNT_2000_Xp
Scanner
(Printer Driver for Windows 95/98/Me)
(Printer Driver for Windows NT/2000/XP)
(Scanner Driver (compatible with TWAIN))
Spanish
Printer
Win9x_Me
WinNT_2000_Xp
Scanner
(Printer Driver for Windows 95/98/Me)
(Printer Driver for Windows NT/2000/XP)
(Scanner Driver (compatible with TWAIN))
Japanese
Acroread
NetUtil
Printer
Scanner
Screenfonts
UserGuide
(Adobe Acrobat Reader 5.0)
(Network Utilities)
(Printer Driver)
(Scanner Driver)
(Screen Fonts)
(User's Manual)
Macintosh
English
Acroread
UserGuide
Others
(Adobe Acrobat Reader 4.0)
iphigh_int_vxxx.pdf
webutil_e_vxxx.pdf
jobspl_e_vxxx.pdf
(Printing System(2)/UG-1/IB-1 User's Manual for non-USA)
(Web Utilities User's Reference Guide)
(JobSpooler User's Reference Guide)
iphigh_us_vxxx.pdf
webutil_e_vxxx.pdf
jobspl_e_vxxx.pdf
(Printing System(2)/UG-1/IB-1 User's Manual for USA)
(Web Utilities User's Reference Guide)
(JobSpooler User's Reference Guide)
USA
Japanese
Acroread
UserGuide
(Adobe Acrobat Reader 4.0)
(User's Manual)
19
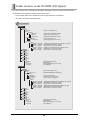
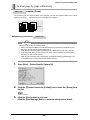
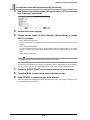
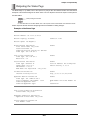
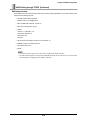
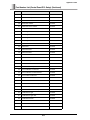
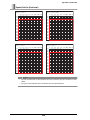
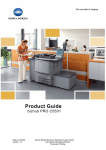
Folder structure on the CD-ROM (PS3 Option)
The folders included on the accompanying CD-ROM for PostScript 3 option are structured as shown below.
This illustration will be helpful for locating specific folders or files.
• In this manual, folder names and file names are not preceded by the root directory.
• You may use the files in the English folder.
User Software CD
Windows
English
Acroread
Driver
(Adobe Acrobat Reader 5.0)
AdobePS
Win9x_Me
WinNT
Win2000_Xp
Screenfonts
ATM Light
PS Screen Fonts
UserGuide
Others
iphigh_int_vxxx.pdf
webutil_e_vxxx.pdf
jobspl_e_vxxx.pdf
USA
iphigh_us_vxxx.pdf
webutil_e_vxxx.pdf
French
jobspl_e_vxxx.pdf
Driver
Italian
Driver
German
Driver
Spanish
Driver
Japanese
Acroread
Driver
Screenfonts
UserGuide
(Printer Driver for Windows 95/98/Me)
(Printer Driver for Windows NT)
(Printer Driver for Windows 2000/XP)
(Adobe Type Manager 4.1)
(PS3 TrueType/Type1 Screen Fonts)
(Printing System(2)/UG-1/IB-1 User's Maual for non-USA)
(Web Utilities User's Reference Guide)
(JobSpooler User's Reference Guide)
(Printing System(2)/UG-1/IB-1 User's Maual for USA)
(Web Utilities User's Reference Guide)
(JobSpooler User's Reference Guide)
(Adobe Acrobat Reader 5.0)
(Printer Driver)
(Adobe Type Manager / Screen Fonts)
(User's Manual)
Macintosh
English
Acroread
Driver
(Adobe Acrobat Reader 4.0)
OS8_x to 9_x
Screenfonts
ATM Light
PS3 TrueType
PS3 Type1
UserGuide
Others
(Printer Driver/PPD file for Power Mac)
(Adobe Type Manager 4.1)
(Screen Fonts for PS3 TrueType)
(Screen Fonts for PS3 Type1)
iphigh_int_vxxx.pdf
webutil_e_vxxx.pdf
(Printing System(2)/UG-1/IB-1 User's Manual for non-USA)
(Web Utilities User's Reference Guide)
jobspl_e_vxxx.pdf
(JobSpooler User's Reference Guide)
iphigh_us_vxxx.pdf
(Printing System(2)/UG-1/IB-1 User's Manual for USA)
webutil_e_vxxx.pdf
(Web Utilities User's Reference Guide)
jobspl_e_vxxx.pdf
(JobSpooler User's Reference Guide)
USA
French
Driver
Italian
Driver
German
Driver
Spanish
Driver
Japanese
Acroread
Driver
Screenfonts
UserGuide
(Adobe Acrobat Reader 4.0)
(Printer Driver)
(Adobe Type Manager / Screen Fonts)
(User's Manual)
20
About this Manual
This manual describes how to operate the Print Controller when the Copier is used as a printer by connecting it
to computers.
This manual assumes you are familiar with the basic operation of your operating system and the KM-8530.
The KM-8530 comes is with user’s manuals. Refer to these manuals as needed.
For detailed operations of Windows 95/98/Me and Windows NT4.0/2000/XP, refer to the operating manuals for
each operating system. For application operations, refer to the operating manuals provided with each application.
Important
This manual explains operating procedures for Printing System(2) Print Controller. The procedures may vary depending on models of machine.
This manual is composed of the following five sections and appendices:
Section 1: Before Using the Print Controller
Section 1 describes the print controller hardware and the overview of its functions, and briefly explains
how to connect the parallel and Ethernet ports of computers to the print controller and the main body
printer (copier).
Section 2: How to Print
Section 2 describes how to install the printer driver (user software included on the user software CD) to
Windows-compliant computers and Macintosh.
It enables printing from each application to the main body printer by way of a parallel port/network.
Section 3: How to Scan
Section 3 describes procedures on using the copier as the network scanner.
Section 4: Control Panel (for Administrator)
Section 4 describes the layout of the control panel of the main body printer and explains how to operate
and set functions on the control panel.
Section 5: Network Setting (for Administrator)
Section 5 describes how to set and use network.
Appendices
Appendix A describes product specifications for the print controller.
Appendix B describes function list.
Appendix C lists the built-in printer fonts included with the print controller.
21
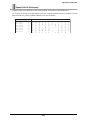
Notation of each product
The following abbreviations are used in this manual:
(1) Printing System(2) Print Controller:
(2) IB-1 optional Network Interface Card:
print controller
network interface card ( or NIC)
(3) UG-1 PostScript3 option:
(4) KM-8530 Printer/Copier:
(5) A printing system that combines the above
(1), (2), (3) and (4) products:
PS3 option
copier (or main body printer)
(6) Microsoft Windows 95:
Microsoft Windows 98:
Microsoft Windows Me:
Microsoft Windows NT4.0:
Microsoft Windows 2000:
Microsoft Windows XP:
Windows 95
Windows 98
Windows Me
Windows NT4.0 or Windows NT
Windows 2000
Windows XP
printing system
Above OSs:
Windows 95/98/Me
Windows NT4.0/2000/XP
Windows NT/2000/XP
Windows 95/98/Me/NT/2000/XP
Important
• The network interface card (IB-1) is an optional.
• PostScript3 option is an optional.
22
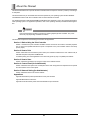
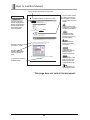
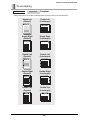
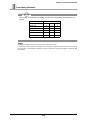
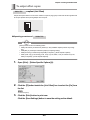
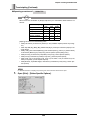
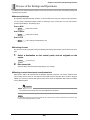
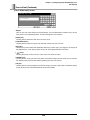
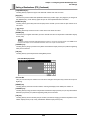
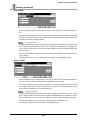
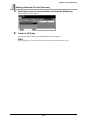
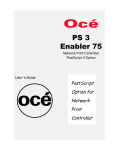
How to read this Manual
Shows an object and feature of a procedure.
PCL5e
Adobe PS3
Two types of printer
drevers, PCL5e Printer
Drever, are explained in
this document. Shows
about which printer
drever explained.
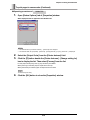
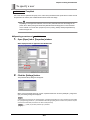
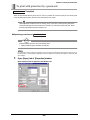
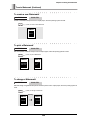
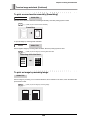
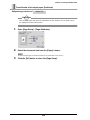
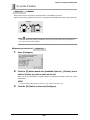
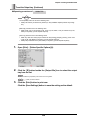
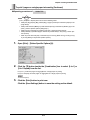
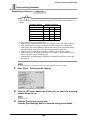
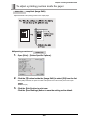
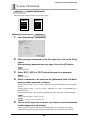
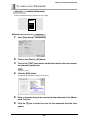
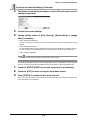
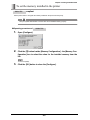
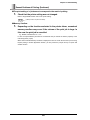
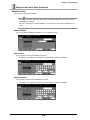
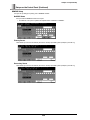
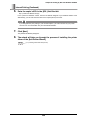
To perfo
rmtest printing to checkthe current setting
To perform test printing to check the current setting
PCL5e
Adobe PS3
Compliant (Wait with Proof)
In this printing system, you can check test printing output and check current setting from the control panel.
This document contains
column spaces in the
body. Types of columns
shown in this way are as
follows.
Use this when printing a large volume, such as multiple sets of page.
Explains cautions and
restrictions or operating
hardware and software.
Operating procedures of
PCL5e
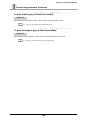
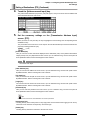
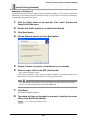
Limitation
Expalains function
principles and other
functions that cannnot
be used together.
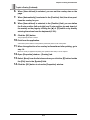
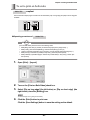
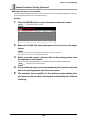
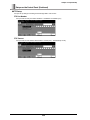
[Wait with Proof] cannot be set in the following case.
• When [Collate] is not available in [Paper] tab
If you attempt to make a setting corresponding to the combination as shown above that cannot
be set on the printer driver, a message will be displayed. Check the details of message and
adjust the relationship with other settings.
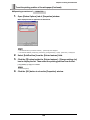
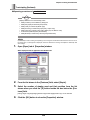
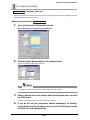
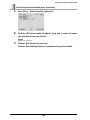
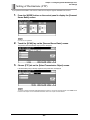
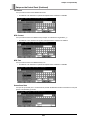
1.
Explains impertant
notices on operating
procedures.
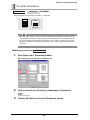
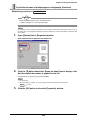
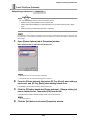
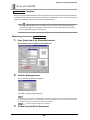
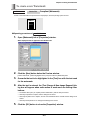
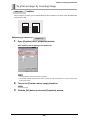
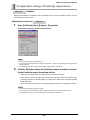
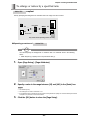
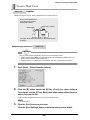
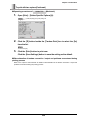
Display the [Paper] tab of the [Properties] window.
When displayed from the application of Windows 98.
Describes operating
procedures.
Explanations to
supplement the body.
Memoes may be
included in the body.
Describes status of
hardware and software
when an operation is
done.
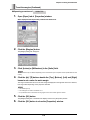
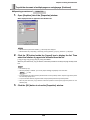
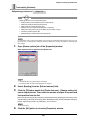
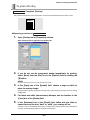
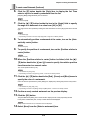
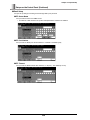
2.
From the list shown in the [Features] field, select [Wait Mode].
[ ] are used for the terms
displayed on the
318
Section 2 How to Print
Shows a page to refer.
Refer to if necessary.
References may be
included in the body.
Hints and Advices on
operating procedures.
This page does not exist in the document.
23
1
Section
Before Using the Print Controller
Chapter 1 Overview of the Print Controller ............... 25
Chapter 2 Connections of the Print Controller .......... 29
Chapter 3 Overview of the Preparation Task ............. 34
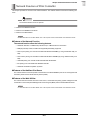
Chapter 1 Overview of the Print Controller
Chapter 1 Overview of the Print Controller
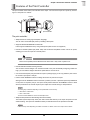
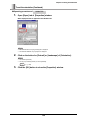
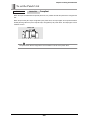
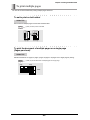
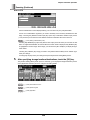
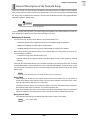
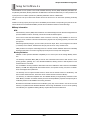
Features of the Print Controller
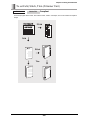
This print controller is the built-in print controller for the copier. You can use the copier as a printer by connecting it to a computer or a network.
Copier
print controller
The print controller:
• Adopts PCL5e as a PDL (page description language).
You can use it as a PostScript3 printer by installing a PS3 option.
• Supports Windows 95/98/Me/NT 4.0/2000/XP.
It also supports a Macintosh OS by using a PS3 option. (Mac OS X is not supported.)
• Includes a standard parallel port (IEEE 1284) and an Ethernet-compatible network card as an option,
enabling you to use the copier as a network printer.
Important
Never use the parallel port and Ethernet at the same time. It may cause a system error.
• Includes standard network scanning features.
You can store scanned images in an internal hard disk in the print controller.By configuring TCP/IP settings, you can send the images via Email or upload them to an FTP server.
• Can receive subsequent print jobs while the copier is printing/copying. It can copy while the print controller receives a print job or a scan job.
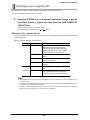
• Has the Printer ECM/EKC function to manage the number of prints on the copier.
Setting the Printer ECM/EKC feature means that, provided you enter a password previously established
on the printer to request a print job, the copier counts printouts based on the ECM/EKC counter to know
when a preset limit is hit, and also rejects a print request from a client having no valid password.
The writing may be different depending on the specification of each country.
• USA market : Printer ECM
• Other : Printer EKC
The term Printer ECM/EKC is used for the description here.
• Adopts E-RDH (Electronic Recirculating Document Handler).
The E-RDH system temporarily stores print data in the E-RDH memory in the copier and prints it as the
selected setting. The copier has 128 MB of memory as standard and can be expanded to 512 MB.
E-RDH memory varies depending on models of machine. For details, refer to the "Copier's User’s Guide."
25
Chapter
1
Chapter 1 Overview of the Print Controller
The Print Controller Functions
The main functions of this print controller fall into three broad categories:
• Print controller features
• Scanning features
• Network features
Important
The network interface card is an optional.
● Print controller features
These features allow you to use the copier as a printer.
When a print job is executed from an application on a computer, the print data is sent to the print controller
via a parallel interface (IEEE 1284) or a network.
The interpreter in the print controller rasterizes the print data to image data (the bitmap extracting process).
The image data is sent to the print engine in the copier via the PCI bus.
The print engine in the copier receives the image data from the video interface card through the PCI bus and
starts printing.
Even while the copier is printing jobs or receiving print data, the print controller can receive print jobs from an
application.
This printing system can continuously print A4/Letter paper at the maximum print speed of 85 ppm (400 dpi/
600 dpi).
Print speed and resolution vary depending on models of machine.
The system supports the duplex function and the finisher function which enables the use of five paper trays,
stapling, folding, stitching and hole-punching.
● Scanning features
You can store original image data (scanned data) scanned from the copier's RADF or the platen glass in the
hard disk in the print controller as TIFF/PDF files and use it in a TWAIN-compliant application such as Adobe
Acrobat. The scanned data can be transmitted as an attached data via Email or uploaded to an FTP server.
When scanning an original image, you can configure image quality, scaling, resolution, scan size, Scan
mode and so on.
The scanning features fall into three categories: "Scan to HDD," "Scan to Email," and "Scan to FTP."
26
Chapter 1 Overview of the Print Controller
The Print Controller Functions (Continued)
● Network features
The network card (optional) can be installed in this print controller. The copier can work as a network printer
with this option.
The network features:
• Select 100Base-TX (Fast Ethernet)/10 Base-T automatically.
• Support multi-protocol (TCP/IP, IPX/SPX, AppleTalk (EtherTalk)).
• Support peer-to-peer printing over TCP/IP from Microsoft Windows 95/98/Me (by using a dedicated
utility).
• Support LPD/LPR printing over TCP/IP for Microsoft Windows NT 4.0/2000/XP (by using a dedicated
utility).
• Support IPP (Internet Printing Protocol). You can print via internet or intranet from Windows 2000/XP.
• Support both Bindery mode and Novell Directory Services (NDS) to accommodate Novell NetWare
print server features.
• Include a HTTP server that supports Java to enable the printing system management in conjunction
with the attached Management Access Program (MAP) and a standard Web browser.
• Allocate IP addresses automatically with DHCP.
• Include a flash memory that allows you to upgrade a firmware via network.
27
Chapter 1 Overview of the Print Controller
Print Controller Options
This print controller has following options. For more detailed information, contact your service representative.
● Add-on memory
For optimum printing performance, expanding the memory capacity is recommended.
Most of the print controller memory is used for rasterizing images (bitmap extracting process), font cache,
form overlay or other functions. Only a small part of the memory is used for system operation.
The basic memory setting for the print controller can print with 1 bit mode (400 dpi/600 dpi) in all paper sizes.
The memory of the print controller can be expanded.
Basic memory, maximum memory and resolution of print controller vary depending on models of machine.
The more memory is in the print controller, the more pages can be rasterized while waiting for a job to print.
When A4 size paper is used, approximately 4,345 KB memory is required to print 1 bit data at 600 dpi.
The E-RDH memory in the copier is used for the print process, which can be expanded.
E-RDH memory varies depending on models of machine. For details, refer to the "Copier's User’s Guide."
The memory capacity of the print controller may be insufficient if:
• Print data for a page to be rasterlized by the print controller is too complicated.
If this is the case, expanding the memory capacity is recommended.
For printouts using features such as Multiple copies, the Booklet mode and the Wait mode, all data about the
entire set of pages rasterized by the print controller (one job) must be stored in the E-RDH memory first.
Therefore, there are occasions when attempting to produce a large number of pages using those features
will not produce the correct printouts.
If such is the case, install additional E-RDH memory in the copier.
● PostScript3 option
Installing the PostScript3 option in the print controller, you can print data from the application on Windows
95/98/Me/NT 4.0/2000/XP or Macintosh with your copier as the PostScript3 printer. Before printing data with
PostScript, you must set up attached Adobe PS3 printer driver in your system.
28
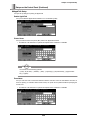
Chapter 2 Connections of the Print Controller
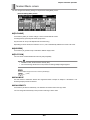
Chapter 2 Connections of the Print Controller
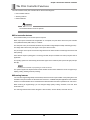
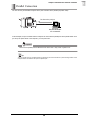
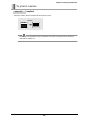
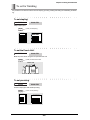
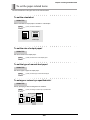
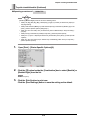
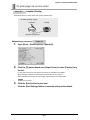
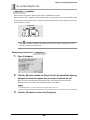
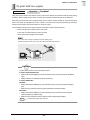
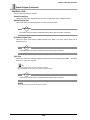
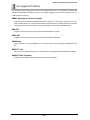
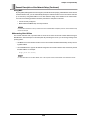
Parallel Connection
You can connect your Windows computer to the print controller via the parallel port (IEEE 1284).
The flow of the print job
Parallel connection
Copier
Computer
Windows 95/98/Me/
NT 4.0/2000/XP
In this example, the print controller and the computer are connected via parallel port with a parallel cable. Once
you set up the printer driver in the computer, you can print from it.
Important
Never use the parallel port and Ethernet at the same time. It may cause a system error.
Tips
You can use the copier as a network printer by executing a print server function or a printer sharing function on the
computer that is connected to the copier via parallel port.
29
Chapter
2
Chapter 2 Connections of the Print Controller
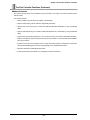
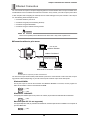
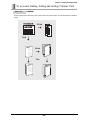
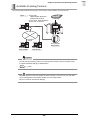
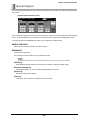
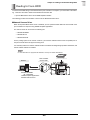
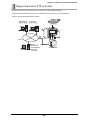
Ethernet Connection
You can connect the copier to computers supporting Ethernet via the network card in the print controller. Several alternatives can be considered in the Ethernet connection. In any of them, you must set up the printer driver
in each computer after configuring the network (such as TCP/IP settings) for the print controller or the computers. The following shows examples of them.
• Connection without a print server
• Connection using IPP (Internet Printing Protocol)
• Connection using Novell NetWare
• Connection using the network scanning function
Important
Never use the parallel port and Ethernet at the same time. It may cause a system error.
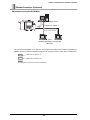
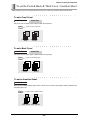
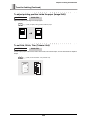
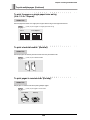
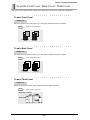
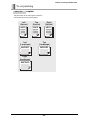
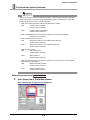
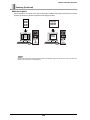
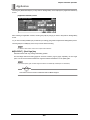
● Connection without a print server
peer to peer
Windows 95/98/Me
100Base-TX/10Base-T
The flow of the print job
Copier
Ipd/Ipr
Windows NT 4.0/2000/XP
AppleTalk
Macintosh
The PS3 option is required to print data from Macintosh.
You can use the copier as the network printer without a print server on the network. If such is the case, the printing protocol is different depending on your OS. Each computer treats the copier as the local printer.
Windows 95/98/Me
The IP peer to peer is used for the connection from Windows 95/98/Me. To connect, use the program "IPP2P" and "IPX-P2P" is stored in the attached CD-ROM.
Reference
(p.544)
Reference
(p.552)
Windows NT 4.0/2000/XP
Use lpd/lpr (the standard print server protocol for TCP/IP) to print data from Windows NT 4.0/2000/XP.
Reference
(p.557)
Macintosh (Mac OS X is not supported)
Use AppleTalk (EtherTalk) to print data from Macintosh; the PS3 option must be installed in the computer to
print from Macintosh.
Reference
(p.581)
30
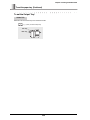
Chapter 2 Connections of the Print Controller
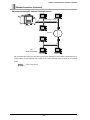
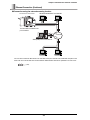
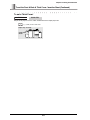
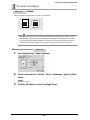
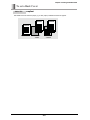
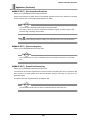
Ethernet Connection (Continued)
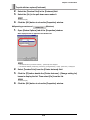
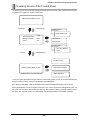
● Connection using IPP (Internet Printing Protocol)
The flow of the print job
Copier
Internet
IPP
Windows 2000/XP
IPP (Internet Printing Protocol) is the protocol used to print data from the printer that is connected Internet or
Intranet. When you print data with IPP, TCP/IP is used. Each computer treats the copier as the network
printer.
Reference
(p.564) Internet Printing
31
Chapter 2 Connections of the Print Controller
Ethernet Connection (Continued)
● Connection using Novell NetWare
NetWare server
100Base-TX/10Base-T
The flow of the print job
Copier
Client
Windows 95/98/Me/NT 4.0/2000/XP,
Macintosh
You can use Novell NetWare, too. In this case, the configuration procedures may be different depending on
NetWare version or resource management method. Each computer treats the copier as the network printer.
Reference
(p.568) Setup for NetWare 3.x
Reference
(p.569) Setup for NetWare 4.x
The PS3 option is required to print data from Macintosh.
32
Chapter 2 Connections of the Print Controller
Ethernet Connection (Continued)
● Connection using the network scanning function
The flow of the scanned data
Windows 95/98/Me/NT 4.0/2000/XP
Copier
The hard disk is installed in the
print controller
Internet
SMTP(Mail) Server/FTP Server
You can retrieve scanned data stored in the hard disk of the print controller from a Windows computer in the
same LAN. The scanned data can be transmitted as attached data via Email or uploaded to an FTP server.
Reference
(p.432)
33
Chapter 3 Overview of the Preparation Task
Chapter 3 Overview of the Preparation Task
Using as a Printer
You must decide whether to connect the computer to the print controller with a parallel connection or an Ethernet connection. The following shows the outline of the preparation procedures for each connection.
● Parallel connection
You can use the copier from a computer running Windows 95/98/Me/NT 4.0/2000/XP with a parallel connection.
Refer to "Section 2 How to Print" for detailed procedures.
Reference
1.
2.
(p.37)
Connect the computer to the print controller with a parallel cable.
Install the printer driver in the computer.
The standard Kyoceramita PCL5e printer driver and the optional Adobe PS3 printer driver are available as printer drivers.
3.
Set up the property of the printer as required.
● Ethernet connection
You can use the copier from a computer in which Windows 95/98/Me/NT 4.0/2000/XP is running in the
Ethernet connection. Using Adobe PS3 printer driver, you can use it from Macintosh.
Refer to "Section 5 Network Settings (for Administrator)" for detailed procedures.
Reference
1.
(p.512)
Connect the print controller to Ethernet with an UTP cable.
Configure computers that are connected to the LAN first.
2.
Set up the network configuration such as the IP address for the print
controller and so on.
Configure the IP address from the control panel of the copier for the first time.
3.
Install the printer driver in the computer.
The standard Kyoceramita PCL5e printer driver and the optional Adobe PS3 printer driver are available as the printer driver.
4.
Set up the property of the printer as required.
Important
The network interface card is optional.
34
Chapter
3
Chapter 3 Overview of the Preparation Task
Printer Driver
The printer driver is the software that is required to print data with a printer. It must be installed in a using computer. The standard Kyoceramita PCL5e printer driver and the optional Adobe PS3 printer driver are provided
for this printing system.
Refer to "Section 2 How to Print" for detailed information on the printer driver.
Reference
(p.37)
The installation procedures of each driver are different depending on your OS or the connection between the
copier and the computer. Install it with the appropriate procedures.
35
Chapter 3 Overview of the Preparation Task
Using as a Network Scanner
You must connect the printing system to Ethernet (100Base-TX/10Base-T) to use the network scanning features.
Important
The network interface card is optional.
Refer to "Section 5 Network Settings (for Administrator)" for detailed procedures on connecting to Ethernet.
Reference
(p.512)
You can retrieve scanned data stored in the hard disk installed in the print controller from the computer in which
Windows 95/98/Me/NT 4.0/2000/XP.
It is recommended that you register the destination from the control panel of the copier before sending the
scanned data via Email or upload it to an FTP server.
The following shows the outline of the preparation procedures of the network scanner.
Refer to "Section 3 How to Scan" for detailed information on the network scanner features.
Reference
1.
(p.431)
Connect the print controller to Ethernet with a UTP cable.
Configure computers that are connected to the LAN first.
2.
Set up the network configuration such as the IP address for the print
controller and so on.
Configure the IP address from the control panel of the copier for the first time.
3.
Register the destination.
Register the SMTP server or the FTP server to which the scanned data is sent from the control panel
of the copier.
4.
Install the network scanner driver in the computer.
Tips
The network scanner driver is required to use your computer to retrieve or delete the scanned data stored in the
hard disk of the print controller.
Important
When scanning large amount of drafts, print data will not be printed while the scanned data is
transferred to the hard disk of the print controller.
Wait until the transfer completes.
36
2
Section
How to Print
Chapter 4 How to Setup ............................................... 38
Chapter 5 Printing from Windows ............................ 129
Chapter 6 Printing from Macintosh .......................... 331
Chapter 7 Tandem Print ............................................. 417
Chapter 8 Managing the Number of Prints .............. 421
Chapter 9 Troubleshooting ....................................... 425
Chapter 4 How to Setup
Chapter 4 How to Setup
The Flow of the Setup
The setup procedures are required before using this printing system.
The setup procedures are the series of preparation to connect the copier to the computer and install the printer
driver in the computer.
If you use this printing system in your computer for the first time, perform the setup as shown in "New Setup."
If you have been using this printing system and you want to install a new printer driver, perform the setup as
shown in "Updating a Printer Driver."
● New Setup
To perform the setup for the first time:
1
Prepare items for the setup.
Reference
2
Connect the copier to the computer.
Reference
3
(p.41)
Install the printer driver.
Reference
4
(p.40)
(p.42)
Print the test print.
Reference
(p.114)
38
Chapter
4
Chapter 4 How to Setup
The Flow of the Setup (Continued)
● Updating a Printer Driver
To update the current printer driver:
1
Prepare items for the setup.
Reference
2
(p.40)
Delete the current printer driver.
Reference
(p.119)
3
Restart the computer.
4
Install the printer driver.
Reference
5
(p.42)
Print the test print.
Reference
(p.114)
The installation procedures of the printer driver may be different depending on the printer driver or OS.
The deletion procedures of the printer driver may be different depending on the OS.
39
Chapter 4 How to Setup
Items Required for the Setup
The following items are required for the setup.
Prepare them before starting the setup:
• User Software CD
The contents of the User Software CD
Reference
(p.19)
• Parallel cable (centronics IEEE 1284)
or
Ethernet cable (100Base-TX or 10Base-T)
Important
Use the parallel cable if you want to connect the copier to the computer in parallel.
Reference
(p.29) Parallel Connection
Use the Ethernet cable if you want to connect the copier to the computer in Ethernet.
Reference
(p.30) Ethernet Connection
40
Chapter 4 How to Setup
Connecting the copier
Connect the copier to the computer or the network after preparing the items required for the setup.
The following two connection types are available:
● Parallel connection
This is the connection type to directly connect this printing system to the computer with a parallel cable.
Connect the parallel connecter at the back of this printing system to the parallel connecter at the back of the
computer directly with the parallel cable.
Reference
(p.29) Parallel Connection
● Ethernet connection
This is the connection type to take if you want to use this printing system on the network.
Connect the Ethernet connector (8-pin modular connector) on the optional network interface card at the back
of this printing system to the network with the Ethernet cable.
Reference
(p.30) Ethernet Connection
41
Chapter 4 How to Setup
Installing a Printer Driver
Make sure that the copier is connected to the computer or network before installing a printer driver. The installation procedures may be different depending on the printer driver or OS.
Installing on Windows 95/98/Me
• Install Kyoceramita PCL5e printer driver
Reference
(p.43) Installing to Windows 95/98/Me (PCL5e)
• Install Adobe PS3 printer driver (option)
Reference
(p.49) Installing to Windows 95/98/Me (PS3)
Installing on Windows NT 4.0
• Install Kyoceramita PCL5e printer driver
Reference
(p.55) Installing to Windows NT4.0 (PCL5e)
• Install Adobe PS3 printer driver (option)
Reference
(p.63) Installing to Windows NT4.0 (PS3)
Installing on Windows 2000
• Install Kyoceramita PCL5e printer driver
Reference
(p.71) Installing to Windows 2000 (PCL5e)
• Install Adobe PS3 printer driver (option)
Reference
(p.81) Installing to Windows 2000 (PS3)
Installing on Windows XP
• Install Kyoceramita PCL5e printer driver
Reference
(p.91) Installing to Windows XP (PCL5e)
• Install Adobe PS3 printer driver (option)
Reference
(p.101) Installing to Windows XP (PS3)
Installing on Macintosh (Adobe PS3 printer driver (option) only)
Reference
(p.111) Installing to Macintosh (PS3)
42
Chapter 4 How to Setup
Installing to Windows 95/98/Me (PCL5e)
To install the printer driver to Windows 95/98/Me, perform the following steps.
Please keep the "User Software CD" on hand; it is required to install the printer driver.
● Start the Add Printer Wizard
1.
Turn on the computer and start Windows 95/98/Me.
Exit from all active Windows applications, if required.
2.
Click the [Start] button of the task bar. Then, select [Settings] from the
Start menu to click [Printers] from the sub-menu.
The [Printers] window will appear.
3.
Double-click the [Add Printer] icon of the [Printers] window.
The [Add Printer Wizard] window will appear for setting the printer.
4.
Click the [Next] button.
The next [Add Printer Wizard] window will appear.
If your computer does not have the network setting, go to step 6.
43
Chapter 4 How to Setup
Installing to Windows 95/98/Me (PCL5e) (Continued)
5.
Select [Local printer] or [Network printer].
When the printing system is directly connected to a computer in which the printer driver will be
installed, select [Local printer].
When personal computers are connected to a network and you want to print via the network, select
[Network printer].
Tips
When using the network printer, it is necessary to complete the network settings on the network interface card and
on the personal computers. For details, see your network administrator.
If your computer does not have the network setting, go to "When selecting the [Local Printer]" step 1 .
Reference
6.
(p.45)
Click the [Next] button.
If you have selected the [Local printer] at step 5, the window to select the printer manifacturer and
model will appear. In this case, go to "When selecting the [Local Printer]".
Reference
(p.45)
If you have selected [Network printer] at step 5, the window to set the network path or queue name will
appear. In this case, go to "When selecting the [Network printer]".
Reference
(p.48)
44
Chapter 4 How to Setup
Installing to Windows 95/98/Me (PCL5e) (Continued)
● When selecting the [Local Printer]
1.
Click the [Have Disk] button.
The [Install From Disk] window will appear.
2.
Click the [Browse] button.
The [Open] window will appear.
3.
4.
5.
Set the "User Software CD" in the CD-ROM drive.
6.
Click the [OK] button.
Change [Drive] to CD-ROM drive.
Select the [oemsetup.inf] file in the "\English\Printer\Win9x_Me" folder
of the "User Software CD" and click the [OK] button.
The next [Add Printer Wizard] window to select the printer manufacturer and model will appear.
45
Chapter 4 How to Setup
Installing to Windows 95/98/Me (PCL5e) (Continued)
7.
Be sure that in the list of [Printers], [Kyocera Mita KM-8530 PCL] is
highlighted.
[Kyocera Mita KM-8530 PCL] is the printer name of the default.
The model name of print controller is displayed in [xxx].
8.
Click the [Next] button.
The next [Add Printer Wizard] window to assign a port will appear.
9.
Select the port to which the printing system is connected.
Select LPT port when the printing system is used as a local printer.
10.Click the [Next] button.
The next [Add Printer Wizard] window to specify the printer name will appear.
11. In the [Printer name] text box, check the printer name.
If you want to change the printer name, enter the new printer name in the [Printer name] text box.
12.Select whether to use this printer as the default printer or not.
Select [Yes] to use this printer as the default printer, and select [No] to not.
If you are installing the first printer to your computer, the [Default printer] setting will not appear. The first printer
installed automatically becomes the default printer.
46
Chapter 4 How to Setup
Installing to Windows 95/98/Me (PCL5e) (Continued)
13.Click the [Next] button.
The next [Add Printer Wizard] window to perform the test print will appear.
14.Select Whether to perform the test print or not.
Select [Yes (recommended)] to perform the test print, or select [No] to not.
15.Click the [Finish] button.
Necessary files will be copied from the "User Software CD" to complete the installation.
If you have selected [Yes (recommended)] at step 15, printing of the test page starts.
16.Make sure the test page printed properly.
If you have selected [No] at step 15, the test page will not be printed.
If the test page is printed properly, click the [Yes] button.
17.The installation is completed.
The printer driver of the printing system becomes available without restarting your computer.
47
Chapter 4 How to Setup
Installing to Windows 95/98/Me (PCL5e) (Continued)
● When selecting the [Network printer]
1.
If you have selected the [Network printer] at step 5 of "Start the Add
Printer Wizard" type the [Network path or queue name] text box and
click the [Next] button.
Tips
If you don't know its name, click the [Browse] button to view available network printers.
If the printer driver for Windows 95/98/Me is saved in the server, the window to check/change the
printer name will appear. In this case, go to step 12 of "When selecting the [Local Printer]".
Reference
(p.46)
If the printer driver for Windows 95/98/Me is not saved in the server, the window to select the printer
manufacturer and model will appear. In this case, go to step 1 of "When selecting the [Local Printer]".
Reference
(p.45)
48
Chapter 4 How to Setup
Installing to Windows 95/98/Me (PS3)
To install the Adobe PS3 printer driver to Windows95/98/Me, perform the following steps.
Please keep the "User Software CD" on hand; it is required to install the printer driver.
● Start the Add Printer Wizard
1.
Turn on the computer and start Windows 95/98/Me.
Exit from all active Windows applications, if required.
2.
Click the [Start] button of the task bar. Then, select [Settings] from the
Start menu to click [Printers] from the sub-menu.
The [Printers] window will appear.
3.
Double-click the [Add Printer] icon of the [Printers] window.
The [Add Printer Wizard] window will appear to set the printer.
4.
Click the [Next] button.
The next [Add Printer Wizard] window will appear.
49
Chapter 4 How to Setup
Installing to Windows 95/98/Me (PS3) (Continued)
5.
Select the [Local printer] or the [Network printer].
When the printing system is directly connected to a computer in which the printer driver will be
installed, select [Local printer].
When personal computers are connected to a network and you want to print via the network, select
[Network printer].
Tips
When using the network printer, it is necessary to complete the network settings on the network interface card and
on the personal computers. For details, see your network administrator.
If your computer does not have the network setting, go to "When selecting the [Local Printer]" step 1 .
Reference
6.
(p.45)
Click the [Next] button.
If you have selected the [Local printer] at step 5, the window to select the printer manufacturer and
model will appear. In this case, go to "When selecting the [Local Printer]".
Reference
(p.45)
If you have selected [Network printer] at step 5, the window to set the network path or queue name will
appear. In this case, go to "When selecting the [Network printer]".
Reference
(p.48)
50
Chapter 4 How to Setup
Installing to Windows 95/98/Me (PS3) (Continued)
● When selecting the [Local printer]
1.
Click the [Have Disk] button.
The [Install From Disk] window will appear.
2.
Click the [Browse] button.
The [Open] window will appear.
3.
4.
5.
Set the "User Software CD" in the CD-ROM drive.
6.
Click the [OK] button.
Change [Drive] to CD-ROM drive.
Select the [oemsetup.inf] file in the "\English\Driver\AdobePS\
Win9x_Me" folder of the "User Software CD" and click the [OK] button.
The next [Add Printer Wizard] window to select the printer manufacturer and model will appear.
51
Chapter 4 How to Setup
Installing to Windows 95/98/Me (PS3) (Continued)
7.
Be sure that in the list of [Printers], [Kyocera Mita KM-8530 PCL] is
highlighted.
[Kyocera Mita KM-8530 PCL] is the printer name of the default.
The model name of print controller is displayed in [xxx].
8.
Click the [Next] button.
The next [Add Printer Wizard] window to assign a port will appear.
9.
Select the port to which the printing system is connected.
Select LPT port when the printing system is used as a local printer.
10.Click the [Next] button.
The next [Add Printer Wizard] window to specify the printer name will appear.
11. In the [Printer name] text box, check the printer name.
If you want to change the printer name, enter the new printer name in the [Printer name] text box.
12.Select whether to use this printer as the default printer or not.
Select [Yes] to use this printer as the default printer, and select [No] to not.
If you are installing the first printer to your computer, the [Default printer] setting will not appear. The first printer
installed automatically becomes the default printer.
52
Chapter 4 How to Setup
Installing to Windows 95/98/Me (PS3) (Continued)
13.Click the [Next] button.
The next [Add Printer Wizard] window to perform the test print will appear.
14.Select Whether to perform the test print or not.
Select [Yes (recommended)] to perform the test print, or select [No] to not.
15.Click the [Finish] button.
Necessary files will be copied from the "User Software CD" to complete the installation.
If you have selected [Yes (recommended)] at step 15, performing of the test print starts.
16.Make sure the test page printed properly.
If you have selected [No] at step 15, the test page will not be printed.
If the test page is printed properly, click the [Yes] button.
17.The installation is completed.
The printer driver of the printing system becomes available without restarting your computer.
53
Chapter 4 How to Setup
Installing to Windows 95/98/Me (PS3) (Continued)
● When selecting the [Network printer]
1.
If you have selected the [Network printer] at step 5 of "Start the Add
Printer Wizard," type the [Network path or queue name] text box and
click the [Next] button.
Tips
If you don't know its name, click the [Browse] button to view available network printers.
If the printer driver for Windows 95/98/Me is saved in the server, the window to check/change the
printer name will appear. In this case, go to step 12 of "When selecting the [Local printer]".
Reference
(p.52)
If the printer driver for Windows 95/98/Me is not saved in the server, the window to select the printer
manufacturer and model will appear. In this case, go to step 1 of "When selecting the [Local printer]".
Reference
(p.51)
54
Chapter 4 How to Setup
Installing to Windows NT4.0 (PCL5e)
To install the Kyoceramita PCL5e printer driver to Windows NT4.0, perform the following steps. The installation
should be performed by a qualified system administrator or printer administrator.
● Start the Add Printer Wizard
1.
2.
3.
Turn on the computer and start Windows NT4.0.
Log on as an administrator (or a user entitled to install a printer).
Click the [Start] button of the task bar. Then, select [Settings] of the
Start menu and click [Printers] from the sub-menu.
The [Printers] window will appear.
Exit from all active Windows applications, if required.
4.
Double-click the [Add Printer] icon of the [Printers] window.
The [Add Printer Wizard] window will appear to add the printer.
5.
Select [My computer] or [Network printer server].
When the printing system is directly connected to a computer in which the printer driver will be
installed, select [My computer]. When the printing system is managed in a computer in which the
printer driver will be installed, also select [My computer].
When personal computers or workstations are connected to the network and you want to print via the
network, select [Network printer server].
Tips
When using the network printer server, it is necessary to complete the network settings on the network interface
card and on the personal computers. For details, see your network administrator.
If your computer does not have the network setting, go to "When selecting [My computer]" step 1.
Reference
(p.57)
55
Chapter 4 How to Setup
Installing to Windows NT4.0 (PCL5e) (Continued)
6.
Click the [Next] button.
If you have selected [My Computer] at step 5, the window to select the printer port will appear. In this
case, go to "When selecting the My computer."
If you have selected the [Network printer server] at step 5, the [Printer Connection] window will
appear. In this case, go to "When selecting the Network printer server."
Reference
(p.57) When selecting [My computer]
Reference
(p.61) When selecting the [Network printer server]
56
Chapter 4 How to Setup
Installing to Windows NT4.0 (PCL5e) (Continued)
● When selecting [My computer]
1.
If you have selected [My Computer] at step 5 of "Start the Add Printer
Wizard," select the checkbox of the port connecting the printer, and
click the [Next] button.
Select the port to which the printing system is directly connected.
The window to select the printer manufacturer and model will appear.
If you want to print directly to the printing system via the network, select the LPR port. For details, see your network
administrator.
Refer to Section 5, "Network Settings (for Administrator)" for more details.
Reference
2.
(p.557) LPD/LPR Setup
Click the [Have Disk] button.
The [Install From Disk] window will appear.
3.
Click the [Browse] button.
The [Locate File] window will appear.
57
Chapter 4 How to Setup
Installing to Windows NT4.0 (PCL5e) (Continued)
4.
5.
6.
7.
Set the "User Software CD" in the CD-ROM drive.
Change [Look in] to CD-ROM drive.
View the [\English\Printer\WinNT_2000_Xp] folder in the list.
Click [Printer.inf] in the [File name] text box, then click the [Open] button.
The [Install From Disk] window will appear.
8.
Click the [OK] button.
The next [Add Printer Wizard] window to select the manufacturer and model of the printer will appear.
9.
Be sure that in the list of [Printers], [Kyocera Mita KM-8530 PCL] is
highlighted.
[Kyocera Mita KM-8530 PCL] is the printer name of the default.
The model name of print controller is displayed in [xxx].
10.Click the [Next] button.
The next [Add Printer Wizard] window will appear.
11. In the [Printer name] text box, check the printer name.
If you want to change the printer name, enter the new printer name in the [Printer name] text box.
58
Chapter 4 How to Setup
Installing to Windows NT4.0 (PCL5e) (Continued)
12.Select whether to use this printer as the default printer or not.
Select [Yes] to use this printer as the default printer, and select [No] to not.
If you are installing the first printer to your computer, the [Default printer] setting will not appear. The first printer
installed automatically becomes the default printer.
13.Click the [Next] button.
The next [Add Printer Wizard] window will appear.
14.Select whether to share the printer or not.
Select [Shared] or [Not shared] checkbox.
You can select the Network Client OS using the shared printer from the list displayed at the lower part
of the window.
15.Click the [Next] button.
The next [Add Printer Wizard] window to perform the test print will appear.
16.Select Whether to perform the test print or not.
Select [Yes] to perform the test print, or select [No] to not.
Printing the test page is also possible after the installation of the printer driver.
Reference
(p.114) Test Page Print
17.Click the [Finish] button.
Necessary files will be copied from the "User Software CD" to complete the installation.
If you have selected [Yes (recommended)] at step 16, performing of the test print starts.
59
Chapter 4 How to Setup
Installing to Windows NT4.0 (PCL5e) (Continued)
18.Make sure the test page printed properly.
If you have selected [No] at step 16, the test page will not be printed.
If the test page is printed properly, click the [Yes] button.
19.The installation is completed.
The printer driver of the printing system becomes available without restarting your computer.
60
Chapter 4 How to Setup
Installing to Windows NT4.0 (PCL5e) (Continued)
● When selecting the [Network printer server]
1.
If you have selected the [Network printer server] at step 5 of "Start the
Add Printer Wizard," type the network path in the [Printer] textbox, and
click the [OK] button.
Tips
If you don't know the network path, search in the [Shared Printer] list to view and select available network printers.
Important
Depending on your server and the state of your computer, steps differ as follows.
• If the printer driver for Windows NT4.0 is installed in the server and a different printer is installed in the
computer:
Go to step 2.
Reference
(p.62)
• If the printer driver for Windows NT4.0 is installed in the server and the printer will be the first printer
installed on the computer:
Go to step 3.
Reference
(p.62)
• If the printer driver for Windows NT4.0 is not installed in the server and a different printer is installed in
the computer:
A message is displayed. If you click [OK], the window to select the printer manufacturer and model will
appear. Follow the same procedure from step 2 to 10 of "When selecting [My computer]," and install
the printer driver for Windows NT4.0.
Reference
(p.57)
After the installation, go to step 2.
Reference
(p.62)
• If the printer driver for Windows NT4.0 is not installed in the server and the printer will be the first printer
installed on the computer:
• A message is displayed. If you click [OK], the window to select the printer manufacturer and model will
appear. Follow the same procedure from step 2 to 10 of "When selecting [My computer]," and install
the printer driver for Windows NT4.0.
Reference
(p.57)
After the installation, go to step 3.
Reference
(p.62)
61
Chapter 4 How to Setup
Installing to Windows NT4.0 (PCL5e) (Continued)
2.
Select whether to use this printer as the default printer or not, and follow the procedure from step 15 of "When selecting [My computer]."
Select [Yes] to use this printer as the default printer, and select [No] to not.
Reference
3.
(p.59)
Click the [Finish] button.
The installation is completed. The printer driver of the printing system becomes available without
restarting your computer.
62
Chapter 4 How to Setup
Installing to Windows NT4.0 (PS3)
To install the AdobePS3 printer driver to Windows NT4.0, perform the following steps. The installation
should be performed by a qualified system administrator or printer administrator.
● Start the Add Printer Wizard
1.
2.
3.
Turn on the computer and start Windows NT4.0.
Log on as an administrator (or a user entitled to install a printer).
Click the [Start] button of the task bar. Then, select [Settings] of the
Start menu and click [Printers] from the sub-menu.
The [Printers] window will appear.
Exit from all active Windows applications, if required.
4.
Double-click the [Add Printer] icon of the [Printers] window.
The [Add Printer Wizard] window will appear to add the printer.
5.
Select [My Computer] or the [Network printer server].
When the printing system is directly connected to a computer in which the printer driver will be
installed, select [My computer]. When the printing system is managed in a computer in which the
printer driver will be installed, also select [My computer].
When personal computers or workstations are connected to the network and you want to print via the
network, select [Network printer server].
Tips
When using the network printer server, it is necessary to complete the network settings on the network interface
card and on the personal computers. For details, see your network administrator.
If your computer does not have the network setting, go to "When selecting [My computer]" step 1.
Reference
(p.65)
63
Chapter 4 How to Setup
Installing to Windows NT4.0 (PS3) (Continued)
6.
Click the [Next] button.
If you have selected [My Computer] at step 5, the window to select the printer port will appear. In this
case, go to "When selecting [My computer]".
Reference
(p.65) When selecting [My computer]
If you have selected the [Network printer server] at step 5, the [Printer Connection] window will
appear. In this case, go to "When selecting the [Network printer server]".
Reference
(p.69) When selecting the [Network printer server]
64
Chapter 4 How to Setup
Installing to Windows NT4.0 (PS3) (Continued)
● When selecting [My computer]
1.
If you have selected [My Computer] at step 5 of "Start the Add Printer
Wizard," select the checkbox of the port connecting the printer, and
click the [Next] button.
Select the port to which the printing system is directly connected.
The window to select the printer manufacturer and model will appear.
If you want to print directly to the printing system via the network, select the LPR port. For details, see your network administrator.
Refer to Section 5, "Network Settings (for Administrator)" for more details.
Reference
2.
(p.557) LPD/LPR Setup
Click the [Have Disk] button.
The [Install From Disk] window will appear.
65
Chapter 4 How to Setup
Installing to Windows NT4.0 (PS3) (Continued)
3.
Click the [Browse] button.
The [Locate File] window will appear.
4.
5.
6.
7.
Set the "User Software CD" in the CD-ROM drive.
Change [Look in] to CD-ROM drive.
View the [\English\Driver\AdobePS\WinNT] folder in the list.
Click [OEMSETUP.inf] in the list of [File name] text box, then click the
[Open] button.
The [Install From Disk] window will appear.
8.
Click the [OK] button.
The next [Add Printer Wizard] window to select the manufacturer and model of the printer will appear.
9.
Be sure that in the list of [Printers], [Kyocera Mita KM-8530 PostScript]
is highlighted.
[Kyocera Mita KM-8530 PostScript] is the printer name of the default.
The model name of print controller is displayed in [xxx].
66
Chapter 4 How to Setup
Installing to Windows NT4.0 (PS3) (Continued)
10.Click the [Next] button.
The next [Add Printer Wizard] window will appear.
11. In the [Printer name] text box, check the printer name.
If you want to change the printer name, enter the new printer name in the [Printer name] text box.
12.Select whether to use this printer as the default printer or not.
Select [Yes] to use this printer as the default printer, and select [No] to not.
If you install a printer to the computer for the first time, [Default printer] setting will not appear, and the first printer
installed will be the default printer.
13.Click the [Next] button.
The next [Add Printer Wizard] window to select whether to share the printer will appear.
14.Select whether to share the printer or not.
Select [Shared] or [Not shared] checkbox.
You can select the Network Client OS using the shared printer from the list displayed at the lower part
of the window.
67
Chapter 4 How to Setup
Installing to Windows NT4.0 (PS3) (Continued)
15.Click the [Next] button.
The next [Add Printer Wizard] window to perform the test print will appear.
16.Select Whether to perform the test print or not.
Select [Yes] to perform the test print, or select [No] to not.
Printing the test page is also possible after the installation of the printer driver.
Reference
(p.114) Test Page Print
17.Click the [Finish] button.
Necessary files will be copied from the "User Software CD" to complete the installation.
If you have selected [Yes (recommended)] at step 16, performing of the test print starts.
18.Make sure the test page printed properly.
If you have selected [No] at step 16, the test page will not be printed.
If the test page is printed properly, click the [Yes] button.
19.The installation is completed.
The printer driver of the printing system becomes available without restarting your computer.
68
Chapter 4 How to Setup
Installing to Windows NT4.0 (PS3) (Continued)
● When selecting the [Network printer server]
1.
If you have selected the [Network printer server] at step 5 of "Start the
Add Printer Wizard," type the network path in the [Printer] textbox, and
click the [OK] button.
Tips
If you don't know the network path, search in the [Shared Printer] list to view and select available network printers.
Important
Depending on your server and the state of your computer, steps differ as follows.
• If the printer driver for Windows NT4.0 is installed in the server and a different printer is installed in the
computer:
Go to step 2.
Reference
(p.70)
• If the printer driver for Windows NT4.0 is installed in the server and the printer will be the first printer
installed on the computer:
Go to step 3.
Reference
(p.70)
• If the printer driver for Windows NT4.0 is not installed in the server and a different printer is installed in
the computer:
A message is displayed. If you click [OK], the window to select the printer manufacturer and model will
appear. Follow the same procedure from step 2 to 10 of "When selecting [My computer],"and install the
printer driver for Windows NT4.0.
Reference
(p.65)
After the installation, go to step 2.
Reference
(p.70)
• If the printer driver for Windows NT4.0 is not installed in the server and the printer will be the first printer
installed on the computer:
• A message is displayed. If you click [OK], the window to select the printer manufacturer and model will
appear. Follow the same procedure from step 2 to 10 of "When selecting [My computer]," and install
the printer driver for Windows NT4.0.
Reference
(p.65)
After the installation, go to step 3.
Reference
(p.70)
69
Chapter 4 How to Setup
Installing to Windows NT4.0 (PS3) (Continued)
2.
Select whether to use this printer as the default printer or not, and follow the procedure from step 15 of "When selecting [My computer]."
Select [Yes] to use this printer as the default printer, and select [No] to not.
Reference
3.
(p.68)
Click the [Finish] button.
The installation is completed. The printer driver of the printing system becomes available without
restarting your computer.
70
Chapter 4 How to Setup
Installing to Windows 2000 (PCL5e)
To install the Kyoceramita PCL5e printer driver to Windows 2000, perform the following steps.
The installation should be performed by a qualified system administrator or printer administrator.
● Start the Add Printer Wizard
1.
2.
3.
Turn on the computer and start Windows 2000.
Log on as an administrator (or a user entitled to install a printer).
Click the [Start] button of the task bar. Then, select [Settings] of the
Start menu and click [Printers] from the sub-menu.
The [Printers] window will appear.
Exit from all active Windows applications, if required.
4.
Double-click the [Add Printer] icon of the [Printers] window.
The [Add Printer Wizard] window will appear to add the printer.
71
Chapter 4 How to Setup
Installing to Windows 2000 (PCL5e) (Continued)
5.
Click the [Next] button.
The next [Add Printer Wizard] window will appear.
6.
Select the [Local printer] or the [Network printer].
When the printing system is directly connected to a computer in which the printer driver will be
installed, select [Local printer]. When the printing system is managed in a computer in which the
printer driver will be installed, also select [Local printer].
When selecting the [Local printer], turn the [Automatically detect and install my Plug and Play
printer] setting "off".
When personal computers or workstations are connected to the network and you want to print via the
network, select [Network printer].
Tips
When using the network printer, it is necessary to complete the network settings on the network interface card and
on the personal computers. For details, see your network administrator.
If your computer does not have the network setting, go to "When selecting the [Local printer]" step 1 .
Reference
(p.74)
72
Chapter 4 How to Setup
Installing to Windows 2000 (PCL5e) (Continued)
7.
Click the [Next] button.
If you have selected the [Local printer] at step 6, the window to select the printer Port will appear. In
this case, go to "When selecting the [Local printer]".
If you have selected [Network printer] at step 6, the window to set the printer name will appear. In this
case, go to "When selecting the [Network printer]".
73
Chapter 4 How to Setup
Installing to Windows 2000 (PCL5e) (Continued)
● When selecting the [Local printer]
1.
If you have selected [Local printer] at step 6 of "Start the Add Printer
Wizard", select the port connecting the printer, and click the [Next]
button.
Select the port to which the printing system is directly connected.
The window to select the printer manufacturer and model will appear.
If you want to print directly to the printing system via the network, select the LPR port. For details, see your network
administrator.
Refer to Section 5, "Network Settings (for Administrator)" for more details.
Reference
2.
(p.557) LPD/LPR Setup
Click the [Have Disk] button.
The [Install From Disk] window will appear.
74
Chapter 4 How to Setup
Installing to Windows 2000 (PCL5e) (Continued)
3.
Click the [Browse] button.
The [Locate File] window will appear.
4.
5.
6.
7.
Set the "User Software CD" in the CD-ROM drive.
Change [Look in] to CD-ROM drive.
View the [\English\Printer\WinNT_2000_Xp] folder in the list.
Click [Printer.inf] in the [File name] text box, then click the [Open] button.
The [Install From Disk] window will appear.
8.
Click the [OK] button.
The next [Add Printer Wizard] window to select the manufacturer and model of the printer will appear.
9.
Be sure that in the list of [Printers], [Kyocera Mita KM-8530 PCL] is
highlighted.
[Kyocera Mita KM-8530 PCL] is the printer name of the default.
The model name of print controller is displayed in [xxx].
75
Chapter 4 How to Setup
Installing to Windows 2000 (PCL5e) (Continued)
10.Click the [Next] button.
The next [Add Printer Wizard] window will appear.
11. In the [Printer name] text box, check the printer name.
If you want to change the printer name, enter the new printer name in the [Printer name] text box.
12.Select whether to use this printer as the default printer or not.
Select [Yes] to use this printer as the default printer, and select [No] to not.
If you are installing the first printer to your computer, the [Default printer] setting will not appear. The first printer
installed automatically becomes the default printer.
13.Click the [Next] button.
The next [Add Printer Wizard] window will appear.
14.Select whether to share the printer or not.
Select [Share as] or [Do not share this printer] checkbox.
76
Chapter 4 How to Setup
Installing to Windows 2000 (PCL5e) (Continued)
15. Click the [Next] button.
If you have selected [Do not share this printer] at step 14, the next [Add Printer Wizard] window will
appear. In this case, go to step 18.
Reference
(p.78)
If you have selected [Share as] at step 14, the next [Add Printer Wizard] window will appear. In this
case, go to step 16.
Reference
(p.77)
16.If you have selected [Share as] at step 14,
enter the location of the
shared printer and comment in the [Location] and [Comment] textbox.
77
Chapter 4 How to Setup
Installing to Windows 2000 (PCL5e) (Continued)
17.Click the [Next] button.
The next [Add Printer Wizard] window to perform the test print will appear.
18.Select Whether to perform the test print or not.
Select [Yes (recommended)] to perform the test print, or select [No] to not.
Printing the test page is also possible after the installation of the printer driver.
Reference
(p.114) Test Page Print
19.Click the [Next] button.
The [Add Printer Wizard] completion window will appear.
78
Chapter 4 How to Setup
Installing to Windows 2000 (PCL5e) (Continued)
20.Click the [Finish] button.
[Digital Signature Not Found] window will appear.
21.Click the [Yes] button.
Necessary files will be copied from the "User Software CD" to complete the installation. The printer
driver of the printing system becomes available without restarting your computer. If you click the [No]
button, the installation will not complete.
If you have selected [Yes (recommended)] at step 18, performing of the test print starts.
22.Make sure the test page printed properly.
If you have selected [No] at step 18, the test page will not be printed.
If the test page is printed properly, click the [OK] button.
23.The installation is completed.
The printer driver of the printing system becomes available without restarting your computer.
79
Chapter 4 How to Setup
Installing to Windows 2000 (PCL5e) (Continued)
● When selecting the [Network printer]
1.
If you have selected the [Network printer] at step 6 of "Start the Add
Printer Wizard", type the network printer name in the [Name] textbox or
type the URL in the [URL] textbox, and click the [Next] button.
If the printer driver for Windows 2000 is saved in the server, the window to set the default printer will
appear. In this case, go to step 2.
Tips
If you don't know the network printer name, click the [Next] button and search the network printer in the window to
browse printer, and select available network printers.
2.
Select whether to use this printer as the default printer or not.
Select [Yes] to use this printer as the default printer, and select [No] to not.
3.
Click the [Next] button.
The [Add Printer Wizard] completion window will appear.
4.
Click the [Finish] button.
The installation is completed.
The printer driver of the printing system becomes available without restarting your computer.
80
Chapter 4 How to Setup
Installing to Windows 2000 (PS3)
To install the AdobePS3 printer driver to Windows 2000, perform the following steps. The installation should be
performed by a qualified system administrator or printer administrator.
● Start the Add Printer Wizard
1.
2.
3.
Turn on the computer and start Windows 2000.
Log on as an administrator (or a user entitled to install a printer).
Click the [Start] button of the task bar. Then, select [Settings] of the
Start menu and click [Printers] from the sub-menu.
The [Printers] window will appear.
Exit from all active Windows applications, if required.
4.
Double-click the [Add Printer] icon of the [Printers] window.
The [Add Printer Wizard] window will appear to add the printer.
81
Chapter 4 How to Setup
Installing to Windows 2000 (PS3) (Continued)
5.
Click the [Next] button.
The next [Add Printer Wizard] window will appear.
6.
Select the [Local printer] or the [Network printer].
When the printing system is directly connected to a computer in which the printer driver will be
installed, select [Local printer]. When the printing system is managed in a computer in which the
printer driver will be installed, also select [Local printer].
When selecting the [Local printer], turn "off" the [Automatically detect and install my Plug and
Play printer] check box setting.
When personal computers or workstations are connected to the network and you want to print via the
network, select [Network printer].
Tips
When using the network printer, it is necessary to complete the network settings on the network interface card and
on the personal computers. For details, see your network administrator.
If your computer does not have the network setting, go to "When selecting [Local printer]" step 1 .
Reference
(p.84)
82
Chapter 4 How to Setup
Installing to Windows 2000 (PS3) (Continued)
7.
Click the [Next] button.
If you have selected the [Local printer] at step 6, the window to select the printer port will appear. In
this case, go to "When selecting the [Local printer]".
Reference
(p.84)
If you have selected [Network printer] at step 6, the window to set the printer name will appear. In this
case, go to "When selecting the [Network printer]".
Reference
(p.90)
83
Chapter 4 How to Setup
Installing to Windows 2000 (PS3) (Continued)
● When selecting the [Local printer]
1.
If you have selected the [Local printer] at step 6 of "Start the Add
Printer Wizard", select the port connecting the printer, and click the
[Next] button.
Select the port to which the printing system is directly connected.
The window to select the printer manufacturer and model will appear.
If you want to print directly to the printing system via the network, select the LPR port. For details, see your network administrator.
Refer to Section 5, "Network Settings (for Administrator)" for more details.
Reference
2.
(p.557) LPD/LPR Setup
Click the [Have Disk] button.
The [Install From Disk] window will appear.
84
Chapter 4 How to Setup
Installing to Windows 2000 (PS3) (Continued)
3.
Click the [Browse] button.
The [Locate File] window will appear.
4.
5.
6.
7.
Set the "User Software CD" in the CD-ROM drive.
Change [Look in] to CD-ROM drive.
View the [\English\Driver\AdbePS\Win2000_Xp] folder in the list.
Click [OEMSETUP.inf] in the [File name] text box, then click the [Open]
button.
The [Install From Disk] window will appear.
8.
Click the [OK] button.
The next [Add Printer Wizard] window to select the manufacturer and model of the printer will appear.
9.
Be sure that in the list of [Printers], [Kyocera Mita KM-8530 PostScript]
is highlighted.
[Kyocera Mita KM-8530 PostScript] is the printer name of the default.
The model name of print controller is displayed in [xxx].
85
Chapter 4 How to Setup
Installing to Windows 2000 (PS3) (Continued)
10.Click the [Next] button.
The next [Add Printer Wizard] window to check/change the printer name will appear.
11. In the [Printer name] text box, check the printer name.
If you want to change the printer name, enter the new printer name in the [Printer name] text box.
12.Select whether to use this printer as the default printer or not.
Select [Yes] to use this printer as the default printer, and select [No] to not.
If you are installing the first printer to your computer, the [Default printer] setting will not appear. The first printer
installed automatically becomes the default printer.
13.Click the [Next] button.
The next [Add Printer Wizard] window to select whether to share the printer will appear.
14.Select whether to share the printer or not.
Select [Share as] or [Do not share this printer] checkbox.
86
Chapter 4 How to Setup
Installing to Windows 2000 (PS3) (Continued)
15. Click the [Next] button.
If you have selected [Do not share this printer] at step 14, the next [Add Printer Wizard] window to perform the test print will appear. In this case, go to step 18.
Reference
(p.88)
If you have selected [Share as] at step 14, the next [Add Printer Wizard] window to enter location and
comment will appear. In this case, go to step 16.
16.If you have selected [Share as] at step 14,
enter the location of the
shared printer and comment in the [Location] and [Comment] textbox.
87
Chapter 4 How to Setup
Installing to Windows 2000 (PS3) (Continued)
17.Click the [Next] button.
The next [Add Printer Wizard] window to perform the test print will appear.
18.Select Whether to perform the test print or not.
Select [Yes (recommended)] to perform the test print, or select [No] to not.
Printing the test page is also possible after the installation of the printer driver.
Reference
(p.114) Test Page Print
19.Click the [Next] button.
The [Add Printer Wizard] completion window will appear.
88
Chapter 4 How to Setup
Installing to Windows 2000 (PS3) (Continued)
20.Click the [Finish] button.
[Digital Signature Not Found] window will appear.
21.Click the [Yes] button.
Necessary files will be copied from the "User Software CD" to complete the installation. The printer
driver of the printing system becomes available without restarting your computer. If you click the [No]
button, the installation will not complete.
If you have selected [Yes (recommended)] at step 18, performing of the test print starts.
22.Make sure the test page printed properly.
If you have selected [No] at step 18, the test page will not be printed.
If the test page is printed properly, click the [OK] button.
23.The installation is completed.
The printer driver of the printing system becomes available without restarting your computer.
89
Chapter 4 How to Setup
Installing to Windows 2000 (PS3) (Continued)
● When selecting the [Network printer]
1.
If you have selected the [Network printer] at step 6 of "Start the Add
Printer Wizard", type the network printer name in the [Name] textbox or
type the URL in the [URL] textbox, and click the [Next] button.
If the printer driver for Windows 2000 is saved in the server, the window to set the default printer will
appear. In this case, go to step 2.
Tips
If you don't know the network printer name, click the [Next] button and search the network printer in the window to
browse printer, and select available network printers.
2.
Select whether to use this printer as the default printer or not.
Select [Yes] to use this printer as the default printer, and select [No] to not.
3.
Click the [Next] button.
The [Add Printer Wizard] completion window will appear.
4.
Click the [Finish] button.
The installation is completed.
The printer driver of the printing system becomes available without restarting your computer.
90
Chapter 4 How to Setup
Installing to Windows XP (PCL5e)
A qualified system administrator or printer administrator should perform the installation of the printer driver in
Windows XP.
● Start the Add Printer Wizard
1.
2.
3.
Turn on the computer and start Windows XP.
Log on as an administrator (or a user entitled to install a printer).
Click the [Start] button of the task bar. Then, select [Printers and
Faxes] of the Start menu.
The [Printers and Faxes] window will appear.
Exit from all active Windows applications, if required.
4.
Click the [Add a printer] icon of the [Printers and Faxes] window.
The [Add Printer Wizard] window will appear to add the printer.
5.
Click the [Next] button.
The [Add Printer Wizard] window to select the printer connection will appear.
91
Chapter 4 How to Setup
Installing to Windows XP (PCL5e) (Continued)
6.
Select the [Local printer attached to this computer] or the [A network
printer, or a printer attached to another computer].
When the printing system is directly connected to a computer in which the printer driver will be
installed, select [Local printer attached to this computer]. When the printing system is managed in a
computer in which the printer driver will be installed, also select [Local printer attached to this computer].
When selecting the [Local printer attached to this computer], turn the [Automatically detect and
install my Plug and Play printer] setting "off".
Tips
When using the network printer, it is necessary to complete the network settings on the network interface card and
on the personal computers. For details, see your network administrator.
If your computer does not have the network setting, go to "When selecting [Local printer attached to this computer]" step 1 .
Reference
(p.94)
92
Chapter 4 How to Setup
Installing to Windows XP (PCL5e) (Continued)
7.
Click the [Next] button.
If you have selected the [Local printer attached to this computer] at step 6, the window to select the
printer port will appear. In this case, go to "When selecting the [Local printer attached to this computer]".
Reference
(p.94)
If you have selected the [A network printer, or a printer attached to another computer] at step 6, the
window to set the printer name will appear. In this case, go to "When selecting the [A network printer,
or a printer attached to another computer]".
Reference
(p.100)
93
Chapter 4 How to Setup
Installing to Windows XP (PCL5e) (Continued)
● When selecting the [Local printer attached to this computer]
1.
If you have selected [Local printer attached to this computer] at step 6
of "Start the Add Printer Wizard", select the port connecting the printer
from the list displayed by clicking [▼] at the side of the [Use the following port:] box, and click the [Next] button.
Select the port to which the printing system is directly connected.
The window to select the printer manufacturer and model will appear.
If you want to print directly to the printing system via the network, select the LPR port. For details, see your network administrator.
Refer to Section 5, "Network Settings (for Administrator)" for more details.
Reference
2.
(p.557) LPD/LPR Setup
Click the [Have Disk] button.
The [Install From Disk] window will appear.
94
Chapter 4 How to Setup
Installing to Windows XP (PCL5e) (Continued)
3.
Click the [Browse] button.
The [Locate File] window will appear.
4.
5.
6.
7.
Set the "User Software CD" in the CD-ROM drive.
8.
Click the [OK] button.
Change [Look in] to CD-ROM drive.
View the [\English\Printer\WinNT_2000_Xp] folder in [File Location].
Click [Printer.inf] in the [File name] text box, then click the [Open] button.
The next [Add Printer Wizard] window to select the manufacturer and model of the printer will appear.
9.
Be sure that in the list of [Printers], [Kyocera Mita KM-8530 PCL] is
highlighted.
[Kyocera Mita KM-8530 PCL] is the printer name of the default.
The model name of print controller is displayed in [xxx].
95
Chapter 4 How to Setup
Installing to Windows XP (PCL5e) (Continued)
10.Click the [Next] button.
The next [Add Printer Wizard] window to check/change the printer name will appear.
11. In the [Printer name] text box, check the printer name.
If you want to change the printer name, enter the new printer name in the [Printer name] text box.
12.Select whether to use this printer as the default printer or not.
Select [Yes] to use this printer as the default printer, and select [No] to not.
13.Click the [Next] button.
The next [Add Printer Wizard] window to select whether to share the printer will appear.
14.Select whether to share the printer or not.
Select [Share as] or [Do not share this printer] checkbox.
When you select [Share as], you can input the shared name in the textbox.
96
Chapter 4 How to Setup
Installing to Windows XP (PCL5e) (Continued)
15.Click the [Next] button.
If you have selected [Do not share this printer] at step 14, the next [Add Printer Wizard] window to perform the test
print will appear. In this case, go to step 18.
Reference
(p.98)
If you have selected [Share as] at step 14, the next [Add Printer Wizard] window to enter location and
comment will appear. In this case, go to step 16.
16.If you have selected [Share as] at step 14,
enter the location of the
shared printer and comment in the [Location] and [Comment] textbox.
97
Chapter 4 How to Setup
Installing to Windows XP (PCL5e) (Continued)
17.Click the [Next] button.
The next [Add Printer Wizard] window to perform the test print will appear.
18.Select Whether to perform the test print or not.
Select [Yes] to perform the test print, or select [No] to not.
Printing the test page is also possible after the installation of the printer driver.
Reference
(p.114) Test Page Print
19.Click the [Next] button.
The [Add Printer Wizard] completion window will appear.
98
Chapter 4 How to Setup
Installing to Windows XP (PCL5e) (Continued)
20.Click the [Finish] button.
[Hardware Installation] window will appear.
21.Click the [Continue Anyway] button.
Necessary files will be copied from the "User Software CD."
If you have selected [Yes (recommended)] at step 18, performing of the test print starts.
22.Make sure the test page printed properly.
If you have selected [No] at step 18, the test page will not be printed.
If the test page is printed properly, click the [OK] button.
23.The installation is completed.
The printer driver of the printing system becomes available without restarting your computer.
99
Chapter 4 How to Setup
Installing to Windows XP (PCL5e) (Continued)
● When selecting the [A network printer, or a printer attached to another computer]
1.
If you have selected [A network printer, or a printer attached to another
computer] at step 6 of "Start the Add Printer Wizard", type the network
printer name in the [Name] textbox or type the URL in the [URL] textbox, and click the [Next] button.
If the printer driver for Windows XP is saved in the server, the window to set the default printer will
appear. In this case, go to step 2.
Tips
If you don't know the network printer name, click the [Next] button and search the network printer in the window to
browse printer, and select available network printers.
If the printer driver for Windows XP is not saved in the server, a message is displayed. If you click the
[OK] button, the window to select the printer manufacturer and model will appear. Follow the same
procedure from step 2 to 10 of "When selecting [Local printer]", and install the printer driver for Windows XP.
After the installation, the same window to set the default printer described above appears. Go to step
2.
Reference
2.
(p.94)
Select whether to use this printer as the default printer or not, and perform operation from step 17 of "Printers and Faxes."
Select [Yes] to use this printer as the default printer, and select [No] to not.
Reference
3.
(p.98)
Click the [Finish] button.
The printer driver of the printing system becomes available without restarting your computer.
100
Chapter 4 How to Setup
Installing to Windows XP (PS3)
To install the Adobe PS3 printer driver to Windows XP, perform the following steps. A qualified system administrator or printer administrator should perform the installation.
● Start the Add Printer Wizard
1.
2.
3.
Turn on the computer and start Windows XP.
Log on as an administrator (or a user entitled to install a printer).
Click the [Start] button of the task bar. Then, select [Printers and
Faxes] of the Start menu.
The [Printers and Faxes] window will appear.
Exit from all active Windows applications, if required.
4.
Click the [Add a printer] icon of the [Printers and Faxes] window.
The [Add Printer Wizard] window will appear to add the printer.
5.
Click the [Next] button.
The next [Add Printer Wizard] window to select the printer connection will appear.
101
Chapter 4 How to Setup
Installing to Windows XP (PS3) (Continued)
6.
Select the [Local printer attached to this computer] or the [A network
printer, or a printer attached to another computer].
When the printing system is directly connected to a computer in which the printer driver will be
installed, select [Local printer attached to this computer]. When the printing system is managed in a
computer in which the printer driver will be installed, also select [Local printer attached to this computer].
When selecting the [Local printer attached to this computer], turn "off" the [Automatically detect
and install my Plug and Play printer] setting "off".
When personal computers or workstations are connected to the network and you want to print via the
network, select [A network printer, or a printer attached to another computer].
Tips
When using the network printer, it is necessary to complete the network settings on the network interface card and
on the personal computers. For details, see your network administrator.
If your computer does not have the network setting, go to "When selecting the [Local printer attached to this computer]" step 1 .
Reference
(p.104)
102
Chapter 4 How to Setup
Installing to Windows XP (PS3) (Continued)
7.
Click the [Next] button.
If you have selected [Local printer attached to this computer] at step 6, the window to select the printer
port will appear.
Reference
(p.104)
If you have selected the [A network printer, or a printer attached to another computer] at step 6, the
window to set the printer name will appear. In this case, go to "When selecting the [A network printer,
or a printer attached to another computer]"
Reference
(p.110)
103
Chapter 4 How to Setup
Installing to Windows XP (PS3) (Continued)
● When selecting the [Local printer attached to this computer]
1.
If you have selected [Local printer attached to this computer] at step 6
of "Start the Add Printer Wizard", select the port connecting the printer
from the list displayed by clicking [▼] at the side of the [Use the following port:] box, and click the [Next] button.
Select the port to which the printing system is directly connected.
The window to select the printer manufacturer and model will appear.
If you want to print directly to the printing system via the network, select the LPR port. For details, see your network administrator.
Refer to Section 5, "Network Settings (for Administrator)" for more details.
Reference
2.
(p.557) LPD/LPR Setup
Click the [Have Disk] button.
The [Install From Disk] window will appear.
104
Chapter 4 How to Setup
Installing to Windows XP (PS3) (Continued)
3.
Click the [Browse] button.
The [Locate File] window will appear.
4.
5.
6.
Set the "User Software CD" in the CD-ROM drive.
7.
Click [OEMSETUP.inf] in the [File name] text box, then click the [Open]
button.
Change [Look in] to CD-ROM drive.
View the [\English\Driver\AdobePS\Win2000_Xp] folder in [File Location].
The [Install From Disk] window will appear.
8.
Click the [OK] button.
The next [Add Printer Wizard] window to select the manufacturer and model of the printer will appear.
9.
Be sure that in the list of [Printers], [Kyocera Mita KM-8530 PostScript]
is highlighted.
[Kyocera Mita KM-8530 PostScript] is the printer name of the default.
The model name of print controller is displayed in [xxx].
105
Chapter 4 How to Setup
Installing to Windows XP (PS3) (Continued)
10.Click the [Next] button.
The next [Add Printer Wizard] window to check/change the printer name will appear.
11. In the [Printer name] text box, check the printer name.
If you want to change the printer name, enter the new printer name in the [Printer name] text box.
12.Select whether to use this printer as the default printer or not.
Select [Yes] to use this printer as the default printer, and select [No] to not.
13.Click the [Next] button.
The window to select whether you share the printer will appear.
14.Select whether to share the printer or not.
Select [Share name:] or [Do not share this printer] button.
When you select [Share name:], you can input the shared name in the textbox.
106
Chapter 4 How to Setup
Installing to Windows XP (PS3) (Continued)
15.Click the [Next] button.
If you have selected [Do not share this printer] at step 14, the window to perform the test print will
appear. In this case, go to step 18.
Reference
(p.108)
If you have selected [Share name:] at step 14, the window to enter location and comment will appear.
In this case, go to step 16.
16.If you have selected [Share name:] at step 14, enter the location of the
shared printer and comment in the [Location] and [Comment] textbox.
107
Chapter 4 How to Setup
Installing to Windows XP (PS3) (Continued)
17.Click the [Next] button.
The next [Add Printer Wizard] window to perform the test print will appear.
18.Select Whether to perform the test print or not.
Select [Yes] to perform the test print, or select [No] to not.
Printing the test page is also possible after the installation of the printer driver.
Reference
(p.114)
19.Click the [Next] button.
The [Add Printer Wizard] completion window will appear.
108
Chapter 4 How to Setup
Installing to Windows XP (PS3) (Continued)
20.Click the [Finish] button.
[Hardware Installation] window will appear.
21.Click the [Continue Anyway] button.
Necessary files will be copied from the "User Software CD."
If you have selected [Yes (recommended)] at step 18, performing of the test print starts.
22.Make sure the test page printed properly.
If you have selected [No] at step 18, the test page will not be printed.
If the test page is printed properly, click the [OK] button.
23.The installation is completed.
The printer driver of the printing system becomes available without restarting your computer.
109
Chapter 4 How to Setup
Installing to Windows XP (PS3) (Continued)
● When selecting the [A network printer, or a printer attached to another computer]
1.
If you have selected [A network printer, or a printer attached to another
computer] at step 6 of "Start the Add Printer Wizard", type the network
printer name in the [Name] textbox or type the URL in the [URL] textbox, and click the [Next] button.
If the printer driver for Windows XP is saved in the server, the window to set the default printer will
appear. In this case, go to step 2.
Tips
If you don't know the network printer name, click [next] to search the network, and select the appropriate printer.
If the printer driver for Windows XP is not saved in the server, a message is displayed. If you click the
[OK] button, the window to select the printer manufacturer and model will appear. Follow the same
procedure from step 2 to 10 of "When selecting [Local printer]", and install the printer driver for Windows XP.
After the installation, the same window to set the default printer described above appears. Go to step
2.
Reference
2.
(p.104)
Select whether to use this printer as the default printer or not, and perform operation from step 17 of "Printers and Faxes."
Select [Yes] to use this printer as the default printer, and select [No] to not.
Reference
3.
(p.108)
Click the [Finish] button.
The printer driver of the printing system becomes available without restarting your computer.
110
Chapter 4 How to Setup
Installing to Macintosh (PS3)
To install the Adobe PS3 printer driver to Macintosh, perform the following steps.
● Start the setup program
1.
Turn on the computer and start Macintosh.
Exit from all active applications, if required.
2.
Set the "User Software CD" in the CD-ROM drive.
The driver and PPD file may be different depending on the version of Macintosh.
Power Macintosh:
Verify the version of your OS.
Mac OS 8.5 - Mac OS 9.x
Open the [\English\Driver\OS8_x to 9_x] folder in the User Software CD.
Mac OS X
Mac OS X is not supported at September 2002.
Other Macintosh
Open the [\English\Driver\OS7_1 or more] folder in the User Software CD.
3.
Copy the PPD file into the hard disk.
Select the [K8530xxx.ppd] file and copy it into the [HDD] - [System Folder] - [Extensions] - [Printer
Descriptions].
PPD file name varies depending on models of machine.
4.
Execute the installer.
Select and double-click [AdobePS Installer].
The dialog box will appear.
5.
Click the [Continue...] button.
The [License] dialog box will appear.
111
Chapter 4 How to Setup
Installing to Macintosh (PS3) (Continued)
6.
Click the [Accept] button.
The [AdobePS Installer] dialog box will appear.
]
You must agree to the license to use the printer driver for the PS3 printing system. Click the [Accept] button and go
to the next step.
7.
Click the [Install] button.
The installation starts.
When the installation is completed, the following message appears.
8.
Click the [Quit] button.
Then, go to "Selecting the printer with the selector".
(It is recommended that you restart your computer if you select Other Macintosh at step 2.)
Reference
(p.113)
112
Chapter 4 How to Setup
Installing to Macintosh (PS3) (Continued)
● Selecting the printer with the Chooser
1.
2.
3.
4.
Select [Chooser] in the [Apple Menu Items].
Make sure that [AdobePS] is selected in [AppleTalk] box
Click the [AdobePS] icon.
Click the printer name for your PS3 printing system from the [Select a
PostScript Printer] list.
Refer to "Status Page" for your printer name.
Reference
5.
(p.524) Outputing the Status Page
Click the [Setup...] button if you are using the PS3 printing system
printer for the first time.
Select the PPD file that is copied from the CD-ROM.
The following dialog will appear.
6.
7.
Click each items to set the options for the PS3 printing system printer.
Click the [OK] button.
The [Chooser] dialog will appear.
8.
Close the [Chooser] dialog.
113
Chapter 4 How to Setup
Test Page Print
● Windows
You can make sure whether or not the printer driver is installed properly by printing the test page that comes
standard in Windows.
To print the test page:
1.
Click the [Start] button of the task bar. Then, select [Settings] of the
Start menu and click [Printers] from the sub-menu.
The [Printers] window will appear.
2.
Right-click the printer icon on the [Printers] window. Then select
[Properties].
[Kyocera Mita KM-8530 PCL Propeties] dialog box will appear.
The property window may different depending on your OS.
Windows 98
• Click [Printers and Faxes] in Windows XP.
• The model name of print controller is displayed in [xxx].
3.
Select the [General] tab in the [Kyocera Mita KM-8530 PCL Propeties]dialog box and click the [Print Test Page].
The test page is printed and the confirmation window will appear.
4.
Verify that it is printed properly. Then, click the [Yes] button.
The test print is completed.
If it is not printed properly, verify the current status of this printing system.
Reference
(p.426) You cannot print the test print.
● Macintosh
Macintosh has no standard test print function. Double-click [ReadMe.txt] in the User Software CD. Then,
select [Print...] from [File] menu and make sure it is printed properly.
114
Chapter 4 How to Setup
Setting Optional Devices (Windows)
You can store print data and print settings in a pair in the internal hard disk in this printing system and print the
data as required.
To set the Large Capacity Tray
PCL5e
Adobe PS3
You can set the printer driver to recognize the optional Large Capacity Tray in the [Properties] - [Setup] tab
in this printing system.
Reference
(p.173) To set the Large Capacity Tray
To set the Finisher
PCL5e
Adobe PS3
You can set the printer driver to recognize the optional Finisher in the [Properties] - [Setup] tab in this printing
system.
Reference
(p.179) To set the Finisher
To set the Cover Sheet Feeder
PCL5e
Adobe PS3
You can set the printer driver to recognize the optional cover sheet feeder in the [Properties] - [Setup] tab in
this printing system.
Reference
(p.229) To set a Thick Cover
To set the Punch Unit
PCL5e
Adobe PS3
You can set the printer driver to recognize the optional punch unit in the [Properties] - [Setup] tab in this
printing system.
Reference
(p.238) To set the Punch Unit
To set the Trimmer Unit
PCL5e
Adobe PS3
You can set the printer driver to recognize the optional trimmer unit in the [Properties] - [Setup] tab in this
printing system.
115
Chapter 4 How to Setup
Setting Optional Devices (Windows) (Continued)
To set printer memory
Adobe PS3
You can set the printer driver to recognize the memory used by the printer in the [Properties] screen if you
use the Adobe PS3 printer driver.
Reference
(p.329) To set printer memory
To set printer memory configuration
PCL5e
Adobe PS3
You can set the printer driver to recognize the memory mounted on the printer in the [Properties] screen.
Reference
(p.330) To set printer memory configuration
116
Chapter 4 How to Setup
Setting Optional Devices (Macintosh)
You can store print data and print settings in a pair in the internal hard disk in this printing system and print the
data as required.
To set the Large Capacity Tray
Adobe PS3
You can set the printer driver to recognize the optional Large Capacity Tray by selecting the unit from [Large
capacity Tray] in the [Installable Options] in the [Option Configuration] screen.
Reference
(p.353) To set the Large Capacity Tray
To set the Finisher
Adobe PS3
You can set the printer driver to recognize the optional finisher by selecting the unit from [Finisher] in the
[Installable Options] in the [Option Configuration] screen.
Reference
(p.356) To set the Finisher
To set the Cover Sheet Feeder
Adobe PS3
You can set the printer driver to recognize the optional cover sheet feeder by selecting the feeder from
[Sheet Feeder] in the [Installable Options] in the [Option Configuration] screen.
Reference
(p.380) To set a Thick Cover
To set a Punch Unit
Adobe PS3
You can set the printer driver to recognize the optional punch unit by selecting the unit from [Punch Unit] in
the [Installable Options] in the [Option Configuration] screen.
Reference
(p.386) To set the Punch Unit
To set the Trimmer Unit
Adobe PS3
You can set the printer driver to recognize the optional trimmer unit by selecting the unit from [Trimmer Unit]
in the [Installable Options] in the [Option Configuration] screen.
117
Chapter 4 How to Setup
Setting Optional Devices (Macintosh) (Continued)
To set the memory installed in the printer
Adobe PS3
You can set the printer driver to recognize the memory mounted on the printer in the [Properties] screen if
you use the Adobe PS3 printer driver.
Reference
(p.416) To set the memory installed in the printer
118
Chapter 4 How to Setup
Updating a Printer Driver
You must delete the current printer driver at first if you want to update/reinstall the printer driver. The deleting
procedures of the printer driver may be different depending on the type of the driver and the OS running in the
computer.
• Updating the Printer Driver (Windows 95/98/Me)
Reference
(p.120)
• Updating the Printer Driver (Windows NT 4.0)
Reference
(p.121)
• Updating the Printer Driver (Windows 2000)
Reference
(p.124)
• Updating the Printer Driver (Windows XP)
Reference
(p.126)
• Updating the Printer Driver (Macintosh) (only when the PS3 option is installed)
Reference
(p.128)
119
Chapter 4 How to Setup
Updating the Printer Driver (Windows 95/98/Me)
To update the Windows 95/98/Me-compatible printer driver:
● Updating in the the [Printers] window
1.
2.
Turn on the computer and start Windows 95/98/Me.
Click the [Start] button of the task bar. Then, select [Settings] from the
Start menu to click [Printers] from the sub-menu.
The [Printers] window will open.
Exit from all active Windows applications, if required.
3.
Right-click the icon for the printer you want to delete. Then, select
[Delete] button.
4.
5.
Click the [Yes] button.
Restart the computer.
The printer driver is uninstalled.
If the printer has been set as the default printer, the message saying the default printer is deleted appears after the
deletion.
6.
Then, go to "Installing a Printer Driver".
Reference
(p.42)
120
Chapter 4 How to Setup
Updating the Printer Driver (Windows NT4.0)
To update the printer driver, perform the following steps.
Important
To delete the PCL5e printer driver, you must delete the files related to the printer driver. Delete
them after following the procedures on this page.
● Updating the Printer
1.
Turn on the computer and start Windows NT 4.0.
Exit from all active Windows applications, if required.
2.
Click the [Start] button of the task bar. Then, select [Settings] from the
Start menu to click [Printers] from the sub-menu.
The [Printers] window will appear.
Exit from all active Windows applications, if required.
3.
Right-click the icon for the printer you want to delete. Then, select
[Delete] button.
The confirmation message will appear.
4.
Click the [Yes] button.
The printer driver is uninstalled. After completion of uninstall, close the [Printers] window.
5.
Delete the files related to the printer driver. (PCL5e printer driver only)
To delete the PCL5e printer driver, you must delete the files related to the printer driver. Go to "Deleting the files related to the printer driver" and follow the procedures from step 6. When using PS3
printer driver, ignore the operations described in this section and go to Step 6.
Reference
(p.122)
If the printer has been set as the default printer, the message saying the default printer is deleted appears after the
deletion.
6.
Restart the computer.
Important
To avoid the system failure, make sure to restart the computer after deleting the printer driver.
121
Chapter 4 How to Setup
Updating the Printer Driver (Windows NT4.0) (Continued)
7.
Then, go to "Installing a Printer Driver"
Reference
(p.42)
● Deleting the files related to the printer driver
This operation is required to delete the PCL5e printer driver.
The files for the old driver may be left if you have problems during updating the driver. If such is
the case, delete them all.
1.
Click the [Start] button of the task bar. Then, select [Settings] from the
Start menu to click [Control Panel] from the sub-menu.
The [Control Panel] window will appear.
2.
Double-click the [Services] icon.
The [Services] window will appear.
3.
Select [Spooler] from the list in the [Services] window. Then, click the
[Stop] button.
The confirmation message will appear.
4.
5.
Click the [Yes] button.
Click the [Start] button of the task bar. Then, select [Find] from the
Start menu to click [Files or Folders...] from the sub-menu.
The [Find. All Files] window appears.
6.
Type "K8530" in [Files or Folders...] the [NAME] textbox and search it
form the [Winnt] folder including its subfolder.
7.
Select and right-click the files in the list. Then, select the [Delete] button.
The confirmation message will appear.
8.
Click the [Yes].
122
Chapter 4 How to Setup
Updating the Printer Driver (Windows NT4.0) (Continued)
9.
Close the [Find. All Files] window.
Tips
If you cannot delete a file because Windows is using it, log off the computer and log in again.
10.Select [Spooler] from the list in the [Services] window. Then, click the
[Start] button.
11. Follow the procedure from step 6 of "Updating the Printer".
Reference
(p.121)
123
Chapter 4 How to Setup
Updating the Printer Driver (Windows 2000)
To update the Windows 2000-compatible printer driver:
Important
To delete the PCL5e printer driver, you must delete the files related to the printer driver.
● Updating the printer
1.
2.
Turn on the computer and start Windows 2000.
Click the [Start] button of the task bar. Then, select [Settings] from the
Start menu to click [Printers] from the sub-menu.
The [Printers] window will appear.
Exit from all active Windows applications, if required.
3.
Right-click the icon for the printer you want to delete. Then, select
[Delete] button.
The confirmation message will appear.
4.
Click the [Yes].
The printer is uninstalled.
If the printer has been set as the default printer, the message saying the default printer is deleted appears after the
deletion.
5.
Select the [Server Properties] from the [File] menu of the [Printers]
window.
The [Print Server Properties] window will appear.
6.
7.
Open the [Drivers] tab of the [Print Server Properties] window.
Select the printer driver you want to delete from the [Installed printer
drivers:]. Then click the [Remove].
The confirmation message will appear.
124
Chapter 4 How to Setup
Updating the Printer Driver (Windows 2000) (Continued)
8.
Click the [Yes].
The printer driver is deleted (uninstalled) .
9.
Restart the computer.
Important
To avoid the system failure, make sure to restart the computer after deleting the printer driver.
10.Then, go to "Installing a Printer Driver".
Reference
(p.42)
125
Chapter 4 How to Setup
Updating the Printer Driver (Windows XP)
To update the Windows XP-compatible printer driver:
Important
To delete the PCL5e printer driver, you must delete the files related to the printer driver.
● Updating the printer
1.
2.
Turn on the computer and start Windows XP.
Click the [Start] button of the task bar. Then, select [Printers and
Faxes] from the Start menu.
The [Printers and Faxes] window will appear.
Exit from all active Windows applications, if required.
3.
Select the icon for the printer you want to delete. Then, click [Delete
this printer].
The confirmation message will appear.
4.
Click the [Yes] button.
The printer is uninstalled.
If the printer has been set as the default printer, the message saying the default printer is deleted appears after the
deletion.
5.
Select the [Server Properties] from the [File] menu of the [Printers and
Faxes] window.
The [Print Server Properties] window will appear.
6.
7.
Open the [Drivers] tab of the [Print Server Properties] window.
Select the printer driver you want to delete from the [Installed printer
drivers:]. Then click the [Remove].
The confirmation message will appear.
126
Chapter 4 How to Setup
Updating the Printer Driver (Windows XP) (Continued)
8.
Click the [Yes].
The printer driver is deleted (uninstalled) .
9.
Restart the computer.
Important
To avoid the system failure, make sure to restart the computer after deleting the printer driver.
10.Then go to "Installing a Printer Driver"
Reference
(p.42)
127
Chapter 4 How to Setup
Updating the Printer Driver (Macintosh)
To update the Macintosh-compatible printer driver:
● Updating the printer
1.
2.
Turn on the computer and start Macintosh.
Select the icon for the printer that you want to delete from the desktop
and drag it onto [Trash].
The desktop printer is deleted (uninstalled).
The files for the old driver may be left if you have problems updating the driver. If such is the
case, delete them all.
3.
Select [Kyocera Mita KM-8530v01000.xxxx] in [HDD] - [System Folder] [Extensions] - [Printer Descriptions] and drag it onto [Trash].
The files related to the driver file are deleted.
Tips
[Kyocera Mita KM-8530v01000.xxxx] loses its effect on the printer just by removing it from the [Extensions] folder.
PPD file name varies depending on models of machine.
4.
Then, go to "Installing a Printer Driver"
Reference
(p.42)
128
Chapter 5 Printing from Windows
Chapter 5 Printing from Windows
Basic printing method
This section explains how to use this printing system for printing from a Windows.
1.
Check the printing system to ensure it is turned on. Then turn on the
computer.
2.
Open the file to be printed.
When there are any applications started, exit them all in advance.
3.
Select [File] - [Print] in an application.
The [Print] dialog box will appear.
For Windows 98
4.
Ensure [Name] is the name of this printing system.
When [Name] does not show the name of this printing system, click the "▼" button to display a list, and select this
printing system from the list.
5.
Check the settings of the [Print] dialog box.
From the [Print] dialog box, you can also display the window to set up the printer and set up the detailed functions
of this printing system.
Reference
6.
(p.132)
Click the [OK] button.
Printing will be executed.
129
Chapter
5
Chapter 5 Printing from Windows
Printer [Properties] window
● The [Properties] window used in this section
You can set up this printing system by using each window shown in the table below.
Display method
From the menu displayed by right clickFrom the [Print] dialog box of an applicaing the printer icon of the [Printers] wintion
dow
OS
Windows 95/98/Me
Window displayed by clicking the [Properties] button
Window displayed by selecting [Properties]
Windows NT4.0
Window displayed by clicking the [Properties] button
Window displayed by selecting [Presetting of document],
Window displayed by selecting [Properties].
Windows 2000
Window displayed by clicking the printer icon, Window
displayed by clicking the [Detailed setting] that has been
displayed by clicking the printer icon
Window displayed by selecting [Print setting], Window
displayed by selecting [Properties]
Windows XP
Window displayed by clicking the printer icon, Window
displayed by clicking the [Detailed setting] that has been
displayed by clicking the printer icon
Window displayed by selecting [Print setting], Window
displayed by selecting [Properties]
The name and the details of these windows vary depending on the type of the OS and the printer driver
used. Refer to the following for the difference due to the OS and printer driver.
• For Windows 95/98/Me
Reference
(p.132)
• For Windows NT4.0
Reference
(p.135)
• For Windows 2000
Reference
(p.139)
• For Windows XP
Reference
(p.145)
In this section, these Windows are collectively called the [Properties] window.
The following explanation will be given by using the [Properties] window (corresponding to those encircled a
bold line in the table above) displayed from the [Print] dialog box that is frequently used.
The OS is Windows 98 in this manual as an example.
Supplementary explanation are given when differences arise due to Operating System.
PCL5e
Adobe PS3
is mentioned in the explanation of the Kyoceramita PCL5e printer driver-related matters.
is mentioned in the explanation of the Adobe PS3 printer driver-related matters.
130
Chapter 5 Printing from Windows
Printer [Properties] window (Continued)
● Components of the [Properties] window
The [Properties] window is made up of the following components.
[OK] button
By clicking the [OK] button, you can save all the tab settings and close the [Properties] window.
[Cancel] button
By clicking the [Cancel] button, you can close the [Properties] window without saving all the
changes to the tab settings.
[Apply] button
By clicking the [Apply] button, you can save the current tab settings.
When using successively other tabs for setting, this button is used to register the current tab settings before proceeding to the other tabs.
[Help] button
By clicking the [Help] button, you can display the help information of each of the tabs.
Clicking the [Help] button displayed by right clicking an item of which you want to display the information displays pop-up help of the item.
131
Chapter 5 Printing from Windows
[Properties] window of Windows 95/98/Me
● The [Properties] window displayed from an application
By clicking the [Properties] button with the [Print] dialog box displayed from an application of Windows 95/98/
Me, the following [Properties] window appears.
For Windows 98 (Kyoceramita PCL5e printer driver)
For Windows 98 (Adobe PS3 printer driver)
The following tabs are displayed.
For Kyoceramita PCL5e printer driver
[Paper], [Cover], [Graphics], [POD], [Options], [Watermarks], [Overlay], and [About]
For Adobe PS3 printer driver
[Paper], [Graphics], [Device Options], [PostScript] and [Watermarks]
132
Chapter 5 Printing from Windows
[Properties] window of Windows 95/98/Me (Continued)
● The [Properties] window displayed from the [Printers] window
By clicking the [Properties] button with the [Printers] window displayed from an application of Windows 95/
98/Me, the following [Properties] window appears.
1.
2.
Turn on the computer to start up Windows 95/98/Me.
Select [Start] - [Settings] - [Printers] from the task bar.
The [Printers] window will appear.
3.
Right click the printer icon of this printing system and then click [Properties].
The [Properties] window of this printing system will appear.
The name of the printer icon may be changed by conditions and settings used.
Important
• The configuration set at [Printers] - [Properties] will be applied for all applications.
• The configuration set at [Properties] window opened from an application will be applied during an application is running. The configuration will be discarded when you exit from an
application.
For Windows 98 (Kyoceramita PCL5e printer driver)
133
Chapter 5 Printing from Windows
[Properties] window of Windows 95/98/Me (Continued)
For Windows 98 (Adobe PS3 printer driver)
The following tabs are displayed.
For Kyoceramita PCL5e printer driver
[General], [Details], [Sharing], [Paper], [Cover], [Graphics], [POD], [Options], [Watermarks], [Overlay],
[Setup] and [About]
For Adobe PS3 printer driver
[General], [Details], [Sharing], [Paper], [Graphics], [Fonts], [Device Options], [PostScript] and [Watermarks]
The tabs such as [General] and [Details] are standard Windows tabs.
134
Chapter 5 Printing from Windows
[Properties] window of Windows NT4.0
● The [Properties] window displayed from an application
By clicking the [Properties] button with the [Print] dialog box displayed from an application of Windows
NT4.0, the following [Properties] window appears.
Important
The configuration set at [Properties] window opened from an application will be applied during
an application is running. The configuration will be discarded when you exit from an application.
For Windows NT4.0 (Kyoceramita PCL5e printer driver)
For Windows NT4.0 (Adobe PS3 printer driver)
The following tabs are displayed.
For Kyoceramita PCL5e printer driver
[Paper], [Cover], [Graphics], [POD], [Options], [Watermarks], [Overlay], and [About]
For Adobe PS3 printer driver
[Page Setup] and [Advanced]
135
Chapter 5 Printing from Windows
[Properties] window of Windows NT4.0 (Continued)
● The [Properties] window displayed from the [Printers] window
When the [Properties] window of Windows NT4.0 is displayed from the [Printers] window, the two [Properties] windows appear as shown below. The following procedures are used.
When using the [Properties] menu:
1.
2.
Turn on the computer to start up Windows NT4.0.
Select [Start] - [Settings] - [Printers] from the task bar.
The [Printers] window will appear.
3.
Right click the printer icon of this printing system and then click [Properties].
The [Properties] window of this printing system will appear.
The name of the printer icon may be changed by conditions and settings used.
For Windows NT4.0 (Kyoceramita PCL5e printer driver)
For Windows NT4.0 (Adobe PS3 printer driver)
136
Chapter 5 Printing from Windows
[Properties] window of Windows NT4.0 (Continued)
The following tabs are displayed.
For Kyoceramita PCL5e printer driver
[General], [Ports], [Scheduling], [Sharing], [Security], [Setup] and [About]
For Adobe PS3 printer driver
[General], [Ports], [Scheduling], [Sharing], [Security] and [Device Settings]
When using the [Document Defaults...] menu
1.
2.
Turn on the computer to start up Windows NT4.0.
Select [Start] - [Settings] - [Printers] from the task bar.
The [Printers] window will appear.
3.
Right click the printer icon of this printing system and then click [Document Defaults...].
The [Properties] window of this printing system will appear.
The name of the printer icon may be changed by conditions and settings used.
For Windows NT4.0 (Kyoceramita PCL5e printer driver)
For Windows NT4.0 (Adobe PS3 printer driver)
137
Chapter 5 Printing from Windows
[Properties] window of Windows NT4.0 (Continued)
The following tabs are displayed.
For Kyoceramita PCL5e printer driver
[Paper], [Cover], [Graphics], [POD], [Options], [Watermarks], [Overlay] and [About]
For Adobe PS3 printer driver
[Page Setup] and [Advanced]
138
Chapter 5 Printing from Windows
[Properties] window displayed from Windows 2000
● The [Properties] window displayed from an application
When the [Print] dialog box is displayed from an application of Windows 2000, the following [Properties] window will appear.
For Windows 2000 (Kyoceramita PCL5e printer driver)
For Windows 2000 (Adobe PS3 printer driver)
For Windows 2000 (Adobe PS3 printer driver), the window displayed by clicking [Layout] [Advanced...].
The window displayed by clicking the [Advanced] tab is referred to as the [Properties] window in this section.
139
Chapter 5 Printing from Windows
[Properties] window displayed from Windows 2000 (Continued)
The following tabs are displayed.
For Kyoceramita PCL5e printer driver
[Paper], [Cover], [Graphics], [POD], [Options], [Watermarks], [Overlay] and [About]
For Adobe PS3 printer driver
[Layout] and [Paper / Quality]
140
Chapter 5 Printing from Windows
[Properties] window displayed from Windows 2000 (Continued)
● The [Properties] window displayed from the [Printers] window
When the [Properties] window of Windows 2000 is displayed from the [Printers] window, the two [Properties]
windows appear as shown below. The following procedures are used.
When using the [Properties] menu:
1.
2.
Turn on the computer to start up Windows 2000.
Select [Start] - [Settings] - [Printers] from the task bar.
The [Printers] window will appear.
3.
Right click the printer icon of this printing system and then click [Properties].
The [Properties] window of this printing system will appear.
The name of the printer icon may be changed by conditions and settings used.
For Windows 2000 (Kyoceramita PCL5e printer driver)
For Windows 2000 (Adobe PS3 printer driver)
By clicking the [Printing Preference] button of the [General] tab, you can display the same window as the one displayed by using the [Printing Preference] shown on the next page.
Reference
(p.143)
141
Chapter 5 Printing from Windows
[Properties] window displayed from Windows 2000 (Continued)
The following tabs are displayed.
For Kyoceramita PCL5e printer driver
[General], [Sharing], [Ports], [Advanced], [Security], [Setup] and [About]
For Adobe PS3 printer driver
[General], [Sharing], [Ports], [Advanced], [Color Management], [Security] and [Device Settings]
142
Chapter 5 Printing from Windows
[Properties] window displayed from Windows 2000 (Continued)
When using the [Printing Preference] menu:
1.
2.
Turn on the computer to start up Windows 2000.
Select [Start] - [Settings] - [Printers] from the task bar.
The [Printers] window will appear.
3.
Right click the printer icon of this printing system and then click [Printing Preference].
The [Properties] window of this printing system will appear.
The name of the printer icon may be changed by conditions and settings used.
For Windows 2000 (Kyoceramita PCL5e printer driver)
For Windows 2000 (Adobe PS3 printer driver)
• The window displayed by clicking [Printer Preference] is referred to as the "[Properties] window (Printer Preference)" in this section.
• Also, the window displayed by clicking [Advanced] tab is referred to as the "[Properties] window (Printer Preference - Advanced)" in this section.
143
Chapter 5 Printing from Windows
[Properties] window displayed from Windows 2000 (Continued)
For Windows 2000 (Adobe PS3 printer driver):
The window displayed by clicking [Layout] - [Advanced...].
The following tabs are displayed.
For Kyoceramita PCL5e printer driver
[Paper], [Cover], [Graphics], [POD], [Options], [Watermark], [Overlay] and [About]
For Adobe PS3 printer driver
[Layout] and [Paper / Quality]
144
Chapter 5 Printing from Windows
[Properties] window of Windows XP
● The [Properties] window displayed from an application
When you click the [Detailed setting] button after displaying the [Print] dialog box from an application of Windows XP, the [Properties] window appears as shown below.
For Windows XP (Kyoceramita PCL5e printer driver)
For Windows XP (Adobe PS3 printer driver)
For Windows XP (Adobe PS3 printer driver):
The window displayed by clicking [Layout] - [Advanced...].
145
Chapter 5 Printing from Windows
[Properties] window of Windows XP (Continued)
The following tabs are displayed.
For Kyoceramita PCL5e printer driver
[Paper], [Cover], [Graphics], [POD], [Options], [Watermarks], [Overlay], and [About]
For Adobe PS3 printer driver
[Layout] and [Paper/Quality]
146
Chapter 5 Printing from Windows
[Properties] window of Windows XP (Continued)
● The [Properties] window displayed from the [Printers and Faxes] window
When the [Properties] window of Windows XP is displayed from the [Printers and Faxes] window, the two
[Properties] windows appear as shown below. The following procedures are used.
When using the [Properties] menu
1.
2.
Turn on the computer to start up Windows XP.
Select [Start] - [Printers and Faxes] from the task bar.
The [Printers and Faxes] window will appear.
3.
Right click the printer icon of this printing system and then click [Properties].
The [Properties] window of this printing system will appear.
The name of the printer icon may be changed by conditions and settings used.
For Windows XP (Kyoceramita PCL5e printer driver)
For Windows XP (Adobe PS3 printer driver)
147
Chapter 5 Printing from Windows
[Properties] window of Windows XP (Continued)
The following tabs are displayed.
For Kyoceramita PCL5e printer driver
[General], [Sharing], [Ports], [Advanced], [Setup] and [About]
For Adobe PS3 printer driver
[General], [Sharing], [Ports], [Color Management], [Advanced] and [Device Settings]
148
Chapter 5 Printing from Windows
[Properties] window of Windows XP (Continued)
When using the [Printing Preference] menu
1.
2.
Turn on the computer to start up Windows XP.
Select [Start] - [Printers and Faxes] from the task bar.
The [Printers and Faxes] window will appear.
3.
Right click the printer icon of this printing system and then click [Printing Preferences...].
The [Properties] window of this printing system will appear.
The name of the printer icon may be changed by conditions and settings used.
For Windows XP (Kyoceramita PCL5e printer driver)
For Windows XP (Adobe PS3 printer driver)
149
Chapter 5 Printing from Windows
[Properties] window of Windows XP (Continued)
The following tabs are displayed.
For Kyoceramita PCL5e printer driver
[Paper], [Cover], [Graphics], [POD], [Options], [Watermarks], [Overlay] and [About]
For Adobe PS3 printer driver
[Layout] and [Paper/Quality]
150
Chapter 5 Printing from Windows
To set the paper-related items
The size and direction of the paper can be set as shown below.
To set the orientation:
PCL5e
Adobe PS3
Set the orientation to output paper in "Portrait" or "Landscape".
(p.153) To set the orientation
Reference
ABCD
ABCDEF
Portrait
Landscape
To print in rotation:
Adobe PS3
Print in rotation, when the Adobe PS3 printer driver is used.
Reference
(p.155) To print in rotation
Rotation
ABCDEF
ABCDEF
To set the size of output paper:
PCL5e
Adobe PS3
Set various sizes for the output paper.
Reference
(p.157) To set the size of the output paper
To set the type of manual-feed paper:
PCL5e
Adobe PS3
Set various types of paper as output paper.
Reference
(p.160) To set the type of manual-feed paper
151
Chapter 5 Printing from Windows
To set the paper-related items (Continued)
To enlarge or reduce by a specified ratio:
PCL5e
Adobe PS3
Print by specifying a value of enlargement or reduction.
Reference
(p.164) To enlarge or reduce by a specified ratio
Enlargement
ABCD
ABCD
ABCD
ABCD
Document
Reduction
To set the printing position of the wide paper:
PCL5e
Adobe PS3
Set a printing position for the wide paper.
Reference
ABCD
ABCD
Middle
ABCD
Right
Direction of
feeding
sheets
Left
(p.167) To set the printing position of the wide paper.
To set the margins:
Adobe PS3
Set the margins of output paper, when the Adobe PS3 printer driver is used.
Reference
(p.169) To set the margins
Margin
152
Chapter 5 Printing from Windows
To set the orientation
PCL5e
Compliant
Adobe PS3
Set the orientation to output paper in "Portrait" or "Landscape".
ABCD
Portrait
ABCDEF
Landscape
When the paper direction set for the document created by an application is different than the
paper direction or orientation of the [Properties] window displayed from an application, the setting in the [Properties] window takes precedence over the other for printing. Set the paper
direction or orientation set in the [Properties] window to the paper direction of the document if
necessary.
● Operating procedures of
1.
PCL5e
Open [Paper] tab of [Properties] window.
When displayed from an application with Windows 98.
2.
Click on the button for [Portrait] or [Landscape] of [Orientation].
The default is [Portrait].
3.
Click the [OK] button to close the [Properties] window.
153
Chapter 5 Printing from Windows
To set the orientation (Continued)
● Operating procedures of
1.
Adobe PS3
Open [Paper] tab of [Properties] window.
When displayed from an application with Windows 98.
• For Windows NT4.0, the [Page Setup] tab is displayed.
• For Windows 2000/XP, the [Layout] tab is displayed.
2.
Click on the button for [Portrait] or [Landscape] of [Orientation].
• The default is [Portrait].
• Turning on [Landscape] allows you to set [Rotated].
Reference
3.
(p.155)
Click the [OK] button to close the [Properties] window.
154
Chapter 5 Printing from Windows
To print in rotation
Adobe PS3
Compliant
Print the in rotation, when the Adobe PS3 printer driver is used.
Rotation
ABCDEF
ABCDEF
Depending on an application used, it sometimes occurs that an image cannot be rotated correctly with the rotation set.
155
Chapter 5 Printing from Windows
To print in rotation (Continued)
● Operating procedures of
1.
Adobe PS3
Open [Paper] tab of [Properties] window.
When displayed from an application with Windows 98.
• For Windows NT4.0, the [Page Setup] tab is displayed.
• For Windows 2000/XP, the [Layout] tab is displayed.
2.
Click on the button for [Portrait] or [Landscape] of [Orientation].
[Rotated] becomes available.
• For Windows NT4.0, Step 2 is not required.
• For Windows 2000/XP, Step 2 is not required. In Step 3, click on the button for [Rotate in landscape].
3.
4.
Turn on the check box of [Rotated].
Click the [OK] button to close the [Properties] window.
156
Chapter 5 Printing from Windows
To set the size of the output paper
PCL5e
Adobe PS3
Compliant
Print various sizes of documents as shown below.
Document size that can be selected
5.5" x 8.5" (Statement)
8.5" x 11" (Letter)
8.5" x 14" (Legal)
11" x 17" (Tabloid)
A3
297 x 420 mm
A4
210 x 297 mm
A5
148 x 210 mm
A6
105 x 148 mm
B4
250 x 354 mm
B5
182 x 257 mm
B6
128 x 182 mm
F4
8.0" x 13"
8K
267 x 390 mm
16K
195 x 267 mm
5.5" x 8.5" W (Statement[wide])
8.5" x 11" W (Letter[wide])
11" x 17" W (Tabloid[wide])
A3W
297 x 420 mm
A4W
210 x 297 mm
A5W
148 x 210 mm
B4W
250 x 354 mm
B5W
182 x 257 mm
A4 Tabstock
8.5'' x 11'' Tabstock (Letter Tabstock)
• The paper with "W" at the end of the document size represents "Wide paper".
Reference
(p.167)
• If there is no space for displaying "Wide" in the driver, it is replaced --> with "+".
For example, Tabloid (wide) --> Tabloid +.
• The paper size that can be used vary depending on print controller.
157
Chapter 5 Printing from Windows
To set the size of the output paper (Continued)
● Operating procedures of
1.
PCL5e
Display the [Paper] tab of the [Properties] window.
When displayed from an application with Windows 98.
2.
Click the [▼] button beside the [Paper Size] box to display a list. Then
select a paper size from the list.
• The default is [8.5” x 11”] in the U.S.A.
• The Default is [A4] in the other countries.
3.
Click the [OK] button to close the [Properties] window.
158
Chapter 5 Printing from Windows
To set the size of the output paper (Continued)
● Operating procedures of
Adobe PS3
Limitation
Often, a specific paper size cannot be selected due to other functions set. For details, refer to
the explanation of each of the functions.
If you attempt to make a setting corresponding to the incongruous combinations described that cannot be set on
the printer driver, a message will be displayed. Check the details of message and adjust the relationship with other
settings.
1.
Open [Paper] tab of [Properties] window.
When displayed from an application with Windows 98.
• For Windows NT4.0, the [Page Setup] tab is displayed.
• For Windows 2000/XP, [Properties] - [Advanced] - [printing Defaults] - [Layout] - [Advanced...] is displayed.
2.
Select the document size from the [Paper size] column.
The default is [Letter] in the U.S.A.
The Default value may be different depending on the specifications of each country.
3.
Click the [OK] button to close the [Properties] window.
159
Chapter 5 Printing from Windows
To set the type of manual-feed paper
PCL5e
Adobe PS3
Compliant
Set various types of paper sizes as the output paper as shown below.
Types of paper that can be selected.
Plain paper
Thin paper
This is set when printing thin paper such as airmail letter paper.
Thick paper
This is set when printing thick paper such as a post card.
Tab sheet
This is set when printing on index paper.
Trace
This is set when printing the Trace paper.
OHP [Transparency]
OHP-Interleave [Blank]
An interleave sheet is output each time an OHP sheet is printed.
OHP-Interleave [Print]
An interleave sheet is output each time an OHP sheet is printed.
User defined type
This is set when printing the user specified paper set on the copier.
160
Chapter 5 Printing from Windows
To set the type of manual-feed paper (Continued)
● Operating procedures of
PCL5e
Limitation
[OHP] cannot be set in the following cases:
• When [Duplex], [Staple] or [Punch] is selected in [Paper] tab - [Features] field
• When [Fold & Stitch] or [Booklet] is available in [Paper] tab - [Features] field
[OHP(interleave)] cannot be set in the following cases:
• When [Duplex], [Staple] or [Punch] is selected in [Paper] tab - [Features] field
• When [Fold & Stitch] or [Combination] - [Booklet] is available in [Paper] tab - [Features] field
• When [Collate] is not available in [Paper] tab
• When any item in [Cover] tab is available
• When [Duplex], [Staple] or [Punch] is selected in [Paper] tab - [Features] field
• When [Fold & Stitch] or [Combination] - [Booklet] is available in [Paper] tab - [Features] field
[Tab sheet] cannot be set in the following cases:
• When settings other than [8.5 x 11, 11 x 17, A3, A4, B5] in [Paper] tab - [Paper size]
• When [Fold & Stitch] is available in [Paper] tab - [Features] field
If you attempt to make a setting corresponding to the incongruous combinations described that cannot be set on
the printer driver, a message will be displayed. Check the details of message and adjust the relationship with other
settings.
1.
Open [Paper] tab of [Properties] window.
When displayed from an application of Windows 98.
2.
Click the [▼] button beside the [Paper Source] box to display the list.
Then select [Bypass tray] from the list.
The default is [Auto Select].
161
Chapter 5 Printing from Windows
To set the type of manual-feed paper (Continued)
3.
Click the [▼] button beside the [Media Type] box to display the list.
Then select a paper type you want to use from the list.
The default is [Plain paper].
4.
Click the [OK] button to close the [Properties] window.
162
Chapter 5 Printing from Windows
To set the type of manual-feed paper (Continued)
● Operating procedures of
Adobe PS3
Limitation
[OHP] cannot be set in the following cases:
• When [Duplex] is available in [Paper] tab
• When [Fold, Stitch] is available in [Device Options] tab - [Printer features]
• When [Combination] is available in [Device Options] tab - [Printer features]
[OHP(interleave)] cannot be set in the following cases:
• When [Duplex] is available in [Paper] tab
• When [Fold, Stitch] is available in [Device Options] tab - [Printer features]
• When [Combination] is available in [Device Options] tab - [Printer features]
• When [Group] is selected in [Device Options] tab - [Printer features]-[Collate]
[Tabbed sheet] cannot be set in the following cases:
• When settings other than [Letter, Tabloid, A3, A4, B4, B5] in [Paper] tab - [Paper size]
• When [Fold, Stitch] is available in [Device Options] tab - [Printer features]
If you attempt to make a setting corresponding to the incongruous combinations described that cannot be set on
the printer driver, a message will be displayed. Check the details of message and adjust the relationship with other
settings.
1.
Open [Paper] tab of [Properties] window.
When displayed from an application of Windows 98.
• For Windows NT4.0, the [Advanced] tab is displayed
• For Windows 2000/XP, the [Paper/Quality] tab is displayed.
2.
Click the [▼] button beside the [Paper type] box to display the list.
Then select a paper type you want to use from the list.
• The default is [Plain Paper].
• The name of the setup item for Windows NT4.0 / 2000/XP is [Paper type] --> [Media].
3.
Click the [OK] button to close the [Properties] window.
163
Chapter 5 Printing from Windows
To enlarge or reduce by a specified ratio
PCL5e
Adobe PS3
Compliant
Print by specifying the enlargement or reduction ratio in the range from 25% to 400%.
ABCD
ABCD
Document
ABCD
ABCD
ABCD
ABCD
Reduction
Enlargement
Any sheet size for printing can be set freely.
If printing runs out of the output room on paper as a result of enlargement, printing is made starting at the upper left
corner of the paper.
164
Chapter 5 Printing from Windows
To enlarge or reduce by a specified ratio (Continued)
● Operating procedures of
PCL5e
When the document size is [A3], [B4], [11"x17"] (Tabloid) or [8.5"x14"] (Legal) and the OS is
Windows 95/98/Me, the maximum enlargement ratio is 300%.
Limitation
[Scaling] cannot be set in the following case:
• When setting other than [1] in [Options] tab - [Pages per sheet]
If you attempt to make a setting corresponding to the incongruous combinations described that cannot be set on
the printer driver, a message will be displayed. Check the details of message and adjust the relationship with other
settings.
1.
Open [Options] tab of [Properties] window.
When displayed from an application of Windows98
2.
Click the [▲] / [▼] buttons beside the [Scaling] box to specify a value
between [10] and [400].
• The default is [100%].
• The setting can be made in increments of 1%.
• It is possible to select a numeral in the range given in the [Scaling] box and enter directly the number.
3.
Click the [OK] button to close the [Properties] window.
165
Chapter 5 Printing from Windows
To enlarge or reduce by a specified ratio (Continued)
● Operating procedures of
Adobe PS3
Limitation
[Scaling] cannot be set in the following case:
• When setting other than [1-up] in [Graphics] tab - [Layout]
If you attempt to make a setting corresponding to the incongruous combinations described that cannot be set on
the printer driver, a message will be displayed. Check the details of message and adjust the relationship with other
settings.
1.
Open [Graphics] tab of [Properties] window.
When displayed from an application of Windows 98.
• For Windows NT4.0, the [Advanced] tab is displayed.
• For Windows 2000/XP, [Properties] - [Advanced] - [printing Defaults] - [Layout] - [Advanced...] is displayed.
2.
Click the [▲] / [▼] buttons beside the [Scaling] box to specify a value in
the range between [25] and [400].
• The default is [100%].
• The setting can be made in increments of 1%.
• It is possible to select a numeral in the range given in the [Scaling] box and enter directly the number of copies
to be printed.
3.
Click the [OK] button to close the [Properties] window.
166
Chapter 5 Printing from Windows
To set the printing position of the wide paper
PCL5e
Compliant
Adobe PS3
Set the printing position of wide paper.
ABCD
Middle
● Operating procedures of
1.
ABCD
Right
Direction of
feeding
sheets
Left
ABCD
PCL5e
Open [POD] tab of [Properties] window.
When displayed from an application with Windows 98.
2.
3.
4.
Turn on the [Print Position] check box.
Click [Left], [Middle] or [Right].
Click the [OK] button to close the [Properties] window.
167
Chapter 5 Printing from Windows
To set the printing position of the wide paper (Continued)
● Operating procedures of
1.
Adobe PS3
Open [Device Options] tab of [Properties] window.
When displayed from an application of Windows 98.
• For Windows NT4.0, [Document Defaults...] - [Advanced] tab is displayed.
• For Windows 2000/XP, [Properties] - [Advanced] - [printing Defaults] - [Layout] - [Advanced...] is displayed.
2.
3.
Select [PrintPosition] from the [Printer features] field.
Click the [▼] button beside the [Printer features] - [Change settings for]
box to display the list. Then select the printing position from the list.
[Left], [Middle] or [Right] are available.
The default is [None].
4.
Click the [OK] button to close the [Properties] window.
168
Chapter 5 Printing from Windows
To set the margins
Adobe PS3
Compliant
Set the margins of the output paper, when the Adobe PS3 printer driver is used.
Important
This setting can only be set in the Properties shown by right-clicking the [Printers] folder. The
Important marks are used.
Margin
For Windows NT4.0 / 2000/XP, this function is not provided.
169
Chapter 5 Printing from Windows
To set the margins (Continued)
● Operating procedures of
1.
Adobe PS3
Open [Paper] tab of [Properties] window.
When displayed from the [Printers] window with Windows 98.
2.
Click the [Margins] button.
The [Margins] dialog box will appear.
3.
Click [Inches] or [Millimeters] in the [Units] field.
The default value may be different depending on the environment of your computer and the specifications of each
country.
4.
Click the [▲] / [▼] buttons beside the [Top], [Bottom], [Left] and [Right]
boxes to set a value for each margin.
The range of values that can be set as each margin is displayed on the right side of the box. However,
this range varies depending on the paper size selected.
• The default is [0.13].
• The setting can be made in increment of 0.1.
• It is possible to select a numeral in the range given in the box and enter type the number.
5.
Click the [OK] button.
The [Margins] dialog box is closed and the display returns to the [Properties] window.
6.
Click the [OK] button to close the [Properties] window.
170
Chapter 5 Printing from Windows
To set the paper tray
For the paper trays such as the feed tray and the output tray, the following settings are available.
To set the Large Capacity Tray:
PCL5e
Adobe PS3
You can set the printer driver to recognize an optional Large Capacity Tray.
Reference
(p.173) To set the Large Capacity Tray
Large Capacity Tray
To set the Bypass tray (Manual feed):
PCL5e
Adobe PS3
You can select and set a Bypass tray (Manual feed) to be used from the list.
Reference
(p.176) To set the Bypass tray (Manual feed)
Bypass tray
Tray 1
Tray 2
Tray 3
Tray 4
To set the Finisher:
PCL5e
Adobe PS3
You can set the printer driver to recognize an optional Finisher.
Reference
(p.179) To set the Finisher
Finisher
171
Chapter 5 Printing from Windows
To set the paper tray (Continued)
To set the Output tray:
PCL5e
Adobe PS3
Select and set an output tray to be used from the list.
Reference
(p.182) To set the Output tray
Sub tray
Main tray
172
Chapter 5 Printing from Windows
To set the Large Capacity Tray
PCL5e
Adobe PS3
Compliant
Set the printer driver recognize an optional Large Capacity Tray, if it is installed in the copier.
When printer driver recognizes the Large Capacity Tray, it possible to select [Tray 4].
Large Capacity Tray
Even if the copier is provided with a Large Capacity Tray, the printer driver will not recognize it,
if the Large Capacity Tray is not set on the computer.
173
Chapter 5 Printing from Windows
To set the Large Capacity Tray (Continued)
● Operating procedures of
1.
PCL5e
Open [Setup] tab of [Properties] window.
When displayed from [Printers] window with Windows 98.
When nothing is selected, it is not possible to use [Tray 4].
2.
Select a Large Capacity Tray you want to use from the [Available
options] list.
When the copier is provided with an optional Large Capacity Tray, select either [LT-402 Large Capacity Tray] or [LT-412 Large Capacity Tray].
When you do not know if the optional Large Capacity Tray installed is a [LT-402 Large Capacity Tray] or [LT-412
Large Capacity Tray], consult your system administrator.
3.
Click the [OK] button to close the [Properties] window.
174
Chapter 5 Printing from Windows
To set the Large Capacity Tray (Continued)
● Operating procedures of
1.
Adobe PS3
Open [Device Options] tab of [Properties] window from [Printers] window.
When displayed from [Printers] window with Windows 98.
For Windows NT4.0 / 2000/XP, the [Device Settings] tab of the [Properties] window is displayed from the [Printers]
window.
2.
Select [Large Capacity Tray] from the [Installable options] field.
The default is [None]. When [None] is selected, it is not possible to use [Tray 4].
3.
Click the [▼] button beside the [Installable options] - [Change setting
for] box to display the list. Then select a Large Capacity Tray you want
to use from the list.
When the copier is provided with an optional Large Capacity Tray, select either [LT-402] or [LT-412].
When the copier is not provided with an optional Large Capacity Tray, select [None]
When do not know if the optional Large Capacity Tray installed is a [LT-402 Large Capacity Tray] or [LT-412 Large
Capacity Tray], consult your system administrator.
4.
Click the [OK] button to close the [Properties] window.
175
Chapter 5 Printing from Windows
To set the Bypass tray (Manual feed)
PCL5e
Adobe PS3
Compliant
Select and set a Bypass tray (Manual feed) to be used from the list.
Bypass tray
(Manual feed)
Tray 1
Tray 2
Tray 3
Tray 4
Important
The paper sizes that can be used vary depending on each tray. Care should be taken when
selecting a tray.
Feed Tray
paper size that can be used.
Tray 1 to Tray 3
8.5''x11'' (Letter), 5.5''x8.5'' (Statement), 8.5''x14'' (Legal), 11''x17''
(Tabloid), A3, A4, A5, B4, B5, B6, F4, 16K, 8K, 8.5''x11''W (Letter
[wide]), 5.5''x8.5''W (Statement [wide]), 11''x17''W (Tabloid [wide]),
A3W, A4W, A5W, B4W, B5W, A4 Tabstock, 8.5''x11'' Tabstock (Letter Tabstock)
Tray 4
(LT-402)
8.5''x11'' (Letter), A4, B5, F4, 8.5''x11''W (Letter [wide]), A4W, B5W,
A4 Tabstock, 8.5''x11'' Tabstock (Letter Tabstock)
Tray 4
(LT-412)
8.5''x11'' (Letter), 5.5''x8.5'' (Statement), 8.5''x14'' (Legal), 11''x17''
(Tabloid), A3, A4, B4, F4, 8.5''x11''W (Letter [wide]), 11''x17''W (Tabloid [wide]), A4W, A4 Tabstock, 8.5''x11'' Tabstock (Letter Tabstock)
Bypass Tray
8.5''x11'' (Letter), 5.5''x8.5'' (Statement), 8.5''x14'' (Legal), 11''x17''
(Tabloid), A3, A4, A5, A6, B4, B5, B6, F4, 16K, 8K, 8.5'' x 11''W (Letter [wide]), 11''x17''W (Tabloid [wide]), A3W, A4W, A5W, B4W, B5W,
A4 Tabstock, 8.5''x11'' Tabstock (Letter Tabstock)
Manual feed
176
Chapter 5 Printing from Windows
To set the Bypass tray (Manual feed) (Continued)
● Operating procedures of
PCL5e
Limitation
[Tray 4] cannot be set in the following case:
• When [LT-402 Large Capacity Tray] or [LT-412 Large Capacity Tray] is not available in
[Setup] tab
If you attempt to make a setting corresponding to the incongruous combinations described that cannot be set on
the printer driver, a message will be displayed. Check the details of the message and adjust the relationship with
other settings.
1.
Open [Paper] tab of [Properties] window.
When displayed from an application with Windows 98.
The default is [Auto Select]. When [Auto Select] is set, a tray set with paper specified in [Properties] of this printing
system is automatically selected from an application.
2.
Click the [▼] button beside the [Paper Source] box to display the list.
Then select a tray you want to use from the list.
3.
Click the [OK] button to close the [Properties] window.
177
Chapter 5 Printing from Windows
To set the Bypass tray (Manual feed) (Continued)
● Operating procedures of
Adobe PS3
Limitation
[Tray 4] cannot be set in the following case:
• When [Large Capacity Tray] is not available in [Device Options] tab
• The [Device options] tab - [Installable options] is displayed in [Properties] displayed from the [Printers] window.
• If you attempt to make a setting corresponding to the incongruous combinations described that cannot be set
on the printer driver, a message will be displayed. Check the details of the message and adjust the relationship
with other settings.
1.
Open [Paper] tab of [Properties] window.
When displayed from an application with Windows 98.
• For Windows NT4.0, the [Page Setup] tab is displayed.
• For Windows 2000/XP, the [Paper/Quality] tab is displayed.
2.
Click the [▼] button beside the [Paper source] box to display the list.
Then select a tray you want to use from the list.
The default is [AutoSelect Tray]. When [AutoSelect Tray] is set, a tray set with paper specified in [Properties] of this
printing system is automatically selected from an application.
3.
Click the [OK] button to close the [Properties] window.
178
Chapter 5 Printing from Windows
To set the Finisher
PCL5e
Adobe PS3
Compliant
Set the printer driver to recognize an optional Finisher, if it is installed in the copier.
When the printer driver recognizes the Finisher, it is possible to select [Main tray] or [Sub tray] as [Output
Tray].
Finisher unit
s
Even if the copier is provided with a Finisher, the printer driver will not recognize it, if the Finisher unit is not set on the computer.
179
Chapter 5 Printing from Windows
To set the Finisher (Continued)
● Operating procedures of
1.
PCL5e
Open [Setup] tab of [Properties] window.
When displayed from the [Printers] window with Windows 98.
2.
Select a Finisher you want to use from the [Available options] list.
When the copier is provided with an optional Finisher, select either [DF-630 Finisher] or [DF-635 Finisher].
When Nothing is selected, it is not possible to set a Finisher.
3.
Click the [OK] button to close the [Properties] window.
When you do not know if the optional Finisher installed is a [DF-630 Finisher] or [DF-635 Finisher], consult your
system administrator.
180
Chapter 5 Printing from Windows
To set the Finisher (Continued)
● Operating procedures of
1.
Adobe PS3
Open [Device Options] tab of the [Properties] window from the [Printers] window.
When displayed from the [Printers] window with Windows 98.
For Windows NT4.0 / 2000/XP, the [Device Settings] tab of the [Properties] window is displayed from the [Printers]
window.
2.
Select [Finisher] from the [Installable options] field.
The default is [No Finisher]. When [No Finisher] is selected, it is not possible to set an Finisher tray.
3.
Click the [▼] button beside the [Installable options] - [Change setting
for] boxes to display the list. Then select a finisher you want to use
from the list.
When the copier is provided with an optional Finisher, select either [DF-630] or [DF-635].
• When you do not know if the optional Finisher installed is a [DF-630] or [DF-635], consult your system administrator.
4.
Click the [OK] button to close the [Properties] window.
181
Chapter 5 Printing from Windows
To set the Output tray
PCL5e
Adobe PS3
Compliant
Set [Main tray] or [Sub tray] as [Output Tray], if the output tray is recognized by the printer driver.
Sub tray
Main tray
182
Chapter 5 Printing from Windows
To set the Output tray (Continued)
● Operating procedures of
PCL5e
Limitation
[Sub Tray] cannot be set in the following cases:
• When [DF-630 Finisher] or [DF-635 Finisher] is not available in [Setup] tab
• When [Staple], [Punch] or [Fold & Stitch] is available in [Paper] tab - [Features] field
If you attempt to make a setting corresponding to the incongruous combinations described that cannot be set on
the printer driver, a message will be displayed. Check the details of the message and adjust the relationship with
other settings.
1.
Open [Paper] tab of [Properties] window.
When displayed from an application with Windows 98.
When [Output Tray] is not recognized as a the Finisher, it cannot be used.
2.
Click the [▼] button beside the [Output Tray] box to display the list.
Then select a tray you want to use from the list.
[Main tray] and [Sub tray] are available.
3.
The default is [Default].
Click the [OK] button to close the [Properties] window.
Clicking the [▼] button displays a feed tray and Finisher tray selected in the preview image at the lower right side of
the [Setup] tab.
183
Chapter 5 Printing from Windows
To set the Output tray (Continued)
● Operating procedures of
Adobe PS3
Limitation
[Sub Tray] cannot be set in the following cases:
• When [Finisher] is not available in [Device Options] tab
• When [Stapling], [Punch] or [Fold, Stitch] is available in [Device Options] tab
• The [Device option] tab - [Additional option] is displayed in [Properties] displayed from the [Printers] window.
• If you attempt to make a setting corresponding to the incongruous combinations described that cannot be set
on the printer driver, a message will be displayed. Check the details of the message and adjust the relationship
with other settings.
1.
Open [Paper] tab of [Properties] window.
When displayed from an application with Windows 98.
• For Windows NT4.0, the [Advanced] tab is displayed.
• For Windows 2000/XP, [Properties] - [Advanced] - [printing Defaults] - [Layout] - [Advanced...] is displayed.
• For Windows NT4.0 / 2000/XP, the name of the item set is [Output Bin].
2.
Click the [▼] button beside the [Output bin] box to display the list.
Then select an output tray you want to use from the list.
[Main tray] and [Sub tray] are available.
• The default is [Default].
• When the Finisher is not recognized, [Output bin] cannot be set.
3.
Click the [OK] button to close the [Properties] window.
184
Chapter 5 Printing from Windows
To print multiple copies
To print multiple sets of the same output result pages, set as below.
To set the number of copies to be printed:
PCL5e
Adobe PS3
Set the number of copies to be printed from the [Properties] window.
Reference
(p.187) To set the number of copies to be printed
To print by sets (Collate):
PCL5e
Adobe PS3
Print the first one set of pages in one lot, and then the second set of pages, the third set of pages, ...., when
printing multiple sets of pages.
Reference
(p.189) To print by sets
ABCD
ABCD
ABCD
1
32
ABCD
ABCD
ABCD
1
32
To print page by page collectively (Group):
PCL5e
Adobe PS3
Print the required number of the first page, and then the required umber of the second pages, the third page,
.... collectively when printing multiple sets of pages.
Reference
(p.191) To print page by page collectively
ABCD
ABCD
ABCD
1
11
ABCD
ABCD
ABCD
2
22
185
Chapter 5 Printing from Windows
To print multiple copies (Continued)
To output offset copies:
PCL5e
Adobe PS3
Output groups of copies shifted to opposite sides.
Reference
(p.194) To output offset copies
ABCD
ABCD
ABCD
ABCD
ABCD
ABCD
ABCD
ABCD
ABCD
Offset Copies
186
Chapter 5 Printing from Windows
To set the number of copies to be printed
PCL5e
Adobe PS3
Compliant
Set the number of copies to be printed from the [Properties] window.
● Operating procedures of
1.
PCL5e
Open [Paper] tab of [Properties] window.
When displayed from an application with Windows 98.
2.
Click the [▲] / [▼] button beside the [Copies] box to set the number of
copies to be printed.
• The default is [1].
• The maximum number of copies to be set is [9999].
• It is also possible to select a numeric value in the range given in the [Copies] box and enter directly the number
of copies to be printed.
3.
Click the [OK] button to close the [Properties] window.
187
Chapter 5 Printing from Windows
To set the number of copies to be printed (Continued)
● Operating procedures of
Adobe PS3
When the Adobe PS3 printer driver is used, printing is made in the number of copies set in the [Print] dialog
box of an application.
Using Windows 98
188
Chapter 5 Printing from Windows
To print by sets
PCL5e
Adobe PS3
Compliant (Collate)
Print the first one set of copies in one lot, and then the second set of copies, the third set of copies, ...., when
printing multiple sets of pages.
ABCD
ABCD
ABCD
1
32
ABCD
ABCD
ABCD
1
32
For the Kyoceramita PCL5e printer driver, this function is referred to as [Collate]. However, for the Adobe PS3
printer driver, it is referred to as [Collate] - [Sort].
● Operating procedures of
1.
PCL5e
Open [Paper] tab of [Properties] window.
When displayed from an application with Windows 98.
2.
Turn on the [Collate] check box.
The default is [ON].
3.
Click the [OK] button to close the [Properties] window.
189
Chapter 5 Printing from Windows
To print by sets (Continued)
● Operating procedures of
1.
Adobe PS3
Open [Device Options] tab of [Properties] window.
When displayed from an application with Windows 98.
• For Windows NT4.0, the [Advanced] tab is displayed.
• For Windows 2000/XP, [Properties] - [Advanced] - [printing Defaults] - [Layout] - [Advanced...] is displayed.
2.
3.
Select [Collate] from the [Printer features] field.
Click the [▼] button beside the [Printer features] - [Change setting for]
boxes to display the list. Then select [Sort] from the list.
The default is [Sort].
4.
Click the [OK] button to close the [Properties] window.
190
Chapter 5 Printing from Windows
To print page by page collectively
PCL5e
Adobe PS3
Compliant (Group)
Print the required number of the first page, and then the required number of the second pages, the third
page, .... collectively when printing multiple sets of pages.
ABCD
ABCD
ABCD
1
11
ABCD
ABCD
ABCD
2
22
191
Chapter 5 Printing from Windows
To print page by page collectively (Continued)
● Operating procedures of
PCL5e
Limitation
[Group] cannot be set in the following cases:
• When [OHP-Interleave(Blank)] or [OHP-Interleave(Print)] is selected in [Paper] tab - [Media
Type]
• When [Fold & Stitch] is available in [Paper] tab - [Features] field
• When [Front Cover], [Back Cover] or [Sheet Insertion] is available in [Cover] tab
• When [Duplex] is available in [Paper] tab
If you attempt to make a setting corresponding to the incongruous combinations described that cannot be set on
the printer driver, a message will be displayed. Check the details of the message and adjust the relationship with
other settings.
1.
Open [Paper] tab of [Properties] window.
When displayed from an application with Windows 98.
2.
Turn off the [Collate] check box.
The default is [ON].
3.
Click the [OK] button to close the [Properties] window.
192
Chapter 5 Printing from Windows
To print page by page collectively (Continued)
● Operating procedures of
Adobe PS3
Limitation
[Group] cannot be set in the following cases:
• When [OHP-Interleave(Blank)] or [OHP-Interleave(Print)] is selected in [Paper] tab - [Paper
type]
• When [Fold only], [Fold, Trim], [Fold, Stitch] or [Fold, Stitch, Trim] is selected in [Device
Options] tab
• When [Front Cover] or [Back Cover] is available in [Device Options] tab
• When [Duplex] is available in [Paper] tab
If you attempt to make a setting corresponding to the incongruous combinations described that cannot be set on
the printer driver, a message will be displayed. Check the details of the message and adjust the relationship with
other settings.
1.
Open [Device Options] tab of [Properties] window.
When displayed from an application with Windows 98.
• For Windows NT4.0, the [Advanced] tab is displayed.
• For Windows 2000/XP, [Properties] - [Advanced] - [printing Defaults] - [Layout] - [Advanced...] is displayed.
2.
3.
Select [Collate] from the [Printer features] field.
Click the [▼] button beside the [Printer features] - [Change setting for]
boxes to display the list. Then select [Group] from the list.
The default is [Sort].
4.
Click the [OK] button to close the [Properties] window.
193
Chapter 5 Printing from Windows
To output offset copies
PCL5e
Adobe PS3
Compliant (Offset / Job Offset)
Output with copies shifted in a unit of the number of copies or page group to this side and the opposite side
at the eject position when printing multiple sets of copies.
ABCD
ABCD
ABCD
ABCD
ABCD
ABCD
ABCD
ABCD
ABCD
Offset Copies
For the Kyoceramita PCL5e printer driver, this function is referred to as [Offset]. However, for the Adobe PS3
printer driver, it is referred to as [Job Offset].
194
Chapter 5 Printing from Windows
To output offset copies (Continued)
● Operating procedures of
PCL5e
Limitation
[Offset] cannot be set in the following cases:
• When [DF-630 Finisher] or [DF-635 Finisher] is not available in [Setup] tab
• When [Sub tray] is selected in [Paper] tab - [Output Tray]
• When [Fold only], [Fold, Trim], [Fold, Stitch] or [Fold, Stitch, Trim] is selected in [Paper] tab [Features] field
If you attempt to make a setting corresponding to the incongruous combinations described that cannot be set on
the printer driver, a message will be displayed. Check the details of the message and adjust the relationship with
other settings.
1.
Open [Paper] tab of [Properties] window.
When displayed from an application with Windows 98.
2.
3.
Select the [Offset] in the [Features] field.
Select the [On] in the pull-down menu under it.
The default is [OFF].
4.
Click the [OK] button to close the [Properties] window.
195
Chapter 5 Printing from Windows
To output offset copies (Continued)
● Operating procedures of
Adobe PS3
Limitation
[Offset] cannot be set in the following cases:
• When [Finisher] is not available in [Device Options] tab
• When [Sub tray] is selected in [Paper] tab - [Output bin]
• When [Fold only], [Fold, Trim], [Fold, Stitch] or [Fold, Stitch, Trim] is selected in [Device
Options] tab
If you attempt to make a setting corresponding to the incongruous combinations described that cannot be set on
the printer driver, a message will be displayed. Check the details of the message and adjust the relationship with
other settings.
1.
Open [Device Options] tab of the [Properties] window.
When displayed from an application with Windows 98.
• For Windows NT4.0, [Document Defaults...] - [Advanced] tab is displayed
• For Windows 2000/XP, [Properties] - [Advanced] - [printing Defaults] - [Layout] - [Advanced...] is displayed
2.
3.
Select [Job Offset] from the [Printer features] field.
Click the [▼] button beside the [Printer features] - [Change setting for]
boxes to display the list. Then select [On] from the list.
The default is [Off].
4.
Click the [OK] button to close the [Properties] window.
196
Chapter 5 Printing from Windows
To print multiple pages
You can set as shown below when printing multiple pages document.
To set to print on both sides:
PCL5e
Adobe PS3
Print continuous multiple pages on both front and back sides.
(p.199) To set to print on both sides
Reference
Flip on
long edge
Flip on
short edge
To print the document of multiple pages on a single page:
(Page allocation / Layout):
PCL5e
Adobe PS3
Allocate the document of 2 pages, 4 pages, 6 pages, 9 pages or 16 pages onto a single page for printing.
Reference
(p.202) To print the document of multiple pages on a single page
2 up
ABCD
4 up
ABCD
ABCD
ABCD
ABCD
ABCD
To print 2 pages on a single paper twice as big:
(2-in-1 / 2-in-1 Repeat):
PCL5e
Adobe PS3
Print a document of 2 pages onto a single paper twice as big as a paper set in the output paper.
Reference
(p.205) To print 2 pages on a single paper twice as big
2-in-1
2-in-1 Repeat
ABCD
ABCD
ABCD
ABCD
1
2
1
1
197
Chapter 5 Printing from Windows
To print multiple pages (Continued)
To print a twofold booklet (Booklet):
PCL5e
Adobe PS3
Print output paper so that they become a book when they are folded in two.
Reference
(p.209) To print a twofold booklet
To print a specific page on the front face (Chapter):
PCL5e
When the Kyoceramita PCL5e printer driver is used, print a specific page so that it comes on the front, especially when printing on both sides of the paper.
Reference
(p.212) To print a specific page on the front face
1'st page of a chapter
To print pages in reverse order (Face up):
PCL5e
Adobe PS3
Output paper in reverse order when printing multiple pages.
Reference
(p.214) To print pages in reverse order
Face down
Face up
AB
CD
CCDDCDCCDDCCDD CD
AABBABAABBAABB AB
111111 8
198
Chapter 5 Printing from Windows
To set to print on both sides
PCL5e
Adobe PS3
Compliant
Print continuous multiple pages on both front and back sides. [Flip on long edge] and [Flip on short edge] are
available.
Flip on
long side
Flip on
short side
199
Chapter 5 Printing from Windows
To set to print on both sides (Continued)
● Operating procedures of
PCL5e
Limitation
[Duplex] cannot be set in the following cases:
• When [OHP] or [Tab sheet] is selected in [Paper] tab - [Media Type]
• When [Collate] is not available in [Paper] tab
If you attempt to make a setting corresponding to the incongruous combinations described that cannot be set on
the printer driver, a message will be displayed. Check the details of the message and adjust the relationship with
other settings.
1.
Open [Paper] tab of [Properties] window.
When displayed from an application with Windows 98.
2.
Click the [▼] button beside the [Duplex] box to display the list. Then
select [Flip on long edge] or [Flip on short edge].
The default is [None].
3.
Click the [OK] button to close the [Properties] window.
200
Chapter 5 Printing from Windows
To set to print on both sides (Continued)
● Operating procedures of
Adobe PS3
Limitation
[Duplex] cannot be set in the following cases:
• When [OHP] or [Tabbed sheet] is selected in [Paper] tab - [Paper Type]
• When [Group] is selected in [Device Options] tab - [Collate]
If you attempt to make a setting corresponding to the incongruous combinations described that cannot be set on
the printer driver, a message will be displayed. Check the details of the message and adjust the relationship with
other settings.
1.
Open [Paper] tab of [Properties] window.
When displayed from an application with Windows 98.
• For Windows NT4.0, the [Page Setup] tab is displayed.
• For Windows 2000/XP, the [Layout] tab is displayed.
2.
Click the [▼] button beside the [Duplex] box to display the list. Then
select [Flip on long edge] or [Flip on short edge].
The default is [None].
3.
Click the [OK] button to close the [Properties] window.
201
Chapter 5 Printing from Windows
To print the document of multiple pages on a single page
PCL5e
Adobe PS3
Compliant
(Pages per sheet / Paper handling)
Allocate a document of 2 pages, 4 pages, 6 pages, 9 pages or 16 pages onto a single page for printing. The
allocated pages are automatically reduced for printing based on the printable region of the output paper.
2 up
ABCD
4 up
ABCD
9 up
6 up
ABCD
ABCD
ABCD
ABCD
ABCD
ABCD
ABCD
ABCD
ABCD
ABCD
16 up
ABCD
ABCD
ABCD
ABCD
ABCD
ABCD
ABCD
ABCD
ABCD
ABCD
ABCD
ABCD
ABCD
ABCD
ABCD
ABCD
ABCD
ABCD
ABCD
ABCD
ABCD
ABCD
ABCD
ABCD
ABCD
202
Chapter 5 Printing from Windows
To print the document of multiple pages on a single page (Continued)
● Operating procedures of
PCL5e
Limitation
[Pages per sheet] cannot be set in the following case:
• When [scaling] is 101% more in [Options] tab
If you attempt to make a setting corresponding to the incongruous combinations described that cannot be set on
the printer driver, a message will be displayed. Check the details of the message and adjust the relationship with
other settings.
1.
Open [Options] tab of [Properties] window.
When displayed from an application with Windows 98.
2.
Click the [▼] button beside the [Pages per sheet] box to display a list.
And then select the number of pages from the list.
The selection of [1], [2], [4], [6], [9] or [16] is available.
• The default is [1].
• When the [Duplex] is available, you can use [Pages per sheet] and [Duplex] at the same time.
Reference
3.
(p.199)
Click the [OK] button to close the [Properties] window.
203
Chapter 5 Printing from Windows
To print the document of multiple pages on a single page (Continued)
● Operating procedures of
1.
Adobe PS3
Open [Graphics] tab of the [Properties] window.
When displayed from an application with Windows 98.
• Windows NT4.0, [Document Defaults...] - [Advanced] tab is displayed.
• Windows 2000/ XP, [Properties] - [Advanced] - [Printing Defaults] - [Layout] - [Advanced...] is displayed.
2.
Click the [▼] button beside the [Layout] box to display the list. Then
select the number of pages to be allocated from the list.
[1-up], [2-up], [4-up], [6-up], [9-up] or [16-up] is available.
When any item other than [1-up] is selected, it becomes possible to use the [Print page border] check
box.
• The default is [1-up].
• When the [Duplex] is available, you can use [Paper handling] and [Duplex] at the same time.
Reference
(p.199)
• In the [Graphics] tab of the [Properties] window shown from the [Printers] window, the [Print page border] check
box under the [Layout] box is.
• To print boundaries between pages allocated, view [Properties] window from [Printers] window.
• When any item other than [1-up] is selected, it becomes possible to use the [Print page frame] check box. The
default is [ON].
3.
Click the [OK] button to close the [Properties] window.
204
Chapter 5 Printing from Windows
To print 2 pages on a single paper twice as big
PCL5e
Adobe PS3
Compliant (2-in-1 / 2-in-1 Repeat)
Print a document of 2 pages onto a single paper twice as big as a paper set in the output paper.
Example: 2 A4 size papers are aggregated on 1 A3 size paper.
2-in-1
ABCD
ABCD
ABCD
ABCD
1
2
1
2
ABCD
ABCD
ABCD
ABCD
1
2
1
1
ABCD
ABCD
2
2
2-in-1 Repeat
205
Chapter 5 Printing from Windows
To print 2 pages on a single paper twice as big (Continued)
● Operating procedures of
PCL5e
Limitation
[2-in-1] cannot be set in the following cases:
• When [8.5"x14",11"x17",11"x17W",A3,A3W,B4,B4W,8K,16K] is selected in [Paper] tab [Paper size]
• When [OHP-Interleave(Blank)] or [OHP-Interleave(Print)] is selected in [Paper] tab - [Media
type]
• When [Front Cover], [Back Cover] or [Sheet Insertion] is selected in [Cover] tab
If you attempt to make a setting corresponding to the incongruous combinations described that cannot be set on
the printer driver, a message will be displayed. Check the details of the message and adjust the relationship with
other settings.
1.
Open [Paper] tab of [Properties] window.
When displayed from an application with Windows 98.
2.
3.
4.
Check the [Collate] box on.
From the list shown in the [Features] field, select [Combination].
In the pull-down menu under it, select [2-in-1] or [2-in-1 Repeat].
For [2-in-1], 2 different pages are aggregated on a single paper for printing.
For [2-in-1 Repeat], the same 2 pages are aggregated on a single paper for printing.
The default is [None].
5.
Click the [OK] button to close the [Properties] window.
206
Chapter 5 Printing from Windows
To print 2 pages on a single paper twice as big (Continued)
● Operating procedures of
Adobe PS3
Limitation
[2-in-1] cannot be set in the following cases:
• When [Legal, Tabloid, A3, A6, B4, B6, F4, 8k, 16k, All widesize] is selected in [Paper] tab [Paper size]
• When [OHP], [OHP-Interleave(Blank)], [OHP-Interleave(Print)] or [Tabbed sheet] is
selected in [Paper] tab - [Paper type]
• When [Front Cover] or [Back Cover] is selected in [Device Options] tab
If you attempt to make a setting corresponding to the incongruous combinations described that cannot be set on
the printer driver, a message will be displayed. Check the details of the message and adjust the relationship with
other settings.
1.
Open [Device Options] tab of [Properties] window.
When displayed from an application with Windows 98.
• For Windows NT4.0, [Document Defaults...] - [Advanced] tab is displayed.
• For Windows 2000/ XP, [Properties] - [Advanced] - [Printing Defaults] - [Layout] - [Advanced...] is displayed.
2.
Select [Combination] from the [Printer features] field.
207
Chapter 5 Printing from Windows
To print 2 pages on a single paper twice as big (Continued)
3.
Click the [▼] button beside the [Printer features] - [Change setting for]
box to display then list. Then select [2-in-1] or [2-in-1 Repeat] from the
list.
For [2-in-1], 2 different pages are aggregated on a single paper for printing.
For [2-in-1 Repeat], the same 2 pages are aggregated on a single paper for printing.
The default is [None].
4.
Click the [OK] button to close the [Properties] window.
208
Chapter 5 Printing from Windows
To print a twofold booklet
PCL5e
Adobe PS3
Compliant (Booklet)
Print output paper so that they become a book when they are folded in two.
209
Chapter 5 Printing from Windows
To print a twofold booklet (Continued)
● Operating procedures of
PCL5e
Limitation
[Booklet] cannot be set in the following cases:
• When [8.5"x14",11"x17",11x17W",A3,A3W,A6,B4,B4W,B6,F4,8K,16K]
[Paper] tab - [Paper size]
• When [Tab sheet] or [OHP] is selected in [Paper] tab - [Media Type]
• When [Collate] is not available in [Paper] tab
• When [Back Cover] or [Sheet Insertion] is selected in [Cover] tab
is
selected
in
If you attempt to make a setting corresponding to the incongruous combinations described that cannot be set on
the printer driver, a message will be displayed. Check the details of the message and adjust the relationship with
other settings.
1.
Open [Paper] tab of [Properties] window.
When displayed from an application with Windows 98.
2.
3.
4.
5.
Check the [Collate] box on.
Select the [Combination] in the [Features] field.
Select [Booklet] or [Booklet-Right] in the pull-down menu under it.
Click the [OK] button to close the [Properties] window.
210
Chapter 5 Printing from Windows
To print a twofold booklet (Continued)
● Operating procedures of
Adobe PS3
Limitation
[Booklet] cannot be set in the following cases:
• When [Legal, Tabloid, A3, A6, B4, B6, F4, 8K, 16K, All widesize] is selected in [Paper] tab [Paper size]
• When [Tabbed Sheet] or [OHP] is selected in [Paper] tab - [Paper type]
• When [Group] is selected in [Device Options] tab - [Collate]
• When [Back Cover] is selected in [Device Options] tab
If you attempt to make a setting corresponding to the incongruous combinations described that cannot be set on
the printer driver, a message will be displayed. Check the details of the message and adjust the relationship with
other settings.
1.
Open [Device Options] tab of [Properties] window.
When displayed from an application with Windows 98.
• For Windows NT4.0, [Document Defaults...] - [Advanced] tab is displayed.
• For Windows 2000/ XP, [Properties] - [Advanced] - [Printing Defaults] - [Layout] - [Advanced...] is displayed.
2.
3.
Select [Combination] from the [Printer features] field.
Click the [▼] button beside the [Printer features] - [Change setting for] box
to display a list. And then select [Booklet] or [Booklet-Right] from the list.
The default is [None].
4.
Click the [OK] button to close the [Properties] window.
211
Chapter 5 Printing from Windows
To print a specific page on the front face
PCL5e
Compliant (Chapter)
For the Kyoceramita PCL5e printer driver, print a specific page so that it comes on the front, when printing
on both sides of the paper or booklet.
Regular duplex printing
A specified page
Duplex printing when edited by chapter
If a page specified as an opening page of a
chapter comes to a back side, the back side
becomes a blank page, and the specified
page will silide to the next page(front side).
The example is long-side folded, but duplex printing can
also be done with short-side folded documents.
Regular pamphlet printing
Example: page 4 is the opening
page of a chapter.
Pamphlet printing when edited
by chapter
Page 1 is printed
This is the front side
If a page specified as an opening
page of a chapter does not come
to the first page, a blank page is
inserted, and the specified page
will slide to the first page(front
side) of the next paper.
212
Chapter 5 Printing from Windows
To print a specific page on the front face (Continued)
● Operating procedures of
PCL5e
Limitation
[Chapter] cannot be set in the following cases:
• When [Duplex] is not available in [Paper] tab
• When [OHP] is selected in [Paper] tab - [Media Type]
• When [Collate] is not available in [Paper] tab
If you attempt to make a setting corresponding to the incongruous combinations described that cannot be set on
the printer driver, a message will be displayed. Check the details of the message and adjust the relationship with
other settings.
1.
Open [POD] tab of [Properties] window.
When displayed from an application with Windows 98.
2.
3.
Turn on the [Chapter] check box.
Enter a page number you want to print on the front in the [Pages] box.
You can specify the maximum page numbers of 30 pages in the [Pages] box.
When specifying multiple page numbers, divide the page numbers by a comma.
• Ex.: When making the fourth page into a table:
4
• Ex.: When making the fourth, sixth and 12th pages into a table: 4,6,12
Numerals that can be specified as a specified page must be within the range of 1 to 999.
When specifying page numbers, no duplication is allowed.
4.
Click the [OK] button to close the [Properties] window.
213
Chapter 5 Printing from Windows
To print pages in reverse order
PCL5e
Compliant (Face Up)
Adobe PS3
Output paper in reverse order when printing multiple pages.
Ex.: When printings 8 pages
FaceDown
FaceUp
AB
CD
CCDDCDCCDDCCDD CD
AABBABAABBAABB AB
111111 8
Page that is printed first.
● Operating procedures of
1.
PCL5e
Open [Paper] tab of [Properties] window.
When displayed from an application with Windows 98.
2.
3.
Select the [Output Order] in the [Features] field.
Select the [Face Up] in the pull-down menu under it.
For the [Output Order] box, [Face Up] or [Face Down] is available.
When [Face Up] is selected, paper is output with its front up.
When [Face Down] is selected, paper is output with its front down.
The default is [Face Down].
4.
Click the [OK] button to close the [Properties] window.
214
Chapter 5 Printing from Windows
To print pages in reverse order (Continued)
● Operating procedures of
1.
Adobe PS3
Open [Device Options] tab of [Properties] window.
When displayed from an application with Windows 98.
• For Windows NT4.0, [Document Defaults...] - [Advanced] tab is displayed.
• For Windows 2000/ XP, [Properties] - [Advanced] - [Printing Defaults] - [Layout] - [Advanced...] is displayed.
2.
3.
Select the [Output Order] from the [Printer features] field.
Click the [▼] button beside the [Printer features] - [Change setting for]
box to display the list. Then select [Face up] from the list.
For the [Output Order] box, [Face up] or [Face down] is available.
When [Face up] is selected, paper is output with its front up.
When [Face down] is selected, paper is output with its front down.
The default is [Face down].
4.
Click the [OK] button to close the [Properties] window.
215
Chapter 5 Printing from Windows
To set the Front & Back & Thick Cover / Insertion Sheet
Make settings to print not only pages but also a front cover, back cover, insertion sheet and thick cover.
To set a Front Cover:
PCL5e
Adobe PS3
Set a front cover for which paper is different than the text papers.
Reference
(p.218) To set a Front Cover
ABCD
ABCD
ABCD
ABCD
ABCD
ABCD
ABCD
Front Cover
- Blank
ABCD
ABCD
ABCD
ABCD
ABCD
ABCD
Front Cover
- Printed
To set a Back Cover:
PCL5e
Adobe PS3
Set a back cover for which paper is different than the text papers.
Reference
(p.222) To set a Back Cover
ABCD
ABCD
ABCD
ABCD
ABCD
ABCD
Back Cover
- Blank
ABCD
ABCD
ABCD
ABCD
ABCD
ABCD
ABCD
Back Cover
- Printed
To set an Insertion Sheet:
PCL5e
When the Kyoceramita PCL5e printer driver is used, insert a blank or printed paper which is different than
the output papers set.
Reference
(p.226) To set an Insertion Sheet
ABCD
ABCD
ABCD
ABCD
ABCD
ABCD
ABCD
ABCD
ABCD
ABCD
ABCD
ABCD
ABCD
ABCD
ABCD
ABCD
ABCD
ABCD
ABCD
ABCD
ABCD
ABCD
ABCD
ABCD
ABCD
Insertion
Insertion
sheet - Blank sheet - Printed
216
Chapter 5 Printing from Windows
To set the Front & Back & Thick Cover / Insertion Sheet (Continued)
To set a Thick Cover:
PCL5e
Adobe PS3
Output a thick paper as a cover, which is different than the output papers set.
Reference
(p.229) To set a Thick Cover
Output tray - Sub tray
Cover sheet
feeder
217
Chapter 5 Printing from Windows
To set a Front Cover
PCL5e
Adobe PS3
Compliant
Set a front cover for which paper is different than the text paper.
ABCD
ABCD
ABCD
ABCD
ABCD
ABCD
ABCD
ABCD
ABCD
ABCD
ABCD
ABCD
ABCD
No Front Cover
Front Cover
- Blank
ABCD
ABCD
ABCD
ABCD
ABCD
ABCD
Front Cover
- Printed
218
Chapter 5 Printing from Windows
To set a Front Cover (Continued)
● Operating procedures of
PCL5e
Limitation
[Front Cover] cannot be set in the following cases:
• When [OHP-Interleave(Blank)] or [OHP-Interleave(Print)] is selected in [Paper] tab - [Media
Type]
• When [Collate] is not available in [Paper] tab
• When [2-in-1] is selected in [Paper] tab - [Features] - [Combination]
If you attempt to make a setting corresponding to the incongruous combinations described that cannot be set on
the printer driver, a message will be displayed. Check the details of the message and adjust the relationship with
other settings.
1.
Open [Cover] tab of [Properties] window.
When displayed from an application with Windows 98.
2.
3.
Turn on the [Front Cover] check box.
Click on the button for [Blank] or [Printed].
When [Blank] is turned on, nothing is printed on the front cover.
When [Printed] is turned on, the front cover is also printed.
The default is [Blank].
4.
Click the [▼] button beside the [Tray] box to select a tray that feeds a
paper for the front cover.
The default is [Tray 1].
5.
Click the [OK] button to close the [Properties] window.
219
Chapter 5 Printing from Windows
To set a Front Cover (Continued)
● Operating procedures of
Adobe PS3
Limitation
[Front Cover] cannot be set in the following cases:
• When [OHP-Interleave(Blank)] or [OHP-Interleave(Print)] is selected in [Paper] tab - [Paper
type]
• When [Group] is selected in [Device Options] tab - [Collate]
• When [2-in-1] is selected in [Device Options] tab - [Combination]
If you attempt to make a setting corresponding to the incongruous combinations described that cannot be set on
the printer driver, a message will be displayed. Check the details of the message and adjust the relationship with
other settings.
1.
Open [Device Options] tab of [Properties] window.
When displayed from an application with Windows 98.
• For Windows NT4.0, the [Advanced] tab is displayed.
• For Windows 2000/ XP, the [Properties] window (detailed setting) is displayed.
2.
3.
Select [Front Cover] from the [Printer features] field.
Click the [▼] button beside the [Printer features] - [Change setting for]
box to display the list. Then select [Blank] or [Printed] from the list.
When [Blank] is selected, nothing is printed on the front cover.
When [Printed] is selected, the front cover is also printed.
The default is [None].
4.
Select [Front Cover Tray] from the [Printer features] field.
220
Chapter 5 Printing from Windows
To set a Front Cover (Continued)
5.
Click the [▼] button beside the [Printer features] - [Change setting for]
box to display the list. Then select a tray that feeds a paper for the
front cover from the list.
The default is [None].
6.
Click the [OK] button to close the [Properties] window.
221
Chapter 5 Printing from Windows
To set a Back Cover
PCL5e
Adobe PS3
Compliant
Set a back cover for which paper is different than the text paper.
ABCD
ABCD
ABCD
ABCD
ABCD
ABCD
ABCD
ABCD
ABCD
ABCD
ABCD
ABCD
No Back Cover
ABCD
ABCD
ABCD
ABCD
ABCD
ABCD
ABCD
Back Cover
- Blank
Back Cover
- Printed
222
Chapter 5 Printing from Windows
To set a Back Cover (Continued)
● Operating procedures of
PCL5e
Limitation
[Back Cover] cannot be set in the following cases:
• When [OHP-Interleave(Blank)] or [OHP-Interleave(Print)] is selected in [Paper] tab - [Media
Type]
• When [Collate] is not available in [Paper] tab
• When [2-in-1] is selected in [Paper] tab - [Features] - [Combination]
If you attempt to make a setting corresponding to the incongruous combinations described that cannot be set on
the printer driver, a message will be displayed. Check the details of the message and adjust the relationship with
other settings.
1.
Open [Cover] tab of [Properties] window.
When displayed from an application with Windows 98.
2.
3.
Turn on the [Back Cover] check box.
Click on the button for [Blank] or [Printed].
When [Blank] is turned on, nothing is printed on the front cover.
When [Printed] is turned on, the front cover is also printed.
The default is [Blank].
4.
Click the [▼] button beside the [Tray] box to select a tray that feeds a
paper for the back cover.
The default is [Tray 1].
5.
Click the [OK] button to close the [Properties] window.
223
Chapter 5 Printing from Windows
To set a Back Cover (Continued)
● Operating procedures of
Adobe PS3
Limitation
[Back Cover] cannot be set in the following cases:
• When [OHP-Interleave(Blank)] or [OHP-Interleave(Print)] is selected in [Paper] tab - [Paper
type]
• When [Group] is selected in [Device Options] tab - [Collate]
• When [Combination] is available in [Device Options] tab
If you attempt to make a setting corresponding to the incongruous combinations described that cannot be set on
the printer driver, a message will be displayed. Check the details of the message and adjust the relationship with
other settings.
1.
Open [Device Options] tab of the [Properties] window.
When displayed from an application with Windows 98.
• For Windows NT4.0, the [Advanced] tab is displayed.
• For Windows 2000/ XP, the [Properties] window (detailed setting) is displayed.
2.
3.
Select [Back Cover] from the [Printer features] field.
Click the [▼] button beside the [Printer features] - [Change setting for]
box to display the list. Then select [Blank] or [Printed] from the list.
When [Blank] is selected, nothing is printed on the front cover.
When [Printed] is selected, the front cover is also printed.
The default is [None].
4.
Select [Back Cover Tray] from the [Printer features] field.
224
Chapter 5 Printing from Windows
To set a Back Cover (Continued)
5.
Click the [▼] button beside the [Printer features] - [Change setting for]
box to display the list. Then select a tray that feeds a paper for the
back cover from the list.
The default is [None].
6.
Click the [OK] button to close the [Properties] window.
225
Chapter 5 Printing from Windows
Chapter 5 Printing from Windows
To set an Insertion Sheet
PCL5e
Compliant
When the Kyoceramita PCL5e printer driver is used, insert a blank or printed sheet different than the output
paper set. It is also possible to register the page number of an insertion sheet, feed tray, and the setting of
"blank or printed" as a list.
Insertion sheet - Blank
Insertion sheet - Printed
ABCD
ABCD
ABCD
ABCD
ABCD
ABCD
ABCD
ABCD
ABCD
ABCD
ABCD
ABCD
ABCD
ABCD
ABCD
ABCD
ABCD
ABCD
ABCD
ABCD
ABCD
ABCD
ABCD
ABCD
ABCD
ABCD
ABCD
ABCD
ABCD
ABCD
ABCD
ABCD
ABCD
ABCD
ABCD
ABCD
ABCD
ABCD
ABCD
ABCD
ABCD
ABCD
ABCD
ABCD
ABCD
ABCD
ABCD
226
Chapter
5
Chapter 5 Printing from Windows
To set an Insertion Sheet (Continued)
● Operating procedures of
PCL5e
Limitation
[Sheet Insertion] cannot be set in the following cases:
• When [OHP-Interleave(Blank)] or [OHP-Interleave(Print)] is selected in [Paper] tab - [Media
Type]
• When [Collate] is not available in [Paper] tab
• When [Booklet] or [2-in-1] is selected in [Paper] tab - [Features] field - [Combination]
If you attempt to make a setting corresponding to the incongruous combinations described that cannot be set on
the printer driver, a message will be displayed. Check the details of the message and adjust the relationship with
other settings.
1.
Open [Cover] tab of [Properties] window.
When displayed from an application with Windows 98.
2.
3.
Turn on the [Sheet Insertion] check box.
Click on the button for [Blank] or [Printed].
When [Blank] is turned on, nothing is printed on the front cover.
When [Printed] is turned on, the front cover is also printed.
The default is [Blank].
227
Chapter 5 Printing from Windows
To set an Insertion Sheet (Continued)
4.
In the [Pages] box, enter the number of a page into which an insertion
sheet is inserted.
The maximum allowable number of characters to specify the page number in the [Pages] box is 128
including numerals and symbols ("," / "-").
When specifying multiple page numbers, divide each page number by a comma. When page numbers
are continuous, combine them with a hyphen.
• Ex.: When inserting a sheet into the fourth page: 4
• Ex.: When inserting sheets into the fourth, sixth and 12th pages: 4,6,12
• Ex.: When inserting sheets into the fourth to 12th pages: 4-12
Numerals that can be specified as a specified page are between 1 to 999 when [Blank] is turned on,
and between 1 to 9999 when [Printed] is turned on.
If you turn on the [Advanced...] Check box, you can set page numbers directly to each tray by clicking
the [Setting] button.
The default is [Tray 1].
5.
Click the [▼] button beside the [Tray] box to display the list. Then
select a tray that feeds a paper for the insertion sheet.
The default is [Tray 1].
6.
Click the [OK] button to close the [Properties] window.
228
Chapter 5 Printing from Windows
To set a Thick Cover
PCL5e
Adobe PS3
Compliant
Output a thick paper as a cover, which is different from the output paper set.
To set a cover, options have
to be selected as shown in
the illustration below.
Sheet Feeder
Output Tray - Sub Tray
The copier shown in the illustration has been provided with
all options.
Important
The settings made in the [Properties] window that is opened from the [Printers] window are
applied to all applications.
Set a cover sheet feeder on the [Properties] window displayed from [Printers] window;
For Kyoceramita PCL5e, select [Setup] tab - [Options], and for Adobe PS, select [Device
Options] tab - [Installable Options].
● Operating procedures of
PCL5e
Limitation
[PI Cover Sheet] cannot be set in the following cases:
• When [PI-108 Sheet feeder] is not available in [Setup] tab.
• When [OHP-Interleave(Blank)] or [OHP-Interleave(Print)] is selected in [Paper] tab - [Media
Type]
• When [Sub Tray] is selected in [Paper] tab - [Output Tray]
If you attempt to make a setting corresponding to the incongruous combinations described that cannot be set on
the printer driver, a message will be displayed. Check the details of the message and adjust the relationship with
other settings.
229
Chapter 5 Printing from Windows
To set a Thick Cover (Continued)
1.
Open [Cover] tab of [Properties] window.
When displayed from an application with Windows 98.
2.
Turn on the [PI Cover Sheet] check box.
The default of [PI Front Cover] is [ON] and the default of [PI Back Cover] is [None].
3.
Click the [▼] button beside the [PI Front Cover] and [PI Back Cover]
box, and select [ON] if necessary.
4.
Click the [OK] button to close the [Properties] window.
230
Chapter 5 Printing from Windows
To set a Thick Cover (Continued)
● Operating procedures of
Adobe PS3
Limitation
[PI Tray (Front/Back)] cannot be set in the following cases:
• When [PI-108] is not available in [Device Options] tab
• When [OHP-Interleave(Blank)] or [OHP-Interleave(Print)] is selected in [Paper] tab - [Paper
type]
• When [Sub Tray] is selected in [Paper] tab - [Output bin]
If you attempt to make a setting corresponding to the incongruous combinations described that cannot be set on
the printer driver, a message will be displayed. Check the details of the message and adjust the relationship with
other settings.
1.
Open [Device Options] tab of [Properties] window.
When displayed from an application with Windows 98.
• For Windows NT4.0, the [Advanced] tab is displayed.
• For Windows 2000/ XP, the [Device Settings] tab is displayed.
2.
From the [Printer features] field, select [Pl-Tray (Front)] when setting a
front cover, and [Pl-Tray (Back)] when setting a back cover.
It is possible to set both the front cover and the back cover.
3.
Click the [▼] button beside the [Printer features] - [Change setting for]
box to display the list. Then select [ON] from the list.
Follow the same procedure whether setting a front cover or a back cover.
• The default is [None].
4.
Click the [OK] button to close the [Properties] window.
231
Chapter 5 Printing from Windows
To set for finishing
It is possible to use various functions such as stapling, punching, binding and folding for bookbinding and finishing.
To set stapling:
PCL5e
Adobe PS3
Staple output paper.
Reference
(p.234) To set stapling
ABCD
ABCDEF
To set the Punch Unit:
PCL5e
Adobe PS3
Make the printer driver recognize an optional Punch unit.
Reference
(p.238) To set the Punch Unit
Punch unit
To set punching:
PCL5e
Adobe PS3
Process output paper with double punching.
Reference
ABCD
(p.241) To set punching
ABCDEF
232
Chapter 5 Printing from Windows
To set for finishing (Continued)
To adjust printing position inside the paper (Image Shift):
PCL5e
Adobe PS3
Adjust the position of printing to the output paper.
Reference
ABC
(p.245) To adjust printing position inside the paper
ABC
To set Fold, Stitch, Trim (Trimmer Unit):
PCL5e
Adobe PS3
Fold an output paper at the center, bind it at the center, fold it in a Z-shape, cut it or fold it into three equal for
output.
Reference
(p.248) To set Fold, Stitch, Trim (Trimmer Unit)
233
Chapter 5 Printing from Windows
To set stapling
PCL5e
Adobe PS3
Compliant
Staple output paper. The number of staplings and their positions can be set as shown below.
Single Left
(Portrait)
ABCD
Single Right
(Portrait)
ABCD
Double Left
(Portrait)
ABCD
Double Right
(Portrait)
ABCD
Double Top
(Portrait)
ABCD
Single Left
(Landscape)
ABCDEF
Single Right
(Landscape)
ABCDEF
Double Left
(Landscape)
ABCDEF
Double Right
(Landscape)
ABCDEF
Double Top
(Landscape)
ABCDEF
234
Chapter 5 Printing from Windows
To set stapling (Continued)
Limitation
When used in the combination of [Stapling] and [Punch], the combinations listed below are not
allowed:
Position of stapling
Position of punching
Left
Top
Right
Single Left
O
O
X
Single Right
X
O
O
Double Left
O
X
X
Double Right
X
X
O
Double Top
X
O
X
For details of stapling and punching, refer to the User’s Guide of the copier.
If you attempt to make a setting corresponding to the incongruous combinations described that cannot be set on
the printer driver, a message will be displayed. Check the details of the message and adjust the relationship with
other settings.
235
Chapter 5 Printing from Windows
To set stapling (Continued)
● Operating procedures of
PCL5e
Limitation
[Staple] cannot be set in the following cases:
• When [Finisher] is not available in [Setup] tab
• When [A6] or [B6] is selected in [Paper Size]
• When [OHP] is selected in [Media Type]
• When [Sub Tray] is selected in [Paper] tab - [Output Tray]
• When [Fold only], [Fold & Trim], [Fold & Stitch] or [Fold, Stitch & Trim]
• is selected in [Features] field -[Fold & Stitch]
• When [Booklet] is selected in [Features] field-[Combination]
If you attempt to make a setting corresponding to the incongruous combinations described that cannot be set on
the printer driver, a message will be displayed. Check the details of the message and adjust the relationship with
other settings.
1.
Open [Paper] tab of [Properties] window.
When displayed from an application with Windows 98.
2.
3.
From the list shown in the [Features] field, select [Staple].
Select the number of staples used and their position from the list
shown when you click the [▼] button beside the box below the [Features] field.
[None] [Single Left] [Single Right] [Double Left] [Double Right] [Double Top] can be selected.
4.
Click the [OK] button to close the [Properties] window.
236
Chapter 5 Printing from Windows
To set stapling (Continued)
● Operating procedures of
Adobe PS3
Limitation
[Stapling] cannot be set in the following cases:
• When [Finisher] is not available in [Device Options] tab
• When [A6] or [B6] is selected in [Paper size]
• When [OHP] is selected in [Paper type]
• When [Sub Tray] is selected in [Paper] tab - [Output bin]
• When [Fold only], [Fold, Trim], [Fold, Stitch] or [Fold, Stitch, Trim] is
• selected in [Device Options] tab
• When [Booklet] is selected in [Device Options] tab
If you attempt to make a setting corresponding to the incongruous combinations described that cannot be set on
the printer driver, a message will be displayed. Check the details of the message and adjust the relationship with
other settings.
1.
Open [Device options] tab of the [Properties] window.
When displayed from an application with Windows 98.
• For Windows NT4.0, the [Advanced] tab is displayed.
• For Windows 2000/ XP, the [Device Settings] tab is displayed.
2.
3.
Select [Stapling] from the [Printer features] field.
Click the [▼] button beside the [Printer features] - [Change setting for]
box to display the list. Then select the number of staple to be used and
their position from the list.
[None] [Single(Portrait)] [Single(Landscape)] [SingleRight(Portrait)] [SingleRight(Landscape] [Double
Side(Portrait)] [Double Side(Landscape)] [Double SideRight(Portrait)] [Double SideRight(Landscape)]
[Double Top(Portrait)] [Double Top(Landscape)] can be selected.
The default is [None].
4.
Click the [OK] button to close the [Properties] window.
237
Chapter 5 Printing from Windows
To set the Punch Unit
PCL5e
Adobe PS3
Compliant
When the copier is loaded with an optional punch unit, it is possible to make the printer driver recognize the
unit.
When the punch unit [PU-108] is recognized by the printer driver, the output paper can be processed with a
double punching. When the punch unit [PZ-108] is recognized by the printer driver, the output paper can be
folded in a Z-form.
Punch unit
The printer driver will not recognize the unit if a finisher is not set on the printer driver.
238
Chapter 5 Printing from Windows
To set the Punch Unit (Continued)
● Operating procedures of
1.
PCL5e
Open [Setup] tab of [Properties] window from the [Printers] window.
When displayed from the [Printers] window with Windows 98.
2.
Select a [Punch Unit] you want to use from the list in the [Available
options] box.
When the copier is provided with an optional punch unit, select either [PU-108 Punch Unit] or [PZ-108
Punch Unit].
• When nothing is selected, it is not possible to set the [Punch] and [Z-folding] functions.
• When you do not know whether the optional punch unit installed is a [PU-108 Punch Unit] or [PZ-108 Punch
Unit], consult your system administrator.
3.
Click the [OK] button to close the [Properties] window.
239
Chapter 5 Printing from Windows
To set the Punch Unit (Continued)
● Operating procedures of
1.
Adobe PS3
Open [Device Options] tab of [Properties] window from the [Printers]
window.
When displayed from the [Printers] window with Windows 98.
For Windows NT4.0/2000/XP, open [Device settings] tab of the [Properties] window from the [Printers] window.
2.
3.
Select [Punch Unit] from the [Installable options] field.
Click the [▼] button beside the [Installable options] - [Change setting
for] box to display the list. Then select a [Punch Unit] you want to use
from the list.
When the copier is provided with an optional punch unit, select either [PU-108] or [PZ-108].
When the copier is not provided with an optional punch unit, select [None].
• The default is [None].
• When it is not known whether a punch unit optionally loaded to the copier is [PU-108] or [PZ-108], contact the
administrator.
4.
Click the [OK] button to close the [Properties] window.
240
Chapter 5 Printing from Windows
To set punching
PCL5e
Adobe PS3
Compliant
The output paper can be set to be punched in advance.
Punch holes can be set as shown below.
Left
(Portrait)
Top
(Portrait)
Right
(Portrait)
ABCD
ABCD
ABCD
Left
(Landscape)
Top
(Landscape)
ABCDEF
ABCDEF
Right
(Landscape)
ABCDEF
241
Chapter 5 Printing from Windows
To set punching (Continued)
Limitation
When used in the combination of [Stapling] and [Punch], the combinations listed below are not
allowed:
Position of stapling
Position of punching
Left
Top
Right
Single left
O
O
X
Single right
X
O
O
Double left
O
X
X
Double right
X
X
O
Double top
X
O
X
• For details of staple and punch, refer to the User’s Guide of the copier.
• If you attempt to make a setting corresponding to the incongruous combinations described that cannot be set
on the printer driver, a message will be displayed. Check the details of the message and adjust the relationship
with other settings.
242
Chapter 5 Printing from Windows
To set punching (Continued)
● Operating procedures of
PCL5e
Limitation
[Punch] cannot be set in the following cases:
• When [PU-108 Punch Unit] is not available in [Setup] tab
• When [A6] or [B6] is selected in [Paper] tab - [Paper Size]
• When [OHP] is selected in [Paper] tab - [Media Type]
• When [Sub Tray] is selected in [Paper] tab - [Output Tray]
• When [Fold only], [Fold & Trim], [Fold & Stitch] or [Fold, Stitch & Trim] is selected in [Paper]
tab - [Features] field - [Fold & Stitch]
• When [Booklet] is selected in [Paper] tab - [Features] field - [Combination]
If you attempt to make a setting corresponding to the incongruous combinations described that cannot be set on
the printer driver, a message will be displayed. Check the details of the message and adjust the relationship with
other settings.
1.
Open [Paper] tab of [Properties] window.
When displayed from an application with Windows 98.
2.
3.
From the list shown in the [Features] field, select [Punch].
Select the position of a punch to be used from the list shown when you
click the [▼] button beside the box below the [Features] field.
[None] [Left] [Top] [Right] can be selected.
The default is [None].
4.
Click the [OK] button to close the [Properties] window.
243
Chapter 5 Printing from Windows
To set punching (Continued)
● Operating procedures of
Adobe PS3
Limitation
[Punch] cannot be set in the following cases:
• When [PU-108] is not available in [Device Options] tab
• When [Tabbed Sheet] or [OHP] is selected in [Paper] tab - [Paper type]
• When [Sub Tray] is selected in [Paper] tab - [Output bin]
• When [Fold, Stitch] is available in [Device Options] tab
If you attempt to make a setting corresponding to the incongruous combinations described that cannot be set on
the printer driver, a message will be displayed. Check the details of the message and adjust the relationship with
other settings.
1.
Open [Device Options] tab of [Properties] window.
When displayed from an application with Windows 98.
• For Windows NT4.0, the [Advanced] tab is displayed.
• For Windows 2000/ XP, the [Device Settings] tab is displayed.
2.
3.
Select [Punch] from the [Printer features] field.
Click the [▼] button beside the [Printer features] - [Change setting for]
box to display the list. Then select the position of a punch to be used
from the list.
[None] [Left(Portrait)][ Left(Landscape)] [Top(Portrait)] [Top(Landscape)] [Right(Portrait)] [Right(Landscape)] can be selected.
The default is [None].
4.
Click the [OK] button to close the [Properties] window.
244
Chapter 5 Printing from Windows
To adjust printing position inside the paper
PCL5e
Adobe PS3
Compliant (Image Shift)
Adjust the details of the printing position to the output paper.
● Operating procedures of
1.
PCL5e
Open [POD] tab of [Properties] window.
When displayed from an application with Windows 98.
2.
Turn on the [Image Shift] check box.
If you turn on the [Shift Value of Printer Driver] Check box, the [Settings] button can be used.
[Shift Value of Printer Engine] check box will be turned on when setting a binding margin on the control panel of the copier.
245
Chapter 5 Printing from Windows
To adjust printing position inside the paper (Continued)
3.
Click the [Settings] button.
The [Image Shift] dialog box will appear.
4.
Turn on the [Up] or [Down] or [Left] or [Right] button in the [Front Shift]
field.
When [Left] is turned on, data prints to the left of the normal position by the value set in Step 5.
When [Right] is turned on, data prints to the right of the normal position by the value set in Step 5.
5.
Enter a value to specify the shift distance in a value from [0] to [2500].
The unit is [0.1 mm].
6.
Set each item for the [Front Shift] and the [Back Shift] in the same manner as in Steps 4 and 5.
7.
Click the [OK] button.
The [Image Shift] dialog box disappears and the display returns to the [Properties] window.
8.
Click the [OK] button to close the [Properties] window.
246
Chapter 5 Printing from Windows
To adjust printing position inside the paper (Continued)
● Operating procedures of
1.
Adobe PS3
Open [Device Options] tab of [Properties] window.
When displayed from an application with Windows 98.
• For Windows NT4.0, the [Advanced] tab is displayed.
• For Windows 2000/ XP, the [Device Settings] tab is displayed.
2.
3.
Select [Image Shift] from the [Printer features] field.
Click the [▼] button beside the [Printer features] - [Change setting for]
box to display the list. Then select [ON] from the list.
When [ON] is selected, the printing is made at the printing position set on the control panel of the
copier.
The default is [None].
4.
Click the [OK] button to close the [Properties] window.
247
Chapter 5 Printing from Windows
To set Fold, Stitch, Trim (Trimmer Unit)
PCL5e
Adobe PS3
Compliant
Fold a output paper at the center, bind it at the center, fold it in a Z-shape, cut it or fold it into three equal for
output.
Z-Fold
Fold
Stitch
Trim
248
Chapter 5 Printing from Windows
To set Fold, Stitch, Trim (Trimmer Unit) (Continued)
● Operating procedures of
PCL5e
Limitation
[Fold & Stitch] cannot be set in the following cases:
• When [DF-635 Finisher] is not available in [Setup] tab
• When [Tab sheet] or [OHP] is selected in [Paper] tab - [Media Type]
[Fold only] cannot be set in the following cases:
• When [Sub Tray] selected in [Paper] tab - [Output Tray]
• When [Collate] is not available in [Paper] tab
[Fold & Trim] cannot be set in the following cases:
• When [TU-108 Trimmer Unit] is not available in [Setup] tab
• When [Sub Tray] selected in [Paper] tab - [Output Tray]
• When [Collate] is not available in [Paper] tab
[Fold & Stitch] cannot be set in the following cases:
• When [Sub Tray] selected in [Paper] tab - [Output Tray]
• When [Collate] is not available in [Paper] tab
[Fold, Stitch & Trim] cannot be set in the following cases:
• When [TU-108 Trimmer Unit] is not available in [Setup] tab
• When [Sub Tray] selected in [Paper] tab - [Output Tray]
• When [Collate] is not available in [Paper] tab
[Z-Fold(A3, B4, 11 x 17, 8K)] cannot be set in the following cases:
• When [PZ-108 Punch Unit] selected in [Setup] tab
• When [Sub Tray] selected in [Paper] tab - [Output Tray]
[Z-Fold(8.5 x 14)] cannot be set in the following cases:
• When [PZ-108 Punch Unit] selected in [Setup] tab
• When [Sub Tray] selected in [Paper] tab - [Output Tray]
• If you attempt to make a setting corresponding to the incongruous combinations described that cannot be set
on the printer driver, a message will be displayed. Check the details of the message and adjust the relationship
with other settings.
249
Chapter 5 Printing from Windows
To set Fold, Stitch, Trim (Trimmer Unit) (Continued)
1.
Open [Paper] tab of [Properties] window.
When displayed from an application with Windows 98.
2.
3.
From the list shown in the [Features] field, select [Fold & Stitch].
Select items you want to use from the list shown when you click the
[▼] button beside the box below the [Features] field.
• The default is [None].
4.
Click the [OK] button to close the [Properties] window.
250
Chapter 5 Printing from Windows
To set Fold, Stitch, Trim (Trimmer Unit) (Continued)
● Operating procedures of
Adobe PS3
Limitation
[Fold, Stitch] cannot be set in the following cases:
• When [DF-635] is not available in [Device Options] tab
• When [Tabbed Sheet] or [OHP] is selected in [Paper] tab - [Paper type]
[Fold only] cannot be set in the following cases:
• When [Sub Tray] selected in [Paper] tab - [Output bin]
• When [Group] is selected in [Device Options] tab - [Collate]
[Fold, Trim] cannot be set in the following cases:
• When [TU-108] is not available in [Device Options] tab
• When [Sub Tray] selected in [Paper] tab - [Output bin]
• When [Group] is selected in [Device Options] tab - [Collate]
[Fold, Stitch] cannot be set in the following cases:
• When [Sub Tray] selected in [Paper] tab - [Output bin]
• When [Group] is selected in [Device Options] tab - [Collate]
[Fold, Stitch & Trim] cannot be set in the following cases:
• When [TU-108] is not available in [Device Options] tab
• When [Sub Tray] selected in [Paper] tab - [Output bin]
• When [Group] is selected in [Device Options] tab - [Collate]
[Z-Fold(A3, B4, 11 x 17, 8k)] cannot be set in the following cases:
• When [PZ-108] selected in [Device Options] tab
• When [Sub Tray] selected in [Paper] tab - [Output bin]
[Z-Fold(8.5 x 14)] cannot be set in the following cases:
• When [PZ-108] selected in [Device Options] tab
• When [Sub Tray] selected in [Paper] tab - [Output bin]
• The [Device Options] tab - [Installable Options] is displayed in [Properties] shown from the [Printers] window.
• If you attempt to make a setting corresponding to the incongruous combinations described that cannot be set
on the printer driver, a message will be displayed. Check the details of the message and adjust the relationship
with other settings.
251
Chapter 5 Printing from Windows
To set Fold, Stitch, Trim (Trimmer Unit) (Continued)
1.
Open [Device Options] tab of [Properties] window.
When displayed from an application with Windows 98.
• For Windows NT4.0, the [Advanced] tab is displayed.
• For Windows 2000/ XP, the [Device Settings] tab is displayed.
2.
3.
Select [Fold, Stitch] from [Printer features] field.
Click the [▼] button beside the [Printer features] - [Change setting for]
box to display the list. Then select the function you want to use from
the list.
• The default is [None].
4.
Click the [OK] button to close the [Properties] window.
252
Chapter 5 Printing from Windows
To print a confidential document
In order to print a highly confidential document, it is possible to print it face down or by using a print job password for protection.
To specify a user
PCL5e
Set a User ID and password to specify a print job user, when the Kyoceramita PCL5e printer driver is used.
Reference
(p.254) To specify a user
To print with protection by a password
PCL5e
Protect a print job with a password, when the Kyoceramita PCL5e printer driver is used.
Reference
(p.256) To print with protection by a password
253
Chapter 5 Printing from Windows
To specify a user
PCL5e
Compliant
Set a User ID and a password to specify a user, when the Kyoceramita PCL5e printer driver is used. User ID
and password are used to print confidential documents and to save image.
Depending on the application software, there are also passwords that save the settings of the
printer driver. When printing was made with [Password Print Settings] done on the shared file
on the network or on a file other people may use for printing, delete [UserID] and [Password]
before saving the file.
● Operating procedures of
1.
PCL5e
Open [Paper] tab of [Properties] window.
When displayed from an application with Windows 98.
2.
Click the [Settings] button.
The [Password Print] dialog box will appear.
When a user has already been set, or when a password has been set in the [POD] tab - [Image Storage], the existing settings are displayed.
A password set in the [Paper] tab - [Settings] button - [Password Print] dialog box, and a password set in the [POD]
tab - [Image Storage] check box - [Job Combination Print Storage] dialog box are saved as one password. A password that is set later takes precedence over those saved previously.
Reference
(p.256) To print with protection by a password
254
Chapter 5 Printing from Windows
To specify a user (Continued)
3.
Enter a User ID (up to 8 digits) in the [UserID] box.
A User ID that has already been set is cancelled when a new ID is entered, and the new one becomes
valid.
4.
Enter a Password (up to 8 digits) in the [Password] box.
A password that has been already set is cancelled when a password is entered, and the new one
becomes valid.
Tips
Passwords are case-sensitive.
5.
Click the [OK] button.
The [User setup] dialog box disappears and the display returns to the [Properties] window.
6.
Click [OK] button to close the [Properties] window.
255
Chapter 5 Printing from Windows
To print with protection by a password
PCL5e
Compliant
When the Kyoceramita PCL5e printer driver is used, it is possible to prevent the print job from starting until
[User ID] and [Password] are entered on the control panel of the copier.
Some application softwares save the settings of the printer driver. When printing with [Password Print Settings] set on shared file on the network or on a file other people may print, delete
[UserID] and [Password] before saving the file.
● Operating procedures of
PCL5e
Limitation
[Password Print] cannot be set in the following case:
• When [Image Storage] is available in [POD] tab
If you attempt to make a setting corresponding to the incongruous combinations described that cannot be set on
the printer driver, a message will be displayed. Check the details of the message and adjust the relationship with
other settings.
1.
Open [Paper] tab of [Properties] window.
When displayed from an application with Windows 98.
256
Chapter 5 Printing from Windows
To print with protection by a password (Continued)
2.
Turn on the [Password Print] check box.
The [Password Print] dialog box will appear.
When the user setup is not yet made, a message "User ID must be entered." is displayed.
3.
Confirm the User ID and password.
A password set in the [Paper] tab - [Settings] button - [Password Print] dialog box, and a password set in the [POD]
tab - [Image Storage] check box - [Job Combination Print Storage] dialog box are saved as one password. A password that is set later takes precedence over those saved previously.
4.
When changing the password, enter a new password (up to 8 digits) in
the [Password] box.
A password that has already been set is cancelled when a password is entered, and the new one
becomes valid.
5.
Click the [OK] button.
The [Password Print] dialog box disappears and the display returns to the [Properties] window.
6.
7.
Click the [OK] button to close the [Properties] window.
Print from the application.
The procedures on and after Step 8 show the operation on the control panel of the copier.
8.
Press the [MODE] button to display the print mode basic screen and
display [Password Print] touch key.
9.
Touch the [Password Print].
[User ID] key, [Password] key and numeric key etc. are displayed.
257
Chapter 5 Printing from Windows
To print with protection by a password (Continued)
10.Enter your password using the numeric, uppercase or lowercase keys,
and touch the [OK] key.
If no uppercase letters are displayed, touch the [Uppercase] key to get them displayed.
If no lowercase letters are displayed, touch the [Lowercase] key to get them displayed.
If no numbers are displayed, touch the [Number] key to get them displayed.
When you touch the [OK] key, a list of the corresponding print jobs is displayed.
The list will be blank if there are no corresponding print jobs.
If this is the case, touch the [Cancel] key to terminate the Confidential Output feature.
11. Select the print job you need, and touch the [Print] key.
The print process starts.
You can specify multiple print jobs for them to be printed out at one time.
258
Chapter 5 Printing from Windows
To use an internal hard disk
A print job can be saved into the hard disk of in this printing system, and it can be printed as needed.
To save and print a print job (Image Storage)
PCL5e
Save a print job into the hard disk of this printing system as a job file, when the Kyoceramita PCL5e printer
driver is used.
Reference
(p.260) To save and print a print job
To re-set a Job ID
PCL5e
Re-set a Job ID and a password that specify a print job saved into a hard disk, when the Kyoceramita PCL5e
printer driver is used.
Reference
(p.263) To re-set a Job ID
259
Chapter 5 Printing from Windows
To save and print a print job
PCL5e
Compliant (Image Storage)
When the Kyoceramita PCL5e printer driver is used, it is possible to save a print job into the hard disk of this
printing system as a password-protected job file. The saved job file can be printed through the control panel
of the copier as needed. When the conditions listed in the table below are met, the saved job file can be
overlaid in combination with other job files (such as copy data).
Copier
Printer
note
[P-JOB] is not selected
-
[P-JOB] can not be performed
on printer
[Sheet/Cover Insertion] is not
selected
[Sheet Insertion] is not selected
-
[Chapter] is not selected
[Chapter] is not selected
-
[Combination] is not selected
[Combination] is not selected
-
[Repeat] is not selected
[Repeat] is not selected
-
[Booklet] is not selected
[Booklet] is not selected
-
[OHP-Interleave] is not selected
[OHP-Interleave] is not selected
[Image Insert] is not selected
-
[Image Insert] can not be performed on printer
[Dual Page] is not selected
-
[Dual Page] can not be performed on printer
[Mixed Original] is not selected
the same size of original papers
-
the same size of original papers
the same size of original papers
-
the same resolution
the same resolution
-
the same graphic mode
the same graphic mode
Leave a print job resolution as
[600 dpi]
-
Single tray
-
When printing of shared file on the network or on a file other people may use with [UserID] and
[Password], delete [UserID] and [Password] before saving the file.
For some models of machine, Hard Disk must be selected beforehand at [Setup] tab-[Options].
260
Chapter 5 Printing from Windows
To save and print a print job (Continued)
● Operating procedures of
PCL5e
Limitation
[Image Storage] cannot be set in the following case:
• When [Password Print] is available in [Paper] tab
If you attempt to make a setting corresponding to the incongruous combinations described that cannot be set on
the printer driver, a message will be displayed. Check the details of the message and adjust the relationship with
other settings.
1.
Open [POD] tab of [Properties] window.
When displayed from an application with Windows 98.
2.
Turn on the [Image Storage] check box.
The [Image Storage] dialog box will appear.
When a password has been already set in the [Paper] tab - [Password Print] check box or [Settings]
button, and when a password has been set in the [Job ID] - [Settings] button, the existing settings are
displayed.
A password set in the [Paper] tab - [Settings] button - [Password Print] dialog box, and a password set in [Paper]
tab - [Settings] button - [Image Storage] check box - [Job Combination Print Storage] dialog box are saved as one
password. A password that is set later takes precedence over those saved previously.
Reference
3.
(p.256)
Confirm the [Job ID] and [Password].
261
Chapter 5 Printing from Windows
To save and print a print job (Continued)
4.
When changing the Job ID, or when creating a new Job ID, enter a new
Job ID (up to 8 digits) in the [Job ID] box.
A Job ID that has already been set is cancelled when a new Job ID is entered, and the new one
becomes valid.
When a [Job ID] overlaps with a saved [Job ID], the copier automatically adds a number to the last digit of the [Job
ID], and identifies it as a different [Job ID].
5.
When changing the password, enter a new password (up to 8 alphanumeric characters) into the [Password] box.
A password that has already been set is cancelled when a new password is entered, and the new one
becomes valid.
6.
Click the [OK] button.
The [Image Storage] dialog box disappears and the display returns to the [Properties] window.
7.
Click [Store] or [Store and Print].
When [Store] is turned on, a print job can be saved into the hard disk of the copier. The printing of the
saved print job is made through the control panel of the copier as needed.
When [Store and Print] is turned on, it is possible to save a print job into a hard disk contained in the
copier and print it.
8.
Click the [OK] button to close the [Properties] window.
Before printing with the application, you can change [Job ID] and [Password].
Reference
9.
(p.263) To re-set a Job ID
Print with the application.
The operations on and after this section are made through the control panel of the copier.
262
Chapter 5 Printing from Windows
To re-set a Job ID
PCL5e
Compliant
Re-set a [Job ID] and a [Password] that confirm and specify a print job saved into a hard disk, when the Kyoceramita PCL5e printer driver is used. When [Job ID] and a [Password] are re-set, they are used to save
images. The [Password] is the same as that of the confidential output.
Some application softwares save the settings of the printer driver. When printing with [Password Print Settings] set on shared file on the network or on a file other people may use, delete
[Job ID] and [Password] before saving the file.
● Operating procedures of
1.
PCL5e
Open [Paper] tab of the [Properties] window.
When displayed from an application with Windows 98.
2.
Click the [Settings] button.
The [Password Print] dialog box will appear.
The details of existing settings will appear.
A password set in the [Paper] tab - [Settings] button - [Password Print] dialog box, and a password set in the [POD]
tab - [Image Storage] check box - [Job Combination Print Storage] dialog box are saved as one password. A password that is set later takes precedence over those saved previously.
Reference
3.
(p.256) To print with protection by a password
Confirm the [Job ID] and [Password].
263
Chapter 5 Printing from Windows
To re-set a Job ID (Continued)
4.
When changing a Job ID, enter a new Job ID (up to 8 digits) in the [Job
ID] box.
A Job ID that has already been set is cancelled when a new Job ID is entered, and the new one
becomes valid.
When a [Job ID] overlaps with a saved [Job ID], the copier automatically adds a number to the last digit of the [Job
ID], and identifies it as a different [Job ID].
5.
When changing the password, enter a new password (up to 8 alphanumeric characters) into the [Password] box.
A password that has already been set is cancelled when a new password is entered, and the new one
becomes valid.
6.
Click the [OK] button.
The [Password Print] dialog box disappears and the display returns to the [Properties] window.
7.
Click the [OK] button to close the [Properties] window.
264
Chapter 5 Printing from Windows
To set a Watermark
A Watermark or an Overlay can be set and printed on the output paper.
To create a Overlay:
PCL5e
Create a overlay design that is printed on the output paper, when the Kyoceramita PCL5e printer driver is
used.
Reference
(p.268) To create a Overlay
To print a Overlay:
PCL5e
Set a overlay and print it on the output paper, when the Kyoceramita PCL5e printer driver is used.
Reference
(p.270) To print a Overlay
ABCD
To delete a Overlay:
PCL5e
Delete an unnecessary transparent design the [Properties] window, when the Kyoceramita PCL5e printer
driver is used.
Reference
(p.272) To delete a Overlay
265
Chapter 5 Printing from Windows
To set a Watermark (Continued)
To create a new Watermark:
PCL5e
Adobe PS3
Create a new Watermark printed on the output paper, when this printing system is used.
Reference
(p.273) To create a new Watermark
ABCD
COPY
To print a Watermark:
PCL5e
Adobe PS3
Set a transparent character and print it on the output paper, when this printing system is used.
Reference
(p.277) To print a Watermark
ABCD
ABCD
PY
CONFID
ENTIAL
CO
To change a Watermark:
PCL5e
Adobe PS3
Edit and change a registered transparent character printed on the output paper, when this printing system is
used.
Reference
(p.282) To change a Watermark
Editting
ABCD
ABCD
Draft
COPY
266
Chapter 5 Printing from Windows
To set a Watermark (Continued)
To delete a Watermark:
PCL5e
Adobe PS3
Delete an unnecessary transparent character, when this printing system is used.
Reference
(p.285) To delete a Watermark
267
Chapter 5 Printing from Windows
To create a Overlay
PCL5e
Compliant (Overlay)
Create a watermark to be printed on the output paper in the [Properties] window of an application, when the
Kyoceramita PCL5e printer driver is used.
● Operating procedures of
1.
PCL5e
Open [Overlay] tab of [Properties] window.
When displayed from an application with Windows 98.
2.
Click the [Select Bitmap] button in the [Symbol] field.
The [Open overlay file] dialog box will appear.
Important
In advance, create a file which will be an overlay and save it as a bitmap.
3.
Select a bitmap file to save overlay data from the folder field, and click
the [OK] button.
File name selected in the [File] box of the [Symbol] field is shown.
4.
If you do not use the transparent design immediately for printing,
select [None] from the list shown when you click the [▼] button beside
the [File] box in the [Symbol] field.
268
Chapter 5 Printing from Windows
To create a Overlay (Continued)
5.
Click the [OK] button to close the [Properties] window.
269
Chapter 5 Printing from Windows
To print a Overlay
PCL5e
Compliant (Overlay)
Set a watermark and print it on the output paper, when the Kyoceramita PCL5e printer driver is used.
ABCD
● Operating procedures of
1.
PCL5e
Open [Overlay] tab of [Properties] window.
When displayed from an application with Windows 98.
2.
If you do not use the transparent design immediately for printing,
select [None] from the [File] box in the [Symbol] field by clicking the
[▼] button.
File name selected in the [File] box of the [Symbol] field is shown.
3.
In the [Page] box of the [Symbol] field, choose a page on which to
place the overlay design.
Select [All but first page], [All pages], [First page only] or [No overlay] from the list shown by clicking
the [▼] button.
4.
For black and white (monochrome) bitmaps, use the function in the
[Color] box of the [Shade] field.
5.
In the [Darkness] box of the [Shade] field, define with the slider or
numerical entry box how "dark" or "solid" your overlay will be.
A setting of 100% is a completely solid overlay, a setting of 50% provides equal overlay to background
coverage, and lesser setting make the overlay more transparent.
270
Chapter 5 Printing from Windows
To print a Overlay (Continued)
6.
When [User defined] is selected, you can set the overlay size on the
page.
7.
When [Automatically] is selected in the [Position] field, the driver positions the overlay for you.
8.
When [User defined] is selected, in the [Position] field, you can define
the X axis position (left and right) and Y axis position (up and down) of
the overlay on the page by clicking the [▲] or [▼] button or by directly
entering the values from the keyboard (0-100).
9.
Click the [OK] button.
The [Properties] window is closed.
10.Print from the application.
A document printed with the overlay data is printed and placed on the overlay data.
11. When the application of an overlay is discontinued after printing, go to
step 14.
When an overlay is applied to all printing, the operations after Step 13 is not required.
12.Open [Properties] window - [Overlay] tab.
13.Select [None] from the list shown when you click the [▼] button beside
the [File] box in the [Symbol] field.
14.Click the [OK] button to close the [Properties] window.
271
Chapter 5 Printing from Windows
To delete a Overlay
PCL5e
Compliant (Overlay)
Delete an unnecessary watermark from the [Properties] window, when the Kyoceramita PCL5e printer driver
is used.
● Operating procedures of
1.
PCL5e
Delete or move the original bitmap file from the current location;
Move the bitmap file of the transparent design you want to delete to the
Recycle Bin on Desktop.
• You cannot remove registration from the [File] box in the [Symbol] field. Delete the original bitmap
file.
• If you do not want to delete it, move it to an other folder.
2.
Open [Overlay] tab of [Properties] window.
• The name remains in the [File] box, but it will not be printed as a transparent design.
When displayed from an application with Windows 98.
3.
In the [Symbol] field, click the [▼] button next to the [File] box. From
the list shown, select [- None -].
4.
Click the [OK] button to close the [Properties] window.
272
Chapter 5 Printing from Windows
To create a new Watermark
PCL5e
Adobe PS3
Compliant (Watermark)
Create a new watermark to be printed on the output paper, when this printing system is used.
ABCD
COPY
● Operating procedures of
1.
PCL5e
Open [Watermark] tab of [Properties] window.
When displayed from an application with Windows 98.
2.
Click the [New] button below the Preview window.
[Custom watermark 1] will be highlighted in the [Text] box under the [Watermark] field.
3.
Overwrite the text to be highlighted in the [Text] box with the text used
for the watermark.
4.
After the text is entered, the [Text Change & New Image Request] dialog box will appear when some action is made such as clicking other
buttons.
• The window asks you if you replace [Custom watermark 1] with the text just entered.
• Click the [Yes] button to replace, and the dialog box is closed.
• Click the [No] button not to replace, and the new watermark will be created and the dialog box is
closed.
• Click the [Cancel] button for no changes and dialog box is closed.
5.
Click the [OK] button to close the [Properties] window.
273
Chapter 5 Printing from Windows
To create a new Watermark (Continued)
● Operating procedures of
1.
Adobe PS3
Open [Watermarks] tab of [Properties] window.
When displayed from an application with Windows 98.
Windows NT4.0/2000/XP is not equipped with this function.
2.
Click the [New] button.
The [New Watermark] dialog box appears.
3.
Enter the text to be used as a watermark in the [Text] box.
The default is [Helvetica].
4.
Click the [▼] button beside the [Font] box to display the list. Then
select a font to be used by watermark from the list.
5.
Click the [▲] / [▼] button beside the [Size] box to specify the point size
of a watermark in a value from [7] to [600].
• The default is [72].
• By selecting a number in the [Size] box, a size can be directly entered.
274
Chapter 5 Printing from Windows
To create a new Watermark (Continued)
6.
Click the [▼] button beside the [Style] box to display the list. Then
select a style to be used by watermark from the list.
[Regular] [Bold] [Italic] [Bold Italic] can be selected.
The default is [Bold].
7.
Click the [▲] / [▼] button beside the box in the [Angle] field to specify
the angle of a watermark in a value from [-90] to [90].
The angle can be also specified by shifting the slider beside the box in the [Angle] field to the left and
right.
• The default is [0].
• By selecting a number in the box in the [Angle] field, a angle can be directly entered.
8.
To automatically position a watermark at the center, turn on the [Automatically center] button.
The default is [ON].
9.
To specify the position of a watermark, turn on the [Position relative to
center] button.
The default is [Off].
10.When the [Position relative to center] button is clicked, click the [▲] /
[▼] button beside the [x] and [y] boxes to specify the relative position
from the center in a numeric value.
The unit of specified value is [cm].
• The defaults are [0.00], [0.00].
• By selecting a number in the [x] and [y] boxes, a value can be directly entered.
11. Click the [▲] / [▼] button beside the [Red], [Green] and [Blue] boxes to
specify the color of a watermark.
Color can also be specified in the [Color] dialog box, displayed by clicking the [Choose Color] button.
• The defaults are [120], [120], [120].
• By selecting a number in the [Red], [Green] and [Blue] boxes, a value can be directly entered.
12.Confirm a newly created watermark on the preview display.
13.Click the [OK] button.
The [New Watermark] dialog box is closed and the display returns to the [Properties] window.
In the [Select a watermark] box, a newly created watermark is displayed.
Newly created watermarks can be selected from the list displayed.
14.Select [None] from the [Select a watermark] box.
275
Chapter 5 Printing from Windows
To create a new Watermark (Continued)
15.Click the [OK] button to close the [Properties] window.
276
Chapter 5 Printing from Windows
To print a Watermark
PCL5e
Adobe PS3
Compliant (Watermark)
Set a watermark and print it on the output paper, when this printing system is used.
ABCD
CONFID
ENTIAL
ABCD
Y
P
CO
277
Chapter 5 Printing from Windows
To print a Watermark (Continued)
● Operating procedures of
1.
PCL5e
Open [Watermarks] tab of [Properties] window.
When displayed from an application with Windows 98.
• A number of watermarks have been registered in advance.
• It is possible to create a new character string and register it.
Reference
(p.273)
• The defaults is [None]. When [None] is selected, no transparent character is set.
2.
Click the [▼] button beside the [Text] box to display the list. Then
select a watermark you want to use from the list.
A selection can be made from among [CONFIDENTIAL], [COPY], [DRAFT], [FILE COPY], [FINAL],
[PROOF], [TOP SECRET], and others newly created and registered.
3.
To print watermarks on the first page only, in the [Watermark] field,
click the [▼] button next to the [Page] box. From the list shown, select
[First page only].
If you select [All but first page], watermarks are printed on all pages except for the first page.
If you select [All pages], watermarks are printed on all pages.
If you select [No watermark], watermarks are not printed.
4.
Click [Top], or [Bottom].
When [Top] is turned on, a watermark can be printed on top of the printing.
When [Bottom] is turned on, a watermark can be printed behind the text.
5.
In the [Watermark] field, set [Count] and [Separation] to specify the
number and spacing of watermarks.
Spacing will be automatically adjusted according to the number of watermarks.
6.
In the [Font] field, click the [▼] button next to the [Name] box. Select
fonts to use for watermarks from the list shown.
278
Chapter 5 Printing from Windows
To print a Watermark (Continued)
7.
In the [Font] field, click the [▼] button next to the [Color] box. Select
font colors to use for watermarks from the list shown.
Select [Black], [Dark Gray], [Light Gray], or [White].
8.
In the [Font] field, you can specify the density of the font color by dragging the slider bar of the [Darkness] box.
9.
In the [Font] field, select a font size by directly entering the font size in
the [Size] box or by clicking the [▲] or [▼] button next to the [Size] box.
10.Check the [Bold] or [Italic] Check box in the [Font] field to specify bold
or italic formatting.
11. You can specify the watermark position in the [Position] field. Click the
[User Defined] button on to define X axis position (left and right) in the
[X] box, and Y axis position (up and down) in the [Y] box.
Click the [Automatically] button on to position the watermark automatically at the center of the page.
12.Specify the lean angle of the watermark by dragging the slider bar of
the [Angle] box in the [Position] field or by directly entering the angle.
13.To
adjust the watermark manually in the preview window, click the
[Move] button on in the [Adjustment] field and drag to move the mark
around or click the [Rotate] button on and drag to rotate the mark
around.
14.Click the [OK] button to close the [Properties] window.
15.Print from the application.
When [Duplex] is executed with the odd number of pages, a blank paper is added. The blank paper is also printed
with a watermark.
279
Chapter 5 Printing from Windows
To print a Watermark (Continued)
● Operating procedures of
1.
Adobe PS3
Open [Watermarks] tab of [Properties] window.
When displayed from an application with Windows 98.
Windows NT4.0 / 2000/XP is not equipped with this function.
2.
Select a watermark to be used from the [Select a watermark] box.
A selection can be made from among [CONFIDENTIAL], [Copy], [Draft] and others newly created and
registered.
• A Number of watermarks have been registered in advance.
• It is possible to create a new character string and register it.
Reference
(p.273)
• The default is [None]. When [None] is selected, no transparent character is set.
3.
When printing a watermark on the first page only, turn on the [On first
page only] check box of the [Print watermark] field.
When the [First page only] check box is turned on, a watermark is printed on the first page only.
When the [First page only] check box is turned off, a watermark is printed on all pages.
The default is [OFF].
280
Chapter 5 Printing from Windows
To print a Watermark (Continued)
4.
To print a watermark in the background, turn on the [In background]
check box of the [Print watermark] field.
When the [Background] check box is turned on, a background printing is available.
When the [Background] check box is turned off, a background printing is not available.
The default is [ON]. If the watermark is difficult to see due to the printing from the application, set it to [OFF].
5.
To print an outline, turn on the [As outline only] check box of the [Print
watermark] field.
When the [As outline only] check box is turned on, the outline of a watermark can be printed.
When the [As outline only] check box is turned off, a complete watermark can be printed.
The default is [OFF]. A watermark is difficult to see due to the printing from the application, set it to [OFF].
6.
7.
8.
Click the [OK] button to close the [Properties] window.
Print from application.
When the application of a watermark is discontinued after printing,
Open [watermarks] tab of the [Properties] window.
9. Select [None] from the [Select a watermark] box.
10.Click the [OK] button to close the [Properties] window.
281
Chapter 5 Printing from Windows
To change a Watermark
PCL5e
Compliant (Watermark)
Adobe PS3
Edit and change a registered watermark to be printed on the output paper, when this printing system is used.
Editting
ABCD
ABCD
Draft
COPY
● Operating procedures of
1.
PCL5e
Open [Watermarks] tab of [Properties] window.
When displayed from an application with Windows 98.
2.
Click the [▼] button beside the [text] box in the [Watermark] tab to display the list. Then select a watermark to be changed from the list.
The selected character is highlighted.
3.
4.
To change text for watermark, enter text in the [Text] box.
After the text is entered, the [Text Change & New Image Request] dialog box will appear when some action is made such as clicking other
buttons.
• The window asks you if you replace the existing text with the text just entered.
• Click the [Yes] button to replace, and the dialog box is closed.
• Click the [No] button not to replace, and the new watermark will be created and the dialog box is
closed.
• Click the [Cancel] button for no changes and dialog box is closed.
5.
Click the [OK] button to close the [Properties] window.
282
Chapter 5 Printing from Windows
To change a Watermark (Continued)
● Operating procedures of
1.
Adobe PS3
Open [Watermarks] tab of [Properties] window.
When displayed from an application with Windows 98.
Windows NT4.0/2000/XP is not equipped with this function.
2.
Click the [Edit] button.
The [Edit Watermark] dialog box will appear.
3.
4.
To change text for watermark, enter text in the [Text] box.
To change the font, click the [▼] button beside the [Font] box to display the list. Then select a font to be changed from the list.
The default is [Helvetica].
5.
To change a size, click the [▲] / [▼] button beside the [Size] box and
specify the size of a watermark in a value from [7] to [600].
• The default is [72].
• By selecting a number in the [Size] box, a size can be directly entered.
283
Chapter 5 Printing from Windows
To change a Watermark (Continued)
6.
To change a style, click the [▼] button beside the [Style] box to display
a list. And then select a style to be used by a watermark from the list.
[Regular] [Bold] [Italic] [Bold Italic] can be selected.
The default is [Bold].
7.
To change the angle, click the [▲] / [▼] button beside the box in the
[Angle] field and specify the angle of a watermark in a value from [-90]
to [90].
The angle can also be specified by shifting the slider beside the box in the [Angle] field to the left and
right.
• The default is [0].
• By selecting a number in the box in the [Angle] field, an angle can be directly entered.
8.
To automatically position a watermark at the center, click [Automatically center].
The default is [ON].
9.
To change a value to specify the position of a watermark, click [Position relative to center] button.
The default is [OFF].
10.When the [Position relative to center] button is turned on, click the [▲]
/ [▼] button beside the [x] and [y] boxes to specify the relative position
from the center in a numeric value.
The unit of a value set is [cm].
• The defaults are [0.00], [0.00].
• By selecting numbers in the [x] and [y] boxes, values can be directly entered.
11. To
change the color, click the [▲] / [▼] buttons beside the [Red],
[Green] and [Blue] boxes to specify a color to be changed.
In the [Color] dialog box displayed by clicking the [Choose Color] button, a color can also be specified.
• The defaults are [120], [120], [120].
• By selecting a number in the [Red], [Green] and [Blue] boxes, a value can be directly entered.
12.Confirm a changed watermark on the preview display.
13.Click the [OK] button.
The [Edit watermark] dialog box is closed and the display returns to the [Properties] window.
In the [Select a watermark] box, the changed watermark is displayed.
14.Select [None] from the [Select a watermark] box.
15.Click the [OK] button to close the [Properties] window.
284
Chapter 5 Printing from Windows
To delete a Watermark
PCL5e
Compliant (Watermark)
Adobe PS3
Delete an unnecessary watermark, when this printing system is used.
● Operating procedures of
1.
PCL5e
Open [Watermarks] tab of [Properties] window.
When displayed from an application with Windows 98.
2.
Click the [▼] button beside the [text] box in the [Watermarks] tab to
display the list. Then select a transparent character to be deleted from
the list.
3.
Click the [Delete] button.
[Delete Specified Watermark Request] dialog box will appear.
4.
Click the [Yes] button.
The selected watermark is deleted.
5.
Click the [OK] button to close the [Properties] window.
285
Chapter 5 Printing from Windows
To delete a Watermark (Continued)
● Operating procedures of
1.
Adobe PS3
Open [Watermarks] tab of [Properties] window.
When displayed from an application with Windows 98.
Windows NT4.0/2000/XP are not equipped with this function.
2.
3.
Select a watermark to be deleted from the [Select a watermark] box.
Click the [Delete] button.
[Delete watermark?] dialog box will appear.
4.
Click the [OK] button.
The selected watermark is deleted.
5.
Click the [OK] button to close the [Properties] window.
286
Chapter 5 Printing from Windows
To set an image and shade
Set a shade of color when outputting an image and a method for processing graphic data.
To set Halftoning (Halftoning):
PCL5e
Set printing mode of a graphic image for printing, when the Kyoceramita PCL5e printer driver is used.
Reference
(p.290) To set Halftoning
To set a printing density (Brightness/Contrast):
PCL5e
Set a printing density in 3 levels, when the Kyoceramita PCL5e printer driver is used.
Reference
(p.291) To set a printing density
Standard
Light
To save toner consumption by controlling print density:
PCL5e
Adobe PS3
Save the consumption of toner by controlling print density, when this printing system is used.
Reference
(p.292) To save toner consumption by controlling print density
Normal
Toner Save
Draft
ABCD
ABCD
ABCD
To set a resolution:
PCL5e
Adobe PS3
Set a resolution to 400 dpi or 600 dpi, when this printing system is used.
Reference
(p.294) To set a resolution
287
Chapter 5 Printing from Windows
To set an image and shade (Continued)
To print a curved section smoothly (Smoothing):
PCL5e
Adobe PS3
Print the curved section of characters and images smoothly, when this printing system is used.
(p.296) To print a curved section smoothly
Reference
Smoothing
To print an image by reversing white and black:
PCL5e
Adobe PS3
Print a negative image by reversing white into black, when this printing system is used.
(p.298) To print an image by reversing white and black
Reference
Reversing white into black
ABCD
ABCD
ABCD
ABCD
ABCD
ABCD
ABCD
ABCD
To print an image by reversing image:
Adobe PS3
Print an image by reversing it in a horizontal direction, like a reflection in the mirror, when the Adobe PS3
printer driver is used.
Reference
(p.300) To print an image by reversing image
ABCD
DCBA
288
Chapter 5 Printing from Windows
To set an image and shade (Continued)
To print a text in gray or black more clearly:
Adobe PS3
Print a text in grey or black more clearly, when the Adobe PS3 printer driver is used.
Reference
(p.301) To print a text in gray or black more clearly
To print an image in gray or black more clearly:
Adobe PS3
Print an image in grey or black more clearly, when the Adobe PS3 printer driver is used.
Reference
(p.302) To print an image in gray or black more clearly
289
Chapter 5 Printing from Windows
To set Halftoning
PCL5e
Compliant (Halftoning)
When the Kyoceramita PCL5e printer driver is used, it is possible to it is possible to set Halftoning for printing.
● Operating procedures of
1.
PCL5e
Open [Graphics] tab of [Properties] window.
When displayed from an application with Windows 98.
2.
Select optional radio button from the [Halftoning] field.
[Solid Black and White], [Patterned Grays] or [Diffused Grays] are available.
The default is [Patterned Grays].
3.
Click the [OK] button to close the [Properties] window.
290
Chapter 5 Printing from Windows
To set a printing density
PCL5e
Compliant (Brightness / Contrast)
When the Kyoceramita PCL5e printer driver is used, it is possible to set a printing density.
Standard
● Operating procedures of
1.
Light
PCL5e
Open [Graphics] tab of [Properties] window.
When displayed from an application with Windows 98.
2.
By shifting the slider of the [Brightness] field to the left or right, set a
printing density from [100] to [-100].
The default is [0].
3.
By shifting the slider of the [Contrast] field to left and right, set a printing density from [100] to [-100].
The default is [0].
4.
Click the [OK] button to close the [Properties] window.
291
Chapter 5 Printing from Windows
To save toner consumption by controlling print density
PCL5e
Compliant
Adobe PS3
Save the consumption of toner by controlling printing density, when this printing system is used.
Normal
● Operating procedures of
1.
Toner Save
Draft
PCL5e
Open [Paper] tab of [Properties] window.
When displayed from an application with Windows 98.
2.
From the list shown in the [Features] field, select [Toner Saver].
From the pull-down menu under it, select [Normal], [Toner Save] or [Draft].
You can select print density from [Normal](100%), [Toner Save](80%) or [Draft](60%).
3.
Click the [OK] button to close the [Properties] window.
292
Chapter 5 Printing from Windows
To save toner consumption by controlling print density (Continued)
● Operating procedures of
1.
Adobe PS3
Open [Device Options] tab in [Properties] window.
When displayed from an application with Windows 98.
• For Windows NT4.0, the [Advanced] tab is displayed.
• For Windows 2000/XP, open [Advanced Options] window by clicking the [Advanced ...] button on the [Printing
Preferences] window.
2.
3.
From the list shown in the [Printer features] box, select [Toner Save].
Click the [▼] button beside the [Printer features] - [Change setting for]
box to display the list. Then select [Toner Save] or [Draft] from the list.
• The default is [Normal].
• You can select a printing density from [Normal](100%), [Toner Save](80%) or [Draft](60%).
4.
Click the [OK] button to close the [Properties] window.
293
Chapter 5 Printing from Windows
To set a resolution
PCL5e
Adobe PS3
Compliant
Set a resolution to 400 dpi or 600 dpi, when this printing system is used.
● Operating procedures of
1.
PCL5e
Open [Options] tab of [Properties] window.
When displayed from an application with Windows 98.
2.
In the [Resolution] field, click [400 x 400] or [600 x 600].
• The unit is [dpi].
• The default is [600 x 600].
3.
Click the [OK] button to close the [Properties] window.
294
Chapter 5 Printing from Windows
To set a resolution (Continued)
● Operating procedures of
1.
Adobe PS3
Open [Graphics] tab of the [Properties] window.
When displayed from an application with Windows 98.
• For Windows NT4.0, the [Advanced] tab is displayed.
• For Windows 2000/XP, open [Advanced Options] window by clicking the [Advanced ...] button on the [Printing
Preferences] window.
2.
Click the [▼] button beside the [Resolution] box to display the list.
Then select [600 dpi] or [400 dpi] from the list.
The default is [600 dpi].
3.
Click the [OK] button to close the [Properties] window.
295
Chapter 5 Printing from Windows
To print a curved section smoothly
PCL5e
Adobe PS3
Compliant (Smoothing)
Print the curved section of characters and images smoothly, when this printing system is used.
Smoothing
● Operating procedures of
1.
2.
3.
PCL5e
Open [Paper] tab of [Properties] window.
Select [Smoothing] from the [Features] field.
Click the [▼] button beside the box below the [Features] field to display
the list. Then select [Type 1], [Type 2] or [Type 3] from the list.
The default is [None].
4.
Click the [OK] button to close the [Properties] window.
296
Chapter 5 Printing from Windows
To print a curved section smoothly (Continued)
● Operating procedures of
1.
Adobe PS3
Open [Device Options] tab of [Properties] window.
When displayed from an application with Windows 98.
• For Windows NT4.0, the [Advanced] tab is displayed.
• For Windows 2000/XP, open [Advanced Options] window by clicking the [Advanced ...] button on the [Printing
Preferences] window.
2.
3.
Select [Smoothing] from the [Printer features] field.
Click the [▼] button beside the [Printer features] - [Change setting for]
box to display the list. Then select [Type 1], [Type 2] or [Type 3] from
the list.
[Type 1] normally provides processing suitable to a slanting line of a character and graphic.
[Type 2] normally provides processing suitable to a curved section of a character.
[Type 3] normally provides processing suitable to a curved section of fine character.
When [None] is selected, no smoothing function is provided.
The default is [None].
4.
Click the [OK] button to close the [Properties] window.
297
Chapter 5 Printing from Windows
To print an image by reversing white and black
PCL5e
Adobe PS3
Compliant
Print a negative image by reversing white into black, when the this printing system is used. This function is
suitable for printing a monochromatic or coarse RGB image.
Reversing white into black
ABCD
ABCD
ABCD
ABCD
● Operating procedures of
1.
ABCD
ABCD
ABCD
ABCD
PCL5e
Open [Graphics] tab of [Properties] window.
When displayed from an application with Windows 98.
2.
Turn on the [Negative] check box.
The default is [None].
3.
Click the [OK] button to close the [Properties] window.
298
Chapter 5 Printing from Windows
To print an image by reversing white and black (Continued)
● Operating procedures of
1.
Adobe PS3
Open [Graphics] tab of [Properties] window.
When displayed from an application with Windows 98.
• For Windows NT4.0, the [Advanced] tab is displayed.
• For Windows 2000/XP, open [Advanced Options] window by clicking the [Advanced ...] button on the [Printing
Preferences] window.
2.
Turn on the [Print as a negative image] check box.
The default is [OFF].
3.
Click the [OK] button to close the [Properties] window.
299
Chapter 5 Printing from Windows
To print an image by reversing image
Adobe PS3
Compliant
Print an image by reversing it in a horizontal direction, like a reflection in the mirror, when the Adobe PS3
printer driver is used.
ABCD
● Operating procedures of
1.
DCBA
Adobe PS3
Open [Graphics] tab of [Properties] window.
When displayed from an application with Windows 98.
• For Windows NT4.0, the [Advanced] tab is displayed.
• For Windows 2000/XP, open [Advanced Options] window by clicking the [Advanced ...] button on the [Printing
Preferences] window.
2.
Turn on the [Print as a mirror image] check box.
The default is [OFF].
3.
Click the [OK] button to close the [Properties] window.
300
Chapter 5 Printing from Windows
To print a text in gray or black more clearly
Adobe PS3
Compliant
Print a text in gray or black more clearly, when the Adobe PS3 printer driver is used.
● Operating procedures of
1.
Adobe PS3
Open [Graphics] tab of [Properties] window from the [Printers] window.
When displayed from [Printers] window with Windows 98.
Windows NT4.0/2000/XP are not provided with this function.
2.
Turn on the [Convert gray text to PostScript gray] check box.
The default is [OFF].
3.
Click the [OK] button to close the [Properties] window.
301
Chapter 5 Printing from Windows
To print an image in gray or black more clearly
Adobe PS3
Compliant
Print an image in gray or black more clearly, when the Adobe PS3 printer driver is used.
● Operating procedures of
1.
Adobe PS3
Open [Graphics] tab of [Properties] window from the [Printers] window.
When displayed from [Printers] window with Windows 98.
Windows NT4.0/2000/XP are not equipped with this function.
2.
Turn on the [Convert gray graphics to PostScript gray] check box.
The default is [OFF].
3.
Click the [OK] button to close the [Properties] window.
302
Chapter 5 Printing from Windows
To set font-related items
It is possible to set the printer font-, TrueType font-, and PostScript font-related items.
To print without using printer fonts:
PCL5e
Adobe PS3
Make settings so that printing is done without using the printer font, when this printing system is used.
Reference
(p.304) To print without using printer fonts
To replace TrueType with the printer font:
Adobe PS3
Replace TrueType with the printer font while in printing, when the Adobe PS3 printer driver is used. To
replace a font, detailed settings can also be made.
Reference
(p.306) To replace TrueType with the printer font
To set a method for sending PostScript:
Adobe PS3
Set a method for sending the PostScript font of the computer to the printer, when the Adobe PS3 printer
driver is used.
Reference
(p.308) To set a method for sending PostScript
To add the Euro currency mark to the font:
Adobe PS3
Add the Euro mark to the PostScript font, when the Adobe PS3 printer driver is used.
Reference
(p.310) To add the Euro currency mark to the font
To download the font information:
Adobe PS3
Make the printer driver recognize the PostScript information of the printer as needed, when the Adobe PS3
printer driver is used.
Reference
(p.311) To download the font information
303
Chapter 5 Printing from Windows
To print without using printer fonts
PCL5e
Adobe PS3
Compliant
Make settings so that printing is done without using the printer font, when this printing system is used. When
the printer font is not used, the printing data is increased but the same printing result is obtained.
● Operating procedures of
1.
PCL5e
Open [Options] tab of [Properties] window.
When displayed from an application with Windows 98
2.
Click on the [Rasters] button of the [TrueType options] field.
• [Outline soft fonts] prints documents using a TrueType font which downloaded from your computer
using Outline data format.
• [Bitmap soft fonts] prints documents using a TrueType font which downloaded from your computer
using bitmap data format.
• [Rasters] is selected, all text and font data is converted in the computer into Raster graphics and
downloaded to the printer.
The default is [Outline soft fonts].
3.
Click the [OK] button to close the [Properties] window.
304
Chapter 5 Printing from Windows
To print without using printer fonts (Continued)
● Operating procedures of
1.
Adobe PS3
Open [Fonts] tab in [Printers] - [Properties].
When displayed from the [Printers] window with Windows 98
• For Windows NT4.0, the [Advanced] tab is displayed.
• For Windows 2000/XP, on the [Properties] window, click the [Advanced ...] button.
• For Window NT4.0/2000/XP, [Graphics] - [TrueType Font] - [Download as Softfont] is selected.
2.
Turn on the [Do not use printer fonts] check box.
The default is [OFF].
Important
Also, when sending PostScript output to another printer, any trouble due to the difference of
the print fonts can be avoided by turning on the [Do not use printer fonts] check box.
3.
Click the [OK] button to close the [Properties] window.
305
Chapter 5 Printing from Windows
To replace TrueType with the printer font
Adobe PS3
Compliant
Replace the TrueType font with the printer font while printing, when the Adobe PS3 printer driver is used.
And to replace a font, detailed settings can also be made.
When the printer font is used, printing data gets reduced. However, since the font is replaced,
there sometimes occurs difference between the display on the monitor and the results of printing.
● Operating procedures of
1.
Adobe PS3
Open [Fonts] tab in [Printers] - [Properties].
When displayed from the [Printers] window with Windows 98
• For Windows NT4.0, the [Advanced] tab is displayed.
• For Windows 2000/XP, open [Advanced Options] window by clicking the [Advanced ...] button on the [Printing
Preferences] window.
• For Window NT4.0/2000/XP, [Graphics] - [TrueType font] - [Download as softfont] is selected.
2.
Click the [Substitute printer fonts for TrueType fonts when applicable]
check box.
When the [Do not use printer fonts] check box is turned on, it is displayed in gray and cannot be
turned on. In such a case, turn off the [Do not use printer fonts] check box to cancel the grayish display.
The default is [ON].
306
Chapter 5 Printing from Windows
To replace TrueType with the printer font (Continued)
3.
Click the [Send Fonts As] button.
The [Send Fonts As] dialog box will appear.
For Windows NT4.0/2000/XP, set [PostScript Options] - [TrueType Font Download Option].
4.
Click the [▼] button beside [Send TrueType fonts as] box to display the
list. Then select a method for sending to be used from the list.
• When [Outlines] is selected, the printer driver uses the outline of TrueType character to create and
send a PostScript Type 1 font.
• When [Bitmaps] is selected, the printer driver uses the outline of TrueType character to create and
send a bitmapped PostScript Type 3 font.
• When [Type 42] is selected, font that is a TrueType font [Type 42] that can be used by the PostScript printer is sent.
• When [Don't send] is selected, a font is not sent. This is set when a font can be provided by the network spooler.
5.
When [Outline] is selected in Step 4, click the [▲] / [▼] button beside
the [Threshold to switch between downloading bitmap or outline fonts,
measured in pixels (in pixel size at the current resolution)] box, and
specify a font size to change when the Printer driver sends the TrueType font as bitmap font or sends outline font.
When [0] is specified, outline is always sent.
• The default is [100].
• By selecting a number in the box, a value can be directly entered.
6.
Click the [OK] button.
The [Send Fonts As] dialog box is closed, and the display returns to the [Properties] window.
7.
Click the [OK] button to close the [Properties] window.
307
Chapter 5 Printing from Windows
To set a method for sending PostScript
Adobe PS3
Compliant
For Adobe PS3 printer driver, you can specify how to send PostScript fonts in the computer to the printer.
Important
The settings made in the [Printers] - [Properties] are applied to all applications. Make sure to
set fonts in the [Printers] - [Properties].
The settings made in the [Properties] window that is opened from an application are valid only
while the application is being used.
● Operating procedures of
1.
Adobe PS3
Open [Fonts] tab in [Printers] - [Properties].
Opened from the [Printers] window with Windows 98.
Windows NT 4.0/2000/XP does not support this function.
2.
Click the [Send Fonts As].
The [Send Fonts As] dialog box will appear.
308
Chapter 5 Printing from Windows
To set a method for sending PostScript (Continued)
3.
Click the [▼] button beside the [Send PostScript fonts as] box of the
[PostScript fonts] field to specify how to send the PostScript fonts
from the list.
• If you specify [In Native Format], the PostScript font is sent to the printer in native fonts (Type 1).
• If you select [Don't Send], the fonts will be not sent to the printer; however, it will not substitute
printer fonts for PostScript. Select this setting if the network spooler can provide the fonts. If the
PostScript fonts are not available, it is replaced with the default printer fonts (usually Courier).
4.
Click the [OK] button.
The [Send Fonts As] dialog box disappears and the display returns to the [Properties] window.
5.
Click the [OK] button to close the [Properties] window.
309
Chapter 5 Printing from Windows
To add the Euro currency mark to the font
Adobe PS3
Compliant
Add the Euro currency symbol to PostScript fonts, when the Adobe PS3 printer driver is used.
Important
The settings made in the [Printers] - [Properties] are applied to all applications. Make sure to
set fonts in the [Printers] - [Properties].
The settings made in the [Properties] window that is opened from an application are valid only
while the application is being used.
● Operating procedures of
1.
Adobe PS3
Open [Fonts] tab in [Printers] - [Properties].
Opened from the [Printers] window with Windows 98.
Windows NT 4.0/2000/XP does not support this function.
2.
Turn on the [Add Euro Currency Symbol to PostScript Fonts] check
box.
The default is [OFF].
3.
Click the [OK] button to close the [Properties] window.
310
Chapter 5 Printing from Windows
To download the font information
Adobe PS3
Compliant
Set the printer driver to recognize the PostScript font information in the printer, when the Adobe PS3 printer
driver is used.
Important
The settings made in the [Printers] - [Properties] are applied to all applications. Make sure to
set fonts in the [Printers] - [Properties].
The settings made in the [Properties] window that is opened from an application are valid only
while the application is being used.
● Operating procedures of
1.
Adobe PS3
Open [Fonts] tab in [Printers] - [Properties].
Opened from the [Printers] window with Windows 98.
Windows NT 4.0/2000/XP does not support this function.
2.
Click the [Update Soft Fonts] button.
The list of the PostScript fonts downloaded in the printer is updated.
3.
Click the [OK] button to close the [Properties] window.
311
Chapter 5 Printing from Windows
To adjust settings of PostScript output format
For Adobe PS3 printer driver, you can adjust the settings about PostScript.
To adjust basic settings of PostScript output format:
Adobe PS3
Adjust the basic settings of PostScript such as PostScript output format and PostScript header, when the
Adobe PS3 printer driver is used.
Reference
(p.313) To adjust basic settings of PostScript output format
To adjust detailed settings of PostScript output format:
Adobe PS3
Adjust the detailed settings of PostScript such as PostScript language level and Data protocol format, when
the Adobe PS3 printer driver is used.
Reference
(p.316) To adjust detailed settings of PostScript output format
312
Chapter 5 Printing from Windows
To adjust basic settings of PostScript output format
Adobe PS3
Compliant
Adjust the basic settings of PostScript such as PostScript output format and PostScript header, when the
Adobe PS3 printer driver is used.
● Operating procedures of
1.
Adobe PS3
Open [PostScript] tab in [Printers] - [Properties].
Opened from the [Printers] window with Windows 98.
• Open the [Advanced] tab in Windows NT 4.0.
• Open [Advanced Options] window by clicking the [Advanced ...] button on the [Printing Preferences] window in
Windows 2000/XP.
• Set [PostScript Options] - [PostScript Output Option] in Windows NT 4.0/2000/XP.
2.
Click the [▼] button beside the [PostScript output format] box to specify the PostScript output format from the list.
• When printing a normal document, select [PostScript (optimize for speed)].
• When printing a file that is Adobe DSC (Document Structuring Convention) compliant, select
[PostScript (optimize for portability-ADSC)]. Creating a file in EPS format, select [Encapsulated
PostScript (EPS)].
• When creating and saving a file for using PostScript data at a later time, select [Archive format].
• The default is [PostScript (optimize for speed)].
• If you select [Encapsulated PostScript (EPS)], select [Print to file] check box in the [Print] dialog box.
• Set [PostScript Options] - [PostScript Output Option] in Windows NT 4.0/2000/XP.
313
Chapter 5 Printing from Windows
To adjust basic settings of PostScript output format (Continued)
3.
Click [Download header with each print job] or [Assume header is
downloaded and retained] in the [PostScript header] field.
• The setting in the [PostScript header] field is ignored if you have selected [Encapsulated PostScript (EPS)] or [Archive format] in the [PostScript output format] box at step 2.
• The [PostScript header] includes information and settings required for printout. It has to be sent
at least once in every job.
• When printing to a network printer, it is suitable to send PostScript header in every prints.
• If the printing system and the computer is connected directly, you can increase the printing speed
by setting the [PostScript header] to be sent only one time.
• If the printing system and the computer is connected directly, you can increase the printing speed
by the following procedures:
1. Make sure the printing system is turned on.
2. Click the [Send Header Now] button.
3. Select the [Assume header is downloaded and retained] button.
• The default is [Download header with each print job].
• Windows NT 4.0/2000/XP does not support this function.
4.
Click the [Send Header Now] button if you want to send the PostScript
header now.
• If you click the [OK] button on the [Download PostScript header] dialog box that appears when
you click the [Send Header Now] button, the [Assume header is downloaded and retained] button
is turned on automatically.
Windows NT 4.0/2000/XP does not support this function.
5.
Turn on the [Print PostScript error information] check box if you want
to set the error handler that is sent in every printing to print PostScript
error information.
• This setting is ignored if you have selected [Encapsulated PostScript (EPS)] at step 2.
• The default is [ON].
• Set [PostScript Options] - [Send PostScript Error Handler] in Windows NT 4.0/2000/XP.
314
Chapter 5 Printing from Windows
To adjust basic settings of PostScript output format (Continued)
6.
Click the [▲] and [▼] buttons beside the [Job timeout] box of the [PostScript timeout values] field to specify a value for the job timeout in the
range between [0] and [999].
• The unit is second.
• The [Job timeout] is the time the printer can spend on a print job. If the job is not completed within
the time, it is aborted.
• Printing by a network printer, set a value to avoid the computer to spend too much time of the
printer.
• If the printing system and the computer is connected directly, you can set the [Job timeout] to [0]
to perform the print job without regard to time.
• The default is [0]. Set to [0] if you don't want the timeout to occur.
• By selecting a number in the [Job timeout] box, a value can be directly entered.
• Windows NT 4.0/2000/XP does not support this function.
7.
Click the [▲] and [▼] buttons beside the [Wait timeout] box of the
[PostScript timeout values] field to specify a value in the range
between [0] and [999].
• The unit is seconds.
• The default presents no problem in most cases.
• The [Wait timeout] is the maximum time for the printer to wait for data. The job is aborted if it cannot receive the data within the time.
• If the printing system and the computer are connected directly, you can specify high value.
• The default is [300].
• By selecting a number in the [Wait timeout] box, a value can be directly entered.
• Windows NT 4.0/2000/XP does not support this function.
8.
Click the [OK] button to close the [Properties] window.
315
Chapter 5 Printing from Windows
To adjust detailed settings of PostScript output format
Adobe PS3
Compliant
Adjust the detailed settings of PostScript such as PostScript language level and Data protocol format, when
the Adobe PS3 printer driver is used.
Important
Do not adjust the detailed settings of PostScript output format unless it is required.
● Operating procedures of
1.
Adobe PS3
Open [PostScript] tab in [Printers] - [Properties].
Opened from the [Printers] window with Windows 98.
Windows NT 4.0/2000/XP does not support this function.
2.
Click the [Advanced...] button.
The [Advanced PostScript Options] dialog box will appear.
316
Chapter 5 Printing from Windows
To adjust detailed settings of PostScript output format (Continued)
3.
Click the [▲] and [▼] buttons beside the [PostScript language level]
box to select either [2] or [3] for the language level used.
• The default is [3].
• Set [PostScript Options] - [PostScript Language Level] in Windows NT 4.0/2000/XP.
4.
Set each button and check box in the [Data format] field if you have to
change the data format.
• When you turning on the [ASCII data] button, data is sent in ASCII format.
• When you turning on the [Tagged binary communications protocol] button, all data except data of
special characters is sent in binary (8-bit) format via the parallel port.
• When you turning on the [Pure binary data] button, all data is sent in binary format.
• When you turning on the [Send CTRL+D before job] check box, the reset memory code
(CTRL+D) is sent before the print job. Turning on the [Pure binary data] radio button, you cannot
turn on this check box.
• When you turning on the [Send CTRL+D after job] check box, the reset memory code (CTRL+D)
is sent after the print job. Turning on the [Pure binary data] radio button, you cannot turn on this
check box.
• The [ASCII data] button and the [Send CTRL+D after job] check box are turned on as default.
• Windows NT 4.0/2000/XP does not support this function.
5.
Turn on the [Display alert for applications incompatible with driver features] check box, if you want to alert for an application that is incompatible with driver features.
The setting in the [PostScript header] field is ignored if you have selected [Encapsulated PostScript
(EPS)] or [Archive format] in the [PostScript output format] box at step 2.
• The default is [OFF].
• Windows NT 4.0/2000/XP does not support this function.
6.
Click the [OK] button.
The [Advanced PostScript Options] dialog box disappears and the display returns to the [Properties]
window.
7.
Click the [OK] button to close the [Properties] window.
317
Chapter 5 Printing from Windows
Checking the Printer Driver Setting
You can check the setting before printing and perform test printing to check current setting.
To test print to check the settings (Wait with Proof):
PCL5e
Adobe PS3
Check test printing output and check current settings from the control panel, when this printing system is
used.
Reference
(p.319) To test printing to check the settings
To check the current settings before printing (Wait):
PCL5e
Adobe PS3
Check the current setting from the control panel before printing, when this printing system is used.
Reference
(p.323) To check the current settings before printing
To check the version of the printer driver:
PCL5e
Adobe PS3
Check the printer driver version from the [Properties] window, when this printing system is used.
Reference
(p.327) To check the version of the printer driver
318
Chapter 5 Printing from Windows
To test printing to check the settings
PCL5e
Adobe PS3
Compliant (Wait with Proof)
Check test printing output and check current setting from the control panel. Use this when printing a large
volume, such as multiple sets of pages.
● Operating procedures of
PCL5e
Limitation
[Wait with Proof] cannot be set in the following case:
• When [Collate] is not available in [Paper] tab
If you attempt to make a setting corresponding to the incongruous combinations described that cannot be set on
the printer driver, a message will be displayed. Check the details of message and adjust the relationship with other
settings.
1.
Open [Paper] tab of [Properties] window.
When displayed from an application of Windows 98.
2.
From the list shown in the [Features] field, select [Wait Mode].
319
Chapter 5 Printing from Windows
To test printing to check the settings (Continued)
3.
From the pull-down menu under it, select [Wait with Proof].
The default is [None].
4.
5.
Click the [OK] button and close the [Properties] window.
Perform printing from the application.
Step 6 and after are operations on the control panel of the copier.
6.
The [Printer Check Mode Screen] will appear on the LCD touch screen
and no printing is performed.
[HDD STORE] appears only when the optional HDD is installed in the main body printer.
7.
8.
Confirm the current settings.
Change setting values of [Print Quantity], [Duplex Mode] or [Image
Shift], if necessary.
• How to change [Print Quantity]
Enter the value from the keypad on the control panel when the [Printer Check Mode Screen]
appears.
• How to change [Duplex Mode]
To show the [Basic Screen], touch the [Duplex Mode]. Set the [Duplex Mode] on the [Basic Screen].
To return to the [Printer Check Mode Screen], press the [CHECK] button on the control panel.
• How to change [Image Shift]
Available only when [On] is selected in [Image Shift] of printer driver.
To show the [Image Shift Screen], touch the [Image Shift]. Set the [Image Shift] on the [Image Shift
Screen]. To return to the [Printer Check Mode Screen], touch [EXIT] on the [Image Shift Screen].
9. Touch the [PROOF PRINT] to print one copied set for proofreading.
10.Touch the [Exit] to return to the print mode basic screen.
11. Press [START] to resume the rest of the print job.
When you change the settings, press [STOP] to cancel the print job, and change the settings on the
printer properties on your computer.
320
Chapter 5 Printing from Windows
To test printing to check the settings (Continued)
● Operating procedures of
Adobe PS3
Limitation
[Wait with Proof] cannot be set in the following case:
• When [Group] is selected in [Device Options] tab - [Collate]
If you attempt to make a setting corresponding to the incongruous combinations described that cannot be set on
the printer driver, a message will be displayed. Check the details of message and adjust the relationship with other
settings.
1.
Open [Device Options] tab of [Properties] window.
When displayed from an application of Windows 98.
• For Windows NT4.0, the [Advanced] tab is displayed.
• For Windows 2000/XP, on the [Properties] window, click the [Advanced ...] button.
2.
3.
Select [Wait Mode] in the [Printer features] field.
Click the [▼] button besides the [Printer features] - [Change settings
for] box to display the list. Then select [Wait with Proof] from the list.
The default is [None].
4.
5.
6.
Click the [OK] button and close the [Properties] window.
Print form the application.
The [Printer Check Mode Screen] will appear on the LCD Touch Screen
and one set of copy for proofreading will be printed.
321
Chapter 5 Printing from Windows
To test printing to check the settings (Continued)
7.
Change setting values of [Print Quantity], [Duplex Mode] or [Image
Shift], if necessary.
• How to change [Print Quantity]
Enter the value from the keypad on the control panel when the [Printer Check Mode Screen]
appears.
• How to change [Duplex Mode]
To show the [Basic Screen], touch the [Duplex Mode]. Set the [Duplex Mode] on the [Basic Screen].
To return to the [Printer Check Mode Screen], press the [CHECK] button on the control panel.
• How to change [Image Shift]
Available only when [On] is selected in [Image Shift] of printer driver.
To show the [Image Shift Screen], touch the [Image Shift]. Set the [Image Shift] on the [Image Shift
Screen]. To return to the [Printer Check Mode Screen], touch [EXIT] on the [Image Shift Screen].
8.
Touch the [PROOF PRINT] to print one copied set for proofreading, if
necessary.
9.
Touch [EXIT] and then press [Start] to resume the rest of the print job.
322
Chapter 5 Printing from Windows
To check the current settings before printing
PCL5e
compliant (Wait)
Adobe PS3
Check the current setting from the control panel before printing.
● Operating procedures of
1.
PCL5e
Open [Paper] tab of [Properties] window.
When displayed from an application of Windows 98.
2.
3.
From the list shown in the [Features] field, select [Wait Mode].
From the pull-down menu under it, select [Wait].
The default is [None].
4.
5.
Click the [OK] button and close the [Properties] window.
Print from the application.
Step 6 and after are operations on the control panel of the copier.
323
Chapter 5 Printing from Windows
To check the current settings before printing (Continued)
6.
The settings are displayed on the LCD.
The [Printer Check Mode Screen] will appear on the LCD touch screen and no printing is
performed.
7.
Confirm the current settings.
Change setting values of [Print Quantity], [Duplex Mode] or [Image Shift], if necessary.
(Refer to the above mentioned procedure: How to check the job [Wait Mode] Proof,6.)
• How to change [Print Quantity]
Enter the value from the keypad on the control panel when the [Printer Check Mode Screen]
appears.
• How to change [Duplex Mode]
To show the [Basic Screen], touch the [Duplex Mode]. Set the [Duplex Mode] on the [Basic Screen].
To return to the [Printer Check Mode Screen], press the [CHECK] button on the control panel.
• How to change [Image Shift]
Available only when [On] is selected in [Image Shift] of printer driver.
To show the [Image Shift Screen], touch the [Image Shift]. Set the [Image Shift] on the [Image Shift
Screen]. To return to the [Printer Check Mode Screen], touch [EXIT] on the [Image Shift Screen].
8.
Press [START] button to resume the rest of the print job.
When you change the settings, press [STOP] to cancel the print job, and change the settings on the
printer properties on your computer.
324
Chapter 5 Printing from Windows
To check the current settings before printing (Continued)
● Operating procedures of
Adobe PS3
Limitation
[Wait with Proof] cannot be set in the following case:
• When [Group] is selected in [Device Options] tab - [Collate]
If you attempt to make a setting corresponding to the incongruous combinations described that cannot be set on
the printer driver, a message will be displayed. Check the details of message and adjust the relationship with other
settings.
1.
Open [Device Options] tab of [Properties] window.
When displayed from an application of Windows 98.
• For Windows NT4.0, the [Advanced] tab is displayed.
• For Windows 2000/XP, on the [Properties] window, click the [Advanced ...] button.
2.
3.
Select [Wait Mode] in the [Printer features] field.
Click the [▼] button besides the [Printer features] - [Change settings
for] box to display the list. Then select [Wait] from the list.
The default is [None].
4.
5.
Click the [OK] button and close the [Properties] window.
Print from the application.
Step 6 and after are operations on the control panel of the copier.
325
Chapter 5 Printing from Windows
To check the current settings before printing (Continued)
6.
The settings are displayed on the LCD.
The [Printer Check Mode Screen] will appear on the LCD Touch Screen and no printing is performed.
[HDD STORE] appears only when the optional HDD is installed in the main body printer.
7.
8.
Confirm the current settings.
Change setting values of [Print Quantity], [Duplex Mode] or [Image
Shift], if necessary.
• How to change [Print Quantity]
Enter the value from the keypad on the Control Panel of the copier when the [Printer Check Mode
Screen] appears.
• How to change [Duplex Mode]
To show the [Basic Screen], touch the [Duplex Mode]. Set the [Duplex Mode] on the [Basic
Screen]. To return to the [Printer Check Mode Screen], press the [CHECK] button on the Control
Panel of the copier.
• How to change [Image Shift]
Available only when On is selected in [Image Shift] of printer driver.
To show the [Image Shift Screen], touch the [Image Shift]. Set the [Image Shift] on
the [Image Shift Screen]. To return to the [Printer Check Mode Screen], touch
[EXIT] on the [Image Shift Screen].
9.
Touch the [PROOF PRINT] to print one copied set for proofreading, if
necessary.
10.Touch the [Exit] and then press [Start] to resume the rest of the print
job.
326
Chapter 5 Printing from Windows
To check the version of the printer driver
PCL5e
Adobe PS3
compliant
Check the printer driver version from the [Properties] window.
● Operating procedures of
1.
PCL5e
Open [About] tab of [Properties] window.
When displayed from an application of Windows 98.
2.
3.
Check for the notation [Version *.* V (*.*, Build ****)].
Click the [OK] button and close the [Properties] window.
327
Chapter 5 Printing from Windows
To check the version of the printer driver (Continued)
● Operating procedures of
1.
Adobe PS3
Open [Paper] tab of [Properties] window.
When displayed from an application of Windows 98.
For Windows NT4.0, open [Advanced] tab and click the [Kyocera Mita KM-8530 PostScript document settings].
Windows 2000/XP does not have this feature.
2.
Click the [About...] button.
[About] dialog box will appear.
3.
4.
Check for the notation [PostScript Printer Driver Version *.*.*(***)].
Click the [OK] button.
The [About] dialog box closes and returns to the [Properties] window.
5.
Click the [OK] button to close the [Properties] window.
328
Chapter 5 Printing from Windows
To set printer memory
Adobe PS3
compliant
Make the printer driver to recognize the printer memory from the [Properties] window, when the Adobe PS3
printer driver is used.
Contact the system administrator for information about proper setting value of available memory.
● Operating procedures of
1.
Adobe PS3
Open [Device Options] tab in [Printers] - [Properties].
When displayed from [Printers] window of Windows 98.
For Windows NT4.0/2000/XP, open [Device Settings] tab of the [Properties] window from the [Printers] window.
2.
Click the [▲] / [▼] button beside the [Available printer memory in KB]
box to set available printer memory.
The default is [14000].
3.
Click the [OK] button to close the [Properties] window.
329
Chapter 5 Printing from Windows
To set printer memory configuration
Adobe PS3
compliant
Make the printer driver to recognize the printer memory configuration from the [Properties] window, when the
Adobe PS3 printer driver is used.
Contact the system administrator for information about proper setting value of memory configuration.
● Operating procedures of
1.
Adobe PS3
Open [Device Options] tab of [Properties] window from the [Printers]
window.
When displayed from [Printers] window of Windows 98.
For Windows NT4.0/2000/XP, open [Device Settings] tab of the [Properties] window from the [Printers] window.
2.
3.
Click the [Memory Configuration] from the [Installable options] field.
Click the [▼] button besides the [Installable options]-[Change setting
for] box to set the number of memory configuration.
The default is [64MB].
4.
Click the [OK] button to close the [Properties] window.
330
Chapter 6 Printing from Macintosh
Chapter 6 Printing from Macintosh
Basic printing method
This chapter explains how to use this printing system for printing from a Macintosh.
The following shows the basic methods of use of the printing system from the computer used.
1.
Check the printing system to ensure it is turned on. Then turn on the
computer.
2.
Select this printing system from the [Chooser] dialog.
See "Chapter 4 How to Setup" for detailed information on selecting this printing system from the [Chooser] dialog.
Reference
3.
4.
(p.113) Selecting the printer with the Chooser
Open the file to be printed.
Select [File] - [Page Setup...] of the application.
The [Page Setup] dialog box will appear.
You can configure the functions of this printing system further in the [Page Setup].
Reference
5.
(p.335) Displaying the [Page Setup] dialog box
Click the [OK] button.
The [Page Setup] dialog box will disappear.
6.
Select [File] - [Print...] of the application.
The [Printing] dialog box will appear.
7.
Make sure that the printer name is the name of this printing system.
If the printer name is not the name of this printing system, click the [▼] button at the side of the [Printer] box to
select the printing system.
331
Chapter
6
Chapter 6 Printing from Macintosh
Basic printing method (Continued)
8.
Make settings in the [Print].
You can set the function of the printing system further by opening the screen from the [Print].
9.
Click the [Print] button.
The file is printed.
332
Chapter 6 Printing from Macintosh
Dialog boxes used for configuring this printing system
● Three dialog boxes
You can set this printing system to use various functions when you print a file from a Macintosh with this
printing system.
[Configure] dialog box
This dialog box is opened from the [Chooser] dialog. You can set the printer driver to recognize optional
devices in this printing system.
[Page Setup] dialog box
This dialog box is opened from an application. You can set paper size, orientation, scaling, watermarks,
visual effect, alternate font, smoothing, and custom page setting.
[Print] dialog box
This dialog box is opened from an application. You can set various functions.
333
Chapter 6 Printing from Macintosh
Displaying the [Configure] dialog box
1.
2.
3.
4.
Select [Chooser] from [Apple Menu].
5.
Click the [Setup] button if you are using the printing system for the
first time.
Make sure that [Active] is selected in the [AppleTalk] box
Click the [AdobePS] icon.
Click the printer name for your PS3 printing system from the [Select a
PostScript Printer] list.
A dialog box will appear.
6.
Click the [Configure] button.
The [Configure] dialog box will appear.
334
Chapter 6 Printing from Macintosh
Displaying the [Page Setup] dialog box
1.
Select [File] - [Page Setup...] of the application.
The [Page Attributes] dialog box in the [Page Setup] dialog box will appear.
[Page Setup] - [Page Attributes] dialog box
2.
Click the [▼] button upper left corner the dialog box to select each
menu as required.
[Page Setup] - [Watermark] dialog box
[Page Setup] - [PostScript Options] dialog box
[Page Setup] - [Custom Page Default] dialog box
335
Chapter 6 Printing from Macintosh
Displaying the [Print] dialog box
1.
Select [File] - [Print...] of the application.
The [General] dialog box in the [Print] dialog box will appear.
[Print] - [General] dialog box
2.
Click the [▼] button below the [Printer] box to select each menu as
required.
[Print] - [Background Printing] dialog box
[Print] - [Cover Page] dialog box
[Print] - [Layout] dialog box
336
Chapter 6 Printing from Macintosh
Displaying the [Print] dialog box (Continued)
[Print] - [Error Handling] dialog box
[Print] - [PostScript Setting] dialog box
[Print] - [Printer Specific Options] dialog box (1)
[Print] - [Printer Specific Options] dialog box (2)
337
Chapter 6 Printing from Macintosh
About descriptions in this chapter
In the descriptions of the settings for each function from the dialog boxes, in the following pages of this chapter, the procedures for opening the dialog boxes is omitted.
Refer to the procedures described earlier as necessary.
For example:
Open [Configure].
Reference
(p.334) Displaying the [Configure] dialog box
Open [Page Setup] - [Cover Page].
Reference
(p.335) Displaying the [Page Setup] dialog box
Open [Print] - [Printer Specific Options] dialog box (1)
Reference
(p.336) Displaying the [Print] dialog box
This chapter mainly describes information on the functions inherent in this printing system. Refer to the manual
for the Adobe PS3 printer driver for detailed information on the functions common to the Adobe PS3 printer
driver.
338
Chapter 6 Printing from Macintosh
To set the paper-related items
The size and direction of the paper can be set as shown below.
To set the orientation:
Adobe PS3
Set the orientation to output paper in "Portrait" or "Landscape."
(p.341) To set the orientation
Reference
ABCD
ABCDEF
Portrait
Landscape
To set the size of output paper:
Adobe PS3
Set various sizes for the output paper.
Reference
(p.342) To set the size of the output paper
To set the type of manual-feed paper:
Adobe PS3
Set various types of paper as output paper.
Reference
(p.344) To set the type of manual-feed paper
To enlarge or reduce by a specified ratio:
Adobe PS3
Print by specifying a value of enlargement or reduction.
Reference
(p.347) To enlarge or reduce by a specified ratio
Enlargement
ABCD
ABCD
ABCD
ABCD
Document
Reduction
339
Chapter 6 Printing from Macintosh
To set the paper-related items (Continued)
To set the printing position of the wide paper:
Adobe PS3
Set a printing position for the wide paper.
Reference
ABCD
ABCD
Center
ABCD
Rear end
Direction of
feeding
sheets
Front end
(p.348) To set the printing position of the wide paper
To set the margins:
Adobe PS3
Set the margins of output paper.
Reference
(p.349) To set the margins
Margin
To set custom size paper:
Adobe PS3
Set custom size paper.
Reference
(p.350) To set a custom size paper
340
Chapter 6 Printing from Macintosh
To set the orientation
Adobe PS3
compliant
Set the orientation to output paper in "Portrait" or "Landscape."
ABCD
Portrait
ABCDEF
Landscape
When the paper direction set for the document created by the application is different from the
paper direction or orientation of the [Print] dialog box displayed from the application, the setting
in the [Print] dialog box takes precedence over the other for printing. Set the paper direction or
orientation set in the [Print] dialog box to the paper direction of the document if necessary.
● Operating procedures of
Adobe PS3
1.
Open [Page Setup] - [Page Attributes].
2.
Click on the button for "Portrait" (left) or "Landscape" (right) of [Orientation].
The default is "Portrait."
3.
Click the [OK] button to close the [Page Setup].
341
Chapter 6 Printing from Macintosh
To set the size of the output paper
Adobe PS3
compliant
Print various sizes of documents as shown below.
May be different depending on the specification of each country.
Document size that can be selected
Statement
Letter
Legal
Tabloid
A3
A4
A5
A6
B4
B5
B6
F4
8K
16K
Statement (Wide)
Letter (Wide)
Tabloid (Wide)
A3 (Wide)
A4 (Wide)
A5 (Wide)
B4 (Wide)
B5 (Wide)
Letter Tabstock
A4 Tabstock
Custom
When selecting [Custom], you can set and register a paper size.
Reference
(p.350) To set a custom size paper
342
Chapter 6 Printing from Macintosh
To set the size of the output paper (Continued)
● Operating procedures of
Adobe PS3
Limitation
Often a specific paper size cannot be selected due to other functions set. For details, refer to
the explanation of each of the functions.
1.
Open [Page Setup] - [Page Attributes].
2.
Select the document size from the [Paper] column.
The default is [Letter].(May be different depending on the specification of each country.)
3.
Click the [OK] button to close the [Page Setup].
343
Chapter 6 Printing from Macintosh
To set the type of manual-feed paper
Adobe PS3
compliant
Set various types of paper sizes as the output paper as shown below.
Types of paper that can be selected.
Plain Paper
Thin Paper
This is set when printing a thin paper
such as airmail letter paper.
Thick Paper
This is set when printing a thick paper
such as a post card.
Tabbed Sheet
This is set when printing on index paper.
Trace
This is set when printing the Trace paper.
OHP (Transparency)
OHP-Interleave (Blank)
An interleave paper is output each time
an OHP paper is printed.
OHP-Interleave (Print)
An interleave paper is output each time
an OHP paper is printed.
User defined type
This is set when printing the user specified paper set on the copier.
344
Chapter 6 Printing from Macintosh
To set the type of manual-feed paper (Continued)
● Operating procedures of
Adobe PS3
Limitation
[OHP] cannot be set in the following cases:
• When any item other than [OFF] is selected for the [Print] - [Layout] - [Print on Both Sides].
• When any item other than [None] is selected for the [Print] - [Printer Specific Options] dialog
box (2) - [Fold, Stitch], [Stapling] or [Punch].
• When [Booklet] or [Booklet-Right] is selected for the [Print] - [Printer Specific Options] dialog
box (2) - [Combination].
[OHP-Interleave (Blank)] and [OHP-Interleave (Print)] cannot be set in the following cases:
• When [A5R(W)], [B5RW], [B6], [Statement R(W)] or [Custom] is selected for the [Page
Setup] - [Paper].
• When any item other than [OFF] is selected for the [Print] - [Layout] - [Print on Both Sides].
• When any item other than [None] is selected for the [Print] - [Printer Specific Options] dialog
box (2) - [Collate], [Fold only], [Stapling], [Punch], [Front Cover], [Back Cover], [Pl-Tray
(Front)] or [Pl-Tray (Back)].
• When [Booklet] or [Booklet-Right] is selected for the [Print] - [Printer Specific Options] dialog
box (2) - [Combination].
[Trace] cannot be set in the following cases:
• When [A5R(W)], [B5RW], [B6], [Statement R(W)] or [Custom] is selected for the [Page
Setup] - [Paper].
• When any item other than [OFF] is selected for the [Print] - [Layout] - [Print on Both Sides].
• When any item other than [None] is selected for the [Print] - [Printer Specific Options] dialog
box (2) - [Fold, Stitch], [Stapling] or [Punch].
[Tabbed Sheet] cannot be set in the following cases:
• When any item other than [A3], [A4(R)], [B4], [B5], [Letter (R)] or [Tabloid] is selected for the
[Page Setup] - [Paper].
• When any item other than [OFF] is selected for the [Print] - [Layout] - [Print on Both Sides].
• When any item other than [None] is selected for the [Print] - [Printer Specific Options] dialog
box (2) - [Fold, Stitch], [Stapling] or [Punch].
• When [Booklet] or [Booklet-Right] is selected for the [Print] - [Printer Specific Options] dialog
box (2) - [Combination].
345
Chapter 6 Printing from Macintosh
To set the type of manual-feed paper (Continued)
1.
Open [Print] - [Printer Specific Options](1).
2.
Click the [▼] button beside the [Media Type] box to select the paper
type you want to use from the list.
The default is "Plain Paper."
3.
Click the [Print] button to print now.
Click the [Save Settings] button to save the setting as the default.
346
Chapter 6 Printing from Macintosh
To enlarge or reduce by a specified ratio
Adobe PS3
compliant
Print by specifying the enlargement or reduction ratio in the range from 25% to 400%.
ABCD
ABCD
Document
ABCD
ABCD
ABCD
ABCD
Reduction
Enlargement
Any sheet size for printing can be set freely.
● Operating procedures of
Adobe PS3
Limitation
You cannot specify the enlargement or reduction ratio in a numerical value in the following
cases:
• When the [Print] - [Layout] is set to any item other than [1].
1.
Open [Page Setup] - [Page Attributes].
2.
Specify a value in the range between [25] and [400] in the [Scale] box.
• The default is [100].
• The setting can be made in increment of 1%.
• It is possible to select a numeral in the range given in the [Number of copies] box and enter directly the number
of copies to be printed in a lowercase numeral.
3.
Click the [OK] button to close the [Page Setup].
347
Chapter 6 Printing from Macintosh
To set the printing position of the wide paper
Adobe PS3
compliant
Set the printing position of the wide paper.
ABCD
Center
● Operating procedures of
ABCD
Rear end
Direction of
feeding
sheets
Front end
ABCD
Adobe PS3
1.
Open [Print] - [Printer Specific Options](2).
2.
Click the [▼] button beside the [Print Position] box to select the printing position from the list.
Selections of [Left], [Middle] or [Right] are available.
The default is [None].
3.
Click the [Print] button to print now.
Click the [Save Settings] button to save the setting as the default.
348
Chapter 6 Printing from Macintosh
To set the margins
Adobe PS3
compliant
Set the margins of the output paper.
Margin
● Operating procedures of
Adobe PS3
1.
Open [Page Setup] - [Custom Page Default].
2.
Input a value for each margin in the [Top], [Bottom], [Left] and [Right]
boxes in the [Margins] box at the right side of the dialog box.
• The range of values that can be set as each margin is displayed by pressing the [▼] button under the [PPD Limits] at the left side of the dialog box
• The default is [0.28].
• The default unit is [cm]. You can change the unit at the [Units] box.
3.
Click the [OK] button to close the [Page Setup].
349
Chapter 6 Printing from Macintosh
To set a custom size paper
Adobe PS3
compliant
Set a custom size paper.
● Operating procedures of
Adobe PS3
1.
Open [Page Setup] - [Custom Page Default].
2.
Enter a paper size in the [Width], [Height] boxes in the [Paper Size] box
at the left side of the dialog box.
• The range of values that can be set as each margin is displayed by pressing the [▼] button under the [PPD Limits] at the left side of the dialog box
• The default is [0.28].
• The default unit is [cm]. You can change the unit at the [Units] box.
3.
Click the [OK] button to close the [Page Setup].
Once a paper is set in the [Custom Page Default] dialog box, you can select the paper as [Custom]
from the [Paper] box in the [Page Attributes].
350
Chapter 6 Printing from Macintosh
To set the paper tray
For the paper trays such as the Feed Tray and the eject tray, the following settings are available.
To set the Large Capacity Tray:
Adobe PS3
Set the printer driver to recognize an optional Large Capacity Tray for this printing system.
Reference
(p.353) To set the Large Capacity Tray
Large Capacity Tray
To set the Manual Feed Tray:
Adobe PS3
Select and set a Manual Feed Tray to be used from the list for this printing system.
Reference
(p.354) To set the Manual Feed Tray
Bypass tray
Tray 1
Tray 2
Tray 3
Tray 4
To set the Finisher:
Adobe PS3
Set the printer driver to recognize an optional Finisher for this printing system.
Reference
(p.356) To set the Finisher
Finisher
351
Chapter 6 Printing from Macintosh
To set the paper tray (Continued)
To set the Output Tray:
Adobe PS3
Select and set an Finisher tray to be used from the list.
Reference
(p.357) To set the Output tray
Sub tray
Main tray
352
Chapter 6 Printing from Macintosh
To set the Large Capacity Tray
Adobe PS3
compliant
Set the printer driver to recognize an optional Large Capacity Tray if it is installed in the copier.
When the printer driver recognizes the Large Capacity Tray, it is possible to select [Tray 4].
Large Capacity Tray
-
Even if the copier is provided with a Large Capacity Tray, the printer driver will not recognize it
if the Large Capacity Tray is not set on the computer.
● Operating procedures of
Adobe PS3
1.
Open [Configure].
2.
Click the [▼] button beside the [Installable Options] - [Large Capacity
Tray] to select a Large Capacity Tray you want to use from the list.
When you do not know whether the optional Large Capacity Tray is LT-402 or LT-412, consult your
system administrator.
The default is [None]. When [None] is selected, it is not possible to use [Tray 4].
3.
Click the [OK] button to close the [Configure].
353
Chapter 6 Printing from Macintosh
To set the Manual Feed Tray
compliant
Adobe PS3
Select and set a Manual Feed Tray to be used from the list.
Manual feed
tray
Tray 1
Tray 2
Tray 3
Tray 4
Important
The paper sizes that can be used vary depending on each Feed Tray. Care should be taken
when selecting a Feed Tray.
Feed Tray
paper size that can be used.
Tray 1 to Tray 3
8.5''x11'', 5.5''x8.5'', 8.5''x14'', 11''x17'', A3, A4, A5, B4, B5, B6, F4,
16K, 8K, 8.5''x11''W, 5.5''x8.5''W, 11''x17''W, A3W, A4W, A5W, B4W,
B5W, Letter Tabstock, A4 Tabstock
Tray 4
(LT-402)
8.5''x11'', A4, B5, F4, 8.5''x11''W, A4W, B5W, Letter Tabstock, A4
Tabstock
Tray 4
(LT-412)
8.5''x11'', 5.5''x8.5'', 8.5''x14'', 11''x17'', A3, A4, B4, F4, 8.5''x11''W,
11''x17''W, A4W, Letter Tabstock, A4 Tabstock
Manual Feed
Bypass Tray
8.5''x11'', 5.5''x8.5'', 8.5''x14'', 11''x17'', A3, A4, A5, A6, B4, B5, B6,
F4, 16K, 8K, 8.5'' x 11''W, 11''x17''W, A3W, A4W, A5W, B4W, B5W,
Letter Tabstock, A4 Tabstock
Available paper sizes may vary depending on models of machine.
354
Chapter 6 Printing from Macintosh
To set the Manual Feed Tray (Continued)
● Operating procedures of
Adobe PS3
Limitation
[Tray 4] cannot be set in the following cases:
• When [Off] is selected for the [Configure] - [Large Capacity Tray].
Also, when setting a Feed Tray, take note of the following:
• When using [B6] or be sure to select [Manual Feed].
• When selecting [OHP -Interleave(Blank)] or [OHP -Interleave(Print)] for the [Media Type] in
the [Printer Specific Options] dialog box (2), select a tray from among [Tray 1] / [Tray 2] /
[Tray 3] / [Tray 4]. When selecting any other than the above, be sure to select [Manual
Feed].
1.
Open [Print] - [General].
2.
Click the [All pages from] or [First page from] button in the [Paper
Source] box.
3.
Click the [▼] button beside the [All pages from] or [First page from]
button to select a tray you want to use from the list.
• The default is [Auto Select]. When [Auto Select] is set, a tray set with paper specified in [Property] of this printing system is automatically selected from the application.
• If [Tray 4] is not recognized as a Large Capacity Tray, it is not shown in the list.
Reference
4.
(p.353) To set the Large Capacity Tray
Click the [Print] button to print now.
Click the [Save Settings] button to save the setting as the default.
355
Chapter 6 Printing from Macintosh
To set the Finisher
Adobe PS3
compliant
Set the printer driver to recognize an optional Finisher if it is installed in the copier.
When the printer driver recognizes the Finisher, it is possible to select [Main tray] or [Sub tray] as [eject tray].
Finisher
Even if an ejector unit (finisher) is installed in the copier, the printer driver will not recognize it if
the unit is not set on the computer.
● Operating procedures of
Adobe PS3
1.
Open [Configure].
2.
Click the [▼] button beside the [Installable Options] - [Finisher] box to
select a finisher you want to use from the list.
When you do not know whether the optional Finisher is [DF-630] or [DF-635], consult your system
administrator.
• The default is [None]. When [None] is selected, it is not possible to set the eject tray.
3.
Click the [OK] button to close the [Configure].
356
Chapter 6 Printing from Macintosh
To set the Output tray
Adobe PS3
compliant
Set [Main Tray] or [Sub Tray] as [Finisher tray] if the Finisher is recognized by the printer driver.
Sub tray
Main tray
357
Chapter 6 Printing from Macintosh
To set the Output tray (Continued)
● Operating procedures of
Adobe PS3
Limitation
The output tray cannot be set in the following case:
• When [No Finisher] is selected for [Finisher] in the [Installable Options] field of the [Configure].
[Main tray] cannot be set in the following case:
• When [Fold only], [Fold, Stitch], [Fold, Trim] or [Fold, Stitch, Trim] is selected for [Fold,
Stitch] in the [Print] - [Printer Specific Options].
[Sub Tray] cannot be set in the following cases:
• When any item other than [Off] is selected for the [Sorting], [Staple], [Punch], [Cover seat
(front) or [PI-Tray (Back)] in the [Print] - [Printer Specific Options].
• When [Off] is selected for the [Fold, Stitch] in the [Print] - [Printer Specific Options].
1.
Open [Print] - [Printer Specific Options](2).
2.
Click the [▼] button beside the [Output Bin] box to select the output
tray from the list.
You cannot select the [Output Bin] if an Finisher is not recognized.
Reference
3.
(p.356) To set the Finisher
Click the [Print] button to print now.
Click the [Save Settings] button to save the setting as the default.
358
Chapter 6 Printing from Macintosh
To print multiple copies
If you want to print multiple copies, you can select the following settings.
To set the number of copies to be printed:
Adobe PS3
Set the number of copies to be printed from the [Print].
Reference
(p.361) To set the number of copies to be printed
To print by sets (Sort):
Adobe PS3
Print the first one set of pages in one lot, and then the second set of pages, the third set of pages, ...., when
printing multiple sets of pages.
Reference
(p.362) To print by sets
ABCD
ABCD
ABCD
1
32
ABCD
ABCD
ABCD
1
32
To print page by page collectively (Group):
Adobe PS3
Print the required number of the first page, and then the required umber of the second pages, the third page,
.... collectively when printing multiple sets of pages.
Reference
(p.363) To print page by page collectively
ABCD
ABCD
ABCD
1
11
ABCD
ABCD
ABCD
2
22
359
Chapter 6 Printing from Macintosh
To print multiple copies (Continued)
To output offset copies (Job Offset):
Adobe PS3
Output groups of copies shifted to opposite sides.
Reference
(p.364) To output offset copies
ABCD
ABCD
ABCD
ABCD
ABCD
ABCD
ABCD
ABCD
ABCD
Offset Copies
360
Chapter 6 Printing from Macintosh
To set the number of copies to be printed
Adobe PS3
compliant
Set the number of copies to be printed from the [Print].
● Operating procedures of
Adobe PS3
1.
Open [Print] - [General].
2.
Input the number of copies to be printed in the [Copies] box.
The default is [1].
3.
Click the [Print] button to print now.
Click the [Save Settings] button to save the setting as the default.
361
Chapter 6 Printing from Macintosh
To print by sets
Adobe PS3
compliant (Sort)
Print the first one set of copies in one lot, and then the second set of copies, the third set of copies, ...., when
printing multiple sets of pages.
ABCD
ABCD
ABCD
1
32
ABCD
ABCD
ABCD
1
32
● Operating procedures of
Adobe PS3
1.
Open [Print] - [Printer Specific Options](2).
2.
Click the [▼] button beside the [Collate] box to select the [Sort] from
the list.
The default is [Sort].
3.
Click the [Print] button to print now.
Click the [Save Settings] button to save the setting as the default.
362
Chapter 6 Printing from Macintosh
To print page by page collectively
Adobe PS3
compliant (Group)
It is possible to print the required number of the first page, and then the required number of the second
pages, the third page, .... collectively when printing multiple sets of pages.
ABCD
ABCD
ABCD
1
11
ABCD
ABCD
ABCD
2
22
● Operating procedures of
Adobe PS3
Limitation
[Group] cannot be set in the following cases:
• When [OHP-Interleave(Blank)] or [OHP-Interleave(Print)] is selected for the [Media Type] in
the [Print] - [Printer Specific Options] dialog box (1).
• When any item other than [Off] is selected for [Print on Both Sides] in the [Print] - [Layout].
• [Fold only], [Fold, Stitch], [Fold, Trim] or [Fold, Stitch, Trim] is selected for [Fold, Stitch] in
the [Print] - [Printer Specific Options].
• When any item other than [Off] is selected for [Combination], [Stapling], [Wait Mode], [Front
Cover], [Back Cover] in the [Print] - [Printer Specific Options].
1.
Open [Print] - [Printer Specific Options](2).
2.
Click the [▼] button beside the [Collate] box to select the [Group] from
the list.
The default is [Sort].
3.
Click the [Print] button to print now.
Click the [Save Settings] button to save the setting as the default.
363
Chapter 6 Printing from Macintosh
To output offset copies
Adobe PS3
compliant (Job Offset)
Output with copies shifted in a unit of the number of copies or page group to this side and the opposite side
at the eject position when printing multiple sets of copies.
ABCD
ABCD
ABCD
ABCD
ABCD
ABCD
ABCD
ABCD
ABCD
Offset Copies
● Operating procedures of
Adobe PS3
Limitation
[Offset] cannot be set in the following cases:
• When [No Finisher] is selected for [Finisher] in the [Installable Options] field of the [Configure].
• When [B6], or [Custom] is selected for [Paper] in the [Page Setup].
• When [Sub Tray] is selected for [Output Bin] in the [Print] - [Printer Specific Options].
• When [Fold only], [Fold, Stitch], [Fold, Trim] or [Fold, Stitch, Trim] is selected for [Fold,
Stitch] in the [Print] - [Printer Specific Options].
1.
Open [Print] - [Printer Specific Options](2).
2.
Click the [▼] button beside the [Job Offset] box to select the [On] from
the list.
The default is [None].
3.
Click the [Print] button to print now.
Click the [Save Settings] button to save the setting as the default.
364
Chapter 6 Printing from Macintosh
To print multiple pages
You can set as shown below when printing multiple pages document.
To set to print on both sides:
Adobe PS3
Print continuous multiple pages on both front and back sides.
(p.367) To set to print on both sides
Reference
Flip on
long edge
Flip on
short edge
To print the document of multiple pages on a single page
(Pages per sheet):
Adobe PS3
Allocate a document of 2 pages, 4 pages, 6 pages, 9 pages or 16 pages onto a single page for printing.
Reference
(p.368) To print the document of multiple pages on a single page
2 up
ABCD
4 up
ABCD
ABCD
ABCD
ABCD
ABCD
365
Chapter 6 Printing from Macintosh
To print multiple pages (Continued)
To print 2 pages on a single paper twice as big
(2-in-1 / 2-in-1 Repeat):
Adobe PS3
Print a 2 pages document on a single piece of paper twice as big as the original documents.
(p.370) To print 2 pages on a single paper twice as big
Reference
2-in-1
2-in-1 Repeat
ABCD
ABCD
ABCD
ABCD
1
2
1
1
To print a twofold booklet (Booklet):
Adobe PS3
Print output paper so that they become a book when they are folded in two.
(p.372) To print a twofold booklet
Reference
To print pages in reverse order (FaceUp):
Adobe PS3
Output paper in reverse order when printing multiple pages.
Reference
(p.374) To print pages in reverse order
Face down
Face up
AB
CD
CCDDCDCCDDCCDD CD
AABBABAABBAABB AB
111111 8
366
Chapter 6 Printing from Macintosh
To set to print on both sides
Adobe PS3
compliant
Print continuous multiple pages on both front and back sides. [Flip on long edge] and [Flip on short edge] are
available.
Flip on
long edge
● Operating procedures of
Flip on
short edge
Adobe PS3
Limitation
[Print on Both Sides] cannot be set in the following cases:
• When [B6], [Post card] or [Custom] is selected for [Paper] in the [Page Setup...].
• When [OHP], [OHP-Interleave(Blank)], [OHP-Interleave(Print)], [Trace] or [
• Sheet] is selected for [Media Type] in the [Print] - [Printer Specific Options] dialog box (1).
• When [Group] is selected for [Collate] in the [Print] - [Printer Specific Options].
• When [Booklet] or [Booklet-Right] is selected for [Combination] in the [Print] - [Printer Specific Options].
1.
Open [Print] - [Layout].
2.
3.
Turn on the [Print on Both Sides] check box.
Select [Flip on long edge] (the left button) or [Flip on short edge] (the
right button) from the [Binding] box.
The default is [Flip on long side] (the left button).
4.
Click the [Print] button to print now.
Click the [Save Settings] button to save the setting as the default.
367
Chapter 6 Printing from Macintosh
To print the document of multiple pages on a single page
Adobe PS3
compliant (Pages per sheet)
Allocate documents of 2 pages, 4 pages, 6 pages, 9 pages or 16 pages onto a single page for printing. The
allocated pages are automatically reduced for printing based on the printable region of the output paper.
2 up
ABCD
4 up
ABCD
9 up
6 up
ABCD
ABCD
ABCD
ABCD
ABCD
ABCD
ABCD
ABCD
ABCD
ABCD
16 up
ABCD
ABCD
ABCD
ABCD
ABCD
ABCD
ABCD
ABCD
ABCD
ABCD
ABCD
ABCD
ABCD
ABCD
ABCD
ABCD
ABCD
ABCD
ABCD
ABCD
ABCD
ABCD
ABCD
ABCD
ABCD
368
Chapter 6 Printing from Macintosh
To print the document of multiple pages on a single page (Continued)
● Operating procedures of
Adobe PS3
1.
Open [Print] - [Layout].
2.
Click the [▼] button beside the [Pages per sheet] to select the number
of pages to be allocated from the list.
The selection of [1], [2], [4], [6], [9] or [16] is available.
When any item other than [1] is selected, it becomes possible to use the [Layout direction] box.
• The default is [1].
• When the [Print on Both Sides] check box is turned on, the [Print on Both Sides] is available.
(p.367)
Reference
3.
Select the left or right button from the [Layout direction].
The sequence of pages is laid out from left to right when the left button is selected, and is laid out from
right to left when the right button is selected.
The sequence of pages is laid out as shown below.
ABCD
ABCD
ABCD
ABCD
1
2
2
1
ABCD
ABCD
ABCD
ABCD
1 2
2 1
ABCD
ABCD
ABCD
3 4
ABCD
4 3
The default is the left button.
4.
Click the [▼] button beside the [Border] to specify a page border from
the list if you want to print the boundary between pages allocated.
The default is [None].
5.
Click the [Print] button to print now.
Click the [Save Settings] button to save the setting as the default.
369
Chapter 6 Printing from Macintosh
To print 2 pages on a single paper twice as big
compliant (2-in-1 / 2-in-1 Repeat)
Adobe PS3
Print a document of 2 pages onto a single paper twice as big as the original documents.
Example: 2 A4 size papers are aggregated on 1 A3 size paper.
2-in-1
ABCD
ABCD
ABCD
ABCD
1
2
1
2
ABCD
ABCD
ABCD
ABCD
1
2
1
1
ABCD
ABCD
2
2
2-in-1 Repeat
370
Chapter 6 Printing from Macintosh
To print 2 pages on a single paper twice as big (Continued)
● Operating procedures of
Adobe PS3
Limitation
[2-in-1] and [2-in-1 Repeat] cannot be set in the following cases:
• When [A3 (W)], [B4 (W), [B6], [Tabloid (W)], [Legal] or [Custom] is selected for [Paper] in the
[Page Setup].
• When [OHP-Interleave(Blank)] or [OHP-Interleave(Print)] is selected for [Media Type] in the
[Print] - [Printer Specific Options] dialog box (1).
• When [Group] is selected for [Collate] in the [Print] - [Printer Specific Options].
• When [Booklet] or [Booklet-Right] is selected for [Combination] in the [Print] - [Printer Specific Options].
• When any item other than [Off] is selected for [Front Cover], [Back Cover], [PI-Tray (Front)]
or [PI-Tray (Back)] in the [Printer Specific Options].
1.
Open [Print] - [Printer Specific Options](2).
2.
Click the [▼] button beside the [Combination] box to select [2-in-1] or
[2-in-1 Repeat] from the list.
For [2-in-1], continuous pages are aggregated on a single paper for printing.
For [2-in-1 Repeat], two same pages are aggregated on a single paper for printing.
The default is [None].
3.
Click the [Print] button to print now.
Click the [Save Settings] button to save the setting as the default.
371
Chapter 6 Printing from Macintosh
To print a twofold booklet
Adobe PS3
compliant (Booklet)
Print output paper so that they become a book by folding them in two.
372
Chapter 6 Printing from Macintosh
To print a twofold booklet (Continued)
● Operating procedures of
Adobe PS3
Limitation
[Booklet] / [Booklet-Right] cannot be set in the following cases:
• When [A3 (W)], [B4 (W)], [B6], [Tabloid (W)], [Legal] or [Custom] is selected for [Paper] in
the [Page Setup].
• When [OHP-Interleave(Blank)] or [OHP-Interleave(Print)] is selected for [Media Type] in the
[Print] - [Printer Specific Options] dialog box (1).
• When any other item than [OFF] is selected for [Print on Both Sides] in the [Print Setup] [Layout].
• When [Group] is selected for [Collate] in the [Print] - [Printer Specific Options].
• When [2-in-1] or [2-in-1 Repeat] is selected for [Combination] in the [Print] - [Printer Specific
Options].
• When any other item than [Off] is selected for [Combination], [Back Cover] in the [Print] [Printer Specific Options].
1.
Open [Print] - [Printer Specific Options](2).
2.
Click the [▼] button beside the [Combination] box to select [Booklet] or
[Booklet-Right] from the list.
The default is [None].
3.
Click the [Print] button to print now.
Click the [Save Settings] button to save the setting as the default.
373
Chapter 6 Printing from Macintosh
To print pages in reverse order
Adobe PS3
compliant (FaceUp)
Eject output papers in reverse order when printing multiple pages.
Ex.: When printings 8 pages
FaceDown
FaceUp
AB
CD
CCDDCDCCDDCCDD CD
AABBABAABBAABB AB
111111 8
Page that is printed first.
● Operating procedures of
Adobe PS3
1.
Open [Print] - [Printer Specific Options](2).
2.
Click the [▼] button beside the [Output Order] to select [FaceUp] from
the list.
For the [Output Order] box, the selection of [FaceUp] or [FaceDown] is available.
When [FaceUp] is selected, an output paper is ejected with its front facing up.
When [FaceDown] is selected, an output paper is ejected with its front facing down.
The default is [FaceDown].
3.
Click the [Print] button to print now.
Click the [Save Settings] button to save the setting as the default.
374
Chapter 6 Printing from Macintosh
To set the Front Cover / Back Cover / Thick Cover
Set to print not only pages but also a Front Cover, Back Cover, or thick cover to attach to printed pages.
To set a Front Cover:
Adobe PS3
Set a Front Cover for which the paper (e.g. a color paper) is different than the text papers.
(p.376) To set a Front Cover
Reference
ABCD
ABCD
ABCD
ABCD
ABCD
ABCD
ABCD
Front Cover
- Blank
ABCD
ABCD
ABCD
ABCD
ABCD
ABCD
Front Cover
- Printed
To set a Back Cover:
Adobe PS3
Set a Back Cover for which the paper (e.g. a color paper) is different than the text papers.
Reference
(p.378) To set a Back Cover
ABCD
ABCD
ABCD
ABCD
ABCD
ABCD
Back Cover
- Blank
ABCD
ABCD
ABCD
ABCD
ABCD
ABCD
ABCD
Back Cover
- Printed
To set a Thick Cover:
Adobe PS3
Output a thick paper as a cover, which is different than the output papers set.
Reference
(p.380) To set a Thick Cover
Output tray - Sub Tray
Sheet Feeder
375
Chapter 6 Printing from Macintosh
To set a Front Cover
Adobe PS3
compliant
Set a Front Cover for which paper (a color paper) is different than the text papers.
ABCD
ABCD
ABCD
ABCD
ABCD
ABCD
ABCD
No Front Cover
ABCD
ABCD
ABCD
ABCD
ABCD
ABCD
Front Cover
- Blank
ABCD
ABCD
ABCD
ABCD
ABCD
ABCD
Front Cover
- Printed
376
Chapter 6 Printing from Macintosh
To set a Front Cover (Continued)
● Operating procedures of
Adobe PS3
Limitation
[Front Cover] cannot be set in the following cases:
• When [OHP-Interleave(Blank)] or [OHP-Interleave(Print)] is selected for [Media Type] in the
[Print] - [Printer Specific Options] dialog box (1).
• When [Group] is selected for [Collate] in the [Print] - [Printer Specific Options].
• When [2-in-1] or [2-in-1 Repeat] is selected for [Combination] in the [Print] - [Printer Specific
Options].
1.
Open [Print] - [Printer Specific Options].
2.
Click the [▼] button beside the [Front Cover] to select [Blank] or
[Printed] from the list.
When [Blank] is selected, nothing is printed on the Front Cover.
When [Printed] is selected, the Front Cover is printed.
The default is [None].
3.
Click the [▼] button beside the [Front Cover Tray] box to select a tray
to feed a paper for the Front Cover from the list.
The default is [None].
4.
Click the [Print] button to print now.
Click the [Save Settings] button to save the setting as the default.
377
Chapter 6 Printing from Macintosh
To set a Back Cover
Adobe PS3
compliant
Set a Back Cover for which the paper (e.g. a color paper) is different than the text papers.
ABCD
ABCD
ABCD
ABCD
ABCD
ABCD
ABCD
ABCD
ABCD
ABCD
ABCD
ABCD
No Back Cover
ABCD
ABCD
ABCD
ABCD
ABCD
ABCD
ABCD
Back Cover
- Blank
Back Cover
- Printed
378
Chapter 6 Printing from Macintosh
To set a Back Cover (Continued)
● Operating procedures of
Adobe PS3
Limitation
[Back Cover] cannot be set in the following cases:
• When [OHP-Interleave(Blank)] or [OHP-Interleave(Print)] is selected for [Media Type] in the
[Print] - [Printer Specific Options] dialog box (1).
• When [Group] is selected for [Collate] in the [Print] - [Printer Specific Options].
• When [2-in-1] or [2-in-1 Repeat] is selected for [Combination] in the [Print] - [Printer Specific
Options].
1.
Open [Print] - [Printer Specific Options].
2.
Click the [▼] button beside the [Back Cover] to select [Blank] or
[Printed] from the list.
When [Blank] is selected, nothing is printed on the Back Cover.
When [Printed] is selected, the Back Cover is printed.
The default is [None].
3.
Click the [▼] button beside the [Back Cover Tray] box to select a tray to
feed a paper for the Back Cover from the list.
The default is [None].
4.
Click the [Print] button to print now.
Click the [Save Settings] button to save the setting as the default.
379
Chapter 6 Printing from Macintosh
To set a Thick Cover
Adobe PS3
compliant
Output thick paper as a cover, which is different from the output paper set.
To set a cover, options have
to be selected as shown in
the illustration below.
Sheet Feeder
Output Tray - Sub Tray
The copier shown in the illustration has been provided with
all options.
● Operating procedures of
Adobe PS3
Limitation
[PI-Tray (Front)] and [PI-Tray (Back)] cannot be set in the following cases:
• When [OHP-Interleave(Blank)] or [OHP-Interleave(Print)] is selected for [Media Type] in the
[Print] - [Printer Specific Options] dialog box (1).
• When [Sub Tray] is not selected for [Output Bin] in the [Print] - [Printer Specific Options].
1.
Open [Print] - [Printer Specific Options].
2.
Click the [▼] button beside the [PI-Tray (Front)] box when setting a
Front Cover, and the [PI-Tray (Back)] box when setting a Back Cover to
select [On] from the list.
Same procedure is applicable on the Front Cover and the Back Cover.
• The default is [None].
3.
Click the [Print] button to print now.
Click the [Save Settings] button to save the setting as the default.
380
Chapter 6 Printing from Macintosh
To set for finishing
You can use various functions such as stapling, punching, binding and folding for bookbinding and finishing.
To set stapling:
Adobe PS3
Staple output paper.
Reference
(p.383) To set stapling
ABCD
ABCDEF
To set the Punch Unit:
Adobe PS3
Set the printer driver to recognize an optional punch unit.
Reference
(p.386) To set the Punch Unit
Punch unit
To set punching:
Adobe PS3
Process output paper with double punching.
Reference
ABCD
(p.387) To set punching
ABCDEF
381
Chapter 6 Printing from Macintosh
To set for finishing (Continued)
To adjust a printing position inside the paper (Image Shift):
Adobe PS3
Adjust the position of printing to the output paper.
Reference
ABC
(p.389) To adjust a printing position inside the paper
ABC
To set Fold, Stitch, Trim (Trimmer Unit):
Adobe PS3
Fold an output paper at the center, bind it at the center, fold it in a Z-shape, cut it or fold it into three equal for
output.
Reference
(p.390) To set center binding, folding and cutting (Trimmer Unit)
382
Chapter 6 Printing from Macintosh
To set stapling
Adobe PS3
compliant
Staple output paper. The number of staples and their positions can be set as shown below.
Single Left
(Portrait)
ABCD
Single Right
(Portrait)
ABCD
Double Left
(Portrait)
ABCD
Double Right
(Portrait)
ABCD
Double Top
(Portrait)
ABCD
Single Left
(Landscape)
ABCDEF
Single Right
(Landscape)
ABCDEF
Double Left
(Landscape)
ABCDEF
Double Right
(Landscape)
ABCDEF
Double Top
(Landscape)
ABCDEF
383
Chapter 6 Printing from Macintosh
To set stapling (Continued)
● Operating procedures of
Adobe PS3
Limitation
When used in the combination of [Staple] and [Punch], the combinations listed below are not
allowed:
Position of stapling
Position of punching
Left
Top
Single
O
O
Right
X
SingleRight
X
O
O
Double Side
O
X
X
Double SideRight
X
X
O
Double Top
X
O
X
[Stapling] cannot be set in the following cases:
• When [No Finisher] is selected for [Finisher] in the [Installable Options] field of the [Configure].
• When the [A5R (W)], [B5R], [B6], [Statement R(W)] or [Custom] is selected for [Paper] in the
[Page Setup].
• When [OHP], [OHP-Interleave(Blank)], [OHP-Interleave(Print)], [Trance] or [Tabbed Sheet]
is selected for [Media Type] in the [Print] - [Printer Specific Options] dialog box (1).
• When [Sub tray] is selected for [Output Bin] in the [Print] - [Printer Specific Options].
• When [Group] is selected for [Collate] in the [Print] - [Printer Specific Options].
• When [Fold only], [Fold, Stitch], [Fold, Trim] or [Fold, Stitch, Trim] is selected for [Fold,
Stitch] in the [Print] - [Printer Specific Options].
• When [Booklet], or [Booklet-Right] is selected for [Combination] in the [Print] - [Printer Specific Options].
For detailed information on stapling and punching, refer to the instruction manual of the copier.
1.
Open [Print] - [Printer Specific Options].
384
Chapter 6 Printing from Macintosh
To set stapling (Continued)
2.
Click the [▼] button beside the [Stapling] to select the number of stapling and their positions from the list.
The default is [None].
3.
Click the [Print] button to print now.
Click the [Save Settings] button to save the setting as the default.
385
Chapter 6 Printing from Macintosh
To set the Punch Unit
Adobe PS3
compliant
Set the copier to recognize an optional punch unit if it is installed on the copier.
When the printer driver recognizes a punch unit [PU-108], the output paper can be processed with double
punching. Also, when the printer driver recognizes a punch unit [PZ-108], the output paper becomes possible to be folded in a Z-form.
Punch unit
Even if a punch unit is installed on the copier, the printer driver will not recognize the unit if an
Finisher is not set on the printer driver.
● Operating procedures of
Adobe PS3
1.
Open [Configure].
2.
Click the [▼] button beside the [Punch Unit] in the [Installable Options]
dialog box to select the punch unit you want to use from the list.
When the copier is provided with an optional punch unit, select either [PU-108] or [PZ-108].
When the copier is not provided with an optional Finisher, select [None].
• The default is "None". If "None" is selected, you cannot set the punch unit
• When you do not know whether the optional punch unit is PU-108 or PZ-108, consult your system administrator.
3.
Click the [OK] button to close the [Configure].
386
Chapter 6 Printing from Macintosh
To set punching
Adobe PS3
compliant
Set punch holes on the output paper in advance.
Punch holes can be set as shown below.
Left
(Portrait)
Top
(Portrait)
Right
(Portrait)
ABCD
ABCD
ABCD
Left
(Landscape)
Top
(Landscape)
ABCDEF
ABCDEF
Right
(Landscape)
ABCDEF
387
Chapter 6 Printing from Macintosh
To set punching (Continued)
● Operating procedures of
Adobe PS3
Limitation
When used in the combination of [Stapling] and [Punch], the combinations listed below are not
allowed:
Position of stapling
Position of punching
Left
Top
O
O
X
SingleRight
X
O
O
Double Side
O
X
X
Double SideRight
X
X
O
Double Top
X
O
X
Single
Right
[Punch] cannot be set in the following cases:
• When [None] is selected for [Punch Unit] in the [Installable Options] field of the [Configure].
• When the [B6], [Wide paper (W)] or [Custom] is selected for [Paper] in the [Page Setup].
• When [OHP], [OHP-Interleave(Blank)], [OHP-Interleave(Print)], [Trace] or [Tabbed Sheet] is
selected for [Media Type] in the [Print] - [Printer Specific Options] dialog box (1).
• When [Sub Tray] is selected for [Output Bin] in the [Print] - [Printer Specific Options].
• When [Fold only], [Fold, Stitch], [Fold, Trim] or [Fold, Stitch, Trim] is selected for [Fold,
Stitch] in the [Print] - [Printer Specific Options].
• When [Booklet], or [Booklet-Right] is selected for [Combination] in the [Print] - [Printer Specific Options].
For detailed information on stapling and punching, refer to the instruction manual of the copier.
1.
Open [Print] - [Printer Specific Options].
2.
Click the [▼] button beside the [Punch] box to select the punching
positions from the list.
The default is [Off].
3.
Click the [Print] button to print now.
Click the [Save Settings] button to save the setting as the default.
388
Chapter 6 Printing from Macintosh
To adjust a printing position inside the paper
Adobe PS3
compliant (Image Shift)
Adjust the details of the printing position to the output paper.
● Operating procedures of
Adobe PS3
1.
Open [Print] - [Printer Specific Options].
2.
Click the [▼] button beside the [Image Shift] to select [ON] from the list.
When [ON] is selected, the prints are made at the position set on the control panel of the copier.
The default is [Off].
3.
Click the [Print] button to print now.
Click the [Save Settings] button to save the setting as the default.
389
Chapter 6 Printing from Macintosh
To set center binding, folding and cutting (Trimmer Unit)
Adobe PS3
compliant
Fold an output paper at the center, bind it at the center, fold it in a Z-shape, cut it or fold it into three equal for
output.
Z-Fold
Fold
Stitch
Trim
390
Chapter 6 Printing from Macintosh
To set center binding, folding and cutting (Trimmer Unit) (Continued)
● Operating procedures of
Adobe PS3
Limitation
[Fold, Stitch] and [Fold, Stitch, Trim] cannot be set in the following cases:
• When [No Finisher] is selected for [Finisher] in the [Installable Options] field of the [Configure].
• When [OHP], [OHP-Interleave(Blank)], [OHP-Interleave(Print)], [Trace] or [Tabbed Sheet] is
selected for [Media Type] in the [Print] - [Printer Specific Options] dialog box (1).
[Fold, Stitch], [Fold only], [Fold, Trim] and [Fold, Stitch, Trim] cannot be set in the following
cases:
• When the [B6], [Wide paper (W)] or [Custom] is selected for [Paper] in the [Page Setup].
• When [-Default-] or [Sub Tray] is selected for [Output Bin] in the [Print] - [Printer Specific
Options].
• When [Group] is selected for [Collate] in the [Print] - [Printer Specific Options].
• When any item other than [Off] is selected for the [Offset], [Stapling], [Punch] or [PI-Tray
(Back)] in the [Back Cover].
[Fold, Trim] and [Fold, Stitch, Trim] cannot be set in the following case:
• When [Off] is selected for [Trimmer Unit] in the [Installable Options] field of the [Configure].
[Z-fold (A3, B4, 11 x 17.8k)] and [Z-fold (8.5 x 14)] cannot be set in the following case:
• When [Sub Tray] is selected for [Output Bin] in the [Print] - [Printer Specific Options].
• You can select "On" for [Trimmer Unit] only if the trimmer unit is installed on the copier.
1.
Open [Print] - [Printer Specific Options].
2.
Click the [▼] button beside the [Fold, Stitch] to select binding / cutting
you want to use from the list.
The default is [Off].
3.
Click the [Print] button to print now.
Click the [Save Settings] button to save the setting as the default.
391
Chapter 6 Printing from Macintosh
To set a Watermark
A watermark or a transparent character can be set and printed on the output paper.
To print a Watermark:
Adobe PS3
Set a transparent character and print it on the output paper.
Reference
(p.393) To print a Watermark
ABCD
ABCD
PY
CONFID
ENTIAL
CO
To create a new Watermark:
Adobe PS3
Create a new transparent character printed on the output paper.
Reference
(p.395) To create a new Watermark
ABCD
COPY
To change a Watermark:
Adobe PS3
Edit and change a registered transparent character printed on the output paper.
Reference
(p.397) To change a Watermark
Editting
ABCD
ABCD
Draft
COPY
392
Chapter 6 Printing from Macintosh
To print a Watermark
Adobe PS3
compliant (Watermark)
Set a transparent character and print it on the output paper.
ABCD
CONFID
ENTIAL
● Operating procedures of
ABCD
PY
CO
Adobe PS3
1.
Open [Page Setup] - [Watermark].
2.
When printing a watermark on the first page only, click on the [First]
button.
When printing a watermark on every page, click on the [All] button.
The default is [None].
3.
Select [PICT], [EPS], or [TEXT] as the file format for a watermark.
The default is [PICT].
4.
Select a watermark to be used from the [Watermark] field, five Watermark have been registered in advance.
Selecting [PICT] at step 3, you can select a watermark, the name of [Adobe-PICT2] or [Confidential.pict].
Selecting [EPS] at step 3, you can select a watermark, the name of [Adobe.B&W.eps] or
[Adobe.color.eps].
Selecting [TEXT] at step 3, you can select a watermark, the name of [Draft] or created watermarks.
You can create and register a new item in [TEXT].
Reference
5.
(p.395) To create a new Watermark
Turn on the [Foreground] check box if you want to print the watermark
on the foreground of the printing.
Turning on the [Foreground] check box, prints the watermark on the foreground of the printing.
Turning off the [Foreground] check box, prints the watermark on the background of the printing.
393
Chapter 6 Printing from Macintosh
To print a Watermark (Continued)
6.
Turn on the [Save With Document] check box if you want to save the
watermark with the printing document.
Turning on the [Save With Document] check box, you can print the watermark under the same settings at the next time you print the document.
7.
8.
9.
Click the [OK] button to close the [Page Setup].
Execute printing from an application.
When the use of the watermark is discontinued after printing, conduct
operations on and after Step 10.
If you want to apply the watermark at the next printing, the operations after Step 10 are not required.
10.Open [Page Setup] - [Watermark].
11. Click on the [None] button.
12.Click the [OK] button to close the [Page Setup].
394
Chapter 6 Printing from Macintosh
To create a new Watermark
Adobe PS3
compliant (Watermark)
Create a new Watermark to be printed on the output paper.
ABCD
COPY
● Operating procedures of
Adobe PS3
1.
Open [Page Setup] - [Watermark].
2.
3.
Click on the [First] or [All] button.
Turn on the [TEXT] radio button as the file format for the new transparent character (watermark).
The default is [PICT].
4.
Click the [Edit] button.
The [Watermark Specification] dialog box will appear.
5.
Enter a character string to be used as the new watermark in the [Watermark Text] box.
6.
Click the [▼] box to select the color for the watermark from the color
palette.
395
Chapter 6 Printing from Macintosh
To create a new Watermark (Continued)
7.
Click the [▲] and [▼] button beside the [Watermark Font/Size/Style]
box to select the font, size, and style for the watermark from the list.
The default is [Helvetica].
8.
Drag the character string on the preview screen at the left side of the
dialog box to set the location and angle of the watermark.
9. Confirm a newly created watermark on the preview display.
10.Click the [Save As] button.
A dialog box in which you can set the name of the new watermark will appear.
11. Input the name of the new watermark in the box.
12.Click the [OK] button.
The dialog box for setting the name of the new watermark disappear and the
display returns to the [Watermark Specification] window.
13.Click the [OK] button.
The [Watermark Specification] dialog box is closed and the display returns to the [Page Setup].
The newly created watermark appears on the [Watermark].
14.Click on the [None] button.
15.Click the [OK] button to close the [Page Setup].
396
Chapter 6 Printing from Macintosh
To change a Watermark
Adobe PS3
compliant (Watermark)
Edit and change a registered transparent character to be printed on the output paper.
Editting
ABCD
ABCD
Draft
COPY
● Operating procedures of
Adobe PS3
1.
Open [Page Setup] - [Watermark].
2.
3.
Click on the [First] or [All] button.
Click on the [TEXT] button as the file format for a watermark.
The default is [PICT].
4.
5.
Select the watermark you want to edit from the [Watermark].
Click the [Edit] button.
The [Watermark Specification] dialog box will appear.
6.
Enter a character string to be changed in the [Watermark Text] box to
change the character string of a watermark.
7.
Click the [▼] box to select the color for the watermark from the color
palette if you want to change it.
397
Chapter 6 Printing from Macintosh
To change a Watermark (Continued)
8.
Click the [▲] and [▼] button beside the [Watermark Font/Size/Style]
box to select the font, size, and style for the watermark from the list if
you want to change them.
9.
Drag the character string on the preview screen at the left side of the
dialog box to set the location and angle of the watermark if you want to
change them.
The default is [Helvetica].
10.Confirm the edited watermark on the preview display.
11. Click the [OK] button.
The [Watermark Specification] dialog box is closed and the display returns to the [Page Setup].
12.Turn on the radio button of [None].
13.Click the [OK] button to close the [Page Setup].
398
Chapter 6 Printing from Macintosh
To set an image and shade
You can set the shade of an output image and a processing method of graphic data.
To save toner consumption by controlling a print density
(Toner Save):
Adobe PS3
Save toner by controlling a printing density.
Reference
(p.401) To save toner consumption by controlling a print density
Normal
Toner Save
Draft
ABCD
ABCD
ABCD
To set a resolution:
Adobe PS3
Set resolution to 400 dpi or 600 dpi.
Reference
(p.402) To set a Resolution
To print a curved section smoothly (Smoothing):
Adobe PS3
Print a curved section of a character or image smoothly.
Reference
(p.403) To print a curved section smoothly
Smoothing
399
Chapter 6 Printing from Macintosh
To set an image and shade (Continued)
To print an image by reversing white and black:
Adobe PS3
Print in a negative image by reversing white into black and vice versa.
Reference
(p.404) To print an image by reversing white and black
Reversing white into black
ABCD
ABCD
ABCD
ABCD
ABCD
ABCD
ABCD
ABCD
To print an image by reversing image:
Adobe PS3
Print an image by reversing it in a horizontal direction, just like a reflection in the mirror.
Reference
(p.405) To print an image by reversing image
Flip Horizontal
DCBA
Flip Vertical
ABCD
ABCD
To print a bitmapped image more clearly:
Adobe PS3
Print a image more clearly by adjusting the displacements of bits.
Reference
(p.406) To print a bitmapped image more clearly
400
Chapter 6 Printing from Macintosh
To save toner consumption by controlling a print density
Adobe PS3
compliant
Save toner by controlling a printing density.
Normal
Toner Save
Draft
ABCD
ABCD
ABCD
● Operating procedures of
Adobe PS3
1.
Open [Print] - [Printer Specific Options].
2.
Click the [▼] button beside the [Toner Save] to select [Toner Save] or
[Draft] from the list.
• The default is [Normal].
• You can select a printing density from [Normal](100%), [Toner Save](80%) or [Draft](60%).
3.
Click the [Print] button to print now.
Click the [Save Settings] button to save the setting as the default.
401
Chapter 6 Printing from Macintosh
To set a Resolution
Adobe PS3
compliant
Set resolution to 400 dpi or 600 dpi.
Important
Resolution means the number of dots that can be printed in the length of one inch. It can be
said that the higher a value in dpi (dot per inch), the more the information that makes up an
image.
● Operating procedures of
Adobe PS3
1.
Open [Print] - [Printer Specific Options] dialog box (1).
2.
Click the [▼] button beside the [Resolution] box to select [600 dpi] or
[400 dpi] from the list.
The default is [600 dpi].
3.
Click the [Print] button to print now.
Click the [Save Settings] button to save the setting as the default.
402
Chapter 6 Printing from Macintosh
To print a curved section smoothly
Adobe PS3
compliant (Smoothing)
Print a curved section of a character and image smoothly.
Smoothing
● Operating procedures of
Adobe PS3
1.
Open [Print] - [Printer Specific Options].
2.
Click the [▼] button beside the [Smoothing] box to select [Type 1],
[Type 2] or [Type 3] from the list.
[Type 1] normally provides processing suitable to a slanting line of a character and graphic.
[Type 2] normally provides processing suitable to a curved section of a character.
[Type 3] normally provides processing suitable to a curved section of fine character.
When [None] is selected, no smoothing function is provided.
The default is [None].
3.
Click the [Print] button to print now.
Click the [Save Settings] button to save the setting as the default.
403
Chapter 6 Printing from Macintosh
To print an image by reversing white and black
Adobe PS3
compliant
Print a negative image by reversing white into black and vice versa. This function is suitable for printing a
monochromatic or coarse RGB image.
Reversing white into black
ABCD
ABCD
ABCD
ABCD
● Operating procedures of
ABCD
ABCD
ABCD
ABCD
Adobe PS3
1.
Open [Page Setup] - [PostScript Options].
2.
Turn on the [Invert Image] check box.
• The default is [OFF].
• You can turn on all of [Flip Horizontal], [Flip Vertical], and [Invert Image] if you want.
3.
Click the [OK] button to close the [Page Setup].
404
Chapter 6 Printing from Macintosh
To print an image by reversing image
Adobe PS3
compliant
Print an image by reversing it in a horizontal direction, just like a reflection in the mirror.
Flip Horizontal
DCBA
Flip Vertical
ABCD
ABCD
● Operating procedures of
Adobe PS3
1.
Open [Page Setup] - [PostScript Options].
2.
Turn on the [Flip Horizontal] or [Flip Vertical] check box.
• The default is [OFF].
• You can turn on [Flip Horizontal], [Flip Vertical], and [Invert Image] if you want.
3.
Click the [OK] button to close the [Page Setup].
405
Chapter 6 Printing from Macintosh
To print a bitmapped image more clearly
Adobe PS3
compliant
Print an image more clearly by adjusting the displacements of bits.
● Operating procedures of
Adobe PS3
1.
Open [Page Setup] - [PostScript Options].
2.
Turn on the [Precision Bitmap Alignment] check box.
The default is [OFF].
3.
Click the [OK] button to close the [Page Setup].
406
Chapter 6 Printing from Macintosh
To set font-related items
You can set the items for the printer font, TrueType font, and PostScript font.
To print without using printer fonts:
Adobe PS3
Set the printer to print data without using the printer font.
Reference
(p.408) To print without using printer fonts
To restrict fonts that can be downloaded:
Adobe PS3
Set the restriction on downloadable fonts.
Reference
(p.409) To restrict fonts that can be downloaded
407
Chapter 6 Printing from Macintosh
To print without using printer fonts
Adobe PS3
compliant
Set the printer to print data without using the printer font. When the printer font is not used, the print data is
increased, but the same print result can be obtained.
● Operating procedures of
Adobe PS3
1.
Open [Page Setup] - [PostScript Options].
2.
Turn off the [Substitute Fonts] check box.
The default is [ON].
3.
Click the [OK] button to close the [Page Setup].
Important
Also, when sending PostScript output to the other printer, any trouble due to the difference of
the print fonts can be avoided by turning off the [Substitute Fonts] check box.
408
Chapter 6 Printing from Macintosh
To restrict fonts that can be downloaded
Adobe PS3
compliant
Restrict downloadable fonts. Set this item if the printer does not print fonts properly.
● Operating procedures of
Adobe PS3
1.
Open [Page Setup] - [PostScript Options].
2.
Turn on or off the [Unlimited Downloadable Fonts] check box.
The default is [ON].
3.
Click the [OK] button to close the [Page Setup].
409
Chapter 6 Printing from Macintosh
To check the printer driver setting
You can check the settings before print or perform the test printing to check the current settings.
To test print to check the settings (Wait with Proof):
Adobe PS3
Check the test printing output and the current settings from the control panel.
Reference
(p.411) To test print to check the settings
To check the current settings before printing (Wait):
Adobe PS3
Check the current settings from the control panel before printing.
Reference
(p.413) To check the current settings before printing
To check the version of the printer driver:
Adobe PS3
Check the version of the printer driver from the [Print].
Reference
(p.415) To check the version of the printer driver
410
Chapter 6 Printing from Macintosh
To test print to check the settings
Adobe PS3
compliant (Wait with Proof)
Check the test printing output and the current settings from the control panel. Use this function before printing multiple sets of copies.
● Operating procedures of
Adobe PS3
Limitation
[Wait Mode] cannot be set in the following cases:
• When [Group] is selected for [Collate] in the [Print] - [Printer Specific Options].
1.
Open [Print] - [Printer Specific Options].
2.
Click the [▼] button beside the [Wait Mode] box to select [Wait with
Proof] from the list.
The default is [None].
3.
Click the [OK] button to print.
Perform the operation from the control panel on the main body copier after the step 3.
411
Chapter 6 Printing from Macintosh
To test print to check the settings (Continued)
4.
The [Printer Check Mode] will appear on the LCD touch screen and no
printing is performed.
5.
6.
Confirm the current settings.
Change setting values of [Print Quantity], [Duplex Mode] or [Image
Shift], if necessary.
• How to change [Print Quantity]
Enter the value from the keypad on the control panel when the [Printer Check Mode Screen]
appears.
• How to change [Printer Mode
To show the [Basic Screen], touch the [Printer Mode]. Set the [Printer Mode] on the [Basic Screen].
To return to the [Printer Check Mode Screen], press the [CHECK] button on the control panel.
• How to change [Image Shift]
Available only when [On] is selected in [Image Shift] of printer driver.
To show the [Image Shift Screen], touch the [Image Shift]. Set the [Image Shift] on the [Image Shift
Screen]. To return to the [Printer Check Mode Screen], touch [EXIT] on the [Image Shift Screen].
7.
8.
9.
Touch the [PROOF PRINT] to print one copied set for proofreading.
Touch the [EXIT] to return to the print mode basic screen.
Press [START] to resume the rest of the print job.
When you change the settings, press [STOP] to cancel the print job, and change the settings on the
printer properties on your computer.
412
Chapter 6 Printing from Macintosh
To check the current settings before printing
Adobe PS3
compliant (Wait)
Check the current settings from the control panel before printing.
● Operating procedures of
Adobe PS3
Limitation
[Wait Mode] cannot be set in the following cases:
• When [Group] is selected for [Collate] in the [Print] - [Printer Specific Options].
If you try to apply an invalid combination of settings as described left, a message appears. Check the message and
adjust the settings.
1.
Open [Print] - [Printer Specific Options].
2.
Click the [▼] button beside the [Wait Mode] box to select [Wait] from
the list.
The default is [None].
3.
Click the [OK] button to print.
Perform the operation from the control panel on the copier after the step 4.
413
Chapter 6 Printing from Macintosh
To check the current settings before printing (Continued)
4.
The [Printer Check Mode screen] will appear on the LCD touch screen
and no printing is performed.
5.
6.
Confirm the current settings.
Change setting values of [Print Quantity], [Duplex Mode] or [Image
Shift], if necessary.
• How to change [Print Quantity]
Enter the value from the keypad on the control panel when the [Printer Check Mode Screen]
appears.
• How to change [Duplex Mode]
To show the [Basic Screen], touch the [Duplex Mode]. Set the [Duplex Mode] on the [Basic
Screen]. To return to the [Printer Check Mode Screen], press the [CHECK] button on the control
panel.
• How to change [Image Shift]
Available only when [On] is selected in [Image Shift] of printer driver.
To show the [Image Shift Screen], touch the [Image Shift]. Set the [Image Shift] on the [Image Shift
Screen]. To return to the [Printer Check Mode Screen], touch [EXIT] on the [Image Shift Screen].
7.
8.
9.
Touch the [PROOF PRINT] to print one copied set for proofreading.
Touch the [Exit] to return to the print mode basic screen.
Press [START] to resume the rest of the print job.
When you change the settings, press [STOP] to cancel the print job, and change the settings on the
printer properties on your computer.
414
Chapter 6 Printing from Macintosh
To check the version of the printer driver
Adobe PS3
compliant
Check the version of the printer driver from the [Print].
● Operating procedures of
1.
Adobe PS3
Open [Page Setup] dialog box or the [Print].
The [Page Setup] dialog box will appear.
2.
3.
Check an expression [*.*.*] at the upper right of the screen.
Press the [Cancel] button to close the [Page Setup].
415
Chapter 6 Printing from Macintosh
To set the memory installed in the printer
Adobe PS3
compliant
Set the printer driver to recognize the memory installed in the printer from the [Print].
Ask your system administrator to set the value for the installed memory properly.
● Operating procedures of
Adobe PS3
1.
Open [Configure].
2.
Click the [▼] button beside [Memory Configuration] - the [Memory Configuration] box to select the value for the installed memory from the
list.
The default is [64MB].
3.
Click the [OK] button to close the [Configure].
416
Chapter 7 Tandem Print
Chapter 7 Tandem Print
To print with two copiers
PCL5e
Adobe PS3
Compliant
Using two copiers (master copier and sub copier), prints can be made at the same time under the same printing
conditions. When printing a large number of copies, time required to complete the job can be shortened.
When either one of the two copiers is equipped with a print controller, tandem printing can be performed. When
both of the copiers are equipped with a print controller, the copier which receives the printing job instruction
functions as the master copier and the other one is the sub copier.
For the tandem printing, the two copiers should be connected by either method as follows.
• Connect the two copiers directly with a cross cable.
In this case, the network functions cannot be used.
• Connect them with a straight cable via HUB.
Use a cross cable or straight cable higher than the category type 5.
Tandem printing should only be set up by your authorized service representative.
Sub copier
Computer
Master copier
Limitation
[Tandem Print] cannot be set in the following cases:
In case of Kyoceramita PCL5e:
• When [OHP-Interleave(Blank)] or [OHP-Interleave(Print)] is selected in [Paper] tab-[Media
Type]
• When [Collate] is not available in [Paper] tab-[Copies]
In case of Adobe PS3:
Windows:
• When [OHP-Interleave(Blank)] or [OHP-Interleave(Print)] is selected in [Paper] tab-[Paper
type]
• When [Group] is selected in [Device Options] tab-[Printer features]-[Collate]
Macintosh:
• When [OHP-Interleave(Blank)] or [OHP-Interleave(Print)] is selected in [Printer Specific
Options] dialog box(1)-[Media Type]
• When [Group] is selected in [Printer Specific Options] dialog box(2)-[Collate]
Reference
(p.336) Displaying the [Print] dialog box
417
Chapter
7
Chapter 7 Tandem Print
To print with two copiers (Continued)
Important
When the sub copier is under the following conditions, a corresponding message is displayed
on the control panel of the master copier and the tandem printing is discontinued. In this case,
printing with the master copier is normally performed.
• When before starting operation under the tandem master condition:
USA:
"Tandem mode unavailable"
"Tandem mode is released"
Other:
"Tandem mode is not available"
"Tandem mode is released"
• When in INTERRUPT mode or interrupt copy under the tandem master condition:
"Tandem mode is released"
• When reserved jobs have reached 5:
USA:
"Please wait. Reserve is not available in Sub machine"
"Tandem mode is released"
Other:
"Please wait. Reserve is not available in Slave unit"
"Tandem mode is released"
• When SC call is issued:
USA:
"Sub machine error"
"Tandem mode is released"
Other:
"Slave unit error"
"Tandem mode is released"
• When the front door is open, key counter is removed, or the sub copier is in other condition
that the printing is impossible.
USA:
"Please check sub machine"
"Tandem mode is released"
Other:
"Please check slave unit"
"Tandem mode is released"
● Operating procedures of
1.
PCL5e
Open [Paper] tab of [Properties] window.
When displayed from an application with Windows 98
418
Chapter 7 Tandem Print
To print with two copiers (Continued)
2.
3.
Select the [Tandem Print] in the [Features] field.
Select the [On] in the pull-down menu under it.
The default is [Off].
4.
Click the [OK] button to close the [Properties] window.
● Operating procedures of
1.
Adobe PS3
(Windows)
Open [Device Options] tab of the [Properties] window.
When displayed from an application with Windows 98.
• For Windows NT4.0, [Document Defaults...] - [Advanced] tab is displayed
• For Windows 2000/XP, [Properties] - [Advanced] - [printing Defaults] - [Layout] - [Advanced...] is displayed
2.
3.
Select [Tandem Print] from the [Printer features] field.
Click the [▼] button beside the [Printer features] - [Change setting for]
boxes to display the list. Then select [On] from the list.
The default is [Off].
4.
Click the [OK] button to close the [Properties] window.
419
Chapter 7 Tandem Print
To print with two copiers (Continued)
● Operating procedures of
1.
(Macintosh)
Open [Print] - [Printer Specific Options](2).
Reference
2.
Adobe PS3
(p.336) Displaying the [Print] dialog box
Click the [▼] button beside the [Tandem Print] box to select the [On]
from the list.
The default is [Off].
3.
Click the [Print] button to print now.
Click the [Save Settings] button to save the setting as the default.
● Discontinuation of tandem connection / output and problems encountered during
printing process
Refer to the "Copier's User's Manual" for details of discontinuation of the tandem connection / output and
problems encountered during the printing process.
420
Chapter 8 Managing the Number of Prints
Chapter 8 Managing the Number of Prints
Overview of the Printer ECM/EKC
Printer ECM/EKC is a feature used to manage the number of prints made on the copier.
Setting the Printer ECM/EKC feature means that, provided you enter a password previously established on the
printer to request a print job, the copier counts the printouts on the ECM/EKC counter to know when a preset
limit is hit, and rejects print requests from clients without a password.
The name of this feature varies according to the specifications of each country.
USA market: Printer ECM
Others: Printer EKC
The term Printer ECM/EKC is used here.
421
Chapter
8
Chapter 8 Managing the Number of Prints
Setting of Printer ECM/EKC
A password for the Printer ECM/EKC and its counter are set in the copier’s Key Operator setting. For information about setting the Printer ECM/EKC, refer to the User’s Guide of the copier.
The password for the Printer ECM/EKC must be the same as User ID entered when printing.
Reference
(p.424) ECM/EKC Limit
422
Chapter 8 Managing the Number of Prints
Printing with Printer ECM/EKC
If the Printer ECM/EKC has been set, perform the following steps to print or copy.
1.
Select the [Paper] tab in the printer driver properties window, and click
the [Settings] button.
The [Password Print] dialog will appear.
2.
Type the User ID set in the Printer ECM/EKC into the [User ID] text box.
• With some application software, the setting for the printer driver also is saved. When you
use [Settings] to print a shared file on a network or a file likely to be printed by other’s,
delete the [UserID] and [Password] before saving the files.
• You must enter the same password (8 digits or less) in the [User ID] text box that is set on
the copier for Printer ECM/EKC.
• When in doubt about the password for Printer ECM/EKC, ask your system administrator.
• If you do not enter the correct password or if you leave the [User ID] text box blank, the print
job could be performed or not performed.
• If not performed, it is registered as a non complete job.
• In the service mode, you can set whether or not to print these jobs.
• For more information, contact your Kyoceramita service representative.
3.
Click [OK] button to close the [Properties] and start the printing process.
423
Chapter 8 Managing the Number of Prints
ECM/EKC Limit
If you exceed the limit previously set in the Printer ECM/EKC, the following will occur, depending on the settings
of the Printer ECM/EKC.
When in doubt about the Printer ECM/EKC settings, ask your system administrator.
● When a print job is sent after limit has been reached:
• A message will appear indicating that the ECM/EKC counter reached a preset limit, but the printing
process is completed normally and the ECM/EKC counter increments as if nothing happened.
• No output is produced and the job is registered on the non complete job list.
● If the ECM/EKC counter hits a preset limit in the process of getting an output:
• A message will appear indicating that the ECM/EKC counter reached a preset limit, but the printing
process is completed normally and the ECM/EKC counter increments as if nothing happened.
• After the current print job is completed, no additional jobs are accepted. If you try to send the next print
job, it is deleted and registered on the non complete job list.
• The print job instantly stops, causing the already fed paper to be output. The job is registered on the
non complete job list.
• A print job deleted by the Printer ECM/EKC feature is registered on the [non complete job list]. For information
on checking the non complete job list screen, refer to "Troubleshooting".
Reference
(p.430) Checking on non complete jobs
• If the Printer ECM/EKC feature is set in the copier, the [User ID] set in [Password Print] in the [Settings] dialog
box will be recognized as the ECM/EKC password.
• If the Printer ECM/EKC feature is set in the copier, enter the same number as the Printer ECM/EKC password
in the [User ID] column of [Password Print].
Reference
(p.254) To specify a user
424
Chapter 9 Troubleshooting
Chapter 9 Troubleshooting
Basic Troubleshooting
This section describes how to troubleshoot. If problems are not resolved by using the following procedure, contact your Kyoceramita service representative.
First check the following ordinary causes of abnormalities:
1.
Check the power of the main body printer (copier), computers and
cable connections.
2.
Check the LCD touch screen of the main body printer to find information concerning the current trouble.
3.
If possible, perform Test Print from the LCD of the main body printer to
check that the settings are correct.
Reference
4.
(p.484) Printing the Test Print
Check the current status of the print controller.
• Check the current status shown on the LCD of the control panel.
• Touch the [STATUS] key on the Basic Screen to check the job status.
Reference
(p.479) Confirming the Status of a Print Job
• When your job is being processed or waiting to be printed:
Windows:
The current status is displayed on the dialog shown by double-clicking [Start] - [Settings] - [Printers]
- printing system currently used.
Macintosh:
The current status is displayed on the dialog shown by double-clicking the currently-used printer
icon on the desktop.
Important
Mac OS X is not supported at September 2002.
425
Chapter
9
Chapter 9 Troubleshooting
General Problems of Printing
● The Print Controller does not respond to the Print command.
1.
Check that the printing system is selected as the current printer.
The printing system must be selected as the current printer on Windows before printing.
2.
3.
Check that the power switch of the copier is turned on.
Print the Test Page from Windows.
When you cannot print a job from an application even though you can print a test print, contact a system administrator or a service representative.
4.
If the message "Error" is displayed, check that the control panel is in
copy mode, not scanner mode.
● Cannot select any media other than [Plain paper] from [Media Type].
1.
For the PCL5e Driver, select [Restore Defaults] from [Paper] tab or
[Cover] tab to restore the default setting.
2.
Set [Paper Source] to a setting other than [Auto Select].
● A message requesting a paper size you did not specify is displayed.
1.
Cancel the job to change the paper size in the "Page (Paper) Setup"
dialog on your application.
Touch and select the desired size displayed in the paper sizes area of the control panel, then press
the [START] button. The forced output will start.
Reference
(p.505) Using the Forced Output Function
● You cannot print the test print.
1.
Check the LCD of the main body printer control panel.
When "Ready to copy" is displayed on the LCD, go to Step 3.
When a diagnostic message or an error message is displayed on the LCD, refer to the operating manual of the main body printer (copier).
When the LCD is blank, go to Step 2.
2.
Press the POWER SAVER ON/OFF on the control panel.
When the main body printer is used in the Power Save mode, press this switch to show the LCD in the
Display mode.
3.
Try to make a copy.
When copying is available, go to Step 4.
4.
Turn off the copier and wait for 10 seconds, then restart it. Print the
test print again after the print controller is ready.
Contact your Kyoceramita service representative if you cannot print the test page after performing the
above procedures.
426
Chapter 9 Troubleshooting
General Problems of Printing (Continued)
● The print setting of a job does not correspond to the result of printing.
1.
Check that the printer setting was not changed.
Refer to "Appendix B Function List" for the printer setting.
Reference
(p.595) Function List (Print Controller)
● Memory Overflow
1.
Depending on the functions selected in the printer driver, occasional
memory overflow may occur if the volume of the print job is large. In
this case the print job is cancelled.
e.g., Booklet, Fold & Stitch, 2 in 1, etc.
In case of frequent Memory Overflow we recommend that you extend the memory capacity in the
main body printer (copier).
When "Print Controller Memory Overflow" is displayed on the LCD Touch Screen when you are using
Duplex printing or another Application function, you may cancel the print job and try to reprint with
another function.
427
Chapter 9 Troubleshooting
General Problems of Printing (Continued)
● Enough disk space is not available
An error message will appear at the top-left icon on the touch screen when available disk space of this printing system becomes less than 3% of total disk capacity.
Solution:
1.
Press the [MODE] button to open the printer mode basic screen.
Reference
2.
(p.475) Switching Between Modes
Make sure the [HD free space] displayed at the red circle on the upper
screen.
If [HD free space] is not full, the disk space of the hard disk in the copier may be full.
Refer to the copier's manual for more detailed information.
3.
Delete scan jobs saved on the hard disk in this printing system from
the computer on the network.
Refer to "Setting the ScanDataAutoDel." for specific procedures on deleting scanned data.
Reference
(p.492) Setting the ScanDataAutoDel.
4.
Print confidential output print jobs (password print) stored on the hard
disk in the printing system from the control panel.
5.
The automatic timer capability in this printing system deletes print
jobs stored on the hard disk in the system automatically after 24 hours
of storing.
428
Chapter 9 Troubleshooting
General Problems of PostScript
● A PostScript Error message displays.
For the content of the error, visit Adobe’s home page at http://www.adobe.com(URL subject to change without notice).
● PostScript Error messages such as “VMerror” and “limitcheck” display.
The printer (copier) may be short on memory capacity. Consider upgrading the memory.
● A PostScript Error message displays when attempting to get a printout from any
computers are in use.
There may be loose connections in the printing system. Recheck all of connections.
● A PostScript Error message displays when attempting to get a printout from a specific application.
Error conditions may exist in the application. Try to print out a simple test file. If this also does not succeed,
reinstall the application in question.
● A PostScript Error message displays when attempting to get a printout from a specific file.
It is possible that the print setting for the file is wrong, that graphics contained in the file are damaged, or that
bad elements are contained in the file.
Find a print setting that does not cause any PostScript Error message to appear, and try to get a printout. If
this fails, save the file as a new file.
● A PostScript Error message displays when attempting to get a printout of a specific page.
It is possible that elements or fonts used in the page are damaged, or that larger memory capacity than currently available capacity is needed for the printout.
Try to print with specifying one element or font of the various ones in the page. If this trial causes no problems, consider upgrading the memory.
● Fonts cannot be downloaded.
It is possible that [Spool] is set to [On] in Printer Setting Menu on the copier’s control panel.
Set [Spool] to [Off], switch off the copier’s main power, wait 10 seconds or more, switch it back on, and then
try downloading fonts again.
For details on how to download fonts, refer to the User’s Guide that comes with the fonts.
● Non fixed size paper can not be printed correctly (Macintosh).
The direction in which non fixed size paper is loaded in the copier may be incorrect.
Rotate the paper direction 90 degrees and then try printing after changing the settings of the driver and
copier accordingly.
429
Chapter 9 Troubleshooting
Checking on non complete jobs
If print jobs are not output, you can check them on the Non complete Job List screen.
To get the Non complete Job List screen to appear:
1.
Press the [STATUS] key on the printer mode basic screen to get the
Job Status Screen to appear, and then press the [NON COMPLETE
JOB LIST] key.
The Non complete Job List screen will appear.
You can scroll the up/down with the [
][
] keys.
● Content of Non complete Job List
On the Non complete Job List, you can check on the mode, file and application names, as well as the causes
of non complete jobs.
Here is a list of Non complete Job List content.
Mode
PRINTER
SCANNER
Factor
Description of causes
Cancel
Stopped with STOP/CLEAR. Deleted from
Joblist. W/O key count/set. Interruption
request from print controller. Job aborted.
Prohibited by Web count. Copy prohibited
before examination. Error in memory.
ID Differ
Job not output because User ID did not
match.
Limit over
Job not output because Printer ECM/EKC
reached a preset limit.
Mem Full
Job not output because copier ran out of
memory.
Error
Job not completed in uploading data to hard
disk.
Cancel
Stopped with STOP/CLEAR. Deleted from
Job List. W/O key count/set. Interruption
request from print controller. Job aborted.
• When switching the copier's main power is switched OFF, the Non complete jobs in the Non complete Job List
screen are deleted.
• Provided the Printer ECM/EKC feature has been set on the copier, [User ID] set up in the [Settings] dialog is
recognized as a password for Printer ECM/EKC.
• Provided a Printer ECM/EKC feature has been set on the copier, you can enter the same number in the [User
ID] text box as that representing your password for Printer ECM/EKC.
430
3
Section
How to Scan
Chapter 10 Overview of the Scanning Features ...... 432
Chapter 11 Configuring Destination/Storage Location Settings 436
Chapter 12 Scanner Operation ................................. 444
Chapter 13 Loading in the Scanned Image Data ..... 460
Chapter 14 Troubles Concerning the Scanner ........ 470
Chapter 10 Overview of the Scanning Features
Chapter 10 Overview of the Scanning Features
Available Scanning Features
The scanning features fall into three groups: "Scan to HDD," "Scan to Email," and "Scan to FTP."
Scan to HDD:
TWAIN-capable Application
Network Scanner Driver
Scan to Email: Email Application
Scan to FTP: FTP Client
Import
Original
Scanning
E-RDH
Ethernet
Internet
Print Controller
Scan to HDD
SMTP Server
Scan to Email
FTP Server
Scan to FTP
Important
To make use of the scanning features, you need to set the network of the print controller. Refer
to "Section 5 Network Settings (for Administrator)"
Reference
(p.512)
When the objective of output is specified as ''Scan to Email'' or ''Scan to FTP'', the scan data
may be damaged due to the network condition or for some otherreason.
Be sure to check the scan data for damage.
432
Chapter
10
Chapter 10 Overview of the Scanning Features
Available Scanning Features (Continued)
● Scan to HDD
This feature lets you save scanned data to the hard disk of the print controller.
To scan originals, you need to specify a 4-digit box number from the control panel. This box number is a
holder in the print controller's hard disk.
Scanned data files stored on the hard disk are available to be loaded, edited and stored over network using
TWAIN-compliant Windows applications. When loading in scanned data, you need to enter a box number.
If you program scanned data to be automatically deleted at [Controller Set]-[ScanDataAutoDel.] on the
[Printer Mode], scanned data on the hard disk of the print controller is automatically deleted after the specified time (set to 24 hours by default) passes. If you do not program this option, scanned data on the hard
disk of the print controller can be deleted only from personal computers on a network.
When the remaining disk space reaches less than 20 MB, attempts to store scanned data are automatically
rejected.
● Scan to Email
This feature transmits scanned data to recipients at specified Email addresses as attachments to Email.
● Scan to FTP
This feature uploads scanned data to specified FTP servers.
433
Chapter 10 Overview of the Scanning Features
Process of the Settings and Operations
To make use of the network scanning features of the print controller for the first time, the following settings and
operations must be done.
● Necessary Settings
By registering destinations/storage locations of scanned data before using the network scanning features,
you can specify a destination/storage location by selecting it on the control panel. You can enter destinations/storage locations in the following ways.
Scan to HDD
•
Reference
(p.436) Scan to HDD
Scan to Email
•
Reference
(p.438) Scan to Email
Scan to FTP
•
Reference
(p.441) Setting of Destinations (FTP)
● Scanning Process
The process of scanning originals, storing/transmitting and loading scanned data, may be summed up as follows:
1.
Select a destination on the control panel, and set originals on the
copier.
Reference
2.
(p.444) Scanning
Run a scan job.
Scanned data is stored/transmitted depending on your settings.
● Reading scanned data already stored/transmitted
Data stored in HDD to be imported from the Windows supported computers. You need to install the dedicated network scanner driver on the computers from which data are imported. Since this driver supports
TWAIN, you can import scanned data stored in HDD in the format of applications that conform to TWAIN,
such as Adobe Acrobat.
Important
The network scanner driver does not support Macintosh computers.
For information regarding use of scanned data sent as an attachment to Emails or uploaded to FTP servers, refer
to the corresponding applications' manuals.
434
Chapter 10 Overview of the Scanning Features
Scanning Screen of the Control Panel
The scanning functions are performed through the control panel of the copier. Here, screens used in the scanning features are explained in relation to each other.
[Scanner/Server Basic] screen
[SCAN] key
[CANCEL] key
Email Destinations
Manual Input
Email Subject Input
Select Destinations/
Storage Locations
screen
Email
HDD
HDD Box No.
FTP
Manual Input
FTP Destinations
Manual Input
FTP Port Number
Input
[OK] key
[ADDRESS] key
File Name Input
[Scanner Setting Basic] screen
Select Special Original
[START] button to perform scanning
Select Application
To set and register destinations/storage locations, select [Email], [HDD] or [FTP] on the Select Destinations/
Storage Locations screeen, and touch the [MANUAL I/P ADDRESS] key.
After entering a destination, select the destination on the Select Destinations/Storage Locations screeen.
Specify the destination, and set an original on the copier. Then, set it in the [Scanner Settings Basic] screen. On
this screen, you can set the various settings of scanning. After making the setting, press the [START] button on
the copier. The original is scanned, and scanned data are stored/transmitted to the specified destination.
435
Chapter
Configuring
11
Destination/Storage
Location
Settings
Chapter 11 Configuring Destination/Storage Location Settings
Scan to HDD
When storing scanned data on the hard disk of the print controller, follow the next steps to register the destination hard disk.
1.
Press the [MODE] button on the control panel to display the [Scanner/
Server Basic] screen.
Up to 48 can be registered.
2.
Touch the [SCAN] key on the [Scanner/Server Basic] screen.
The [Please select transmission object] screen will appear.
When the [Scanner/Server Basic] screen appears, the [E-mail] screen will appear first.
3.
Choose the [HDD] key on the [Please select transmission object]
screen.
If the storage location (HDD) is already registered, the entry name will appear.
• To deselect a destination/storage location you have selected, touch the selected destination/storage location
key again.
• To change or delete registered Destinations/Storage Locations, use the Key Operator mode or the WWW
Server Function of the copier. For more detailed information, refer to the "Copier's User's Manual."
436
Chapter
11
Chapter 11 Configuring Destination/Storage Location Settings
Scan to HDD (Continued)
4.
Touch the [Address manual input] key.
The [HDD Box No. Input] screen will appear, and you can enter storage locations.
5.
Set the necessary settings on the [HDD Box No. Input] screen.
[Entry Name] key
You need to enter alphanumeric names that will be displayed on the [Select Transmission Object] screen
(HDD). Any name can be entered up to 18 characters long. Use the touch panel to enter alphabetical letters, and the hard keypad to enter numbers.
You cannot enter signs.
[Box No.] key
Into this field, you enter a 4-digit Box No. using the hard keypad. The Box Nos. are numbers to attach to
folders when storing scanned data on the hard disk. Be sure to write down these numbers. You will need
them when reading scanned data from your PC.
[Delete] key
Touch this key to delete the character to the left of the cursor.
[Capital/Small] key
Touch this key to replace an upper case letter with a lower case and vice versa.
[Sign] key
Touch this key and the lowercase alphabetical letter keys produce signs. Then the [Sign] key is changed
into the [Alphabet] key. Touch this key again and you can enter alphabetical letters as before.
[
] keys
Touching these keys moves the cursor. Letters enter at the left of the cursor.
[ENTRY] key
Touch this key to register information you have entered and return to the [Select Transmission Object]
screen (HDD).
[CANCEL] key
Touch this key to go back to the [Select Transmission Object] screen (HDD) without registering what you
have entered.
[OK] key
Touch this key to open the [Scanner Setting Basic] screen.
• If you intend to use your printing system as a scanner, it is recommend that you assign Box Nos. (from 0001 to
9998) to users and inform them about their allotted numbers in advance.
• The Box Nos. protect each user's data.
• To change or delete registered Destinations/Storage Locations, use the Key Operator mode or the WWW Server Function of the copier. For more detailed information, refer to the "Copier's User's Manual."
437
Chapter 11 Configuring Destination/Storage Location Settings
Scan to Email
In case you send scanned data as an attachment to Emails, follow the next steps to register destination Email
addresses.
1.
Press the [MODE] button on the control panel to display the [Scanner/
Server Basic] screen.
Up to 96 can be registered.
2.
Touch the [SCAN] key on the [Scanner/Server Basic] screen.
The [Select Transmission Object] screen will appear.
To deselect a destination/storage location you have selected, touch the selected destination/storage location key
again.
3.
Make sure that [E-Mail] tab is selected.
If the destination (Email) is already registered, the destination name will appear. If [HDD] tab or [FTP]
tab is selected, change it to [E-Mail] tab.
To change or delete registered Destinations/Storage Locations, use the Key Operator mode or the WWW Server
Function of the copier. For more detailed information, refer to the "Copier's User's Manual."
4.
Touch the [Address manual input] key.
The [Transmission Address Input] screen (Email) will appear, and you can enter Email addresses.
438
Chapter 11 Configuring Destination/Storage Location Settings
Scan to Email (Continued)
5.
Set the necessary settings on the [Transmission Address Input]
screen(Email).
Input the subject on the [Title in Email Input] screen that is displayed when you touch the [TITLE] key.
Reference
(p.440)
[Entry Name] key
Enter the name of a recipient, up to 18 alphanumeric characters long, that will be displayed in the destination (Email) on the [Select Transmission Object] screen (Email). To enter alphabetical letters, use the
touch panel, and to enter numbers, use the hard keypad.
You cannot enter signs.
[E-Mail Address] key
Enter an Email address, up to 60 alphanumeric characters long. To enter alphabetical letters, use the
touch panel, and to enter numbers, use the hard keypad.
[Delete] key
Touch this key to delete the letter to the left of the cursor.
[Capital/Small] key
Touch this key to replace an upper case letter with a lower case and vice versa.
[Sign] key
Touch this key and the lowercase alphabetical letter keys produce signs. (The [Sign] key is changed to
the [Alphabet] key.) Touch this key again and you can enter alphabetical letters as before.
[TITLE] key
Touching this key opens the [Title in E-Mail input] screen.
Reference
[
(p.440)
] keys
Touching these keys moves the cursor. Letters enter to the left of the cursor.
[ENTRY] key
Touch this key to register information you have entered and return to the [Select Transmission Object]
screen (Email).
To change or delete registered Destinations/Storage Locations, use the Key Operator mode or the WWW Server
Function of the copier. For more detailed information, refer to the "Copier's User's Manual."
[CANCEL] key
Touching this key brings you back to the [Select Transmission Object] screen (Email) without registering
what you have entered.
[OK] key
Touching this key opens the [Scanner Setting Basic] screen.
439
Chapter 11 Configuring Destination/Storage Location Settings
Scan to Email (Continued)
[Title in E-Mail Input] screen
Subject
Here you can enter a brief Subject of Email messages, up to 45 alphanumeric characters long. Use the
touch panel to enter alphabetical letters, and the hard keypad to enter numbers.
[Delete] key
Touching this key deletes the letter to the left of the cursor.
[Capital/Small] key
Touching this key replaces an upper case letter with a lower case and vice versa.
[Sign] key
Touch this key and the lowercase alphabetical letter keys produce signs. (The [Sign] key is changed to
the [Alphabet] key.) Touch this key again and you can enter alphabetical letters as before.
[
] keys
Touching these keys moves the cursor. Letters enter to the left of the cursor.
[CANCEL] key
Touching this key brings you back to the [Select Transmission Object] screen (Email) or the [Transmission Address Input] screen (Email) without registering what you have entered.
[OK] key
Touching this key stores the Subject you entered, bringing you back to the [Select Transmission Object]
screen (Email) or the [Transmission Address Input] screen (Email).
440
Chapter 11 Configuring Destination/Storage Location Settings
Setting of Destinations (FTP)
If you upload scanned data to FTP servers, follow the next steps to register destination FTP servers.
1.
Press the [MODE] button on the control panel to display the [Scanner/
Server Basic] screen.
Up to 12 can be registered.
2.
Touch the [SCAN] key on the [Scanner/Server Basic] screen.
The [Please select transmission object] screen will appear.
3.
Choose [FTP] tab on the [Select Transmission Object] screen.
If the destination [FTP] is already registered, the profile name is displayed.
To change or delete registered Destinations/Storage Locations, use the Key Operator mode or the WWW Server
Function of the copier. For more detailed information, refer to the "Copier's User's Manual."
441
Chapter 11 Configuring Destination/Storage Location Settings
Setting of Destinations (FTP) (Continued)
4.
Tocuh the [Address manual input] key.
The [Transmission Address Input] screen (FTP) will appear, and you can enter the host address and
other information about the FTP server.
5.
Set the necessary settings on the [Transmission Address Input]
screen [FTP].
When you touch an entry item key, the key is highlighted in reverse image; the corresponding field is
available for entry.
The port number of the FTP server is to be input on the FTP Port Number Input screen that will be displayed by touching [PORT NO.] key.
Reference
(p.443)
[Profile Name] key
Here you can enter a name that will be displayed in the destination (FTP) on the [Select Transmission
Object] screen (FTP). Any alphanumeric name can be up to 18 characters long. Use the touch panel to
enter alphabetical letters, and the hard keypad to enter numbers.
You cannot enter signs.
[Host Address] key
Here you can enter the address of an FTP server, up to 63 characters long. Use the touch panel to enter
alphabetical letters, and the hard keypad to enter numbers.
[File Path] key
Here you can enter the file path of an FTP server, up to 96 characters long. Use the touch panel to enter
alphabetical letters, and the hard keypad to enter numbers.
[Login] key
You can here enter the account of an FTP server, up to 47 characters long. Use the touch panel to enter
alphabetical letters, and the hard keypad to enter numbers.
[Password] key
Here you can enter the password of an FTP server, up to 31 characters long. Use the touch panel to
enter alphabetical letters, and the hard keypad to enter numbers.
Tips
At anonymous FTP servers, Email addresses are used as passwords.
[Anonymous] key
Touching this key enters "Anonymous" in the [Login] field. Use this feature when logging into an anonymous FTP server that does not require any account for login.
[Delete] key
Touching this key deletes the character to the left of the cursor.
442
Chapter 11 Configuring Destination/Storage Location Settings
Setting of Destinations (FTP) (Continued)
[Capital/Small] key
Touching this key replaces an upper case letter with a lower case and vice versa.
[Sign] key
Touch this key and the lowercase alphabetical letter keys produce signs. (The [Sign] key is changed to
the [Alphabet] key.) Touch this key again and you can enter alphabetical letters as before.
[PORT NO.] key
Touching this key opens the [FTP Port No.Input] screen at which you can enter the port number for an
FTP server.
[
] keys
Touching these keys moves the cursor. Letters enter to the left of the cursor.
[ENTRY] key
Touch this key to register information you have entered and return to the [Select Transmission Object]
screen (FTP).
To change or delete registered Destinations/Storage Locations, use the Key Operator mode or the WWW Server
Function of the copier. For more detailed information, refer to the "Copier's User's Manual."
[CANCEL] key
Touching this key brings you back to the [Select Transmission Object] screen (FTP) without registering
what you have entered.
[OK] key
Touching this key opens the [Scanner Setting Basic] screen.
[FTP Port No.Input] screen
FTP Port No.
Here you can enter the port number for an FTP server using the touch panel. Any number can be up to 5
digits long.
[RESET] key
Touching this key clears the entered numbers, restoring the display to the default port number: 21.
[CANCEL] key
Touching this key brings you back to the [Select Transmission Object] screen (FTP) or the [Transmission
Address Input] screen (FTP) without registering what you have entered.
[OK] key
Touching this key stores in memory the port number you entered, bringing you back to the [Select Transmission Object] screen (FTP) or the [Transmission Address Input] screen (FTP).
443
Chapter 12 Scanner Operation
Chapter 12 Scanner Operation
Scanning
To scan the originals, and to either store scanned data on the HDD of the print controller, attach the data to
Emails or upload the data to FTP server, follow the steps shown below.
Operation status is displayed on the control panel's tag.
Reference
(p.459)
Select Storage Locations/Destinations.
Set the Originals.
Set the Various Settings.
Press the [Start] button.
You can check the current settings on the [Check Mode] screen that appears when you press the [CHECK] button.
Reference
(p.459)
Each step is explained on the following pages.
444
Chapter
12
Chapter 12 Scanner Operation
Scanning (Continued)
● Set the Originals
Set the originals to be scanned on the copier's platen glass or RADF. Depending on the direction you set the
originals, the direction in which the applications read images will differ.
ABCDE
ABCDE
ABCDE
ABCDE
ABCDE
ABCDE
ABCDE
ABCDE
ABCDE
ABCDE
ABCDE
ABCDE
ABCDE
ABCDE
ABCDE
ABCDE
Paper sizes acceptable for scanning and the method of loading the original are the same as in the copy mode. For
details, refer to the "Copier's User's Manual."
445
Chapter 12 Scanner Operation
Scanning (Continued)
● Select the storage locations/destinations of scanned data
Before scanning the originals, select the storing/transmitting destinations.
1.
Press the [MODE] button on the control panel to display the [Scanner/
Server Basic] screen.
2.
Touch the [SCAN] key on the [Scanner/Server Basic] screen.
The [Please select transmission object] screen will appear.
3.
Select storing/transmitting destinations of scanned data from [E-Mail],
[HDD] or [FTP].
Storing/Transmitting Destinations screens for each will appear.
4.
Select a registered storage location/destination.
From the entry names listed on the screen, select a storage location/destination.
Tips
You can select [E-Mail], [HDD] and [FTP] at the same time as a storing/transmitting destination. The key selected
as a destination will be highlighted in reverse image.
446
Chapter 12 Scanner Operation
Scanning (Continued)
Scan to HDD
Choose a storage location from the displayed listing. You can select only one [HDD] storage location.
If necessary storage locations are not previously registered, you need to manually enter locations at
this stage. Touching the [Address manual input] key opens the [HDD Box No. Input] screen (HDD)
at which you can enter the storage location.
Reference
(p.436) Scan to HDD
Touching the [SEARCH] key opens the [Search Letter Input] screen at which you can enter the first
letter of registered names. When the search result is displayed, the [SEARCH] key is highlighted in
reverse image. At this stage, you can touch the [ALL ITEM] key to have all registered options displayed as before.
Touching the [CANCEL] key brings you back to the [Scanner/Server Basic] screen without registering you settings.
Touching the [OK] key saves your settings and opens the [Scanner Setting Basic] screen.
Scan to E-Mail
Choose recipients from the displayed listing. You have the option to select multiple destinations at
one time. The keys selected as destinations are highlighted in reverse image.
If necessary destinations are not previously registered, you need to manually enter recipient names
at this stage. Touching the [Address manual input] key opens the [Transmission Address Input]
screen (Email) and allows you to enter Email addresses.
Reference
(p.438) Scan to Email
Touching the [SEARCH] key opens the [Search Letter Input] screen at which you can enter the first
letter of registrant. When the search result is displayed, the [SEARCH] key is highlighted in reverse
image. At this stage, you can touch the [ALL ITEM] key to have all registrants displayed as before.
Touching the [CANCEL] key brings you back to the [Scanner/Server Basic] screen.
Touching the [OK] key and opens the [Scanner Setting Basic] screen.
447
Chapter 12 Scanner Operation
Scanning (Continued)
Scan to FTP
Choose a destination from the displayed listing. You can select only one [FTP] destination.
If there are no destinations registered, you need to manually enter necessary destinations at this
stage. Touching the [Address manual input] key opens the [Transmission Address Input] screen
(FTP) at which you can enter the host address and other information about the FTP server.
Reference
(p.441) Setting of Destinations (FTP)
Touching the [SEARCH] key opens the [Search Letter Input] screen at which you can enter the first
letter of a registered destination for search. When the search result is displayed, the [SEARCH] key
is highlighted in reverse image. At this stage, you can touch the [ALL ITEM] key to display all registered names.
Touching the [CANCEL] key brings you back to the [Scanner/Server Basic] screen without registered your settings.
Touching the [OK] key saves your settings and opens the [Scanner Setting Basic] screen.
5.
After specifying storage locations/destinations, touch the [OK] key.
The [Scanner Setting Basic] screen opens. If necessary, go to the [Special Original Selection] screen
or the [Application Selection] screen to configure the setting details.
Reference
(p.450) Scanner Basic screen
Reference
(p.454) Special Original
Reference
(p.456) Application
448
Chapter 12 Scanner Operation
Scanning (Continued)
6.
Press the [START] button on the copier.
The original loaded in the RADF or on the platen glass is scanned with the current settings, and
stored/transmitted to the specified destination.
Before the scanned data is sent to the Print Controller, you can press the [START] button again to run
an additional scanning process, so that two sets of scanned data are sent at one time to the Print Controller.
You can scan multiple originals and send them to the print controller at the same time.
Touch the [STORE] key to highlight it in reverse image, and press the [START] button. The original loaded in the
RADF or on the platen glass is scanned. At this stage, nothing is sent to the print controller. After scanning all the
originals, again touch the [STORE] key, and then press the [START] button. Scanned data is sent to the print controller.
449
Chapter 12 Scanner Operation
Scanner Basic screen
You can configure the following settings on the [Scanner Setting Basic] screen.
[Scanner Setting Basic] screen
● [FILE NAME]
Touch this key when you need to change or enter scanned data file names.
Touching this key opens the [File Name Input] screen.
Any file name can be up to 26 alphanumeric characters long.
Depending on the file format, the extension ".tif" or ".pdf" is automatically added to the end of a file name.
● [ADDRESS]
Touch this key to go back to the [Transmission Address Input] screen.
● [FILE FORM]
You can choose a scanned data file form from [TIFF] and [PDF].
• For Scan to HDD, the file format is fixed at [TIFF].
• You cannot change the file form in the process of sending multiple images together.
To send multiple images at one time, touch the [STORE] key.
Reference
(p.453)
● SCAN MODE
Use this feature to determine whether the original document is Duplex or Simplex. If the RADF is not
mounted, [Duplex] cannot be selected.
● SCAN DENSITY
Touch this key to select a read density. The default is the same as that in the copy mode.
You can change the read density in the process of scanning in Store mode.
450
Chapter 12 Scanner Operation
Scanner Basic screen (Continued)
● LENS MODE
Touch this key to change the magnification ratio at which the original document is read.
You can select [ZOOM], [RE] or [1:1]. Touching the [ZOOM] or [RE] key pops up a screen at which you can
select the magnification ratio.
[RE] is the same as the default in the copy mode.
[ZOOM] range in each resolution are as follows:
• 200 dpi: 75% - 400%
• 300 dpi: 50% - 400%
• 400 dpi: 38% - 400%
• 600 dpi: 25% - 400%
The setting of [ZOOM] may vary depending on models of machine.
● SCAN SIZE
Touch this key to select the scanning paper size.
You can select [AUTO] or [SIZE SETTING].
Touching the [SIZE SETTING] key pops up a screen at which you can select the scanning paper size.
[AUTO] : Same as the default in the copy mode
[SIZE SETTING] : For example, when an A3 original is loaded and you select B5, then the scanning takes on
the B5 frame.
Available paper sizes:
A3 / A4R / A4 / A5R / A5 / A6R / B4 / B5R / B5 / B6R / 11x17 / 8.5x14R / 8.5x11R / 8.5x11 / 5.5x8.5R /
5.5x8.5 / Full AREA
• Default is [AUTO].
The setting of available paper sizes may vary depending on models of machine.
451
Chapter 12 Scanner Operation
Scanner Basic screen (Continued)
● QUALITY
Use this feature to select the resolution.
The default can be configured in the Key Operator mode.
For information about the Key Operator mode, refer to the "Copier's User's Manual."
The scanned data is read into the copier's memory (E-RDH). If scanned data exceeds the E-RDH capacity,
which translates into an error, you cannot continue with scanning.
The following table shows how many Letter/A4-size originals can be scanned with the copier's standard
memory (128 MB).
Resolution
200 dpi
300 dpi
400 dpi
600 dpi
Original
Data Size
No. of Originals
Text only
About 70 KB
About 1780
Text and Picture
About 130 KB
About 860
Text only
About 120 KB
About 1050
Text and Picture
About 210 KB
About 600
Text only
About 200 KB
About 620
Text and Picture
About 480 KB
About 260
Text only
About 430 KB
About 280
Text and Picture
About 1.43 MB
About 80
• Basic memory of copier vary depending on models of machine. For details, refer to the "Copier's User’s Guide."
• Data Size and No. of Originals available to be read depend on data actually scanned. Understand that the numbers in the table are intended only to serve as a rough guide for you.
● [SPECIAL ORIGINAL] key
Touching the [SPECIAL ORIGINAL] key at the [Scanner Setting Basic] screen displays the [Special Original
Selection] screen.
Reference
(p.454)
● [APPLICATION] key
Touching the [APPLICATION] key in the [Scanner Setting Basic] screen displays the [Application Selection]
screen.
Reference
(p.456)
452
Chapter 12 Scanner Operation
Scanner Basic screen (Continued)
● [ROTATION OFF] key
Touch this key to not rotate the original image automatically.
Loaded images are rotated 90 degrees clockwise when displayed on computer applications. This feature
modifies the rotation, and automatically sends the images rotated 90 degrees counterclockwise.
The feature is [ON] by default.
Limitation
If [Paper Size x Lens Mode] is [A4/A4R] or [8.5Rx11/8.5x11R] or larger, you cannot use ZOOM
(independent length / width) and Mixed Original in combination.
● [STORE] key
Touch this key to send multiple originals at a time.
Touch the [STORE] key to highlight it in reverse image, and press the [START] button. The original loaded in
the RADF or on the platen glass is scanned. At this stage, nothing is sent to the print controller. After scanning all the originals, again touch the [STORE] key, and then press the [START] button. Scanned data is
sent to the print controller.
453
Chapter 12 Scanner Operation
Special Original
Touching the [Special Original] key in the [Scanner Setting Basic] screen displays the [Specical Original Selection] screen.
[Special Original Selection] screen
After selecting an application function, touching the [OK] key brings you back to the [Scanner Setting Basic]
screen. Touch the [CANCEL] key to abandon your setting and return to the [Scanner Setting Basic] screen.
Touching the [RECALL STANDARD] key resets every configuration to default setting.
● ORIG. DIRECTION
Allows you to choose which direction to load the original.
● ENHANCE
Use to select image quality.
The default is the same as that in the copy mode (Auto mode).
For the default setting of the copy mode (Key Operation mode), refer to the "Copier's User's Manual."
[AUTO] key
Automatically distinguish between text and photo and select the appropriate image quality.
[Increase Contrast] key
Darken light images (e.g., pencil) without changing background exposure.
[Photo] key
Reproduce halftone photo images.
[Text] key
In this mode, text is improved in comparison to the Auto mode.
454
Chapter 12 Scanner Operation
Special Original (Continued)
● SPECIAL ORIG.
Set this feature depending on originals.
[Normal mode] key
Choose this mode when originals are the same size, normal paper, neither folded nor pasted.
[Mixed Original] key
Choose this mode when loading originals of varying sizes in the RADF.
Limitation
This feature cannot be used in combination with the Non-image Area Erase, Dual Page.
[Z-Folded Original ] key
Choose this mode when loading Z-folded originals in the RADF. This mode ensures paper size is
detected correctly.
Limitation
This feature cannot be used in combination with the Non-image Area Erase.
[SDF] key
Choose this mode when scanning cardboard originals and pasted originals using the RADF. The RADF
sends only 1 page of the originals.
Tips
When using [SDF] mode, load only 1 page of the originals.
All of the originals will not be scanned if multiple pages are loaded.
Limitation
This feature cannot be used in combination with the Non-image Area Erase.
Some models of machine may not correspond to [SDF].
455
Chapter 12 Scanner Operation
Application
Touching the [APPLICATION] key in the [Scanner Setting Basic] screen displays the [Application Selection]
screen.
[Application Selection] screen
After selecting an application function, touching the [OK] key brings you back to the [Scanner Setting Basic]
screen.
Or, you can touch the [CANCEL] key to abandon your setting, going back to the [Scanner Setting Basic] screen.
Touching the [ALL CLEAR] key clears every scanner advanced setting.
For details of each feature, refer to the "Copier's User's Manual."
● [FILE EDIT] - [Dual Page] key
Sets/Cancels the book copy settings and binding position.
The Dual Page mode scans facing pages of a book or brochure, page by page, separately, but in a single
pass. You can use this feature whether the original is loaded in the RADF or on the platen glass.
If you use the platen glass, the Non-Image Area Erase is automatically selected(can be deselected).
Limitation
This feature cannot be used in combination with the Mixed Original.
456
Chapter 12 Scanner Operation
Application (Continued)
● [IMAGE EDIT] - [Non-image Area Erase] key
Allows you to enable/disable the Non-image Area Erase.
Original sizes loaded on the platen glass are automatically detected and the scan is limited to the printable
area.This feature does not work with originals loaded in the RADF.
Limitation
You need to press the [START] button without closing the RADF.
This feature cannot be used in combination with Mixed Original, Z-Folded original, SDF,
Reverse Image, Full-image Area or RADF.
If lights are present directly above the machine, the original size may not be correctly identified.
● [IMAGE EDIT] - [Reverse Image] key
Allows you to enable/disable Reverse Image mode.
Limitation
This feature cannot be used in combination with the Non-image Area Erase, or Full-image
Area.
● [IMAGE EDIT] - [Frame/Fold Erasure] key
Allows you to enable/disable Frame/Fold Erasure setting.
Use this feature when a thick original such as a book is loaded on the platen glass. Then, the scanned data
does not take on the black shadow which otherwise develops along the outer edge or at the center of a
duplicated original.
This feature works with originals loaded in the RADF as well.
Limitation
The Fold Erasure mode cannot be used in combination with the Full-image Area.
457
Chapter 12 Scanner Operation
Application (Continued)
● [IMAGE EDIT] - [Full-image Area] key
Normally, the scan is made with an image data erase margin of 2 mm width at the top, bottom, left and right
edges.
In this mode, the document is scanned completely to the edges.
Limitation
This feature cannot be used in combination with Non-image Area Erase, Reverse Image, or
Frame/Fold Erasure.
458
Chapter 12 Scanner Operation
Check Deciphering and Settings for Scanning
● Tag Display of Operation Status
The following tags are displayed to show the scanning process.
SCANNER READING JOB
A scan job is being read.
SCANNER OUTPUTTING JOB
A scan job is being output to the print controller.
SCANNER WAITING JOB
A scan job has been read in but is waiting to be output because a print job is being output.
SCANNER INTERRUPTING JOB
The reading of a scan job is stopped.
SCANNER JAM JOB
A paper jam has been produced in the process of the reading in of a scan job.
When the copier's operation panel is in the scanner mode, no print jobs are sent and therefore no output is produced. You are advised to put the operation panel into the Printer mode or the Copy mode when you don't need
any scanning features. When Auto Reset is activated, the operation panel automatically shifts to the Copy mode
when a predetermined time is up.
● Check Settings for Scanning
Press the [CHECK] button on the control panel and the [Check Mode] screen will appear.
This screen shows the current settings for scanning.
[CHANGE SETTINGS] key
Tocuhing an item key opens the [Scanner Setting Basic] or the [Application Selection] screen at which
you can change the settings concerned.
[CANCEL SETTINGS] key
If advanced features are configured, you can disable any of them by choosing the corresponding items
on the screen.
459
Chapter 13 Loading in the Scanned Image Data
Chapter 13 Loading in the Scanned Image Data
Reading In From HDD
To read scanned data sitting on the hard disk of the print controller to a computer, you need either of the following. These are also used to delete scanned data from the hard disk.
• Kyocera Mita Scanner Driver and TWAIN-compliant software
The following provides an information of how to use the Network Scanner Driver.
● Network Scanner Driver
When the Kyocera Mita Scanner Driver is installed, you can upload scanned data from the hard disk of the
print controller to a computer using TWAIN-compliant applications.
The scanner driver can be used on the following OS:
• Windows 95/98/Me
• Windows NT 4.0
• Windows 2000/XP
For the printing system to be used as a scanner, you need the network interface card. The parallel port on
the print controller does not support scanning work.
It is necessary that the PC and the network interface card should be assigned appropriate IP addresses, and
that the TCP/IP network are enabled.
For more information on appropriate IP addresses, contact your network administrator.
Original
Print Controller
Scan to HDD
Read In
Scanning
E-RDH
Ethernet
Windows 95/98/Me/
NT 4.0/2000/XP
TWAIN-compliant applications
Network Scanner Driver
Copier
460
Chapter
13
Chapter 13 Loading in the Scanned Image Data
Reading In From HDD (Continued)
● To install the Network Scanner Driver
To install the scanner driver, perform the following procedure.
1.
Turn on the computer and start Windows.
Exit from all active Windows applications, if required.
2.
3.
Set the "User Software CD" on the CD-ROM drive.
4.
Double-click [Setup.exe] in the [\English\Scanner] folder.
Double-click the [My Computer] icon on the desk top to open the [My
Computer] window, and then double-click the icon corresponding to
the connected CD (i.e. User Software CD).
The setup program starts running.
5.
Select the language, and click the [OK] button.
The [Welcome] window will appear.
6.
Click the [Next] button.
The [Start Installation] window will appear.
461
Chapter 13 Loading in the Scanned Image Data
Reading In From HDD (Continued)
7.
Click the [Next] button.
The [Installing] window will appear and the file copy process starts.
The [Installation Complete] window will appear.
8.
Click the [Finish] button.
The setup program is completed.
462
Chapter 13 Loading in the Scanned Image Data
Reading In From HDD (Continued)
● TWAIN-compliant applications can be used to read in scanned data.
Select a TWAIN driver (the Kyocera Mita Scanner Driver) from your application, select a scanner (copier having scanned original) using the TWAIN driver, then enter the box number corresponding to the scanned data
so that the scanned data can be read in from the print controller's hard disk.
There are several TWAIN-capable applications on the market. In this manual, Adobe Acrobat 4.0 is used to
illustrate how to read in scanned data.
Reading in Scanned Data
To read in scanned data, you should follow these steps:
1.
2.
Run the TWAIN-compliant application (Adobe Acrobat 4.0).
Select [File] - [Import] - [Scan].
[Adobe Acrobat Scan] window will appear.
3.
Choose [Kyocera Mita Scanner Driver] from the [Device] pull-down
menu.
From the [Format] pull-down menu, choose [Single sided] or [Double sided], as required. Also, choose
[Current Document] or [New Document] into which scanned data to be taken in.
4.
Click the [Scan] button.
[Scanner Box No. Set-up] window will appear.
463
Chapter 13 Loading in the Scanned Image Data
Reading In From HDD (Continued)
5.
In the [Scanner Box No. Set-up] window, enter the server name (IP
address) of the scanner you want to connect to, the scanner name for
the driver to identify the scanner, and the box number you entered
when scanning the document. Then click the [OK] button.
Once the Scanner setting has been set, this window is not displayed the next time you perform a
scanning task. To display this window and select another scanner, click the [Scanner Selection] button on the [Kyocera Mita Scanner Driver] window. Then click the [Add] button on the [Scanner Box No.
Set-up] window.
Limitation
Neither the DNS nor the NetBIOS names can be used as a Scanner Server name.
The [Kyocera Mita Scanner Driver] window will appear.
6.
Select a file from the file list shown in the [Kyocera Mita Scanner
Driver] window, then click the [Reading] button to allow the selected
file to be read in.
The selected file is read from the hard disk.
By default, the file is cleared from the controller's hard disk immediately after the file is fully read in. If you want, you
can override this default setting so that the file is held in the hard disk.
7.
You can open the read-in document within the application for editing/
saving.
464
Chapter 13 Loading in the Scanned Image Data
Reading In From HDD (Continued)
● Features and Settings of the Network Scanner Driver
[Kyoceramita Scanner Driver] window
Information displayed on the [Kyocera Mita Scanner Driver] window are the following.
[Box No.]
Shows the currently selected box number.
[Scanner Name]
Shows the currently selected scanner's name. Any desired name can be entered.
[Document]
Shows scanned data file numbers. Numbers are automatically assigned in sequence.
[Date & Time]
Shows the date and time each scanned data file was generated.
[Page]
Shows the total number of pages of each scanned data file.
[Size]
Shows the horizontal and vertical pixel numbers of the first page of each scanned data file.
[Resolution]
Shows horizontal resolution (dpi) of the first page of each scanned data file.
465
Chapter 13 Loading in the Scanned Image Data
Reading In From HDD (Continued)
The [Kyocera Mita Scanner Driver] window contains the following features.
[Box No. Selection] button
Click this button to change only the box number of the currently connected scanner. Specify the box
number on the [Scanner Box No. Set-up] window.
[Scanner Selection] button
Click this button when establishing a connection to another scanner, registering new scanner settings, or
performing editing, copying and deleting. The [Scanner Selection] window is displayed. In the window,
you can establish a connection to another scanner, register new scanner, perform editing, copying and
deleting.
[Page Selection]
This button is used to select a page or pages when reading in a scanned data file.
Enter the number of start page and end page. Default is [All Pages]. With applications that cannot handle
files containing multiple pages, [Specify page] is set to [1].
If you select [Specify page], you limit pages by changing the total page number of scanned files.
[Reading] button
This reads a selected scanned data file from the scanner.
[Delete] button
This deletes selected scanned data file.
[Refresh] button
This updates information in a scanned data file in the selected box number field, so it reflects all changes
you made most recently.
[Option] button
This is used to change various settings of the scanner driver.
[Close] button
This button is used to close the scanner driver.
[Help] button
This button is used to access Help.
Sorting Feature
You can sort what is displayed by clicking [Document], [Date & Time], [Page], [Size] and [Resolution].
466
Chapter 13 Loading in the Scanned Image Data
Reading In From HDD (Continued)
● Variable Option
In the [Kyocera Mita Scanner Driver] window, click the [Option] button to display the [Variable Option] window.
You can set up the various elements of the scanner driver described below.
[Use reverse display of Scanned document]
Reverse the image of the scanned document.
[Delete after taking in Scanner document]
Delete a scanned document file held in the scanner after reading it in.
[Temp folder set-up for scanner]
This allows you to select a directory for temporarily stored data before saving it to the computer's hard
disk.
Click the [Folder Change] button, then specify where you want to temporarily store the current scanned document.
467
Chapter 13 Loading in the Scanned Image Data
Deleting images stored in the HDD
Perform the following steps to delete a scanned data file from the hard disk.
1.
2.
3.
Run the TWAIN-compliant application (Adobe Acrobat 4.0).
4.
Click the [Scan] button.
Select [File] - [Import] - [Scan].
Select [Kyocera Mita Scanner Driver] in the [Device] on the [Adobe
Acrobat Scan] window.
The [Scanner Box No. Set-up] window will appear.
5.
On the [Scanner Selection] window, enter the server name (IP address)
to access the scanner, the scanner name to be identified by the driver
and the box number you entered when scanning the original document, and then click the [OK] button.
The [Kyocera Mita Scanner Driver] window will appear.
6.
From the file list shown in the [Kyocera Mita Scanner Driver] window,
select a file you want to delete, and then click the [Delete] button.
The selected scanned data is deleted.
468
Chapter 13 Loading in the Scanned Image Data
Images Scanned to FTP or E-mail
Scanned data sent as an attached file to an e-mail can be read by Email applications.
Scanned data uploaded to FTP servers can be downloaded on computers by FTP client software.
Refer to corresponding applications's manuals.
SMTP Server
Scan to Email
Original
FTP Server
Scan to FTP
Scanning
E-RDH
Internet
Copier
Read In
Ethernet
Scan to Email:
Email Software
Scan to FTP:
FTP Client
469
Print Controller
Chapter 14 Troubles Concerning the Scanner
Chapter 14 Troubles Concerning the Scanner
Cannot connect to the scanner
When an error message appears when attempting to access the scanner, perform the following checks:
Consult your network administrator for problems with or questions about your network settings.
1.
Check whether the correct IP address of the scanner has been entered.
If the IP address is not correct, enter the correct one.
If the entered IP address is correct, go on to step 2.
2.
From the DOS prompt run a ping test through the destination host to
the IP address of the scanner.
e.g. : C:/>ping 192.168.101.152
If the ping test fails, check whether the copier's main power is switched on, and also check the network cable for proper connection.
If the ping test is successful, go on to step 3.
3.
Check whether the IP router is correctly set.
If it is not correctly set, set it correctly.
If there is no problem in IP router setup, go on to step 4.
4.
Trace the routing to the scanner to check whether there are any error
conditions within the network.
If any error conditions are found, eliminate them.
If no error is found and yet the connection to the scanner cannot be established, contact your service
representative.
470
Chapter
14
Chapter 14 Troubles Concerning the Scanner
When an Error Message Appears
The following describes the cause and the solution for the error message that appears during scanning.
● Cause
The available disk space of this printing system may become less than 3% of total disk capacity. Make sure
the available disk space of the hard disk by following the following procedures.
1.
Press the [MODE] button to open the printer mode basic screen.
Reference
2.
(p.475) Switching Between Modes
Make sure the [HD free space] displayed at the red circle on the upper
window.
● Solution
To increase the available disk space:
• Delete scan jobs saved on the hard disk in the print controller from the computer on the network.
Reference
(p.468) Deleting images stored in the HDD
• Print confidential output print jobs (password print) stored on the hard disk in the print controller from
the control panel.
Reference
(p.510) Deleting a Password Print Job
• If you have configured the automatic timer capability at [Controller Set] - [ScanDataAutoDel.] in the
printer mode basic screen (the default is 24 hours), scanned data stored on the hard disk in the print
controller is automatically deleted after the specified period of time.
Reference
(p.492) Setting the ScanDataAutoDel.
● Cautions
Print jobs will not be printed if the required disk space is not available.
If a scan job is transmitted when the required disk space is not available, an error message appears and the
job is cancelled automatically.
Cancelled scan jobs are listed on [Non complete Job List] that appears when [NON COMPLETE JOB LIST]
is pressed in the Non Complete Job List screen.
Reference
(p.430) Checking on non complete jobs
471
Chapter 14 Troubles Concerning the Scanner
Scan ErrorList
When scanned image files sitting on the hard disk of the print controller are deleted without being output from
the print controller by course except user operations, relative information is displayed as a scan error list.
● Listing Objects
Listed are image files and the corresponding management data stored on the hard disk of the print controller
as a result of the scan using the "Scan to FTP", the "Scan to Email" or the "Scan to HDD" feature.
● Causes of Error
• The automatic deletion feature (ScanDataAutoDel) was activated in the "Scan to HDD" process.
• The file was not successfully sent to an FTP server in the "Scan to FTP" process because, for example, of
connection timeout or login error.
• The Email relay was not completed on the part of the SMTP server in the "Scan to Email" process.
Remember, however, the print controller does not identify the cause of errors developed after the SMTP
relay has been completed.
When a job is interrupted in the process of uploading from the engine, the job is handled on the scan error list on
the part of the engine and is not displayed on the print controller.
● Accessing the List
The scan error job list is shown on the [Scan Error List] in the [Printer Mode Basic] screen.
● Content of the List
The list shows the following, one line for each error-developed destination. If "FTP" and "Email" were both
enabled, one line is assigned to one error in each of them.
Destination
For the destination, an FTP server name, an Email address or a HDD Box No. is shown. There are occasions when only the first few characters are shown because of the display space limits.
If multiple Email addresses were specified, only the first few characters of a string of comma-separated
addresses are shown.
File Name
This refers to a file name managed by the FTP server in the "Scan to FTP" mode, or to an attachment file
name in the "Scan to Email" mode.
Factor
The cause of an error is displayed within the display space limits, sometimes in the form of error codes.
● Deleting List Data
A maximum of 16-line list of data is kept in memory. As an additional non-output scan job is detected, the
oldest one is deleted from the list in sequence.
472
4
Section
Control Panel (for Administrator)
Chapter 15 Control Panel .......................................... 474
Chapter 16 Configuration of Printer Setting Menu . 481
Chapter 17 Print Job Control .................................... 505
Chapter 15 Control Panel
Chapter 15 Control Panel
Names and Functions of the Control Panel
You can set up the printing system from the control panel of the copier.
This chapter describes the basic operation of the control panel, the setup menu and functions of the printing
system setup. Refer to the operating manual of the copier for other functions and screens of the control panel.
The control panel has the following names and functions.
1
3
2
4
5
6 7
COPY
TIMER
SCANNER / SERVER
PRINTER
INTERRUPT
POWER SAVER
ON / OFF
PROOF COPY
CHECK
HELP
STOP
JOB MEMORY
AUTO RESET
14 13
COUNTER
12 11
CLEAR QTY.
10
START
9
8
Name
Function
1
LCD TOUCH SCREEN
Displays printing system status; various setting menus and setup
items; help information; interactive screens; and touch keys for selecting all functions.
2
CHECK
Displays a screen showing all settings that are selected for the current
job when setting up the Wait mode on the printer driver screen.
3
MODE
Switches the machine operation mode to copy, printer, and scanner/
server in turn.
4
KEYPAD
Enters numeric values.
5
INTERRUPT
Stops printing in progress to allow copying from the platen glass.
6
STOP
Stops the copying sequence, scanning or printing; deletes the stored
memory.
7
TIMER
Lights when the timer function is set.
8
POWER SAVER ON/OFF
Activates Power-saving mode for times when the copier is inactive, or
activates timer interrupt mode when weekly timer function is active.
9
START
Activates scanning or copying. Restarts the printing after Wait Mode Wait or Proof.
10
[C] (CLEAR QTY.)
Allows resetting of print quantity.
11
[P] (COUNTER)
Displays the Counter Screen or accesses programming modes for setting special functions.
12
HELP
Displays a screen with help for the currently selected function.
13
AUTO RESET
Restores copier to automatic mode settings or to key operator settings.
14
JOB MEMORY
Displays screens for selecting job store/job recall functions.
474
Chapter
15
Chapter 15 Control Panel
Switching Between Modes
The main body of the copier has following three modes:
• Copy Mode
• Printer Mode
• Scanner/Server Mode
If you press the [MODE] button, the basic screens for each mode appear in the LCD touch screen sequentially.
[Copy Mode Basic] screen
[Printer Mode Basic] screen
[Scanner / Server Basic] screen
This chapter describes how to operate the copier from the basic screen of the Printer mode and the Copy mode.
Select the target mode with the [MODE] button when you perform the operation described in this chapter.
475
Chapter 15 Control Panel
LCD Touch Screen
You may be required to operate the copier from the LCD touch screen when using this printing system.
Make sure to understand the following basic operations for using the system.
● Selecting an item
Touch button-shaped item displayed on the LCD touch screen to select the item. Selected items are highlighted when touched.
● Inputting information
Touch alphabet characters and numbers displayed on the LCD touch screen to input the setting value.
There may be cases where you must input information from the numeric keypad on the control panel.
● Moving a page
If items are too many to display on a page, there may be cases where the items are shown across multiple
pages. Touch easily the [▼][▲] key on the LCD touch screen to move between pages.
476
Chapter 15 Control Panel
LCD Touch Screen (Continued)
● Displaying subsequent screen
Touch [ ][ ] keys or [
][
] keys displayed on the LCD touch screen to display the remainder of the
selection item list or the menu.
● Choosing an operation
Touch [OK], [Cancel] or [Exit] key displayed on the LCD touch screen to choose the selection or the operation.
The LCD touch screen is covered with glass. Do not drop a heavy object on the glass, or put
excess weight or pressure on it; otherwise the glass may break or become scratched.
477
Chapter 15 Control Panel
Basic Screen
After the power switch is turned on, the Kyoceramita name displays for approximately 10 seconds, until initial
machine settings are established.
Once the copier gets ready to print/copy/scan, the [Copy Mode Basic] screen will appear.
[Copy Mode Basic] screen
@
The [Copy Mode Basic] screen displays the status of current mode and the settings.
The status of each mode is also displayed with a icon as shown in the illustration below.
Notice icon
[Notice icon] means the following when the copier is in Print mode:
Status
Description
IDLE
The printing system is ready to receive the print data from your computer.
PRINT
The printing system is currently printing.
The print data rasterized in the printing system is now being transferred to the E-RDH memory in the copier.
ERROR
The printing system generated an error message.
WAIT
The printing system is in warm-up mode.
INITIALIZING
The printing system is in initialization process.
478
Chapter 15 Control Panel
Confirming the Status of a Print Job
You can confirm the status of a print job from the control panel on the copier in this printing system.
● Operating procedures
1.
Touch the [STATUS] key on the [Copy Mode Basic] screen.
The [Job Status Display] screen will appear.
2.
3.
Confirm the status of a print job.
Touch the [OK] key.
The [Printer Mode Basic] screen will appear.
479
Chapter 15 Control Panel
Confirming the Status of a Print Job (Continued)
● Contents of the [Job Status] Screen
Contents of the [Job Status] screen are as follows:
Item
Contents
NO.
Displays the No. (1-99) for each job (print/copy/scan) assigned to the copier.
MODE
Displays the current operation mode of the printing system:
STATUS
COPIER
Current mode is the Copier mode
PRINTER
Current mode is the Printer mode
SCANNER / SERVER
Current mode is the Scanner/Server mode
READY
Ready to use in each mode
ERROR
Error in each mode
PRINTING
Output in each mode
RESERVE
Ready to reserve
NO PAPER
No paper in paper tray in Copy/Print mode
STOP
Stop in each mode
JAM
Jam in each mode
INTERRUPT
Interrupting the previous job
TOTAL
PAGE(s)
Displays the number of print originals for each job. (0 - 9999)
PAGE(s) TO
GO
Displays the remaining print count of the job. 0 to 9999 (The number exceeding 9999
will be displayed as 9999 .)
MINUTE(s)
TO GO
Displays the time (in minutes) required for completing the job.
1 to 999
Exceeding 999 minutes:999
Shorter than 1 minute:<1
Other
The following message will be displayed on the bar when the reserved job does not exist.
RESERVED JOB DOES NOT EXIST
480
Chapter16ConfigurationofPrinterSettingMenu
Chapter 16 Configuration of Printer Setting Menu
Setting up the Printer from the Control Panel
You can set up the printer from the control panel on the copier in this printing system.
● [Printer Mode Basic] Screen
When the printing system starts properly, the [Printer Mode Basic] screen can be displayed on the LCD by
pressing the [MODE] button.
When the [MODE] button is pressed again, the LCD changes to the [Copy Mode Basic] Screen, and the normal copy settings become available.
[Printer Mode Basic] Screen
● Settings can be selected
The following settings can be selected from the [Printer Mode Basic] screen.
Item
Contents
[Test Print Menu]
Display the [Test Print Setup] screen. You can print a test print by selecting an item.
[Controller Set]
Display the [Controller Set] screen. You can perform various settings related to the
print controller.
[Set Default]
Display the [Set Default] screen. You can return various settings to factory default by
selecting the item.
[Password Print]
Display the [Password Print] screen. Refer to "Chapter 5 Printing from Windows" for
more information.
Reference
(p.256)
[PCL Setup]
Display the [PCL5e Setup] screen. You can perform various settings related to
PCL5e.
[Network Setup]
Display the [Network Setup] screen. Refer to "Chapter 19 Copier Setup" for more
information.
Reference
[Scan Error List]
(p.525)
Display the [Scan Error List] screen. Refer to "Chapter 14 Troubles Concerning the
Scanner" for more information.
Reference
(p.472)
481
Chapter
16
Chapter 16 Configuration of Printer Setting Menu
Setting up the Printer from the Control Panel (Continued)
● Setting Items
The following table shows the items that can be set from the [Printer Mode Basic] screen.
Item
[Test Print Menu]
Contents
PCL5e Demo Page
PCL5e Font List
PS Demo Page
PS Font List
Config. Data
NIC Config.
[Controller Set]
[Set Default]
Banner Page
On / Off*
Banner Page Tray
Auto Tray* / Tray1 / Tray2 / Tray3 / Tray4 / Bypass Tray
Spool
On / Off*
Job Time Out
5sec. / 10sec. / 15sec. / 20sec. / 30sec. / 60sec.* / 120sec. /
180sec. / 240sec. / 300sec.
Copier Time Out
15 sec. / 30 sec.* / 60 sec. / 90 sec.
ScanDataAutoDel.
Off / 12 hour / 24 hour* / 2 days / 4 days / 6 days / 8 days /
10 days
PDL Select
Auto* / PCL5e / PostScript
Default Paper
A3R, A4, A5, B4R, B5, B6R, F4R,11 x 17R, 8.5 x 14R,8.5 x
11*, 5.5 x 8.5R, Postcard, 8KR, 5.5 x 8.5
The paper sizes you can set differ depending on specifications in the country and trays.
[Password Print]
[PCL Setup]
Resolution
400 x 400 dpi / 600 x 600 dpi*
Duplex
Off* / Long Edge / Short Edge
Orientation
Portrait* / Landscape
Copies
1* to 9999
Override Paper
Off* / 8.5 x 11 → A4 / A4 → 8.5 x 11
Refer to "Chapter 5 Printing from Windows". Reference
(p.256)
Point Size
Pitch
Font Number
Refer to "Appendix C Font". Reference
(p.610)
Font Lines
Courier Style
Dark / Light*
CR/LF Mapping
CR/LF / CR*
Input Tray
Auto Tray* / Tray1 / Tray2 / Tray3 / Tray4 / Bypass Tray
Symbol Set
[Network Setup]
[Controller Time]
Refer to "Appendix D Symbol Set". Reference
Refer to "Chapter 19 Copier Setup". Reference
(p.525)
Refer to "Chapter 14 Troubles Concerning the Scanner". Reference
482
(p.621)
(p.472)
Chapter 16 Configuration of Printer Setting Menu
Setting up the Printer from the Control Panel (Continued)
• The setting values marked with an asterisk (*) are the default.
• [PS Demo Page] and [PS Font List] can be selected only when the PS3 option is installed.
• Refer to the followings for specific procedures on setting up the printer from the [Printer Mode Basic] screen.
• The setting values may vary depending on models of machine.
• Some models of machine may not correspond to [PDL select], [Resolution], [Copies] and [Override Paper].
• The setting of [PCL Setup] may vary depending on models of machine.
• Test Print Menu
Reference
(p.484)
• Controller Set
Reference
(p.486)
• Set Default
Reference
(p.496)
483
Chapter 16 Configuration of Printer Setting Menu
Printing the Test Print
You can print the test print from the control panel.
1.
Press the [Mode] button, displays the [Printer Mode Basic] Screen.
The [Printer Mode Basic] screen will appear.
2.
Touch the [Test Print Menu] key.
The [Test Print Setup] screen will appear.
3.
4.
Touch the key for the list you want to print the test print.
Touch the [OK] key.
The selected list will print.
The [Printer Mode Basic] screen will appear.
You can return to the [Printer Mode Basic] screen without printing the test print by touching the [CANCEL] key.
484
Chapter 16 Configuration of Printer Setting Menu
Printing the Test Print (Continued)
The following table shows the descriptions of the selectable lists and the printed lists.
Item
PCL5e Demo
Page
PCL5e Font List
PS Demo Page
PS Font List
Config. Data
Contents
Select to print the PCL5e Demo Page.
Select to print the PCL5e Font List. Reference
(p.604)
Select to print the PS Demo Page.
Select to print the installed PS font sample. Reference
(p.607)
Select [Config. Data] to print the System Configuration data immediately.
Items of the Config. Data are as follows:
• Version information
• Set Default (Default Paper / Orientation / Duplex / Resolution / Print Quality)
• Controller Set (Interpreter / Banner Page / Job Time Out / Copier Time Out)
• Installed Paper (Bypass Tray / Tray1 / Tray2 / Tray3 / Tray4)
• Device Status (Total RAM installed / Hard disk free space)
• Miscellaneous (PCL5e pages printed)
NIC Config.
Select to print information on the NIC configuration. Refer to "Chapter 19 Copier
Setup" for details.
Reference
(p.524)
485
Chapter 16 Configuration of Printer Setting Menu
Setting the Banner Page
You can set whether or not to print the banner page from the control panel.
On a banner page as a log file of the printer, the followings are shown. The shown information varies depending
on what printer driver you use.
Job
A job number is shown(Example:JOB #45).
User ID
It is always shown as [N/A].
User Name
A login name to the computer is shown.
Title
An application name and a file name are shown(Example:Microsoft Word-Test.doc).
Source
Network Card or Paralled is shown.
Language
It is shown as PCL5.
Printed
A date and a time are shown. Example:SAT DEC 22 21:06:47 2001
1.
Press the [Mode] button to display the [Printer Mode Basic] screen.
The [Printer Mode Basic] screen will appear.
2.
Touch the [Controller Set] key.
The [Controller Set] screen will appear.
3.
Touch the [Banner Page] key, and then touch the [OK] key.
The [Banner Page Set] screen will appear.
4.
Touch the [On] or [Off] key.
486
Chapter 16 Configuration of Printer Setting Menu
Setting the Banner Page (Continued)
5.
Touch the [OK] key.
The banner page is set according to your selection.
The [Controller Set] screen will appear.
Touch the [CANCEL] key if you want to return to the [Controller Set] screen without changing the setting
6.
Touch the [CANCEL] key.
The [Printer Mode Basic] screen will appear.
487
Chapter 16 Configuration of Printer Setting Menu
Setting the Banner Page Tray
The following table shows the descriptions of the selectable lists and the printed lists.
1.
Press the [Mode] button to display the [Printer Mode Basic] screen.
The [Printer Mode Basic] screen will appear.
2.
Touch the [Controller Set] key.
The [Controller Set] screen will appear.
3.
Touch the [Banner Page Tray] key, and then touch the [OK] key.
The [Banner Page Tray Set] screen will appear.
4.
5.
Touch the [On] key or the [Off] key.
Touch the [OK] key.
The banner page is set according to your selection.
The [Controller Set] screen will appear.
Touch the [CANCEL] key if you want to return to the [Controller Set] screen without changing the setting.
6.
Touch the [CANCEL] key.
The [Printer Mode Basic] screen will appear.
488
Chapter 16 Configuration of Printer Setting Menu
Setting the Job Time Out
You can set the value of the job time out setting from the control panel.
1.
Press the [Mode] button, to display the [Printer Mode Basic] screen.
The [Printer Mode Basic] screen will appear.
2.
Touch the [Controller Set] key.
The [Controller Set] screen will appear.
3.
Touch the [Job Time Out] key, and then touch the [OK] key.
The [Job Time Out Set] screen will appear.
Touch [▲] and [▼] to display the previous screen and the following screen of the [Job Time Out Set] screen
respectively.
4.
5.
Touch the key for the value that you want to set.
Touch the [OK] key.
The job time out is set according to your selection.
The [Controller Set] screen will appear.
Touch the [CANCEL] key if you want to return to the [Controller Set] screen without changing the setting.
6.
Touch the [CANCEL] key.
The [Printer Mode Basic] screen will appear.
489
Chapter 16 Configuration of Printer Setting Menu
Setting the Copier Time Out
You can set the value of the copier time out setting from the control panel.
The printing system receives the print data when it reaches the copier timeout value after the copy operation from
the control panel of the copier.
1.
Press the [Mode] button, displays the [Printer Mode Basic] screen.
The [Printer Mode Basic] screen will appear.
2.
Touch the [Controller Set] key.
The [Controller Set] screen will appear.
3.
Touch the [Copier Time Out] key, and then touch the [OK] key.
The [Copier Time Out Set] screen will appear.
4.
Touch the key for the value that you want to set.
490
Chapter 16 Configuration of Printer Setting Menu
Setting the Copier Time Out (Continued)
5.
Touch the [OK] key.
The copier time out is set according to your selection.
The [Controller Set] screen will appear.
Touch the [CANCEL] key if you want to return to the [Controller Set] screen without changing the setting.
6.
Touch the [CANCEL] key.
The [Printer Mode Basic] screen will appear.
491
Chapter 16 Configuration of Printer Setting Menu
Setting the ScanDataAutoDel.
You can set the time period for saving scanned data before the printing system deletes it automatically from the
control panel.
The printing system deletes the scanned data automatically when it reaches the time out value.
If you set the ScanDataAutoDel setting to other than [OFF], you can reserve the free space in the internal hard disk
automatically.
1.
Press the [Mode] button, displays the [Printer Mode Basic] Screen.
The [Printer Mode Basic] screen will appear.
2.
Touch the [Controller Set] key.
The [Controller Set] screen will appear.
Touch [▲] key and [▼] key to display the previous screen and the following screen of the [Controller Set] screen
respectively.
3.
Touch the [ScanDataAutoDel.] key, and then touch the [OK] key.
The [ScanDataAutoDel. Set] screen will appear.
4.
Touch the key for the value that you want to set.
492
Chapter 16 Configuration of Printer Setting Menu
Setting the ScanDataAutoDel. (Continued)
5.
Touch the [OK] key.
The ScanDataAutoDel setting is set according to your selection.
The [Controller Set] screen will appear.
Touch the [CANCEL] key if you want to return to the [Controller Set] screen without changing the setting.
6.
Touch the [CANCEL] key.
The [Printer Mode Basic] screen will appear.
493
Chapter 16 Configuration of Printer Setting Menu
Setting the PDL
You can set the PDL from the control panel.
1.
Press the [Mode] button, to display the [Printer Mode Basic] screen.
The [Printer Mode Basic] screen will appear.
2.
Touch the [Controller Set] key.
The [Controller Set] screen will appear.
3.
Touch the [PDL Select] key, and then touch the [OK] key.
The [PDL Select Set] screen will appear.
4.
Touch the key for the PDL that you want to set.
[PostScript] can be selected only when the PS3 option is installed.
494
Chapter 16 Configuration of Printer Setting Menu
Setting the PDL (Continued)
5.
Touch the [OK] key.
The PDL is set according to your selection.
The [Controller Set] screen will appear.
Touch the [CANCEL] key if you want to return to the [Controller Set] screen without changing the setting.
6.
Touch the [CANCEL] key.
The [Printer Mode Basic] screen will appear.
495
Chapter 16 Configuration of Printer Setting Menu
Setting the Default Paper size
You can set the default paper from the control panel.
The default paper that is set here is used if the print job does not request the specific paper.
1.
Press the [Mode] button, to display the [Printer Mode Basic] screen.
The [Printer Mode Basic] screen will appear.
2.
Touch the [Set Default] key.
The [Set Default] screen will appear.
3.
Touch the [Default Paper] key, and then touch the [OK] key.
The [Default Paper Set] screen will appear.
Touch [▲] key and [▼] key to display the previous screen and the following screen of the [Default Paper Size]
screen respectively.
4.
Touch the key for the paper that you want to set.
496
Chapter 16 Configuration of Printer Setting Menu
Setting the Default Paper size (Continued)
5.
Touch the [OK] key.
The default paper is set according to your selection.
The [Default Paper Set] screen will appear.
Touch the [CANCEL] key if you want to return to the [Set Default] screen without changing the setting.
6.
Touch the [CANCEL] key.
The [Printer Mode Basic] screen will appear.
497
Chapter 16 Configuration of Printer Setting Menu
Setting the Resolution
You can set the resolution from the control panel.
1.
Press the [Mode] button, to display the [Printer Mode Basic] screen.
The [Printer Mode Basic] screen will appear.
2.
Touch the [Set Default] key.
The [Set Default] screen will appear.
3.
Touch the [Resolution] key, and then touch the [OK] key.
The [Resolution Set] screen will appear.
4.
5.
Touch the key for the resolution that you want to set.
Touch the [OK] key.
The resolution is set according to your selection.
The [Set Default] screen will appear.
Touch the [CANCEL] key if you want to return to the [Set Default] screen without changing the setting.
6.
Touch the [CANCEL] key.
The [Printer Mode Basic] screen will appear.
498
Chapter 16 Configuration of Printer Setting Menu
Setting the Default Value for the Duplex
You can set the default printing direction at the duplex printing from the control panel.
1.
Press the [Mode] button, to display the [Printer Mode Basic] screen.
The [Printer Mode Basic] screen will appear.
2.
Touch the [Set Default] key.
The [Set Default] screen will appear.
3.
Touch the [Duplex] key, and then touch the [OK] key.
The [Duplex Set] screen will appear.
4.
Touch the key for the printing direction at the duplex printing that you
want to set.
• Off : set Duplex off (Default)
• Long Edge : set Long Edge Duplex
• Short Edge : set Short Edge Duplex
499
Chapter 16 Configuration of Printer Setting Menu
Setting the Default Value for the Duplex (Continued)
5.
Touch the [OK] key.
The default value for the Duplex is set according to your selection.
The [Set Default] screen will appear.
Touch the [CANCEL] key if you want to return to the [Set Default] screen without changing the setting.
6.
Touch the [CANCEL] key.
The [Printer Mode Basic] screen will appear.
500
Chapter 16 Configuration of Printer Setting Menu
Setting the Default Orientation
You can set the default orientation of the paper from the control panel.
1.
Press the [Mode] button, to display the [Printer Mode Basic] screen.
The [Printer Mode Basic] screen will appear.
2.
Touch the [Set Default] key.
The [Set Default] screen will appear.
3.
Touch the [Orientation] key, and then touch the [OK] key.
The [Orientation Set] screen will appear.
4.
Touch the key for the orientation that you want to set.
• Portrait : set the Orientation to Portrait (Default)
• Landscape : set the Orientation to Landscape
501
Chapter 16 Configuration of Printer Setting Menu
Setting the Default Orientation (Continued)
5.
Touch the [OK] key.
The default orientation is set according to your selection.
The [Set Default] screen will appear.
Touch the [CANCEL] key if you want to return to the [Set Default] screen without changing the setting.
6.
Touch the [CANCEL] key.
The [Printer Mode Basic] screen will appear.
502
Chapter 16 Configuration of Printer Setting Menu
Setting the Number of Pages to Copy
You can set the number of pages to copy from the control panel.
1.
Press the [Mode] button, to display the [Printer Mode Basic] screen.
The [Printer Mode Basic] screen will appear.
2.
Touch the [Set Default] key.
The [Set Default] screen will appear.
3.
Touch the [Copies] key, and then touch the [OK] key.
The [Copies Set] screen will appear.
4.
5.
Touch the key for the value that you want to set.
Touch the [OK] key.
The number of pages to be copied is set according to your selection.
The [Set Default] screen will appear.
Touch the [CANCEL] key if you want to return to the [Set Default] screen without changing the setting.
6.
Touch the [CANCEL] key.
The [Printer Mode Basic] screen will appear.
503
Chapter 16 Configuration of Printer Setting Menu
Setting the Override Paper
You can set the override paper from the control panel.
1.
Press the [Mode] button, to display the [Printer Mode Basic] screen.
The [Printer Mode Basic] screen will appear.
2.
Touch the [Set Default] key.
The [Set Default] screen will appear.
3.
Touch the [Override Paper] key, and then touch the [OK] key.
The [Override Paper Set] screen will appear.
4.
5.
Touch the key for the override papaer that you want to set.
Touch the [OK] key.
The override paper is set according to your selection.
The [Set Default] screen will appear.
Touch the [CANCEL] key if you want to return to the [Set Default] screen without changing the setting.
6.
Touch the [CANCEL] key.
The [Printer Mode Basic] screen will appear.
504
Chapter 17 Print Job Control
Chapter 17 Print Job Control
Using the Forced Output Function
You can use the forced output function from the control panel in this printing system.
● Forced Output
When the tray runs out of preset size papers, or when the tray does not contain papers whose size meets
the demand from the printer driver, the printing system displays a message prompting the user to load additional papers.
The process by which the user selects a different size paper on the operation panel and lets printing continue is referred to as "Force Output."
When you choose not to use Forced Output, delete the print job, and change the setting concerned on the application, or set the requested size of papers in the tray.
Reference
(p.171)
● Procedure
1.
Make sure that the LCD touch screen shows a message prompting the
user to load additional papers of proper size.
2.
Touch the key of the desired size displayed in the paper sizes area.
3.
4.
Press the [START] button.
The printout is made on the selected size of papers.
505
Chapter
17
Chapter 17 Print Job Control
Reserving a Print Job
You can reserve a print job from the control panel in this printing system.
● Reserve
Reserving means that you make the settings for the next copying job while a job is printing, and print out the
reserved job when the current job is completed.
You can reserve up to 5 jobs.
Limitation
You cannot reserve a job if a job is interrupted.
● Procedure
1.
Touch the [FREE] tab to set the conditions for a copying job.
You cannot reserve a job if the [FREE] tab is dimmed. Wait until the dimming is canceled.
2.
Press [START] button.
This copying job will be performed after the print job in progress is completed.
506
Chapter 17 Print Job Control
Canceling a Print Job
You can cancel the printing print job or the reserved job from the control panel in this printing system.
● Cancel
Canceling means clearing the print job in the copier and forcefully terminating the print job or the reserved
job.
The job is deleted in the different way if it is a password print job.
Reference
(p.510)
Limitation
If the job is still on your computer, first, delete the job from your computer and press the
[STOP] button on the control panel. You can not stop the remaining job completely by only
pressing the [STOP] button. The [STOP] button can clear the memory of the print controller
and E-RDH in the main body printer but can not clear the remaining job on your computer.
● Procedure for the printing print job
1.
Press the [Stop] button to cancel the job.
The confirmation screen will appear.
2.
Touch the [EXIT] key.
The printing job is canceled.
The print job is not canceled if you select the [CANCEL] key.
507
Chapter 17 Print Job Control
Canceling a Print Job (Continued)
● Procedure for the reserved print job
1.
Touch the [STATUS] key on the [Copy Mode Basic] screen.
The [Job Status Display] screen will appear.
2.
3.
Select a job you want to delete.
Touch the [JOB DELETE] key.
The confirmation screen will appear.
4.
Touch the [YES] key.
The reserved print job is canceled.
The print job is not canceled if you select the [NO] key.
5.
Touch the [OK] key.
The [Copy Mode Basic] will appear.
508
Chapter 17 Print Job Control
Confirming the Canceled Print Job
You can confirm the canceled print job from the control panel in this printing system.
● Procedure
1.
Touch the [STATUS] key on the [Copy Mode Basic] screen.
The [Job Status Display] screen will appear.
2.
Touch the [NON COMPLETE JOB LIST] key.
The [Non Complate Job List] screen will appear.
Touch [
] key and [
List] screen respectively.
] key to display the previous screen and the following screen of the [Non Complete Job
Up to 4 screens or 16 jobs of non complete jobs are displayed.
3.
4.
Confirm the canceled job.
Touch the [OK] key.
The [Job Status Display] screen will appear.
5.
Touch the [OK] key.
The [Copy Mode Basic] screen will appear.
509
Chapter 17 Print Job Control
Deleting a Password Print Job
You can delete a password print job from the control panel in this printing system.
1.
Press the [MODE] button to display the [Print Mode Basic] screen.
The [Printer Mode Basic] screen will appear.
2.
Touch the [Password Print] key.
The [User ID] key, the [Password] key and numeric key etc. are displayed.
3.
Enter your user ID using the numeric keys, and touch the [OK] key.
The ID is displayed with the [Password] key highlighted.
You don't have to input your user ID if it is not set. Touch the [OK] key.
4.
Enter your password using the numeric, uppercase or lowercase keys,
and touch the [OK] key.
If no uppercase letters are displayed, you can touch the [Uppercase] key to display them..
If no lowercase letters are displayed, you can touch the [Lowercase] key to display them..
If no numbers are displayed, you can touch the [Number] key to display them..
When you touch the [OK] key, a list of the corresponding print jobs is displayed.
The list will be blank if there are no corresponding print jobs.
If this is the case, touch the [Cancel] key to terminate the Confidential Output feature.
510
Chapter 17 Print Job Control
Deleting a Password Print Job (Continued)
5.
Select the print job you want to delete, and touch the [Delete] key.
The confirmation screen will appear.
6.
Touch the [YES] key.
The print job is deleted. Then, the [Copy Mode Basic] screen will appear.
Touch the [NO] key if you want to return to the [Print Job List] screen without deleting the print job.
511
5
Section
NetworkSettings(forAdministrator)
Chapter 18 Network Function Overview .................. 513
Chapter 19 Copier Setup ........................................... 519
Chapter 20 Printing by IP Peer-to-Peer from Windows 95/98/Me 544
Chapter 21 Printing by LPD/LPR from Windows NT 4.0/2000/XP 557
Chapter 22 Printing by IPP from Windows 2000/XP 564
Chapter 23 NetWare Configuration .......................... 568
Chapter 24 UNIX Configuration ................................ 571
Chapter 25 Apple Talk Configuration ....................... 581
Chapter 26 Troubleshooting of Network .................. 582
Chapter 18 Network Function Overview
Chapter 18 Network Function Overview
Network Function of Print Controller
This chapter provides an overview of the network features. The network interface card has the following features:
Important
The network interface card is an optional.
• Features of the Network Function
• Features of the NetWare Print Server
• Features of the Web Utilities
For more information on the Web Utilities, refer to the separate volume, "Web Utilities User's Reference Guide."
● Features of the Network Function
The network function offers the following features:
• Automatic Selection of 100BaseTX (Fast Ethernet) or 10BaseT Ethernet connection
• Multiple protocols (TCP/IP, IPX/SPX and AppleTalk [EtherTalk]) supported
• Peer-to-peer printing over TCP/IP from Microsoft Windows 95/98/Me (by using a dedicated utility, IPP2P)
• Peer-to-Peer printing over IPX/SPX for Microsoft Windows 95/98/Me (By using dedicated utility, IPXP2P)
• LPD/LPR printing over TCP/IP for Microsoft Windows NT/2000/XP
• IPP printing over TCP/IP Microsoft Windows 2000/XP
• Automatic IP address acquisition by DHCP
● Features of the NetWare Print Server
The network interface card corresponds to the features of the Novell NetWare print server and supports both
the bindery mode and the Novell Directory Service (NDS).
● Features of the Web Utilities
The network interface card has the built-in HTTP server, and enables the printing system management with
coordination of the accompanied Management Access Program (MAP) and the standard Web browsers.
For more information on the Web Utilities, refer to the separate volume, "Web Utilities User's Reference Guide."
513
Chapter
18
Chapter 18 Network Function Overview
Accompanied Utilities
The CD-ROM contains utility programs used for the network interface card. The CD-ROM is compatible with
Windows 95/98/Me/NT2.0/2000/XP or Mac OS. The English language version software included in the CDROM includes the following:
● MAP (Management Access Program)
Utility program to let Windows 95/98/Me/NT4.0/2000/XP identify IP- or IPX-based printing systems on networks. This also allows you to access the Web Utilities implemented in the network interface card, and make
network and printing system settings by using the Web Utilities in conjunction with Web Browsers.
● IP-P2P
Program to execute peer-to-peer printing from Windows 95/98/Me via TCP/IP.
● IPX-P2P
Program to execute peer-to-peer printing from Windows 95/98/Me via IPX/SPX.
● NWSetup
Utility program to set up Novell NetWare for the network interface card from Windows 95/98/Me/NT/2000/
XP.
● BOOTP Lite
Utility program to assign IP address to the network interface card through Windows 95/98/Me/NT/2000/XP.
● UNIX-TCP/IP Programs
Program for printing from various UNIX systems when not running lpd/lpr.
514
Chapter 18 Network Function Overview
Network setting procedures
Before using the network interface card, you must first connect the network interface card to the network and
then perform the setup procedures for the printing system.
To connect the network interface card to the network, use the Ethernet connector (RJ45) of the network interface card and a UTP cable (of category 5, recommended).
● Usage Types and Setting Items
To print using the network function, several settings and preparations are necessary. Settings and preparation may be different depending on the using environment. Network setting is also necessary when Network
Scanner feature is used.
• Windows 95/98/Me configuration (peer-to-peer)
To print over LAN (Local Area Network) in Windows 95/98/Me, with no print servers installed, you can
link your print controllers with a configuration called peer-to-peer connection. In peer-to-peer connections, TCP/IP and IPX/SPX protocols are used, each with a dedicated utility program. Setup procedures
are as follows:
Reference
(p.516) Windows 95/98/Me configuration (peer-to-peer)
• Windows NT4.0/2000/XP configuration (LPD/LPR)
To print by LPD/LPR from Windows NT/2000/XP.
Reference
(p.516) Windows NT4.0/2000/XP configuration (LPD/LPR)
• Windows 2000/XP configuration (IPP)
To print by IPP from Windows 2000/XP.
Reference
(p.517) Windows 2000/XP configuration (IPP)
• NetWare configuration
To print in a Novell NetWare network, setup procedures depend on the NetWare version and resource
management.
Reference
(p.517) NetWare configuration
• UNIX configuration (LPD/LPR)
To print by LPD/LPR from UNIX.
Reference
(p.517) UNIX configuration (lpd/lpr)
• Macintosh configuration (AppleTalk)
To print by AppleTalk from Macintosh
Reference
(p.518) AppleTalk configuration
• Network Scanner feature configuration
To use the network scanner feature.
Reference
(p.518) Network Scanner feature configuration
515
Chapter 18 Network Function Overview
Network setting procedures (Continued)
Windows 95/98/Me configuration (peer-to-peer)
For IP peer-to-peer connections
1.
Make TCP/IP settings on the control panel of the copier.
Reference
2.
Make TCP/IP settings on your computer (Windows 95/98/Me).
Reference
3.
(p.544) Basic TCP/IP setup
Install IP-P2P from the accompanying CD-ROM.
Reference
4.
(p.527) TCP/IP Setup
(p.545) Installation of IP Peer-to-Peer
Install Printer Driver.
Reference
(p.545) Installation of IP Peer-to-Peer
For IPX peer-to-peer connections
1.
Add IPX/SPX Protocols to your computer.
Reference
2.
Install IPX-P2P from the accompanying CD.
Reference
3.
(p.552) Using IPX Peer-to-Peer
(p.553) Installation of IPX Peer-to-Peer
Install Printer Driver.
Reference
(p.553) Installation of IPX Peer-to-Peer
Windows NT4.0/2000/XP configuration (LPD/LPR)
1.
Make TCP/IP settings on the control panel of the copier.
Reference
2.
3.
(p.527) TCP/IP Setup
Make TCP/IP settings on your computer (Windows NT/2000/XP).
Add/Create the Printer Port, and install Printer Driver.
Reference
(p.557) LPD/LPR Setup
516
Chapter 18 Network Function Overview
Network setting procedures (Continued)
Windows 2000/XP configuration (IPP)
1.
Make TCP/IP settings on the control panel of the copier.
Reference
2.
3.
(p.527) TCP/IP Setup
Make TCP/IP settings on your computer (Windows 2000/XP).
Install Printer Driver.
Reference
(p.564) Internet Printing
NetWare configuration
With NetWare 3.x
1.
Make NetWare settings on the control panel of the copier.
Novell NetWare Setup includes assigning a new name and password to the Network Interface Card
Novell Print Server, identifying the preferred file server connection, setting up for Novell Directory Services (NDS), identifying the Ethernet frame type, and disabling Bindery Services.
Reference
2.
(p.530) NetWare Setup
Using PCONSOLE, configure for print server features.
Reference
(p.568) Setup for NetWare 3.x
By using NDS with NetWare 4.x
1.
Make NetWare settings on the control panel of the copier.
Reference
2.
(p.527) TCP/IP Setup
Using NWADMIN or PCONSOLE, configure for print server features.
Reference
(p.569) Setup for NetWare 4.x
By using bindery emulation with NetWare 4.x
1.
Make NetWare settings on the control panel of the copier.
Reference
2.
(p.527) TCP/IP Setup
Using PCONSOLE, configure for print server features.
Reference
(p.570) PCONSOLE
UNIX configuration (lpd/lpr)
Reference
(p.514) UNIX-TCP/IP Programs
Reference
(p.527) TCP/IP Setup
Reference
(p.571) UNIX Printing through TCP/IP
517
Chapter 18 Network Function Overview
Network setting procedures (Continued)
AppleTalk configuration
To print from Macintosh, you need the PostScript3 option.
1.
Make AppleTalk settings on the control panel of the copier.
AppleTalk Setup includes identifying the AppleTalk zone where the print server resides, and assigning
a new name to the print server.
2.
Reference
(p.527) TCP/IP Setup
Reference
(p.533) AppleTalk Setup
Make AppleTalk settings on your computer (Macintosh).
Reference
3.
(p.581) Preparation to print from Macintosh
Install Printer Driver.
Reference
(p.111) Installing to Macintosh (PS3)
Network Scanner feature configuration
1.
Make TCP/IP settings on the control panel of the copier.
Reference
2.
(p.527)
Make DNS, Email and FTP settings on the control panel of the copier or
the Web Utilities.
Reference
(p.535) FTP Setup
Reference
(p.536) Email Setup
Reference
(p.538) DNS Setup
518
Chapter 19 Copier Setup
Chapter 19 Copier Setup
General Description of the Network Setup
To print over TCP/IP, you need to assign an IP address to the network interface card. With the network interface
card, you can print over TCP/IP in such ways as using IP-P2P in peer-to-peer printing setup via Windows 95/98/
Me, using lpd/lpr via Windows NT4.0/2000/XP, and using IPP via Windows 2000/XP. Using AppleTalk(EtherTalk) also requires the TCP/IP setting.
Important
The network interface card is an optional.
To use the network scanning feature, you need to assign the IP address to the network interface card, and configure the settings for DNS, Email or FTP servers according to your need.
● Assigning IP Address
There are three ways to assign the IP address to the network interface card.
• Use DHCP (Dynamic Host Configuration Protocol) to automatically assign an IP address.
• Assign an IP address from the copier's control panel.
• Use MAP (Management Access Program) and Web Utilities for assigning an IP address
When initially connecting the network interface card to networks that are not using DHCP, you need to confirm the following information:
• IP address to assign to the network interface card
• Network address of the network interface card (MAC [Media Access Control] address or Ethernet
address)
Check with the network administrator for the IP address assigned to the network interface card. To find the
network (MAC) address of the network interface card, press [Printer Mode Basic] → [Network Setup] → [Unit
Info] on the copier's control panel or refer to the Status Page (network setup list) that is output when turning
ON the copier.
Depending on the network interface card settings, the Status Page cannot be output.
Using DHCP
When assigning an IP address to the network interface card from the DHCP server, set up (reserve) to
enable the IP address of the network interface card to be used continually on the DHCP server. Otherwise, the same address might be given to other hosts.
The network interface card is set to use DHCP by default. In this case, the network interface card generates a DHCP request when you reset/turn on the network interface card.
When the network interface card is set to use DHCP, the option [Enable DHCP] is ON, and no specific IP
address is assigned to the network interface card, or the option [Enable IP address defined] is OFF.
Using Control Panel
For information about setting an IP address and others from the copier's control panel.
Reference
(p.527) TCP/IP Setup
519
Chapter
19
Chapter 19 Copier Setup
General Description of the Network Setup (Continued)
Using MAP
By using MAP (Management Access Program) included the accompanying CD-ROM that comes with the
network interface card, you can automatically identify the network interface card on the network and set it
up for TCP/IP by using Web Utilities. To use this method to assign the IP address to the network interface card, the following procedure should be performed on computers in advance:
• TCP/IP correctly configured
• MAP installed and MAP setup correctly executed
For information about how to set up TCP/IP and how to install IPX/SPX-compatible protocol, refer to Windows Help
menus for example.
● Accessing Web Utilities
The network interface card is provided with an HTTP server which has access to Web Utilities through a
Web Browser, either Netscape or Internet Explorer. By accessing this server, you can change settings of the
printing system.
• Use MAP to have the network interface card on the networks identified automatically, thereby accessing Web Utilities.
• Use a Web Browser to type the IP address assigned to the network interface card, and thereby access
the Web Utilities. For example:
http://192.168.0.128/
For more information on the Web Utilities, refer to the separate volume, "Web Utilities User's Reference Guide."
520
Chapter 19 Copier Setup
General Description of the Network Setup (Continued)
Using BOOTP Lite (Windows 95/98/Me/NT/2000/XP)
From Windows 95/98/Me/NT/2000/XP, you can use the BOOTP Lite program to assign the IP address to
the network interface card. TCP/IP must be set up correctly on the computer that will execute this program. To copy/install the program files in the Windows directory, perform the following procedure:
1.
Reset the print controller and the main body printer.
The BOOTP Lite program uses the BOOTP protocol. The BOOTP request is for a finite period of time.
The print controller and the main body printer must be freshly reset for this to work.
2.
Insert the accompanying CD-ROM into CD-ROM drive, and double click
[Bootpl32.exe] in the "English\NetUtil\BOOTP" folder.
3.
4.
Pull down the [Admin] menu to [Configure].
Enter the [IP address] that you want to assign to the network interface
card, its [Subnet Mask] (make sure it matches what you are using on
your subnet), [Default Gateway] (your router's IP address), and the
[MAC address] of the network interface card.
Use colons as delimiters as shown on the Status Page rather than the dashes that Windows uses.
5.
6.
Click on Go.
7.
Pull down the [Admin] menu to [Verify].
Wait about five minutes. The network interface card should recycle
and produce a Status Page showing the IP parameters you have just
entered.
You should get a message back stating that [The Unit is Active]. If you do not get this message, verify
that TCP/IP is enabled on the Status Page.
8.
When you get a response that the unit is active, you should be able to
ping the network interface card.
521
Chapter 19 Copier Setup
General Description of the Network Setup (Continued)
Using arp command (Windows 95/98/Me/NT/2000/XP)
From Windows 95/98/Me MS-DOS prompt or at Windows NT/2000 command prompt, you can use the
arp command to assign the IP address to the network interface card. It is necessary that TCP/IP is set up
correctly on the computer to execute the arp command. Perform the following procedure:
1.
At Windows 95/98/Me, select [Start] → [Programs] → [MS-DOS prompt].
At Windows NT/2000/XP, select [Start] → [Programs] → [Accessories] →
[Command prompt].
2.
Execute the arp command.
For example, if the MAC address of the network interface card is 00:11:22:33:44:55 and the IP
address to assign is 192.168.0.128, then input as shown below, and then press [Enter].
(Example: C:\>arp -s 192.168.0.128 00-11-22-33-44-55
3.
Turn off the main power supply to the main body printer, then turn it
back on.
A Status Page will be output. Check that the IP address is correctly set in the list. Or, when about 5
minutes have passed after having restarted the print controller and the main body printer using the
ping command, check that the network interface card responds correctly. The ping command is also
executed at Windows 95/98/Me MS-DOS prompt or Windows NT/2000 Command prompt. An example of executing a ping command is shown below.
(Example: C:\>ping 192.168.0.128
4.
5.
Open the prompt window as in 1.
Execute the ping command for the assigned IP address.
In this case, no response is returned from the network interface card.
(Example: C:\>ping 192.168.0.128
522
Chapter 19 Copier Setup
General Description of the Network Setup (Continued)
Using arp command (UNIX)
From UNIX you can use the arp command to assign an IP address to the network interface card. Perform
the following procedure:
1.
2.
Turn off the print controller and the main body printer.
Log in as superuser on a host on the same subnet as the network
interface card.
If the server resides on another subnet, complete this procedure to store the IP address in the network
interface card.
3.
Find the MAC address of the network interface card.
The address is printed on the Status Page each time you turn on the print controller and the main
body printer.
4.
Edit the hosts file (usually /etc/hosts) or use NIS or DIS to add IP
address and node name of the network interface card.
See the network administrator for the IP address. For example, a network interface card with a name
of printfast and an IP address of 192.9.200.200 has the entry:
192.9.200.200 printfast
5.
Add an entry to the arp cache for IP address and MAC address of the
network interface card:
arp -s 192.9.200.200 0:40:c8:0:0:ff
RS6000 (AIX) requires the ether option after arp -s. For example:
arp -s ether 192.9.200.200 0:40:c8:0:0:ff
6.
Check the print controller and the main body printer to see that the network interface card is connected to the network.
Turn on the print controller and the main body printer.
7.
Send a ping command to the network interface card to verify it is running on the network:
ping 192.9.200.200 or ping printfast
The network interface card will not respond to this ping command but it will read its IP address from
the packets.
8.
Turn off the print controller and main body printer.
Turn them back on and send the ping command again to verify that the network interface card
obtained its IP address. A confirmation message displays:
192.9.200.200 is alive
9.
Remove the entry from the arp cache using the following command.
Specify the network interface card either by its IP address or by its name, for example:
arp -d printfast
523
Chapter 19 Copier Setup
Outputing the Status Page
The Status Page is, by default, sent to the copier as a print job after the network interface card has started.
Examples of the network setting list are shown below. You can output the list from the copier's control panel or
the Web utilities.
Reference
(p.484) Printing the Test Print
For more information on the Web Utilities, refer to the separate volume, "Web Utilities User's Reference Guide."
Please output the list and check the settings right after the installation or setting changes.
Examples of the Status Page
Unit Serial No: 123456
Version: XX.XXX
Network Address: 00:11:22:33:44:55
Network Topology: Ethernet
Connector: RJ45
Network Speed: 100 Megabits
Novell Network Information
Print Server Name: IB1_123456
Password Defined: No
Preferred Services Context not defined
Frame Type: 802.2 On 802.3
enable
Peer-to-Peer Information
Frame Type: 802.2 On 802.3
Network ID: 0 h
enable
TCP/IP Network Information
Frame Type: Ethernet II
Subnet Mask: 255.0.0.0
DNS Address: 0.0.0.0
WINS Name: Not Registered - IB1_123456
enable
Protocol Address: Not Configured
Default Gateway: 0.0.0.0
IPP Network Information
Internet Printing Protocol
enable
http://0.0.0.0:631/nic/Print
AppleTalk Network Information
Frame Type: 802. SNAP On 802.3
Protocol Address: Net Number: 65384
Preferred AppleTalk Zone:
Preferred AppleTalk Type:
enable
Novell inactive
Peer-to-Peer Connection Information
Printer Name: IB1_123456
AppleTalk Connection Information
AppleTalk Printer Name: IB1_123456
TCP/IP Connection Information
Port Number: 10001
524
Node Number 224 Socket Number 129
*
LaserWriter
Chapter 19 Copier Setup
Setups on the Control Panel
● Steps for Network Setup
A broad outline of the network setup is shown below. For setups performed on the copier's control panel for
functions other than network functions, refer to the "Section 4 Control Panel (for Administrator)" in your
User's Manual.
Reference
(p.473)
1.
Press the [MODE] button on the control panel to get to the [Printer
Mode Basic] screen.
2.
Touch [Network Setup] key.
3.
Select the necessary option from the menu and configure the setting.
The [Network Setup] menu is three layers deep, offering the following options:
4.
5.
• Unit Info
Reference
(p.526)
• Update NIC
Reference
(p.526)
• Startup Page
Reference
(p.526)
• TCP/IP Setup
Reference
(p.527)
• NetWare Setup
Reference
(p.530)
• AppleTalk Setup
Reference
(p.533)
• WINS Setup
Reference
(p.534)
• FTP Setup
Reference
(p.535)
• Email Setup
Reference
(p.536)
• DNS Setup
Reference
(p.538)
• Admin Password
Reference
(p.538)
• Factory Default
Reference
(p.539)
When all settings are completed, touch [Update NIC] key.
After the Update NIC process, turn the main power to the copier off.
525
Chapter 19 Copier Setup
Setups on the Control Panel (Continued)
6.
Wait at least 10 seconds and turn the copier back on.
There are occasions when the print controller malfunctions if you recycle the copier's main
power quickly. There are occasions when the Network Interface card malfunctions if you don't
recycle the copier's main power.
● Unit Info
Shows information about the Network Interface Card's [ROM Version], [Serial Number] and [Ethernet
Address].
● Update NIC
Updates the Network Interface Card with your settings.
● Startup Page
Allows you to configure settings to get a network settings list or Status Page printed out.
Print on Startup
Lets you set whether you want to get Status Page printed out each time the copier is powered up. The
default is [YES].
Interpreter
Lets you select the interpreter from [ASCII] and [PostScript]. The default is [ASCII].
526
Chapter 19 Copier Setup
Setups on the Control Panel (Continued)
● TCP/IP Setup
Lets you configure the TCP/IP settings.
Enable TCP/IP
Lets you set whether TCP/IP is enabled or not. The default is [YES].
IP Address
Lets you enter an IP address. An IP address is made up of four sets of numbers (each from 0 to 255),
separated by dots, (e.g, [192.168.0.10]).
Important
To assign a specific IP address, specify a valid IP address to [IP Address], and select [YES] for
[Enable IP address defined].
Subnet Mask
Lets you enter a subnet mask. A subnet mask is made up of four sets of numbers (each from 0 to 255),
separated by dots, (e.g, [225.225.225.0]).
527
Chapter 19 Copier Setup
Setups on the Control Panel (Continued)
Default Gateway
Lets you enter the IP address of the default gateway. This IP address is made up of four sets of numbers
(each from 0 to 255), separated by dots, (e.g, [192.168.0.1]).
Base Port Number
Lets you enter a base port number from 1000 to 65530.
The default is [10000].
Enable DHCP
Lets you set whether DHCP (Dynamic Host Configuration Protocol) is enabled or not. The default is
[DHCP Enable].
Important
If you selected [DHCP Disable], make sure to select [YES] for [Enable IP address defined], and
specify a valid IP address to [IP Address].
528
Chapter 19 Copier Setup
Setups on the Control Panel (Continued)
IP Addr. in NVRAM
Lets you set whether the entered IP address is stored in NVRAM or not. The default is [YES].
Important
If you selected [NO] for [Enable IP address defined], select [YES] for [Enable DHCP].
LPD Banner
Lets you set whether the LPD banner is printed or not when printing via lpd/lpr. The LPD banner is the
capability of printing print information as a banner page when printing via lpd/lpr. The default is [NO].
529
Chapter 19 Copier Setup
Setups on the Control Panel (Continued)
● NetWare Setup
Lets you set for printing with NetWare.
The Network Interface Card takes long to start up if Novell NetWare is not a primary protocol
and NetWare is enabled.
Be sure to select [No] to disable NetWare in an environment where Novell NetWare is not
used.
Enable NetWare
Lets you set whether NetWare is available or not. The default is [YES].
Server Name
Lets you enter the name of the NetWare print server.
• A maximum of 47 characters of symbols and alphanumeric characters is available.
Server Password
Lets you enter a password for the NetWare print server.
• A maximum of 31 characters of symbols and alphanumeric characters is available.
530
Chapter 19 Copier Setup
Setups on the Control Panel (Continued)
File Server
Lets you enter the name of the NetWare file server.
• A maximum of 47 characters of symbols and alphanumeric characters is available.
NDS Context
Lets you enter the name of an NDS context (example: ou=standard.ou=organization_1).
• A maximum of 127 characters of symbols and alphanumeric characters is available.
NDS Tree
Lets you enter the name of an NDS Directory tree.
• A maximum of 47 characters of symbols and alphanumeric characters is available.
Queue Scan Rate
Lets you set up intervals (from 1 to 255 seconds) at which the Network Interface Card scans for new print
queues. The default is [1] second.
531
Chapter 19 Copier Setup
Setups on the Control Panel (Continued)
Frame Type
Lets you select frame types from the following for use on a LAN. The default is [Auto].
Disable Bindery
Lets you disable/enable bindery services of NetWare 4.x or later. Selecting [YES] disables bindery services and selecting [NO] enables bindery services. The default is [NO].
532
Chapter 19 Copier Setup
Setups on the Control Panel (Continued)
● AppleTalk Setup
Lets you set up settings for printing via AppleTalk.
Enable AppleTalk
Lets you set whether AppleTalk is enabled or not. The default is [YES].
Printer Name
Lets you enter the name of a printer (NIC) used on an AppleTalk network.
• A maximum of 32 characters of symbols and alphanumeric characters is available.
Limitation
You cannot use the following symbols.
: (colon), @ (at mark), * (asterisk), ~ (tilde), = (equal sign), ( (left parenthesis), ) (right parenthesis), - (hyphen)
Zone Name
Lets you enter the zone in which the Network Interface Card sits. Leave the field blank if there are no
zones to specify (on networks without seed routers). No prints can be produced without specifying the
correct zone.
• A maximum of 32 characters of symbols and alphanumeric characters is available.
533
Chapter 19 Copier Setup
Setups on the Control Panel (Continued)
● WINS Setup
Lets you set up settings for printing over a NetBIOS network.
NetBIOS Name
Lets you enter the NetBIOS name of the copier.
• A maximum of 15 bytes of symbols and alphanumeric characters is available.
Primary Server
This is made up of four sets of numbers (each from 0 to 255), separated by dots. (Example: [192.168.0.1])
Secondary Server
This is made up of four sets of numbers (each from 0 to 255), separated by dots. (Example: [192.168.0.1])
534
Chapter 19 Copier Setup
Setups on the Control Panel (Continued)
● FTP Setup
Lets you set up settings for sending scanned image data to FTP servers.
FTP Port Number
Lets you enter an FTP port number between 1 and 65535. The default is [21].
FTP Timeout
Lets you enter an FTP timeout value between 1 and 60 (sec.). The default is [15 sec].
535
Chapter 19 Copier Setup
Setups on the Control Panel (Continued)
● Email Setup
Lets you set up settings for sending scanned image data by way of Email.
SMTP Server Name
Lets you enter the name of an SMTP server.
• A maximum of 239 characters of symbols and alphanumeric characters is available.
SMTP Port Number
Lets you enter an SMTP port number between 1 to 65535. The default is [25].
SMTP Timeout
Lets you enter an SMTP timeout value between 1 to 60 (sec.). The default is [15 sec].
536
Chapter 19 Copier Setup
Setups on the Control Panel (Continued)
Max. Message Size
Lets you enter a maximum SMTP message size between 10 to 1000 (x 100 KB). The default is [999 x
100 KB].
This sets the maximum capacity that the SMTP server can receive for one email.
From
Lets you enter the system administrator's Email address. All returned mails from the system are sent back to
the system administrator at this address.
• A maximum of 239 characters of symbols and alphanumeric characters is available.
Subjects
Lets you enter the subject of an Email within the length of 45 characters (alphanumeric).
Message Body
Lets you enter an Email body text up to 239 characters (alphanumeric).
537
Chapter 19 Copier Setup
Setups on the Control Panel (Continued)
● DNS Setup
Lets you set up DNS (Domain Name Service) settings for the network your copier is connected to.
DNS Server
Lets you enter the address of a DNS server.
• This is made up of four sets of numbers (each from 0 to 255), separated by dots.
NIC Domain Name
Lets you enter the domain name of a network interface card.
• A maximum of 127 bytes of symbols and alphanumeric characters is available.
● Admin Password
Lets you enter a password between 4 and 8 bytes or change the current password.
You can use numbers, as well as alphabetical letters.
The default is [sysadm].
To change the password, enter it in [Current Password], enter a new password in [New Password], and
again enter the new password in [Confirmation]. Press the [OK] button to validate the change.
If you have forgotten the renewed password, you can enter [3069] in [Current Password], enter a new password in
[New Password] and [Confirmation].
538
Chapter 19 Copier Setup
Setups on the Control Panel (Continued)
● Factory Default
Lets you reset all the network configurations to default settings. To do this, you need to enter a password.
You also need to turn the copier off, wait ten seconds, and turn it on again to complete the process.
539
Chapter 19 Copier Setup
Using MAP
A utility called MAP is provided on the CD-ROM that comes with the network interface card. This program automatically identifies the network interface cards on the networks and lists them in a Web Browser screen. From
this Web Browser list you can select a network interface card to change its settings and control Web Utilities.
For more information on the Web Utilities, refer to the separate volume, "Web Utilities User's Reference Guide."
● Operating requirements
MAP is a utility that runs on Windows 95/98/Me/NT4.0/2000/XP. It identifies the network interface cards on
the networks and achieves connection with HTTP servers implemented on the network interface cards. The
MAP itself has no interface, so either of the following Web Browsers is required as an interface:
• Netscape Navigator
• Interment Explorer
To use a Web Browser, a TCP/IP protocol must be installed to a Windows-compliant computer.
To identify the network interface cards, a TCP/IP protocol or an IPX protocol must be setup both on the network interface cards on the Windows-compliant computers.
● Installing MAP
Perform the following steps to install MAP:
1.
Insert the accompanying CD-ROM into the CD-ROM drive, and doubleclick on [Setup.exe] in the "\English\NetUtil\Map" folder.
[Welcome] window will appear.
2.
Click the [Next] button.
[Installation Notes] window will appear.
540
Chapter 19 Copier Setup
Using MAP (Continued)
3.
Click the [Yes] button.
[Choose Destination Directory] window will appear.
By default setting, the destination folder is "C:\Program Files\MAP". To change this, press the [Browse] button to
specify a folder.
4.
Click the [Next] button.
[Select Program Folder] window will appear.
5.
Click the [Next] button.
Necessary files will be copied from the "User Software CD" to complete the installation.
541
Chapter 19 Copier Setup
Using MAP (Continued)
● Setting up MAP
As a result of executing the MAP setup program, two programs, "MAP Setup" and "MAP" are installed. The
MAP Setup is a program to set up a necessary environment for MAP which identifies the network interface
cards. To use the MAP, it is necessary to execute the MAP Setup program first.
To start the MAP Setup program, select [Start] → [Programs] → [Map] → [MAP Setup]. When the program
starts, the following display will appear.
At the MAP Setup stage, you need to specify protocols used by the network interface cards and a maximum
IP hop number. To do this, indicate check-mark next to [Search for IPX based printers] for IPX-based network interface cards, and [Search for IP based printers] for IP-based network interface cards.
When using an IP protocol, specify [Max Hops for IP Search], in which case you can select a number
between 0 and 15. The default number is set to 2. If you select 0, only segments pertaining to computers,
which restart the MAP, are found. If you select 2, all networks which are accessible passing through two or
less routers are found.
Important
Note that selecting a large number can result in the occurrence of large traffic volume at one
time.
542
Chapter 19 Copier Setup
Using MAP (Continued)
● Starting MAP
To start the MAP, select [Start] → [Program] → [Map] → [MAP].
Once started, MAP searches for the network interface cards existing on the networks according to the MAP
setup. When identifying the network interface card, MAP starts a Web Browser specified as standard, and
displays a list of available network interface cards. By default, the network interface card is named
"IB1_(serial number)". When you select a desired network interface card from the list, the [MainPage] of Web
Utilities is displayed.
If you designate the proxy setting in your Web Browser, you cannot access the Web Utilities.
For more information see your network administrator.
543
Chapter
20
Printing
by
IP
Peer-to-Peer
from
Windows
95/98/Me
Chapter 20 Printing by IP Peer-to-Peer from Windows 95/98/Me
Using IP Peer-to-Peer
This printing system employs a method which sends the print job directly to the print controller from the Windows 95/98/Me compliant computer, not through the dedicated print server.
This is called peer-to-peer printing.
As peer-to-peer printing uses the network protocol TCP/IP, the network interface card must be set up for TCP/
IP in advance. For each of the Windows 95/98/Me computers that perform peer-to-peer printing, it is necessary
to set up TCP/IP, install and set up [IP-P2P] included in the accompanying CD-ROM, and set up the printer
driver.
● Basic TCP/IP setup
Select [Network] from the [Control Panel] of a Windows 95/98/Me computer that uses the main body printer
via the network interface card to display the [Network] dialog box. Click the [Configuration] tab and make
sure that [TCP/IP] exists in the list of [The following network components are installed]. If it is not found, add
TCP/IP.
Refer to Windows 95/98/Me Help or some other means to add TCP/IP.
When [TCP/IP] exists in the [The following network components are installed] list, confirm the accuracy of
the values of the IP address, etc. Select [TCP/IP] and click the [Properties] button. The [TCP/IP Properties]
dialog box appears. Click the [IP Address] tab and confirm or define the TCP/IP address and subnet mask
assigned to the computer. Continue the setup procedure on another screen if necessary. Click the [OK] button to return to the Network dialog box.
Consult your network administrator to determine the values of parameters for the IP address. If
the IP address is inadequate, failures may occur in various locations in the network.
544
Chapter
20
Chapter 20 Printing by IP Peer-to-Peer from Windows 95/98/Me
Using IP Peer-to-Peer (Continued)
● Installation of IP Peer-to-Peer
To install the IP Peer-to-Peer, double click [Setup.exe] in the [IP-P2P] folder of the accompanying CD-ROM.
The installer will start. Install the program according to the instructions displayed on the screen. The [IP
Peer-to-Peer Setup] dialog box will appear while installation is still in progress. Set up the necessary items
shown in the next paragraph.
1.
Insert the accompanying CD-ROM into the CD-ROM drive, and doubleclick on [Setup.exe] in the "\English\NetUtil\IP-P2P" folder.
[Welcome] window will appear.
2.
Click the [Next] button.
[Installation Notes] window will appear.
545
Chapter 20 Printing by IP Peer-to-Peer from Windows 95/98/Me
Using IP Peer-to-Peer (Continued)
3.
Click the [Yes] button.
[Choose Destination Directory] window will appear.
The default destination directory is [C:\Program Files\IP-P2P]. To change this, click the [Browse] button to select a
destination directory.
4.
Click the [Next] button.
[Select Program Folder] window will appear.
5.
Click the [Next] button.
Necessary files will be copied from the "User Software CD" to complete the installation.
● Uninstallation of IP Peer-to-Peer
When uninstalling the IP Peer-to-Peer, perform the following procedure.
1.
Change the printer port or delete the printing system using IP Peer-toPeer from the [Printers] folder.
2.
Delete the [IP-P2P] by using [Add/Delete Applications] from the [Control Panel].
546
Chapter 20 Printing by IP Peer-to-Peer from Windows 95/98/Me
Using IP Peer-to-Peer (Continued)
● IP Peer-to-Peer setup
You can set up the IP Peer-to-Peer while installation is in process.
To change the setting, select [Start] → [Programs] → [Ip-p2p] → [IP-P2P] to start up IP Peer-to-Peer.
1.
Start IP Peer-to-Peer.
Once IP Peer-to-Peer begins the [IP Peer To Peer Setup] dialog box appears to enable you to set up
the [Max Hops for], [IP Port], and [Printer Names] of the printing system.
Max Hops for
IP Peer-to-Peer broadcasts a search for the network interface card on the network.
The default of Max Hops for (0-15) is 2. When the value is set to 0, a search will be exercised only
in the segment in which the computer with an activated IP Peer-to-Peer belongs. When the value is
2, up to two network routers will be searched everywhere accessible via up to two routers.
Important
Note that the greater the value of Maximum Hop Count, the more traffic that is generated.
IP Port
You need to enter the same number as set in the copier by selecting [TCP/IP Setup]-[Base Port
Number]. The Default is [10000].
Printer Names
Designate the network interface card name indicated when you selected the printer port during the
printer driver setup. You may use the serial number of the network interface card, IP address, DNS
name, or any unit name as the network interface card name.
To change the currently assigned printer name, restart Windows. Then execute the IP Peer-to-Peer
again to set up the network interface card for printing via IP Peer-to-Peer. The [Printers] dialog box
can be displayed by clicking the [Printers...] button.
547
Chapter 20 Printing by IP Peer-to-Peer from Windows 95/98/Me
Using IP Peer-to-Peer (Continued)
[OK] button
Exits IP-PeerToPeer after saving your settings.
[Cancel] button
Exits IP-PeerToPeer without saving your settings.
[Printers...] button
Displays the [Printers] dialog box.
[Help] button
Allows you to get help.
2.
Click [Printers...] button to display the [Printers] dialog box.
[Printers] dialog box will appear.
Set up the network interface card to print using IP Peer-to-Peer. You can search the list available network interface card and manually add or remove network interface cards to the Windows Port Listing.
OK
Accepts all changes made to setup and exits to the previous screen.
Cancel
Discards any changes made to setup and exits to the previous screen.
Add
Allows a user to manually add a printer to the [Available Printers] list
Delete
Deletes the highlighted printer(s) from the [Available Printers] list.
Find Printers
Finds printers connected to a network (network interface card) in the range specified in [Max Hops
for] of [IP Peer-to-Peer] dialog box, and displays in the [Available Printers].
Clear
Clears the [Available Printers] list. This will not clear any printer marked with the [P] flag.
Select
In the [Available Printers] list, marks the [S] flag to the highlighted printers.
Printers marked with the [S] flag are added to the Windows port listing in the [Add Printer Wizard].
548
Chapter 20 Printing by IP Peer-to-Peer from Windows 95/98/Me
Using IP Peer-to-Peer (Continued)
Permanent
Flags the highlighted printer(s) with the [P] flag. Any printer marked with this flag will not be removed
from the [Available Printers] list, even if the printer is physically removed from the network or the
[Clear List] button is selected (described above)
S flag
In the [Available Printers] list, highlight printers and click [Select] to mark the [S] flag. Click [Select]
again to clear the [S] flag.
Printers marked with the [S] flag are added to the Windows port listing in the [Add Printer Wizard].
Added to the Windows port listing enables the network printer to be used as a local printer virtually.
P flag
In the [Available Printers] list, highlight printers and click [Permanent] to mark the [P] flag. Click
[Permanent] again to clear the [P] flag.
Printers marked with the [P] flag will not be removed from the list even if the [Clear] button is
selected.
M flag
[M] flag is marked when a printer is added manually.
Adding and Deleting Printers Manually
Enter the following items and click the [Add] button to add printers to the [Available printers] list if a
target printer (network interface card) is not found.
Each of the [S], [M] and [P] flags are marked if printers are added manually.
IP Address
Enter the IP Address assigned to a printer (network interface card).
Name
Enter the printer name to be displayed when you select the printer port during the printer driver
setup.
Port
Enter the number added [1] to the number set in the copier by selecting [TCP/IP Setup]-[Base Port
Number].
Default is [10001].
Description
Enter the description text. This text is displayed following the port number when you select the
printer port during the printer driver setup.
Click [Unit Name] to select the printing system. Click [Delete] to delete the highlighted printing system.
3.
Click the [OK] button when all settings are completed.
All setting values are stored when you return to the [IP Peer to Peer Setup] dialog. If you click the
[Cancel] button before clicking [OK], the changed values will not be saved.
4.
Click the [OK] button.
Click the [OK] button in the [IP Peer-to-Peer] dialog box to save the setting values. If you click the
[Cancel] button, the values will not be changed.
549
Chapter 20 Printing by IP Peer-to-Peer from Windows 95/98/Me
Installation of Printer Driver
When all settings are completed, install the printer driver. When you are using IP Peer-to-Peer, specify the connection type as [Local], and the printer name set in IP Peer-to-Peer to the [Printer Port].
For more information on installation and setting of the printer driver, refer to "Section 2 How to Print" in this Manual.
Reference
1.
(p.37)
Turn on the computer and start Windows.
Exit from all active Windows applications, if required.
2.
Click the [Start] button of the task bar. Then, select [Settings] from the
Start menu to click [Printers] from the sub-menu.
The [Printers] window will open.
Shut down all open Windows applications.
3.
Double-click the [Add Printer] icon of the [Printers] window.
The [Add Printer Wizard] will appear to set the printer.
4.
Click the [Next] button.
The window to select the printer manufacturer and model will appear.
5.
Select [Local] and click the [Next] button.
The window to select the printer manufacturer and model will appear.
6.
Click the [Have Disk] button.
The [Install From Disk] window will appear.
7.
Click the [Browse] button.
The [Open] window will appear.
8.
9.
Set the "User Software CD" on the CD-ROM drive.
Change [Drive] to the CD-ROM drive.
From the [Folder] list, double-click on "English\Printer\Win9x_Me" folder. If [Setup.inf] is displayed on
the list of [File] name, click the [OK] button. The [Install From Disk] window will appear.
10.Click the [OK] button.
The next [Add Printer Wizard] window to select the printer manufacturer and model will appear.
11. Be sure that in the list of [Printers], [Kyocera Mita KM-8530 PCL] is
highlighted, then click the [Next] button.
The next [Add Printer Wizard] window to assign a port will appear.
The model name of print controller is displayed in [xxx].
550
Chapter 20 Printing by IP Peer-to-Peer from Windows 95/98/Me
Installation of Printer Driver (Continued)
12.From [Available ports], choose the printer name you have set up in IP
PeerToPeer Setup.
13.From [Printer Name] text box, check the printer name.
To change the printer name, enter a new printer name to the [Printer Name] text box.
14.Select whether to use this printer as the default printer, and click the
[Next] button.
Select [Yes] to set it as a default printer, and select [No] not to set it as a default printer. The test print
selection window will appear.
15.Select whether to perform the test print.
Select [Yes (recommended)] to perform the test page, or select [No] not to print it.
16.Click the [Finish] button.
Necessary files will be copied from the "User Software CD" to complete the installation.
17.The test print starts.
Ensure the test page is printed properly.
If the test page is printed properly, click the [Yes] button.
If you selected [No] on the print test selection window, the test page will not be printed.
18.The installation is completed.
The printer driver of the printing system becomes available without restarting your computer.
551
Chapter 20 Printing by IP Peer-to-Peer from Windows 95/98/Me
Using IPX Peer-to-Peer
Windows Peer-to-Peer printing allows Windows 95/98/Me computers to print to the printing system without
an intervening server and without using IP. The main features of the Windows IPX Peer-to-Peer printing are
as follows:
• Runs on Windows 95/98/Me "out of the box".
• Runs on networks that do not have a NetWare file server, as well as those that do.
• Implements IPX peer-to-peer bi-directional printing between Windows PCs and the printing system.
● Introduction and preparation
The Peer-to-Peer implementation uses the IPX/SPX stacks that are provided with Windows 95/98/Me. The
IPX Peer-to-Peer provided will establish a connection with the printers supporting IPX Peer-to-Peer, without
using an intermediate file server, whether or not your network uses Novell NetWare.
When configuring the network capabilities for the Windows computer, you must include the [IPX/SPX Compatible Protocol]. If you are not using NetWare, you do not need to activate any NetWare Client application.
This inclusion of IPX/SPX can also be done after initial Windows installation by going to the [Network] setup
function under [Control Panel]. To do this, you will need the Windows CD.
Because Peer-to-Peer uses the IPX/SPX Protocol, Novell operation must remain enabled on the network interface
card, even if traditional Novell printing facilities are not being used. The name of the Peer-to-Peer printer, as it
appears in the Windows Port List, is the same as the Novell Print Server name, and may be changed by changing
the Novell Print Server name using the Web Utility or MAP utility.
On power up, the network interface card checks the network to see if there is Novell activity. If there is, it will
use the same frame type and the local network number that it senses. If, in addition, the network interface
card can log on to a file server, it will assume that Novell is normally used and will store this frame type and
new number in NVRAM so that, when it comes up again, it will not have to spend the time sensing (which
can take some time).
However, if the network interface card cannot attach to a file server, it will use the sensed values, but will not
store them.
If the network interface card does not see any Novell activity, it will use 802.2 on 802.3 as a frame type and
will assign itself a network number of 0. The frame type and network number being used is reported on the
Status Page.
If a network interface card is being moved from a site that had active Novell to a site that does not, the unit
should be reset to factory default to clear the frame type and network number information.
552
Chapter 20 Printing by IP Peer-to-Peer from Windows 95/98/Me
Using IPX Peer-to-Peer (Continued)
● Installation of IPX Peer-to-Peer
To install the IPX Peer-to-Peer, perform the following procedure:
1.
Insert the CD-ROM that came with the network interface card into the
CD-ROM drive.
2.
3.
4.
5.
6.
From the Windows main window, click on [Start].
Click on [Run].
From [Run], type <CDROM drive>:\IPX-P2P\SETUP.EXE.
Click on [OK].
At the [IPX Peer-to-Peer Setup] screen, click on [Next].
• If setup detected a previous installation of the IPX Peer-to-Peer, it will prompt you to have Setup delete the old
driver and continue the installation procedure. Click on [Yes] or [No]. Once the IPX Peer-to-Peer is installed,
each printer on the network that supports this peer-to-peer capability will appear as a [Port] under [Printer Properties].
• To use the Peer-to-Peer connection, create a logical printer using the [Add Printer Wizard] according to the
instructions for the print controller. Set up the printer as a [LOCAL] printer. Use the driver that came with the
print controller. When the [Add Printer Wizard] asks you to choose the [Port], select the name of the Peer-toPeer printer you wish to print to. When you complete the installation, select the [Print Test Page] option.
When uninstalling the IPX Peer-to-Peer, perform the following procedure.
1. Delete the printer using IPX Peer-to-Peer from the [Printer] folder.
2. Delete the [IPX-P2P] by using [Add/Delete Applications] from [Control Panel].
553
Chapter 20 Printing by IP Peer-to-Peer from Windows 95/98/Me
Using IPX Peer-to-Peer (Continued)
● IPX Peer-to-Peer setup
IPX Peer-to-Peer printing allows you to print to a network printer for networks without a file server or for networks where you do not want to use the network interface card for printing.
Use peer-to-peer printing on Windows 95/98/Me systems. Click on the [IPX-P2P] menu item in Windows to
bring up the [IPX Setup] screen.
An explanation for each field on the screen is described below:
OK:
Accepts changes made to setup and exits the program.
Cancel:
Discards any changes made to setup and exits the program.
Clear:
Clears the [Available Printers] list below. This will not clear any printer marked with the [Permanent] flag.
Delete:
Deletes the highlighted printer(s) from the [Available Printers] list below. Printers deleted in this fashion will
no longer be listed in the [PORT] listing when adding a printer.
However, this does not actually delete the printer from the network, it only removes it from the list maintained
on this computer. The printer may be re-added to the list by selecting the [Find Printers] button (described
below) as long as it remains connected to the network.
Permanent:
Flags the highlighted printer(s) with the [P] flag. Any printer marked with this flag will not be removed from
the [Available Printers] list, even if the printer is physically removed from the network or the [Clear List] button is selected (described above).
Find Printers:
Initiates a search routine out to the network. This routine will then list all printers found on the network by
their print server name (defined in the printer). The default Print Server Name for a printer is a three letter
identifier and the six digit serial number of the network interface card (e.g., IB1_(serial number)).
Select:
Flags the highlighted printer(s) with the "S" flag. Only 30 printers may be selected at one time. When displaying the [PORT] list during the process of adding or changing a printer, only [Selected] printers will be displayed.
554
Chapter 20 Printing by IP Peer-to-Peer from Windows 95/98/Me
Using IPX Peer-to-Peer (Continued)
Available Printers:
List of printers that was detected on the network. This list can be cleared using the [Clear List] button
(described above) and this list can be updated or refilled using the [Find Printers] button (described
above).Printers in this list are described with three fields:
• Unit Name:
This is the print server name defined in the printing system. The default print server name for a printing system is a three letter identifier and the six digit serial number of the network interface card (e.g., IB1_(serial
number)).
• Description:
Printer’s description. This field usually contains the manufacturer's name and the printer’s model.
• Flags:
[S], selected or [P], permanent. Any printers marked with an [S] flag will be displayed in the [Window’s Port]
Listing. When displaying the Windows port list during the process of adding or changing a printer, only
[Selected] printers will be displayed. Only 30 printers may be selected at one time.
Any printer marked with a [P] flag will not be removed from the [Available Printers] list, even if the printer is
physically removed from the network or the [Clear List] button is selected.
Add Printers for IPX Peer-To-Peer Printing
You can add printers manually whenever the program cannot find printers automatically because of router
setup or hop count setting. In general, this should not be necessary:
Step 1: Use IPX-P2P to Add Printers
1.
Click on the IPX-P2P menu item in Windows. The [IPX Peer-to-Peer
Setup] screen will appear.
2.
A list of available IPX-enabled printers is displayed after a brief pause
while the program searched the network.
3.
Highlight the printer(s) you wish to have displayed in the Windows
Printer Port listing and click “Select”. This will ensure these the printers are included in the Windows Printer Port listing. You may have a
maximum of 30 printers selected at any one time.
4.
Click OK when you have finished selecting all the printers you wish to
have displayed in the Windows Printer Port list.
Step 2: Use the Add Printers option in Windows.
1.
2.
3.
Click on the Add Printer button.
Select Local Printer from the menu.
Select the make and model of the printer you want to use. A list of
printer ports appears. Any IPX peer-to-peer printers that have been
selected from IPX-P2P Setup will appear in this list.
555
Chapter 20 Printing by IP Peer-to-Peer from Windows 95/98/Me
Using IPX Peer-to-Peer (Continued)
4.
5.
Select the IPX printer you want to use.
Complete the remainder of the printer setup procedure as you would
normally.
You may change the printer driver setting at a later time by doing the following:
1. Right click on the printer driver icon and select properties.
2. Select the Details tab (it may take up to 15 seconds to access).
3. Click on the arrow in the box labeled Print to the Following Port.
4. Select the printer address you wish to use.
5. Click OK.
556
Chapter
21
Printing
by
LPD/LPR
from
Windows
NT
4.0/2000/XP
Chapter 21 Printing by LPD/LPR from Windows NT
4.0/2000/XP
LPD/LPR Setup
The network interface card is equipped with the standard print server protocol (LPD: Line Printer Daemon) for
TCP/IP, which enables you to use network printing service for TCP/IP (LPR: Line Printer Remote) from Windows NT 4.0 (Service Pack 3 or later) or Windows 2000/XP computers to print.
To use the TCP/IP network protocol for LPD/LPR printing, the network interface card must be set up for TCP/IP
in advance.
Important
Confirm that TCP/IP is set up correctly on the Windows NT/2000/XP computer using the main
body printer via the network interface card before setting up the print controller.
For TCP/IP setting refer to Windows NT/2000/XP on-line help, etc.
● Adding a printer port on Windows NT 4.0
To print by LPD/LPR from Windows NT computer, add a printer port and install the printer driver on Windows
NT.
Before doing
Confirm the following settings:
• TCP/IP setting to each Windows NT computer
• Installation of [Microsoft TCP/IP Printing]
Important
Installation of [Microsoft TCP/IP Printing]
Select [Network] from the [Control Panel] of Windows NT 4.0 to display the [Network] dialog
box. Click the [Service] tab and make sure that [Microsoft TCP/IP Printing] exists in the list of
[Network Services]. If it is not found, add it.
For details, refer to Windows NT on-line help, etc.
To add a various services to Windows NT, the CD-ROM for setting up Windows is required.
557
Chapter
21
Chapter 21 Printing by LPD/LPR from Windows NT
4.0/2000/XP
LPD/LPR Setup (Continued)
Adding a printer port
To add a printer port, perform the following procedure. The CD-ROM containing the printer driver must
be on hand:
1.
2.
3.
Click the [Start] button and select [Printers] from [Settings].
4.
5.
Click the [Add Port] button.
6.
Type the IP address assigned to the network interface card for [Name
or address of server providing lpd] in the [Add LPR compatible printer]
dialog box.
7.
Type [PORT1](upper case) for [Name of printer or print queue on that
server], and click the [OK] button.
Double-click [Add Printer] to activate [Add Printer Wizard].
Select [My Computer] and then click [Next] button.
Select [LPR Port] from [Available Printer Ports] in the [Printer Port] dialog box. Click the [New Port] button.
558
Chapter 21 Printing by LPD/LPR from Windows NT
4.0/2000/XP
LPD/LPR Setup (Continued)
8.
In the list of available ports, put a checkmark next to the LPR port you
created and click [Next] button.
9.
You come to the step of installing the printer driver. Follow the wizard
information.
Reference
(p.55) Installing to Windows NT4.0 (PCL5e)
● Creating a printer port on Windows 2000
To print by LPD/LPR from a Windows 2000 computer, create a printer port and install the printer driver on
Windows 2000.
Before doing
Confirm the following settings:
• TCP/IP setting to each Windows 2000 computer
• Installation of [Print Services for Unix]
Important
Installation of [Print Services for Unix]
Select [Network and Dialup Connections] from the [Control Panel] of Windows 2000 to display
the [Network and Dialup Connections] dialog box. Then select the [Optional Networking Components] in the [Advanced] menu to indicate the [Optional Components Wizard].
Select the [Other Network File and Print Services] and then click the [Details] button to display
the [Other Network File and Print Services] dialog box. Make sure that the [Print Services for
Unix] is checked.
If it is not checked, add it.
For information regarding adding the [Print Services for Unix], refer to Windows 2000 on-line help, etc.
To add a various services to Windows 2000, the CD-ROM for setting up Windows is required.
Creating a printer port
To add a printer port, perform the following procedure. The CD-ROM containing the printer driver must
be on hand:
1.
2.
3.
Click the [Start] button and select [Printers] from [Settings].
Double-click [Add Printer] to activate [Add Printer Wizard].
Click [Next] button.
559
Chapter 21 Printing by LPD/LPR from Windows NT
4.0/2000/XP
LPD/LPR Setup (Continued)
4.
Select [Local printer] and click [Next] button.
Check [Automatically detect and install my Plug and Play printer] off.
5.
Select [Create a new port] and then choose [LPR Port] from [Type].
Click the [Next] button.
6.
Type the IP address assigned to the network interface card for [Name
or address of server providing lpd] in the [Add LPR compatible printer]
dialog box.
7.
Type [PORT1](upper case) for [Name of printer or print queue on that
server], and click the [OK] button.
8.
Follow the wizard information to install the printer driver.
Reference
(p.71) Installing to Windows 2000 (PCL5e)
560
Chapter 21 Printing by LPD/LPR from Windows NT
4.0/2000/XP
LPD/LPR Setup (Continued)
● Creating a printer port on Windows XP
To print by LPD/LPR from Windows 2000 computer, create a printer port and install the printer driver on Windows 2000.
Before doing
Confirm the following settings:
• TCP/IP setting to each Windows XP computer
• Installation of [Print Services for Unix]
Important
Installation of [Print Services for Unix]
Select [Network and Internet Connections] from the [Control Panel] of Windows XP to display
the [Network and Internet Connections] window and select [Network Connections] to display
the [LAN or High-Speed Internet] window. Then select the [Optional Networking Components]
in the [Advanced] menu to indicate the [Optional Components Wizard].
Select the [Other Network File and Print Services] and then click the [Details] button to display
the [Other Network File and Print Services] dialog box. Make sure that the [Print Services for
Unix] is checked.
If the [Print Services for Unix] is unchecked, check it, and add the service from the Windows
XP CD.
For information regarding adding the [Print Services for Unix], refer to Windows XP on-line help, etc.
To add a various services to Windows XP, the CD-ROM for setting up Windows is required.
Creating a printer port
To add a printer port, perform the following procedure. The CD-ROM containing the printer driver must
be on hand:
1.
2.
3.
4.
Click the [Start] button and select [Printers and Faxes].
Double-click [Add a printer] to activate [Add Printer Wizard].
Click [Next] button.
Select [Local printer attached to this computer] and click [Next] button.
561
Chapter 21 Printing by LPD/LPR from Windows NT
4.0/2000/XP
LPD/LPR Setup (Continued)
Check [Automatically detect and install my Plug and Play printer] off.
5.
Select [Create a new port] and then choose [LPR Port] from [Type of
port]. Click the [Next] button.
6.
Type the IP address assigned to the network interface card for [Name
or address of server providing lpd] in the [Add LPR compatible printer]
dialog box.
7.
Type [PORT1](upper case) for [Name of printer or print queue on that
server], and click the [OK] button.
8.
Follow the wizard information to install the printer driver.
Reference
(p.91) Installing to Windows XP (PCL5e)
562
Chapter 21 Printing by LPD/LPR from Windows NT
4.0/2000/XP
LPD/LPR Setup (Continued)
Adding Print Services for Unix
If [LPR Port] is not displayed at step 5 of "Adding a printer port", perform installation of print service for Unix.
1.
Click the [Start] button and select [Network and Dialup Connections]
from the [Control Panel].
For Windows XP, select [Start]-[Control Panel], and select [Network and Internet Connection]-[Network Connection] from the [Control Panel] window displayed.
2.
3.
4.
5.
Select the [Optional Networking Components] in the [Advanced] menu.
6.
7.
Click the [Next] button.
Check the [Other Network File and Print Services] box on.
Click the [Details] button.
Make sure that the [Print Services for Unix] is checked, and click the
[OK] button.
When [Disk Insertion] window is displayed, follow the instructions and
insert the Windows CD to the CD-ROM drive, and click the [OK] button.
Necessary files are copied.
Follow the procedures of "Adding a printer port" from the beginning again and activate [Add Printer Wizard].
Reference
(p.559) Creating a printer port on Windows 2000
Reference
(p.561) Creating a printer port on Windows XP
563
Chapter22PrintingbyIPPfromWindows2000/XP
Chapter 22 Printing by IPP from Windows 2000/XP
Internet Printing
This printing system works with IPP (Internet Printing Protocol).
IPP lets you send a print job to a printer connected to the Internet or an intranet: with this protocol, this printing
system will produce outputs as requested via Internet or intranet.
Copier
internet
IPP Client
(Windows 2000/XP)
● Settings on the Copier
To run a print job over IPP, TCP/IP settings must have been previously established.
You can also set IPP attributes. To do this, choose [Network Setup]-[Set IPP Printer Attributes] from the Web
Utilities.
For more information on the Web Utilities, refer to the "Web Utilities User's Reference Guide."
564
Chapter
22
Chapter 22 Printing by IPP from Windows 2000/XP
Internet Printing (Continued)
● Settings on Windows 2000
Complete the steps shown below to add the copier to the existing installation on your computer running under
Windows 2000. TCP/IP settings must have already been set up on your computer. You need the accompanying
CD-ROM which includes the printer driver.
1.
2.
3.
4.
Click the [Start] button, and select [Printers] from [Settings].
5.
Choose [Connect to a printer on the Internet or your intranet].
Double-click [Add Printer] to run [Add Printer Wizard].
Click [Next] button.
Choose [Network printer] and click [Next] button.
565
Chapter 22 Printing by IPP from Windows 2000/XP
Internet Printing (Continued)
6.
Enter the copier's URL in the [URL] field like this:
http:// printer's IP address :631/ipp
In the "printer's IP address" column, enter the IP address assigned to your Network Inteface Card.
Alternatively, you can enter the host name of the copier's (NIC's) host name.
If you designate the proxy setting in your Internet Explorer, you cannot access the your printer
over IPP. For more information see your network administrator.
7.
Click [Next].
The [Add Printer Wizard] will appear.
8.
The wizard will take you through the process of installing the printer
driver of the [Add Printer Wizard].
Reference
(p.71) Installing to Windows 2000 (PCL5e)
566
Chapter 22 Printing by IPP from Windows 2000/XP
Internet Printing (Continued)
● Settings on Windows XP
Complete the steps shown below to add the copier to the existing installation on your computer running under
Windows XP. TCP/IP settings must have already been set up on your computer. You need the accompanying
CD-ROM which includes the printer driver.
1.
Click the [Start] button of the task bar. Then, select [Printers and
Faxes] of the Start menu.
2.
3.
4.
Double-click [Add a printer] to run [Add Printer Wizard].
5.
6.
Choose [Connect to a printer on the Internet or your intranet].
Click [Next] button.
Choose [Network printer] and click [Next] button.
Enter the copier's URL in the [URL] field like this:
http:// printer's IP address :631/ipp
In the "printer's IP address" column, enter the IP address assigned to your Network Inteface Card.
Alternatively, you can enter the host name of the copier's (NIC's) host name.
If you designate the proxy setting in your Internet Explorer, you cannot access the your printer
over IPP. For more information see your network adminisrator.
7.
Click [Next].
The [Add Printer Wizard] will appear.
8.
The wizard will take you through the process of installing the printer
driver of the [Add Printer Wizard].
Reference
(p.91) Installing to Windows XP (PCL5e)
567
Chapter 23 NetWare Configuration
Chapter 23 NetWare Configuration
Setup for NetWare 3.x
Before setting up NetWare, you have to define the print server name, etc., from the Web Utilities.
Reference
(p.530) NetWare Setup
The setup procedure of NetWare 3.x is as follows. To perform this procedure, you need authorization to perform
this procedure.
1.
Start up PCONSOLE and select the file server to use.
Refer to the manual of Novell NetWare for setting up with PCONSOLE.
2.
3.
4.
5.
Generate and assign a print queue.
Define the network interface card as the print server.
Define the notification list/password as necessary.
Set up the primary file server as necessary.
On completion of setup, turn off the main power of the print controller and the main body printer and turn it on
again.
The main body printer will print out a Status Page indicating the file servers equipped with print server and the
queues that the file servers will service.
Reference
(p.524) Outputing the Status Page
Define the primary file sever if the network connects to many sites and has more than one file server. PCONSOLE
should be used to set up the primary file sever.
568
Chapter
23
Chapter 23 NetWare Configuration
Setup for NetWare 4.x
Novell NetWare 4.x can operate in two modes, NetWare Directory Service (NDS) and Bindery Emulation Service (Bindery Emulation). Bindery Emulation and NDS will be executed simultaneously. It is also possible to set
up the print server so that it operates only in Bindery Emulation mode or in NDS mode.
The print server set up for NDS mode will also service the file server of an old version operating in Bindery
mode.
If NDS is not set up properly for the print server and Bindery Service mode is not operating, the print server cannot find the file server and Novell NetWare protocol will be indicated as inactive in the Status Page.
● Setup information
NDS
Novell Directory Service (NDS) offers a different, more advanced approach to network management than
previous NetWare versions. Generally, it stores and tracks all network objects.
All 4.x servers must have NDS loaded in order to function. In this way, every NetWare 4.x server is a
Directory server, because it services named Directory objects such as printing systems, print server and
print queues.
With the appropriate privileges, you can create a print server object, which, once configured in its context
(or location) on the network, eliminates the setup of print servers on every network server.
NDS provides true enterprise networking based on a shared network database rather than individually
defined physical sites. The result is a greatly improved print server setup and management.
Bindery Emulation
NetWare 4.x also provides backward compatibility for 3.x and 4.x print service through Bindery emulation.
The Directory Information Base (DIB) is used to store information about servers and services, users,
printing systems, gateways, etc. It is a distributed database, allowing access to data anywhere on the
network wherever it is stored.
Pre-4.x NetWare versions provide the same data found in the DIB but the data is stored in the NetWare
Bindery. The DIB was designed with more flexible access, more specific security, and, since it is distributed, was designed to be partitioned.
The Directory uses an object-oriented structure, rather than the flat-file structure of the Bindery, and
offers network-oriented access, rather than server-oriented access found in the Bindery.
The Directory is backward-compatible with the NetWare Bindery through Bindery Emulation mode.
When Bindery emulation is enabled, Directory Services will accept Bindery requests and respond just as
if a Bindery existed on the NetWare server being accessed.
Be aware that information obtained from the Bindery query may not be stored in the server since the
Directory is a partitioned and distributed database. Even though the NetWare 4.x server is not operating
from a Bindery, the applications making Bindery requests will not know the difference.
569
Chapter 23 NetWare Configuration
Setup for NetWare 4.x (Continued)
● NDS setup
Web Utilities
This is used for context setup of the print server (network interface card).
For more information on the Web Utilities, refer to the "Web Utilities User's Reference Guide."
Novell NWADMIN
Novell NWADMIN (NetWare Administration) is used to generate a directory tree and print queue objects
in the print server, printing system and tree.
The network interface card is provided with a plug-and-play feature to support NetWare administration
utility (NWADMIN) that enables the NDS administrator to perform centralized management of print servers.
Refer to the Novell NetWare manual for details of Setup with NWADMIN.
PCONSOLE
NetWare allows the use of PCONSOLE as an alternative of NWADMIN. PCONSOLE is used to set up
static information of print servers regarding which queues to service and to whom information is given in
case of trouble.
Refer to the Novell NetWare manual for details of setup with PCONSOLE of NDS.
● Setup for Bindery Emulation
Make sure of the Bindery Context.
Before connecting the print server (network interface card) to the Novell NetWare 4.x server of Bindery
mode, make sure that the NetWare server contains the bindery context.
If the bindery context does not exist, the network administrator should modify the AUTOEXEC.NCF file to
add an adequate SET command and restart the NetWare server or enter a SET command from the console prompt to make changes.
Note that any command entered following the console prompt is effective immediately but the
definition of the autoexec.ncf file becomes effective only after turning off power and on again.
Setup with PCONSOLE in Bindery mode.
If you are sure that the bindery context exists in the file server, you can set up the print server with
PCONSOLE.
Refer to the Novell NetWare manual for details of setup with PCONSOLE.
In Bindery mode, only upper-case letters are valid for the printer server password.
570
Chapter 24 UNIX Configuration
Chapter 24 UNIX Configuration
UNIX Printing through TCP/IP
● Introduction
This section explains how to configure the network interface card and your network for use with TCP/IP communication in various UNIX environments. Independent setup and installation procedures are provided for
most popular UNIX systems.
The TCP/IP capability of the network interface card will also operate with lpr spoolers on other systems, and
with spooler/supervisor capabilities that communicate raw print jobs to the TCP/IP port of the network interface card. This port number is 10001.
SNMP (Simple Network Management Protocol) is a protocol for network management services. SNMP is supported for Management Information Base (MIB) II over the IP for the network interface card. This support allows
you to query MIB II to get system information about the network interface card.
The network interface card can support UNIX TCP/IP printing in two modes:
• Host-based where a supplied line printer daemon is run on one or more workstations and print data is
communicated to the network interface card via a TCP/IP port.
• Printer-based lpd where the print controller appears as a host running a line printer daemon.
Many operating systems provide the option of using host-resident printing or printer-resident printing.
In general, printer-based lpd is easier to use on BSD UNIX systems. This requires an entry in the printcap
file once the network interface card has its IP information. Some UNIX System V systems have restrictions
on support of remote lpd printers, requiring that the host-based lpd approach be used.
Each printing mode has certain advantages over the other mode, as follows:
• The host-resident method can print the username and filename on its banner page; whereas the
printer-resident method prints a banner page with the host's name.
• The printer-resident method requires you to configure the print controller and the network interface
card only one time, when you install the network interface card; whereas, the host-resident method
requires that a printing daemon be installed on every host that you want to be able to print jobs.
The network interface card will also operate with other host-resident print supervisor/spooler programs that present
a print image to the print controller over a TCP/IP port.
571
Chapter
24
Chapter 24 UNIX Configuration
UNIX Printing through TCP/IP (Continued)
● Printing overview
Considering both the host-based and printer-based TCP/IP printing capabilities, the network interface card
works with the following systems:
• All UNIX systems that support lpd
• System V Rel. 4 (on 386 platforms)
• DEC ULTRIX RISC Versions 4.3 and 4.4
• DEC OSF/1 Versions 2.0 and 3.0
• Solaris:
Version 1.1.3 (SunOS 4.1.3),
Version 2.3 (SunOS 5.3),
Version 2.4, and
Version 2
• HP-UX Series 700 and 800 Version 9.01 and Version 10
• IBM AIX Version 3.2.5 and Version 4.0
• SCO UNIX Version 3.2
• AS400
• If the systems you are using do not run lpd, refer to "Installing UNIX TCP/IP programs".
• The UNIX-TCP/IP Programs on accompanying CD-ROM also include source code so that you can recompose
host-based code for configuring on other System V platforms.
572
Chapter 24 UNIX Configuration
UNIX Printing through TCP/IP (Continued)
● Configuring IP address to the network interface card
Regardless of the printing mode selected, the network interface card must be given the IP address and routing parameters. You can configure the IP address for the network interface card in one of the following ways:
• Use DHCP (Dynamic Host Configuration Protocol).
Reference
(p.519) Using DHCP
• Use arp and ping capability.
Reference
(p.523) Using arp command (UNIX)
• Use BOOTP (Internet Boot Protocol).
Reference
(p.521) Using BOOTP Lite (Windows 95/98/Me/NT/2000/XP)
• Use reverse ARP (rarp) capability (Ethernet II frame type only).
Reference
(p.523) Using arp command (UNIX)
• Use arp command, MAP (Management Access Program), or BOOTP Lite for Windows.
You can use the BOOTP, rarp, or arp and ping procedures only when the network interface card is in its default
state (when no IP information has been entered).
Depending on the topology, you may need to provide the MAC address of the network interface card. The
MAC address is the 12-character code that is printed on the Status Page each time the print controller and
the main body printer is turned on.
After the network interface card has an IP address, you must use the MAP utility, or other dedicated utilities
(for Windows or Macintosh) to change an IP address, Subnet Mask and Default Gateway.
573
Chapter 24 UNIX Configuration
UNIX Printing through TCP/IP (Continued)
● lpd UNIX Printing
lpd is an implementation of the standard UNIX line printer daemon that lets you print across a TCP/IP network without the need to install software on your workstation, with all filtering and banners done by the network interface card.
Remote printing uses the same commands (lpr, lpq, lpc) as local printing.
The process begins when the lpr call finds the printer on a remote system by looking at the remote (rm) entry
in the /etc/printcap file for that printer.
lpr handles a print job for a remote printer by opening a connection with the lpd process on the remote system and sending the data file (followed by the control file containing control information for this job) to the
remote system.
The printer-based lpd then filters the data and prints the job according to information contained in the control
file and its own printcap file.
The network interface card lpd recognizes the format of a certain printer emulation and filters the data, if possible, so it can be printed on the printer you specify.
You can indicate to the network interface card lpd what type of print controller it is attached to by either:
• Accepting the default port setting (PCL5e, PostScript and other), or
• Changing the listed emulations via a standard IP based Web Browser.
The sections that follow give specific lpd setup instructions for various systems.
Setting Up a BSD Remote Printer to Use lpd
To set up a remote printer on the host that sends jobs to the network interface card using printer resident
lpd, add an entry to the /etc/printcap file on your host for each printer you use. Perform the following procedure:
1.
Open the /etc/printcap file.
Make an entry naming the network interface card as the remote host and PORT1 as the remote
printer name. A typical printcap entry is as follows:
<printer_name>\ (for example, lprprinter)
:lp=:\
:rm=<remote_host>:\ (for example, name as entered in /etc/hosts)
:rp=PORT1:\
:sd=/usr/spool/lpd/<printer_name>:
(for example, spool directory on system used to spool
data and control files)
This entry will send jobs spooled at /usr/spool/lpd/<printer_name> to the printer designated
<printer_name> to be printed at PORT 1 (the internal connection to the printer) of the network interface card designated as <remote_host>.
2.
Create the spooling directory. For example, type:
mkdir /usr/spool/lpd/<printer_name>
3.
To print via the spooler, use the lpr command. Type:
lpr-P <printer_name> < file_name>
Installation and testing are done. You are now ready to print.
574
Chapter 24 UNIX Configuration
UNIX Printing through TCP/IP (Continued)
Setting Up an AIX version 2.5 Remote Printer to Use lpd
Use the following procedure to set up a remote printer on the host that sends jobs to the network interface card using the lpd of the network interface card.
1.
At the prompt, type:
#smit spooler <cr>
2.
3.
4.
5.
6.
When a window appears, select [Manage Remote Printers].
When a menu appears, select [Client Services].
Another menu appears, select [Remote Printer Queues].
Another menu appears, select [Add a Remote Queue].
When a window appears, change the values shown to configure the
network interface card.
The values displayed are default values. You must replace the short and long form filter values with
the values shown in the following table.
Data Requested
Name of queue to add
queue Destination Host
Short Form Filter
Long Form Filter
Name of remote printer queue
Name of device to add
7.
Example
print1
printfast
/usr/lpd/bsdshort
/usr/lpd/bsdlong
PORT1
print1
Data Description
Name of local printer
NIC IP hostname
Required value
Required value
Network interface card
Name of local queue
After you have supplied all values, press Enter.
You can now print.
Setting Up an AIX 4.0 System
Use these procedures to install the network interface card in a AIX 4.0 system:
1.
2.
3.
4.
5.
6.
7.
Run SMIT Printer.
Select [Print Spooling].
Select [Add a Print Queue].
Select [Remote].
Use [Standard Processing].
Assign a queue name.
Use the host address of the Network Interface Card for the Remote
System.
8. Use [PORT1] for the queue on the remote system.
9. Add a description (optional).
10.Press [Enter] to generate.
Installation is complete. Test your printer by executing the following command:
lp -d<queue_name> <file_name>
575
Chapter 24 UNIX Configuration
UNIX Printing through TCP/IP (Continued)
Setting Up an HP-UX Remote Printer to Use lpd
Set up a remote printer on the host that sends jobs to the network interface card using the lpd of the network interface card. To do this:
1.
At the prompt, type:
sam
2.
3.
4.
5.
6.
When a window appears, select [Printer/Plotter Manager].
When the menu appears, select [List printer and plotters].
When a list appears, select [Actions] in the title bar.
From the pull-down menu, select [Add Remote Printer].
When a window appears, add values to configure the network interface
card.
See example below.
Data Requested
Printer Name
Remote System Name
Example
myprinter
fastprint
Remote printer Name
PORT1
Description of Input Data
name to be used in lp command
Network Interface Card hostname as in
/etc/hosts
lpd queue name
7.
At the bottom of the screen, select [Remote Printer is on BSD system]
from the three choices available.
8.
9.
Click on the OK button.
Ping the unit to test communications. Type:
ping
<IP address of the network interface card>
10.Ping should confirm your IP address with the message:
<IP address of the network interface card> is alive
11. If the connection is confirmed, you can now print.
576
Chapter 24 UNIX Configuration
UNIX Printing through TCP/IP (Continued)
Setting Up an AS/400 System to Use lpd
When working with the output queue description (WORKOUTQD), there are several fields that must be
defined for the network interface card to function properly as a remote printer device.
Use the following procedure to define fields for the network interface card to make it function as a remote
printer:
1.
When prompted for the remote system, type INTNETADR so the AS/400
recognizes the device as an IP device.
2.
3.
4.
5.
6.
Port must be [PORT 1].
7.
Manufacturer type and model must be the print driver that goes with
your print controller.
Connection type must be [IP].
Internet address must be the IP address of the network interface card.
Destination type must be [OTHER].
When prompted for transforming SCS to ASCII, type YES to allow the
AS/400 do the character translation.
577
Chapter 24 UNIX Configuration
UNIX Printing through TCP/IP (Continued)
Setting Up a DEC ULTRIX 4.3 RISC or OSF1 Remote Printer
Use the following procedure to set up a remote printer on the host that sends jobs to the network interface card.
1.
2.
3.
At the prompt, type: lprsetup, then select [add].
4.
5.
6.
Type: remote, and press [Enter].
7.
8.
Designate a remote system name and press [Enter].
9.
You are asked to enter the name of a printcap symbol from a displayed
list. Type: Q, and press [Enter].
Enter a name for your printer, then press [Enter].
"Do
you want more information on specific printer types?" Press Enter.
A list of ULTRIX-supported printers is listed.
Enter a printer synonym (alias) and press [Enter].
Designate a spooler directory and press [Enter], or accept the default
spooler directory displayed and press [Enter].
Designate PORT1 as the remote system printer name and press
[Enter].
10.Your configuration is displayed.
You are asked whether these values are final. Type: Y or N, and press Enter. An example is shown
below.
Printer #7 Symbol
lp (line printer)
rm (remote host)
rp (remote printer)
sd (spooler directory)
Type
STR
STR
STR
STR
Representative Value
Network Interface Card_host
PORT1
/usr/spool/lpd7
11. Add comments to the printcap file. For example, you can type:
Lois' printer down the hall <Enter>
12.Select exit to save your configuration, then press [Enter].
You are now prepared to print.
578
Chapter 24 UNIX Configuration
UNIX Printing through TCP/IP (Continued)
Setting Up a SCO UNIX Remote Printer to Use lpd
Use the following procedure to set up a remote printer on the host that sends jobs to the network interface card using lpd.
1.
At the prompt, enter the mkdev rlp command.
You cannot run mkdev rlp twice. If you have additional printers to be configured, use the rlpconf command.
2.
You are now asked a series of questions. Respond as follows (shown
in bold type):
Please enter a printer name: lprprinter1
Is lprprinter1 a remote printer or a local printer? R
Enter remote host name: lprprinter
Confirm the information you entered: Y
Confirm the preceding connection as your system
default: Y
Enter another printer name or quit setup: Q
3.
4.
If necessary, stop and restart your remote daemon.
Using a line editor of your choice, edit the /etc/printcap file and change
the:
rp=entry to PORT1.
579
Chapter 24 UNIX Configuration
UNIX Printing through TCP/IP (Continued)
Setting Up System V Release 4 and Solaris 2.X to Use lpd
If your system recognizes the LPSYSTEM command, you do not need to install the dedicated utility, Kyoceramita's host-side software. Another option is the admintool if your system supports it.
• LPSYSTEM Installation
The following procedure must be executed from the Bourne Shell.
Type: SH then press Enter to enter the Bourne Shell program.
Use the following procedures to install LPSYSTEM:
1.
2.
lpsystem -t bsd < Print server host name in /etc/hosts file >
lpadmin -p <local printername> -s <remote host name or IP address>
!PORT1
Your system may want its IP address instead of the remote host name.
3.
4.
Enable <local printername>
Accept <local printername>
Printing on Linux
1.
2.
Start x terminal.
At the command prompt, enter the printtool command.
The Red Hat Print System Manager window opens.
3.
Click the Add button.
The Add Printer Entry window opens.
4.
Choose Remote Unix (lpd) Queue and click OK .
The Edit Remote Unix Queue Entry window opens.
5.
Specify the following:
•
•
•
•
•
•
6.
The printer name
The spooler directory (typically, /usr/spool/lpd/prntr-name)
The IP address of the Network Interface Card (in the Remote Host field)
PORT1 (in In the Remote Queue field)
An input filter (optional)
When you finish, click OK.
Restart the daemon by choosing lpd -> Restart lpd in the Print Server
Manager.
580
Chapter 25 Apple Talk Configuration
Chapter 25 Apple Talk Configuration
Preparation to print from Macintosh
● Configuration for Apple Talk
The AppleTalk protocol must be enabled before printing can be performed.
Use the Control Panel, MAP utility or Web Utilities for Windows to check or to enable the AppleTalk protocol.
Important
Macintosh OS X is not supported.
Reference
(p.533) AppleTalk Setup
Reference
(p.533) Printer Name
Reference
(p.533) Zone Name
• Print to the printing system by using Chooser to select the network and printer.
• The network interface card is found in Chooser as IB1_(serial number) 1, where 1 stands for the print controller.
● How To Access The HTTP Server With A Web Browser
Access to the HTTP Server allows you to perform all network interface card functions.
Use the following procedure to access HTTP (HyperText Transfer Protocol) with the standard Web Browser,
such as Netscape or Internet Explorer (4.x or higher).
1.
Assign an IP address to the network interface card.
Reference
2.
(p.527) IP Address
Start the Web Browser you normally use.
When the Browser is up and running, type http:// followed by the IP address of the unit in the Location
field at the top of the Browser screen, or by going to [File] at the menu bar and choosing Open Location. Example: For a unit with an IP address of 199.9.200.200, type:
http://199.9.200.200
If you designate the proxy setting in your Web Browser you cannot access the Web Utilities.
For more information on the proxy settings. See your network administrator.
For more information on the Web Utilities, refer to the ''Web Utilities User's Reference Guide.''
581
Chapter
25
Chapter 26 Troubleshooting of Network
Chapter 26 Troubleshooting of Network
Resetting the Network Interface Card to Factory Default
● Resetting the Network Interface Card to Factory Default
You can cause the network interface card to restore all parameters to factory default values, so the network
interface card appears just as it came from the factory. You may choose to do this when the network interface card is moved to a new location where the environment (NetWare file servers, IP subnets, and so on) is
different.
This process is called "Reset to Factory Default".
It can be done with a control panel on the copier or Web Utilities.
• Control Panel
Reference
(p.539) Factory Default
• Web Utilities
For more information on the Web Utilities, refer to the "Web Utilities User's Reference Guide."
Resetting to factory default value means that the network interface card loses all data such as
names and IP address. It does not lose its serial number or MAC address.
582
Chapter
26
Chapter 26 Troubleshooting of Network
How to Diagnose Problems
Use the following list to determine the cause of printing problems:
1.
Verify that the printing system is functioning properly.
• Make sure the printing system is operating properly by generating a test page.
For instructions on generating a test page, refer to ''Section 4 How to Setup'' in this Manual.
Reference
(p.114) Test Page Print
• Does the LCD Touch Screen of the main body printer display an error message?
Refer to the Kyoceramita User's Manual designed for your specific main body printer.
2.
Check the Status Page to see what protocols are enabled and active.
Refer to the appropriate chapter to confirm that you have installed and configured your network protocol correctly for the network interface card.
Reference
3.
(p.524) Outputing the Status Page
Determine if other users can print.
If they can't and they are all on the same NOS, go to the troubleshooting section for that NOS operation manual.
4.
When you have determined the nature of the problem, use the checklists in the next section.
583
Chapter 26 Troubleshooting of Network
How to Diagnose Problems (Continued)
● Troubleshooting Network Hardware Connections
• For 100BaseTX or 10BaseT, check that the network connector is plugged into the RJ connector on the
network interface card.
• Try another cable to make sure you do not use a defective cable.
● Troubleshooting MAP Problems
If the MAP cannot detect a target network interface card, check the following:
• Are the network settings on the network interface card correctly made?
• Did you correctly select the MAP settings?
• Are the protocols used by the computer on which the MAP is to run correctly set up?
• Are the Web Browsers used by the computer on which the MAP to run correctly set up?
• If nothing irregular is found, turn off the main power supply to the print controller and the main body
printer, then turn it back on, wait several minutes and try running the MAP again.
● Troubleshooting NetWare Protocol
It is recommended that you use MAP to get the NetWare setup and parameter values. If you have not
resolved the problem after running MAP, go through the checklists in this section.
NetWare Checklist
• Is the print server name (network interface card name) entered correctly? The factory default name is
IB1_(serial number). The serial number can be found on the Status Page.
• Did you assign print queues to the printing system? It is recommended that you assign each print
queue to only one network interface card-connected printing system. If print queues are assigned to
other network printers, the print jobs may be going to another network printer.
• Did you set up the print controller to the type Remote Other/Unknown?
• If the PCONSOLE or NWADMIN settings are correct, the connection between the printing system and
network may have been broken. Turn the print controller and the main body printer off and, using
PCONSOLE or NWADMIN, wait for the status message "Not Connected". Turn the print controller and
the main body printer on and the status should change to "Waiting for Job".
File Server Checklist
• Is there enough disk space on the File Server and is it running?
• Is the correct file server associated with the printing system? Use PCONSOLE or NWADMIN to check
this.
• Did you have the proper rights to configure the print controller? (supervisor or administrator)
• Are the File Server and the network interface card communicating? Run NetWare's COMCHECK utility
from any network workstation to check this.
• Are there enough user positions on the File Server?
584
Chapter 26 Troubleshooting of Network
How to Diagnose Problems (Continued)
Workstation Checklist
• Is the network loaded onto the workstation? Refer to the NetWare documentation.
• Is the application set up to print to the printing system? For instance, are you using the correct driver?
• Is the workstation connected to the correct print queue? Print a file and verify that the file goes to the
queue.
• Are the print queues assigned to the network interface card-connected printing system also assigned
to another network printer? If they are, the print jobs may be going to that printer.
• From PCONSOLE or NWADMIN, enter a sample print job directly into an assigned queue. Does the
job become Active? Is the job printed?
• Is AUTO ENDCAP enabled? Auto Endcap lets you send data to a network printer. Use PCONSOLE or
NWADMIN to check. If not, enable it.
• To check AUTO ENDCAP, use PRINTCON. If AUTO ENDCAP is disabled, enable it.
Print Server Configuration Checklist
If all your hardware connections are correct, check the following:
• Use MAP to check the status of the print server. The [Unit Status] screen shows the status for the
selected print server. This report includes a status of file servers and queues assigned to a printing
system along with a description of any problems.
• The printer may not be assigned to the correct print queues. Use PCONSOLE or NWADMIN to direct
print jobs to the correct queues, then check to see if the print job is in the queue.
• If print servers were added or changed, use PCONSOLE or NWADMIN to make sure you configured
the new devices correctly.
• Make sure the print server name has been entered correctly. If you changed the name in MAP, you
must also change the name in PCONSOLE or NWADMIN before you can print.
• Use PCONSOLE or NWADMIN to check the Printer Status. Make sure it is not stopped.
• You cannot use PCONSOLE Version 1.0 to configure the print server. Contact Novell Inc. for an
upgrade.
Printer Server/File Server/Printer Checklist
Check the following to see if:
• The print server can log into the file server, and can service jobs from a File Server.
• The print server name is listed on that File Server. Use PCONSOLE or NWADMIN to set up the print
server to the File Server.
• The password assigned to the print server through PCONSOLE matches the password assigned
through MAP. Use MAP to update the password stored in the print server memory.
• The print job is in the print queue and waiting to be printed. Use PCONSOLE or NWADMIN to check if
the print jobs are being sent to the printing system.
585
Chapter 26 Troubleshooting of Network
How to Diagnose Problems (Continued)
Workstation to Print Server Connection Checklist
To make sure the workstation is communicating with the print server, check the following:
• Print a file from the workstation and make sure the print job gets to the print queue using PCONSOLE
or NWADMIN. If the print job does get to the queue, the problem is not with the workstation/print
server connection.
• Use CAPTURE to send data to the printing system from a workstation software application. Refer to
your NetWare print server manual for information.
• Make sure another printer is not taking the print jobs from the queues before the print server can service the job. To do this, disable the other printer until you can verify the print server-connected printing
system setup.
Print Server Loses Its Novell File Server Connection
If the print server loses its connection to the file server, it can take approximately 5 to 10 minutes to
reconnect. If the connection is not made after a reasonable amount of time, check the error conditions to
troubleshoot the problem.
Unable to Print than a Different Context
The print server does not support printing from a context different than the context in which you are
installed. If you want to do this, you must create an alias queue.
Refer to your NetWare Manual for more information.
586
Appendices
Appendices
Appendix A Product Specifications ......................... 588
Appendix B Function List .......................................... 595
Appendix C Font ........................................................ 604
Appendix D Symbol Set ............................................. 621
Appendix A Product Specifications
Appendix A Product Specifications
Product Specifications (Printing System (2))
Type:
Built-in box type for the KM-8530 Printer/Copier
Paper (PCL5e):
5.5" x 8.5" / 8.5" x 11" / 8.5" x 14" / 11" x 17" / A3 / A4 / A5 / A6
/ B4 / B5 / B6 / F4 / 8K / 16K / 5.5" x 8.5" (Wide) / 8.5" x 11"
(Wide) / 11" x 17" (Wide) / A3(Wide) / A4(Wide) / A5(Wide) /
B4(Wide) / B5(Wide) / A4 Tabstock / 8.5'' x 11'' Tabstock
Paper (PS3):
Statement / Letter / Legal / Tabloid / A3 / A4 / A5 / A6 / B4 / B5 /
B6 / F4 / 8K / 16K / Statement (Wide) / Letter(Wide) / Tabloid
(Wide) / A3(Wide) / A4(Wide) / A5(Wide) / B4(Wide) / B5(Wide)
/ Letter Tabstock / A4 Tabstock / Custom
May be different depending on the specification of each country.
The paper with "W" at the end of the document size represents
"Wide paper". If there is no space for displaying "Wide" in the
driver, it is replaced --> with "+".
Paper Feeding and
Amount of Feeding Paper:
Same as the copier
Load Output Paper:
Same as the copier
Mode:
Dual operation of the copier and the printer
(5 jobs, including scanning jobs, can be processed at the maximum.)
Special Printing (PCL5e):
Duplex printing, selection of sheet types (manual paper feed),
selection of Output Tray, Layout (Nup function), Scaling Function, Sorting, Booklets, 2-in-1 Function, 2-in-1 repeat function,
Fold, Stitch and Trim Function, Staple Function, Wait Mode
Function, Image Shift Function, Front/Back Cover Function,
Watermark, Punch Function, Tandem Print etc.
Special Printing (PS3):
Duplex printing, selection of sheet types (manual paper feed),
selection of Output Tray, Negative Image Printing, Mirror Image
Printing, Layout (Nup function), Scaling Function, Offset, Booklets, 2-in-1 Function, 2-in-1 repeat function, Fold, Stitch and
Trim Function, Staple Function, Wait Mode Function, Image
Shift Function, Front/Back Cover Function, Watermark, Punch
Function, Tandem Print etc.
Orientation:
Portrait and Landscape
Resolution:
Printing System:400 x 400 dpi / 600 x 600 dpi
Scanning System: 200 dpi / 300 dpi / 400 dpi / 600 dpi
Gradation:
1 bit
No. of Prints:
1 to 9999
Continuous Print Speed:
85 ppm (A4, 8.5 x 11)(See Note 1)
Printable Area:
Standard:
Top and Bottom Margins:2.5 mm
Right and Left Margins:2.5 mm
Wide Size:
Margins 0 mm (unlike standard size's)
Max. Printable Area: 303 x 458 mm
Warm-up Time:
Same as the copier
CPU:
Intel Pentium III 866 MHz
System Memory:
64 MB (Standard)
Expandable up to 512 MB (Option: MB-4A / MB-4B)
588
Appendix A Product Specifications
Product Specifications (Printing System (2)) (Continued)
Host Interface:
Parallel port Centronics
(IEEE 1284 / amphenol 25 pin male connector)
Network Interface:
Ethernet
Printer Description Language:
PCL5e
(100Base-TX / 10Base-T)
Adobe PS3 (optional PS3 kit required)
Built-in Fonts:
80 Agfa Microtype fonts
136 Adobe PostScript fonts
Compliant OS:
Windows 95/98/Me
Windows NT 4.0 (NT Service Pack 3 or more)
Windows 2000
Windows XP
Mac OS 7.1 to 9.x (Mac OS X is not supported at September
2002)
(optional PS3 kit required)
Printer Driver (PCL5e):
There are 2 types of PCL drivers, each supported by the following.
Windows 95/98/Me
Windows NT4.0/2000/XP
Printer Driver (PS3):
There are 5 types of PS drivers, each supported by the following.
Windows 95/98/Me
Windows NT4.0
Windows 2000/XP
Mac OS 7.1 to Mac OS 8.5
Mac OS 8.5 to Mac OS 9.x
(Mac OS X is not supported at September 2002)
Compliant Host Computer:
A Windows-based computer
Macintosh (optional PS3 kit required)
Options:
UG-1 (PostScript Option)
IB-1 (Network Interface Card)
MB-4A (64 MB) / MB-4B (128 MB)
Dimensions:
200 mm(W) x 350 mm(H) x 415 mm(D)
7.9" (W) x 13.8" (H) x 17" (D)
Weight:
Approx. 11 kg
Approx. 242.5 lb
Power:
Supplied from the copier
Working Environment:
Temperature: 10 °C to 30 °C
50 °F to 86 °F
Humidity:
10 % to 80 %RH (non-condensing)
Restrictive Conditions
When the Weekly Timer function of the copier is activated, power is not turned off until the data output is
finished, if data remains in the E-RDH.
Note:These speeds are based on continuous printing following the storage of all pages in the E-RDH
memory or based on continuous printing of the same image on multiple pages.
Note:Specifications are subject to change without notice.
589
Appendix A Product Specifications
590
Appendix A Product Specifications
591
Appendix A Product Specifications
Product Specifications (Network Interface Card (NIC))
Type:
Print Controller Built-in type
Frame Type:
IEEE 802.2/802.3/Ethernet II/IEEE 802.3 SNMP
Ethernet Connection:
100Base-TX / 10Base-T
Network Connector:
RJ-45
Protocols:
TCP/IP (BOOTP, ARP, RARP, ICMP, DHCP, SNMP, HTTP,
SMTP, FTP, IPP), IPX/SPX, AppleTalk (EtherTalk)
Compliant OS (NOS):
Novell NetWare (3.x, 4.x), Windows 95/98/Me, Windows NT 4.0,
Windows 2000, Windows XP, UNIX, MAC OS 7.x or more
Multiple Protocols:
Automatic selection
Printing Method:
Peer-to-Peer (TCP/IP for Windows 95/98/Me), Pserver (IPX/
SPX), lpd/lpr (TCP/IP for Windows NT 4.0/2000), lpd/lpr (TCP/
IP for UNIX), AppleTalk (EtherTalk)
Dedicated Utilities:
IP-P2P, IPX-P2P, MAP (Management Access Program),
NWSetup, UNIX-TCP/IP Programs
Standard Utilities:
Web Browser (Netscape Navigator, Internet Explorer)
Operating Conditions:
0 to 50 °C, 5% to 80% RH
Status Indicators:
Green LED, Yellow (amber) LED (one each)
Settings:
Stored in nonvolatile memory
592
Appendix A Product Specifications
UTP cable specifications
Use the following universal Ethernet standard when configuring your 10/100BaseT UTP cables to connect to
the RJ-45 connector on the Network Interface Card. The cable should be Category Type 5 or better (depending
on length).
Pin No.
Color
Ethernet
8
Blue/White
7
Blue
6
Orange/White
5
Green/White
4
Green
3
Orange
Receive+
2
Brown/White
Transmit-
1
Brown
Transmit+
Receive-
593
Appendix A Product Specifications
Factory Default Settings (NIC)
Data transfer speed:
Automatic recognition
Password:
sysadm
TCP/IP:
Novell NetWare:
IP Address
0.0.0.0
Subnet Mask
255.0.0.0
Default Gateway
0.0.0.0
Base Port Number
10001
DHCP
Enabled
IP Address
Enabled
LPD Banner
Enabled
Ethernet Frame Type
Ethernet II
NetWare (IPX/SPX)
Enabled
Print Server Name
xxx_(serial number) *1
Print Server Password
No Value
Scan Rate Print Queue
1 Sec.
Ethernet Frame Type
Auto Search*2
Disable Bindery
Preferred NDS Context
Preferred NDS Tree
AppleTalk:
Peer-to-Peer:
Enabled
No Value
No Value
AppleTalk
Enabled
Printer Name
xxx_(serial number)*1
Ethernet Frame Type
802.2 On 802.3
Peer-to-Peer
Enabled
Printer Name
xxx_(serial number)*1
Ethernet Frame Type
Auto Search*2
*1
[xxx] varies depending on models of machine.
*2
If the Network Interface Card cannot find the frame type when starting, [802.2 On 802.3] must be
selected.
594
Appendix B Function List
Appendix B Function List
Function List (Print Controller)
Classification
Setting Items
Set Value
Description
95/98/
Me
NT4.0/
2000
XP
Copies
1 to 9999
This function is used to specify
the number of copies to be
printed.
O
O
O
Collate
On / Off
This function is used to specify
how to output multiple pages.
O
O
O
Orientation
Portrait
Landscape
This function is used to specify
orientation.
O
O
O
Paper size
5.5" x 8.5"
8.5" x 11"
8.5" x 14"
11" x 17"
A3 - 297 x 420 mm
A4 - 210 x 297 mm
A5 - 148 x 210 mm
A6 - 105 x 148 mm
B4 - 250 x 354 mm
B5 - 182 x 257 mm
B6 - 128 x 182 mm
F4 - 8.0" x 13"
8K - 267 x 390 mm
16K - 195 x 267 mm
5.5" x 8.5" W
8.5" x 11" W
11" x 17" W
A3W- 297 x 420 mm
A4W - 210 x 297 mm
A5W - 148 x 210 mm
B4W - 250 x 354 mm
B5W - 182 x 257 mm
A4 Tabstock
8.5'' x 11'' Tabstock
The paper sizes you can set differ depending on specifications
in the country and trays. Refer
to the operating manual of the
copier for details.
The paper with "W" at the end of
the document size represents
"Wide paper". If there is no
space for displaying "Wide" in
the driver, it is replaced --> with
"+".
O
O
O
Media Type
Plain paper
Thin paper
Thick paper
Tab sheet
This function is used to specify
Trace
the paper type to be printed
OHP [Transparency]
from the Bypass tray.
OHP-Interleave [Blank]
OHP-Interleave
[Print]
User defined type
O
O
O
Paper Source
Auto Select
Bypass tray
Tray 1
Tray 2
Tray 3
Tray 4
O
O
O
Paper tab
This function is used to specify
the paper tray.
595
Appendix B Function List
Function List (Print Controller) (Continued)
Classification
Paper tab
(Features)
Setting Items
Set Value
Description
95/98/
Me
NT4.0/
2000
XP
Duplex
None
Flip on long edge
Flip on short edge
This function is used to set the
mode of Duplex printing.
O
O
O
Output Tray
Default
Sub Tray
Main Tray
This function is used to specify
the output tray.
O
O
O
Password Print
Off/On
This function is used to set the
password print.
O
O
O
Settings
-
Press this button to open [Password Print] dialog.
Enter your User ID and password.
O
O
O
Restore
Defaults
-
This function is used to return
the settings to default settings.
O
O
O
Offset
Off
On
This function is used to specify
offset mode.
O
O
O
Staple
None
Single Left
Double Top
Double Left
Single Right
Double Right
This function is used select the
staple position.
O
O
O
Combination
None
Booklet
Booklet-Right
2-in-1
2-in-1 Repeat
This function is used to arrange
page layout.
O
O
O
Punch
None
Left
Top
Right
This function is used to select
the punch position.
O
O
O
Fold & Stitch
None
Fold Only
Fold & Trim
Fold & Stitch
Fold, Stitch & Trim
Z-Fold[A3, B4, 11 x
17.8k]
Z-Fold[8.5 x 14]
Three-Fold
This function is used to arrange
the finishing method for printed
papers.
O
O
O
Wait Mode
None
Wait
Wait with Proof
This function is used to confirm
setting or to proof a print out
before starting the entire print
job.
O
O
O
Image Shift
Off
On
This function is used to create a
new binding margin on papers.
Printing System (2) does not
correspond to this.
O
O
O
Output Order
FaceDown
FaceUp
O
O
O
Smoothing
None
Type1
Type2
Type3
O
O
O
Toner Save
Normal Toner
Save Draft
O
O
O
Tandem Print
Off
On
O
O
O
Two copiers print at the same
time.
596
Appendix B Function List
Function List (Print Controller) (Continued)
Classification
Graphics tab
POD tab
Setting Items
Set Value
Description
95/98/
Me
NT4.0/
2000
XP
Halftoning
Solid Black and White
Patterned Grays
Diffused Grays
This function is used to select
the method of the image processing for halftones.
O
O
O
Brightness
-100 to 100
This function is used to make an
adjustment on halftones.
O
O
O
Contrast
-100 to 100
This function is used to make an
adjustment on halftones.
O
O
O
Negative
Off/On
This function is used to print
image with reversed tone.
O
O
O
Restore
Defaults
-
This function is used to return
the settings to default settings.
O
O
O
Image Shift
Shift Value of Printer
Engine
Shift Value of Printer
Driver
This function is used to create a
new binding margin on papers.
O
O
O
Image Storage
Off/On
Store
Store and Print
This function is used to storage
the image.
O
O
O
Image Storage Settings
Press this button to open
[Image Storage] dialog. Enter
your Job ID and password.
O
O
O
Chapter
Off/On
This function is used to chapter.
O
O
O
Chapter Pages
-
This function is used to specify
the page to be chaptered.
O
O
O
Restore
Defaults
-
This function is used to return
the settings to default settings.
O
O
O
Layout - Pages
per sheet
1 / 2 / 4 / 6 / 9 / 16
This function is used to print
more than one page of a document on one sheet of paper.
O
O
O
This function is used to specify
the enlargement or reduction
rate of image in percentage.
O
O
O
O
O
O
O
O
O
Layout - Scaling 10 to 400
Options tab
Resolution
400 x 400
600 x 600
TrueType
options
Outline soft fonts
Bitmap soft fonts
Rasters
This function is used to specify
how to output TrueType fonts.
597
Appendix B Function List
Function List (Print Controller) (Continued)
Classification
Watermarks tab
Description
95/98/
Me
NT4.0/
2000
XP
Watermark Text
None
CONFIDENTIAL
COPY
DRAFT
FILE COPY
FINAL
PROOF
TOP SECRET
This function is used to specify
the watermark.
O
O
O
Watermark Page
All but first page
All pages
First page only
No watermark
This function is used to specify
the page on which a selected
watermark is printed.
O
O
O
Watermark Top/Bottom
Top
Bottom
This function is used to specify
whether to print watermarks in
the foreground or background.
O
O
O
Watermark Count
-
This function is used to specify
how many copies of the watermark on each page.
O
O
O
Watermark Separation
-
This function is used to specify
how far apart multiple watermarks are on the page.
O
O
O
Font - Name
Arial
Arial Black
Courier New
Symbol
Tahoma
Times New Roman
Wingdings, etc.
This function is used to specify
the font of the selected watermark.
(A list of the fonts installed in the
PC is displayed.)
O
O
O
Font - Color
Black
Dark Gray
Light Gray
White
This function is used to specify
the color of the selected watermark.
O
O
O
Font - Darkness 0 to 100
This function is used to control
the density of the watermark
text.
O
O
O
Font - Bold
Off/On
This function is used to apply
bold formatting to the watermark text.
O
O
O
Font - Italic
Off/On
This function is used to apply
italic formatting to the watermark text.
O
O
O
Font - Size
1 to 300
This function is used to specify
the font size of the selected
watermark.
O
O
O
Position
Automatically
User defined
(X: 0 to 100)
(Y: 0 to 100)
This function is used to specify
the position of the selected
watermark.
O
O
O
This function is used to specify
the control the "lean" angle of
the selected watermark.
O
O
O
This function is used to specify
the type of adjustment.
O
O
O
O
O
O
O
O
O
Setting Items
Set Value
Position - Angle 0 to 360
Adjustment
Move
Rotate
Show layout
-
New
-
This function is used to preview
your settings in layout with the
current watermark settings.
This function is used to create a
custom watermark.
598
Appendix B Function List
Function List (Print Controller) (Continued)
Classification
Watermarks tab
Overlay tab
Setting Items
Set Value
Description
95/98/
Me
NT4.0/
2000
XP
Delete
-
This function is used to delete
the selected watermark.
O
O
O
Restore
Defaults
-
This function is used to return
the settings to default settings.
O
O
O
Symbol - File
None (default)
This function is used to specify
a BMP file (Microsoft Windows
standard) as an overlay form
printed on paper.
O
O
O
Symbol - Page
All but first page
All pages
First page only
No overlay
This function is used to specify
the page on which a selected
overlay form is printed.
O
O
O
Symbol - Select
Bitmap
-
This function is used to register
a Bitmap image for overlay.
O
O
O
Shade - Color
Black
This function is used to specify
color for a bitmap image. Only
Black is selectable.
O
O
O
Shade - Darkness
0 to 100
This function is used to specify
Darkness of a bitmap image for
overlay.
O
O
O
Size
Automatically
User defined
(10 to 100)
This function is used to specify
the magnification ratio of overlay image in percentage.
O
O
O
Position
Automatically
User defined
(X: 0 to 100)
(Y: 0 to 100)
This function is used to specify
the position of overlay image.
O
O
O
O
O
O
O
O
O
Show layout
-
Restore
Defaults
-
This function is used to preview
your settings in layout with the
current watermark settings.
This function is used to return
the settings to default settings.
599
Appendix B Function List
Function List (Print Controller) (Continued)
Classification
Cover tab
About tab
Setting Items
Set Value
Description
95/98/
Me
NT4.0/
2000
XP
Front Cover
Off/On
Blank
Printed
This function is used when front
covers are used.
O
O
O
Front Cover Tray
Bypass tray
Tray 1
Tray 2
Tray 3
Tray 4
This function is used to select a
paper source used for front covers.
O
O
O
Back Cover
Off/On
Blank
Printed
This function is used when back
covers are used.
O
O
O
Back Cover Tray
Bypass tray
Tray 1
Tray 2
Tray 3
Tray 4
This function is used to select a
paper source used for back covers.
O
O
O
Sheet Insertion
Off/On
Blank
Printed
This function is used when intersheets are used.
O
O
O
Sheet Insertion
- Pages
-
This function is used to specify
the page to be inserted.
O
O
O
Sheet Insertion
- Tray
Bypass tray
Tray 1
Tray 2
Tray 3
Tray 4
This function is used to select a
paper source used for intersheets.
O
O
O
Sheet Insertion
- Advanced
Off/On
This function is used to perform
advanced settings.
O
O
O
Sheet Insertion
- Settings
-
Press this button to open [Sheet
Insertion Advanced Settings]
dialog. Specify the page to be
inserted, per each tray.
O
O
O
PI Cover Sheet
Off/On
This function is used when PI
cover sheets are used.
O
O
O
PI Front Cover
None
On
Specify the tray you intend to
use with PI Front Cover Sheet.
O
O
O
PI Back Cover
None
On
Specify the tray you intend to
use with PI Back Cover Sheet.
O
O
O
Restore
Defaults
-
This function is used to return
the settings to default settings.
O
O
O
-
-
This function is used to show
version information of the
printer driver.
O
O
O
600
Appendix B Function List
Function List (PostScript3 Option)
● Printer Special Functions
Setting Items
Job Offset
Set Value
Off / On
95/
98/
Me
NT
4.0
Win
2000
Win
XP
Mac
When [On] is selected, every
set of copies is offset upon
exit.
O
O
O
O
O
Description
Note
Print Position Left / Middle / Right
Collate
Sort / Group
Prints multiple sets according
to the selected method. sorting or each page grouping.
O
O
O
O
O
Combination
None / Booklet / BookletRight / 2-in-1 / 2-in-1 Repeat
Prints 2 pages onto 1 sheet
with the selected method.
O
O
O
O
O
Fold, Stitch
- None - / Fold only /
Fold, Trim / Fold, Stitch /
Fold, Stitch, Trim /
Z-fold (A3, B4, 11 x 17, 8K) /
Z-fold (8.5 x 14) / Three-fold
Makes folded / stitched /
trimmed set according to the
selected method.
O
O
O
O
O
Stapling
None / Single (Portrait) / Single (Landscape) / SingleRight (Portrait) / SingleRight
(Landscape) / Double Side
(Portrait) / Double Side
Staples the set by the
(Landscape) / Double Sidselected positioning method.
eRight (Portrait) / Double
SideRight (Landscape) /
Double Top (Portrait) / Double Top (Landscape)
O
O
O
O
O
Punch
- None - / Left (Portrait) / Left
(Landscape) / Top (Portrait)
/ Top (Landscape)/ Right
(Portrait) / Right (Landscape)
Punches the set by the
selected positioning method.
In some case of the settings
of punching / stapling / paper /
size combination, punch function can not be used.
O
O
O
O
O
Wait Mode
- None - / Wait / Wait with
Proof
Stops before printing out multiple sets according to the
selected method.
O
O
O
O
O
Output Order
FaceDown / FaceUp
Outputs sheets of paper, face
up or down, as selected.
O
O
O
O
O
Image Shift
Off / On
When [On] is selected, prints
documents with the binding
margins set up from the LCD
Panel of copier.
O
O
O
O
O
Front Cover
None / Printed / Blank
Inserts a paper on the top of
each set of copies as a front
cover by the selected method.
O
O
O
O
O
Front Cover
Tray
- None - / Manual Feed /
Tray 1 / Tray 2 / Tray 3 /
Tray 4
Use the paper of a selected
tray as a front cover.
O
O
O
O
O
Back Cover
None / Printed / Blank
Inserts a paper on the bottom
of each set of copies as a
back cover by the selected
method.
O
O
O
O
O
Back Cover
Tray
- None - / Manual Feed /
Tray 1 / Tray 2 / Tray 3 /
Tray 4
Use the paper of a selected
tray as a back cover.
O
O
O
O
O
PITray(Front)
None / On
Inserts a sheet from the PITray to the top of each set of
copies.
O
O
O
O
O
PI-Tray(Back)
None / On
Inserts a sheet from the PITray to the bottom of each set
of copies.
O
O
O
O
O
Smoothing
None / Type1 / Type2 /
Type3
O
O
O
O
O
Toner Save
Normal / Toner Save /Draft
O
O
O
O
O
O
O
O
O
O
Tandem Print
When Printed/Blank is set up
in Back Cover, Manual Feed
is automatically selected as
Back Cover Tray if you set up
None in Back Cover Tray.
Two copiers print at the
same time.
Off / On
601
Appendix B Function List
Function List (PostScript3 Option) (Continued)
● Paper / Output
Set Value
Description
Note
95/
98/
Me
NT
4.0
Win
2000
Win
XP
Mac
Paper Size
Statement / Letter / Legal /
Tabloid / A3 / A4 / A5 / A6 /
B4 / B5 / B6 / F4 / 8K / 16K /
Statement (Wide) /
Letter(Wide) / Tabloid
(Wide) / A3(Wide) /
A4(Wide) / A5(Wide) /
B4(Wide) / B5(Wide) / Letter Tabstock / A4 Tabstock /
Custom
Selects a paper size.
The paper with "W" at the
end of the document size
represents "Wide paper". If
there is no space for displaying "Wide" in the driver, it is
replaced --> with "+".
[Custom] can only be
selected when using a Macintosh.
This may vary depending on
models of machine.
O
O
O
O
O
Orientation
Portrait / Landscape /
Rotated
Prints onto selected paper
direction. [Rotated] is available with [Landscape].
Try ''Rotated'' if you want to
get a uniform orientation
with Mixed Original.
O
O
O
O
O
Print on Both
Side
(Duplex)
None / Flip on long edge /
Flip on short edge
Performs duplex printing
with specified method.
O
O
O
O
O
Paper Source
AutoSelect Tray / Tray1 /
Tray2 / Tray3 / Tray4 / Manual feed
Prints using the selected
input tray.
O
O
O
O
O
Output Bin
Default / Sub Tray / Main
Tray
Prints to the selected output
tray.
When Default is selected,
outputs to Main Tray.
O
O
O
O
O
Paper type
Plain Paper / Thin Paper /
Thick Paper / Tabbed Sheet
/ Trace / OHP(Transparency) / OHP-Interleave(Blank) / OHPInterleave(Print) / User
defined type
Prints under the condition of
each selected paper type.
(with Manual Feed)
When OHP-Interleave(Blank)/OHP-Interleave(Print) is selected in
Paper type, the tray specified in paper source is used
for interleaving papers. OHP
is fed from Manual feed.
For paper type settings of
each tray except Manual
feed, sets up from the
copier. For details, see the
''Copier User's Manual''
O
O
O
O
O
Margins
Units (Inches / Millimeters),
Top / Bottom / Left / Right
Prints with the margins set
using the specified unit.
O
-
-
-
-
Layout
1 / 2 / 4 / 6 / 9 / 16 / Booklet
Prints the selected page(s)
onto 1 sheet.
O
O
O
O
O
Print page
border
-
Prints the page border when
the check box is checked in
over 2-up (Layout) printing.
O
-
-
-
O
95/
98/
Me
NT
4.0
Win
2000
Win
XP
Mac
O
-
-
-
O
Setting Items
● Graphic
Setting Items
Set Value
Description
Note
Resolution
400 dpi / 600 dpi
Prints with specified resolution
Scaling
25-400
Prints the document image
reduced or enlarged to the
specified value.
1-1000 (WindowsNT / 2000)
O
O
O
O
O
Special-Print
as a negative
image
-
Prints with black and white
reversed under selection.
Negative Output
(WindowsNT / 2000)
O
O
O
O
O
Special-Print
as a mirror
image
-
Prints with left and right
reversed under selection.
Mirrored Output
(WindowsNT / 2000)
O
O
O
O
O
Convert gray
text to PostScript gray
-
Prints the image after converting gray text to PostScript gray.
O
-
-
-
-
Convert
graphics to
PostScript
gray
-
Prints the image after converting graphics to PostScript gray.
O
-
-
-
-
602
Appendix B Function List
Function List (PostScript3 Option) (Continued)
● Installable options
Setting Items
Set Value
Description
Note
95/
98/
Me
NT
4.0
Win
2000
Win
XP
Mac
Finisher
No Finisher / DF-630 / DF635
Lets printer recognize the
selected finisher.
O
O
O
O
O
Sheet Feeder
None / PI-108
Lets printer recognize the
selected Sheet Feeder.
O
O
O
O
O
Trimmer Unit
None / TU-108
Lets printer recognize the
selected Trimmer Unit.
O
O
O
O
O
Punch Unit
None / PU-108 / PZ-108
Lets printer recognize the
selected Punch Unit.
O
O
O
O
O
Large Capacity Tray
None / LT-402 / LT-412
Lets printer recognize the
selected Large Capacity
Tray (Tray 4).
O
O
O
O
O
Memory Configuration
64 - 512 (MB RAM)
Lets printer recognize the
selected value as available
printer memory.
O
O
O
O
O
603
Appendix C Font
Appendix C Font
Font List (Print Controller)
604
Appendix C Font
Font List (Print Controller) (Continued)
605
Appendix C Font
Font List (Print Controller) (Continued)
606
Appendix C Font
Font List (PostScript3)
607
Appendix C Font
Font List (PostScript3) (Continued)
608
Appendix C Font
Font List (PostScript3) (Continued)
609
Appendix C Font
Font Number List (Control Panel-PCL Setup)
Font#
Font
Pitch/Point
0
line printer
16.67/8.5
1
line printer
16.67/8.5
2
line printer
16.67/8.5
3
line printer
16.67/8.5
4
line printer
16.67/8.5
5
line printer
16.67/8.5
6
line printer
16.67/8.5
7
line printer
16.67/8.5
8
Courier Bold Italic
scalable
9
Courier Bold
scalable
10
Courier Italic
scalable
11
Courier
scalable
12
Letter Gothic
scalable
13
Letter Gothic Italic
scalable
14
Letter Gothic Bold
scalable
15
Courier PS
scalable
16
Courier PS Oblique
scalable
17
Courier PS Bold
scalable
18
Courier PS Bold Oblique
scalable
19
CG Times Bold Italic
scalable
20
CG Times Bold
scalable
21
CG Times Italic
scalable
22
CG Times
scalable
23
Albertus Medium
scalable
24
Albertus Extra Bold
scalable
25
Antique Olive
scalable
26
Antique Olive Italic
scalable
27
Antique Olive Bold
scalable
28
Univers Medium
scalable
29
Univers Medium Italic
scalable
30
Univers Bold
scalable
31
Univers Bold Italic
scalable
32
Claredon Condenced
scalable
610
Appendix C Font
Font Number List (Control Panel-PCL Setup) (Continued)
Font#
Font
Pitch/Point
33
Coronet
scalable
34
Garamond Antiqua
scalable
35
Garamond Kursiv
scalable
36
Garamond Halbfett
scalable
37
Garamond Kursiv Halbfett
scalable
38
Marigold
scalable
39
CG Omega
scalable
40
CG Omega Italic
scalable
41
CG Omega Bold
scalable
42
CG Omega Bold Italic
scalable
43
SymbolPS
scalable
44
Times New
scalable
45
Times New Italic
scalable
46
Times New Bold
scalable
47
Times New Bold Italic
scalable
48
Helvetica
scalable
49
Helvetica Oblique
scalable
50
Helvetica Bold
scalable
51
Helvetica Bold Oblique
scalable
52
Univers Medium Condensed
scalable
53
Univers Medium Condensed Italic
scalable
54
Univers Bold Condensed
scalable
55
Univers Bold Condensed Italic
scalable
56
ITC Avant Garde Book
scalable
57
ITC Avant Garde Book Oblique
scalable
58
ITC Avant Garde Demi
scalable
59
ITC Avant Garde Demi Oblique
scalable
60
ITC Bookman Light
scalable
61
ITC Bookman Light Italic
scalable
62
ITC Bookman Demi
scalable
63
ITV Bookman Demi Italic
scalable
64
Arial
scalable
65
Arial Italic
scalable
611
Appendix C Font
Font Number List (Control Panel-PCL Setup) (Continued)
Font#
Font
Pitch/Point
66
Arial Bold
scalable
67
Arial Bold Italic
scalable
68
Helvetica Narrow
scalable
69
Helvetica Narrow Oblique
scalable
70
Helvetica Narrow Bold
scalable
71
Helvetica Narrow Bold Oblique
scalable
72
New Century Schoolbook Roman
scalable
73
New Century Schoolbook Italic
scalable
74
New Century Schoolbook Bold
scalable
75
New Century Schoolbook Bold Italic
scalable
76
Palatino Roman
scalable
77
Palatino Italic
scalable
78
Palatino Bold
scalable
79
Palatino Bold Italic
scalable
80
Courier
scalable
81
Times Roman
scalable
82
Times Italic
scalable
83
Times Bold
scalable
84
Times Bold Italic
scalable
85
ITC Zapf Chancery Medium Italic
scalable
86
Courier
scalable
87
Symbol
scalable
88
Wingdings
scalable
612
Appendix C Font
Screen Fonts
Two types of screen fonts are contained in the User Software CD.
PostScript Type 1 font
TrueType font
The PostScript Type 1 font has the same design as the internal printer font. It is recommended to install this
font when desiring to match the monitor display with printed results in the case of printing when using the
printer font.
For a list of the types of fonts available, refer to “Appendix C Font List.”
Reference
(p.604)
For details on the installation of screen fonts, refer to the ReadMe file in the Mac or Windows folder on the
“User Software CD.”
The “User Software CD” includes two ReadMe files, one in the Mac folder, and the other in the Windows
folder. They are distinguished as follows:
ReadmeE.txt in the Windows folder
Readme(E) in the Mac folder
Screenfonts Installation procedure
A. How to install PostScript Type1 fonts under Windows 95/98/Me/NT 4.0
In order to use PostScript Type 1 fonts in Windows 95/98/Me/NT 4.0, you must first install Adobe Type
Manager (ATM), and then install the fonts through ATM. ATM version 4.0 or higher is required for Windows 98/Me/NT and 3.02 or higher for Windows 95.
If ATM is not installed, you will need to install an ATM compliant to your OS using the “User Software
CD.”
Reference
(p.617)
If ATM version is lower than which mentioned above, you must first uninstall the lower ATM, and then
install adequate ATM.
To Install Type1 fonts in Windows95/98 and NT 4.0 using ATM Light 4.1:
1.
Choose [Start] - [Programs] - [Adobe] - [Adobe Type Manager] - [Adobe
Type Manager 4.1].
2.
In ATM, click the [Font] tab.
613
Appendix C Font
Screen Fonts (Continued)
3.
4.
Choose [Browse For Fonts] from the [Source] pop-up menu.
5.
Select the fonts you want to install. You can click to select one font,
Ctrl-click to select several fonts, or Shift-click to select a contiguous
group of fonts.
6.
Press the [Add] button to install the fonts.
7.
Exit ATM.
Select to “\English\Screenfonts” folder on the “User Software CD.”
614
Appendix C Font
Screen Fonts (Continued)
B. How to install TrueType fonts under Windows 95/98/Me/NT 4.0
In order to use your TrueType fonts in Windows 95/98/Me/NT 4.0, you must first install them, which can
be done either of two ways:
1)
Copy the .ttf font files to your “\windows\fonts” folder (Windows95/98/Me), or “\winnt\fonts”
folder (Windows NT 4.0) from “User Software CD.”
2)
1.
2.
3.
4.
Choose [Start] - [Setting] - [Control Panel].
5.
6.
Click on [Select all].
Double-click on the [Fonts] icon.
Go to the [File] menu, select [Install new font].
In the [folders] panel at the lower left, navigate to the location
“\English\Screenfonts” folder on the “User Software CD.”
Click on [OK].
615
Appendix C Font
Screen Fonts (Continued)
C. How to install PostScript Type1 & TrueType fonts in Windows 2000/XP
Windows 2000/XP supports PostScript Type 1 fonts at the system level just like TrueType fonts.You do
not need to install ATM.
You have two ways of running the installation: 1) and 2), below. You can use either way.
1)
Copy the font files at “\English\Screenfonts\PS Screen Fonts” folder on the “User Software CD”
to your “\winnt\fonts” folder.
2)
1.
2.
3.
4.
Choose [Start] - [Setting] - [Control Panel].
5.
6.
Click on [Select all].
Double-click on the [Fonts] icon.
Go to the [File] menu, select [Install new font].
In the [folders] pane at the lower left, navigate to the location
“\English\Screenfonts” folder on the “User Software CD.”
Click on [OK].
616
Appendix C Font
Screen Fonts (Continued)
D. How to install ATM
1.
Turn on computer and start Windows.
ATM install program will require restart the computer after installation. Before installation, exit from all
active applications, if running.
2.
Double-click the [atm41eng.exe] file in the “\English\Screenfonts”
folder of the “User Software CD.”
The setup program starts running and an installation window appears.
3.
Click the [Next] button.
The window is switched to [Select Country].
4.
Select your country, then click the [Next] button.
The [Software License Agreement] window will appear.
5.
Click the [Yes] button.
Use of Adobe Type Manager (ATM) is subject to the terms and conditions of the [Software License
Agreement]. If you agree by them, click the [Yes] button.
The [User Information] window will appear.
617
Appendix C Font
Screen Fonts (Continued)
6.
Type in user information (Name, Company), then click the [Next] button. You are asked to confirm your entry. If it is OK, click the [Yes] button.
The [Select Components] window will appear.
7.
Click the [Next] button.
The [Select Program Folder] window will appear.
8.
Click the [Next] button.
The [Start Copying Fils] window will appear.
9.
Click the [Next] button.
The file copy process starts. Upon completion of the process, an [Adobe Type Manager] window will
appear.
618
Appendix C Font
Screen Fonts (Continued)
10.Click the [Finish] button.
When the [Display Adobe Type Manager Read Me file.] check box is checked, clicking the [Finish]
button opens the ReadMe file.
After closing the ReadMe file or unchecking the [Display Adobe Type Manager Read Me file.] check
box, the [Setup Complete] window will appear when you click the [Finish] button.
11. Click the [Finish] button and Windows restarts.
When Windows is restarted, Adobe Type Manager (ATM) goes into effect.
619
Appendix C Font
Downloading New Fonts
Important
• When downloading fonts, you need to set [Controller Set]-[Spool] to [Off] in Printer Menu
Screen on the copier control panel.
• For details on the menu structure of the copier control panel as well as on how to access
Printer Menu Screen, refer to the “Print Controller User’s Guide,” Chapter 15 Control Panel.
• Select [disk0] when downloading fonts onto the hard disk in the Print Controller.
• Downloaded to [disk1], the fonts are not available for use.
• Downloading fonts to [disk1] might result in the Print Controller not functioning dependably.
After having downloaded fonts, turn the copier off, wait 10 seconds at least, then turn it back
on. If you don’t do so, you cannot use the downloaded fonts dependably.
For details on how to download fonts, refer to the User’s Guide that comes with the fonts.
620
Appendix D Symbol Set
Appendix D Symbol Set
About Symbol Sets
By setting the symbol set, the print controller can be adapted to various character codes.
Before changing the symbol set, the symbol set now being set to the print controller should be identified.
● Symbol Sets List (Control Panel-PCL Setup)
Symbol Set Name
(WebUtilities)
Symbol Set ID
Symbol Set Name
(Printer LCD panel)
7J
Desktop
DESKTOP
0S
ISO 11 Swedish
ISO 11
ISO 15 Italian
ISO 15
2S
ISO 17 Spanish
ISO 17
1G
ISO 21 Germany
ISO 21
1E
ISO 4 United Kingdom
ISO 4
0U
ISO 6 ASCII
ISO 6
0D
ISO 60 Danish
ISO 60
1F
ISO 69 French
ISO 69
0N
ISO 8859/1 Latin 1
ISO L1
2N
ISO 8859/2 Latin 2
ISO L2
5N
ISO 8859/9 Latin 5
ISO L5
1U
Legal
LEGAL
8M
Math-8
MATH-8
12J
MC Text
MC TEXT
Microsoft Publishing
MS PUBL
10U
PC-8
PC-8
11U
PC-8 D/N (Danish/Norwegian)
PC-8 D/N
PC-8 Turkish
PC8-TK
12U
PC-850
PC-850
17U
PC-852
PC-852
15U
Pi-Font
PI FONT
5M
PS Math
PS MATH
10J
PS Text
PS TEXT
8U
Roman-8
ROMAN-8
13J
Ventura International
VN INTL
6M
Ventura Math
VN MATH
14J
Ventura US
VN US
Windows 3.0 "Latin 1"
WIN 3.0
Windows 3.1 Latin 1 "ANSI"
WIN L1
0I
6J
9T
9U
19U
621
Appendix D Symbol Set
About Symbol Sets (Continued)
Symbol Set ID
Symbol Set Name
(WebUtilities)
Symbol Set Name
(Printer LCD panel)
9E
Windows 3.1 Latin 2
WIN L2
5T
Windows 3.1 Latin 5
WIN L5
Not Supported:
Not Supported:
Not Supported:
19M
Symbol
579L
Wingdings
622
Appendix D Symbol Set
Symbol Set List
Symbol sets which can be used are shown below.
Symbol Set Code
Symbol Set Code
Desktop
ISO 11 Swedish
0 1 2 3 4 5 6 7 8 9 A B C D E F
00
10
20
30
40
50
60
70
80
90
A0
B0
C0
D0
E0
F0
0 1 2 3 4 5 6 7 8 9 A B C D E F
00
10
20
30
40
50
60
70
80
90
A0
B0
C0
D0
E0
F0
SP
NBS
SP
Symbol Set Code
Symbol Set Code
ISO 15 Italian
ISO 17 Spanish
0 1 2 3 4 5 6 7 8 9 A B C D E F
00
10
20
30
40
50
60
70
80
90
A0
B0
C0
D0
E0
F0
0 1 2 3 4 5 6 7 8 9 A B C D E F
00
10
20
30
40
50
60
70
80
90
A0
B0
C0
D0
E0
F0
SP
SP
• The area enclosed with red lines presents the scope confined by the print controller for confirmation.
• The gray-out area indicates that no characters have been allocated there.
623
Appendix D Symbol Set
Symbol Set List (Continued)
Symbol Set Code
Symbol Set Code
ISO 21 Germany
ISO 4 United Kingdom
0 1 2 3 4 5 6 7 8 9 A B C D E F
00
10
20
30
40
50
60
70
80
90
A0
B0
C0
D0
E0
F0
0 1 2 3 4 5 6 7 8 9 A B C D E F
00
10
20
30
40
50
60
70
80
90
A0
B0
C0
D0
E0
F0
SP
SP
Symbol Set Code
Symbol Set Code
ISO 6 ASCII
ISO 60 Danish
0 1 2 3 4 5 6 7 8 9 A B C D E F
00
10
20
30
40
50
60
70
80
90
A0
B0
C0
D0
E0
F0
0 1 2 3 4 5 6 7 8 9 A B C D E F
00
10
20
30
40
50
60
70
80
90
A0
B0
C0
D0
E0
F0
SP
SP
• The area enclosed with red lines presents the scope confined by the print controller for confirmation.
• The gray-out area indicates that no characters have been allocated there.
624
Appendix D Symbol Set
Symbol Set List (Continued)
Symbol Set Code
Symbol Set Code
ISO 69 French
ISO 8859/1 Latin 1
0 1 2 3 4 5 6 7 8 9 A B C D E F
0 1 2 3 4 5 6 7 8 9 A B C D E F
00
10
20
30
40
50
60
70
80
90
A0
B0
C0
D0
E0
F0
00
10
20
30
40
50
60
70
80
90
A0
B0
C0
D0
E0
F0
SP
SP
Symbol Set Code
Symbol Set Code
ISO 8859/2 Latin 2
ISO 8859/9 Latin 5
0 1 2 3 4 5 6 7 8 9 A B C D E F
0 1 2 3 4 5 6 7 8 9 A B C D E F
00
10
20
30
40
50
60
70
80
90
A0
B0
C0
D0
E0
F0
00
10
20
30
40
50
60
70
80
90
A0
B0
C0
D0
E0
F0
SP
NBS
SP
NBS
• The area enclosed with red lines presents the scope confined by the print controller for confirmation.
• The gray-out area indicates that no characters have been allocated there.
625
Appendix D Symbol Set
Symbol Set List (Continued)
Symbol Set Code
Symbol Set Code
Math-8
Legal
0 1 2 3 4 5 6 7 8 9 A B C D E F
0 1 2 3 4 5 6 7 8 9 A B C D E F
00
10
20
30
40
50
60
70
80
90
A0
B0
C0
D0
E0
F0
00
10
20
30
40
50
60
70
80
90
A0
B0
C0
D0
E0
F0
SP
Symbol Set Code
Symbol Set Code
MC Text
Microsoft Publishing
0 1 2 3 4 5 6
00
10
20
30
40
50
60
70
80
90
A0
B0
C0
D0
E0
F0
DLE
SP
SOH
STX
ETX
EOT
ENQ
ACK
DC1
DC2
DC3
DC4
NAK
SYN
7 8 9 A B C D E F
ETB
EN
SUB
ESC
FS
GS
RS
0 1 2 3 4 5 6
00
10
20
30
40
50
60
70
80
90
A0
B0
C0
D0
E0
F0
US
SP
DLE
SOH
STX
ETX
EOT
ENQ
ACK
DC1
DC2
DC3
DC4
NAK
SYN
7 8 9 A B C D E F
ETB
CAN
EN
SUB
FS
GS
RS
US
SP
• The area enclosed with red lines presents the scope confined by the print controller for confirmation.
• The gray-out area indicates that no characters have been allocated there.
626
Appendix D Symbol Set
Symbol Set List (Continued)
Symbol Set Code
Symbol Set Code
PC-8
PC-8 D/N (Danish/Norwegian)
0 1 2 3 4 5 6 7 8 9 A B C D E F
0 1 2 3 4 5 6 7 8 9 A B C D E F
00
10
20
30
40
50
60
70
80
90
A0
B0
C0
D0
E0
F0
00
10
20
30
40
50
60
70
80
90
A0
B0
C0
D0
E0
F0
Symbol Set Code
Symbol Set Code
PC-8 Turkish
PC-850
0 1 2 3 4 5 6 7 8 9 A B C D E F
00
10
20
30
40
50
60
70
80
90
A0
B0
C0
D0
E0
F0
0 1 2 3 4 5 6 7 8 9 A B C D E F
00
10
20
30
40
50
60
70
80
90
A0
B0
C0
D0
E0
F0
SP
SP
• The area enclosed with red lines presents the scope confined by the print controller for confirmation.
• The gray-out area indicates that no characters have been allocated there.
627
Appendix D Symbol Set
Symbol Set List (Continued)
Symbol Set Code
Symbol Set Code
PC-852
Pi-Font
0 1 2 3 4 5 6 7 8 9 A B C D E F
00
10
20
30
40
50
60
70
80
90
A0
B0
C0
D0
E0
F0
0 1 2 3 4 5 6 7 8 9 A B C D E F
00
10
20
30
40
50
60
70
80
90
A0
B0
C0
D0
E0
F0
SP
Symbol Set Code
SP
Symbol Set Code
PS Math
PS Text
0 1 2 3 4 5 6 7 8 9 A B C D E F
00
10
20
30
40
50
60
70
80
90
A0
B0
C0
D0
E0
F0
0 1 2 3 4 5 6 7 8 9 A B C D E F
00
10
20
30
40
50
60
70
80
90
A0
B0
C0
D0
E0
F0
SP
SP
NBS
• The area enclosed with red lines presents the scope confined by the print controller for confirmation.
• The gray-out area indicates that no characters have been allocated there.
628
Appendix D Symbol Set
Symbol Set List (Continued)
Symbol Set Code
Symbol Set Code
Roman-8
Ventura International
0 1 2 3 4 5 6 7 8 9 A B C D E F
00
10
20
30
40
50
60
70
80
90
A0
B0
C0
D0
E0
F0
0 1 2 3 4 5 6 7 8 9 A B C D E F
00
10
20
30
40
50
60
70
80
90
A0
B0
C0
D0
E0
F0
SP
NBS
SP
Symbol Set Code
Symbol Set Code
Ventura Math
Ventura US
0 1 2 3 4 5 6 7 8 9 A B C D E F
00
10
20
30
40
50
60
70
80
90
A0
B0
C0
D0
E0
F0
0 1 2 3 4 5 6 7 8 9 A B C D E F
00
10
20
30
40
50
60
70
80
90
A0
B0
C0
D0
E0
F0
SP
SP
• The area enclosed with red lines presents the scope confined by the print controller for confirmation.
• The gray-out area indicates that no characters have been allocated there.
629
Appendix D Symbol Set
Symbol Set List (Continued)
Symbol Set Code
Symbol Set Code
Windows 3.0 "Latin 1"
Windows 3.1 Latin 1 "ANSI"
0 1 2 3 4 5 6
00
10
20
30
40
50
60
70
80
90
A0
B0
C0
D0
E0
F0
DLE
SOH
STX
ETX
EOT
ENQ
ACK
DC1
DC2
DC3
DC4
NAK
SYN
7 8 9 A B C D E F
ETB
CAN
EN
SUB
FS
GS
RS
0 1 2 3 4 5 6
00
10
20
30
40
50
60
70
80
90
A0
B0
C0
D0
E0
F0
US
SP
NBS
DLE
SOH
STX
ETX
EOT
ENQ
ACK
DC1
DC2
DC3
DC4
NAK
SYN
Symbol Set Code
Windows 3.1 Latin 5
DLE
SOH
STX
ETX
EOT
ENQ
ACK
DC1
DC2
DC3
DC4
NAK
SYN
0 1 2 3 4 5 6
7 8 9 A B C D E F
ETB
CAN
EN
SUB
FS
GS
RS
00
10
20
30
40
50
60
70
80
90
A0
B0
C0
D0
E0
F0
US
SP
NBS
EN
SUB
FS
GS
RS
US
NBS
Windows 3.1 Latin 2
0 1 2 3 4 5 6
CAN
SP
Symbol Set Code
00
10
20
30
40
50
60
70
80
90
A0
B0
C0
D0
E0
F0
7 8 9 A B C D E F
ETB
DLE
7 8 9 A B C D E F
SOH
STX
ETX
EOT
ENQ
ACK
BEL
DC1
DC2
DC3
DC4
NAK
SYN
ETB
CAN
EN
SUB
FS
GS
RS
US
SP
NBS
• The area enclosed with red lines presents the scope confined by the print controller for confirmation.
• The gray-out area indicates that no characters have been allocated there.
630
Appendix D Symbol Set
Symbol Set List (Continued)
Characters which can be used only for the specific character set are shown in the following table.
The numerals on the top of the table represent the code values of characters which are replaced in the US
ASCII character set. See the US ASCII character set for other characters.
23
SYMBOL SET
ISO4
United Kingdom 1E
ISO6
ASCII
24
40
5B
5C
5D
5E
60
7B
7C
7D
7E
0U
ISO11 Swedish
ISO15 Italian
0S
0I
ISO17 Spanish
2S
ISO21 Germany
ISO60 Danish
1G
0D
ISO69 French
1F
1
631
Index
Index
Index (Object)
C
Cover (Windows)
To set a Back Cover ..................................................................................................... 222
To set a Front Cover..................................................................................................... 218
To set an Insertion Sheet ............................................................................................. 226
To set a Thick Cover .................................................................................................... 229
Cover (Macintosh)
To set a Back Cover ..................................................................................................... 378
To set a Front Cover..................................................................................................... 376
To set a Thick Cover .................................................................................................... 380
F
Finish (Windows)
To adjust printing position inside the paper .................................................................. 245
To set Fold, Stitch, Trim (Trimmer Unit) ....................................................................... 248
To set punching ............................................................................................................ 241
To set stapling .............................................................................................................. 234
To set the Punch Unit ................................................................................................... 238
Finish (Macintosh)
To set center binding, folding and cutting (Trimmer Unit)............................................. 390
To set punching ............................................................................................................ 387
To set stapling .............................................................................................................. 383
To set the Punch Unit ................................................................................................... 386
Font (Windows)
To download the font information ................................................................................. 311
To print without using printer fonts ............................................................................... 304
To replace TrueType with the printer font..................................................................... 306
Font (Macintosh)
To print without using printer fonts ............................................................................... 408
To restrict fonts that can be downloaded...................................................................... 409
632
Index
Index (Object) (Continued)
M
Multiple pages (Windows)
To print 2 pages on a single paper twice as big ........................................................... 205
To print a specific page on the front face ..................................................................... 212
To print a twofold booklet ............................................................................................. 209
To print the document of multiple pages on a single page ........................................... 202
To set to print on both sides ......................................................................................... 199
Multiple pages (Macintosh)
To print 2 pages on a single paper twice as big ........................................................... 370
To print a twofold booklet ............................................................................................. 372
To print the document of multiple pages on a single page ........................................... 368
To set to print on both sides ......................................................................................... 367
Multiple sets of copies (Windows)
To output offset copies ................................................................................................. 194
To print by sets ............................................................................................................. 189
To print page by page collectively ................................................................................ 191
To set the number of copies to be printed .................................................................... 187
Multiple sets of copies (Macintosh)
To output offset copies ................................................................................................. 364
To print by sets ............................................................................................................. 362
To print page by page collectively ................................................................................ 363
To set the number of copies to be printed .................................................................... 361
P
Paper-related items (Windows)
To enlarge or reduce by a specified ratio ..................................................................... 164
To print in rotation......................................................................................................... 155
To set the margins........................................................................................................ 169
To set the orientation.................................................................................................... 153
To set the printing position of the wide paper............................................................... 167
To set the size of the output paper ............................................................................... 157
To set the type of manual-feed paper........................................................................... 160
633
Index
Index (Object) (Continued)
Paper-related items (Macintosh)
To enlarge or reduce by a specified ratio ..................................................................... 347
To set the margins........................................................................................................ 349
To set the orientation.................................................................................................... 341
To set the printing position of the wide paper............................................................... 348
To set the size of the output paper ............................................................................... 342
To set the type of manual-feed paper........................................................................... 344
W
Watermark (Windows)
To change a Watermark ............................................................................................... 282
To create a new Watermark ......................................................................................... 273
To print a Watermark.................................................................................................... 277
Watermark (Macintosh)
To change a Watermark ............................................................................................... 397
To create a new Watermark ......................................................................................... 395
To print a Watermark.................................................................................................... 393
634
Index
Index
Index (Item)
Numerics
L
2-in-1 ........................................ 205, 370
2-in-1 Repeat ............................. 205, 370
Landscape ................................. 153, 341
Large Capacity Tray .................... 173, 353
B
Back Cover ................................ 223, 378
Bindery Emulation ...............................569
Booklet ..................................... 209, 372
Brightness .........................................291
Bypass tray ........................................176
M
Main Tray ..........................................357
Main tray ................................... 179, 182
Manual feed .......................................176
margins ..................................... 169, 349
C
Chapter .............................................212
Collate ..............................................189
Contrast ............................................291
control pane .......................................474
copies ....................................... 187, 361
Copy Mode ........................................475
custom size ........................................350
N
NDS .................................................569
NetWare ...........................................568
O
Offset ....................................... 194, 364
OHP ......................................... 160, 344
Output Tray .......................................182
Overlay ..................................... 268, 270
F
Face Up ............................................214
FaceUp .............................................374
Feed Tray ..........................................354
Finisher ..................................... 179, 356
Flip on long edge ........................ 199, 367
Flip on short edge ....................... 199, 367
Fold & Stitch ......................................249
Fold & Trim ........................................249
Fold only ................................... 249, 391
Fold, Stitch ........................................391
Fold, Stitch, Trim .................................391
Front Cover ................................ 219, 376
P
Page Setup ........................................333
Pages per sheet ......................... 202, 368
Paper handling ...................................202
Password ..........................................256
PI Cover Sheet ...................................229
PI Tray ..............................................231
Portrait ...................................... 153, 341
Printer Mode ......................................475
printing position .......................... 167, 348
PU-108 ..................................... 238, 386
Punch ...............................................242
PZ-108 ..................................... 238, 386
G
Group ....................................... 191, 363
S
Scanner/Server Mode ..........................475
scanning features ................................432
setup ..................................................38
Sheet Insertion ...................................227
Smoothing ................................. 296, 403
Sort ..................................................362
Staple ...............................................236
stapling .............................................383
staplings ...........................................234
Status Page .......................................524
Sub Tray ...........................................357
Sub tray .................................... 179, 182
Halftoning
H
..........................................290
I
Image Shift ................................ 245, 389
Image Storage ....................................260
IP Peer-to-Peer ...................................545
IPP ...................................................564
IPX Peer-to-Peer .................................554
J
Job ID ...............................................263
Job Offset ..........................................194
635
Index
Index (Item) (Continued)
Toner Save
User ID
T
........................................401
U
.............................................256
W
Wait ......................................... 323, 413
Wait with Proof ........................... 319, 411
Watermark ..................273, 277, 393, 395
Z
Z-Fold ...............................................249
636
KYOCERA MITA AMERICA, INC.
Headquarters. MARKETING DEPARTMENT
225 Sand Road, P.O. Box40008
Fairfield, New Jersey 07004-0008
TEL: (973)808-8444
FAX: (973)882-6000
2002.10