1
Version 9.4
Installation Guide
v. 2.0
April 21, 2009
RightFax 9.4 Installation Guide
Edition
Information in this document applies to version 9.4 Service Release 3 of the RightFax Installation Guide. This document was last updated on April 21, 2009.
Copyright Notice
©2008, 2009 Captaris, Inc. All rights reserved.
Captaris
301 116th AVE SE
Suite 400
Bellevue, WA 98004
(425) 455-6000
http://www.captaris.com
Information in this document is subject to change without notice. Companies, names, and data used in examples herein are fictitious unless otherwise noted.
About Captaris Inc
Captaris, Inc. is a leading provider of software products that automate document-centric business processes. Captaris specializes in document capture, recognition, routing, workflow and delivery. Captaris integrated solutions
provide interoperability with leading line of business applications and technology platforms. Captaris products include RightFax, Captaris Workflow, Alchemy, FaxPress, DOKuStar, RecoStar, Single Click Entry and IDStar which
are distributed through a global network of leading technology partners. Captaris customers include the entire Fortune 100 and the majority of Global 2000 companies. Headquartered in Bellevue, Washington, Captaris was
founded in 1982 and is publicly traded on the NASDAQ Global Market under the symbol CAPA. www.Captaris.com.
ii
Captaris RightFax End User License Agreement
IMPORTANT–READ CAREFULLY: This End User License Agreement
(“EULA”) is a legal agreement between you (either an individual or a single
entity) and Captaris, Inc. (“Captaris”) for the Captaris software product
identified above, which includes computer software and may include
associated media, printed materials, and “online” or electronic documentation
(“Product”).
YOU AGREE TO BE BOUND BY THE TERMS OF THIS EULA BY
INSTALLING, COPYING OR OTHERWISE USING THE PRODUCT, IN
WHOLE OR PART. IF YOU DO NOT AGREE TO THE TERMS OF THIS
EULA, DO NOT INSTALL, COPY OR USE THE PRODUCT. INSTEAD, YOU
SHOULD PROMPTLY CONTACT CAPTARIS FOR INSTRUCTIONS ON
RETURN OF THE PRODUCT.
IF YOU HAVE NOT PAID A LICENSE FEE FOR THE PRODUCT, THEN YOU
HAVE ACQUIRED AN EVALUATION EDITION OF THE PRODUCT, WHICH
IS GOVERNED BY THIS EULA, EXCEPT THAT YOUR RIGHT TO USE THE
PRODUCT AS AN EVALUATION EDITION IS LIMITED TO TWENTY (20)
USER ACCOUNTS AND THE WARRANTIES AND CERTAIN OTHER
PROVISIONS OF THIS EULA DO NOT APPLY AS STATED BELOW. YOUR
RIGHT TO USE THE EVALUATION EDITION UNDER THIS EULA WILL
AUTOMATICALLY TERMINATE AND THE PRODUCT WILL
AUTOMATICALLY CEASE FUNCTIONING THIRTY (30) DAYS AFTER YOU
INSTALL IT UNLESS YOU PURCHASE A LICENSE AND ACTIVATE THE
PRODUCT BEFORE THE END OF SUCH THIRTY (30) DAY PERIOD. THE
COMPONENTS OF THE PRODUCT ARE LICENSED SEPARATELY AND,
EXCEPT FOR AN EVALUATION EDITION, YOUR LICENSE RIGHTS
UNDER THIS EULA EXTEND ONLY TO THE COMPONENTS OF THE
PRODUCT FOR WHICH YOU HAVE PAID THE LICENSE FEE.
AS THE FIRST STEP IN THE INSTALLATION PROCESS, WE
RECOMMEND THAT YOU ALLOW THE INSTALLATION UTILITY TO
CHECK AND INSTALL THE PREREQUISITE APPLICATIONS AS
DESCRIBED IN THE DOCUMENTATION. IF YOU DO NOT ALLOW THE
INSTALLATION UTILITY TO CHECK AND INSTALLTHE PREREQUISITE
APPLICATIONS, THEN THE WARRANTIES CONTAINED IN THIS EULA
WILL NOT APPLY TO THE PRODUCT. THE PREREQUISITE
APPLICATIONS INCLUDE PROGRAMS OWNED BY THIRD PARTIES
("THIRD PARTY PROGRAMS"). THE THIRD PARTY PROGRAMS ARE
SUBJECT TO THIS EULA AND ANY SEPARATE LICENSE AGREEMENTS
THAT ACCOMPANY SUCH PROGRAMS, EXCEPT THAT THE THIRD
PARTY PROGRAMS ARE FURNISHED BY CAPTARIS “AS IS” AND
WITHOUT ANY WARRANTIES OF ANY KIND, EXPRESS OR IMPLIED.
Server Software License
Subject to the terms and conditions herein, Captaris grants you a
non-exclusive, non-transferable, personal license to install, run and use one
copy of the server software provided as part of the Product on a single server
that is owned or controlled by you for use in the capacity for which you have
paid license fees. For purposes of this EULA, the capacity licensed by you is
determined based on the number of ports (also referred to as channels), seats,
CPUs, user accounts, or other capacity limitations on which software pricing is
based. As an exception to the restriction set forth in the first sentence of this
section on the number of servers on which the server software may be
installed, you may install, run and use the following server software
components on an unlimited number of servers owned or controlled by you;
provided, you have paid the license fee for such software and such software is
used only with a properly licensed RightFax Server module: Workserver,
Doctranport, Sync, Production Service, Faxrpc, Exchange Gateway, SMTP
Gateway, Lotus Notes Gateway, WPO Gateway, SAP Gateway, Isolated
Engine Conversion, Java/XML module, and Lotus Notes module.
iii
RightFax 9.4 Installation Guide
Client Software License
Subject to the terms and conditions herein, Captaris grants you a
non-exclusive, non-transferable, personal license to install, run and use the
client software provided as part of the Product on an unlimited number of client
computers or devices that are owned or controlled by you for use in the
capacity for which you have paid license fees and solely with the server
software properly licensed by you under this EULA.
Documentation
You may make and use a reasonable number of copies of any documentation
provided with the Product; provided, that such copies will only be used for
internal business purposes in connection with the components of the Product
for which you have paid the applicable license fees and are not to be
republished or redistributed (either in hard copy or electronic form) beyond
your premises.
Backup
You may make one copy of the Product for back-up and archival purposes.
Updates
Any software provided to you by Captaris which updates or supplements the
original Product is governed by this EULA unless separate license terms are
provided with such updates or supplements, in which case, such separate
terms will govern.
License Limitations
Except with respect to an Evaluation Edition, the preceding licenses apply only
to the extent you have ordered and paid for the applicable licenses. The
preceding sections state the entirety of your rights with respect to the Product.
Captaris reserves all rights not expressly granted to you in this EULA. Without
limiting the foregoing, you will not, and you will not authorize or permit any third
party to:
(a) use the Product for any purpose other than your internal business
purposes;
(b) use an Evaluation Edition for any purpose other than your evaluation and
testing of the Product during the thirty (30) day evaluation period;
(c) license, distribute, lease, rent, lend, transfer, assign or otherwise dispose of
the Product or use the Product in any commercial hosted or service bureau
environment;
(d) reverse engineer, decompile, disassemble or attempt to discover the source
code for or any trade secrets related to the Product, except and only to the
extent that such activity is expressly permitted by applicable law
notwithstanding this limitation;
(e) modify, alter or create any derivative works of the Product;
(f) exceed the capacity or concurrent user limitations for the license purchased
by you; or
(g) remove, alter or obscure any copyright notice or other proprietary rights
notice on the Product;
(h) disclose the results of any benchmark testing using the Product to any third
party; or
(i) circumvent or attempt to circumvent any methods employed by Captaris to
control access to the components, features or functions of the Product.
Audit
Captaris shall have the right to audit your compliance with the terms of this
EULA. You agree to grant access to Captaris to facilities, equipment, books,
records and documents and to otherwise reasonably cooperate with Captaris
in order to facilitate any such audit.
Ownership
The Product is valuable property of Captaris and its suppliers and is protected
by copyright and other intellectual property laws and treaties. Captaris or its
suppliers own all right, title and interest in and to the Product and all copyright
and other intellectual property rights in the Product.
Limited Warranty
Captaris warrants to you that the components of the Product for which you
have paid the applicable license fees will perform substantially in accordance
with the accompanying Product manual for a period of thirty (30) days from the
date of receipt.
Exclusive Remedy
If a component of the Product fails to conform to the foregoing warranty, then
iv
Captaris will use commercially reasonable efforts to repair or replace the
nonconforming component. If Captaris is unable to repair or replace the
nonconforming component or determines, in its sole discretion, that repair or
replacement is not practicable, then Captaris may instead terminate this EULA
as it pertains to the nonconforming component and return the license fee paid
by you for the nonconforming component. To the maximum extent permitted by
applicable law, the foregoing sets forth Captaris's and its suppliers’ entire
liability and your sole and exclusive remedy for breach of the limited warranty
set forth above. THE LIMITED WARRANTY SET FORTH ABOVE IS VOID IF
THE FAILURE IS DUE TO ACCIDENT, ABUSE OR MISAPPLICATION AND
DOES NOT APPLY TO AN EVALUATION EDITION. Any replacement
component will be warranted for the remainder of the original warranty period,
if any.
Indemnification
Captaris will defend you against any judicial proceeding based upon a third
party claim that the components of the Product for which you have paid the
applicable license fee infringes any U.S. patent, U.S. trademark, copyright or
trade secret and will indemnify you against any damages, judgments and costs
finally awarded against you in such proceeding; provided that, you: (a) give
Captaris prompt written notice of the claim; (b) permit Captaris to control the
defense and settlement of the claim; and (c) cooperate with Captaris in the
defense and settlement of the claim. Captaris's defense and indemnification
obligations will not apply to any actual or alleged infringement based upon: (i)
modification of the Product by anyone other than Captaris, (ii) abuse,
misapplication or casualty loss, (iii) use of the Product in combination with any
other program or device, if such infringement would have been avoided but for
such modification or combination, or (iv) failure to install or use any error
corrections, fixes or other updates furnished by Captaris, if such infringement
could have been avoided by such installation or use. In the event any
component of the Product licensed by you or your use of such component is
held to infringe or in Captaris’s reasonable judgment is likely to infringe any
third party intellectual property right, Captaris may, at its option, (x) obtain a
license for you to continue to use such component, (y) modify the component
so that it is noninfringing, or (z) terminate this EULA as it pertains to such
component and refund a portion of the license fee paid by you for such
component prorated over three (3) years from the date of purchase. The
foregoing indemnification obligations do not apply to an Evaluation Edition or
the Third Party Programs. Any indemnification that may be provided for any
Third Party Program is set forth in any separate license agreement
accompanying the Third Party Program.
Disclaimer of Warranties
EXCEPT AS EXPRESSLY SET FORTH ABOVE, CAPTARIS AND ITS
SUPPLIERS PROVIDE THE PRODUCT “AS IS” AND WITH ALL FAULTS.
CAPTARIS AND ITS SUPPLIERS HEREBY DISCLAIM ALL OTHER
WARRANTIES, EXPRESS, IMPLIED OR STATUTORY, ARISING BY LAW
OR OTHERWISE, INCLUDING BUT NOT LIMITED TO ANY IMPLIED
WARRANTIES OF MERCHANTABILITY, FITNESS FOR A PARTICULAR
PURPOSE OR USE, TITLE AND NONINFRINGEMENT, WITH REGARD TO
THE PRODUCT. WITHOUT LIMITING THE FOREGOING, CAPTARIS
DOES NOT WARRANT THAT THE PRODUCT WILL BE FREE OF BUGS,
ERRORS, VIRUSES OR OTHER DEFECTS.
Disclaimer of Certain Damages
IN NO EVENT WILL CAPTARIS OR ITS SUPPLIERS BE LIABLE FOR THE
COST OF COVER OR FOR ANY INCIDENTAL, INDIRECT, SPECIAL,
PUNITIVE, CONSEQUENTIAL OR SIMILAR DAMAGES OR LIABILITIES
WHATSOEVER (INCLUDING, BUT NOT LIMITED TO LOSS OF DATA,
INFORMATION, REVENUE, PROFIT OR BUSINESS) ARISING OUT OF
OR RELATING TO THE USE OR INABILITY TO USE THE PRODUCT OR
OTHERWISE UNDER OR IN CONNECTION WITH THIS EULA OR THE
PRODUCT, WHETHER BASED ON CONTRACT, TORT (INCLUDING
NEGLIGENCE), STRICT LIABILITY OR OTHER THEORY EVEN IF
CAPTARIS HAS BEEN ADVISED OF THE POSSIBILITY OF SUCH
DAMAGES.
Limitation of Liability
CAPTARIS’S AND ITS SUPPLIERS’ LIABILITY ARISING OUT OF OR
Captaris Inc. Software License Agreement
v
RightFax 9.4 Installation Guide
RELATING TO THE USE OR INABILITY TO USE THE PRODUCT OR
OTHERWISE UNDER OR IN CONNECTION WITH THIS EULA OR THE
PRODUCT IS LIMITED TO THE AMOUNT ACTUALLY PAID BY YOU FOR
THE PRODUCT REGARDLESS OF THE AMOUNT OF DAMAGES YOU
MAY INCUR AND WHETHER BASED ON CONTRACT, TORT (INCLUDING
NEGLIGENCE), STRICT LIABILITY OR OTHER THEORY. The foregoing
disclaimer of warranties, disclaimer of certain damages and limitation of liability
will apply to the maximum extent permitted by applicable law. The laws of some
states/jurisdictions do not allow the exclusion of implied warranties or the
exclusion or limitation of certain damages. To the extent that those laws apply
to this EULA, the exclusions and limitations set forth above may not apply to
you.
Export Restrictions
You acknowledge that the Product is subject to U.S. export restrictions. You
agree to comply with all applicable laws and regulations that apply to the
Product, including without limitation the U.S. Export Administration
Regulations.
U.S. Government License Rights
All Product provided to the U.S. Government is provided with the commercial
license rights and restrictions described in this EULA. By installing, copying or
using the Product, the U.S. Government agrees that the Product is
"commercial computer software" or "commercial computer software
documentation" within the meaning of FAR Part 12.
Trademarks
This EULA does not grant you any rights in connection with any trademarks or
service marks of Captaris or its suppliers.
Termination
Without prejudice to any other rights, Captaris may terminate this EULA if you
do not abide by the terms and conditions contained herein. Upon termination
of this EULA, you must cease use of the Product and destroy all copies of the
Product and all of its component parts.
Assignment
You may not assign (whether voluntarily, involuntarily, by operation of law or
otherwise) this Agreement, the licenses granted to you hereunder, or any other
rights under this Agreement without the prior written consent of Captaris.
Subject to the foregoing restriction on assignments by you, this Agreement will
be fully binding upon, inure to the benefit of, and be enforceable by Captaris
and its respective successors and assigns.
Governing Law; Jurisdiction
Unless expressly prohibited by local law, this EULA is governed by the laws of
the State of Washington, U.S.A. without regard to any conflict of law principles
to the contrary. The 1980 U.N. Convention on Contracts for the International
Sale of Goods or any successor thereto does not apply. You hereby
irrevocably submit to jurisdiction of the state and federal courts located in King
County, Washington with respect to any proceeding under this EULA or
relating to the Product. You will not prosecute any action, suit, proceeding or
claim arising under or by reason of this EULA except in such courts.
Attorneys' Fees
In any action or proceeding to enforce rights under this Agreement, the
prevailing party will be entitled to recover costs and reasonable attorneys' fees.
Severability
If any provision of this EULA is held by a court of competent jurisdiction to be
invalid, illegal, or unenforceable, the remainder of this EULA will remain in full
force and effect.
English Language
It is the express wish of the parties that this Agreement and all related
documents be drawn up in English. C'est la volonté expresse exigé par les
parties que cette convention et tous les documents y afférents, soient rédigés
en anglais seulement.
Entire Agreement
This EULA sets forth the entire agreement of Captaris and you with respect to
the Product and the subject matter hereof and supersedes all prior and
vi
contemporaneous understandings and agreements whether written or oral. No
amendment, modification or waiver of any of the provisions of this EULA will be
valid unless set forth in a written instrument signed by the party to be bound
thereby.
Captaris Inc. Software License Agreement
vii
RightFax 9.4 Installation Guide
viii
Contents
Chapter 1
Hardware and Software Requirements ............................ 9
Fax Server Requirements ................................................................9
SQL Requirements and Information .......................................... 10
Virtualization Support .................................................................... 12
FaxUtil Legacy Support ................................................................ 12
Fax Board Requirements.............................................................. 12
Phone Line Requirements............................................................ 12
Chapter 2
What Is Installed on the RightFax Server?.................... 15
RightFax Software.......................................................................... 15
RightFax Configuration Programs .............................................. 15
RightFax Services .......................................................................... 18
RightFax Registry Entries ............................................................. 18
RightFax Client Applications ....................................................... 18
Chapter 3
Upgrading RightFax Server Software ............................. 19
Upgrade Information...................................................................... 19
Running the RightFax Server Upgrade ..................................... 20
Chapter 4
Installing RightFax Server Software ...............................23
New Installation Overview ............................................................23
Updates may be available .............................................................23
Installing and Integrating RightFax
with SQL Server 2005 Express ...............................................24
Installing and Integrating RightFax
with SQL Server 2000 or 2005...............................................25
Uninstalling the RightFax Server .................................................28
Chapter 5
Installing RightFax Web Applications.............................29
Other Help Resources...................................................................29
IIS server requirements .................................................................29
Running the Web Applications Install....................................... 30
URL for RightFax Web applications...........................................32
Configuring Web Access Session Timeout Period ................32
Configuring RightFax Web Delivery ...........................................32
ix
RightFax 9.4 Installation Guide
Chapter 6
Installing RightFax Client Applications.......................... 35
RightFax Client Computer Requirements .................................37
Upgrading the RightFax Client Applications ............................37
Before You Begin........................................................................... 38
Installing the Client Applications................................................ 39
Installing the SOAP Client........................................................... 39
Installing the Client Applications from a Command Line...... 40
Configuring Windows 2003 and Windows 2008 Terminal
Services to Support RightFax Client Sessions.....................43
Chapter 7
Installing and Configuring
the Shared Services Module............................................. 47
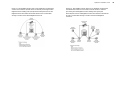
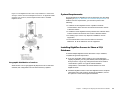
Overview ...........................................................................................47
Server Topology ..............................................................................47
System Requirements................................................................... 49
Installing RightFax Servers to Share a SQL Database......... 49
Performing Daily Maintenance .....................................................53
Chapter 8
Installing RightFax in a Windows 2003 Cluster ........... 55
Clustering RightFax with Microsoft
Windows 2003 Server ...............................................................55
Chapter 9
Upgrading and Adding Fax Channels,
User Licenses, and Optional Components.................... 65
Checking for Installed Components...........................................65
Upgrading the RightFax Server License................................... 66
Licensing Brooktrout SR140 Channels ....................................67
Chapter 10
Documentation and Support............................................. 69
RightFax Documentation.............................................................. 69
Getting Help Online .......................................................................70
Captaris Training Services............................................................71
Captaris Implementation Services..............................................71
Customer Support..........................................................................71
x
Chapter 1
Hardware and Software Requirements
Fax Server Requirements
Many of the software requirements for RightFax 9.4 are provided
on RightFax Product Suite DVD. During Setup, a wizard will
perform a system check for required third-party components and if
necessary, will install them. Some components, such as Microsoft
service packs and Microsoft Exchange server are not provided.
Minimum hardware requirements
Computer/Processor 2.6 GHz or higher Pentium IV-compatible CPU
Memory
1 GB RAM
Hard drive*
10 GB free space
CPU support
Single and dual CPU systems
Drive
DVD drive
RightFax server software is Microsoft certified on the following
server operating systems.
Display
SVGA or higher resolution monitor running at a
resolution of 800 × 600 or higher
Windows 2008 Standard x86
Windows 2008 Enterprise x86
Windows Server 2003 Standard x86 SP2 or later
Windows Server 2003 R2 Standard x86 SP2 or later
Windows Server 2003 Enterprise x86 SP2 or later
RightFax 9.4 does not support Windows 2000 Server operating
systems. If you are upgrading from RightFax 9.0 or 9.3 and your
server uses a Windows 2000 operating system, you must upgrade
to Windows Server 2003 or 2008 before installing RightFax 9.4.
Keyboard and mouse Required
Supported Microsoft Windows Operating Systems
Note Windows 2008 Hyper-V is not supported.
Important Hard disk requirements do not include space for storage of
document images. To calculate disk space, Captaris recommends using
an estimate of 35kb per document page.
Recommended hardware requirements
Computer/Processor 3.6 GHz or higher Pentium IV-compatible CPU
Memory
2 GB RAM
Hard drive
10 GB free space
CPU
Dual CPU system
Chapter 1
Hardware and Software Requirements
9
RightFax 9.4 Installation Guide
Drive
DVD drive
Display
SVGA or higher resolution monitor running at a
resolution of 1024 × 768 or higher
Keyboard and mouse Required
Additional server requirements
Microsoft .NET Framework 3.5*
Microsoft Data Access Components 2.8*
Microsoft Internet Explorer 6 SP1 or later
Microsoft Internet Information Services (IIS) 6.0 SP2 or later
Microsoft Messaging Queuing*
Microsoft Visual C++ 2005 runtime components*
Microsoft Windows Installer 3.1*
A Windows account to run RightFax services. The account you
choose must be a member of the local administrators group and
must have the right to logon as service on the local computer.
*Installed during RightFax setup
Supported Versions of Microsoft SQL Server
RightFax uses a SQL database to store all data on faxes, users,
and dialing rules. During Setup, you have the option to connect to
an existing SQL Server, or install a new RightFax database which
includes a new installation of SQL Server 2005 Express directly on
the RightFax server. Supported versions Microsoft SQL server are
as follows.
SQL Server 2000 Standard Edition
SQL Server 2000 Enterprise Edition
SQL Server 2005 Express
SQL Server 2005 Standard Edition
SQL Server 2005 Enterprise Edition
SQL Requirements and Information
New installation permissions
During new server installations, Setup will prompt for two SQL
accounts. The first is used by Setup to execute SQL create
statements during the creation of the RightFax database. This
account is required only for Setup and is neither saved nor used by
RightFax. The SQL permissions required for this account are
provided below.
Create database
Create table
Create procedure
Create view
Create rule
Create default
The second account is used by and during Setup to run SQL
stored procedures and subsequently by RightFax services
requiring a SQL connection. To execute stored procedures, Setup
will create a new RightFax database role (called DB_executer) and
will assign this account to the role.
Normal operation of RightFax
The RightFax Database Module, DocTransport Module, Remoting
Service, and Server Module request information from the RightFax
database. Access to the database is controlled via the service
account assigned to these services.
RightFax users without Administrative Access permission do not
have direct access to the RightFax database.
10
The following access levels allow RightFax services to perform
various tasks on the SQL Server.
Server Roles: None required.
Select, Update, Insert, Delete, and Execute permissions on all
RightFax database objects. DB_writer and DB_reader database
roles provide Select, Update, Insert, and Delete permission, but
do not grant explicit Execute permission.
Database collation support
The RightFax 9.4 database supports only the SQL Language
collation. Case sensitivity, Accent sensitivity and Kana
sensitivity collations are not supported. In additon, the language
collation must be configured before you install RightFax and cannot
be changed post-install.
however, is encoded into the database when it is installed based
on the current Regional setting on the SQL server. This is true
whether you have a separate SQL server or are installing the SQL
server during the RightFax installation. You should ensure that the
Regional setting on the SQL server is properly configured for the
character set that the server will support before installing the
database. If you have already installed a SQL database with the
incorrect Regional setting, contact Microsoft for assistance in
reconfiguring the SQL regional setting.
The following ASCII code pages are supported by the RightFax
server and client applications:
Database character set support
Tip Many of the RightFax client applications have localized versions that
allow non-English speakers to easily use the RightFax client tools. See
page 35 for a complete list of the languages available in the RightFax
client applications. The languages into which the RightFax client
applications are translated are not related to the character sets that can
be stored in the RightFax database as discussed in this section.
RightFax supports a wide range of characters and symbols from
non-English alphabets, however, the RightFax server, SQL
database, and client applications must all be configured to use the
same symbol sets. If not, characters may not appear on your
clients’ outbound faxes as expected. This is because a character
written on a client computer that is using one symbol set may map
to an entirely different character when sent to a server using a
different symbol set.
The symbol sets that are supported on the RightFax server and
client computers are determined by the Regional and Language
Options configured from Windows Control Panel and can be
changed at any time. The symbol set used by the SQL database,
1250 Central Europe: Albania, Croatia, Faeroese, Hungarian,
Polish, Romanian, Serbian, Slovak, Slovenian
1251 Cyrillic: Byelorussian, Bulgarian, Russian, Ukrainian
1252 Latin 1: Afrikaans, Basque, Catalan, Danish, Dutch
(standard and Belgium), English (United States, Britain, Canada,
New Zealand, Ireland, South Africa), Finnish, French (standard,
Belgium, Switzerland, Canada, Luxembourg), German (standard,
Switzerland, Austria, Luxembourg, Liechtenstein), Icelandic,
Indonesian, Italian (standard, Swiss), Norwegian (Bokmal,
Nynorsk), Portuguese (standard and Brazil), Spanish (Mexican,
traditional, modern) and Swedish.
1253 Greek
1254 Turkish
1255 Hebrew
1256 Arabic
1257 Baltic: Estonian, Latvian, Lithuanian
1258 Vietnam
NoteTime strips are printed using the printer’s available symbol set
regardless of the code page in use on the server. For characters on these
lines to appear as expected, the code page on the fax server must match
the printer’s available symbol set. Because TTI lines and quick headers
are placed onto the fax image by your fax board, RightFax does not
support the use of diacritical characters on these lines.
Chapter 1
Hardware and Software Requirements
11
RightFax 9.4 Installation Guide
Virtualization Support
RightFax 9.4 server software supports VMware ESX server 3.0.1
or later. VMware Workstation and all other virtualization software is
not supported.
Fax Board Requirements
RightFax supports Dialogic (formerly Cantata) Brooktrout fax
boards, and Eicon fax boards. For a list of all supported fax board
types, refer to the online list of supported fax boards at the
Captaris Web site.
VMware ESX Server requirements
Requirements for all RightFax servers begin on page 9. Additional
requirements for virtual RightFax servers are as follows:
Virtual RightFax servers must be installed on ESX platforms that
meet the minimum requirements as documented by VMware.
Captaris recommends a virtual machine dedicated to each
RightFax server.
No virtual RightFax server may contain fax board hardware.
Sending and receiving fax documents requires a boardless
solution (e.g., FOIP) or dialing rules to route faxes to and from a
physical server that contains one or more fax boards. For more
information about creating dialing rules, see the Administrator’s
Guide.
FaxUtil Legacy Support
RightFax 9.4 servers are compatible with FaxUtil versions 9.0 or
later.
Installing the fax boards
Fax boards can be installed in the physical computer running the
RightFax server software, or on a separate computer called a
Remote DocTransport. For information on using Remote
DocTransport computers, refer to the RightFax Administrator’s
Guide.
Phone Line Requirements
The fax boards that RightFax supports can make use of several
different types of phone lines: loop-start (regular analog phone
lines), Direct Inward Dial (DID), Dialed Number Identification
Service (DNIS), Integrated Services Digital Network (ISDN), and
several types of digital phone lines. Different types of fax boards
support different types of phone lines. For information on the types
of fax boards that are compatible with your available phone lines,
refer to your fax board supplier or manufacturer.
Loop-start phone lines
Loop-start lines can be used for incoming or outgoing faxes. A line
can be installed by the local telephone company if one is not
already available through your organization’s existing phone
system. Loop-start lines are also called POTS (Plain Old Telephone
Service) lines.
12
Direct Inward Dial (DID) phone lines
Each DID phone line is called a “trunk.” When a DID trunk is
installed, it is assigned a bank of numbers. For example, a DID
trunk may be assigned the bank of 20 numbers ranging from
321-7450 to 321-7469. All calls to any of the assigned numbers
are routed to the DID trunk.
DID phone lines have a few special attributes. First, DID lines are
used for incoming faxes only. Outgoing faxes must be sent through
a standard loop-start line. Second, the customer, rather than the
phone company, supplies the power (called the “talk battery”)
necessary to drive the phone line. For this reason, certain DID fax
boards may come with an additional power adapter which provides
the necessary –48 volt current.
DID allows RightFax to route incoming faxes to their destinations
within your company. Whenever someone dials a number within the
range, the DID trunk is activated by the phone company and the fax
board accepts the incoming fax. Along with the fax data, the phone
company sends the board the last three or four digits of the phone
number dialed. The fax board collects these digits and passes them
to RightFax. Each RightFax user has a personal fax mailbox which is
assigned one of the DID trunk’s numbers (known as the “routing
code”). Received faxes are routed to the mailbox whose routing
code matches the dialed DID number.
Integrated Services Digital Network (ISDN) phone lines
ISDN is a worldwide standard communications network for digital
data, voice, and video communication. The main advantages of
ISDN over analog telephone lines are fast call setup and release
and additional cost-recovery information included with the call.
PRI, BRI, E1, and T1 digital phone lines
RightFax supports PRI, BRI, E1, and T1 digital phone lines
assuming you have purchased and installed the appropriate type of
fax boards and network interface card. For more information on
digital phone lines, refer to the RightFax Fax Board Guide.
Warning Never plug a loop-start phone line into a DID fax board when
there is any voltage present on the phone line. Doing so will damage the
fax board and void all warranties.
Dialed Number Identification Service (DNIS) phone lines
DNIS is a T1-based version of DID service. For information on
configuring your fax boards for DNIS, refer to the hardware guide
included with your fax board.
Chapter 1
Hardware and Software Requirements
13
RightFax 9.4 Installation Guide
14
Chapter 2
What Is Installed on the RightFax Server?
The RightFax server installation program installs the complete suite
of RightFax products. The capabilities of the server and the
modules that are enabled depend on your product licensing.
Because all of the RightFax software is installed, the RightFax
server can be upgraded and optional modules can be added simply
by purchasing a license and activating the feature. For information
about upgrading the server and adding new RightFax modules, see
Chapter 9, “Upgrading and Adding Fax Channels, User Licenses,
and Optional Components”.
In addition to the installed software, The RightFax installation
creates several Windows services, adds RightFax configuration
settings to the Windows Registry, adds configuration programs to
Windows Control Panel, and installs the FaxUtil and Enterprise Fax
Manager client programs.
RightFax Software
All of the RightFax software is installed on the server in the folder
you specify during installation. By default, the software installs in
the C:\Program Files\RightFax folder.
RightFax Configuration Programs
The RightFax server includes several configuration programs that
let you customize the RightFax services. The RightFax configuration
programs can be run from Windows Control Panel or from
Enterprise Fax Manager (described in the RightFax Administrator’s
Guide).
RightFax uses a SQL database to store all data on faxes, users,
and dialing rules. If you do not connect to an existing SQL
database on your network during installation, RightFax will install
and use a SQL Server 2005 Express database on the RightFax
server. This is a fully-functional SQL database, but lacks the SQL
management tools that accompany the full version of Microsoft
SQL server.
Chapter 2
What Is Installed on the RightFax Server?
15
RightFax 9.4 Installation Guide
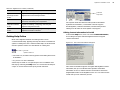
The following table describes all of the RightFax configuration
programs that are available.
Note Some of these configuration programs may not be enabled on the
server, depending on the type of RightFax server you have licensed and
the modules that are enabled.
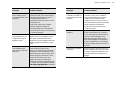
Table 2a RightFax Server Configuration Programs (Continued)
Configuration
program
RightFax BoardServer
Table 2a RightFax Server Configuration Programs
Configuration
program
Captaris Conversion
Engine
Captaris Sync
RightFax Alerting
Description
The Captaris Conversion Engine is a stand-alone,
fault tolerant service that is used to invoke
applications commonly used in server-side
application conversion. These applications will be
used to convert their associated file types when
installed on the RightFax server and remote
WorkServers.
The Captaris Sync Module is an XML/XSLT based
tool that allows RightFax administrators to create
and synchronize users from Active Directory
domains, groups, and organizational units. LDAP
compliant data sources are also supported.
Use this program to configure the RightFax Alerting
and Monitoring feature. This feature lets RightFax
administrators create custom server statistics to
monitor and define thresholds on which to send
alerts. For more information on the Alerting and
Monitoring feature, refer to the RightFax
Administrator’s Guide.
Description
This is a configuration program used for legacy
Brooktrout fax boards supported by RightFax. Use
the BoardServer configuration program to
customize each installed fax board and each fax
channel. Although you may have only one
BoardServer service installed on a single computer,
you can optionally create RightFax BoardServer
services on remote computers to offload fax board
processes or to expand your network’s fax board
and fax channel capacity. For more information on
BoardServers, refer to the RightFax Administrator’s
Guide.
The BoardServer configuration program can only be
launched from within the Doc Transport program
(described next.)
For more information on the fax boards you use and
their configuration requirements, refer to the
RightFax Fax Board Guide.
RightFax Doc
Transport
The Doc Transport configuration program is used to
configure most transport methods for your RightFax
documents including standard fax boards, T.37
Fax-over-IP, SMS (short message service) and fax
board simulation.
All fax board configuration, including BoardServer
configuration, is initiated from this configuration
program.
For more information on the fax boards you use and
their configuration requirements, and the T.37 and
T.38 Fax-over-IP features, refer to the RightFax Fax
Board Guide. For information on document
transport via SMS, refer to the RightFax
Administrator’s Guide.
16
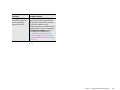
Table 2a RightFax Server Configuration Programs (Continued)
Configuration
program
RightFax E-mail
Gateway
Description
Use this program to create and modify the RightFax
e-mail gateway services. E-mail gateway services
act as the communication link between the RightFax
server and your organization’s e-mail software. It is
possible to install multiple e-mail gateways, each
communicating with a different e-mail server. For
more information on e-mail gateways, refer to the
RightFax Administrator’s Guide, the RightFax
Gateway for Microsoft Exchange Guide, or the
RightFax Gateway for Lotus Notes Guide
(depending on the gateway you add).
RightFax Integration
Use this program to modify the RightFax Integration
Module service. The Integration Module integrates
the RightFax server with applications on mainframe,
mid-range, and local area network host systems. For
more information on the RightFax Integration
Module, refer to the RightFax Integration Module
Guide.
RightFax Remoting
Provides an internal API used by RightFax .NET
applications and services, such as Web Access and
the Captaris Sync Module. The Remoting service
also provides a statistics API which is used by
RightFax services to generate statistics about how
often those services start and stop..
RightFax SAP
Connector
Use this program to create and modify the RightFax
SAP gateway services. SAP gateway services act
as the communication link between the RightFax
server and SAP clients. It is possible to install
multiple SAP gateways, each communicating with a
different SAP client. For more information on the
SAP gateway module, refer to the RightFax
Connector for SAP R/3 Guide.
Table 2a RightFax Server Configuration Programs (Continued)
Configuration
program
Description
RightFax Server
Use this program to modify the RightFax Server
service. The Server service controls all of the
RightFax services and coordinates communication
between the server computer, client computers, fax
boards, and the fax database. For more information
on the RightFax Server service, refer to the RightFax
Administrator’s Guide.
RightFax WorkServer
Use this program to create and modify the RightFax
WorkServer services. WorkServer services perform
the most processor-intensive functions required by
the RightFax server, such as cover sheet generation,
PCL-to-fax conversion, and optical character
recognition. By default, three separate WorkServer
services are installed on the RightFax server, and
each WorkServer service can be customized to
perform specific functions. You can also create
RightFax WorkServer services on remote computers
to offload your most processor-intensive functions.
For more information on WorkServers, refer to the
RightFax Administrator’s Guide.
Chapter 2
What Is Installed on the RightFax Server?
17
RightFax 9.4 Installation Guide
RightFax Services
The names of all RightFax services begin with the word “RightFax”
or “Captaris.” This lets you easily identify all of RightFax services
that are currently running. You can modify most RightFax services
through their configuration programs, which can be run from
Windows Control Panel or from the RightFax administrative
program, Enterprise Fax Manager (described in the RightFax
Administrator’s Guide).
RightFax Client Applications
In addition to the RightFax server software, several RightFax client
applications are available to allow administration of fax servers
(Enterprise Fax Manager), user access to fax mailboxes (FaxUtil),
print drivers that allow users to print documents directly to fax
format (RightFax print drivers), and Web-based versions of these
applications. For more information about FaxUtil, Enterprise Fax
Manager, RightFax print drivers, and Web-based applications, refer
to the RightFax Administrator’s Guide or the online help that is
built-in and shipped with each client.
RightFax Registry Entries
All of the RightFax registry entries are located in the Windows
Registry under the following keys:
HKEY_CURRENT_USER\SOFTWARE\RightFax
HKEY_CURRENT_USER\SOFTWARE\RightFax Client
HKEY_LOCAL_MACHINE\SOFTWARE\RightFax
HKEY_LOCAL_MACHINE\SOFTWARE\RightFax Client
HKEY_CLASSES_ROOT\RF...
HKEY_CLASSES_ROOT\RightFax...
In most cases, you should not have to make changes or additions
to the RightFax registry settings, however, some RightFax features
do require you to make modifications to the Windows Registry.
Wherever this is true, instructions are provided in the RightFax
documentation.
18
Chapter 3
Upgrading RightFax Server Software
Upgrade Information
You can only upgrade to RightFax 9.4 from versions 9.0 with
Feature Pack 2 and later installed or 9.3 with the latest feature
pack and service release installed. If you are running an earlier
version of RightFax, you must either upgrade to a supported
version, or uninstall the RightFax server and perform a new install.
RightFax 9.4 does not support Windows 2000 Server operating
systems. If you are upgrading from RightFax 9.0 or 9.3 and your
server uses a Windows 2000 operating system, you must either
upgrade to Windows Server 2003 or 2008 before installing
RightFax 9.4 or perform a new install and migrate your existing
RightFax settings.
Support for some fax boards has been discontinued with this
release. For a complete list of fax boards supported by this
version, refer to the online list of supported fax boards at the
Captaris documentation Web page. If you have already installed
one or more fax boards that do not appear on this list, do not
upgrade to this version of RightFax.
All 9.0 installations that use an MSDE database must upgrade
MSDE to a supported version of SQL Server (see “Supported
Versions of Microsoft SQL Server” on page 10). By default,
Setup will upgrade local MSDE installations to SQL Server 2005
Express.
Important Setup can upgrade only local MSDE installations. If your
organization is using a remote MSDE server, you must upgrade
MSDE to a supported version of SQL Server before upgrading to
RightFax 9.4.
After the MSDE to SQL Server 2005 Express upgrade, you may
see error messages when attempting to run OSQL backup and
restore procedures. These errors are cosmetic and do not cause
any loss in functionality. For more information, see Microsoft
Knowledge base article 907284.
Before upgrading, back up the entire \RightFax folder structure.
To get a complete server backup, you must first stop all RightFax
services. For information on RightFax backup procedures, see
the RightFax Administrator’s Guide.
Chapter 3
Upgrading RightFax Server Software
19
RightFax 9.4 Installation Guide
Any existing files for the RightFax SecureDocs Module or
Enterprise Fax Manager Web Edition will be replaced during the
upgrade. If you have created customized files for any of these
applications, you must save copies of the customized files before
upgrading, and then merge your customizations into the
upgraded files.
By default, the RightFax Server Module, RPC service, and Queue
Handler service are setup to startup automatically. If you have
changed the startup type from automatic to manual, Setup will
restore the default (automatic) startup type during the upgrade.
Each service may be reconfigured for manual startup after
finishing the upgrade.
Updates may be available
By the time you receive this software, new information or software
updates may be available. For the latest information on RightFax
software, visit the RightFax support Web site at
www.captaris.com/support/downloads/rightfax/index.html. This
Web site may provide up-to-date information on installing and
upgrading the RightFax server.
Rolling out a software upgrade
If you have a large enterprise with a complex server and client
network, you may want to gradually phase in the RightFax software
upgrade.
Because the RightFax server software is backward-compatible with
all supported versions (9.0 and 9.3) of the RightFax client software,
you should plan to upgrade the server first, and then upgrade the
client systems later.
The RightFax servers need not all be upgraded at the same time.
You can run a network of RightFax servers of different supported
versions without loss of functionality. The same is true for RightFax
client applications.
For more information about the installation of RightFax client
applications, “Installing RightFax Client Applications” on page 35.
Running the RightFax Server Upgrade
The RightFax 9.4 Setup wizard will upgrade all supported versions
of local RightFax software. This includes all core server software,
fax board drivers and software, the RightFax database, and
Administrative Utilities. Setup will also upgrade RightFax database
installations on remote SQL Servers. If you are upgrading from a
RightFax 9.0 MSDE integration, Setup will upgrade your MSDE
installation to Microsoft SQL Server 2005 Express.
1. Log on to the computer using a Windows account that is a
member of the domain and local Administrators group.
2. Insert the RightFax Product Suite DVD. If AutoRun is enabled, a
menu of install options appears. If AutoRun is not enabled,
browse the DVD and run Setup.exe. The RightFax Product
Suite Setup wizard opens.
3. RightFax 9.4 Setup requires Microsoft .NET Framework 2.0 or
later and Windows Installer 3.1. If this software is not installed
on your system, Setup will prompt you to install it. To install,
click OK. To cancel Setup and install .NET Framework 2.0 and
Windows Installer 3.1 yourself, click Cancel.
4. Review the welcome screen and click Next.
5. Carefully read and accept the license agreement and click
Next.
6. Setup can check for RightFax updates and other late-breaking
information. To check for updates, verify you have an active
HTTP connection and click Check for Updates. If updates are
found, follow the instructions in the Result section. To skip the
update check and continue with Setup, check the box next to
Do not check for updates and click Next.
7. The Preview Requirements step lists third-party software
required by your existing features and also lists the status of
setup operations. Software that must be installed will have a
status of Not Installed. To continue, click Next.
20
8. If your environment uses remote RightFax servers (e.g., remote
DocTransports, remote WorkServers, remote E-mail Gateways,
remote IIS servers, and computers joined to a RightFax
collective), you must manually shutdown all running RightFax
services on these computers. If you have shutdown all remote
RightFax services, or do not use remote RightFax servers, place
a check mark in the box next to the text that reads I have
shutdown all remote RightFax services. To continue, click Next.
9. RightFax requires TCP ports 10520, 10521, 10062, 34987,
and 34988. Setup can reserve these ports for exclusive use by
RightFax. To allow setup to reserve these ports, enable the
Reserve Ports option and click Next.
10. To apply your upgrade settings and install required third-party
software, click Apply.
11. To proceed to the second phase of Setup and begin installing
RightFax software, click Next followed by Apply. This step may
take several minutes.
12. The third and final phase of Setup guides you through the
configuration of RightFax settings and will enable your feature
set using the Captaris product licensing utility. To continue, click
Next.
13. Setup will upgrade your existing RightFax database to version
9.4. Before continuing, verify a functional database backup. If
your server is joined to a RightFax collective, also verify that all
RightFax services and applications on all other computers
joined to the collective are stopped and closed. Review the
information at the database upgrade screen and check the box
next to the text that reads The database has been backed up. To
continue, click Next.
14. To launch the Captaris Product Licensing Utility (or PLU) and
license file). Enter your e-mail address and SUID. When
finished, click Continue. Fill-in your information as needed and
click Activate. To complete activation, read the license
agreement and click Accept. When finished and to return to
Setup, click OK.
If you are already in possession of a license file and do not need
to activate over the Internet, click Import and follow the steps in
the Instructions section of the PLU. To complete activation,
read the license agreement and click Accept. When finished,
close the PLU and click OK to return to setup.
To activate your server in the absence of an Internet connection,
refer to “Activating RightFax components without a RightFax
server Internet connection” on page 67.
16. To complete Setup, click Apply followed by Finish.
If you have upgraded from a RightFax 9.0 server with a
Brooktrout 1034 faxboard installed, you must run a separate
install batch file to remove unsupported, non-plug-and-play
drivers and install new Brooktrout drivers that are plug-and-play
compatible. When finished, a reboot may be required.
a. Browse to the \RightFax\DocTransport\Brooktrout folder.
b. Double-click installdriver.exe or installdriver64.exe if you
are installing on an x64 server. A command prompt window
opens. After a few seconds the install will complete.
Important To complete your upgrade you must run the RightFax
Product Suite Setup on each of your organizations remote RightFax
servers (e.g., remote DocTransports, remote WorkServers, remote
E-mail Gateways, remote IIS servers, and computers joined to a
RightFax collective).
activate RightFax 9.4, click Launch Licensing Utility.
15. You may activate RightFax using the Internet or using a local
license file. Click Activate to license your RightFax server via the
Internet (see the next paragraph to activate with an existing
Chapter 3
Upgrading RightFax Server Software
21
RightFax 9.4 Installation Guide
22
Chapter 4
Installing RightFax Server Software
New Installation Overview
The RightFax server is the computer that runs the fax server
software. The server performs all the work required for sending and
receiving faxes, including managing the fax database, converting
documents into fax images, adding signatures, overlaying forms,
maintaining logs, printing faxes, and creating fax cover sheets.
The RightFax server installation lets you create a new RightFax
database on an existing SQL server or install a SQL Server 2005
Express database directly on the RightFax server. SQL Server
2005 Express does not include any SQL management tools such
as database backup utilities. If you intend to install SQL Server
2005 Express, Captaris recommends that you purchase a separate
SQL backup utility and any additional SQL management tools you
feel necessary for proper management of your RightFax database.
A typical RightFax server installation consists of these major tasks:
1. Optionally install the fax boards into your RightFax server
chassis. If you will be using one or more remote DocTransport
computers or will be installing RightFax on a VMware ESX
server, you do not need to have fax boards installed in the
RightFax server computer. For more information on using
remote DocTransport computers, refer to the RightFax
Administrator’s Guide.
3. Configure the RightFax Server, WorkServer, and DocTransport
modules (described in the RightFax Administrator’s Guide).
4. Test the fax boards (described in the RightFax Fax Board
Guide).
5. Set up users and other RightFax database objects using
Enterprise Fax Manager (described in the RightFax
Administrator’s Guide).
6. Install additional features as needed on remote servers (e.g.,
Microsoft Exchange servers and Microsoft IIS web servers).
Note for information on the setup and configuration of RightFax Server
Collectives, see “Installing and Configuring the Shared Services
Module”on page 47.
Updates may be available
By the time you receive this software, new information or software
updates may be available. For the latest information on RightFax
software, visit the RightFax support Web site at
www.captaris.com/support/downloads/rightfax/index.html. This
Web site may provide up-to-date information on installing and
upgrading the RightFax server
2. Install the RightFax server software.
Chapter 4
Installing RightFax Server Software
23
RightFax 9.4 Installation Guide
Installing and Integrating RightFax with SQL
Server 2005 Express
This section outlines the steps to install a RightFax 9.4 integration
with a local instance SQL Server 2005 Express.
To ensure that your RightFax server installation goes smoothly and
to avoid unnecessary delays, it is important to perform each step in
the installation completely and correctly before proceeding to the
next step.
To install RightFax 9.4
1. Log on to the computer using a Windows account that is a
member of the domain and local Administrators group.
2. Insert the RightFax Product Suite DVD. If AutoRun is enabled, a
menu of install options appears. If AutoRun is not enabled,
browse the DVD and run Setup.exe. The RightFax Product
Suite Setup wizard opens.
3. RightFax 9.4 Setup with requires Microsoft .NET Framework
2.0 or later and Windows Installer 3.1. If this software is not
installed on your system, Setup will prompt you to install it. To
install, click OK. To cancel Setup and install .NET Framework
2.0 and Windows Installer 3.1 yourself, click Cancel.
Note RightFax server software requires.NET 3.5. This software is
installed during step 12. Optionally, you may cancel Setup, install
.NET 3.5, and re-run RightFax Setup.
4. Review the welcome screen and click Next.
5. Carefully read and accept the license agreement and click
Next.
6. Setup can check for RightFax updates and other late-breaking
information. To check for updates, verify you have an active
HTTP connection and click Check for Updates. If updates are
found, follow the instructions in the Result section. To skip the
update check and continue with Setup, check the box next to
Do not check for updates and click Next.
7. Select the components for this install. A Typical Server includes
all core server components, but does not include fax board and
FOIP drivers, RightFax Web Access, and Administrative
Utilities. To install fax board drivers, click the box next to Include
fax board and FOIP drivers. To create a custom set of features
to install, click Custom. After choosing your feature set, click
Next.
Tip The software product license cards that are included with your
RightFax software package will contain your licensed features.
8. The Preview Requirements step lists third-party software
required by your chosen features and also lists the status of
setup operations. Software that must be installed will have a
status of Must Install. To continue, click Next.
9. If your server does not already have Microsoft Message
Queuing installed, Setup will prompt you to install it. Select your
option and click Next.
10. Select option to:
Install Microsoft SQL Server 2005 Express Edition on this
computer. Select this option to install a local instance of
SQL Server 2005 Express specifically for use with RightFax.
To continue, click Next.
Choose a Typical or Custom SQL Server 2005 Express
installation. Typical installations install to the default
Windows program files folder (e.g., C:\Program Files),
enables Windows authentication, creates a default instance
name (RightFax), and sets the RightFax services to run using
the Local System account.
Chose Custom to setup SQL Server 2005 Express using an
interactive install, which allows advanced configuration and
the option to specify the installation folder, authentication
method, instance name, and service account and password.
For more information on customizing SQL Server Express
2005 installs, consult Microsoft Documentation.
To continue, Click Next.
24
11. RightFax requires TCP ports 10520, 10521, 10062, 34987,
and 34988. Setup can reserve these ports for exclusive use by
RightFax. To allow setup to reserve these ports, enable the
Reserve Ports option and click Next. If you do not reserve
these ports, some RightFax services may not start.
Installing and Integrating RightFax with SQL
Server 2000 or 2005
This section outlines the steps to install a RightFax 9.4 integration
with an existing SQL Server 2000 or 2005 environment.
12. To apply your settings and install required third-party software,
click Apply. This will take several minutes. When finished, click
Next.
13. Choose your installation folder and click Next.
14. To begin installing RightFax software, click Apply. This may take
several minutes.
15. The third and final phase of Setup will activate RightFax using
the Captaris product licensing utility. To continue, click Next.
16. To launch the Captaris Product Licensing Utility (or PLU) and
activate RightFax 9.4, click Launch Licensing Utility.
17. Click Activate to license your RightFax server via the Internet
(see the next paragraph to activate with an existing license file).
Enter your e-mail address and SUID. When finished, click
Continue. Fill-in your information as needed and click Activate.
To complete activation, read the license agreement and click
Accept. When finished and to return to Setup, click OK.
If you are already in possession of a license file and do not need
to activate over the Internet, click Import and follow the steps in
the Instructions section of the PLU. To complete activation,
read the license agreement and click Accept. When finished,
close the PLU and click OK to return to setup.
To activate your server in the absence of an Internet connection,
refer to “Activating RightFax components without a RightFax
server Internet connection” on page 67.
18. To complete Setup, click Apply followed by Close.
Note For information on installing RightFax Web Applications, see
“Installing RightFax Web Applications”.
Advanced database setup
During the installation of RightFax, Setup can create a new
RightFax database using a fully-automated process. To accomplish
this, Setup requires a SQL account that is assigned the following
explicit permissions:
Create database
Create table
Create procedure
Create view
Create rule
Create default
If the Create database permission is not available to you, a SQL
administrator may, in advance of Setup, create an empty database
to remove the Create database requirement. This does not,
however, eliminate the need for Create table, Create procedure,
Create view, Create rule, and Create default permission.
SQL admin task
1. Create a new SQL database. Captaris recommends using
RightFax as the database name, however, this is not a
requirement and custom database names are supported.
2. Assign the database a SQL account that is a member of the
db_datareader and db_datawriter roles and explicitly
permitted to Create table, Create procedure, Create view,
Create rule, and Create default. This account must be used
during Setup, but is not required for or during RightFax
production.
Chapter 4
Installing RightFax Server Software
25
RightFax 9.4 Installation Guide
RightFax admin tasks
1. Install RightFax server software (described in the next section)
using the following options:
2. At step 17, choose the option to Assume Ownership.
3. At step 18, enter the required SQL information making sure to
select your pre-configured database and the service account
you assigned to the database by the SQL administrator.
4. Complete the remaining install tasks.
To install RightFax server software
To ensure that your RightFax server installation goes smoothly and
to avoid unnecessary delays, it is important to perform each step in
the installation completely and correctly before proceeding to the
next step.
1. Log on to the computer using a Windows account that is a
member of the domain and local Administrators group.
2. Insert the RightFax Product Suite DVD. If AutoRun is enabled, a
menu of install options appears. If AutoRun is not enabled,
browse the DVD and run Setup.exe. The RightFax Product
Suite Setup wizard opens.
3. RightFax 9.4 Setup requires Microsoft .NET Framework 2.0 or
later and Windows Installer 3.1. If this software is not installed
on your system, Setup will prompt you to install it. To install,
click OK. To cancel Setup and install .NET Framework 2.0 and
Windows Installer 3.1 yourself, click Cancel.
Note RightFax server software requires .NET 3.5. This software is
installed during step 12. Optionally, you may cancel Setup, install
.NET 3.5, and re-run RightFax Setup.
4. Review the welcome screen and click Next.
5. Carefully read and accept the license agreement and click
Next.
6. Setup can check for RightFax updates and other late-breaking
information. To check for updates, verify you have an active
HTTP connection and click Check for Updates. If updates are
found, follow the instructions in the Result section. To skip the
update check and continue with Setup, check the box next to
Do not check for updates and click Next.
7. Select the components for this install. A Typical Server includes
all core server components, but does not include fax board and
FOIP drivers, RightFax Web Access, and Administrative
Utilities. To install fax board drivers, click the box next to Include
fax board and FOIP drivers. To create a custom set of features
to install, click Custom. After choosing your feature set, click
Next.
Tip The software product license cards that are included with your
RightFax software package will contain your licensed features.
8. The Preview Requirements step lists third-party software
required by your chosen features and also lists the status of
setup operations. Software that must be installed will have a
status of Must Install. To continue, click Next.
9. If your server does not already have Microsoft Message
Queuing installed, Setup will prompt you to install it. Select your
option and click Next.
10. Select the option to:
Use an existing SQL Server. Select this option to add a
RightFax database instance to an existing SQL server
running on your network. To continue, click Next.
11. RightFax requires TCP ports 10520, 10521, 10062, 34987,
and 34988. Setup can reserve these ports for exclusive use by
RightFax. To allow setup to reserve these ports, enable the
Reserve Ports option and click Next. If you do not reserve
these ports, some RightFax services may not start.
26
12. To apply your settings and install required third-party software,
19. Enter your SQL server name, authentication type, and a service
click Apply. This will take several minutes. When finished, click
Next.
account. The information you enter is used to create a SQL
connection string for RightFax services. These items are critical
and should be documented safely and securely. The service
account must have the following permissions on the database:
13. Choose your installation folder and click Next.
14. To begin installing RightFax software, click Apply. This may take
several minutes.
15. The third and final phase of Setup guides you through the
configuration of RightFax settings and will enable your feature
set using the Captaris product licensing utility. To continue, click
Next.
16. Enter a Windows account to run RightFax services. This
account must be a member of the local administrators group
and must have the right to logon as service on the local
computer. Click Browse to load and select a user account. Use
the Test Account button verify account credentials. When
finished, click Next.
Select
Update
Insert
Delete
Execute
If your existing SQL server uses a port number other than the
default of 1433, you must specify the port number during
Setup. Specify your port in the Server Name field using the
following syntax:
For example:
SQLServer,55123 or
Note If you will be accessing files from or printing to Novell queues
on a NetWare volume, the service account must also exist in Novell.
17. Choose your database installation option (either Create New
RightFax Database or Assume Ownership) and click Next.
18. Setup must execute SQL create statements that require
elevated account permissions. This account is required only for
Setup and is neither saved nor used by RightFax. Required SQL
statement permissions are as follows:
SQLServer\MyInstance,55123
When finished, click Next.
20. Accept the default name or type a new name for the RightFax
database and click Next.
21. To launch the Captaris Product Licensing Utility (or PLU) and
activate RightFax 9.4, click Launch Licensing Utility.
Create database
Create table
Create procedure
Create view
Create rule
Create default
When finished, click Next.
Chapter 4
Installing RightFax Server Software
27
RightFax 9.4 Installation Guide
22. Click Activate to license your RightFax server via the Internet
(see the next paragraph to activate with an existing license file).
Enter your e-mail address and SUID. When finished, click
Continue. Fill-in your information as needed and click Activate.
To complete activation, read the license agreement and click
Accept. When finished and to return to Setup, click OK.
If you are already in possession of a license file and do not need
to activate over the Internet, click Import and follow the steps in
the Instructions section of the PLU. To complete activation,
read the license agreement and click Accept. When finished,
close the PLU and click OK to return to setup.
23. To complete Setup, click Apply followed by Close.
Note For information on installing RightFax Web Applications, see
“Installing RightFax Web Applications”.
Uninstalling the RightFax Server
WarningWhen you uninstall the RightFax server, all RightFax program
files, Windows Registry settings, and shortcuts are removed. In addition,
all of your RightFax configuration settings are removed. The RightFax
database, however is not removed and must be manually removed using
SQL protocols. Captaris recommends that you back up the contents of
the entire RightFax folder before uninstalling the software. For
information on creating a backup of the RightFax server, refer to the
RightFax Administrator’s Guide.
1. Log on to the computer using a Windows account that is a
member of the domain and local Administrators group.
2. Insert the RightFax Product Suite DVD. If AutoRun is enabled, a
menu of install options appears. If AutoRun is not enabled,
browse the DVD and run Setup.exe. The RightFax Product
Suite Setup wizard opens.
3. In the list of options, select Uninstall and click Next. The
RightFax install wizard opens.
4. To remove all local RightFax settings and software, click
Remove all documents, images, and settings followed by Next.
5. Verify that all RightFax services and applications on all remote
RightFax servers are closed or stopped. When finished, click All
remote RightFax services have been manually shutdown.
When the uninstall process is complete, click Next.
6. To shutdown all local RightFax processes, click Next followed
by Apply.
7. To complete the uninstall, click Close
28
Chapter 5
Installing RightFax Web Applications
The information and instructions provided in this chapter assume
you have a functional RightFax server that is licensed to use
RightFax Web applications. For information on installing RightFax
server software, see “Installing RightFax Server Software” on
page 23. To activate RightFax Web applications, see “Upgrading
and Adding Fax Channels, User Licenses, and Optional
Components” on page 65.
The following RightFax Web applications support Microsoft
Internet Information Servers (IIS) version 6.0 SP2 or later.
Enterprise Fax Manager Web Edition
RightFax Certified Delivery
RightFax SOAP Server (requires SOAP client. For information on
installing the SOAP client, see “Installing RightFax Client
Applications” on page 35.
RightFax Web Access
All RightFax Web applications should not be installed on the same
computer as the RightFax server software, even if IIS is installed on
the RightFax server. Captaris recommends installing all Web
applications on a dedicated IIS server, separate from the RightFax
server.
When installing RightFax Web applications, you have the option to
allow Setup to configure IIS settings as they relate to RightFax
Web applications or you may choose to configure IIS settings
yourself. For information on advanced, manual configuration of IIS
settings, see “Manual setup of Web applications” on page 31.
Other Help Resources
Additional Help resources for RightFax administrators and
end-users are available for the following Web-based applications:
Enterprise Fax Manager Web Edition (see the RightFax
Administrator’s Guide).
RightFax Certified Delivery (see the SecureDocs Module
Guide).
RightFax Web Access (see the context-sensitive Help included
with Web Access).
IIS server requirements
Many of the software requirements for RightFax Web applications
are provided on RightFax Product Suite DVD. During Setup, a
wizard will perform a system check for required third-party
29
RightFax 9.4 Installation Guide
components (shown below) and if necessary, will install them.
Some components, such as Microsoft service packs and Microsoft
Internet Information Services are not provided.
Microsoft .NET Framework 2.0*
Microsoft Data Access Components 2.8*
Microsoft Internet Explorer 6 SP1 or later
Microsoft Internet Information Services (IIS) 6.0 SP2 or later
Microsoft Visual C++ 2005 runtime components*
Microsoft Windows Installer 3.1*
*Installed during RightFax setup
Browser requirements
Additional IIS server requirements and information
During the installation of RightFax Web applications, Setup
provides the option to configure Web (IIS) settings. A complete list
of these settings is provided below.
ImportantIf you do not allow Setup to configure RightFax Web settings,
you must make these changes yourself. For information on advanced,
manual configuration of IIS settings, see “Manual setup of Web
applications” on page 31.
An IIS virtual directory for each Web application is added under
the IIS Default Web Site. The default name of each site is as
follows: WebEFM (Enterprise Fax Manager Web Edition),
SecureDocs (RightFax Certified Delivery), RfIpcSoapServer
(RightFax SOAP Server), and WebUtil (RightFax Web Access).
All RightFax Web sites are set to anonymous authentication.
ASP.NET is registered as Web service extension.
Active Server Pages, ASP.NET, and ISAPI Extensions are
enabled. In IIS 6, this is a global change. In IIS 7, this is a per-site
setting. If using IIS 7, Setup will enable these options only at the
virtual directory level. ISAPI Extensions are not required by
Certified Delivery and will not be enabled during Certified
Delivery Setup.
IIS directory permissions for each virtual directory are set to
Scripts and Executables, Read and Execute and Browse.
All RightFax virtual directories are set to use ASP.NET 2.0 or
later.
Pop-up blockers should be disabled on all Internet Explorer
clients.
Windows User Account Control (available with Windows Vista
and Windows Server 2008) must be disabled.
Annotating text with RightFax Web Access requires a change to
the default Internet Explorer 7 security settings.
1. Open the Internet Explorer 7 Internet Properties.
2. Click the Security Tab > Internet > Custom Level.
3. Under the Miscellaneous section, enable the option to
Allow websites to prompt for information using scripted
windows.
4. When finished, click OK.
Running the Web Applications Install
To ensure that your installation goes smoothly and to avoid
unnecessary delays, it is important to perform each step in the
installation completely and correctly before proceeding to the next
step.
1. Log on to an IIS server using a Windows account that is a
member of the domain and local Administrators group.
2. Insert the RightFax Product Suite DVD. If AutoRun is enabled, a
menu of install options appears. If AutoRun is not enabled,
browse the DVD and run Setup.exe. The RightFax Product
Suite Setup wizard opens.
30
3. RightFax 9.4 requires Microsoft .NET Framework 2.0 and
Windows Installer 3.1. If this software is not installed on your
system, Setup will prompt you to install it. To install, click OK. To
cancel Setup and install .NET Framework 2.0 and Windows
Installer 3.1 yourself, click Cancel.
4. Review the welcome screen and click Next.
5. Carefully read and accept the license agreement and click Next.
6. Setup can check for RightFax updates and other late-breaking
information. To check for updates, verify you have an active
HTTP connection and click Check for Updates. If updates are
found, follow the instructions in the Result section. To skip the
update check and continue with Setup, check the box next to
Do not check for updates and click Next.
7. Select the components for this install. A Typical Web Server
installs Web Access and Enterprise Fax Manager Web edition.
Certified Web Delivery and SOAP Server are not installed. To
create a custom set of Web-based features to install, click
Custom. After choosing your feature set, click Next.
13. Setup can configure Microsoft Internet Information Server
settings associated with the RightFax web applications you
have chosen to install. These settings include the creation of
virtual directories, enabling web service extensions, and setting
access permissions. Alternatively, you may skip this step and
perform this advanced configuration yourself. Choose your
setup option and click Next.
14. Type the name of your RightFax server and click Next.
15. To complete Setup, click Apply followed by Finish.
Note If Setup fails to apply IIS settings, you must configure Web
application settings in IIS. For more information, see the next section.
Manual setup of Web applications
This section outlines advanced configuration of IIS settings
required by all RightFax Web applications and assumes you have a
working knowledge of Microsoft Internet Information Server.
1. Install RightFax Web applications using the instructions on
page 30. At step 13, choose Do Not Configure Web Settings.
Tip The software product license cards that are included with your
RightFax software package will contain your licensed features.
8. The Preview Requirements step lists third-party software
required by your chosen features and also lists the status of
setup operations. Software that must be installed will have a
status of Must Install. To continue, click Next.
2. Register ASP.NET as a Web Service Extension. To do this, click
Start > Run. Type cmd and press Enter. Type the following at
the command prompt, and press Enter:
C:\Windows\Microsoft.NET\Framework\v2*\aspnet_regiis -i
where v2* is the most recent version of .NET Framework 2.x on
your server.
9. To apply your settings and install required third-party software,
click Apply. This may take several minutes. When finished, click
Next.
10. Choose your RightFax installation folder and click Next.
11. To begin installing RightFax software, click Apply. This may take
several minutes.
12. .The third and final phase of Setup guides you through the
configuration of RightFax settings. To continue, click Next.
Chapter 5
Installing RightFax Web Applications
31
RightFax 9.4 Installation Guide
3. Create a new virtual directory for each RightFax Web
application you have installed. Configure each site with the
following attributes:
Create a unique site alias. Captaris recommends using the
default names of WebEFM (Enterprise Fax Manager Web
Edition), SecureDocs (RightFax Certified Delivery),
RfIpcSoapServer (RightFax SOAP Server), and WebUtil
(RightFax Web Access).
The path to all RightFax Web content is installed during
Setup to the \RightFax\WebApps folder. Each application is
represented by its own folder, e.g., WebEFM.
Set directory permissions to: Read, Run Scripts, Execute,
and Browse.
4. Enable Active Server Pages, ASP.NET, and ISAPI Extensions
for all RightFax Web sites.
5. Set the ASP.NET version for each RightFax virtual directory to
version 2.0 or later.
6. If using Certified Delivery, Parent Paths must be enabled either
for the Default Web Site as a whole, or for the SecureDocs
virtual directory which appears after the installation of Certified
Delivery.
7. Restart the Default Web Site.
Configuring Web Access Session Timeout Period
Web Access will end its IIS session after 20 minutes of inactivity.
To increase or decrease the session timeout period you must edit
the RightFax web.config file and modify related IIS settings.
1. Log on to the IIS 6 server where you have installed RightFax
Web Access.
2. Open the web.config file in a text editor and search for the entry
timeout=.
3. Decrease or increase the number in minutes as needed.
4. Save and close the web.config file.
5. Open IIS Manager and expand the Application Pool virtual
folder.
6. Right-click DefaultAppPool and choose properties.
7. Click Recycling and verify the Recycle worker processes field
contains a number (shown in minutes) that is equal to or greater
than the number you have entered in the web.config file in step
3. This option can also be disabled.
8. Click Performance and increase or decrease the value next to
the option; Shutdown worker processes after being idle for
(time in minutes). This option can also be disabled.
9. To complete the process, click OK.
URL for RightFax Web applications
In each example ServerName is the machine name of the IIS server
where Web applications are installed.
http://ServerName/WebEFM (Enterprise Fax Manager Web)
Edition)
http://ServerName/SecureDocs (RightFax Certified Delivery)
http://ServerName/WebUtil (RightFax Web Access)
Configuring RightFax Web Delivery
The RightFax Web Delivery feature uses Web Access and an
e-mail gateway to help minimize the consumption of disk space on
a e-mail server (fax images files are stored on the RightFax server
not an e-mail server).
When Web Delivery is configured, users receive an e-mail
notification that includes a clickable URL to a fax. When clicked,
the fax opens in Web Access. If your e-mail client application does
32
not support hypertext links, users can copy the URL and paste it in
the browser address box. The URL can be included in the e-mail
notification of both sent and received faxes.
Windows authentication can be used to ensure that the fax and
Web Access can only be opened by the intended recipient. If
Windows authentication is not used, the recipient will be prompted
to enter a RightFax user ID and password.
To add the Web Access URL to the Windows registry in a
RightFax Collective
If you are using RightFax Collective that is advertising its common
network name using Microsoft Network Load Balancing or some
other IP load balancer, you must create the following registry
modifications.
1. Log on to the RightFax server as an administrator.
If a user wants to forward a fax for which they have received e-mail
notification, the user should forward the fax from Web Access. This
ensures that the new recipient can open the fax.
2. Open the Windows registry editor.
This method of notification is intended to work only within the
network served by your RightFax server.
4. Create a new REG_SZ entry called WebLinkURL.
To implement this feature, complete the following tasks:
1. Set up Windows authentication, if needed.
2. Add the Web Access URL to the Windows registry (page 33).
3. Configure users to receive fax notifications in e-mail (page 33).
3. Browse to HKLM\Software\RightFax\Faxserver.
5. Edit this entry to contain the URL to Web Access exactly as is
shown below substituting Server Name with the IIS server
where Web Access is installed and RFServer with the
advertised network name for the RightFax Server Collective.
http://ServerName/WebUtil/default.aspx?Action=Show
Document({handle})&Server=RFServer.
6. Close Windows registry editor.
4. Configure notification messages (page 34).
To configure users to receive fax notifications in e-mail
To add the Web Access URL to the Windows registry
1. Log on to the RightFax server as an administrator.
Configure each user who should receive e-mail notification of a fax
with a URL.
2. Open the Windows registry editor.
1. In Enterprise Fax Manager, double-click a user to edit. The User
3. Browse to HKLM\Software\RightFax\Faxserver.
4. Create a new REG_SZ entry called WebClientServer.
5. Edit this entry to contain the URL to Web Access. exactly as is
shown substituting Server Name with the IIS server where Web
Access is installed.
http://ServerName/WebUtil/
6. Close Windows registry editor.
Edit dialog box opens.
2. On the Inbound Routing tab, in the Routing Type box, select
Fax Mailbox.
3. On the Notification tab, in the Notification Method box, select
the e-mail gateway you have installed, such as Microsoft
Exchange.
4. In the Notification Address/Info box, type the user's e-mail
address.
Chapter 5
Installing RightFax Web Applications
33
RightFax 9.4 Installation Guide
5. The user can receive a link for received faxes, sent faxes, and
unsuccessfully sent faxes. To activate the e-mail notification of
these faxes, click to select one or more of the following check
boxes. These faxes will be stored only on the RightFax server.
Table 5a Type of Fax that Should Include a Link
Type of fax
Select this check box
Received
When initially received
Sent
Fax is successfully sent
Unsuccessfully sent
Error encountered; fax will be
abandoned
To configure notification messages to include URLs
For the URLs to appear in notification messages, you must modify
the notification messages on the RightFax server.
1. In Enterprise Fax Manager, select the RightFax server to modify.
2. Under Service Name, double-click RightFax Server Module.
The Server Configuration dialog box opens.
3. On the Custom Messages tab, modify one or more of the
notification messages using the following variables. The
maximum length of a notification message is 200 characters,
including the URL and the message text. The maximum length
of the URL is 80 characters.
Table 5b Defining Custom Messages
Message
Variabl
e
New fax
~6
Example
You have received a fax; click here to
view it ~6
Table 5b Defining Custom Messages
Message
Variabl
e
Example
Successful
send
~4
Your fax was sent; click here to view it
~4
Too many
retries
~9
Your fax was not sent; click here to
view it ~9
34
Chapter 6
Installing RightFax Client Applications
RightFax software includes the following client applications that let
RightFax users send and receive faxes via the RightFax server and
also let administrators manage RightFax servers from remote
computers:
“Enterprise Fax Manager” (page 35)
“RightFax Print Driver” (page 36)
“SOAP client” (page 36)
“FaxUtil” (page 36)
“Outlook Advanced Fax Extensions” (page 36)
“MAPI Print Driver” (page 36)
“VIM Print Driver” (page 37)
“AutoReply Client” (page 37)
These client applications can be installed in the following
languages:
English
French
French Canadian
German
Italian
Japanese
Portuguese
Simplified Chinese
Spanish
Arabic (RightFax Web Access Client only)
Before installing the RightFax client applications to users’
computers, you should identify which applications are appropriate
for each user and then install only those applications.
Enterprise Fax Manager
Enterprise Fax Manager is a Windows-based application that
provides RightFax administrators access to all RightFax servers on
the network. Enterprise Fax Manager lets administrators manage all
aspects of the RightFax server including managing users and other
database objects, starting and stopping RightFax services, and
monitoring server statistics. This application should be installed on
35
RightFax 9.4 Installation Guide
all computers from which RightFax administrators will be managing
the servers. For information about running Enterprise Fax Manager,
refer to the RightFax Administrator’s Guide.
A Web-based version of Enterprise Fax Manager (Enterprise Fax
Manager Web Edition) can be installed on a Microsoft IIS server on
your network. This version of Enterprise Fax Manager provides
nearly all of the same functionality as the Windows version, but is
accessible both locally and remotely via the Web using any Web
browser. This version of Enterprise Fax Manager is not installed as
a client application. For information on installing Enterprise Fax
Manager Web Edition, see “Installing RightFax Web Applications”
on page 29.
RightFax Print Driver
The RightFax Print Driver lets users fax documents directly from the
applications used to create them (such as Microsoft Word.) The
print driver also installs a RightFax tray icon in the Windows
taskbar that lets users configure fax options, run fax client
applications, send faxes, and set the default printer. This
application should be installed on all computers from which
RightFax users will be sending and receiving faxes.
SOAP client
The SOAP client installation lets RightFax users use the
Print-to-Fax feature from any computer with an Internet connection.
The SOAP server must be installed on an IIS server running version
9.4 of RightFax Web Access. The SOAP client then accesses
RightFax through that server. This provides RightFax functionality to
home-office or other remote employees who do not have direct
access to your organization's network. There are two components
to the SOAP installation: install the SOAP server on the IIS
computer running RightFax Web Access, and then install the
SOAP client on the remote client computers.
FaxUtil
FaxUtil is a Windows-based fax mailbox tool that lets users send,
receive, view, edit, and manage faxes. This application should be
installed on all computers from which RightFax users will be
sending and receiving faxes, unless you will be installing alternative
client applications such as the RightFax Web Client, the Client for
Microsoft Outlook (described in the RightFax Gateway for
Microsoft Exchange Guide), or the Lotus Notes Client (described
in the RightFax Gateway for Lotus Notes Guide). For information
about running FaxUtil, refer to the FaxUtil online help which is
installed with FaxUtil.
A Web-based version of FaxUtil (RightFax Web Access) can be
installed on a Microsoft IIS server on your network. This version of
FaxUtil provides all the same functionality as the Windows version,
but is accessible both locally and remotely via the Web using any
Web browser. This RightFax mailbox tool is not installed as a client
application. For information on installing the RightFax Web Client,
see “Installing RightFax Web Applications” on page 29.
Outlook Advanced Fax Extensions
The Outlook Advanced Fax Extensions enable advanced fax
functionality in your users’ Outlook mailboxes. This application
should be installed on computers running Microsoft Outlook only if
you will be installing the RightFax Gateway for Microsoft Exchange.
For information about using the Advanced Fax Extensions, refer to
the RightFax Gateway for Microsoft Exchange Guide.
MAPI Print Driver
The RightFax MAPI (Messaging Application Programming
Interface) Print Driver lets fax users send fax images as e-mail
attachments using MAPI-compliant applications such as Microsoft
Outlook, Microsoft Mail, and Novell Groupwise. When the user
prints a document using this print driver, a MAPI-compliant e-mail
application window opens with the document attached as a TIFF
file. The e-mail message can then be addressed and sent. This
36
application should be installed on all computers to which you want
to provide this functionality. Before installing this application, make
sure that a PCL print driver is installed on the client’s computer.
MAPI printing is supported only Windows XP x86 workstations.
RightFax Client Computer Requirements
RightFax client applications for this version can be installed only on
computers running the following operating systems:
Microsoft Windows Vista x86 and x64 versions
Microsoft Windows XP Professional SP2 or later x86 and x64
versions
The minimum hardware requirements for the client computer vary
depending on the operating system you are running. See Microsoft
documentation for Windows hardware requirements.
VIM Print Driver
The RightFax VIM (Vendor Independent Messaging) Print Driver
lets fax users send fax images as e-mail attachments using
VIM-compliant applications such as Lotus Notes and Lotus cc:Mail.
When the user prints a document using this print driver, a
VIM-compliant e-mail application window opens with the document
attached as a TIFF file. The e-mail message can then be addressed
and sent. This application should be installed on all computers to
which you want to provide this functionality. Before installing this
application, make sure that a PCL print driver is installed on the
client’s computer.
Additional Client Computer Requirements
Microsoft .NET Framework 2.0 or later*
Microsoft Visual C++ 2005 runtime components*
* Installed during Setup
VIM printing is supported only Windows XP x86 workstations
AutoReply Client
The AutoReply service monitors one or more RightFax mailboxes
for inbound faxes and automatically faxes a response to the sender
based on each sender's caller service identification (CSID)
number. The AutoReply Client lets administrators configure the
AutoReply service from any computer on the network This
application should be installed on all computers from which
RightFax administrators will be managing the AutoReply service.
For information about AutoReply, refer to the RightFax
Administrator’s Guide.
Upgrading the RightFax Client Applications
Because newer versions of the RightFax client applications may not
be compatible with older versions of the RightFax server, all of the
RightFax servers on your network that will be accessed by fax users
should be upgraded before upgrading the client applications.
To upgrade existing client applications, complete the steps for
client installation (page 39).
Warning In FaxUtil versions 8.0 and later, users can create nested
folders, which is not supported in earlier versions. In an environment
where users can switch between FaxUtil version 8.0 (or later) and earlier
versions, any folders created in the later version of FaxUtil won’t appear
in earlier versions of the client. Similarly, folders created in earlier
versions of FaxUtil will not appear in FaxUtil 8.0, however, folders created
in earlier versions of FaxUtil will appear in FaxUtil versions 8.5 and later
in the All folder.
Chapter 6
Installing RightFax Client Applications
37
RightFax 9.4 Installation Guide
Before You Begin
By default, the RightFax client installation will use the first
compatible printer driver it finds to create the RightFax Print Driver.
If no compatible printer driver is found, RightFax will install one
automatically.
Note If RightFax installs a printer driver automatically, this driver and its
associated files will not be removed if RightFax is uninstalled. In a
Microsoft Windows XP and Vista installation, the printer driver files reside
at \Windows\System32\Spool\Drivers\W32X86\3 and include the
following:
HPLJ5.BUD
HPLJ5.GPD
PCL5ERES.DLL
STDNAMES.GPD
TTFSUB.GPD
UNIDRV.DLL
UNIDRV.HLP
UNIDRVUI.DLL
UNIRES.DLL
In addition to requiring one of these printer drivers, all RightFax
client computers must have network access to the HPFAX print
queue on the RightFax server.
If the number of users configured on the RightFax server results in
slow FaxUtil load times, you can create a registry entry on client
computers that disables the automatic loading of users when
FaxUtil is run. The loading of user records will occur only if a user
performs actions in FaxUtil that require it.
You can disable the loading of two types of user: administered
users and unprotected users.
Administered users are users that appear in a RightFax
administrator’s or group administrator’s FaxUtil mailbox.
Unprotected users are users who have the Unprotected mailbox
permission set in their user profiles. These users appear in all
other FaxUtil user lists as though they had delegated everyone
else to allow them to access their fax mailboxes.
For RightFax administrators, disabling the loading of both
administered and unprotected may be necessary. For all other
FaxUtil users, it is only necessary to disable the loading of
unprotected users.
To disable the loading of administered users
To disable the loading of administered users in FaxUtil on startup,
close FaxUtil and then add a REG_DWORD value called
LoadAdministeredUsers to HKEY_CURRENT_USER\
Software\RightFAX Client\FUW32 and set the value data to 0
(zero).
Decreasing FaxUtil load time
The time required for each user to load the FaxUtil client application
depends largely on the number of RightFax users configured on the
RightFax server that FaxUtil is accessing. If the RightFax server
contains a large number of users, FaxUtil may be noticeably slow to
load.
To disable the loading of unprotected users
To disable the loading of unprotected users in FaxUtil on startup,
close FaxUtil and then add a REG_DWORD value called
LoadUnprotectedUsers to HKEY_CURRENT_USER\Software
\RightFAX Client\FUW32 and set the value data to 0 (zero).
38
To automatically disable user loading for new FaxUtil users
These REG_DWORD values can also be applied for all new
FaxUtil users on a particular computer. Modify the Windows
Registry to add the REG_DWORD values described above to
HKEY_LOCAL_MACHINE\Software\RightFAX Client\FUW32.
When users run FaxUtil for the first time, they will be automatically
configured to disable the loading of users.
Installing the Client Applications
Follow these steps to install the client applications directly from the
RightFax software DVD.
7. Select the components for this install. A Typical Client includes
FaxUtil, RightFax print driver, and Outlook fax extensions. An
Admin Client install Enterprise Fax Manager and FaxUtil. To
create a custom set of features to install, click Custom. After
choosing your feature set, click Next.
8. The Preview Requirements step lists third-party software
required by your chosen features and also lists the status of
setup operations. Software that must be installed will have a
status of Must Install. To continue, click Next.
9. To apply your settings and install required third-party software,
click Apply. This may take several minutes. When finished, click
Next.
10. Choose your RightFax installation folder and click Next.
To install the RightFax client applications
1. Log on to the computer using a Windows account that is a
member of the domain and local Administrators group.
2. Insert the RightFax Product Suite DVD. Browse the DVD, open
the Client folder, and run Setup.exe. The RightFax Product
Suite Setup wizard opens.
11. To begin installing RightFax software, click Apply. This may take
several minutes.
12. The third and final phase of Setup guides you through the
configuration of RightFax settings. To continue, click Next.
13. Type the name of your RightFax server and click Next.
14. To complete Setup, click Apply followed by Finish.
3. RightFax 9.4 client applications require Microsoft .NET
Framework 2.0 or later. If this software is not installed on your
system, Setup will prompt you to install it. To install, click OK. To
cancel Setup and install .NET Framework 2.0 yourself, click
Cancel.
4. Review the welcome screen and click Next.
5. Carefully read and accept the license agreement and click Next.
6. Setup can check for RightFax updates and other late-breaking
information. To check for updates, verify you have an active
HTTP connection and click Check for Updates. If updates are
found, follow the instructions in the Result section. To skip the
update check and continue with Setup, check the box next to
Do not check for updates and click Next.
Installing the SOAP Client
When you install the SOAP server on the Web Access IIS server,
the SOAP client installation file RightFax Client for the Web.exe is
installed in the Program Files\RightFax\WebApps\WebUtil\Client
Install folder. You must send this file via e-mail, copy it to a
removable storage medium, or otherwise make it available to the
remote clients. Follow these steps on each remote computer to
install the SOAP client:
1. Log on to the workstation as an administrator
2. Double-click the RightFax SOAP client installation file RightFax
Client for the Web.exe. The install wizard opens.
Chapter 6
Installing RightFax Client Applications
39
RightFax 9.4 Installation Guide
3. At the welcome screen, click Next.
Modifying an existing installation:
4. Enter the Web address of the SOAP server (e.g.,
www.MyCompany.SOAPServer.com) and the machine name of
the RightFax server when prompted. When finished, click Next.
Setup.exe /modify /unattended=true
/allowShutdown=true /add="faxctrl"
Removing one RightFax client application from a server:
5. To begin the installation, click Install. A status bar indicates the
Setup.exe /modify /unattended=true
/allowshutdown=true /drop="faxctrl"
progress of the installation.
6. When the installation is complete, click Finish.
Uninstalling all RightFax client applications from a server:
Setup.exe /remove /unattended=true
/allowShutdown=true
Using the SOAP Client
After the RightFax SOAP client is installed, a RightFax tray icon will
appear in the computer's notification area in the lower right corner
of the desktop. Users can access RightFax Print-to-Fax features
through the shortcut menu from this icon. Users can also print
documents directly to the RightFax Fax Printer (a new printer type
that the client installation adds), which prompts for fax addressing
information and transmits the document via the RightFax server.
Installing the Client Applications
from a Command Line
The RightFax client applications can be installed from an MS-DOS
prompt in a Command Prompt window. You can:
Install RightFax client applications for the first time.
Modify an existing installation of a client application to add or
remove (uninstall) one or more client applications.
Remove (uninstall) all of the client applications
Following are examples of common operations that can be
performed. Note that these examples wrap to fit on this page. The
command line must not include a carriage return.
Installing a RightFax client application for the first time:
Setup.exe /unattended=true /allowShutdown=true
/add="FaxUtil,EFM" /rightFaxServer="myserver"
Before You Begin
Copy the Setup.exe to a network file location from which you will
run the command line. You have the following options:
Copy the RightFax product suite Setup.exe from the DVD to the
network. (Only the client applications can be installed from the
command line.)
Copy the Setup.exe for client applications from the DVD to the
network. The client Setup.exe is located on the RightFax product
suite DVD in the \Client folder. The file size is 105 MB.
If you use the Setup.exe for client applications, you can further
reduce the file size of the Setup.exe with the following options:
If the destination client computer operating systems are all
32-bit, you can reduce the Setup.exe to 60 MB. Delete the file
\Client\Prereqs\NetFx64.exe.
If .NET 2.0 is already installed on the destination client
computers, you can reduce the Setup.exe to 32 MB. Delete the
file \Client\Prereqs\dotnetfx2.0.
The command line install is not intended for installing client
applications on the RightFax server.
40
Specifying the Level of User Interaction
Setup.exe runs with a fully interactive wizard, but it also can be run
with minimal or no user interaction.
Specifying the Installation Mode
To modify an existing installation or to uninstall all of the client
applications, you must specify the installation mode.
To check for success or failure, see Exit Codes later in this section.
Command
Description
/unattended=true
Setup.exe displays a progress bar and will not
require user input except in the case of an error.
In the case of an error, Setup.exe will display a
message explaining the error. The user must click
OK to continue.
/quiet=true
Command
Description
/modify
Modifies an existing installation to add or remove
RightFax client applications. This command must
be used with the Add or Drop command.
This command cannot be used to remove all
features.
/remove
Setup.exe runs with no user interaction.
This command cannot be used to add or remove
specific features.
Specifying the Location of the Setup.exe File
You must run the command in the directory where the RightFax
Setup.exe is copied, or you must specify the full path to Setup.exe.
Command
Description
/manifest=”file_path” The location can be any valid path, such as "D:\"
or "\\server\share".
Removes all RightFax client applications from the
system.
Specifying the RightFax Client Applications to Install
With the Add command, you can specify one or more RightFax
client applications to add. This option applies when you are
installing features for the first time or when you decide to add
RightFax client applications at a later time (modifying an existing
installation).
For available names, see “Client Application Names”.
Command
Description
/add=”name1,
name2, …”
Feature names must be separated by commas.
Specifying the RightFax Client Applications to Remove
With the Drop command, you can remove one or more client
applications at a time. For available names, see “Client Application
Names”.
Chapter 6
Installing RightFax Client Applications
41
RightFax 9.4 Installation Guide
Do not use this option to remove all of the client applications. To
remove (uninstall) all client applications, use the /remove
command. For instructions, see “Specifying the Installation Mode”.
Command
Description
/drop=”name1,
name2”
Feature names must be separated by commas.
Specifying the RightFax Server
Some commands require the name of a RightFax server to which
the client application will connect when it is first installed.
Command
Description
/rightFaxServer=”My
Server”
"MyServer" is the name of the RightFax server.
Client Application Names
The client applications must be specified with these names.
Command
Description
FaxUtil
RightFax FaxUtil
EFM
RightFax Enterprise Fax Manager
FaxCtrl
RightFax Print Driver
Outlook
RightFax Outlook Advanced Fax Extensions
MAPI
MAPI Print Driver
VIM
VIM Print Driver
AutoReply
RightFax AutoReply
Exit Codes
Setup.exe returns an exit code. The exit codes can be utilized in a
batch file to display the exit code when Setup.exe is finished or to
branch to another operation. Use the errorlevel command in the
batch file to utilize the exit code.
Shutting Down RightFax Processes
Before running Setup.exe, RightFax applications should be shut
down and then restarted after Setup.exe is finished. You can stop
and start the applications manually, or Setup.exe can perform these
operations for you.
Command
Description
/allowShutdown=
true
None.
Exit Code
Description
0
Success.
1
No errors, but a reboot is required to finish the
operation.
-1
An error occurred.
42
Configuring Windows 2003 and Windows 2008
Terminal Services to Support
RightFax Client Sessions
RightFax client applications can be installed on and run in multiple
sessions from a Windows Server 2003 or Windows Server 2008
using terminal services. Running the RightFax client in the
Windows terminal server environment requires only one client
install directly on the server configured for terminal services, but
supports an unlimited number of simultaneous client sessions.
This installation also supports (but does not require) Citrix
MetaFrame.
To install the RightFax client using Windows 2003 Terminal
Services
1. Log on to the Windows 2003 server using an account with
administrative access.
2. Insert the RightFax Product Suite DVD. Close the RightFax
splash screen if autorun is enabled.
3. On the Windows Server configured to use terminal services,
open Add/Remove Programs in the Windows Control Panel.
4. Choose Add New Programs.
5. Select the ‘CD or Floppy’ and click Next.
6. Browse to the Client\setup.exe file and click Open followed by
Next.
7. Install the RightFax client according to the instructions in the
section “Installing the Client Applications” on page 39.
To install the RightFax client using Windows 2008 Terminal
Services
1. Log on to the Windows 2008 server using an account with
administrative access.
2. Install the RightFax client application according to the
instructions in the section “Installing the Client Applications” on
page 39.
3. Open Terminal Services RemoteApp Manager.
4. From the Action menu choose Add RemoteApp Programs. The
RemoteApp Wizard opens.
5. At the welcome screen, click Next.
6. In the RemoteApps Programs list, click the box next to each
RightFax client application you wish to make available over terminal
services. When finished, click Next.
7. Review your application settings and click Finish.
Troubleshooting the Client Installation
and Configuration
The following table lists the most common error messages that may
appear after installing the RightFax client applications with the
probable causes and solutions.
Error or error
message
The server is unavailable
Possible solutions
Verify that the RightFax Database module
and RightFax RPC Server module
services are running on the RightFax
server.
Chapter 6
Installing RightFax Client Applications
43
RightFax 9.4 Installation Guide
Error or error
message
The common network
protocol being used is
not routed between LAN
segments
Possible solutions
Try running a client on the same LAN
segment as that of the server. Modify
the appropriate bridge or routers to
route the proper protocols.
Update the server and clients to use a
routed protocol.
If the server machine has multiple
network adapters installed, try
removing all but one of the adapters
and allow other routers on the network
to route the packets.
The Windows server
running RightFax is not
configured to support
NetWare clients
Verify that the Windows server is running
gateway services for NetWare and the
SAP Agent. Verify that the IPX/SPX
transport is properly configured using the
Network program in Windows Control
Panel.
The NetWare clients are
using different frame
types than the Windows
NT server
On the client computer, the frame type is
in the Link Driver section of the
NET.CFG. On the Windows server, the
frame type is in the configuration of the
NWLink IPX/SPX transport object in the
Network program in Windows Control
Panel. If the Windows server must
support more than one frame type,
ensure that the internal network number
is a unique, non-zero number and that the
Auto Frame Type Detection is disabled.
Error or error
message
Possible solutions
There is no SAP agent
computer accessible to
both the client and server
machines
Verify that the client and server
machines can log on to a NetWare
server. Verify that the SAP Agent is
installed on the Windows server.
Verify that the client and server are on
the same network segment and that the
router between the segments is
configured to transport SAP type
0×640 messages.
User ID was not found in
database
RightFax has its own list of fax users and
the user ID specified is not on that list.
You can use Enterprise Fax Manager to
add users, either individually or by
reading them from the domain or file
server. When RightFax is first installed,
the users “Administrator” and “Default”
are loaded. Initially, neither user ID has a
password.
The password supplied
is incorrect
You must use the correct password for
the user specified. If the user has lost his
password, a RightFax administrator can
re-set the password in Enterprise Fax
Manager.
44
Error or error
message
The RightFax fax
addressing dialog box
opens, but nothing
appears in FaxUtil
Possible solutions
You are using a different user ID than
expected. Check the RightFax Client
program in Control Panel to see what
user ID the software is using.
In Windows, the port setting for the fax
printer may be incorrect. Complete the
Configure Fax Printers dialog box
according to the instructions in
“Configuring Windows 2003 and
Windows 2008 Terminal Services to
Support RightFax Client Sessions” on
page 43.
Chapter 6
Installing RightFax Client Applications
45
RightFax 9.4 Installation Guide
46
Chapter 7
Installing and Configuring the Shared Services Module
Overview
The capacity of RightFax servers can be multiplied by combining
two or more servers that share a common RightFax database
(known as a server collective). This is accomplished by installing
and configuring multiple RightFax servers to share a database and
corresponding resource folders. Benefits of the Shared Services
Module may include:
Server Topology
The following examples describe some basic shared
configurations.
Figure 7.1 Two RightFax servers share a SQL database. Common disk
storage is used to store shared RightFax resources.
Increased throughput for sending faxes due to internal load
sharing among RightFax services.
Multiple RightFax servers share all SQL stored data (e.g., users,
delegates, phonebook entries, distribution lists, and document
data such as fax status).
All received faxes are stored on the SQL server and are available
to all clients in the network.
Redundant data is eliminated thus saving storage space.
Remote RightFax services can be shared by multiple machines to
balance the workload from many RightFax clients.
Note This feature is only available on RightFax Enterprise Servers and
must be purchased separately.
Chapter 7
Installing and Configuring the Shared Services Module
47
RightFax 9.4 Installation Guide
Figure 7.2 Two RightFax servers share a SQL database. DocTransport
services are located on remote servers to off-load processing from the
RightFax servers. Dialing rules specify the DocTransport services and
RightFax servers from which documents will be sent. Common disk
storage is used to store shared RightFax resources.
Figure 7.3 Two RightFax servers share a SQL database. DocTransport
and WorkServer services are located on remote servers to off-load
processing from the RightFax servers. Dialing rules specify the
DocTransport services and RightFax servers from which documents will
be sent. Common disk storage is used to store shared RightFax
resources.
48
Figure 7.4 Two RightFax servers share a SQL database. Common disk
storage is used to store shared RightFax resources. An application traffic
manager, such as BIG IP, directs RightFax client traffic to available
RightFax servers.
System Requirements
The requirements for RightFax Server environments are described
beginning on page 9, “Hardware and Software Requirements”. In
addition to these requirements, you must also possess the
following:
A minimum of two RightFax servers capable of network
communication. Each of these must be licensed for the ‘Server
Collective’ feature.
A maximum of four RightFax servers joined to the collective. Each
of these must be licensed for the ‘Server Collective’ feature.
An existing SQL Server. SQL Express installations are not
supported.
IP v6 environments must use host names to resolve IP
addresses. IP v6 IP addresses are not supported.
Installing RightFax Servers to Share a SQL
Database
To install multiple RightFax servers that share a SQL database,
complete the general steps below.
1. If you are upgrading, print or make a copy of the Windows
Geographic distribution of services
While servers can be geographically dispersed over a wide-area
network, this configuration has not been tested by Captaris.
registry key HKEY_LOCAL_MACHINE\ Software\RightFax so
that you have a copy of any changes that have been made to
customize the system. In a typical shared database
configuration, customization should be identical on each
RightFax server.
2. Install the RightFax server on the first RightFax server computer
(described in the next section). During the installation, choose
the option to Create New RightFax Database.
Chapter 7
Installing and Configuring the Shared Services Module
49
RightFax 9.4 Installation Guide
3. On all additional RightFax servers, run the RightFax server
installation. During the installation, choose the option to Add to
Shared Services Database and point the install to the SQL
database that you defined when you installed the first RightFax
server.
4. Repeat steps 1 through 3 for each added RightFax server.
5. Configure your RightFax collective using the information
provided in this chapter. Additional information about RightFax
servers is located in the Administrator’s Guide.
Important In a server collective, each server must have a DocTransport
configured for outbound faxing or have dialing rules that specify a fax be
sent from a specific server. For information about dialing rules, see the
Administrator’s Guide.
To install RightFax server software
To ensure that your RightFax server installation goes smoothly and
to avoid unnecessary delays, it is important to perform each step in
the installation completely and correctly before proceeding to the
next step.
1. Log on to the computer using a Windows account that is a
member of the domain and local Administrators group.
2. Insert the RightFax Product Suite DVD. If AutoRun is enabled, a
menu of install options appears. If AutoRun is not enabled,
browse the DVD and run Setup.exe. The RightFax Product
Suite Setup wizard opens.
3. RightFax 9.4 Setup requires Microsoft .NET Framework 2.0 or
later and Windows Installer 3.1. If this software is not installed
on your system, Setup will prompt you to install it. To install,
click OK. To cancel Setup and install .NET Framework 2.0 and
Windows Installer 3.1 yourself, click Cancel.
Note RightFax server software requires .NET 3.5. This software is
installed during step 12. Optionally, you may cancel Setup, install
.NET 3.5, and re-run RightFax Setup.
4. Review the welcome screen and click Next.
5. Carefully read and accept the license agreement and click
Next.
6. Setup can check for RightFax updates and other late-breaking
information. To check for updates, verify you have an active
HTTP connection and click Check for Updates. If updates are
found, follow the instructions in the Result section. To skip the
update check and continue with Setup, check the box next to
Do not check for updates and click Next.
7. Select the components for this install. A Typical Server includes
all core server components, but does not include fax board and
FOIP drivers, RightFax Web Access, and Administrative
Utilities. To install fax board drivers, click the box next to Include
fax board and FOIP drivers. To create a custom set of features
to install, click Custom. After choosing your feature set, click
Next.
Tip The software product license cards that are included with your
RightFax software package will contain your licensed features.
8. The Preview Requirements step lists third-party software
required by your chosen features and also lists the status of
setup operations. Software that must be installed will have a
status of Must Install. To continue, click Next.
9. If your server does not already have Microsoft Message
Queuing installed, Setup will prompt you to install it. Select your
option and click Next.
10. Select the option to:
Use an existing SQL Server. Select this option to add a
RightFax database instance to an existing SQL server
running on your network. To continue, click Next.
50
11. RightFax requires TCP ports 10520, 10521, 10062, 34987,
and 34988. Setup can reserve these ports for exclusive use by
RightFax. To allow setup to reserve these ports, enable the
Reserve Ports option and click Next. If you do not reserve
these ports, some RightFax services may not start.
12. To apply your settings and install required third-party software,
click Apply. This will take several minutes. When finished, click
Next.
13. Choose your installation folder and click Next.
14. To begin installing RightFax software, click Apply. This may take
several minutes.
15. The third and final phase of Setup guides you through the
configuration of RightFax settings and will enable your feature
set using the Captaris product licensing utility. To continue, click
Next.
16. Enter a Windows account to run RightFax services. This
account must be a member of the local administrators group
and must have the right to logon as service on the local
computer. Click Browse to load and select a user account. Use
the Test Account button verify account credentials. When
finished, click Next.
Note If you will be accessing files from or printing to Novell queues
on a NetWare volume, the service account must also exist in Novell.
17. Choose the option to Create New RightFax Database and
click Next.
18. Setup must execute SQL write and create statements that
require elevated account permissions. This account is required
only for Setup and is neither saved nor used by RightFax.
Required SQL statement permissions are as follows:
Create database
Create table
Create procedure
Create view
Create rule
Create default
When finished, click Next.
19. Enter your SQL server name, authentication type, and a service
account. The information you enter is used to create a SQL
connection string for RightFax services. These items are critical
and should be documented safely and securely. The service
account must have the following permissions on all database
objects:
Select
Update
Insert
Delete
Execute
If your existing SQL server uses a port number other than the
default of 1433, you must specify the port number during
Setup. Specify your port in the Server Name field using the
following syntax:
For example:
SQLServer,55123 or
SQLServer\MyInstance,55123
When finished, click Next.
Chapter 7
Installing and Configuring the Shared Services Module
51
RightFax 9.4 Installation Guide
20. Accept the default name or type a new name for the RightFax
database and click Next.
servers.
For Example:
21. To launch the Captaris Product Licensing Utility (or PLU) and
\\<Shared Storage>\RightFax\Image
activate RightFax 9.4, click Launch Licensing Utility.
\\<Shared Storage>\D$\RightFax\Image
22. Click Activate to license your RightFax server via the Internet
(see the next paragraph to activate with an existing license file).
Enter your e-mail address and SUID. When finished, click
Continue. Fill-in your information as needed and click Activate.
To complete activation, read the license agreement and click
Accept. When finished and to return to Setup, click OK.
If you are already in possession of a license file and do not need
to activate over the Internet, click Import and follow the steps in
the Instructions section of the PLU. To complete activation,
read the license agreement and click Accept. When finished,
close the PLU and click OK to return to setup.
\\<ip address>\RightFax\Image
\\<Shared Storage>|RightFax\Image
A complete list and description of the shared data folders is
provided below.
The fields within the Data Sharing tab represent folders that must
be shared among all the RightFax servers within a collective. Share
permissions must be given to the account used to run both the
Server module and DocTransport module. This account must have
full control of these folders. Choosing this account can be done by
click the Select Service Account button.
Image (contains sent and received faxes stored as compressed
graphic image files).
SIG (contains graphic images of user signatures for placement
on faxes).
Papers (contains the names of overlay form files).
FCS (contains fax cover sheets).
Outgoing (contains outbound files from all submission methods
that are held while being processed into fax images, such as
temporary fax queue spool files).
BFT (contains text files created by the OCR process).
CmdData (contains transaction files for each fax sent via e-mail
or via SecureDocs).
Each of these folders can be located in common disk storage, such
as a storage area network (SAN), network share on file server, or
network access to a local drive on one of the RightFax servers. The
folders must be accessible to all the servers in the shared
configuration.
The Remote Service Paths button allows you to specify UNC
paths to the \RightFax\Image directory on Remote DocTransport
In an IP v6 environment you must use host names to resolve IP
addresses. IP v6 IP addresses are not supported.
23. To complete Setup, click Apply followed by Close.
Providing Access to Shared Resource Folders
Each RightFax Server that is licensed for Shared Services Module
(Server Collective) will have a Data Sharing tab within the Server
Module configuration.
On each RightFax server, create shared access to these files using
the Server Module Configuration > Data Sharing tab. Access to
these locations can be expressed differently for each server due to
permissions and network layout. Each server can be configured to
52
use unique paths and user accounts to the same storage location
for each type of resource file. Services that directly access image
and other files must be given service accounts with access to the
specified paths.
For Example: Server A may access a local storage area network
(SAN) using the path S:\RightFax\Image and use the local system
account for RightFax services to access this path. Server B might
access the same location remotely using the path
\\ServerA\RightFax\Image which would require use of an account
that had permissions to access that network path (such as,
DomainA\RightFax).
Configuring Remote Services
The following RightFax services can be installed on remote
computers.
DocTransport specifies the methods by which documents will be
transmitted and converts and copies received documents to the
Image directory.
WorkServer performs processor-intensive functions such as
cover sheet generation, print-to-fax conversion, and optical
character recognition.
To support remote fax board services, the DocTransport module
must be installed on a remote computer. The DocTransport module
must be defined on each RightFax server, that is, whether local or
remote, DocTransport modules should be discrete and should not
be shared. A remote DocTransport module can connect to one
RightFax server. It cannot access multiple RightFax servers. For
information about installing and configuring Remote DocTransports
see the RightFax Administrator’s Guide.
A remote WorkServer can connect to one RightFax server. It
cannot access multiple RightFax servers. Refer to Figure 7.2 on
page 48 for a basic illustration of remote services.
Using Dialing Rules
A fax may be sent by any server using the shared database, not
necessarily the one that initially received the job.
To specify that a fax be sent from a specific server, use dialing
rules. More information on dialing rules can be found in the
RightFax Administrator’s Guide.
Refer to Figure 3 on page 48 for a basic illustration.
Performing Daily Maintenance
Maintenance is a collection of daily tasks that help maintain an
efficient SQL database. Maintenance tasks may be run by any
server on a first come first serve basis.
Aging and Purging
The aging process evaluates the age of each document on the
RightFax server. When a document exceeds the age limit, it is
marked for deletion. The marked documents will later be deleted by
the purge process. Documents that are marked for deletion can be
recovered until they are purged. The age limit for documents is
defined for each RightFax user group (in Enterprise Fax Manager).
Documents that are marked for deletion can also be queried for
reporting purposes.
The purging process removes documents from the SQL database
that are both marked for deletion and have reached the configured
limit. The purging process deletes the corresponding image files
that are stored in the Image directories on the RightFax servers in
the shared configuration. One event triggers the aging and purging
process.
Chapter 7
Installing and Configuring the Shared Services Module
53
RightFax 9.4 Installation Guide
Orphan Scanning
Configuring the Maintenance Processes
The orphan process scans the \RightFax\Image directories on the
RightFax servers for fax image files that are not referenced by any
document or library document in the SQL database. The image
files are called “orphans” because RightFax has no record of their
existence and cannot access them.
Each maintenance process is an event that is stored in the event
queue on the SQL server. One RightFax server will perform
maintenance when a maintenance event is queued, on a first-come,
first-served basis. Aging is performed before purging.
The default time for maintenance to begin is 2 AM. The time is set
in the Server Module Configuration > Advanced tab.
To manually delete orphan image files from the RightFax server, use
the Orphan.exe utility.
Viewing the Maintenance Logs
Recovery
Logs of the maintenance process are stored in the
\RightFax\Database folder on the server that performed the
process. These logs are:
The RightFax 9.4 the event queue is stored in the SQL database
on the SQL server, and it is shared among RightFax servers. The
queue is persistent, that is, it retains its objects and values if the
RightFax Server module stops. If one of the RightFax Server
modules in the shared configuration stops, then it is not necessary
to rebuild the queue. The recovery process is performed daily on
the RightFax servers as a fail safe.
MaintAgingAndPurging.log
MaintOrphanScan.log
MaintDocRecovery.log
54
Chapter 8
Installing RightFax in a Windows 2003 Cluster
Caution Because the RightFax server software architecture is not fully
cluster-aware with replayable transaction logs, some in-process data may
be lost during a cluster failover. If failover occurs, faxes that were
in-process may fail conversion, may have fax conversion delayed, or may
be lost and unrecoverable.
requires the following components.
Clustering RightFax with Microsoft
Windows 2003 Server
This section outlines how to install RightFax 9.4 on an existing
Microsoft Windows 2003 Server cluster. This is not meant as a
general guide on clustering concepts, configuration, operation, or
support. It is recommended that you become familiar with
clustering concepts and the Windows 2003 Cluster Service prior
to beginning this procedure.
System requirements
These instructions assume you have installed and configured the
Microsoft Distributed Transaction Coordinator service, Windows
Message Queuing, and if applicable, Microsoft Office. For more
information about installing and configuring the Microsoft
Distributed Transaction Coordinator service, Windows Message
Queuing, and Microsoft Office, consult Microsoft documentation.
Installing RightFax in a Windows Server 2003 cluster environment
Two servers, each with network cards, that are on the Microsoft
Clustering Hardware Compatibility List (located on the Microsoft
Web site).
A local or remote installation of SQL Server 2000 or 2005. SQL
Server Standard Edition cannot be installed on the RightFax
cluster.
An installation of Microsoft .NET Framework 3.5 on both nodes.
The Windows cluster service must be installed, configured, and
operational.
Windows Application server component with Network
Distributed Transaction Coordinator and Message Queuing
installed.
If your organization sends Microsoft Word, Excel, or PowerPoint
documents, a local installation of Microsoft Office is required.
Print services for Unix (if using the Integration Module).
Supported Windows Operating Systems
Microsoft Windows Server 2003 Enterprise X86 SP2 or later
SQL Server requirements
All versions of SQL Server must be set to Mixed Mode, with SQL
authentication enabled.
Chapter 8
Installing RightFax in a Windows 2003 Cluster
55
RightFax 9.4 Installation Guide
Configuring the Cluster Group
All of the clustered RightFax resources must be maintained in a
single cluster group to provide failover protection. This group must
include a disk resource, a server name resource, an IP address
resource, and be configured to use a preferred server to allow
fail-back.
The default group created during the cluster service installation,
named “Cluster Group,” may be used for the RightFax resources. In
this case, the quorum drive is typically used as the shared
installation drive for the RightFax software. While this approach
may add complexity to recovery procedures in the event of a cluster
service or disk device failure, it will not affect configuration or
performance, and it is a good choice when hardware resources are
limited to a single RAID controller. You may also create a new
cluster group specifically for RightFax resources. For more
information about creating and configuring cluster groups, see
Microsoft documentation.
Important If SQL Server is installed on the same cluster, it is
recommended that the RightFax resources be added to the same cluster
group which contains the SQL instance to be used. This will allow a
dependency to be created which will prevent the RightFax services from
attempting to start if the SQL instance is unavailable.
Configuring RightFax DocTransport Servers
It is strongly recommended that no fax boards be installed on
clustered servers. Phone lines and T1 lines cannot be clustered
and will not failover in the event of a hardware problem. Captaris
recommends that you use remote DocTransport Servers,
connecting to the virtual RightFax server. For more information
about Remote DocTransport Servers, see the RightFax
Administrator’s Guide.
For the purpose of these instructions, the name 'RightFax group' is
used to designate the cluster group containing the RightFax
resources.
To create a clustered print spooler
1. Open the quorum drive (shared disk) and create a folder called
spool.
2. Open Cluster Administrator, create a new print spooler
resource in the RightFax group (right-click Resources and click
New > Resource. The New Resource Wizard opens.
3. In the name box, type the name of the resource (e.g., RightFax
Print Spooler). The description can be the same as the resource
name.
4. Set the Resource Type to Print Spooler and the group to
RightFax group. Click Next.
5. Verify that both cluster nodes are listed in the Possible Owners
box and click Next.
6. In the Resource Dependencies box, add the cluster name and
shared disk. Click Next.
7. On the Parameters tab, verify the path to the spool folder is set
to <shared disk:\spool>.
8. To add the resource to the group, click Finish.
To cluster the TCP/IP print server service
This step is required only if you plan to install the RightFax
Integration Module.
1. On both nodes, install Print Services for Unix. For more
information about installing Print Services for Unix on Windows
2003, see Microsoft documentation.
2. Stop the TCP/IP print server service (Print Services for Unix)
and change its startup type to manual. Perform this step on both
nodes.
3. Open Cluster Administrator and create a new resource in the
RightFax group (right-click Resources and click New >
Resource. The New Resource Wizard opens.
56
4. In the name box, type the name of the resource (e.g., TCP/IP
8. In the Resource Dependencies window, select the physical
print server). The description can be the same as the resource
name.
disk and network name. When finished, click Add. To complete
the process, click Finish followed by OK.
5. Set the Resource Type to Generic and the group to RightFax
9. Using Cluster Administrator, right-click the RightFax group and
group. Click Next.
6. From the properties dialog of the new service, select the print
spooler resource as a dependency.
7. Verify that both cluster nodes are listed in the Possible Owners
box and click Next.
8. In the Resource Dependencies box, add the print spooler and
click Next.
9. On the Parameters tab, set the name to LPDSVC and check
the option to Use Network Name for Computer Name. To add
the resource to the group, click Finish.
To create cluster resources for required networking
services
1. From Cluster Administrator, open the RightFax group and take
the network name resource offline.
2. Right-click the network name resource and choose properties.
Click the Parameters tab and click the option to Enable
Kerberos Authentication. When finished, click OK.
3. Bring the network name resource back online.
4. Using Cluster Administrator, right-click the RightFax group and
choose new resources.
5. In the name and description fields, type MSDTC.
choose new resources.
10. In the name and description fields, type Message Queuing.
11. Set the Resource Type to Message Queuing and verify the
RightFax group is selected. Click Next.
12. Confirm that both cluster nodes are listed in the Possible
Owners box and click Next.
13. In the Resource Dependencies window, select the network
name and disk resources. When finished, click Add. To
complete the process, click Finish followed by OK.
14. Bring all resources online.
To verify failover and failback
1. Using Cluster Administrator, right-click the RightFax group and
choose properties. Confirm the primary node is the preferred
owner.
2. Click the Failback tab and enable the option to Allow for
failback immediately.
3. Verify that the primary node owns all resources, and that they
are online.
4. Shut down the primary node and verify that all resources fail
over to the secondary node.
5. Restart the primary node and verify that all resources fail back.
6. Set the Resource Type to Distributed Transaction coordinator
and verify the RightFax group is selected. Click Next.
7. Confirm that both cluster nodes are listed in the Possible
Owners box and click Next.
Chapter 8
Installing RightFax in a Windows 2003 Cluster
57
RightFax 9.4 Installation Guide
Installing RightFax on each cluster node
1. Ensure the primary node has control of the RightFax group,
including the shared drive to which RightFax will be installed.
2. Verify that Microsoft .NET Framework 3.5 is installed on both
nodes.
3. On the primary node run the RightFax 9.4 Setup according to
the instructions in Chapter 4, “Installing and Integrating
RightFax with SQL Server 2000 or 2005”. Be sure to provide
the network name of either the clustered SQL Server instance
(if used) or the name of a remote SQL Server.
4. On the primary node, install the RightFax server software to the
shared drive according to the instructions in Chapter 4,
“Installing and Integrating RightFax with SQL Server 2000 or
2005” and the additional requirements outlined below.
Use a WorkServer service account that is a domain member
and has access to all nodes (local accounts cannot be used).
If prompted to restart the computer at the end of the
installation, select No.
Do not install the fax board hardware drivers.
5. Open the Windows Services management console and stop all
running RightFax services. Set the startup type all of the
RightFax services to manual.
Tip All RightFax service names begin with RightFax or Captaris.
10. Switch to the secondary node and delete the entire RightFax
directory from the shared drive.
11. On the secondary node, run the RightFax 9.4 Setup.
12. Install RightFax on the secondary node, using the same options
chosen during the primary node setup. Remember to change
the install location to the shared drive, not the default of
C:\ProgramFiles\RightFax.
13. When asked whether to overwrite the existing database or add
a new instance, select overwrite.
14. Open the Windows Services management console and stop all
running RightFax services. Set the startup type all of the
RightFax services to manual.
15. Open the Windows Control Panel and double-click Printers.
16. Right-click the HPFAX printer and choose stop sharing.
To create the HPFAX print queue
1. From either node, click Start > Run and type \\<cluster_name>
when finished click OK. Windows Explorer opens
2. Double click Printers and Faxes. The Printers and Faxes view
opens.
3. Double click Add Printer. The Add Printer Wizard opens. Click
Next.
4. Choose the option to Create a new port. Using the drop-down,
6. On the primary node, open the Windows Control Panel and
double-click Printers.
7. Right-click the HPFAX printer and choose stop sharing.
8. From Cluster Administrator, right-click the RightFax group and
choose Move Group.
9. Confirm the RightFax resources are back online and are owned
by the secondary node.
select the Standard TCP/IP Port option and click Next. The
printer port wizard opens. Click Next.
5. Type the shared cluster IP address as the Printer Name or IP
Address and HPFAX as the Port Name. When finished, click
Next.
6. Select Custom and click Settings. The Configure Standard
TCP/IP Port Monitor window opens. Select RAW as the
Protocol, set the Port Number to 53199, and click OK.
58
7. To continue, click Next followed by Finish.
Table 8a RightFax Cluster Resources (Continued)
8. Select an HP LaserJet III, LaserJet 4, or LaserJet 5 printer driver
Name of Resource
Type of Resource Service Name
Captaris Sync Module
Generic Service
CapaSync
9. In the Printer name field, type HPFAX and click Next.
RightFax DocTransport
Generic Service
RFDocTrans
10. Verify the Share name option is selected and the adjacent field
RightFax Server Module
Generic Service
RFServer
RightFax Queue Handler
Generic Service
RFqueue
and click Next.
reads HPFAX. When finished, click Next.
11. Optionally, enter Location and Comment information and click
RightFax RPC Server Module Generic Service
RFRPC
12. Do not print a test page. Click Next followed by Finish.
RightFax Remoting Service
Generic Service
RFremote
13. Right-click the HPFAX printer and choose Properties.
RightFax Paging Module
Generic Service
RFpage
14. Click the Advanced tab followed by Separator Page. Enter the
RightFax E-mail Gateway
Generic Service
RFEmail
Next.
following for the separator page:
To create the File Share resource
SharedDrive:\RightFax\bin\RightFax.sep
Where SharedDrive is the drive letter of the shared drive where
RightFax is installed. When finished, click OK at the separator
page and HPFAX printer properties.
15. Restart both nodes. Once restarted, the primary node should
have control of the RightFax group, including the shared drive.
16. Use Cluster Administrator to move the group to the node which
was installed LAST.
1. Right-click Resources, and choose New > Resource. The
Generic Resource wizard opens.
2. In the Name and Description boxes, enter RightFax File Share.
3. Set Resource Type to File Share and select the RightFax
group.
4. In the Possible Owners box, select both nodes and click Add.
5. In the Resource Dependencies box, add the Disk Resource,
Network Name, and IP Address resources.
Creating the RightFax Cluster Resources
To create the RightFax cluster resources, run Cluster Administrator
and open the RightFax cluster group. You will create the following
resources.
6. In the Generic File Share Parameters box, enter the path to
the RightFax directory on the shared drive. Be sure to use
RightFax as the share name.
7. On the Parameters tab, click the Permissions. Give the
Everyone group Change permission.
Table 8a RightFax Cluster Resources
Name of Resource
Type of Resource Service Name
8. To add the resource to the group, click Finish.
RightFax File Share
File Share
N/A
9. Bring the resource online.
Captaris Conversion Engine
Generic Service
RFIsoConv
Chapter 8
Installing RightFax in a Windows 2003 Cluster
59
RightFax 9.4 Installation Guide
To create the RightFax RPC Server Module resource
5. In the Possible Owners box, select both nodes and click Add.
1. Right-click Resources, and choose New > Resource. The
6. In the Resource Dependencies box, add the RightFax file
Generic Resource wizard opens.
2. In the Name and Description boxes, enter RightFax RPC
Server Module.
3. Set Resource Type to Generic Service and select the
RightFax group.
4. In the Possible Owners box, select both nodes and click Add.
5. In the Resource Dependencies box, add the RightFax file
share, disk resource, network name, and IP address. If you are
clustering your SQL Server, you must also add the SQL server
name as a dependency.
6. In the Generic Service Parameters box, type RFRPC. Be sure
to select the option to use network name for computer name.
7. Under Registry Replication, click Add and type
SOFTWARE\RightFax. This allows the registry information
stored by RightFax to dynamically change from one node to
another in the event of a failure.
8. To add the resource to the group, click Finish.
To create the RightFax Remoting Service resource
share.
7. In the Generic Service Parameters box, type RFREMOTE. Do
Not enable use network name for computer name.
8. To add the resource to the group, click Finish.
To create the Captaris Conversion Engine resource
Complete this step only if your organization sends Word, Excel,
PowerPoint, or HTML documents.
1. Open the Windows Control Panel and double-click Captaris
Conversion Engine. The Captaris Conversion Engine
Configuration opens.
2. Click OK to write the service information to the Windows
registry.
3. Run Cluster Administrator and open the RightFax cluster group.
4. Right-click Resources, and choose New > Resource.The
Generic Resource wizard opens.
5. In the Name and Description boxes, enter Captaris
Conversion Engine.
6. Set Resource Type to Generic Service and select the
1. Open the Windows Control Panel and double-click RightFax
Remoting Service. The RightFax Remoting Configuration
opens. To write service information to the Windows registry,
click OK.
2. Right-click Resources, and choose New > Resource. The
Generic Resource wizard opens.
3. In the Name and Description boxes, enter RightFax Remoting
Service.
4. Set Resource Type to Generic Service and select the
RightFax group.
RightFax group.
7. In the Possible Owners box, select both nodes and click Add.
8. In the Resource Dependencies box, add the RightFax file
share and Message Queuing.
9. In the Generic Service Parameters box, type RFISOCONV.
Do Not enable use network name for computer name.
10. To add the resource to the group, click Finish.
60
To create the Captaris Sync Module resource
4. In the Possible Owners box, select both nodes and click Add.
Complete this step only if your organization synchronizes users via
Active Directory or an LDAP source, such as Lotus Domino server.
5. In the Resource Dependencies box, add the RightFax RPC
1. Open the Windows Control Panel and double-click Captaris
6. In the Generic Service Parameters box, type RFDOCTRANS.
Sync Module. The Captaris Sync Module Configuration opens.
Module (RFRPC).
Be sure to select the option to use network name for
computer name.
2. Click Sources & Destinations. The Sync Sources and
Destination window opens. Define a sync source and
destination. For information about sources and destinations,
click the ? in the upper right-hand corner of the Sync Module.
When finished, click OK
3. Run Cluster Administrator and open the RightFax cluster group.
4. Right-click Resources, and choose New > Resource.The
Generic Resource wizard opens.
5. In the Name and Description boxes, enter Captaris Sync
Module.
6. Set Resource Type to Generic Service and select the
RightFax group.
7. In the Possible Owners box, select both nodes and click Add.
8. In the Resource Dependencies box, add the RightFax
Remoting service.
9. In the Generic Service Parameters box, type CapaSync. Do
Not enable use network name for computer name.
10. To add the resource to the group, click Finish.
To create the DocTransport Module resource
1. Right-click Resources, and choose New > Resource. The
Generic Resource wizard opens.
2. In the Name and Description boxes, enter RightFax
DocTransport Module.
3. Set Resource Type to Generic Service and select the
RightFax group.
To add the resource to the group, click Finish.
To create the RightFax Server Module resource
1. Right-click Resources, and choose New > Resource. The
Generic Resource wizard opens.
2. In the Name and Description boxes, enter RightFax Server
Module.
3. Set Resource Type to Generic Service and select the
RightFax group.
4. In the Possible Owners box, select both nodes and click Add.
5. In the Resource Dependencies box, add the RightFax RPC
Module (RFRPC).
6. In the Generic Service Parameters box, type RFSERVER. Be
sure to select the option to use network name for
communications
7. To add the resource to the group, click Finish.
To create the RightFax Queue Handler resource
1. Right-click Resources, and choose New > Resource. The
Generic Resource wizard opens.
2. In the Name and Description boxes, enter RightFax Queue
Handler.
3. Set Resource Type to Generic Service and select the
RightFax group.
Chapter 8
Installing RightFax in a Windows 2003 Cluster
61
RightFax 9.4 Installation Guide
4. In the Possible Owners box, select both nodes and click Add.
4. In the Possible Owners box, select both nodes and click Add.
5. In the Resource Dependencies box, add the RightFax file
5. In the Resource Dependencies box, add the RightFax Server
share.
6. In the Generic Service Parameters box, type RFQUEUE. Be
sure to select the option to use network name for
communications
resource (RFSERVER).
6. In the Generic Service Parameters box, type RFEMAIL. Be
sure to select the option to use network name for
communications
7. To add the resource to the group, click Finish.
7. To add the resource to the group, click Finish.
To create the RightFax Paging Module resource
To complete the cluster installation
1. Right-click Resources, and choose New > Resource. The
1. Confirm that all RightFax resources on-line.
Generic Resource wizard opens.
2. In both the Name and Description boxes, enter RightFax
Paging Module.
3. Set Resource Type to Generic Service and select the
RightFax group.
4. In the Possible Owners box, select both nodes and click Add.
5. In the Resource Dependencies box, add the RightFax file
share.
6. In the Generic Service Parameters box, type RFPAGE. Be
sure to select the option to use network name for
communications
7. To add the resource to the group, click Finish.
To create the RightFax E-mail Gateway resource (if
installed)
1. Right-click Resources, and choose New > Resource. The
Generic Resource wizard opens.
2. In both the Name and Description boxes, enter RightFax
E-mail Gateway.
3. Set Resource Type to Generic Service and select the
RightFax group.
2. Open the Windows Control Panel and double-click the Captaris
Conversion Engine. The Captaris Conversion Engine
configuration opens. Click OK to write service information to the
Window registry. Repeat these steps for the Captaris Sync
Module and RightFax Remoting service.
3. From the node with ownership of the RightFax group, open
Windows registry editor.
4. Browse to HKLM\SOFTWARE\RightFax\Capasync\. Change
the RemoteHost value to the cluster name.
5. Browse to
HKLM\SOFTWARE\RightFax\Capasync\Profiles\<GUID> (the
GUID subkey is a unique, 32 character name that is associated
with Capasync profiles). Change the RemoteHost value to the
cluster name.
6. Browse to HKLM\SOFTWARE\RightFax\Install\. Change the
value RFServerName to the shared network name of the
RightFax group.
7. Browse to HKLM\SOFTWARE\RightFax\Remoting. Change
the RemoteHost value to the cluster name.
8. Browse HKLM\SOFTWARE\RightFax\Production\. Change the
RightFaxServerName value to the shared network name of the
RightFax group.
62
9. From Cluster Administrator, verify that the RightFax group can
be taken offline and online without errors.
10. Move the group between the nodes, verifying that all the
resources start correctly on each node. Correct any issues
found before proceeding.
11. Make sure the RightFax resources are online. Install remote
BoardServers as required, pointing them to the shared network
name of the RightFax cluster group, rather than the name of any
individual node. When prompted during remote BoardServer
installation, select the option to use an existing SQL Server, and
supply the correct server name (clustered instance name if
applicable) and logon information
Configuring the Integration Module in a Windows 2003
Cluster
4. Still at HKLM\SOFTWARE\RightFax\Production\RFProd,
modify the command line for the three default printer inputs to
use TCP/IP ports rather than named pipes by using the table
below. The numbers at the end of the new command lines are
the TCP/IP port numbers. You can select any port number that
is not in use on either node of the cluster. Alternatively, you may
delete and recreate existing inputs, however, you must set the
new inputs to the type of "TCP/IP Port"
Table 8b
Printer
Name
Default Command
Line
Required Command
Line
HostFax
nplisten -c "makedoc
$$" -p hflpr
portlstn -c "makedoc $$"
-p 8201
PCL
nplisten -c "pfilter $$ |
makedoc" -p hfpcl
portlstn -c "pfilter $$ |
makedoc" -p 8202
Postscript
nplisten -c "pfilter -p $$ |
makedoc" -p hfps
portlstn -c "pfilter -p $$ |
makedoc" -p 8203
Follow the instructions below if licensed for the Integration Module.
1. From the active node, open the RightFax Integration applet from
the Windows Control Panel.
Note If the Integration applet does not appear in the Control Panel,
locate the Shared Files folder under the RightFax Directory, and open
rfprod_ctl.cpl to launch the applet.
2. Run the Integration Wizard or manually configure the Integration
Module. When finished, click OK.
Important Change the RightFax Server name to the shared
network name of the RightFax group.
3. Browse HKLM\SOFTWARE\RightFax\Production\. Here, you
will find a subkey with the same name as the node. Rename this
subkey to the shared network name of the RightFax group.
5. If additional printer inputs are needed, create them in the same
way using TCP/IP ports. Named pipes will not function in the
cluster environment.
6. Click OK to close the applet and create the service.
7. Verify that the RightFax Integration Module service is set to
manual start.
8. Move the group to the second node.
9. Open the Integration applet on the second node. All
configuration settings should be retained. Click OK to close the
applet and create the service.
10. Verify that the RightFax Integration Module service is set to
manual start.
Chapter 8
Installing RightFax in a Windows 2003 Cluster
63
RightFax 9.4 Installation Guide
Create a new Generic Service resource in the RightFax
group
6. Select Custom Device Type, and click Settings. Select RAW
1. Right-click Resources, and choose New > Resource. The
7. Configure the printer to use a Generic Text / Only print driver.
Generic Resource wizard opens.
2. In both the Name and Description boxes, enter RightFax
Integration Module.
3. Set Resource Type to Generic Service and select the
as the protocol and set the port number to 8201.
8. Share the printer using its default name.
9. Repeat these steps for PCL and Postscript printers, using
HFPCL and HFPS as the port names and 8202 and 8203 as
port numbers.
RightFax group.
4. In the Possible Owners box, select both nodes and click Add.
5. In the Resource Dependencies box, add the RightFax Server
resource (RFSERVER).
6. In the Generic Service Parameters box, type RFPROD. Be
sure to select the option to use network name for
communications
7. To add the resource to the group, click Finish.
Using FTP with the Integration Module
If FTP is to be used for the Integration Module, add a virtual
directory to BOTH nodes using IIS Manager, with the local path
being the \RightFax\Production\Inbox directory on the shared drive.
It is not necessary to cluster the FTP service.
Applying Service Packs and Service Releases
8. Bring the new resource online.
To apply a RightFax service pack or service release on a RightFax
cluster:
9. Verify failover and failback is successful.
1. Run Cluster Administrator and stop all RightFax services. Do
not take the RightFax file share offline.
Configuring Integration Module Printers
1. From either node, click Start > Run and type
\\<cluster_name>. when finished Click OK. Windows Explorer
opens
2. Double click My Computer > Control Panel > Printers and
Faxes. The Printers and Faxes window opens.
3. Right-click the HostFax printer and choose Properties.
4. Click the Ports tab followed by Add Port. The Printer Ports
window opens.
2. Apply the update to the active node according to the
instructions provided with the update.
3. Move the group containing the RightFax services to the next
node without bringing them online.
4. Apply the update to the new node according to the instructions
provided with the update.
5. Apply the update to any Remote DocTransport, WorkServers,
and server joined to a RightFax collective, if applicable.
6. From Cluster Administrator, bring the RightFax services online.
5. Create a new TCP/IP port, using the shared cluster IP address
as the target IP address. The port name should be HostFax.
64
Chapter 9
Upgrading and Adding Fax Channels,
User Licenses, and Optional Components
You can easily expand and extend the functionality of your RightFax
server by upgrading your RightFax server license, adding fax
channels and user licenses, or by enabling new components.
4. In the right pane, the server type, number of licensed fax
channels and users, and enabled components are listed.
Most of these additions to your fax server can be made without
installing or re-installing software. You can add new functionality to
all RightFax servers using the Captaris Product Licensing Utility,
which is included with the server installation of RightFax 9.4
Checking for Installed Components
The different types of RightFax servers are installed with different
numbers of licensed fax channels and users, and different optional
components enabled. Follow these steps to display a list of the fax
channels, users, and components that have been enabled on the
server.
To check for installed components
1. Log on the RightFax server as an administrator.
2. Click Start > All Programs > Captaris > Product Licensing
Utility. The Captaris Product Licensing Utility (PLU) opens.
3. In the list of product licenses in left pane, click RightFax.
Chapter 9
Upgrading and Adding Fax Channels, User Licenses, and Optional Components
65
RightFax 9.4 Installation Guide
Upgrading the RightFax Server License
Captaris RightFax servers can support small, medium, and large
enterprises. The following servers are available.
Table 9a RightFax Server Types
RightFax
server
Description
To upgrade the RightFax server license, add channels, add
user licenses, and enable new components
The following steps require an Internet connection on the RightFax
server. If your RightFax server is not connected to the Internet,
follow the instructions in the next section, “Activating RightFax
components without a RightFax server Internet connection”.
1. Contact your RightFax distributor and purchase the appropriate
license. You will be sent a new license card that includes a new
SUID (required for activation).
Business server
This RightFax server supports unlimited user accounts, It
includes one fax channel, and is expandable to 30 fax
channels.
Enterprise
server
This RightFax server supports unlimited user accounts. It
includes three WorkServers and one fax channel,
expandable to support unlimited fax channels. This server
includes the RightFax Web Access and the OCR
Router™, OCR Converter™, Docs-on-Demand™, and
TeleConnect™ modules.
3. Click Start > All Programs > Captaris > Product Licensing
The Enterprise server is also available as a product suite
that includes the RightFax Enterprise server, plus the
Gateway for Microsoft® Exchange, the Gateway for Lotus
Notes®, the Document Management Connector™, and the
SNMP Alerting™, and PDF modules.
6. On the PLU toolbar, click Activate.
Integration
server
The RightFax server and the RightFax Integration Module
enable applications for information exchange. The
Integration Module integrates RightFax with applications
on mainframe, mid-range, and local area network host
systems.
The RightFax Business Integration Module can be
installed on the RightFax Business and Enterprise servers.
The RightFax Enterprise Integration Module can be
installed on the RightFax Enterprise server.
Satellite server
This RightFax server supports up to 15 user accounts. It
includes two WorkServers and two fax channels.
2. Log on to the RightFax server as an administrator.
Utility. The Captaris Product Licensing Utility opens.
4. In the list of product licenses in left pane, click RightFax.
5. In the right pane, the server type, number of licensed fax
channels and users, and enabled components are listed.
7. Type an e-mail address and the new SUID. When finished, click
Activate.
8. If activation is successful, the RightFax license agreement will
appear. To continue, click Accept.
9. Review your new license summary. When finished, click Close.
If you experience problems with activation, call the RightFax
product support group at (520) 320-7070.
66
Activating RightFax components without a RightFax server
Internet connection
If your RightFax server is without Internet access, you may use
another computer with Internet access to assist with activation.
Requirements for this process are:
Computer with Internet access
Network access to the RightFax server or access to a
removable storage medium such as a compact disc or
compact flash drive.
1. Contact your RightFax distributor and purchase the appropriate
license. You will be sent a new license card that includes a new
SUID (required for activation).
2. Log on to the RightFax server as an administrator.
11. To process your license and generate a license file, click Finish.
If successful, click the Download License Activation File link.
Save this file (RightFax.XML) to a removable storage medium or
otherwise make it available to the RightFax server. When
finished, close the Web browser and return to the RightFax
server.
12. On the PLU toolbar, click Import. Use the button next to the
License File field at the bottom of the PLU to browse to the
location of the RightFax.XML file. When finished, click OK.
When prompted to overwrite your existing license, click the
option to Backup existing license and click Yes.
13. Review your new license summary. When finished, click Close.
If you experience problems with activation, call the RightFax
product support group at (520) 320-7070.
3. Click Start > All Programs > Captaris > Product Licensing
Utility. The Captaris Product Licensing Utility (PLU) opens.
4. In the list of product licenses in left pane, click RightFax.
5. In the right pane, copy and save the characters next to
Activation String.
6. Take the activation string to another computer with Internet
access and open the following Web page:
https://activation.captaris.com/registration/registration.aspx
Licensing Brooktrout SR140 Channels
The Brooktrout License Manager, provided by Brooktrout allows
you to self-active your SR140 license key. Instructions and an
activation wizard are included with Brooktrout License Manager.
Using this method requires an active Internet connection.
Alternatively, you may activate your SR140 channels by contacting
RightFax technical support at (520) 320-7070. A support
representative will guide you through the activation process.
7. At the activation Web page, type your e-mail address and
activation string.
8. Click the drop-down arrow and pick RightFax from the product
list. When finished, click Next.
Important To activate your SR140 channels, you must have an SR140
license card. This card contains your SR140 license key and is included
with the purchase of SR140 channels.
9. Type the information requested at the System Information page
and click Next.
10. Enter optional contact information at the next two pages and
click Next.
Chapter 9
Upgrading and Adding Fax Channels, User Licenses, and Optional Components
67
RightFax 9.4 Installation Guide
To open Brooktrout License Manager
1. Click the Windows Start button > All Programs > Brooktrout
> Brooktrout License Manager. The Brooktrout License
Manager opens.
2. To complete the activation, follow the instructions provided with
the online Help shipped with the Brooktrout License Manager.
For quick access to the Help, click the ? located on the license
manager toolbar.
68
Chapter 10
Documentation and Support
RightFax Documentation
Documentation for the RightFax server, the RightFax client
applications, and all of the RightFax components and modules is
installed in PDF format on the RightFax server.
All of the RightFax user guides are located in the RightFax\Docs
folder on the RightFax server and on the product DVD. In addition,
most of these documents can be downloaded from the RightFax
Web site at
http://www.captaris.com/support/documentation/rightfax/index.ht
ml.
The following table describes all of the user guides available for
RightFax and lists the RightFax components that each guide
supports.
Note To view these files, you must have Adobe Acrobat Reader
installed. A copy of Adobe Acrobat Reader can be found on the RightFax
server installation CD in the Docs folder.
Table 10a RightFax User Guides
Table 10a RightFax User Guides (Continued)
Guide name
Description
Client for Lotus
Notes Quick
Reference Card
A reference card for users who will send and manage
faxes with the RightFax Lotus Notes Module.
Client for Microsoft
Outlook Quick
Reference Card
A reference card for users who will send and manage
faxes with the Microsoft Exchange.Module
Connector for SAP
Guide
A guide to installing, configuring, and using the
RightFax Connector for SAP.
Docs-on-Demand
Guide
A guide to installing, configuring, and using RightFax
Docs-on-Demand.
Fax Board Guide
A guide to all the fax boards supported by RightFax,
including required hardware and software
configuration.
FaxUtil Quick
Reference Card
A reference card for users who will send and manage
faxes with RightFax FaxUtil.
Guide name
Description
Oracle Purchasing
A guide to installing, configuring, and using the
11i Connector Guide RightFax Connector for Oracle Purchasing 11i.
Activating and Using
PDF Module
A guide to installing, configuring, and using the
RightFax PDF Module.
RightFax Lotus Notes
Module Guide
Administrator’s
Guide
A comprehensive guide to configuring and
maintaining all RightFax servers.
A guide to installing, configuring, and using the
RightFax Lotus Notes Module.
Chapter 10
Documentation and Support
69
RightFax 9.4 Installation Guide
Table 10a RightFax User Guides (Continued)
Guide name
Description
RightFax Microsoft
Exchange Module
Guide
A guide to installing, configuring, and using the
RightFax Microsoft Exchange Module.
Installation Guide
A guide to installing the RightFax server, upgrading
the server, and adding new components.
Integration Module
Guide
A guide to installing, configuring, and using the
RightFax Integration Module.
SecureDocs Module
Guide
A guide to installing, configuring, and using the
RightFax SecureDocs Module.
Select the
Help menu
The Captaris Web site offers the latest product information.
Updated documentation, a searchable customer support
knowledgebase, software downloads, and the latest product
offerings are all online at www.captaris.com/support.
Editing Contact Information in FaxUtil
Getting Help Online
Most of the RightFax windows and dialog boxes include
context-sensitive help. Typically, this help describes each field and
option in a dialog box. This context-sensitive help can be launched
from the question mark icon in the title bar of a dialog box.
In the FaxUtil Help menu, users can select Contact Information,
and a dialog box opens that lists RightFax technical support
contact information.
Figure 10.1 The Contact Information Dialog Box
Click the
question mark icon
Click this icon, and then click any option on the dialog box to view
its definition.
Or, press F1 to view a definition.
Online help for tasks or conceptual topics also is available. View
this help by selecting the Help menu. You can browse the help for
a topic or use the index to look up key words and terms.
This contact information appears in English with RightFax contact
information, but you can edit the text to provide customized
information. To do so, edit the text file Contact.txt located in the
\RightFax\Bin folder on the RightFax server. You can enter 24 lines
of text and up to 59 characters per line.
70
Captaris Training Services
RightFax training gives you the skills to optimize your RightFax
solution. Our comprehensive technical, administrative, and user
training programs produce full utilization and understanding of
RightFax products. Regular classes are held throughout the year.
Training materials and computer-based training tools are also
available. For more information on RightFax training, please visit our
Web site at www.captaris.com/training, and let us help you
develop a customized training plan for your organization.
Captaris Implementation Services
Captaris Implementation Services offers a team of highly skilled
engineers who are experts in the deployment, implementation, and
integration of RightFax solutions. Implementation services include
installation and configuration, upgrades, configuration review, and
advanced integration services. Whether it's through remote dial-in,
an on-site implementation, or a combination of both, the
Implementation Services team can quickly integrate RightFax
solutions with your existing applications.
Customer Support
If you have questions of a technical nature, contact your
organization’s RightFax administrator or network administrator
before calling the Captaris Technical Support. On the Captaris
Web site (http://www.captaris.com/support), a database of
customer support knowledge contains a wealth of information on
installing, configuring, and maintaining RightFax software.
Chapter 10
Documentation and Support
71
RightFax 9.4 Installation Guide
72