1
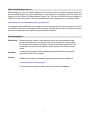
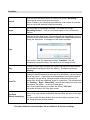
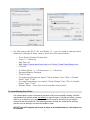
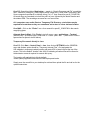
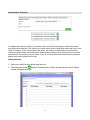
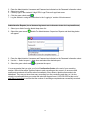
FRENCH LANGUAGE e-EXAMS: FRAL12 and FRALP12 SYSTEM USER MANUAL TECHNICAL SUPPORT – A. WILLOCK INFORMATION SYSTEMS: 1-866-558-5339 (toll free) Support now available in French 1 Before Students Enter the Lab Before bringing in your first student, please be sure to test (or have a technical support person test) the workstation that will be used to administer the oral e-Exams by navigating to the URL below and logging in to the e-Exam Pre-Administration System Test. This test will confirm that your computer is ready for the live exam session. We recommend that you do this in advance of your testing session. www.bced.gov.bc.ca/eassessment/eexam_preadmin.htm It is strongly recommended that you complete a round of testing and then call tech support at 1-866558-5339 to confirm the overall quality of the recordings. They will check the audio levels and clarity of the sound. If adjustments are needed, they can assist you with this. Recommendations: Microphone: Microphones with a built-in noise reduction device are recommended to help prevent static within the recording. Do not turn the microphone volume to Max or it can results in distortion and static. It is also recommended to place the mic on the table, and not allow the student to hold it or place it too close to his/her mouth. Speakers: Turning off the speakers while recording helps avoid feedback and increases the overall quality of the recording. Practice: Students are strongly encouraged to complete a sample exam available at: www.bced.gov.bc.ca/exams/search/ The maximum recording time within the oral exam site is 12 minutes. 2 Sound Recorder and Microphone Boost Settings Sound Recorder (Java) The oral exam system utilizes a built-in Java-based recorder. The Sound Control Bundle is no longer required to be downloaded or installed. It also means that your Java must be installed and updated prior to exam administration. When you login to the FRAL12 or FRALP12 exam, the sound recorder control should say “Ready” under the “Record” button. If you are still having trouble, see the Troubleshooting section of this document, or contact the technical support line at 1-866-558-5339. Microphone Boost Settings These settings only need to be set once per computer, and these instructions should be used as a guideline only; settings will vary from one operating system to the next. Your local technician may also be able to assist you with this. Find the Volume or Sound icon (often in the lower right of your screen, or directly from the Control Panel) Locate the Recording Sound or Microphone settings You may need to adjust both the Levels and the Advanced setting menus Balance should be set near the mid-range Volume should be set near the mid-upper range (too high can cause feedback and distortion) Make sure that the checkbox called “Mic Boost” is checked on unless this conflicts with an external microphone Click on Close to exit the volume area Best rule of thumb is to adjust your settings, record and send a TEST sound file, call the support line to ensure your test was successful and then make further adjustments, if necessary, based on the feedback received. 3 Logging In www.bced.gov.bc.ca/eassessment/grad_secure.htm The login screen will look like this: 1. Select your school district from the drop-down menu 2. Enter the student's PEN 3. Session Password – enter the password specific to your exam (Your principal will be notified of the passwords prior to the session). Remember the passwords are different for the FRAL12 and the FRALP12. Passwords are not case sensitive. 4. Click Login; the following pop-up window will appear: 5. If the information displayed is correct, then click “Yes” to continue. If it is not correct, click “No” to return to the login screen and try again. 4 6. If you get a message indicating that the PEN or Password is incorrect (as shown), it can be the case that the student is not registered to take the exam at your school and may need to be added to the roster as a walk-in. To do this, simply follow the steps shown in the administrative functions section to follow in this document. 7. Once the student has been successfully logged in, a security “warning” box may pop-up. It may be similar to the following: Always allow system to display “non-secure items” (click NO to the message shown above) and do not block any content. Always ensure that your system is set to allow pop-ups for proper administration of all online exams. 8. If your screen goes WHITE, it is often the case that the exam page has opened in behind the login screen. Simply click to minimize the screen or press the “Alt + Tab” keys to view the next window (Command + Tab on a Mac). 5 Exam Administration: The FRAL12 and FRALP12 exams use the recorder control displayed below: NOTE: If it says “Undefined” instead of “Ready” as shown above, then your JAVA is not installed or needs to be updated. You may need a technician or other network administrator to complete the installation. You must then close your browser and in some cases perform a full computer re-start for updates to take effect. This is necessary for all PC’s, however most Mac computers and Macbooks will update automatically. If you are still having trouble, refer to the Troubleshooting section of this document, or contact the technical support line at 1-866-558-5339. To update Java: To update Java on a PC: go to the Control Panel > Programs > Java > update > update now > OK. If needed go to Java.com to install Java for PC. This is a free download, but users must be logged in as Administrators to ensure the correct privileges. There is also a direct link through the online Pre-Administration System Test. To update Java on a Mac: Click apple (top left corner) > Software > it should update but if not click the “Check Now” button and it will auto-update. Most Mac computers and notebooks update automatically so this should not be necessary. “How do I know if I have Java installed on my Mac?” Mac OS X 10.6 and below: Apple's Java comes pre-installed with your Mac OS. Mac OS X 10.7 (Lion) and above: Java is not pre-installed with Mac OS X versions 10.7 and above. To get the latest Java 7 from Oracle, you will need Mac OS X 10.7.3 and above. If you have Java 7, you will see a Java icon under System Preferences. Java versions 6 and below are listed in the Java Preferences app located in the Applications > Utilities folder on your Mac. 6 Functions: Record: When you click the Record button, the status bar will say “Recording…” and the visual sound bar will show movement. Note to Teachers: you should pay close attention to the volume of your own voice as well as the student’s during the recording. Pause: You can pause the recording at any time. The status bar will say “Recording Paused…” until you click Pause again or click on Record to continue. Once you click the Stop button, the recording will stop immediately, so it is a good idea to wait a few seconds after the student has stopped talking before clicking the Stop button. A message box will appear as shown: Stop: If you click on “Yes”, the status bar will show “Complete”. This will permanently stop the recording. The sound file is now ready to send. Play: Clicking the Play button will allow you to listen and check over the student’s interview before sending the file to the Ministry. The status bar will say “Playing”. Send File: Clicking the Send File button will send the file to the Ministry, via the Internet. The file may take 1 – 8 minutes to send, depending on the upload speed of the computer you are using. Wireless Internet connections also tend to upload more slowly than traditional “wired-in” connections. The status bar will say “Sending … Bytes…Please Wait”, and will also display how much time has elapsed. Be patient….do not click Send again! Once it has finished sending, the status bar will say “File Sent.” The system will return you to the login screen. Exit Exam Without Completing: If you want to exit without completing the recording or sending the file, then click on “Exit exam without completing” and the screen will return to the login screen. You can re-enter the same student when you are ready to continue at any time during the exam session window. **File sizes within the oral examination site are limited to 12-minute recordings 7 General Troubleshooting Tips: If the files begin sending very slowly or seem to be slowing down as the recordings go on, it could indicate that the temporary memory space on the computer is getting too full for optimum performance. It is always recommended that you do a full system re-start after every 5-6 student recordings to free up this memory space. The files are extremely large in size and smaller systems often cannot handle more than this. The temporary memory space is designed to “empty” automatically when the system is shut down or re-started. It is a good idea to call the tech support line before re-booting to make sure all files have been successfully received! For testing purposes and for the oral exam execution, a microphone MUST be connected and enabled (volume adjusted, etc) for the recorder to function. If user attempts to run a test without a mic, it will appear that the recorder is not working (line will not move). Sound must be registered in order for the recording to begin. A full “system test” without a mic properly installed is not possible. When the “STOP” button does not seem to work it is generally an indicator that your Java is out of date. Running through the Pre-administration System Test will catch this issue before the live exam session. Some teachers, at times, may think the system has frozen or will describe that “nothing is happening” when in fact the dialogue box or “next” screen of the exam has opened in behind the first screen. In this case, the teacher simply needs to minimize the screen to locate the next set of instructions. This can be accomplished by clicking the “minimize” button on your browser or by clicking the “Alt + Tab” keys to move to the next open window. As with all of our e-exams, you must ensure that pop-ups are allowed for the browser being used. JAVA settings should be confirmed prior to recording and can be accessed through the Control Panel > JAVA on most systems (Utilities on a Mac). The first screen shot image below illustrates the Java Control Panel and the various tabs available for review of all Java settings. Under Temporary Internet Files, click the Settings button on the General Menu Tab and a panel similar to the second image below will display. You want to ensure that the “Keep temporary files on my computer” checkbox is CHECKED and that the scroll bar under “Set the amount of disk space for storing temporary files” is set to the far right hand side (maximum). On a Mac, your Java settings are accessed through the Applications > Utilities menu. These are the default settings so in most cases will not need to be adjusted. 8 For Mac users with OS 10.9+ and Safari 7+ - you will need to change some additional settings to allow Java to work with this combination: o o o o o From Apple System Preferences Java-->-->Security Edit Site List Add https://www.awinfosys.com and https://www3.awinfosys.com Click OK In Safari Menu-->-->Preferences-->-->Security Manage Website Settings Click on Java For www.awinfosys.com select “Allow Always” then “Run in Unsafe Mode” then “Trust” o For www3.awinfosys.com select “Allow Always” then “Run in Unsafe Mode” then “Trust” o Restart Safari – then the sound recorder should work o o o o To Locate Missing Sound Files: If an internet glitch or loss of connectivity prevents a file from successfully sending, an AWIS representative will call the school immediately to report the issue. In these rare cases, you may need to run a search on your hard drive to locate the sound file and send it to us using an upload site that we will provide. The following process will help you locate the file and may prevent you from having to re-record the student’s exam. DO NOT turn off Computer and be sure to log in as an Administrator so a full search can be executed. 9 On a PC: Search hard drive: Start button > search in “Search Programs and File” magnifying field. Search for pxm(eg36)_Pen#(9 digits) and/or search the C Drive under Temporary Files. Some computers can search on desktop using “Ctrl + F” then Search for pxm36_123456789. All search files are formatted to include the prefix of pxm, followed by the district number and the student PEN. The recordings are saved as .wav sound files. ALL computers save audio files to a Temporary File Directory; a technician may be required to locate them as they are sometimes set to store in a less obvious location. On a MAC: Click on the “Finder” icon > then search fox pxm36_123456789 in the search magnifying glass. Alternate Search (Mac): Click Finder in top left corner > go > applications > Terminal (double click) > (to find file type) = sudo find –x / -name “*pxm*.wav” (make sure to insert a space where a space is shown above) Temporary files search directly in Java: On a PC: Click Start > Control Panel > Java, then click on SETTINGS on the GENERAL menu tab (bottom option should be “Temporary Internet Files”). Cut and paste the URL address in temporary/cached location and paste URL in search field at the top of the screen. This is the default “location” that JAVA is indicating all cached files will be saved to. Administrator access is required to execute this query. The location will read similar to this by default: \Users\(Name)\AppData\LocalLow\Sun\Java\Deployment\cache Simply save the sound file to your desktop for retrieval then upload the file and call us for the upload instructions. 10 Administrative Functions If a student has recently enrolled in your school and is not in the exam system, then the supervisor may add him/her manually. First, select your school district from the drop-down menu then click on the “Walk-in Students” arrow. On the screen that opens, the teacher or administrator must enter their Username (8-digit school code) and session administration password then select the school from the drop-down list. An example is shown below. If you do not know the session administration password, please call the tech support line for help. Adding Students 1. Select your district form the district drop-down list beside For Administrators: Walk-in Students and the Add a Student 2. Select the green arrow window will appear as shown: 11 3. Enter the Administrative Username and Password as indicated on the Password information sheet 4. Select your school 5. Carefully type in the student’s 9-digit PEN, Legal First and Legal Last name 6. Click the green check mark 7. Log the student in using the instructions in the ‘Logging In’ section of this document Administrative Reports (List of Students Registered and Confirmation Codes for Completed Exams) 1. Select your district from the district drop-down list 2. Select the green arrow will appear beside For Administrators: Supervisor Reports and the dialog below 3. Enter the Administrative Username and Password as indicated on the Password information sheet 4. Use the --- Select a report --- drop down and select the desired report 5. Select the green check mark to generate the report. It is recommended that you print your list of Confirmation Codes at the end of your recording session. Willock Information Systems listens to each recording as they come in to ensure overall quality and sound and will call the school immediately if they detect a problem that needs to be addressed. They may not know how many recordings you are conducting each day, so it is also strongly recommended that you contact the technical support line at 1-866-558-5339 at the end of each day of recording to confirm that the number of recordings completed was successfully received. 12