1
1
Title:
Date:
Version:
Author:
Program conformity:
ScoreEngine User Guide
October 4, 2011, last updated August 27, 2014
4.19
Jan de Kloe
v5.0.0.37
Table of contents
1 Introduction .................................................................................................................................................... 6
1.1 Scope ........................................................................................................................................................ 6
1.2 How to read this manual........................................................................................................................... 6
1.3 Rationale................................................................................................................................................... 6
1.4 License issue ............................................................................................................................................ 6
1.5 Score installation issue ............................................................................................................................. 6
1.6 Distribution policy.................................................................................................................................... 7
1.7 Product availability .................................................................................................................................. 7
1.8 Education and training ............................................................................................................................. 7
2 Design considerations .................................................................................................................................... 7
2.1 Screen issues ............................................................................................................................................ 7
2.2 Space issues .............................................................................................................................................. 8
2.3 Speed issues.............................................................................................................................................. 8
2.4 Security..................................................................................................................................................... 9
2.4.1 ‘Open’ Backup ................................................................................................................................. 9
2.4.2 Abnormal termination ...................................................................................................................... 9
2.4.3 Other errors....................................................................................................................................... 9
2.4.4 ScoreEngine and User Access Control ........................................................................................... 9
2.5 Output issues .......................................................................................................................................... 10
2.6 User comfort ........................................................................................................................................... 10
2.7 Quality issue ........................................................................................................................................... 10
2.7.1 MENU4.DAT ................................................................................................................................. 10
2.8 Keyboard issues...................................................................................................................................... 10
2.8.1 Keyboards ....................................................................................................................................... 11
2.8.2 Function keys ................................................................................................................................. 11
2.8.3 The tabulation key.......................................................................................................................... 11
2.8.4 NumLock ........................................................................................................................................ 11
2.8.5 Special keys .................................................................................................................................... 11
2.8.6 Keystroke reduction ....................................................................................................................... 11
2.9 Mouse compatibility ............................................................................................................................... 11
2.10
The demo version ............................................................................................................................... 12
2.11
Stepped development .......................................................................................................................... 12
2.12
A note on filenames in this guide ....................................................................................................... 12
3 Program organization ................................................................................................................................... 12
3.1 The Dispatcher ....................................................................................................................................... 12
3.2 The menu line ......................................................................................................................................... 13
3.3 The Link profile ..................................................................................................................................... 13
3.3.1 PREF and LIB ................................................................................................................................ 15
3.3.2 PSC folder ...................................................................................................................................... 15
3.3.3
EPS print options ............................................................................................................................ 16
3.3.4 Link utilities ................................................................................................................................... 17
3.3.4.1
SipEPS01 path ........................................................................................................................ 17
3.3.4.2
seps4id path ............................................................................................................................. 17
3.3.4.3
PDFcreator path ...................................................................................................................... 17
2
3.3.4.4
Acrodist path ........................................................................................................................... 17
3.3.4.5
PCSEND path ......................................................................................................................... 18
3.3.4.6
EPSTOOL path ....................................................................................................................... 18
3.3.5 Dialects ........................................................................................................................................... 18
3.3.5.1
The Exec profile ...................................................................................................................... 19
3.3.6 Peripherals ...................................................................................................................................... 19
3.3.6.1
Large command screen ........................................................................................................... 20
3.3.6.2
For each EPS output page ...................................................................................................... 20
3.3.7 Compatibility.................................................................................................................................. 20
3.3.7.1
Commands .............................................................................................................................. 21
3.3.7.2
EPS options ............................................................................................................................. 22
3.3.7.3
Screen features ........................................................................................................................ 23
3.3.7.4
Other features .......................................................................................................................... 24
3.3.7.5
Length of filename .................................................................................................................. 26
3.3.8 Font embedding .............................................................................................................................. 27
3.3.9 Utilities ........................................................................................................................................... 28
3.3.9.1
Page(4) .................................................................................................................................... 28
3.3.9.2
Scorlas(4) ................................................................................................................................ 29
3.3.9.3
Draw(4) ................................................................................................................................... 29
3.3.9.4
Just(4) ...................................................................................................................................... 29
3.3.9.5
SipEPS01 (fingering).............................................................................................................. 29
3.3.9.6
Fingering ................................................................................................................................. 29
3.3.10 Lyrics .............................................................................................................................................. 33
3.3.11 Backup ............................................................................................................................................ 33
4 Score command panel .................................................................................................................................. 34
4.1 The top menu line ................................................................................................................................... 37
4.1.1 File menu ........................................................................................................................................ 37
4.1.1.1
Submenu Open MUS file ....................................................................................................... 37
4.1.1.2
Submenu Recent MUS files ................................................................................................... 37
4.1.1.3
Submenu Open […] ................................................................................................................ 38
4.1.1.4
Submenu Environment > ........................................................................................................ 38
4.1.1.5
Submenu Current file summaries > ....................................................................................... 39
4.1.1.6
Submenu EPS size summary .................................................................................................. 41
4.1.1.7
Submenu EPS log file > ......................................................................................................... 41
4.1.1.8
Submenu Stored PSC/DRW ................................................................................................... 41
4.1.1.9
Cancel ...................................................................................................................................... 41
4.1.1.10 EX/Exit(F8)............................................................................................................................. 42
4.1.2 View menu ..................................................................................................................................... 42
4.1.2.1
Less/More................................................................................................................................ 42
4.1.2.2
Normal/Large command form size ........................................................................................ 42
4.1.2.3
Normal font (MS Sans serif)/Small font for Help list file .................................................... 42
4.1.2.4
Place music display ................................................................................................................ 42
4.1.2.5
View quick commands ........................................................................................................... 42
4.1.3 Insert menu ..................................................................................................................................... 42
4.1.4 License menu.................................................................................................................................. 43
4.1.5 About menu .................................................................................................................................... 43
4.2 Command panel top line buttons ............................................................................................................ 43
4.2.1 New page button ............................................................................................................................ 43
4.2.2 Open file button.............................................................................................................................. 43
4.2.3 Keep selection ................................................................................................................................ 43
4.2.4 Command file ................................................................................................................................. 44
3
4.2.5 Open More button .......................................................................................................................... 44
4.2.6 Intelligent NB/NX button .............................................................................................................. 44
4.2.7 Save button ..................................................................................................................................... 44
4.2.8 EPS button ...................................................................................................................................... 44
4.2.9 Print button ..................................................................................................................................... 44
4.2.10 PDF button ..................................................................................................................................... 44
4.2.11 Copy, Cut, Paste, Undelete buttons ............................................................................................... 44
4.2.12 Help button ..................................................................................................................................... 45
4.2.13 SH/Z button .................................................................................................................................... 45
4.2.14 Clear button .................................................................................................................................... 45
4.2.15 Position button ............................................................................................................................... 45
4.2.16 Minimize button ............................................................................................................................. 45
4.3 Command panel bottom line buttons ..................................................................................................... 45
4.4 Program status ........................................................................................................................................ 45
5 Score music display ..................................................................................................................................... 46
5.1 Pop-up controls ...................................................................................................................................... 46
5.2 Slider ...................................................................................................................................................... 46
5.3 Pos .......................................................................................................................................................... 47
5.4 Fit ........................................................................................................................................................... 47
5.5 Additional info on the music panel ........................................................................................................ 47
5.6 Pitch Stage .............................................................................................................................................. 47
6 File functions ................................................................................................................................................ 48
6.1 Path definition ........................................................................................................................................ 48
6.2 Drive and Folder selection ..................................................................................................................... 48
6.3 MUSinfo ................................................................................................................................................. 49
6.4 File selection .......................................................................................................................................... 49
6.5 Directories .............................................................................................................................................. 49
7 Text manipulation ........................................................................................................................................ 50
7.1 Font name display and update ................................................................................................................ 50
7.2 Advanced text update ............................................................................................................................. 51
7.3 Automatic syllable placement ................................................................................................................ 51
7.4 Simple text input .................................................................................................................................... 52
7.5 Advanced text input ............................................................................................................................... 53
7.6 Copy, cut and paste text ......................................................................................................................... 54
8 Additional features, examples ..................................................................................................................... 54
8.1 Parameter change by mouse ................................................................................................................... 54
8.2 Slider editing (Score4) ........................................................................................................................... 55
8.3 Advanced help output samples ............................................................................................................... 55
8.4 Advanced reporting ................................................................................................................................ 58
8.5 Fix of date format ................................................................................................................................... 58
8.6 Example of full screen display ............................................................................................................... 58
8.7 Example of EPS comments .................................................................................................................... 59
9 Inputting ....................................................................................................................................................... 60
10 Command symbols ....................................................................................................................................... 61
10.1
String symbols .................................................................................................................................... 61
11 Commands .................................................................................................................................................... 63
11.1
? .......................................................................................................................................................... 63
11.2
DIR ..................................................................................................................................................... 63
11.3
DIRA .................................................................................................................................................. 64
11.4
DIRR................................................................................................................................................... 64
11.5
DP ....................................................................................................................................................... 64
11.6
11.7
11.8
11.9
11.10
11.11
11.12
11.13
11.14
11.15
11.16
11.17
11.18
11.19
11.20
11.21
11.22
11.23
11.24
11.25
11.26
11.27
11.28
11.29
11.30
11.31
11.32
11.33
11.34
11.35
11.36
11.37
11.38
11.39
11.40
11.41
11.42
11.43
11.44
11.45
11.46
11.47
11.48
11.49
11.50
11.51
11.52
11.53
11.54
11.55
11.56
4
DP- ...................................................................................................................................................... 64
DRV .................................................................................................................................................... 64
G ......................................................................................................................................................... 64
GM ...................................................................................................................................................... 64
GM- and GM+ .................................................................................................................................... 64
LJ – horizontal alignment ................................................................................................................... 64
K – keyboard fingering ....................................................................................................................... 64
PMX.................................................................................................................................................... 64
PR ....................................................................................................................................................... 65
RES ..................................................................................................................................................... 65
RS ....................................................................................................................................................... 65
SH, SHX ............................................................................................................................................. 65
TYPE .................................................................................................................................................. 65
XAD – stem length setting ................................................................................................................. 65
XARP – arpeggio................................................................................................................................ 66
XBOX – draw box around text item................................................................................................... 66
XBUCKET – use Score as Scorlas ..................................................................................................... 66
XCAF – change all fonts .................................................................................................................... 67
XCAFF – change all font overrides .................................................................................................... 67
XCLS – clear screen ........................................................................................................................... 67
XCM – center measure numbers ........................................................................................................ 68
XCVH – check vertical height............................................................................................................ 68
XDA – insert dash .............................................................................................................................. 68
XDE – delete staves............................................................................................................................ 68
XDEBUG – debug information .......................................................................................................... 68
XDP – extended DP ............................................................................................................................ 68
XDUM – delete dummy items............................................................................................................ 68
XE – EPS file display ......................................................................................................................... 69
XENDING – first or second ending ................................................................................................... 69
XEPS – read enhanced EPS................................................................................................................ 69
XEQU – define equated string symbol ............................................................................................... 69
XFF – convert F-ligatures .................................................................................................................. 69
XFUL – set full screen........................................................................................................................ 69
XJTA – JT on all systems ................................................................................................................... 69
XK – keyboard fingering .................................................................................................................... 69
XKEEP – remember current file for next session .............................................................................. 69
XLIN – generate vertical line ............................................................................................................. 70
XLJA – LJ all systems ........................................................................................................................ 70
XLYRM – move lyrics up or down .................................................................................................... 70
XLYRV – lyrics view ......................................................................................................................... 70
XNB – open previous file ................................................................................................................... 70
XNX – open next file.......................................................................................................................... 70
XNOW – display current time stamp ................................................................................................. 70
XPCS – send EPS to PCSEND .......................................................................................................... 70
XPLAY – Midi output ........................................................................................................................ 70
XPT – get point size ........................................................................................................................... 70
XPDF – create PDF ............................................................................................................................ 70
XREMARK – make a remark ............................................................................................................ 71
XRS – reset memory........................................................................................................................... 71
XRUN – execute external program .................................................................................................... 71
XSD – screen dump ............................................................................................................................ 71
5
11.57 XSIPEPSSUMMARY ........................................................................................................................ 71
11.58 XSTAFD – set distances between staves/systems .............................................................................. 71
11.59 XSV – save SipInput created file ....................................................................................................... 71
11.60 XSYL – align syllables ....................................................................................................................... 71
11.61 XT – enter text .................................................................................................................................... 72
11.62 XTRMAC – trace macro .................................................................................................................... 72
11.63 XTXT – adapt text parameters ........................................................................................................... 72
11.64 XUND – underline text....................................................................................................................... 72
11.65 Insert commands ................................................................................................................................. 73
11.65.1 XB – insert barré ........................................................................................................................ 73
11.65.2 XIE – insert Code15 PostScript item......................................................................................... 73
11.65.3 XIK – insert character ................................................................................................................ 73
11.65.4 XIL – insert library item (excluding LIBnn)............................................................................. 73
11.65.5 XILL – insert library item (including LIBnn) ........................................................................... 73
11.65.6 XIS – insert symbol .................................................................................................................... 73
11.65.7 XIS3 – insert symbol from CODE9.DAT ................................................................................. 74
11.65.8 XIT – insert text.......................................................................................................................... 74
11.65.9 XLGD – insert line going down ................................................................................................ 74
11.65.10
XLGU – insert line going up .................................................................................................. 74
11.66 Fingering commands .......................................................................................................................... 74
11.66.1 XFn – generate finger................................................................................................................. 74
11.66.2 XSn – generate string ................................................................................................................. 74
11.66.3 XPn – generate position ............................................................................................................. 74
11.66.4 XC/ – generate a vertical line through C ................................................................................... 74
11.67 Macros ................................................................................................................................................ 74
12 Score utilities ................................................................................................................................................ 75
12.1
Page(4) ................................................................................................................................................ 75
12.1.1 Long filenames ............................................................................................................................... 75
12.1.2 Other Page extensions .................................................................................................................... 75
12.2
Scorlas(4) ............................................................................................................................................ 79
12.3
Draw(4) ............................................................................................................................................... 80
12.4
Just(4) ................................................................................................................................................. 81
13 PostScript commands ................................................................................................................................... 83
14 Features currently under study .................................................................................................................... 83
15 Installation .................................................................................................................................................... 84
15.1
Workfiles ............................................................................................................................................ 84
15.2
Service files ........................................................................................................................................ 85
15.3
File placement..................................................................................................................................... 85
15.4
Multiple installations of ScoreEngine ................................................................................................ 86
15.5
Installation issues................................................................................................................................ 86
16 Diagnostics ................................................................................................................................................... 86
17 Product training ............................................................................................................................................ 87
18 Calling ScoreEngine .................................................................................................................................... 87
19 SIP and ScoreEngine.................................................................................................................................... 87
19.1
ScoreEngine called by SipInput ......................................................................................................... 88
19.2
ScoreEngine called by SipSib, SipXML2Score, etc........................................................................... 89
20 Working with Acrobat ................................................................................................................................. 89
21 Third party software ..................................................................................................................................... 90
22 Document update history ............................................................................................................................. 91
6
1
Introduction
1.1
Scope
ScoreEngine is a Windows program which runs the DOS programs Score3 and Score4 and their utilities in
emulation. It benefits from typical Windows features without restricting the original DOS functionality. The
look and feel of ScoreEngine is identical to the DOS version and the added Windows functionalities are
intuitive. The user influences the level of additional Windows features which are self-explanatory to an
experienced Score and Windows user.
1.2
How to read this manual
New users should first read from begin to end to see what ScoreEngine has to offer on top of DOS Score.
Then it will serve as a reference guide for all those details that are rarely used.
When working with ScoreEngine make yourself acquainted with the online help feature as much explanation
is at your fingertips when you know how to get it.
The website has a number of tutorials that show the more complex manipulations dynamically.
1.3
Rationale
Newer versions of Windows are increasingly hostile to DOS programs and future hardware will not have
native 16-bit instruction support which is a requirement for Score. ScoreEngine is not using any DOS
functions and is therefore entirely independent from the presence of DOS on a modern system.
While a pure Windows version of Score has been available since early 2009, it is felt that the program is not
as popular as its DOS predecessors. ScoreEngine therefore is a valid alternative for users accustomed to the
original program. No additional font software is required. ScoreEngine has more powerful commands than
WinScore.
ScoreEngine offers an investment protection for Score users for as long as Windows will be alive while there
is no need for additional training or documentation.
On top of that there is a tendency to work with ever larger or multiple screens – a tendency fully in line with
the philosophy of ScoreEngine.
Windows allows much longer paths and filenames with special characters. ScoreEngine is made to accept
any valid Windows path and filename as Score file.
Today a standard document format, PDF production is integrated in both Score and Scorlas when running
under ScoreEngine.
It is also felt that some functions which were missing or cumbersome needed to be added. An example is the
placement and manipulation of lyrics. Another is the stem alignment across staves.
1.4
License issue
ScoreEngine requires that the user has a license for the original DOS program and that Score is resident on
the system. The Score license is verified by ScoreEngine. As such, ScoreEngine does not make any
infringement on the Score copyright as it will not be able to run without the original licensed program.
ScoreEngine itself comes with a license as well. At order time, the user must provide his Score license
number(s). This is, or these are then coupled to the license number of an individual ScoreEngine license
number.
1.5
Score installation issue
It is entirely possible to have both Score3 and Score4 on the Windows system.
Note that Score need not be installed in the traditional way (INSTALL.EXE which will not run on Windows
7). The DOS files need to be present though. To move from an old system to one with ScoreEngine, just copy
the Score folders, preferably to C:\SCORE, C:\LIB and C:\HLP for Score 3 and to C:\SCOR4 for Score4
7
1.6
Distribution policy
A demonstration version is downloadable for free to anyone. It will work with the user’s original Score
programs without any license check.
The demo version however is not fully operational in that most output functions are blocked. When a
ScoreEngine license is acquired, the individual license file is included in the installation medium.
It is felt that this approach is the most convincing way of promoting this product, as users can play with it
and learn to appreciate the additional features which ScoreEngine offers over just Score while qualifying
their version of Windows against this new product.
When attempting to write a file in the demo version with any of the Score programs, an appropriate message
is given. Some of those situations are critical and cause a terminal error.
1.7
Product availability
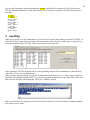
ScoreEngine is available for:
SCORE
3.11-585
SCOR4
4.01-555
PAGE
3.1-540 and 3.11-540
PAGE4
4.00-540
SCORLAS 3.11
SCORLAS4 1.0 and 1.01
DRAW
3.10
DRAW4
4.00
JUST
3.01
JUST4 4.00
When users have different versions (which are called dialects in this context) of one of these Score programs
they need to take contact with ScoreEngine development to investigate conformity. For Score(4), there is no
dialect issue.
1.8
Education and training
To assure an easy start with ScoreEngine, a number of tutorials are provided on www.dekloe.be. Each movie
only lasts a few minutes.
2
Design considerations
In general, the environment of ScoreEngine benefits from the many Windows features which make working
with Score and its utilities more convenient.
2.1
Screen issues
Score dates from the time that a PC screen was rather limited in size while part of the screen needed to be
split between a command area and a music display. The Score user had some control over the relation of
command/music display with commands like Alt+C etc. Modern systems have much larger screens and
users in many cases have more than one monitor on their computer. ScoreEngine separates the command
function and the music display function in separate panels. While it works on a single monitor, ScoreEngine
works best on two monitors. The user defines how the command panel and the music display panel are
configured. The monitor configuration is selected by the user and remembered for subsequent sessions.
One advantage of splitting the command and music display panels is that the latter can be at the maximum
size as if the Alt+F were given. The bottom-of-screen commands (which usually have function key
equivalents) are always available in ScoreEngine.
The quality of the graphics displayed in the music panel is not better than that of DOS, even though
Windows screens have higher resolution. This is because the actual graphic screen of DOS is emulated. One
pixel for a DOS screen translates to one or a few on the Windows screen to give optimal visibility.
8
The size of the command panel comes in two variants, normal and large. The large version is supplied to
approach DOS size viewing.
The music panel is dynamic in size. The default of 100% can be adapted to any value from 32% to 99%.
This flexibility is provided because different screens give better resolution when set to a lower value than the
maximum. Also, it allows a customized screen configuration. The setting is remembered between sessions.
When both command panel and music display panel are on the same monitor, a smaller music display panel
will be necessary. On my laptop with a 15.4" WXGA (1280x800) Wide Screen LCD, both panels fit nicely
on a single screen when the music display percentage is set to 65. On my 24 inch screen both windows are
also next to each other, the music display giving best results at 96 percent.
The two-panel approach means that either one of the panels has the focus. After graphics operations on the
music display, it may be necessary to click the command panel to obtain focus for typed commands.
Some commands have been foreseen as a button function for user comfort. The command panel also
recognizes mouse functions for the bottom control line with function keys and for some specific features.
There are two types of fields and lists. The white background signifies a change or selection capability. A
yellow background is a field that cannot be changed. Lists with a yellow background can be closed by
clicking on any text in it. Other background colors indicate just commentary.
2.2
Space issues
Personal computers have lots more central memory and disk space than in the days when Score was first
operational on a PC. The overlay technique had to be applied to assure that the limited memory could handle
a single page of music on top of all the computer instructions. As ScoreEngine executes the DOS Score
instruction per instruction, is also emulates the overlay technique but it has an improved mechanism that
avoids disk access for the most common overlays.
Disk space today cannot be compared to the limited space of the original diskette systems of the early Score
days. ScoreEngine uses much more disk space than Score but it does considerably less input/output because
it keeps overlays in memory.
File backup other than the standard SCORE.SAV requires additional disk space if so selected by the
Dispatcher.
Systems today are expected to have 2GB central memory or more.
An attempt to run ScoreEngine on a Windows98 system with 32MB RAM (second edition 4.10.2222A)
failed with a ‘not enough memory’ message.
2.3
Speed issues
Today personal computers are a lot faster than the systems on which Score originally ran.
The processor speed allows the original instruction set to be emulated whereby one 8086 or 8087 instruction
(which Score uses) is performed by a number of instructions in the 32-bit instruction set. The ScoreEngine
emulator is written in 32-bit assembler and the program speed on fast processors is comparable to normal
DOS Score operation. Some functions are even faster. With processors becoming ever faster, any speed
inconvenience will disappear over time.
Another factor slowing down the emulation is the screen paint time. In DOS, Score writes pixels to memory
locations which are reserved to represent the screen pixels. ScoreEngine paints pixel by pixel. You have all
interest in using a screen with a fast paint time.
Disc access speed is not a factor of importance for ScoreEngine. Overlays, particularly in Score4, slowed
down processing considerably. ScoreEngine keeps the overlays in memory and therefore speeds up
processing.
Because of high speed in modern machines, features could be added that could not have been realized in the
original programs – an example is the extended functionality of DRAW (with the ‘extended’ option set)
which when asked now to read a vector list (F4-Read), immediately comes up with a table of all the files in
the current directory which are vector lists.
9
Another example is in PAGE (with the ‘filename drop’ option set) where option 2 (part extraction) scans
the music files to generate the PARTS file while providing a list of the instruments encountered.
Keyboard handling has improved drastically compared to Score which used to loop until a key was hit and
thereby claiming the entire processor.
2.4
Security
ScoreEngine protects against user manipulation errors and against errors made by itself. It also offers
additional backup facilities.
2.4.1 ‘Open’ Backup
Every time a music file is opened by the G-command, a backup is made with additional information in the
filename. For example when you open the file
C:\MyScoreFiles\Brahms\Song01.MUS
the file
C:\$EWORK\20121023081005ScoreEngineBackup20100101110102_SONG01.MUS
is created.
This name has two date/time stamps: the first is the moment of creation of the backup; the second is the
original file’s date/time stamp. This naming convention allows a mechanism which avoids duplication
backups of files for which a backup was already taken once with identical contents without a physical
comparison.
The folder where this file is stored is defined by the user. Management of the security backups (summary,
clean-up) is done by the Dispatcher.
Restore of security backups is left to the user. Such files cannot be read from the work folder by
ScoreEngine – they must be moved elsewhere and renamed by the user when they need to be processed.
2.4.2 Abnormal termination
Another security feature is that if for any reason ScoreEngine does an abnormal termination, the user is
given the possibility to save the current state of the file being updated.
2.4.3 Other errors
When the program gets into a loop or becomes unresponsive, the Windows key will interrupt that state.
2.4.4 ScoreEngine and User Access Control
ScoreEngine heavily depends on a strong Windows feature – that of filename drop. The first versions of
ScoreEngine were delivered to customers with Windows XP systems where that feature became an every
day way of presenting MUS and other files to Score and its utilities. In its wisdom, Microsoft restricted the
filename drop in Vista, Windows 7, and probably later operating systems as well. Only when User Access
Control is at the lowest level will flename drop work on those systems, basically being unfriendly to the
majority of users.
Since some functions could only be performed with the filename drop, ie. the XBUCKET command to make
EPS/PDF generation and PAGE file selection, alternatives have been provided for situations where User
Access Control prohibits filename drop.
On the XBUCKET command, or XBU for short, just click the bucket and a file selector will be given. Select
one or multiple consecutive files and the command will proceed normally.
To select files in PAGE option 1 (Page layout) and option 2 (Part extraction), left click in the yellow boxes
to get the file selection panel. Typing filenames for page layout as in the old DOS program has been
suppressed.
10
2.5
Output issues
On top of a number of EPS enhancements, PDF files can be created from a music file through the XPDF
command or a button in Score and automatically by Scorlas.
Another option is to call PCSEND from Score(4) or Scorlas(4), passing it EPS files as printing to a port is
not supported by ScoreEngine. PCSEND is a 16-bit program which excludes running it in 64-bit Windows 7.
To fix the bounding box problem – Score does not correctly give proper coordinates when there is text at the
edge – the freeware GhostView utility ‘EPSTOOL’ can be called. Note that ScoreEngine optionally gives a
summary with exact EPS print area sizes.
A feature is also added to incorporate licensed utilities ‘SipEPS01’ for staff line suppression under fingering
and text, and ‘seps4id’ to prepare EPS files for InDesign.
2.6
User comfort
While the keyboard commands can be typed as in Score, ScoreEngine uses the mouse more intensively to
replace a number of typed commands. Several Score commands were reprogrammed in pure Windows to
benefit from modern hardware and a number of specific commands were added to make the life of the
engraver easier.
Changing parameters can be done through mouse operations.
The Score restriction of 24 characters (Score3, for Score4 it is 22 characters) for a file path has been lifted.
Paths for standard folders and files (LIB, HLP, PREF) are as for DOS Score
The command area will sometimes provide a colored background to make specific information more
conspicuous and it shows additional controls for extended features.
Help file display is instantly for items being edited by just moving the mouse over the ‘?-button’. Separate
help forms may stay open during edit.
ScoreEngine accepts the middle button of the mouse. The function was no longer operational with modern
mice but ScoreEngine reinstates it for current mice.
Copy and paste between ScoreEngine and other Windows applications is now possible and is useful mainly
for text manipulation. A comfortable way to enter lyrics is with the ‘automatic syllable placement’ feature
which takes lyrics from a text file and pastes it under a staff, note by note.
OLE technique is applied such that file selections from the Explorer can be dropped to the Score
applications, thus saving valuable time. There is no more need to create names files for Score(4), Page(4) or
Scorlas(4), or for a part extractor control file for Page(4).
File selection has been extended with some powerful features. It is for example possible to move a number
of files from the Explorer to ScoreEngine which will load all files and stack the files in one operation.
2.7
Quality issue
The diagnostic messages by Score are sometime cryptic or misleading. In many cases, ScoreEngine traps
these messages and provides additional information as to how to remedy the situation.
2.7.1 MENU4.DAT
This file is used by Score4 and contains the details for the bottom function buttons. DOS Score4 keeps this
file open from program start to end such that the DOS version and the ScoreEngine version cannot be run
simultaneously. ScoreEngine therefore uses a copy of this file and works from the copy as not to block
running the DOS version at the same time.
Note that ScoreEngine keeps this file in memory thus avoiding disk access to it every time the band of
bottom buttons is changed.
2.8
Keyboard issues
While basically everything which can be done in DOS can also be done in Windows, there are keyboard
differences inherent to the operating system and hardware.
11
To facilitate typing of accented and special Score characters, an ‘insert symbol’ feature is provided.
2.8.1 Keyboards
The default keyboard is US QWERTY but other keyboards are supported. The selected keyboard must be
equal to the language selection in the taskbar, assuming that the ‘language bar’ is set (See ‘regional and
language options’ in the control page, then tab ‘languages’, then ‘details’, then ‘language bar’ then ‘show
language bar’).
Non US-keyboards may have accented character keys such as ‘á’ which cause a space. To type accented
characters, use the ‘Insert’ menu. Pasted strings in advanced text input may have accented characters which
are automatically translated to Score.
2.8.2 Function keys
For Score3: Function key F10 cannot be assigned. Where a DOS F10-key is used in a Score utility, it is
replaced by F11 and to highlight this exception it appears on the command screen in red like this: F11-Path.
For Score4 this exception does not apply.
2.8.3 The tabulation key
The key labeled ‘Pause Break’ is identical to the TAB key and it works with Shift for backward tabulation.
2.8.4 NumLock
ScoreEngine shows a small letter ‘N’ next to the keyboard input field to indicate that NumLock is on. You
can switch the display off by a mouse click on it.
DRAW(4) uses ‘NumLock’ which ScoreEngine does not support. Use ‘Enter’ continuously to get to the next
vector endpoints.
2.8.5 Special keys
Screen setting control keys which in Score are made with the ‘Alt’ key have been revised. A separate chapter
explains this. See ‘Screen features’.
Use the Windows key to interrupt a loop or an unresponsive situation. It will perform an SM and terminate
ScoreEngine.
2.8.6 Keystroke reduction
When you have a numeric command in edit mode ie. “15 -3.5” to set the offset of a selected Code9, the
space in front of the minus sign may be omitted: “15-3.5”.
Many keystrokes can be saved when using the drag/drop of filenames. With that feature it is hardly ever
necessary to type a file name, except for the SA command.
2.9
Mouse compatibility
Clicking outside the music display area (in the area above or below the music bezel if there is one) causes
the horizontal coordinate to be ignored.
Furthermore, the middle mouse button can be used to select another item when in Edit Mode. Many controls
use the right or middle button for additional functionality and are always explained by a tooltip.
The effect of the left mouse button in Score can be redefined such that it will not move a selected item.
ScoreEngine does not support the simultaneous click with two buttons, as some Score manipulations allow.
In these cases there exist valid alternatives.
12
2.10 The demo version
The features which are blocked in the demonstration version are all related to output, sound and Midi. When
such Score commands are given, the user receives a message and can in most cases continue operation as if
the function were successful. The Score functions that are thus suppressed are:
- music file output (SA, SM, DEC)
- PMX file output (PMX)
- printed output (PR, XBUCKET, XPDF)
- DPY (other than 1 or -1)
- Sound and Midi
Note that macros can be saved in the demo version.
The demo version suppresses page output of Page(4), Scorlas(4).
The Draw(4) functions suppressed are Save and Write.
Output of Just(4) is not suppressed.
2.11 Stepped development
Early production versions of ScoreEngine do not have all the features of the DOS version of Score. When
updates of the program are made available, there will be no additional charge.
Users may request addition of as yet unimplemented features. Depending on urgency and feasibility, features
will be added. Initially not available are Midi input and color selection.
ScoreEngine has been qualified for Windows XP SP3, Vista and Windows 7 (32/64).
Note that the filename drag and drop feature may not work when User Account Control is active. It is best to
switch that off when you are the only user of that system.
2.12 A note on filenames in this guide
The filenames in this User Guide always have suffixes. Many users cannot see the suffixes because they
have set the Folder Option ‘Hide extensions for known file types’. To avoid confusion between PREF.SCR
and PREF.TXT for example it is therefore suggested not to hide the suffixes.
3
Program organization
All Score programs are started from the Dispatcher. All information that is necessary for ScoreEngine to
know the entire Score environment and the features that the user desired are defined here.
3.1
The Dispatcher
The emulation of Score and its utilities is started from the ScoreEngine Dispatcher. The Dispatcher also
serves other purposes:
- to establish the links between the original Score software and ScoreEngine. When a user has Score3
or Score4 or both, the various programs are linked by the Dispatcher and this usually needs to be
done only once in a production environment. Linking can be done manually, or the user can ask the
program to discover for itself where the programs to be linked are located;
- once linked, to check whether those object modules (their dialects) are confirmed;
- to establish links to folders which ScoreEngine uses, such as for PSC and PFB files, LIB and HLP
files as the third party products PCSEND, PDFcreator, Acrobat, SipEPS01, GhostView and seps4id;
- to select Acrobat Distiller joboptions and the EPS options file for the project you are working on;
- to activate the various runtime options;
- to set the monitor and keyboard configuration;
- to define note, fingering and string settings;
- to prepare service files for ScoreEngine;
- to set the compatibility profile.
13
The Dispatcher runs until exited. When any of the Score programs is running, the Dispatcher panel is
hidden.
The menu of the Dispatcher has some self-explanatory features. The ‘Help’ menu allows the user to access
the User Guide from the web, provided he is online.
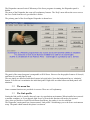
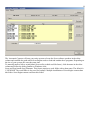
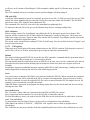
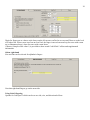
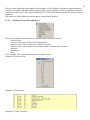
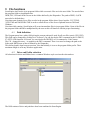
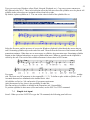
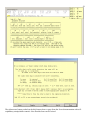
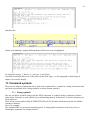
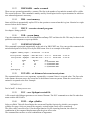
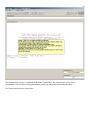
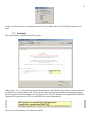
The primary panel of the ScoreEngine Dispatcher is shown here:
The panel of the started program is comparable to DOS Score. However for the graphic features of Score(4)
and Draw(4) a second panel is used
The two panels are described with their features in logical order. Note that both panels have a ‘minimize’
button. Left click on it to minimize the individual panel. Right click on either button and both panels will
minimize.
3.2
The menu line
Some common functions are provided via a menu. These are self-explanatory.
3.3
The Link profile
Setting the link profile is usually done only once in a production environment. When installed on or moved
to another computer, or if you upgrade from Score3 to Score4 this function will need to be repeated.
Also, when you decide to work with a different font library, the path to it is to be redefined.
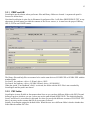
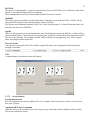
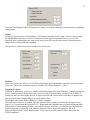
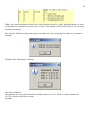
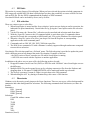
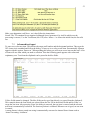
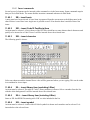
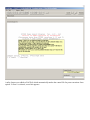
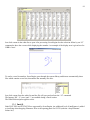
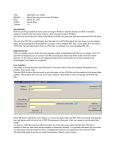
The Dispatcher’s main panel has a button named ‘Link profile’ which brings you to the Score environment
setup. The panel which controls this phase is as shown:
14
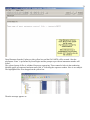
The ‘Automatic’ buttons will scan your entire system to locate the Score software products in the white
column and establish the paths which ScoreEngine needs to load and emulate these programs. Depending on
the size of your system, this can take some time.
To manually make a link to an individual Score utility (which could be faster), click the name in the white
column and follow the dialog familiar to Windows users.
Score and Page handle long filenames. This feature requires a work folder with a short name. The default is
C:\$EWORK. The work folder is also used for backups. Multiple installations of ScoreEngine cannot share
this folder. ScoreEngine cannot read from this folder.
15
3.3.1 PREF and LIB
ScoreEngine needs to know where preference files and library folders are located. A separate tab panel is
foreseen to define those.
Note that ScoreEngine is quite free in filenames for preference files. I will allow PREFERENCE.TXT or any
other name for that matter provided the contents of the file are correct, ie. it must have the proper LIBRary,
HELP, GUITar and CODE9 entries.
The library files and help files are assumed to be on the same drive as SCORE.EXE or SCOR4.EXE with the
standard paths.
For Score3, the paths are <drive>:\LIB and <drive>:\HLP.
For Score4, the paths are <drive>:\SCOR4\LIB and <drive>:\SCOR4\HLP.
When the option ‘Tom Brodhead’s Help’ is selected, the folder with the HLP files is not consulted by
ScoreEngine and the path is not shown.
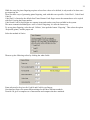
3.3.2 PSC folder
ScoreEngine is more flexible in font matters than Score as you can keep different folders with PSC files and
define per project which set you use. It does not use the path defined in PREF.SCR. The default defined by
Score3 and Score4 is overwritten by this path. So when you work with different versions of FONTINIT.PSC
there is no more need to rename that file as is necessary in Score3.
Initially, ScoreEngine assigns the default folder. When the user sets a different folder it checks whether that
folder indeed contains PSC files.
16
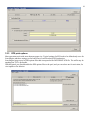
3.3.3
EPS print options
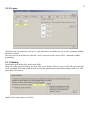
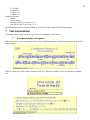
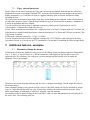
Most operations work with more than one paper size. Typical settings for EPS need to be defined only once for
ScoreEngine and these settings are for both Score(4) and Scorlas(4) EPS production.
ScoreEngine keeps a pool of EPS options files that correspond to the DOS PRINT.SCR file. The suffix may be
anything but TXT is preferable.
With this panel you can add and delete EPS options files to the pool, and you can select one for activation, for
view/update or for deletion.
17
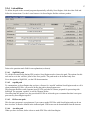
3.3.4 Link utilities
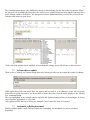
To define the path to the external programs dynamically called by ScoreEngine, click the white field and
follow the instructions. Use the Locate button to let ScoreEngine find the software product.
Point to the question mark field for an explanation (as shown).
3.3.4.1 SipEPS01 path
To call this licensed utility during EPS creation, ScoreEngine needs to know the path. The options for this
tool can be set in the ‘utilities’ panel of the Exec profile. The path needs to be defined only once.
For a description of SipEPS01, see the SIP documentation.
3.3.4.2 seps4id path
To communicate to ScoreEngine that you have a license for ‘seps4id’ and that ScoreEngine needs to call it
when producing EPS files, you need to define the path to that program once.
This program modifies some elements in an EPS file such that it is better prepared for processing with
InDesign. The program ‘seps4id’ is sold by Thomas Weber.
Note that when the option is set, the processed EPS file in its header gets a comment line that it was postprocessed by ScoreEngine/seps4id.
3.3.4.3 PDFcreator path
This freeware program is a requirement if you want to make PDF files with ScoreEngine and you do not
have Acrobat. It must be defined in the indicated path. PDFcreator can be downloaded from the internet.
3.3.4.4 Acrodist path
When you have Acrobat, define it here to make PDF files with ScoreEngine.
18
Next to the Locate button is a small button called ‘joboptions’. Acrobat comes with a collection of
joboptions files and the user can make one himself with preferential settings for Acrobat Distiller. When
ScoreEngine calls the Distiller, it passes the selected joboptions file. When no joboptions are selected, the
Standard setting is default.
The panel which opens for the selection of joboptions is not shown here. You have the possibility to link it
directly, or via a selection list of all joboptions files on the system.
3.3.4.5 PCSEND path
When EPS files need to be sent to the printer, use this external utility. It is delivered with ScoreEngine and
automatically linked to it when the user has no path of his own.
Note that PCSEND is a 16-bit program that does not run on 64-bit architecture. It will be blocked in that
case.
3.3.4.6 EPSTOOL path
When this free downloadable tool is linked, this program will be called when ScoreEngine makes EPS files.
It fixes known problems with the ‘Bounding Box’.
There is no need to download and install the entire GhostView suite from the internet. Simply use the three
files EPSTOOL.EXE, GSDLL32.DLL and GSWIN32C.EXE and put them in the same folder from which
EPSTOOL.EXE is linked. Note that both 32-bit and 64-bit platforms use the same modules.
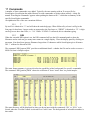
3.3.5 Dialects
ScoreEngine emulates the DOS executables SCORE.EXE, PAGE.EXE, etc. To emulate these executables,
ScoreEngine expects the 16-bit instructions to be at unique storage locations. The executables of one
particular version should therefore be identical, which is not always the case. There can be several dialects of
for instance SCORE.EXE because at distribution time there were version differences which cannot be
detected from the filename alone. Each unique version therefore has a dialect number.
The Dispatcher has a function to verify that the executables used are indeed the ones ScoreEngine can work
with by checking the file date and time stamp with predefined settings. Contact development when your
object does not pass this check.
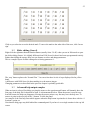
A separate panel shows the supported program dialects.
19
Point to the question mark field for an explanation.
3.3.5.1 The Exec profile
The ‘Exec profile’ button on the Dispatcher brings you to a panel with tabs of which one is reserved for the
developer.
3.3.6 Peripherals
The first tab defines the monitor configuration and the keyboard selection. ScoreEngine knows how many
monitors there are and will select the appropriate setting. The system detects by itelf if there is one or nore
than one monitor.
20
Also the music display size may be adapted here but it is simpler to do that when ScoreEngine displays it as
there the effect can be seen immediately.
Once you have moved the command and music display forms to your most convenient screen locations,
these locations are remembered for the next session. Also the size of the music display is carried forward to
the next session.
Define the music display color scheme and the command cursor color.
3.3.6.1 Large command screen
The command screen comes in two sizes. The large screen is about the size of the DOS version of Score.
The View menu of ScoreEngine allows change of size once Score or one of its utilities is called.
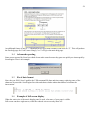
3.3.6.2 For each EPS output page
EPS files can be output to PCSEND, PDFcreator and Acrobat. The links must have been defined for the
options to be enabled. The example shows that Acrobat was not linked to ScoreEngine.
3.3.7 Compatibility
ScoreEngine has many added features to make life easier on the Score user. Select your preferences on the
second tab ‘Compatibility’. The features are categorized in four groups – Commands, EPS options, Screen
features, and Other features.
21
3.3.7.1 Commands
Filename drop
When activated, the user can select a MUS file from the Explorer and drag/drop it to the command area. It
will then be interpreted as a G command. To perform a GM command with this feature keep the Control key
pressed.
This technique can also be used to read text files such as PMX. Drop a PMX file and ScoreEngine will
perform a RES rather than a G command.
In the same way, an EPS file can be dropped when it has item information (referred to as MUSinfo in this
guide) as described in “EPS post-processing, XEPS command”. ScoreEngine makes the distinction between
these three formats itself.
A nifty feature of ScoreEngine is that you can drag/drop multiple filenames from the Explorer to the
command area. An inbuilt feature is that it creates a temporary file from the selection named
COMBINED.MUS which is then the subject of the G or GM command. This way, the number of resulting
staves might exceed 32 but excess staves will be ignored in this process. The loading of such files is bottom
to top, in descending order. If for example you created the files DEC001.MUS till DEC009.MUS, these files
can be combined in one drag/drop and DEC001.MUS becomes the top file.
Recent files
ScoreEngine remembers the files that were written by Score’s SA and SM-command. Use this history to
select files on which you have worked recently. Clicking a name in the white list will perform the Gcommand.
Initially, there are no recent files and ScoreEngine then assumes all the files in the current directory which
have a MUS or a PAG suffix and have the valid Score format.
GM input above highest staff
Most of the time you will use GM to put a file on top of what has been loaded. This feature lets ScoreEngine
find the highest staff above which input is to be read and not prompt for a staff number. Note that this option
22
is effective in all variants of ScoreEngine’s GM-command, whether typed, by filename drop, or by the
button.
The GM command can be given without a name and ScoreEngine will then prompt it.
GM- and GM+
Usually the GM command is issued on a logically previous or next file. To GM a previous file just type GMand the file which alphabetically precedes the current file in the same folder will be added. The file suffix
must be the same. GM+ loads the next alphabetical file.
The commands GM- and GM+ just refer to the immediately neighboring files.
To load more than one file in one go, use the filename drop feature, selecting multiple files.
MUS validation
Before reading a music file, ScoreEngine can validate the file for having the proper Score format. This
function will not consider the file if it has a different format and a warning is then given. The feature was
added since many users have Finale or other files with the MUS extension. ScoreEngine quickly looks at the
contents to establish the digestible format.
The switch is also checked when reading SET files for Staff setup. Also, the utilities Scorlas(4), Page(4), and
Just(4) honor this switch.
3.3.7.2 EPS options
When activated, ScoreEngine offers many enhancements to the EPS file creation. Following the creation of
an EPS file by Score or Scorlas, optional post-processing can take place automatically.
Default
The software InDesign and EPSTOOL do not like the EPS ‘statusdict’ command which is generated when a
Score3 file is taller than a certain size. It is removed by default.
The font initialization file which Score inserts in EPS files is in some cases ‘too late’ and needs to be moved
forward as has been shown when defining special characters which Score does not recognize such as in
Icelandic.
ScoreEngine suppresses traditional progress reporting while EPS is made (the message ‘Sending item #nnn’)
and by suppression of drawing the arrow for each item being processed.
Score
One option causes comments (MUSinfo) to be generated within the EPS file. When activated, the parameter
structure of each item will be included in the file as a matter of documentation. Such a file may be read by
the XEPS command. As such, the original MUS file can be recreated from the EPS file might it be lost. An
example is given towards the end of this document.
When MUSinfo is requested, ScoreEngine can change tuplet fonts. Set the check mark and select a font by
clicking the white field.
Score and Scorlas
The ‘Overwrite’ option when set is functional for both EPS and PDF file creation.
Space suppression assures that the file size of the EPS file is drastically reduced.
For font embedding to work, you need to have the PFB files for the desired fonts for which there is the tab
panel ‘Font embedding’.
As most printers have the Base35 fonts, you may wish to exclude those from embedding.
When linked, the utilities ‘EPSTOOL’, ‘SIPEPS01’ and ‘seps4id’ can be called as postprocessor to
ScoreEngine.
The A4 header uses the project header while the standard header/footer offsets can be defined here as well.
23
EPSTOOL
The option ‘Fix bounding box’ causes the external GhostView tool EPSTOOL to be called to fix what Score
missed. It also adds the high resolution coordinates.
This recommended tool is freely downloadable from the GhostView website.
SipEPS01
This utility suppresses staff line portions when there is fingering or text in the staff. The ‘Utilities’ tab has
some parameter setting for this external program which it will pass.
The features are documented separately in the User Guide for this program. To benefit from this feature you
must have the license for SIPEPS01.
seps4id
When set, this program is executed immediately after ScoreEngine has created an EPS file, so before all the
other extended features. The third party licensed program ‘seps4id’ by Thomas Weber fixes problems in EPS
files for use by InDesign. The program ‘seps4id’ makes a backup file by appending ‘.bak’ to the original
name. ScoreEngine deletes these files.
Force A4 header
A header box is generated in EPS files with the original file name, time stamp and license holder name.
Example of a header:
Tails
A separate panel is provided to select tail features:
3.3.7.3 Screen features
Seconds splash screen
The Score splash screen can stay displayed for 0 to 9 seconds. Experienced users set this to zero once they
have seen it bypass.
Automatic SH/Z after G command
When the files you are working on are not too big you may want them to load in display mode by default.
This option controls the action.
24
Automatic Z after DP/SH/SHX
The Z command to show the effect of a previous command can be combined in this feature.
Automatic SHX/Z after DP warning
When there is not enough memory for display mode, a warning is issued. ScoreEngine allows you to
perform a reset of the display mode automatically.
Red arrow
To get a more conspicuous pointer to Score items being edited, the small up-arrow can be colored red. When
displayed and you redraw or resize the music panel, the arrow will change to the original color until it
advances.
Full screen at startup (“Alt+F”)
Since the music display in ScoreEngine is separated from the command screen the user may wish to benefit
from the larger display area. Note that the default area has a bezel which disappears when working in full
screen mode. Score in DOS suppresses the bottom line F-key explanation in full screen but ScoreEngine
shows them at all times.
Note that the INP command sets the small screen.
The combination of Alt+F is a menu letter to open the File menu as this is a Windows function. Type XFUL
to set full screen.
Note that screen view commands with Alt (C, O, D, U, and M) or screen positioning in Edit mode
(Ctrl+L/R/U/D) are all ignored in Score under ScoreEngine. Alt+S is identical to Score in DOS. When not in
Edit mode you can use the middle mouse button to position music.
Invert Up and Down (Arrow/Page)
This feature can be selected to make those screen commands in line with Windows practice. They are not
inverted in Edit Mode, as there up is up and down is down always.
3.3.7.4 Other features
Extended PMX
When set, the command PMX behaves differently from DOS Score. When the filename is omitted it will be
taken from the currently loaded file.
The PMX file which DOS Score generates is rather difficult to be read by humans or third party software.
The ScoreEngine format provides optional commentary and it can edit the PMX file in a tabular format.
Example:
8.
3.
1.
1.
6.
1.0
1.0
1.0
1.0
1.0
.000
10.000
20.000
34.000
20.000
5.00
8.00
7.00
12.00
11.00
8.00
.00
.00
34.00
1.0000
1.0000
12.0000
2.00
.00
The user may select the output to be condensed (which does not truncate fractions and removes trailing zero
parameters) and output will look like this:
8
3
1
1
1
1 10
1 20 5 12 0 1 2.0007
1 34 8 11 0 1 -0.0007
25
6
1 20 7 8 34 12
Optionally, comments may be included in either format. This feature makes the PM command redundant. An
example:
* ScoreEngine created PMX file - Creation date/time: 01-27-2010 - 12:03:22
* STA.PMX has 5 items
* Item number 1 Parameters: 3
8 1
* Item number 2 Parameters: 3
3 1 10
* Item number 3 Parameters: 8
1 1 20 5 12 0 1 2.0007
* Item number 4 Parameters: 8
1 1 34 8 11 0 1 -0.0007
* Item number 5 Parameters: 7
6 1 20 7 8 34 12
* Measurement = INCHES
* Score license = 3101073
Files produced in any of the above formats can be read by Score as it ignores records starting with an
asterisk.
Advanced help
This used to be a user option before version 29 but it has since become the default.
A button is visible with a question mark as its caption.
v
This button has various functions:
Pointing to it when an item was selected.
The parameter structure from the Score help file is momentarily shown under the displayed Score
parameters. Optionally, their values are shown with 4 decimals.
Clicking the left mouse button (an item is not selected).
A list rolls out with the names of all help files from which one can be selected for further display and
one can walk through the available pages in that group.
‘HELP.HLP’ is given first, right under the ‘?-button’. This is intentional such that another click on
the same spot brings you to the main help page.
From the main help page you can also click to further pages by clicking on a code number or its text.
ScoreEngine reads the actual help pages but since there are some differences in the DOS and the
Windows character sets, some characters are translated. A monospace typeface needs to be used
(Courier New). In this font there is no equivalent for Code9 Par5=119 (≥) and the character shown is
‘ò’.
A great benefit of this advanced help feature over DOS Score is that its display stays open while
music editing can continue. The user can close it any time. Also notice that the help form always
opens on the spot where it was last used.
An example of this help form is given towards the end of this guide.
Note that there is a help file called “ScoreEngine commands”. Select this to get a summary of the
specific commands. Click a command in this list to obtain a detailed description.
Point to the list to see whether the original HLP folder is active or that Tom Brodhead’s help text was
activated in the Dispatcher.
Clicking the left mouse button (an item is selected).
Page 2 of the help file is given in a separate form.
26
Clicking the right mouse button.
A page from the Score manual is displayed, and one can walk though the available pages.
The user can close it by clicking in the picture or by the Close button. Notice that this help form
always opens on the spot where it was last used. Within one session, the last page remains current.
The form can be resized by dragging the outer form edges.
An example of this help form is given in the chapter ‘Advanced help output samples’.
The F1 function key, the Score3 bottom function ‘F1 Help’, the Score4 function ‘F1-Help’ and the ‘?’ or ‘??’
commands immediately show the main help panel.
When the Quick commands panel is visible, a right click on one of its buttons also provides details on that
command.
Display 4 fractions
For those users who need to see more fractional digits than Score displays, there is an additional panel which
shows this when an item is selected and the mouse points to the help button.
When being edited, original values are shown until the item is closed.
Forbid text items without font
This gives an additional level of security. Score allows Code16 items without a font prefix. When set, text
items must have the font prefix when entered or updated.
Advanced font update
Optionally you can see the font name of a text item by clicking on the prefix. The font can be replaced by a
different number. The feature is shown further down in this User Guide. Note that the font name of a
selected Code16 item is always given in the music display’s left bottom corner.
Advanced text input
When set, text items can be entered in a more mouse oriented way, thus giving a paste capability from other
Windows applications. The feature is demonstrated below.
Advanced text modify
When set, text items can be modified using a Windows type dialog, thus giving a paste capability from other
Windows applications. The feature is demonstrated below.
Suppress ‘any key’ after INC command
Score3 only. The confirmation to this command was foreseen because of the vertically small command area.
ScoreEngine does not have such restriction and the redundant confirmation can be bypassed.
Home after G-command
Score3 only. When Score3 reads a file, it show the bottom of the file as if the End–key was typed. To be
compatible with Score4, this feature can force a Home after loading.
3.3.7.5 Length of filename
The path length restriction of 24 for Score3 and 22 for Score4 characters has been lifted in ScoreEngine.
When a long filename is used in an open command, an information field will display the name.
27
Internally, ScoreEngine will temporarily make a short name file (CURRENT.MUS) in the work folder but
the user need not be concerned about the contents of that folder. Results are automatically restored in the
original folder under the original name.
Note that you now have a large freedom in defining names for Score MUS files. Paths and names can have
additional characters such as space, and those: ~!@#$%^&()_-{} and there is no necessity to use the 8.3
DOS format for names.
Valid file names are:
Copy of BACH01.mus
Beethoven.Score mus file
Opus 100 #23.page
Users should not use the name CURRENT.MUS since this is a reserved name for ScoreEngine.
3.3.8 Font embedding
Embedding fonts has several advantages:
- you do not need to download files to the printer;
- it gives flexibility to send EPS files to someone who does not have the fonts;
- you can reliably create PDF files from EPS files with embedded fonts such that they are portable to
any system.
28
Before ScoreEngine can embed fonts it needs to know where the PFB files are which contain this
information for the fonts you have selected. As different projects may use different sets of PFBs, the path to
the desired folder must be defined here. Click on the white field to change the selection.
Currently, ScoreEngine does not use AFM files but it may do so in a future release. When you have AFM
files, define the path here also.
Then make an inventory. The inventory is nothing more than a structured file which ScoreEngine uses to
link font numbers to PSC and their PFB files. In most shops, you will only have to do this once or
occasionally as the settings are remembered by ScoreEngine.
3.3.9 Utilities
A few options pertain to the Score utilities. MUS validation is copied from the Score features frame and
given here for information.
3.3.9.1 Page(4)
Overwrite when set, bypasses the warning message to overwrite the resulting file(s).
Filename drop
Like Score the filenames can be dropped from the Explorer into the command area. A namelist file by the
name NAMES.SEP will be created and the dialog automatically continues with this selection. Long
filenames can be used. The input files will then be analyzed to see if there are more than one system per page
such that the PAGE question ‘Will any single file contain more than one system?’ is automatically answered
by ScoreEngine.
Also when extracting file this feature is very helpful as it allows the automatic creation of the part extractor
control file.
Note that User Access Control is Windows system later than XP may prohibit filename drop.
29
Erase PAGE workfiles
At the end of the program, the files BARS.TMP and DECnn.TMP will be erased.
Erase own workfiles
At the end of the program, the files in the work folder (default name is C:\$EWORK) will be erased. Also
the temporary file in the current directory $$$$NAME.LST will be erased.
3.3.9.2 Scorlas(4)
Note that under ScoreEngine, Scorlas will always send output to a file. Immediate output to the printer is
blocked. Also, overwrite is the default option.
PDF files can be made simultaneously with EPS files.
When statistics are requested (the -1 option), they are written by default to file SESTATS.TXT and this file
is automatically shown following the collection of this information.
The demo version suppresses EPS output but it does handle the statistics option.
The option ‘Use EPS settings from Score’ causes the same values 2 to 13 to be used for the setup as Score.
Point to the EPS button to see the settings. When this option is not set, those values are prompted from the
keyboard. PRINT.SCR is not used.
Note that Score options for ‘Space suppression’ and ‘Item numbers & comments’ (MUSinfo) are not
functional in Scorlas under ScoreEngine.
3.3.9.3 Draw(4)
This highly suggested ‘extended folder/file’ option will show a comfortable
- folder selection panel when the Path command is given;
- file and member selection summary when the Get command is given;
- summary of vector lists when the Read command is given.
Examples are shown in the chapter on Draw.
3.3.9.4 Just(4)
The ‘filename drop’ feature makes life really easy so it is suggested to select it. An example is given in the
chapter on Just.
3.3.9.5 SipEPS01 (fingering)
Te call to this SIP utility to blank out the staff line behind fingering, a few parameters are required. They can
be set at this point.
3.3.9.6 Fingering
A button is provided to give control to a separate panel for setting fingering details.
Fingering for guitar
Engraving fingering is a very time consuming activity and since this is one of the author’s regular jobs,
automation imposed itself.
Numeric fingers are created by selecting a note and then type the command XFn where n is the finger. The
zero may be omitted.
Alphabetic fingers as is common for guitar right hand can be formed by selecting a note and then type XFP,
XFI, XFM, or XFA for p, i, m, a. Other letters require a space after XF.
Guitar left hand
For flexibility, the user can influence the horizontal offset calculation. Here are the features with typical
settings:
30
Digits for fingers are as a house style always on the left on an even Par4 as to cross staff lines or on the level
of a ledger line. When a note is not on an even Par4, the finger is moved one notch up for notes with a stem
up (or unstemmed note), down for notes with a stem down.
A button (‘Sample offset values’) is provided to show actual Code10Par15 offsets and supplemental
information.
Guitar right hand
Size and font can be selected for alphabetic fingers.
Note that right hand fingers go on the stem side.
Using Code1 fingering
Options for Code1par11 which can be set are side, size, and directional offsets:
31
Note that Tom Brodhead’s BEAM program uses finger 6 to control stemming in situations with overlapping
beam groups.
Strings
Strings are represented by circled numbers. ScoreEngine can make Code10 with a circle or Code16 using
the ZapfDingbats character set. Select a stemmed note then type the command XSn (n=1 to 10). The
generated item is placed above the stem for up stems, below the stem for down stems. Unstemmed notes
cannot receive a string with this command.
The options for Code10 and Code16 strings to be selected are:
Positions
Select a note, then type XPn (n=1 to 20). This will generate the Roman number equivalent on the stem side
of the note. There is no Dispatcher setup for positions. The default font/size is _00/1.0.
Fingering for piano
Fingering of piano music as it occurs usually in educational material is quite laborious. Coding fingering in a
piece is complex because many factors play a role: the side of the note/chord, whether a note is inside or
outside the staff, the stem length, the size of digit, horizontal and vertical offset so the digit is aligned with
the notes, the distance between fingers on chords and the font.
ScoreEngine takes away all the fiddling by a simple command.
Select the note or any note in a chord, type the command XK or simply K followed by the digit(s in any
order). For a 3-note chord this could be ‘k135’. Right hand and left hand order are generated automatically.
When a note is selected on a staff with a curved brace bottom (accolade), it is considered for the left hand.
Replace fingering by typing XK or K with new fingering. Delete fingers by typing just XK or K.
Removed fingers create Code13 dummy items. To save space you may want to remove those with the
XDUM command.
32
While the setup for piano fingering requires at least four values to be defined, it only needs to be done once
per engraving site.
There are three ways of generating piano fingering, each with their own specifics: Code1Par11, Code10 and
Code16.
Code1Par11 is limited to the default font Times-Roman. Each finger causes the stemmed note to be copied
with Par11 having the finger number.
Code10 and Code16 finger digits are separate items and can have any font available in the system.
The most economical method space wise is Code10 fingering. It is also the fastest way.
To set up piano fingering, select the tab ‘Utilities’, then push the button ‘Fingering’. Then select the option
‘Keyboard (piano)’ and the proper tab.
Select the method of choice:
Then set up the following values by clicking the white fields:
Fonts only need to be given for Code10 and Code16 type fingers.
Note that one finger size means different things for the three different methods.
Tutorial #24 gives a complete set of instructions and compares the three methods.
33
3.3.10 Lyrics
Define here the size and font for the lyrics. Only when these are defined can you use the ‘automatic syllable
placement’ feature.
Note sizes need to be defined for when the ‘vowel’ option is in effect on the XSYL command (syllable
positioning).
3.3.11 Backup
ScoreEngine puts backup files in the work folder.
There are various types of backup. The first is the ‘open’ backup. That is a copy of a file that was opened by
the G-command. No backup is taken when the file was opened earlier without any changes made to it. This
panel shows the features:
Sample of the status report (a text file):
34
The standard method of Score to occasionally take a backup called SCORE.SAV is identical in ScoreEngine.
However, as there is only a single file by this name, ScoreEngine offers an elaborated version. It is
controlled by this form:
The elaborated option works like this:
The frequency with which Score generates the file SCORE.SAV is a well kept secret which I have not been
able to figure out.
Every time Score closes the file SCORE.SAV, ScoreEngine takes a copy of that file with a sequence
number. The file is placed in the user work folder – by default this is C:\$EWORK – and the format of the
name is SCOREnnn.SAV where nnn is a number from 000 to 999. After 999, the number cycles to 000. At
least this gives the user the opportunity to inspect a number of recent backups. Note that the most recent
SCORE.SAV is identical to the last SCOREnnn.SAV. The size of SCORE.SAV file does not correspond to
the file currently being edited. The size of a file named SCOREnnnn.SAV is however the correct one.
Files made this way cannot be read immediately by ScoreEngine as reading from the work folder is
prohibited. You need to move it to another folder first.
The Dispatcher has a facility to show the status of numbered SAV files in the work folder and allows the
removal of those files when you no longer need them. Also, the counter can be reset. Remember that you
cannot see from the name which file was backed up.
The summary gives the number of items which is some way to tell you about the status of the backup.
Use the initialize button to reset the counter and delete numbered SAV files.
Monthly check
Every month, the Dispatcher tells you the total amount of space taken up by backup files. This is necessary
because your system might keep old files that no longer serve any purpose and just take up space. Use the
‘Status’ button in the Backup panel to see what can be removed from your system.
4
Score command panel
Score users will appreciate the familiar Score command panel within a Windows frame, shown here for
Score3:
35
and for Score4:
36
The difference between those two screens is obvious – bottom functions in Score4 are represented by real
buttons.
The bottom line lists the familiar Score function buttons and other equivalences for letter commands. You
can click them with the mouse (always after the ‘F’ in Score3).
Typing characters is always in the keyboard input field. Most of them also appear then within the command
screen. You can paste here with the ‘Ctrl+v’ feature which is particularly convenient while inputting music.
Note that the right mouse click with the ‘paste’ menu does not work. When you just used the mouse on
another Windows application, you need to click the keyboard input field first to obtain ‘focus’ and you will
see the cursor blink. When not in focus – by running another open Windows application – you cannot enter
characters in ScoreEngine. A mouse click in this panel automatically gives it focus.
A double-click anywhere in the command area has the effect of typing the ESC key.
Because of the separation between commands and music, more of the command panel will show useful
information which in DOS is pushed off the screen:
37
4.1
The top menu line
A line of intuitive menus familiar to Windows users is foreseen for the most common functions.
4.1.1 File menu
The File menu rolls out a submenu.
4.1.1.1 Submenu Open MUS file
This is identical to the Open button, the G-command without filename, the LOAD (F1) button in Score3 and
the Open (F2) button in Score4.
4.1.1.2 Submenu Recent MUS files
When this menu is selected, the selection panel is displayed as shown. The most recent file is on top. You
can sort the selection on path name and back on time stamp. Only files which are currently online and which
were saved by the SA or SM command are given. Any file from the white list can be selected and the Gcommand is then performed.
The maximum number of files that ScoreEngine will remember is user defined in the Exec profile.
38
4.1.1.3 Submenu Open […]
The last file that was created by ScoreEngine can be immediately opened this way. The file needs to be
present at its previous location. The submenu is disabled when there is no most recent file.
4.1.1.4 Submenu Environment >
This gives a submenu with the possibility to inspect some Score and ScoreEngine control files: PREF.SCR
and CODE9.DAT. These files are shown with Notepad and can be edited.
The folder where ScoreEngine expects PREF.SCR or PREF-4.SCR is the library folder.
The path to CODE9.DAT is defined in PREF.SCR.
Note that the PREF.SCR file which Score uses is dynamically adapted to a shortened version with keywords
of maximum four letters. Screen is always set to 17 and the following keyword lines are removed: MOUS,
DESC, KEYD, DOT, and LASE as well as any line with unrecognizable contents.
Most control files typical for ScoreEngine are ordinary text files. Do not attempt changing these with an
editor as this annuls the right to report errors.
The Link profile and the Exec profile can also be shown, as well as a font summary, the PSC/PFB/AFM
inventory, and user defined String symbols.
Close a display with a yellow background by clicking on text.
Submenu Clipboard
39
There are three clipboards in the context of ScoreEngine: (1) the Windows clipboard to pass information
between ScoreEngine and other Windows applications, (2) The clipboard for Score3 emulation which can
contain a text item, and (3) The Score4 clipboard !!CUT.TMP. The submenu explains the features of these
clipboards.
The contents of each clipboard can be shown by a ScoreEngine function.
4.1.1.5
Submenu Current file summaries >
This gives a submenu with four choices to obtain statistics on the current file:
- totals per item;
- a list of all text items, sorted per staff and position;
- statistics of the Code10 items used, with font overrides;
- statistics of the Code16 items used, sorted by number. Includes font overrides;
- staff sizes;
- instruments;
- beats.
Close a display with a yellow background by clicking on a text.
Example of ‘totals per item’:
Example of ‘all text items’:
Example of ‘Code16 statistics’:
40
Where ‘pfx’ means the number of times the Code16 item has the prefix, ‘inside’ means the number of times
a font number is used inside a text item, and ‘override’ is the number of times Code16 Par8 is set to override
any font in the string.
The selection ‘Staff sizes’ shows how many staves there are in the current page for each size it encounters.
Example:
Example of the ‘Instruments’ summary:
The ‘Beats’ summary:
The summary gives you an idea about the LJ-ability before you do LJ, XLJA or call the external tool
LJ.EXE. It reports conflicts per system.
Example:
41
4.1.1.6 Submenu EPS size summary
After you have created EPS files with PR or with XBUCKET or with Scorlas, this shows a summary of the
actual sizes of the printable areas. It is suggested to set the ‘Fix bounding box’ option as the original
Score/Scorlas values are inaccurate.
Sample output:
Remember that when a page is too tall for Score to display it, the Bounding Box y1’s will be set to a
negative value and cause an invalid representation of the music file.
4.1.1.7 Submenu EPS log file >
This gives a submenu with two choices: one named View EPS log file and one named Cleanup EPS log
file. The first simply shows the list of all EPS files that were created with their date/time stamp, the most
recent on top. The second will remove all entries from this file that are no longer online (at the original path).
The file which keeps this information is ScoreEngineEPSlog.TXT and the user can delete this at any time.
4.1.1.8 Submenu Stored PSC/DRW
When a music file is read or being created, Score reads PSC and DRW files. To see which files were loaded
and how many times, is given in a summary produced by this menu.
4.1.1.9 Cancel
Terminate ScoreEngine without checking whether the last updates were saved. This works in all modes for
all programs.
42
4.1.1.10 EX/Exit(F8)
Perform the Score exit command. When Score terminates in whatever fashion, control is returned to the
Dispatcher.
4.1.2 View menu
The View menu rolls out a submenu:
4.1.2.1 Less/More
This controls display of the bottom part of the command screen which gives supplemental information on
your current session. By default, this bottom is displayed.
4.1.2.2 Normal/Large command form size
A user option which is interesting for users who prefer DOS size characters is provided. The following is an
example. Obviously, this feature is only possible when there are multiple monitors or with extra large
screens. The large screen can be set as a start-up option or can be set dynamically. This is a partial view:
4.1.2.3 Normal font (MS Sans serif)/Small font for Help list file
Select this menu to assure that all names of help files are displayed by the ‘?-button’ in a list without the
vertical scroll bar. The setting is kept between sessions.
4.1.2.4 Place music display
Sometimes, the music panel in a multiple monitor configuration may have its controls off the screen due to
an unlucky setting of the top coordinate (Display setting for the second monitor has a different top than the
primary one). This menu put the music panel on the primary so that the controls can be reached again.
4.1.2.5 View quick commands
A narrow panel with some longer commands may be shown. This panel is mainly to limit the number of key
strokes as those commands can be mouse clicked to be performed. A right click gives verbose explanation.
Left click in the grey area to move it to the left of the command panel. Right click to move it right. Center
click to make it disappear. The next ScoreEngine session starts with the last setting.
4.1.3 Insert menu
43
Several items can be inserted. The roll out menu is self-explanatory. See the Insert commands for details.
An item must be selected first in most cases.
4.1.4 License menu
Self-explanatory.
4.1.5 About menu
Self-explanatory. The menu to view Tom’s help log is enabled when the option is in effect.
4.2
Command panel top line buttons
Under the menu line there are buttons for the most common functions and recognizable from other Windows
applications. Different utilities enable different buttons and some buttons may be disabled during specific
operations.
4.2.1 New page button
This corresponds to RS in Score. When pushed with the right mouse button, the ‘yes/no’ prompt is bypasses.
4.2.2 Open file button
Equivalent to the ‘G-Command’ without a filename. A Windows selection panel is shown.
See the File selection chapter for details.
4.2.3 Keep selection
The ‘Keep selection’ option needs to be set before selecting a file. Whenever set, the same file will be
immediately loaded at the next execution of Score. Reset the option by the Cancel menu.
44
4.2.4 Command file
At program start, the Command file if one is provided it is executed first. It may contain any legal
Score(Engine) command and is used for general preferences such as:
INC.5
4.2.5 Open More button
Just hit this button or type GM without a filename. Select a name from the panel that comes up and the file
will be put on top of the current one in memory.
4.2.6 Intelligent NB/NX button
Score3 is not very good at working with files which are not sequential. For instance when you have files
BACH001.MUS, BACH002.MUS and BACH004.MUS where number 3 is missing, Score will not find
number 4 when 2 is loaded and you do an NX. Instead it will advance to BACH010.MUS.
ScoreEngine has two buttons which proceed to the previous or next file in alphabetical order. The file suffix
must be the same. You can also type the commands XNB and XNX.
4.2.7 Save button
This button’s function is identical to typing SM.
4.2.8 EPS button
This button is identical to the PR command. Do a right click if you want EPS file creation to be followed by
PDF creation (The PDF button must be enabled).
The EPS caption is underlined when ScoreEngine remembered the last created EPS file which is necessary
to make the PDF. The PDF can be separately made with the XPDF command provided an EPS was made as
a last action.
4.2.9 Print button
Score: When PCSEND is linked, this button when enabled will send the EPS file to the printer on LPT1. The
EPS file must be the most recent produced in the current session.
To see which EPS file is current, just point to the button.
Before sending a batch to the printer, Score will prompt a user confirmation.
Scorlas: When this button is enabled, Scorlas will send each EPS file to the printer.
4.2.10 PDF button
Score: The button is identical to the PR command. Click this button (it must be enabled) to create a PDF file.
The EPS file must be the most recent produced in the current session. To see which EPS file is current, just
point to the button.
Scorlas: When PDFcreator or Acrobat is linked to ScoreEngine this button is enabled to signal that Scorlas
will after having made the EPS files, create PDFs.
4.2.11 Copy, Cut, Paste, Undelete buttons
Score3: Only when a text item is selected will the Copy and Cut buttons become enabled. Then when the
copy exists (kept in file ScoreEngineClipboard.TXT) and a staff item is selected, the Paste button comes up.
Point to the Paste button to see the saved item. Press Paste to insert it. A dialog asks for Par2, Par3 and Par4.
The Undelete is never enabled for Score3.
Score4: These buttons are identical to the bottom key buttons Copy, Cut, Paste and UNDelete. Click right on
the Paste button to see the contents of the file !!CUT.TMP where Score4 keeps the copied information.
45
4.2.12 Help button
When an item is selected, the first help text page is shown momentarily while pointing to this button. For
further explanation see the chapter ‘Advanced help output samples’.
4.2.13 SH/Z button
Usually the commands SH/Z and SHX/Z are given in succession. To speed this up there is a single button to
perform these actions. The button remembers the last action, even when those commands are typed (in order.
When not in order, ScoreEngine loses track and disables the button).
4.2.14 Clear button
The ‘Clear’ button resets all the text in the command screen except the top and bottom line.
4.2.15 Position button
Left click to position on the left of the current monitor, ditto for right. Center puts it a the center top. Center
button with Ctrl key puts it in the middle.
4.2.16 Minimize button
Click with the left mouse button to minimize the command panel. With the right button both panels will be
minimized.
4.3
Command panel bottom line buttons
In Score3, the bottom line functions are identical to the DOS version. You can use the Function keys or click
on the text. Note that F10 is replaced by F11.
In Score4, there are real Windows type buttons. F10 can be used. Occasionally, a button is disabled for a
function as yet not implemented. Also, there are various differences between captions in the DOS version
and ScoreEngine because of character set differences.
Note that next to the button marked ‘6 Zm’ there is an empty space. Use other zoom features, ie. via
‘Screen>>’ or with a typed command.
When in Edit mode, a colored text strip is shown on the music panel bottom with the text ‘Click to where
current item is to be moved/copied’. Click in the music to where the item is moved. Press the ‘Cut’ button to
copy it and the text strip disappears. It will also disappear when clicked while the move/copy feature remains
active.
Example:
4.4
Program status
Under the command panel is an information part referred to as ‘Program status’. It has information about the
current session. Point to the fields for supplementary information. The View menu (Less/More) controls the
presence of this portion.
When suppressed, the program may occasionally force it as a pat change is required.
The bottom of the command Most useful are the ‘Arrow increment’ and DP settings which in DOS Score
need to be inspected by a command to know their current values.
The current filename does not show the path prefix but the current directory at program start is provided on
the right. Point to the filename field to see the tooltip which has the current file’s path prefix (not given for
SET files – the path prefix is in a separate field that comes up when selecting F2-INPUT in Score3).
46
The creator field will have a pink background if different from the current Score installation (a file
received from a Score system with a different license number).
The white field can be clicked and has the same effect as a path change. Pushing the middle mouse button in
this field is a quick way to see the folder’s contents.
Each ‘G/GM/NX/NB’ command sets the highest staff number. The value is not updated by other
manipulations such as adding a new top staff. Press ‘Refresh top staff’. When there are two values such as “3
(4)” this means that the highest staff is 3 but that there is an item for staff 4 for which there is no
corresponding Code8 item.
5
Score music display
This panel corresponds to the DOS panel but can use the additional top and bottom lines for display. The
bezel around the default display area disappears when working in full screen mode, as does DOS Score. The
top is shown here:
The grey area receives a replication of the parameters on the command screen, compacted by omitting
trailing zeros and zero parameters when in Edit mode. The CR and ESC buttons are identical to typing Enter
or Escape. A fast way also to ESCape is by double clicking in the command area. Min does the Windows
minimize of both panels.
When the cursor moves over the More button – it is disabled in Edit mode – pop-up controls become visible.
The slider on the left becomes visible when moving over the gray band.
5.1
Pop-up controls
The buttons with the captions Home, PgUp, PgDn, End, Page< and Page> correspond to keys. The Clear
button erases the music display while the file remains in memory, and Redraw brings the music display
back. Edited items are redrawn with a slightly lesser thickness. To normalize this, redraw the panel.
5.2
Slider
The slider defines the size (reduction percentage) of the music display panel. Some monitors do not give a
good image at 100% and the proper setting for your screen may be better when smaller. Configurations with
a single monitor may need to use a smaller music display as well to have the command screen and the music
screen next to each other. Occasionally, the display becomes garbled and it is necessary to change the
percentage one notch in either direction.
The slider is normally invisible. Move the mouse to the area where the slider is hidden or to the gray band to
make it visible.
Here is an example from a Dell Inspiron 8600 with a 100% setting which would need a smaller display to get
rid of the white spots:
47
A slightly reduced panel size will give a better resolution:
On an Acer Aspire 2920, the 100% gives a good view, shown here with a different color scheme:
You can also click the slider. The center mouse button decrease the size by 1%, the right button increases it.
5.3
Pos
Left click to position on the left of the current monitor, ditto for right. Center puts it a the center top. Center
button with Ctrl key puts it in the middle.
5.4
Fit
The tooltip of this button gives detailed explanation. It positions both the command panel and the music
panel. This allows to easily setup the command form and the music display form in the preferred
configuration.
5.5
Additional info on the music panel
When you select a text item, the font name and point size is shown on the bottom. When you select any item
for editing, a box with blue background at the bottom reminds you that the item can be moved/copied, or not,
depending on the Dispatcher option ‘No move on left mouse button’.
5.6
Pitch Stage
Like in DOS Score, you can input notes with the mouse. When the Pitch Stage is active, you have the
possibility to enlarge the display by the ‘Big staff’ button. Also, to avoid switching between keyboard and
mouse, the terminating semicolon and Enter can be done with a button.
Entering notes with accidentals is slightly different in ScoreEngine. A list with the mouse click combinations
is shown when in Pitch Stage. Note that in ScoreEngine’s Pitch Stage you cannot enter accidentals in
parentheses.
48
6
File functions
ScoreEngine itself works in its program folder while user music files are in the user folder. The user defines
the program folder at installation time.
DRW, PSC, PFB and AFM files are in the folders defined by the Dispatcher. The path to PREF(-4).SCR
must also be defined there.
Note that some dynamic Score files are also in the program folder where Score4 resides: !!CUT.TMP,
!!CPR.TMP and #MUSDIR#.TMP in order to allow the use of the Score clipboard between DOS and
Windows.
Note that while running, ScoreEngine will create intermediate files in its program folder. None of the files in
the program folder should be manipulated by the user as this will interfere with the proper functioning.
6.1
Path definition
The Program status has a white field giving the current path prefix used for all user files (music, EPS, PDF).
This field can be changed by clicking on it. In Score3 you can also do the DRV command or the F6-DRIVE,
F7-SET PATH functions. In Score4 you can also do the DR/DRV or PA command or ‘Path’ button.
The CD – change directory – is equated to the DRV command. There is no need to change the path to the
folder with DRW items as that is defined by the Dispatcher.
This defined path is kept between sessions. Note that initially it is set to the program folder prefix. Their
maximum length is as in any Windows application.
6.2
Drive and Folder selection
All selections for drives and folders have a common Windows style user interface shown here:
The DOS notions of drive and path have thus been combined in ScoreEngine.
49
6.3
MUSinfo
This notion is a strong feature of ScoreEngine. When you have selected the option to include comments in
EPS output, all original MUS file data is included and you have the possibility to restore a MUS file from
such an EPS file. See the XEPS command and the Example of EPS comments.
Note that MUSinfo can be included by Score, not by Scorlas.
6.4
File selection
There are various ways to select files:
1. When ScoreEngine is started and the ‘keep selection’ option was set during an earlier execution, the
indicated file opens immediately. Deselect the file by giving the Cancel option on the file selection
panel.
2. Via the File menu, the ‘Recent files’ collection can be consulted and selection made from there.
3. With the ‘Open file’ button or the OP command which is equivalent to the G command without
operand. In Score4 this corresponds to MkDir and Load. You get the Windows file selection panel.
4. When the ‘drop file’ option is in effect, just drop a file from the Explorer or corresponding
application to the white command panel.
5. Commands such as GM, NX, NB, XNX, XNB also open files.
6. The DOS Score command of G with a filename is entirely supported though cumbersome compared
to menu driven selection.
Note that the File selection panel has a ‘Refresh’ menu. The Refresh option is provided to update the panel
while a different process has changed the music file situation. Examples of this are:
- the DOS version of Score created a new file while ScoreEngine is running.
- a MUS file was erased with the Explorer or another application.
In addition to the above ways to open a file, the following needs to be said:
1. Dropped file names can be text files (PMX) or EPS files with ‘MUSinfo’ since ScoreEngine can see
the difference.
2. Multiple MUS files can be opened in one go by selecting consecutive files from the Explorer and
dropping them. A file named COMBINED.MUS will be made and loaded top to bottom.
3. The Score4 ‘open more’ button (8 GtMor) is equivalent to the GM command.
4. When holding the ALT key during a filename drop, this causes a GM function.
6.5
Directories
Windows style directories greatly improve the Score functions. There are two types: yellow background for
summaries and white background for selections. The following commands show directories (see there for
details):
Summaries:
DIR [pattern]
DIRA [pattern]
DIRR [pattern]
Selections:
G and GM without a name
RES
TYPE
XEPS
XIE
XIL
XILL
Functions (Score3)
50
F1-LOAD
F4-READ
Code11 ‘13 1’
Code15 ‘13 1’
Functions (Score4)
MkDir
Open, GtMor
NewNm (Code11) as well as ‘13 1’
NewNm (Code15) as well as ‘13 1’
Special selection lists are given for DRW as well as for Code9 insertions (XIS) and changes.
7
Text manipulation
ScoreEngine has a few features on top of Score for handling Code16 items.
7.1
Font name display and update
When you select a text item, the name of the font is immediately shown on the bottom corner of the music
display panel.
When you have the Cyrillic fonts from the ScoreCyr or TimeScore family, text is also shown in readable
text:
51
The command panel shows a few additional controls to either change just the font or the text portion. When
the font prefix is overridden by Par8, this value will be given a pink background as to signal to the user that a
prefix change would be ineffective. The font prefix becomes shaded and when you click this, a list rolls out
with the fonts known to your Score.
Click a selection and the font is modified. After making the change, Score will advance to the next item.
7.2
Advanced text update
There is also a ‘Modify text’ button which when left-clicked gives the text in an input box ready for change:
When right-clicked, the font prefix does not appear and text only is to be changed. A fast way to get the
same effect is typing a period so you do not have to move the cursor from the music display to the ‘Modify
text’ command button.
The text highlighted in the example can be copied to the clipboard and used later in ScoreEngine or in any
other Windows application, or vice versa.
After update and OK the text is effectively changed. Cancel causes the item to be passed.
7.3
Automatic syllable placement
Placing syllables under a staff is always rather time consuming. An automated way saves you many
keystrokes.
52
Type your text in any Windows editor (Word, Notepad, Wordpad, etc.). Copy one or more sentences to
the clipboard with Ctrl+C. Then, in ScoreEngine select the first note where the syllables are to be placed. All
syllables in the selected text are assigned to notes from left to right.
By default, it places syllables at -5. You can set the value in front of the syllables like so:
Select the first note, and the presence of text on the Windows clipboard is distributed thus across the top
staff. Generating syllables stops at the end of the staff. Then click on the first note of the bottom staff and
generation continues. When there are no more notes or syllables, the generation stops. Remaining syllables
remain on the clipboard when there are more syllables than notes. Whatever remains on the clipboard is
visible by the user. The result of this syllable placement is shown here in PDF format:
Text separators are a hyphen for a dash and two hyphens for an extender. They must have spaces on either
side. The Score way for separators is also supported (/, !!, ??). To define a space within a syllable, use ‘$’.
Accented characters are translated to the internal Score value.
All syllables set Par9 to -360 conform the LJ program requirement.
After placement of a line, there is the possibility to undo this.
The font and size of syllables is defined in the Dispatcher, tab ‘Compatibility’.
To position syllables to their notes (offset and center) use the XSYL or XTXT command.
7.4
Simple text input
Score3: When you select F4-TEXT or type the TX command, the following panel rolls out:
53
Make your adaptation (staff, horz., etc.) then follow the instructions.
Score4: The TX command is not supported (although Score4 generates it by itself in which case the
processing is correct). Use the Text button (Alt+F10) after ‘Items>>’ to choose the initial font, the list rolls
out.
7.5
Advanced text input
To enter text, select any item. This defines the target staff number and the horizontal position. Then type the
XIT (insert text) command and follow the dialog. A fast way is to select a staff item. Automatically a button
appears with the caption ‘Enter text’. When pushing this button you will create a text item on this staff. A list
of fonts rolls out from which you make a selection. Then the following panel appears with values and
explanatory text. Text from the clipboard can be pasted in the blue fields.
Yellow fields cannot be changed. The blue fields can be typed into directly (or pasted from the clipboard).
This example shows the font which was selected from the list. Fill in the desired fields and hit ‘Enter’ to
create the text item. After pressing ‘Enter’ the dialog is removed, the text item is created, and the selected
staff item is automatically reselected. The font/text portion is validated. When no text is typed, no text item
is created.
A strong feature is that a pasted text string is automatically converted to internal Score format such as
‘Jänner’ becoming ‘J%%anner’.
54
7.6
Copy, cut and paste text
Score3: When a text item is selected, the Copy and Cut buttons are enabled. Both will put the item in the
clipboard file named ScoreEngineClipboard.TXT. Saved are the filename, the item number, the parameter
header, parameters 1 to 10 and the text item as it appears when the item is selected, and the text string
including the font.
The Paste button is enabled in Input mode when there is something on the clipboard. Point to this button to
see what the copied/cut item is. Push the Paste button to copy it to the current file in memory. Parameters 2,
3, and 4 are prompted and have defaults.
You can visualize the current Score3 clipboard contents by pointing to the Paste button or via File
>Environment >Clipboard, then right click the text.
Score4: These functions are not restricted to a single text item as in Score3. In Input mode the Cut, Paste and
Redo buttons are enabled on the main menu (when the bottom keys Cut, Paste and UNDelet are shown). The
Copy button is enabled
In Edit mode (when the bottom key ‘3 Copy’ is visible).
You can visualize the current Score4 clipboard contents (file !!CUT.TMP) by right clicking on the Paste.
Note that in Score4 you can also use the CT command for Cut and the PS command for Paste in Input mode.
8
Additional features, examples
8.1
Parameter change by mouse
In Edit Mode click on any parameter value to select it for change. Some parameters cannot be changed this
way (1, 2, above 11 for text items, etc.). When a parameter is not displayed, type the place where it is
supposed to be. By selecting it, the value gets a colored background and a menu rolls out under the
parameter. Here is an example:
Then select any action from the submenu and the value is changed accordingly. Round adapts the value to
the nearest integer.
Some parameter changes cause specific actions, such as Code1Par4 which can only be modified by integer
steps, or Code16Par8 which rolls out a list of fonts from which a selection becomes the override. Notes
allow rapid change of accidentals (Code1Par5) via again a special submenu.
Note marks can be set when clicking on the Code1Par11 value, or when that parameter is not displayed on
the word ‘Edit’. The following rolls out:
55
Click on you selection to set the desired mark. To move the mark to the other side of the note, click ‘Invert
sign’.
8.2
Slider editing (Score4)
Right-click the rightmost bottom function button (usually it has ’10’) when you are in Edit mode to open
the slider editing feature. It is slightly different from DOS Score4 in that it has been reprogrammed entirely.
Rather than sliding the mouse, there are now buttons to select and adapt parameters.
This is a sample layout of slider editing after selecting parameter 9:
The ‘step’ button replaces the ‘Normal/Fine’. You can select three levels of steps displayed in the yellow
band.
A difference with DOS Score4 is that rounding is to the nearest integer.
Changing parameters as described in the previous chapter is probably preferable.
8.3
Advanced help output samples
When an item is selected for editing, moving the mouse to the question mark button will instantly show the
first page of the help file for that kind of item. It is demonstrated below. When the mouse is moved away
from the button, the help text disappears. Moving the mouse pointer very fast may leave the help text. To
remove it point to the area left of the ‘?-button’ or click the panel.
An example of the first help form which appears when the help button is pointed to is shown here with the ‘4
fractions’ option set.
Note that the help page may hide behind the command panel if you have it on a single monitor in the top left
corner.
56
The right mouse button pushed on the help button shows a page from the Score documentation with selfexplanatory manipulation controls. Note that this form can be resized.
57
When you select the help file ‘ScoreEngine commands’ from the list of help files, an index rolls out with the
specific commands added by ScoreEngine. Select any of these commands and a verbal explanation is shown.
Some have illustrations such as XAD:
58
An additional feature is that a ‘?’ command can be typed with a numeric code such as ‘?3’. This will produce
the first help page for Code3 items. Simply ? or ?? will give the main help page.
8.4
Advanced reporting
Some errors reported by Score but which do not make sense because they pass too quickly are intercepted by
ScoreEngine. Here is an example:
8.5
Fix of date format
Since the year 2000, Score3 garbles the VER-command file date and time stamp, replacing some of the
characters by asterisks. ScoreEngine fixes this and shows slashes rather than dashes to indicate the
intervention:
8.6
Example of full screen display
When the entire size of the music display panel is used, a lot more of your page is visible.
Full screen can show eight staves, while the reduced screen can only show six:
59
Note that when using the full screen in DOS, the bottom line instructions i.e. the F1-HELP in Score3 and the
function buttons in Score4 disappear, while in ScoreEngine they are shown in the command panel. It is
therefore suggested to always work in Full screen mode.
Score will revert to the reduced screen on an INP command. Use XFUL to reset full screen mode.
In Score4 the music screen is slightly less tall (447 pixels rather than 480) because it does not use that
bottom space correctly as a result from the original F-functions display.
8.7
Example of EPS comments
The header information of the EPS file enhanced by ScoreEngine running Score is indicated here:
%!PS-Adobe-2.0 EPSF-1.2
%%BoundingBox: 37 29 580 173
%%HiResBoundingBox: 37.800 29.351 579.543 172.248
%%Creator: SCORE (tm) Ver. 3.10
%%Title: C:\ACHTCHAR\FolderWithLongPrefix\CT001.MUS
%%DocumentFonts: (atend)
%%Remark - This file was reformatted suppressing non-significant spaces by ScoreEngine etc.
%%Remark - This file was reformatted after 'EPSTOOL' under ScoreEngine etc.
%%Remark - This file was processed by 'seps4id' under ScoreEngine etc.
%%Remark - This file was processed by 'SipEPS01', License=0126 etc.
%%EndComments
ScoreEngine and its several post-processors which manipulate the EPS file leave traces in the heading of the
EPS file such that the user can always see which post-processing took place. Text in yellow is adapted by
ScoreEngine.
These lines are inserted when the GhostView tool EPSTOOL ran on the file. When ‘seps4id’ is called, this
line is inserted. SipEPS01 added this line.
The Title record has a temporary filename when the path was long (as shown above) or when the file was
made by Scorlas. The original filename is given when you also called ‘seps4id’.
60
Here is a staff generation showing information inserted which allows recreation of a MUS file from an
EPS file, and this information is used when an EPS file is reread to reconstruct a MUS file that may have
been lost:
%% item 2
%% parms 8 1
0 -24000 m
30000 -24000 l
0 -23650 m
30000 -23650 l
0 -23300 m
30000 -23300 l
0 -22950 m
30000 -22950 l
0 -22600 m
30000 -22600 l
S
9
Inputting
When you type the IN or INP command (or in Score3 hit F2 to enter Input Mode or click on F2-INPUT; or
in Score4 hit the F5 Input function button), the bottom line with the first few ‘staff setups’ is replaced by a
menu showing all the xxx.SET files. Click on any name to select that file:
After selecting a SET file, the panel can be closed by hitting a button. The combinations of function keys
with ‘shift’ or ‘ctrl’ are not implemented.
When you have typed the input in a text file (sample taken from the Score User’s Guide, page 14 which is
provided as ScoreEngineSampleINP.TXT), you can copy/paste multiple lines in the input field (which will
only show the first line) after hitting the ‘SPACE to Continue’ button:
Make sure that there is a carriage return at the end of the copied text. If not, the dialog is displayed and the
user needs to press ‘Enter’.
61
and show this:
Syntax error handling is slightly different than in DOS as the error is highlighted:
To replace the wrong ‘L’ here by ‘a’, just type ‘a’ and ‘Enter’.
Note that ScoreEngine allows use of the mouse in the Pitch Stage – see the paragraph on Pitch Stage in
chapter ‘Score music display’.
10 Command symbols
There are two kinds of symbols that can be used in the command line. A symbol is a string of characters that
represents a predefined value (String symbols) or action (System symbols).
10.1 String symbols
The user can define symbolic strings with the XEQU statement. A symbolic string is composed of letters
and/or digits. Reference to such symbols is by encapsulating them by $-characters. Lowercase characters are
made uppercase.
There is one system symbol called $CURRENTFILE$ or $CF$ for short which represents the file which is
currently in memory.
Here is an example:
The command XRUN executes an external program. A string symbol can thus be used in any Score or
ScoreEngine command. An example follows:
62
g bach001
xequ accs,'c:\score utilities\accs.exe'
xrun $accs$,$cf$
g $cf$
The XRUN and second G-command here are dynamically replaced by:
xrun c:\score utilities\accs.exe,bach001
g bach001
Symbols defined by XEQU are kept between sessions. They may be redefined and undefined. Use single or
double quotes when the string contains spaces or quotes. To see which symbols are defined, use the File
menu (Environment).
In the above example, the first G-command establishes the current filename. The run works on the music
file, not on the file in memory. The last line will bring the updated file in memory.
It is generally not necessary to type long paths such as in the XEQU above as these can be copy/pasted into
the keyboard field from the Explorer or another Windows application.
This feature partly overlaps the Score saved strings defined with apostrophe or colon which are expanded by
‘;’, ‘;;’, or ‘;;;’ but is not limited to number or size or to being entire command strings.
63
11 Commands
A number of letter commands were added. Typically, the ones starting with an X are specific for
ScoreEngine. ScoreEngine has added features to some commands or replaces them entirely. A help file
named ‘ScoreEngine commands’ appears when pushing the button with ‘?’ which has a summary of the
specific ScoreEngine commands.
An alphabetical list of the user extensions follows:
11.1
?
By itself it is identical to ‘??’ and will show the main help page. When followed by a letter it will give the
first page for that letter. Longer words are truncated to the first letter so ‘?PRINT’ is identical to ‘?P’. A digit
can be given to show that Code, i.e. ‘?14’. While ‘?CODE14’ is allowed, this is redundant typing.
11.2
DIR
When the extended DIR option is set, the DIR command will use the full command panel to show the
filenames and as such can give many more names in a single display. Close the display panel by clicking on
any name. Note that Score ignores filenames longer than 12 characters while ScoreEngine gives all names.
The ‘?’ wildcard is allowed in DIR.
The command ‘DIR [pattern].EPS’ provides an additional detail – whether the file can be used to recreate a
MUS file from it. Sample output:
The same format summary is given with selection capability (white background) for specific commands.
The command ‘DIR [pattern].DRW’ shows the collection of ‘draw’ items. Here is a partial sample:
The same directory will be displayed in when you do an insert with the commands ‘XIL’ or ‘XILL’ or in
Score4 when the ‘NewNm’ button is selected for a Code11 item. The backgrounds of selectable members is
then white.
64
11.3
DIRA
Same as DIR but with details on file size and date/time stamp.
11.4
DIRR
Same as DIR but it presents the output as the DOS versions of Score.
11.5
DP
Additional to its Score function, the current status of this setting is always shown in the program status
portion.
One can give a range with the DP command such as DP 3,0,7 which does DP 3,4,5,6,7. However, one cannot
give additional staff numbers such as DP 3,0,7,11. Score will not tell you that this is illegal. ScoreEngine
verifies the syntax properly.
11.6
DP-
This makes all staves disappear. Identical to DP-1. The DP status field will have the text ‘All staves’.
11.7
DRV
Drive change in ScoreEngine is not supported. Use the Path change to select another drive as path prefix.
11.8
G
This command can be given without a filename and thus will be identical to the ‘open-file’ function.
Additional information about the file is supplied on the bottom of the command form (full name, creator,
size, date and time stamp, measurement). When the option is set, ScoreEngine forces a SH/Z command after
the load. Note that Score is limited in its display vector and a file too big will not give the desired result. In
that case, the DP-command may be required.
11.9
GM
This command can be given without a filename and thus will be identical to the ‘open-file more’ function.
On top of its normal function, the feature to automatically detect the highest staff may be performed. This is
controlled by the option in the Exec profile ‘GM input above hi staff’.
11.10
GM- and GM+
These commands GM’s the file which is alphabetically before or after the current one. The filename suffix
must be identical. It is only the adjacent file that is added on top.
11.11
LJ – horizontal alignment
While DOS Score takes two extra prompts for the LJ command, ScoreEngine allows the values on the same
line, such as in LJ 4 3.
11.12
K – keyboard fingering
See the XF command.
11.13
PMX
The extended PMX gives accuracy of four fractional digits in tabular and more in condensed format. It does
not prompt for a filename as it uses the current filename with the ‘.PMX’ suffix.
When a file by that name exists already, the user is warned.
Optionally comments may be generated. At the end of the file creation, the file is shown in full screen.
65
11.14
PR
This command is slightly different from the pure Score command. ScoreEngine does not send a print file to a
printer. It always creates an EPS file. Also, the PR menu is replaced by a control file which is maintained by
the EPS menu. When no control file is present, the user’s defaults are used except for parameters 1, 14, 15
and 16 which ScoreEngine overrides (1, 16) or ignores (14, 15).
The reason to modify this command is primarily because of the optional post-processing capabilities of
ScoreEngine and for user comfort.
Pointing to the PR button shows the current EPS options setting, the name of the current font initialization
file, and status of the EPS control file ‘ScoreEngineEPSsetup.txt’.
Note that there are four ways to execute the PR command:
type PR
push the EPS button
push the function button or its equivalent bottom.
Before you create a PDF, a PR must have been done.
Instead of typing PR, press the ‘EPS’ button. With the right mouse button it will also make a PDF.
11.15
RES
This command can be given without a name. All Ascii text files in the current directory are given and a
selection can be made. The first line of each file is given in the list.
The command can have any text file name as operand.
11.16
RS
This also clears some fields in the Program status area. Use XRS to bypass the prompt when the file was not
saved. RS is blocked when DP is active.
11.17
SH, SHX
When the option is set, the Z-command is automatically added.
11.18
TYPE
This command replaces the Score command and Score4 function button entirely. Without an operand, a list
of Ascii text files in the current folder is shown (with the first text line) from which a file can be selected.
Display is full-screen. A filename may be given.
11.19
XAD – stem length setting
In Edit mode select a note, a beam or a staff, then enter the XAD command. The stem length is adapted. For
overlapping notes having more than one beam use XAD for the closest beam, XAD1 for the next, and so on.
A very strong feature is that XAD takes care of shared beams as is common in piano and harp.
In Input mode you can type XAD and it will cover the whole file.
Note that XAD takes care of offset notes while AD does not. Example (before and after):
66
11.20
XARP – arpeggio
Select a bottom note before typing XARP and a vertical arpeggio is generated till the top note of the chord.
When you want the arpeggio to extend to the staff above, select the arpeggio, then type XARP again. This
will extend it to the top note on the staff above.
You can also type XARP3 on a selected arpeggio to extend it to the top note of one staff higher. Notes must
be aligned for this command to find the top note.
Code4Par15 is set to the proper offset.
11.21
XBOX – draw box around text item
Select a text item. Then type XBOX. A box is draw around the text. The box consists of four line items
rather than a Code12 item because in the latter the horizontal positions in Par7 are unreliable. Examples:
There is an optional argument, the thickness of the line, ie. XBOX 2.2
Another option is the ‘dash’ keyword. A dash size is optional, the default being 1:
xbox dash .4
will give:
11.22
XBUCKET – use Score as Scorlas
While Scorlas is provided to produce multiple EPS files in a single run, Score can only make a single EPS –
that of the file in memory.
With the added feature of adding MUSinfo to an EPS file which Score can do, it just misses the mechanism
to work on multiple files. This feature has been added and in fact with this feature you no longer need
Scorlas to make EPS files.
Type the XBUCKET command and a bucket shows on the command panel:
67
From the Explorer, drop a selection of Score MUS files into this bucket and automatically EPS files will be
made from the dropped files. When you have set the Dispatcher option to call PDFcreator or Acrobat, you
will be asked if you also want PDF files to be made. When you keep the ALT key pressed during the
drag/drop, PDF will be made without the prompt.
The bucket symbol will be removed at the end of the file creation. You can also remove the bucket by
clicking on it when inadvertently activated.
If you want to include MUSinfo in EPS files and/or change the tuplet font for a series of files you need to do
this with the XBUCKET command as Scorlas under ScoreEngine does not have this feature. Evidently, as
there is only a single file in memory, the tiling feature cannot be used – use Scorlas if you need to generate a
single EPS from multiple files.
The XBUCKET – or XBU for short – feature has a few advantages over Scorlas:
- You do not have to leave Score to print multiple files;
- You can include MUSinfo in EPS files; and
- You can change the tuplet font for a series of files.
When this feature is in effect, warnings on files containing dummy items will be suppressed.
Another feature of this command is that when you have ScoreEngine setup to call SIPEPS01 for staff line
interruption, at the end of an XBUCKET run, you will be asked to see a summary of the changes made by
SIPEPS01. This can be handy to verify that indeed it inserted the staff line gaps. Remember that fingering is
not recognized as such when the font for it is not defined as a PSC file.
11.23
XCAF – change all fonts
Change all fonts in Code16 texts. Overrides in Par8 are not affected. The syntax is:
XCAF xx,yy
where xx is a font number of which each occurrence will be replaced by font number yy. Use the character
‘*” to change all fonts: XCAF *,00 changes all fonts in all Code16 items to 00.
11.24
XCAFF – change all font overrides
Same as XCAF but it works on Code16Par8 font overrides.
11.25
XCLS – clear screen
The command screen is cleared. The bottom line is not affected (in Score3). In Score4, the two lower lines
are not affected.
When the bottom of the command screen is reached, a message to this effect is issued and the screen is
cleared for more output at the top of the panel. This message can be suppressed by this command in which
case subsequent output starts at the top without clearing the panel.
The command is XCLS NOWARNING or to reset it, XCLS WARNING. Note that his status remains valid
for subsequent runs of ScoreEngine. The left margin shows the letter ‘b’ when the warning is in effect.
68
11.26
XCM – center measure numbers
Select a measure number, then type XCM. A numeric argument can be given which is the horizontal
displacement for measure numbers at the staff start. The Score CM command is executed on all measure
numbers that are not at the staff begin.
Note that the selected measure number must be above its staff.
Other measure numbers on the page must have the same size (par6), font (par7) and box/circle value (par8)
to be recognized as such.
11.27
XCVH – check vertical height
When EPS files are being made, their vertical height can be inspected. The check is based on the boundary box
(the ‘Fix Boundary Box’ feature must be set). This command specifies the height in inches, i.e. XCVH 10.5 will
signal when a page image is taller than 10.5 inches. You can reset the check by XCVH 0.
It should be noted that the Score V-command is not very precise – the actual vertical size is always slightly
higher.
11.28
XDA – insert dash
Select a syllable and type XDA to generate a dash immediately right of the syllable.
11.29
XDE – delete staves
You can delete more than one staff with this command, Examples are:
XDE 1,3 to 7,12
This deletes staves 1, 3, 4, 5, 6, 7, and 12.
Note that Score allows fractions in staff numbers, a technique which is used by some external applications.
The XDE ignores the fractional part. Progress is shown during this command.
Items with a negative value below -100 are not removed.
When you give a staff number higher than the top staff, the latter is taken.
11.30
XDEBUG – debug information
At specific times the developer may ask you to provide the information supplied by this command.
11.31
XDP – extended DP
The command XDP makes it easier to work with pages that are to big to be shown with SH/Z in their
entirety.
By typing the command XDP U the user will make the upper half of the page disappear. By typing XDP L it
is the lower half of the page that disappears. Typing just XDP inverts the two halves. No need to do the
SH/Z as these are automatic. Exit the disappear mode by the standard Score command DP99.
11.32
XDUM – delete dummy items
Check if the current file has dummy items and optionally remove them.
69
It also removes items with any other Code than 1 hrough 18
11.33
XE – EPS file display
Display an EPS file with Notepad. When no filename is given, the name will be constructed from the current
file. The suffix ‘.EPS’ is assumed.
11.34
XENDING – first or second ending
When an item in a bar is selected, or a left barline, this command will create a first or second ending Code05
item, with the left and right aligned to the adjacent barlines. Use a ‘2’ operand for the second ending. When
no barlines are present, the staff ends are used.
The first ending is one position shorter as to not coincide with the beginning of the second item.
11.35
XEPS – read enhanced EPS
Read enhanced EPS file. The list of applicable files is given from which a selection can be made. An
enhanced EPS file may be input with this command when it was made with comments by ScoreEngine and
as such has MUSinfo. Note that you can also drop an enhanced EPS file from the Explorer in the command
area, similar to PMX files and MUS file types. The result of XEPS is comparable to reading a PMX file.
What actually happens in this process is that a temporary PMX file is made from the EPS file.
11.36
XEQU – define equated string symbol
See chapter ‘String symbols’.
11.37
XFF – convert F-ligatures
The character combinations ‘fi’ and ‘fl’ are changed to the Score ligatures ‘!i’ and ’!l’. To convert the other
way around, enter the command ‘XFF 1’.
11.38
XFUL – set full screen
The music display can be started with a reduced size or Score sets it in reduced size occasionally during
operation (ie. by the INP command). Use this command to set full size. The preference as set by the
Dispatcher is not affected.
11.39
XJTA – JT on all systems
The XJTA command finds the various systems in a page and performs as many JT commands as there are
lines of lyrics in each system. Syllables must have a negative Par4 to be recognized.
The size and font of the syllables must be defined in the Dispatcher so they can be distinguished from other
text below a staff. XJTA works from the top staff in a system to its bottom staff.
When you do not want to inspect font and size, give the argument 1, i.e. XJTA1.
11.40
XK – keyboard fingering
Provided the piano fingering mode was selected and setup in the Dispatcher, use this command to generate
fingering. Select any note in a chord, then type the command XK or just K followed by the digits in any
order.
11.41
XKEEP – remember current file for next session
When you want the file currently in memory to be remembered and opened at the next ScoreEngine start,
type this command. To reset the selection, type XKEEP OFF.
70
11.42
XLIN – generate vertical line
In Edit mode the XLIN works across two staves. Select a bottom note and type XLIN. Optionally add the
operand A = arpeggio, B= barré, D = dashed.
In Input mode there are two or three operands. The first two are item numbers and a vertical line will be
drawn from the first to the second. The optional third line gives the type of line – A or B or D.
11.43
XLJA – LJ all systems
This command means ‘LJ all’. It analyzes the page for the system structure and LJ’s each system one by one.
11.44
XLYRM – move lyrics up or down
Select a syllable, then type XLYRM with as operand a vertical displacement. All syllables, dashes and
extenders are moved up or down for that staff. The vertical displacement is sticky, so a subsequent XLYRM
in the same run does not need an operand unless it is different.
11.45
XLYRV – lyrics view
Select a syllable, then type XLYRV. The command panel will show all lyrics on the current page, with staff
and height. Cyrillic is not supported.
11.46
XNB – open previous file
The file is opened which is in the same path as the current file and has the same suffix which alphabetically
precedes the current file.
11.47
XNX – open next file
The file is opened which is in the same path as the current file and has the same suffix which alphabetically
follows the current file.
11.48
XNOW – display current time stamp
Self explanatory.
11.49
XPCS – send EPS to PCSEND
The EPS file created last is presented to the external utility PCSEND. The latter must have been linked with
ScoreEngine.
11.50
XPLAY – Midi output
When no item is selected, the systems on the current page are played. When a staff is selected, only that staff
will sound. When you type the PL command, this will translate to XPLAY.
11.51
XPT – get point size
Score does not apply a correct point size. To obtain the correct size, select a text item and type this
command. Actually, the point size (as documented by Tom Brodhead) is always provided on the lower left
corner of the music panel when a text item is selected.
11.52
XPDF – create PDF
Immediately after a PR command, this command can be given to create a PDF file. It uses the EPS file just
created by the PR command and the result has the same path prefix and name but with the PDF suffix. The
resulting PDF is immediately shown.
A requirement is that the path to Acrobat or the freely downloadable program PDFcreator has been
established in the link profile. When both external utilities are defined, the PDFcreator takes precedence.
71
11.53
XREMARK – make a remark
There are two operand separated by a comma. The first is the number of seconds the remark will be visible.
The second is the text. This command is mainly used by ScoreEngine itself to report situations for which no
user acknowledgement is necessary.
11.54
XRS – reset memory
Same as RS but it automatically replies YES to the question to restart when this is given. Identical to a right
mouse click on the RS button.
11.55
XRUN – execute external program
See chapter ‘String symbols’.
11.56
XSD – screen dump
Copy the command screen to file ScoreEngineScreenDump.TXT and show the file. This may be done to ask
questions to development or report problems.
11.57
XSIPEPSSUMMARY
This command is generated automatically at the end of an XBUCKET run. You can type this command after
an individual print of a file by PR or by the EPS button. Here is an example of the output:
SipEps01 summary report - 08-26-2014 - 17:56:04
First process: SipEps01 - Edit EPS file - v9.0.0.1
Last process: SipEps01 - Edit EPS file - v9.0.0.1
Lines
2
12
20
0
1
2
3
4
Whites
2
15
24
0
08-26-2014
08-26-2014
17:54:16
17:55:52
file
C:\0\BOS18201.EPS
C:\0\BOS18202.EPS
C:\0\BOS18203.EPS
C:\0\BOS18204.EPS
(end report)
11.58
XSTAFD – set distances between staves/systems
The command takes one or two arguments, separated by a comma if there is a second value. The first value
is the distance between staves, the second one is the distance between systems. When the second value is
omitted it is equated to the first. Example:
XSTAFD -10,5
Par4 of staff 1 is always set to zero.
11.59
XSV – save SipInput created file
A file created with SipInput generates a text item as filename. The XSV command saves the file under that
name with the MUS suffix.
11.60
XSYL – align syllables
Select a syllable. This tells ScoreEngine the current staff and the font/size by which it can recognize
syllables in a page. Only text items with a negative vertical height (Par4) will be considered.
The offset value is moved to Par11 for the align function. For the centering function, the offset is a
combination of the computed displacement plus the given offset value.
The command line can have several combinations of arguments:
72
XSYL PAGE [CENTER] [offset]
XSYL [LINE] [CENTER] [offset]
XSYL VOWEL [offset]
XSYK V [offset]
When no arguments are provided, the command will prompt to act on syllables on the current line or the
whole page, then center or align, then it asks for an offset.
Note that ‘vowel’ alignment takes the first vowel of a syllable and aligns it to the middle of the closest note.
When the vowel is beyond the middle of the syllable, the syllable is centered to the middle of the note.
The ‘V’ option is equivalent to the ‘vowel’ option. Examples:
xsyl page center 1.2
xsyl line -1
xsyl -1.0
xsyl vowel 0
11.61
align all syllables at the current Par4, add 1.2 to
Code16Par11
align only the syllables on the current line, Par11 is set
to minus 1
same as previous
align all syllables on the first vowel encountered in the
syllable. Acts on whole page (line is no option)
XT – enter text
Select a staff item and type XT followed by a text. The font is defaulted to _00 and the text is put at a default
location from which you will have to move it to the desired spot.
11.62
XTRMAC – trace macro
This works only when emulating Score4. The execution of a macro is traced when the operand is 1. Reset
tracing by XTRMAC without operand.
11.63
XTXT – adapt text parameters
Select a syllable, then enter XTXT. This command is provided to manipulate syllables per staff or per file.
The first operand is a parameter number from 5 to 11. Then follows a space and then the value to be assigned
to that parameter. The change will affect all syllables on this staff with the same Par4. When an optional
ALL operand is present, all staves in the file are considered.
Use this command to change the size of all syllables, the displacement, etc.
11.64
XUND – underline text
Select a syllable, then enter XUND. Then select a terminating syllable and the underline will be drawn. You
can also select a lyrics dash or a lyrics extender.
To underline a single text item, select the item, type XUND, and then select the same text item again. For
texts/syllables to be underlined, they must have the same height. Lyrics dashes and extenders must be
vertically close to the selected first item. Example:
There are two optional arguments, the thickness (default 1) and the distance (default -.5).
Examples would be XUND 2,-2 and XUND,-1.1. The distance may be positive for strike through.
73
11.65 Insert commands
Several types of elements can be inserted with a command or via the Insert menu. Some commands require
that you are in Edit Mode. The menu disables insertion commands when not in Edit Mode.
11.65.1
XB – insert barré
A note must have been selected. A barré item is generated from the current note to the highest note in the
chord if there is one. Barré on a single note is possible as well. Note that the barré consists of three line
items.
11.65.2
XIE – insert Code15 PostScript item
An item must be selected. A list is shown of the EPS files which have a name shorter than 6 characters and
qualify to be inserted as a Code15 item. It will be inserted above the selected item.
11.65.3
XIK – insert character
The following panel is shown:
Select any character and the internal Score value will be generated where you are typing. This can be either
in a command or in text input.
11.65.4
XIL – insert library item (excluding LIBnn)
An item must be selected. The table of Code11 library members is shown. Select a member from the list
with the white background. It will be inserted above the selected item.
11.65.5
XILL – insert library item (including LIBnn)
Same as XIL but DRW files starting with ‘LIB’ are also included in the list.
11.65.6
XIS – insert symbol
An item must be selected. A table with all Code9 symbols is shown and a member can be selected. It is
inserted above the selected item.
74
11.65.7
XIS3 – insert symbol from CODE9.DAT
An item must be selected. A table with all Code9.DAT texts is shown and a member can be selected. It is
inserted above the selected item.
11.65.8
XIT – insert text
An item must be selected. Optionally an integer operand may be given as a Par4 value which remains used
until changed. Its initial value is -3.
11.65.9
XLGD – insert line going down
When a note was selected, a small line going downwards in the direction of the note is generated left of the
note.
11.65.10
XLGU – insert line going up
When a note was selected, a small line going upwards in the direction of the note is generated left of the
note.
11.66 Fingering commands
For guitar music, there are commands to place fingering according to house style.
11.66.1
XFn – generate finger
The XFn command can be given when a note was selected for editing. It will generate finger n (0 – 5) in
front of the note, as customary in guitar music. The digit will receive the note’s horizontal position and the
offset in Par15 depending on accidental, accidental offset and user settings.
11.66.2
XSn – generate string
To indicate a string as a circled number as is common in guitar notation, set n to 1-10 and it will be
generated at the stem’s side. A stemmed note must have been selected.
11.66.3
XPn – generate position
A note must be selected. The Roman number equivalent of ‘n’ is generated above the note. This is valid for
values 1 through 20.
11.66.4
XC/ – generate a vertical line through C
A text item starting with ‘C’ of size 1 must be selected. A vertical line is drawn through it. It is used by some
engravers to indicate a barré position.
11.67 Macros
Basically macros are the same as in DOS Score. However, the Scor4 implementation has a number of added
features. During a macro run, all commands are listed to the command panel. When you give the command
‘XTRMAC 1’, it will pause before every macro which is a useful feature for debugging your macro.
75
To interrupt a macro, click in the command panel.
While ScoreEngine traps the normal command interpreter, which is how it interprets the specific Xcommands, these commands cannot occur in macros. A specific macro technique called batch mode is under
development.
12 Score utilities
For Page, Scorlas, Draw and Just, the same menu line and top buttons appear as with Score but most of them
are disabled. The right side of the top buttons for the utilities has a different format:
This gives a Cancel button to quickly terminate the program without any further processing. The three
smaller buttons are to position the panel.
12.1 Page(4)
12.1.1 Long filenames
PAGE under ScoreEngine handles Score music files with a long Windows style prefix. Non-music files like
the namelist file or the Part Extraction Control File can also have a long prefix. When PAGE encounters
long filenames in the namelist (which is made by the user with an editor, with a SIP selection, or by
dropping), it creates the temporary namelist $$$$NAME.LST in the current directory. It also copies all the
files from the namelist to the work folder and names these files $$$$0001.MUS and up. Then it proceeds to
work from the temporary namelist.
12.1.2 Other Page extensions
The option 1, Page Layout is suppressed and is replaced by a Windows type feature of filename ‘drag and
drop’ Alternatively, files can be selected via a menu.
Old Page Data is not supported. It was a useful feature in the time of slow computers but it no longer serves
a purpose.
In part extraction, ScoreEngine validates the contents of that file because DOS Page3 does not do that very
well.
The output path by default is the same as the input files.
Part extraction allows automatic creation of the control file.
Rather than pushing the dialog text up as in DOS Score, ScoreEngine clears the dialog screen as to have a
faster display. The input report that passes by too rapidly can be inspected through a special button.
The control panel looks like this:
76
The filename drop feature is explained in the panel. Furthermore, the program runs as in a DOS
environment. Note the three overlapping buttons on the top which help positioning the panel.
The Page4 initial screen is shown here:
77
A nifty feature was added to PAGE(4) which automatically makes the control file for parts extraction. Once
option ‘2=Parts’ is selected, a text box appears:
78
Drop filenames from the Explorer to this yellow box and the file PARTS will be created. Also the
subsequent ‘Enter’ is performed by ScoreEngine and the prompt to provide an instrument number will
follow.
The selected group of files is validated for proper sequencing. There cannot be holes in the numbering.
Multifile pages are supported and must start with ‘A’ following the sequence number. Here is an example.
The highlighted files were dropped on the yellow box:
Then the message appears as:
79
It shows you the occurrence of instruments as well. After pushing ‘OK’ the PAGE dialog continues as in
DOS.
12.2 Scorlas(4)
The control panel is identical to the DOS version:
When either 1 or -1 is selected, the program informs the user of the filename drop feature (when activated in
the Dispatcher), allowing him to pass a selection from the Explorer and automation of subsequent prompts.
Because Scorlas under ScoreEngine can only output to files, the EPS filename is set automatically. When the
Dispatch PDF option was set, a PDF of each EPS file is created immediately.
The panel and functionality for Scorlas4 are similar.
80
Note that there are two enabled buttons on top in this example. These indicate that PCSEND and
PDFcreator were selected. After the EPS files were made, output to PCSEND, respectively PDFcreator or
Acrobat is done automatically. The buttons do not function – they just indicate the selection.
When filenames on input are not consecutively numbered, Score3 makes a mess of the output names. This is
fixed by ScoreEngine.
Note that the filenames created by Scorlas3 are constructed from the input names even when not in order.
This fixes an old Scorlas3 inconvenience.
Tiling is supported for Scorlas4 when filenames are dragged to the panel. There is no need to make a name
list file.
12.3 Draw(4)
There is no need to select a different drive or path in ScoreEngine as reading and writing of DRAW files is
always in the selected library.
The initial panel looks like this:
By setting the ‘extended’ feature, there is no more need to type paths and filenames, thus greatly simplifying
selection.
The Path command will give a folder selection panel which is a familiar Windows selector (not shown here).
The panel to get a member is shown here:
81
Just click a name in the white list to open it for processing. ScoreEngine lets the selection follow by an “LI”
command to show the vectors while displaying the member. An example of the display area is given here for
LIBRA ‘bass’:
To read a vector list member, ScoreEngine goes through the current library and detects automatically those
files which contain vector lists, then makes the summary like this:
Just click a name from the white list and the file will open and perform the “LI” command.
The buttons ‘RS’, ‘S’ (save) and ‘?’ are enabled during a Draw session.
The DRAW4 description applies to this.
12.4 Just(4)
Both JUST.EXE and JUST4.EXE are supported by ScoreEngine. An additional level of intelligence is added
to justifying when dropping filenames. Here is the opening panel for JUST4 (with the ‘drop filenames’
feature set):
82
When you select files from the Explorer and drop them to the white area, it assumes that you have structured
your filenames with a numeric part per page and a letter as part of the page. Long path prefixes are allowed
but you have all interest in maintaining the structured filenames in the 8.3 format such as BACH001A.MUS,
BACH001B.MUS for the first page consisting of two files, BACH002A.MUS, BACH002B.MUS for the
second page, and so on.
The internal control table which is generated from the selection is shown and it detects by itself where the
page separations are:
The above selection, dropped to the command area, will cause this:
83
Then you type your command – a combination of J, L, and H. No more typing of input filenames is then
required. You simply need to repeat the JUST options (J/L/H and margins) and provide the output filenames
when prompted. The question ‘Work on more data?’ is automatically replied as ScoreEngine advances to the
next page. After the last page separator has been recognized, the program does the exit by itself.
Progress is shown in the yellow list – files that have been selected as a single page are marked with
‘<used>’.
It is best to have User File Path which is different from the input selection so that there is no chance for
inadvertently overwriting the input by the output.
Note that when the path prefix of the input files is long, the files will be automatically copied to the work
folder first and justification works from there. At termination of JUST these work folder files are deleted.
You can of course type input names as well by not setting the ‘drop’ feature but then you do not benefit from
this advanced mechanism.
13 PostScript commands
These can now be included in a MUS file without limitations of special characters. Use font 99 to define
PostScript commands. They do not look correct on the screen but they will be included in the EPS file ‘as
is’.
14 Features currently under study
Not necessarily in this order are the features and versions planned for future release:
- defining a specific area with the mouse, Score Reference Manual p297;
- undo/redo on any number of levels;
- Midi input;
- mouse wheel support;
84
- advanced in-staff slur/tie positioning (thickest part in between staff lines);
- allow a dynamic height of the taskbar;
- batch mode, ScoreEngine’s own macro feature;
- suppression of the arrow pointing to an item in deisappear mode.
Specific user requests will be honored if possible. Users have requested features which have led to new
commands such as XUND, XBOX and the ‘vowel’ option of XSYL, or as yet unsupported features.
15 Installation
Download the demo program which is called ScoreEngine.msi from www.dekloe.be. To run production,
acquire a license from the distributor. The license changes the demo version into a production version.
The installation puts the following files in the folder of your choice:
BANNER.MUS
BANNER.TXT
COMDLG32.OCX
MSCOMCTL.OCX
ScoreEngine.exe
ScoreEngineBase.mod
ScoreEngineDispatch.exe
ScoreEngineDispatch.ico
SYSINFO.OCX
TABCTL32.OCX
sample music file
sample lyrics file
Microsoft module
Microsoft module
the main program
collected service routines
the main program
the main program icon
Microsoft module
Microsoft module
Most systems will have the Microsoft modules already installed but others do not.
The installer makes a shortcut of ScoreEngineDispatch.exe on the desktop to start ScoreEngine with a
double mouse click.
Only the Dispatcher can be executed by itself.
Note that when you use Cyrillic fonts, the Windows TrueText font ‘Bulgarian Ariel’ needs to be installed.
Just download this public domain font from the internet and move file BUARIL.TTF to the font folder.
15.1 Workfiles
Once operational, the following workfiles are (or may be) created. They are readable with Notepad but
should not be manipulated by the user:
ScoreEngineBase.mod
distribution module with service files
ScoreEngineClipboard.TXT
Score3 only – keeps cut/copied item
ScoreEngineCommands.TXT
help file
ScoreEngineConvert.TXT
conversion aid
ScoreEngineDiagnostic.TXT debugging aid
ScoreEngineExecProfile.TXT
keeps the user option between sessions
ScoreEngineEPSsetup.TXT
made when the EPS menu is performed
ScoreEngineEPSlog.TXT
EPS creation history
ScoreEngineFingeringOffsets.TXT created by ‘Sample offset values’.
ScoreEngineFontInventory.TXT
summary of fonts linked to ScoreEngine
ScoreEngineLinkProfile.TXT
remembers the links to Score programs
ScoreEngineMonth.TXT
remembers last time backup info was given
ScoreEnginePFB.TXT
font embedding workfile
ScoreEngineRecentFiles.TXT
recently created files by Score SA/SM
ScoreEngineScreenDump.TXT
debugging aid
ScoreEngineStringSymbols.TXT updated by the XEQU command
85
ScoreEngineTrace.TXT
ScoreEnginePDFlog.TXT
ScoreEngineQuickCoords.TXT
debugging aid
temporary file collecting Acrobat Distiller messages
memory for screen coordinates
15.2 Service files
While the Dispatcher or ScoreEngine itself are active, the folder where they were installed will have
additional service files. These files are removed at the proper termination of the Dispatcher.
ScoreEngineEmulator.mod the emulator
ScoreEngine2nn.mod
runtime aid
ScoreEngine3nn.mod
runtime aid
ScoreEngine4nn.mod
runtime aid
ScoreEngine500.mod
runtime aid
ScoreEngineBitmapnnn.bmp runtime aid
Score31p6nn.jpg
runtime aid
ScoreEngineCommandXXX.jpg
runtime aid
SIPSTACK.EXE
module to combine several input files
SIPMONIT.EXE
module to obtain system info on monitors
PCSEND.EXE
printer program (free third party tool)
ScoreEnginePFB.exe
program to embed fonts into EPS
The modules starting with SIP are originally from the SIP suite of Score utilities.
15.3 File placement
These are the directories where files are placed:
Program directory – where the ScoreEngine software is installed. Cannot be changed during operation.
Score workfiles such as !!CUT.TMP, !!CPR.TMP and #MUSDIR#.DAT are placed in the program directory
where Score4 resides.
User file directory – Where by default the user keeps his music files. This folder also scontains files mad
during runtime. The path can be changed at any time:
SESTATS.TXT – Scorlas and Just workfile
SCORE.SAV – a file made by Score
Music files, EPS and PDF files
NAMES.SEP – namesfile made by ScoreEngine for several Score programs
$$$$NAME.LST – namesfile made by ScoreEngine for Page
BARS.TMP and DECnn.TMP – made by Page
PSC, PFB and AFM directories
The folders where these reside are to be defined once with the Dispatcher.
Score3 and Score4
Depending on which Score(s) you have, these paths must be defined once by the Dispatcher:
Score3 Program directory – where Score3 and its utilities are.
Score3 LIB and HLP directory
Score3 PREF directory
Score4 program directory– where Score4 and its utilities are.
Score4 LIB and HLP directory
Score4 PREF-4 directory
86
Work folder
ScoreEngine requires a working folder in the root directory and should have a name shorter than ten
characters. The Dispatcher requests you to define one. The default name is $EWORK. The folder is used for
handling files with a long path prefix and all EPS files are temporarily stored here. Filenames typically begin
with CURRENT.
Do not open files in this folder with the name CURRENT.* as their status is unreliable.
The work folder also houses backup files.
ScoreEngine cannot read from this folder. If ever a file from this folder is required for a restore, the user
needs to move it to another folder and rename the file.
15.4 Multiple installations of ScoreEngine
It is entirely possible to run multiple occurrences of ScoreEngine on a single system provided they are
installed multiple times in different directories. It is not necessary to duplicate the Score software. Make sure
the work folder for different installations is not referred to by different installations.
15.5 Installation issues
Use the Windows uninstall feature to remove an earlier version of ScoreEngine. Note that the directory
where it was installed will still have some temporary .TXT files which you may want to remove by hand.
The file ScoreEngine05.exe contains the license key and you may want to hold on to it for later use.
When you reinstall the product, previous profiles made with the Dispatcher remain valid.
The installation file comes as an ‘msi’. Virus scanners, e.g. Norton, can prohibit ‘msi’ files and need to be
temporarily switched off.
The file ScoreEngineEmulator.mod is an object module that is considered suspect by some virus checkers
and has been known to have been moved to quarantine. ScoreEngine cannot work without this module so it
must be declared ‘trusted’.
The following virus action was taken by Avira:
When your virus checker cannot declare these files as ‘trusted’ you need a better one.
16 Diagnostics
The Dispatcher has a button ‘How to report a problem’. Follow the instructions.
Even when ScoreEngine terminates involuntarily, it is always possible to have the last updates of the current
MUS file saved.
87
17 Product training
While basically compatible with Score products, and while little training is necessary to become productive,
ScoreEngine offers many additional features that need to be studied from this manual.
There is however an increasing number of lessons and tutorials on the www.dekloe.be explaining the
features of ScoreEngine and the additional commands.
Also there is a separate document explaining how to print from ScoreEngine. A detailed write-up of EPS
post-processing by ScoreEngine is also provided.
18 Calling ScoreEngine
You can call the Dispatcher also from the command line or from another program and pass it an optional
MUS filename. The calling format is:
<drive>:\<foldername>\ScoreEngineDispatch.exe [<MUS filename>]
19 SIP and ScoreEngine
SIP can call ScoreEngine, provided the two programs are linked. Linkage is prompted at initialization of SIP
which maintains the path to the dispatcher in the profile SIPCNTR.INI. View this file by clicking the
Beethoven picture. Another installation setting is the preference for either Score3 or Score4 emulation which
is done in the global settings panel (push ‘Set project options’ on the ‘Other’ tab):
When both Score3 and Score4 are present, the user has the option to set his preference. Otherwise one of the
options is disabled.
When SIP calls ScoreEngine, it bypasses the Dispatcher.
Since the Dispatcher is bypassed, any user settings in the Dispatcher must have been done in a previous
session.
88
The interface between SIP and ScoreEngine is a utility called SipSkore which is activated from the SIP
main panel menu Score(Engine) and looks like this:
The information in the yellow table is only shown when pointing to ‘Currently linked?’.
Since in this example, ScoreEngine is linked to SIP, it will be called when hitting a Score button. To still
activate the DOS version of Score, hit the text ‘Since ScoreEngine…’.
PAGE, DRAW, JUST and SCORLAS are always called in the DOS version from this panel.
19.1 ScoreEngine called by SipInput
Files created by SipInput are text files. After creation of a text file, ScoreEngine performs a RES on that file.
This panel has a switch that needs to be set. If not, the DOS program Score(4) is performed on the text file.
89
19.2 ScoreEngine called by SipSib, SipXML2Score, etc.
The other SIP utilities will call ScoreEngine rather than the DOS Score(4) when it is installed and linked to
SIP.
ScoreEngine will perform the G command on the passed file.
20 Working with Acrobat
You can link Acrobat Distiller to have ScoreEngine create PDF’s with a single mouse click.
Link Acrobat Distiller with the Dispatcher (Link profile, tab Link utilities, then
- click the white field when you know where acrodist.exe is located; or
- ask the Dispatcher to look for it by pressing the ‘Locate’ button.
When you want to use a joboptions file, click the little button and select the desired file. The selected
joboption file will be passed to Acrobat Distiller. When not defined, the default is used.
Then return to the main Dispatcher panel and hit ‘Exec profile’, tab Peripherals.
There on the right hand bottom select ‘Call Acrobat’.
In Score(4) you will see the options you have selected for making EPS and PDF when you point to the EPS
button.
90
To make a PDF you type the commands PR and XPDF, or you right click the EPS button. Creation of the
PDF runs without user intervention. When finished, Acrobat displays the result. When the Acrobat Distiller
has generated a log file with warnings or error messages, these will be displayed in the command panel.
When using the XBUCKET command or Scorlas(4), there are successive calls to Acrobat Distiller and the
resulting files are not shown. Logging is collected and when there are any messages, these are displayed in a
text file at the end of the run.
21 Third party software
The following products are or can be linked to or used in combination with ScoreEngine:
Score and its utilities, by Passport Designs, Inc. and Leland Smith;
Seps4id, by Thomas Weber;
PCSEND by Adobe Systems Inc.; (*)
PDFcreator, by PDFforge.com;
Acrobat, by Adobe Systems Inc.;
GhostView;
Bulgarian Ariel Cyrillic font; (*)
SIP and its utilities, by Jan de Kloe;
Font files (AFM, PFB) by various suppliers;
Any external tool via the XRUN command.
ScoreEngine requires that when those products are used in conjunction, these may need to be separately
licensed.
(*) While a third party tool, it is delivered with ScoreEngine. PCSEND is placed in the installation folder at
installation time.
91
22 Document update history
Document
version
1.01
2.00
3.00
4.00
4.02
Date
Remark
December 30, 2009
October 4, 2011
First publication
Second major update for program release 4.0.0.0
Not distributed
4th major update for program release 5.0.0.15
Update release 5.0.0.17, XCYR, XUND, XBOX and tuplet font
change, XSYL VOWEL feature
Arguments for XBOX and XUND, new command XPT, new
summary on Code10Par7, Force A4 feature, header feature, improved
XSYL, XKEEP, 64-bit GSVIEW link
Extended fingering, Code1Par11 sign inversion, chapter on education,
automatic ‘open’ backup, elaborated SAV, regional setting check,
Control file described
Extended backup feature and monthly status, XDEBUG command
Recent files summary only updated by SA and SM command,
improved asset protection. Colored cursor in command panel. Colored
command cursor. Omit space in front of minus in numeric commands
(Keystroke reduction). New command XDA and XLYRV. XCYR
suppressed. Stored PSC/DRW menu.
New chapter: Fingering for piano, KX command. New command
XCAFF to change Code16 override fonts.
String fingering with ZapfDingbats added.
Pitch Stage mouse input, fast PAGE(4), No move on left mouse click,
Dispatcher Stats menu.
Acrobat Distiller link and joboptions, XSTAFD command, chapter
‘Working with Acrobat’
Review of printing – working with multiple EPS options files;
support of header/footer, removal of EPS menu.
Additional sort buttons on the recent files summary; scroll capability
on recent files; command panel colors; shorthand LJ command;
second monitor on the right supported; panel positioning reviewed;
music panel slider mouse clicks; tail options; XNOW command;
additional view menus; quick commands panel; macro trace
improved; tiling in scorlas4.
XJTA command, Tom Brodhead help, extended help, ‘?’, ?n
command (n=1-18)
Support of Midi output: XPLAY, XKEEP OFF,PAGE option 2
improvement, Tom’s 11.HLP shown, msg on too big file, no RS when
DP active, DP forced when file too big, progress msg on XDE, XLJA
improvements, SA shows new active filename
New command XCVH, new link mechanism for EPSTOOL, when
EPS file has header, its font is embedded also for PDF, no report
generated when PDF is compliant, fixed \\ in EPS title record, no
warning on dummy items when XBUCKET active. XBOX can have
dash keyword. Block PCSEND in 64-bit.
New command XDP, DP syntax check, full PostScript command
June 12, 2012
September 17, 2012
4.03
October 7, 2012
4.04
December 2, 2012
4.05
4.06
January 1, 2013
February 22, 2013
4.07
March 1, 2013
4.08
4.09
March 7, 2013
March 15, 2013
4.10
March 24, 2013
4.11
April 1, 2013
4.12
April 21, 2013
4.13
May 22, 2013
4.14
July 12, 2013
4.15
November 12, 2013
4.16
February 1, 2014
92
4.17
4.18
June 4, 2014
July 7, 2014
4.19
August 27, 2014
(end of text)
support, most recent file in File menu, XARP extension, improved
XIK hint, Z-option, XDUM extension.
Explanation of CURRENT.MUS
Added filename drop explanation with User Access Control. This
Windows restriction forced an additional file selection panel.
Expanded XCLS with operand warning|nowarning.
Improved explanation of GM command.
Added feature to obtain statistics from an XBUCKET run when
SIPEPS01 was in effect; new command XSIPEPSSUMMARY;
suppressed option to type filenames for PAGE(4), PAGE yellow text
box adapted.