1
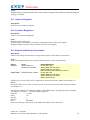
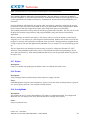
Tech-note
Windows CE 4.2 for
the eTOP
Workstations User's Manual
UniOP eTOP C-series: a convenient
platform for running the Microsoft Windows
CE .NET operating system and applications
Sitek S.p.A.
Tn233
Ver. 1.1
Tech-note
Copyright © 2007 Sitek S.p.A. – Verona, Italy
Subject to change without notice
The information contained in this document is provided for informational purposes only. While
efforts were made to verify the accuracy of the information contained in this documentation, it is
provided “as is” without warranty of any kind.
Third-party brands and names are the property of their respective owners.
www.uniop.com
tn233-1.doc - 15.03.2007
Windows CE 4.2 for the eTOP Workstations - User's Manual
2
Tech-note
Contents
1
Heading 1 - Introduction....................................................................................................4
2
Introduction .......................................................................................................................5
3
Windows CE. NET Features Implemented in UniOP........................................................6
4
Power-up...........................................................................................................................8
5
Control Panel Applets .......................................................................................................9
5.1
Date / Time...........................................................................................................9
5.2
Dialing ..................................................................................................................9
5.3
Display .................................................................................................................9
5.4
Internet Options....................................................................................................9
5.5
Keyboard............................................................................................................10
5.6
Mouse ................................................................................................................10
5.7
Owner.................................................................................................................10
5.8
Password ...........................................................................................................10
5.9
PC Connection ...................................................................................................10
5.10
Regional Settings ...............................................................................................10
5.11
Remove Programs .............................................................................................11
5.12
Contrast / Brightness..........................................................................................11
5.13
Network and Dial-up Connections .....................................................................11
5.14
SMUX Assignment .............................................................................................12
5.15
Storage Manager ...............................................................................................12
5.16
System ...............................................................................................................12
5.17
Stylus .................................................................................................................13
5.18
Power .................................................................................................................13
5.19
Config Mode.......................................................................................................13
6
OEM Applications............................................................................................................14
6.1
Batch.exe ...........................................................................................................14
6.1.1 Running scripts at start-up .................................................................................14
6.2
ChkBatch.exe.....................................................................................................15
6.3
VKey.exe............................................................................................................15
6.4
RegSave.exe......................................................................................................15
6.5
RegClean.exe ....................................................................................................15
6.6
Version.exe ........................................................................................................16
6.7
SpinTest.exe ......................................................................................................16
6.8
LedTest.exe .......................................................................................................16
6.9
MemDump.exe...................................................................................................17
6.10
MemSet.exe .......................................................................................................17
6.11
SysMemDiv.exe .................................................................................................17
7
Serial Ports......................................................................................................................18
7.1
Terminal Connection ..........................................................................................18
8
Connecting UniOP to a PC via Microsoft ActiveSync .....................................................19
8.1
Connection via Serial Line .................................................................................19
8.2
Connection via Ethernet.....................................................................................20
Appendix A. – System Start-up Diagnostic Information and troubleshooting ..............................22
tn233-1.doc - 15.03.2007
Windows CE 4.2 for the eTOP Workstations - User's Manual
3
Tech-note
1 Heading 1 - Introduction
tn233-1.doc - 15.03.2007
Windows CE 4.2 for the eTOP Workstations - User's Manual
4
Tech-note
2 Introduction
The UniOP eTOP C-series workstations are a family of state-of-the-art products offering an efficient
platform for running the Microsoft Windows CE .NET operating system.
Microsoft® Windows® CE is a robust, compact, highly efficient, scalable operating system (OS) that
is designed for a variety of embedded systems and products. Its multithreaded, multitasking, fully preemptive OS environment is designed specifically for hardware with limited resources.
Windows CE .NET, the successor to Windows CE 3.0, combines an advanced real-time embedded
operating system with the most powerful tools for rapidly creating the next generation of smart,
connected, and small-footprint devices.
Windows CE .NET 4.2 supports Microsoft eMbedded Visual C++ 4.0 and Microsoft Visual Studio
.NET, providing a complete development environment for building Web services and applications for
the Microsoft .NET Compact Framework, a subset of the Microsoft .NET Framework on the desktop.
With these tools, developers can rapidly build smart designs running rich applications on the latest
hardware.
To start develop the applications for Windows CE. NET on UniOP C-series eTOP products, you must
install SDK for the specific WCE build image version. The SDK for UniOP C-series eTOP products
is available on demand.
tn233-1.doc - 15.03.2007
Windows CE 4.2 for the eTOP Workstations - User's Manual
5
Tech-note
3 Windows CE. NET Features Implemented in UniOP
The UniOP implementation of the Windows CE .NET 4.2 is particularly rich of features.
The Table 1 shows a list of all features and technologies of Windows CE. NET 4.2 that have been
included in OEM build image for the eTOP C-series products.
Services, Tools, Features,
and Applications
Applications and Services
Development
Applications: End User
Core Operating System
Services
Communication Services
and Networking
File Systems and Data
Store
Capabilities
The combined Web and application services of Windows CE .NET
provide unprecedented opportunities to build smart, mobile, and
connected devices that have integrated access to Windows operating
systems, applications, databases, and the Internet.
• Component Services: Distributed Component Object Model
(DCOM)
• Standard SDK for Windows CE .NET
Ready-to-use applications perform common tasks and rely on
underlying services, providing rapid application deployment within
specific classes of devices, such as mobile handheld devices, data
collection devices, and thin clients.
• Microsoft ActiveSync
• CAB File Installer/Uninstaller
• File Viewers (Microsoft PowerPoint, Image, PDF)
• Terminal Emulator
• Windows Messenger
• WordPad
• Remote Desktop Connection
Core operating system services contain information on the Windows
CE kernel and other features common to all Windows CE platforms.
The core operating system services enable low-level tasks such as
process, thread, and memory management and provide some file
system functionality.
• USB Host Support – HID (Human input device), Printer, Remote
NDIS, Storage class drivers
• Battery driver
• Serial port Support - UART, DMA UART
• Debugging Tools (Toolhelp API)
• Fonts (Tahoma, Times New Roman, Symbol)
Windows CE .NET provides networking and communications
capabilities that enable devices to connect and communicate more
securely with other devices and people over both wireless and wired
networks.
• Networking Features: Network Driver Interface Specification
(NDIS) 4.0, utilities (IpConfig, Ping, Route), TCP/IP, Windows
Networking API/Redirector (SMB/CIFS)
• Local Area Network (LAN): 802.3 (Ethernet), 802.5
• Personal Area Network (PAN): Bluetooth, Infrared Data
Association (IrDA)
• Wide Area Network (WAN): dial-up networking, telephony API
File systems and data store enable devices to compress, store, or
read data from RAM or ROM and have varying responsibilities from
filtering to partitioning.
• File and Database Replication
• File System
• Registry Storage
• Storage Manager
• System Password
tn233-1.doc - 15.03.2007
Windows CE 4.2 for the eTOP Workstations - User's Manual
6
Tech-note
Multimedia and Browsing
Services
Shell and User Interface
The Internet connectivity modules enable you to build the most
sophisticated Internet access devices. Off-the-shelf protocols are
available at various levels to give you multiple Internet access
options. Windows CE .NET includes the high performance Microsoft
DirectX API and Microsoft Windows Media technologies found on
desktop computers, enabling high-performance audio, video, and
streaming media services on Windows CE .NET–based devices.
• Pocket Internet Explorer
• Basic Multimedia (streaming, WMV and MPEG-4 streaming)
Ready-to-use, built-in user interfaces (UI) and UI services can save
you considerable time when you want to create the sophisticated,
easy-to-use, graphical devices that users demand.
• Custom Message Box
• Graphics, Windowing, and Events
• Shell
• User Interface (customizable UI, software input panel, touch
display)
Table 1. Windows CE 4.2 Features Implemented in the UniOP Platform
tn233-1.doc - 15.03.2007
Windows CE 4.2 for the eTOP Workstations - User's Manual
7
Tech-note
4 Power-up
Immediately after power has been applied the unit will load the operating system showing in sequence
a white page with the “loading MIPS Code...” message followed by a screen with solid color that can
be blue or green and finally the Windows CE Desktop.
The “Backup Battery Low” warning message is displayed in the lower right corner whenever the
UniOP battery is low; in this case the standard UniOP Battery Low LED is also blinking in the upper
left corner.
In case the unit does not start correctly, the panel will switch in Configuration Mode. Diagnostic
information can be obtained if the Enter key (in the touch keypad at the lower right corner) is pressed
for more than two seconds. Appendix A contains the description of the diagnostic information.
tn233-1.doc - 15.03.2007
Windows CE 4.2 for the eTOP Workstations - User's Manual
8
Tech-note
5 Control Panel Applets
This chapter describes the applet included in the Control Panel folder. Please note that some of them
are specific to the UniOP platform.
5.1
Date / Time
Description:
Used to set date, time and time zone.
Notes:
Applying changes to the time zone will update the registry.
Time will be saved through power cycles only if the backup battery is correctly installed.
5.2
Dialing
Description:
Used to set dial-up location and dialing patterns.
Notes:
Not necessary when connecting via LAN.
5.3
Display
Description:
Used to set desktop image and screensaver idle time.
Notes:
You can select between two possible desktop images or none (no desktop image).
Screensaver) idle time may be set in a range from 15 sec to 30 min. This feature turns off
automatically the display backlight (the screen becomes black) after the touchscreen has been idle for
the specified time. Tapping on the touchscreen will turn on the backlight again. The purpose of this
feature is to extend the life of the backlight.
5.4
Internet Options
Description:
Used to set default web pages, connection settings and the level of security.
Notes:
These settings are effective for browsing using Internet Explorer.
The same applet is accessible also from Internet Explorer in the ‘Tools/Options’ toolbar:
- under the ‘General’ tab, the Start and Search Page can be defined.
- in the ‘Connection’ tab it is necessary to set ‘Use LAN’ and ‘Access the Internet using proxy server’
with Address and Port, if the network connection is across a local network.
tn233-1.doc - 15.03.2007
Windows CE 4.2 for the eTOP Workstations - User's Manual
9
Tech-note
5.5
Keyboard
Description:
Used to set keyboard repeat rate and delay.
Notes:
Applies only to external USB keyboards and not to the Virtual Keyboard (the Virtual Keyboard does
not support repeat).
5.6
Mouse
Description:
Used to set and test double-click sensitivity.
Notes:
Applies to both external USB mouse and touchscreen.
5.7
Owner
Description:
Used to specify owner identification data and user name, password and domain for networking
API/Redirector.
Notes:
Owner identification or Notes may be shown at power on. Since there is no benefit from password for
API/Redirector it is suggested to leave it blank.
5.8
Password
Description:
Used to specify power-up password or screensaver password (turn the backlight on).
Notes:
The user must type password at power-up or backlight on. If there is no USB keyboard it is
recommended to leave it blank.
5.9
PC Connection
Description:
Used to control the connection between the Windows CE device and a desktop computer. If a
different speed or port (COM2) is required for serial communication, change it here.
Notes:
Connection settings are defined in Network and Dial-up Connections (4.8)
5.10 Regional Settings
Description:
Used to specify local settings for the Date/Time applet and number formatting.
tn233-1.doc - 15.03.2007
Windows CE 4.2 for the eTOP Workstations - User's Manual
10
Tech-note
Notes:
Default setting is English (United States). Only subset of languages from Windows 2000/XP Regional
Settings is available.
5.11 Remove Programs
Description:
Used to remove installed programs.
5.12 Contrast / Brightness
Description:
Used to set contrast and brightness.
Notes:
Depends on the display type.
Contrast adjust is possible only in products with monochrome or STN color displays.
Brightness adjust is possible only in products with TFT color display
5.13 Network and Dial-up Connections
Description:
Used to enter change network driver settings and set-up for serial (Dial-up) connections.
Notes:
In the UniOP platform there are two network drivers that can work simultaneously.
Applet
LAN9001
Driver
SMC LAN91C111
Ethernet 10/100 Mb/s
SMXETHER1
SMUX Ethernet 10 Mb/s
Default Addresses
IP 192.168.0.200
Subnet Mask 255.255.255.0
Default Gateway 192.168.0.1
Name Servers (DNS, WINS) not required.
IP 192.168.0.201
Subnet Mask 255.255.255.0
Default Gateway 192.168.0.1
WINS 192.168.0.100
If DHCP server exist in the LAN it is sufficient to select the check box “Obtain an IP address via
DHCP”
If a remote Web server is to be accessed, a proxy server must also be specified in Internet Options
(see chapter 3.5.).
One dial-up connection is defined by default: ‘COM1 HW115200’. Its properties may be changed
selecting the ‘Configure…’ tab. The default settings are:
baud rate
115200
Parity
No
stop bit
1
data bits
8
Flow
Hardware
New serial (Dial-up) connections can be added from “Make New Connection”.
tn233-1.doc - 15.03.2007
Windows CE 4.2 for the eTOP Workstations - User's Manual
11
Tech-note
5.14 SMUX Assignment
SMUX refer to a UniOP-specific internal connection bus designed to offer a flexible association
between Windows CE devices (COM ports) and UniOP physical ports.
There are two serial ports available as COM1 and COM2.
Description:
Used to set desired SMUX assignment, i.e. a link between DUART (COM1) and one of the
communication ports (PLC, PC/Printer, and Aux port).
Notes:
Changing this assignment may also cause other UARTs to be redirected. The only useful choices
currently are:
PC/Printer (DB15 female)
PLC Port (DB15 male).
5.15 Storage Manager
Description:
Used to mount and format the two Flash disks available in the platform:
DSK1 (PanelMemory)
DSK2 (FlashCard).
Notes:
Before formatting it is necessary to dismount the selected disk. Formatting is possible only from the
‘Properties’ toolbar. After formatting a certain disk, mounting and reset should be done.
Formatting DSK1 (PanelMemory) will cause registry settings to be erased.
Storage Manager also allows scanning and defragmentation of disks in a way similar to desktop
Windows.
It is recommended to perform disk scan and defragmentation after several writing/deleting cycles on
disks. Also, in the case of interrupted file transfers (like in the case of power off), it is possible that
lost clusters remain. Then the user should dismount the disk, start scanning with fixing and mount the
disk again. Lost clusters will appear as FILE000x.CHK and must be deleted.
5.16 System
Description:
Used to display general information and system memory set-up.
Notes:
System memory (RAM) in a Windows CE device is divided into two areas: Storage memory and
Program memory.
The Storage memory or object store resembles a permanent, virtual RAM disk. Data in the object
store could be retained when the system is suspended or soft-reset, and devices typically have a
backup power supply for the RAM, to preserve data if the main power supply is interrupted
temporarily. When operation is resumed, the system looks for a previously created object store in
RAM and uses it if one is found. Devices that do not have battery-backed RAM can use the hivebased registry to preserve data across boots. In UniOP the hive-based registry is not stored on Storage
memory in RAM, but on PanelMemory flash disk.
tn233-1.doc - 15.03.2007
Windows CE 4.2 for the eTOP Workstations - User's Manual
12
Tech-note
Note: UniOP Windows CE workstations do not support retained RAM disks
The remaining RAM is dedicated to Program Memory. Program Memory works like the RAM in
Personal Computers: it stores the heaps and stacks for both system and non-system applications. Nonsystem applications are loaded from memory, uncompressed, and stored into Program Memory for
execution.
On some Windows CE platforms, the system, under low-memory conditions, might ask the user for
permission to take some object store RAM for use as program RAM to satisfy an application's RAM
needs. It means that some applications require more Program memory to run smoothly.
The boundary between the storage memory and the program RAM is movable. The user can move the
dividing line between storage memory and program RAM by using the System Control Panel
application.
Memory settings are stored in the registry. The registry can be saved to the memory card using the
“Registry save” (see chapter 5.4) shortcut placed on the Desktop. Double click on the icon to run the
program; a message will confirm the completion of the operation. Changing memory assignment and
saving to registry will start the application SysMemDiv.exe (see chapter 5.11) at the following powerup.
The user application can determine System memory division by calling two Windows CE .NET
functions. GetSystemMemoryDivision() retrieves information from the kernel pertaining to object
store and system memory, while SetSystemMemoryDivision() sets the specified number of pages for
the object store.
5.17 Stylus
Description:
Used to test double tap speed/physical distance and to re-calibrate the touch screen.
5.18 Power
Description:
Used to displays battery (main/backup) status and power supply selection.
Notes:
FED HMI products only have the main battery. For this reason the status of backup battery is grayedout. Power supply selection is not possible for FED products.
5.19 Config Mode
Description:
This enables the user to switch from Windows CE mode to Configuration Mode. In Configuration
Mode the user can change some of the firmware/hardware settings of the product.
Notes:
Only for advanced users.
tn233-1.doc - 15.03.2007
Windows CE 4.2 for the eTOP Workstations - User's Manual
13
Tech-note
6 OEM Applications
This chapter contains the list and a short description of all OEM-supplied applications that have been
included in OEM Windows CE for UniOP T2005 build image.
All OEM applications are placed in the /Windows folder of the UniOP build. All of them can be
started from command prompt. The user should select ‘/Start/Programs/Command Prompt’ and type
(the example for starting Batch.exe):
> cd /windows
> batch /windows/autoexec.bat
The OEM applications that do not need parameters can be started by double clicking on their icon in
/Windows folder.
It is necessary to change ‘View’ options in Windows Explorer to see these applications. The user
should select ‘View/Options’ and unselect all 3 check boxes. Windows Explorer can be started by
selecting ‘/Start/Programs/Windows Explorer’ or by selecting the ‘My Computer’ icon on the
desktop.
6.1
Batch.exe
Purpose:
batch file processor
Usage:
BATCH filename
Description:
The following commands are supported in Batch File:
REM
ignores the line (remark)
PAUSE
waits for a keystroke
WAIT number
waits for a number of milliseconds
COPY sourcefile destfile
copies a source file to a destination file
(overwrites destination file)
MOVE sourcefile destfile
moves a source file or directory to a destination
file or directory
DEL file
deletes a file
MD directory
makes a directory
RD directory
removes an empty directory
XCOPY sourcefile(s) destdir
copies source files (wildcards supported) to
specified destination directory
XCOPY sourcefile(s) destdir /s
copies source files and subdirectories to specified
destination directory
CALL batchfile
transfers execution to another batch file
ProgramName
executes a program
Note: Full path names must always be specified.
6.1.1 Running scripts at start-up
At power-up the system checks for the presence of a file named AUTOEXEC.BAT in the root
directory of the FlashCard.
If present, the file is opened and the instructions specified in it are executed.
tn233-1.doc - 15.03.2007
Windows CE 4.2 for the eTOP Workstations - User's Manual
14
Tech-note
Note:
6.2
An error message will be written to the console upon each command that failed; you may use
the PAUSE command in the batch file to isolate the problem.
ChkBatch.exe
Purpose:
check command line arguments
Usage:
CHKBATCH BatchFile
Description:
If a batch file is specified as an argument, transfer the processing of that file to BATCH.
If the file is not specified or if the file does not exist, it exits silently.
Full path names must be used.
6.3
VKey.exe
Purpose:
show virtual keyboard
Usage:
VKEY
Description:
When a USB keyboard is not present, the user can enter text/numbers using this application that will
show a pop-up touch keypad on the screen.
Notes:
This application is started by clicking its icon in the right corner of Windows CE taskbar. Clicking the
icon when the keyboard is shown, will close the application.
6.4
RegSave.exe
Purpose:
save current registry to non-volatile memory
Usage:
REGSAVE
Description:
The registry is saved to PanelMemory in the subfolder /user in *.hv and *.mky files.
Notes:
Registry should be explicitly saved after any registry change (for instance, after changing Control
Panel settings or installing new programs). Registry information must be saved to non-volatile
memory before turning off the device, otherwise information changed since last registry save will be
lost.
A shortcut to this program has been placed on the desktop (“Registry save”).
6.5
RegClean.exe
Purpose:
restore default ROM registry
Usage:
REGCLEAN
tn233-1.doc - 15.03.2007
Windows CE 4.2 for the eTOP Workstations - User's Manual
15
Tech-note
Description:
The registry files cannot be erased manually, because they are system files. This special application is
available to delete changed registry settings and restore original settings.
Notes:
It is necessary to restart UniOP after executing RegClean.exe, so that default registry settings can be
restore and take effect.
A shortcut to this program is available on the desktop (“Restore ROM Registry”).
6.6
Version.exe
Purpose:
show Windows CE OEM version information
Usage:
VERSION
Description:
Displays Windows CE OEM build image version. The information contains name, number and date
of Windows CE OEM build.
Notes:
Before reporting any problems, please use this program to determine the product version you are
using.
6.7
SpinTest.exe
Purpose:
demo application
Usage:
SPINTEST
Description:
The application is intended to show the graphical performance of the Windows CE device. It starts
spinning boxes in 3 tiled windows. New start of spinning boxes can be done by clicking in one of 3
windows or after default inactivity timeout.
Notes:
The application uses SPINCUBE.dll custom controls
6.8
LedTest.exe
Purpose:
demo/diagnostic application
Usage:
LEDTEST
Description:
The application is an example of using the API for programming UniOP auxiliary keys, LED
indicators and buzzer. It may turn on and off all LED indicators from number 0 to number 100. For all
LEDs that turning on/off passed the number is shown, and for those where failed the point is shown.
Notes:
tn233-1.doc - 15.03.2007
Windows CE 4.2 for the eTOP Workstations - User's Manual
16
Tech-note
There is a matching eVC++ 4.0 application that is the same as this Windows CE application , so the
user can modify it according to its needs.
6.9
MemDump.exe
Purpose:
display memory content
Usage:
MEMDUMP address
Description:
address must be specified in hexadecimal form (no leading 0x) and defines memory range to be
displayed.
The content of consecutive 16 bytes is displayed.
While the application is running, the following commands can be entered (followed by an
<ENTER>):
U
increments the address by 16
D
decrements the address by 16
H
switches display to hex mode
A
switches display to ASCII mode
X
closes the application
Notes:
This program should be used for debugging purposes only.
6.10 MemSet.exe
Purpose:
set memory content
Usage:
MEMSET b|h|w address data
Description:
Address and must be specified in hexadecimal form (no leading 0x). Byte is specified with a b, halfword with an h, and word with a w.
Notes:
This program should be used for debugging purposes only.
6.11 SysMemDiv.exe
Purpose:
set system memory division
Usage:
SYSMEMDIV
Description:
Restores the memory division stored in the registry.
Notes:
This program is run automatically at Windows CE start-up.
tn233-1.doc - 15.03.2007
Windows CE 4.2 for the eTOP Workstations - User's Manual
17
Tech-note
7
Serial Ports
Three physical serial communication interfaces are available in UniOP: one UART and two DMA
UART (DUART) ports.
The UART port is reserved exclusively as a debug interface (for debug messages) and cannot be used
for anything else.
DUART1 is the serial port COM1, DUART2 is the serial port COM2; they may be used for
ActiveSync or Terminal connection, as configured in "Network and Dial-up Connections" (see
chapter 3.8) and „PC Connection“ (see chapter 3.11) in Control Panel.
7.1
Terminal Connection
Only advanced users should use terminal connections.
A terminal session may be started using 'Start/Programs/Communication/Terminal’ and double click
on ‘Make New Session’.
An appropriate ‘Session name’ should be typed in.
Choose ‘Select a modem’: ‘Hayes Compatible on COM1’.
Some number should be entered as ‘Telephone number’ and pressed ‘Configure’. ‘Device Properties’
window opens with Tab ‘Port Setting’.
All 3 check boxes on the left side should be selected and changed ’Baud Rate’ from 19200 to 115200.
tn233-1.doc - 15.03.2007
Windows CE 4.2 for the eTOP Workstations - User's Manual
18
Tech-note
8 Connecting UniOP to a PC via Microsoft ActiveSync
8.1
Connection via Serial Line
Connection between a PC and UniOP can be done using Microsoft ActiveSync via serial line using
the CA193 cable.
Microsoft ActiveSync V3.5 or higher has to be installed on the PC; the ActiveSync software is
downloadable for free from the Microsoft web site at the following link:
http://www.microsoft.com/mobile/pocketpc/downloads/default.asp
The CA193 cable has to be connected to the PC serial port and to the UniOP PC/Printer port
Once the software is installed on the PC, communication via serial line has to be enabled in
ActiveSync “Connection Settings” as shown in the following picture:
Figure 1
After confirmation with the OK button, the system will automatically take connection with UniOP; if
connection does not start, the service can be started manually on the panel starting the “PC Link”
application available under “Start\Programs\Communication”.
ActiveSync will ask for set up a partnership; partnership is only required if Ethernet connection via
ActiveSync will be used; next chapter describes how to set up the connection via Ethernet.
The Device Name required for the partnership, can be any free name; this will be used by ActiveSync
to identify the Windows CE device in future connections.
If the partnership is defined, the registry on the UniOP must be saved running the “Registry save”
program on the unit’s Desktop.
tn233-1.doc - 15.03.2007
Windows CE 4.2 for the eTOP Workstations - User's Manual
19
Tech-note
8.2
Note:
Connection via Ethernet
Ethernet Connection is supported only by Microsoft ActiveSync V3.x.
If the UniOP workstation has an on-board Ethernet port or is equipped with the TCM10 Ethernet
module, the connection with Active Sync can be established also via Ethernet.
Ethernet connection requires that a partnership with the CE device be established.
If not established, please refer to the previous chapter; connect to the device via serial line and setup a
partnership.
Once the partnership is established, the serial link must be terminated. This can be done directly from
the CE unit with a double click on the connection icon shown in the system icon tray. On the
“Connection Status” dialog box, click then on “Disconnect”.
In Microsoft ActiveSync select “File\Connection Settings” and verify that network connection is
allowed, like shown in the following picture:
Figure 2
Close the “Connection Settings” dialog and run on the panel the “Active Sync” program available
from “Start\Programs\Communication”.
In the “ActiveSync” dialog box select the method of connection as “”Network Connection” and set
the “Connect to:” according with the personal computer name from where ActiveSync is started. This
parameter should be automatically proposed by the system and it will match with the identification
name given to the PC on the Microsoft Network.
Click then “Connect” to activate the connection.
A message will confirm that the connection has been established successfully.
tn233-1.doc - 15.03.2007
Windows CE 4.2 for the eTOP Workstations - User's Manual
20
Tech-note
tn233-1.doc - 15.03.2007
Windows CE 4.2 for the eTOP Workstations - User's Manual
21
Tech-note
Appendix A. – System Start-up Diagnostic Information and
troubleshooting
Symptoms
The Windows CE Operating System does not start and the following error message is displayed on
the screen: 'WCE xx xx xx', where xx are 3 error codes.
Error codes can be displayed in Configuration mode pressing the Enter key for more than 3 seconds.
Cause
The Windows CE image stored in the memory card can be damaged.
The possible error codes are the following:
1st code:
01 = WCE image without loader
02 = No Windows CE system detected on the memory card
2nd code:
01 = Windows CE checksum error in loader
02 = Windows CE checksum error in Windows CE file system
3rd code:
01 = timeout in loading Windows CE system
02 = generic Windows CE load failure
Solution
The memory card will probably have to programmed again
tn233-1.doc - 15.03.2007
Windows CE 4.2 for the eTOP Workstations - User's Manual
22