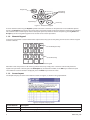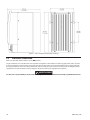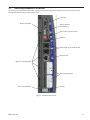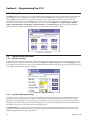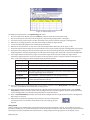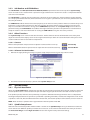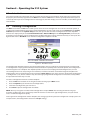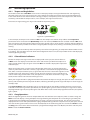
1
04581740 Edition 2 December 2007 Insight IC-D and IC-M DC Electric Tool Controller User Manual Save These Instructions Table of Contents Section 1 – Introduction - 5 1.1 Control Panel....................................................................................................................................................................................5 1.1.1 1.1.2 1.1.3 1.1.4 1.1.5 Navigation Keypad.................................................................................................................................................................................5 Numeric Keypad......................................................................................................................................................................................6 Screen Layout...........................................................................................................................................................................................6 Screen Elements......................................................................................................................................................................................7 Using Menus and Screens....................................................................................................................................................................8 1.2 System Options...............................................................................................................................................................................8 1.2.1 Field Bus......................................................................................................................................................................................................8 1.2.2 Expanded I/O............................................................................................................................................................................................8 1.2.3 Cabinet Mounting...................................................................................................................................................................................8 Section 2 – Installation - 9 2.1 Mounting...........................................................................................................................................................................................9 2.2 Electrical Connection................................................................................................................................................................. 10 2.3 Attaching Peripheral I/O Devices........................................................................................................................................... 11 2.3.1 2.3.2 2.3.3 2.3.4 2.3.5 2.3.6 Activating an Input ............................................................................................................................................................................. 12 Receiving an Output........................................................................................................................................................................... 12 Default Assignments of I/O............................................................................................................................................................... 12 PLC Connection and Setup............................................................................................................................................................... 13 Configuration Switch Connection and Setup............................................................................................................................ 13 Light Box Connection and Setup.................................................................................................................................................... 13 2.4 Attaching Other Peripheral Devices..................................................................................................................................... 13 2.4.1 Printer Connections and Setup....................................................................................................................................................... 13 2.4.2 Bar Code Connection and Setup.................................................................................................................................................... 14 Description......................................................................................................................................................................................................................14 Passive Bar Code Mode . ............................................................................................................................................................................................14 Active Bar Code Mode.................................................................................................................................................................................................14 Bar Code Operation......................................................................................................................................................................................................14 Bar Code Compatibility With Other Functions...................................................................................................................................................14 2.5 E-Stop Connection...................................................................................................................................................................... 14 2.5.1 Single Spindle Operation.................................................................................................................................................................. 15 2.5.2 Multi-Spindle Operation.................................................................................................................................................................... 15 2.5.3 E-Stop Not Present............................................................................................................................................................................... 16 2.6 Making Network Connections................................................................................................................................................ 16 2.6.1 Ethernet Connection........................................................................................................................................................................... 16 2.6.2 Computer Connection and Setup via the Ethernet Port . ..................................................................................................... 16 2.6.3 Fieldbus Card Connection................................................................................................................................................................. 16 2.7 Powerhead Setup........................................................................................................................................................................ 17 2.8 Initial Startup................................................................................................................................................................................. 17 2.8.1 Startup Procedures.............................................................................................................................................................................. 17 Section 3 – Programming the IC-D - 18 3.1 Setup Menu................................................................................................................................................................................... 18 3.2 Quick Setup Procedure.............................................................................................................................................................. 18 3.2.1 Select Language................................................................................................................................................................................... 18 3.2.2 Quick Setup Programming............................................................................................................................................................... 18 Gang Count.....................................................................................................................................................................................................................19 Auto Increment..............................................................................................................................................................................................................20 3.2.3 Start Mode and Config Select.......................................................................................................................................................... 20 04581740_ed2 3.3 System Setup................................................................................................................................................................................ 20 3.3.1 3.3.2 3.3.3 3.3.4 Passwords................................................................................................................................................................................................ 20 Set Date and Time................................................................................................................................................................................ 20 Job Number and CAN Address........................................................................................................................................................ 21 Other Functions.................................................................................................................................................................................... 21 3.3.4.1 3.3.4.2 Contrast.......................................................................................................................................................................................................21 Software Version Numbers...................................................................................................................................................................21 3.4 Spindle Setup................................................................................................................................................................................ 21 3.4.1 Physical Attachment........................................................................................................................................................................... 21 3.4.2 Spindle Setup Screen.......................................................................................................................................................................... 21 3.4.3 Autocal Function.................................................................................................................................................................................. 23 3.5 Serial Setup.................................................................................................................................................................................... 23 3.5.1 3.5.2 3.5.3 3.5.4 3.5.5 3.5.6 Protocol.................................................................................................................................................................................................... 23 Baud Rate................................................................................................................................................................................................ 23 Parity......................................................................................................................................................................................................... 23 Bits Per Character................................................................................................................................................................................. 23 # of Stop Bits.......................................................................................................................................................................................... 23 Host Address.......................................................................................................................................................................................... 24 3.6 PC Connection.............................................................................................................................................................................. 24 3.6.1 Ethernet Setup...................................................................................................................................................................................... 24 3.6.2 Additional Communication Entries............................................................................................................................................... 24 3.7 USB Storage Device Data Transfer......................................................................................................................................... 25 3.7.1 Insertion................................................................................................................................................................................................... 25 3.7.2 Removal................................................................................................................................................................................................... 25 3.8 PLUS Settings Screen................................................................................................................................................................. 25 Section 4 – Operating the IC-D System - 26 4.1 Introduction.................................................................................................................................................................................. 26 4.2 Selecting a Configuration......................................................................................................................................................... 26 4.3 Monitoring Operation................................................................................................................................................................ 27 4.3.1 Torque and Angle Values................................................................................................................................................................... 27 4.3.2 Colored Status Indicators.................................................................................................................................................................. 27 4.3.3 Gang Operations.................................................................................................................................................................................. 27 4.4 Message Area................................................................................................................................................................................ 28 4.5 Stats and PM Alarms................................................................................................................................................................... 28 4.5.1 Stats Alarms............................................................................................................................................................................................ 28 4.5.2 Preventive Maintenance Alarms..................................................................................................................................................... 28 Section 5 – Quality Control - 29 5.1 Statistics Menu............................................................................................................................................................................. 29 5.1.1 5.1.2 5.1.3 5.1.4 Cycle Log................................................................................................................................................................................................. 29 Spindle Statistics................................................................................................................................................................................... 31 Stats Settings......................................................................................................................................................................................... 32 Powerhead Stats................................................................................................................................................................................... 32 Section 6 – Diagnostics and Troubleshooting - 34 6.1 Diagnostics Menu........................................................................................................................................................................ 34 6.1.1 6.1.2 6.1.3 6.1.4 System Test............................................................................................................................................................................................. 34 Display Inputs........................................................................................................................................................................................ 35 Set Outputs............................................................................................................................................................................................. 35 Tool Test................................................................................................................................................................................................... 36 6.2 Event Log........................................................................................................................................................................................ 37 04581740_ed2 Appendix 1 – System Specs and Spare Parts - 38 Insight Technical Specifications...................................................................................................................................................... 38 Pinout Tables.......................................................................................................................................................................................... 38 Default I/O Assignments................................................................................................................................................................................ 38 Inputs Outputs ......................................................................................................................................................................................................................38 ..................................................................................................................................................................................................................39 Recommended Spare Parts List...................................................................................................................................................... 39 Outside the Cover................................................................................................................................................................................ 40 Inside the Cover.................................................................................................................................................................................... 41 Side . ........................................................................................................................................................................................................ 42 Appendix 2 – Event Codes - 43 Event Code Explanation..................................................................................................................................................................... 43 Event Code Table.................................................................................................................................................................................. 43 04581740_ed2 Section 1 – Introduction The Insight IC-D and IC-M Fastening Systems are electronic tightening controllers that can be programmed to operate Ingersoll Rand QE- and QM-series spindles, depending on the model, to perform repetitive fastening operations. The spindles may be individual hand-held spindles, or several may be mounted together (called a powerhead) for manual or automated assembly tasks. This manual addresses the Insight IC-D and IC-M control unit only; the spindles are supplied with their own operating manuals. Although the IC-M has the same functionality as the IC-D, it does not have a display screen and keypad, only a single line display. Many of programming functions for both units are done via separate PC software. This programming is explained in the PC manual. It is not necessary to access the Insight’s interior components, so they are not explained in this section. This manual provides information on how to install, setup, program, operate, and troubleshoot your IC-D and IC-M controllers. The figure below shows the major elements of the IC-D controller. Main Menu Options Graphics Display Screen Numeric Keypad Navigation Keypad Figure 1 - Main Panel 1.1 Control Panel Four menu buttons on the unit’s front panel provide access to all of the IC-D displays. You use the Navigation and Numeric keypads to move through the IC-D screens and to enter data. 1.1.1 Navigation Keypad The arrows on the navigation keypad (see graphic below) are used to navigate among the screen elements (buttons, drop boxes, etc.). When you have navigated to a screen element it becomes highlighted with a border. Pressing the Enter key on the navigation keypad (or the one on the numeric keypad) will activate the highlighted screen element. (The action is similar to clicking on a screen button with a computer mouse.) 04581740_ed2 Escape Key Directional Arrow Keys Expand Key Enter Key Figure 2 - Directional Keypad A screen element containing the Expand symbol indicates the element can be opened to reveal additional options. Pressing the Expand key located in the center of the navigation keypad will open the element and display the options. You can then use the arrow keys to move to the option you want, and then select that option by pressing Enter. The Escape key on the navigation keypad can be used to cancel certain operations. 1.1.2 Numeric Keypad If you have navigated to a screen element that requires data entry (a data entry box), you will use the numeric keypad to enter numbers. The Backspace Key The Enter Key Figure 3 - Numeric Keypad Most of the data entry boxes are for entering numeric data only. Simply enter a numeric value directly from the keyboard. If you make a mistake, press the backspace key to delete the number, or the ESC key to restore the prior value. When the correct number is displayed, press the Enter key to enter the value. 1.1.3 Screen Layout The Graphics Display Screen has two distinct sections or regions, as shown in the graphic below. Figure 4 - Graphics Display Screen Screen Element Description Header The Header shows the Insight’s current menu, the date and the time. Main Window The Main Window displays all the sub-menus, parameter selection and data entry fields. 04581740_ed2 1.1.4 Screen Elements All the different screens that can appear on the Insight IC-D display have certain design elements in common. These design elements, called screen elements, are shown in the graphics below. In actual operation, you use the arrow keys on the Navigational keypad to navigate the cursor to the individual screen elements. A yellow border around the screen element indicates that the cursor is located at that screen element. Button Drop Box Data Entry Box Check Box Radio Button Dispaly Boxes Figure 5 - Screen Elements Screen Element Description Button To click on a button, navigate to it with the arrow keys and press the Enter key. Yellow highlighting around a box indicates that it has been selected. Drop Box Drop boxes are indicated by the Expand symbol. To open a drop box, navigate to it with the arrow keys and press the Expand key. Data Entry Box Navigate to a data entry box with the arrow keys and then use the numeric keypad to enter a value. Press the Enter key to place that value in the data entry box. Pressing ESC before Enter resets the prior value. Check Box / Radio Button Navigate to a check box or radio button using the arrow keys. Press the Enter key to check or uncheck the box. Display Box Display boxes may contain view-only or editable information. Use the arrow keys to scroll up/down and left/right. Icon 04581740_ed2 1.1.5 Using Menus and Screens 1. Push the corresponding button to select the menu section you want to view. There are four sets of menu screens from which you can select. The selection buttons for these four menus are located above the display screen in the upper part of the front panel. Run The Run screen displays fastening data (torque and angle after each fastening operation. Statistics Setup The Statistics menu displays raw fastening data as well as statistical analyses. Statistics consists of four sub-menus. The first sub-menu, Cycle Log allows viewing of previously recorded tightening data. Other sub-menus include Spindle Stats, Powerhead Stats, and Stats Settings, which provides general statistics parameters. The Setup menu programs the fastening strategy. The five sub-menus on Setup include a Quick Setup feature that allows rapid programming of standard strategies, while System Setup contains settings for general parameters such as date and time. Setup also controls numerous basic system parameters, such as the Spindle Setup sub-menu, which is used to select spindle parameters, and Serial Setup and Ethernet Setup, which are used to set the respective port parameters. The PLUS Settings submenu will be available for those customers using the PLUS communications protocol. Diagnostics The Diagnostics menu controls Insight’s self-diagnosis programs. Insight continually looks for operating problems or component failures. It alerts the operator to problems with the spindles or with the controller electronics, and can even suggest root causes and corrective action. 2. To choose a sub-menu from a selected menu, use the cursor (arrow) keys to highlight (select) a sub-menu item and then press the Enter key to start that item. You can also select the sub-menu by pressing the number associated with that menu. There are up to five sub-menu options for each menu type. 3. To enter numeric data into a field, simply highlight the desired onscreen element, use the numeric keypad to enter numbers and press the Enter key. 1.2 System Options 1.2.1 Field Bus Your system may come equipped with a fieldbus slave card. The field buses allow the Insight unit to communicate with other devices across a network. Supported cards are: • Profibus • DeviceNet • Modbus RTU • Interbus S • Ethernet IP/Modbus TCP 1.2.2 Expanded I/O The base unit is equipped with eight discrete inputs and eight outputs for connection to peripheral devices. The Insight accommodates an optional remote I/O board with an additional 16 inputs and 16 outputs, totaling 24 inputs and 24 outputs. The input/output functions are fully assignable and programmable using ICS Software. 1.2.3 Cabinet Mounting The Insight comes standard with wall-mounting brackets. An optional cabinet-mounting bracket is available that allows the heat-sink fins to extend out of the back of the cabinet. Use the bracket as a template to cut a hole through the back of the cabinet in the position where you wish to place the unit. Install the cabinet mounting bracket after first removing the wall-mounting brackets from the unit. 04581740_ed2 Section 2 – Installation 2.1 Mounting Bolt the Insight controller enclosure to a suitable rigid surface near the assembly area using the mounting brackets on the back of the enclosure. See the drawings below for dimensions, information on bracket hole spacing, recommended mounting bolts, door opening clearances, and other mounting information. Make sure the mounting is stable, secure, and level. ADVERTISSEMENT Attach the Insight enclosure to a structure capable of safely supporting its total weight. Failure to follow installation instructions properly can result in structure collapse and personal injury. Figure 6 - Front Dimensional Drawing 04581740_ed2 Figure 7 - Side and Back Dimensional Drawings 2.2 Electrical Connection Make sure the Main Power Switch is in the Off position. Insight controllers are available with various power cord options. Some options include a pigtail power cable, and the user must supply the correct power cord connector. Review the electrical circuit information on the Insight’s label (on the right-side panel) and in the safety information manual. Verify that your electrical circuit meets the Insight’s power requirements and circuit breaker ratings. Plug the AC power cord into an appropriate receptacle. ADVERTISSEMENT It is the user’s responsibility to ensure that the Insight controller is installed and wired by a qualified electrician. 10 04581740_ed2 2.3 Attaching Peripheral I/O Devices To remove the I/O cover, first remove the retaining screw on the right-hand side of the cover, and then press in the locking tab below the screw and lift up the cover. Serial Port Optional Fieldbus Rotary Switches (CA2 Address) Termination Resistor Switch USB Port Powerhead Synchronization Bus Ethernet Port Optional Inputs/Outputs Base Inputs/Outputs 24V DC Base Inputs/Outputs Figure 8 - Peripheral Port Layout 04581740_ed2 11 2.3.1 Activating an Input All input signals operate at 24VDC. The Return for the 24V signal must be connected to COM IN for each input bank. It is recommended that you use the internal 24VDC located at the terminals marked 24VDC OUT +/-. Switch the 24VDC back to the desired input signal (FORWARD, REVERSE, FREE SPEED, etc.). To use the internal 24VDC, you must connect a jumper wire from 24VDC OUT (-) to COM IN of each input bank. To activate an input you would then provide a contact closure between the desired inputs signals and 24VDC OUT (+).You can daisy chain the COM IN signal to the next input terminal bank as shown in the Input Signal drawing. Figure 9 - Input Signal Drawing 2.3.2 Receiving an Output All output signals operate at 24VDC. The 24V signal and its return must be connected to the terminal blocks labeled +/24VDC EXT on each output connector bank. It is recommended that you use an external 24VDC supply. The output signals will be switched back to you from the appropriate output signal (ACCEPT, REJECT, HIGH TORQUE, etc.). See the Output Signal drawing. You can daisy chain the +/- 24VDC to the next output bank. Figure 10 - Output Signal Drawing 2.3.3 Default Assignments of I/O See Pinout Tables on page 39 for the default assignments. 12 04581740_ed2 2.3.4 PLC Connection and Setup NOTE: All connections to a PLC are made via the Insight’s terminal blocks, except data collection. Data collection is done via the serial Fieldbus and/or Ethernet ports. For data collection, follow the procedures for setup via the serial or Ethernet port. To connect a PLC to the terminal blocks, see the procedure above. Through the terminal blocks, a PLC can send and receive a variety of outputs to and from the Insight controller. It is important to always use a shielded cable for all PLC signals to the Insight controller, and the shield should only be terminated at the controller end. All inputs and outputs are activated/received in the same way, as discussed above. 2.3.5 Configuration Switch Connection and Setup 1. Connect the configuration switch to the Insight controller’s terminal blocks and Connect Config 1 wire to the input assigned to Behavior Config 1, and so forth through Config 8. NOTE: The Behavior (i.e., the assignment of function) for inputs and outputs is accomplished through the ICS software. 2. Attach a spindle to the Insight controller and turn the controller On using power switch on the front panel. 3. Go to the Setup menu and the Spindle Setup sub-menu screen. 4. If your configuration switch has more than eight positions, select External Binary from the Config Select drop box. If your socket tray has eight or fewer positions, select External Discrete from the Config Select drop box. How to Test a Configuration Switch 1. After you have connected and setup the configuration switch, go to the Diagnostics menu and the Discrete Inputs sub-menu screen. 2. As you activate each position on the configuration switch you should see the appropriate indicator light up on the screen, indicating activity on the configuration lines. (Note: If you selected External Binary in the Config Select drop box on the Setup menu’s Spindle Setup screen, then the first four configuration lines will indicate the binary encoded number for the configuration selection, with 0000 indicating configuration 1 is selected.) 2.3.6 Light Box Connection and Setup 1. Locate the active wire colors for light boxes. 2. Connect the light box to the Insight controller’s terminal blocks on the controller’s left side with the appropriate accessory cable. 3. Ensure a spindle is attached to the Insight controller and turn it on using the controller’s power switch. In a standard setup, the colored lamps indicate the following: Red Torque Hi and/or Angle Hi. Green Accept output. Yellow Torque Lo and/or Angle Lo. 2.4 Attaching Other Peripheral Devices 2.4.1 Printer Connections and Setup NOTE: The Insight supports serial printers for printing E.O.R. (End of Run) data and labels. To Print E.O.R Data: 1. Connect your serial printer via a standard 9-pin serial cable to the serial port located on the left side of the Insight controller labeled I0I0I. 2. On the Setup menu’s Serial Setup sub-menu screen, select EOR Data Out from the Protocol drop box. 3. Check that the settings for Baud Rate, Parity, Bits Per Character, and # of Stop Bits match those settings on the serial printer. Change the settings as necessary. 4. Turn on the printer and make sure it is on line. 5. Run a tightening and ensure that the tightening result is printed. To Print Labels: 1. Connect your serial printer via a standard 9-pin serial cable to the serial port located on the left side of the Insight controller labeled I0I0I. 2. FTP the Status.txt file into lbl folder of the controller. This Status file contains information relative to printer initialization and application specific settings. 3. FTP the Body.txt file into lbl folder of the controller. This Body file will be used solely for defining the contents and format of the label/report that will be printed. 4. Reboot the controller. 5. Turn on the printer and make sure it is on line. 6. Run a tightening and ensure that the label is printed. 04581740_ed2 13 2.4.2 Bar Code Connection and Setup Description The bar code function allows the Insight IC controller to be connected to any serial ASCII bar code scanner or Ethernet bar code scanner. Each spindle can be equipped with its own scanner or, in the case of a powerhead, one scanner can be assigned to the powerhead. The bar code function has two main operating modes, Passive and Active. The choice of bar code mode, along with all bar code operational settings, is made in the PC software. See the ICS software manual for more information on selecting this option. Passive Bar Code Mode In this mode bar code data is attached to EOR data and stored in the cycle log, but Configurations are not selected via the bar code scan data. Active Bar Code Mode In this mode Configurations are selected via the bar code scan data. The scan data is also attached to the EOR data. To setup the controller for bar code operation, follow the directions below. Bar Code Operation When the bar code function is activated for a spindle, wherever the cycle data is sent (either Fieldbus, cycle log report, EOR data or host data out), the bar code data is sent with it. Upon bootup, if a cycle is run before a barcode is scanned then the bar code data is recorded as “No Bcode”. When a barcode is scanned and is the valid length, then the scan data is recorded to all subsequent cycles until a new scan is initiated. If an invalid barcode is scanned, then “Invalid BC” is recorded as the scan data. Bar Code Compatibility With Other Functions Gang Count Bar code operation functions fully with gang count. The scan data is attached to all cycles in the gang count. If Disable tool until scan is selected via programming in the ICS software, the tool is disabled once the gang or assembly (see Auto Increment) is complete. If a gang count needs to be reset, this must be performed through the Gang Reset Input or the Run Main screen. On the Run Main screen, press 0 (zero) and then Enter. A re-scan of a part does not reset the gang count. Auto Increment Auto increment operation functions fully when Disable tool until scan has been selected. In all cases both bar code and auto increment will operate together. One bar code scan allows all Configurations in auto increment to operate when in active mode. The scan should be set up to select the first Configuration in the auto increment chain. Powerhead For the barcode function to be used with a powerhead, the powerhead must be created first. Once the powerhead has been created, set up bar code operation for spindle number 1 in the powerhead. The scan data is not added to all spindles in the powerhead, only the lead. 2.5 E-Stop Connection The Emergency Stop (E-stop) feature allows for a rapid spindle shutdown (by the spindle user) in an emergency situation. An emergency stop switch may be wired to the connectors provided at the bottom of the connector panel. An E-stop for a single unit is connected to the controller’s internal 24V power supply. When multiple controllers are wired together in a multiple-Configuration cabinet, an external power supply is used to run the E-stop so that the power for the entire system is shut off when the E-stop is pressed. E-stop is implemented via the Emergency Stop relay. The relay is normally energized. De-energizing it initiates E-stop. The relay has two outputs: 1, 24 VDC which is used by the Motor Controller Electronics (MCE) for controlling other relays that allow AC input voltage to be routed to the spindle’s bus voltage rectifier and 2, a voltage signal that is routed to the MCEs Control board processor to indicate that an emergency stop has occurred. The E-stop relay coil terminals (+) and (-) are routed to jumper JP21 behind the I/O panel door. JP21 also has the module’s internal 24 VDC power supply routed to it. The relay is energized by supply 24 VDC to the coil terminals at JP21. The 24 VDC can be supplied by an external power supply or the internal 24-volt power supply. 14 04581740_ed2 2.5.1 Single Spindle Operation If the E-stop is being used, JP21 pin 2 (relay coil (-)) is routed to one contact of a remote (normally closed) SPST palm button switch (PBS). The switch’s other contact is routed back to JP21 pin 4. JP21 pin 1 remains connected to JP21 pin 3. If an emergency occurs the spindle operator can depress the switch and the relay coil’s low side voltage path will be interrupted. The E-stop can also be implemented by routing JP21 pins 1 and 3 to the remote switch. In this case, the relay coil’s high side would be interrupted (JP21 pin 2 would have to be connected to JP21 pin 4). JP21 Coil (+) 1 Coil (-) 2 Int 24V (+) 3 Int 24V Com 4 Figure 11 - E-Stop Connection, Single Spindle 2.5.2 Multi-Spindle Operation If an E-stop is being used, an external 24-volt power supply is used to energize each of the module’s Emergency Stop relays. Depressing the PBS (Palm Button Switch) now interrupts the current flow to the E-stop relay on all modules. NOTE: Each relay coil requires 25 mA (nominal) of power supply current. Module 1 JP21 24V 1 Power Supply 2 (+) (-) 3 4 Module 2 JP21 PBS 1 2 3 4 Module n JP21 1 2 3 4 Figure 12 - E-Stop Connection, Multi-Spindle 04581740_ed2 15 2.5.3 E-Stop Not Present If E-stop is not being used, the E-stop relay must still be energized to permit normal operation. This is accomplished by connecting JP21 pin 1 to JP21 pin 3 and JP21 pin 2 to JP21 pin 4. This allows the module’s internal 24 VDC to energize the relay. The wiring is the same regardless of single or multi-spindle operation. JP21 Coil (+) 1 Coil (-) 2 Int 24V (+) 3 Int 24V Com 4 Figure 13 - E-Stop Not Present 2.6 Making Network Connections 2.6.1 Ethernet Connection An Ethernet port can be found on the connector panel of the Insight unit. This port can be used to connect a PC to the unit so that programming changes can be made. When the PC is connected, this Ethernet connection can also be programmed to send data strings at the end of every tightening. For changing local Ethernet settings on the unit, go to the Setup menu’s Ethernet Setup sub-menu screen. On that screen, you can check that the settings for IP Address, Subnet Mask, and Gateway are correct. You can also turn Dynamic Host Communications Protocol (DHCP) On or Off on this screen. When DHCP is turned On, it allows the network server to set IP addresses for this unit. 2.6.2 Computer Connection and Setup via the Ethernet Port NOTE: To connect a computer to the Insight controller you need the ICS Software. 1. Connect the controller to the PC via an Ethernet crossover cable. 2. On the Setup menu’s Ethernet Settings sub-menu screen, check that the settings for IP Address, Subnet Mask, and Gateway are correct. 3. If any settings need to be changed, press Enter on the Settings button to reach the Ethernet settings screen and make all required changes. NOTE: The system must be re-booted before Ethernet set-up changes take effect. 2.6.3 Fieldbus Card Connection If equipped with the available optional card, the Insight can connect to a fieldbus. Determine which, if any, of these Fieldbus cards is installed in your system. If you have DeviceNet attached, use the following table to arrange your Fieldbus connectors: Pluggable Connector Screw Terminal 1 1 V- 2 2 CAN_L 3 3 SHIELD 4 4 CAN_H 5 5 V+ Description If you are using any other Fieldbus card then simply plug the appropriate connector to the Insight unit. 16 04581740_ed2 2.7 Powerhead Setup A group of Insight units synchronized together to perform a multiple bolt tightening task is called a Powerhead. If you are arranging a series of Insight controllers together in this way, you must link them in a “daisy chain” fashion to create a Powerhead Synchronization Bus. These can comprise up to 40 Insight controllers. You must also set each controller’s two rotary address switches depending on its location in the chain. 1. On the first Insight controller in the powerhead, the top rotary switch must be set to 0, while the bottom switch is set to 1. 2. Connect a powerhead synchronization cable to the bottom powerhead connector on the first controller. 3. Connect the other end of the same cable to the top powerhead connector on the second unit in the chain. 4. On the second controller, set the top rotary switch on the second unit to 0, with the bottom switch set to 2. 5. Continue using this same pattern of cabling and rotary settings up to 40 units. NOTE: The top rotary switch is set to 1 for units 10-19, 2 for units 20-29, 3 for units 30-39, and 4 for unit 40. 6. Set the terminal block for the first and last units in the chain to 1 On and 2 Off,.as shown below. NOTE: All other units in the powerhead should be set to 1 Off and 2 Off. 2.8 Initial Startup Before starting the Insight for the first time, you must go through the following checklist and verify that all of the steps have been completed. If in doubt about any aspect of this checklist, contact Ingersoll Rand. The Insight controller enclosure is vertical, level, and securely mounted. Ensure that the spindle is attached, and that the spindle cable connector is locked down. If the Insight is equipped for attaching external devices (printers, computers, etc.), the proper devices have been attached to the appropriate ports in the connector panel (located on the controller’s left side). The AC power cord is plugged into a properly rated electrical circuit. 2.8.1 Startup Procedures Once the above checklist is verified, you are ready to power-up the Insight Fastening System. 1. Turn the Insight Circuit Breaker Switch to Off. 2. Ensure the unit is plugged into the appropriate power outlet: 120V, 16A or 230V, 8A; 50-60Hz. 3. Ensure the GFI (A) (Ground Fault Interrupt) is switched to the On (up) position. • Switch the Insight Circuit Breaker (B) switch up to the On position. This switch sends power to the internal Motor Controller Electronics, the graphics display, the keypads, and to the spindle(s) or powerhead. Figure 14 - GFI (A) and Circuit Breaker (B) 4. After approximately 130 seconds, the Run Main screen is displayed on the graphics display panel, indicating the startup was successful and the Insight IC is ready to operate. • If you need to turn the entire Insight system on or off use the Circuit Breaker Switch. • After powering down, wait at least five seconds before powering up again. 04581740_ed2 17 Section 3 – Programming the IC-D 3.1 Setup Menu The Setup menu and its sub-menus are used to program tightening strategies and to set a broad variety of important system parameters. Basic tightening strategies are created in the Setup menu. In addition to strategies, you can use the Setup menu to set many basic system parameters, such as time, display language, measurement units, and communications protocols. The Setup menu is also used to create passwords for controlling access to Insight’s software and data records. There are five different sub-menus under the Setup menu: 1. Quick Setup, 2. System Setup, 3. Spindle Setup, 4. Serial Setup, 5. Ethernet Setup, and 6. PLUS Setup (provided user is using the PLUS communications protocol). The following sections covers each of these sub-menus in detail. Figure 15 - Setup Menu 3.2 Quick Setup Procedure 3.2.1 Select Language The first step in programming the Insight to operate for your requirements, is to select the language that is used in the graphical display. Language is selected by going to the Setup menu’s System Setup screen. The Language parameter is the eighth item listed on this screen. Push the expand button to select the language you wish to use while operating the Insight IC-D. The default language is English. Figure 16 - Language Selection 3.2.2 Quick Setup Programming This menu screen is used to get you up and running quickly. Single-step torque control and angle control fastening strategies can be set up from this screen. Only basic fastening parameters are displayed with this screen. If a more complex, multi-step strategy or other strategies are needed--such as yield or drag torque--they can be programmed through the ICS software. Only the first eight Configurations can be viewed and programmed from the controller. The ICS software allows you set up a maximum of 256 Configurations. The Quick Setup screen allows you to set key parameters for your tightening strategy. You may pre-program up to eight separate tightening operations. These are called Configurations. The parameters displayed on the screen vary, depending upon the fastening strategy selected. 18 04581740_ed2 Figure 17 - Quick Setup Screen To complete the parameters in the Quick Setup sub-menu: 1. Press the Setup menu button, then press Enter to choose the first sub-menu, Quick Setup. 2. Use the arrow keys to move to one of the eight lines representing Configurations 1 through 8. 3. Press Enter to bring up the Step 2, the first of two data entry screens used for setting up a Configuration. 4. Move to the Strategy parameter and select either Torque Control or Angle Control. 5. Select a direction CW (Clockwise) or CCW (Counter-clockwise). 6. Move to the next parameter on the screen and choose Torque Units: Nm, Ft-lbs, In-lbs, Kg-m, or dN. 7. Choose the button with the right arrow and press Enter to move to the second page of the Configuration setup process. 8. Using the numeric keypad, enter the desired target value for your fastening operation into the Torque Target or Angle Target data entry box, depending on which of the two strategies you selected for a particular Configuration. 9. The Insight software automatically assigns values within target limits to the other torque or angle control parameters displayed on this screen. If you want to edit any of these values, navigate to the data entry box and enter a new value using the numeric keypad. These parameters include: Torque High Limit The maximum acceptable torque value for a fastening. Torque Low Limit The maximum acceptable torque value for a fastening. Angle High Limit The maximum acceptable angle through which the fastener may turn. Angle Low Limit The minimum angle through which the fastener must turn. Torque Threshold The torque required to seat components in the joint; also the torque point at which angle begins to be measured. Free Speed The maximum % speed the spindle can turn during fastening. Shiftdown Point The point during the final stage of tightening at which the spindle shifts to a lower speed to improve accuracy. Shiftdown Speed The spindle % speed during the shiftdown phase. 10. If the assembly requires that multiple bolts are fastened in sequence, enter a Gang Count in the applicable data entry box. See below for more information on Gang Count. 11. If you wish to setup the Insight to move through a specific sequence of fastening Configurations, use the Auto Increment parameter. Enter the number of the Configuration you wish the Insight to use upon completion of the current Configuration. See below for more information on Auto Increment. 12. Enter an Increment Reset parameter to indicate which Configuration the Insight should use after a Configuration Reset Signal is received. 13. After you have completed entering all the parameters for your Configuration, you must go to the Save button and hit Enter to store the settings you just entered. Save Button Gang Count Some assemblies have multiple bolts that must be fastened in sequence (called a “Gang”). For example, if you have a four-bolt assembly you can set the Gang Count to 4. The controller then keeps track of each fastening and, when all four fastenings have been completed within specification, a “Gang Complete” message appears on the display screen. 04581740_ed2 19 If the Gang Count is successfully completed, in addition to displaying “Gang Complete” on the screen, the controller provides a gang complete output signal on the spindle’s I/O connector. There are two ways to reset the Gang Count. 1. Use the dedicated reset palm switch on the Gang Reset Input. 2. While on the Run Main screen, press 0 (zero) and then the Enter key to reset the Gang Count for the spindle. Auto Increment Auto Increment allows the Insight to move through a specific sequence of fastening Configurations. For example, if you have programmed six different Configurations numbered 1 – 6, you can instruct the Insight to perform fastening in the sequence 1-4-6 and 2-3-5. By using this parameter to tell the Insight which Configuration to go to next, the system continues to step through all programmed Configurations in the Auto Increment chain. The Increment Reset parameter tells the Insight which Configuration to use when the Configuration Reset Input is activated. NOTE: The present Configuration must be completed successfully and the spindle trigger released before the next Configuration in the chain is selected. 3.2.3 Start Mode and Config Select The final two steps in the quick setup procedure are done on the Spindle Setup screen, where you must set the Start Mode and Config Select parameters before you begin to operate the Insight controller. For information on setting these parameters, see Spindle Setup Screen on page 23. 3.3 System Setup 3.3.1 Passwords When your Insight IC-D is first booted up, it is unlocked, allowing full read and write access. This means that there is no password protection in place when the system is first booted up. The default password is 1111. To begin using the password: 1. Go the Setup menu’s System Setup screen, and scroll down with the arrow keys until you reach the Password Logout button at the bottom of the screen. 2. Press the Enter key to logout. 3. Return to the System Setup screen and notice that Password Logout button has become Password Login. 4. Press the Enter key to login. 5. When password request popup appears, enter the default password, 1111. 6. Move to the Change Password screen and press Enter to set a new password for the Insight controller. 7. Enter the current password on the popup screen that appears and press Enter. 8. Enter a new 4-digit password twice in the data enter boxes provided. 9. Hit Enter again to set the new password. 10. Go to the Password Timer parameter on the System Setup screen to change the delay after which password protection takes effect. The available increments are 30 sec, 1 min, 2 min, 5 min, 15 min, and 1 hr. NOTE: Except when the Password Timer parameter is set to “Off,” a Password login is always required after reboot, even if the password timer increment period has not passed. 3.3.2 Set Date and Time The Date and Time parameters found on the System Setup screen include Time Set, Time Mode, Date Set, Time Zone, and Date Format. The time is shown in 24-hour clock format. To set Date and Time parameters: 1. Go to the System Setup screen and move to the Time Mode parameter. 2. Choose either Manual or Auto (NTP). NTP = Network Time Protocol NOTE: If you choose Auto (NTP), the Insight controller has its time setting synchronized through the network time protocol on an Ethernet network upon boot up, The Time Set parameter is not available if NTP is selected. 3. If you select Manual in the Time Mode parameter, go to the Time Set parameter and enter the correct time for your location, and skip to step 5. 4. If you entered Auto (NTP) in the Time Mode parameter, go to the Time Zone parameter and select the correct GMT (Greenwich Mean Time) +/- hours for your location. 5. Move to the Date Format parameter to set the format as either MM/DD/YY or DD/MM/YY. 6. Finally, move to the Date Set parameter and enter the current date in the format you selected. 20 04581740_ed2 3.3.3 Job Number and CAN Address The Job Number and CAN (Controller Area Network) Address parameters found at the top of the System Setup screen are used to set a Location ID for a particular Insight controller. The Location ID is used as a unique identifier for each unit on the network. The Job Number is a 4-digit entry that represents a location on the assembly line. Each standalone Insight controller has a unique job number. However, when controllers are arranged in a powerhead, each unit in the powerhead shares the same job number. The CAN Address reflects whatever has been physically set on the unit’s rotary address switches. It should always read 0 (zero) for a single spindle operation. If it does not read zero, physically move the rotary switches on the unit until they are set at 0.You cannot make a change to the CAN Address parameter on the System Setup screen itself. For a powerhead setup, the CAN Address must reflect the Insight controller’s position in the powerhead. See Powerhead Setup on section 2.7 for more information on setting the CAN Address using the unit’s rotary switches. 3.3.4 Other Functions The System Setup screen contains two other functions. The first function consists of two buttons that allow you to adjust the contrast of the display screen on the Insight controller up or down. The second function allows you to view version numbers of the various software components. 3.3.4.1 Contrast Move to the top button and press Enter to adjust the contrast of the screen up. Contrast Up Move to the bottom button and press Enter to adjust the contrast of the screen up. Contrast Down 3.3.4.2 Software Version Numbers 1. Move to the right-pointing arrow key on System Setup and press Enter to go to Step 2 of the screen. Figure 18 - System Setup, Step 2 2. Press Enter to return to the Step 1 portion of the System Setup screen. 3.4 Spindle Setup 3.4.1 Physical Attachment Attach your Ingersoll Rand QE- or QM-series spindles (or powerheads) on the front of the Insight enclosure. At the end of each spindle’s cable is a twist-to-lock multi-pin connector. Plug the spindle into the connector and lock it in place. If no spindle is present, when the unit is powered up, no power is delivered to the empty connector. This is a safety feature. The Insight interprets the lack of a spindle as a spindle with a possible ground fault, and does not energize that circuit. To add a spindle at a later time, first turn off the Main Power Switch. Next, connect the spindle, wait five seconds, and turn it back on. NOTE: Never connect a spindle to the Insight Controller with the power switch ON. 3.4.2 Spindle Setup Screen Notice that the connected spindle’s model number is shown on the Spindle Setup screen, just below the header. The screen contains ten different spindle parameters that can be set. It also contains two buttons that allow you to return the Transducer Range and the Angle Constant values to the original factory-calibrated settings. 04581740_ed2 21 Figure 19 - Spindle Setup Screen The first parameter, Transducer Range (TR), allows you to enter a desired TR value in Nm to calibrate the torque output of the connected spindle. The second parameter is Angle Constant. This is where you set a value to calibrate the angle output of the spindle. Config Selection is the parameter where you choose the mode for Configuration selection. The options available from the drop box list for this parameter are Internal, External Discrete, External Binary, and External Ethernet. These selections relate to the Configurations you programmed on the Quick Setup screen, or in the ICS software. If you are using 24 or fewer Configurations and selecting Configurations via the inputs at the side of the Controller, then select External Discrete. With more than 24 Configurations in use, you must select External Binary. When you select Internal, a drop box is activated on the Run screen. This drop box allows you to choose any programmed Configuration available for the spindle connected. Select External Ethernet if an external network device (PLC) will be providing the Configuration selection. The fourth parameter on the Spindle Setup screen is Spindle Operation. This is where you select the method by which the spindle receives a start signal. You can change your Insight Controller from handheld operation (spindle trigger) to machine mount (or fixtured) mode. A fixtured spindle (or machine spindle) is one that receives the external start or throttle signal remotely through the Insight’s I/O connector on the left-side of the controller. To change from a handheld spindle to a fixtured spindle, select Machine Mount from the Spindle Operation drop box. To switch back to handheld mode, select Handheld Spindle from this drop box The fifth parameter available on the Spindle Setup screen is Start Mode. This parameter does not apply unless Machine Mount was selected under the Spindle Operation parameter. Under machine mount operations, this parameter determines the type of signal that is used to start the spindle: When Throttle is selected the signal mirrors the signal sent out in hand-held tightening where the operator must completely depress the spindle’s trigger to send a start signal. In other words, the signal must be maintained for the entire length of the tightening for the cycle to work properly. Pulse indicates a momentary external signal, which starts the spindle and it runs the spindle until it times out or until the required torque or angle is reached. Dual requires two switch closures--free speed and safety latch. This applies to spindles that require the operator to activate two switches within a 2-second interval to ensure his hands are safely away from the machinery. If either input is not energized within the 2-second interval, the spindle does not operate. The next two parameters, Tube Nut and Tool Switch are used together to determine the operation of the handheld spindles. The switch is located in the momentary spring return position of the spindle’s reverse ring. It remains in the activated position only while the user holds it there. Upon release the ring returns to the forward or home position. To program an attached handheld spindle: 1. Change the Tube Nut parameter from Disable to Enable. 2. Set the Tool Switch parameter to Disable, Tube Nut 1, Tube Nut 2, Gang Advance, Gang Reset, Config Reset, or Tube Nut 3. With Tool Switch set to Disable and the Tube Nut Enable, the reverse position of the ring functions as the tube nut reverse just as it does for a normal reverse operation. When the switch is put in the reverse position and the trigger is pressed, the spindle shall operate in reverse until the tube nut head returns to the open position. The momentary position has no functionality in this Configuration. 22 04581740_ed2 When Tube Nut 1 is selected, the spindle operates in tube nut reverse when the momentary position of the switch is activated. No trigger press is necessary to operate the spindle in tube nut reverse in this mode. When the momentary switch is released, the spindle stops, and it is then ready for forward operation. When Tube Nut 2 is selected, tube nut reverse requires the activation of both the momentary switch and the trigger. In other words, this mode requires 2-handed operation by the user. If the trigger is released and the momentary switch is not released, the spindle remains ready to operate in tube nut reverse with the press of the trigger. If the momentary switch is released but the trigger is not, the spindle remains stopped until the trigger is also pressed. When both the momentary switch and the trigger are released, the spindle returns to forward operation and is ready to accept a trigger press for running forward. When Gang Advance is selected and momentary position of the switch is activated, the gang count is incremented by 1 for the failed cycle. When Gang Reset is selected and momentary position of the switch is activated, the gang count is reset 1. When Config Reset is selected and momentary position of the switch is activated, the configuration is reset to the configuration programmed in the engage step of “Reset to”. When Tube Nut 3 is selected, the spindle operates in tube nut reverse when the momentary position of the switch is reverse direction and trigger is pulled. The final parameter that you can set on this screen is TactAlert. This parameter is set to either Disable or Enable. When set to Enable, the spindle vibrates at the end of a failed cycle. To reset the Transducer Range (TR) or Angle Scale Constant (ASC) back to their factory-set values, choose the appropriate button from the right side of the Spindle Setup screen and press Enter. To reset the Transducer Range (TR) or Angle Scale Constant (ASC) back to their factory-set values, choose the appropriate button from the right side of the Spindle Setup screen and press Enter. TR reset ASC reset 3.4.3 Autocal Function Autocal or Auto calibration allows you to calibrate the Transducer Range (TR) for Insight spindles using an Ingersoll Rand ETA series external torque transducer. You can set up Autocal by connecting a PC to the controller through the Ethernet port, and connecting the ETA to the PC via its serial port. The data received from the ETA during a series of cycles helps to refine the TR value. 3.5 Serial Setup On the Setup menu’s Serial Settings sub-menu screen, you can select the serial communications parameters assigned to the serial port. These parameters are set based on the communications requirements of the serial device that is being connected to the Insight controller. 3.5.1 Protocol This parameter sets the communications protocol. Use the dropdown list in Protocol parameter to set it to None or E.O.R. Data Out. Other protocols are available through the ICS software. If one of these protocols is selected then the dropbox becomes disabled and will display the protocol selected. Only the ICS software can change the protocol once the dropbox has been disabled. 3.5.2 Baud Rate This sets the speed of communications for the serial port. Select a Baud Rate from the dropdown list in the range 1,200 to 115,200. 3.5.3 Parity Select the Parity for the serial connection to None, Odd, or Even from the drop box list. 3.5.4 Bits Per Character Use the dropdown list to set the Bits Per Character parameter to 7 or 8. 3.5.5 # of Stop Bits The # of Stop Bits for serial port communications is set to indicate 1 or 2 stop bits with the dropdown list found in this parameter. 04581740_ed2 23 3.5.6 Host Address The Host Address is only used when Host Data Out has been selected in the Protocol parameter. For more information on applying the Serial Setup screen to particular devises, see section 2.4.1 Printer Connections and Setup. 3.6 PC Connection When a PC is connected to the Insight controller via the Ethernet, the Setup menu’s Ethernet Setup sub-menu screen must be correctly programmed to allow the Insight controller to communicate with the PC. 3.6.1 Ethernet Setup 1. When you select Ethernet Setup from the Setup menu, the screen shows the present Ethernet settings. Figure 20 - Ethernet Setup, Present Settings 2. To make changes to the present settings, press the Enter key to access the screen that allows data entry of the Ethernet parameters. Figure 21 - Ethernet Setup, Change Settings 3. Once on the data entry screen, make any necessary changes to the IP Address, Subnet, Gateway, Sys Port #, ICS Port #, and NTP Address. You can also turn Dynamic Host Communications Protocol (DHCP) On or Off on this screen. When DHCP is turned On, it allows the network server to set IP addresses for this unit. NOTE: Sys Port # sets the port number used to send the EOR data if requested on Ethernet. ICS Port # sets the port number used to send and receive data to and from the ICS software. In most cases this should be left to the default value of 50001. NOTE: Ethernet changes do not go into effect until the controller is rebooted. 3.6.2 Additional Communication Entries Remember that the Job Number and CAN Address on the System Setup screen must be correctly set to allow a PC to communicate with the Insight controller. See Section 3.3.3 Job Number and CAN Address for details on how to make changes to those parameters. 24 04581740_ed2 3.7 USB Storage Device Data Transfer 3.7.1 Insertion A USB Storage device or key can be inserted into the controller at either run time or prior to booting. Such a device is convenient for transferring setup files to the controller, or for retrieving data files from it. For instance, you can copy an entire setup to an Insight controller and avoid having to enter each parameter manually. When a USB storage key is inserted into the USB port on the Insight controller, the unit’s software acts according to the rules found in the following table: Insert Key After Boot Insert Key Before Boot Copy Files From Controller to Key Copy Files To Key After Controller is Booted When a USB Storage Device is inserted, an event is logged in the Event Log. When the RISC Software image is updated, an event is also recorded in the log. 3.7.2 Removal The USB Storage Device can be removed from the controller at either run time or prior to booting. If the device is removed, and the controller is not processing a file transfer, no action is taken. If the USB Storage Device is removed while the controller is processing a file transfer, the file transfer is interrupted. If a file transfer is in progress when the USB removal event occurs, the destination file may be corrupted. The removal of the USB Storage Device is logged in the Event Log. 3.8 PLUS Settings Screen A settings screen for the PLUS communications protocol is provided for those customers using the protocol. This screen allows the user to manually rest the PLUS communications, abort the current assembly, advance to the next bolt in the gang, advance to the next configuration in the auto increment chain, or enable/disable the PLUS communications. When the Manual Reset is pressed, the PLUS communication will be reset. If the user wish to abort the assembly using PLUS communication, then the user should select the Abort Assembly submenu and then press Enter. During the tightening, if there is a failed cycle and the user wish to override the cycle within the gang, then the user should select the Gang Advance submenu and then press Enter. During the tightening, if the user wish to override current configuration in the auto increment chain then the user should select the Gang Advance submenu and then press Enter. If the user wish to enable the PLUS feature, then the user should select the On and then press Enter. If the user wish to disable the PLUS feature, then the user should select the Off and then press Enter. Figure 22 - Plus Setup 04581740_ed2 25 Section 4 – Operating the IC-D System 4.1 Introduction This section provides the information that you need to operate the Insight controller. At this point, the system should be properly installed and programmed. The Main screen from the Run menu is where system operation takes place. It is made up of three parts: the Configuration and Strategy bar, the Main Display area in the middle, and the Message box at the bottom. 4.2 Selecting a Configuration The Main screen from the Run menu allows you to either select the Configuration to run for the attached spindle, or it displays the Configuration that has been selected, depending on your setup. If you selected Internal for the Config Selection parameter on the Spindle Setup screen, then you are able to select a Configuration from the dropdown menu that is displayed. If you selected External Discrete or External Binary for the Config Selection parameter, this part of the screen becomes a label and displays the Configuration that has been selected externally via the Inputs. The figure below shows a Run Main screen with the Configuration dropbox available. Figure 23 - Run Main Screen The Configuration dropbox contains only those Configurations that are valid for the attached spindle. In other words, if a Configuration was programmed with parameters outside the capability of the attached spindle, that Configuration would not appear in the dropbox. The dropbox provides access to all valid programmed Configurations, so if 256 valid Configurations were setup using the ICS Software, all of these would be accessible through the dropbox. The Configurations that are programmed on the controller’s Quick Setup screen always have the designation Configuration 1, Configuration 2, etc.; The ICS Software may be used to give programmed Configurations names that actually reflect the operation for which they are used. To select a Configuration from the available dropbox: 1. Press the Run menu button on the Insight controller to bring up the Main screen. 2. Press the Expand key to show the list of Configurations. 3. Scroll to the Configuration you wish to use. 4. Press Enter to put the Configuration into effect. NOTE: You may also type the number of the Configuration and press Enter after selecting the box to bring up a particular Configuration. This is particularly useful when there are more than eight Configurations, and you want to access a known Configuration quickly. To the right of the Configuration label or dropbox, the strategy type for the particular Configuration is displayed. In the example shown, the Configuration selected is a Torque strategy. 26 04581740_ed2 4.3 Monitoring Operation 4.3.1 Torque and Angle Values The middle section of the Run Main screen on the IC-D displays torque and angle information for each tightening operation. The larger value is the primary one, and it reflects the strategy that applies to the selected Configuration. In the cutout of the screen shown below, the strategy is Torque, so the primary value is the torque value. The smaller, secondary, value below the torque value is, in this example, the angle measured value. If this were an Angle strategy, the angle value would be the primary value. Figure 24 - System Monitor In this example, the torque value is shown in Nm units. The torque value shown always reflects the Torque Units parameter that was selected on the Quick Setup screen. For instance, if Ft-lbs had been selected instead of Nm, then that is the torque unit that would be displayed. The angle control value is always shown in degrees. Note that both the primary and secondary numbers show either a degree symbol or torque units, making it clear which parameter you are viewing. The LED display on the IC-M only shows the primary value after each tightening, as compared to both numbers on the IC-D display. The text above the result shows the Configuration that was run, the step number for the result displayed, and the tightening strategy. 4.3.2 Colored Status Indicators Besides the torque and angle values that are displayed for each cycle, this section of the ICD Main screen also displays status indicators at the end of each cycle. When the torque and angle are both within range, the green circle with OK in the middle is displayed to represent a successful cycle. When one or both values are out of range, independent status icons are used to indicate the results. A yellow down arrow with a minus (-) sign indicates a value below the programmed low limit, while a red up arrow with a plus (+) sign shows that the value is above the high limit. In the example to the right, the primary number is high, while the secondary value is low. When one value is within range, and the other is not, the space on the side of the value within range is left blank, while the other side indicates either high or low. When your Insight controller is programmed with limits other than torque and angle, the spaces on either side of the primary and secondary dividers may both be blank, indicating something besides angle and torque is out of range, for example, slope. Each Ingersoll Rand hand-held spindle also has an indicator light on the spindle itself that mimics the screen status indicators. If the fastening is within specification, the spindle light is green. If either the torque or angle value is above the programmed high limit, the spindle light is red. When either value is below the programmed low limit, the spindle light is yellow. 4.3.3 Gang Operations When the tightening process involves multiple bolts that must be fastened in sequence, which is called a “Gang,” the Main screen also displays a “Gang Complete” message following the completion of a successful gang assembly. This is designated in the Configuration programming as having a gang that is greater than 0. The current gang status is displayed on the screen and replaced with the gang complete message when the sequence has all pass cycles. You can also reset the Gang count while on this screen. Press 0 (zero) on the number key pad once and the then Enter to reset the Gang count. To reset the Auto Increment to a programmed Configuration. Press 0 (zero) two times and then press Enter to reset the Auto Increment. 04581740_ed2 27 4.4 Message Area The Message Box at the bottom of the Main screen summarizes system status and provides warnings and alarms on the IC-D. On the IC-M LED display, only the Event Code number is displayed in the event of an error. See Event Code Table on page 44 for a listing of these events. 4.5 Stats and PM Alarms 4.5.1 Stats Alarms Statistics Alarms are set in the ICS Software. They are target values for the data displayed on the Spindle Stats screen. When the controller fails to meet these target values, alarm messages appear in the message box on the Run Main screen. They can also be set to energize an alarm output such as a light box. These alarms indicate deviations from selected fastening statistics, so you are alerted to potential quality control problems. 4.5.2 Preventive Maintenance Alarms Preventative Maintenance (PM) alarms are also set on the ICS software. PM Alarms are reminders for regular spindle preventative maintenance. Up to five different alarms can be set with either a number of cycles or days duration. For example, an alarm could be set to indicate required PM of the spindle’s gearbox case after 50,000 cycles. When an alarm is activated, it appears in the message box on the Run Main screen. All preventative maintenance data is stored in the spindle’s onboard memory chip. Preventative Maintenance alarms can only be cleared through the ICS software. 28 04581740_ed2 Section 5 – Quality Control 5.1 Statistics Menu The Statistics menu allows you to access a variety of statistical data on completed fastenings. For example, you can view actual fastening parameters, as well as statistical calculations, and can compare them to target values. This section discusses the four Statistics sub-menu screens, including: • • • • Cycle Log Spindle Stats Stats Settings Powerhead Stats. Figure 25 - Statistics Menu 5.1.1 Cycle Log The Cycle Log is a view-only screen that displays various tightening parameters that are monitored during a fastening. Up to a maximum of 1,000 of the most recent cycles for the IC-D and 200 for the IC-M are stored in the respective controllers. This screen displays cycle data for every Configuration used, but note that the torque value shown reflects whatever unit of measurement (Nm, Ft-lbs, etc.) was selected for a particular Configuration. Figure 26 - Cycle Log The Cycle Log table parameters include Cycle Number, the Configuration # that was in effect for that cycle, the Torque value, the Angle value, and the SD Code. The Configuration # is found under the icon over the second column in the header of the Cycle Log. When the torque and angle values for a cycle are within the programmed range, nothing appears in the column next to those two values. However, if the values are high or low, the arrow symbols seen on the Main screen are displayed in this column to represent a deviation from the norm. See cycles 467 and 468 in the above figure for examples of high and low icons on this screen. 04581740_ed2 29 The SD Code column on the Cycle Log shows the Shutdown Code for each cycle. The shutdown code is a 2-digit code that gives the reason why the cycle stopped. See a list of the shutdown codes in the table below. Shutdown Code # 0 1 2 3 4 5 6 7 8 9 10 11 12 13 14 15 16 17 18 19 20 21 22 23 24 25 26 27 28 29 30 31 32 33 100 101 102 103 104 105 106 107 108 109 110 111 112 113 114 115 116 117 118 119 120 30 Description Normal Completion of Cycle Handheld – Trigger released before cycle was complete Torque High Angle High Yield override failure Prevailing torque seating torque fail Prevailing torque seating angle fail Reserved for future use Forced to shutdown because sync flag was set Reserved for future use Motor stalled (I2t limit reached) User tr is less than the target torque which would cause a stall MCE – IGBT fault MCE – Overcurrent MCE – Low bus voltage Cycle timeout The controller issued a stop command to the tool. The tool was disconnected during cycle MCE – communications lost between MCE and the controller Bad Torque Reference - torque step ref+tare-overshoot is > the step limit MCE – Watchdog timer fired Retorque steps complete without reaching the setpoint When “yield override” is enabled and “fail on yield” is disabled, if the final torque reached is below the torque low limit Cycle stopped due to tool becoming disabled Stick slip occurrence Slope A/Gradient high Reserved for future use Slope B high No bolt was found Proximity Switch – normal shutdown MCE – motor temperature high MCE – drive temperature high Spindle TactAlert – normal shutdown Cycle ended before achieving threshold torque Powerhead – spindle stopped due to command from powerhead master Powerhead – spindle in bypass Powerhead – undetermined prerun error Powerhead – spindle emergency stop activated while in cycle Powerhead – Trigger Abort – trigger inputs removed before spindle achieved torque threshold Powerhead – Prerun error – no tool connected Powerhead - Prerun error – invalid tool connnected Powerhead - Prerun error – invalid configuration to run Powerhead – Prerun error – settings error – configuration step counts do not match Powerhead – Prerun error – settings error – synchronization maps do not match Powerhead – Prerun error – settings error – Job IDs do not match Powerhead – Prerun error – spindle emergency stop activated Powerhead – Prerun error – spindle in diagnostics mode Powerhead – Prerun error – spindle not ready to run Powerhead – Prerun error – spindle disabled (master only) Powerhead – Prerun error – cannot lock config to run Powerhead – Prerun error – settings CRC does not match Powerhead – Prerun error – unexpected CRC message Powerhead – MCE calibration failed Powerhead – MCE motor over temperature fault Powerhead – MCE motor heatsink over temperature fault 04581740_ed2 Shutdown Code # 121 122 123 124 125 126 127 128 129 130 131 132 133 134 135 Description Powerhead – MCE step sequence error Powerhead – MCE software fault Powerhead – MCE IGBT fault Powerhead – MCE low bus voltage fault Powerhead – MCE hardware watchdog fault Powerhead – MCE calibration failed due to EEPROM mode Powerhead – MCE calibration failed due to offset Powerhead – MCE calibration failed due to shunt calibration Powerhead – spindle was not known to be stopped at cycle complete Powerhead – timeout on start Powerhead – configurations do not match Powerhead – invalid tool connected Powerhead – no tool connected Powerhead – spindle stopped at a sync point Powerhead – spindle in diagnostics mode To access and use the Cycle Log: 1. Press the Stats button on the Insight controller. 2. On the Statistics menu, select Cycle Log and press Enter. 3. Scroll through the cycles that have been recorded using the arrow keys. 4. Move the cursor to the C (Clear) button and press Enter to clear all existing cycle data. NOTE: Although using the C button clears data on up to 1,000 cycles, it does not reset the counter. The counter continues up to 9,999, unless reset with the ICS Software. Screen Element Description Clear Cycle Data This button will clear the cycle log data table for the displayed spindle. Main Window This window displays the cycle log summary table. Additional information on the parameters displayed is described below. 5.1.2 Spindle Statistics The Spindle Statistics screen displays useful statistics that have been calculated from the data collected. Note that on the left side of the screen displays the statistical data for all the fastenings performed since the statistics were last reset (the Population Stats), while the right side the statistics for a subset of the cycle (the Sample Stats) The sample size for Sample Stats is set to 25 by default, but this parameter may be changed in the Stats Settings screen. Both Population and Sample statistics may also be reset on that screen. Figure 27 - Spindle Statistics Note that you must use the dropdown box to select the Configuration from which you wish to view the spindle statistics. These statistics are only available for the first eight Configurations. The ICS Software can be set up to calculate statistics for further Configurations. To access and use the Spindle Statistics: 1. Press the Stats button on the Insight controller. 04581740_ed2 31 2. On the Statistics menu, select Spindle Statistics and press Enter. 3. Select the dropdown Configuration box and press the Expand button to view a list of the available Configurations with statistics that can be viewed. 4. Select the Configuration you wish to use and press Enter. 5. Scroll through the various parameters of calculated statistics using the arrow keys. Screen Element Description Select Config Use this dropbox to select the tightening Configuration. Population Statistics The statistics for the entire fastening population are displayed here. Sample Statistics The statistics for the sample subset of the population are displayed here. 5.1.3 Stats Settings The Stats Setting screen allows you to reset statistics for a selected Configuration, to set change the sample size used for Sample Statistics on the Spindle Stats screen from the default of 25, and to set what types of statistics are displayed. Figure 28 - Stats Settings To access and use the Stats Settings: 1. Press the Stats button on the Insight controller. 2. On the Statistics menu, select Stats Settings and press Enter. 3. Select the dropdown Configuration box and press the Expand button to view a list of the available Configurations. 4. Select the Configuration for which you want to change the statistics settings and press Enter. 5. Using the arrow keys, move to the Reset All Statistics button and press Enter to reset both Population and Sample Statistics on the Spindle Stats screen. 6. Move to the Reset Sample button and press Enter to reset just the Sample Statistics on the Spindle Stats screen. 7. Move the to the Sample Size data entry box and type in a value to change the sample used for Sample Statistics on the Spindle Stats screen. 8. Move the to the Value for Stats dropdown box and press Expand to select the type of tightening results that are used to select statistics: Good Only, All but H/W Rej, or All. When you select Good Only, only statistics for good cycle are shown. All but H/W Rej displays all cycles except those that involved a hardware reject. When All is selected, every cycle is used for statistics calculations. Screen Element Description Select Config Use this dropbox to select the tightening Configuration whose statistics settings you wish to change. The options include Configuration 1 through 8 only. Sample Size Using the numeric keypad, enter a sample size. This will be the number of samples used to calculate the sample statistics. Values for Stats Use this dropbox to select what tightening results are included in your statistical calculation. The options are Good Only, All, or All but H/W Rej (hardware rejects). 5.1.4 Powerhead Stats 32 04581740_ed2 The final selection on the Statistics menu is Powerhead Stats. This screen provides useful data when the IC-D is part of a powerhead Configuration.These statistics are only available when the controller is a powerhead master (the controller can2 rotary switches must be set to 01). Figure 29 - Powerhead Stats Note that the first data column displays the statistics for the entire powerhead, while the columns to the right show statistics for the individual spindles in the powerhead, up to as many as 40. The data for the individual spindles is useful in determining the problem spindles in a powerhead. For instance, if the % Reject under Spindle 5 was 95%, you would know that the bulk of your reject problems can be traced to that one spindle. All the values are cumulative, except the Time value, which represents the cycle time for the last cycle. The Population Size label next to the Configuration box indicates the number of readings used in the statistics calculations displayed on this screen. To access and use the Powerhead Statistics: 1. Press the Stats button on the Insight controller. 2. On the Statistics menu, select Powerhead Stats and press Enter. 3. Select the dropdown Configuration box and press the Expand button to view a list of the available Configurations. 4. Select the Configuration for which you wish to view powerhead statistics and press Enter. 5. Use the arrow keys to scroll to the right to view statistics for each spindle included in the powerhead setup. Screen Element Select Config 04581740_ed2 Description Use this dropbox to select the tightening Configuration whose statistics settings you wish to change. The options include Configuration 1 through 8 only. 33 Section 6 – Diagnostics and Troubleshooting 6.1 Diagnostics Menu The Diagnostics menu allows you to check the overall system health of the Insight IC-D. This functionality also diagnoses system problems. This section discusses the four Diagnostics sub-menu screens, including: • System Test • Display Inputs • Set Outputs • Tool Test Figure 30 - Diagnostics Menu 6.1.1 System Test You can use the System Test screen to display diagnostics test results on the tightening spindles and on the Motor Controller Electronics (MCEs). Figure 31 - System Test The following data displays on the System Test screen. For each data element, the table shows the value measured during the test and whether that value is within allowable parameters (PASS) or (FAIL). Pass is represented by a green icon, and Failure by a red icon. 34 04581740_ed2 Test Data Element Explanation Tool Motor temperature Checks motor temperature and reports PASS or FAIL. Amplifier offset MCE’s offset voltage (as % of Shunt Cal voltage). Shunt calibration Front-end electronics gain (as % of ideal Shunt Cal voltage). Sine Offset The offset in A/D counts of the resolver sine analog input signal used for angle measurement. Cosine Offset The offset in A/D counts of the resolver cosine analog input signal used for angle measurement. Motor Kt The peak torque divided by peak current in the units of Nm/Amp. Motor Control Electronics MCE temperature Displays MCEs internal temperature. Note that the System Test window is a display box. To access and use System Test: 1. Press the Diag button on the Insight controller. 2. On the Diagnostics menu, select System Test and press Enter. 3. Scroll through the current measured values using the arrow keys. 4. Move the cursor to the Refresh button and press Enter to update the screen to the most recent readings. 6.1.2 Display Inputs The Display Inputs screen allows you to view the status of the Controller’s discrete inputs. I/O (Input/Output) connectors are found on the left side panel of the Insight controller. Although the behavior of each input is programmed in the ICS Software, this screen is useful for troubleshooting an I/O problem. For example, if the controller was not running cycles started from a PLC, this screen would allow you to determine if the assigned input was programmed and functioning properly. A green icon next to an input indicates that it is active, as shown in the example screen below. If no signal is present, the circle remains white. Figure 32 - Diagnostics Discrete Inputs Menu To access and use Display Inputs: 1. Press the Diag button on the Insight controller. 2. On the Diagnostics menu, select Display Inputs and press Enter. 3. Scroll through the listed inputs using the arrow keys. 6.1.3 Set Outputs With the Set Outputs screen, you can artificially activate an output signal. This function is typically used for troubleshooting; for example, you can send a signal to an external device (such as a PLC) to verify the device is operating correctly. Unlike the Display Inputs screen, this screen does not have an indicator to represent a successful output. The programmed function of each output is shown in the third column. 04581740_ed2 35 Figure 33 - Discrete Outputs Menu To access and use Set Outputs: 1. Press the Diag button on the Insight controller. 2. On the Diagnostics menu, select Set Outputs and press Enter. 3. Scroll through the listed outputs using the arrow keys to the Output you wish to test. 4. Press the Enter key to send an output signal from the selected Output. 5. Press the OK button to disable the tool and enter diagnostics mode. The tool will be returned to its previous state when the user leaves the screen. 6. Press Enter again to turn the output off. 6.1.4 Tool Test The Tool Test screen is used to interrupt regular tightening operations to perform tests.This screen is useful in troubleshooting problems that appear to originate with a spindle. Figure 34 - Diagnostics Tool Test Menu The tests include Tool and Lamp Test. The Start/Stop Tool button facilitates running of a fixtured spindle for the Tool Test. You can run the test in either clockwise (CW) or counter-clockwise (CCW) directions. When using a handheld spindle, the measurements displayed for Speed, Torque, and Angle are updated continuously as you hold down the throttle. For a fixtured spindle, select the Start Tool button and press Enter to get updated values on the screen. This test aids in diagnostics, because it allows you to see if the readings for the spindle are within normal ranges. The Lamp Test toggles through Torque Hi, Torque Lo, Angle Hi, Angle Lo, and Pass to energize outputs to an attached light box as well as the LEDs on the attached tool. 36 04581740_ed2 To access and use Tool Test: 1. Press the Diag button on the Insight controller. 2. On the Diagnostics menu, select Tool Test and press Enter. 3. A pop-up message warns you that running the test interrupts spindle operations. Press Enter to continue. 4. For a fixtured spindle, use the arrow keys to the Start Tool button and press Enter to run the spindle. Press Enter again to stop the spindle. 5. If you are running the test with a handheld spindle, press the throttle as necessary to view the Speed, Torque, and Angle results. 6. To run the Lamp Test, use the arrow keys to move the to the radio button next to the lamp ON icon and press Enter. 7. To turn the Lamp Test off, move to the radio button next to the lamp OFF icon and press Enter. 8. To change the direction to CW or CCW, move to the radio button for the direction you want and press Enter. 6.2 Event Log Although the Event Log cannot be viewed on the IC-D display, all major events are recorded, and the log may be accessed through the ICS software. The Event Log records the date and time that certain important Insight events occur. The events recorded include hardware and software faults (such as a spindle over-temperature event) and significant user actions (such as changes to a spindle’s transducer range or angle constant). This record of significant events can help in troubleshooting problems. 04581740_ed2 37 Appendix 1 – System Specs and Spare Parts Insight Technical Specifications The specifications for the Insight IC Tightening System are shown below. ±0.2% of torque full scale ±1 count of angle (degrees) Measurement Resolution ±0.025% of torque full scale Torque Transducer Bridge Excitation ±5VDC/GND Torque Transducer Zero Offset/Drift ±0.4% of full scale Compensation Input Signal Sensitivity 2.0 mV/V Values read from spindle memory Calibration Automatic digital correction Frequency Response (Torque Filter) Selectable 75 Hz, 150 Hz, 350 Hz, 500 Hz, 750 Hz Membrane keypad containing four hot keys, four function keys, numerical Keypad (IC-D only) keypad and directional keypad. IC-D-3.5-inch diagonal, 320px by 240px, 8-bit 65K backlit color (QVGA) flat panel Display display.IC-M--5-character, 7-segment numerical LED display. Parameter Sets 256 Number of Cycles Stored in Memory IC-D: 1,000. IC-M: 200. Statistics Data Memory 100,000 per spindle Communications Serial RS232, Ethernet, USB, Optional Profibus or DeviceNet. 8 inputs/8 outputs, with behavior assignable through ICS Software. With I/O optional I/O card, an additional 16 inputs and outputs are available. Indicators Power ON lamp Optional Devices DeviceNet Card, Profibus Card, Additional I/O, Cabinet Mounting Bracket. Input Voltage Single Phase 120 Volts, 50/60 Hz, 16 Amps Single Phase 230 Volts, 50/60 Hz, 8 Amps Ambient Operating Conditions 0-50° C, 20/90% non-condensing humidity Enclosure IP-52 System Weight 12.4 pounds (5.6 kg) Measurement Accuracy Pinout Tables Default I/O Assignments Below are the default Pinout assignments for the base I/O of the IC-D and IC-M controllers NOTE: I/O Behaviors are assignable through ICS Software. Inputs Intput Behavior Block # Pin # Freespeed 1 I-1 Softstart 1 I-2 Forward 1 I-3 Reverse 1 I-4 Configuration 1 1 I-5 Configuration 2 1 I-6 Configuration 3 1 I-7 Configuration 4 1 I-8 38 04581740_ed2 Outputs Output Behavior Block # Pin # Spindle In cycle 2 O-1 Cycle Complete 2 O-2 Accept 2 O-3 Torque High 2 O-4 Torque Low 2 O-5 Angle High 2 O-6 Angle Low 2 O-7 Gang Complete 2 O-8 Recommended Spare Parts List See the illustrations following the Parts List. Detail Number 1 2 Part Number Description 04581740 IC-D, IC-M Operations Manual - CD ROM 16573701 Controller Safety Information Manual 04581732 IC-D, IC-M Product Information Manual 3002013 Connector Label 10568343 I/O Interface Label PC80150394 Read Manual Label PC10570034 Additional I/O Assy Kit PC10569994 Profibus Kit PC10569986 DeviceNet Kit PC45521184 Ethernet IP PC45521200 Interbus 3 PC80144199 Power Indicator Lamp 4 1840447 Connector, Terminal Block - 10 Pin 5 1840382 Connector, Terminal Block - 4 Pin 6 3002001 Cover 3002016 Cover Gasket 3002003 Connector Plug PC10569945 Cord, Power - 120V AC, USA PC10569952 Cord, Power - 220V AC, USA PC10569978 Cord, Power - 230V AC, Pigtail PC80144330 IC-M Membrane Panel 3002007 Wall Mounting Bracket 3002010 Cabinet Mounting Bracket 10570182 Shipping Container 8015139 Front Cover Fasteners 3002029 Cover Screw 8015013 USB Data Key 80151996 Electrical Warning Label 7 8 9 Illustrations with detail numbers are shown on the following pages. 04581740_ed2 39 Outside the Cover 6 8 3 2 40 04581740_ed2 Inside the Cover 1 4 7 5 04581740_ed2 41 Side 9 42 04581740_ed2 Appendix 2 – Event Codes The following table lists the Event Codes for the IC-D and IC-M. Below is an explanation of table columns. Event Code Explanation Event Code This is the event code number. On an IC-M controller, the code is displayed on the screen as “E” and then the code number, for example, E002. For a IC-D controller, text detailing the error is placed in the systems dialog and warnings box at the bottom of the Run Main screen. Description/Condition Description of Error. Critical Error If yes, then error condition must be resolved before system can run. Action Required/Explanation Action required to resolve error Display on IC-D, IC- M GUI Indicates which systems the error is displayed on. Some errors of secondary importance are only shown on the I320D controller. Event Code Table Event Code Description/Condition Boot-up Events 001 to 060 002 Language File not found A system file has been lost (previously 004 existed) Critical Error Display on D, M GUI Yes Load language file to controller and re-boot D,M No None D 005 Unable to initialize serial port No 006 Unable to initialize Ethernet port No 016 027 028, 029 Restore Can2 switch Invalid Boot Image No Yes Invalid Image Yes 030 Error setting IP address No Tool Events 061 to 080 061 Tool has been disabled through I/O 063 Tool Stall detected 064 Tool Hall Fault 065 Tool IGBT Fault 066 Tool Over Current No No Yes Yes No 067 Tool Low Bus Voltage No 068 Tool Cycle Timeout No 071 Tool Memory Write Fail No 072 Tool Memory Read Fail No 073 Tool Memory Page Set Fail No 074 Tool Factory Null TR No 04581740_ed2 Action Required/Explanation Reboot system, If error still occurs call authorized Ingersoll Rand service center Reboot system, If error still occurs call authorized Ingersoll Rand service center Restore the Can2 switches to “00” Call authorized Ingersoll Rand service center Load, Reload new application. If error still occurs call authorized Ingersoll Rand service center Reboot system, If error still occurs call authorized Ingersoll Rand service center None None Check Tool and Tool cable Check Tool and Tool cable Check tool size correct for application Ensure Source line voltage is not dropping under load. If error still occurs call authorized Ingersoll Rand service center None Check tool cable. Reboot system, If error still occurs call authorized Ingersoll Rand service center Check tool cable. Reboot system, If error still occurs call authorized Ingersoll Rand service center Check tool cable. Reboot system, If error still occurs call authorized Ingersoll Rand service center Call authorized Ingersoll Rand service center D, M D, M D,M D,M D,M D,M D D, M D, M D, M D, M D, M D D, M D D D, M 43 Event Code Description/Condition Critical Error USB Events 081 to 100 Not enough space to save controller 081 No data to USB key Time out while saving data to the USB 082 No Disk Time out while loading data to the USB 083 No Disk Data files on USB key are of an 084 No incompatible version Communication Events 101 to 120 CAN Bus communications between 101 Yes controllers (Powerhead) has been lost CAN Bus communications have been 103 Yes lost between RISC and MCE 105 Ethernet DHCP Failed No An invalid Can2 address has been read 110 No from Persistent Storage 111 Can 2 Address has been reset to default No Preventative Maintenance Alarm events 121 to 140 121 PM Alarm 1 has been triggered No Service Tool D 122 PM Alarm 2 has been triggered No Service Tool D 123 PM Alarm 3 has been triggered No 124 PM Alarm 4 has been triggered No 125 PM Alarm 5 has been triggered No Programming Events 141 to 150 141 Invalid Configuration selected Yes 142 Two or more Configurations selected Yes The Auto Increment attempted to 147 No select an invalid Configuration Shutdown Events 151 to 170 151 Calibration Error No 152 153 154 Tool Motor Over Temperature Heat Sink Over Temperature Step Sequence Error Yes Yes No 156 MCE Watchdog Fault No 157 Trigger Released No 158 Yield Override Failure No Average Prevailing Torque plus next step Target Torque Exceeds next Step High Limit 164 Failed to reach Target in Retorque 166 No Bolt Fount / Cycle Timeout Software Download Events 201 to 210 201 MCE firmware has been downloaded 202 RICS Software has been downloaded 161 44 Display on D, M GUI Action Required/Explanation Remove excess files for USB key D, M Check that USB key is approved to function with controller Check that USB key is approved to function with controller Check Data files on key are of correct version for the controller Check powerhead synchronization (CAN2) cables between controllers Reboot system, If error still occurs call authorized Ingersoll Rand service center Check Ethernet connection and DHCP server D, M D, M D, M D, M D, M D, M Check value of Can2 (Powerhead) address switches D, M None D, M Service Tool Service Tool Service Tool D D D Select a valid Configuration for the tool attached Select only one Configuration Check the programming of the Auto Increment function D, M D, M Check tool cable. Reboot system, If error still occurs call authorized Ingersoll Rand service center Allow tool to cool Allow controller to cool Check programming of Configuration Reboot system, If error still occurs call authorized Ingersoll Rand service center Operator released trigger of tool before tightening complete Yield point of fastener reached before target torque/angle D D, M D, M D, M D, M D, M D, M D, M No None D, M No No None Check fastener present in assembly D, M D, M No No None None D, M D, M 04581740_ed2 Index A F Activating an Input 12 Attaching Peripheral Devices 11 Attaching The Spindles 11 Auto Increment 20 Field Bus 8 Fieldbus Card Connection 16 B Backspace Key 6 Bar Code Active Mode 14 Compatibility With Other Functions 14 Auto Increment 14 Gang Count 14 Powerhead 14 Connection and Setup 14 Description 14 Operation 14 Passive Mode 14 Button 7 C Check Box 7 Circuit Breaker 17 Communication Protocols 43 Configuration 13 Selecting 26 Connections Field Bus Card 16 Control Panel 5 Cycle Log Screen 29 D Data Entry Box 7 DHCP 16, 24 Diagnostics 34 Diagnostics Menu 34 Discrete Inputs Screen 35 Event Log Screen 37 Directional Arrow Keys 6 Discrete Inputs Screen 35 Display Box 7 Graphics Display Screen 6 Drop Box 7 Dynamic Host Communications Protocol. See DHCP G Gang Count 19 Graphics Display Screen 5, 6 H Handheld 22 Header 6 I Initial Startup 17 Input Signal Drawing 12 Installation 9 L Language Selection 18 Light Box Connection 13 M Machine Mount 22 Main Door 41 Main Menu Options 5 Main Power Switch 10 Main Window 6 Menu Diagnostics 8, 34 Discrete Inputs 35 Run 8 Setup 8 Statistics 8 Message Box 28 Monitoring Operation 27 Mounting 9 N Navigation Keypad 5 Numeric Keypad 5 O Operating the System 26 Output, Receiving 12 E P Electrical Connection 10 Enter Key 6 Escape Key 6 Ethernet 16 Event Log Screen 37 Expand Key 6 Expand symbol 6 Pinout Tables 38 Powerhead 21 Printer Serial 13 Printer Connections and Setup 13 Programming 18 04581740_ed2 45 Index cont’d Q Quality Control 29 Quick Setup screen 18 R Radio Button 7 Receiving an Output 12 Run Menu Statistic Summary Screen 31 Run Menus Cycle Log Screen 29 S Screen Elements 7 Serial Port 16 Serial Printer 13 Setup 23 Shutdown Code 30 Spare Parts List 39 Specifications 38 Spindle Operation 22 Spindles Attaching 11 Startup 17 Statistic Summary Screen 31 System Operating 26 Specs 38 System Monitor 27 System Options 8 T Technical Specifications 38 Tool Test 36 Transducer Range 22 Troubleshooting 34 Tube Nut 22 46 04581740_ed2 Notes: 04581740_ed2 47 www.irtools.com © 2007 Ingersoll Rand Company