1
The LATEX SKB Package
User Manual
Examples
The SKB User Guide
Sven van der Meer
Wednesday 4th August, 2010
Contents
1
2
3
The LATEX SKB Package . . .
1.1
The Idea . . . . . . . .
1.2
The Story . . . . . . . .
1.3
The underlying Concept
User Manual . . . . . . . . . .
2.1
Getting Started . . . . .
2.2
Headings, Files, Figures,
2.3
Other usefull Macros . .
Examples . . . . . . . . . . . .
3.1
A simple Article . . . .
. . . .
. . . .
. . . .
. . . .
. . . .
. . . .
Slides,
. . . .
. . . .
. . . .
. . . .
. . . .
. . . .
. . . .
. . . .
. . . .
Paths,
. . . .
. . . .
. . . .
1
. . . . . .
. . . . . .
. . . . . .
. . . . . .
. . . . . .
. . . . . .
Acronyms
. . . . . .
. . . . . .
. . . . . .
. . . . . . . . .
. . . . . . . . .
. . . . . . . . .
. . . . . . . . .
. . . . . . . . .
. . . . . . . . .
and References
. . . . . . . . .
. . . . . . . . .
. . . . . . . . .
.
.
.
.
.
.
.
.
.
.
.
.
.
.
.
.
.
.
.
.
.
.
.
.
.
.
.
.
.
.
.
.
.
.
.
.
.
.
.
.
.
.
.
.
.
.
.
.
.
.
.
.
.
.
.
.
.
.
.
.
.
.
.
.
.
.
.
.
.
.
.
.
.
.
.
.
.
.
.
.
.
.
.
.
.
.
.
.
.
.
.
.
.
.
.
.
.
.
.
.
.
.
.
.
.
.
.
.
.
.
2
2
5
8
13
13
21
28
33
33
The LATEX SKB Package
1
1.1
The Idea
The LATEX SKB Package
User Manual
Examples
The Idea
The LATEX SKB Package
This package provides macros that help to build a repository for
long living documents. It focuses on structure and re-use of text,
code, figures etc. The basic concept is to first separate structure
from content (i.e. text about a topic from the structure it is
presented by) and then separating the content from the actual
published document, thus enabling easy re-use of text blocks in
different publications (i.e. text about a protocol in a short article
about this protocol as well as in a book about many protocols); all
without constantly copying or changing text. As a side effect,
using the document classes provided, it hides a lot of LaTeX from
someone who just wants to write articles and books.
2
The LATEX SKB Package
User Manual
Examples
The Idea
The Intent
Maintain repository for Long-living Documents using LATEX
Provide easy access to ‘stuff’: text, figures, code examples, ...
Reuse ‘stuff’ rather than copy’n paste it all the time
Allow easy creation of different documents using the same
‘stuff’
Limit LATEXspecific code, simplify the interface between User
and LATEX
The Intent
Provide a LATEXpackage that helps to create and maintain a repository for long-living documents. It’s
probably not usefull for some short-term articles, however, I learned that most of my short term articles
eventually become part of my long-term documents. Here you go. The repository should allow for easy
access to ’stuff’: text blocks, senteces, paragraphs, sections, complete chapters. But also to figures, code
sniplets, examples, etc. And I do want to limit the amount of repetition of information. For example,
if I use a certain example in an article I might want to use the same (identical) example in a book or
a presentation or lecture notes. If I only copy the example I have to maintain several sources, and over
time I will not remember which of them is normative. As a side effect, I also want to optimise document
creation and limit the LATEXor document class specific code in my documents.
3
The LATEX SKB Package
User Manual
Examples
The Idea
Applicability and Side Effects
The SKB can be helpful if you
Need to organise large amount of ’stuf’
Want to reorganise ‘stuff’
Plan to maintain a personal repository
The SKB has side effects (and cannot do coffee for you either)
Separating content from structure makes content (almost)
context-free
Changes in content effect (potentially) multiple documents of
different type
Versioning and change logging becomes (almost) impossible
Your style of writing documents might need to change
Cross-references between parts of ‘stuff’ need to be used
carefully
Applicability and Side Effects
The SKB can help you if
• You have too many concepts and ideas spread over too many places.
• You want to re-organise all of your ’stuff’.
• You plan a ’personal’ repository or a well-maintained document base for a single purpose. It will be
difficult to use the SKB for a widely distributed repository that is not well-maintained, since there
are side effects that might run out of control.
The SKB has side effects which might cause problems
• Separating contents from structure (see below) means that the contents needs to be almost contextfree. Since we can assemble any contents into ’anything’ (a book, an article, ...) we need to write
self-contained text. That can be very difficult and lead to documents that do not give the reader
the impression of a consitent and coherent story. However, carefully writing can avoid that problem,
and I am sure you are carefull writer already ,.
• Changes in the repository will potentially effect multiple documents. These changes are not necessarily intended or wanted. I.e. if an article, a book and a beamer presentation access the same source
code example, a change here might have a negative effect on the beamer presentation. Similarly, if
text is changed it might have a negative effect on lecture notes or annotated beamer slides.
• Versioning the repository (text and figures) is very difficult.
• Cross-references need to be used carefully, since a repository file cannot assume that the master
document uses the (other) file referenced. The SKB provides no solution for this at the moment
(though I have some ideas).
4
1.2
The Story
The LATEX SKB Package
User Manual
Examples
The Story
The Story, short version
After 10 years writing documents...and not maintaining them
properly
My ‘stuff’ got distributed in multiple dimensions
Some hidden in emails, on shared discs, external document
systems, web sites
Finding anything became almost impossible
Tried many tools, none really helped to organise my ‘mess’
Early 2009, I decided to reorganise everything
Well-defined set of tools/applications: PHP, LATEX, BibTEX,
Inkscape, SQLite, Java
Then I started writing the LATEXpart for the SKB
This now became the SKBpackage
The Short Story
I have written papers, done a lot of presentations, provided some book chapters, still working on a book,
participated in many research proposals and projects, and created tons of notes and figures. As of early
2009, most of that information was distributed over the repositories of different projects and organisations
I worked for, in some document management systems, on several websites, databases, my preferred email
client (which changed twice), different computers and later even different external hard drives and USB
sticks. Looking for specific text or a particular figure could easily end in a days work. Tools like desktop
search engines can help to find ’stuff’. I used them, but if they found anything it was hard to maintain
the context it was written in and some formats or sources were out of reach for them. Even worse with
figures and the many versions some of them evolved in over time. After multiple jobs and several years,
all I had is kind of a very messy base of knowledge, well-hidden somewhere, thus very difficult to locate
and impossible to maintain.
So I started early 2009 to re-organise my ’stuff’. At the same time, I did realise that moving away from
LATEXwas part of the problem (and I thought using the other text processor would help, it actually didn’t,
long-term). So LATEXbecame, again, the text processor of choice, and with it the ability for a complete
different approach to organise my ’stuff’. This was the moment the SKB was created. SKB stands for
Sven’s Knowledge Base. The LATEXpackage skb, described in this article, forms part of a larger software
system that uses SQLite databases, a small PHP framework, Apache for HTML access and recently also
a Java port.
My document repository uses the skb package, so most of my documents are eventually LATEXdocuments.
I am saying eventually because I still use other tools (like Microsoft’s Powerpoint), but integrate their
output in my repository. I do all my figures these days using Inkscape, so the source is SVG and the
output for LATEXdocuments PDF. For editing the text files I do flip between UE Studio and LeD. Parts
of the content (such as acronyms and bibliographic information) are maintained in SQLite databases and
exported to LATEX. This package now shows how I build my documents.
5
The LATEX SKB Package
User Manual
Examples
The Story
The Story, long version, Part I
The Problems I was facing
Ideas/concepts hidden and unaccessible
Many documents in many different formats
Reuse of ‘stuff’ requires lots of work, and involves copy and
paste
Many different versions of very similar ‘stuff’, no time for
maintenance
Same for text, figures, examples, tables, lists, acronyms,
references; all created ‘stuff’
The Long Story, Part I
Over several years of writing documents (articles, books, reports, standards, research proposals) ideas
and concepts became distributed (actually a euphemism for ’hidden’) within many many documents (in
all sorts of formats) located at many many locations (such as local file system, document management
system, subversion/perforce systems, web servers, email clients). The problems associated to this situation
are manifold:
• Ideas/concepts are hidden, often un-accessible and, as I experienced, search tools are of limited help.
• The documents are written in all sorts of formats or available only in (usually proprietary) binary
formats. Ever tried to open a document written in MS WinWord 6.0 with customised document
template in a newer version of the same programme? You know then what I am talking about.
• Reusing the ideas/concepts, once found in a document and managed to open that very document,
usually involves huge amount of re-formatting. This will produce mistakes. Ever tried to use a
BibTEX) generated reference list, found in a PDF file in a new article? I found better ways to spend
my nights and weekends (yes, I am married and I have a garden).
• Over time, it can become very difficult to distinguish between different versions of a document,
concept and/or idea. As it happens in real life, things move on even in computing and the related
sciences. Documents are written for a specific historic context, which might but often will not appear
in their abstract (or the name of the folder their are stored in).
• The above issues do apply to figures and presentations as much as to the text part of documents.
Reorganising my documents/figures/presentations I did find way too many duplicates. I have used
too many graphic software packages in the past 10 years which don’t exist anymore, or which do not
run on the latest version of my preferred operating system. Some of the figures are only available
in some sort of low-resolution bitmap, rendering them useless even for a non-peer-reviewed article
today (the original source got ’lost’, in most cases because someone removed the project folder after
the project was terminated).
6
The LATEX SKB Package
User Manual
Examples
The Story
The Story, long version, Part II
Solution: Create a (unified) document repository
Then use it as source to generate documents
Leave text, heading text, figures etc. in the repository
Helps to keep information updated (no more copy and paste)
Only a few rules, little effort for maintanance
An Example from 2009 (first version of the SKB)
Moved 4 lecture notes, 2 presentations, 1 book chapter, 2
books and 4 articles
Created 1,314 files in 87 folders, but:
Removed about 100 pages of douplicated ‘stuff
Removed many many duplicated figures
Also found tons of errors from re-using already reused ‘stuff’
The Long Story, Part II
A solution is to create a unified document repository, then use this repository as ’normative source’ to
create documents for specific purposes while leaving the text blocks, headings, figures, presentations,
references, acronyms and all other reusable ’stuff’ in the repository for the next document which might
(hopefully will) benefit from them. This can (did it for me already) safe a lot of time, demands archiving
(of published documents, thus creating a traceable history), helps to keep important information updated
(without jeopardising any other work) and prevents losing any ’stuff’.
The repository needs a few rules, a (customisable) structure but beside that only a bit of effort to be
maintained. To give an example: while writing the first version of this article (May 11, 2009), I have
moved 4 lecture notes, 2 presentations, 1 book chapter, 1 book (in writing), 1 textbook (for students, with
4 chapters) and 4 articles from my ’mess’ into my repository. This involved some re-formatting (plus the
occasional re-drawing) to bring the original sources into the target formats. At the same time I did develop
the rules of my repository, the structure and the (mostly LATEX) code (and re-wrote/structured/ruled most
of them a few times). I ended up with 1,314 files in 87 folders, which create 9 articles, 2 books, 1 textbook,
3 lecture notes and this document (note: the number of articles increased, because I could re-assemble
’stuff’ for new uses, spending some five minutes per one new article). I did remove roughly 100 pages of
text (take the classic Spring LNCS format and you get the point of the number of characters) and some
40 figures (all duplicates). I did find way too many errors in the original sources (most of which have been
created by ’re-using’ them earlier from even more-original-sources).
7
1.3
The underlying Concept
The LATEX SKB Package
User Manual
Examples
The underlying Concept
The Concept: Separate Things
Separate as much as you can (but not more)
Separate content of a document from its structure
Identify small, coherent blocks of information
Put them in a separate folder: the repository
Separate the different parts of a document
Documentation reason (publish) from repository
Code, figures, examples, acronyms, references
The Concept: Separate Things
You already got the idea that separation is important, reading about published documents and a normative
repository. The basic idea is: think separation – separate as much as you can, but not more. I know that
this sounds like a strange idea when the goal is a unified repository, but it is essential. So we separate
several concerns (taking a concept of distributed system design). So if we want to facilitate re-usability,
we have to:
1. separate content of a document from its structure and
2. separate the different parts of a document.
For the impatient:
1. Separating content from structure means to identify small, coherent blocks of information, i.e. text
describing a certain aspect or an example, and put them separated into the repository folder.
2. Separating parts of a document means to separate the part that is important for publishing from the
part that is important for the content and put them into different places (one in the publish folder
and the other one in the repository older). It also means to build a separate repository for figures,
since they could be used in many different small blocks of information.
8
The LATEX SKB Package
User Manual
Examples
The underlying Concept
Separate Content from Structure
Example
[repository] ............................................ the Repository Folder
sdo...........................................the folder with our SDO files
omg...............................................files for OMG ’stuff’
corba-idl.tex.........................The CORBA IDL language
omg-mda.tex..................The OMG Model-driven Architecture
[...]
ieee..............................................files for IEEE ’stuff’
802-1.tex.................................The IEEE LAN concept
ethernet.tex .............................. The Ethernet protocol
[...]
ietf..............................................files for IETF ’stuff’
dns.tex........................................The DNS protocol
uri.tex....................................The URI specifications
[...]
[...]
[...]
Separate Content from Structure: the Repository Folder
Now, separating the structure from the content first. The structure of a document (we stay with classic
text documents like articles, books, etc. for a while) is words in sentences in paragraphs in (sub-) sections
in chapters (if its a book, of not only sections)1 . We collect sentences and paragraphs but separate them
from headings. LATEXis doing that already with the macros for chapters and sections. We go one step
further and provide a generic way to identify a heading with the SKB macro \setheading. This allows to
select the appropriate LATEXheading level at a later stage having the context of that later stage in mind
(i.e. it might be a section in an article but a chapter in a book). Now we create a structure for the resulting
files in our repository, adding meaningful names to the directories and files. Obviously the names of these
folders should provide some idea about the general characterisation of the files they contain. Example?
Well, if you collect information from Standard Defining Organisations (SDOs) the top folder could be
named sdo and the sub-folders using the respective SDO acronyms, such as omg for the OMG and ieee
for the IEEE and ietf for the IETF. We put all this in a folder named repository, making it explicit that
here is were we find all our normative content. This slide shows how that looks like.
The result: we have a structure of files, containing our ’stuff’, integrated in a structure of folders that
allows us to find it (the better this structure the more helpful it is, and remember this is a ’personal’
repository, so your personal flavour is king).
1
One very meticulous person might add ’characters’ and mention that there are more ways to think about a document’s
structure. But that person is not me. The structure I used fits the purpose (as of now), if it doesn’t anymore I will look
further.
9
The LATEX SKB Package
User Manual
Examples
The underlying Concept
Separate Parts of the Document, Part I
Create a folder for data
Acronyms, References, ...
Create a folder for figures
Bibliography, Acronyms and Figures
[root].......................................................for instance /doc
database.......................folder for all sorts of data for the repository
latex ............................. data in LATEX, such as our acronyms
bibtex..............................................BibTEX database
[...]
figures......................folder for figures, my sources are SVG & PDF
[...]
repository.........................................folder for the text files
[...]
Bibliography, Acronyms and Figures
So the combination of LATEXand BibTEXalready helps us for this separation. Using the acronym package,
we can extend this to acronyms. Looking into the highly common re-use of figures, we should look into
this as well. Let’s take the organisation of bibliographic information as a template. I store them using
BibTEXand process them with the biblatex package (but that is not critical for now). My BibTEXdatabase
is in a special folder (we can call it references for the moment) and it uses a file structure that helps me
to find information. This structure is based on the BibTEXand biblatex classification, i.e. inproceedings,
article, book, thesis, standard, etc.
Now, I can do the same for figures: put them into a special folder (we can call it figures for the moment),
which contains the source of the figures and the generated formats I need for my documents (usually PDF,
some PNG). Now I can reference these figures from the repository as well as for other use cases, such as
web publishing or presentations2 .
Last not least, the acronym package allows for an automatic handling of acronyms, including list of
acronyms. It is very similar to BibTEX in that it will only show the acronyms used in a document
out of a (potentially large) database.
One might also want to create other specific structures, such as for programming code. Dont’ stop yourself,
it’s easier to combine things later (if the separation is not effective) than to separate things that are hugely
integrated into each other. For one of my internal projects, a parser generation environment based on
ANTLR, I created a special folder for the EBNF specifications along with railroad diagrams. Now I can
use them in my book and my papers.
Now we name the folders for the separated content. This is straight forward, although you might want to
use different names (don’t worry, the skb supports that). We add to the already created repository folder
the things we need for figures (figures) and combine acronyms and BibTEXin a folder called database,
separating the data from all other content 3 .This slide shows the resulting directory structure
What did we do so far? We did separate the different parts of our documents. The more clinical you are,
the better the result will be. But please note: separate as much as you should, not as you could. If you
don’t find a reason for separating ’stuff’, then don’t do it!
2
My figures are exclusively in SVG using inkscape (www.inkscape.org). This has the advantage of a standardised,
text-based format with many export options. All my figures are in a single root folder, structured very similar to the
document folders created above, but separated from it. This makes re-use of figures very easy.
3
Now, the reason for the database folder and it’s structure is that the whole SKB contains more databases, all of which
reside here. If you want to simply apply this to LATEXdocuments you might want to use a different strutural approach.
10
The LATEX SKB Package
User Manual
Examples
The underlying Concept
Separate Parts of the Document, Part II
Publications and Content
Now look into published documents, there are different types
Articles, Books, Lecture Notes, Presentations, ...
The Folder publish
[your repository root]..........path to your repository, like /dev /documents
[...]
publish .................................... folder for published documents
articles ............................................ ...such as articles
books.........................................................or books
lecture notes.....................or lecture notes for computer science
presentations .............................. ...or general presentations
[...]
[...]
Publications and Content, Part II
Here is were it might get slightly more complicated than in the first few steps. And you might see already
that the reason for that is separation! We didn’t finish the separation, we have to go one step further. And
that means to separate now the contents (with the references and acronyms and figures) from the reason
to publish a document. This last step of separation is more conceptual, being focused on the why? and
where? and how? we publish, rather than being focused on the what? we publish.
So we do publish for many reasons: articles for research, project proposals, reports, lecture notes, standard
documents, annotated presentations, sometimes even books. We publish for a specific purpose, in a
specific (soon historic) context, using the requested format (and style sheets) and a particular structure
of our document that fits the purpose. That means we organise and structure our content every time
according to these constrains. Thus we need a new directory structure for that, since we will not reuse
that as often as our ’stuff’ itself. Remember, we use the skb macro \skbheading for headings, not the
classical LATEXmacros like \section, so our files effectively do not contain much information about their
place in the structure, only that they claim one 4 . This comes in handy now, since all we have actually
to do is to assign a document heading level to every repository file we load. Let’s create a folder for the
published documents and call it published with a set of sub-folders that help us to understand the general
context of the publication.My directory structure is shown in this slide
4
Currently experimental, but soon to be ready, there will be an extension to the \skbheading macro that allows a little
bit more information to be put in the repository files. For the moment this is captured in the \skbheadingduc macro.
11
The LATEX SKB Package
User Manual
Examples
The underlying Concept
Separate Parts of the Document, Part III
Publications: Articles
Now look into articles, there are a few of them, i.e.
Object Naming (naming.tex)
Object Models (object-models.tex)
Protocols (protocols.tex)
And a separate folder with the links to repository files (tex)
The Folder publish/articles
articles...........................................................our articles
naming.tex...........................the file creating an article on naming
object-models.tex.............the file creating an article on object-models
protocols.tex......................the file creating an article on protocols
tex.................a folder containing the tex files that include our content
naming.tex .................... the file including all content for naming
object-models.tex ...... the file including all content for object-models
protocols.tex ............... the file including all content for protocols
Publications and Content, Part II
We could, and it usually makes sense to do so, go one step further in that separation. This time within the
documents in the published folder. The reason is the structure of LATEX documents: they do need some
commands specific to LATEX, which we don’t necessarily want to mix with the commands that input our
content (the files from repository). So it would make sense to have another pair of documents here, one
containing all LATEX commands needed to create a document, and one containing all the commands that
include our content. Say we have a few articles for state of the art discussions on naming, object-models
and protocols, we could create the structure shown in this slide for the article folder
Now everything is structured, thus simple again. If we are looking for content, we go to the repository
directory and the directory names help us to find what we are looking for. If we need a figure, we do the
same at the figures directory. acronyms and bibtex help with the respective other content. If we want
a specific published document, we simply check the published directory and will have a look into a tex
sub-directory to see what content is include how.
Good news, the separation is finished! What have we done? We have separated the contents from the
structure by creating, created a separate directory structure for figures, another one for bibliographic data,
one for acronyms and finally a complete directory structure for published documents. Content and title
form a pair, include figure, use acronyms and references and are combined in the published documents. At
this point we can start calling it document repository.
12
2
User Manual
2.1
Getting Started
The LATEX SKB Package
User Manual
Examples
Getting Started
The SKB Distribution
distribution contents
[start folder]
doc...........................The generated PDFs and User Guide Sources
[user-guide] .............................. Sources for the User Guide
skb.pdf ................................ The generated Documentation
skb-guide.pdf...................................The User Guide only
run .................................... The generated Class and Style Files
skb.cfg..................................The global Configuration File
skb.sty ................................................ The Style File
*.cls ................................................. The Class Files
source ................................................... The Source files
skb.dtx ................................. Documented LATEXSource File
skb.ins ........................................ The LATEXInstaller File
*.txt............Manifest, Licence, Todo List and History as plain Text
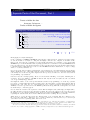
The SKB Distribution
The SKB distribution that one can download from SourceForge or CTAN (CTAN coming soon) contains
the source files for the SKB, the generated classes and styles, the generated documentation and the source
files for the user guide. This slide shows the structure and content of the SKB distribution.
13
The LATEX SKB Package
User Manual
Examples
Getting Started
Installation
First
Go to your LATEXdistribution
Classes and Style Files
Create a folder tex/latex/skb
Copy run/* into that folder (tex/latex/skb)
Update filename database of your LATEXdistribution
Documentation
Create a folder doc/latex/skb
Copy doc/* into that folder (doc/latex/skb)
Source
Create a folder source/latex/skb
Copy source/* into that folder (source/latex/skb)
Installation
There are two ways to install the SKB. The first option is have it automatically installed by your LATEX distribution using TEXLife or the CTAN archive5 . The second option is a manual installation doing the
following steps:
1.
2.
3.
4.
Go to your LATEX distribution to the folder tex/latex.
Create a folder skb.
Copy all files from the directory run of this package to the newly created folder tex/latex/skb.
Update the filename database of your LATEX distibution. Please see the manual or help files of your
LATEX distribution for details.
If you want copy the source and documentation files as well, then do the following steps. We start with
the documentation:
1. Go to your LATEX distribution to the folder doc/latex.
2. Create a folder skb.
3. Copy all files from the directory doc of this package to the newly created folder doc/latex/skb.
And now the source files of the SKB:
1. Go to your LATEX distribution to the folder source/latex.
2. Create a folder skb.
3. Copy all files and directories from the directory source of this package to the newly created folder
source/latex/skb.
Now you have installed the SKB and you are ready to use it.
5
Note: This option is not yet supported, since the SKB has not yet been submitted to CTAN.
14
The LATEX SKB Package
User Manual
Examples
Getting Started
Rebuilding the SKB
Class/Style Files and Documentation
# Rebuild Class and Style files
$ cd run ; latex ../ source / skb . ins
-> creates : skb . cfg , skb . sty , skbarticle . cls , skbbook . cls ,
skbbeamer . cls , skblncsbeamer . cls and skblncsppt . cls
# Rebuild Documentation
$ cd doc
$ pdflatex ../ source / skb . dtx
$ pdflatex user - guide / user - guide
$ pdflatex user - guide / ug - slides - anim
$ pdflatex user - guide / ug - slides - noanim
$ pdflatex user - guide / ug - slides - notes
#
#
#
#
#
repeat
repeat
repeat
repeat
repeat
twice
twice
twice
twice
twice
# remove all files except the PDFs for cleanup
Rebuild the SKB from Source
The SKB class and style files as well as the documentation can be rebuild from its sources very easily.
The class and style files are part of the documented LATEXsources in the file source/skb.dtx and the
LATEXinstaller (source/skb.ins) provides all necessary instructions. Simply follow the steps shown in the
first part of this slide. All you have to do then is to copy the files created to your LATEX distribution.
The SKB documentation comes in several different ways. The file source/skb.dtx contains the documented source while the files in doc/user-guide can be used to generate the User Guide without source
documentation, the SKB presentation (animated and not animated) and the lecture notes for the presentation.
When processing the file source/skb.dtx, the User Guide will automatically be included in the generated
PDF if it is found in either of the directories source/../doc/user-guide (when using the SKB original
distribution) or source/../doc/latex/skb/user-guide (when the SKB is already installed with your
LATEXdistribution).
The second part of this slide shows how to generate the complete SKB documentation. Please note that
the sequence is partially important, for instance the file ug-slides-noanim must be processed before the
file ug-slides-notes.
Please note that the SKB documentation is heavily using the SKB macros, so you will need to have the
style and class files installed before you can rebuild the documentation.
15
The LATEX SKB Package
User Manual
Examples
Getting Started
Configuration: Options
root
Sets the root path of the SKB. Everything that the
SKB processes should be located below the root.
/doc
pub
Sets the path for the published documents.
publish
rep
Sets the path for the repository documents.
/repository
fig
Sets the path for figures.
/figures
sli
Sets the path for the slides.
/transparencies
acr,
acrfile
The SKBuses the acronym package and these two macros
dtail the directory (acr) and the file (acrfile) where the
acronyms can be found.
acr:
database/latex
acrfile:
acronym
bib,
bibfile
These two macros detail the directory (bib) and the
main file (bibfile) where bibliographic information
(BibTEX database) can be found.
bib:
database/bibtex
bibfile:
bibliography
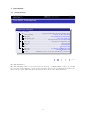
There are multiple options to configure the SKB. The following list contains all possible options starting
with the least significant. That means that the higher priority settings, which overwrite other settings,
will be listed at the bottom.
• Change the file skb.sty in your LATEXdistribution. This might require administrator (root) privileges.
This option, while possible, is not recommended.
• Change the file skb.cfg in your LATEXdistribution. This might require administrator (root) privileges.
This option is suitable for a system wide configuration, say on your own computer or laptop.
• Create a file skblocal.cfg in your personal LATEXstyle/template directory. This will be the most
convenient way to configure the SKB. Note: you might need to refresh the file database of your
LATEXdistribution.
• Use \skbconfig in your documents.
If you chose option 1 we assume you know what you are doing. In case you chose options 2-3, you can
use the macro \skbconfig to do the configuration for you. The macro comes with options for all possible
settings of the SKB. This slide describes all options and shows their default value. Please note that the
SKB can currently not handle inputs from directories outside the root hierarchy. However, one can call
\skbconfig anytime to change the root directory, but be carefull with potential side effects!.
16
The LATEX SKB Package
User Manual
Examples
Getting Started
Configuration: \skbconfig
Example (variations for \skbconfig)
% default content of skb . cfg
\ skbconfig [
root =/ doc , fig = figures , sli = slides
acr = database / latex , acrfile = acronym ,
bib = database / bibtex , bibfile = bibliograhpy ,
rep = repository , pub = publish
]{ skb . cfg }
% using rel a tive path for root and no d i r e c t o r y s t r u c t u r e
\ skbconfig [
root =./ , rep = , pub = , fig = , sli = ,
acr = , acrfile = acronym ,
bib = , bibfile = bibliograhpy
]{ myfile . tex }
The macro \skbconfig requires one argument, which describes where the configuration has been changed.
This is helpful in combination with the macro \skboptionsused to trace configuration settings. For
instance, in the files skb.cfg and skblocal.cfg we should use the respective filename. When changing
configuration settings elsewhere, some other descriptive text should be useful.
If you want to change the configuration settings for a single document without any directory structure,
overwriting all default settings (from skb.sty, skb.cfg and skblocal.cfg and using the current relative
path, you can use the second examle shown in this slide.
To trace the configuration settings, you can use \skboptionsused.
17
The LATEX SKB Package
User Manual
Examples
Getting Started
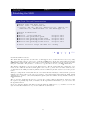
Confguration: View Options Used
Macro that can be used to show configuration options
Shows the Change Log and actually used options
Uses package warning to printout information
Automatically called at the end of processing main document
Example (Root path Change Log and Option)
( skb )
( skb )
Change log :
- root = skb . sty , ug - slides - noanim . tex
( skb )
( skb )
Last set Path / File Options :
- file root = user - guide /
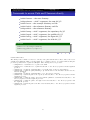
Confguration: View Options Used
This macro will print out a warning including the currently used configuration information and the change
list for each of them. For example, if the configuration for root has not been changed the output for root
will be
- root [skb.sty]: /doc
but if the configuration for fig has been changed using \skbconfig to graphics the output for root will
be
- fib [skb.sty, skbconfig]: graphics
This macro is automatically called at the end of processing.
When creating the documentation for the SKB by running pdflatex skb.dtx, the following output will
be created:
Package skb Warning :
( skb )
( skb )
( skb )
( skb )
( skb )
( skb )
( skb )
( skb )
( skb )
( skb )
( skb )
( skb )
( skb )
( skb )
( skb )
( skb )
( skb )
( skb )
( skb )
( skb )
Options last changed by : skb - p r e s e n t a t i o n
Change log :
- root = skb . sty , ug - slides - noanim . tex
- acr = skb . sty
- acrfile = skb . sty
- bib = skb . sty
- bibfile = skb . sty
- rep = skb . sty
- pub = skb . sty , ug - slides - noanim . tex
- fig = skb . sty
- sli = skb . sty , skb - p r e s e n t a t i o n
Last set Path / File Options :
- file root = user - guide /
- path root = user - guide
- file acr = user - guide / database / latex / acronym
- file bib = user - guide / database / bibtex / b i b l i o g r a p h y
- path bib = user - guide / database / bibtex
- path rep = user - guide / r e p o s i t o r y /
- path pub = user - guide //
- path fig = user - guide / figures /
- path sli = user - guide / slides / .
The change log shows that all configuration options have been set by skb.sty and later by skb.cfg.
Furthermore, the configuration option root has been changed by skb.dtx.
18
The LATEX SKB Package
User Manual
Examples
Getting Started
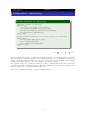
Creating a Directory Structure
The Directory Structure used in this Guide
[your repository root]..........path to your repository, like /dev /documents
database.......................folder for all sorts of data for the repository
latex ..... this is were LATEXdata will be collected, such as our acronyms
bibtex.............................folder for all BibTEX reference files
figures......................folder for figures, my sources are SVG & PDF
publish .................................... folder for published documents
articles ............................................ ...such as articles
books.........................................................or books
lecture notes.....................or lecture notes for computer science
presentations .............................. ...or general presentations
repository ..................................... folder for the text content
Creating a Directory Structure
The real power (and possibly madness) of the SKB comes with the separation of different parts of a
document into different directory structures. For the user guide, we assume the general directory structureshown in this slide.
To create this structure, go to the directory were you want to put all your documents, say /doc. Now
create the folders database, figures, publish and repository and the respective sub-folders as shown in
this slide. Finally, configure the SKB by either editing one of the configuration files or adding the following
line to all of your published documents (and of course change the text myfile.tex to something that tells
you about the location of the configuration change):
\ s k b c o n f i g [ root =/ doc ,
acr = database / latex , acrfile = acronym ,
bib = database / bibtex , bibfile = bibliograhpy ,
rep = repository , pub = publish ,
fig = figures , sli = slides
]{ myfile . tex }
The directory structures for the publish folder and the repository folder reflect different views to your
document base. The publish folder contains documents that are published for a reason (i.e. articles,
books, presentations, white papers, work in progress) while the repository folder contains content, most
likely structured following a content-specific categorisation. The choice of how the directory structure looks
like is yours, and of course you could also have multiple document directories with completely different
structures, for instance one for computer science publications and one for a gardening book. The SKB does
not set any limit, since it can be configured very flexibly to your needs .
19
User Manual
The SKB provides macros that simplify file handling and hide some LATEX code (i.e. for figures) from the
user, thus helping everyone to focus on the actual document one wants to write. There are a few macros,
and they can be catagorised as follows.
• Files and Headings: \skbinput and \skbheading are used to load files and manage the headings of
documents, i.e. associating a heading with a level in the document structure (section, subsection,
etc.)
• Figures: \skbfigure is your Swiss Army knife for loading figures and graphics.
• Path and filenames - these macros provide direct access to SKB-managed paths and filenames.
• Input files - here we have a few macros that load .tex files, figures, slides and slide annotations.
• Emphasising text - some macros that deal with typesetting text in different ways to emphasise that
text from the surrounding paragraph.
• List styles - SKB specific environments adding specific behaviour to lists and enumerate environments.
• Listings - basically a few pre-defined styles for using the listing environment.
• PDF Info - some macros that help to set meta information in PDF documents.
• Acronyms - some macros that help to load the acronym database and more.
• BibTEX- one macro that loads bibliographic information.
For the impatient, we start with a few examples. The first one shows how to use the SKB to produce a
simple article. The second one exmplains how the documentation for the SKB is created using most of the
SKB macros. Then we detail the usage of all the macros, following the above introduced categorisation.
20
2.2
Headings, Files, Figures, Slides, Paths, Acronyms and References
The LATEX SKB Package
User Manual
Examples
Headings, Files, Figures, Slides, Paths, Acronyms and References
Headings and Files
skbheading
\ skbheading { My Heading }
skbinput
1
2
3
4
5
6
\ skbinput { myfile }
\ skbinput [ from = rep ]{ myfile }
\ skbinput [ from = pub ]{ myfile }
\ skbinput [ level = chapter ]{ myfile }
\ skbinput [ from = pub , level = chapter ]{ myfile }
\ skbinput [ from = pub ]{ test / myfile }
from: pub, rep, fig, sli
level: book, part, title, chapter, section, subsection, subsubsection
Files and Headings
Just to remember: we have two different types of files in two different directory structures. The repository
folder stores the content and the publish folder stores everything needed to produce complete documents.
For the content in the repository, we mark headings with the macro \skbheading. This macro has no
options and no arguments and is simply called with the text for the heading, as shown in the first block
on this slide.
Leaving the argument empty will have the same effect as calling the original LATEX macros directly with
an empty argument.
The association of a LATEX document level with the heading is then defined for the published documents
(in the publish folder) using the macro \skbinput. This macro provides a number of options and requires
one argument. The second block on this slide shows a few use cases for \skbinput.
Let’s start with the simpliest form, one argument only shown in line 1. The macro will look for a file called
myfile.tex in the root directory of the SKB. The file extension .tex is automatically added, and since we
did not specify any special directory the root directory is used instead. If the file is not found, the macro
will throw an error providing the full path and filename it did try to load.
Line 2 shows how we can load the file myfile.tex from the repository folder. As you can see, the option
from is supplied with the argument rep, which in fact directs the macro to look for myfile.tex in the
repository folder. Should the file be located in the folder for published documents, we simply change the
from option to pub as shown in line 3.
If from is used and neither pub nor rep is given, the macro will trow an error.
To associate a document level for the heading, we can use the option level to define which level we want.
This option understands all standard document levels from the memoir package: book, part, title, chapter,
section, subsection and subsubsection. So, if we want to load myfile.tex as a chapter we simple invoke
\skbinput as shown in line 4 of the example.
Since myfile.tex is part of the repository, we combine the two options from and level (see line 5). This
call to \input will load myfile.tex from the repository and use \chapter for the heading found in that
file. If myfile.tex is in a sub folder, we simply add that sub folder to the filename. An example is shown
in line 6 assuming the the file is located in the repository sub-folder examples.
21
The LATEX SKB Package
User Manual
Examples
Headings, Files, Figures, Slides, Paths, Acronyms and References
Figures
Classic LATEX Example
\ begin { figure }\ begin { center }
\ resizebox {\ textwidth }{!}{
\ in cl udegraphic s [ width =\ textwidth ]{../ figures / myfig }}
\ caption { My Figure }\ label { myfig }
\ end { center }\ end { figure }
skbfigure
1
2
3
4
5
\ skbfigure { myfig }
\ skbfigure [ figure , center ]{ myfig }
\ skbfigure [ figure , center , width =\ textwidth ]{ myfig }
\ skbfigure [ figure , center ,
caption = My Figure , label = myfig ]{ myfig }
Figures
The classic way to add figures to your document is to have a PDF or PNG or JPG file ready, include
it using \includegraphics while putting it into a box to resize it (i.e. to the width of the text in your
document), putting this very box into a figure environment so that LATEX can process list of figures etc.
and of course adding lable and caption to it.The first block of this slide show a LATEX example, which also
uses the center environment.
With the SKB macro \skbfigure things become a little bit simplier. takes a number of options and one
argument.The second block on this slide shows a number of examples for using this macro.
1
2
3
4
5
\ s k b f i g u r e { myfig }
\ s k b f i g u r e [ figure , center ]{ myfig }
\ s k b f i g u r e [ figure , center , width =\ t e x t w i d t h ]{ myfig }
\ s k b f i g u r e [ figure , center ,
caption = My Figure , label = myfig ]{ myfig }
Let’s start with the easy usage, simply using the one argument to load a figure, as shown in line 1. This
call will simply use \includegraphics and \resizebox to load the figure myfig from the figure directory,
so we do not need to say ../figures anymore. To use the figure and the center environment, we simply
add two options requesting exactly that, as shown in line 2. In other words, using the option figure will
put the myfig in a figure environment and using the option center will center the figure.
Similar for width and height information. Say the figure should be rescaled to the width of the text in
your document you simply add width to the options, as shown in line 3 Use height for height or both
options if required. Note that the width and the hight are automatically applied to the \resizebox and
\includegraphics. You can also add caption and label information using the respective options (lines 4
and 5). Now we will have the same result as the classi LATEX example. You can also add the required
position for your figure, if using the figure environment applying the option position with the usual
paramters, including H from the float environment.
22
The LATEX SKB Package
User Manual
Examples
Headings, Files, Figures, Slides, Paths, Acronyms and References
Options for skbfigure
width
Set the width to be used with resizebox and includegraphics.
height
Set the height to be used with resizebox and includegraphics.
center
Use center environment.
figure
Use figure environment.
position
The position to be used within figure environment. This option
will be ignored if not combined with figure.
caption
The caption to be used. Ignored if the option figure is not used.
label
The label to be used. Ignored if the option figure is not used.
multiinclide
The label to be used. Ignored if the option figure is not used.
Figures, Multiinclude
The last option for the macro \skbfigure is called multiinclude. It can be used with the beamer package
to realise animations by loading a series of images and showing them in sequence with or without overlaying.
If used, this option will overwrite all other options resulting in a simple call to multiinclude within a
resised box. One can use all standard multiinclude paramters with \skbfigure, just omit the enclosing
brackets. For instance, if you want to use multiinclude on the myfig with the options <+-> call
\ s k b f i g u r e [ m u l t i i n c l u d e =+−]{myfig }
The figure size will be automatically set to \textwidth and the height to !. The start of the multiinclude
is fixed to be 0, the format is PDF. For more informatio on how to use multiinclude please refer to mpmulti
and beamer packages.
23
The LATEX SKB Package
User Manual
Examples
Headings, Files, Figures, Slides, Paths, Acronyms and References
Slides
Use \skbslide and \skbslidecite to integrate slides from
outside the LATEXuniverse
Load PDF slides with or without LATEXannotations
Load the PDF and/or the LATEXfrom any SKBknown path
Add standardised citation for the slides to the annotation
Example with Microsoft Powerpoint
Take a Powerpoint presentation and print all slides into a 4x3
format, individual PDFs
Write or reuse existing anotations using LATEX(and
BibTEXetc.)
Produce handouts using the SKBand present the slides using
Powerpoint
Slides
This macro helps to create lecture notes (handouts) using PDF slides and LATEX notes without using the
beamer package. The reason for adding this to the SKB was to integrate slides from sources outside
the LATEX universe (i.e. Microsoft Powerpoint). Some of my presentations are done using Powerpoint,
but for handouts I do prefer using LATEX thus benefiting from many of the automated features it provides
(references, acronyms). As a nice side effect, the output generated is scalable (assuming that the PDF
sources of the slides contain scalable images rather than bitmaps, which can be easily realised using for
instance Inkscape’s EMF export within Microsoft Powerpoint slides).
The macro \skbslide provides all means to include PDF slides with or without annotations, annotations
only and it can load the annotations using different mechanisms. The macro offers two options to set the
input path for the slides and the annotations: slidefrom and notefrom. If slidefrom is used, then the
slide (PDF) file will be loaded from the requested path (sli, rep or pub). If notefrom is used, then the
annotation (TEX) file will be loaded from the requested path (sli, rep or pub). The default path for slides
and annotations is the path for slides.
The third option annotate requests to load annotations. If not used, no annotations will be loaded. It can
be used in combination with the two arguments to automated loading annotations.
The two arguments of this macro define the files for the slide and the annotation. They can be used as
followes:
• Argument 1 is the slide to be loaded. If a name if given, we load the PDF using \inputgraphics
with width being \textwidth. If no name is given, no slide will be loaded.
• Argument 2 is the file with the annotations in combination with the option annotate. If this option
is not used then no annotations will be loaded. If the option is used and no name is given, then the
annotation is loaded from a file with the same name as the slide plus the extension .tex. If this
option is used and a name is given then this file will be loaded.
24
The LATEX SKB Package
User Manual
Examples
Headings, Files, Figures, Slides, Paths, Acronyms and References
Slides
skbslide
1
2
3
4
5
6
7
\ skbslide { myslides / slide 1}{}
\ skbslide { myslides / slide 2}{}\ clearpage
\ skbslide [ annotate ]{ myslides / slide 3}{}
\ skbslide [ annotate , notefrom = rep ]
{ myslides / theme 1}{ text / theme 1}
\ skbslide [ annotate , notefrom = rep , slidefrom = rep ]
{ text / theme 2}{ text / theme 2}
skbslidecite
1
2
\ skbslidecite { Slide }{\ cite { tanenbaum - andrew : book :2003}}
\ skbslidecite { Notes }{\ cite { standard : IETF : RFC :1155}}
This provides the following combinations for \skbslide
• Slide only: argument 1 has the name for the PDF, argument 2 is empty
• Annotation only: argument 1 is empty, argument 2 has the name for the TEX, option annotate used
• Slide with Annotation 1: argument 1 has the name for the PDF, argument 2 has the name for the
TEX, option annotate used
• Slide with Annotation 2: argument 1 has the name for the PDF, argument is empty, option annotate
used
• do nothing: leave both arguments empty
In line 1 and 2 we load myslides/slide1.pdf and myslides/slide2.pdf from the default directory without
any annotations and clear the page after that. In line 3 we load myslides/slide2.pdf and request this
slide to be annotated without giving a specific file name, thus loading myslides/slide3.tex, both files
from the default slides directory. In lines 4&5 we change the directory for the notes and request a particular
file to be loaded, resulting in the slide loaded as myslides/theme1.pdf from the slides directory and the
annotations loaded as text/theme1.tex from the repository. Finally, in lines 6&7 we change both folders
to the repository, this loading text/theme2.pdf and text/theme2.tex from the repository.
Slides and Citations
The macro \skbslidecite provides some simple means to add citations to annotated slides. It takes two
arguments, the first one for the type of citation and the second one for the actual citation. This second
block on this slide shows a simple example. The first line states that the slide contains material from a
book of Tannenbaum and the second line states that the annotation contains material from an IETF RFC
standard documents (RFC 1155). Since this macro is very simple, any content can be given for the two
arguments.
25
The LATEX SKB Package
User Manual
Examples
Headings, Files, Figures, Slides, Paths, Acronyms and References
Commands to access Path and Filenames directly
\skbfileroot – the root directory
\skbpathroot – with 1 argument, the root-dir/#1
\skbfileacr – the acronym directory and file
\skbfilebib – the reference directory and file
\skbpathbib – the reference directory
\skbfilerep – with 1 argument, the repository-dir/#1
\skbfilepub – with 1 argument, the publish-dir/#1
\skbfilefig – with 1 argument, the figure-dir/#1
\skbfilesli – with 1 argument, the slide-dir/#1
Example
\ skbfileroot { examples / skbem }
\ skbfilfig { dirtree / complete }
Path and File Names
The SKB provides a number of macros to directly create path and file names. Most of these macros are
actually used within the SKB , but they might also be useful for users to access files without using the
provided specialised macros (such as \skbinput. The following macros are provided:
• \skbpathroot – returns the set root path of the SKB .
• \skbfileroot – returns the set root path and adds /#1, i.e. the directory separator and the argument
provided.
• \skbfileacr – returns the path (including root) and file name for the acronym database.
• \skbfilebib – returns the path (including root) and file name for the file that loads the reference
database (BibTEX).
• \skbpathbib – returns the path (including root) to the reference database.
• \skbfilerep – returns the path to the repository and adds /#1, i.e. the directory separator and the
argument provided.
• \skbfilepub – returns the path to the folder with the published documents and adds /#1, i.e. the
directory separator and the argument provided.
• \skbfilefig – returns the path to the figure folder and adds /#1, i.e. the directory separator and
the argument provided.
• \skbfilesli – returns the path to the slide folder and adds /#1, i.e. the directory separator and the
argument provided.
26
The LATEX SKB Package
User Manual
Examples
Headings, Files, Figures, Slides, Paths, Acronyms and References
Acronyms and References
Load Acronym Database
\skbacronyms will load the Acronymnym Database
Should be called right at the place you want to have the list
of acronyms printed
Load References
\skbbibtex will load the reference list
Should be called before starting with the document
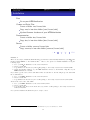
Loading Acronyms and Bibliographic Information
These two macros can be used to load the acronym database (\skbacronyms) and the references
(\skbbibtex). Both macros behave identical: they use \InputIfFileExists to check whether the acronym
or bibtex file exists. If so, they simply input the file. If not, they use \PackageError to throw an error
with a help message, showing the requested database file to input. One should use \skbacronyms at the
place in the document were the list of acronyms should be printed and \skbbibtex at the beginning of the
document to load the bibliographic information.
27
2.3
Other usefull Macros
The LATEX SKB Package
User Manual
Examples
Other usefull Macros
Emphasising Text
LATEXexample for skbinput
Use \ cmd {\ skbem } to produce \ skbem [ bold ]{ bold } ,
\ skbem [ italic ]{ italic } or \ skbem [ code ]{ type writer } text .
The example above shows the macro \ skbem [ code ]{ skbem } with
the option \ skbem [ italic ]{ bold } and \ skbem [ bold ]{ italic }.
And the result
Use \skbem to produce bold, italic or type writer text.
The example above shows the macro skbem with the option bold
and italic.
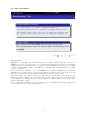
Emphasising Text
Highlighting or emphasising text is an important aspect of many technical documents. One can use
LATEXmacros directly to set text in italic or bold. This has the disadvantage that there is no meaningful
information given as on why that text is treated in a special way. Furthermore, when the editor requires
to change certain highlights, it will be very difficult to go through a large document and figure out which
text is to be changed.
To prevent that from happening, one can use LATEXmacros to actually distignguish between different
highlighted text. A simple start is provided by the SKB. It is simply because, at the moment, it only
supports three different ways and no furhter meaningful information. But it is a start.
The macro \skbem comes with three different options. The option bold will set the text given in the
argument in bold face. Similar, the option italic will set it italic. Last not least, the option code will use
another SKB macro (\skbcode) for typesetting the argument text. This slide shows a few examples along
with the resulting type setting
skbcode This macro \skbcode is a facade for calling the macro lstinline from the listing package with
a basic style that uses type writer font (ttfamily).
28
The LATEX SKB Package
User Manual
Examples
Other usefull Macros
Lists
Two new environments for lists
\skbnotelist for replacing itemize
\skbnoteenum for replacing enumerate
Both do nothing but chaning itemsep and parskip
Set to 0
Same effect as \tightlist in the memoir package
Both enviroments do nothing if the memoir package is used!
Environments for lists and enumerates
These two environments mimic the macro \tightlists from the memoir package. It might be usefull when
not using memoir to minimise the margin between items in lists (iemize) and enumerations (enumerate).
Both environments do the following:
•
•
•
•
Store current value of \parskip and \itemsep.
Set \parskip and \itemsep to 0cm.
Use the original environments (itemize for skbnotelist and enumerate for skbnoteenum)
Set \parskip and \itemsep back to thir original value.
Here is an example using first the classic list environment (itemize) and then the SKBmacro skbnotelist
6 7
:
• Lorem ipsum dolor sit amet, consectetur adipisicing elit, sed do eiusmod tempor incididunt ut labore
et dolore magna aliqua.
• Ut enim ad minim veniam, quis nostrud exercitation ullamco laboris nisi ut aliquip ex ea commodo
consequat.
• Duis aute irure dolor in reprehenderit in voluptate velit esse cillum dolore eu fugiat nulla pariatur.
• Excepteur sint occaecat cupidatat non proident, sunt in culpa qui officia deserunt mollit anim id est
laborum.
Now list with \skbnotelist:
• Lorem ipsum dolor sit amet, consectetur adipisicing elit, sed do eiusmod tempor incididunt ut labore
et dolore magna aliqua.
• Ut enim ad minim veniam, quis nostrud exercitation ullamco laboris nisi ut aliquip ex ea commodo
consequat.
• Duis aute irure dolor in reprehenderit in voluptate velit esse cillum dolore eu fugiat nulla pariatur.
• Excepteur sint occaecat cupidatat non proident, sunt in culpa qui officia deserunt mollit anim id est
laborum.
Note: both macros will only change the margins of the memoir package is not loaded!
6
7
For those who are interested, the ‘Lorem Ipsum’ is the standard phrase commonly used since the 1500s.
The following examples might have no effect on annotated slides...
29
The LATEX SKB Package
User Manual
Examples
Other usefull Macros
Styles and Support for Listings
A few pre-defined styles provided
Most of them set a small type writer font
Some provide for line numbers
\lstdefinestyle used to reset style to basic parameters
Example (use within normal text)
\ lstin putlisting [ style = generic , language = TeX ]{ example }
\ lstin putlisting [ style = generic ]{\ skbfileroot { example - toc }
Example (use for beamer frames)
\ lstin putlisting [ style = beamer - example ]{ example }
\ lstin putlisting [ style = beamer - exampleLN ]{ example }
Listings Styles and Support
The SKB comes with a few predefined styles for the listing package. Most of them use type writer font in
scriptsize, arrange a grey box around the listing and set the keywords to Blue4.
• generic – for any generic listing without specifying a language and no line numbers.
• genericLN – same as generic, just with line number in the left side, which means allowing extra space
left to the listing box.
• gentab – almost the same as generic, but without definitions for frame and numbers, which seem to
collide with some table environments.
• genericLNspecial – same as genericLN, just with a lighter grey for the box.
• beamer-example – style designed for examples in beamer frames.
• beamer-exampleLN – same as beamer-example, just with line numbers on the left, which means
allowing extra space left to the listing box.
• javaCode – generic style plus lanugage Java.
There is also one macro supported, which sets the listing style back to normal, i.e. after changing it in the
text. Some macros in the SKB make use of this. All that \lstdefinestyle does is setting the basic style
back to type writer font.
30
The LATEX SKB Package
User Manual
Examples
Other usefull Macros
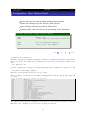
Macros for PDF Info
Macros to set information, call them anywere in your document:
\skbtitle – the title
\skbauthor – the author
\skbsubject – the subject
\skbkeywords – the keywords
date – will be set automatically to today
SKB automatically calls the \skbpdfinfo macro at the end of
the main document
Macros for PDF Info
The macro \skbtitle will set the title to be used for PDF info. The default for the title is an empty
string.
The macro \skbauthor will set the author information to be used for PDF info. The default for the author
is an empty string.
The macro \skbsubject will set the subject information to be used for PDF info. The default for the
subject is an empty string.
The macro \skbkeywords will set the keywords to be used for PDF info. The default for the keywords is
an empty string.
The macro skbpdfinfo will call the macro \pdfinfo to set the meta information in the created PDF output
file. The SKB automatically calls this macro just before finishing the process of the main document, using
the information provided by the above described macros. Furthermore, the date of the PDF file will be
set.
31
The LATEX SKB Package
User Manual
Examples
Other usefull Macros
Optional Text – Versions and Optional
Supports the packages version and optional
Comes with 6 defined modes, automatically configured
text – normal text, i.e. in an article
slide – slides, i.e. beamer frames
note – annotated slides, i.e. beamerarticle
anim/noanim – animated and non-animated slides/frames
memoir – used when memoir package is loaded
Example
\ opt { text }{ The following example }\ opt { note }{ This slide } %
shows some examples for optional text ( optional package )
\ begin { skbmodememoir } Only with memoir \ end { skbmodememoir }
\ opt { anim }{\ skbfigure [ multiinclude =+ -]{ myfigure }}
\ opt { noanim }{\ skbfigure [ width =\ textwidth ]{ myfigure }}
Optional Text – Versions and Optional
The SKB provides two means to include text and other LATEXcommands on an otional basis. They
are pre-configured and will be automatically set/unset according to the three main document types the
SKB supports:
•
•
•
•
•
•
text – is equivalent to any classic text document, for instance an article or a book.
slide – is used to idenify slides, for instance beamer frames.
note – is used to identify lecture notes or handouts, in essence annotated slides (frames).
anim – for beamer frames, used for text with animation activated.
noanim – for beamer frames, used for text with animation deactivated.
memoir – used for documents that include the memoir package.
We use the packages versions and optional and support both. The main difference is that with versions
one has to use \beging and \end while with optional one can use more than one of the above introduced
types. The macros for provided for optional text are:
• \skbmodetext and options using text – will be valid if neither beamer nor beamerarticle is loaded
(normal text).
• \skbmodeslide and options using slide – will be valid if the beamer package is loaded (slides).
• \skbmodenote and options using note – will be valid if the beamerarticle package is loaded (annotated
slides).
• \skbmodeanim and options using anim – will be valid if the beamer package is loaded and the SKB is
loaded with the argument beameranim
• \skbmodenoanim and options using noanim – will be valid if the beamer package is loaded and the
SKB is loaded with the argument beamernoanim
• \skbmodememoir and options using memoir – will be valid if the memoir package is loaded
This slide shows a few examples on how to use the optional text.
32
3
Examples
3.1
A simple Article
The LATEX SKB Package
User Manual
Examples
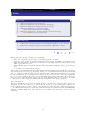
A simple Article
An Example Article – TEX code
Example (start of the tex file)
\ documentclass { skbarticle }
\ begin { document }
\ author { Sven van der Meer }
\ title { Protocols , Formats and Communication Services }
\ maketitle
\ tableofcontents *
\ bigskip
A Simple Article
Take the article that describes the state of the art in protocols. Remember, we have all the contents for
that in our repository directory. We go the directory that has the published articles published/articles
and create a new file say protocols.tex as shown on this slide and the following two slides.
The article uses the class skbarticle. That class will load the SKB package and the memoir class and do
all settings we need. It prepares the title page and prints the table of contents like any other LATEXarticle.
The it uses \skbinput to load files from the repository. The first one is loaded without requesting a level.
In other words, there is some text right at the beginning of our article, without any special heading, like
an abstract.
Then we do start the section ’Introduction’ and collect a few files with their heading categorised as subsections. Reading the directory and file names, we can already guess what the introduction will be doing:
it introduces general protocol concepts with regard to data encoding, protocol message formats, protocols
themselves and protocol services. The last block loads four files with headings categorised as sections.
Using the directory names, we see that the remaining article describes the protocols GIOP defined by the
OMG, SNMP by the IETF, CMIP by the ITU-T and finally HTTP by the W3C.
Finally, we load acronyms and bebliography and finishing the article. This example will create a table of
contents similar to this:
1 Introduction . . . . . . . . . . . . . . . . . . . . . 1
1.1 Data Encoding . . . . . . . . . . . . . . . . . . . 2
1.2 Message Formats . . . . . . . . . . . . . . . . . . 5
1.3 P r o t o c o l s . . . . . . . . . . . . . . . . . . . . . 7
1.4 Protocol Services . . . . . . . . . . . . . . . . . 9
2 General Inter - ORB Protocol . . . . . . . . . . . . . . 10
3 Simple Network M a n a g e m e n t Protocol . . . . . . . . . . 13
4 Common M a n a g e m e n t I n f o r m a t i o n Protocol . . . . . . . . 15
5 H y p e r t e x t T r a n s p o r t Protocol . . . . . . . . . . . . . 18
Job done. Now we can use LATEX or PDF-LATEX to compile our article.
33
The LATEX SKB Package
User Manual
Examples
A simple Article
An Example Article – TEX code
Example (loading inital text)
\ skbinput [ from = rep ]{ sota / protocols }
Example (a section called Introduction)
\ section { Introduction }
\ skbinput [ from = rep , level = subsection ]
{ sota / protocols / data _ encoding }
\ skbinput [ from = rep , level = subsection ]
{ sota / protocols / message - formates }
\ skbinput [ from = rep , level = subsection ]
{ sota / protocols / protocols }
\ skbinput [ from = rep , level = subsection ]
{ sota / protocols / protocol - services }
The LATEX SKB Package
User Manual
Examples
A simple Article
An Example Article – TEX code
Example (more sections)
\ skbinput [ from = rep , level = section ]{ sdo / omg / corba - giop }
\ skbinput [ from = rep , level = section ]{ sdo / ietf / snmp - protocol }
\ skbinput [ from = rep , level = section ]{ sdo / itu / x 700 - cmip }
\ skbinput [ from = rep , level = section ]{ sdo / w 3 c / http }
Example (finishing the tex file)
\ end { document }
\ endinput
34