1
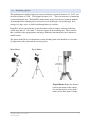
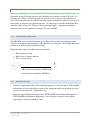
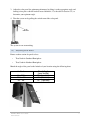
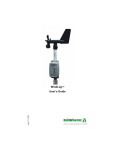
MK-III Weather Stations™
User’s Guide
Rev Date: 8/25/14
Copyright © 2014 by RainWise, Inc.
All rights reserved. No part of this work may be reproduced in any form except by written
permission of the publisher. All rights of translation are reserved.
RainWise MK-III is a trademark of RainWise, Inc.
FCC DISCLAIMER
This equipment generates and uses radio frequency energy, and if not installed properly in strict
accordance with the manufacturer’s instructions, may cause interference to radio and television
reception. It has been type tested and found to comply with the limits for a class B computing
device in accordance with the specifications in Subpart J of Part 15 of FCC rules, which are
designed to provide reasonable protection against such interference in residential installation.
However, there is no guarantee that interference will not occur in a particular installation. If this
equipment does cause interference to radio or television reception, which can be determined by
turning the equipment off and on, the user is encouraged to try to correct the interference by one
or more of the following measures:
•
•
•
•
Reorient the receiving antenna
Increase the separation between the equipment and the receiver
Connect the equipment to an outlet on a circuit different from the one the receiver is
connected to
Consult the dealer or an experienced radio/television technician for help
Changes or modifications to this equipment not expressly approved by the party responsible for
compliance could void the user’s authority to operate the equipment.
RainWise MK-III Users Guide
2014 Revision
2
Table of Contents
1)
Introduction ........................................................................................................................... 4
2)
Getting Started ...................................................................................................................... 4
3)
Installation ............................................................................................................................. 4
3.1)
Choosing Location ........................................................................................................ 4
3.2)
Mounting Options ......................................................................................................... 5
3.21) Roof Mount ........................................................................................................... 6
3.3)
Transmitting Installation............................................................................................... 6
3.4)
Installation Steps........................................................................................................... 6
3.5)
Adjusting Solar Panel ................................................................................................... 7
4)
Maintenance .......................................................................................................................... 8
5)
Troubleshooting .................................................................................................................... 9
5.1)
Interference from Nearby RainWise Weather Stations ................................................ 9
5.11) 418Mhz Weather Station....................................................................................... 9
5.12) LR Weather Station ............................................................................................... 9
6)
Specifications ....................................................................................................................... 10
6.1)
MKIII (General Specifications) .................................................................................. 10
6.2)
LR Model (2.4GHz) ................................................................................................... 11
6.3)
418/433MHz Transmitter ........................................................................................... 11
7)
Contact Information ........................................................................................................... 12
8)
Warranty ............................................................................................................................. 12
RainWise MK-III Users Guide
2014 Revision
3
1)
Introduction
The MK-III sensor assembly has been designed to offer improved durability and serviceability.
This sleek new design is 33 inches high and weighs just over 7 pounds. It is the most accurate,
durable, and easiest to install weather station available.
The long range MK-III-LR features a powerful new 2.4 GHz spread spectrum radio that
increases range to 1 mile line of sight. It also features a real time 2 second wind speed and
direction update interval.
2)
Getting Started
Congratulations! You are unpacking the ultimate in fine weather watching equipment. RainWise
has been setting industry standards in precision environmental monitoring instrumentation since
1974. The MK series weather station you have just purchased is the result of our years of
expertise.
Before permanently installing your system, set it in the same room as your receiving device, turn
the system on and confirm successful communication.
3)
Installation
3.1)
Choosing Location
The best location for your weather station is one that is free of obstruction and at an elevation
high enough to prevent interference to the anemometer (wind sensor) from nearby trees or
buildings.
Ideally, the station should be no closer to an obstruction than 10X the obstruction’s height.
RainWise MK-III Users Guide
2014 Revision
4
3.2)
Mounting Options
The mounting mast included with your sensor assembly has an outside diameter of 1 11/16” and
an inside diameter of 1 5/16”. The length of the mast is 18”. There are many ways to mount the
system utilizing the mast. The RainWise mono mount or tripod are the most common methods
of mounting but the mounting mast can be placed over another pipe, into another pipe, hoseclamped to a pipe or post, or drilled and through bolted to a surface.
Regardless of how you mount the system the bottom of the electronics enclosure should not
extend more than 12” or less than 7” above the support of the mounting mast. The reason for
this is stability of the tipping bucket rain gauge; unintended movement may cause inaccurate
rainfall counts.
The station should be free of obstructions or heat-absorbing items and should have a clear lineof-sight between the station and the receiving device.
Mono Mount
Tripod Mount
Tripod Mount: Ensure the distance
between the bottom of the control
box and the tripod is no less than 7
inches and no more than 12 inches.
RainWise MK-III Users Guide
2014 Revision
5
3.21) Roof Mount
When roof-mounting the sensor assembly the unit should be mounted toward an edge of the roof
(preferably on the prevailing wind side of the building) and it should be installed at least 2-1/2
feet above the roofline. Avoid locating the station near any heat sources such as chimneys or
vents. The anemometer may be separated from the station and mounted separately if necessary to
ensure that it is adequately free from interference. An adapter kit is available through RainWise
called the wind extension kit. 50 feet of cable (maximum length), a support mast, coupling
connector and a cap are supplied in a package. The cost is $50.00.
3.3)
Transmitting Installation
The MK-III LR series station can transmit up to 1 mile with a clear line-of-sight between the
weather station and the Oracle display or other RainWise receiving unit. The 418Mhz model can
transmit up to 400 feet with a clean line-of-sight.
Things that may reduce or disable transmission include:
•
•
•
Metal roofing or siding
Brick, stone or cement structures
Trees or dense foliage
400’ clear line-of-sight for (418Mhz model)
1 mile clear line-of-sight for (LR Model)
3.4)
Installation Steps
1. Secure the support tube in the desired mounting apparatus as described above. Slide the MK
station down over the necked-down section of the support tube until seated and the slot lines
up with the retaining screw. Tighten the screw.
2. Rotate the station until the solar panel faces TRUE SOUTH in the Northern Hemisphere or
TRUE NORTH in the Southern Hemisphere. Once positioned correctly ensure that the
support tube is secure and unable to rotate.
RainWise MK-III Users Guide
2014 Revision
6
3. Adjust the solar panel for optimum performance by tilting it to the appropriate angle and
locking it into place with the bracket located behind it. Use the table in Section 3.5) to
determine your optimum angle.
4. Turn the system on by pulling the switch toward the solar panel.
The system is now transmitting.
3.5)
Adjusting Solar Panel
Rotate weather station for panel to face:
•
True North in Southern Hemisphere
•
True South in Northern Hemisphere
Match the angle of the panel to the latitude of your location using the following chart.
Latitude
0° - 22.5°
22.5° - 55°
55° - 90°
RainWise MK-III Users Guide
2014 Revision
Panel Angle
(from Verticle)
60° (Low Hole)
30° (Mid Hole)
15° (Top Hole)
7
4)
Maintenance
Depending on the location of your system, the rain gauge may periodically get clogged with dirt,
leaves or other debris. When this happens your rainfall data will appear significantly lower than
other totals in your area or cease to record altogether. Clean the rain gauge as follows:
1. Loosen the 4 screws holding the collector portion onto the base of the rain gauge.
2. Twist the collector counter-clockwise and remove it.
3. Observe the cotter pin holding the plastic screen in place. Straighten the cotter pin
legs to remove it along with the plastic screen.
4. Clear debris from the screen, collector drain, and white dipper assembly.
5. Visually inspect the small circuit board located beneath the white dipping assembly.
If there is evidence of corrosion call RainWise for a replacement switch, which we
will ship with a complete set of installation instructions.
6. Place the screen and cotter pin back in place and bend the cotter pin legs up and
around the inlet as they were before. If they are not bent up and away from the tipper
mechanism they will prevent a complete tip.
7. Replace the collector and tighten the 4 screws.
RainWise MK-III Users Guide
2014 Revision
8
5)
Troubleshooting
Before calling customer support, check the cable connections to the receiver box and the display.
Make sure the cable is plugged in correctly - it should snap and lock into position on both ends.
If you do call, please have the serial number of your MK-III available, and please have the
display with you near the phone.
5.1)
Interference from Nearby RainWise Weather Stations
If your weather station is within signal range of another RainWise weather station, the rainfall
counts on your receiving unit will increase rapidly by 2.36" blocks until it reaches 99.99". This
will occur with or without actual rain. The solution to this problem is to change the station ID
code in your system as outlined below.
5.11) 418Mhz Weather Station
You must call RainWise to request firmware chips to physically swap out with your existing
firmware chips in the outside sensor assembly and display receiving devices. The IP 100 and
CC3000 must be sent to RainWise for reprogramming.
5.12) LR Weather Station
The code may be changed by dip switches located in the upper left corner of the motherboard.
The switches that change the code are #1 and #2.
1. Remove the solar panel cover by loosening the 4 screws in the corners. Carefully pull the
cover away far enough to unplug the solar panel from the motherboard and set aside.
2. Placing switch #1 in the "ON" position changes the code to 1, placing switch #2 in the
"ON" position changes the code to 2. Placing switches #1 and #2 in the "ON" position
changes the code to 3.
3. Plug the solar panel back into the motherboard and secure the solar panel cover to the
enclosure by replacing and tightening the 4 screws.
The code in your receiving devices must match the code set in your sensor assembly. Refer to
the Owner’s Manual of the appropriate receiving device for instructions to change the codes.
RainWise MK-III Users Guide
2014 Revision
9
6)
6.1)
Specifications
MKIII (General Specifications)
Power Specification:
6V 5AH AGM Sealed Lead Acid, 0.6W Solar Panel
Operating Environment:
Temperature:
-40 ~ 70°C (-40 ~ 158°F)
Humidity:
0 ~ 100% Condensing
Ambient Air Temperature Sensor:
Range:
-55 ~ 85°C (-67 ~ 185°F)
Accuracy:
±0.2°C at 25°C (±0.4°F at 77°F)
Resolution:
0.056°C (0.1°F)
Relative Humidity:
Operational Temperature:
-40 ~ 70°C (-40 ~ 158°F)
Range:
0 ~ 100%
Accuracy:
±2% for 10 ≤ %RH ≤ 90 at 25°C (77°F)
±4% for 10 > %RH > 90 at 25°C (77°F)
Resolution:
1%
Barometric Pressure:
Operational Temperature:
-40 ~ 85°C (-67 ~ 185°F)
Range:
300 ~ 1100 mbar (8.86 ~ 32.49 inHg)
Accuracy:
± 0.5 mbar between 700-1100 mbar at 25°C
(±0.015 inHg between 20.67 ~ 32.49 inHg. at 77°C)
Resolution:
0.34 mbar (0.01 inHg)
Anemometer (Reed Switch)
Operational Temperature:
-40 ~ 85°C (-40 ~ 185°F)
Anemometer Extension:
Up to 15.24m (50ft)
RainWise MK-III Users Guide
2014 Revision
10
Wind Direction:
Range:
0 ~ 360°
Accuracy:
±11.25°
Resolution:
22.5°
Starting Threshold:
1.98 m/s (4.43 mph)
Wind Speed:
6.2)
6.3)
Range:
0 ~ 67 m/s (0 ~ 150 mph)
Accuracy:
Greater of 0.45m/s (1 mph) or 5% of Reading
Resolution:
0.045 m/s (0.1 mph)
Threshold:
0.65 m/s (1.45 mph)
LR Model (2.4GHz)
Operational Temperature:
-40 ~ 85°C (-67 ~ 185°F)
Outdoor Line-of-Sight Range:
Up to 1600 m (1 mi), Up to 750 m (2500 ft) for EU
Variant
Transmitter Output Power:
18dBm, 10 dBm for EU Variant
Operating Frequency:
ISM 2.4GHz
Update Rate:
2s
418/433MHz Transmitter
Operational Temperature:
-30 ~ 70°C (-22 ~ 158°F)
Outdoor Line-of-Sight Range:
Up to 122 m (400 ft)
Transmit Power Output:
6.5 dBm
Operating Frequency:
418MHz, 433MHz for EU Variant
Update Rate:
30s
RainWise MK-III Users Guide
2014 Revision
11
7)
Contact Information
RainWise Inc.
18 River Field Road, Trenton, ME 04605 USA
Phone: (207) 288-5169
Toll Free: (800) 762-5723
Online: http://www.rainwise.com/
Contact Form: http://www.rainwise.com/about/contact
8)
Warranty
RainWise, Inc. warrants this product against defects in materials and workmanship for a period
of two (2) years from the date of purchase, and agrees to repair or replace any defective product
without charge. Additionally, the solar cell is guaranteed for five (5) years from the date of
purchase.
This warranty does not cover damage resulting from accident, misuse or abuse, lack of
reasonable care, the fixing of any attachment not provided with the product, or damage due to
lightning strike or power surge. RainWise will not reimburse for takedown or reinstallation
charges. RainWise will not pay for any warranty service performed by a non-authorized repair
service. No responsibility is assumed for any special, incidental or consequential damages.
RainWise, Inc. authorizes no other warranty, written or oral.
NOTE: This warranty gives you specific legal rights, and you may have other rights, which vary
from state to state. Some states do not allow the exclusion of ‘incidental or consequential
damages,’ and so the above exclusions and limitations may not apply to you.
To return a unit under warranty: Contact RainWise or authorized Reseller for Return
Authorization. To contact RainWise call 1-800-762-5723 within the continental US or
Internationally at (207) 288-5169.
IMPORTANT: Make sure equipment is properly packed - preferably in the original box.
Damage incurred in shipping is not covered by this warranty.
RainWise MK-III Users Guide
2014 Revision
12