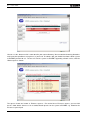
1
ECaccess User Guide
User Support
Operations Department
Version 3.3.0
May 2009
c Copyright 2009
European Centre for Medium-Range Weather Forecasts
Shinfield Park, Reading, RG2 9AX, United Kingdom
Literary and scientific copyrights belong to ECMWF and are reserved in all countries.
The information within this publication is given in good faith and considered to be true, but ECMWF accepts
no liability for error, omission and for loss or damage arising from its use.
CONTENTS
Contents
1 Introduction
3
2 Ecaccess concepts
2.1 ECaccess gateway . . . . . . . . . . . . . . . . . . . . . . . . . . . . . . . . . . . . . . . . .
2.2 Using an ECaccess gateway . . . . . . . . . . . . . . . . . . . . . . . . . . . . . . . . . . .
2.3 Plugins . . . . . . . . . . . . . . . . . . . . . . . . . . . . . . . . . . . . . . . . . . . . . . .
4
4
5
5
3 Security authentication
3.1 ECaccess certificate . . . . . . . . . . . . . . . . . . . . . . . . . . . . . . . . . . . . . . . .
3.2 ECcert command . . . . . . . . . . . . . . . . . . . . . . . . . . . . . . . . . . . . . . . . .
7
7
7
4 Unattended file transfers initiated from ECMWF
4.1 Target location . . . . . . . . . . . . . . . . . . . . .
4.2 ECtrans command . . . . . . . . . . . . . . . . . . .
4.2.1 Transfer to a Member State host via gateway .
4.2.2 Transfer from a Member State host via gateway
.
.
.
.
.
.
.
.
.
.
.
.
.
.
.
.
.
.
.
.
.
.
.
.
.
.
.
.
.
.
.
.
.
.
.
.
.
.
.
.
.
.
.
.
.
.
.
.
.
.
.
.
10
10
11
12
12
5 Shell commands
5.1 Environment . . . . . . . . . . . . . . . . . . . . . . . . . . . . . . . .
5.2 Access to Shell commands . . . . . . . . . . . . . . . . . . . . . . . .
5.3 General information . . . . . . . . . . . . . . . . . . . . . . . . . . . .
5.4 File management . . . . . . . . . . . . . . . . . . . . . . . . . . . . .
5.5 Batch job management . . . . . . . . . . . . . . . . . . . . . . . . . .
5.6 Management of ECMWF-initiated transfers . . . . . . . . . . . . . . . .
5.7 Management of events at ECMWF . . . . . . . . . . . . . . . . . . . .
5.8 Execution return codes . . . . . . . . . . . . . . . . . . . . . . . . . .
5.9 Examples of Shell command usage . . . . . . . . . . . . . . . . . . . .
5.9.1 File management . . . . . . . . . . . . . . . . . . . . . . . . . .
5.9.2 Job management . . . . . . . . . . . . . . . . . . . . . . . . . .
5.9.3 File transfers initiated at ECMWF, but started from your computer
5.9.4 Management of notifications . . . . . . . . . . . . . . . . . . . .
.
.
.
.
.
.
.
.
.
.
.
.
.
.
.
.
.
.
.
.
.
.
.
.
.
.
.
.
.
.
.
.
.
.
.
.
.
.
.
.
.
.
.
.
.
.
.
.
.
.
.
.
.
.
.
.
.
.
.
.
.
.
.
.
.
.
.
.
.
.
.
.
.
.
.
.
.
.
.
.
.
.
.
.
.
.
.
.
.
.
.
.
.
.
.
.
.
.
.
.
.
.
.
.
.
.
.
.
.
.
.
.
.
.
.
.
.
.
.
.
.
.
.
.
.
.
.
.
.
.
.
.
.
.
.
.
.
.
.
.
.
.
.
.
.
.
.
.
.
.
.
.
.
.
.
.
14
14
15
15
15
15
16
16
17
17
18
19
22
24
6 The Web server
6.1 Authentication . . . . . . . . . . . . . . . . . . . . . . . . . . . . . . . . . .
6.2 Features . . . . . . . . . . . . . . . . . . . . . . . . . . . . . . . . . . . . .
6.3 Users views . . . . . . . . . . . . . . . . . . . . . . . . . . . . . . . . . . .
6.4 Ectrans setup . . . . . . . . . . . . . . . . . . . . . . . . . . . . . . . . . .
6.5 NX service . . . . . . . . . . . . . . . . . . . . . . . . . . . . . . . . . . . .
6.5.1 How to connect using a web browser . . . . . . . . . . . . . . . . . .
6.5.2 Example of session starting a standalone xterm on the supercomputer
6.5.3 Example of session starting a virtual desktop on ecgate . . . . . . . .
6.5.4 How to connect using a standalone NX client . . . . . . . . . . . . . .
6.5.5 WindowMaker overview . . . . . . . . . . . . . . . . . . . . . . . . .
.
.
.
.
.
.
.
.
.
.
.
.
.
.
.
.
.
.
.
.
.
.
.
.
.
.
.
.
.
.
.
.
.
.
.
.
.
.
.
.
.
.
.
.
.
.
.
.
.
.
.
.
.
.
.
.
.
.
.
.
.
.
.
.
.
.
.
.
.
.
.
.
.
.
.
.
.
.
.
.
.
.
.
.
.
.
.
.
.
.
25
25
25
27
32
36
36
37
38
39
42
.
.
.
.
.
.
.
.
.
.
.
.
.
.
.
.
.
.
.
.
.
.
.
.
.
.
.
.
.
.
.
.
.
.
.
.
7 Monitoring tools
44
7.1 Monitoring batch job submissions . . . . . . . . . . . . . . . . . . . . . . . . . . . . . . . . . 44
7.2 Monitoring file transfers initiated with ectrans . . . . . . . . . . . . . . . . . . . . . . . . . . . 46
ECMWF Technical Notes
1
ECaccess User Guide
8 The Telnet server
47
9 The SSH server
48
10 X11 connections
49
10.1 Starting xterm within a telnet session . . . . . . . . . . . . . . . . . . . . . . . . . . . . . . . 49
10.2 Starting xterm within a SSH session . . . . . . . . . . . . . . . . . . . . . . . . . . . . . . . 49
10.3 Support for VNC servers . . . . . . . . . . . . . . . . . . . . . . . . . . . . . . . . . . . . . . 49
11 The FTP server
11.1 Temporary password . . . .
11.2 Standard commands . . . .
11.3 Extended commands . . .
11.3.1 DOMAIN command
11.3.2 INFO command . .
11.3.3 JREQ command . .
11.3.4 JDEL command . .
11.3.5 QLS command . . .
11.3.6 JLS command . . .
11.3.7 TREQ command . .
11.3.8 TRET command . .
11.3.9 TDEL command . .
11.3.10TLS command . . .
.
.
.
.
.
.
.
.
.
.
.
.
.
.
.
.
.
.
.
.
.
.
.
.
.
.
.
.
.
.
.
.
.
.
.
.
.
.
.
.
.
.
.
.
.
.
.
.
.
.
.
.
.
.
.
.
.
.
.
.
.
.
.
.
.
.
.
.
.
.
.
.
.
.
.
.
.
.
.
.
.
.
.
.
.
.
.
.
.
.
.
.
.
.
.
.
.
.
.
.
.
.
.
.
.
.
.
.
.
.
.
.
.
.
.
.
.
.
.
.
.
.
.
.
.
.
.
.
.
.
.
.
.
.
.
.
.
.
.
.
.
.
.
.
.
.
.
.
.
.
.
.
.
.
.
.
.
.
.
.
.
.
.
.
.
.
.
.
.
.
.
.
.
.
.
.
.
.
.
.
.
.
.
.
.
.
.
.
.
.
.
.
.
.
.
.
.
.
.
.
.
.
.
.
.
.
.
.
.
.
.
.
.
.
.
.
.
.
.
.
.
.
.
.
.
.
.
.
.
.
.
.
.
.
.
.
.
.
.
.
.
.
.
.
.
.
.
.
.
.
.
.
.
.
.
.
.
.
.
.
.
.
.
.
.
.
.
.
.
.
.
.
.
.
.
.
.
.
.
.
.
.
.
.
.
.
.
.
.
.
.
.
.
.
.
.
.
.
.
.
.
.
.
.
.
.
.
.
.
.
.
.
.
.
.
.
.
.
.
.
.
.
.
.
.
.
.
.
.
.
.
.
.
.
.
.
.
.
.
.
.
.
.
.
.
.
.
.
.
.
.
.
.
.
.
.
.
.
.
.
.
.
.
.
.
.
.
.
.
.
.
.
.
.
.
.
.
.
.
.
.
.
.
.
.
.
.
.
.
.
.
.
.
.
.
.
.
.
.
.
.
.
.
.
.
.
.
.
.
.
.
.
.
.
.
.
.
.
.
.
.
.
.
.
.
.
.
.
.
.
.
.
.
.
.
.
.
.
.
.
.
.
.
.
.
.
.
.
.
.
.
.
.
.
.
.
.
.
.
.
.
.
.
.
.
.
.
.
51
51
51
52
52
54
54
56
56
57
58
59
59
59
12 Writing a script
61
12.1 Helpers . . . . . . . . . . . . . . . . . . . . . . . . . . . . . . . . . . . . . . . . . . . . . . . 61
12.2 Sample script . . . . . . . . . . . . . . . . . . . . . . . . . . . . . . . . . . . . . . . . . . . 61
12.3 More examples . . . . . . . . . . . . . . . . . . . . . . . . . . . . . . . . . . . . . . . . . . . 63
The ECaccess change history can be found at www.ecmwf.int/services/ecaccess/download/
changelog.html
2
ECMWF Technical Notes
1
Introduction
The ECaccess software gives Member States 1 and other ECMWF users batch and interactive access to the
ECMWF computing and archiving facilities. Access is available via the Internet as well as via RMDCN.
This user guide, which is intended for all users of the ECaccess software, describes the concepts and procedures for accessing data and running jobs at ECMWF. If you are to perform the administrative task of
installing and/or maintaining the ECaccess software, you should study the ECaccess Administrator’s Guide
(see http://www.ecmwf.int/services/ecaccess/download/). For the gateway concepts and
procedures see section 2.
This guide is structured as follows:
Getting started
• Section 2 describes the ECaccess global architecture, focusing on the FTP, Web, Telnet and X11
components.
• Section 3 gives an overview on interactive and shell script user authentication.
Running batch work at ECMWF
For automating data transfers and submitting batch jobs, refer to:
• Section 4 describes initiating unattended transfers from ECMWF.
• Section 5 describes the ECaccess Shell commands.
ECaccess on-line
For access to on-line ECMWF computing facilities, refer to:
• Section 6 describes web-based management of jobs and file transfers to and from the ECHOME (for
“ecgate” home directory), ECSCRATCH (for “ecgate” scratch directory) and ECFS directories.
• Section 7 describes web-based monitoring and trouble- shooting of batch jobs and file transfers.
• Section 8 describes logging in at ECMWF via the gateway’s single-sign-on Telnet server component.
• Section 9 describes logging in at ECMWF via the gateway’s single-sign-on SSH server component.
• Section 10 describes starting X11 applications on ECMWF servers using the single-sign-on X11 access
component.
Advanced topics
Refer to the following sections for customizing ECaccess Shell commands:
• Section 11 describes the extended FTP server and its advanced features, as are used to access
ECMWF computing and archiving facilities from within scripts.
• Section 12 shows how to write a shell script for listing files at ECMWF (using the extended FTP server).
1
In the following “Member States” (MS) includes “Co-operating States”.
ECMWF Technical Notes
3
ECaccess User Guide
2
Ecaccess concepts
ECaccess is a framework for batch and interactive access to ECMWF services for Member States and other
ECMWF users.
Figure 1: ECaccess design layout.
The components of ECaccess are:
• The ECaccess gateways: all Member State users can access the ECMWF computing and archiving facilities through a gateway. Full ECaccess functionality requires an ECaccess gateway to be installed at
the Member State. Alternatively, reduced ECaccess functionality is available on the ECMWF ECaccess
gateway.
• The ECaccess Server: all gateways are connected to this server. It provides technical and high
level services to the gateway, allowing generic access to computing and archiving facilities at ECMWF
(through “ecgate”).
• The “ecgate” server: includes services such as the local LoadLeveler batch system, the (LoadLeveler)
batch system on c1a (the High Performance Computing Facility) and access to the ECFS, HOME and
SCRATCH storage areas.
To allow authentication and improve security, an ECaccess Certification Authority (ECCA) certifies all ECaccess components.
2.1
ECaccess gateway
The gateway software is provided for Member States’ remote access to ECMWF computing and archiving
facilities. Throughout the guide, the terms “gateway” and “ECaccess gateway” are used interchangeably.
Gateways include a model for the management of “plugin” services. A plugin is a piece of code that handles
4
ECMWF Technical Notes
2.2
Using an ECaccess gateway
requests/responses flowing through the gateway. Currently, there are plugins for incoming FTP, HTTP/S, X11,
Telnet and SSH requests to ECMWF. Additional plugins are planned. On top of the SSH plugin the NX application can be used for interactive access to ECMWF. The ECMWF ECaccess gateway (hereafter referred to
as “ECgateway”) can be used on its own. Nevertheless, using a Member State ECaccess gateway (hereafter
referred to “MSgateway”) instead offers the following features and advantages over using the ECgateway on
its own:
• Secure tunnel between ECMWF and MSgateway: all services are channelled through SSL (Secure
Socket Layer) secure connections to ensure data integrity. For confidentiality, administrators can set
up encryption.
• Security authentication: protocols such as FTP or Telnet use only basic security mechanisms during
their login process. The MSgateway plugins invoke an SSL protocol component for user authentication.
• Low resource usage / fast response: opening and closing SSL connections takes a significant amount
of CPU time, bandwidth and memory. MSgateways maintain a set of permanent SSL connections (to
the ECaccess server) for their plugins.
• Web memory cache: pages collected by the MSgateway from ECMWF and passed to Member State
browsers can be stored in a memory cache. If the same page is required again, it is retrieved from this
cache. Since this cache is located on the MSgateway, this is quicker than access through the Internet.
2.2
Using an ECaccess gateway
If the basic features, available via the ECMWF ECaccess gateway interfaces, are sufficient, you can use
“ecaccess.ecmwf.int” for the web and the FTP interface. The Shell commands (section 5) use “ecaccess.ecmwf.int”
as the default gateway name. If you have access to RMDCN and want to use it for accessing ECMWF, you
can use “msaccess.ecmwf.int” instead.
If you wish to use the advanced features, only available via a Member State ECaccess gateway, you will
need to find out, on which host this gateway has been installed at your local site and which FTP and HTTPS
ports are being used by that gateway. You may be able to obtain this information by running the “ecenv” Shell
command. If ”ecenv” is in your command path, it will provide information about your Member State ECaccess
gateway.
If the command is not available, you will need to contact your local ECaccess administrator or the Computing
representative for your country or organisation. You can also email [email protected].
2.3
Plugins
By default, the following plugins are automatically started on all the gateways:
• The FTP plugin: allows Member State users to submit jobs and to transfer files (between their own
computer on one side and ECMWF file systems and ECFS on the other side). This extended FTP
server can also be used for access to ECMWF computing and archiving facilities from within shell
scripts.
• The HTTP/S plugin: for job and file transfer management/monitoring from a browser.
• The Telnet and the X11 plugins (available on MSgateways only): provide access to ECMWF servers
with a single-sign-on login process. Communication and authentication are established through the
gateway.
ECMWF Technical Notes
5
ECaccess User Guide
• SSH is increasingly used for external connections. ECaccess includes an SSH plugin which will allow
you to access ECMWF and run X11. Note that only SSH protocol version 2 is supported.
6
ECMWF Technical Notes
3
Security authentication
This section discusses the gateways’ built-in security mechanisms, used to control access to ECMWF.
Two authentication methods are available:
• Interactive authentication: users will be prompted for their ECMWF user identifier and the PASSCODE
(obtained by entering their PIN number into the security token).
• Batch authentication: users need to create an ECaccess certificate before they access ECMWF facilities. This method allows Member State users to automate authentication within scripts. The HTTP/S,
Telnet, X11 and SSH plugins support only the first method. The FTP plugin supports both.
3.1
ECaccess certificate
The ECaccess certificate is a standard X509 digital certificate saved on the user’s computer as a file. It identifies a user to the gateway. The ECaccess Certification Authority (ECCA) signs each certificate. Therefore,
when a user provides his certificate to the gateway, its signature is checked using the ECCA public key for
verification. A certificate can be created:
• Using the “eccert” command: this is described in section 3.2.
• Using the Web interface: login to the Web server (providing an ECMWF user identifier and token
PASSCODE) and in the menu click the “Get Certificate” option to download the new Certificate, see
section 6.
The ECaccess certificate is valid for 7 days for all services but is valid for 1 month for MARS access.
3.2
ECcert command
The “eccert” command is one of the Shell commands (section 5). From an ECMWF user identifier and a
PASSCODE (using a security token), it generates a certificate in “.eccert.crt” in the user’s home directory.
You need to ensure that you have access to the Shell commands (see section 5.2).
To display a help screen describing the “eccert” usage:
$ eccert -help
Usage: eccert [args ...]
-echost
-ecport
-eccert
-ecuser
-expire
-gateway
-display
-ecpass
-tunnel
-verbose
-help
str - gateway host name (default: teaccess.ecmwf.int)
num - gateway port (default: 443)
str - certificate location (default: $HOME/.eccert.crt)
- display certificate user id
- display certificate expiration date
str - target gateway for xterm
str - target display for xterm (override default)
- create a new passcode for FTP
- create a new tunnel
- verbose mode on
- this message
Default values can also be set by the ECHOST, ECCERTPORT,
ECMWF Technical Notes
7
ECaccess User Guide
ECCERTFILE and DISPLAY environment variables.
$
To create a certificate for user “xyz”, you will be prompted for your ECMWF user identifier and a Passcode
from your security token:
$ eccert -verbose
echost: ecaccess.meteo.ms
ecport: 443
eccert: /home/xyz/.eccert.crt
Certificate request
ECMWF user identifier: xyz
Passcode from your security token: ******
Certificate saved (912 bytes)
The verbose output shows the certificate has been successfully created and saved to the “.eccert.crt” file
(size is 855 bytes). Certificates are PEM/Base64 encoded ASCII files. Below a typical certificate content is
shown:
$ cat /home/xyz/.eccert.crt
-----BEGIN CERTIFICATE----MIICSTCCAbICAQkwDQYJKoZIhvcNAQEEBQAwUTELMAkGA1UEBhMCVUsxEjAQBgNV
BAgTCUJlcmtzaGlyZTEQMA4GA1UEBxMHUmVhZGluZzEOMAwGA1UEChMFRUNNV0Yx
DDAKBgNVBAsTA05TUzAeFw0wMjAyMDQxODA3MzlaFw0wMjAyMDkxODA3MzlaMIGI
MQswCQYDVQQGEwJVSzESMBAGA1UECBMJQmVya3NoaXJlMRAwDgYDVQQHEwdSZWFk
aW5nMQ4wDAYDVQQKEwVFQ01XRjEMMAoGA1UECxMDTlNTMTUwMwYDVQQDEyxzeWkv
ZWNiYXRjaC9lY2JhdGNoMi5lY213Zi5pbnQvMTAxMjg0NjA2ODk3ODCBnzANBgkq
hkiG9w0BAQEFAAOBjQAwgYkCgYEAxMT3GChn3X6thkEZKtDNCKjbeORROGI9U3kO
OqjG6DLuIMd8D6VnNOFru2tsVoZdI3bPqG0ZRYFlz/SXofvKhkWCUOPlnR/UCpru
bIHQ/X8SDOeaCptdhocmVrqxeHUt02Dd4AOpSsaX8JTTkbJ+aW6GCS67rmyz5cQU
nVSsvzUCAwEAATANBgkqhkiG9w0BAQQFAAOBgQB9Sd3CM6wu3uC7AnCDqf1ja/+b
xukGldKN2d+Lhol+ecQfYeHj5bdGWRiqmt/gT3ozN6HaPB1a1YN/tmYv5P8tYKGA
jj4XoeWERC+YPdji0xf186tCbqClHJAINP/iHMu9U245OJhtL+bt1Jx0QpwwyrHS
I5dLThBrxzIlagkv/A==
-----END CERTIFICATE-----
OpenSSL can be used to decode and display certificate components.
To display the expiry date of the current ECaccess certificate in clear text:
$ eccert -expire
Mar 18 12:16:19 2009 GMT
The expiration shown above (usually 1 month) refers to the validity of MARS access.
To see the expiry of the various ECaccess services the eccls command can be used:
ecgate{/home/ectrain/trx}:1 --> eccls
submitJob
168h
Mar 31 12:40
getJobList
168h
Mar 31 12:40
deleteJob
168h
Mar 31 12:40
getJobResult
168h
Mar 31 12:40
deleteFile
168h
Mar 31 12:40
getFileList
168h
Mar 31 12:40
mkdir
168h
Mar 31 12:40
getFileSize
168h
Mar 31 12:40
readFile
168h
Mar 31 12:40
writeFile
168h
Mar 31 12:40
moveFile
168h
Mar 31 12:40
rmdir
168h
Mar 31 12:40
chmod
168h
Mar 31 12:40
8
job submission
job list
delete a job
job result
delete file
get file list
make directory
get file size
read file
write file
move file
remove directory
change file mode
ECMWF Technical Notes
3.2
ECcert command
getTempFile
getTransferList
168h
168h
Mar 31 12:40
Mar 31 12:40
create temporary file
get transfer list
As can be seen from the output, for a normal user-id the certificate expiration is 168 hours for all services.
The date/time shows when the certificate has been requested.
To display the user of the current ECaccess certificate in clear text:
$ eccert -ecuser
xyz
ECMWF Technical Notes
9
ECaccess User Guide
4
Unattended file transfers initiated from ECMWF
The “ectrans” command allows you to transfer files securely between ECMWF and remote sites. Like the
UNIX “rcp” command, “ectrans” requires no password to be specified for the remote host: the ECaccess
gateway performs the security checking. Unlike standard FTP, “ectrans” is suitable for unattended file transfers
in scripts, cron jobs, etc., as it avoids the problems inherent in storing passwords in text files and sending
passwords across networks.
Even if you don’t have a local gateway installed, you can benefit from the ectrans command by using the
ECMWF ECaccess gateway. Please note that in this case the transfer is not as secured as when a Member
State ECaccess gateway is used.
4.1
Target location
Users who wish to transfer files between ECMWF and Member State servers need to declare one or more
remote Member State users (msuser association) for the storage/retrieval of the remote file. This can be done
through the ECaccess Web interface of the target gateway (see section 6.4). For every “msuser” declaration,
the hostname and the login username and password need to be specified.
After the ECaccess gateway installation, the Member State ECaccess system administrator can customise
the access methods for file transfers. These will be displayed through the ECaccess Web interface. Several
schemes can be implemented, such as:
• The target directory for a particular destination is a sub-directory of a central directory configured by
the administrator, with the sub-directory name matching the msuser name.
• The target directory for all file transfers to a given destination is a sub-directory of the msusers home
directory. The administrator configures the sub-directory name.
• The target directory for a given destination is configurable by the user. The administrator determines
whether or not the user is allowed to include “..” in the directory path.
Target directories can be located on:
• Member State servers running a standard FTP service accessible from the ECaccess gateway. This is
known as a “genericFtp” destination and is the most convenient way of getting the files to the system
you want, under the specified user ID.
• The server running the ECaccess gateway. This is known as a “genericFile” destination. All users will
share in a common directory the files transferred using this destination.
• Member State servers running a proprietary application. The administrator provides ectrans with the
implementation of the access protocol. The administrator can also use more complex rules to define
special target locations for ECMWF users, Member State users or groups of Member State users. The
command “ectinfo” described in the next section can be used to get the translated URL of a target
location, giving a Member State user identifier and a destination name (passwords are displayed as
***).
10
ECMWF Technical Notes
4.2
4.2
ECtrans command
ECtrans command
With the “ectrans” command, Member State users who use their shell account at ECMWF can initiate secure
file transfers between ECMWF (ecgate or HPCF systems) and Member State servers.
When “ectrans” is used to put a file (from ECMWF to a Member State), the ECaccess Server will spool the file
in the user’s “ectrans” transfer queue: if the connection between the ECMWF and Member State gateways is
down or if any error occurs, the file will be kept in the spool area at ECMWF and you can resume the transfer
either through the web interface or with the ECtools command ectret.
When “ectrans” is used to get a file (from a Member State to ECMWF) the transfer will fail by default, if the
connection between the ECMWF and Member State gateway is down. A retry mechanism is available for all
types of transfers. To show the “ectrans” usage:
$ ectrans -help
usage: ectrans [-gateway name] -remote msuser@[destination] \
[-get|-put] -source [ec:|ectmp:]filename [args ...] (*)
ectrans -check requestID (*)
-gateway {arg}
-remote
{arg}
-source
{arg}
-target
{arg}
-mailto
{arg}
-lifetime {arg}
-delay
{arg}
-at
{arg}
-format
{arg}
-retryCnt {arg}
-retryFrq {arg}
-priority {arg}
-put
-get
-onsuccess
-onfailure
-onretry
-keep
-remove
-reject
-append
-resume
-overwrite
-verbose
-version
-help
-
access gateway name (default (**): ecaccess.ecmwf.int)
access method (default (**): *none*)
source file name
target file name (default: same as -source)
target email address (default: current user)
lifetime of the file in the spool (default: 1w) (***) (****)
transmission delay (default: immediate transfer) (***) (****)
transmission date (default: immediate transfer) (****)
define the date format as used with -at (default: yyyyMMddHHmmss)
define the number of retries (default: async=144, sync=0)
define the frequency of retries (default: async=10m, sync=1m) (***)
transmission priority 0-99 (default: 99) (****)
interactive/synchronous transfer (no spool)
interactive/synchronous pull (rather than push) file
mail sent on successful transfer
mail sent when transfer has failed
mail sent when transfer is retried
keep the request in the spool till expiration (****) (*****)
always remove the request from the spool (****) (*****)
if existing target file (default)
if existing target file
if existing target file
if existing target file
verbose mode on
print version number
this message
(*) If successful, a requestID is returned, which can be used in
check requests. Exit code is 0 on success and >0 otherwise.
(**) The default values depend on the GATEWAY or REMOTE environment
variables.
(***) Duration in weeks, days, hours, minutes or seconds (e.g. 1w|2d).
(****) These options are only relevant when the spool is used. The spool
is no used during interactive transfers (-get and -put options).
(*****) By default, successful requests are removed from the spool and
failed requests are kept in the spool till expiration.
The “reject”, “append”, “resume” and “overwrite” options are mutually exclusive and determine what to do
if there is an existing target file. The “mailto” option specifies an email address to be notified in case of a
successful (option “onsuccess”) and/or a failed transfer (option “onfailure”). The “check” option prints the
ECMWF Technical Notes
11
ECaccess User Guide
status of the specified request on the standard output.
Transfer statuses, which can be checked with the ectls command or the Web interface, are listed in table 1.
Status
INIT
COPY
WAIT
RETR
STOP
DONE
Meaning
Files are being transferred to the spool
Files are being transferred to the remote site
Files are scheduled and waiting to be started
File transfer will be retried
Files have NOT been successfully transferred (error)
Files have been successfully transferred
Table 1: Transfer status.
4.2.1
Transfer to a Member State host via gateway
To transfer file “fff” from the current working directory on “ecgate” to the “genericFtp” destination of the use
“myUser” on the ECaccess gateway “ecaccess.meteo.ms”:
$ ectrans -gateway ecaccess.meteo.ms \
-remote myUser@genericFtp
-source fff \
-verbose
verbose: gateway=ecaccess.meteo.ms
verbose: echost=ecgate.ecmwf.int
verbose: ecport=644
verbose: action=spool
verbose: ecuser=xyz
verbose: source=fff
verbose: target=fff
verbose: keep=false
verbose: remove=false
verbose: option=reject
verbose: lifetime=1w
verbose: delay=(none)
verbose: at=(now)
verbose: format=yyyyMMddHHmmss
verbose: retryCnt=144
verbose: retryFrq=10m
File to upload (5140480 bytes)
9442903031
When a request has been spooled successfully, a requestID is returned immediately. “ectrans” will then
return the exit code 0. The requestID can be used to reference the transfer, using the interface described in
section 7 or with the command “ectls”.
If the file is not successfully spooled, an error message is printed and the “ectrans” return code is -1.
4.2.2
Transfer from a Member State host via gateway
To transfer file “fff” at the “genericFtp” destination of the “myUser” msuser of the ECaccess gateway “ecaccess.meteo.ms” to the current directory at ECMWF:
$ ectrans gateway ecaccess.meteo.ms \
-remote myUser@genericFtp \
12
ECMWF Technical Notes
4.2
ECtrans command
-get -source fff \
-verbose
gateway: ecaccess.ecmwf.int
echost: ecgate.ecmwf.int
ecport: 644
action: get
ecuser: xyz
target: fff
source: fff
keep : false
option: reject
File to download (0 bytes)
5140480 bytes to download
When the request has been carried out successfully, the result is returned immediately. Transfers from a
Members State to ECMWF are not spooled; they are carried out synchronously. The “ectrans” return code is
0 if the file has been transferred successfully or -1 if the file has not been transferred successfully.
ECMWF Technical Notes
13
ECaccess User Guide
5
Shell commands
This section describes the Unix shell commands for the management of files, file transfers and jobs. They can
be run by any user and on any Member State host. They all point to a common shell script and are included
in the ECaccess software distribution. Running these commands requires a valid certificate (see section 3.2)
and a number of environment variables to be set up. Command usage information is available via the “-help”
flag (or giving the command name to “echelp”).
These shell commands are also available on “ecgate” at ECMWF. As you have already been validated to
enter “ecgate”, you will not need a certificate when using these ECaccess shell commands on “ecgate”.
5.1
Environment
Table 2 gives a list of environment variables used by ECaccess.
Environment variable
ECHOST
ECCERTPORT
ECFTPPORT
ECCERT
ECDOMAIN
ECDEBUG
Purpose
Gateway host name
Gateway SSL port number
Gateway FTP port number
Certificate file location
Target domain
Enable debug mode
Default value
Local host
443
21
$HOME/.eccert.crt
Home directory
False
Table 2: ECaccess environment variables.
ECDOMAIN value
ECFS
ECTMP
ECHOME
ECSCRATCH
ECHOST
ECJOBS
ECMARS
Purpose
for the home directory on ECFS
for the temporary directory on ECFS
for “ecgate” home directory
for “ecgate” scratch directory
to access file systems on a specific host, e.g. ”c1a”
to access the auto start batch job directories
to access the auto start Mars requests directory
Table 3: ECDOMAIN values.
The ECDOMAIN value, see table 3, is case insensitive. Moreover, to access another user’s domain, use the
following syntax: “domain-name[target-user]”. Finally, to select the domain from the path, just set ECDOMAIN
to “/”. This corresponds to a virtual Root directory, under which all domains (ECFS, ECTMP, ECHOME,
. . . ) are. Then, the domain name must be added to the beginning of the path (e.g. “ECFS/myFile” or “
/ECFS/myFile” to point to the ECFS file ”myFile” ).
Your gateway administrator can provide other default values for these parameters. However, your environment
variables take precedence over these default values.
14
ECMWF Technical Notes
5.2
5.2
Access to Shell commands
Access to Shell commands
If the directory containing the shell commands is not in your command path or you do not know the directory
in which the shell commands are installed, try running the “ecenv” command. If the command is not available,
you will need to contact your Computing Representative, your local ECaccess administrator - if known - or
User Support at ECMWF. Alternatively, you may wish to install the shell commands yourself (see http:
//www.ecmwf.int/services/ecaccess/download/).
5.3
General information
The following commands will give you general information:
Command
ecenv
ecinfo
eccert -expire
eccls
Purpose
Provide information about the ECaccess gateway used
Display the service information about systems at ECMWF
Display expiry of the current ECaccess certificate
Display expiry of the ECaccess certificate for the various services
Table 4: Shell commands for general information.
5.4
File management
The commands for the management of files listed in table 5 correspond to FTP commands described in
section 11 “The FTP server”.
Command
ecls
ecdir
ecget
ecreget
ecput
ecdelete
ecmkdir
ecrmdir
ecmodtime
ecsize
ecchmod
Purpose
Print a list of files at $ECDOMAIN
Same as the previous command but with any system- dependent
information
Retrieve a $ECDOMAIN file and store it on the local machine
Same as the previous command, but transfer is continued from
the apparent point of failure
Store a local file at $ECDOMAIN
Delete a file at $ECDOMAIN
Create a directory at $ECDOMAIN
Remove an empty directory at $ECDOMAIN
Get the last modification date of a file at $ECDOMAIN
Get the size of a file at $ECDOMAIN
Change file permissions of a file at $ECDOMAIN
Table 5: Shell commands for file management (the user domain is set in the “ECDOMAIN” environment variable).
5.5
Batch job management
The batch job management commands listed in table 6 correspond to FTP commands described in section
11 “The FTP server”. Job statuses, which can be checked with the ecjls command or via the Web interface,
ECMWF Technical Notes
15
ECaccess User Guide
are listed in table 7.
Command
ecjreq
ecjget
ecjput
ecjdel
ecjls
ecqls
Purpose
Submit a batch request (file is at $ECDOMAIN)
Get job input, job output and job error
Submit a batch request (file is local)
Delete a batch request
List your batch requests submitted via “ecjreq” and “ecjput”
List ECaccess queues and associated batch queues at ECMWF
Table 6: Shell commands for batch job management.
Status
STDBY
INIT
WAIT
EXEC
RETR
STOP
DONE
Meaning
Jobs are waiting for an event
Jobs are being initialised
Jobs have been queued to the scheduler (e.g. LoadLeveler)
Jobs are running
Jobs will be resubmitted
Jobs have NOT completed (error)
Jobs have successfully completed
Table 7: Job status.
5.6
Management of ECMWF-initiated transfers
The commands for the management of ECMWF-initiated transfers (see section 4.2) are listed in table 8.
These commands correspond to FTP commands described in section 11 and can only be used for the management of transfers, which have used the ECaccess gateway (as shown with the “ecenv” command).
Command
ectreq
ectls
ectret
ectdel
ectinfo
ecenv
Purpose
Initiate a file transfer from $ECDOMAIN, using the ectrans spooling mechanism
List transfers carried out by ectrans
Retry a transfer
Cancel an ectrans transfer (remove it from the spool)
Display the target location for a user identifier or a group identifier
Provide information about the ECaccess gateway used
Table 8: Shell commands for management of ECMWF-initiated transfers.
5.7
Management of events at ECMWF
ECMWF maintains some notifications (events) which are linked to ECMWF’s operational activity and offers
the service for time-critical jobs. This service is also available to MS users who maintain their own notifications
and can therefore create simple dependencies between different activities, at ECMWF and remote sites.
16
ECMWF Technical Notes
5.8
Execution return codes
Command
ecevent
ecesent
Purpose
Maintenance of notification (only available on ecgate)
Sents a notification to an event
Table 9: Shell commands for management of events at ECMWF.
5.8
Execution return codes
Shell commands return 0 if successful, otherwise one of the error codes listed in table 10. Each time an error
occurs, a message indicating the error is displayed to the user.
The ECDEBUG environment variable can be set to “yes” to display information concerning a command execution.
Code
1
2
Meaning
Configuration error
Authentication error
3
425
Protocol error
Cant open data connection
426
Connection closed; transfer
aborted
Requested action aborted; local
error in processing
Syntax error in parameters or
arguments
451
501
To do
Check ftp and eccert are in your path
Check your certificate is valid and the gateway is
available
Run the debug mode to get more details
Check your network configuration; FTP must be allowed between the gateway and your system
Check your network configuration; FTP must be allowed between the gateway and your system
Gateway error: read details in the embedded message
Check the command usage
Table 10: Shell commands’ error codes.
5.9
Examples of Shell command usage
This section shows a number of examples of Shell command usage from a user’s viewpoint.
The following assumes user “xyz” has already created an ECaccess certificate and runs commands from
within a Bourne shell. First of all, to display the information on ECMWF services, use ecinfo:
$ ecinfo
*****************************************************************
YOU ARE LOGGED IN ON IBM SERVER *** ECGATE ***
*****************************************************************
For information about the use of ECGATE, please consult URL:
http://www.ecmwf.int/services/computing/ecgate
*****************************************************************
For additional info on various topics please read
more /etc/motd_additional_info
*****************************************************************
System Sessions
---------------
ECMWF Technical Notes
17
ECaccess User Guide
WEDNESDAY 01.03.2006
08:00-10:00 UTC
Mars and Ecfs server system session
*** Mars & Ecfs services will be unavailable
Sorry for any inconvenience this may cause.
=======================================================================
For latest information on system session and service/service status
please go to:
http://www.ecmwf.int/services/computing/
To read this message again:
$
5.9.1
- select cosinfo
more /etc/motd
File management
To display the files in the home directory (default ECDOMAIN), use ecls or ecdir:
$ ecls
script.sh
ecaccess
ecaccess-tools.tar.gz
$ ecdir ecaccess
10838 drwxr-xr-- 4 xyz systems
3194 drwxr-xr-x 47 xyz systems
12721 drwxr-x--- 4 xyz systems
$
96 Mar 14 09:30 .
4096 Mar 14 09:30 ..
96 Mar 13 18:55 client
To download the “ecaccess-tools.tar.gz”, ecget is used:
$ ecget ecaccess-tools.tar.gz
$ ecget ecaccess-tools.tar.gz tools.tar.gz
$ ls *.tar.gz
ecaccess-tools.tar.gz
tools.tar.gz
$
The first “ecget” downloads the “ecaccess-tools.tar.gz” file, and the second “ecget” downloads the “ecaccesstools.tar.gz” file, renaming it “tools.tar.gz”. To delete the remote file “ecaccess-tools.tar.gz” and upload the
local file “ecaccess- tools.tar.gz”, ecdelete and ecput are used:
$ ecdelete ecaccess-tools.tar.gz
DELE command successful
$ ecput ecaccess-tools.tar.gz
$
To create a new remote directory called “ectest”, use ecmkdir:
$ ecmkdir ectest
MKD command successful
$
18
ECMWF Technical Notes
5.9
Examples of Shell command usage
To remove the newly created directory, ecrmdir is used:
$ ecrmdir ectest
RMD command successful
$
A user tries to remove a non-empty directory:
$ ecrmdir ecaccess
Directory not empty
$
To access ECFS files, the default domain is changed:
$ export ECDOMAIN=ecfs
$
Now, all subsequent commands will be executed from the ECFS domain: To list ECFS files:
$ ecdir
10838 drwxr-xr-- 4 xyz systems
3194 drwxr-xr-x 47 xyz systems
12721 drwxr-x--- 4 xyz systems
124513 drwxr-x--- 11 xyz systems
$
96
4096
96
2048
Mar 14 09:30 .
Mar 14 09:30 ..
Mar 13 18:55 backup
Mar 5 11:38 doc
To list ECFS files of user “zzz”:
$ export ECDOMAIN="ecfs[zzz]"
$
Now, all subsequent commands will be executed from the ECFS domain of the user “zzz”, assuming user
“zzz” allows you to access his files (read, write and exec permissions set accordingly).
To access an ECFS project (e.g. ENSEMBLES) you need, after having set ECDOMAIN to ecfs, to use the
argumnet dir=, e.g.
$ ecls dir=PROJECT/...
$ ecget dir=PROJECT/.../<files>
To return to your home directory:
$ export ECDOMAIN=echome
$
Now all subsequent commands will be executed from your home directory on “ecgate”.
5.9.2
Job management
Two different types of queues are now in use with ECaccess:
1. The ECaccess batch queues, which correspond to one system at ECMWF with its specific batch environment, e.g. ecgate will be the ECaccess queue, which will redirect jobs to ecgate at ECMWF, running
LoadLeveler. This ECaccess queue will be given as argument when submitting a batch job.
ECMWF Technical Notes
19
ECaccess User Guide
2. The batch queues (or classes) on the systems at ECMWF will be given in the batch job with #@ class =
for LoadLeveler.
The names of the ECaccess queues and associated batch queues at ECMWF can be seen with the command
ecqls, if available
$ ecqls
ecgate LoadLeveler
c1a
LoadLeveler
hpcf
LoadLeveler
submission on ecgate (INIT=815,WAIT=1,EXEC=5,DONE=4623,STOP=108)
submission on ca1 (INIT=9,WAIT=0,EXEC=0,DONE=50,STOP=1)
submission on hpcf (INIT=2,WAIT=0,EXEC=0,DONE=5,STOP=2)
To see the batch queues available on c1a:
$ ecqls hpcd
debug
ts
os
ns
xs
bench2
bench1
bench
n2
oF
of
tF
tf
nF
nf
xp
np
tp
op
diag
debug class
time-critical MS serial/single task work
operational serial/single task work
serial/single task work
system bypass class for serial/single task work
Top half benchmark class
Bottom half benchmark class
benchmark class
parallel work requiring 2 CPUs
fractional ( <31 Cpus ) operational parallel work without SMT
fractional ( <62 Cpus ) operational parallel work with SMT
fractional ( <31 Cpus ) time critical work without SMT
fractional ( <62 Cpus ) time critical work with SMT
fractional ( <31 Cpus ) parallel work without SMT
fractional ( <62 Cpus ) parallel work with SMT
bypass class for parallel work, reserved for operations
parallel work
time-critical MS parallel work
operational parallel work
system diagnostic jobs only
To submit a batch job, first take a look at the different options available with ecjreq:
$ ecjreq -help
Syntax: JREQ ECaccess-queue remote-script [args ...]
-at - start date (yyyy-MM-dd HH:mm)
-nd - no directives within the input script
-tg - specify the target gateway name
-tr - specify the access method (msuser[@destination])
-to - transfer output file when the request ends
-te - transfer error file when the request ends
-ti - transfer input file when the request ends
-tk - keep in spool (default: deleted if transfer successful)
-ni - notifications ids (list separated by ’;’ or ’,’)
-eo - redirect sterr to stdout
-ro - renew subscription off (default is on)
-oo - one script to one notification off (default is on)
-mu - send mail for the request to the stated address
-mb - send mail when the execution/transfer begins
-me - send mail when the execution/transfer ends
-mf - send mail when the execution/transfer fails
-mr - send mail when the execution/transfer retries
-jn - job name (default: source file name)
-mp - man page content (comment for the operators)
20
ECMWF Technical Notes
5.9
Examples of Shell command usage
-lt - job input/output lifetime in days (default is 7)
-rc - define the number of retries (default is 0)
-rf - define the frequency of retries in seconds (default is 600)
A special service (see option -ni) allows registered users to run their own batch jobs when the ECMWF
operational activity has reached certain stages. For more information please refer to
www.ecmwf.int/services/computing/docs/tc_apps/tc_opt1.html.
To submit the script “script.sh” from your “ecgate” home directory to the “normal” queue, ecjreq is used:
$ ecjreq ecgate script.sh -mu [email protected] -mb -me
34850
$ ecjreq ecgate test.sh
Error opening file
In the above example, the “normal” queue will be included as a LoadLeveler directive with #@ class = normal
in the script “script.sh”. The first command is successful. A mail will be sent to [email protected] at the beginning and end of the request execution. The job identifier number (34850) is returned. It can be used with
the command “ecjls” or to reference the submitted job using the interface described in section 7. The second
command is rejected because the source script is not available.
The “ecjreq” command is used to submit a script that is already at ECMWF, but if you want to submit a script
that is local to your system, the “ecjput” command must be used.
Assuming the file “test.sh” is a local file, ecjput is used:
$ ecjput ecgate test.sh -mu [email protected] -mb -me
34852
$
The command is successful and the job identifier number (34852) is returned. Note that ecjput will transfer
your file test.sh to ECMWF into a spool area before submitting it, not into your ECDOMAIN. To monitor the
status of all your jobs, use ecjls:
$ ecjls
34850
34852
$
normal@ecgate
normal@ecgate
DONE
DONE
Mar 13 19:05
Mar 13 19:05
To monitor the status of a specific job:
$ ecjls 34852
Jobid: 34852
Location: normal@ecgate
Date/Time: Mar 13 19:05
Status: DONE
stdout size: 686
stderr size: 45
stdin size: 7
$
The job is complete. You can retrieve its stdout, stderr or stdin using the following syntax for the source file:
• stdout: o{job-id}
ECMWF Technical Notes
21
ECaccess User Guide
• stderr: e{job-id}
• stdin: i{job-id}
For example to retrieve the output file of job number 34852:
$ ecjget o34852
$ ls JOB*
JOB-o34852
$ ecjget o34852 job.out
$ ls -ail job.out
71196 -rw-r----- 1 xyz systems
$
686 Mar 13 19:10 job.out
The first command retrieves the output file in the “JOB-o34852”; the second example retrieves the same
output in a file named “job.out”.
Note that these files are left on “ecgate”. You should delete them when they are not needed anymore.
To delete or cancel a running job:
$ ecjdel 34852
JDEL command successful
$
All the stdout, stderr and stdin files are removed from the job spool.
5.9.3
File transfers initiated at ECMWF, but started from your computer
To get the options of the “ectreq” command:
$ ectreq -help
Syntax: TREQ source [args ...]
-gateway
{arg} - target gateway name (default: ecaccess.ecmwf.int)
-remote
{arg} - target location in the format msuser@destination
-target
{arg} - target file name (default: same as source)
-mailto
{arg} - target email address (default: ecuser)
-retryCount
{arg} - define the number of retries (default: 144)
-retryFrequency {arg} - define the frequency of retries in seconds (default: 600)
-priority
{arg} - transmission priority 0-99 (default: 99)
-lifeTime
{arg} - lifetime in days
-onsuccess
- mail sent on successful transfer
-onfailure
- mail sent when transfer has failed
-onretry
- mail sent when transfer is retried
-keep
- keep the request in the spool
-reject
- if existing target file (default)
-append
- if existing target file
-resume
- if existing target file
-overwrite
- if existing target file
$
This command follows the same syntax as the “ectrans” command described in section 4.2. Note that no
valid certificate is needed for this command.
Assuming user “xyz” has the file called “job.out” in his “ecgate” home directory and a remote association
defined on the MSgateway and wants to transfer it:
22
ECMWF Technical Notes
5.9
Examples of Shell command usage
$ ectreq job.out
10161191
$
The copy identifier number (10161191) is returned. It can be used to reference the copy request using the
interface described in section 7. To list transfers carried out by “ectrans”:
$ ectls
10161191 STOP
10164593 DONE
10161193 DONE
$
xyz@genericFtp
xyz@genericFtp
xyz@genericFtp
ecaccess.meteo.ms
ecaccess.meteo.ms
ecaccess.meteo.ms
Mar 14 15:19
Mar 14 15:22
Mar 14 15:19
To get more information for the previous transfer (1016119):
$ ectls 10161191
Copyid: 10161191
MS user: xyz@genericFtp
Hostname: ecaccess.meteo.ms
Access: ECaccess gateway
Status: STOP
Error message: Wrong password
Date/Time: Mar 14 15:19
Source: ./job.out
Target: ./job.out
$
The transfer has been aborted, because the connecting parameters attached to the MS user “xyz” do not
allow a connection to the selected destination to be opened. If you correct this error by updating the login
parameters of the MS user “xyz” (using the Web interface) on the gateway “ecaccess.meteo.ms”, you can
restart your transfer request from the “ectrans” spool:
$ ectret 10161191
TRET command successful
$
Your transfer is restarted. You could also have decided to modify any parameters using the various “ectret”
options:
$ ectret -help
Syntax: TRET copy-id [args ...]
-gateway
{arg} - target gateway name
-remote
{arg} - target location in the format msuser@destination
-target
{arg} - target file name
-mailto
{arg} - target email address
-onsuccess {arg} - mail sent on successful transfer (true/false)
-onfailure {arg} - mail sent when transfer has failed (true/false)
-keep
{arg} - keep the request in the spool (true/false)
-reject
- if existing target file
-append
- if existing target file
-resume
- if existing target file
-overwrite
- if existing target file
$
If there is an existing target and no option is selected, the value provided to the “ectreq” command is used.
Note that these Ecaccess shell commands only have very limited support for metacharacters. Only the ecls
and ecdir commands allow you to use the character “*”. All other commands work on a file by file basis.
ECMWF Technical Notes
23
ECaccess User Guide
5.9.4
Management of notifications
Users will first have to create a notification using the ecevent command on ecgate. To get the options of the
ecevent command:
$ ecevent -help
usage: ecevent [-create|-send|-clear|-delete|-grant|-update] <MyNotification> \
[-comment "comment_for_my_notification"] \
[-public] [-private] [-env "variables_to_pass"] [-seq <number>] \
[-notify|-subscribe] [-users "list_of_users"]
For example with
$ ecevent -create an00 -comment "The ECMWF operational Anaysis at 00Z is ready" \
-public
a user will create a public event called “an00” and become its owner. Other users will be able to subscribe
batch jobs to this notification, using ecjput or the ECaccess Web-interface. When the event is created, the
owner can send notifications to this event, which will trigger the users jobs which have subscribed to this
event. The notification of the event can happen at your remote site with ecesend. To get the options:
$ecesend -help
Syntax: ESEND event-id seq [args ...]
-env {arg}
- variables to pass
-delay {arg}
- submission delay (default: immediate submission)
-at {arg}
- submission date (default: immediate submission)
Assuming that the event an00 has been created, the following command will send a notification:
$ecesend an00 36 -env "DATE=$DATE; TIME=00"
where 36 is a notification sequence number, which can only be used once. Subsequent sequence numbers
should also be given in increasing order, e.g. by building the sequence number using date and time. Some
variables are passed with the option env. These variables will be available to the jobs that are submitted.
24
ECMWF Technical Notes
6
The Web server
The ECaccess gateway HTTP/S interface allows Member States to manage their job submissions and file
transfers from their Web browser, e.g. Firefox, Mozilla or Internet Explorer. This section gives an overview of
what this interface provides and how it works. Please note that only interactive authentication as described
in section 3 is supported.
The main purpose of the HTTP/S plugin is to provide easy access and monitoring for on-line users. For use
from within shell scripts (batch), most of those features are also provided through the FTP plugin and are
described in the previous sections.
6.1
Authentication
Assuming that the Member State ECaccess gateway (see section 2.2) runs on the server “ecaccess.meteo.ms”,
users connect to the application by pointing their Web browser at “http://ecaccess.meteo.ms:9080/” and will
be redirected to the login page. Note that the default HTTP port number used for ECaccess is 9080.
By giving an ECMWF user identifier and a passcode, the user is authenticated and routed to a personal
page; a user context is maintained for the subsequent operations from his browser. Users have the ability to
request everything available from their account, until the time allocation expires or the “logout” option from
the “Account” menu is selected.
Users connecting for the first time to the login page of the Web server will receive a security alert from their
browser. This is normal; users have to accept the HTTP/S plugin certificate as a trusted certificate to allow
the encryption of communications.
The procedure to trust the certificate depends on the browser:
• If using Internet Explorer, you will receive a security alert. You will be given an option to view the
certificate. Select it, and then select the “install certificate” option. Follow the instructions to install the
certificate. Once you have returned to the security alert box, select the “Accept” option.
• If using Firefox or Mozilla, you will receive a security alert. Follow the instructions in the alert box to
accept the certificate as certified. In the last dialogue box you will be given an option to accept this
certificate for all your sessions. Select it.
Once this procedure is complete, your future connections to the HTTP/S plugin will not produce any security
alerts.
6.2
Features
After successful authentication users are redirected from the login page to the main page, from which they
will be provided with a menu including available operations described in this section.
Note that the ECaccess gateway administrator can set up the HTTP/S plugin to secure only the login process.
Therefore, when redirected from the secured login page to the unsecured main page you may receive a
security alert. This is a normal message; just select the “Accept” option to continue.
The main page provides the following options (organized through menu entries in the left margin):
Browsing menu
ECMWF Technical Notes
25
ECaccess User Guide
• Browse files: the user can browse through his ECHOME, ECSCRATCH or ECFS files and directories.
• Delete files: users can select files to be deleted from the different places listed above.
• Copy files: users can copy files between two domains (files can be copied from an ECSCRATCH
directory to an ECFS directory, for example).
• Transfer files: users can use their browser facilities to transfer files between their computer and their
ECHOME, ECSCRATCH or ECFS directories; files are transferred over an FTP connection.
• Add scripts to the job list: users can select one or several scripts and add them to their job list for later
submission. Users may continue browsing files, adding more scripts to their basket.
• Select scripts for submission: users can select one or several scripts for immediate submission.
• Request secure file transfers: users can select files to be sent via their transfer spool (equivalent of the
TSUB command of the FTP plugin or of the ectreq command of the Ectools or of the ectrans command
on the systems at ECMWF).
Queues/Jobs menu
• Browse queues: users can browse through the “ecgate” queues to select a target queue for their next
job request.
• Browse basket: users can select scripts from their basket for their next job request.
• Submit new jobs: users can specify complementary parameters related to the execution and confirmed
action of their request. The application then submits the job request, which is sent to the job spool
(equivalent of the JREQ command of the FTP plugin).
Monitoring menu
• Monitor job submissions: see section 7.1.
• Monitor secure file transfers: see section 7.2.
• Browse the events history: the history allows saving details (date, name and summary) concerning
each event for later consultation by users themselves.
Account menu
• Access the ECtrans configuration: the user can define the mapping between his ECMWF user identifier
and his local user identifiers. He can also check his available destinations.
• Request a new ECaccess Certificate: the user can download a new ECaccess Certificate (description
and purpose of these Certificates are discussed in section 3).
• Logout: the user context is deleted and the browser is sent back to the login page.
26
ECMWF Technical Notes
6.3
6.3
Users views
Users views
The following snapshots illustrate a typical interactive session a user could have using the web interface.
Different browsers on different operating systems may have different presentations of the same page.
First, under the heading “Web session”, login by providing your ECMWF user identifier and your passcode.
You may modify the default value of 30 minutes to a greater value, if you plan to use the service with breaks
of more than 30 minutes.
Once authenticated, your browser is redirected to the main page containing the menu described in the previous section (the default option is “Browsing > ECHOME files”). To browse other directories from your home
directory, select a target directory and press the “Browse” button.
To download a file from your current directory (./gribex in this case), click the transfer icon of the target file
ECMWF Technical Notes
27
ECaccess User Guide
in the list. To upload a file into your current directory select the “Upload files” option and click the “I want to”
button.
Click the “Browse” button and select the file (E:\fortran.txt) you want to upload to your current directory
(you may repeat the operation three times if you want to transfer more than one file). Then click the “Upload
local files to your target directory”.
Once uploaded, a summary is printed to inform you of the size of the files uploaded. You may click the
“Browse uploaded files” to return to your current directory (where your files have been uploaded).
28
ECMWF Technical Notes
6.3
Users views
You can see the “fortran.txt” file is now stored in your current directory. You can continue browsing directories
and repeat the operation as many times as you need. To submit a job, you should first choose which system
at ECMWF you want to use. To have a list of the systems at ECMWF supporting a batch service, click the
“Browse queues” button.
The queues shown are known as ECaccess queues. For each of these ECaccess queues, you can click
on the “show details” icon to see its associated batch queues on the system at ECMWF, e.g. below for the
ECaccess queue hpcd:
ECMWF Technical Notes
29
ECaccess User Guide
To submit a new job, select the “Submit new job” option in the “Queues/Jobs” menu.
You may enter your script in the text area provided or select a script from your computer. Select the target queue (“hpcd” in this case). Note that the batch queue (or class) and other batch directives have to be
included in your script. Alternatively, you can inform ECaccess that your script does not contain batch directives. In this case, default values will be used and ECaccess will fully manage your submission. Once your
script is read, click the “Submit job” button to send your request to the server.
The list of notifications allows you to attach your job to one event in the ECMWF operational suite. Please refer to www.ecmwf.int/services/computing/docs/ms_items/tc_for_MS.html. for further
details.
30
ECMWF Technical Notes
6.3
Users views
Once the job is submitted, a summary screen gives you the job identifier number of your new job request. It
can be used to reference the submitted job using the monitoring interface (described in the next section). If
you want to arrange a secure file transfer of the result, click the “Transfer with Ectrans after execution” button.
If required, modify the default values (gateway name, user identifier) and specify the erase option of the
secure file transfer (erase option is discussed in section 4.2). Then click the “Send file(s) to your target host”
to proceed.
ECMWF Technical Notes
31
ECaccess User Guide
Once it is spooled, a summary screen gives you the copy identifier number of your new transfer request. It
can be used to reference the secure file transfer using the monitoring interface (described in the next section.
6.4
Ectrans setup
Before being able to launch unattended transfers from ECMWF (section 4) back to your site, using the command ectrans, you will have to configure ectrans association between your ECMWF User ID and the destina32
ECMWF Technical Notes
6.4
Ectrans setup
tion system and User. This is done through the web interface, by clicking “ECtrans setup” from the lower left
panel.
To create a new association, click the “Add association” button. Choose an Association name, “trajectory”
in the example below. This is the name that will be used as “msuser” with the ectrans command. Fill in the
remaining info, giving the required information on your local system.
In the example below, we create an association named trajectory that will be used to transfer files using ftp
by default to a local system named “system.meteo.ms” as a user local_UID. The data transferred will
be written into the directory /data/trajectory. The local files will have a temporary suffix “.tmp” added to their
names during the transfer. Note that you can change the configuration of the ectrans association by modifying
the options given in the window titled “Complementary information”:
ECMWF Technical Notes
33
ECaccess User Guide
When you have entered all the information for your association, click the button “Create this MS user”. A
new association has been defined for you. Please note that (between all users) an association name can
be defined only once per gateway. You can define more associations, e.g. to transfer files from ECMWF to
different systems or other local UIDs. You can also allow other users at ECMWF to transfer files with ectrans
to your association. To do this, click the “Grant Association(s)” button:
Select the association to which you want to give access to another user. Enter the ECMWF user name. Then
grant the association.
34
ECMWF Technical Notes
6.4
Ectrans setup
The UID and name of the person you have given access to the destination is now added to the list. To remove
an entry from the list, click the “Remove from the list” icon on the left:
ECMWF Technical Notes
35
ECaccess User Guide
6.5
NX service
A service using the NX technology allows users to run at ECMWF X Window based applications like Metview,
XCdp, or a simple xterm.
The easiest way to use this service is via a web browser, see section 6.5.1.
It is also possible to connect using a standalone NX client application completely independent of any web
browser, see section 6.5.2. A similar service is available through the ECaccess gateway “msaccess.ecmwf.int”
and through your local gateway provided that you have installed the ECaccess gateway v3.3.0 at least.
NX allows you to run remote X Window sessions even across slow or low-bandwidth network connections,
making it possible to start sessions from clients running on Windows, Linux, Mac OS X and Solaris platforms.
Thanks to exclusive X protocol compression techniques and an integrated set of proxy agents, NX improves
the power of the X Window System to transparently run graphical desktops and applications through the
network. Even on slow or low-bandwidth network connections, you can get a fast response thanks to the
NX lazy encoding algorithm and NX capability to automatically tune itself to network bandwidth and latency
parameters.
In addition NX allows having both standalone X terminal and “virtual desktops” independent of the web
browser session used to start them. The windows can be minimised and the web browser can even be
terminated.
For more information on NX, please see www.nomachine.com/documents.php.
6.5.1
How to connect using a web browser
The easiest way to connect to ECMWF using the NX service is simply to go to: http://ecaccess.
ecmwf.int/. You will get to a page like:
Using various drop down menus in the bottom part of the page you will be able to select the type of NX
session you want to establish. Please note that your web browser needs to be Java enabled.
You can connect to both ecgate and the supercomputer using the drop down menu “ECMWF server”.
36
ECMWF Technical Notes
6.5
NX service
You can select the type of network link you are using with the menu “Network link speed”. This will select a
number of options which should by optimal for your configuration.
You can select the type of window you want to have using the “Window option” menu: if you select “floating
window” you will get a single X Window application like xterm or Metview (you can choose the application
using the next menu). If, instead, you select “virtual desktop” you will get a fully working desktop using the
WindowMaker window manager. In this case you can select the “Virtual desktop resolution” to be either
“available area” or “full screen”.
6.5.2
Example of session starting a standalone xterm on the supercomputer
In this case you need to select “c1a” as “ECMWF server”, specify your type of network link (you can leave
this to the default “adsl”), then select “floating window” as “Window option, leave the default “Floating window
application” to “xterm” and press “Log on”.
This, after some windows warning about certificates and ssh key which you need to accept, will display the
following page:
You will need to click on the “Continue” button to start the NX connection. The following window will appear:
ECMWF Technical Notes
37
ECaccess User Guide
This window allows you to enter your userid and corresponding passcode generated by your security token.
After entering the appropriate information click on “Login” to proceed. The Java applet in the web browser
will display various messages detailing the progress of the connection to ECMWF (depending on your firewall
setup you may get various warning messages: you will need to authorise all sessions from anything related
to NX - nxclient, nxauth, nxssh, etc) until this will be displayed in your browser:
The application you have requested to start, in this case an “xterm”, should also start as a separate X based
window. You can now minimise (or even close) your web browser and start using your xterm.
6.5.3
Example of session starting a virtual desktop on ecgate
In this case select the following (for the link speed you can leave the default “adsl”):
38
ECMWF Technical Notes
6.5
NX service
and press “Log on”. The login process will be the same as the one described in the previous example but at
the end the following window will appear:
Figure 2: Virtual desktop on ecgate started using NX.
The window manager available on this desktop is called WindowMaker. By right clicking on the mouse you will
get an Application Menu which allows you to start an xterm or other X based applications. The main desktop
window is a standalone X Window and can be minimised. If you prefer, you can start a virtual desktop in full
screen mode by choosing the “Virtual desktop resolution” option “full screen”. Section 6.5.5 below describes
the usage of WindowMaker in more detail.
6.5.4
How to connect using a standalone NX client
In addition to using the web browser based access to ECMWF via NX described previously, you can also
download a standalone NX client. To do this, go to www.nomachine.com/download.php and select the
NX client for your platform. The installation is quite straightforward and is described in more detail at
www.nomachine.com/documents/client/install.php. You can then use the “Download session file” option available through the web interface:
ECMWF Technical Notes
39
ECaccess User Guide
This URL allows you to download a complete configuration file which can be used with your standalone NX
client. You can have multiple configuration files, say one for a standalone xterm on ecgate and another one
for a full virtual desktop still on ecgate, and then select the appropriate one from your NX client.
Alternatively, you can use the NX client “Wizard” to setup your own configuration as described in the NX client
documentation available at www.nomachine.com/documents/configuration/client-guide.php We recommend
using this option for advanced users only. We also recommend that you first look at one of the configuration
files which you can obtain by downloading the “session file”. The first time you start the NX client the following
window will appear:
You will have to click “Next” where you will be asked to enter the name of your NX session (in the example
<your session>) and the host to connect to. You will have to enter the ECaccess host name “ecaccess.ecmwf.int” as host:
40
ECMWF Technical Notes
6.5
NX service
You will then get the following window where you can choose you type of desktop. You will need to choose
“Unix” and “Custom”:
Click on “Next” to get the following window:
ECMWF Technical Notes
41
ECaccess User Guide
Check the “Show the Advanced Configuration dialog” box and click the Finish button. You will get the following
window:
If you then click “Ok” you will be able to start your session. In this case you will get a standalone xterm on
ecgate. Depending on your firewall setup you may get various warning messages. You will need to authorise
all sessions from anything related to NX (nxclient, nxauth, nxssh, etc).
6.5.5
WindowMaker overview
WindowMaker is a popular window manager for the X Window System, allowing graphical applications to
be run on Unix-like operating-systems. It is designed to emulate NeXT’s GUI as an OpenStep-compatible
environment and has been described as “one of the most useful and universal window managers available.”
WindowMaker has a reputation for being fast, efficient and highly stable and is very popular among open
source solutions for use on both newer and older machines. More information on WindowMaker can be found
at http://en.wikipedia.org/wiki/Window Maker and www.windowmaker.info.
WindowMaker is the window manager which is used when you connect with NX to either ecgate or the
supercomputer and select the “virtual desktop” option. For example, when you connect to ecgate using the
virtual desktop you will get a desktop as shown in figure 2.
The main customisation which has been implemented is a specific “Application Menu” which you can obtain
when right-click (opposite mouse button for left-handed mouse) on the desktop. The menus on ecgate and
the supercomputer are designed to be very similar with the one on ecgate offering more choices regarding the
available applications. The usage of the menus should be quite straightforward. To terminate a WindowMaker
session you need to select the “Exit” option from the menu:
42
ECMWF Technical Notes
6.5
NX service
ECMWF Technical Notes
43
ECaccess User Guide
7
Monitoring tools
The purpose of the monitoring interface is to provide Member States users with information concerning:
• Job requests referenced by the job identifier number, which is returned by the “ecjreq” and “ecjpout”command
(see section 5).
• Secure file transfer requests referenced by the copy identifier number, which is returned by the “ectreq”
command (see section 5) or the “ectrans” command (see section 4.2).
The “monitoring” interface is accessible through the ECaccess HTTP/S plugin, which supports the interactive
method of authentication described in section 3.
Procedures to login and use this plugin are discussed in the previous section. The following discussion
assumes that you are connected.
7.1
Monitoring batch job submissions
To access this interface, select the option “Job submissions” in the “Monitoring” menu.
Your submitted jobs are listed. You are informed of the status of the jobs (meanings of the different values
are provided in the help tips). You can use the “show details” icon to get more information about a job. For
example, if a job submission failed, you can get the reason for this failure by looking at the job details. Once
a job is marked as “DONE” you can select it with your mouse to see its output.
44
ECMWF Technical Notes
7.1
Monitoring batch job submissions
You can view the content of the output, error or input files associated with the job. You can also choose
not to consult these files on-line but copy them to one of your directories or get them using the secure file
transfer feature. Use the “I want to” button for this purpose. To edit one of them, just click the edit icon on the
corresponding line.
You may use the cut and paste function of the operating system to get the complete file, or just read it on-line.
ECMWF Technical Notes
45
ECaccess User Guide
7.2
Monitoring file transfers initiated with ectrans
To access this interface, select the option “File transfers” in the “Monitoring” menu.
A list displays your transfer requests. You are informed of the status of the transfers (meanings of the different
values are provided in the help tips). Once a transfer is marked as “DONE” or “STOP” you can select it with
your mouse and obtain the following screen:
46
ECMWF Technical Notes
8
The Telnet server
The telnet access to ecaccess.ecmwf.int and msaccess.ecmwf.int will be terminated on 24 Jun 2009.
Please use ssh or NX instead! Telnet to MS gateways will remain.
The Telnet plugin (part of the gateway) allows Member State users to log into their shell account at ECMWF
and execute commands directly on “ecgate”. When contacting the ECaccess service with telnet, you will see
something like:
Connected to ecaccess.
Escape character is ’ˆ]’.
Authorized access only.
***********************************************
For further information, read the ECaccess
documentation at:
-> http://www.ecmwf.int/services/ecaccess/
You can also use ECaccess to load/download
files from your EChome, ECscratch or ECfs
directories using the ECaccess FTP server:
-> ftp://[email protected]/
Use your UID and the SecurID code to login!
***********************************************
TelnetPlugin v3.0.0_2005010701
login: xyz
Passcode:******
The prompt is for your login name (which is your ECMWF user identifier). You will then be prompted for your
passcode (obtained by entering your PIN number into your security token), and then you will get a UNIX
prompt, typically ’$’ or ’%’. A login with telnet puts you automatically in your home directory.
Note that a different message may be displayed during your login procedure, as this message is customisable
by the gateway administrator. This option gives the opportunity to broadcast important notes to Member State
users (availability of a new product, disruptions planned for maintenance purposes, etc.).
The Telnet plugin supports only the interactive method of authentication described in section 3.
Note that the gateway at ECMWF will close telnet sessions idle for 6 hours. If you use a Member State
ECaccess gateway, note that the default port number used by ecaccess is 9023. You’ll therefore have to run:
$ telnet ecaccess.meteo.ms 9023
Your Ecaccess administrator may have changed this. If the ECaccess shell commands are available to you,
you can check the port number to use with “ecenv”. If you use an ECaccess gateway at ECMWF, you will not
need to specify a port number, like:
$ telnet ecaccess.ecmwf.int
ECMWF Technical Notes
47
ECaccess User Guide
9
The SSH server
The SSH plugin (part of the gateway) allows Member State users to log into their shell account at ECMWF
and execute commands directly on “ecgate”. The first time you use SSH to ECaccess, you will see something
like:
$ ssh [email protected]
The authenticity of host ’ecaccess.ecmwf.int (193.61.196.110)’ can’t be
established.
DSA key fingerprint is 9e:e3:f0:12:f5:08:61:d8:55:89:1a:40:e6:18:b8:42.
Are you sure you want to continue connecting (yes/no)? yes
***********************************************
For further information, read the ECaccess
documentation at:
-> http://www.ecmwf.int/services/ecaccess/
You can also use ECaccess to load/download
files from your EChome, ECscratch or ECfs
directories using the ECaccess FTP server:
-> ftp://[email protected]/
Use your UID and the SecurID code to login!
***********************************************
Password authentication
xyz’s password ******
You will then be prompted for your passcode (obtained by entering your PIN number into your security token),
and then will get a UNIX prompt, typically ’$’ or ’%’. A login with SSH puts you automatically in your home
directory on ecgate.
Note that a different message may be displayed during your login procedure, as this message is customisable
by the gateway administrator. This option gives the opportunity to broadcast important notes to Member State
users (availability of a new product, disruptions planned for maintenance purposes, etc.).
The SSH plugin supports only the interactive method of authentication described in section 3.
Note that the gateway at ECMWF will close SSH sessions idle for 6 hours.
Note also that if you use a Member State ECaccess gateway, there is no need to use ssh, as the connection
between the MS gateway and ECMWF is already secure. Using telnet will do. If you decide to use your MS
gateway (and your gateway administrator has opened this service), you may need to contact port number
9022, like in:
$ ssh -p 9022 -l xyz ecaccess.meteo.ms
48
ECMWF Technical Notes
10
X11 connections
The X11 plugin (part of the gateway) allows Member State users who have an X11 server running on their
workstation to log into their shell account and start X11 applications directly on ECMWF systems.
First, users must check that their DISPLAY environment variable is properly set up on their workstation:
$ echo $DISPLAY
hostname:0.0
The content of this variable is the name of the display to which X11 applications will connect (usually the
name of the user workstation).
If users have a server access control program for X, they must add the gateway hostname to their host list
allowed to make connections to their X11 server, e.g., assuming that the Member State ECaccess gateway
(see section 2.2) runs on the server “ecaccess.meteo.ms”, with the “xhost” command
$ xhost +ecaccess.meteo.ms
ecaccess.meteo.ms being added to access control list
The MS gateway is then authorized to open connections to their X11 server. Note that the “xhost” command
is only required for telnet, not for ssh.
After these preliminary settings you should be able to request an X11 proxy via your telnet or SSH connection.
Each subsequent X11 application started from this xterm window (including new xterm) will make connections
to your X11 server.
10.1
Starting xterm within a telnet session
The telnet access to ecaccess.ecmwf.int and msaccess.ecmwf.int will be terminated on 24 Jun 2009.
Please use ssh or NX instead! Telnet to MS gateways will remain.
By connecting to either “ecaccess.meteo.ms” or “ecaccess.ecmwf.int” with the telnet plugin described in section 8, after having selected the ECMWF host to access, you will have to request an X11 proxy, by typing “X”.
You will then be asked to validate the DISPLAY. No need to re-enter it if it is correct. A control window will
then appear, showing the DISPLAY used by the X11 proxy. From this login session, you will be able to start
X11 applications. Please keep the control window up and running, as it keeps the X11 proxy alive.
10.2
Starting xterm within a SSH session
By connecting to “ecaccess.ecmwf.int” with the SSH plugin described in section 9, after having been validated
with your security token, you will first have to select the system at ECMWF to access.
Note that you may have to use “ssh -X” to open the X11 tunnel.
10.3
Support for VNC servers
The VNC service will be terminated on 23 Sep 2009. Please use NX instead!
Users working on Microsoft systems without X11 server or who want to optimise the use of the network
connection to ECMWF and wanting to launch X11 applications at ECMWF may choose to install the VNC
(Virtual Network Computing) software (available from www.realvnc.com) on their local system.
ECMWF Technical Notes
49
ECaccess User Guide
If you are using telnet, after the validation with your security token and the selection of your hostname to
access, you will have to request a VNC proxy, by typing “V”. After having started the VNC listening viewer
locally, a VNC Desktop will be started on your local system, together with your interactive telnet into ECMWF.
Any X application launched from this interactive session (or from the VNC Desktop itself) will be displayed in
the VNC Desktop environment.
If you are using SSH, you will need to use the option -R, like in:
$ ssh -l UID -R5500:your_local_host:5500 ecaccess.ecmwf.int
Please refer to the SSH man page for further information.
50
ECMWF Technical Notes
11
The FTP server
FTP is an acronym for File Transfer Protocol. It is the Internet mechanism for transferring files between two
computers. The Ecaccess FTP plugin is an extended FTP Server adding features to submit jobs to “ecgate”
or the High Performance Computers or to exchange files with ECFS directories.
The FTP plugin supports both methods of authentication described in section 3.
The main purpose of the FTP plugin is to allow access to ECMWF computing facilities from within shell scripts
(using the “eccert” command to generate a temporary password). However, it can also be used interactively.
In this section it is assumed, that the Member State ECaccess gateway (see section 2.2) runs on the server
“ecaccess.meteo.ms”.
11.1
Temporary password
The “eccert” command can create temporary passwords from an ECaccess certificate It is used to login from
a standard FTP client, using both the ECMWF user identifier and the temporary password (which can be
used only once and for a short period of time).
To generate a temporary password for user “xyz”:
$ eccert -ecpass -verbose
echost: ecaccess.meteo.ms
ecport: 443
eccert: /home/xyz/.eccert.crt
Passcode retrieved from certificate
Certificate loaded (855 bytes)
xyz:51xeth9o
The verbose output shows the new temporary password has been successfully created. It is “51xeth9o”.
User “xyz” can use it to access the ECaccess FTP Server:
$ ftp ecaccess.meteo.ms 9021
Connected to ecaccess.meteo.ms.
220 FtpPlugin v1.0.0
Name (ecaccess:xyz): xyz
331 Enter PASSCODE at password prompt
Password: 51xeth9o
230 User xyz logged in from host.meteo.ms
Remote system type is UNIX.
ftp>
Note that your ECaccess administrator may have assigned the standard ftp port number (21) to the ECaccess
ftp plugin. If so, and also when accessing an ECaccess gateway at ECMWF, you will not need to add the port
number 9021.
11.2
Standard commands
Since this FTP server is compliant with the FTP protocol, all standard commands (such as open, ls, dir, cd,
pwd, get, put, ascii/binary, chmod, umask, etc.) are supported. Help with their usage can be found in the
FTP client documentation.
ECMWF Technical Notes
51
ECaccess User Guide
11.3
Extended commands
The extended commands within the FTP plugin, see table 11, correspond to the Shell commands described
in section 5. All extended commands have to be preceded by the FTP quote command, which sends any
command, verbatim, to the remote server computer. Using the alias command, the behaviour of the FTP dir
and ls commands can be changed by redefining the list command with jls, qls or tls.
The syntax and usage of each extended command is detailed in the following subsections. Help for these
commands can also be obtained with the “quote help” command.
Command
domain
info
jreq
jdel
qls
jls
treq
tret
tdel
tls
Purpose
changes the current domain on the remote computer; valid domains are currently ECFS, ECHOME (for “ecgate” home directory) or ECSCRATCH (for “ecgate” scratch directory).
gets ECMWF service information
submits a job on the remote server computer
cancels a job submission
lists ECaccess queues
lists jobs
requests a secure file transfer from ECMWF to Member States
(see section 4)
retries a secure file transfer
cancels a secure file transfer
lists transfers carried out by “ectrans”
Table 11: Extended ECaccess FTP commands.
11.3.1
DOMAIN command
It is possible to access a specific domain by:
• Specifying a target domain during authentication, concatenating the domain name to the ECMWF user
identifier (user_id@target_domain).
• Changing to a new domain with the “quote domain” command.
Note that ’@ needs to be replaced with ’-’ when connecting to the FTP server within a URL, as in: ftp:
//[email protected]/ to access directly the ECFS domain for user xyz. The following
example shows the two methods (assuming “qrf54t79” is a temporary password created by the “eccert”
command):
$ ftp ecaccess.meteo.ms
Connected to ecaccess.meteo.ms.
220 FtpPlugin v1.0.0
Name (ecaccess:xyz): xyz@ecfs
331 Enter PASSCODE at password prompt
Password: qrf54t79
230 User xyz logged in from host.meteo.ms
Remote system type is UNIX.
ftp>
...
52
ECMWF Technical Notes
11.3
Extended commands
ftp> quote domain echome
200 SITE DOMAIN set to echome
ftp>
...
ftp> quote domain foo
501 Invalid domain name
ftp>
When a DOMAIN request is successful, code 200 is returned immediately. Code 501 is returned otherwise
(domain not recognized).
Assuming user “xyz” is still connected, to display available domains:
ftp> quote help domain
214-Syntax: DOMAIN target-domain
214ECHOME
ECHOST
ECMARS
ECFS
ECSCRATCH
214-Above domains are recognized.
214-Current domain is ECHOME[xyz].
214-Default domain is /[xyz].
214 Direct comments to [email protected].
ftp>
ECJOBS
ECTMP
The “/” indicates a virtual Root directory under which the different ECdomains are. Note that if you want to
access another user’s domain, you can use the following syntax for the domain name:
Domain-name[target-user]
For example, to access the ECFS domain of user “zzz”:
ftp> quote domain ecfs[zzz]
200 SITE DOMAIN set to ecfs
ftp> quote help domain
214-Syntax: DOMAIN target-domain
214ECHOME
ECMARS
ECFS
ECSCRATCH
214-Above domains are recognized.
214-Current domain is ECFS[zzz].
214-Default domain is /[xyz].
214 Direct comments to [email protected].
ftp>
ECJOBS
ECTMP
The current domain is set to the ECFS domain of user “zzz”.
To access an ECFS project, two steps are necessary:
1. Set the ECdomain to ecfs
ftp> quote domain ecfs
2. use the argument ”dir=”, i.e.
ftp> cd dir=PROJECT/...
ftp> mget ...
Please note that for large ECFS files or during ECFS system sessions, the transfer from ECFS may take
longer then the timeout period of the ftp data connection (300 seconds) and therefore fail. This problem can
be solved by using ectrans.
The domain ECHOST will allow you to access all file systems on selected hosts available to you, e.g. for user
xyz from Member State MS to transfer from c1a:
ECMWF Technical Notes
53
ECaccess User Guide
ftp> cd /ECHOST
250 CWD command successful
ftp> ls
200 PORT command successful
150 Opening ASCII mode data connection
ecgate
c1a
226 Transfer complete
ftp> cd c1a/ms_tmp/ms/MS/xyz
250 CWD command successful
ftp> mget *.out
...
11.3.2
INFO command
Assuming user “xyz” is still connected, to display the ECMWF service info:
ftp> quote info
214-===========================================================
214214-System session:
214-===============
214214-WEDNESDAY 12.11.2003
214214-08:00-10:00 UTC
ECFS servers upgrade
214-*** ECFS services affected
214214-08:00-10:00 UTC
MARS servers - possible test session
214- preparation of extended session below 214214-SATURDAY 15.11.2003
214-===================
214214-08:00-20:00 UTC
Mars server system session
214-*** Mars service affected as access to Mars tapes
214will be unavailable
214214-Sorry for any inconvenience this may cause.
214214-To read this message again:
more or cat /etc/motd
214-==========================================================
214214 Direct comments to [email protected].
ftp>
11.3.3
JREQ command
The jreq command allows jobs to be submitted from Member States to ECMWF. It is an interface to the NQS
“qsub” command. Options that can be passed to the NQS “qsub” command can be specified within the first
comment block inside the batch request script file, as embedded default options. Such options in the batch
request script file set default characteristics for the batch request. However, options can also be passed
directly to the jreq command.
If an option is passed both to the jreq command and within the first comment block inside the batch request
54
ECMWF Technical Notes
11.3
Extended commands
script file, then the command option (and any associated values) takes precedence over the embedded
option.
Assuming user “xyz” is still connected, to display available options:
ftp> quote help jreq
214-Syntax: JREQ ECaccess-queue remote-script [args ...]
214- -at - start date (yyyy-MM-dd HH:mm)
214- -nd - no directives within the input script
214- -tg - specify the target gateway name
214- -tr - specifiy the access method (msuser[@destination])
214- -to - transfer output file when the request ends
214- -te - transfer error file when the request ends
214- -ti - transfer input file when the request ends
214- -tk - keep in spool (default: deleted if transfer successful)
214- -ni - notifications ids (list separated by ’;’ or ’,’)
214- -eo - redirect sterr to stdout
214- -ro - renew subscription off (default is on)
214- -oo - one script to one notification off (default is on)
214- -mu - send mail for the request to the stated address
214- -mb - send mail when the execution/transfer begins
214- -me - send mail when the execution/transfer ends
214- -mf - send mail when the execution/transfer fails
214- -mr - send mail when the execution/transfer retries
214- -jn - job name (default: source file name)
214- -mp - man page content (comment for the operators)
214- -lt - job input/output lifetime in days (default is 7)
214- -rc - define the number of retries (default is 0)
214- -rf - define the frequency of retries in seconds (default is 600)
214 Direct comments to [email protected].
ftp>
Note that if connected to a Ecaccess gateway older than Version 2.1.0, you will still see the old syntax,
including the NQS command line options.
The following examples show how to submit the source script “test.sh” to the ECaccess queue “ecgate”.
The first attempt is successful and the second attempt fails because the source script has been previously
deleted.
Assuming user “xyz” is still connected and has a file called “test.sh” in his home directory (default domain):
ftp> quote jreq ecgate test.sh -mu [email protected] -mb -me
213 87006
ftp> delete test.sh
250 DELE command successful
ftp> quote jreq ecgate test.sh
451 Error opening file
ftp>
The first jreq command is successful. A mail will be sent to [email protected] when the request begins and
ends its execution. The job identifier number (87006) is returned. It can be used to reference the submitted
job, using the interface described in section 7. The second jreq command is rejected because the source
script is not available.
The jreq command is used to submit a script, which is already at ECMWF, but if you want to submit a script,
which is local to your workstation, the “put” command needs to be invoked with the stoe command (store and
execute) rather than the stor command (called by the client put command):
ECMWF Technical Notes
55
ECaccess User Guide
ftp> quote alias stor=stoe
200 ALIAS command successful
ftp>
ftp> put test.sh ‘‘jreq ecgate -mb -me’’
200 PORT command successful
150 File status okay; about to open Binary mode connection
213 12828
ftp: 40 bytes sent in 0.00Seconds 40000.00Kbytes/sec.
ftp>
The command is successful. The job identifier is given by message 213 (12828 in this case).
To remove the alias:
ftp> quote alias stor=stor
200 ALIAS command successful
ftp>
The next “put” command will act normally.
11.3.4
JDEL command
The jdel command cancels any previous jreq (running or not). It is an interface to the NQS “qdel” command.
Assuming user “xyz” is still connected and wants to cancel his previous jreq (with job identifier 87006):
ftp> quote jdel 87006
200 JDEL command successful.
ftp>
11.3.5
QLS command
Assuming user “xyz” is still connected, to list Ecaccess queues the ftp “dir” or “ls” command needs to be
invoked with the qls command rather than the list command (called by the ftp dir command):
ftp> quote alias list=qls
ftp> dir
200 PORT command successful
150 Opening ASCII mode data connection
ecgate
LoadLeveler
submission on ecgate (INIT=819,WAIT=1,EXEC=2,DONE=4631,STOP=107)
c1a
LoadLeveler
submission on ca1 (INIT=9,WAIT=0,EXEC=0,DONE=50,STOP=1)
hpcf
LoadLeveler
submission on hpcf (INIT=2,WAIT=0,EXEC=0,DONE=5,STOP=2)
226 Transfer complete
ftp>
To see the batch queues available at ECMWF for one ECaccess queue, e.g. “c1a”:
ftp> dir c1a
200 PORT command successful
150 Opening ASCII mode data connection
debug
debug class
ts
time-critical MS serial/single task work
os
operational serial/single task work
ns
serial/single task work
xs
system bypass class for serial/single task work
56
ECMWF Technical Notes
11.3
Extended commands
bench2
Top half benchmark class
bench1
Bottom half benchmark class
bench
benchmark class
n2
parallel work requiring 2 CPUs
oF
fractional ( <31 Cpus ) operational parallel work without SMT
of
fractional ( <62 Cpus ) operational parallel work with SMT
tF
fractional ( <31 Cpus ) time critical work without SMT
tf
fractional ( <62 Cpus ) time critical work with SMT
nF
fractional ( <31 Cpus ) parallel work without SMT
nf
fractional ( <62 Cpus ) parallel work with SMT
xp
bypass class for parallel work, reserved for operations
np
parallel work
tp
time-critical MS parallel work
op
operational parallel work
diag
system diagnostic jobs only
226 Transfer complete
ftp>
Note that the batch queue names on the systems at ECMWF need to be included in the script.
11.3.6
JLS command
Assuming user “xyz” is still connected, to list jobs the “dir” or “ls” command needs to be invoked with the jls
command rather than the list command (called by the ftp dir command):
ftp> quote alias list=jls
200 ALIAS command successful
ftp> ls
200 PORT command successful
150 Opening ASCII mode data connection
3884
[email protected] WAIT
3146
ecgate
DONE
226 Transfer complete
ftp>
Nov 18 11:42
Nov 15 21:33
It is also possible to get information for a specific job (e.g. 3884):
ftp> dir 3884
200 PORT command successful
150 Opening ASCII mode data connection
Jobid: 3884
Location: [email protected]
Date/Time: Nov 18 11:42
Status: DONE
stdout size: 221
stderr size: 219
stdin size: 241
226 Transfer complete
ftp>
When a job is complete, you can retrieve its stdout, stderr or stdin file using the following syntax for the source
file:
• stdout: jbd:o{job-id}
• stderr: jbd:e{job-id}
ECMWF Technical Notes
57
ECaccess User Guide
• stdin: jbd:i{job-id}
For example to retrieve the output file of job number 3884 (local file will be “job.out”):
ftp> get jbd:o3884 job.out
200 PORT command successful
150 ASCII mode connection for jbd:o3884 (221 bytes)
226 Transfer complete
228 bytes received in 0.1473 seconds (1.512 Kbytes/s)
local: job.out remote: jbd:o3884
ftp>
Finally, to remove the alias:
ftp> quote alias list=list
200 ALIAS command successful
ftp>
The next “ls” or “dir” command will act normally.
11.3.7
TREQ command
Assuming user “xyz” is still connected, to display treq options:
ftp> quote help treq
214-Syntax: TREQ source [args ...]
214- -gateway {arg} - target gateway name (default: msaccess.meteo.ms)
214- -remote {arg} - target location in the format msuser@destination
(default: ecuser)
214- -target {arg} - target file name (default: same as source)
214- -mailto {arg} - target email address (default: ecuser)
214- -onsuccess
- mail sent on successful transfer
214- -onfailure
- mail sent when transfer has failed
214- -keep
- keep the request in the spool
214- -reject
- if existing target file (default)
214- -append
- if existing target file
214- -resume
- if existing target file
214- -overwrite
- if existing target file
214 Direct comments to [email protected].
ftp>
This command follows the same syntax as the “ectrans” command described in section 4.2.
Assuming user “xyz” is still connected and has a file called “filename” in his home directory (default domain),
to transfer “filename” from “ecgate” to his gateway:
ftp> quote treq filename
213 10130074296659
ftp>
The copy identifier number (10130074296659) is returned. It can be used to reference the copy request,
using the interface described in section 7.
58
ECMWF Technical Notes
11.3
Extended commands
11.3.8
TRET command
The purpose of the tret command is to retry an unsuccessful transfer.
Assuming user “xyz” is still connected, to display options of the tret command:
ftp> quote help tret
214-Syntax: TRET copy-id [args ...]
214- -remote {arg} - target user (default: current user)
214- -gateway {arg} - target gateway name (default: current gateway)
214- -target {arg} - target file name (default: same as source)
214- -keep
- keep the request in the spool
214- -reject
- if the target file already exists
214- -append
- if the target file already exists
214- -resume
- if the target file already exists
214- -erase
- if the target file already exists
214 Direct comments to [email protected].
ftp>
If there is an existing target and no option has been selected, the value provided to the treq command is
used.
11.3.9
TDEL command
The purpose of the tdel command is to cancel a transfer.
Assuming user “xyz” is still connected, to display options of the tdel command:
ftp> quote help tdel
214-Syntax: TDEL copy-id
214 Direct comments to [email protected].
ftp>
Assuming user “xyz” is still connected and wants to cancel his previous treq (with transfer identifier 10130074296659):
ftp> quote tdel 10130074296659
200 TDEL command successful.
ftp>
11.3.10
TLS command
Assuming user “xyz” is still connected, to list transfers carried out by “ectrans” the “dir” or “ls” command needs
to be invoked with the tls command rather than the list command (called by the client dir/ls command):
ftp> quote alias list=tls
200 ALIAS command successful
ftp> dir
200 PORT command successful
150 Opening ASCII mode data connection
101459882739211 DONE
[email protected] Feb 25 01:02
101464623610330 STOP
[email protected] Feb 25 14:10
226 Transfer complete
ftp: 129 bytes received in 0.06Seconds 2.15Kbytes/sec.
ftp>
ECMWF Technical Notes
59
ECaccess User Guide
It is also possible to get information for a specific transfer (101464623610330 for example):
ftp> dir 101464623610330
200 PORT command successful
150 Opening ASCII mode data connection
Copyid: 101464623610330
MS user: xyz
Hostname: ecaccess.meteo.ms
Access: ECaccess gateway
Status: STOP
Error message: No such file or directory
Date/Time: Feb 25 14:10
Source: ./foo
Target: ./foo
226 Transfer complete
ftp: 243 bytes received in 0.05Seconds 4.76Kbytes/sec.
ftp>
To remove the alias:
ftp> quote alias list=list
200 ALIAS command successful
ftp>
The next “ls” or “dir” command will act normally.
60
ECMWF Technical Notes
12
Writing a script
This section shows how to write scripts to exploit the ECaccess extended FTP server.
The first subsection introduces “helpers”, small pieces of code, used to perform repetitive the tasks needed
to access the extended FTP server. The second subsection shows a sample script, using these helpers, to
print a list of files at ECMWF.
Note that the script described in this section are using the Bourne shell and assume that the Member State
ECaccess gateway (see section 2.2) runs on the server “ecaccess.meteo.ms”.
12.1
Helpers
The “default” helper is used to set the values of environment variables (it can be used to set ECHOST and
ECDOMAIN):
# Set default values
#
# Usage: default param1 param2 (result is in $res)
default() {
if [ "$1" == "" ]; then
res=$2
else
res=$1
fi
}
If the variable is already set, its current value is used; otherwise, the default value (second parameter) is
used. The value is returned in the “res” local parameter.
The “check” helper is used to stop the script (returning code param3), if a given code (param2) is found in a
given string (param1):
# Used to check return codes from FTP
#
# Usage: check param1 param2 param3
check() {
res=‘echo "$1" | grep "$2 "‘
if [ "$res" != "" ]; then
echo $res | sed 2,/./d | cut -c5exit $3
fi
}
This helper can be used to check return codes from FTP.
12.2
Sample script
First of all we have to set the “ftp” and “eccert” parameters (optionally with their full path):
#
# Check ftp and eccert are in the PATH:
#
ftp=ftp
eccert=eccert
ECMWF Technical Notes
61
ECaccess User Guide
Then we can set values for ECUSER, ECHOST and ECDOMAIN (using “default” helper):
#
# Set values for ECHOST and ECDOMAIN
#
default $ECHOST ecaccess.meteo.ms; ECHOST=$res
default \verb!$ECDOMAIN! echome; ECDOMAIN=$res
If the “ECHOST” parameter is not set, we use the “ecaccess.meteo.ms” host name and, if the “ECDOMAIN”
is not set, we take the “ecgate” home directory (which is the “echome” domain).
Then we can create the temporary password calling the “eccert” command provided within the “ecaccess”
distribution:
#
# Create temporary passcode:
#
eccert=‘$eccert -ecpass‘
if [ $? != 1 ]; then
$echo -n $eccert
exit 2
fi
ecuser=‘echo $eccert | $awk -F":" ‘{printf("%s\n",$1)}’‘
ecpass=‘echo $eccert | $awk -F":" ‘{printf("%s\n",$2)}’‘
If authentication fails, the script stops. Error code 2 is returned (authentication error).
FTP can now be called (the result is stored in the local parameter called session):
#
# Call ftp:
#
session=‘$ftp -v -n -d 2>/dev/null <<**
open $ECHOST
quote USER $ecuser@\verb!$ECDOMAIN!
quote PASS $ecpass
ls $*
bye
**‘
If FTP is successful (return code is 0), the result must be checked (using the “check” helper) to ensure there
are no error codes (451, 501, 425 or 426):
#
# Analyse previous ftp session:
#
if [ $? == 0 ]; then
#
# Check for error messages:
#
for n in 425 426 451 501 530 550; do
check $session $n
done
#
# Check for binary transfers (150 to 226):
#
if [ "‘echo "$session" | grep ‘226 T’‘" != "" ]; then
echo "$session" | \
62
ECMWF Technical Notes
12.3
More examples
sed -n ‘/ˆ150 O/,/ˆ226 T/p’ | \
sed ‘/150 O/d | \
sed ‘/226 T/d
exit 0
fi
fi
If an error code is found, the script stops and returns it (using the “check” helper). Otherwise, the list of files
(extracted between messages “150” and “226”) is displayed.
If messages “150” and “226” are not found the following code is executed:
#
# ftp or protocol error (if debug display session):
#
if [ "$ECDEBUG" != "yes" ]; then
echo "ftp error (try ‘ECDEBUG=yes $0 [args ...] to enable debugging)!"
else
echo "$session"
fi
exit 3
If the debug mode is not set, the user is invited to use it (to get more details), otherwise the complete session
content is displayed. Return code is 3, indicating a protocol error.
12.3
More examples
The “.ecaccess” script (used to implement the Shell commands) gives a more complex example using all the
extended FTP features.
ECMWF Technical Notes
63