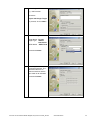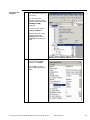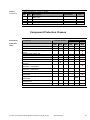
1
Premium with AS-Interface Master Magelis, TeSysU and Preventa System User Guide 33003960.00 [source code] SEP 2006 Contents Application Source Code................................................................................................... 4 Typical Applications .......................................................................................................... 5 System................................................................................................................................ 6 Architecture ....................................................................................................................... 6 Installation ....................................................................................................................... 10 Hardware...............................................................................................................................................12 Software................................................................................................................................................19 Communication ......................................................................................................................................20 Implementation ................................................................................................................ 23 PLC.......................................................................................................................................................24 AS-Interface Configuration......................................................................................................................46 HMI .......................................................................................................................................................49 Safety Monitor........................................................................................................................................67 Data Exchange ......................................................................................................................................79 Appendix .......................................................................................................................... 82 Detailed Component List .................................................................................................. 82 Component Protection Classes ........................................................................................ 85 Component Features ....................................................................................................... 86 Contact ............................................................................................................................. 90 Introduction This document is intended to provide a quick introduction to the described System. It is not intended to replace any specific product documentation. On the contrary, it offers additional information to the product documentation, for installing, configuring and starting up the system. A detailed functional description or the specification for a specific user application is not part of this document. Nevertheless, the document outlines some typical applications where the system might be implemented. Premium with AS-Interface Master Magelis,TeSysU and Preventa_EN.doc Schneider Electric 2 Abbreviations Word / Expression AC Advantys Altivar (ATV) CANopen CB CoDeSys ConneXium DC EDS E-OFF, E-STOP Harmony HMI I/O IclA (ICLA) Lexium/Lexium05/LXM Magelis MB - SL Micro NIM Osiswitch PC Phaseo PLC Powersuite Premium Preventa PS1131 (CoDeSys) PS SE Sycon Telefast TesysU Twido TwidoSoft TwidoSoft Unity (Pro) Vijeo Designer VSD WxHxD XBT-L1000 Zelio ZelioSoft Signification Alternating Current SE product name for a family of I/O modules SE product name for a family of VSDs Name for a communications maschine bus system Circuit Breaker Hardware-independant IEC 61131-3 programming software SE product name for a Family of Transparent Factory devices Direct Current Electronic Data Sheet Emergency Off switch SE product name for a family of switches and indicators Human Machine Interface Input/Output SE product name for a compact drive SE product name for a family of servo-drives SE product name for a family of HMI-Devices SE name for a serial Modbus communications protocol SE product name for a middle range family of PLCs SE product name for a Network Interface Module SE product name for a family of position switches Personal Computer SE product name for a family of power supplies Programmable Logic Computer An SE software product for configuring drives SE product name for a middle range family of PLCs SE product name for a family of safety devices SE Product name for PLC programming software with CoDeSys Power Supply Schneider Electric SE product name of a Field bus programming software SE product name for a series of distributed I/O devices SE product name for a decentralised I/O System SE product name of a middle range family of PLCs SE product name for a PLC programming software SE product name for a PLC programming software SE product name for a PLC programming software An SE software product for programming Magelis HMI devices Variable Speed Drive Dimensions : Width, Height and Depth An SE software product for programming Magelis HMI devices SE product name for a low range PLC family SE product name for a PLC programming software Premium with AS-Interface Master Magelis,TeSysU and Preventa_EN.doc Schneider Electric 3 Application Source Code Introduction Examples of the source code used to attain the system function as described in this document can be downloaded under this online link. The example source code is in the form of configuration, application and import files. Use the appropriate software tool to either open or import the files. Extension AIW CNF CO CSV CTX DCF DIB DOC DOP EDS FEF GSD ISL PB PDF PRO PS2 RTF STU STX TLX TWD VDZ XEF XPR ZM2 File Type Configuration file Configuration file CANopen definitions file Comma Seperated Values, Spreadsheet Device Configuration File Device Independent Bitmap Document file Project file Electronic Data Sheet – Device Definition Export file EDS file (Geraete Stamm Datei) Island file, project file Profibus definitions file Portable Document Format - document Project file Export file Rich Text File - document Project file Project file Project file Project file Project file Export file Project file Project file Premium with AS-Interface Master Magelis,TeSysU and Preventa_EN.doc Schneider Electric Software Tool Required Advantys Sycon Sycon Twidosoft Unity Advantys Sycon Microsoft Word Magelis XBTL Industrial standard PL7 Profibus Advantys Sycon Adobe Acrobat PS1131 - CoDeSys Powersuite export file Microsoft Word Unity Pro PL7 Twinline control tool TwidoSoft Vijeo Designer Unity Pro TwidoSuite Zeliosoft 4 Typical Applications Introduction Here you will find a list of the typical applications, and their market segments, where this system or subsystem can be applied: Industrial Small to middle sized automated machines De-centralised automated sub systems serving as components in large or middle sized machines Building/Services Material elevators, e.g. in cafeterias or hospitals Climate control in greenhouses Application Industry conveying & handling moving walkway machinery automation systems, with low complexity Building / services lift escalator Lighting management Access, control and surveillance management Heating and air Description Image The example shows a small conveying system. The control elements are: operator interface peripheral motor control AS-Interface The example shows a lift control system. The control elements are: operator interface central motor control AS-Interface on each floor AS-Interface in the shaft AS-interface in the car conditioning management Premium with AS-Interface Master Magelis,TeSysU and Preventa_EN.doc Schneider Electric 5 System Introduction The system chapter describes the architecture, the dimensions, the quantities and different types of components used within this system. Architecture General The architecture comprises three main-function groups: Control cabinet with operator interface Remote cabinet with motor control Subsystem for the field installation Each of the three groups is described separately. Layout Central Cabinet Premium with AS-Interface Master Magelis,TeSysU and Preventa_EN.doc Schneider Electric 6 Control Cabinet The control cabinet comprises the following main components: Premium PLC with AS-Interface master module Magelis XBT-GT display terminal (graphical monochrom display) 3 TeSysU motor starters with AS-Interface (TeSysU) Optional: AS-Interface safety monitor, AS-Interface emergency-off switch with redundant load contactors for disconnecting the 400 V AC power supply The central devices in this control cabinet include the Twido PLC, the Magelis HMI and the optional safety provided in the event of an emergency-off, by means of which the load is disconnected via an AS-Interface safety monitor with assigned contactors. As well as the distribution board for the load power supply for the load components (400/230 V AC), this control cabinet also houses the conventional 24 V and AS-Interface power supplies, along with three TeSysU type motor starters. Layout Remote Cabinet and Field installation Remote Cabinet Optional Safety Function The remote cabinet comprises the following main components: 3 TeSysU motor starters with AS-Interface (TeSysU) 4 digital IP20 I/O modules with AS-Interface (ASI20MT) Optional: AS-Interface safety monitor, AS-Interface emergency-off switch with redundant load contactors for disconnecting the 400 V AC power supply. The TeSysU motor starters can be installed side-by-side and supplied with power via busbars in order to minimize requirements in respect of space and wiring. The IP20 I/O modules can also be installed side-by-side to save space. Furthermore, an AS-Interface safety monitor with associated redundant load contactors for implementing an optional safety guard function is also assigned to this cabinet. The AS-Interface emergency-off switch is connected to the shared yellow AS-Interface cable (this means that it does not have to be wired separately). Although the emergencyoff switches on the main cabinet and on the remote cabinet will trigger both safety monitors, if the door safety function (which is controlled by the roller limit switches) is cancelled, only the safety monitor in the remote cabinet will be disconnected. Premium with AS-Interface Master Magelis,TeSysU and Preventa_EN.doc Schneider Electric 7 Field Installation The field installation essentially comprises 3+2 ASI67FMP digital IP67 I/O modules. The last two modules are optional field devices and can be used for remote control (start/error unlatching) of the safety monitors. As the IP67 modules and their connection adapters do not require enclosures, their installation location and type can be selected in accordance with requirements. Field installations can, therefore, be set up anywhere and in any configuration using cables and sensors with the appropriate degree of protection. Components Hardware for the control cabinet: Vario VCF master switch (with red and yellow knob) (MS) - optional GV2ME motor circuit breaker (MCB) Multi 9 circuit breaker, 1- and 2-pole (CB) Phaseo power supply, 30V (PS) for AS-Interface Modular Premium PLC with Ethernet interface and AS-Interface-Master (PLC) Magelis XBT-GT display terminal (graphical monochrom display) 3 x TeSysU-Motor starter with AS-Interface (TeSysU) Optional: Devices required for safety in the control cabinet ASISAFEMON1 safety module for AS-Interface Safety@Work ASISSLB4 with mushroom pushbutton attachment (tamper-proof) 2 x LC1D load contactors Hardware for the remote cabinet: 3 x TeSysU motor starters with AS-Interface (TeSysU) 1 x GV2G busbar with GV1G terminal blocks 3 x taps for connection to the AS-Interface bus 4 x ASI20MT digital IP20 I/O blocks (4 transistor inputs/3 transistor outputs) with AS-Interface (IP20 I/O) 4 x ASI20MACC IDCs (IDC = Insulation Displacement Connector) for connection to the AS-Interface bus Optional: Devices required for safety in the remote cabinet ASISAFEMON1 safety module for AS-Interface Safety@Work ASISSLB4 with mushroom pushbutton attachment (tamper-proof) 2 x LC1D load contactors Hardware for field installation: 3(5) x ASI67FMP digital IP67 I/O blocks (4 transistor inputs/3 transistor outputs) with AS-Interface (IP67 I/O) 3(5) x ASIDCMP for connection to the AS-Interface bus XZCP1564x jumper cable for connection to machines or similar AS-Interface cable, yellow and black (yellow: bus; black: 24 V aux. power) Optional: Safety components in the field ASISAFEMON1 safety module for AS-Interface Safety@Work ASISSLC2 safe AS-Interface slave for 2 safe inputs XCS39M15xx roller limit switches for safety door supervision XB5AW illuminated pushbutton in XALD housing Software: Unity Pro 2.2 XL Vijeo-Designer 4.3 ASISWIN 2 V2.0.3 (optional) Premium with AS-Interface Master Magelis,TeSysU and Preventa_EN.doc Schneider Electric 8 Quantities of Components For a complete and detailed list of components, the quantities required and the order numbers, please refer to the components list at the rear of this document. Degree of Protection Not all the components in this configuration are designed to withstand the same environmental conditions. Some components may need additional protection, in the form of housings, depending on the environment in which you intend to use them. For environmental details of the individual components please refer to the list in the appendix of this document and the appropriate user manual. Technical Data Mains Voltage Power Requirement Drive Power Rating Motor brake Connection Safety Level Safety Notice The standard and level of safety you apply to your application is determined by your system design and the overall extent to which your system may be a hazard to people and machinery. 400 VAC ~ 5 kW <= 0,75 kW none 5 x 2,5 mm² (L1, L2, L3, N, PE) category 3 (optional) In this application example, category 3 has been selected for the safety level. Category 3 is the second highest safety level according to EN954-1. Whether or not the above safety category should be applied to your system should be ascertained with a proper risk analysis. This document is not comprehensive for any systems using the given architecture and does not absolve users of their duty to uphold the safety requirements with respect to the equipment used in their systems or of compliance with either national or international safety laws and regulations Dimensions The control cabinet components can be housed in an enclosure with external dimensions of approx. 600 x 1000 x 300 mm (WxHxD). The safety module with circuit breaker can also be included in the cabinet. The components of the remote cabinet can be installed in very close proximity to one another. The TeSysU motor starters can be installed side-by-side and supplied with power via busbars. The IP20 I/O modules can also be installed side-by-side. The external dimensions of the remote cabinet, as with the main cabinet above, need to be approx. 600 x 1000 x 300 mm (WxHxD). Again, this allows a 20% reserve for optional devices. An enclosure is not required for the field devices and taps. Thanks to IP 67 degree of protection, the installation location can be adapted to meet requirements and, therefore, be situated near to the sensors and actuators in the field. Premium with AS-Interface Master Magelis,TeSysU and Preventa_EN.doc Schneider Electric 9 Installation Introduction This chapter describes the steps necessary to set up the hardware and configure the software required to fulfil the described function of the application. Assembly Premium with AS-Interface Master Magelis,TeSysU and Preventa_EN.doc Schneider Electric 10 Notes The components intended for installation in a control cabinet, i.e. Phaseo power supply unit, safety monitor, automatic circuit breakers, load contactors, and motor starters, can be connected to a 35 mm DIN rail. The Premium-PLC, with its rack, can be mounted directly on the rear wall of the cabinet. The emergency-off switches and the installation box for the main switch have been designed for installation in a cabinet door. Two mounting options are available for XB5 pushbuttons and indicator lamps: 1. A hole measuring 22 mm drilled into the front door of the control cabinet in the appropriate location. 2. An XALD housing able to accommodate up to 5 momentary-contact switches or indicator lamps. This XALD housing is designed for backplane mounting or direct wall mounting. 400 V AC wiring between the main circuit breaker, primary side of the 24 V power supply plus motor circuit breakers, motor starters and motors. 230V AC-wiring between the master switch and Premium (the premium also has a power supply of 24 VDC). 24 V DC wiring between power supply unit and safety module. AS-Interface power supply and auxiliary power supply (30/24 VDC) via yellow and black AS-Interface cable. Premium with AS-Interface Master Magelis,TeSysU and Preventa_EN.doc Schneider Electric 11 Hardware Components Control Cabinet Installation box GV2MP + Emergency-off switch GV2K04 + Combination for the installation of a GV2ME motor circuit breaker in a cabinet door as a circuit breaker with fault clearing capability (lockable) Control lamp GV2SN37 Motor circuit breaker GV2ME16 Circuit breaker 2-pole multi9 Circuit breaker 1-pole multi9 Premium with AS-Interface Master Magelis,TeSysU and Preventa_EN.doc Schneider Electric 12 Phaseo power supply unit ASIABLM3024 Components Control Cabinet Power section, motor starter (reversing contactor) LU2B12B + Control module motor starter LUCA05BL AS-Interface module ASILUF C5 + Coil connection LU9MRC + AS-Interface tap XZCG0142 Busbar system GV2G345 with terminal block GV1G09 Premium with AS-Interface Master Magelis,TeSysU and Preventa_EN.doc Can only be used if the motor starters are installed side-by-side. Schneider Electric 13 Premium-PLC TSXP572634M + Power Supply TSXPSY2600 + Rack TSXRKY6EX + Terminal Resistor TSXTLYEX (1) display (1) TER-socket (1) AUX-socket 5 PCMCIA-slot for memory card 6 PCMCIA-slot for communcations card 8 Ethernet Port 10 RESET button Components Control Cabinet Premium AS-Interface Master Module TSXSAY1000 Magelis terminal XBTGT1100 (1) XBTGT1100 without Ethernet Option in main cabinet: Emergencyoff and safety guard AS-Interface safety monitor ASISAFEMON1 Premium with AS-Interface Master Magelis,TeSysU and Preventa_EN.doc Schneider Electric 14 Emergency-off ASI SSL B4 + ZB4BS844 Safe input slave 1 x 2 inputs ASISSLC2 Harmony 5 momentarycontact switch with LED XB5AW-36M5 and switch housing XALD01 TeSys load contactor LC1D09BL Components Remote Cabinet Power section, motor starter (reversing contactor) LU2B12B + Control module, motor starter LUCA05BL Premium with AS-Interface Master Magelis,TeSysU and Preventa_EN.doc Schneider Electric 15 AS-Interface module ASILUFC5 + Coil connection LU9MRC + AS-Interface tap XZCG0142 Busbar system GV2G345 with terminal block GV1G09 Can only be used if the motor starters are installed side-by-side. AS-Interface Input/output module (IP20) ASI20MT4I3OSE with ASI20MACC1 ASI 20MACC1 Option in Remote cabinet: Emergency-off and safety guard Emergency-off ASISSLB4 + ZB4BS844 Premium with AS-Interface Master Magelis,TeSysU and Preventa_EN.doc Schneider Electric 16 AS-Interface safety monitor ASISAFEMON1 TeSys load contactor LC1D09BD Components Field Installation AS-Interface input/output block IP67 ASI67FMP43E with ASIDCPM12D03 ASI DCPM 12D03 AS-Interface sensor/actuator connection XZCP1564x Premium with AS-Interface Master Magelis,TeSysU and Preventa_EN.doc Schneider Electric 17 Option: Safety in the field Safe input slave 1x 2 inputs ASISSLC2 Safety limit switch XCSM3915L1 Acknowledgement button housing Harmony 5 Push button with LED XB5AW36M5 and switch housing XALD01 Premium with AS-Interface Master Magelis,TeSysU and Preventa_EN.doc Schneider Electric 18 Software General The programming software tool Unity is used for programming the Premium PLC. This software is also used for configuring the communication of the AS-Interface and assigning the I/O. The Magelis display is configured using the software tool Vijeo-Designer. The ASISWIN software is used for first use and parameterization of the two optional safety monitors. To run the software, you must have one of the following Windows operating systems installed on your PC: Windows 2000 or Windows XP The default installation path on the hard drive of your PC for each of these software programs is: Unity: Vijeo-Designer: ASISWIN: Unity Pro XL V2.2 C:\Program Files\Schneider Electric\Unity C:\Program Files\Schneider Electric\Vijeo-Designer C:\Program Files\Schneider Electric\ASISWIN Vijeo-Designer V4.3 ASISWIN V2.0.3 Note: To use the example program for Vijeo Designer you will need to download and install the patch V4.3.0C update Premium with AS-Interface Master Magelis,TeSysU and Preventa_EN.doc Schneider Electric 19 Communication General This architecture uses 2 different communication systems: UniTelway AS-Interface A Unitelway connection is used to exchange data between the Magelis terminal and the Premium PLC. The XBTZ9680 communication cable shown below is needed to connect these two devices. The software driver required for Unitelway communication is contained in both the software package for the Magelis panel and the Premium PLC. The AS-Interface communication consists of Premium Mastermodules TSXSAY1000. Each master can be expanded up to 62 Moduls. When using standard modules and safety Slaves together, 31 Modules can be used. Premium <> PC Serial Programming Cable TSX PCX 1031 Optional: USB Programming Cable TSX PCX 3030 Driver must be installed seperately. Standard Cross-Over CAT5 cable can be used for programming via the Ethernet interface. Magelis <> Premium Communication Cable XBTZ9780 Premium with AS-Interface Master Magelis,TeSysU and Preventa_EN.doc Schneider Electric 20 Magelis <> PC USB Programming Cable XBTZG925 AS-Interface IP20-Modules In-/Outputs AS-Interface IP20 Motor-starter module Module for use in a cabinet ASI 20MT4I3OSE Connection for using TeSysU-devices, consisting of 3 components : ASILUFC5 ASILUFC5 XZCG0142 LU9MRC *) *) resistor module integrated in TeSysU, no image ASIDCPM12D03 AS-Interface IP67-Modules In/Outputs Modules for use in the Field ASI67FMP43E ASIDCPM12D03 ASI67FMP43E Premium with AS-Interface Master Magelis,TeSysU and Preventa_EN.doc Schneider Electric ASIDCPM12D03 21 AS-Interface Safety Monitor (optional) AS-Interface safety Slaves (optional) Expansion module connects to the Twido ASISAFEMON1 Safety Input slaves for AS-Interface for implementing safety functions : ASISSLB2 ASISSLB2 ASISSLC2 ASISSLC2 Premium with AS-Interface Master Magelis,TeSysU and Preventa_EN.doc Schneider Electric 22 Implementation Introduction Function This chapter describes how to install and set up the software for the task associated with the following application. 1. The entire application is controlled via the Magelis terminal in the main cabinet. The installed hardware must be operational: - The components must have been installed correctly. The main switch, circuit breakers and motor starters must have been switched on. The emergency-off switch must be off (neither pressed nor latched). The roller limit switches for the safety guard function must both be in their proper positions (safety guard established). Both safety monitors must have been acknowledged (the blue indicator lamp has gone out). 2. The HMI has several screens for monitoring and controlling the motor starters. Each screen indicates the states of the motor starters (ready/running) and enables them to be controlled (forward/reverse). 3. Two additional HMI screens are used for supervising the AS-interface and the Safety modules 4. The right-hand navigation buttons (R1-R6) are used to control the corresponding TeSysU 5. The Alarm screen can be called up to display the current system condition. Premium with AS-Interface Master Magelis,TeSysU and Preventa_EN.doc Schneider Electric 23 PLC Introduction The PLC chapter describes how to initialize, parameterize and download the program to the PLC in order for the functional scope outlined above to be provided. The PLC program is created using the Unity Pro XL software.. Preconditions The procedure described below is subject to the following preconditions: Create a New Project 1 Version 2.2 of Unity Pro XL is installed on your PC. The Unity example project is at hand. The Premium-PLC is connected to the power supply and switched on. The PLC and PC are connected to each other with the programming cable TSXPCX1031, via the TER port on the PLC. To create a new Unity project select: File->New or use the New Project icon 2 In the following dialog select the CPU type. Our example uses a Premium. A double click on the CPU type Premium opens up a selection list. Change PLC Type 1 In the list of premiums displayed select: TSXP572634M If your CPU does not have the suffix M, assume it has. (models without M are older models but work just the same) Continue with OK Premium with AS-Interface Master Magelis,TeSysU and Preventa_EN.doc Schneider Electric 24 2 Once the CPU type has been defined you are shown the Unity desktop. 3 In the Project Browser select : Station-> Configuration-> 0:X-Bus 4 Start the hardware configuration by double clicking the marked element (right mouse click works too) to open up a pop-up menu for the bus. Here, select: Open. 5 The graphical configuration display opens. Unity automatically offers a default power supply module If the power supply module is not of type TSXPSY2600 (as used in the example) then it must be changed Double click on the modul and select the new one. Premium with AS-Interface Master Magelis,TeSysU and Preventa_EN.doc Schneider Electric 25 Inserting a Memory Module 1 add the memory extension card to slot A on the CPU. Right mouse click on the slot opens up a menu. Select: New/Replace Submodule.. In our case we are using the memory expansion card type: TSXMAPC002M with 2 MB memory. 2 In the New/Replace Submodule dialog select the card type : TSXMAPC002M under SRAM. continue with OK. Adding Extension Modules 1 To add the AS-InterfaceMaster module click on an empty slot with the right mouse button. Click on New Device.. in the pop-up menu. 2 In the New Device dialog expand the Communication section and select the AS-Interface Master TSXSAY1000. Continue with OK. Premium with AS-Interface Master Magelis,TeSysU and Preventa_EN.doc Schneider Electric 26 AS-Interface Configuration 3 the module has now been added to the graphics image in the slot that you selected. 4 The Project Browser also shows the added devices in its projct directory. 1 In the project browser you will now see that an AS-Interface V2 (AS-i V2) bus has been added. To configure all the modules, double click on it. Premium with AS-Interface Master Magelis,TeSysU and Preventa_EN.doc Schneider Electric 27 2 An empty configuration dialog appears. 3 A double click on an AS-Interface-Slave entry (left A- and right B-channel), opens up the Associate Profile dialog. Here you can select the AS-I family name. Note: Slave 0 cannot be configured. 4 To configure the TeSysU Modules select the family group with Code 4 Motorstarters and then select the TeSysU Modul ASILUFC5 in the catlog below it. Confirm the selection with OK. 5 Repeat the above selection to integrate the other 5 TeSysU modules. Premium with AS-Interface Master Magelis,TeSysU and Preventa_EN.doc Schneider Electric 28 6 In this image all the standard slaves and 2 extended slaves on the B channel have been configured. Slave 1A-6A ASILUFC5 Slave 7A-9A ASI67FMP43E Slave 7B-8B ASI67FMP43E Slave 10A-13A ASI20MT4I3OSE 7 Safety Modules always require both A and B Kanal. Slave 21 + 22 Slave 25 8 ASISSLB4 ASISSLC2 The same applies to the safety monitors on the last 2 addresses. Slave 31 + 30 ASISAFEMON1 Safety Monitors for the ASInterface bus should always occupy the last addresses. 9 Setting the check-box Automatic Addressing allows the PLC to automatically configure replacement slaves that have been changed for maintenance/repair. Premium with AS-Interface Master Magelis,TeSysU and Preventa_EN.doc Schneider Electric 29 10 The addresses are listed in the Input / Output Symbols table. They have the format: %I\Slot.Slave\0.0.0-3 e.g.: %I\1.12\0.0.0 => Input (%I\) on AS-Interface-Master in Slot 1 (\1.) at Slave 12A (.12\) Wort 0 (\0.0.0) %Q\2.112\0.0.3 => Ouput (%Q\) on AS-InterfaceMaster in Slot 2 (\2.) at Slave 12B (.112\) Word 3 (\0.0.3) 11 2 AS-Interface Masters on one CPU is not possible – the image is for examples only. The family and code are shown in the Specifications 12 Unity only allows you to configure the AS-InterfaceSafety-Slaves. They cannot be addressed. The modules must be configured in Unity howecer, so that the safety monitor can recognise them. 13 To take on the changes, the configuration is only accepted when the check box (upper left corner) is set. If you exit the dialog before setting the check box all changes are lost. Premium with AS-Interface Master Magelis,TeSysU and Preventa_EN.doc Schneider Electric 30 Configuring the Ethernet Interface 14 After changing the configuration, the changes can be seen in the project browser. 1 Select Communication In the project browser and open the directory tree. Premium with AS-Interface Master Magelis,TeSysU and Preventa_EN.doc Schneider Electric 31 2 Under Communication, right mouse click on Network to open up a popup menu. In the menu select: New Network.. 3 In the Add Network dialog that now appears, select the type of network. Here, Ethernet. 4 Give the network a name and exit with OK . Here, the name Ethernet_Premium1 is used. 5 after successfully configuring the Ethernet network, it is displayed in the project browser under Networks with the name you have given it. Note the icon has a red cross on it to signify that it has not been consigned to an interface. Premium with AS-Interface Master Magelis,TeSysU and Preventa_EN.doc Schneider Electric 32 Setting the Ethernet Address 1 The IP addresse can be assigned by double clicking on the element Ethernet_Premium1 in the project browser. In the dialog you can enter the Model Family. Here there are several different types of model but only those fitting the configured interface are listed. 2 Choose an IP address from your private IP range Hier einfach eine IP. Here, we have chosen: IP: 192.168.100.10 Subnet: 255.255.255.0 A Gateway is not necessary. 3 Again, to take-on the configuration you must set the check box. Optional: Once the program has been downloaded to the PLC, if your PC is in the same network (i.e. IP-range: 192.168.100.0-255), you can use the Ethernet connection to communicate with the PLC 4 To link the Network to the CPU Ethernet interface, select the graphic display via the X-bus entry in the project browser. Premium with AS-Interface Master Magelis,TeSysU and Preventa_EN.doc Schneider Electric 33 5 In the graphic display left clcik on the ETY PORT module to enter the pop–up and select: Open module 6 In the dialog that opens up, select Channel 0. 7 In the list box Function select ETH TCP IP. Premium with AS-Interface Master Magelis,TeSysU and Preventa_EN.doc Schneider Electric 34 8 Once the function has been selected, the dialog expands to allow the choice of a Net Link. cahng ethe default value No Link to the name of the ethernet network in the project browser Ethernet_Premium1. 9 To take on the changes set the check box on the left in the tool bar. 10 Check the entry in the Project Browser under Communication to see if the red cross has disappeared. If the configuration was successful you should now see a PLC icon. If this is so, the network can now be used. Configuring Variables 1 Expand the entry Variablen & FB Instances in the Project Browser. click on the entry Elementary Variables Premium with AS-Interface Master Magelis,TeSysU and Preventa_EN.doc Schneider Electric 35 2 3 In the desktop you should now see the variables table. Note the tabs at the top for the different types of variables and that the list is empty. A double click on an empty field in the Name column allows you to enter the name of a variable. 4 To select the variable type double click on the column Type and select one of the offered data types. 5 Similarly add the memory address of the variable in the column Address. 6 A comment can be added in the Comment column. 7 To create more variables you can ‚pull‘ a vriable name from one line to the next. the editor will automatically shuffle the list, if needed, to make room for the new variable. the new varaibles have the same name as the original with a suffix added. _0, _1, _2, _3 etc. Create a Program 1 In the Project Browser under: New Section Programm-> Tasks-> MAST-> Sections. Premium with AS-Interface Master Magelis,TeSysU and Preventa_EN.doc Schneider Electric 36 2 Right mouse click on Sections opens up a popup menu. select: New Section 3 In the New dialog that appears select the programming language and give the section a Name. This example uses FBD and Safety. Exit the dialog with OK. The section name should now appear in the project browser. Function Block for AS-Interface Safety Monitor 1 To select a function block right mouse click in the FBD editor. in the pop-up menu select FFB Input Assistant 2 The assistent lists all the function blocks that have already been instanced in the program. Here, in a new program, it is empty. Click on the icon at the end of the list box FFB Typ Premium with AS-Interface Master Magelis,TeSysU and Preventa_EN.doc Schneider Electric 37 3 The dialog now displayed lists the names of all the Libraries and the function blocks existing in those libraries that were delivered with Unity. 4 The function block for the safety monitor is a DFB. To find the DFB for the safety monitor set the check box DFB. Only libraries with DFBs are now listed. Select a library and browse the list of DFBs it contains. 5 Select the DFB SAFETY_MONITOR and click on OK The Function Input Assistant now lists the input and output parameter names and their data types for this function block. Exit this dialog with OK to position the DFB in the FBD editor. 6 Here is the DFB displayed in a section. You can use drag & drop to position the function block. Premium with AS-Interface Master Magelis,TeSysU and Preventa_EN.doc Schneider Electric 38 7 Double-click on a pin of the DFB to enter a variable name for that parameter. Note: the datatype of the variable and parameter must match. there are several ways to enter a variable: 8 Type in a Name in the box. Select an existing variable from the list (downward arrow) Select a Variable from the complete variable list (dotted icon) Abort the input (cross icon) Confirm the selection (tick icon) The F1 function key calls up the helptext. Inputting the function block name (Safety_Monitor) in the index gives the help text on the function. 9 The function block still has the instance name given to it by the system (FBI_0). To rename the instance, a right mouse click on the function block invokes a pop-up menu. Here, select: Data Properties Premium with AS-Interface Master Magelis,TeSysU and Preventa_EN.doc Schneider Electric 39 10 In the Data Properties dialog double-click on the name to change it to a better mnemonic, e.g. Safety_Mon1. 11 The new name now appears in the Data Properties and will also be displayed above the DFB in the FBD section. 12 the Variable List also displays the new instance name of the DFB. Premium with AS-Interface Master Magelis,TeSysU and Preventa_EN.doc Schneider Electric 40 Open an existing Program 1 To work on an existing program use File->Open. 2 In the open dialog select the path to look in. Enter the file type you wish to open (*.STU). The files of the selected type in the given path are listed. Select a file and click on Open to load it. Premium with AS-Interface Master Magelis,TeSysU and Preventa_EN.doc Schneider Electric 41 Build the Program 1 Before downloading a program it must be built, i.e. compiled. Select: Build->Rebuild All Project to generate the program. 2 Confirm the safety warning with Yes. 3 The progress bar is now displayed. 4 The process of the Build is displayed in the window beneath the main window. Once the build is finished errors/warnings are listed. If errors are indicated these must be remedied before you can download the program. Warnings do not block the download but may still need to be remedied. Premium with AS-Interface Master Magelis,TeSysU and Preventa_EN.doc Schneider Electric 42 Connect the PLC 1 Before making a connection between the PC and the PLC they must be connected with the programming cable TSXPCX1031 (serial). Ensure that the cable is set to TER Direct (2). Use the TER port on the PLC. 2 Before connecting to the PLC the connection must be setup. Select: PLC->Set Address 3 in the Set Address dialog set Address : SYS Media : UNTLW01 for the serial Unitelway connection. Premium with AS-Interface Master Magelis,TeSysU and Preventa_EN.doc Schneider Electric 43 Download the program to the PLC 1 To download a program to the PLC the connection must first be established. select: PLC->Connect 2 3 The connection status is indicated in the status bar at the bottom of the window. The image shows the PLC in RUN mode but running with a DIFFERENT program to that which is being viewed. To download the current select: PLC->Transfer Project to PLC To upload a program from the PLC use: PLC->Transfer Project from PLC 4 5 Before downloading the program you will be asked to confirm your action. Here you can set the check box PLC run after transfer to automatically start the PLC when the download is finished If the PLC is in RUN mode you will be asked to confirm the STOP before the download starts. Premium with AS-Interface Master Magelis,TeSysU and Preventa_EN.doc Schneider Electric 44 6 During the download you will see the progress bar. 7 When the download is finished you will be asked to confirm setting the PLC to run mode. 8 Once the download is finished and the PLC is started, the status bar should indicate EQUAL and RUN 9 Once the PLC is running you can animate the program sections. Here an example of an FBD section. Green coloured variables indicate a boolean 1 (high/on), red a boolean 0 (low/off). 10 The toolbar has iconsfor downloading, uploading, starting and stopping the PLC. Premium with AS-Interface Master Magelis,TeSysU and Preventa_EN.doc Schneider Electric 45 AS-Interface Configuration Introduction This chapter defines the steps required to initialise and configure the AS-interface. It includes the method of configuring the addresses of the AS-interface components. Equipment for Node Addressing 1 Use the ASITERV2 handheld to address the individual slaves. 2 Use the ASITERIR1 infrared adapter to address safe input slaves. ASITERV2 Handheld ASISSL* Safety Input Slaves Please note the coding key on the slave and connect the adapter to the node. 3 In order for slave addressing to be successful, the nodes must be connected to the power supply via the yellow ASInterface cable. Before you start addressing, switch the master ‘offline’ by pressing and holding down the PB2 button on the AS-interface master module for 3 – 4 seconds. The master will switch to offline mode and will indicate this on the module via an LED lighting up red next to the word OFF. Premium with AS-Interface Master Magelis,TeSysU and Preventa_EN.doc Schneider Electric 46 ASILUFC5 ASI20M* ASI67FMP* 4 5 Use the XZMG12 adapter to address ASI20M* and ASILUFC5 IP20 devices (TeSysU motor starters). Connect the adapter to the node via the yellow plug. On slaves requiring a 24 V auxiliary supply (black ASinterface cable) at output level (e.g., as is the case with TeSysU), the power supply must be connected when the nodes are programmed. Use the ASITERACC1F adapter to address IP67 field devices. M12 male with yellow and green plug-in connectors Connect the adapter to the M12 female ASI AUX on the right underside of the device. Addressing Slaves 1 To perform addressing, turn the rotary switch to the ADDR position and press the OK button on the top right. The device will now look for connected nodes and display the address of any slaves it locates within a few seconds. 2 If no ASi appears on the display, the device has not been able to locate any AS-I nodes and you should check the connection between the addressing device and the slave. Premium with AS-Interface Master Magelis,TeSysU and Preventa_EN.doc Schneider Electric 47 3 The address of the connected slave will appear on the display as read by the device. The factory setting for new slaves is 0. 4 You can press the two arrows in the centre of the device (up/down) to set the address in the range from 0 to 31 (0 is not a valid slave address). While an address is being set, the current address will continue to appear on the display. On slaves with advanced addressing, an A or B will appear on the display after the address, indicating the channel assignment. In this example, both the IP20 (ASI20M*) and IP67 (ASI67FMP*) modules support advanced addressing. The photo shows an ASI20MT4I3OSE module with address 12A. 5 Once you have set the required address, press OK to apply the setting. During transmission, the display will switch to ProG. 6 Once you have made the address setting, the new address will appear permanently on the device display. To address another device, press the ESC button on the left-hand side and resume the process at Step 4. Premium with AS-Interface Master Magelis,TeSysU and Preventa_EN.doc Schneider Electric 48 HMI Introduction This application features a touchscreen Magelis XBT-GT1100 HMI which can be connected to the PLC via Modbus or UniTelway protocol. Due to the Premium PLC UniTelway is used here. The terminal is programmed and configured using the Vijeo Designer software. Programming and configuring the HMI is described on the following pages. Preconditions The procedure described below is subject to the following preconditions being met. The configuration software tool, Vijeo Designer V4.30 is installed on your PC. The “Example.dop” project is available in the default directory that has been set up (C:\Program Files\Schneider Electric\XBT-L1000\Apps). The Magelis terminal is connected to the power supply. The Magelis terminal and the PC have been connected via the PC <> Magelis USB data cable (XBTZG925). note: For the example program you must also have at least the patch B for Vijeo Designer v4.30 installed. The example program was created using Vijeo Designer V4.3.0c and cannot be used with V4.3.0. Version 4.3.0b will accept the program. Create a new Configuration 1 After starting Vijeo Designer a dialog asks you if you to create a new, or open an existing, project. Select Create New Project and click on Next. Premium with AS-Interface Master Magelis,TeSysU and Preventa_EN.doc Schneider Electric 49 2 Input a Project Name e.g. “ASI Premium” and select: Project with Single Target To proceed, click on Next>. 3 Select the target device Target Name: Target1 Target Type: XBTGT 1000 Series XBTG Model: XBTGT1100 Proceed with Next>. 4 Other Magelis devices have an ethernet interface. The selected model has no ethernet interface and the input mask is de-activated. Proceed with Next>. Premium with AS-Interface Master Magelis,TeSysU and Preventa_EN.doc Schneider Electric 50 5 The Magelis needs the correct driver to exchange data with the PLC. Use Add to go to the driver selection dialog and select a new driver. 6 In the New Driver dialog Select: Manufacturer: Schneider Electric Industries SAS Driver: Uni-Telway Equipment: Unitelway Equipment 7 8 confirm with OK. After setting up the driver you can exit the dialog with Finish. Vijeo Designer now returns you to its work top, with an empty display and the project navigator. Premium with AS-Interface Master Magelis,TeSysU and Preventa_EN.doc Schneider Electric 51 Configuring the Programming Interface 1 Once the UnitelWay connection has been configured, the programming interface must be set up for the USB programming cable XBTZG925. In the Navigator, click on Target1 and view the information in the Property Inspector (lower window). If the Property Inspector is not visible a right mouse click on Target1 gives you a pop-up menu in which you can select the properties. Premium with AS-Interface Master Magelis,TeSysU and Preventa_EN.doc Schneider Electric 52 2 The default values offer a serial COM1 interface. As we are using a USB programmning cable this must be changed. 3 First check in the Windows device manager which COM port has been configured for the USB cable and that the cable is connected. In our example it is COM4 4 Now you can configure the port in the Property Inspector. Set the COM Port to (in our case) COM4. The type of connection remains as serial. Premium with AS-Interface Master Magelis,TeSysU and Preventa_EN.doc Schneider Electric 53 Configuring the UniTelway Driver 1 For better legability the name of the UniTelway Equipment01 should be changed. To do this right click on UniTelwayEquipment01 in the Navigator to go to the pop-up menu to do the Rename. 2 In the example it was renamed to Premium as the Premium uses this interface. Premium with AS-Interface Master Magelis,TeSysU and Preventa_EN.doc Schneider Electric 54 3 Right mouse click on UniTelway01 to setup the interface. In the pop-up menu select: Configuration.. . 4 In the driver configuration dialog the setup must match the setup as for the Unity TER interface. The Transmission Speed must changed from 9600 to 19200. 5 As a comparison, the Unity set up for the TER. Premium with AS-Interface Master Magelis,TeSysU and Preventa_EN.doc Schneider Electric 55 Linking Variables 1 (Variable Import from Program file) All the variables are already programmed in Unity. Vijeo Designer offers a function to Link Variables.. and read them in from the Unity program. To do this select the tab Variables in the Navigator In the Navigator, right mouse click on Target1 and in the pop-up menu select Link Variables.. 2 In the Link Variables dialog that opens up, enter the path and file type to display and the equipment (premium) Premium with AS-Interface Master Magelis,TeSysU and Preventa_EN.doc Schneider Electric 56 3 In the example the path is Unity, the file type is UnityPro (*.stu) and the equipment Premium. 4 After linking to the file, the dialog shows all the variables that can be imported By setting the check box next to the variable a selection of variables can be made (click select all for all variables). Clicking Add adds the selected variables to the Vijeo Designer variable list. Premium with AS-Interface Master Magelis,TeSysU and Preventa_EN.doc Schneider Electric 57 5 Added variables are now disabled in the list. When finished with the import clcik on Close. 6 The variables can be viewed in the Variables tab in the Navigator under: Traget->PLC_Premium Premium with AS-Interface Master Magelis,TeSysU and Preventa_EN.doc Schneider Electric 58 Creating a Variable 1 To create a new variable, right mouse click on Target1 or PLC_Premium. In the pop-up menu select: New Variable followed by the type of variable, here Discrete. 2 In the variable properties dialog you can enter the name and a description for the variable Important here is what device delivers the value if it comes from an external system. If this is the case you must enter a ScanGroup and a Device Address. The device address is not the hardware address. It is the memory address in the device that delivers the value. To select a device address click on the button at the right end of the list box. Premium with AS-Interface Master Magelis,TeSysU and Preventa_EN.doc Schneider Electric 59 3 In the dialog that opens, input the memory address of the variable as given in the device. The example here shows the discrete as bit 3 of memory word 55 and can be addressed as %MW55:X3 Exit with OK. 4 The device address is now listed in the list box. Confirm with OK. Import a Project 1 Select the Tab VijeoManager in the Navigator A right mouse click on Vijeo-Manager in the Navigator opens a pop-up menu. here, select: Import Project… If the Import Project function is de-activated, first shut all open projects with: File->Close Projekt Premium with AS-Interface Master Magelis,TeSysU and Preventa_EN.doc Schneider Electric 60 2 The import file is of type Vijeo-Frame Archive (*.vdz). Check that the path is correct and select a file to import. Click on Open to import the file 3 When the import is finished, acknowledge with OK. 4 In the Navigator you can now see the project listed. Double click on it to open it. Premium with AS-Interface Master Magelis,TeSysU and Preventa_EN.doc Schneider Electric 61 Example Program 1 The example program here has several screens that are activated through the touch screen or the buttons R1R6. 2 There are 2 alarm groups, grouped in a single alarm category. Premium with AS-Interface Master Magelis,TeSysU and Preventa_EN.doc Schneider Electric 62 Build the Program 1 Before you can downlaod a program to the HMI it must be compiled. Use the Build All function to do this Build->Build All 2 A progress bar will be displayed. 3 when the build is finished the feedback zone lists the results Only when the green coloured message Build Complete is shown can the program be downloaded to the HMI Premium with AS-Interface Master Magelis,TeSysU and Preventa_EN.doc Schneider Electric 63 Download the Program 1 The configurated connection of an imported program may be incorrect. First, check that the imported program has the correct programming cable, XBTZG925 (USB), configured. For this you can use the Property Inspector. Right mouse click on the program name (here plattform1) and select Properties in the pop-up menu 2 The Image shows a program using a serial connection on COM5. The example, however, uses a USB programming cable. Premium with AS-Interface Master Magelis,TeSysU and Preventa_EN.doc Schneider Electric 64 3 First check in the Windows device manager which COM port has been configured for the USB cable and that the cable is connected. In our example it is COM4 4 Now change the COM port to COM4. The interface type remains at serial. Premium with AS-Interface Master Magelis,TeSysU and Preventa_EN.doc Schneider Electric 65 5 Use: Build->Download All to start an automatic build before downloading the program to the HMI. 6 A progress bar is displayed. 7 Once the build is finished the Feedback Zone displays the results and indicates if the download is complete. Premium with AS-Interface Master Magelis,TeSysU and Preventa_EN.doc Schneider Electric 66 Safety Monitor Introduction This section describes how to parameterize, load, start, and stop the safety monitor. Please note that only an appropriate overall layout and appropriate interconnection of the individual function blocks in the software, along with their hardware structure, can ensure that the machine will operate correctly and in a manner that poses no risk to personnel or equipment. In order to transfer and also enable, start and stop an application on the safety monitor, a unique password must be entered, thereby ensuring protection against unauthorized access. As an additional measure, the RJ 45 programming port on the safety monitor can also be capped using the transparent plastic stoppers supplied with the product and sealed to prevent access. The breaking of a seal or removal of a stopper would indicate tampering. The Asiswin 2 software, which is described below, is used to create the application on the safety monitor. Preconditions The procedure described below is subject to the following preconditions being met: The ASISWIN V2.0.3 is installed on your PC. The safety monitor is connected to the power supply and to the AS-Interface master on the Twido (via the AS-i cable). The safety slaves and the standard slaves used for safety (e.g., for acknowledgement, error reset) are correctly addressed and ready for operation on the AS-Interface network. The PC is connected to the safety monitor (ASISAFEMON1) via the special interface cable (ASISCPC). The password for configuring the safety monitor is known (the default setting on delivery is “SIMON”). If you wish to adapt the preconfigured example to your application, example “Example.as2” must be available in the software’s default directory (“C:\Program Files\Schneider Electric\ASISWIN\Example.as2”). Premium with AS-Interface Master Magelis,TeSysU and Preventa_EN.doc Schneider Electric 67 Starting ASISWIN 1 When the ASISWIN software starts up, the screen opposite will appear, offering you the following options (some of which will be grayed out): Diagnostics New configuration Open configuration Load configuration from ASInterface safety monitor If this dialog box does not appear, use New or Open in the File menu. Create a New Configuration Setting up the Monitor 1 To create a new configuration, first assign a unique title to your configuration on the Information about monitor tab. In this example, an ASISAFEMON1, which has just one OSSD and basic functionality, is being used. Note: An ASISAFEMON2B safety monitor, however, would have two OSSDs, which could be switched independently or dependently and support an extended range of functions. Premium with AS-Interface Master Magelis,TeSysU and Preventa_EN.doc Schneider Electric 68 2 On the Information about bus tab, enter the safe and standard slaves you are using. If you are using standard slaves for acknowledgement and error reset, you will need to enter them here. The safe slaves' address range starts at address 21, the standard slaves' range is from 20 downwards. The safety monitors for which addresses 30 and 31 have been reserved are not entered here. 3 Enter the address of the safety monitor on the last tab, Diagnosis / Service. The highest addresses available on the bus should be assigned to the safety monitors; it is for this reason that, in this example, addresses 30 and 31 are being used for the safety monitors. In the example, the slave with address 8B is used with the first input (IN-0) to reset the safety monitor in the event of an error (e.g., if the delay time is exceeded for an NC/NO combination Confirm with OK. Premium with AS-Interface Master Magelis,TeSysU and Preventa_EN.doc Schneider Electric 69 Create a New Configuration 1 The screen on the right will appear for the base controller. A variety of functions can be implemented, these include: Emergency-off Safety guard Module Feedback loop Monitored start To use the individual blocks, drag the elements from the yellow area on the left-hand side to the white area on the right-hand side (1. OSSD). Premium with AS-Interface Master Magelis,TeSysU and Preventa_EN.doc Schneider Electric 70 Adding an EmergencyOff 1 The following dialog box will appear if you place a forced emergency-off in the area. In the Name field, enter a unique name, which will help you to find the device reliably and without confusion (all device names should be selected on this basis). Next, assign an Address to the device; only the addresses you entered as safe slaves when configuring the motor and have not yet used will appear. Local acknowledgement and the Start-up test are not used here. Note: If you activate the Start-up test, when the power supply is restored, the device specified must be forced (triggered) in order to be able to acknowledge the monitor. Confirm with OK. Premium with AS-Interface Master Magelis,TeSysU and Preventa_EN.doc Schneider Electric 71 Adding a Safety Guard 1 The example safety guard is implemented using two roller switches assigned to the same guard. As the switches are positioned to the left and right of the guard, the contacts are not forced directly; rather, there is a dependency between the two switches. On the left of the window, select the Safety guard module under Double channel dependent. A period of 0.5 s is entered for the Synchronization time. This time defines the permissible delay of the lagging roller switch. Confirm with OK. Adding a Monitoring Circuit 1 Once the switches and safety guard monitoring have been added to the configuration, the monitoring circuit for the load contactors is added. The default Switching time of 100 ms can be used for smaller compact load contactors (e.g., LC1D09). This value will need to be increased accordingly for larger load contactors. Confirm with OK. Premium with AS-Interface Master Magelis,TeSysU and Preventa_EN.doc Schneider Electric 72 Selecting the Start Condition 1 A standard non-safe slave now has to be configured for the monitored start of the monitor. In this example, slave 8B, which has already been used for the error reset, is used again with input IN-0. Note: Please note that for the slave type used (ASI67FMP), the designations are I1 to I4, although in the software, the designations start with IN-0 and end with IN-3. Confirm with OK. Defining a Stop Category 1 Switch-off features are based on stop category 0 (undelayed switch-off). Note: If frequency inverters have been integrated, a delayed switchoff (stop category 1) can be selected, enabling the controlled ramping-down of load disconnection. However, this option must be checked in respect of its relevance to safety. Confirm with OK. Premium with AS-Interface Master Magelis,TeSysU and Preventa_EN.doc Schneider Electric 73 2 The complete configuration of the monitor now looks like this. All conditions [32..34] must be true in order for the monitor to be enabled. Transferring the Configuration to the Monitor 3 Click on the check-mark icon to check the configuration. The result will appear in a separate window which will hide itself automatically. 1 The following preconditions now need to be met: 2 Connect the safety monitor to the power supply. Connect the configured ASinterface slaves via the yellow cable. Wire the monitoring circuit for the load contactors on the monitor. Connect the PC and monitor via the ASISCPC cable [COM1 (PC) & config port (monitor)]. ASISCPC ASISAFEMON Before you connect to the monitor, select Interface from the Monitor menu to check which communication port has been set. In this case, COM1 is the only port. There is no need to modify the baud rate or transfer protocol settings. Premium with AS-Interface Master Magelis,TeSysU and Preventa_EN.doc Schneider Electric 74 3 To transfer a configuration to the monitor, select PC->Monitor from the Monitor menu and continue with Step 4. If the four items at the top of the menu list cannot be selected (because they are grayed out), a safety monitor may already have been started (if this is the case, you can stop it by selecting Stop from the Monitor menu). Note: As when starting, the monitor will prompt you to enter a password if you have not connected to the device in the last five minutes or have been offline. 4 You will need to enter your password in order for the actions you have requested to be executed. If you are using the safety monitor for the first time, the password will be SIMON. Confirm with OK. 5 The PC will now start to transfer the configuration to the monitor. Premium with AS-Interface Master Magelis,TeSysU and Preventa_EN.doc Schneider Electric 75 6 Once the transfer is complete, you will be asked if you would like to teach the code sequences. Confirm the prompt with YES. The subsequent procedure demonstrates the teaching-in of code tables in order to monitor the state of the safety ASInterface slaves cyclically. 7 Next, the PC will receive a handshake from the monitor in the form of a log representing the “understood” configuration. This will appear on the screen as a section of plain text and you will be prompted to check the configuration, along with the function of the monitor. Confirm the message with OK. Once you have carried out this check, you can click on the close icon (cross) in the top right-hand corner to exit the screen. Premium with AS-Interface Master Magelis,TeSysU and Preventa_EN.doc Schneider Electric 76 Changing the Password 1 The factory-set default password for new monitors is SIMON. To change the password, select: Change password… in the Monitor menu. 2 In the top line of the next dialog box that appears, enter the old password SIMON (remember that passwords are casesensitive). In the middle line, enter your new password and then repeat your entry in the bottom line. Confirm your entries with OK. An error message will appear if the password you have entered is not valid. Validating the Monitor 1 To validate the monitor, select: Validate… In the Monitor menu. Validation is the last stage before starting the monitor and, functioning virtually as the signature of the responsible programmer, represents the last check prior to first use. Premium with AS-Interface Master Magelis,TeSysU and Preventa_EN.doc Schneider Electric 77 2 In the next screen, enter your name, confirm your identity by entering the correct password and confirm your entries with OK. 3 Make a note of the information that appears in the next message and keep this in a safe place. Note: Monitors can only be used with valid passwords. However, a generic password can be generated using the field entries. Starting the Monitor 1 Select Start from the Monitor menu to activate the validated safety monitor. It is only when this last setting is made that the signals from the safe slaves are processed and the OSSD can be switched (load connection). Note: Depending on the last direct access via PC to the monitor, you may need to re-enter your password. Premium with AS-Interface Master Magelis,TeSysU and Preventa_EN.doc Schneider Electric 78 Data Exchange Introduction The Magelis terminal is connected via UniTelway to the Premium PLC. The AUX interface on the Premium PLC is used for this connection This chapter explains how the data is exchanged between the Magelis terminal and the Premium PLC via the Unitelway connection as well as the assignment of communication data to the AS-Interface modules. Data Transfer Primary Data Direction PLC from/to HMI Premium PLC <-> Magelis XBT-GT1100 Variable Symbol Designation %M101 HMI_Mode HMI-Mode selected AS-Interface Data Direction PLC to HMI Premium PLC -> Magelis XBT-GT1100 Variable Symbol Designation %M102 %M103 %M104 ASI_BUS_Fail ASI_Modul_Fail ASIMON_01_Fail %M105 ASIMON_02_Fail %M106 %M107 %M210 %M211 %M212 %M213 %M214 %M215 %M216 %M217 ASIMON_01_ok ASIMON_02_ok ASIMON_01_Fail_0 ASIMON_02_Fail_0 ASIMON_01_Running ASIMON_02_Running ASIMON_01_Estop1 ASIMON_01_Estop2 ASIMON_02_Door1 ASIMON_02_Door2 BUS Error on ASI Master (%I0.2.0.ERR) Module failure on am ASI Master (%I0.2.MOD.ERR) ASI Safety monitor 01 activated (%I\1.30\.0.0.0.ERR) ASI Safety monitor 02 activated (%I\1.31\.0.0.0.ERR) ASI Safety monitor 01 okay ASI Safety monitor 02 okay ASI Safety monitor 01 triggered by DFB ASI Safety monitor 02 triggered by DFB ASI Safety monitor 01 on DFB is running ASI Safety monitor 02 on DFB is running ASI Safety Mon. 01 triggered by DFB contact 01 ASI Safety Mon. 01 triggered by DFB contact 02 ASI Safety Mon. 02 triggered by DFB contact 01 ASI Safety Mon. 02 triggered by DFB contact 02 Premium with AS-Interface Master Magelis,TeSysU and Preventa_EN.doc Schneider Electric 79 TeSysU (Status data) TeSysU 1(A) TeSysU 2(A) TeSysU 3(A) TeSysU 4(A) TeSysU 5(A) TeSysU 6(A) Data Direction PLC to HMI Premium PLC -> Magelis XBT-GT1100 Variable Symbol Designation %M110 TeSysU_01_Fail %M111 TeSysU_01_Ready %M112 TeSysU_01_Run %M120 TeSysU_02_Fail %M121 TeSysU_02_Ready %M122 TeSysU_02_Run %M130 TeSysU_03_Fail %M131 TeSysU_03_Ready %M132 TeSysU_03_Run %M140 TeSysU_04_Fail %M141 TeSysU_04_Ready %M142 TeSysU_04_Run %M150 TeSysU_05_Fail %M151 TeSysU_05_Ready %M152 TeSysU_05_Run %M160 TeSysU_06_Fail %M161 TeSysU_06_Ready %M162 TeSysU_06_Run Motor starter TeSysU, Slave address 1A, is faulty (from AS-Interface-Address %I\1.1\0.0.0.ERR) Motor starter TeSysU, Slave address 1A, is ready (from AS-Interface-Address %I\1.1\0.0.0.0) Motor starter TeSysU, Slave address 1A, running (from AS-Interface-Address %I\1.1\0.0.1.0) Motor starter TeSysU, Slave address 2A, is faulty (from AS-Interface-Address %I\1.2\0.0.0.ERR) Motor starter TeSysU, Slave address 2A, is ready (from AS-Interface-Address %I\1.2\0.0.0.0) Motor starter TeSysU, Slave address 2A, running (from AS-Interface-Address %I\1.2\0.0.1.0) Motor starter TeSysU, Slave address 3A, is faulty (from AS-Interface-Address %I\1.3\0.0.0.ERR) Motor starter TeSysU, Slave address 3A, is ready (from AS-Interface-Address %I\1.3\0.0.0.0) Motor starter TeSysU, Slave address 3A, running (from AS-Interface-Address %I\1.3\0.0.1.0) Motor starter TeSysU, Slave address 4A, is faulty (from AS-Interface-Address %I\1.4\0.0.0.ERR) Motor starter TeSysU, Slave address 4A, is ready (from AS-Interface-Address %I\1.4\0.0.0.0) Motor starter TeSysU, Slave address 4A, running (from AS-Interface-Address %I\1.4\0.0.1.0) Motor starter TeSysU, Slave address 5A, is faulty (from AS-Interface-Address %I\1.5\0.0.0.ERR) Motor starter TeSysU, Slave address 5A, ist ready (from AS-Interface-Address %I\1.5\0.0.0.0) Motor starter TeSysU, Slave address 5A, running (von AS-Interface-Address %I\1.5\0.0.1.0) Motorstarter TeSysU, Slave address 6A, is faulty (from AS-Interface-Address %I\1.6\0.0.0.ERR) Motor starter TeSysU, Slave address 6A, is ready (from AS-Interface-Address %I\1.6\0.0.0.0) Motor starter TeSysU, Slave address 6A, läuft (from AS-Interface-Address %I\1.6\0.0.1.0) Premium with AS-Interface Master Magelis,TeSysU and Preventa_EN.doc Schneider Electric 80 TeSysU (control data) TeSysU 1(A) TeSysU 2(A) TeSysU 2(A) TeSysU 2(A) TeSysU 2(A) TeSysU 6(A) Data Direction HMI to PLC Magelis XBT-GT1100 -> Premium PLC Variable Symbol Designation %M113 TeSysU_01_Forward %M114 TeSysU_01_Reverse %M123 TeSysU_02_Forward %M124 TeSysU_02_Reverse %M133 TeSysU_03_Forward %M134 TeSysU_03_Reverse %M143 TeSysU_04_Forward %M144 TeSysU_04_Reverse %M153 TeSysU_05_Forward %M154 TeSysU_05_Reverse %M163 TeSysU_06_Forward %M164 TeSysU_06_Reverse Motor starter TeSysU, Slave address 1A, forwards (to AS-Interface-Address %Q\1.1\0.0.0.0) Motor starter TeSysU, Slave address 1A, reverse (to AS-Interface-Address %Q\1.1\0.0.1.0) Motor starter TeSysU, Slave address 2A, forwards (to AS-Interface-Address %Q\1.2\0.0.0.0) Motor starter TeSysU, Slave address 2A, reverse (to AS-Interface-Address %Q\1.2\0.0.1.0) Motor starter TeSysU, Slave address 3A, forwards (to AS-Interface-Address %Q\1.3\0.0.0.0) Motor starter TeSysU, Slave address 3A, reverse (to AS-Interface-Address %Q\1.3\0.0.1.0) Motor starter TeSysU, Slave address 4A, forwards (to AS-Interface-Address %Q\1.4\0.0.0.0) Motor starter TeSysU, Slave address 4A, reverse (to AS-Interface-Address %Q\1.4\0.0.1.0) Motor starter TeSysU, Slave address 5A, forwards (to AS-Interface-Address %Q\1.5\0.0.0.0) Motor starter TeSysU, Slave address 5A, reverse (to AS-Interface-Address %Q\1.5\0.0.1.0) Motor starter TeSysU, Slave address 6A, forwards (to AS-Interface-Address %Q\1.6\0.0.0.0) Motor starter TeSysU, Slave address 6A, reverse (to AS-Interface-Address %Q\1.6\0.0.1.0) I/O-Module (Control Data) Modul FMP 01 (7A) Modul FMP 02 (8A) Modul FMP 03 (9A) Modul MT 01 (10A) Modul MT 02 (11A) Modul MT 03 (12A) Modul MT 04 (13A) Modul Safety FMP 01 (7B) Modul Safety FMP 02 (8B) Data direction PLC to HMI Premium PLC -> Magelis XBT-GT1100 Variable Symbol Designation %M170 FMP_01_Fail %M171 FMP_02_Fail %M172 FMP_03_Fail %M180 MT_01_Fail %M181 MT_02_Fail %M182 MT_03_Fail %M183 MT_04_Fail %M200 FMP_Safe01_Fail %M201 FMP_Safe02_Fail IP67-Modul ASI67FMP, Slave address 7A, (to AS-Interface-Address %I\1.7\0.0.0.ERR) IP67-Modul ASI67FMP, Slave address 8A, (to AS-Interface-Address %I\1.8\0.0.0.ERR) IP67-Modul ASI67FMP, Slave address 9A, (to AS-Interface-Address %I\1.9\0.0.0.ERR) IP20-Modul ASI20MT, Slave address 10A, (to AS-Interface-Address %I\1.10\0.0.0.ERR) IP20-Modul ASI20MT, Slave address 11A, (to AS-Interface-Address %I\1.11\0.0.0.ERR) IP20-Modul ASI20MT, Slave address 12A, (to AS-Interface-Address %I\1.12\0.0.0.ERR) IP20-Modul ASI20MT, Slave address 13A, (an AS-Interface-Address %I\1.13\0.0.0.ERR) IP67-Modul ASI67FMP, Slave address 7B, (to AS-Interface-Address %I\1.107\0.0.0.ERR) IP67-Modul ASI67FMP, Slave address 8B, (to AS-Interface-Address %I\1.108\0.0.0.ERR) Premium with AS-Interface Master Magelis,TeSysU and Preventa_EN.doc Schneider Electric 81 Appendix Detailed Component List Hardware Main cabinet Hardware components (main cabinet) – Group 1: Main switch, power supply and distribution, load current components Rev./ Item Amt. Description Part Number Vers. 1.1 1 Motor circuit breaker as main switch, GV2ME16 configurable from 9 to 14 A 1.2 1 Installation box for motor circuit breaker, IP55 GV2MP02 1.3 1 “Power ON” indicator glow lamp, clear, GV2SN37 380/440 V AC 1.4 1 Emergency-off button for installation box, GV2K04 latching, with turn-to-reset 1.5 1 multi9 circuit breaker D 1.5 A, 2-pole 17453 (Phaseo primary side) 1.6 1 multi9 circuit breaker B 3 A, 1-pole 24502 (Phaseo secondary side) 1.7 1 Phaseo, combined power supply for ASIABLM3024 AS-Interface and 24 V, 3 A sec. rated current 1.8 2 multi9 circuit breaker, C 6A, 3-pole (back-up 24112 fuse for TeSysU motor starter groups) 1.9 3 TeSysU – power section for motor starters, LU2B12B 2 directions of rotation, 12 A 1.10 3 TeSysU – control module for motor starters, LUCA05BL standard; 1.25 .. 5 A 1.11 3 TeSysU - motor starter for AS-Interface ASILUFC5 module 1.12 3 TeSysU - coil connection for motor starters LU9M RC 1.13 3 AS-Interface tap for TeSysU motor starters XZ CG0142 1.14 1 Busbar system, 3-pole, 3 outgoing feeders GV2G345 1.15 1 Busbar terminal block, 3-pole GV1G09 Hardware components (main cabinet) – Group 2: Emergency-off (optional) Item Amt. Description Part Number 2.1 1 ASISAFEMON1 2.2 1 2.3 1 2.4 2.5 1 2 2.6 1 AS-interface safety monitor, 1 switch-off circuit, basic functionality Emergency-off switch, set up as safe AS-i slave, metal Mushroom pushbutton, red/yellow, d=40 mm, turn-to-reset Yellow “emergency-off” plate, d=90 mm TeSys D, redundant load contactors, 9A/AC3, 1xNO, 1xNC, 24 V, incl. protective circuit multi9 circuit breaker B 1 A, 1-pole (protection for safety monitor and contactors) Premium with AS-Interface Master Magelis,TeSysU and Preventa_EN.doc Rev./ Vers. ASISSLB4 ZB4BS844 ZBY8330 LC1D09BD 24045 Schneider Electric 82 HardwareComponents (control cabinet) – Group 3: Control components and HMI Pos. Amt. Description Part Number 3.1 1 TSXP572634M 3.2 3.3 3.4 3.5 3.6 3.7 1 1 1 1 1 1 3.8 3.9 3.10 1 2 1 Premium CPU for CANopen and AS-interface with Ethernet interface Memory expansion module SRAM 2MB Premium AS-interface Module Rack for 6 modules Terminal resistor for Rack Power module 26 W Standard 230V/24V Power switch, C60 N B 6A, 1-polig (Premium safety) Magelis-Display, graphic monochrom Communication cable Magelis <> Premium Circuit breaker B 1 A, 1-pole (protection for Magelis) TSXMRPC002M TSXSAY1000 TSXRKY6EX TSXTLYEX TSXPSY2600M 23612A XBTGT1100 XBTZ9780 24045 Hardware Hardware components (remote cabinet) – Group 4: Load components Remote cabinet Item Amt. 4.1 1 4.2 1 4.3 2 4.4 4.5 4.6 4.7 1 1 1 1 Rev./ Vers. Description Part Number TeSysU – power section for motor starters, 2 directions of rotation, 12 A TeSysU – control module for motor starters, standard; 1.25 .. 5 A TeSysU – motor starter for AS-Interface module TeSysU – coil connection for motor starters AS-Interface tap for TeSysU motor starters Busbar system, 3-pole, 3 outgoing feeders Busbar terminal block, 3-pole LU2B12B Rev./ Vers. LUCA05BL ASILUFC5 LU9MRC XZCG0142 GV2G345 GV1G09 Hardware components (remote cabinet) – Group 5: Safety guard combined with emergency-off Rev./ Item Amt. Description Part Number Vers. 5.1 1 AS-interface safety monitor, 1 switch-off ASISAFEMON1 circuit, basic functionality 5.2 1 Emergency-off switch, set up as safe ASASISSLB4 interface slave, metallic 5.3 1 Mushroom pushbutton, red/yellow, d=40 mm, ZB4BS844 turn-to-reset 5.4 1 Yellow “emergency-off” plate, d=90 mm ZBY8330 5.5 2 TeSys D, redundant load contactors, 9A/AC3, LC1D09BD 1xNO, 1xNC, 24 V, incl. protective circuit 5.6 1 Circuit breaker B 1 A, 1-pole 24045 Hardware components (remote cabinet) – Group 6: ASi control components Item Amt. 6.1 4 6.2 1 6.3 3 Description Part Number AS-Interface - IP20 digital input/output block, 4 inputs, 3 transistor outputs AS-Interface - insulation displacement connectors (IDC), 4 x yellow, 4 x black, 5/5 items AS-Interface tap for TeSysU motor starters ASI20MT4I3OSE Premium with AS-Interface Master Magelis,TeSysU and Preventa_EN.doc Rev./ Vers. ASI20MACC1 XZCG0142 Schneider Electric 83 Hardware Field devices Hardware Field devices Software Components Hardware components – Group 7: Field installation Item Amt. 7.1 7.2 7.3 7.4 7.5 7.6 7.7 7.8 7.9 7.10 7.11 7.12 7.13 7.14 1 1 3 3 1 2 2 2 4 4 4 2 2 2 Description Part Number AS-Interface profile cable, yellow (ASi), 100 m AS-Interface profile cable, black (AUX), 100 m AS-Interface tap for AS-Interface module IP67 I/O block with 4 inputs/3 outputs Cover caps for unused M12 connectors, set of 10 Retroflective sensor, M12 connector Terminal block for 18 mm sensors M12 connecting cable, 1 m length Inductive sensor, d=18 mm, M12 connector Terminal block for 18 mm sensors M12 connecting cable, 1 m length Ultrasonic sensor, d=18 mm, M12 connector Terminal block for 18 mm sensors M12 connecting cable, 1 m length XZCB11001 XZCB11002 ASIDCPM12D03 ASI67FMP43E FTXCM12B XUK0AKSAM12 XSZB118 XCR1511041C1 XS618B1PAM12 XSZB118 XCR1511041C1 XX518A1KAM12 XSZB118 XCR1511041C1 Rev./ Vers. optional Hardware components – Group 8: Safety components for installation in the field Item Amt. 8.1 8.2 8.3 8.4 8.4 1 2 2 2 2 8.5 2 8.6 4 Description Part Number AS-Interface, safe slave, 2X IN M12 Safety roller limit switches M12 connecting cable (male + female), length 1 m M12 male for customer assembly Pushbutton housing, standard, for acknowledgements (1x emergency-off, 1x safety guard) Illuminated pushbutton, blue, 24 V LED, 1 NO contact M12 connecting cable, with M12 male connectors fitted at one end, length 2 m ASISSLC2 XCSM3915L1 XZCR1511041C1 XZCC12MDP40B XALD01 Rev./ Vers. ZB5AW0B61 XZCP1541L2 Software Components – Group 9 Item Amt. Description Part Number 9.1 9.2 9.3 1 1 1 UnityPro XL Programming software Premium Programming cable Magelis-Configurationssoftware Vijeo-Designer incl. USB Programming cable XBTZG925 UNYSPUEFUCD22 TSXPCX1031 VJDSUDTGAV43M 9.3b 9.4 1 1 XBTZG925 ASISWIN2 9.5 1 9.6 9.7 1 1 Magelis-Programming cable for XBT-GT1100 Configurations software for AS-Interface safety monitors Download cable for AS-Interface safety monitors Hand terminal for Programming ASI Slaves Infrared adapter for Hand terminal (ASITERV2) Premium with AS-Interface Master Magelis,TeSysU and Preventa_EN.doc Schneider Electric Rev./ Vers. 2.2 4.30 patch C needed 2.0.3 ASISCPC ASITERV2 ASITERIR1 84 Cabinet Components Cabinet Componensn – Group 10 (SAREL) Item Amt. Description Part Number 10.1 1 ENN83357 10.2 10.3 10.4 2 2 1 Cabinet, 800x600x300mm (HxBxT, with Monting plate, Sarel) Filter Fan, 230V, 56 m³/h (Sarel) Filter mounting for fan (Sarel) Thermostat for Filter fan, 0..60°C (Sarel) Rev./ Vers. ENN17901 ENN17911 ENN17562 Component Protection Classes Positioning Component Protection Class IP54 Emergency-off installation box for GV2ME Load contactors LC1D Circuit breakers, all power ranges and types Phaseo power supply unit TeSysU motor starters, all ratings Premium PLC incl. expansion modules Magelis display terminal “Harmony” range of pushbuttons in housing AS-Interface – input/output modules ASI20MT***/ASI20MA*** AS-Interface – input/output modules ASI67FF***/ASI67FM*** AS-Interface safety monitor AS-Interface emergency-off slave ASISSLB4 Mushroom attachment/switch for ASISSLB4 AS-Interface emergency-off slave ASISSC1/C2 Preventa safety limit switch XCSM*** Premium with AS-Interface Master Magelis,TeSysU and Preventa_EN.doc Cabinet Front Inside In Field, On Site IP65 IP67 IP55 IP65 X IP20 X X X X X X X X X X X X X IP66 X X Schneider Electric 85 Component Features Premium-PLC with AS-Interface Master Module TSXP572634M TSXSAY1000 The remote I/O is implemented with AS-Interface function blocks . 240 VAC power supply with integrated 24V/5A power supply Ethernet interface, 2x UniTelway (TER & AUX) Up to 9 expansion modules in local rack (digital/analog/remote E/A and communications modules such as ASI and CANopen) AS-Interface-Master-Module for 31 Slaves with standard addressing / 62 Slaves with extended addressing 5 Programming languages: ST IL FBD SFC LD Pre-definierte functions: Diverse communications modules for Fipway, Modbus Plus, Fipio Agent, UniTelway, Modbus/Jbus, CANopen, Modem, serial interface, Ethernet TCP/IP Memory Expansion using PCMCIA card (RAM or Flash-EPROM) Real-time clock Online program changes during RUN Mode Digital and analog In-/Output modules closed loop control, counter, positioning und communications modules Temperature range: 0..+ 60°C (+5..+55 acc. IEC 1131-2) Licences : UL, CSA, BV, DNV, GL, LR, RINA Premium with AS-Interface Master Magelis,TeSysU and Preventa_EN.doc Schneider Electric 86 Magelis Operator Terminal XBT-GT1100 The functions implemented with the Magelis display unit are: Displaying data of the control system and reporting alarms Modifying control system parameters and controlling a process using discrete commands The HMI terminal is powered from the 24 VDC sensor supply output from the PLC. This has the advantage that PLC and HMI work independently of other system components. Display: Graphic, monochrom LCD with background lighting, 3,8“, green/orange 6 Function keys Communication: Modbus UniTelway Phaseo power supply unit 100 bis 240 VAC ASI ABLM3024 30 VDC/2,4 A Short-circuit-proof, earth fault detection Premium with AS-Interface Master Magelis,TeSysU and Preventa_EN.doc Schneider Electric 87 AS-Interface Safety Monitor for E-off and safety doors ASISAFEMON1 Safety module for monitoring safety cicuits (E-Off and safety doors) 1 or 2 release circuits (1 release circuit with ASISAFEMON1) basic or extended functions Up to Category 4 safety according to EN 954-1 2 poles per release circuit Usable in an AS-Interface bus segment with standard slave (e.g. TeSysU ASILUFC5 and safety slaves (e.g. ASISSLB2) Diagnosis LEDs on the front TeSysU Motor Starter LU2B12B Premium with AS-Interface Master Magelis,TeSysU and Preventa_EN.doc Motor starter base for two directions with indication screw clamp connectors 12 A (12 ..32A available) control unit LUCA 05BL, 1.25.. 5A /1.5 kW max. (0.09 .. 15 kW available) communication module ASI LUFC5, AS-Interface Version 2.0, standard addressing connection to AS-Interface and auxiliary cable via Tap XZCG0142 Schneider Electric 88 AS-Interface Digital I/O Module IP20 ASI20MT4I3OSE Discrete modular interface IP20 AS-Interface Digital I/O Module IP67 ASI 67FMP43E Discrete interface, remote connection Premium with AS-Interface Master Magelis,TeSysU and Preventa_EN.doc 4 inputs, 3 transistor outputs, 0.5 A output supply via external power 24 VDC (black cable) AS-Interface Version 2.1, extended addressing connection to AS-Interface and auxiliary cables via screw clamp connectors or insulation displacement connectors 4 inputs, 3 transistor outputs, 2A output supply via external power 24 VDC (block cable) AS-Interface Version 2.1, extended addressing connection to AS-Interface and auxiliary cables via Tap ASI DCPM 12D03 (module types with insulation displacement connectors available) Schneider Electric 89 Contact Author Schneider Electric GmbH Machines and Process Architectures Telephone +49 6182 81 2555 Schneider Electric GmbH Steinheimer Strasse 117 D - 63500 Seligenstadt Germany Premium with AS-Interface Master Magelis,TeSysU and Preventa_EN.doc E-Mail [email protected] As standards, specifications and designs change from time to time, please ask for confirmation of the information given in this publication. 90