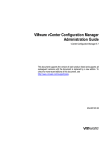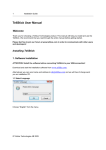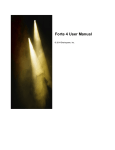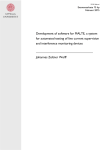
1
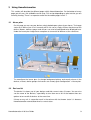
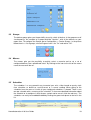
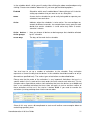
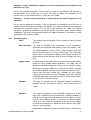
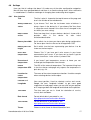
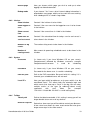
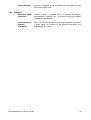
HomeAutomation v2.0.2
User Guide
2011-02-28
Tom Rosenback
Daniel Malmgren
Table of contents
1 Introduction.................................................................................................................................................. 3
2 Installation and setup ................................................................................................................................... 4
2.1 Prerequisites ........................................................................................................................................... 4
2.2 Windows installation............................................................................................................................... 4
2.3 Linux/Mac installation ............................................................................................................................. 4
2.4 Upgrading ................................................................................................................................................ 4
2.5 Installation guide ..................................................................................................................................... 5
3 Using HomeAutomation ............................................................................................................................... 9
3.1 House plan............................................................................................................................................... 9
3.2 Devices list ............................................................................................................................................... 9
3.3 Groups ................................................................................................................................................... 10
3.4 Macros ................................................................................................................................................... 10
3.5 Scheduler ............................................................................................................................................... 10
3.5.1 Activation types ............................................................................................................................. 12
3.6 Log ......................................................................................................................................................... 13
3.7 Mobile version....................................................................................................................................... 13
4 Configuration.............................................................................................................................................. 14
4.1 Devices .................................................................................................................................................. 14
4.1.1 Available device types ................................................................................................................... 14
4.2 Device groups ........................................................................................................................................ 15
4.3 House plan............................................................................................................................................. 15
4.4 Scenarios ............................................................................................................................................... 15
4.5 User management ................................................................................................................................. 16
4.6 Temperature sensors ............................................................................................................................ 16
4.7 Macros ................................................................................................................................................... 16
4.8 Settings .................................................................................................................................................. 17
4.8.1 User interface ................................................................................................................................ 17
4.8.2 Info box .......................................................................................................................................... 18
4.8.3 System ........................................................................................................................................... 18
4.8.4 Telldus ........................................................................................................................................... 18
4.8.5 Scheduler ....................................................................................................................................... 19
5 Special functions......................................................................................................................................... 20
5.1 Command line tool ................................................................................................................................ 20
5.2 Sensor reading....................................................................................................................................... 20
5.3 Custom pages ........................................................................................................................................ 21
6 FAQ ............................................................................................................................................................. 22
7 License information .................................................................................................................................... 23
HomeAutomation v2.0 User Guide
2
1 Introduction
Thank You for downloading HomeAutomation v2.0.
HomeAutomation is a open-source web interface made for use with the Telldus TellStick which
keeps track of your wireless devices (switches and lights). HomeAutomation development
started in august 2008 by Tom Rosenback and in december 2009 Daniel Malmgren joined in to
speed up the development.
Please give us feedback so we know what you like / don´t like with HomeAutomation and also
of course if you have any improvement proposals, please let us know. Contact information you
can find on the homepage.
If you feel that HomeAutomation has helped you in the daily living with be in control your home
or if you want to push some new feature to be lifted higher in the priority list, please make a
donation to contribute to this project. For more information please visit the HomeAutomation
homepage.
Homepage: http://karpero.mine.nu/ha
HomeAutomation v2.0 User Guide
3
2 Installation and setup
2.1
Prerequisites
•
•
•
•
•
•
2.2
2.3
Tellstick dongle, raw command devices requires v2 dongle or newer
Webserver, developed on Apache but should work on any other Webserver aswell
PHP engine, developed on v5.xx, newer than 5.0 recommended
MySQL server, developed on v5.xx, newer than 5.0 recommended
PHP need to have read/write access to HomeAutomation root folder
Scheduling
o Windows needs the following to work
Admin rights
If UAC is enabled on Windows Vista / 7 scheduling might not work
o Linux / Mac needs the following to work
Cron
AT scheduler
Windows installation
1.
Unzip all files to your www folder (eg wwwroot/HomeAutomation)
2.
Rename config_sample.php to config.php, edit config.php to suit your system (found
in root of HomeAutomation)
3.
Create a database which you
HomeAutomation
4.
You need to edit system registry to allow the scripts to access the Tellstick devices by
changing
the
following
registry
key
to
1
“HKEY_LOCAL_MACHINE\SOFTWARE\Telldus\Devices\SharedDevices”
5.
Surf to yourhost/HomeAutomation
6.
A installation guide will now lead you through the rest of the installation of
HomeAutomation. The installation guide is described in section 2.5
7.
Start using HomeAutomation
intend to use with HomeAutomation,
eg.
Linux/Mac installation
Same as for Windows above, except for the registry part.
Both at and cron needs to be installed and running and the user running the web server
service has to be able to put up jobs in them, meaning it needs to be in /etc/at.allow and
/etc/cron.allow or not in /etc/at.deny or /etc/cron.deny. See "man at.allow" and "man
crontab" for closer explanation of this.
The user running the web server needs permissions to tdtool. This can normally be
achieved by either adding the user to the group “plugdev” or by editing the
file/etc/udev/rules.d/99-tellstick.rules and adding for example MODE="0666" to force udev
into creating a device node for tellstick that is writable for everyone.
2.4
Upgrading
1. Due to possible changes in filenames and deletes of unused files it is recommended to
unzip all files to a new folder (not same as previous install)
2. Rename old installation to HomeAutomation_old
3. Unzip all files to your www folder (eg wwwroot/HomeAutomation)
HomeAutomation v2.0 User Guide
4
4. Rename config_sample.php to config.php, edit config.php to suit your system (found in
root of HomeAutomation)
5. Copy system/mysql_settings.php from old install to new
6. Copy resources/houseplan.png from old install to new (if exists)
7. Surf to yourhost/HomeAutomation
8. A installation guide will now lead you through the rest of the update of
HomeAutomation. The installation guide is described in section 2.5
2.5
Installation guide
The installation guide is a simple tool to install a new version of HomeAutomation. Here
follows a set of screenshots with description of all the steps you will encounter in the
installation guide.
This is the page that you will see when you surf to your HomeAutomation installation the
first time (also after updating the files from the new version). Here you need to read and
approve the license agreement to be able to start the installation procedure by clicking
”Start installation”.
HomeAutomation v2.0 User Guide
5
Step 1: Preqrequisities. HomeAutomation does necessary prerequisities checks and
shows you the statuses with icons. If all the lights shows status ”Ok” (light on) you can
safely proceed with the installation. If any of the lights are in ”Not recommended” (light off)
status it is not recommended to proceed before correcting these first. If you get any ”Was
not able to check” statuses you can continue with the risk that HomeAutomation will not
work as intended.
Descriptions for the different prequisities:
1. The version of your PHP engine must be same or newer than recommended version, if
older please update.
2. MySQL extension for PHP must be loaded, if not edit your PHP configuration, typically in
php.ini
3. HomeAutomation root folder must be writable
4. If Date/Timezone is not set in php.ini sun dependent time calculations can be wrong,
check available timezones on PHP.net / timezones
5. If ‘safe_mode’ is ON the paths to tdtool and the scheduling tools (cron, at, schtasks)
must be configured in ‘safe_mode_exec_dir’ in php.ini. Read more on PHP.net / safemode
6. If ‘open_basedir’ is other than empty HomeAutomation root folder also must be
configured here. Read more here PHP.net / ini.core
HomeAutomation v2.0 User Guide
6
Step 2: MySQL Settings. Enter the credentials for the MySQL database connection here.
If you haven´t created the database to be used with HomeAutomation this is a good time to
do it with your favorite MySQL administration tool, eg. phpMyAdmin.
After you have successfully entered the credentials and clicking ”Next step” you will get the
following prompt, where you need to click Ok to update the HomeAutomation database.
Step 3: Settings. Please change the settings to fit your system. The different settings are
described in section 4.8
HomeAutomation v2.0 User Guide
7
Step 4: Admin user. Create an admin user here, if you are upgrading you can either create
a new user or enter the username and password of an existing admin user and log in.
Step 5: Configure Telldus devices. The Telldus devices are imported and shown in this
list (requires that you have the correct settings in step 3 and that the www-user has got
privileges to access your devices with tdtool). Configure the type of your devices and click
next. The different device types are described in section 4.1.1.
Step 6: Completion. Now you are almost done. What still remains is to delete the
installation folder. Using HomeAutomation without deleting the installation folder can be a
big security risk.
HomeAutomation v2.0 User Guide
8
3 Using HomeAutomation
This section will describe the different pages within HomeAutomation. On the bottom of every
page you will see a link to Mobile version resp. Full version depending on what version you are
currently viewing. There is a separate section for the mobile pages here 3.7.
3.1
House plan
On this page you can see your devices nicely plotted upon a plan of your house. To change
status for a device (turn it on if currently off or vice versa) simply click on the picture of the
device. Macros, devices groups and sensors can also be configured to be displayed here.
Under the house plan image there are options to turn on/off all devices at the same time.
To reconfigure the house plan (ie change background picture and exactly where all the
devices, macros, device groups and sensors are shown) go to Configuration -> House plan.
3.2
Devices list
The device list shows you all your devices and their current status if known. You can also
see the name of the devices, a possibility to turn them on or off. At the bottom there are
options to turn on/off all devices at the same time.
If there on any unit is a question mark in the column with last known status it is because
HomeAutomation cannot determine its current status.
HomeAutomation v2.0 User Guide
9
3.3
Groups
The device groups gives you the possibility to easily switch all devices in the group on or off
simultaneously. An example of a group could be “Upstairs”, with all the devices on your
upper floor. To configure the Groups go to Configuration -> Device Groups. In the picture
below there is a list of groups, where the green icon is for ”On” and red for ”Off”.
3.4
Macros
The macros give you the possibility to quickly select a scenario and to set a set of
configured devices into a predefined status. By clicking on the icon to the left of the macro
name the macro will be run.
3.5
Scheduler
The scheduler is a very powerful way to control your units, either based on purely static
time schedules or based on sunrise/sunset or a sensor reading. When going to the
scheduler from the menu a list with all your configured schedules is showed. There is one
row per schedule with a summary of the schedule. To view more detailed information about
the schedule or to configure it click the pen symbol and to erase it click the red cross. The
schedules can easily be enabled/disabled by clicking the green/red sphere to the left in the
list.
HomeAutomation v2.0 User Guide
10
In the schedule details, which you will see by either clicking the above mentioned pen or by
clicking "Create new schedule" below the list, you have got the following options:
Enabled
Schedules which aren”t enabled doesn”t do anything at all. Useful for
setting up schedules that you want to use at a later point.
Name
A name for the schedule for you to easily being able to separate your
schedules from each other.
Active
Indicates when the schedules is to be active. You can configure an
amount of different scenarios, for example home, away, party etc and
decide that certain schedules is to be active only when a certain
scenario is chosen.
Active devices / Here you choose all devices or device groups that should be affected
Active groups
by this schedule.
Active days
The days of the week for the schedule.
You also have to set up a number of activations to the schedule. Every activation
represents a time of the day that the devices in the schedule should be turned on or off (or
dimmed to a specified level). The various types of activations are described below.
Please note that the order of the activations is very important! Activations that are in a
specific order in the list and not the same order time wise cancel each other out. This for
example makes it possible to make a static activation that turns the devices on at 06:00 and
then a sun controlled activation that turns them off again at sunrise and then neither of
those activations will be run if the sunrise is before 06:00. If you need to re-order the
activations just drag and drop them into the correct order.
Since all this may seem a bit complicated at start we will outline some examples below to
make things perfectly clear.
HomeAutomation v2.0 User Guide
11
Example 1. Lamps should be on between six in the morning and ten at night but not
when the sun is up.
For this we need four activations. The first one is a static on, set to 06:00. The second is a
sun controlled, set to activate off at sunrise. The third is another sun controlled, set to
activate on at sunset and the fourth is a static off, set to 22:00.
Example 2. A heater that should keep a room between 22 and 24 degrees at the
afternoon.
For this we also need four activations. The first and fourth are needed to set up the limits in
between which the dynamic activations will operate, the second and third are the dynamic
activations to control the device. First set up a static activation for 12:00. The second
activation is a dynamic activation for which you choose the correct sensor and on if below
22 degrees. The third is the other way around, off if above 24 degrees. The fourth is a static
activation for (for example) 18:00.
3.5.1 Activation types
Static
The simplest form of activation. You just choose a static time and
on or off.
Sun controlled
This type of activation uses calculations of sun movements
based on your longitude and latitude (as per the settings). You
can choose between sunset, sunrise, dawn and dusk and also
choose an offset from this in hours and minutes. The “Activation
today” field is a calculation for today of the settings at hand, but
please note that the activation time of course changes for every
day.
Engine heater
A special type of activation which is aimed to turning your engine
heater on long enough before departure. Just input time of
departure and which temperature sensor to use and your engine
will be warm enough at departure. The time calculations is based
on recommendations from the engine heater manufacturer Calix.
Please note that when setting up a schedule for your engine
heater you also have to set up an activation to turn the heater off
afterward, preferably a while after you leave so the engine heater
is still on if you”re late from home.
Random
This type of activation will be activated randomly somewhere
between the time you input as “earliest” and the time given as
“latest”.
Dynamic
This type of activation are not calculated in advance as all the
other, but instead they are activated when a specific condition is
fulfilled, for example when the temperature rises above a certain
level or when another device is turned on or dimmed above
some level. This could for example be used for turning a heater
on when the temperature is below one level and turn it off again
when it”s warm enough.
Dependencies between dynamic activations work in another way
HomeAutomation v2.0 User Guide
12
than between all other activation types. The conditions for the
dynamic activations will be evaluated every fifth minute All the
activations before the dynamic must have run today and the
ones after must not have run (if any other than dynamic
configured).
The dynamic activations will then be executed multiple times if
needed in contrast to other activations that will only be activated
once a day.
3.6
Log
All activations and deactivations of devices are saved in the log. By default the last 50 events
are showed here. In the drop down menu at the upper left corner you can choose to only
show events for a particular device. The next menu gives possibility to change the amount of
events being showed. "Reset filter" changes these settings back to default and "Update"
updates the view to include new events. To clear the log completely click "Clear log" at the
upper right corner (this will remove all log entries from the database).
To change the sorting of the log list click the header of the column which to use for sorting, to
reverse the sorting click the same header once again.
3.7
Mobile version
The mobile pages are made to fit smaller displays better and also more touch friendly. All
of the pages are not available in the mobile version due to the restrictions of the smaller
screens causing some of the pages to be more or less unreadable. Below is an example of
the mobile devices page.
HomeAutomation v2.0 User Guide
13
4 Configuration
4.1
Devices
Here you set what devices you have got and how they are to behave. The devices are
normally imported from your Tellstick configuration, so the only thing you need to do in most
cases is clicking on "Update from Tellstick" below the list.
To edit a device click the pen symbol by the device. You are then presented with the settings
for the device where you can change the following:
Description
The name showed for the device for example in the device list.
Device type
By default devices imported from Tellstick gets the device type "Lamp".
There are some other device types to choose from. This affects things
like the picture being showed on the unit, if it”s able to be dimmed etc.
Change this for all devices not being ordinary lamps.
Icons
Shows the current icons for on/off statuses. You can here upload custom
icons r reset the icons to the default ones.
Active
If the device is active or not. If you have got a device that currently isn”t
used and isn”t supposed to be visible anywhere in the interface, set it up
as inactive here.
RAW device
States whether the devices is a RAW device.
4.1.1 Available device types
Sauna
A device of type ”sauna” is not affected by the ”All on” buttons or any
activations, macros or device groups with more than one device
configured to it.
If your dimmer dims by clicking shortly again on the ”On” button of the
remote after turning the device on and stops dimming by clicking again
HomeAutomation v2.0 User Guide
14
Dimmer
this is the type you need to select.
4.2
Dimmer
(abs)
If your device supports absolute dimlevel by Tellstick use this type. Which
devices which support absolute dimlevel you can find on Telldus
homepage This type is displayed with a slider for the dimlevel.
Lamp
A device which only support on or off
Engine
heater
To be removed, behaves like the ”Lamp” but has got a different default
icon.
Device groups
Device groups are useful if you have got multiple devices that you wish to control as a
group. You can then either switch them all on or off from the group list, by adding them to
your house plan or by using them in your scheduling.
To create a device group click ”Create new device group”, to edit an existing group click the
pen. You have to give the group a name, possibly a custom icon and choose which devices
belong to the group. Groups can be deleted by clicking the red cross.
4.3
House plan
Choose your house plan image and upload it to HomeAutomation with the form to right.
What you choose is a background image and where your various devices are to be shown.
As house plan image it is suitable to choose an image with a house plan covering the area
where you have got your receivers. Choose image by clicking "Browse" and browse to your
image. After that click "Upload" whereby the image will be uploaded to the server and set
up as background image. After the house plan has been uploaded one should place the
devices. First choose which device to place in the drop down menu marked "Choose
device". Then click once on the house plan where you wish so place the device. You can
put a device on multiple locations. To remove a no longer wanted unit click on it on the
house plan and it will be removed. There is also a “Delete all” button which deletes all
devices from the house plan.
4.4
Scenarios
Scenarios is a way to control the scheduling. If you for example want a particular event to
only occur when you are on vacation, create a scenario named "Vacation" and choose this
scenario under "Active" on the schedule. There is one scenario from the beginning that you
can neither erase nor edit and that is the scenario "Always". This is for the schedules that
are always to be activated independently of which scenario is currently active. To change
which scenario is currently chosen there is a drop down menu at the top of the info box that
is showed on most of the pages in HomeAutomation. The scenario can also be changed
with a macro.
HomeAutomation v2.0 User Guide
15
4.5
User management
To protect HomeAutomation from unauthorized persons for example turning on or off
devices in your home there is a user control system. You can setup a number of users that
can log in to the system. During the installation a admin user is was created. There is also
from the beginning a user called "Local". This is the user that gets automatically logged in
when you enter HomeAutomation from within the “Local IP´s” which is configured on the
“Settings” page.
For every user you can choose the following settings:
User name and Username and password are used when logging in to HomeAutomation
Password
First name and Name of the user. This has no meaning to HomeAutomation but is more
Last name
for your convenience to keep track of your users.
User level
4.6
There are three different levels of users in HomeAutomation. A user with
level admin has full access to everything. A user with level user has
access to turn devices on or off and to edit schedules, but not to edit
any settings. This user level is suitable for family members. A user with
level demo can log into HomeAutomation and click around but can´t
affect anything, thus it is a suitable level when you wish to show off
HomeAutomation to people outside of your family that you dont want to
put your lights on at the middle of the night...
Temperature sensors
This page is not complete yet, but works. You need to have your own sensor readings in
the temps table for this page to work at all, also the setting “Use 1-wire temperature” needs
to be activated. More about the sensor reading into the database here.
4.7
Macros
Macros are more or less the same as device groups but here you also can define which
status the device should have when running the macro and if the scenario should be
changed.
To create a device macro click ”Create new macro”, to edit a existing macro click the pen.
You have to give the macro a name, optionally a comment and a custom icon and choose
which devices belong to the macro and which scenario should be selected, if any. Macros
can be deleted by clicking the red cross.
HomeAutomation v2.0 User Guide
16
4.8
Settings
Here you find all settings that doesn´t fit under any of the other configuration categories.
Most of them have got good default and there is no need to change them. Unless otherwise
is stated below it is however no danger in changing them and testing what happens.
4.8.1 User interface
Title
The title is what is showed at the top left corner of the page and
also in the title bar of the web browser.
Always show last
status
If you choose "Yes" here the last known status of devices is
always shown in the device list. If you choose "No" then there
is a question mark showed if the status hasn´t changed in the
last while (see next setting).
Hours status
active
Enter how long time is to pass before a device is shown with a
question
mark
in
the
device
list
after
latest
activation/deactivation.
House plan width
Set in which size to show your house plan during configuration.
For house plan view the size can be changed with CSS.
House plan icon
height
Set in which size the icons representing your devices is to be
shown on the house plan.
Use 1-wire
temperature
Choose "Yes" if you have got 1-wire sensors in your home
connected to your server. If you have not (or haven´t got the
faintest clue what a 1-wire sensor is) choose "No".
Use external
temperature
If you haven´t got temperature sensors at home you can
instead get the temperature from the web.
Extern
temperature URL
The URL of the external temperature. The important thing here
is that the chosen web page only outputs the temperature in
plain text, eg. -2.3
Location for
extern
temperature
The name of the extern temperature location. Used for example
when selecting devices to houseplan.
Latitude and
Longitude
Your exact position. Used to calculate sunrise and sunset.
Google the term "longitude latitude" to get some good
suggestions of web pages where you can click on your position
on a map to get back the longitude and latitude for the position.
Time zone
The time zone you are in. Used for calculation of sunrise,
sunset, dusk and dawn.
Date format
Format which date is presented in, see
http://php.net/manual/en/function.date.php
Time format
Format which time is presented in, see
http://php.net/manual/en/function.date.php
Theme
Choose a color theme for HomeAutomation here.
HomeAutomation v2.0 User Guide
17
Default page
Here you choose which page you wish to end up at when
logging into HomeAutomation.
Debug mode
If you choose "Yes" here a lot of internal debug information is
outputted on every page, which can be useful for error tracking.
Also a debug.txt file is saved in /logs folder.
4.8.2 Info box
Show info box
Controls if the info box is to be visible.
Show logged in
user
Controls if the user name for the logged on user is to be shown
in the info box.
Show current
time
Controls if the current time is visible in the info box.
Show time for
sunrise/sunset:
Controls if the calculated time for todays sunrise and sunset is
to be shown in the info box.
Number of log
events
The number of log events to be shown in the info box.
Number of
coming events
Max amount of upcoming scheduled events to be shown in the
info box.
4.8.3 System
Username
(Is shown only if you have Windows OS on your server):
Computername followed by Windows username, example
Computername\Username.
Is
used
for
scheduling
Password
(Is shown only if you have Windows OS on your server):
Password for the above user. Is used for scheduling
PHP bin path
Path to the PHP executable. Be careful with this setting, if it is
incorrect your scheduled events will not work.
Local IP´s
Here you input which ip addresses or ip spans which is to be
considered "local". This affects both the automatic login and
which events that show up as "local" in the log. You can enter
multiple entries of the type [ip address][/subnet mask]
separated
with
semi
colon
(for
example
"192.168.1.1/24;88.206.128.248" is a valid setting here).
4.8.4 Telldus
Tdtool path
Dimlevel stepsize
HomeAutomation v2.0 User Guide
Path to the tdtool executable. If this setting is wrong you will no
longer be able to turn on or off any devices.
Determines how exact you will be able to control your dimmers.
A low value here allows for more exact control but also gives
longer more steps in the slider control.
18
Default dimlevel
4.8.5 Scheduler
Number of signal
repetitions:
Interval between
dynamic
activations:
HomeAutomation v2.0 User Guide
If the last used dimlevel (for ON-state) can´t be found this is the
level which will be used.
Number of times a schedule will try to activate the devices
configured to it. Keep this on 1 if you don´t have any troubles
with devices not reacting.
Interval in minutes between the running of dynamic activation,
in other words the criterias of the dynamic activations are
checked with this interval.
19
5 Special functions
In this section special functions that need a bit of manual editing of files or similar will be
handled.
5.1
Command line tool
With command line tool “run.php” you can easily activate your devices by executing the
script with different arguments. The script should be run like this:
php run.php arg1=x arg2=y arg3=z
Her is the list of accepted arguments:
command
= activation | device | group | macro | updateschedules
id
= id of the command, can be several ids separated by a ';', activation
command only accepts one id, updateschedules takes no id argument
status
= 0 | 1 | off | on | dimlevel, can be several ids separated by a ';' (only valid for
device and group commands)
If several statuses are given they must match the amount of id´s
Each argument is only allowed once per execution\n
5.2
Sensor reading
Sensor values like 1-wire temperatures need to be read into the temps table. At least
temp_c, sensor_serial and date need to be inserted. For temperature readings from
weather stations there is a Weather parser available for download from HomeAutomation
homepage. Cumulus, vwiew and owfs are supported by v0.2 of Weather parser.
HomeAutomation v2.0 User Guide
20
5.3
Custom pages
There is a possibility to add own custom pages to HomeAutomation. To do this you need to
edit the custompages.php file in the system folder, what to add where is stated in this file as
well.
The custom pages must NOT contain <body></body>, <head></head> or <html></html>
tags, ONLY the tags which goes inside <html></html>. An example of a custom page could
be a network camera page containing only the camera object or just some PHP script, like
this:
mycustompage.php
<table width="50%">
<tr>
<td>
<?php
echo "<pre>";
print_r($_SERVER);
echo "</pre>";
?>
</td>
</tr>
</table>
HomeAutomation v2.0 User Guide
21
6 FAQ
Questions and answers to come, at the moment only on homepage.
HomeAutomation v2.0 User Guide
22
7 License information
HomeAutomation is free and open source software. It may be copied, modified, distributed,
redistributed, burned, etc, so long as it remains this way and adheres to the licensing
information listed below.
Copies of the licenses are included in each download and must be distributed along with any
redistribution of the software.
HomeAutomation is licensed under the GNU General Public License
http://www.gnu.org/licenses/gpl.html
HomeAutomation v2.0 User Guide
23