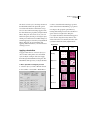
1
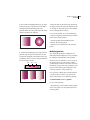
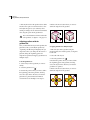
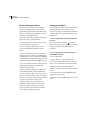
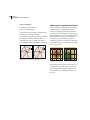
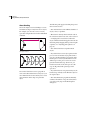
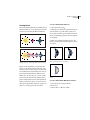
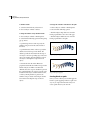
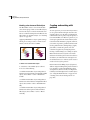
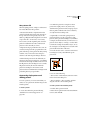
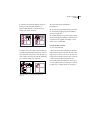
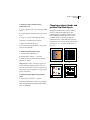
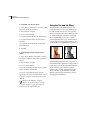
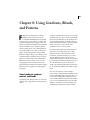
187
Chapter 8: Using Gradients, Blends,
and Patterns
F
illing artwork with patterns, gradients,
multiple colors, and textures is easily
accomplished with Illustrator. You can fill
an object or type with a pattern, or objects with
a gradient, much the way you apply a color. You
can also smoothly flow multiple colors in multiple
directions within an object, using the gradient
mesh tool. Mesh objects can be manipulated for
very detailed shifts in color. You can also blend
shapes, and modify the blends using standard
Illustrator editing techniques. Special effects, such
as simulated ink pen hatching effects, can also be
applied to artwork using the Pen and Ink filters.
Illustrator provides a variety of ways to create
and apply patterns to artwork. You can create
pattern tiles and save them in the Swatches palette.
Patterns can also be applied to a path using the
brush tools.
About gradients, gradient
meshes, and blends
Depending on the effect you want, you can choose
different ways to apply blends or color gradients to
objects.
To apply a graduated blend of colors as you would
apply any other color, you can create a gradient fill.
You use the Gradient palette or the gradient tool to
apply a gradient; applying a gradient in this way
does not transform the object. Creating a gradient
fill is a good way to create a smooth color
gradation across one or more objects.
In contrast, the gradient mesh tool transforms a
path object (or a bitmap image) into a single,
multicolored object. When an object is transformed into a gradient mesh object, you create
smooth shifts in color that can be precisely
adjusted and manipulated—the color is controlled
by a mesh that can be moved and adjusted to vary
the color shift from one part of the object to
another. The gradient mesh tool provides the most
precise method for shifting colors within a single
object.
You can create blends of colors and shapes
between objects using the Blend command or the
blend tool. Blending shapes and colors allows you
to select the beginning and ending shapes and
colors, and have Illustrator create the intermediate
steps to create the final blend. You can also make
changes to elements between the blending steps
and Illustrator will adjust the blends instantly.
188 CHAPTER 8
Using Gradients, Blends, and Patterns
Creating and working with
gradient fills
A gradient fill is a graduated blend between two or
more colors or tints of the same color. You use the
Gradient palette to create your own gradients and
—in combination with the Color palette and
Swatches palette—to modify existing gradients.
You can also add intermediate colors to a gradient
to create a fill defined by multiple blends among
colors. For details on using the Color palette and
the Swatches palette when working with gradients,
see Chapter 7, “Working with Color.”
Gradient colors can be assigned as CMYK process
color, RGB process color, or a spot color. When a
gradient is printed or separated, mixed-mode
gradient colors are all converted to CMYK process
color. (See “Printing gradients, gradient mesh
objects, and color blends” on page 347.)
3 To define the starting color of a gradient, click
the left square below the gradient bar and then do
one of the following:
• Alt-click (Windows) or Option-click (Mac OS)
a color swatch in the Swatches palette.
• Create a color using the sliders or the color bar in
the Color palette.
• Drag a color from the Color palette or the
Swatches palette to the square below the gradient
bar.
Note: If you create a gradient between spot colors,
you must deselect Convert to Process in the
Separation Setup dialog box to print the gradient in
individual spot color separations. (See “Printing
gradients as separations” on page 363.)
To create a gradient:
1 Select an object with a selection tool, and click
the Fill box in the toolbox to select the object’s fill.
2 To apply a gradient, do one of the following:
A
B
C
• Choose Window > Show Gradient, and click the
A. Starting color B. Midpoint C. Ending color
Gradient Fill box at the upper left of the Gradient
palette. (If the Gradient Fill box is not displayed,
choose Show Options from the pop-up menu in
the Gradient palette.)
4 To define the ending color of the gradient, click
the right square below the gradient bar. Then
choose the color you want as described in step 3.
• Click the Gradient button in the toolbox.
• Click a gradient swatch in the Swatches palette.
ADOBE ILLUSTRATOR 8.0 189
User Guide
5 Choose Linear or Radial from the pop-up menu
to indicate the type of gradient you want. With a
radial gradient, the beginning point of the
gradient defines the center point of the fill, which
radiates outward to the endpoint.
7 Enter the angle of direction for the gradient in
the Angle text box. The angle can range from -180
to 180 degrees. (The angle option is not available
when a radial gradient is chosen.)
8 To save the gradient, do one of the following:
• Drag the completed gradient from the Gradient
palette to the Swatches palette.
• Drag the gradient from the Fill box in the
toolbox to the Swatches palette.
• Click the New Swatch button in the Swatches
palette.
Linear and radial gradients
6 To adjust the beginning point or endpoint of the
gradient, drag the squares located below the bar.
To adjust the midpoint of the gradient (the point
at which the colors are at 50%), drag the diamond
icon located above the bar.
25%
50%
75%
Modifying gradients
You can modify gradients by adding colors to
make blends from multiple colors or by adjusting
the endpoints and midpoints of the gradients.
Gradient colors are defined by a series of stops in
the gradient bar. A stop is the point at which a
gradient changes from one color to the next and is
identified by a square below the gradient bar. The
squares in the Gradient palette display the color
currently assigned to each gradient stop.
It’s a good idea to fill an object with the gradient
you plan to adjust so that you can preview the
effect on the artwork as you adjust the gradient.
25%
50%
75%
Gradient fills with midpoint at different percentages
To add intermediate colors to a gradient:
Do one of the following:
• Drag and drop a color from the Swatches palette
or the Color palette onto the gradient bar in the
Gradient palette.
190 CHAPTER 8
Using Gradients, Blends, and Patterns
• Click anywhere below the gradient bar to define
another color square. You can then select a color
and adjust the square as you would any other
starting or ending color. To delete an intermediate
color, drag the square off the gradient bar.
4 Release the mouse button where you want to
define the endpoint of the gradient.
For a color illustration of linear and multicolor gradients, see figure 8-1 on page 231.
Adjusting gradients with the
gradient tool
Once you have filled an object with a gradient, the
gradient tool lets you modify the gradient by
“repainting” the fill along an imaginary line you
drag. This tool lets you change the direction of a
gradient, change the beginning point and
endpoint of a gradient, and apply a gradient across
multiple objects.
To use the gradient tool:
1 Select an object whose gradient you want to
modify.
2 Select the gradient tool (
).
3 Position the pointer where you want to define
Drag to set direction and length of gradient.
To apply a gradient across multiple objects:
1 Fill each object with a gradient using the
Gradient palette, the Swatches palette, or the paint
bucket tool.
2 Select all of the objects.
3 Select the gradient tool (
).
4 Position the pointer where you want to define
the beginning point of the gradient, and drag
across the objects in the direction you want the
gradient to be painted.
5 Release the mouse button where you want to
define the endpoint of the gradient.
the beginning point of the gradient, and drag
across the object in the direction you want the
gradient to be painted. Hold down Shift to
constrain the tool to multiples of 45 degrees.
Default gradient fill and gradient applied across objects
ADOBE ILLUSTRATOR 8.0 191
User Guide
Creating multicolored objects
with the gradient mesh tool
The gradient mesh tool, the Create Gradient Mesh
command, and the Expand command can all be
used to transform an object into a mesh object. A
mesh object is a single, multicolored object on
which colors can flow in different directions, and
transition smoothly from one point to another.
By creating a fine mesh on an object and manipulating the color characteristics at each point in the
mesh, you can precisely manipulate the coloring of
the mesh object. You can also apply color to four
mesh points at the same time by clicking the patch
between them, to create broad color changes on
part of the object.
At the intersection of two mesh lines is a special
kind of anchor point called a mesh point. Mesh
points appear as diamonds and have all of the
same properties as anchor points but with the
added capability of accepting color. You can add
and delete mesh points, edit the mesh points, or
change the color associated with each mesh point.
Anchor points also appear in the mesh (differentiated by their square rather than diamond shape),
and can be added, deleted, edited, and moved as
with any anchor points in Illustrator. Anchor
points can be placed on any mesh line; you can
click an anchor point and drag its direction lines to
modify it. (See “About direction lines and
direction points” on page 70.)
The area between any four mesh points is called
the mesh patch. You can also change the color of
the mesh patch using the same techniques as
changing colors on a mesh point.
B
Gradient mesh tool applied; highlights and colors added
About gradient meshes
When you create a mesh object, multiple lines
called mesh lines crisscross the object and provide
a way to easily manipulate color transitions on the
object. By moving and editing points on the mesh
lines, you can change the intensity of a color shift,
or change the extent of a colored area on the
object.
C
A
A. Anchor point
B. Mesh point
C. Mesh line
D. Mesh patch
D
192 CHAPTER 8
Using Gradients, Blends, and Patterns
Tips for creating mesh objects
Creating a mesh object
You can create a mesh object out of any path
object, or any bitmap image (such as a photographic image imported from Adobe Photoshop).
There are a few important guidelines to keep in
mind when creating mesh objects:
Use the gradient mesh tool or the Create Gradient
Mesh command to convert objects to mesh
objects. You can also use the Expand command to
convert radial or linear gradient path objects into
mesh objects.
• You cannot create mesh objects from compound
paths, text objects, or placed EPS files.
• Once a mesh object has been created, it cannot
be converted back to a path object.
• When converting complex objects, use the
Create Gradient Mesh command for the best
results.
• When converting simple objects, use either the
gradient mesh tool or the Create Gradient Mesh
command. However, if you want to add a highlight
to a particular spot, use the gradient mesh tool and
click at the point you want the highlight to appear.
To create a gradient mesh object with the gradient
mesh tool:
Choose the gradient mesh tool ( ) and click
a filled object. The object is converted to a gradient
mesh object with the minimum number of
mesh lines.
To create a gradient mesh object with the Create
Gradient Mesh command:
1 Select a filled object.
2 Choose Object > Create Gradient Mesh.
• To create a mesh object with a regular pattern of
3 Enter the number of horizontal rows of mesh
lines to create on the object in the Rows text box.
mesh points and mesh lines, use the Create
Gradient Mesh command.
4 Enter the number of vertical columns of
• When converting complex objects, Illustrator
can add hidden anchor points to maintain the
shape of a line. If you want to edit, add, or delete
one or more of these anchor points, use the addanchor-point tool or the delete-anchor-point tool.
• To improve performance and speed of
redrawing, keep the size of mesh objects to a
minimum. Complex mesh objects can greatly
reduce performance. Therefore, it is better to
create a few small, simple mesh objects than to
create a single, complex mesh object.
mesh lines to create on the object in the Columns
text box.
5 Select the direction of the highlight from the
Appearance pop-up menu:
• To Center creates a highlight in the center of the
object.
ADOBE ILLUSTRATOR 8.0 193
User Guide
• To Edge creates a highlight on the edges of the
To add or delete mesh points and mesh lines:
object.
1 Select the gradient mesh tool (
• Flat applies the object’s original color evenly
across the surface, resulting in no highlight.
2 Do one of the following:
Mesh object with the highlight appearance set to Flat,
To Edge, and To Center.
6 Enter a percentage of white highlight to apply to
the mesh object. A value of 100% applies
maximum white highlight to the object; a value of
0% applies no white highlight to the object.
).
• To add a mesh point colored with the current fill
color, click anywhere in the mesh object. The
corresponding mesh lines extend from the new
mesh point to the edges of the object. Clicking on
an existing mesh line adds a single intersecting
mesh line.
• To add a mesh point without changing to the
current fill color, press Shift and click.
• To delete a mesh point and the corresponding
mesh lines, Alt-click (Windows) or Option-click
(Mac OS) directly on the mesh point.
To edit a mesh point:
1 Select the gradient mesh tool and click directly
Creating a mesh object using the Expand command:
on a mesh point. Direction lines appear on the
mesh point.
1 Select an object containing a radial or linear
gradient fill.
2 Do one of the following:
2 Choose Object > Expand.
3 Select the Gradient Mesh option in the Expand
dialog box and click OK. The selected object is
converted to a mesh object that takes the shape of
the gradient, either circular (radial) or rectangular
(linear).
Editing mesh objects
Once you have created a mesh object, you can
adjust or edit its mesh points, anchor points, and
mesh lines. Anchor points can be added with the
add-anchor-point tool or deleted with the deleteanchor-point tool on any mesh line.
• Drag the direction lines to edit the mesh point as
you would any anchor point. For more information about editing anchor points, see “About
direction lines and direction points” on page 70.
• Shift-drag a direction line to move all direction
lines from the mesh point at once.
• Use the direct-selection tool, the convertselection-point tool, or the transformation tools to
edit mesh points.
194 CHAPTER 8
Using Gradients, Blends, and Patterns
To move a mesh point:
Adjusting colors on gradient mesh objects
1 Select the gradient mesh tool.
Colors are added to gradient mesh objects using
the Color palette, by dragging and dropping
colors, or by using the paint bucket tool. When
you select and color a mesh point, the mesh point
and surrounding area are colored with the current
fill color. When you click over a mesh patch, all
four mesh points surrounding the patch are
colored. You can also use color filters to change the
color of mesh points. (See “Using filters to modify
colors” on page 176.)
2 Do one of the following:
• Click a mesh point and drag to freely move the
point and the connecting mesh lines.
• Press Shift and drag the mesh point to constrain
the movement to follow a mesh line. This is a
convenient way to move a mesh point along a
curved mesh line without distorting the mesh line.
Dragging to move mesh point and Shift-dragging with the
gradient mesh tool to constrain to mesh line
Adding color to a mesh point and to a mesh patch
Once color is applied to parts of a mesh object, you
can change the shape and extent of the colored
areas by editing the mesh points, anchor points,
and mesh lines. (See “Editing mesh objects” on
page 193.)
ADOBE ILLUSTRATOR 8.0 195
User Guide
To add color to a mesh point or mesh patch with the
Color palette:
1 Select a mesh point or mesh patch with the
gradient mesh tool (
tool ( ).
) or the direct-selection
2 Do one of the following:
• In the Color palette, select a color using the
sliders or the color bar.
• In the Swatches palette, select a swatch.
To add color to a mesh point or mesh patch by
dragging and dropping:
Do one of the following:
• Drag a color from the Color palette directly over
a mesh point or mesh patch and release the mouse
button.
• Drag a swatch color from the Swatches palette
directly over a mesh point or mesh patch and
release the mouse button.
To add color to a mesh point or mesh patch with the
paint bucket:
1 Select the paint bucket tool.
2 Click directly on a mesh point or a mesh
patch. The point or patch is colored with the
current fill color.
Blending shapes
The Adobe Illustrator blend tool and the Make
Blend command let you create a series of intermediate objects and colors between two or more
selected objects. You can blend between two open
paths (such as two different lines), between two
closed paths (such as a circle and a square),
between gradients, or between other blends.
Depending on the way you paint the objects you
are blending, you can produce airbrush effects
such as complex shading, highlighting, and
contouring. The Blend filters can also be used to
blend colors between filled objects.
You can edit blends that you created by moving,
resizing, deleting, or adding objects. After you
make editing changes, the artwork is automatically
reblended.
196 CHAPTER 8
Using Gradients, Blends, and Patterns
About blending
One of the simplest uses for blending is to create
and distribute shapes evenly between two objects.
For example, you can create a series of evenly
spaced bars using the blend tool or the Make Blend
command.
The following rules apply to blending shapes and
their associated colors:
• You can blend between an unlimited number of
objects, colors, or gradients.
• Blends can be directly edited with tools such as
the selection tools, the rotate tool, or the scale tool.
• A straight path is created between blended
objects when the blend is first applied. You can edit
the blend path by dragging anchor points and path
segments. (See “Adjusting path segments” on
page 73.)
Two objects selected
• You cannot blend between gradient mesh
objects.
• If you blend between one object painted with a
Blending distributes shapes evenly
You can also blend between two open paths to
create a smooth transition between objects, or you
can combine blends of colors and objects to create
color transitions in the shape of a particular
object.
process color and another object painted with a
spot color, the blended shapes are painted with a
blended process color. If you blend between two
different spot colors, process colors are used to
paint the intermediate steps. If, however, you
blend between tints of the same spot color, the
steps are all painted with percentages of the
spot color.
• If you blend between two patterned objects, the
blended steps will only use the fill of the object on
the topmost layer.
• The Adobe Illustrator program automatically
calculates the number of steps in a blend, unless
you select Specify Steps in the Blend Options
dialog box.
ADOBE ILLUSTRATOR 8.0 197
User Guide
Creating blends
To create a blend with the blend tool:
You create blends in Illustrator by clicking objects
with the blend tool, or by selecting objects with a
selection tool and using the Blend commands.
1 Select the blend tool (
).
2 Click objects to blend in sequential order. If you
want to blend to a specific anchor point on an
object, click the anchor point with the blend tool.
If you are blending open paths, select an endpoint
on each path.
3 When you are finished adding objects to the
blend, you can click the blend tool again to start a
new blend.
Click anchor point on first object with blend tool.
Then click anchor point on second object.
Multiple objects are clicked sequentially with the blend tool
Objects are blended relative to selected anchor
points on each blended object. If the objects are
unselected, or if you have only one anchor point
selected, Illustrator automatically selects the two
points from which the blend commences and
finishes. You can also select two or more anchor
points from which to blend by clicking anchor
points with the blend tool. By selecting different
anchor points on the objects, you can create the
effect of rotating the blend from one point in an
object to a selected point in the next object.
Result
To create a blend with the Make Blend command:
1 Select the objects to blend with any
selection tool.
2 Choose Object > Blends > Make.
198 CHAPTER 8
Using Gradients, Blends, and Patterns
To unmake a blend:
To change the orientation of the blend to the path:
1 Select the blend with any selection tool.
1 Choose Objects > Blends > Blend Options.
2 Choose Object > Blends > Release.
2 Select from the following options:
To change the number of steps between blends:
1 Choose Object > Blends > Blend Options.
2 Select from the following options in the Spacing
• Click the Align to Page button to orient the
blend perpendicular to the x axis of the page.
• Click the Align to Path button to orient the
blend perpendicular to the path.
pop-up menu:
• Specified Steps. Enter a value to specify the
number of steps between the start and end of
the blend.
• Specified Distance. Enter a value to specify the
distance between the steps in the blend. The
distance specified is measured from the edge of
one object to the corresponding edge on the next
object (for example, from the rightmost edge of
one object to the rightmost edge of the next
object).
Align to Page option applied
• Smooth Color has the Adobe Illustrator
program autocalculate the number of steps for the
blends. If objects are filled or stroked with
different colors, the steps are calculated to provide
the optimum number of steps for a smooth color
transition. If the objects contain identical colors,
or if they contain gradients or patterns, the
number of steps is based on the longest distance
between the bounding box edges of the two
objects.
Align to Path option applied
Creating blends on paths
Once you create a blend, you can then apply the
blend to a path. Applying a blend to a path is an
easy way to wrap a blend around an object or
create special effects in your artwork.
ADOBE ILLUSTRATOR 8.0 199
User Guide
The blend follows the contours of the path in the
orientation specified in the Blend Options dialog
box. If Align to Path is selected, the alignment of
the blend follows the contours of the path. If Align
to Page (the default setting) is selected, the blend is
aligned with the x axis of the page.
To apply a blend to a path:
1 Select a blend and hold down Shift to select
a path.
To reverse the stacking order of a blend on a path:
1 Select the blend.
2 Choose Object > Blends > Reverse Front to
Back. The objects are reversed in the stacking
order on the path, so that those objects on the
frontmost stacking order are moved to the back of
the stacking order, and vice-versa. (See “Stacking
objects” on page 123.)
2 Choose Object > Blends > Replace Spine.
To reverse the order of a blend on a path:
1 Select the blend.
2 Choose Object > Blends > Reverse Spine. The
objects are ordered in reverse on the path.
Original and with Reverse Front to Back command applied
Editing blends
Original and with Reverse Spine command applied
You can move, delete, transform, edit anchor
points and Bezier curves, or change colors on
blends, using any of the editing tools available in
the Adobe Illustrator program. When you edit a
blend path, the changes take place interactively
while you work.
200 CHAPTER 8
Using Gradients, Blends, and Patterns
Blending colors between filled objects
The Blend filters create a series of intermediate
colors from a group of three or more filled objects,
based on the objects’ vertical or horizontal orientation, or on their stacking order. The filters do not
affect strokes or unpainted objects. (See “Stacking
objects” on page 123.)
Applying a Blend filter to objects painted using a
mix of process and spot color, or a mix of color
models, converts the color to CMYK.
Original and with Blend Front to Back filter applied
To blend colors between filled objects:
1 Select three or more filled objects to blend.
2 Do one of the following:
• To fill the intermediate objects with gradated
blends between the frontmost and backmost filled
objects, choose Filter > Colors > Blend Front
to Back.
• To fill the intermediate objects with gradated
blends between the leftmost and rightmost filled
objects, choose Filter > Colors > Blend Horizontally.
• To fill the intermediate objects with gradated
blends between the topmost and bottommost
filled objects, choose Filter > Colors > Blend
Vertically.
Creating and working with
patterns
To create a pattern, you create artwork you want to
use as a pattern and then drag the artwork to the
Swatches palette or use the Edit > Define Pattern
command. You can use paths, compound paths, or
text with solid fills (or no fill) for a pattern, or you
can design a pattern from scratch with any of the
tools in the Adobe Illustrator program. (However,
you cannot use patterns, gradients, blends, brushstrokes, gradient meshes, bitmap images, graphs,
placed files, or masks in a pattern.) You can
customize any pattern by resizing the pattern,
moving or transforming it, or coloring its objects.
Note: The Illustrator Extras folder on the Adobe
Illustrator CD includes pattern and texture libraries.
In addition, the Adobe Illustrator Startup file and
the Adobe Illustrator 8.0 > Libraries folder contain a
smaller collection of these patterns.
Patterns intended for filling objects (fill patterns)
differ in design and tiling from patterns intended
to be applied to a path with the Brushes palette
(brush patterns). For best results, use fill patterns
to fill objects and brush patterns to outline objects.
(See “Using the Brush Libraries” on page 98 and
“Creating corner tiles for brush patterns” on
page 206.)
ADOBE ILLUSTRATOR 8.0 201
User Guide
How patterns tile
When designing patterns, it helps to understand
how Adobe Illustrator tiles patterns:
• Patterns tile from left to right from the ruler
origin (by default, the bottom of the artwork) to
the top of the artwork. Typically, only one tile
makes up a fill pattern. Brush patterns can consist
of up to five tiles—for the sides, outer corners,
inner corners, and the beginning and end of the
path. The additional corner tiles enable brush
patterns to flow smoothly at corners.
• Fill patterns tile perpendicular to the x axis. In
contrast, brush patterns tile perpendicular to the
path (with the top of the pattern tile always facing
outward). Also, corner tiles rotate 90 degrees
clockwise each time the path changes direction.
2 To make the pattern less complex so that it
prints more rapidly, remove any unnecessary
detail from the pattern artwork, and group objects
that are painted with the same color so that they
are adjacent in the stacking order.
3 Optionally, to control the spacing between
pattern elements or to clip out portions of the
pattern, draw a pattern bounding box (an unfilled
rectangle) around the artwork you want to use as a
pattern. Choose Object > Arrange > Send to Back
to make the rectangle the backmost object. To use
the rectangle as a bounding box for a brush or fill
pattern, fill and stroke it with None.
4 Use the selection tool to select the artwork and
bounding box (if any) that will make up the
pattern tile.
• Fill and brush patterns also tile differently in
relation to the pattern bounding box—an unfilled
and unstroked rectangle backmost in the artwork.
For fill patterns, the bounding box acts as a mask;
fill patterns tile only the artwork within the
pattern’s bounding box. In contrast, brush
patterns tile artwork within the bounding box and
protruding from or grouped with it.
5 Do one of the following:
Constructing simple patterns and
defining patterns
• Choose Edit > Define Pattern, and enter a name
To create a pattern, you create artwork that you
want to use as a pattern tile and then drag it to the
Swatches palette.
• Choose Window > Show Swatches, and then
in the New Swatch dialog box.
drag the artwork to the Swatches palette.
To name a pattern in the Swatches palette:
To create a pattern:
1 Double-click a pattern swatch.
1 Create artwork for the pattern following
2 Enter the new pattern name in the Swatch Name
text box, and click OK.
“Guidelines for constructing patterns” on
page 202.
202 CHAPTER 8
Using Gradients, Blends, and Patterns
Guidelines for constructing patterns
• To make an organic or textural pattern appear
Follow these general guidelines for constructing
pattern tiles:
irregular, vary the tile artwork subtly, not dramatically, for a more realistic effect. You can use the
Roughen filter in the Distort menu to control
variations.
• As you create your pattern tile, zoom in on the
artwork to align elements more accurately, and
then zoom out from the artwork for the final
selection.
• For greatest efficiency in previewing and
printing, a fill pattern tile should be about 1/2 inch
to 1 inch square. Side tiles for brush patterns
should be no larger than 1/2 inch to 1 inch high by
1 inch to 2 inches wide; the corner tiles must be the
same height as the side tiles and should be square.
Original and Roughen filter applied
• The more complex the pattern, the smaller the
• To ensure smooth tiling, close paths before
selection used to create it should be; however, the
smaller the selection (and the pattern tile it
creates), the more copies are needed to create the
pattern. Thus, a 1-inch-square tile is more efficient
than a 1/4-inch-square tile. If you are creating a
simple pattern, you can include multiple copies of
the object within the selection intended for the
pattern tile.
defining the pattern.
• To create simple line patterns, layer stroked lines
of varying widths and colors and place an unfilled
and unstroked bounding box behind the lines to
create a pattern tile.
• Enlarge your artwork view, and check for flaws
before defining a pattern.
• If you draw a bounding box around the artwork,
make sure that the box is a rectangle, that it is the
backmost object of the tile, and that it is unfilled
and unstroked. To have Illustrator use this
bounding box for a brush pattern, do not fill or
stroke the box and make sure that nothing
protrudes from it.
Follow these additional guidelines when creating
brush patterns:
• When possible, confine artwork to an unpainted
bounding box so that you can control how the
pattern tiles. (See “How patterns tile” on
page 201.)
Corner tile and side tile
ADOBE ILLUSTRATOR 8.0 203
User Guide
• Corner tiles must be square and have the same
To construct a geometric pattern:
height as side tiles to align properly on the path. If
you plan to use corner tiles with your brush
pattern, align objects in the corner tiles horizontally with objects in the side tiles so that the
patterns tile correctly.
1 Make sure that Smart Guides are turned on and
that the View > Snap to Point command has been
selected.
2 Select the geometric object. For precise
positioning, use the selection tool positioned on
one of the object’s points.
3 Begin dragging the object vertically from one of
its anchor points; then press Alt+Shift (Windows)
or Option+Shift (Mac OS) to copy the object and
constrain its movement.
Side tile
4 When the copy of the object has snapped into
place, release the mouse button and then release
Alt+Shift (Windows) or Option+Shift (Mac OS).
5 Shift-click to select both objects, and begin
dragging the objects horizontally by one of their
anchor points; then press Alt+Shift (Windows) or
Option+Shift (Mac OS) to create a copy and
constrain the move.
Incorrect corner tile and correct corner tile
• Create special corner effects for brush patterns
using corner tiles. (See “Creating corner tiles for
brush patterns” on page 206.)
Constructing geometric patterns
To construct a geometric pattern that tiles
uniformly, first construct a geometric object with
a center point and paint the object. Then arrange
copies of the object in the pattern you want, select
the artwork, and define it as a pattern tile by
dragging it to the Swatches palette.
6 When the copy of the object has snapped into
place, release the mouse button, and then release
Alt+Shift (Windows) or Option+Shift (Mac OS).
7 Repeat steps 2 through 6 until you’ve built the
pattern you want.
8 Using the rectangle tool ( ), follow one of two
methods:
204 CHAPTER 8
Using Gradients, Blends, and Patterns
• For a fill pattern, draw a bounding box from the
To create an irregular texture:
center point of the upper left object to the center
point of the lower right object.
1 Make sure that View > Snap to Point has been
selected.
• For a brush pattern, draw a bounding box that
2 Draw a bounding box. If you are creating a
brush pattern, skip to step 13.
surrounds the objects and coincides with their
outer boundaries. If the pattern is to be a corner
tile, hold down Shift as you drag to constrain the
bounding box to a square. The bounding box
should surround the objects and coincide with
their outer boundaries.
3 Draw the texture with the objects or lines that
intersect only the left side of the bounding
rectangle.
4 Select the texture and the rectangle, and place
the pointer on the lower left corner of the
rectangle.
5 Drag the rectangle to the right; then press
Alt+Shift (Windows) or Option+Shift (Mac OS)
to create a copy and to constrain the move.
Bounding box for a fill pattern and for a brush pattern
9 Paint the geometric objects the desired color.
10 Define the geometric objects as a pattern,
following the procedure in “Constructing simple
patterns and defining patterns” on page 201.
Constructing patterns with irregular
textures
You can create an irregularly textured fill pattern
that tiles seamlessly. Remember that fill patterns
clip any artwork outside the bounding box,
whereas brush patterns do not. To create an irregularly textured brush pattern, you should select
and define as a pattern only the textured artwork
within the bounding box.
Draw texture on left side of bounding box. Then copy
texture and rectangle.
When the upper left corner point of the copy snaps
to the upper right corner point of the bounding
box, release the mouse button, and then release
Alt+Shift (Windows) or Option+Shift (Mac OS).
If you know the exact dimensions of the
bounding box, you can select only the textures
and use the Move command to specify a horizontal
move the width of the rectangle. Be sure to click Copy
instead of OK in the Move dialog box.
ADOBE ILLUSTRATOR 8.0 205
User Guide
6 Click outside the rectangle to deselect it.
7 Select the right rectangle, and delete it.
10 When the upper left corner point of the copy
snaps to the lower left corner point of the
rectangle, release the mouse button and then
Alt+Shift (Windows) or Option+Shift (Mac OS).
11 Deselect everything.
12 Select the lower rectangle and any objects that
don’t cross the top rectangle, and delete them.
Select the right rectangle and delete it to create identical
texture on right and left.
8 Using the pencil tool ( ), continue drawing
your texture with only the objects or lines that
intersect the top side of the rectangle. When you
finish with the top side only, select all of the
lines or objects crossing the top side and the
bounding box.
9 Edit the corner tile so that its artwork lines up
vertically and horizontally with the tiles next to it.
Select and delete any portions of the tile that you
do not want in the corner and edit the remaining
art to create the final outer corner tile.
Draw texture on top side of bounding box. Then copy
texture and rectangle.
Select the lower rectangle and delete it to create an identical
texture on top and bottom.
13 Using the pencil tool, fill the middle of the
rectangle with your texture. Be careful not to
intersect any of the rectangle edges. Paint the
texture.
14 Define the artwork and rectangle as a pattern,
following the procedure in “Constructing simple
patterns and defining patterns” on page 201.
206 CHAPTER 8
Using Gradients, Blends, and Patterns
Creating corner tiles for brush patterns
Corner tiles lend special border effects when
applying brush patterns. You can create corner
tiles from scratch, or you can use a brush pattern’s
side tile as the basis for designing complementary
outer and inner (reflected –135 degrees)
corner tiles.
To create symmetrical corner tiles from a side tile:
1 Open a brush pattern file, supplied with Adobe
Illustrator, that you want to use.
2 Choose Window > Show Swatches. Select the
tile you want to use, and drag it to the center of
your artwork.
3 If the tile does not have a square bounding box,
6 Using the rotate tool, Alt+Shift (Windows) or
Option+Shift (Mac OS) the lower left corner of
the bounding box. Enter a value of 90 degrees, and
click Copy to create a copy flush left of the first tile.
This tile becomes the corner tile.
7 Using the selection tool, drag the left tile
down by the top right anchor point, pressing
Alt+Shift (Windows) or Option+Shift (Mac OS)
to make a copy and constrain the move so that you
create a third tile beneath the second. When the
copy’s upper right anchor point snaps to the
corner tile’s lower right anchor point, release the
mouse button and Alt+Shift (Windows) or
Option+Shift (Mac OS).
You use the third copy for alignment.
create a box that completely encompasses the
artwork, the same height as the side tile. (Side tiles
can be rectangular.) Fill and stroke the box with
None, and choose Object > Arrange > Send to
Back to make the box backmost in your artwork.
(The bounding box helps you align the new tile.)
4 Select the tile and the bounding box.
5 Use the rotate tool ( ) to rotate the tile and its
bounding box 180 degrees.
Pasted tile and tile rotated 180º
Rotate 90º and copy left tile. Then Alt-drag/Option-drag
corner tile to make copy beneath it.
ADOBE ILLUSTRATOR 8.0 207
User Guide
8 Select the artwork in the right tile. Drag it to
the left, pressing Alt+Shift (Windows) or
Option+Shift (Mac OS) so that the artwork
overlaps that in the corner tile.
10 Select all of the tile including the
bounding box.
11 Save the new pattern following the procedure
in “Constructing simple patterns and defining
patterns” on page 201.
12 Double-click the new pattern swatch to bring
up the Swatch Options dialog box, name the tile as
a variation of the original (for example, use the
suffix .outer), and click OK.
To create an inner corner tile:
Copy and move upper right tile over corner tile.
Do one of the following:
9 Edit the corner tile so that its artwork lines up
• If the side tile for the brush pattern is horizon-
vertically and horizontally with the tiles next to it.
Select and delete any portions of the tile that you
do not want in the corner and edit the remaining
art to create the final outer corner tile.
tally symmetric (that is, if it looks the same when
flipped top to bottom), you can use the same tile
for the inner corner tile as for the outer corner tile.
• If the side tile for the brush pattern is not
horizontally symmetric, follow the same steps as
to create symmetrical corner tiles from a side tile,
but skip step 5 (rotating the tile by 180 degrees).
Unneeded elements selected and deleted; Final outer
corner tile
208 CHAPTER 8
Using Gradients, Blends, and Patterns
Modifying patterns
To move all of the patterns within a file:
You can modify a pattern by editing the artwork
and then replacing the old pattern in the Swatches
palette with the new artwork. If you replace an
old pattern with a new pattern, any new and
existing objects painted with that pattern are
painted with the new definition rather than with
the old definition.
1 Choose View > Show Rulers.
To modify an existing pattern:
1 Make sure that nothing is selected in your
2 Move the selection pointer to the box in the
upper left corner where the rulers intersect.
3 As you drag into the window, two intersecting
lines, indicating the ruler origin, follow the
pointer. When the ruler origins are positioned as
desired, release the mouse button. (See “Changing
the ruler origin” on page 107.)
artwork.
Transforming pattern-filled objects
2 Choose Windows > Show Swatches, and select
If an object that you want to transform is
filled with a pattern, you can choose to transform
only the pattern, transform only the object,
or transform the pattern and the object simultaneously.
the pattern swatch you want to modify.
3 Drag the pattern swatch onto your artwork.
4 Select artwork in the pattern tile, an d edit the
tile. (To do this, use the direct-selection tool or
group-selection tool, or ungroup the pattern.)
5 Select the pattern tile.
6 Alt-drag (Windows) or Option-drag (Mac OS)
the modified pattern on top of the old pattern
swatch in the Swatches palette. The pattern is
replaced in the Swatches palette and is updated in
the current file.
Moving patterns
Patterns begin tiling from the ruler origin and
continue to tile in a left-to-right sequence, from
bottom to top, until the object is filled. To adjust
where all patterns in your artwork begin tiling, you
can change the file’s ruler origin.
Once you have transformed a fill pattern, all
patterns that you subsequently apply are transformed the same way. To return fill patterns to
their original states, select another paint style and
then reselect the desired pattern.
You can transform fill patterns using the dialog
box associated with a transformation tool.
Regardless of the method you choose, turning this
option on or off in any dialog box updates the
option in all dialog boxes. (See “Moving, copying,
and deleting objects” on page 117.)
ADOBE ILLUSTRATOR 8.0 209
User Guide
To transform a pattern and object using a
transformation tool:
1 Use the selection tool to select the pattern-filled
object.
2 Double-click the transformation tool you want
to use.
3 Select one or both of the following options:
• Patterns to transform the pattern tiles.
• Objects to transform the object.
4 Enter the desired transformation values in the
text boxes and click OK.
Changing gradients, blends, and
patterns into filled objects
The Expand command can convert gradients,
blends, or patterns into filled objects. This
command can be particularly useful if you are
having difficulty printing objects that contain
gradients, blends, or patterns. The Expand
command can also convert fills and strokes into
individual objects, and can convert gradients into
mesh objects. (See “Creating a mesh object” on
page 192.)
To transform patterns using the mouse:
1 Select the pattern-filled object.
2 Hold down the tilde key (~) and drag.
3 Release the mouse button when the transfor-
mation is as desired.
Original gradient and Expand command applied
Important: The borders of the object appear to be
transformed while dragging with the mouse, but
when the mouse button is released the borders snap
back to their original configuration, leaving only the
pattern transformed.
To select the Transform Pattern Tiles preferences
option:
1 Choose File > Preferences > General.
2 Select Transform Pattern Tiles to select Pattern
Tiles automatically in the transformation dialog
boxes, and click OK.
Original pattern and Expand command applied
210 CHAPTER 8
Using Gradients, Blends, and Patterns
To convert fills or strokes into objects:
Using the Pen and Ink filters
1 Select a filled or stroked object, or an object that
The Pen and Ink > Hatch Effects filter creates
textured gradations, such as cross-hatching, and
irregular random textures, such as wood grains,
that you can apply to artwork to simulate the look
of an ink pen drawing. A similar tool, called the
Photo Crosshatch filter, can convert a bitmap
photographic image into a series of hatched layers,
so that it appears to be sketched by an ink pen. (See
“Using the Photo Crosshatch filter” on page 245.)
has been both filled and stroked.
2 Choose Object > Expand.
3 Do one of the following:
• To expand only the fill, select the Fill check box.
• To expand only the Stroke, select the Stroke
check box.
• To expand both the fill and the stroke, select
both check boxes.
4 Click OK.
To convert gradients, blends, and patterns into
objects:
1 Select objects that have been blends, or objects
that have been filled or stroked with a gradient or
pattern.
2 Choose Object > Expand.
3 Do one of the following:
• If you are expanding a complex object, select the
Object check box and click OK.
• If you are expanding a gradient, select the
Specify Objects option, enter the number of steps
to which you want to convert the gradient, and
click OK.
Hold down Alt (Windows) or Option
(Mac OS) as you choose Object > Expand
to expand a gradient using the last number of
steps entered in the Expand dialog box.
The Hatch Effects filter converts a selected object
into a mask and then draws lines or shapes behind
it. The shapes created by the Hatch Effects filter are
objects and can require significant program
memory. Thus, consider applying Pen and Ink
effects as the last step in creating your artwork:
Make the entire drawing and paint it as desired.
Then apply the hatch effects.
ADOBE ILLUSTRATOR 8.0 211
User Guide
The hatch (or hatch style) is the design element of
the Hatch Effects filter. The particular options
associated with a hatch are called hatch settings.
You can select from hatch settings supplied with
the Adobe Illustrator program by using the Hatch
Effects dialog box. You can also create your own
hatched designs by drawing or selecting an object,
naming it as a hatch in the New Hatch dialog box,
and then applying it to artwork by using the Hatch
Effects dialog box. Try experimenting with
applying different hatches to your artwork before
creating your own.
3 Choose a hatch from the Hatch pop-up menu
and an effect from the Hatch Effect pop-up menu.
4 To improve the program’s performance by
turning off the hatch preview, deselect the Preview
option at the lower right of the dialog box.
5 To adjust the number of hatch elements applied
to the selection, drag the Density slider or enter
values in the text box. To intensify the effect, click
a gradation within the density adjustment bar.
Original hatch
Low
value
Applying a hatch effect
To apply a hatch effect to a selected object, you
choose a hatch setting and its associated hatch
style, modify the settings if desired, and apply
them through the Hatch Effects dialog box. The
Hatch Effects dialog box lets you adjust the hatch.
Density
Dispersion
To fill an object with an existing ink pen hatch:
1 Select the object you want to fill with a hatch.
2 Choose Filter > Pen and Ink > Hatch Effects.
Rotation
Scale
Thickness
Hatch concentration and direction
High
value
212 CHAPTER 8
Using Gradients, Blends, and Patterns
6 To specify hatch uniformity or design characteristics, adjust sliders or enter values for Dispersion,
Thickness, Scale, or Rotation.
Enter an angle along which to apply the effect by
entering a value from -360 to 360 in the text boxes.
Then drag the slider or enter values in the text
boxes to specify a range, as follows:
• Fade specifies whether the hatch fades across the
object. Choose the fade properties from the Fade
pop-up menu: None for no fade, To White to fade
the hatch to white, To Black to fade the hatch to
black, or Use Gradient if the object is filled with a
gradient and you want that gradient to define the
fade’s direction and colors.
• Dispersion, which controls the spacing of hatch
elements, ranges from 0% to 300%.
• Thickness, or stroke weight, of the hatch
elements ranges from 10 pts to 1000 pts. (This
option is dimmed if the selection is unstroked.)
A
B
C
D
E
F
• Scale, which sets the size of the hatch elements,
ranges from 10% to 1000%.
• Rotation, which sets the angle at which the hatch
elements are applied, ranges from –180 degrees to
180 degrees.
7 Use the dial or text boxes to enter a value
between -360 and 360 for effect variables as
follows:
A. Original hatch B. Constant C. Linear D. Reflect
E. Symmetric F. Random
• Linear increases the effect progressively.
• Reflect varies the effect from the center of the
8 Select from the following color options for the
hatch:
object outward.
• Match Object’s Color changes the hatch fill to
• Constant creates the same effect evenly across
the selection’s fill.
the shape.
• Keep Object’s Fill Color applies the hatch in its
• Symmetric varies the effect proportionately and
original color on top of the object’s fill color.
evenly, for example, if applying hatches to round
or cylindrical shapes.
9 When you finish adjusting the hatch options,
click OK.
• Random applies the effect irregularly.
ADOBE ILLUSTRATOR 8.0 213
User Guide
Creating and saving hatches
To save hatch settings:
You can create and save your own hatches or
modify existing hatches and save them for reuse.
To save hatches, you use either the New Hatch or
the Hatch Effects dialog box.
1 Choose Filter > Pen and Ink > Hatch Effects.
To create a hatch:
1 Draw the objects you want to convert to a hatch
design for the ink pen effect.
2 Select the artwork.
2 Specify the hatch settings and any style options
you want to save.
3 To save the settings in the file, click New. Enter a
new name for the settings, and click OK.
To delete hatch settings:
1 Choose Filter > Pen and Ink > Hatch Effects.
2 Select the hatch settings and any style options
3 Choose Filter > Pen and Ink > New Hatch.
you want to delete.
4 Click New. Enter a name for the new hatch and
3 Click Delete, and then click OK.
click OK.
5 To improve the program’s performance,
deselect Preview to turn off the preview of the
hatch and click OK.
To delete an existing hatch:
To modify an existing hatch:
3 Click Delete, and then click OK.
1 Make sure that nothing is selected in the
artwork.
Using Pen and Ink hatch libraries
2 Choose Filter > Pen and Ink > New Hatch.
3 Choose a hatch from the Hatch pop-up menu.
4 Click Paste and then click OK.
5 Edit the hatch as desired, and then select it.
6 Choose Filter > Pen and Ink > New Hatch.
7 Click New. Name the new hatch and click OK.
1 Choose Filter > Pen and Ink > New Hatch.
2 Choose a hatch from the Hatch pop-up menu.
When using the Hatch Effects filter you may want
to import hatches that you previously created in
Illustrator, or save the current set of hatches you
made into a hatch library. Hatch libraries are
stored in the Illustrator 8.0 \ Plug-Ins \ Illustrator
Filters \ Ink Pen folder.
Once you have opened a hatch library, all the
hatches in the library are loaded into the Hatch
Effects dialog and can be viewed in the Hatch
Effect pop-up menu at the upper left corner of the
dialog.
214 CHAPTER 8
Using Gradients, Blends, and Patterns
To load a pen and ink hatch library into Illustrator:
1 Choose Filter > Pen and Ink > Library Open.
2 In the dialog box, locate the hatch library you
want to open and click OK. The hatch libraries are
located in the Illustrator 8.0 \ Plug-Ins \ Illustrator
Filters \ Ink Pen folder.
Once the new library has been loaded, use the Pen
and Ink filter as described in “Applying a hatch
effect” on page 211.
To save new hatches in an ink pen library:
1 Create new hatches as described in “Creating
and saving hatches” on page 213.
2 Choose Filter > Pen and Ink > Library Save As.
3 In the dialog box, name the new file, save it in
the Illustrator 8.0 \ Plug-Ins \ Illustrator Filters \
Ink Pen folder, and click OK.