1
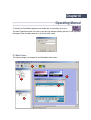
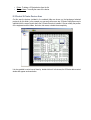
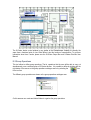
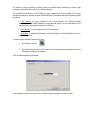
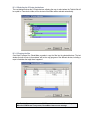
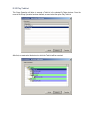
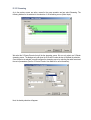
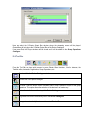
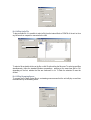
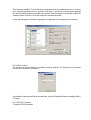
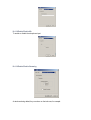
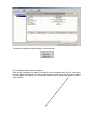
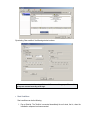
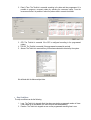
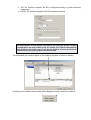
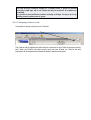
CLUSTERWARE
USER MANUAL
2.1.1.0 VERSION
INDEX
Introduction .....................................................................................................................3
Installation Guide ............................................................................................................4
II.1 System requirements...................................................................................................4
II.2 Software installation ....................................................................................................4
II.3 Uninstalling.................................................................. ¡Error! Marcador no definido.
Operation Manual ............................................................................................................5
III.1 Main Screen ...............................................................................................................5
III.1.1 Cluster Devices catalogue...............................................................................6
III.1.1.1 Folder Menu ...............................................................................................6
III.1.1.2 S-Cluster Device Menu ..............................................................................7
III.2 Control S-Cluster Devices Area..................................................................................8
III.3 Group Operations .......................................................................................................9
III.3.1 Copy TaskList................................................................................................12
III.3.1.1 Selecting the TaskList. .............................................................................12
III.3.1.2 Selecting the S-Cluster destinations.........................................................13
III.3.1.3 Copying the files.......................................................................................13
III.3.2 Play TaskList .................................................................................................14
III.3.3 Streaming......................................................................................................16
III.4 Tool Bar....................................................................................................................17
III.4.1 User Options Dialogue ..................................................................................18
III.4.2 TaskList Editor...............................................................................................18
III.4.3 Editing a TaskList ..........................................................................................19
III.4.3.1 Adding Tasks to a TaskList ......................................................................20
III.4.3.2 Activate GPO............................................................................................21
III.4.3.3 Pause .......................................................................................................21
III.4.3.4 Play Audio File .........................................................................................22
III.4.3.5 Play Streaming Source.............................................................................22
III.4.3.6 Run TaskList ............................................................................................23
III.4.3.7 RS-232 Command....................................................................................23
III.4.3.8 Enable/Disable Mic...................................................................................24
III.4.3.9 Enable/Disable Streaming........................................................................24
III.4.3.10 Adding Start and Stop Conditions ..........................................................25
III.4.3.11 Assigning priorities to a task...................................................................29
I.
Chapter I
Introduction
ClusterWare is a Windows application that allows controlling and monitoring different S-Clusters in a
simultaneous way. It is thought to control and check a full installation of S-Clusters, providing with tools
for the control of many S-Clusters.The software has the following characteristics:
Automatic recognition of all the S-Cluster series devices.
It offers a view of the S-Clusters as objects, so it is possible to draw the installation using
background images and placing the objects in real situation.
Integrated TaskList editor.
Automatic and manual group operations.
A centralized system of alarms that constantly monitors all the units in real-time.
User priority levels for the user.
Chapter II
Installation Guide
II.1 System requirements
Pentium 166 or higher.
64MB RAM or higher.
Supported operating systems:
-
Microsoft Windows XP.
Microsoft Windows 2000.
Microsoft Windows NT 4.0 Service Pack 6 or newer.
Microsoft Windows Millennium Edition (ME).
Microsoft Windows 98.
Microsoft Internet Explorer 5.0 or higher.
II.2 Software installation
Please, find below the steps required for installing the software:
1. Start the operating system.
2. Insert the installation ClusterWare CD in the CD-ROM unit.
3. Execute in the CD-ROM unit:
4. \Installation\ClusterWare Vx.x.x.exe
5. Please, follow the installation instructions.
II.3 Deletion
Please, find below the following steps to delete the software:
1. Press the button START, CONFIGURATION, CONTROL PANEL.
2. Click twice ADD/DELETE PROGRAM.
3. Click twice CLUSTERWARE and follow the instructions.
Chapter III
Operating Manual
To execute the ClusterWare application we double click on the desktop of the icon.
The main ClusterWare screen will come up and the login dialogue allowing the entry to the application
will appear. Enter the valid password to go into the main screen.
III.1 Main Screen
The following image is an example of the ClusterWare main screen.
5
2
1
3
4
The main screen in the ClusterWare consists of the following areas:
1
Area of S-Cluster device catalogue.
2
Control S-Cluster device area.
3
S-Cluster device control window.
4
Area of operations in the group catalogues.
5
Area of menu.
1. Area of S-Cluster device catalogue: The devices organized in folders are shown on this area.
2. Control S-Cluster device area: On this area, the devices included in the selected folder are
shown on the background selected previously for this folder. Also it is possible to control each
device.
3. S-Cluster device control window: To control each device inside the control area.
4. Area of operations group catalogue: This area shows the different group operations defined by
the user.
5. Area of menu: A tool bar with different functionalities.
III.1.1 Cluster device catalogue
By clicking the right button of the mouse over this window the user has access to the folder menu
which allows to create folders and to organize the devices for folders or zones. The different S-Cluster
devices and their availability can be seen on this area. For example:
The colour of the icon identifies if the device is an S-Cluster Output Box (blue colour) or an S-Cluster
Encoder (red colour).
If the device icon appears in grey colour, it means that the device is not available. There
may be two reasons: Another ClusterWare is controlling the device or the communication
with the device was lost.
III.1.1.1 Folder Menu
There is a menu associated to each folder or zone which appears by clicking the right button of the
mouse. It also allows to create new folders:
Add Device: We can add devices to this folder. By clicking on this option, a list of S-Cluster
devices will appear:
New Folder: Option to define a new folder inside the first one. It is useful to divide a zone in
sub-zones.
Delete Folder: To delete a folder.
Load Background: To load a background for a folder. When we select a folder on the S-Cluster
devices catalogue, the background image appears on the S-Cluster devices control area.
Remove Background: To remove the background of a folder.
Change Name: To modify the name of the selected folder.
Group Operation: This option allows to make a group operation with the folder devices
identified.
III.1.1.2 S-Cluster Device Menu
By clicking the right button of the mouse when the cursor is on one device, the following dialogue will
appear:
Open: To open the device. The S-Cluster device control window appears on the control area.
Open In Internet Explorer: To open the device in Internet Explorer (Cluster Access).
Delete: To delete a S-Cluster device from the list.
Change Name: To modify the name of the device.
III.2 Control S-Cluster Devices Area
On this area the devices included in the selected folder are shown on the background selected
previously for this folder. In the example, we can see that there are two S-Cluster Output Boxes and a
subfolder with the name Control where the S-Cluster Encoder is installed. We can modify the position
of the equipment and the folders, their size, their name, or delete them completely.
It is also possible to control one of them by double click on it. In that case, the S-Cluster device control
window will appear as shown below:
The S-Cluster device control window is very similar to the ClusterAccess. Actually it is exactly the
same from a functional point of view. What differs is just the location of some buttons. To get more
information about how it works, please see the S-Cluster Output Box and S-Cluster Encoder User
Manual.
III.3 Group Operations
This tool allows to define group operations. That is, operations that the user will be able to carry out
simultaneously over a selected group of S-Cluster devices. It is possible to define by clicking with the
right button of the mouse on the group operations catalogue area or by selecting the
icon
in the tool bar.
The different group operations are shown on the group operations catalogue area:
On this area we can create and delete folders to organize the group operations.
The creation of group operations is made by using an assistant which will advise you step by step
through the whole process of creation of a desired operation.
This assistant will advise you on the creation of group operations, that will be added to the group
operations catalogue, to be used as many times as we want. ClusterWare has got three kinds of group
operations:
Copy TaskList: To copy a TaskList to one or more devices. The TaskList is added
automatically to the TaskList Manager of each selected device. You can also select to copy
the audio files that include the device in the TaskList.
Play TaskList: To play a TaskList in one or more devices.
Streaming: To establish a streaming connection between one Encoding Box and one or
more Output Boxes.
To create a group operation there are two ways:
1. By clicking on the icon
2. By clicking the right button of the mouse on the group operation catalogue area and by
selecting the option group operation.
Then the following dialogue will appear:
Once the name is entered, we press “Next” to select the group operation we want to create:
Next, we describe each of them.
How to execute a group operation:
Once a group operation has been created, a control menu associated to that operation will appear:
Using this control we can play, that is execute the group operation, or make a pause, or stop it.
The operation “Copy TaskList” does not require this control because it is executed,
immediately the TaskList or TaskLists to copy is/are selected.
III.3.1 Copy TaskList
This group operation will copy TaskList files into a group of S-Cluster Output Boxes. The TaskList file
will be copied on the PCMCIA card of each device and will automatically be loaded into the TaskList
Manager of each unit.
III.3.1.1 Selecting the TaskList.
If we select Copy TaskList as operation of a group operation the following dialogue will be displayed:
We can write directly the route and file name or we press Browse to select the TaskList file. If the
TaskList includes the audio files reproduction we can proceed in two different ways:
1. If we check the option Copy audio files, the audio files indexed in the TaskList file will be
copied to the PCMCIA of the selected devices. So, the execution is guaranteed even if the
network connection is lost.
2. If we do not check the option Copy audio files, the audio files indexed in the TaskList will not
be copied into the selected devices and the network connection will be necessary to achieve
correct execution because the TaskList will indicate the original route of the audio files.
It is possible to select several TaskList files using the Browse option.
By selecting Next we go to the next window to select the devices where the TaskLists will be copied to.
III.3.1.2 Selecting the S-Cluster destinations.
The next dialogue shows the S-Cluster devices, allowing the user to select where the TaskList file will
be copied to. If we check a folder, all the devices of that folder will be selected automatically.
III.3.1.3 Copying the files
Once Next is pressed, the ClusterWare proceeds to copy the files into the selected devices. The last
window that we will see in the assistant, will be the copy progress of the different devices, including a
report of mistakes that might have happened.
The TaskList files are copied onto the PCMCIA card of each selected S-Cluster Output Box.
When the PCMCIA card is not present, ClusterWare shows an error message.
III.3.2 Play TaskList
This Group Operation will allow to execute a TaskList in the selected S-Cluster devices. Once the
name of the Group Operation has been defined, we must select the option Play TaskList:
After that, we must select the devices in which the TaskList will be executed:
After these steps, the TaskList file selection window will appear:
We have two options:
From File: To select TaskList stored in any unit connected to the network.
PCMCIA Common: To select one or more TaskList files stored on the PCMCIA cards of the
selected units. This option is interesting if we want to guarantee the operation even if the network
connection is lost temporally. The file list only shows the common files stored in the previously
selected devices in order to avoid that one unit can not execute the TaskList because not having it
stored on its PCMCIA card.
When the file selection is finished, the ClusterWare will show the control tool of this group operation:
Also, the new group operation will be added to the Group Operation Catalogue.
III.3.3 Streaming
As in the previous cases, we write a name for the group operation and we select Streaming. The
following window for the assistant is the selection of the streaming source (Select Input):
We select the S-Cluster Encoder that will be the streaming source. We can only select one S-Cluster
streaming source. The dialogue only will show the S-Cluster Encoder devices to facilitate the selection.
Once the device is selected, we must configure the streaming source by selecting the audio format and
the rest of parameters (See the S-Cluster Encoder User Manual for more information).
Next, the destiny selection will appear:
Here we select the S-Cluster Output Box devices where the streaming source will be played.
ClusterWare will only show the S-Cluster Output Box of the Device Catalogue.
If we press End, the Player windows will be closed and it will be added to the Group Operations
Catalogue.
III.4 Tool Bar
From the Tool Bar we have quick access to some Cluster Ware functions , like for instance, the
TaskList editor, Automatic Organization, Group Operations, etc.
To show / hide the Device Catalogues window.
To show the User Options Dialogue.
To show / hide the device control windows and/or Group Operation Players of the group
operations. This option allows the selection of the devices in an easier way.
To be allocated to the root directory of the Device Catalogues.
To go back one level in the directory tree of the Device Catalogues.
To organize automatically the icons on the control Device Zone.
To start the TaskList editor.
Group Operation tool
III.4.1 User Options Dialogue
Log in automatically next time, means it will not be necessary to enter the security password.
Show application background: It is only recommendable to eliminate the background in case the
application works too slow.
III.4.2 TaskList Editor.
The TaskList editor is very similar to the ClusterAccess one, with the advantage that we can save and
load TaskLists to the editor from any disk unit or PC.
The window will display the following:
4
5
6
2
1
3
1. TaskList area. This zone shows the TaskList selected.
2. This area shows the task associated with the TaskList selected on the TaskList area. From
here it is also possible to add, modify or delete tasks.
3. This area shows the Start and Stop conditions of the TaskList selected on the tasklist area. It
is also possible to add or modify them.
4. The first step to edit a TaskList is to create the TaskList file. It can be done by selecting the
“New TaskList” option. From here a TaskList file is created and saved where the user decides
with the help of the dialogue that is displayed. Once the file is created, tasks and start – stop
conditions can be introduced.
5. “Add TaskList” allows to add TaskLists to the TaskList Manager for modifying them later.
6. The TaskLists can have different priority levels and the TaskLists are executed according to
their priority levels. The option “TaskList Priority” allows to assign a priority level to a TaskList.
The options “delete TaskList” and “delete from list” appear deactivated because no TaskLists were
selected. These options allow to delete a TaskList from the unit where it was saved or eliminate it
form the TaskList Manager.
III.4.3 Editing a TaskList
The first step to edit a TaskList is to create the TaskList file. It can be done by selecting the “New
TaskList” option. From here a TaskList file is created and saved where the user decides with the help
of the following window:
Once the name of the file is written, click OK to confirm it. The file will appear on the TaskList Manager
area.
The second step is to add task and to define start and stop conditions.
III.4.3.1 Adding Tasks to a TaskList.
By clicking on the tasks area a dialogue to add task is shown.
By selecting “New Task” a task selection window appears. The task selection menu is activated by
clicking on Task Type:
The tasks that can be selected are the following:
III.4.3.2 Activate GPO
The outputs marked are activated, that is, they are to high level.
III.4.3.3 Pause
A pause stops the TaskList. The time that the task will be stopped is selected by the user according to
the following options:
1. A time programmed on the duration display.
2. Until one or more inputs are activated.
3. Until a RS-232 command is received.
III.4.3.4 Play Audio File
To play an audio file. It is possible to select a file from the internal flash or PCMCIA of the unit or from
any other units or computers connected to the LAN.
To select a file we double click over the file or click Ok after writing the file name. To select several files
simultaneously, follow the standard Windows proceedings; pressing at the same time Shift or Ctrl
depending on the fact, whether the files are continuous or not. To finish the selection Ok must be
clicked.
III.4.3.5 Play Streaming Source
To connect the S-Cluster Output Box to a streaming source means that the unit will play on real time
the audio sent by the streaming server.
There are two possibilities: To write the name and the channel of the streaming source or, in case we
don’t know the streaming sources, to press the “Find Server “. In this case, a window will be displayed
with all the streaming sources connected to the network. From this dialogue it is possible to select the
streaming source to which the S-Cluster Output Box should be connected.
On the right side appears information regarding the configuration of the streaming source selected.
III.4.3.6 Run TaskList
The execution of several TaskLists is possible by nesting TaskLists. The TaskLists can be selected
from any unit connected to the network.
It is possible to select several files at the same time, using the Standard Windows proceeding (Shift or
CTrl keys).
III.4.3.7 RS-232 Command
To send an RS-232 command.
III.4.3.8 Enable/Disable Mic
To enable or disable the microphone input.
III.4.3.9 Enable/Disable Streaming
As tasks are being added, they are shown on the task area, for example:
The task can be deleted or modified clicking over the task area:
III.4.3.10 Adding Start and Stop Conditions
Start and stop conditions are needed if we want to work in automatic mode, that is, if we want to
execute TaskLists automatically. The way to add them is very similar to the way the tasks are added,
as shown before. By clicking over the start-stop conditions area a dialogue will appear to create a
“New Condition”:
By selecting “New condition” the following window is shown:
The name serves to facilitate the definition of different condition groups. The condition
groups are executed according to OR logic.
Start Conditions
Start conditions can be the following :
1. Run at StartUp: The TaskList is executed immediately the unit starts, that is, when the
initialization sequence has been executed.
2. Date & Time: The TaskList is executed according to the date and time programmed. It is
possible to program a recurrent pattern by selecting the recurrence option. From the
recurrence window it is possible to select the pattern used to execute the tasklist.
3. GPI: The TaskList is executed if the GPI is configured according to the programmed
pattern.
4. RS-232: The TaskList is executed if the programmed command is received.
5. Alarms: The TaskList is executed if any of the alarms selected is detected by the system.
We will deal with the Alarms subject later.
Stop Conditions
The stop conditions can be the following:
1. Loop: The TaskList is stopped after it has been executed a programmed number of times.
If the number is not introduced, the TaskList will be executed endlessly.
2. Duration: The TaskList is stopped as soon as the programmed executing time is over.
3. GPI: The TaskList is stopped if the GPI is configured according to a pattern previously
programmed.
4. RS-232: The TaskList is stopped if a RS-232 command is received.
The stop conditions are only effective if the TaskList was started with the Start condition
corresponding to the same condition group. For example, if the TaskList started with the
start condition of the condition group 1, only the stop conditions of this group will stop the
TaskList and the rest of stop conditions will not be checked.
The programmed stop conditions appear on the conditions area when a TaskList is selected:
By clicking on the conditions area a window will be displayed to modify or delete the conditions:
The start and stop conditions included on a condition name or group are executed
according to AND logic, that is, the TaskList will only be executed if all conditions are
completed.
It is possible to execute different conditions according to OR logic. The way to do it is by
defining several condition names or groups.
III.4.3.11 Assigning priorities to a task
It is possible to assign a priority level to a TaskList:
The TaskList with the highest level will interrupt the execution of other TaskLists with lower priority
level. When the TaskList with higher priority level has been finished, the TaskList that was
interrupted, will be resumed at the same point where it had been interrupted.