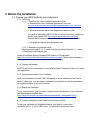
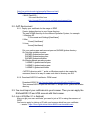
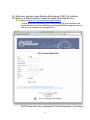
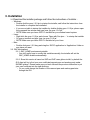
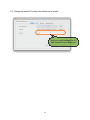
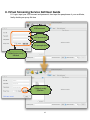
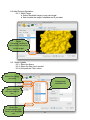
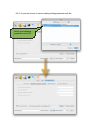
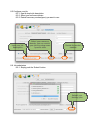
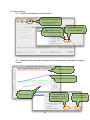
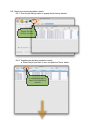
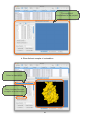
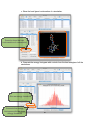
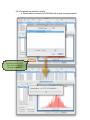
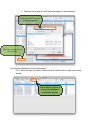
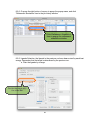
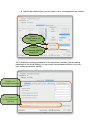
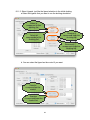
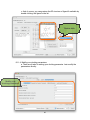
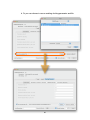
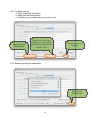
1
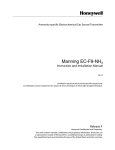
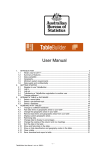
Grid-Enabled Virtual Screening Service
Quick User Guide 1.0
Academia Sinica Grid Computing
Centre
1
Table of Content
______________________________________________________________________
System Requirement!
3
Before the Installation!
4
Installation!
9
After the Installation - How to start?!
10
GUI Client Configuration!
11
DC2 Refinement Activity!
13
GRID Service Architecture!
14
Virtual Screening Service GUI User Guide!
15
References!
38
2
1. System Requirement
1.1. Windows
•
•
•
Operating Systems
• Windows 2000
• Windows XP
• Windows Vista
Minimum Hardware
• Pentium 4 2.4 GHz(Recommended: Intel Core 2 Duo or greater)
• 1 GB RAM(Recommended: 2 GB or greater)
• 100 MB hard drive space
JRE 1.5 required
1.2. Mac
•
•
•
Operating Systems
• Mac OS X 10.3 and later
Minimum Hardware
• Macintosh computer with an Intel x86 or PowerPC G3, G4 or G5 processor
• 512 MB RAM(Recommended: 1 GB RAM or greater)
• 100 MB hard drive space
JRE 1.5 required
1.3. Linux
•
•
•
Operating Systems
• Linux with X window environment
Minimum Hardware
• Pentium 4 2.4 GHz(Recommended: Intel Duo Core or greater)
• 512 MB RAM(Recommended: 1 GB RAM or greater)
• 100 MB hard drive space
JRE 1.5 required
3
2. Before the Installation
2.1. Prepare your GRID Authority and environment
2.1.1. Certificate
2.1.1.1. Download the User Certificate Application Form
a. Download the User Certificate Application Form from
http://ca.grid.sinica.edu.tw/certificate/request/request_user_cert.html
b. Setup an interview with a local Registration Authority (RA)
You need to meet with a ASGCCA RA to verify your identity. Locate and
contact your nearest RA: http://ca.grid.sinica.edu.tw/contact.html
Prepare the following documents for the your interview with the RA
c. Complete and submit your application form
2.1.1.2. Request for certificate online.
Before going through 2.1.1.2, make sure that you have finished 2.1.1.1 and a
CA staff has confirmed with you.
Create a Certificate Signing Request(CSR) online on CA web page
(http://ca.grid.sinica.edu.tw/certificate/request/nscert.php). Please submit request on
the computer that you want to store your public/private key.
2.1.2. Confirm the request.
ASGCCA will send a confirmation to your email address. Please click the url to confirm
your application
2.1.3. Download and Import Your Certificate.
Once your certificate is issued, ASGC will publish it on the website and send out a
email to inform you. You can simply download your certificate via the link provided in
the e-mail and import it into your browser.
2.1.4. Export the Certificate
To use your certificate, you first need to export it from your browser. You can find the
certificate export procedure here.
(http://ca.grid.sinica.edu.tw/certificate/request/certificate_management.html)
2.1.5. Convert certificate to pem format for the usage of GRID.
To use your certificate for Grid authentication, you need to convert your
certificate(*.pfx or *.p12) to PEM format. You could find instructions here.
4
(http://ca.grid.sinica.edu.tw/general/p12toserver.html)
For Window users, you will need • Win32 OpenSSL • You could find this from
• http://gnuwin32.sourceforge.net/packages/openssl.htm
2.2. GAP Environment
2.2.1. Deploy your certificate for the usage of GRID
Create .globus directory in your Home directory.
The user HOME directory on the different Operation System, for example
1. Windows XP
!C:\Document and Settings\[UserName]"
2. Mac
!/Users/[UserName]"
3. Linux
!/home/[UserName]"
Put your userkey.pem and usercert.pem on $HOME/.globus directory.
On Unix-like operation system
$HOME/.globus/usercert.pem
$HOME/.globus/userkey.pem
$HOME/.globus/certificates
On Window-based operating system
%HOME%\.globus\usercert.pem
%HOME%\.globus\userkey.pem
%HOME%\.globus\certificates
• NOTE! A directory with “.” prefix on Windows needs to be created by
command, there is no way to create such kind of directory via GUI.
2.2.2. Download ASGCCA certificate : PEM format
Download ASGCCA http://ca.grid.sinica.edu.tw/publication/ASGCCA.pem
Then rename ASGCCA.pem as 9cd75e87.0, and put it into .globus\certificates
directory
#
2.3. You must import your certificate into your browser. Then you can apply the
#
EUAsiaGRID VO and VQS account with this browser.
2.4. Join a VO(After 2.1 is finished)
After you get your user certificate, you need to join a VO for using the resource of
GRID.
You have to apply for joining a VO with your browser which has your certificate.
• euasia - https://vomrs.grid.sinica.edu.tw:8443/vomrs/euasia/vomrs
5
2.5. Make sure you have Java Runtime Environment (JRE1.5+) installed.
2.6.Apply for a VQS account for using this Virtual Screening Service.
2.6.1. Apply via https://vl01.grid.sinica.edu.tw:8443/vqsreg
• Please make sure the browser you used contains your user certificate, the
server will detect the user certificate and retrieve the DN(Distinguishing Name)
from the user certificate for the registration.
•
NOTE! Please select the corresponding VO( Virtual Organization ) you belong to.
6
2.6.2.
After you submit the application for the VQS account, you will receive a notification mail
and need to wait one working day for approving your application.
7
2.6.3. Once your application is approved, you will receive an email telling you that your
VQS account is approved and available. And follow the download link in the email to get
the GUI client tool.
8
3. Installation
3.1.Download the installer package and follow the instructions of installer • Windows • Double click the gvss-1.0.0.jar to startup the installer, and follow the instructions from
the installer to complete the installation.
• If you are not able to startup the installer by double clicking gvss-1.0.0.jar, please open
the command line window and type !java -jar gvss-1.0.0.jar".
• NOTE! Make sure you have JRE1.5+ installed on your window-based system.
• Linux • Right click the gvss-1.0.0.jar and choose !Open with Sun java ..." to startup the installer
• Or open a terminal and type !java -jar gvss-1.0.0.jar"
• NOTE! Make sure you have JRE1.5+ installed on your Linux.
• Mac • Double click gvss-1.0.0.dmg and drag the !GVSS" application to !Applications" folder or
any place you want.
3.2. GAP environment
3.2.1. GAP_HOME environment variable
• You don"t really have to modify this variable manually, the installer will set the
GAP_HOME variable automatically.
3.2.2. Since this service is based on GAP and GAP uses globus toolkit, by default the
GUI client will try to find your user certificate(usercert.pem and userkey.pem) under
$HOME/.globus/. Please make sure you have followed the previous instruction to put
your user certificate into the right directory.
• Or you could change the location of the usercert.pem and userkey.pem later
through the GUI.
9
4. After the Installation - How to start?
4.1. Windows 4.1.1. Desktop Shortcut
• After the installation, there will be a shortcut icon created for quick launching
this GUI client.
4.1.2. The startup batch script - vsautodock.bat
• The will be a startup batch script under the $INSTALL_PATH/GVSS-1.0.0\opt
\gap\bin, execute the script, eg
#
#
#
C:\> %INSTALL_PATH%\GVSS-1.0.0\opt\gap\bin\vsautodock
#
#
#
Or double click the batch script to launch this GUI client.
#
4.2. Linux 4.2.1. Desktop Shortcut
• After the installation, there will be a shortcut icon created for quick launching
this GUI client.
4.2.2. The startup bash script - vsautodock
• The will be a startup bash script under the $INSTALL_PATH/GVSS-1.0.0/opt/
gap/bin, execute the script. e.g. #
#
#> $INSTALL_PATH/GVSS-1.0.0/opt/gap/bin/vsautodock
4.3. Mac 4.3.1. Application Bundle
• Simply double click the GVSS application bundle.
10
5. GUI Client Configuration
5.1. Show the configuration window.
Press this button
5.2. Change the location of your user certificate
• Here you can change the location of your !usercert.pem" and !userkey.pem"
Input the full path directly or
browse and select your *.pem
11
5.3. Change the default VO setting, the default one is !euasia".
Here you could change the VO
and use the VO you belong to
12
6. DC2 Refinement Activity
After the DC2 phase I results post-processing, we completed the 300,000 ligands against new 8
Avian Flu variant target proteins, we have estimated 20,000 ligands for DC2 refinement process.
Those targets are different from DC1 targets that we successfully demonstrated in 2006. The targets
are based on X-ray determined structure and 2 types of conformation.
The 8 mutations of target divided into 2 categories.
1. Closed Form
a. DC2_T01IAN
b. DC2_T02IAN
c. DC2_T03IAN
d. DC2_T04IAN
2. Open Form
a. DC2_T05IAN
b. DC2_T06IAN
c. DC2_T07IAN
d. DC2_T08IAN
For the DC2 refinement activity, we have extracted the best 20,000 compounds from the results of
DC2 initial docking activity.
The 20,000 compounds extracting from the previous DC2 initial docking. And these compounds will
be divided into 1,000 data sets ( DCR_0001 ~ DCR_1000 ) for different EUAsiaGRID partners.
1. Here we provide a web page for subscribing your data sets which you want to process and
the feedback of the current running progress.
• https://vl01.grid.sinica.edu.tw:8443/dc2refine
2. You can process these data sets one by one, each data set contains 20 ligands ( 20 tasks ).
However, we basically recommend you processing 10 or more data sets(200 tasks) at a
time. This will make you use the computing resource more efficiently.
We developed the Stand-alone GUI for using virtual screening service based on GAP (Grid
Application Platform). The software packages integrated the EGEE gLite software DIANE2 and
AMGA and used the Autodock as the simulation docking engine. User can submit computing jobs
when the user selects the target and ligands in grid environment. Therefore, the DC2 refinement that
we prepared the 20,000 ligands and 8 Avian Flu targets for the user that he/she can submit job using
the computing resources of EUAsiaGRID VO. Moreover, the user can upload himself target or ligands
to do the same docking process and compare the significant result and verify in wet lab.
13
7. GRID Service Architecture
14
8. Virtual Screening Service GUI User Guide
8.1.Login, input your VQS account and password, then input the passphrase of your certificate,
finally decide your proxy life time
VQS account
VQS password
CA passphrase
Adjust your proxy
lifetime
Current proxy
lifetime
15
8.2.Initial Docking Simulation
8.2.1. Select Target
a. Select the default target or your own target.
b. And visualize the target if available and if you want.
Press
“Visualize” button to
show the 3D structure
of the target
8.3. Select Ligands
8.3.1. Select the library
8.3.2. Select the filter rule if needed
8.3.3. And push the !Filter" button
Select the library
you want
Compounds
candidate list
Select the filter
rule you want to
use
Query the
compounds in this
library with the filter
rule
16
8.3.4. Select the ligands that you want to run the docking simulation.
Select a
compound to the
docking list
Remove a
compound from the
docking list
Select
all compounds to the
docking list
Remove all
compounds from the
docking list
8.3.5. Further more, you can select the ligand as the control if you want.
Select a
compound as the
control
Remove
a compound from the
control list
17
8.3.6. Double click the item of ligand, you can visualize the ligand 2D structure if
available.
Double click
18
8.4. Modify your docking parameters
8.4.1. There are 4 tabs for setting your docking parameter. Just modify the parameters
directly.
Four tabs for setting your docking
parameters
19
8.4.2. Or you can choose to use an existing docking parameter awk file.
Select your docking
parameters awk file
20
8.5.Configure your job
8.5.1. Input a simple job description.
8.5.2. Select your resource domain
8.5.3. Decide how many workers(cpus) you want to use
Input your job
description
Select your resource
domain, you can restrict
your jobs to using some
specific sites
Decide the worker
number
8.6. Job submission
8.6.1. Simply push the !Submit" button
Submit your
docking jobs
21
8.7.Job monitoring
8.7.1. Push the running job monitoring buttion
Popup the running job
monitoring window
The number of the
completed simulations
The number of the
total simulations
8.7.2. Monitor the job status via the dynamic job monitoring chart with a given refreshing
interval.
Total simulations
Completed simulations
Busy workers
The refreshing
interval for the job
monitoring chart
22
Popup the job
monitoring chart
8.8. Check your docking simulation results
8.8.1. Push the job history button to popup the job history window.
Popup the job
history window
8.8.2. Visualize your docking simulation results
a. Select the job you want to see, and push the !Show" button.
Press this button to
show the simulation
results
23
The results of
simulations in the project
b. Show the best complex of a simulation.
Select a simulation
Press to show the best
complex of a simulation
24
c. Show the best ligand conformation of a simulation.
Press to show the best
conformation of a simulation
d. Generate the energy histogram with controls from the best energies of all the
simulations
Give an energy threshold
Generate the energy
histogram with the given
energy threshold
25
8.8.3.Download the simulation results
a. Download the compound"s PDBQ files with a given energy threshold
Download the PDBQ
files with the given
energy threshold
26
b. Download the dlg files(the output of !autodock") with a given energy threshold
Download the dlg files
with the given energy
threshold
27
c. Generate the energy list of all the best energies of the simulations
Determine the file name
of the energy list
Save the energy list of
this project
8.9.Advanced Refinement Docking Simulation
8.9.1. Select the item you want to refine and push !Refine" button in the in job history
window
Press !Refine" button to
popup the refinement
simulation window
28
8.9.2. Or press the right button of mouse to popup the popup menu, and click
!Refinement Simulation" item in the job history window
Click !Refinement Simulation"
item to popup the refinement
simulation window
8.9.3. Ligands Selection, the ligands in the previous run have been sorted by each best
energy. Remember that the target is determined by the previous run.
a. Filter the ligands by a range.
Decide the range with
the slider bar
29
b. Filter the ligands with a given energy threshold
Decide the range with
the slider bar
c. Select the ligands that you want to refine
Select a
compound to the
docking list
Remove a
compound from the
docking list
Select all
compounds to the
docking list
Remove all
compounds from the
docking list
30
d. Just like the initial docking, you can select one or more ligands as the controls.
Select a
compound as the
control
Remove
a compound from the
control list
8.9.4. Modify the docking parameters for the refinement simulation, just like setting
parameters in the initial docking, you can modify the parameters directly or just use
your docking parameters awk file
Modify your
docking parameters
Or choose a
docking parameter
awk file
31
8.10. Configure your job
8.10.1. Input a simple job description.
8.10.2. Select your resource domain
8.10.3. Decide how many workers(cpus) you want to use
Input your job
description
Select your resource
domain, you can restrict
your jobs to using some
specific sites
Decide the worker
number
8.10.4. Push !Submit" button to submit the refinement simulations job
Submit your
refinement docking
jobs
32
8.11. Attach more docking simulations to an existing project.
8.11.1. Select the item you want to attach and press the right button of mouse to popup
the popup menu, and click !Attach more simulations" item in the job history window
Click !Attach more
simulations" item to
popup the attaching
simulation window
8.11.2. Select Target
a. Select the default target or your own target.
b. Visualize the target if available and if you want.
Press
“Visualize” button to
show the 3D structure
of the target
33
8.11.3. Select Ligands, just like the ligand selection in the initial docking.
a.Select the ligands that you want to run the docking simulation.
Select a
compound to the
docking list
Remove a
compound from the
docking list
Select all
compounds to the
docking list
Remove all
compounds from the
docking list
b. You can select the ligand as the control if you want.
Select a
compound as the
control
Remove
a compound from the
control list
34
c. And of course, you can preview the 2D structure of ligand if available by
double clicking the ligand in the list.
Double click
8.11.4. Modify your docking parameters
a. There are 4 tabs for setting your docking parameter. Just modify the
parameters directly.
Modify your
docking parameters
35
b. Or you can choose to use an existing docking parameter awk file.
36
8.12. Configure your job
a. Input a simple job description.
b. Select your resource domain
c. Decide how many workers(cpus) you want to use
Input your job
description
Select your resource
domain, you can restrict
your jobs to using some
specific sites
Decide the worker
number
8.13. Attaching docking job submission
Submit your
docking jobs
37
9. References
9.1. GAP website - http://gap.grid.sinica.edu.tw/
9.2. EUAsiaGRID website - http://www.euasiagrid.org/
9.3. EUAsiaGRID voms website https://vomrs.grid.sinica.edu.tw:8443/vomrs/euasia/vomrs
9.4. MGLTools website - For preparing the target and ligands.
http://mgltools.scripps.edu
38