1
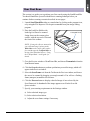
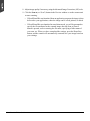
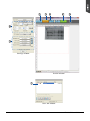
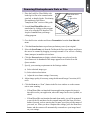
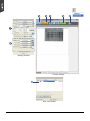
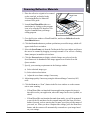
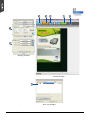
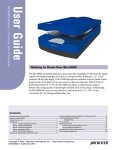
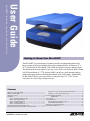
User Guide
Bio-6000T features, scenarios, and information
Getting to Know Your Bio-6000T
The Bio-6000T is a professional gel scanner specially designed and optimized for
image capture of biological samples from gels or transparent film. It features a 12" x
16.9" scan bed, 48-bit color depth, 3200 x 6400-dpi optical resolution, and one SmartTouch button on the front panel for an easy access to the scan function. With a Dmin
of 0.05D and a Dmax of 3.77D, the Bio-6000T can deliver a wide dynamic range to
enhance the image quality in both bright and dark areas of the image. Additionally,
the Bio-6000T also lets you scan reflectives and prints up to 12" x 16.9" in size,
convenient for any biological laboratory use.
Contents
Getting to KnowYour Bio-6000T .................................................................... 1
Features of the Bio-6000T ................................................................................ 2
Taking a Closer Look ........................................................................................ 3
Initial Setup ...................................................................................................... 4
Step 1: Unpacking Package Contents ................................................... 4
Step 2: Installing the Software .............................................................. 5
Step 3: Unlocking the Scanner .............................................................. 6
Step 4: Installing the TMA ...................................................................... 7
Step 5: Connecting the Scanner ............................................................ 8
Using the U-Shaped Ruler (Calibration Ruler) ............................................... 9
Positioning Electrophoresis Gels/Film or Transparent Film ....................... 11
Copyright © 2013 Microtek International, Inc.
I49-004845 D, September 2013
Using the 11 x 11 cm / 24 x 24 cm Leak-Free Glass Holder ................... 11
Using the 12" x 16" Leak-Free Glass Holder ......................................... 12
Positioning Reflective Materials ................................................................... 13
The Black Plate .............................................................................. 14
Your First Scan ............................................................................................... 15
Scanning Scenarios ....................................................................................... 17
Scanning Electrophoresis Gels or Film ................................................ 18
Scanning Reflective Materials ............................................................... 21
Specifications / System Requirements ........................................................ 23
FCC Compliance Statement .......................................................................... 24
http://www.microtek.com
Features of the Bio-6000T
The Bio-6000T comes with several important features, including the following:
2
•
Large 12" x 16.9" scan bed — The tabloid-size scan bed of the Bio-6000T lets you
easily scan biological samples from a gel or film up to 12" x 16 1/16" and oversized
reflective originals, such as contact sheets, large pieces of art and mechanical
blueprints.
•
3200 x 6400-dpi resolution: The exceptionally high resolution of the Bio-6000T lets
you scan even postage-size images and enlarge them with amazing clarity, with
little loss of detail. The scanner’s 3.77 maximum optical density allows it to capture
a wide range of tones approximating real-life color and hues.
•
Smart-Touch button: A Smart-Touch button (Scan) locating at the front panel of
the scanner provides you a quick and easy way to capture images that can be
automatically saved as files or sent to another application for further processing
later.
•
Energy-saving LED light source: Adopting LEDs as the light source, when the
scanner is detected by the system, there are no requirements for any warm-up time
before carrying out the scan, which boots your productivity and reduces energy
costs amazingly. With its stable performance, the image quality will remain
consistent even after used for a certain period of time.
•
Convenient Leak-Free Glass Holders: These holders are designed to scan
electrophoresis gels with Bio-6000T, which can be removed and clean-up easily.
Available holder sizes are 11x 11 cm, 24 x 24 cm, and 12” x 16”. Contact your local
authorized dealers or Microtek sales for additional information if necessary.
•
Microtek ScanWizard™ Bio scanning software: This is a scanning software for
the use of the electrophoresis gel/film scanning. Friendly and easy-to-use
interface with powerful functions and controls offer you a quick access and
management for all your scanning tasks.
•
Microtek's MiBio software: This is a management software developed exclusively
for Bio-tech analysis and research. It features several easy-to-use but very
practical functions, supporting users with powerful tools in a clear and simple
control panel.
Bio-6000T User Guide
Taking a Closer Look
TMA
Scanner Glass surface
(Scan bed)
Vertical ruler
READY indicator (Green)
POWER indicator (Orange)
Smart-Touch button (Scan)
Accessory port (or with TMA's
connector securely connected)
Power connector
Hi-Speed USB port (1)
Power switch
Bio-6000T User Guide
3
Initial Setup
Step 1: Unpacking Package Contents
After unpacking your scanner package, please check for the major components listed
below.
7
4
1
8
2
3
1.
2.
3.
4.
5.
6.
7.
8.
9.
4
Bio-6000T User Guide
5
6
9
Bio-6000T (lower base)
USB Cable
U-shaped Ruler (Calibration Ruler) - for calibrating your scanner
TMA (Transparent Media Adapter)
Black Plate - for scanning reflectives
Power Cord
White Mat - for scanning reflectives
Software CDs
Leak-Free Glass Holders (11 x 11 cm, 24 x 24 cm, and 12" x 16")
Step 2: Installing the Software
Important: Do not remove the yellow sticker from your scanner until you are
told to do so. You must install software before connecting your scanner.
Always close any open programs and turn off Anti-virus utilities before installing
software.
1. Place the Adobe CD-ROM into the CDROM drive, and install the software.
Skip this step if you have a newer
version of Adobe Photoshop Elements
already installed on your computer.
2. Place the Microtek software CD-ROM
into the CD-ROM drive, then follow the
on-screen instructions to install the
driver and software.
NOTE: If the Microtek Software Installer screen does not come up automatically, doubleclick the following in succession: “My Computer”; the CD-ROM icon; then cdsetup.exe to
start the installer program.
3. Restart your computer at the end of all software installation.
Drivers & Software Upgrades
After you finish the installation of software, if you found that the installed drivers and software cannot
run your product or your computer system properly later, please go to the Microtek Download Service
site at ww7.microtek.com.tw/service.php to download and install any updates you may require.
For additional information about Microtek products, please visit our website at www.microtek.com.
Bio-6000T User Guide
5
Step 3: Unlocking the Scanner
Before you operate the scanner, you will need to unlock the scanner. To unlock the
scanner, follow the steps below:
1. Remove the yellow “Unlock” sticker from
your scanner.
2. With the scanner power off, turn the
scanner on its side and locate the
locking screw at the bottom of the
scanner.
3. Using a screwdriver, push and turn the
locking screw counterclockwise to the
unlock position.
Unlocked
When successfully unlocked, the screw
will push out a little, protruding slightly
from the bottom of the scanner.
Locking the Scanner
To lock the scanner (for shipping and other purposes), follow the steps below:
1. Turn off the scanner.
2. Turn the scanner back on.
When the indicators on the front of
your scanner stop blinking, use a
screwdriver, and then push and turn
the locking screw clockwise to the
locked position.
When the screw has been tightened,
this indicates that your scanner is
locked.
3. Turn off your scanner.
6
Bio-6000T User Guide
Locked
Step 4: Installing the TMA
1. Attach the TMA by sliding the posts at the rear of the TMA into the holes.
Unlocked
2. Plug the connector of the TMA into the
scanner’s 15-pin accessory port.
3. Unlock the TMA.
a) Remove the yellow “Unlock” sticker from the TMA.
a) Look for the locking knob at the base of the TMA.
b) Turn the locking knob counterclockwise to the unlock position “ ”.
Locking the TMA
To lock the TMA (for shipping and other purposes), follow the steps below:
1. Make sure the TMA is connected to the
scanner, then turn off the scanner if
your scanner is on.
Locked
2. Turn the scanner back on. The TMA's
carriage will move to the standby
position in a few moments.
3. When the indicators on the front of
your TMA and scanner stop blinking,
turn the locking knob clockwise to the
lock position “ ”.
4. Turn off your scanner and disconnect the TMA connector from the scanner. The
TMA is ready for transport.
Bio-6000T User Guide
7
Step 5: Connecting the Scanner
To the power adapter
1. Connect the power cord to the back of the scanner.
2. Plug the power cord into a power source.
To the Hi-Speed USB cable
3. Connect one end of the cable to your computer.
4. Connect the other end of the cable to the scanner.
5. Press the power switch at the back of your scanner, and wait for the indicator light
on the front panel to stop blinking and stay on steady.
The system will detect your scanner automatically.
8
Bio-6000T User Guide
Using the U-shaped Ruler
(Calibration Ruler)
The U-shaped Ruler (Calibration Ruler) is designed for the use of the scanner
calibration. Please take note that before putting the U-shaped Ruler on the scanner
glass surface, make sure the scanner is turned off.
To use the U-shaped Ruler:
1. Peel the protective film from the back side of the ruler before using it to calibrate
the scanner.
2. You may choose either the electrophoresis gel/film or reflective material as a target
to calibrate your scanner.
•
If you using the electrophoresis gels/film as a target to calibrate your
scanner, put the U-shaped Ruler facing up on the scan bed and hook the ruler
onto the raised Silicone Rings located on the both sides of the scanner
surface, making sure that they have been oriented correctly.
Silicone Rings
U-shaped Ruler
Bio-6000T User Guide
9
• If you using the reflective material as a target to calibrate your scanner, you
have to put the White Mat on the scanner glass surface first.
a) Peel the protective films from the
both sides of the White Mat.
b) Put the White Mat on the
scanner glass surface. Make sure
that the White Mat covers the
whole scanner glass surface
completely.
White Mat
c) Then, put the U-shaped Ruler
facing up on the top of the White
Mat and hook the ruler onto the
raised Silicone Rings located on
the both sides of the scan bed,
making sure that they have been
oriented correctly.
White Mat
U-shaped Ruler
3. Finally, turn on the scanner power.
10
Bio-6000T User Guide
Positioning Electrophoresis Gels/Film or
Transparent Film
To scan the electrophoresis gels/film (such as 1D/2D gels, SDS-PAGE, western/
northern/southern blots, or membranes) and transparent film (such as slide, positive
film, or reversal film), please use the Leak-Free Glass Holder together.
The Leak-Free Glass Holders are designed to scan electrophoresis gels/film or
transparent film with Bio-6000T, which are easily removed and cleaned with water.
Supported holder sizes are 11 x 11 cm, 24 x 24 cm, and 12” x 16”.
12" x 16"
11 x 11 cm
24 x 24 cm
Using the 11 x 11 cm / 24 x 24 cm Leak-Free Glass
Holder
1. Place the gel or film to be scanned on
the top of the Leak-Free Glass Holder,
with the target facing down.
2. Then, place the holder with loaded
gel or film on the scanner glass
surface, and center the holder
along the edge of the scanner
glass surface or U-shaped Ruler.
Leak-Free Glass
Holder
Calibration strip
Remember to keep the area of the
calibration strip clear.
Bio-6000T User Guide
11
Using the 12" x 16" Leak-Free Glass Holder
1. Put the holder on the top of the
scanner glass surface. Make sure
that four corners of the holder
have been snapped on the both
sides of the scanner tightly and
the top edge of the holder has
been aligned with the edge of the
scanner glass surface.
2. Then, place the gel or film to be
scanned on the top of the holder.
Make sure the top edge of the target
has been aligned with the white lines
labeled at the two sides of the holder.
12
Bio-6000T User Guide
12" x 16"
Leak-Free Glass
Holder
Positioning Reflective Materials
To scan reflective materials (such as photo, prints, dissertations, papers, etc.), you
have to scan the reflective together with the U-shaped Ruler (Calibration Ruler),
White Mat, and Black Plate. Before positioning the reflective, make sure that the
White Mat and U-shaped Ruler are on the scanner bed properly.
1. Peel the protective films from the both
sides of the White Mat.
2. Put the White Mat on the scanner
glass surface. Make sure that the
White Mat covers the whole scanner
glass surface completely.
White Mat
3. Next, put the U-shaped Ruler facing
up on the top of the White Mat and
hook the ruler onto the raised
Silicone Rings located on the both
sides of the scan bed, making sure
that they have been oriented
correctly. .
U-shaped Ruler
4. Next, place the reflective original to be
scanned facing down on the top of the
White Mat, with the top end of it
toward the front of the scanner.
Reflective
Bio-6000T User Guide
13
5. Peel the protective film from the Black
Plate.
6. Put the Black Plate on the top of the
reflective to cover it, with the side of the
Black Plate that reads “This side up”
facing up.
Black Plate
The Black Plate
Light from the TMA and other ambient light during scanning may
result in overexposed images. The Black Plate is designed to work
with reflective originals. To ensure correct exposure and optimal
image quality during scanning, the Black Mat should be used to
shield unwanted light out.
Take note of the following before using the Black Plate.
1. The Black Plate may become dirty over time and with prolonged use. To clean the plate, use a
white cotton cloth dipped in some water, and gently wipe the plate surface. This ensures that the
Black Plate is in optimal condition at all times.
2. A protective film covers the Black Plate during shipping and prevents it from being scratched.
When peeling the film from the plate, be careful not to tear or bend the Black Plate.
14
Bio-6000T User Guide
Your First Scan
This section is to guide you to perform your first scan by using the ScanWizard Bio.
You should familiarize yourself with the basic scanning technique before you
continue further scanning scenarios described in next pages.
1. Launch ScanWizard Bio either as a stand-alone by clicking on the program icon,
or by using the File-Import or File-Acquire command from your image-editing
program.
2. Place the Leak-Free Holder with
loaded gel or film to be scanned
facing down on the scanner glass
surface, with the top end of it toward
the front of the scanner.
U-shaped Ruler
NOTE: If using the reflective material as
your calibration target, please put the
White Mat on the scanner glass surface
first, and then put the U-shaped Ruler on
the top of the What Mat. Refer to “Using
the U-Shaped Ruler” in this guide for
details.
3. Go to the Preview window of ScanWizard Bio, and choose Transmissive from the
Scan Material menu.
4. Click the Overview button to perform a preliminary scan of the image, which will
appear in the Preview window.
5. Select the Scan Frame tool from the Toolbar in the Preview window, and choose
the area to be scanned by dragging a rectangle around it. You will see a flashing
frame (marquee) around the selected area.
6. Click the Prescan button to display a detailed image of area selected by the
Scan Frame tool. A thumbnail of the image appears as well in the Scan Job
Queue window.
7. Specify your scanning requirements in the Settings window.
a) Select a desired image type.
b) Select a desired resolution.
c) Adjust the scan frame settings if necessary.
Bio-6000T User Guide
15
8. Adjust image quality if necessary, using the Advanced Image Correction (AIC) tools.
9. Click the Scan to (or “Scan”) button in the Preview window or on the scanner unit
to start scanning.
16
•
If ScanWizard Bio was launched from an application program, the image is then
delivered to your application, where the image can be saved, printed, or edited.
•
If ScanWizard Bio was launched in stand-alone mode, you will be prompted to
specify the file attributes for the scanned image after the Scan or Scan to
button is pressed, such as entering the file name, specifying a folder name of
your own, etc. When you have completed the settings, press the Done/Save
button, and the scanner will automatically scan and save your image based on
your settings.
Bio-6000T User Guide
Settings window
Preview window
Scan Job window
Bio-6000T User Guide
17
Scanning Scenarios
The following pages provide various scenarios for scanning with the Bio-6000T,
including the following:
18
•
Scanning electrophoresis gels or film: This scenario details the steps for scanning
electrophoresis gels or film.
•
Scanning reflective originals: This scenario details the steps for scanning
reflective materials, such as photos or prints.
Bio-6000T User Guide
Scanning Electrophoresis Gels or Film
1. Place the Leak-Free Glass Holder with
loaded gel or film to be scanned on the
scan bed, as detailed in the “Positioning
Electrophoresis Gels/Film or
Transparent Film” section of this guide.
2. Launch ScanWizard Bio either as a
stand-alone by clicking on the program
icon, or by using the File-Import or FileAcquire command from your imageediting program.
Leak-Free Glass
Holder
Gel or film
Calibration strip
3. Go to the Preview window and choose Transmissive from the Scan Material
menu.
4. Click the Overview button to perform a preliminary scan of your original.
5. Select the Scan Frame tool from the Toolbar in the Preview window, and choose
the area to be scanned by dragging a rectangle around it. You will see a flashing
frame (marquee) around the selected area.
6. Click the Prescan button to display a detailed image area selected via the
Scan Frame tool. A thumbnail of the image appears as well in the Scan Job
Queue window.
7. Specify your scanning requirements in the Settings window.
a) Select a desired image type.
b) Select a desired resolution.
c) Adjust the scan frame settings if necessary.
8. Adjust image quality if necessary, using the Advanced Image Correction (AIC)
tools.
9. Click the Scan to (or “Scan”) button in the Preview window or on the scanner
unit to start scanning.
•
If ScanWizard Bio was launched from an application program, the image is
then delivered to your application, where the image can be saved, printed, or
edited.
•
If ScanWizard Bio was launched in stand-alone mode, you will be prompted
to specify the file attributes for the scanned image after the Scan or Scan to
button is pressed, such as entering the file name, specifying a folder name of
your own, etc. When you have completed the settings, press the Done/Save
button, and the scanner will automatically scan and save your image based
on your settings.
Bio-6000T User Guide
19
Settings window
Preview window
Scan Job window
20
Bio-6000T User Guide
Scanning Reflective Materials
1. Place the reflective original to be scanned
on the scan bed, as detailed in the
“Positioning Reflective Materials”
section of this guide.
2. Launch ScanWizard Bio either as a
stand-alone by clicking on the program
icon, or by using the File-Import or FileAcquire command from your imageediting program.
Black Plate
Reflective
White Mat
U-shaped Ruler
3. Go to the Preview window of ScanWizard Bio, and choose Reflective from the
Scan Material menu.
4. Click the Overview button to perform a preliminary scan of the image, which will
appear in the Preview window.
5. Select the Scan Frame tool from the Toolbar in the Preview window, and choose
the area to be scanned by dragging a rectangle around it. You will see a flashing
frame (marquee) around the selected area.
6. Click the Prescan button to display a detailed image area selected via the
Scan Frame tool. A thumbnail of the image appears as well in the Scan Job
Queue window.
7. Specify your scanning requirements in the Settings window.
a) Select a desired image type.
b) Select a desired resolution.
c) Adjust the scan frame settings if necessary.
8. Adjust image quality if necessary, using the Advanced Image Correction (AIC)
tools.
9. Click the Scan to (or “Scan”) button in the Preview window or on the scanner
unit to start scanning.
•
If ScanWizard Bio was launched from an application program, the image is
then delivered to your application, where the image can be saved, printed, or
edited.
•
If ScanWizard Bio was launched in stand-alone mode, you will be prompted
to specify the file attributes for the scanned image after the Scan or Scan to
button is pressed, such as entering the file name, specifying a folder name of
your own, etc. When you have completed the settings, press the Done/Save
button, and the scanner will automatically scan and save your image based
on your settings.
Bio-6000T User Guide
21
Settings window
Preview window
Scan Job window
22
Bio-6000T User Guide
Specifications
Scanning Modes
Light Source
Scanning Area
Resolution
Dynamic Range
Interface
Dimensions (L x W x H)
Weight
Voltage
Power Consumption
Environment
Color and grayscale in a single scanning pass
True 48-bit color (approx. 281 billion colors)
16-bit grayscale (approx. 65,536 shades of gray)
LED
Reflective: 12" x 16.9" (304.8 mm x 429.26 mm)
Transparent: 12" x 16 1/16" (304.8 mm x 408 mm)
Optical: 3200 (H) dpi x 6400 (V) dpi
Transparency: 0.05D ~ 3.77D, 3.77 Dmax
Hi-Speed USB (USB 2.0)
24.7" x 14.8" x 7.3" ( 627 mm x 375 mm x 185 mm)
35.4 lbs (16.1 kg)
AC 100V-240V, 47-63 Hz, 1.5 A max.
54.9 W max.
Operating Temperature: 50° F to 104° F (10° C to 40° C)
Relative Humidity: 20% to 85%
System Requirements
General Requirements
• CD-ROM drive (for installing software)
• Color display with 24-bit color output capability
• 512 MB RAM or more
PC and compatibles
• Pentium IV PC or higher with Hi-Speed USB (USB 2.0) port
• Microsoft Windows 7; compatible with Windows XP, Vista and Windows 8
Important
Specifications, software bundles, and accessories are subject to change without
notice. Not responsible for typographic errors.
Bio-6000T User Guide
23
FCC Compliance Statement
This equipment (Model: MRS-6400A3PL) has been tested and found to comply with
the limits for a Class B digital device, pursuant to Part 15 of the FCC rules. These
limits are designed to provide reasonable protection against harmful interference in a
residential installation. This equipment generates, uses and can radiate radio
frequency energy and, if not installed and used in accordance with the instructions,
may cause harmful interference to radio communications. However, there is no
guarantee that interference will not occur in a particular installation. If this equipment
does cause harmful interference to radio or television reception, which can be
determined by turning the equipment off and on, the user is encouraged to try to
correct the interference by one or more of the following measures:
•
Reorient or relocate the receiving antenna.
•
Increase the separation between the equipment and receiver.
•
Connect the equipment into an outlet on a circuit different from that to which the
receiver is connected.
•
Consult the dealer or an experienced radio/TV technician for help.
NOTE: A shielded Hi-Speed USB interface cable with ferrite core installed on the
scanner connector and must be used with this equipment.
Caution: Changes or modifications not expressly approved by the manufacturer
responsible for compliance could void the user's authority to operate the equipment.
This device complies with Part 15 of the FCC Rules. Operation is subject to the
following two conditions: (1) This device may not cause harmful interference, and (2)
this device must accept any interference received, including interference that may
cause undesired operation.
24
Bio-6000T User Guide