1
DocuPrint C1618
User Guide
TrueType font, AppleTalk, MacOS, Macintosh and EtherTalk are trademarks of Apple Computer, Inc., registered in
the U.S. and other countries.
NetWare is a registered trademark of Novell, Inc., in the United States and other countries.
Microsoft, MS-DOS, Windows, and Windows NT are either registered trademarks or trademarks of Microsoft
Corporation in the United States and/or other countries.
Permission has been obtained from Microsoft Corporation for use of software screen shots.
This software is based in part on the work of the Independent JPEG Group.
This product incorporates RSA® BSAFE™ Crypto-C from RSA Security Inc. RSA is a registered trademark of RSA
Security Inc. BSAFE is a registered trademark of RSA Security Inc. in the United States and/or other countries. RSA
Security Inc. All rights reserved.
All product/brand names are trademarks or registered trademarks of the respective holders.
Important
This manual is copyrighted with all rights reserved. Under the copyright laws, this manual may not
be copied or modified in whole or part, without the written consent of the publisher.
Parts of this manual are subject to change without prior notice.
We welcome any comments on ambiguities, errors, omissions, or missing pages.
Never attempt any procedure on the machine that is not specifically described in this manual.
Unauthorized operation can cause faults or accidents. Fuji Xerox is not liable for any problems
resulting from unauthorized operation of the equipment.
Xerox is a registered trademark. The Document Company and Ethernet are trademarks which may be registered in
certain jurisdictions.
CentreWare and DocuWorks are trademarks.
Preface
Thank you for choosing the DocuPrint C1618.
This is a guide on operating the DocuPrint C1618 and the important points to note. To
understand the features fully and to use the machine correctly and effectively, please read
this guide before using it.
Keep this guide handy for use as a quick reference on using the machine.
This guide is written for users who are familiar with the personal computers, operating
systems, and software compatible with this printer. For operational procedures and
information regarding these items, refer to the documentation provided with the various
hardware and software that you are using.
It may be a legal offence to print currency notes, certificates of stocks and securities, or any other
documents of similar nature, regardless of whether they will be used.
This equipment conforms to the guidelines of the Japan Business Machine Makers Association on the
harmonic effects by copiers and other reproduction devices. These guidelines conform to the guides on
the harmonic suppressors of electronic appliances and general-purpose machines.
In this manual, safety instructions are preceded by the symbol
instructions before performing the required procedures.
. Always read and follow the
This equipment is certified as a Class 1 laser product under IEC60825. This means that the machine
does not emit hazardous laser radiation. Since radiation emitted inside the machine is completely
confined within the protective housings and external covers, the laser beam cannot escape from the
machine during any phase of user operation.
As a member of the International Energy Star Program, Fuji Xerox confirms this product
satisfies the requirements for International Energy Star Program standards.
i
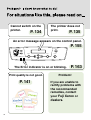
For situations like this, please read on...
Cannot switch on the
printer.
The printer does not
print.
P. 135
P. 134
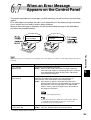
An error message appears on the control panel.
Menu
Ready
P. 155
Power saver
Front Door Release Button
Eject
Cancel
Set
Back
Error
The Error indicator is on or blinking.
ii
P. 163
Print quality is not good.
Problem!
P. 141
If you are unable to
rectify problems with
the recommended
remedies, contact
your Fuji Xerox or
dealers.
I want to stop printing:
P. 67
I want to know how to set paper and print:
Custom-size paper
P. 76
Envelopes
Transparencies
P. 71
P. 73
A paper jam message
appears on the control
panel:
Feed Jam
Check Tray
P. 176
Duplex Jam
Open Cover B
Two-sided
printing
Two-sided printing
on specialty paper
P. 80
P. 81
I want to replace
consumables:
Toner cartridge
P. 186
Drum cartridge
P. 190
Transfer roll cartridge
P. 196
P. 182
Regi. Jam
Open Cover A
Fuser Jam
Open Cover A & B
P. 179
Feed Jam
Check Tray
P. 177
Feed Jam
Check Tray
P. 183
iii
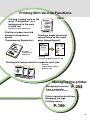
You can do the following with your
Using the printer efficiently!
You can do the following with your printer:
Help keywords are used in Windows. For information about the contents of
Help and how to use it, refer to "3.4 Using Online Help".
Economizing
Print on both sides
Keyword:
of the paper
You can do the following with your printer: 2 sided Print
Using the printer efficiently!
Help
Printing With Various Functions
Printing a stamp such as the
Printing multiple pages on a
word ''Confidential'' as a
background to the main
single page
Keyword:
printed text
Help keywords are used in Windows. For information about the contents of
Help and how to use it, refer to "3.4 Using Online Help".
Economizing
Help
Keyword: Printing a Watermark
Multi-Up
Print on both sides
Keyword:
of the paper
Printing on paper inserted
between transparency
sheets
(Transparency Separators)
Help
2 sided Print
Printing multiple pages on a
single page
Keyword:
Printing a single document
several times on the same
page (Image Repeat)
Multi-Up
Keyword:
Transparency
Separators
Setting the power
saver mode
Setting the power
saver mode
P. 117
Printing with banner sheets to separate print jobs
Ms A
Mr B
Ms C
Keyword:
Placing Banner Sheets
Between Jobs
P. 117
Adjusting colors
Setting different image
quality levels to suit
your needs
Adjusting tones and
image quality
Adjusting colors
Printing the
PDF file directly
Setting different image
quality levels to suit
your needs
PDF File Easy Printing Guide
Adjusting tones and
image quality
Printing the
PDF file directly
PDF File Easy Printing Guide
iv
Keyword:
Using Image Repeat to Print a Job
Managing the printer
Managing the printer
from a computer
P. 204
(CentreWare Internet Services)
Printer operational settings
Managing job logs
Printing reports
P. 199
Printing With Various Functions
Printing a stamp such as the
word ''Confidential'' as a
background to the main
printed text
Help
Keyword: Printing a Watermark
Printing on paper inserted
between transparency
sheets
(Transparency Separators)
Printing a single document
several times on the same
page (Image Repeat)
Keyword:
Transparency
Separators
Keyword:
Using Image Repeat to Print a Job
Printing with banner sheets to separate print jobs
Ms A
Mr B
Ms C
Keyword:
Placing Banner Sheets
Between Jobs
Managing the printer
Managing the printer
from a computer
P. 204
(CentreWare Internet Services)
Printer operational settings
Managing job logs
Printing reports
P. 199
v
Contents
◆ Preface
◆ For situations like this, please read on...
◆ You can do the following with your printer:
◆ Contents
◆ Type of Manuals
◆ Using This Guide
Organization
Conventions
◆ Safety Notes
◆ The Objective of the International Energy Star Program
◆ Illegal Copies
Chapter 1 Printer System Settings
1.1
Adjusting Color Registration ............................................................................................ 2
1.2
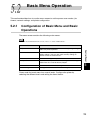
Configuring the Printer..................................................................................................... 5
1.2.1
Compatible Systems ......................................................................................... 5
1.2.2
Printer Configuration Flow............................................................................... 10
1.2.3
Setting the IP Address .................................................................................... 12
1.2.4
Setting the Protocols ....................................................................................... 16
1.2.5
Checking Settings ........................................................................................... 19
Chapter 2 Installing the Printer Driver
2.1
vi
After Setting up the Printer ............................................................................................ 22
2.1.1
The PCL6 Printer Drivers ................................................................................ 22
2.1.2
Using the TCP/IP Direct Print Utility................................................................ 23
2.2
Installing the Printer Driver (Windows 95/Windows 98/Windows Me) ........................... 24
2.3
Configuring the TCP/IP Direct Print Utility ..................................................................... 31
2.3.1
Installing the TCP/IP Direct Print Utility........................................................... 31
2.3.2
Setting the Port ............................................................................................... 34
2.4
Installing the Printer Driver (Windows NT 4.0/Windows 2000/Windows XP)................. 38
2.5
Setting Up the USB Port ................................................................................................ 47
Chapter 3 Basic Printer Operation
3.1
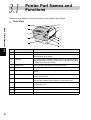
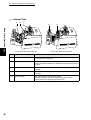
Printer Part Names and Functions................................................................................. 54
3.2
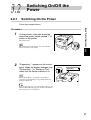
Switching On/Off the Power ........................................................................................... 57
3.2.1
Switching On the Power .................................................................................. 57
3.2.2
Switching Off the Power .................................................................................. 58
3.3
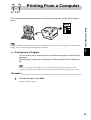
Printing From a Computer.............................................................................................. 59
3.4
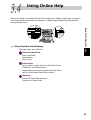
Using Online Help.......................................................................................................... 63
3.5
Canceling Printing.......................................................................................................... 67
3.5.1
Canceling Printing From the Computer ........................................................... 67
3.5.2
Canceling Printing at the Control Panel .......................................................... 68
3.6
Changing the Configuration for Options......................................................................... 69
3.7
Printing on Envelopes, Transparencies, and Custom-size (Long) Paper ....................... 71
3.8
3.9
3.7.1
Printing on Envelopes ..................................................................................... 71
3.7.2
Printing on Transparencies.............................................................................. 73
3.7.3
Printing Custom-size (Long) Paper ................................................................. 76
Two-sided Printing ......................................................................................................... 79
3.8.1
Two-sided Printing........................................................................................... 80
3.8.2
Two-sided Printing on Specialty Paper............................................................ 81
Using E-Mail Printing ..................................................................................................... 83
3.9.1
Configuring the System for E-Mail Printing ..................................................... 83
3.9.2
Transmittable File Attachments ....................................................................... 84
3.9.3
Sending Mail ................................................................................................... 84
3.9.4
Points to Note When Sending Documents via E-Mail ..................................... 87
Chapter 4 Loading Paper and Usable Paper Types
4.1
4.2
Suitable and Unsuitable Paper Types ............................................................................ 90
4.1.1
Suitable Paper................................................................................................. 90
4.1.2
Unsuitable Paper............................................................................................. 94
4.1.3
Storing Paper .................................................................................................. 95
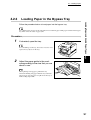
Loading Paper................................................................................................................ 96
4.2.1
Loading Paper in the Paper Tray ..................................................................... 96
4.2.2
Loading A5 Paper in the Paper Tray/Changing From A5 to
Another Paper Size1 ..................................................................................... 100
4.2.3
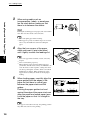
Loading Paper in the Bypass Tray................................................................. 107
vii
Chapter 5 Control Panel
5.1
5.2
5.3
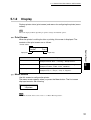
Control Panel Part Names and Functions ................................................................... 110
5.1.1
LED Indicators............................................................................................... 110
5.1.2
Display .......................................................................................................... 111
5.1.3
Buttons .......................................................................................................... 112
Basic Menu Operation ................................................................................................. 113
5.2.1
Configuration of Basic Menu and Basic Operations...................................... 113
5.2.2
What to Do if You Make a Mistake ................................................................ 115
5.2.3
Example Operation ....................................................................................... 116
List of Menu Items ....................................................................................................... 117
5.3.1
System .......................................................................................................... 117
5.3.2
Maintenance.................................................................................................. 120
5.3.3
Parallel .......................................................................................................... 122
5.3.4
Report/List..................................................................................................... 122
5.3.5
Network ......................................................................................................... 123
5.3.6
PDF Bridge ................................................................................................... 127
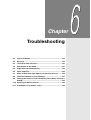
Chapter 6 Troubleshooting
6.1
Type of Problems ......................................................................................................... 132
6.1.1
6.2
No Power ..................................................................................................................... 134
6.3
The Printer Does not Print ........................................................................................... 135
6.4
6.3.1
Indicators are Illuminated, Blinking or Off ..................................................... 135
6.3.2
Cannot Print in Windows............................................................................... 138
Print Quality is Not Good ............................................................................................. 141
6.4.1
Blank or Completely Black Pages are Output ............................................... 141
6.4.2
Faded or Dirty Printouts, White Areas (Drop-outs), Creases, Blurs .............. 142
6.4.3
Unsatisfactory Printing .................................................................................. 147
6.5
Paper Does not Feed Properly .................................................................................... 148
6.6
Other Problems............................................................................................................ 150
6.6.1
Network Problems......................................................................................... 150
6.6.2
Other Problems ............................................................................................. 153
6.7
When an Error Message Appears on the Control Panel.............................................. 155
6.8
The Error Indicator is On or Blinking............................................................................ 163
6.9
viii
Problem List .................................................................................................. 132
6.8.1
The Error Indicator is On............................................................................... 163
6.8.2
The Error Indicator is Blinking ....................................................................... 163
Forcing the Printer to Print Remaining Data (When Printing is Halted) ....................... 164
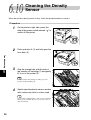
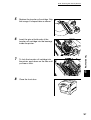
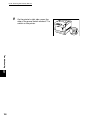
6.10 Cleaning the Density Sensor ....................................................................................... 166
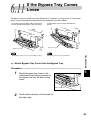
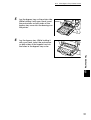
6.11 If the Bypass Tray Comes Loose ................................................................................. 169
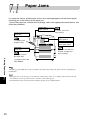
Chapter 7 Clearing Paper Jams
7.1
Paper Jams.................................................................................................................. 174
7.2
Paper Jams in Bypass Tray.......................................................................................... 176
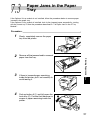
7.3
Paper Jams in the Paper Tray ...................................................................................... 177
7.4
Paper Jams Between the Drum Cartridge and Fuser Cartridge.................................. 179
7.5
Paper Jams in the Paper Rotator................................................................................. 182
7.6
Paper Jams in the 2 Tray Module................................................................................. 183
Chapter 8 Daily Care
8.1
8.2
8.3
8.4
8.5
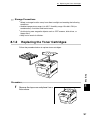
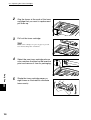
Replacing the Toner Cartridges ................................................................................... 186
8.1.1
Toner Cartridge Handling Precautions .......................................................... 186
8.1.2
Replacing the Toner Cartridges .................................................................... 187
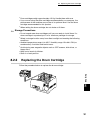
Replacing the Drum Cartridge ..................................................................................... 190
8.2.1
Drum Cartridge Handling Precautions .......................................................... 190
8.2.2
Replacing the Drum Cartridge ...................................................................... 191
Replacing the Transfer Roll Cartridge.......................................................................... 196
8.3.1
Transfer Roll Cartridge Handling Precautions ............................................... 196
8.3.2
Replacing the Transfer Roll Cartridge ........................................................... 197
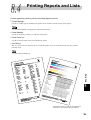
Printing Reports and Lists ........................................................................................... 199
8.4.1
Confirming Printer Configuration and Network Settings................................ 200
8.4.2
Checking the Print Log.................................................................................. 202
Confirming Printer Status from Your Computer ........................................................... 204
8.5.1
Checking Status and Remaining Amounts of Consumables with
a Web Browser.............................................................................................. 204
8.5.2
Checking Status From the Desktop............................................................... 208
8.5.3
Checking Status by E-Mail ............................................................................ 209
8.6
Cleaning the Printer ..................................................................................................... 210
8.7
Moving the Printer........................................................................................................ 211
8.8
Storing the Printer........................................................................................................ 216
ix
Appendix
A
Introduction to Options and Consumables................................................................... 218
A.1
Options.......................................................................................................... 218
A.2
Consumables ................................................................................................ 220
B
Control Panel Menu List .............................................................................................. 221
C
Specifications .............................................................................................................. 225
C.1
Printer Specifications .................................................................................... 225
C.2
Network Specifications.................................................................................. 227
C.3
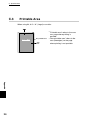
Printable Area ............................................................................................... 228
D
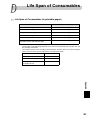
Life Span of Consumables........................................................................................... 229
E
Obtaining Product Information ..................................................................................... 230
F
Precautions and Limitations ........................................................................................ 231
G
Glossary ...................................................................................................................... 233
Index ................................................................................................................................237
x
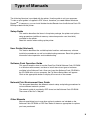
Type of Manuals
The following literature is provided with the printer. Use the guide to suit your purposes.
To view or print guides is supplied in PDF format, therefore, you need Adobe® Acrobat®
ReaderTM. If necessary, you can install Adobe Acrobat Reader from the Software Pack CDROM provided with the printer.
Setup Guide
This section describes the items in the printer package, the printer and options
setup procedures (additional memory, network expansion card, hard disk)
available for the printer.
Read this section when setting up the printer.
User Guide (this book)
This section describes the available printer functions and necessary software
installation procedures, as well as troubleshooting measures. Read this guide for
information about operation and troubleshooting.
Software Pack Operation Guide
This manual explains how to use the DocuPrint C1618 Software Pack CD-ROM
in a Windows environment, and how to install the various types of software
available in the Software Pack. Once you insert the Software Pack CD-ROM in
the CD-ROM drive of your computer, the Fuji Xerox Setup Menu will appear.
Click on the appropriate button to display this manual on the screen.
Network Print Environment User Guide
This document describes the different network setup and printing procedures for
various different network systems.
The network guide is provided in PDF format on the Software Pack CD-ROM.
The name of this file is "Net.pdf".
Other Manuals
Manuals explaining how to use other optional products are included on the
Software Pack CD-ROM as PDF files. Refer to these as appropriate for options
you have purchased.
xi
Using This Guide
Organization
The present guide is divided into the following nine chapters. A brief outline of
each chapter is given below.
Chapter 1 Printer System Settings
Describes the color registration procedures, system requirements, and network
settings needed to use the printer.
Chapter 2 Installing the Printer Driver
Describes the procedure for installing software necessary to use the printer (the
printer driver) on your computer.
Chapter 3 Basic Printer Operation
Describes the basic functions of the printer and how to use them.
Chapter 4 Loading Paper and Usable Paper Types
Describes the loading methods of the various types of paper compatible with the
printer.
Chapter 5 Control Panel
Describes the operation of the control panel and functions that you can set from
it.
Chapter 6 Troubleshooting
Describes error messages and their meanings, as well as what to do in case an
error message appears.
Also describes common problems that occur during printing and their remedies.
Read this chapter to determine the nature of the problem and the best method of
dealing with it.
Chapter 7 Clearing Paper Jams
This chapter explains procedures to deal with paper jams.
Chapter 8 Daily Care
Describes the consumables used by the printer, handling precautions, and
replacement procedures.
Also, this chapter describes the cleaning procedures required for continued
normal operation, printer storage requirements when it is not in use over a long
period, and procedures for transporting the printer.
xii
Appendix
The following information is presented in the appendix.
● Introduction to Options and Consumables
● Control Panel Menu List
● Specifications
● Life Span of Consumables
● Obtaining Product Information
● Precautions and Limitations
● Glossary
Conventions
1. In this guide, "computer" refers to personal computer, Macintosh, workstation,
and host device.
2. The following icons are used in this guide.
Indicates important information which you should read.
Indicates additional information about operations or features.
Indicates reference sources.
" ": indicates reference to a chapter or section.
3. The following conventions are used in this guide.
Bold: Indicates selections and all kinds of buttons.
Example: Click Next.
xiii
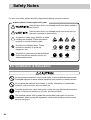
Safety Notes
For your own safety, please read this page carefully before using the machine.
Graphic symbols used throughout this guide
Used for items that if not followed strictly, can lead to severe or
fatal injuries.
Used for items that if not followed strictly, can cause injury to
the user or damage to the machine.
A symbol for items to pay attention to when
handling the machine. Follow instructions
carefully to use the machine safely.
A symbol for prohibited items. Follow
instructions carefully to avoid any
dangerous acts.
A symbol for items that must be performed.
Follow instructions carefully to carry out
these essential tasks.
Heated
surface
Flammable
Electric
shock
Pinched
fingers
Prohibited
No fire
Do not
tear down
Do not
touch
Instructions
Unplug
Ground/
Earth
For Installation & Relocation
Do not place the machine in a hot, humid, dusty, or poorly ventilated environment.
Prolonged exposure to these adverse conditions can cause fire or electric shocks.
Do not place the machine near heaters or volatile, flammable, or combustible
materials such as curtains that may catch fire.
Place the machine on a level and sturdy surface that can withstand the machine
weight. If tilted, the machine may fall over and cause injuries.
The machine weighs 35.3 kg when the consumables and paper tray are fully
assembled. When moving the equipment, make sure that there are two or more
persons carrying it.
xiv
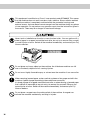
When lifting the machine, face the front panel and firmly grip the recessed areas
provided on both sides of the machine. Never try to lift the machine by gripping any
other areas. Lifting the machine by gripping any other areas can cause the machine
to fall and result in injuries.
Recess
If you hold the printer by the front
door, left or right sides, there is a
danger of the printer falling.
When lifting the machine, get a firm footing and bend your knees to avoid possible
injuries to your back.
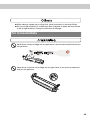
The machine has ventilation holes on the left, right, and rear sides. Ensure that the
machine is installed with a minimum clearance of 150 mm from the right side, 100
mm from the left side, and 200 mm from the rear side. A poorly ventilated machine
can cause excessive internal heat and fire. The accompanying diagram shows the
minimum clearances required for normal operation, consumables replacement, and
maintenance to ensure your machine operates at peak performance.
600mm*
100mm
200mm
150mm
When moving the machine, be sure to unplug the power cord from the outlet. If the
machine is moved with the power cord connected, it can cause damage to the cord
which could result in fire or electric shocks.
xv
When moving the machine, do not tilt it more than an angle specified in the figure
below. If tilted excessively, the machine may fall over and cause injuries.
When the optional 2 tray module is installed, be sure to lock the caster stoppers. An
unlocked machine may fall over or slide and cause injuries.
● The machine is capable of operating normally within the following recommended
environmental limits.
Temperature range 10–32°C
Humidity range
15–85 % (no condensation)
Humidity should be 65 % or below at 32°C, and temperature should be 28°C or
below at 85 % humidity.
Sudden temperature fluctuations can affect copy quality. Rapid heating of a cold room can cause
condensation inside the machine, directly interfering with image transfer.
● Do not expose the machine to direct sunlight. Exposure to direct sunlight can
adversely affect the machine's performance.
● When moving the printer, remove the toner cartridges. Do not reuse toner
cartridges once you have removed them from the printer. Loose toner can spill
inside the printer and impair print quality.
● Do not place the printer immediately next to an air conditioner or heater. Doing so
will affect the printer's internal temperature, possibly resulting in damage.
xvi
For Power & Earth Connection
Three power specifications are listed below. The specifications that apply to your
machine depend on your machine configuration. Connect the power plug only to a
properly rated power outlet. Otherwise, it can cause fire or electric shocks. If in
doubt, contact your Fuji Xerox or dealers.
• Rated voltage
100 V
Rated frequency
50/60 Hz
• Rated voltage
110 V
Rated frequency
60 Hz
• Rated voltage
220-240 V
Rated frequency
50/60 Hz
Never use multi-plug adaptors to plug multiple power plugs in the same outlet. Be
sure to operate the machine on a sole-use receptacle. Multiple connectors can
cause the outlet to overheat and cause fire.
Ensure that the plug connection is free of dust. In a damp environment, a
contaminated connector can draw a non-negligible amount of current that can
generate heat and eventually cause fire over an extended period of time.
Always use the power cord provided with your machine. When an extension power
cord is required, always use a properly rated cord.
• In Japan: 125 V/15 A
• In other countries: Contact your Fuji Xerox or dealers.
If you use a cord with an unspecified current rating, the machine or plug may emit
smoke or become hot to the touch externally.
Do not attempt to rework, pull, bend, chafe, or otherwise damage the power cord.
Do not place a heavy object on the cord. A damaged cord can cause fire or electric
shocks.
Never touch a power cord with wet hands. Danger of electric shock exists.
Stop operation immediately if your machine produces smoke, excessive heat,
unusual noise, or smell, or if water is spilt onto the machine. These conditions can
cause fire. Immediately switch off and unplug the machine, and contact your Fuji
Xerox or dealers.
xvii
To prevent fire or electric shocks, follow the instruction below based on your
machine configuration. If in doubt, contact your Fuji Xerox or dealers.
• If your machine is a 220–240 V model, there is no need to attach a separate earth
line since the earth connection is incorporated in the power line. Plug it into a
properly rated outlet.
If the power cord is broken or insulated wires are exposed, ask your Fuji Xerox or
dealers for a replacement. Using a damaged cord can cause fire or electric shocks.
Do not unplug or replug the machine while it is on. Unplugging a live connector can
deform the plug and cause fire.
When unplugging the machine, grasp the plug instead of the cord. Forcibly pulling on a
cord can damage it and cause fire or electric shocks.
Be sure to switch off and unplug the machine before accessing the interior of the
machine for cleaning, maintenance, or fault clearance. Access to a live machine's
interior can cause electric shocks.
Once a month, unplug the machine and check the power cord for the following:
• The power cord is plugged firmly into a receptacle.
• The plug is not excessively heated, rusted, or bent.
• The plug and receptacle are free of dust.
• The cord is not cracked or frayed.
If you notice any unusual conditions, contact your Fuji Xerox or dealers.
When the machine is not used over an extended period of time, switch it off and
unplug it. If an unused machine is left connected to a power source for a long
period, degraded insulation can cause electric shocks, current leakages, or fire.
Switch off the machine before connecting the interface cable or any optional
product. Connecting the cable or optional product with a live machine can cause
electric shocks.
xviii
● Reception interference
When installed at a certain location, the machine may cause interference with radio
and television reception. If you notice flickering or distorted images or noises on
your audio-visual units, your machine may be causing radio interference. Switch it
off, and if the interference disappears, the machine is the cause of radio
interference. Perform the following procedure until the interference is corrected.
• Move the machine and the TV and/or radio away from each other.
• Reposition or reorientate the machine and TV and/or radio.
• Unplug the machine, TV and/or radio, and replug them into outlets that operate
on different circuits.
• Reorientate the TV and/or radio antennas and cables until the interference stops.
For an outdoor antenna, ask your local electrician for support.
• Use coaxial cable antennas.
For Machine Operation
Do not place any liquid container such as a vase or coffee cup on the machine. Spilt
water can cause a fire or shock hazard.
Do not place any metal parts such as staples or clips on the machine. If metal and
flammable parts get into the machine, they can short-circuit internal components,
and cause fire or electric shocks.
If debris (metal or liquid) gets into the machine, switch off and unplug the machine.
Contact your Fuji Xerox or dealers. Operating a debris-contaminated machine can
cause fire or electric shocks.
Never open or remove machine covers that are secured with screws unless
specifically instructed in the Use Guide. A high voltage component can cause
electric shocks.
Do not try to alter the machine configuration, or modify any parts. An unauthorized
modification can cause smoke or fire.
xix
This equipment is certified as a Class 1 laser product under IEC60825. This means
that the machine does not emit hazardous laser radiation. Since radiation emitted
inside the machine is completely confined within the protective housings and
external covers, the laser beam cannot escape from the machine during any phase
of user operation. Do not perform any operation apart from the instructions given in
the manual. There may be a danger of laser beam leakage.
Never touch a labelled area found on or near the heat roller. You can get burnt.If a
sheet of paper is wrapped around the heat roller, do not try to remove it by yourself
to avoid injuries or burns. Switch off the machine immediately, and contact your Fuji
Xerox or dealers.
Do not place any heavy object on the machine. An off-balance machine can fall
over or the heavy object can fall, causing injuries.
Do not use a highly flammable spray or solvent near the machine. It can cause fire.
When removing jammed paper, make sure that no pieces of torn paper are left in the
machine. A piece of paper remaining in the machine can cause fire.
If a sheet of paper is wrapped around the heat roller, or when clearing a jammed paper
that is difficult or impossible to see, do not try to remove it by yourself. Doing so can
cause injuries or burns. Switch off the machine immediately, and contact your Fuji
Xerox or dealers.
Do not place a magnet near the safety switch of the machine. A magnet can
activate the machine accidentally, resulting in injuries.
xx
● When clearing a paper jam or other fault, follow instructions in the User Guide.
● Do not use the machine if it is tilted more than 5 degrees in either the front-to-back
or left-to-right directions. Doing so could result in damage.
For Consumables
Never throw a toner cartridge into an open flame. It can cause an explosion and you
can get burnt.
Never throw a transfer roll cartridge into an open flame. It can cause an explosion
and you can get burnt.
xxi
Never throw a drum cartridge into an open flame. It can cause an explosion and you
can get burnt.
● Do not unpack consumables before use. Store consumables in a cool, dry, and
clean environment, away from an open flame, and out of direct exposure to sunlight.
● When using consumables, read and observe operating instructions and safeguards
given on the package and container.
● Administer emergency first aid as follows:
●
If you get toner in your eyes, rinse them abundantly in clean water and consult
your physician, if necessary.
●
If you get toner on your skin, wash it with soap and water. Rinse well.
●
If you inhale toner, leave the contaminated area immediately and gargle with
water.
●
If you swallow toner, induce vomiting and consult your physician immediately.
● When you remove the transfer roll cartridge from the printer because the transfer
roll collection box is full, do not attempt to empty the transfer roll box and reuse the
cartridge, as toner may spill inside the printer and cause damage. Loose toner can
spill inside the printer and deteriorate print quality.
● Do not tilt or shake drum cartridges or transfer roll cartridges when removing them
temporarily. Loose toner can spill inside the printer and deteriorate print quality.
xxii
The Objective of the International
Energy Star Program
To protect the global environment and conserve energy sources, the International Energy
Star Program encourages the following product features. Fuji Xerox confirms DocuPrint
C1618 satisfies the requirements for this program.
Low Power Mode Feature
This product has a power-saving feature, which switches the machine to the
lower mode ("Power Saver Mode 1") automatically if the machine is on and not
operated for a certain period of time. In this mode the machine lowers the fuser
temperature and saves the power consumption. The default low power mode
start time is set at three minutes. You can change this setting from 1 to 120
minutes. See "Chapter 5 Control Panel" of this guide for details.
In addition to "Power Saver Mode 1", this printer features "Power Saver Mode 2", a second power
mode that saves even more power.
xxiii
Illegal Copies
Copying certain documents may be illegal in your country. Penalties of fines or
imprisonment may be imposed on those found guilty.
The following are examples of items that may be illegal to copy in your country:
❑ Currency
❑ Banknotes and cheques
❑ Bank and government bonds and securities
❑ Passports and identification cards
❑ Copyright material or trademarks without the consent of the owner
❑ Postage stamps and other negotiable instruments
This list is not inclusive and no liability is assumed for either its completeness or
accuracy. In case of doubt, contact your legal counsel.
xxiv
Chapter
1
Printer System Settings
1.1
Adjusting Color Registration........................................................ 2
1.2
Configuring the Printer ................................................................. 5
Adjusting Color
Registration
Printer System Settings
1
Follow the procedure below to adjust the color registration when you first install the printer or
after moving it to a new location.
Refer to "5.2 Basic Menu Operation" and "Appendix B Control Panel Menu List" for information about the
operation of the control panel.
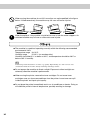
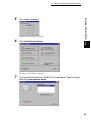
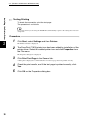
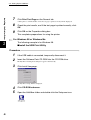
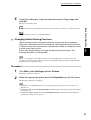
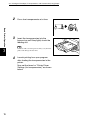
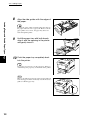
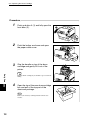
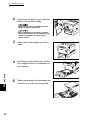
Printing the Color Registration Correction Chart
Use the control panel to print the Color Registration Correction Chart.
Ready to Print
(Print screen. The printer is ready to print.)
Press the Menu button. The menu screen appears.
Menu
(Menu screen)
1:System
Press the
button once.
Menu
2:Maintenance
Press the Set/Eject or
button once.
2:Maintenance
Init NVM
Press the
button three times.
2:Maintenance
ColorRegiCorrect
Press the Set/Eject or
button once.
ColorRegiCorrect
Correction Chart
Press the Set/Eject or
button once.
Correction Chart
Ready to Print
Press the Set/Eject button once.
The Color Registration Correction Chart is printed.
When printing is finished, the print screen reappears.
2
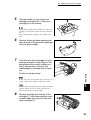
1.1 Adjusting Color Registration
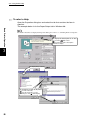
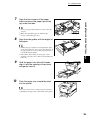
From the lines to the right of the Y (yellow), M (magenta), and C (cyan) pattern,
find the values of the straightest lines.
You can also use the densest colors of the grid to find the straightest lines. The colors printed at the
highest density are those next to the straightest lines.
When "0" is the value nearest the straightest line, you do not need to adjust the color registration.
When the value is not "0", follow the procedure outlined in "Entering Values".
Printer System Settings
Determining Values
1
Straightest line
Lattice pattern
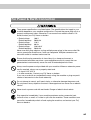
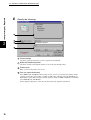
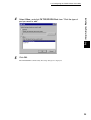
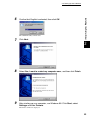
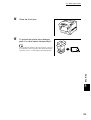
Entering Values
Using the control panel, enter the values that you found in the Color Registration
Correction Chart to make adjustments.
Ready to Print
Follow steps
through
on the previous page to display
the color registration correction chart settings menu.
ColorRegiCorrect
Correction Chart
Press the
button once.
ColorRegiCorrect
Enter Number
Press the Set/Eject or
button once.
Continued
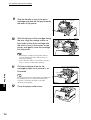
3
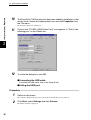
1.1 Adjusting Color Registration
Printer System Settings
1
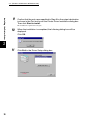
Continued from previous page.
Enter Number
Y= 0 M= 0 C= 0
Using the
or
buttons, press the buttons until you
reach the value (for example, +3) displayed on the chart.
Enter Number
Y=+3 M= 0 C= 0
Press the
button once and move the cursor to the next value.
Enter Number
Y=+3 M= 0 C= 0
Repeat steps
registration.
and
to continue adjusting the color
Enter Number
Y=+3 M=+1 C=+2
Press the Set/Eject button once.
Correction Chart
Ready to Print
Press the Set/Eject button once.
The Color Registration Correction Chart is printed with the
new values.
Color registration adjustment is complete when the
straightest Y (yellow), M (magenta), and C (cyan) lines
are next to the "0" line.
After printing the Color Registration Correction Chart, do not turn
off the printer until the printer motor has stopped running.
If "0" is not next to the straightest lines, determine the values
and adjust again.
4
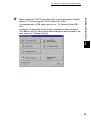
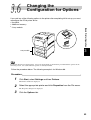
Configuring the Printer
1.2.1
Compatible Systems
You can use the printer locally when it is connected directly to your computer.
You can use the printer through a network when it is connected to a network.
Because the printer supports a variety of protocols, it is possible to share it
among a number of different networks.
Printer System Settings
This section describes how to confirm your system environment and how to make the
necessary printer settings.
1
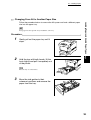
Local Connection
You can connect the printer to your computer with a parallel or USB cable.
<Parallel cable connection>
Windows 95/Windows 98/Windows Me/
Windows NT 4.0/Windows 2000/Windows XP
Printer
Parallel cable
5
1.2 Configuring the Printer
Printer System Settings
<USB cable connection>
You can use a USB cable to connect the printer if any of the conditions below are
met: However, we cannot guarantee the normal operation of all USB compatible
equipment.
● Computers running preinstalled Windows Me, preinstalled Windows 98 Second
Edition, preinstalled Windows 2000, or preinstalled Windows XP.
Windows 98 Second Edition/Windows Me/
Windows 2000/Windows XP
1
Printer
USB cable
TCP/IP (Windows NT 4.0/Windows 2000/Windows XP)
The printer supports TCP/IP (LPD) protocol, allowing you to print by sending
data through an lpr port directly to the printer from computers running Windows
NT 4.0, Windows 2000, or Windows XP. To do this, you need to set the IP
address of the printer and the Windows NT 4.0, Windows 2000, or Windows XP
computer.
Windows NT 4.0/Windows 2000/Windows XP
Printer
TCP/IP(LPR/LPD)
■In Windows 2000/Windows XP the following are possible:
●
●
6
The printer supports port 9100, allowing you to print by sending data from the
designated port to the printer.
The printer supports IPP, allowing you to print by specifying the URL of the
printer and sending data to it through the Internet.
1.2 Configuring the Printer
Use the TCP/IP Direct Print Utility to print from Windows 95, Windows 98, or
Windows Me.
The TCP/IP Direct Printer Utility is a program that sends print data from the
computer directly to the printer through a network, without the need to go through
a network print server.
To do this, you need to set the IP address of the printer and the Windows 95,
Windows 98, or Windows Me computer.
The TCP/IP Direct Print Utility protocol also works with LPD and port 9100.
TCP/IP Direct Print Utility running on
Windows 95/Windows 98/Windows Me
Printer System Settings
TCP/IP (Windows 95/Windows 98/Windows Me)
1
Printer
TCP/IP (LPR/LPD) or TCP/IP (port 9100)
■With Windows Me setup for IPP, the following types of
printing are possible:
The printer supports IPP, allowing you to print by specifying the URL of the
printer and sending data to it through the Internet.
7
1.2 Configuring the Printer
Printer System Settings
1
SMB (Windows network)
Installing an optional network expansion card enables the printer to use the SMB
(Server Message Block) protocol. The SMB protocol allows computers running
Windows 95, Windows 98, Windows Me, Windows NT 4.0, Windows 2000, and
Windows XP to share files and printers. Using the SMB protocol means that you
do not need to use a server. Printing is carried out by sending data directly to the
printer.
The SMB transport protocol can be NetBEUI or TCP/IP. However, Windows XP
does not support NetBEUI.
Windows 95/Windows 98/Windows Me
Windows NT 4.0/Windows 2000/Windows XP
(*1)
NetBEUI
(*1)
or TCP/IP
Windows XP does not support NetBEUI.
8
Printer
1.2 Configuring the Printer
Installing an optional network expansion card enables the printer to use IPX/SPX
protocol. In a network environment using NetWare versions 3.12, 3.2, 4.1, 4.11,
4.2, or 5.0 from Novell Inc., printing is performed from NetWare client computers.
NetWare client
NetWare server
Printer
Printer System Settings
NetWare®
1
NetWare(IPX/SPX)
NetWare(IPX/SPX)
Printing from a Macintosh Computer
The optional PostScript3 kit is required in order to print from a Macintosh
computer.
When the printer is connected to the Macintosh computer by USB cable, printing
is possible using the Adobe PostScript driver.
Further, with the optional network expansion card installed, the printer can be
connected to an EtherTalk network. Printing is then possible from Macintosh
computers that are connected to the network.
See the User Guide (PostScript3 Kit) for how to print from a Macintosh computer.
9
1.2 Configuring the Printer
Printer System Settings
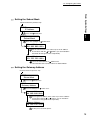
1.2.2
Printer Configuration Flow
This section describes the flow of printer configuration.
Refer to the flow chart and confirm that each requirement is met, according to
your needs.
Are you using a
network?
Yes
No
1
*1
*1
With
TCP/IP (LPD)
With SMB
With
port 9100
With
Internet
With
NetWare
Are you using
TCP/IP?
"1.2.3"
Set IP addresses
Start the
protocol
Start SMB
NetBEUI
(set as the
default)
Start SMB
TCP/IP
(set as the
default)
Start LPD
(set as the
default)
"1.2.4"
Start
port9100
(set as the
default)
Start IPP
(set as the
default)
Start
NetWare
(set as the
default)
*2
Configure the system
with the network utility
*4
Installing the printer driver
*3
*3
"Chapter 2"
Finish
*1
*2
*3
*4
10
To use these protocols you need an optional network expansion card.
Refer to "Configuring in NetWare Environment" in the Network Print Environment User Guide.
Refer to "Configuring in TCP/IP Environment" in the Network Print Environment User Guide.
Windows NT 4.0, Windows 2000, and Windows XP allow you to share the printer. For details
about how to share the printer and printing from client computers, refer to "Configuring in TCP/IP
Environment" in the Network Print Environment User Guide.
1.2 Configuring the Printer
The following network functions are provided with the printer. For details about
these functions, refer to the Network Print Environment User Guide on the CDROM provided with the printer.
■In a variety of network environments, the printer gives you flexibility to:
●
In a TCP/IP system...
Have the printer's IP address managed by a DHCP server.
Register the printer on a WINS server.
Printer System Settings
Cases When You Should Refer to the Network Print Environment
User Guide
1
The IP address will change from time to time when you use DHCP, so periodic confirmation of the
IP address is necessary. An optional network expansion card is required in order to use DHCP in a
WINS environment.
●
In an SMB system...
Change the host name or workgroup name.
■Using CentreWare Internet Services in a TCP/IP system
This enables you to display the printer status and make various settings from a
Web page. This function is called "CentreWare Internet Services".
■The printer has an SNMP agent function for use in TCP/IP and NetWare
systems.
With the SNMP function active (active by default), you can control the printer
from an SNMP manager.
Also, with the CentreWare Simple Status Notification function, you can check
the status of the printer from your computer.
■In a TCP/IP system, the printer can send and receive e-mail.
E-mail can be used to control operation of the printer over a corporate network
or through the Internet. This function is called the "Status Messenger".
11
1.2 Configuring the Printer
Printer System Settings
1
1.2.3
Setting the IP Address
This section describes the procedure for setting the IP address, subnet mask,
and gateway address from the control panel of the printer.
Follow the procedure below.
IP addresses are managed throughout the system as a whole. Specifying the wrong IP address can
affect the entire network. Before setting an IP address, consult your system administrator.
Refer to "5.2 Basic Menu Operation" and "Appendix B Control Panel Menu List" for information
about operation of the control panel.
Set the IP Address Acquisition Method to Panel.
Ready to Print
(The print screen. The printer is ready to print.)
Press the Menu button. The menu screen appears.
Menu
(The menu screen)
1:System
Press the
button four times.
Menu
5:Network
Press the Set/Eject or
button once.
5:Network
Ethernet
Press the
button once.
5:Network
TCP/IP
Press the Set/Eject or
Continued
12
button once.
1.2 Configuring the Printer
TCP/IP
IP Address Setup
Press the Set/Eject or
button once.
IP Address Setup
DHCP
Press the
*
The value currently set has
a "*" displayed next to it.
Printer System Settings
Continued from previous page.
1
button once.
IP Address Setup
Panel
Press the Set/Eject button once.
Reboot Printer
to Take Effect
Three seconds later, the following screen appears.
IP Address Setup
Panel
*
When the value is set, a
"*" appears next to it.
Press the Cancel/Back or
button once.
The lower line of the screen returns to the
"IP Address Setup".
Only restart the printer after setting the gateway
address at the last step. Continue to the next step
without restarting the printer.
13
1.2 Configuring the Printer
Printer System Settings
1
Setting the IP Address
The IP address consists of four separate values (base 10) separated by decimal points. The four values
can be set anywhere between 0 and 255.
Continued from the previous step
Example:
• IP Address "129.249.242.179"
• Subnet Mask "255.255.255.0"
• Gateway Address "129.249.242.254"
TCP/IP
IP Address Setup
Press the
button once.
TCP/IP
IP Address
Press the Set/Eject or
button once.
IP Address
000. 000. 000. 000
*
Using the
or
button, press the buttons until the
desired value (for example, 129) appears. You can hold
down the buttons to change the value in increments of 10.
IP Address
129. 000. 000. 000
Press the
button once and move the cursor to
the next value.
IP Address
129. 000. 000. 000
Repeat steps
When you do not
understand the
menu screens
displayed or at
which level in the
menu tree the
displayed screen
is, refer to
"Appendix B
Control Panel
Menu List".
and
to finish setting the IP address.
IP Address
129. 249. 242. 179
Press the Set/Eject button once.
Reboot Printer
to Take Effect
Three seconds later, the following screen appears.
IP Address
129. 249. 242. 179
*
Press the Cancel/Back or
button once.
The lower line of the screen returns to "IP Address".
14
1.2 Configuring the Printer
Printer System Settings
Setting the Subnet Mask
Continued from the previous step
TCP/IP
IP Address
Press the
button once.
1
TCP/IP
Subnet Mask
Press the Set/Eject or
button once.
Subnet Mask
000. 000. 000. 000
*
Set the subnet mask in the same way as the IP address.
To set values with the
or buttons, you can hold down
the button to change the value sequentially.
Subnet Mask
255. 255. 255. 000
*
Press the Cancel/Back or
button once.
The lower line of the screen returns to "Subnet Mask".
Setting the Gateway Address
Continued from the previous step
TCP/IP
Subnet Mask
Press the
button once.
TCP/IP
Gateway Address
Press the Set/Eject or
button once.
Gateway Address
000. 000. 000. 000
*
Set the gateway address in the same way as the IP address.
To set values with the
or
buttons, you can hold down
the button to change the value sequentially.
Gateway Address
129. 249. 242. 254
*
At this point, restart the printer.
15
1.2 Configuring the Printer
Printer System Settings
1
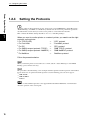
1.2.4
Setting the Protocols
When the printer is shipped from the factory, all protocols except SMTP/POP3 ("Status Messenger",
"E-Mail Printing") and "FTP" are "Enabled" by default. You do not need to perform the operations
described in this section when you connect a new printer to a network for the first time.
This concludes the Printer Settings list. Move on to "1.2.5 Checking Settings".
When you want to use the printer as a network printer, you need to set the right
protocols on the printer.
● For TCP/IP(LPD)
→ "LPD" protocol
●
For Port 9100
→ "Port9100" protocol
● For IPP
→ "IPP" protocol
●
For SMB (transport protocol: TCP/IP) → "SMB TCP/IP" protocol
● For SMB (transport protocol: NetBEUI) →
"SMB NetBEUI" protocol
●
For NetWare
→ "NetWare" protocol
Follow the procedure below.
When you want the printer to send and receive e-mail, start the "Status Messenger" and "E-Mail
Printing" protocol in the same way.
The procedure is described using screen examples with the optional network expansion card installed.
If you do not have an optional network expansion card, the following protocols do not appear:
●
SMB TCP/IP
●
SMB NetBEUI
●
NetWare
Refer to "5.2 Basic Menu Operation" and "Appendix B Control Panel Menu List" for information
about the operation of the control panel.
16
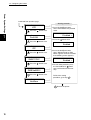
1.2 Configuring the Printer
(The print screen. The printer is ready to print.)
Press the Menu button. The menu screen appears.
Menu
(The menu screen)
1:System
Press the
Printer System Settings
Ready to Print
1
button four times.
Menu
5:Network
Press the Set/Eject or
button once.
5:Network
Ethernet
Press the
button three times.
5:Network
Protocol
Press the Set/Eject or
button once.
Continued
17
1.2 Configuring the Printer
Printer System Settings
1
Continued from previous page.
Starting protocols
Protocol
LPD
Press the
button once.
1. Press the Set/Eject button
once. XXX indicates the protocol
name.
xxx
Disabled
Protocol
Port9100
2. Press the
Press the
*
button once.
button once.
xxx
Enabled
Protocol
IPP
Press the
button once.
Protocol
SMB TCP/IP
Press the
button once.
Protocol
SMB NetBEUI
Press the
button once.
3. Press the Set/Eject button
once. "Reboot Printer to Take
Effect" appears for three seconds,
then following screen appears.
xxx
Enabled
4. To start other protocols, press
the Cancel/Back or
button
once and continue to the next
step.
To finish the setting
procedure, go to step
Protocol
NetWare
Restart the printer.
18
*
.
1.2 Configuring the Printer
Checking Settings
Print the Printer Settings list to check the content of printer settings.
The Printer Settings list also contains information that is required when
configuring computers for printing. Use the list to confirm that settings on the
printer and the computer match.
For details about printing the list, refer to "8.4.1 Confirming Printer Configuration and Network
Settings".
Printer System Settings
1.2.5
1
Example of a Printer Settings List
Use the sample Printer Settings list on the following page as a guide when
confirming the printer’s configuration.
The sample Printer Settings list shown on the following page is from a printer with an optional
network expansion card installed.
19
1.2 Configuring the Printer
Printer System Settings
1
These settings
must be made on
the computer
Check the IP
address
Check the protocol port status
20
Chapter
2
Installing the Printer
Driver
2.1
After Setting up the Printer......................................................... 22
2.2
Installing the Printer Driver
(Windows 95/Windows 98/Windows Me) ................................... 24
2.3
Configuring the TCP/IP Direct Print Utility ................................ 31
2.4
Installing the Printer Driver
(Windows NT 4.0/Windows 2000/Windows XP) ........................ 38
2.5
Setting Up the USB Port.............................................................. 47
After Setting up the Printer
Installing the Printer Driver
2
Configure the computer after you have set up the printer.
When the printer is used as a local printer, install the printer driver to the computer
connected to the printer. If it is used as a network printer, install the printer driver to the
computer connected to the network.
To print directly to the printer from Windows 95/Windows 98/Windows Me in the TCP/IP
environment, install the printer driver and the TCP/IP Direct Print Utility to the computer.
2.1.1
The PCL6 Printer Drivers
A printer driver is a software that converts print data or instructions from the
computer to data interpreted by the printer.
The drivers for the following operating systems (OS) are available for DocuPrint
C1618:
● Windows 95
● Windows 98
● Windows Millennium Edition
● Windows NT 4.0
● Windows 2000
● Windows XP
The printer drivers are stored inside the Software Pack CD-ROM. Use the Fuji
Xerox Setup Menu in the same CD-ROM to install.
●
●
●
The printer driver for Windows NT 4.0 is for Intel x86 version NT 4.0.
You can use the printer driver for Windows 98 on Windows Me.
You can use the printer driver for Windows 2000 on Windows XP.
Obtaining the latest printer driver
There may be new printer drivers with future upgrades and you can download
the latest version of printer driver from the Fuji Xerox home page.
22
2.1 After Setting up the Printer
Using the TCP/IP Direct Print Utility
The TCP/IP Direct Print Utility is a software for printing print data sent from a
computer directly to a printer on the network, without going through any server.
The TCP/IP Direct Print Utility is available in the Software Pack CD-ROM.
This manual assumes that the TCP/IP Direct Print Utility will be used when
printing from Windows 95, Windows 98 or Windows Me in TCP/IP environment.
Network Print Environment User Guide in the Software Pack CD-ROM for information on the TCP/IP
Direct Print Utility
Installing the Printer Driver
2.1.2
2
To install the TCP/IP Direct Print Utility, the computer must meet the following requirements:
●
Set the computer name in ASCII characters (single-byte alphanumeric letters in upper or lower
case/numerals/hyphen (-)/underscore (_)).
●
Installed with TCP/IP protocol
If TCP/IP is not installed, refer to the Network Print Environment User Guide or manuals on Windows
to add the protocol.
23
Installing the Printer Driver
(Windows 95/Windows 98/
Windows Me)
Installing the Printer Driver
2
The procedure for installing printer driver to Windows 95/Windows 98/Windows Me is
described in this section.
Here, we will use Windows 98 as an example. When the printer is used as a network printer, it
is assumed that the network environment client settings of the computer have been completed.
To install the printer driver on port 9100 or the IPP port, refer to the Network Print Environment User Guide.
Installing the Printer Driver
Procedure
1
2
Switch on the printer.
Start your computer and activate Windows 98.
When the printer is connected to the computer, a dialog box indicating that new hardware has been
detected is displayed when you activate Windows 98. In this case, click Cancel to close the dialog
box.
3
4
For NetWare environment, log on to the target file server.
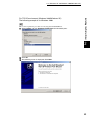
Insert the Software Pack CD-ROM into the CD-ROM drive.
The Fuji Xerox StartUp Tool dialog box appears automatically.
If the Fuji Xerox StartUp Tool dialog box does not appear automatically, double-click the
Install_e.exe icon in the CD-ROM. Proceed to Step 6.
24
2.2 (Windows 95/Windows 98/Windows Me)
Click Install Language.
The Fuji Xerox Setup Menu is displayed.
6
Click Install Printer Driver.
Installing the Printer Driver
5
2
The Driver Setup dialog box is displayed.
7
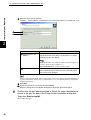
Confirm that FX DocuPrint C1618 PCL6 is selected in "Select a model",
then click Install printer driver.
25
2.2 (Windows 95/Windows 98/Windows Me)
Installing the Printer Driver
8
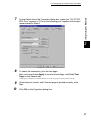
Specify the following:
2
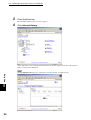
Printer settings
Check the optional products that you have purchased and installed.
Make this the default printer
Check the check box if DocuPrint C1618 is to be used as the default printer.
Printer name
Enter a name for the printer, if necessary.
Port (for output destination)
Select Others and click Browse if the printer is to be used as a local printer (the printer and the
computer are directly connected by a parallel or USB cable) and when using the TCP/IP Direct
Print Utility to print. When using the network printer in either the SMB or NetWare environment,
select Network and click Browse.
On the displayed dialog box, select the port that matches the required environment.
26
2.2 (Windows 95/Windows 98/Windows Me)
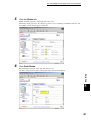
Select LPT1 from the list and click OK.
If you use the TCP/IP Direct Print Utility to print and are connected with a USB cable, set the port
later. Select LPT1: here.
Installing the Printer Driver
■When Others is selected:
2
■When Network is selected:
Select a printer or print queue icon from the network list by following the procedure described below.
For SMB environment
From the network list, search and select the printer. The printer will be displayed as
"host name-p" and will be under the host name icon. The factory default for the
workgroup name and host name is "Workgroup" and "FXnnnnnn" (nnnnnn: lower six
digits of the Ethernet address of the printer) respectively.
When you do not know the workgroup name and host name of the printer, either check with the
network administrator, or print out the Printer Settings list to confirm. Refer to "8.4.1 Confirming
Printer Configuration and Network Settings".
Click OK.
For NetWare environment
From the network list, search and select the printer. The print queue is displayed under
the NetWare file server icon.
When you do not know the print queue name, check with your network administrator.
Click OK.
27
2.2 (Windows 95/Windows 98/Windows Me)
Installing the Printer Driver
9
Confirm that the port name specified in Step 8 for the output destination
is shown in the Port text box of the Printer Driver Installation dialog box.
Then click Start to install.
The installation of printer driver begins.
10
When the installation is completed, the following dialog box will be
displayed.
Click OK.
2
11
28
Click Exit in the Driver Setup dialog box.
2.2 (Windows 95/Windows 98/Windows Me)
When using the TCP/IP Direct Print Utility to print, proceed to the next
section "2.3 Configuring the TCP/IP Direct Print Utility"
If connected with a USB cable, move on to "2.5 Setting Up the USB
Port".
Installation for the printer driver will be completed in other situations.
Click Exit on the Fuji Xerox Setup Menu dialog box and proceed to the
next section on "Testing Printing".
Installing the Printer Driver
12
2
29
2.2 (Windows 95/Windows 98/Windows Me)
Installing the Printer Driver
2
Testing Printing
To check the connection, print the test page.
The procedure is as follows:
Do not test print if you are using the TCP/IP Direct Print Utility to print as the settings have not been
completed.
Procedure
1
Click Start, select Settings and then Printers.
The Printers window is displayed.
2
The DocuPrint C1618 printer icon has been added by installation of the
printer driver. Select this added printer icon and click Properties from
the File menu.
The Properties dialog box is displayed.
3
Click Print Test Page in the General tab.
A dialog box is displayed to confirm whether or not the test page has been printed correctly.
30
4
Check the print results, and if the test page is printed correctly, click
Yes.
5
Click OK on the Properties dialog box.
Configuring the TCP/IP
Direct Print Utility
2.3.1
Installing the TCP/IP Direct Print Utility
The procedure for installing the TCP/IP Direct Print Utility to the computer is
described below. We will use Windows 98 in this procedure as an example.
If you are continuing with the procedure from the previous section, carry out the
procedure from Step 4 after the Fuji Xerox Setup Menu dialog box is displayed
on the computer screen.
1
2
Switch on the computer and start Windows 98.
Installing the Printer Driver
This section explains the settings required for using the TCP/IP Direct Print Utility to print
from Windows 95/Windows 98/Windows Me.
2
Insert the Software Pack CD-ROM into the CD-ROM drive.
The Fuji Xerox StartUp Tool dialog box appears automatically.
If the Fuji Xerox StartUp Tool dialog box does not appear automatically, double-click the
Install_e.exe icon in the CD-ROM. Proceed to Step 4.
3
Click Install Language.
The Fuji Xerox Setup Menu is displayed.
31
2.3 Configuring the TCP/IP Direct Print Utility
Installing the Printer Driver
4
Click Install TCP/IP Direct Print Utility.
2
If you are prompted to install TCP/IP when Install TCP/IP Direct Print Utility is clicked, stop the
operation, and after you have installed TCP/IP protocol to your computer, carry out the installation
again.
5
32
Click Next.
2.3 Configuring the TCP/IP Direct Print Utility
Check the path under Destination Folder, and click Next if it is all right.
Installing the Printer Driver
6
2
The installation of the TCP/IP Direct Print Utility begins.
7
When the installation is completed, the following dialog box will be
displayed. Take out the CD-ROM from the CD-ROM drive. Select Yes,
I want to restart my computer now, and then click Finish.
The settings will not take effect if you do not restart the system.
33
2.3 Configuring the TCP/IP Direct Print Utility
Installing the Printer Driver
2.3.2
Setting the Port
After you have created the printer icon in the previous section, configure the
TCP/IP Direct Print Utility port for the printer. The procedure is as follows:
Procedure
1
After starting up your computer, run Windows 98. Click Start, select
Settings and then Printers.
The Printers window is displayed.
2
2
The DocuPrint C1618 printer icon has been added by installation of the
printer driver. Select this added printer icon and click Properties from
the File menu.
The Properties dialog box is displayed.
3
34
Click Add Port in the Details tab.
2.3 Configuring the TCP/IP Direct Print Utility
Select Other, and click FX TCP/IP DPU Port from "Click the type of
port you want to add".
Installing the Printer Driver
4
2
5
Click OK.
The FX TCP/IP Direct Print Utility Port Setup dialog box is displayed.
35
2.3 Configuring the TCP/IP Direct Print Utility
Installing the Printer Driver
2
6
Enter the appropriate value for each item, and click OK.
Example:For port name, "Trans5" and IP address, "129.249.242.179".
Item
Port Name
Remarks
Enter a name of your choice to identify the printer.
When you are adding multiple TCP/IP Direct Print Utility ports, do
not use port names as in the following.
There is no difference between using upper-case and lower-case
characters. Examples of port names that cannot be used (current port
name is "printer"):
●
Adding characters at the end of the current port name.
Example: "printer1", "printer-01" and so forth.
●
Deleting some characters from the current port name.
Example: "prin", "print" and so forth.
IP Address
Enter the IP address of the printer. If the Domain Name
System (DNS) has been installed, the printer host name can
be entered.
Protocol
Select the protocol to be used for data transfer.
Select either of printing protocols (1) or (2) below. The default
selection is (1) LPR.
(1) "LPR": The lpr protocol is used for printing.
Enable or disable the "Validate byte count" option by
selecting or deselecting its check box.
The default selection is enabled (check box selected).
(2) "Raw": Port9100 protocol is used for printing.
You can specify a port number at the destination in "Port
Number". This setting is effective only when Raw protocol
is selected. The default setting is "9100". If the number is
deleted, "9100" appears. You can enter up to 5 digits. If
you enter a number greater than 65536 and click OK,
"9100" is registered.
If you do not know the IP address of the printer, check with your network administrator, or print out
the Printer Settings list. Refer to "8.4.1 Confirming Printer Configuration and Network Settings".
36
2.3 Configuring the TCP/IP Direct Print Utility
On the Details tab of the Properties dialog box, check that "(FX TCP/IP
DPU Port)" appears in "Print to the following port" together with the port
name entered in Step 6.
Installing the Printer Driver
7
2
8
To check the connection, print the test page.
After you have clicked Apply to confirm the settings, click Print Test
Page on the General tab.
A dialog box is displayed to confirm whether or not the test page has been printed correctly.
9
10
Check the print results, and if the test page is printed correctly, click
Yes.
Click OK on the Properties dialog box.
37
Installing the Printer Driver
(Windows NT 4.0/Windows
2000/Windows XP)
Installing the Printer Driver
The procedure for installing the printer driver to Windows NT 4.0/Windows 2000/Windows
XP is as follows. If the printer is used as a network printer, it is assumed that the network
environment client settings of the computer have been completed.
Refer to the Network Print Environment User Guide about installation of the printer driver on Port9100 or IPP port
for Windows 2000/Windows XP.
●
●
2
Before installing the printer driver on a Windows NT 4.0 system, it is necessary to set up TCP/IP Protocol and
Microsoft TCP/IP Printing. Refer to the manuals on Windows NT 4.0 for details.
You can select LPR Port or Standard TCP/IP Port as the output destination for the port on a Windows 2000
system. When you select LPR Port, before installing the printer driver, you are required to set up Print Services
for Unix on Windows 2000. Refer to the manuals on Windows 2000 for details.
Installing the Printer Driver
Procedure
1
Switch on the Printer.
2
Switch on the computer.
Activate Windows NT 4.0 or Windows 2000/Windows XP and log on as a user of the administrator
group or as the administrator.
When the printer is connected to the computer, a dialog box indicating that new hardware has been
detected is displayed when you activate Windows 2000. In this case, click Cancel to close the dialog
box.
3
For NetWare environment, log on to the target file server.
4
Insert the Software Pack CD-ROM into the CD-ROM drive.
The Fuji Xerox StartUp Tool dialog box appears automatically.
If the Fuji Xerox StartUp Tool does not appear automatically, double-click the Instal_e.exe icon in the
CD-ROM. Proceed to Step 6.
38
2.4 (Windows NT 4.0/Windows 2000/Windows XP)
Click Install Language.
The Fuji Xerox Setup Menu is displayed.
6
Click Install Printer Driver.
Installing the Printer Driver
5
2
The Driver Setup dialog box is displayed.
7
Confirm that FX DocuPrint C1618 PCL6 is selected in "Select a model",
then click Install printer driver.
39
2.4 (Windows NT 4.0/Windows 2000/Windows XP)
Installing the Printer Driver
8
Specify the following on the Printer Driver Installation dialog box.
2
Printer settings
Check the optional products that you have purchased and installed.
Make this the default printer
Check the check box if DocuPrint C1618 is to be used as the default printer.
Printer name
Enter a name for the printer, if necessary.
Displays the specified port (for output destination)
Select LPT1: for local printer and proceed to Step 9
If the port to be used is not displayed in the port list for network printer, click Add Port.
The Add Port dialog box is displayed.
Refer to the following sections to select a port suitable for the environment.
40
2.4 (Windows NT 4.0/Windows 2000/Windows XP)
Select Network and click Browse.
From the network list, search and select the printer. The printer will be displayed as
"host name-p" and will be under the host name icon. The factory defaults for the
workgroup name and the host name is "Workgroup" and "FXnnnnnn" (nnnnnn: lower six
digits of the Ethernet address of the printer) respectively.
Installing the Printer Driver
For SMB environment
2
When you do not know the workgroup name and host name of the printer, either check with the
network administrator, or print out the Printer Settings list to confirm. Refer to "8.4.1 Confirming
Printer Configuration and Network Settings".
Click OK.
Check that "\\Host name\\Host name-P" is displayed correctly in "Network Path for the
Printer" in Add Port dialog box and click OK.
Proceed to Step 9 when the Printer Driver Installation dialog box is displayed.
For NetWare environment
Select Network and click Browse.
From the network list, search and select the print queue. The print queue is displayed
under the NetWare File Server icon.
When you do not know the print queue name, check with the network administrator.
Click OK.
Check that "\\NetWare file server name\Print queue name-P" is displayed correctly in
"Network Path for the Printer" in Add Port dialog box and click OK.
Proceed to Step 9 when Printer Driver Installation dialog box is displayed.
41
2.4 (Windows NT 4.0/Windows 2000/Windows XP)
Installing the Printer Driver
2
For TCP/IP environment (Windows NT 4.0)
Select Others and click LPR Port from Available ports.
Click OK.
The Add LPR compatible printer dialog box is displayed.
Enter the items at each text box.
Example: For Name or address of server providing lpd, "129.249.242.179", and the
Name of printer or print queue on that server, "Trans5"
Item
Name or address of
server providing lpd
Remarks
Enter the IP address of the printer. You can enter the
registered printer name when it is possible to use name
solving services like WINS.
When the IP address has numbers with less than three digits, do
not enter "0" before these numbers, e.g.
"XXX.XXX.00X.0XX". It will not work properly.
Name of printer or print
queue on that server
Enter any name for DocuPrint C1618.
When you do not know the IP address of the printer, either check with the network administrator,
or print out the Printer Settings list to confirm. Refer to "8.4.1 Confirming Printer Configuration
and Network Settings".
Click OK. When the Printer Driver Installation dialog box is displayed, proceed to Step 9.
42
2.4 (Windows NT 4.0/Windows 2000/Windows XP)
This section explains the procedure for selecting Standard TCP/IP Port.
Select Others and click Standard TCP/IP Port from Available ports.
Installing the Printer Driver
For TCP/IP environment (Windows 2000/Windows XP)
The following example is for Windows 2000.
2
Click OK.
The following screen is displayed. Click Next.
43
2.4 (Windows NT 4.0/Windows 2000/Windows XP)
Installing the Printer Driver
Enter the items at each text box.
Example: For IP address, "129.249.242.179", and the port name "IP_129.249.242.179".
2
Item
Printer Name or IP
Address
Remarks
Enter the IP address of the printer. You can enter the
registered printer name when it is possible to use name
resolving services like WINS.
When the IP address has numbers with less than three digits, do
not enter "0" before these numbers, e.g.
"XXX.XXX.00X.0XX". It will not work properly.
Port Name
Enter name or IP address of the printer and the name of
port is automatically set. Enter the port name only when
you want to make changes.
When you do not know the IP address of the printer, either check with the network administrator,
or print out the Printer Settings list to confirm. Refer to "8.4.1 Confirming Printer Configuration
and Network Settings".
Click Next.
Check the contents on the screen and click Finish.
When the Printer Driver Installation dialog box is displayed, proceed to Step 9.
9
Confirm that the port name specified in Step 8 for output destination is
shown in the port list box of the Printer Driver Installation dialog box.
Then click Start to install.
The installation begins.
44
2.4 (Windows NT 4.0/Windows 2000/Windows XP)
When the installation is completed, the following dialog box will be
displayed.
Click OK.
.
11
Click Exit.
Installing the Printer Driver
10
2
12
If connected with a USB cable, move on to "2.5 Setting Up the USB
Port". Otherwise, this completes the installation of the printer driver.
Click Exit on the Fuji Xerox Setup Menu dialog box and proceed to the
next section on "Testing Printing".
45
2.4 (Windows NT 4.0/Windows 2000/Windows XP)
Installing the Printer Driver
2
Testing Printing
To check the connection, print the test page.
The procedure is as follows:
Procedure
1
Click Start, select Settings and then Printers.
The Printers window is displayed.
2
The DocuPrint C1618 printer icon has been added by installation of the
printer driver. Select this added printer icon and click Properties from
the File menu.
The Properties dialog box is displayed.
3
Click Print Test Page on the General tab.
A dialog box is displayed to confirm whether or not the test page has been printed correctly.
46
4
Check the print results, and if the test page is printed correctly, click
Yes.
5
Click OK on the Properties dialog box.
Setting Up the USB Port
For Windows 2000 or Windows XP
The following example is for Windows 2000.
Procedure
1
2
3
Check that the computer is on, and then switch off the printer.
Connect the USB cable.
Switch on the printer.
Installing the Printer Driver
When connecting the printer to your computer with a USB cable, do the following
procedures after installing the printer driver.
2
The computer automatically detects the new hardware and installs necessary software. This concludes
setup of the USB port.
4
Check the connection.
Click Start, select Settings and then Printers.
The Printers window is displayed.
5
The DocuPrint C1618 printer icon has been added by installation of the
printer driver. Select this added printer icon and click Properties from
the File menu.
The Properties dialog box is displayed.
6
The USB port now appears in "Print to the following port(s)" on the
Ports tab. Select the USB port and click Apply.
47
2.5 Setting Up the USB Port
Installing the Printer Driver
7
Click Print Test Page on the General tab.
A dialog box to confirm whether or not the test page is printed correctly will be displayed.
8
Check the print results, and if the test page is printed correctly, click
OK.
9
Click OK on the Properties dialog box.
This completes preparations for using the printer.
For Windows 98 or Windows Me
2
The following example is for Windows 98.
■Install the USB Print Utility
Procedure
1
2
If the USB cable is connected, temporarily disconnect it.
Insert the Software Pack CD-ROM into the CD-ROM drive.
The Fuji Xerox StartUp Tool dialog box appears automatically.
3
Click Install Language.
The Fuji Xerox Setup Menu is displayed.
4
5
48
Click CD-ROM reference.
Open the Usb98me folder and double-click the Setup.exe icon.
2.5 Setting Up the USB Port
Confirm that English is selected, then click OK.
The USB Print Utility wizard starts.
7
Click Next.
Installing the Printer Driver
6
2
8
Select Yes, I want to restart my computer now., and then click Finish.
9
After starting up your computer, run Windows 98. Click Start, select
Settings and then Printers.
The Printers window is displayed.
49
2.5 Setting Up the USB Port
Installing the Printer Driver
10
The DocuPrint C1618 printer icon has been added by installation of the
printer driver. Select this added printer icon and click Properties from
the File menu.
The Properties dialog box is displayed.
11
Confirm that "FXUSB: (USB Printer Port)" now appears in "Print to the
following port" on the Details tab.
12
To close the dialog box, click OK.
2
■Connecting the USB cable
To connect the USB cable, refer to the Setup Guide.
■Setting the USB port
Procedure
1
Switch on the printer.
The computer automatically detects the new hardware and installs necessary software.
2
Click Start, select Settings and then Printers.
The Printers window is displayed.
50
2.5 Setting Up the USB Port
Select the DocuPrint C1618 printer icon, then click Properties on the
File menu.
The Properties dialog box is displayed.
4
"FXUSB_x_DocuPrint C1618: (USB Printer Port)" now appears in "Print
to the following port" on the Details tab. Select this port.
In FXUSB_x_ …, a value from 0 to FF appears in the position indicated
by [x]. The value varies according to the environment.
Installing the Printer Driver
3
2
5
To check the connection, print the test page.
After you have clicked Apply to confirm the settings, click Print Test
Page on the General tab.
A dialog box is displayed to confirm whether or not the test page has been printed correctly.
6
Check the print results, and if the test page is printed correctly, click
Yes.
7
Click OK on the Properties dialog box.
51
Chapter
3
Basic Printer Operation
3.1
Printer Part Names and Functions............................................. 54
3.2
Switching On/Off the Power........................................................ 57
3.3
Printing From a Computer .......................................................... 59
3.4
Using Online Help........................................................................ 63
3.5
Canceling Printing ....................................................................... 67
3.6
Changing the Configuration for Options................................... 69
3.7
Printing on Envelopes, Transparencies, and Custom-size
(Long) Paper................................................................................. 71
3.8
Two-sided Printing....................................................................... 79
3.9
Using E-Mail Printing .................................................................. 83
Printer Part Names and
Functions
The names and functions of the various parts of the printer are as follows:
Front View
6
5
7
Basic Printer Operation
3
54
4
8
3
9
2
10
1
11
12
No.
Name
Explanation
1
Paper tray
Load paper here.
2
Bypass tray
Open when manually printing. Use this tray when printing
transparencies or envelopes.
3
Front door
This is the printer's front door. Color has been added in the drawing
above. Open this to remove jammed paper, or to replace the drum
cartridge or transfer roll cartridge.
4
Control panel
Use the buttons and display to control the printer.
5
Face down tray
Printed documents are output here, printed side down.
6
Paper stopper
Lift to prevent paper from spilling out of the face down tray as it is
output.
7
Exhaust grille
Allows internal heat to dissipate. Make sure that the exhaust grilles
are never obstructed.
8
Ventilation intake grille
Allows air to enter the printer to prevent it from overheating. Make
sure that the ventilation intake grilles are never obstructed.
9
Power switch
The printer's power switch. Press "|" to switch on the printer and
"O" to switch it off.
10
Button B
Use button B to open the upper part of the front door.
11
Button A
Use button A to open the whole front door.
12
Paper meter
Use the meter as a guide to refill the paper tray.
3.1 Printer Part Names and Functions
Rear View
19
20
17
21
16
22
15
14
13
No.
Name
Explanation
13
Parallel interface connector
To use the printer locally, connect the parallel cable here.
14
USB interface connector
To use the printer locally, connect the USB cable here.
15
Ethernet interface
connector
To use the printer through a network, connect the Ethernet cable
here.
16
Power cord connector
Connect the power cord here.
17
Exhaust grille
Allows internal heat to dissipate. Make sure that the exhaust
grilles are never obstructed.
18
Toner cartridges
Insert the black, yellow, magenta, and cyan toner cartridges here.
19
Top cover (Face-down
tray)
This is the printer's top cover. Remove it to change the toner
cartridges. The top cover also acts as the printer's face down tray.
Printed documents are output here, printed side down.
Do not use the printer without the top cover.
20
Option slot (for the network
expansion card)
Install the optional network expansion card here.
21
Option slot (for the optional
hard disk)
Install the optional hard disk here.
22
Ventilation intake grille
Allows air to enter the printer to prevent it from overheating. Make
sure that the ventilation intake grilles are never obstructed.
Basic Printer Operation
18
3
55
3.1 Printer Part Names and Functions
Internal View
23
24
25
26
27
Basic Printer Operation
3
<Front door open with button A>
No.
56
Name
<Front door open with button B>
Explanation
23
Transfer roll cartridge
Images formed on the drum surface are transferred to the paper.
Also, it recovers used toner.
24
Drum cartridge
Consists of a light-sensitive drum, developer, and a transfer roller.
Images are initially created as an electrical charge on the surface of
this drum.
25
Paper outlet cover
This is the paper discharge unit. Open it to replace the drum
cartridge.
26
Paper rotator
With two-sided printing, it turns the paper over after the front side
is printed.
27
Fuser cartridge
Uses heat to fuse the toner to the paper.
The fuser unit gets very hot during printing. Do not touch.
Touching the fuser cartridge can cause burns.
Switching On/Off the
Power
3.2.1
Switching On the Power
Follow the procedure below.
Basic Printer Operation
Procedure
1
On the printer's right side, press the
side of the power switch marked "|" to
switch on the printer.
The printer starts.
The printer motors warm up for one or two minutes
when you switch on the printer.
2
"Diagnosing..." appears on the control
panel. When the display changes from
"Please Wait..." to "Ready to Print",
check that the Ready indicator is lit.
3
Ready
When "Please Wait..." is displayed, the printer is
preparing to print. Printing is not possible while this
message is displayed.
If an error message appears on the display, refer to "6.7
When an Error Message Appears on the Control Panel"
and rectify the error as instructed.
57
3.2 Switching On/Off the Power
3.2.2
Switching Off the Power
Follow the procedure below.
Basic Printer Operation
3
Procedure
1
Confirm that "Ready to Print" is
displayed on the control panel.
Ready
Do not switch off the printer in the following situations:
●
When "Data Wait" is displayed on the control panel.
●
When the Ready indicator is blinking.
●
When the Error indicator is lit.
2
On the printer's right side, press the
side of the power switch marked " " to
switch off the printer.
The printer is now off.
58
Ready
Data Wait
Printing From a Computer
This section describes the procedures for printing from computers using the PCL6 printer
driver.
Printing from a Program
Basic Printer Operation
When you install new printer options, you must reconfigure the printer driver to use the options. To confirm or make
settings, refer to "3.6 Changing the Configuration for Options".
3
You can output jobs to the printer from most Windows programs with their Print
command.
The following is a description of printing from Microsoft® Word 97 in Windows®
98.
How to access dialog boxes and their contents various depending on the operating system and
programs you are using. For details, refer to the literature provided with the program you are using.
Procedure
1
On the File menu, click Print.
The Print dialog box appears.
59
3.3 Printing From a Computer
Select this printer in the Name box and click Properties.
3
On the various tabs, make settings for each item as required.
Basic Printer Operation
2
3
●
●
4
For details about the various tabs, refer to Help. For details about how to use Help, refer to "3.4
Using Online Help".
Use the Graphics tab to adjust the image and colors to suit your needs.
When you finish making settings, click OK in the Properties dialog box.
The Properties dialog box closes.
60
3.3 Printing From a Computer
5
In the Print dialog box, select the desired interval in Page range and
click OK.
The data is sent to the printer.
To cancel printing, refer to "3.5 Canceling Printing".
Changing Default Printing Functions
Default printing functions are preset functions in the printer driver properties
dialog box accessed from the Print dialog box. Setting default printing functions
in advance saves you time, because it reduces the number of settings you need
to make every time you print.
Follow the procedure below to change the default printing functions. The
following example is for Windows 98.
Basic Printer Operation
Be careful when removing printed material from the face down tray, as the top cover detaches easily.
3
How to access dialog boxes and their contents various depending on the operating system and
programs you are using. For details, refer to the notes included with this procedure and the literature
provided with your operating system.
Procedure
1
Click Start, select Settings and then Printers.
The Printers window is displayed.
2
Select the appropriate printer and click Properties from the File menu.
The Properties dialog box is displayed.
●
●
●
In Windows 95 and Windows Me, you can open the Properties dialog box the same way as in
Windows 98.
In Windows NT 4.0, click Document Defaults on the File menu and make the settings in the dialog
box that appears.
In Windows 2000 and Windows XP, click Printing Preferences on the File menu and make the
settings in the dialog box that appears.
61
3.3 Printing From a Computer
3
On the various tabs, make settings for each item as required.
Basic Printer Operation
3
For details about the various tabs, refer to Help. For details about how to use Help, refer to "3.4 Using
Online Help".
4
When you finish making settings, click OK in the Properties dialog box.
The default printer functions in the printer driver are now changed.
62
Using Online Help
Help for the printer is provided with the PCL6 printer driver. Refer to Help when you need to
know about printer driver items and settings, or need to check different printing methods
when problems occur.
Keyword
How to Use Help
Printer Driver
Summary
Explanation on Ea
How to Print Job
Help Contains the following:
The Help topics are as follows.
How to Use Help Files
Basic Printer Operation
Wine party
3
How to Use Help
Help Notation
How to Print
Printer Driver
How to Get the Latest Version of the Printer Driver
Trademarks and Abbreviations
Supplementary Information About the Printer Driver
How to Confirm the Printer Driver Version
Summary
DocuPrint C1618 Characteristics
Overview of Printer Driver
63
3.4 Using Online Help
Explanation on Each Tab
Basic Printer Operation
3
64
Paper/Output Tab
Graphics Tab
Watermarks Tab
Fonts Tab
Configuration Tab
Options Tab
User Settings Tab
How to Print Job
Printing on Special Media
Printing on Envelopes
Printing on Glossy Paper
Printing on Transparencies
Inserting Paper Between Transparencies (Transparency Separators)
Duplex Print
Printing on Side 2 (Back) of Special Media
Printing on Side 2 (Back) of Plain Paper
Adjusting Graphics
Specifying the ICC Profile
Setting Color Temperature
Adjusting Color Balance When Printing Color Documents
Adjusting Brightness and Contrast When Printing B/W Documents
Saving Frequently Used Printer Driver Settings
Saving Printer Driver Settings
Using the Retrieved Printer Driver Settings to Print a Job
Printing a Specific Text Repeatedly(Watermark)
Printing a Watermark
Collating/Printing Multiple Sets
Printing Multiple Sets of a Document
Collate
Using This Feature
Using Image Repeat to Print a Job
Printing Multiple Pages of Documents on One Sheet of Paper (Multi-Up
Option)
Using Poster to Print a Job
Using Booklet Creation to Print a Job
Printing on a Output Size Different From the Paper Size
Printing on Non-standard Output Size
Shortening Print Data Transmission Time
Solution to Unacceptable Settings Dialog Box
Placing Banner Sheets Between Jobs
3.4 Using Online Help
Consumables
Replacing the Toner Cartridges, Drum Cartridge and Transfer Roll Cartridge
How to Solve Printing Problems
Nomenclature
Multi-Up
TrueType Fonts
Color Balance
Resolution
Output Color
Black/White
Restore Defaults
Banner Sheet
Printer Fonts
Non-standard Size (Custom Sizes 1-5)
Color Temperature
ICC Profile
Basic Printer Operation
Unable to Print
Poor Print Quality
Paper Jams
Network Related Problems
When an Error Message is Displayed
When a Problem Could Not be Solved
3
65
3.4 Using Online Help
To refer to Help
Open the Properties dialog box and select the tab that contains the item in
question.
The example below is for the Paper/Output tab in Windows 98.
Basic Printer Operation
For details about how to display the Properties dialog box, refer to "3.3 Printing From a Computer" .
To display the description of an item,
( ) click the
button and
( ) click the item whose description
you want to display.
3
To display Help contents,
click
.
To search for an item by keyword,
( ) click the Index tab,
( ) type the keyword(s) you are
searching for, and ( ) click Display.
66
Canceling Printing
This section explains how to cancel printing.
3.5.1
Canceling Printing From the Computer
Print command
1
Cancel printing
2
Cancel printing
Cancel
FX DocuPrint C1618
PCL6
Printer(P) Document(D
) View(V) Help(H)
Document Name
Microsoft Word-
Back
Status
Cancelled
Basic Printer Operation
To cancel printing in Windows, first cancel the print job on the computer, then
cancel printing on the printer's control panel.
3
Procedure
1
Click Start, select Settings and then Printers.
The Printers window is displayed.
2
Double-click the appropriate printer.
3
Click the document that you want to cancel and press the Delete key on
the keyboard.
The printer window is displayed.
Continue to "3.5.2 Canceling Printing at the Control Panel".
67
3.5 Canceling Printing
3.5.2
Canceling Printing at the Control Panel
Basic Printer Operation
Perform this operation to cancel the print data from the printer after canceling the
print command on the computer. Note that the printer finishes printing the current
page. Use the following control panel buttons to cancel printing.
Display (messages appear here)
Power saver
Front Door Release Button
Menu
Ready
Eject
Cancel
Set
Back
Error
3
Cancel/Back button
For details about control panel operations, refer to "5.2 Basic Menu Operation".
Printing
Parallel
Tray 1
(The printer is printing)
Press the Cancel/Back button once.
The printer begins to process the printing cancellation.
Canceling
When the cancellation finishes, the print screen reappears.
Ready to Print
68
(The print screen. The printer is ready to print.)
Changing the
Configuration for Options
Hard disk
Additional
memory
2tray module
Basic Printer Operation
If you add any of the following options to the printer after completing initial set-up, you must
reconfigure the PCL6 printer driver.
● Hard disk
● Additional memory
● 2 tray module
3
For details about how to install options, refer to the Setup Guide or the literature provided with the options. In the
following section, it is assumed that the options are already installed.
Follow the procedure below. The following example is for Windows 98.
Procedure
1
Click Start, select Settings and then Printers.
The Printers window is displayed.
2
Select the appropriate printer and click Properties from the File menu.
The Properties dialog box is displayed.
3
Click the Options tab.
69
3.6 Changing the Configuration for Options
4
Select the options added to the printer and click OK.
Example: With the 2 tray module installed.
Basic Printer Operation
3
70
Select this check box.
Printing on Envelopes,
Transparencies, and Custom-size
(Long) Paper
When frequently printing specialty paper in Windows, we recommend that you register the necessary settings in the
User Settings tab. Registering the settings saves you time, because you do not need to configure the driver each time
you print. For details about the User Settings tab, refer to Help.
3.7.1
Printing on Envelopes
Use the bypass tray to print envelopes.
The envelope sizes listed below are those suitable for use with this printer. Make
sure that the flap is closed, and set the envelopes with the flap facing to the right.
● Com-10
●
Monarch
● C5
●
DL
Basic Printer Operation
If you are printing on special paper, you have to specify the type of paper and image quality
in the PCL6 printer driver when you send a print command from the application software.
Take care when setting envelopes, because setting them incorrectly may result in text being
printed on the wrong side or upside down.
When printing on transparencies or specialty paper, make sure that you set the type of
paper and image quality before sending the print command.
3
Flap
●
●
●
Do not use envelopes that have tape seals. Printing some types of
preglued envelopes may not be possible, depending on the
condition of the adhesive.
Do not use envelopes larger than 88.9 mm wide and 139.7 mm long.
Using poor-quality envelopes can cause creasing and inferior print
quality.
e
or
m
88.9
m
or m m
ore
.7
or
m
m
9
13
The following is an example of how to print the address on an envelope.
Example:
printed like this.
71
3.7 Printing on Envelopes, Transparencies, and Custom-size (Long) Paper
Procedure
Basic Printer Operation
3
1
Adjust the paper guide to the mark
corresponding to the size that you are
about to use.
2
Make sure the flap is closed, then load
the envelope with the side to be printed
facing down and the flap to the right.
3
Launch printing from your program
after setting the envelope in the printer.
Now set the items in "Printer Driver
Settings (for envelopes)" as shown
below:
Printer Driver Settings (for envelopes)
■Windows settings:
Tab
Paper/Output
Item
Value
Output Size
Set Com-10, Monarch, C5, DL or
"Same as Paper Size" (If the original
size is Com-10, Monarch, C5, and
DL)
Turn Image by 180 deg
Clear checkmark
(When the flap is set on the left side,
select this option.)
Paper Source
Bypass
2 Sided Print
1 Sided Print
Paper Type
Envelope
For details about individual printer driver items, refer to Help. For details about how to use Help, refer
to "3.4 Using Online Help".
72
3.7 Printing on Envelopes, Transparencies, and Custom-size (Long) Paper
3.7.2
Printing on Transparencies
Use only the recommended types of transparencies. Do not use any other types, such as color
transparencies (bordered with a white frame).
Using unsuitable transparencies may damage the printer.
Do not use transparencies bordered with a white frame.
Full color
transparencies
Basic Printer Operation
Use the bypass tray to print transparencies.
You can print in color on Fuji Xerox transparencies (XEROX FILM (no border))
using the DocuPrint C1618.
3
Remove each transparency from the face down tray as soon as it is output. When transparencies are
allowed to accumulate in the face down tray, static electricity can build up and cause jams.
Follow the procedure below to print transparencies.
Procedure
1
Adjust the paper guide to the mark
corresponding to the size that you are
about to use.
73
3.7 Printing on Envelopes, Transparencies, and Custom-size (Long) Paper
Fan a few transparencies at a time.
3
Insert the transparencies into the
bypass tray until they lightly touch the
feeding slot.
a
Tr
ns
pa
Basic Printer Operation
2
re
3
4
Launch printing from your program
after loading the transparencies in the
printer.
Now set the items for "Printer Driver
Settings (for transparencies)" as shown
below:
74
y
nc
Do not use full color transparencies. They can jam in the
printer and damage the fuser unit.
3.7 Printing on Envelopes, Transparencies, and Custom-size (Long) Paper
Printer Driver Settings (for transparencies)
■Windows settings:
Tab
Graphics
Value
Output Size
Set A4 or "Same as Paper Size" (if
the original size is A4)
Paper Source
Bypass
2 Sided Print
1 Sided Print
Paper Type
Transparency
Image Types
Transparencies
You can also print transparencies with paper inserted between the sheets. For details about the way to
set paper between the transparencies and the functions of individual printer driver items, refer to Help.
For details about how to use Help, refer to "3.4 Using Online Help".
Basic Printer Operation
Paper/Output
Item
3
75
3.7 Printing on Envelopes, Transparencies, and Custom-size (Long) Paper
3.7.3
Using the bypass tray enables you to print custom-size paper or long paper,
longer than legal portrait (355.6 mm).
The paper sizes suitable for use with this printer are as follows:
● One-sided printing: Width 90–216 mm: Length 139.7–900.0 mm
●
Two-sided printing: Width 90–216 mm: Length 139.7–355.6 mm
Basic Printer Operation
3
Printing Custom-size (Long) Paper
Feeding custom-size paper sideways is not possible. Always feed this type of paper lengthwise.
To print on custom-size paper, you must set the paper size as a user defined
size first.
Setting a User Defined Size
In Windows, you need to set the user defined size using the following procedure
before launching the printing command from a program. The following example
is for Windows 98.
Procedure
1
Click Start, select Settings and then Printers.
The Printers window is displayed.
2
Select the appropriate printer and click Properties from the File menu.
The Properties dialog box is displayed.
76
3.7 Printing on Envelopes, Transparencies, and Custom-size (Long) Paper
3
Click the Configuration tab.
Basic Printer Operation
3
4
Click Custom Paper Size.
The Custom Paper Size dialog box appears.
5
Select one of the five paper sizes.
For details of the Custom Paper Size dialog box settings, refer to Help. For details about how to use
Help, refer to "3.4 Using Online Help".
77
3.7 Printing on Envelopes, Transparencies, and Custom-size (Long) Paper
Basic Printer Operation
3
6
When you finish making the settings, click OK in the Custom Paper
Size dialog box.
7
In the Properties dialog box, click OK.
The user defined size is now set.
How to Print
Follow the steps below to print on custom-size (long) paper.
Procedure
1
Adjust the paper guide to the width of
the paper that you are about to use.
2
With the printed side facing down, set
the paper into the bypass tray so that it
lightly touches the feeding slot.
3
Launch printing from your program
after setting the paper.
Set the items for "Printer Driver
Settings (for Custom-size (Long)
Paper)" as shown below:
When printing on long paper, after giving the print command, support the paper with your hands while
it feeds in the printer.
Printer Driver Settings (for Custom-size (Long) Paper)
■Windows settings:
Tab
Paper/Output
Item
Value
Output Size
Select a setting from Custom 1 to
Custom 5.
(The paper size selected in the
Custom Paper Size dialog box on
the Configuration tab.)
Paper Source
Bypass
For details about individual printer driver items, refer to Help.
For details about how to use Help, refer to "3.4 Using Online Help".
78
Two-sided Printing
For details about the types of paper suitable for two-sided printing, refer to "4.1.1 Suitable Paper".
If you use two-sided printing frequently in Windows, we recommend that you register the necessary settings in the
User Settings tab. Registering the settings saves time, because you do not need to configure the driver each time you
print. For details about the User Settings tab, refer to Help.
Types of Two-sided Printing
Basic Printer Operation
You can use one of the following procedures to do use the printer for two-sided printing.
● For plain paper, whether fed from a paper tray or the bypass tray, two-sided printing is
carried out automatically if you select it in the PCL6 printer driver upon executing the print
command.
● For specialty paper such as envelopes or heavy weight paper, you can print the back
surface of the paper from the bypass tray as long as the front surface of the paper was
printed using this printer.
3
There are two types of two-sided printing: "Flip on Long Edge" and "Flip on Short
Edge". The results of printing with the two types are shown below:
79
3.8 Two-sided Printing
3.8.1
To print on both sides of plain paper, set the paper into the paper tray or bypass
tray.
You can use the following paper sizes for two-sided printing:
● Min. W: 149 mm x L: 210 mm. . . . . Corresponding to A5 size
●
Max. W: 216 mm (8.5 inch) x L: 356 mm (14 inch)
. . . . .Corresponding to 14 inch Legal size
Basic Printer Operation
3
Two-sided Printing
Follow the procedure below to print on both sides of plain paper.
To print on both sides of specialty paper such as envelopes, heavy weight paper, or glossy paper, refer
to "3.8.2 Two-sided Printing on Specialty Paper".
Procedure
1
Set the paper lengthwise into the paper tray or bypass tray.
When printing on both sides of long-sized, plain paper (paper that exceeds 355.6 mm in length), print
one sheet at a time from the bypass tray.
2
Launch printing from your program after setting the paper.
Now set the items for "Printer Driver Settings (for two-sided printing on
plain paper)" as shown below:
Printer Driver Settings (for two-sided printing on plain paper)
■Windows settings:
Tab
Paper/Output
Item
Value
2 Sided Print
"Flip on Long Edge" or "Flip on Short
Edge"
Paper Type
Plain Paper 1 or Plain Paper 2
With custom sizes, it is necessary to configure other items to suit the paper size.
Refer to the previous section or the printer driver Help for details about these settings. For details
about how to use Help, refer to "3.4 Using Online Help".
80
3.8 Two-sided Printing
Two-sided Printing on Specialty Paper
Avoid printing on paper preprinted with another printer, as this can damage the printer.
Set the paper in the bypass tray according the orientation of the original or the
desired binding orientation.
To print like this:
Paper orientation
Basic Printer Operation
Provided the front side of the paper has been printed using the DocuPrint C1618,
you can use the bypass tray to print on the back of the following types of
specialty paper.
●
Heavy weight paper
● Envelopes
● Glossy paper
3
XXXXX
Print side down
To print like this:
Paper orientation
XXXXX
3.8.2
Print side down
To print like this:
Paper orientation
Print side down
To print like this:
Paper orientation
XXXXX
Print side down
means the top of the document.
81
3.8 Two-sided Printing
When printing on the back of specialty paper, make sure that you configure the
items below in the PCL6 printer driver when giving the print command from the
program.
Printer Driver Settings (when printing on side 2 of a printed paper)
Basic Printer Operation
3
82
■Windows settings:
Tab
Paper/Output
Item
Value
Paper Source
Bypass
Paper Type
xxx (Side 2)
(xxx refers to the type of paper)
With custom sizes, it is necessary to configure other items to suit the paper size.
Refer to the previous section or the printer driver Help for details about these settings. For details
about how to use Help, refer to "3.4 Using Online Help".
Using E-Mail Printing
When the printer is connected to a network and has been configured to use TCP/IP
communication and transmission/reception of e-mail, computers can send mail to the
printer.
Mail server
Subject: Information
Date: 2002. 04. 17
To:
From:
Internet
PDF/text file
3.9.1
Basic Printer Operation
Mail sent to the printer is printed, along with any attached documents (PDF files or text files).
This function is called "E-Mail Printing".
3
Configuring the System for E-Mail Printing
In order to use e-mail printing, the servers (such as the SMTP and POP3
servers) in your network need to the set up appropriately.
Consult your system administrator regarding mail-related settings.
You will also need to make the following printer settings using CentreWare
Internet Services.
Item
Setting content
Port start-up
Starts "E-Mail Printing" using SMPT/POP3.
Port setting
(SMTP/POP3)
This is where you make mail system and e-mail printing
settings, such the printer's mail address, the SMTP
server address, the POP3 server address, the POP user
name, and the POP password.
The password used for printing is also set here.
●
●
You can also start up the port from the control panel. For details about starting the port from the
control panel, refer to "1.2.4 Setting the Protocols".
For details about making CentreWare Internet Services settings, refer to the Network Print
Environment User Guide on the CD-ROM provided, or to the CentreWare Internet Services online
help.
The explanations which follow assume that these system settings have already
been made.
83
3.9 Using E-Mail Printing
3.9.2
Basic Printer Operation
3
Transmittable File Attachments
Only the following types of file attachments can be transmitted to the printer.
● PDF files
●
Text (txt) files
When printing text files, select "Yes" for the "Text Print" option of "1: System". By default, the "Text
Print" option is set to "No".
3.9.3
Sending Mail
With e-mail printing, you specify the mail address of the printer using the mail
software installed on your computer.
The following special commands must be included in either the subject line or
the body of the e-mail, and the file to be printed must either be specified in the email, or attached to the e-mail as a PDF or txt file.
Procedures for sending mail vary according to the e-mail software being used. See the instructions
provided with the e-mail software for details.
Specify text as the format for sending e-mail. The e-mail printing function does not support the HTML
format (HTML mail).
When specifying commands in the body of the e-mail
Commands that can be included in the body of the e-mail are as follows.
When commands are included in the body, it does not matter what is included in
the subject line. Indicate any subject desired.
Command
84
Parameter
Explanation
#Password
Password
Be sure to include this command first
if a password for printing has been
set. This command may be omitted if
no password has been set.
#Print
- (none)
Text is printed starting from the line
following the #Print command.
If the e-mail has a file attachment
(PDF or txt), the attached file is
printed.
3.9 Using E-Mail Printing
<Example>
Examples of command description with Outlook Express are shown below. In
these examples, the mail address of the printer is assumed to be
"[email protected]", and the print password is assumed to be "prtuser".
Example 1:When printing text included in the body of the e-mail
Basic Printer Operation
Commands are included in the e-mail according to the following rules.
● No distinction is made between uppercase and lowercase characters.
●
Commands always begin with the "#" symbol, and if a password has been set,
the #Password command is always included at the beginning of the body of the
e-mail.
●
Lines beginning with characters other than "#" are ignored.
● The body of the e-mail may include one command per line, and commands are
delimited from parameters with spaces or tabs.
●
If the same mail includes two or more of the same command, the second and
subsequent instances are ignored.
3
Example 2:When printing an attachment to the e-mail
85
3.9 Using E-Mail Printing
●
●
●
Basic Printer Operation
3
Nothing is printed if there is no text following the #Print command.
Multiple e-mail attachments (PDF or text files) can be printed.
From the control panel, select "Yes" for the "Text Print" option of "1: System". By default, the
"Text Print" option is set to "No".
When Specifying Commands in the Subject Line of the E-Mail
Commands that can be specified in the subject line are as follows.
Command
Explanation
#Print password
If a password for printing has been set, specify it
following #Print, separating the two with a space. If no
password has been set, specify "#Print" by itself.
Example:#Print
#Print prtuser
#Print[password]
If a password for printing has been set, it can also be
specified in brackets following #Print. In this case, do not
include any spaces between "#Print" and the opening
bracket.
Example:#Print[prtuser]
When the #Print command is specified in the subject line of the e-mail, the entire
body of the e-mail is printed, along with any e-mail attachments (PDF or text
files).
However, the body of the e-mail is not printed if the first line of the body is empty
(if it contains only a line return or spaces).
Confirmation Mail Sent by the Printer
Upon receiving mail containing the #Print command, the printer sends e-mail like
the following in response.
This response mail makes it possible for the user to determine whether or not the
print command was successfully submitted.
If the #Print command is specified in the subject line of the e-mail, then the subject line of the
response mail always contains "Re:#Print", regardless of whether or not a password has been
specified.
Subject: Re: test print
Date: Fri, 22 Feb 2002 16:11:39 +0900 (JST)
From: [email protected]
To: [email protected]
[E-Mail Printing]
- Command received.
86
3.9 Using E-Mail Printing
3.9.4
Points to Note When Sending Documents
via E-Mail
Mail is transmitted via the Internet, which is connected to computers all over the
world. Therefore, appropriate security precautions are necessary to prevent
documents from being viewed or altered by third parties.
Accordingly, it is recommended that alternate measures that provide adequate
security be employed when transmitting information of a sensitive nature.
Additionally, to avoid receiving unwanted mail, avoid disclosing the printer's email address to third parties.
Specifying Addresses From Which the Printer Will Accept Mail
The printer can be set to accept mail only from designated addresses. You can
register up to two mail addresses from which the printer will accept mail.
Basic Printer Operation
Precautions Related to Security
3
For details about setting addresses from which the printer will accept mail, refer to the Network Print
Environment User Guide on the CD-ROM provided, or to the CentreWare Internet Services online
help.
87
Chapter
Loading Paper and
Usable Paper Types
4
4.1
Suitable and Unsuitable Paper Types........................................ 90
4.2
Loading Paper.............................................................................. 96
Suitable and Unsuitable
Paper Types
Loading Paper and Usable Paper Types
Using paper that is unsuitable for printing can cause paper jams and deteriorate print
quality. We recommend that you use the types of paper listed below for the best results from
your printer.
4.1.1
Suitable Paper
Suitable Paper Density
When using stationary supplier paper, make sure that it complies with the
following specifications. However, we recommend that you use standard
domestic paper.
Feeding Method
Specifications
Bypass tray
G.S.M.: 60 to 216 g/m2
Tray 1
Trays 2, 3 (optional)
G.S.M.: 60 to 105 g/m2
4
G.S.M. or g/m2 is a measure of the substance of paper expressed in grams per square meter, which
does not depend on the number of sheets in the ream.
Standard Domestic Paper
Standard paper for this printer is defined as follows:
Paper Type
90
Paper Name
Specifications
Plain Paper 1
Fuji Xerox P Paper
(for monochrome printing)
G.S.M.: 64 g/m2
Plain Paper 2
Fuji Xerox J Paper
(for color and one-sided printing)
G.S.M.: 82 g/m2
4.1 Suitable and Unsuitable Paper Types
Specialty Paper
Paper Type
Product
Code
Important
Transparency
(Xerox Film (no borders))
V516
Do not use full color transparencies
(bordered by a white frame).
Labels (A4)
V862
Use label sheets that are uncut with
labels covering the whole sheet.
Envelope
Com-10
●
Monarch
●
C5
●
DL
-
Do not use envelopes that have tape
seals. Printing some types of preglued
envelopes may not be possible,
depending on the condition of the
adhesive.
Heavyweight
(G.S.M: 100 to 216 g/m2)
-
When printing on rigid, heavy weight
paper, the image position may shift.
●
Glossy Paper
Mylar-film
(A4)
157g/m2
●
NK special double-sided art
paper (for two-sided printing)
(A4)
●
V588
V607
When printing on glossy paper, feed the
sheets one by one. Moisture can cause
the sheets to stick together, causing
more than one sheet go through at one
time, which can result in malfunction or
damage.
Loading Paper and Usable Paper Types
You can print the following types of paper from the bypass tray. They are
referred to as specialty paper.
4
91
4.1 Suitable and Unsuitable Paper Types
Paper Trays, Types, and Sizes
Loading Paper and Usable Paper Types
The paper types, sizes, and the maximum number of sheets that you can load in
the different trays are shown in the table below. Load all paper into the printer in
the portrait orientation (lengthwise).
Feeding Method
Bypass tray
4
Paper Type
Plain Paper 1
(60-75g/m2)
Plain Paper 2
(76-99g/m2)
Envelope
Labels
Transparency
(no border)
Heavyweight 1
(100-159g/m2)
Heavyweight 2
(160-216g/m2)
150 sheets
Up to 10 mm
stack
Glossy Paper
1 sheets
Paper longer than
355.6 mm
Tray1
(500 sheets cassette
(bundled or optional))
Trays 2, 3
(2 tray module (optional))
92
Maximum
number of sheets
Plain Paper 1
(60-75g/m2)
Plain Paper 2
(76-99g/m2)
Paper Size
A5
B5
A4
8.5 x 11" (Letter)
8.5 x 14" (Legal)
Envelopes
(Com-10, Monarch, C5, DL)
Custom paper size
(width: 88.9 to 215.9 mm,
length: 139.7 to 900 mm)
●
●
Using low-quality paper can
cause creasing and deteriorate
print quality.
When printing on paper longer
than 355.6 mm, support the
paper with your hands while it
feeds through the printer.
Up to 500 sheets A5
or a 56 mm stack B5
A4
8.5 x 11" (Letter)
8.5 x 14" (Legal)
For A5 portrait,
you can use up to
350 sheets or a 40
mm stack.
4.1 Suitable and Unsuitable Paper Types
Portrait
orientation
Feed direction
Length
The illustrations below provide a description of width and length mentioned in the table above.
Width
Types and Sizes of Paper Usable for Two-sided Printing
You can use this printer to print on both sides of the paper.
Use Fuji Xerox JD paper for two-sided printing when printing high-resolution, color images.
■ Automatic Two-sided Printing
Loading Paper and Usable Paper Types
The number of sheets that you can load varies according to paper thickness.
4
For automatic two-sided printing, select "2 Sided Print" in the printer driver's
Properties dialog box before executing the print command.
You can use the following paper types and sizes for two-sided printing:
Paper Type
Plain Paper
(G.S.M: 64 to 99 g/m2)
Paper Size
A5
B5
A4
8.5 x 11" (Letter)
8.5 x 14" (Legal)
■ Manual Two-sided Printing with the Bypass Tray
To print on both sides of the following types of specialty paper, print the front side
first, then load the sheets into the bypass tray to print the back side.
Do not print the back side of sheets whose front side was printed using a printer other than the
DocuPrint C1618.
Paper Type
Heavyweight (G.S.M.: 100 to 216 g/m2)
Envelope
Glossy Paper
93
4.1 Suitable and Unsuitable Paper Types
4.1.2
Loading Paper and Usable Paper Types
4
Unsuitable Paper
Avoid using the following paper types as they can cause paper jams or damage
the printer.
● Transparencies other than those
recommended. (Fuji Xerox Full Color
transparencies or other.)
● Inkjet paper
● Paper that is too thick or too thin
● Paper with a face preprinted with
another printer or copier, or paper
Full color
Inkjet paper
transparencies
preprinted with ink
● Folded, creased, or torn paper
● Damp or wet paper
● Curled or warped paper
● Sheets affected by static electricity
● Layered or adhesive paper
● Specially glossy paper
● Colored paper with a treated surface
● Paper printed with ink that cannot withstand temperatures of 155°C.
● Heat-sensitive paper
● Carbon paper
● Paper with a rough surface such as textured or fiber form paper
● Acidic paper that can cause the characters
to fade over time. Use neutral paper.
● Envelopes with a rough surface or clips
attached
● Paper with staples, paper clips, tape, or
ribbons attached
● Envelopes with sticky adhesive
● Labels whose backing is visible or are
Paper with tape attached
precut.
Shiny backing
paper visible
●
●
94
Precut label
sheets
T-shirt transfer paper (heat press use)
Transfer paper (cold water use)
4.1 Suitable and Unsuitable Paper Types
●
●
●
4.1.3
Storing Paper
Failure to properly store paper can result in paper jams, impaired print quality, or
damage to the printer. Store paper under the following conditions:
● Temperature
10 to 30°C
● Relative Humidity
30 to 65 %
● In a dry place
● After opening the package, wrap unused sheets in their original package and
store in a cabinet or other dry place.
● Store paper on a flat surface. Do not lean paper against other objects or place
it in an upright position.
● Avoid storing paper in way that may cause creasing, folding, or curling.
● Store paper away from direct sunlight.
Loading Paper and Usable Paper Types
●
Opaque film
Digital coated glossy paper
Adhesive paper (transparent, colorless)
Paper with holes
4
95
Loading Paper
Refer to the appropriate section below to load or change paper.
Loading Paper and Usable Paper Types
4
"4.2.1 Loading Paper
in the Paper Tray"
"4.2.2 Loading A5 Paper
in the Paper Tray/
Changing From A5 to
Another Paper Size"
Tran
s
pare
ncie
s
"4.2.3 Loading Paper
in the Bypass Tray"
For more information about suitable paper types, refer to "4.1 Suitable and Unsuitable Paper Types".
4.2.1
Loading Paper in the Paper Tray
Follow the procedure below to load paper into the paper tray.
Load paper into the optional 2 tray module the same way.
To load A5 paper or change to a paper size other than A5, you need to install or
remove the A5 spacer. To install or remove the A5 spacer, refer to "4.2.2
Loading A5 Paper in the Paper Tray/Changing From A5 to Another Paper Size".
Procedure
1
96
Gently pull out the paper tray until it
stops.
4.2 Loading Paper
2
Place the tray on a flat surface.
3
Move the side paper guides to their
outermost positions.
4
Gently lift the end paper guide to move
it, and insert the pins at the bottom of
the guide in the holes (indicated by the
mark) corresponding to the paper
size that you want to load.
Loading Paper and Usable Paper Types
Hold the tray with both hands, lift the
front slightly and pull it completely out
of the printer.
4
Make sure that the end guide is properly inserted into the
appropriate holes for the paper size.
Even small movement of the end paper guide can make
automatic paper size detection impossible. If this occurs,
move the end paper guide all the way to its outermost
position again, then realign it with the appropriate paper
size mark.
97
4.2 Loading Paper
5
Loading Paper and Usable Paper Types
Align the four corners of the paper
stack and insert the paper (print side
up) under the tabs.
●
●
●
6
Align the side guides with the edges of
the paper.
●
●
4
Do not use paper that is folded, creased, or heavily
warped.
Make sure that all the paper is under the tabs.
Do not overload the paper tray.
Pushing the paper guides too hard against the edges
of the paper stack can cause a paper jam. However, if
the paper guides are too loose, the paper may twist as
it feeds through the printer.
Particularly, when setting A4 size paper, set the
gradation correctly to A4 so that it is not mistaken for
letter size.
7
Hold the paper tray with both hands,
align it with the opening in the printer
and gently insert it.
8
Push the paper tray completely back
into the printer.
Do not use excessive force on the paper tray. Doing so
could damage the paper tray or the inside of the printer.
98
Paper loading limit
4.2 Loading Paper
9
When printing A4 or Letter size paper,
lift the stopper on the top cover.
Loading Paper and Usable Paper Types
There is an indicator next to the paper tray that tells you
how much paper remains in the tray. Use this meter as a
guide to refill the paper tray.
4
99
4.2 Loading Paper
4.2.2
Loading Paper and Usable Paper Types
Loading A5 Paper in the Paper Tray/
Changing From A5 to Another Paper Size
Loading A5 Paper
Follow the procedure below to load A5 paper into the paper tray.
Load paper into the optional 2 tray module the same way.
Procedure
1
Gently pull out the paper tray until it
stops.
2
Hold the tray with both hands, lift the
front slightly and pull it completely out
of the printer.
4
Place the tray on a flat surface.
3
100
Move the side paper guides to their
outermost positions.
4.2 Loading Paper
4
Make sure that the end guide is properly inserted into
the holes for the paper size.
Only a small amount of movement of the end paper
guide can make automatic paper size detection
impossible. If this occurs, move the end paper guide all
the way to its outermost position again, then realign it
with the appropriate paper size mark.
5
Grip the A5 spacer, gently lift it up
while pulling it forward and remove it
from the tray.
Loading Paper and Usable Paper Types
Gently lift the end paper guide to move
it, and insert the pins at the bottom of
the guide in the holes (indicated by the
mark) corresponding to the paper
size that you want to load.
4
6
Align the A5 spacer with the paper
guide slot and push it down until it
clicks.
7
Align the four corners of the paper
stack and insert the paper (print side
up) under the tab.
●
●
●
Do not use paper that is folded, creased, or heavily
warped.
Make sure that all the paper is under the tab.
Do not overload the paper tray.
101
4.2 Loading Paper
8
Loading Paper and Usable Paper Types
Align the side guides with the edges of
the paper.
9
4
10 Push the paper tray completely back
Pushing the paper guides too hard against the edges of
the paper stack can cause a paper jam. However, if the
paper guides are too loose, the paper may twist as it
feeds through the printer.
Hold the paper tray with both hands,
align it with the opening in the printer
and gently insert it.
into the printer.
Do not use excessive force on the paper tray. Doing so
could damage the paper tray or the inside of the printer.
There is an indicator next to the paper tray that tells you
how much paper remains in the tray. Use this meter as a
guide to refill the paper tray.
102
4.2 Loading Paper
Changing From A5 to Another Paper Size
Load paper into the optional 2 tray module the same way.
Procedure
1
Gently pull out the paper tray until it
stops.
2
Hold the tray with both hands, lift the
front slightly and pull it completely out
of the printer.
Loading Paper and Usable Paper Types
Follow the procedure below to remove the A5 spacer and load a different paper
size into the paper tray.
4
Place the tray on a flat surface.
3
Move the side guides to their
outermost positions and remove the
paper from the tray.
103
4.2 Loading Paper
Loading Paper and Usable Paper Types
4
4
Grip the A5 spacer, gently lift it up
while pulling it forward and remove it
from its position next to the paper
guide.
5
Insert the A5 spacer into its storage
slot in the paper tray.
6
Gently lift the end paper guide to move
it, and insert the pins at the bottom of
the guide in the holes (indicated by the
mark) corresponding to the paper
size that you want to load.
Make sure that the end guide is properly inserted into
the holes for the paper size.
Even small movement of the end paper guide can make
automatic paper size detection impossible. If this occurs,
move the end paper guide all the way to its outermost
position again, then realign it with the appropriate paper
size mark.
104
4.2 Loading Paper
7
●
●
●
8
Do not use paper that is folded, creased, or heavily
warped.
Make sure that all the paper is under the tabs.
Do not overload the paper tray.
Align the side guides with the edges of
the paper.
●
●
Pushing the paper guides too hard against the edges
of the paper stack can cause a paper jam. However, if
the paper guides are too loose, the paper may twist as
it feeds through the printer.
Particularly, when setting A4 size paper, set the
gradation correctly to A4 so that it is not mistaken for
letter size.
9
Hold the paper tray with both hands,
align it with the opening in the printer
and gently insert it.
10
Push the paper tray completely back
into the printer.
Paper loading limit
Loading Paper and Usable Paper Types
Align the four corners of the paper
stack and insert the paper (print side
up) under the tabs.
4
Do not use excessive force on the paper tray. Doing so
could damage the paper tray or the inside of the printer.
105
4.2 Loading Paper
Loading Paper and Usable Paper Types
4
106
There is an indicator next to the paper tray that tells you
how much paper remains in the tray. Use this meter as a
guide to refill the paper tray.
11
When printing A4 or Letter size paper,
lift the stopper on the top cover.
4.2 Loading Paper
4.2.3
Loading Paper in the Bypass Tray
Set a different size of paper at the same time. Do not add new paper while paper remains in the bypass
tray. This can be the cause of paper jams.
Procedure
1
If retracted, open the tray.
To avoid damage to the tray, do not use excessive force
or place heavy objects on the tray.
2
Loading Paper and Usable Paper Types
Follow the procedure below to load paper into the bypass tray.
4
Adjust the paper guide to the mark
corresponding to the size that you are
about to use.
When printing on long paper, pull out the tray
extension. Printing long paper with the tray extension
retracted can cause the paper to spill out of the tray or
make feeding impossible.
107
4.2 Loading Paper
3
Loading Paper and Usable Paper Types
When using media such as
transparencies, labels, or envelopes,
fan the stack before loading so that
there is air between the sheets.
Fanning the stack helps prevent paper jams caused when
more than one sheet feeds at the same time.
●
●
4
4
Align the four corners of the paper
stack and insert it (print side down)
until it lightly touches the feeding slot.
●
●
●
5
Do not fan plain paper before loading.
When paper is poorly cut and the edges are not clean,
remove any unsuitable sheets before loading the
paper.
Do not use paper that is folded, creased, or heavily
warped.
Do not overload the paper tray.
When printing on sheets longer than Legal paper
(355.6 mm), load the sheets one by one. Moisture can
cause the sheets to stick together, causing more than
one sheet go through at one time, which can result in
malfunction or damage. When feeding long paper,
support the sheet with your hands to ensure proper
feeding.
When loading paper, carefully align the
paper guides with the edges of the
paper so that there is a small gap
between the paper stack and the
guides.
Pushing the paper guides too hard
against the edge of the paper stack can
warp the paper and cause paper jams.
Load the paper so that it is straight in
the tray.
If the paper is not loaded correctly, the printing position
may shift and cause incorrect printing.
108
Chapter
5
Control Panel
5.1
Control Panel Part Names and Functions ............................... 110
5.2
Basic Menu Operation............................................................... 113
5.3
List of Menu Items ..................................................................... 117
Control Panel Part Names
and Functions
The control panel consists of indicators, a display, and buttons. This section describes the
names and functions of the control panel's parts.
Display
Power saver
Front Door Release Button
Menu
Ready
Control Panel
5
Set
Back
Buttons
LED Indicators
The LED indicators are on, blinking, or off to indicate the status of the printer.
Name
Ready indicator
Explanation
Green:
On:
Blinking:
Off:
Error indicator
Red:
On:
Blinking:
Off:
A indicator
B indicator
110
Cancel
Error
Indicators
5.1.1
Eject
Indicates the printing status.
Printing is possible. Also, this lights when the printer is
not receiving print data while processing the print job.
The printer is receiving print data.
Printing is not possible.
Indicates an error.
Indicates a paper jam or other problem that the user
can rectify.
There is a problem that the user cannot rectify.
Contact your Fuji Xerox or dealers.
The printer is functioning normally.
Indicates what buttons to press to open the front door to clear
paper jams.
On:
Press the button indicated and open the front door.
Off:
The printer is functioning normally.
5.1 Control Panel Part Names and Functions
5.1.2
Display
Displays printer status (print screen) and menus for configuring the printer (menu
screen).
The items displayed differ depending on printer settings and installed options.
Print Screen
When the printer is waiting for data or printing, this screen is displayed. The
contents of the print screen are as follows.
Printer status
Input port
Name
Tray 1
Paper tray
Explanation
Printer status
Shows the printer status.
Example:"Please Wait...", "Printing", "Ready to Print".
Input port
Shows the port through which the printer is receiving data.
Example:"Parallel", "USB", "LPD", "NetWare".
Paper tray
Shows the paper tray in use.
Example:"Tray 1", "Tray 2", "Tray 3", "Bypass".
Control Panel
Printing
Parallel
5
Menu Screen
Use this screen to configure the printer.
The menu screen appears when you press the Menu button. The first screen
displayed contains the following:
Menu
1:System
For details about the menu screen, refer to "5.2 Basic Menu Operation".
111
5.1 Control Panel Part Names and Functions
5.1.3
Buttons
There are eight buttons on the control panel.
Their functions depend on the screen displayed. The functions are as follows:
Menu
Name
Control Panel
112
Cancel
Set
Back
Power saver
Print screen
Menu screen
Switches to the menu screen.
Closes the menu screen and
switches to the print screen.
buttons
-
Allows you to scroll through
menus and menu items.
buttons
-
Switches to different menu
levels and moves the cursor
between parameters.
Pressing the
button in a
menu moves the menu one
level down. Pressing the
button moves the menu one
level up.
Set/Eject button
Forces the remaining print
data to be output. For details
about this function, refer to
"6.9 Forcing the Printer to
Print Remaining Data (When
Printing is Halted)"
Selects menus and menu
items. Moves the menu one
level down when a menu is
selected. Sets a parameter
when one is displayed.
Cancel/Back button
Cancels printing. For details
about this function, refer to
"3.5 Canceling Printing".
Moves the displayed menu
one level up.
Power saver button
Releases the printer from
power saver mode 2.
Menu button
5
Eject
-
Basic Menu Operation
This section describes how to use the menu screen to set the power saver modes, job
timeout, network settings, and printer configuration.
5.2.1
Configuration of Basic Menu and Basic
Operations
The menu screen contains the following main menus.
For details about individual menu screens, refer to "5.3 List of Menu Items".
Menu
Content
Used to configure the power saver modes, job log settings,
and basic printer operation.
2: Maintenance
Use this to initialize the NV memory or adjust plain paper
quality settings. You can also make security settings to
restrict access to certain menus.
3: Parallel
Use this to configure the parallel interface.
4: Report/List
Use this menu to print the Printer Settings, Panel Settings,
PCL6 Fonts List, and Job History Report.
5: Network
Use this to make network settings.
6: PDF Bridge
Settings related to the PDF Direct Printing Function
Control Panel
1: System
5
Please note that each menu has several levels. Configure the printer by
selecting the different levels and setting the items therein.
113
5.2 Basic Menu Operation
Example of Menu Levels and Basic Operations
To configure the printer, press the buttons described below to display and
change the level of individual menus.
For the general operational procedure, refer to "5.2.3 Example Operation".
Print screen (the printer is ready to print)
Press the Menu button to change screens.
The Menu button does not change the screen while the
printer is printing or when there is an error.
Menu screen
Control Panel
5
To select a menu or item and move to the next level,
press the Set/Eject or
button.
To go back to the preceding level, press the Cancel/Back
or
button once.
(Level 1) Main Menu
Menu
1:System
(Level 2) Submenu
1:System
Power Save Timer
(Level 3) Item
Use the
and
buttons to move between
menus and items.
Power Save Timer
Mode 1
(Level 4) Parameter
Mode 1
3min.
*
To set a parameter, press the
Set/Eject button.
Pressing the Cancel/Back or
button returns you to the preceding menu or item. Once you set a
parameter with the Set/Eject button ("*" appears next to the set parameter), you cannot return to the
button.
original settings even if you press the Cancel/Back or
Some menus only have three levels. (They do not contain items.)
114
5.2 Basic Menu Operation
Resetting the Printer (to defaults)
Press the
and
buttons simultaneously.
Job Time-Out
60sec.
*
Press the and
buttons simultaneously.
The following screen appears.
Settings Reset
to Defaults
When processing finishes, the default settings appear.
Job Time-Out
300sec.
*
Job Time-Out
300sec.
5.2.2
*
What to Do if You Make a Mistake
Control Panel
Press the Set/Eject button. The parameters are now set.
5
Perform the appropriate operation below if you accidentally push a wrong button
while using the control panel.
You accidentally pressed the Set/Eject button, but you want to
return to the preceding screen.
Press the Cancel/Back or
button.
You accidentally pressed the
the preceding screen.
Press the
button, but you want to return to
button.
You made a mistake and cannot display the preceding screen.
Press the Menu button and remake the settings.
You accidentally pressed the Set/Eject button and set the wrong
parameter.
When the parameter is set, "*" appears next to it.
When "*" appears next to a parameter, pressing the Cancel/Back or
button
does not return to the preceding screen. Remake that particular setting.
115
5.2 Basic Menu Operation
5.2.3
Example Operation
To illustrate operation, this section describes the necessary procedure to set
"Job Time-Out" to "60 sec." on the "1:System" menu.
Ready to Print
(The Print screen. The printer is ready to print.)
Press the Menu button.
Menu
1:System
(The Menu screen)
Press the Set/Eject or
Control Panel
5
The printer cannot print when
you access the menu screen.
button. The first level submenus appear.
1:System
Power Save Timer
Press the
button until the desired submenu appears.
1:System
Job Time-Out
Press the Set/Eject or
button. The next sublevel appears.
Job Time-Out
300sec.
*
Press the
or
desired value.
Job Time-Out
60sec.
A " " appears next to parameters
that*are currently set.
buttons to set the parameter to the
*
Press the Set/Eject button. The parameter is now set.
Job Time-Out
60sec.
*
When the value is set,
a " " appears next to it.
*
Press the Menu button.
The menu screen closes and the print screen reappears.
116
List of Menu Items
The section describes the various modifiable items of each main menu.
It is possible to set some items of the menu screens from your computer when you print. If the computer settings
differ from those on the printer, the computer settings take precedence.
Default refers to the factory settings of the printer.
5.3.1
System
Used to configure the power saver modes, job log settings, and basic printer
operation.
Power Save Timer
Control Panel
The power saver mode is a function that reduces the electricity consumption of the
printer when it is idle. The power saver mode has two modes. Power saver mode 1
partially reduces the power consumption of certain parts of the printer. Power
saver mode 2 reduces consumption even more by turning off specific parts of the
printer completely.
When the printer is in power saver mode 1, "Ready/Standby" appears on the
display. When in this state, the printer takes slightly more time than usual to start
printing when it receives data.
When the printer is in power saver mode 2, the Power saver button is lit. When
the printer receives data while in this state, it takes more time than in power
saver mode 1 for the printer to begin printing.
The following offers an example of the possible delays before the printer goes
into each power saver mode.
Example: "Power Save Timer Mode 1" is set to 30 minutes. "Power Save Timer
Mode 2" is set to 60 minutes.
5
Power consumption
Switch to power saver mode 1
Switch to power saver mode 2
Elapsed time (in minutes)
If the "Power Saver Mode" is set to "Disabled", the printer does not go into that power saver mode.
117
5.3 List of Menu Items
The table below describes the situations when the printer is released from the power saver modes. By
default, "Power Saver Mode 2" is "Disabled". The printer does not switch to power saver mode 2
unless you set it to do so.
When an optional network expansion card is installed, the printer will not switch to power saver mode
2.
Release from power saver mode 1
●
●
●
Control Panel
5
When receiving print data.
When printing a report or list with "4:
Report/List".
When the menu screen is quit
●
Release from power saver mode 2
(When the optional network expansion card is not installed)
●
●
●
When pressing the Power saver button on the control
panel.
When receiving print data via the network.
When accessing the printer via the network.
●
When accessing the printer via the network utility.
●
When searching for the printer with CentreWare Internet
Services.
●
When accessing the printer with CentreWare Simple
Status Notification.
●
When the computer accesses the printer via the network.
Mode 1 (default: 3 minutes)
Set a time between 1 and 120 minutes. The printer automatically goes into power saver mode 1
when it is idle for the duration set here.
●
Mode 2 (default: 5 minutes)
Set a time between 5 and 120 minutes. The printer automatically goes into power saver mode 2 after
being in power saver mode 1 for the duration set here.
"Mode 2" is not displayed when an optional network expansion card is installed.
Power Saver
Set this for each mode to determine if the printer goes into power saver mode.
The printer does not go into power saver mode when it is "Disabled".
●
Mode 1 (default: Enabled)
●
Mode 2 (default: Disabled)
"Mode 2" is not displayed when an optional network expansion card is installed.
118
5.3 List of Menu Items
Error Alarm
This allows you to set if the printer sounds an alarm or not when an error occurs.
●
No
"No" means that the printer does not sound an alarm when an error occurs.
●
Yes (default)
"Yes" means that the printer sounds an alarm when an error occurs.
It is not possible to adjust the volume of the alarm.
Job Time-Out
When printing from Windows, if the job timeout settings differ from the printer driver settings, the
printer driver settings take priority. The printer driver is set to Off as the default setting. Also, when
using the direct print function to print a PDF file, job timeout processing does not occur.
●
5 to 300 seconds (default: 300 seconds)
Set the job timeout between 5 and 300 seconds.
●
Off
Control Panel
The job timeout function causes the printer to stop processing print data when it
takes more than a certain set time.
When a job timeout occurs, the printer only prints the data it received up to the
timeout.
5
Deactivates the job timeout function.
Auto Log Print
Set this to print logs automatically.
This item cannot be set during printing.
You can also print the logs using "4:Reports/List" menu.
●
No (default)
The printer does not print logs automatically.
●
Yes
The printer automatically prints a log after 22 print jobs.
119
5.3 List of Menu Items
ID Print
Use this to print the user ID in a particular location.
●
Off (default)
●
Top Left
●
Top Right
●
Bottom Left
●
Bottom Right
Text Print
Set this for the printer to print data other than the supported PDL data as text.
Text data is printed on A4 paper. Set the A4 paper lengthwise into the paper tray.
Control Panel
5
●
Yes
The data is printed as text.
●
No (default)
Data is not printed as text.
5.3.2
Maintenance
Use this to initialize the NV memory or adjust plain paper quality settings. You
can also make security settings to restrict access to certain menus.
Init NVM
Initialize the memory card's non-volatile memory.
The non-volatile memory stores configuration data, even when the printer is off.
This item cannot be set during printing.
●
Yes
Initialize the memory card's non-volatile memory. Initializing the NV memory restores all the items
of the control panel menus to their defaults.
You must restart the printer for this setting to take effect. After configuring items, be sure to restart
the printer.
●
No
Does not initialize the NV memory and returns to the menu.
120
5.3 List of Menu Items
Security
When necessary, you can set a password to limit access to menus. This helps
prevent items from being changed accidentally.
●
Panel Lock (default: No)
Select "Yes" to set a password.
●
Change Password
Set a four-digit password.
By default the password is "0000".
If you forget the password, select "Yes" in "Init NVM" in "2:Maintenance", and then press the
and
and Set/Eject buttons simultaneously. This resets the password to the default.
Paper Density
●
Plain Paper 1
(default: Light 60–75g/m2)
Set plain paper 1 to "Light 60–75g/m2" or "Heavy 65–80g/m2".
●
Plain Paper 2
(default: Light 76–99g/m2)
Set plain paper 2 to "Light 76–99g/m2" or "Heavy85–105g/m2".
ColorRegiCorrect
Use this to print the color registration adjustment chart. After setting up or
moving the printer, print the Color Registration Correction Chart and adjust the
color registration to ensure that colors are correctly aligned when printed.
Control Panel
Use this to adjust the paper quality settings.
5
The Color Registration Correction Chart is printed on A4 paper. Set the A4 paper lengthwise into the
paper tray.
For details about this operation, refer to "1.1 Adjusting Color Registration".
121
5.3 List of Menu Items
5.3.3
Parallel
Use this to configure the parallel interface.
ECP
Use this to configure the ECP communication mode of the parallel interface.
●
Enabled (default)
The printer receives data in ECP mode.
●
Disabled
The printer does not receive data in ECP mode.
5.3.4
Control Panel
5
Report/List
Use this to print the various reports and lists.
Reports and lists are printed on A4 paper. Set the A4 paper lengthwise into the paper tray.
Printer Settings
This is a list of the hardware installed and detailed configuration.
For an example of the Printer Settings, refer to "8.4.1 Confirming Printer Configuration and Network
Settings".
Panel Settings
This is a detailed list of all the settings in the control panel menus.
PCL6 Fonts List
This is a list of the available PCL6 data fonts.
Job History
This is a detailed list of the processed print jobs (maximum 22). Use this list to
confirm that jobs were printed correctly.
For an example of the Job History Report, refer to "8.4.2 Checking the Print Log".
122
5.3 List of Menu Items
5.3.5
Network
Use this to make network settings. Some network settings are only displayed
when an optional network expansion card is installed.
●
●
It is not possible to set items in this menu while printing.
You must restart the printer for this setting to take effect. After configuring items, be sure to restart
the printer.
Ethernet
Use this to set Ethernet communication speed and mode.
●
Auto (default)
10Base-T Half, 10Base-T Full, 100Base-TX Half, or 100Base-TX Full is selected automatically.
10Base/Half
●
10Base/Full
●
100Base/Half
●
100Base/Full
TCP/IP
Use this to make TCP/IP settings. This menu contains the following:
●
IP Address Setup
Control Panel
●
5
Select the how to obtain an IP address. Parameters are as follows:
DHCP (default)
The IP address is obtained from a DHCP server on the network.
Panel
Use this to set the IP address from the control panel.
123
5.3 List of Menu Items
●
IP Address
Use this to set the IP address.
aaa.bbb.ccc.ddd
Set aaa, bbb, ccc, and ddd between 0 and 255.
You cannot use the following:
224–225.xxx.xxx.xxx
127.xxx.xxx.xxx
The IP address cannot be set when DHCP is set in the "IP Address Setup". To set, set the "IP
Address Setup" to "Panel".
●
IP addresses are managed throughout the system as a whole. Specifying the wrong IP address can
affect the entire network. Before setting an IP address, consult your system administrator.
●
●
Subnet Mask
Control Panel
Use this to set the subnet mask address.
aaa.bbb.ccc.ddd
Use 0,128, 192, 224, 240, 248, 252, 254, or 255 for aaa, bbb, ccc, and ddd.
●
Gateway Address
Use this to set the gateway address.
aaa.bbb.ccc.ddd
5
Set aaa, bbb, ccc, and ddd between 0 and 255.
You cannot use the following:
224-225.xxx.xxx.xxx
127.xxx.xxx.xxx
IPX Frame Type
Set a frame type when you use the printer in an IPX/SPX (NetWare)
environment.
This menu is only appears when an optional network expansion card is installed.
●
Auto (default)
Sets the frame type automatically.
124
5.3 List of Menu Items
●
802.3
Set this to use IEEE 802.3 frame type.
●
802.2
Set this to use IEEE 802.3/802.2 frame types.
●
SNAP
Set this to use IEEE 802.3/802.2/SNAP frame types.
●
Ethernet-II
Set this to use Ethernet-II frame type.
Protocol
Set "Enabled" or "Disabled" for each item activate or deactivate them.
The items below marked with a "*" are only displayed when an optional network expansion card is
installed.
LPD (default: Enabled)
When using TCP/IP, set "LDP" to "Enabled" to print with LPD (LPR) or to "Disabled" if you do not
want to use this feature.
●
Port9100 (default: Enabled)
When using TCP/IP, set "Port9100" to "Enabled" to print with port 9100 (Raw Data Socket) or to
"Disabled" if you do not want to use this feature.
●
IPP (default: Enabled)
Control Panel
●
5
When using TCP/IP, set "IPP" to "Enabled" to print with IPP (Internet Printing Protocol) or to
"Disabled" if you do not want to use this feature. Available with Windows 2000, Windows XP, and
Windows Me.
●
SMB TCP/IP (default: Enabled)*
When using SMB (Windows network) with TCP/IP as the transport protocol, set "SMB TCP/IP" to
"Enabled" to print using SMB or to "Disabled" if you do not want to use this feature.
●
SMB NetBEUI (default: Enabled)*
When using SMB (Windows network) with NetBEUI as the transport protocol, set "SMB NetBEUI"
to "Enabled" to print using SMB or to "Disabled" if you do not want to use this feature.
●
NetWare (default: Enabled)*
"NetWare" to "Enabled" to print in a NetWare system or to "Disabled" if you do not want to use this
feature.
●
FTP (default: Disabled)
When using TCP/IP, set "FTP" to "Enabled" to print with FTP (File Transfer Protocol) or to
"Disabled" if you do not want to use this feature.
●
SNMP UDP/IP (default: Enabled)
When using TCP/IP, set "SNMP UPD/IP" to "Enabled" to use the SNMP Agent function or to
"Disabled" if you do not want to use this feature.
125
5.3 List of Menu Items
●
SNMP IPX (default: Enabled)*
In a NetWare environment, set "SNMP IPX" to "Enabled" to use the SNMP Agent function or to
"Disabled" if you do not want to use this feature.
●
Status Messenger (default: Disabled)
When using TCP/IP, set "Status Messenger" to "Enabled" to use the printer's e-mail management
function through an SMPT/POP3 server or to "Disabled" if you do not want to use this feature.
●
E-Mail Printing (default: Disabled)
Select "Enabled" if you will use e-mail printing through an SMTP/POP server in a TCP/IP system;
otherwise, select "Disabled".
●
Internet Services (default: Enabled)
Set to "Enabled" to use CentreWare Internet Services or to "Disabled" if you do not want to use this
feature.
IP Filter
Control Panel
5
Use this to block the reception of data from certain locations.
To block a particular IP address, specify the IP address in "Filter X Address" (X is
a number between 1 and 5) and the subnet mask in "Filter X Mask" as numbers
between 0 and 255. For the set address, select "Off" (default), "Reject", or
"Accept" from "Filter X Mode".
You can filter up to 5 addresses. "Filter 1" takes priority over the other filters.
Therefore, when setting filters for a number of addresses, assign the addresses
in ascending ranges from "Filter 1" to "Filter 5".
●
●
126
You can also perform IP filter settings with CentreWare Internet Services and Network Utilities.
For a detailed example of these settings, refer to the Network Print Environment User Guide on the
provided CD-ROM.
For more information about CentreWare Internet Services, refer to "8.5 Confirming Printer Status
from Your Computer".
●
Filter 1
●
Filter 2
●
Filter 3
●
Filter 4
●
Filter 5
5.3 List of Menu Items
Init NVM
This initializes the non-volatile memory of the network card.
The non-volatile memory stores configuration data, even when the printer is off.
This item cannot be set during printing.
●
Yes
Initialize the memory card's non-volatile memory. Initializing the NV memory restores the items of
the "5:Network" menu to their defaults.
You must restart the printer for this setting to take effect. After configuring items, be sure to restart
the printer.
●
No
Does not initialize the NV memory and returns to the menu.
PDF Bridge
This is used to make settings related to the PDF DirectPrint function. The PDF
DirectPrint function sends PDF files directly to the printer without going through
the printer driver.
This setting is enabled when printing PDF files without using our utility "Contents
Bridge".
Control Panel
5.3.6
5
Duplex Print
Set for two-sided printing.
●
No Duplex (default)
No two-sided printing
●
Bind Long Edge
Prints in duplex to be read in the correct direction when paper is bound lengthwise.
●
Bind Short Edge
Prints in duplex to be read in the correct direction when paper is bound widthwise.
No. of Sets
Set the number of copies to print from 1 to 999. (default: 1)
127
5.3 List of Menu Items
Collate
Sets whether to print multiple copies of a document sorting for each group
(1,2,3...1,2,3...).
●
No (default)
●
Yes
Skip Blank Pages
Sets whether or not to control to not print blank pages.
●
Off (default)
●
On
Password
Control Panel
5
When a password has been set for the PDF file, that password is specified in
advance. Printing is possible only when the PDF file to be printed and the
password set here match.
The password input screen has the following hierarchy. Set while moving
through the hierarchy according to the characters to input.
Password
Password
Select digits with
and set with SE .
Select uppercase letters with
and set with SE .
Password
Select lowercase letters with
and set with SE .
Password
Password
END
SE
Select symbols with
and set with SE .
■Flow of settings
Move through the hierarchy corresponding to the first letter of the password using the
buttons.
Use the
buttons to display the character to input, then press the Set/Eject button.
The letter you select is displayed at the bottom row and one letter is fixed.
Repeat steps 1 and 2 to input the entire password.
Use the
button to move to the End screen, then press the Set/Eject button. The
password you input is displayed as "****************" and is fixed.
128
5.3 List of Menu Items
Print Mode
Set the paper size to output and the printing method.
●
Fix Size (default)
Pages are printed on A4 paper. If the PDF file to print is other than A4 size, it automatically zooms
in or out to align with the size of the paper.
●
Auto
This automatically determines either A4 or letter size according to the size of the PDF file to print,
and prints the file. However, if letter size paper is not set in the paper tray, it will print to A4 size
paper.
●
Catalog
Re-organizes pages so that the print results will be cataloged according to the organization of the
pages of the PDF file to print, and prints the file. However, there are some cases in which printing a
catalog is not possible because of the organization of the pages. In such cases, it prints with Auto.
Quality
Sets the type of image quality.
●
Fast Mode (default)
Prints faster.
●
Quality Mode
Control Panel
Prints in duplex on A4 size paper in Catalog. When doing so, "Duplex Print" and "Skip Blank
Pages" settings are not available.
5
Printing speed slows down, but image quality increases.
Output Color
Specifies whether documents are to be printed in color or in black and white.
●
Auto (default)
Document content is checked automatically page by page. Color printing is used if any color other
than black or white is present, while black and white printing is used if there are no other colors.
●
Black/White
Documents are printed in black and white.
129
Chapter
6
Troubleshooting
6.1
Type of Problems....................................................................... 132
6.2
No Power .................................................................................... 134
6.3
The Printer Does not Print ........................................................ 135
6.4
Print Quality is Not Good .......................................................... 141
6.5
Paper Does not Feed Properly.................................................. 148
6.6
Other Problems.......................................................................... 150
6.7
When an Error Message Appears on the Control Panel ........ 155
6.8
The Error Indicator is On or Blinking....................................... 163
6.9
Forcing the Printer to Print Remaining Data (When Printing is
Halted) ........................................................................................ 164
6.10 Cleaning the Density Sensor .................................................... 166
6.11 If the Bypass Tray Comes Loose ............................................. 169
Type of Problems
When your printer suffers from a problem, refer to the categories below to determine the
cause of the problem and the action needed to rectify it.
Fix the problem by following the corresponding procedure. Refer to this chapter even if you
think you cannot fix a problem when one occurs. There are several types of potential
problem that you can rectify.
6.1.1
Problem List
Power Problems
●
No Power
● No power.............................................134
● The printer frequently turns off ............134
Troubleshooting
6
Indicators are Illuminated, Blinking or Off
●
The Error indicator is on......................135
●
The Error indicator is blinking..............135
●
The Ready indicator is off ...................135
●
The Ready indicator does not blink or light
when you try to print............................135
● The Ready indicator is on or blinking, but
paper is not output ..............................137
Cannot Print in Windows
●
The printer does not print ....................138
●
Cannot print with TCP/IP.....................139
●
Cannot print with the TCP/IP Direct Print
Utility ...................................................139
●
Cannot print in an SMB environment ..139
●
Cannot print in a NetWare environment
............................................................140
● An error message appears on the
computer screen .................................140
Blank or Completely Black Pages are
Output
● Nothing is printed ................................141
● Output sheets are completely black ....141
Faded or Dirty Printouts, White Areas
(Drop-outs), Creases, Blurs
● Faded printouts ...................................142
● Dirty spots are printed .........................142
● Vertical black lines ..............................143
● Recurring smudges .............................143
132
●
●
●
●
●
●
●
●
●
●
Ink smears when rubbed .................... 143
Hair-like marks appear around black
halftone printing .................................. 143
There are ghost images of characters and
lines .................................................... 144
Shadows appear around areas of dense
black printing ...................................... 144
White spots appear in areas of dense black
printing................................................ 144
Partial blanks ...................................... 145
Blotted printing ................................... 145
Blurred printing ................................... 145
Vertical blanks .................................... 145
Creased paper.................................... 146
Slanted printing/ Incorrectly positioned
printing................................................ 146
Unsatisfactory Printing
●
Unsatisfactory transparencies ............ 147
●
Unsatisfactory envelopes ................... 147
●
Unsatisfactory printing ........................ 147
Paper Does not Feed Properly
● Paper does not feed/Paper jams/ Several
sheets feed at once/Paper does not feed
straight................................................ 148
Network Problems
●
The IP address changes when turning on
the printer ........................................... 150
● Cannot connect to CentreWare Internet
Services.............................................. 150
● CentreWare Internet Services do not work
properly .............................................. 151
●
Unable to check the status by e-mail/
Cannot use e-mail printing ................. 151
6.1 Type of Problems
●
●
●
E-mail body text or text file attachment
does not print...................................... 152
PDF file attachments to e-mail are not
printed................................................. 152
You are not notified of errors by e-mail
............................................................ 152
Other Problems
● Cannot print in color ........................... 153
● Paper does not feed from the specified tray
............................................................ 153
● Printing is slow.................................... 153
● Unusual noises are coming from the printer
............................................................ 153
●
●
There is condensation in the printer ......154
The printer does not switch to power saver
mode 2................................................ 154
If a problem occurs that is not included in
these categories or if you cannot rectify the
problem using the prescribed procedures,
switch off the printer, disconnect the power
cord from the AC outlet, and contact your Fuji
Xerox or dealers for assistance.
Do not try to alter the machine configuration, or modify any parts. An unauthorized modification
can cause smoke or fire.
Troubleshooting
Be sure to switch off and unplug the machine before accessing the interior of the machine for
cleaning, maintenance, or fault clearance. Access to a live machine's interior can cause electric
shocks.
6
133
No Power
Symptom
No power
Possible Cause
Is the printer off?
Action
Press the "I" on the power switch to
switch on the printer.
"3.2.1 Switching On the Power"
The printer
frequently turns off
Troubleshooting
6
134
Is the power cord loose or
disconnected?
Switch off the printer and connect the
power cord properly. Switch on the
printer again.
Is the printer connected to a properly
rated 220 to 240 V outlet?
Connect the printer to a 220 to 240 AC
outlet. Do not connect any other
equipment to the outlet.
Do not connect the printer to an auxiliary
power outlet on the rear of a computer.
The printer is defective.
Switch off the printer immediately,
disconnect the power cord from the
outlet, and contact your Fuji Xerox or
dealers.
Is the power cord loose or
disconnected?
Switch off the printer and connect the
power cord properly. Switch on the
printer again.
The Printer Does not Print
6.3.1
Indicators are Illuminated, Blinking or Off
Symptom
The Error indicator
is on
Possible Cause
Is there an error message on the
control panel display?
Action
Check the message and rectify the error
accordingly.
"6.7 When an Error Message Appears on the
Control Panel"
The Error indicator
is blinking
A problem that the user cannot rectify
has occurred.
Note the error code on the display,
switch off the printer immediately,
disconnect the power cord from the
outlet, and contact your Fuji Xerox or
dealers.
The Ready
indicator is off
Is the control panel display on the
menu screen?
Press the Menu button on the control
panel to go back to the print screen.
The Ready
indicator does not
blink or light when
you try to print
Is the parallel, USB, or Ethernet
interface cable loose or
disconnected?
Switch off the printer and check the
interface cable. If necessary, reconnect.
Setup Guide
Is the optional network expansion
card loose or disconnected?
Switch off the printer and reinstall the
network expansion card into the printer.
Troubleshooting
"5.1.3 Buttons"
6
Setup Guide
135
6.3 The Printer Does not Print
Condition
(Continued from
previous page)
The Ready
indicator does not
blink or light when
you try to print
Verification
Solution
Does the parallel, USB, or Ethernet
interface cable meet the required
printer specifications?
Use only the recommended parallel
interface cables for the printer.
10Base-T and 100Base-TX Ethernet
interface cables are compatible with the
printer. Use twisted pair cables suitable
for network connections. A Category 5
100Base-TX is required.
Is the computer configured correctly?
Check the following settings on your
computer and reconfigure any that are
not correct.
●
Make sure that the appropriate printer
driver for your operating system is
installed.
●
Make sure that the port is set correctly
in the printer driver.
Troubleshooting
"Chapter 2 Installing the Printer Driver"
Is the printer IP address correct?
(When using TCP/IP.)
Consult your system administrator to
obtain a valid IP address. Use the Printer
Settings list to confirm the IP address.
●
●
6
136
"8.4.1 Confirming Printer Configuration
and Network Settings".
"1.2.3 Setting the IP Address".
6.3 The Printer Does not Print
Condition
(Continued from
previous page)
The Ready
indicator does not
blink or light when
you try to print
Verification
Is the printer properly configured for
use through a network? (When on a
network.)
Solution
Print the Printer Settings list to check the
network settings.
Correct any inappropriate settings.
●
●
●
"8.4.1 Confirming Printer Configuration
and Network Settings"
"1.2 Configuring the Printer"
Network Print Environment User Guide
The network has a problem. (When on
a network).
Check that the printer is on and execute
the print command from the computer
one more time.
If the problem persists, consult your
system administrator.
Is the printer off?
Press the "I" on the power switch to
switch on the printer.
The Ready
indicator is on or
blinking, but paper
is not output
Data may still remain inside the
printer.
Select to abort the print job or forcibly
output the remaining data.
●
●
"3.5.2 Canceling Printing at the Control
Panel"
"6.9 Forcing the Printer to Print Remaining
Data (When Printing is Halted)"
Troubleshooting
"3.2.1 Switching On the Power"
6
137
6.3 The Printer Does not Print
6.3.2
Cannot Print in Windows
Symptom
The printer does
not print
Troubleshooting
6
Verification
Action
Does "Pause Printing" appear in the
printer window?
When printing stops because of an error,
the printer sometimes switches to the
Pause Printing state. Follow the
procedure below to release the printer
from the Pause Printing state.
1) On the Start menu, point to Settings
and click Printers.
2) Double-click the appropriate printer.
3) In the printer window, click the Printer
menu.
4) On the Printer menu, if Pause Printing
is selected, click it to release.
Is the printer off?
Press the "I" on the power switch to
switch on the printer.
"3.2.1 Switching On the Power"
Is the parallel, USB, or Ethernet
interface cable loose or
disconnected?
Switch off the printer and check the
interface cable. If necessary, reconnect.
Setup Guide
Is the optional network expansion
card loose or disconnected?
Switch off the printer and reinstall the
network expansion card into the printer.
Setup Guide
138
6.3 The Printer Does not Print
Condition
Cannot print with
TCP/IP
Verification
Solution
Is the printer IP address set correctly?
(When using TCP/IP.)
The IP address might be different. Ask
your system administrator for the correct
settings.
Use the Printer Settings list to confirm
the current IP address.
●
●
Cannot print with
the TCP/IP Direct
Print Utility
"8.4.1 Confirming Printer Configuration
and Network Settings".
"1.2.3 Setting the IP Address".
Consult your system administrator to
whether the IP Filter is set or not.
Is the spool option deselected on the
Details tab of the printer icon's
Properties dialog box, so that print
data is sent directly to the printer?
(Windows 95)
Enable print job spooling in the Details
tab.
Does Printer Error appear in the
status column of the printer window?
If printing is not possible using the TCP/
IP Direct Print Utility, refer to the
Network Print Environment User Guide
and follow the prescribed procedure.
Network Print Environment User Guide
Cannot print in an
SMB environment
(When a network
expansion card is
installed)
Does the computer display a
message indicating that there is
insufficient space on the server?
This message appears when there are
several simultaneous print requests or
when the printer is printing a job sent
with another protocol when you make
the request.
Before sending a print job, open the
printer window and check that the queue
is empty.
Troubleshooting
Is the IP Filter set?
6
139
6.3 The Printer Does not Print
Condition
Verification
Solution
(Continued from
previous page)
Cannot print in an
SMB environment
(When a network
expansion card is
installed)
Does the message Write Error appear
on the computer screen?
This message appears when the
maximum number of permissible
connections on the Windows network is
exceeded.
Before sending a print job, open the
printer window and check that the queue
is empty.
Cannot print in a
NetWare
environment
(When a network
expansion card
installed)
Do hubs or other network equipment
support automatic frame type setting?
Check that the data link indicator of the
printer connection port on the network
equipment is on.
If the indicator is off, set the same frame
type on the control panel as the one
used by the NetWare file server.
"5.3 List of Menu Items"
Troubleshooting
6
140
Is the NetWare file server or print
server running? (In remote printer
mode.)
Start the NetWare file server or print
server. (In remote printer mode.)
Is the NetWare file server correctly
configured for a NetWare
environment?
Use Network Utilities and check the
network configuration.
Network Print Environment User Guide
An error message
appears on the
computer screen
A printer error has occurred.
Check the message and rectify the error
accordingly.
Print Quality is Not Good
6.4.1
Blank or Completely Black Pages are
Output
Symptom
Nothing is printed
Possible Cause
Action
Two or more sheets may be feeding
at once.
Remove the paper stack from the tray,
fan it, and reinsert it.
The drum cartridge is old or damaged.
Replace the drum cartridge.
"8.2.2 Replacing the Drum Cartridge"
Output sheets are
completely black
The power supply is defective.
Contact your Fuji Xerox or dealers.
The drum cartridge is old or damaged.
Replace the drum cartridge.
The power supply is defective.
Contact your Fuji Xerox or dealers.
Troubleshooting
"8.2.2 Replacing the Drum Cartridge"
6
141
6.4 Print Quality is Not Good
6.4.2
Faded or Dirty Printouts, White Areas
(Drop-outs), Creases, Blurs
Symptom
Faded printouts
Possible Cause
Is the media suitable?
Action
Replace the media with a size and type
of media suitable for use with this printer.
Set the printer driver to the type of paper
you are using.
"4.1 Suitable and Unsuitable Paper Types"
Is the paper damp?
Replace the paper.
"4.2 Loading Paper"
Troubleshooting
The drum cartridge is old or damaged. Replace the drum cartridge.
"8.2.2 Replacing the Drum Cartridge"
Is the EconoMode selected on the
printer driver?
Change the printer driver settings on the
Graphics tab (in Windows).
Help
6
Dirty spots are
printed
The power supply is defective.
Contact your Fuji Xerox or dealers.
Is the media suitable? Are you using
preprinted or inkjet paper?
Replace the media with a size and type
of media suitable for use with this printer.
Set the printer driver to the type of paper
you are using.
"4.1 Suitable and Unsuitable Paper Types"
The drum cartridge is old or damaged. Replace the drum cartridge.
"8.2.2 Replacing the Drum Cartridge"
142
6.4 Print Quality is Not Good
Symptom
Vertical black lines
Possible Cause
The drum cartridge or transfer roll
cartridge is old or damaged.
Action
Check the drum cartridge and transfer
roll cartridge and replace them as
necessary.
●
●
Recurring smudges
Dirt in the paper path.
Print several blank sheets.
The drum cartridge or transfer roll
cartridge is old or damaged.
Check the drum cartridge and transfer
roll cartridge and replace them as
necessary.
●
Is the paper damp?
"8.2.2 Replacing the Drum Cartridge"
"8.3.2 Replacing the Transfer Roll
Cartridge"
Replace the paper.
"4.2 Loading Paper"
Is the media suitable?
Replace the media with a size and type
of media suitable for use with this printer.
Set the printer driver to the type of paper
you are using.
Troubleshooting
●
Ink smears when
rubbed
"8.2.2 Replacing the Drum Cartridge"
"8.3.2 Replacing the Transfer Roll
Cartridge"
6
"4.1 Suitable and Unsuitable Paper Types"
Hair-like marks
appear around
black halftone
printing
The paper was left unwrapped for a
long time (especially in a dry
environment).
Replace the paper.
"4.2 Loading Paper"
143
6.4 Print Quality is Not Good
Symptom
Troubleshooting
6
Possible Cause
Action
There are ghost
images of
characters and
lines
Are you printing in a high
temperature, high humidity or low
temperature, low humidity
environment?
Use at room temperature. Print after the
room has warmed up, such as on winter
mornings.
Shadows appear
around areas of
dense black
printing
Is the media suitable?
Replace the media with a size and type
of media suitable for use with this printer.
Set the printer driver to the type of paper
you are using.
"4.1 Suitable and Unsuitable Paper Types"
The transfer roll cartridge is old or
damaged.
Replace the transfer roll cartridge.
"8.3.2 Replacing the Transfer Roll
Cartridge"
White spots appear
in areas of dense
black printing
Is the media suitable?
Is the media folded or creased?
Replace the media with a size and type
of media suitable for use with this printer.
Set the printer driver to the type of paper
you are using.
"4.1 Suitable and Unsuitable Paper Types"
The drum cartridge is old or damaged. Replace the drum cartridge.
"8.2.2 Replacing the Drum Cartridge"
Is the paper damp?
Is it too dry?
144
Use at room temperature.
Use the paper immediately after opening
the package.
6.4 Print Quality is Not Good
Symptom
Partial blanks
Possible Cause
Is the color registration correctly
adjusted?
Action
Adjust the color registration.
"1.1 Adjusting Color Registration"
Blotted printing
Blurred printing
Is the paper damp?
Is it too dry?
Use at room temperature.
Use the paper immediately after opening
the package.
Is the media suitable?
Replace the media with a size and type
of media suitable for use with this printer.
Set the printer driver to the type of paper
you are using.
Is the transfer roll cartridge properly
installed in the printer?
Make sure that the transfer roll cartridge
is properly installed.
"8.3.2 Replacing the Transfer Roll
Cartridge"
Troubleshooting
"4.1 Suitable and Unsuitable Paper Types"
6
Vertical blanks
Is the drum cartridge properly
installed in the printer?
Make sure that the drum cartridge is
properly installed.
"8.2.2 Replacing the Drum Cartridge"
The drum cartridge or transfer roll
cartridge is old or damaged.
Check the drum cartridge and transfer
roll cartridge and replace them as
necessary.
●
●
"8.2.2 Replacing the Drum Cartridge"
"8.3.2 Replacing the Transfer Roll
Cartridge"
145
6.4 Print Quality is Not Good
Symptom
Creased paper
Possible Cause
Is the paper damp?
Action
Replace the paper.
"4.2 Loading Paper"
Is the media suitable?
Are you using warped paper?
Replace the media with a size and type
of media suitable for use with this printer.
Set the printer driver to the type of paper
you are using.
"4.1 Suitable and Unsuitable Paper Types"
Troubleshooting
6
Is the paper tray properly inserted into
the printer?
Push the paper tray completely back into
the printer.
Is there paper or a foreign object
jammed in the printer?
Switch off the printer and remove the
jammed paper or foreign object. When
you cannot remove the obstruction,
switch off the printer and contact your
Fuji Xerox or dealers. Do not attempt to
disassemble the printer.
Is the transfer roll cartridge properly
installed in the printer?
Make sure that the transfer roll cartridge
is properly installed.
"8.3.2 Replacing the Transfer Roll
Cartridge"
Slanted printing/
Incorrectly
positioned printing
Are the paper guides of the paper tray
set correctly?
In the paper tray, set the side and end
guides to their correct positions.
●
●
Is the paper guide in the bypass tray
set at the correct mark?
"4.2.1 Loading Paper in the Paper Tray"
"4.2.2 Loading A5 Paper in the Paper
Tray/Changing From A5 to Another
Paper Size"
Set the paper guide in the bypass tray at
the correct mark.
"4.2.3 Loading Paper in the Bypass Tray"
Did you correctly install the A5 spacer
when loading A5 paper into the paper
tray?
Make sure that the A5 spacer is properly
installed next to the end guide in the
paper tray.
"4.2.2 Loading A5 Paper in the Paper Tray/
Changing From A5 to Another Paper Size"
146
6.4 Print Quality is Not Good
6.4.3
Unsatisfactory Printing
Symptom
Unsatisfactory
transparencies
Possible Cause
Action
Is the transparency suitable?
Use transparencies suitable for use with
this printer as outlined below:
●
Transparencies,V516 (Xerox film (no
border).
Do not use full color transparencies.
Is the media properly loaded into the
bypass tray?
Make sure that the transparencies are
properly loaded into the bypass tray.
"3.7.2 Printing on Transparencies"
Is the printer driver configured to print
transparencies?
Set the printer driver for transparencies
on the Paper/Output tab (in Windows).
Unsatisfactory
envelopes
Is the envelope suitable?
Use Com-10, Monarch, C5, DL
envelopes. Use envelopes
recommended for use with the printer.
"4.1 Suitable and Unsuitable Paper Types"
Is the media properly loaded into the
bypass tray?
Make sure the envelopes are properly
loaded into the bypass tray.
Troubleshooting
"3.7.2 Printing on Transparencies"
6
"3.7.1 Printing on Envelopes"
Is the printer driver configured to print
Envelopes?
Set the printer driver for Envelopes in the
Paper/Output tab (in Windows).
"3.7.1 Printing on Envelopes"
Unsatisfactory
printing
Is EconoMode or a low resolution
option selected on the printer driver?
Change the printer driver settings on the
Graphics tab (in Windows).
Help
147
Paper Does not Feed
Properly
Symptom
Possible Cause
Paper does not
feed/Paper jams/
Several sheets
feed at once/Paper
does not feed
straight
Is the media properly loaded?
If using special paper, is the media
properly loaded into the bypass tray?
Action
Make sure that the media is properly
loaded.
When using media such as
transparencies, label sheets, or
envelopes, fan the stack before loading
so that there is air between the sheets.
"4.2 Loading Paper"
Is the paper damp?
Replace the paper.
"4.2 Loading Paper"
Is the media suitable?
Replace the media with a size and type
of media suitable for use with this printer.
Troubleshooting
"4.1 Suitable and Unsuitable Paper Types"
Is the paper tray properly inserted into
the printer?
Push the paper tray completely back into
the printer.
Remove the jammed paper.
Is there paper jammed in the printer?
The problem can sometimes be
adhesive tape or glue adhering to the
rollers. Inspect the insides of the printer
often and completely remove any foreign
matter.
6
"Chapter 7 Clearing Paper Jams"
Is the printer level?
Reposition the printer on a flat, stable
surface.
"Safety Notes"
Is the printer driver paper feed
method correctly set?
Make sure that the printer driver paper
feed method is correctly set.
Also, when an optional tray module is
present, you must reconfigure the printer
to use the module as tray 2 or 3.
Help
148
6.5 Paper Does not Feed Properly
Condition
Verification
(Continued from
previous page)
Paper does not
feed/Paper jams/
Several sheets
feed at once/Paper
does not feed
straight
Are the paper guides of the paper tray
set correctly?
Solution
In the paper tray, set the side and end
guides in the correct positions.
●
●
Is the paper guide in the bypass tray
set at the correct mark?
"4.2.1 Loading Paper in the Paper Tray"
"4.2.2 Loading A5 Paper in the Paper
Tray/Changing From A5 to Another
Paper Size"
Set the paper guide in the bypass tray at
the correct mark.
"4.2.3 Loading Paper in the Bypass Tray"
Did you correctly install the A5 spacer
when loading A5 paper into the paper
tray?
Make sure that the A5 spacer is properly
installed next to the end guide in the
paper tray.
Troubleshooting
"4.2.2 Loading A5 Paper in the Paper Tray/
Changing From A5 to Another Paper Size"
6
149
Other Problems
6.6.1
Network Problems
Condition
The IP address
changes when
turning on the
printer
Verification
Is the printer set to acquire an IP
address through a DHCP server?
Solution
On the control panel, select "5:Network",
then "IP Address Setup" and select
"Panel" to set a permanent IP address
for the printer.
●
●
Cannot connect to
CentreWare
Internet Services
Is the printer off?
"5.3 List of Menu Items"
"1.2.3 Setting the IP Address".
Press the "I" on the power switch to
switch on the printer.
"3.2.1 Switching On the Power"
Troubleshooting
6
Is the Ethernet cable loose or
disconnected?
Switch off the printer and check the
Ethernet cable. If necessary, reconnect.
Setup Guide
Is the printer’s Internet address
correct?
Confirm that the printer Internet address
is correct. If the problem persists, use an
IP address to connect to the printer
instead.
Is the printer’s IP address correct?
The IP address might be different. Ask
your system administrator for the correct
settings.
Use the Printer Settings list to confirm
the current IP address.
●
●
Are you using a proxy server?
"8.4.1 Confirming Printer Configuration
and Network Settings".
"1.2.3 Setting the IP Address".
Certain proxy servers block access to
the printer.
Configure your Web browser so that it
does not use the proxy server or set the
address you want to access so that it
does not go through the proxy server.
Network Print Environment User Guide.
150
6.6 Other Problems
Symptom
(Continued from
previous page)
Cannot connect to
CentreWare
Internet Services
CentreWare
Internet Services
do not work
properly
Possible Cause
Is the port number correct?
−
Action
The default port number is "80". Specify
the correct port number.
When CentreWare Internet Services do
not operate properly, refer to the
Network Print Environment User Guide
and follow the procedures therein.
Network Print Environment User Guide
Unable to check
the status by
e-mail/Cannot use
e-mail printing
Is the "Status Messenger" or "E-Mail
Printing" running?
Use the control panel or CentreWare
Internet Services to start up the "Status
Messenger" or "E-Mail Printing" protocol.
Is the POP/SMTP server's IP address
entered correctly?
Enter the correct value using CentreWare
Internet Services.
Are the POP user name and password
entered correctly?
Enter the correct value using CentreWare
Internet Services.
Network Print Environment User Guide
Is the APOP setting correct?
Check with your system administrator to
confirm whether the POP server
supports APOP.
Can your mail address receive mail?
Check that your mail address is included
among those that can receive mail.
Troubleshooting
Network Print Environment User Guide
6
Network Print Environment User Guide
Were commands correctly described
in your e-mail?
Enter the commands correctly.
Did you include the "#Password"
command at the beginning of your email?
If a password has been set, the
"#Password" command must be
included at the beginning of your e-mail.
Did you correctly specify the
password?
Enter the correct password.
Is the POP/SMTP server operating
properly?
Check with your system administrator.
151
6.6 Other Problems
Symptom
Possible Cause
E-mail body text or
text file attachment
does not print
Has the "Text Print" option of
"1:System" been set to "Yes" from the
control panel?
Action
Make the proper settings from the
control panel.
"3.9 Using E-Mail Printing"
Troubleshooting
6
PDF file
attachments to
e-mail are not
printed
Has the attached file been sent with a
Content-type setting of text/xxx or
message/xxx?
Change the settings of your e-mail
software so that PDF files are sent using
a Content-type of other than text/xxx or
message/xxx (for example, application/
pdf). The Content-Type can be
determined by displaying the source text
of the transmitted mail. For details, see
the user's guide provided with your email software.
You are not notified
of errors by e-mail
Is "Status Messenger" running?
Use the control panel or CentreWare
Internet Services to start up the "Status
Messenger" protocol.
Is the POP/SMTP server's IP address
entered correctly?
Enter the correct value using
CentreWare Internet Services.
Network Print Environment User Guide
Are the POP account and password
entered correctly?
Enter the correct value using
CentreWare Internet Services.
Network Print Environment User Guide
Is the APOP setting correct?
Check with your system administrator to
confirm whether the POP server
supports APOP.
Are the notification items to be sent
set correctly?
Select the items you want to be notified
of by e-mail using CentreWare Internet
Services.
Network Print Environment User Guide
Is the destination address entered
correctly?
Specify the correct destination address
using CentreWare Internet Services.
Network Print Environment User Guide
Is the POP/SMTP server operating
properly?
152
Check with your system administrator.
6.6 Other Problems
6.6.2
Other Problems
Symptom
Cannot print in
color
Possible Cause
Action
Is the printer driver set to Black/White
as the output color?
Change the printer driver settings in the
Paper/Output or Graphics tab
(Windows).
Help
Paper does not
feed from the
specified tray
Are the application settings overriding
the printer driver settings?
Set the paper tray in the application to
the same paper tray set in the printer
driver.
Printing is slow
Is the printer driver set to Color as the
output color even when you are
printing in monochrome?
Change the printer driver settings in the
Paper/Output or Graphics tab
(Windows).
Is the Power Save Mode Timer too
short?
When the printer is in power saver
mode, it takes longer than normal to
begin printing if it receives a print
request. On the control panel, set a
longer Power Save Timer.
"5.3 List of Menu Items"
Unusual noises are
coming from the
printer
Is the printer level?
Reposition the printer on a flat, stable
surface.
Troubleshooting
Help
6
"Safety Notes"
Is the paper tray properly inserted into
the printer?
Push the paper tray completely back into
the printer.
Is there paper or a foreign object
jammed in the printer?
Switch off the printer and remove the
jammed paper or foreign object. When
you cannot remove the obstruction,
switch off the printer and contact your
Fuji Xerox or dealers. Do not attempt to
disassemble the printer.
153
6.6 Other Problems
Symptom
Possible Cause
Action
There is
condensation in the
printer
-
On the control panel, set the Power
Save Mode Timer to one hour or more
and leave the printer on.
After leaving the printer for an hour to
allow condensation to dissipate, you can
use the printer normally.
"5.3 List of Menu Items"
The printer does
not switch to power
saver mode 2
(When an optional
network expansion
card is not
installed)
Troubleshooting
6
154
Is "Disabled" selected from the control
panel for switching to power saver
mode 2?
Select "Enabled" from the control panel
for switching to power saver mode 2.
Is it set to startup the CentreWare
Simple Status Notification when the
computer is started?
Set the time for the CentreWare Simple
Status Notification to access the printer
longer than the time to shift to the power
saver mode.
When an Error Message
Appears on the Control Panel
This section describes error messages and their meanings, as well as what to do when they
appear.
Error messages are warnings that alert you to precautions to take when printing, and inform
you of actions that you need to take to rectify problems.
When an error message is displayed, find the corresponding message in the table below
and follow the procedure herein.
Ready to Print
Drum Cartridge
Replace Drum
Cartridge
Message
***-*** Please
Reboot Printer
Transp. Error
Open Cover A
Meaning and Action
The printer is not functioning normally.
Action: Switch off the printer and switch it on again. When the
same message reappears after taking this action, write the
error code displayed, switch off the printer, and contact
your Fuji Xerox or dealers.
Troubleshooting
When the message is too long to fit on the display, the screen changes every three seconds, displaying the message in
segments.
6
Transparencies were not specified as the paper type on the
computer, the media in the printer is not transparencies, or
transparencies were fed instead of the intended media.
Action: Press button A, open the front door and remove the
jammed media. After that, load the media type specified on
the computer. If this message appears and the loaded
media is correct, specify the paper tray of that media on
the computer and reprint.
"Chapter 7 Clearing Paper Jams"
Do not use transparencies framed by a white border. Refer to
"4.1 Suitable and Unsuitable Paper Types" and load the
recommended type of transparencies.
PDFPermissionErr
Please Press Set
PDF files that are disallowed will not print.
Action: Press the Set/Eject button and cancel printing.
"**" indicate alphanumeric characters.
155
6.7 When an Error Message Appears on the Control Panel
Message
Meaning and Action
PDF Error
Please Press Set
An error occurred when using the direct print function to print a PDF
file.
Action: Press the Set/Eject button and cancel printing.
PDF Wrong Password
Please Press Set
The PDF file password and the password set on the printer do not
match.
Action: Press the Set/Eject button and cancel printing.
Reset the correct password on the control panel and
reprint.
"5.3.6 PDF Bridge"
LZW Unacceptable
Please Press Set
Includes an object compressed using LZW in the PDF file. Printing
will not be possible if the Contents Bridge Enhancement Kit
(optional) is not installed.
Action: Press the Set/Eject button and cancel printing.
Replace Yellow
Toner (Y)
The yellow toner cartridge is empty.
Action: Replace the yellow toner cartridge.
Troubleshooting
"8.1.2 Replacing the Toner Cartridges"
Reinsert Yellow
Toner (Y)
6
There is no yellow toner cartridge inserted in the printer or the
cartridge is improperly set.
Action: Grip the levers at each end of the yellow toner cartridge
with your fingers, then push down firmly to rotate the levers
forward to install the cartridge.
"8.1.2 Replacing the Toner Cartridges"
Need Maintenance
CTD Sensor
It is time to check the density sensor.
Action: Remove the transfer roll cartridge and check the
cleanliness of the density sensor.
"6.10 Cleaning the Density Sensor"
Please Clean
CTD Sensor
The density sensor is dirty.
Action: Remove the transfer roll cartridge and clean the density
sensor.
"6.10 Cleaning the Density Sensor"
Regi. Jam
Open Cover A
There is paper jammed in the printer.
Action: Press button A, open the front door and remove the
jammed media. Make sure there is no paper jammed in the
paper trays.
"Chapter 7 Clearing Paper Jams"
156
6.7 When an Error Message Appears on the Control Panel
Message
Fuser Jam
Open Cover A & B
Meaning and Action
There is paper jammed in the printer.
Action: Press button A or B, open the front door and remove the
jammed media. Make sure there is no paper jammed in the
paper trays.
"7.4 Paper Jams Between the Drum Cartridge and Fuser
Cartridge"
Duplex Jam
Open Cover B
There is paper jammed in the paper rotator used for two-sided
printing.
Action: Press button B, open the front door and remove the
jammed media.
"7.5 Paper Jams in the Paper Rotator"
Feed Jam
Check Tray
There is paper jammed in the bypass tray, the paper tray, or the
optional 2 tray module if installed.
Action: Pull out the tray and remove the jammed media.
Drum Cartridge
ID Error
The drum cartridge is defective.
Action: Replace the drum cartridge.
"8.2.2 Replacing the Drum Cartridge"
Replace Cyan
Toner (C)
The cyan toner cartridge is empty.
Action: Replace the cyan toner cartridge.
Troubleshooting
"7.2 Paper Jams in Bypass Tray"
"7.3 Paper Jams in the Paper Tray"
"7.6 Paper Jams in the 2 Tray Module"
6
"8.1.2 Replacing the Toner Cartridges"
Reinsert Cyan
Toner (C)
There is no cyan toner cartridge inserted in the printer or the
cartridge is improperly set.
Action: Grip the levers at each end of the cyan toner cartridge with
your fingers, then push down firmly to rotate the levers
forward to install the cartridge.
"8.1.2 Replacing the Toner Cartridges"
157
6.7 When an Error Message Appears on the Control Panel
Message
Sys Data Deleted
Press Set
Meaning and Action
All system settings stored in the NV memory were deleted.
Action: Press the Set/Eject button to initialize the NV memory.
The printer settings may be deleted when you reset the NV
memory. Print the Printer Settings list and the Panel
Settings list to confirm settings.
"8.4.1 Confirming Printer Configuration and Network Settings".
"5.3 List of Menu Items"
No Paper in
All Trays
There is no paper in any of the paper trays.
Action: Load paper into the trays.
"4.2.1 Loading Paper in the Paper Tray"
Troubleshooting
Push in
All Trays
One of the trays is not properly inserted.
Action: Push the all paper trays completely back into the printer.
Disk Full
Please Press Set
The hard disk became full during electronic sorting and data writing
was halted.
Action: Press the Set/Eject button.
It deletes print jobs from the printer. Print with one of the
following methods:
●
Print fewer pages at a time.
●
Deactivate the printer driver hard disk setting.
"3.6 Changing the Configuration for Options"
6
Load xxxx
in BypassTray
Paper size xxxx is not loaded in the bypass tray or is different from
the size specified on the computer.
Action: Load paper xxxx into the bypass tray. If the computer
settings are incorrect, cancel printing. Specify the correct
paper the computer and reprint.
"4.2.3 Loading Paper in the Bypass Tray"
"3.5.2 Canceling Printing at the Control Panel"
Check Paper
in BypassTray
Paper is not properly loaded in the bypass tray or is different from
that specified on the computer.
Action: Make sure the paper is properly loaded into the bypass
tray. If the computer settings are incorrect, cancel printing.
Check the following settings on your computer, reconfigure
any that are incorrect, and reprint.
●
Is the correct paper tray specified?
●
Is the correct paper size specified?
"4.2.3 Loading Paper in the Bypass Tray" and "3.5.2 Canceling
Printing at the Control Panel"
"xxx" represents a paper size or paper orientation.
158
6.7 When an Error Message Appears on the Control Panel
Message
Replace Transfer
Roll Cartridge
Meaning and Action
The transfer roll cartridge needs to be replaced.
Action: Replace the transfer roll cartridge.
"8.3.2 Replacing the Transfer Roll Cartridge"
Reinsert Trans
Roll Cartridge
The transfer roll cartridge is not inserted in the printer or the cartridge
is set improperly.
Action: Push the transfer roll cartridge all the way into the printer.
"8.3.2 Replacing the Transfer Roll Cartridge"
Replace Drum
Cartridge
The drum cartridge needs to be replaced.
Action: Replace the drum cartridge.
"8.2.2 Replacing the Drum Cartridge"
The drum cartridge is not inserted in the printer or the cartridge is set
improperly.
Action: Push the drum cartridge all the way into the printer.
"8.2.2 Replacing the Drum Cartridge"
No Paper in
Tray 1
There is no paper in tray 1.
Action: Load paper into paper tray 1.
"4.2.1 Loading Paper in the Paper Tray"
Load xxx
in Tray N
Paper size xxxx is not loaded in tray N or is different from that
specified on the computer.
Action: Load paper xxxx into tray N. If the computer settings are
incorrect, cancel printing.
Check the following settings on your computer, reconfigure
any that are incorrect, and reprint.
●
Is the correct paper tray specified?
●
Is the correct paper size specified?
Troubleshooting
Reinsert Drum
Cartridge
6
"4.2.1 Loading Paper in the Paper Tray"
"3.5.2 Canceling Printing at the Control Panel"
"N" represents a number.
"xxx" represents a paper size or paper orientation.
159
6.7 When an Error Message Appears on the Control Panel
Message
Check Paper
in Tray N
Meaning and Action
Paper is not properly loaded in tray N or is different from that
specified on the computer.
Action: Pull out tray N and check the paper. If the computer
settings are incorrect, cancel printing.
Check the following settings on your computer, reconfigure
any that are incorrect, and reprint.
●
Is the correct paper tray specified?
●
Is the correct paper size specified?
"4.2.1 Loading Paper in the Paper Tray"
"3.5.2 Canceling Printing at the Control Panel"
Troubleshooting
6
Push in
Tray N
Tray N is not properly inserted.
Action: Push tray N completely back into the printer.
Load xxxx
in a Tray
The paper specified on the computer is not loaded into any of the
trays.
Action: Load paper xxxx into a tray. If size specified on the
computer is incorrect, cancel printing. Specify the correct
paper on the computer and reprint.
"4.2.1 Loading Paper in the Paper Tray"
"3.5.2 Canceling Printing at the Control Panel"
Push in
the Tray
None of the trays are properly inserted.
Action: Push the all paper trays completely back into the printer.
Empty
Exit Tray
The face down tray is full.
Action: Remove the paper from the face down tray.
Replace Black
Toner (K)
The black toner cartridge is empty.
Action: Replace the black toner cartridge.
"8.1.2 Replacing the Toner Cartridges"
Reinsert Black
Toner (K)
There is no black toner cartridge inserted in the printer or the
cartridge is improperly set.
Action: Grip the levers at each end of the black toner cartridge with
your fingers, then push down firmly to rotate the levers
forward to install the cartridge.
"8.1.2 Replacing the Toner Cartridges"
Operation Error
Please Press Set
The request from the computer could not be printed.
Action: Press the Set/Eject button and cancel printing. Check the
printer driver settings and reprint.
Operation Denied
Wile Printing
An illegal operation was performed on the control panel during
printing.
Wait until printing finishes.
"N" represents a number.
"xxx" represents a paper size or paper orientation.
160
6.7 When an Error Message Appears on the Control Panel
Message
Meaning and Action
This is a warning message. There is almost no toner remaining in
OOOOO toner cartridge.
Prepare a new OOOOO toner cartridge to replace the old cartridge
when it becomes empty.
Ready to Print
ServCall J
This is a warning message.
It is time to replace the fuser unit. However, if there is no problem in
the quality of the print, you can continue using it without
replacement. If there are problems in the print quality, contact your
Fuji Xerox or dealers. Also, the fuser unit should be replaced
approximately every 100,000 pages of print.
Ready to Print
Trans Roll Cart
Need Replacement
This is a warning message. It is almost time to replace the transfer
roll cartridge.
Prepare a new transfer roll cartridge ready to replace the old one
when the time comes.
Ready to Print
Drum Cartridge
Need Replacement
This is a warning message. It is almost time to replace the drum
cartridge.
Prepare a new drum cartridge to replace the old one when the time
comes.
Close
Front Door
The front door is open.
Action: Make sure that the front door is properly closed.
Front door
Replace Magenta
Toner (M)
The magenta toner cartridge is empty.
Action: Replace the magenta toner cartridge.
Troubleshooting
Ready to Print
OOOOO toner (O)
Need Replacement
6
"8.1.2 Replacing the Toner Cartridges"
Reinsert Magenta
Toner (M)
There is no magenta toner cartridge inserted in the printer or the
cartridge is improperly set.
Action: Grip the levers at each end of the magenta toner cartridge
with your fingers, then push down firmly to rotate the levers
forward to install the cartridge.
"8.1.2 Replacing the Toner Cartridges"
161
6.7 When an Error Message Appears on the Control Panel
Message
Out of Memory
Please Press Set
Meaning and Action
There is not enough memory available for the printer to function
normally.
Action: Press the Set/Eject button and cancel printing. Install an
additional memory and reprint.
"Appendix A Introduction to Options and Consumables"
If you are unable to install an additional memory, print after
configuring the printer driver as follows:
●
Switch off two-sided printing and Multi-Up.
●
Set Standard to Image Types in the Graphics tab (Windows).
Note that this lowers image quality.
Help
Troubleshooting
6
162
The Error Indicator is On or
Blinking
The red Error indicator on the control panel indicates that there is a problem with the printer.
When the Error indicator is on or is blinking while you are using the printer, refer to the
sections below and follow the procedures therein.
Ready
6.8.1
Error
The Error Indicator is On
For detailed information about the meaning of error messages, refer to "6.7 When an Error Message
Appears on the Control Panel", and correct the error as instructed.
6.8.2
The Error Indicator is Blinking
Troubleshooting
When the Error indicator is on, it indicates a paper jam or other problem that you
can rectify by yourself. Rectify the problem according to the message displayed
on the control panel.
6
When the Error indicator is blinking, it indicates a problem that you cannot rectify
by yourself. Write down the message and error code displayed, switch off the
printer and contact your Fuji Xerox or dealers.
163
Forcing the Printer to Print
Remaining Data
(When Printing is Halted)
If the end of the data stops in the middle of a page, the printer waits for the next data until
the job timeout occurs and "Date Wait" appears on the control panel.
Forcing the printer to print data is useful in this case, because the printer does not wait for
the timeout to elapse before it begins printing the data stored in it.
This section describes the procedure for forcing the printer to print data remaining in it.
The default job timeout is 300 seconds. You can set the job timeout between 5 and 300 seconds on the control panel.
For details about the job timeout function, refer to "5.3 List of Menu Items".
Data Wait
Troubleshooting
6
164
Ejecting
6.9 Forcing the Printer to Print Remaining Data (When Printing is Halted)
Follow the procedure below. Use the following control panel buttons:
Display (messages appear here)
Power saver
Front Door Release Button
Menu
Ready
Eject
Cancel
Set
Back
Error
Set/Eject button
For details about control panel operations, refer to "5.2 Basic Menu Operation".
(The printer is processing)
Press the Set/Eject button once.
The remaining data in the printer is printed out.
Ejecting
Parallel
Tray 1
When processing is finished, the print screen reappears.
Ready to Print
Troubleshooting
Data Wait
Parallel
6
(The print screen. The printer is ready to print.)
165
Cleaning the Density
Sensor
When the printer's density sensor is dirty, follow the procedure below to clean it.
Procedure
Troubleshooting
6
1
On the printer's right side, press the
side of the power switch marked " " to
switch off the printer.
2
Push up button A (1) and fully open the
front door (2).
3
Grip the orange tabs at both ends of
the transfer roll cartridge (1) and gently
lift it out of the printer (2).
Lift the transfer roll cartridge carefully to prevent
transfer roll from spilling out.
4
Gently wipe the density sensor window
with a clean dry cloth or cotton swab.
Do not allow anything hard to come in contact with the
density sensor window. Do not use excessive force to
clean the window.
166
6.10 Cleaning the Density Sensor
Replace the transfer roll cartridge. Grip
the orange U-shaped tabs as shown.
6
Insert the pins at both ends of the
transfer roll cartridge into the bearings
inside the printer.
7
To lock the transfer roll cartridge into
the printer, push down on the tabs until
you hear a click.
Troubleshooting
5
6
8
Close the front door.
167
6.10 Cleaning the Density Sensor
9
Troubleshooting
6
168
On the printer's right side, press the
side of the power switch marked "I" to
switch on the printer.
If the Bypass Tray Comes
Loose
The bypass tray can come loose from the printer if it receives a strong shock. If it has come
loose, move to the reference according to the symptom to fix the problem.
<If the pins on one or both sides of the bypass
tray are outside of the holes in the tray cover>
<If the bypass tray has separated from the
printer>
Bypass tray
Bypass tray
Bypass tray cover
Bypass tray cover
"Mount Bypass Tray Onto the Printer."
Mount Bypass Tray Cover Onto the Bypass Tray.
Procedure
1
Bend the bypass tray cover to the
outside and insert the protrusions on
the bypass tray into the holes in the
cover.
Pin
Troubleshooting
"Mount Bypass Tray Cover Onto the Bypass Tray."
6
Hole
Bypass tray cover
2
If both sides are loose, do the same for
the other side.
169
6.11 If the Bypass Tray Comes Loose
Mount Bypass Tray Onto the Printer.
Procedure
1
Removing the bypass tray cover and
bypass tray from the printer.
2
Push up button A (1) and fully open the
front door (2).
Pin
Then, close the front door.
Hole
Troubleshooting
Bypass tray cover
3
Make sure that the part shown in the
drawing hanging down.
4
Hold the bypass tray horizontally and
insert it all the way inside from the front
of the printer.
6
Pull the protrusions on the bypass tray
all the way from the front to the back on
the printer bearings.
170
6.11 If the Bypass Tray Comes Loose
5
Lay the bypass tray on the printer side.
While holding it with your hand, insert
the protrusions on both sides of the
bypass tray cover into the bearings on
the printer.
6
Lay the bypass tray. While holding it
with your hand, insert the protrusions
on both sides of the bypass tray into
the holes in the bypass tray cover.
Troubleshooting
6
171
Chapter
7
Clearing Paper Jams
7.1
Paper Jams.......................................................................................174
7.2
Paper Jams in Bypass Tray ............................................................176
7.3
Paper Jams in the Paper Tray .........................................................177
7.4
Paper Jams Between the Drum Cartridge and Fuser Cartridge..179
7.5
Paper Jams in the Paper Rotator ...................................................182
7.6
Paper Jams in the 2 Tray Module ...................................................183
Paper Jams
If a paper jam occurs, printing stops and an error message appears on the control panel
informing you of the location of the paper jam.
To clear the paper jam, read the error message, refer to the appropriate section below, and
follow the procedure.
Duplex Jam
Open Cover B
Feed Jam
Check Tray
"7.2 Paper Jams
in Bypass Tray"
Feed Jam
Check Tray
"7.5 Paper Jams in the
Paper Rotator"
Regi. Jam
Open Cover A
Fuser Jam
Open Cover A & B
"7.4 Paper Jams Between
the Drum Cartridge and
Clearing Paper Jams
7
174
"7.3 Paper Jams in
the Paper Tray"
"7.6 Paper Jams in the
2Tray Module "
Fuser Cartridge"
Attempting to print while there is paper jammed in the printer may damage the printer. Remove jammed paper
immediately.
●
●
If a paper jam occurs, the open cover indicators on the printer comes on, according to the location of the jam.
Press button A or B, open the front door, and remove the jammed paper.
The illustration above shows the printer with the optional 2 tray module installed.
7.1 Paper Jams
●
●
●
If smoke comes out of the printer when a paper jam occurs, do not open the printer covers. Switch off the printer,
remove the power cord from the AC outlet, and contact your Fuji Xerox or dealers for assistance.
Remove jammed paper slowly and carefully to avoid tearing it.
Paper jams can be caused by incorrect printer installation, or using unsuitable or low-quality paper. For details about
the types of paper suitable for printing, refer to "4.1 Suitable and Unsuitable Paper Types".
Clearing Paper Jams
●
When removing jammed paper, make sure that no pieces of torn paper are left in the machine.
A piece of paper remaining in the machine can cause fire.
If a sheet of paper is wrapped around the heat roller, or when clearing a jammed paper that is
difficult or impossible to see, do not try to remove it by yourself. Doing so can cause injuries
or burns. Switch off the machine immediately, and contact your Fuji Xerox or dealers.
Never touch a labelled area found on or near the heat roller. You can get burnt.
If a sheet of paper is wrapped around the heat roller, do not try to remove it by yourself to
avoid injuries or burns. Switch off the machine immediately, and contact your Fuji Xerox or
dealers.
7
175
Paper Jams in Bypass
Tray
Follow the procedure below to remove the jammed paper.
Procedure
Clearing Paper Jams
7
176
1
Pull the jammed paper out of the
bypass tray.
2
Push up button A (1) and fully open the
front door (2). Confirm that there are no
scraps of paper remaining inside the
printer.
3
Close the front door.
Paper Jams in the Paper
Tray
If the Optional 2 tray module is not installed, follow the procedure below to remove paper
jammed in the paper tray.
If the Optional 2 tray module is installed, look for the jammed paper sequentially, starting
with the lowest tray. Follow the procedure described in "7.6 Paper Jams in the 2 Tray
Module".
Procedure
Slowly, completely remove the paper
tray from the printer.
2
Remove all the jammed and/or creased
paper from the tray.
3
If there is jammed paper remaining
inside the printer, pull it out carefully to
avoid tearing it.
4
Clearing Paper Jams
1
7
Push up button A (1) and fully open the
front door (2). Confirm that there are no
scraps of paper remaining inside the
printer.
177
7.3 Paper Jams in the Paper Tray
Clearing Paper Jams
7
178
5
Close the front door.
6
Hold the paper tray with both hands,
align it with the opening in the printer
and gently insert it.
7
Push the paper tray completely back
into the printer.
Do not use excessive force on the paper tray. Doing so
could damage the paper tray or the inside of the printer.
Paper Jams Between the
Drum Cartridge and Fuser
Cartridge
This section describes the procedures to remove paper jammed around the drum cartridge
and in the fuser. Select the appropriate procedure according to the location of the jammed
paper.
Paper Jams Around the Drum Cartridge:
Follow the procedure below to remove the jammed paper.
Procedure
Push up button A (1) and fully open the
front door (2).
2
If there is paper jammed around the
drum cartridge (Illustration A), continue
following this procedure.
<Illustration
Clearing Paper Jams
1
A>
Fuser cartridge
Drum
cartridge
Paper
If there is paper jammed around the
fuser cartridge (Illustration B), follow
the procedure for "Paper Jams Around
the Fuser Cartridge:" on the next page.
<Illustration
B>
7
Fuser cartridge
Paper
Drum
cartridge
179
7.4 Paper Jams Between the Drum Cartridge and Fuser Cartridge
3
Open the fuser cartridge levers and
remove the jammed paper.
If the paper is torn, remove any scraps
of paper remaining inside the printer.
4
Be sure to close the fuser cartridge
levers after removing the jammed
paper.
5
Close the front door.
Clearing Paper Jams
Paper Jams Around the Fuser Cartridge:
1
Push button B (1) and open the front
door (2).
2
Open the levers at the ends of the fuser
cartridge and remove the jammed
paper.
7
If the paper is torn, remove any scraps
of paper remaining inside the printer.
During operation, the fuser unit (heater) becomes very
hot.
Touching directly can cause burns. Be very careful.
180
7.4 Paper Jams Between the Drum Cartridge and Fuser Cartridge
3
Be sure to close levers at the ends of
the fuser cartridge after removing the
jammed paper.
4
Close the front door.
Paper Longer Than 355.6 mm Becomes Jammed:
Clearing Paper Jams
If paper longer than 355.6 mm becomes jammed in the printer, cut the paper as
necessary and remove the paper from the location where it is jammed using the
appropriate procedure. If the front door is difficult to open, do not force it. Switch
off the printer immediately and contact your Fuji Xerox or dealers.
7
181
Paper Jams in the Paper
Rotator
Follow the procedure below to remove the jammed paper.
Procedure
1
Push button B (1) and open the front
door (2).
2
Remove the jammed paper.
If the paper is torn, remove any scraps
of paper remaining inside the printer.
Clearing Paper Jams
7
182
3
Close the front door.
Paper Jams in the 2 Tray
Module
Follow the procedure below to remove the jammed paper.
Procedure
1
Starting with the bottom tray, pull out
each tray until you find the jammed
paper.
Paper in the tray module passes in front of the paper tray
as it feeds into the printer. If paper jams along this path,
clear the jam starting with the lower paper tray, then the
upper one. Otherwise, the jammed paper may block the
upper paper tray, preventing you from taking it out of
the printer.
Remove all the jammed and/or creased
paper from the tray.
3
If there is jammed paper inside the
printer, pull it out carefully to avoid
tearing it.
Clearing Paper Jams
2
7
4
Push up button A (1) and fully open the
front door (2). Confirm that there are no
scraps of paper remaining inside the
printer.
183
7.6 Paper Jams in the 2 Tray Module
Clearing Paper Jams
7
184
5
Close the front door.
6
Close all open paper trays.
Chapter
8
Daily Care
8.1
Replacing the Toner Cartridges ............................................... 186
8.2
Replacing the Drum Cartridge.................................................. 190
8.3
Replacing the Transfer Roll Cartridge ..................................... 196
8.4
Printing Reports and Lists........................................................ 199
8.5
Confirming Printer Status from Your Computer ..................... 204
8.6
Cleaning the Printer .................................................................. 210
8.7
Moving the Printer ..................................................................... 211
8.8
Storing the Printer ..................................................................... 216
Replacing the Toner
Cartridges
The printer uses four toner cartridges: black, yellow magenta, and cyan.
When the toner supply in a cartridge begins to run out, the message "Replace xxxx Toner
(x)" message appears on the control panel (xxxx is the toner cartridge color). Replace toner
cartridges as soon as the message prompting you to do so appears. The printer stops
operating if you do not replace the cartridge when required.
Replace Cyan
Toner (C)
Toner cartridges are consumables. For more information about consumables, refer to "Appendix A Introduction to
Options and Consumables".
For details about when to change consumables, refer to "Appendix D Life Span of Consumables".
8.1.1
Toner Cartridge Handling Precautions
Never throw a toner cartridge into an open flame. It can cause an explosion and you
can get burnt.
Daily Care
8
Handling Precautions
●
●
●
●
●
●
186
Never use a vacuum cleaner to clean toner. Static electricity could build up and
damage sensors.
Do not reuse toner cartridges once you have removed them from the printer.
Loose toner could spill inside the printer and deteriorate print quality.
To prevent residual toner form spilling, avoid shaking or bumping used toner
cartridges.
After moving a toner cartridge from a cold place to a warm place, allow 1 hour
for the cartridge to adapt to room temperature before installing it. (This is not
necessary if there is no condensation.)
Toner is harmless, but should still be washed off immediately if it comes into
contact with hands or clothing.
If you are not using the toner cartridge recommended by our company, the
performance of the machine may not be at its optimum level. Use the toner
cartridge recommended for this product.
8.1 Replacing the Toner Cartridges
Storage Precautions
●
●
●
●
8.1.2
Select a storage location away from direct sunlight and meeting the following
conditions:
Ambient temperature range, 0 to 35°C. Humidity range 15 to 80% RH (no
condensation). Avoid hot and humid areas.
Avoid storing near magnetic objects such as CRT screens, disk drives, or
floppy disks.
Keep out of reach of children.
Replacing the Toner Cartridges
Follow the procedure below to replace toner cartridges.
1
Remove the top cover and place it on a
flat surface.
Daily Care
Procedure
8
187
8.1 Replacing the Toner Cartridges
2
Grip the levers at the ends of the toner
cartridge that you want to replace and
pull them up.
3
Pull out the toner cartridge.
Put the toner cartridge on a piece of paper to prevent
toner from staining floor or furniture.
Daily Care
8
188
4
Select the new toner cartridge whose
color matches the label on the insertion
point and remove it from its packaging.
5
Shake the toner cartridge seven or
eight times as illustrated to distribute
toner evenly.
8.1 Replacing the Toner Cartridges
6
Align the toner cartridge with the
corresponding insertion point in the
printer and insert it as illustrated.
7
Grip the levers at each end of the toner
cartridge with your fingers, then push
down firmly to rotate the levers forward
to the ( ) position.
Toner seal
Turn to the proper position. You will
hear a click.
8
Pull the toner seal straight up to
remove it.
Pull out the toner seal directly upward. The tape can
break partway if pulled out at an angle.
Replace the top cover.
Daily Care
9
8
189
Replacing the Drum
Cartridge
Consists of the light-sensitive drum, the developer and the transfer roller.
When the drum deteriorates, the "Replace Drum Cartridge" message appears on the control
panel. Replace the drum cartridge as soon as the message prompting you to do so appears.
Replace Drum
Cartridge
The drum cartridge is a consumable. For more information about consumables, refer to "Appendix A Introduction to
Options and Consumables"
For details about when to change consumables, refer to "Appendix D Life Span of Consumables".
8.2.1
Drum Cartridge Handling Precautions
Never throw a drum cartridge into an open flame. It can cause an explosion and you
can get burnt.
Daily Care
Handling Precautions
●
8
●
●
●
●
●
190
Do not touch the photosensitive surface (the blue colored portion) or the
intermediate transfer roll surface (the black colored area) directly with your
hands. Do not allow anything to touch or scratch the surfaces of the
photosensitive or intermediate transfer roller. Scratches or oil and dirt from your
hands on the roller deteriorates print quality.
Do not expose the drum cartridge to direct sunlight. Do not expose it to
fluorescent lights. This will cause the print to become dirty or to not show up in
those areas.
When replacing the drum cartridge, work on a desk or other flat surface to
avoid scratching the light-sensitive drum and transfer roller.
Do not remove drum cartridges in use. Dirty spots may be printed
Do not tilt or shake drum cartridges in use when removing them temporarily.
Loose toner can spill inside the printer and deteriorate print quality.
To ensure good print quality, keep the drum cartridge level when handling it.
8.2 Replacing the Drum Cartridge
●
●
●
Drum cartridges weigh approximately 4.5 Kg. Handle them with care.
If you are not using the drum cartridge recommended by our company, the
performance of the machine may not be at its optimum level. Use the drum
cartridge recommended for this product.
When setting the drum cartridge, do not shake or tilt them.
Storage Precautions
●
●
●
●
●
●
8.2.2
Do not unpack new drum cartridges until you are ready to install them. If a
drum cartridge is unpacked, put it in its aluminum package for storage.
Select a storage location away from direct sunlight and meeting the following
conditions:
Ambient temperature range, 0 to 35°C. Humidity range 15 to 80% RH (no
condensation). Avoid hot and humid areas.
Avoid storing near magnetic objects such as CRT screens, disk drives, or
floppy disks.
Keep out of reach of children.
Store in a level position.
Replacing the Drum Cartridge
Follow the procedure below to replace the drum cartridge.
Daily Care
8
191
8.2 Replacing the Drum Cartridge
Procedure
1
Push up button A (1) and fully open the
front door (2).
2
Push the button as shown and open
the paper outlet cover.
3
Grip the handle on top of the drum
cartridge and gently lift it out of the
printer.
Daily Care
8
Hold the drum cartridge by its handle to prevent it from
falling.
4
Open the top of the new drum cartridge
box and pull of the top part of the
aluminum package.
Remove the sheet by working inward from the two
notches.
192
8.2 Replacing the Drum Cartridge
5
Grip the handle on top of the drum
cartridge and gently lift it. Place the
cartridge on a flat surface.
Lift the drum cartridge by the handle. Do not allow the
cartridge to touch anything when removing it from the
box.
When setting the drum cartridge, do not shake or tilt
them.
6
Remove the polystyrene packing and
open the top of the aluminum package
from the left and right.
7
Take the new drum cartridge out of its
package and pull on the longer of the
paired seals horizontally toward you.
Verify that there is a circle on the
leading edge of the tape that you pull
out.
If there is no circle on the leading edge of the tape, you
cannot use this drum cartridge. Contact your dealer.
Keep the drum cartridge polystyrene packing, aluminum
package, and box in case you need to transport the
printer over long distances in the future.
8
Daily Care
Do this for another three.
Check for a circle on
the leading end of the tape
8
Remove the tape from the top of the
cartridge (1), hold the protective cover
on both sides and remove it from the
drum cartridge (2).
193
8.2 Replacing the Drum Cartridge
9
Grip the handle on top of the drum
cartridge and face the flat part towards
the back of the printer.
10
With the flat part of the cartridge facing
the rear, align the orange rollers on
both sides of the drum cartridge with
the slots in front of the arrows on the
printer, and gently lower the cartridge
into the printer.
●
●
11
Daily Care
8
194
Protective
sheet
Orange
rollers
Lowering the cartridge into the printer without
correctly aligning the rollers with the slots can
damage the cartridge.
Do not allow the surface covered with a protective
sheet to come into contact with anything.
Pull the protective sheet on the
cartridge straight up to remove it, as
illustrated.
Do not touch the transfer roller (black part). Make sure
that nothing touches or scratches the roller surface.
Scratches or oil from your hands on the roller
deteriorates print quality.
12
Flat side faces
the rear
Close the paper outlet cover.
Do not touch the transfer roller
8.2 Replacing the Drum Cartridge
13
Close the front door.
Daily Care
8
195
Replacing the Transfer
Roll Cartridge
The transfer roll cartridge consists of a transfer roller and a transfer roll collection box.
When the transfer roll cartridge deteriorates, the "Replace Transfer Roll Cartridge" message
appears on the control panel. Replace the transfer roll cartridge as soon as the message
prompting you to do so appears. The printer stops operating if you do not replace the
cartridge when required.
Replace Transfer
Roll Cartridge
The transfer roll cartridge is a consumable. For more information about consumables, refer to "Appendix A
Introduction to Options and Consumables".
For details about when to change consumables, refer to "Appendix D Life Span of Consumables".
8.3.1
Transfer Roll Cartridge Handling
Precautions
Daily Care
Never throw a transfer roll cartridge into an open flame. It can cause an explosion
and you can get burnt.
Handling Precautions
●
8
●
●
●
●
196
Do not remove transfer roll cartridges in use.
Replace the transfer roll cartridge as soon as the message prompting you to do
so appears. The printer stops operating if you do not replace the cartridge
when required.
Do not attempt to reuse toner from the transfer roll collection box.
When you remove the transfer roll cartridge from the printer because the
transfer roll collection box is full, do not attempt to empty the transfer roll box
and reuse the cartridge, as toner may spill inside the printer and cause
damage. Loose toner can spill inside the printer and deteriorate print quality.
Do not temporarily remove transfer roll cartridges in use. Loose toner can spill
inside the printer and deteriorate print quality.
8.3 Replacing the Transfer Roll Cartridge
8.3.2
Replacing the Transfer Roll Cartridge
Follow the procedure below to replace the transfer roll cartridge.
Procedure
Push up button A (1) and fully open the
front door (2).
2
Grip the orange tabs at both ends of
the transfer roll cartridge (1) and gently
lift it out of the printer (2).
Daily Care
1
8
Lift the transfer roll cartridge carefully to prevent
transfer roll from spilling out.
197
8.3 Replacing the Transfer Roll Cartridge
Daily Care
8
198
3
Unpack a new transfer roll cartridge
and grip the orange tabs as shown.
4
Insert the pins at both ends of the
transfer roll cartridge into the bearings
inside the printer, and gently push the
roller into the printer.
5
To lock the transfer roll cartridge into
the printer, push down on the tabs until
you hear a click.
6
Close the front door.
Printing Reports and Lists
Use the operation panel to print the following reports and lists.
●
Printer Settings
Use this to confirm options installed in the printer and to check the network settings on the printer.
"8.4.1 Confirming Printer Configuration and Network Settings"
●
Panel Settings
Use this to check the parameters set with the control panel.
●
PCL6 Fonts List
Use this to find out which fonts are loaded into the printer.
●
Job History
This is a report of the last 22 print jobs received by the printer. Use it to check whether the jobs were printed
normally or not.
"8.4.2 Checking the Print Log"
Daily Care
8
* Fonts stated in the PCL Fonts List are trademarks of
Bitstream Inc. and International Type Company.
199
8.4 Printing Reports and Lists
8.4.1
Confirming Printer Configuration and
Network Settings
Printing the Printer Settings list allows you to check what options are installed on
the printer and the way the printer's network settings are configured.
Daily Care
8
200
8.4 Printing Reports and Lists
This section describes how to print the Printer Settings list. Use the following
control panel buttons:
Display (messages appear here)
Power saver
Front Door Release Button
Menu
Ready
Eject
Cancel
Set
Back
Error
button
Menu button
Set/Eject button
For details about control panel operations, refer to "5.2 Basic Menu Operation".
The Printer Settings list is printed on A4 paper. Set the A4 paper lengthwise into the paper tray.
Ready to Print
(The print screen. The printer is ready to print.)
Press the Menu button. The menu screen appears.
Menu
1:System
Daily Care
Press the
(The Menu screen)
button three times.
Menu
4:Report/List
Press the Set/Eject or
button once.
4:Report/List
Printer Settings
Press the Set/Eject or
8
button once.
Printer Settings
Ready to Print
Press the Set/Eject button once.
Printer Settings
Printing
Tray 1
When printing is finished, the print screen reappears.
201
8.4 Printing Reports and Lists
8.4.2
Checking the Print Log
Use the control panel to print the Job History Report. The print log is a report of
the last 22 print jobs received by the printer. Use it to check whether the jobs
were printed normally or not.
When "Auto Log Print" in the "1:System" menu is set to "Yes", the print log is printed automatically
every 22 print jobs (Default: "No"). For more details, refer to "5.3 List of Menu Items".
This section describes how to print the Job History Report.
Use the following control panel buttons:
Display (messages appear here)
Daily Care
8
Power saver
Front Door Release Button
Menu
Ready
Eject
Cancel
Set
Back
Error
Menu button
button
Set/Eject button
For details about control panel operations, refer to "5.2 Basic Menu Operation".
The Job History Report is printed on A4 paper. Set the A4 paper lengthwise into the paper tray.
202
8.4 Printing Reports and Lists
Ready to Print
(The print screen. The printer is ready to print.)
Press the Menu button. The menu screen appears.
Menu
(The Menu screen)
1:System
Press the
button three times.
Menu
4:Report/List
Press the Set/Eject or
button once.
4:Report/List
Printer Settings
Press the
button three times.
4:Report/List
Job History
Press the Set/Eject or
button once.
Job History
Ready to Print
Press the Set/Eject button once.
Tray 1
When printing is finished, the print screen reappears.
Daily Care
Job History
Printing
8
203
Confirming Printer Status
from Your Computer
This printer features a variety of network tools that enable you to check the status of the
printer from your computer through the network.
Using these tools saves you from having to leave your computer to check if the printer is
working properly.
This section gives a basic introduction to the various tools.
8.5.1
Checking Status and Remaining
Amounts of Consumables with a Web
Browser
When using TCP/IP to communicate with the printer, you can check the printer
status and make printer settings through the network from a Web browser.
This feature is called "CentreWare Internet Services".
CentreWare Internet Services also let you check the remaining amount of paper
and consumables in the printer.
Printer Console
Online
Error
Close
Front Door
Close
Front Door
Printer Consol
e
Online
Error
Daily Care
8
204
Close
Front Door
The following section describes the procedure to use CentreWare Internet
Services.
The example presented here uses Microsoft Internet Explorer 6.0 running on
Windows 98.
8.5 Confirming Printer Status from Your Computer
Procedure
1
Switch the computer on and start your Web browser.
To ensure that CentreWare Internet Services is working correctly, you need to change the following
settings of the browser.
And if the CentreWare Internet Services is not connected properly, check the settings below:
●
Set "Check for newer versions of stored pages" to "Every visit to the page or Every time you start
Internet Explorer".
For details about CentreWare Internet Services, refer to the Network Print Environment User Guide on
the CD-ROM provided.
2
In the Address box of your Web browser, type the IP address or the
Internet address of the printer.
If you are not certain of the printer's IP address, print the Printer Settings list to confirm it. For details
about printing the list, refer to "8.4.1 Confirming Printer Configuration and Network Settings".
●
Example 1: For IP address 129.249.242.179, type http://129.249.242.179/
Daily Care
●
If the network uses DNS (Domain Name System) and the printer host name is registered with the
domain name server, you can access the printer using a combination of the host name and the
domain name as the Internet address.
DNS is a service that creates an IP address from a host name on the Internet. Consult your system
administrator to learn if DNS is in use and the Internet address for the printer.
With some proxy servers, CentreWare Internet Services might not appear, even if you input the IP
address.
When this occurs, refer to the Network Print Environment User Guide on the CD-ROM provided
with the printer, and set your browser to connect directly to CentreWare Internet Services, without
going through the proxy server.
8
Example 2: For Internet address: dpc.aaa.bbb.fujixerox.co.jp,
type http://dpc.aaa.bbb.fujixerox.co.jp/
205
8.5 Confirming Printer Status from Your Computer
3
Press the Enter key.
The CentreWare Internet Services screen appears.
4
Click Job and History.
At the right of the screen, detailed status information about jobs requested from the control panel as
well as each protocol is displayed.
Click Completed Jobs in the tree on the left to view the print log of completed jobs.
Daily Care
8
206
8.5 Confirming Printer Status from Your Computer
5
Click the Status tab.
Printer information appears on the right side of the screen.
Information about paper trays, the output tray, printer covers, remaining consumables and toner, and
the number of sheets output appears in this area.
6
Click Fault Status.
Event information appears on the right side of the screen.
Use this to check for errors. The control panel status of the is also displayed.
Daily Care
8
207
8.5 Confirming Printer Status from Your Computer
8.5.2
Checking Status From the Desktop
This printer features a network tool called "CentreWare Simple Status
Notification" that enables you to check the status of the printer through the
network from your Windows computer. With this tool, you can determine the
status of the printer from the appearance of the icon displayed on the computer's
desktop. You can also use this tool to start CentreWare Internet Services.
For more details, refer to the Network Print Environment User Guide on the CDROM provided.
Daily Care
8
208
8.5 Confirming Printer Status from Your Computer
8.5.3
Checking Status by E-Mail
When the printer uses TCP/IP, you can communicate with the printer by e-mail.
● When users inquire about network settings or the printer status, the printer
sends a reply by e-mail.
●
If an error occurs at the printer, the printer sends an error notification to the
user by e-mail.
This function is called "Status Messenger".
Daily Care
For details about the necessary settings to use the Status Messenger and how to send e-mail, refer to
the Network Print Environment User Guide on the CD-ROM provided.
8
209
Cleaning the Printer
We recommend that you clean the printer at least once a month to keep it in good working
condition and to maintain print quality.
Be sure to switch off and unplug the machine before accessing the interior of the machine for
cleaning, maintenance, or fault clearance. Access to a live machine's interior can cause electric
shocks.
Cleaning Precautions
●
●
●
Never spray anything directly onto the printer. Droplets can enter the printer
and cause malfunctions. Never use detergents other than neutral detergents.
Never lubricate the printer with oil. The printer does not require lubrication.
Never use a vacuum cleaner to clean the printer.
Cleaning the Outside of the Printer
Procedure
Daily Care
1
On the printer's right side, press the
side of the power switch marked " " to
switch off the printer.
2
Use a soft, damp, well-squeezed cloth
to clean the outside of the printer.
If some stains prove difficult to remove,
use a cloth lightly moistened with
neutral detergent.
8
3
210
Wipe any remaining water with a soft,
dry cloth.
Moving the Printer
Before transporting the printer by car or truck over long distances, follow the procedure
below to prevent strong vibrations from damaging the printer.
●
●
●
The machine weighs 35.3 kg when the consumables and paper tray are fully assembled. When
moving the equipment, make sure that there are two or more persons carrying it.
When lifting the machine, face the front panel and firmly grip the recessed areas provided on
both sides of the machine. Never try to lift the machine by gripping any other areas. Lifting the
machine by gripping any other areas can cause the machine to fall and result in injuries.
When lifting the machine, get a firm footing and bend your knees to avoid possible injuries to
your back.
Recessed area
If you hold the printer by the front door, left or right
sides, there is a danger of the printer falling.
●
●
Procedure
1
On the printer's right side, press the
side of the power switch marked " " to
switch off the printer.
Daily Care
●
When moving, do not allow the printer to tilt more than 10 degrees left, right, front or back. Wear-out parts in the
printer can fall and cause damage.
When moving, remove the toner cartridge. Loose toner can spill inside the printer and deteriorate print quality.
When the optional 2 tray module is installed, remove it before transporting the printer. If the tray module is not
removed, it may fall, resulting in damage or injuries. To remove 2 tray module, refer to the 2Tray Module
Installation Guide.
8
211
8.7 Moving the Printer
2
Disconnect the power cord, interface
cable, and any other cables.
Never touch a power cord with wet hands.
Danger of electric shock exists.
When unplugging the machine, grasp the
plug instead of the cord. Forcibly pulling on
a cord can damage it and cause fire or
electric shocks.
Daily Care
8
212
3
Gently pull out the paper tray until it
stops.
4
Hold the tray with both hands, lift the
front slightly and pull it completely out
of the printer.
5
Remove the paper from the paper tray,
and store it in a dry, dust-free place.
8.7 Moving the Printer
Insert the heavy weight paper spacers
in the tray as illustrated.
7
Hold the paper tray with both hands,
align it with the opening in the printer
and gently insert it.
8
Push the paper tray completely back
into the printer.
9
Remove the tray cover from the rear of
the printer.
Daily Care
6
8
213
8.7 Moving the Printer
10
Push up button A (1) and fully open the
front door (2).
11
Push the button as shown and open
the paper outlet cover.
12
Grip the handle on top of the drum
cartridge and gently lift it out of the
printer.
●
●
Daily Care
8
214
Do not touch the transfer roller.
Hold the drum cartridge by its handle to prevent it
from falling.
Wrap the drum cartridge in its aluminum package or
thick paper to avoid exposing it to direct sunlight or
other strong light.
13
Close the paper outlet cover.
Transfer roller
8.7 Moving the Printer
14
Close the front door.
15
To protect the printer from damage,
pack it in a box before transporting it.
After moving the printer to the new location, you need
to readjust the color registration. For details about this
operation, refer to "1.1 Adjusting Color Registration".
Daily Care
8
215
Storing the Printer
Follow the procedure below when you do not need to use the printer for a long period.
Procedure
1
On the printer's right side, press the
side of the power switch marked " " to
switch off the printer.
2
Disconnect the power cord, interface
cable, and any other cables.
Never touch a power cord with wet hands.
Danger of electric shock exists.
When unplugging the machine, grasp the
plug instead of the cord. Forcibly pulling on
a cord can damage it and cause fire or
electric shocks.
3
Daily Care
8
216
Remove the paper from the paper tray,
and store it in a dry, dust-free place.
If the paper proves difficult to remove, pull the tray
completely out of the printer and try removing the paper
again.
1
Appendix
A
Introduction to Options and Consumables............................. 218
B
Control Panel Menu List............................................................ 221
C
Specifications ............................................................................ 225
D
Life Span of Consumables........................................................ 229
E
Obtaining Product Information................................................. 230
F
Precautions and Limitations .................................................... 233
G
Glossary ..................................................................................... 233
Introduction to Options
and Consumables
The following options are available for this printer. To order any of these options, contact
your Fuji Xerox or dealers.
A.1
Options
Additional Memory (128/256 MB)
It may be necessary to expand the memory
of your printer if you want to print color
documents containing complex graphic
layouts or large amounts of color image
data.
Additional memory cards compatible with the
printer must be of the following type:
●
144 pin SO-DIMM
For the installation procedure, refer to the
Setup Guide.
Hard Disk Kit
The optional hard disk enables high-speed
sorting, when you print multiple copies of a
document.
For the installation procedure, refer to the
Setup Guide.
500sheets Cassette
Appendix
218
This is the same as the standard tray
supplied with the printer but is also available
separately.
A Introduction to Options and Consumables
2Tray Module
This option allows you to attach an additional
2 trays to the printer. Each tray of the
module holds up to 500 sheets of paper.
When installed, the trays become the
printer's tray 2 and tray 3.
To install the tray module, refer to the Setup
Guide or the 2Tray Module Installation
Guide.
Network Expansion Card
The printer can be adapted to support TCP/
IP. Installing a network expansion card also
allows you to print in NetWare, SMB, or
EtherTalk networks.
For the installation procedure, refer to the
Setup Guide. For details about configuring
the printer for use on a network, refer to "1.2
Configuring the Printer" or the Network Print
Environment User Guide.
Contents Bridge Enhancement Kit
By installing the Contents Bridge Enhancement Kit on the interface board, it is
possible to output PDF files that comprise objects that use LZW compression,
when using PDF direct printing.
You can use the machine as a PostScript printer by installing the PostScript3 Kit
on the interface board.
For details, please refer to the User Guide (PostScript3 Kit).
Appendix
PostScript3 Kit
219
A Introduction to Options and Consumables
A.2
Consumables
The following consumables are made exclusively for use with this printer. They cannot be used with
other printers.
Toner Cartridges
The printer uses four toner cartridges: black,
yellow, magenta, and cyan.
For the installation procedure, refer to "8.1.2
Replacing the Toner Cartridges".
Drum Cartridge
Consists of the light-sensitive drum, the
developer and the transfer roller.
For the installation procedure, refer to "8.2.2
Replacing the Drum Cartridge".
Transfer Roll Cartridge
The transfer roll cartridge consists of a
transfer roller and a transfer roll collection
box.
For the installation procedure, refer to "8.3.2
Replacing the Transfer Roll Cartridge".
Appendix
220
Control Panel Menu List
Ready to Print
Print screen
The following flow chart shows the
menus and the items they contain.
Press Menu button
Menu screen
1:System
SE
SE
Power Save Timer
SE
3 min. *
Mode 1
SE
Range: 1 to 120 minutes
SE
Mode 2
5 min. *
SE
Range: 5 to 120 minutes
SE
Power Saver
SE
Mode 1
Enabled *
SE
Disabled
SE
Mode 2
Enabled
SE
Error Alarm
SE
Disabled *
Yes *
SE
No
SE
Job Time-Out
300 sec. *
SE
Range: Off, 5 to 300 seconds
SE
Yes
Auto Log Print
SE
No *
SE
ID Print
Off *
Top Left
Top Right
SE
Bottom Left
Bottom Right
SE
Yes
Text Print
SE
No *
SE
2:Maintenance
Init NVM
SE
Ready to Init
SE
Security
Yes
No
SE
SE
Panel Lock
Yes
SE
No *
Paper Density
SE
Plain Paper 1
Light 60-75g/m2 *
SE
Heavy 65-80g/m2
SE
Plain Paper 2
Light 76-99g/m2 *
Appendix
Change Password
SE
SE
Heavy85-105g/m2
SE
ColorRegiCorrect
SE
Correction Chart
Ready to Print
SE
SE
Enter Number
See next page...
SE
Y= 0 M= 0 C= 0
: select value,
: shift cursor
221
B Control Panel Menu List
Power saver
Front Door Release Button
Menu
Ready
Eject
Cancel
Set
Back
Error
Symbols
SE
●
●
●
●
Press the
buttons.
Press the
and
buttons to move between menus
and items on the same level. Pressing the
button
moves to the previous menu or item. Pressing the
button advances to the next menu or item.
Press the
and
buttons to switch to different menu
levels and move the cursor (_) between parameters.
Pressing the
button in a menu moves the menu one
level down. Pressing the
button moves the menu one
level up.
Press the Set/Eject
button.
Moves to the next level. Also, press this button to set a
parameter. (When the parameter is set, "*" appears next
to it.)
Pressing the Cancel/Back button returns to the preceding menu or item.
To exit the menu screen, press the Menu button.
"*" or "_" indicate defaults.
To reset defaults, press the
and
buttons simultaneously.
...from previous page
SE
3:Parallel
SE
Enabled *
ECP
SE
Disabled
Appendix
SE
Printer Settings
4:Report/List
Panel Settings
SE
PCL6 Fonts List
Ready to Print
SE
Job History
SE
5:Network
SE
Ethernet
Auto *
10Base/Half
10Base/Full
100Base/Half
100Base/Full
"6:PDF Bridge"
222
See next page...
SE
B Control Panel Menu List
...from previous page
SE
TCP/IP
SE
IP Address Setup
DHCP *
SE
Panel
SE
IP Address
000. 000. 000. 000 *
: select value,
SE
: shift cursor
SE
Subnet Mask
000. 000. 000. 000 *
: select value,
SE
: shift cursor
SE
Gateway Address
000. 000. 000. 000 *
: select value,
SE
: shift cursor
SE
IPX Frame Type
Auto *
Shaded menu items (
) are
displayed only when an optional
network expansion card is installed.
802.3
802.2
SE
SNAP
Ethernet-II
SE
Protocol
LPD
Port9100
IPP
SMB TCP/IP
SMB NetBEUI
NetWare
Enabled *
SE
SE
Disabled
FTP
SNMP UDP/IP
Default for Status Messenger,
E-Mail Printing and FTP is Disabled.
SNMP IPX
Status Messenger
E-Mail Printing
Internet Services
SE
IP Filter
Filter 1 Address
Filter 1 Mask
Filter 2 Address
Select Address, Mode
Filter 2 Mask
000. 000. 000. 000 *
Filter 2 Mode
: select value,
SE
: shift cursor
Appendix
Filter 1 Mode
Filter 3 Address
Filter 3 Mask
SE
Filter 3 Mode
Filter 4 Address
Select Mode
Off *
Filter 4 Mask
Filter 4 Mode
Reject
Filter 5 Address
Accept
SE
Filter 5 Mask
Filter 5 Mode
SE
Init NVM
SE
Ready to Init
Yes
No
SE
223
B Control Panel Menu List
"5:Network"
SE
6:PDF Bridge
NoFix
Duplex
Size *
Bind Long Edge
Auto
Duplex Print
SE
Bind Short Edge
SE
1
No. of Sets
SE
Range: 1–999
SE
Collate
No *
Yes
SE
Off *
On
SE
SE
Skip Blank Pages
Password
Print Mode
SE
SE
Fix Size *
Auto
SE
Catalog
SE
Quality
Fast Mode
Auto *
Quality Mode
SE
Auto *
Black/White
SE
SE
Output Color
"1:System"
Appendix
224
Specifications
C.1
Printer Specifications
Type
Desktop Printer
Print Method
Laser Xerography
Resolution
1,200 dots/25.4 mm (1,200 dpi),
600 dots/25.4 mm (600 dpi)
Color Graduation
256 per color (16,700,000 colors)
Plain paper
Print speed(*1)
1,200dpi
BW/Color
Specialty paper
(heavy weight
paper,
transparencies,
labels)
Plain paper
600dpiBW/
Color
Specialty paper
(heavy weight
paper,
transparencies,
labels)
Two-sided
printing
5.0 sheets/minute
One- sided
printing
8.0 sheets/minute
Two-sided
printing
–
One- sided
printing
16.0 sheets/minute
Two-sided
printing
10.0 sheets/minute
One- sided
printing
8.0 sheets/minute
Two-sided
printing
–
Plain paper 1 (69-75 g/m2), plain paper 2 (76-99 g/m2)
Bypass Tray
Plain paper/Heavy weight paper (60-216 g/m2),
transparencies (Xerox film, no border), envelopes(*),
labels, glossy paper.
(*)
Some envelope sizes are not suitable for use.
Paper Tray
Appendix
Paper Tray
Paper Type
Output
Capacity
8.0 sheets/minute
A5, B5, A4, 8.5 x 11" (Letter), 8.5 x 14" (Legal), custom
(width: 90-216 mm, length: 139.7-900.0 mm)
Paper Size
Paper Tray
Capacity
(Standard
Domestic
Paper)
One- sided
printing
Standard: (Tray 1) 500 sheets(*)
Option: 2 tray module (trays 2, 3) 500 sheets(*) x 2
(*)
350 A5 sheets
Bypass Tray
100 sheets
Face Down Tray
250 sheets (All sheets suitable for use with the
printer.)
225
C Specifications
Memory Capacity
Standard: 64 MB (320 MB with optional memory
installed.)
Option: 128/256 MB (1 memory expansion slot
available)
Fonts
Standard: 80 PCL Typefaces
Option:
136 PostScript Fonts
PDL
Standard: PCL6 Emulation
Option:
PostScript3
Windows® 95, Windows® 98, Windows® Me,
Windows NT® 4.0 (Service Pack 4 or later),
Operating Systems Supported by the PCL6
Printer Driver
Appendix
226
Windows® 2000, Windows® XP
(Windows 98 Second Edition, Windows Me,
Windows 2000, Windows XP for USB connections.
However, we cannot guarantee the normal operation
of all USB compatible equipment.)
Interface
Bi-directional parallel (IEEE1284 compliant)
USB 2.0 (Full Speed)
Ethernet 100Base-TX/10Base-T (TCP/IP) (*)
(*)
Other protocols available with the network
expansion card installed.
Noise Level
Standby: 35 dB (A) or less, Operating (One-sided
printing): 52 dB (A) or less, Operating (Two-sided
printing): 53 dB (A) or less.
Power Supply
220/240 V ± 10 % (198 to 264 V), 50/60 Hz ± 3 Hz
Power Consumption
Operating: 850 W, Power saver mode 1: 45 W,
Power saver mode 2: 4 W or less
Weight/Dimensions
Dimensions: 439 (W) x 638 (D)(*) x 445 (H) mm
Weight: 35.3kg
(*)
With the paper tray mounted and the bypass tray
retracted:
(*1)
The values in the table indicate the maximum speeds for the A4 and Letter sizes fed lengthwise
(portrait).
●
This printer interrupts printing to clean the internal developer mechanism when continuously
printing. "Please Wait..." is displayed on the control panel while the printer is cleaning.
●
C Specifications
C.2
Network Specifications
Common Specifications
Supported Standards
Ethernet Version 2.0 IEEE 802.3
Network Protocols
TCP/IP, SMB(*1), IPX/SPX (NetWare)(*1),
AppleTalk (EtherTalk)(*2)
Interface
100Base-TX, 10Base-T
TCP/IP Specifications
Supported Operating
Systems
Windows 95, Windows 98, Windows Me,
Windows NT 4.0, Windows 2000, Windows XP
Frame Type
Ethernet_ II (Ethernet II)
Print Protocols
LPD(LPR), Port 9100 (Available in Windows 95, Windows
98, Windows Me, Windows 2000 and Windows XP), IPP
(Available in Windows Me, Windows 2000 and Windows
XP)
Management Protocols
http, SNMP, SMTP/POP3
SMB Specifications(*1)
Supported Operating
Systems
Windows 95, Windows 98, Windows Me,
Windows NT 4.0, Windows 2000, Windows XP
Print Protocols
SMB (TCP/IP), SMB (NetBEUI)
NetWare Specifications(*1)
NetWare 3.12/3.2/4.1/4.11/4.2/5
Frame Type
Ethernet_II (Ethernet II),
Ethernet_802.3 (IEEE 802.3),
Ethernet_802.2 (IEEE 802.2),
Ethernet_SNAP (IEEE 802.1 SNAP)
Print Protocols
Print server mode
Remote server mode
Management Protocols
SNMP
Appendix
Network Operating
Systems
AppleTalk (EtherTalk) Specifications(*2)
Supported Operating
Systems
Mac OS 8.1-9.2.2
Frame Type
Ethernet_ SNAP (IEEE 802.1 SNAP)
Printer Type
Laser Writer
(*1)
(*2)
Optional network expansion card required.
Optional network expansion card and PostScript3 kit required.
227
C Specifications
C.3
Printable Area
When using A4, 8.5 × 14" (Legal) or smaller.
●
Printable area
Appendix
228
Non-printable area
●
"Printable area" refers to the area
on a page where printing is
possible.
"Non-printable area" refers to the
area (the edges) on the page
where printing is not possible.
Life Span of Consumables
Life Span of Consumables (in printable pages)
Number of printable pages (*)
Consumable
Black toner cartridge
About 8,500 pages
Yellow toner cartridge
About 6,000 pages
Magenta toner cartridge
About 6,000 pages
Cyan toner cartridge
About 6,000 pages
Drum cartridge
About 30,000 pages
Transfer roll cartridge
(includes transfer roll collection box)
About 25,000 pages
(*)
The number of printable pages corresponds to the printing conditions in the table below. The
actual number of printable pages depends on the content of printed material, the paper size, and
the operating environment.
The number of pages varies according to the initialization operation that occurs when turning the
printer power on and off and the adjustments to maintain print quality.
Paper Size
A4 portrait
Coverage
5%
Monochrome/color ratio
1:1
Average number of sheets in
a single print run
4
Appendix
229
Obtaining Product
Information
The following information is provided on our internet home page:
● Latest product information
● Latest software
● Recommended applications
● Limitations of applications
URL: http://www.fujixeroxap.com
The company will not be responsible for any communications fee incurred.
Appendix
230
Precautions and
Limitations
Precautions and Limitations Relating to the Printer
Item
Explanation
Sound of movement
The sound of movement is pronounced when this printer is installed
next to desks.
Consider the surroundings when setting up the printer.
Paper wrinkles are generated
when printing documents having
high image density in two-sided
mode.
When printing documents containing highly dense images to both
sides of the paper, wrinkles can be generated, depending upon the
type of paper you use.
Print to thicker paper (such as Fuji Xerox JD paper, etc.).
Poor storing heavy weight paper
on the exit tray.
Depending on the type of paper, it may curl a great deal when fixing
the image. For that reason paper may not be stored properly in the
exit tray.
Use paper with a weight of less than 160 g/m2.
Notes About Printing
Item
Explanation
In some applications and document types, carriage returns and
pages are inserted in unintended positions. To print documents as
they appear on screen, set High Quality in Image Types in the
Graphics tab (Windows) in the printer driver.
Thin lines don't print
Thin lines are printed with
different colors.
Dotted lines are printed
Print with one of the following methods: This may result in correct
printing.
●
Make thin lines thicker.
●
Specify a darker color.
●
Do not use yellow lines (particularly on a white background) if
possible. It is recommended that you use a different color.
●
Select the Complementary Color Conversion check box with the
Detailed Settings (for Windows) in the printer driver Graphics tab.
Shaded areas are printed with
different colors.
Patterns disappear.
Patterns are printed with
different colors.
Shaded areas are marred with
printed.
Make the following settings with the printer driver to print. This may
print correctly.
●
Set Image Types to Transparencies in the Graphics tab
(Windows).
●
Select the Complementary Color Conversion check box with the
Detailed Settings in the Graphics tab (for Windows).
There are color variations in the
same object.
Depending on the application program you use, one object may be
separated into several and graphics in some locations may be sent
to the printer as an image for a different location.
Because this printer converts to the appropriate colors according to
each graphic and image, color levels occur according to the
differences in the results.
Printed with completely different
colors that the specified graphic
(blues are yellow, light blues are
red, there are blanks, etc.).
This symptom occurs when set to Super Fine in Image Types in the
Graphics tab (Windows) in the printer driver.
Set the Strict Raster Operation to On with the Graphics tab (for
Windows).
Appendix
A document's on-screen
appearance and printout are not
the same.
231
F Precautions and Limitations
Appendix
232
Item
Explanation
Printed results differ from the
Standard and High Quality in the
Image Types.
With Standard the printer processes internally with 300 x 300 dpi,
and outputs at 600 x 600 dpi. With High Quality the printer
processes internally with 600 x 600 dpi, and outputs at 600 x 600
dpi.
For that reason, internal processing may result in slight differences
in layout.
Spots are printed randomly or in
regular places.
Spots are not printed to the same locations all the time.
Print the job again.
Characters and lines are thicker
compared to other printers from
Fuji Xerox.
The transfer method differs from other printers so when printing with
this printer, the characters and lines are printed a little thicker.
For that reason, it may seem like characters are blotted, hard to see
or that white characters are blotted.
When printing photo images
after printing a large volume of
data having the same image in
the same place, such as the
lines of a table, those images are
printed faintly in those places
where images of the previous
data existed.
If there are ghosts on the drum, the images from previous data may
also be printed.
Either print a different document or temporarily stop printing. Try
reprinting after allowing the printer to sit unused for a while.
Also, outputting several hundred pages of the same document can
place a load on the printer, which should be avoided.
When ghosts occur in the
characters and lines (particularly
when printing in environments
having low temperature and low
humidity).
Use at room temperature. In winter, allow the room to warm up
before printing.
If the problem persists, reprint with a color with which the ghost
image is not obvious.
Ruined printing when using
reduced printing
Depending on the document to print, characters and patterns may
be blotted with outputting with reduced printing.
Outputting from Adobe Acrobat
Reader 4.0/5.0, Adobe Acrobat
When printing PDF files from Adobe Acrobat Reader or Acrobat on
Windows, it is recommended that Image Types be set to High
Quality in the Graphics tab for printing. When using Standard,
depending on the document you are printing, the contents may not
be accurately reproduced, such as the characters being blurred.
Outputting with FTP
Output with FTP is only possible when using the PDF direct printing
function to print.
When using the PDF direct print
function
If using the PDF direct printing function, it is necessary to add
128 MB or 256 MB memory (optional).
Glossary
10Base-T
An IEEE802.3-compliant 10-Mbps base
band twisted pair cable.
mouse button twice in quick succession
without moving the mouse.
Client
100Base-TX
An improved version of 10Base-T
sometimes called "fast Ethernet". With a
speed of 100 Mbps, it is a vast improvement
over the 10-Mbps speed of 10Base-T.
On a network, computers called "servers"
collect, store, and distribute information to
other network computers called "clients"
upon receiving requests from clients.
DHCP
Address
Unique identification assigned to individual
nodes (computer terminals, printers, etc.)
on a network. Addresses are also used to
identify separate memory areas.
"Dynamic Host Configuration Protocol". A
protocol used to automatically assign IP
addresses to DHCP clients from a DHCP
server.
DNS
Bi-directional communications
Communications that involve sending and
receiving information between 2 devices.
With bi-directional communication,
computers can send data to printers and the
printer can send status data back to the
computer.
"Domain Name System". DNS is a service
that creates IP addresses from host names
on the Internet.
dpi
"Dots per inch". A unit used to describe
printing resolution in terms of the number of
dots printed in one inch (25.4 mm).
Browser
Software used to access information from a
Web server on your computer.
Commonly used browsers include
Netscape® Communicator and Microsoft®
Internet Explorer.
CD-ROM
A device that reads from and/or writes to
disks. Several types of disk drives are in
common use: floppy disk drives, CD-ROM
drives, and hard disk drives.
EtherTalk
One of the protocols developed for use with
Macintosh "AppleTalk" network software.
Font
Click
The act of pressing and releasing the left
mouse button once without moving the
mouse. In this manual, "click" means
pressing the left mouse button. Pressing the
right mouse button is referred to as
"right-click".
Another common mouse operation is the
"double-click". It refers to pressing the left
Appendix
A compact disc (CD) that contains data
such as programs or images to be used with
computers.
Drive
A set of characters of the same typeface
(such as Times New Roman), style (such as
italic), and weight (such as bold). A font
consists of all the characters available in a
particular style and weight for a particular
typeface.
233
G Glossary
FTP
"File Transfer Protocol". A protocol used for
communicating files and data in a TCP/IP
system.
Full Color
The maximum number of different colors
that computer screens can display.
Approximately 16,770,000 colors.
G.S.M (g/m2)
This is a measure of the substance of paper
expressed in grams per square meter,
which does not depend on the number of
sheets in the ream.
Interface Cable
A cable connected between different pieces
of equipment through which
communications are carried.
Interface cables include parallel and USB
cables used to connect printers and other
peripherals to a computer, as well as
Ethernet cables used to connect peripherals
to a network.
IP Address
A TCP/IP address used on a network. IP
addresses consist of numbers (base 10)
separated by decimal points.
IPP
Help
On-screen explanations about software or
hardware.
"Internet Printing Protocol". A printing
protocol that uses HTTP.
Job
HTTP
"Hyper Text Transfer Protocol". A protocol
used to transfer data from Web servers on
the Internet.
Install
Appendix
The action required to load software or fit
hardware into computers or peripherals to
enable use. "Install" can refer to the process
of either loading software into a computer,
or fitting hardware such as a network
expansion card into a printer.
In this manual, "Install" refers to both the
installation of software and hardware.
Interface
Refers to the point where different systems
interact with one another. "Interface" is
often used to describe the communications
links between computers or systems that
allow users to interact with computers.
"Interface" can also refer to the nature of an
interface, in particular its electronic
specifications.
234
A specified amount of processing performed
as a unit by a computer. For example, when
a computer processes a file for printing, it is
called a "print job". Printing is managed in
units called "jobs", regardless of whether
the job is printed or cancelled.
Legal
A standard paper size. 14 x 8.5"
(approximately 356 x 216 mm). Widely used
in the United States for contracts and other
legal documents.
Letter
A standard paper size. 11 x 8.5"
(approximately 279 x 216 mm). Widely used
in the United States for business
documents.
Local Printer
In this manual, "local printer" refers to a
printer connected to a computer through a
parallel or USB cable.
G Glossary
Log on
The process of accessing recourses in a
computer system, such as printers or hard
disks on a network. Conversely, closing the
access is referred to as "logging off".
Multi-Up
A function that prints several pages of a
document on one page. The printer is
capable of print pages with 2, 4, 8, 16, and
32 up.
NetWare®
A network operating system developed by
Novell Inc.
NetWare File Server
The specialized server required in a
NetWare system. Server software operates
on the server and client software operates
on client computers.
Network Path
The path to a particular computer or file on a
network.
Network paths are often specified using
server names and so on.
Network Printer
In this manual, "network printer" refers to a
printer connected to a network through an
Ethernet cable.
"Non-volatile" random access memory.
Stores configuration data even after the
power is off.
OS
"Operating System". Software that controls
the basic computer operations. The
operating system is the foundation on which
application software runs.
One of the methods available to transfer
data to peripherals from a computer.
Parallel interfaces allow the simultaneous
transfer of multiple bit data. Printers are
often connected to computers through
parallel interfaces, such as the widely used
Centronics parallel interface.
PDF File
"Portable Document Format" file. A format
developed by Adobe Inc. used to create
online documents with their Adobe Acrobat
software. To read or print PDF files, you
need to install Adobe Acrobat Reader on
your computer.
Plug and Play
In Windows OS, it is a reference to the
ability of the computer system to
automatically configure a device added to it.
Port
The point of connection between computers
and peripherals through which data passes.
Port 9100
A network communications facility for
sending data with Windows 2000 and
Windows XP. Works with a standard TCP/
IP port monitor.
The TCP/IP Direct Print Utility can be used
on Windows 95, Windows 98, and Windows
Me with this printer.
Printer Driver
Software that converts data created with a
program into a form that a printer can
interpret.
Appendix
NV Memory
Parallel Interface
Print Queue
A place in a computer's memory where print
data is stored or queued until it can be sent
to the desired printer for printing.
235
G Glossary
Protocol
Convention that allows different computers
and peripherals to communicate with each
other. An arranged procedure for
transferring data between hardware or
between computers across a network.
Software
Software packages that people use for work
or pleasure on their computers. Software
sold on today's market includes programs
such as word processors, spreadsheets,
graphic editing programs, database
programs, and many more.
Resolution
Describes image quality in terms of detail
and clarity. Usually expressed in dots per
inch (dpi). The higher the resolution, the finer
the image (image details become clearer).
Server
A network computer that collects, stores,
and distributes information to other network
computers or peripherals.
Computers that request information from
the server are called "clients".
TCP/IP
A protocol developed by DARPANET
(Defense Advanced Research Project
Agency Network). This is the most common
protocol on the Internet. Machines ranging
from personal to large-scale computers use
it.
Uninstall
Removing software installed on a computer.
USB
Sort
When printing multiple copies of a
document, the sort function collates the
document as it is printed out. For example,
pages are printed in the order 1,2,3...1,2,3...
Software
Computer programs; instructions that make
hardware work. Two main types of software
are system software (operating systems)
and applications.
Web Page
Screens displayed on the computer using a
Web browser are referred to as Web pages
in this manual.
Appendix
SMB
"Server Message Block". A network
communications facility developed for use
on Windows networks (Microsoft network).
Works with Windows 95, Windows 98,
Windows Me, Windows NT 4.0, Windows
2000, and Windows XP.
SNMP
A protocol used to control network
equipment through the network.
Consists of the SNMP Manager software
(installed at the control end) and SNMP
Agent software (installed at the controlled
end).
236
"Universal Serial Bus". A method used for
transferring data between the computer and
peripheral devices. USB supports hot
plugging, which greatly simplifies
connecting peripherals, because you can
connect equipment while your computer is
on.
WINS
"Windows Internet Name Services". A
service that creates IP addresses from
computer names.
Wizard
Program used to install other software on a
computer.
WWW
"World Wide Web". The Internet. A
worldwide service that providing for the
publication and access of Web sites.
Index
Control Panel Menu List ................................221
buttons ...................................................112
buttons ...................................................112
2Tray Module .................................................219
500sheets Cassette ..........................................218
A
A indicator ......................................................110
Additional Memory ........................................218
Adjusting Color Registration .............................2
Auto Log Print ...............................................119
B
B indicator ......................................................110
black lines ......................................................143
Black Pages ....................................................141
Blotted printing ..............................................145
Blurred printing ..............................................145
Button A ...........................................................54
Button B ...........................................................54
Bypass tray ...............................................54, 169
C
Daily Care ......................................................185
DHCP .............................................................123
Dirty Printouts ................................................142
Drum cartridge .................................56, 190, 220
Duplex Print ...................................................127
E
ECP .................................................................122
E-Mail Printing .........................................83, 126
Error Alarm ....................................................119
Error indicator ................................110, 135, 163
Error Message ................................................155
Ethernet ..........................................................123
Ethernet interface connector .............................55
F
Face down tray .................................................54
Faded Printouts ...............................................142
Front door .........................................................54
FTP .................................................................125
Fuser cartridge ..................................................56
G
Gateway Address ......................................15, 124
Glossary ..........................................................233
H
Hard Disk Kit .................................................218
Index
Cancel/Back button ........................................112
Canceling Printing ............................................67
CentreWare Internet Services ........................204
CentreWare Simple Status Notification .........208
Cleaning the Density Sensor ..........................166
Cleaning the Printer .......................................210
Collate ............................................................128
Color Registration Correction Chart ..................2
ColorRegiCorrect ...........................................121
Compatible Systems ...........................................5
Configuring the Printer ......................................5
Consumables ..................................................220
Contents Bridge ..............................................127
Control panel ............................................54, 109
D
I
ID Print ...........................................................120
Incorrectly positioned printing .......................146
237
Init NVM ................................................120, 127
Install the USB Print Utility .............................48
Installing the Printer Driver (Windows 95/
Windows 98/Windows Me) .............................24
Installing the Printer Driver (Windows NT 4.0/
Windows 2000/Windows XP) ..........................38
Installing the TCP/IP Direct Print Utility .........31
Internet Services .............................................126
IP Address ..........................................12, 14, 124
IP Address Setup ............................................123
IP Filter ...........................................................126
IPP ..................................................................125
IPP protocol ......................................................16
IPX Frame Type .............................................124
J
Job History Report .........................122, 199, 202
Job Time-Out .................................................119
L
Life Span of Consumables .............................229
Loading A5 Paper ..........................................100
Loading Paper in the Bypass Tray .................107
Loading Paper in the Paper Tray ......................96
LPD ................................................................125
LPD protocol ....................................................16
M
Index
Maintenance ...................................................120
Menu button ...................................................112
Menu Screen ...................................................111
Moving the Printer .........................................211
N
NetWare .........................................................125
NetWare protocol .............................................16
Network ..........................................................123
Network Expansion Card ...............................219
238
Network Problems ......................................... 150
No Power ....................................................... 134
No. of Sets ..................................................... 127
O
Online Help ..................................................... 63
Option slot (for the network expansion card) .. 55
Option slot (for the optional hard disk) ........... 55
Options .................................................... 69, 218
Output Color .................................................. 129
P
Panel Settings ........................................ 122, 199
Paper ................................................................ 90
Paper Density ................................................ 121
Paper Jams ..................................................... 174
Paper meter ...................................................... 54
Paper outlet cover ............................................ 56
Paper rotator .................................................... 56
Paper stopper ................................................... 54
Paper tray ......................................................... 54
Parallel ........................................................... 122
Parallel interface connector ............................. 55
Partial blanks ................................................. 145
Password ........................................................ 128
PCL6 Fonts List ..................................... 122, 199
PCL6 Printer Drivers ....................................... 22
PDF Bridge .................................................... 127
Port9100 ........................................................ 125
Port9100 protocol ............................................ 16
Power cord connector ...................................... 55
Power Save Timer ......................................... 117
Power Saver ................................................... 118
Power saver button ........................................ 112
Power switch ................................................... 54
Print Mode ..................................................... 129
Print Screen ................................................... 111
Printable Area ................................................ 228
Printer Settings .............................. 122, 199, 200
Printing Custom-size (Long) Paper ..................76
Printing from a Computer ................................59
Printing on Envelopes ......................................71
Printing on Transparencies ...............................73
Problem List ...................................................132
Protocol ....................................................16, 125
Q
Quality ............................................................129
R
Ready indicator ......................................110, 135
Report/List .....................................................122
S
TCP/IP ............................................................123
TCP/IP Direct Print Utility .........................23, 31
Text Print ........................................................120
Toner cartridges ................................55, 186, 220
Top cover (Face-down tray) .............................55
Transfer roll cartridge .......................56, 196, 220
Troubleshooting .............................................131
Two-sided Printing .....................................79, 93
U
Unsuitable Paper ..............................................94
USB interface connector ..................................55
USB port ...........................................................50
USB Port (Windows 2000/ Windows XP) .......47
USB Port (Windows 98/ Windows Me) ...........48
Using E-Mail Printing ......................................83
V
Ventilation intake grille ....................................55
Vertical blanks ................................................145
W
White spots .....................................................144
Index
Security ..........................................................121
Set/Eject button ..............................................112
Skip Blank Pages ...........................................128
Slanted printing ..............................................146
SMB NetBEUI ...............................................125
SMB NetBEUI protocol ...................................16
SMB TCP/IP ..................................................125
SMB TCP/IP protocol ......................................16
smudges ..........................................................143
SNMP IPX .....................................................126
SNMP UDP/IP ...............................................125
Specifications .................................................225
Status Messenger ....................................126, 209
Storing Paper ....................................................95
Storing the Printer ..........................................216
Subnet Mask .............................................15, 124
Suitable Paper ..................................................90
Switching Off the Power ..................................58
Switching On the Power ..................................57
System ............................................................117
T
239
Customer Response Sheet
User Guide (DE-1329E2)
To improve our publications, we would appreciate your feedback regarding this manual. Please take
a few moments to complete and return this form to us.
● About Yourself
1. How often do you use this manual?
[ ] Daily [ ] Weekly [ ] Monthly [ ] Infrequently
2. When do you usually refer to the manual?
[ ] Doing a usual operation [ ] Using unfamiliar features
[ ] Solving a problem
3. Which part of the manual do you read frequently?
Chapter/Section/Page:
4. Where do you keep this manual?
5. (Optional)
Your Name:
Company or organization:
Address:
Occupation:
● About the Manual
Strongly
agree
1. It is handy.
1
2. It is easy to read.
1
3. Titles of chapters and sections make sense.
1
4. Information is logically placed.
1
5. Referencing is easy.
1
6. Content is easy to understand.
1
7. The step-by-step instructions are easy to follow.
1
8. All necessary information is included.
1
9. Illustrations aid in the understanding of content.
1
10. The use of color is effective.
1
Neutral
2
2
2
2
2
2
2
2
2
2
3
3
3
3
3
3
3
3
3
3
4
4
4
4
4
4
4
4
4
4
Strongly
disagree
5
5
5
5
5
5
5
5
5
5
Other comments:
After completing this form, detach and send it to the address below.
(Please use your own envelope and postage stamp. )
Thank you for your cooperation.
✂
Fuji Xerox Co., Ltd.
KSP R&D 2D7
3-2-1, Sakado, Takatsu-ku
Kawasaki-shi, Kanagawa-ken
JAPAN 213-0012.
This page is intentionally left blank.
DocuPrint C1618 User Guide
Human Interface Design Development
Document Products Company
Fuji Xerox Co., Ltd.
DE-1329E2 (Edition 1)
Copyright© 2002 by Fuji Xerox Co., Ltd.