1
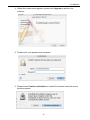
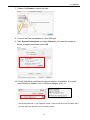
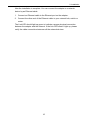
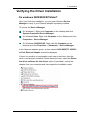
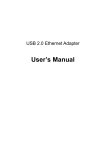
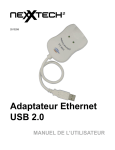
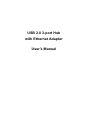
USB 2.0 3-port Hub with Ethernet Adapter User’s Manual USB 2.0 3 Port Hub with Ethernet Adapter ABOUT THIS MANUAL This manual is designed for use with the USB 2.0 3 Port Hub with Ethernet Adapter. Information in this document has been carefully checked for accuracy; however, no guarantee is given to the correctness of the contents. The information in this document is subject to change without notice. The manufacturer does not make any representations or warranties (implied or otherwise) regarding the accuracy and completeness of this document and shall in no event be liable for any loss of profit or any commercial damage, including but not limited to special, incidental, consequential, or other damage. SAFETY INSTRUCTIONS Always read the safety instructions carefully: Keep this User’s Manual for future reference Keep this equipment away from humidity If any of the following situation arises, get the equipment checked by a service technician: The equipment has been exposed to moisture. The equipment has been dropped and damaged. The equipment has obvious sign of breakage. The equipment has not been working well or you cannot get it to work according to the User’s Manual. COPYRIGHT This document contains proprietary information protected by copyright. All right are reserved. No part of this manual may be reproduced by any mechanical, electronic or other means, in any form, without prior written permission of the manufacturer. TRADEMARKS All trademarks and registered trademarks are the property of their respective owners or companies. i Table of Contents Table of Contents 1. Introduction ............................................................................................................1 Features ............................................................................................................................. 1 Package Contents .............................................................................................................. 2 System Requirements........................................................................................................ 2 2. Installation ..............................................................................................................3 Hardware Connection ....................................................................................................... 3 Driver Installation ............................................................................................................. 4 On Windows 2000/2003/XP/Vista/Windows 7................................................................. 4 On MAC OS X 10.3/10.4.................................................................................................. 7 Verifying the Driver Installation ..................................................................................... 10 On Windows 2000/2003/XP/Vista/Windows 7............................................................... 10 On MAC OS X 10.3/10.4................................................................................................ 10 3.Uninstalling the Driver.......................................................................................... 11 Uninstalling the Driver.................................................................................................... 11 4. Specifications.......................................................................................................12 5. Regulatory Compliance .......................................................................................13 FCC Conditions .............................................................................................................. 13 CE ................................................................................................................................... 13 WEEE Information ......................................................................................................... 13 ii 1. Introduction 1. Introduction It is a combination 10/100M Ethernet adapter and integrated standard-based 3-port USB hub all in one easy to use device. As a fully integrated USB solution, the new USB/Ethernet adapter allows users to easily connect to the Ethernet network with a complete out of the box, Plug-N-Play solution. Features LAN For 10/100M LAN port RJ45 Compliant with USB 2.0 and USB 1.1 specifications Compliant with IEEE 802.3 (10Base-T) and 802.3u (100Base-TX) standards Supports both full-duplex and half-duplex operations Powered by USB port. No external power adapter required Mac supported HUB 1 upstream and 3 downstream USB ports Compliant with USB 2.0 (Data Rate 1.5/12/480 Mbps) Connects up to 127 USB Devices Bus-power and self-power mode used Over-current detection and protection Plug-and-play 1 1. Introduction Package Contents USB 2.0 3-port Hub with Ethernet Adapter CD (Manual & Driver) Quick Installation Guide Power Adapter (optional) System Requirements Operating Systems: Windows 2000, 2003, XP, Vista and Windows 7 Mac OS X v10.3 or later. One available USB port 2 x1 x1 x1 optional 2. Installation 2. Installation Hardware Connection General instructions for installing the USB 2.0 3 Port Hub with Ethernet Adapter are provided below. Since the design of system may vary, refer to your system’s reference manual for further information, if needed. 3 2. Installation Driver Installation On Windows 2000/2003/XP/Vista/ 7 Caution: DO NOT connect the Ethernet adapter to your computer before you install the provided driver. You will be instructed to do so later. 1. Insert the provided CD into your disc drive. Then locate and double-click the setup.exe file under x:\Driver\Windows where x is your disc drive letter. 2. When you see the screen below, please click Next. 4 2. Installation 3. Please Click Install to begin the installation and wait a while for the program to install the driver. 4. When the installation is done, click Finish. Then the computer will be restarted as promptly. 5 2. Installation 5. Connect the Ethernet adapter’s USB end to a free USB port of your computer. Then a pop-up message will appear in the notification area indicating the installation is complete. * Actual strings depend on your operation system. These screen shots are from Windows 7 and might vary slightly for each operation system. Now the installation is complete. You can connect the adapter to a network device by an Ethernet cable: 1. Connect an Ethernet cable to the Ethernet port on the adapter. 2. Connect the other end of the Ethernet cable to your network hub, switch or router. The Link LED should light up green to indicate a proper physical connection between the adapter and the network. If the Link LED doesn’t light up, please verify the cable connections between all the network devices. 6 2. Installation On MAC OS X 10.3/10.4 1. Insert the provided driver CD into your CD-ROM drive. Double-click the CD and navigate to the directory of \Driver\Mac\Mac_OS X 10.x\AX88772.pkg 2. When the Install AX88772 USB CDC Drivers screen appears, please select Continue. 3. When the screen below appears, please choose the volume that you want to install and click Continue. 7 2. Installation 4. When the screen below appears, please click Upgrade to perform the software. 5. Please enter your password as prompted. 6. Please select Continue Installation to install the software when the screen below prompted. 8 2. Installation 7. Please click Restart to reboot the Mac. 8. Connect the Ethernet adapter to a free USB port. 9. Start System Preferences and select Network, you’ll see the screen as below prompted and please select OK. 10.You will find that a new Ethernet network interface is available. It’s usually named Ethernet Adapter (en1) or Ethernet Adapter (en2).11. *Actual strings depend on your operation system. These screen shots are from MAC OS X 10.4 and might vary slightly for each operation system. 9 2. Installation Now the installation is complete. You can connect the adapter to a network device by an Ethernet cable: 1. Connect an Ethernet cable to the Ethernet port on the adapter. 2. Connect the other end of the Ethernet cable to your network hub, switch or router. The Link LED should light up green to indicate a proper physical connection between the adapter and the network. If the Link LED doesn’t light up, please verify the cable connections between all the network devices. 10 2. Installation Verifying the Driver Installation On windows 2000/2003/XP/Vista/7 Once you finish the installation, you can open Windows Device Manager to verify if your Ethernet adapter is properly installed. To access the Device Manager: On Windows 7: Right-click Computer on the desktop and click System Properties>Device Manager On Windows Vista: Right-click Computer on the desktop and click Properties > Device Manager. On Windows 2000/2003/XP: Right-click My Computer on the desktop and click Properties > (Hardware) > Device Manager. In the Network adapters group, an item named ASIX AX88772 USB2.0 to Fast Ethernet Adapter should be displayed. If there is a question or exclamation mark next to that item, then the driver is not properly installed. Please delete the item, select the Delete the driver software for this device option (if provided), unplug the adapter from your computer and then repeat the installation steps. 10 2. Installation On MAC OS X 10.3/10.4 Once you finish the installation, you can open GO > Utilities > System Profile > Hardware > USB > to verify if your Ethernet adapter is properly installed. In the USB High-Speed Bus group, an item named ASIXx72A should be displayed. 10 3. Uninstalling the Driver 3. Uninstalling the Driver Uninstalling the Driver Please take these steps to uninstall Driver: 1. Open the Control Panel, Programs and Features and double-click Uninstall a Program on Vista and 7 or Add or Remove Programs on XP. 2. Select AX88772A and click Uninstall or Remote 3. The uninstall process automatically as below. 4. Select Yes and click Finish to restart your computer to complete uninstall process. 11 4. Specifications 4. Specifications Upstream port x 1 (USB Type A plug) USB Downstream port x 3 (USB Type A receptacles) Compliance : USB1.1 & USB 2.0 RJ-45 x 1 (Ethernet 10BASE-T/Fast Ethernet 100Base-TX port) LAN Power Supply Complies with the Full-duplex with flow control and Half-duplex with backpressure operation Input : 100~240v 50Hz-60Hz Output: 5V 2.5A Blue LED for Power-on indication LED Green LED for Ethernet Connection indication Size (Lx W x H) : 98 x 36 x 20 mm Housing Material : plastic (ABS) Weight : 46G QIG Accessory CD (Manual & Driver) Power adapter (optional) Bus-powered : 5V 500mA Self-powered : 5V 2.5A Power Mode Adapter: Input : 100~240V 50Hz ~60Hz Output : 5V/2.5A Operation temperature : 0 ~ 70 °C Working Environment Storage temperature : -10 ~ 80 °C Certification : FCC, CE 12 5. Regulatory Compliance 5. Regulatory Compliance FCC Conditions This equipment has been tested and found to comply with Part 15 of the FCC Rules. Operation is subject to the following two conditions: (1) This device may not cause harmful interference (2) This device must accept any interference received. Including interference that may cause undesired operation. Important! Changes or modifications not expressly approved by the manufacturer responsible for compliance could void the user’s authority to operate the equipment. Use an approved phone set. CE This equipment is in compliance with the requirements of the following regulations: EN 55 022: CLASS B WEEE Information For EU (European Union) member users: According to the WEEE (Waste electrical and electronic equipment) Directive, do not dispose of this product as household waste or commercial waste. Waste electrical and electronic equipment should be appropriately collected and recycled as required by practices established for your country. For information on recycling of this product, please contact your local authorities, your household waste disposal service or the shop where you purchased the product. 13