1
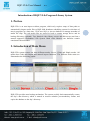
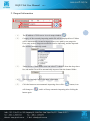
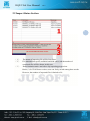
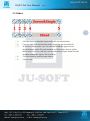
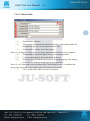
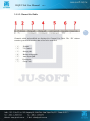
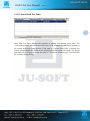
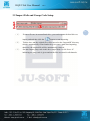
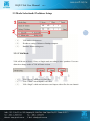
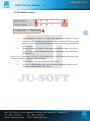
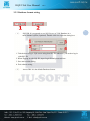
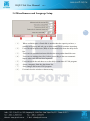
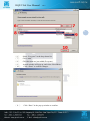
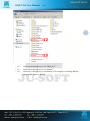
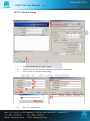
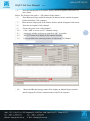
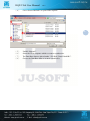
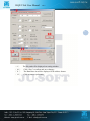
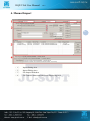
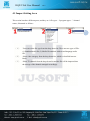
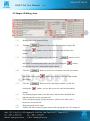
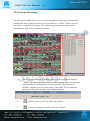
HQP-VLib Video Library
User Manual
R1.4
2012 September
Contents
1. Preface ------------------------------------------------------------------------------------------------------- 1
2. Introduction of Main Menu ------------------------------------------------------------------------------- 1
2.1 Import Information --------------------------------------------------------------------------------- 2
2.2 Import Status Section ------------------------------------------------------------------------------- 3
2.3 Others ------------------------------------------------------------------------------------------------- 4
3. Setup Window----------------------------------------------------------------------------------------------- 5
3.1 TV Channel, Storage Path, and Color Setup ---------------------------------------------------- 6
3.1.1 TV Channel Setting ------------------------------------------------------------------------ 7
3.1.1.1 Channel Info ------------------------------------------------------------------------ 8
3.1.1.2 Function Buttons ------------------------------------------------------------------- 9
3.1.1.3 Channel List Table --------------------------------------------------------------- 10
3.1.2 Storage Path Setting ---------------------------------------------------------------------- 11
3.1.2.1 Path Info --------------------------------------------------------------------------- 12
3.1.2.2 Function Button ------------------------------------------------------------------ 12
3.1.2.3 Stored Path List Table ----------------------------------------------------------- 13
3.2 Import Path and Group Code Setup ------------------------------------------------------------ 14
3.3 Mode Selection& IP address Setup ------------------------------------------------------------- 15
3.3.1 VLib Mode -------------------------------------------------------------------------------- 15
3.3.2 IP Address setting ------------------------------------------------------------------------- 16
3.3.3 Database format setting ------------------------------------------------------------------ 17
3.4 Miscellaneous and Language Setup ------------------------------------------------------------ 18
3.5 Redundant VLib System Setup (Optional) ---------------------------------------------------- 19
3.5.1 Generate and Shear folders -------------------------------------------------------------- 19
3.5.2 TV Channel Setting ---------------------------------------------------------------------- 23
3.5.3 Database Recover (Redundant system only) ----------------------------------------- 25
4. Manual Import -------------------------------------------------------------------------------------------- 28
4.1 Import Setting Area ------------------------------------------------------------------------------- 29
4.2 Import Editing Area------------------------------------------------------------------------------- 30
4.2.1 Media File Check Dialog ---------------------------------------------------------------- 32
4.2.2 How to Load KTC File ------------------------------------------------------------------ 33
4.2.3 Program Clip Editing -------------------------------------------------------------------- 34
4.3 File Import Worksheet ---------------------------------------------------------------------------- 36
4.4 File Transfer Status and Disk Space Displaying Area --------------------------------------- 37
5. Automatic Import ----------------------------------------------------------------------------------------- 38
5.1 Auto Import path setting ------------------------------------------------------------------------- 38
5.2 Place Video File to Folder Classified ---------------------------------------------------------- 40
5.3 Start Importing ------------------------------------------------------------------------------------ 42
6. Database Maintenance / Queries ----------------------------------------------------------------------- 44
6.1 Searching condition setting area ---------------------------------------------------------------- 45
6.2 Database operating and maintaining area ----------------------------------------------------- 46
HQP-VLib User Manual
R1.4
Introduction of HQP-VLib Program Library System
1. Preface
HQP-VLib is an auto-import resident program, which only requires setup of data paths to
automatically import media files to HQP-1000 broadcast scheduling system for selections of
movie programs in a later time. VLib uses SQL or Access database to manage metadata of
media file clips. The real media files are stored in local or remote storage device and its
backup disk array (optional). Two identical video library servers and disk arrays can form a
mutual supportive Redundant VLib System. Both video libraries can therefore remain
consistent with each other.
2. Introduction of Main Menu
HQP-VLib system comes out three different modes: Server, Client and Single modes. All
modes have both auto-import and manual import functions. The different main menu are
illustrated as the following graphs.
HQP-VLib provides auto-backup mechanism. The system on daily basis automatically creates
the day’s data directory which is named in western calendar year-month-day format, and
copies the database to the day’s directory.
1
HQP-VLib User Manual
R1.4
2.1 Import Information
2
[1].
The IP address of VLib server is set in setup window “
”.
[2].
Category of the currently importing media file will be displayed here. Folders
will be automatically created to import source save path by ten categories.
Users only need to categorize media files before importing, and the imported
files will be automatically sorted.
[3].
Under Server / Client mode, users can select TV channels from the drop-down
list, and media files will be automatically imported into the channel folder.
[4].
Click “on-line help” button for more information.
[5].
Click the button to start automatic importing. Once click “
will change to “
button again.
” button, icon
”, and it will stop automatic importing after clicking the
HQP-VLib User Manual
R1.4
2.2 Import Status Section
3
[1].
[2].
The status of importing file will be listed here.
File transmission speed, available hard disk space, and the number of
[3].
completed files will be shown in this area.
Demo limitation notice and video clip importing progress bar.
Notice (!): In VLib Demo version, users can freely switch among three modes.
However, the number of imported files is limited to 20.
HQP-VLib User Manual
R1.4
2.3 Others
4
[1].
[2].
[3].
Click the button to manually import media file and edit metadata.
Users are allowed to add metadata before importing the real media file.
In Server or Single mode, users can click the button (the upper icon) to
[4].
[5].
inquire/maintain media files and metadata. In Client mode, the icon will be
shown as the lower one, and users are only allowed to inquire media files and
metadata (without the right to edit or modify).
Click the button to open the setup window.
Click to exist.
HQP-VLib User Manual
R1.4
3. Setup Window
In the main menu, click the setup button “
” to open VLib Setup Dialog. Users are allowed
to add new channel names、specify import main path、assign backup hard disks among other
setups. For VLib demo version, users can switch among Server、Client and Single modes, and
VLib will decide which functions to enable accordingly. The system setup window is as the
following graph. For the commercial version, the window displays fixed functions accessible
with the modes of your purchase.
5
[1].
TV Channel (only in Server/Client mode), Storage Path, and Color setup
[2].
[3].
section
Import Path and Group Code setup section
VLib Mode, IP address and Data Base setup section
[4].
Miscellaneous Setups and Language setup section
HQP-VLib User Manual
R1.4
3.1 TV Channel, Storage Path, and Color Setup
6
[1].
“
”: In “Server” mode, click this button to open channel setup
window that allows you to add new channels; in “Client” mode, you can only
view the window contents but not modify; in “Single” mode, this setup is all
disabled.
[2].
“
”: In “Server” or “Single” mode, click this button to open
[3].
media file store path setup window to add new store paths. In “Client” mode,
you can only view the window contents, but not modify.
Tick to write the same TV Channel Setting of Master VLib to Backup.
[4].
Click “
” to open color setup window, and users can define colors of the
ten categories.
[5].
Click “on-line help” button for more information.
HQP-VLib User Manual
R1.4
3.1.1 TV Channel Setting
HQP-VLib provides channel setup functions that allow users to specify channel names、set
up media file store path and assign media file auto-import path, and have the directories in
shared mode under desired access controls.
In “Server” mode, all the channel setups are available; in “Client” mode, only window
viewing is allowed, no modification; in “Single” mode, the setup is disabled. The window
shows as following:
[1].
[2].
[3].
Channel setting area
Channel editing area
Channel list table
7
HQP-VLib User Manual
R1.4
3.1.1.1 Channel Info
8
[1].
[2].
Channel name input box.
VLib system will automatically generate directory of the channel under the
[3].
designate storage path, storing imported media files.
Users can direct a folder for backup storage.
Notice (!): In Single or Client mode, the storage path should not locate in local computer.
[4].
Channel path of automatic import source can be designated here.
[5].
[6].
Users can input channel description and remark here.
Users can classify channels into groups by designating group code ranging
from 1~99. “0” indicates channel group is not specified.
Notice (!): In Client mode, users can only modify “Auto-import source” in condition that
group code is identical to auto-import group code preset in the system.
[7]. Click “on-line help” button for more information.
HQP-VLib User Manual
R1.4
3.1.1.2 Function Buttons
9
[1].
After completion of the Channel Info inputs, click the “Add” button to add the
[2].
info data to the following Channel List Table.
Double-click channel item you want to modify from the list, and click the
[3].
button to save the modification.
To delete a channel item in Channel List Table, highlight it and then click the
[4].
“Delete” button.
Click the “Exit” button to exit and close the Channel Setup Window.
HQP-VLib User Manual
R1.4
3.1.1.3 Channel List Table
10
Channels added and modified are displayed in Channel List Table. The “ID” column
contains system serial numbers that are not to be modified.
[1].
[2].
[3].
[4].
ID name
TV Channel
Storage path
Backup storage path
[5].
[6].
[7].
Auto-import path
Description
Group Code
HQP-VLib User Manual
R1.4
3.1.2 Storage Path Setting
In “Server” or “Single” mode, VLib allows users to add media file store paths and assign
its default path. The user interface is as following:
11
[1].
[2].
Path Info
Function button
[3].
Stored Path List Table
HQP-VLib User Manual
R1.4
3.1.2.1 Path Info
[1].
The setting window allows users to designate storage path only from the local
[2].
[3].
[4].
disk drive. If you designate storage directory under E: drive, storage path will
be automatically set as “E:\VideoE\”. Except default storage path is set as
“D:\HQP_Data\Video\”.
Free space of the currently using hard disk drive
Total space of hard disk drive
Click “on-line help” for more information
3.1.2.2 Function Button
[1].
Select any storage path from the list, and click the button to set the one as the
[2].
default storage path. The system reserved default path is
“D:\HQP_Data\Video”.
After editing storage path, click the button to create a new storage path to the
[3].
list.
Select/highlight a designate storage path to delete from the list, and then click
[4].
the button to remove it (It won’t remove real files, only the database record).
Exit and close storage path setting window
12
HQP-VLib User Manual
R1.4
3.1.2.3 Stored Path List Table
13
Store Path List Table displays the outcome of adding and deleting store paths. The
“Current Store Path” box on the low-left corner of the window is dynamically updated by
the system during the setup process. If the path in “Current Store Path” is deleted, the
system will automatically switch to the default path as the current store path. All storage
path data will be displayed on the list, and “Y” shown on “Used storage” field indicates
the currently using storage.
HQP-VLib User Manual
R1.4
3.2 Import Path and Group Code Setup
14
[1].
If source files are in external hard drive, you can designate the hard drive as
import path and then click the “
[2].
” button to start importing.
Tick the box, and the original file will be moved to the “ImportOK” directory
which is automatically created under the given source path after importing;
[3].
otherwise, the original file will be automatically removed
Set auto-import group code in this box, ranged from 1 to 99. Set to “0”
indicating no group code is given and media files are stored in all channels.
HQP-VLib User Manual
R1.4
3.3 Mode Selection& IP address Setup
15
[1].
[2].
[3].
VLib mode selection area
IP address setting of Master or Backup computer
Database format setting area
3.3.1 VLib Mode
VLib will be set as Server, Client, or Single mode according to users’ purchase. Users are
allowed to change mode of VLib in Demo version.
[1].
[2].
[3].
VLib “Server” which stores video files.
VLib “Client” which imports video files.
VLib “Single” which can both stores and imports video files for one channel.
HQP-VLib User Manual
R1.4
3.3.2 IP Address setting
16
[1].
Master IP Address: In Server or Single mode, please enter IP address of local
[2].
computer; in Client mode, please enter IP address of remote VLib server and
make sure that you have the permission to read and write HQP_Data directory
in VLib server.
Backup IP Address: A Master VLib can be connected to a Backup VLib, so 2
sets of VLib can work simultaneously. Users need to enter correct IP address
for Backup VLib.
Notice (!): In Client mode, “127.0.0.1” which stands for the local IP Address should be typed
in Master IP Address, and leave blank in Backup.
[3].
Click “Clear” to clear the Backup IP Address box.
[4].
In Server or Single mode, users can select Master or Backup mode for local
computer with Redundant VLib system.
HQP-VLib User Manual
R1.4
3.3.3 Database format setting
[1].
SQL DB: It is suggested to use SQL Server as VLib Database in a
multi-channel system (Optional). Double-click it to open the dialog box.
1. Tick the box to log in SQL server using local PC ID; otherwise, you need to log in
with SQL ID.
2. When logging in with SQL ID, input Login ID and password here.
3. Save and exit the dialog.
4. Exit without saving.
[2].
Access DB: It is the default Database format.
17
HQP-VLib User Manual
R1.4
3.4 Miscellaneous and Language Setup
18
[1].
When available space of hard disk is smaller than the capacity set here, a
[2].
warning will pop up and ask you to delete some files to continue importing.
Users can adjust packet size (KB) of each transmission from the drop-down
[3].
list.
Users can set transmission interval before the next packet should be sent.
[4].
Users can set waiting time (Sec) before proceeding to the next automatic
[5].
[6].
[7].
[8].
import when each file has been imported.
Users can avoid the rush hour to set the daily restart time of VLib program.
Select a language from the drop down list.
Save changes and restart VLib program.
Exit and close the window without saving.
HQP-VLib User Manual
R1.4
3.5 Redundant VLib System Setup (Optional)
Users can form a fault-tolerant VLib server system by setting one as Master video library
and the other as Backup. The feature of consistency check and adjust function will always
keep two VLibs’ contents consistent with each other. Once Master or Backup VLib
computer fails, users can easily recovery or replace with a new one.
19
3.5.1 Generate and Shear folders
[1].
Open the folder of DAT (D :) on Master VLib computer.
[2].
[3].
Right click on blank area of the folder, and click “Folder” in the “New” tab.
Enter designate name of Master storage folder. For instance, we type in
“Master” here.
HQP-VLib User Manual
R1.4
20
[4].
[5].
Right click on the folder “HQP_Data”.
Move the cursor to “Share with” and then click “Specific people”, and the “File
Sharing” window will pop up.
HQP-VLib User Manual
R1.4
21
[6].
[7].
[8].
[9].
[10].
[11].
Select “Everyone” in the drop-down list.
Click “Add”.
Click the name we just added (Everyone).
A small window will pop up, and select “Read/Write”.
Click “Share” to confirm changes.
Click “Done” in the pop up window to confirm.
HQP-VLib User Manual
R1.4
22
[12].
[13].
[14].
Redo step 4 through step 11 on “HQP_Sys”.
Redo step 4 through step 11 on “Master”.
Redo step 1 through step 13 on Backup VLib computer, but change Backup
storage folder name to “Backup”.
HQP-VLib User Manual
R1.4
3.5.2 TV Channel Setting
23
[1].
[2].
[3].
Open VLib and click on “Setup” button.
Tick this box to write the same setting into a backup VLib computer.
Click to open TV Channel Setup dialog.
[4].
Enter TV Channel name.
HQP-VLib User Manual
[5].
R1.4
Enter the storage path in IP address format, and the designate folder name we
just created.
Notice: The format of the path is: “\\IP Address\Folder Name\”.
[6].
Enter Backup storage path following the IP address format, and the designate
folder on Backup VLib computer.
[7].
Enter the auto-import path in IP address format, and the designate folder name.
[8].
Enter the description of this channel.
[9].
Choose the group code of this channel.
[10].
Click “Add” to create new TV Channel setting.
[11].
[12].
[13].
A message window will pop up, and click “OK” to confirm.
The TV Channel will display in the channel list table.
Users can follow the same steps above to add a new TV Channel.
[14].
Master and Backup storage path will be display on Manual import window,
and the import files will be synchronized to both VLib computer.
24
HQP-VLib User Manual
R1.4
3.5.3 Database Recover (Redundant system only)
If one of the redundant VLib computers fails, users can synchronize the clip files by using
HQP-VLib Sync.
25
[1].
[2].
Double click the icon of HQP-VLib Sync to open VLib Sync program.
Click “Setting” to open setting dialog.
[3].
Enter Local IP Address.
HQP-VLib User Manual
[4].
R1.4
Click “Source DB Path” to open folder explorer.
26
[5].
[6].
Unfold “Network”.
Select the VLib computer which we want to synchronize.
[7].
[8].
The Data Base data are placed under “\\D:\HQP_Data\VideoDB\\”.
Choose the Data Base data we want to synchronize.
HQP-VLib User Manual
R1.4
27
[9].
[10].
[11].
[12].
The file path will be displayed on setting window.
Click “Save” to confirm and save changes.
The Data Base data will be displayed in IP address format.
Click to start to synchronize.
HQP-VLib User Manual
R1.4
4. Manual Import
28
[1].
[2].
[3].
[4].
Import Setting Area
Import Editing Area
File Import Worksheet
File Transfer Status and Disk Space Displaying Area
HQP-VLib User Manual
R1.4
4.1 Import Setting Area
This section has three different parts, and they are 1.file types、2.program types、3.channel
names, illustrated as follows.
29
[1].
Users can select file type from the drop down list. There are two types of File:
[2].
(1) Standard media file (2) Media file attached with second language audio
file.
Select video category from the drop down list, which is classified into ten
[3].
kinds.
Select TV channel from the drop down list and the file will be imported into
the storage of the channel managed accordingly.
HQP-VLib User Manual
R1.4
4.2 Import Editing Area
30
[1].
Storage path of the imported file(s).
[2].
Click the “
clicking the “
”button to select video file you want to import. By
” button, you are able to preview and confirm video
content.
[3].
If it’s a bilingual TV program, users can click the “
” button to select
and import second language audio *wav file. By clicking the “
” button,
you are able to preview and confirm audio content.
[4].
Click the “
” button to select low resolution video file you want to
import. By clicking the “
” button, you are able to preview and confirm
file content.
[5].
Click the “
clicking the “
” button to select and import subtitle *txt file. By
” button, you are able to preview and confirm subtitle
[6].
content.
The default program name is the file name, which can be modified after
[7].
importing and be used as program title.
Users can input program excerpt in the box, which can be later used as
[8].
[9].
keyword to search the file.
Program remark can be input.
Tick the DS-title to show program name while playing this clip. The setting of
HQP-VLib User Manual
[10].
R1.4
duration, border, size, and color will follow the configuration of title in
HQP-BPlayer.
Select program logo from the drop down list. To have more options, save logo
patterns in the “D:\HQP_Data\Targa\Pg_Patn” directory. After restarting VLib
program, the logos will be shown on the drop down list.
[11].
Select rating logo from the drop down list. To have more options, save logo
patterns in the “D:\HQP_Data\Targa\Rt_Patn” directory. After restarting VLib
program, the logos will be shown on the drop down list.
[12].
Scroll the controller to adjust the volume, and the default value is 1.00.
[13].
[14].
Click the button to add a new import task to the Worksheet.
Click the button to load a video partitioning *txt file generated by the cutting
tool.
[15].
Click the button to partition video by the non-destructive cutting tool.
[16].
Users can partition video into sections (up to 64 sections) by giving each of
which starting and ending points. Click any of the desired segmentation boxes
to bring up the detailed clips partition dialog to manually adjust it. The dialog
is as below:
1. In/Out Point of each segment.
2. Tick the “T” box means advertisement can be added before this clip. On the other
hand, uncheck the “T” box means no advertisement allowed before this clip.
3. Click “OK” to save changes and leave.
4. Click “Exit” to leave without saving.
5. Click “Delete All” to clear partition.
6. If start point of the clip is not 00:00:00:00 (usually happens while importing
betacam files), VLib cut tools can help users to subtract a period of time automatically.
31
HQP-VLib User Manual
R1.4
4.2.1 Media File Check Dialog
When media files at the local computer are initially added to the broadcast schedule for
import, the system automatically opens the “Check Media File Information” window, and
scans the media file format to see if it meets the current settings. If it does, the media file is
scheduled for import; otherwise, an error message is displayed. The window layout is as
follows:
[1].
The progress bar indicates the scanning process. The preceding figure indicates
[2].
[3].
[4].
the number of the currently scanning file, and the succeeding figure indicates
total number of files to be scanned.
Path of the currently scanning file.
Name of the currently scanning file.
Error message of the incompatible file will be shown in this area, shown as
bellow.
[5].
[6].
Click “Exit” button to close the File Check dialog.
Click “on-line help” button for more information.
32
HQP-VLib User Manual
R1.4
4.2.2 How to Load KTC File
KTC file is a text file which record partitions of clip, and it can be edited by Notepad.
33
[1].
[2].
[3].
[4].
[5].
The format of the KTC file is look like this.
Click to open folder explorer to load KTC.
Select the *.txt file which corresponds to the clip file.
Click to confirm.
The partitions will be displayed on this section.
HQP-VLib User Manual
R1.4
4.2.3 Program Clip Editing
The Program Clip Editor allows users to test run programs for producing segmentations to
accommodate advertisements in between. For program file in “.WMV” format, icons are
provided for program file key frames. The resulted program clip table will be used as
information by HQP-VLib to import the program.
34
[1].
The key frame icon window is displayed only when the media file format is
“.WMV”. The following graph shows the initial scanning status. The scanning
result is used to locate the position of each icon in the “Key Frame Icon
Window”, and then every key frame image of the WMV file is fetched and
placed in the key frame position of the displayed window.
[2].
“
”: Scrolls to the top of the key frame icon window.
[3].
“
” Scrolls to the bottom of the key frame icon window.
HQP-VLib User Manual
[4].
[5].
[6].
R1.4
Pull-down menu of languages.
File path that stores the media files.
Clip Editing Section.
1.
: Designate the number of clips you want create from the drop-down
list, the maximum of which is 32.
2.
: File duration will be automatically detected and shown on the
window.
3.
35
: The number of key frames of the “.WMV” file will be
automatically detected and shown on the window..
4. Clip table is as follows. The preceding letter “T” means advertisement can be added
before this clip; “~” means no advertisement allowed before this clip. To change the
permission, simply double-click the letter “T” or “~” to switch between.
5.
: Double-click a pair of Cue Points, and then click this button to
delete it.
6.
: Double-click a pair of Cue Points, and then click this button to
preview the clip. Users can adjust Start/End Trim Point on Preview window to reset the
clip.
7.
: Click this button to save metadata of the created Ad Cue Points
in HQP-VLib server as the basis of segmenting TV program.
8.
9.
: Click this button to exit the window.
: The progress of captured key frames will be
shown here.
10.
: The number precedes the “/” symbol indicates the selected clip,
and total number of clips will be shown after it.
11.
: Total time of all the clips summed up, which
HQP-VLib User Manual
R1.4
may be longer than the original program length.
[7].
Click “on-line help” button for more information.
4.3 File Import Worksheet
36
[1].
[2].
[3].
[4].
Start batch-importing files into HQP-VLib video library.
Stop importing.
Remove the selected media file from the Import Task Worksheet.
Clear all media files from the Import Task Worksheet.
[5].
[6].
Exit Manual Import Window.
Import Task Worksheet.
HQP-VLib User Manual
R1.4
4.4 File Transfer Status and Disk Space Displaying Area
37
[1].
[2].
[3].
[4].
Available space of the storage
Available space of backup storage
File importing information displaying area
File importing progress bar
HQP-VLib User Manual
R1.4
5. Automatic Import
VLib allows user to import video clips automatically, and clips can be imported by category.
In Single mode, the Auto Import path should not be directed to HQP data disk (D :). This
chapter is a demonstration of automatic import setting in Server mode.
5.1 Auto Import path setting
[1].
[2].
Click “Setup” button to open the Setup Dialog
Click “Path” button of Auto-import path to select the folder
[3].
[4].
Click “Computer” to unfold folders.
Click “DAT (D :)” to unfold folders.
38
HQP-VLib User Manual
R1.4
39
[5].
[6].
Click “Make New Folder” button to add a new folder
Enter designate folder name of import path, we type in “video import” for
[7].
[8].
[9].
example
Click “OK” to confirm.
The path will be shown in the “Auto-import path”.
Click “Save” to save changes and exit.
HQP-VLib User Manual
R1.4
5.2 Place Video File to Folder Classified
40
[1].
[2].
[3].
[4].
[5].
[6].
Open the folder where the video clips are located
Click the designate clip
Right click on the clip and select “Copy”.
Open the folder which was created in chapter 5.1.
VLib will automatically generate 10 folders by category.
Double click on the folder corresponded to clips (we take P. program for
example)
HQP-VLib User Manual
R1.4
41
[7].
[8].
[9].
Right click on blank area of the “P. program” folder
Select “Paste” to copy clips into current folder
The clip will be generated.
HQP-VLib User Manual
R1.4
5.3 Start Importing
42
[1].
[2].
Open HQP-VLib and Click “Start automatic import” button
Start automatic import button will become “Stop” button while VLib importing,
[3].
[4].
and some functions will be locked VLib stops importing.
The clip which is being imported will show in the “Import Status Area”.
Importing information will show in this area.
[5].
Importing progress bar will display here.
HQP-VLib User Manual
R1.4
43
[6].
[7].
Once the clip has been imported, the message will display “Import completed.
Click “Stop” after importing completed.
HQP-VLib User Manual
[8].
[9].
R1.4
If we tick the box, VLib will remain clips which were imported.
Open the P. program folder which we just pasted the clip, and double click
“Import OK” folder.
[10].
Notice that the clip has been moved into the folder.
6. Database Maintenance / Queries
HQP-VLib system provides functions for database maintenance and queries. With different
modes, its window interfaces are slightly different. The window layout of Sever mode is as
follows:
[1].
[2].
Searching condition setting area
Database operating and maintaining area
44
HQP-VLib User Manual
R1.4
6.1 Searching condition setting area
45
[1].
Select HD or SD format as searching condition from the drop down list.
[2].
Users can inquire media clips by giving a range of Program IDs.
[3].
[4].
Users can inquire media clips by giving a time range.
By selecting a channel from the drop down list, users can inquire media clips
from the designate channel (It works only on a multi-channel VLib server).
[5].
[6].
[7].
[8].
Click the “on-line” help button for more information.
Users can inquire media clips by entering keywords.
Users can inquire media clips by giving a range of dates.
Users can inquire media clips from a certain category.
HQP-VLib User Manual
R1.4
6.2 Database operating and maintaining area
46
[1].
[2].
[3].
After enter searching conditions, click the button to start inquiring.
Click the button to clear the preset searching conditions.
In Server or Single mode, users can click the button to modify the selected
media clip (or double-click the clip) from the Metadata editing window. In
Client mode, users can still open the window, but you are not allowed to
modify the metadata. The functions of modified window are very similar to
“Import Editing Area” in chapter 4.2.
HQP-VLib User Manual
R1.4
47
[4].
Click the button to preview the selected video content (This action can also be
[5].
[6].
done by double-clicking the clip with the right mouse button).
Refresh VLib and update the latest data.
If searching results are more than 1 page, you can select page number from the
[7].
drop down list when you’re not able to find your target in the first page. Each
page displays 100 data.
Check if the actual file of each media clip does exist; this function is disabled
[8].
in “Client” mode.
Users are allowed to export the designate database of certain channel, default
storage path of which is D:\HQP_Data\Export_DB, and the file name is
VideoDB.mdb. Database export dialog is shown as below, in which you
double-click the “Add” field with the left mouse button to designate channel
database you want to export. “V” indicates database of the channel will be
exported.
HQP-VLib User Manual
R1.4
48
[9].
Click the button to delete the selected media clip, the confirming dialog will
pop up after clicking the button; in “Client” mode, this function is disabled.
The dialog is as below:
[10].
Click the button to delete multiple media clips, the confirming dialog will pop
up after clicking the button; in “Client” mode, this function is disabled. The
dialog is as below:
[11].
[12].
Exit VLib Maintenance window.
Query results will be shown on the list. “V” symbol indicates that the clip
exist, and “X” symbol indicates that the clip doesn’t exist
JU-SOFT CO., LTD.
http://www.jusoft.com.tw
mail:[email protected]