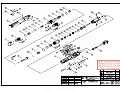
1
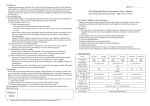
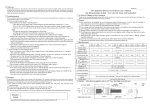
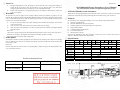
. W W .T W 00Y .100 .TW 1 M.T . OM W M O W C . O W C W Y .C W WW .100Y. .TW M.T .100 .TW 00Y M O 1 W □ After Use Serial No. : M . O W C . O W C .long W W it or WW .100Y Y TW . 0 Y.Cif you do.TnotWplan to use theWscrewdriver T . Storage and maintenance: for a period, unplug 0 0 WW M 1 0 M . M the screwdriver in a W .1 source.OStore CO Industrial WW 00Y.ASA Wpower .COaway .from switch offWthe dry,W dust-free Y place, direct Electric Screwdriver User’s Manual W .C W .TW W 0 Y W T 1 0 0 W T M . . 1 0 M . O 1 W M sunlight. Inspect and maintain it periodically to ensure continued functioning. . O (for semi-automatic models-strengthened tightening torque) W C . O W W to disassemble WW .100Y Wscrewdriver .TW W 0Y.C it.M Yis.C Wattempt TWone . If the not operating normally, do not Contact Repair: W 0 0 T M . 1 0 . O to Our Customers W of Thanks W.1 Y.COM W □ W AW Word WW 00Y.CO .TW of our serviceW agents. 0Y.C M .TW 0 W 1 0 W T . . 1 0 M . O 1 Thank you for choosing lightweight and powerful ASA electric screwdrivers. In order to insure maximum W M . □ Warranty O W W W Y.C life, please WW 00Y.CO .TW C . 0 W T W . W 0 Y W performance and product through this manual before using your screwdriver. 0 warranty We provide a one-year warranty one year W free repair M .1 is good for W.1 Y.COM read M.Twith this product. TheW .10service O W O W W C W . C from the date of purchase W the Product Information retailer’s stamp 0 theW . Y appear on.T W .T W Form. TheW 0 must W entered on .100 00Ythe following Mparts .1the OM □ Features W M.Tcircumstances we willWcharge .1under form to confirm the date. However, user C forO any W C . O W W Y Y. W W repairs:00Y.C .TW screws. They include many patented features: W .TW Our screwdrivers 100designedOfor Wwith and labor costs associated Mfastening .were .TW 100 M . 1 W M . O W C . W W COincluding For repairs involvingW 0Ybody Y.Cand also.TW Anti-slip WW egg-shaped .TW Y.parts 10brush 00cord, 0to W normal .wear TWcarbon brushes,Wbits and power M . . 1 0 M . O 1 W Patented carbon cover prevents shocks M O to the exterior surface. W .C W W Y WW 00Y.C CO W . 0 W T W . W 0 Y W T . Indicator light shows when carbon brush needs replacement 1 0 W T M . If the screwdriver was connected1to . of the incorrect voltage. W.1 0 a power source M O W M . O C . O W W C W . Y W Integral dual insulation C . user cannot After the period of the guarantee, if the present the manual YProduct .TW W .T W 00 W with stamped WW .1or 00Y M .100 OM W.1heat dispersion M.T CentrifugalW turbine O W Information Form. C . O W C . Y W transmission .TW WW .100Y .TW Low-noise 100 WW .100Y.C M.TW M . Please note: M O W O W Wcord clip00Y.C W W Patented W power .CO Form The retailer’s stamp must appear on Information service. Win order to receive 0Y.C M.TW Y WWfree repair 0 0 WWthe Product T M.T of small items such as watches and eyewear to home .1range fromOassembly . 1 0 . 1 W M . Screw-driving applications O W C If the date is not filled in, the guarantee W takes effect from product assembly.W . .C W .COthe date.TofW 0Yother WW .10and .TW W .Tappliances, 00Y WWsafeguard hardware, furniture products. M We cannot replace this manual. Please 1 00it.Y M . O 1 W M . O W O W WW .100Y.C M.TW □ Other points WW .100Y.C □ TW .Specifications WW .100Y.C M.TW M The adapters (optional) with many applicationsW this product. However, for drilling .CO WW AS- 00YAS-.CO AS- .TW WW AS- W ASASASASASASASASW .CforOuse with Y W are available W 0 Y W T Model . 0 0 W T M 3632 .1 2632 O3631 . 1631 1632 2631 4631 4631S 4632 4632S 6631 6632 1 0 holes, it should never be used on any material except especially M . W M less than 2mm thick, and .1 plastic andOwood O W C . W Power source 115 230 115 230 115 230 115 230 115 230 W C W Y 60HZ .T50HZ not on metal or walls. 0050HZ WW .100Y. ACV 50HZ 60HZ 60HZ 50HZ 60HZ 50HZ .TW 60HZ W 1 WW .100Y.C M.TW M . M O W Torque range Please note: 2.0-18.0/1.7-15.6 5.0-25.0/4.3-21.7 W WW 00Y.COkgf-cm/1bf-in W 0.2-2.0/0.17-1.7 0Y.C1.0-12.0/0.9-10.4 WW0.5-7.0/0.43-6.1 WW 00Y.CO .TW 0 W T . 1 W M.T . 1 No load speed rpm 1000 1000 1000 1000 Drill bits may break off if the screwdriver is not held tightly or held at M an angle to the drilling surface.W Take M . O 1 W . O O W W WW .100Y.C M.TW care of your hands and eyes! WW .100Y.CTorque setting T . WW .100Y.C M.TW MScrew Machine .CO .TW 2.0-4.0/0.08-0.16 2.6-5.0/0.10-0.20 O WW 00Y1.4-3.0/0.06-0.12 W WW 00Y.COmm/in .TW1.0-2.0/0.04-0.08 W1.0-2.6/0.04-0.10 C . W W Y W 1 0 W T M . . 1 0 M . O W O Screw 1.0-1.7/0.04-0.07 1.0-2.3/0.04-0.09 Tapping W OM W.1 2.3-4.0/0.09-0.16 Y.C WW .1001.4-2.6/0.06-0.10 .TW 2.0-3.0/0.08-0.12 WW .100Y.C mm/inM.TW WW .100Y.C M.TW M O W Weight O g/1b 400/0.88 W 480/1.0 W .C O W Y.Cmm/in .TW W .TW 00Y 228/9.0 WW .100Length 1 WW .100Y.C M.TW M . M W O , 1/4’’Hex shank, 1/4’’Hex double end shank .CO Hex .shank WW Available Y.bitCshankW .TW ψ4.0 WW .100Yψ5.0/5mm TW WW 00Y.CO .TW 0 W 0 W M Power consumption 30 40 1 Product Information Form M . O 1 W M . O W .C O W W C W . Y W C W . 0 Y W T W □ Outline . W 0 Y W .T W .100 W.1 Y.COM W Model M.TStamp .100 Retailer’s OM W O W W C . W C W W type W .TW 00Y start M WW .100Y. M.T .100 .1Lever OFORWARD W M.T O W C . O W Serial No. W C Y LEVER .TW RING W WW .100Y. .TW WW .100Y.C M.TW M .100 M HANGER O W O W C . O W WW .100Y .TW Date of Purchase WW .100Y.C M.TW WW .100Y.C M.TW M O W O W O W WW .100Y.C M.TW AS-4632S ◎ Specifications and design may be changed without notice for improvement(A-5) W Y.C WW .100Y.C M.TW 0 WW T . 0 1 OM WW 00Y.CO .TW W. WW 00Y.CO .TW C . W W W Y W W M .1 .T 00 W.1 Y.COM W WW 00Y.CO .TW W.1 Y.COM W W W W W .T 1 CARBON MAINTENANCE 00SLIDE M W REVERSE OM M.T .100 O REGULATING ENGRAVINR WW. BONNET W.1BITSLEEVE C . O W LEVER C W . Y W C W . 0 Y W T RING . HANDEL W 0 0 W T . 1 0 WW .100Y T M . . 1 M . O W O W OM W WW .100Y.C WW .100Y.C M.TW WW .100Y.C M.TW W O W O WW WW W 0Y.C Y.C WW .TW Available Screw 1000 1800 1000 1800 . W W .T W 00Y .100 .TW 1 M.T . OM W M O W C . O W C W 0Y W Y.C WW .100Y. .TW M.Toutput. Actual torque can only be determined with a torque testing .10not .TW M indicate torque O W □ AccessoriesW.100 M O W C . Wtwo bits.00Y.C .CO pair.ToffWcarbon brushesWand spanner torque tester.) If you have difficulty removing screws (reverse WW .1machine .TW 00Y or hand-held .TW This product WWcomes.supplied M 1 00Y with a M M . O 1 W setting), increase torque by turning the regulating handle clockwise into the casing. O W C . O W W C . Bits (one set per screwdriver) W 0Y W TW . 0 WW .100Y T . 1 WW .100Y.C M.TW M . M O 1/4" hex 1/4" bit slide sleeve down with O WWInserting W W .CO .TW Ythe.Cbit: Push .the WW C hex . 0 Y W Tsuitable W double end W 0 0 Y W 1 0 0 your finger and insert a bit. When the bit slide W T M . . 1 0 shank M . shank W O .COthe bit.Twill WW W.1 Y.COM W C sleeve is 0 released, become engaged. If the Push bit slide W . Y W W Y W W W .T 10sleeve canOnot 00 W M . sleeve in .T 1 00 Bit specifications bit slide homing, please pull out the bit M . 1 W M . W .C CO W switch( forward & the.T 3 band ψ4.0 WW.Count!-please WWψ5.0 00Y.CO .T1/4"WHex shank 00Y changeM 0endY.shank WW1/4Hex .double TW . 1 0 W . 1 M O reverse switch) to middle band, and don't beat or force W M Tip Tip.1 Tip Tip O W C . Tip Tip Tip Tip W W diameter00Y.CP# diameter P# P# diameter P# W .CONo. 0Yinserting WW to pull out when bit..TW W 0 Y W T No No. No. . 1 0 WWdiameter T M . . D D D D M .1 M .10 WW 00Y.CO .TW WW 00Y.CO AS-1631 ψ1.7 ψ1.7W 7W6204 #00 7W1202 #00 W W WW 00Y.CO W T Inserting and single-or . W T M double-ended 1/4" .1 removing O . .1 ψ2.0 #00 7W1402 #00 Mψ2.0 7W6404 AS-1632 WInserting .1 OM W C . O hex bits: the bit and arriveW W W C . Y W C W ψ2.5 ψ2.5 W7W6524 #0 7W1522 AS-2631 .T bottom, then push W .TW 100 down with 00Y WW .100Y. #0#1 M M . the bit slide sleeve your finger, the will be .T 7W6644 1 M . O W ψ4.0 ψ3.0 #1 7W1742 AS-2632 O .C W W flip WW 7W7147 Wout. WW7W364400Y.#1CO ψ3.0.TW 00Y 0Y.C AS-3631 TW ψ3.0 #1 7W6644 #1 W ψ6.35 . 1 0 W M.T . 1 M . O 1 W M . O W C ψ5.0 ψ4.5 ψ6.35 #2 7W3864 #2 7W6764 #2 7W7167 AS-3632 . O W During W .C Yuse the screwdriver W Wsecurely: .TW should be hung up securely to prevent it from failing, W Wψ6.35 10the0 power 00Y AS-4631M.TW Hang ψ3.0 #1 #1 7W7147 WW 7W3644.100Y#1.C ψ3.0M.T7W6644 M . 1 . O W and also to protect cord from sudden pulls. O .C W W C ψ5.0 ψ6.0 ψ6.35 #2 7W3864 #2 .CO 7W6964 #2 Wtrigger(power switch) down to start the screwdriver, Ymotor: WW7W716700Y.AS-4632/S W 0 W T W . W 0 Y Starting and stopping the Press the W T . 1 0 W T M . . ψ5.0 ψ4.5 ψ6.35 #1 7W3844 10 #1 7W6744 #2 7W7167 AS-6631 M 1 . O W W it to stop. .C OM 7W6964 #2 W W. #2 Y.Cψ6.0 W .CO .TW And release ψ5.0 ψ6.35W 7W7167 #2 7W3864 Wpoints: W 00Y 0YAS-6632 W 1 0 0 Important WW T M.T . . 1 0 M . O 1 W M . O W C . fully .tightened O W the clutch slips when screws WW TW (i.c. Clicking sound is not heard when torque is 00Y thearetrigger WW .100Y.C M.TW Ifreached) 1release WW .100Y.C M.TW M . □ Before Using immediately (power switch) to prevent the motor from burning out (due O W W O and the manual thoroughly W flow 0while Wthe product .CO .TW to continued Y.itCis not operating). Check voltage: Please read the label on exterior Wbefore C power . 0 Y W W .TW W 0 Y W 1 0 Wespecially.1sure Mperiod, . .T 1 00to correctlyMdetermine M . using the screwdriver, and make the screwdriver’s voltage O If the screwdriver is operating for a long if excessive current surges are experienced, W O W C . O into an outlet with the correct W Worswitch WW requirement (115VAC or 230VAC). W Only plug the0screwdriver may overheat. In this case it.T will off automatically. When the heat has W 00Y Y.C WW .100Y.C M.TWthe screwdriver 1 W T M . . 0 O W M .1 voltage. O dispersed, normal operation can resume. W C . O W W C W Y W WW .100Y. .TW WW .100Y.C M.TW M.T .100 M O W O W C Check for suitable torque range: Choose a screwdriver model that matches your required torque . Operational frequency: operational frequency 1/4”(ON/OFF)second, the total screws Wsuggest 0the0Y W W .CO .Ttorque Y.C W WW .TWsuggest, W over longW .T7000pcs/8hours, 1 operationalOfrequency Wusing range. To lengthen product life, avoid screwdrivers periods. .100 M . don’t over our and avoid the inside part of 00Y at maximum M 1 W M . O W .Cwork 8hours O W W C W . Y screwdriver serious damage. If everyday upward, please use two screwdriver by turns, W C W . 0 Y W T W . W T the life of screwdrivers..10 .protect W Check.1that M .TW bonnet is closed 100 00Y Check that product is completely assembled: the carbonM maintance M . O W O W C . O W tightly. If the bonnet or spring connector have the.C motor will automatically cut off-the WW .100Y .TW W WW .100Y.C M.TW WWcom loose, Mchange .T 00Yreassembled. O 1 screwdriver will operate only after the have been correctly If the power cord is in W M . Changing the carbon brush: When the carbon brush indicator lights up (red), please O W W W W .CO it for.TaW 0Y.C unplug Y.C Change W TW WW and . any way damaged, unplug the screwdriverW immediately exchange new product inW order 0 0 Y T it as described below. (Caution!-Always the screwdriver before changing the brush. . 1 0 0 M . M use the factory-specification O with the screwdriver Wbrushes provided M .10 to protect against short circuit. W.1 Y.COOnly C replacements.) . O W W W Y W C W . 0 Wa 3.0mm.wide, T in the slot onas the .head W 0 1.0mm thick 0 W T a slotted bit with . 1 0 WW .100Y T 1. M Insert side of the carbon M . 1 . O M safety do not use it WW O maintance bonnet and leverWitW .C Oensure Check the workplace: Although this product featuresW dual insulation, to C up. Open0the bonnet. .TW . Y C W . Y W W W 0 0 Y .1 brush. OM in damp or high-temperature environments, orW near flammable 00materials. Keep.Tthe power cord W W.10 2. ORemove M.T the spring resting onWthe Wcarbon W.1it. Y.COM W C W out. . W away from tools and equipment that might damage W or melt 3. Lift the copper wire attached to carbon W 0Y.Cand pull Y W .Tbrush 0brush, 0 W T . 1 0 0 W T Mthe . . 1 0 M . O 1 4. Pull out the tip of the copper wire and complete the removal. W M . O W C W W .C Y. W carbon brush, .CO Wfollowing TW order. Caution: When plugging in or unplugging the power cord, make sure theW plug. Never WW in .reverse .Tnew 1the00above steps 00Y5. InsertMthe WW M . 1 00Yto hold itMby.T . O 1 W . pull the power cord forcibly. O W .C O W W W 00Y WW .100Y.C Guide TWcarbon brushWreplacement .for 1 WW .100Y.C M.TW M.T Guide for 3P plug-in . M O W O W C . STEP 1 STEP 2 STEP 3W STEP 04Y □ Usage and Cautions guide notch W WW 00Y.CO .TW .TW WW .100Y.C M.TW 10 M . Screw and unscrew settings: To drive a screw, set the W forward/reverse switch to theM FWD position. O 1 W . O W W To remove a screw, set the switch to the REV position (Caution! .CO the switch WW .100Y.C Mconvex .TW point W Ychange WW .100Y.C M.TW WW ---.1Never T . 00and O position when the motor is running! Release the trigger (power switch) change the position W O W OM W WW .100Y.C M.TW after the motor stops.) WW .100Y.C M.TW WW .100Y.C M.TW O W 3P plug WW 00Y.CO .TW CO into .clockwise WW .100Y.C M.TW WWTurning W Y W Torque setting: Set the torque level by rotating the regulating it the 0 Whandle. T . M .1 receptacle M .10casing willOdecrease POSITION A WW 00Y.CO .TW casing will increase the torque, and turning it counterclockwise out of Wthe WW 00Y.CO VIEW.TOFW C . W W (screwdriver side) W Y W the torque. (Caution!-The markings on the regulating handleW are for reference do M .1 W.1 Y.COM M.T .100 only and O W O W W C . W W Y W W WW .100Y.C M.TW .100 M.T .100 W O W O W W C W W W 0Y. Y.C WW .TW Available Screwdriver Model Lever up Pull out remove Position A Pull out . W W .T W 00Y .100 .TW 1 M.T . OM W M O W C . O W C W Y .C W WW .100Y. .TW M.T .100 .TW 00Y M O 1 W M . O W C . O W WW .100Y .TW WW .100Y.C M.TW WW .100Y.C M.TW M O W O W O W WW .100Y.C M.TW WW .100Y.C M.TW WW .100Y.C M.TW O WW 00Y.CO .TW W WW 00Y.CO .TW C . W W W Y W W M .1 .T 00 W.1 Y.COM W WW 00Y.CO .TW W.1 Y.COM W W W W W .T 00 W M .1 .T 00 W.1 Y.COM W WW 00Y.CO .TW W.1 Y.COM W W W W W .T W .100 W.1 Y.COM W M.T .100 OM W O W W C . W C W Y W .T W W WW .100Y. .100 M.T .100 OM W M.T O W C . O W W C W Y W WW .100Y. .TW WW .100Y.C M.TW M.T .100 M O W O W C O W WW .100Y. .TW WW .100Y.C M.TW WW .100Y.C M.TW M O W O W O W WW .100Y.C M.TW WW .100Y.C M.TW WW .100Y.C M.TW O WW 00Y.CO .TW W WW 00Y.CO .TW C . W W W Y W W M .1 .T 00 W.1 Y.COM W WW 00Y.CO .TW W.1 Y.COM W W W W W .T 00 W W.1 Y.COM W M.T .100 W.1 Y.COM W O W W W C . W .T W .T WW .100Y .100 .TW 100 M . OM W M O W C . O W W C . Y W W .TW W .TW 100 00Y WW .100Y.C M.TW M . 1 M . O W O W O W WW .100Y.C M.TW WW .100Y.C M.TW WW .100Y.C M.TW O W O W O W WW .100Y.C M.TW WW .100Y.C M.TW WW .100Y.C M.TW O W O W O W WW .100Y.C M.TW WW .100Y.C M.TW WW .100Y.C M.TW O WW 00Y.CO .TW W WW 00Y.CO .TW C . W W W Y W W M .1 .T 00 W.1 Y.COM W WW 00Y.CO .TW W.1 Y.COM W W W W W .T 00 W W.1 Y.COM W M.T .100 W.1 Y.COM W O W W W C . W .T W 00 W WW .100Y M.T .100 W.1 Y.COM W M.T O W O W W C . W W WW .100Y WW .100Y.C M.TW M.T .100 M.T O W O W C . O W W W Y W WW .100Y.C M.TW WW .100Y.C M.TW M.T .100 O W O W C O W WW .100Y. .TW WW .100Y.C M.TW WW .100Y.C M.TW M O W O W O W WW .100Y.C M.TW WW .100Y.C M.TW WW .100Y.C M.TW O W O W O W WW .100Y.C M.TW WW .100Y.C M.TW WW .100Y.C M.TW O W O W O W WW .100Y.C M.TW WW .100Y.C M.TW WW .100Y.C M.TW O WW 00Y.CO .TW W WW 00Y.CO .TW C . W W W Y W W M .1 .T 00 W.1 Y.COM W WW 00Y.CO .TW W.1 Y.COM W W W W W .T 00 W W.1 Y.COM W M.T .100 W.1 Y.COM W O W W W C . W .T W 00 W WW .100Y M.T .100 W.1 Y.COM W M.T O W O W W C . W W Y W .T W WW .100Y.C M.TW .100 M.T .100 OM W O W C . O W W C W Y W WW .100Y. .TW WW .100Y.C M.TW M.T .100 M O W O W C O W WW .100Y. WW .100Y.C M.TW WW .100Y.C M.TW W O W O WW WW W 0Y.C Y.C WW .TW . W W .T W 00Y .100 .TW 1 M.T . OM W M O W C . O W C W Y .C W WW .100Y. .TW M.T .100 .TW 00Y M O 1 W M . O W C . O W WW .100Y .TW WW .100Y.C M.TW WW .100Y.C M.TW M O W O W O W WW .100Y.C M.TW WW .100Y.C M.TW WW .100Y.C M.TW O WW 00Y.CO .TW W WW 00Y.CO .TW C . W W W Y W W M .1 .T 00 W.1 Y.COM W WW 00Y.CO .TW W.1 Y.COM W W W W W .T 00 W W.1 Y.COM W M.T .100 W.1 Y.COM W O W W W C . W W .T WW .100Y M.T .100 .TW 100 M . O W M O W C O W WW .100Y. .TW WW .100Y.C M.TW WW .100Y.C M.TW M O W O W O W WW .100Y.C M.TW WW .100Y.C M.TW WW .100Y.C M.TW O WW 00Y.CO .TW W WW 00Y.CO .TW C . W W W Y W W M .1 .T 00 W.1 Y.COM W WW 00Y.CO .TW W.1 Y.COM W W W W W .T W .100 W.1 Y.COM W M.T .100 OM W O W W C . W C W Y W .T W 00 W WW .100Y. M.T .100 W.1 Y.COM W M.T O W O W W C . W WW .100Y .TW WW .100Y.C M.TW M.T .100 M O W O W C . O W W W Y W WW .100Y.C M.TW WW .100Y.C M.TW M.T .100 O W O W C O W WW .100Y. .TW WW .100Y.C M.TW WW .100Y.C M.TW M O W O W O W WW .100Y.C M.TW WW .100Y.C M.TW WW .100Y.C M.TW O W O W O W WW .100Y.C M.TW WW .100Y.C M.TW WW .100Y.C M.TW O W O W O W WW .100Y.C M.TW WW .100Y.C M.TW WW .100Y.C M.TW O WW 00Y.CO .TW W WW 00Y.CO .TW C . W W W Y W W M .1 .T 00 W.1 Y.COM W WW 00Y.CO .TW W.1 Y.COM W W W W W .T 00 W W.1 Y.COM W M.T .100 W.1 Y.COM W O W W W C . W .T W 00 W WW .100Y M.T .100 W.1 Y.COM W M.T O W O W W C . W W WW .100Y WW .100Y.C M.TW M.T .100 M.T O W O W C . O W W W Y W WW .100Y.C M.TW WW .100Y.C M.TW M.T .100 O W O W C O W WW .100Y. .TW WW .100Y.C M.TW WW .100Y.C M.TW M O W O W O W WW .100Y.C M.TW WW .100Y.C M.TW WW .100Y.C M.TW O W O W O W WW .100Y.C M.TW WW .100Y.C M.TW WW .100Y.C M.TW O W O W O W WW .100Y.C M.TW WW .100Y.C M.TW WW .100Y.C M.TW O WW 00Y.CO .TW W WW 00Y.CO .TW C . W W W Y W W M .1 .T 00 W.1 Y.COM W WW 00Y.CO .TW W.1 Y.COM W W W W W .T 00 W W.1 Y.COM W M.T .100 W.1 Y.COM W O W W W C . W .T W 00 W WW .100Y M.T .100 W.1 Y.COM W M.T O W O W W C . W W WW .100Y WW .100Y.C M.TW M.T .100 M.T O W O W C . O W W W Y W WW .100Y.C M.TW WW .100Y.C M.TW M.T .100 O W O W C O W WW .100Y. WW .100Y.C M.TW WW .100Y.C M.TW W O W O WW WW W 0Y.C Y.C WW .TW