1
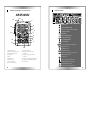
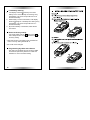
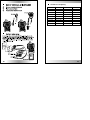
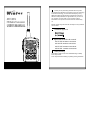
45V/45U
FM Radio Transceiver
USER'S MANUAL
Thank you for purchasing 45V/45U two way radio
manufactured by Wintecroncs. Based on the ever-changing
innovative technology ,we have been developing many
different wireless products which had gained consumers'
affection widely. Besides our appreciation for your love of
our products, we even wish you to find new product
information. Your precious comment will be cherished by
us.
Please read through the manual carefully for many features
of this model.
Certificate Approval
Applicable Model for this manual
45V-E VHF amateur transceiver
45V-A VHF amateur transceiver
45U-E UHF amateur transceiver
45U-A UHF amateur transceiver
Safety warning
Consumers need to have clear understanding of safety
se of this product.
Turn off power before fueling or parking at the gas station.
Distinctive features
Distinctive features
1
Radio controls/Functions
2
Use of TCXO resonator to enhance freq. stability
Digitally designed to ensure stable quality
Icons Guide
Operation Guide
3
Extra-small size with sturdy case, compliant with US military
standards
7 group tone calls and includes amateur's MORSE code
4-15
Low battery warning / Return to factory
8 levels of VOX ( voice-activate feature) with quick VOX
capability ON/OFF
setting / Programming by cable and
3 steps auto-power save modes / 4 steps auto power-ON /
4 steps time-out- timer
software
16
1 hazard channel and 36 memory channel setting
Installing / Removing battey pack
17
38 standard CTCSS code
Multi-Icon Backlit LCD screen with back light
Use of external MIC / Speaker /
Roger Tone ON/OFF
Battery charging
18
CTCSS vs. frequency
19
Specification
20
Frequency progressive value selection
Optional Accessories
21
REV/ TX/RX frequency
Safety information
22
TX/RX modulation switch 5K/2.5KHz
Signal indicator
Repeater value setting 0.1~15MHz
1
ICONS GUIDE
RADIO CONTROLS/FUNCTIONS
45V/45U
15
1
2
14
3
4
5
13
6
12
7
8
11
9
TONE CALL
AUTO-POWER SAVE
( Voice-activate system ) VOX
KEYPAD TONES
VOLUME
AUTO-POWER-OFF
TIME-OUT TIMER
BATTERY POWER
CTCSS CODE
Frequency Channel Display
10
1. LED indicator
2. External Speaker jack
3. External Mic jack
4. Speaker
5. Mic
6. LCD screen
7. UP button
8. Power button
9. Function button
10. Down button
11. CTCSS ( group code)
button
12. Frequency adjustment
button
13. Monitor /backlight button
14. (Push-to-Talk) PTT button
15. Antenna
Squelch level
KEYPAD lock
TX power level
Hazard (Emergency) channel
Memory Channel
Scanning
Signal strength indicator
TX/RX different channel
CTCSS ON indicator
Repeater mode enabled
2
3
Operation Guide
1. Power ON/OFF
Hold
about 0.5 sec to power radio. While power
ON, hold
about 1.5 sec to turn power OFF.
2. Transmitting/ Receiving
(This function will be unworkable when MEM
channel function is on)
2. Momentarily press
+
to swift to MEM
channel as above icon display. (This function will
be workable only after MEM channel is set
beforehand)
While holding , speak to the microphone area.
LED glows red during transmission. To receive,
release . LED glows green when receiving.
※When speaking, keep about 5~10 cm from
microphone area slowly and clearly.
3. Press and hold
3 sec to swift to SOS frequency
as above icon display, and press and hold
3
sec again to return to VFO frequency.
3. Volume adjustment
5. VFO frequency operation
1. KHz adjustment:
Momentarily press repeatedly on
, to adjust
volume louder. Momentarily press repeatedly on
to adjust volume lower. Press and hold
or
to swiftly adjust volume. Do adjustment as you
need.
※Caution: For external mic/speak user, adjust volume
, starting from lowest level.
4. VFO frequency/ MEM channel/
SOS channel Selection.
1. Momentarily press
+
to swift to VFO
frequency mode as above icon display.
4
Momentarily press
and then frequency icon
blinks, Momentarily press
+
to select the
frequency and then press to exit adjustment
mode.
If the desired frequency is far from the frequency
setting at present, MHz can provide a quick
adjustment for the frequency.
2. MHz adjustment:
Momentarily press
twice ( Press once if in KHz
mode) and then frequency icon blinks, Momentarily
5
press
+
to select the frequency. Press to
store and exit adjustment mode. ( Press
once
again can return to KHz mode)
※Each selection is to add or decrease 1MHz of
frequency.
※Each selection for KHz is to add or decrease 10KHz
(factory default). To change Factory Default, please
refer to 12.
3. Scan Frequency
Press
once, while frequency icon blinks, hold
or
about 2 sec to start scanning of channel.
Jumping of channel numbers increasingly or
decreasingly indicates scan in progress. Scan
stops when it detects a memory channel. Press
or
or
to store and exit the scan mode.
3. Memorize and delete memory channel/SOS channel
(1)
Momentarily press
once. While frequency icon
blinks, hold on
or
about 2 sec to start
scanning of frequency. Jumping of Frequency
numbers increasingly or decreasingly indicates
scan in progress . Scan stops when it detects a
frequency. Temporarily press or
or
will
disable auto scan and select the final frequency.
※Note: To Scan, turn off CTCSS codes.
6. Memory channel mode operation
1. Memory Channel Selection: (store the channels
beforehand)
Press
, while frequency icon blinks, hold
or
to select channels. Press to store and exit
the selection mode.
2. Scan memory channels:
6
(2)
Operate under VFO frequency mode, and select
your expected frequency. Hold
,and press
once to enter managing mode. (Please hold
button until the setting is completed). Press
or
key to select your desired memory or deletion
Ch No. (There are total 37 CHs including SOS
Channel). If there is blank beside the CH (as
Illustration 1) that means CH is memorized with
value. If it shows the Icon "- -", (as Illustration 2),
that means the Channel is vacant. Press
once
again can store the CH and hold
longer can
delete the CH. (you can only memorize SOS
channel) (Please release
button after the
setting is completed and it will go back to VFO
frequency mode automatically.
※The above functions can be programed easily trough
our cable and software for PC.
4. Examine Frequency for memory channels.
Operate under MEM channel mode. Hold
, and
press monitor button once, LCD icon will display
7
the number of present frequency. Release
button about 2 sec., LCD display will return to MEM
mode automatically.
7. CTCSS Code ON/OFF
(ON)
(OFF)
1. Hold on
for about 2 sec, to enable CTCSS .
Hold on
again for about 2 sec to disable.
2. While CTCSS is enabled, the icon will blink and
press temporarily
/
repeatedly to select
CTCSS.
3. Press
short once, CTCSS code can be change
by
/
button.
4. Press
or
or to leave the CTCSS setting.
1. Hold on
for about 3 sec till shows on the
screen to confirm keypad is locked.
2. To unlock keypad ,hold on
again for about 3
sec till disappear from the screen.
※When keypad lock is enabled, volume control and
program features are locked to prevent accidental
function changes.
11.Function settings
Temporarily press
to enable menu mode. Use
/
to scroll manu item between 1 and 9.
1. Tone call selection: Under menu item 1, tone call
1 ~ 7 can be selected. Factory default is at b1.
8. LCD back light ON/OFF
Temporarily press to turn backlight ON.
Temporarily press again to turn backlight OFF or
it will automatically turn OFF after 5 sec lighting.
9. Monitoring
Hold on for about 1 sec to open the speaker. In
the meantime, If any user is using under the same
frequency even with different CTCSS, the voice will
still be heard. (LED glows green).
※ Monitor is used for following purposes.
1. To receive weak signal for long to distance or for
intermittentl signal.
2. To receive all signals on same channel even with
different CTCSS for monitoring.
2.Power save mode selection. Under manu item 2
, power save modes 1:1 ~ 1:4 can be selected.
Choose 1:4 if talk time is short for best power
saving.Factory default is OFF.
3.VOX on/off selection: Under manu item 3, VOX
on/off can be selected. Factory default is OFF.
VOX ON/OFF.
10.Keypad lock /unlock
8
9
4.VOX's sensitivity: Under manu item 4, VOX's
sensitivity can be selected L1~L8 levels. L8 is
the least sensitive (Refer to 12).
※This function will be unworkable when
3 turns
OFF.
5.REV/ TX/RX frequency: When the mode is on,
RX and TX frequency will be reverse. (Factory
default is off)
※It is disable while
10 is off.
※Please refer to page16 for quick setting.
6.Keypad tones: Under manu item 6, select ON/
OFF. The factory default is OFF. The beep
sounds weakest at OFF. (Factory default is on)
8.time-out Timer: Under manu item 8, choose OFF
/30/60/120/180 according to your need. The
factory default is OFF. When 30 is selected, the
radio will send beep sounds twice and stop
transmission. If continuous talk exceeds over 30
sec, radio will automatically swift to receiving
mode.(Factory default is off) TOT icon blinks if
still holding at time-out.
9.Squelch setting: Factory default is L3. If the
squelch is set at L0, the static sound is heard all
the time. If setting at L1, radio is best to pick up
weak signal but susceptible to interferences.
Squelch L9 is the least sensitive and suited for
use against high interferences.
10.Repeater ON/OFF(Factory default is off)
7.Auto-power-off: Under manu item 7, choose OFF
/03/10/30/60 min according to your need. (The
factory default is OFF.) When 03 is selected, the
radio automatically turns power off if there is no
operation or signal received after 3 mins. It beeps
twice per 10 secs and lasts for 30 secs before
turning off. (Factory default is off)
10
Press
or
key for selection, when screen
displays "+" ( as illustration 1) means repeater is
on, and the frequency of transmission is higher
than that of receiving by 1 span. This function
turns off when screen displays "OFF" ( as
illustration 2) When screen displays "-" ( as
illustration 3) means repeater is on, and the
11
frequency of transmission is lower than that
of receiving by 1 span.
11.Roger tone ON/OFF
The radio will send a sound to the receiver at
each end of the talk. Factory default is off.
12.Frequency span value setting: 5K/10K/
12.5K/25K.
Factory default is 10K. The value can be
changed.
13.Frequency span value setting for repeater (
Factory default is 0.6MHz). When enable this
function, the frequency span value between
transmission and receiving can be from 100K
(01) to 15MHz (150)
※Please refer to 15 repeater function for more details.
14.Wide/ Narrow band transmission and receiving
setting: The radio can operate the transmission
or receiving both 5KHz in wide band and
2.5Khz in narrow band.
12.Tone call & 1575 Hz Tone Burst
12
For selecting the type of tone call, please refer to
1. Holding , temporarily press
can send
tone call to other receivers.For sending 1575 Hz
tone burst, please enter the tone call selection
mode and select b7. Hold and press
bottoms
together to send 1575Hz tone burst for accessing
the repeaters.
13.VOX ( Voice quick activate transmission
feature) ON/OFF
Holding , temporarily press
to enable VOX.
To disable it, holding , temporarily press again
. For programming of VOX's sensitivity, refer
to 4.
※While VOX is enabled , no need to hold
during
transmission. Just talk into the microphone area of
radio unit. with appropriate sound ( depending on
VOX's sensitivity)
14.TX Power adjustment
Holding , temporarily press
/
to select for
option of H/M/L.Select H for high TX power, M for
medium and L for low .The factory default is Low.
13
15.Attention for reapter mode
1.
2.
3.
4.
Please attend to the following points while
operating this function.
( 10) select "+" or "-"
( 13)select the discrepancy of span by 0.6MHz
or select any of settings but it will be invalid if
exceeding the frequency ranges of the radios.
Be sure to enable the CTCSS tone. Some
repeater need to open up CTCSS tone.
Turn off REV TX/RX function ( 5) if possible to
decrease the interference for the transmission and
receiving frequency.
Let go of all buttons after 1 beep sounds to restore
the operation.
18.Keeping MEM channel
MEM channel can be stored in a long period of
time.Keep the channel in advance and then turn
off the power, Press
+
and turn on the
power, let go of all buttons after 3 beep sounds.
The memorization is enabled. To disable,repeat
the same steps when power off. Let go of all
buttons after 1 beep sounds.
※This function does not work while there is no M Ch.
※Frequency span for VHF is 600KHz (default 6)
※Frequency span for UHF is 4MHz (default 40)
16.Swift setting for REV TX/RX Reverse
Holding , temporarily press
to enable REV
reverse function. Press again to turn off this
function.
※This function can only work when the repeater (
10) is on.
17.Function Setting Lock/Unlock
Enabling Function Setting Lock can keep the
setting as original ones when power off. Press
+
and then turn on the power. Let go of all
buttons after 3 beep sounds. The function is
locked. When this function is enabled, all of the
functions include CTCSS code, quick VOX, swift
setting REV cannot be adjusted besides
frequencies, CHs, and volume.To unlock, turn off
the power and press
+
and then turn on the
power.
14
15
Low battery warning
1. LCD display will show and beep once when
battery is low. and it will beep once during every
transmission. The power output will lower to M
level automatically.
2. When battery is near to exhausted, LCD display
will show and glow. It will beep twice during every
transmission. The power output will lower to L
level automatically.
3. By the time battery is exhausted, radio will turn
off it selves.
Return to factory setting
Turn off the radio. Hold on
, then press
until 3 beep sounds. Let go off all buttons to return
to factory setting.
※After this function is activated, VFO and SOS will
return to factory setting besides M ch.
※M ch will not be changed.
Programming by cable and software
The radio can be edited some of functions, MEM
and SOS frequencies by Wintec PC cable and
software for more convenient setting.
16
17
CTCSS vs. frequency
01=67.0Hz
11=97.4Hz
12=100.0Hz
21=136.5Hz
22=141.3Hz
31=192.8Hz
02=71.9Hz
03=74.4Hz
13=103.5Hz
23=146.2Hz
33=210.7Hz
04=77.0Hz
14=107.2Hz
24=151.4Hz
34=218.1Hz
05=79.7Hz
15=110.9Hz
25=156.7Hz
35=225.7Hz
06=82.5Hz
16=114.8Hz
26=162.2Hz
36=233.6Hz
07=85.4Hz
08=88.5Hz
17=118.8Hz
27=167.9Hz
37=241.8Hz
18=123.0Hz
28=173.8Hz
38=250.3Hz
09=91.5Hz
19=127.3Hz
29=179.9Hz
10=94.8Hz
20=131.8Hz
30=186.2Hz
32=203.5Hz
2
1
18
19
Specification
Optional Accessories
Frequency Range for 45V-E
144~146
ANT AL80 M/L antenna
Frequency Range for 45V-A
144~148
LP-84M Belt clip
Frequency Range for 45U-E
430~440
PB AL01 Leather case
Frequency Range for 45U-A
438~450
WI AL01 Interface cable for programming
Number of Channels (include SOS)
37
CTCSS
1~38
Electric Wave Type
FM
Speaker Impedance
8ohm 0.5W
Power Supply Voltage
Dimensions
Weight
Operating Temperature Range
7.2V
55(W)x95(H)x31(D)mm
250g(include battery)
-20 C~+70 C
Receiver
0.20uV
less than 40mA
Transmitter
LP-83B Clip microphone earphone with LED
indicator
LP-82A Speaker microphone with LED
indicator
BT FR80 700mA Ni-MH battery pack
BT FR80Li 1500mA Li-polymer battery pack
LCHG-81A Twin rapid charger for BT FR80
LCHG-81B Rapid charger for BT FR80 &
BT FR80Li
Output Power(45V)
max. 5W @7.2VDC
Output Power(45U)
max. 4W @7.2VDC
Electric Current (45V)
1.6
0.2A@5W
Electric Current (45U)
1.6
0.2A@4W
20
indicator
BT FR80C Car adapters fake battery
Sensitivity
Electric Current
LP-83A Clip microphone earphone with LED
LCHG-81C Regular charger for BT FR80
21
Safety information
1. Self-replacing or re-structuring of any parts
by is legally not permitted or will lose license
2. Use is prohibited at restricted environment
declared by authority,during flight, highlyexplosive area like near mining areas
3. Avoid storing in high temperature or humid
place for long time
4. Turn to lowest volume if external Mic/
Speaker is used,then adjust appropriately
5. If strange smell or smoke comes off from
radio,dispatch to service center immediately
6. Never use other power sources for charging
other than the standard charger set designed
for this radio model
7. Take off battery pack if out of use for long
time
22