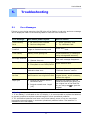
1
Hand-Held Scanner User’s Manual Regulatory model: HF-1115B/HF-1116B Avision Inc. manual-en-250-0746-E-miwand2all-v1 Trademarks Microsoft is a U.S. registered trademark of Microsoft Corporation. Windows, Windows XP, Windows Vista, and Windows 7 are either registered trademarks or trademarks of Microsoft Corporation in the United States and/or other countries. IBM, IBM PC are registered trademarks of International Business Machines Corp. Other brands and product names herein are trademarks or registered trademarks of their respective holders. Copyright All rights reserved. No part of this publication may be reproduced, transmitted, transcribed, stored in a retrieval system, or translated into any language or computer language, in any form or by any means, electronic, mechanical, magnetic, optical, chemical, manual, or otherwise, without the prior written permission of Avision Inc. Material scanned by this product may be protected by governmental laws and other regulations, such as copyright laws, the customer is solely responsible for complying with all such laws and regulations. Warranty The information contained in this document is subject to change without notice. Avision makes no warranty of any kind with regard to this material, including, but not limited to, the implied warranties of fitness for a particular purpose. Avision shall not be liable for errors contained herein or for incidental or consequential damages in connection with the furnishing, performance, or use of this material. Disposal of Waste Equipment by Users in Private Union This symbol on the product or on its packaging indicates that the product can not be disposed of with your other household waste. Instead it should be sent to appropriate facilities for recovery and recycling in an effort to protect human health and the environment. Fore more information about where you can drop off your waste equipment for recycling, please contact your local city office, your household waste disposal service or the shop where you purchased the product. ii User’s Manual FCC Radio Frequency Interference Statement This product has been tested and found to comply with the limits for a class B digital device, pursuant to Part 15 of the FCC rules. Operation is subject to the following two conditions: (1) this device may not cause harmful interference, and (2) this device must accept any interference received, including interference that may cause undesired operation. The FCC Class B limits are designed to provide reasonable protection against harmful interference in a residential installation. This equipment generates, uses, and can radiate radio frequency energy and, if not installed and used in accordance with the instructions, may cause harmful interference to radio communications. However, there is no guarantee that interference will not occur in a particular installation. If this equipment does cause harmful interference to radio or television reception, which can be determined by turning the equipment off and on, the user is encouraged to try to correct the interference by one or more of the following measures: Reorient or relocate the receiving antenna. Increase the separation between the equipment and receiver. Connect the equipment into an outlet on a circuit different from that to which the receiver is connected. Consult your point of purchase or service representative for additional suggestions. European Union Regulatory Notice Products bearing the CE marking comply with the following EU Directives: • • Low Voltage Directive 2006/95/EC EMC Directive 2004/108/EC CE compliance of this product is valid if powered with the correct CE-marked AC adapter provided by Avision. *This machine is certified as Class 1 LED product. This means that this machine does not produce hazardous laser radiation. iii Warning and Precautions of the lithium-ion battery Warning: Danger warning to prevent the possibility of the battery from leaking, heating, explosion, please observe the following precautions: • Don’t immerse the battery in water and seawater. Please put it in cool and dry environment if no using. • Do not discard or leave the battery near a heat source as fire or heater • Being charged, using the battery charger specifically for that purpose • Don’t reverse the positive and negative terminals • Don’t connect the battery to an electrical outlet directly. • Don’t connect the positive and negative terminal directly with metal objects such as wire. Short terminals of battery is strictly prohibited, it may damage battery. • Do not transport and store the battery together with metal objects such as necklaces, hairpins. • Do not strike, throw or trample the battery. • Do not directly solder the battery and pierce the battery with a nail or other sharp object. • Do not use lithium ion battery and others different lithium polymer battery model in mixture. • Prohibition of use of damaged cells. • Don’t bend or fold sealing edge. Don’t open or deform folding edge. Don’t fillet the end of the folding edge. • Don’t fall, hit, bend battery body. • Battery pack designing and packing Prohibition injury batteries. • Never disassemble the cells. • Keep the battery away from babies. • Any components contacting these two edges, they must be insulated. iv User’s Manual Caution: • Risk of explosion if battery is replaced by an incorrect type. Dispose the battery according to local regulations. • Never place batteries or devices on or in heating devices, such as microwave ovens, stoves, or radiators. Batteries may explode when overheated or its performance will be degenerate and its service life will be decreased. • Do not use it in a location where is electrostatic and magnetic greatly, otherwise, the safety devices may be damaged, causing hidden trouble of safety. • If the battery leaks, and the electrolyte get into the eyes. Do not wipe eyes, instead, rinse the eyes with clean running water, and immediately seek medical attention. Otherwise, eyes injury can result. • If the battery gives off an odor, generates heat, becomes discolored or deformed, or in any way appear abnormal during use, recharging or storage, immediately remove it from the device or battery charge and stop using it. • Avoid charging batteries for more than a week, as overcharging may shorten battery life. Over time, unused batteries will discharge and must be recharged before use. • Disconnect chargers from power sources when not in use. • Use batteries only for their intended purposes. • Store the battery at 0°C to 40°C. • Avoid exposing your device and batteries to very cold or very hot temperatures. Extreme temperatures can cause the deformation of the device and reduce the charging capacity and life of your device and batteries. • Prevent batteries from contacting metal objects, as this can create a connection between the + and – terminals of your batteries and lead to temporary or permanent battery damage. • In case the battery terminals are dirt, clean the terminals with a dry cloth before use. Otherwise power failure or charge failure may occur due to the poor connection with the instrument. • Be aware discharged batteries may cause fire. Follow all local regulations when disposing of used batteries or devices. • Never crush or puncture the battery. Avoid exposing the battery to high external pressure, which can lead to an internal short circuit and overheating. v Table of Contents 1. Overview ........................................................................... 1-1 1.1 1.2 1.3 1.4 1.5 1.6 1.7 2. Installation ........................................................................ 2-1 2.1 2.2 2.3 2.4 2.5 3. Introduction.................................................................................... 1-1 Package Contents ............................................................................ 1-1 Top View ........................................................................................ 1-3 Rear View ....................................................................................... 1-4 Bottom View ................................................................................... 1-4 Front View with Feeder Dock ............................................................. 1-5 Scanner Indicator Light .................................................................... 1-6 Precautions..................................................................................... 2-1 Remove Scanner from the Feeder Dock .............................................. 2-1 Install the Batteries ......................................................................... 2-2 Charge the Batteries ........................................................................ 2-4 2.4.1 Via the USB cable ................................................................. 2-5 2.4.2 Via the power adapter or USB power cable ............................... 2-5 Install micro SD Card ....................................................................... 2-7 Operation........................................................................... 3-1 3.1 3.2 3.3 3.4 3.5 3.6 3.7 Suitable and Unsuitable Original Types ............................................... 3-1 Turn on the Scanner ........................................................................ 3-1 Choose Your Desired Scan Settings .................................................... 3-2 Start Wand Scanning (Hand-Held)...................................................... 3-2 Start Sheet-Fed Scanning with Feeder Dock ........................................ 3-3 Preview Scanned Images on the LCD Screen ....................................... 3-6 View or Download the Scanned Images (Windows) ............................... 3-7 3.7.1 Computer System Requirements for USB Connection ................. 3-8 3.7.2 After Successful Connection ................................................... 3-8 3.8 View or Download Images with iPad ................................................... 3-9 3.9 Use the OCR Software Application ...................................................... 3-9 3.10 Customize Your Scan Settings ......................................................... 3-10 3.10.1 Resolution ....................................................................... 3-10 3.10.2 Color Mode ...................................................................... 3-10 3.10.3 Save Format .................................................................... 3-11 3.10.4 LCD Off ........................................................................... 3-11 3.10.5 Power Saving ................................................................... 3-12 3.10.6 Anti-mirror (wand scans only) ............................................ 3-13 3.10.7 Card Format .................................................................... 3-14 3.10.8 Auto-crop (sheet-fed scan only).......................................... 3-15 3.10.9 Calibration ....................................................................... 3-15 3.10.10 Language ...................................................................... 3-16 3.10.11 Factory Default............................................................... 3-16 3.10.12 About............................................................................ 3-17 vi User’s Manual 4. Maintenance....................................................................... 4-1 4.1 4.2 5. Troubleshooting ................................................................. 5-1 5.1 5.2 5.3 6. Calibrate the Scanner .......................................................................4-1 Clean the Scanner and Feeder Dock ....................................................4-2 Error Messages ................................................................................5-1 Frequently asked questions and answers .............................................5-2 Technical Service .............................................................................5-4 Specifications..................................................................... 6-1 vii User’s Manual 1. 1.1 Overview Introduction Congratulations on your purchase of the portable handheld scanner. With this scanner, you can scan and store your photos or documents directly to a micro SDTM card without any computer. Simply turn on the scanner, press the Power/Scan button to start and slide the scanner on the surface of your document and press the Power/Scan button again to stop. The scanned image is stored into your micro SD card. What is best, the scanner allows you to preview your scanned images with a built-in color LCD display to confirm the document you have just captured. Before you install and operate the product, please take a few minutes to read through this manual. It provides proper instructions for you to install, operate and maintain the product. The following figure indicates the package contents. Please check all the items against your checklist. If you do not receive all the items, please contact your authorized local dealer immediately. 1.2 Package Contents Standard package items: Scanner Quick Guide microSD Card (User's Manual) USB Cable Carry Bag Calibration Sheet Cleaning Cloth Package items vary based on your scanner model: Feeder dock USB Power Cable 2x AA batteries Li-Ion Battery *Rechargeable Charger 1-1 Software CD *Power Adapter Package items vary based on your scanner model: MiWand 2 : MiWand 2L: MiWand 2 Pro: MiWand 2L Pro: 2xAA batteries, *battery charger. Li-Ion battery, CD. Feeder dock, 2xAA batteries, *battery charger, USB power cable, *power adapter. Feeder dock, Li-Ion battery, USB power cable, *power adapter, CD. The model names of MiWand 2 and MiWand 2 Pro apply for the regulatory model number of HF-1116B. The model name of MiWand 2L and MiWand 2L Pro apply for the regulatory model number of HF-1115B. *: The SC version of that model does not include this item. Note: Retain the scanner box and packing materials in case you may use them for shipping purposes. 1-2 User’s Manual 1.3 Top View 2 3 4 5 6 1 Item 7 Name Description 1 System indicator light Indicates the operating/warning status of the scanner. 2 LCD display Displays preview pictures and settings menus. 3 Up arrow Power/Scan button 4 Down arrow 5 6 Back arrow 7 Battery compartment Enters Menu screen from [Scan Ready] screen. z Navigate “backward” through images and menu options. z Press to turn on the scanner. z Press to start or end a scan. z Accept option choice in Menu and Preview options. z Press and hold for 3 seconds to turn off the scanner. z Enters Display mode from [Scan Ready] screen. z Navigate “forward” through images and menu options. Return to previous screens or exists from Display mode or Menu option. z Slide to remove the cover. 1-3 1.4 Rear View 1 Item 1.5 2 Name Description 1 USB port Used to plug the mini end of the USB cable to connect to PC. 2 Memory card slot Used to insert a memory card. Bottom View 1 2 Ite m Name Description 1 Sensor rollers The rollers are sensors and should only be rolled in one direction. Do NOT roll back and forth while scanning, except during calibration. 2 Glass While rolling scanner over a document, the optical sensor in the glass reads and scans the image. 1-4 User’s Manual 1.6 Front View with Feeder Dock 1 2 3 4 Item Name Description 1 Guide Slide Slide the guide to fit your document size. 2 Feed Slot Used to insert original into the feed slot to begin scanning. 3 Latch Used to disengage the wand scanner from the feeder dock. 4 DC Jack Used to plug power adapter. 1-5 1.7 Scanner Indicator Light Scanner Indicator Light Status Off Orange briefly Green, steadily on Indication Scanner is off or scanner is on and ready for use Powering on for initialization Scanning in progress in 300 dpi Orange, steadily on Scanning in progress in 600 dpi Green or Orange flashing Processing scanned image Red, flashing No SD card, SD card full, card error, no scan performed after initiating wand scan mode, or low battery 1-6 User’s Manual 2. Installation 2.1 Precautions z Keep the product out of direct sunlight. Direct exposure to the sun or excessive heat may cause damage to the unit. z Do not install the product in a humid or dusty place. z Place the product securely on an even, flat surface. Tilted or uneven surfaces may cause mechanical or paper-feeding problems. z Retain the product box and packing materials for shipping purposes. 2.2 Remove Scanner from the Feeder Dock 1. Press and hold the latch. 2. Lift the left end of the scanner 3. Detach the right end of the scanner from the feeder dock. Warning: Do not lift the scanner too high and avoid using force to detach the scanner from the feeder dock in case the connector may be damaged! 4. Remove the protective tapes on the scanner and inside the feeder dock as indicated. Protective Tapes 2-1 2.3 Install the Batteries For the model of MiWand 2/MiWand 2 Pro: 1. Push and remove the battery cover on the scanner. 2. Insert 2x AA batteries into the battery compartment. Make sure the batteries are inserted with the correct polarity. (note correct + - direction) 3. Insert the battery cover. Note: z The LED light on the charger does not turn off when charging is complete. It turns off only when the safety time (18 hours) expires. z The scanner does not recharge the rechargeable batteries. 2-2 User’s Manual For the model of MiWand 2L/MiWand 2L Pro (with Li-Ion Battery): 1. Push and remove the battery cover on the scanner. 2. Load the battery into the battery container. Make sure the battery is loaded with the correct polarity. Note the copper strips on the battery should be touching the copper strips on the device inside the battery container. Note: Please use only the supplied battery. 3. Insert the battery cover. 2-3 2.4 Charge the Batteries For MiWand 2/MiWand 2 Pro: *The scanner comes with a battery charger and 2 pieces of AA rechargeable batteries to let you reuse batteries. Please follow these steps to recharge the rechargeable batteries: 1. 2. 3. Insert 2 rechargeable batteries into the battery charger. Make sure the batteries are inserted with the correct polarity. (note correct + - direction) Plug the battery charger into an electrical outlet. A green LED light appears on the charger while the batteries are charged. Note every time the batteries must be charged for 7 hours. When charging is complete, unplug charger and remove batteries to prevent overcharging and cause damage to the batteries. Note: 1. The LED light on the charger does not turn off when charging is complete. It turns off only when the safety time (18 hours) expires. 2. The scanner does not recharge the rechargeable batteries. 3. The scanner can only run on 2x AA alkaline batteries or 2 NiMH rechargeable batteries. * AA battery charger: Available for full version only! 2-4 User’s Manual For MiWand 2L/MiWand 2L Pro: There are two methods to charge the batteries, through the USB cable to the computer or through the power adapter or the USB power cable to the electric outlet. 2.4.1 Via the USB cable 1. Turn off the scanner. 2. Connect the mini USB connector to the USB port of the scanner. 3. Connect the other USB connector to the USB port on your computer. Important: z Do not turn on the scanner power when charging the battery. z Charge the batteries for at least 2 hours until green LED goes off before using the scanner. 2.4.2 Via the power adapter or USB power cable 1. Turn off the scanner. 2. Insert the scanner in the feeder dock. 3. Insert the small end of the power adapter to the feeder dock and the other end to a power outlet. 2-5 Or 3. Insert the small end of the USB power cable to the feeder dock and the other end to a computer or a power outlet through a USB power adapter (not included). USB Power Adapter (not included) Important: z Do not turn on the scanner power when charging the battery. z Charge the batteries for at least 2 hours until green LED goes off before using the scanner. 2-6 User’s Manual 2.5 Install micro SD Card You must install a micro SDTM card to the SD slot of the scanner to store your images. Gently press in until the SD card is latched. micro SD card Note: z z The scanner only accepts micro SD card in FAT16 or FAT32 format. NTFS and other file formats are not supported. Always insert a micro SD card before calibrating and scanning. 2-7 User’s Manual 3. Operation 3.1 Suitable and Unsuitable Original Types Suitable for Wand Scanning The scanner used as a wand scanner without the feeder dock is designed to obtain the best scanning results with photo and document up to 8.5” x 14” size. Suitable for Feeder Dock The scanner used with the feeder dock is designed to obtain the best scanning results with the following types of originals: z z Photos and documents (3”x5”, 4”x6”, 5”x7”, 8”x14”) Business cards (standard 3.5”x 2” or larger) Unsuitable for Feeder Dock Do not use the following types of originals for scanning in the feeder dock, otherwise the feeder dock may malfunction or cause the original to jam in the slot. • Originals thicker than 1.0mm • Original with either side shorter than 55mm • Originals with lots of black or dark colors • Original with dark colors surrounding the edges • Printed media (newspapers, magazines, etc • Soft and thin materials (thin paper, cloth, etc.) • Curl or wrinkle originals • Originals with staples or paper clips. • Originals that exceed acceptable size - 8” (width) x 14”(length) (216 mm x 356 mm) 3.2 Turn on the Scanner Press to turn on the scanner. The LED will be flashing and then extinguished. The [Scanner Ready] screen will be displayed as illustrated. Press again for about 3 seconds to turn off the scanner. The scanner will be automatically shut off if it is left idle for 3 minutes. 3-1 3.3 Choose Your Desired Scan Settings 1. On the [Scan Ready] screen, press mode. to enter the Menu 2. A list of menu options is displayed. The options include Resolution, Color Mode, Save Format, LCD Off, and so on. 3. Press to focus on your desired option such as Save to select it. Format, and then press 4. Press to focus on your desired item such as PDF, and to select it. then press 5. Press to exit. * To increase ease of use, please first go to “Menu” and then choose “Language” to select your desired language on the screen. * Default settings: Resolution: 300 dpi, Color Mode: Color, File Format: JPEG, LCD Off: 45 sec 3.4 Start Wand Scanning (Hand-Held) 1. Place your document on a flat surface. 2. Press to start a scan. 3. Hold the scanner and glide the scanner gently over the surface of the page as illustrated. 4. Press to stop the scan. *By default, the Preview mode is on allowing you to view the scanned images for 2 seconds immediately after scanning (available for JPEG file format only). Note: 1. Refer to the following list for a proper scan speed (based on an A4-size paper): 0.6 second (B&W, 300 dpi)/1.6 second (Color, 300 dpi);2.4 seconds (B&W, 600 dpi)/6.5(Color, 600 dpi) 2. If you hold the scanner vertically and scan your original from right to left or from left to right, your image will be rotated 90°. Please use the included software application or other imageediting software application to rotate the scanned image correctly. 3-2 User’s Manual 3.5 Start Sheet-Fed Scanning with Feeder Dock By attaching the feeder dock into the scanner, the whole unit allows you to start auto scan as soon as your document is inserted to the feed slot. When the scan is finished, the image is saved in the memory card. Note: z Only MiWand 2L Pro/MiWand 2 Pro comes with a feeder dock! z When the scanner is attaching to the feeder dock, no battery is required to operate. However, you must connect the supplied power adapter to get the power. Installation: 1. Press and HOLD the latch at the left end. 2. Plug the right end of the scanner to the right end of the feeder dock with the copper strips inserting into the hole. 3. Place the left side of the scanner to the slot. 4. Release the latch. 5. Connect the power: (a) From a power outlet through a power adapter: Simply plug the small end of the power adapter to the power jack of the ducking unit and the other end to a power outlet. * Power Adapter: Available for full version only! 3-3 (b) From a power outlet through a USB power adapter (not included) Simply plug the small end of the power adapter to the power jack of the ducking unit and the other end to a power outlet through a USB power adapter (not included). USB Power Adapter (not included) (C) From a computer through a USB cable Plug the small end of the USB power cable to the power jack of the ducking unit and the USB connector to the USB port of your computer. (D) From a USB power bank (not included) Plug the small end of the USB power cable to the power jack of the ducking unit and the USB connector to the USB port (5V, 1A) of your USB power bank. 3-4 User’s Manual Operation: 1. Press to turn on the scanner. 2. Refer to the section [Customize Your Scan Settings] to select your desired scan settings. 3. Insert a page FACE UP and align it to the left edge of the feeding slot. The scan is automatically started when your document is fed into the feeding slot. When the scan is finished, the image is saved in the memory card. * By default, the Preview mode is on allowing you to view the scanned images for 2 seconds immediately after scanning (available for JPEG file format only). 3-5 3.6 Preview Scanned Images on the LCD Screen You can quickly and easily preview your JPEG images on the LCD screen immediately after a scan, or at any other time. You can also view all images individually or as a slideshow. 3.6.1 Set Preview Mode By default, the Preview mode is on allowing you to view the scanned images for 2 seconds immediately after scanning (available for JPEG file format only). Two options appear on the to Save (default) or press to Delete the screen with the image allowing you to press image immediately. When Preview mode is off, the JPG scanned image is saved immediately without displaying a preview. * Scans performed with Preview mode off use less battery power, so you can expect more scans with Preview mode off. Follow these steps to disable the Preview mode: 1. With the to enter the Menu mode. screen displayed, press 2. Press to focus on Preview, and then press 3. Press to focus on Off, and then press 4. Press to exit. to select it. to select it. The Preview Screen View Scanned JPEG images as Slideshow 1. With the to enter the Display mode. screen displayed, press 2. The slideshow automatically begins and displays the images in the alphanumeric order they are stored on the SD card. 3. To pause the slideshow, press 4. Press ; to restart the slideshow press at any time to exit the slideshow. 3-6 again. User’s Manual View Scanned JPEG images Individually 1. With the to enter the Display mode. screen displayed, press 2. The slideshow automatically begins and displays the images in the alphanumeric order they are stored on the SD card. 3. Press / to view previous or next image. 4. Press to exit the Display mode and return to the Scan Ready screen. 3.7 View or Download the Scanned Images (Windows) 1. To view or download your scanned images, you can either remove the micro SD card and connect it to a card reader, or connect the scanner to your computer via the supplied USB cable (be sure to turn on your scanner). * When the scanner and your computer is connected successfully, all tasks are interrupted and the USB connection screen is display. Warning: It is recommended to download the scanned images by removing the memory card from the scanner and then inserting the memory card to your computer instead of connecting the scanner directly to your computer with the USB cable since this may require a lot of battery power. 2. Your computer should recognize the card or the scanner as a Removable Disk. 3. Click the Removable Disk and you will find a folder of “DCIM” is created and all the PDF files will be stored in the subfolder of “200DOC” and the JPEG files in the subfolder of “100PHOTO”. File name starts from IMG_0001.pdf or IMG_0001.jpg. 3-7 Each scanned image is given a file name with the prefix IMG_ followed by a 4-digit sequential number in the order the images are stored. For example, IMG_0001.jpg, IMG_0002.jpg, IMG_0001.pdf, IMG_0002.pdf, etc. JPG files are stored in a sub folder titled DCIM\100PHOTO. The folder stores 9999 photo files, and then automatically creates another sub folder titled 101PHOTO, and so on to 199PHOTO. PDF files are stored in a sub folder titled DCIM\200DOC. The folder stores 9999 document files, and then automatically creates another sub folder titled 201DOC, and so on to 299DOC. 3.7.1 Computer System Requirements for USB Connection Operating system: Windows XP, Windows Vista, Windows 7 Mac 10.5 or above (Mac is used only for data transferring) USB port: USB 2.0 /USB 1.1 3.7.2 After Successful Connection When the scanner connects with the PC, an additional drive is listed in the Explorer window titled Removable Disk [drive letter], or the personalized title you may have previously assigned to your microSD card. 3.7.2.1 Safely Disconnect Scanner/micro SD Card From PC 1. On the Windows System Tray, click the hardware removal icon. 2. Click the “Safely remove USB mass Storage device” message with the corresponding Drive. 3. When the “Safe to Remove Hardware” message appears, you can safely remove the scanner’s USB cable. 3-8 User’s Manual 3.8 View or Download Images with iPad 1. Plug the iPad Camera Connector(not included)to iPad dock connector. Plug the mini USB connector of the supplied USB cable to the Mini USB port of your scanner and plug the USB connector of the supplied USB cable to iPad Camera Connector. 2. The scanned images in the micro SD card of your scanner will be displayed in iPad in 3 seconds. 3. Choose “Import All” to load the scanned images to the album of your iPad. iPad Camera Connector (not included) 3.9 Use the OCR Software Application The bundled software application allows you to convert image text to editable or searchable text through the OCR (Optical Character Recognition) process. For detailed information on how to use the function, please refer to the user’s manual or the online help of the software application contained in the CD. 3-9 3.10 Customize Your Scan Settings You can customize scanner settings through the Menu screen to fit different document types. 3.10.1 Resolution The scan resolution is measured in dpi (dots per inch). The higher the resolution, the more details the scanned image will be displayed. However, a higher resolution may require more disk space stored in the SD card. The scanner offers two resolution modes, 300 (default, normal) or 600 dpi (high quality). Follow these steps to select your desired resolution: 1. With the screen displayed, press to enter the Menu mode. 2. Press to select Resolution. 3. Press to focus on your desired resolution, and then press 4. Press to exit. to select it. 3.10.2 Color Mode The scanner offers two color modes for your scanned image. Color (default, fits for photos) and Black and White (fits for text document). Follow these steps to select your desired color mode: 1. With the screen displayed, press to enter the Menu mode. 2. Press to scroll to Color Mode, and then press 3. Press to focus on your desired mode, and then press 4. Press to exit. 3-10 to select it. to select it. User’s Manual 3.10.3 Save Format The scanner offers two types of file formats for your scanned image. JPEG (default, fits for photos) and PDF (fits for text document). Follow these steps to select your desired file format: 1. With the screen displayed, press to enter the Menu mode. 2. Press to scroll to Save Format, and then press 3. Press to focus on your desired format, and then press 4. Press to exit. to select it. to select it. 3.10.4 LCD Off To let the scanner enter power saving mode, the scanner provides option to turn off the LCD screen after idle for a specified time without turning off the power. The choice includes 45 seconds (default), 90 seconds, and 3 minutes. To turn the LCD screen back on, simply press any button. Follow these steps to change the setting: 1. With the screen displayed, press to enter the Menu mode. 2. Press to scroll to LCD Off, and then press 3. Press to focus on your desired setting, and then press 4. Press to exit. 3-11 to select it. to select it. 3.10.5 Power Saving To conserve power, the scanner automatically shuts off after left idle for a specified time (90 seconds, 3 minutes, or 5 minutes). Follow these steps to change the time setting: 1. With the screen displayed, press to enter the Menu mode. 2. Press to scroll to Power Saving, and then press 3. Press to focus on your desired setting, and then press 4. Press to exit. 3-12 to select it. to select it. User’s Manual 3.10.6 Anti-mirror (wand scans only) When the [Anti-mirror] feature is turned on (default), the scanner allows you to scan an original either from top-to-bottom or from bottom-to-top. In either way, you can obtain a correct scanned image. (The scanner automatically detects your scanning direction and if you scan your original from bottom-to-top, the scanned image will be automatically flipped and rotated upside-down.) When [Anti-mirror] is turned off, if you scan your original from bottom-to-top, your scanned image will be upside-down and mirrored (the right side and left side of your image will be reversed.) *This feature is only available when using the scanner as a hand-held wand scanner. Original Scanning direction (Anti-Mirror: on) The Scanned Image Or Top-to-bottom Bottom-to-top Follow these steps to turn Anti-Mirror off: 1. With the screen displayed, press to enter the Menu mode. 2. Press to scroll to Anti-Mirror, and then press 3. Press to focus on your desired setting, and then press 4. Press to exit. 3-13 to select it. to select it. 3.10.7 Card Format Warning !: If you reformat your memory card, all existing files on the card will be deleted. To format your SD card: 1. With the screen displayed, press to enter the Menu mode. 2. Press to scroll to Card Format, and then press 3. Press to select Yes. 4. To confirm, press to select it. . 5. After successful format, the Menu screen is displayed. 6. Press to exit. 3-14 User’s Manual 3.10.8 Auto-crop (sheet-fed scan only) When using the feeder dock, the whole unit has a built-in cropping function to capture an image according to the actual size of your original as illustrated below. *This feature is available when using sheet-fed scan with the feeder dock. Auto-crop off Original/Auto-crop on (default) Depending on the shape and size of your original, you may want to perform additional manual cropping on the scanned image to achieve your desired final image. Follow these steps to disable the auto-crop feature: 1. With the screen displayed, press to enter the Menu mode. 2. Press to scroll to Auto-crop, and then press 3. Press to focus on desired mode, and then press 4. Press to exit. to select it. to select it. 3.10.9 Calibration If the scanned image has vertical lines or discolorations, the scanner may need to calibrate in order for the Contact Image Sensor (CIS) to resume its color & sharpness precision. For calibration instructions, see the “Calibrate the Scanner” section. *Calibrate the scanner only when the color of the scanned image looks abnormal. 3-15 3.10.10 Language The scanner offers multi-lingual text for LCD screen. Choice includes English, German, French, Dutch, Italian, Spanish, Chinese Traditional, Chinese Simplified, Japanese, Korean, and so on. However, the availability of the languages varies based on your area. Follow these steps to choose your desired language: screen displayed, press to enter the Menu mode. 1. With the 2. Press to scroll to Language, and then press 3. Press to focus on desired language, and then press 4. Press to exit. to select it. to select it. 3.10.11 Factory Default At any time, you can reset all menu settings back to the factory defaults. To reset to defaults: 1. With the screen displayed, press to enter the Menu mode. 2. Press to scroll to Factory Default, and then press 3. Press to select YES. 4. To confirm, press to select it. . 5. After a successful reset, the scanner automatically shuts off. Press back on. 6. Press to exit. 3-16 to turn the scanner User’s Manual 3.10.12 About The About option lists the current Firmware and Calibration versions. You may need this information if you contact our Customer Support. Follow these steps to view the About information: 1. With the screen displayed, press to enter the Menu mode. 2. Press to scroll to About, and then press 3. Press to focus on desired mode, and then press 4. Press to exit. 3-17 to select it. to select it. User’s Manual 4. Maintenance 4.1 Calibrate the Scanner Calibrate only if the scanned image looks fuzzy, the color looks abnormal (e.g., darker than normal), after 8K+ scanned, or the scanner has been stored without use for a long time. The calibration process resets the Contact Image Sensor to resume its color and sharpness precision. Calibration can only be performed with the wand scanner out of the feeder dock. When the scanner is attached to the feeder dock, the calibration feature is disabled. To calibrate the scanner, complete the following steps: 1. Make sure the battery is fully charged and a memory card is inserted. 2. Remove the calibration sheet from its plastic cover and lay it on a flat surface with the printed side UP. 3. Remove the scanner from the feeder dock. 4. Place the scanner on the white area of the calibration sheet, at the top of the white area. * Make sure the sheet is clean (i.e. no debris or colored objects). screen displayed, press to enter the Menu mode. 5. With the 6. Press to scroll to Calibration, and then press 7. Press to select YES. 8. The scanner enters Calibration mode. Slowly slide the scanner down over ONLY the white area of the calibration sheet. 9. The scanner completes the calibration sequence and automatically powers off. to select it. 10. Carefully place the calibration sheet back into the plastic cover and store it in a safe place for future use. 4-1 During calibration, move the scanner only in the white area. Warning: z Do not interrupt the calibration sequence or try to shut off the device while it is calibrating. If you stop the calibration before it has completed, a calibration error may occur. As a result, when you next power up the unit, an error message may be displayed, and you will have to power off the unit and repeat the instructions in this section. z Calibrate the scanner only when color of the scanned image looks abnormal. z Make sure the memory card is inserted. z z Keep the calibration sheet from dust and debris. Any dirt may make the calibration chart invalid or impact the calibration result. Use only the included calibration sheet to calibrate the scanner. 4.2 Clean the Scanner and Feeder Dock It is recommended to clean the scanner and feeder dock approximately every 200 scans or if vertical lines or stripes appear on the scanned image. Use only the recommended or supplied tool to clean the scanner and feeder dock. Cleaning steps: Clean the wand scanner: 1. Remove the scanner from the feeder dock. 2. Turn the scanner over to reveal the rollers and glass. 3. Wipe the rollers and the glass with the included cleaning cloth. 4. Wipe the scanner with a dry and clean lint-free cloth. Rollers Glass Wand Scanner 4-2 User’s Manual Clean the feeder dock: 1. Remove the scanner from the feeder dock. 2. Wipe the rollers with the included cleaning cloth. 3. Wipe the feeder dock with a dry and clean lint-free cloth. Rollers Note: Adding some isopropyl alcohol (95%) on the cleaning cloth is more efficient when cleaning the rollers. z z Do not use any solvents or corrosive liquid (i.e., alcohol, kerosene, etc.) to clean any part of the scanner, otherwise the plastic material will be permanently damaged. z Make sure the surface of the document or photo doesn’t have any paper clips, etc. or this could damage the scanner glass lens. 4-3 User’s Manual 5. 5.1 Troubleshooting Error Messages If there is error during scanning, the LED light will be flashing in red color and error message will be displayed. Refer to the following table to clear the error conditions. Error Message Root Cause/Code Purpose How to restore Insert Memory Card 1. No memory card inserted. 1. Insert a memory card. 2. Card not recognized. 2. Try a different card. Card Full Card is full; can’t save scanned image to inserted memory card Free more space or insert a new micro SDTM card. *Low battery Battery power getting low. Replace batteries (or recharge if using rechargeable batteries). No image scanned 1. No scan data detected. 2. Scanner time out. Wait until message disappears. Format Fails 1. Memory card not recognized. 2. File system is not FAT16/FAT32 Use a different card. Calibration Fails Internal check failed and found calibration data error Recalibrate the scanner (see the “Calibrate Scanner” section. Scanned speed too fast Images look distorted. Moving wand scanner over original too fast. Move the scanner over the original slower, and if necessary, rescan the original. Paper jam 1. Original has become stuck in the feeder dock. Remove the scanner from the feeder dock and then gently pull the original out of the feed slot. to eject the Or you may press original. 2. Original exceeds max. length (14”) * Warning: 1. If "low battery" is indicated on the LCD display, it is recommended to replace the batteries to prevent possible incomplete scanned images or other operational problems. 2. If 2 AA Alkaline batteries have been used, when battery power is low you may obtain incomplete scanned images or encounter operational problems before "low batteries" is indicated on the LCD display. 5-1 5.2 Frequently asked questions and answers Q: Why does not my scanner turn on? A: 1. The scanner may not be engaged with the feeder dock correctly. 2. The batteries may not enough power or may not be inserted correctly. Q: A: The image can not be saved into the memory card while scanning? Make sure you have a microSDTM card inserted correctly, and that it has adequate space Q: Why doesn’t my computer recognize my scanner when it’s connected via USB cable? A: Make sure the cable connection is correct and secure. Restart the computer if necessary. Q: Why do all the images I scan have the same date when saved on the memory card? A: The device does not have an internal “clock” to keep real time, so the date & time attributes are always a fixed date & time assigned during production, not current date & time. Q: Why are my scanned images distorted? A: You may be scanning too fast; scan again at a lower speed. 5-2 User’s Manual Q: How can I tell if the scanner is scanning at 300 dpi or 600 dpi? A: The scan indicator light indicates the selected resolution: Green= 300 dpi, Orange=600 dpi Q: Why there are strange lines on the scanned document? A: Please check the following: 1. Are there scratches on the original or is the original clean? 2. Remove any stains or dust from the original before scanning. 3. Clean the rollers and glass with the included cleaning cloth. (Refer to the section “Cleaning the Rollers and Glass)) Q: Will the scanner recharge my rechargeable batteries? A: No, the scanner does NOT recharge rechargeable batteries. You must use your own battery charging device. Q: Why there is a red or gray background with lines on my scanned image? A: The scanner does not enough power to perform a scan. Charge your batteries and restart the scan. Q: Should the scanner feel warm to the touch? A: It is normal for the scanner to emit a small amount of heat after prolonged use. However, if there are strange odors coming from the scanner or the scanner feels a little bit hot to the touch, turn the scanner off immediately. 5-3 5.3 Technical Service Before contact Avision, please prepare the following information: Scanner serial & revision number (located on the bottom of the scanner); Hardware configuration (e.g., your host CPU type, RAM size, free disk space, display card, interface card); Headquarter Avision Inc. No. 20, Creation Road I, Science-Based Industrial Park, Hsinchu 300, Taiwan, ROC TEL: +886 (3) 578-2388 FAX: +886 (3) 577-7017 E-MAIL: [email protected] Web Site: http://www.avision.com.tw US and Canada Area Avision Labs, Inc. 6815 Mowry Ave., Newark CA 94560, USA TEL: +1 (510) 739-2369 FAX: +1 (510) 739-6060 E-MAIL: [email protected] Web Site: http://www.avision.com China Area Hongcai Technology Limited 7A,No.1010, Kaixuan Road, Shanghai 200052 P.R.C. TEL :+86-21-62816680 FAX :+86-21-62818856 E-MAIL : [email protected] Web Site: http://www.avision.com.cn Europe Area Avision Europe GmbH Bischofstr. 101 D-47809 Krefeld Germany TEL: +49-2151-56981-40 FAX: +49-2151-56981-42 E-MAIL: [email protected] Web Site: http://www.avision.de 5-4 User’s Manual 6. Specifications Specifications are subject to change without notice. Item Description Regulatory model number HF-1115B/HF-1116B MiWand 2L/MiWand 2L Pro (HF-1115B) MiWand 2/MiWand 2 Pro (HF-1116B) Image Technology: Contact Image Sensor (CIS) Scanner Display: 1.8” TFT LCD Memory: 16MB Max. Document Size: 8” x 14” (216 x 355 mm) Auto power off: 3 minutes Output File Format: JPEG/PDF Resolution: 300 dpi /600 dpi Power: Wand Scanner MiWand 2L/MiWand 2L Pro: MiWand 2/MiWand 2 Pro: Rechargeable Li-ion battery compatible with NP45/(3.7V, 700mAh)/CA NP45 (3.7V, 700mAh) 2x AA alkaline batteries or 2 NiMH rechargeable batteries Warning: Never mix battery types as this could cause damage or fire. The scanner does not recharge rechargeable batteries. Feeder Dock Net Weight: Dimensions:(WxLxH) AC Adapter: 100-240V, 50/60 Hz (input) 5Vdc, 1.0A (output) Wand Scanner: 250 g Feeder Dock: 413 g Wand Scanner docked: 663 g Wand Scanner:41 x 258 x 36 (mm) Feeder Dock: 69 x 322 x 57 (mm) Operating Environment: Temperature:5ºC ~ 35ºC (59ºF~95ºF) Humidity: 20%~85% RH Storage Environment: Temperature: -20ºC ~ -60ºC Humidity: 20%~85% RH 6-1